

Page 1

Document Centre
490/480/470/460 DC/ST
Reference Guide
August 2001 701P36442
Xerox Document Centre Model _______________
Serial Number ____________________________
If you have a problem or need supplies:
In the USA
Calling for Service and ordering Replaceable Units 1-800-821-2797 (USA)
Ordering Supplies 1-800 822-2200 (USA)
In Canada
Calling for Service 1-800-939-3769 (Canada)
Ordering Supplies and Replaceable Units 1-800-668-0199 (Canada)
Page 2

Xerox Corporation
Global Knowledge & Language Services
800 Phillips Road - Bldg 845-17S
Webster, New York 14580
USA
©2001 by Xerox Corporation. All rights reserved.
Printed in the United States of America
Copyright protection claimed includes all forms and matters of copyrighted material and information now allowed by
statutory or judicial law or hereinafter granted, including without limitation material generated from the software
programs that are displayed on the screen such as icons, screen display looks, etc.
XEROX®, The Document Company® and the stylized X and identifying product names and numbers are registered
trademarks of XEROX CORPORATION and X erox Canada Ltd. is a licensee of all the trademarks.
md
, Les Gens De Documentsmd, le X stylisé et Document Centre sont des marques de commerce de Xerox
Xerox
Corporation pour lesquelles Xerox Canada ltée détient des permis d'utilisation.
The Document Centre ST model includes an implementation of LZW licensed under U.S. Patent 4,558,302.
Product names used in this guide may be trademarks or registered trademarks of their respective companies and are
hereby acknowledged.
This document contains images of screens that were created using Zinc Applicat ion Framewor k software version 3.5
© January 1997 Zinc Software Inc.
As an ENERGY STAR® partner, Xerox Corporation has determined that this product meets the ENERGY STAR®
guidelines for energy efficiency.
Terra Choice Environmental Services Inc. of Canada has verified that this Xerox product conforms to all applicable
Environmental Choice EcoLogo requirements for minimized impact to the environment.
While the information in this Guide is correct at the time of first publication, Xerox reserves the right at any time to
change the information without notice. Changes are made periodically to this document. Changes and technical updates
will be added in subsequent editions.
ii Xerox Document Centre Reference Guide
Page 3

The Document Centre ST model includes software provided by the Internet Software Consortium.
Copyright (c) 1995, 1996, 1997, 1998, 1999, 2000, 2001
The Internet Software Consortium - DHCP. All rights reserved.
Redistribution and use in source and binary forms, with or without modification, are permitted provided that the
following conditions are met:
Redistributions of source code must retain the above copyright notice, this list of conditions and the following
disclaimer.
Redistributions in binary form must reproduce the above copyright notice, this list of conditions and the following
disclaimer in the documentation and/or other materials provided with the distribution.
Neither the name of The Internet Software Consortium - DHCP nor the names of its contributors may be used to endorse
or promote products derived from this software without specific prior written permission.
This Software Is Provided By The Internet Software Consortium And Contributors "As Is" And Any Express Or
Implied Warranties, Including, But Not Limited To, The Implied Warranties Of Merchantability And Fitness For A
Particular Purpose Are Disclaimed. In No Event Shall The Internet Software Consortium Or Contributors Be Liable For
Any Direct, Indirect, Incidental, Special, Exempla ry, Or Consequential Da ma ges (Including, But Not Limited To,
Procurement Of Substitute Goods Or Services; Loss Of Use, Data, Or Profits; Or Business Interruption) However
Caused And On Any Theory Of Liability, Whether In Contract, Strict Liability, Or Tort (Including Negligence Or
Otherwise) Arising In Any Way Out Of The Use Of This Software, Even If Advised Of The Possibi li ty Of Su ch
Damage.
Xerox Document Centre Reference Guide iii
Page 4

Radio Frequency Notice
US Federal Communications Commission
Note: This equipment has been tested and found to comply with the
limits for a Class B digital device, pursuant to Part 15 of the FCC
Rules. These limits are designed to provide reasonable protection
against harmful interference in a residential installation. This
equipment generates, uses and can radiate radio frequency energy
and, if not installed and used in accordance with the instructions,
may cause harmful interference to radio communications. However,
there is no guarantee that interference will not occur in a particular
installation. If this equipment does cause harmful interference to
radio or television reception, which can be determined by turning
the equipment off and on, the user is encouraged to try to correct the
interference by one or more of the following measures:
- Reorient or relocate the receiving antenna.
- Increase the separation between the equipment and receiver.
- Connect the equipment into an outlet on a circuit different from
that to which the receiver is connected.
- Consult the dealer or an experienced radio/TV technician for
help.
Changes or modifications to this equipment not specifically
approved by the Xerox Corporation may void the user’s authority to
operate this equipment.
Shielded cables must be used with this equipment to maintain
compliance with FCC regulations.
iv Xerox Document Centre Reference Guide
Page 5

This device complies with Part 15 of the FCC Rules.
Operation is subject to the following two conditions: (1)
This device may not cause harmful interference, and (2)
this device must accept any interference received,
including interference that may cause undesired operation.
Contact: Xerox Corporation
Phone: 1-800-828-6571
Address: 800 Phillips Road
Webster, New York 14580
USA
Canadian EME
This Class B digital apparatus complies with Canadian ICES-
003.
Cet appareil numérique de la classe B est conforme la norme
NMB-003 du Canada.
Xerox Document Centre Reference Guide v
Page 6

Telephone Requirements Notice
US Federal Communications Commission
1. The FCC has established rules that permit this device to be
directly connected to the telephone network. Standardized jacks
are used for these connections. This equipment should not be
used on party lines or coin lines.
2. If this device is malfunctioning, it may also be causing harm to
the telephone network; this device should be disconnected until
repair has been made. If this is not done, the telephone company
may temporarily disconnect service.
3. The telephone company may make changes in its technical
operations and procedures; if such changes affect the
compatibility or use of this device, the telephone company is
required to give adequate notice of the changes. You will be
advised of your right to file a complaint with the FCC.
4. If the telephone company requests information on what
equipment is connected to their lines, inform them of:
A. the telephone number this unit is connected to.
B. the ringer equivalence number.
C. the USOC jack required.
D. the FCC Registration number.
Items ‘B’ and ‘D’ are indicated on the label.
The Ringer Equivalence Number (REN) is used to determine
how many devices can be connected to your telephone line. In
most areas, the sum of the RENs of all devices on any one line
should not exceed five (5.0). If too many devices are attached,
they may not ring correctly.
Service Requirements
In the event of equipment malfunction, all repairs should be
performed by Xerox or authorized agent. It is the responsibility
of users requiring service to report the need for service to Xerox
or to an authorized agent. Service can be obtained at:
Xerox Customer Support
1301 Ridgeview Drive, Bldg. 301
Lewisville, TX 75067
Telephone: (800) 821-2797
vi Xerox Document Centre Reference Guide
Page 7

Canadian Industry Requirements
Notice: The Canadian Industry Canada label identifies certified
equipment. This certification means that the equipment meets
certain telecommunications network protective, operational and
safety requirements. The Department does not guarantee the
equipment will operate to the user’s satisfaction.
Before installing this equipment, users should ensure that it is
permissible to be connected to the facilities of the local
telecommunications company. The equipment must also be installed
using an acceptable method of connection. In some cases, the
company’s inside wiring associated with a single line individual
service may be extended by means of a certified connector assembly
(telephone extension cord). The customer should be aware that
compliance with the above conditions may not prevent degradation
of service in some situations.
Repairs to certified equipment should be made by an authorized
Canadian maintenance facility designated by the supplier. Any
repairs or alterations made by the user to this equipment, or
equipment malfunctions, may give the telecommunications
company cause to request the user to disconnect the equipment.
Users should ensure for their own protection that the electrical
ground connections of the power utility, telephone lines and internal
metallic water pipe system, if present, are connected together. This
precaution may be particularly important in rural areas.
Caution: Users should not attempt to make such connections
themselves, but should contact the electric inspection authority, or
electrician, as appropriate.
The Load Number (LN) assigned to each terminal device denotes
the percentage of the total load to be connected to a telephone loop
that is used by the device, to prevent overloading. The termination
on a loop may consist of any combination of devices subject only to
the requirement that the total of the Load Numbers of all the devices
does not exceed 100.
For service in Canada call (800) 939-3769
Xerox Document Centre Reference Guide vii
Page 8
In the USA, it’s Illegal to copy the following
Congress, by statute, has forbidden the copying of the following
items. Penalties of fine or imprisonment may be imposed on those
guilty of making such copies. This list is not all-inclusive. In case of
doubt, consult your attorney.
1. Copyrighted material, unless permission of the copyright owner
has been obtained or the copying falls within the “fair use” or
library reproduction provisions of the copyright law. Further
information of these provisions may be obtained from the
Copyright Office, Library of Congress, Washington, DC 20559
(circular R21).
2. United States Government obligations or securities such as:
l
Certificates of Indebtedness
l
Coupons from Bonds
l
Gold and Silver Certificates
l
Treasury Notes and United States Bonds
l
Federal Reserve and Federal Reserve Bank Notes
l
Certificates of Deposit
l
National Bank currency
l
Fractional Notes
l
Paper money and Postal Money Orders
l
Bonds and obligations of certain agencies of the
government, such as FHA
l
Bonds. (US Savings Bonds may be photographed only for
publicity purposes in connection with the campaign for the
sale of such bonds)
l
Internal Revenue Stamps. (If it is necessary to copy a legal
document on which there is a cancelled revenue stamp, this
may be done provided the reproduction of the document is
performed for lawful purposes)
l
Postage Stamps, cancelled or uncancelled. (For philatelic
purposes, postage stamps may be photographed provided
the reproduction is black and white and less than 3/4 or
more than 1 1/2 times the linear dimensions of the original)
l
Bills, checks, or drafts for money drawn by or on authorized
offices of the United States
viii Xerox Document Centre Reference Guide
Page 9
l
Stamps and other representatives of value, of whatever
denomination, which may be or have been issued under any
Act of Congress
3. Adjusted compensation Certificates for veterans of the World
Wars.
4. Obligations or Securities of any foreign government, bank, or
corporation.
5. Certificates of Citizenship or Naturalization. (Foreign
naturalization certificates may be photographed).
6. Passports. (Foreign passports may be photographed).
7. Immigration papers.
8. Badges, identification cards, passes or insignias carried by
military or Naval personnel, or by members of the various
Federal Departments and Bureaus, such as the FBI and Treasury
(unless the photograph is ordered by the head of such
Department or Bureau).
9. Copying of the following is also prohibited in certain states:
automobile licences, driver’s licenses, and automobile
Certificates of Title.
10. Draft Registration cards and Selective Service Induction papers
which bear any of the following information:
l
Registrant’s earnings or income
l
Registrant’s dependency status
l
Registrant’s court record
l
Registrant’s previous military service
l
Registrant’s physical or mental condition
Exception:
US Army and Navy discharge certificates may be
photographed.
Xerox Document Centre Reference Guide ix
Page 10

x Xerox Document Centre Reference Guide
Page 11

Table Of Contents
1. Safety Notes ................................................................................................... 1-1
Symbology ................................................................................................... 1-2
Electrical Safety ........................................................................................... 1-2
Emergency Power Off ................................................................................. 1-4
Ozone Information ....................................................................................... 1-5
Laser Safety ................................................................................................. 1-6
Table of Contents
Operational Safety ....................................................................................... 1-7
Safety Extra Low Voltage Approval ........................................................... 1-9
2. Start Here ........................................................................................................ 2-1
Terms and Typeface .................................................................................... 2-2
Default .............................................................................................. 2-2
Image Orientation ............................................................................. 2-2
Paper Orientation ............................................................................. 2-2
Interchangeable Terms ..................................................................... 2-2
Typefaces ............................................................................................... 2-3
Xerox Document Centre Reference Guide xi
Page 12

Information Sources ....................................................................................2-4
At the Machine ............ ............................................. ....... .........................2-4
At the Workstation (for ST Models) ...... ....... ...... ......................................2-4
Used by the Machine Administrator .........................................................2-4
Frequently Asked Questions ...................................................................2-5
My Document Centre looks different-Why? ......................................2-5
Are there other options available? ....................................................2-5
What is the difference between DC and ST? ....................................2-6
Where is Information about Copying? ...............................................2-6
What are System Management Tools? .............................................2-6
Where is network connectivity information? ......................................2-6
3. Product Overview ...........................................................................................3-1
Hardware Component Diagram ..................................................................3-2
Document Feeder and Scanner ..................................................................3-3
Document Glass ...........................................................................................3-4
Paper Trays (Trays 1 - 4) .............................................................................3-5
Setting Up Paper Trays ...........................................................................3-5
Auto Tray Switching .... ....... ...... ....... ............................................. ...... ......3-6
Bypass Tray (Tray 5) ....................................................................................3-7
High Capacity Feeder (Tray 6) ....................................................................3-8
User Interface ...............................................................................................3-9
Touch Screen .................................................... ....................................3-11
xii Xerox Document Centre Reference Guide
Page 13

Finisher ....................................................................................................... 3-12
Offsetting Catch Tray ................................................................................ 3-13
Convenience Stapler ................................................................................. 3-14
4. Making Copies ................................................................................................ 4-1
Basic Copying Tab ...................................................................................... 4-2
Output ..................................................................................................... 4-3
Sorting options .................................................................................. 4-3
Stapling options ................................................................................ 4-3
More... .............................................................................................. 4-4
More Output Options ........................................................................ 4-4
More Stapling Options ...................................................................... 4-5
2 Sided Copy .......................................................................................... 4-6
More... .............................................................................................. 4-7
Side 2 Rotation ................................................................................. 4-7
Reduce / Enlarge .................................................................................... 4-8
Normal Setting .................................................................................. 4-9
Entering numbers from the keypad .................................................. 4-9
Custom Setting ............................................................................... 4-10
Paper Supply ........................................................................................ 4-11
More... ............................................................................................ 4-11
Image Adjustment Tab .............................................................................. 4-12
Image Quality ........................................................................................ 4-13
Original Type .................................................................................. 4-13
Lighten/Darken ............................................................................... 4-14
Background Suppression ............................................................... 4-14
More Image Quality ............................................................................... 4-15
How to use the Image Quality settings ........................................... 4-16
How to use the More Image Quality settings .................................. 4-17
Bound Originals .................................................................................... 4-18
Binding Erase ................................................................................. 4-19
Bound Originals and 1 to 2 sided copying ...................................... 4-19
Using Bound Originals with Build Job ............................................. 4-20
Copying both pages to one side of a Sheet .................................... 4-20
Edge Erase ........................................................................................... 4-21
Original Input ......................................................................................... 4-22
Auto ................................................................................................ 4-22
Manual Platen Input ........................................................................ 4-23
Mixed Size Originals ....................................................................... 4-24
Image Shift ............................................................................................ 4-26
Table of Contents
Xerox Document Centre Reference Guide xiii
Page 14

Output Format Tab .....................................................................................4-27
Transparency Dividers ...........................................................................4-28
Booklet Creation ....................................................................................4-29
Multi-Up .................................................................................................4-30
Covers ...................................................................................................4-31
Notes about 2-sided covers ............................................................4-31
Invert Image ...........................................................................................4-33
Job Assembly Tab ....................................................................................4-34
Build Job ................................................................................................4-35
Build Job Controls .................................................................................4-36
Sample Set ............................................................................................4-37
Stored Programming .............................................................................4-38
5. Fax (Optional Feature) ...................................................................................5-1
Setting Up a Network Fax ............................................................................5-2
Fax Repository Setups ................................................................................5-3
Fax Network Service Login .........................................................................5-4
Login - Authentication Access .................................................................5-5
Login - Guest Access ..............................................................................5-6
Getting to the Fax Feature ...........................................................................5-7
Sending a Fax ...............................................................................................5-8
Basic Faxing Screen ....................................................................................5-9
Dialing Options ........................................................................................5-9
Dialing Characters .................................................................................5-10
Dial Pause [,] ...................................................................................5-10
Long Pause [I] .................................................................................5-10
Group Dial [\] ...................................................................................5-11
Mask Data [/] ...................................................................................5-11
Password Check Switch [S] ............................................................5-11
Wait for network tone detection [W] ................................................5-11
Pulse-to-Tone Switch [:] .............................. ...... ....... ...... ....... ..........5-12
Local ID [+] Character Check [+] .....................................................5-12
Local ID [space] Character Check [] ...............................................5-12
Begin DTMF [*] ................................................................................5-12
End DTMF [#] ..................................................................................5-12
Phone List ..............................................................................................5-13
Resolution ..............................................................................................5-14
Sides Scanned ......................................................................................5-14
xiv Xerox Document Centre Reference Guide
Page 15

More Fax Features screen ........................................................................ 5-15
Image Quality ........................................................................................ 5-16
Delayed Send ....................................................................................... 5-17
Original Input ......................................................................................... 5-18
Auto ................................................................................................ 5-18
Manual Platen Input ........................................................................ 5-18
6. Network Scanning (Optional Feature) .......................................................... 6-1
Scanning resources .................................................................................... 6-2
Template Overview ...................................................................................... 6-4
Scrolling through the Template Name List . ...................................... 6-4
Selecting the correct Distribution Template ...................................... 6-5
Making Templates ............................................................................ 6-5
Changing Preprogrammed Template Selections .............................. 6-5
How to scan a document ............................................................................ 6-6
Network Scanning Tab ................................................................................ 6-7
Image Adjustment tab ..... ...... ....... ...... ............................................. ....... ... 6-12
Output Format ............................... ............................................. ...... ....... ... 6-16
Filing Setups ....... ...... ....... ...... ............................................. ....... ...... .......... 6-17
Internet Services (Embedded HTTP Server) ........................................... 6-19
Authentication .................................... ............................................. ....... ... 6-21
Configuring the Authentication Server .................................................. 6-22
Service Access Control ............................ ...... ...... ....... ...... ....................... 6-23
Network Authentication Access ............................................ ...... ....... ... 6-24
How to enter Login Name and Password ....................................... 6-24
Guest Access ........................................................................................ 6-25
How to enter Guest Access password ............................................ 6-25
7. E-mail (Optional Feature) .............................................................................. 7-1
Table of Contents
E-mail Network Service Login .................................................................... 7-2
Login - Authentication Access ........................... ....... ...... ......................... 7-3
Login - Guest Access .............................................................................. 7-4
Xerox Document Centre Reference Guide xv
Page 16

Basic E-mail Tab ..........................................................................................7-5
From... ...............................................................................................7-5
To... ...................................................................................................7-5
Cc... ...................................................................................................7-5
Bcc... .................................................................................................7-5
Edit Subject... ....................................................................................7-6
Subject: .............................................................................................7-6
Details ...............................................................................................7-6
Remove .............................................................................................7-6
Remove All ........................................................................................7-6
Address List .............................................................................................7-7
Adding Recipients to the Address List ............................................... ......7-8
How to Add Recipients ..........................................................................7-10
Address Book ........................................................................................7-11
Image Adjustment Tab ...............................................................................7-12
Output Format Tab .....................................................................................7-13
8. Job Status ......................................................................................................8-1
Job Status .....................................................................................................8-2
Scrolling through the Job Status List .................................................8-2
Other Queues ..........................................................................................8-4
Managing the Job Queue ........................................ ....... ...... ....... ............8-5
Job Commands .................................................................................8-5
Required Resources .........................................................................8-6
9. Machine Status ..............................................................................................9-1
Machine Information Tab .............................................................................9-2
Machine Details .......................................................................................9-3
Paper Tray Status ....................................................................................9-4
Billing Counters .......................................................................................9-5
Print Reports ............................................................................................9-6
xvi Xerox Document Centre Reference Guide
Page 17

The Faults Tab ............................................................................................. 9-7
The Supplies Tab ......................................................................................... 9-8
10. Tools ............................................................................................................ 10-1
System Management Tools Overview ..................................................... 10-2
Tools Screen 1 - System Settings ............................................................ 10-3
Tools Screen 1 - Screen Defaults and Auditron Administration ........... 10-4
Tools Screen 1 - Feature Defaults and Network Connectivity .............. 10-5
Tools Screen 2 - Supplies, Configuration, Tests, Power Saver ............ 10-6
Tools Screen 3 - Setups, Software Upgrade, Service Access Control . 10-7
System Settings Screen 1 ......................................................................... 10-8
System Settings Screen 2 ......................................................................... 10-9
System Settings Screen 3 ....................................................................... 10-10
Paper Management System ............................................................... 10-11
Paper Attributes ............................................................................ 10-11
Tray Settings ................................................................................ 10-11
Tray Management ....................................................................... 10-12
Tray Settings ................................................................................ 10-13
Stock Settings ............................................................................... 10-15
Default Stock ................................................................................ 10-16
Paper Substitution ........................................................................ 10-17
Standard Size Required ............................................................... 10-18
Audio Tones ........................................................................................ 10-19
Display Brightness .............................................................................. 10-20
Time and Date .................................................................................... 10-21
Set Date and Time ........................................................................ 10-21
Greenwich Mean Time Offset ............... ...... ....... ...... ....... ...... ........ 10-21
Timers ................................................................................................. 10-22
Configuration Report ........................................................................... 10-23
Job Sheets .......................................................................................... 10-24
Banner Sheets .............................................................................. 10-24
Fax Status Sheets ...... ............................................. ....... .............. 10-24
Error Sheets ...................... ...... ....... ...... ........................................ 10-24
Scan Status Sheets ..................................................................... . 10-24
Stock Choice ..................... ............................................. .............. 10-25
Table of Contents
Xerox Document Centre Reference Guide xvii
Page 18

Reduce and Enlarge Presets ...............................................................10-26
Measurements .....................................................................................10-27
Document Scanner Size Sensing ........................................................10-28
Decurler Setting ...................................................................................10-29
Display Options ...................................................................................10-30
Image Rotation ....................................................................................10-31
Contention Management .....................................................................10-32
Single Job Mode ..................................................................................10-33
Output Options ....................................................................................10-34
Thin Stapled Sets ..........................................................................10-34
Out Of Staples Option ...................................................................10-35
Output Location for Non-Stapled Jobs ..........................................10-35
Within Job Offsetting ................................... ...... ............................10-35
Electronic Hole Removal .....................................................................10-36
Feature Defaults (Copy jobs) ..................................................................10-37
Screen Defaults ........................................................................................10-38
Online/Offline ...........................................................................................10-39
Connectivity and Network Setup ............................................................10-40
Supplies Management .............................................................................10-41
Service Plan ..................................................................................10-41
Replacement Method ....................................................................10-41
Feed Roll Cartridge Replacement .................................................10-41
Xerographic Module Reorder Notification .....................................10-42
Fuser Module Reorder Notification ...............................................10-42
Resetting the Feed Roll Cartridge Counters .................................10-43
Configuration and Setup .........................................................................10-44
50/60 Hz ........................................................................................10-44
Document Scanner Cover Color ...................................................10-44
Optional Services ..........................................................................10-44
Xerox Customer Call Center .........................................................10-45
Disk Finisher Setup .......................................................................10-45
Remote Data Transfer Setups .................................................................10-46
Enable Incoming Calls .........................................................................10-47
Entering the Outlet Telephone Number ...............................................10-48
Using a PhoneShare Device ................................................ ...............10-49
xviii Xerox Document Centre Reference Guide
Page 19

Sixth Sense .............................................................................................. 10-50
Connecting the Telephone Line ............................................................. 10-51
Machine Tests ......................................................................................... 10-52
Image Quality Tests and Patterns ....................................................... 10-53
Xerographic System Routine ...................... ...... ....... ........................... 10 -5 4
User Interface Tests ........................................................................... 10-55
Video Path Diagnostics Test ............................................................... 10-57
Echo Tests .......................................................................................... 10-58
Network Connectivity Test .................................................................. 10-59
Remote Testing Access for Network Controller .................................. 10-60
Customer Software upgrade ............................................................... 10-61
Upgrading Machine Software .................................. ..................... 10-61
Power Saver Administration ........ ...... ....... ...... ...... ....... ...... ..................... 10-62
Low Power Mode Indications .............................................................. 10-62
Power Saver Timer Values ................................................................. 10-63
Software Reset ................. ...... ....... ............................................. .............. 10-64
11. Tracking Usage ............................................................................................11-1
Auxiliary Accounting Devices .................................................................. 11-2
Installing an Auxiliary Accounting Device .............................................. 11-2
Auxiliary Device Notes .......................................................................... 11-3
Auxiliary Interface Setup ....................................................................... 11-4
Job Timer ........................................................................................ 11-4
Large Image Counter ...................................................................... 11-5
Print Job Control ............................................................................. 11-5
Table of Contents
Internal Auditron ........................................................................................ 11-6
Internal Auditron Overview .................................................................... 11-7
Planning an Auditron System ................................................................ 11-8
Planning User Accounts ................................................................. 11-8
Planning General Accounts ............................................................ 11-9
User and General Account Combinations .................................... 11-10
Managing Data and other considerations ........................................... 11-11
Auditron Report Software ............................................................. 11-11
Assign a Backup Auditron Administrator ...................................... 11-11
Prevent unauthorized use of the Copier ............ ...... ....... .............. 11-11
Xerox Document Centre Reference Guide xix
Page 20

Setting up your Internal Auditron System .............................................11-12
Initializing the Auditron System .....................................................11-12
Changing the Tools password ................................................................11-14
Auditron Initialization ...........................................................................11-15
User Accounts and Access Rights ......................................................11-16
Access ...........................................................................................11-17
Default Account .............................................................................11-17
Auditron General Accounts ..................................................................11-18
Network Accounting Overview (Optional Feature) ...............................11-19
Types of Tracked Data ........................................................................11-20
Using Network Accounting ..................................................................11-21
Logging In and Out of the Document Centre .......................................11-22
Setting Up Network Accounting ...........................................................11-23
12. Reference ....................................................................................................12-1
Copy Job Default Settings ........................................................................12-2
Tools Defaults ..........................................................................................12-14
Relocating your Document Centre .........................................................12-22
The ENERGY STAR® Programme ..........................................................12-24
Low Power Indications .........................................................................12-25
Setting Tray 6 to hold either A4 or 8.5 x 11 inch paper ........................12-27
Material Safety Data Sheets ....................................................................12-28
Document Centre Document Security Note ..........................................12-31
Greenwich Mean Time Offset ..................................................................12-33
Xerox on the Web .....................................................................................12-35
13. Paper & Stock .............................................................................................13-1
Paper and Stock Performance Information .............................................13-2
Paper Handling Guidelines .............................................................13-2
Paper Tray Media Capability ...........................................................13-3
General Stapling Guidelines ...........................................................13-4
xx Xerox Document Centre Reference Guide
Page 21

Loading Types of Common Stock ......................................................... 13-13
Document Feeder Paper Stock information .......................................... 13-15
Paper Loading, Storage and Handling .................................................. 13-17
14. Machine Maintenance ................................................................................ 14-1
Power On Procedures ............................................................................... 14-2
Power Off Procedures ............................................................................... 14-3
Machine Faults ........................................................................................... 14-5
Replaceable Units and Supplies .............................................................. 14-8
Expected life of Replaceable Units ................................................. 14-8
Reordering Replaceable Units and Supplies .................................. 14-9
Changing the Finisher Staple Cartridge ................................................ 14-10
Cleaning the Machine .............................................................................. 14-11
15. Problem Solving ......................................................................................... 15-1
General Operating Guidelines .................................................................. 15-2
Calling the Welcome Center ..................................................................... 15-3
Diagnostic Tools ........................................................................................ 15-4
Troubleshooting Tips ...................................................................... 15-6
16. Glossary ...................................................................................................... 16-1
Index
Table of Contents
Xerox Document Centre Reference Guide xxi
Page 22

xxii Xerox Document Centre Reference Guide
Page 23

1. Safety Notes
Your Xerox product and supplies have been designed and tested to meet strict safety
requirements. These include safety agency examination and approval, and compliance to
established environmental standards. Please read the following instructions carefully before
operating the machine and refer to them as needed to ensure the continued safe operation of your
machine. The safety testing and performance of this product have been verified using
Xerox materials only.
Follow all warnings and instructions marked on or supplied with the product.
1. Safety Notes
Xerox Document Centre Reference Guide Page 1 - 1
Page 24
Symbology
This symbol on the machine indicates a heated surface.
Electrical Safety
CAUTION Ensure that the power connection for your machine satisfies these
requirements.
Document Centre Model Power Requirements
490 Model DC or ST 208V Outlet
Dedicated 20A circuit
480/470/460 DC or ST 115V Outlet
Dedicated 20A circuit
1. The power receptacle for the machine must meet the
requirements stated on the data plate on the rear of the machine.
2. The socket outlet shall be installed near the equipment and shall
be easily accessible.
3. Use the power cable that is supplied with your Document Centre.
Do not use an extension cord or remove or modify the power
cord plug.
4. Plug the power cable directly into a correctly grounded electrical
outlet. If you are not sure, consult an electrician.
Page 1 - 2 Xerox Document Centre Reference Guide
Page 25

5. Do not use an adapter to connect the Document Centre to an
electrical outlet that lacks a ground connection terminal.
6. The power cord is the disconnect device for this machine.
7. Do not override or disable electrical or mechanical interlocks.
8. Do not push objects into slots or openings on the machine.
Electrical shock or fire may result.
9. Do not obstruct ventilation openings. These openings prevent
overheating of the Document Centre.
1. Safety Notes
Xerox Document Centre Reference Guide Page 1 - 3
1. Safety Notes
Page 26
Emergency Power Off
If any of the following conditions occur, turn off the Document
Centre immediately and disconnect the power cable from the
electrical outlet. Contact an authorized Xerox Service
Representative to correct the problem:
l
l
l
l
l
l
The Document Centre emits unusual odors, or makes
unusual noises.
The power cable is damaged or frayed.
A wall panel circuit breaker, fuse, or other safety device has
been tripped.
Liquid is spilled into the Document Centre.
The Document Centre is exposed to water.
Any part of the Document Centre is damaged.
NOTE
The only method to remove all power from the Document Centre is
to disconnect the power cable from the electrical outlet.
Page 1 - 4 Xerox Document Centre Reference Guide
Page 27
Ozone Information
This product produces ozone during normal operation. The ozone
produced is dependent on copy volume and is heavier than air.
Install the system in a well ventilated room with the minimum cubic
requirements size listed below. Providing the correct environmental
parameter will ensure the concentration levels meet safe limits.
The minimum cubic requirements are listed below:
Table 1: Ozone requirements
Document Centre Product Ozone Cubic requirement
490/480/470/460 DC or ST 1,060 ft
To determine if the room has the required volume to meet the ozone
requirement, the length of the room multiplied by its width and
height should be equal to or greater than the cubic volume listed
above.
If you need additional information about ozone, visit
www.xerox.com. Select the link to Environment, Health and Safety
then scroll down to EH&S Publications. You can also request the
Xerox publication Facts about Ozone (part number 610P64653) b y
calling 1-800-828-6571 in the United States and Canada.
3
1. Safety Notes
Xerox Document Centre Reference Guide Page 1 - 5
1. Safety Notes
Page 28
Laser Safety
CAUTION Use of controls, adjustments or procedures other than those
specified in this guide may result in hazardous light exposure.
The Document Centre complies with international safety standards
and is certified as a Class 1 Laser Product.
With specific regard to lasers, the equipment complies with laser
product performance standards set by governmental, national, and
international agencies as a Class 1 Laser Product. It does not emit
hazardous light, as the beam is totally enclosed during all phases o f
customer operation and maintenance.
Page 1 - 6 Xerox Document Centre Reference Guide
Page 29

Operational Safety
Xerox equipment and supplies have been designed and tested to
meet strict safety requirements. These include safety agency
examination, approval and compliance with established
environmental standards.
To ensure the continued safe operation of your Document Centre,
follow these safety guidelines at all times:
Always Do These
l
Always connect equipment to a correctly grounded power
outlet. If in doubt, have the outlet checked by a qualified
electrician.
l
Always follow all warnings and instructions that are marked on
or are supplied with the equipment.
l
Always exercise care when moving or relocating the
equipment. Please contact your local Xerox Service Department
to arrange relocation of the machine to a location outside of
your building.
l
Always locate the machine on a solid support surface (not on
plush carpet) that has adequate strength to support the weight of
the machine.
l
Always locate the machine in an area that has adequate
ventilation and room for servicing.
l
Always use materials and supplies that are specifically designed
for your Xerox equipment. Use of unsuitable materials may
result in poor performance and possibly a hazardous situation.
1. Safety Notes
1. Safety Notes
NOTE
Your Document Centre is equipped with an energy saving device to
conserve power when the machine is not in use. The machine may
be left on continuously.
Xerox Document Centre Reference Guide Page 1 - 7
Page 30

Never Do These
l
Never use an adapter plug to connect equipment to a power
source that lacks a ground connection terminal.
l
Never obstruct ventilation openings. They are provided to
prevent overheating.
l
Never push objects of any kind into the ventilation openings.
l
Never attempt any maintenance function that is not specifically
described in the Document Centre documentation.
l
Never remove any covers or guards that are fastened with
screws. There are no operator serviceable areas within these
covers.
l
Never position the machine near a radiator or any other heat
source.
l
Never override or “cheat” any of the electrical or mechanical
interlock devices.
l
Never operate the equipment if you notice unusual noises or
odors. Disconnect the power cord from the power outlet and
call the Xerox Welcome Center.
Page 1 - 8 Xerox Document Centre Reference Guide
Page 31

Safety Extra Low Voltage Approval
These Xerox Digital Copiers/Printers are in compliance with
various governmental agencies and national safety regulations. All
system ports meet the requirements for Safety Extra Low Voltage
(SELV) circuits for connection to customer-owned devices and
networks. Additions of customer-owned or third-party accessories
that are attached to these printers/copiers must meet or exceed the
requirements previously listed. All modules that require external
connection must be installed per Xerox installation procedures.
1. Safety Notes
Xerox Document Centre Reference Guide Page 1 - 9
1. Safety Notes
Page 32

Page 1 - 10 Xerox Document Centre Reference Guide
Page 33

2. Start Here
This Reference Guide contains information on both the Document
Centre ST copier/printer system and the Document Centre DC
digital copier.
Load your originals or press the Feature
button to display the screen where you can
make copies, prints or scans.
2. Start Here
Press the button
for the
appropriate
feature.
Xerox Document Centre Reference Guide Page 2 - 1
Page 34

Terms and Typeface
Default
The term default simply refers to the assigned value or setting that
the machine uses in the absence of input from a user. Most default
settings can be changed to accommodate specific needs.
Image Orientation
Images are oriented in one of two directions, Portrait o r Landscape.
Paper Orientation
There are two paper orientations
l
l
Portrait Landscape
A
Long Edge Feed (LEF) The short edges of the paper are across
the top and bottom, and the long edges are on each side.
Short Edge Feed (SEF) The long edges of the paper are across
the top and bottom, and the short edges are on each side.
A
NOTE
LEF Orientation
A
Paper feed direction
For the fastest printing or copying speed, feed the documents and
load the paper Long Edge Feed (LEF).
A
SEF Orientation
A
Paper feed direction
A
Interchangeable Terms
The following terms are used interchangeably throughout this guide.
l
Duplex is synonymous with 2-sided copy or print.
l
Paper is synonymous with stock or media.
l
Machine is synonymous with Document Centre.
Page 2 - 2 Xerox Document Centre Reference Guide
Page 35

Typefaces
Bold typeface identifies the first mention of major features or
selections and their associated options.
Italic typeface is used to emphasize a word or phrase. For example:
Always follow safety procedures when operating equipment. In
addition, references to other chapters, publications, or features are
displayed in Italic typeface.
NOTE statements provides information that may affect a task. For
example:
NOTE
CAUTION
WARNING
Changing the defaults will affect every subsequent job. If you have
a series of jobs that use the same programming features, consider
using the Stored Programming feature.
CAUTION statements identify mechanical damage that can result
from an action or alert the user of a potentially critical procedure or
practice. For example:
Ensure that the power connection satisfies the following
requirements.
WARNING statements alert you to conditions that may affect your
safety or that of other personnel. For example:
Do not touch the rolls of the fuser when you change the Fuser
Module. The rolls are hot.
2. Start Here
Xerox Document Centre Reference Guide Page 2 - 3
Page 36

Information Sources
Use the following information sources to answer your questions.
At the Machine
l
l
l
l
l
At the Workstation (for ST Models)
Labels are affixed at points of need throughout the system.
They depict information about loading originals or paper stock.
Green or Gold colored areas
Gold colored areas typically indicate the handle or levers to
push or pull when removing Replaceable Modules or Cartridges.
Green colored areas are where you clear jams.
The User Interface Touch Screen displays important messages
about the status of the machine.
The User Guide provides information and instructions about
using the features of the machine to perform copying tasks.
The Help system provides you point-of-need information.
l
The Quick Start Guide for Printing contains easy-to-use and
helpful information.
l
The CentreWare Help System is available by clicking on the
help button on the Print Driver.
Used by the Machine Administrator
l
The Reference Guide provides detailed information about all
features and settings as well as maintenance.
l
The Personal Learning Program is designed to help train new
users by providing interactive training on copying and
maintenance tasks. It also includes a computer-based simulation
of copying tasks that can be practiced at a computer
workstation.
Page 2 - 4 Xerox Document Centre Reference Guide
Page 37

Frequently Asked Questions
My Document Centre looks different-Why?
The Document Centre is available in multiple configurations with
the choice of an on-line stapler, telephone line connection, and a
high capacity paper feeder. A fully configured system includes these
options. The Reference Guide covers a fully configured Document
Centre.
Are there other options available?
Xerox provides optional software solutions that extend the
capabilities of the Document Centre family. These solutions
include:
l
Authentication - The ability to limit access to Document Centre
services. Authentication is the verification and authorization of
user identity.
l
E-mail - The ability to scan an image at the Document Centre
and e-mail it through a Local Area Network connection (LAN)
l
Fax - The ability to scan an image at the Document Centre and
Fax it through a Local Area Network connection
l
Network Scanning - The ability to create an electronic image
file which is then stored on a server. The file can be processed
further or electronically distributed depending on the available
applications
l
Network Accounting - The ability to track usage of all jobs
processed at the Document Centre
2. Start Here
Xerox Document Centre Reference Guide Page 2 - 5
Page 38

What is the difference between DC and ST?
The ST is a printer and copier. The optional software solutions
discussed in the above paragraph can be installed on these models.
The DC is a copier that can be easily upgraded to a printer as your
needs dictate.
Where is Information about Copying?
This book provides detailed information on all the copying features
as well as describing the System Management Tools (Tools) used by
the Machine A dministr ator. For step-by-step instructions on making
copies refer to the User Guide.
What are System Management Tools?
The Tools function is specifically intended to be used by the
Machine Administrator to customize the machine to a specific work
environment.
Where is network connectivity information?
Please consult the System Administration Guide for detailed
information.
Page 2 - 6 Xerox Document Centre Reference Guide
Page 39

3. Product Overview
This chapter provides an overview of the Document Centre, which is intended to help you to
understand basic machine operations and components. This chapter provides a comprehensive
discussion of the following:
l
Standard and optional components
l
Component locations
l
Component capabilities
Xerox Document Centre Reference Guide Page 3 - 1
3. Product Overview
Page 40

Hardware Component Diagram
The main components of the Document Centre are identified in t he
diagram below. Your configuration may differ slightly, depending
on the options installed on your machine.
Scan your originals once using the
Document Feeder.
or
Use the Document Glass underneath the
cover to scan originals that will not feed
through the Document Feeder.
Use the Convenience
Stapler to restaple your
originals.
Use Tray 5 for odd
size or special
stock.
Touch the Screen to make your copy
selections. Use the buttons to access
other features.
Turn the machine on/off here.
= Off
= On
Use the Finisher to
create single or dual
stapled sets.
Use Tray 6 and its 5100 sheet capacity of
8.5 x 11-inch paper as your main paper
source.
Page 3 - 2 Xerox Document Centre Reference Guide
Trays 1 to 4 hold many
types of stock.
Page 41

Document Feeder and Scanner
Scanner
(Underneath Cover and Glass)
Document Feeder
The Document Feeder, is used to feed your single- and double-sided
originals into the machine. The scanner, located under the
Document Glass, captures the images of the originals.
Document Centre Sheet Capacity
490/480 DC or ST 100 sheets of 20 pound paper, less if
470/460 DC or ST 75 sheets of 20 pound paper, less if
Load your originals in the Document Feeder face up, with the first
page on top.
Document Feeder
using heavier paper
using heavier paper
NOTE
Xerox Document Centre Reference Guide Page 3 - 3
Do not feed transparencies or glossy photos through the Document
Feeder. Use the Document Glass to avoid damaging these types of
originals.
Scanner
The scanner creates an electronic image of the document which is
stored by the system. The scanner also moves depending where the
originals will be scanned from and its need for self-calibration.
3. Product Overview
Page 42
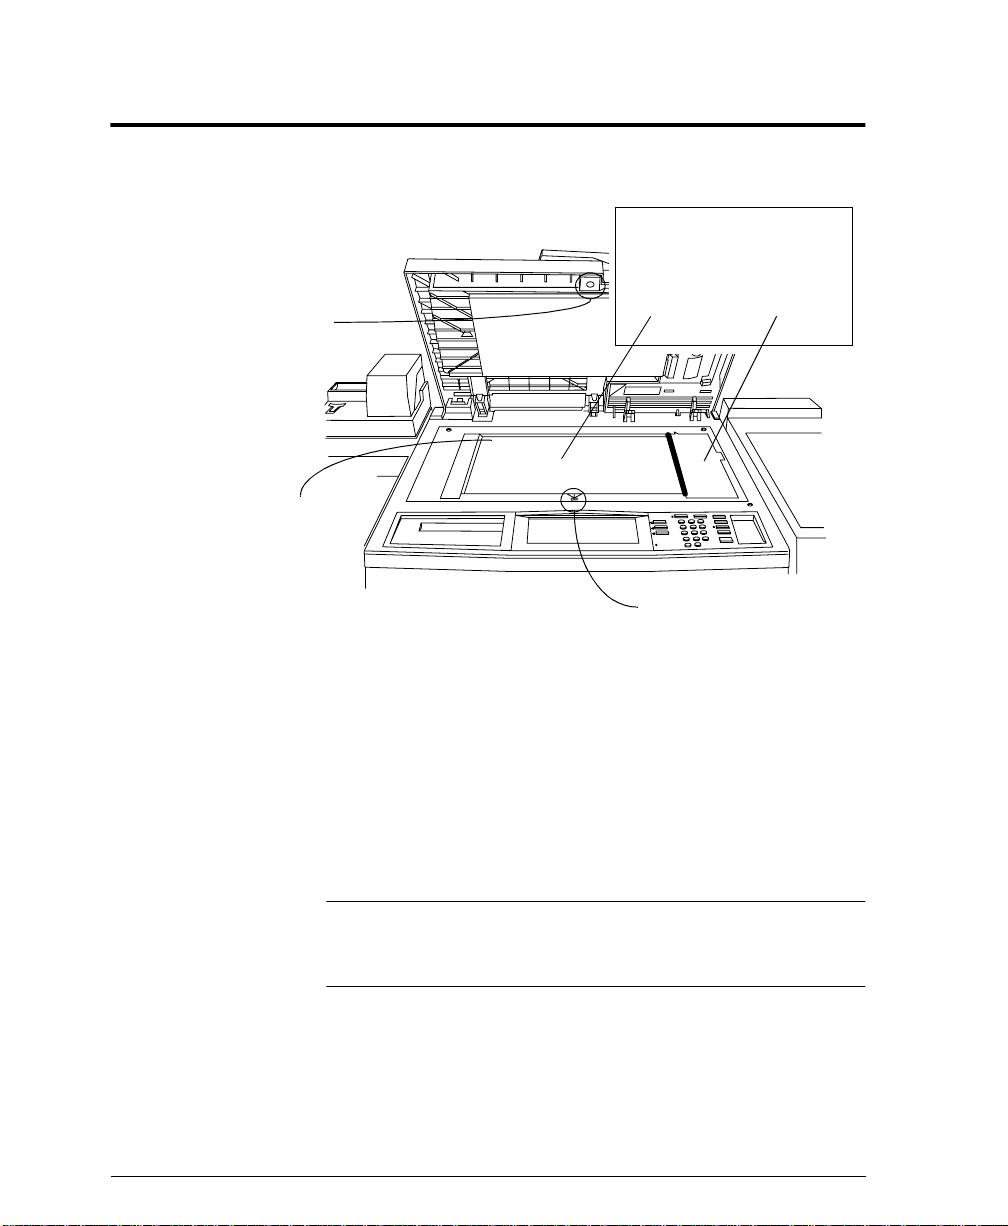
Document Glass
Press green button to
separate cover
Registration
Corner
The Document Glass is
divided into 2 areas.
Main
Area
When making copies from the Document Glass use the Main Area.
Place your original on the glass face down. Use the Registration
Corner in the upper left corner of the glass. The largest size original
that can be scanned from the glass is 11 x 17 inches.
Document Feeder
Scanning Area
Bound Original
Registration Mark
When making copies using the Document Feeder, the scan bar
underneath the Document Glass will move to align the left edge of
the Document Feeder Scanning Area. As originals are fed, the
scanner will capture the images.
NOTE
Page 3 - 4 Xerox Document Centre Reference Guide
It is important to clean both areas of the Document Glass to prevent
streaks and improve document detection. R efer to Chapter 14,
Machine Maintenance for additional information.
Page 43

Paper Trays (Trays 1 - 4)
Paper Trays 1 - 4
The Paper Trays hold up to 500 sheets of 20 lb. stock each. You can
adjust the trays to hold many sizes of paper, up to 11 x 17 inches. A
service representative can permanently adjust a tray to handle 12 x
18 inch paper. To permanently dedicate a tray to handle this size
paper, contact the Xerox Welcome Center.
Refer to Chapter 13, Paper and Stock for a listing of acceptable
stock and paper sizes, orientations, and weights.
NOTE
To achieve the maximum printing speed, paper should be loaded
LEF in the paper trays whenever possible.
Setting Up Paper Trays
The Document Centre uses a system of programmable settings to
manage the Paper Trays and the stock. These settings are established
by the Machine Administrator and determine whether a user can
change the programmed stock attributes.
There are four stock attributes: siz e, orientation, type, and color.
Correctly setting the Edge Guides in the paper trays allows the
machine to sense the stock size and orientation automatically.
Xerox Document Centre Reference Guide Page 3 - 5
3. Product Overview
Page 44

The Machine Administrator will set up each tray to be Fully
Adjustable, Dedicated, or, on a DC model, Size Only.
If the tray is Fully Adjustable, anyone can change the stock size,
type and color through a pop-up screen that appears when the paper
tray is opened then closed. This screen provides the option to
confirm or to change the paper settings.
When a Dedicated paper tray is opened, a pop-up screen will appear
on the Touch Screen identifying the stock that should be loaded in
that tray; however, it will not allow you to reprogram the settings.
Only the Machine Administrator can change the stock attributes for
a Dedicated paper tray.
A Size Only paper tray allows anyone to adjust the size of the paper
stock that can be loaded in that tray. The system will not display the
type and color of the stock and will assume it to be the standard
default stock, which is typically plain white paper. This is available
only on a DC model.
The ST model requires certain sheet orientation for network print
jobs. A message on the screen will notify you when the orientation
is not correct to support network printing.
NOTE
To avoid undesired output results, ensure that the programmed
stock settings match the actual tray contents and all the stock in the
tray is identical.
Auto Tray Switching
Auto Tray Switching provides the ability to draw stock from another
tray when the initial tray becomes empty.
In order for this feature to work properly, the Machine
Administrator must enable the Auto Selection on the trays. Refer to
page 10-14 for information on enabling Auto Selection.
Page 3 - 6 Xerox Document Centre Reference Guide
Page 45

Bypass Tray (Tray 5)
The Bypass Tray is an additional paper tray designed for quick and
easy loading of both standard and non-standard paper. It can
physically extend to accommodate different stock sizes and
orientations. You can load a maximum of 50 sheets of standard
weight 20 pound stock. If using a heavier stock, use fewer than 50
sheets.
The Bypass Tray can also hold non-standard size and weight paper
such as transparencies, labels, covers, index, and bond paper. Refer
to Chapter 13, Paper and Stock for additional information.
Bypass Tray
(Tray 5)
A confirmation window may appear when paper is loaded in the
Bypass Tray. Use this to confirm or change the paper size, type, or
color. If an incorrect size is confirmed, jams may occur or
unexpected image shift on the printed output could result.
Xerox Document Centre Reference Guide Page 3 - 7
3. Product Overview
Page 46

High Capacity Feeder (Tray 6)
The High Capacity Feeder (Tray 6) is located under the Bypass Tray
and saves you from having to load the other individual paper trays
with 8.5 x 11 inch paper. You can load 5100 sheets of 20 lb. 8.5 x
11 inch Long Edge Feed (LEF) paper. The High Capacity Feeder
can feed only 8.5 x 11 inch or A4 LEF paper and cannot be adjusted
to hold any other sizes or orientations.
Reloading Paper
Open the cover and wait for the tray to lower in order to reload
paper. After reloading paper, close the cover and the tray will
automatically rise.
The High Capacity Feeder can also accommodate 8.5 x 11 inch
punched or colored LEF paper between 16 to 32 lb.
High
Capacity
Feeder
Page 3 - 8 Xerox Document Centre Reference Guide
Page 47

User Interface
Touch
Screen
Pathway
Buttons
Power Saver
Indicator Light
Keypad
Feature
Buttons
The User Interface is divided into four major categories: Touch
Screen, Pathway buttons, Keypad, and Feature buttons.
1. The Touch Screen allows users to view, program, and select the
options, features, and functions that are available in the various
pathways. Touch the screen to activate a feature.
2. There are three Pathway buttons that enable the access to the
primary machine functions and features.
l
Features: Allows you to programme copy, fax, scan, and email jobs. For more details, refer to the chapters pertaining
to these functions.
l
Job Status: Allows you to view and manage jobs that are or
have been queued into the system. Refer to Chapter 8, Job
Status, for more detailed information.
l
Machine Status: Provides information pertaining to
machine faults, how to contact Xerox, and supplies. Refer to
Chapter 9, Machine Status, for more detailed information.
3. The Power Saver Indicator Light, when lit, indicates that the
Power Saver feature is active. Touch any key or the Touch
Screen to exit this mode.
4. The Keypad is used to input specific values and includes a Clear
(C) button to clear your last entry, and a Dial Pause button,
which may be used when entering telephone numbers for the online support link feature.
3. Product Overview
Xerox Document Centre Reference Guide Page 3 - 9
Page 48

5. Feature buttons include the following:
l
Start: Submits a job for scanning.
l
Stop/Pause: Select this button to stop any scanning and/or
printing that is currently in process. A pop-up screen will
appear, providing the options to cancel or to resume the
scanning and printing.
If an option is n ot selected, the job will automatically resume
printing, based on a time set by the Machine Administrator.
If neither scanning option is selected and the originals are
removed from the Document Feeder, the portion of the job
already scanned eventually will be deleted from memory,
based on a time set by the Machine Administrator. If the
originals remain in the Documen t Feeder no action will occur
until they are removed or one of the options is selected.
l
Help: Provides access to the on-line help system. Help is
based on the current feature selection on the Touch Screen.
l
Clear All: Clears any selections and resets the Features
Pathway to its default setting. It does not delete jobs from
the Job Queue, reset languages, or exit Help.
If you are not in the default pathway (Features for DC
models and Job Status for ST models), a pop-up screen will
appear indicating that confirming the window will reset all
pathways to their default values and you will be returned to
your default pathway.
l
The Access ( ) button serves two functions. It allows users
to log into and out of the system when Authentication or the
internal Auditron feature is active. It also is the entrance to
the Tools Pathway which is used by the Machine
Administrator to customize the machine. Access is
restricted and requires a password to login.
l
Language: Provides access to the languages that can be
displayed on the Touch Screen.
l
Interrupt: This button stops the job that is currently
printing at the end of a complete set. It will then print the
copy job just scanned.
To use this feature, select the Interrupt button before
pressing the Start button to make copies.
Page 3 - 10 Xerox Document Centre Reference Guide
Page 49

Touch Screen
Touch Pathway
Screen Buttons
You will make the majority of your selections on the Touch Screen.
The actual screen will vary depending on the Pathway buttons
selected or optional software that is available on your Document
Centre.
l
Features Pathway - To make copies, send a fax or an e-mail,
or perform a network scanning job, press the Features
button. Press the Fax, Network Scanning or Copy buttons on
the Touch Screen to access these features.
l
Job Status Pathway - To check on the status of your job,
press the Job Status button.
l
Machine Status Pathway- To check on the status of the
machine, press the Machine Status button.
The Touch Screen also displays important messages about the
current condition of the machine.
3. Product Overview
Important messages
are displayed here
Xerox Document Centre Reference Guide Page 3 - 11
Page 50

Finisher
The Finisher consists of the Top Tray and the Stacker Tray.
The Top Tray receives sheets that are purged from the system. It
can hold up to 250 sheets of small paper. It can be set as a destination
tray for non-stapled jobs. Copies that are less than 6.7 inches long in
the feed direction or 8 inches long in the cross-feed direction will go
to the Top Tray rather than the Main Tray.
The Main Tray is the output tray for all other copies. This tray can
hold up to 2000 unstapled sheets. It has two staplers, each with a
5000 staple cartridge, that can staple sheets ranging in size from 6.7
x 8 inch to 12 x 18 inch of 16 to 110 lb. stock.
To ensure that the stapling of thin sets is satisfactory, the machine
stops after producing between 80 and 100 sets of 2 -15 sheets to
allow you to unload the machine. It automatically resumes printing
after it is unloaded or after one minute. These options are adjustable
in Tools. Refer to page 10-34 for more information.
Some versions of hardware may not require these options.
Top Tray
Main Tray
Press the Finisher
Pause Button to
unload Stacker
Tray during a print
run
NOTE
Removing output while the machine is running may produce
finished sets that are incorrectly stapled. To unload the Finisher
while it is printing, Press the Finisher Pause button and wait for the
tray to lower. After you unload, press the button again to continue.
Page 3 - 12 Xerox Document Centre Reference Guide
Page 51

Offsetting Catch Tray
The Offsetting Catch Tray is available on the Document Centre 460
DC or ST. Output is delivered face down in offsetting sets. The
Offsetting Catch Tray holds a maximum of 250 sheets of 20 lb.
media and does not provide stapling options.
Offsetting Catch Tray
Xerox Document Centre Reference Guide Page 3 - 13
3. Product Overview
Page 52

Convenience Stapler
The Convenience Stapler attaches to the back left corner of the
machine.
It is designed for restapli ng originals and can also be used as an offline stapler. The Convenience Stapler can handle a maximum of 50
sheets of 20 lb. paper. It contains a cartridge that holds 5000 staples.
Convenience
Stapler
The staple cartridge used in the Convenience Stapler is identical to
the cartridges used in the Finisher and may be interchanged.
Page 3 - 14 Xerox Document Centre Reference Guide
Page 53

4. Making Copies
The Features button allows you access to the copy selections. Load your originals or press
the Features button to display the screen where you can make copies, prints or scans. Press
your selection on the Touch Screen.
If you do not see a screen similar to the one shown below, press the Features Button.
4. Making Copies
The Basic Copying
Tab provides access
to the most
commonly used
copying features.
More Copy Features Tab provides access to three additional tabs
The Image
Adjustment Tab
provides access to
the various image
enhancement
settings.
Xerox Document Centre Reference Guide Page 4 - 1
E-mail
see Chapter 7
The Output
Format Tab allows
you to produce
booklets,
presentations, and
other sophisticated
output.
Fax
see Chapter 5
The Job Assembly
Tab allows you to
combine individual
jobs into a complete
set and contains
other selections.
Network Scanning
see Chapter 6
The E-mail tab
allows you to enter
e-mail addresses
and manually build
an address list.
Page 54

Basic Copying Tab
The Basic Copying Tab is the default screen for the Features
Pathway. It contains the most commonly used features including:
l
Output
l
2 Sided Copy
l
Reduce / Enlarge
l
Paper Supply
The sections of this chapter that follow explain in greater detail how
to use each of these features.
Page 4 - 2 Xerox Document Centre Reference Guide
Page 55

Output
Collated
Sorting options
Select Collated if you want your output stacked in sets to match the
sequence of your originals. Depending on the machine
configuration you can direct the output to the Top Tray or to the
Main Tray.
Stapling options
If your Document Centre is equipped with a Finisher, you will see
the stapling options; otherwise, stapling options will not be visible.
Sets of up to 50 sheets can be stapled. All stapled jobs are delivered
to the Main Output Tray. Single pages, or sets of more than 50 sheets
will not be stapled.
For additional stapling information refer to the Paper and Stock
Chapter, page 13-4.
When using the Document
Glass the edge shown will be
stapled.
When using the Document
Feeder the edge shown will
be stapled.
4. Making Copies
Xerox Document Centre Reference Guide Page 4 - 3
Page 56

More...
Uncollated
The Collated, 1 Staple LEF, 1 Staple SEF, Top Tray and Main Tray
options perform in the same manner as the options provided on the
Basic Copying Tab (refer to the previous page). Additional output
choices include Uncollated, 2 Staples, and No Staples.
More Output Options
Use the Output Options screen to select specific Sort, Staple, and
Output Tray preferences for your job.
Any output selection made on the Basic Copy screen will be
reflected on the Output Options screen when the More... button is
selected.
Select Uncollated if you want your output sorted into stacks of
individual pages.
To close the Output Options screen, select Undo, Cancel or Save.
Any selections made on this screen will be reflected on the Basic
Copy screen.
Page 4 - 4 Xerox Document Centre Reference Guide
Page 57

More Stapling Options
Stapling is only allowed in the main tray.
Select 2 Staples to produce output with staples on the side or across
the top depending on the feed direction of the paper.
Select No Staples to produce Collated or Uncollated non-stapled
jobs. Non-stapled jobs can be directed to the Top Output or Main
Output Tray.
NOTE
To achieve the best staple location, select the Paper Supply
orientation that matches the format of the original document. If the
appropriate paper is not detected, the system will prompt you to
load the paper. If the job is run without loading the correct paper, a
message will display advising you that the staple is not in the
optimal position.
4. Making Copies
Xerox Document Centre Reference Guide Page 4 - 5
Page 58

2 Sided Copy
The 2 Sided Copy selection provides you the option to make oneor two-sided copies from one- or two-sided originals from either the
Document Feeder or the Document Glass.
l
11 Sided: Use this option when your originals are printed on
1 side only and you want single-sided copies.
l
12 Sided: Use this option when your originals are printed on
one side only and you want to produce two-sided copies. For
example, if you have two single-sided originals, the image from
the first original would be on the first side of the copy and the
image of the second original will be on the second side of the
copy.
l
22 Sided: Use this option if your originals are double-sided
and you also want double-sided copies.
l
21 Sided: Use this option when your originals are doublesided, and you want single-sided copies.
Selecting More... displays another screen that offers additional
options for making double-sided copies (as discussed on the next
page).
NOTE
When either 1 - 2 or 2 - 2 Sided Copy is selected and the original is
scanned from the Document Glass, no output copies will be printed
until the side 2 image has been scanned.
Page 4 - 6 Xerox Document Centre Reference Guide
Page 59

More...
The 1 - 1 Sided, 2 - 1 Sided, 1 - 2 Sided and 2 - 2 Sided options
perform in the same manner as the options provided on the Basic
Copying Tab (refer to the previous page).
Side 2 Rotation
For both the 1 - 2 and 2 - 2 Rotate Side 2 selections, the second
image is rotated 180 degrees so that the copy reads in a “head to toe”
manner, similar to a calendar-type orientation.
4. Making Copies
1-2 Rotate Side 2 2-2 Rotate Side 2
The Document Centre can rotate images except 11 x 17 inches. If
you want to rotate this size, set the reduction options to 97% or
increase Border Erase to 0.2 inches.
NOTE
Xerox Document Centre Reference Guide Page 4 - 7
When the 1- 2 Sided option is selected and originals are fed SEF
onto SEF copy paper, Side 2 rotation should be selected in order to
obtain the correct copy orientation. This capability is especially
helpful when creating dual stapled sets.
Page 60
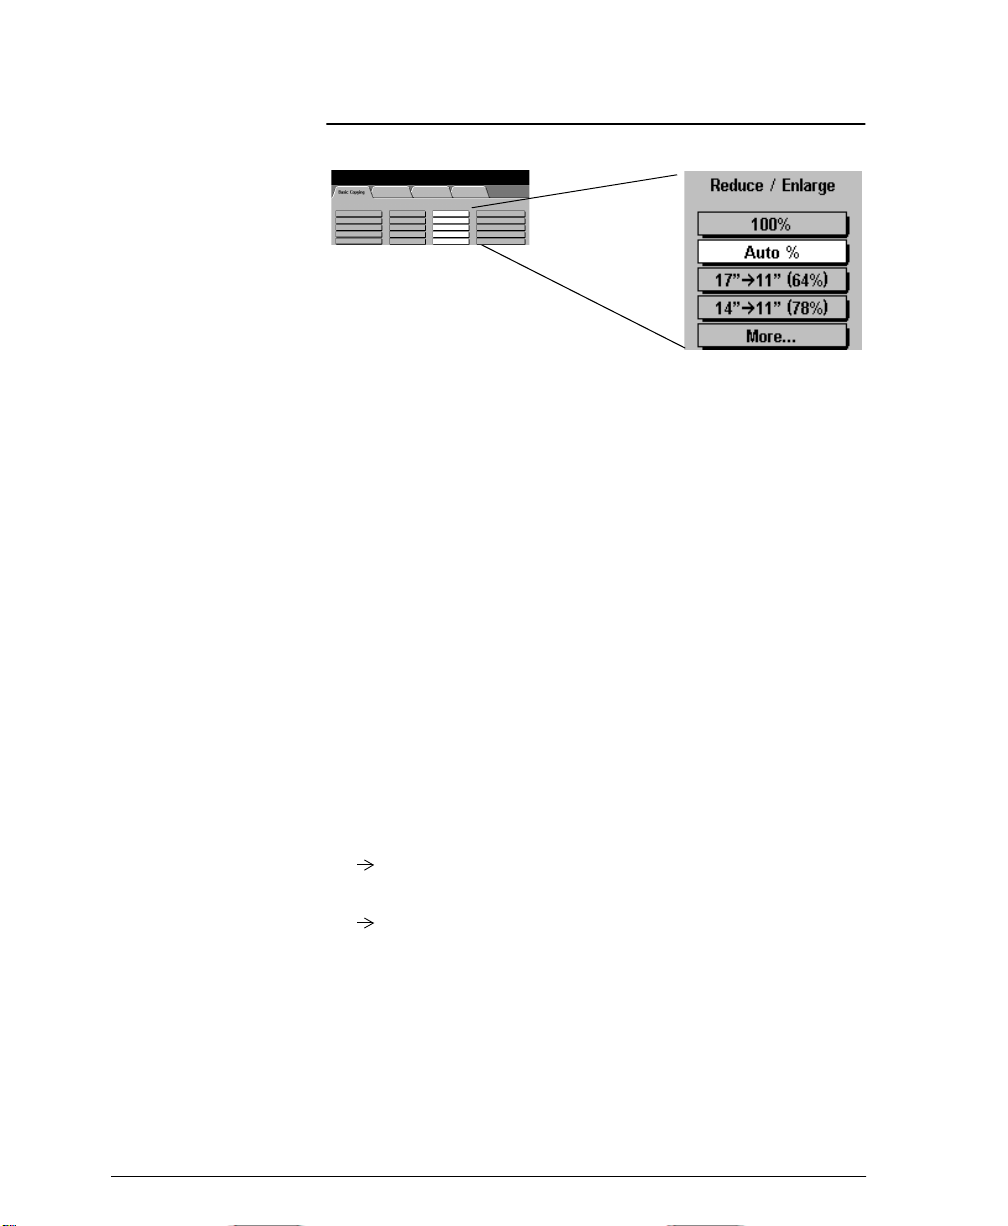
Reduce / Enlarge
The Reduce / Enlarge option provides a variety of reduction and
enlargement options to adjust the size of the output image from 25%
to 400%.
Originals placed on the Document Glass can be enlarged by as much
as 400%. Originals fed through the Document Feeder can be
enlarged as much as 200%.
100% produces an image on your copies the same size as the image
on your original document.
Auto% proportionally reduces or enlarges the image on your
originals based on the size of the original and the size of the selected
output paper.
The Auto% selection cannot be used with the Auto Paper selection.
If Auto% is selected and then Auto Paper is select ed, a message will
appear indicating that the combination cannot be selected and the
machine will select a paper tray with the correct size that contains
the standard paper type and color.
The next two positions can be customized by the Machine
Administrator. In the screen pictured above, the first 2 positions are:
17” 11” (64%) reduces an 11x17 inch sized image to fit on 8.5x11
inch paper.
14” 11” (78%) reduces an 8.5x14 inch sized image to fit on
8.5x11 inch paper.
Selecting More... provides two additional reduction and
enlargement options, Normal and Custom, as shown on the next
two pages.
Page 4 - 8 Xerox Document Centre Reference Guide
Page 61

Normal Setting
Select Normal to reduce or enlarge your output image the same
proportion percentage in both directions.
The 100% and Auto% provide the same functionality as described
on the previous page and are located here for your convenience.
In addition, there are six preset percentages of reduction or
enlargement, from 25% to 200%, designed for resizing to common
document sizes when copying from the Document Feeder.
Entering numbers from the keypad
When copying from the Document Glass you can make non-preset
adjustments as illustrated below:
4. Making Copies
Using the
keypad.
If the box does
not have a black
background,
simply touch it
and it will change
to black.
Then enter a
number from the
keypad.
Xerox Document Centre Reference Guide Page 4 - 9
Using the scroll
buttons
Press the arrows to
adjust the reduce/
enlarge
percentages in 1%
increments.
Page 62

Custom Setting
Choose Custom to adjust the height (Y) and the width (X)
dimensions for reduction or enlargement independently. Your
output will NOT be reduced or enlarged proportionally.
100%: Produces an image the same size as your original document.
Auto%: When Auto% is used in the Custom Reduce / Enlarge
screen, it automatically reduces or enlarges t he image on your output
based on the size of the original and the size of the output stock. It
will stretch the original image to fill the output stock, using different
percentages in the X and Y directions if necessary.
X 78%, Y 100% preselect: This selection automatically reduces
the X dimension of the output to 78% (width). Y remains the same
(height) dimension. This selection enables you to reduce an 8.5 x 14
inch SEF original to fill an 8.5 x 11 inch paper. The percentages in
this section can be adjusted by your Machine Administrator.
X, Y adjustments: You can also adjust the X and Y dimensions
manually in 1% increments by using the scroll arrows. Touch the
upper scroll arrow to increase a dimension.
You can also enter a percentage by touching the X: and Y: boxes and
entering the percentage from the keypad.
Page 4 - 10 Xerox Document Centre Reference Guide
Page 63

Paper Supply
This is where you choose the paper tray for your copy job. The trays
displayed on the Basic Copying tab are based on priorities set by the
Machine Administrator.
When Auto Paper is selected the machine will pick the correct
paper for your copy job.
If the Machine Administrator enabled Standard Size Required, the
machine may be required to use one of t he following standard sizes
with the default type and color: 8.5 x 11 inch, 8 .5 x 14 inch, or
11 x 17 inch.
If Standard Size Required is not active or if the image is not one of
the standard sizes, the machine will pick the smallest available size
with the default type and color that will accommodate the image.
4. Making Copies
More...
Pressing the More... button displays all paper stocks that are loaded
in the machine. The paper size, the orientation, the stock type and
the color are shown for each tray. Select a tray by touching the
associated line on the display. Refer to page 10-13 for more
information on Tray Type.
Xerox Document Centre Reference Guide Page 4 - 11
Page 64

Image Adjustment Tab
A checked box indicates
that the settings have
been changed from the
default values
Job Review
Summaries
To access the Image Adjustment tab, select the More Copy
Features tab.
The Image Adjustment Tab provides the following features for
fine-tuning the appearance of your finished output.
l
Image Quality
l
More Image Quality
l
Bound Originals
l
Edge Erase
l
Original Input
l
Image Shift
Select any of the buttons to view additional options. A separate
screen will appear for each feature. You may set as many features as
you choose for each copy job.
The text next to the feature button, called a Job Review Summary,
reflects the current settings for that feature. A checked box indicates
that this feature has been modified from its default setting.
Most feature screens include three buttons to confirm or cancel your
choices.
l
The Undo button resets the current screen to the default
values that were set when the screen was opened.
l
The Cancel button resets the screen and returns to the
previous screen.
l
The Save button saves your choices and returns you to the
previous screen.
Page 4 - 12 Xerox Document Centre Reference Guide
Page 65

Image Quality
Use this feature to enhance the quality of your output.
Original Type
This feature provides a convenient way to enhance the copy quality
of your output based on the type of original images you are copying.
The Normal, Text, and Halftone Photo Original Types use Auto I Q®
Image Processing to classify each pixel in the image and to apply
the appropriate image processing to enhance the copy quality for
each type of pixel. The Photo Original Type applies a special
contrast setting and screen to the entire scanned page.
l
Normal - This is the standard setting and is appropriate for the
majority of the jobs run on the machine. It is designed to
provide high quality copies of originals that contain a mixture
of text, graphics, and pictures.
l
Text - Use this option if your original contains only text or line
art. This will result in the sharpest edges for the text and the line
art.
l
Halftone Photo - Use this option if your original is from a
magazine or other source that contains high quality lithographic
images or continuous tone photographs with text and/or
graphics. This setting will produce better pictures, but slightly
reduces sharpness for text and line art.
l
Photo - This option is specifically designed to copy continuous
tone photographs or printed halftone originals. Use this option
if your original is a photograph or halftone picture without any
text or lines. Any text or lines copied in this mode will be less
sharp than if you select any of the other Original Types.
4. Making Copies
Xerox Document Centre Reference Guide Page 4 - 13
Page 66

Lighten/Darken
Lighten/Darken provides controls to adjust the lightness or darkness
of the output.
Use Darken (press the down scroll button) to darken the copy from
light originals such as pencil images.
Lighten can be used to lighten a copy when the lower contrast or the
Background Suppression On adjustments are not adequate. For
example, use Lighten (press the up scroll button) to copy more
details in the dark areas of an original, to suppress the background
from colored paper originals, and to eliminate lines resulting from
paste-ups, or backside show-through.
Background Suppression
Background Suppression is automatically selected when any
Original Type other than Photo is selected. Background
Suppression automatically reduces or eliminates the background
from colored paper originals or from newspaper originals.
Turn Background Suppression off when you encounter the
following conditions:
l
Using the Darken adjustment does not produce a satisfactory
copy when copying very light originals
l
The original has a gray or colored border such as a certificate.
The machine will incorrectly assume that the border of the
document is the background level of the entire original and
consequently cause the entire image to appear lighter
l
To bring out fine detail that was lost due to the dark edge or
gutter when using Bound Originals
Page 4 - 14 Xerox Document Centre Reference Guide
Page 67

More Image Quality
Contrast controls the differences between the image densities
within the copy. Lower contrast settings improve the copy quality of
pictures by reproducing more detail in light and dark areas of the
original. Higher settings produce more vivid blacks and whites for
sharper text and lines but less detail in pictures. Use the scroll
buttons to adjust the contrast values.
Sharpness controls the balance between sharp text and moiré
(undesirable patterns within the image). Generally, sharpness is
used to enhance the copy quality after evaluating the output. Use the
scroll buttons to adjust the sharpness values from sharper to softer
after you view your output.
4. Making Copies
High sharpness settings provide the sharpest text and lines, but
increase the likelihood of moiré.
Screen
This is only available for the Normal, Text, and Halftone Photo
Original Types.
The Auto setting is preset at the factory to be on when Normal, Text,
or Halftone Photo is selected. It eliminates the risk of blotches or
small areas that have a different texture or pattern appearance than
the surrounding area, but produces a slightly grainier picture than if
Special is used.
The Special selection can be utilized to enhance continuous tone
photographs or high frequency halftone images. It is used to create
smoother, less grainy output for continuous tone and halftone
images, but the risk of blotchy copy quality defects is higher.
Xerox Document Centre Reference Guide Page 4 - 15
Page 68

How to use the Image Quality settings
Normal:
This factory default
setting accommodates
most types of originals.
It delivers excellent
text and line output.
However: It produces
somewhat dark pictures
with some detail lost in
both light and dark
areas.
Halftone Photo:
Enhances a picture or
graphic if copying
originals with text,
lines, graphics, and
pictures.
However: Sharpness is
slightly decreased for
text and lines.
Lighten:
Reproduces more detail
in the darker areas of an
original or suppresses the
background if you are not
satisfied with the output
after using Background
Suppression.
However: Lighter
settings result in lighter
and thinner text and lines
and lighter solids.
Background
Suppression - On:
This factory default setting
suppresses the background
from originals on colored
or gray paper.
It can also be used to
suppress paste-up lines,
pencil marks, backside
show-through, or light
smudges on originals.
However: Some light
original images may not
copy well.
Text:
Use if copying only
text and lines because
it provides the sharpest
text and line output.
However: It produces
high contrast pictures
with most details lost
in light and dark areas.
Page 4 - 16 Xerox Document Centre Reference Guide
Photo:
This setting provides
the best copy quality
for photographs
without any text or
graphics.
However: It can be
used to copy pictures
with text and graphics,
but the text and lines
will appear less sharp.
There is also the risk of
moiré when copying
halftone pictures.
Darken:
Use to copy low density
areas such as pencil
marks on the original.
However: The darker the
setting, the heavier and
thicker the text and lines
and the darker the solids
will appear on your
output. There is also a
risk of creating a light
gray background with the
higher settings.
Background
Suppression - Off:
Use to copy originals
having a colored or
gray border. Improves
copy quality of light
originals if you are
dissatisfied with the
output after using the
Darken adjustment.
However: There is
also a risk of creating
a light gray
background.
Page 69

How to use the More Image Quality settings
Contrast - High
Higher contrast causes the
blacks and whites to appear
more vivid and the text to
appear sharper.
However: Increasing the
contrast will result in darker
pictures and less detail in both
the lightest and the darkest
areas.
Sharpness - Sharp
Increasing sharpness will
increase the edge definition of
text and lines.
However: The higher the
sharpness setting, the more likely
moiré will appear on your output.
Screen - Auto:
This factory preset is the best
mode for most originals and
avoids the risk of copy quality
blotches on the output.
However: Pictures and solid areas
may appear more grainy.
4. Making Copies
Contrast - Low
The lower the setting, the
better the pictorial copy
quality. There will be more
detail in the lightest and
darkest areas of the output.
However: Decreasing the
contrast reduces the text and
line sharpness.
Xerox Document Centre Reference Guide Page 4 - 17
Sharpness - Soft
The lower the setting, the softer
the image will appear. The
lower settings reduce or
eliminate moiré.
However: The lower the setting,
the less edge definition of text
and lines.
Screen - Special:
This provides smoother and
less grainy pictures.
However: There is a higher
risk of blotches from certain
types of originals.
Page 70

Bound Originals
This feature is used to copy pages from books or other bound
documents onto separate single-sided or double-sided pages. The
Machine Administrator can add additional scanning options for the
Both Pages selection giving you the choice of scanning left to right
or right to left.
To use this feature:
1. Open the Document Glass cover. The cover must remain open
during copying.
2. Place the book face down anywhere on the Document Glass,
with the bottom edge of the bound document towards the front
of the machine.
l
To avoid skewing the book and therefore the copy, align
with the Book Binding Mark on the front edge of the glass.
l
When an original is placed on the front edge of the glass,
any information within 0.25 inches of the bottom edge of an
original placed will be deleted on the copy. Most books do
not have information within this area. If this is not the case,
place the original anywhere on the glass at least 0.25 inches
away from the front edge.
l
To compensate for books having dark borders or edges,
refer to page 4-23 for additional information.
3. Select Left Page, Right Page, or Both Pages.
4. If necessary, apply light pressure in the center of the book to
flatten it in order to minimize distortion of the image.
5. Press the Start button. Remember, as this is an automatic feature
from the glass, the machine will make multiple scans. Do not
remove the original until all scans are completed.
Page 4 - 18 Xerox Document Centre Reference Guide
Page 71

Binding Erase
Binding Erase allows you to reduce the output shadow caused by the
center binding of the book. To adjust the amount of Binding Erase,
touch the arrow keys to change the amount erased.
For Left Page and Right Page options, the area erased can be
adjusted in 0.1 inch increments, up to 1.0 inch.
For the Both Pages option, the erased area can be adjusted in 0.2
inch increments up to 2.0 inches with the erased amounts divided
equally between both pages.
Bound Originals and 1 to 2 sided copying
To use this feature with 1 to 2 sided copy, select the 1 to 2 sided copy
option, then select Bound Originals. Position your original on the
Document Glass as required, select the appropriate page setting in
Bound Originals, and press the Start button. Prepare your original to
copy the second side, select the appropriate page in Bound Originals
to copy and press the Start button again. As soon as the machine
processes the second original, it will print the output.
Originals
Right
Left
Features
1 to 2 sided copying
Bound Originals
Output
L
R
4. Making Copies
Xerox Document Centre Reference Guide Page 4 - 19
Page 72

Using Bound Originals with Build Job
Use Build Job to copy individual pages that are distributed
throughout the book or individual chapters with minimal button
pushing or adjustment of originals.
For Example:
Select the following features to copy multiple pages:
Original Input
Right
Both
Both
Left
What to do
1. On the Job Assembly Tab, Select Build Job, then
On, then Save.
2. Select 1 to 2 sided copy.
3. Select the desired quantity from the keypad.
4. On the Basic Copy Tab, Select the output paper
size and select Auto% to fill the output paper stock.
Output
Select stapled sets, if desired.
5. On the Image Adjustment Tab, select Bound
Originals.
6. Select the page or pages to copy on the Bound
Original screen. Press the Start button. Repeat
until all the pages have been scanned.
7. Press the Build Job Controls button, then press
End Build Job to print your job.
Copying both pages to one side of a Sheet
To print both pages of the book on one output page, do not use the
Bound Originals feature. Place your book on the Document Glass as
you would a non-bound document (place in upper left corner of
Document Glass). If you use Auto% the machine will find your
original and make the necessary adjustments to the image to fit it
onto a single sheet of paper.
Page 4 - 20 Xerox Document Centre Reference Guide
Page 73

Edge Erase
This feature allows you to “refresh” the quality of an original that
has become frayed at the edges, has punched holes, has staple marks
or other extraneous marks.
Border Erase adds equal amounts of white space on all edges of
your copies. The default is 0.1 inches. All marks or defects on the
border are deleted. Use the scroll buttons to adjust the amount
erased.
The Edge Erase option (screen pictured above) allows you to adjust
the amount erased for each of the four edges independently. The
default is 0.1 inches. Make your selections, using the scroll arrows.
Use 0.7 inch on the appropriate edge to erase drill hole marks from
your copies.
For both Border Erase and Edge Erase, the range to be erased for
each edge can be adjusted in 0.05 inch increments up to 2 .0 inches.
The amount to be erased extends across the entire width/height of
the page.
4. Making Copies
If producing duplex copies, the left and right erase values will be
mirrored for each side. For example:
0.7 in.
Side 1 Side 2
The Print to Edge feature allows images to be printed to the edge
of the output stock. It may, however, reduce the ability of the system
to clean itself and can cause defects on your output if used
excessively.
Xerox Document Centre Reference Guide Page 4 - 21
0.7 in.
Page 74

Original Input
This selection allows you the option to program the size of originals
or to allow the Document Centre to determine the size
automatically.
Auto
Originals scanned, using the Document Feeder
Auto is the normal operating mode of the machine and allows the
machine to determine automatically the size of the originals fed
through the Document Feeder.
Originals scanned, using the Document Glass
When originals are scanned from the Document Glass and you have
selected an auto feature such as Auto Paper, Auto%, or Auto Center,
the system will scan the original twice. The first scan is a prescan to
determine the size and location of the original, and the second scan
is the scan that captures the image.
This is useful if you are scanning an odd-size original from the
Document Glass; for example, business cards, receipts, checks, or
small billing statements.
NOTE
Page 4 - 22 Xerox Document Centre Reference Guide
Scanning multiple or odd-shape originals using an Auto feature will
produce a black area around or between the originals.
Page 75

Manual Platen Input
Book Binding
Guide Mark
The Manual Platen Input feature allows you to specify the
dimensions of the document scanning region. There are several
dimensions that correspond to common document sizes and
orientations.
Select a standard size or use Custom size to manually adjust the
scanning dimensions. The adjustment range is 1 x 1 inch to 17 x 11.7
inches.
The originals are assumed to be registered at the left rear corner of
the Document Glass.
Use this feature to scan:
l
originals with dark edges that are difficult for the machine to
detect
l
transparency originals
4. Making Copies
Xerox Document Centre Reference Guide Page 4 - 23
Bound Originals and Manual Platen Input
You may want to consider combining these features when your
bound original has dark edges.
Align the book with the Book Binding Guide Mark on the front of
the Document Glass and enter the dimensions for one page of the
book. The allowed range is 1 x 1 inch to 8.5 x 11.7 inch. Use the
keypad to enter the adjustments. The machine will calculate the total
dimensions of the book.
Page 76

Mixed Size Originals
This feature allows users to input original documents of mixed sizes
and produce them as a single copy job. Users can select mixed size
output using the Mixed Size Or iginals button or allow the system to
automatically determine a common copy size. The default is
automatic common copy size.
The originals must all have the same width and must be fed from the
Document Feeder. If valid sizes are not s canned, a warning message
will appear and the job will be deleted.
NOTE
If the system displays a paper stock error message, the machine’s
document size values might require adjustment. Valid document
size sensing is programmable by the Machine Administrator.
Input What to do
If you want the same size output, load your
originals, select a paper size and press Auto% on
the Basic Copying Tab.
If you want mixed size output, see the procedure
on page 4-25.
Page 4 - 24 Xerox Document Centre Reference Guide
Page 77

Mixed Size Output
To produce mixed size copies you must first tell the system to expect
Mixed Size Originals otherwise, the output will be on common size
paper. Go to the Image Adjust Tab. On the Original Input screen,
select the Mixed Size Originals button.
When mixed size output is desired, any one of these options must
also be selected: Auto Paper, Auto%, or Auto Center.
Examples of US document size combinations are as follows:
l
8.5 x 11-inch (SEF) and 8.5 x 14-inch (SEF)
l
8.5 x 11-inch (LEF) and 11 x 17-inch (SEF)
Scanning time for one-sided originals is significantly slower than
normal when this option is selected. Double-sided documents can be
processed with this feature, at no loss in productivity.
Mixed Size Originals cannot be selected if both Auto Paper and 1-2
Sided options are selected.
NOTE
Use Auto Paper to produce the same size output as the original
sizes. The copy paper must be the same size and orientation as the
originals.
Use Auto% to produce the same size output based on the paper size
you select.
4. Making Copies
Xerox Document Centre Reference Guide Page 4 - 25
Page 78

Image Shift
This feature allows you to control the position of the image on the
output page. There are three selections:
No Shift is the default setting, and makes no adjustment.
Auto Center automatically centers the scanned image on the output
paper. To work effectively, the original should be smaller than the
selected output paper stock or the image should be reduced.
Margin Shift (screen pictured above) allows you to create a binding
edge. The image can be adjusted up or down on the page and/or
shifted to the right or left. Use the scroll buttons to adjust the amount
of shift.
For Margin Shift, the amount of shift for each edge can be adjusted
in 0.1 inch increments up to 2.0 inches in each direction (from top
or bottom, from right or left).
Image Shift - Duplex Operation
The Document Centre is capable of shifting the image on the second
side of a document. You can mirror the first side or adjust the shift
independently. To access this feature, press the Side 2 button.
Page 4 - 26 Xerox Document Centre Reference Guide
Page 79

Output Format Tab
When you select the Output Format Tab, you will find features
that produce different options for the finished output.
The following features are located in Output Format:
The sections that follow in this chapter explain how to use each of
these features in more detail.
l
Transparencies
l
Booklet Creation
l
Multi-Up
l
Covers
l
Invert Image
4. Making Copies
Xerox Document Centre Reference Guide Page 4 - 27
Page 80

Transparency Dividers
This feature allows you to create a single set of transparencies with
either blank or printed dividers. Use this screen to select the correct
transparency and stock trays. Pressing either the Transparency
Stock or Divider Stock buttons allows you to select the paper tray
that contains the desired stock.
When producing a transparency set, it will always be single-sided on
transparency stock and collated with no stapling if dividers are
selected.
You can only set the quantity to one when using this feature.
Dividers
You have three options for Transparency Dividers; Off, Blank
Dividers, or Imaged Dividers. Any stoc k loa ded in the machine may
be used as a divider as long as its size and orientation matches that
of the transparencies.
l
Off is the initial setting. Dividers will not be produced until you
select either Blank or Imaged Dividers.
l
Blank Dividers places a blank sheet between each
transparency.
l
Imaged Dividers places the same image on the divider sheet as
on the transparency.
Page 4 - 28 Xerox Document Centre Reference Guide
Page 81

Booklet Creation
Use this feature to create multipage booklets from a sequential set of
either 1-sided or 2-sided originals. The machine will reduce and
correctly position each image to fit on the desired page so that when
the page is folded a booklet will be created.
The Machine Administrator can enable an option that produces
booklets that read either left to right or right to left.
4. Making Copies
NOTE
You must input your originals LEF and use output paper that has
SEF orientation.
Refer to the illustration below to see how to make a booklet.
Step 1 Step 2 Step 3
Document Feeder has Short Edge Feed (SEF) Stock.
Long Edge Feed (LEF).
1
2
3
4
or
4
Orientation of
Ordered originals
Xerox Document Centre Reference Guide Page 4 - 29
1
2
3
11 x 17 in., 8.5 x 11 in., or 8.5 x
14 in. SEF stock
Fold the output sheet.Ensure that the Paper TrayLoad the originals in the
(Outside back page)
4
3
1
or
(Inside front page)
(Outside back page)
4
3
1
(Inside front page)
2
2
Page 82

Multi-Up
The Multi-Up feature is ideal for handouts, storyboards, or for
archival purposes. Using the Multi-Up feature, you can create
documents with up to 36 images for small statement size paper
reduced onto 11 x 17 inch paper. The practical limit is 16 for
8.5 x 11 inch paper.
To use this feature: Select the button that identifies to the machine
how your original images are oriented. There must be one original
for each image.
Select the desired number of Rows and/or Columns, from 1 to 6. The
actual number of images is limited by the minimum reduction value
(25%) and the selected output stock.
The examples below are typical output that can be produced when
using the Multi-Up feature.
12
34
4 originals u sing
2 rows and
2 columns
Page 4 - 30 Xerox Document Centre Reference Guide
12
34
65
6 originals using
3 rows and
2 columns
1
Blank
2
Area
2 originals using
2 rows and
1 column
Page 83

Covers
This feature allows you to add covers using stock drawn from a
different tray than your copies. You can have 1-sided or 2-sided
front or back covers, with or without an image.
The Covers section provides the following options:
l
No Covers will not produce any covers.
l
Select Front only to create a front cover.
l
Select Back only to create a back cover.
l
Selecting Front and Back creates both front and back
covers for your job. This selection is required if you are
adding covers to booklets.
The Output Cover Images button allows you to select blank, 1sided, 2-sided, or 2-sided with the second side rotated.
The Cover Stock button allows you to select the tray in which you
have loaded the cover stock. The cover stock must be at least as large
as the stock for the body of the job.
4. Making Copies
If you create 1-sided covers with images, the machine uses the first
image and last image of your original set as the cover images.
Notes about 2-sided covers
If you have an odd number of originals and you want a blank page
on the back cover, you must add a blank page to your original set.
Otherwise, the last two images of your odd number of originals will
be printed on the back cover. A b lank page will be inserted between
the back cover images and the body of the document.
Xerox Document Centre Reference Guide Page 4 - 31
Page 84

Output Cover Images
Select this option in order to print images on one or both sides of
your covers.
l
Select Blank Cover if you want covers without images.
l
Select 1 Sided covers to place the first original submitted in
the job as the front cover image, and the last image as the
image on the inside back cover of your document.
l
Select 2 Sided covers to place the first two images of your
original set on the front and back side of the cover. The back
cover will be based on the last two images in the job.
l
Select 2 Sided Rotate side 2 to rotate the second side 180
degrees.
NOTE
To produce one-sided covers with the back image on the outside of
the booklet, select 2-sided covers and insert a blank page in the set
of originals at the location to be left blank.
Cover Stock
Select Cover Stock to select the paper tray with the desired stock.
The orientation of the selected cover stock must be the same as the
body of your copy job.
Page 4 - 32 Xerox Document Centre Reference Guide
Page 85

Invert Image
This feature allows you to make Mirror Image or Negative Image
copies of your original documents.
Mirror Image
As illustrated below, this option changes the direction of the original
image creating a mirror of the original. This option is primarily used
to transpose the position of a graphic.
4. Making Copies
Negative Image
Some originals have a dark background and white text. Using
Negative Image on these originals can save on dry ink consumption.
This option will create copies that are the opposite of the original
document as illustrated below.
Xerox Document Centre Reference Guide Page 4 - 33
Page 86

Job Assembly Tab
Use the Job Assembly tab to combine multiple documents into a
single job, produce a sample set of a job before printing large
quantities or storing the programming of up to 10 jobs. These
features include the following:
l
Build Job
l
Sample Set
l
Stored Programming
Page 4 - 34 Xerox Document Centre Reference Guide
Page 87

Build Job
Build Job enables you to combine multiple, individually
programmed job segments from either the Document Glass or the
Document Feeder into a single copy job.
You can feed more than the maximum number of originals through
the Document Feeder by splitting the job into multiple segments or
by adding inserts to a large job. For more options see Build Job
Controls on page 4-36.
Quantity, stapling, and collation options can be adjusted at any time,
and will assume the values of the last job segment.
4. Making Copies
NOTE
Xerox Document Centre Reference Guide Page 4 - 35
The recommended limits of Build Job are 100 individual job
segments and 1000 8.5 x 11 inch images with 5% area coverage. If
these limits are exceeded, your job may be deleted.
Page 88

Build Job Controls
Aft er the final segment is s canned, press the End Build Job button
to accept the programming. The entire job will be printed and Build
Job will automatically deselect.
Use Sample Last Segment to see a proof of the last segment you
just scanned. The copy will go to the default output tray. If you are
satisfied with the sample you can continue programming your job.
Use Delete Last Segment to delete the last segment that was just
scanned. You can continue programming your job.
Use Cancel Sample Printing to halt a sample print job that is
currently running. This option can save paper and time by stopping
the sample printing of a large s egment. You can then reprogram and
rescan the segment.
Use Delete All Segments to delete the current job and return to the
main Build Job screen.
Page 4 - 36 Xerox Document Centre Reference Guide
Page 89

Sample Set
Use this feature to review your output to ensure that it is exactly
what you expect before printing a large quantity.
Sample Set will print out one complete set, and then place the
remaining job on hold in the Job Queue.
Access the job queue by pressing the Job Status button, then touch
your job on the screen to access an additional screen. If the output is
acceptable, press Release and the programmed number of sets will
be produced. If the output is not acceptable, press Delete to delete
the job from the queue. Reprogram and rescan the entire job.
4. Making Copies
Xerox Document Centre Reference Guide Page 4 - 37
Page 90

Stored Programming
This feature allows you to program up to 10 programming
sequences. This feature is helpful to store commonly used selections
or combinations of selections such as Edge Erase and Bound
Originals.
To use this feature, use the up and down scroll buttons on the
scrolling list to select the desired storage location, then press a
function button - Store or Recall Programming.
Use the Store Programming feature to store the current
programming selection. A confirmation message will ask you if you
want to overwrite the existing programming in that location. If you
choose to overwrite, the new programming will be stored in that
location.
Every time you use this, a confirmation message will be displayed.
Use the Recall Programming feature to retrieve past programming
that has been stored in a selected location. First, select a Job
Number, then press the Recall Programming button. The recalled
programming will overwrite the current copy programming. After
being recalled, the selections can be modified further.
Check your programming values when applying stored
programming values to a Build Job segment. Some stored
programming, such as Multi-Up, cannot be recalled in the middle of
a Build Job segment.
Page 4 - 38 Xerox Document Centre Reference Guide
Page 91

5. Fax (Optional Feature)
The Facsimile (Fax) feature is optional on the Document Centre.
If installed, it connects a networked Document Centre to a server
running a network fax solution. The Network Fax software manages
the transmission of files created by the Document Centre and receipt
of incoming fax files to be printed on the Document Centre.
Coupling the Document Centre’s rapid 1 or 2-sided scanning
capability with an enterprise-wide Network Fax software solution,
will provide your organization a great deal of power to meet your
productivity needs.
Your Network Fax documentation will contain detailed information
about configuring the Fax hardware and software to receive and
route incoming faxes, access on-line telephone listings or other
specialized features.
Feature)
5. Fax (Optional
5. Fax (Optional
Originals
Scanned
D
i
g
i
t
a
l
f
i
l
e
s
Xerox Document Centre Reference GuidePage 5 - 1
Incoming or Outgoing Faxes
Telephone
Network
Fax Server
Page 92

Setting Up a Network Fax
The person responsible for installing the Document Centre to a
network should follow these steps to set up the faxing solution.
1. There are special software and hardware components required to
enable the Network fax solution. You may need:
l
A server for the Network Fax software. If you are using an
existing server with Network Fax software, use the Network
Fax documentation to add the Document Centre to your
existing Fax network.
l
Specialized hardware and software installed at the
Document Centre. Contact Xerox to ensure your machine
meets the minimum requirements and to make any required
upgrades to your machine.
2. Enable the Faxing option on the Document Centre.
A Xerox technician will install any required hardware or
software on your Document Centre to enable the Faxing option.
3. Setup the Document Centre Fax Repository settings at the
Document Centre. Refer to the next page for more information.
Originals Faxed from the Document Centre are scanned and
saved to a location on the server. The fax software watches this
directory and faxes any files it finds to the specified destination.
The identification of this repository location is part of the fax
component software setup. The same location must be entered
into the Document Centre so the machine will route a faxed job
to the correct location.
4. Installation is complete.
Page 5 - 2 Xerox Document Centre Reference Guide
Page 93

Fax Repository Setups
The Fax Repository is the location on the server where faxes that are
processed by the Document Centre are stored until they can be sent
to the final destination using the Network Fax software.
Feature)
5. Fax (Optional
Use Internet Services Fax Repository Setup screens to identify the
path from the Document Centre to the location on the server where
the Network Fax software will find fax jobs to send. Fax setup
screens are used by the individual responsible for maintaining the
network aspects of the faxing function. Refer to the System
Administration Guide for more details.
Xerox Document Centre Reference GuidePage 5 - 3
5. Fax (Optional
Page 94

Fax Network Service Login
Access to the fax features can be restricted by the System
Administrator. This provides security and tracking o f fax
documents. Restriction levels include Network Access, Gu e st
Access, or both.
If Network Service Login is required you will be presented with a
Login Required screen.
l
Authenticated Access requires a Network Login Name and
Password.
l
Guest Access requires a passcode which can be provided by
the System Administrator.
Page 5 - 4 Xerox Document Centre Reference Guide
Page 95

Login - Authentication Access
Using the touch screen
1. Select Authentication Access. You will be presented with a
keyboard on the User Interface.
2. Enter your Login Name. Press the enter button.
3. Enter your Password. Press the enter button.
The system will attempt to validate the login information through
the network server. If the account information is authenticated the
restriction will be released and the Fax tab can be selected.
Feature)
5. Fax (Optional
NOTE
The system will allow 5 attempts to validate login name and
password. If any of the information is incorrect on the last attempt,
you will be notified on the local user interface and all users will be
locked out of all services offering authentication for a period of 5
minutes.
Logout
To Log off, press the Access button to the right of the screen, and
then press the Logout button.
Xerox Document Centre Reference GuidePage 5 - 5
5. Fax (Optional
Page 96

Login - Guest Access
Using the keypad on the user interface:
1. Enter the passcode (maximum of nine digits).
2. Press the enter button.
The system will attempt to validate the login information. If the
passcode is authenticated the restriction will be released and the Fax
tab can be selected.
NOTE
The system will allow 5 attempts to validate login name and
password. If any of the information is incorrect on the last attempt,
you will be notified on the local user interface and all users will be
locked out of all services offering Guest Access authentication for a
period of 5 minutes.
Logoff
To Log off, press the Access button to the right of the screen, and
then press the Logout button.
Page 5 - 6 Xerox Document Centre Reference Guide
Page 97

Getting to the Fax Feature
When Fax has been installed on the Document Centre the Fax button
will be available on the right hand side of the Touch Screen of the
Features Pathway.
Access to the fax features can be restricted. When authentication is
enabled, users will be required to login.
Feature Screen
displayed after
originals are
loaded and the
Fax button is
pressed.
Features button
If you cannot see the copy, Fax or
Scan selection, press this button
Feature)
5. Fax (Optional
Telephone number
appears here
Xerox Document Centre Reference GuidePage 5 - 7
Select 1 or 2-sided
originals
Use the keypad to enter
telephone numbers
5. Fax (Optional
Page 98

Sending a Fax
1. Load your originals.
If using the Document Feeder, load face up. The Document
Centre has an image rotation feature that enables you to feed
originals Long Edge Feed even if the destination Fax can only
print Short Edge Feed.
2. Press the Fax button to display the Fax screen.
3. If Faxing 2-sided originals, touch the 2-sided button.
4. Enter the fax number using the numeric keypad.
To send a fax to more than one number, press the Add to Send
list button then enter the next telephone number. Repeat until all
the numbers have been added.
Press the Send List button to view the list of destination phone
numbers.
You can also use the Phone List to add preprogrammed numbers
to the Send List. Refer to page 5-13.
Use the Dial Pause button on the control panel to add a pause
between characters if necessary.
Add other Dialing Characters as necessary. Refer to page 5-10.
5. Press Start.
The Document Centre will scan the originals and store the
electronic files in the Fax Respository.
Confirmation Sheets and Transmission sheets. If enabled by
your Machine Administrator, the machine will print a
Confirmation Sheet when the job is successfully transferred to
the Fax respository. When the job is received by the distant
station and the Network Fax software has enabled transmission
reports, a transmission report will be printed.
6. Remove your original documents.
Page 5 - 8 Xerox Document Centre Reference Guide
Page 99
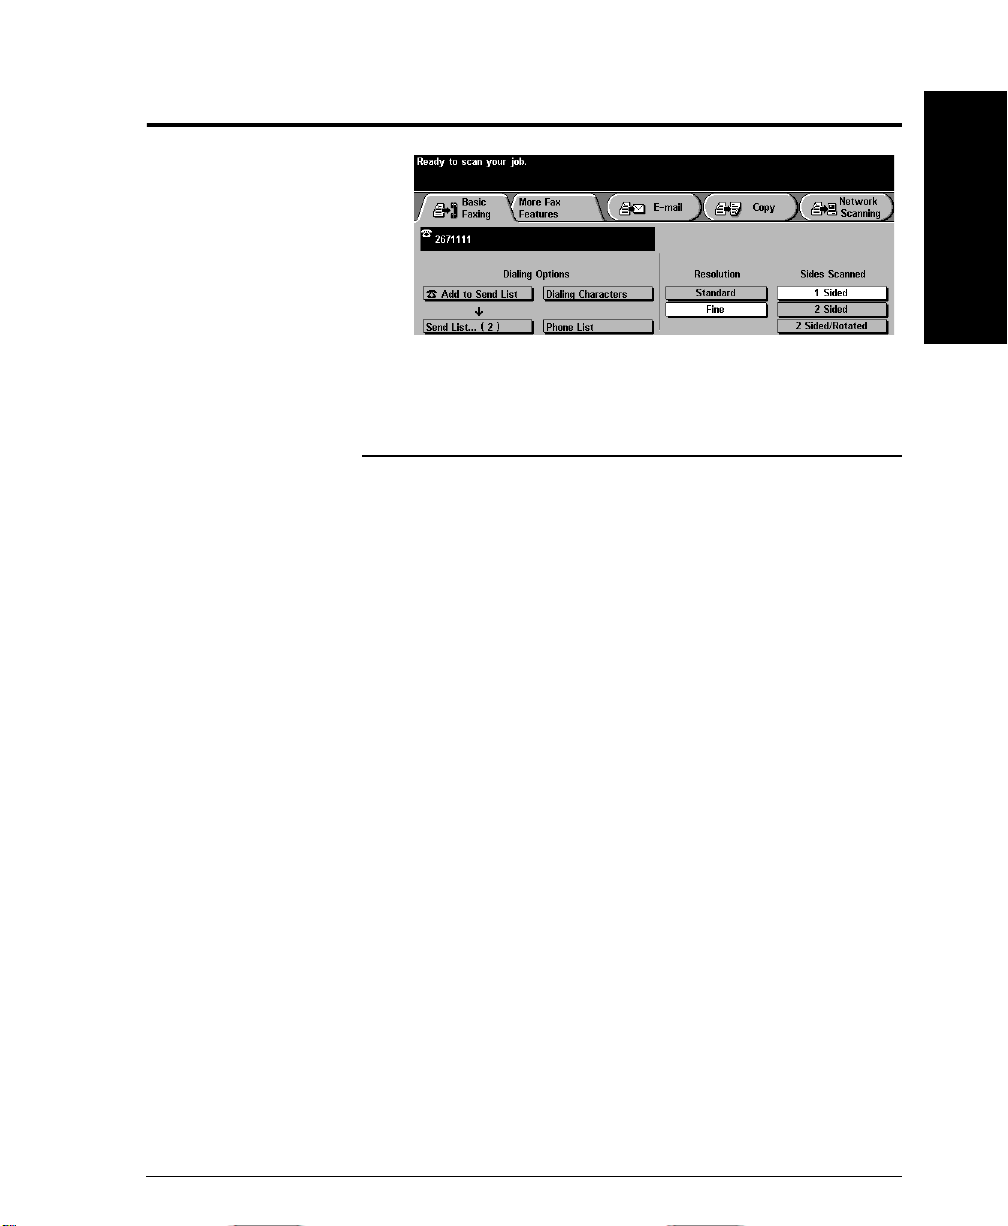
Basic Faxing Screen
The most commonly used faxing features can be found on the Basic
Faxing Tab.
Dialing Options
The Dialing Options area contains a window where the telephone
number entered is displayed. Once it is displayed you can add it to a
list of destination telephone numbers, add a special character, or
access a list of up to 30 stored telephone numbers.
Add to Send List/Send List Selection:
The Document Centre allows you to send a fax to multiple locations.
To send a Fax to multiple locations, you simply have to build a list
of destination telephone numbers. This list is known as the Send
List.
Feature)
5. Fax (Optional
To add a number to the send list, simply enter the number using the
keypad or the Phone List and press the Add to Send List button. You
can also access stored numbers by pressing the Phone List.
The number on the Send List button will change indicating how
many telephone numbers currently reside in the send list.
If you press the Send List button, you can view and delete telephone
numbers.
Xerox Document Centre Reference GuidePage 5 - 9
5. Fax (Optional
Page 100

Dialing Characters
Dialing characters are special characters that provide a unique
capability when dialing through a telephone network or to a specific
fax machine. Depending on the setup of the telephone and
communication lines, some or all of the following characters may be
needed.
Dial Pause [,]
This character provides a 3 second pause in dialing. This pause gives
the Document Centre time to switch from an inside line to an outside
line during automatic dialing.
For additional pause time, add multiple pause c haracters. However,
do not add pauses unless a delay is expected. If using charge code
numbers, enter a pause after the fax number, but before the charge
code numbers, to ensure that the telephone line is ready to accept the
numbers.
Dial Pause [,] is also available as a button on the keypad.
Long Pause [I]
This character provides a 5 second pause in dialing. This pause is
used if you normally have a long wait for a dial tone.
Page 5 - 10 Xerox Document Centre Reference Guide
 Loading...