

Page 1

Xerox 4050/4090/4450/4650
Laser Printing Systems
Installation Planning
XEROX
June 1994
720P92990
Page 2

Xerox Corporation
701 S. Aviation Boulevard
El Segundo, CA 90245
© 1991, 1992, 1993, 1994 by Xerox Corporation. All rights
reserved.
Copyright protection claimed includes all forms and matters of
copyrightable material and information now allowed by statutory
or judicial law or hereinafter granted, including without limitation,
material generated from the software programs which are
displayed on the screen, such as icons, screen displays, looks,
etc.
Printed in the United States of America
Publication number: 720P92990
Xerox® and all Xerox products mentioned in this publication are
trademarks of Xerox Corporation. Products and trademarks of
other companies are also acknowledged.
Changes are periodically made to this document. Changes,
technical inaccuracies, and typographic errors will be corrected in
subsequent editions.
This document was created on the Xerox 6085 Professional
Computer System using GlobalView software. The typeface is
Optima.
Page 3

Table of contents
Introduction v
Related publications vi
1. Preinstallation 1-1
Responsibilities 1-1
Xerox responsibilities 1-1
Customer responsibilities 1-2
Installation planning checklist 1-3
LPS space and delivery requirements 1-5
System controller 1-6
Printer 1-8
Clearance space requirements 1-13
Shared space 1-14
Efficiency of use 1-15
Delivery access requirements 1-16
Environmental and electrical requirements 1-18
4050 1-18
4090/4650 1-19
Cabling requirements 1-19
Cable locations 1-20
Cable lengths 1-20
Configuration options for the 180 Cartridge Tape System 1-20
Interface requirements 1-22
Channel-attached 1-22
Third-party connections 1-22
Connecting IBM host equipment 1-22
Connecting DEC equipment using XPMF-VMS 1-23
Possible configurations 1-23
Components 1-24
Installation responsibilities 1-25
Installation requirements 1-25
Hardware requirements 1-25
Software requirements 1-26
Documentation 1-26
Training 1-26
XEROX 4050/4090/4450/4650 LPS INSTALLATION PLANNING iii
Page 4

TABLE OF CONTENTS
Fonts and supplies for installation 1-27
Fonts 1-28
Paper 1-29
Dry ink 1-30
Fuser lubricant 1-30
Developer 1-30
Floppy disks 1-30
Stitcher wire 1-30
Tapes 1-31
Space planning templates 1-31
2. Installation 2-1
Installation process 2-1
Installation responsibilities 2-1
3. Postinstallation 2-1
Xerox support services 3-1
Routine maintenance 3-2
Meter reading and reporting 3-2
Xerox Font Service 3-2
How to order fonts in the United States 3-2
How to order fonts in other countries 3-3
Ordering documentation and software 3-3
Xerox Supplies Order Service 3-3
How to order supplies 3-4
Consumable supplies table 3-5
Glossary GLOSSARY-1
Index INDEX-1
iv XEROX 4050/4090/4450/4650 LPS INSTALLATION PLANNING
Page 5
Introduction
The Xerox 4050/4090/4450/4650 LPS Installation Planning guide
helps you prepare for delivery and installation of your new Xerox
Laser Printing System (LPS). This is one of many manuals
available with your new LPS. You received it first to help you
plan for installation. You receive the complete reference set
when your LPS is delivered.
This manual is intended for the person responsible for
coordinating the installation of the printer at your site.
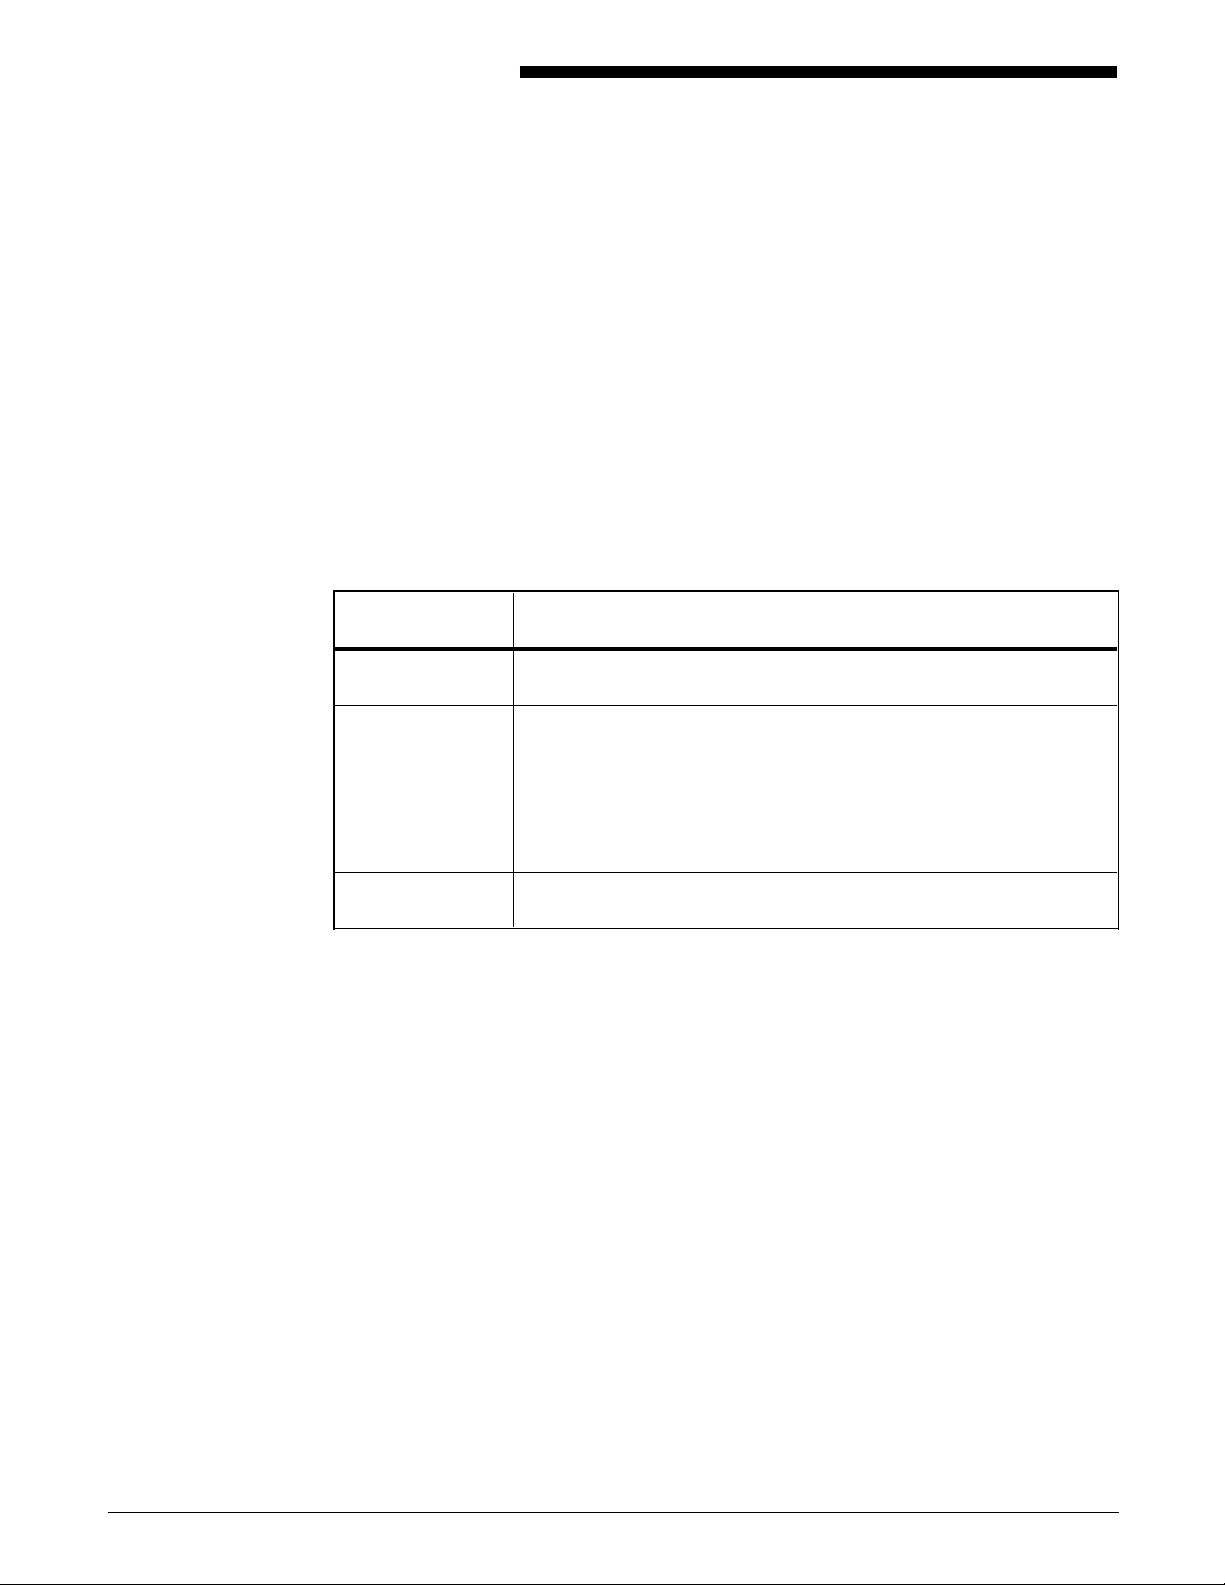
Along with descriptions of Xerox and Customer responsibilities,
this guide provides the following information for each phase of
installation:
Phase Activities/concerns
Preinstallation Space planning, electrical and environmental requirements, and
connectivity information.
Installation Customer: Supplies on site, system specialist available,
operators available, document and software kits checked, and
test jobs ready.
Xerox: Installing the LPS, loading software and applications,
setting interface parameters, training operators, and reviewing
preventive maintenance schedules and service call procedures.
Postinstallation Calling for service, scheduling routine maintenance procedure,
and information on ordering supplies.
XEROX 4050/4090/4450/4650 LPS INSTALLATION PLANNING v
Page 6

INTRODUCTION
Related publications
You can find additional information related to the
4050/4090/4450/4650 LPS in the following publications.
Publication Number
Xerox 4050/4090/4450/4650 LPS Master Index 720P93070
Xerox 4050/4090/4450/4650 LPS Bypass
Transport Instructions
Xerox 4050/4090/4450/4650 LPS Bypass
Transport Operator Training Guide Flipcharts
Supplement
Xerox 4050/4090/4450/4650 LPS Bypass
Transport Operator Training Guide
Supplement
Xerox 4050/4090/4450/4650 LPS Command
Reference
Xerox 4050/4090/4450/4650 LPS Forms
Creation Guide
Xerox 4050/4090/4450/4650 LPS Forms
Creation Quick Reference Card
Xerox 4050/4090/4450/4650 LPS Message
Guide
Xerox 4050/4090/4450/4650 LPS Operator
Guide
Xerox 4050/4090/4450/4650 LPS Operator
Instructor Training Flipcharts
Xerox 4050/4090/4450/4650 LPS Operator
Instructor Training Guide
720P22320
720P22340
720P22330
720P23260
720P93060
720P93100
720P93020
720P93000
720P22080
720P22070
Xerox 4050/4090/4450/4650 LPS Operator
Quick Reference
Xerox 4050/4090/4450/4650 LPS Print
Description Language (PDL) Quick Reference
Card
Xerox 4050/4090/4450/4650 LPS Print
Description Language (PDL) Reference
Xerox 4050/4090/4450/4650 LPS Product
Reference
Xerox 4050/4090/4450/4650 LPS System
Administration Guide
Xerox 4050/4090/4450/4650 LPS System
Administration Quick Reference Card
Xerox Standard Font Library Font User Guide 600P86174
Xerox Tape Formats Manual 600P86175
Helpful Facts About Paper 610P50497
720P93050
720P93090
720P93030
720P93010
720P93040
720P93080
vi XEROX 4050/4090/4450/4650 LPS INSTALLATION PLANNING
Page 7
Responsibilities
Xerox responsibilities
1. Preinstallation
This chapter assists you in preparing for the installation of your
Laser Printing System (LPS). Consult your sales representative for
the requirements of any related equipment or communications
devices that may have been ordered.
A successful installation depends upon both you and Xerox. The
sections that follow describe your responsibilities and the
responsibilities Xerox has to you. Some areas overlap and are
joint responsibilities. Your service representatives are available to
discuss installation issues and to assist you in completing the site
installation.
Site selection • Assist in site selection
• Inspect and improve site
Installation
Training
Support
• Schedule the delivery of your LPS
• Monitor installation activities
• Assist you in ordering supplies and fonts
• Install the LPS
• Configure your system parameters (4450/MRP)
• Provide standard operator training
• Assist in determining system and training needs
• Assist in scheduling system and user training
• Provide assistance and information, as needed, in the areas of:
— Software capabilities
— Selecting software options
— Operations
— Applications and forms development
— Interface capabilities
— Interface capabilities with third-party finishers
Service
• Review preventive maintenance schedules and service call procedures
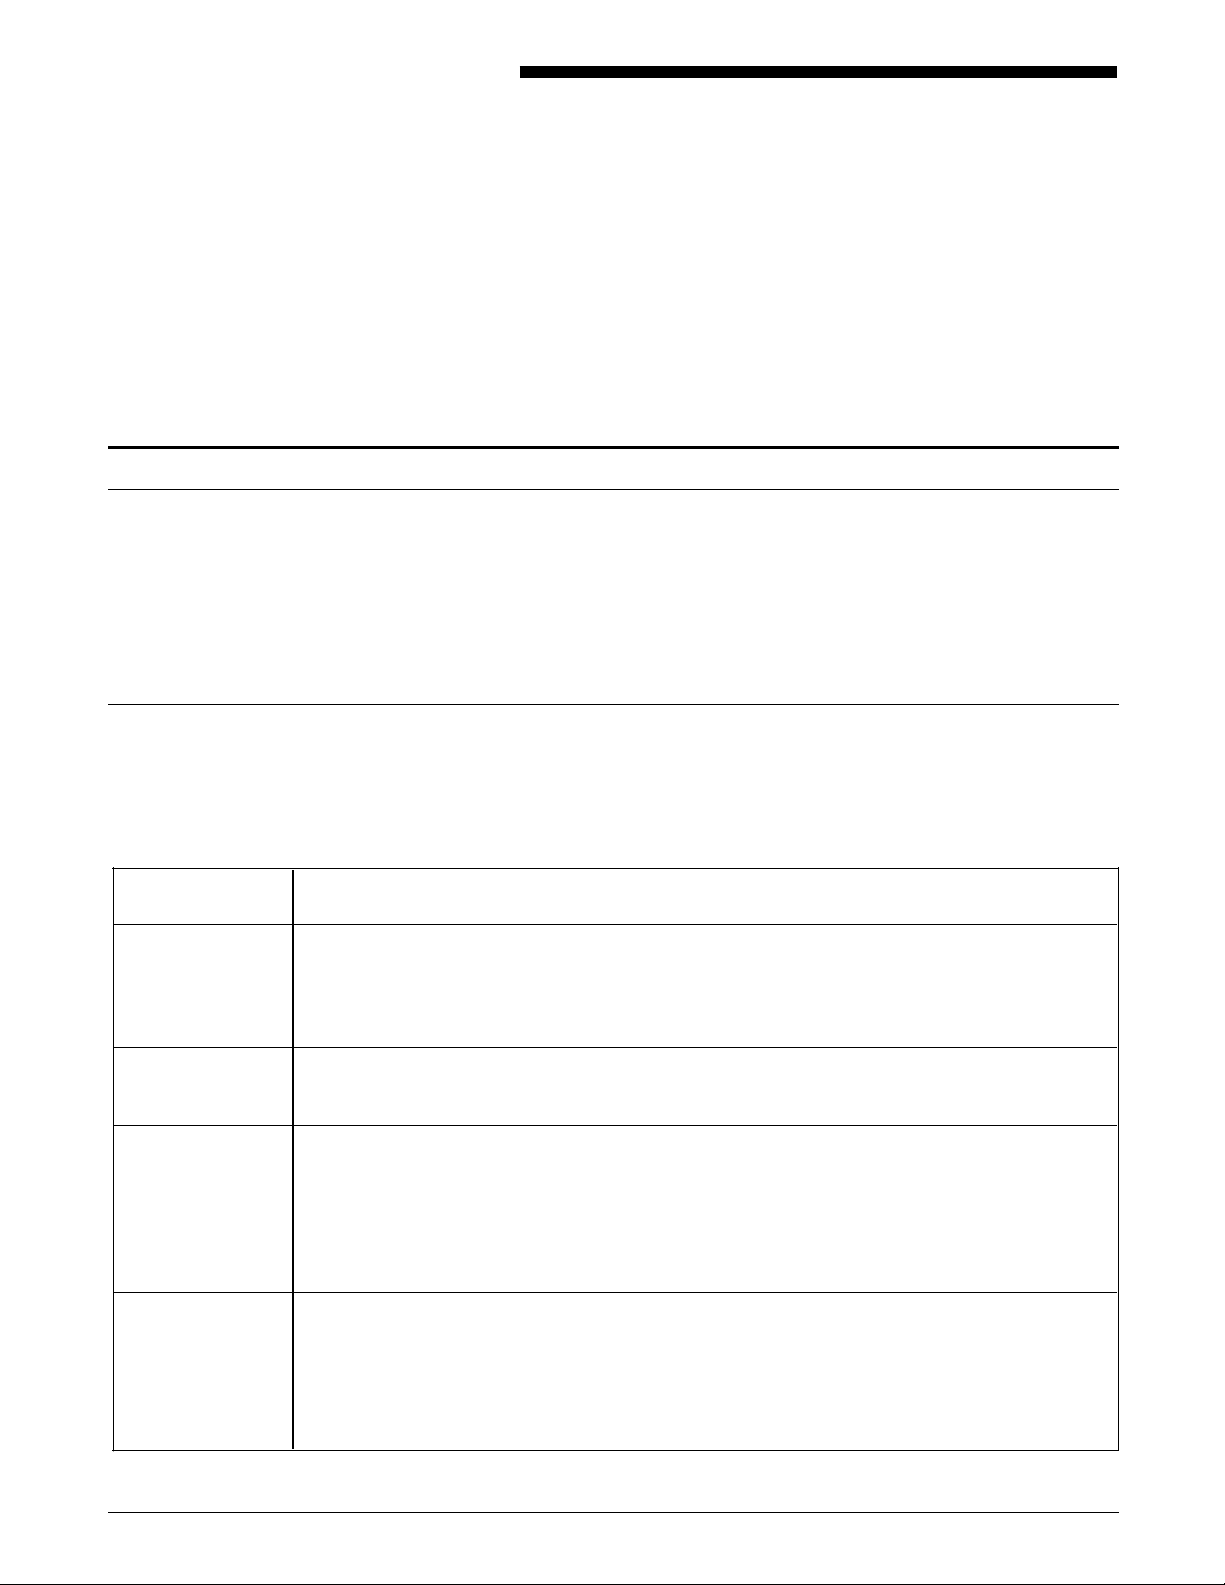
Xerox responsibilities prior to, during, and after installation are
outlined in table 1-1. Some services are dependent on the
amount of support purchased or included with your system.
Table 1-1. Xerox responsibilities
• Determine your needs and then set the wire percentage indicator on the printer
control console (stitcher/stacker option)
• Provide ongoing system maintenance
• Resolve hardware/software problems.
XEROX 4050/4090/4450/4650 LPS INSTALLATION PLANNING 1-1
Page 8
PREINSTALLATION
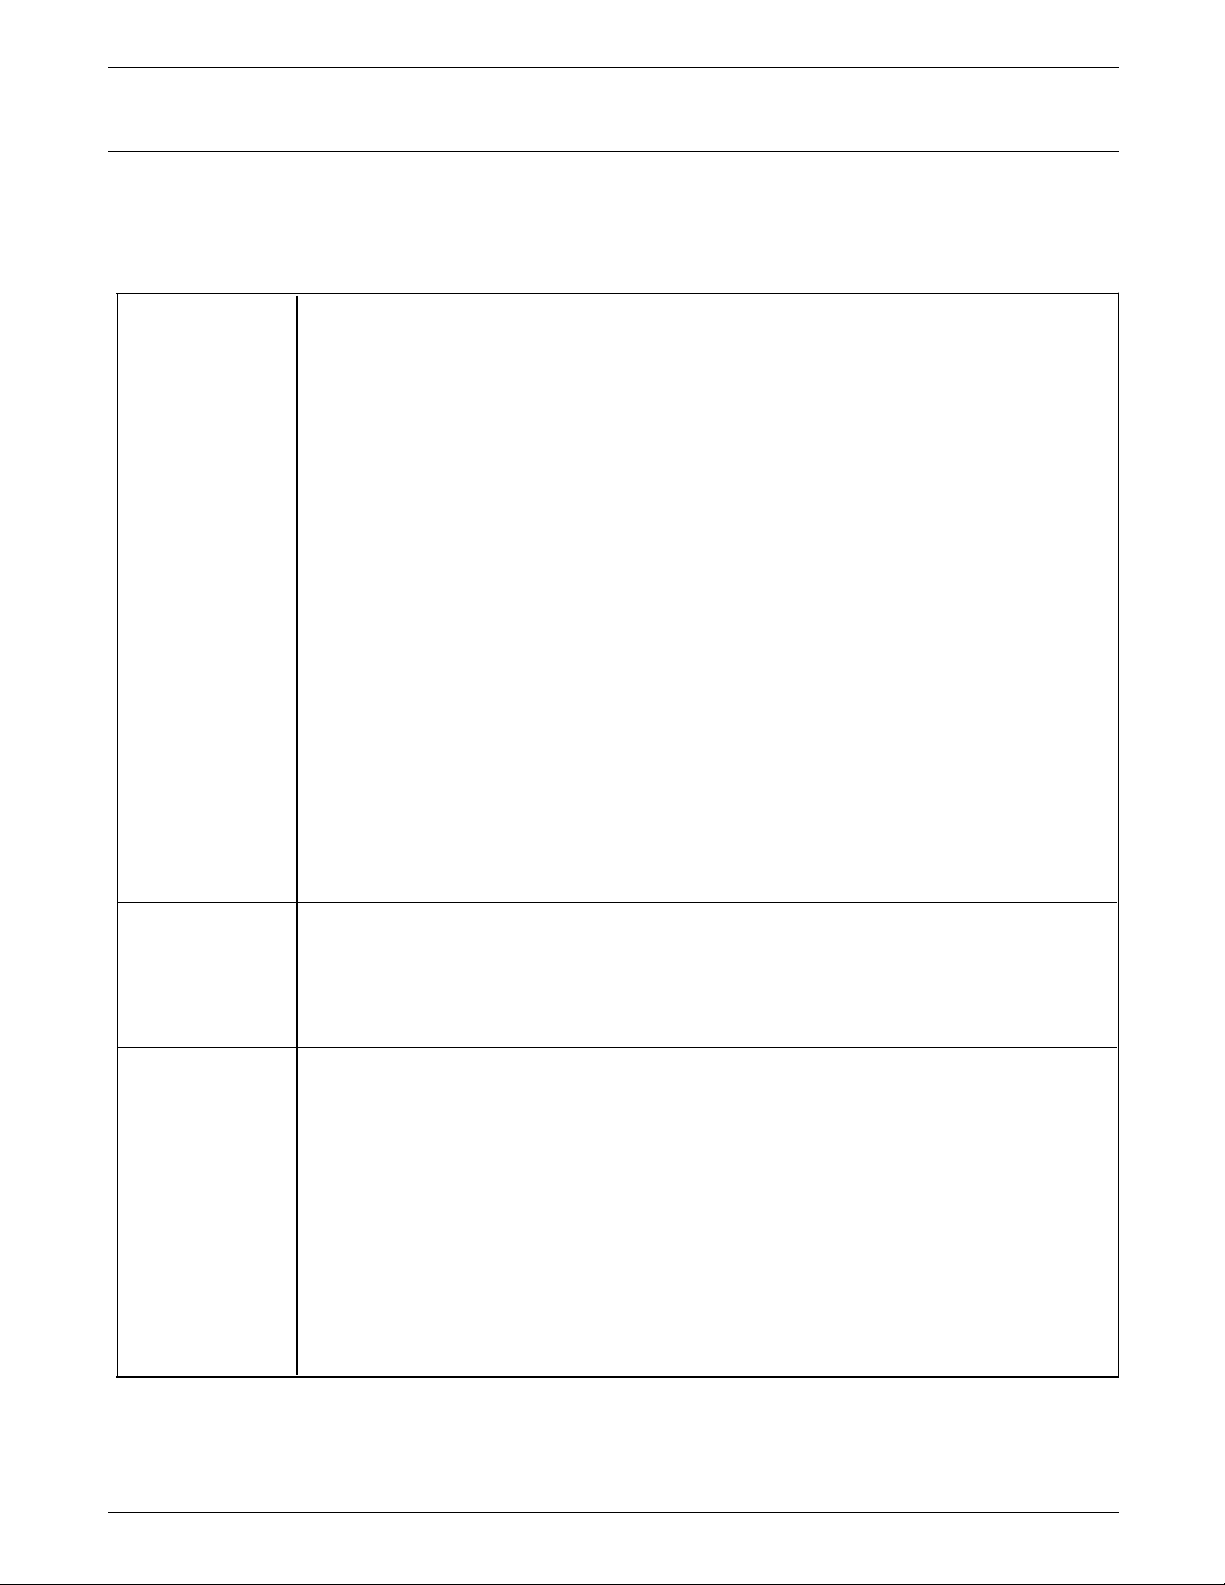
Customer responsibilities
Your responsibilities prior to, during, and after installation are
detailed in table 1-2.
Table 2-1. Customer responsibilities
Activities • Identify the primary interface with Xerox
• Select and prepare the site for LPS installation (including adequate power and air
conditioning)
• Obtain the necessary interfaces, cables, transceivers, phone lines, and so on, if
connecting to other equipment
• Plan for and schedule installation activities
• Monitor progress for a successful installation
• Provide space for hardware options
• Work with your sales representative to determine requirements for initial
applications
• Work with your service representative to determine the “low wire” percent values
to be displayed on the printer control console (stitcher/stacker option)
• Select operators and system specialists, and schedule their training.
Notes:
In a mixed environment where there are a variety of printing systems, discuss print
quality differences with your service representative.
Ensure that your system specialists are familiar with the operating system software
specific to your LPS. Operating system software is not the same for all laser printing
systems. If your system specialists are familiar with one operating system and you are
converting to or adding another, they should learn the differences between the
systems.
Training Operator training is conducted at your site shortly after the LPS is installed. Operators
receive hands-on instruction regarding printing jobs, maintenance, and problem solving.
Xerox offers a number of workshops and self-paced courses that teach advanced skills,
including Advanced Customer Training (ACT). Contact your sales representative for
additional information about these courses, or call Xerox Customer Education at 1-800445-5554. Refer to the “Training” section of this chapter.
Personnel One or more people need to be assigned the following routine LPS tasks:
• Preventive maintenance and cleaning
• Changing stitcher wire (with the stitcher/stacker option; performed by ACT-trained
operators only)
• Meter reading and reporting
• Placing service calls for hardware problems and applications-related issues
• Identifying and implementing new applications
• Ordering additional fonts
• Ordering supplies.
Refer to the “Postinstallation” chapter for information on these activities.
1-2 XEROX 4050/4090/4450/4650 LPS INSTALLATION PLANNING
Page 9

Installation planning checklist
PREINSTALLATION
An installation planning checklist is provided to aid you in LPS
installation planning. Table 1-3 summarizes the tasks that must
be performed and when in the installation process they should
occur.
Use the checklist as a guide for ensuring the successful
installation of your LPS. Should you have any questions, contact
your sales representative or local Xerox or Rank Xerox office.
• Week column shows the approximate time an activity should
occur. The weeks shown relate to the installation date. For
example, -4 is four weeks prior to installation.
• Reference column lists the chapter in this manual which
provides detailed information for that activity.
Notes:
• Time frames shown are intended to serve only as guidelines.
Consult your suppliers to determine exact lead times.
• Information on Xerox Print Management Facility—VMS
Version (XPMF/VMS) installation requirements are located in
this chapter.
XEROX 4050/4090/4450/4650 LPS INSTALLATION PLANNING 1-3
Page 10
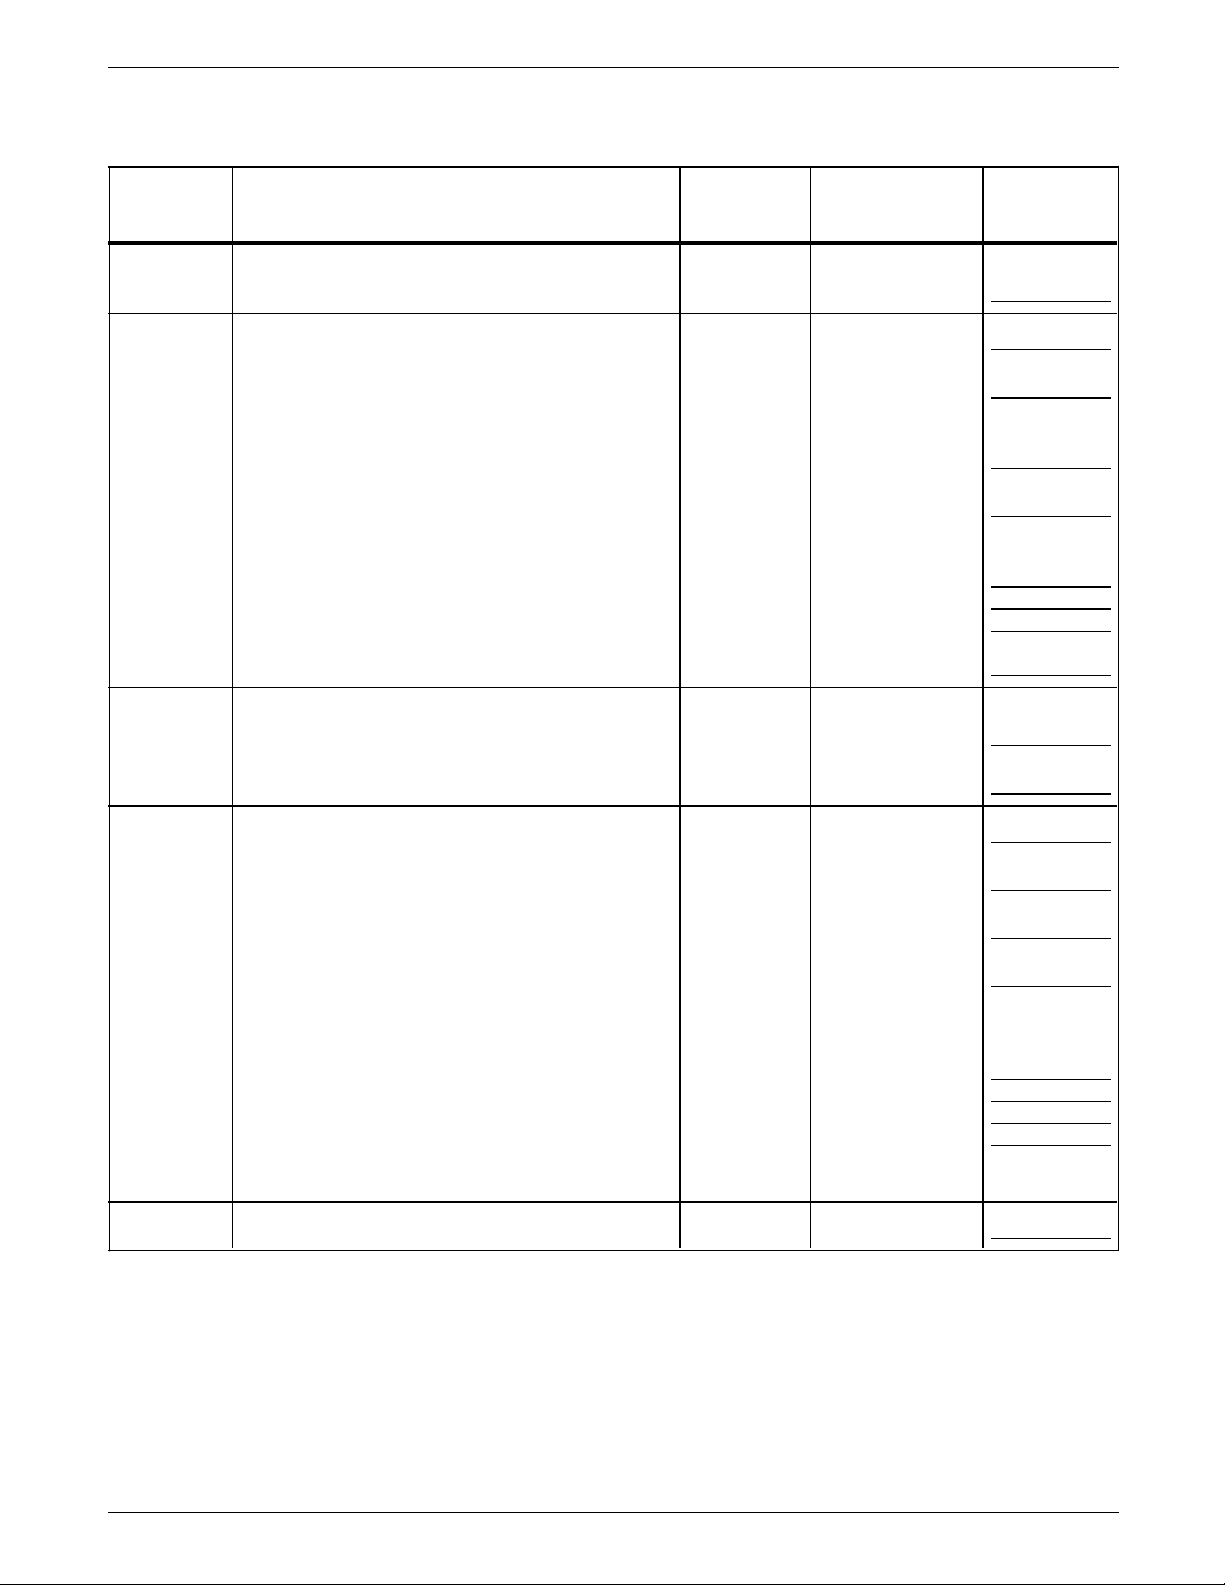
PREINSTALLATION
Table 1-3. Installation planning checklist
Week Tasks Reference Responsibility
Date
completed
– 5 Sign up for Xerox Documentation and
Software Service.
XDSS order
form
Customer
– 4 Order additional manuals, if needed. Customer
Schedule LPS delivery. Xerox
Identify systems specialists and schedule
Introduction Customer/Xerox
training.
Select the site. Chapter 1 Customer/Xerox
Prepare the site:
Chapter 1 Customer
— Space requirements
— Electrical requirements
— Cabling
— Environmental requirements (temperature,
humidity, heat dissipation)
– 3 Call Xerox Font Services to request font
Chapter 1 Customer
samples.
Order custom fonts and logos. Customer
– 2 Train user systems specialists. Xerox
Schedule operator training. Chapter 1 Customer/Xerox
Order licensed fonts and signatures. Chapter 1 Customer
Order consumable supplies. Chapter 3 Customer/Xerox
Minimum supplies requirements needed for
installation:
— Paper (2 cartons)
— Developer (1 carton)
— Fuser lubricant (2 cartons)
— Dry ink (1 carton)
Note: You should have at least one carton of
each item on hand at all times.
– 1 Inspect and approve the site. Xerox
1-4 XEROX 4050/4090/4450/4650 LPS INSTALLATION PLANNING
Page 11
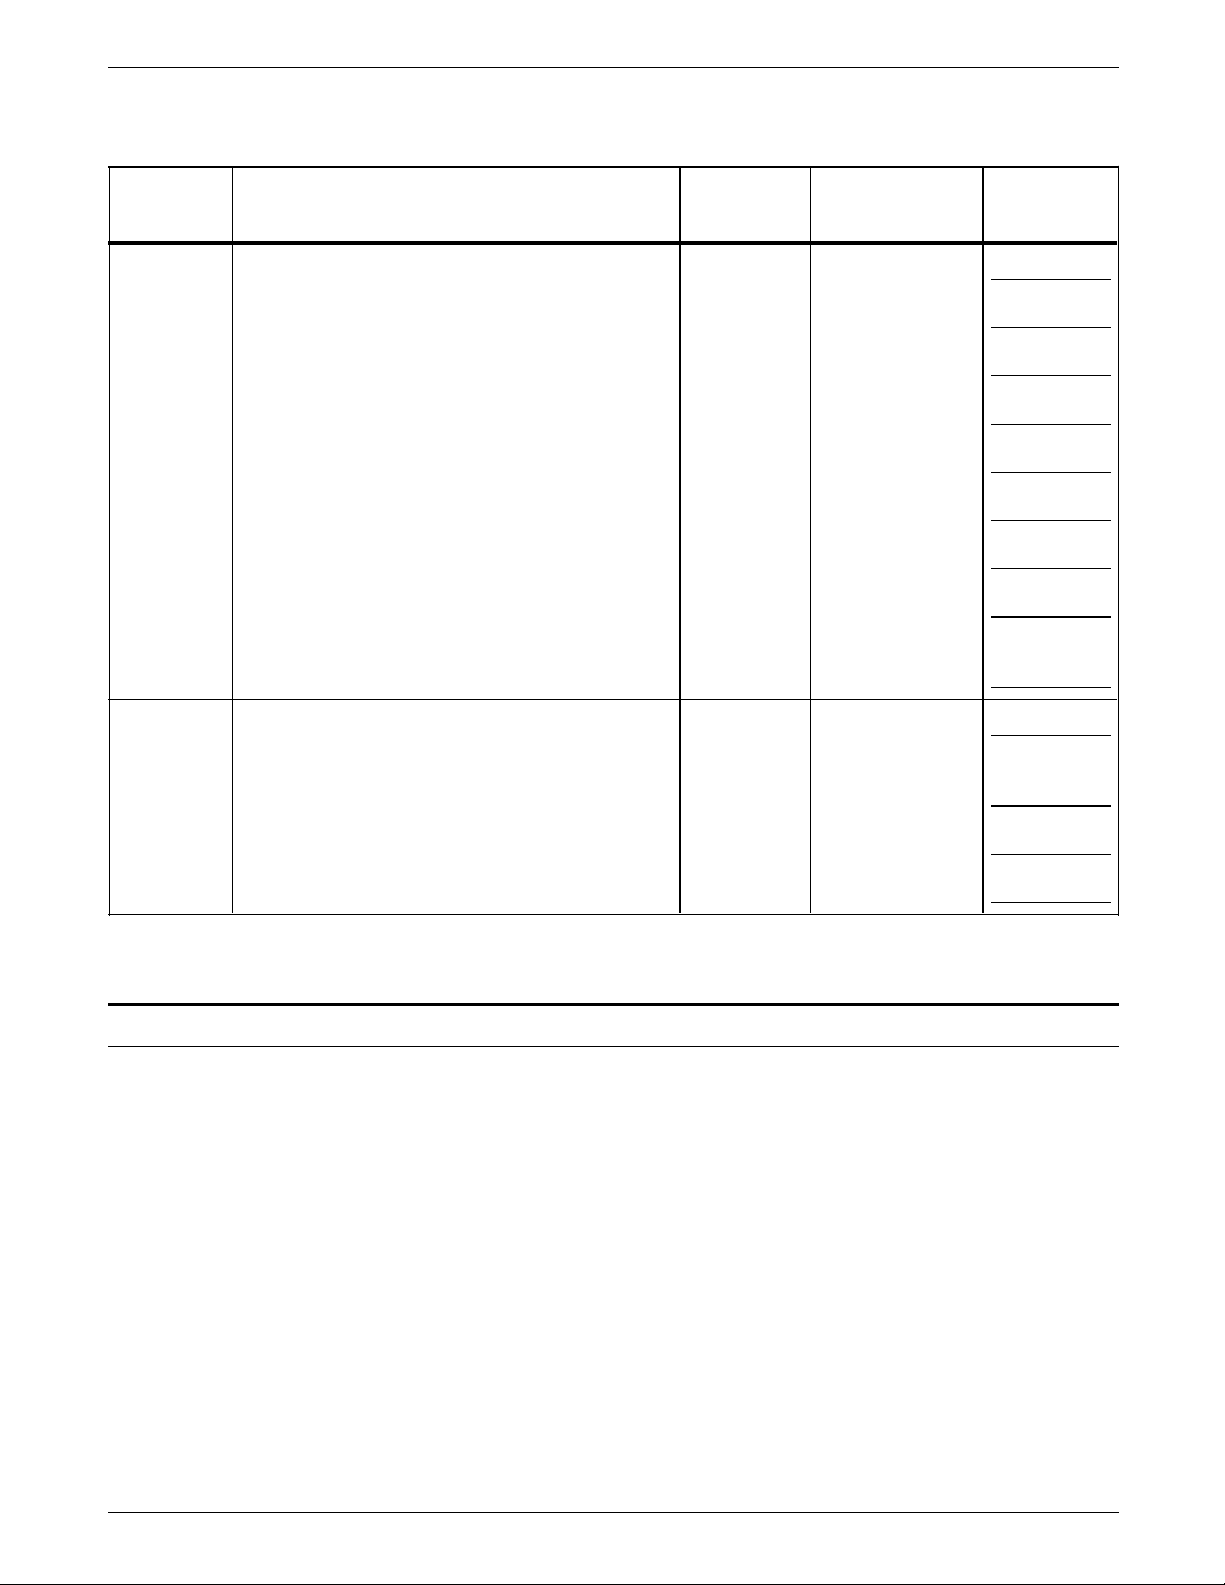
Table 1-3. Installation planning checklist (continued)
Week Tasks Reference Responsibility
Installation Ensure that supplies are available. Customer
Install the LPS. Chapter 2 Xerox
Have systems specialist on hand. Customer
Install the primary application. Customer/Xerox
Have test jobs available, if desired. Customer
Have operators available for training. Customer
Train operators. Xerox
Check the documentation kit. Customer
PREINSTALLATION
Date
completed
Review preventive maintenance schedules and
service call procedures.
Postinstallation Provide ongoing system maintenance.
Establish supply and maintenance procedures. Customer
Identify additional applications. Chapter 3 Customer/Xerox
Order additional fonts and documentation. Chapter 3 Customer
LPS space and delivery requirements
Dimensions and weights of the LPS system controller and printer
are listed in this chapter, along with diagrams to help you
visualize their sizes and total space requirements.
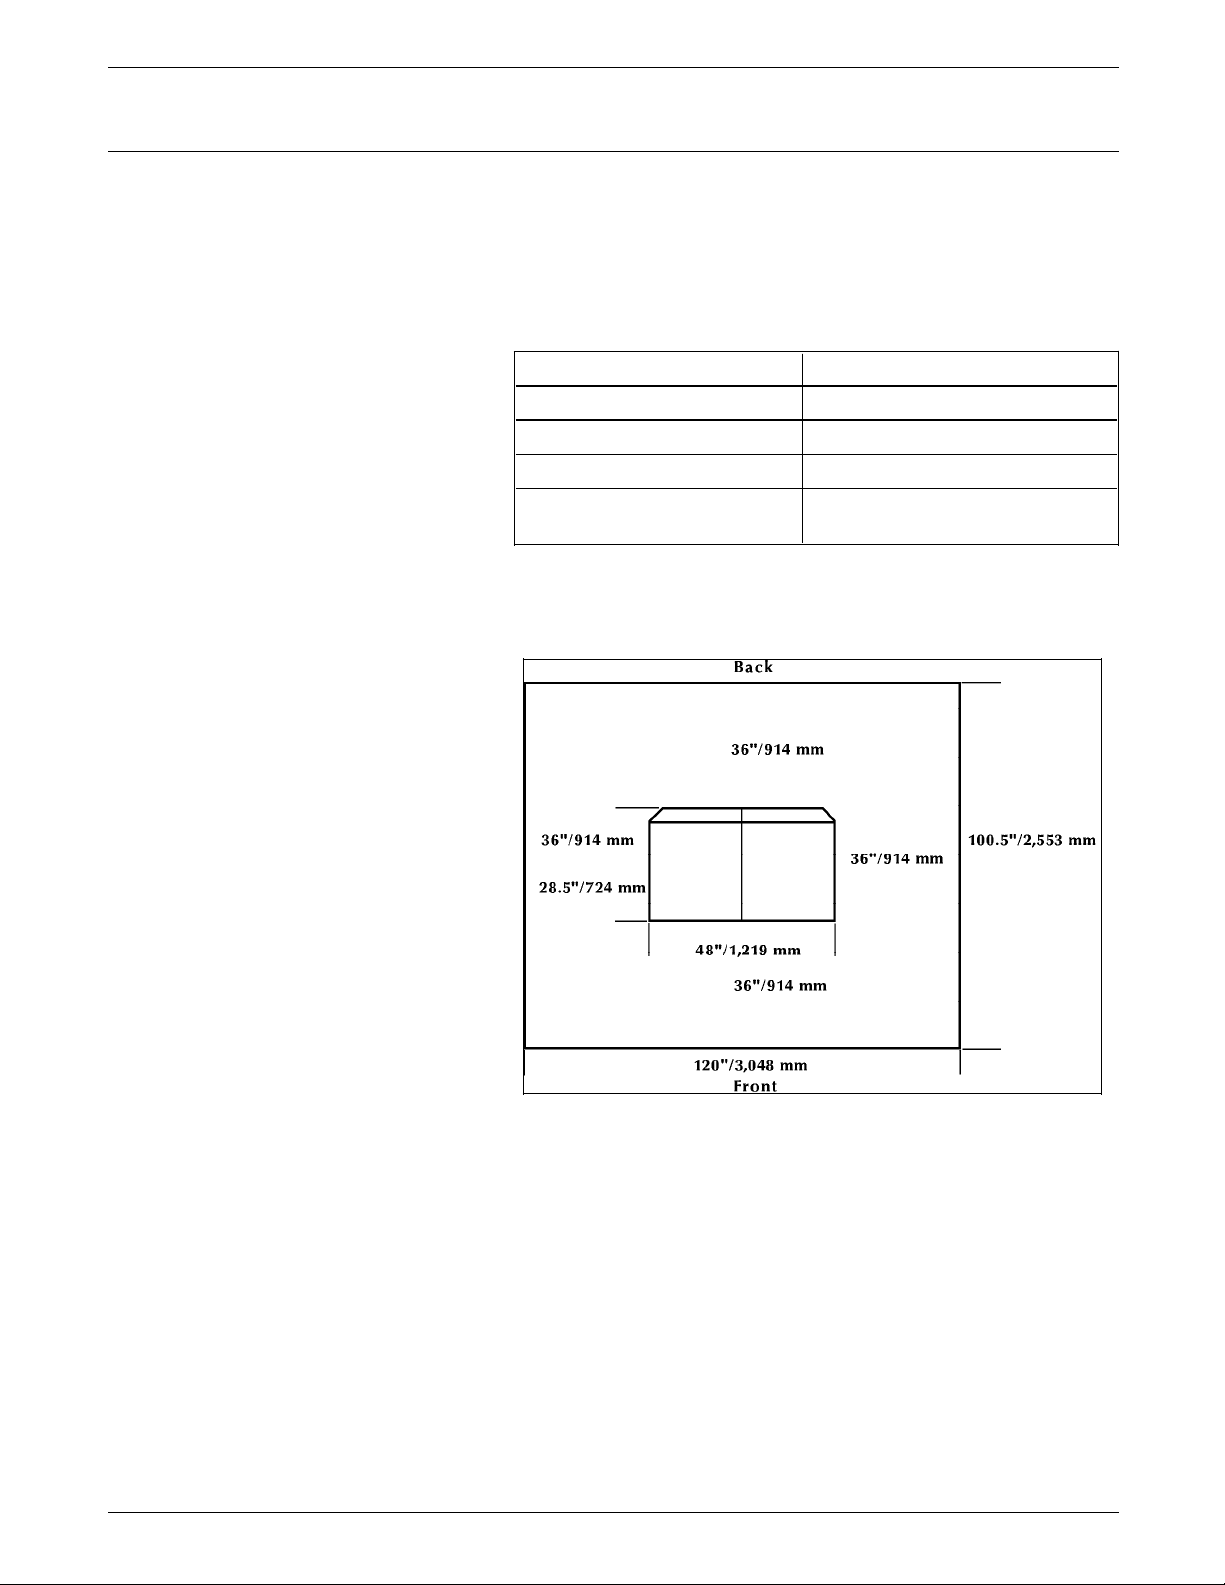
Note: There must be a 78 inch/1,981.2 mm vertical clearance
throughout the entire area. In addition, your LPS must be
installed in a fixed location with a minimum clearance space of
36 inches/914 mm around all sides of each piece of equipment
for access by Xerox service representatives.
Xerox
Chapter 3 Customer
Space planning templates, a space planning template
transparency, and a grid are provided at the end of this chapter
to assist you in planning the placement of your LPS. Contact
your service representative if you have questions not specifically
addressed in this guide.
The following diagrams represent top views of the components,
surrounded by the required 36-inch/914 mm clearance on all
sides.
XEROX 4050/4090/4450/4650 LPS INSTALLATION PLANNING 1-5
Page 12
PREINSTALLATION
System controller
System controller dimensions The dimensions of the 4050/4090/4450/4650 system controller
This section provides the dimensions for the system controller.
are as shown in table 1-4.
Table 1-4. Dimensions
Width: 48 inches/1,219 mm
Depth: 28.5 inches/723 mm
Height: 41 inches/1,041 mm
Weight: 430 pounds/195 kg
Total space requirement: 120 inches/3,048 mm by 100.5
inches/2,552 mm
Figure 1-1. Space requirements
1-6 XEROX 4050/4090/4450/4650 LPS INSTALLATION PLANNING
Page 13
PREINSTALLATION
System controller with 9-track The 9-track magnetic tape drive sits on top of the 4050, 4090,
magnetic tape drive dimensions 4450, or 4650 system controller and has no additional width or
depth requirements.
Its height and weight, however, may be important
considerations. When calculating the 78-inch/1,981 mm height
clearance for the system controller, make sure you add 32.5
inches/825 mm for the 9-track magnetic tape drive.
Note: When viewed from the front, the magnetic tape drive is
positioned on the top of the right half of the 4050 system
controller and on the top of the left half of the 4090/4650 system
controller.
Its weight should also be factored into the LPS total weight.
Dimensions of the 4050/4090/4650 system controller with the 9-
track magnetic tape drive measurements are shown in table 1-5.
Table 1-5. Dimensions
Width: 24 inches/609 mm
Depth: 23 inches/584 mm
Height: 73.5 inches/1,866 mm
Weight: System controller:
9-track magnetic tape drive:
430 pounds/195 kg
196 pounds/88.9 kg
XEROX 4050/4090/4450/4650 LPS INSTALLATION PLANNING 1-7
Page 14
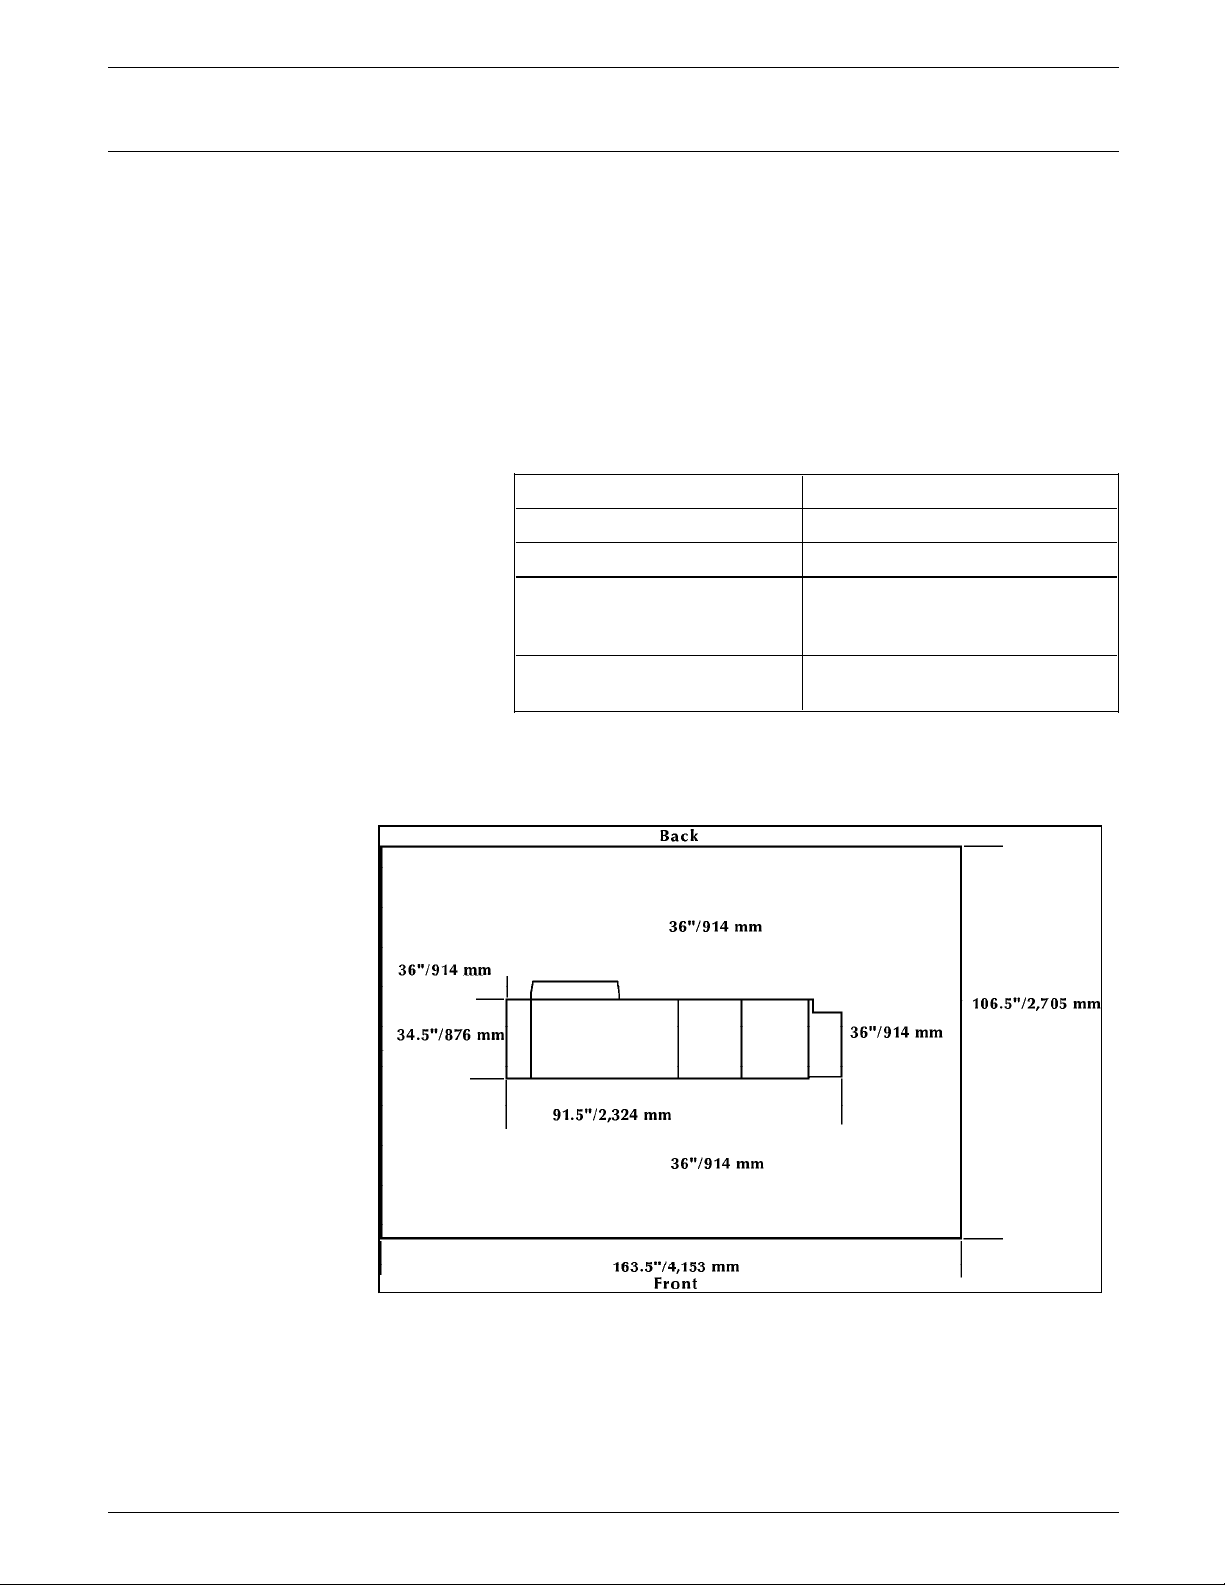
PREINSTALLATION
Printer
This section provides the dimensions for the following
configurations available for your 4050/4090/4450/4650 printer:
• Dual feeder with dual stacker
• Dual feeder with stitcher/stacker
• High-capacity feeder with dual stacker
• High-capacity feeder with stitcher/stacker.
Printer with dual feeder and dual The dimensions of the printer with the dual feeder and the dual
stacker dimensions stacker are shown in table 1-6.
Table 1-6. Dimensions
Width: 91.5 inches/2,324 mm
Depth: 34.5 inches/876 mm
Height: 41 inches/1,041 mm
Weight: Printer:
Dual stacker:
Total:
1,046 pounds/474.5 kg
226 pounds/102.5 kg
1,272 pounds/577 kg
Total space requirement: 163.5 inches/4,152 mm by 106.5
inches/2,705 mm
Figure 1-2. Space requirements
1-8 XEROX 4050/4090/4450/4650 LPS INSTALLATION PLANNING
Page 15
PREINSTALLATION
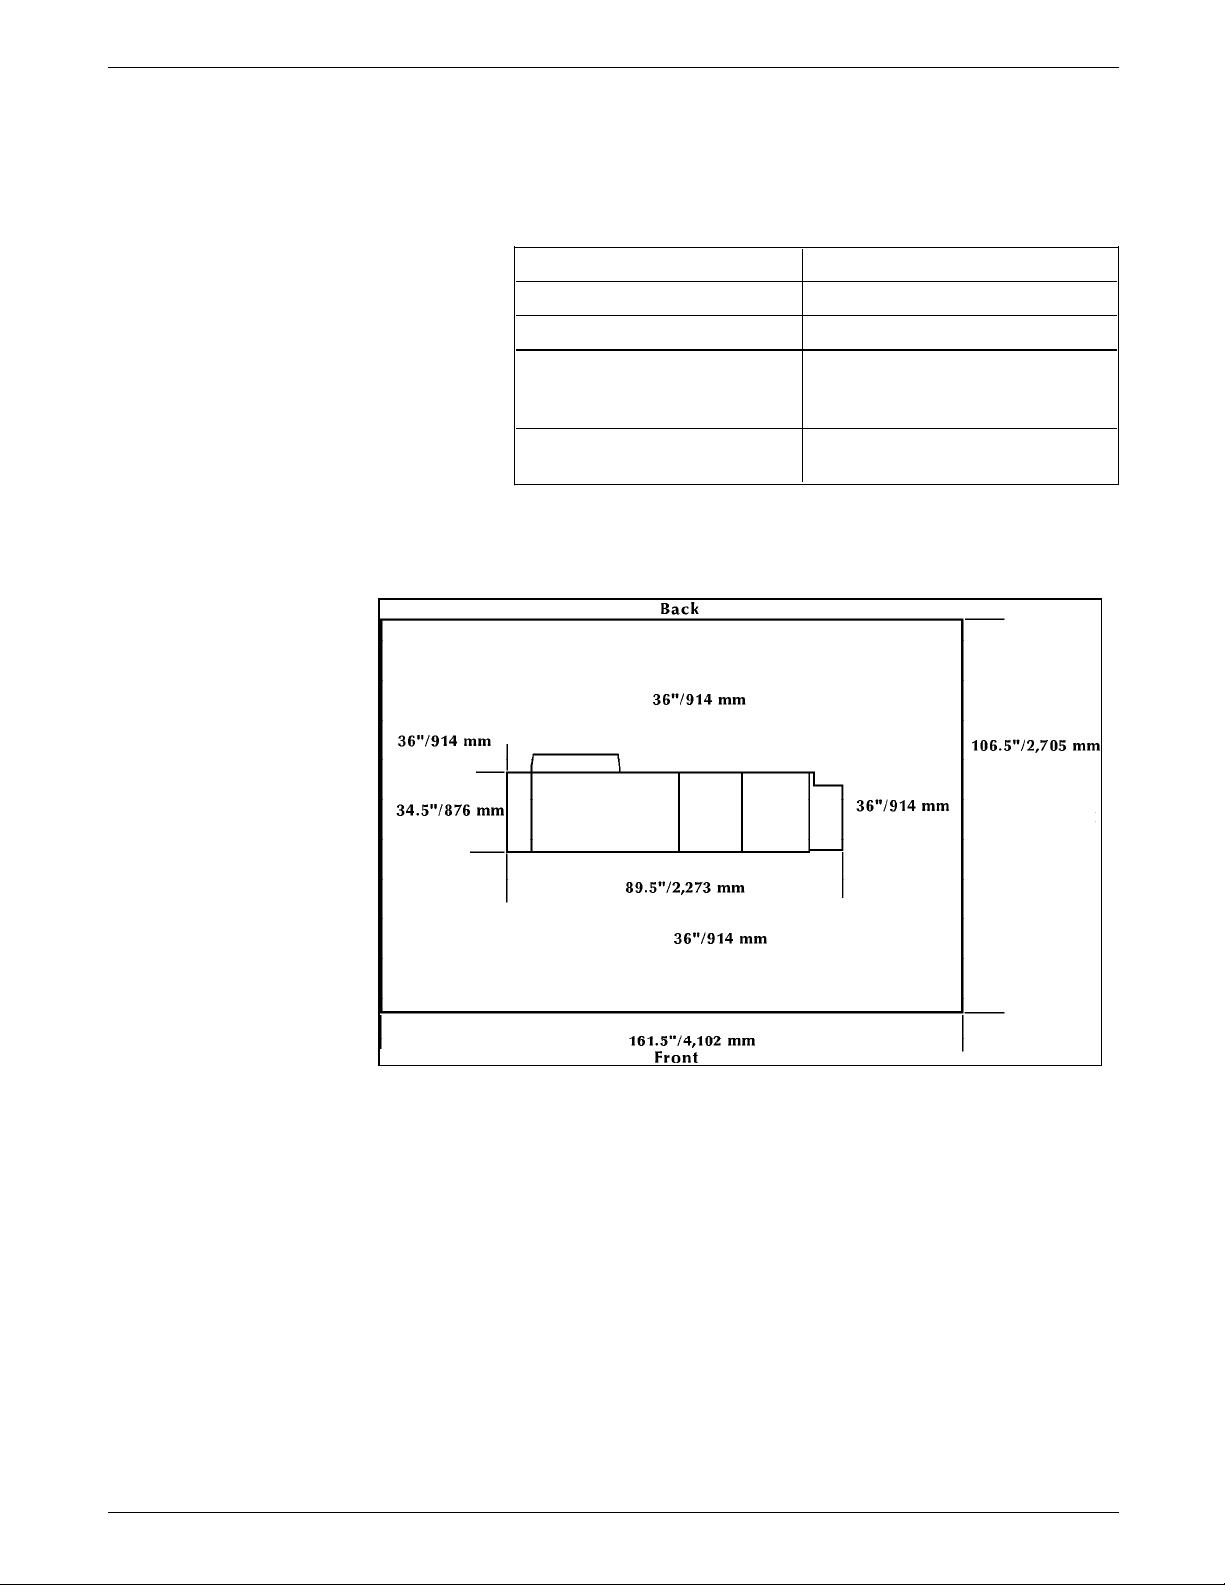
Printer with dual feeder and The dimensions of the printer with the dual feeder and the
stitcher/stacker dimensions stitcher/stacker are shown in table 1-7.
Table 1-7. Dimensions
Width: 89.5 inches/2,273 mm
Depth: 34.5 inches/876 mm
Height: 41 inches/1,041 mm
Weight: Printer:
Stitcher/stacker:
Total:
1,046 pounds/474.5 kg
228 pounds/103.4 kg
1,274 pounds/577.9 kg
Total space requirement: 161.5 inches/4,102 mm by 106.5
inches/2,705 mm
Figure 1-3. Space requirements
XEROX 4050/4090/4450/4650 LPS INSTALLATION PLANNING 1-9
Page 16
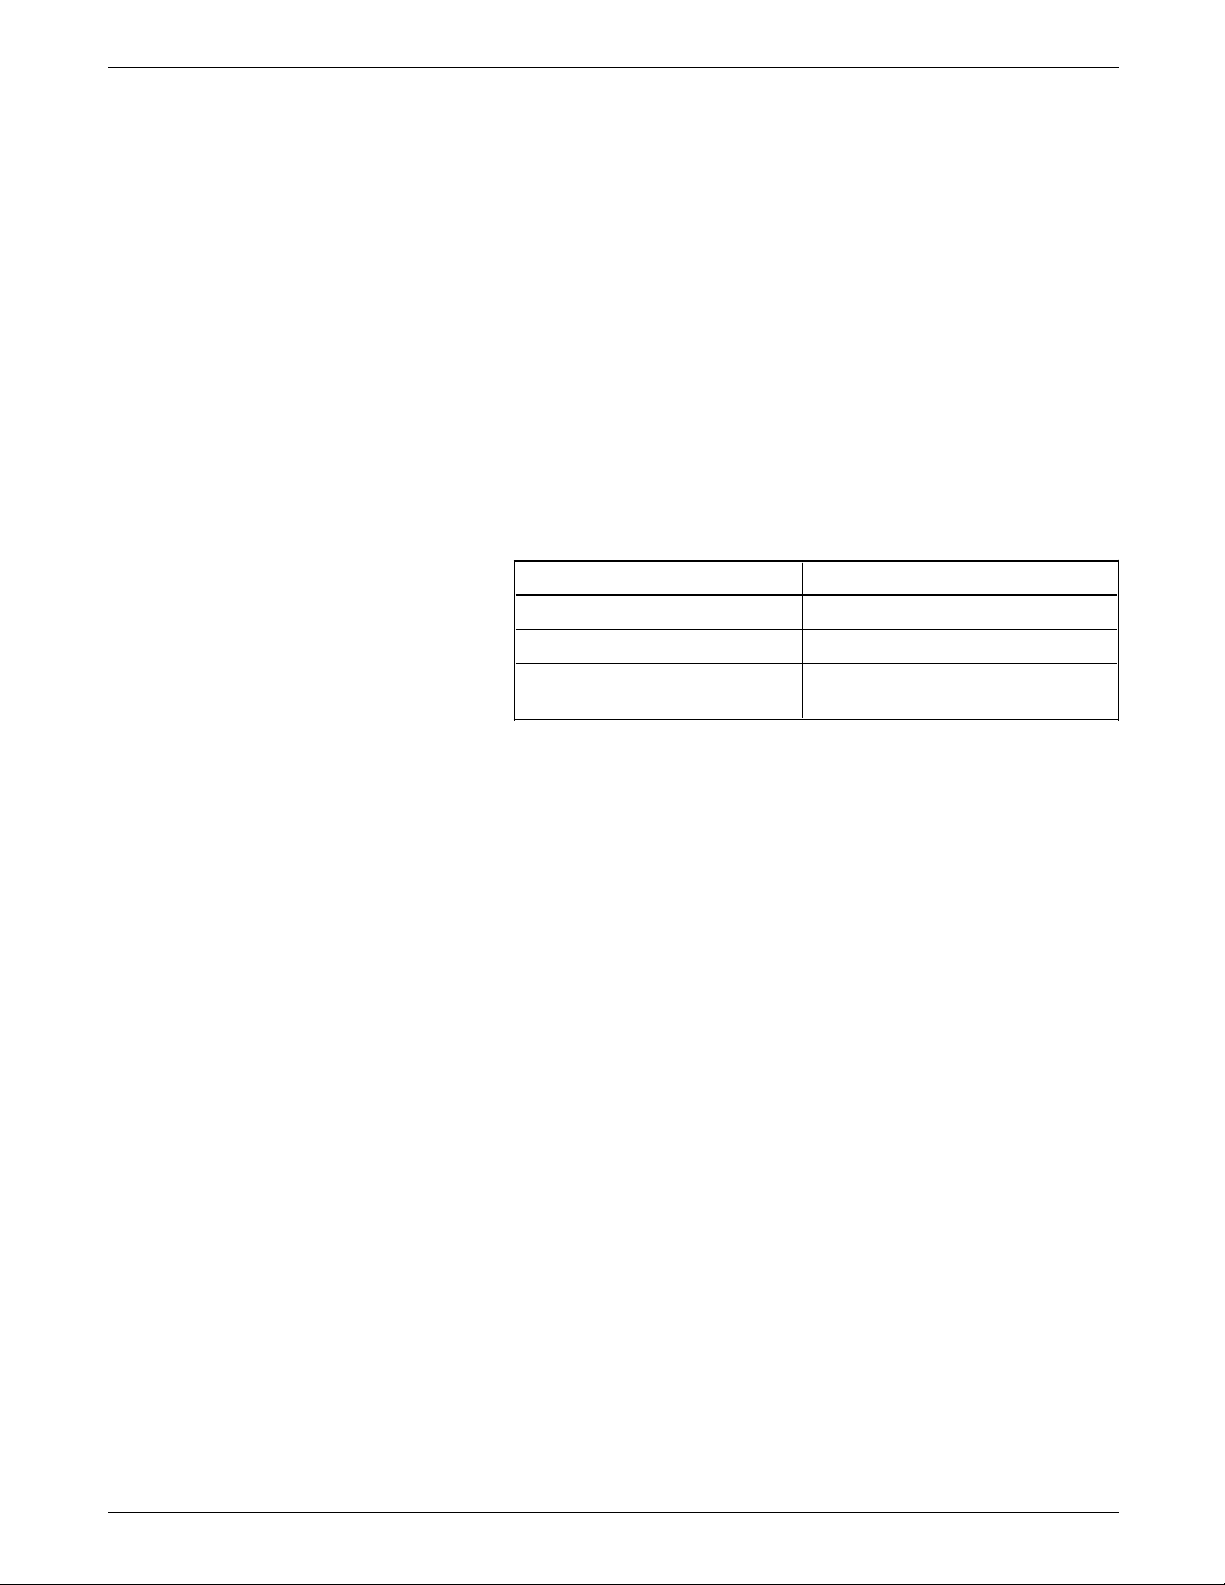
PREINSTALLATION
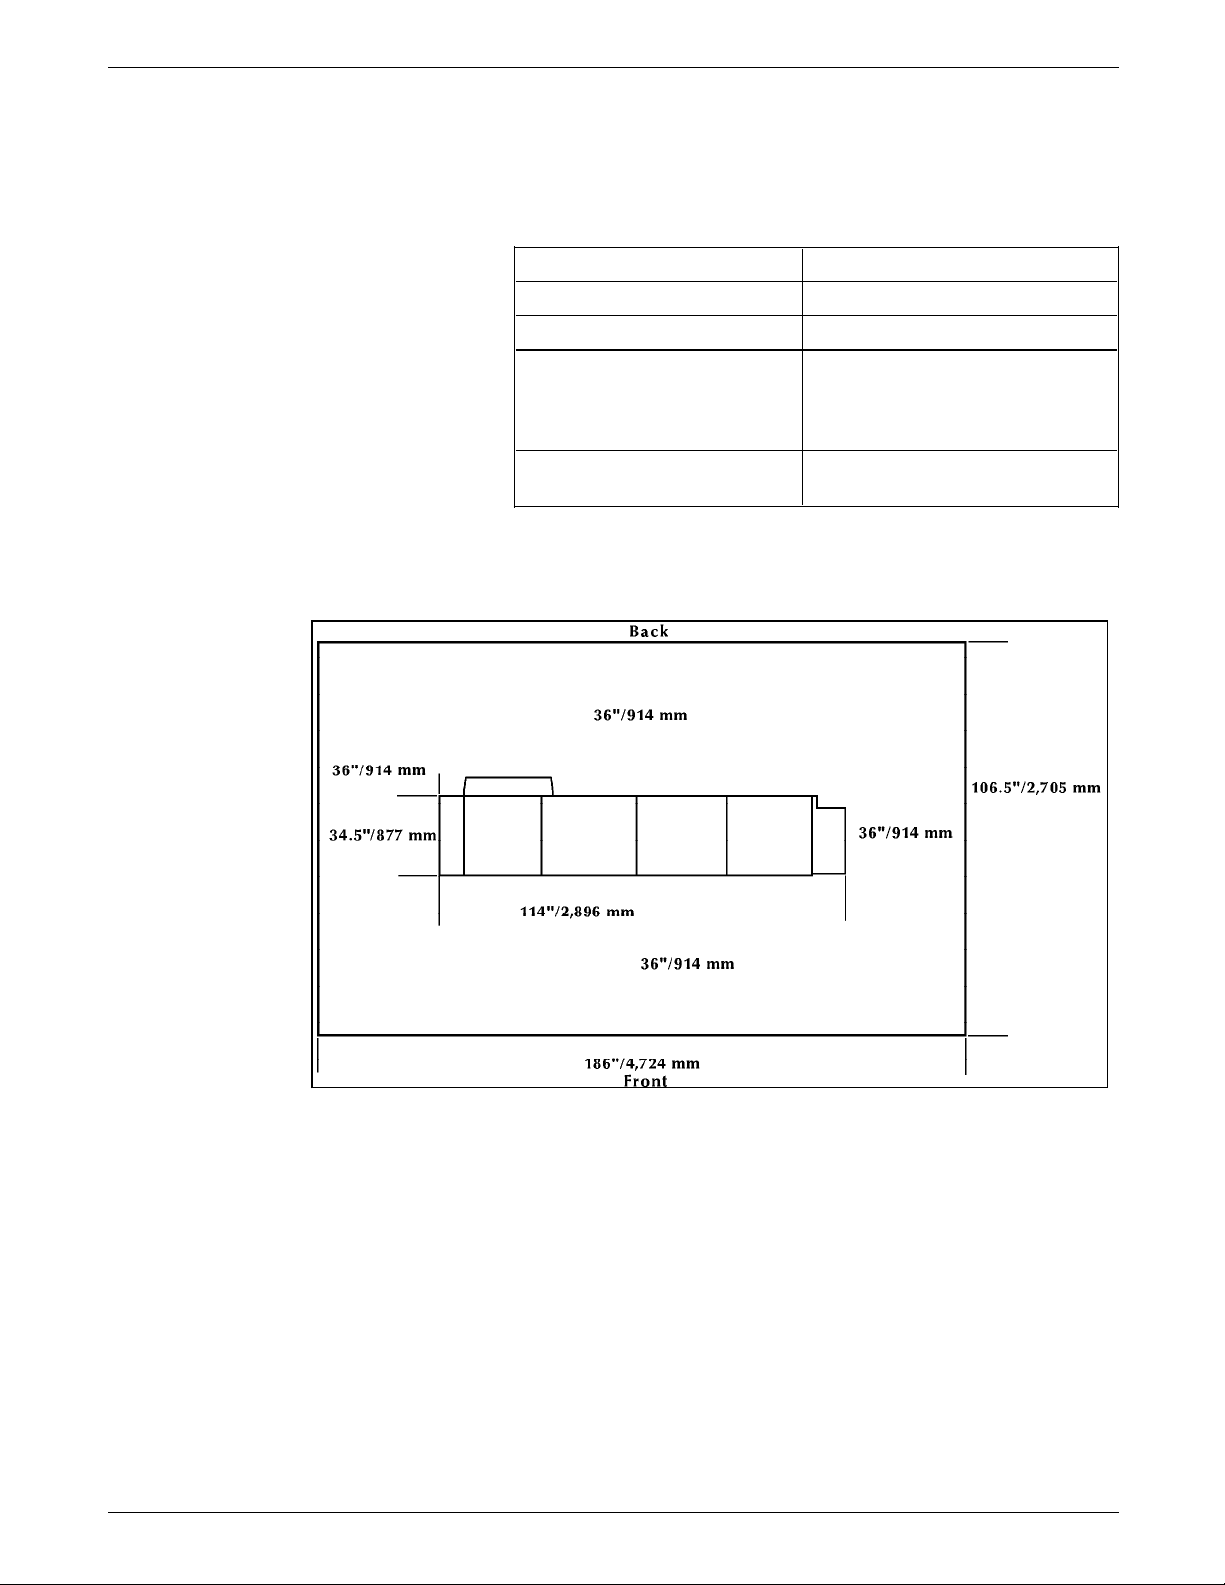
Printer with high-capacity feeder and The dimensions of the printer with the high-capacity feeder and
dual stacker dimensions the dual stacker are shown in table 1-8.
Table 1-8. Dimensions
Width: 114 inches/2,895 mm
Depth: 34.5 inches/876 mm
Height: 41 inches/1,041 mm
Weight: Printer:
Dual stacker:
High-capacity feeder:
Total:
1,046 pounds/474.5 kg
226 pounds/102.5 kg
288 pounds/130.6 kg
1,560 pounds/707.6 kg
Total space requirement: 186 inches/4,724 mm by 106.5
inches/2,705 mm
Figure 1-4. Space requirements
1-10 XEROX 4050/4090/4450/4650 LPS INSTALLATION PLANNING
Page 17
PREINSTALLATION
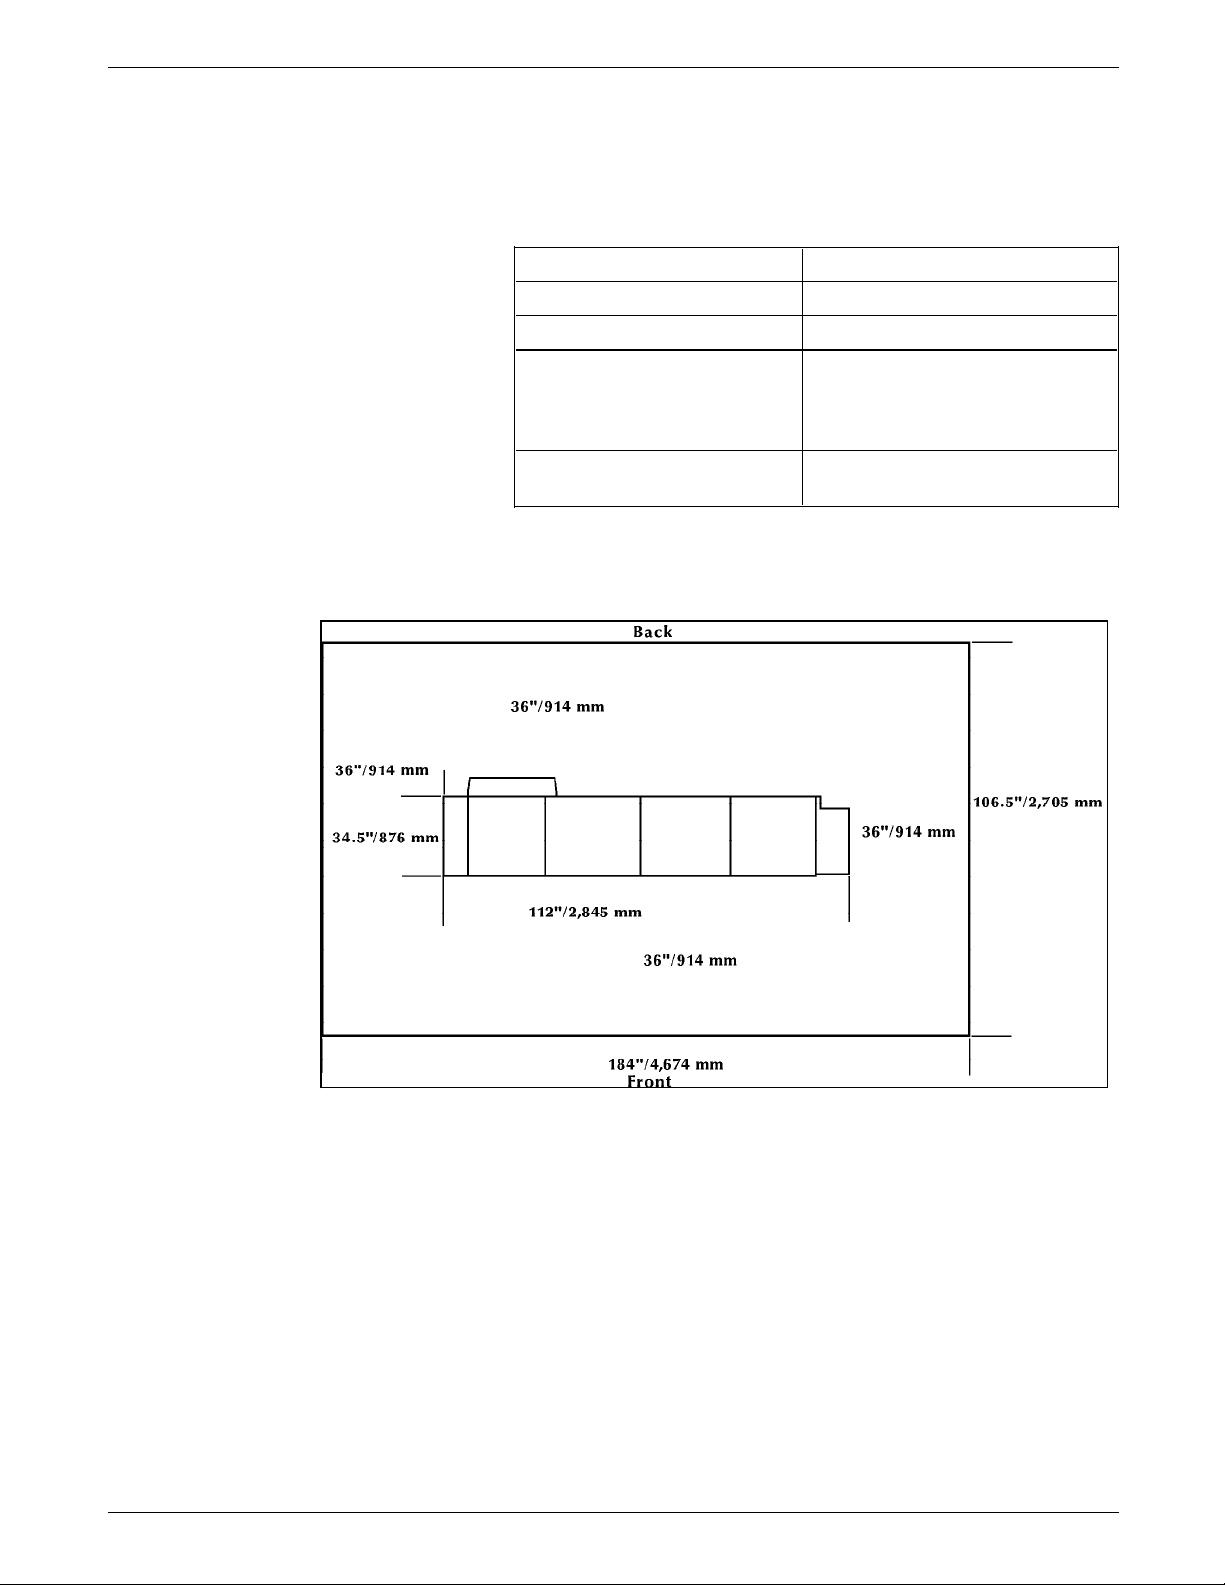
Printer with high-capacity feeder and The dimensions of the printer with the high-capacity feeder and
stitcher/stacker dimensions the stitcher/stacker are shown in table 1-9.
Table 1-9. Dimensions
Width: 112 inches/2,844 mm
Depth: 34.5 inches/876 mm
Height: 41 inches/1,041 mm
Weight: Printer:
Stitcher/stacker:
High-capacity feeder:
Total:
1,046 pounds/474.5 kg
228 pounds/103.4 kg
288 pounds/130.6 kg
1,562 pounds/708.5 kg
Total space requirement: 184 inches/4,673 mm by 106.5
inches/2,705 mm
Figure 1-5. Space requirements
XEROX 4050/4090/4450/4650 LPS INSTALLATION PLANNING 1-11
Page 18

PREINSTALLATION
Printer with dual stacker and bypass The dimensions of the printer with the bypass transport and the
transport dimensions dual stacker are shown in table 1-10.
Table 1-10. Dimensions
Width: 95 inches/2,413 mm
Depth: 34.5 inches/876 mm
Height: 41 inches/1,041 mm
Weight: Printer:
Bypass Transport:
Dual Stacker:
Total:
Figure 1-6. Space requirements
1,046 pounds/474.5 kg
35 pounds/15.9 kg
226 pounds/102.5 kg
1,307 pounds/592.9 kg
1-12 XEROX 4050/4090/4450/4650 LPS INSTALLATION PLANNING
Page 19
PREINSTALLATION
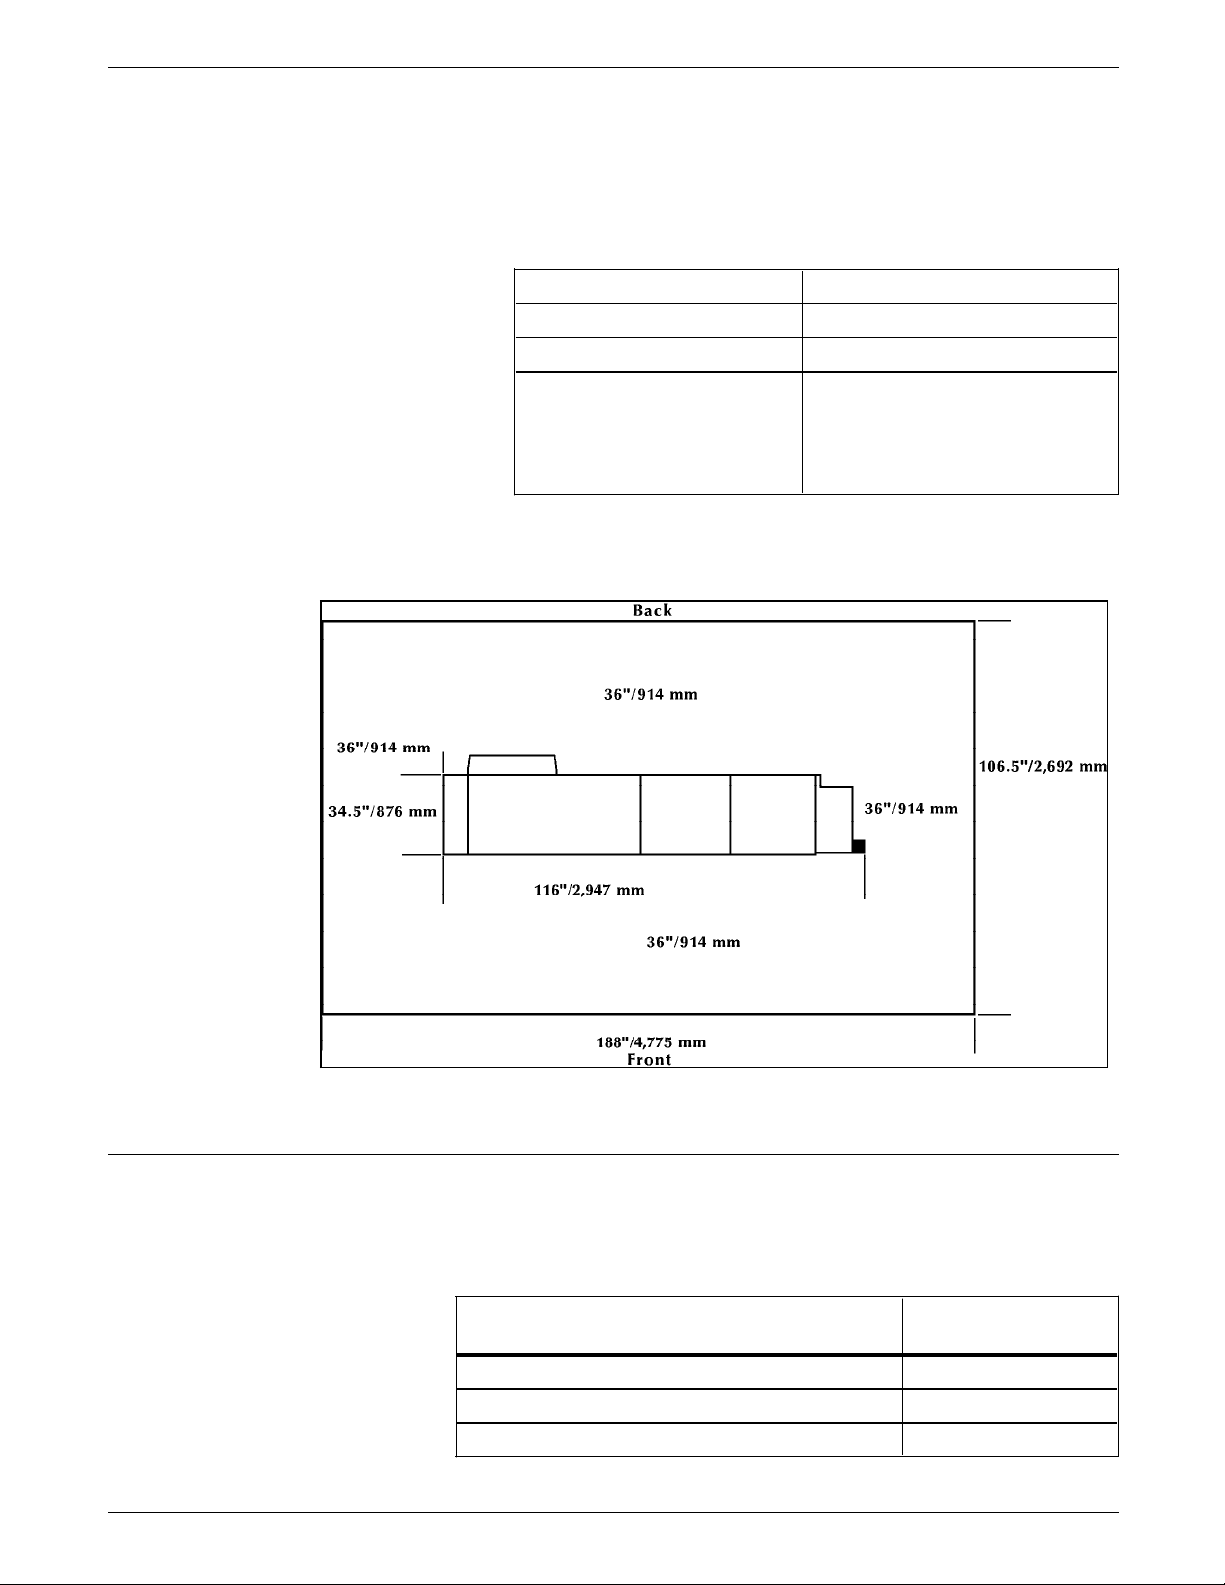
Printer with high-capacity feeder, The dimensions of the printer with the high-capacity feeder, dual
dual stacker, and bypass transport stacker, and bypass transport are shown in table 1-11.
dimensions
Table 1-11. Dimensions
Width: 116 inches/2,947 mm
Depth: 34.5 inches/876 mm
Height: 41 inches/1,041 mm
Weight: Printer:
Bypass Transport:
High-capacity feeder:
Dual stacker:
Total:
Figure 1-7. Space requirements
1,046 pounds/474.5 kg
35 pounds/15.9 kg
288 pounds/130.6 kg
226 pounds/102.5 kg
1,595 pounds/723.5 kg
Clearance space requirements
Your LPS must be installed in a fixed location and meet the
clearance requirements shown in table 1-12.
Table 1-12. Clearance space requirements
Clearance location Requirements
All sides of each component 36 inches/914 mm
Vertical clearance throughout the entire area 78 inches/1,981 mm
Front operator area for each component 24 inches/609 mm
XEROX 4050/4090/4450/4650 LPS INSTALLATION PLANNING 1-13
Page 20
PREINSTALLATION
Shared space
It is always best to provide the full amount of clearance space
around your LPS. It is sometimes necessary, however, to have
shared space between components, such as between the printer
and the system controller, or between the 4050, 4090, 4450, or
4650 LPS and another printing system. It is possible to share the
36 inch/914 mm clearance space around each component, but
there are three rules which must always be observed:
• Space may be shared only with other Xerox equipment.
• Components may share the 36 inch/914 mm general service
clearance areas, but they may not share the 24 inch/609 mm
operator area in front of each component.
• There must be 78 inches/1,981 mm of vertical clearance
throughout the entire area.
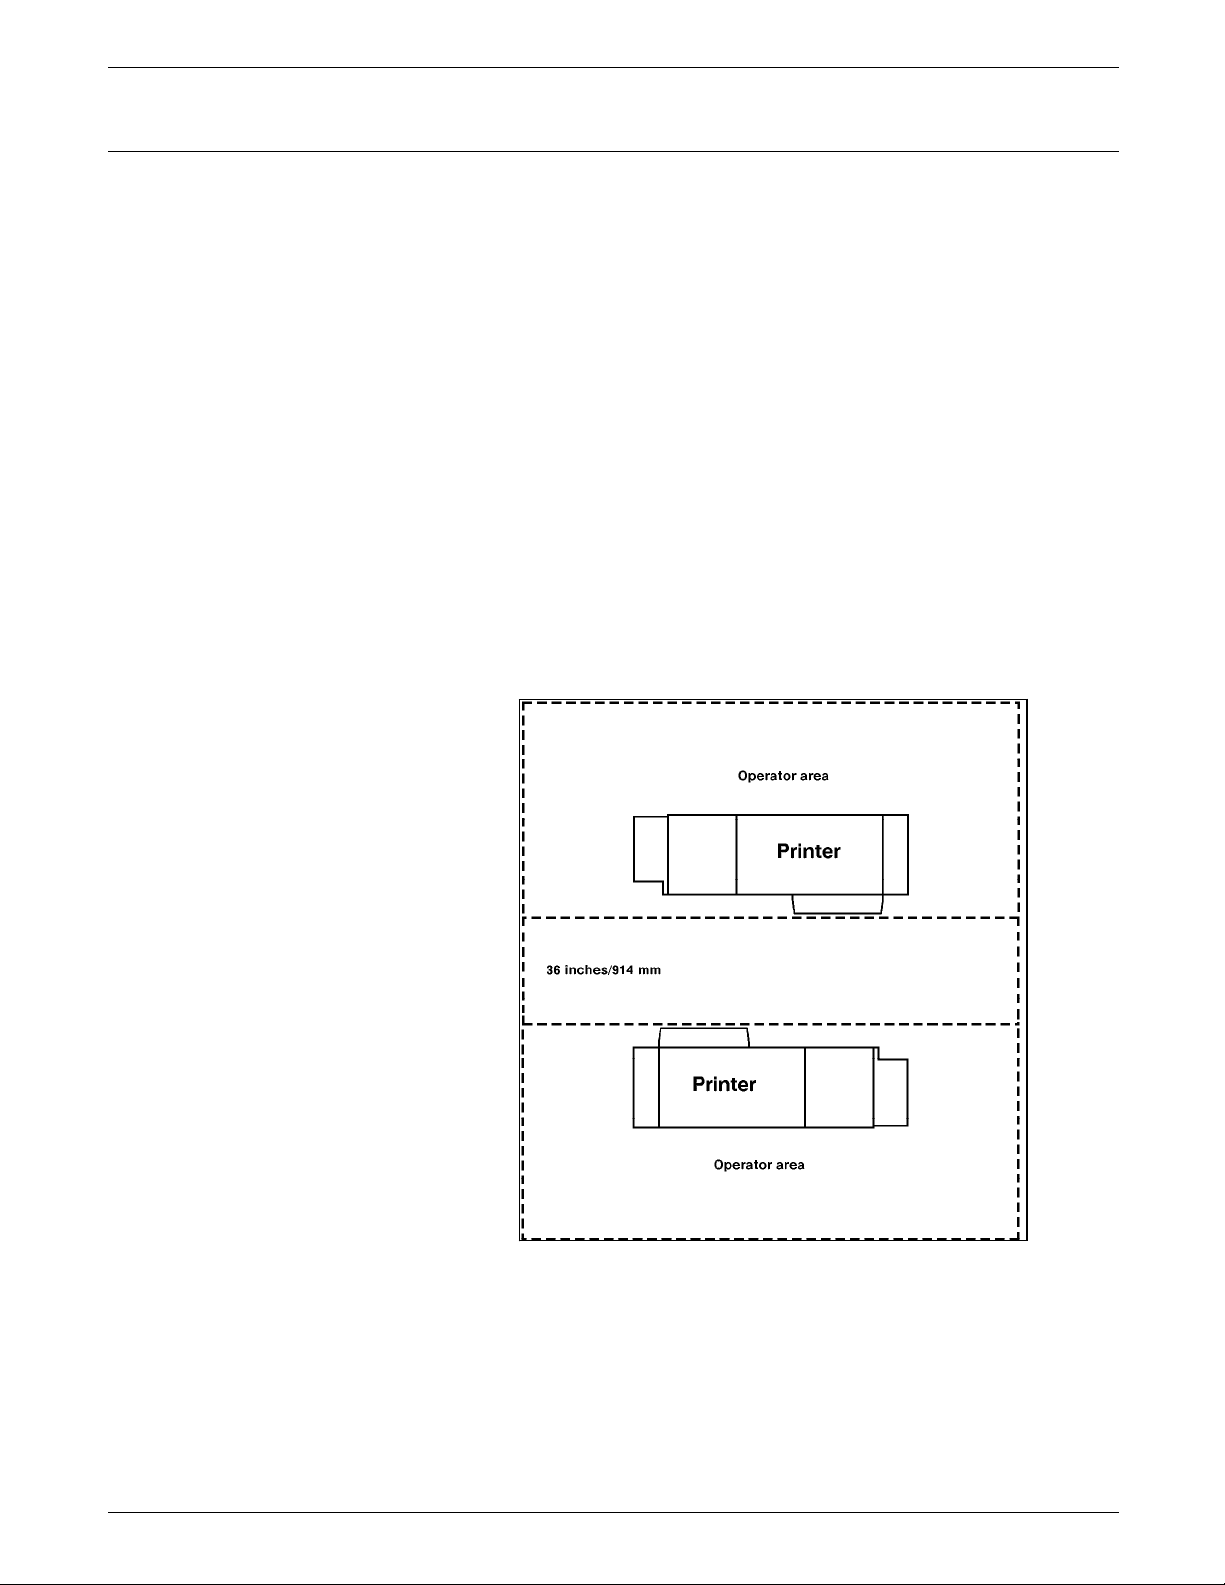
Figures 1-8 and 1-9 illustrate two possible configurations of
shared space. In the first illustration, two printers are back to
back. Because there is no operator area to be concerned with,
the entire 36 inches/914 mm of general service space may be
shared.
Figure 1-8. Back-to-back shared service area space
Figure 1-9 shows the two printers facing each other. The printers
share 12 inches/305 mm of the general service space but not the
exclusive operator area in front of each printer. Therefore, the
printers must be 24 inches/610 mm + 24 inches/610 mm + 12
inches/305 mm apart: the entire operator space for each printer
plus the shared general service area of 12 inches/305 mm.
1-14 XEROX 4050/4090/4450/4650 LPS INSTALLATION PLANNING
Page 21
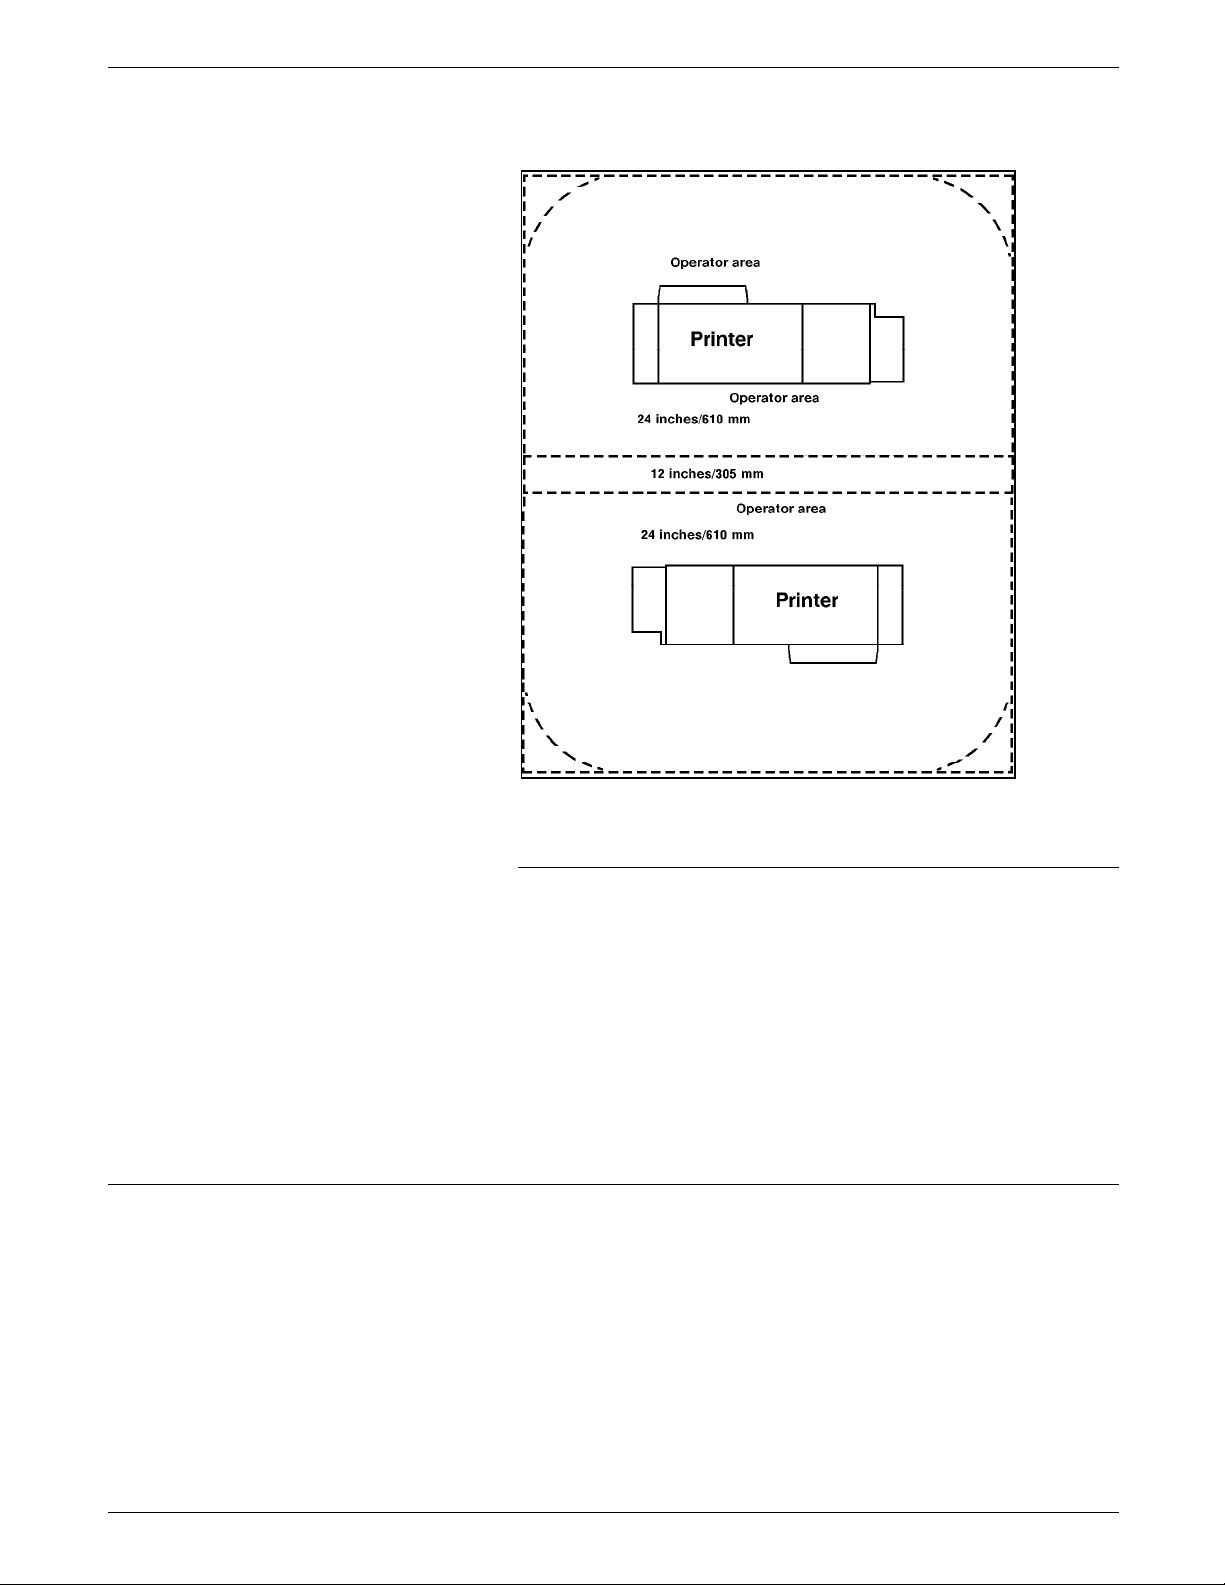
Figure 1-9. Face-to-face shared service area space
PREINSTALLATION
Efficiency of use
Terminal
Requirements for the terminal follow:
• Terminal must sit within 15 ft/4.6 m of the system controller
(usually directly on it).
• Power source (wall or under flooring) for the terminal must
be within the maximum 15-ft/4.6 m length of the power
cord.
Note: To ensure the safety of service personnel during
maintenance and service, the terminal must be in the same room
as the printer and in direct line of sight with it.
There are many possible layouts for your LPS. Placement
depends on the type and amount of equipment and the size and
shape of the room used to house the equipment. Some
possible configurations for LPS components include:
• Side by side
• L-shaped
• Face to face.
Equipment placement should limit operator movements as much
as possible. Here are a few suggestions that may be helpful:
XEROX 4050/4090/4450/4650 LPS INSTALLATION PLANNING 1-15
Page 22

PREINSTALLATION
Delivery access requirements
• Place the system controller as close to the output end of the
printer as possible. This enables operators to reach over to
collect and check printed output.
• Consider the location of supplies in relation to the placement
of the equipment. For example, having paper as close to the
printer as possible saves time.
• Placing the system controller as close to offline interface
devices saves time when monitoring tapes, jobs, and so on.
It is easy to overlook how the equipment is going to get from
the truck to the operation site.
• Does it need to go up stairs?
• Do you have an elevator if it will be located above the first
floor?
• Is the elevator large enough?
• How wide are the hallways and the doorways?
• Do you have a loading dock or a specific door to which the
equipment should be delivered?
All these issues must be reviewed prior to or at the time of the
site inspection that is performed by your service representative.
The equipment dimensions are specified earlier in this chapter,
so it is easy to know whether your hallways and doorways are
wide enough to permit travel through them.
Turning radius The width of the passageway where the equipment must
negotiate a corner, whether into a room (or elevator) or into
another passageway, must also be considered.
There are L-shaped turns and T-shaped turns. The diagrams and
tables that follow show the minimum space needed to maneuver
through the turns. To use the tables, measure the passage or
doorway width into which you want to move at its minimum
width. This is Passage A. Find that number (or the next higher
number) on the appropriate table (table 1-13 or 1-14) and read
across to the corresponding minimum value for Passage B,
depending on the type of turn the equipment must negotiate.
Figure 1-10 shows the two types of turns.
Figure 1-10. L-shaped and T-shaped turns
1-16 XEROX 4050/4090/4450/4650 LPS INSTALLATION PLANNING
Page 23

PREINSTALLATION
Table 1-13. Turning radius for the system controller
If passage or
doorway A is:
Passage B must be
(either turn):
30 inches/762 mm 51 inches/1,295 mm
31 inches/787 mm 49 inches/1,244 mm
32 inches/812 mm 48 inches/1,219 mm
34 inches/863 mm 45 inches/1,143 mm
36 inches/914 mm 42 inches/1,066 mm
38 inches/965 mm 40 inches/1,016 mm
40 inches/1,016 mm 38 inches/965 mm
42 inches/1,066 mm 36 inches/914 mm
Table 1-14. Turning radius for the printer
If passage or
doorway A is:
Passage B for an L-turn
must be:
Passage B for a T-turn must
be:
29 inches/736 mm 68.6 inches/1,742 mm 67.6 inches/1,717 mm
30 inches/762 mm 66.2 inches/1,681 mm 65.7 inches/1,668 mm
31 inches/787 mm 64.2 inches/1,630 mm 63.9 inches/1,623 mm
32 inches/812 mm 62.3 inches/1,582 mm 62.2 inches/1,579 mm
33 inches/838 mm 60.7 inches/1,541 mm 60.6 inches/1,539 mm
34 inches/863 mm 59.1 inches/1,501 mm 59.1 inches/1,501 mm
35 inches/889 mm 57.7 inches/1,465 mm 57.7 inches/1,465 mm
36 inches/914 mm 56.3 inches/1,430 mm 56.3 inches/1,430 mm
37 inches/939 mm 55.2 inches/1,402 mm 55.2 inches/1,402 mm
38 inches/965 mm 54.0 inches/1,371 mm 54.0 inches/1,371 mm
39 inches/990 mm 52.9 inches/1,343 mm 52.9 inches/1,343 mm
40 inches/1,016 mm 51.8 inches/1,315 mm 51.8 inches/1,315 mm
41 inches/1,041 mm 50.5 inches/1,282 mm 50.5 inches/1,282 mm
42 inches/1,066 mm 49.8 inches/1,264 mm 49.8 inches/1,264 mm
XEROX 4050/4090/4450/4650 LPS INSTALLATION PLANNING 1-17
Page 24
PREINSTALLATION
Environmental and electrical requirements
This section provides important environmental and electrical
requirements for your LPS that must be accommodated.
4050
Environmental and electrical requirements for the 4050 LPS are
provided in table 1-15 and 1-16.
Table 1-15. Environmental requirements
Operating temperature Normal: 68° F to 76° F/20° C to 24° C
Humidity Normal: 45 +/- 10%
Heat dissipation, online Operating: 15,000 BTU per hour
Minimum: 60° F/16° C
Maximum: 80° F/27° C
Minimum: 30%
Maximum: 60%
Standby: 7,500 BTU per hour
Heat dissipation, offline Operating: 15,500 BTU per hour
Standby: 8,000 BTU per hour
Table 1-16. Electrical requirements
System controller 120/208 or 120/240 VAC; 50/60 Hz,
30 amp service, NEMA L14-30R
1.5 KVA both in standby mode and when
operating
Note: Magnetic tape unit assumed
(maximum draw)
Printer U.S./Canada, 60 Hz: 120/208 or 120/240
VAC; 30 amp service, NEMA 14-30R
.875 KVA in standby, 3.1 when operating
International, 50 Hz:
220/240 VAC or 380 VAC
Agency certification UL, CSA, IEC
1-18 XEROX 4050/4090/4450/4650 LPS INSTALLATION PLANNING
Page 25
4090/4650
PREINSTALLATION
The environmental and electrical requirements for the 4090 and
4650 LPS are listed in tables 1-17 and 1-18
Table 1-17. Environmental requirements
Operating temperature Normal: 68° F to 76° F/20° C to 24° C
Minimum: 60° F/16° C
Maximum: 80° F/27° C
Humidity Normal: 45 +/- 10%
Minimum: 30%
Maximum: 60%
Heat dissipation, online Operating: 15,000 BTU per hour
Standby: 7,500 BTU per hour
Heat dissipation, offline Operating: 15,500 BTU per hour
Standby: 8,000 BTU per hour
Table 1-18. Electrical requirements
Cabling requirements
System controller 120/208 or 120/240 VAC; 50/60 Hz,
20 amp service, NEMA L14-20R
1.8 KVA both in standby mode and when
operating
Note: Magnetic tape unit assumed
(maximum draw)
Printer U.S./Canada, 60 Hz: 120/208 or 120/240
VAC; 20 amp service, NEMA 14-30R
.875 KVA in standby, 3.1 when operating
International, 50 Hz:
220/240 VAC or 380 VAC
Agency certification UL, CSA, IEC
The printer and the system controller can be separated by up to
25 ft/7.6 m. The system controller is delivered with a 50 ft/
15.5 m interface cable and a 14 ft/4.3 m, 220 VAC power cable.
The printer is delivered with a 10 ft/3 m, 220 VAC power cable.
The power cable for the terminal is 15 ft/4.7 m long. The
terminal must sit within 15 ft/4.7 m of the system controller, if
not directly on it. The power source (wall or beneath flooring)
for the terminal must be within the maximum 15 ft/4.7 m length
of the power cable.
XEROX 4050/4090/4450/4650 LPS INSTALLATION PLANNING 1-19
Page 26

PREINSTALLATION
Cable locations
Note: To ensure the safety of the service representative during
maintenance and service of the equipment, the terminal must be
in the same room as the printer and in direct line of sight of the
printer.
To run the cables effectively beneath the flooring, it is necessary
to know where the cables enter and exit the printer and the
system controller. Figure 1-11 shows those locations (marked
with an X).
Figure 1-11. Cable enter/exit locations
Cable lengths
Cable lengths are important considerations in planning your LPS
layout, as components cannot be separated by more than the
recommended cable distances. The distances affect the
placement of the printer, system controller, and terminal.
Note: There are also distance requirements for some LPS
options. Consult with your sales or service representative for
these requirements.
Printer and system controller
Information on the cable lengths of the system controller and
printer follow:
• Printer and system controller can be separated by up to 25
ft/7.6 m.
• Printer is delivered with a 10 ft/3 m power cable.
• System controller is delivered with a 14 ft/4.3 m power cable
and a 50 ft/15.2 m interface cable.
1-20 XEROX 4050/4090/4450/4650 LPS INSTALLATION PLANNING
Page 27

Configuration options for the 180 Cartridge Tape System
The following are several configuration options for placement of
the 180 Cartridge Tape System (CTS) and your 4050/4090/4650
LPS. The 180 CTS option does not apply to the 4450 LPS.
• Offline and switchable (online and offline)
• Online only
• Dual channel—offline and switchable
• Dual channel—online only.
Figures 1-12 to 1-15 illustrate these configurations.
Figure 1-12. 180 CTS offline and switchable configurations
PREINSTALLATION
Figure 1-13. 180 CTS online only configuration
Figure 1-14. 180 CTS dual channel option: offline and
switchable configurations
Notes:
All printers have online only capability.
Two printers are sharing one 180 CTS with a second transport.
XEROX 4050/4090/4450/4650 LPS INSTALLATION PLANNING 1-21
Page 28

PREINSTALLATION
There are two possible cable configurations:
• 40 ft cable from the LPS to the 180 CTS, with 25 ft cables
connecting other components
• 25 ft cable from the LPS to the 180 CTS, with 15 ft cables
connecting the LPS to the switchbox and a 25 ft cable
connecting the 180 CTS to the switchbox.
Figure 1-15. 180 CTS dual channel option: online only
configuration
Notes:
Interface requirements
Channel-attached
All printers have online only capability.
Two printers are sharing one 180 CTS with a second transport.
Two 25 ft/7.6 m cables or two 40 ft/12.4 m cables connect the
printers with the 180 CTS transports.
This section describes requirements for the various interface
environments.
For an online configuration with an IBM host system, supply the
following cables:
• Bus and tag cables (bus in, bus out, tag in, tag out)
• Emergency Power Off (EPO) cable (optional)
• Terminators (if necessary, due to location on channel).
For your convenience, it is possible to purchase the bus and tag
cables for the printer through Xerox. Contact your Xerox sales
representative for current pricing and order information.
Third-party connections
Xerox supports a number of third-party connections. For product
recommendations and ordering information, contact The Xerox
Connection.
Reference Refer to the back of this manual for information regarding The
Xerox Connection.
1-22 XEROX 4050/4090/4450/4650 LPS INSTALLATION PLANNING
Page 29

Connecting IBM host equipment
If you have an existing Xerox LPS installed and are
communicating with an IBM host environment, you may have an
871 Communications Module installed. You may continue to use
that device for connection to the LPS.
If this is your first Xerox LPS installation, The Xerox Connection
may recommend the BARR/SNA device. This is a PC-based
device that enables printing of host datastreams from a remote
site, 3270 emulation to network users, and allows transfer of
large files from your host environment to the LPS.
Contact The Xerox Connection for additional information on
either of these interface products or for a suitable
recommendation for your particular environment. The Xerox
Connection can provide you with statistics and installation
requirements for any recommended interface product.
Connecting DEC equipment using XPMF-VMS
PREINSTALLATION
The Xerox Print Management Facility (XPMF) is an interconnect
product that includes the hardware, software, and documentation
necessary to link your LPS with various Digital Equipment
Corporation (DEC) VAX and micro VAX systems. General
installation guidelines are described below. Contact your Xerox
sales representative.
Reference Refer to the Xerox Print Symbiont Installation Guide for
additional information on this interconnect product.
XPMF is composed of three elements:
• Hardware components installed on the Xerox printer (by
Xerox personnel)
• Appropriate DEC synchronous communications controller,
modems, and communications line installed on the DEC VAX
(by DEC personnel)
• XPMF-VMS software installed on the VAX/VMS system (by
you).
The host software module included in the XPMF package is
specifically designed for compatibility with the Digital Electronic
Corporation VMS operating system. The UNIBUS
communications controller is compatible with the
communications controllers of each of the following DEC bustype environments:
• UNIBUS
• VAXBI
• Q-bus.
Possible configurations
There are a number of possible configurations, including:
• Single or multi-user standalone environments with a single
processor. Terminals are connected to the processor using a
DEC connectivity device.
XEROX 4050/4090/4450/4650 LPS INSTALLATION PLANNING 1-23
Page 30

PREINSTALLATION
• Two or more standalone systems can be linked together to
enable the transfer of information between systems using
two processors. With a modem and the appropriate
communications controller installed in one of the DEC
processors, data from another processor can be submitted to
the LPS using that processor.
• DEC systems may be located in different geographic
locations. Standard telephone lines form the
communications network across town or cities. The linkage
for the LPS remains the same: the appropriate DEC
communications controller, XPMF/VMS software in the host
processor, and XPMF/VMS hardware in the LPS.
• Terminals, processors, and other devices may be linked in a
Local Area Network (LAN) using Ethernet. The LPS is
connected using the communications controller linked to
one of the host processors (the “client”) in the LAN. As a
result, all processors connected to the Ethernet network
access the LPS through the client processor. A modem is
used to transmit print data to the printer.
• Wide Area Network (WAN) connects sites or multi-vendor
systems that may be located around the world. Independent
of the complexity of the network configuration, the
connectivity to the LPS remains the same.
Components
• VAX systems and intelligent storage controllers may be
clustered. In a VAX cluster system, the various devices are
connected to a common distribution unit, such as an SC008
Star Coupler. Each processor operates independently, with
common access to the various storage elements connected
to the intelligent I/O controllers (servers). The result is the
linkage of numerous computer resources that appear to the
user as a single system. Print data is transmitted from the
cluster to the LPS using a modem.
Note: The modem is optional if your LPS is within 50 ft/15.2 m
of the DEC processor.
Table 1-19 describes the hardware and software components
your LPS requires when connecting to DEC equipment.
Table 1-19. Components
Hardware The hardware interface residing in the LPS is the DMR11
Synchronous Controller. It is installed into the LPS system
controller with an adapter kit and cable supplied by Xerox.
Software The XPMF/VMS interface is supported by Xerox software on
both the LPS and the VAX system.
The VAX-resident software performs the print supervisor
(symbiont) role in the DEC print architecture and enhances the
uses of the LPS. Refer to the Xerox Print Management Facility—
VMS Version Installation Guide for additional information on
the installation of this software.
1-24 XEROX 4050/4090/4450/4650 LPS INSTALLATION PLANNING
Page 31

Installation responsibilities
Xerox • Install the hardware component of the XPMF/VMS interface.
PREINSTALLATION
The following explains Xerox and customer responsibilities.
Table 1-20. Installation responsibilities
• Assist you, if necessary, in installing the software
component.
• Provide the XPMF/VMS interconnect kit.
Customer
Installation requirements
• Arrange for telephone lines and modems to be installed, if
required by your interconnect configuration.
• Verify kit contents to make sure all necessary items are
included.
• Install the host-resident software component (part of the
XPMF/VMS kit provided by Xerox) onto the VMS system.
• Obtain all necessary hardware and software to form the
selected connection solution.
• Coordinate the installation steps that involve both DEC and
Xerox service organizations.
• Produce specifications for XPMF/VMS during the
configuration of the printer.
• Install any communications controller components needed
for the DEC VAX system that submits jobs to the LPS.
Before installing the host-resident software, you must have the
following privileges and resources available:
• SETPRV privilege, or CMKRNL, WORLD, and SYSPRV
privileges
• Minimum of 1,000 blocks of free disk space during
installation; 500 blocks after installation.
Hardware requirements
Listed below are the three VAX/VMS systems that support the
VAX-resident print supervisor (symbiont) software and the
requirements for each.
Note: Appropriate communication cables and modems may be
required. Consult your sales representative.
XEROX 4050/4090/4450/4650 LPS INSTALLATION PLANNING 1-25
Page 32
PREINSTALLATION
Table 1-21. Hardware requirements
System Requirements
Software requirements
Documentation
VMS/UNIBUS
VMS/VAXBI
VMS/Q-bus
• Supported VAX series hardware configuration (CPU,
memory, peripherals) with UNIBUS I/O subsystem
• DMR11-M synchronous interface and cabinet kit.
• Supported VAXBI series hardware configuration (CPU,
memory, peripherals)
• DSB32-AA synchronous interface and cabinet kit.
• Supported MicroVAX hardware configuration (CPU,
memory, peripherals)
• DSV11 Q-bus synchronous interface and cabinet kit.
The VAX-resident print supervisor (symbiont) software requires
the following supported software:
• VMS Version 5.0 (or later)
• VAX Wide Area Device driver.
Training
A number of reference manuals are available to assist you in
maximizing the productivity of your LPS. The reference set for
your LPS is delivered with the equipment at installation. All of
the manuals may be ordered as a set or individually.
References Refer to the “Ordering documentation and software” section of
the “Postinstallation” chapter for procedures on how to order
additional documentation and the Xerox Customer
Documentation Catalog.
This section describes the training available through Xerox.
Operator training Operator training is conducted at your location shortly after your
LPS is installed. Training takes approximately four to seven
hours, depending on the system configuration, and includes
hands-on practice running basic jobs, maintenance, and problem
solving. Determine the number of operators you want to attend
the initial training, and schedule training dates and costs through
your sales representative and system analyst.
Advanced Customer Training (ACT) is available at the Xerox
training center in Leesburg, Virginia. Discuss candidates for this
training with your sales representative, if desired. Keep in mind
that operators should not be considered for ACT until they have
1-26 XEROX 4050/4090/4450/4650 LPS INSTALLATION PLANNING
Page 33

PREINSTALLATION
spent several months working with the LPS and have shown
good mechanical aptitude. Call Xerox Customer Education at 1800-445-5554 to schedule ACT.
System training Several training workshops and a self-study course are included in
the LPS technical training curriculum. Workshops are designed
to provide a system overview, as well as forms creation, job
control, and increased productivity expertise. The workshops
include the following courses:
• LPS Introduction Workshop. This one-day workshop
includes a technical overview of LPS features, system disk
structure, operating system software, the system generation
procedure, disk utilities, problem solving, and an introduction
to command files. Hands-on experience includes configuring
and generating a new software system and performing
maintenance procedures using the LPS utility commands.
• LPS Forms Description Language (FDL) Workshop. This
one-day workshop provides instruction on FDL commands,
inserting logos and graphics, using the forms design ruler and
quick reference card, coding and printing electronic forms,
modifying a form to print variable data, and converting to a
two-up format.
• LPS Print Description Language (PDL) Workshop. This
three-day workshop provides lecture and hands-on practice
for using PDL commands to identify the source and format of
input to the LPS, using special processing options, defining
how printed documents should be formatted, merging forms
with variable data, specifying when and where various fonts,
typestyles, and sizes should be used within a job, employing
Dynamic Job Descriptor Entries (DJDEs), and creating and
compiling Job Description Libraries (JDLs).
• LPS Print Description Language (PDL) II Workshop. This
two-day workshop combines lecture and lab work to help
students apply advanced PDL techniques in maximizing
system productivity and developing new applications for the
LPS.
• LPS Command File Workshop. This is a modularized two-
day workshop that provides self-paced training on such
activities as establishing menus, providing system security,
effective file maintenance, merging variable data on
electronic forms, simplifying accounting file information,
manipulating files, creating new font files, effective disk
management, and creating customized applications.
For detailed information about any of these courses, to enroll in
workshops, or to order the self-study, call Xerox Customer
Education at 1-800-445-5554.
Fonts and supplies for installation
Consumable supplies, such as paper, dry ink, developer, and
fuser lubricant, need to be ordered for your LPS.
A set of standard fonts is provided with your system. If
nonstandard fonts are needed, they must be ordered from Xerox
Font Services.
XEROX 4050/4090/4450/4650 LPS INSTALLATION PLANNING 1-27
Page 34

PREINSTALLATION
Fonts
This section describes the fonts and supplies needed for
installation. Your sales representative will help you place your
initial order for fonts (if any) and supplies.
Reference Refer to the “Postinstallation” chapter for procedures on how to
order fonts and supplies after initial installation.
There are three classifications of fonts for your LPS:
• Standard fonts
• Licensed fonts
• Custom fonts.
Standard fonts Provided with your LPS operating system software is a library of
over 250 standard 300 spots per inch (spi) fonts, referred to as
the A03 font family.
Note: If you are installing a 4650 LPS, you are provided with five
600 spi font families in addition to the standard library of 300 spi
fonts. There are three categories of 600 spi fonts available:
• Data center fonts
• Publishing fonts
• Interpress fonts.
Your sales representative will assist you in selecting the
appropriate 600 spi font category for your 4650 LPS.
Licensed fonts In addition to the library of standard fonts delivered with your
LPS, over 100 licensed fonts may be ordered from Xerox Font
Services.
Custom fonts Custom fonts and graphic images, such as company logos and
signatures, can be digitized by Xerox Font Services for use on
your LPS.
Receiving fonts
The fonts provided by Xerox Font Services are provided on 5.25
inch double-sided, dual density diskettes, floppy disks (one disk
may contain more than one font), 9-track, 1,600 bits per inch
(bpi), unlabeled magnetic tape, 18-track cartridges, or 32-track
cartridges. One tape may contain several fonts, each of which is
a separate file.
Note: The 4650 comes standard with 600 spi fonts on magnetic
tape or 32-track cartridge.
As with the other initial supplies, your sales representative assists
you in determining your LPS font needs for installation. After
installation, Xerox Font Services can help you order additional
licensed and custom fonts.
1-28 XEROX 4050/4090/4450/4650 LPS INSTALLATION PLANNING
Page 35

Paper
Select your paper carefully; without the proper paper, the
probability of paper jams and misfeeds increases.
Acceptable paper stocks and sizes Your LPS can print on standard white, colored, predrilled, and
preprinted (for example, letterhead and forms) paper, labels, and
transparencies. They must meet the specifications set forth by
Xerox for operability in the LPS.
Reference Additional information about paper for your LPS can be found in
Helpful Facts About Paper.
Paper weights and grade For best results, use 20 pound/80 gsm (grams per square meter)
bond xerographic grade paper. Xerox 4024 Dual Purpose Paper
and Xerox 10 Series Dual Purpose Paper are specifically designed
for optimal performance in your LPS.
Reference Refer to the “Consumable supplies” table in the “Postinstallation”
chapter for a list
Use paper within the following parameters:
of papers and supplies.
PREINSTALLATION
Lightest: 20 pound/80 gsm
Heaviest: 110 pound/200 gsm
Your LPS accepts 8 1/2 by 11 inch, 8 1/2 by 14 inch, and A4 (210
by 297 mm) cut sheet paper.
Note: If you have a 4650 LPS, it is recommended that you use
Xerox 10 Series, or other high-quality paper, to receive optimum
quality for your applications.
Storing paper Paper has a tendency to curl when exposed to the heat that is
present inside xerographic equipment. Paper with low moisture
content curls less. Paper with excessive moisture content has a
tendency to jam because of the greater curl.
Note: The maximum recommended moisture content is 5.7%.
Paper is fed into the LPS with the long side as the leading edge.
The grain should be parallel with the long side (long grain) for
the most reliable feeding and stacking. Purchase long grain
paper.
Keep these points in mind when preparing your paper storage
area.
• Store paper in its own wrapper; do not leave it unwrapped or
where it can be damaged by dampness or heat.
• Store paper on a flat surface and not on its side or edge.
• Store reams of paper in a closed cabinet.
• Always store paper in a cool, dry area.
• Store paper on pallets or shelves, not on the floor.
• Keep a supply of paper designed to last several hours in the
same area as the printer to allow for the environmental
stabilization of the paper.
XEROX 4050/4090/4450/4650 LPS INSTALLATION PLANNING 1-29
Page 36

PREINSTALLATION
Dry ink
Fuser lubricant
Dry ink is the black powder which forms the image on the
printed page. There are three cartridges of dry ink in each
container. At least one container needs to be ordered and kept
on hand at all times. The throw-away cartridges are changed
easily by the operator with no mess. The consumption rate of
dry ink is approximately one cartridge per 45,000 pages. Use
only dry ink that is specified for use in your LPS.
Reference Refer to the “Consumable supplies” table in the “Postinstallation”
chapter for information on how to order dry ink after initial
installation.
Fuser lubricant is a consumable item required by the LPS. At
least one box (two tubes) needs to be ordered and kept on hand
for installation by the service representative. The consumption
rate of fuser lubricant is approximately one tube per 100,000
pages. The system holds up to three tubes when full and is
refilled to capacity during each service call.
Developer
Floppy disks
Reference Refer to the “Consumable supplies” table in the “Postinstallation”
chapter for information on how to order fuser lubricant after
initial installation.
Xerox developer has an effective life of approximately 500,000
pages per container. (Xerox developer is warrantied by Xerox for
300,000 pages.) Developer also needs to be ordered and kept
on hand. It is changed by a service representative. Use only
developer specified for use in your LPS.
Reference Refer to the “Consumable supplies” table in the “Postinstallation”
chapter for information on how to order developer after initial
installation.
Floppy disks are optional items that provide loading and backup
of fonts, forms, and user files to and from the LPS system disk.
The LPS accepts 5.25 inch double-sided, dual density disks. Best
results are obtained with floppy disks that are not high-density or
high-capacity.
Reference Refer to the “Consumable supplies“ table in the “Postinstallation”
chapter for information on how to order floppy disks after initial
installation.
Stitcher wire
Stitcher wire is a consumable item for an LPS with the
stitcher/stacker option. Stitcher wire reels need to be ordered
and kept on hand. They are installed by your service
representative or ACT-trained operators.
Reference Refer to the “Training” section of this chapter for information on
training operators and the “Consumable supplies” table in the
1-30 XEROX 4050/4090/4450/4650 LPS INSTALLATION PLANNING
Page 37

Tapes
PREINSTALLATION
“Postinstallation” chapter for information on how to order
stitcher wire after initial installation.
Each of the tape drives available with your 4050/4090/4650 LPS
requires tapes of a different format.
26-track cartridge tapes The optional 26-track tape drive uses 0.5 inch compatible
cartridge tapes with a data capacity of 320 MB or 525 MB,
depending on the choice of DC6320 or DC6525 tape cartridges.
Both tapes are .25 inch ANSI compatible. Cartridges are not
available from Xerox.
18-track cartridge tapes The optional 18-track tape drive uses 0.5 inch IBM 3480
compatible cartridge tapes with a data capacity of 200 MB.
Cartridges are not available from Xerox.
9-track magnetic tapes The optional 9-track tape drive supports reel-to-reel 9-track 1600
bpi Phase Encoded (PE) and 6250 bpi Group Code Recording
(GCR) encoded magnetic tapes.
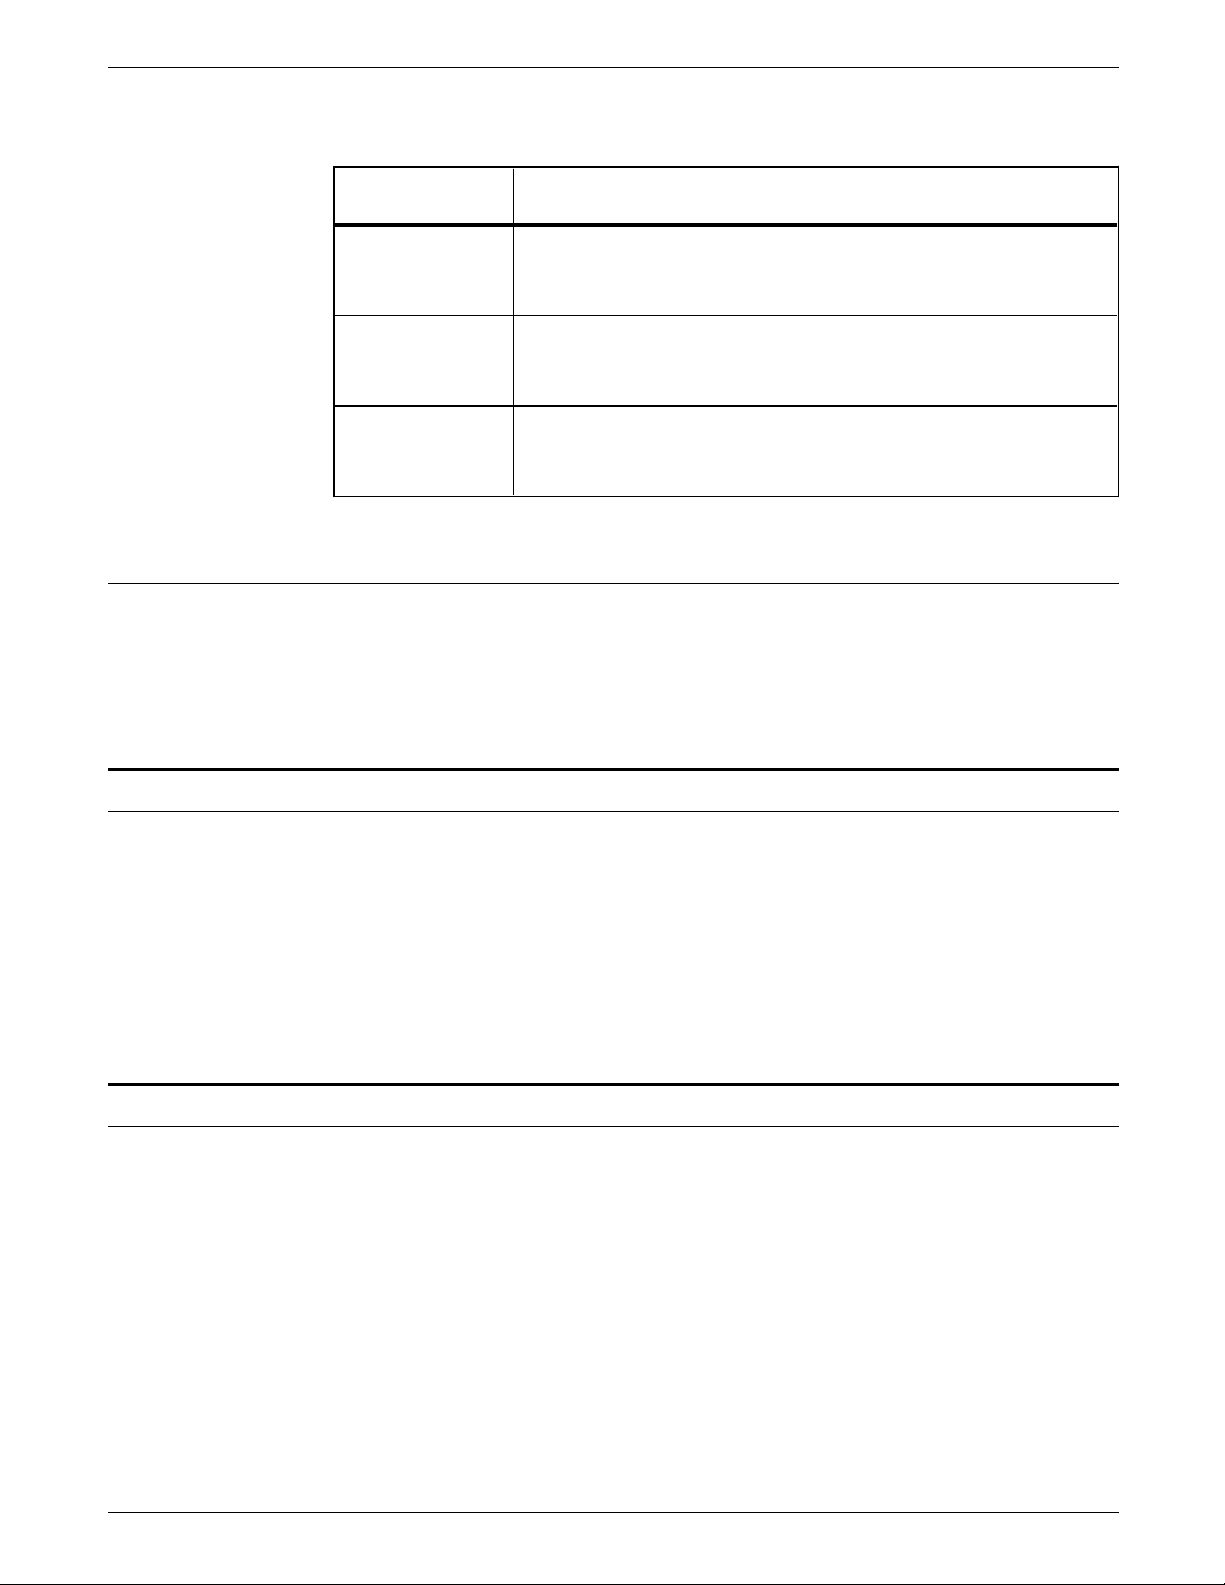
Space planning templates
Dimensions and space requirements for LPS components are
provided earlier in this chapter. The space planning templates
are designed to simplify the space planning process by helping
you create a floorplan for your LPS base components, particularly
if you will have shared clearance space.
The easiest way to use the space planning templates is to remove
the transparency located at the end of this chapter and move the
templates around on the grid (also located at the end of this
chapter) to find the optimum placement for your LPS
components. Make sure you consider other pieces of
equipment, such as storage cabinets and tables, when planning
space for your LPS.
The templates are to scale with the grid; each square is equal to
one foot. The curved dotted lines in the corners of the space
perimeters indicate the corners that may be rounded off while
still maintaining the required clearance space.
The templates provided are for the system controller and the
various printer configurations. Make sure you allow space for
optional equipment as appropriate. Your sales representative can
help you plan space for additional components.
There are a number of factors to keep in mind when planning
your site. These include:
• Clearance space requirements
• Cable lengths
• Efficiency of use.
Reference Refer to these sections in this chapter when considering the
various factors in planning the appropriate location for your LPS.
XEROX 4050/4090/4450/4650 LPS INSTALLATION PLANNING 1-31
Page 38

Page 39
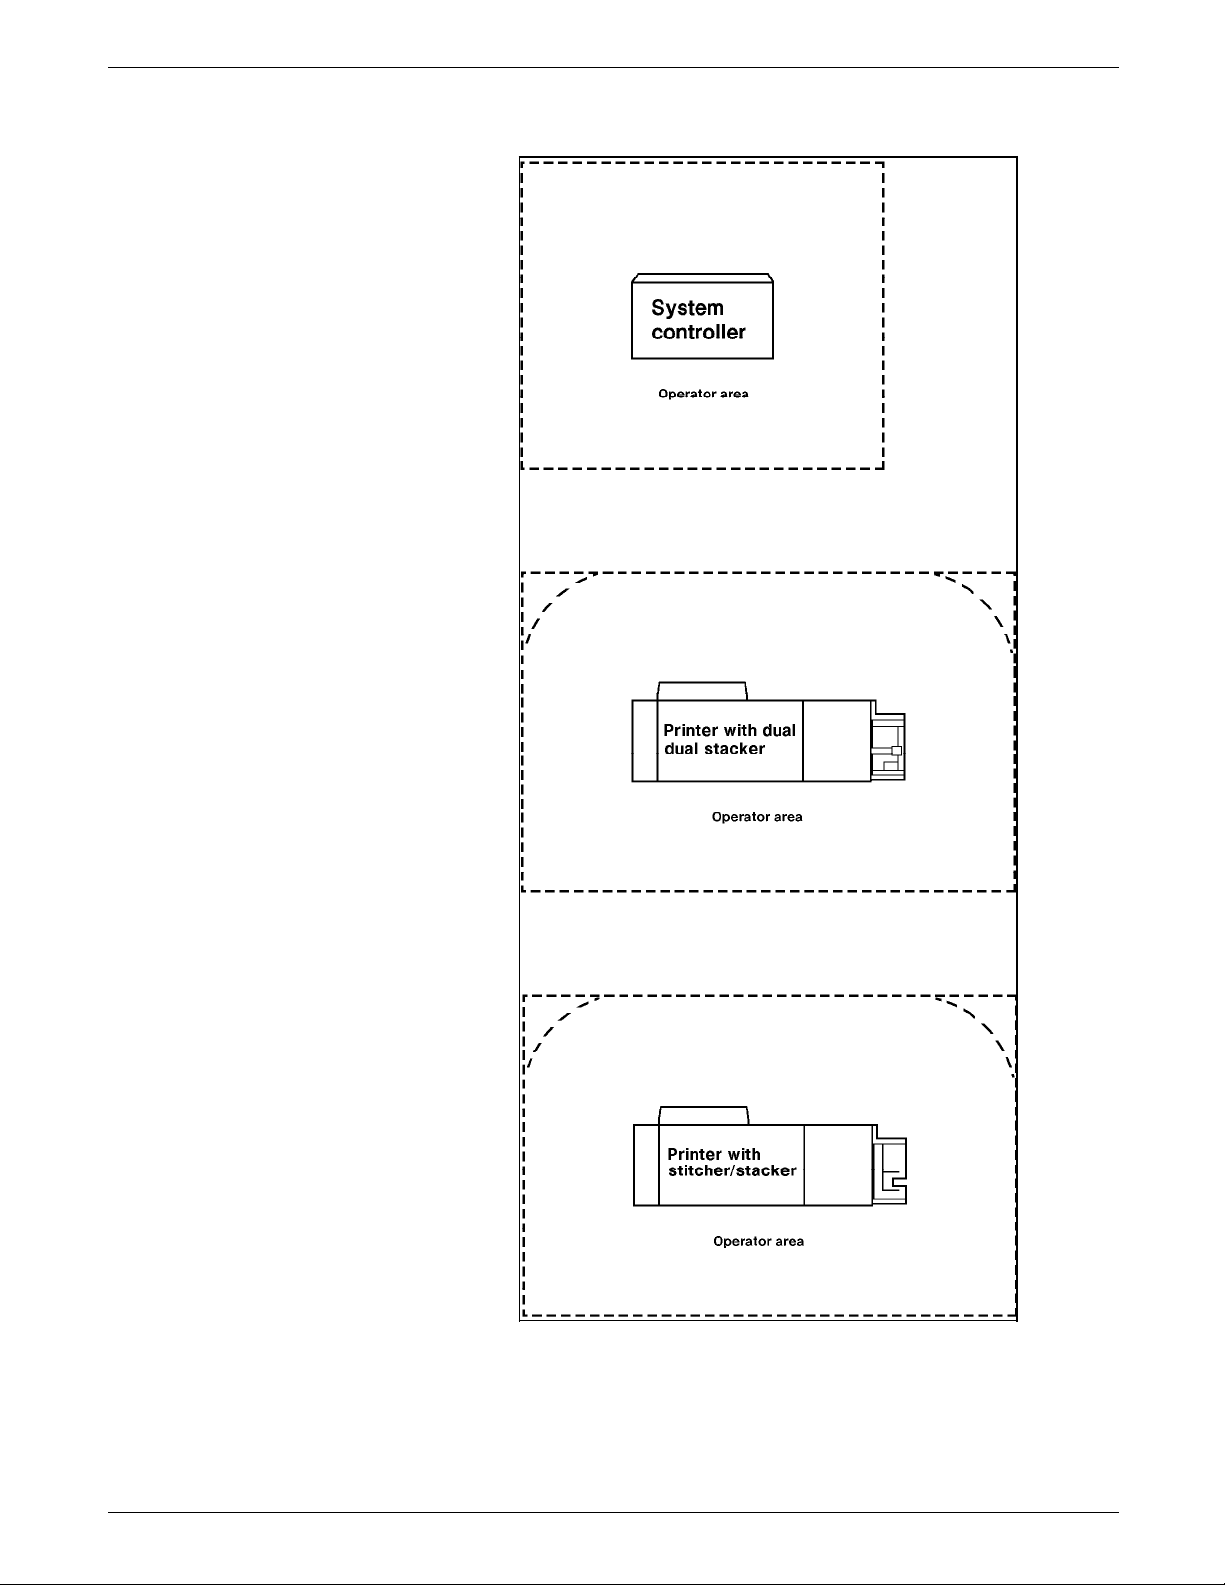
Figure 1-16. Space planning templates
PREINSTALLATION
XEROX 4050/4090/4450/4650 LPS INSTALLATION PLANNING 1-33
Page 40

Page 41
Figure 1-16. Space planning templates (continued)
PREINSTALLATION
XEROX 4050/4090/4450/4650 LPS INSTALLATION PLANNING 1-35
Page 42

Page 43

Figure 1-16. Space planning templates (continued)
PREINSTALLATION
XEROX 4050/4090/4450/4650 LPS INSTALLATION PLANNING 1-37
Page 44

Page 45

Installation process
2. Installation
This chapter provides a brief explanation of the installation
process for your Laser Printing System (LPS).
The installation process generally takes one to several days to
complete. Equipment, software kits, and documentation kits may
all arrive in one day or over the course of several days.
When all necessary items are in place, a team of Xerox personnel
completes the installation of your LPS. Installation
responsibilities are shared by sales and service representatives
and analysts.
The installation process typically occurs in the following order:
• Equipment (hardware) and options are installed.
• LPS is “sysgened” and tested.
• System is placed online, if appropriate.
• Initial applications are loaded and sample jobs are run.
• Interface configurations are set (4450/MRP)
• Initial operator training is provided.
Installation responsibilities
Who Responsibilities
Xerox
Customer
• Install the LPS.
• Load the software and initial applications.
• Train operator(s).
• Review preventive maintenance schedules and service call procedures.
• Ensure that all needed supplies are on site.
• Ensure that your system specialist is available during the loading of software and
applications tapes.
• Have the appropriate operators available for training.
• Check the documentation and software kits for completeness.
• Have test jobs ready to run, if desired.
Xerox is responsible for the physical installation of the LPS
components and the loading of software and applications. You
have the more general site responsibility of ensuring that the
right personnel and supplies are available. Installation
responsibilities are outlined in table 2-1.
Table 2-1. Installation responsibilities
XEROX 4050/4090/4450/4650 LPS INSTALLATION PLANNING 2-1
Page 46

INSTALLATION
Reference Refer to the “Installation planning checklist” in the
“Preinstallation” chapter of this guide for a complete list of all
installation responsibilities.
2-2 XEROX 4050/4090/4450/4650 LPS INSTALLATION PLANNING
Page 47

3. Postinstallation
After the installation of your Laser Printing System (LPS), a
number of ongoing tasks must be performed. These tasks may
include all or some of the following:
• Placing service calls for hardware problems and obtaining
assistance in solving application-related problems
• Identifying and implementing new applications
• Arranging additional operator training
• Overseeing routine customer maintenance and meter
reporting
• Ordering additional fonts and documentation
• Maintaining an adequate inventory of consumable supplies.
Reference Refer to the “Training” section of the “Preinstallation” chapter for
information on training and workshops.
As installation coordinator, it is your responsibility to designate a
person to perform these tasks.
Xerox support services
This chapter describes these tasks and some of the Xerox
support services available to you. Use the “Consumable
supplies” table and “Supplies checklist” provided at the end of
the chapter when ordering supplies.
Xerox provides many services in support of your LPS. These
services include the following:
• Xerox Printing Systems Customer Support Center
• The Xerox Connection
• Xerox Font Services
• Xerox Documentation and Software Services (XDSS)
• Xerox Supplies Order Service.
Detailed information about these services is described in this
chapter.
Prior to installation, your Xerox sales representative is available to
answer your questions about the products, services, or billing. If
you need assistance in resolving applications-related problems or
questions, contact the Xerox Customer Support Center. Your
Xerox system can provide a variefy of systems consulting
services.
XEROX 4050/4090/4450/4650 LPS INSTALLATION PLANNING 3-1
Page 48

POSTINSTALLATION
Routine maintenance
There are a number of routine maintenance tasks that must be
performed to ensure maximum efficiency of your LPS. These
tasks include the following:
• Adding dry ink
• Adding stitcher wire (with the stitcher/stacker option)
• Cleaning the tape and floppy disk drives
• Cleaning the terminal and the exterior surfaces of the system.
Step-by-step instructions on performing these routine
maintenance tasks are contained in your Xerox
4050/4090/4450/4650 LPS Operator Guide. You need to decide
how many operators are responsible for performing these
maintenance tasks. Most maintenance procedures are covered in
the initial operator training provided shortly after installation.
Note: Stitcher wire replacement is to be performed by operators
who have completed Advanced Customer Training (ACT) only.
Refer to the “Training” section of the “Preinstallation” chapter for
additional information.
Meter reading and reporting
Xerox Font Service
Reference Refer to the “Fonts and supplies for installation” section of the
How to order fonts in the United States
As print jobs are processed, firmware in the printer or software in
the system controller accumulates, saves, and maintains usage
data in its nonvolatile memory.
Sometime during the last five working days of each month, usage
data needs to be reviewed and the information transmitted to
Xerox for billing purposes. Refer to your Xerox
4050/4090/4450/4650 LPS Operator Guide for complete
instructions on how to report meter readings.
Numerous licensed fonts are available from Xerox Font Services.
If you plan to use a font that is not a system font, place your
order so that the font diskettes arrive before your LPS is installed.
Fonts can be ordered on magnetic tape or diskette for
downloading from your host computer system to the LPS.
“Preinstallation” chapter for more information on fonts.
Call Xerox Font Services to place an order. The Xerox Font
Services representative assists you in completing the necessary
forms. The representative also answers your questions regarding
literature, order status, or custom font specifications.
When dialing the appropriate toll-free number listed below, give
your LPS serial number:
LPS serial number: __________
3-2 XEROX 4050/4090/4450/4650 LPS INSTALLATION PLANNING
Page 49
POSTINSTALLATION
Call Xerox Font Services at 1-800-445-FONT (3668).
Write to the following address to order fonts or to request
information:
Xerox Corporation
Font Services ESCP-126
701 South Aviation Boulevard
El Segundo, California 90245
The following chart shows the approximate time it takes to
receive your order. A Xerox Font Services representative can give
you a more precise delivery schedule.
Approximate time to place an order before the day of installation
is shown in table 3-1.
Table 3-1. Ordering schedule
Time Fonts
6 weeks Custom fonts and alterations of existing
fonts (thinning, scaling, and so on)
5 business days Logos, signatures
3 business days Licensed standard fonts
How to order fonts in other countries
Contact your local Xerox sales representative to place an order.
The Xerox representative assists you in completing the necessary
forms. The representative also answers your questions regarding
literature, order status, or custom font specifications.
Ordering documentation and software
Call the Xerox Document and Software Services (XDSS) at 1-800445-5554 to order additional copies of the reference manuals or
any of the other documents listed.
In the back of this book is a card to use for ordering the Xerox
Customer Documentation Catalog that has a complete list and
description of available Xerox documents.
Xerox Supplies Order Service
To order Xerox supplies within the United States, call the
following toll-free number during business hours—8:00 a.m. to
6:00 p.m (Pacific Standard Time): 1-800-822-2200.
In Canada, call your Xerox supply order representative between
7:30 a.m. and 7:00 p.m. (Eastern Standard Time) at the following
toll free numbers:
XEROX 4050/4090/4450/4650 LPS INSTALLATION PLANNING 3-3
Page 50

POSTINSTALLATION
How to order supplies
733-9400 (in Toronto)
1-800-688-0133 (in Quebec)
1-800-668-0199 (in the rest of Canada)
Contact your local sales representative for orders in other
locations.
The Xerox supply order representative will ask you to supply the
following information:
1. Your Xerox customer order number (supplied by your
Xerox representative and/or included on your Xerox invoice).
2. Your product model number: (4050, 4090, 4450, or 4650)
3. Purchase order number (if that is the method of payment
used by our company.
4. Your supply items:
• Description
• Part number
• Quantity.
Reference Refer to the following “Consumable supplies” table for a
description and part numbers for each supply item.
Use the following “Supplies checklist” to prepare and record
your order.
3-4 XEROX 4050/4090/4450/4650 LPS INSTALLATION PLANNING
Page 51
Consumable supplies table
Item Description Part Number
Paper Xerox paper quantities are 10 reams (5,000 sheets) to a
carton unless otherwise noted below.
8.5 x 11 inch 4024 Dual Purpose Paper 3R721
A4 4024 Dual Purpose Paper 3R2594
8.5 x 14 inch 4024 Dual Purpose Paper 3R727
8.5 x 11 inch 4024 Dual Purpose Paper, 3-hole 3R723
8.5 x 11 inch 4024 Dual Purpose Paper, 3-hole* 3R2193
8.5 x 11 inch 4024 Dual Purpose Paper, 4-hole 3R1983
POSTINSTALLATION
Table 3-2 lists the supplies that are available for your LPS. Use
this table to help you determine your supplies needs.
Table 3-2. Consumable supplies
8.5 x 11 inch 4024 Dual Purpose Paper, 4-hole* 3R3008
8.5 x 11 inch 4024 Dual Purpose Paper, 7-hole 3R1984
8.5 x 11 inch 4024 Dual Purpose Paper, 7-hole* 3R3010
8.5 x 11 inch 4024 Smooth 3R2675
8.5 x 14 inch 4024 Smooth 3R2677
8.5 x 11 inch Dual Purpose Colors, Blue 3R3052
8.5 x 11 inch Dual Purpose Colors, Blue, 3-hole 3R3068
8.5 x 14 inch Dual Purpose Colors, Blue, 3-hole 3R3084
8.5 x 11 inch Dual Purpose Colors, Green 3R3056
8.5 x 11 inch Dual Purpose Colors, Green, 3-hole 3R3072
8.5 x 14 inch Dual Purpose Colors, Green 3R3088
8.5 x 11 inch Dual Purpose Colors, Pink 3R3058
8.5 x 11 inch Dual Purpose Colors, Pink, 3-hole 3R3074
8.5 x 14 inch Dual Purpose Colors, Pink 3R3090
8.5 x 11 inch Dual Purpose Colors, Yellow 3R3054
8.5 x 11 inch Dual Purpose Colors, Yellow, 3-hole 3R3070
8.5 x 14 inch Dual Purpose Colors, Yellow 3R3086
8.5 x 11 inch Dual Purpose Colors, Buff 3R3060
8.5 x 11 inch Dual Purpose Colors, Buff, 3-hole 3R3076
8.5 x 14 inch Dual Purpose Colors, Buff 3R3092
8.5 x 11 inch Dual Purpose Colors, Goldenrod 3R3062
8.5 x 11 inch Dual Purpose Colors, Goldenrod, 3-hole 3R3078
8.5 x 14 inch Dual Purpose Colors, Goldenrod 3R3094
8.5 x 11 inch Dual Purpose Colors, Ivory 3R3064
XEROX 4050/4090/4450/4650 LPS INSTALLATION PLANNING 3-5
Page 52
POSTINSTALLATION
Item Description Part Number
8.5 x 11 inch Dual Purpose Colors, Ivory, 3-hole 3R3080
8.5 x 14 inch Dual Purpose Colors, Ivory 3R3096
8.5 x 11 inch Dual Purpose Colors, Gray 3R3066
8.5 x 11 inch Dual Purpose Colors, Gray, 3-hole 3R3802
8.5 x 14 inch Dual Purpose Colors, Gray 3R3098
Table 3-2. Consumable supplies (continued)
8.5 x 11 inch** Dual Purpose Colors, Rainbow Pack 35,000 sheets/carton 250
3R3107
sheets/pack)
8.5 x 11 inch 10 Series Dual Purpose Paper 3R2950
8.5 x 11 inch 10 Series Dual Purpose Paper, 3-hole 3R2952
8.5 x 11 inch 10 Series Dual Purpose Paper, 3-hole* 3R3016
8.5 x 14 inch 10 Series Dual Purpose Paper 3R2954
8.5 x 11 inch 10 Series Smooth 3R54
8.5 x 14 inch 10 Series Smooth 3R83
Transparencies Xerox transparencies are packaged 100 sheets to a box.
8.5 x 11 inch Clear, with a white strip on the edge 3R2780
Removable strip 3R3108
Paper backed 3R3028
Labels
Xerox labels are packaged 100 sheets to a box.
(Gummed)
8.5 x 11 inch 24 labels per sheet 3R2363
8.5 x 11 inch 8 labels per sheet 3R2364
8.5 x 11 inch Custom form (uncut) 3R2365
Dry ink Packaged 3 cartridges/carton. (Consumption rate is
6R717
approximately one cartridge per 45,000 pages).
Developer Packaged 1 container/carton. (Effective life is approximately
5R302
one container per 500,000 pages).
Fuser lubricant Packaged 2 tubes/carton. (Consumption rate is
8R983
approximately one tube per 100,000 pages).
Stitcher wire Packaged 1 reel per carton. (Consumption rate is
8R1174
approximately 32,000 stitches per reel).
Floppy disks Packaged 10 floppy disks per box. 5.25 inch, double-sided,
11R66003
dual density floppy disks.
Cleaning
Magnetic Head Cleaning Kit. Packaged 1 diskette per box. 9R980230
supplies
Hub and transport cleaner 99P87486
Foam-tipped swabs 99P87256
Lint-free towels 35P2163
3-6 XEROX 4050/4090/4450/4650 LPS INSTALLATION PLANNING
Page 53
Table 3-3. Supplies checklist
Checklist: Supplies
Use this checklist to help record the supplies you require, the date on which the order should be
placed, and the actual date of the order.
POSTINSTALLATION
Item Description and part number
Paper
Transparencies
Labels
Dry ink
Quantity
Date to
order
Date
ordered
Developer
Fuser lubricant
Stitcher wire
Floppy disks
Cleaning
supplies
XEROX 4050/4090/4450/4650 LPS INSTALLATION PLANNING 3-7
Page 54

Page 55

Glossary
A3 International paper size measuring 297 by 420 mm or 11.69 by
16.54 inches.
A4 International paper size measuring 210 by 297 mm or 8.27 by
11.69 inches.
B4 International paper size measuring 250 by 353 mm or 9.84 by
13.9 inches.
batch processing Process that allows for repetitive operations to be performed
sequentially on batched data without much involvement from the
computer operator.
BCD Binary coded decimal.
bitmap Visual representation of graphic images in which a bit defines a
picture element (pixel) and a matrix of bits defines an image. For
example, if a bit is 1, the corresponding pixel is printed.
blocking Process of combining two or more records into a single block of
data which can moved, operated upon, stored, and so on, as a
single unit by the computer.
block length Number of characters or bytes contained in a block of data (the
block is treated as a unit within the computer). Block length is
usually invariable within a system and may be specified in units
such as records, words, computer words, or characters.
BOF Bottom-of-form.
BOT Beginning-of-tape.
bpi Bits per inch.
CCID Character Code Identifier. Code associated with the universal
identifier “Xerox” to indicate the version of the Xerox character
code standard used to code Interpress strings.
character set Set of all characters defined in a font, including alphabetic,
numeric, and special characters such as symbols.
cluster Group of related feeder trays, usually containing the same size
and type of paper (stock). Each cluster has a name, consisting of
one to six alphanumeric characters.
XEROX 4050/4090/4450/4650 LPS INSTALLATION PLANNING GLOSSARY-1
Page 56

GLOSSARY
CME Entry modifying the output printing characteristics of a report on
a copy-to-copy basis.
compiler Software that translates instructions written in high-level language
into machine language for execution by a system.
Copy Modification Entry See CME.
copy-sensitive Job in which multiple copies of a report contain different data,
such as paychecks and banking statements.
cpi Characters per inch.
default Value assigned to a field by the system if no input is received
from the operator. You can change the default value of a field.
DJDE Dynamic Job Descriptor Entry. Command within an input data
stream used to modify the printing environment dynamically.
dot Picture element (pixel) imaged by a printer. The number of dots
imaged per inch measures printer resolution, for example, 300
dots per mich (dpi). See also spot.
dpi Dots per inch. Indicates the number of dots per inch displayed
on a terminal screen or printed to form a character or graphic.
dry ink Minute particles of resin and carbon black that can accept an
electrical charge and create images. Resin and carbon black or
color pigment toner are combined with developer to form the
dry ink.
duplex 1. Ability of a data communications system to send and receive
information simultaneously. 2. In printing, duplex means printing
on both sides of the paper.
Dynamic Job Descriptor Entry See DJDE.
edgemarking Use of graphic objects (usually lines or boxes) that bleed off the
edge of the physical page. See also physical page.
embedded blanks Blank spaces within a command line.
ENET Ethernet network.
EOT End of tape.
Ethernet Xerox local area network (LAN) that allows transmission of data
by cable from one device to another.
GLOSSARY-2 XEROX 4050/4090/4450/4650 LPS INSTALLATION PLANNING
Page 57

GLOSSARY
FCB Forms Control Buffer. Controls the vertical format of printed
output.
FCP File Control Parameter.
FCU File Conversion Utility.
FDL Forms Description language. LPS-resident source language used
to design electronic forms. See also FSL and form.
FDR File directory.
FIS Font Interchange Standard. Defines the digital representation of
fonts and character metrics for the generation of an entire series
of Interpress fonts.
floating accent Nonspacing accent characters that can be combined with
characters and printed as a composite.
font Complete set of characters of a particular font family having the
same point size, weight, stress, and orientation.
Font Interchange Standard See FIS.
form 1. Compiled .FSL file. 2. Specific arrangement of lines, text, and
graphics stored in an electronic version. Forms can be printed
without variable data or merged with variable data during the
printing process. See also FDL and FSL.
Forms Control Buffer See FCB.
Forms Description Language See FDL.
Forms Source Library See FSL.
FSL Forms Source Library. Uncompiled collection of user-created
files containing FDL commands. See also FDL and form.
hexadecimal Numbering system with a base of 16. The numbers 10 through
15 are represented by A through F.
highlight color Printing with black plus another color. A range of colors, tints,
and shades is printed by varying the percentage of black dots,
colored dots, and the white space between the dots.
HIP Host Interface Processor.
image area Area on a physical page that may contain text or graphics.
XEROX 4050/4090/4450/4650 LPS INSTALLATION PLANNING GLOSSARY-3
Page 58

GLOSSARY
initialize 1. To prepare a blank diskette so it can accept data. This is
usually accomplished when a program is booted. 2. To set all
information in a computer system to its starting values.
Interpress Industry-standard page description language developed by Xerox.
Interpress documents can be printed on any sufficiently powerful
printer equipped with Interpress print software.
JCB Job Control Block.
JCL Job Control Language.
JDE Job Descriptor Entry. Collection of job descriptions.
JDL Job Description Library. Collection of compiled job descriptions.
See also JSL.
JID Job Identifier.
job Synonymous with a START command, a job is a group of print
data sets called reports. A job may contain one or multiple
reports.
job control Program called into storage to prepare each job or job step to
be run.
Job Descriptor Entry See JDE.
Job Descriptor Library See JDL.
job management Collective functions of job scheduling and command processing.
Job Source Library See JSL.
JSL Job Source Library. Collection of uncompiled job descriptions.
See also JDE and JDL.
keyword Required part of a command.
label Reference to a file saved on tape or disk, a record indicating the
file name or date created, or other control information.
landscape Orientation in which text and images are positioned parallel to
the long edge of the paper.
legal size Paper size measuring 8.5 by 14 inches or 216 by 356 mm.
letter size Paper size measuring 8.5 by 11 inches or 216 by 279 mm.
GLOSSARY-4 XEROX 4050/4090/4450/4650 LPS INSTALLATION PLANNING
Page 59

GLOSSARY
line feed Control character that (unless set to be interpreted as a line end)
causes the printing system to begin printing in the current
character position of the next line.
literal Alphanumeric character beginning with a letter, including an
asterisk, period, colon, or slash, and not enclosed in single
quotes.
logical page In Xerox printing systems, a logical page is a formatted page that
is smaller than the physical page. A logical page is defined by an
origin, thus allowing more than one logical page to be placed on
a physical page.
lpi Lines per inch.
LPS Laser printing system.
mask Selection of bits from a storage unit by use of an instruction that
eliminates the other bits in the unit. In accessing files, a file
name mask is used to reference one or more files with similar
file-id (identifier) syntax. In Interpress, a mask serves as a
template, indicating the shape and position of an object on a
page.
metacode Method of controlling the image generator. The character
dispatcher uses these codes to generate scan line information.
This information is sent in the form of character specifications to
the image generator, which uses it to compose the bit stream
that modulates the laser. Also called native mode.
monochrome Printing in one color only.
nesting Subroutine or set of data, such as a comment, contained
sequentially within another set of data.
object file Source file converted into machine language (binary code).
octal System of representing numbers based on 8.
offset To place printed output sets in slightly different positions from
each other in an output bin for easy separation of collated sets.
operand That which is acted upon, for example, data, in an operation or
process.
operating system Software that controls the low-level tasks in a computer system,
such as input or output and memory management. The
operating system is always running when the computer is active.
XEROX 4050/4090/4450/4650 LPS INSTALLATION PLANNING GLOSSARY-5
Page 60

GLOSSARY
orientation In reference to image area, describes whether the printed lines
are parallel to the long edge of the paper (landscape) or the
short edge of the paper (portrait).
origin In reference to image area, the upper left corner of a sheet.
overprint ratio Maximum number of variable data and form characters that can
be intersected by a single scan line.
packet A group of DJDE records terminated by an END command.
page end Command character (form feed) to terminate the current page.
palette Predefined set of colors or inks. Different versions are provided
with the printer and with host- or PC-based application software.
parameter Part of a command, other than the keyword. See keyword.
parse To read or interpret a command; to build up a parameter list
from information within a command.
PCC Printer Carriage Control.
PDE Page Description Entry.
PDL Print Description Language. Language used to describe printing
jobs to a laser printing system. PDL describes the input (type,
format, characteristics), performs the processing functions
(logical processing), and describes the output (type, format, font
selection, accounting options).
PE Phase encoded.
physical page Actual page size your printer uses to print a form.
pitch Width of a fixed-pitch font expressed in characters per horizontal
inch.
pixel Acronym for picture element. Smallest addressable point of a
bitmapped screen that can be independently assigned color and
intensity.
point In Xerox laser printing systems, a unit of measurement equal to
0.0139 inch. Points are always used to express type, size, and
leading. There are 12 points to a pica and about 72 points to an
inch.
portrait Orientation in which text and images are positioned parallel to
the short edge of the paper.
GLOSSARY-6 XEROX 4050/4090/4450/4650 LPS INSTALLATION PLANNING
Page 61

ppm Pages per minute.
PQA Print quality adjustment.
Print Description Language See PDL.
print file Portion of the system disk memory (up to 4 MB) reserved for
temporary storage of formatted pages for printing. Pages are
retained until they are delivered to the output tray.
PSC Printer Subsystem Controller
query Request for data or other information, entered by an operator
while the system is processing.
record A line of data as defined in the RECORD command.
report A single output data set, delimited by an RSTACK command or as
a file. In setting a separation boundary, reports are subsets of a
job.
GLOSSARY
resolution Number of dots per inch (dpi) or spots per inch (spi). The
greater the number of dots, the higher the resolution and the
clearer the image. The terms dots, spots, and pixels are
synonymous.
scale To adjust font or image size according to given proportions.
sequential 1. In numeric sequence, usually in ascending order. 2. A file
structure in which records are written one after another and
cannot be randomly accessed.
set Multiple copies of the same report.
simplex printing Printing on one side of the page.
spi Spots per inch. See resolution.
spot A picture element imaged by the printer. Synonymous with dot
and pixel.
statement Detailed instructions in a program step, written according to
specific rules called syntax.
stock User-defined name in the JSL that specifies a certain type of
paper for printing a job.
stockset Collection of stocks to be used on a print job. See also stock.
XEROX 4050/4090/4450/4650 LPS INSTALLATION PLANNING GLOSSARY-7
Page 62

GLOSSARY
string Connected sequence of alphanumeric characters treated as one
unit of data by a program.
syntax Rules governing the structure of expressions in a programming
language.
system page Maximum area in which text and graphics can be imaged on a
printing system.
tape density Expression of the format of a magnetic tape measured in number
of bytes that can be stored per inch of tape.
TOF Top of form.
two-up Printing two logical pages on one side of a physical page.
UCSB Universal Character Set Buffer.
UCS Universal Character Set
variable data Changeable information which is merged with a standard
document to create specialized or personalized versions of that
document. Variable data is not a part of a form design, but
varies from page to page.
virtual page Page area selected by a forms designer for printing.
vpos Vertical positioning.
wildcard Character (usually an asterisk *) which can be inserted into a
command string to indicate that it may represent one or more
characters in that position.
xdot Unit of measurement representing a fraction of an inch. May
also be referred to as a picture element (pixel) or spot; for
example, 1/600 spots per inch (spi).
xerographic mode Either of two possible printer configurations: 1. Black mode
which allows printing with black dry ink only. 2. Highlight mode
which enables both highlight color and black printing.
XNS Xerox Network Systems.
XPAF, XPF Xerox Printer Access Facility.
GLOSSARY-8 XEROX 4050/4090/4450/4650 LPS INSTALLATION PLANNING
Page 63

Index
Numerals
180 cartridge tape system, 1-21 to 1-22
9-track magnetic tape drive, 1-7
A
activities, 1-2
B
bypass transport, 1-13
C
cable
lengths, 1-20
location, 1-20
requirements, 1-19 to 1-20
channel connection, see interface requirements
cleaning supplies, 3-6
clearance, 1-13
consumable supplies, see supplies
customer responsibilities, see responsibilitie
Customer Support Center, 3-1
D
DEC, 1-23 to 1-26
delivery access, 1-16
developer, 1-30, 3-6
Digital Equipment Corp, see DEC
dimensions, see system controller or printer
documentation, 1-26
dry ink, 1-30, 3-6
dual
feeder, 1-8, 1-9
stacker, 1-8, 1-10, 1-12
E
efficiency of use, 1-15
electrical requirements, 1-18 to 1-19
environmental requirements, 1-18 to 1-19
F
floppy disks, 1-30, 3-6
fonts, 1-27 to 1-28
fuser lubricant, 1-30, 3-6
H
high capacity feeder, 1-10, 1-11
I
IBM host connection, 1-23
installation, v, 1-1, 1-5, 2-1
installation planning checklist, 1-3 to 1-5
interface requirements, 1-22
L
labels, 3-6
M
meter reading and reporting, 3-2
O
ordering
documentation, 3-3
software, 3-3
supplies, 3-3 to 3-4
P
paper, 1-29, 3-5 to 3-6
personnel, 1-2
planning checklist, installation, see installation planning
checklist
postinstallation, v, 1-5
preinstallation, v
printer, 1-8 to 1-13
R
responsibilities, 1-1 to 1-2, 2-1
routine maintenance, 3-2
S
service, 1-1
shared space, 1-14
site selection, 1-1,1-4
space planning templates, 1-31 to 1-37
space requirements, 1-5 to 1-13
stitcher/stacker, 1-9, 1-11, 1-30
stitcher wire, 1-30, 3-6
supplies, 1-4, 1-27 to 1-31, 3-5 to 3-7
support, 1-1, 3-1
system controller, 1-6 to 1-7
T
tapes, 1-31
terminal requirements, 1-15
third party interface connection, see interface
requirements
training, 1-1, 1-2, 1-26 to 1-27
transparencies, 3-6
XEROX 4050/4090/4450/4650 LPS INSTALLATION PLANNING INDEX-1
Page 64

INDEX
X
Xerox Font Service, 3-2 to 3-3
Xerox support services, 3-1
INDEX-2 XEROX 4050/4090/4450/4650 LPS INSTALLATION PLANNING
 Loading...