

Page 1

Document Centre
490/480/470 /46 0 ST
System Administration Guide
August 2001 604P06900
Xerox Document C ent re M ode l _______________
Serial Number ___ ________________ _________
Page 2

Xerox
Besseme r Roa d
Welwyn Garden City
Hertfordshire AL71HE
Great Britain
©2001 by Xerox Corporation. All rights reserved.
Copyright protection claimed includes all forms and matters of copyrighted material and information now allowed by
statutory or judicial law or hereinafter granted, including without limitation material generated from the software
programmes that are displayed on the screen such as icons, screen display looks, etc.
XEROX®, The Document Company® and the stylised X and identifying product names and numbers are registered
trademarks of XEROX CORPORATION or Xerox (Europe) limited.
The Document Centre ST model includes an implementation of LZW licensed under U.S. Patent 4,558,302.
Product names used in this guide may be trademarks or registered trademarks of their respective companies and are
hereby acknowledged.
This document contains images of screens that were created using Zinc Application Framework software version 3.5
© January 1997 Zinc Software Inc.
As an ENERGY STAR® partner, Xerox Corporation has determined that this product meets the ENERGY STAR®
guidelines for energy efficiency.
RAL, the German Institute for Quality Assurance and Labeling, has awarded the Document Centre 255 and 265 DC the
Blue Angel Environmental Label, distinguishing it as a machine which satisfies Blue Angel criteria for environmental
acceptability in terms of machine design, manufacture, and operation.
Whilst the information in this Guide is correct at the time of first publication, Xerox reserves the right at any time to
change the information without notice. Changes are made periodically to this document. Changes and technical updates
will be added in subsequent editions.
ii Xerox Document Centre System Administration Guide
Page 3

The Document Centre ST model includes software provided by the Internet Software Consortium.
Copyright (c) 1995, 1996, 1997, 1998, 1999, 2000, 2001
The Internet Software Consortium - DHCP. All rights reserved.
Redistribution and use in source and binary forms, with or without modification, are permitted provided that the
following conditions are met:
Redistributions of source code must retain the above copyright notice, this list of conditions and the following
disclaimer.
Redistributions in binary form must reproduce the above copyright notice, this list of conditions and the following
disclaimer in the documentation and/or other materials provided with the distribution.
Neither the name of The Internet Software Consortium - DHCP nor the names of its contributors may be used to endorse
or promote products derived from this software without specific prior written permission.
This Software Is Provided By The Internet Software Consortium And Contributors "As Is" And Any Express Or
Implied Warranties, Including, But Not Limited To, The Implied Warranties Of Merchantability And Fitness For A
Particular Purpose Are Disclaimed. In No Event Shall The Internet Software Consortium Or Contributors Be Liable For
Any Direct, Indirect, Incidental, Special, Exemplary, Or Consequential Damages (Including, But Not Limited To,
Procurement Of Substitute Goods Or Services; Loss Of Use, Data, Or Profits; Or Business Interruption) However
Caused And On Any Theory Of Liability, Whether In Contract, Strict Liability, Or Tort (Including Negligence Or
Otherwise) Arising In Any Way Out Of The Use Of This Software, Even If Advised Of The Possibility Of Such
Damage.
Xerox Document Centre System Administration Guide iii
Page 4

European Union Declaration of Conformity
Approvals and Certifications
The CE marking applied to this product symbolises XEROX
Limited Declaration of Conformity with the following applicable
Directives of the European Union as of the dates indicated:
January 1, 1995:
Council Direc ti ve 73/23/EEC amended by Council Di rective 93/68/
EEC, approximat ion of th e l aws of the mem ber s tates r elate d to l ow
voltage equipment.
January 1, 1996:
Council Directive 89/336/EEC, approximation of the laws of the
member states re lated to e lectromagnetic co mpatibi lity.
March 9, 1999:
Council Directive 99/5/EC, on radio equipment and
telecommu nication s termina l equipm ent and t he mutu al recogn ition
of their conformity.
A full declaration, defining the relevant directives and referenced
standards can be obtained from your XEROX Limited
representative or by contacting:
Environment, Heal th and Safety,
XEROX Limited,
PO Box 17,
Bessemer Road,
Welwyn Garden City,
Hertfordshire
AL7 1HE
ENGLAND.
Tel Number +44 (0) 1707 353434
iv Xerox Document Centre System Administration Guide
Page 5

WARNING
This produ ct is cer tified man ufactured and tested in complia nce with
strict safety and radio frequency interference regulations. Any
unauthorised alteration which, includes the addition of new
functions or the connection of external devices, may impact this
certification. Please contact your local XEROX Limited
representative for a list of approved accessories.
WARNING
In order to allow this equipment to operate in proximity to
Industrial, Scientific and Medical (ISM) equipment, the external
radiatio n from the ISM equ ipment may hav e to be limite d or special
mitigation measures taken.
WARNING
Shielded cables must be used with this equipment to maintain
compliance with Council Directive 89/336/EEC.
Xerox Document Centre System Administration Guide v
Page 6

The Electricity at Work Regulation (in England and
Wales ) UK ONLY
Electricity at Work Regulations:
The Electrici ty at Work Regulati on 1989 came into f orce in England
and Wales on th e 1 Apr il 1990 . Thi s 1989 Regulation places a duty
on all employers and sel f-empl oyed pers ons to ensu re the ele ctri cal
system in the ir premise s are constru cted, mainta ined and operat ed in
such a manner as to prevent, so far as reasonably practical, danger.
This includes ensuring all electrical equipment connected to such
electrical systems are safely constructed, maintained and operated.
All Xerox equipment have been designed to exacting safety
standards . They have all underg one a variety of st ringent safe ty tests
including earth bond, insulation resistance and electrical strength
tests. Xerox manufacturing plants have been awarded ISO 9000
quality certification and are subject to regular audits by the British
Standards Institution or equivalent national standards body.
Xerox equipment which has been properly and regularly serviced
and maintaine d should not have to und ergo additional sp ecific safety
tests pursuant to the 1989 Regulation. Customers wishing to
complete s afety testing s hould contact Xerox (s ee page 1 ) for a dvice
prior to any test implementation.
Xerox equipment should, however, be properly and regularly
serviced and maintained at all times.
QUESTION: What is the Electricity at Work Regulation?
ANSWER: The Electricity at Work Regulation 1989 came into
force in England and Wales on the 1 April 1990. This 1989
Regulation places a duty on all employers and self-employed
persons to ensure the electrical systems in their premises are
constructed, maintained and operated in such a manner as to
prevent, so far as reasonably practicable, danger. This includes
ensuring all elect rical pro ducts connect ed to such elec trical sys tems
are safe ly constructed, maintained and operated.
QUESTION: Does Xerox comply with the Electricity at Work
Regulation?
ANSWER: The regulation places a duty on all employers and
self-employed persons to ensure the electric al systems in their
premises are, effectively safe.
The regulation does not impose on, amongst others, manufacturers
or suppli ers of such electrica l systems. H owever, r est assure d that all
Xerox equipment which Xerox and its authorised distributors
vi Xerox Document Centre System Administration Guide
Page 7

supplies to customers, conform with all the relevant safety
legislation and standards.
QUESTION: Is Xerox equipment safe?
ANSWER: All Xerox equipment supplied by Xerox and their
authorise d distrib utors conform to all re levant safety leg islati on and
standards.
QUESTION: Is the Xerox equipment in my premises safe?
ANSWER: All Xerox equipment supplied by Xerox and its
authorise d distrib utors conform to all re levant safety leg islati on and
standards. However, like all electrical equipment, they have to be
regularly serviced and maintained by competent persons.
Xerox Customer Service Engineers ensure Xerox equipment is
serviced and maintained to exacting Xerox safety standards. If you
would like your Xerox equipment to be serviced and maintained to
such high standards, please contact your local Xerox Customer
Service Organisation. They will be pleased to assist you.
QUESTION: Does the Xerox equipment in my premises comply
with the Electricity at Work Regulations?
ANSWER: All employers and self-employed persons must
ensure that the electrical systems in their premises are safe. This will
include ensuring Xerox equipment in such premises is safe.
Xerox Product Safety functi on has pr epare d a guide whi ch cont ains
a list of tests which may be completed by your Xerox Customer
Service Organisation. THESE TESTS MUST BE CARRIED OUT
ONLY BY PERSONS WHO POSSESS THE RELEVANT SKILL,
KNOWLEDGE AND EXPERIENCE TO CARRY OUT SUCH
TESTS.
Please conta ct the Xerox Custom er Service Organi sation fo r further
information.
THE USE OF INAPPROPRIATE TEST PROCEDURES AND
TEST EQUIPMENT MAY PROVIDE MISLEADING RESULTS
AND MAY CAUSE DEATH, PERSONAL INJURY AND/OR
DAMAGE TO PROPERTY.
Xerox Document Centre System Administration Guide vii
Page 8

QUESTION: I would like to carry out my own safet y te st s on t he
Xerox equipment in my premises.
ANSWER: You may, of course, request such tests as you de em
necessary to satisfy yourself that your Xerox equipment is safe.
Your Xerox Customer Sup port will be pl eased to advis e you on such
testing.
QUESTION: I require records of all tests
ANSWER: After safety testing, your Xerox Customer Service
Engineer wi ll provide y ou with a certifi cate whic h detail s the re sults
of all tests completed.
In the event of any defect bei ng noted , the Xerox equi pment wil l be
switched off and disconnected from the supply until the defect has
been corrected. You will be advised of such action to enable such
defects to be corrected.
PLEASE NOTE: YOU MUST ENSURE THAT YOUR XEROX
EQUIPMENT IS SAFE AT ALL TIMES
Please contact us if you hav e any quer ies rega rding the informat ion
provided in this document.
Xerox Product Safety,
Bessemer Road,
Welwyn Garden City,
Herts AL7 1HE, England
viii Xerox Document Centre System Administration Guide
Page 9

Radio Equipment & Telecommunications Terminal
Equipment Directive 99/5/EC
The Xerox Document Centre RDT modem option has been selfcertified by Xerox (Europe) Limited in accordance with Directive
99/5/EC and has been designed to work with the national analogue
public switched telephone networks (PSTN) and compatible PBXs
of the fo llowing c ountries:
Austria Germany Luxembourg Sweden
Belgium Greece Netherlands Switzerland
Denmark Iceland Norway United Kingdom
France Ireland Portugal
Finland Italy Spain
In the event of problems, you should contact your local Xerox
representative in the first instance.
The modem may be confi gured t o be comp atibl e with other coun try
networks. Please contact your Xerox representative if the modem
needs to be reconnected to another co unt ry’s network. There are no
user-adjustable settings in the modem.
NOTE: Although the m odem can use eithe r loop di sconne ct (pul se)
or DTMF (tone) sig nalling it is reco mmended that it is set to use
DTMF signalli ng. DTMF s ignalli ng provide s reli able and faster call
set-up.
Modificati on, conne ction to exter nal contro l soft ware or to exte rnal
control apparatus not authorised by Xerox, will invalidate the
product’s certification.
Xerox Document Centre System Administration Guide ix
Page 10

x Xerox Document Centre System Administration Guide
Page 11

Table of Contents
1. Introduction
How to Use this Document ..........................................................................................1-2
Document Centre Options ............................................................................................ 1-3
Conventions used in this document..............................................................................1-4
Other Sources of Information.......................................................................................1-5
ST Model Features ................................ ......... ........ .................................. ........ ......... ...1-7
2. How to Connect to Ethernet or Token Ring Networks
Before You Connect to a 100BaseT Ethernet Network............................................... 2-1
How to set the Ethernet Speed..................................................................................... 2-2
Before You Connect to a Token Ring Network........................................................... 2-3
How to set the Ring Speed and Source Routing.......................................................... 2-4
How to set the Hardware (MAC) Address................................................................... 2-5
3. Dynamic/Static IP Addresses and WINS
Before you start............................................................................................................3-1
Dynamic Addressing (DHCP, BOOTP, or RARP)......................................................3-2
Static Addressing..........................................................................................................3-6
Windows Internet Name Service (WINS) Installation...............................................3-10
Where to go from here ...............................................................................................3-13
4. CentreWare Device Admin Wizard
Before you start............................................................................................................4-1
Go to the Document Centre and................................................................................... 4-2
Go to the workstation and............................................................................................4-3
Go to the Document Centre and................................................................................... 4-3
Go to a workstation and... ............................................................................................4-4
5. Novell NetWare 4.X and 5.X (NDS) Networks
Before You Start...........................................................................................................5-1
Go to the Document Centre and................................................................................... 5-2
Go to a workstation and... ............................................................................................5-5
6. Novell NetWare 3.1x or 4.x/5.x in Bindery Mode
Before you start............................................................................................................6-1
Go to the Document Centre and................................................................................... 6-2
Go to a workstation and... ............................................................................................6-6
7. UNIX Networks
Before You Start...........................................................................................................7-1
If you have not already assigned TCP/IP information.................................................7-2
Page 12

Go to a workstation and................................................................................................7-3
8. Microsoft (NetBEUI) Networks
Before You Start...........................................................................................................8-1
Go to the Document Centre and...................................................................................8-2
Go to the workstations and...........................................................................................8-5
9. Microsoft (TCP/IP) Networks
Before You Start...........................................................................................................9-1
If you have not already assigned TCP/IP information.................................................9-2
Go to the Document Centre and...................................................................................9-3
Go to the workstation and.............................................................................................9-6
10. Windows 2000 LPR and IPP Printing
Before you Start..........................................................................................................10-1
If you have not already assigned TCP/IP information............................................... 10-2
Go to the Server/Workstation and..............................................................................10-3
11. Microsoft Windows NT 4.X Server Network (TCP/IP)
Before you Start..........................................................................................................11-1
If you have not already assigned TCP/IP information............................................... 11-2
Go to the server and....................................................................................................11-3
Go to the workstation and...........................................................................................11-5
12. OS/2 (TCP/IP) Networks
Before You Start.........................................................................................................12-1
If you have not already assigned TCP/IP information............................................... 12-2
Go to a workstation and..............................................................................................12-3
13. OS/2 (NetBEUI) Networks
Before You Start.........................................................................................................13-1
Go to the Document Centre and.................................................................................13-2
Go to the workstations and.........................................................................................13-5
14. Macintosh Networks (AppleTalk)
Before you start..........................................................................................................14-1
Go to the Document Centre and.................................................................................14-2
Go to the workstation and...........................................................................................14-4
15. Banyan VINES Network
Go to the Document Centre and.................................................................................15-1
Go to the server and....................................................................................................15-4
16. Internet Services
Overview ....................................................................................................................16-1
Who should read this chapter.....................................................................................16-3
Before You Start.........................................................................................................16-4
Browser Configuration...............................................................................................16-6
Internet Services Interface Features...........................................................................16-8
Administration Logon ..............................................................................................16-11
Internet Services Use ................................................................................................16-12
Print Documents with Job Submission on the Services Page...................................16-13
Scanning Documents................................................................................................16-17
Page 13

Template Management................................... ........ .................................. ........ ........16-19
Distribution Templates.............................................................................................16-21
Template Settings........................................... ................................. ......... ................16-22
Deleting Distribution Templates..............................................................................16-32
Copying Distribution Templates..............................................................................16-33
Updating the Template List at the Document Centre...............................................16-33
Manage Jobs with Internet Services.........................................................................16-34
Active Jobs...............................................................................................................16-35
Deleting Jobs............................................................................................................16-36
View Document Centre Status with Internet Services.............................................16-37
Viewing Active Alert Messages...............................................................................16-38
Viewing Tray Status.................................................................................................16-39
View Document Centre Properties with Internet Services.......................................16-40
Configuration ...........................................................................................................16-42
Billing Counters.......................................................................................................16-43
Job Management .....................................................................................................16-44
Connectivity.............................................................................................................16-45
Services ....................................................................................................................16-77
Testing the Document Centre.................................................................................16-104
Maintenance ...........................................................................................................16-104
Getting Support......................................................................................................16-109
Viewing Support Information................................................................................16-110
Problem Solving.....................................................................................................16-111
17. Network Troubleshooting
Overview....................................................................................................................17-1
TCP/IP Troubleshooting ............................................................................................17-2
NetWare Troubleshooting..........................................................................................17-5
Microsoft (NetBIOS/NetBEUI) Troubleshooting......................................................17-7
OS/2 Troubleshooting (TCP/IP).................................................................................17-9
AppleTalk Troubleshooting.....................................................................................17-11
Banyan VINES Troubleshooting.............................................................................17-13
18. Network Accounting
Overview....................................................................................................................18-1
Before You Start.........................................................................................................18-3
Go to the Document Centre and................................................................................. 18-4
Go to the workstation and..........................................................................................18-6
Network Accounting Troubleshooting....................................................................... 18-8
19. Network Fax
FAX Installation for FTP........................................................................................... 19-2
FAX Installation for IPX/SPX................................................................................... 19-5
Network FAX Troubleshooting ................................................................................. 19-8
20. Scan Setup without CentreWare
Terminology used in this Chapter..............................................................................20-2
Who Should Use This Guide......................................................................................20-3
Page 14

What to Do Next.........................................................................................................20-4
Scanning Overview ....................................................................................................20-5
Scanning with the Document Centre..........................................................................20-6
Scan Templates...........................................................................................................20-7
The Scanning Process.................................................................................................20-8
Overview of Repositories.........................................................................................20-11
Set Up Scanning - NetWare .....................................................................................20-15
Before You Start.......................................................................................................20-15
Set Up Options .........................................................................................................20-16
General Installation Requirements........................ ................................. ......... ........ .20-18
Set Up Scanning (NetWare).....................................................................................20-19
Test scanning............................................................................................................20-21
Set Up Scanning - FTP (File Transfer Protocol)......................................................20-24
Before you start........................................................................................................20-24
Set up options...........................................................................................................20-24
General Installation Requirements........................ ................................. ......... ........ .20-27
Set up scanning (TCP/IP).........................................................................................20-28
Test scanning............................................................................................................20-30
Hints and Tips...........................................................................................................20-32
Installation Considerations.......................................................................................20-34
Scan Troubleshooting...............................................................................................20-36
Error Messages.........................................................................................................20-37
21. E-mail
Overview ....................................................................................................................21-1
Before You Start.........................................................................................................21-2
Internet Messaging.....................................................................................................21-3
HTTP..........................................................................................................................21-4
Enable E-mail.............................................................................................................21-5
Configuring SMTP.....................................................................................................21-6
Configuring E-mail.....................................................................................................21-8
LDAP Directory Setup (Internal Address Book) .....................................................21-10
Important Information about E-mail Access............................................................21-12
Public Address Book................................................................................................21-13
Authentication..........................................................................................................21-15
E-mail Troubleshooting............................................................................................21-17
22. Port 9100 Printing
Go to the Document Center and.................................................................................22-3
Go to a workstation and..............................................................................................22-6
Glossary
Index
Page 15

1. Introduction
This document provides an experienced Systems Administrator
with information for setting up and troubleshooting the Document
Centre family of products on the various networks indicated.
Requirements
This document assumes you have purchased your printer with the
integrated network interface or have purchased a Token Ring
network interface upgrade kit separately and it has been installed
using the instructions provided.
1. Introduction
In general, the requirements needed for connection and setup
include:
• A working knowledge of your network.
• Appropriate cabling to connect your printer to your network.
• A workstation with the appropriate operating system software
installed for that station connected to the same network as the
printer.
• CentreWare Admin Services CD-ROM to install CentreWare
applications.
• CentreWare Network Services CD-ROM to install print drivers.
Xerox Document Centre System Administration Guide Page 1 - 1
Page 16

How to Use this Document
This document has been arranged to get the printer set up on your
network quickly and with minimum reading.
1. Before connecting network cabling to the Document Centre
device, perform the procedure contained in this document
entitled How to Connect to Ethernet / Token Ring
Networks.
2. For Dynamic TCP/IP addressing refer to the section entitled
Dynamic/Static IP Addresses and WINS.
3. Review the Table of Contents in this document. Find the
network operat ing system (NOS) or protocol, whi ch per ta ins
to your network.
4. Go to the page indicated and perform the procedure(s).
5. Once you are finished it is recommende d you print a test page.
6. Check the p rint job f or prin t qual ity. If p ri nt qua lity probl ems
exist, use the Problem Solving section of the Reference
Guide to correct the problem.
7. If your print job DID NOT print, see the Troubleshooting
section f or you r operating system in th is document to correct
the pro blem.
8. Once your Document Centre is inst alled and pr inting, you can
repeat these steps to enable your printer to print with
additional protocols or network operating systems.
NOTE
Page 1 - 2 Xerox Document Centre System Administration Guide
For detailed safety information about this product refer to the
Document Centre Reference Guide.
Page 17

Document Centre Options
The Document Centr e can be us ed as a hi gh speed s can device . You
can use Xerox CentreWare Scanning Admin Wizard to configure
your Document Centre as a network scanner if you have a
workstation on your network that has a 32 bit version of Windows.
Details on this are available in the d ocument supplie d with your
Document Cent re entitled CentreWare Network Scanning
Services Guide.
For install ation inst ructions on connecting y our Document Centre as
a scanner wi th out the use of CentreWare, refer to the section in this
document entitled Scan Setup without CentreWare.
The Document Ce ntre also support s Network Accountin g software.
For installation instructions on connecting to an OfficeTrac server,
refer to t he section in this document entitled Network Accounting.
The Document Cent re su pports Netw ork Fax Soluti ons t hat al low it
to be used as a high speed fax device. For installation instructions
on connecting to a hardware or software solution, refer to the
section in this document entitled Network Fax Solutions.
1. Introduction
1. Introduction
Xerox Document Centre System Administration Guide Page 1 - 3
Page 18

Conventions used in this document
This symbol indicates that entries will be made on the printer’s
keypad or Touch Screen.
This symbol indicates that entries will be made at a workstation or
fileserver.
NOTE
Page 1 - 4 Xerox Document Centre System Administration Guide
When you see thi s text in the left margin, it indicates the text to the
right is of s peci al importance and should be read before proceeding.
Page 19

Other Sources of Information
Setup and Copy / Scan / Fax features information:
• The Reference Gu ide provides detailed information about all
features and settings as well as maintenance.
• The User Guide provides information and instructions about
using the features of the machine to perform copy, scan, fax,
and e-mail tasks.
• The Help system provides you point-of-need information.
CentreWare in for mation:
• CentreWare Netw ork Services G uide (hard copy). This doc-
ument contains information about installation procedures for
Xerox CentreWare print and fax drivers and installation and
use of the features of the Xerox CentreW a re Network Servic es
software.
• CentreWare Help Centre and Context-Sensitive Help Systems (Electronic Help). This electronic documentation is sup-
plied with the CentreWare software and can be viewed on the
client workstation.
1. Introduction
1. Introduction
Xerox Document Centre System Administration Guide Page 1 - 5
Page 20

Xerox on the Web
• Use the Document Centre web site to get the latest information
about the Xerox Document Centre:
http://www.documentcentre.xerox.com
• Download the lates t CentreWare drivers at
http://www.centreware.com
• For more information about other Xerox products visit the
Xerox Corporation main page at:
http://www.xerox.com
Page 1 - 6 Xerox Document Centre System Administration Guide
Page 21
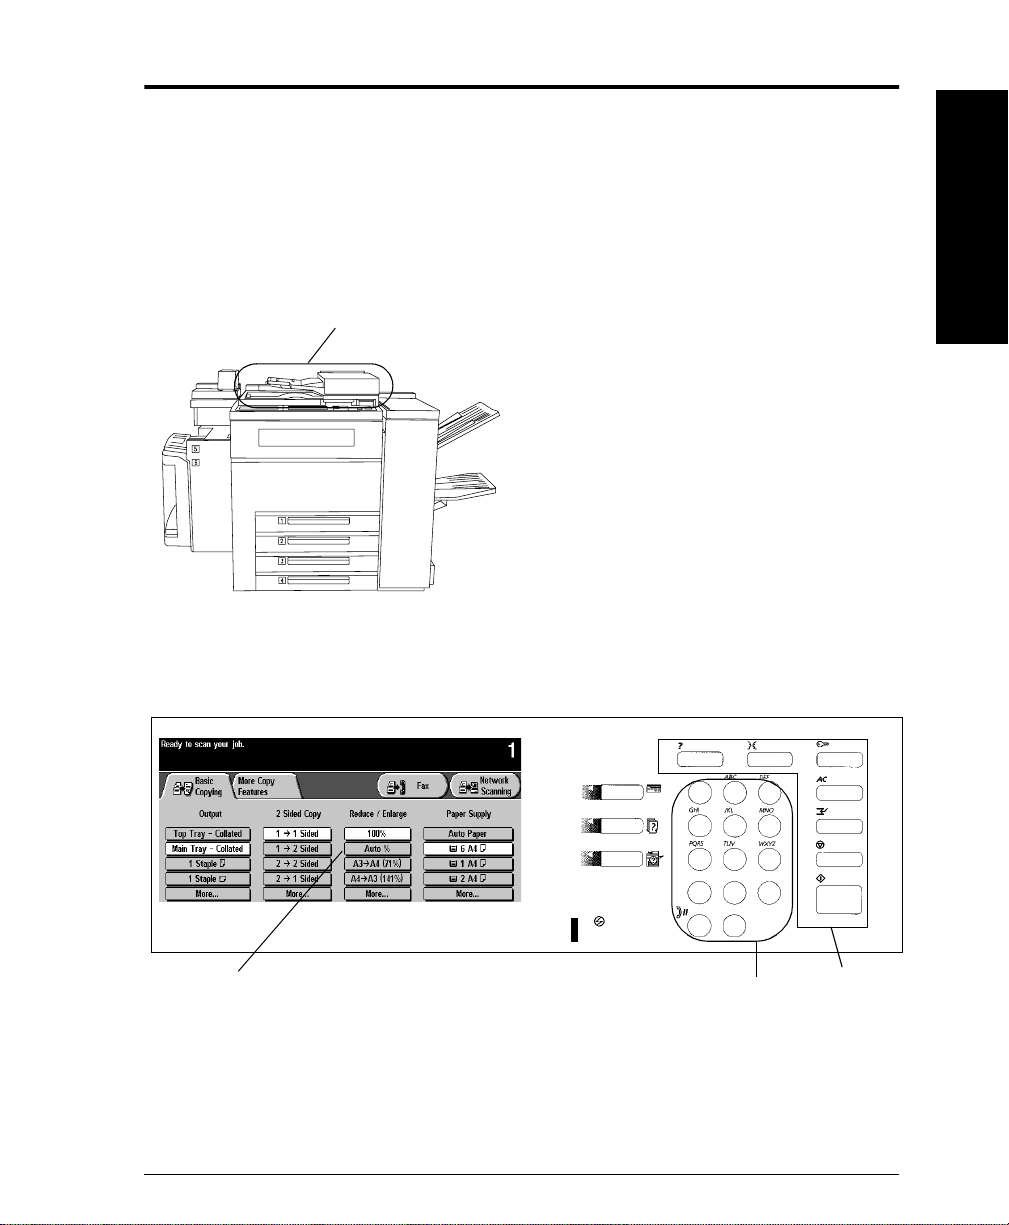
ST Model Features
Document Feeder and Scan ner
What is the ST?
The ST m odel has the abilit y to make copies as well as print. ST
models have full copy (and optional Network Scanning, Scan to Email, Network Faxing, Network Accounting) capability .
User Interface
1. Introduction
1. Introduction
Touch
Screen
Xerox Document Centre System Administration Guide Page 1 - 7
Keypad
Feature
Buttons
Page 22
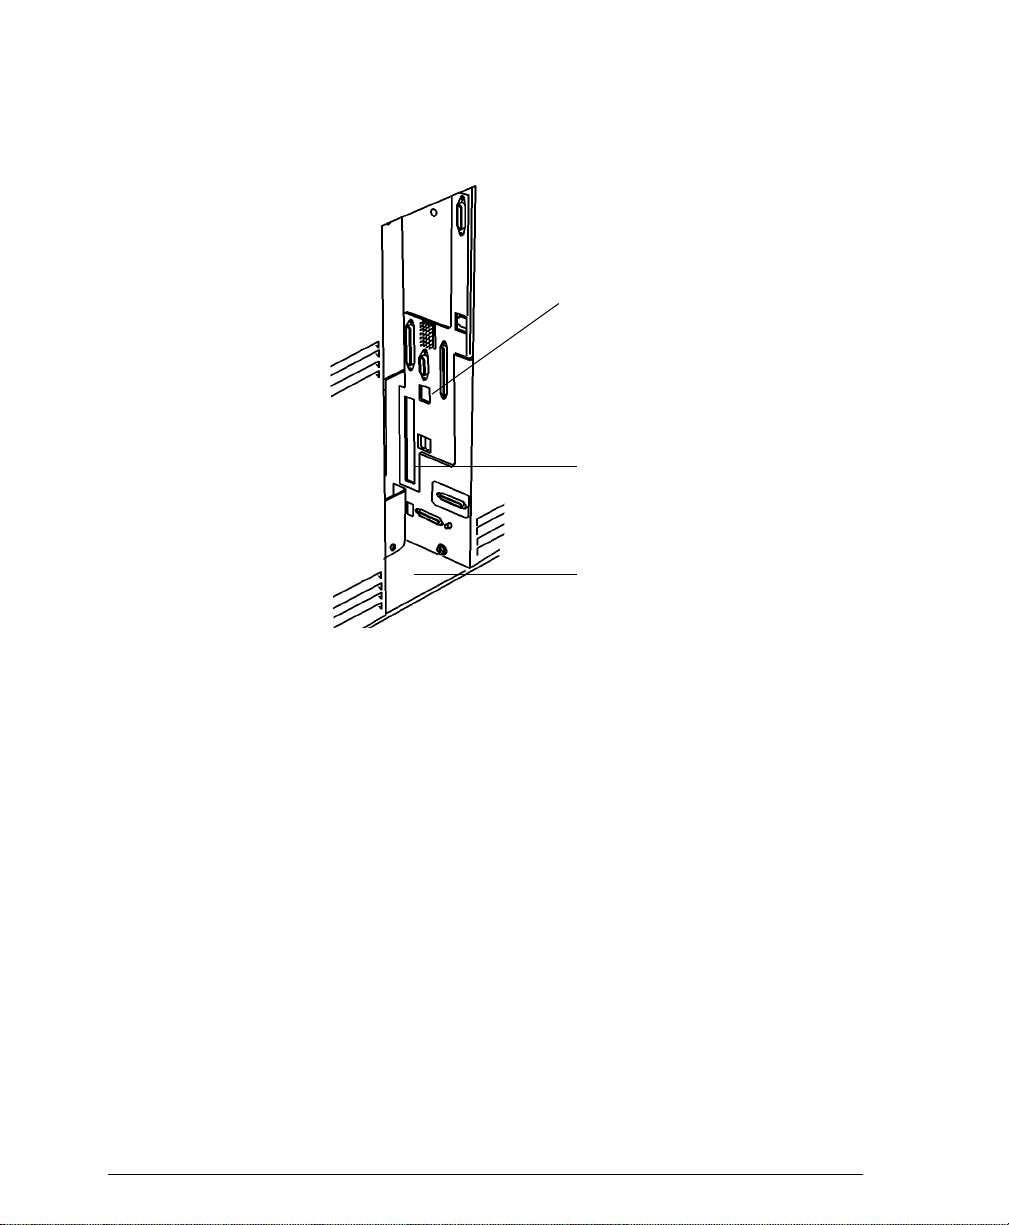
Network Connections
Use UTP/STP (Cate gory 3 or 5 for 10Mbps Et hernet, Cate gory 5 f or
Token Ring or 100Mbps Fast Ethernet ) type of cable to connect to
the network as indicated below.
10/100BaseT Ethern et network
interface. RJ45 connector
Token Ring network interface slot
(will have RJ45 connect or )
Recessed area at rear of machine
Page 1 - 8 Xerox Document Centre System Administration Guide
Page 23

2. How to Connect to Ethernet or Token Ring Networks
Before You Connect to a 100BaseT Ethernet Network
The Document Centre Ethernet Interface has speed settings of
10Mbps (10 Megabits per seco nd), 100M bps (1 00 Me gabi ts per
second) and Auto (AutoSensing). If your network has hubs or
concentrators that have Auto-Sensing enabled, it is possible that if
the Document Cen tre is set to Auto, the hub/concentrator will not
arbitrate to the correct speed.
2. How to Connect to
2. How to Connect to
Ethernet or Token
Ethernet or Token Ring
Before you connect the printer to your network, perform the
procedure on the next page entitled How to set the Ethernet
Speed.
Xerox Document Centre System Administration Guide Page 2 - 1
Page 24

How to set the Ethernet Speed
1. Enter the Tools pathway
a) Press the Access ( or ) button.
b) On the keypad enter 1111 or the current password. Press
the Enter button when finished. The Touch Screen will
be used for the remainder of the data entry, unless
instructed otherwise.
c) Press the Go to Tools button.
2. Set or Change the Network Connection Speed.
a) Wait for the screen to refresh and press the Connectivity
and Network Setup button.
b) Wait for the screen to refresh and press the Physical
Media button.
c) Press the Ethernet button.(If avai lable.)
NOTE
Auto-Sensing hubs may not arbitrate correctly with the Document
Centre when Auto is selected. If your hubs/concentrators support
the 100BaseT speed it is recommended you select 100Mbps in
Step d below. (Be sure your Ethernet cable is Category 5)
d) Select the desired Speed 10Mbps, 100Mbps, or Auto.
e) When finished with your changes press Save.
3. Press the Exit Tools button.
4. Wait a MINIMUM of 7 minutes for the printer to reset. The
Network Controller is being reset and initializing with the
new setup. When complete a Configura tion Report wil l pri nt .
a) Obtain the Configuration Report page from your
printer and verify that your settings have been retained.
5. Connect your Document Centre to the network with the
appropriate cabling.
Page 2 - 2 Xerox Document Centre System Administration Guide
Page 25

Before You Connect to a Token Ring Network
If your printer is equipped with a Token Ring interface, to avoid
problems with your network you must configure the correct Ring
Speed and Source Routing settings for your environment prior to
connecting the printer to your network.
The default settings for the Ring speed and Source Routing are
16Mbps and None respe ctiv ely. If you do not need to chan ge thes e
then you do not need to read any further in this chapter.
2. How to Connect to
Ethernet or Token
NOTE
As with any other Token Ring device, connecting the Document
Centre Token Ring card to your network while it is set at the
incorrect Ring Speed can cause severe problems on your network.
Before you connect the printer to your network, perform the
procedure on the next page entitled How to set the Ring Speed
and Source Routing.
2. How to Connect to
Ethernet or Token Ring
Xerox Document Centre System Administration Guide Page 2 - 3
Page 26

How to set the Ring Speed and Source Routing
1. Enter the Tools pathway
a) Press the Access ( or ) button.
b) On the keypad enter 1111 or the current password. Press
the Enter button when finished. The Touch Screen will
be used for the remainder of the data entry, unless
instructed otherwise.
c) Press the Go to Tools button.
2. Set or Change the Ring Speed or Source Routing.
a) Wait for the screen to refresh and press the Connectivity
and Network Setup button.
b) Wait for the screen to refresh and press the Physical
Media button.
c) Press the Token Ring button.
d) Press the Token Ring Settings button.
e) Select the desired Ring Speed (4 Megabits or 16 Mega-
bits per second).
f) Select the desired method of Source Routing (Single
Route Broadcast or All Route Broadcast).
g) When finished with your changes press Save.
3. Press the Exit Tools button.
4. Wait a MINIMUM of 7 minutes for the printer to reset. The
Network Controller is being reset and initializing with the
new setup. When complete a Configura tion Report wil l pri nt .
a) Obtain the Configuration Report page from your
printer and verify that your Token Ring Settings have
been retained.
5. Connect your Document Centre to the network with the
appropriate cabling.
Page 2 - 4 Xerox Document Centre System Administration Guide
Page 27

How to set the Hardware (MAC) Address
All Document Centre printers equipped with a Token Ring
interface have a default MAC address. It is STRONGLY
recommended that you use caution when changing the MAC
Address of the network i nterface.
1. Access the Tools pathway.
a) Press the Access ( or ) button.
b) On the keypad enter 1111 or the current password. Press
the Enter button when finished. The Touch Screen will
be used for the remainder of the data entry, unless
instructed otherwise.
c) Press the Go to Tools button.
2. Set or Change the MAC address.
a) Wait for the screen to refresh and press the Connectivity
and Network Setup button.
b) Wait for the screen to refresh and press the Physical
Media button.
c) Press the Token Ring button.
d) Press the Token Ring Settings button.
e) Press the MAC Address button.
f) Enter the six (6) hexadecimal pairs on the touch keypad
separated by colons.
g) When finished press Save .
h) Press the Exit Tools button.
3. Wait a MINIMUM of 7 minutes for the printer to reset. The
Network Controller is being reset and initializing with the
new setup. Whe n complete a Configuration Re por t will print.
2. How to Connect to
2. How to Connect to
Ethernet or Token
Ethernet or Token Ring
a) Obtain the Configuration Report page from your
printer and verify that your Token Ring Settings have
been retained.
4. Connect your Document Centre to the network with the
appropriate cabling.
Xerox Document Centre System Administration Guide Page 2 - 5
Page 28

Page 2 - 6 Xerox Document Centre System Administration Guide
Page 29

3. Dynamic/Static IP Addresses and WINS
Before you start
NOTE Your Document Centre now has DHCP, LPR, and NetBIOS over
the IP protocol enabled by default. If your DHCP server will
provide host name, IP add ress, Gatewa y addres s, and Subn et Mas k,
the Document Centre TCP/IP information will be configured on
initial boot.
3. Dynamic/Static IP
Addresses and WINS
Your Document Centre printer can be connected to a variety of
networks that use the TCP/IP protocol. You may either choose to
allow the device to retrieve a dynamic address or yo u may se le ct to
enter one manually. This section contains procedures for both of
these methods. Determine which method will be used for your
network and follow the steps of the appropriate procedure.
Xerox Document Centre System Administration Guide Page 3 - 1
3. Dynamic/Stat ic IP
Addresses and WINS
Page 30

Dynamic Addressing (DHCP, BOOT P, or RARP)
If your printer is equipped with a Token Ring interface, prior to
connecting your printer to your network, use the section of this
document entitled Token Ring Interface Network Connection to
set the Ring Speed and Source Routing settings for your
environment. Then return to this procedure and follow the
instructions
The Document Centre supports two methods of Dynamic
Addressing:
DHCP (Dynamic Host Configuration Protocol) or BOOTP
RARP (Reverse Address Resolution Protocol)
The TCP/IP address is assigned automatically by a DHCP server.
Follow the steps below:
NOTE
By default, DHCP is enabled on the Document Centre. This
procedure will show you how to disable DHCP (or enable it if it
was disabled) and set your TCP/IP information using BOOTP or
RARP.
DHCP/BOOTP/RARP servers vary in the information that they
return to the device requestin g service. Consult the documen tation
supplied with your DHCP or RARP server software to verify what
TCP/IP information it can supply. Your Document Centre can
retrieve the following values from DHCP, BOOTP, and RARP
servers:
TCP/IP Address
Host Name (DHCP Only)
Subnet Mask
Gateway TCP/IP Address
Broadcast Address (DHCP only)
Domain Name (DHCP only)
Preferred and Alternate DNS Server (DHCP only)
Wins Server (DHCP only)
Page 3 - 2 Xerox Document Centre System Administration Guide
Page 31

Go to the dynamic server and...
1. Configure the DHCP, BOOTP, or RARP server with the
TCP/IP information you want assigned to your printer. Use
the documentation supplied with your server software for
this task.
Go to the Document Centre and...
2. Connect your Document Centre to the network with the
appropriate cabling.
3. Enter the Tools pathway
a) Press the Access ( or ) button.
b) On the keypad enter 1111 or the current password. Press
the Enter button when finished. The Touch Screen will
be used for the remainder of the data entry, unless
instructed otherwise.
c) Press the Go to Tools button.
4. Enter the Network Setup menus.
a) Wait for the screen to refresh and press the Connectivity
and Network Setup button.
3. Dynamic/Static IP
Addresses and WINS
b) Wait for the screen to refresh and press the Network
Setup button.
c) Press the TCP/IP Options button.
5. Enab le TCP/IP printing.
a) Press the TCP/IP Settings button.
b) Press the Protocol and Media button.
c) Press the Enable button. If Physical Media buttons
appear, select either Ethernet or Token Ring. Press
Save.
Xerox Document Centre System Administration Guide Page 3 - 3
3. Dynamic/Stat ic IP
Addresses and WINS
Page 32

6. Select either DHCP, BOOTP, or RARP as the dynamic
address source.
a) Press the Dynamic Addressing button. By default,
DHCP will be selected. To disable DHCP, choose
another dynamic addressing method (BOOTP, DHCP,
DHCP/AutoNet, RARP) or Disabled, and press Save.
b) Press the Exit Tools button. Wait approximately 2 min-
utes before you continue to Step 7.
7. Print a C onfigurat ion Repor t page t o verify the DocuCent re
TCP/IP information was assigned correctly by the dynamic
server.
a) Repeat Steps 3a and 3c.
b) Select System Setting.
c) Select Configuration Report.
d) Select Print Configuration Report Now.
e) Press the Cancel button.
f) Press the Exit Tools button.
8. Set the Host Name
a) Repeat Steps 3a - 5a.
b) Press the Name/Address button.
c) Press the Host Name button.
d) By default, the Document Centre assigns a default host
name. To change the host name, type the host name
EXACTLY as you want it to appear with correct case.
When finished press the Save button to record the
changes and exit to the TCP/IP Settings screen.
NOTE
The Document Ce ntre will only a ccept one Gat eway ad dress from a
DHCP server.
9. Set Subnet Mask and Gateway Address.
a) Press the Subnet and Gateway button.
b) Press the soft buttons on the Touch Screen one at a time
for each oc te t of the Subnet Mask and ent er the num be rs
from the keypad.
Page 3 - 4 Xerox Document Centre System Administration Guide
Page 33

c) Repeat this process for the IP Gateway address. When
finished press Save to record the ch anges and exit to the
TCP/IP Settings screen.
d) Press the Close button.
10. Enable LP and LPR printing.
a) Press the TCP/IP - Line Printer button.
b) Press the Enable button.
NOTE
NOTE
While you can change the port number at which your Document
Centre will accept lpr print jobs it is recommended that you do this
ONLY with extreme caution as most lpr spoolers are set to send
print jobs to the default port.
c) If you wish to change the lpr port for your printer press
the Port Number soft button and enter the desired port
number at the keypad. Press Save.
d) Press the Close button.
11. Enable HTTP/IPP
a) Press the HTTP/IPP button. At the n ext sc reen p ress the
Enable button. Then press Save.
b) Press the Exit Tools button.
12. Verify printer settings.
a) Print a Configuration Repor t page to verify the TCP/IP
information was assigned correctly. (see step 7.)
Update the lease time (if necessary) at the DHCP or BOOTP server
depending on your printer usage patterns. Consult your server
documentation for details.
3. Dynamic/Static IP
3. Dynamic/Stat ic IP
Addresses and WINS
Addresses and WINS
NOTE
Xerox Document Centre System Administration Guide Page 3 - 5
If your RARP Seve r does not dyn amic ally u pdate i ts etc/ethers an d
etc/hosts files with a host name, you need to do this manually.
Consult your RARP or BOOTP server documentation for details.
Page 34

Static Addressing
NOTE Your Document Centre now has DHCP, LPR, and NetBIOS over
the IP protocol e nabled by default. If you have a DHCP server and
it is set to provide host name, IP address, Gateway address, and
Subnet Mask, the Document Centre TCP/IP information will be
configured on initial boot. This procedure assumes you will set the
IP information manually.
To enable 100BaseT or a Token Ring interface, refer to Chapter 2
How to Connect to Ethernet or Token Ring Networks to
configure the Speed and Source Routing settings for your
environment.
For information on how your printer can connect to a DHCP,
BOOTP, or a RARP server to be assigned an IP address
dynamically, refer to the section in this chapter entitled Dynamic
Addressing (DHCP, BOOTP, or RARP) .
Page 3 - 6 Xerox Document Centre System Administration Guide
Page 35

Go to the Document Centre and...
1. Connect your Document Centre to the network with the
appropriate cabling.
2. Enter the Tools pathway.
a) Press the Access ( or ) button.
b) On the keypad enter 1111 or the current password. Press
the Enter button when finished. The Touch Screen will
be used for the remainder of the data entry, unless
instructed otherwise.
c) Press the Go to Tools button.
3. Enter the Network Setup menus.
a) Wait for the screen to refresh and press the Connectivity
and Network Setup button.
b) Wait for the screen to refresh and press the Network
Setup button.
4. Enable TCP/IP prot ocol.
a) Press the TCP/IP Options button.
b) Press the TCP/IP Settings button.
3. Dynamic/Static IP
Addresses and WINS
c) Press the Protocol and Media button.
d) Press the Enable button. If Physical Media buttons
appear, select either Ethernet or Token Ring. Press
Save.
5. Select either DHCP, BOOTP, or RARP as the dynamic
address source.
a) Press the Dynamic Addressing button. By default,
DHCP will be selected. To disable DHCP, choose
another dynamic addressing method or Disabled. Press
Save.
6. To enter the IP address and Host Name.
a) Press the Name/Address button.
b) Press the soft buttons one at a time on the touch screen
for each Octet of the IP address and enter the numbers
from the keypad.
Xerox Document Centre System Administration Guide Page 3 - 7
3. Dynamic/Stat ic IP
Addresses and WINS
Page 36

c) Press the Host Name button.
d) When the soft keypad appe ars, type the SMB host name
EXACTLY as you want it to appear with proper case.
When finished press the Save button twice to record the
changes and exit to the TCP/IP Settings screen.
Subnet and Gateway.
7. To enter a Subnet Mask and Gateway Address.
a) Press the Subnet and Gateway button.
b) Press the soft buttons one at a time on the Touch Screen
for each Oc tet o f t he Sub net M ask an d ente r t he numbe rs
from the keypad.
c) Repeat this process for the IP Gateway address. When
finished press Save to record the ch anges and exit to the
TCP/IP Settings screen.
d) Press the Close button.
NOTE
NOTE
The Broadcast Address will be calculated automatically.
8. To enable LP and LPR printing...
a) Press the TCP/IP - Line Printer button.
b) Press the Enable button.
While you can change the port number at which your Document
Centre will accept lpr print jobs it is recommended that you do this
ONLY with extreme caution as most lpr spoolers are set to send
print jobs to the default port.
c) If you wish to change the lpr port for your printer press
the Port Number soft button and enter the desired port
number at the keypad. Press Save.
Page 3 - 8 Xerox Document Centre System Administration Guide
Page 37

9. Enable HTTP/IP.
a) Press the HTTP/IPP button.
b) Press Enable.
c) Press Save.
10. Print a Conf iguration Report page to ve rify the DocuCentre
TCP/IP information was assigned correctly.
a) Repeat Steps 3a and 3c.
b) Select System Setting.
c) Select Configuration Report.
d) Select Print Configuration Report Now.
e) Press the Cancel button.
f) Press the Exit Tools button.
3. Dynamic/Static IP
3. Dynamic/Stat ic IP
Addresses and WINS
Addresses and WINS
Xerox Document Centre System Administration Guide Page 3 - 9
Page 38

Windows Internet Name Service (WINS) Installation
Before You Start
If your printer is equipped with a Token Ring interface, use the
100BaseT Ethernet or Token Ring Quick Install Card supplied
in this Quick Inst all Card set to configure the Ring Speed and
Source Routing se ttings for your environment.
Your Document Centre now has DHCP, LPR, and NetBIOS over
the IP protocol enabled by default. If your DHCP server will
provide the IP address, Gateway address, Subnet Mask for the
Document Centre, and WINS server address(es), the TCP/IP
information will be configured on initial boot. This means that if
you have configured your DHCP server with the desired
information, you may connect your Document Centre to your
network and it will boot and register with the WINS server
automatically.
NOTE
Your DHCP server must return at least one (1) WINS server
address to the Document Centre in order to enables WINS
registration.
In this mode the default NetBIOS host name, SMB host name and
the DNS host name for the device will be the letters XRX followed
by the MAC address of the network interface.
Example:
XRX08003E313E0A
If this NetBIOS host name is acceptable you can go right to the
section in the next section entitled Go to the Workstation and....
and complete those steps.
T o change the NetB IOS h o st na me f or your printer follow St eps 1,
2, and 3 then skip to Step 5 and finish the Go to the Document
Centre... portion. When you finish that section, go to the section
entitled Go to the Workstation and.... and complete those steps.
Page 3 - 10 Xerox Document Centre System Administration Guide
Page 39

Go to the Document Centre and...
1. Connect your Document Centre to the network with the
appropriate cabling.
2. Enter the Tools pathway.
a) Press the Access ( ) button.
b) On the keypad enter 1111 or the current password. Press
the Enter button when finished. The Touch Screen will
be used for the remainder of the data entry, unless
instructed otherwise.
c) Press the Go to Tools button.
3. Enter the Network Setup menus.
a) Wait for the screen to refresh and press the Connectivity
and Network Setup button.
b) Wait for the screen to refresh and press the Network
Setup button.
c) Press the Microsoft Networks button.
4. Enable the Transport and Media.
a) Press the Transport and Media button.
3. Dynamic/Static IP
Addresses and WINS
b) Press the Enable button. If Physical Media buttons
appear, select either IP/Ethernet or IP/Token Rin g.
Press Save.
5. Set the NetBIOS Host Name.
a) Press the Workgroup and Host button.
b) Press the SMB Host Name (this is the same as the Net-
BIOS host name) button.
c) When the soft keypad appears, type the host name
EXACTLY as you want it to appear with correct case.
When finished press the Save button to record the
changes and exit to the Workgroup and Host Screen.
Xerox Document Centre System Administration Guide Page 3 - 11
3. Dynamic/Stat ic IP
Addresses and WINS
Page 40

6. Exit the Tools Menu.
a) Press the Exit Tools button.
b) The Document Centre will reconfigure itself with the
new settings and automatically register its TCP/IP
address and Net B IOS h ost na m e wi th your W INS ser ver.
Go to the workstation and...
1. Create a new lpr printer on the NT workstation.
a) With an LPR port as the desired destination, enter the
Microsoft Networking host name.
b) Enter a queue name to identify the printer.
c) When prompted, select the desired PostScript or PCL
driver from the Xerox CentreWare Network Services
CD or directory where drivers are stored.
Page 3 - 12 Xerox Document Centre System Administration Guide
Page 41

Where to go from here
After you have verified that the TCP/IP information you have
assigned to your Document Centre is correct, go to the section of
this document that applies to your network operating system or
protocol and perform the procedures indicated:
Unix Networks - Chapter 7
Microsoft (TCP/IP) Netw orks - Chapter 9
Windows 2000 LPR and IPP Printing - Chapter 10
Microsoft Windows NT 4.X Server Network (TCP/IP) -
Chapter 11
OS/2 (TCP/IP) Ne tworks - Chapter 12
If you prefer there are also a Quick Install Cards for this process
supplied with your Document Centre. Please r ef er to the following
cards:
UNIX/Linux (Solaris/SunOS) (HP- UX) (AIX) Quick Install
Card
Microsoft Windows NT 4.0 Server (TCP/IP) Quick Install
Card
Microsoft Windows 200 LPR and IPP Printing Quick
Instal l Card
Port 9100 TCP/IP Printing Quick Install Card
3. Dynamic/Static IP
Addresses and WINS
Xerox Document Centre System Administration Guide Page 3 - 13
3. Dynamic/Stat ic IP
Addresses and WINS
Page 42

Page 3 - 14 Xerox Document Centre System Administration Guide
Page 43

4. CentreWare Device Admin Wizard
Before you start
This procedure assumes you have already installed CentreWare
application s on a Windows 95/98, Windows ME , Windows NT4 .0
Workstatio n a nd W i ndows 200 0 Pr ofessional. If you have no t done
so, detailed instructions for installation are contained in the
CentreWare Network Services Guide. This document was
supplied with your printer.
Admin Wizard
4. Centre Ware Device
In order to use the CentreWare Device Admin Wizard for
installation, you must login to the fileserver or Tree with Supervisor
or Administrator privileges. Additionally, You will need the
following NetWare information:
NDS Tree (NetWare 4.X and 5.X environment)
NDS Context (NetWare 4.X and 5.X environment)
Primary Fileserver (NetWare 3.X environment)
Frame Type
Xerox Document Centre System Administration Guide Page 4 - 1
Admin Wizard
4. CentreWare Device
Page 44

Go to the Document Centre and...
1. Connect your Document Centre to the network with the
appropriate cabling.
2. Enter the Tools Menu.
a) Press the Access ( or ) button.
b) On the keypad enter 1111 or the current password. Press
the Enter button when finished. The Touch Screen will
be used for the remainder of the data entry, unless
instructed otherwise.
c) Press the Go to Tools button.
3. Enable the Network Protocol.
a) Wait for the screen to refresh and press the Connectivity
and Network Setup button.
b) Wait for the screen to refresh and press the Network
Setup button.
c) Press the NetWare button.
d) W ait for t he s creen to ref resh and p ress t he Pr otoco l and
Media button.
e) Press the Enable button. If Physical Media buttons
appear, select either Ethernet or Token Ring. Press
Save.
4. Set the Frame Type.
a) Press the Frame Type button.
b) Select the frame type desired then press Save to retain
your changes and exit to the NetWare Options screen.
5. Exit the Tools Menu.
a) Press the Exit Tools button. The printer will store the
settings you have made.
Page 4 - 2 Xerox Document Centre System Administration Guide
Page 45

Go to the workstation and...
1. Fro m the desktop click the Start button on the Task Bar.
2. Select the Programs entry in the menu.
3. From the cascade menu select the Xerox CentreWare entry.
4. On the next cascade menu select the Dev ic e Admin Wizar d.
5. The Device A dmin Wizard will start.
6. Follow the instructions on each Device Admin Wizard
Screen to setup the Document Centre on your networ k.
Context sens itive help is availabl e for each step.
Admin Wizard
4. Centre Ware Device
NOTE
You will be asked for a pa ssword, enter “1111” (or the current
Admin password for your printer that you would enter from the
keypad), then click OK.
7. The Device Admin Wizard will comp lete the in stallation by
writing the settings to the Document Centre and the Novell
Server.
Go to the Document Centre and...
1. Power off and power on the Document Centre so the setup
selections will take effect.
2. Wait a MINIMUM of 7 minutes for the printer to reset.
Admin Wizard
4. CentreWare Device
Xerox Document Centre System Administration Guide Page 4 - 3
Page 46

Go to a workstation and...
1. Use the Centre Ware Print and FAX Drivers CD-ROM to
install pri nt driver s on a W indows-ba sed workst ation. Deta ils
for this are found in the document supplie d wit h you r pr inter
entitled Network Services Guide.
2. Connect the print driver you loaded above to the queue you
created on the NetWare server.
3. Open an application and print a test job.
4. Check your test job for quality and use the problem solving
section of the Document Centre Reference Guide for
resolving print d efects.
5. If your test job does not print, refer to the troubleshooting
section in this document to correct the problem.
6. Repeat this Go to a workstation and... procedure at each
worksta tion that will print to this printer.
Page 4 - 4 Xerox Document Centre System Administration Guide
Page 47

5. Novell NetWare 4.X and 5.X (NDS) Networks
Before You Start
NOTE Your Document Centre may be installed on your network using
Novell NDPS. The Xerox NDPS Agent, Documentation, and Print
drivers are available from the Xerox Web Site www.xerox.com
To enable 100Bas eT or a Token Ring interface, refer to
Chapter 2 How to Connect to Ethernet or Token Ring
Networks to configure the Speed and Source Routing settings
for your environmen t.
The CentreWare software supplied with your printer can be
used to set up yo ur pr in ter on your Novell network. For detail s
refer to the document entitled CentreWar e Networ k Servic es
Guide.
This procedure assumes you ran NWADMIN or PCONSOLE
to set up a print server object. Please refer to the
documentation supplied by Novell to complete those tasks.
Record precisely (observe upper and lower case, dot notation
etc.) the follow ing: the NDS Tree, NDS Context Name,
frame ty pe, Print Server Name, and the Print Server
password, that was assigned.
5. Novell NetWare
5. Novell NetWare 4.X
4.X and 5.X (NDS)
and 5.X (N D S ) Networ ks
Xerox Document Centre System Administration Guide Page 5 - 1
Page 48

NOTE ALL Print Servers you create must have a password. When your
printer will service queues on multiple fileservers, the Print Serv er
name must be the same on all fileservers and the Print Server
password must be the same on all fileservers.
Go to the Document Centre and...
1. Connect your Document Centre to your network with the
appropriate cabling.
2. Enter the Tools pathway.
a) Press the Access ( or ) button.
b) On the keypad enter 1111 or the current password. Press
the Enter button when finished. The Touch Screen will
be used for the remainder of the data entry, unless
instructed otherwise.
c) Press the Go to Tools button.
3. Enable the Network Protocol.
a) Wait for the screen to refresh and press the Connectivity
and Network Setup button.
b) Wait for the screen to refresh and press the Network
Setup button.
c) Press the NetWare button.
d) W ait for t he s creen to ref resh and p ress t he Pr otoco l and
Media button.
e) Press the Enable button. If Physical Media buttons
appear, select either Ethernet or Token Ring. Press
Save.
4. Set the Frame Type.
a) Press the Frame Type button.
b) Select the frame type desired or Auto on Document
Centre 490/480 then press Save to retain your changes
and exit to the NetWare Options screen.
Page 5 - 2 Xerox Document Centre System Administration Guide
Page 49

5. Set th e NDS Settings.
a) Press the NDS Settings button.
Novell suggests using typeful names when entering
Name Context and Directory Service Tree information.
TYPEFUL NAME EXAMPLE:
cn=contextname.ou=organization.o=company.c=country
b) At this screen press the Name Context button and use
the touch panel keyboard to enter the context in which
this printer resides. To access numeric characters and
punctuation, press the More Characters or 123 button .
When finished press Save.
c) Press the Directory Service Tree button and enter the
NDS tree name where the Context chosen in the previous step resides. When finished press the Save button
twice to record the changes.
6. Set the Print Se rver Name and Passwo rd.
a) Press the Print Server button.
b) Press the Print Server Name button and use the Touch
Screen keyboard to enter the name you assigned to your
print server (it is recommended you use al l UPPER
CASE characters). A default name will appear. Use the
backspace key ( it looks like an ar row point ing to the le ft)
to clear out the default name prior to entering your new
name. When finished press Save to retain the changes
and return to the Print Serv er Screen .
5. Novell NetWare
5. Novell NetWare 4.X
4.X and 5.X (NDS)
and 5.X (N D S ) Networ ks
c) Press the Print Server Password button. Use the Touch
Screen keyboard to enter the print server password, in
the correct case, you recorded when you set up your
print server and press Save.
d) Press Save to exit the Print Server Screen and save your
changes.
Xerox Document Centre System Administration Guide Page 5 - 3
Page 50

7. OPTIONAL STEP: To change the desired SAP rate or Poll
Interval for your printer or set the Primary File Server.
a) Press the Rates button.
b) Press the box under SAP Rate or Poll Int erval and enter
the desired number from the keypad. The default values
are recommended. When finished, press Save to retain
your changes and return to the NetWar e Options screen.
c) Press the Primary File Server button. At this screen
press the Name Context button and use the touch panel
keyboard to enter the context in which this printer
resides. To access numeric characters and punctuation,
press the More Characters or 123 button. When
finished press Save.
8. Exit the Tools Menu.
a) Press the Exit Tools button. The printer will store the
settings you have made.
9. Prepare for print driver installation.
a) From the documentation package supplied with your
printer, retrieve the CentreW ar e Networ k Servi ces
CD-ROM and the document entitled CentreWare Net-
work Services Guide. Proceed to the next section of
this procedure called Go to a Workst ation and...
Page 5 - 4 Xerox Document Centre System Administration Guide
Page 51

Go to a workstation and...
1. Use the CentreWare Network Services CD-ROM to install
print drivers on a Windows-based workstation. Details for
this are found in the document supplied with your printer
entitled CentreWare Network Serv ices Guide.
2. Connect the print driver you loaded above to the queue you
created on the NetWare server.
3. Open an application and print a test job.
4. Check your test job for quality and use the problem solving
section of the Document Centre Reference Guide for
resolving print d efects.
5. If your test job does not print, refer to the Troubleshooting
section in this document to correct the problem.
6. Repeat this Go to a workstation and... procedure at each
worksta tion that will print to this printer.
5. Novell NetWare
5. Novell NetWare 4.X
4.X and 5.X (NDS)
and 5.X (N D S ) Networ ks
Xerox Document Centre System Administration Guide Page 5 - 5
Page 52

Page 5 - 6 Xerox Document Centre System Administration Guide
Page 53

6. Novell NetWare 3.1x or 4.x/5.x in Binder y Mode
Before you start
To enable 100BaseT or a Token Ring interface, refer to
Chapter 2 How to Connect to Ethernet or Token Ring
Networks section to configure the Ring Speed and
Source Routing settings for your environment.
The CentreWare software suppli ed wit h you r pri nter can
be used to set up your printer on your Novell network.
For details refer to the doc ument entitled CentreWare
Network Services Guide. This procedure assumes you
ran PCONSOLE to set up a print server. Please refer to
the documentation supplied by Novell to complete this
task. Record precisely (observe upper and lower case,
punctuation etc.) the following: the Primary Server
name, Frame type used, Print Server name, Print
Server password, and the Queue name assigned.
3.1x or 4.x/5.x in
6. Novell NetWare
4.x/5.x in Bindery Mode
6. Novell NetW are 3. 1x or
Xerox Document Centre System Administration Guide Page 6 - 1
Page 54

NOTE ALL Print Servers you create must have a password. When your
printer will service queues on multiple fileservers, the Print Serv er
name must be the same on all fileservers and the Print Server
password must be the same on all fileservers.
Go to the Document Centre and...
1. Connect your Document Centre to the network with the
appropriate cabling.
2. Enter the Tools pathway.
a) Press the Access ( or ) button.
b) On the keypad enter 1111 or the current password. Press
the Enter button when finished. The Touch Screen will
be used for the remainder of the data entry, unless
instructed otherwise.
c) Press the Go to Tools button.
3. Enable the Network Protocol.
a) Wait for the screen to refresh and press the Connectivity
and Network Setup button.
b) Wait for the screen to refresh and press the Network
Setup button.
c) Press the NetWare button.
d) W ait for t he s creen to ref resh and p ress t he Pr otoco l and
Media button.
e) Press the Enable button. If Physical Media buttons
appear, select either Ethernet or Token Ring. Press
Save.
Page 6 - 2 Xerox Document Centre System Administration Guide
Page 55

4. Set the Primary File Server.
a) Press the Primary File Server but ton.
b) Press the upper-left keyboard icon button on the touch
screen to set the fi rst Primary File Server.
c) Use the touch panel keyboard and enter the name of the
first Primar y F ile S erver to whi ch you want t he print er to
connect. To access numeric c har acter s and pun ctuat ion,
press the More Characters or 123 button. When fin-
ished press the Save button twice to record the changes.
d) You will be returned to the NetWare Options screen.
5. Set the Frame Type.
a) Press the Frame Type button.
b) Select the frame type desired or Auto on Document
Centre 490/480 then press Save to retain your changes
and exit to the NetWare Options screen.
3.1x or 4.x/5.x in
6. Novell NetWare
4.x/5.x in Bindery Mo de
6. Novell NetWa r e 3.1x or
Xerox Document Centre System Administration Guide Page 6 - 3
Page 56

6. Set the Print Se rver Name and Passwo rd.
a) Press the Print Server button.
b) Press the Print Server Name button and us e the touch
panel keyboard to enter the name you assigned to your
print server (it is recommended you use al l UPPER
CASE characters). A default name will appear. Use the
backspace key ( it looks like an ar row point ing to the le ft)
to clear out the default name prior to entering your new
name. When finished press Save to retain the changes
and return to the Print Serv er screen.
c) Press the Print Server Password button and use the
Touch Screen keyboard to enter the print server pass-
word you recorded when you set up your print server
and press Save.
d) Press Save to exit the Print Server screen and save your
changes.
e) To change the desired SAP rat e or its Poll Interva l for
your printer, press the Rates button.
f) Press the b ox under SAP Rate or Poll Int erval and enter
the desired number from the keypad. The default values
are recommended. When finished, press Save to retain
your changes and return to the NetWar e Options screen.
Page 6 - 4 Xerox Document Centre System Administration Guide
Page 57

7. Exit the Tools Menu.
a) Press the Exit Tools button. The printer will store the
settings you have made.
8. Prepare for print driver installatio.n
a) From the documentation package supplied with your
printer, retrieve the CentreWare Network Services
CD-ROM and the document entitled CentreWare Net-
work Services Guide. Proceed to the next section of
this procedure called Go to a Workst ation and...
3.1x or 4.x/5.x in
6. Novell NetWare
4.x/5.x in Bindery Mo de
6. Novell NetWa r e 3.1x or
Xerox Document Centre System Administration Guide Page 6 - 5
Page 58

Go to a workstation and...
1. Use the CentreWare Network Services CD-ROM to install
print drivers on a Windows-based workstation. Details for
this are found in the document supplied with your printer
entitled CentreWare Network Serv ices Guide.
2. Connect the print driver you loaded above to the queue you
created on the NetWare server.
3. Open an application and print a test job.
4. Check your test job for quality and use the Problem Solving
section of the Document Centre Reference Guide for
resolving print d efects.
5. If your test job does not print, refer to the troubleshooting
section in this document to correct the problem.
6. Repeat this Go to a workstation and... procedure at each
worksta tion that will print to this printer.
Page 6 - 6 Xerox Document Centre System Administration Guide
Page 59

7. UNIX Networks
Before You Start
To enable 100BaseT or a Token Ring interface, refer to Chapter 2
How to Connect to Ethernet or Token Ring Networks to
configure the Ring Speed and Source Routing settings for your
environment.
7. UNIX Networks
NOTE
Your Document Centre now has DHCP, LPR, and NetBIOS over
the IP protocol enabled by default. If your DHCP server will
provide host name, IP add ress, Gatewa y addres s, and Subn et Mas k,
the Document Centre TCP/IP information will be configured on
initial boot. This means that if you have configured your DHCP
server with the desired information, you may go right to the area
within this section entitled Go to a Workstation and....
For information on how your printer can connect to a BOOTP
server, or a RARP server to be a ss igned an IP address dynamical ly ,
refer to the sectio n in this do cument entitled Dynamic/Static IP
Addresses & WINS. Information in regards to static IP address
configuration may be found within that section as well.
Your Document Centre printer supports printing from a variety of
UNIX platforms. The procedure contained in this document will
enable you to connect your printer in many of these environments.
7. UNIX Networks
Xerox Document Centre System Administration Guide Page 7 - 1
Page 60

If you have not already assigned TCP/IP information...
The preceding sections assume that any IP address, subnet
mask, gateway, or host name nece ssa ry f or net w or k in st all ation
has already been assigned to the Document Centre. If these
components have not been configured, please refer to the
sectio n of this document entitled Dynamic/Static IP
Addresses & WINS before continuing further:
For Dynamic Addressing - Section 3, pages 3-2 thru 3-5.
For Static Addres si ng - Section 3, pages 3-6 thru 3-8.
Once the prin ter ha s been configured to the appr opriate TCP/IP
settings, you may procede to the next section.
Page 7 - 2 Xerox Document Centre System Administration Guide
Page 61

Go to a workstation and...
NOTE This proce dur e a ss u mes that any TCP/IP component s necessary for
network installation have already been assigned to the Document
Centre. If these components have no t bee n c onfigured, please refer
to the appropriate information contained within the section entitled
Dynamic/Static IP Addresses & WINS before continuing further.
1. Mount the CentreWare Network Services CD-ROM .
Solaris/SunOS, HP-UX, and AIX users can load the
CentreWare Print DCPR Tool. Details are contained in the
document entitled CentreWare Network Services Guide.
2. Add the printers host name, TCP/IP address, hardware
address to you r /etc/hosts file or NIS database depending on
your UNIX version.
3. Create a queue using the CentreWare tool OR by using the
native tools available in your operating system version.
4. Create a print job and send it to the printer.
5. Check your test job for quality and use the Problem Solving
section of the Document Centre Reference Guide for
resolving print d efects.
6. If your print job does not print, refer to the Troubleshooting
section in this document entitled TCP/IP Troubleshooting
to correct the problem.
7. Repeat this Go to a workstation and... procedure at each
worksta tion that will print to this printer.
7. UNIX Networks
7. UNIX Networks
Xerox Document Centre System Administration Guide Page 7 - 3
Page 62

Page 7 - 4 Xerox Document Centre System Administration Guide
Page 63

8. Microsoft (NetBEUI) Networks
Before You Start
To enable 100BaseT or a Token Ring interface, refer to Chapter 2
How to Connect to Ethernet or Token Ring Networks to
configure the Speed and Source Routing settings for your
environment.
8. Microsoft
8. Microsoft (NetBEUI)
Networks
(NetBEUI) Networks
Xerox Document Centre System Administration Guide Page 8 - 1
Networks
8. Microsoft (NetBEUI)
Page 64

Go to the Document Centre and...
1. Connect your Document Centre to the network with the
appropriate cabling.
2. Enter the Tools pathway.
a) Press the Access ( or ) button.
b) On the keypad enter 1111 or the current password. Press
the Enter button when finished. The Touch Screen will
be used for the remainder of the data entry, unless
instructed otherwise.
c) Press the Go to Tools button.
3. Enable Microsoft Network printing.
a) Wait for the screen to refresh and press the Connectivity
and Network Setup button.
b) Wait for the screen to refresh and press the Network
Setup button.
4. Enable the Protocol and Media.
a) Press the Microsoft Networks button.
b) Press the Transport and Medi a button.
c) Press the Enable button to enable the Microsoft
Network protocols.
d) If Physical Media buttons appear. Press the
corresponding button to select either
NetBEUI/Ethernet or Net BEUI/ Token Ring. After
making your selection press Save.
Page 8 - 2 Xerox Document Centre System Administration Guide
Page 65

5. Assign the Workgroup and Host names.
a) You will be returned to the previous screen. Press the
Workg r oup and Host button.
b) At the next screen, press the Wor kgroup Name button,
using the touch panel keys. Enter the name of the
workgroup in which you want the printer to appear then
press Save.
c) You will be returned to the previous screen. Press the
SMB Host Name button. Using the Touch Scree n, enter
the desired text fo r this item then pre ss Save.
d) OPTIONAL STEP: Press the SMB Host Desc ription
button, enter the desired text then press Save. You will
be returned to the previous screen.
e) Press Save again to return to the previous screen.
6. Assign a Printer Name and Description.
a) Press the Printer Description button.
b) Press the Printer Name button. Using the touch panel
keys, enter the desired text for this item. When finished
press the Save button twice to record the changes.
c) OPTIONAL STEP: Press the Printer Description
button, usin g th e touch panel keys, enter the desir ed text
for this item then press Save.
8. Microsoft
8. Microsoft (NetBEUI)
Networks
(NetBEUI) Networks
Xerox Document Centre System Administration Guide Page 8 - 3
Networks
8. Microsoft (NetBEUI)
Page 66

7. Set Maximum Connections and Timeout.
a) Press the Connections button.
b) Touch the Maximum Connections soft button on the
Touch Screen and on the keypad enter the desired
maximum connection number between 10 and 30. It is
recommended that this value should be set at the default.
c) Touch the Connection Timeout soft button on the
Touch Screen. On the keypad enter the desired number
of seconds between 1and 32,767 Press Save to exit the
connections screen.
8. Exit the Tools Menu.
a) Press the Exit Tools button. The printer will store the
settings you have made.
9. Print a Configurati on Repo rt pa ge from your printer to use
in the rem ainder of the installation.
a) Repeat Steps 2a and 2c.
b) Select System Setting.
c) Select Configuration Report.
d) Select Print Configuration Report Now.
e) Press Cancel.
10. Prepare for print driver installation.
a) From the documentation package supplied with your
printer, retrieve the CentreW ar e Networ k Servi ces
CD-ROM and the document entitled CentreWare Net-
work Services Guide. Proceed to the next section of
this procedure called Go to a Workst ation and...
Page 8 - 4 Xerox Document Centre System Administration Guide
Page 67

Go to the workstations and...
1. Verify that the NetBEUI protocol is loaded (ALL Windows
3.11 or greater versions).
2. Use the CentreWare Network Services CD-ROM to install
print drivers on a Windows-based workstation. Details for
this are found in the document supplied with your printer
entitled CentreWare Network Serv ices Guide.
Networks
8. Microsoft
3. On the Configuration Report review the NetBIOS: area and
note the Workgroup, Host Name, and Printer Name.
Windows for Workgroups Users
• Open the Control Panel and double-click the Printers icon.
• Select the printer driver you just installed and click Connect.
• Select an available port and click Network.
• Double-click the name of the WorkGroup for the printer.
• Double-click the Host Name of the printer.
• Click once on the Printer Name then click OK.
8. Microsoft (NetBEUI)
(NetBEUI) Networks
Xerox Document Centre System Administration Guide Page 8 - 5
Networks
8. Microsoft (NetBEUI)
Page 68

Windows 95/98, Windows NT 4.0 WorkStation and
Windows 2000 Users
• Click the Start button and select Settings.
• From the cascade menu select Printers.
• Select a printer with the right mouse button.
• Select the Properties entry in the casc ade menu.
• Select the Details tab on the Properties dialog.
• Click the Add Port button and browse to the Workgroup.
• Double click the name of the WorkGroup for the printer as
shown on the Configuration Report.Double click the Host
Name of the printer as shown on the Configuration Report.
• Click once on the Printer Name then click OK.
• Open an application and print a test page to verify operation.
• If your print job does not print, refer to the Troubleshooting
section of this document to solve the problem.
Page 8 - 6 Xerox Document Centre System Administration Guide
Page 69

9. Microsoft (TCP/IP) Networks
Before You Start
NOTE Your Document Centre now has DHCP, LPR, and NetBIOS over
the IP protocol e nabled by default. If you have a DHCP server and
it is set to provide host name, IP address, Gateway address, and
Subnet Mask, the Document Centre TCP/IP information will be
configured on initial boot.
Networks
Networks
9. Microsoft (TCP/IP)
9. Microsoft (TCP/IP)
To enable 100BaseT or a Token Ring interface, refer to Chapter 2
How to Connect to Ethernet or Token Ring Networks to
configure the Speed and Source Routing settings for your
environment.
For information on how your printer can connect to a BOOTP
server, or a RARP server to be assigned an IP addr es s dynamically,
refer to the chapt er in this d ocument entitled Dynamic/Static IP
Addresses & WINS Information in regards to static IP address
configuration may be found within that section as well.
Xerox Document Centre System Administration Guide Page 9 - 1
Page 70

If you have not already assigned TCP/IP information...
The preceding sections assume that any IP address, subnet
mask, gateway, or host name nece ssa ry f or net w or k in st all ation
has already been assigned to the Document Centre. If these
components have not been configured, please refer to the
sectio n of this document entitled Dynamic/Static IP
Addresses & WINS before continuing further:
For Dynamic Addressing - Section 3, pages 3-2 thru 3-5.
For Static Addres si ng - Section 3, pages 3-6 thru 3-8.
Once the prin ter ha s been configured to the appr opriate TCP/IP
settings, you may proceed to the next section.
Page 9 - 2 Xerox Document Centre System Administration Guide
Page 71

Go to the Document Centre and...
NOTE This proce dur e a ss u mes that any TCP/IP component s necessary for
network installation have already been assigned to the Document
Centre. If these components have no t bee n c onfigured, please refer
to the appropriate information contained within the section entitled
Dynamic/Static IP Addresses & WINS before continuing further.
Networks
Networks
Connect your Document Centre to the network with the
appropriate cabling.
1. Enter the Tools pathway.
a) Press the Access ( or ) button.
b) On the keypad enter 1111 or the current password. Press
the Enter button when finished. The Touch Screen will
be used for the remainder of the data entry, unless
instructed otherwise.
c) Press the Go to Tools button.
2. Enter the Network Setup menus.
a) Wait for the screen to refresh and press the Connectivity
and Network Setup button.
b) Wait for the screen to refresh and press the Network
Setup button.
3. Enable Microsoft Networking.
a) Press the Microsoft Networks button.
b) At the next screen, press the Transport and Media
button.
9. Microsoft (TCP/IP)
9. Microsoft (TCP/IP)
c) Press the Enable button to enable the Microsoft
Network protocols.
d) If Physical Media buttons appear, press the
corresponding button to select either IP/Ethernet, or
IP/Token Ring. After making your select ion press Sa ve.
e) Press the Workgroup and Host button.
Xerox Document Centre System Administration Guide Page 9 - 3
Page 72

f) At the next screen, press the Workgr oup Name button,
using the touch panel keys. Enter the name of the
workgroup in which you want the printer to appear then
press Save.
g) Press the SMB Host Name (this will set the NetBIOS
name) button, using the Touch Screen keys, enter the
desired text then press Save.
h) OPTIONAL STEP: Press the SMB Host Desc ription
button and ent er the desi re d text for this item, then press
Save.
i) Press Save aga in to return to the M i crosoft N etwork s
screen.
j) Press the Printer Descript ion button.
k) Press the Printer Name button, using the Touch Screen
keys, enter the desired text for this item then press Save.
l) OPTI ONAL STEP: Press the Printer Description
button, using the touch panel keys and enter the desired
text for this item, then press Save.
m) Press Save again to r eturn to th e Micros oft Networks
screen.
n) Press the Connections button
o) Touch the Maximum Connections soft button on the
Touch Screen and on the keypad enter the desired
maximum connection number between 1 and 30. This
number shoul d be se t to equ al or great er t han th e num ber
of workstations on your Peer to Peer network.
p) Touch the Connect ion Timeout soft button on the
Touch Screen. On the keypad enter the desired number
of seconds between 0 and 9999.
q) Press Save to exit the Connections Screen.
4. Exit the Tools Menu.
a) Press the Exit Tools button. The printer will store the
settings you have made.
Page 9 - 4 Xerox Document Centre System Administration Guide
Page 73

5. Prepare for print driver installation.
a) From the documentation package supplied with your
printer, retrieve the CentreWare Network Services
CD-ROM and the document entitled CentreWare Net-
work Services Guide. Proceed to the next section of
this procedure called Go to a Workst ation and...
6. Obtain a Configuration Report from the printer to use in
the remainder of the installation.
Networks
Networks
9. Microsoft (TCP/IP)
9. Microsoft (TCP/IP)
Xerox Document Centre System Administration Guide Page 9 - 5
Page 74

Go to the workst a tio n an d...
NOTE This proce dur e a ss u mes that any TCP/IP component s necessary for
network installation have already been assigned to the Document
Centre. If these components have no t bee n c onfigured, please refer
to the appropriate information contained within the section entitled
Dynamic/Static IP Addresses & WINS before continuing further.
1. Verify that the TCP/IP protocol stack is loaded.
2. Use the CentreWare Network Services CD-ROM to install
print drivers. Details for this are found in the document supplied with your printer entitled CentreWare Network Ser-
vices Guide.
Windows 95/98, Windows NT 4.X Workstation and
Windows 2000 Users
• Add a network printer as you normally would.
• Browse for and Double-click the na me of th e WorkGroup for
the printer as shown on the Configuration Report.
• Double-click the Ne tBIOS Host Name of the pri nte r as sh own
on the Configuration Report.
• Click once on the Printer Na me as shown on the Configura-
tion Report then click OK.
• For a new printer you will be prompted for a print driver.
Select Have Disk and browse to the directory with the Docu-
ment Centre dr iver, select it then click OK.
3. Open an application and print a test page to verify operation.
4. If your print job does not print, refer to the Troubleshooting
section of this document to solve the problem.
5. Check your test job for quality and use the Problem Solving
section of the Document Centre Reference Guide for
resolving print d efects.
6. Repeat this Go to th e workstat ion and. .. pro cedure for each
workstation on the network that will print to the printer.
Page 9 - 6 Xerox Document Centre System Administration Guide
Page 75

10. Windows 2000 LPR and IPP Printing
Before you Start
NOTE Your Document Centre now has DHCP, LPR, and NetBIOS over
the IP protocol enabled by default. If your DHCP server will
provide host name, IP add ress, Gatewa y addres s, and Subn et Mas k,
the Document Centre TCP/IP information will be configured on
initial boot. This means that if you have configured your DHCP
server with the desired information, you may connect your
Document Centre to your network and go right to the section
entitled Go to the Server/Workstation and....
LPR and IPP
10. Windows 2000
and IPP Printing
10. Windows 2000 LPR
For information on how your printer can connect to a BOOTP
server, or a RARP server to be a ss igned an IP address dynamical ly ,
refer to the chapt er in this d ocument entitled Dynamic/Static IP
Addresses & WINS. Information in regards to static IP address
configuration may be found within that section as well.
To enable 100BaseT or a Token Ring interface, refer to Chapter 2
How to Connect to Ethernet or Token Ring Networks to
configure the Speed and Source Routing settings for your
environment.
Xerox Document Centre System Administration Guide Page 10 - 1
Page 76

If you have not already assigned TCP/IP information...
The preceding sections assume that any IP address, subnet
mask, gateway, or host name nece ssa ry f or net w or k in st all ation
has already been assigned to the Document Centre. If these
components have not been configured, please refer to the
sectio n of this document entitled Dynamic/Static IP
Addresses & WINS before continuing further:
For Dynamic Addressing - Section 3, pages 3-2 thru 3-5.
For Static Addres si ng - Section 3, pages 3-6 thru 3-8.
Once the prin ter ha s been configured to the appr opriate TCP/IP
settings, you may proceed to the next step.
Page 10 - 2 Xerox Document Centre System Administration Guide
Page 77

Go to the Server/ Workstation and.. .
NOTE This proce dur e a ss u mes that any TCP/IP component s necessary for
network installation have already been assigned to the Document
Centre. If these components have no t bee n c onfigured, please refer
to the appropriate information contained within the section entitled
Dynamic/Static IP Addresses & WINS before continuing further.
1. Verify the correct software is loaded.
a) At the Desktop, right mouse click the My Network
Places icon and select Properties. Right m ous e cl i ck o n
the Local Area Connection icon and verify that the
Internet Protocol (TCP/IP) protocol has been loaded.
2. Add the printer.
a) Open Cont rol Panel and double cl ick t he Printers icon.
LPR and IPP
10. Windows 2000
b) Verify that Network Printer is selected and click Next.
c) The Locate Your Printer screen will appear.
d) Follow the steps to Create a LPR printer OR Create an
IPP printer in the right column.
To create a LPR Printer
a) Select Local Pr inter; deselect Autom atically detect
and install my Plug and Play printer. Click Next.
b) Select Cre ate a new port and choose Standard
TCP/IP port from the pull-down menu. Click Next
twice.
c) Enter the Printer Name or its IP address. The Printer
Name can be either the Host Name or the SMB Host
Name as shown on the configuration report, depending
on the name resolution used by your network (WINS or
DNS). The Port Name is automatica lly filled in for you
but you can change it if you want to. Click Next.
and IPP Printing
10. Windows 2000 LPR
Xerox Document Centre System Administration Guide Page 10 - 3
Page 78

d) The Wizard will automatically detect the Printer Model
for you. If that does not happen select Standard and
choose the your Printer Model from the pull-down
menu.
e) Click Finish. Go to Step 3.
To Create an IPP printer
a) Select Ne t work Printer. Click Next.
b) Select Connect to a printer on t he I nternet or on you r
intranet. Type HTTP:// followed by the printer’s fully
qualified Domain name or IP address in the URL field.
The Printer Name can be either the Host Name or the
SMB Host Name as shown on the configuration report,
depending on th e nam e res olu ti on used by your network
(WINS or DNS). Click Next.
c) Click OK to install the printer drive r. Go to Step 3.
3. Select the driver to be used (Document Centre 480/470/460
drivers are included on the Windows 2000 CD-ROM).
a) A driver list will be displayed. Select Xerox from the
Manufacturers: area. Then select the desired print
driver from th e Printers: and click OK. The driver will
be installed.
b) The Default Printer window will open. Select Yes to
make this the default printer, otherwise click the Next>
button.
c) At the Completing the Add Printer Wizard screen,
click th e Finish button.
d) Print a Test Page. Verify that it prints. Repeat this Go
to the Server Workstation and... procedure for each
workstation on the network that will print to the printer.
Page 10 - 4 Xerox Document Centre System Administration Guide
Page 79

11. Microsoft Windows NT 4.X Server Network (TCP/IP)
Before you Start
NOTE Your Document Centre has DHCP enabled by default. If you have
configured a DHCP se rver with TCP/IP information, you can
connect your Document Centre to your network and it will retrieve
its TCP/IP inform ation from the DHCP server w hen it is tu rned on.
11. Microsoft
Windows NT 4.X
To enable 100BaseT or a Token Ring interface, refer to Chapter 2
How to Connect to Ethernet or Token Ring Networks to
configure the Speed and Source Routing settings for your
environment.
If you are using DHCP, perform Steps 1 through 8b contained
within the Dynamic Addressing portion of the Dynamic/Status IP
Address Assignment & WINS section but DO NOT change any
values. Then read the note before step 9 and determine if you wish
to change the lpr port number. After choosing, complete the
remainder of the procedure.
Xerox Document Centre System Administration Guide Page 11 - 1
11. Microsoft Windows
NT 4.X Server Network
Page 80

If you have not already assigned TCP/IP information...
The preceding sections assume that any IP address, subnet
mask, gateway, or host name nece ssa ry f or net w or k in st all ation
has already been assigned to the Document Centre. If these
components have not been configured, please refer to the
sectio n of this document entitled Dynamic/Static IP
Addresses & WINS before continuing further:
For Dynamic Addressing - Section 3, pages 3-2 thru 3-5.
For Static Addres si ng - Section 3, pages 3-6 thru 3-8.
Once the prin ter ha s been configured to the appr opriate TCP/IP
settings, you may proceed to the next section.
Page 11 - 2 Xerox Document Centre System Administration Guide
Page 81

Go to the server and...
NOTE This proce dur e a ss u mes that any TCP/IP component s necessary for
network installation have already been assigned to the Document
Centre. If these components have no t bee n c onfigured, please refer
to the appropriate information contained within the section entitled
Dynamic/Static IP Addresses & WINS before continuing further.
1. Verify the correct software is loaded.
a) At the Desktop, right mouse click the Network
Neighborhood icon and select Properties. Click on the
Protocols TAB and verify that the TCP/IP protocol has
been loaded.
b) Select the Services TAB and verify that Microsoft
TCP/IP Printing is loaded. If this software is not
present, install it using the documentation provided by
Microsoft. Then r et u rn t o t he next step in this d ocum e nt.
2. Add the printer.
a) Open the Control Panel and double- click Printers icon.
Double-click Add Printer. The Add printer Wizard
starts.
11. Microsoft
Windows NT 4.X
b) Verify that My Computer is selected and click Next>.
c) Click Add Port. From the list that appears select LPR
Port. Click New Port.
d) This will open up the Add LPR compatible printer
window. Type in the IP address of the Document Centre
printer and th e printer na me and select OK. Note that the
printer name is case sens itive.
e) The Wi zard will ret urn you to the pre vious dial og. Verify
the new IP address you entered is in the list and correct.
f) The check box to the left of the addr ess must be
checked; if it is not, check it then select Next>.
Xerox Document Centre System Administration Guide Page 11 - 3
11. Microsoft Windows
NT 4.X Server Network
Page 82

g) Insert CentreWare Networks Services CD-ROM and
click Ha ve Disk.
h) Click the Browse button and select the directory
containing the Windows NT drivers. Details for this are
contai ned in the document entitled Network Services
Guide. Select the PRINTER.INF file then click Open.
i) The Wizard will return you to th e previous dialog. Verify
the path and file name are correct and click OK.
j) At the next dia log, en ter a name for th e pri nter a nd s elect
whether you want that print er to be the default t hen cli ck
Next>.
k) If the pr inter will not be shar ed, click Next>. To share
the prin ter, check the share checkbox, enter a Share
Name, then click Next>.
l) At the next dialog i t is recom mended t hat you print a test
page. Click Finish.
m) W a it for th e Test Print to print. A new dialog wil l ask for
confirmation of the test print; if the page printed, click
Yes. If it did not print, run th e Prin tin g T roubl eshoot er in
NT.
3. Send a test job to the printer.
a) Check your test job for quality and use the pr oblem
solving section of the Document Centre Reference
Guide for resolving print defects.
b) If your print job does not print, refer to the
Troubleshooting section in this document to correct the
problem.
Page 11 - 4 Xerox Document Centre System Administration Guide
Page 83

Go to the workst a tio n an d...
NOTE This proce dur e a ss u mes that any TCP/IP component s necessary for
network installation have already been assigned to the Document
Centre. If these components have no t bee n c onfigured, please refer
to the appropriate information contained within the section entitled
Dynamic/Static IP Addresses & WINS before continuing further.
1. Verify that the TCP/IP protocol stack is loaded.
2. Use the CentreWare Network Services CD-ROM to install
print drivers. Details for this are found in the document supplied with your printer entitled CentreWare Network Ser-
vices Guide.
3. Connect the printer that you just created to the shared
resource on the server.
4. Open an application on the workstation and print a test page
to verify operation.
5. Check your test job for quality and use the problem solving
section of the Document Centre 490/480/470/460 Refer-
ence Guide for resolving print defe cts.
11. Microsoft
Windows NT 4.X
6. Repeat this Go to th e workstat ion and. .. pro cedure for each
workstation on the network that will print to the printer.
Xerox Document Centre System Administration Guide Page 11 - 5
11. Microsoft Windows
NT 4.X Server Network
Page 84

Page 11 - 6 Xerox Document Centre System Administration Guide
Page 85

12. OS/2 (TCP/IP) Networks
Before You Start
To enable 100BaseT or a Token Ring interface, refer to Chapter 2
How to Connect to Ethernet or Token Ring Networks to
configure the Speed and Source Routing settings for your
environment.
Networks
12. OS/2 (TCP/IP)
NOTE
Xerox Document Centre System Administration Guide Page 12 - 1
Your Document Centre now has DHCP, LPR, and NetBIOS over
the IP protocol enabled by default. If your DHCP server will
provide host name, IP add ress, Gatewa y addres s, and Subn et Mas k,
the Document Centre TCP/IP information will be configured on
initial boot. This means that if you have configured your DHCP
server with the desired information, you may go right to the
heading in this section entitled Go to a Workstation and....
For information on how your printer can connect to a BOOTP
server, or a RARP server to be a ss igned an IP address dynamical ly ,
refer to the sectio n in this do cument entitled Dynamic/Static IP
Addresses & WI NS. Information in regards to static IP address
configuration may be found within that section as well.
Networks
12. OS/2 (TCP/IP )
Page 86

If you have not already assigned TCP/IP information...
The precedi ng se ctions assume that any I P a ddr ess, subnet
mask, gateway, or host name nece ssa ry f or net w or k in st all ation
has already been assigned to the Document Centre. If these
components have not been configured, please refer to the
sectio n of this document entitled Dynamic/Static IP
Addresses & WINS before continuing further:
For Dynamic Addressing - Section 3, pages 3-2 thru 3-5.
For Static Addres si ng - Section 3, pages 3-6 thru 3-8.
Once the prin ter ha s been configured to the appr opriate TCP/IP
settings, you may procede to the next step.
Page 12 - 2 Xerox Document Centre System Administration Guide
Page 87

Go to a workstation and...
NOTE This proce dur e a ss u mes that any TCP/IP component s necessary for
network installation have already been assigned to the Document
Centre. If these components have no t bee n c onfigured, please refer
to the appropriate information contained within the section entitled
Dynamic/Static IP Addresses & WINS before continuing further.
Networks
1. Create a new printer and load print drivers from the CDROM.
2. Create a printer sha re and its acces s permiss ions (shari ng and
connecting).
3. Start LPRPORTD/LPRMON, ping printer, open EPM and
send a print job to the printer.
4. Check your test job for quality and use the problem solving
section of the Document Centre Reference Guide for
resolving print d efects.
5. If your print job does not print, refer to the Troubleshooting
section in this document to correct the problem.
6. Repeat this Go to a workstation and... procedure at each
worksta tion that will print to this printer.
12. OS/2 (TCP/IP)
Xerox Document Centre System Administration Guide Page 12 - 3
Networks
12. OS/2 (TCP/IP )
Page 88

Page 12 - 4 Xerox Document Centre System Administration Guide
Page 89

13. OS/2 (NetBEUI) Networks
Before You Start
To enable 100BaseT or a Token Ring interface, refer to Chapter 2
How to Connect to Ethernet or Token Ring Networks to
configure the Speed and Source Routing settings for your
environment.
Networks
Networks
13. OS/2 (NetBEUI)
13. OS/2 (NetBEUI)
Xerox Document Centre System Administration Guide Page 13 - 1
Page 90

Go to the Document Centre and...
1. Connect your Document Centre to the network with the
appropriate ca bling.
2. Enter the Tools pathway.
a) Press the Access ( or ) button.
b) On the keypad enter 1111 or the current password. Press
the Enter button when finished. The Touch Screen will
be used for the remainder of the data entry, unless
instructed otherwise.
c) Press the Go to Tools button.
3. Enable Microsoft Network printing.
a) Wait for the screen to refresh and press the Connectivity
and Network Setup button.
b) Wait for the screen to refresh and press the Network
Setup button.
4. Enable the Protocol and Media.
a) At the next screen, press the Microsof t Networks
button.
b) At the next screen, press the Transport and Media
button.
c) At the next screen, press the Enable b utt on to enable the
Microsoft Network protocols.
d) If Physical Media buttons appear, press the
corresponding button to select either
NetBEUI/Ethernet or NetBEUI/Token Ring. Press
Save.
Page 13 - 2 Xerox Document Centre System Administration Guide
Page 91

5. Assign the Workgroup and Host names.
a) You will be returned to the previous screen; press the
Workg r oup and Host button.
b) At the next screen, press the Wor kgroup Name button.
Using the touch panel keys, enter the name of the
workgroup in whic h you want the printer to appea r, then
press Save.
c) You will be returned to the previous screen. Press the
SMB Host Name button, using the touch pan el keys a nd
enter the desired text for this item, then press Save.
d) OPTIONAL STEP: Press the SMB Host Desc ription
button, enter the desired text then press Save. You will
be returned to the previous screen.
e) Press Save again to return to the previous screen.
6. Assign a Printer Name and Description.
a) Press the Printer Description button.
b) Press the Printer Name button. Using the touch panel
keys, enter the desired text for this item then press Save.
Press Save again to return to the previous screen.
c) OPTIONAL STEP: Press the Printer Description
button, usin g th e touch panel keys, enter the desir ed text
for this item then press Save.
Networks
Networks
13. OS/2 (NetBEUI)
13. OS/2 (NetBEUI)
d) Press the Connections button.
Xerox Document Centre System Administration Guide Page 13 - 3
Page 92

e) Set Maximum Connections and Timeout.
f) Touch the M aximum Connections soft button on the
touch screen and on the keypad enter the desired
maximum connection number between 1 and 30. It is
recommended that this value should be set at the default.
g) Touch the Connection Timeout soft button on the
Touch Screen. On the keypad enter the desired number
of seconds between 0 and 9999. Press Save to exit the
connections screen.
7. Exit the Tools Menu.
a) Press the Exit Tools button. The printer will store the
settings you have made.
8. Prepare for print driver installation.
a) From the documentation package supplied with your
printer, retrieve the CentreW ar e Networ k Servi ces
CD-ROM and the document entitled CentreWare Net-
work Services Guide. Proceed to the next section of
this procedure called Go to a Workst ation and...
Page 13 - 4 Xerox Document Centre System Administration Guide
Page 93

Go to the workstations and...
1. Perform an OS2 Warp (4.0) Selective Install.
a) Install Both NetBIOS (NetBEUI) and NetBIOS for IP
during the install process.
b) Select and Enabl e a ll of the file and print shari ng opti ons
during the Selective Install process.
2. Create a shared resource and connect it to the network
device.
a) Double-click on the Connections Icon.
b) Click on the + symbol next to Network.
c) Click on the + symbol next to Network Services.
d) Double-click on Start File a nd Print C lient.
e) Close the Logons window.
f) Double Click on Shared Resources and Network
Connections.
g) Close the Connections Window.
h) Enter a valid user /pas sword (t he one ent ered at the cli ent
installation).
i) Select the Connections tab of these property pages.
j) Select the Create connection button.
k) Set the resource type to Printer.
Networks
Networks
13. OS/2 (NetBEUI)
13. OS/2 (NetBEUI)
Xerox Document Centre System Administration Guide Page 13 - 5
Page 94

l) Enter the machin e’s hostname in the Server field
m) Select the desired lpt port.
n) Verify that the Connect to resource at logon button is
selected.
o) Place the cursor in the server field and pr ess the Enter
key on the keyboard.
p) Click the OK button after the share name appears in the
Resource window.
q) Close the Shared Resources and Networ k
Connections - Properties window.
r) Double-click on the Connections Icon.
s) Double-click on Printers.
t) Close the Connections window.
u) Double-click on Printer in the Printers windo w. DO
NOT CHOOSE THE NETWORK PRINTER OPTION.
v) Enter a name f or t he l oca l queue in the Printer window.
(Overwrite the printer that already appears with
something unique - this does not have to be the share or
hostname of the printer)
w) Make sure the cursor is still in the printer window and
press the Enter key on the keyboard.
x) Select familiar w/ OS/2 if prompted.
y) Highlight the correct lpt port (assigned in step 2m).
Page 13 - 6 Xerox Document Centre System Administration Guide
Page 95

3. Install a new printer driver.
a) Insert CentreWare CD into your CD-ROM drive.
b) Make a /desktop/drivers directory from an OS/2
Window.
c) Copy the driver fil es from th e CD-ROM disk to the
/desktop/drivers directory.
d) Click the Install new printer driver... button.
e) Select Other OS/2 printer driver.
f) Enter the correct directory in the appropriate field.
g) Click the Refresh button.
h) Click the Install button after you see the driver
description appear.
i) Click the OK button to confirm that the dr iver has been
installed.
4. Highlight th e OS/2 driver in the Default printer driver
window and click the Create button.
5. Close the Printers window.
6. You are now ready to print to the local queue created in step
2v.
7. Print a test job.
8. Check your test job for quality and use the problem solving
section of the Document Centre Reference Guide for
resolving print d efects.
9. If your print job does not print, refer to the Troubleshooting
section in this document to correct the problem.
Networks
Networks
13. OS/2 (NetBEUI)
13. OS/2 (NetBEUI)
Xerox Document Centre System Administration Guide Page 13 - 7
Page 96

Page 13 - 8 Xerox Document Centre System Administration Guide
Page 97

14. Macintosh Networks (AppleTalk)
Before you start
Networks
14. Macintosh
To enable 100BaseT or a Token Ring interface, refer to Chapter 2
How to Connect to Ethernet or Token Ring Networks to
configure the Speed and Source Routing settings for your
environment.
This procedure assumes you have Macintosh computers equipped
with an Ethernet card or Token Ring card that is connected to the
network and you are currently printing using the AppleTalk
protocol.
As part of the procedure in this section you will need to know the
following information, the AppleTalk Name you wish to assign to
your printe r, and the App leTalk Zone (if used) in which you r printer
will reside.
(AppleTalk)
14. Macintosh Networks
Xerox Document Centre System Administration Guide Page 14 - 1
Page 98

Go to the Document Centre and...
1. Connect your Document Centre to the network with the
appropriate ca bling.
2. Access the Tools pathway.
a) Press the Access ( or ) button.
b) On the keypad enter 1111 or the current password. Press
the Enter button when finished. The Touch Screen will
be used for the remainder of the data entry, unless
instructed otherwise.
c) Press the Go to Tools button.
3. Enable the AppleTalk protocol.
a) Wait for the screen to refresh and press the Connectivity
and Network Setup button.
b) Wait for the screen to refresh and press the Network
Setup button.
c) Press the AppleTal k button.
d) Press the Protocol and Media button.
e) Press the Enable button. If Physical Media buttons
appear, select either Ethernet or Token Ring. Press
Save.
Page 14 - 2 Xerox Document Centre System Administration Guide
Page 99

4. Assign a Name and Zone to your printer.
a) You will be returned to the previous screen. Press the
AppleTalk Settings button.
b) At the n ext s cr een , press the Printer Name butt on, e nter
the name you want for the printer (this is the name that
will appear in the Chooser on your workstations) using
the touch panel keys.
c) Press the Zone Name button, enter the desired text for
this item using the touch panel keys (the printer default
is * which means the printer w ill appea r in ALL zones).
When finished press the Save button twice to record the
changes.
5. Exit the Tools Menu.
a) Press the Exit Tools button. The printer will store the
settings you have made.
6. Print a Configuration Repo rt pa ge from your printer to use
in the rem ainder of the installation.
a) Repeat Steps 2a and 2b.
b) Select System Setting.
c) Select Configuration Report.
d) Select Print Configuration Report Now.
e) Select Cancel.
7. Prepare for print driver installation.
a) Review the AppleTalk Settings: area of the
Configuration Report page and verify that AppleTalk
is enabled, the AppleTalk Name is correct, the
AppleTalk Zone is correct (if use d).
Networks
14. Macintosh
(AppleTalk)
14. Macintosh Networks
b) From the documentation package supplied with your
printer, retrieve the CentreWare Network Services
CD-ROM and the document entitled CentreWare Net-
work Services Guide. Proceed to the next section of
this procedure called Go to a Workst ation and...
Xerox Document Centre System Administration Guide Page 14 - 3
Page 100

Go to the workst a tio n an d...
1. Use the CentreWare Network Services CD-ROM to install
print drivers and the Macintosh PUtility on the workstation.
Details for thi s are f ound in th e docum ent supp lied wit h your
printer entitled CentreWare Network Services Guide
2. Send a test job to the printer from an app li ca ti on pr ogramme.
3. Check your test job for quality and use the Problem Solving
section of the Document Centre Reference Guide for
resolving print d efects.
4. If your job did not print see the Tr oubleshooting section in
this document to correct the problem.
Page 14 - 4 Xerox Document Centre System Administration Guide
 Loading...