

Page 1
XEROX 4595 Copier/Printer Basic Navigation
Quick Reference for Users
701P46245, Version 1.0, April 2007
Getting Help
For information/assistance, check the following:
• User Guide for information on how to use the
Xerox 4595.
• For online assistance go to: www.xerox.com
• Click the Support and Drivers link.
•In Product Name, type 4595 and click
Search.
• From the list presented, locate your model
(4595).
• Click the appropriate link for the desired
information: Support, Drivers & Download,
or Documentation
• You may also call 1-800-275-9376 extension
871 for technical assistance.
System Messages
If the system displays a message on the screen, be
sure to follow the steps in the order presented in
order to solve the problem. Failure to do so may
cause additional problems.
Log In/Log Out
If it is a requirement to log in to the Xerox 4595,
press the Log In/Log Out button. If required, enter
your UserID and password.
To log out, press this button again.
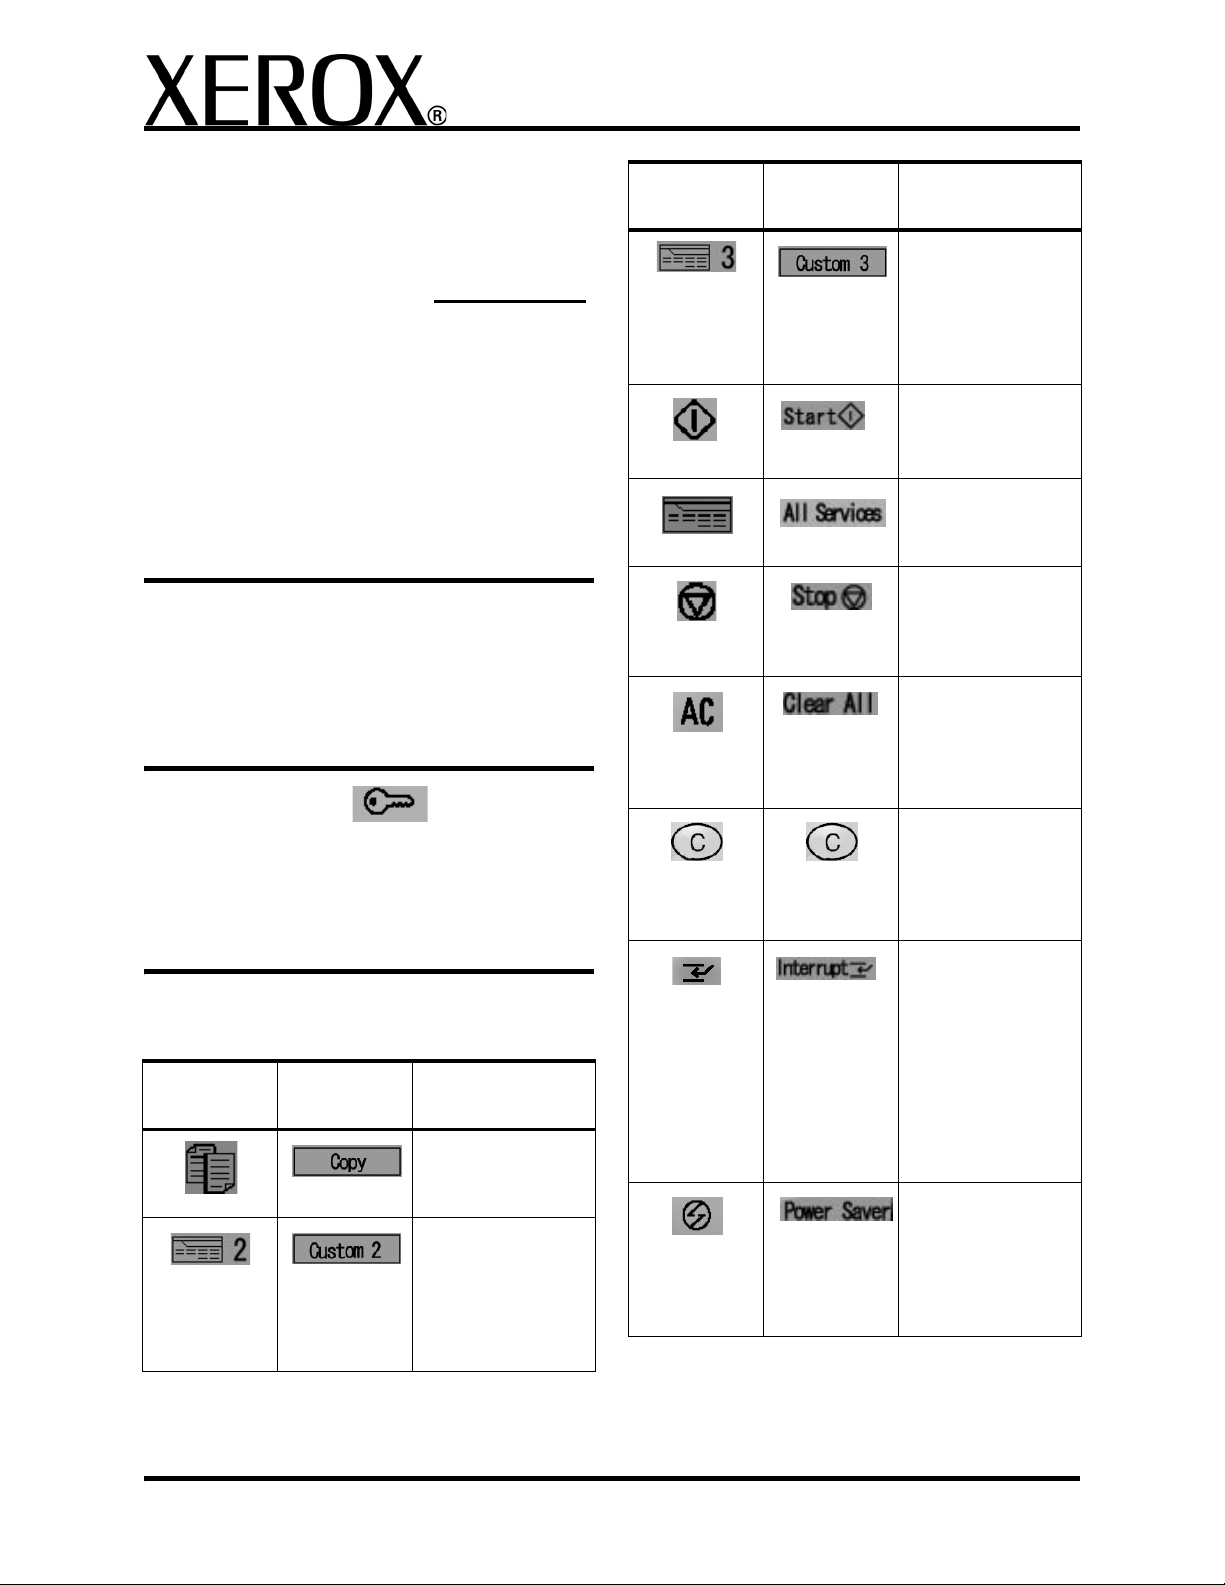
Icon
(Wordless)
Icon (With
Words)
Function
Custom 3
Use to access a
custom feature
(must be set by
your System
Administrator)
Start
Starts the copy or
scan process
All Services
Displays the menu
screen
Stop
Stops the current
job or communications
Clear All
Clears all programming and returns
the machine to
default settings
Clear
Clears wrong
numerical values;
press this button if
instructed by the UI
Control Panel icons
Icon
(Wordless)
Icon (With
Words)
Function
Copy
Use to access the
Copy feature
Custom 2
Use to access a
custom feature
(must be set by
your System
Administrator)
Interrupt
Interrupts the current process to
allow another job of
higher of priority;
press again after
the interrupt job is
complete to resume
the previous operation
Power Saver
Lights when the
machine is in
Power Saver mode;
press to cancel the
Power Saver mode
1
Page 2
XEROX 4595 Copier/Printer Basic Navigation
Quick Reference for Users
701P46245, Version 1.0, April 2007
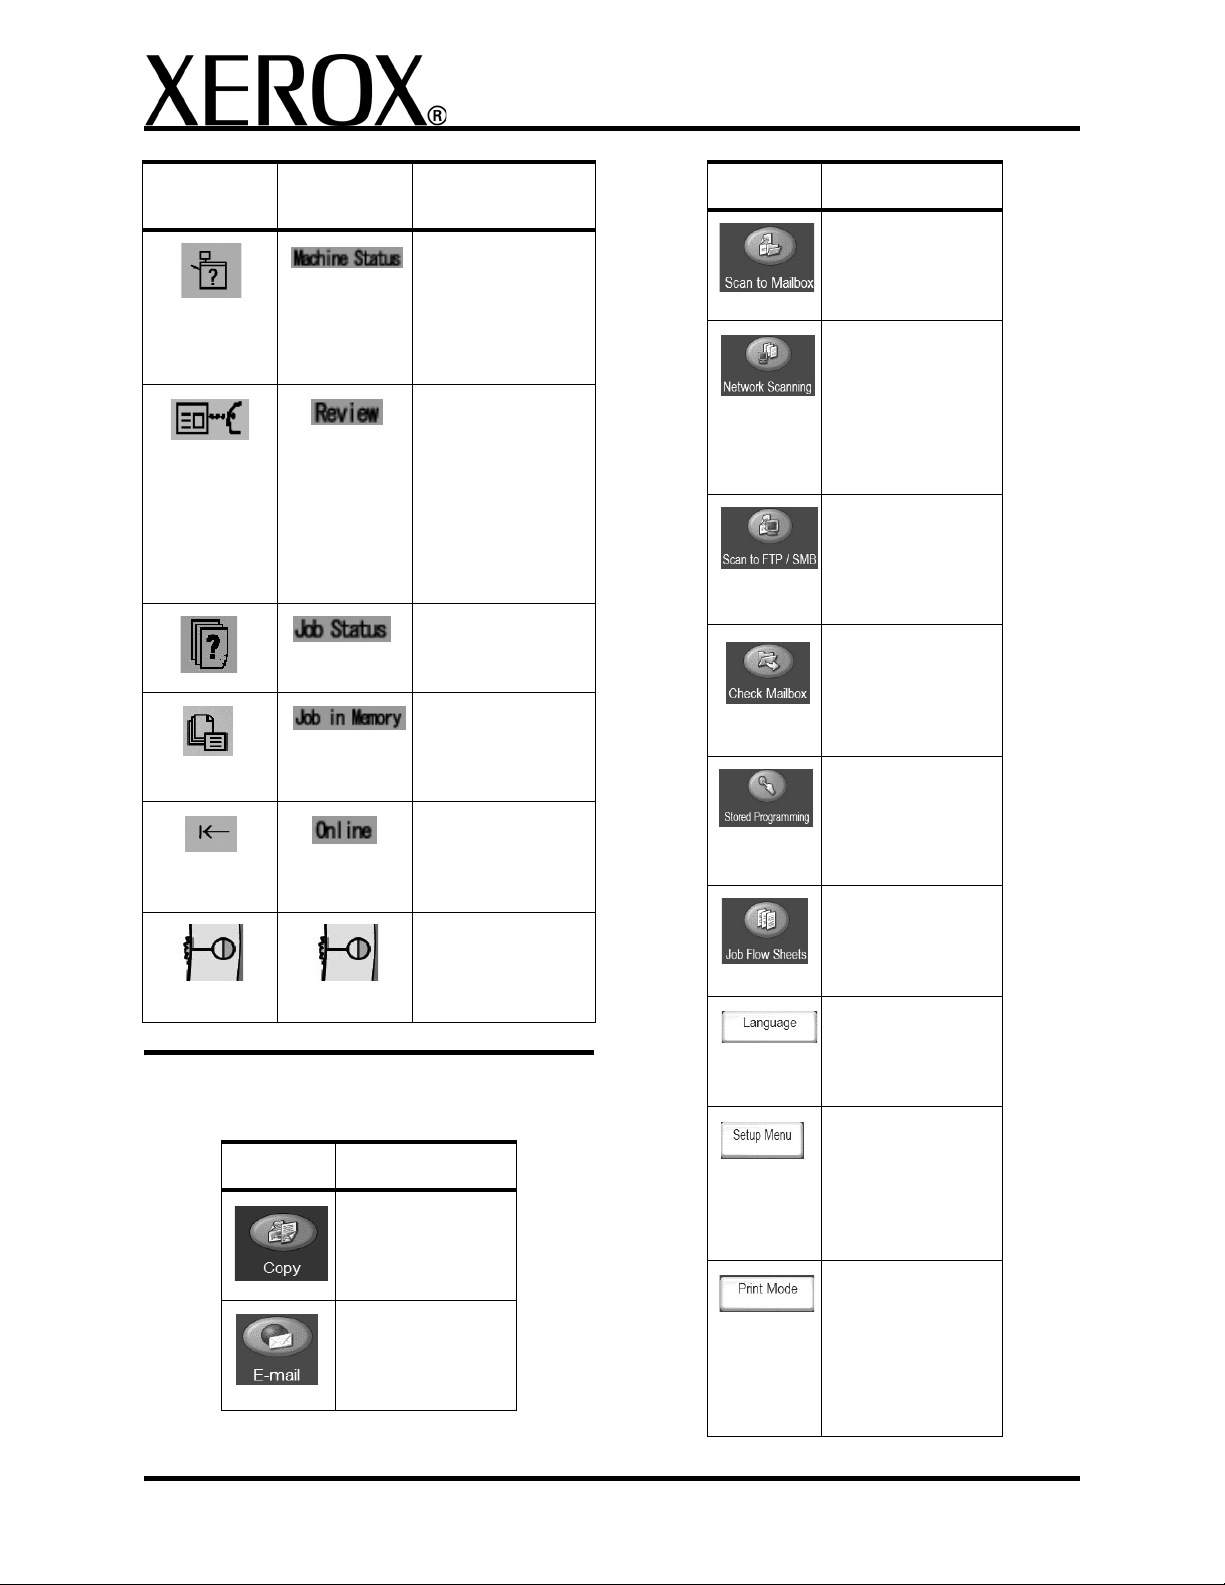
Icon
(Wordless)
Icon (With
Words)
All Services buttons
Function
Machine Status
Checks machine
status, meters, consumables, and
allows printing
reports
Review
Opens the review
screen to check
settings changed
from the default;
you can also check
destination information for faxes and
email
Job Status
Confirms or cancels
job
Job in Memory
Lights when data is
stored in the
machine’s memory
Online indicator
Lights when data is
being transmitted to
or from the machine
Brightness dial
Adjusts the brightness of the touch
screen
Icon Function
Scan to Mailbox
Allows documents
to be scanned and
saved for later use
Network
Scanning
Scans the original
documents and
saves the scanned
data to the server
as a Job Template
Scan to FTP/
SMB
Scans to a network
server using FTP or
SMB
Check Mailbox
Allows management of the mailboxes on the
copier/printer
Stored
Programming
Saves and stores
multiple job steps
as a single job
Job Flow Sheets
Allows the execution of a series of
registered actions
Language
Allows the user to
change the
language on the UI
Icon Function
Copy
Provides access to
the Basic Copy
screen
E-mail
Allows documents
to be scanned and
e-mailed
Setup Menu
Allows the creation
and modification of
mailboxes, address
book entries, and
Job Flow Sheets
Print Mode
Sets whether the
machine is on or
offline and what
printer language
the machine is
using
2
Page 3

XEROX 4595 Copier/Printer Basic Navigation
Quick Reference for Users
701P46245, Version 1.0, April 2007
Print a file from a client workstation
To print a file from your client workstation:
1. Open the document
2. Select File>Print.
3. From the Print window, select the desired
printer.
4. Select your desired print options:
For Windows users - Select Properties
• Select the Fiery Printing tab and your
desired print options; then select OK
repeatedly until job is sent to printer, OR
•Help to obtain specific information on the
printing options.
For Macintosh users:
• Select the desired print options; then
select OK to send the job to the printer, OR
•Help to obtain specific information on the
printing options.
• You may also refer to PostScript User
Guide for information.
Tip: Always refer to www.xerox.com
latest infomation.
for the
5. Use the default document name or create a
new one.
6. Select any other desired options.
7. Enter desired copy quantity.
8. Press Start.
Save Only
1. Load documents in document feeder or place a
document on the document glass.
2. Press All Services button.
3. Select Copy > Save Only.
4. Select desired mailbox where the data will be
saved.
Tip: If necessary, see your System Administrator
to set up a mailbox.
5. Use the default document name or create a
new one.
6. Select any other desired options.
7. Press Save and then Start.
More? In the User Guide, review the Copy
chapter for more information on Copy Only, Copy
& Save, and Save Only.
Copy Only
1. Load documents in document feeder or place a
document on the document glass.
2. Press All Services button.
3. Select Copy > Copy Only.
4. Select desired options.
5. Enter desired copy quantity.
6. Press Start.
Copy & Save
1. Load documents in document feeder or place a
document on the document glass.
2. Press All Services button.
3. Select Copy > Copy & Save.
4. Select desired mailbox where the data will be
saved.
Tip: If necessary, refer to Create Mailbox.
Large Volume Copy Jobs
To copy a document larger than 50 pages:
1. Load up to 50 pages in the document feeder
and press All Services > Copy.
2. Select the method to use (Copy Only, Copy &
Save, Save Only).
3. Select the Job Assembly tab and then Large
Volume Document.
4. Select On and then Save.
5. Press Start to begin.
6. Select Next Original to scan the next batch of
pages in the document.
7. When all the pages in the document have been
scanned select Last Original. The copy or
save starts.
More? In the User Guide, check the Copy
chapter for Large Volume Documents.
3
Page 4

XEROX 4595 Copier/Printer Basic Navigation
Quick Reference for Users
701P46245, Version 1.0, April 2007
Scan
Scan, save, and/or send/email documents over the
network to specified destinations.
The scan modes are: Email, Scan to Mailbox,
Network Scanning, and Scan to FTP/SMB.
Tip: Do not confuse the Scan modes with the
Copy & Save or Save Only features which only
scan and save documents to the machine’s local
disk.
E-mail a Document
1. Press All Services > E-mail.
2. Select a recipient from the Address Book or
enter one using the keyboard.
3. Select From to specify who is sending the email. Select Save.
4. Select Subject to enter the subject of the email. Select Save.
5. Select Message Content to add a message to
accompany the document.
6. Select the file format (TIFF or PDF).
7. 7.Load the documents and press Start. Once
the document is scanned, it will be sent to the
recipients selected.
More? In the User Guide, check the Scan
chapter for E-mail.
Z-fold/Bi Fold/Tri-fold
To fold documents:
1. Select the method to use (Copy Only, Copy &
Save, Save Only).
2. Select the Output Format tab and then Fold-
ing.
3. Select the type of fold and if the print will be on
the inside or outside.
4. Select Save and proceed with the job setup.
More? In the User Guide, check the Copy
chapter or the Mailbox Management chapter for
Folding.
Copying on Tab Stock
To copy on tab stock:
1. Select the method to use (Copy Only, Copy &
Save, Save Only).
2. Select the Output Format tab and then Tab
Margin Shift.
3. Select Shift to tab to copy only the tab area of
the original or Shift All to copy the entire origi-
nal to the tab stock and select Save.
4. The Output Format tab reappears. Select Out-
put Orientation, Face Down and then Save.
5. Load the original as shown on the User Interface, select the tray where the tab stock is
located and select Save.
Reprint a Saved Document
To print a saved document:
1. Press All Services.
2. Select Check Mailbox > Copy & Print Jobs.
3. Select the mailbox where the document
resides and select Document List.
4. Select the document to reprint and select
Change Settings/Print.
5. Check the settings and may any necessary
changes.
6. Select Print.
More? In the User Guide, check the Mailbox
Management chapter for Printing Copy and Print
Job Documents.
6. Ensure the tab stock is loaded and the media
settings are correct. Press Start to print.
More? In the User Guide, check the Copy
chapter for Tab Margin Shift.
4
 Loading...