

Page 1

Version 1.2
January 2008
Xerox 4595 Copier/Printer
User
Guide
Page 2

‘
Xerox Corporation
Global Knowledge & Language Services
800 Phillips Road
Building 218
Webster, New York 14580
©Copyright 2008 by Xerox Corporation. All Rights Reserved.
Copyright protection claimed includes all forms and matters of copyrighted material and information now allowed by statutory or judicial law or
hereinafter granted, including without limitation, material generated from the software programs that are displayed on the screen such as styles,
templates, icons, screen displays, looks, etc.
Xerox® and all Xerox product names and product numbers mentioned in this publication are trademarks of XEROX CORPORATION. Other
company brands and product names may be trademarks or registered trademarks of the respective companies and are also acknowledged.
Microsoft, MS-DOS, Windows, Windows NT, Microsoft Network, and Windows Server are either trademarks or registered trademarks of Microsoft
Corporation in the United States and/or other countries. Novell, NetWare, IntranetWare and NDS are registered trademarks of Novell, Inc. in the
United States and other countries. Adobe, Acrobat, PostScript, PostScript3, and PostScript Logo are trademarks of Adobe Systems
Incorporated. Apple, AppleTalk, EtherTalk, LocalTalk, Macintosh, MacOS and TrueType are trademarks of Apple Computer, Inc., registered in the
U.S. and other countries. HP, HPGL, HPGL/2, and HP-UX are registered trademarks of Hewlett-Packard Corporation.
All product/brand names are trademarks or registered trademarks of the respective holders.
The following software configuration was used to create this guide: Controller + PS ROM 1.2026 / IOT ROM: 17.14.0
Page 3

Table of contents
1. Product overview 1-1
Related information sources . . . . . . . . . . . . . . . . . . . . . . . . . . . 1-1
Customer documentation updates . . . . . . . . . . . . . . . . . . . . . . 1-1
Machine components . . . . . . . . . . . . . . . . . . . . . . . . . . . . . . . . 1-2
Control Panel . . . . . . . . . . . . . . . . . . . . . . . . . . . . . . . . . . . . . . 1-9
Assigning a feature to Custom Buttons. . . . . . . . . . . . 1-12
Customizing the All Services Screen . . . . . . . . . . . . . 1-12
Changing feature screen. . . . . . . . . . . . . . . . . . . . . . . 1-13
Power on/off . . . . . . . . . . . . . . . . . . . . . . . . . . . . . . . . . . . . . . 1-13
About the circuit breaker. . . . . . . . . . . . . . . . . . . . . . . . . . . . . 1-14
Power Saver Mode . . . . . . . . . . . . . . . . . . . . . . . . . . . . . . . . . 1-15
2. Copy 2-1
Copy Procedure . . . . . . . . . . . . . . . . . . . . . . . . . . . . . . . . . . . . 2-1
Step 4 Start the Copy Job . . . . . . . . . . . . . . . . . . . . . . . 2-7
Step 5 Confirm the Copy Job in the Job Status . . . . . . 2-8
Cancel the Copy Job . . . . . . . . . . . . . . . . . . . . . . . . . . . . . . . . 2-9
Change the copy quantity. . . . . . . . . . . . . . . . . . . . . . . . . . . . 2-10
Interrupt the copy job . . . . . . . . . . . . . . . . . . . . . . . . . . . . . . . 2-11
Save Scanned Documents . . . . . . . . . . . . . . . . . . . . . . . . . . . 2-12
Document List . . . . . . . . . . . . . . . . . . . . . . . . . . . . . . . 2-13
Basic Copying tab. . . . . . . . . . . . . . . . . . . . . . . . . . . . . . . . . . 2-15
Reduce/Enlarge . . . . . . . . . . . . . . . . . . . . . . . . . . . . . 2-15
Paper Supply . . . . . . . . . . . . . . . . . . . . . . . . . . . . . . . 2-19
2 Sided (Making 2 sided Copies) . . . . . . . . . . . . . . . . 2-23
Lighten/Darken . . . . . . . . . . . . . . . . . . . . . . . . . . . . . . 2-24
Image Quality tab . . . . . . . . . . . . . . . . . . . . . . . . . . . . . . . . . . 2-25
Lighten/Darken . . . . . . . . . . . . . . . . . . . . . . . . . . . . . . 2-26
Original Type. . . . . . . . . . . . . . . . . . . . . . . . . . . . . . . . 2-26
Auto Exposure . . . . . . . . . . . . . . . . . . . . . . . . . . . . . . 2-27
Sharpness. . . . . . . . . . . . . . . . . . . . . . . . . . . . . . . . . . 2-28
Scan Options tab . . . . . . . . . . . . . . . . . . . . . . . . . . . . . . . . . . 2-29
Xerox 4595 Copier/Printer User Guide
i
Page 4

Table of contents
Bound Originals . . . . . . . . . . . . . . . . . . . . . . . . . . . . . 2-29
2 Sided Book Copy . . . . . . . . . . . . . . . . . . . . . . . . . . . 2-32
Original Size . . . . . . . . . . . . . . . . . . . . . . . . . . . . . . . . 2-34
Mixed Size Originals . . . . . . . . . . . . . . . . . . . . . . . . . . 2-35
Edge Erase . . . . . . . . . . . . . . . . . . . . . . . . . . . . . . . . . 2-36
Image Shift . . . . . . . . . . . . . . . . . . . . . . . . . . . . . . . . . 2-41
Mirror Image/Negative Image . . . . . . . . . . . . . . . . . . . 2-46
Original Orientation . . . . . . . . . . . . . . . . . . . . . . . . . . . 2-47
Output Format tab. . . . . . . . . . . . . . . . . . . . . . . . . . . . . . . . . . 2-48
Booklet Creation . . . . . . . . . . . . . . . . . . . . . . . . . . . . . 2-49
Covers. . . . . . . . . . . . . . . . . . . . . . . . . . . . . . . . . . . . . 2-53
Transparency Separators . . . . . . . . . . . . . . . . . . . . . . 2-56
Multiple-Up . . . . . . . . . . . . . . . . . . . . . . . . . . . . . . . . . 2-57
Poster . . . . . . . . . . . . . . . . . . . . . . . . . . . . . . . . . . . . . 2-59
Repeat Image . . . . . . . . . . . . . . . . . . . . . . . . . . . . . . . 2-60
Annotation. . . . . . . . . . . . . . . . . . . . . . . . . . . . . . . . . . 2-62
Watermark. . . . . . . . . . . . . . . . . . . . . . . . . . . . . . . . . . 2-73
Tab Margin Shift . . . . . . . . . . . . . . . . . . . . . . . . . . . . . 2-76
Output Orientation. . . . . . . . . . . . . . . . . . . . . . . . . . . . 2-77
Folding . . . . . . . . . . . . . . . . . . . . . . . . . . . . . . . . . . . . 2-78
Preset Repeat Image . . . . . . . . . . . . . . . . . . . . . . . . . 2-79
2 Sided . . . . . . . . . . . . . . . . . . . . . . . . . . . . . . . . . . . . 2-80
Finishing . . . . . . . . . . . . . . . . . . . . . . . . . . . . . . . . . . . 2-80
Job Assembly tab . . . . . . . . . . . . . . . . . . . . . . . . . . . . . . . . . . 2-84
Build Job . . . . . . . . . . . . . . . . . . . . . . . . . . . . . . . . . . . 2-84
Sample Set Screen . . . . . . . . . . . . . . . . . . . . . . . . . . . 2-88
Large Volume Document . . . . . . . . . . . . . . . . . . . . . . 2-90
Form Overlay . . . . . . . . . . . . . . . . . . . . . . . . . . . . . . . 2-91
Delete Outside/Delete Inside . . . . . . . . . . . . . . . . . . . 2-92
3. Scan 3-1
Scan procedure . . . . . . . . . . . . . . . . . . . . . . . . . . . . . . . . . . . . 3-1
Cancel the Scan Job. . . . . . . . . . . . . . . . . . . . . . . . . . . . . . . . 3-10
E-mail . . . . . . . . . . . . . . . . . . . . . . . . . . . . . . . . . . . . . . . . . . . 3-11
Address Book . . . . . . . . . . . . . . . . . . . . . . . . . . . . . . . 3-12
Keyboard. . . . . . . . . . . . . . . . . . . . . . . . . . . . . . . . . . . 3-14
Sender . . . . . . . . . . . . . . . . . . . . . . . . . . . . . . . . . . . . 3-15
Recipient Name/Email Address . . . . . . . . . . . . . . . . . 3-15
From . . . . . . . . . . . . . . . . . . . . . . . . . . . . . . . . . . . . . . 3-17
Subject . . . . . . . . . . . . . . . . . . . . . . . . . . . . . . . . . . . . 3-18
Delete . . . . . . . . . . . . . . . . . . . . . . . . . . . . . . . . . . . . . 3-18
Change . . . . . . . . . . . . . . . . . . . . . . . . . . . . . . . . . . . 3-19
ii
Xerox 4595 Copier/Printer User Guide
Page 5

Table of contents
From . . . . . . . . . . . . . . . . . . . . . . . . . . . . . . . . . . . . . . 3-19
Subject . . . . . . . . . . . . . . . . . . . . . . . . . . . . . . . . . . . . 3-20
Message Contents . . . . . . . . . . . . . . . . . . . . . . . . . . . 3-20
Scan to Mailbox . . . . . . . . . . . . . . . . . . . . . . . . . . . . . . . . . . . 3-21
Document List . . . . . . . . . . . . . . . . . . . . . . . . . . . . . . . 3-22
Job Templates. . . . . . . . . . . . . . . . . . . . . . . . . . . . . . . . . . . . . 3-23
Scan to FTP/SMB . . . . . . . . . . . . . . . . . . . . . . . . . . . . . . . . . . 3-25
Transfer Protocol. . . . . . . . . . . . . . . . . . . . . . . . . . . . . 3-25
Address Book . . . . . . . . . . . . . . . . . . . . . . . . . . . . . . . 3-26
Specify a Forwarding Destination . . . . . . . . . . . . . . . . 3-27
Lighten/Darken . . . . . . . . . . . . . . . . . . . . . . . . . . . . . . 3-28
2 Sided Originals. . . . . . . . . . . . . . . . . . . . . . . . . . . . . 3-28
Original Type. . . . . . . . . . . . . . . . . . . . . . . . . . . . . . . . 3-28
File Format . . . . . . . . . . . . . . . . . . . . . . . . . . . . . . . . . 3-28
Basic Scanning. . . . . . . . . . . . . . . . . . . . . . . . . . . . . . . . . . . . 3-29
Lighten/Darken . . . . . . . . . . . . . . . . . . . . . . . . . . . . . . 3-29
Output Color (optional Color Scanner Kit only). . . . . . 3-29
2 Sided Originals. . . . . . . . . . . . . . . . . . . . . . . . . . . . . 3-30
Original Type. . . . . . . . . . . . . . . . . . . . . . . . . . . . . . . . 3-32
File Format . . . . . . . . . . . . . . . . . . . . . . . . . . . . . . . . . 3-33
Image Quality . . . . . . . . . . . . . . . . . . . . . . . . . . . . . . . . . . . . . 3-35
Sharpness. . . . . . . . . . . . . . . . . . . . . . . . . . . . . . . . . . 3-35
Auto Exposure . . . . . . . . . . . . . . . . . . . . . . . . . . . . . . 3-36
Photographic Scanning (optional Color Scanning
Kit only) . . . . . . . . . . . . . . . . . . . . . . . . . . . . . . . . . . . . 3-36
Lighten/Darken/Contrast (optional Color Scanning
Kit only) . . . . . . . . . . . . . . . . . . . . . . . . . . . . . . . . . . . . 3-37
Background Suppression (optional Color Scanning
Kit only) . . . . . . . . . . . . . . . . . . . . . . . . . . . . . . . . . . . . 3-37
Scan Options . . . . . . . . . . . . . . . . . . . . . . . . . . . . . . . . . . . . . 3-38
Scan Resolution . . . . . . . . . . . . . . . . . . . . . . . . . . . . . 3-38
2 Sided Originals. . . . . . . . . . . . . . . . . . . . . . . . . . . . . 3-39
Book Scanning Bound Originals . . . . . . . . . . . . . . . . . 3-39
Scan Size . . . . . . . . . . . . . . . . . . . . . . . . . . . . . . . . . . 3-41
Mixed Size Originals . . . . . . . . . . . . . . . . . . . . . . . . . . 3-42
Edge Erase . . . . . . . . . . . . . . . . . . . . . . . . . . . . . . . . 3-44
Reduce/Enlarge . . . . . . . . . . . . . . . . . . . . . . . . . . . . . 3-46
Output Format. . . . . . . . . . . . . . . . . . . . . . . . . . . . . . . . . . . . . 3-47
Image Compression (optional Color Scanning
Kit only) . . . . . . . . . . . . . . . . . . . . . . . . . . . . . . . . . . . . 3-47
Split Send . . . . . . . . . . . . . . . . . . . . . . . . . . . . . . . . . . 3-48
File Name . . . . . . . . . . . . . . . . . . . . . . . . . . . . . . . . . . 3-48
Document Name . . . . . . . . . . . . . . . . . . . . . . . . . . . . . 3-49
Xerox 4595 Copier/Printer User Guide
iii
Page 6

Table of contents
File Name Conflict. . . . . . . . . . . . . . . . . . . . . . . . . . . . 3-50
Reply To . . . . . . . . . . . . . . . . . . . . . . . . . . . . . . . . . . . 3-51
Read Status (MDN). . . . . . . . . . . . . . . . . . . . . . . . . . . 3-52
4. Mailbox Management 4-1
Check Mailbox Procedure. . . . . . . . . . . . . . . . . . . . . . . . . . . . . 4-1
Select Copy & Print Jobs . . . . . . . . . . . . . . . . . . . . . . . . . . . . . 4-5
Check/Select Copy & Print Jobs Documents . . . . . . . . . . . . . . 4-6
Delete Copy & Print Jobs Documents . . . . . . . . . . . . . . . . . . . 4-7
Copy/Move Copy & Print Documents . . . . . . . . . . . . . . . . . . . . 4-8
Copy to Mailbox-Document List screen . . . . . . . . . . . 4-11
Move to Mailbox-Document List screen . . . . . . . . . . . 4-13
Edit Copy & Print Documents . . . . . . . . . . . . . . . . . . . . . . . . . 4-14
Mailbox - Insert Separators Screen . . . . . . . . . . . . . . 4-17
Mailbox - Chapter Start + Insert screen . . . . . . . . . . . 4-18
Mailbox - Insert Document Screen . . . . . . . . . . . . . . . 4-19
Merge/Batch Print Copy & Print Documents. . . . . . . . . . . . . . 4-20
Finishing - Hole Punching Screen. . . . . . . . . . . . . . . . 4-25
Front Cover Quantity. . . . . . . . . . . . . . . . . . . . . . . . . . 4-27
Stamp Screen . . . . . . . . . . . . . . . . . . . . . . . . . . . . . . . 4-28
Stamp - Position Screen . . . . . . . . . . . . . . . . . . . . . . . 4-29
Date Screen . . . . . . . . . . . . . . . . . . . . . . . . . . . . . . . . 4-30
Date - Position Screen . . . . . . . . . . . . . . . . . . . . . . . . 4-31
Page Number Screen . . . . . . . . . . . . . . . . . . . . . . . . . 4-32
Page Number - Total Pages (N) Screen . . . . . . . . . . . 4-33
Page Number - Print On Screen . . . . . . . . . . . . . . . . . 4-34
Watermark - Text Screen . . . . . . . . . . . . . . . . . . . . . . 4-36
Watermark - Text Effect Screen . . . . . . . . . . . . . . . . . 4-37
Printing Copy & Print Job Documents . . . . . . . . . . . . . . . . . . 4-39
Document Details . . . . . . . . . . . . . . . . . . . . . . . . . . . . 4-40
Sample Print . . . . . . . . . . . . . . . . . . . . . . . . . . . . . . . . 4-40
Save . . . . . . . . . . . . . . . . . . . . . . . . . . . . . . . . . . . . . . 4-41
Save and Print . . . . . . . . . . . . . . . . . . . . . . . . . . . . . . 4-41
Print. . . . . . . . . . . . . . . . . . . . . . . . . . . . . . . . . . . . . . . 4-41
Paper Supply . . . . . . . . . . . . . . . . . . . . . . . . . . . . . . . 4-41
Finishing . . . . . . . . . . . . . . . . . . . . . . . . . . . . . . . . . . . 4-42
Covers. . . . . . . . . . . . . . . . . . . . . . . . . . . . . . . . . . . . . 4-45
Folding . . . . . . . . . . . . . . . . . . . . . . . . . . . . . . . . . . . . 4-47
2 Sided Printing. . . . . . . . . . . . . . . . . . . . . . . . . . . . . . 4-49
Adjust Image Shift. . . . . . . . . . . . . . . . . . . . . . . . . . . . 4-50
Booklet Creation . . . . . . . . . . . . . . . . . . . . . . . . . . . . . 4-51
Annotation. . . . . . . . . . . . . . . . . . . . . . . . . . . . . . . . . . 4-53
iv
Xerox 4595 Copier/Printer User Guide
Page 7

Table of contents
Watermark. . . . . . . . . . . . . . . . . . . . . . . . . . . . . . . . . . 4-61
Sending Print Jobs to a Mailbox using the PCL Print Driver. . 4-65
Select a Scan & Other Jobs Mailbox . . . . . . . . . . . . . . . . . . . 4-67
Check/Select Scan & Other Jobs Documents . . . . . . . . . . . . 4-68
Delete Documents in the Scan & Other Jobs Mailbox . . . . . . 4-69
Check Scan & Other Jobs Documents . . . . . . . . . . . . . . . . . . 4-70
Change the Document Name . . . . . . . . . . . . . . . . . . . 4-71
Configure/Start a Job Flow . . . . . . . . . . . . . . . . . . . . . . . . . . . 4-72
Create a Job Flow. . . . . . . . . . . . . . . . . . . . . . . . . . . . 4-72
About Job Flow Restrictions . . . . . . . . . . . . . . . . . . . . 4-77
5. Job Flow 5-1
Job Flow Procedure . . . . . . . . . . . . . . . . . . . . . . . . . . . . . . . . . 5-1
Job Flow List. . . . . . . . . . . . . . . . . . . . . . . . . . . . . . . . . . . . . . . 5-3
Confirming/Changing Job Flow. . . . . . . . . . . . . . . . . . . . . . . . . 5-4
6. Stored Programming 6-1
Stored Programming Overview . . . . . . . . . . . . . . . . . . . . . . . . . 6-1
Registering/Deleting/Renaming Stored Programs . . . . . . . . . . 6-1
Registering a Stored Program. . . . . . . . . . . . . . . . . . . . 6-2
Registering Stored Program (Build Job) . . . . . . . . . . . . 6-4
Deleting Stored Programs. . . . . . . . . . . . . . . . . . . . . . . 6-5
Naming/Renaming a Stored Program. . . . . . . . . . . . . . 6-6
Calling a Stored Program . . . . . . . . . . . . . . . . . . . . . . . . . . . . . 6-7
7. Paper and Other Media 7-1
Paper Types . . . . . . . . . . . . . . . . . . . . . . . . . . . . . . . . . . . . . . . 7-1
Normal Paper (Printable Paper) . . . . . . . . . . . . . . . . . . 7-1
Load paper in the trays. . . . . . . . . . . . . . . . . . . . . . . . . . . . . . . 7-4
Load tab paper in trays 3 and 4 . . . . . . . . . . . . . . . . . 7-10
Load tab paper in Tray 5 (Bypass) . . . . . . . . . . . . . . . 7-11
Load tab paper in Tray 8 (Post-process inserter) . . . . 7-12
Change the paper size in trays. . . . . . . . . . . . . . . . . . . . . . . . 7-13
Change/confirm the tray settings . . . . . . . . . . . . . . . . . . . . . . 7-18
Copy/print on tabs. . . . . . . . . . . . . . . . . . . . . . . . . . . . . . . . . . 7-27
Xerox 4595 Copier/Printer User Guide
v
Page 8

Table of contents
8. Job Status 8-1
Job Status Overview . . . . . . . . . . . . . . . . . . . . . . . . . . . . . . . . . 8-1
Checking Current/Pending Jobs . . . . . . . . . . . . . . . . . . . . . . . . 8-2
Checking Completed Jobs . . . . . . . . . . . . . . . . . . . . . . . . . . . . 8-3
When jobs are not completed correctly. . . . . . . . . . . . . 8-4
Printing and Deleting Stored Documents . . . . . . . . . . . . . . . . . 8-4
When You Select Delete . . . . . . . . . . . . . . . . . . . . . . . . 8-6
When You Select Print . . . . . . . . . . . . . . . . . . . . . . . . . 8-7
When You Select Delete . . . . . . . . . . . . . . . . . . . . . . . . 8-9
When You Select Print . . . . . . . . . . . . . . . . . . . . . . . . 8-10
When You Select Delete . . . . . . . . . . . . . . . . . . . . . . . 8-11
When You Select Print . . . . . . . . . . . . . . . . . . . . . . . . 8-12
When You Select Delete . . . . . . . . . . . . . . . . . . . . . . . 8-14
When You Select Print . . . . . . . . . . . . . . . . . . . . . . . . 8-15
9. Machine Status 9-1
Overview . . . . . . . . . . . . . . . . . . . . . . . . . . . . . . . . . . . . . . . . . . 9-1
Machine Status . . . . . . . . . . . . . . . . . . . . . . . . . . . . . . . . . . . . . 9-2
Machine Configuration Screen . . . . . . . . . . . . . . . . . . . 9-3
Software Version Screen . . . . . . . . . . . . . . . . . . . . . . . 9-4
Retrieve Programming . . . . . . . . . . . . . . . . . . . . . . . . . 9-8
Programming . . . . . . . . . . . . . . . . . . . . . . . . . . . . . . . . 9-9
Store/Delete Programming . . . . . . . . . . . . . . . . . . . . . 9-10
Default Programming . . . . . . . . . . . . . . . . . . . . . . . . . 9-11
Password . . . . . . . . . . . . . . . . . . . . . . . . . . . . . . . . . . 9-12
Billing Meter/Print Report . . . . . . . . . . . . . . . . . . . . . . . . . . . . 9-12
Job Status . . . . . . . . . . . . . . . . . . . . . . . . . . . . . . . . . . 9-18
Copy Mode Settings . . . . . . . . . . . . . . . . . . . . . . . . . . 9-19
Print Mode Settings. . . . . . . . . . . . . . . . . . . . . . . . . . . 9-20
Scan Mode Settings . . . . . . . . . . . . . . . . . . . . . . . . . . 9-21
Mailbox List . . . . . . . . . . . . . . . . . . . . . . . . . . . . . . . . . 9-22
Job Counter Report. . . . . . . . . . . . . . . . . . . . . . . . . . . 9-23
Auditron Administration . . . . . . . . . . . . . . . . . . . . . . . . 9-23
Consumables . . . . . . . . . . . . . . . . . . . . . . . . . . . . . . . . . . . . . 9-27
Faults . . . . . . . . . . . . . . . . . . . . . . . . . . . . . . . . . . . . . . . . . . . 9-28
vi
Xerox 4595 Copier/Printer User Guide
Page 9

Table of contents
10. Maintenance 10-1
Replacing Consumables . . . . . . . . . . . . . . . . . . . . . . . . . . . . . 10-1
D Finisher . . . . . . . . . . . . . . . . . . . . . . . . . . . . . . . . . . 10-8
D2 Finisher . . . . . . . . . . . . . . . . . . . . . . . . . . . . . . . . 10-11
Cleaning the Machine. . . . . . . . . . . . . . . . . . . . . . . . . . . . . . 10-17
11. Problem Solving 11-1
Troubleshooting . . . . . . . . . . . . . . . . . . . . . . . . . . . . . . . . . . . 11-1
Machine Trouble . . . . . . . . . . . . . . . . . . . . . . . . . . . . . . . . . . . 11-3
Image Quality Problems . . . . . . . . . . . . . . . . . . . . . . . . . . . . . 11-9
Trouble during Copy . . . . . . . . . . . . . . . . . . . . . . . . . . . . . . . 11-15
Trouble during Printing . . . . . . . . . . . . . . . . . . . . . . . . . . . . . 11-20
Trouble during Scanning. . . . . . . . . . . . . . . . . . . . . . . . . . . . 11-24
Error Code . . . . . . . . . . . . . . . . . . . . . . . . . . . . . . . . . . . . . . 11-30
Paper Jams. . . . . . . . . . . . . . . . . . . . . . . . . . . . . . . . . . . . . . 11-47
Paper jams at lever 1a and knob 1c . . . . . . . . . . . . . 11-60
Paper jams at lever 1d . . . . . . . . . . . . . . . . . . . . . . . 11-61
Paper jams at lever 1b . . . . . . . . . . . . . . . . . . . . . . . 11-62
Paper jams at lever 3b and 3d . . . . . . . . . . . . . . . . . 11-63
Paper jams at lever 3e and knob 3c . . . . . . . . . . . . . 11-65
Paper jams at lever 3g and knob 3f . . . . . . . . . . . . . 11-66
Paper jams at lever 4b and knob 3a . . . . . . . . . . . . . 11-67
Paper jams at lever 2a and knob 3a . . . . . . . . . . . . . 11-68
Paper jams at lever 2b and knob 2c . . . . . . . . . . . . . 11-69
Paper jams at knob 2c, levers 2e/2f and tri-fold
output tray 2d. . . . . . . . . . . . . . . . . . . . . . . . . . . . . . . 11-70
Paper jams at tri-fold output tray 2d and lever 2g. . . 11-71
Paper jams at unit 4 and knob 4a . . . . . . . . . . . . . . . 11-72
Paper jams at output tray . . . . . . . . . . . . . . . . . . . . . 11-74
Paper jams at finisher tray . . . . . . . . . . . . . . . . . . . . 11-74
Paper jams at booklet output tray . . . . . . . . . . . . . . . 11-75
Paper jams in Lower Left Cover . . . . . . . . . . . . . . . . 11-76
Paper jams at lever 1a and Knob 1c. . . . . . . . . . . . . 11-77
Paper jams at lever 1b . . . . . . . . . . . . . . . . . . . . . . . 11-78
Paper jams at lever 1d . . . . . . . . . . . . . . . . . . . . . . . 11-79
Document Jams . . . . . . . . . . . . . . . . . . . . . . . . . . . . . . . . . . 11-80
Document jams at cover . . . . . . . . . . . . . . . . . . . . . . 11-80
Document jams at output area . . . . . . . . . . . . . . . . . 11-83
Stapler Faults . . . . . . . . . . . . . . . . . . . . . . . . . . . . . . . . . . . . 11-84
D Finisher . . . . . . . . . . . . . . . . . . . . . . . . . . . . . . . . . 11-85
D2 Finisher . . . . . . . . . . . . . . . . . . . . . . . . . . . . . . . . 11-87
Xerox 4595 Copier/Printer User Guide
vii
Page 10

Table of contents
Solving Curled Output. . . . . . . . . . . . . . . . . . . . . . . . . . . . . . 11-91
Mode and function of De-curl button. . . . . . . . . . . . . 11-92
12. Specifications 12-1
Specifications . . . . . . . . . . . . . . . . . . . . . . . . . . . . . . . . . . . . . 12-1
Printable Area . . . . . . . . . . . . . . . . . . . . . . . . . . . . . . . . . . . . 12-14
Using PDF Direct Print . . . . . . . . . . . . . . . . . . . . . . . . . . . . . 12-16
PCL Emulation . . . . . . . . . . . . . . . . . . . . . . . . . . . . . . . . . . . 12-18
HP-GL/2 Emulation. . . . . . . . . . . . . . . . . . . . . . . . . . . . . . . . 12-18
List of Options. . . . . . . . . . . . . . . . . . . . . . . . . . . . . . . . . . . . 12-19
Cautions and Limitations . . . . . . . . . . . . . . . . . . . . . . . . . . . 12-20
Simple Procedures . . . . . . . . . . . . . . . . . . . . . . . . . . . . . . . . 12-22
13. Safety Information and Notices 13-1
Safety notices . . . . . . . . . . . . . . . . . . . . . . . . . . . . . . . . . . . . . 13-1
Laser safety . . . . . . . . . . . . . . . . . . . . . . . . . . . . . . . . . . . . . . 13-3
Safety standards. . . . . . . . . . . . . . . . . . . . . . . . . . . . . . . . . . . 13-4
Maintenance safety. . . . . . . . . . . . . . . . . . . . . . . . . . . . . . . . . 13-5
Operational safety. . . . . . . . . . . . . . . . . . . . . . . . . . . . . . . . . . 13-5
Ozone safety. . . . . . . . . . . . . . . . . . . . . . . . . . . . . . . . . . . . . . 13-6
Notices . . . . . . . . . . . . . . . . . . . . . . . . . . . . . . . . . . . . . . . . . . 13-7
FCC in the USA . . . . . . . . . . . . . . . . . . . . . . . . . . . . . 13-7
In Canada (ICES-003) . . . . . . . . . . . . . . . . . . . . . . . . 13-7
Regulatory information for RFID . . . . . . . . . . . . . . . . . 13-7
Regulatory information for RFID (US). . . . . . . . . . . . . 13-8
Safety extra low voltage approval. . . . . . . . . . . . . . . . . . . . . . 13-8
Certifications in Europe. . . . . . . . . . . . . . . . . . . . . . . . . . . . . . 13-9
It’s illegal... . . . . . . . . . . . . . . . . . . . . . . . . . . . . . . . . . . . . . . 13-10
Environmental notices for the USA . . . . . . . . . . . . . . . . . . . . 13-14
Product recycling and disposal. . . . . . . . . . . . . . . . . . . . . . . 13-15
viii
Xerox 4595 Copier/Printer User Guide
Page 11
1. Product overview
KEY POINT: The screens shown in this guide may or may not
reflect the screens displayed on your 4595 Copier/Printer
system. The screens vary from system to system and from
marketplace to marketplace. Therefore, the screens in this guide
are a representation of the type of screens that may be seen on
your particular system.
Related information sources
The following resources are available for more information:
• Getting Star ted Guide: This guide gives basic information for
copy/print/scan jobs, clearing paper jams, daily care, and
safety information.
• System Administrator Guide: System Administrators use
this guide to set up the machine defaults/settings and the
network environment.
• PostScript User Guide: This guide provides information for
installing print driver, configuring the printer environment, and
other information related to the CentreWare Utilities CD-ROM.
Customer documentation updates
You can get the latest customer documentation and information for
your product by going to www.xerox.com
following:
• Enter your product number (e.g., 4110, 4595) in the Search
field and select Search.
• Select the Support & Drivers
options to locate your specific printer.
Be sure to periodically check www.xerox.com
information for your product.
and doing one of the
link and then use the search
for the latest
Xerox 4595 Copier/Printer User Guide
1-1
Page 12
1. Product overview
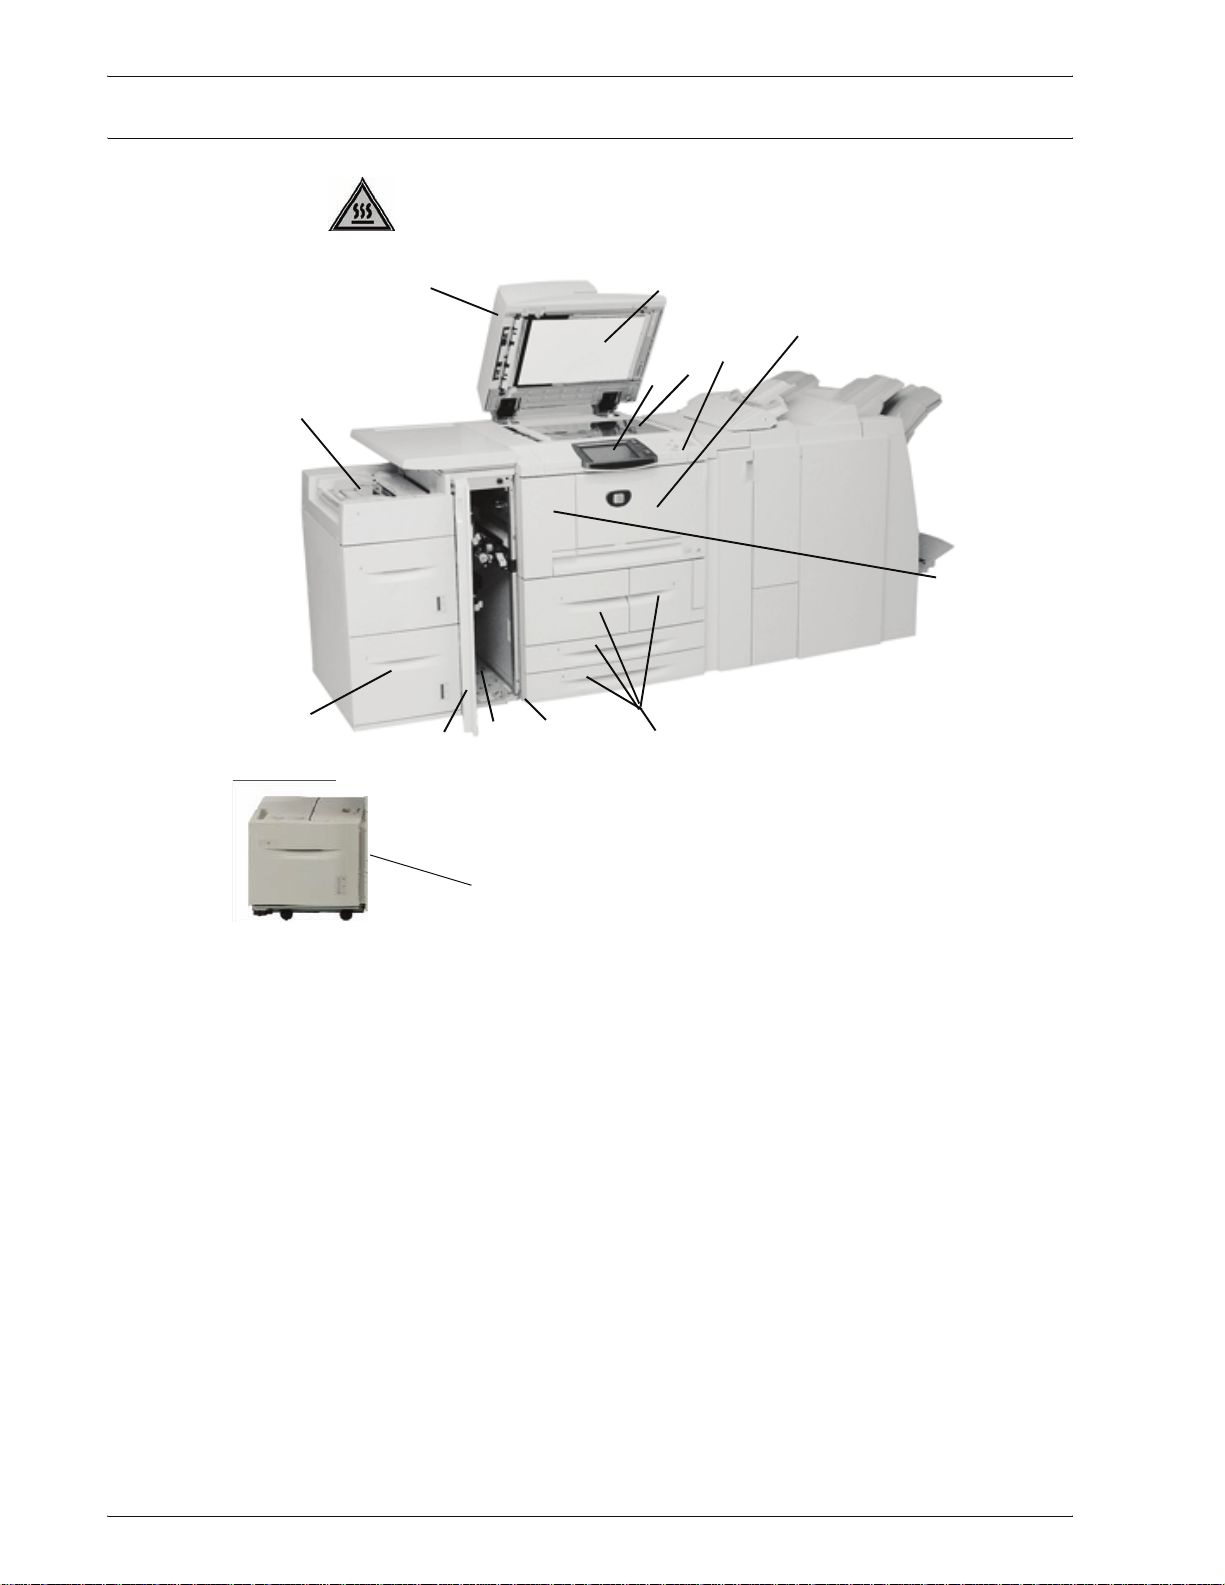
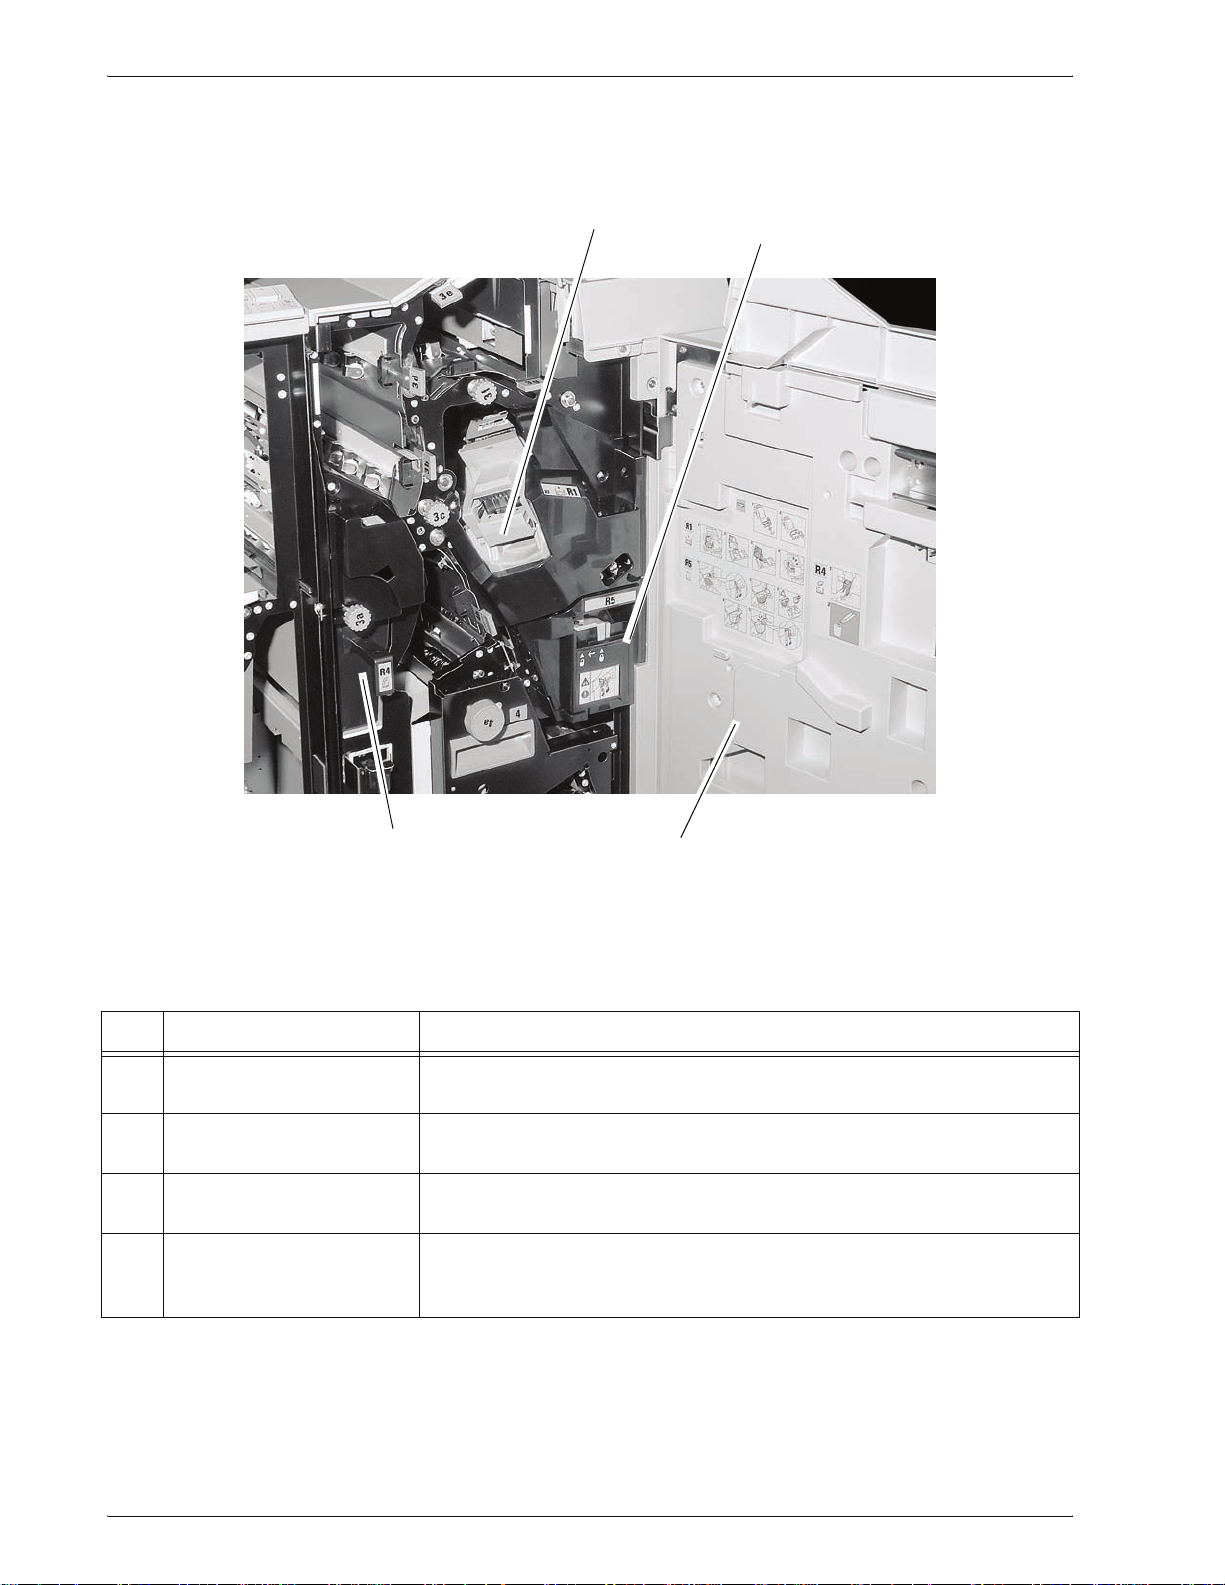
Machine components
WARNING: To prevent personal injury, do not touch any labeled
area that indicates High Temperature.
1 2
13
12a
11
12b
10
5
4
3
9
8
6
7
1-2
Xerox 4595 Copier/Printer User Guide
Page 13
1. Product overview
No. Component Function
1 DADF Duplex Automatic Document Feeder
2 Document cover Holds a document in place on the document glass.
3 Control Panel The Control Panel consists of the Touch Screen, Pathway buttons, Feature
buttons and Numeric keypad. Refer to “Control Panel” on page 1-9.
4 Document glass Place a document here in order to copy it.
5 Power switch Switches on/off the machine power.
6 Front cover Open this cover to clear paper jams and to replace the waste toner bottles.
7 Left Cover Open this cover to replace the toner cartridge.
8 Tray 1, 2, 3, 4 Contains the media used for copy or print output.
9 Locking casters Locks the wheels of the machine. Lock these casters after moving the
machine to its installation site.
10 Bottom left cover Open this cover to remove paper jams.
11 Front cover for the
optional Trays 6
and 7
12a Tray 6, 7 (optional
HCF)
12b Tray 6 (optional
OHCF)
13 Tray 5 (Bypass) Load nonstandard paper, such as heavy stock or other special media, that
Open this cover to access the bottom left cover.This cover and the trays 6 and
7 are part of the optional High Capacity Feeder (HCF).
Contains the media used for copy or print output.
Alternative to the 2-drawer HCF, the optional Oversized High Capacity Feeder
(OHCF) feeds oversized stock up to 13 x 19 in/SRA3 paper.
cannot be loaded in trays 1-4.
Xerox 4595 Copier/Printer User Guide
1-3
Page 14

1. Product overview
26
25
14
15
24
23
16
18
17
19
20
22
21
1-4
Xerox 4595 Copier/Printer User Guide
Page 15

1. Product overview
No. Component Function
14 Left cover Open to access the top cover and to remove paper jams.
15 Front cover Open to remove paper jams.
16 Confirmation indicator This lights when a document is loaded correctly.
17 Document guides Use these guides to align the edges of the document.
18 Document feeder tray Load documents here.
19 Document output tray Retrieve scanned documents here.
20 Document Stopper Holds large document, such as 11 x 17 in./A3, in place. When not in use,
position it upward.
21 Waste toner container
cover
22 Waste toner container Collects used toner.
23 Fuser Fuses the printed image on the paper.
24 Lever Use in order to pull out the transfer module.
25 Transfer module Copies the image from the drum to the paper. Open this to remove
26 Toner cartridge Provides toner for laying down the image on the paper.
Open this cover when removing the waste toner bottle.
The Fuser is extremely hot and will cause injury if jam clearing
instructions are not followed.
paper jams.
Xerox 4595 Copier/Printer User Guide
1-5
Page 16
1. Product overview
D Finisher
40
27
28
29
30
31
37
3839
36
35
34
32
33
1-6
Xerox 4595 Copier/Printer User Guide
Page 17
No. Component Function
1. Product overview
27 Post-process inserter
(Cover/Transparency
separator tray) / Tray 8
28 Decurl button For lighter weight paper especially, press this button to decurl the output.
29 Output tray Copies are delivered here when specific output features are selected,
30 Finisher tray Receives copies when you select stapled, punched, and Z-folded copies.
31 Booklet output tray Receives copies when you select Bi-Fold or Bi-Fold + Stapling.
32 Booklet output tray button Press this button to deliver and retrieve booklets from the output area.
33 Right cover Open to clear paper jams, replace staples, clear jammed staples, or
34 Staple cartridges for
booklet
35 Staple cartridge Contains staples; remove this cartridge to replace staples and clear
36 Punch scrap container Collects the scraps from the puncher. Open to remove the scraps.
37 Tri-Fold output tray
(optional)
38 Tri-Fold output tray button Press this button to open tri-Fold output tray.
Load paper for cover or transparency separators. Paper loaded here is
not used for copying.
such as Automatic sorting, Collated, Uncollated, or Normal.
remove the scraps from the puncher.
There are two staple cartridge for booklet. Remove this cartridge to
replace staples and clear staple jams.
staple jams.
Receives copies when you select Tri-Fold In or Tri-Fold out.
39 Left cover. Open this cover to access the machine and to clear paper jams.
40 Staple cartridge storage
space
Staple cartridge for replacement can be stored (D Finisher only).
NOTE 1:Throughout this guide, Finish er D, Bookl et Finis her D, or
Finisher D2 may be referred to simply as the Finisher.
NOTE 2:Throughout this guide, the Duplex Automatic Document
Feeder is abbreviated as “Document Feeder” or “DADF.”
Xerox 4595 Copier/Printer User Guide
1-7
Page 18
1. Product overview
D2 Finisher
41
42
44
No. Component Function
41 Staple cartridge Contains staples; remove this cartridge to replace staples and clear
staple jams.
42 Staple waste container Container for staple waste; remove this cartridge when full (D2 Finisher
only).
43 Right cover Open to clear paper jams, replace staples, clear jammed staples, or
remove the scraps from the puncher.
44 Post-process inserter
(Cover/Transparency
separator tray) / Tray 8
Load paper for cover or transparency separators. Paper loaded here is
not used for copying.
43
1-8
Xerox 4595 Copier/Printer User Guide
Page 19
Control Panel
1. Product overview
The Control Panel consists of the Touch Screen, Pathway buttons,
Feature buttons, and Numeric Keypad. The following describes
the names and functions of components on the control panel.
International Control Panel (no words)
Touch Screen
Numeric Keypad
Pathway buttons
Control Panel with wor ds
Feature buttons
Xerox 4595 Copier/Printer User Guide
1-9
Page 20

1. Product overview
Component Function
Touch Screen Allows selections to be made simply by touching
a button on the screen.
Numeric Keypad Press these buttons to enter the number of
copies, passwords, and other numerical values.
Pathway buttons 1 Online indicator: This lights when data is
1
2
3
7
6
4
5
transmitting from this machine or when it is
receiving data from a client.
2 Job Status: Press this button to confirm or
cancel currently running jobs or completed or
to confirm or print saved documents.
3 Review: Press this button to open the
Review screen in order to check the status of
copy and scan features whose settings have
changed from the defaults. You can also
check the destination information for sending
e-mail.
4 Machine Status: Press this button to check
the machine status, meters, and the state of
consumables and print reports.
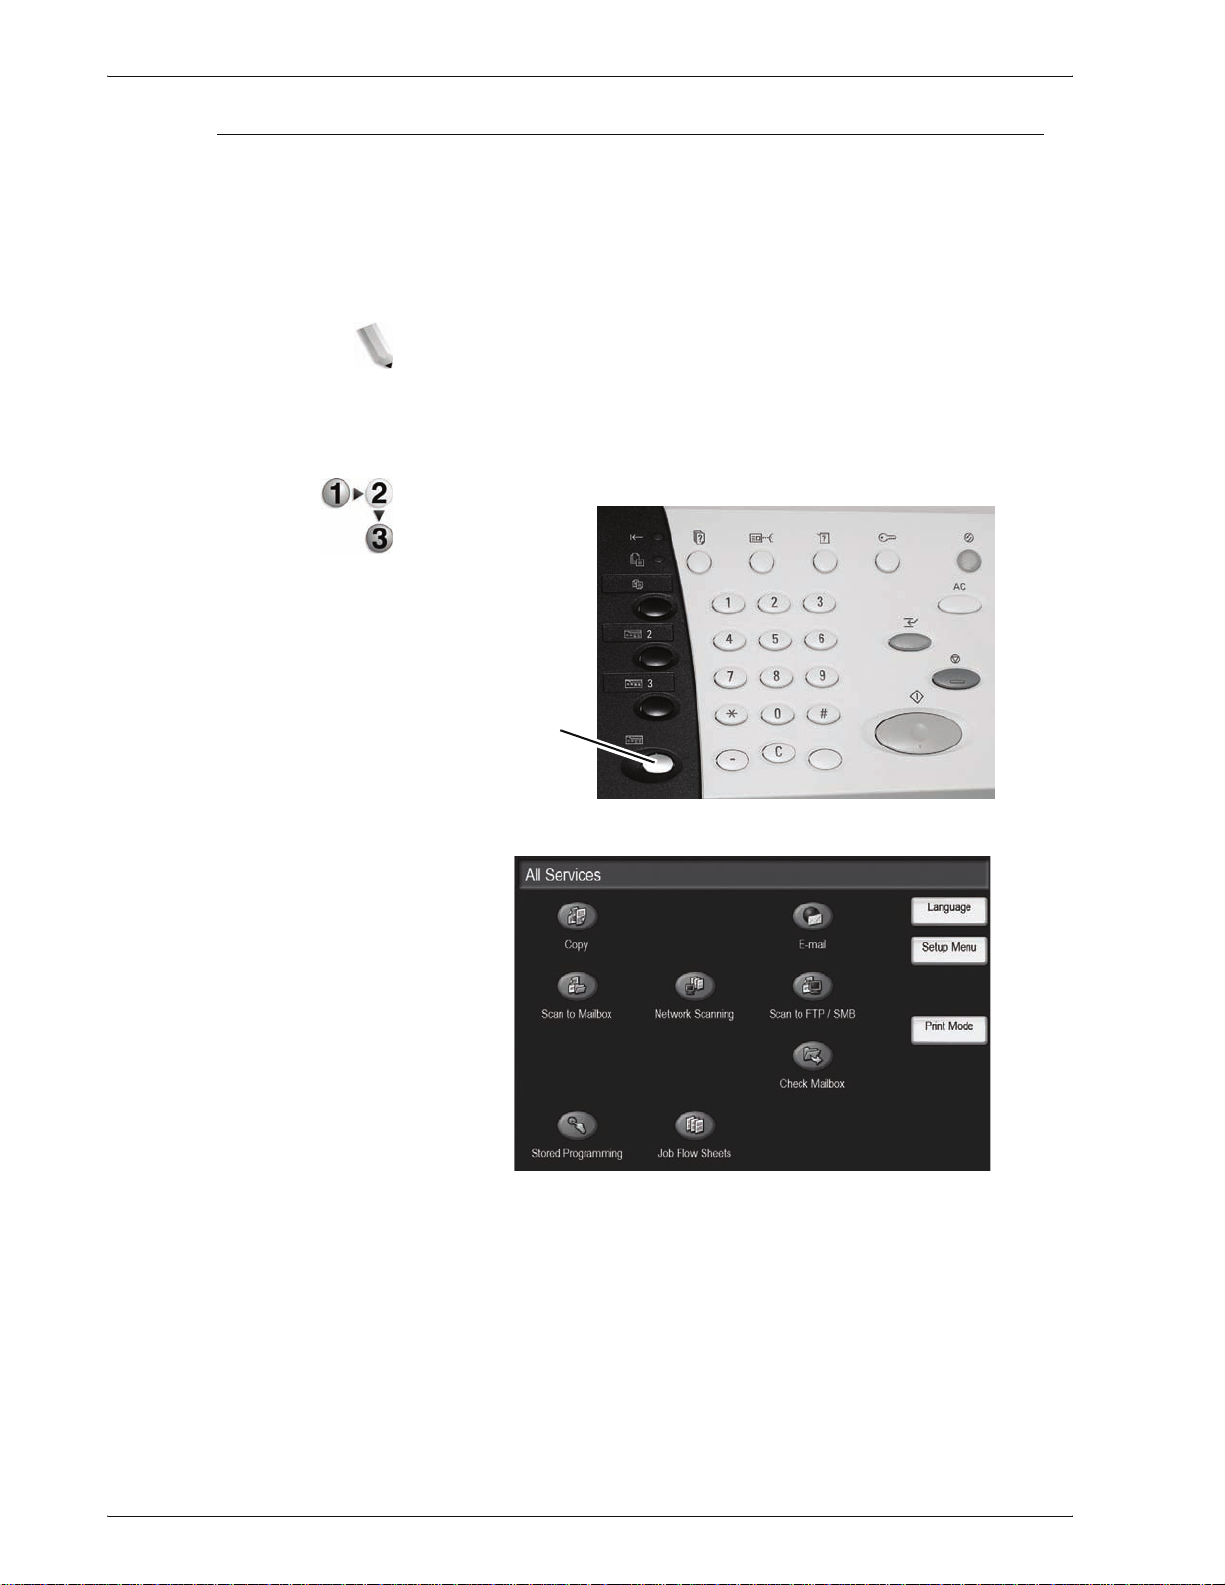
5 All Services: Displays the main menu
screen.
6 Custom Buttons 1, 2, 3: Use for these
buttons to access the copy feature or other
customized feature.
7 Job in Memory indicator: This indicator lights
when data is stored in the machine's
memory.
1-10
Xerox 4595 Copier/Printer User Guide
Page 21
1. Product overview
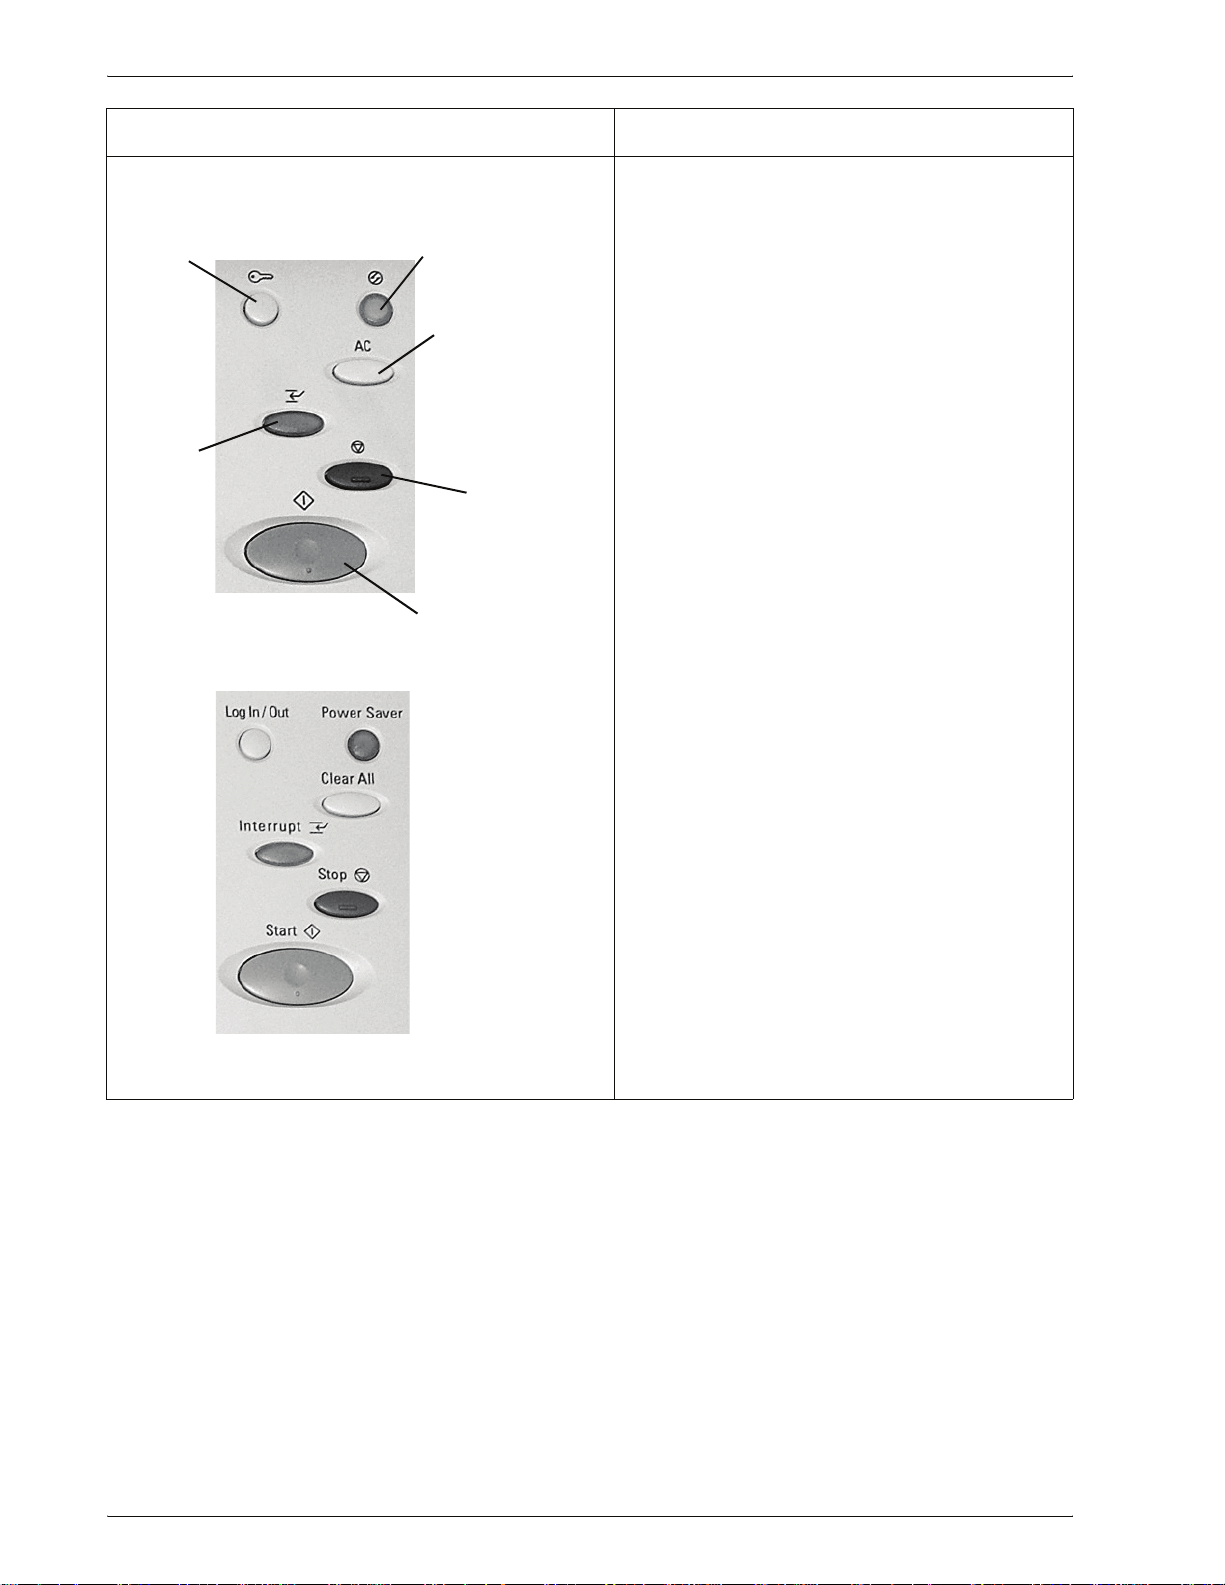
Component Function
Feature buttons 1 Log In/Out: This button is used by the
System Administrator to log into the System
Administration mode or Login Setup/Auditron
1
2
3
6
4
5
Administration mode.
2 Power Saver: Lights when the machine is in
the Power Saver mode. To cancel the Power
Saver mode, press this button.
3 Clear All: Press this button to clear all the
programming and return the machine to its
defaults.
4 Stop: Press this button to stop the current
copy job or communications.
5 Start: Press this button to start the copy
process.
6 Interrupt: Pressing this button interrupts the
print or copy process to give another job
higher priority; the Interrupt indicator
lights. Press the button after the job is
completed to resume the previous operation.
Xerox 4595 Copier/Printer User Guide
1-11
Page 22
1. Product overview
Customizing the Control Panel
You can customize the Custom buttons and items on the All
Services screen.
Assigning a feature to Custom Buttons
By assigning a feature to Custom buttons (Copy, Custom 2, and
Custom 3), you can switch to that feature without returning to the
All Services screen. The factory default settings for these
buttons are, Copy for the 1st button, and none for the 2nd and 3rd
buttons.
For the procedure to assign features, refer to “Screen Defaults” in
the System Administration Guide or ask your System
Administrator to make the changes for you.
Attach the labels included in this product when you have changed
the assignment. If you have used a feature for which no label is
provided, use a blank label and write down the feature using a
permanent marker and attach it to the appropriate Custom button.
Customizing the All Services Screen
You can customize the types of features and the location of
buttons on the All Servi ces screen. The following illustration
shows the factory default settings.
For the procedure to assign features, refer to “Screen Defaults” in
the System Administration Guide or ask your System
Administrator to make the changes for you.
NOTE: When the feature is not available the button wil l not be
displayed. Also, if the feature is unavailable due to hardware
problems, the button will be grayed out.
1-12
Xerox 4595 Copier/Printer User Guide
Page 23
Power on/off
1. Product overview
Changing feature screen
You can customize the setting screen for the following features on
the All Services screen.
• Copy
•E-mail
• Scan to Mailbox
• Scan to FTP/SMB
For how to change settings, refer to “Copy Mode Settings” and
“Scan Mode Settings” in the System Administration Guide.
WARNING: Never touch a labeled area indicating High
Temperature. Contact can lead to burns.
Switch on the power before operating the machine. After the
power is on, the machine will take about 5 minutes to warm up
before you can start making copies. Turn the machine off at the
end of the day or when it is not in use for a long period of time.
Also, use Power Saving feature when not in use for a while to
reduce the power consumption.
Powering on
CAUTION: Switching off the power of the machine may cause
loss of data being processed.
For information about power saving feature, refer to “Power Saver
Mode” on page 1-15.
The procedure for turning on the power is as follows:
Open the cover and press the power switch to the | position to turn
the power on.
NOTE: The “Please wait...” message indicates that the machine
is warming up. The machine cannot be used while it is warming
up.
Xerox 4595 Copier/Printer User Guide
1-13
Page 24

1. Product overview
Powering off
The procedure for turning the power off is as follows:
CAUTION: Switching off the power of the machine may cause
loss of data being processed.
1. Before turning the power off, make sure that all copy or print
jobs have completely finished. Also, make sure that the
Online indicator is not lit.
KEY POINT: Never turn the power off in the following instances:
• While data is being received
• While data is being sent (FTP/SMB/e-mail)
• While jobs are being printed.
• While jobs are being copied
• While a scan is being executed
• While data is being imported from computer
2. Press the power switch to the position.
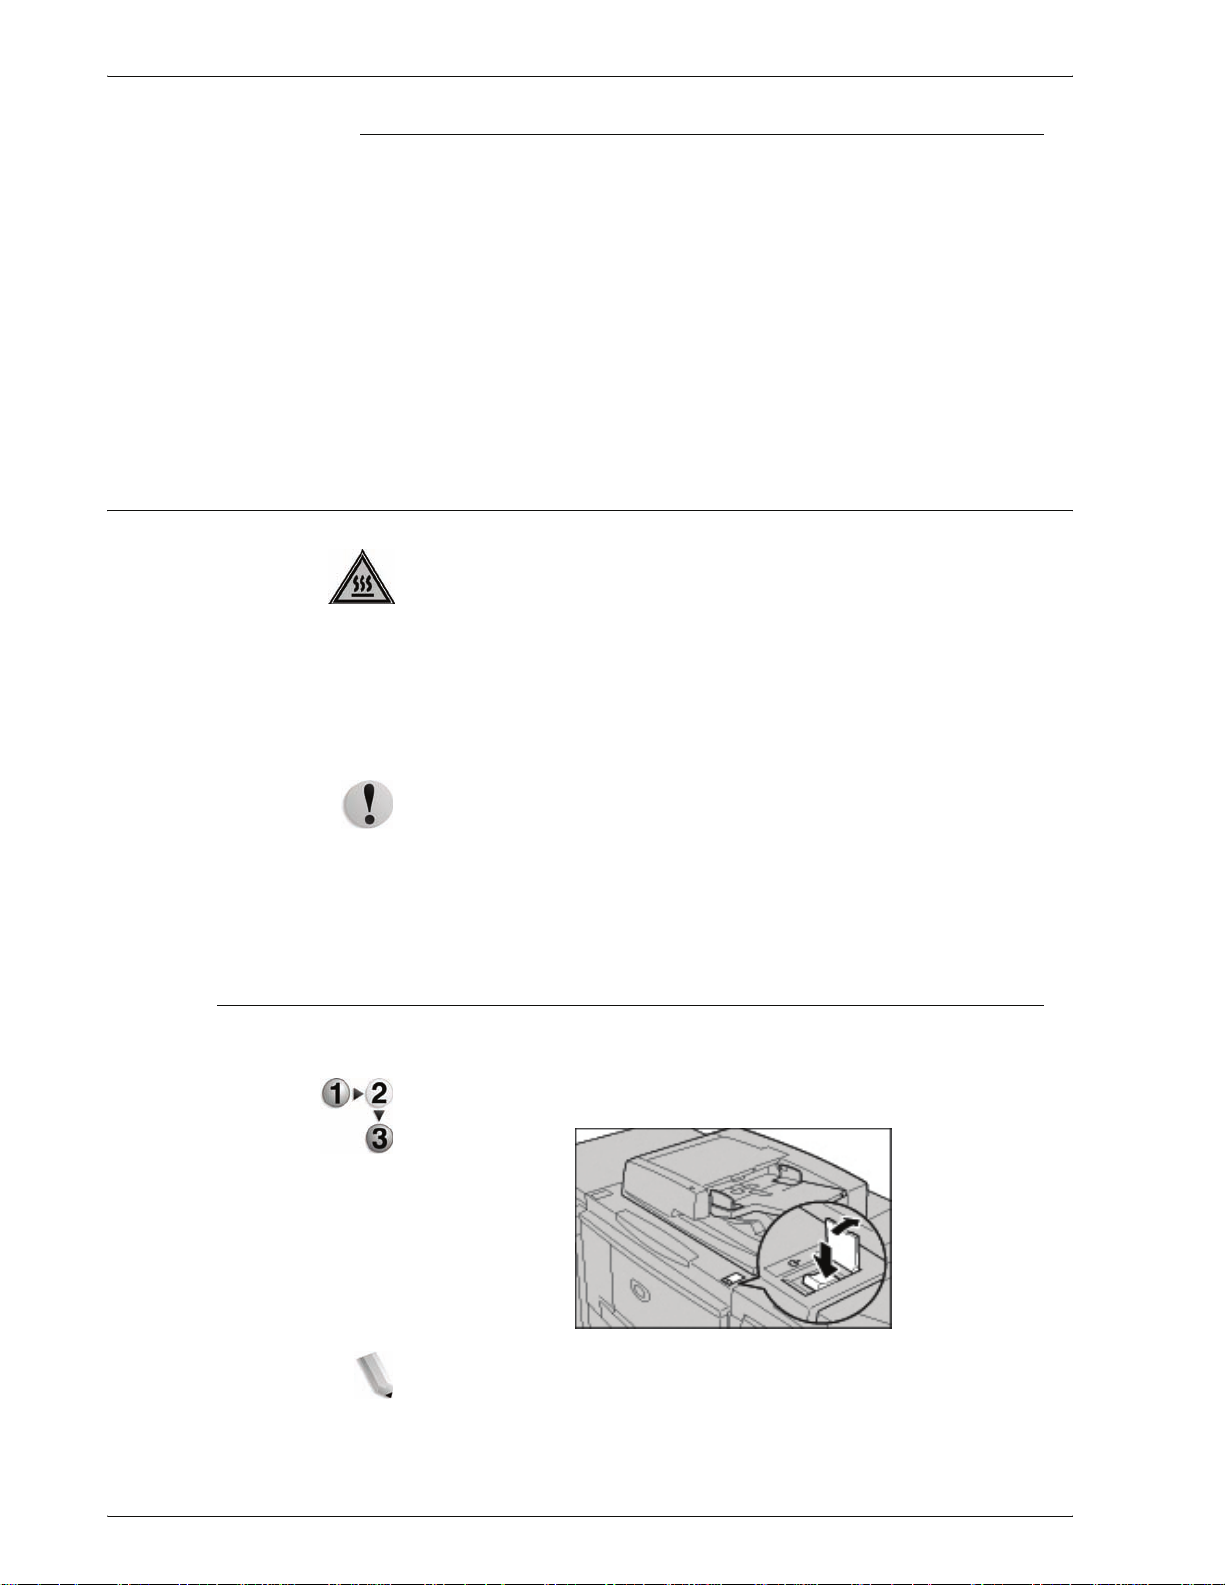
About the circuit breaker
KEY POINT: Power off processing is performed internally on the
machine for a while after the power switch is turned off. Therefore,
do not unplug the power cord from the power outlet immediately
after turning the power switch off.
NOTE: If you turn the power back on after turning it off, first make
sure that the display on the Touch Screen has gone out.
The machine is provided with a circuit breaker.
In the event of a current leakage, the breaker will automatically cut
off the power circuit to prevent any leakage or fire from occurring.
1-14
The circuit breaker is normally On (“l”) position as shown in the
figure above.
If the breaker is Off (“O”) position, contact your Customer Support
Center as there might be some unusual conditions.
Xerox 4595 Copier/Printer User Guide
Page 25
Power Saver Mode
1. Product overview
The machine is installed with a Power Saver feature that will
automatically cut off the electricity to the machine if no copy or
print data is received for a certain duration.
The Power Saver feature has two modes, a Low Power mode and
Sleep mode.
The machine enters the Low Power mode after the preset time
has elapsed if the machine is left unused for a fixed period of time.
The machine then enters the Sleep mode if a further preset time
elapses.
Here are two examples:
• If Low Power mode is set to 15 minutes and Sleep mode is
set to 60 minutes, Sleep mode activates after 60 minutes
of total inactivity, not 60 minutes after Low Power mode
begins.
• If Low Power mode is set to 15 minutes and Sleep mode is
set to 20 minutes, Sleep mode activates 5 minutes after
Low Power mode begins.
Exiting the Power Saver Mode
The following describes how to exit the Power Saver mode.
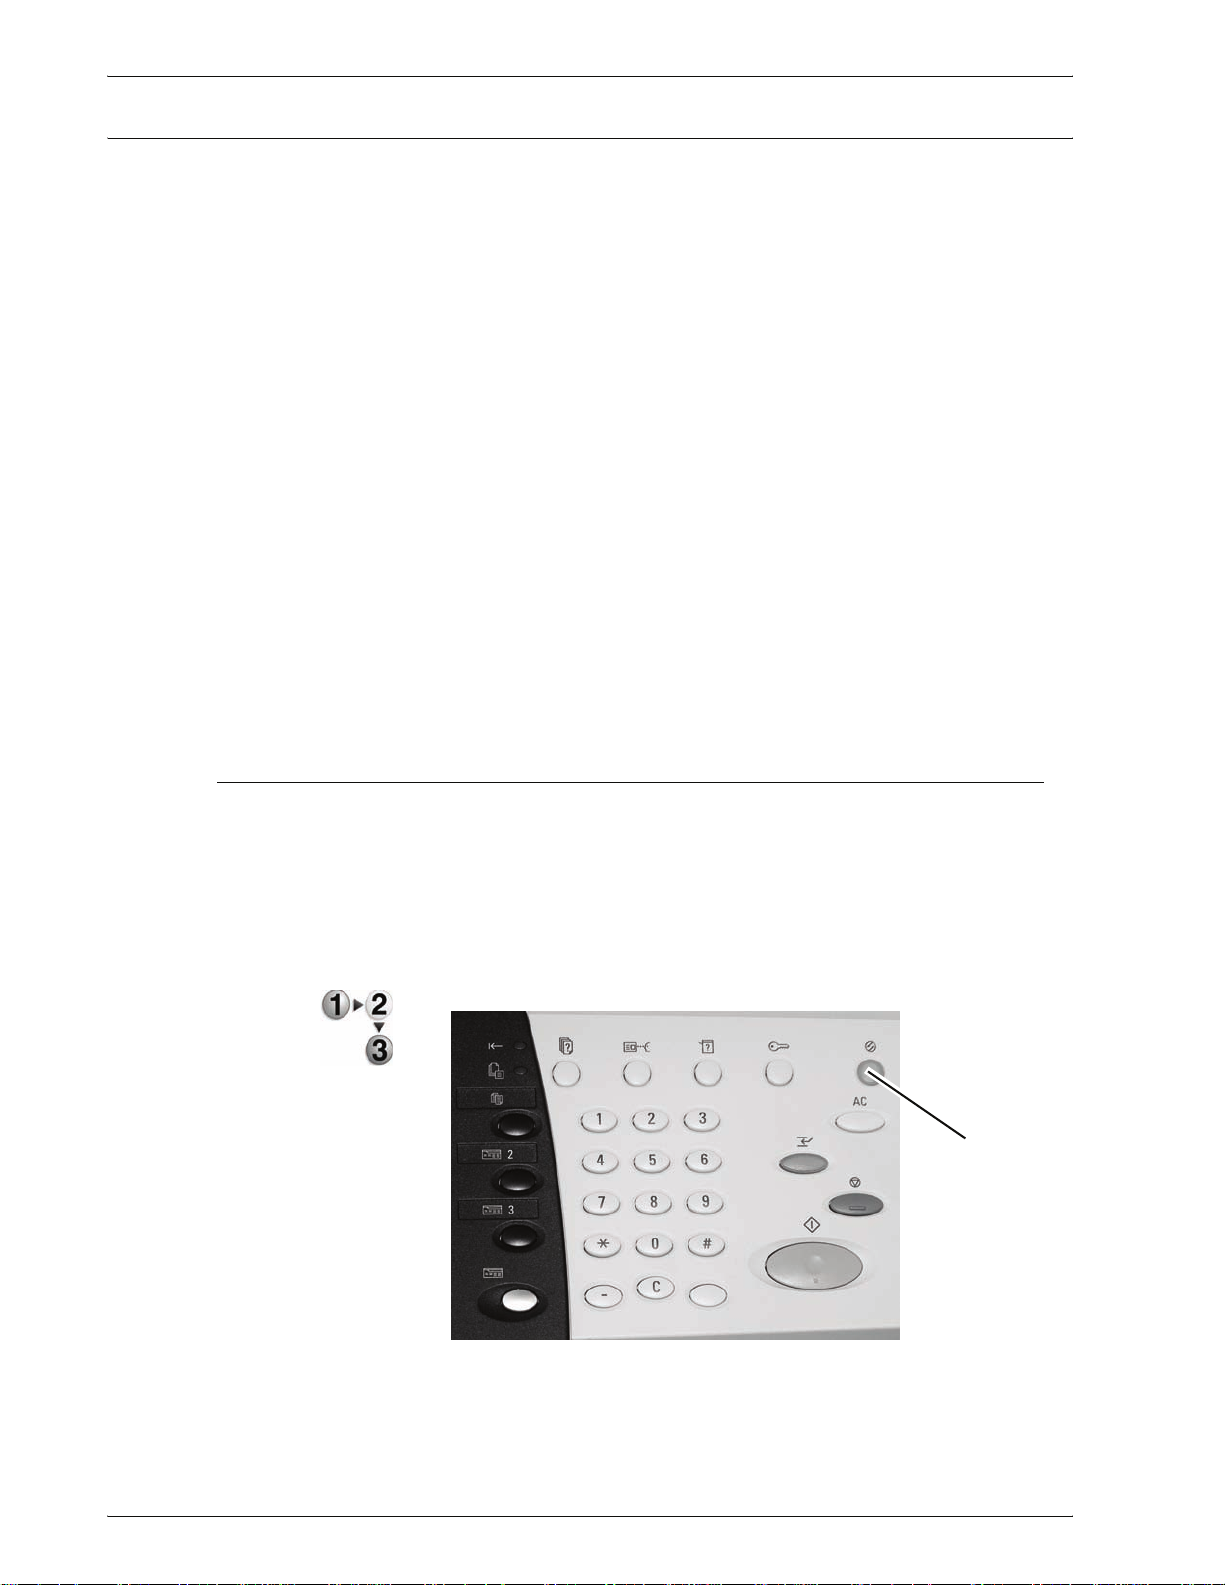
The Power Saver mode is exited in the following instances:
• By pressing the Power Saver button
• Receiving Print Data
Press the Power Saver button.
Power
Saver
Xerox 4595 Copier/Printer User Guide
1-15
Page 26

1. Product overview
1-16
Xerox 4595 Copier/Printer User Guide
Page 27
Copy Procedure
Step 1 Load Documents
2. Copy
There are two methods of loading documents:
Document Feeder
• Single sheet
• Multiple sheets
Document Glass
• Single sheet
• Bound documents, such as books
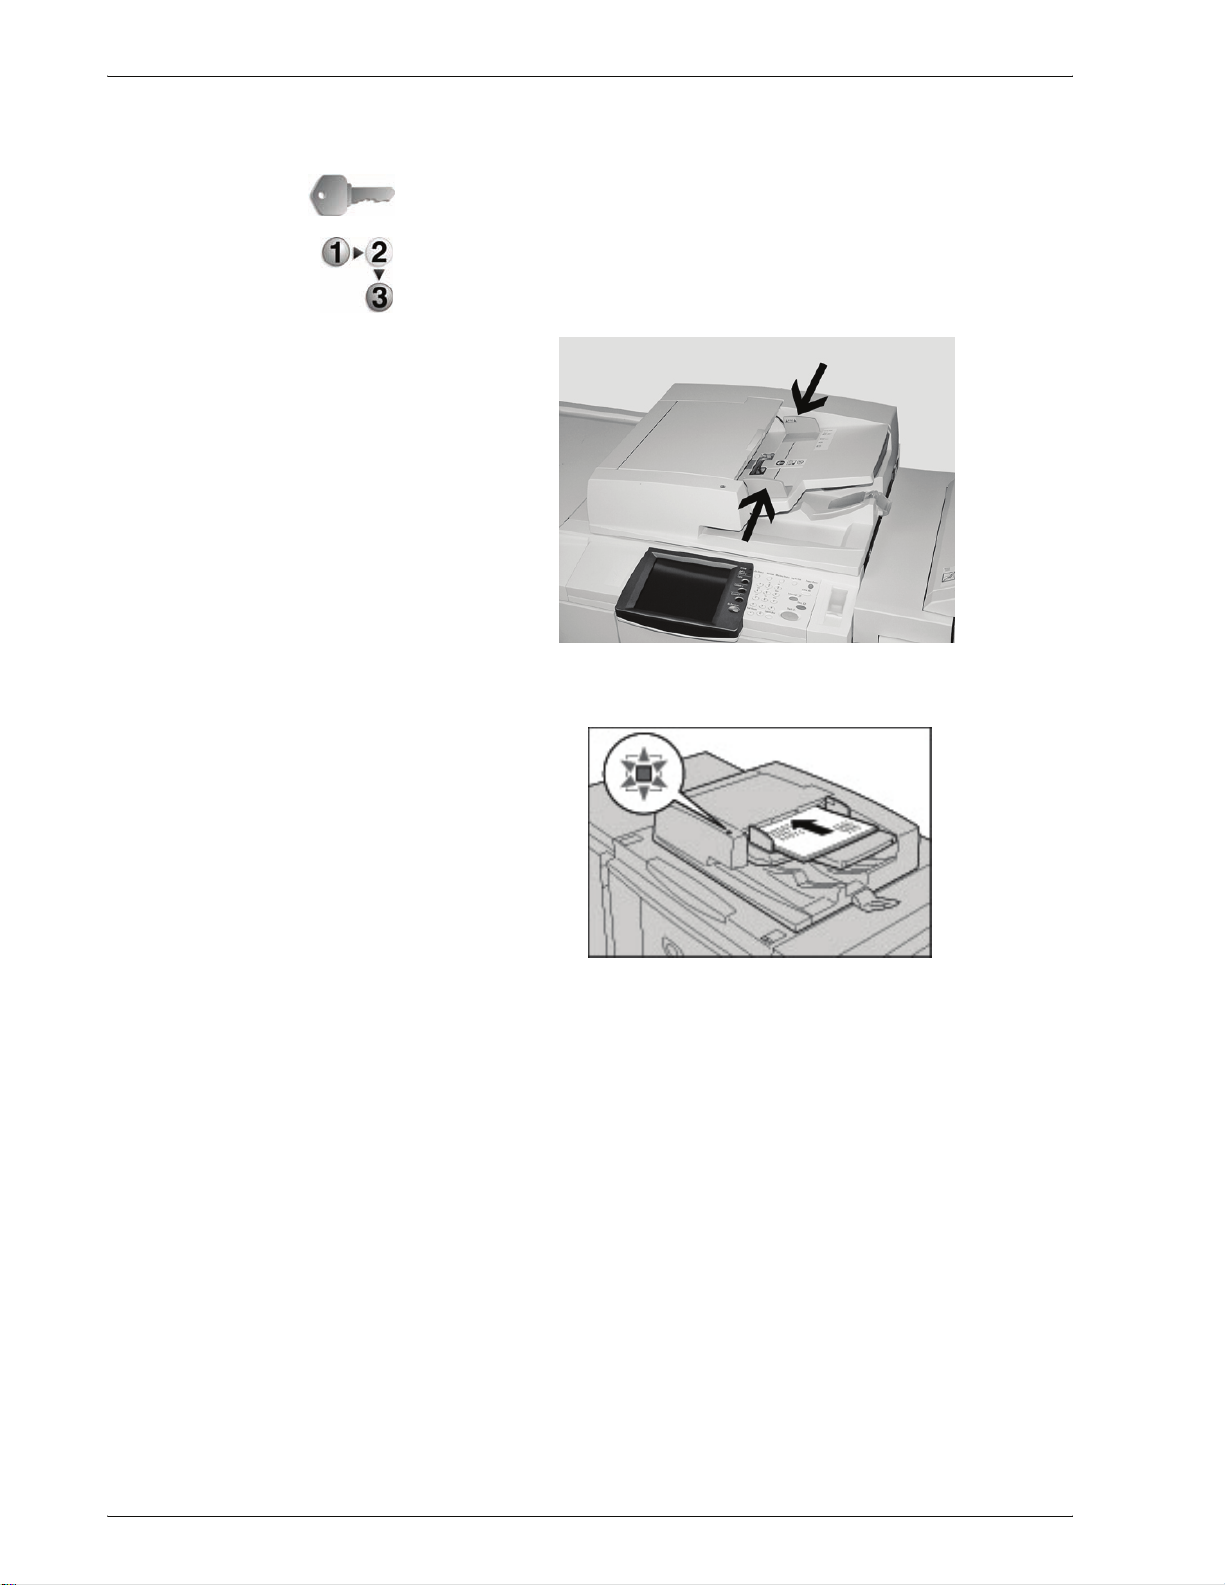
Document Feeder
The document feeder supports single and multiple sheet
documents, with sizes ranging from 140 × 210mm (A5, A5 , 5.5
× 8.5inches, 5.5 × 8.5inches ) to a maximum of 297 × 432mm
(A3, 11 × 17 inches).
The document feeder can auto-detect only documents of standard
sizes. For documents that are not of a standard size, input the size
in the Original Size field.
For information about entering a custom size, refer to “Original
Size” on page 2-34.
NOTE: The standard document si zes that can be auto-detected
depend on the Paper Size Sett ings in the System Administration
mode. For more information, refer to "Paper Size Settings" in the
System Administration Guide.
The document feeder can accept the following number of sheets:
Document type (weight)
Lightweight paper (38-49 g/m2) 250 sheets
Plain paper (50-80g/m
Heavyweight paper (81-128g/m
Heavyweight paper (129-200g/m
2
) 250 sheets
2
) 150 sheets
2
) 100 sheets
Number of
sheets
Xerox 4595 Copier/Printer User Guide
2-1
Page 28
2. Copy
For information about copying documents of mixed size, refer to
“Original Size” on page 2-34.
KEY POINT: Place folded or creased documents on the document
glass because they may cause paper jams if placed in the DADF.
1. Remove any clips and staples before loading the document.
2. Adjust the movable document guides to just touch the edge
of the document stack.
3. Load the document and ensure the Confirmation indicator
lights to show that the document has been loaded correctly.
2-2
Xerox 4595 Copier/Printer User Guide
Page 29
2. Copy
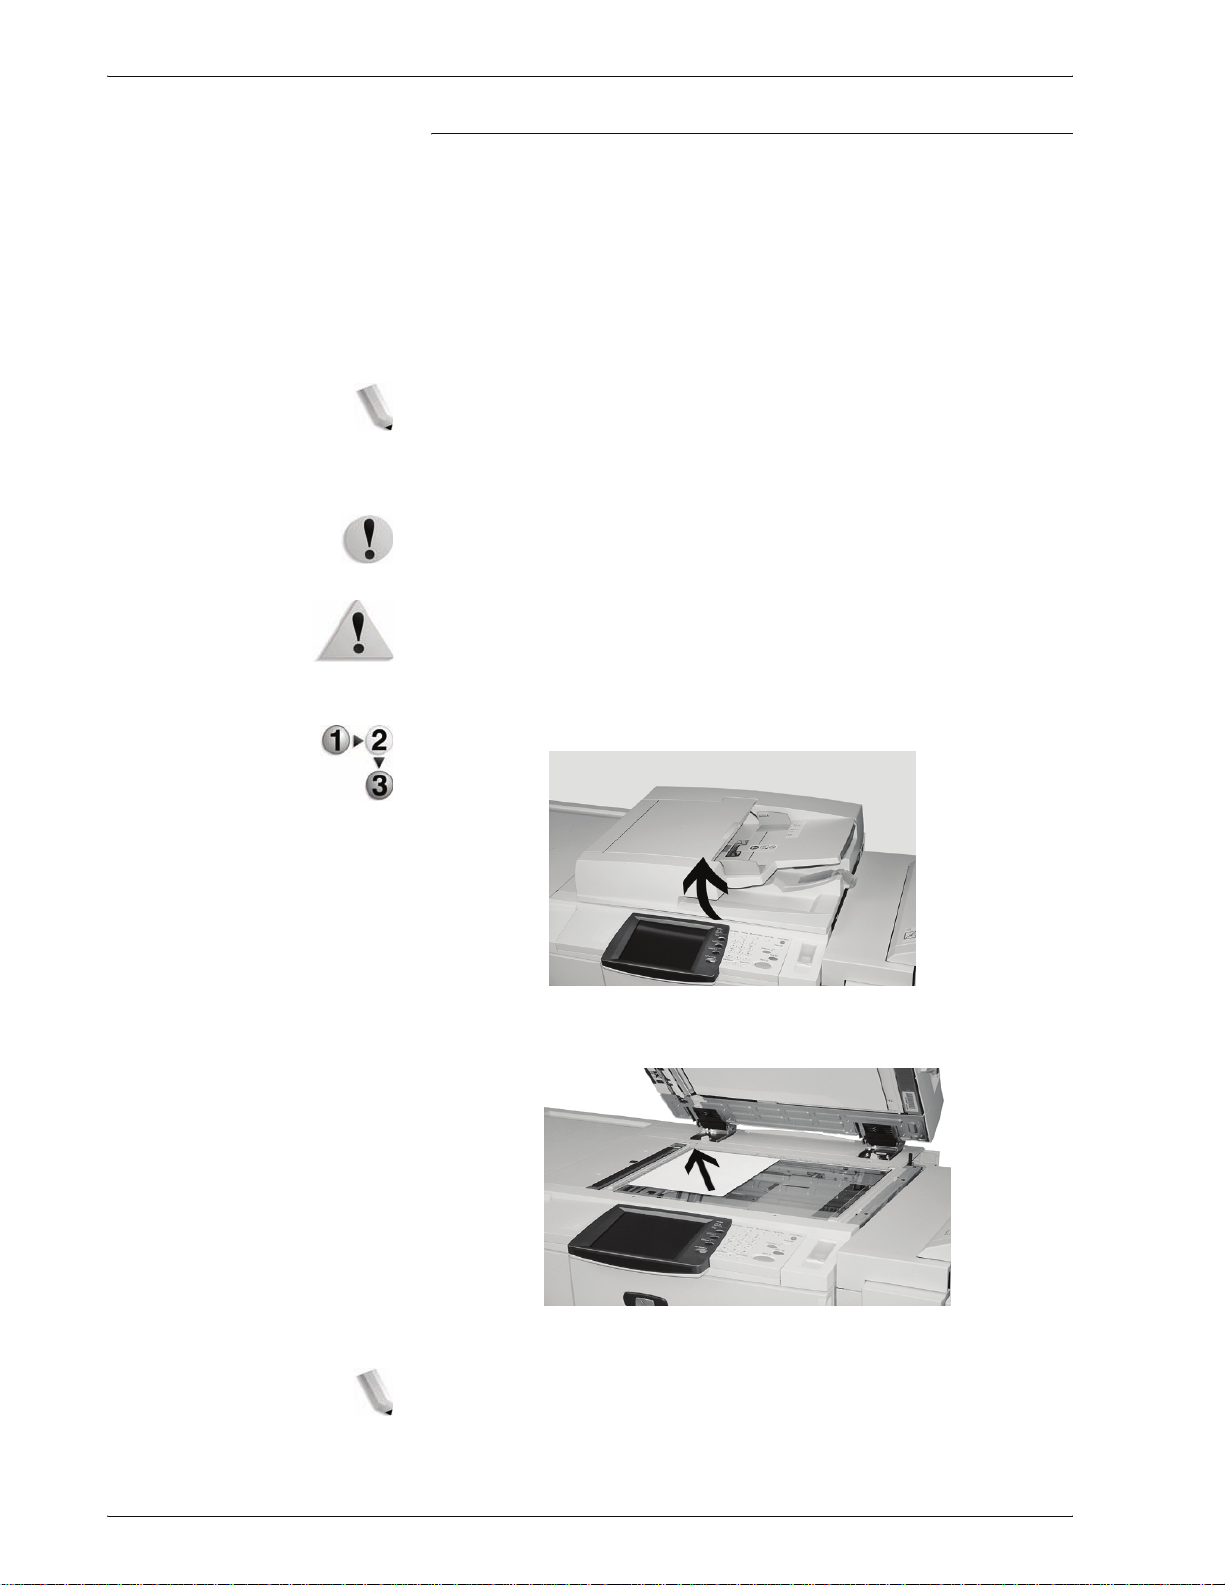
Document Glass
On the document glass, you can place a single sheet, or a book or
other similar document, up to 297 × 432 mm (A3, 11 × 17 inches).
On the document glass, only standard size documents can be
detected automatically. For non-standard size documents, enter a
custom size in Original Size.
For information about entering a custom size, refer to “Original
Size” on page 2-34.
NOTE: The standard document si zes that can be auto-detected
depend on the Paper Size Sett ings in the System Administration
mode. For more information, refer to “Paper Size Settings” in the
System Administration Guide.
CAUTION: When copying a thick document, do not use
excessive force to press it against the document glass. The glass
may break and cause an injury.
WARNING: When making copies with the document cover open,
avoid looking directly at the copy lamp. Direct eye exposure can
cause eye fatigue or damage.
1. Open the document cover.
2. Place the document face down, and align it against the
upper left corner of the document glass.
3. Close the document cover.
NOTE: When a standard size document is placed on the
document glass, the size of the document is displayed in the
message area.
Xerox 4595 Copier/Printer User Guide
2-3
Page 30
2. Copy
Step 2 Select Features
You can select copy features from the Copy button or the Basic
Copying button.
This machine comes with following features for copy: Copy Only,
Copy & Save and Save Only . You can select one from the Copy
screen.
NOTE: The features displayed depend on the configur ation of the
machine. To use the Login Setup feature or Auditron
Administration feature, you nee d a UserID and Password, or just
a UserID. For information about UserIDs and Passwords, contact
the System Administrator.
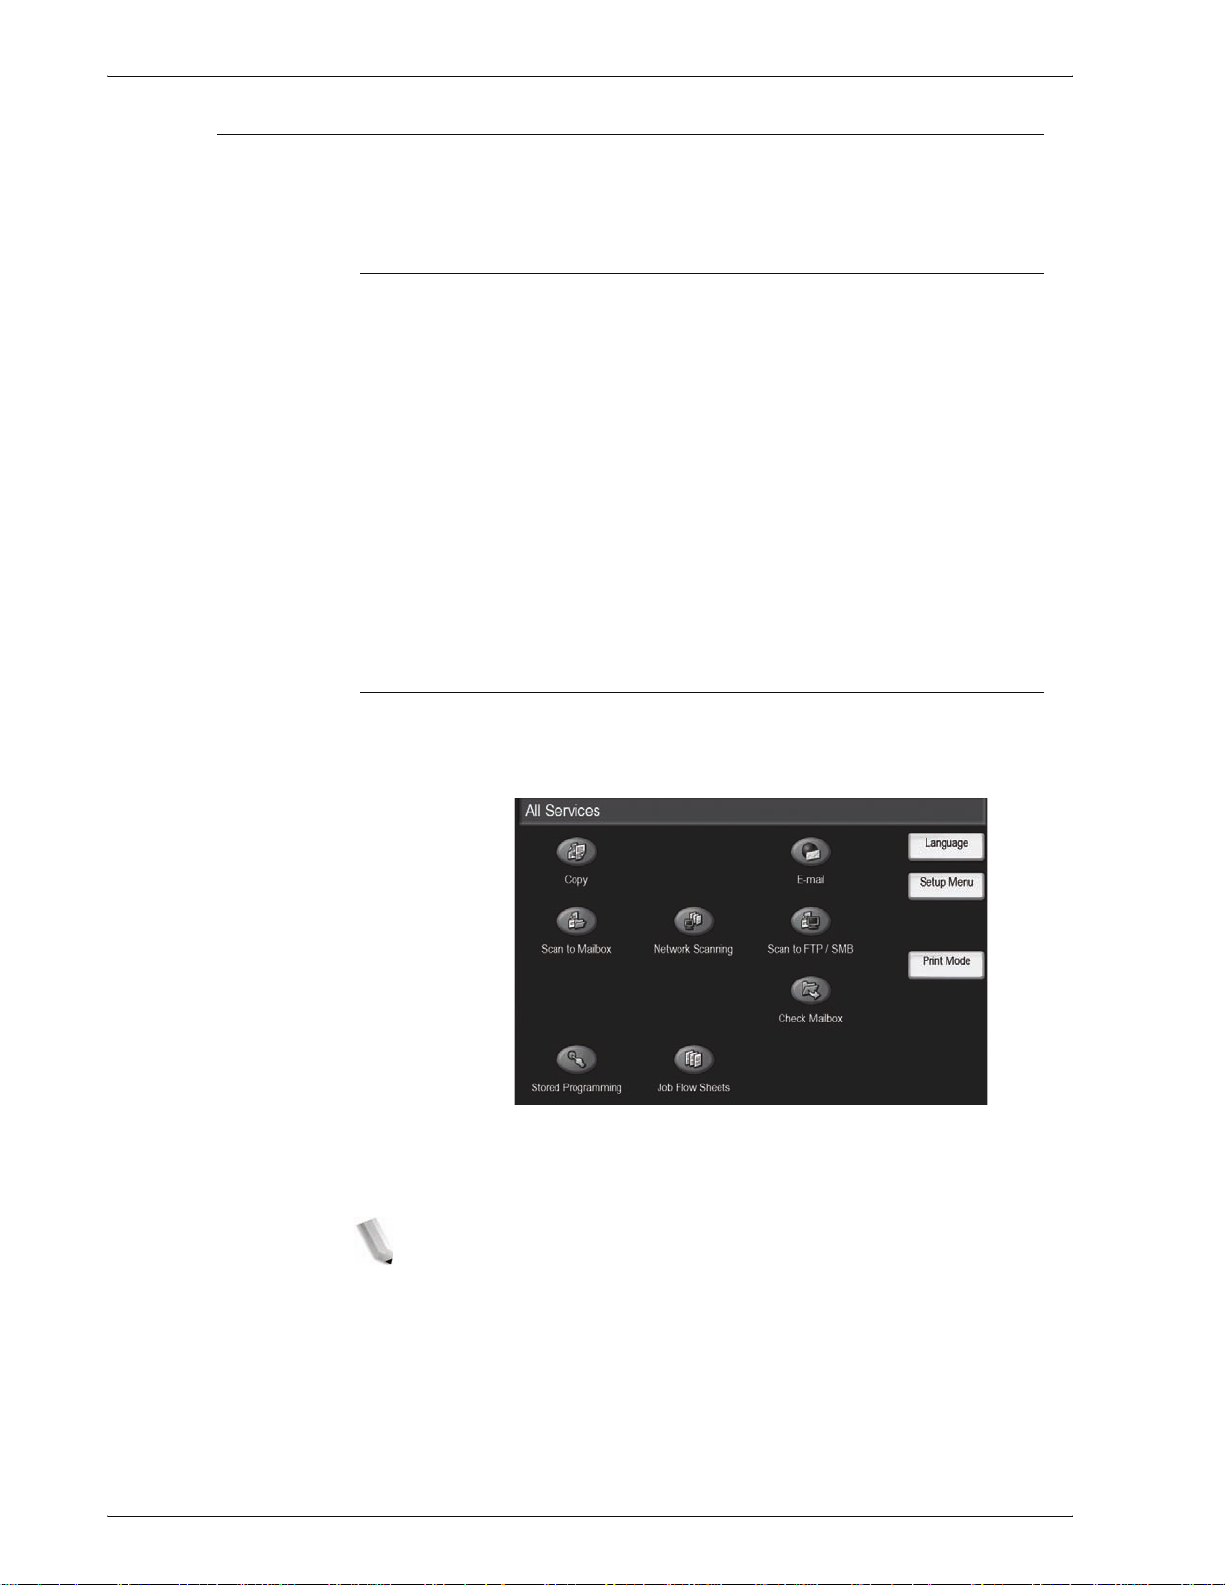
1. Press the All Services button.
All Services
2. Select Copy.
2-4
Xerox 4595 Copier/Printer User Guide
Page 31

2. Copy
3. If the previous settings remain, press the Clear All button.
Clear All
4. Select one of the Copy Only, Copy & Save or Save Only.
Copy
Copies scanned documents.
Copy & Save
Copies scanned documents and then save them as a data to the
mailbox on the machine. You can print saved data from the
Mailbox or change settings.
Save to Mailbox
Save scanned documents as data to the mailbox on the machine.
You can print saved data from the Mailbox or change settings.
For details about Copy & Save and Save Only , refer to “Save
Scanned Documents” on page 2-12. Also, refer to “Check Box” in
the System Administration Guide for details about check mailbox.
NOTE: The features displayed are different according to the
machine configuration. To use the Login Setup feature or
Auditron Administration feature, you need a LoginID and
Password, or just a LoginID. Ask the System Administrat or for the
LoginID and Password.
Xerox 4595 Copier/Printer User Guide
2-5
Page 32

2. Copy
5. Select the features to set from each tab as necessary.
Each feature is discussed in more detail throughout this
chapter.
Step 3 Enter the Quantity
You can enter up to 9999 for the number of copies.
1. Enter the number of copies using the numeric keypad. The
number of copies entered appears on the upper right of the
display.
Numeric Keypad
2-6
Xerox 4595 Copier/Printer User Guide
Page 33

2. If you enter an incorrect value, press the C button and enter
the correct value.
Step 4 Start the Copy Job
1. Press the Start button.
2. Copy
C button
Start
NOTE: If a problem occurs, an error message appears on the
display . Solve the problem in accordance wit h the message on the
display. You can set the next job during copying.
If You Have Another Document
If you have another document, select the Next Original on the
touch screen while the current document is being scanned. You
can copy multiple documents together.
1. Select Next Original while scanning is in progress.
NOTE 1: The Next Original option does not automatically
display. To use this feature, activate Build Job by selecting Job
Assembly Build Job On.
NOTE 2: When using the document feeder, load the next
document after the machine has finished scanning the first
document.
Xerox 4595 Copier/Printer User Guide
2-7
Page 34

2. Copy
2. Load the next document.
3. Press the Start button. If you have more documents, load
the next document and press the Start button.
4. When all documents have been scanned, select Last
Original.
Step 5 Confirm the Copy Job in the Job Status
1. Press the Job Status button.
Job Status
2-8
2. Confirm the job status.
NOTE: Use the up button and down buttons to navigate between
screens.
Xerox 4595 Copier/Printer User Guide
Page 35

Cancel the Copy Job
2. Copy
1. Select Stop on the touch screen or press the Stop button.
Stop
2. If the screen of step 1 does not appear, press the Job
Status button.
Job Status
3. Select the job to cancel, and then select Stop.
NOTE: If the job is a short one, the job may complet e before being
able to cancel it.
Xerox 4595 Copier/Printer User Guide
2-9
Page 36

2. Copy
Change the copy quantity
1. Select Stop on the touch screen or press the Stop button.
2. Select Change Quantity on the touch screen.
3. Specify the quantity using the numeric keypad.
4. Press the Start button.
Stop
NOTE: The quantity entered must be greater than the
quantity already copied. If you enter a quantity that is the
same number as that which has been copied, no additional
copies will be made.
2-10
Xerox 4595 Copier/Printer User Guide
Page 37

Interrupt the copy job
2. Copy
To temporarily interrupt a copy job in progress in order to perform
another copy job, follow these steps:
1. Press the Interrupt button.
Interrupt
NOTE: The interrupt indicat or light s; this means the machi ne
is in the job interrupt mode.
2. Place a document in the document feeder or on the
document glass and change the feature settings as required.
3. Specify a desired output quantity by using the numeric
keypad.
4. Press the Start button.
5. When the interrupt copy job is completed, press the
Interrupt button.
NOTE: The Interrupt indicat ion is no longer lit; this informs
you that the job interrupt mode is canceled or completed. If
you placed a document on the document glass, remove it.
6. Press the Start button to resume the previous copy job.
Xerox 4595 Copier/Printer User Guide
2-11
Page 38

2. Copy
Save Scanned Documents
Save scanned documents as a data to the mailbox on the
machine.
To use mailbox, select Copy & Save or Save Only.
NOTE: Mailboxes must be set up in order to use this feature.
1. On the All Services screen, select Copy.
The maximum pages stored in the machine is about
45,000 pages for the 8.5 x 11 inch or A4 portrait. This
figure should only be used as a guide, since the maximum
scanned pages depend on the types, sizes, and direction
of the document.
Up to 100 copied and printed documents can be stored
altogether.
2. Select Copy & Save or Save Only.
3. Specify the mailbox to save data.
NOTE: If a password is set for the mailbox, the password entry
screen appears. Enter the password and select Confirm. If you
have forgotten the password, contact your System Administration.
2-12
Xerox 4595 Copier/Printer User Guide
Page 39

2. Copy
4. Press Save to save the changes and then press the Start
button. Press Cancel to erase any changes.
Mailbox
This box saves data. Use the up and down buttons to navigate
between screen.s
Document Name
Set the document name for saving.
Using the displayed keyboard and the numeric keypad, you may
enter up to 20 characters.
Go to
Use the numeric keypad to enter a 3 digit box number. That
mailbox then appears at the top of the list.
No. of Documents
When a mailbox is selected which contains documents, the
number of stored documents is displayed.
Document List
Select a box and press this button to check or delete documents
stored within.
Document List
Check or delete documents stored within a box.
1. From the All Services screen, select Copy. Then select Copy
& Save or Save Only and specify the mailbox desired. Select
Document List.
2. Select the document to confirm or delete.
NOTE: If the scanned data is not displayed, select Refresh.
Xerox 4595 Copier/Printer User Guide
You can so rt documents in ascending or descendi ng order
by pressing either Document Name or Stored Date.
2-13
Page 40

2. Copy
3. When finished checking or deleting items in the mailboxes,
select Close.
Number of Documents
When a box is selected which contains documents, the number of
stored documents is displayed.
Select All
Select to choose all documents stored in the box.
Delete
Use to delete selected documents.
Yes/No
Use this to confirm deletion of the selected document. It is valid
only when selecting one document.
Document Details
Displays additional information about the selected document.
2-14
Xerox 4595 Copier/Printer User Guide
Page 41

Basic Copying tab
2. Copy
You can set the basic features on the Basic Copying screen.
1. From the All Services screen, select Copy.
2. Select features on the Basic Copying screen that appears
first.
Reduce/Enlarge
1. In the Reduce/Enlarge area, select the copy ratio.
100%
Copies are made at the same size as the document.
Auto%
The copy ratio is automatically set based upon the document and
paper sizes specified in Paper Supply, and the document is
copied to fit in the specified size.
NOTE: If you select Auto%, specify a value other than Auto for
Paper Supply.
Xerox 4595 Copier/Printer User Guide
2-15
Page 42

2. Copy
Ratio (3rd to 5th Buttons)
Select from preset ratios.
You can change the indicated ratios. For information about the
setting procedures, refer to "Reduce/Enlarge - Button X” (where X
is the button number) in the System Administration Guide.
More...
Display the Reduce/Enlarge screen.
Refer to "When Preset% is Selected," "When Variable% is
Selected," "When Independent X-Y% is Selected," and "When
Calculator% is Selected," for more information.
When Reduce/Enlarge Preset is Selected
You can select from preset standard copy ratios.
1. From the Basic Copying screen, select More and then select
Preset%.
2. Select the copy ratio.
100%
Copies are made at the same size as the document.
Auto%
The copy ratio is automatically set based upon the document and
paper sizes, and the document is copied to fit in the selected
paper.
NOTE: If you select Auto%, specify a value other than Auto for
Paper Supply.
Reduce/Enlarge Presets
Select from the preset copy ratios.
2-16
Xerox 4595 Copier/Printer User Guide
Page 43

2. Copy
Copy All (Full Screen)
To prevent image loss, the document is reduced to just below
100% when it is copied. If this option is selected, a check mark
appears in the Copy All check box.
KEY POINT: If you select Copy All, you need to set border erase
dimensions to 0 inches (0 mm), depending on the size of the
original document. Note that even if the border erase is set to 0
inches (0 mm), the edge of the copied document sometimes
appears dirty or image loss sometimes occurs depending of the
size of the original.
When Variable% is Selected
You can enter any ratio for copying. Set the ratio within the range
from 25 to 400% in 1% increments.
1. Select Variable%.
2. Specify the ratio with the numeric keypad or the up and
down buttons.
If you enter an incorrect value, select C.
When Independent X-Y% is Selected
You can specify different height and width ratios to scale the
height and width independently.
Xerox 4595 Copier/Printer User Guide
2-17
Page 44

2. Copy
1. Select Independent X-Y%.
2. To specify the height and width ratios, use the up and down
buttons.
Auto
Copies are made with the height and width ratios set automatically
to match the paper size. If this option is selected, a check mark is
added.
Auto (Copy All)
The height and width ratios are set automatically to match the
paper size and the document is copied at a slightly reduced size to
prevent image loss. If this option is selected, a check mark
appears in the Copy All check box.
KEY POINT: If you select Copy All, you need to set border erase
dimensions to 0 inches (0 mm), depending on the size of the
original document. Note that even if the border erase is set to 0
inches (0 mm), the edge of the copied document sometimes
appears dirty or image loss sometimes occurs depending of the
size of the original.
X (width) Y (height)
Set the height and width ratios within the range from 25 to 400% in
1% increments.
2-18
Xerox 4595 Copier/Printer User Guide
Page 45

Paper Supply
You can select the tray loaded with the copy paper you wish to use
for copying.
1. From the Basic Copying screen, select the paper supply.
Auto
Based on the document size and set ratios, the machine
automatically selects the tray loaded with the appropriate paper
and makes copies.
2. Copy
NOTE: If you select Auto, you must specify a value other than
Auto for Reduce/Enlarge.
Trays 2 to 5
Select from preset paper trays.
You can change the paper trays to display.
For more information about settings, in the System Administration
Guide, refer to "Paper Supply - Button 2," "Paper Supply - Button
3," "Paper Supply - Button 4," or "Paper Supply - Button 5."
More...
The Paper Supply screen is displayed.
Xerox 4595 Copier/Printer User Guide
2-19
Page 46

2. Copy
Paper Supply Screen
You can select a paper tray that does not appear on the Basic
Copying screen.
1. From the Basic Copying screen, in the Paper Supply area,
select More....
2. Select the Bypass paper tray.
3. Select the paper size and paper type.
4. Select Save to keep your changes.
Auto
Based on the document size and set ratios, the machine
automatically selects the tray loaded with the appropriate paper
and makes copies.
Trays 1 to 4 and (optional HCF) trays 6 and 7
You can select paper from six different trays (if you have the
optional HCF attached).
Bypass
The Tray 5 (Bypass) screen is displayed.
2-20
Xerox 4595 Copier/Printer User Guide
Page 47

2. Copy
Tray 5 (Bypass) Screen
If you want to make copies on paper that cannot be loaded in
Trays 1 to 4 and 6 to 7, use Tray 5 (Bypass).
1. From the Basic Copying screen, in the Paper Supply area,
select More....
2. Select the Bypass paper tray.
3. Select the paper size and paper type.
4. Select Save to save the changes.
NOTE: Select the up button to display the previous screen and
select the down button to display the next screen.
Paper Size
Select from Auto Size Detect, Standard Size, and
Non-Standa rd Size.
When Auto Size Detect is selected, the paper size is identified
automatically.
NOTE: Auto Size Detect can only detect standard sizes.
Paper Type
Select the paper type.
Xerox 4595 Copier/Printer User Guide
2-21
Page 48

2. Copy
When Standard Size is Selected
Select the paper size from standard sizes and select the paper
type.
1. Select Standard Size.
2. Select the paper size and paper type.
NOTE: Select up bu tt on to di spla y the p revious scr een and sel ect
the down button to display the next screen.
3. Select Save to save the changes.
When Non-standard Size is Selected
Set the width (X) within the range from 5.9 to 19.2 inches (140 to
400 mm) and the height (Y) within the range from 4.0 to 12.9
inches (100 to 330 mm) in 0.1 inches or 1 mm increments.
KEY POINT: Printing may not be performed correctly when the X
(horizontal) direction of a non-standard size paper is less than 5.7
inches (148 mm).
When copying both sides on a non-standard size paper, specify
the size within the range from 7.2 to 19.2 inches (182 to 488 mm)
for the X (horizontal) direction and from 5.5 to 13.0 inches (140 to
330 mm) for the Y (vertical) direction.
1. Select Non-standard Size.
2-22
Xerox 4595 Copier/Printer User Guide
Page 49

2. Enter the paper size using the up, down, left, and right
buttons.
3. Select the paper type.
NOTE: Select the up button to display the previous screen and
select the down button to display the next screen.
4. Select Save to save the changes.
2 Sided (Making 2 sided Copies)
Copies of 1 sided and 2 sided documents can be made on one
side or both sides.
1. From the Basic Copying screen, in the 2 Sided area, make a
selection.
2. Copy
Æ 1 Sided
1
When you select the 1-1 Sided button you are making fast,
simplex to simplex copies.
Æ 2 Sided (Head to Head)
1
The 1-2 Sided option allows you to create double-sided, head-tohead copies - for example, presentations, and bulletins.
1
Æ 2 Sided (Head to Toe)
The 1-2 Sided option allows you to create double-sided,
head-to-toe copies - for example, calendars, and landscape
Power Point presentations.
Æ 2 Sided (Head to Head)
2
The 2-2 Sided option allows you to generate fast duplex copies
from duplex originals.
Æ 1 Sided (Head to Head)
2
Makes fast simplex copies from duplex originals
More...
Displays the 2 Sided screen.
Xerox 4595 Copier/Printer User Guide
2-23
Page 50

2. Copy
2 Sided screen
Specify how the two sides of the 2-sided documents were
originally printed and how copies are to be printed.
Select Save to keep your changes.
Lighten/Darken
You can adjust the copy density to one of seven levels. Copying is
darker when you move the down button to the left and lighter
when you move it to the right.
NOTE: Copy Density of the Basic Copying screen and Copy
Density of Lighten/Darken/Contrast of the Image Quality
screen are the same.
1. From the Basic Copying, in the Lighten/Darken area, adjust
the density by selecting either the left or right buttons.
2-24
Xerox 4595 Copier/Printer User Guide
Page 51

Image Quality tab
2. Copy
1. On the All Services screen, select Copy.
2. Select the Image Quality tab and then select a feature on
the Image Quality screen.
For example, Sharpness:
Xerox 4595 Copier/Printer User Guide
2-25
Page 52

2. Copy
Lighten/Darken
You can select from seven copy density levels between Lighter
and Darker.
1. Select Lighten/Darken.
2. Select the density.
3. Select Save to save the changes.
Original Type
When making copies of photographs, text, and other documents,
you can make copies at the image quality that corresponds to
each type of document. Copies of the document can be
reproduced at a more faithful image quality by selecting the
document type that matches the document.
1. On the All Services screen, select Copy. Then select the
Image Quality tab and select Original Type.
2. Select the type of image quality.
2-26
3. Select Save to save your choice.
Text & Photo
Select this item when making copies of documents that contain
both text and photos. The machine automatically distinguishes the
Xerox 4595 Copier/Printer User Guide
Page 53

2. Copy
text and photo areas and sets the appropriate image quality for
each area of the document.
Text
Select this item to make sharp copies of text. Sharp copies of
graphs and illustrations, for example, can also made in this mode.
Photo
Select this item for making copies of photos.
Pencil Text
Select this item for pencil text documents.
Lightweight documents
Select this item for lightweight (38 to 49 g/m
NOTE: Whether Lightweight documents is displayed on the
Touch Screen or not depends on the system setting. Refer to
"Original Type - Lightweight Originals" in the System
Administration Guide (or ask your System Administrator) for
instructions on how to display it.
2
) documents.
Auto Exposure
When Auto Exposure is selected, the background color of
documents such as newspapers and colored paper documents is
erased.
NOTE: When Document Type is set to Photo, the Auto
Exposure feature does not work.
1. On the All Services screen, select Copy. Then select the
Image Quality tab and select Auto Exposure.
2. Select Off or On.
3. Select Save to save the changes.
Off
The background color of the document is included during copying.
Xerox 4595 Copier/Printer User Guide
2-27
Page 54

2. Copy
On
The background color of the document is excluded during
copying.
Sharpness
You can select from five sharpness levels between Sharper and
Softer.
The nearer the level is to Sharper, the sharper the contours of
images. The nearer the level is to Softer, the softer the contours of
images.
1. Select Sharpness.
2. Select the image outline level from one of the five levels
displayed.
3. Select Save to save the changes.
2-28
Xerox 4595 Copier/Printer User Guide
Page 55

Scan Options tab
2. Copy
From the Scan Options screen, you can configure features for
scanning documents.
1. On the All Services screen, select Copy.
2. Select the Scan Options tab and then select a feature from
the Scan Options screen that appears.
Bound Originals
The Bound documents feature allows you to copy facing pages of
a document on separate sheets of paper in page order. This
feature is useful if you need to make separate copies from facing
pages of bound documents such as a booklet.
KEY POINT: You cannot use the document feeder with this
feature.
A document of non-standard size or undetectable size may not be
divided exactly into two.
1. On the All Services screen, select Copy, then the Scan
Options tab. From the Scan Options screen that appears,
select Bound Originals.
2. Select the document.
Xerox 4595 Copier/Printer User Guide
2-29
Page 56

2. Copy
3. Select the page to copy.
4. Select Save to save the changes.
Off
The document is not copied as a bound document.
Left Page then Right
Copies are made from the left page of facing pages in an
document starting from the left page.
Right Page then Left
Copies are made from the right page of facing pages in an
document starting from the right page.
Top Page then Bottom
Copies are made from the top page of facing pages in an
document starting from the top page.
Both Pages
Copies are made of both pages in page order.
Left Page Only
Copies are made of the left page only. You can select this item
when Left Page then Right or Right Page then Left is selected.
Right Page Only
Copies are made of the right page only. You can select this item
when Left Page then Right or Right Page then Left is selected.
Top Page Only
Copies are made of the top page only. You can select this item
when Top Page then Bottom is selected.
Bottom Page Only
Copies are made of the bottom page only. You can select this item
when Top Page then Bottom is selected.
Center Erase
Erases the shadow from the center section of a bound document.
You can set the width for Center Erase in the range from 0 to 1.9
inches (0 to 50 mm) in 0.1 inch or 1 mm increments.
2-30
The following examples demonstrates the Center Erase value:
Xerox 4595 Copier/Printer User Guide
Page 57

2. Copy
Center Erase value: 0 mm • Your bound original is a spiral-bound book and you want to
copy both the right and left pages of the book.
• You select Left Page then Right.
• You do not increase the Center Erase value; therefore, the
Center Erase value is 0 mm.
• You make a copy of the left and right side pages of your book.
The copy output shows the copies with black marks along the
binding edge:
xjdhjcjhkjs
sjhfjhksfh
kshdhfd
kshfkhf’
skhfk
shfjdka
fh8&02034
Center Erase value: 10 mm • Using the same bound original, you select Left Page then
Right.
• Increase the Center Erase to 10 mm.
You make a copy of the left and right side pages of your book. The
copy output shows the copies without black marks along the
binding edge, and you have a crisp, white copy of the pages:
xjdhjcjhkjs
sjhfjhksfh
kshdhfd
kshfkhf’
skhfk
shfjdka
fh8&02034
xjdhjcjhkjs
sjhfjhksfh
kshdhfd
kshfkhf’
skhfk
shfjdka
fh8&02034
xjdhjcjhkjs
sjhfjhksfh
kshdhfd
kshfkhf’
skhfk
shfjdka
fh8&02034
Xerox 4595 Copier/Printer User Guide
2-31
Page 58

2. Copy
2 Sided Book Copy
You can assign pages when making copies of facing pages in a
bound document so that pages face each other in the same way
as the document. A blank sheet is inserted automatically as the
first page.
NOTE: Non-standard sized documents will not be separated into
two accurately.
1. On the All Services screen, select Copy, then the Scan
Options tab. From the Scan Options screen that appears,
select 2 Sided Book Copy.
2. Select which page to copy first.
3. Select which pages to copy.
4. Make any required settings for Center Erase.
5. Select Save to save the changes.
NOTE: Confirm the orientation of the loaded document.
2-32
Xerox 4595 Copier/Printer User Guide
Page 59

2. Copy
Off
When Off is selected, the Bound Originals feature cannot be
used
Left Page then Right
Copies are made of both pages of a bound document, starting
from the left page and then the right.
Right Page then Left
Copies are made of both pages of a bound document, starting
from the right page and then the left.
Top Page then Bottom
Copies are made of both pages of a bound document, starting
from the top page and then the bottom.
Start Page & End Page
Displays the 2 Sided Book Copy - Start Page & End Page
screen.
Center Erase
Erases the shadow from the center section of a bound document.
You can set the width for Center Erase in the range from 0 to 1.9
inches (0 to 50 mm) in 0.1 inch or 1 mm increments.
See “Center Erase” on page 2-30 for more information on this
function.
2 Sided Book Copy - Start Page & End Page Screen
You can set the copy start page and end page.
1. On the All Services screen, select Copy, then the Scan
Options tab. From the Scan Options screen that appears,
select Start Page & End Page.
2. Set the start page and end page.
3. Select Save to save the changes.
Xerox 4595 Copier/Printer User Guide
2-33
Page 60

2. Copy
Start Page
Select the copy start page from the following items.
• Left Page/Right Page
You can select these items when Left Page then Right or
Right Page then Left is selected.
• Top Page/Bottom Page
You can select these items when Top Page then Bottom
is selected.
End Page
Select the copy end page from the following items.
• Left Page/Right Page
You can select these items when Left Page then Right or
Right Page then Left is selected.
• Top Page/Bottom Page
You can select these items when Top Page then Bottom
is selected.
Original Size
You can set the scan size for the document.
Specify the size of the document when scanning non-standard
size documents or when making copies at a size different from
that of the currently loaded document.
When a document size is specified, it is scanned at the specified
size regardless of the size of the loaded document.This feature
allows you to copy the document with adding or deleting the
margin.
1. On the All Services screen, select Copy, then the Scan
Options tab. From the Scan Options screen that appears,
select Original Size.
2-34
2. Select the size of the document.
If you select a non-standard size, specify values for the X
and Y directions.
Xerox 4595 Copier/Printer User Guide
Page 61

2. Copy
3. Select Save to save the changes.
Auto Size Detect
Scan sizes are detected automatically.
NOTE: If the document s ize cannot be de tected, a screen to i nput
the document size appears.
Standard size
Select from the preset size buttons.
You can change the indicated document sizes. For information
about the setting procedure, refer to "Original Size Defaults" in the
System Administration Guide.
Non-Standard Size
Use the area at the right of the screen to enter the desired scan
size when scanning non-standard size documents or when
making copies at a size different from that of the currently loaded
document. The size can be specified in 0.1 inch or 1 mm
increments within the range from 0.6 to 17.0 inches (15 to 432
mm) for the width (X) on the document glass and within the range
from 0.6 to 11.6 inches (15 to 297 mm) for the height (Y) on the
document glass. The scale on the outside of the document glass
is a useful reference for specifying the document size.
Mixed Size Originals
You can simultaneously scan different sized documents. Output
can be made to media the same size as the originals or so that
output is made on the same size of media no matter the size of the
original.
KEY POINT: Be sure to load A5 documents in Long Edge Feed
orientation.
When loading a B5 size document with A3 or 8.5 x 11 in./
A4 size documents in a vertical direction, place the B5
document also in a vertical direction.
The recommended combinations of documents are 8.5 x
11 inch/A4 portrait and11 x 17 inch/A3 landscape or B5
portrait and B4 landscape. If you combine documents with
sizes other than the ones just stipulated, the documents
may not feed correctly or scan properly.
Xerox 4595 Copier/Printer User Guide
2-35
Page 62

2. Copy
1. On the All Services screen, select Copy, then the Scan
Options tab. From the Scan Options screen that appears,
select Mixed Size Originals.
2. Select On
3. Select Original Orientation.
4. Select Save to save the changes.
Off
Select this item when all documents are of the same size.
On
When documents of different sizes are copied, the machine
automatically detects the size of each document.
Edge Erase
When you make copies with the document cover open or make
copies from a book, black shadows sometimes appear along the
edges and center margin of the paper. If this happens, you can
make copies with the shadows erased.
NOTE: When making 2 sided copies, the same border erase
amount is set for both sides 1 and 2.
If you set Reduce/Enlarge, the edge eras e dimensions will
be reduced/enlarged in proportion to the ratio you
configured.
2-36
For information about the areas that can actually be printed, refer
to “Printable Area” on page 12-14.
Xerox 4595 Copier/Printer User Guide
Page 63

2. Copy
1. On the All Services screen, select Copy, then the Scan
Options tab. From the Scan Options screen that appears,
select Edge Erase.
2. Select any item.
3. Select Original Orientation.
4. Select Save to save the changes.
Normal
The border erase amount is set to 0.1 inches or 2 mm for the top,
bottom, left, and right.
Equal Opposite Edges
Refer to “When Equal Opposite Edges is Selected:” on page 2-38.
4 Independent Edges
Refer to “When 4 Independent Edges is Selected:” on page 2-39.
4 Equal Edges
Refer to “When 4 Equal Edges is Selected:” on page 2-40.
Original Orientation
Refer to “Original Orientation” on page 2-47.
Xerox 4595 Copier/Printer User Guide
2-37
Page 64

2. Copy
When Equal Opposite Edges is Selected:
You can specify the same value for the top and bottom edges or
left and right edges.
1. From the All Services screen, select Copy, then the Scan
Options tab. From the Scan Options screen that appears,
select Edge Erase and then Equal Opposite Edges.
2. Use the up and down buttons to enter the value for the
Edge Erase.
3. Select Save to save the changes.
Top & Bottom Edges
Shadows at the top and bottom of the document are erased.
Edges at the top and bottom are erased in accordance with the
direction that the document was loaded. You can set the border
erase width within the range from 0 to 1.9 inches (0 to 50 mm) in
0.1 inch or 1 mm increments.
Left & Right Edges
Shadows on the left and right of the document are erased. Edges
on the left and right are erased in accordance with the direction
that the document was loaded. You can set the border erase width
within the range from 0 to 1.9 inches (0 to 50 mm) in 0.1 inch or 1
mm increments.
Center
Shadows in the center of documents such as booklets or
documents with facing pages are erased. You can set the center
erase width within the range from 0 to 1.9 inches (0 to 50 mm) in
0.1 inch or 1 mm increments.
2-38
Original Orientation
Refer to “Original Orientation” on page 2-47.
Xerox 4595 Copier/Printer User Guide
Page 65

2. Copy
When 4 Independent Edges is Selected:
You can specify different values for the top, bottom, left and right
edges.
1. From the All Services screen, select Copy, then the Scan
Options tab. From the Scan Options screen that appears,
select Edge Erase and then 4 Independent Edges.
2. Use the up and down buttons to enter the value for the
Edge Erase.
3. Select Save to save the changes.
Top Edge
Erases shadows at the top of the copies. The edges are erased
based on the orientation of the document set.
You can set the border erase width within the range from 0 to 50
mm in 1 mm increments.
Bottom Edge
Erases shadows at the bottom of the copies. The edges are
erased based on the orientation of the document set.
You can set the border erase width within the range from 0 to 1.9
inches (0 to 50 mm) in 0.1 inch or 1 mm increments.
Left Edge
Erases shadows at the left of the copies. The edges are erased
based on the orientation of the document set.
You can set the border erase width within the range from 0 to 1.9
inches (0 to 50 mm) in 0.1 inch or 1 mm increments.
Right Edge
Erases shadows at the right of the copies. The edges are erased
based on the orientation of the document set.
You can set the border erase width within the range from 0 to 1.9
inches (0 to 50 mm) in 0.1 inch or 1 mm increments.
Xerox 4595 Copier/Printer User Guide
2-39
Page 66

2. Copy
Center
Shadows in the center of documents such as booklets or
documents with facing pages are erased. You can set the center
erase width within the range from 0 to 1.9 inches (0 to 50 mm) in
0.1 inch or 1 mm increments.
Original Orientation
Refer to “Original Orientation” on page 2-47.
Side 2
• Same as Side 1
Select this item when you want the same settings for both
Side 1 and Side 2.
• Opposite to Side 1
Select this item when you want the symmetry settings for
both Side 1 and Side 2.
When 4 Equal Edges is Selected:
You can specify the same value for the top, bottom, left and right
edges.
1. From the All Services screen, select Copy, then the Scan
Options tab. From the Scan Options screen that appears,
select Edge Erase and then 4 Equal Edges.
2. Use the up and down buttons to enter the value for the
Edge Erase.
3. Select Save to save the changes.
2-40
4 Edges
Erases shadows at the top, bottom, left and right of the copies.
You can set the border erase width within the range from 0 to 1.9
inches (0 to 50 mm) in 0.1 inch or 1 mm increments.
Xerox 4595 Copier/Printer User Guide
Page 67

Center
Shadows in the center of documents such as booklets or
documents with facing pages are erased. You can set the center
erase width within the range from 0 to 1.9 inches (0 to 50 mm) in
0.1 inch or 1 mm increments.
Original Orientation
Refer to “Original Orientation” on page 2-47.
Image Shift
Copies can be made with the document image position shifted to
the left, right, top, or bottom of the paper or with the document
center shifted to the center of the paper. You can also make
copies with a margin added to the top, bottom, left, or right. When
making 2 sided prints, you can set the shift positions for both Side
1 and Side 2.
NOTE: When Mixed Size Originals is set, the position is shifted
in reference to the position of the image of the first shee t of the
document.
2. Copy
The image shift amount is set in accordance with the
paper . Even if you set copies to be enlarged or reduced in
Reduce/Enlarge, the image shift amount is not affected.
1. On the All Services screen, select Copy, then the Scan
Options tab. From the Scan Options screen that appears,
select Image Shift.
2. Select any item.
3. Select Save to save the changes.
Xerox 4595 Copier/Printer User Guide
2-41
Page 68

2. Copy
No Shift
Copies are made without the position of the document image
being shifted.
Auto Center
Copies are made so that the center of the document matches the
center of the paper.
Image Shift/Variable Shift
You can set the margin amount within the range from 1.9 to 0 to
1.9 inches (50 to 0 to 50 mm) in 0.1 inch or 1 mm increments.
Side 1
Displays the Image Shift - Side 1 screen.
Side 2
Displays the Image Shift - Side 2 screen.
M ir r or Shift
When copying with the same setting as Side 1, Check Mirror Shift.
Original Orientation
Refer to “Original Orientation” on page 2-47.
Image Shift - Side 1/Image Shift - Side 2 Screen
You can set the copy position/image shift of Side 1 or Side 2.
1. On the All Services screen, select Copy, then the Scan
Options tab. From the Scan Options screen that appears,
select Image Shift and then Side 1 or Side 2.
2. Select an item.
2-42
Xerox 4595 Copier/Printer User Guide
Page 69

2. Copy
3. Select Save to save the changes.
No Shift
Copies are made without the position of the document image
being shifted.
Auto Center
Copies are made so that the center of the document matches the
center of the paper.
Corner Shift
Copies are made with the document image shifted to the edges or
corners of the paper. You can select from eight shift directions.
• Right-and-left minor adjustment
You can make a few minor adjustments left and right. The
document is copied with its image shifted to the left or right
within a range of 1.9 to 0 to 1.9 inches (50 to 0 to 50 mm)
in 0.1 inch or 1 mm increments.
• Top-and-bottom minor adjustment
You can make a few minor adjustments up and down. The
document is copied with its image shifted to the top or
bottom within a range of 0 to 1.9 inches (0 to 50 mm) in 0.1
inch or 1 mm increments.
Variable Shift
Enter the margin values for copying. Set the top, bottom, left, and
right values within the range from 0 to 1.9 inches (0 to 50 mm) in
0.1 inch or 1 mm increments.
Xerox 4595 Copier/Printer User Guide
2-43
Page 70

2. Copy
Image Rotation
If the orientation of the paper currently loaded in the tray differs
from that of the document that is loaded, the machine
automatically rotates the document image to make copies with the
document and paper orientations matched. You can also select
which edge of the original document to use as a reference for
image rotation if documents are of mixed orientations.
The image rotation feature can only be used to make copies to
paper of A4 and 8.5 × 11 inches or smaller.
1. On the All Services screen, select Copy, then the Scan
Options tab. From the Scan Options screen that appears,
select Image Rotation.
2. Select an item.
3. Select Save to save the changes.
Off
Copies of documents are made as they are even if the orientation
of the document differs from that of the paper.
Always On
Copies are made with the document image automatically rotated
so that the orientation of the document matches that of the paper.
On during Auto
Copies are made with the document image automatically rotated
so that the orientation of the document matches that of the paper
when Auto% or Reduce/Enlarge or Auto on Paper Supply is
selected.
Rotation Direction
Displays the Image Rotation - Rotation Direction screen.
2-44
Xerox 4595 Copier/Printer User Guide
Page 71

2. Copy
Image Rotation - Rotation Direction Screen
You can set the reference position for rotation.
1. On the All Services screen, select Copy, then the Scan
Options tab. From the Scan Options screen that appears,
select Image Rotation and then Rotation Direction.
2. Select a rotation reference position.
3. Select Save to save the changes.
Staple Position
When the finisher is installed, Staple Position is displayed.
If documents are of mixed orientations, images will be rotated to
match the stapling edge based on the staple feature settings.
Portrait Original - Left Edge
If documents are of mixed orientations, images will be rotated so
that the top edge of a landscape document is aligned with the left
edge of a portrait document.
Portrait Original - Right Edge
If documents are of mixed orientations, the image will be rotated
so that the top edge of a landscape document is aligned with the
right edge of a portrait document.
Xerox 4595 Copier/Printer User Guide
2-45
Page 72

2. Copy
Mirror Image/Negative Image
Copies can be made with the left and right sides of the document
image reversed.
NOTE: When Negative Image and Edge Erase are set
simultaneously, the edge erase area turns to white.
1. On the All Services screen, select Copy, then the Scan
Options tab. From the Scan Options screen that appears,
select Mirror Image/Negative Image.
2. Select On for Mirror Image and Negative Image.
3. Select Save to save the changes.
2-46
Xerox 4595 Copier/Printer User Guide
Page 73

Original Orientation
The document orientation needs to be set to indicate the top of the
document.
NOTE: If the Original Orientation differs from the actual
document orientation, then th e machine may mistakenly detect the
head of the document.
1. On the All Services screen, select Copy, then the Scan
Options tab. From the Scan Options screen that appears,
select Original Orientation.
2. Select Head to Top or Head to Left in accordance with the
orientation that the document is loaded.
2. Copy
3. Select Save to save the changes.
Head to Top
Select this item when placing the top of the document facing the
inner side of the document glass or document feeder.
Head to Left
Select this item when placing the top of the document facing the
left side of the document glass or document feeder. Be sure to
select Head to Lef t when the top of the document is placed facing
the left side (horizontal text).
Xerox 4595 Copier/Printer User Guide
2-47
Page 74

2. Copy
Output Format tab
On the Output Format screen, you can configure features for
scanning documents.
1. On the All Services screen, select Copy.
2. Select the Output Format tab and then select a feature on
the Output Format screen that appears.
2-48
Xerox 4595 Copier/Printer User Guide
Page 75

Booklet Creation
The machine can copy pages laid out so as when multiple-page
sheets are overlaid and folded along the center (gutter), a booklet
is created in page order. You can also set the gutter and attach a
cover when making booklets.
When the booklet finisher D or D2 is installed, Bi-Fold or
Bi-Fold + Stapling can be made.
KEY POINT: Confirm that the orientation of the document and the
Original Orientation setting of the Scan Options screen are the
same.
NOTE: If the number of pages in the booklet is not a multiple of
four, the remaining pages will be output as blank pages.
1. On the All Services screen, select Copy. Select the Output
Format tab and then select Booklet Creation.
2. Copy
2. Select Left Bind/Top Bind or Right Bind.
3. Select Save to keep your choices.
Off
Booklet Creation is not applied to copies.
Left Bind/Top Bind
Copies are made to enable left binding or top binding.
Right Bind
Copies are made to enable right binding.
Xerox 4595 Copier/Printer User Guide
2-49
Page 76

2. Copy
Copy Booklet
If you wish to make booklets from an original that is already a
booklet, select Copy Booklet. The original will be scanned as is
by specifying Bi-fold/Stapling without having to specify Booklet
Imposition.
Covers
You can attach a cover to a booklet. Selections for covers are as
follows:
•No Covers
No cover is added.
• Blank Covers
A blank sheet of paper is attached as the cover.
• Printed Covers - 2 Sided
The document is copied to the cover from the first page.
• Printed Covers - Print Outside
The document is copied to only the outside of the cover.
Last Original as Back Cover
Pastes the final image to the last page of the booklet as Back
Cover. Check when specifying the last page as the back cover.
When using Subsets to divide a booklet, final image is pasted to
the last page of the last division set.
NOTE: A blank page may be inserted just before the last page to
ensure correct pagination.
Gutter
Displays the Booklet Creation - Gutter screen.
Finishing
Displays the Booklet Creation - Finishing screen.
Paper Tray Settings
Displays the Booklet Creation - Paper Tray Settings screen.
NOTE: This only displays when Covers is selected.
Select the paper tray from Cover Tray and Text Tray. Select trays
with paper of the same size and orientation for the text and the
cover.
2-50
When Bypass is selected, the Tray 5 (Bypass) screen appears.
For more information, refer to “Tray 5 (Bypass) Screen” on
page 2-21.
Xerox 4595 Copier/Printer User Guide
Page 77

2. Copy
Booklet Creation - Gutter Screen
You can set the gutter within the range from 0 to 1.9 inches
(0 to 50 mm) in 0.1 inch or 1 mm increments.
1. Use the up and down buttons to specify a gutter value.
Booklet Creation - Finishing screen.
When the booklet finisher D or D2 is installed, Bi-Fold or Bi-Fold +
Stapling can be made.
1. Select any item.
Off
No Finishing is carried out.
Folding
Output copies are folded in half.
Folding + Stapling
The copies are folded in half and stapled at the center. The
number of copies that can be stapled is from 2 to 15.
Xerox 4595 Copier/Printer User Guide
2-51
Page 78

2. Copy
Booklet Creation - Subsets screen
A booklet is divided by the number of sheets specified when there
are many pages in a document. It can copy so that the resulting 2sided copies can be folded to become a booklet. You can set the
number of sheets in the range from 1 to 50 sheets in 1 sheet
increments
.
NOTE: When specifying Fold, set the dividing number of s heets in
the range from 1 to 15.
When there is a large number of sheets, the number of sheets can
be divided so that booklet does not become thick.
Copies are assigned and discharged in order by specified number
of sheets. You can set the number of sheets (number of division)
in the range from 1 to 50 sheets.
For example, if the number of sheets (the number of division) is
set as "5" in order to use one sheet (side 1/ side 2) of paper with
four documents when creating a booklet, a document will be
assigned per 20 sheets.
1. From the Booklet Creation screen, select On or Off.
2. If you select On, use up/down buttons or the numeric
keypad to specify the number of sheets.
3. Select Save to keep your changes.
2-52
Xerox 4595 Copier/Printer User Guide
Page 79

Covers
2. Copy
You can make copies with a cover attached.
The front and back cover can be output before the first page of the
document on a different type of paper (for example, colored paper
or heavyweight paper).
KEY POINT: When you select this feature, if the number of the
document pages exceeds the maximum that the machine can
scan, the portion of the document already scanned cannot be
printed, copied, or saved. In this case, cancel the job following the
message that is displayed.
The maximum number of the document pages that can be
scanned is 2,000 pages per job. For multiple jobs, the maximum is
about 20,000 pages altogether if the document size is A4 or Letter.
This figure should only be used as a guide, since the maximum
number of the document pages the machine can scan depends on
the types, sizes and direction of the document.
1. On the All Services screen, select Copy. Select the Output
Format tab and then select Covers.
2. Select any item.
3. Select Save to keep your changes.
Front Cover
Setting front cover for the first page can be done.
•No Covers
A cover is not attached.
• Blank Covers
• Printed Front Cover - Side 1
• Printed Front Cover - Side 2
Xerox 4595 Copier/Printer User Guide
A blank sheet of paper is attached as the cover.
The document is copied on the external sides of front
cover from the first page. Select when you want to copy on
only the external side of the front cover.
2-53
Page 80

2. Copy
The document is copied on the internal sides of front cover
from the first page. Select when you want to copy on only
the internal side of the front cover.
• Printed Front Cover - 2 Sided
The document is copied to the both sides of cover from the
first page. Select when you want to copy on both sides.
Back Cover
Setting back cover for the last page can be made. When attaching
a back cover, you need to scan a document corresponding to the
back cover first. When using Automatic Document Feeder, place a
document corresponding to the back cover on the top of a
document stack. When using document glass, scan in order of the
Back Cover document, Front Cover document, Body Text.
Selections for Back Cover are as follows:
•No Covers
A cover is not attached.
• Blank Covers
A blank sheet of paper is attached as the cover.
• Printed Back Cover - Side 1
Copies one document applicable to a back cover on the
external side of the back cover.
• Printed Back Cover - Side 2
Copies one document applicable to a back cover on the
internal side of the back cover.
• Printed Back Covers - 2 Sided
Copies two documents applicable to a back cover on the
both sides of the back cover.
If a cover selection is made, then the following options appear:
Paper Tray Settings
Displays the Covers - Paper Tray Settings screen.
Select the paper tray to use from Front Cover, Back Cover and
Body Pages. When pasting image to the cover, select trays with
paper of the same size and orientation for the text and the cover.
When Bypass… is selected, the Tray 5 (Bypass) screen
appears. For more information, refer to “Tray 5 (Bypass) Screen”
on page 2-21.
2-54
Front Cover Quantity
Displays the Cover - Front Cover Quantity screen. Select only
when specifying Blank Cover under the Front Cover screen.
Back Cover Quantity
Xerox 4595 Copier/Printer User Guide
Page 81

2. Copy
Displays the Cover - Back Cover Quantity screen. Select only
when specifying Blank Cover under the Back Cover screen.
For more information, refer to“Covers - Front/Back Cover
Quantity” on page 2-55.
Covers - Front/Back Cover Quantit y
You can specify the number of cover sheets used for front cover in
the range between 1 and 99 for insertion. Prints the front cover
equally as the body text, even if multiple number of copies are
made.
NOTE: These instructions also work for Covers - Back Cover
Quantity.
1. Use the up/down buttons or the numeric keypad to specify the
number of cover sheets that are loaded.
Xerox 4595 Copier/Printer User Guide
2-55
Page 82

2. Copy
Transparency Separators
A blank sheet can be output and be inserted as a separator
between copied transparencies. At the same time, only the
required number of copies for distribution is printed. When loading
transparencies in Tray 5 (Bypass Tray), make sure that the paper
for the separators (or for distribution) is loaded at the same
orientation as that of the transparencies.
KEY POINT: Xerox recommends OHP film. Use of films not
recommended by Xerox may cause machine breakdown or paper
jams.
1. On the All Services screen, select Copy. Select the Output
Format tab and then select Transparency Separators.
2. Select any item.
3. Select Save to keep your changes.
No Separators
Transparency separators are not used.
Blank Separators
A blank sheet of paper is inserted as a separator each time a
transparency is copied. Only one set of copies can be made.
Blank Separators + N Sets
A blank sheet of paper is inserted as a separator each time a
transparency is copied. At the same time, only the required
number of copies for distribution is printed.
2-56
Xerox 4595 Copier/Printer User Guide
Page 83

No Separators + N Sets
Copies are made on transparencies and only the required number
of copies for distribution is printed.
Depending on your selection, the following options may appear:
Paper Tray Settings
Displays the Transparency Sep arators - Paper T ray Set tings
screen. Select each paper tray to use.
NOTE: Transparency Separators - Paper Tray Settings screen
will not display if No Separators is selected.
From Transparency size/orientation, select transparency size
and orientation. From Separators/N sets Tray or N sets Tray,
select the tray to be used. Select trays with paper of the same size
and orientation for the transparency and the separators
(N Sets).
Multiple-Up
2. Copy
Two, four, or eight sheets of original documents can be copied
together onto a single sheet of paper.
When you select Multiple Up, Auto% or Reduce/Enlarge is
selected automatically. The machine automatically sets the copy
ratio and makes copies of the images so that they fit on the
selected paper.
NOTE: Image loss may occur depending on the image size of the
document.
When Border Erase is set, border erase is executed for
each document copied to the whole document.
When Image Shift is set, shift is executed on the whole
document. For this reason, image loss may occur
depending on the document image size of the document.
Select the other than Auto for the paper tray of Paper
Supply on the Basic Copying screen.
Xerox 4595 Copier/Printer User Guide
2-57
Page 84

2. Copy
1. On the All Services screen, select Copy. Select the Output
Format tab and then select Multiple-Up.
2. Select any item.
3. Select Save to keep your changes.
1 Up
Multiple Up is not applied.
2 Up
Two document sheets can be copied together onto a single sheet
of paper.
4 Up
Four document sheets can be copied together onto a single sheet
of paper.
8 Up
Eight document sheets can be copied together onto a single sheet
of paper.
Image Order
You can select the layout for copying the documents together.
2-58
Xerox 4595 Copier/Printer User Guide
Page 85

Poster
2. Copy
An enlarged copy of an document can be made to spread over
multiple sheets.
This feature allows you to create a large poster by pasting
together the copies spread over multiple sheets. Copied sheets
are provided with a paste margin so that they can be pasted
together. This paste margin is fixed to 0.4 inches (10 mm).
KEY POINT: Confirm that the orientation of the document and the
Original Orientation setting of the Scan Options screen are the
same.
1. On the All Services screen, select Copy. Select the Output
Format tab and then select Poster.
2. Select any item.
3. Select Save to keep your changes
Off
Poster is not applied to copies.
Output Size
You can select from seven paper sizes.
Enlargement%
You can select enlargement by percentage.
Depending on your selection, the following options may appear:
Paper Tray Settings
Displays the Poster - Paper Tray Settings screen. Select the
paper tray to use.
When Bypass is selected, the Tray 5 (Bypass) screen appears.
For more information, refer to “Tray 5 (Bypass) Screen” on
page 2-21.
Xerox 4595 Copier/Printer User Guide
2-59
Page 86

2. Copy
When Enlargement% is Selected
You can specify a different ratio for the height and width.
1. From the Poster screen, select Enlargement%.
2. Use the up/down buttons to specify the height and width
ratios.
3. Select Save to keep your selection.
X (width) Y (height)
Set the height and width ratios within the range from 100 to 400%
in 1% increments.
Repeat Image
An document image can be copied on one sheet of paper
repeatedly for a specified number of times.
When the copy ratio is set to Auto, the repeated copies of the
image are reduced to fit on the selected paper. You can also
specify how the repeated copies of the image are arranged.
NOTE: When making repeat copies at the same size as the
document image, specify a number of repeats that wil l fi t on the
paper.
2-60
Xerox 4595 Copier/Printer User Guide
Page 87

2. Copy
1. On the All Services screen, select Copy. Select the Output
Format tab and then select Repeat Image.
2. Select Auto Repeat or Variable Repeat.
Off: Repeat Image is not applied.
Auto Repeat
The machine automatically sets the number of copies according to
the document size, paper size, and copy ratio, and then
repeatedly copies the document image onto the paper.
NOTE: Copies cannot be made when the document image is
larger than the specified paper size.
Variable Repeat
Specify the number of times to repeatedly copy the document
image along each of the long and short sides of the paper. You
can specify from 1 to 23 repeats along the long side (Y) and from
1 to 33 repeats along the short side (X).
Image Layout
• Evenly Spaced
Images are copied on the paper with the paper evenly
divided up by the repeated number of images.
• Side by side
The repeat images are copied to the paper consecutively.
Xerox 4595 Copier/Printer User Guide
2-61
Page 88

2. Copy
Annotation
You can add a stamp, date, and page number not included on the
document to copy paper when outputting copies.
You can select from already provided formats for the stamp type,
date, page number, and printing position.
KEY POINT: When you select this feature, if the number of the
document pages exceeds the maximum that the machine can
scan, the portion of the document already scanned cannot be
printed, copied, or saved. In this case, cancel the job following the
message that is displayed.
The maximum number of the document pages that can be
scanned is 2,000 pages per job. For multiple jobs, the maximum is
about 20,000 pages altogether if the document size is 8.5 x 11 in./
A4 landscape. This figure should only be used as a guide, since
the maximum number of the document pages the machine can
scan depends on the types, sizes and direction of the document.
NOTE: The annotation image and character size is not changed
even if you set the enlarge/reduce setting.
If a stamp, date, and page are specified at the same time,
we recommend confirming that none of the positions
overlap before making copies.
If Multiple-Up is set, the annotation is added to the
combined image.
If Repeat Image or Booklet Creation is set, the
annotation is added to each individual image.
1. On the All Services screen, select Copy. Select the Output
Format tab and then select Annotation.
2. Select any item
2-62
Xerox 4595 Copier/Printer User Guide
Page 89

2. Copy
3. Select Save to keep your choices.
Stamp
Displays the Annotation - Stamp screen.
Date
Displays the Annotation - Stamp screen.
Page Number
Displays the Annotation - Page Number screen.
Annotation - Stamp Screen
You can add the "CONFIDENTIAL," "Copy Prohibited,"
"URGENT," "IMPORTANT," "Circulation," "Side 2 Recycled,"
"DRAFT," and "VOID" stamps to copies.
1. On the Annotation screen, select Stamp.
2. Make a selection.
3. Select Save to keep your choices.
Off
No stamp is added.
On
A stamp is added.
Text
You can select from eight character types for the stamp.
Print On
Displays the Annotation - Stamp - Print On screen.
You can select the page(s) to print the stamp from First Page
Only and All Pages.
Xerox 4595 Copier/Printer User Guide
2-63
Page 90

2. Copy
Position
Displays the Annotation - Stamp - Position screen.
Size
Displays the Annotation - Stamp - Size screen.
You can select from three sizes for the stamp.
Annotation - Stamp - Position screen
You can set a position to print a stamp.
1. From the Output Format tab, select Annotation, St amp, On,
and then Position.
2. Make a selection.
3. Select Save to keep your choices.
Side 1
Select from any of the nine positions for the stamp.
Side 2
• Same as Side 1
Add the stamp to the same location as the Side 1.
• Opposite to Side 1
Add the stamp to the opposite location as the Side 1.
2-64
Xerox 4595 Copier/Printer User Guide
Page 91

2. Copy
Annotation - Date Screen
You can make copies with a date added. The printed date is the
date and time that the copy was made.
For information about the date display format, refer to "Date
Format" in the System Administration Guide.
1. From the Output Format tab, select Annotation and then
select Date.
2. Make a selection.
3. Select Save to keep your choices.
Off
No date is added.
On
A date is added.
P ri n t O n .. .
Displays the Annotation - Date - Print On screen.
You can select the page(s) to print the date from First Page Only
and All Pages.
Position
Displays the Annotation - Date - Position screen.
Size
Displays the Annotation - Stamp - Size screen.
You can select from three sizes for the date.
Xerox 4595 Copier/Printer User Guide
2-65
Page 92

2. Copy
Annotation - Date - Position screen
You can set a position to print a date.
1. From the Output Format tab, select Annotation. select Date
and then select Position.
2. Make a selection.
3. Select Save to keep your choices.
Side 1
You can select from six positions for printing the date.
Side 2
• Same as Side 1
Add the date to the same location as Side 1.
• Opposite to Side 1
Add the date to the symmetry location as compared to
Side 1.
2-66
Xerox 4595 Copier/Printer User Guide
Page 93

2. Copy
Annotation - Page Number Screen
You can add a page number to copies.
1. From the Output Format tab, select Annotation and then
select Page Number.
2. Make a selection.
3. Select Save to keep your choices.
Off
No page number is added.
On
A page number is added.
Style
You can select from the 6 numbers for the page.
• 1,2,...
Only page number is added.
• -1-,-2-,...
A hyphen is added to the left and right of the page number.
(Example: -1-)
• Page1, Page2,...
"Page" is added in front of the page number. (Example:
Page1, Page2)
• 1/N,2/N,...
Xerox 4595 Copier/Printer User Guide
The total number of pages is added to the right side of the
page number. (Example: 1/50, 2/50)
2-67
Page 94

2. Copy
• -1/N-,-2/N-,...
Put total page number beside the right of page number and
hyphen the right and left of the page and total page
number. (Example: -1/50, -2/50-)
• Page1/N, Page2/N,...
"Page" is added in front of the page number and the total
number of pages is added to the right side of the page
number. (Example: Page1/50, Page2/50)
Total Pages (N)
Annotation - Page Number -Total Page (N) screen appears.
Print On
Displays the Annotation - Page Number - Page On screen.
Position
Displays the Annotation - Page Number - Position screen.
You can select from six positions for the page number.
Size
Displays the Annotation - Page Number - Size screen.
Annotation - Page Number -Total Pages (N) Screen
You can set the total page number.
1. From the Output Format tab, select Annotation and then
Page Number. Select Total Pages (N) and then select Auto
or Enter Number.
2-68
2. If you selected Enter Number, use the up/down buttons or
the numeric keypad to specify number of sheets.
Xerox 4595 Copier/Printer User Guide
Page 95

2. Copy
3. Select Save to keep your choices.
Auto
The number of pages of the document is automatically counted as
the total number of pages.
Enter Number
You can specify the total number of pages within the range from 1
to 9999.
Annotation - Page Number - Print On Screen
You can specify the page(s) to add a page number.
1. From the Output Format tab, select Annotation. Select Page
Number and then select Print On.
2. Use the up/down buttons or numeric keypad to specify the
start number.
3. Select Save to keep your choices.
All Pages
A page number is added to all pages.
Enter Start Page Number
Refer to “When Enter Start Page Number is Selected” on page 2-
70.
Enter End Page Number
Enter an end page number. The procedure to enter an end page
number is the same as “When Enter Start Page Number is
Selected” on page 2-70.
Enter Start and End Page Number
Enter a start and an end page number. The procedure to enter
these numbers is the same as “When Enter Start Page Number is
Selected” on page 2-70.
Xerox 4595 Copier/Printer User Guide
2-69
Page 96

2. Copy
Include Covers/Separators
Select to include a cover or separators. A check mark appears to
verify your choice.
NOTE: You cannot make copies on the paper
(Covers/Transparency Separators) loaded in the tray 8 (PostProcess Inserter).
Start Number
Specify the start page for adding page numbers within the range
from 1 to 999. To enter the number with the numeric keypad,
select Enter Number Using Keypad and then enter the number.
KEY POINT: Page numbers after 9999 will not be printed.
When Enter Start Page Number is Selected
You can specify the start page for adding page numbers within the
range from 1 to 9999.
1. From the Output Format tab, select Annotation. Select Page
Number, Print On and then select Enter Sta rt Page Number
2. Use the up/down buttons or select Enter Number Using
Keypad to specify the start page and start number.
3. Select Save to keep your choices.
Start Page
You can specify the start page for adding page numbers within the
range from 1 to 9999.
Start Number
2-70
Specify the start page for adding page numbers within the range
from 1 to 9999.
KEY POINT: Page numbers after 9999 will not be printed.
Xerox 4595 Copier/Printer User Guide
Page 97

2. Copy
When Enter End Page Number is Selected
You can specify the end page for adding page numbers within the
range from 1 to 9999.
1. From the Output Format tab, select Annotation. Select Page
Number, Print On and then select Enter End Page Number
2. Use the up/down buttons or select Enter Number Using
Keypad to specify the end page and start number.
3. Select Save to keep your choices.
End Page
You can specify the end page for adding page numbers within the
range from 1 to 9999.
Start Number
Specify the start page for adding page numbers within the range
from 1 to 9999.
KEY POINT: Page numbers after 9999 will not be printed.
Xerox 4595 Copier/Printer User Guide
2-71
Page 98

2. Copy
When Enter Start and End Page Number is Selected
You can specify the start page and end page for adding page
numbers within the range from 1 to 9999.
1. From the Output Format tab, select Annotation. Select Page
Number, Print On and then select Enter St ar t and End Page
Number
2. Use the up/down buttons or select Enter Number Using
Keypad to specify the start and end page and start number.
3. Select Save to keep your choices.
Start Page
You can specify the start page for adding page numbers within the
range from 1 to 9999.
End Page
You can specify the end page for adding page numbers within the
range from 1 to 9999.
Start Number
Specify the start page for adding page numbers within the range
from 1 to 9999.
KEY POINT: Page numbers after 9999 will not be printed.
2-72
Xerox 4595 Copier/Printer User Guide
Page 99

Watermark
You can lightly print a sequential control number on the
background of each copy set. For example, if you set "1" for the
start number, "1" is printed on all pages of the first copy set and "2"
is printed on all pages of the second set.
To prevent, for instance, the duplication of confidential documents
for distribution at conferences, you can use sequential numbering
to associate distribution copies to people.
KEY POINT: When you select this feature, if the number of the
document pages exceeds the maximum that the machine can
scan, the portion of the document already scanned cannot be
printed, copied, or saved. In this case, cancel the job following the
message that is displayed.
The maximum number of the document pages that can be
scanned is 2,000 pages per job. For multiple jobs, the maximum is
about 20,000 pages altogether if the document size is 8.5 x 11 in./
A4 and Letter. This figure should only be used as a guide, since
the maximum number of the document pages the machine can
scan depends on the types, sizes and direction of the document.
2. Copy
The font size or density printed by multiple control can be
configured in the system settings. For more information, refer to
the System Administration Guide.
1. From the Output Format tab, select Watermark.
2. Select On.
3. Select any item.
4. Select Save to keep your choices.
Off
Watermark is not applied to copies.
On
Watermark is applied to copies.
Xerox 4595 Copier/Printer User Guide
2-73
Page 100

2. Copy
Start Number
You can set a control number within the range from 1 to 9999.
When you put control number, use the up/down buttons or the
numeric keypad to enter the start number.
Text
Displays the Wate rmark - Text screen.
User Account Number
The user account number is printed. Check when printing the user
account number.
NOTE: Displays when using Auditron Administration.
Date and Time
You can print the date and time that copying started. Check when
printing the date.
For how to display the date, refer to "Date Format" in the System
Administration Guide.
Serial Number
The serial number of the machine is printed. Check when printing
the serial number.
Text Effect
Displays the Wate rmark - Text Effect screen.
2-74
Xerox 4595 Copier/Printer User Guide
 Loading...