

Page 1

The Xerox DocuPrint 4512
4512N Network Laser Printer
Setting Up Guide
/
Page 2

Xerox Corpo rat i on Xerox Cana da, L i mi ted
701 South Aviation Blv d. 5650 Yonge Str eet
El Segundo, CA North York, Ontario
90245 Canada
USA M2M 4G7
Americas Opera t ions Support Rank Xerox, L imi t ed
800 Long R idge Road Parkway
Stamford, CT Marlow
06904-160 0 Buckingha ms hire
USA SL7 1YL
United Kingdom
Copyright © 1995, 1996 Xerox Corporation. All Rights Reserved.
Copyright protection claimed includes all forms of matters of copyrightable materials and
information now allowed by statutory or judicial law or hereinafter granted, including
without limitation, material generated from the software programs which are displayed on
the screen such a s sty le s, t e mpla tes, i c on s, sc ree n d ispl ays , look s, et c.
XEROX®, The Document Compa n y®, the stylized X, DocuPrin t , an d 4512 are
trademarks of Xerox Corporation or its subsidiaries.
Adobe® and Po stSc r ipt ® a r e tr a de mar k s o f Ad obe Systems Incorporated.
MultiGray is a t ra demark of Xionics Document Technologies, Inc. TrueRes is a
trademark of DP -Tek. PCL, HP, and Lase r Jet are trademarks of He wl ett -P a ckard
Company. IBM is a trademark of International Business Machines Corporation.
Microsoft, Microsoft Windows, Microsoft Word, MS, and MS-DOS are trademarks of
Microsoft Corporation. Intellifont is a registered trademark of Miles, Inc. MicroType is a
trademark of Bayer Corporation, Agfa Division. Times, Univers, Helvetica, and Palatino
are trademarks of LINOTYPE-HELL AG and/or its subsidiaries. ITC A vant Garde, ITC
Bookman, ITC Z ap f C ha nce ry, and ITC Zapf Di n gb ats are registered tradem arks of
International Typeface Corporation. Arial and T i mes Ne w Roman are re gistered
trademarks o f t he M on otyp e Corporation PLC. WordPerfect i s a t r ad em ar k of
WordPerfect Corporation. Centronics is a trademark of Centronics Corporation.
Macintosh and TrueType are trademarks of Ap pl e C om pu te r, Incorporated. O nPage is a
trademark of Computer:applications, Inc. All other product names are trademarks/
tradenames of t h eir respective own er s.
PCL
emulation of the Hewlett-Packard PCL 5e command language, recognizes HP PCL 5e
commands, and processes these command s i n a m an ner comparable with
Hewlet t- P ackard LaserJet printer products.
and
PCL 5e
are trade mark s o f Hewlett-Packard Com pa n y. This printer c on t ai ns an
Notice
Specifications described in this publication are subject to change without notice. Use of
some features may be limited by your hardware or software configuration. Contact your
dealer , Xerox, or Rank Xer ox f o r details.
Page 3

Table of Contents
i
Overview
Selecting a Printer Location
Unpacking the Printer
Getting to Know the Printer
Assembling the Printer
Testing the Printer
Installing Printer Options
Connecting to the Host
Xerox Font Manager
Installing a Printer Driver
What to Do Next
................ ............................... ............................... .................
.........................................................................
........................................................................
.............................................................................
.................... ..... ..... ..... ...... ..... ..... ..... ..... .....
......................................................................
.........................................................................
.................... ..... ..... ..... ..... ..... ..... ...... ..... ..... ..... ..... .....
................ ............... ................ ............... ..
................................................................
................... ..................... .................... .....
2
3
4
5
6
12
13
14
16
17
19
Setting Up Guide ❖
1
Page 4

Setting Up the DocuPrint 4512/4512N
Overview
Setting up your Xerox DocuPrint 4512/4512N Network Laser Printer is
quite easy. It will likely take 10 to 30 minutes, depending on which
printer options you install. Follow all instructions in this guide to
complete printer setup.
1.
“Selecting a Printer Location”
2.
“Unpacking the Printer”
3.
“Getting to Know the Printer”
4.
“Assembling the Printer”
5.
“Testing the Printer”
6.
“Installing Printer Options”
7.
“Connecting to the Host”
8.
“Xerox Font Manager”
9.
“Installing a Printer Driver”
(page 12)
(page 16)
(page 3)
(page 4)
(page 5)
(page 6)
(page 13)
(page 14)
(page 17)
Setting Up Guide
2 ❖
Page 5
Setting Up the DocuPrint 4512/4512N
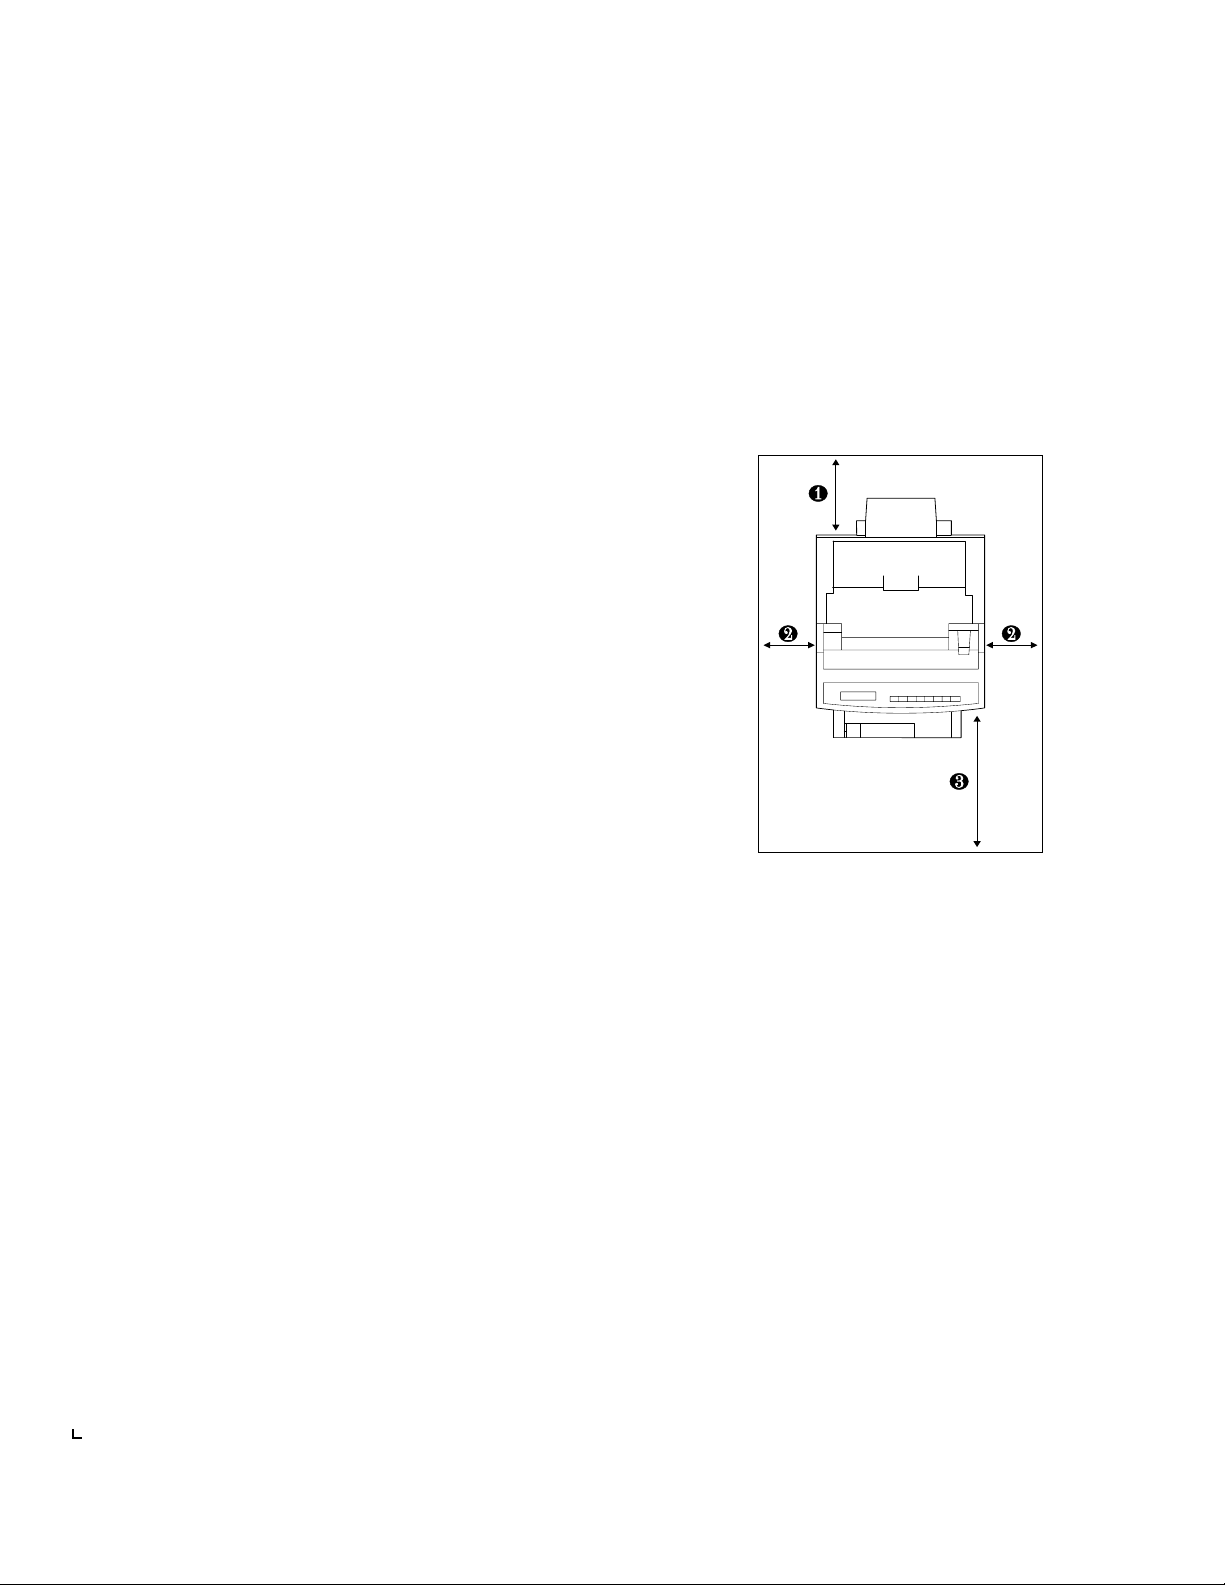
Selecting a
Printer
Location
Select a printer location that meets the minimum space requirem ent s
shown in Figure 1. Set the printer on a flat, stable surface away from
direct sunlight and electrical interference.
Figure 1 Minimum space
requirements around
the printer
Top View
8 in. (203 mm)
1
4 in. (102 mm)
2
20 in. (508 mm)
3
In selecting a location for the printer, you should also consider the
following:
• Is the Control Panel accessible for viewing and use?
• Is there enough clearance above and around the printer to replace
consumables?
• Is there enough clearance above the printer to add the optional High
Capacity Feeder? It adds 155 mm (6.5 in.) to the height of the
printer.
• Is there enough clearance around the printer to in stall options on the
controller board (accessed from the rear)?
• Is there enough clearance around the printer should it ever require
servicing? (If not, you may need to relocate the printer for
servicing.)
Setting Up Guide ❖
3
Page 6

Setting Up the DocuPrint 4512/4512N
Unpacking the
Printer
Power Cord
1
Photocon du ct or / Dr um
2
T o ner Cartridge
3
Tray Extension
4
Printer
5
Diskettes
6
User Documentation
7
Manual Feed Guide
8
Cleaning Felt
9
Unpack the printer from its box. Make sure that all of the parts, as
shown in Figure 2, are present. If they are not, contact your dealer or
Xerox/Rank Xerox.
Figure 2 Printer parts
Setting Up Guide
4 ❖
Keep all packing material should you ever need to repack and transport
the printer.
Note
Page 7
Setting Up the DocuPrint 4512/4512N
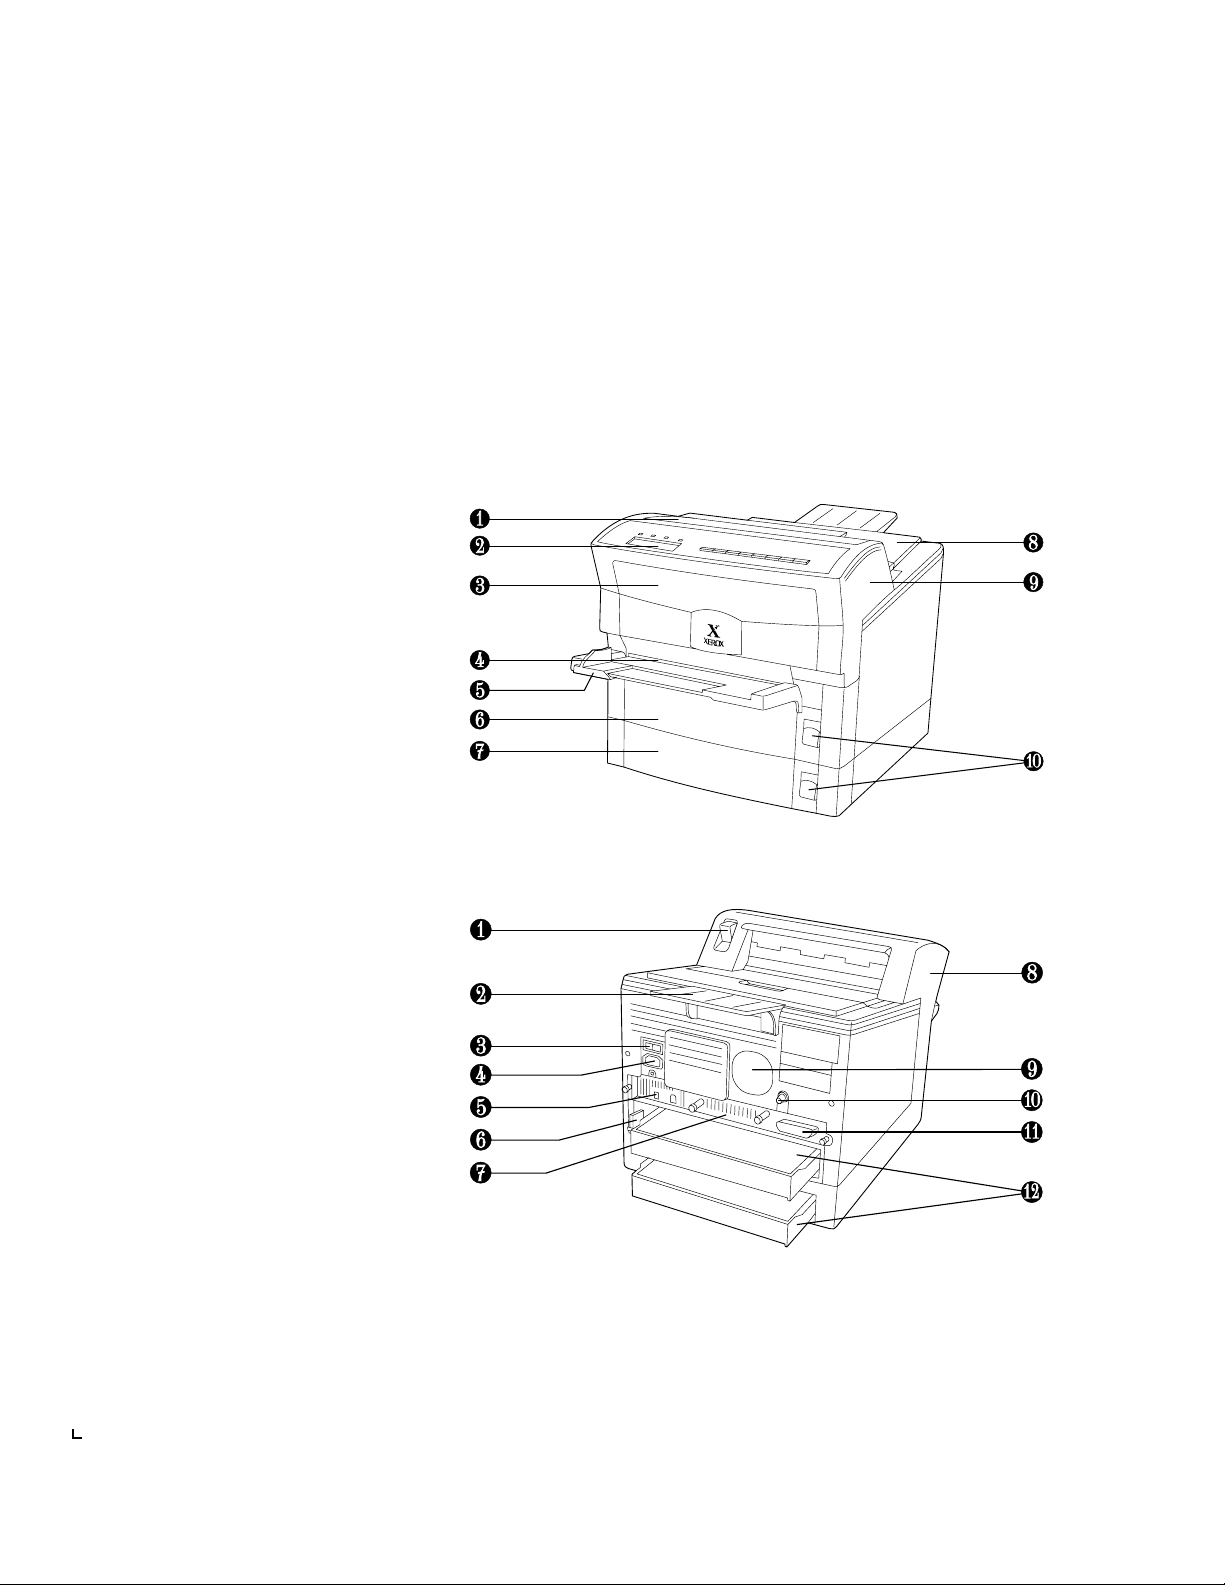
Getting to
Know the
Front View
Fuser Cover
1
Control Panel Display
2
Front Cover
3
Manual Feed Slot
4
Manual Feed Guide
5
Upper Paper Tray
6
Lower Paper Tra y
7
Paper Out put Tray
8
Top Cover
9
Tray Release Buttons
10
Printer
First, familiarize yourself with the major components identified in
Figure 3. Then continue with
Figure 3 Major printer components
“Assembling the Printer”
(page 6).
Rear View
Top Cover Release Lever
1
Tray Extension
2
Power Switch
3
Power Cord Connector
4
High Capacity Feeder
5
Connector
Corotron Cleaner
6
Controller Board
7
Top Cover
8
Cooling Fan Outlet
9
Print Density Adjuster
10
Parallel Interface
11
Paper Tra ys
12
Setting Up Guide ❖
5
Page 8
Setting Up the DocuPrint 4512/4512N
Assembling the
Printer
Caution
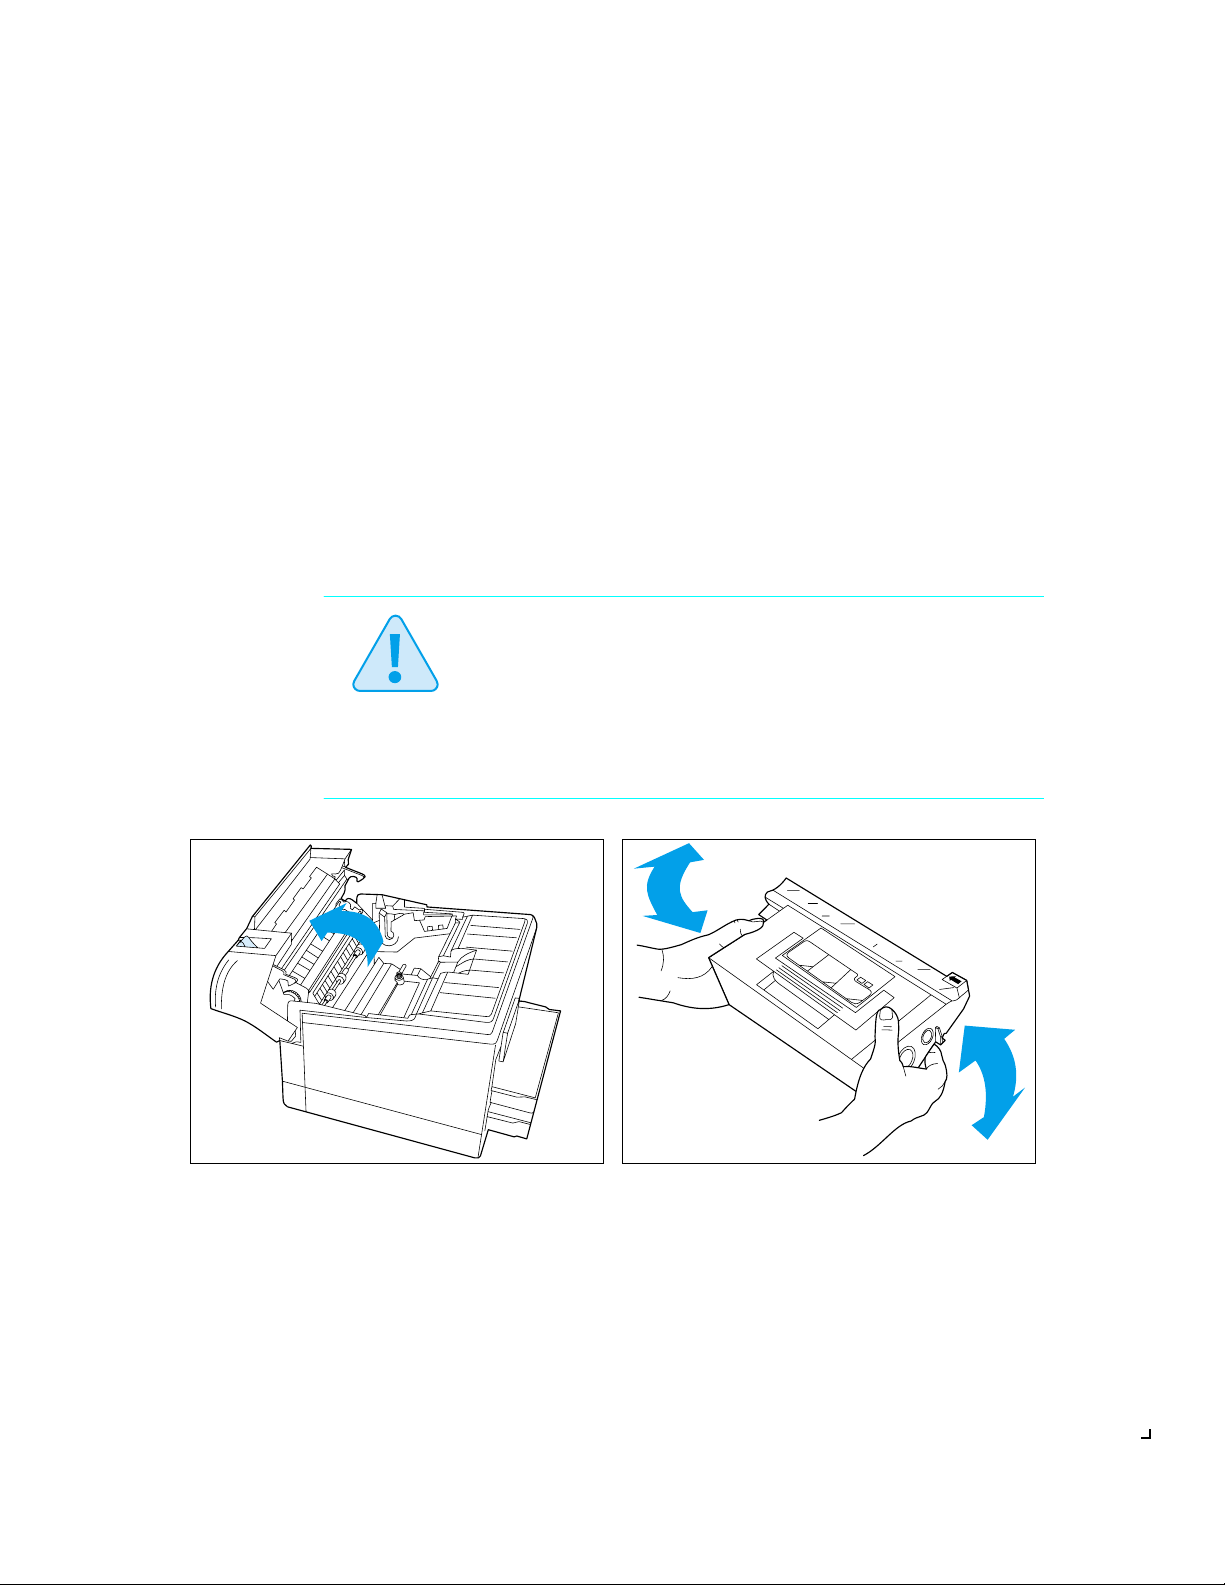
Assembling the printer is easily accomplished in just a few steps:
• Install the Toner Cartridge.
• Install the Photoconductor / Drum.
• Install the Cleaning Felt.
• Load the paper tray(s) with paper.
• Attach the Manual Feed Guide and the Tray Extension.
• Connect the power cord.
Follow the instructions below to assemble the printer.
Do not expose the Photoconductor / Drum to direct sunlight or
artificial light for more than 15 minutes. Overexposure will
permanently damage the photosensitive imaging drum.
Complete the Toner Cartridge and Photoconductor / Drum
installation within 15 minutes of removing them from their
packaging.
Open the top cover by pulling up on t he top
1
cover release lever and pivoting the cover
toward the front of the printer.
Setting Up Guide
6 ❖
Remove the Toner Cartridge from its wrap per
2
and shake it several times to evenly distribute
the toner.
Page 9
Assembling the Printer
Hold the Toner Cartridge by its handl e and
3
gently lower it into the printer.
The cartridge does not click into place.
The arrows on t he cartridge and printer
should line up.
Hold the Toner Cartridge in place and pull the
4
tab to remove the tape strip.
Setting Up Guide ❖
7
Page 10
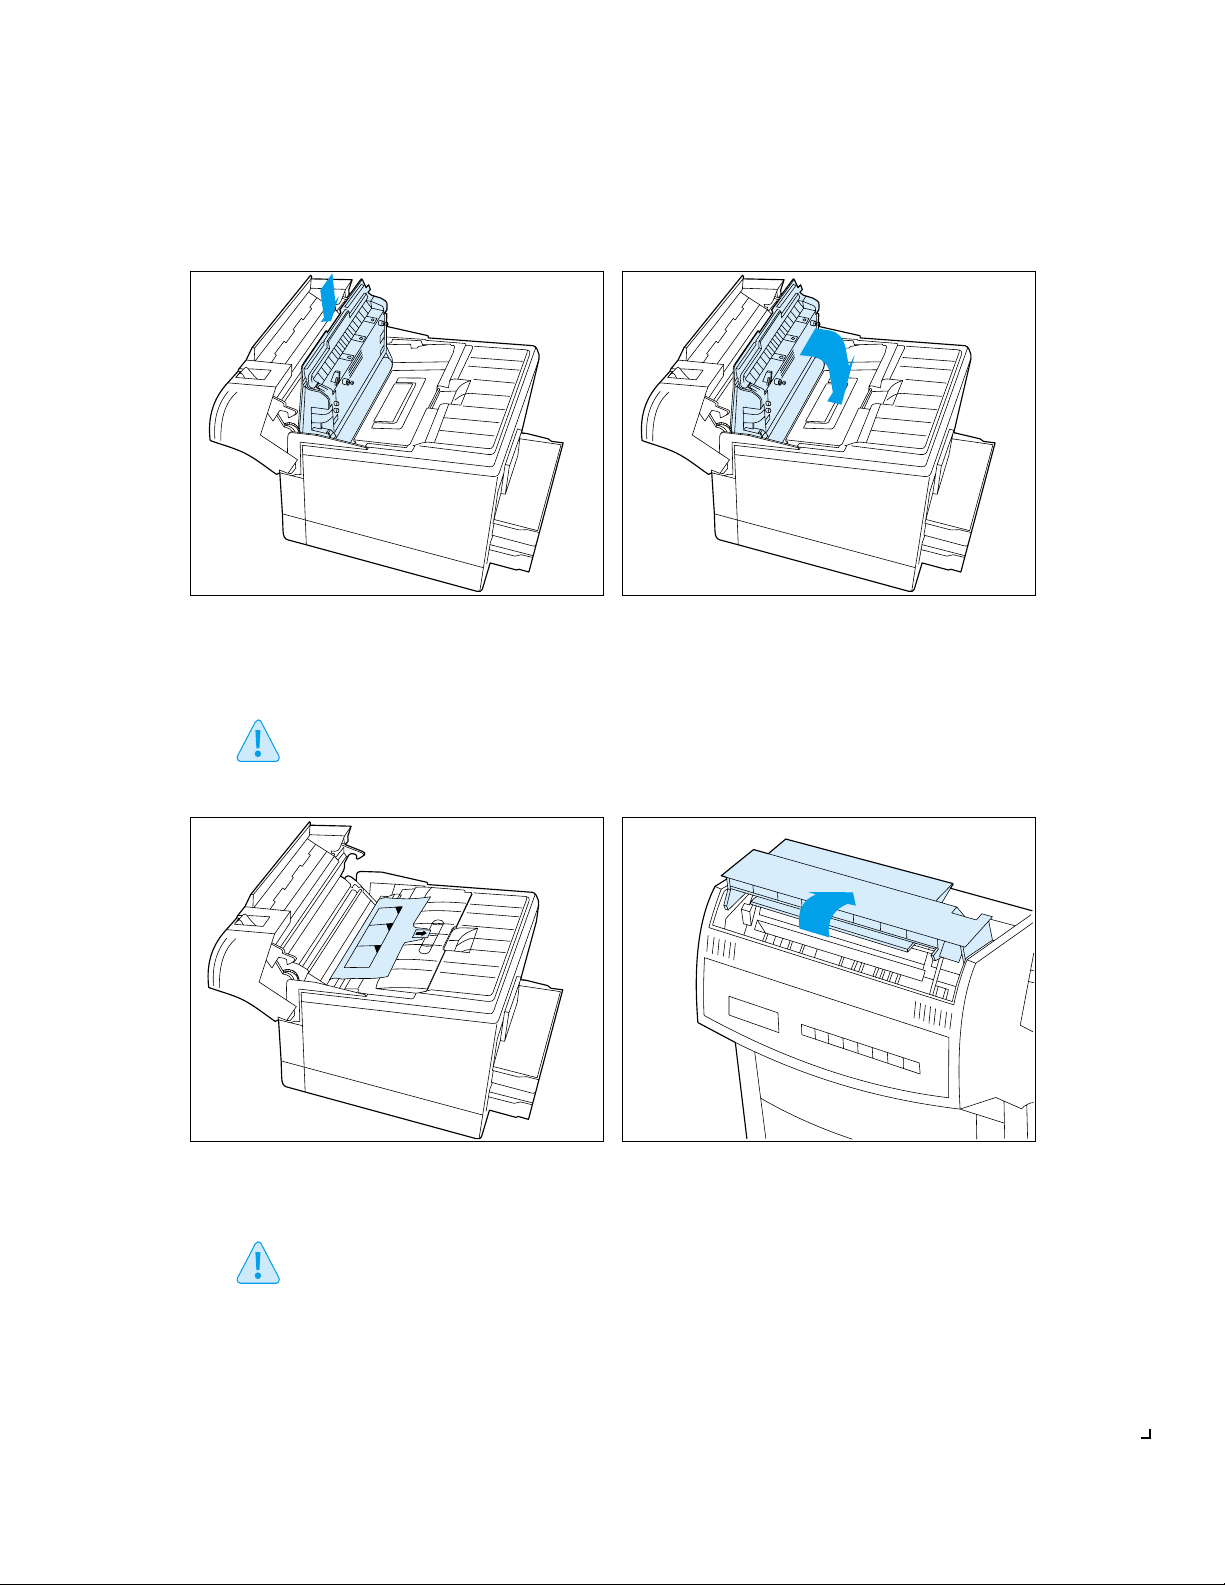
Assembling the Printer
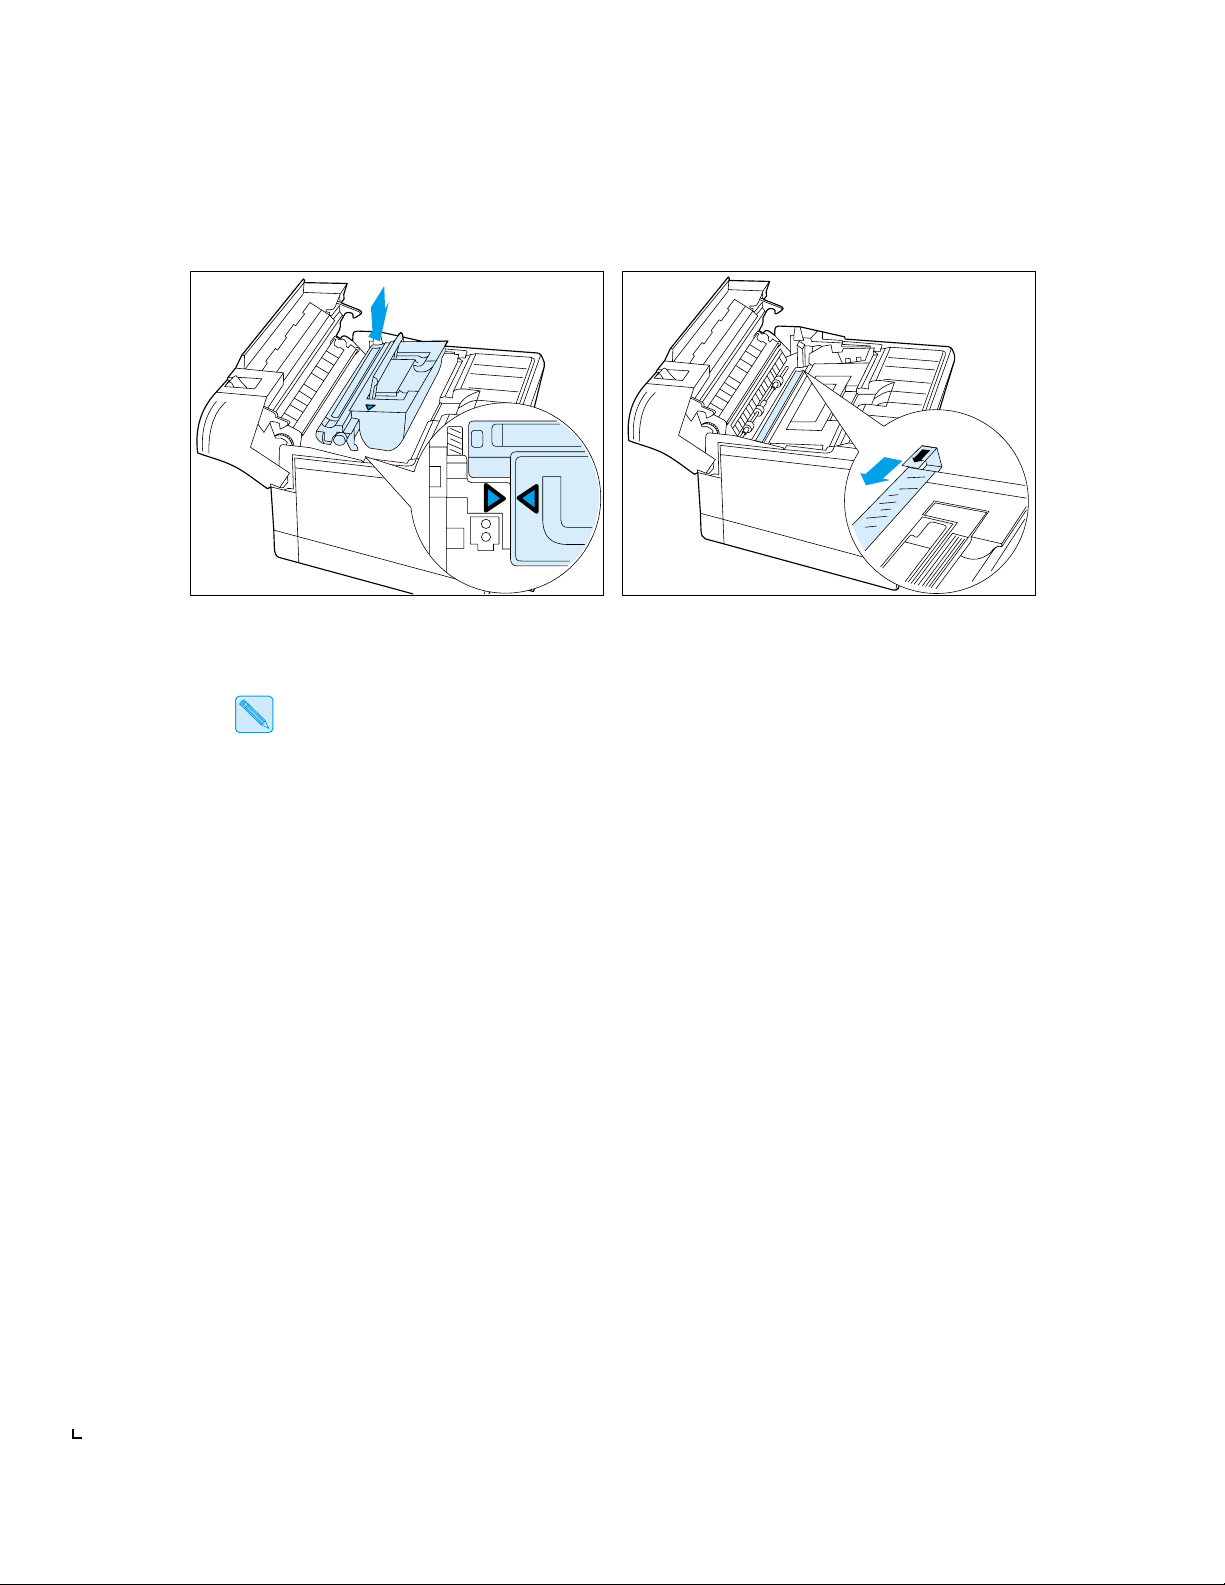
Remove the P hotoconductor / Drum from its
5
wrapper and insert it vertic ally into the slots
on the sides of the printer’s interior.
The photosensitive drum is ea s ily
damaged. Do not touch it or expose it to
direct light.
Carefully remove the sheet of black protective
7
paper from the Photoconductor / Drum.
Pivot the Photoconductor / Drum down toward
6
the back of the printer until it falls into place
horizontally.
Rotate the fuser cover to the rear.
8
Be sure not to leave any torn pieces of
paper in the printer.
Setting Up Guide
8 ❖
Page 11
Assembling the Printer
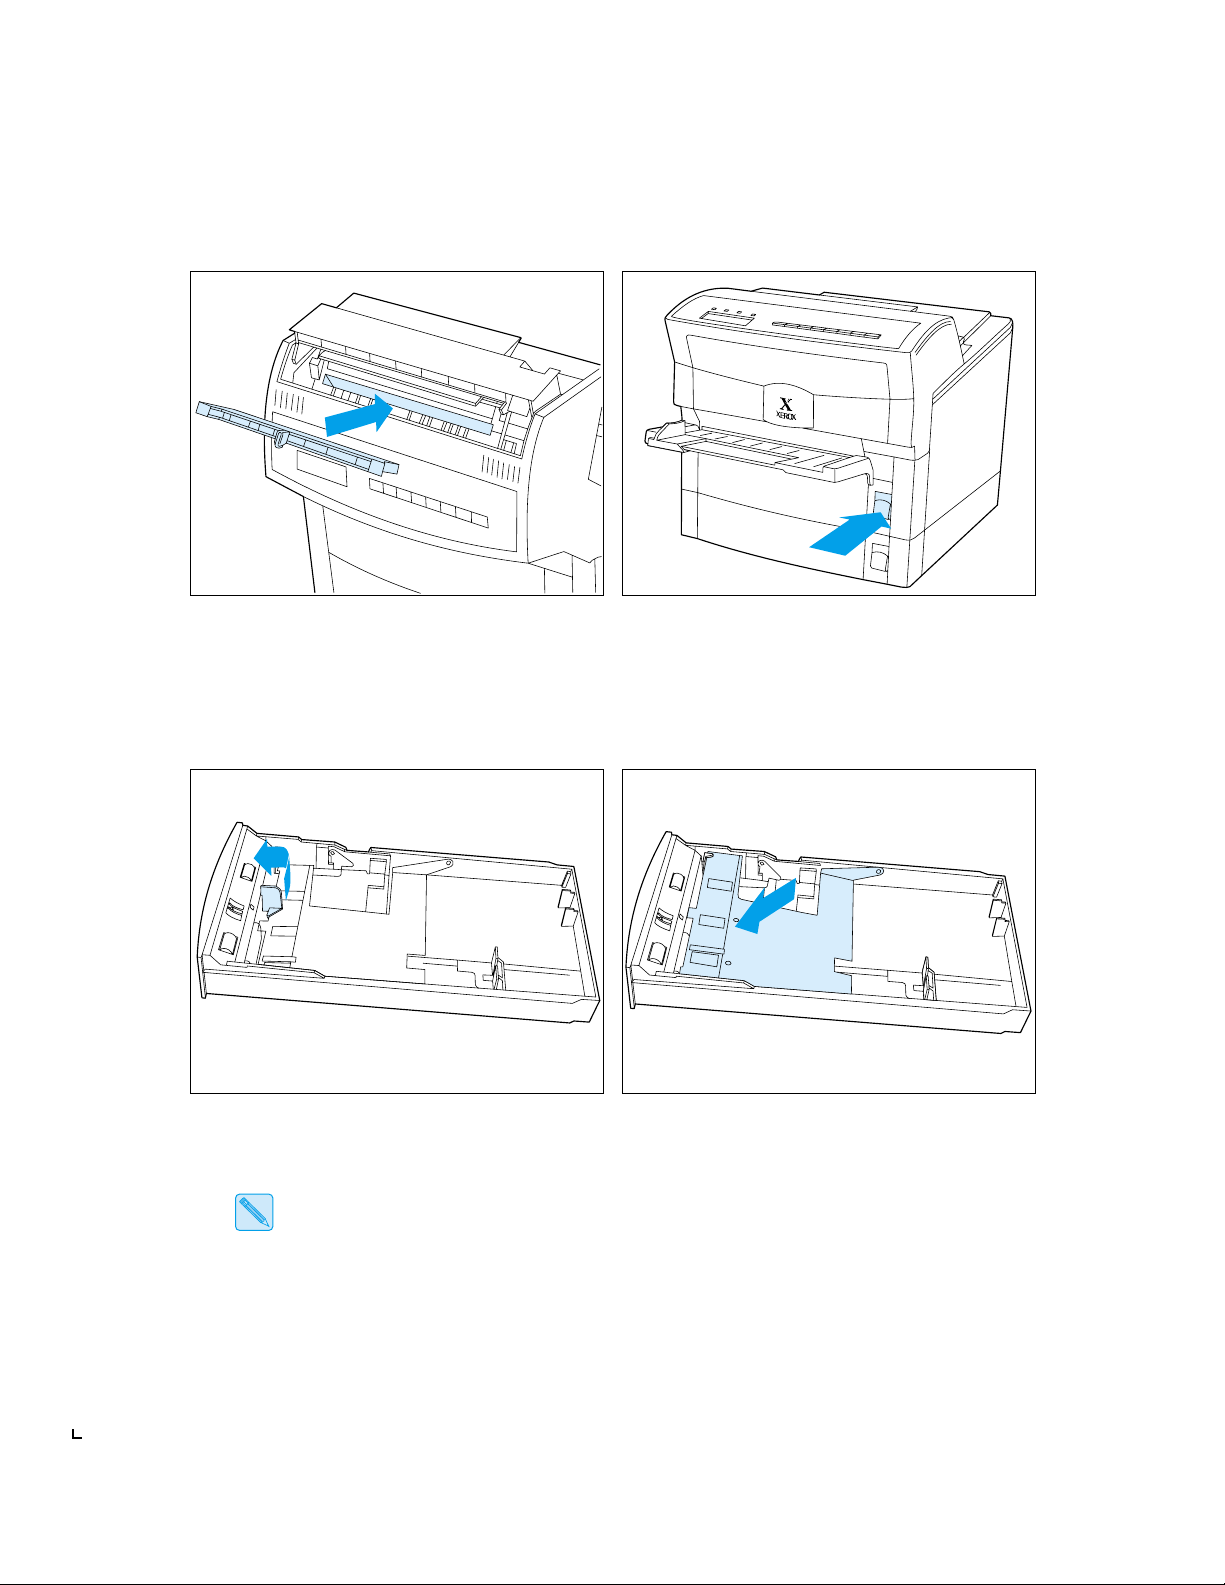
Remove the Cleaning Felt from its wrapper
9
and, holding it by the protruding grip, insert it
into the slot.
Close the front cover and the top cover.
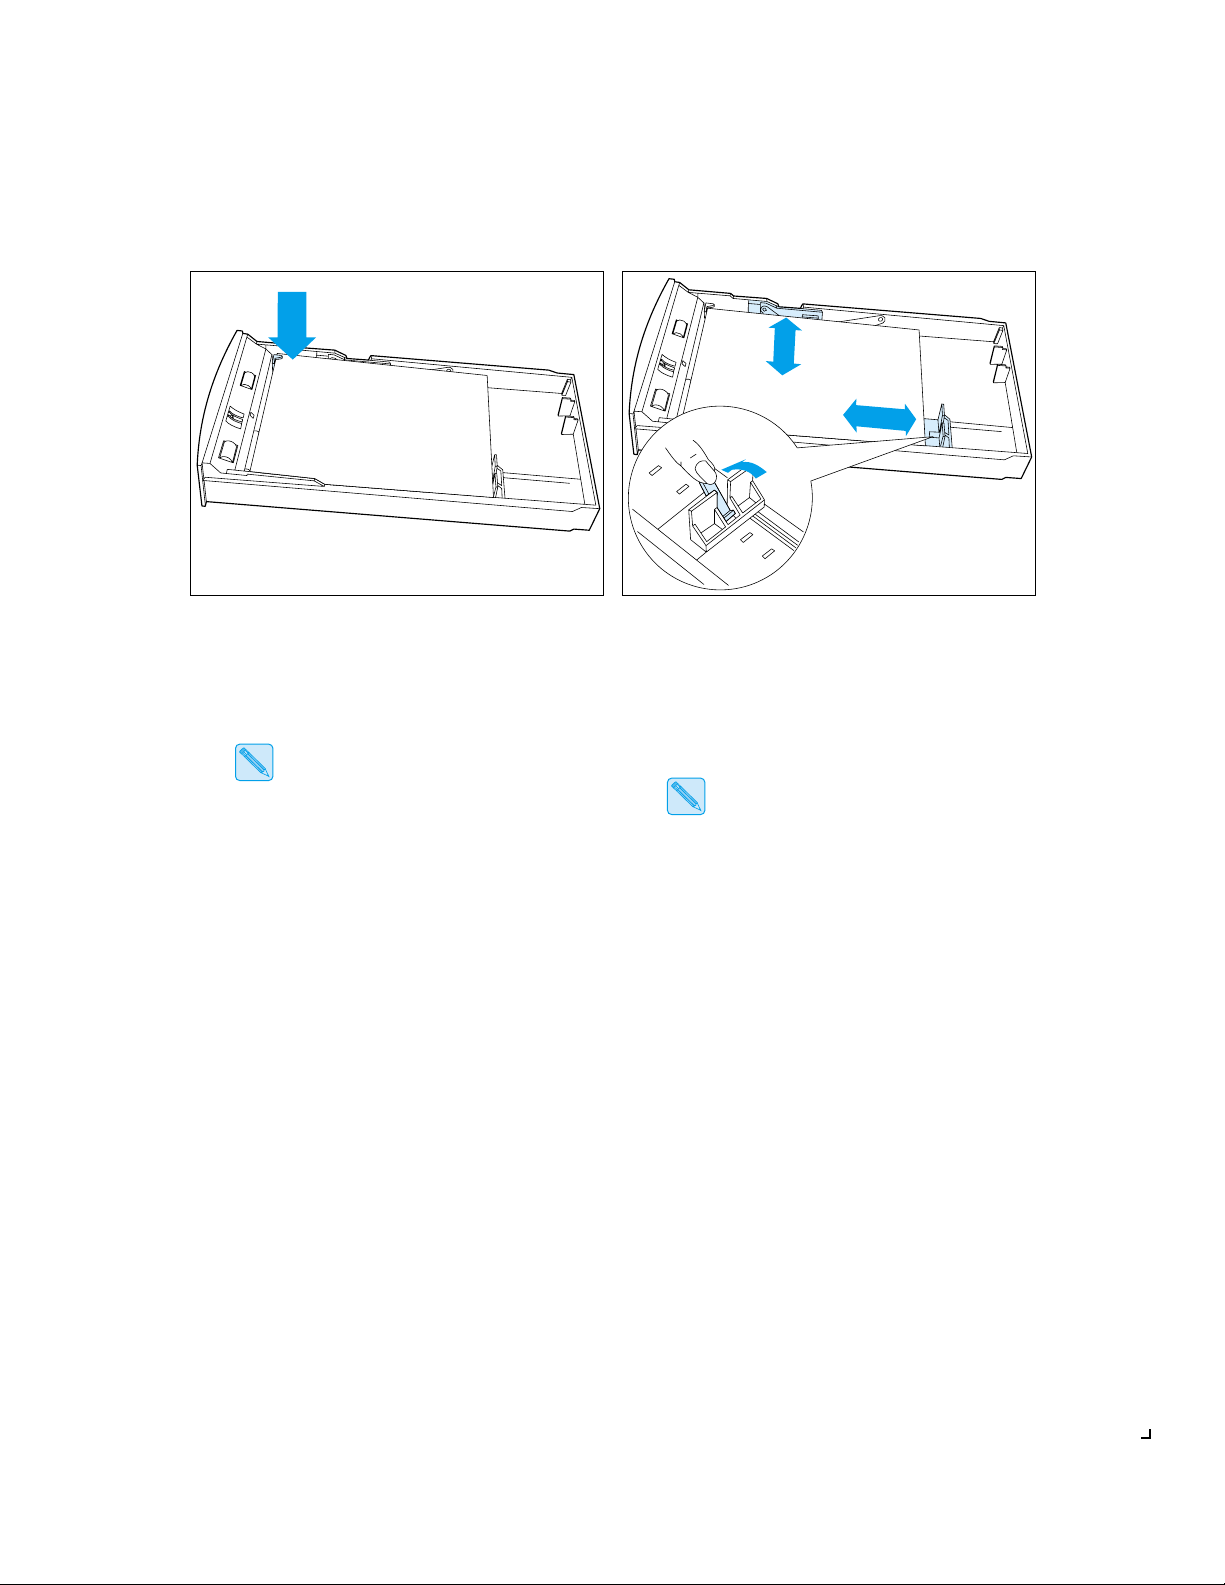
Remove the sto pp er th at pr ot ec ts the tra y’s
11
spring mechanism by twisting it out.
Keep the st o pp er in c ase you need it when
transporting the printer.
Press the tray release button on the right side
10
of the upper paper tray, then remove the tray
from the printer.
Push down the metal pressure plate until it
12
locks into place.
Setting Up Guide ❖
9
Page 12
Assembling the Printer
Insert a stack of paper into the tray so that the
13
stack fits under the two metal tabs at the inside
front corners of the tray. Do not overload the
tray.
The side of paper facing up get s printed.
If the paper does not fit within the pre set
14
paper guides, adjust the guides so that they
rest against t he stack of paper. Th en insert the
tray into the printer.
Repeat step s 10-14 for the lower tray.
The lower tray will not feed paper unless
the upper tray is in place.
10 ❖
Setting Up Guide
Page 13
Setting Up the DocuPrint 4512/4512N
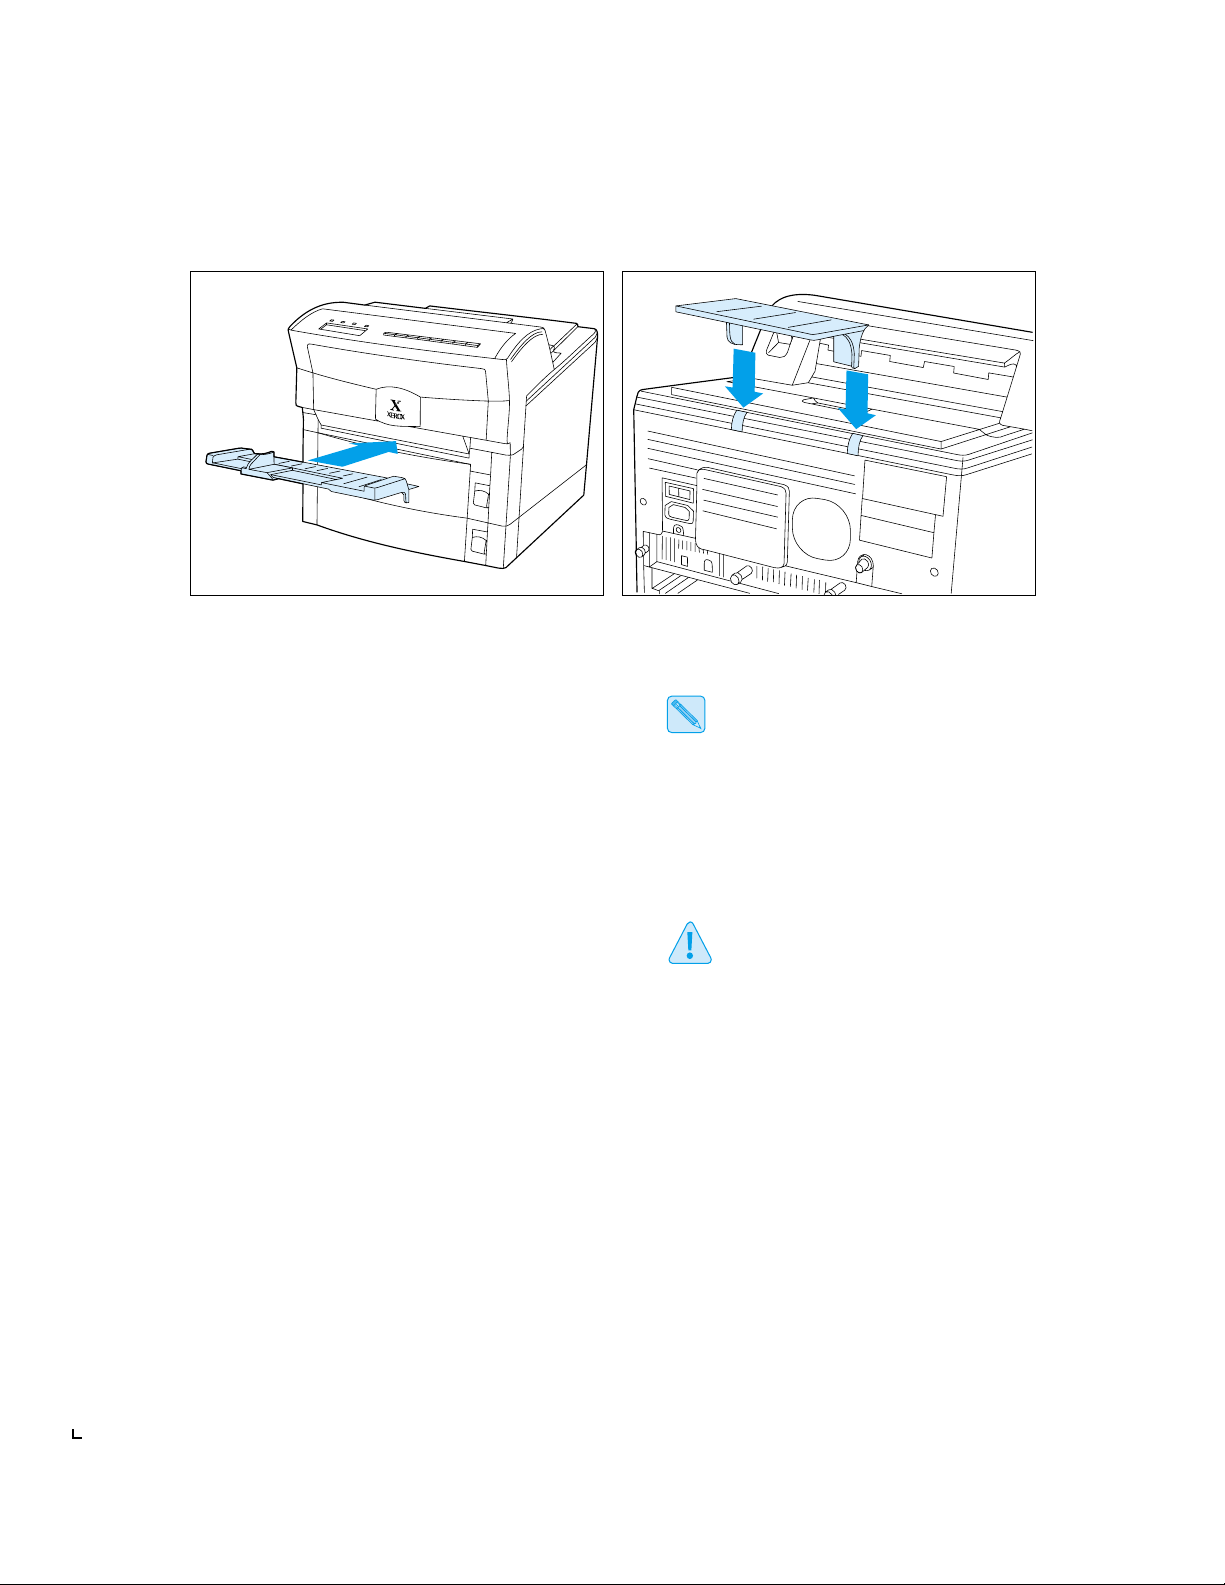
Insert the Manual Feed Guid e into the manual
15
feed slot on the fr ont of the printer.
It should rest on its support brackets in an almost
horizontal position.
Insert the Tray Extension into the back of the
16
paper output tray.
The Tray Extension supports printed
sheets of paper as they come out of the
printer . You may find it convenient to leave
it permanently in place.
Check that the power switch is in the OFF (O)
17
position, then insert t he pow er cor d into the
power cord connector and plug it into a
proper l y gr o un de d an d rat e d w al l out l et.
The printer has two configurations:
110-115 V or 220-240 V
Read the data plate on the back of the
printer to verify which configuration
you have before connecting the printer
to the wall outlet.
Setting Up Guide ❖
11
Page 14

Setting Up the DocuPrint 4512/4512N
Testing the
Printer
To test the printer, power it ON, then print a configuration sheet using
the Control Panel.
Power ON the printer and observe the following sequence on the
1
Control Panel:
The display reads
The
On Line
The display reads
where
Emulation
Size/Size
Press On Line .
2
The
On Line
The display reads
Press Menu until:
3
The display reads
Press Item until:
4
The display reads
Self Test
light goe s on.
Emulation Size/Size
is the emulation (PCL, PS2, A uto, HEX), and
is the size of paper in the upper tray/lower tray.
light goe s off.
Printing Menu
Test Menu
Config. Sheet
.
.
.
.
.
12 ❖
Setting Up Guide
Press Enter .
5
The
When the page finishes printing, the DATA light goes off.
Press On Line .
6
The
The display reads
If you have purchased printer options, power off the printer , unplug
7
the power cord, and continue to
(page 13). Otherwise, skip to
light goes on and the Configuration Sheet prints.
Data
If the Config uration Sheet does not print, refer to
Troubleshooting
On Line
light goe s on.
Emulation Size/Size
DocuPrint 4512/4512N User Guide
in the
.
“Installing Printer Options”
“Connecting to the Host”
Chapter 6:
(page 14).
.
Page 15

Setting Up the DocuPrint 4512/4512N
Installing
Printer Options
Note
A number of options are available to increase the capabilities of your
DocuPrint 4512/4512N. Contact your dealer or Xerox/Rank Xerox for
ordering information.
Printer options include:
• Memory SIMMS
• PostScript
• AppleTalk/Serial Interface Board
• Ethernet Interface Board (pre- instal led on th e 4512N )
• Token Ring Interface Board
Paper handling options include:
• High Capacity Feeder
• Envelope Tray
If you have purchased any of these options, install them now. Refer to
Appendix B: Installing Options
for complete instructions.
Guide
Installation of memory SIMMS, PostScript and/or an interface card
requires removal of the controller board. If you have more than one of
these options, you can install all of them while the controller board is
removed (before reinserting the controller board into the printer).
in the
DocuPrint 4512/4512N User
Setting Up Guide ❖
13
Page 16
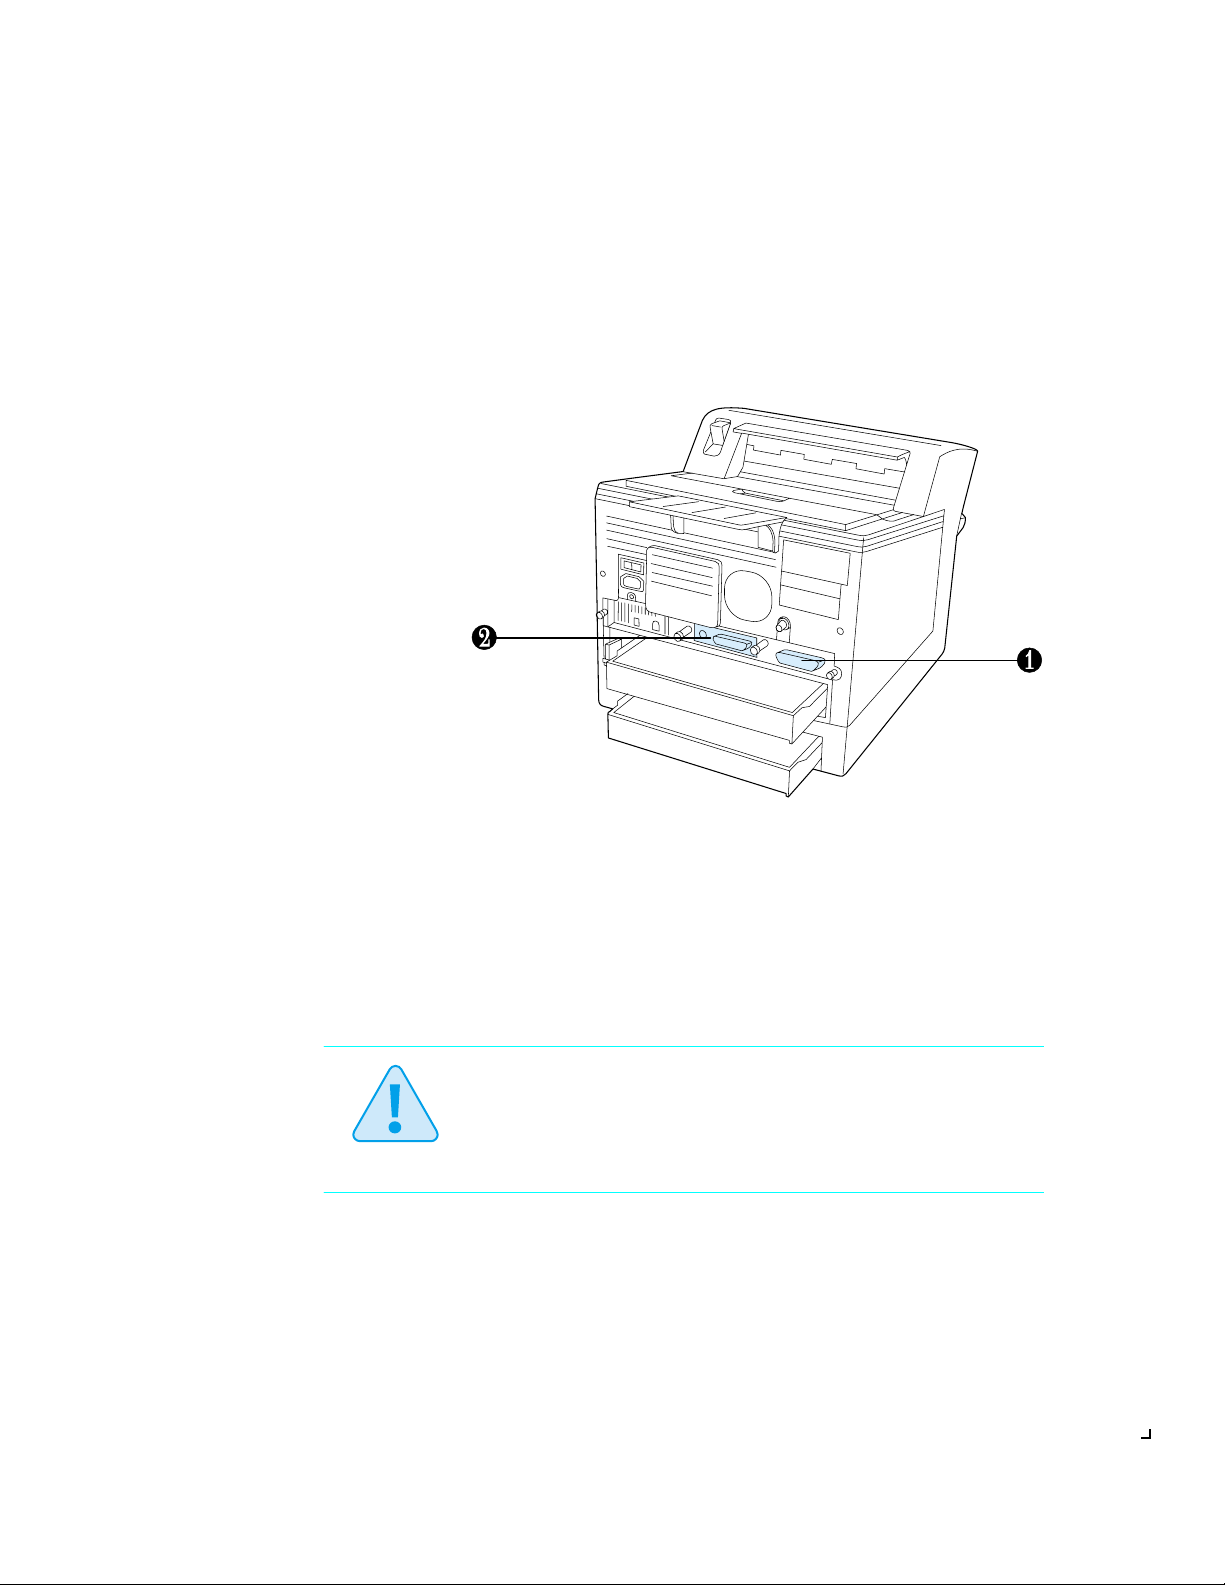
Connecting to the Host
Connecting to
the Host
Rear View
Parallel Interface
1
Network port (optio n)
2
The DocuPrint 4512 can have up to two communication ports
(Figure 4). These ports allow you to connect to two distinct host systems
concurrently.
Figure 4 DocuPrint 4512 input/output ports
14 ❖
You must supply the appropriate interface cable(s) to connect the printer
to the host(s). Refer to Table 1 on page 15 for specifications.
If the printer has the Ethernet NIC option preinstalled, refer to the NIC
card installation manual to initialize, configure and set up the NIC card
on the p ri n ter.
Always power off the DocuPrint 4512 and the host before attaching
the printer interface cable.
Caution
Setting Up Guide
Page 17
Setting Up the DocuPrint 4512/4512N
Table 1 DocuP rin t 451 2 cab le speci fications
Port Type Cable Type(s) Connection Type Maximum Length
Parallel P1284 IEEE P1284-B Complian t
Parallel Cable
Serial (option) 9 to 25-pin M/F RS-232 DB-25 9 feet (3 meters)
Ethernet (option) ThinNet (10base2)
(RG-58 coaxial cable)
10baseT
(24 gauge, uns hiel ded
twisted pair cable)
Token Ring (option) STP (shielded twisted pair) DB-9 330 feet (100 meters)
UTP
(unshielded twisted pair)
LocalTalk (option) LocalTalk
PhoneNet
Standard Centronics
36-pin male
BNC 607 feet (185 meters) and
RJ-45 330 feet (100 meters)
RJ-45 330 feet (100 meters)
DIN-8 990 feet (300 meters) with
6 feet (2 meters)
30 devices per segment
per cable
per cable
per cable
a maximum of 32 devices
Install the appropriate DocuPrint 4512 printer driver(s) (described on
page 17) on your host as per the instructions provided with each driver.
To verify communications, send a job to the printer.
Refer to
Appendix B: Installing Options
User Guide
for complete instructions.
in the
DocuPrint 4512/4512N
Setting Up Guide ❖
15
Page 18

Setting Up the DocuPrint 4512/4512N
Xerox Font
Manager
The Xerox Font Manager ships with 110 fonts. Most importantly, the
Xerox Font Manager uses Agfa’s new MicroType font compression
technology, designed for high throughput of all type styles with
uncompromised ty pe rend er ing.
The Xerox Font Manager also includes a number of productivity
enhancements, such as double clicking for font previews, on-demand
drive search, font grouping, and available font listings. In addition, the
Xerox Font Manager installs and de-installs all the major Windows
fonts, including TrueType, PostScript, screen bitmaps, and MicroType.
16 ❖
Setting Up Guide
Page 19

Installing a Printer Driver
Installing a
The DocuPrint 4512 supports the PCL 5e emulation printer drivers
listed in T able 2. To take full adv antage of all the printer’s features when
Printer Driver
printing PCL jobs, install the appropriate DocuPrint 4512 PCL 5e
emulation printer driver(s). (Consult your operating system user manual
for instructions on installing a new printer driver.)
Table 2 DocuPrint 4512 PCL 5e emulation printer drivers
Environment Printer Driver Diskette
†
DOS
Windows Windows 3.1 /
IBM OS/2 OS/2 Ver. 2.1 Xerox DocuPrint 4512 PCL 5e Emulation Printer Driver
Microsoft Word Ver. 6.0 Xerox DocuPrint 4512 Printer Driver
for MS Word 6.0 for DOS
WordPerfect Ver. 6.0 Xerox DocuPrint 4512 Printer Driver
for WordPerfect 6.0 for DOS
Xerox DocuPr int 4512 PCL 5e Emulation Printer Driver
Windows 95
Windows NT 3.5 OnPAGE PCL 5e Emulation Printer Driver
OS/2 WARP Xerox DocuPrint 4512 PC L 5e Emu lation Printer Driver
for Micr osoft Windows 3.1/ Windows 95
for Microsoft Windows NT 3.5
for IBM OS/2 Ver. 2.1
for IBM OS/2 WARP
† If you are using a DOS application other than Microsoft Word or WordPerfect, use the HP LaserJet 4si printer driver supplied with
your applicati on software.
If you purchased the PostScript option, your printer will also support the
PostScript drivers listed in T able 3 on page 18. T o take full advantage of
all the pri nter’s features when printing PostScript jobs, install the
appropriate DocuPrint 4512 PostScript printer driver(s). (Consult your
operating system user manual for instructions on installing a new printer
driver.)
Contact your dealer or Xerox/Rank Xerox for any drivers you need
beyond those supplied with the printer.
Setting Up Guide ❖
17
Page 20
Setting Up the DocuPrint 4512/4512N
Table 3 DocuPri n t 4512 PostScript prin ter drivers
Environment Printer Driver Diskette
Windows Windows 3.1 /
Windows 95
Windows NT 3.5 OnPAGE PS2 Printer Driver
IBM OS/2 OS/2 Ver. 2.1 Xerox DocuPrint 4512 PS2 Printer Driver
OS/2 WARP Xerox DocuPrint 4512 PS2 Printer Driver
Macintosh System 6.x OnPAGE
System 7.x OnPAGE
UNIX
(SUN 4.1x,
SCO UNIX,
IBM AIX 3.1,
HP.UX on
HP 9000)
Document Manager Xerox Do cuPrint 4512 PS2 Prin t er Driver for SUN OS 4.1.3
Xerox DocuPrint 4512 PS2 Printer Driver
for Micr osoft Windows 3.1/ Windows 95
for Microsoft Windows NT 3.5
for IBM OS/2 Ver. 2.1
for IBM OS/2 WARP
Printer software and drivers may be available through on-line services
and the Internet.
18 ❖
Note
Setting Up Guide
Page 21

What to Do Next
What to
Do Next
Note
Congratulations! You have completed your setup of the
Xerox DocuPrint 4512/4512N Network Laser Printer.
If you have an y questions or need to set optional parameters f or printing,
the
DocuPrint 4512/4512N User Guide
all the pri nter’s features and functions.
For a listing of the printer’s fa ctory defau lt settings, refer to
The Control Panel
DocuPrint 4512/4512N User Guide
in the
is a complete reference guide to
Chapter 3:
.
Setting Up Guide ❖
19
Page 22

What to Do Next
20 ❖
Setting Up Guide
Page 23

Chapter 1
Introduction
Overview of the User Guide
Printer Components
Special Features
Duplex Printing .............................................................................. 1-4
Multiple Paper Trays and Increased Paper Handling ................... 1-4
Automatic Emulation/Input Switching ........................................... 1-4
State Saving .................................................................................... 1-4
Printer Generated Reports ............................................................. 1-5
Memory Expansion ........................................................................ 1-5
MultiGray Enhancement .............. ..... ..... ..... ..... ...... ..... ..... ..... ..... .... 1-6
Power Saving ................................................................................. 1-6
Memory Considerations
................... .................... ..................... ..............
.................... ..... ..... ..... ..... ..... ..... ...... ..... ..... ..... ..... ....
................. ............... ................ ..............
.................. ..... ..... ..... ..... ...... ..... ..... ..... ..... ....
Chapter1
1-2
1-3
1-4
1-7
Chapter 1: Introduction ❖
1-1
Page 24

Introduction
Overview of the
User Guide
This book is for use wit h bo th th e Xero x Docu Pri nt 45 12 an d Docu Prin t
4512N Network Laser Printers. The DocuPrint 4512N contains all the
components of the DocuPrint 4512, plus the Ethernet Network Interface
Card pre-installed.
As this guide serves both printers, the DocuPrint 4512N will hereafter
be referred to as the DocuPrint 4512.
The DocuPrint 4512 is ready to go after you set it up following the
instructions in the
you may occasionally need to refer to this User Guide as a reference for
the following:
• Learning about special printer features [
(page 1-4)]
• Paper specifications, loading paper, and duplex printing
(
Chapter 2: Paper Handling
• Instructions on using the Control Panel (
)
Panel
• Downloading fonts (
• Installing printer drivers (
Setting Up Guide
Chapter 4: Fonts
. As you use the printer, however,
“Special Features”
)
Chapter 3: The Control
)
Chapter 5: Printer Drivers
)
1-2 ❖
• Troubleshooting printing problems if they occur
(
Chapter 6: Troubleshooting
• Tips on taking care of the printer (
and Consumables
• Replacing consumables (
Consumables
• Ordering printer options (
• Installing printer options (
• Printer specifications (
DocuPrint 4512/4512N User Guide
)
)
Chapter 7: Printer Maintenance
)
Chapter 7: Printer Maintenance and
Appendix A: Ordering Inform ation
Appendix B: Installing Options
Appendix C: Printer Specifications
)
)
)
Page 25
Introduction
Printer
Components
Front View
Fuser Cover
1
Control Panel Display
2
Front Cover
3
Manual Feed Slot
4
Manual Feed Guide
5
Upper Paper Tray
6
Lower Paper Tra y
7
Paper Out put Tray
8
Top Cover
9
Tray Release Buttons
10
The major printer components are indicated below.
Figure 1.1 Major printer components
Rear View
Top Cover Release Lever
1
Tray Extension
2
Power Switch
3
Power Cord Connector
4
High Capacity Feeder
5
Connector
Corotron Cleaner
6
Controller Board
7
Top Cover
8
Cooling Fan Outlet
9
Print Density Adjuster
10
Parallel Interface
11
Paper Tra ys
12
Chapter 1: Introduction ❖
1-3
Page 26

Introduction
Special F e atures
Duplex Printing
Multiple
Paper Trays and
Increased Paper
Handling
Several features have been designed into the DocuPrint 4512 to enhance
your printing environment. Using the Control Panel menu system, you
can tailor printer settings to match your printing requirements.
See
Chapter 3: The Control Panel
Control Panel and its menu system.
The DocuPrint 4512 can print two-sided documents. Duplex printing is
as easy as printing a one-sided job.
The DocuPrint 4512 offers two paper trays, each of which can hold up
to 250 sheets of paper. When the paper source is set to AUTO SELECT
(the factory default), the printer automatically senses the paper size and
feeds paper from the appropriate tray according to print instructions
from the application software. If both trays contain the same size of
paper, the printer gives priority to the lower tray and feeds from there
first, effectively giving you a 500-sheet capacity.
You can also install the optional 1000-sheet High Capacity Feeder to
further extend your printing capacity.
For more information on using the paper trays, see the section
Tray Loading”
(page 2-5) in
for more information about the
Chapter 2: Paper Handling
“Paper
.
Automatic
Emulation/Input
State Saving
1-4 ❖
DocuPrint 4512/4512N User Guide
Switching
When you have installed the PostScript option, the printer can process
both PCL and PostScript jobs. When Emulation is set to
DocuPrint 4512 samples the incoming data stream to determine which
language the print job requires. The DocuPrint 4512 then switch es to the
proper language for that job.
The DocuPrint 4512 can have up to two active ports when you install an
optional interface card (AppleTalk/Serial Interface, Ethernet or Token
Ring). The printer automatically switches between input sources,
samples the print job, and switches to the appropriate processing
language.
When you have installed the PostScript option and are printing both
PostScript and PCL jobs, the printer clears any data in memory when it
switches between PostScript and PCL 5e emulations. However, you can
Auto
, the
Page 27

Special Features
set the State Saving item to On, and the printer will save the data in
memory when it switches emulations. This saves you from having to
download fonts and headers every time the printer switches between
PostScript and PCL 5e emulation.
Printer Generated
Reports
Memory Expansion
Using the Control Panel, you can print the following reports:
• The
• The
• The
• When PostScript is installed on the DocuPrint 45 12, the
See
reports.
The DocuPrint 4512 printer has 2 MB resident memory and can be
increased with additional memory SIMMs up to 50 MB. See
Considerations”
Information
Configuration Sheet
the current settings for each option in the Control Panel’s menu
system.
PCL 5e Demo Page
capabilities and lists th e printer’s key features.
PCL 5e Font List
available. The list includes resident fonts and downloaded fonts.
(PS2) Font List
available (both resident and downloaded fonts), and the
Demo Page
capabilities.
Chapter 3: The Control Panel
to order more printer memory.
shows which PostScript fonts are currently
provides a sample of the printer’s Pos tS cript
(page 1-7). Also see
lists the options you have installed and
provides a sample of the printer’s
shows which PCL fonts are currently
PostScript
PostScript
for more information about these
“Memory
Appendix A: Ordering
Chapter 1: Introduction ❖
1-5
Page 28

Special Features
MultiGray
Enhancement
Pow er Saving
When the PostScript option is installed, MultiGray enhancement
multiplies the number of gray scales available for printing scanned
photographs or computer graphic images with graded fills.
After 30 minutes of inactivity , the printer automatically turns off interna l
components to reduce the amount of electricity used. The printer
automatically turns those parts back on when it receives a print job.
Using the Control Panel, you can send the printer into Power Saver
mode after your choice of 15, 30, or 45 minutes of inactivity.
1-6 ❖
DocuPrint 4512/4512N User Guide
Page 29
Introduction
Memory
Considerations
Table 1.1 Memory requirements
Page Protection Setting Simplex Duplex
Paper Size 300 dpi 600 dpi 300 dpi 600 dpi
Page Protection
Page Protection
Auto
On
In today’s printing environments, technologies have advanced greatly.
Corresponding memory requirements have increased too.
• DocuPrint 4512 printing features such as duplex printing, page
protection and state saving, when on, use available printer
memory—memory that is otherwise used for processing jobs.
• Downloading fonts also uses available printer memory.
If you plan to print highly complex jobs or need features like state
saving and page protection, you may need to add printer memory.
Table 1.1 lists memory requirements when printing simplex (one-sided)
and duplex (two-sided) jobs at 300 and 600 dpi.
2 MB 2 MB 2 MB 2 MB
Letter 3 MB 8 MB 4 MB 14 MB
A4 3 MB 8 MB 4 MB 14 MB
A5 3 MB 8 MB 4 MB 14 MB
Executive 3 MB 8 MB 4 MB 14 MB
Legal 4 MB 10 MB 8 MB 18 MB
Folio 4 MB 10 MB 8 MB 18 MB
Chapter 1: Introduction ❖
1-7
Page 30

1-8 ❖
DocuPrint 4512/4512N User Guide
Page 31

Chapter 2
Paper Handling
Selecting Paper
Storing Paper ................................................................................. 2-4
Paper Tray Loa di ng
Paper Trays ............. ..... ...... ..... ..... ..... ..... ..... ..... ...... ..... ..... ..... ..... .... 2-5
Adjusting Trays for Paper Si ze ......... ..... ..... ..... ...... ..... ..... ..... ..... .... 2-5
Loading Paper for Simplex (One-Sided) Printing ......................... 2-6
Loading Paper for Duplex (Two-Sided) Printing .......................... 2-7
Loading Envelopes in the Envelope Tray ...................................... 2-7
Manual Feed Guide Loading
Fitting and Adjusting the Manual Feed Guide .............................. 2-9
Feeding Paper for One-Sided Printing ........................................ 2-10
Feeding Paper for Two-Sided Printing ........................................ 2-10
Printing Envelopes ....................................................................... 2-11
Printing Labels and Transparencies ............................................ 2-11
Adjusting Print Density
.................................................................................
................... ............................... ........................
...........................................................
..................................................................
Chapter2
2-3
2-5
2-9
2-13
Chapter 2: Paper Handling ❖
2-1
Page 32

Paper Handling
Paper Outpu t
................... ............................... ............................... ..
Using the Tray Extensi on ... ..... ..... ..... .......... ..... ...... ..... ..... ..... ..... .. 2-14
Automatic Tray Switching
Bind Options for Duplex Printing
................... ............................... ............
................. ................ ............... ..
2-14
2-15
2-16
2-2 ❖
DocuPrint 4512/4512N User Guide
Page 33

Paper Handling
Selecting Paper
Table 2.1 lists the size paper, envelopes, and other print media you can
use with all DocuPrint 4512 input and output trays. Using sizes other
than those listed below, or paper not recommended for laser printers,
may result in paper jams.
Table 2.1 Media specifications for all DocuPrint 4512 trays
Paper Size Upper Tray
Lower Tray
A4
(210x297mm)
Letter
(8.5x11” / 216x279mm)
Folio (Lega l 13”)
(8.5x13” / 216x330mm)
Legal (Legal 14”)
(8.5x14” / 216x356mm)
Executive
(7.25x10.5” / 184x267mm)
A5
(148.5x210mm)
16-24lb
60-90 g/m
16-24lb
60-90 g/m
16-24lb
60-90 g/m
16-24lb
60-90 g/m
16-24lb
60-90 g/m
16-24lb
60-90 g/m
2
2
2
2
2
2
60-90 g/ m
60-90 g/ m
60-90 g/ m
60-90 g/ m
60-90 g/ m
60-90 g/ m
High
Capacity
†
Feeder
16-24lb
16-24lb
16-24lb
16-24lb
16-24lb
16-24lb
2
2
2
2
2
2
Envelope
†
Tray
Manual
Feed
16-36lb
60-136 g/ m
16-36lb
60-136 g/ m
16-36lb
60-136 g/ m
16-36lb
60-136 g/ m
16-36lb
60-136 g/ m
16-36lb
60-136 g/ m
2
2
2
2
2
2
Envelopes
COM-10 (4.12x9. 5” / 105x24 1mm)
Monarch (3.8 7x 7.5 ” / 98x 19 1mm)
DL (4.33x8.66” / 110x220mm)
C5 (6.38x9.01” / 162x229mm)
Transparency
A4 (210x297 mm)
Letter (8.5x11” / 216x279mm)
Label
A4 (210x297 mm)
Letter (8.5x11” / 216x279mm)
† Optional paper handler . See
Appendix A
for ordering information.
16-24lb
60-90 g/ m
2
Clear, paper-
backed or
permanent
stripe
Paper
Chapter 2: Paper Handling ❖
2-3
Page 34

Selecting Paper
Storing Paper
The DocuPrint 4512’s print quality is optimized when paper and other
print media are properly stored. Proper storage ensures optimum print
quality and trouble-free printer options.
• Store the paper on a flat surface, in a relatively low humidity
environment.
• Do not unwrap paper until you are ready to use it, and rewrap any
paper you are not using.
• Do not expose paper to direct sunlight or high humidity.
2-4 ❖
DocuPrint 4512/4512N User Guide
Page 35

Paper Handling
Paper Tray
Loading
Paper Trays
Adjusting Trays for
Paper Size
Side guide
1
End guide
2
Paper and other print media are loaded into the upper and lower trays
identically. Refer to Table 2.1 on page 2-3 for acceptable paper sizes.
The DocuPrint 4512 provides the following paper trays:
• The upper and lower trays each hold 250 sheets of 20 lb (75 g/m
paper.
• The optional High Capacity Feeder holds 1,000 sheets of 20 lb (75
2
)paper.
g/m
• An optional Envelope Tray holds up to 20 envelopes and replaces
the upper paper tray for automatic envelope loading.
Figure 2.1 shows how to adjust the upper and lower paper trays for
different paper sizes.
Figure 2.1 Upper/Lower tray paper
adjustment guides
2
)
The width guide (
The end guide (
Proper orientation of media in the paper and envelope trays is discussed
in the following sections.
) slides to fit the width of the paper.
1
) slides to fit the length of the paper.
2
Chapter 2: Paper Handling ❖
2-5
Page 36

Paper Tray Loading
Loading Paper
for Simplex
(One-Sided) Printing
Figure 2.2 shows the proper orientation when loading paper for simplex
(one-sided) printing.
Figure 2.2 Proper orientation in tray for
simplex printing
2-6 ❖
DocuPrint 4512/4512N User Guide
Page 37

Paper Tray Loading
Loading Paper
for Duplex
(Two-Sided) Printing
Loading Env elopes
in the Envelope Tray
Figure 2.3 shows the proper orientation when loading paper for duplex
(two-sided) printing.
Figure 2.3 Proper orientation in tray for
duplex printing
Figure 2.4 shows how to adjust the Envelope Tray for different env elope
sizes.
Figure 2.4 Envelope Tray adjustment
Chapter 2: Paper Handling ❖
2-7
Page 38

Paper Handling
Figure 2.5 shows how envelopes are loaded flap down for printing. Use
the software application for proper orientation.
Figure 2.5 Proper envelope orientation in
Envelope Tray
2-8 ❖
DocuPrint 4512/4512N User Guide
Page 39

Manual Feed Guide Loading
Manual Feed
Guide Loading
Fitting and
Adjusting the
Manual Feed Guide
To print sizes of paper that the paper trays cannot accommodate, or to
print other media such as envelopes, adhesive labels or transparencies,
you will need to feed the media into the printer manually.
If the manual feed guide is not attached to the manual feed slot on the
front of the printer, start with Step 1, below. Otherwise, skip to Step 2.
Insert the man ual feed gui de int o t h e ma nu al f ee d
1
slot on the front of the printer.
It should rest on its support brackets in an almost
horizontal position.
Proper orientation of media in the manual feed guide is discussed in the
following sections.
Place the item you want to print on the manual
2
feed guide, lined up along the right edg e. Then
move the ad justab le edg e guide ge ntl y agains t the
left edge of the item to be printed.
Chapter 2: Paper Handling ❖
2-9
Page 40
Manual Feed Guide Loading
Feeding Paper for
One-Sided Printing
Feeding Paper for
Two-Sided Printing
Figure 2.6 shows the proper orientation for feeding paper for simplex
(one-sided) printing.
Figure 2.6 Proper orientation in Manual
Feed Guide for simplex printing
Figure 2.7 shows the proper orientation for feeding paper for duplex
(two-sided) printing.
2-10 ❖
Figure 2.7 Proper orientation in Manual
Feed Guide for duplex printing
DocuPrint 4512/4512N User Guide
Page 41

Manual Feed Guide Loading
Printing Envelopes
Printing Labels and
Transparencies
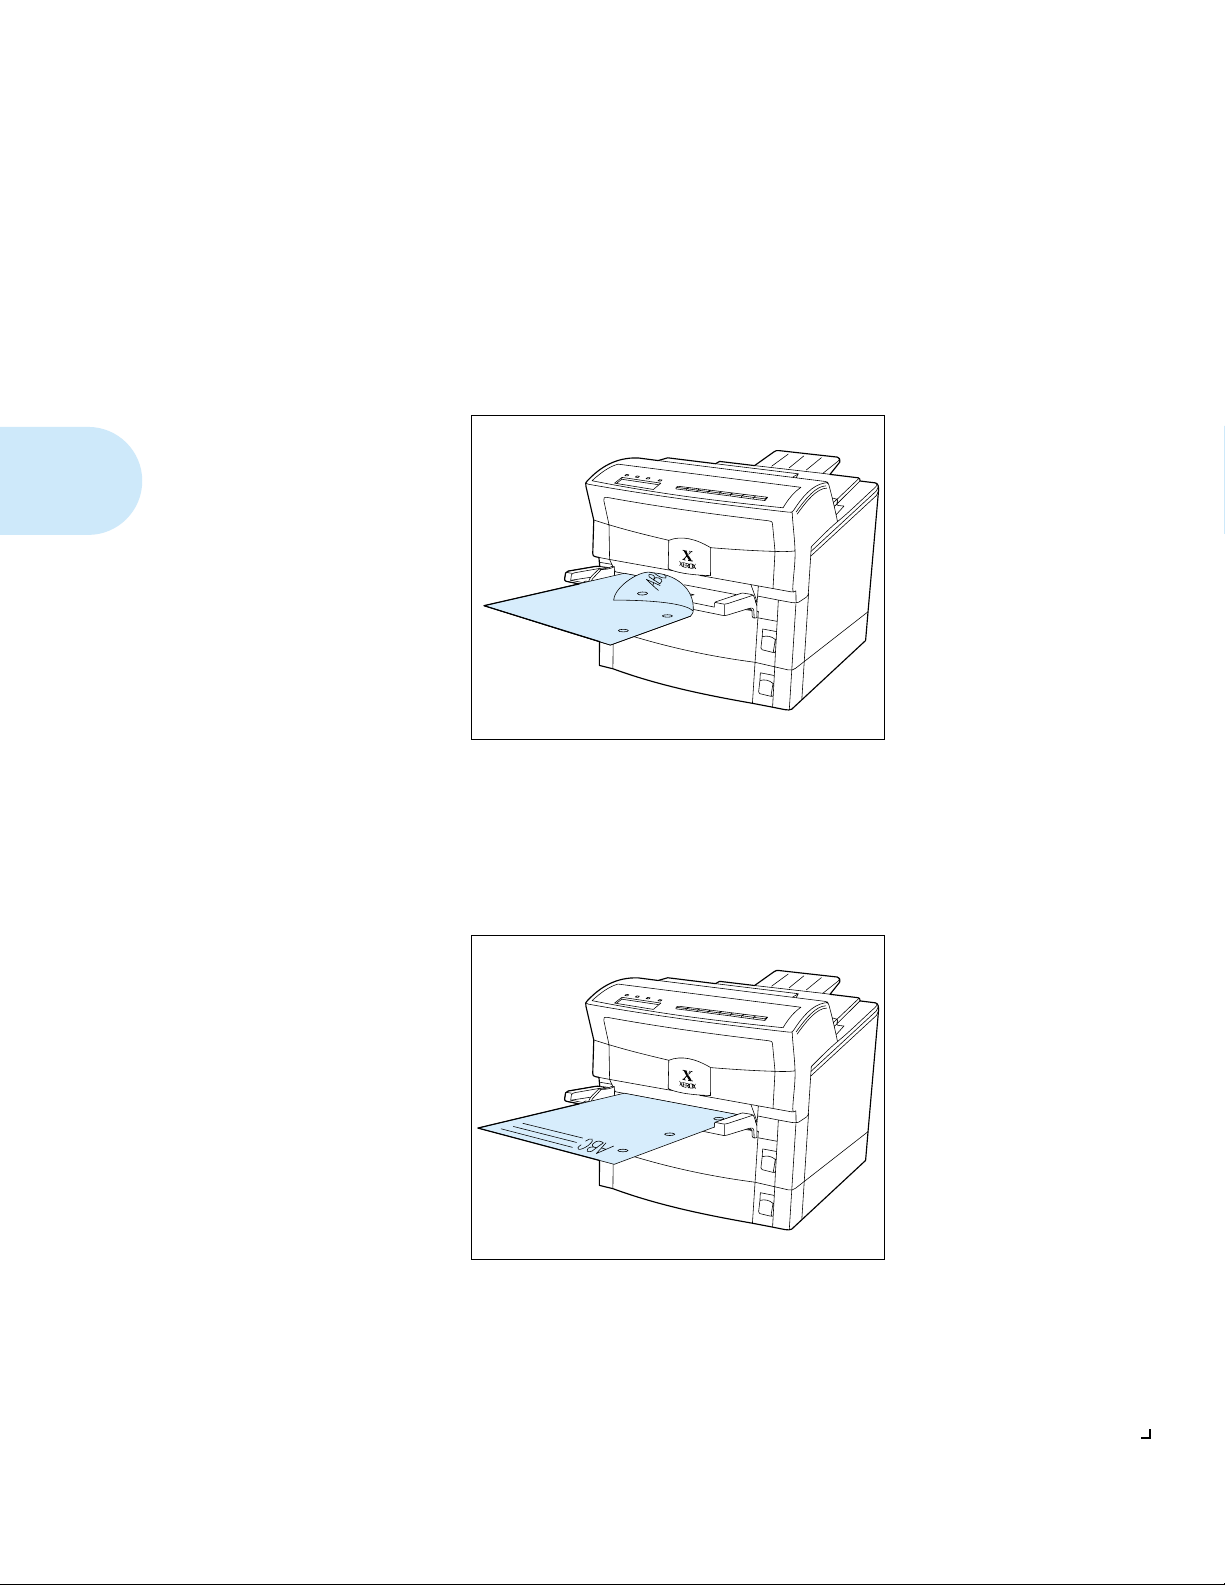
Figure 2.8 shows how envelopes are fed flap up. Use the software
application for proper orientation.
Figure 2.8 Manual feed envelope orientation
Figure 2.9 shows the correct orientation for feeding labels.
Figure 2.9 Manual feed label orientation
Chapter 2: Paper Handling ❖
2-11
Page 42

Paper Handling
Note
Figure 2.10 shows the correct orientation for feeding transparencies.
Figure 2.10 Manual feed transparency orientation
If you get poor results when you change from normal printing on paper
to printing on transparency film of the type used for overhead
projectors, you should adjust the printer using the print density adjuster ,
discussed in the section “Adjusting Print Density” (page 2-13).
2-12 ❖
DocuPrint 4512/4512N User Guide
Page 43

Paper Handling
Adjusting Print
Density
When printing graphics or when printing on media which you do not
normally use, you may want to change the density of the toner. Greater
toner density gives darker printing, but it also uses more toner, so you
will have to replace your Toner Cartridge sooner. You can conserve
toner by reducing density when doing draft printing.
There is a dial for adjusting the de nsity of ton er at th e rear of t he printe r,
between the fan outlet and the parallel port, as shown in Figure 2.11.
Figure 2.11 Print density adjuster
The symbols on the dial offer approximate indicators of density settings.
You may need to experiment before achieving optimum results. Turning
the dial fully clockwise gives the greatest density. The toner density
setting decreases as you turn the dial counterclockwise.
Chapter 2: Paper Handling ❖
2-13
Page 44

Paper Handling
Paper Output
Using the Tray
Extension
Printed items are deliv ered f ace down to the output tray. The output tray
supports up to 250 sheets of 80 g/m
larger sheet sizes and helps to neatly stack large volumes of output.
The Tray Extension is inserted into the slots on the back of the printer as
shown in Figure 2.12. (It may have already been installed as part of the
procedure described in the
Figure 2.12 The Tray Extension
Setting Up Guide
2
paper. A Tray Extension supports
.)
2-14 ❖
You will probably find it convenient to leave the Tray Extension
permanently in place. However should you want to remove it, grasp the
bottom of the bracket and gently pull it out.
DocuPrint 4512/4512N User Guide
Page 45

Paper Handling
Automatic Tray
Switching
Automatic tray switching is available for both PCL and PostScript jobs.
Tray switching is useful for:
• Increasing paper capacity.
When the current paper tray runs out of paper, the printer
automatically switches to the next tray in the sequence, provided
the paper in the next tray is the same size as that in the current tray.
• Searching for the correct paper size.
If the paper size specified in your software application does not
match the size paper loaded in the current paper tray, the printer
automatically searches the next tray in the sequence for a paper size
that matches. The default tray is the lowest tray installed.
Chapter 2: Paper Handling ❖
2-15
Page 46

Bind Options
for Duplex
To ensure that duplex jobs print in the proper orientation, set the Bind
item (in the Control Panel’s Printing menu) to the appropriate settings
(see Figure 2.13).
Printing
Figure 2.13 Duplex binding orientation and Control Panel menu settings
Portrait Printing Landscape Printing
2-16 ❖
Set Bind to
Set Bind to
DocuPrint 4512/4512N User Guide
Long Edge
Short Edge
Set Bind to
Set Bind to
Long Edge
Short Edge
Page 47

Bind Options for Duplex Printing
Chapter 2: Paper Handling ❖
2-17
Page 48

Bind Options for Duplex Printing
2-18 ❖
DocuPrint 4512/4512N User Guide
Page 49

Bind Options for Duplex Printing
Chapter 2: Paper Handling ❖
2-19
Page 50

Bind Options for Duplex Printing
2-20 ❖
DocuPrint 4512/4512N User Guide
Page 51

Chapter 3
The Control Panel
Control Pa ne l Fe atur e s
Indicator Lights .............................................................................. 3-3
Display Panel Messages ................................................................ 3-3
Control Keys . ..... ..... ..... ...... ..... ..... ..... ..... ..... ..... ...... ..... ..... ..... ..... .... 3-4
The Menu System
Using the Control Panel
Setting the Printer .......................................................................... 3-7
Printing Test Sheets ..................................................................... 3-17
Setting Power Saver Mod e ................ ..... ..... ..... ...... ..... ..... ..... ..... .. 3-20
Printing Simplex and Duplex Demo Pages .................................. 3-20
Printer Parameters and Default Settings
....................................................................
.............................................................................
...................................................................
................. ......................
Chapter3
3-2
3-6
3-7
3-22
Chapter 3: The Control Panel ❖
3-1
Page 52

The Control Panel
Control Pa ne l
Features
Figure 3.1 DocuPrint 4512 Control Panel
The DocuPrint 4512 Control Panel (Figure 3.1) serves two purposes:
• It displays information about the status of the printer (or the job in
process) and
• It provides the means for changing printer settings to control how
the DocuPrint 4512 operates.
Indicator lights
1
Display pan el
2
Control keys (8)
3
3-2 ❖
DocuPrint 4512/4512N User Guide
Page 53

Control Panel Features
Indicator Lights
Display Panel
Messages
The Control Panel contains four indicator lights. Table 3.1 describes the
function of each light.
Table 3.1 Control Panel
indicator lights and
their functions
Light Description
Fault
(Yellow)
Toner/D rum
(Yellow)
Data
(Green)
On Line
(Green)
Glows to show that an error has occurred. It flashes when
the selected paper tray has run out of paper.
Begins to glow when the toner is low or when the
Photoconductor / Drum is near the end o f its life.
Glows when the printer is processing data normally. It
goes off when the final page of a print job has finished
printing. It flashes if data for a page is in the printer
memory and the end of page cannot be determined.
Glows when the printer is ready to receive print data from
the computer. It flashes when the printer is recei v in g
and/or processing data.
The Control Panel’s display shows the following:
• Status messages
These inform you of the printer’s operating condition, such as
Self Test
PCL 5e A4/A4
or
.
• Menu settings
These are manually set using the Control Panel keys. See the
section
“The Menu System”
(page 3-6) for an overview of the
menus.
• Error conditions
These indicate the likely cause of printer problems, such as paper
jams and running out of supplies
.
• Service messages
These provide technical information about equipment failure
Chapter 3: The Control Panel ❖
.
3-3
Page 54

Control Panel Features
Control Keys
The Control Panel keypad consists of
control keys. Table 3.2
eight
describes the function of each key.
Table 3.2 Control Panel keys
Key Description
On Line
Menu
Item
Up
Down
Sets the printer on-line and off-line.
When on-line, the printer is ready to receive, or has
already accepted, data for printing.
Y ou must take the printer off-line to set menus, perform
off-line print tests, and do other manual tasks. The
other keys do not function when the printer is on-li ne.
Cycles the display through the menus.
Cycles the display through the item s in eac h men u.
Cycles the display backward through the values for
each menu item.
The current setting is indicated by an asterisk (*) at the
right edge of the display.
Cycles the display forward through the values for each
menu item.
The current setting is indicated by an asterisk (*) at the
right edge of the display.
and their functions
3-4 ❖
Enter
Form Feed
Data Clear
DocuPrint 4512/4512N User Guide
Sets the displayed value of the currently displayed
menu item, or ex ecutes the currently displayed off-line
print test.
Prints the data which is left in printer memory when the
printer is taken off-line.
This key has no effect when the printer is on-line.
Clears print er memory of print job data.
Page 55

Control Panel Features
In general, the control keys are used in the following sequence:
1. Press
2. Press
3. Press
4. Press
5. Press
6. Press
See
On Line
Menu
Item
Up
Enter
On Line
“The Menu System”
to set the printer off-line.
to display the menu you want to access.
to display the menu item you want to set.
or
Down
to set the item to the value displayed.
to set the printer on-line.
(page 3-6) for an overview of the Control
Panel’s menu structure, and
specific procedures.
to change the item’s value.
“Using the Control Panel”
(page 3-7) for
Chapter 3: The Control Panel ❖
3-5
Page 56

The Control Panel
The Menu
Table 3.3 shows the Control Panel menu structure. The name of the
menu appears at the top of the column, and the menu’s items are
System
displayed beneath it.
Table 3.3 Control Panel men us an d item s
Printing
Menu
Copies Resolution Warn Msg Baud Rate Config Sheet Prt Screen
Font Numbe r Page P Manual Set Data Bit PCL 5e Font List Message
Duplex St Saving High Speed Parity PS2 Font List
††
Bind
† Appears when the serial interface option is installed.
‡ Appears when the PostScript option is installed.
†† Appears when the Printing Menu’s Duplex item is set to On.
Job Menu Config Menu Serial Menu
Emulation Adv Fnctns Robust XON PCL 5e Demo
DTR Polarity PS2 Demo Page
†
Test Menu Misc Menu
‡
Page
‡
3-6 ❖
DocuPrint 4512/4512N User Guide
Page 57

The Control Panel
Using the
Control Pa ne l
Setting the Printer
The Control Panel is used to set various printer operations and to print
test sheets.
Table 3.4, starting on the next page, lists the most common printer
setting tasks, organized by menu and menu item. The examples show a
printer set for PCL 5e emulation with A4 paper in both upper and lower
PCL 5e A4/A4
tray (
For an alphabetical listing of menu items (and more detailed
descriptions), see Table 3.6 on page 3-23.
For each task listed in Table 3.4, you will find:
• All possible choices for the item to be set. The choice shown in
is the
bold
• The key press sequence to complete the task.
• For each key press, the action/response, along with the message
displayed. ‘=X’ indicates the current setting, ‘=N’ indicates a new
setting, and the asterisk (*) indicates that the new setting has been
entered.
). Your settings may be different.
factory default setting
.
Note
You can normally control the printer’s operation through your
applications, such as specifying how many copies of the print job you
want.
Chapter 3: The Control Panel ❖
3-7
Page 58
Using the Control Panel
Table 3.4 Using the Control Panel to set printer operation
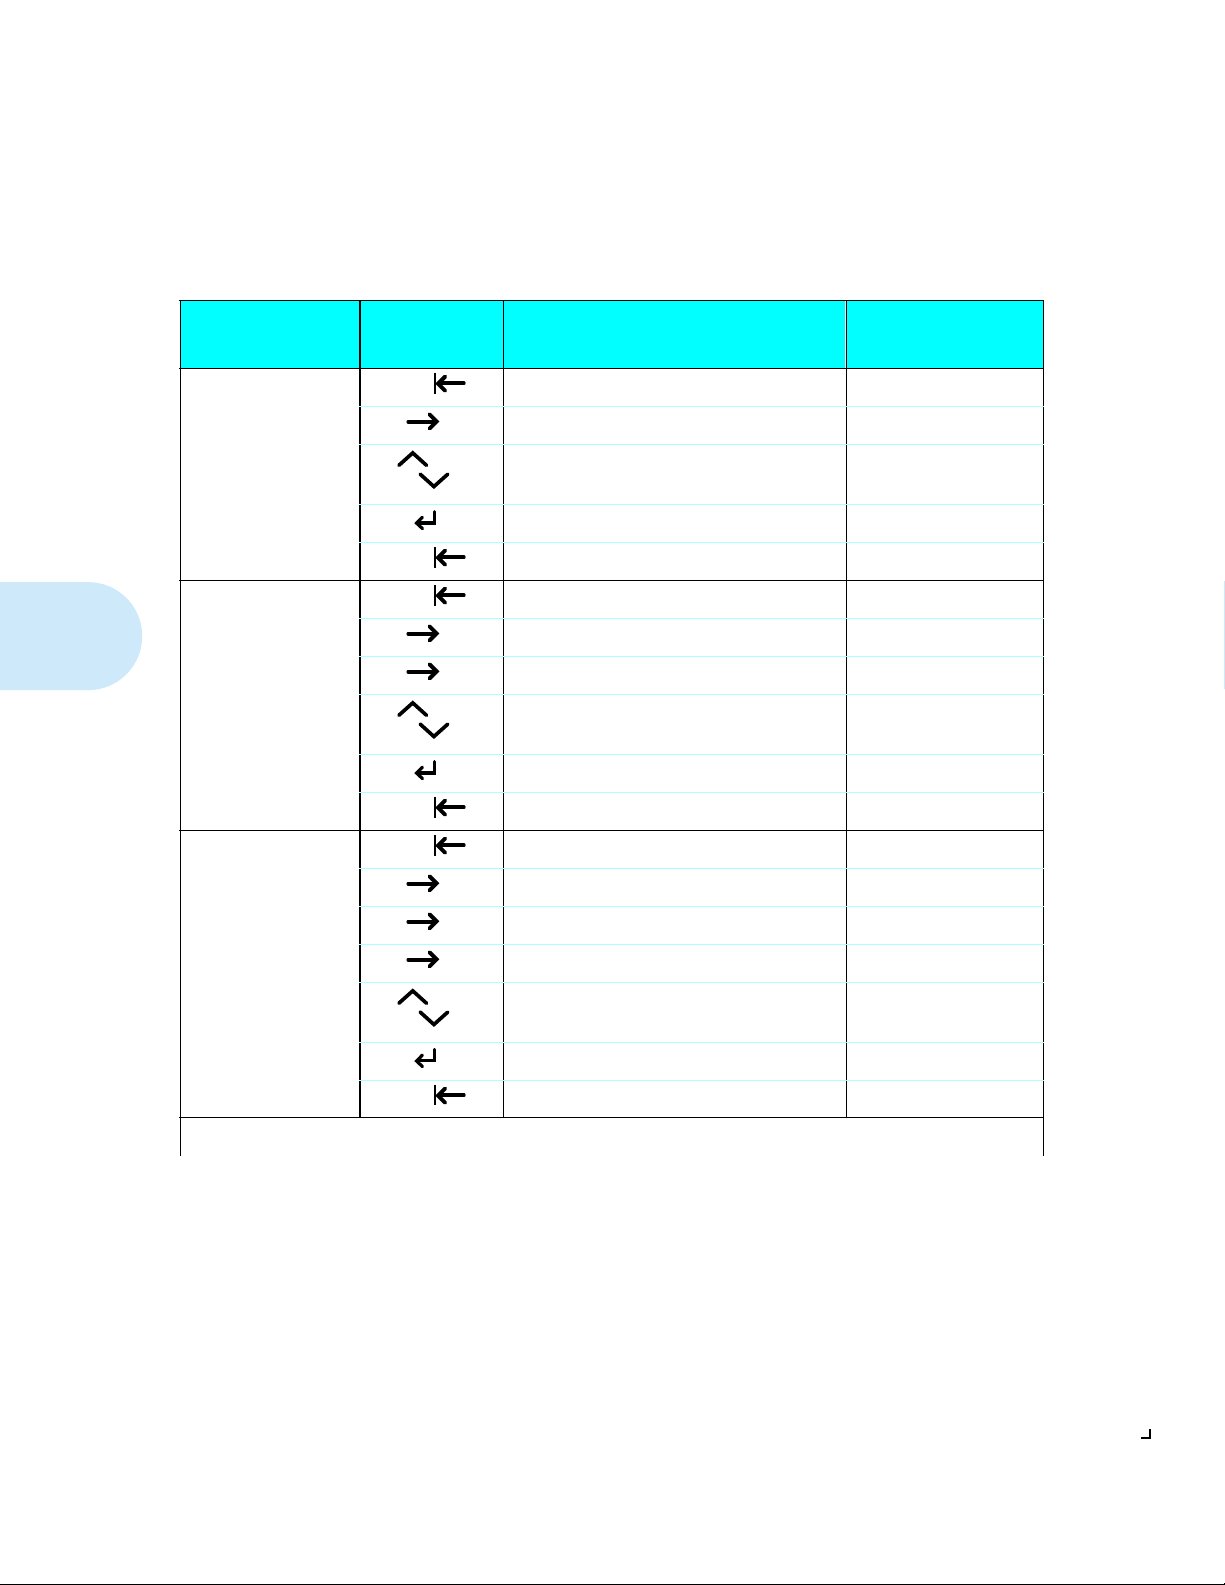
Task
Change the copies
setting.
Sets how many copies
to print.
Choices:
1
-999
Change the font
number setting.
Sets the printer’s base
font.
Choices:
0
-45
Change t he dup lex
setting.
Control s duplex
(two-sided) printing.
Choices:
Off
, On
Key Pres s
Sequence
On Line Takes the printer off-line. Printing Menu
Item Displays the Copies item. Copies=X *
Up or
Down
Enter Sets the new value. Copies=N *
On Line Returns the printer on -line. PCL 5e A4/A4
On Line Takes the printer off-line. Printing Menu
Item Displays the Copies item. Copies=X *
Item Displays the Font Number item. Font Number=X *
Up or
Down
Enter Saves the new value. Font Number=N *
On Line Returns the printer on -line. PCL 5e A4/A4
On Line Takes the printer off-line. Printing Menu
Item Displays the Copies item. Copies=X *
Item Displays the Font Number item. Font Number=X *
Item Displays the Duplex item. Duplex=X *
Up or
Down
†
Action/Response Display Shows
Changes the number of copies. Copies=N
Changes the font number. Font Number=N
Toggles the duplex setting. Duplex=N
3-8 ❖
Enter Saves the new value. Duplex=N *
On Line Returns the printer on -line. PCL 5e A4/A4
Table 3.4 Page 1 of 9
DocuPrint 4512/4512N User Guide
Page 59

Using the Control Panel
Table 3.4 Using the Control Panel to set printer operation
Task
Change the bind
†
setting
Controls print
orientati on f or du pl ex
(two-sided) printing.
Choices:
Long Edge
Short Edge
†
.
,
When the D u pl e x it em
is set to On.
Change the
resolution setting.
Sets the print
resolution in dpi.
Choices:
, 300
600
Key Pres s
Sequence
On Line Takes the printer off-line.
Item Displays the Copies item.
Item Displays the Font Number item.
Item Displays the Duplex item.
Item Displays the Bind item.
Up or
Down
Enter Saves the new value.
On Line Returns the printer on -line.
On Line Takes the printer off-line.
Menu Displays the Job Menu.
Item Displays the Resolution item.
Up or
Down
†
Action/Response Display Shows
Toggles the binding setting.
Toggles the resolution settin g.
(continued)
Printing Men u
Copies=X *
Font Number=X *
Duplex=On *
Bind=X *
Bind=N
Bind=N *
PCL 5e A4/A4
Printing Men u
Job Menu
Resolution=X *
Resolution=N
Change the page
protection setting.
Control s how the
printer completes a
job that is causing a
data loss error.
Choices:
, On
AUTO
Enter Saves the new value.
On Line Returns the printer on -line.
On Line Takes the printer off-line.
Menu Displays the Job Menu.
Item Displays the Resolution item.
Item Displays the Page P item.
Up or
Down
Enter Saves the new value.
On Line Returns the printer on -line.
Toggles the page protectio n setting.
Chapter 3: The Control Panel ❖
Resolution=N *
PCL 5e A4/A4
Printing Men u
Job Menu
Resolution=X *
Page P=X *
Page P=N
Page P=N *
PCL 5e A4/A4
Table 3.4 Page 2 of 9
3-9
Page 60
Using the Control Panel
Table 3.4 Using the Control Panel to set printer operation
Task
Change the state
saving setting.
Controls whether or
not the printer saves
data in memory when
switching between
PCL 5e and Postscript
emulation.
Choices:
Off
, On
Change the
emulation setting.
Sets the base printer
emulation.
Choices:
PCL 5e
, PS2, AUTO,
HEX
Key Pres s
Sequence
On Line Takes the printer off-line. Printing Menu
Menu Displays the Job Menu. Job Menu
Item Displays the Resolution item. Resolution=X *
Item Displays the Page P item. Page P=X *
Item Displays the St Saving item. St Saving=X *
Up or
Down
Enter Saves the new value. St Saving=N *
On Line Returns the printer on -line. PCL 5e A4/A4
On Line Takes the printer off-line. Printing Menu
Menu Displays the Job Menu. Job Menu
Item Displays the Resolution item. Resolution=X *
Item Displays the Page P item. Page P=X *
Item Displays the St Saving item. St Saving=X *
Item Displays the Emulation item. Emulation=X *
†
Action/Response Display Shows
Toggles the state saving setting. St Saving=N
(continued)
3-10 ❖
Up or
Down
Enter Saves the new value. Emulation=N *
On Line Returns the printer on -line. PCL 5e A4/A4
DocuPrint 4512/4512N User Guide
Changes the emulation setting. Emulation=N
Table 3.4 Page 3 of 9
Page 61
Using the Control Panel
Table 3.4 Using the Control Panel to set printer operation
Task
Change the
warning message
setting.
Controls the display
of memory-related
warning messages.
Choices:
On
, Off
Change the
manual feed
setting.
Controls the override
of manual paper feed
requests from
computer
applications.
Choices:
On
, Off
Key Pres s
Sequence
On Line Takes the printer off-line. Printing Menu
Menu Displays the Job Menu. Job Menu
Menu Displays the Config Menu. Config Menu
Item Displays the Warn Msg item. Warn Msg=X *
Up or
Down
Enter Saves the new value. Warn Msg=N *
On Line Returns the printer on -line. PCL 5e A4/A4
On Line Takes the printer off-line. Printing Menu
Menu Displays the Job Menu. Job Menu
Menu Displays the Config Menu. Config Menu
Item Displays the Warn Msg item. Warn Msg=X *
Item Displays the Manual Set item. Manual Set=X *
Up or
Down
Enter Saves the new value. Manual Set=N *
†
Action/Response Display Shows
Toggles the warning messages setting. Warn Msg=N
Toggles the manual feed setting. M anual Set=N
(continued)
On Line Returns the printer on -line. PCL 5e A4/A4
Table 3.4 Page 4 of 9
Chapter 3: The Control Panel ❖
3-11
Page 62

Using the Control Panel
Table 3.4 Using the Control Panel to set printer operation
Task
Change the high
speed setting.
Controls data transfer
speed to slower or
older co mputers.
Choices:
On
, Off
Change the
advanced
functions setting.
Controls whether or
not the printer will
send status messages
to the computer.
Choices:
On
, Off
Key Pres s
Sequence
On Line Takes the printer off-line. Printing Menu
Menu Displays the Job Menu. Job Menu
Menu Displays the Config Menu. Config Menu
Item Displays the Warn Msg item. Warn Msg=X *
Item Displays the Manual Set item. Manual Set=X *
Item Displays the High Speed item. High Speed=X *
Up or
Down
Enter Saves the new value. High Speed=N *
On Line Returns the printer on -line. PCL 5e A4/A4
On Line Takes the printer off-line. Printing Menu
Menu Displays the Job Menu. Job Menu
Menu Displays the Config Menu. Config Menu
Item Displays the Warn Msg item. Warn Msg=X *
Item Displays the Manual Set item. Manual Set=X *
Item Displays the High Speed item. High Speed=X *
Item Displays the Adv Fnctns item. Adv Fnc tns=X *
†
Action/Response Display Shows
Toggles the high speed setting. High Speed=N
(continued)
3-12 ❖
Up or
Down
Enter Saves the new value. Adv Fnctns=N *
On Line Returns the printer on -line. PCL 5e A4/A4
DocuPrint 4512/4512N User Guide
Toggles the advanced functions setting. Adv Fnctns=N
Table 3.4 Page 5 of 9
Page 63

Using the Control Panel
Table 3.4 Using the Control Panel to set printer operation
Task
Change the baud
rate setting.
Controls the rate at
which data is
transferred between
the computer and the
printer through the
optional serial
interface.
Choices:
300, 600, 1200, 2400,
9600
4800,
38400, 57600
, 19200,
Change the data
bit setting.
Controls a
communications
parameter for the
optional serial
interface.
Choices:
8
, 7
Key Pres s
Sequence
On Line Takes the printer off-line. Printing Menu
Menu Displays the Job Menu. Job Menu
Menu Displays the Config Menu. Config Menu
Menu Displays the Serial Menu (if present). Serial Menu
Item Displays the Baud Rate item. Baud Rate=X *
Up or
Down
Enter Saves the new value. Baud Rate=N *
On Line Returns the printer on -line. PCL 5e A4/A4
On Line Takes the printer off-line. Printing Menu
Menu Displays the Job Menu. Job Menu
Menu Displays the Config Menu. Config Menu
Menu Displays the Serial Menu (if present). Serial Menu
Item Displays the Baud Rate item. Baud Rate=X *
Item Displays the Data Bit item. Data Bit=X *
Up or
Down
†
Action/Response Display Shows
Changes the baud rate setting. Baud Rate=N
Changes the data bit setting. Data Bit=N
(continued)
Enter Saves the new value. Data Bit=N *
On Line Returns the printer on -line. PCL 5e A4/A4
Table 3.4 Page 6 of 9
Chapter 3: The Control Panel ❖
3-13
Page 64

Using the Control Panel
Table 3.4 Using the Control Panel to set printer operation
Task
Change the parity
setting.
Controls a
communications
parameter for the
optional serial
interface.
Choices:
None
, Even, Odd
Change the
Robust XON
setting.
Controls a datastream
handshaking protocol
for the optional serial
interface.
Choices:
On
, Off
Key Pres s
Sequence
On Line Takes the printer off-line. Printing Menu
Menu Displays the Job Menu. Job Menu
Menu Displays the Config Menu. Config Menu
Menu Displays the Serial Menu (if present). Serial Menu
Item Displays the Baud Rate item. Baud Rate=X *
Item Displays the Data Bit item. Data Bit=X *
Item Displays the Parity item. Parity=X *
Up or
Down
Enter Saves the new value. Parity=N *
On Line Returns the printer on -line. PCL 5e A4/A4
On Line Takes the printer off-line. Printing Menu
Menu Displays the Job Menu. Job Menu
Menu Displays the Config Menu. Config Menu
Menu Displays the Serial Menu (if present). Serial Menu
Item Displays the Baud Rate item. Baud Rate=X *
Item Displays the Data Bit item. Data Bit=X *
Item Displays the Parity item. Parity=X *
†
Action/Response Display Shows
Changes the parity setting. Parity=N
(continued)
3-14 ❖
Item Displays the Robust XON item. Robust XON=X *
Up or
Down
Enter Saves the new value. Robust XON=N *
On Line Returns the printer on -line. PCL 5e A4/A4
DocuPrint 4512/4512N User Guide
Changes the Robust XON sett ing. Robust XON=N
Table 3.4 Page 7 of 9
Page 65

Using the Control Panel
Table 3.4 Using the Control Panel to set printer operation
Task
Change the DTR
Polarity setting.
Controls the
configuration of Data
Terminal Ready
polarity for the
optional serial
interface.
Choices:
High
, Low
Key Pres s
Sequence
On Line Takes the printer off-line. Printing Menu
Menu Displays the Job Menu. Job Menu
Menu Displays the Config Menu. Config Menu
Menu Displays the Serial Menu (if present). Serial Menu
Item Displays the Baud Rate item. Baud Rate=X *
Item Displays the Data Bit item. Data Bit=X *
Item Displays the Parity item. Parity=X *
Item Displays the Robust XON item. Robust XON=X *
Item Displays the DTR Polarity item. DTR Polarity=X *
Up or
Down
Enter Saves the new value. DTR Polarity=N *
On Line Returns the printer on -line. PCL 5e A4/A4
†
Action/Response Display Shows
Changes the polarity setting . DTR Polarity=N
(continued)
Change the print
screen setting.
Controls the default
symbol set to allow
80 characters per line
on A4 paper.
Choices:
OFF
, 850, 852
On Line Takes printer off-line. Printing Men u
Menu Displays Job Menu. Job Menu
Menu Displays Config Menu. Conf ig Me nu
Menu Displays Serial Menu (if present). S eri al Menu
Menu Displays Test Menu. Test Menu
Menu Displays Misc Menu. Misc Menu
Item Displays Prt Screen item. Prt Screen=X *
Up or
Down
Enter Saves the new value. Prt Screen=N *
On Line Returns printer on-lin e. PCL 5e A4/A4
Changes the screen dump setting. Prt Scree n=N
Table 3.4 Page 8 of 9
Chapter 3: The Control Panel ❖
3-15
Page 66

Using the Control Panel
Table 3.4 Using the Control Panel to set printer operation
Task
Change the
Message setting.
Sets the language of
display panel
messages.
Choices:
English
, FRENCH,
GERMAN,
ITALIAN, PORTUG,
RUSSIAN, SPANISH
Key Pres s
Sequence
On Line Takes printer off-line. Printing Men u
Menu Displays Job Menu. Job Menu
Menu Displays Config Menu. Conf ig Me nu
Menu Displays Serial Menu (if present). S eri al Menu
Menu Displays Test Menu. Test Menu
Menu Displays Misc Menu. Misc Menu
Item Displays Prt Screen item. Prt Screen=X *
Item Displays Message item. Message=X *
Up or
Down
Enter Saves the new value. Message=N *
On Line Returns printer on-lin e. PCL 5e A4/A4
†
Action/Response Display Shows
Changes the message language setti ng. Message=N
(continued)
Table 3.4 Page 9 of 9
† The number of menus and menu items will v ary, depending on whet he r or not you have option boards installed in the printer.
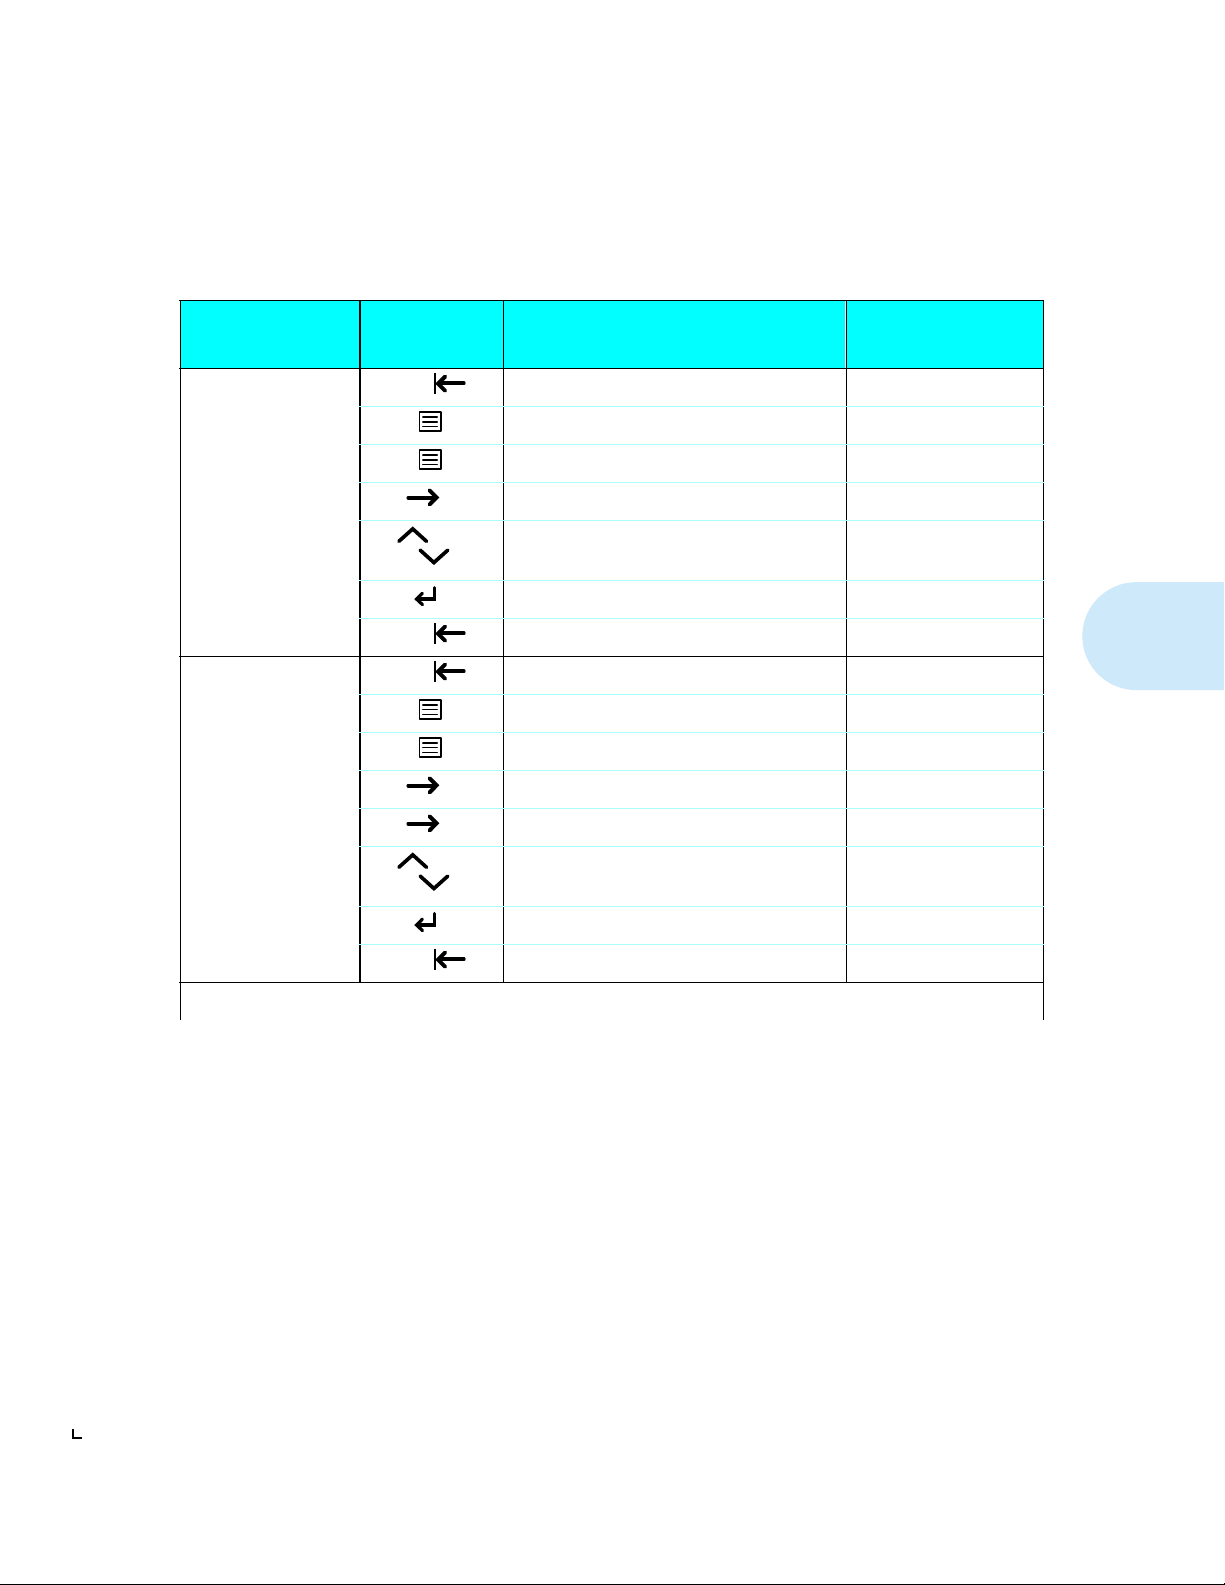
Therefore, the number of times you have to press the Menu or Item key may vary from that shown in this table.
3-16 ❖
DocuPrint 4512/4512N User Guide
Page 67

Using the Control Panel
Printing Test Sheets
Table 3.5 lists the procedures for printing the various test prints.
Table 3.5 Using the Control Panel to print test sheets
Task
Print the
Configuration
Sheet.
Lists the options you
have installed and the
current settings for
each option i n the
Control Panel’s menu
system.
Print the PCL 5e
Font List.
Shows which PCL
fonts are currently
available. The list
includ es resident
fonts and do wnl oaded
fonts.
Key Pres s
Sequence
On Line Takes the printer off-line.
Menu Displays the Job Menu.
Menu Displays the Config Menu.
Menu Displays the Serial Menu (if present).
Menu Displays the Test Menu.
Item Displays the Config Sheet item.
Enter Prints the Configuration Sheet.
On Line Returns the printer on -line.
On Line Takes the printer off-line.
Menu Displays the Job Menu.
Menu Displays the Config Menu.
Menu Displays the Serial Menu (if present).
Menu Displays the Test Menu.
Item Displays the Config Sheet item.
†
Action/Response Display Shows
Printing Men u
Job Menu
Config Menu
Serial Menu
Test Menu
Config Sheet
Config Sheet
PCL 5e A4/A4
Printing Men u
Job Menu
Config Menu
Serial Menu
Test Menu
Config Sheet
Item Displays the PCL 5e Font List item.
Enter Prints the PCL 5e Font List.
On Line Returns the printer on -line.
Chapter 3: The Control Panel ❖
PCL 5e Font List
PCL 5e Font List
PCL 5e A4/A4
Table 3.5 Page 1 of 3
3-17
Page 68

Using the Control Panel
Table 3.5 Using the Control Panel to print test sheets
Task
Print the PS2 Font
List.
Shows which
PostScript f onts are
currently available (if
the PostScript optio n
has been installed).
The list includes
resident fonts and
downloaded fonts.
Print the PCL 5e
Demo Page.
Provides a sample of
the printer’s
capabilities and lists
the printer’s key
features.
Key Pres s
Sequence
On Line Takes the printer off-line. Printing Menu
Menu Displays the Job Menu. Job Menu
Menu Displays the Config Menu. Config Menu
Menu Displays the Serial Menu (if present). Serial Menu
Menu Displays the Test Menu. Test Menu
Item Displays the Config Sheet item. Config Sheet
Item Displays the PCL 5e Font List item. PCL 5e Font List
Item Displays the PS2 Font List item. PS2 Font List
Enter Prints the PS2 Font List. PS2 Font Lis t
On Line Returns the printer on -line. PCL 5e A4/A4
On Line Takes the printer off-line. Printing Menu
Menu Displays the Job Menu. Job Menu
Menu Displays the Config Menu. Config Menu
Menu Displays the Serial Menu (if present). Serial Menu
Menu Displays the Test Menu. Test Menu
†
Action/Response Display Shows
(continued)
3-18 ❖
Item Displays the Config Sheet item. Config Sheet
Item Displays the PCL 5e Font List item. PCL 5e Font List
Item Displays the PS2 Font List item. PS2 Font List
Item Displays the PCL 5e Demo Page item. PCL 5e Demo Pag e
Enter Prints the PCL 5e Demo Page. P CL 5e Demo Page
On Line Returns the printer on -line. PCL 5e A4/A4
Table 3.5 Page 2 of 3
DocuPrint 4512/4512N User Guide
Page 69

Using the Control Panel
Table 3.5 Using the Control Panel to print test sheets
Task
Print the PS2
Demo Page.
Provides a sample
of the printer’s
PostScript capabilities
(if the Pos t Script
option has been
installed).
† The number of menus and menu items will v ary, depending on whet he r or not you have option boards installed in the printer.
Therefore, the number of times you have to press the Menu or Item key may vary from that shown in this table.
Key Pres s
Sequence
On Line Takes the printer off-line. Printing Menu
Menu Displays the Job Menu. Job Menu
Menu Displays the Config Menu. Config Menu
Menu Displays the Serial Menu (if present). Serial Menu
Menu Displays the Test Menu. Test Menu
Item Displays the Config Sheet item. Config Sheet
Item Displays the PCL 5e Font List item. PCL 5e Font List
Item Displays the PS2 Font List item. PS2 Font List
Item Displays the PCL 5e Demo Page item. PCL 5e Demo Pag e
Item Displays the PS2 Demo Page item. PS2 Demo Page
Enter Prints the PS2 Demo Page. PS2 Demo Page
On Line Returns the printer on -line. PCL 5e A4/A4
†
Action/Response Display Shows
(continued)
Table 3.5 Page 3 of 3
Chapter 3: The Control Panel ❖
3-19
Page 70

Using the Control Panel
Setting Power Saver
Mode
The DocuPrint 4512 conforms to the U.S. EPA Energy Star power saver
mode specifications. By default, the printer’s power consumption drops
to less than 30 watts when no data is received for a period of 30 minutes.
Other power saving modes are available that reduce power consumption
to less than 10% of peak consumption after 15, 30, or 45 minutes.
To set the power saver mode:
Power off the printer.
1
Press Data Clear and hold the key down while powering the
2
printer back on.
The display will read:
POWER SAVE 30
Press Form Feed or Data Clear to cycle through the power
3
saver choices.
POWER SAVE 15
POWER SAVE 30
POWER SAVE 45
When the value you wa nt is displayed, turn the printer off.
4
Printing Simplex
and Duplex
Demo Pages
3-20 ❖
DocuPrint 4512/4512N User Guide
Wait 10 to 15 seconds, then turn the printer back on.
5
The new value will then be set.
The DocuPrint 4512 has a Demo Page Mode in which demo pages can
be printed by a single key press. To enter Demo Page Mode:
Power off the printer.
1
Press Form Feed and Data Clear and hold the keys down
2
while powering the printer back on.
The display will read:
DEMO PAGE
Page 71

Using the Control Panel
To pr int a simplex de mo page, press Ent er .
3
To pr int a duplex dem o page, press Up .
If the PostScript option is installed, the PS2 demo pa ges will be printed.
Otherwise, t he PCL 5e demo pages will be printed.
To cancel Demo Page Mode, either power off the printer or
4
simultaneou sly press Menu , Up , and Down .
Chapter 3: The Control Panel ❖
3-21
Page 72

The Control Panel
Printer
Parameters and
Default Settings
Note
Table 3.6, starting on the next page, contains an alphabetical listing of
all Control Panel menu items. For each item listed, you will find:
• The menu item.
• The menu under which the item is located.
• All possible settings for the item.
• The factory default setting for the item. A
it is a
factory default setting
• A description of the item.
You can normally override many of the printer’s default settings thr ough
your applications, such as the font(s) to be used for a print job.
.
boldfaced
setting means
3-22 ❖
DocuPrint 4512/4512N User Guide
Page 73

Printer Parameters and Default Settings
Table 3.6 Control Panel menu item s, settin gs, an d descr ipti ons
Menu Item,
Location
,
Description
Setting(s)
Adv Fnctns
Config Menu
On
, Off
Baud Rate
Serial Menu
300, 600, 1200, 2400, 4800,
9600
†
Appears only when the
serial interface option is
installed.
†
, 19200, 38400, 57600
Bind
Printing Menu
Long Edge
, Short Edge
Copies
Printing Menu
1
~ 999
Data Bit
Serial Menu
8
†
Appears only when the
DTR Polarity
Serial Menu
†
, 7
serial interface option is
installed.
†
When set to On, allows status messages to be sent to the computer through the printer’s
bi-directional parallel port.
Determines the rate at which data is tra nsferred between the computer and the printer.
Older computers require slower settings. Refer to you r computer manual.
Sets the binding of the print job for duplex printing.
Sets how many copies to print.
Sets 7 or 8 bit communications.
Printer and host values must match.
Sets the configuration of Data Terminal Ready polarity, which determines whether the
signal at pin 20 of the serial interface connector is high or low when the printer is ready.
High
, Low
†
Appears only when the
serial interface option is
installed.
Table 3.6 Page 1 of 3
Chapter 3: The Control Panel ❖
3-23
Page 74

Printer Parameters and Default Settings
Table 3.6 Control Panel menu item s, settin gs, an d descr ipti ons
Menu Item,
Location
,
Description
Setting(s)
Duplex
Printing Menu
Off
, On
Emulation
Job Menu
PCL 5e
†
Appears only when a
PostScript op tion is
installed.
†
, PS2, AUTO, HEX
Font Number
Printing Menu
0
-45
High Speed
Config Menu
On
, Off
When set to On, enables duplex (two-sided printing).
Sets the base printer emulation.
Sets the font number of the printer ’s base font.
The number varies according to how many fonts are installed on the printer.
Controls data transfer speed.
This item should be set to
Off
for slower or older computers. Setting i t to On
improves data transfer s peed.
(continued)
Manual Set
Config Menu
On
, Off
Message
Misc Menu
ENGLISH
GERMAN, ITALIAN,
PORTUG, RUSSIAN,
SPANISH
, FRENCH,
Page P
Job Menu
AUTO
, On
3-24 ❖
DocuPrint 4512/4512N User Guide
Controls processing of manual feed request from computer application. When set to
Off, causes paper to feed automatically from the paper tray even if the application
requests manual feed.
Sets the language for the messages that display on the Control Panel.
Controls how data is processed when DATA LOSS ERROR occurs.
If printing speed is a consideration, m ore memory may be required to make
effective use of this item.
Table 3.6 Page 2 of 3
Page 75

Printer Parameters and Default Settings
Table 3.6 Control Panel menu item s, settin gs, an d descr ipti ons
Menu Item,
Location
,
Description
Setting(s)
†
Parity
Serial Menu
None
, Even, Od d
†
Appears only when the
serial interface option is
installed.
Prt Screen
Misc Menu
OFF
, 850, 852
Resolution
Job Menu
600
, 300
Robust XON
Serial Menu
†
Sets the parity communications parameter.
Printer and host values must match.
Controls the default symbol set to allow 80 characters per line on A4 paper.
A4 paper is usually 77 characters wide. When set to
be able to accommodate 80 characters per line, and the default symbol set value
will correspond to PC-850 or PC-852. This item is useful when printin g th e 8 0
characters per line width of computer displays.
Sets the print resolution in dpi (dots per inch).
Controls the XON datastream handshaking protocol. When set to On, the printer sends
signals at one-second inte rvals to tell the hos t it is ready to receive data.
(continued)
850
or
852
, A4 width will
On
, Off
†
Appears only when the
serial interface option is
installed.
St Saving
Job Menu
Off
†
Used onl y when the
PostScript op tion is
installed.
†
, On
Warn Msg
Config Menu
On
, Off
Controls whether or not the printer saves data in memory when switching between PCL
5e and Po stscript emulatio n. When set t o
, the user area is cleared at emulation
Off
change.
Setting this item to On may require more memory.
Controls the display of memory-related warning messages. When set to On, Data Loss
Error and Data Memory Full messages w ill not be displayed.
Table 3.6 Page 3 of 3
Chapter 3: The Control Panel ❖
3-25
Page 76

3-26 ❖
DocuPrint 4512/4512N User Guide
Page 77

Chapter 4
Fonts
Fonts in Your Printer
Xerox Font Manager ...................................................................... 4-2
Intellifont .. ............................... ............................... ........................ 4-3
TrueType ........................................................................................ 4-3
Bitmap ............................................................................................ 4-4
PostScript . .................................... .................................... .............. 4-4
Printing Font Lists
Selecting Fonts
Changing the Font Number Setting ............................................... 4-6
Downloading Fonts
.......................................................................
..................... ............... ................ ............... .........
................ ........... .......... .......... ........... .......... .......... ....
..........................................................................
Chapter4
4-2
4-5
4-6
4-7
Chapter 4: Fonts ❖
4-1
Page 78

Fonts
Fonts in
Your Printer
Note
Xerox Font Manager
The DocuPrint 4512 base printer is equipped with 46 resident fonts that
can be used for PCL jobs:
• 10 TrueType™ scalable typefaces
• 35 Intellifont™ scalable typefaces
• 1 PCL Bitmap font
The PostScript option provides an additional 35 PostScript-compatible
fonts for PostScript jobs.
To review the fonts in your printer, you can print font lists, as described
in the section “Printing Font Lists” (page 4-5).
The Xerox Font Manager ships with 110 fonts. Most important, the
Xerox Font Manager uses Agfa’s new MicroType font compression
technology, designed for high throughput of all type styles with
uncompromised ty pe rend er ing.
The Xerox Font Manager also includes a number of productivity
enhancements, such as double clicking for font previews, on-demand
drive search, font grouping, and available font listings. In addition, the
Xerox Font Manager installs and de-installs all the major Windows
fonts, including TrueType, PostScript, screen bitmaps, and MicroType.
4-2 ❖
DocuPrint 4512/4512N User Guide
Page 79

Fonts in Your Printer
Intellifont
Table 4.1 lists the 35 Intellifont scalable typefaces that are available in
the DocuPrint 4512.
Table 4.1 DocuPrint 4512 base
printer Intellifont
fonts
Antique Olive ™
Antique Olive Bold
Antique Olive Italic
Albertus™ Medium
Albertus Extra Bold
CG Omega
CG Omega Bold
CG Omega Bold Italic
CG Omega Italic
CG Times
CG Times Bold
CG Times Bold Italic
CG Times Italic
Clarendon Condensed
Coronet™
Courier
Courier Bold
Courier Bold Italic
Courier Italic
®
®
Garamond Antiqua
Garamond Halbfett
Garamond Kursiv
Garamond Kursiv Halbfett
Letter Gothic
Letter Gothic Bold
Letter Gothic Italic
Marigold
®
Univers
Univers Medium Italic
Univers Bold
Univers Bold Italic
Univers Medi um Condensed
Univers Medium Condensed Italic
Univers Bold Condensed
Univers Bold Condensed Italic
Medium
TrueType
Table 4.2 lists the ten TrueType typefaces that are available in the
DocuPrint 4512.
Table 4.2 DocuPrint 4512 base
printer TrueType
fonts
Arial™
Arial Bold
Arial Bold Italic
Arial Italic
Symbol
Times New Roman
Times Ne w Roman Bol d
Times Ne w Roman Bol d Ita lic
Times Ne w Roman I talic
Wingdings
Chapter 4: Fonts ❖
®
4-3
Page 80

Fonts in Your Printer
Bitmap
PostScript
There is one bitmap font available in the DocuPrint 4512:
Line Printer
When the PostScript option is installed, there are 35 resident
PostScript-compatible fonts available for printing PostScript jobs (as
shown in Table 4.3).
Table 4.3 DocuPrin t 4512 op tiona l PostScrip t fonts
ITC Avant Garde Gothic® Book
ITC Avant Garde Gothic Book Oblique
ITC Avant Garde Gothic Demi
ITC Avant Garde Gothic Demi Oblique
®
®
®
Narrow
Demi
ITC Bookman
ITC Bookman Demi Italic
ITC Bookman Light
ITC Bookman Light Italic
®
Courier
Courier Bold
Courier Bold Oblique
Courier Oblique
Helvetica
Helvetica Bold
Helvetica Bold Oblique
Helvetica Oblique
Helvetica
Helvetica Narrow Bold
Helvetica Narrow Bold Oblique
Helvetica Narro w Obliq ue
®
New Century Schoolbook
New Century Schoolbook Bol d
New Century Schoolbook Bold Italic
New Century Schoolbook Italic
®
Palatino
Palatino Bold
Palatino Bold Italic
Palatino Italic
Symbol
®
Times
Roman
Times Bold
Times Bold Italic
Times Italic
ITC Zapf Chancery
ITC Zapf Dingbats
®
Roman
®
Medium Italic
4-4 ❖
DocuPrint 4512/4512N User Guide
Page 81

Fonts
Printing
The DocuPrint 4512 can print font lists that show which fonts are
currently available for use. The lists include resident fonts and
Font Lists
downloaded fonts.
Table 4.4 lists the procedures for printing font lists.
Table 4.4 Using the Control Panel to print font lists
Task
Print the PCL 5e
Font List.
Key Pres s
Sequence
On Line Takes the printer off-line.
Menu Displays the Job Menu.
Menu Displays the Config Menu.
Menu Displays the Serial Menu (if present).
Menu Displays the Test Menu.
Item Displays the Config Sheet item.
Item Displays the PCL 5e Font List item.
Enter Prints the PCL 5e Font List.
On Line Returns the printer on -line.
†
Action/Response Display Shows
Printing Men u
Job Menu
Config Menu
Serial Menu
Test Menu
Config Sheet
PCL 5e Font List
PCL 5e Font List
PCL 5e A4/A4
Print the PS2 Font
List.
† The number of menus and menu items will v ary, depending on whet he r or not you have option boards installed in the printer.
Therefore, the number of times you have to press the Menu or Item key may vary from that shown in this table.
On Line Takes the printer off-line.
Menu Displays the Job Menu.
Menu Displays the Config Menu.
Menu Displays the Serial Menu (if present).
Menu Displays the Test Menu.
Item Displays the Config Sheet item.
Item Displays the PCL 5e Font List item.
Item Displays the PS2 Font List item.
Enter Prints the PS2 Font List.
On Line Returns the printer on -line.
Chapter 4: Fonts ❖
Printing Men u
Job Menu
Config Menu
Serial Menu
Test Menu
Config Sheet
PCL 5e Font List
PS2 Font List
PS2 Font List
PCL 5e A4/A4
4-5
Page 82

Fonts
Selecting Fonts
Selecting fonts is rarely done manually, due to the use of WYSIWYG
(What You See Is What You Get) application software, which enables
you to control the look of your output from the computer monitor.
There may be times, however, when you want to print older text files
without going through application software. At such times, you can
print files straight to the printer, using the printer’s default font. Any of
the printer’s resident fonts can be set as the default, as described in the
following section.
Changing the Font
Number Setting
You can set the printer’s default font at the Control Panel. Table 4.5 lists
the procedure. The factory default is 0 (zero). The ‘=X’ indicates the
current setting, the ‘=N’ indicates a new setting, and the asterisk (*)
indicates that the new setting has been entered.
Table 4.5 Using the Control Panel to change the font number setting
Task
Change the Font
Number setting.
Choices:
0
-45
Key Pres s
Sequence
On Line Takes the printer off-line.
Item Displays the Copies item.
Item Displays the Font Number item.
†
Action/Response Display Shows
Printing Men u
Copies=X
Font Number=X
Up or Down Changes the font number.
Enter Saves the new value.
On Line Returns the printer on -line.
† The number of menus and menu items will v ary, depending on whet he r or not you have option boards installed in the printer.
Therefore, the number of times you have to press the Menu or Item key may vary from that shown in this table.
Font Number=N
Font Number=N*
PCL 5e A4/A4
The PCL 5e Font List contains the names and corresponding numbers of
the fonts that can be set with the Font Number item. Downloaded fonts
cannot be selected through the Control Panel.
Note
4-6 ❖
DocuPrint 4512/4512N User Guide
Page 83

Fonts
Downloading
Fonts
Note
Xerox DocuPrint 4512 printer drivers provide you with the ability to
download fonts to the printer.
• To download fonts you must first install the appropriate DocuPrint
4512 Windows 3.1/’95, Macintosh, Windows NT, or UNIX drivers.
See
Chapter 5: Printer Drivers
•“Temporary” fonts downloaded to printer memory on a job basis
are cleared from the printer’s memory after each job.
•“Permanent” fonts downloaded to printer memory are cleared from
the printer’s memory whenever the printer is powered OFF, and
whenever the printer switches PDLs and the
option is set to
(When
State Saving
cleared from printer memory when you power OFF the printer.)
The DocuPrint 4512 printer driver software contains Font Manager, a
utility that enables you to easily download fonts.
Off
.
.
State Saving
is set to On, “permanent” fonts are only
Chapter 4: Fonts ❖
4-7
Page 84

4-8 ❖
DocuPrint 4512/4512N User Guide
Page 85

Chapter 5
Printe r D ri vers
DocuPrint 4512 PCL 5e Emulation Printer Drivers
DocuPrint 4512 PostScript Printer Drivers
.....................................
................... ....
Chapter5
5-2
5-3
Chapter 5: Printer Drivers ❖
5-1
Page 86

Printer Drivers
DocuPrint 4512
PCL 5e
Emulation
The base DocuPrint 4512 supports the PCL printer drivers listed in
Table 5.1. To take full advantage of all the printer’s features when
printing PCL jobs, install the appropriate DocuPrint 4512 PCL 5e
emulation printer driver(s). (Consult your software application user
manual for instructions on installing a new printer driver.)
Printer Drivers
If the driver you need did not come with the printer, see
Appendix A: Ordering Information
also be available through on-line services and the Internet.)
Table 5.1 DocuPrint 4512 PCL 5e emulation printer drivers
Environment Printer Driver Diskette
†
DOS
Windows Windows 3.1 /
IBM OS/2 OS/2 Ver. 2.1 Xerox DocuPrint 451 2 PCL 5e Emulation Printer Driver
Microsoft Word Ver. 6.0 Xerox DocuPrint 4512 Printer Driver
WordPerfect Ver. 6.0 Xerox DocuPrint 4512 Printer Driver
Xerox DocuPr int 4512 PCL 5e Emulation Printer Driver
Windows 95
Windows NT 3.5 OnPAGE PCL 5e Emulation Printer Driver
for Micr osoft Windows 3.1/ Windows 95
for Microsoft Windows NT 3.5
. (Printer software and drivers may
for MS Word 6.0 for DOS
for WordPerfect 6.0 for DOS
for IBM OS/2 Ver. 2.1
OS/2 WARP Xerox DocuPrint 4512 PC L 5e Emu lation Printer Driver
for IBM OS/2 WARP
† If you are using a DOS application other than Microsoft Word or WordPerfect, use the HP LaserJet 4si printer driver supplied with
your applicati on software.
5-2 ❖
DocuPrint 4512/4512N User Guide
Page 87

Printer Drivers
DocuPrint 4512
PostScript
Printer Drivers
Table 5.2 DocuPrint 4512 PostScript printer drivers
Environment Printer Driver Diskette
Windows Windows 3.1 /
Windows 95
Windows NT 3.5 OnPAGE PS2 Printer Driver
IBM OS/2 OS/2 Ver. 2.1 Xerox DocuPrint 4512 PS2 Printer Driver
OS/2 WARP Xerox DocuPrint 4512 PS2 Printer Driver
Macintosh System 6.x OnPAGE
The PostScript option supports the PostScript drivers listed in Table 5.2.
To take full advantage of all the printer’s features when printing
PostScript jobs, install the appropriate DocuPrint 4512 PostScript
printer driver(s). (Consult your software application user manual for
instructions on installing a new printer driver.)
If the driver you need did not come with the printer, see
Appendix A: Ordering Information
also be available through on-line services and the Internet.)
Xerox DocuPrint 4512 PS2 Printer Driver
for Micr osoft Windows 3.1/ Windows 95
for Microsoft Windows NT 3.5
. (Printer software and drivers may
for IBM OS/2 Ver. 2.1
for IBM OS/2 WARP
UNIX
(SUN 4.1x,
SCO UNIX,
IBM AIX 3.1,
HP.UX on
HP 9000)
System 7.x OnPAGE
Document Manager Xerox Do cuPrint 4512 PS2 Prin t er Driver for SUN OS 4.1.3
Chapter 5: Printer Drivers ❖
5-3
Page 88

5-4 ❖
DocuPrint 4512/4512N User Guide
Page 89

Chapter 5
Printe r D ri vers
DocuPrint 4512 PCL 5e Emulation Printer Drivers
DocuPrint 4512 PostScript Printer Drivers
.....................................
................... ....
Chapter5
5-2
5-3
Chapter 5: Printer Drivers ❖
5-1
Page 90

Printer Drivers
DocuPrint 4512
PCL 5e
Emulation
The base DocuPrint 4512 supports the PCL printer drivers listed in
Table 5.1. To take full advantage of all the printer’s features when
printing PCL jobs, install the appropriate DocuPrint 4512 PCL 5e
emulation printer driver(s). (Consult your software application user
manual for instructions on installing a new printer driver.)
Printer Drivers
If the driver you need did not come with the printer, see
Appendix A: Ordering Information
also be available through on-line services and the Internet.)
Table 5.1 DocuPrint 4512 PCL 5e emulation printer drivers
Environment Printer Driver Diskette
†
DOS
Windows Windows 3.1 /
IBM OS/2 OS/2 Ver. 2.1 Xerox DocuPrint 451 2 PCL 5e Emulation Printer Driver
Microsoft Word Ver. 6.0 Xerox DocuPrint 4512 Printer Driver
WordPerfect Ver. 6.0 Xerox DocuPrint 4512 Printer Driver
Xerox DocuPr int 4512 PCL 5e Emulation Printer Driver
Windows 95
Windows NT 3.5 OnPAGE PCL 5e Emulation Printer Driver
for Micr osoft Windows 3.1/ Windows 95
for Microsoft Windows NT 3.5
. (Printer software and drivers may
for MS Word 6.0 for DOS
for WordPerfect 6.0 for DOS
for IBM OS/2 Ver. 2.1
OS/2 WARP Xerox DocuPrint 4512 PC L 5e Emu lation Printer Driver
for IBM OS/2 WARP
† If you are using a DOS application other than Microsoft Word or WordPerfect, use the HP LaserJet 4si printer driver supplied with
your applicati on software.
5-2 ❖
DocuPrint 4512/4512N User Guide
Page 91

Printer Drivers
DocuPrint 4512
PostScript
Printer Drivers
Table 5.2 DocuPrint 4512 PostScript printer drivers
Environment Printer Driver Diskette
Windows Windows 3.1 /
Windows 95
Windows NT 3.5 OnPAGE PS2 Printer Driver
IBM OS/2 OS/2 Ver. 2.1 Xerox DocuPrint 4512 PS2 Printer Driver
OS/2 WARP Xerox DocuPrint 4512 PS2 Printer Driver
Macintosh System 6.x OnPAGE
The PostScript option supports the PostScript drivers listed in Table 5.2.
To take full advantage of all the printer’s features when printing
PostScript jobs, install the appropriate DocuPrint 4512 PostScript
printer driver(s). (Consult your software application user manual for
instructions on installing a new printer driver.)
If the driver you need did not come with the printer, see
Appendix A: Ordering Information
also be available through on-line services and the Internet.)
Xerox DocuPrint 4512 PS2 Printer Driver
for Micr osoft Windows 3.1/ Windows 95
for Microsoft Windows NT 3.5
. (Printer software and drivers may
for IBM OS/2 Ver. 2.1
for IBM OS/2 WARP
UNIX
(SUN 4.1x,
SCO UNIX,
IBM AIX 3.1,
HP.UX on
HP 9000)
System 7.x OnPAGE
Document Manager Xerox Do cuPrint 4512 PS2 Prin t er Driver for SUN OS 4.1.3
Chapter 5: Printer Drivers ❖
5-3
Page 92

5-4 ❖
DocuPrint 4512/4512N User Guide
Page 93

Chapter 6
Troubleshooting
Contacting Technical Support
Before Calling for Service .............................................................. 6-2
Printer Operation Problems
Print Quality Problems
Control Panel Messages
Error Messages at Power On ....................................................... 6-18
Paper Jams
What Causes a Paper Jam? ......................................................... 6-19
Locating the Jam .......................................................................... 6-19
Clearing the Jam .......................................................................... 6-20
................. .......................... .......................... .................
.........................................................
.............................................................
................... .................................... ..............
.................................................................
Chapter6
6-2
6-3
6-8
6-15
6-19
Chapter 6: Troubleshooting ❖
6-1
Page 94

Troubleshooting
Contacting
Technical
Support
Before Calling
for Service
If you are unable to resolve a printing problem related to the printer by
using the instructions in this chapter, contact the dealer from which you
bought your printer or contact Xerox/Rank Xerox. However:
• If the problem is operating system related, consider contacting the
original manufacturer.
• If the problem is related to a specific application package, consider
contacting the original manufacturer.
• If the problem is driver related, consider accessing the Xerox
CompuServe or Internet site.
Before contacting your dealer or Xerox/Rank Xerox, please have the
following information available:
• Printer Serial No. (located on the inside of the printer, under the
Photoconduct o r / Drum)
• A Configuration Sheet
• Any error code or message displayed on the Control Panel
• A description of the problem
• Type of network (if problem is possibly network related)
6-2 ❖
DocuPrint 4512/4512N User Guide
Page 95

Troubleshooting
Printer
Consult Table 6.1 for corrective actions when the printer will not print
or when the printed output is not what you expect.
Operation
Problems
Table 6.1 Printer operation pro blem s
Problem Probable Cause Remedy
Power
Printer does not switch on. Printer is not connected to
power sour ce.
Power source defective. Check voltage rating of circuit.
Print data not received
Printer turns on, but will not
print data from the computer.
Printer is not on-line. Check if On Line indicator is glowing. If it is
Interface cable not secured. Reseat the interface cable at both the printer
Check all co nnections and power switches,
including at wall socket and on printer.
Check circuit breakers and fuses.
not, press the On Line key. A printer error may
have occurred. Check the printer display panel.
and computer ends.
Computer and printer settings
mismatch.
Computer co nnection problem. Check the printer cable connections. Test your
Computer not properly set up. Check the MS-DOS manual for mode settings
Confirm that the emulation selected on the
printer matches the printer driver on the
computer. Print out the Configuration Sheet
and compare with computer settings.
cable by using it with another printer that you
know works. Test your printer after connecting
it with another cable that you know works.
and the computer manual for I/O port settings.
Table 6.1 Page 1 of 5
Chapter 6: Troubleshooting ❖
6-3
Page 96

Printer Operation Problems
Table 6.1 Printer operation pro blem s
(continued)
Problem Probable Cause Remedy
Print data not received
Write Error Fault message
displayed.
Time Out Error message
displayed.
Bad cable. Check the interface cable connections. Test
your cable by using it with another printer that
you know works. Test your printer after
connecting it with another cable that you know
works.
Printer not on-line. Check if the printer is on-line. A printer error
other than PAPER OUT may have set the
printer off-line. Check the printer display
panel.
Time out error. Increase the time for I/O time-out in the
computer software.
If the problem occurs when printing from
DOS, try adding a Mode command to your
computer’s AUTOEXEC.BAT file. It can be
put on its own on a single line after the PATH
statement:
If you are using a parallel interface, add:
MODE LPT1:,,P
If you are using a serial interface, add (for
example):
MODE COM1: 9600,N,8,1,P
MODE LPT1:COM1
6-4 ❖
Table 6.1 Page 2 of 5
DocuPrint 4512/4512N User Guide
Page 97

Printer Operation Problems
Table 6.1 Printer operation pro blem s
(continued)
Problem Probable Cause Remedy
Printing Errors
Print job stalled. End of page code not received. If a long time elapses before a page prints and
the DATA indicator co ntinues flashing, the
printer has probably stalled. Press the On Line
key and then t he Form Fe ed key.
Full pages do not print. Job prematurely terminated. Check that all the data was received from the
comput er. If an application was exited before
the data was sent, th e computer may not have
sent the complete file data. The data file may
also have been corrupted before transmission.
If you cancel a print job from the computer,
partially printed pages may be produced.
Pages too complex (data loss
error).
Too many fonts transferred to
printer (data memory full error).
Try simplifying the file by using fewer
characters per li ne. Turn on page protection
and try to print the file again.
Install more memory if you wa nt to print
complex files.
Clearing soft fonts will free up memory. When
printing without additional memory, avoid
using too many soft fonts and macros.
Lowering the resolution to 300 dpi will also
reduce the memory requirements of a print job.
If you are getting a lot of memory error
messages, in stall more memory.
Interface cable faulty. Reseat the connectors at both the printer and
the computer ends. Check the cable by using it
with another printer.
Software application sending
wrong data.
To check if the application is causing the
problem, print plain t ext from DOS with the
Copy command or redirection, e.g.:
C:\copy filename.txt LPT1:
or
C:\dir >prn
Table 6.1 Page 3 of 5
Chapter 6: Troubleshooting ❖
6-5
Page 98

Printer Operation Problems
Table 6.1 Printer operation pro blem s
(continued)
Problem Probable Cause Remedy
Printing Errors
Printer ejects blank page. Print data. Check the print data sent from the computer. If
there are nat ural pag e breaks an d force d brea ks
close to e ach ot h er in a word processor f ile, the
applicat i on may sen d a blank page to the
printer.
Check the printing parameters in the
application to see if they are set to send extra
page eject commands.
Some network software inserts blank pages to
separate jobs.
Tape strip on Toner Cartridge. Remove the tape strip from a newly installed
Toner Cartridge .
Toner Ca rtridge empty. Replace the Toner Cartridge.
If you are printing a long run of pages
with more than 30% toner coverage,
the printer may not give the usual toner
status messages. Normally the printer
will give advice messages on the
display panel when toner runs out or is
low.
Paper size mismatch. Check that the page size setting in your
application matches the paper size(s) available
in the printer.
Multiple sheets fed. Remove the paper from the paper tray, fan the
edges, stra ight en it u p, and t hen pu t it ba ck into
the tray.
PostScript Printing Errors
A page listing PostScript
commands is output instead of
your print jo b.
A PostScript job fails to print. Insufficient memory. Either simplify the print job or install more
6-6 ❖
DocuPrint 4512/4512N User Guide
PCL 5e selected. Set the emulation parameter to PS2 o r Auto
and try printing the job again.
memory.
Table 6.1 Page 4 of 5
Page 99

Printer Operation Problems
Table 6.1 Printer operation pro blem s
(continued)
Problem Probable Cause Remedy
Print Speed Problems
Printing takes a long time. Toner supply low. Replace the Toner Cartridge.
Long time needed to print first
page.
Printer standby. Change the Power Saver mode (although the
printer will consume more power).
Paper Problems
Frequent paper ja ms. Overloaded tray. Remov e some pa per fr om the tray.
Unsuitable media. Check the paper specifications. See Table 2.1
on page 2-3.
Bad media. Check the pa per batch for creases, tears, ni ck s,
ragged edges, dirt, dampness, etc.
Paper size mismatch. Check that the page size setting in your
application matches the paper size(s) available
in the printer.
Print Character Problems
Wrong characters print. Characters not present in
printer.
Check that the typefaces and fonts that you are
trying to print are in the printer, installed in
your software, or on your computer.
Computer and printer settings
mismatch.
Chapter 6: Troubleshooting ❖
Check your emulation setting optio ns, and
parity and data bit communication settings.
Table 6.1 Page 5 of 5
6-7
Page 100

Troubleshooting
Print Quality
Table 6.2 lists common print quality problems, possible causes, and
recommended actions.
Problems
Table 6.2 Print quali ty proble ms
Problem
Spot deletions. Paper quality problem. Replace paper stock.
Photoconductor / Drum damaged. Replace the Photoconductor / Drum, as
Irregular faded patches of
print.
Paper quality prob l em. Replace paper stock.
Corotron parts dirty. Clean the transfer corotron and the main
Possible Cause(s) Corrective Action(s)
described in the section
Photocon ductor / Drum”
corotron, as described in the section
the Corotron Wires”
“Replacing th e
(page 7-6).
“Cleaning
(page 7-10).
6-8 ❖
Toner low or unevenly dist ributed. Carefully remove the Toner Cartridge and
Photoconductor / Drum unevenly
worn.
DocuPrint 4512/4512N User Guide
gently agitate it to distribute toner evenly.
Replace the Photoconductor / Drum, as
described in the section
Photocon ductor / Drum”
“Replacing th e
(page 7-6).
Table 6.2 Page 1 of 7
 Loading...