

Page 1

The Xerox
DocuPrint 4508
Desktop Laser Printer
User Guide
Page 2

Xerox Corporation Xerox Canada, Limited
701 South Aviation Blvd. 5650 Yonge Street
El Segundo, CA North York, Ontario
90245 Canada
USA M2M 4G7
Americas Operations Support Rank Xerox, Limited
800 Long Ridge Road Parkway
Stamford, CT Marlow
06904-1600 Buckinghamshire
USA SL7 1YL
United Kingdom
Copyright © 1995, 1996 Xerox Corporation. All Rights Reserved.
Copyright protection claimed includes all forms of matters of
copyrightable materials and information now allowed by statutory or
judicial law or hereinafter granted, including without limitation,
material generated from the software programs which are displayed on
the screen such as styles, templates, icons, screen displays, looks, etc.
XEROX®, The Document Company®, the stylized X, DocuPrint, and
4508 are trademarks of Xerox Corporation or its subsidiaries.
PCL, HP, and LaserJet, Intellifont, EconoMode, Bi-Tronics and
Resolution Enhancement Technology (RET) are trademarks of
Hewlett Packard Company. IBM is a trademark of International
Business Machines Corporation. Microsoft, Microsoft Windows,
Microsoft Word, MS, and MS-DOS are trademarks of Microsoft
Corporation. Univers is a trademark of Linotype AG or its
subsidiaries. WordPerfect is a trademark of WordPerfect
Corporation. Centronics is a trademark of Centronics Corporation.
Macintosh and TrueType are trademarks of Apple Computer,
Incorporated. OnPage is a trademark of Computer:applications,
Incorporated. All other product names are trademarks/tradenames
of their respective owners.
PCL and PCL 5e are trademarks of Hewlett Packard Company. This
printer contains an emulation of the Hewlett Packard PCL 5e
command language, recognizes HP PCL 5e commands, and
processes these commands in a manner comparable with Hewlett
Packard LaserJet printer products.
Notice
Specifications described in this publication are subject to change
without notice. Use of some features may be limited by your
hardware or software configuration. Contact your dealer, Xerox, or
Rank Xerox for details.
Page 3

Table of Contentsi
Chapter 1 Overview of the Printer ................................................... 1-1
Overview of the Printer Features ......................................... 1-3
Chapter 2 Setting Up the Printer ...................................................... 2-1
Overview ............................................................................... 2-2
Printer Set-up ........................................................................ 2-3
Unpacking the Printer .......................................................... 2-4
Installing Components .......................................................... 2-6
Testing the Printer .............................................................. 2-10
Installing Software .............................................................. 2-11
Testing the Connection ...................................................... 2-12
Chapter 3 Using the Front Control Panel ........................................ 3-1
Overview ............................................................................... 3-2
Front Panel Key and LED Functions ..................................... 3-3
Resetting the Printer ............................................................ 3-6
Printing the Self Test Pages .................................................. 3-6
Chapter 4 Printing Documents .......................................................... 4-1
Overview ............................................................................... 4-2
DocuPrint 4508 User Guide ❖ i
Page 4

Table of Contents
Chapter 5 Using Software Tools ........................................................ 5-1
Chapter 6 Troubleshooting ................................................................ 6-1
Chapter 7 Maintenance ....................................................................... 7-1
Using the Paper Tray ............................................................ 4-2
Adjusting and Loading the Paper Tray ................................ 4-6
Using Manual Feed ............................................................... 4-7
Status Monitor and Remote Control Panel (RCP) ............... 5-2
The Status Monitor ............................................................... 5-3
The Remote Control Panel (RCP) ......................................... 5-4
Overview ............................................................................... 6-2
Front Panel LED Messages .................................................... 6-2
Remote Control Panel and Status Monitor Messages ........ 6-4
Clearing Paper Jams .............................................................. 6-8
Solving Print Quality Problems .......................................... 6-13
Overview ............................................................................... 7-2
Printer Cartridge ................................................................... 7-2
Adjusting the Print Density .................................................. 7-4
Cleaning the Printer ............................................................. 7-5
Chapter 8 Fonts ..................................................................................... 8-1
Definition of Fonts ................................................................ 8-2
Internal and Soft Fonts ......................................................... 8-4
Selecting Fonts ...................................................................... 8-5
Appendix A Printer Commands ............................................................ A-1
PCL Printer Commands ......................................................... A-2
HP-GL/2 Printer Commands ................................................ A-14
PJL Commands .................................................................... A-17
Appendix B Options Installation .......................................................... B-1
RS232C Serial Interface Option Installation ........................ B-2
ii ❖ DocuPrint 4508 User Guide
Page 5

Table of Contents
SIMM Memory Module Installation ..................................... B-6
250-Sheet Lower Base Installation ....................................... B-9
Appendix C Ordering Information ....................................................... C-1
Appendix D Print Media Specifications .............................................. D-1
Paper and Envelope Sizes Supported .................................. D-2
Paper Specifications .............................................................. D-3
Envelope Specifications ........................................................ D-3
Adhesive Label Specifications .............................................. D-4
Appendix E Printer Technical Specifications ..................................... E-1
Appendix F Environmental Specifications ......................................... F-1
Appendix G Glossary .............................................................................. G-1
Index .............................................................................................. IX-1
DocuPrint 4508 User Guide ❖ iii
Page 6

iv ❖ DocuPrint 4508 User Guide
Page 7

Chapter 1
Overview of the Printer Chapter1
Overview of the Printer Features ........................................ 1-3
Chapter 1: Overview of the Printer ❖ 1-1
Page 8

Overview of the Printer
Engine, Resolution and Speed
• 600 x 600 dpi (dots per inch) printing resolution
• 8 ppm (pages per minute) print speed
• Up to 6000 sheets printing for one Printer Cartridge
(5% coverage)
• EconoMode to extend the Printer Cartridge life even
further
• Recyclable printer cartridge for environmental
protection
• Power Save mode/Energy Star
• Compact Size
Paper Handling
• Universal 250 sheet paper cassette (upgradeable to 500
with paper tray option) which accommodates variable
sizes of paper, including: A4, Letter, Executive, B5, Folio
and Legal paper
• Top output tray with a 125 sheet capacity (face down)
• Manual feed slot (single sheet bypass)
• Straight through paper path for transparencies, labels,
etc.
• Custom media supports for labels, envelopes and post
cards.
Computer Interfaces
• IEEE P-1284 compatible (bi-directional) parallel interface
(Nibble, Byte and ECP)
• An optional serial interface, maximum 115200 bps (bits
per second), XON/XOFF & DTR handshaking
• Automatic interface switching if serial interface is
installed.
1-2 ❖ DocuPrint 4508 User Guide
Page 9

Overview of the Printer Features
Memory
• 2MB base memory which is expandable to 34MB
• Various sizes of expansion SIMM memory to increase
printer efficiency and to provide capacity to print a
complex page: 2MB, 4MB, 16MB, 32MB
Languages
Enhanced PCL 5e Interpreter for DOS, OS/2 and Windows
users
Overview of
the Printer
Features
EconoMode
To reduce your printing costs by conserving toner when
you print drafts, proofs, and internal correspondence, there
are four EconoModes: 1/2, 1/4, 1/6, 1/8. This feature can be
selected using the Remote Control Panel on your PC. For
more information, refer to “The Remote Control Panel (RCP)”
in Chapter 5: Using Software Tools.
Power Save
To reduce your printing costs by reducing power
consumption when printer is not active for a period of time,
there are five time intervals you can choose using the
Remote Control Panel.
Software Tools
Remote Control Panel (RCP) and Status Monitor (SM)
features enable you to send commands to your printer from
your PC, and to view printer status and help messages on
your computer’s screen.
Chapter 1: Overview of the Printer ❖ 1-3
Page 10

Overview of the Printer Features
Enhanced PCL 5e
Printer language features software compatibility with all
previous PCL Emulations, faster printing performance,
built-in type scaling technology to allow you to create
thousands of fonts, built-in HP-GL/2 vector graphics (which
handles Bezier curves and other complex graphics), and
enhanced page formatting features.
Bi-Tronics Parallel Interface
Parallel interface for high speed two-way communication
between the printer and the host computer enables you to
change printer settings and view printer status messages on
your computer’s screen.
45 Scalable Typefaces
A versatile library of fonts is resident in the printer. This
ensures a professional image for reports, memos,
spreadsheets, letters, advertising literature and
announcements. You can scale these typefaces from 0.25
point to 999.75 points, depending on the capabilities of
your software.
Extended Fonts
110 additional fonts are available on disk, supplied with the
printer.
1-4 ❖ DocuPrint 4508 User Guide
Page 11

Chapter 2
Setting Up the Printer Chapter2
Overview ............................................................................... 2-2
Printer Set-up ........................................................................ 2-3
Physical Location .................................................................. 2-3
Environment ......................................................................... 2-4
Safety Precautions ................................................................ 2-4
Unpacking the Printer .......................................................... 2-4
Installing Components ......................................................... 2-6
Printer Cartridge ................................................................... 2-6
Paper Tray ............................................................................ 2-8
Interface Cable ..................................................................... 2-9
Power Cord .......................................................................... 2-9
Testing the Printer .............................................................. 2-10
Installing Software ............................................................. 2-11
Windows Setup .................................................................. 2-11
DOS Setup ......................................................................... 2-11
OS/2 Setup ......................................................................... 2-12
Testing the Connection ...................................................... 2-12
Chapter 2: Setting Up the Printer ❖ 2-1
Page 12

Setting Up the Printer
Overview
In this chapter, you will learn how to install the printer. You
will also learn how to handle the Printer Cartridge and paper
tray.
Please read and perform all the steps in this chapter before
you attempt to configure and operate your printer.
2-2 ❖ DocuPrint 4508 User Guide
Page 13

Printer Set-up
Setting Up the Printer
Physical Location
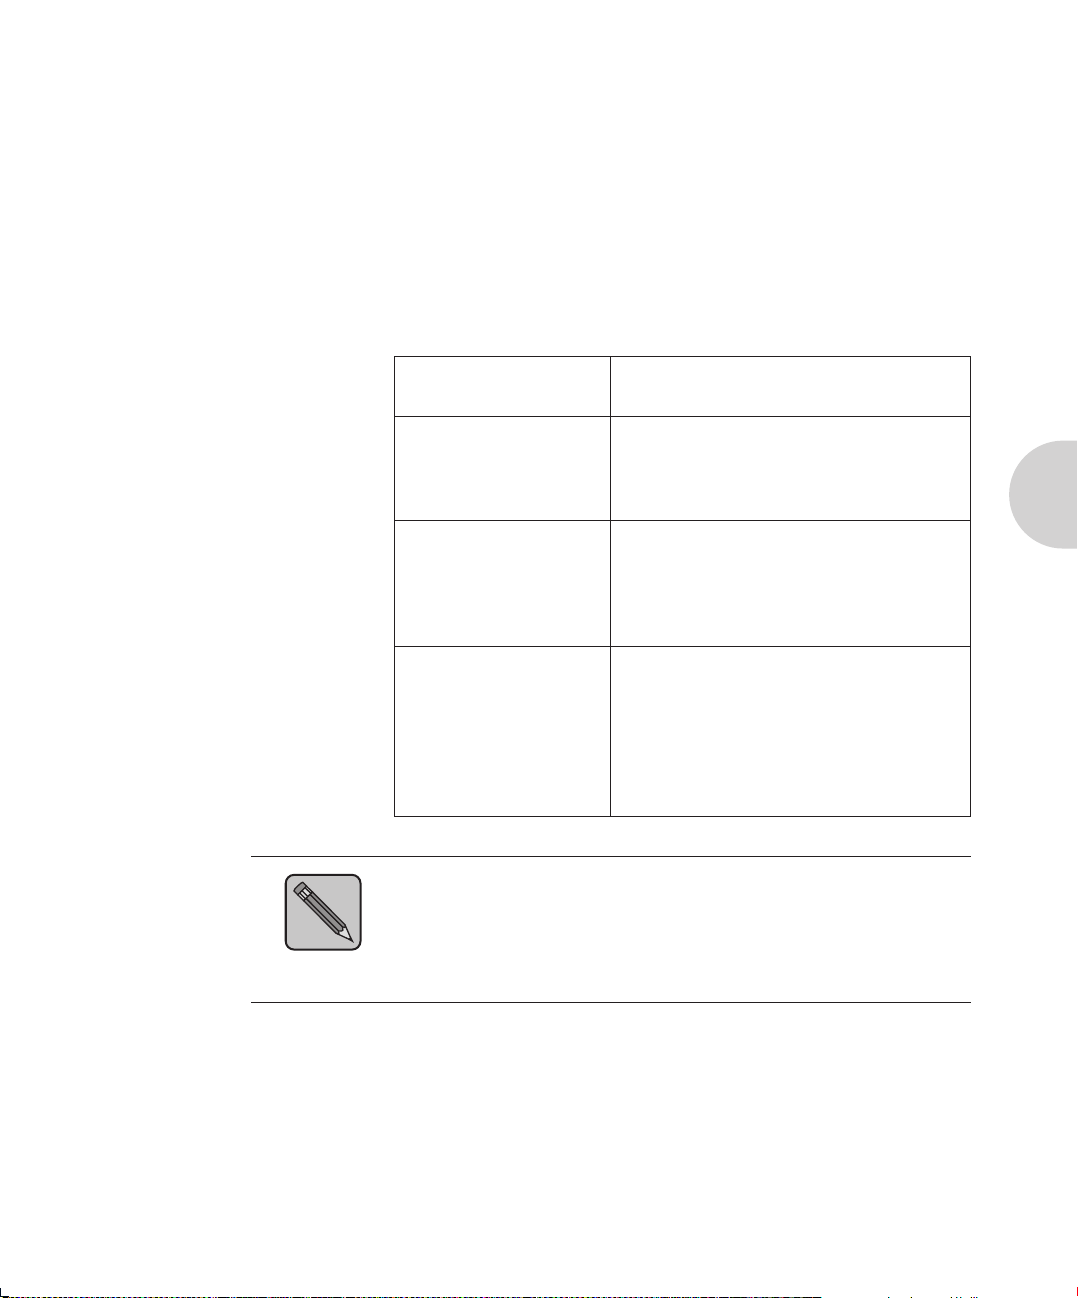
A 14.2 inches / 360 mm
B 14.4 inches / 367 mm
The printer should be installed on a smooth and flat surface.
There should be enough clearance around the printer to
allow air circulation around the vents to prevent the printer
from overheating, and also allow you to easily:
• Open the top door.
• Open the rear door to remove any jammed paper.
• Retrieve paper from the rear face up output.
Figure 2.1 Printer dimensions
C 7.2 inches / 184 mm
D 14.4 inches / 367 mm
Chapter 2: Setting Up the Printer ❖ 2-3
Page 14

Setting Up the Printer
Environment
Safety Precautions
Unpacking the Printer
Place the printer in a well-ventilated room where:
• Room temperature is 50° to 91°F (10° to 32.8°C).
• Relative humidity is 20% to 80% with no condensation.
• There are no abrupt temperature or humidity changes.
• There is no exposure to direct sunlight, chemicals or
vibration.
• Keep the printer away from water.
• Do not place any objects on top of the printer.
Set the box on a sturdy, flat, smooth surface. Remove the
1
“Open Me First” envelope from the box.
Remove the User Guide, Power Cord, and Diskettes.
2
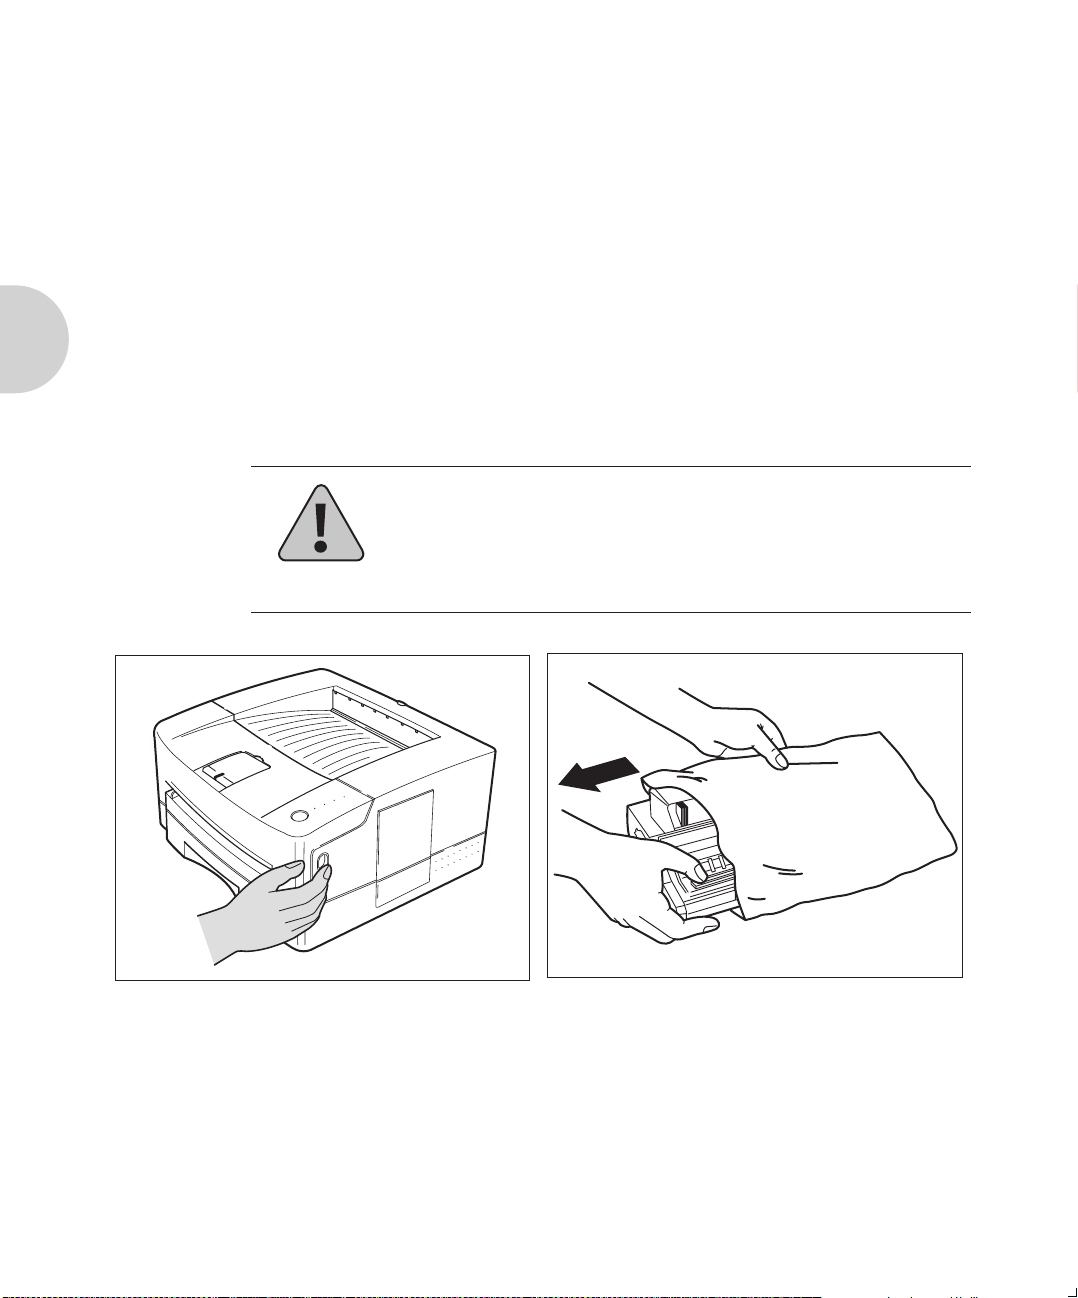
Remove the printer from its box.
3
Do not attempt to remove the printer by lifting it using
the packaging material. Place one hand under the front
of the printer and one hand under the back of the
printer and lift the printer out along with the
packaging material.
Remove the outer packing material from the printer.
4
Remove the tape at the front side of the printer.
5
2-4 ❖ DocuPrint 4508 User Guide
Page 15
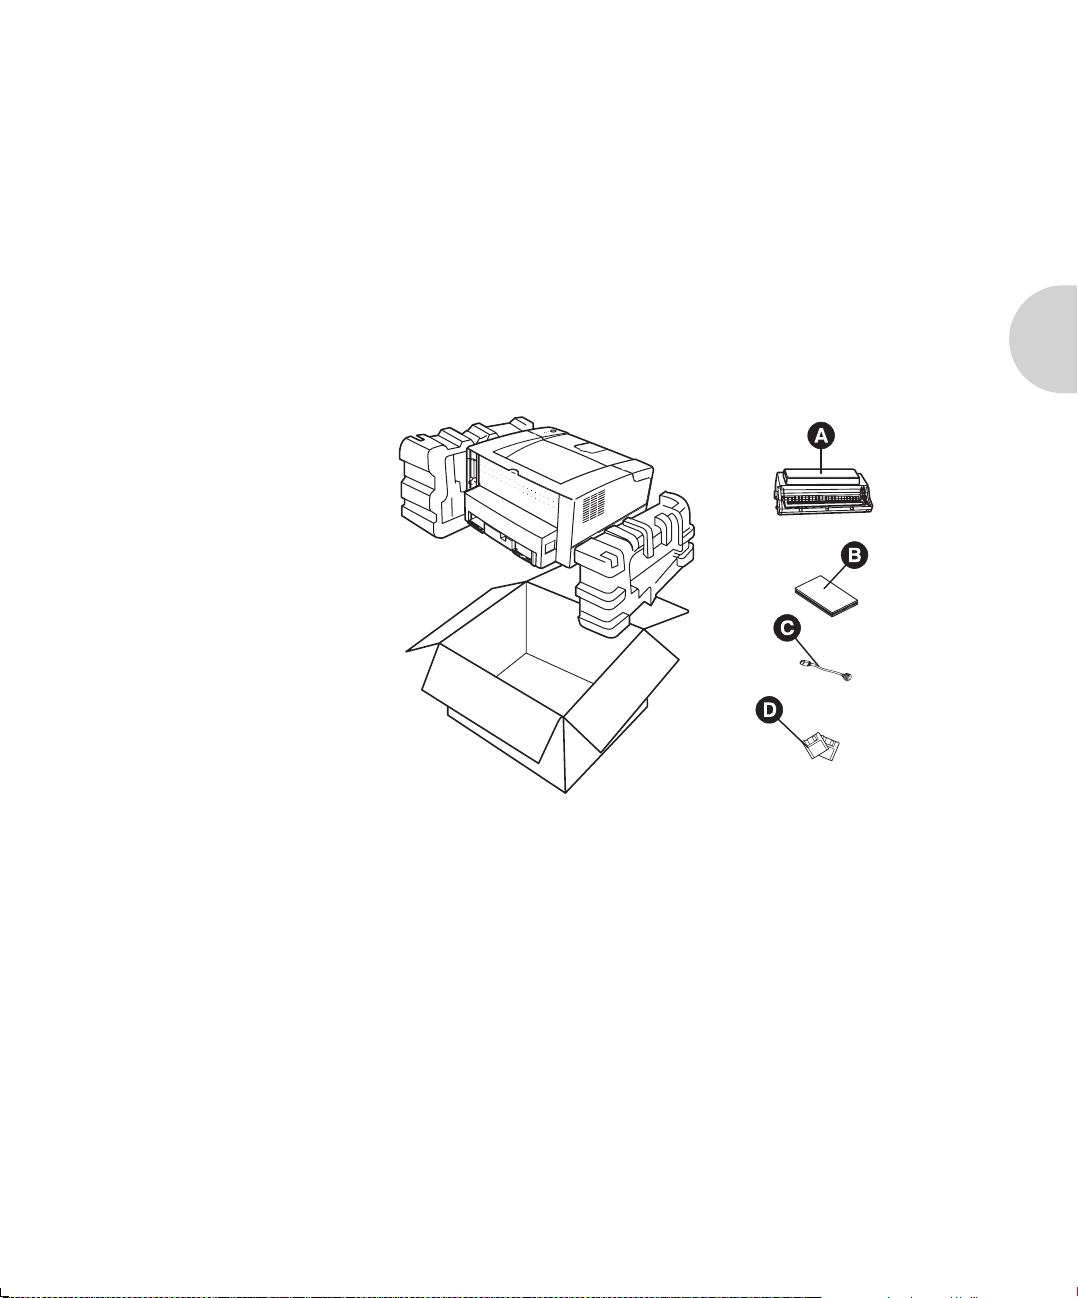
A Printer Cartridge
B User Guide
C Power Cord
D Diskettes
Unpacking the Printer
Check the package contents. If any of the following package
contents are missing or damaged, contact your dealer,
distributor, Rank Xerox, or Xerox.
• User Guide
•Power Cord
• Diskettes
• Printer Cartridge
Figure 2.2 Shipping contents
Chapter 2: Setting Up the Printer ❖ 2-5
Page 16
Setting Up the Printer
Installing
Components
Printer Cartridge
Caution
The protective materials from the Printer Cartridge must be
removed before you actually begin to print. Remove the
Printer Cartridge from the printer. (In some configurations,
the Printer Cartridge will be packaged separately). Remove
the protective materials (sponge, vinyl sheet, label tape, and
plastic strip), shake it several times and slide it back into the
printer.
Always grasp the Printer Cartridge from the top center in
order to avoid obstruction of photoreceptor shutter
mechanism.
Never expose the Printer Cartridge to direct sunlight.
Press the top door release button to open
1
the top door.
2-6 ❖ DocuPrint 4508 User Guide
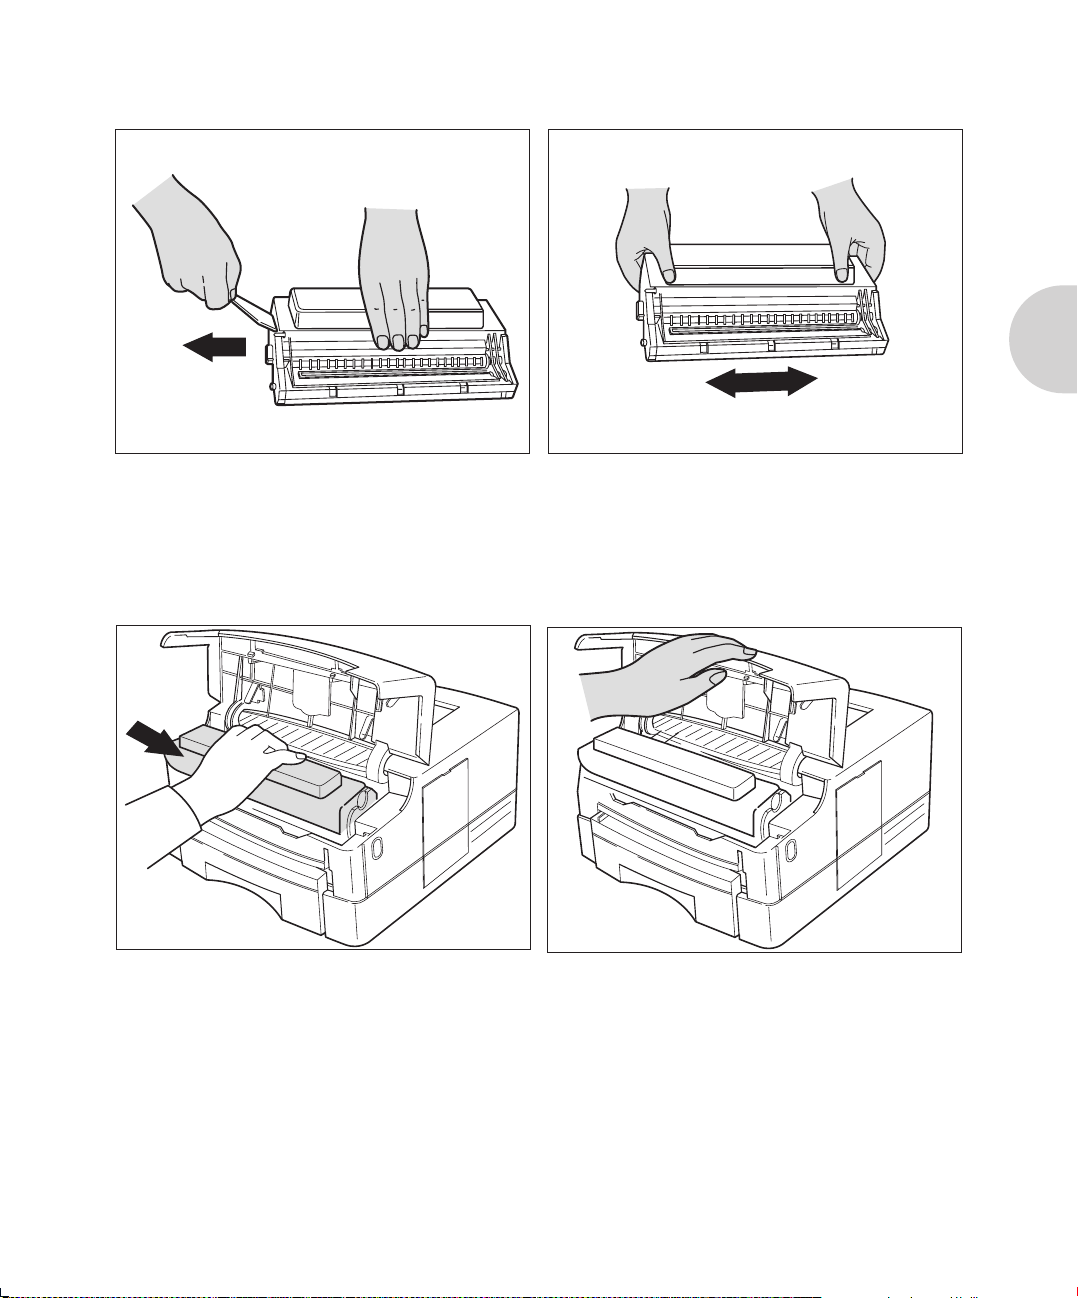
Remove the Printer Cartridge from its
2
packaging.
Page 17
Installing Components
Remove the Plastic Strip from the Printer
3
Cartridge.
Grasp the clear tab on top of the Printer
Cartridge and pull firmly to remove the
entire strip of clear sealing tape.
Insert the Printer Cartridge.
5
With one hand, hold the Printer Cartridge
by the top middle (do not grasp the Printer
Cartridge by the shutter wires), and slide
it into the printer.
Shake the Printer Cartridge several
4
times.
Close the top door.
6
If the door does not close easily, check that
the Printer Cartridge is installed correctly.
Chapter 2: Setting Up the Printer ❖ 2-7
Page 18
Installing Components
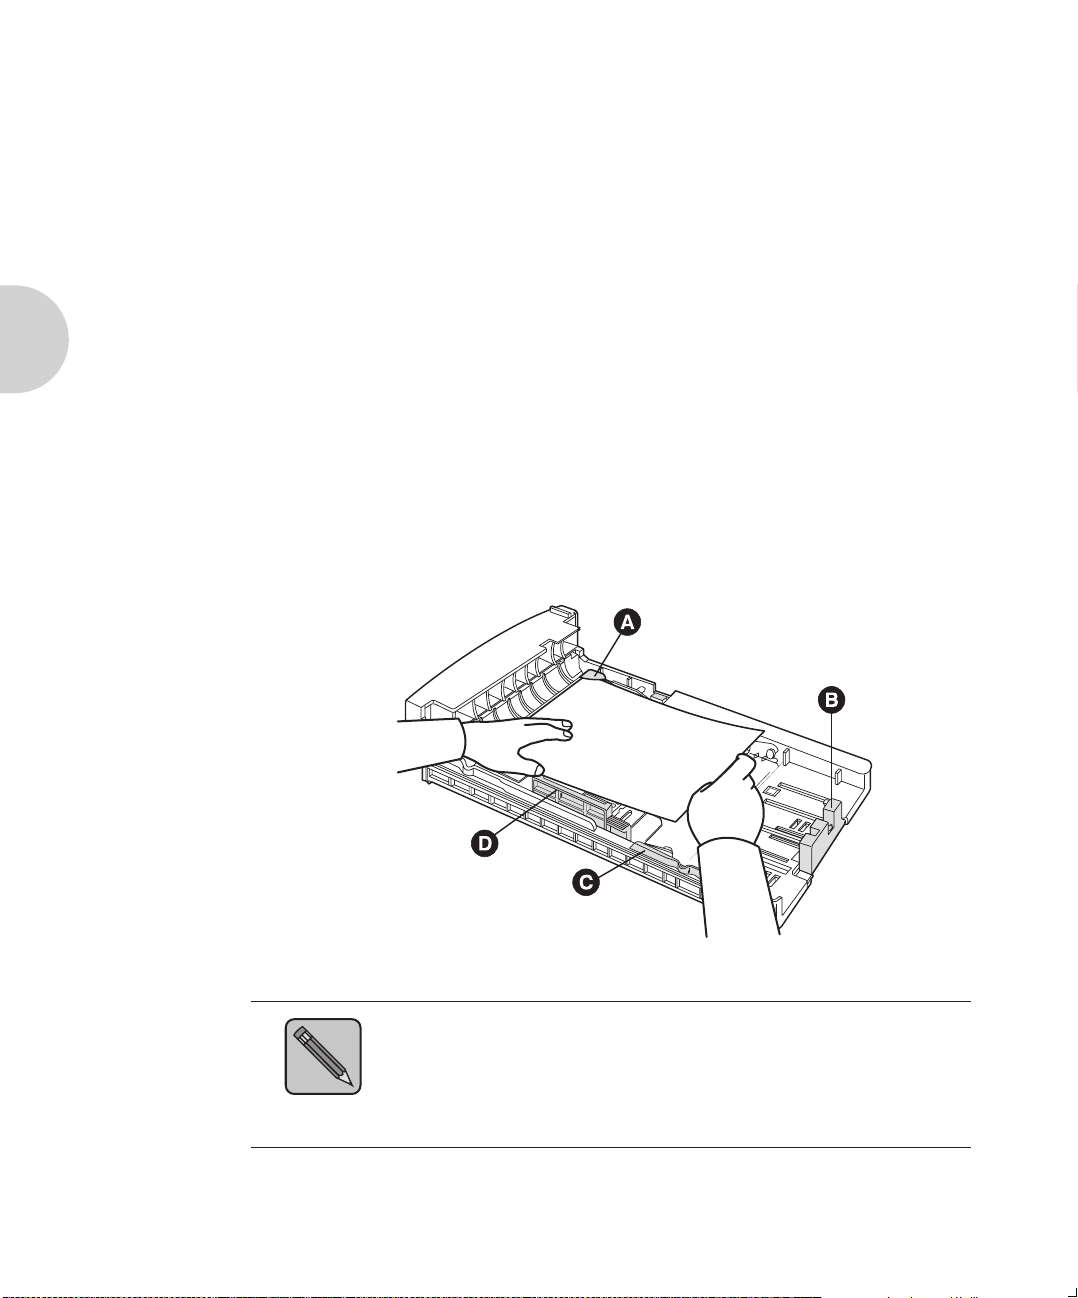
Paper Tray
A Metal corner
B Extension guide
C Rear Guide
D Side Guide
For the best print quality and to avoid misfeed and paper
jams, use only quality, xerographic/photocopier grade paper.
Pull out the paper tray.
1
Locate the three guides according to the paper sizes you
2
want to use.
Refer to the section “Adjusting and Loading the Paper Tray”
in Chapter 4 for details of adjusting the tray guide.
Load up to 250 sheets of paper.
3
Place the paper by the rear guide first. Secure the corner of
the paper stack under the metal corner at the front of the
paper tray by pressing down on the stack.
Reinstall the paper tray into the printer.
4
Figure 2.3 Loading paper
If you use other paper sizes (Folio, Legal, etc.), see “Adjusting
and Loading the Paper Tray” in Chapter 4.
Note
2-8 ❖ DocuPrint 4508 User Guide
Page 19
Installing Components
Interface Cable
Note
Power Cord
Connect the interface cable to the PC and printer.
An interface cable is not supplied with the printer.
If you do not have a cable, purchase the cable separately from
your supplier.
For best performance and guaranteed bi-directional
communication, use a good, shielded parallel cable with the
IEEE P-1284 compatible pin configuration.
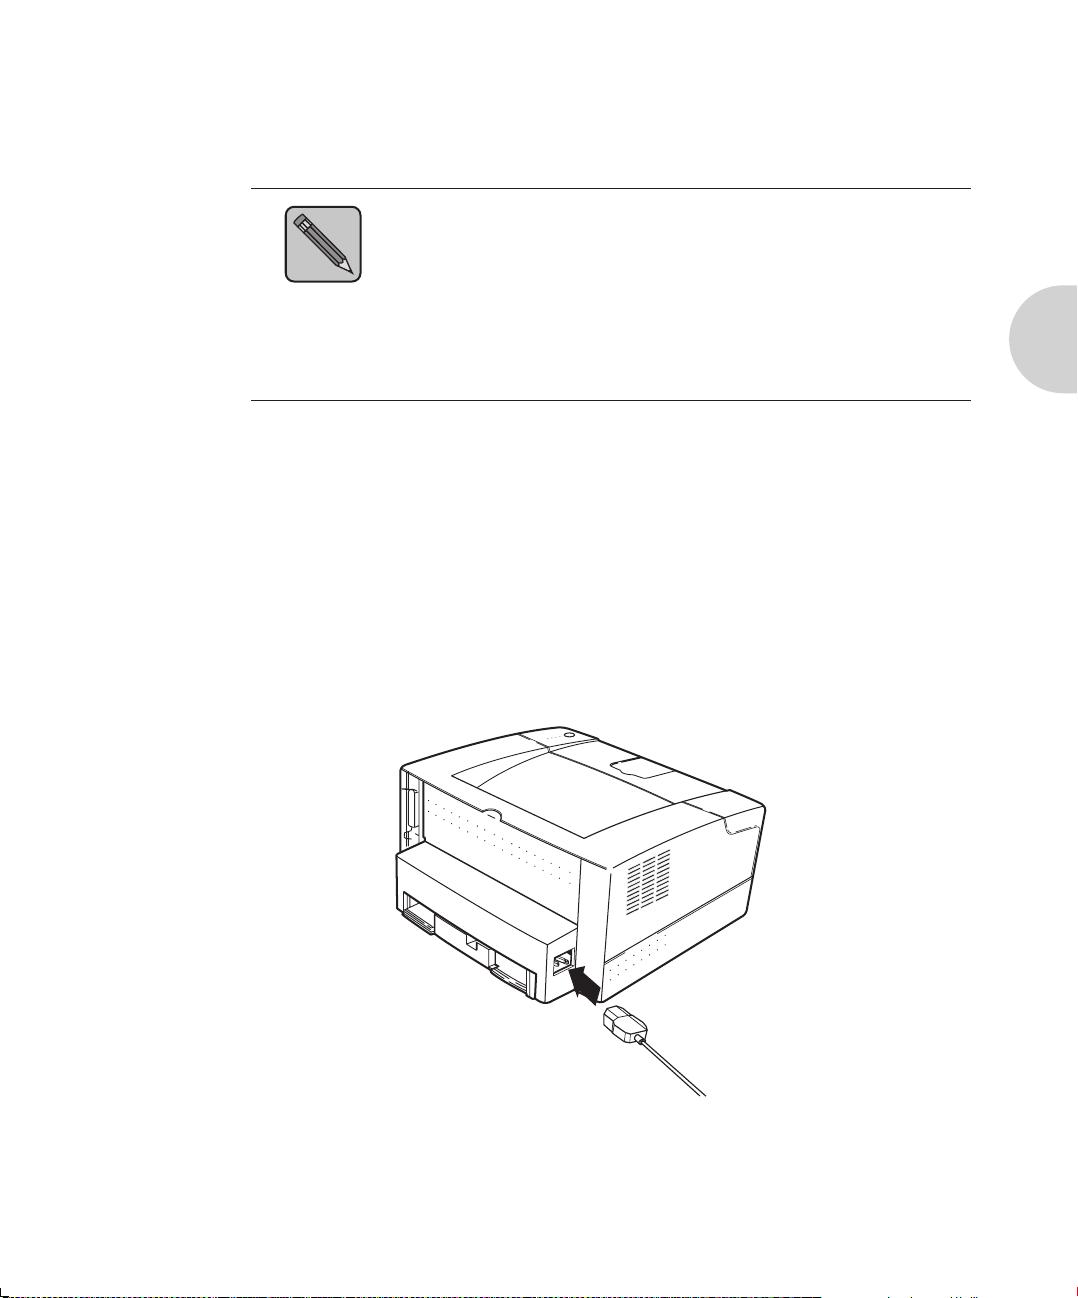
This printer does not have a power switch. It is automatically
powered on when plugged into an AC power socket. This
printer is equipped with advanced energy conservation
technology which reduces power consumption when it is not
in active use. Plug the power cord into a 3-wire grounded
power socket. The printer will power on and the READY LED
will illuminate. If the READY LED does not illuminate, see
Chapter 6: Troubleshooting.
Figure 2.4 Power cord
Chapter 2: Setting Up the Printer ❖ 2-9
Page 20

Setting Up the Printer
Testing the
Printer
Test the printer by printing the Self Test sheets:
Hold down the Control Panel key for four seconds.
1
Self Test sheets will be printed: one PCL 5e Configuration
2
sheet and two PCL 5e Font List sheets.
Configuration Sheet: Provides all printer setup parameters.
Font List Sheets: Provide listings of all resident printer fonts.
If the sheets do not print, see Chapter 6: Troubleshooting.
2-10 ❖ DocuPrint 4508 User Guide
Page 21

Installing Software
Installing Software
Windows Setup
DOS Setup
Follow the steps below to install the Remote Control Panel
(RCP), Status Monitor, printer driver, and Font Manager for
Windows.
Insert the 3.5” diskette labeled “Xerox DocuPrint 4508
1
Software Installation Diskette” into the disk drive of your
computer.
In the Program Manager, click on File, then click on Run and
2
type:
a:\setup or b:\setup
Then click OK.
Follow the instructions on the screen.
3
Insert the 3.5” diskette labeled “Xerox Font Manager” into
4
the disk drive of your computer. Follow steps 2 and 3.
Follow the steps below to install the Remote Control Panel
(RCP), Status Monitor, and printer driver software for DOS.
Insert the 3.5” diskette labeled “DOS and OS/2 Drivers” into
1
the disk drive of your computer.
Switch to the drive in which the diskette was inserted.
2
Example: Type a: or b: then press the return key.
Type README, then press the return key.
3
Follow the instructions on the screen.
4
Chapter 2: Setting Up the Printer ❖ 2-11
Page 22

Setting Up the Printer
Insert the “Xerox DocuPrint 4508 Software Installation
5
Diskette” disk in your disk drive.
Create a directory in which to place the DOS software
6
(for example: DOSUTIL) and switch to that directory.
Type:
7
copy a:\dosutil\*.* or copy b:\dosutil\*.*
Type:
8
DOS4508
OS/2 Setup
Note
Testing the
Connection
Follow the steps below to install the OS/2 software.
Insert the 3.5” diskette labeled “DOS and OS/2 Drivers” into
1
the disk drive of your computer.
Double click on the drive icon, then double click on disk
2
icon, then double click on “INSTALL.TXT” file. Follow
instructions on screen.
To install the Remote Control Panel (RCP) option, use the
Windows subsystem of OS/2 and follow the Windows
installation instructions on the previous page.
To test the connection, make sure that the READY light is ON
and print a file from a software program you are familiar with.
If the printer does not respond at all when you print the file,
perform the following:
• Verify that you have installed the 4508 printer driver.
• Verify that the interface cable is attached securely to both
the printer and the computer.
2-12 ❖ DocuPrint 4508 User Guide
Page 23

Chapter 3
Using the Front Control Panel
Overview ............................................................................... 3-2
Front Panel Key and LED Functions ..................................... 3-3
Key Functions ....................................................................... 3-3
LEDs ..................................................................................... 3-4
Resetting the Printer ............................................................ 3-6
Printing the Self Test Pages ................................................. 3-6
Chapter3
Chapter 3: Using the Front Control Panel ❖ 3-1
Page 24
Using the Front Control Panel
Overview
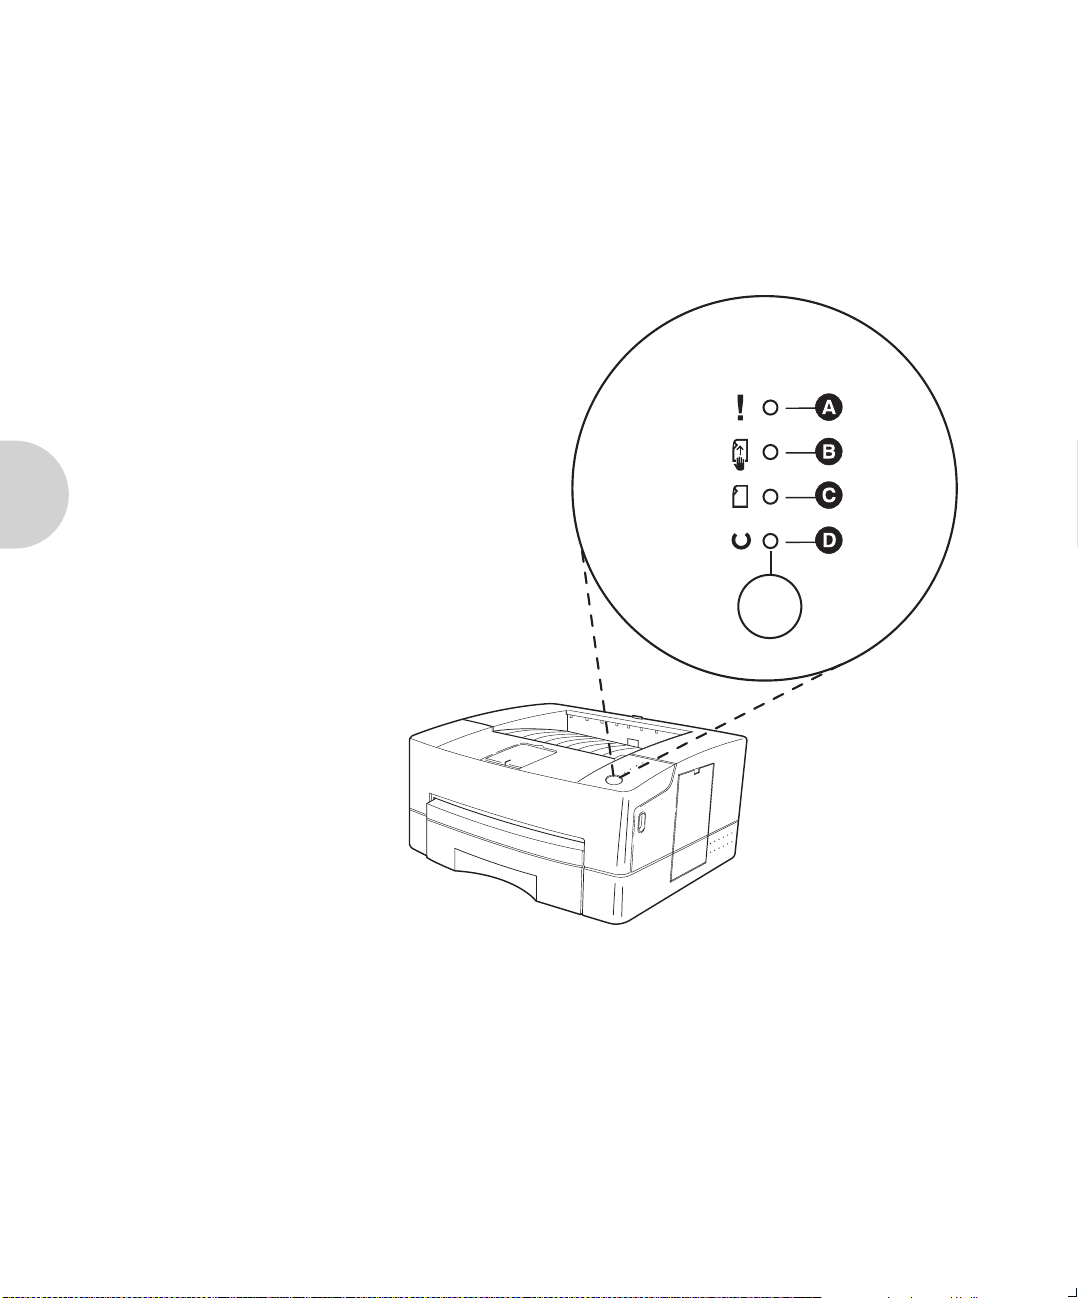
A ERROR*
B MANUAL*
C PAPER*
D READY*
This printer’s control panel consists of four status LEDs and
one Front Panel key. The LEDs indicate the printer’s status.
(The Status Monitor utility displays more detailed information
about the printer’s status on your computer’s screen.)
Figure 3.1 Front control panel
Xerox DocuPrint 4508
* These are not
labeled on the
control panel.
3-2 ❖ DocuPrint 4508 User Guide
Page 25
Using the Front Control Panel
Front Panel
Key and LED
Functions
Key Functions
There are four key functions. The key function is determined
by the current printer’s state. For instance, holding the key
down for four seconds with READY LED ON causes three Self
Test pages to be printed. Holding the key down for four
seconds with the READY LED blinking causes the printer to
print any data remaining in the printer’s memory.
On/Off-line
Self Test
Form Feed
Reset
Pressing the key toggles the printer’s on-line
and off-line state.
When the printer is on-line and all the other
LEDs are off, hold down the key for four
seconds (until all LEDs are blinking). Three
Self Test sheets will be printed.
When the printer is on-line and the READY
LED is blinking, hold down the key for four
seconds (until all LEDs are blinking). The
printer will print any data remaining in the
printer memory.
Press the key to turn the printer off-line.
Hold down the key for four seconds (until all
LEDs are blinking). User default reset causes
the printer to clear all data from the printer’s
memory except permanent fonts and
macros, and then restore the user default
settings.
Note
For all these functions, if the key is pressed for four seconds,
all the LEDs start blinking until the key is released.
Chapter 3: Using the Front Control Panel ❖ 3-3
Page 26
Front Panel Key and LED Functions
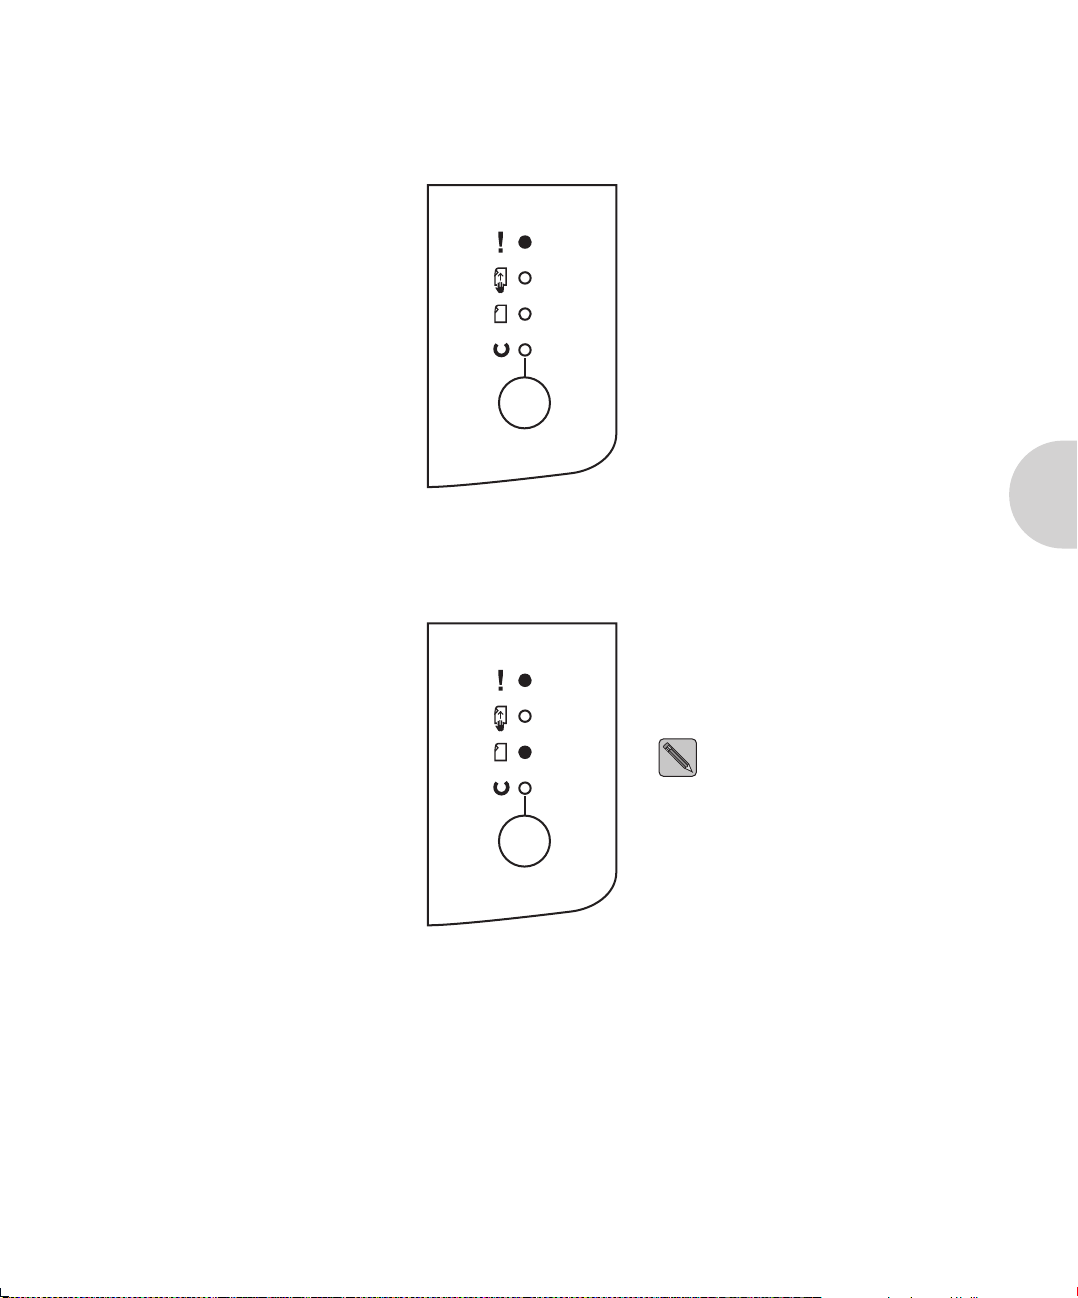
LEDs
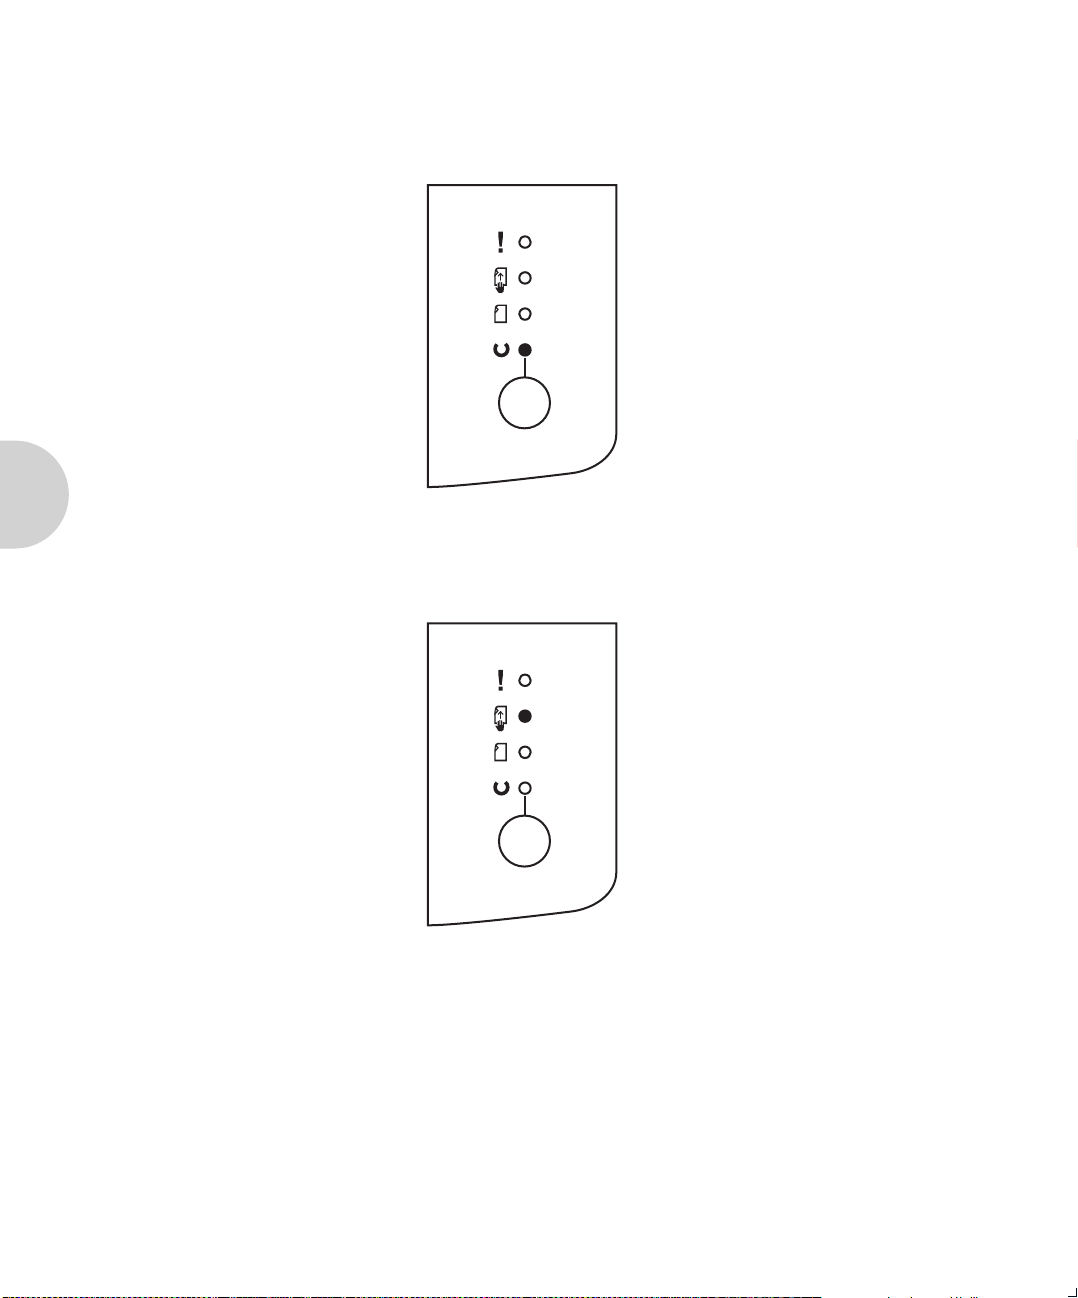
READY
Xerox DocuPrint 4508
MANUAL
Xerox DocuPrint 4508
On: The printer is on-line.
Off: The printer is off-line.
Blinking: The printer is receiving, or
processing data, or printing.
On: The current paper source is
manual feed slot. (READY
LED is also illuminated).
Off: The current paper source is
universal paper tray.
Blinking: When manual feed is
selected and there is some
data to print, this LED blinks
for the following two cases:
Auto Continue
Blinks for ten seconds to wait for the
user to insert the single sheet paper
into manual feed slot. If the paper is
not inserted after ten seconds, the
printer uses the paper in cassette tray.
Auto Continue
Blinks continually until the paper is
inserted into manual feed slot.
† Auto Continue is set using the Remote
Control Panel.
†
ON:
†
OFF:
3-4 ❖ DocuPrint 4508 User Guide
Page 27
ERROR
Front Panel Key and LED Functions
PAPE R
Xerox DocuPrint 4508
Xerox DocuPrint 4508
On: The printer’s cover is open
or printer cartridge is out.
Blinking: The printer is in
“Recoverable error” state.
Press button to continue or
wait time out.
“Recoverable error:”
Overrun error or memory overflow
error. In this case, you may need to
install optional printer memory.
On: There is a paper jam (with
ERROR LED on).
Blinking: The paper tray is empty or
missing.
If all LEDs are blinking, turn off
the printer for a minute, then
restart. If the error persists,
contact your dealer for technical
support.
Chapter 3: Using the Front Control Panel ❖ 3-5
Page 28

Using the Front Control Panel
Resetting the
Printer
Printing the
Self Test Pages
This function resets the printer to the original factory defaults.
Press the key to turn the printer off-line. Hold down the key
for four seconds (until all LEDs are blinking). All data in the
printer’s memory is cleared. This will also restore user default
settings for printer preferences without clearing permanent
fonts and macros.
You can view the printer’s status information and available
fonts through the Self Test Page. This function is only
available when the printer is ON-LINE and the printer has no
data to print.
Make sure the READY LED is on, and all other LEDs are off.
1
Hold down the key for four seconds.
2
Self Test sheets will be printed: one PCL 5e Configuration
3
sheet and two PCL 5e Font List sheets.
Configuration Sheet: Provides all printer setup parameters.
Font List Sheets: Provide listings of all resident printer fonts.
3-6 ❖ DocuPrint 4508 User Guide
Page 29

Chapter 4
Printing Documents Chapter4
Overview ............................................................................... 4-2
Using the Paper Tray ............................................................ 4-2
Paper Sizes Supported .......................................................... 4-2
Adjusting and Loading the Paper Tray ............................... 4-6
Using Manual Feed ............................................................... 4-7
When to Use Manual feed .................................................... 4-7
Setting Up the Software ....................................................... 4-7
Selecting the Correct Manual Feed Paper Path ...................... 4-8
Setting Up the Printer ........................................................... 4-9
Using Priority Feed (Quick Manual Feed) ............................. 4-10
Chapter 4: Printing Documents ❖ 4-1
Page 30

Printing Documents
Overview
Using the
Paper Tray
Paper Sizes
Supported
In this chapter, you will learn how to select the correct paper
path according to your needs and the paper sizes you will
use.
Since the paper tray is adjustable, it can hold up to 250 sheets
of Executive, Letter, A4, B5, Folio or Legal sized paper. To
achieve the best print quality and to avoid paper jam or
damage to your printer, use only quality, xerographic/
photocopier grade paper. See Appendix D: Print Media
Specifications for more detailed paper specifications.
Use the following steps to adjust the three guides to the paper
size.
4-2 ❖ DocuPrint 4508 User Guide
Page 31

Using the Paper Tray
Using the Side Guide
You can use both the tab hole and paper size marker to adjust
the side guide. While pressing the side guide tab, push the
side guide forward towards the center of the tray until the tab
hole of the selected paper size is positioned to the
corresponding size. However, when using B5 size paper,
simply position the paper size marker to the B5 size.
Figure 4.1 Using the side guide
Chapter 4: Printing Documents ❖ 4-3
Page 32

Using the Paper Tray
Using the Rear Guide
For the rear guide, there are four positions: three positions in
the center of the rear, and one position on the side of the rear.
If you are using A4 size paper, place the rear guide in the side
position. Otherwise, place the rear guide in one of the three
positions in the center at the rear.
Figure 4.2 Using the rear guide
4-4 ❖ DocuPrint 4508 User Guide
Page 33

Using the Paper Tray
Using the Extension Guide
Unless you are using legal or folio sized paper, you do not
have to adjust the extension guide at all. If you need to use
legal or folio sized paper, perform the following adjustment.
While pressing the two tabs at the rear center of the paper
tray, pull the extension guide to the rear until the two buttons
are positioned into either the first position holes for folio or
into the final position holes for legal.
Figure 4.3 Using the extension guide
Chapter 4: Printing Documents ❖ 4-5
Page 34

Printing Documents
Adjusting and
Loading the
Paper Tray
A Metal corner
B Extension guide
C Rear Guide
D Side Guide
Pull out the paper tray and remove the paper.
1
Using the rear guide or extension guide, adjust the tray for
2
each paper size.
• Extension guide: Legal, Folio
• Rear guide: Letter, Exec, B5, A4
When letterhead is used, load the paper face down,
with the top edge towards the front of the paper tray.
Secure the corner of the paper stack under the metal corner
3
at the front of the paper tray.
Adjust the side guide to the corresponding size.
4
Reinstall the paper tray into the printer. The green Ready
5
LED will illuminate.
Figure 4.4 Adjustable tray view
4-6 ❖ DocuPrint 4508 User Guide
Page 35

Using
Manual Feed
Printing Documents
When to Use
Manual feed
Note
Setting Up the
Software
Use the printer’s manual feed option with the rear paper path
cover open when printing on media that must go through a
straight paper path. Following are examples of media that
require the manual feed:
• Envelopes
• Adhesive Labels
• Heavy or special paper, such as a single sheet of
letterhead paper
•Odd sized paper
• Transparencies
The rear cover must be open to enable the straight through
paper path.
To print in manual feed mode, perform the following steps:
In your application’s page setup, your print driver, or your
1
Remote Control Panel (RCP), select “manual feed” as the
paper source.
The RCP is only set after the send button is selected.
Chapter 4: Printing Documents ❖ 4-7
Page 36

Using Manual Feed
To prevent a paper jam, select the correct paper size in your
2
software. For example, do NOT select letter size paper in
your software and then try to feed legal paper into the
manual feed slot.
If you are printing envelopes, insert the envelope, flap down,
3
to the left side of the manual feed slot.
Through your software, send the command to print. The
printer’s MANUAL LED blinks, indicating the printer is ready
to receive paper through the manual feed slot.
Selecting the
Correct Manual
Feed Paper Path
Use the facedown paper path (rear paper path cover closed)
for normal paper. Use the faceup paper path (rear paper path
cover open) for envelopes, transparencies, labels, odd sized
paper, and heavier paper.
Figure 4.5 Opening Exit Cover
4-8 ❖ DocuPrint 4508 User Guide
Page 37

Setting Up the Printer
Using Manual Feed
If you want to use the faceup paper path, push down the exit
1
cover latch.
While aligning the paper to the left, gently insert the paper
2
face up into the manual feed slot until you feel resistance on
the left corner.
Leave the other end of the paper resting on the table.
3
Manual feeding of materials such as C5 envelopes will
require you to physically support the trailing edge of
the document to prevent bending/folding of the
envelope.
Through your software, send the job to the printer. After a
moment, the printer prints the page.
If necessary, close the exit cover to use the facedown paper
4
path for your next print job.
Figure 4.6 Using the Manual Feed
Chapter 4: Printing Documents ❖ 4-9
Page 38

Using Manual Feed
Using Priority
Feed (Quick
Manual Feed)
The printer’s Priority Feed feature is a quick way to manually
feed paper. If there is a sheet of paper in the manual feed slot,
the printer always prints on that sheet first, then pulls the
remaining pages from the paper cassette. No special software
commands are required. This feature is especially helpful
when the first page of your job is different from the rest.
Example: Printing multiple page letters where first page is
letterhead paper.
Fill the paper tray with plain paper.
1
While aligning the paper to the left, gently insert the top
2
edge of a sheet of letterhead paper into the manual feed slot
face up until you feel resistance on the left corner.
Let the other end of the paper rest on the table. Send your
3
job to the printer as if you were printing from the cassette
(Do not select “manual feed”). The printer automatically
selects the first page from the manual feed slot, and the
remaining pages from the paper cassette.
4-10 ❖ DocuPrint 4508 User Guide
Page 39

Chapter 5
Using Software Tools Chapter5
Status Monitor and Remote Control Panel (RCP) ............... 5-2
The Status Monitor ............................................................... 5-3
The Remote Control Panel (RCP) ......................................... 5-4
Remote Control Panel for Windows ...................................... 5-4
Remote Control Panel for DOS ........................................... 5-14
Status Monitor for DOS ...................................................... 5-15
Chapter 5: Using Software Tools ❖ 5-1
Page 40

Using Software Tools
Status
Monitor and
Remote
Control Panel
(RCP)
A Printer Driver is a software program that contains
commands to activate your printer’s features. It also contains
information about the names, sizes and shapes of the printer’s
internal typefaces.
You can use the Status Monitor and Remote Control Panel
software tools under DOS and Windows. The following
figures are examples of the Status Monitor and Remote
Control Panel for Windows.
Figure 5.1 Status Monitor and Remote Control Panel
for Windows
Status Monitor
Exit About
STA TUS : ON-LINE
File Help
Tot a l V ie w
Printer
Emulation: PCL 5e
Baud Rate: 9600
Paper Jam Recovery:
Page
Paper Size: LETTER
Paper Feed: AUTO
Font
Symbol Set: Roman-8
Typeface: Courier SWC Upright Medium
Quality
Density: MEDIUM
Send
Form Feed
5-2 ❖ DocuPrint 4508 User Guide
Remote Control Panel : P CL 5e
Printer FontPage Quality Test
Auto Continue: ON
Time Out: 20 Secs
OFF
Orientaion: PORTRAIT
Lines/Page : 60
Default
Status Monito r
Reset
Exit
Power Save: 30 Mins
Robust XON: ON
Copies: 1
Paper Type: NORMAL
Point Size: 12.00
Pitch: 10.00
EconoMode: OFF
THE DOCUMENT COMPANY
Page 41

Using Software Tools
The Status
Monitor
Caution
The Status Monitor is a program that runs in background
mode. When activated it will automatically display messages
from the printer on your computer’s screen whenever the
printer’s status changes.
To start up Status Monitor, double click the Status Monitor
icon. This will start a background program running which
will display error conditions. By double clicking the Status
Monitor icon in the bottom left corner, the current status will
be displayed. Status Monitor messages are listed in “Remote
Control Panel and Status Monitor Messages” (page 6-4).
If you use the Remote Control Panel for Windows with the
Print Manager enabled, the Status Monitor software may not
run correctly.
Chapter 5: Using Software Tools ❖ 5-3
Page 42

The Remote Control Panel (RCP)
The Remote
Control Panel
(RCP)
Remote Control
Panel for Windows
The Remote Control Panel lets you view and change printer
settings from your computer’s screen. It supplements your
printer driver support to give you complete control over the
printer’s configuration.
To start the Remote Control Panel for Windows, double click
on the “Remote Control Panel” icon.
Description of menu items
• Send Key
When a change is made in the RCP, the user must select
the Send Key to change the printer’s configuration.
• Default Key
Reset all the printer’s parameters to the factory default
values.
• Reset Key
Reset all the printer’s parameters to the user default
values.
• Form Feed Key
If any data exists in the printer, the printer form feeds the
current page. If not, this button is ignored.
• Status Monitor Key
It shows current printer status. Refer to “The Status
Monitor.”
• Exit Key
Exit the Remote Control Panel.
5-4 ❖ DocuPrint 4508 User Guide
Page 43

File Help
The Remote Control Panel (RCP)
Total View.
Shows all the parameters in the printer.
Remote Control Pa nel : PCL 5 e
Total Vie w
Printer
Emulation: PCL 5e
Baud Rate: 9600
Paper Jam Re covery:
Page
Paper Size: LETTER
Paper Feed: AUTO
Font
Symbol Set: Roman-8
Typeface: Courier SWC Upright Medium
Quality
Density: MEDIUM
Send
Form Feed
Printer FontPage Quality T est
Auto Continue: ON
Time Out: 20 Secs
OFF
Orientaion: PORTRAIT
Lines /Page: 60
Default
Status Monitor
Reset
Exit
Power Save: 30 Mins
Robust XON: ON
Copies: 1
Paper Type: NORMAL
Point Size: 12.00
Pitch: 10.00
EconoMode: OFF
THED
OCUMENTCOMPANY
Chapter 5: Using Software Tools ❖ 5-5
Page 44

The Remote Control Panel (RCP)
Printer Setup
File Help
Remote Control Panel : PCL 5e
Tot al Vi ew
Send
Form Feed
Printer FontPage Quality Test
Prin ter :
Baud Rate:
Printer Timeout:
Power Save:
Status M o nitor
9600
30 Minutes
Default
Emulation: PCL 5e
Auto Continue
20
Reset
Exit
x
Paper Jam Recovery
Robust XON
x
•Emulation
Current emulation in use.
•Paper Jam Recovery
THED
OCUMENTCOMPANY
When On, maintains print job in memory and reprints
after paper jam is cleared. The default value is OFF.
• Power Save
If it is not OFF, printer goes to the power save mode
according to the indicated/selected time. In the power
save mode, the power consumption is under 10 watts. The
default value is 30 minutes
•Printer Timeout
Sets the printer value for how long to wait for data to print
from the current interface before accepting data through
5-6 ❖ DocuPrint 4508 User Guide
Page 45

The Remote Control Panel (RCP)
the other interface. The default value is 20 seconds.
Active only when optional serial interface is installed.
• Auto Continue
It determines the printer action when the user prints a
page without paper in the manual feed slot but the paper
source is set to manual feed. If Auto Continue is ON, the
printer picks up the paper from the tray after ten seconds.
If Auto Continue is OFF, the printer waits until the user
inserts paper into the manual feed slot.
• Baud Rate
Sets the speed of the serial interface. The default value is
9600 BPS.
• Robust XON
If it is ON, the printer sends XON character every one
second. The default value is ON.
Chapter 5: Using Software Tools ❖ 5-7
Page 46

The Remote Control Panel (RCP)
Page Setup
File Help
Remote Control Panel : PCL 5e
Tot al Vi ew
Send
Form Feed
Printer Font Quality Test
Paper Size:
Paper Feed:
P aper Type:
Lines Per Page:
Copies:
Default
Status M o nitor
Page
Letter
1st Tray
Normal Paper
Orientation:
Portrait
Land scape
60
1
Reset
Exit
•Copies
Selects the number of copies to be printed. You can select
1 to 99 copies. The default value is 1.
THED
OCUMENTCOMPANY
• Paper Feed
You can select the paper source: tray or manual.
•Paper Type
If you use thick paper with a weight of more than 90 gr
(24 lb) or an envelope, you must insert paper into the
manual feed slot and select “Thick Paper.”
• Lines Per Page
Sets the number of lines on the page. The default value is
60 when the paper size is LETTER and 64 when the paper
size is A4.
5-8 ❖ DocuPrint 4508 User Guide
Page 47

The Remote Control Panel (RCP)
•Paper Size
It sets the size of the image that will print on paper and
envelope. The default value is LETTER for 115V printers
and A4 for 220V printers.
• Orientation
It determines the direction of the print on the page. The
default value is PORTRAIT.
Chapter 5: Using Software Tools ❖ 5-9
Page 48

The Remote Control Panel (RCP)
Font Setup
File Help
Remote Control Panel : PCL 5e
• Symbol Set
A symbol set is a unique grouping of all available
characters in a font. The default value is ROMAN-8.
•Pitch
Available only when you select a fixed pitch outline font.
It is ignored for the other fonts. The default value is 10.00.
•Point Size
Available only when you select a proportionally spaced
outline font. It is ignored for the other fonts. The default
value is 12.00.
5-10 ❖ DocuPrint 4508 User Guide
Page 49

Caution
The Remote Control Panel (RCP)
•Typeface
Shows the typeface of the current font. The default value
is “Courier SWC Upright Medium.”
All items can be adjusted automatically according to the
item you have changed. “Pitch” and “Point Size” will be
ignored or have no effect unless a fixed pitch font or
proportionally spaced outline font is selected.
Chapter 5: Using Software Tools ❖ 5-11
Page 50

Using Software Tools
File Help
Quality Setup
Remote Control Panel : PCL 5e
Tot al Vi ew
Send
Form Feed
Printer Page Quality Test
Print Quality
Density
Econo Mode:
Default
Status M o nitor
Reset
Exit
Font
Medium
OFF
THED
OCUMENTCOMPANY
• Density
Determines the overall darkness of the page. The default
value is MEDIUM.
• EconoMode
Saves toner by reducing the resolution of the print. The
default value is off which denotes true 600 x 600 dpi
resolution.
There are four EconoMode settings that enable toner
conservation (
Note
5-12 ❖ DocuPrint 4508 User Guide
1
/8, 1/6, 1/4, 1/2) when printing proofs, drafts, etc.
Page 51

File Help
The Remote Control Panel (RCP)
Te s t
Remote Control Panel : PCL 5e
Tot al Vi ew
Send
Form Feed
Printer Page Quality TestFon t
Test Pri nt
Configuration List
Font List
Demo List
Default
Status M o nitor
Reset
Exit
• Configurations List
Prints the current configuration of the printer.
• Font List
THED
OCUMENTCOMPANY
Prints the current available font list of the printer.
• Demo List
Prints the demonstration page which lists the main
features of this printer.
Chapter 5: Using Software Tools ❖ 5-13
Page 52

The Remote Control Panel (RCP)
Remote Control
Panel for DOS
File
Over-
View
Switch to the directory which contains the DOS RCP
(example: CD:\DOSUTIL).
• To start the Remote Control Panel for DOS, at the DOS
prompt, type “DOSRCP” and press enter.
• The Remote Control Panel for DOS is somewhat different
from that for Windows. If you change any item in the
Remote Control Panel for DOS, you must send it to printer
by selecting the “Send settings to printer” item from the
File menu.
• The following figure is an example of the Remote Control
Panel for DOS.
Help About eXit
Printing
Paper Size Font Emulation Auto Cont Connection Activation
Letter Courier PCL5e On LPT 1 Error Mess
Orientation Pitch Time O ut Power Save Baud Rate Location
Portrait 10.00 20 30 min 9600 1,1
Paper Feed Point Size Resolution Toner Save Robust Poll Time
Auto Ignored 600 dpi Off On 1
Copies Symbol Set Paper Type Density Msg Time
1 Roman-8 Normal Medium 99: 0
Form JamRecover Hot Key
60 Off X
Typefaces Job Config Interface Status/test
Defaults
Settings source: D:\WBFONT\DOSRCP\SETTINGS.DCP
FILE: Save and open RCP file and communicate with printer
5-14 ❖ DocuPrint 4508 User Guide
DocuPrint 4508 REMOTE CONTROL PANEL
(c) 1995
Corporation
Page 53

The Remote Control Panel (RCP)
Status Monitor
for DOS
Switch to the directory which contains the DOS Status
Monitor.
• To Start Status Monitor for DOS, at the DOS prompt, type
“DOS4508 1” and press enter.
• The Status monitor is enabled with a required numeric
parameter. A maximum of two digits is accepted.
DOS4508 XX
The XX parameter value has three meanings:
— 0 deinstalls the Status Monitor TSR.
— 1-98 is the polling time period in seconds.
— 99 disables polling.
• The Status Monitor for DOS is a TSR program that
automatically displays messages from the printer.
• For more information, type “DOS4508”and press enter.
If you run the Status Monitor for DOS under graphic mode, it
doesn’t display messages. Only a beep can be heard.
Note
Caution
Do not use the Software Tools for DOS while running DOS
under Microsoft Windows.
Chapter 5: Using Software Tools ❖ 5-15
Page 54

5-16 ❖ DocuPrint 4508 User Guide
Page 55

Chapter 6
Troubleshooting Chapter6
Overview ............................................................................... 6-2
Front Panel LED Messages ................................................... 6-2
Remote Control Panel and Status Monitor Messages ....... 6-4
Clearing Paper Jams ............................................................. 6-8
Paper Jam Causes ................................................................. 6-8
First Action ........................................................................... 6-9
Checking the Paper Feed Area ............................................ 6-10
If the Paper has Gone Completely into the Printer ............... 6-11
If the Paper is Jammed in the Rear of the Printer ................. 6-12
Solving Print Quality Problems .......................................... 6-13
Printer Cartridge Cleaning Procedure .................................. 6-16
Chapter 6: Troubleshooting ❖ 6-1
Page 56

Troubleshooting
Overview
Front Panel
The troubleshooting methods described in this chapter
enable you to repair simple problems. For problems more
complex than those described in this manual, you should
consult an authorized Xerox service provider.
Table 6.1 lists LED indicator problems, the possible cause,
and recommended actions.
LED Messages
Table 6.1 LED indicator messages
LED
Function Name
ERROR ON Printer cover is open. Close printer cover.
ERROR
(PAPER LED ON)
LED
State
Printer Cartridge is not in printer. Install Printer Cartridge into printer.
ON Printer has a paper jam. Refer to “Clearing Paper Jams”
Problem Corrective Action
If problem persists, contact your
dealer or Xerox/Rank Xerox for
technical support.
(page 6-8).
If problem persists, contact your
dealer or Xerox/Rank Xerox for
technical support.
ERROR Blinking Recoverable Error state. Press Front Panel key to continue.
Overrun Error or Memory Overflow
Error.
6-2 ❖ DocuPrint 4508 User Guide
If printed job is partially broken or
missing, install additional optional
memory.
If problem persists, contact your
dealer or Xerox/Rank Xerox for
technical support.
Table 6.1 Page 1 of 2
Page 57

Table 6.1 LED indicator messages (continued)
Front Panel LED Messages
LED
Function Name
READY OFF Printer is in OFF-LINE state. Press Front Panel key to place printer
READY ON Printer is in the Ready/Operational
READY Blinking Printer is receiving or processing
MANUAL
(READY LED ON)
MANUAL
(READY LED ON)
MANUAL
READY LED ON)
LED
State
Power cord not installed. Install power cord into printer, then
state.
data, or printing a print job.
ON Manual feed slot is current paper
source for feeding.
OFF Main and/or optional paper tray is
current paper source for feeding.
Blinking Manual feed slot is current paper
source for feeding, Auto Continue is
set to OFF, and there is processed
data ready to be printed.
Problem Corrective Action
ON-LINE.
into wall outlet.
If problem persists, contact your
dealer or Xerox/Rank Xerox for
technical support.
No corrective action required.
No corrective action required.
No corrective action required.
No corrective action required.
Insert a sheet of paper into manual
feed slot.
Manual feed slot is current paper
source for feeding, Auto Continue is
set to ON, and there is processed
data ready to be printed.
PAPER Blinking Main paper tray is empty or missing
from printer.
ALL LEDs Blinking Unknown printer malfunction. Unplug printer from wall outlet for a
Chapter 6: Troubleshooting ❖ 6-3
Either wait 10 seconds for printer to
print job from main paper tray, or
insert a sheet of paper into manual
feed slot.
Load main paper tray with paper or
install paper tray into printer.
If problem persists, contact your
dealer or Xerox/Rank Xerox for
technical support.
minute, then plug printer back into
wall outlet.
Table 6.1 Page 2 of 2
Page 58

Troubleshooting
Remote
Control Panel
Table 6.2 lists Remote Control Panel messages and Status
Monitor messages, the possible cause, and recommended
actions.
and Status
Monitor
Messages
The Remote Control Panel and Status Monitor only supply
printer information when the parallel interface port is
connected. They do not
Note
Table 6.2 RCP and SM messages
The Status Monitor does not
messages when the RS232C Serial Interface Option is
installed and the Serial Option is being used as the active
port. Also, the Remote Control Panel does not
configuring of the printer when the RS232C Serial Interface
Option is installed and the parallel interface is not
function through the serial port.
provide printer problem
allow
connected.
Message Condition/Problem Corrective Action
BAND ERROR
COVER OPEN OR
MISSING CARTRIDGE
6-4 ❖ DocuPrint 4508 User Guide
Text or vector graphics sent to the
printer were too complex.
The top cover is open or not properly
closed.
The Printer Cartridge is not installed
properly.
Decrease page complexity.
Add additional printer memory SIMM.
If problem persists, contact your dealer
or Xerox/Rank Xerox for technical
support.
Close the top cover.
Remove the Printer Cartridge, then
re-install it.
If problem persists, contact your dealer
or Xerox/Rank Xerox for technical
support.
Table 6.2 Page 1 of 4
Page 59

Remote Control Panel and Status Monitor Messages
Table 6.2 RCP and SM messages (continued)
Message Condition/Problem Corrective Action
I/O ERROR
MEMORY FULL
OFF-LINE
The printer’s parallel cable does not
support bi-directional communication.
The communication between the
printer and PC/host is having problems.
The printer is not connected properly. Verify the connection from the printer
The printer received excessive data from
the computer to process and is out of
available memory.
You may have tried to transfer too
many soft fonts, or graphic image may
be too complex.
The status of the printer is OFF-LINE. Press the Front Panel key to place the
Check that the ports on your PC/host
are functioning and are not labeled
incorrectly.
Check the cable from your printer. It
could be loose or damaged.
to the PC/host.
If problem persists, contact your dealer
or Xerox/Rank Xerox for technical
support.
Add additional printer memory SIMM.
Decrease page image complexity.
If problem persists, contact your dealer
or Xerox/Rank Xerox for technical
support.
printer in ON-LINE state.
If the printer does not go to ON-LINE
state, unplug it from the wall outlet.
Wait one minute, then reconnect.
ON-LINE
Printer is ready to receive data via the
parallel port.
Chapter 6: Troubleshooting ❖ 6-5
If problem persists, contact your dealer
or Xerox/Rank Xerox for technical
support.
No corrective action required.
Table 6.2 Page 2 of 4
Page 60

Remote Control Panel and Status Monitor Messages
Table 6.2 RCP and SM messages (continued)
Message Condition/Problem Corrective Action
PAPER JAM 0
PAPER JAM 1
PAPER JAM 2
There is paper jammed in the printer. Clear paper jam. See “Clearing Paper
Jams” (page 6-8).
The paper jam sensors are stuck or
worn.
The paper tray was removed while a job
was printing.
There is paper jammed in the printer. Clear paper jam. See “Clearing Paper
The paper jam sensors are stuck or
worn.
The paper tray was removed while a job
was printing.
There is paper jammed in the printer. Clear paper jam. See “Clearing Paper
Check for obstructions in paper path.
Do not remove paper tray during
printing process.
If problem persists, contact your dealer
or Xerox/Rank Xerox for technical
support.
Jams” (page 6-8).
Check for obstructions in paper path.
Do not remove paper tray during
printing process.
If problem persists, contact your dealer
or Xerox/Rank Xerox for technical
support.
Jams” (page 6-8).
The paper jam sensors are stuck or
worn.
The paper tray was removed while a job
was printing.
6-6 ❖ DocuPrint 4508 User Guide
Check for obstructions in paper path.
Do not remove paper tray during
printing process.
If problem persists, contact your dealer
or Xerox/Rank Xerox for technical
support.
Table 6.2 Page 3 of 4
Page 61

Remote Control Panel and Status Monitor Messages
Table 6.2 RCP and SM messages (continued)
Message Condition/Problem Corrective Action
PAPER TRAY OPEN
OR EMPTY
PORT IS NOT
AVAILABLE
UNKNOWN STATUS
The printer has run out of paper. Refill the paper tray with paper.
The paper tray is open or not installed
properly.
The printer is not communicating with
the PC/host.
A printer hardware fault condition has
been detected.
Fully insert the paper tray into the
printer.
If problem persists, contact your dealer
or Xerox/Rank Xerox for technical
support.
Verify the parallel interface is connected
to the correct PC/host.
Verify the PC/host is using the parallel
port to establish communications.
If problem persists, contact your dealer
or Xerox/Rank Xerox for technical
support.
Unplug printer from the wall outlet.
Wait one minute, then reconnect.
If problem persists, contact your dealer
or Xerox/Rank Xerox for technical
support.
Table 6.2 Page 4 of 4
Chapter 6: Troubleshooting ❖ 6-7
Page 62

Troubleshooting
Clearing
Paper Jams
Paper Jam Causes
Paper Path
Position
A
B
C
Reported
Status
Jam 0
Jam 1
Jam 2
Following are some conditions that can cause paper jams.
• Removing the paper tray while a job is printing.
• Filling the tray too full.
• Not securing the paper stack under the metal corner of
the paper tray.
• Using paper that is too coarse or too smooth.
• Using damaged or used paper.
• Storing paper incorrectly, so that it curls or contains
moisture.
Figure 6.1 Paper jam positions
6-8 ❖ DocuPrint 4508 User Guide
Page 63

Clearing Paper Jams
First Action
When a paper jam has occurred, first open the top door by
pressing the door release button on the right side of the
printer, then close it again. In most cases, this will clear the
paper jam by feeding the jammed paper out of the printer. If
this doesn’t solve the problem, refer to the following steps.
Figure 6.2 Opening the top door
Figure 6.3 Closing the top door
Chapter 6: Troubleshooting ❖ 6-9
Page 64

Clearing Paper Jams
Checking the
Paper Feed Area
• Open the top door.
• Take out the Printer Cartridge.
• Pull out the paper tray.
• If paper is in the paper feed area, pull the paper to the
right to release it from the feed roller. Then pull the paper
straight out. If the paper has gone completely into the
printer, see the next page.
• If the previous step clears the jam, replace the paper
tray and the Printer Cartridge, then close the top and rear
doors. The printer should return to the READY state. If it
does not clear the jam, check the top and rear areas of the
printer.
Figure 6.4 Clearing paper jams
6-10 ❖ DocuPrint 4508 User Guide
Page 65

Clearing Paper Jams
If the Paper has
Gone Completely
into the Printer
• While holding the printer steady, carefully pull the
jammed paper toward you to remove it.
• Do not pull the paper straight up when removing it. The
toner on the paper can contaminate the paper
transportation system and affect the print quality. Remove
paper horizontally.
• If it is too difficult to remove the paper, open the printer’s
rear access door and pull the paper straight out toward
you.
• Replace the paper tray and the Printer Cartridge, then
close the top and rear doors.
• The printer should return to the READY state. If it does
not, try one of the following:
— Check to see if there is more jammed paper in the
printer.
— Open and close the printer’s top door or press the front
panel button briefly.
Figure 6.5 Pulling the jammed paper
Chapter 6: Troubleshooting ❖ 6-11
Page 66

Clearing Paper Jams
If the Paper is
Jammed in the
Rear of the Printer
• Open the rear access door.
• Pull out the paper.
• Remember to close the rear access door again.
Figure 6.6 Clearing paper jams
If the paper jam light continues to be lit, open and close the
top door again. This should clear the paper jam message.
Note
6-12 ❖ DocuPrint 4508 User Guide
Page 67

Troubleshooting
Solving
The following table lists common print quality problems, the
possible cause, and recommended actions.
Print Quality
Problems
Table 6.3 Solving print quality problems
Problem Possible Cause(s) Corrective Action(s)
Light/faint prints
Overall image is lighter than
normal
Blank prints
Entire printer page is blank with no
visible print
EconoMode turned on Turn off EconoMode
Density set incorrectly Reset to Medium
Toner level low/empty Remove Printer Cartridge, shake
it several times, then reinstall
If just installed, the Printer
Cartridge insert (tape) may still be
in place
Defective Printer Cartridge or low
on toner
Multiple sheets are being fed from
the paper tray at the same time
Remove the tape insert
Replace Printer Cartridge
Remove paper from paper tray and
fan it. Ensure that paper is correctly
loaded in tray with edges under
metal corners
No printable data received from
computer
Chapter 6: Troubleshooting ❖ 6-13
Print a Self-Test page. If the
Self-Test page is normal, check
the following:
• Interface cable between
computer and printer
• Printer setup and application
software
If the Self-Test page is blank,
contact your dealer or Xerox/
Rank Xerox
Table6.3 Page1 of 4
Page 68

Solving Print Quality Problems
Table 6.3 Solving print quality problems (continued)
Problem Possible Cause(s) Corrective Action(s)
Black prints
The page is entirely black
Spot deletions
Areas of the print are extremely
light or missing
Vertical line deletions
Localized print deletions forming
narrow lines running in the
direction of the paper movement
Horizontal line deletions
Localized print deletions
appearing as bands running
across the page perpendicular to
the direction of paper movement
Defective Printer Cartridge, or the
Printer Cartridge is at its end of life
Printer power supply has failed Contact your dealer or Xerox/
Damp paper stock Replace paper stock
Defective Printer Cartridge, or the
Printer Cartridge is at its end of life
Printer Cartridge not installed
correctly.
Defective paper stock, creases,
folds, etc.
Defective Printer Cartridge, or the
Printer Cartridge is at its end of life
Defective paper stock, creases,
folds, etc.
Page too complex Decrease page complexity or add
Replace Printer Cartridge
(Perform the Printer Cartridge
cleaning procedure discussed on
page 6-16 before replacing the
Printer Cartridge)
Rank Xerox
Replace Printer Cartridge
Remove or reinstall the Printer
Cartridge
Replace paper stock
Replace Printer Cartridge
Replace paper stock
printer memory
Vertical dark streaks
Black lines running across the print
in the direction of paper
movement
6-14 ❖ DocuPrint 4508 User Guide
Contaminated paper path Clean paper path. Print several
Defective Printer Cartridge, or the
Printer Cartridge is at its end of life
blank sheets of paper to remove
any toner accumulations
Replace Printer Cartridge
(Perform the Printer Cartridge
cleaning procedure discussed on
page 6-16 before replacing the
Printer Cartridge)
Table6.3 Page2 of 4
Page 69

Solving Print Quality Problems
Repetitive horizontal dark
streaks
Black lines running across the page
perpendicular to the direction of
paper movement
Dark spots/marks
Unfused or partially fused
image
The printed image is not fully fused
to the paper and easily rubs off
Contaminated paper path Clean paper path. Print several
blank sheets of paper to remove
any toner accumulations
Defective Printer Cartridge, or the
Printer Cartridge is at its end of life
Contaminated paper path Clean paper path. Print several
Defective Printer Cartridge Replace Printer Cartridge
Damp paper stock Replace paper stock
Heavy or unusual paper stock Use only approved paper/media
Defective Fuser Module Contact your dealer or Xerox/Rank
Replace Printer Cartridge
(Perform the Printer Cartridge
cleaning procedure discussed on
page 6-16 before replacing the
Printer Cartridge)
blank sheets of paper to remove
any toner accumulations
(Perform the Printer Cartridge
cleaning procedure discussed on
page 6-16 before replacing the
Printer Cartridge)
Use thick paper setting for heavy
stock
Xerox
Wrinkled prints
Prints are wrinkled, creased, or
torn
Blurred prints
Image is blurred at the edges
Poor paper condition Inspect/replace paper stock
Paper is damp Replace paper stock
Fuser module is at its end of life Contact your dealer or Xerox/
Rank Xerox
Poor paper condition Inspect/replace paper stock
Paper is damp Replace paper stock
Chapter 6: Troubleshooting ❖ 6-15
Page 70

Solving Print Quality Problems
Table 6.3 Solving print quality problems (continued)
Problem Possible Cause(s) Corrective Action(s)
Random deletions
Random light areas and deletions
Printer Cartridge
Cleaning
Procedure
Poor paper condition Inspect/replace paper stock
Paper is damp Replace paper stock
Contaminated Printer Cartridge Replace Printer Cartridge
(Perform the Printer Cartridge
cleaning procedure discussed
below before replacing the Printer
Cartridge)
Table6.3 Page4 of 4
This procedure is used to clean any toner/ink contamination
which may be present on or in the Printer Cartridge and is
found on printed pages.
To initiate the procedure, follow these instructions:
Power ON the Printer and allow the “READY” LED to light
1
and stay lit.
Press and hold down on the Front Panel Key until all four
2
LED’s on the Control Panel remain lit (NOT BLINKING) and
the Printer begins to cycle up (STARTS TO FEED PAPER),
then release pressure on key.
The Printer will produce one page with Toner/Ink
contamination and background. Once is usually sufficient to
clean the Printer Cartridge, but heavy contamination may
require that this procedure be repeated.
6-16 ❖ DocuPrint 4508 User Guide
Page 71

Chapter 7
Maintenance Chapter7
Overview ............................................................................... 7-2
Printer Cartridge ................................................................... 7-2
Replacing the Printer Cartridge ............................................. 7-2
Adjusting the Print Density ................................................. 7-4
Print Density ......................................................................... 7-4
EconoMode .......................................................................... 7-4
Cleaning the Printer ............................................................. 7-5
Chapter 7: Maintenance ❖ 7-1
Page 72

Maintenance
Overview
Printer
Cartridge
Replacing the
Printer Cartridge
In this chapter, you will learn how to replace the Printer
Cartridge and how to adjust the print density.
Refer to the following steps for Printer Cartridge replacement.
Press the top door release button to open
1
the top door.
Remove the old Printer Cartridge.
7-2 ❖ DocuPrint 4508 User Guide
Remove the new Printer Cartridge from
2
its packaging.
Please remember to recycle the
used Printer Cartridge by following
the instructions enclosed in the new
Printer Cartridge packaging.
Page 73

Printer Cartridge
Remove the Plastic Strip from the Printer
3
Cartridge.
Grasp the clear tab on top of the Printer
Cartridge and pull firmly to remove the
entire strip of clear sealing tape. Discard
the tape, shake the Printer Cartridge side
to side to distribute the toner evenly inside
the cartridge.
Insert the Printer Cartridge.
4
With one hand, hold the Printer Cartridge
by the top middle (do not grasp the Printer
Cartridge by the shutter wires), and slide
it into the printer.
Close the top door.
5
If the door does not close easily, check that
the Printer Cartridge is installed correctly.
Chapter 7: Maintenance ❖ 7-3
Page 74

Maintenance
Adjusting the
Print Density
Print Density
EconoMode
The print density of this printer can be selected through the
Remote Control Panel. Refer to Chapter 5: Using Software
To ol s. The three different print densities available are dark,
medium and light. The medium setting is the factory default.
With one Printer Cartridge, you can print up to 6000 sheets of
normal documents (5% coverage). You can extend the life of
your Printer Cartridge even further by utilizing the
EconoMode. While you are printing for an intermediate draft
review, you can select the EconoMode to print. For the final
draft, you can switch back to normal printing. Refer to the
section “The Remote Control Panel (RCP)” (page 5-4) for the
EconoMode setting procedure.
7-4 ❖ DocuPrint 4508 User Guide
Page 75

Maintenance
Cleaning the
Printer
To prevent excessive wear and to preserve the print quality,
keep the printer free of dust and debris.
Figure 7.1 Cleaning the printer
Before cleaning the printer, disconnect the printer from its
power source.
Clean the outside of the printer with a slightly damp cloth
1
(Use water only).
Do NOT use ammonia-based cleaners on or around
your printer.
Clean the inside of the printer with a dry lint-free cloth.
2
Remove all dust, spilled toner, and particles of paper.
Clean the ridges of the rear printer door with a dry lint-free
3
cloth or brush.
Chapter 7: Maintenance ❖ 7-5
Page 76

7-6 ❖ DocuPrint 4508 User Guide
Page 77

Chapter 8
Fonts Chapter8
Definition of Fonts ............................................................... 8-2
Internal and Soft Fonts ........................................................ 8-4
Internal Fonts ....................................................................... 8-4
Soft Fonts ............................................................................. 8-4
Selecting Fonts ...................................................................... 8-5
Chapter 8: Fonts ❖ 8-1
Page 78

Fonts
Definition of
Fonts
A font is a group of characters and symbols that have similar
characteristics.
Figure 8.1 Font samples
• Symbol Set
A unique subgrouping of the available alphabetic,
numeric, and special characters in a font.
• Spacing
The character width.
Fixed pitch font characters have the same width.
The width of a proportional font character is variable.
• Pitch
The number of characters that can be printed in one
horizontal inch.
• Height (Point Size)
Units of measurement that identify the height of a font.
72 points per inch.
•Style
A stylistic variation of a font, such as bold or italic.
8-2 ❖ DocuPrint 4508 User Guide
Page 79

Definition of Fonts
• Stroke Weight
The thickness of the character.
• Typeface
The name of the design of characters and symbols.
• Orientation
The position of the logical page with respect to the
physical page.
Figure 8.2 Examples of orientation
(0,0)
Physical Page
X
ABCD...
Portrait
Physical Page
Reverse Portrait
To p M a r gi n
Logical Page
(0,0)
Logical Page
Top M a rg i n
Y
ABCD...
X
(0,0)
Physical Page
ABCD...
Y
Landscape
Physical Page
Reverse Landscape
(0,0)
Y
ABCD...
Chapter 8: Fonts ❖ 8-3
Page 80

Fonts
Internal and
Soft Fonts
Internal Fonts
Soft Fonts
Depending on the capability of your software, you can size
the proportionally spaced internal typeface from 0.25 point to
999 point, in quarter-point increments.
The printer automatically rotates any font from portrait to
landscape depending on the page orientation.
When the printer is ON-LINE and the READY LED is on, you
can print the list of currently available fonts for the printer by
depressing the key for 4 seconds.
Downloading is the process of transferring soft fonts from a
host computer to the printer’s memory.
Figure 8.3 Examples of soft fonts
(TrueType scalable)
Once downloaded, a soft font occupies a portion of printer
memory (RAM)
Note
8-4 ❖ DocuPrint 4508 User Guide
Page 81

Fonts
Selecting
Fonts
You can select fonts by using the font selection features of
your software application by sending printer commands
through the software program or by using the Remote Control
Panel program.
The factory default font is Courier, 12 point, 10 pitch, portrait
orientation, upright medium weight font with the Roman8
symbol set.
When the printer looks for a requested font, it checks the font
source in the following order:
1. Soft font.
2. Internal font.
Chapter 8: Fonts ❖ 8-5
Page 82

8-6 ❖ DocuPrint 4508 User Guide
Page 83

Appendix A
Printer Commands AppendixA
PCL Printer Commands ........................................................ A-2
HP-GL/2 Printer Commands ............................................... A-14
PJL Commands ................................................................... A-17
Appendix A: Printer Commands ❖ A-1
Page 84

Printer Commands
PCL Printer
Commands
Table A.1 PCL printer commands
Function Parameter Command Decimal Value Hexadecimal Value
JOB CONTROL COMMANDS
Reset
Universal Exit
Language (ULE)
—
Reset —
Number Of Copies # of Copies
Long Edge (Left)
Offset Registration
Short Edge (Top)
Offset Registration
# of Decipoints
(1/720”)
# of Decipoints
(1/720”)
Unit Of Measure # = Number of
units per inch
Paper Source Eject Page
Paper Tray
Manual Feed
Manual
Envelope Feed
Optional Paper
Tray (Lower)
Page Size Executive
Letter
Legal
A4
Monarch
COM 10
DL
C5
Folio
B5
Page Length # of Lines
(5-128)
E
%-12345X 027 037 045 049 050 051 052 053 088 1B 25 2D 31 32 33 34 35 58
C
E
E 027 069 1B 45
C
E
&l#X (x) 027 038 108 # ... # 088 (120) 1B 26 6C # ... # 58 (78)
C
E
&l#U (u) 027 038 108 # ... # 085 (117) 1B 26 6C # ... # 55 (75)
C
E
&l#Z (z) 027 038 108 # ... # 090 (122) 1B 26 6C # ... # 5A (7A)
C
E
&u#D (d) 027 038 117 # ... # 068 (100) 1B 26 75 # ... # 44 (64)
C
PAGE CONTROL COMMANDS
Page Length and Size
E
&l0H (h) 027 038 108 048 072 (104) 1B 26 6C 30 48 (68)
C
E
&l1H (h) 027 038 108 049 072 (104) 1B 26 6C 31 48 (68)
C
E
&l2H (h) 027 038 108 050 072 (104) 1B 26 6C 32 48 (68)
C
E
&l3H (h) 027 038 108 051 072 (104) 1B 26 6C 33 48 (68)
C
E
&l4H (h) 027 038 108 052 072 (104) 1B 26 6C 34 48 (68)
C
E
&l1A (a) 027 038 108 049 065 (97) 1B 26 6C 31 41 (61)
C
E
&l2A (a) 027 038 108 050 065 (97) 1B 26 6C 32 41 (61)
C
E
&l3A (a) 027 038 108 051 065 (97) 1B 26 6C 33 41 (61)
C
E
&l26A (a) 027 038 108 050 054 065 (97) 1B 26 6C 32 36 41 (61)
C
E
&l80A (a) 027 038 108 056 048 065 (97) 1B 26 6C 37 31 41 (61)
C
E
&l81A (a) 027 038 108 056 049 065 (97) 1B 26 6C 38 31 41 (61)
C
E
&l90A (a) 027 038 108 057 048 065 (97) 1B 26 6C 39 30 41 (61)
C
E
&l91A (a) 027 038 108 057 049 065 (97) 1B 26 6C 39 31 41 (61)
C
E
&l3001A (a) 027 038 108 051 048 048 049 065 (97) 1B 26 6C 33 30 30 31 41 (61)
C
E
&l100A (a) 027 038 108 049 048 048 065 (97) 1B 26 6C 31 30 30 41 (61)
C
E
&l#P (p) 027 038 108 #...# 080 (112) 1B 26 6C #...# 050 (70)
C
Table A.1 Page 1 of 12
A-2 ❖ DocuPrint 4508 User Guide
Page 85

PCL Printer Commands
Table A.1 PCL printer commands (continued)
Function Parameter Command Decimal Value Hexadecimal Value
Orientation
Orientation Portrait
Landscape
Reverse Portrait
Reverse
Landscape
Print Direction # Degrees of
Rotation
Top Margin # of Lines
Text Length # of Lines
Left Margin # of Columns
Right Margin # of Columns
Clear Horizontal
Margins
—
Perforation Skip Disable
Enable
Horizontal Motion
Index (HMI)
Vertical Motion
Index (VMI)
Line Spacing
(Lines per inch)
# of 1/120”
Increments
# of 1/48”
Increments
1 line/inch
2 lines/inch
3 lines/inch
4 lines/inch
6 lines/inch
8 lines/inch
12 lines/inch
16 lines/inch
24 lines/inch
48 lines/inch
E
&l0O (o) 027 038 108 048 079 (111) 1B 26 6C 30 4F (6F)
C
E
&l1O (o) 027 038 108 049 079 (111) 1B 26 6C 31 4F (6F)
C
E
&l2O (o) 027 038 108 050 079 (111) 1B 26 6C 32 4F (6F)
C
E
&l3O (o) 027 038 108 051 079 (111) 1B 26 6C 33 4F (6F)
C
E
&a#P 027 038 097 # ... # 080 (112) 1B 26 61 # ... # 50 (70)
C
Margins and Text Length
E
&l#E (e) 027 038 108 # ... # 069 (101) 1B 26 6C # ... # 45 (65)
C
E
&l#F (f) 027 038 108 # ... # 070 (102) 1B 26 6C # ... # 46 (66)
C
E
&a#L (l) 027 038 097 # ... # 076 (108) 1B 26 61 # ... # 4C (6C)
C
E
&a#M (m) 027 038 097 # ... # 077 (109) 1B 26 61 # ... # 4D (6D)
C
E
9 027 057 1B 39
C
Perforation Skip Mode
E
&l0L (l) 027 038 108 048 076 (108) 1B 26 6C 30 4C (6C)
C
E
&l1L (l) 027 038 108 049 076 (108) 1B 26 6C 31 4C (6C)
C
Horizontal Column Spacing
E
&k#H (h) 027 038 107 # ... # 072 (104) 1B 26 6B # ... # 48 (68)
C
Vertical Line Spacing
E
&l#C (c) 027 038 108 # ... # 067 (99) 1B 26 6C # ... # 43 (63)
C
E
&l1D (d) 027 038 108 049 068 (100) 1B 26 6C 31 44 (64)
C
E
&l2D (d) 027 038 108 050 068 (100) 1B 26 6C 32 44 (64)
C
E
&l3D (d) 027 038 108 051 068 (100) 1B 26 6C 33 44 (64)
C
E
&l4D (d) 027 038 108 052 068 (100) 1B 26 6C 34 44 (64)
C
E
&l6D (d) 027 038 108 054 068 (100) 1B 26 6C 36 44 (64)
C
E
&l8D (d) 027 038 108 056 068 (100) 1B 26 6C 38 44 (64)
C
E
&l12D (d) 027 038 108 049 050 068 (100) 1B 26 6C 31 32 44 (64)
C
E
&l16D (d) 027 038 108 049 054 068 (100) 1B 26 6C 31 36 44 (64)
C
E
&l24D (d) 027 038 108 050 052 068 (100) 1B 26 6C 32 34 44 (64)
C
E
&l48D (d) 027 038 108 052 056 068 (100) 1B 26 6C 34 38 44 (64)
C
Table A.1 Page 2 of 12
Appendix A: Printer Commands ❖ A-3
Page 86

PCL Printer Commands
Table A.1 PCL printer commands (continued)
Function Parameter Command Decimal Value Hexadecimal Value
CURSOR POSITIONING
Vertical and Horizontal
Vertical Position # of Rows
# of Units
# of Decipoints
Horizontal Position # of Columns
# of Units
# of Decipoints
Half Line Feed
Line Termination CR=CR; LF=LF;
FF=FF
CR=CR+LF;
LF=LF; FF=FF
CR=CR;
LF=CR+LF;
FF=CR+FF
CR=CR+LF;
LF=CR+LF;
FF=CR+FF
Push/Pop Position Push
Pop
Primary Symbol Set ISO 60:
Norwegian 1
ISO 4: United
Kingdom
Windows 3.1
Latin 2
ISO 69: French
ISO 21: German
ISO 15: Italian
Microsoft
Publishing
DeskTop
PS Text
MC Text
E
&a#R (r) 027 038 097 # ... # 082 (114) 1B 26 61 # ... # 52 (72)
C
E
*p#Y (y) 027 042 112 # ... # 089 (121) 1B 2A 70 # ... # 59 (79)
C
E
&a#V (v) 027 038 097 # ... # 086 (118) 1B 26 61 # ... # 56 (76)
C
E
&a#C (c) 027 038 097 # ... # 067 (99) 1B 26 61 # ... # 43 (63)
C
E
*p#X (x) 027 042 112 # ... # 088 (120) 1B 2A 70 # ... # 58 (78)
C
E
&a#H (h) 027 038 097 # ... # 072 (104) 1B 26 61 # ... # 48 (68)
C
E
= 027 061 1B 3D
C
End-of-Line Termination
E
&k0G (g) 027 038 107 048 071 (103) 1B 26 6B 30 47 (67)
C
E
&k1G (g) 027 038 107 049 071 (103) 1B 26 6B 31 47 (67)
C
E
&k2G (g) 027 038 107 050 071 (103) 1B 26 6B 32 47 (67)
C
E
&k3G (g) 027 038 107 051 071 (103) 1B 26 6B 33 47 (67)
C
Push/Pop Position
E
&f0S (s) 027 038 102 048 083 (115) 1B 26 66 30 53 (73)
C
E
&f1S (s) 027 038 102 049 083 (115) 1B 26 66 31 53 (73)
C
FONT SELECTION
Symbol Set Selection
E
(0D 027 040 048 068 1B 28 30 44
C
E
(1E 027 040 049 069 1B 28 31 45
C
E
(9E 027 040 057 069 1B 28 39 45
C
E
(1F 027 040 049 070 1B 28 31 46
C
E
(1G 027 040 049 071 1B 28 31 47
C
E
(0I 027 040 048 073 1B 28 30 49
C
E
(6J 027 040 054 074 1B 28 36 4A
C
E
(7J 027 040 055 074 1B 28 37 4A
C
E
(10J 027 040 049 048 074 1B 28 31 30 4A
C
E
(12J 027 040 049 050 074 1B 28 31 32 4A
C
Table A.1 Page 3 of 12
A-4 ❖ DocuPrint 4508 User Guide
Page 87

PCL Printer Commands
Table A.1 PCL printer commands (continued)
Function Parameter Command Decimal Value Hexadecimal Value
Ventura
International
Ventura US
Wingdings
PS Math
Ventura Math
Math-8
Symbol
ISO 8859-1
(ECMA-94)
Latin 1
ISO 8859-2
Latin 2
ISO 8859-9
Latin 5
ISO 11: Swedish
ISO 17: Spanish
Windows 3.1
Latin 5
PC Turkish
ISO 6: ASCII
Legal
Roman-8
Windows 3.0
Latin 1
PC-8
PC-8 D/N
PC 850
Pi Font
PC-852
Windows 3.1
Latin 1 (ANSI)
E
(13J 027 040 049 051 074 1B 28 31 33 4A
C
E
(14J 027 040 049 052 074 1B 28 31 34 4A
C
E
(579L 027 040 053 055 057 076 1B 28 35 37 39 4C
C
E
(5M 027 040 053 077 1B 28 35 4D
C
E
(6M 027 040 054 077 1B 28 36 4D
C
E
(8M 027 040 056 077 1B 28 38 4D
C
E
(19M 027 040 049 057 077 1B 28 31 39 4D
C
E
(0N 027 040 048 078 1B 28 30 4E
C
E
(2N 027 040 050 078 1B 28 32 4E
C
E
(5N 027 040 053 078 1B 28 35 4E
C
E
(0S 027 040 048 083 1B 28 30 53
C
E
(2S 027 040 050 083 1B 28 32 53
C
E
(5T 027 040 053 084 1B 28 35 54
C
E
(9T 027 040 057 084 1B 28 39 54
C
E
(0U 027 040 048 085 1B 28 30 55
C
E
(1U 027 040 049 085 1B 28 31 55
C
E
(8U 027 040 056 085 1B 28 38 55
C
E
(9U 027 040 057 085 1B 28 39 55
C
E
(10U 027 040 049 048 085 1B 28 31 30 55
C
E
(11U 027 040 049 049 085 1B 28 31 31 55
C
E
(12U 027 040 049 050 085 1B 28 31 32 55
C
E
(15U 027 040 049 053 085 1B 28 31 35 55
C
E
(17U 027 040 049 055 085 1B 28 31 37 55
C
E
(19U 027 040 049 057 085 1B 28 31 39 55
C
Table A.1 Page 4 of 12
Appendix A: Printer Commands ❖ A-5
Page 88

PCL Printer Commands
Table A.1 PCL printer commands (continued)
Function Parameter Command Decimal Value Hexadecimal Value
Spacing
Primary Spacing Fixed
Proportional
Primary Pitch # Characters/
inch
Set Pitch Mode 10.0
Compressed
(16.5-16.7)
Elite (12.0)
Primary Height # Points
Primary Style Upright (Solid)
Italic
Condensed
Condensed
Italic
Compressed
(Extra
Condensed)
Expanded
Outline
Inline
Shadowed
Outline
Shadowed
E
(s0P (p) 027 040 115 048 080 (112) 1B 28 73 30 50 (70)
C
E
(s1P (p) 027 040 115 049 080 (112) 1B 28 73 31 50 (70)
C
Pitch
E
(s#H (h) 027 040 115 # ... # 072 (104) 1B 28 73 # ... # 48 (68)
C
E
&k0S (s) 027 038 107 048 083 (115) 1B 26 6B 30 53 (73)
C
E
&k2S (s) 027 038 107 050 083 (115) 1B 26 6B 32 53 (73)
C
E
&k4S (s) 027 038 107 052 083 (115) 1B 26 6B 34 53 (73)
C
Point Size
E
(s#V (v) 027 040 115 # ... # 086 (118) 1B 28 73 # ... # 56 (76)
C
Style
E
(s0S (s) 027 040 115 048 083 (115) 1B 28 73 30 53 (73)
C
E
(s1S (s) 027 040 115 049 083 (115) 1B 28 73 31 53 (73)
C
E
(s4S (s) 027 040 115 052 083 (115) 1B 28 73 34 53 (73)
C
E
(s5S (s) 027 040 115 053 083 (115) 1B 28 73 35 53 (73)
C
E
(s8S (s) 027 040 115 056 083 (115) 1B 28 73 38 53 (73)
C
E
(s24S (s) 027 040 115 050 052 083 (115) 1B 28 73 32 34 53 (73)
C
E
(s32S (s) 027 040 115 051 050 083 (115) 1B 28 73 33 32 53 (73)
C
E
(s64S (s) 027 040 115 054 052 083 (115) 1B 28 73 36 34 53 (73)
C
E
(s128S (s) 027 040 115 049 050 056 083 (115) 1B 28 73 31 32 38 53 (73)
C
E
(s160S (s) 027 040 115 049 054 048 083 (115) 1B 28 73 31 36 30 53 (73)
C
Table A.1 Page 5 of 12
A-6 ❖ DocuPrint 4508 User Guide
Page 89

PCL Printer Commands
Table A.1 PCL printer commands (continued)
Function Parameter Command Decimal Value Hexadecimal Value
Stroke Weight
Primary Font
Stroke Weight
Ultra Thin
Extra Thin
Thin
Extra Light
Light
Demi Light
Semi Light
Medium (book
or text)
Semi Bold
Demi Bold
Bold
Extra Bold
Black
Extra Black
Ultra Black
Typeface Family Albertus
Antique Olive
Coronet
Courier
Letter Gothic
CG Times
Univers
Wingdings
(Intellifont
version)
Font Default Primary Font
Secondary Font
Underline Enable Fixed
Enable Floating
Disable
E
(s-7B (b) 027 040 115 045 055 066 (98) 1B 28 73 2D 37 42 (62)
C
E
(s-6B (b) 027 040 115 045 054 066 (98) 1B 28 73 2D 36 42 (62)
C
E
(s-5B (b) 027 040 115 045 053 066 (98) 1B 28 73 2D 35 42 (62)
C
E
(s-4B (b) 027 040 115 045 052 066 (98) 1B 28 73 2D 34 42 (62)
C
E
(s-3B (b) 027 040 115 045 051 066 (98) 1B 28 73 2D 33 42 (62)
C
E
(s-2B (b) 027 040 115 045 050 066 (98) 1B 28 73 2D 32 42 (62)
C
E
(s-1B (b) 027 040 115 045 049 066 (98) 1B 28 73 2D 31 42 (62)
C
E
(s0B (b) 027 040 115 048 066 (98) 1B 28 73 30 42 (62)
C
E
(s1B (b) 027 040 115 049 066 (98) 1B 28 73 31 42 (62)
C
E
(s2B (b) 027 040 115 050 066 (98) 1B 28 73 32 42 (62)
C
E
(s3B (b) 027 040 115 051 066 (98) 1B 28 73 33 42 (62)
C
E
(s4B (b) 027 040 115 052 066 (98) 1B 28 73 34 42 (62)
C
E
(s5B (b) 027 040 115 053 066 (98) 1B 28 73 35 42 (62)
C
E
(s6B (b) 027 040 115 054 066 (98) 1B 28 73 36 42 (62)
C
E
(s7B (b) 027 040 115 055 066 (98) 1B 28 73 37 42 (62)
C
Primary Typeface Family
E
(s4362T (t) 027 040 115 052 051 054 050 084 (116) 1B 28 73 34 33 36 32 54 (74)
C
E
(s4168T (t) 027 040 115 052 049 054 056 084 (116) 1B 28 73 34 31 36 38 54 (74)
C
E
(s4116T (t) 027 040 115 052 049 049 054 084 (116) 1B 28 73 34 31 31 36 54 (74)
C
E
(s4099T (t) 027 040 115 052 048 057 057 084 (116) 1B 28 73 34 30 39 39 54 (74)
C
E
(s4102T (t) 027 040 115 052 049 048 050 084 (116) 1B 28 73 34 31 30 32 54 (74)
C
E
(s4101T (t) 027 040 115 052 049 048 049 084 (116) 1B 28 73 34 31 30 31 54 (74)
C
E
(s4148T (t) 027 040 115 052 049 052 056 084 (116) 1B 28 73 34 31 34 38 54 (74)
C
E
(s6826T (t) 027 040 115 054 056 050 054 084 (116) 1B 28 73 36 38 32 36 54 (74)
C
Font Default
E
(3@ 027 040 051 064 1B 28 33 40
C
E
)3@ 027 041 051 064 1B 29 33 40
C
Underline
E
&d0D (d) 027 038 100 048 068 (100) 1B 26 64 30 44 (64)
C
E
&d3D (d) 027 038 100 051 068 (100) 1B 26 64 33 44 (64)
C
E
&d@ 027 038 100 064 1B 26 64 40
C
Table A.1 Page 6 of 12
Appendix A: Printer Commands ❖ A-7
Page 90

PCL Printer Commands
Table A.1 PCL printer commands (continued)
Function Parameter Command Decimal Value Hexadecimal Value
Transparent Print
Transparent Print
Data
# of Bytes
Assign Font ID Font ID #
Font and
Character Control
Delete all Fonts
Delete all
temporary fonts
Delete last font
ID specified
Delete last
character
specified
Make font
temporary
Make font
permanent
Copy/Assign
the currently
invoked font as
temporary
Set Symbol Set ID #
Define Symbol Set # of Bytes
Symbol Set
Control
Delete all
symbol sets
Delete all
temporary
symbol sets
Delete current
soft symbol set
(last ID #)
Make current
soft symbol set
temporary
Make current
soft symbol set
permanent
Select Font
(with ID #)
ID # primary
font
ID # secondary
font
E
&p#X[Data] 027 038 112 # ... # 088 1B 26 70 # ... # 58
C
FONT MANAGEMENT
E
*c#D (d) 027 042 099 # ... # 068 (100) 1B 2A 63 # ... # 44 (64)
C
E
*c0F (f) 027 042 099 048 070 (102) 1B 2A 63 30 46 (66)
C
E
*c1F (f) 027 042 099 049 070 (102) 1B 2A 63 31 46 (66)
C
E
*c2F (f) 027 042 099 050 070 (102) 1B 2A 63 32 46 (66)
C
E
*c3F (f) 027 042 099 051 070 (102) 1B 2A 63 33 46 (66)
C
E
*c4F (f) 027 042 099 052 070 (102) 1B 2A 63 34 46 (66)
C
E
*c5F (f) 027 042 099 053 070 (102) 1B 2A 63 35 46 (66)
C
E
*c6F (f) 027 042 099 054 070 (102) 1B 2A 63 36 46 (66)
C
Soft Symbol Set Management/Creation
E
*c#R (r) 027 042 099 # ... # 082 (114) 1B 2A 63 # ... # 52 (72)
C
E
(f#W[Data] 027 040 102 # ... # 087 1B 28 66 # ... # 57
C
E
*c0S (s) 027 042 099 048 083 (115) 1B 2A 63 30 53
C
E
*c1S (s) 027 042 099 049 083 (115) 1B 2A 63 31 53 (73)
C
E
*c2S (s) 027 042 099 050 083 (115) 1B 2A 63 32 53 (73)
C
E
*c4S (s) 027 042 099 052 083 (115) 1B 2A 63 34 53 (73)
C
E
*c5S (s) 027 042 099 053 083 (115) 1B 2A 63 35 53 (73)
C
Font Selection by ID Number
E
(#X 027 040 # ... # 088 1B 28 # ... # 58
C
E
)#X 027 041 # ... # 088 1B 29 # ... # 58
C
Table A.1 Page 7 of 12
A-8 ❖ DocuPrint 4508 User Guide
Page 91

PCL Printer Commands
Table A.1 PCL printer commands (continued)
Function Parameter Command Decimal Value Hexadecimal Value
Soft Font Creation
Font Descriptor
(font header)
Download
character
Character code Character code
# of bytes
# of bytes
# (decimal)
Raster Resolution 75 dots/inch
100 dots/inch
150 dots/inch
300 dots/inch
Raster Graphics
Presentation
Start Raster
Graphics
Follows
orientation
Follows
physical page
Left Raster
Graphics
Margin
Current Cursor
Raster Y Offset # of Raster
Lines of vertical
movement
Set Raster
Compression
Mode (Method)
Unencoded
Run-Length
Encoded
Tagged Image
File Format
Delta Row
Adaptive
compression
Transfer Raster
Data by row
End Raster
Graphics
# of Bytes
Old version
Preferred
Raster Height # Raster Rows
Raster Width # Pixels of the
Specified
Resolution
E
)s#W[Data] 027 041 115 # ... # 087 1B 29 73 # ... # 57
C
E
(s#W[Data] 027 040 115 # ... # 087 1B 28 73 # ... # 57
C
E
*c#E (e) 027 042 099 # ... # 069 (101) 1B 2A 63 # ... # 45 (65)
C
GRAPHICS
Raster Graphics
E
*t75R (r) 027 042 116 055 053 082 (114) 1B 2A 74 37 35 52 (72)
C
E
*t100R (r) 027 042 116 049 048 048 082 (114) 1B 2A 74 31 30 30 52 (72)
C
E
*t150R (r) 027 042 116 049 053 048 082 (114) 1B 2A 74 31 35 30 52 (72)
C
E
*t300R (r) 027 042 116 051 048 048 082 (114) 1B 2A 74 33 30 30 52 (72)
C
E
*r0F (f) 027 042 114 048 070 (102) 1B 2A 72 30 46 (66)
C
E
*r3F (f) 027 042 114 051 070 (102) 1B 2A 72 33 46 (66)
C
E
*r0A (a) 027 042 114 048 065 (97) 1B 2A 72 30 41 (61)
C
E
*r1A (a) 027 042 114 049 065 (97) 1B 2A 72 31 41 (61)
C
E
*b#Y (y) 027 042 098 # ... # 089 (121) 1B 2A 62 # ... # 59 (79)
C
E
*b0M (m) 027 042 098 048 077 (109) 1B 2A 62 30 4D (6D)
C
E
*b1M (m) 027 042 098 049 077 (109) 1B 2A 62 31 4D (6D)
C
E
*b2M (m) 027 042 098 050 077 (109) 1B 2A 62 32 4D (6D)
C
E
*b3M (m) 027 042 098 051 077 (109) 1B 2A 62 33 4D (6D)
C
E
*b5M (m) 027 042 098 053 077 (109) 1B 2A 62 35 4D (6D)
C
E
*b#W[Data] 027 042 098 # ... # 087 1B 2A 62 # ... # 57
C
E
*rB (b) 027 042 114 066 (98) 1B 2A 72 42 (62)
C
E
*rC (c) 027 042 114 067 (99) 1B 2A 72 43 (63)
C
E
*r#T (t) 027 042 114 # ... # 084 (116) 1B 2A 72 # ... # 54 (74)
C
E
*r#S (u) 027 042 114 # ... # 083 (115) 1B 2A 72 # ... # 53 (73)
C
Table A.1 Page 8 of 12
Appendix A: Printer Commands ❖ A-9
Page 92

PCL Printer Commands
Select Current
Pattern
Source
Tr an sp a re nc y
Mode
Solid Black
(default)
Solid White
HP-defined
Shading Pattern
HP-defined
Cross-Hatched
Pattern
User-defined
pattern
Tr an sp a re nt
E
C
E
C
E
C
E
C
E
C
E
C
THE PRINT MODEL
Imaging
*v0T (t) 027 042 118 048 084 (116) 1B 2A 76 30 54 (74)
*v1T (t) 027 042 118 049 084 (116) 1B 2A 76 31 54 (74)
*v2T (t) 027 042 118 050 084 (116) 1B 2A 76 32 54 (74)
*v3T (t) 027 042 118 051 084 (116) 1B 2A 76 33 54 (74)
*v4T (t) 027 042 118 052 084 (116) 1B 2A 76 34 54 (74)
*v0˝17.1638 0 TDı˝0.0043 Tcı˝[(()10.6(1)-4.2([(User)60.9(-de)-8(f)14.8(052)11.5( 08)13.6(4 .5( 095)13.6((nı˝[(027)11.5( 0)13.6(n)-8.3(2 )14.8(118 )14.8(048)11.5( 08)13.6(4)]TJı˝/F4 1 Tfı˝17.1638 0 TDı˝0.0043 Tcı˝[(7]TJı˝/81)-4.2(16))]TJı˝/F12 1 Tfı˝3.0086 0 TDı˝0.0063 Tcı˝0.0022 0wı˝[(1B )14.8(2A )14.8(76)12.6( 30)12.6( 5)14.7(4)]TJı˝/F4 1 Tfı˝14.3621 0 TDı˝-0.0063 Tcı˝[463 T464 8(4)-10.6())]TJı˝41 1 Tfı˝3.008654 TDı˝0.006Ecı˝4[(User)60.9(-de)-8(f)5.9ce )]T.7(n)-8.8(e)3.8(3.6(1)-4.O.58 0(r)-q58 0(r)u)-7˝4[E)Tjı˝0.5054 -0.8172 TDı˝(C473ı˝6.96 0 0 6.96 215.64 533.22 Tmı˝-0.0021 Tcı˝[(*v3)-10.6(T)-3355.6(()]TJ4Tjı4 1 Tfı˝5.6897 0 TDı˝0.1(User)60.9(-de)-8(f)14.8(052)11.5( 08)13.6(4 .5( 095)13.6((nı˝[(027)11.5( 0)13.6(n)-8.3(2 )14.8(118 )14.8(048)11.5( 08)13.6(4)]TJı˝/F4 1 Tfı˝17.1638 0 TDı˝0.0093 Tcı˝[(7]TJı˝/81)-4.2(16))]TJı˝/F12 1 Tfı˝3.0086 0 TDı˝0.0063 Tcı˝0.0022 0wı˝[(1B )14.8(2A )14.8(76)12.6( 30)12.6( 5)14.7(4)]TJı˝/F4 1 Tfı˝14.3621 0 TDı˝-0.0013 Tcı˝[463 T464 8(4)-10.6())]TJı˝41 1 Tfı˝3.008654 TDı˝0.006Ecı˝4[(User)60.9(-de)-8(f)51(c73 T-2.293.6(D9.1 536.04 Tmı˝0 Tcı˝0 Twı˝(E)-2.4(e)]TJı˝9.0517 2.3017 TDı.9(a)-106.7(r)-86.1(e)-99.3(n)-111.9(c)-99.1(y)-105.6( )]TJı˝0 -1.1552 TDı˝-0.0052 Tcı˝[(Mo)-13.7(d)-9.5(e)]TJı˝9.051798.2(p)-111˝-0.1034 Tcı˝[(Tr)-103(a)-102.9(n)-111.9(s)-98.2(p)-111.9(a)-106.7(r)-86.1(e)-99.3(n)-111.9(t)]TJı˝5.58 0 0 5.58 209.1 486.06 Tmı˝0 Tcı˝0 Twı˝(E)Tjı˝0.5054 -0.8172 TDı˝(C)Tjı˝2.96 0 0 6.96 215.64 533.22 Tmı˝-0.0021 Tcı˝[(*v3)-10.6(T)-3355.6(()]TJ4˝/F46Tcı˝[(()10.6(1)-4.2([(User)6O.9(-Dı˝-8(f)14.8(052)11.5( 08)13.6(4 .5( 095)13.6((oı˝[(027)11.5( 0)13.6(n)-8.3(2 )14.8(118 )14.8(048)11.5( 08)13.6(4)]TJı˝/F4 1 Tfı˝17.1638 0 TDı˝0.0043 Tcı˝[(7]TJı˝/91)-4.2(16))]TJı˝/F12 1 Tfı˝3.0086 0 TDı˝0.0063 Tcı˝0.0022 1wı˝[(1B )14.8(2A )14.8(76)12.6( 30)12.6( 5)14.7(4)]TJı˝/F4 1 Tfı˝14.3621 0 TDı˝-0.0063 Tcı˝[466022F 8(4)-10.6())]TJı˝41 1 Tfı˝3.008654 TDı˝0.006Ecı˝4[(User)60.9(-de)-8(f)5.9ce )]T.7(n)-8.8(e)3.8(3.6(1)-4.O.58 0(r)-q58 0(r)u)-7˝4[E)Tjı˝0.5054 -0.8172 TDı˝(C444ı˝6.96 0 0 6.96 215.64 483.24 Tmı˝-0.0021 Tcı˝[(*v0)-10.6(˝17.1638 0 TDı˝0.4143 Tcı˝[(()10.6(1)-4.2(1(User)6O.9(-Dı˝-8(f)14.8(052)11.5( 08)13.6(4 .5( 095)13.6((oı˝[(027)11.5( 0)13.6(n)-8.3(2 )14.8(118 )14.8(048)11.5( 08)13.6(4)]TJı˝/F4 1 Tfı˝17.1638 0 TDı˝0.0093 Tcı˝[(7]TJı˝/91)-4.2(16))]TJı˝/F12 1 Tfı˝3.0086 0 TDı˝0.0063 Tcı˝0.0022 1wı˝[(1B )14.8(2A )14.8(76)12.6( 30)12.6( 5)14.7(4)]TJı˝/F4 1 Tfı˝14.3621 0 TDı˝-0.0013 Tcı˝[466022F 8(4)-10.6())]TJı˝41 1 Tfı˝3.008654 TDı˝0.006Ecı˝4[(User)60.9(66())]T7.954 -0.7.9542de)78 4249(iTcı˝[(()1)-8. 5)14.7˝6.9TJı˝/RTr)-2(ectang486cı˝l)- T46e Dim486c6[E)0 Tcısio486cı˝ns˝[(1B )14.8(2A )110.6(˝17.1638 92˝(C41143 Tcı˝[30)12-8. 5)14.7 0 9TJı˝/Rect)1ı˝4[an)1ı˝1(gl6606[E)09.1 W.9(3˝4[i)7)-10371 0t)7)-1he)]TJı˝9.0517 2.3017 14.7(8. 5)(()1)-8.wı˝0.0067-2(HTr)-4(ori63 T7(z).6([(Tr)-5(E)-2.30t)7)45.58606[l Size(User)60-111.9(517 2.3017 14.7648. 5)(()86.8.wı˝0.# of)7)9( dot3 Tc8(s)Tjı˝0.5054 -0.8172 TDı˝(C416.96 0 0 6.96 215.64 533.22 Tmı˝-0.07648.cı˝[(*v0)-10.6(˝17.1638 0 TDı˝0.1143 Tcı˝[(()10.6(1)-4.2c#(User)6A4 101.06 (f)14.8(052)11.5( 085021 Tfı˝3.008676)3.6((aı˝[(027)11.5( 0)13.6(6.012.6( 30)126( 5)14.7(58)11.5( 08)12.304)]Te)-84)-2.5fı˝17.163099˝17.163# )12.7(..)9-2(.)9-2( #˝17.16306]Te)-851)-4.2(16))]TJı˝/F73 2 1 Tfı˝-59.6207 -3.01729TDı˝0.0724 Tcı˝[(S)6.5(o)-6.1(ur)22.4.00012.6( 30)1258. 5)14.7 )]TJı˝/F4 1 3fı˝14.363fı˝63)12.8( #˝17 T7(.)9-7(.)-2(.)7 T7( 3 Tc73# 4]Te)9ı˝08(4)-10.6())]TJı˝3622 1 Tfı˝-59.6207 -3.01726TDı˝0.0124 Tcı˝[(S)6.5(o)-6.1(ur)2)5.9569]T.7(n)-8.8(e()1)68. 5)(()1458.wı˝0.# o)-7˝9(f)2˝(( d)-7˝9(ecipo)-7˝9(in)-7˝9(ts)Tjı˝0.5054 -0.8172 TDı˝(C401ı˝6.96 0 0 6.96 215.64 533.22 Tmı˝-0.0021 Tcı˝[(*v3)-10.6(T)-3355.6(()]TJ3TJı˝ 1 Tfı˝5.6897 0 TDı˝0c#(User)6H.9(-de)-8(f)14.8(052)11.5( 08)13.6(4 .5( 095)13.6((hı˝[(027)11.5( 0)13.6(n)-8.3(2 )14.826( 5)14.7(58)11.5( 08)12.304)]Te)-84)-2.5fı˝17.163099˝17.163# )12.7(..)9-2(.)9-2( #˝17.16307]Te)-821)-4.2(16))]TJı˝/F12 1 Tfı˝3.0086 0 TDı˝0.0063 Tcı˝0.002204wı˝[(1B )14.8(2A )14.8(76)12.6( 30)1258. 5)14.7
A-10 ❖ DocuPrint 4508 User Guide
Page 93

PCL Printer Commands
Table A.1 PCL printer commands (continued)
Function Parameter Command Decimal Value Hexadecimal Value
Shading 2% Gray
10% Gray
15% Gray
30% Gray
45% Gray
70% Gray
90% Gray
100% Gray
Pattern 1 Horiz. Line
2 Vert. Lines
3 Diagonal
Lines
4 Diagonal
Lines
5 Square Grid
6 Diagonal Grid
Define Pattern # of bytes
User-Defined
Pattern Control
Set Pattern
Reference
Point Follow physical
Delete all
patterns
Delete all
temporary
patterns
Delete current
pattern
Make pattern
temporary
Make pattern
permanent
Rotate with
orientation
page
E
*c2G (g) 027 042 099 050 071 (103) 1B 2A 63 32 47 (67)
C
E
*c10G (g) 027 042 099 049 048 071 (103) 1B 2A 63 31 30 47 (67)
C
E
*c15G (g) 027 042 099 049 053 071 (103) 1B 2A 63 31 35 47 (67)
C
E
*c30G (g) 027 042 099 051 048 071 (103) 1B 2A 63 33 30 47 (67)
C
E
*c45G (g) 027 042 099 052 053 071 (103) 1B 2A 63 34 35 47 (67)
C
E
*c70G (g) 027 042 099 055 048 071 (103) 1B 2A 63 37 30 47 (67)
C
E
*c90G (g) 027 042 099 057 048 071 (103) 1B 2A 63 39 30 47 (67)
C
E
*c100G (g) 027 042 099 049 048 048 071 (103) 1B 2A 63 31 30 30 47 (67)
C
E
*c1G (g) 027 042 099 049 071 (103) 1B 2A 63 31 47 (67)
C
E
*c2G (g) 027 042 099 050 071 (103) 1B 2A 63 32 47 (67)
C
E
*c3G (g) 027 042 099 051 071 (103) 1B 2A 63 33 47 (67)
C
E
*c4G (g) 027 042 099 052 071 (103) 1B 2A 63 34 47 (67)
C
E
*c5G (g) 027 042 099 053 071 (103) 1B 2A 63 35 47 (67)
C
E
*c6G (g) 027 042 099 054 071 (103) 1B 2A 63 36 47 (67)
C
USER-DEFINED PATTERN/MANAGEMENT CREATION
E
*c#W[Data] 027 042 099 # ... # 087 (119) 1B 2A 63 # ... # 57 (77)
C
E
*c0Q (q) 027 042 099 048 081 (113) 1B 2A 63 30 51 (71)
C
E
*c1Q (q) 027 042 099 049 081 (113) 1B 2A 63 31 51 (71)
C
E
*c2Q (q) 027 042 099 050 081 (113) 1B 2A 63 32 51 (71)
C
E
*c4Q (q) 027 042 099 052 081 (113) 1B 2A 63 34 51 (71)
C
E
*c5Q (q) 027 042 099 053 081 (113) 1B 2A 63 35 51 (71)
C
E
*p0R (r) 027 042 112 048 082 (114) 1B 2A 70 30 52 (72)
C
E
*p1R (r) 027 042 112 049 082 (114) 1B 2A 70 31 52 (72)
C
Table A.1 Page 10 of 12
Appendix A: Printer Commands ❖ A-11
Page 94

PCL Printer Commands
Table A.1 PCL printer commands (continued)
Function Parameter Command Decimal Value Hexadecimal Value
MACROS
Macro ID Macro ID #
Macro Control Start Macro
Def.
Stop Macro
Def.
Execute Macro
Call Macro
Enable Overlay
Disable Overlay
Delete Macros
Delete All
Temp. Macros
Delete Macro ID
Make
Temporary
Make
Permanent
Set Status
Readback
Location Type
Invalid Location
Currently
Selected
All Locations
Internal
Downloaded
Cartridge
User-Installed
ROM (SIMMs)
Set Status
Readback
Location Unit
Inquire Status
Readback Entity
All entities of
the Location
Ty pe
Entity 1 or
Temporary
Entity 2 or
Permanent
Font
Macro
User-defined
Pattern
Symbol Set
Font Extended
E
&f#Y (y) 027 038 102 # ... # 089 (121) 1B 26 66 # ... # 59 (79)
C
E
&f0X (x) 027 038 102 048 088 (120) 1B 26 66 30 58 (78)
C
E
&f1X (x) 027 038 102 049 088 (120) 1B 26 66 31 58 (78)
C
E
&f2X (x) 027 038 102 050 088 (120) 1B 26 66 32 58 (78)
C
E
&f3X (x) 027 038 102 051 088 (120) 1B 26 66 33 58 (78)
C
E
&f4X (x) 027 038 102 052 088 (120) 1B 26 66 34 58 (78)
C
E
&f5X (x) 027 038 102 053 088 (120) 1B 26 66 35 58 (78)
C
E
&f6X (x) 027 038 102 054 088 (120) 1B 26 66 36 58 (78)
C
E
&f7X (x) 027 038 102 055 088 (120) 1B 26 66 37 58 (78)
C
E
&f8X (x) 027 038 102 056 088 (120) 1B 26 66 38 58 (78)
C
E
&f9X (x) 027 038 102 057 088 (120) 1B 26 66 39 58 (78)
C
E
&f10X (x) 027 038 102 049 048 088 (120) 1B 26 66 31 30 58 (78)
C
STATUS READBACK
E
*s0T (t) 027 042 115 048 084 (116) 1B 2A 73 30 54 (74)
C
E
*s1T (t) 027 042 115 049 084 (116) 1B 2A 73 31 54 (74)
C
E
*s2T (t) 027 042 115 050 084 (116) 1B 2A 73 32 54 (74)
C
E
*s3T (t) 027 042 115 051 084 (116) 1B 2A 73 33 54 (74)
C
E
*s4T (t) 027 042 115 052 084 (116) 1B 2A 73 34 54 (74)
C
E
*s5T (t) 027 042 115 053 084 (116) 1B 2A 73 35 54 (74)
C
E
*s7T (t) 027 042 115 055 084 (116) 1B 2A 73 37 54 (74)
C
E
*s0U (u) 027 042 115 048 085 (117) 1B 2A 73 30 55 (75)
C
E
*s1U (u) 027 042 115 049 085 (117) 1B 2A 73 31 55 (75)
C
E
*s2U (u) 027 042 115 050 085 (117) 1B 2A 73 32 55 (75)
C
E
*s0I (i) 027 042 115 048 073 (105) 1B 2A 73 30 49 (69)
C
E
*s1I (i) 027 042 115 049 073 (105) 1B 2A 73 31 49 (69)
C
E
*s2I (i) 027 042 115 050 073 (105) 1B 2A 73 32 49 (69)
C
E
*s3I (i) 027 042 115 051 073 (105) 1B 2A 73 33 49 (69)
C
E
*s4I (i) 027 042 115 052 073 (105) 1B 2A 73 34 49 (69)
C
Table A.1 Page 11 of 12
A-12 ❖ DocuPrint 4508 User Guide
Page 95

PCL Printer Commands
Flush All Pages Flush All
complete pages
Flush All Page
Data
Free Memory
—
Space
Echo # = Echo value
(-32767 to
32767)
Enter PCL Mode Use previous
PCL cursor
position
Use current
HP-GL/2 pen
position for
cursor position
Enter HP-GL/2
Mode
Use Previous
HP-GL/2 pen
position
Use current
PCL cursor
position
HP-GL/2 Plot
Horizontal Size
Horizontal size
in inches
E
&r0F (f) 027 038 114 048 070 (120) 1B 26 72 30 46 (66)
C
E
&r1F (f) 027 038 114 049 070 (120) 1B 26 72 31 46 (66)
C
E
*s1M (m) 027 042 115 049 077 (109) 1B 2A 73 31 4D (6D)
C
E
*s#X (x) 027 042 115 # ... # 088 (120) 1B 2A 73 # ... # 58 (78)
C
PCL VECTOR GRAPHICS SWITCHING/SET-UP PICTURE FRAME
E
%0A 027 037 048 065 1B 25 30 41
C
E
%1A 027 037 049 065 1B 25 31 41
C
E
%0B 027 037 048 066 1B 25 30 42
C
E
%1B 027 037 049 066 1B 25 31 42
C
E
*c#K )
C
Appendix A: Printer Commands ❖ A-13
Page 96

Printer Commands
HP-GL/2
Printer
Commands
Table A.2 HP-GL/2 Context Printer Commands
Command Mnemonic Parameters
DUAL CONTEXT EXTENSIONS
Enter PCL Mode Esc%#A 0 - Retain previous PCL cursor position
Reset EscE None
Primary Font F1 Font_ID
Secondary Font FN Font_ID
Scalable Or Bitmapped Fonts SB 0 - Scalable fonts only
PALETTE EXTENSIONS
* Parameters in brackets are optional.
Transparency Mode TR 0 - Off (opaque)
Screened Vectors SV [screen_type[,shading[,index]]]
VECTOR GROUP
* Parameters in brackets are optional.
Arc Absolute AA x_center, y_center, sweep_angle [,chord_angle];
Arc Relative AR x_increment, y_increment, sweep-angle [,chord_angle];
Absolute Arc Three Point AT x_inter, y_inter, x_end, y_end [,chord_angle];
Bezier Absolute BZ x1y1x2yx3y3...[x1y1x2y2x3y3]
Bezier Relative BR x1y1x2yx3y3...[x1y1x2y2x3y3]
Plot Absolute PA [x,y . . . [,x,y]];
Plot Relative PR [x,y . . . [,x,y]];
Pen Down PD [x,y . . . [,x,y]];
Pen Up PU [x,y . . . [,x,y]];
Relative Arc Three Point RT x_incr_inter, y_incr_inter, x_incr_end, y_incr_end [,chord_angle];
Polyline Encoded PE [flag[val]|coord_pair . . . [flag[val]|coord_pair]];
POLYGON GROUP
* Parameters in brackets are optional
Circle CI radius [,chord_angle];
Fill Rectangle Absolute RA x_coordinate, y_coordinate;
Fill Rectangle Relative RR x_increment, y_increment;
1 - Use current HP-GL/2 pen position
1 - Bitmapped fonts allowed
1 - On (transparent)
Table A.2 Page 1 of 3
A-14 ❖ DocuPrint 4508 User Guide
Page 97

HP-GL/2 Printer Commands
Table A.2 HP-GL/2 Context Printer Commands (continued)
Command Mnemonic Parameters
Edge Rectangle Absolute EA x_coordinate, y_coordinate;
Edge Rectangle Relative ER x_increment, y_increment;
Fill Wedge WG radius, start_angle, sweep_angle [,chord_angle];
Edge Wedge EW radius, start_angle, sweep_angle [,chord_angle];
Polygon Mode PM polygon_definition;
Fill Polygon FP 0 - Odd/Even
Edge Polygon EP None
CONFIGURATION AND STATUS GROUP
* Parameters in brackets are optional
Scale SC [x1, x2, y1, y2 [,type [,left, bottom]]];
Input Window IW [xLL,yLL,xUR,yUR];
Input P1 and P2 IP [p1x, p1y [,p2x, p2y]];
Input Relative P1 and P2 IR [p1x, p1y [,p2x, p2y]];
Default Values DF None
Initialize IN [n];
Rotate Coordinate System RO [angle];
Comment CO “text ... text:
CHARACTER GROUP
* Parameters in brackets are optional
Select Standard Font SS
Select Alternate Font SA
Absolute Direction DI [run, rise];
Relative Direction DR [run, rise];
Absolute Character Size SI [width, height];
Relative Character Size SR [width, height];
Character Slant SL [tangent_of_angle];
Extra Space ES [width [,height]]
Standard Font Definition SD [kind, value . . . [,kind, value]];
Alternate Font Definition AD [kind, value . . . [,kind, value]];
Character Fill Mode CF [fill_mode [,edge_pen]];
Label Origin LO [position];
Label LB [char . . . [char]]1bterm
Define Label Terminator DT [1bterm [,mode]];
Character Plot CP [spaces, lines];
1 - non-zero winding
or
[x1,xfactor,y1,yfactor,2];
Table A.2 Page 2 of 3
Appendix A: Printer Commands ❖ A-15
Page 98

HP-GL/2 Printer Commands
Table A.2 HP-GL/2 Context Printer Commands (continued)
Command Mnemonic Parameters
Transparent Data TD [mode];
Define Variable Text Path DV [path [,line]];
LINE AND FILL ATTRIBUTES GROUP
* Parameters in brackets are optional
Line Type LT [line_type [,pattern_length [,mode]]];
Line Attributes LA [kind, value . . . [,kind, value]];
Pen Width PW [width [,pen]];
Pen Width Unit Selection WU [type];
Select Pen SP [pen]; (required, 1 for black (recommended) or 0 for white)
Symbol Mode SM [char];
Fill Type FT [fill_type [,option1 [,option2]]];
Anchor Corner AC [x_coordinate, y_coordinate];
Raster Fill Definition RF [index [,width, height, pen_nbr . . . pen_nbr]];
User Defined Line Type UL [index [,gap1 . . . gapn]];
(width and height must be less than 255)
Table A.2 Page 3 of 3
A-16 ❖ DocuPrint 4508 User Guide
Page 99

Printer Commands
PJL Commands
Table A.3 PJL Commands
Command Command Description Parameters Example
COMMENT Causes PJL to accept the command
line as a comment.
DEFAULT Sets default value for environment
variables.
INFO Requests a specified category of
printer information, such as printer
model number, printer memory
available, configuration, status,
environment variables, and
unsolicited status variables.
ECHO Returns the <words> portion of
the command to the host
computer.
PAPER,
ORIENTATION,
MANUALFEED,
SYMSET,
PITCH,
POINTSIZE,
COPIES,
FORMLINES,
AUTOCONT,
TONERSAVE,
POWERSAVE,
BAUDRATE,
ROBUS,
TYPEFACE
ID,
MEMORY,
VARIABLES,
ENGINE,
CONFIG
ESC% - 12345X@PJL(CR/LF)
@PJL COMMENT(CR/LF)
* * Beginning of JOB * * (CR/LF)
ESC% - 12345X
ESC% - 12345X@PJL(CR/LF)
@PJL DEFAULT=A4(CR/LF)
ESC% - 12345X
ESC% - 12345X@PJL(CR/LF)
@PJL INFO ID(CR/LF)
ESC% - 12345X
ESC% - 12345X@PJL(CR/LF)
@PJL ECHO(CR/LF)
This is Echo Test(CR/LF)
ESC% - 12345X
INITIALIZE Resets current variables to factory
default values.
RESET Resets current variables to user
defined values.
UEL/SPJL Exits current printer language and
returns control to PJL.
Appendix A: Printer Commands ❖ A-17
ESC% - 12345X@PJL(CR/LF)
OPJL INITIALIZE(CR/LF)
ESC% - 12345X
ESC% - 12345X@PJL(CR/LF)
@PJL RESET(CR/LF)
ESC% - 12345X
ESC% - 12345X
Page 100

A-18 ❖ DocuPrint 4508 User Guide
 Loading...