

Page 1

The Xerox
4505/4505ps and
4510/4510ps
Desktop Laser Printers
User’s Guide
Page 2

Xerox Corporation Xerox Canada, Limited
701 South Aviation Blvd. 5650 Yonge Street
El Segundo, CA North York, Ontario
90245 Canada
USA M2M 4G7
Americas Operations Rank Xerox, Limited
200 First Stamford Place Parkway
Greenwich Avenue Marlow
Stamford, CT Buckinghamshire
06904-2343 S17 1YL
USA United Kingdom
Copyright
Copyright protection claimed includes all forms of matters of
copyrightable materials and information now allowed by statutory or
judicial law or hereinafter granted, including without limitation, material
generated from the software programs which are displayed on the screen
such as styles, templates, icons, screen displays, looks, etc.
Printed in France.
Xerox
mentioned in this publication are trademarks.
Adobe and PostScript are trademarks of Adobe Systems Incorporated.
TrueRes is a trademark of DP-Tek. PCL, HP, LaserJet, Intellifont, and
Resolution Enhancement T echnology (RET) ar e trademarks of
Hewlett-Packard Company . IBM is a trademark of Inter national Business
Machines Corporation. Microsoft, Microsoft Windows, Microsoft Word, MS,
and MS-DOS are trademarks of Microsoft Corporation. Univers is a
trademark of Linotype AG or its subsidiaries. WordPerfect is a trademark of
WordPerfect Corporation. Centronics is a trademark of Centronics
Corporation. Macintosh and TrueType are trademarks of Apple Computer,
Incorporated. OnPage is a trademark of Computer:applications, Inc. All
other product names are trademarks/ tradenames of their respective owners.
PCL
and
printer contains an emulation of the Hewlett Packard PCL 5e command
language, recognizes HP PCL 5e commands, and processes these
commands in a manner compatible with Hewlett Packard LaserJet printer
products.
1994 Xerox Corporation. All Rights Reserved.
, Rank Xerox, and all product names and product numbers
PCL 5e
are trademarks of Hewlett Packard Company. This
Notice
Specifications described in this publication are subject to change without
notice. Use of some features may be limited by your hardware or software
configuration. Contact your dealer, Xerox or Rank Xerox for details.
Page 3

Table of Contents
Chapter 1
Chapter 2
Chapter 3
Introduction
Overview 1-2
Sharing the Printer 1-5
Memory Considerations 1-6
Handling Paper
Overview 2-3
Paper Input 2-4
Paper Output 2-5
Paper Specifications 2-6
Paper Trays 2-8
Loading Paper 2-14
Selecting a Paper Source 2-22
Using the Control Panel
Overview 3-3
Control Panel Features 3-4
Navigating the Menu System 3-8
Main Menu System 3-12
...................................................
.............................................
..............................
1-1
2-1
3-1
Language 3-14
4505/4505ps or 4510/4510ps User’s Guide ❖
i
Page 4

Table of Contents
PCL Menu 3-15
PostScript Menu 3-29
Interface Menu 3-37
System Menu 3-57
Test Menu 3-61
Reset Menu 3-65
Printer Settings that Affect Memory 3-67
Chapter 4
Chapter 5
Chapter 6
Using Fonts
....................................................
Overview 4-3
Fonts Resident on the Printer 4-5
Adding Fonts 4-9
Selecting a Font 4-12
Downloading Fonts 4-13
Adding Printer Options
...............................
Overview 5-2
Installing a SIMM 5-4
Installing a Font Card 5-19
Maintaining the Printer
..............................
Overview 6-2
Replacing the EP Cartridge 6-3
Fuser Cleaning Cycle 6-9
Adjusting the Print Density 6-12
Cleaning the Printer 6-13
Transporting the Printer 6-14
4-1
5-1
6-1
Chapter 7
Troubleshooting
...........................................
Overview 7-2
Displayed Control Panel Messages 7-5
Paper Jams 7-19
Printer Operational Problems 7-26
ii
❖ 4505/4505ps or 4510/4510ps User’s Guide
7-1
Page 5

Table of Contents
Print Quality Problems 7-29
Appendix A
Printer and Cable Specifications
..............
4505 and 4505ps Printer Specifications A-2
4510 and 4510ps Printer Specifications A-4
Cable Specifications A-7
Appendix B
Printer Commands (Escape Sequences)
Xerox-Unique Settings B-2
PCL Printer Commands B-3
HP-GL/2 Context Printer Commands B-21
Control Codes B-25
Appendix C
Appendix D
I/O Port Polling
..............................................
Ordering Information
.................................
Printer Options D-2
Additional Order Items D-7
Appendix E
Environmental Specifications
....................
Glossary .......................................................................
Index ........................................................................
...
A-1
B-1
C-1
D-1
E-1
GL-1
IX-1
4505/4505ps or 4510/4510ps User’s Guide ❖
iii
Page 6

iv
❖ 4505/4505ps or 4510/4510ps User’s Guide
Page 7

Chapter 1
Introduction
Overview
Sharing the Printer
Memory Considerations
...............................................................................
Printer Components 1-3
Factory Settings 1-4
...............................................................
.......................................................
Chapter 1
1-2
1-5
1-6
Chapter 1: Introduction ❖
1-1
Page 8

Overview
Overview
The Xerox 4505, 4505ps, 4510, and 4510ps Desktop Laser
Printers offer the most cost-effective, best price-performance
solution to single-user or networked printing of any advanced
laser printer in their class.
At
five
pages per minute for the 4505/4505ps and
per minute for the 4510/4510ps, these printers provide
technically advanced features to ensure the high quality
Xerox printing you have come to expect:
• 600 dpi and 300 dpi resolutions
• Up to 10,000 pages per month for the 4505/4505ps
• Up to 20,000 pages per month for the 4510/4510ps
• Power saver mode
• Remote User Interface (RUI)
• TrueRes, for smooth edges and enhanced resolution
• Optional lower base with 500-sheet, 250-sheet, or
30-envelope capacity
• Optional 250-sheet trays supporting a variety of paper sizes
ten
pages
• Multipurpose (MP) tray for single-sheet manual feeding
or small quantity specialized printing
• Memory capacity up to 16 MBytes
• Small footprint
• PCL 5e emulation and PostScript Level 2 PDLs (page
description languages)
• Automatic switching between PCL emulation (hereinafter
referred to as PCL) and PostScript (when the PostScript
option is installed)
• Ethernet, LocalTalk, and Token Ring network options,
each with a variety of protocols
• Printing from up to
the 4505/4505ps and up to
• User installable printer and options
1-2
❖ 4505/4505ps or 4510/4510ps User’s Guide
three
simultaneously-active ports on
five
on the 4510/4510ps
Page 9
Overview
Printer
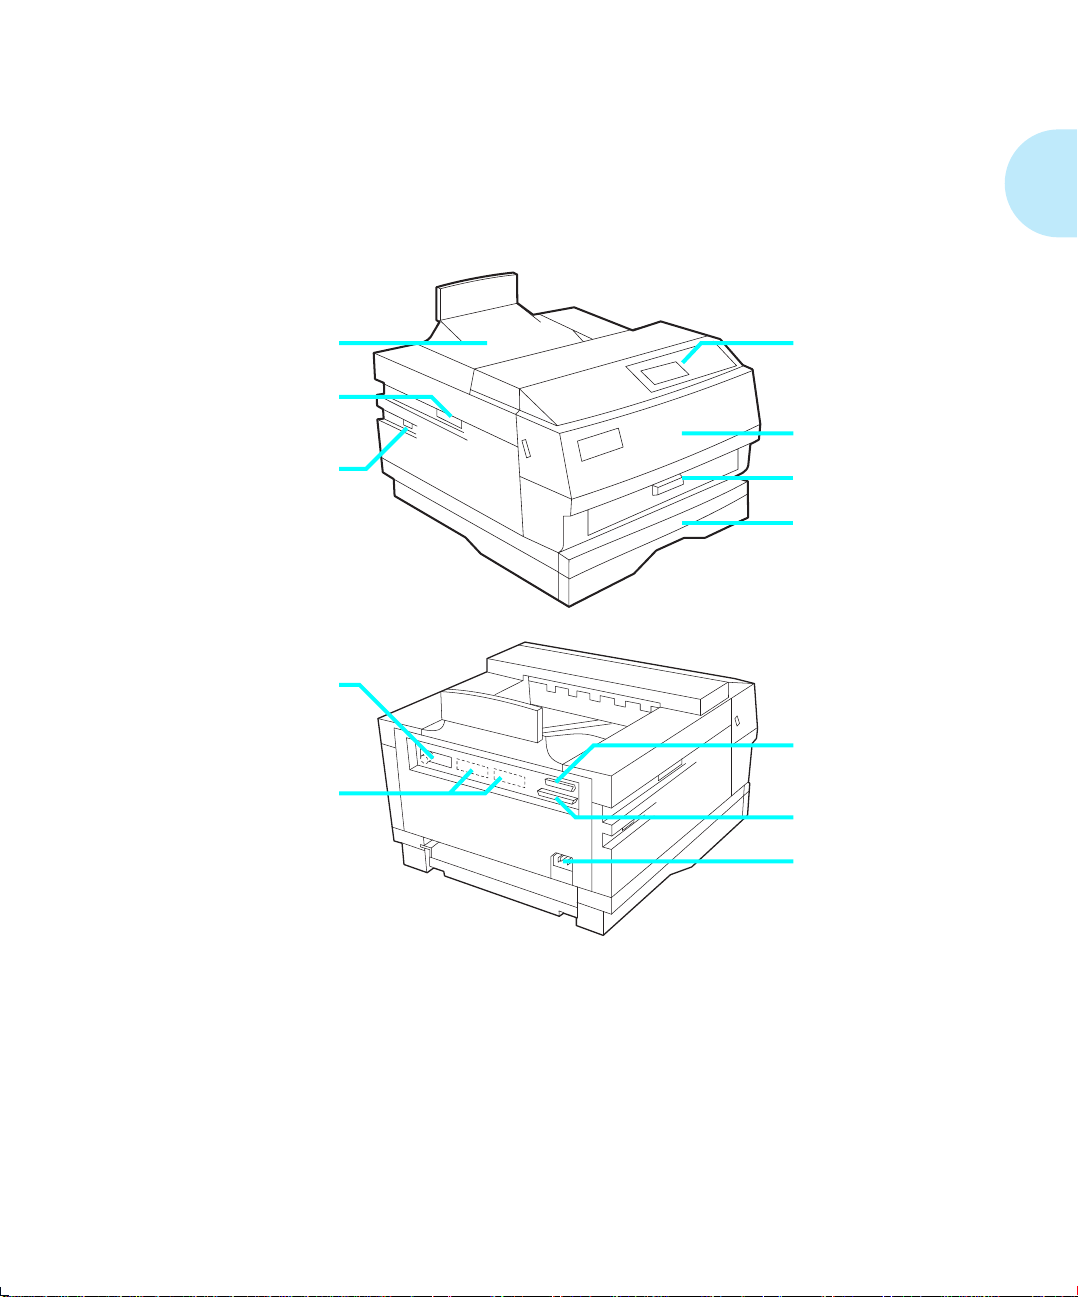
The key printer components are called out in Figure 1.1.
Components
Figure 1.1 Key printer components
Output Tray Control Panel
Font Card Slots
Front Cover
Power Switch
Network Port 1
Multipurpose (MP)
Paper Source
250-sheet Paper Tray
Network Ports 2 & 3
(4510/4510ps only)
Serial Port
Parallel Port
Power Inlet
Chapter 1: Introduction ❖
1-3
Page 10

Overview
y
Factor
Settings
The printer is controlled by numerous settings whose values
are pre-set at the factory. These values are called
settings
If the factory settings do not suit the needs of your printing
environment, you can select a new setting in either of two
ways:
•
•
.
Control Panel
Control Panel
Remote User Interface
Document Services for Printing Guide
on the printer. See
.
on the host computer. Refer to the
Chapter 3: Using the
.
factory
1-4
❖ 4505/4505ps or 4510/4510ps User’s Guide
Page 11

Sharing the Printer
Sharing the
Printer
Particular care must be taken when changing settings for a
printer being shared by users such as those on a local area
network (LAN). When the printer is shared, settings must
accommodate the
Considerations for a networked environment include the
following:
• Downloading fonts and macros by individual users may
consume printer memory. The sharing of downloaded
fonts must be coordinated. See
“Downloading Fonts” (page 4-13)
• Switching between PCL and PostScript may purge
downloaded data. See
Panel, State Saving
(page 3-36) for PostScript.
• Changing settings for
State Saving
Chapter 3: Using the Control Panel, “Printer Settings that
Affect Memory” (page 3-67)
• The type of interface. (See page 3-37,
Appendix C
common
, or
Resolution
.)
needs of users.
Chapter 4: Using Fonts
.
Chapter 3: Using the Control
(page 3-28) for PCL and
Jam Recovery, Page Protection
affect memory utilization. See
.
State Saving
Appendix A
,
,
, and
•
Auto Job End
page 3-53, page 3-56.)
•
Auto Continue
LANs generally require a system or network administrator, a
person who orchestrates the use of the network. Refer to the
installation guide packaged with your network option for
more information.
should be On. (See page 3-43, page 3-47,
should be On. (See page 3-59.)
Chapter 1: Introduction ❖
1-5
Page 12

Memory Considerations
Memory
Considerations
In today’s printing environments, technologies have
advanced greatly but so have their corresponding memory
requirements. To make use of specialized graphics features,
fonts, and other applications on the market today, you may
find it necessary to increase memory size.
From the factory, the 4505 and 4510 are equipped with 2 MB
of resident base memory. The 4505ps and 4510ps are
equipped with 2 MB of resident base memory plus one 4 MB
SIMM (single in-line memory module) for a total of 6 MB.
Maximum memory capacity is 16 MB.
• When is more memory needed?
— You receive out-of-memory error messages when
printing.
See
Chapter 3: Using the Control Panel,“Printer
Settings that Affect Memory” (page 3-67)
information on how certain printer settings may affect
memory usage and performance. See also
Memory Requirements” (page 3-69)
for more
“Minimum
.
— You determine that expanded capability for
additional fonts, more complex documents, graphics,
or higher resolution is needed.
See
Chapter 4: Using Fonts, “Downloading Fonts”
(page 4-13)
memory usage.
• How is more memory added?
— Install a SIMM (single in-line memory module).
SIMMs are small circuit boards with memory chips
that can be installed on the printer controller board.
See
Chapter 5: Adding Printer Options
information on SIMM installation.
1-6
❖ 4505/4505ps or 4510/4510ps User’s Guide
for more information on how fonts affect
for more
Page 13

Chapter 2
Handling Paper
Overview
Paper Input
Paper Output
Paper Specifications
Paper Trays
Loading Paper
...............................................................................
............................................................................
........................................................................
.............................................................
Weight 2-6
Dimensions 2-6
............................................................................
Standard Tray 2-9
Multipurpose Tray 2-11
Optional Lower Base 2-13
.....................................................................
Loading the Standard or Lower Paper Tray 2-14
Feeding the Multipurpose Paper Tray 2-18
Chapter 2
2-3
2-4
2-5
2-6
2-8
2-14
Chapter 2: Handling Paper ❖
2-1
Page 14

Loading Letterhead, Pre-printed, Drilled,
or Label Paper 2-20
Loading Envelopes 2-21
Selecting a Paper Source
....................................................
PCL Paper Sources 2-22
Printing a Page 2-23
Source Mapping Settings 2-25
Factory Source Mapping Settings 2-26
Source Mapping Examples 2-27
Example 1 2-27
Example 2 2-28
Example 3 2-29
Example 4 2-30
Example 5 2-31
Example 6 2-32
Example 7 2-33
Example 8 2-34
2-22
2-2
❖ 4505/4505ps or 4510/4510ps User’s Guide
Page 15

Overview
Overview
Note
This chapter provides specific information on
• Paper specifications
• Paper sources and paper trays
• Manual feeding and loading of paper, including
letterhead, pre-printed stationery, envelopes, labels, and
transparencies
• Paper source mapping
• Printing
In this guide,
paper enters the printer.
device that holds the paper.
paper source
Paper tray
refers to the slot or opening where
refers to the container or
paper handling
:
Chapter 2: Handling Paper ❖
2-3
Page 16
Paper Input
Paper
Input
Paper input sources are the slots or openings where paper
enters the printer. As shown in Figure 2.1, the 4505/4505ps
and 4510/4510ps printers have as many as
sources.
Figure 2.1 Paper input sources
three
paper input
Multipurpose (MP)
Paper Source
Standard Paper Source
Optional Lower Base
Paper Source
(250-sheet or
500-sheet)
2-4
❖ 4505/4505ps or 4510/4510ps User’s Guide
Page 17
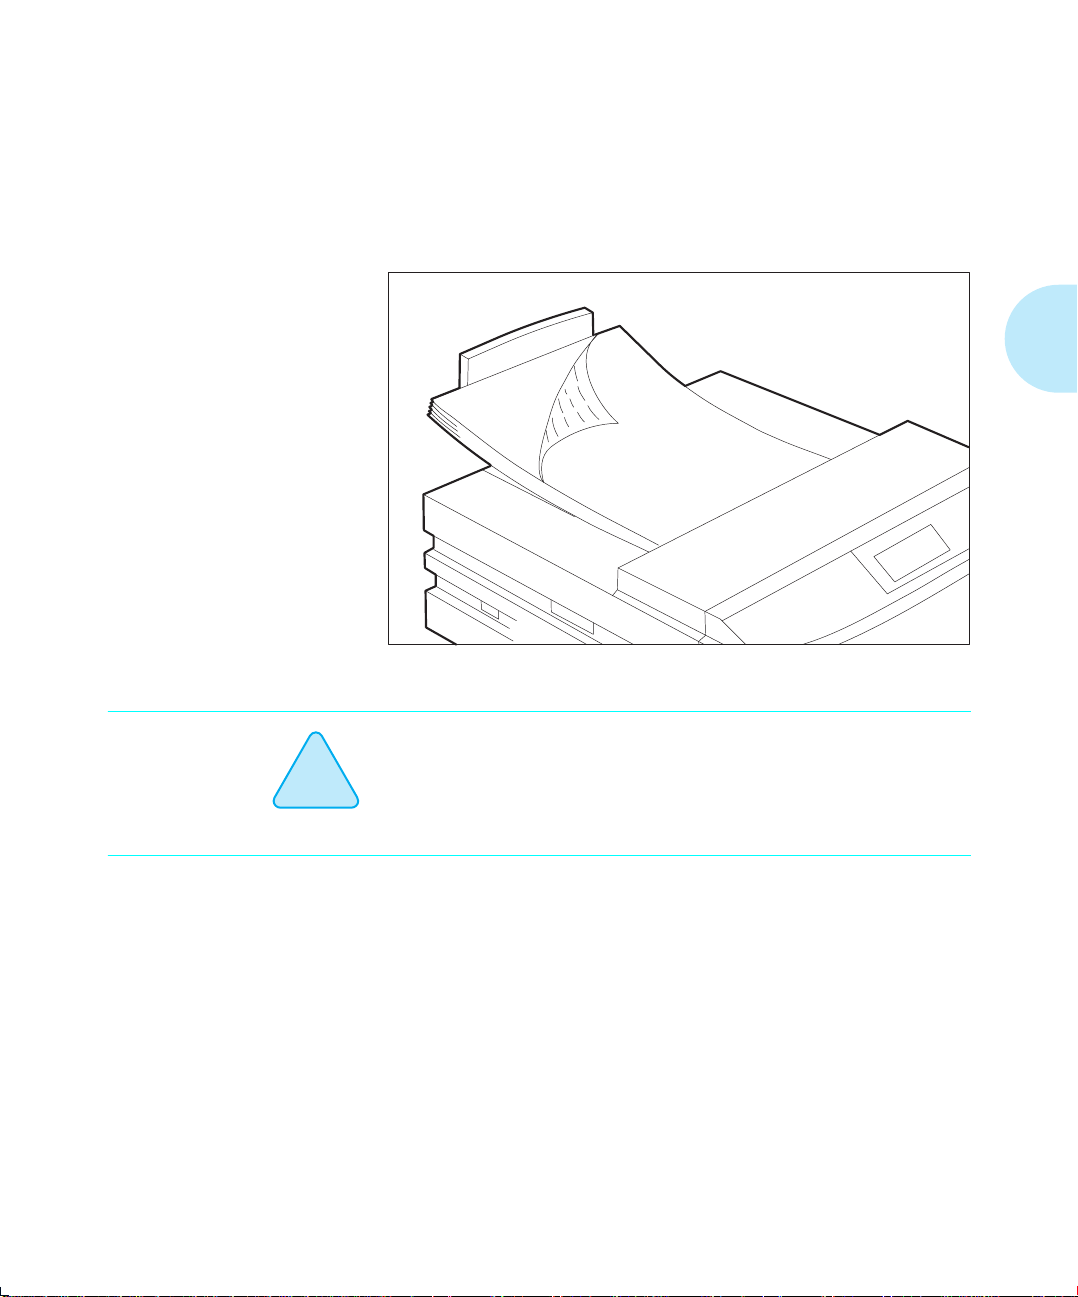
Paper Output
Paper
Output
As shown in Figure 2.2, printed output is delivered face down
to the tray located on top of the printer. Output capacity is 250
sheets of standard weight paper.
Figure 2.2 Output tray
!
Caution
Depending on paper weight, you may find the output tray
holds fewer than 250 sheets. Paper jams may occur if output
capacity is exceeded.
Chapter 2: Handling Paper ❖
2-5
Page 18
Paper Specifications
t
Paper
Specifications
Weigh
Note
Dimensions
Factors such as embossing, special edges, and general paper
quality affect paper handling.
Paper
• 250-sheet and 500-sheet paper trays support paper
• MP tray supports paper weights of
For optimum printer performance, it is recommended that you
use paper made for laser printers and transparency film made
for Xerox laser printers and copiers.
Figure 2.3 shows paper
weight
weights of
gsm (36 lb)
specifications include the following:
60 gsm (16 lb)
.
to
105 gsm (28 lb)
dimensions
.
60 gsm (16 lb)
in millimeters and inches.
to
135
Figure 2.3 Paper dimensions
Paper Size
A4 210 x 297 mm
Letter 216 x 279 mm
B5 (ISO) 176 x 250 mm
Executive 184 x 267 mm
A5 148 x 210 mm
Folio 216 x 330 mm
2-6
❖ 4505/4505ps or 4510/4510ps User’s Guide
Dimensions
8.27 x 11.69 inches
8.5 x 11 inches
6.93 x 9.84 inches
7.25 x 10.5 inches
5.83 x 8.27 inches
8.5 x 13 inches
Page 19
Paper Specifications
Note
Figure 2.3 Paper dimensions
Paper Size
Legal 216 x 356 mm
COM-10 Envelope 105 x 241 mm
Monarch Envelope 98 x 191 mm
DL Envelope 110 x 220 mm
C5 Envelope 162 x 229 mm
(continued)
Dimensions
8.5 x 14 inches
4.13 x 9.5 inches
3.87 x 7.5 inches
4.33 x 8.66 inches
6.38 x 9.02 inches
The Xerox printer driver supports all paper sizes in
Figure 2.3. However, if you do not install—or your application
does not use—the Xerox printer driver, some of these paper
sizes may not be available for your use. Refer to the
Document Services for Printing Guide
for more information
on the Xerox printer driver.
Chapter 2: Handling Paper ❖
2-7
Page 20
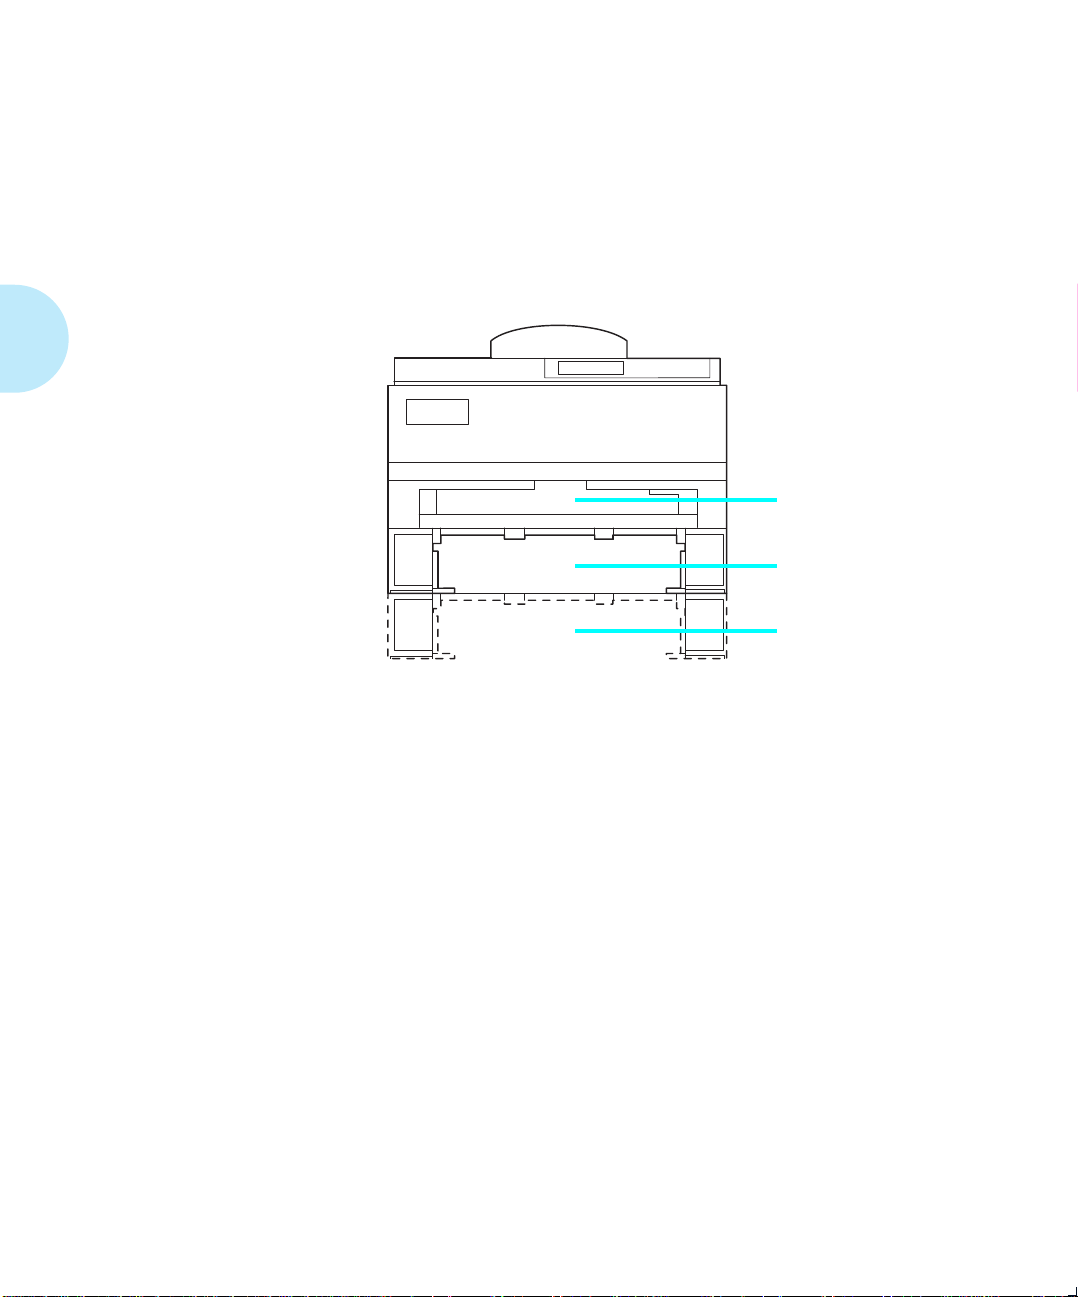
Paper Trays
Paper
Trays
As shown in Figure 2.4, the 4505/4505ps and 4510/4510ps
printers are packaged with one 250-sheet paper tray and one
multipurpose (MP) tray. An optional lower base provides an
additional tray, as shown in Figure 2.4.
Figure 2.4 Input trays
Multipurpose (MP) Tray
Standard Paper Tray
Optional 250-sheet Lower
Base with Paper Tray
or
Optional 500-sheet Lower
Base with Paper Tray
2-8
❖ 4505/4505ps or 4510/4510ps User’s Guide
Page 21
Paper Trays
Standard Tray
The 250-sheet tray packaged with the printer is called a
universal tray
because it is adjustable to a variety of paper
sizes, as shown in Figure 2.5.
Figure 2.5 Universal tray
†
Paper
A4 250
Letter (8.5 x 11) 250
Executive 250
A5 250
OHP (Overhead Projector) Film
(transparency)
Label paper 10
† Paper dimensions are listed on page 2-6.
‡ Tray capacity may differ based on the weight of the paper. Maximum paper stack:
25mm/1 inch.
See
“Loading Paper” (page 2-14)
for further information on
Capacity‡
(Sheets)
10
the universal tray.
Chapter 2: Handling Paper ❖
2-9
Page 22
Paper Trays
Two other standard trays are available for the printer, as
shown in Figure 2.6.
Figure 2.6 Additional standard trays
Note
Optional Tray
Legal
Envelope
† Paper dimensions are listed on page 2-6.
‡ Tray capacity may differ based on the weight of the paper. Maximum paper stack:
25mm/1 inch.
Folio (8.5 x 13) 250
Legal (8.5 x 14) 250
Letter (8.5 x 11) 250
COM-10 30
Monarch 30
DL 30
C5 30
Paper
†
Capacity‡
(Sheets)
To use letterhead, pre-printed stationery, or drilled paper in
the standard tray, see Figure 2.8 (page 2-20) for paper
orientation. See Figure 2.9 (page 2-21) for envelope
orientation.
2-10
❖ 4505/4505ps or 4510/4510ps User’s Guide
Page 23

Paper Trays
Multipurpose
Tray
The multipurpose (MP) tray provides for
manually
feeding a
single sheet or loading small quantities of paper, envelopes,
transparencies, or labels (see Figure 2.7).
Figure 2.7 MP tray
†
Paper
A4 50
Letter (8.5 x 11) 50
B5 (ISO) 50
A5 50
Executive 50
Folio 50
Legal (8.5 x 14) 10
Monarch 5
Com-10 5
C5 5
Capacity‡
(Sheets)
DL 5
Transparencies 35
Labels Less than 4 mm
(.15 in)
† Paper dimensions are listed on page 2-6.
‡ Capacity may differ based on the weight of the paper.
stack size for the MP tray is 4 mm (.15 inches)
Chapter 2: Handling Paper ❖
The maximum paper
.
2-11
Page 24

Paper Trays
Note
Typical uses of the MP tray include:
• Printing a document whose first page is to be printed on
letterhead and the rest from the standard tray. See
Figure 2.8 (page 2-20)
for the orientation of headed paper
in the MP tray.
• Printing documents that require pages of special paper
size, color, or other attribute.
To use letterhead, pre-printed stationery, or drilled paper in
the MP tray, see Figure 2.8 (page 2-20) for paper orientation.
See Figure 2.9 (page 2-21) for envelope orientation.
2-12
❖ 4505/4505ps or 4510/4510ps User’s Guide
Page 25

Paper Trays
Optional Lower
Base
Note
The 4505/4505ps and 4510/4510ps printers accommodate one
of two optional lower bases with a paper tray:
• The
• The
To order a lower base or tray option, see
Appendix D: Ordering Information
250-sheet or 30-envelope trays may be used for either the
standard tray or the 250-sheet lower base.
500-sheet trays may be used in the 500-sheet lower base only.
250-sheet
In the 250-sheet lower base, you can also use either the
legal or envelope tray shown in
500-sheet
Letter (8.5 x 11) tray
There is also an additional Letter tray or A4 tray available
for the 500-sheet lower base.
lower base equipped with a universal tray
Figure 2.6 (page 2-10)
lower base equipped with either an A4 or
.
.
Chapter 2: Handling Paper ❖
2-13
Page 26
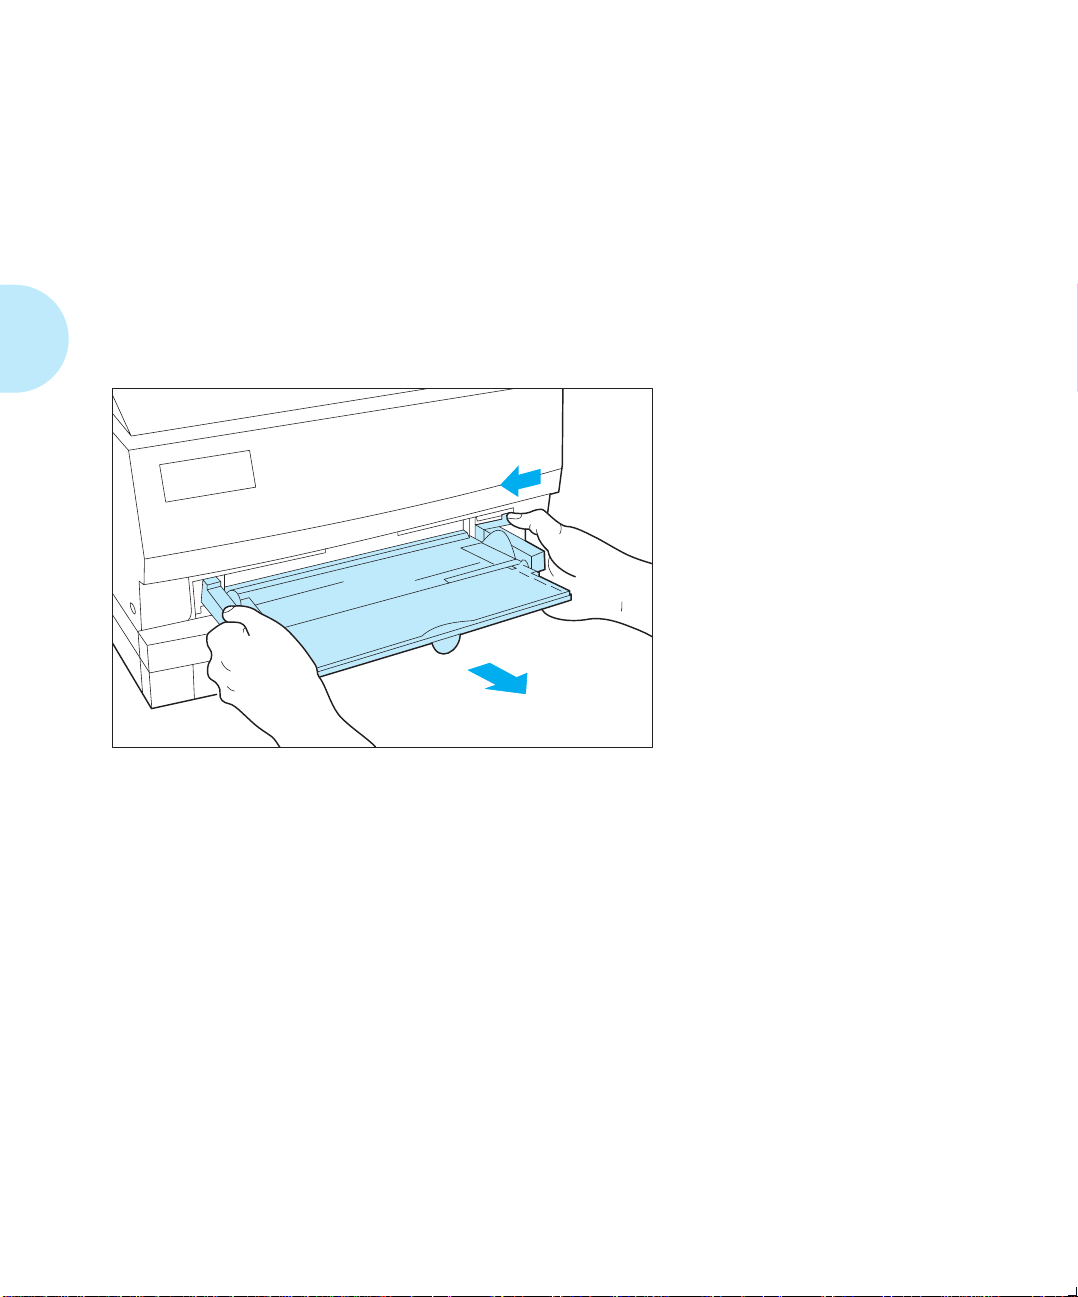
Loading Paper
Loading Paper
Loading the
Standard or
Lower Paper Tray
T o load paper into the standard or lower paper tray, follow the
steps below.
When loading the
1
standard tray, remove
the multipurpose tray,
if it is installed.
2-14
❖ 4505/4505ps or 4510/4510ps User’s Guide
Page 27
Loading Paper
Remove the tray from
2
the printer.
Place the tray on a flat
surface.
If necessary, adjust the
3
end guide to the
desired paper size and
the side guide to its
widest position.
Make sure that the end
guide is positioned in the
!
Caution
See page 2-9 and page 2-13 for more information on
the standard and lower paper trays.
Chapter 2: Handling Paper ❖
appropriate detent for
the paper size installed in
the tray. If the guide is
not positioned in the
detent, the printer may
not correctly recognize
the installed paper size.
2-15
Page 28
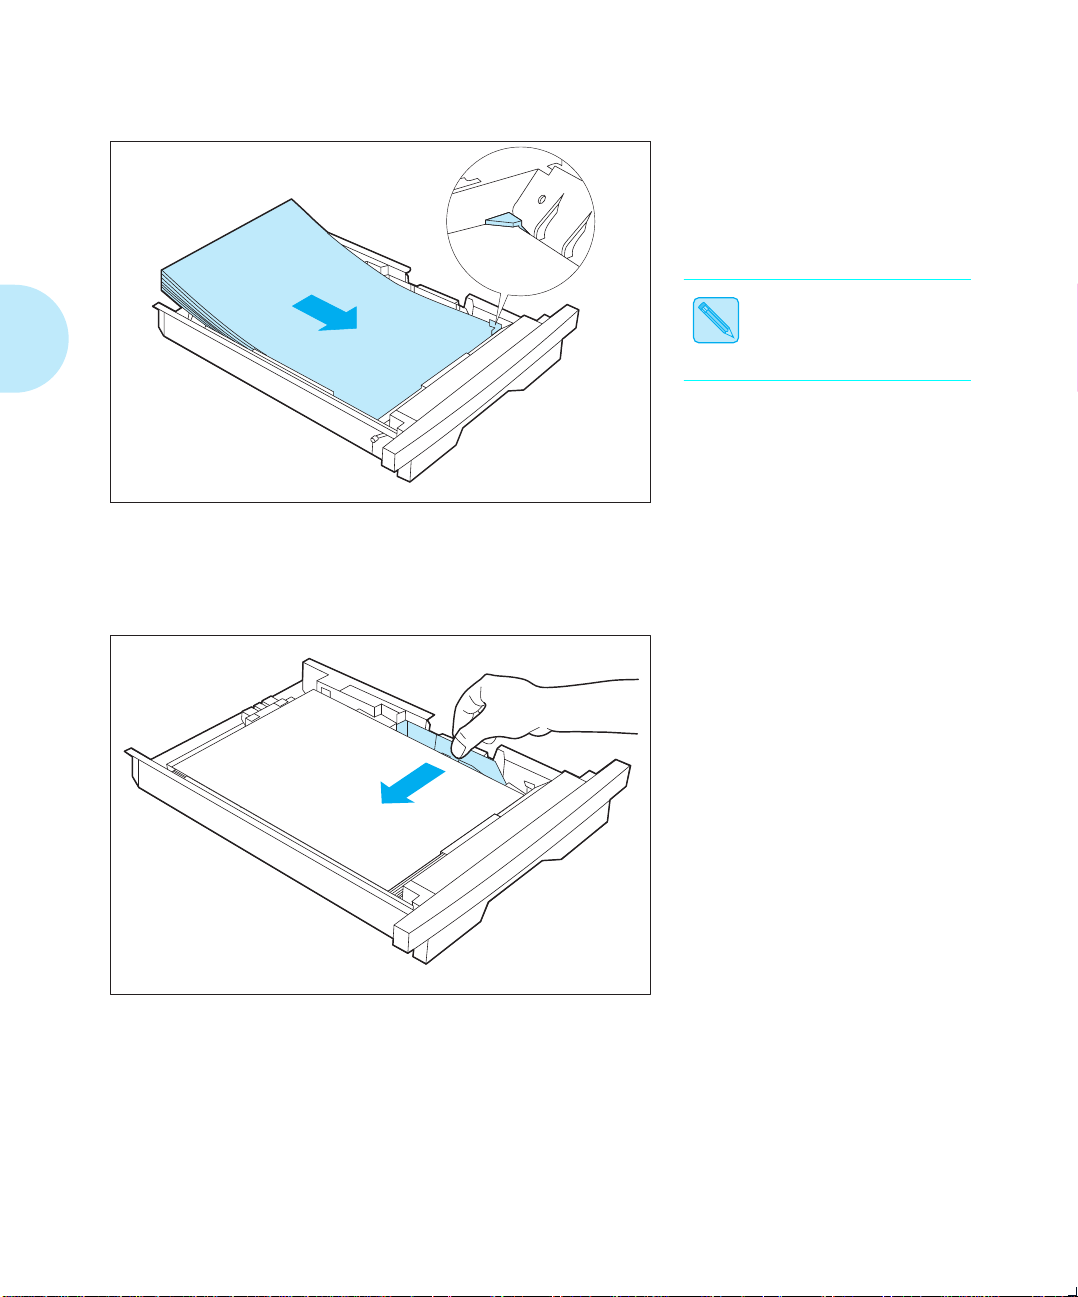
Loading Paper
Load paper in the tray,
4
making sure the paper
is tucked under the
metal corners.
For best performance,
load paper with curl side
up.
Note
If you are loading
letterhead, pre-printed
stationery, or drilled
paper, see
(page 2-20)
envelopes, see
Figure 2.9 (page 2-21)
If necessary, adjust the
5
side guide to the
correct paper width.
Figure 2.8
. If loading
.
2-16
❖ 4505/4505ps or 4510/4510ps User’s Guide
Page 29

!
Caution
Loading Paper
Insert the paper tray in
6
the printer.
Reinstall the
multipurpose tray if it
was removed at Step 1.
With a lower base installed, do not remove the standard tray
while the printer is feeding from the lower tray.
Chapter 2: Handling Paper ❖
2-17
Page 30
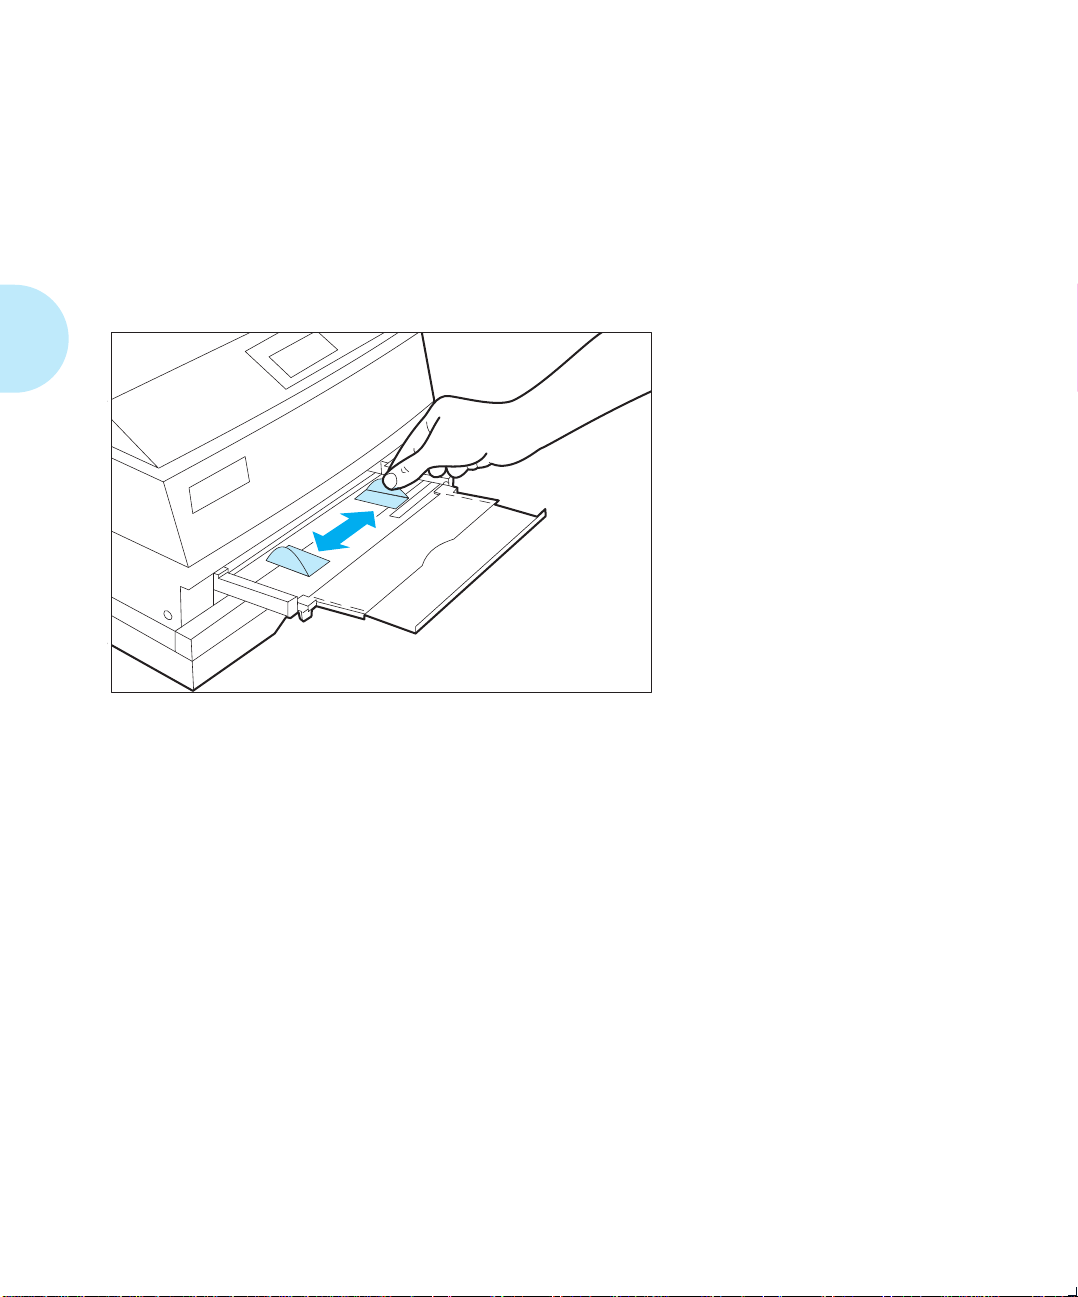
Loading Paper
Feeding the
Multipurpose
Paper Tray
To feed paper into the multipurpose (MP) tray, follow the
steps below.
It is assumed the MP tray has already been installed. If not,
install it by referring to the
the printer.
Setting Up Guide
Adjust the side guides
1
to the desired paper
size.
See
“Multipurpose
Tray” (page 2-11)
packaged with
.
2-18
❖ 4505/4505ps or 4510/4510ps User’s Guide
Page 31

Loading Paper
Feed paper or
2
envelopes into the MP
tray.
If you are loading
letterhead, pre-printed
stationery, or drilled
paper, see
(page 2-20)
Figure 2.9 (page 2-21)
for envelopes.
Figure 2.8
. See
!
Caution
Whenever you open the front cover, you must first remove
the MP tray. Reinsert it once you have closed the front cover.
Chapter 2: Handling Paper ❖
2-19
Page 32

Loading Paper
Loading
Letterhead,
Pre-printed,
Drilled, or
Label Paper
Note
Figure 2.8 illustrates the paper orientation needed to print
headed, pre-printed, drilled, or label paper.
Of course, you may need to adjust your software application’s
printing margins to:
• Prevent overwriting the letterhead or pre-printed images.
• Prevent overwriting the drilled holes.
• Accommodate an individual label size.
Label paper may be loaded in the universal or MP tray only.
Figure 2.8 Loading letterhead, pre-printed, drilled, or label paper
2-20
❖ 4505/4505ps or 4510/4510ps User’s Guide
(face down)
(face up)
Page 33

Loading Paper
Loading
Envelopes
Note
Figure 2.9 illustrates the envelope orientation needed to print
COM-10, Monarch, DL, or C5 envelopes in the 30-envelope
tray and the MP tray.
Envelopes may
tray
or the
information on the envelope tray.
Figure 2.9 Loading envelopes
only
MP tray
be loaded in the standard
. See Figure 2.6 (page 2-10) for more
30-envelope
Chapter 2: Handling Paper ❖
2-21
Page 34

Selecting a Paper Source
Selecting a
Paper Source
Note
PCL Paper Sources
For a print job, your software application sends information,
called the Printer Command Language (PCL), to the printer to
communicate paper source and page size. How the printer
interprets the PCL command for paper source and page size
depends on the printer menu settings for
and
MP Tray Size
page size are not sent to the printer, the printer menu settings
for
Paper Size
Chapter 3: Using the Control Panel
these and all PCL Menu settings (page 3-18).
PostScript functions differently than PCL. Refer to the
PostScript Installation Instructions for more information.
Paper source
from which the printer feeds paper.
. If PCL commands for paper source and
and
Default Source
is a term that describes the tray, feeder, or slot
are used. See
for further information on
Source Mapping
PCL, and therefore your printer, recognizes the six paper
sources shown in Figure 2.10, which may, or may not, appear
in your software application.
Figure 2.10 Six PCL paper sources
PCL Paper Source
Standard
Manual
Manual Envelope
Lower
Large Capacity
Envelope Feeder
2-22
❖ 4505/4505ps or 4510/4510ps User’s Guide
Upper, Paper Tray, Paper Cassette
Alternate Names
Manual, Manual Feed
Envelope Manual Feed
Paper Deck
Page 35

Selecting a Paper Source
Printing a Page
When a print job is received by the printer, the sequence to
select the paper tray for each page is as follows:
1. Page size is established.
If page size is not sent by the application, the PCL Menu
setting called
2. Paper source is established.
If a paper source is sent by the application, it will be one
of the six PCL paper sources listed in
(page 2-22)
If paper source is not sent by the application, the PCL
Menu setting called
software applications have a paper source called “Auto
Select” or “Auto Sheet Feed.” When used, this results in
a PCL paper source being omitted from the print job.
3. When the printer is ready to print the page, tray sequence
is established.
For the paper source chosen in the second step above, a
tray or sequence of trays is taken from the PCL Menu
Source Mapping
Figure 2.11 (page 2-25)
Paper Size
.
setting for that source. For settings, see
is used.
Default Source
.
Figure 2.10
is used. Some
4. The printer searches in the tray or in any tray in the tray
sequence for the correct page size from the first step
above.
In a tray sequence, the trays are searched left to right as
they appear in the
for sequence “Std-Low-MP”, the standard tray is
searched first, the lower tray second, and the MP tray
third. The MP paper size is taken from the PCL Menu
setting called
5. If a tray with the correct paper size is found, the page is
printed from that tray.
If no tray with the correct paper size is found, the tray
sequence and paper size are displayed on the Control
Chapter 2: Handling Paper ❖
Source Mapping
MP Tray Size
setting. For example,
.
2-23
Page 36

Selecting a Paper Source
Panel along with a message to load the correct paper size.
Printing halts.
— Put paper of the requested size in a tray in the tray
sequence and the page will be printed.
— Or, press
Enter
to print from the first tray in the
tray sequence, regardless of paper size. If that tray
becomes empty, the next tray with the same paper
size will be used. This source and size will be used
until the printer receives a new page containing a
PCL paper source, page size, or reset command.
2-24
❖ 4505/4505ps or 4510/4510ps User’s Guide
Page 37

Selecting a Paper Source
Source Mapping
Settings
For each of the six PCL paper sources listed in
(page 2-22)
, a
Source Mapping
setting from Figure 2.11 is
Figure 2.10
used. You may change settings depending on your printing
needs. For details, see
(page 2-26), “Source Mapping Examples” (page 2-27)
Source Mapping
“Factory Source Mapping Settings”
, and
(page 3-22).
Figure 2.11 Source Mapping settings
Source Mapping
setting
Standard
MP Tray
Standard-MP
MP-Standard
Lower
Standard-Lower
Lower-Standard
Lower-MP
Std-Low-MP
Low-Std-MP
MP-Lower
MP-Std-Low
MP-Low-Std
†
†
†
†
Tray or tray sequence to be used for each
of the six PCL paper sources.
Additional settings that appear only
when a lower base (page 2-13) is
installed.
Description
† Use sequences starting with MP to print the first pages of a print job on special
paper stock by placing the required number of special stock sheets in the MP tray
(page 2-11).
Chapter 2: Handling Paper ❖
2-25
Page 38
Selecting a Paper Source
Factory Source
Mapping Settings
Figure 2.12 shows the factory
Source Mapping
settings for
the six PCL paper sources, and how the settings change when
the optional lower base is installed and Reset Menus is
implemented. See
Menu” (page 3-65)
Chapter 3: Using the Control Panel, “Reset
.
Figure 2.12 Factory settings for Source Mapping
PCL Paper Source
Standard
Manual
Manual Envelope
Lower
Large Capacity
Envelope Feeder
Without
Lower Base
Standard Standard-Lower
MP Tray MP Tray
MP Tray MP Tray
Standard Lower-Standard
Standard Lower-Standard
MP Tray MP Tray
With Lower Base
Only the Xerox printer driver allows access to the entire
range of PCL paper source and source mapping settings
specifically designed for the 4505/4505ps and 4510/4510ps
Note
2-26
❖ 4505/4505ps or 4510/4510ps User’s Guide
printers. Refer to the
Document Services for Printing Guide
.
Page 39

Selecting a Paper Source
Source Mapping
Examples
Example 1
Review the following
advantage of the 4505/4505ps and 4510/4510ps capabilities.
All examples assume that
You do not have a lower base installed. You want to load as
much paper in the printer as possible. You use only one size
of paper. You do not do manual feeding.
1. Load the standard and MP trays with regular paper stock.
2. Set
3. Set
4. In either your software application or the Xerox printer
The printer will pull paper from the standard tray until it is
empty, then from the MP tray. When the standard tray is
reloaded, the printer will pull paper from it again.
The Source Mapping setting determines from where the
printer pulls paper.
Source Mapping
MP Tray Size
driver, set paper source to the standard tray.
Source Mapping
Default Source
for “Standard” to “Standard-MP.”
to the same size as the regular stock.
examples to take full
is set to
Standard
.
Note
Note
For the paper sources you intend not to use, always set Source
Mapping to the same setting as that used for your regular
paper stock. You will avoid unexpected results if those paper
sources are used by mistake.
The examples suggest using specific PCL paper sources but
generally you may substitute any source to fit your printing
needs.
Chapter 2: Handling Paper ❖
2-27
Page 40

Selecting a Paper Source
To avoid a paper jam, do not remove the standard or lower
tray while the printer is feeding paper.
!
Caution
Example 2
You have a lower base installed. You want to load as much
paper in the printer as possible. You use only one size of
paper. You do not do manual feeding.
1. Load the standard, lower, and MP trays with regular
paper stock.
2. Set
3. Set
4. In either your software application or the Xerox printer
The printer will pull paper from the lower tray until it is
empty, then fr om the standard tray until it is empty, then from
the MP tray. When either the lower or standard tray is
reloaded, the printer will pull paper from it again.
Source Mapping
MP Tray Size
driver, set paper source to the standard tray.
for “Standard” to “Low-Std-MP.”
to the same size as the regular stock.
2-28
❖ 4505/4505ps or 4510/4510ps User’s Guide
Page 41

Selecting a Paper Source
Example 3
You do not have a lower base installed. You want to print
mostly on Letter (8.5 x 11) paper but sometimes on Legal
(8.5 x 14). You do not intend to do manual feeding.
1. Load the standard tray with Letter paper stock.
2. Load the MP tray with Legal paper stock.
3. Set
4. Set
5. Set
6. In either your software application or the Xerox printer
The printer will pull Letter paper from the standard tray. It
will pull Legal paper from the MP tray.
Alternatively, you could set
to “Standard-MP” and set your application paper source to
the standard tray for both Letter and Legal size pages.
printer will automatically switch between the trays
according to the paper size requested
that Control Panel messages may be misleading. Whether
alerting you to load Letter or Legal paper, the Control Panel
will always display “Standard-MP” as the location to load
that paper size. You must know which paper size goes into
which tray.
Source Mapping
Source Mapping
MP Tray Size
driver, set paper source to:
— Standard tray for Letter pages.
— Manual (MP Tray) for Legal pages.
for “Standard” to “Standard.”
for “Manual” to “MP Tray.”
to “Legal (8.5x14).”
Source Mapping
. The disadvantage is
for “Standard”
The
Chapter 2: Handling Paper ❖
2-29
Page 42

Selecting a Paper Source
Example 4
You have a lower base installed. You also have the optional
standard legal tray (page 2-10). You want to print mostly on
Letter (8.5 x 11) paper but sometimes on Legal (8.5 x 14). You
intend to do manual feeding.
1. Load the lower tray with Letter paper stock.
2. Load the standard tray with Legal paper stock.
3. Empty the MP tray.
4. Set
5. Set
6. Set
7. Set
8. In either your software application or the Xerox printer
Source Mapping
Source Mapping
Source Mapping
Default Source
that do not contain a paper source selection.
driver, set paper source to:
— Lower tray for Letter pages.
— Standard tray for Legal pages.
— Manual (MP Tray) for pages to be manually fed.
for “Standard” to “Standard.”
for “Lower” to “Lower.”
for “Manual” to “MP Tray.”
to “Lower” to take care of print jobs
The printer will pull Letter pages from the lower tray. It will
pull Legal pages from the standard tray. For each manual
page, the printer halts and the Control Panel displays a
message requesting the correct size paper to be manually
placed in the MP tray. Place one page in the MP tray and it
will feed if the requested paper size is the same size as
Tray Size
Alternatively, you could set the Source Mapping for “Lower”
to “Lower-Standard” and set your application paper source to
the lower tray for both Letter and Legal pages.
will automatically switch between the trays according to the
paper size requested
Panel messages may be misleading. Whether alerting you to
load Letter or Legal paper, the Control Panel will always
2-30
❖ 4505/4505ps or 4510/4510ps User’s Guide
. If it is not, you must press
. The only disadvantage is that Control
MP
Enter
The printer
Page 43

Selecting a Paper Source
display “Lower-Standard” as the location to load that paper
size. You must know which paper size goes into which tray.
Example 5
You do not have a lower base installed. You want to print
mostly on white A4 paper but sometimes on pre-printed A4
paper. You occasionally print on DL envelopes.
1. Load the standard tray with white A4 paper stock.
2. Load the MP tray with pre-preprinted A4 paper stock
(face down).
3. Set
4. Set
5. Set
6. In either your software application or the Xerox printer
Source Mapping
Source Mapping
Envelope” to “MP Tray.”
MP Tray Size
driver, set paper source to:
— Standard tray for white A4 pages.
— Manual (MP Tray) for pre-printed A4 pages.
— Manual (MP Tray) for DL envelopes. (You could have
also set paper source to Manual Envelope for DL
envelopes.)
for “Standard” to “Standard.”
for “Manual” and “Manual
to “A4 (210x297)”
The printer will pull white A4 paper from the standard tray . It
will pull pre-printed A4 pages from the MP tray. For each DL
envelope, the printer halts and the Control Panel displays a
message requesting a DL envelope to be loaded in the MP
tray. Remove the pre-printed paper and place one envelope
in the MP tray. Press
Additionally , you might set
“Large Capacity” sources to “MP Tray” so that you could
select the lower tray or large capacity for pre-printed paper if
more convenient.
Chapter 2: Handling Paper ❖
Enter
to print.
Source Mapping
for “Lower” and
2-31
Page 44

Selecting a Paper Source
Example 6
You have a lower base (with either a universal tray or an A4
tray) installed, and you have a DL envelope tray—see
Figure 2.6 (page 2-10)
paper but sometimes on DL envelopes. Occasionally, you
print on color or pre-printed A4 paper.
1. Load the lower tray with white A4 paper stock.
2. Insert the DL envelope tray, filled with DL envelopes, in
the standard paper source.
3. Load the MP tray with color or pre-printed A4 paper stock
(face down).
4. Set
5. Set
6. Set
7. Set
8. Set
9. In either your application or the Xerox printer driver, set
Source Mapping
Source Mapping
Source Mapping
Envelope” to “Standard.”
MP Tray Size
Default Source
not contain a paper source selection.
paper source to:
. You want to print mostly on white A4
for “Standard” to “MP Tray.”
for “Lower” to “Lower.”
for “Manual” and “Manual
to “A4 (210x297).”
to “Lower” to cover print jobs that do
— Lower tray for white A4 pages.
— Standard tray for color or pre-printed A4 pages.
— Manual for DL envelopes.
Because of the Source Mapping settings in steps 4-6, above,
the printer will pull white A4 paper from the lower tray . It will
pull DL envelopes from the standard tray. It will pull color or
pre-printed A4 pages from the MP tray.
Make sure there is one sheet of A4 stationery in the MP tray
each time you print this document.
2-32
❖ 4505/4505ps or 4510/4510ps User’s Guide
Page 45

Selecting a Paper Source
Example 7
You do not have a lower base installed. You want to use
pre-printed stationery for the first page and regular stock for
the other pages of your document. Your software application
has the capability to ask for the first page of a document from
a different source than the remainder of the document.
Xerox PCL 5e emulation Windows printer driver also has this
capability
same size as your regular stock.
1. Load the standard tray with regular paper stock.
2. Load the MP tray with pre-printed stationery (face down).
3. Set
4. Set
5. Set MP
6. In either your software application or the Xerox PCL 5e
. It is assumed your pre-printed stationery is the
Source Mapping
Source Mapping
Tray Size
stationery.
emulation Windows printer driver, set paper source for
the first page to Lower and set paper source for the
remaining pages to Standard.
for “Standard” to “Standard.”
for “Lower” to “MP Tray.”
to the same size as your pre-printed
The
Note
The printer will pull the first page from the MP tray and all
other pages from the standard tray.
Alternatively, you could substitute any paper source, except
standard, for “Lower” in the fourth and sixth steps above.
Refer to the
information about the printer driver.
Document Services for Printing Guide
Chapter 2: Handling Paper ❖
for more
2-33
Page 46

Selecting a Paper Source
Example 8
You do not have a lower base installed. You want to use
pre-printed stationery for the first page and regular stock for
the other pages of your document. Neither your software
application nor your printer driver has the capability to ask
for the first page of a document from a different source than
the remainder of the document. It is assumed your
pre-printed stationery is the same size as your regular stock.
1. Load the standard tray with regular paper stock.
2. Put one page of the pre-printed stationery in the MP tray
(face down).
3. Set
4. Set MP
5. In your application, set paper source to Standard.
The printer will pull the first page from the MP tray and all
other pages from the standard tray.
Make sure there is one sheet of pre-printed stationery in the
MP tray each time you print this document.
Source Mapping
Tray Size
stationery.
for “Standard” to “MP-Standard.”
to the same size as your pre-printed
2-34
❖ 4505/4505ps or 4510/4510ps User’s Guide
Page 47

Chapter 3
Using the Control Panel
Overview
Control Panel Features
Navigating the Menu System
Main Menu System
Language
PCL Menu
...............................................................................
.........................................................
The Display 3-4
The Indicator Lights 3-5
The Keys 3-6
..............................................
Menu System Indicators 3-9
Setting a Menu Option 3-10
.............................................................
.............................................................................
Language Options 3-14
............................................................................
PCL Menu Hierarchy 3-15
Chapter 3
3-3
3-4
3-8
3-12
3-14
3-15
Chapter 3: Using the Control Panel ❖
3-1
Page 48

PCL Menu Options 3-18
PostScript Menu
..................................................................
PostScript Menu Hierarchy 3-30
PostScript Menu Options 3-32
Interface Menu
...................................................................
Interface Menu Hierarchy 3-37
Parallel Menu Options 3-41
Serial Menu Options 3-45
LocalTalk Menu Option 3-50
Ethernet Menu Options 3-51
Token Ring Menu Options 3-54
System Menu
......................................................................
System Menu Hierarchy 3-57
System Menu Options 3-58
Test Menu
............................................................................
Test Menu Hierarchy 3-61
3-29
3-37
3-57
3-61
Test Menu Functions 3-62
Reset Menu
.........................................................................
Reset Menu Hierarchy 3-65
Reset Menu Functions 3-65
Printer Settings that Affect Memory
Minimum Memory Requirements 3-69
3-2
❖ 4505/4505ps or 4510/4510ps User’s Guide
.................................
3-65
3-67
Page 49

Overview
Overview
Shown in Figure 3.1, the Control Panel is both informative
and interactive. Not only does it display status and user
actions required, the Control Panel also enables you to
change printer settings to control how the 4505/4505ps and
4510/4510ps printers operate in your environment.
Figure 3.1 Control Panel
This chapter describes the following:
• Control Panel display and keys
• Control Panel menu selections
• Guidelines for configuring the printer to meet your
printing needs
Chapter 3: Using the Control Panel ❖
3-3
Page 50

Control Panel Features
Control Panel
Features
Three Indicator Lights
Two-line by 16-character Display
Eight Control Keys
The Display
The three major components of the Control Panel are shown
in Figure 3.2:
Figure 3.2 Control Panel components
The Control Panel display:
• Presents a
configure and control the printer.
See
“Navigating the Menu System” (page 3-8)
information on the menu system hierarchy.
hierarchy of menu options and settings
for
to
• Informs you of
toner is low, where to load paper, and so on.
See
“Displayed Control Panel Messages” (page 7-5)
complete list of messages.
3-4
❖ 4505/4505ps or 4510/4510ps User’s Guide
printer status conditions
such as when
for a
Page 51

Control Panel Features
The Indicator
Lights
Shown in Figure 3.3, three
for light-emitting diodes—show the activity status of the
printer.
Figure 3.3 Indicator lights
Figure 3.4 describes the function of each indicator light.
Figure 3.4 Indicator light functions
Indicator
Online
The light is on when the printer is warmed up and available for printing.
The light goes off when:
• You press
• There is a failure or operation that makes the printer unavailable.
Online
Online ___
Ready
Description
to take the printer offline.
indicator
Online Form Feed Ready
lights—also called LEDs
Form Feed
Ready
The light comes on when a
entire page.
To eject the partial page, press
See
Figure 3.5 (page 3-6)
The light comes on when the printer is powered ON and remains lit unless a failure makes
the printer unavailable.
The
Ready
light flashes to indicate that the printer is
Chapter 3: Using the Control Panel ❖
partial page
Form Feed
for information on the
has been prepared for printing, rather than an
when the printer is offline.
Form Feed
receiving
key.
data to print.
3-5
Page 52

Control Panel Features
The Keys
As described in Figure 3.5, the Control Panel keypad consists
of
eight
keys, identified as international symbols and labeled
in English.
Figure 3.5 Control Panel keys and their functions
Key
Online
Toggles between
When online, the printer is able to receive and print pages.
When offline, page processing and printing halts, but the printer is still able to respond to
status requests. You must take the printer
• Access the menu system with
• Insert or remove a font card.
• Perform tasks such as forcing a form feed for a partially printed page.
The printer goes offline automatically when it has a fault condition such as a paper jam or
an open cover. Use
conditions.
The online message indicates a “closed” switch; that is, printing continues:
The offline message indicates an “open” switch; that is, printing halts:
online
and
offline
Online
Online ___
Offline _/_
Description
.
Menu
to put the printer back online after correcting such
offline
or
to:
Reset
Reset
Form Feed
Menu
3-6
❖ 4505/4505ps or 4510/4510ps User’s Guide
Displays the Reset Menu and the first function:
Press
Up
one at a time. See
The printer must be offline for
Prints a partial page if one exists in the printer.
It does not send a blank sheet of paper through the printer.
The printer must be offline for the
Form Feed
Options” (page 3-18)
Displays the Main Menu and the first submenu:
In any submenu, press
Menu System” (page 3-12)
The printer must be offline for
or
Down
“Reset Menu” (page 3-65)
only works in PCL mode, not in PostScript mode. See
for more information.
Menu
repeatedly to step through the other Reset Menu functions
Reset
Form Feed
to take you to the top of the Main Menu. See
for a full description.
Menu
Reset Printer
.
to function.
key to function.
Language
to function.
.
“PCL Menu
.
“Main
Page 53

Control Panel Features
Figure 3.5 Control Panel keys and their functions
Key
Esc
Enter
Up
In the menu system, exits the current menu level and returns to the previous one.
Press
Esc
changes to values will be saved unless you first press
Press
Esc
In the menu system, accesses, sets, or invokes the displayed submenu, value, or function:
• When a submenu is displayed, press
• When a printer setting is displayed, press
default value.
• In PCL, press
• When a printer action is displayed, such as any of the Test Menu (page 3-61) or Reset
Menu (page 3-65) functions, press
Out of the menu system, acts as a Continue key:
• After certain error conditions when
the printing process. See
In the menu system, scrolls backward (up) through submenus or through the current list of
values or functions.
For numeric values such as number of
Scrolling wraps—if the first item in a list is displayed, press
in the list.
Press
Up
may be a greater increment for each step than that for single presses. For example, for the
PCL Menu setting
increment is 1.00.
at any time in the menu system to take you to the previous level. No
while at Reset Menu or the top level of Main Menu to exit either menu.
Enter
for more than two seconds to scroll continuously. During scrolling, there
Pitch
to override a paper mismatch.
Auto Continue
(page 3-20), the single press increment is 0.01 whereas the scrolling
Description
Enter
Enter
Auto Continue
Copies
(continued)
Enter
to access a submenu.
Enter
(page 3-59) for more information.
, press
to set the current value as the
to invoke the action.
is
Off
, press
Enter
Up
to increase the number.
Up
to display the last item
to continue
Down
In the menu system, scrolls forward (down) through the submenus or through the current
list of values or actions.
For numeric values such as number of
Scrolling wraps—if the last item in a list is displayed, press
item in the list.
Press
Down
may be a greater increment for each step than that for single presses. For example, for the
PCL Menu setting
increment is 1.00.
for more than two seconds to scroll continuously. During scrolling, there
Pitch
(page 3-20), the single press increment is 0.01 whereas the scrolling
Chapter 3: Using the Control Panel ❖
Copies
, press
Down
to decrease the number.
Down
to display the first
3-7
Page 54

Navigating the Menu System
Navigating the
Menu System
The 4505/4505ps and 4510/4510ps Control Panel contains
two
menu structures:
•
Main Menu
— Language
— PCL Menu
—
PostScript Menu
installed)
— Interface Menu
— System Menu
— Test Menu
The Main Menu system is accessed by pressing
Menu
submenus, settings, or functions. See
System” (page 3-12)
•
Reset Menu
— Reset Printer
— Reset Menus
and its submenus:
(when the PostScript option is
Each of the submenus may have other
“Main Menu
for more information.
and its functions:
—
Reset I/f Cards
and when a network option is installed)
— Reset All
—
Cancel PS Job
installed)
The
Reset Menu
There are no submenus. See
T ake the printer
the
Reset Menu
.
(available only in firmware release 4.0
(when the PostScript option is
is accessed by pressing
offline
(page 3-6) to access the
Note
3-8
❖ 4505/4505ps or 4510/4510ps User’s Guide
Reset
“Reset Menu” (page 3-65)
Main Menu
.
or
Page 55

Navigating the Menu System
Menu System
Indicators
As shown in Figure 3.6, three symbols called
appear on menu displays.
Figure 3.6 Menu indicator symbols on the Control Panel display
Symbol
> Indicates another
= Indicates that a value or setting follows the
the bottom line.
* After a
setting
Description
menu
level below this one.
option
, indicates it is the current value.
Main Menu
Language >
on
Language =
Français
Language =
English *
indicators
Example
may
Chapter 3: Using the Control Panel ❖
3-9
Page 56

Navigating the Menu System
Setting a
Menu Option
To set a
Menu
Main Menu
function, follow the steps below:
Press Online to take the printer offline.
1
You will see:
Offline _/_
Press a key...
Press Menu to access the Main Menu or press
2
Reset to access the Reset Menu.
Press Down or Up to scroll through the list
3
of submenus, options, or functions.
When you see the submenu, option, or function you
4
want, press Enter
If you selected a submenu or option you did not want,
press
Esc
make the selection you want and press
accept it.
option or to invoke a
to return to the previous level; then
Test Menu
Enter
or
Reset
to
If necessary, repeat Step 3 and Step 4 to go through
5
submenu levels to reach all desired options or
functions.
If many possibilities exist, such as 1 through 99 for
number of
down the key.
After pressing
briefly see on the top line of the display:
* saved *
This indicates the value has been saved as the current
setting.
3-10
❖ 4505/4505ps or 4510/4510ps User’s Guide
Copies
Enter
, you can scroll quickly by holding
to accept a setting, you will
Page 57

Navigating the Menu System
You may either continue to work in the menu system
6
by repeating the steps above, or exit and return to
normal operation by pressing Online
If you press
not be saved.
Note
Online
before
Enter
the value will
Other ways to exit a menu option or the menu system
completely are as follows:
• In the
• Press
Main Menu
the top of the
Esc
, press
Main Menu
from
Main Menu
Menu
.
to return to
or
Reset Menu
exit the menu system and display the following
message:
Offline _/_
Press a key...
to
Chapter 3: Using the Control Panel ❖
3-11
Page 58

Main Menu System
Main Menu
System
The
Main Menu
system of submenus, each containing other submenus or
options designed to configure the printer for your
environment. The
Figure 3.7 (page 3-13)
system is hierarchical, based on a cascading
Main Menu hierarchy
.
is depicted in
Note
In this chapter, factory settings are shown
followed by an asterisk (*). See Chapter 1: Introduction
(page 1-4)
When you change a factory setting or an existing setting to a
new value, the new value becomes the
On the printer, the current setting always appears
list of values and is followed by an asterisk (*). The other
possible values are located by pressing
Down
See “Reset Menu” (page 3-65) for information on how to
revert to factory settings.
for a definition of factory setting.
to scroll through the list.
boldfaced
current
Up
and
setting.
first
or
in the
3-12
❖ 4505/4505ps or 4510/4510ps User’s Guide
Page 59

Figure 3.7 Main Menu hierarchy
Main Menu System
Language
Menu
PCL Menu
PostScript Menu
Interface Menu
System Menu
Test Menu
† Appears only when the PostScript option is installed.
†
Deutsch
English
Español
Français
Français canad.
Italiano
Português (BRA)
See Figure 3.9 (page 3-16).
See Figure 3.11 (page 3-31).
See Figure 3.13 (page 3-38).
See Figure 3.19 (page 3-57).
See Figure 3.21 (page 3-61).
Chapter 3: Using the Control Panel ❖
3-13
Page 60

Language
Language
Language
Options
Note
Language
display messages on the Control Panel and used to print text
on the Configuration Sheet (page 3-62).
Figure 3.8 shows the
equivalent. See
steps to find and change the language option.
The
function (page 3-66).
Figure 3.8 Language options
Deutsch German
English International English
includes a list of international languages used to
Language
Options
Language
“Setting a Menu Option” (page 3-10)
option is not changed by the
options and their English
Reset Menus
English Equivalent
for the
Español Spanish
Français French
Français canad. French Canadian
Italiano Italian
Português (BRA) Brazilian Portuguese
3-14
❖ 4505/4505ps or 4510/4510ps User’s Guide
Page 61

PCL Menu
PCL Menu
PCL Menu
Hierarchy
PCL Menu
printer. PCL (Printer Control Language) is used by software
applications to send information and instructions to the
printer.
The
(page 3-16)
options establish the
PCL Menu hierarchy
.
default
is depicted in
configuration for the
Figure 3.9
Chapter 3: Using the Control Panel ❖
3-15
Page 62

PCL Menu
Figure 3.9 PCL Menu hierarchy showing factory settings
Menu
Language
PCL Menu
PostScript Menu
Interface Menu
System Menu
Test Menu
Copies
Font Source
1* - 99
Internal*
†
Upper
†
Lower
†
Soft
Font Number
Pitch
0* - 999
.44 - 99.99 by .01
(10.00*)
Point Size
4.00 - 999.75 by .25
(12.00*)
Default Source
Source Mapping
Standard*
Manual (MP)
‡
Lower
Standard
Manual
Manual Envelope
Lower
Large Capacity
Envelope Feeder
Appears only when the default font is scalable.
†
Appears only when font cards are installed or downloaded fonts are available.
‡
Appears only when an optional lower base is installed.
Standard
MP Tray
Standard-MP
MP-Standard
‡
Lower
Standard-Lower
Lower-Standard
Lower-MP
Std-Low-MP
Low-Std-MP
MP-Lower
MP-Std-Low
MP-Low-Std
‡
‡
‡
‡
‡
‡
‡
‡
3-16
❖ 4505/4505ps or 4510/4510ps User’s Guide
Page 63

PCL Menu
Figure 3.9 PCL Menu hierarchy
Paper Size
MP Tray Size
Orientation
Form Length
Symbol Set
Page Protection
Note: The default
for Jam Recovery is
On for firmware
release 4.0. The
default is Off (as
shown at right) for
releases > 4.0. To
determine the
firmware release of
your printer, print a
Configuration Sheet.
Jam Recovery
Resolution
TrueRes
State Saving
(continued)
Legal (8.5x14)
Folio (8.5x13)
Letter (8.5x11)*
(USA)
A4 (210x297)*
(Europe)
Exec (7.25x10.5)
B5 (176x250)
A5 (148.5x210)
Com-10
Monarch
DL
C5
Portrait*
Landscape
005 - 128
64* (Europe)
60* (USA)
Off*
A4 (210x297)
Legal (8.5x14)
Letter (8.5x11)
Off*
On
300x300
600x600*
Off
On*
Off*
On
Desktop
ISO L1
ISO L2
ISO L5
ISO-4 UK
ISO-6 ASCII
ISO-11 Swedish
ISO-15 Italian
ISO-17 Spanish
ISO-21 German
ISO-60 Norw. v1
ISO-69 French
Legal
Math-8
Microsoft Publ.
PC-8
PC-8 DN
PC-8 Tk
PC-850
PC-852
Pi Font
PS Math
PS Text
Roman-8*
Ventura Int’l.
Ventura Math
Ventura US
Win 3.0
Win L1
Win L2
Win L5
Chapter 3: Using the Control Panel ❖
3-17
Page 64

PCL Menu
PCL Menu
Options
PCL Menu
Figure 3.10 (page 3-19)
followed by an asterisk (*). See
(page 3-10)
to the
change settings.
Settings for certain
from many software applications. If your software application
specifies a value for any option below, the printer
setting will be ignored:
• Copies
• Font Source
• Font Number
• Pitch
• Point Size
• Default Source
• Paper Size
options and their settings are described in
. Factory settings are
“Setting a Menu Option”
for the steps to find and change a setting, or refer
Document Services for Printing Guide
PCL Menu
options may be overridden
boldfaced
to use the RUI to
,
PCL Menu
• Orientation
• Form Length
• Symbol Set
The Xerox printer driver allows your software application to
specify three additional PCL Menu options:
•
Note
3-18
❖ 4505/4505ps or 4510/4510ps User’s Guide
Page Protection
•
Resolution
•
TrueRes
Page 65

Figure 3.10 PCL Menu options showing factory settings
PCL Menu
Option
Copies
Font Source
Setting
1*
- 99 Number of times each page is printed.
Description
Most software applications override this setting. If
your application does not, the printer assumes the
default setting here.
Internal*
†
Upper
†
Lower
†
Soft
Location of the default font in PCL.
Internal
refers to the font set residing in the printer’s
permanent memory. These fonts are resident in the
printer and cannot be altered.
Upper
and
Lower
refer to the two font card slots and
appear
only
when a font card is installed in a slot. See
Chapter 1: Introduction (page 1-3
font card slots.
When a font card contains its own default font, the
current
Font Source is overridden. You must change
the
Font Source
manually if you do not want to use
the default font on the font card.
Soft
refers to fonts permanently downloaded to
printer memory.
Soft
appears
only
permanently downloaded font.
†
Upper
and
Lower
only when a font card is
installed.
when there is a
downloaded font.
Soft
appear
appears
Note
The
Font Source
setting returns to its
factory setting (“Internal”) if
(page 3-25) is changed.
If the
Font Source
setting specifies a
location other than “Internal”,
Number
(page 3-20) reverts to 0
automatically.
) for location of the
if there is a
Symbol Set
Font
Chapter 3: Using the Control Panel ❖
3-19
Page 66

PCL Menu
Figure 3.10 PCL Menu options showing factory settings
Option
Font Number
Pitch
0*
.44 - 99.99 by .01
(
Setting
- 999 Default font in PCL.
Only
Font Number
location (page 3-19) are displayed. For example, if you
have
internal
is 50.
Font Number
List
(page 3-63) in the first column. Print a
List
to find the correct number to use with this
setting.
The
factory setting (0) if the
(page 3-25) default is changed.
If the
specifies a location other than
“Internal”,
automatically.
10.00*
Note
Number of characters per inch (cpi) for the font
)
represented by
Appears only when the
specifies a scalable fixed pitch font, such as Courier.
Up
99.99 cpi.
Most software applications override this setting. If
your application does not, the printer assumes the
default setting here.
(continued)
Description
values valid for the
fonts only, the maximum
values are printed on the
Font Number
Font Source
Font Number
increments pitch at .01 cpi, from .44 to
Down
setting returns to its
setting (page 3-19)
Font Number
(page 3-20).
Font Number
decrements at .01 cpi.
Font Source
Font Number
PCL Font
PCL Font
Symbol Set
reverts to 0
setting
3-20
❖ 4505/4505ps or 4510/4510ps User’s Guide
Page 67

PCL Menu
Figure 3.10 PCL Menu options showing factory settings
Option
Point Size
Default Source
4.00 - 999.75 by .25
(
Standard*
Manual (MP)
Lower
†
Setting
12.00*
)
†
Appears only when an
optional lower base is
installed.
Point size (a measurement for type height, 1 point
equals 0.351 mm or approximately 1/72 inch) for the
font represented by
Appears only when the
specifies a scalable proportional spaced font, such as
Times New Roman.
Most software applications override this setting. If
your application does not, the printer assumes the
default setting here.
Default paper source in PCL if none is specified by
your software application.
The printer uses
paper source specified in the print job. Some software
applications have a paper source selection called
“Auto Select” or “Auto Sheet Feed” which usually
results in the omission of a paper source selection in a
print job.
When the printer uses
Mapping
tray or slot from which the printer pulls paper. See
Chapter 2: Handling Paper, “Selecting a Paper
Source” (page 2-22)
interaction of
(continued)
Description
Font Number
Font Number
Default Source
Default Source, Source
(page 3-22) is used to determine the actual
for more information on the
Default Source
(page 3-20).
setting
when there is no
and
Source Mapping
.
Chapter 3: Using the Control Panel ❖
3-21
Page 68

PCL Menu
Figure 3.10 PCL Menu options showing factory settings
Option
Source Mapping
Options (Paper Sources):
Standard
Manual
Manual Envelope
Lower
Large Capacity
Envelope Feeder
Standard
MP Tray
Standard-MP
MP-Standard
Lower
Standard-Lower
Lower-Standard
Lower-MP
Std-Low-MP
Low-Std-MP
MP-Lower
MP-Std-Low
MP-Low-Std
†
Setting
†
†
†
†
†
†
†
†
†
Appears only when an
optional lower base is
installed.
Source mapping
software application
printer pulls paper.
Each of the six paper sources that can be requested
through your application maps to one of the
Mapping
Standard
is the factory setting for the Standard,
Lower, and Large Capacity paper sources.
the factory setting for Manual, Manual Envelope, and
Envelope Feeder. See
factory settings with and without a lower base
installed.
When a paper source (e.g., Standard) is mapped to a
sequence
of trays (e.g.,
switch between them for two purposes:
1) To increase paper capacity.
When the current tray becomes empty, the
printer automatically switches to the next tray in
the sequence, provided the paper size is the
same.
2) To search for the correct paper size to print a
page.
If the paper size specified in your software
application does not match what is loaded in the
current tray, the printer automatically searches
the next tray in the sequence for a paper size that
matches.
For more information on taking full advantage of
Source Mapping
see
“Selecting a Paper Source” (page 2-22)
(continued)
Description
enables you to control
the location from which the
settings.
Figure 2.12 (page 2-26)
Standard-MP
and for detailed examples of usage,
from your
Source
MP Tray
is
for
), the printer may
.
3-22
❖ 4505/4505ps or 4510/4510ps User’s Guide
Page 69

PCL Menu
Figure 3.10 PCL Menu options showing factory settings
Option
Paper Size
MP Tray Size
Legal (8.5x14)
Folio (8.5x13)
Letter (8.5x11)*
A4 (210x297)* (Europe)
Exec (7.25x10.5)
B5 (176x250)
A5 (148.5x210)
Com-10
Monarch
DL
C5
See
for more paper
dimensions.
Legal (8.5x14)
Folio (8.5x13)
Letter (8.5x11)*
A4 (210x297)* (Europe)
Exec (7.25x10.5)
B5 (176x250)
A5 (148.5x210)
Com-10
Monarch
DL
C5
Setting
(USA)
Figure 2.3 (page 2-6)
(USA)
Paper size used to print a page if no paper size is
specified by your software application.
The Xerox printer driver supports all
settings. However, without the Xerox printer driver
installed, not all paper sizes may be supported by your
software application.
The
Defaults
determines whether the factory setting for
Size
is “A4 (210x297)” or “Letter (8.5x11)”.
MP Tray Size
through the MP tray. The MP tray does not have a size
sensor; therefore, you must explicitly tell the printer
what MP tray paper size to expect. The printer
compares the paper size communicated in the print
job to the
printer displays a message informing you what paper
size to feed through the MP tray.
The
Defaults
determines whether the factory setting for
Size
is “A4 (210x297)” or “Letter (8.5x11)”.
(continued)
Description
Paper Size
setting (page 3-60) in the System Menu
Paper
communicates the paper size feeding
MP Tray Size
setting (page 3-60) in the System Menu
setting. If different, the
MP Tray
Orientation
See
Figure 2.3 (page 2-6)
for more paper
dimensions.
Portrait*
Landscape
Chapter 3: Using the Control Panel ❖
Page orientation.
Portrait
refers to a vertical page;
horizontal page.
Most software applications override this setting. If
your application does not, the printer assumes the
default setting here.
Landscape
refers to a
3-23
Page 70

PCL Menu
Figure 3.10 PCL Menu options showing factory settings
Option
Form Length
005 - 128
64* (Europe)
60* (USA)
Setting
Number of lines per page used in PCL.
The
Form Length
when the
For example, if you set
Form Length
Size
is set to “Letter (8.5X11),”
adjusted to 60.
Most software applications override this setting. If
your application does not, the printer assumes the
default setting here.
The
Defaults
determines whether the
is 64 or 60.
(continued)
Description
setting is automatically adjusted
Paper Size
(page 3-23) default is changed.
Paper Size
is adjusted to 64 automatically. If
(page 3-60) in the System Menu
Form Length
to “A4 (210x297)”
Form Length
Paper
is
factory setting
3-24
❖ 4505/4505ps or 4510/4510ps User’s Guide
Page 71

PCL Menu
Figure 3.10 PCL Menu options showing factory settings
Option
Symbol Set
Desktop
ISO L1
ISO L2
ISO L5
ISO-4 UK
ISO-6 ASCII
ISO-11 Swedish
ISO-15 Italian
ISO-17 Spanish
ISO-21 German
ISO-60 Norw. V1
ISO-69 French
Legal
Math-8
Microsoft Publ.
PC-8
PC-8 DN
PC-8 Tk
PC-850
PC-852
Pi Font
PS Math
PS Text
Roman-8*
Ventura Int’l.
Ventura Math
Ventura US
Win 3.0
Win L1
Win L2
Win L5
Setting
Collection of characters available for a font, including
uppercase and lowercase alphabets, punctuation
marks, and special characters such as open and close
quotation marks or international characters.
Most software applications override this setting. If
your application does not, the printer assumes the
default setting here.
When you change
settings for
and
Note
their factory settings automatically.
(continued)
Description
Font Number
Font Source
Symbol Set
(page 3-19) are reset to
, the
(page 3-20)
Chapter 3: Using the Control Panel ❖
3-25
Page 72

PCL Menu
Figure 3.10 PCL Menu options showing factory settings
Option
Page Protection
Jam Recovery
Note: The default for Jam
Recovery is On for
firmware release 4.0. The
default is
right) for releases > 4.0. To
determine the firmware
release of your printer,
print a Configuration
Sheet.
Off
(as shown at
Off*
A4 (210x297)
Legal (8.5x14)
Letter (8.5x11)
See
for more paper
dimensions.
Off*
On
Setting
Figure 2.3 (page 2-6)
Use to reserve memory for a full page of the selected
paper size.
When
Off
It then becomes possible for a page to be too complex
to compose. The result is a
error message and the page may be printed on more
than one sheet of paper.
When set to a paper size, each page is composed into
reserved memory before the paper starts to move
through the printer. The printer may slow down
slightly with
assured of printing a complex page on one sheet of
paper.
Page Protection
when the Xerox printer driver is installed.
See
“Printer Settings that Affect Memory” (page 3-67)
for further information.
Determines how the printer recovers from a paper
jam. It is set independently for PCL and PostScript.
When On, the printer reprints any pages in the printer
at the time of the jam, after the jam has been cleared.
The printer does this by using a portion of memory to
store data. This setting can reduce printer speed with
minimum memory installed. Printer speed can be
increased by installing additional memory and/or
using the default setting of
When
Off
been cleared. The print job must be resent, specifying
those pages that did not print as a result of the paper
jam.
See
“Printer Settings that Affect Memory” (page 3-67)
for further information.
(continued)
Description
, memory is not reserved for an entire page.
Page Too Complex
Page Protection
can be overridden by software
, some pages may be lost after the jam has
; however, you will be
Off
.
3-26
❖ 4505/4505ps or 4510/4510ps User’s Guide
Page 73

PCL Menu
Figure 3.10 PCL Menu options showing factory settings
Option
Resolution
TrueRes
300x300
600x600*
Off
On*
Setting
Dots per inch (dpi).
Some software applications override this setting. If
your software application does not, the printer
assumes the default setting here.
Resolution
Xerox printer driver is installed.
Higher resolutions use more printer memory. See
“Printer Settings that Affect Memory” (page 3-67)
further information.
When On, smooths the curves in characters and
graphics to reduce coarseness, thereby improving
image quality.
TrueRes
Xerox printer driver is installed.
can be overridden by software when the
(continued)
Description
can be overridden by software when the
for
Chapter 3: Using the Control Panel ❖
3-27
Page 74

PCL Menu
Figure 3.10 PCL Menu options showing factory settings
Option
State Saving
Off*
On
Setting
Reserves memory for saving permanently downloaded
fonts and macros, when the printer switches from
using the PCL printer language to using the PostScript
printer language, or when the printer steps down in
Page Protection
When
Off
macros are cleared from memory when switching
PDLs. They must be downloaded again when the
printer switches back to PCL from PostScript.
When On, permanently downloaded fonts and
macros are stored in printer memory. You eliminate
the time to download them again when the printer
switches back to PCL.
Temporary fonts and macros are always
cleared at the end of every print job.
Note
State Saving
if the PostScript option is installed. If the PostScript
option is not installed,
with less than 10 MB. This will prevent loss of
downloaded PCL fonts and macros if applications
change the setting of
Protection
effect on printing speed with minimum memory
installed. It is recommended that this option not be
enabled without 10 MB of printer memory.
(continued)
Description
or
Resolution
, all permanently downloaded fonts and
requires 10 MB (MegaBytes) of memory
State Saving
Resolution
. Enabling
State Saving
.
may be selected
or
Page
can have an
3-28
❖ 4505/4505ps or 4510/4510ps User’s Guide
Page 75

PostScript Menu
PostScript
Menu
Note
Note
PostScript Menu
configuration for the printer. PostScript may be used by
software applications to send information and instructions to
the printer.
The 4505ps and 4510ps printers are factory-equipped with
PostScript.
PostScript is available as an option for the 4505 and 4510
printers. See Appendix D: Ordering Information.
PostScript Users:
The Xerox Windows PostScript driver allows you to either
download the PostScript header with every job, or download
it only once. If the printer is used in a network or other shared
environment, where both PCL and PostScript jobs are printed,
the header will be deleted whenever the printer switches
from PostScript to PCL. Banner sheets printed from Novell
networks cause the printer to switch between PostScript and
PCL. If Banner Sheets are printed, insure that the printer’s
Language Sensing
PostScript header, select “Download Each Job” in the
PostScript driver. The “Already Downloaded” option may be
selected in the driver if at least 10 MB of memory is installed
in the printer and the printer’ s
in the printer’s
header at least once for each power on cycle. If several
different PostScript applications are used, the “Download
Each Job” option will guarantee that the correct header is
always available.
options establish the default PostScript
option is On. To avoid the loss of the
PostScript menu
State Saving
. You must download the
option is set to On
Chapter 3: Using the Control Panel ❖
3-29
Page 76

PostScript Menu
PostScript Menu
Hierarchy
Figure 3.11 (page 3-31)
hierarchy, which appears only when the PostScript option is
installed
.
shows the
PostScript Menu
3-30
❖ 4505/4505ps or 4510/4510ps User’s Guide
Page 77

Figure 3.11 PostScript Menu hierarchy showing factory settings
Menu
Language
PCL Menu
PostScript Menu
Interface Menu
System Menu
Test Menu
Copies
Default Tray
1* - 99
Standard*
†
Lower
Manual
PostScript Menu
Note: The default for
Tray Switching is
Standard-MP or
Low-Std-MP for
firmware release 4.0.
The default is Off (as
shown at right) for
releases > 4.0. To
determine the
firmware release of
your printer, print a
Configuration Sheet.
Note: The default for
Jam Recovery is On for
firmware release 4.0.
The default is Off (as
shown at right) for
releases > 4.0.
Tray Switching
Manual Size
Print Errors
Jam Recovery
Resolution
TrueRes
Legal (8.5x14)
Folio (8.5x13)
Letter (8.5x11)*
(USA)
A4 (210x297)*
(Europe)
Exec (7.25x10.5)
B5 (176x250)
A5 (148.5x210)
Com-10
Monarch
DL
C5
Off*
On
Off*
On
300x300
600x600*
Off
On*
Off*
Standard-MP
MP-Standard
Standard-Lower
Lower-Standard
Lower-MP
Std-Low-MP
Low-Std-MP
MP-Lower
MP-Std-Low
MP-Low-Std
†
†
†
†
†
†
†
†
State Saving
†
Appears only when an optional lower base is installed.
Chapter 3: Using the Control Panel ❖
Off*
On
3-31
Page 78

PostScript Menu
PostScript Menu
Options
Note
PostScript Menu
Figure 3.12. Factory settings are
asterisk (*). See
steps to find and change a setting, or refer to the
Services for Printing Guide
Default settings for certain
options and their settings are described in
boldfaced
“Setting a Menu Option” (page 3-10)
, followed by an
for the
Document
to use the RUI to change settings.
PostScript Menu
options may be
overridden from many software applications. If your software
application specifies a value for an option below, the
PostScript Menu setting
will be ignored:
• Copies
• Default Tray
• Manual Size
• Tray Switching
The Xerox printer driver allows your software application to
specify additional PostScript Menu options:
•
Resolution
•
TrueRes
Figure 3.12 PostScript Menu options showing factory settings
Option
Copies
Default Tray
3-32
❖ 4505/4505ps or 4510/4510ps User’s Guide
1*
Standard*
Lower
Manual
†
Setting
- 99 Number of times each page is printed.
Most software applications override this setting. If
your application does not, the printer assumes the
default setting here.
†
Appears only when an
optional lower base is
installed.
Paper tray used if none is specified in your software
application.
Description
Page 79

PostScript Menu
Figure 3.12 PostScript Menu options showing factory settings
Option
Tray Switching
Note: The default for Tray
Switching is
or
Low-Std-MP
firmware release 4.0. The
default is
right) for releases > 4.0. To
determine the firmware
release of your printer,
print a Configuration
Sheet.
Standard-MP
for
Off
(as shown at
Off*
Standard-MP
MP-Standard
Standard-Lower
Lower-Standard
Lower-MP
Std-Low-MP
Low-Std-MP†
MP-Lower
MP-Std-Low
MP-Low-Std
Setting
†
†
†
†
†
Sequence of trays the printer uses when printing a
page of a PostScript print job.
†
†
If the tray requested for the page is included in this
sequence, then the whole sequence is used instead of
the requested tray. The first tray used is the one in the
sequence, going from left to right, that satisfies all
page requirements. If the requested tray is not
included in this sequence, then the requested tray
alone is used. For example, if this setting is
“Lower-Standard” and the standard tray (upper) is
requested, then the lower tray will be used first
provided that it contains the requested size of paper.
When this sequence is being used and the current tray
runs out of paper, then the next tray in the sequence
that has the same size paper will be used.
Settings that include the lower tray only appear in the
menu when an optional lower base is installed.
Settings that begin with MP allow for printing of the
first pages of a job on special stock by placing the
required number of sheets of the special stock in the
MP tray.
The factory default is Low-Std-MP when a lower tray
is installed, or Standard-MP when a lower tray is not
installed.
(continued)
Description
†
Appears only when an
optional lower base is
installed.
Caution
Do not remove either the standard or
lower tray when the printer is feeding
!
paper.
PostScript drivers other than the Xerox driver may
simply enable or disable
Tray Switching
not specify a setting.
Chapter 3: Using the Control Panel ❖
; they can
3-33
Page 80

PostScript Menu
Figure 3.12 PostScript Menu options showing factory settings
Option
Manual Size
Setting
Legal (8.5x14)
Folio (8.5x13)
Letter (8.5x11)*
A4 (210x297)* (Europe)
Exec (7.25x10.5)
B5 (176x250)
A5 (148.5x210)
Com-10
Monarch
DL
C5
(USA)
Paper size to expect in the manual slot if none is
specified in your software application.
Manual Size
communicates the paper size feeding
through the MP tray. The MP tray does not have a size
sensor; therefore, you must explicitly tell the printer
what MP tray paper size to expect. The printer
compares the paper size communicated in the print
job to the
Manual Size
printer displays a message informing you what paper
size to feed through the MP tray.
The
Defaults
option (page 3-60) in the System Menu
determines whether the factory setting for
Size
is “A4 (210x297)” or “Letter (8.5x11).”
The Xerox Windows PostScript driver allows you to
select either “MP Tray” or Manual Feed” to designate
the printer’s MP tray as the paper source. If “MP Tray”
is selected from the driver, the setting of
on the printer Control Panel must match the paper
size requested in the driver. If
selection of the paper size in the driver do not match,
the page may be formatted incorrectly. You can
change the setting of
Menu after the Control Panel prompts you to load the
appropriate paper in the MP tray. The setting of
Manual Size
on the Control Panel only affects paper
fed from the MP tray. This setting is ignored for paper
fed from the standard or lower trays.
(continued)
Description
setting. If different, the
Manual Size
Manual Size
in the PostScript
Manual
Manual Size
and the
Print Errors
Off*
On
Control of PostScript’s built-in error handler
(debugger).
Should the printer encounter a PostScript error while
printing a job, PostScript prints an error sheet when
Print Errors
is On. This is useful on a network, as an
error sheet will alert the user that the print job had
errors and was flushed.
3-34
❖ 4505/4505ps or 4510/4510ps User’s Guide
Page 81

PostScript Menu
Figure 3.12 PostScript Menu options showing factory settings
Option
Jam Recovery
Note: The default for Jam
Recovery is On for
firmware release 4.0. The
default is
right) for releases > 4.0. To
determine the firmware
release of your printer,
print a Configuration
Sheet.
Off
(as shown at
Resolution
Off*
On
300x300
600x600*
Setting
Determines how the printer recovers from a paper
jam. It is set independently for PCL and PostScript.
When On, the printer reprints any pages in the printer
at the time of the jam, after the jam has been cleared.
The printer does this by using a portion of memory to
store data. This setting can reduce printer speed with
minimum memory installed. Printer speed can be
increased by installing additional memory and/or
using the default setting of
When
Off
, some pages may be lost after the jam has
been cleared. The print job must be resent, specifying
those pages that did not print as a result of the paper
jam.
See
“Printer Settings that Affect Memory” (page 3-67)
for further information.
Dots per inch (dpi).
Some software applications override this setting. If
your software application does not, the printer
assumes the default setting here.
Resolution
can be overridden by software when the
Xerox printer driver is installed.
Higher resolutions require more printer memory. See
“Printer Settings that Affect Memory” (page 3-67)
further information.
(continued)
Description
Off
.
for
TrueRes
Off
On*
When On, smooths the curves in characters and
graphics to reduce coarseness, thereby improving
image quality.
TrueRes
can be overridden by software when the
Xerox printer driver is installed.
Chapter 3: Using the Control Panel ❖
3-35
Page 82

PostScript Menu
Figure 3.12 PostScript Menu options showing factory settings
Option
State Saving
Off*
On
Setting
Reserves memory for saving the contents of virtual
memory, when print jobs switch from PostScript to
the PCL printer language or when the printer steps
down in
When
Page Protection
Off
, if print jobs switch from PostScript to PCL,
the contents of virtual memory are cleared.†
When On,
State Saving
contents, eliminating the time to download again
when switching back to PostScript.
State Saving
requires 10 MB (MegaBytes) of memory
if the PostScript option is installed. If the PostScript
option is not installed,
with less than 10 MB. This will prevent loss of
downloaded PCL fonts and macros if applications
change the setting of
Protection
. Enabling
effect on printing speed with minimum memory
installed. It is recommended that this option not be
enabled without 10 MB of printer memory.
The contents of virtual memory will not
be saved if there is not enough free
Note
memory.
(continued)
Description
or
Resolution
saves virtual memory
State Saving
Resolution
State Saving
or
.
may be selected
Page
can have an
†
In Microsoft Windows, the PostScript printer driver has an
option for determining whether header information
(general instructions PostScript needs before processing a
print job) is sent with every print job or just once at the
start of a PostScript session. The header is stored in virtual
memory. If you set the header option to send it to the
printer once, turning
will not need to be sent again upon return to PostScript
operation.
3-36
❖ 4505/4505ps or 4510/4510ps User’s Guide
State Saving On
means the header
Page 83

Interface
Menu
The
Interface Menu
serial
ports on the printer as well as submenus for
interface
The
•
•
•
•
•
ports
Interface Menu
Parallel Menu
Serial Menu
LocalTalk Menu
Ethernet Menu
Token Ring Menu
contains submenus for the
when a network option(s) is installed
may include submenus for the following:
(See page 3-41.)
(See page 3-45.)
(See page 3-50.)
(See page 3-51.)
(See page 3-54.)
Interface Menu
parallel
and
network
.
Interface Menu
Hierarchy
Figure 3.13 (page 3-38)
shows the
Interface Menu hierarchy
.
Chapter 3: Using the Control Panel ❖
3-37
Page 84

Interface Menu
Figure 3.13 Interface Menu hierarchy showing factory settings
Menu
Language
PCL Menu
PostScript Menu
Interface Menu
System Menu
Test Menu
†
Parallel Menu
Port Enable
Off
On*
† Appears only when the PostScript option is installed.
Port Timeout
System Language
Lang. Sensing
Auto Job End
Bidirectional
Transfer Rate
5 - 999 secs (30*)
PCL*
PostScript
Off
On*
Off
On*
Off*
On
High
Low*
†
3-38
❖ 4505/4505ps or 4510/4510ps User’s Guide
Page 85

Interface Menu
Figure 3.13 Interface Menu hierarchy showing factory settings
Port Enable
Serial Menu
Port Timeout
System Language
Lang. Sensing
Auto Job End
Port Type
Baud Rate
(continued)
Off
On*
5 - 999 secs (30*)
PCL*
PostScript
Off
On*
Off
On*
RS232*
RS422
57600
38400
19200
9600*
4800
2400
1200
600
300
†
Handshake
DTR Polarity
Data Bits
Parity
Stop Bits
Robust XON*
XON
Hardware
High*
Low
7
8*
None*
Even
Odd
2
1.5
1*
Chapter 3: Using the Control Panel ❖
3-39
Page 86

Interface Menu
Figure 3.13 Interface Menu hierarchy showing factory settings
LocalTalk Menu
Ethernet Menu
Note: The Frame Type
option (as shown at
right) is available for
firmware release 4.0
only. To determine the
firmware release of
your printer, print a
Configuration Sheet.
Token Ring Menu
‡
‡
Port Timeout 5 - 999 secs (30*)
Port Timeout
System Language
Lang. Sensing
Auto Job End
Frame Type
‡
Port Timeout
System Language
(continued)
5 - 999 secs (30*)
PCL*
PostScript
†
Off
On*
Off
On*
802.3*
Ethernet II
5 - 999 secs (30*)
PCL*
PostScript
†
Lang. Sensing
Auto Job End
† Appears only when the PostScript option is installed.
‡ Appears only when the option is installed.
3-40
❖ 4505/4505ps or 4510/4510ps User’s Guide
Off
On*
Off
On*
Page 87

Parallel Menu
Options
The
Parallel Menu
Figure 3.13 (page 3-38)
, a submenu of the
, contains options for configuring the
printer’s bidirectional parallel port.
Interface Menu
Interface Menu
,
Figure 3.14 describes each
settings are
boldfaced
Parallel Menu
and followed by an asterisk (*). See
“Setting a Menu Option” (page 3-10)
change a setting, or refer to the
Printing Guide
to use the RUI to change settings.
Figure 3.14 Parallel Menu options showing factory settings
Option
Port Enable
Port Timeout
Off
On*
5-999 secs (
Setting
Activation of the parallel port.
When On, the parallel port is enabled so that the
printer can receive print jobs through it.
The parallel port becomes part of a port polling
sequence that includes all enabled ports. See
Appendix C: I/O Port Polling
When
Off
, the port is disabled so no communication
occurs through this port with the host. If you are not
using the parallel port, you can set
30*
) Time interval for determining when to end an
incomplete print job and poll the next port in the
polling sequence.
Port Timeout
End
(page 3-43).
See
Appendix C: I/O Port Polling
information.
option. Factory
for the steps to find and
Document Services for
Description
for information.
Port Enable Off
works in conjunction with
for more
.
Auto Job
System Language
PCL*
PostScript
†
Appears only when the
†
PostScript option is
installed.
Chapter 3: Using the Control Panel ❖
Page description language (PDL) the printer will use
for print jobs coming through the parallel port.
When
Lang. Sensing
Language
detect the PDL used in the incoming print job.
is used only when the printer cannot
(page 3-42) is On,
System
3-41
Page 88

Interface Menu
Figure 3.14 Parallel Menu options showing factory settings
Option
Lang. Sensing
Off
On*
Setting
Automatic recognition of the page description
language (PDL) used in an incoming print job.
When On, if the parallel port receives print jobs of
different PDLs—such as a PostScript print job followed
by a PCL print job—it can automatically sense which
PDL the print job is using. It does this by sampling the
incoming data stream, then switching to the
perceived language for that job or to the
Language
When On, if
Menu or
Menu is also On, the permanently downloaded fonts
and macros are saved in memory, eliminating the time
to download them again when switching between
PDLs occurs.
setting if it fails to sense the language.
State Saving
State Saving
(continued)
Description
System
(page 3-28) in the PCL
(page 3-36) in the PostScript
3-42
❖ 4505/4505ps or 4510/4510ps User’s Guide
Page 89

Interface Menu
Figure 3.14 Parallel Menu options showing factory settings
Option
Auto Job End
Off
On*
Setting
Automatic ending of a print job that does not finish.
When On, after the current print job has paused long
enough to exceed the
interval and no data has been received on any other
port, the print job will be stopped. Any partial page is
ejected from the printer and the print job is cleared
from memory.
Use
Auto Job End On
multiple users on a network. This assures that one
user’s print job will finish and all pages will exit the
printer whether or not another user sends a print job.
No partial pages will be left unprinted.
When
Off
, the print job does not end after the
timeout interval. Instead, the printer waits to continue
until another print job is received on any port. A
partial page will remain unprinted until the next print
job is received. See
information on ejecting partial pages.
Auto Job End
is on a network.
Note
(continued)
Description
Port Timeout
when the printer serves
Form Feed
should be On if the printer
(page 3-41)
(page 3-6) for
If you are not sharing the printer with other users and
if you find that one page is split and printed on
multiple pages, set
Port Timeout
is exceeded before the rest of the page can be sent.
Also see
(page 3-67)
one page printing on multiple pages.
Chapter 3: Using the Control Panel ❖
“Printer Settings that Affect Memory”
for other ways to correct the problem of
Auto Job End Off
interval. It could be the
or increase the
Port Timeout
3-43
Page 90

Interface Menu
Figure 3.14 Parallel Menu options showing factory settings
Option
Bidirectional
Transfer Rate
Off*
On
High
Low*
Setting
Activation of two-way communications between the
printer and your computer.
Bidirectional On
messages to your computer.
Only set Bidirectional On if you have a
software application that supports it.
!
Caution
Relative speed of the port.
The
High
setting will free up the host more quickly for
other processing. If your computer cannot handle the
high speed, data may be lost.
(continued)
Description
enables the printer to send
3-44
❖ 4505/4505ps or 4510/4510ps User’s Guide
Page 91

Serial Menu
Options
The
Serial Menu
, a submenu of the
Figure 3.13 (page 3-38)
printer’s serial port.
Interface Menu
Interface Menu,
, contains options for configuring the
Figure 3.15 describes each
settings are
boldfaced
and followed by an asterisk (*). See
“Setting a Menu Option” (page 3-10)
change a setting, or refer to the
Printing Guide
to use the RUI to change settings.
Figure 3.15 Serial Menu options showing factory settings
Option
Port Enable
Port Timeout
Off
On*
5-999 secs (
Setting
Activation of the serial port.
When On, the serial port is enabled so that the printer
can receive print jobs through it.
The serial port becomes part of a port polling
sequence that includes all enabled ports. See
Appendix C: I/O Port Polling
When
Off
, the port is disabled so no communication
occurs through this port with the host. If you are not
using the serial port, you can set
30*
) Time interval for determining when to end an
incomplete print job and poll the next port in the
polling sequence.
Port Timeout
End
(page 3-47).
See
Appendix C: I/O Port Polling
information.
Serial Menu
option. Factory
for the steps to find and
Document Services for
Description
for information.
Port Enable Off
works in conjunction with
for more
.
Auto Job
System Language
PCL*
PostScript
†
Appears only when the
†
PostScript option is
installed.
Chapter 3: Using the Control Panel ❖
Page description language (PDL) the printer will use
for print jobs coming through the serial port.
When
Lang. Sensing
Language
detect the PDL used in the incoming print job.
is used only when the printer cannot
(page 3-46) is On,
System
3-45
Page 92

Interface Menu
Figure 3.15 Serial Menu options showing factory settings
Option
Lang. Sensing
Off
On*
Setting
Automatic recognition of the page description
language (PDL) used in an incoming print job.
When On, if the serial port receives print jobs of
different PDLs—such as a PostScript print job followed
by a PCL print job—it can automatically sense which
PDL the print job is using. It does this by sampling the
incoming data stream, then switching to the
perceived language for that job or to the
Language
When On, if
Menu or
Menu is also On, the permanently downloaded fonts
and macros are saved in memory, eliminating the time
to download them again when switching between
PDLs occurs.
setting if it fails to sense the language.
State Saving
(continued)
Description
State Saving
(page 3-36) in the PostScript
System
(page 3-28) in the PCL
3-46
❖ 4505/4505ps or 4510/4510ps User’s Guide
Page 93

Interface Menu
Figure 3.15 Serial Menu options showing factory settings
Option
Auto Job End
Off
On*
Setting
Automatic ending of a print job that does not finish.
When On, after the current print job has paused long
enough to exceed the
interval and no data has been received on any other
port, the print job will be stopped. Any partial page is
ejected from the printer and the print job is cleared
from memory.
Use
Auto Job End On
multiple users on a network. This assures that one
user’s print job will finish and all pages will exit the
printer whether or not another user sends a print job.
No partial pages will be left unprinted.
When
Off
, the print job does not end after the
timeout interval. Instead, the printer waits to continue
until another print job is received on any port. A
partial page will remain unprinted until the next print
job is received. See
information on ejecting partial pages.
Auto Job End
is on a network.
Note
(continued)
Description
Port Timeout
when the printer serves
Form Feed
should be On if the printer
(page 3-45)
(page 3-6) for
Port Type
If you are not sharing the printer with other users and
if you find that one page is split and printed on
multiple pages, set
Port Timeout
is exceeded before the rest of the page can be sent.
Also see
(page 3-67)
one page printing on multiple pages.
RS232*
RS422
Chapter 3: Using the Control Panel ❖
Serial interface standard.
“Printer Settings that Affect Memory”
for other ways to correct the problem of
Auto Job End Off
interval. It could be the
or increase the
Port Timeout
3-47
Page 94

Interface Menu
Figure 3.15 Serial Menu options showing factory settings
Option
Baud Rate
Handshake
57600
38400
19200
9600*
4800
2400
1200
600
300
Robust XON*
XON
Hardware
Setting
Speed at which data is transferred.
Baud rate
second
Note
Data flow control. (Flow control, also known as
handshaking, is the cooperation between the host
computer and printer for data transfer. XON signals
the host computer to send more data. XOFF is the
converse signal that tells the host computer to stop
and wait.)
Robust XON
Robust XON
with a host computer that fails to receive the XON
signal.
XON
Hardware
operate in XON/XOFF handshaking mode.
requires a cable with the DTR (Data Terminal
Ready) pin connection enabled
translates approximately to
.
The serial port
match the host computer baud rate
setting.
Your software application may set the
baud rate. If not, use the DOS MODE
command to modify the baud rate on
the host computer. Refer to your DOS
documentation for more information.
sends the signal only once.
is used when the host computer cannot
(continued)
Description
bits per
Baud Rate
sends the XON signal continuously.
helps ensure that handshaking works
setting must
Hardware
.
DTR Polarity
3-48
❖ 4505/4505ps or 4510/4510ps User’s Guide
High*
Low
Serial port’s DTR (Data Terminal Ready) signal sent
from the printer to notify the host computer that it is
ready to receive data.
High
is standard for most computers; it uses true logic
(+5 V).
Low
is typically used on nonstandard equipment; it
uses inverted logic (0 V).
Page 95

Interface Menu
Figure 3.15 Serial Menu options showing factory settings
Option
Data Bits
Parity
Stop Bits
7
8*
None*
Even
Odd
2
1.5
1*
Setting
Number of data bits in a character.
The
host computer data bits setting.
Note
How the parity bit is used in error checking.
The parity bit may be checked against the received
character by means of an
mechanism.
The
computer parity setting.
Note
Number of stop bits in each character. (Stop bits
signal the end of a character.)
(continued)
Description
Data Bits
Parity
setting must match the
Even
or
Odd
setting must match the host
error checking
The
Stop Bits
host computer stop bits setting.
Note
Chapter 3: Using the Control Panel ❖
setting must match the
3-49
Page 96

Interface Menu
The
LocalTalk Menu
Option
Figure 3.16 LocalTalk Menu option showing factory setting
LocalTalk Menu
Figure 3.13 (page 3-38)
configuring the printer’s LocalTalk port,
option has been installed
The LocalTalk option supports AppleTalk protocols. For
detailed information on the supported protocols, refer to
Networking: LocalTalk
Figure 3.16 describes the option. The factory setting is
boldfaced
Menu Option” (page 3-10)
the setting.
and followed by an asterisk (*). See
, a submenu of the
, contains a single option for
.
packaged with the LocalTalk option.
for the steps to find and change
Interface Menu,
when the LocalTalk
“Setting a
Option
Port Timeout
Setting
5-999 secs (
Description
30*
) Time interval for determining when to poll the next
port in the polling sequence, after the LocalTalk port
has been inactive for this amount of time.
3-50
❖ 4505/4505ps or 4510/4510ps User’s Guide
Page 97

Ethernet Menu
Options
Interface Menu
The
Ethernet Menu
Figure 3.13 (page 3-38)
printer’s Ethernet port,
installed
.
, a submenu of the
Interface Menu,
, contains options for configuring the
when the Ethernet option has been
The Ethernet option supports the following protocols:
• Novell NetWare, Version 3.11
• TCP/IP
• EtherTalk
• DEC LAT
• Microsoft LAN Manager
For detailed information on the supported protocols, refer to
Networking: Ethernet
packaged with the Ethernet option kit.
Figure 3.17 describes each
settings are
boldfaced
Ethernet Menu
and followed by an asterisk (*). See
“Setting a Menu Option” (page 3-10)
change a setting, or refer to the
Printing Guide
to use the RUI to change settings.
Figure 3.17 Ethernet Menu options showing factory settings
Option
Port Timeout
System Language
5-999 secs (
PCL*
PostScript
†
Setting
30*
) Time interval for determining when to end an
†
Appears only when the
PostScript option is
installed.
incomplete print job and poll the next port in the
polling sequence.
Port Timeout
End
(page 3-53).
See
Appendix C: I/O Port Polling
on how port polling works.
Page description language (PDL) the printer will use
for print jobs coming through the Ethernet port.
When
Lang. Sensing
Language
detect the PDL used in the incoming print job.
works in conjunction with
is used only when the printer cannot
option. Factory
for the steps to find and
Document Services for
Description
Auto Job
for more information
(page 3-52) is On,
System
Chapter 3: Using the Control Panel ❖
3-51
Page 98

Interface Menu
Figure 3.17 Ethernet Menu options showing factory settings
Option
Lang. Sensing
Off
On*
Setting
Automatic recognition of the page description
language (PDL) used in an incoming print job.
When On, if the Ethernet port receives print jobs of
different PDLs—such as a PostScript print job followed
by a PCL print job—it can automatically sense which
PDL the print job is using. It does this by sampling the
incoming data stream, then switching to the
perceived language for that job or to the
Language
When On, if
Menu or
Menu is also On, the permanently downloaded fonts
and macros are saved in memory, eliminating the time
to download them again when switching between
PDLs occurs.
setting if it fails to sense the language.
State Saving
State Saving
(continued)
Description
System
(page 3-28) in the PCL
(page 3-36) in the PostScript
3-52
❖ 4505/4505ps or 4510/4510ps User’s Guide
Page 99

Interface Menu
Figure 3.17 Ethernet Menu options showing factory settings
Option
Auto Job End
Off
On*
Setting
Automatic ending of a print job that does not finish.
When On, after the current print job has paused long
enough to exceed the
interval and no data has been received on any other
port, the print job will be stopped. Any partial page is
ejected from the printer and the print job is cleared
from memory.
Use
Auto Job End On
multiple users on a network. This assures that one
user’s print job will finish and all pages will exit the
printer whether or not another user sends a print job.
No partial pages will be left unprinted.
When
Off
, the print job does not end after the
timeout interval. Instead, the printer waits to continue
until another print job is received on any port. A
partial page will remain unprinted until the next print
job is received. See
information on ejecting partial pages.
Auto Job End
is on a network.
Note
(continued)
Description
Port Timeout
when the printer serves
Form Feed
should be On if the printer
(page 3-51)
(page 3-6) for
Frame Type
Note: This option is
available for firmware
release 4.0 only. To
determine the firmware
release of your printer,
print a Configuration
Sheet.
If you are not sharing the printer with other users and
if you find that one page is split and printed on
multiple pages, set
Port Timeout
Auto Job End Off
interval. It could be the
is exceeded before the rest of the page can be sent.
Also see
(page 3-67)
“Printer Settings that Affect Memory”
for other ways to correct the problem of
one page printing on multiple pages.
802.3*
Ethernet II
Protocol standard frame type.
Refer to your network software documentation for
the correct frame type.
Chapter 3: Using the Control Panel ❖
or increase the
Port Timeout
3-53
Page 100

Interface Menu
Token Ring
Menu Options
The
Token Ring Menu
Figure 3.13 (page 3-38)
printer’s Token Ring port,
been installed
The Token Ring option supports the following protocols:
• Novell NetWare, Version 3.11
• Microsoft LAN Manager
For detailed information on the supported protocols, refer to
Networking: Token Ring
option kit.
.
, a submenu of the
, contains options for configuring the
when the Token Ring option has
packaged with the Token Ring
Interface Menu,
Figure 3.18 (page 3-55)
option. Factory settings are
asterisk (*). See
steps to find and change a setting.
“Setting a Menu Option” (page 3-10)
describes each
boldfaced
Token Ring Menu
and followed by an
for the
3-54
❖ 4505/4505ps or 4510/4510ps User’s Guide
 Loading...