

Page 1
Trays and
Paper
™
Phaser
Laser Printer
4400
Guide
Page 2

Copyright © 2002, Xerox Corporation. All Rights Reserved. Unpublished rights reserved under the copyright laws of the United
States. Contents of this publication may not be reproduced in any form without permission of Xerox Corporation.
Copyright protection claimed includes all forms of matters of copyrightable materials and information now allowed by statutory
or judicial law or hereinafter granted, including without limitation, material generated from the software programs which are
displayed on the screen such as styles, templates, icons, screen displays, looks, etc.
®
XEROX
, The Document Company®, the stylized X, CentreWare®, DocuPrint®, and Workset® are registered trademarks of
Xerox Corporation. infoSMART™, Phaser™, PhaserPort™, PhaserSMART™, and PhaserTools™ are trademarks of Xerox
Corporation.
®
Adobe
, Acrobat®, Acrobat® Reader®, Illustrator®, PageMaker®, Photoshop®, and PostScript®, ATM®, Adobe Garamond®,
®
Birch
, Carta®, Mythos®, Quake®, and Tekton® are registered trademarks and Adobe Jenson™, Adobe Brilliant Screens™
technology, and IntelliSelect™ are trademarks of Adobe Systems Incorporated or its subsidiaries which may be registered in
certain jurisdictions.
®
Apple
, LaserWriter®, LocalTalk®, Macintosh®, Mac® OS, AppleTalk®, TrueType2®, Apple Chancery®, Chicago®, Geneva®,
®
Monaco
, and New York® are registered trademarks, and QuickDraw™ is a trademark of Apple Computer Incorporated.
Marigold™ and Oxford™ are trademarks of AlphaOmega Typography.
Avery™ is a trademark of Avery Dennison Corporation.
®
PCL
and HP-GL® are registered trademarks of Hewlett-Packard Corporation.
Hoefler Text was designed by the Hoefler Type Foundry.
®
ITC Avant Guard Gothic
ITC Zapf Dingbats
, ITC Bookman®, ITC Lubalin Graph®, ITC Mona Lisa®, ITC Symbol®, ITC Zapf Chancery®, and
®
are registered trademarks of International Typeface Corporation.
Bernhard Modern™, Clarendon™, Coronet™, Helvetica™, New Century Schoolbook™, Optima™, Palatino™, Stempel
Garamond™, Times™, and Univers™ are trademarks of Linotype-Hell AG and/or its subsidiaries.
MS-DOS
Wingdings™ in TrueType
®
and Windows® are registered trademarks of Microsoft Corporation.
®
format is a product of Microsoft Corporation. WingDings is a trademark of Microsoft Corporation
and TrueType is a registered trademark of Apple Computer, Inc.
Albertus™, Arial™, Gill Sans™, Joanna™, and Times New Roman™ are trademarks of Monotype Corporation.
®
Antique Olive
is a registered trademark of M. Olive.
Eurostile™ is a trademark of Nebiolo.
®
Novell
and NetWare® are registered trademarks of Novell, Incorporated.
®
Sun
and Sun Microsystems® are registered trademarks of Sun Microsystems, Incorporated.
®
SPARC
is a registered trademark of SPARC International, Incorporated. SPARCstation™ is a trademark of SPARC
International, Incorporated, licensed exclusively to Sun Microsystems, Incorporated.
®
UNIX
is a registered trademark in the US and other countries, licensed exclusively through X/Open Company Limited.
As an
ENERGY STAR
®
partner, Xerox Corporation has determined that this product meets the ENERGY STAR guidelines for energy
efficiency. The ENERGY STAR name and logo are registered U.S. marks.
This product uses code for SHA-1 written by John Halleck, which is being used by his permission.
This product includes an implementation of LZW licensed under U.S. Patent 4,558,302.
Other marks are trademarks or registered trademarks of the companies with which they are associated.
Page 3

Contents
Supported Papers . . . . . . . . . . . . . . . . . . . . . . . . . . . . . . . . . . . . . . . . . . . . . 1
Trays. . . . . . . . . . . . . . . . . . . . . . . . . . . . . . . . . . . . . . . . . . . . . . . . . . . . . . . . 2
Loading paper in Tray 1, 2, or 3 . . . . . . . . . . . . . . . . . . . . . . . . . . . . . . . . . . . . . . . . . . . . . 3
Loading paper in the Multi-Purpose Tray. . . . . . . . . . . . . . . . . . . . . . . . . . . . . . . . . . . . . . 7
Loading envelopes in the envelope feeder . . . . . . . . . . . . . . . . . . . . . . . . . . . . . . . . . . . 10
Loading custom size paper . . . . . . . . . . . . . . . . . . . . . . . . . . . . . . . . . . . . . . . . . . . . . . . . 13
Loading custom size paper in Trays 1, 2, or 3 . . . . . . . . . . . . . . . . . . . . . . . . . . . . . 13
Loading custom size paper in the Multi-Purpose Tray. . . . . . . . . . . . . . . . . . . . . . . 15
Specialty Printing . . . . . . . . . . . . . . . . . . . . . . . . . . . . . . . . . . . . . . . . . . . . 16
Automatic 2-sided printing . . . . . . . . . . . . . . . . . . . . . . . . . . . . . . . . . . . . . . . . . . . . . . . . 16
Guidelines for automatic 2-sided printing. . . . . . . . . . . . . . . . . . . . . . . . . . . . . . . . . 16
Binding preferences . . . . . . . . . . . . . . . . . . . . . . . . . . . . . . . . . . . . . . . . . . . . . . . . . . 16
Printing 2-sided pages automatically using Trays 1, 2, or 3 . . . . . . . . . . . . . . . . . . 17
Printing 2-sided pages automatically using the Multi-Purpose Tray . . . . . . . . . . . 17
Manual 2-sided printing . . . . . . . . . . . . . . . . . . . . . . . . . . . . . . . . . . . . . . . . . . . . . . . . . . . 19
Guidelines for manual 2-sided printing . . . . . . . . . . . . . . . . . . . . . . . . . . . . . . . . . . . 19
Manual 2-sided printing using Trays 1, 2, or 3 . . . . . . . . . . . . . . . . . . . . . . . . . . . . . 19
Manual 2-sided printing using the Multi-Purpose Tray . . . . . . . . . . . . . . . . . . . . . . 22
Transparencies. . . . . . . . . . . . . . . . . . . . . . . . . . . . . . . . . . . . . . . . . . . . . . . . . . . . . . . . . . 25
Guidelines for printing on transparencies. . . . . . . . . . . . . . . . . . . . . . . . . . . . . . . . . 25
Printing transparencies from Tray 1, 2, or 3 . . . . . . . . . . . . . . . . . . . . . . . . . . . . . . . 25
Printing transparencies from the Multi-Purpose Tray . . . . . . . . . . . . . . . . . . . . . . . 26
Envelopes . . . . . . . . . . . . . . . . . . . . . . . . . . . . . . . . . . . . . . . . . . . . . . . . . . . . . . . . . . . . . . 27
Guidelines for envelope printing . . . . . . . . . . . . . . . . . . . . . . . . . . . . . . . . . . . . . . . . 27
Printing envelopes from the envelope feeder . . . . . . . . . . . . . . . . . . . . . . . . . . . . . . 28
Printing envelopes from the Tray 1, 2, or 3 . . . . . . . . . . . . . . . . . . . . . . . . . . . . . . . . 29
Printing envelopes from the Multi-Purpose Tray . . . . . . . . . . . . . . . . . . . . . . . . . . . 30
Labels . . . . . . . . . . . . . . . . . . . . . . . . . . . . . . . . . . . . . . . . . . . . . . . . . . . . . . . . . . . . . . . . . 31
Guidelines for printing labels . . . . . . . . . . . . . . . . . . . . . . . . . . . . . . . . . . . . . . . . . . . 31
Printing labels from Tray 1, 2, or 3 . . . . . . . . . . . . . . . . . . . . . . . . . . . . . . . . . . . . . . . 31
Printing labels from the Multi-Purpose Tray . . . . . . . . . . . . . . . . . . . . . . . . . . . . . . . 32
Output Trays . . . . . . . . . . . . . . . . . . . . . . . . . . . . . . . . . . . . . . . . . . . . . . . . 33
Offsetting output . . . . . . . . . . . . . . . . . . . . . . . . . . . . . . . . . . . . . . . . . . . . . . . . . . . . . . . . 34
Index. . . . . . . . . . . . . . . . . . . . . . . . . . . . . . . . . . . . . . . . . . . . . . . . . . . . . . . 35
Copyright © 2002 Xerox Corporation. All Rights Reserved. i
Page 4
Phaser™ 4400 Laser Printer
Supported Papers
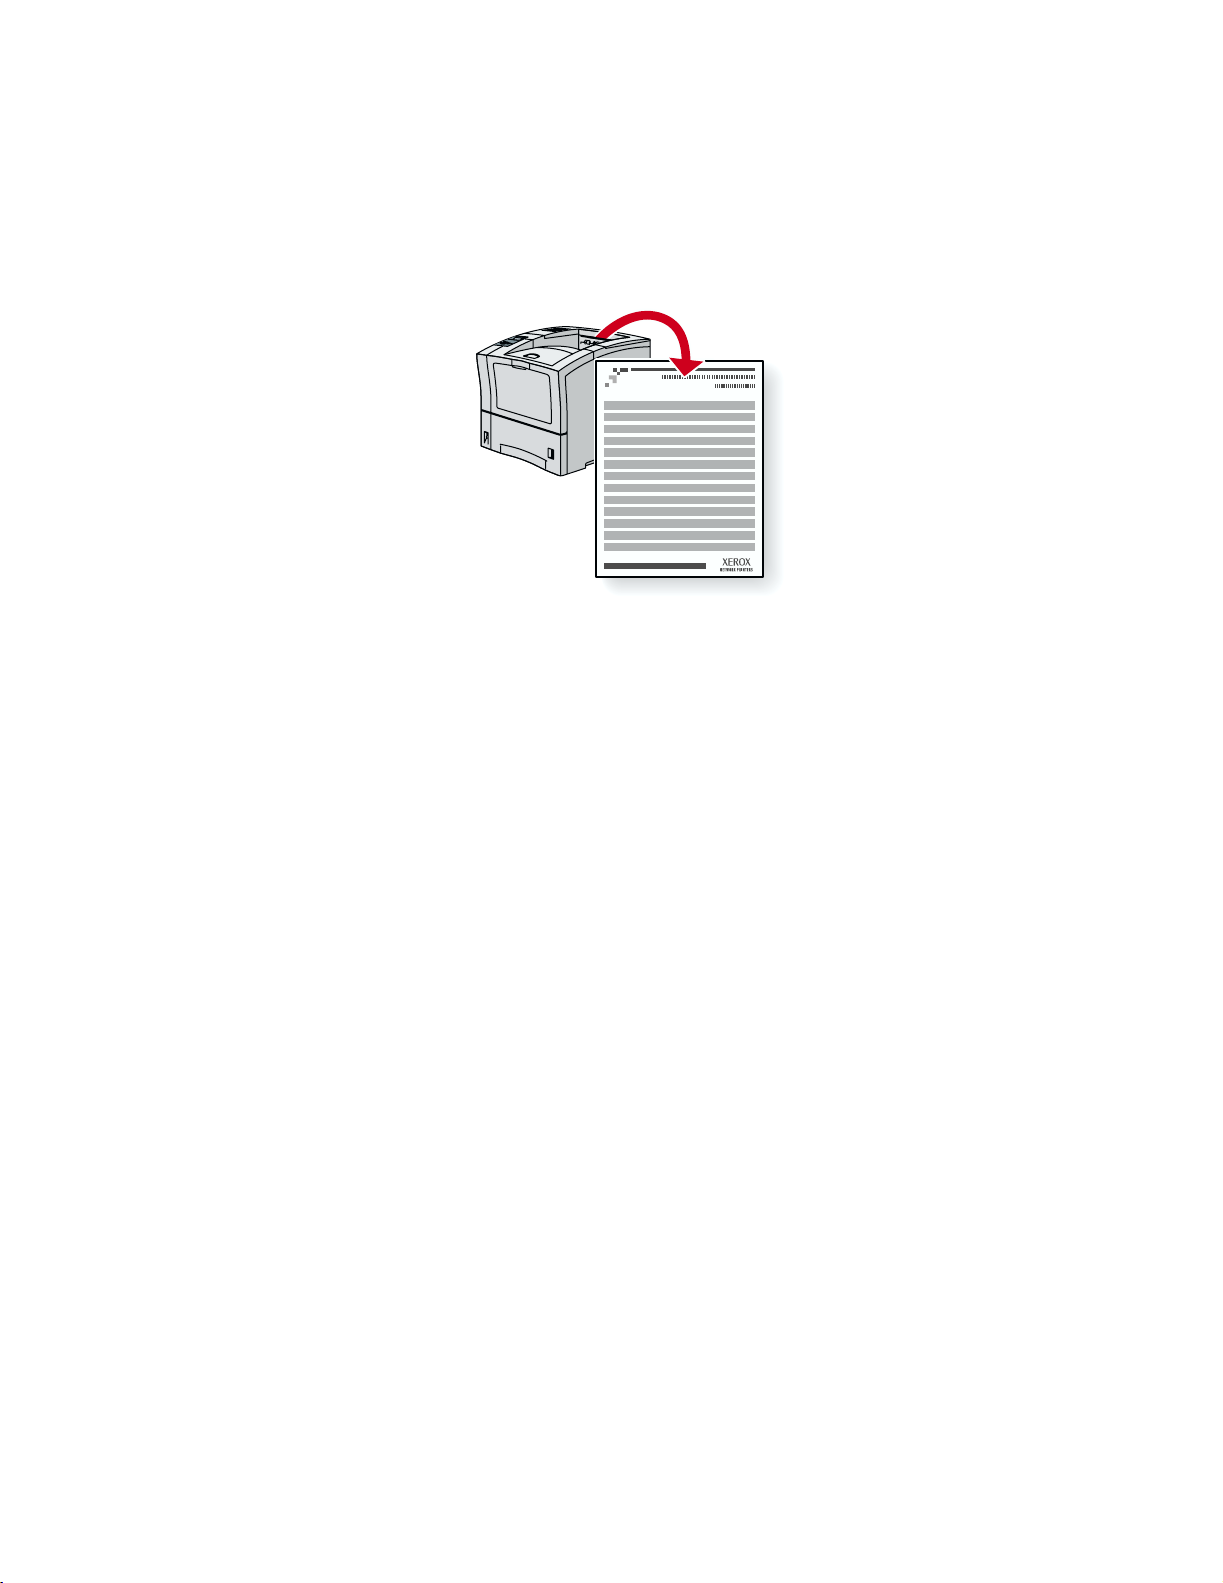
A large amount of information is stored in your printer as printable pages. The following pages show
the Paper Tips printable page, which provides information on the supported papers.
P4400-77
All the printable pages have this format, with bars at the top and at the bottom of the page. Print these
pages at the printer’s front panel.
Accessing the Paper Tips page
Access the Paper Tips page from the Printable Pages Menu:
1. At the front panel, scroll to the
Up Arrow key and press the OK key.
2. Scroll to
OK key.
Print Paper Tips Page using the Down Arrow or Up Arrow key and press the
Printable Pages Menu using the Down Arrow or
Menu Map
For a complete list of printable pages, print the Menu Map:
1. Select
2. Select
Menus on the front panel and press the OK key.
Print Menu Map and press the OK key.
Copyright © 2002 Xerox Corporation. All Rights Reserved. 1
Page 5
PHASERTM 4400 LASER PRINTER
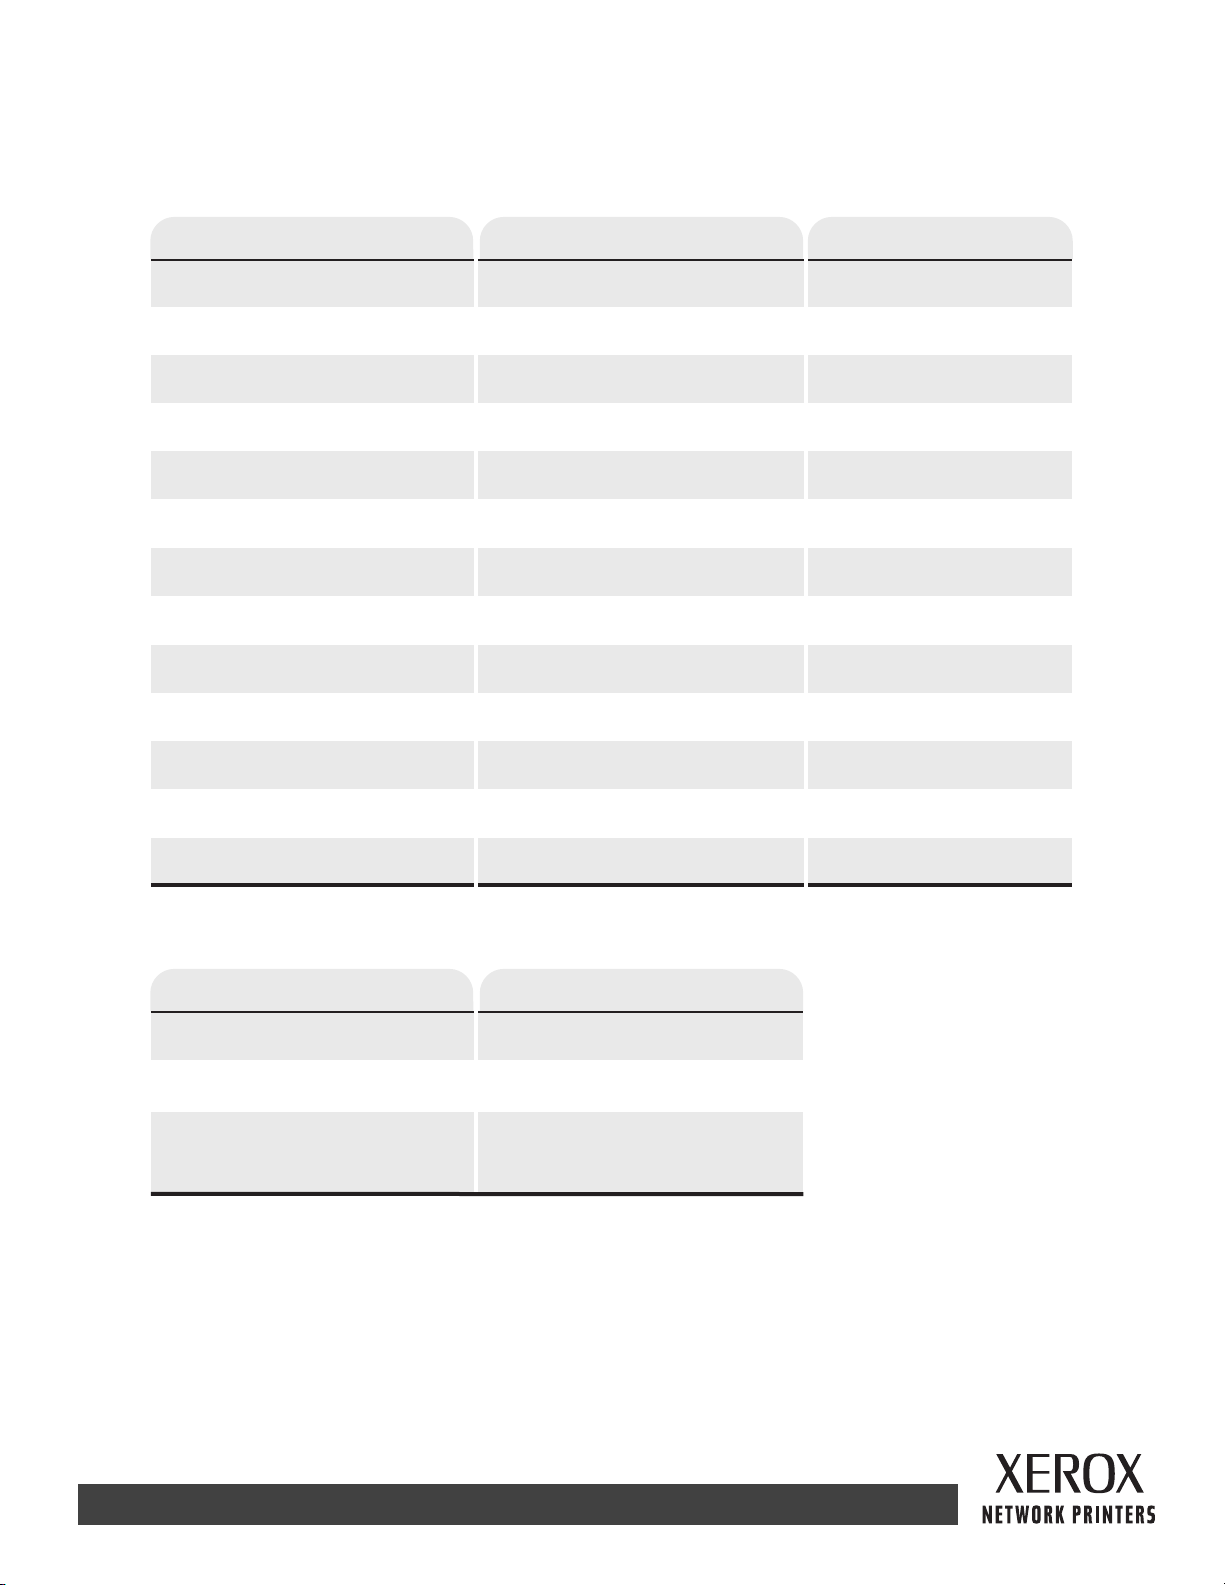
Paper Tips
Refer to the following tables to ensure the best print-quality and to avoid paper jams. For best results, use Xerox-branded paper as it is
guaranteed to produce excellent results on your Xerox Phaser
vary depending on vendor and type of paper used.
Note: If you change the type of paper or transparencies, you must specify the type on the front panel of the printer. For the Multi-Purpose Tray
or envelope feeder only: if you change the size of paper, also specify the size on the front panel.
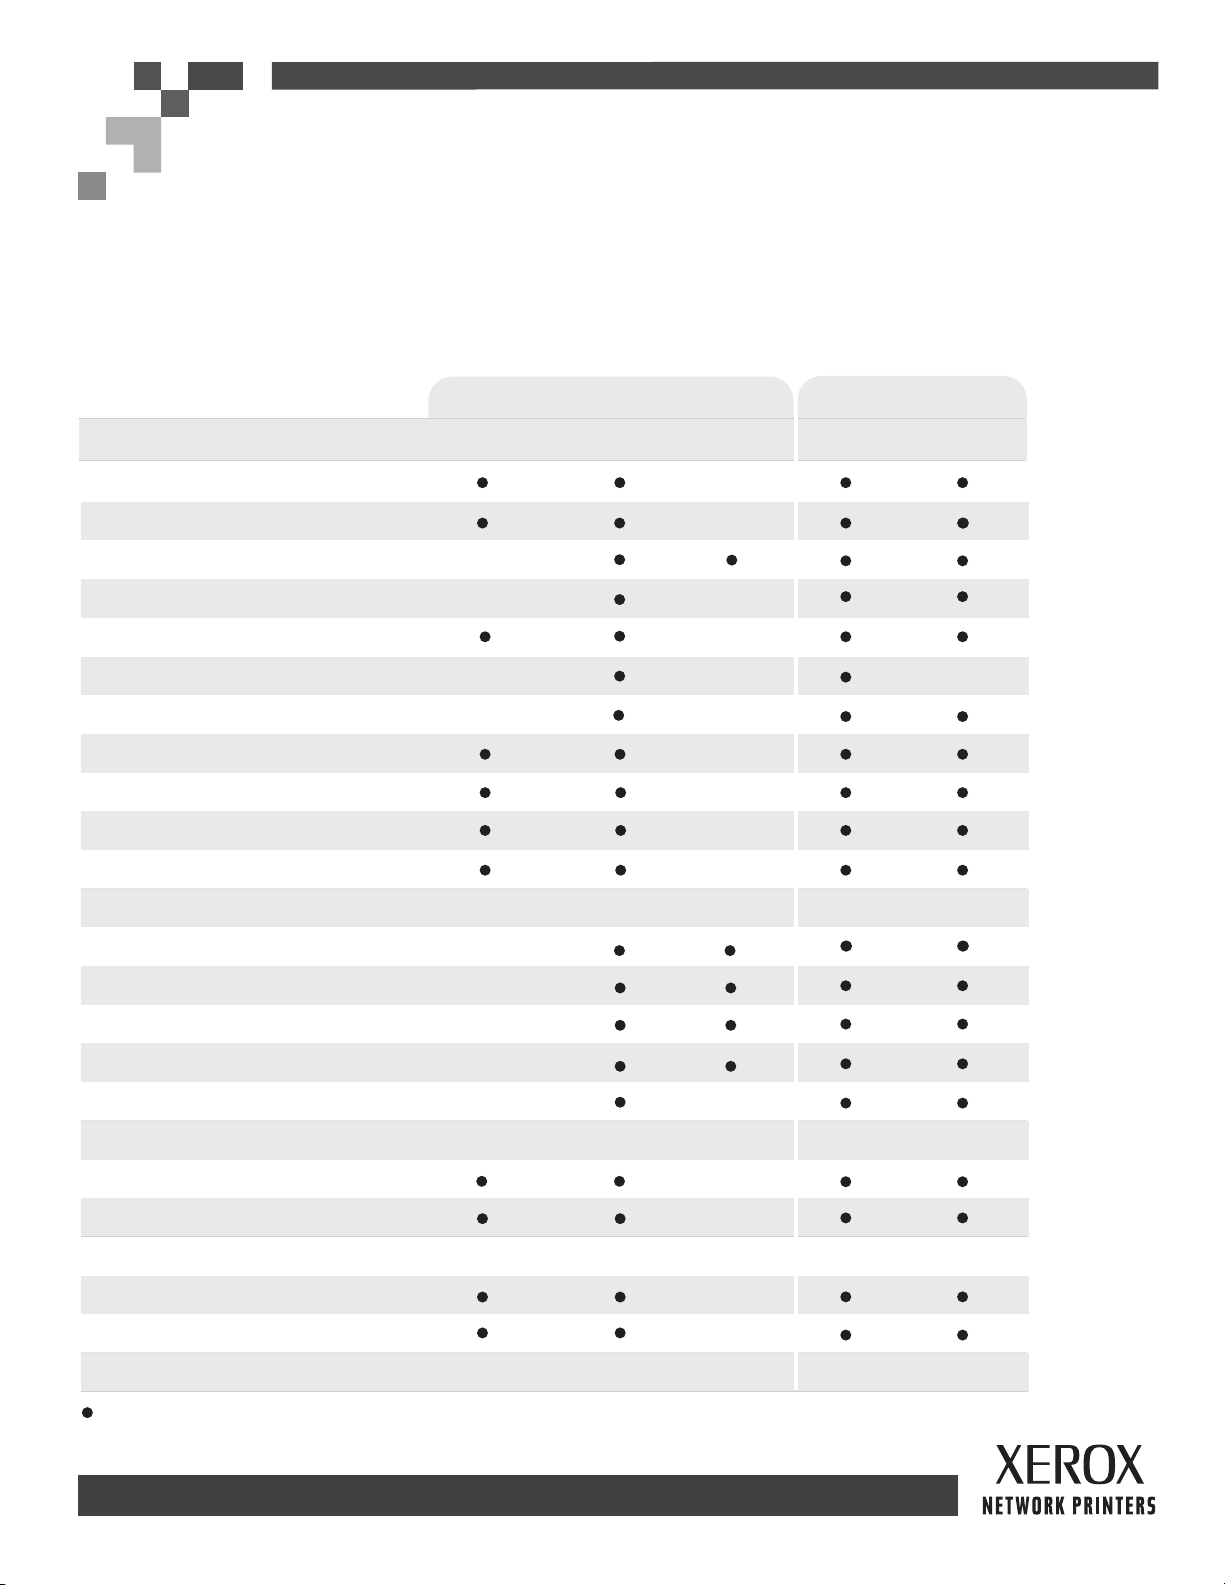
Supported paper and paper sizes
Paper Type
A4 (210 x 297 mm)
A5 (148 x 210 mm)
A6 (105 x 148 mm)
ISO B5 (176 x 250 mm)
550-Sheet Tray
TM
4400 Laser Printer. Print-quality and paper handling performance may
(1) (1)
(1)
custom
(1)
custom
Input Output
Multi-Purpose
Tray
(1)
(1)
Envelope
Feeder
---
---
(1)
---
Standard
Tray
500-Sheet
Stacker
B5 JIS (182 x 257 mm)
Index Card (3 x 5 in.)
Statement (5.5 x 8.5 in.)
Executive (7.25 x 10.5 in.)
Letter (8.5 x 11 in.)
US Folio (8.5 x 13 in.)
Legal (8.5 x 14 in.)
Envelopes
#10 Commercial (4.12 x 9.5 in.)
Monarch (3.87 x 7.5 in.)
DL (110 x 220 mm)
C5 (162 x 229 mm)
B5 (176 x 250 mm)
Transparencies
A4 (210 x 297 mm)
Letter (8.5 x 11 in.)
---
custom
custom
custom
custom
custom
custom
---
(1)
(1)
(1)
---
---
---
---
---
---
---
(1)
(1)
(1)
(1)
(1)
(1)
(1)
(1)
(1)
(1)
(1)
(1)
(1)
(1)
(1)
custom
---
---
(1)
(1)
(1)
(1)
Labels
A4 (210 x 297 mm)
Letter (8.5 x 11 in.)
Capacity
= Short-edge feed (1) Simplex (one-sided) printing only. (2) Maximum capacity at 75 g/m (20 lb.) paper stock. Capacity is reduced for heavier/thicker stock.
(2)
(1)
(1)
550 100 75 500 500
(1)
(1)
2
---
---
Page 1 of 3
Page 6
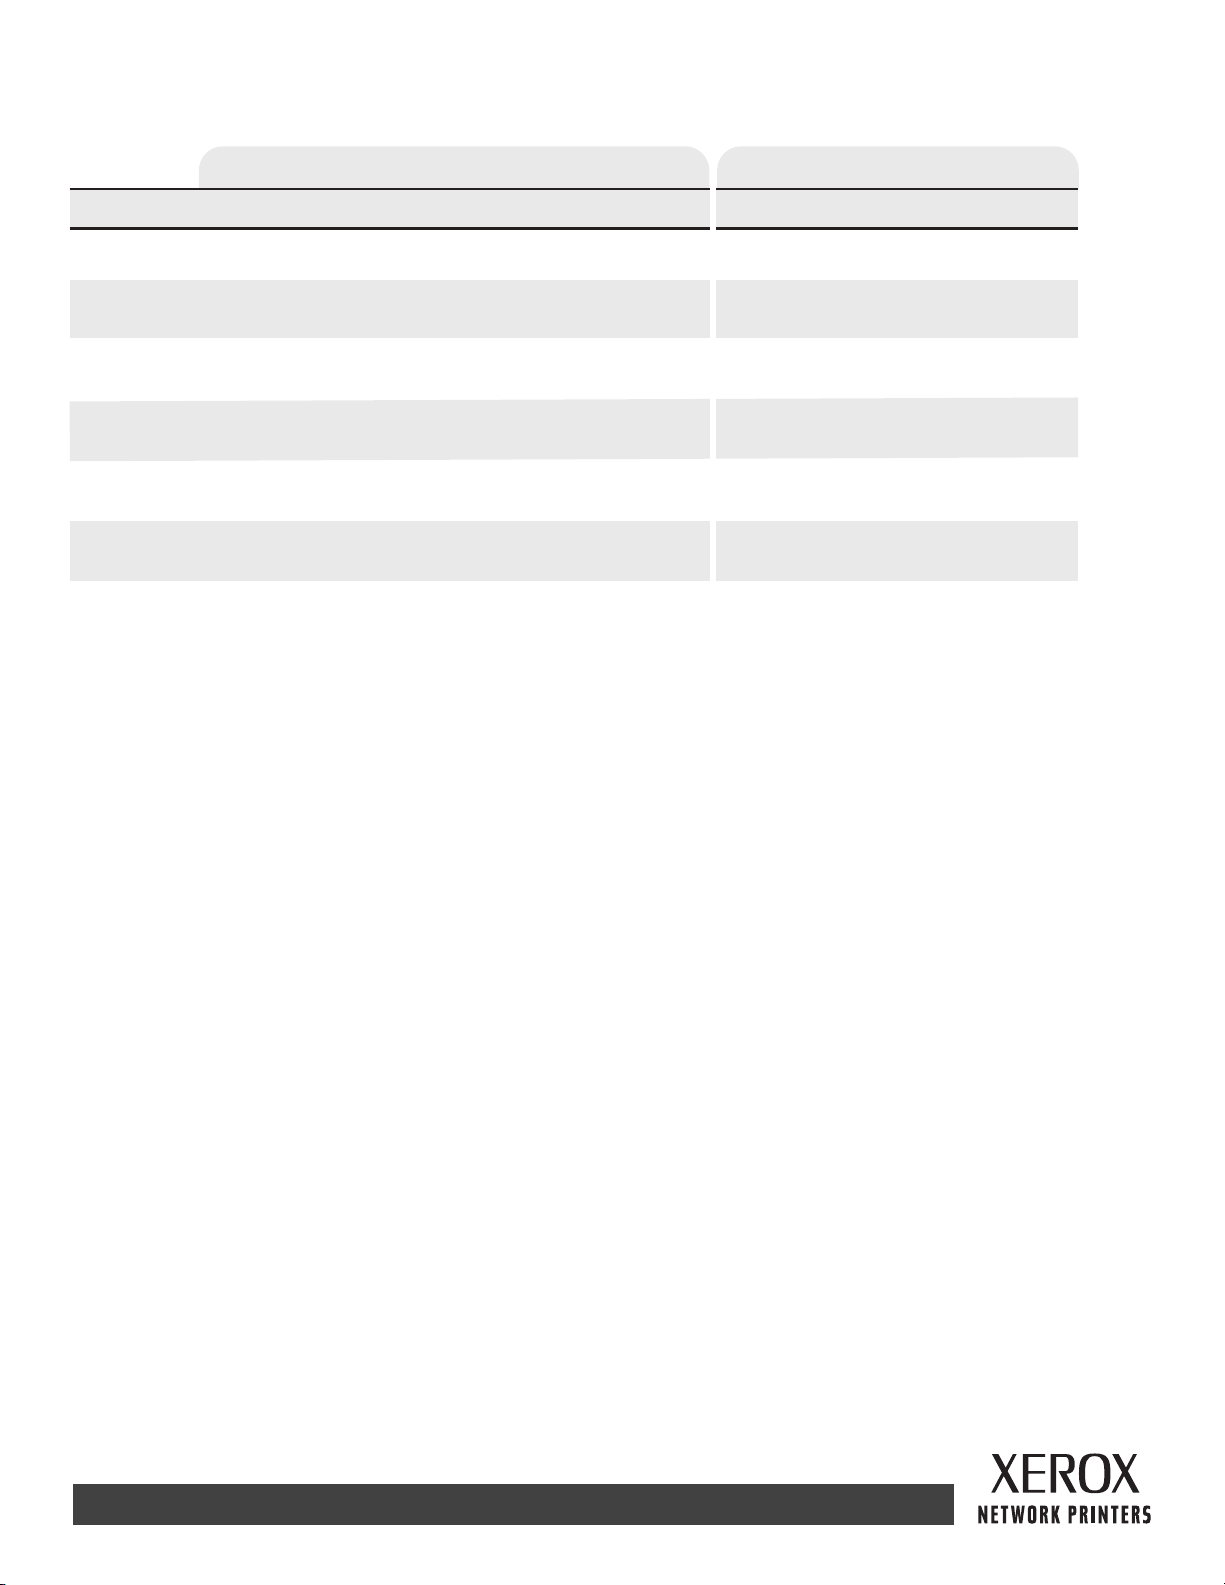
Custom paper sizes
Input Output
Simplex
Width
Length
Duplex
Width
Length
550-Sheet Tray
(one-sided)
98 - 216 mm 76 - 216 mm 98 - 178 mm 76 - 216 mm 98 - 216 mm
3.87 - 8.5 in. 3.0 - 8.5 in. 3.87 - 7.0 in. 3.0 - 8.5 in. 3.87 - 8.5 in.
148 - 356 mm 127 - 356 mm
5.83 - 14.0 in. 5.0 - 14.0 in. 5.83 - 10.0 in. 5.0 - 14.0 in. 5.83 - 14.0 in.
(two-sided)
182 - 216 mm
7.16 - 8.5 in.
257 - 356 mm
10.12 - 14.0 in.
Multi-Purpose Tray
182 - 216 mm
7.16 - 8.5 in.
257 - 356 mm
10.12 - 14.0 in.
Envelope Feeder Standard Tray 500-Sheet Stacker
148 - 254 mm
---
---
Paper weights
The Phaser 4400 Laser Printer supports paper weights as follows:
• 16 - 130 lbs. (60 - 216 g/m ) simplex/one-sided
• 16 - 28 lbs. (60 - 105 g/m ) duplex/two-sided
Plain Paper: (60 - 120 g/m ) (16 - 32 lb.)
Card Stock: (120 - 216 g/m ) (32 - 130 lb.)
TM
2
2
2
2
127 - 356 mm 148 - 356 mm
Same as Input
Same as Input
Paper tips
• If excessive jams occur, flip the paper in the tray or install fresh paper from a newly opened ream.
• Transparencies should be fanned prior to loading.
• Other size envelopes may be printed as custom paper sizes.
• Use only paper envelopes. Do not use envelopes with windows or metal clasps.
• Label media should be fanned prior to loading.
• Do not print to label stock once a label has been removed.
Page 2 of 3
Page 7
Ordering supplies
See www.xerox.com/officeprinting/4400supplies for information on ordering supplies.
Xerox Branded Paper
Item Paper Size Part Number
Plain Paper
Xerox Premier 80 A4 (210 x 297 mm) 3R91720
Xerox Premier 80 A5 (148 x 210 mm) 3R91832
Xerox 4024 DP statement Statement (5.5 x 8.5 in.) 3R2072
Xerox 4024 DP Letter (8.5 x 11 in.) 3R721
Xerox 4024 DP folio Folio (8.5 x 13 in.) 3R725
Xerox 4024 DP legal Legal (8.5 x 14 in.) 3R727
Transparencies
Xerox 3M Type L transparencies A4 (210 x 297 mm) 3R91334
Xerox Clear transparencies Letter (8.5 x 11 in.) 3R4446
Labels
Xerox A4 24-up label A4 (210 x 297 mm) 3R96178
Xerox Multi-purpose 30-up label Letter (8.5 x 11 in.) 3R12051
Replaceable Items
Item Part Number
Standard-Capacity Print Cartridge 113R00627
High-Capacity Print Cartridge 113R00628
Maintenance Kit
Contains: a Fuser Cartridge,
1 Transfer Roll, and 9 Feed Rollers.
108R00497 for 110 V (60 Hz)
108R00498 for 220 V (50 Hz)
Page 3 of 3
Page 8
Phaser™ 4400 Laser Printer
Trays
This section covers:
■ Loading paper in Tray 1, 2, or 3 — see page 3.
■ Loading paper in the Multi-Purpose Tray — see page 7.
■ Loading envelopes in the envelope feeder — see page 10.
■ Loading custom size paper — see page 13.
For a list of the acceptable papers, transparencies, envelopes, and labels that can be used in each tray,
refer to the Supported Papers section of the Trays and Paper Guide on the Interactive Documentation
CD-ROM.
Videos are available with instructions for loading trays. Videos are located on the Interactive
Documentation CD-ROM or the Xerox web site:
www.xerox.com/officeprinting/support
You can also refer to the labels inside the printer for paper-loading instructions.
Note
Do not load the tray that is currently being used for printing.
Copyright © 2002 Xerox Corporation. All Rights Reserved. 2
Page 9
Loading paper in Tray 1, 2, or 3
Note
If you change the type of paper or transparencies, you
MUST specify the type on the front panel of the printer.
To load paper in Tray 1, 2, or 3:
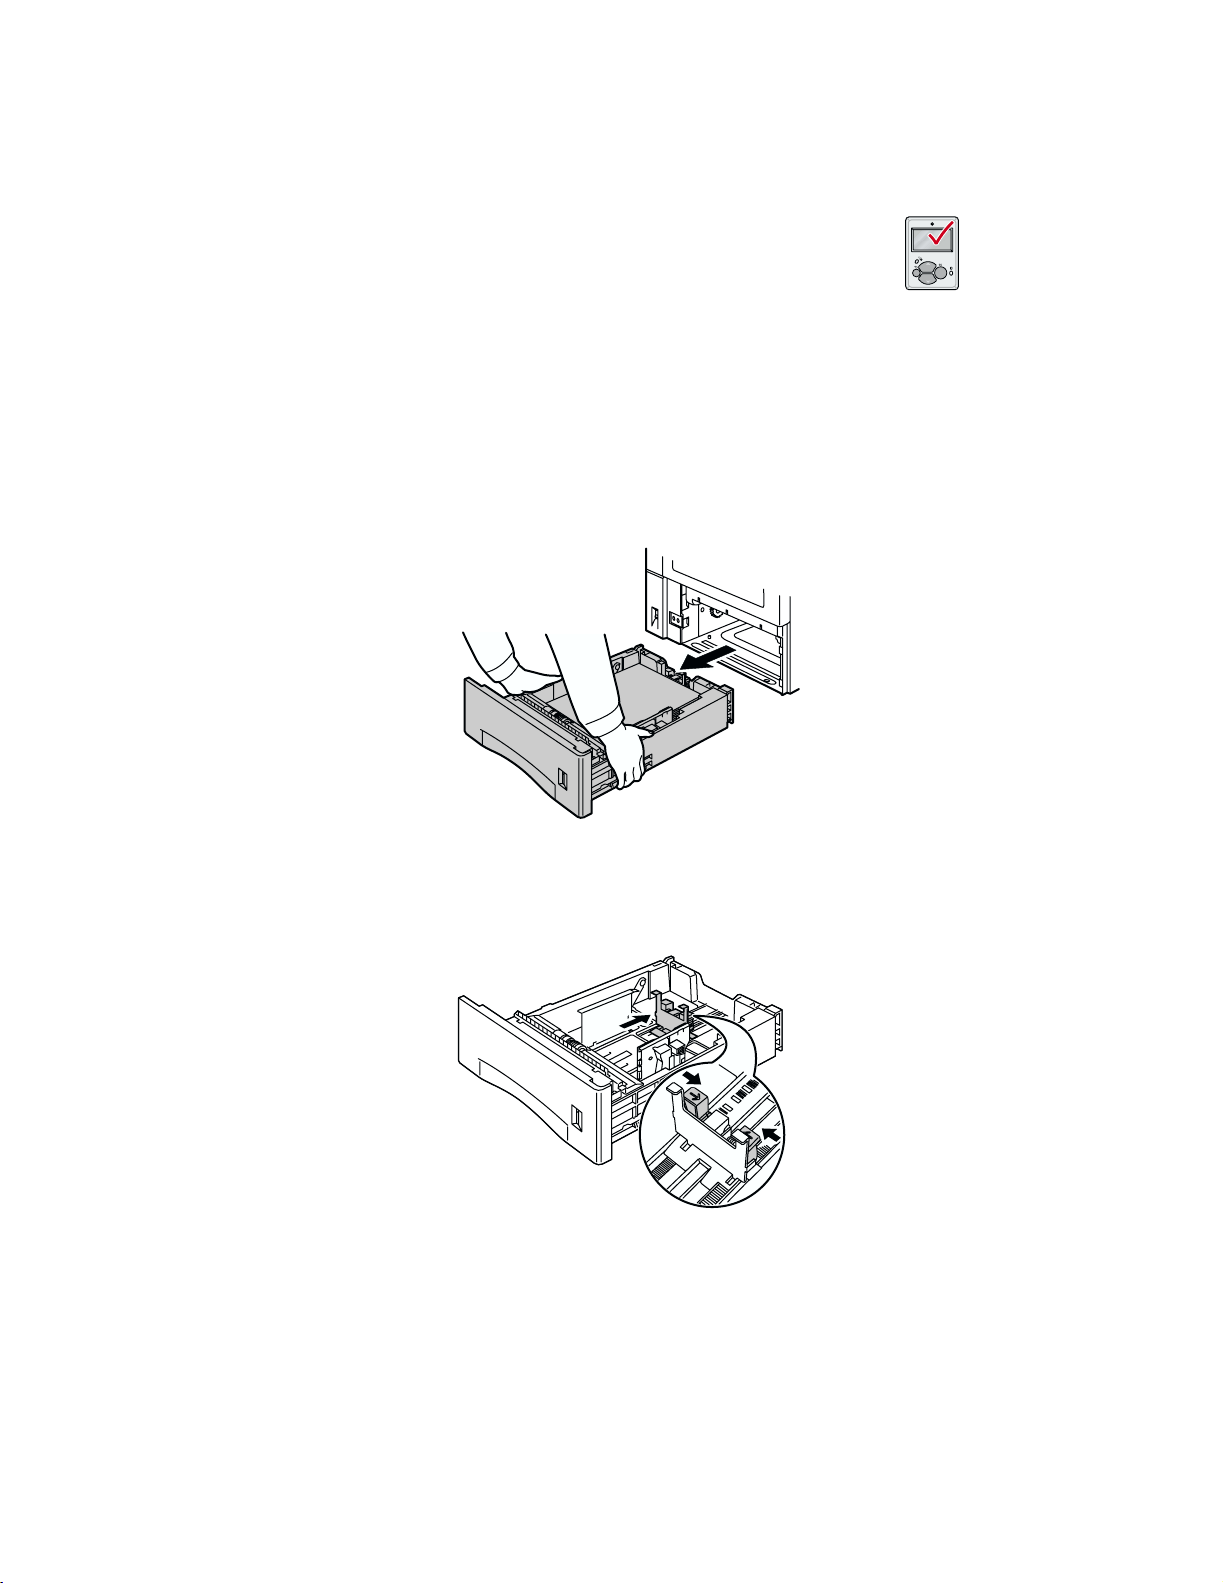
1. Remove the tray from the printer:
a. Pull out the tray until it stops.
b. Gently remove the tray from the printer while lifting up.
c. Place the tray on a flat surface.
Trays
P4400-011
If you are loading paper of the same size, skip to Step 5.
2. Gently squeeze the length guide and slide it all the way to the rear of the tray.
P4400-13
Phaser™ 4400 Laser Printer 3
Page 10
Trays
3. To load paper longer than 297 mm (11.69 in.), adjust the catch as shown below. There are three
settings for the catch. Choose the one that is closest beyond the length of the paper.
a. Press the square latch.
b. Slide out the back of the tray to fit your paper.
a
b
P4400-14
4. Gently squeeze the side guides and slide them all the way to the sides of the tray.
P4400-15
5. To reduce the possibility of misfeeds and jams, fan the stack of paper before inserting it into the
tray.
Phaser™ 4400 Laser Printer 4
Page 11
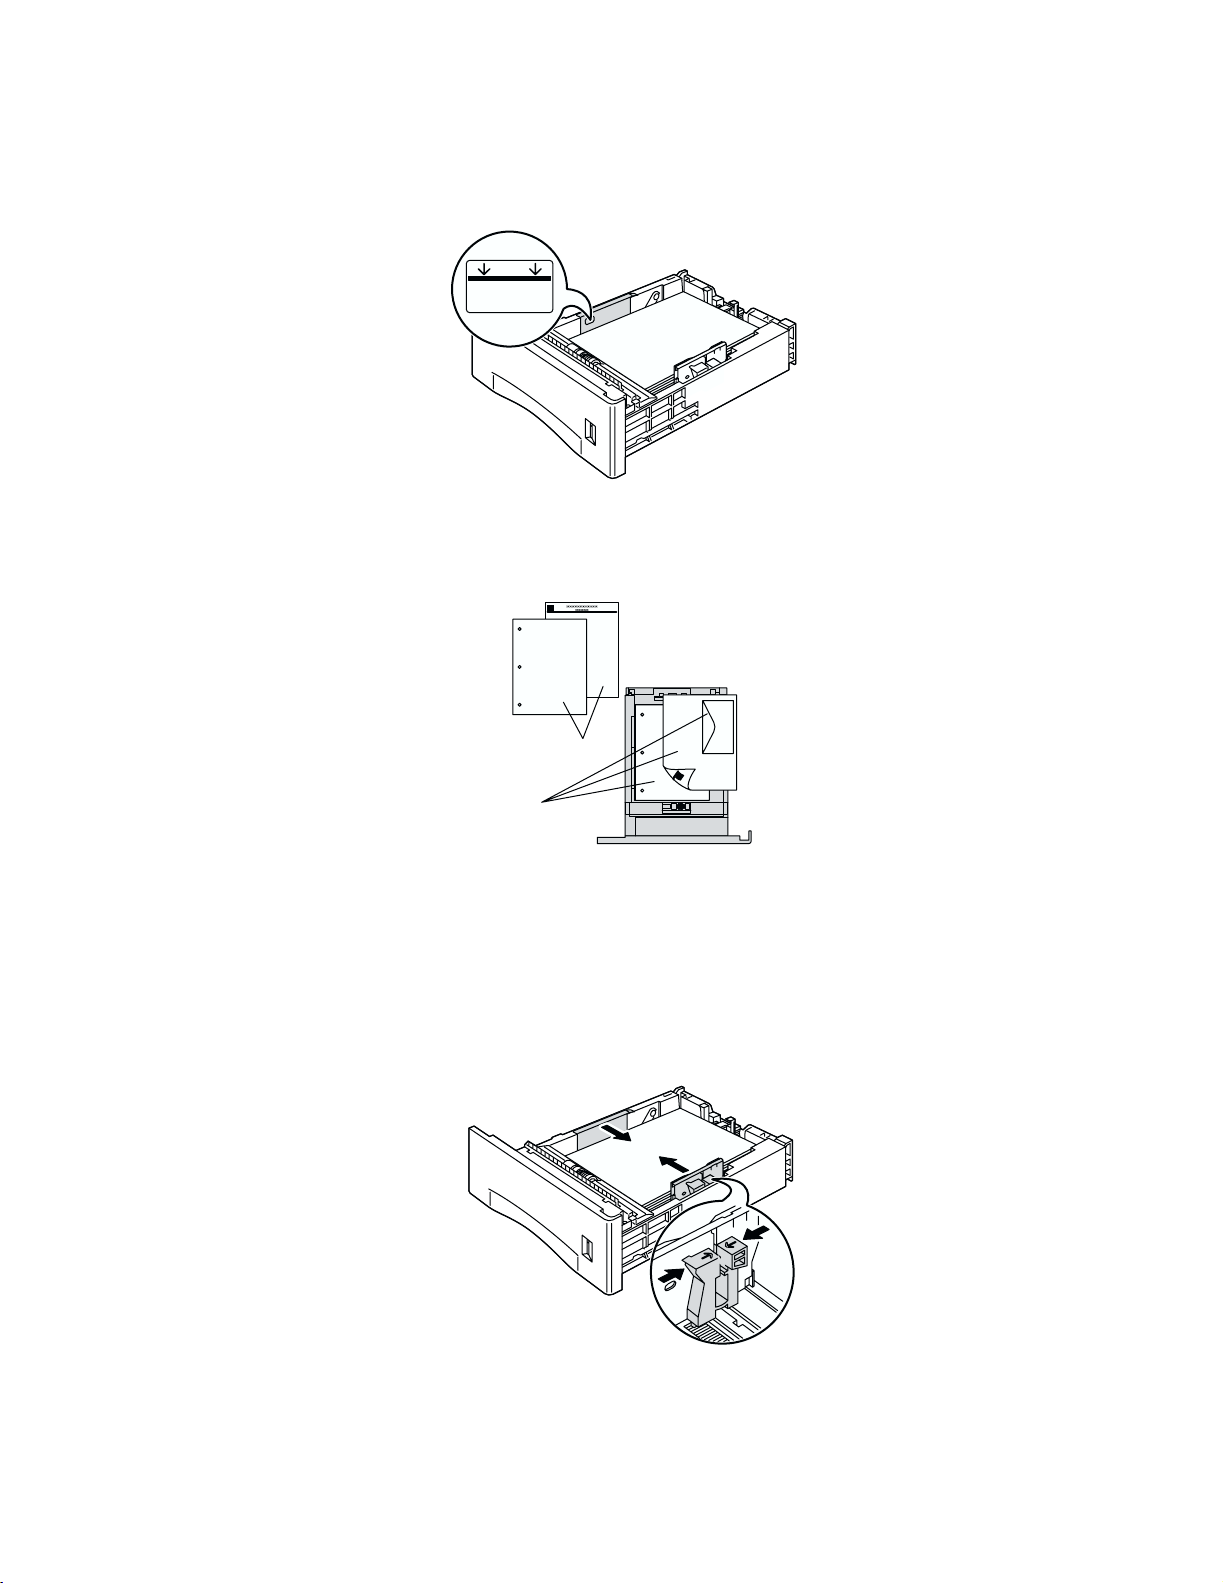
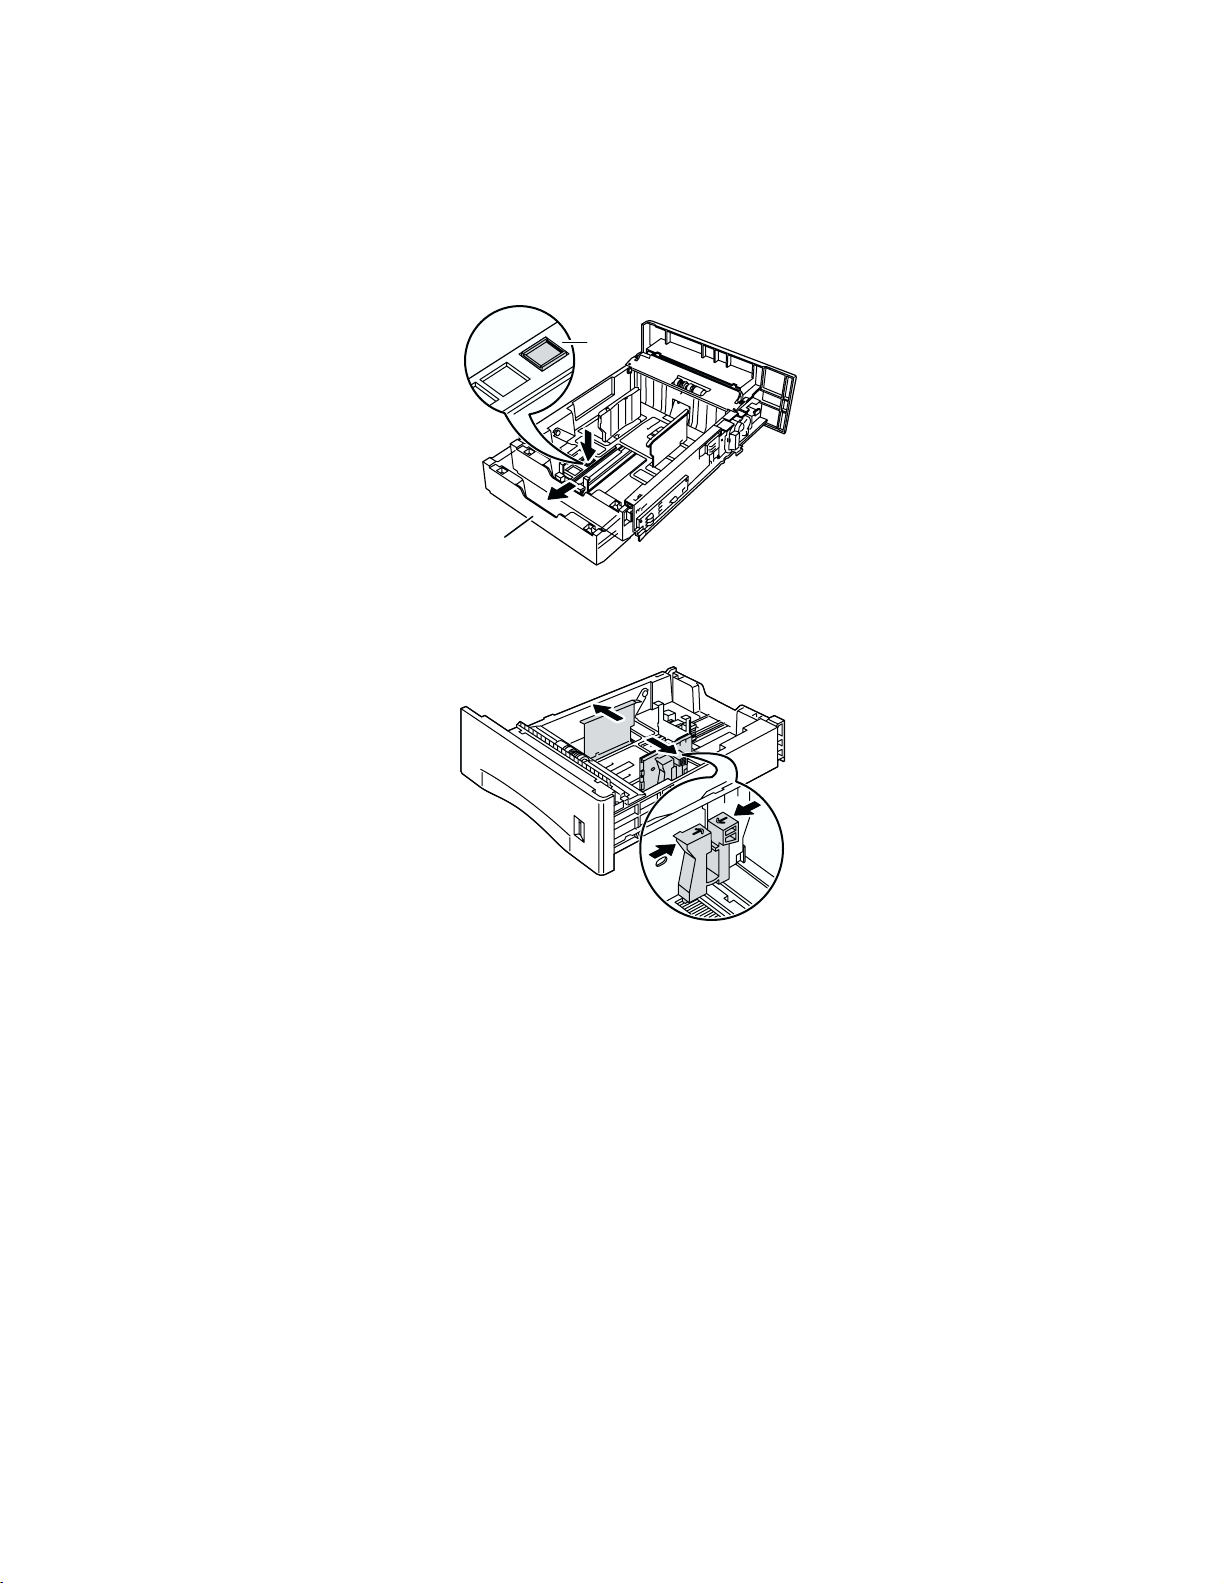
6. Align the four corners of the paper stack and insert it into the tray, following the simplex and
duplex instructions below.
P4400-16
Top view of tray:
A. Simplex printing, B. Duplex printing
Trays
B
A
P4400-17
7. While squeezing the right side of the guides handle, adjust the guides to the paper width.
Note
To avoid misfeeds and jams, make sure that the stack is placed at the center of the tray and
adjust the side guides to the correct size.
P4400-18
Phaser™ 4400 Laser Printer 5
Page 12
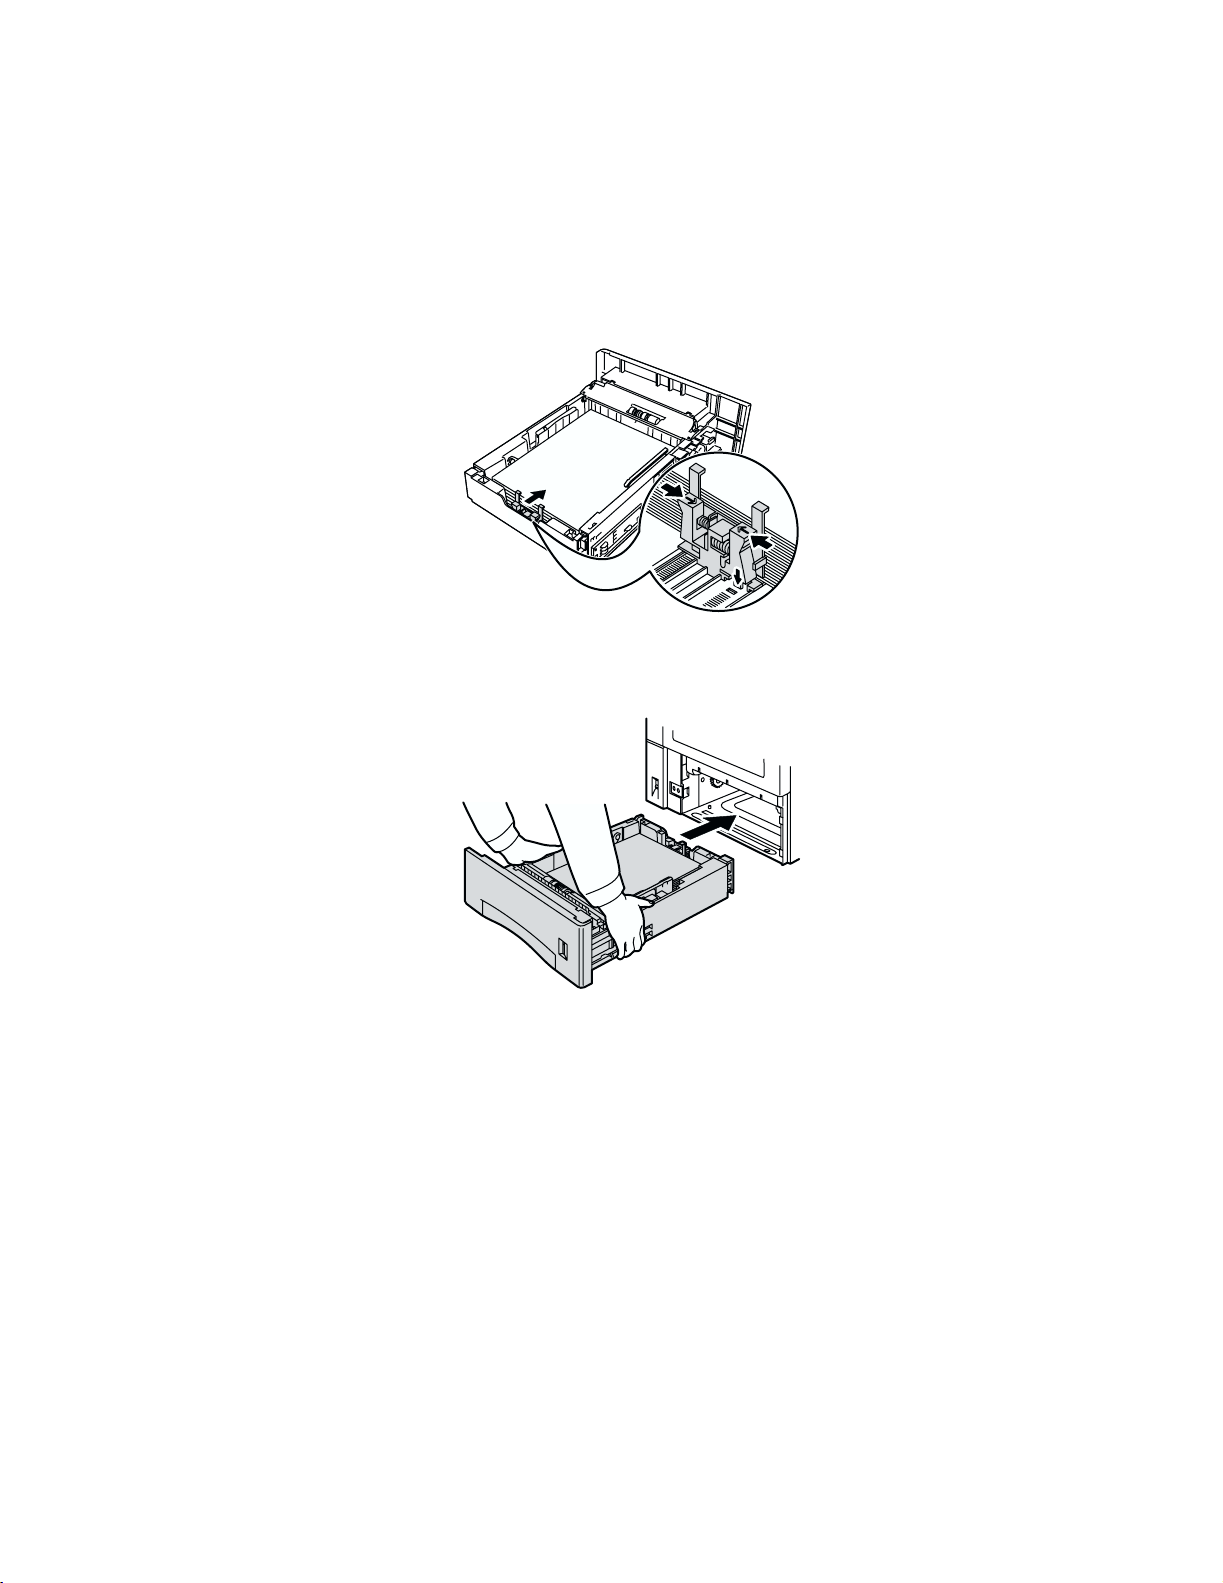
8. When the side guides are aligned, adjust the length guide to the paper length.
Note
To avoid paper jams or incorrect paper size sensing, make sure the length guide stopper is
firmly seated in the floor of the tray. Also, make sure the paper is under the retaining clip on
the length guide.
P4400-19
Trays
9. Insert the tray completely into the printer. Make sure that it is properly seated.
P4400-20
Phaser™ 4400 Laser Printer 6
Page 13
10. When the front panel prompts you:
■ If you haven’t changed the type of paper, press the OK key to accept the current setting for
paper type.
■ If you have changed the type of paper, scroll to the correct paper type and press the OK key
to save your selection.
P4400-100
Loading paper in the Multi-Purpose Tray
Trays
Note
If you change the type of paper or transparencies, you
MUST specify the type on the front panel of the printer.
To load paper in the Multi-Purpose Tray:
1. Open the Multi-Purpose Tray door by pulling the latch at the top center.
Caution
To prevent possible damage to the Multi-Purpose Tray, do not exert strong pressure on it or
place any heavy objects on it.
P4400-22
Phaser™ 4400 Laser Printer 7
Page 14

Trays
2. Extend the Multi-Purpose Tray and adjust the paper guide to fit the media you intend to use.
Note
To prevent possible jams, be sure to adjust the guides correctly and do not overload the tray.
P4400-24
3. To reduce the possibility of misfeeds and jams, fan the stack of paper before inserting it into the
tray.
4. Align the four corners of the paper and place it into the tray with the side to be printed facing up.
Note
Be sure to insert the paper all the way in until it gently touches the stopper inside the printer.
P4400-25
Phaser™ 4400 Laser Printer 8
Page 15

Top view of Multi-Purpose Tray:
A. Simplex printing, B. Duplex printing
Note
Trays
A
B
P4400-26
If you change the size or type of paper while the front panel displays a
Load MPT message,
the printer automatically sets the menus to the size and type specified in the message.
5. When the front panel prompts you and you haven’t changed the type or size of paper, press the
OK key to accept the current settings for type and size.
6. If you have changed the type or size of paper:
a. On the printer’s front panel, scroll to
Change Paper Type by pressing the Down Arrow
key and press the OK key.
b. Scroll to the correct paper type and press the OK key to save your selection.
c. Scroll to
Change Paper Size and press the OK key.
d. Scroll to the correct paper size and press the OK key to save your selection.
P4400-100
Phaser™ 4400 Laser Printer 9
Page 16

Trays
Loading envelopes in the envelope feeder
The envelope feeder is an optional device for your printer. In addition to feeding envelopes, it can also
be used to feed card stock, such as A6 postcards.
Note
Some envelopes may curl or wrinkle, even with the envelope feeder. For best results, test a
few envelopes to determine what works best for you.
1. Pull out the envelope feeder tray, if it is not already extended.
P4400-27
2. Pinch the release tab on the right width adjuster and move the width adjusters to the outside.
P4400-28
Phaser™ 4400 Laser Printer 10
Page 17

3. Lift the envelope holder and load the envelope feeder with the appropriate size and type of
envelopes.
■ Place the side to be printed faceup.
■ The top of the envelopes should be toward the left of the printer.
P4400-29
Caution
Never use envelopes with windows, metal clasps, or exposed gummed surfaces; they can
damage the printer. Damage caused by using unsupported envelopes might not be covered by
your printer’s warranty.
Trays
4. Lower the envelope holder onto the envelopes.
P4400-30
Note
If you change the size or type of envelopes while the front panel displays a
Envelope Feeder
message, the printer automatically sets the menus to the size and type
Load
in the Load message.
5. If the front panel prompts you and you haven’t changed the size or type of envelopes, press the
OK key to accept the current setting for paper type.
Phaser™ 4400 Laser Printer 11
Page 18

6. If the front panel prompts you and you have changed the size or type of envelopes:
Trays
a. Press the Down Arrow key to scroll to
b. Scroll to the correct paper type (usually
Change Paper Type, then press the OK key.
Envelope) and press the OK key to save your
selection.
c. Scroll to
Change Paper Size, then press the OK key.
d. Scroll to the correct envelope size and press the OK key to save your selection.
Phaser™ 4400 Laser Printer 12
Page 19

Trays
Loading custom size paper
In addition to the wide variety of paper sizes available for this printer, you can use custom size paper.
For a list of the acceptable papers, transparencies, envelopes, and labels that can be used in each tray,
refer to the Supported Papers section of the Trays and Paper Guide on the Interactive Documentation
CD-ROM or print the Paper Tips Page from the front panel of your printer.
Note
After you load a custom size paper in any of this printer’s trays, you MUST set the front
panel values to agree with the paper you have loaded. You also must define the custom size
in the printer driver.
This section provides information about loading custom size paper in Trays 1, 2, or 3. You also can load
custom sized paper in the Multi-Purpose Tray and in the Envelope Feeder.
Loading custom size paper in Trays 1, 2, or 3
1. Open the tray.
2. Insert the custom size paper and adjust the guides to match the size of the paper.
Top view of tray:
A. Simplex printing, B. Duplex printing
B
A
P4400-17
3. When the front panel prompts you to confirm the type of paper, scroll to the correct paper type and
press the OK key to save your selection.
4. Set the tray for custom size paper and specify the dimensions:
a. On the front panel, with
b. Scroll to
c. Scroll to
Printer Setup Menu by pressing the Down Arrow key and press the OK key.
Tray Setup Menu and press the OK key.
Menus highlighted, press the OK key.
d. Scroll to
e. If you don’t see a selection for
OK key to change
f. Scroll to
Phaser™ 4400 Laser Printer 13
Tray # Setup Menu (where # is the number of the tray) and press the OK key.
Set Custom X, scroll to Custom Size and press the
Custom Size to On.
Set Custom X and press the OK key.
Page 20

g. Press the Down Arrow or Up Arrow key to scroll to the value for X, and then press the
OK key. (The X value is the measurement from the left to the right of the paper in the tray.)
Trays
h. Scroll to
i. Press the Down Arrow or Up Arrow key to scroll to the value for Y, and then press the OK
key. (The Y value is the measurement from the front to the back of the paper in the tray.)
Set Custom Y and press the OK key.
Turning off custom sizes
When you use standard size paper in the tray and adjust the guides for that paper, you don’t need to
specify the paper size in the front panel. The trays contain size sensors that automatically inform the
printer about the paper size. However, when you insert custom size paper in the tray and change
Custom Size to On, the size sensors are turned off and you must enter the X and Y values as
described in Step 4 on the previous page. If you later insert standard size paper in the tray, you must turn
on the tray sensors again by changing
1. On the front panel with
2. Scroll to
3. Scroll to
4. Scroll to
5. Scroll to
reactivates the tray sensors for that tray.
Printer Setup Menu by pressing the Down Arrow key and press the OK key.
Tray Setup Menu and press the OK key.
Tray # Setup Menu (where # is the number of the tray) and press the OK key.
Custom Size and press the OK key to change Custom Size to Off. This
Menus highlighted, press the OK key.
Custom Size to Off:
Phaser™ 4400 Laser Printer 14
Page 21

Loading custom size paper in the Multi-Purpose Tray
1. Open the Multi-Purpose Tray.
2. Insert the custom size paper and adjust the guides to match the size of the paper.
Top view of Multi-Purpose Tray:
A. Simplex printing, B. Duplex printing
A
B
P4400-26
Trays
3. When the front panel prompts you to confirm the type and size of paper:
a. Scroll to
b. Scroll to the correct paper type and press the OK key to save your selection.
a. Scroll to
b. Scroll to
c. Scroll to
d. Press the Down Arrow or Up Arrow key to scroll to the value for X, and then press the OK
key. (The X value is the measurement from the left to the right of the paper in the tray.)
e. Scroll to
f. Press the Down Arrow or Up Arrow key to scroll to the value for Y, and then press the OK
key. (The Y value is the measurement from the front to the back of the paper in the tray.)
Change Paper Type by pressing the Down Arrow key and press the OK key.
Change Paper Size and press the OK key.
Custom and press the OK key.
Set Custom X and press the OK key.
Set Custom Y and press the OK key.
Phaser™ 4400 Laser Printer 15
Page 22

Phaser™ 4400 Laser Printer
Specialty Printing
This section covers:
■ Automatic 2-sided printing — see page 16.
■ Manual 2-sided printing — see page 19.
■ Transparencies — see page 25.
■ Envelopes — see page 27.
■ Labels — seepage31.
For a list of the acceptable papers, transparencies, envelopes, and labels that can be used in each tray,
refer to the Supported Papers section of the Trays and Paper Guide on the Interactive Documentation
CD-ROM.
Automatic 2-sided printing
Guidelines for automatic 2-sided printing
■ The printer must have an optional duplex unit installed.
■ The paper must have a weight of 60 – 105 g/m
■ The paper size can be Letter, Legal, Executive, US Folio, A4, B5 JIS, and Custom sizes
2
(16 – 28 lb. bond).
between 182 – 216 mm (7.16 – 8.5 inches) wide and 257 – 356 mm (10.12 – 14.0 inches) long.
■ The paper type must be Plain Paper, Card Stock (not exceeding the weight limits listed above),
Letterhead, Colored Paper, or Special.
Caution
DO NOT use transparencies, envelopes, or labels for automatic 2-sided printing. Any
damage caused by duplexing these are not covered under your printer’s warranty.
Binding preferences
When you print any job, you can use the printer driver to select the orientation of the images on the
page: Portrait or Landscape. When you print 2-sided jobs, you also select the binding preference,
which determines how the pages turn.
Portrait
Bind on Side (Long) Edge
Portrait
Bind on Top (Short) Edge
Landscape
Bind on Top (Long) Edge
Landscape
Bind on Side (Short) Edge
Copyright © 2002 Xerox Corporation. All Rights Reserved. 16
Page 23

Specialty Printing
Printing 2-sided pages automatically using Trays 1, 2, or 3
1. Insert a stack of paper into the tray. For more information, refer to the Trays section of the
Trays and Paper Guide on the Interactive Documentation CD-ROM.
■ Place the side to be printed with the odd-number pages faceup with the top of the page
toward the back of the tray.
■ Prepunched holes should be toward the left of the printer.
P4400-80
2. In the printer driver:
■ Select the tray containing the paper.
■ Select the orientation.
■ Select 2-sided printing. Refer to the table on page 18 for instructions and the wording used in
the printer drivers.
3. Send the job to the printer.
Printing 2-sided pages automatically using the Multi-Purpose Tray
1. Insert a stack of paper into the tray. For more information, refer to the Trays section of the
Trays and Paper Guide on the Interactive Documentation CD-ROM.
■ Place the side to be printed facedown with the top of the page entering the printer last.
■ Prepunched holes should be toward the left of the printer.
P4400-84
Phaser™ 4400 Laser Printer 17
Page 24

Specialty Printing
2. In the printer driver:
■ Select the tray containing the paper.
■ Select the orientation.
■ Select 2-sided printing. Refer to the table on page 18 for instructions and the wording used in
the printer drivers.
3. Send the job to the printer.
Setting the printer driver for 2-sided printing
Operating System Driver Instructions
Macintosh
LaserWriter 8.6 or
LaserWriter 8.7
Windows 95,
Windows 98, or
Windows Me
Windows 2000 or
Windows XP
Windows NT PostScript
Windows NT,
Windows 2000, or
Windows XP
PostScript
PCL5e
PCL6
PostScript
PCL5e
PCL5e
PCL6
1. From the File menu, select Print, and then select
Layout.
2. Select Print on Both Sides.
3. Select a binding preference.
1. From the File menu, select Print.
2. Click the Properties button.
3. On the Setup tab, select Print on 2 Sides.
4. Check or uncheck Bind on Top Edge.
1. From the File menu, select Print.
2. Click the Properties button.
3. On the Layout tab under Print on Both Sides (Duplex),
select either Flip on Long Edge or Flip on Short Edge.
1. From the File menu, select Print.
2. Click the Properties button.
3. On the Page Setup tab under Print on Both Sides
(Duplex Printing), select either Long Side or Short
Side.
1. From the File menu, select Print.
2. Click the Properties button.
3. On the Setup tab, select Print on 2 Sides.
4. Check or uncheck Bind on Top Edge.
Phaser™ 4400 Laser Printer 18
Page 25

Specialty Printing
Manual 2-sided printing
If the printer doesn’t have a duplex unit or if you need to duplex paper sizes or weights outside the
duplex unit’s limits, you can still have the printer print on both sides of the paper. However, you must
have the printer print all of the odd-numbered pages first, reinsert the printed pages in the tray, then
have the printer print the even-numbered pages.
You can use Trays 1, 2, or 3 or the Multi-Purpose Tray for manual 2-sided printing.
Guidelines for manual 2-sided printing
■ The application you are printing from must provide an option for printing odd pages and even
pages separately.
■ The paper must have a weight of 60 – 216 g/m
■ Do not use envelopes, labels, or transparencies.
Manual 2-sided printing using Trays 1, 2, or 3
Printing the odd-numbered pages
2
(16 – 80 lb.).
1. Insert a stack of paper into the tray. For more information, refer to the Trays section of the
Trays and Paper Guide on the Interactive Documentation CD-ROM.
The paper size can be Letter, Legal, Executive, US Folio, A4, B5 JIS, A5, or Custom sizes
between 98 – 216 mm (3.87 – 8.5 in.) wide and 148 – 356 mm (5.83 – 14.0 in.) long.
■ Portrait orientation:
Place the side to be printed with odd-numbered pages facedown with the top of the page at
the front of the tray. Prepunched holes should be toward the left of the printer.
P4400-90
■ Landscape orientation:
Place the side to be printed with odd-numbered pages facedown with the top of the page on
the left. Prepunched holes should be toward the left of the printer.
P4400-109
Phaser™ 4400 Laser Printer 19
Page 26

Specialty Printing
2. In the printer driver:
■ Select the tray containing the paper as the paper source.
■ Do not select the option for 2-sided printing.
3. In the application, select the option to print odd-numbered pages.
4. Send the job to the printer so that the odd-numbered pages are printed.
Printing the even-numbered pages
1. Insert the paper printed with the odd-numbered pages into the tray.
If the print job has an odd number of pages, do not place the last page odd-numbered page back
into the tray.
■ Portrait orientation (long-edge binding):
Place the printed side faceup with the top of the page at the front of the tray; (the side to be
printed is facedown). Prepunched holes should be toward the right of the printer.
P4400-91
■ Portrait orientation (short-edge binding):
Place the printed side faceup with the top of the page at the back of the tray; (the side to be
printed is facedown).
P4400-110
■ Landscape orientation (long-edge binding):
Place the printed side faceup with the top of the page on the right of the tray; (the side to be
printed is facedown). Prepunched holes should be toward the right of the printer.
P4400-111
Phaser™ 4400 Laser Printer 20
Page 27

■ Landscape orientation (short-edge binding):
Place the printed side faceup with the top of the page on the left of the tray; (the side to be
printed is facedown).
P4400-112
2. In the printer driver:
■ Select the tray containing the paper as the paper source.
■ Do not select the option for 2-sided printing.
3. In the application, select the option to print even-numbered pages.
4. Send the job to the printer so that the even-numbered pages are printed.
Specialty Printing
Phaser™ 4400 Laser Printer 21
Page 28

Specialty Printing
Manual 2-sided printing using the Multi-Purpose Tray
Printing the odd-numbered pages
1. Insert a stack of paper into the Multi-Purpose Tray. For more information, refer to the Trays
section of the Trays and Paper Guide on the Interactive Documentation CD-ROM.
The paper can be any size that the Multi-Purpose tray accepts. For more information, refer to the
Supported Papers section of the Trays and Paper Guide on the Interactive Documentation CD-
ROM.
■ Portrait orientation:
Place the paper to be printed with odd-numbered pages faceup and the top of the page
entering the printer first. Prepunched holes should be toward the left of the printer.
P4400-89
■ Landscape orientation:
Place the paper to be printed with odd-numbered pages faceup and the top of the page on the
left. Prepunched holes should be toward the left of the printer.
P4400-108
2. In the printer driver:
■ Select Multi-Purpose Tray as the paper source.
■ Do not select the option for 2-sided printing.
3. In the application, select the option to print odd-numbered pages.
4. Send the job to the printer so that the odd-numbered pages are printed.
Phaser™ 4400 Laser Printer 22
Page 29

Specialty Printing
Printing the even-numbered pages
1. Insert the paper printed with the odd-numbered pages into the Multi-Purpose Tray.
If the print job has an odd number of pages, do not place the last odd-numbered page back into the
Multi-Purpose Tray.
■ Portrait orientation (long-edge binding):
Place the printed side facedown with the top of the page entering the printer first; (the side to
be printed is faceup). Prepunched holes should be toward the right of the printer.
P4400-85
■ Portrait orientation (short-edge binding):
Place the printed side facedown with the top of the page entering the printer last; (the side to
be printed is faceup).
P4400-105
■ Landscape orientation (long-edge binding):
Place the printed side facedown with the top of the page on the right; (the side to be printed
is faceup). Prepunched holes should be toward the right of the printer.
P4400-106
Phaser™ 4400 Laser Printer 23
Page 30

■ Landscape orientation (short-edge binding):
Place the printed side facedown with the top of the page on the left; (the side to be printed is
faceup).
2. In the printer driver:
■ Select Multi-Purpose Tray as the paper source.
■ Do not select the option for 2-sided printing.
3. In the application:
Specialty Printing
P4400-107
■ Select the option to print even-numbered pages.
■ Select the option to print pages in reverse order.
4. Send the job to the printer so that the even-numbered pages are printed.
Phaser™ 4400 Laser Printer 24
Page 31

Specialty Printing
Transparencies
Transparencies can be printed from Tray 1, 2, or 3 or the Multi-Purpose Tray. Handle transparencies by
the edges and with both hands to avoid fingerprints and creases, which can cause poor print quality.
Videos are available with instructions for loading transparencies. Videos are located on the
Interactive Documentation CD-ROM and on the Xerox web site at:
www.xerox.com/officeprinting/4400support
Guidelines for printing on transparencies
■ Use Xerox transparencies; for more information, refer to the Supported Papers section of the
Trays and Paper Guide on the Interactive Documentation CD-ROM.
■ Print only single-sided.
Printing transparencies from Tray 1, 2, or 3
1. Insert the transparencies into the tray. For more information, refer to the Trays section of the
Trays and Paper Guide on the Interactive Documentation CD-ROM.
■ Don’t load transparencies above the indicated mark on the tray.
P4400-81
2. When the front panel prompts you to set the paper type, press the Down Arrow key to scroll to
Transparency and press the OK key to save your selection.
3. In the printer driver, select Tray 1, 2, or 3 (the tray you just loaded) as the paper source and select
Transparency as the paper type.
Phaser™ 4400 Laser Printer 25
Page 32

Specialty Printing
Printing transparencies from the Multi-Purpose Tray
1. Insert the transparencies into the Multi-Purpose Tray (maximum capacity is 100 sheets). For more
information, refer to the Trays section of the Trays and Paper Guide on the Interactive
Documentation CD-ROM.
■ Don’t load transparencies above the indicated mark on the Multi-Purpose Tray.
P4400-86
2. When the front panel prompts you to confirm or change the paper type and size:
a. Press the Down Arrow key to scroll to
b. Scroll to
c. Scroll to
Transparency and press the OK key to save your selection.
Change Paper Size, then press the OK key.
Change Paper Type, then press the OK key.
d. Scroll to the correct transparency size and press the OK key to save your selection.
3. In the printer driver, select Multi-Purpose Tray as the paper source and select Transparency as
the paper type.
Phaser™ 4400 Laser Printer 26
Page 33

Specialty Printing
Envelopes
Envelopes can be printed from the optional envelope feeder, the Multi-Purpose Tray, or Tray 1, 2, or 3.
Note
Some envelopes may curl or wrinkle, even with the envelope feeder. For best results, test a
few envelopes to determine what works best for you.
Guidelines for envelope printing
■ Use only paper envelopes.
■ Do not print on the back of the envelope.
■ Never use envelopes with windows, metal clasps, or exposed gummed surfaces.
■ Keep unused envelopes in their packaging to avoid the effects of moisture and dryness,
which can affect print quality and cause wrinkling.
■ Envelopes may wrinkle depending on weight and stiffness of the envelope.
Many applications include a tool for creating an envelope document. For example, Microsoft Word
includes an Envelopes and Labels feature in the Tools menu. Be sure to:
■ Select faceup.
■ Clear Clockwise Rotation.
■ Select the feed method with the image centered and the stamp on the envelope to the upper
left.
Caution
Never use envelopes with windows, metal clasps, or exposed gummed surfaces; they can
damage the printer. Damage caused by using unsupported envelopes might not be covered by
your printer’s warranty.
Note
The heat from the printing process can melt certain types of envelope glue. If the envelope
flap sticks shut after printing the test print, tuck the flaps inside the envelopes when printing
the remaining envelopes.
Phaser™ 4400 Laser Printer 27
Page 34

Specialty Printing
Printing envelopes from the envelope feeder
1. Insert the envelopes into the envelope feeder. For more information, refer to the Trays section of
the Trays and Paper Guide on the Interactive Documentation CD-ROM.
■ Place the side to be printed faceup.
■ The top of the envelopes should be toward the left of the printer.
P4400-30
2. When the front panel prompts you to confirm or change the paper type and size:
a. Press the Down Arrow key to scroll to
b. Scroll to
c. Scroll to
Envelope and press the OK key to save your selection.
Change Paper Size, then press the OK key.
Change Paper Type, then press the OK key.
d. Scroll to the correct envelope size and press the OK key to save your selection.
3. In the printer driver, select Envelope Feeder as the paper source and select Envelopes as the
paper type.
4. Make a test print from your application to confirm that the orientation of your envelope is correct.
Phaser™ 4400 Laser Printer 28
Page 35

Specialty Printing
Printing envelopes from the Tray 1, 2, or 3
1. Insert the envelopes into the tray. For more information, refer to the Trays section of the Trays and
Paper Guide on the Interactive Documentation CD-ROM.
■ Place the side to be printed facedown.
■ The top of the envelopes should be toward the left of the printer.
x
y
P4400-82
2. When the front panel prompts you to set the paper type, scroll to
Envelope and press the
OK key to save your selection.
3. Set the tray for custom size paper and specify the dimensions:
a. On the front panel, with
b. Scroll to
c. Scroll to
d. Scroll to
Printer Setup Menu by pressing the Down Arrow key and press the OK key.
Tray Setup Menu and press the OK key.
Tray # Setup Menu (where # is the number of the tray) and press the OK key.
e. If you don’t see a selection for
OK key to change
f. Scroll to
Set Custom X and press the OK key.
Menus highlighted, press the OK key.
Set Custom X, scroll to Custom Size and press the
Custom Size to On.
g. Press the Down Arrow or Up Arrow key to scroll to the value for X, and then press the
OK key. (The X value is the measurement from the left to the right of the paper in the tray.)
h. Scroll to
Set Custom Y and press the OK key.
i. Press the Down Arrow or Up Arrow key to scroll to the value for Y, and then press the
OK key. (The Y value is the measurement from the front to the back of the paper in the tray.)
4. In the application, define the envelope size (page size).
5. In the printer driver, select Tray 1, 2, or 3 (the tray you just loaded) as the paper source, select the
envelope size, and select Envelope as the paper type.
6. Make a test print from your application to confirm that the orientation of your envelope is correct.
Phaser™ 4400 Laser Printer 29
Page 36

Specialty Printing
Printing envelopes from the Multi-Purpose Tray
1. Insert the envelopes into the Multi-Purpose Tray. For more information, refer to the Trays section
of the Trays and Paper Guide on the Interactive Documentation CD-ROM.
■ Place the side to be printed faceup.
■ The top of the envelopes should be toward the left of the printer.
P4400-87
2. When the front panel prompts you to confirm or change the paper type and size:
a. Press the Down Arrow key to scroll to
b. Scroll to
c. Scroll to
Envelope and press the OK key to save your selection.
Change Paper Size, then press the OK key.
Change Paper Type, then press the OK key.
d. Scroll to the correct envelope size and press the OK key to save your selection.
3. In the printer driver, select Multi-Purpose Tray as the paper source and select Envelopes as the
paper type.
4. Make a test print from your application to confirm that the orientation of your envelope is correct.
Phaser™ 4400 Laser Printer 30
Page 37

Specialty Printing
Labels
Labels can be printed from Tray 1, 2, or 3 and the Multi-Purpose Tray. Refer to the Supplies section of
the Support Guide on the Interactive Documentation CD-ROM for information on part numbers for
ordering these items. To order supplies and accessories, contact your local reseller or visit the Xerox
web site at: www.xerox.com/officeprinting/
Guidelines for printing labels
■ If any of the labels on a sheet are missing, do not use that sheet; it may damage printer
components.
■ Keep labels in a cool, dry place. Labels stored in a high-humidity environment can jam in the
printer.
■ Store unused sheets of labels flat in their containers.
■ Rotate stock frequently. Long periods of storage can cause the labels to curl and jam the
printer.
■ Print only on one side of the sheet of labels.
4400supplies.
Printing labels from Tray 1, 2, or 3
1. If your application has a setting for labels, use it as a template.
2. Insert the sheets of labels into the tray. For more information, refer to the Trays section of the
Trays and Paper Guide on the Interactive Documentation CD-ROM.
■ Place the side to be printed facedown.
■ The bottom of the sheet should enter the printer first.
123
P4400-83
3. When the front panel prompts you to set the paper type, scroll to
save your selection.
4. In the printer driver, select Tray 1, 2, or 3 (the tray you just loaded) as the paper source and select
Labels as the paper type.
Labels and press the OK key to
Phaser™ 4400 Laser Printer 31
Page 38

Specialty Printing
Printing labels from the Multi-Purpose Tray
1. If your application has a setting for labels, use it as a template.
2. Insert the sheets of labels into the Multi-Purpose Tray. For more information, refer to the Trays
section of the Trays and Paper Guide on the Interactive Documentation CD-ROM.
■ Place the side to be printed faceup.
■ The top of the sheet should enter the printer first.
123
P4400-88
3. When the front panel prompts you to confirm or change the paper type and size:
a. Press the Down Arrow key to scroll to
b. Scroll to
c. Scroll to
Labels and press the OK key to save your selection.
Change Paper Size, then press the OK key.
Change Paper Type, then press the OK key.
d. Scroll to the correct label size and press the OK key to save your selection.
4. In the printer driver, select Multi-Purpose Tray as the paper source and select Labels as the
paper type.
Phaser™ 4400 Laser Printer 32
Page 39

Output Trays
You can send output to the following trays:
Phaser™ 4400 Laser Printer
Standard Output Tray
■ Default output destination.
■ Holds 500 sheets.
P4400-79
500-sheet Stacker (with offset)
■ Optional output device for your printer.
■ Use as an additional 500-sheet capacity output tray to
supplement the Standard Output Tray.
To change the default output destination on the front panel:
1. With
2. Scroll to
Menus highlighted, press the OK key.
Printer Setup Menu using the Up Arrow or Down Arrow key.
P4400-78
3. Press the OK key.
4. Scroll to
5. Select
6. Select either
Job Defaults Menu and press the OK key.
Set Paper Destination and press the OK key.
Standard Output Tray or Stacker and press the OK key.
The output goes to the default tray unless specifically changed in the printer driver.
Copyright © 2002 Xerox Corporation. All Rights Reserved. 33
Page 40

Output Trays
Offsetting output
When you send output to the 500-sheet stacker, you can also select offsetting. Offsetting separates print
jobs or collated sets of a single job by approximately 25 mm (1 in.) in the output tray.
Note
If you send output to the Standard Output Tray, the printer does not offset the output.
The 500-sheet Stacker offsets output, but you must have a hard drive to have the printer
offset collated sets.
You can switch job offsetting on or off on the front panel:
1. With
2. Scroll to
3. Scroll to
4. Scroll to
5. Select either
Note
Menus highlighted, press the OK key.
Printer Setup Menu using the Up Arrow or Down Arrow key and press OK.
Job Defaults Menu and press the OK key.
Job Offset.
If you change job offsetting in your printer driver, this overrides the front panel setting for
your print jobs.
On or Off by pressing the OK key.
Phaser™ 4400 Laser Printer 34
Page 41

Index
Numerics
2-sided printing
automatic 16, 17
driver selections 18
manual 19
500-sheet stacker 33
A
automatic 2-sided printing 16
B
binding preference for 2-sided printing 16
C
changing paper type
Tray 1, 2, or 3 7
custom size paper
loading in Multi-Purpose Tray 15
loading in tray 13
menu selections 14
range of sizes supported 13
D
driver selections for 2-sided printing 18
duplex unit 16
E
envelopes
loading 27
loading
envelope feeder 27
Multi-Purpose Tray 7
Tray 1, 2, or 3 3
M
manual 2-sided printing 19
Multi-Purpose Tray
loading 7
orientation 9
O
offsetting output 34
ordering supplies 1
orientation
Multi-Purpose Tray 9
Tray 1, 2, or 3 5
output
500-sheet stacker 33
offset 34
Standard Output Tray 33
P
paper 2
loading tray 1, 2, or 3 3
supported 1
paper tips 1
paper types
automatic 2-sided printing 16
paper weights 1
printable pages
supported papers 1
F
front panel
paper size in Multi-Purpose Tray 9
specify paper type 7, 9
front panel prompts
custom size in Multi-Purpose Tray 15
custom size in tray 13, 29
S
size range
automatic 2-sided printing 16, 19
Standard Output Tray 33
supplies, ordering 1
supported paper sizes 1
supported paper types 1
supported papers 1
L
labels
loading 31
Copyright © 2002 Xerox Corporation. All Rights Reserved. 35
Page 42

T
transparencies 25
loading in Multi-Purpose Tray 26
loading in Tray 1, 2, or 3 25
Tray 1, 2, or 3
changing paper type 7
loading 3
orientation 5
paper specifics 3
tray sensors
turning on 14
tray usage 2
two-sided printing
driver selections 18
manual 19
W
weight range
automatic 2-sided printing 16
manual 2-sided printing 19
Index
Phaser™ 4400 Laser Printer 36
 Loading...