

Page 1
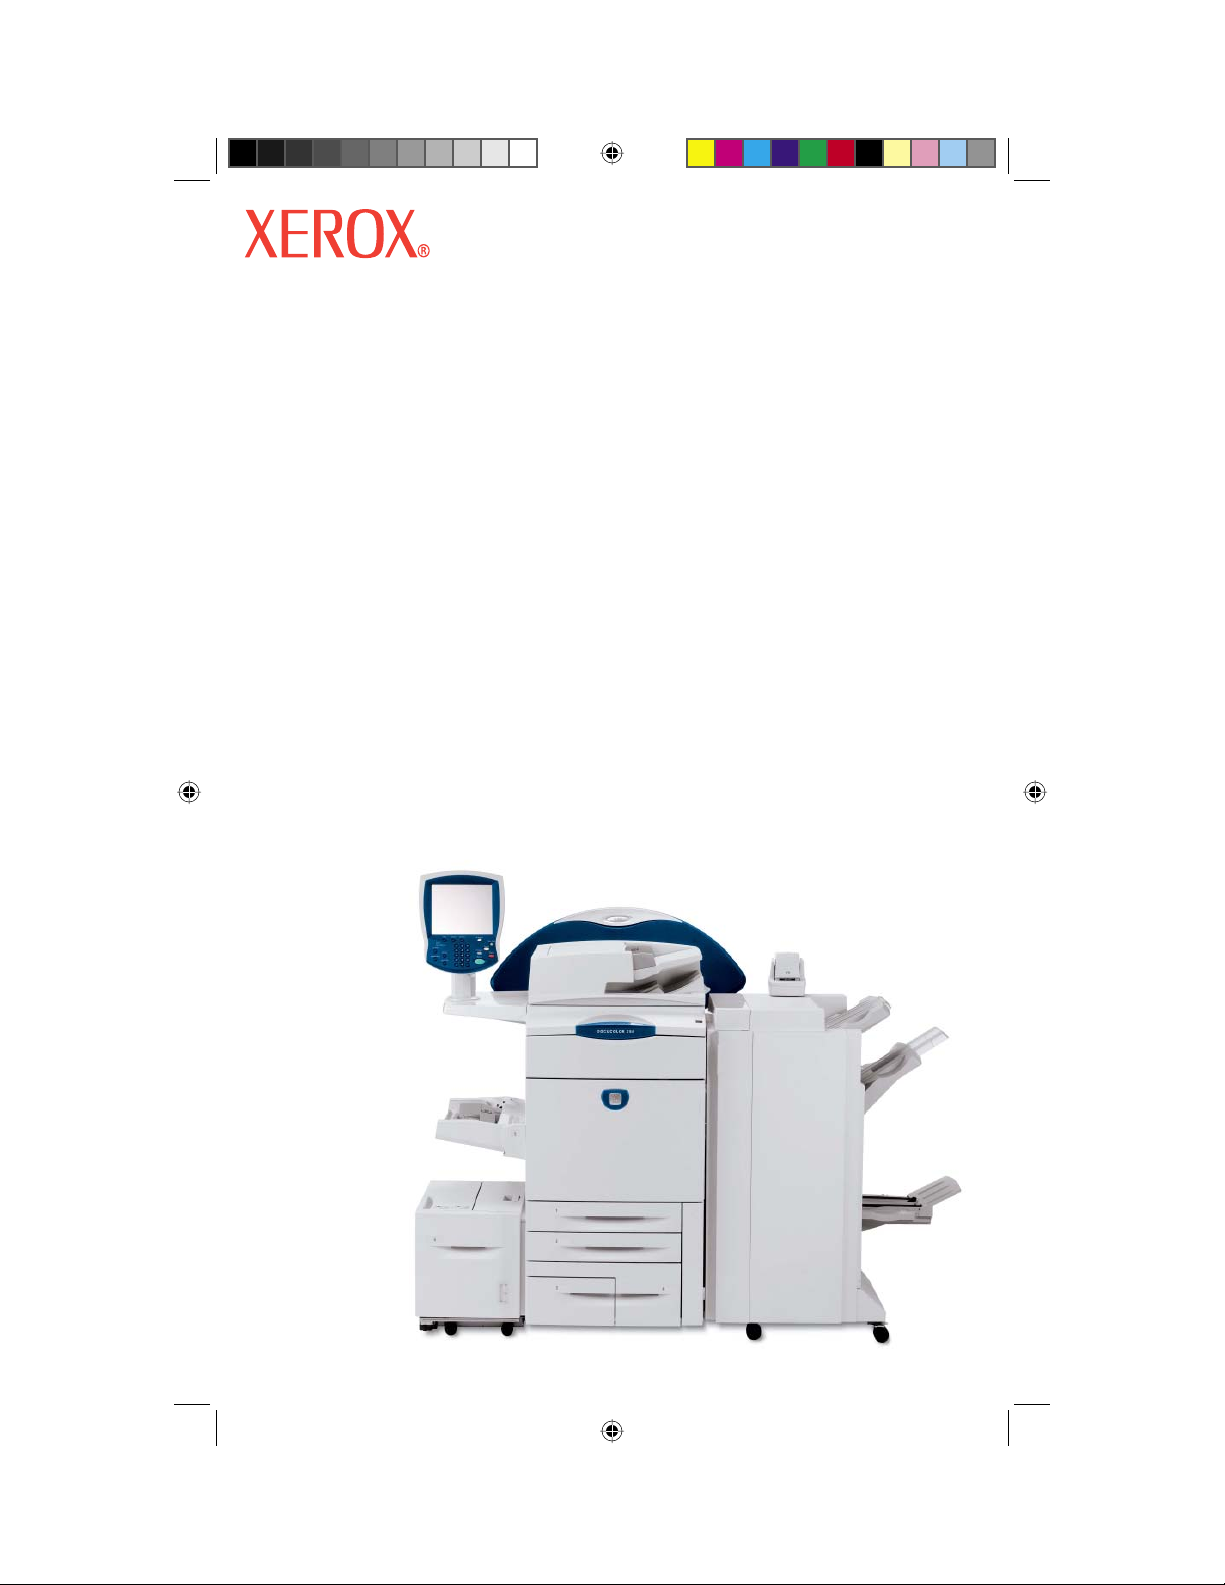
DocuColor 240 / 250
Quick Start Guide
701P43923
May, 2005
QSG Half.indb 1QSG Half.indb 1 5/31/2005 2:28:00 PM5/31/2005 2:28:00 PM
Page 2

Table of Contents
Control Panel ................................................................... 1
Changing Paper Tray Attributes ...................................... 3
Booklet Creation for Copy .............................................. 9
Custom Paper Size for Copy ......................................... 15
Replacing Toner Cartridge ............................................. 19
Auditron Settings for Copy ............................................ 23
System Settings List ...................................................... 38
Note:
BLUE title is for IT administrator type personnel, GREEN for end users and RED
means machine needs attention.
Depending on the confi guration of the DocuColor 240 / 250, some User Interface
screens may vary.
QSG Half.indb 1QSG Half.indb 1 5/31/2005 2:28:32 PM5/31/2005 2:28:32 PM
Page 3
17
1
1 of 2
2
3
16
15
14
12
8
11
10
13
9
4
5
6
7
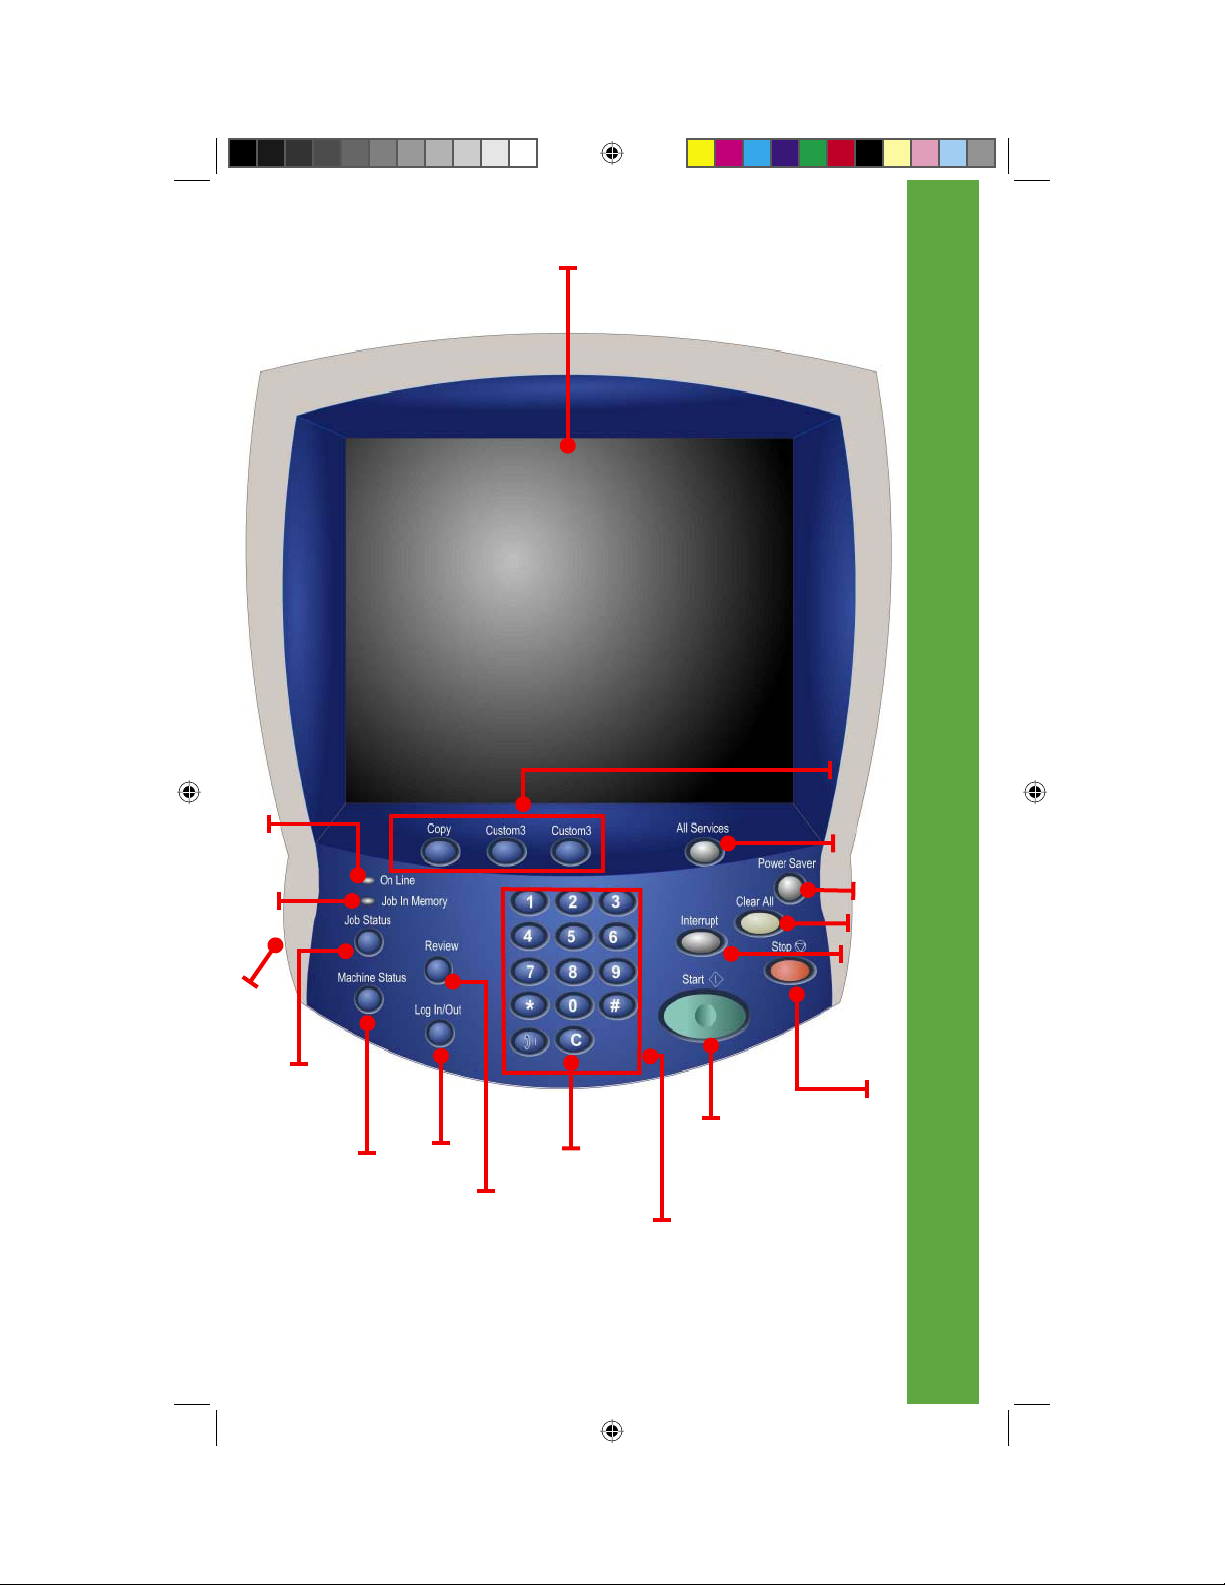
Control Panel
1
QSG Half.indb 1QSG Half.indb 1 5/31/2005 2:28:32 PM5/31/2005 2:28:32 PM
Page 4
No. Component Function
1 Touch Screen This display displays messages required for operation and buttons
2 <Copy>
2 of 2
3 <All Services> Used to display the [All Services] screen.
4 <Power Saver> If the machine is not operated for a while, the machine’s power con-
5 <Clear All> Returns the statuses of all displayed services to their default values.
6 <Interrupt> Select this button to temporarily stop a continuous copy job or
7 <Stop> Press this button to stop the current copy job or communications. In
8 <Start> Press this button to start copying or scanning.
9 Numeric keypad Press these buttons to enter the number of copies, passwords and
10 <C> (Clear) Press this button if you have entered a wrong numerical value with
11 <Log In/Out> When this button is pressed, if in System Administration mode, or
12 <Machine Status> Pressing this button allows you to confi rm the machine status,
13 <Review> Press this button to open the Review screen. In this screen, you can
14 <Job Status> Pressing this button allows you to confi rm or cancel currently exe-
15 Brightness dial Adjusts the brightness of the touch screen. Use this dial to adjust the
16 <Job in Memory> indicator This indicator lights when data is stored in the machine’s memory.
17 <Online> indicator This indicator lights when data is being transmitted from this ma-
Control Panel
for various features. You can directly touch the touch screen to
instruct operations in screens and set features.
Used to call a custom feature.
<Custom 2>
<Custom 3>
In text descriptions, this button is indicated as the <All Services>
button. You can change the features that appear in the [All Services]
screen.
sumption is lowered to enter the Power Saver mode. In the Power
Saver mode, this button is lit. To cancel the Power Saver mode,
press this button again. In text descriptions, this button is indicated
as the <Power Saver>
button.
The machine will be reset to the state after it is turned on. In text
descriptions, these buttons are indicated as the <Clear All> button.
printing to give another job higher priority. During an interrupt, the
Interrupt indicator is lit. Pressing the Interrupt button again cancels
the interrupt and the previous operation is resumed. In text descrip-
tions, this button is indicated as the <Interrupt> button.
text descriptions, this button is indicated as the <Stop> button.
In text descriptions, this button is indicated as the <Start> button.
other numerical values. In text descriptions, these buttons are
indicated as the “numeric keypad”.
the numeric keypad. In text descriptions, this button is indicated as
the <C> button.
Login Setup/Auditron Administration is in effect, the UserID input
screen is displayed. In text descriptions, this button is indicated as
the <Log In/Out> button.
meters and the state of consumables, and print reports.
In text descriptions, this button is indicated as the <Machine
Status>button.
check a list of the status of copy and scan features whose settings
have changed from the defaults. You can also check the destination
information for sending e-mail.
In text descriptions, these buttons are indicated as the <Review>
button.
cuting or completed jobs, or to confi rm or print saved documents. In
text descriptions, this button is indicated as the <Job Status> button.
brightness of touch screen when it is too dark to read.
chine or received from a client.
2
QSG Half.indb 2QSG Half.indb 2 5/31/2005 2:28:32 PM5/31/2005 2:28:32 PM
Page 5
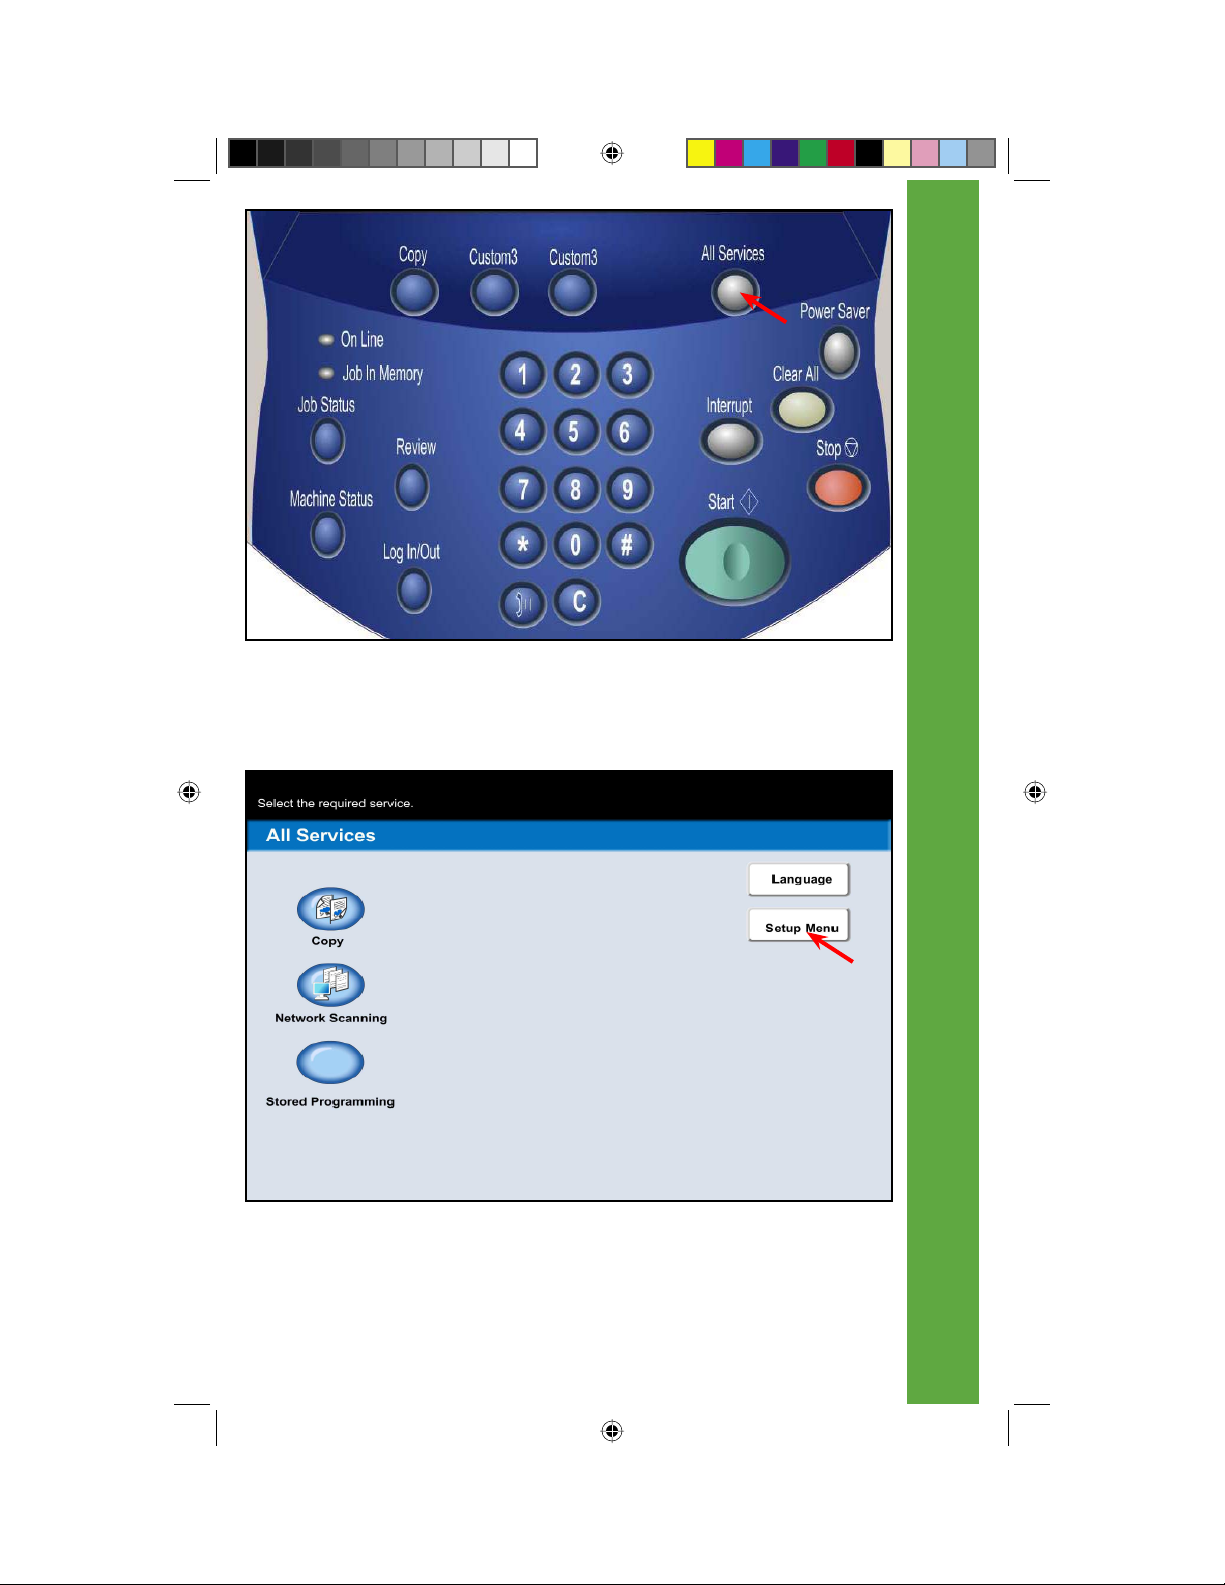
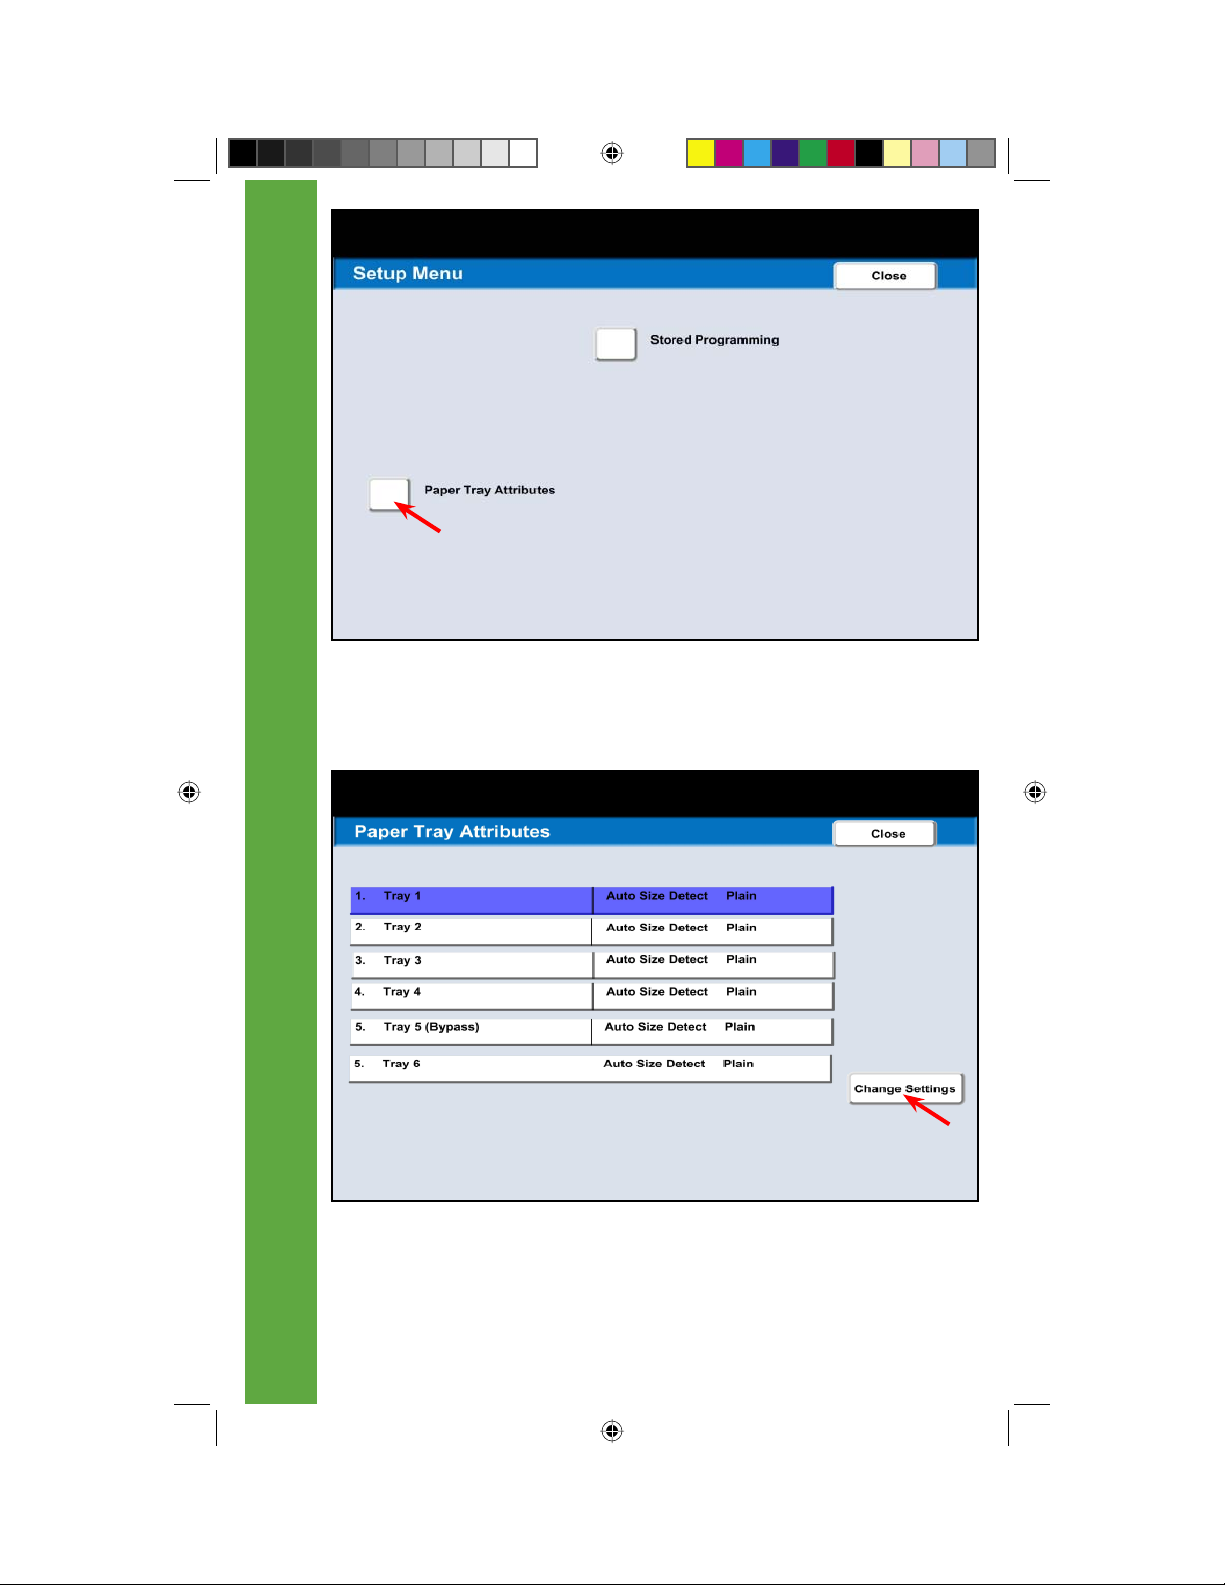
Fig. 1
Press All Services.
1 of 6
Fig. 2
Press Setup Menu.
Changing Paper Tray Attributes
3
QSG Half.indb 3QSG Half.indb 3 5/31/2005 2:28:32 PM5/31/2005 2:28:32 PM
Page 6
2 of 6
Fig. 3
Press Paper Tray Attributes.
Fig. 4
Select 1. Tray 1. Press Change Settings.
Changing Paper Tray Attributes
4
QSG Half.indb 4QSG Half.indb 4 5/31/2005 2:28:33 PM5/31/2005 2:28:33 PM
Page 7
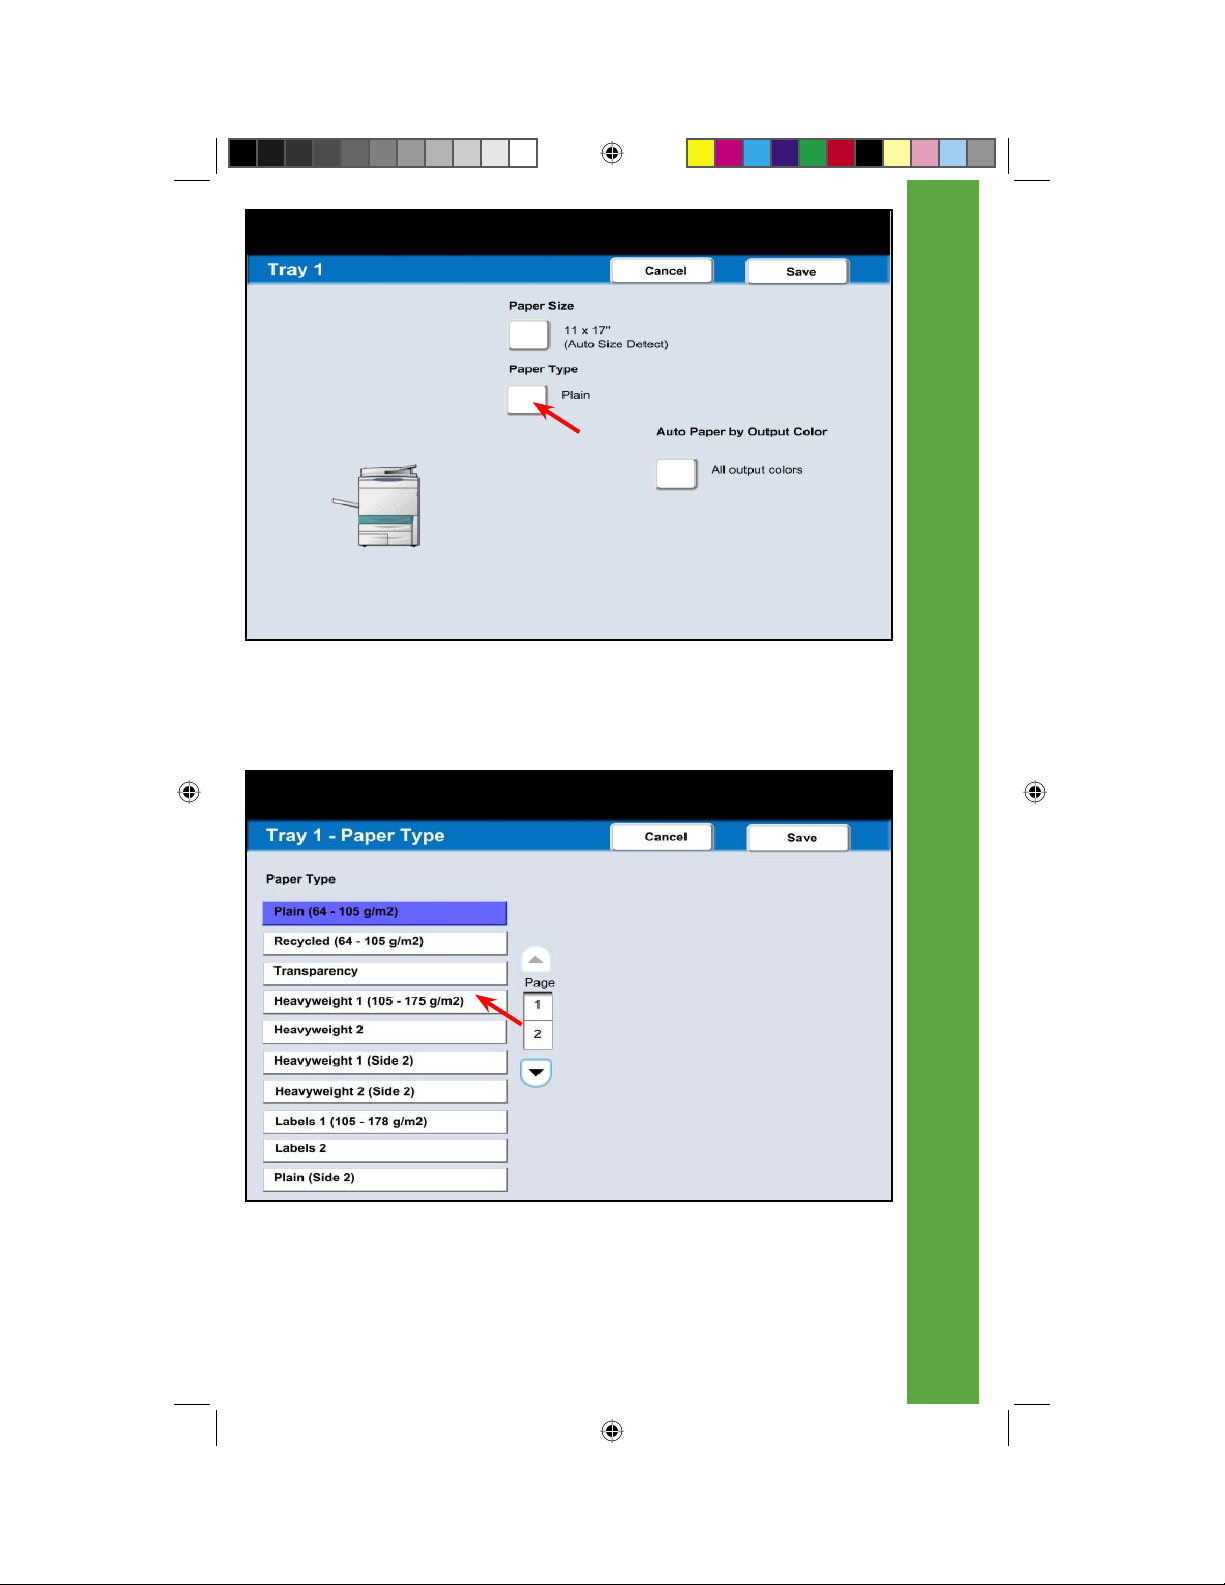
Fig. 5
Press Paper Type.
3 of 6
Fig. 6
Select Heavyweight 1.
Changing Paper Tray Attributes
5
QSG Half.indb 5QSG Half.indb 5 5/31/2005 2:28:34 PM5/31/2005 2:28:34 PM
Page 8
4 of 6
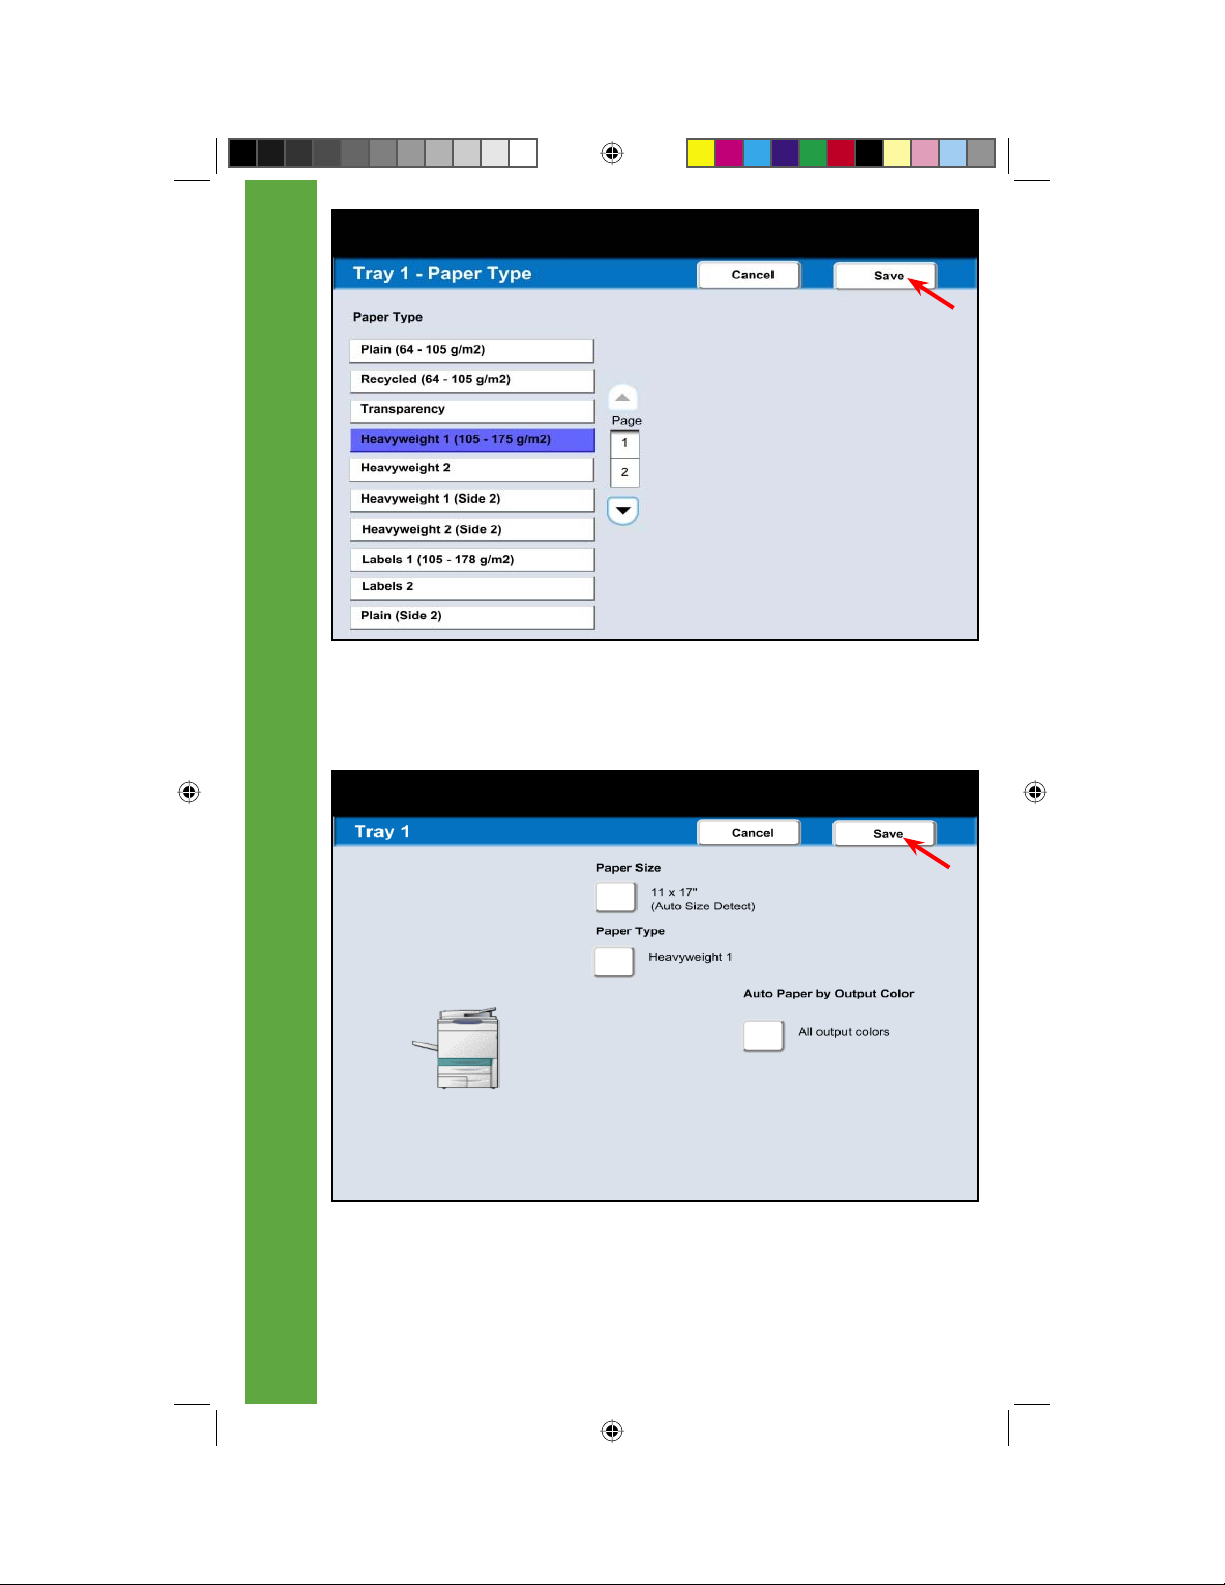
Fig. 7
Press Save.
Fig. 8
Press Save.
Changing Paper Tray Attributes
6
QSG Half.indb 6QSG Half.indb 6 5/31/2005 2:28:36 PM5/31/2005 2:28:36 PM
Page 9
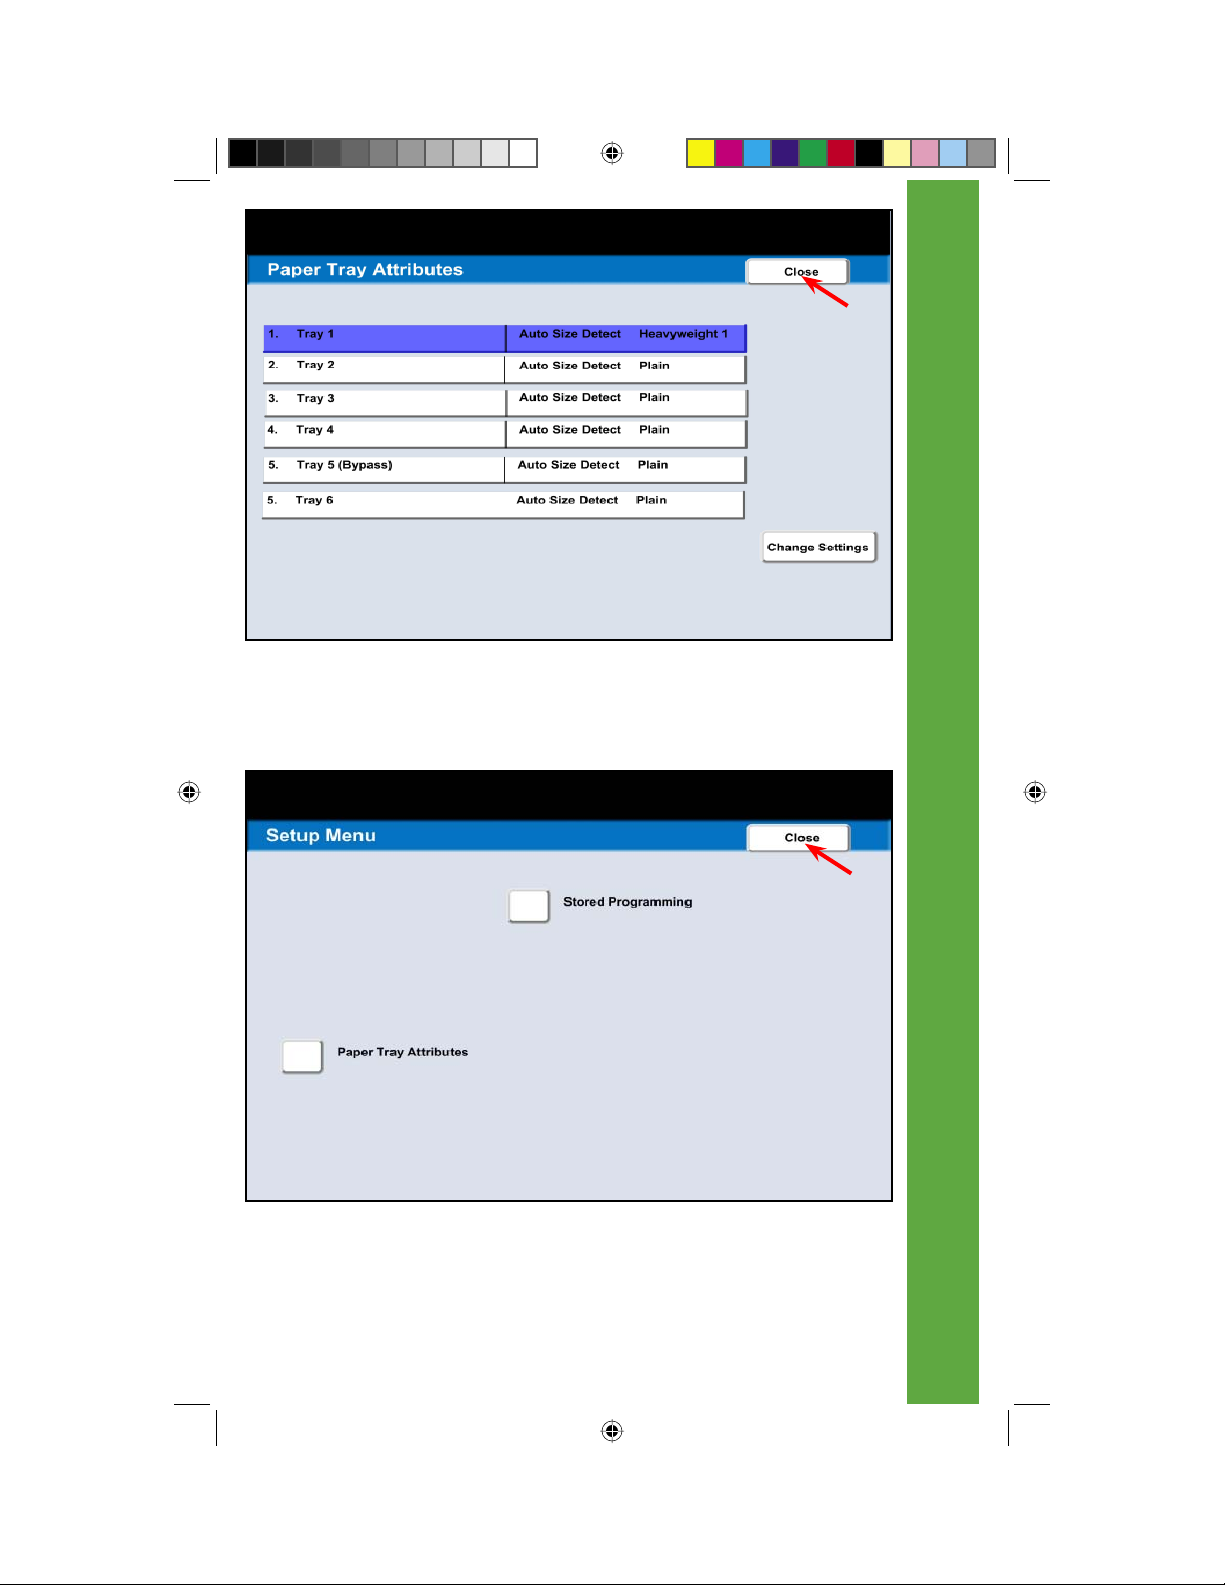
Fig. 9
Press Close.
5 of 6
Fig. 10
Press Close.
Changing Paper Tray Attributes
7
QSG Half.indb 7QSG Half.indb 7 5/31/2005 2:28:38 PM5/31/2005 2:28:38 PM
Page 10
6 of 6
Fig. 11
The selected changes have been made.
Changing Paper Tray Attributes
8
QSG Half.indb 8QSG Half.indb 8 5/31/2005 2:28:39 PM5/31/2005 2:28:39 PM
Page 11

Fig. 1
Place documents on the Automatic Document Feeder.
1 of 6
Fig. 2
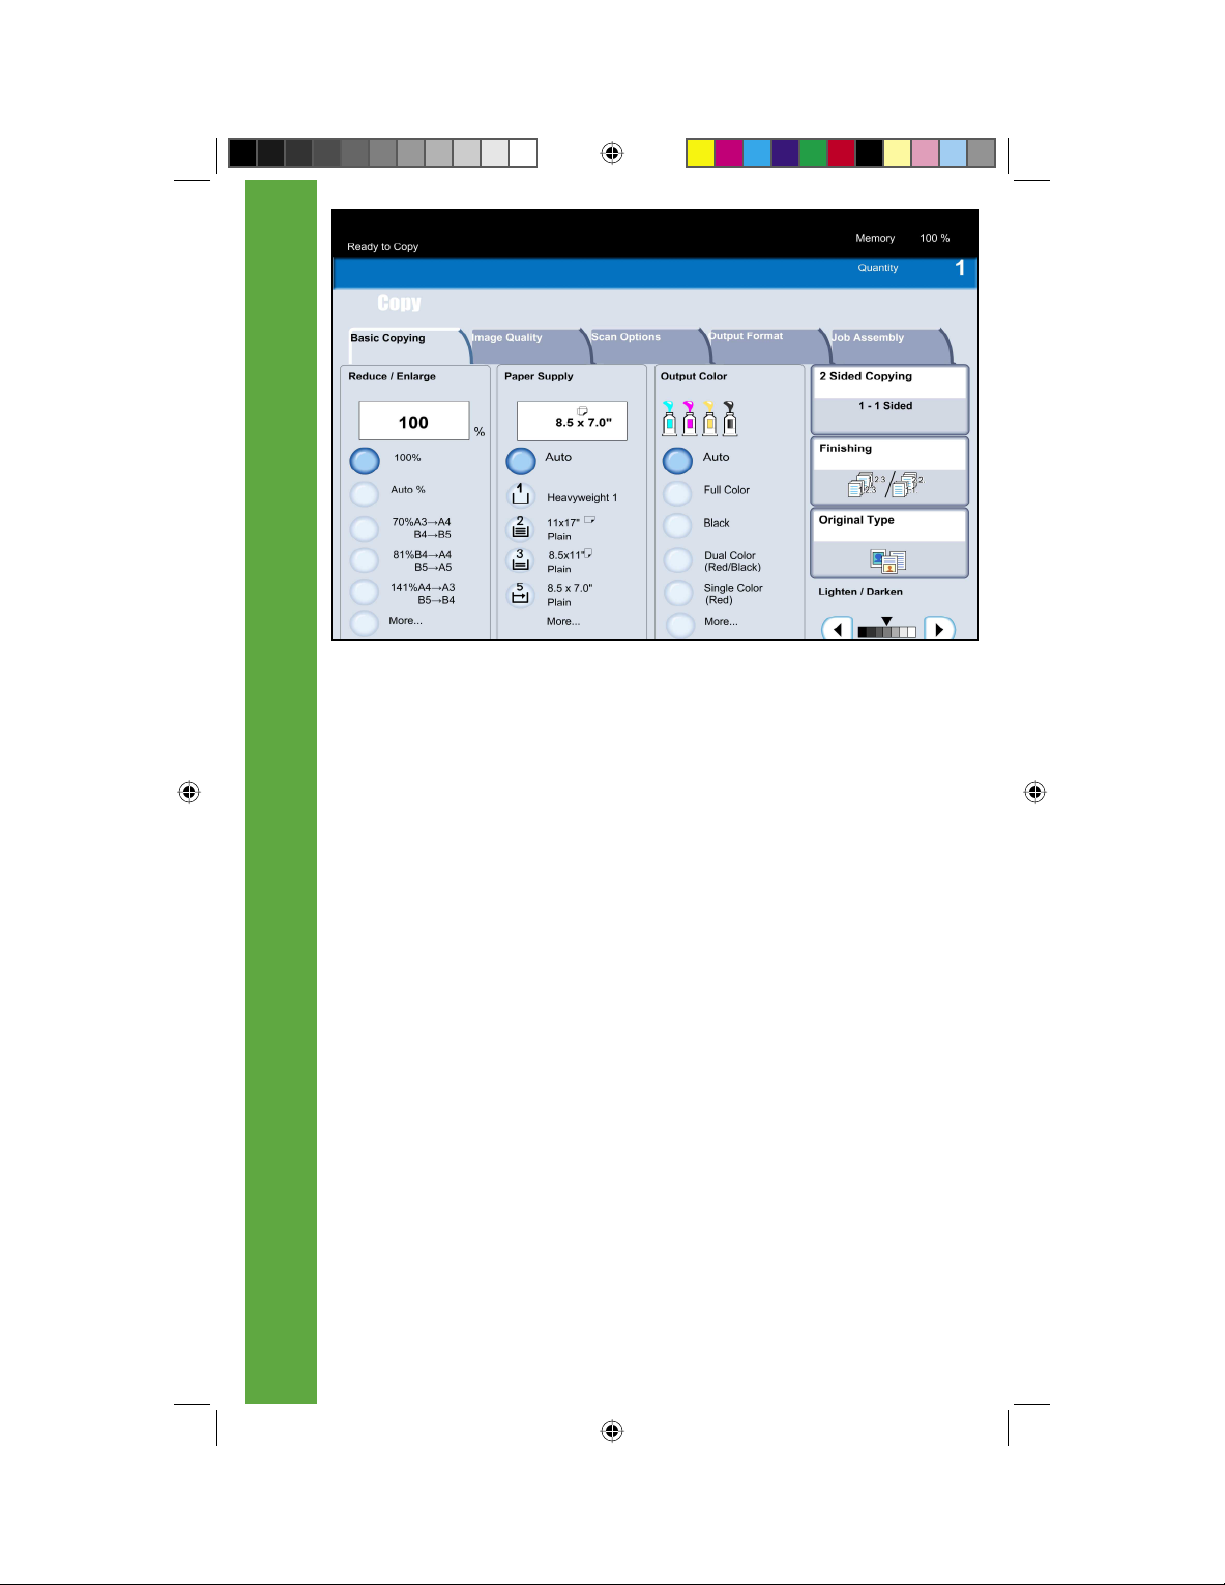
Press Output Format.
Booklet Creation for Copy
9
QSG Half.indb 9QSG Half.indb 9 5/31/2005 2:28:40 PM5/31/2005 2:28:40 PM
Page 12
2 of 6
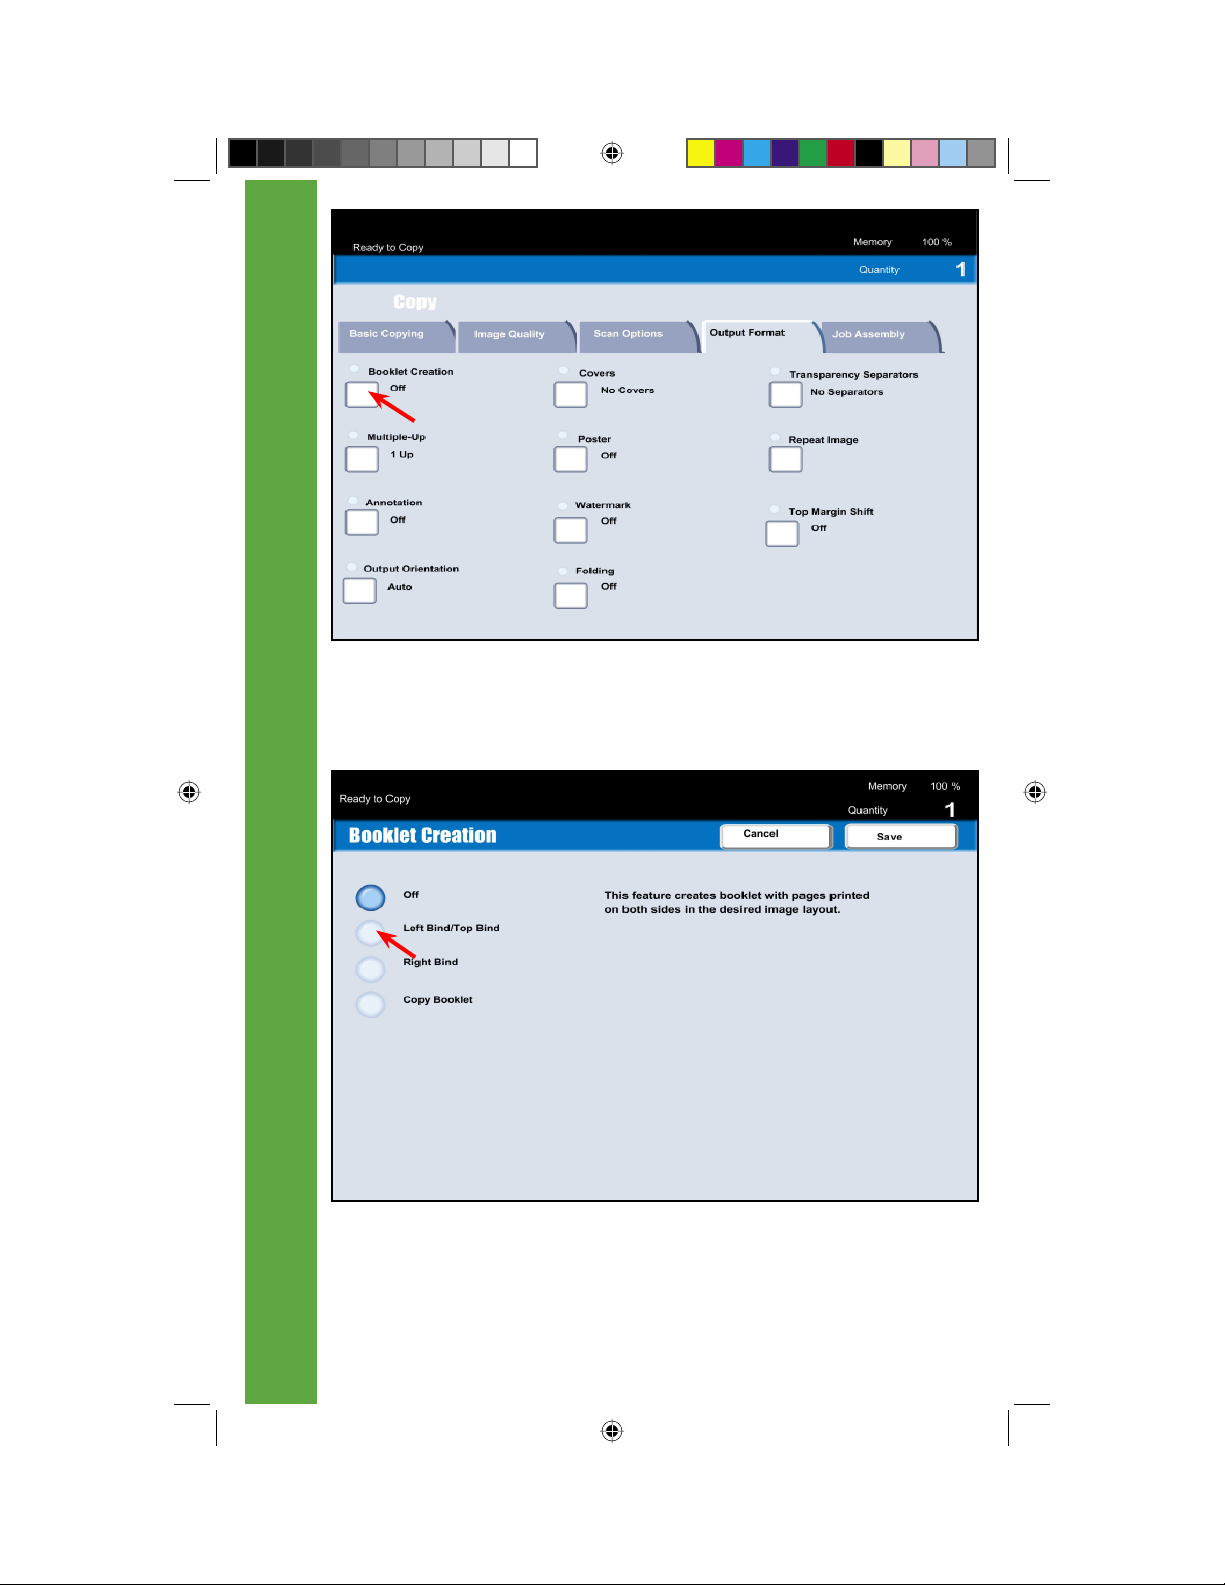
Fig. 3
Select Booklet Creation.
Fig. 4
Select Left Bind/Top Bind.
Booklet Creation for Copy
10
QSG Half.indb 10QSG Half.indb 10 5/31/2005 2:28:41 PM5/31/2005 2:28:41 PM
Page 13
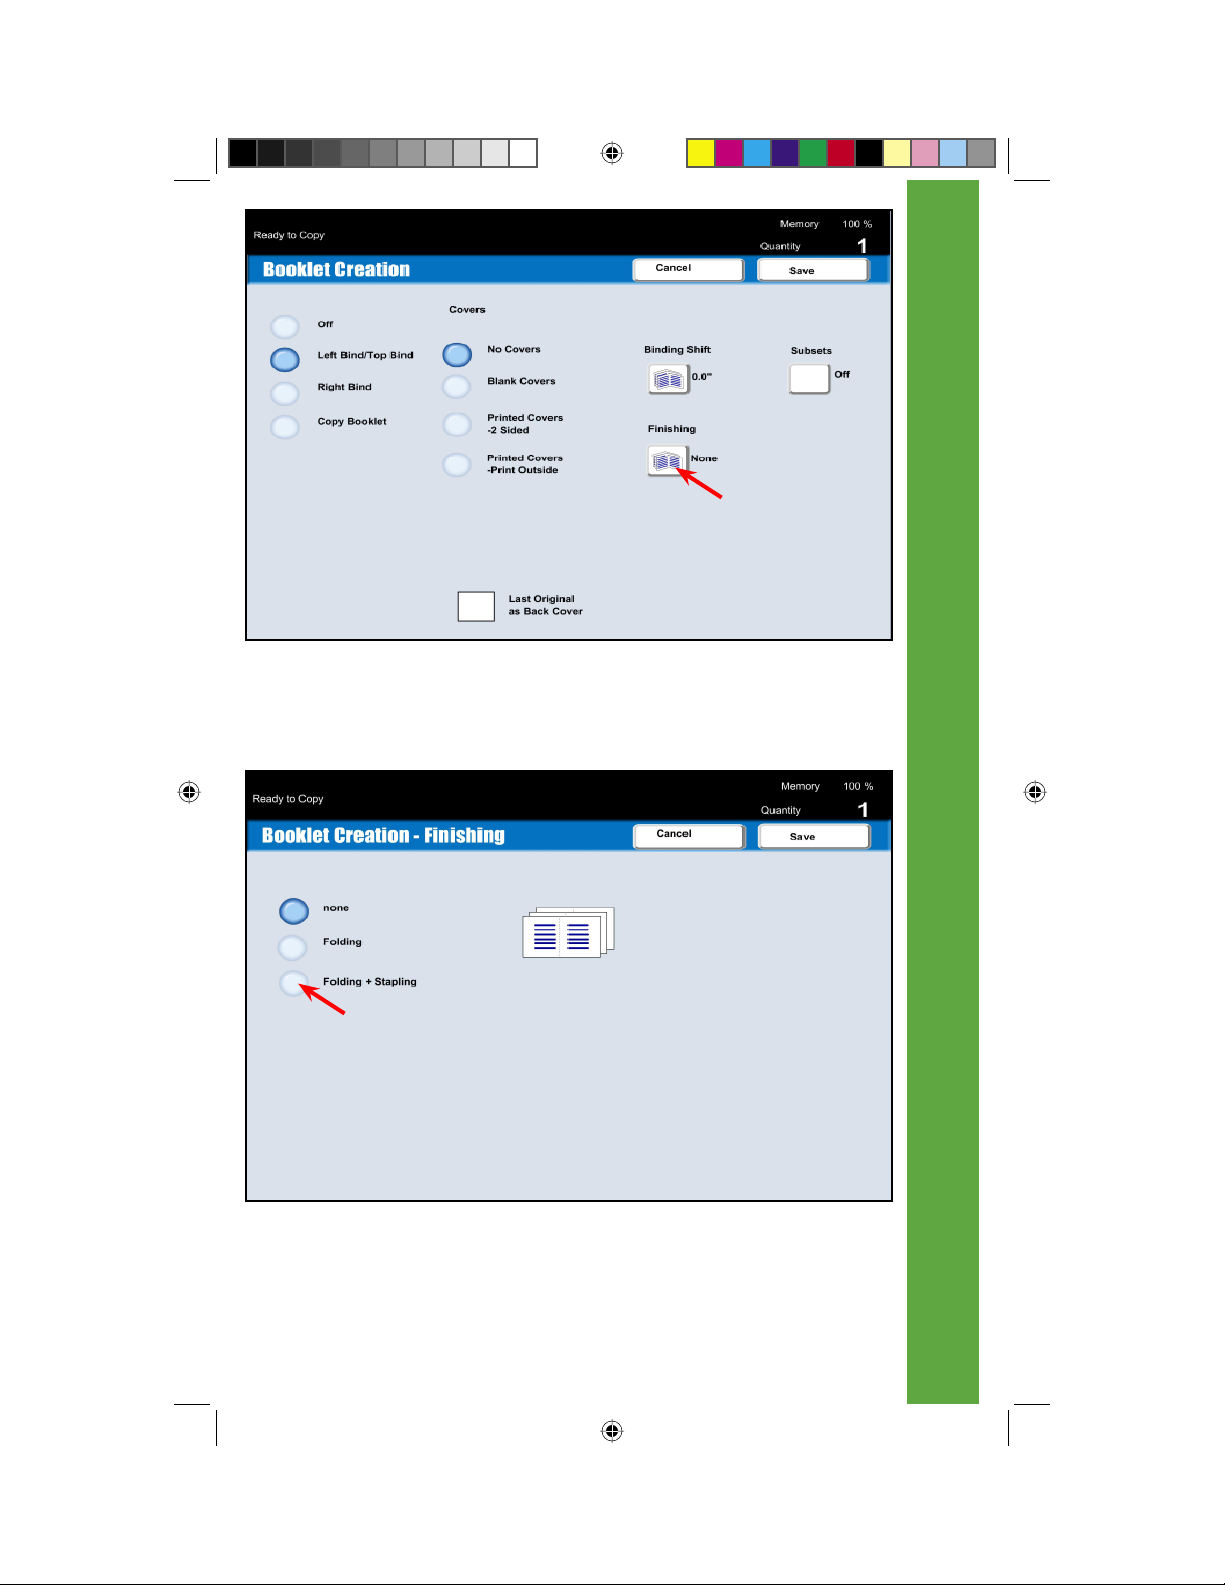
Fig. 5
Select Finishing.
3 of 6
Fig. 6
Select Folding + Stapling.
Booklet Creation for Copy
11
QSG Half.indb 11QSG Half.indb 11 5/31/2005 2:28:43 PM5/31/2005 2:28:43 PM
Page 14
4 of 6
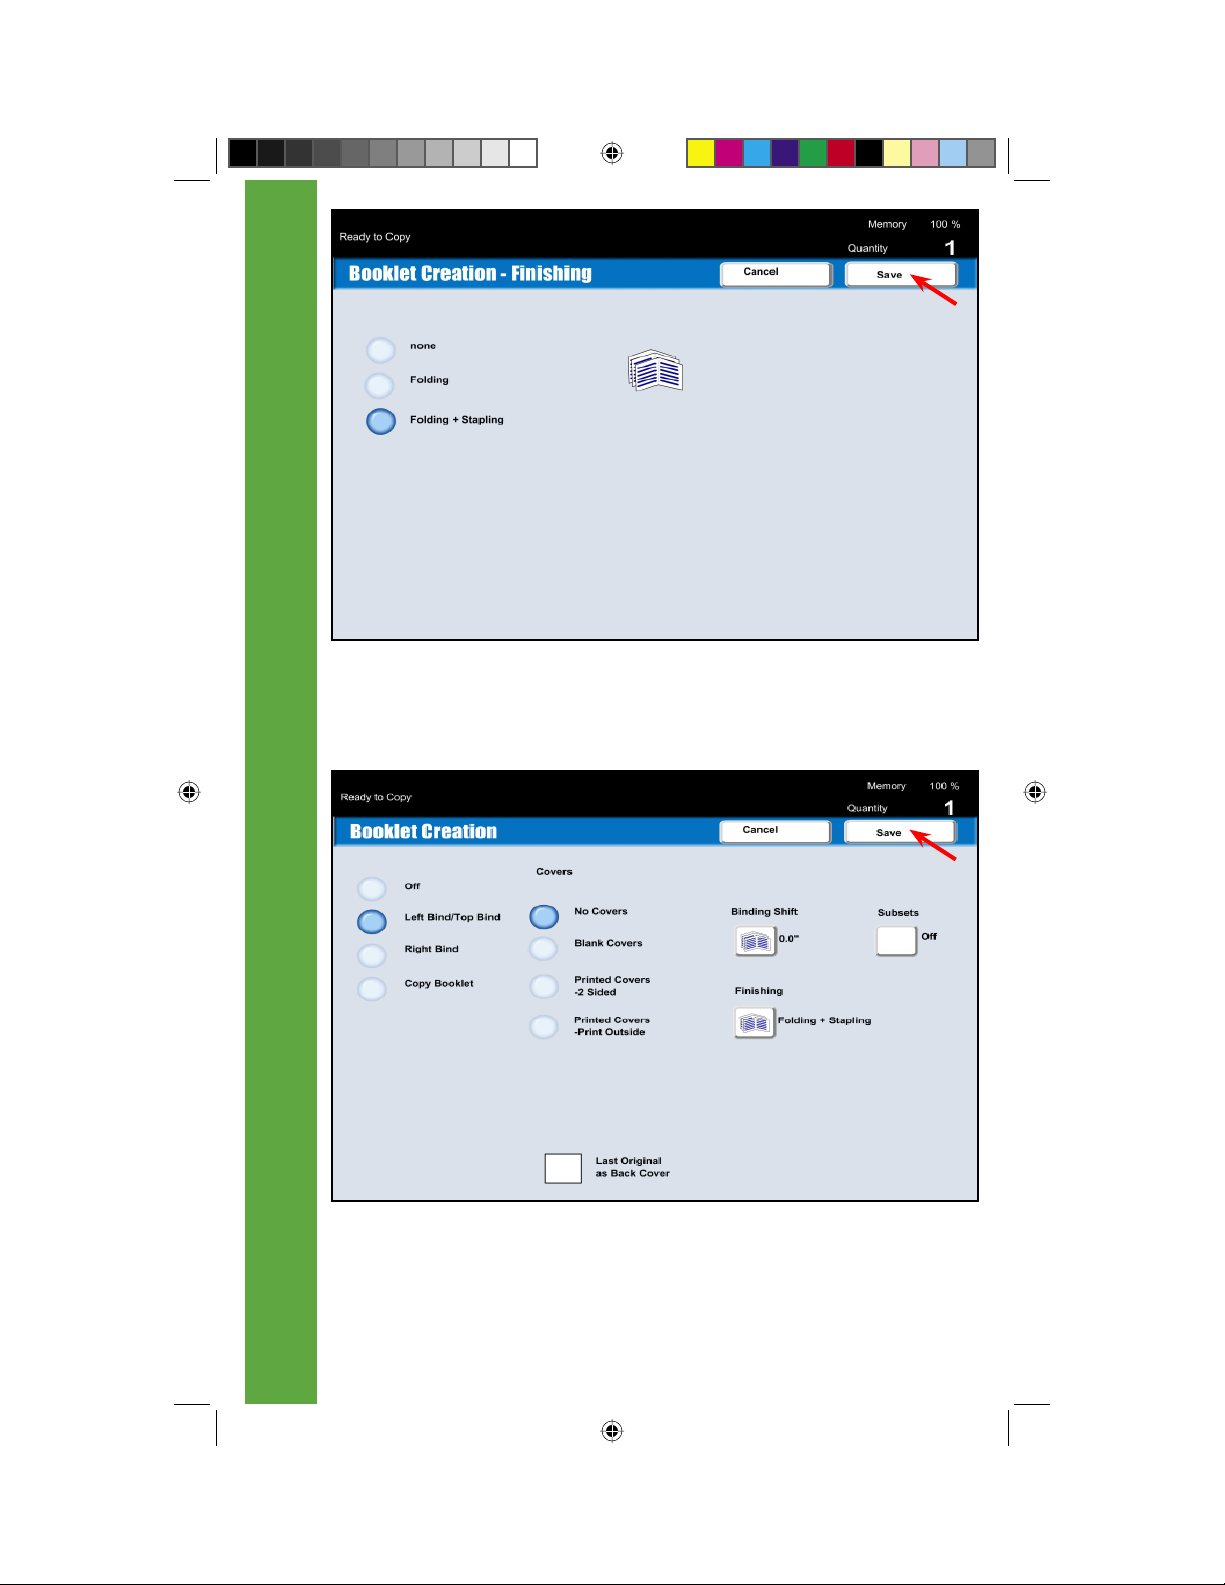
Fig. 7
Press Save.
Fig. 8
Press Save.
Booklet Creation for Copy
12
QSG Half.indb 12QSG Half.indb 12 5/31/2005 2:28:45 PM5/31/2005 2:28:45 PM
Page 15
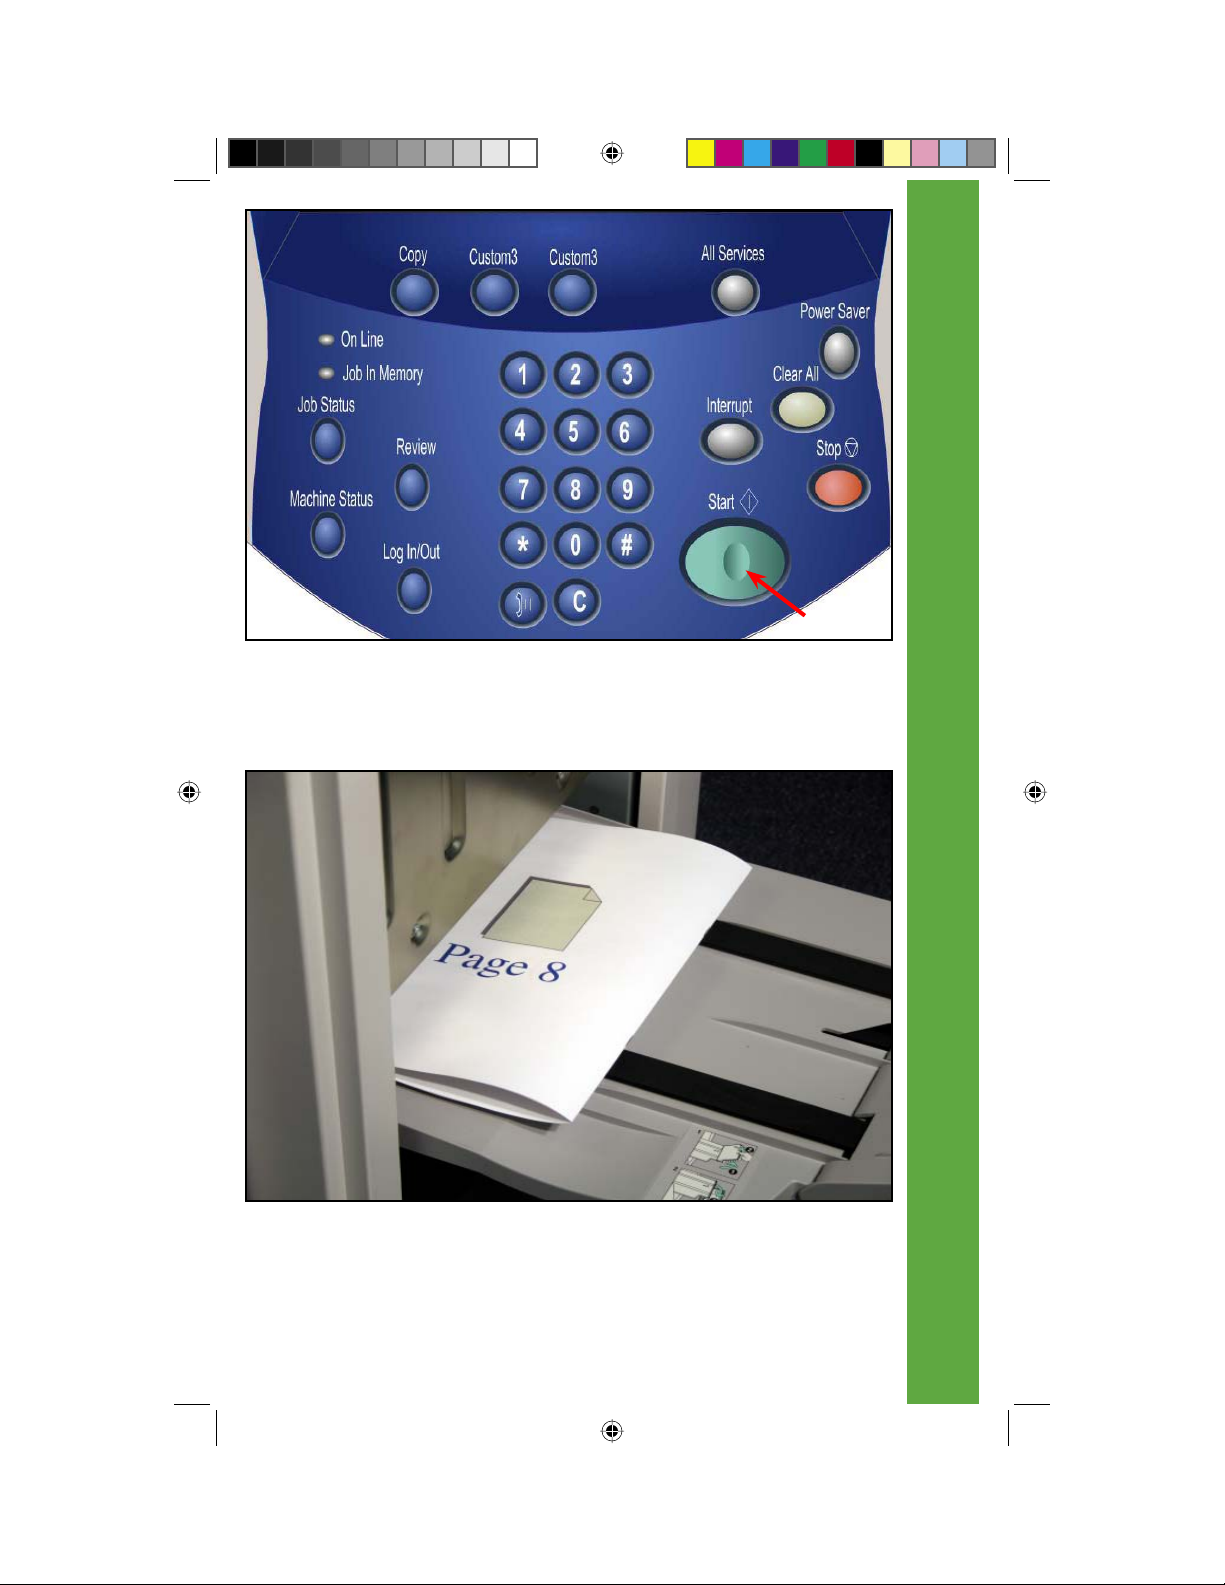
Fig. 9
Press Start.
5 of 6
Fig. 10
Output will be printed.
Booklet Creation for Copy
13
QSG Half.indb 13QSG Half.indb 13 5/31/2005 2:28:46 PM5/31/2005 2:28:46 PM
Page 16

6 of 6
Fig. 11
Sample of fi nished booklet.
Booklet Creation for Copy
14
QSG Half.indb 14QSG Half.indb 14 5/31/2005 2:28:46 PM5/31/2005 2:28:46 PM
Page 17

Fig. 1
Place paper in the bypass tray.
1 of 4
Fig. 2
Press Nonstandard Size.
Custom Paper Size for Copy
15
QSG Half.indb 15QSG Half.indb 15 5/31/2005 2:28:47 PM5/31/2005 2:28:47 PM
Page 18

2 of 4
Fig. 3
Enter nonstandard size.
Fig. 4
Press Save.
Custom Paper Size for Copy
16
QSG Half.indb 16QSG Half.indb 16 5/31/2005 2:28:48 PM5/31/2005 2:28:48 PM
Page 19

Fig. 5
Make other required selections for this job.
3 of 4
Fig. 6
Place document(s) on the Document Feeder or Document Glass.
Custom Paper Size for Copy
17
QSG Half.indb 17QSG Half.indb 17 5/31/2005 2:28:49 PM5/31/2005 2:28:49 PM
Page 20

4 of 4
Fig. 7
Press Start.
Custom Paper Size for Copy
18
QSG Half.indb 18QSG Half.indb 18 5/31/2005 2:28:51 PM5/31/2005 2:28:51 PM
Page 21
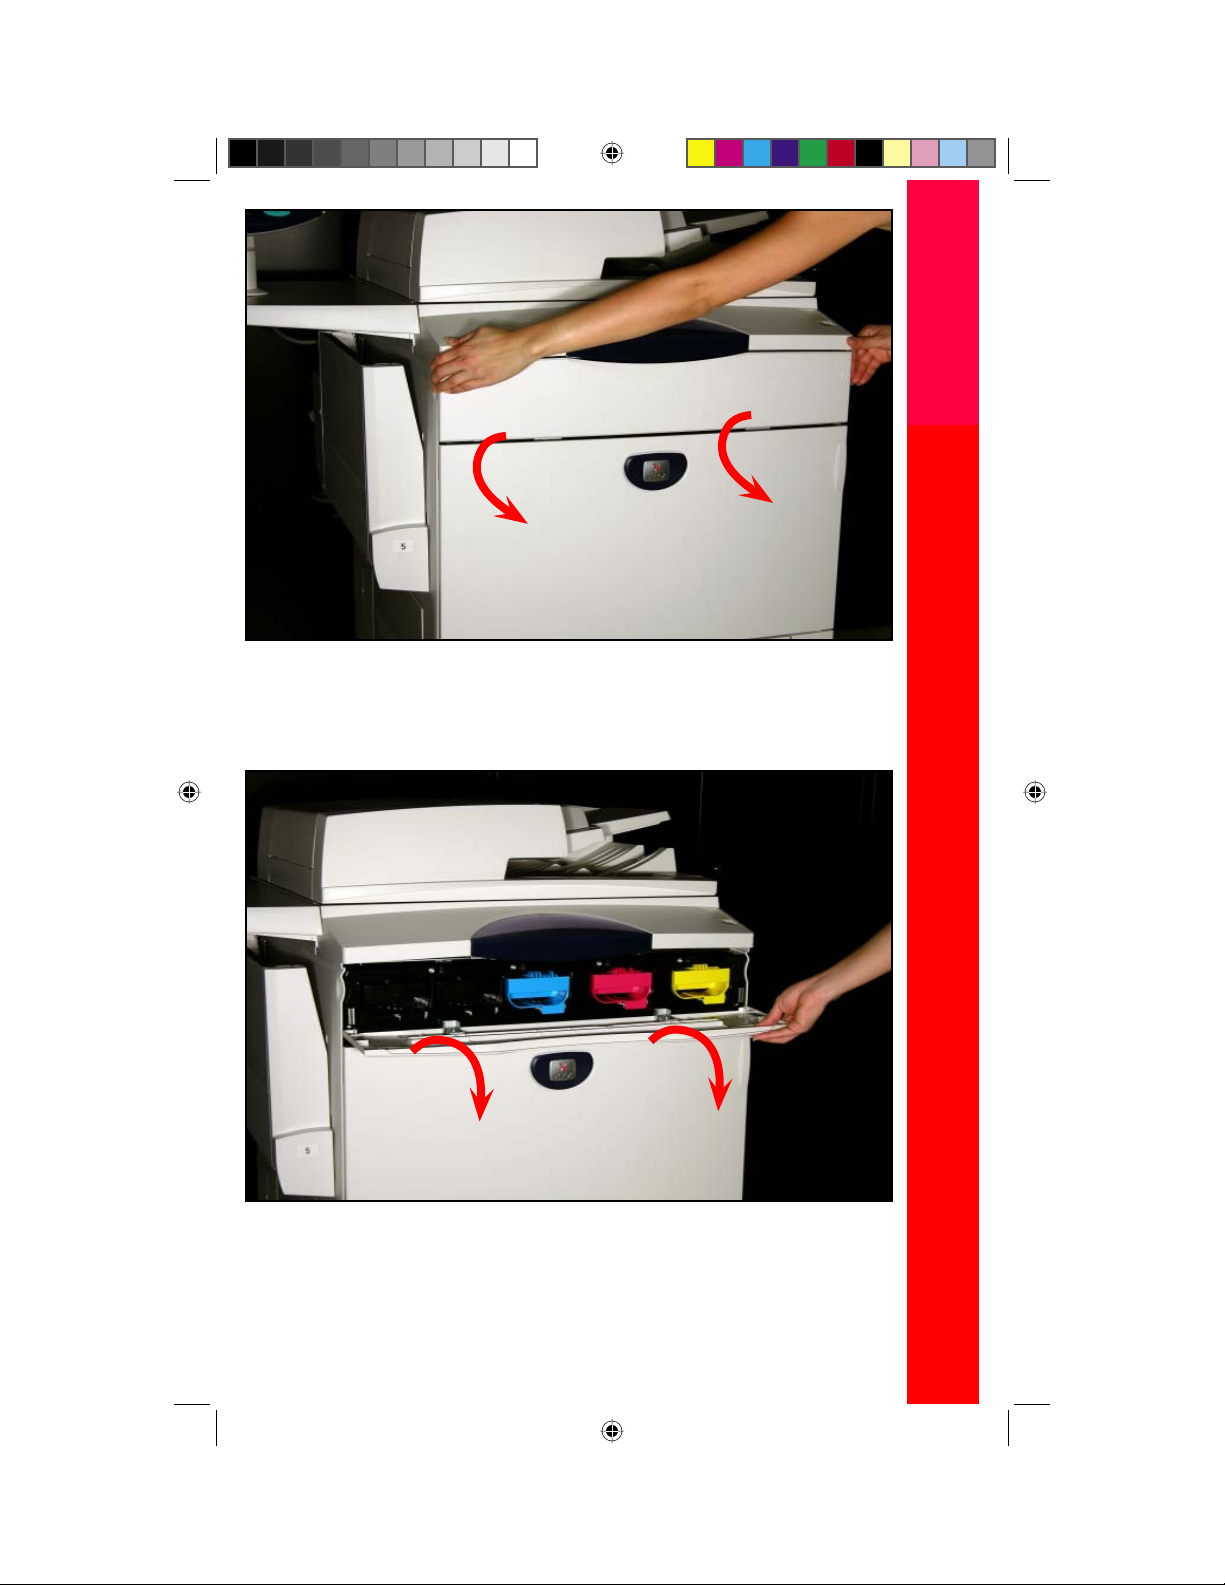
Fig. 1
Using both hands gently open the front cover.
1 of 4
Fig. 2
Select the toner cartridge that needs to be replaced.
Replacing Toner Cartridge
19
QSG Half.indb 19QSG Half.indb 19 5/31/2005 2:28:52 PM5/31/2005 2:28:52 PM
Page 22

2 of 4
Fig. 3
Pull the toner cartridge indicated in the message on the display out.
Note: “Y” stands for Yellow, “M” for Magenta, “C” for Cyan, and “K” for
Black.
Fig. 4
Lightly shake the “new” toner cartridge three or four times up and down and to
the left and right.
Replacing Toner Cartridge
20
QSG Half.indb 20QSG Half.indb 20 5/31/2005 2:28:53 PM5/31/2005 2:28:53 PM
Page 23

Fig. 5
Insert the toner cartridge as far as possible.
3 of 4
Fig. 6
Be sure the toner cartridge is seated properly.
Replacing Toner Cartridge
21
QSG Half.indb 21QSG Half.indb 21 5/31/2005 2:28:55 PM5/31/2005 2:28:55 PM
Page 24

4 of 4
Fig. 7
Close the front cover.
Type of Consumable/Periodical
Replacement Part
Black Toner [K] (Western Hemisphere) 006R01219
Yellow Toner [Y] (Western Hemisphere) 006R01220
Megenta Toner [M] (Western Hemisphere) 006R01221
Cyan Toner [C] (Western Hemisphere) 006R01222
Black Toner [K] (Eastern Hemisphere) 006R01223
Yellow Toner [Y] (Eastern Hemisphere) 006R01224
Megenta Toner [M] (Eastern Hemisphere) 006R01225
Cyan Toner [C] (Eastern Hemisphere) 006R01226
Drum Cartridge (Black) 013R00602
Drum Cartridge (Color) 013R00603
Fuser 120V 008R12988
Fuser 220V 008R12989
Waste Toner Container 008R12990
Charge Corotron 013R00604
Staple Refi lls for Advanced Finisher 008R12941
Staple Cartridge for Advanced Finisher 008R12964
Staple Cartridge for Professional Finisher 008R12925
Part Number
Replacing Toner Cartridge
22
QSG Half.indb 22QSG Half.indb 22 5/31/2005 2:28:57 PM5/31/2005 2:28:57 PM
Page 25

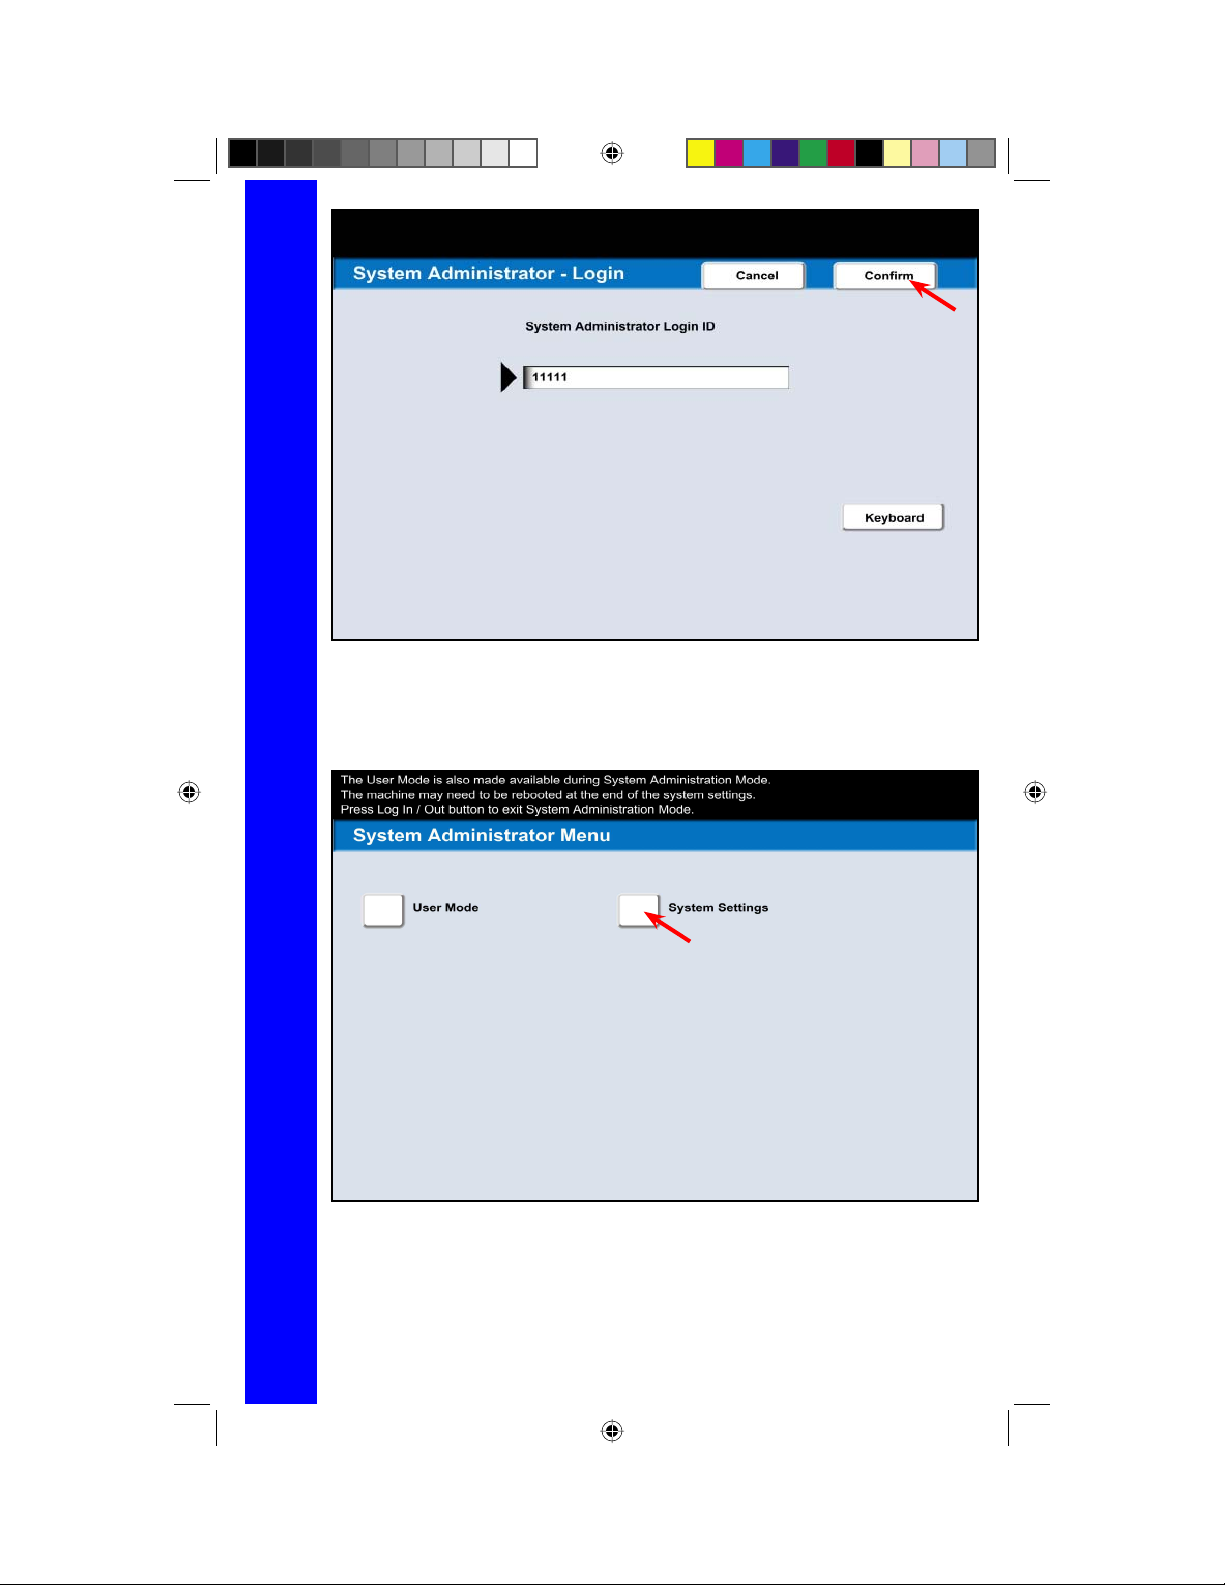
Fig. 1
Press Log in/Out.
1 of 15
Fig. 2
Enter Password.
Auditron Setting for Copy
23
QSG Half.indb 23QSG Half.indb 23 5/31/2005 2:28:58 PM5/31/2005 2:28:58 PM
Page 26
2 of 15
Fig. 3
Press Confi rm.
Fig. 4
Press System Settings.
Auditron Setting for Copy
24
QSG Half.indb 24QSG Half.indb 24 5/31/2005 2:28:59 PM5/31/2005 2:28:59 PM
Page 27

Fig. 5
Press Login Setup / Auditron Administration.
3 of 15
Fig. 6
Press Login Setup / Auditron Mode.
Auditron Setting for Copy
25
QSG Half.indb 25QSG Half.indb 25 5/31/2005 2:28:59 PM5/31/2005 2:28:59 PM
Page 28

4 of 15
Fig. 7
Press Local Machine Access.
Fig. 8
Press Save.
Auditron Setting for Copy
26
QSG Half.indb 26QSG Half.indb 26 5/31/2005 2:29:00 PM5/31/2005 2:29:00 PM
Page 29

Fig. 9
Press Create / Check User Accounts.
5 of 15
Fig. 10
Select 0001 (Not in use). Press Create / Delete.
Auditron Setting for Copy
27
QSG Half.indb 27QSG Half.indb 27 5/31/2005 2:29:01 PM5/31/2005 2:29:01 PM
Page 30
6 of 15
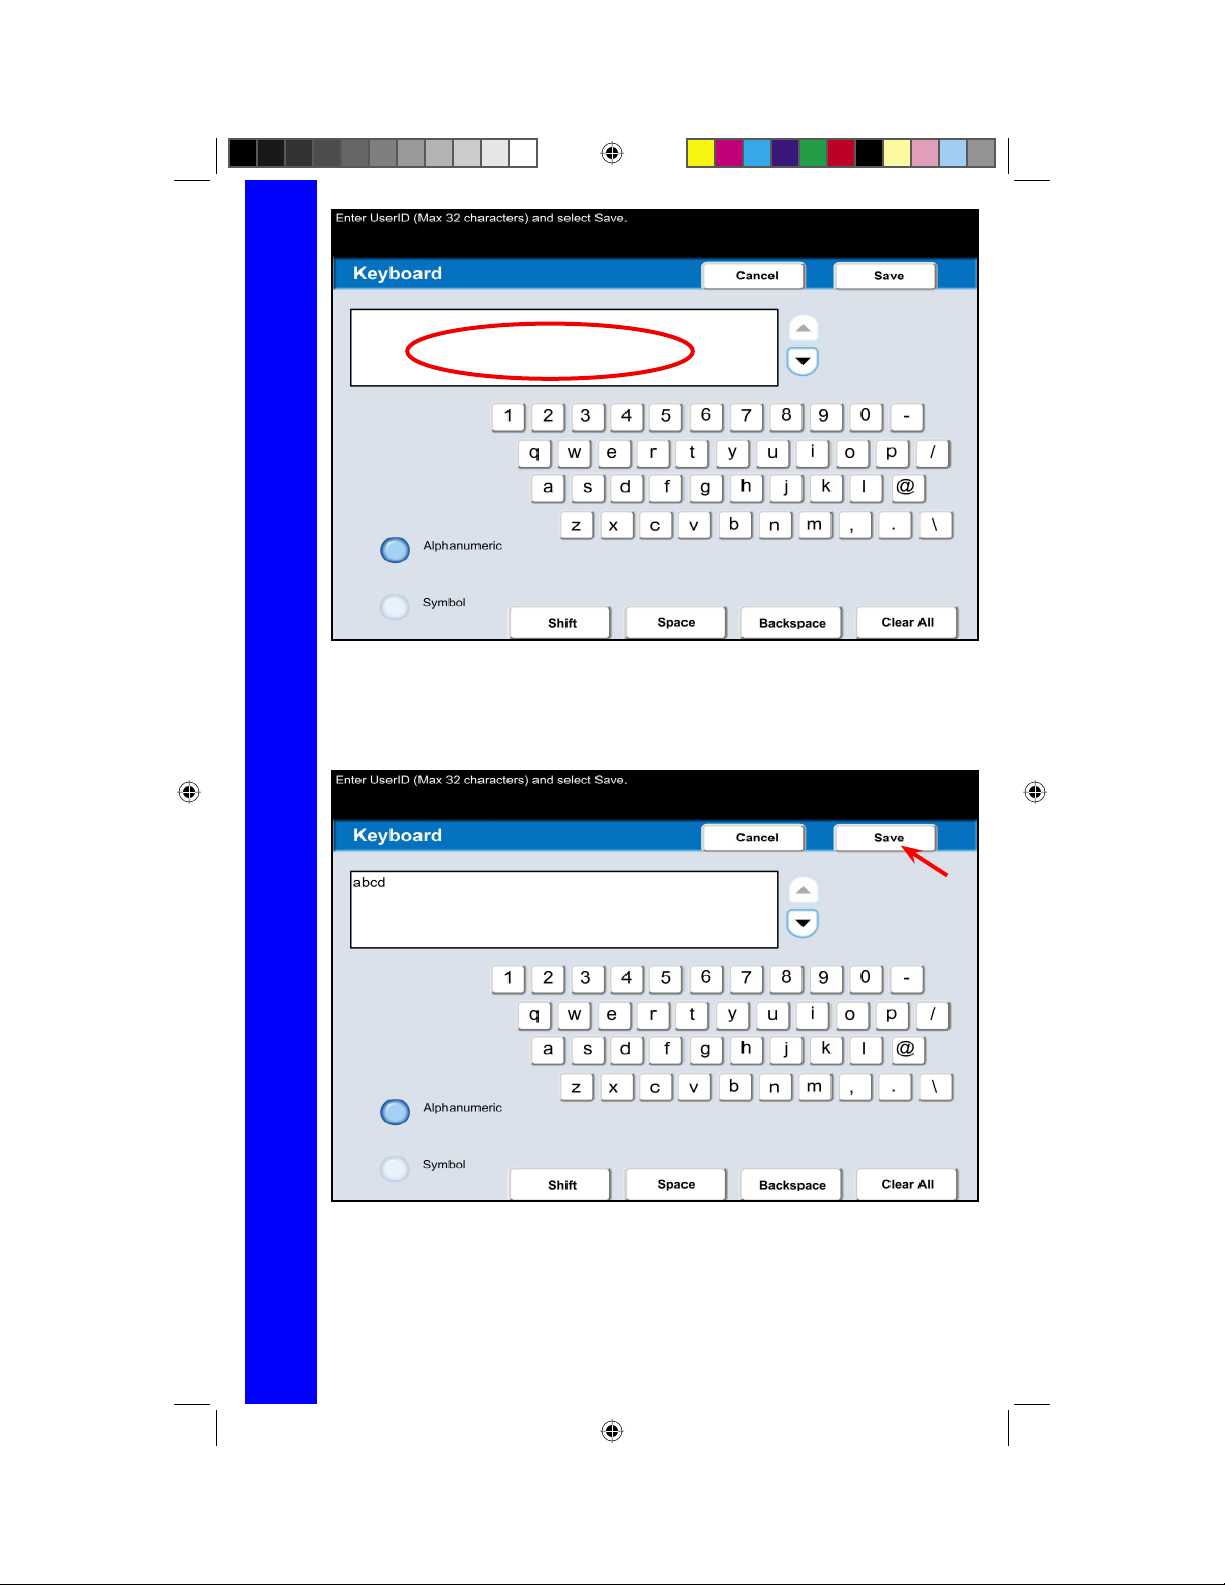
Fig. 11
Enter UserID.
Fig. 12
Press Save.
Auditron Setting for Copy
28
QSG Half.indb 28QSG Half.indb 28 5/31/2005 2:29:02 PM5/31/2005 2:29:02 PM
Page 31

Fig. 13
Press Password.
7 of 15
Fig. 14
Press Keyboard.
Auditron Setting for Copy
29
QSG Half.indb 29QSG Half.indb 29 5/31/2005 2:29:03 PM5/31/2005 2:29:03 PM
Page 32

8 of 15
Fig. 15
Enter Password.
Fig. 16
Press Save.
Auditron Setting for Copy
30
QSG Half.indb 30QSG Half.indb 30 5/31/2005 2:29:03 PM5/31/2005 2:29:03 PM
Page 33

Fig. 17
Press Keyboard.
9 of 15
Fig. 18
Re-enter Password.
Auditron Setting for Copy
31
QSG Half.indb 31QSG Half.indb 31 5/31/2005 2:29:04 PM5/31/2005 2:29:04 PM
Page 34

10 of 15
Fig. 19
Press Save.
Fig. 20
Press Save.
Auditron Setting for Copy
32
QSG Half.indb 32QSG Half.indb 32 5/31/2005 2:29:05 PM5/31/2005 2:29:05 PM
Page 35

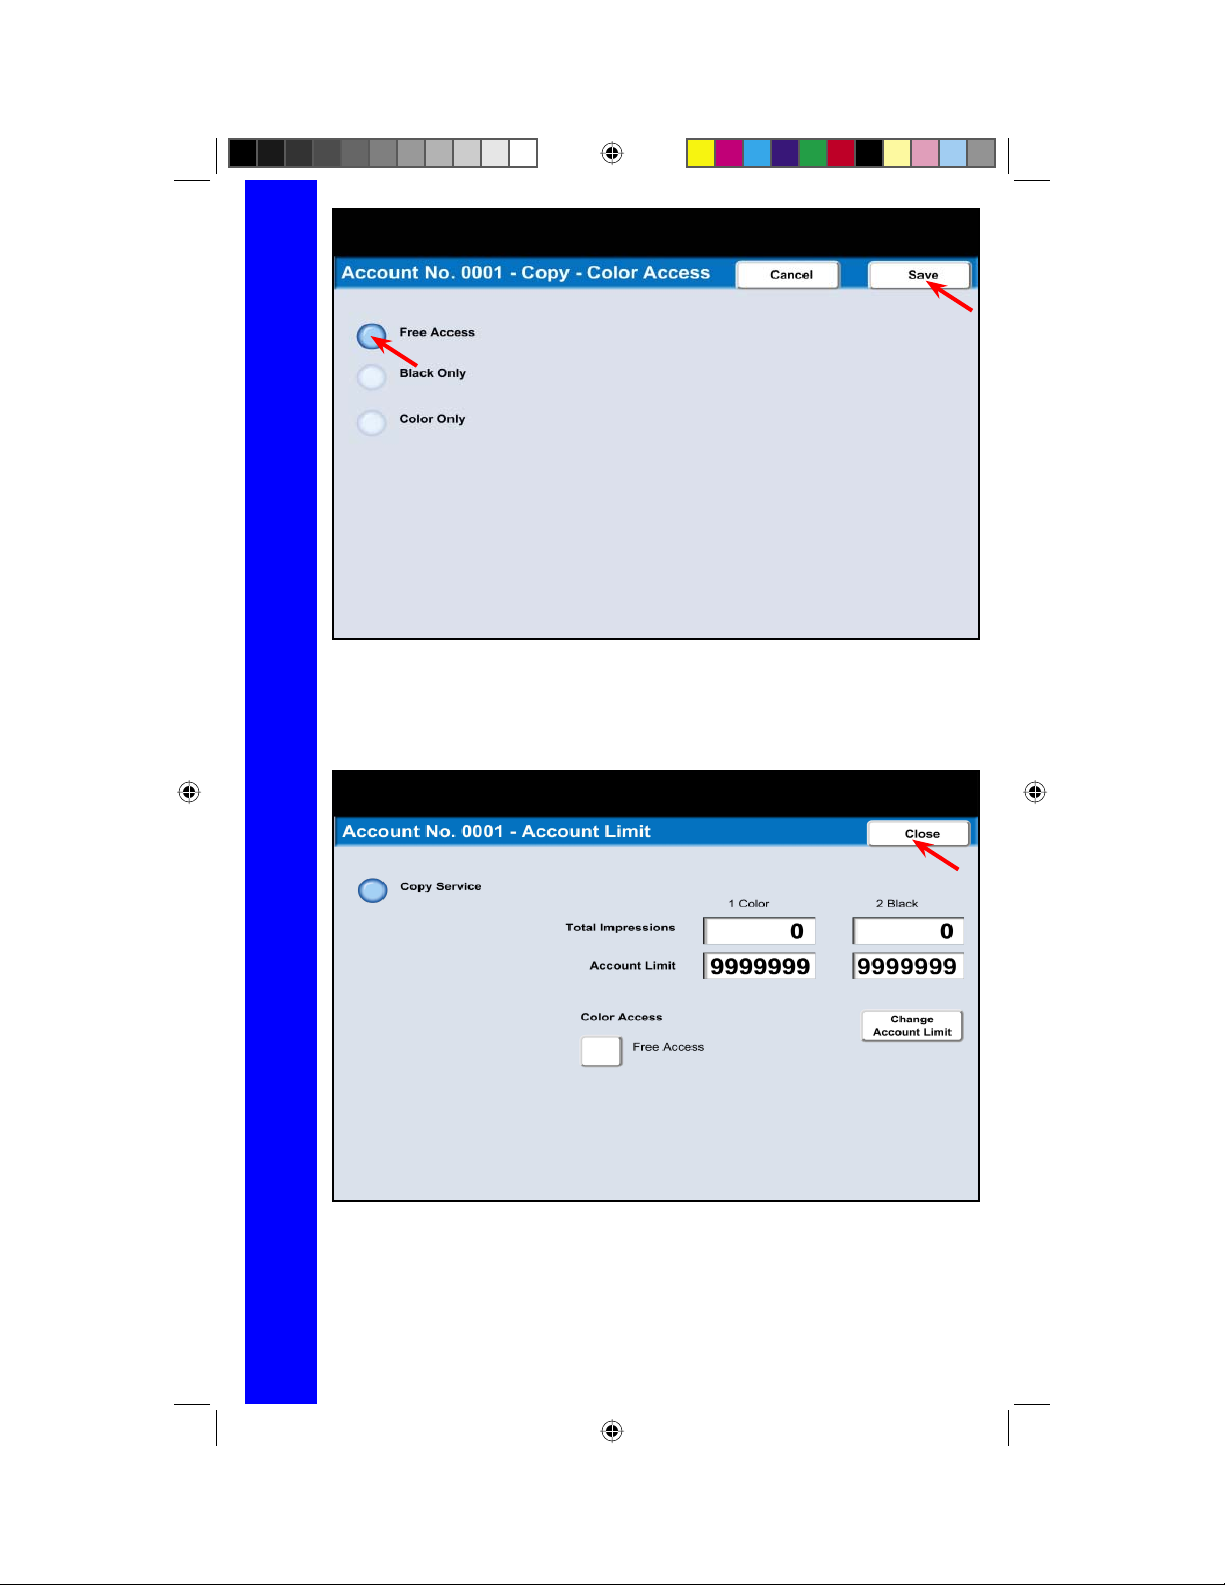
Fig. 21
Press Account Limits.
11 of 15
Fig. 22
Select Color Access.
Auditron Setting for Copy
33
QSG Half.indb 33QSG Half.indb 33 5/31/2005 2:29:06 PM5/31/2005 2:29:06 PM
Page 36
12 of 15
Fig. 23
Select Free Access. Press Save.
Fig. 24
Press Close.
Auditron Setting for Copy
34
QSG Half.indb 34QSG Half.indb 34 5/31/2005 2:29:07 PM5/31/2005 2:29:07 PM
Page 37

Fig. 25
Press Close.
13 of 15
Fig. 26
Press Close.
Auditron Setting for Copy
35
QSG Half.indb 35QSG Half.indb 35 5/31/2005 2:29:09 PM5/31/2005 2:29:09 PM
Page 38

14 of 15
Fig. 27
Press Close.
Fig. 28
Press Exit.
Auditron Setting for Copy
36
QSG Half.indb 36QSG Half.indb 36 5/31/2005 2:29:10 PM5/31/2005 2:29:10 PM
Page 39

Fig. 29
Machine reboots after changes are made.
15 of 15
Auditron Setting for Copy
37
QSG Half.indb 37QSG Half.indb 37 5/31/2005 2:29:11 PM5/31/2005 2:29:11 PM
Page 40

1 of 7
Fig. 1
Press Machine Status.
Fig. 2
Press Billing Meter/Print Report.
System Settings List
38
QSG Half.indb 38QSG Half.indb 38 5/31/2005 2:29:11 PM5/31/2005 2:29:11 PM
Page 41
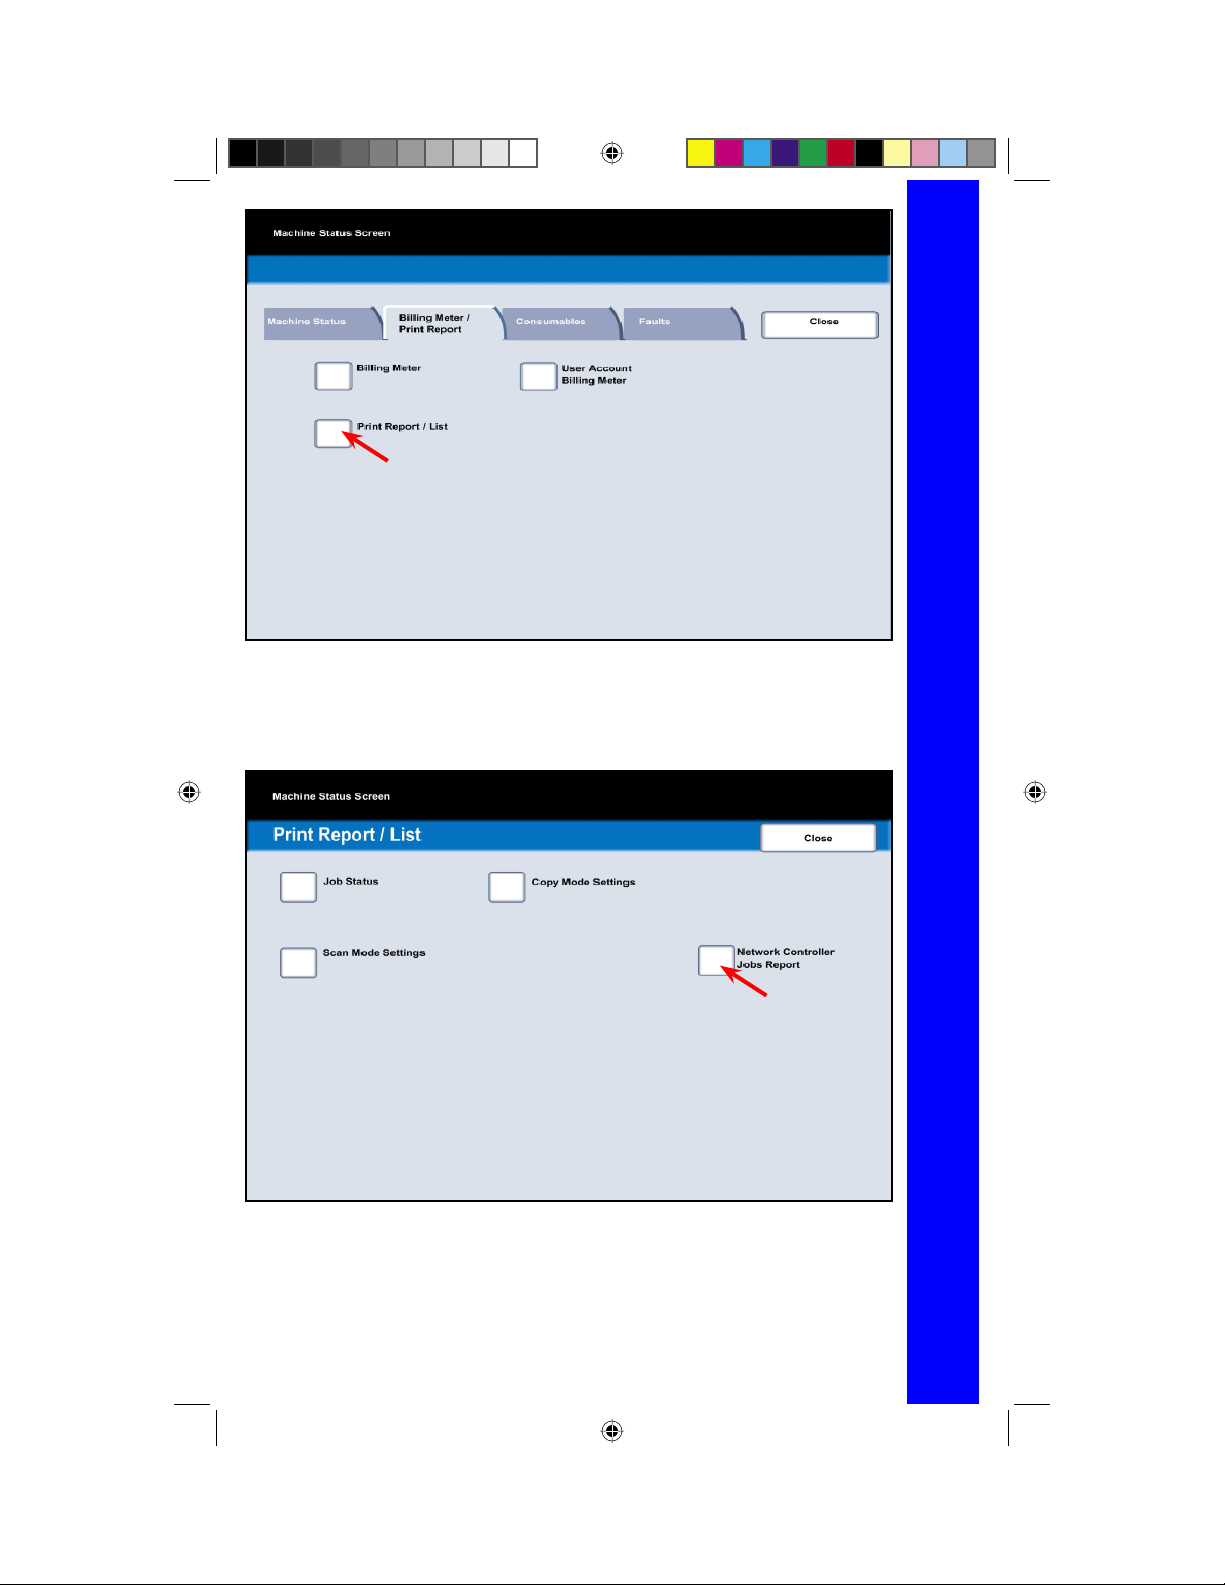
Fig. 3
Press Print Report/List.
2 of 7
Fig. 4
Press Network Controller Jobs Report.
System Settings List
39
QSG Half.indb 39QSG Half.indb 39 5/31/2005 2:29:13 PM5/31/2005 2:29:13 PM
Page 42

3 of 7
Fig. 5
Press System Settings List.
Fig. 6
System Settings List is now selected for printing.
System Settings List
40
QSG Half.indb 40QSG Half.indb 40 5/31/2005 2:29:15 PM5/31/2005 2:29:15 PM
Page 43
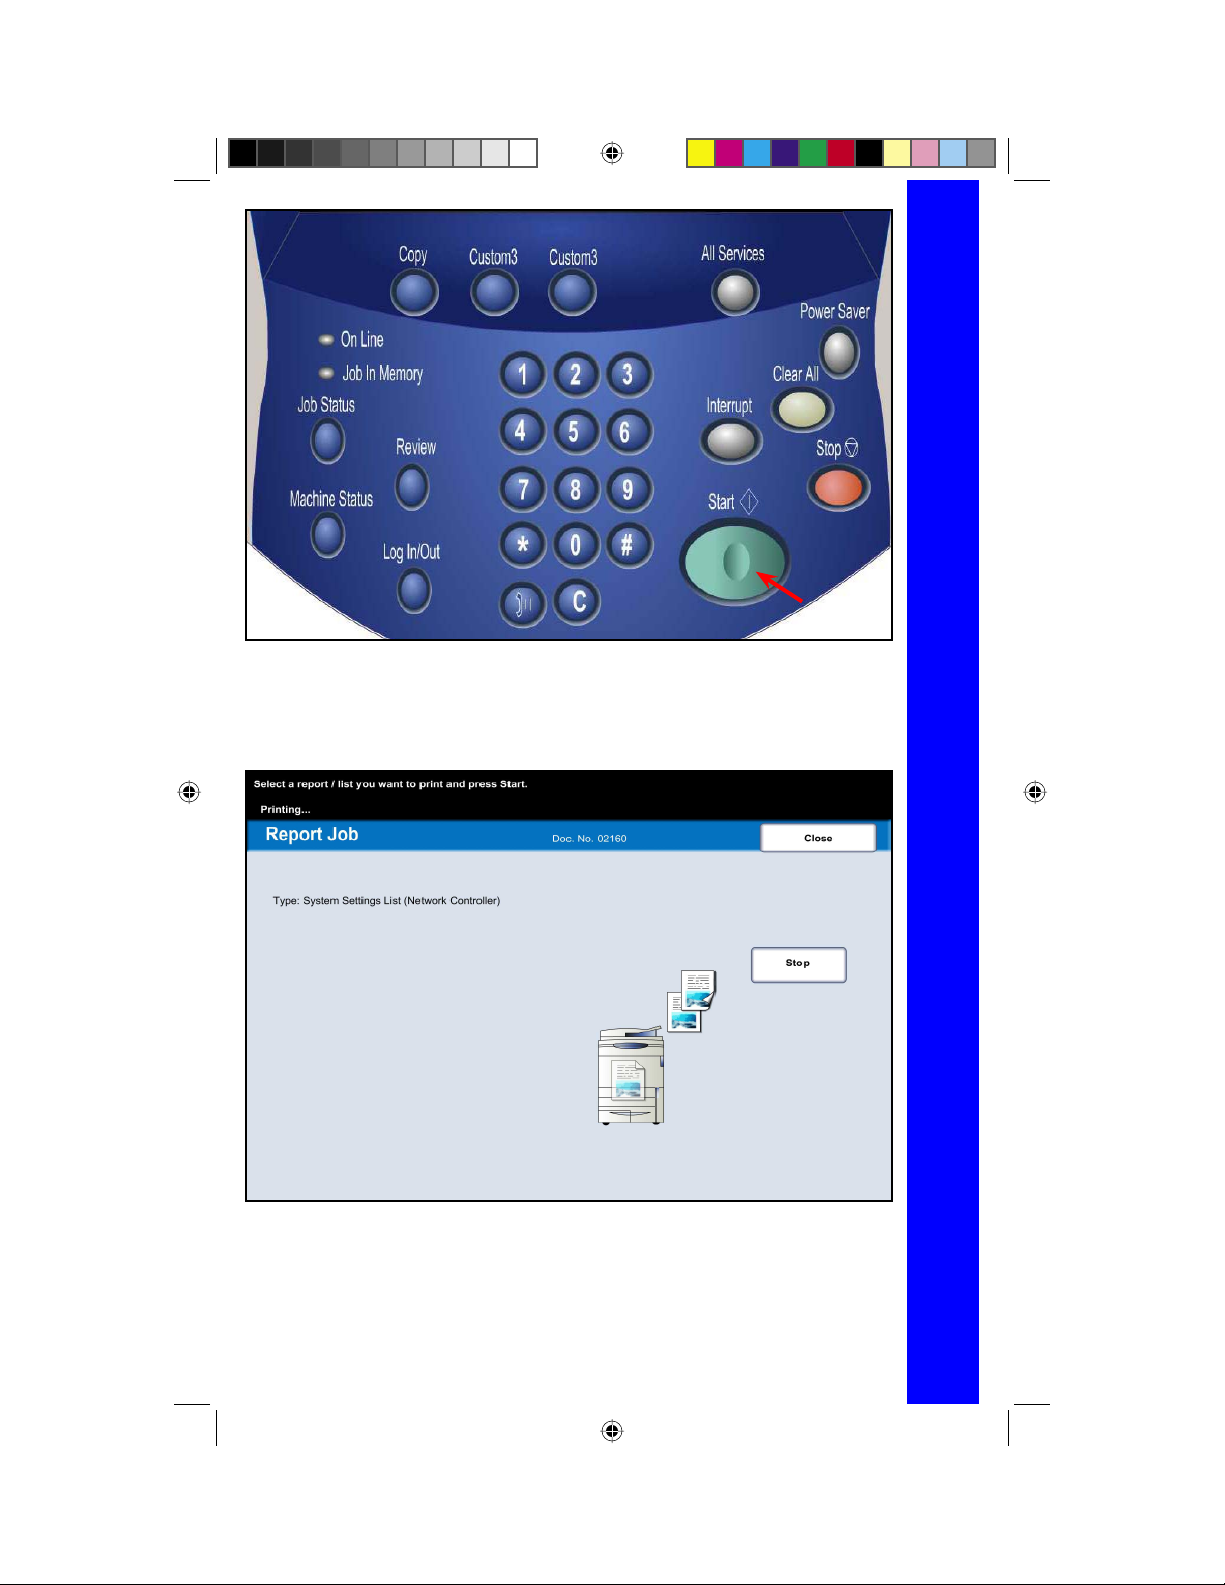
Fig. 7
Press Start.
4 of 7
Fig. 8
The System Settings List report is printing.
System Settings List
41
QSG Half.indb 41QSG Half.indb 41 5/31/2005 2:29:15 PM5/31/2005 2:29:15 PM
Page 44
5 of 7
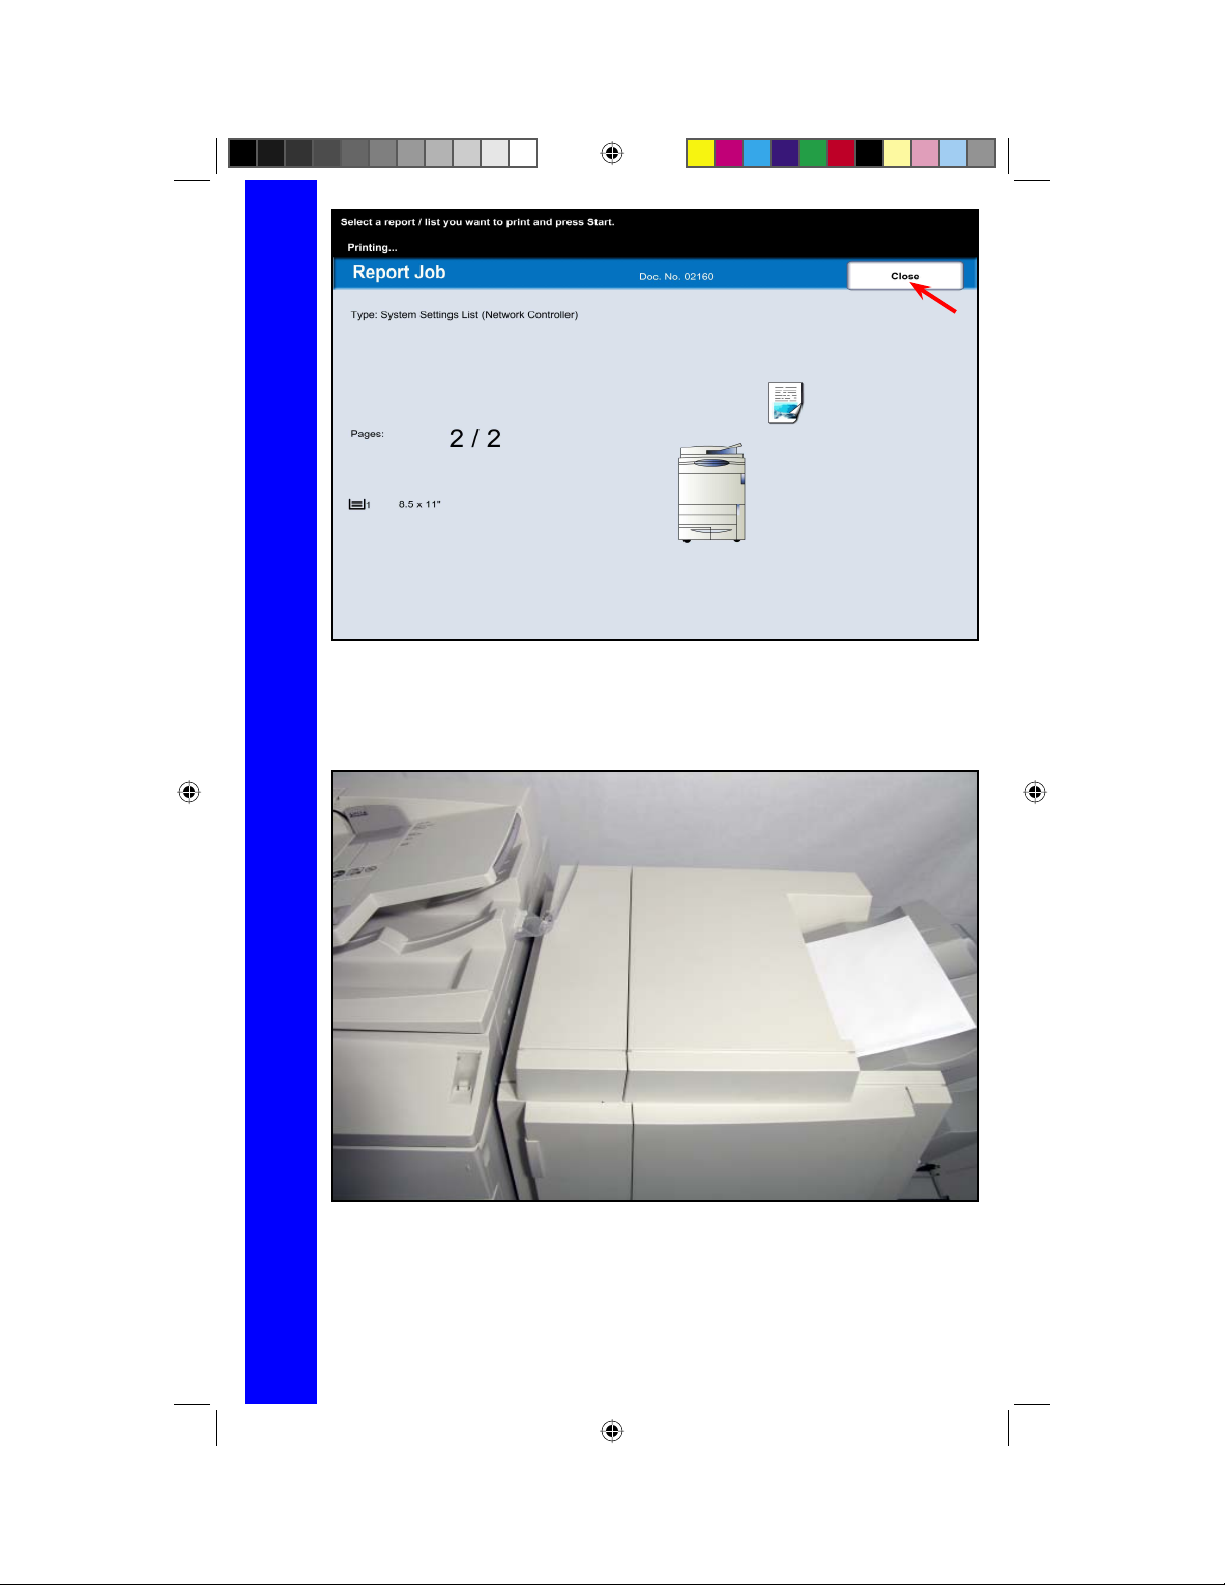
Fig. 9
Press Close several times or the screen will timeout to the main screen
automatically.
Fig. 10
Pick up the System Settings List report.
System Settings List
42
QSG Half.indb 42QSG Half.indb 42 5/31/2005 2:29:16 PM5/31/2005 2:29:16 PM
Page 45

Note:
Please have a copy of your Settings List available when contacting Customer
Support. This may speed up the support process.
6 of 7
System Settings List
43
QSG Half.indb 43QSG Half.indb 43 5/31/2005 2:29:18 PM5/31/2005 2:29:18 PM
Page 46

7 of 7
Sample of System Settings List.
System Settings List
44
QSG Half.indb 44QSG Half.indb 44 5/31/2005 2:29:18 PM5/31/2005 2:29:18 PM
Page 47

Microsoft, MS-DOS, Windows, Windows NT, Microsoft Network, and Windows Server are either trademarks or registered trademarks of
Novell, NetWare, IntranetWare and NDS are registered trademarks of Novell, Inc. in the United States and other countries.
Apple, AppleTalk, EtherTalk, LocalTalk, Macintosh, MacOS and TrueType are trademarks of Apple Computer, Inc., registered in the U.S.
The data saved in the hard disk of the machine may be lost if there is any problem in the hard disk. Xerox is not responsible for any direct
and indirect damages arising from or caused by such data loss.
Xerox is not responsible for any breakdown of machines due to infection of computer virus or computer hacking.
Important
(1) This manual is copyrighted with all rights reserved. Under the copyright laws, this manual may not be copied or modifi ed in whole or part,
without the written consent of the publisher.
(2) Parts of this manual are subject to change without prior notice.
(3) We welcome any comments on ambiguities, errors, omissions, or missing pages.
(4) Never attempt any procedure on the machine that is not specifi cally described in this manual. Unauthorized operation can cause faults
or accidents. Xerox is not liable for any problems resulting from unauthorized operation of the equipment.
An export of this product is strictly controlled in accordance with Laws concerning Foreign Exchange and Foreign Trade of Japan and/or the
export control regulations of the United States.
Xerox and Ethernet are registered trademarks.
QSG Half.indb 45QSG Half.indb 45 5/31/2005 2:29:20 PM5/31/2005 2:29:20 PM
Adobe, Acrobat, PostScript, PostScript3, and PostScript Logo are trademarks of Adobe Systems Incorporated.
HP, HPGL, HPGL/2, and HP-UX are registered trademarks of Hewlett-Packard Corporation.
All product/brand names are trademarks or registered trademarks of the respective holders.
Microsoft Corporation in the United States and/or other countries.
and other countries.
 Loading...