

Page 1

Splash DC Series v4.0
Reference
January 18, 1999
Splash T echnology, Inc.
Sunnyvale, California USA
Page 2

Trademarks and Copyright
Splash and the Splash logo are trademarks of Splash Technology Inc. Apple, Macintosh, LaserWriter, and AppleTalk are registered trademarks of Apple Computer, Inc. DocuColor is a trademark of Xerox, Incorporated. Novell
Netware is a trademark of Novell, Inc. Adobe, the Adobe logo, Adobe Illustrator, PostScript, Adobe Type Manager,
Adobe PageMaker, and Adobe Photoshop are trademarks of Adobe Systems Incorporated, which may be registered
in certain jurisdictions. QuarkXPress is a registered trademark of Quark, Inc. Stuffit Expander Copyright © 1990-
1998. All other brand or product names are trademarks of their respective holders.
Copyright © 1999 Splash Technology, Inc.
PN: 0014713-0102 Last revised: January 18, 1999. Your rights of ownership are subject to the limitations and
restrictions imposed by the copyright laws as outlined below.
PROPRIETARY RIGHTS NOTICE. The digitally encoded machine readable outline data for producing the typefaces provided as part of your laser printer is copyrighted © 1981 Linotype-Hell AG. Copyright © 1993 Adobe System Incorporated. All Rights Reserved. This data is the property of Linotype-Hell AG and Adobe Systems
Incorporated and may not be reproduced, used, displayed, modified, disclosed or transferred without the express
written approval of Linotype-Hell AG and Adobe Systems Incorporated.
LZW Patent Notice:
4,558,302.
U.S. Government Users:
term is defined at 48 C.F.R. 2.101 (OCT 1995), and more specifically “commercial computer software” and “commercial computer software documentation” as such terms are used in 48 C.F.R. 12.212 (SEPT 1995). Consistent
with 48 C.F.R. 12.212 and 48 C.F.R. 227.7202-1 through 227.7202-4 (JUNE 1995), the Licensed System is provided to U.S. Government End Users (a) only as a commercial end item and (b) with only those rights as are granted
to all other End Users pursuant to the terms and conditions herein.
It is against the law to copy, reproduce, or transmit including, without limitation, electronic transmission over any
network any part of the manual or program except as permitted by the Copyright Act of the United States, Title 17,
United States Code. Under the law, cop ying includes translation into another language or format. However, you are
permitted by law to write the contents of the program into the machine memory of your computer so that the program may be executed. You are also permitted by law to make working copies of the program, solely for your own
use, subject to the following restrictions: (1) Working copies must be treated in the same way as the original copy;
(2) If you ever sell, lend, or give away the original copy of the program, all working copies must also be sold, lent,
or given to the same person, or destroyed; (3) No copy (original or working) may be used while any other copy
(original or working) is in use except within the terms of this license. The copyright notice that is on the original
copy of the program must accompany any working copies of the program.
The above is not an inclusive statement of the restrictions imposed on you under the Copyright Act. For a complete
statement of the restrictions imposed on you under the copyright laws of the United States of America, see Title 17,
United States Code.
This Licensed System includes an implementation of LZW licensed under U.S. Patent
The Adobe Licensed System provided with this product is a “commercial item” as that
FCC Compliance
Note: This equipment has been tested and found to comply with the limits for a Class A digital device, pursuant to
Part 15 of the FCC Rules. These limits are designed to provide reasonable protection against harmful interference
when the equipment is operated in a commercial environment. This equipment generates, uses and can radiate radio
frequency energy and, if not installed and used in accordance with the instruction manual, may cause harmful interference to radio communications. Operation of this equipment in a residential area is likely to cause harmful interference in which case the user will be required to correct the interference at his or her own expense.
Shielded cables must be used with this equipment to maintain compliance with FCC regulations.
Page 2 Splash DC Series v4.0 Reference
Page 3
Canadian DOC Notice
This Class A digital apparatus meets all requirements of the Canadian Interference-Causing Equipment Regulations.
CET APPAREIL NUMERIQUE DE LA CLASSE A RESPECTE T OUTES LES EXIGENCES DU REGLEMENT
SUR LE MATÉRIAL BROUILLEUR DU CANADA.
Japanese VCCI Statement
CE Mark
DECLARATION OF CONFORMITY
We, Splash Technology, Inc., declare under our sole responsibility that the Splash products
to which this declaration relates are in conformity with the following standards or other normative documents:
EN55022/CSPR22 CLASS B
EN0082-1/IEC 801-2,3,4
following the provisions of:
89/336/EEC-EMC Directive
Splash Technology, Inc. 555 Del Rey Avenue, Sunnyvale, CA. 94086 USA
The signed and dated Declaration of Conformance is on file at the above address.
Page 3
Page 4

Page 4 Splash DC Series v4.0 Reference
Page 5

Table of Contents
Setting Up Network Printing to Splash. . . . . . . . . . . . . . . . . . . . . . . . . . . . . . . . . . . . . . . .9
Setting Up TCP/IP Direct Printing to Splash . . . . . . . . . . . . . . . . . . . . . . . . . . . . . . . . .10
Configuring the TCP/IP Control Panel . . . . . . . . . . . . . . . . . . . . . . . . . . . . . . . . . . .10
Enabling TCP/IP Printing at the Splash Server . . . . . . . . . . . . . . . . . . . . . . . . . . . . .12
Setting Up a Novell Server Print Queue . . . . . . . . . . . . . . . . . . . . . . . . . . . . . . . . . .14
Setting Up a Windows NT Server Print Queue for Splash . . . . . . . . . . . . . . . . . . . .15
Setting Up NetWare Direct Printing to Splash . . . . . . . . . . . . . . . . . . . . . . . . . . . . . . . .24
Setting Up the Novell Server for Printing to Splash . . . . . . . . . . . . . . . . . . . . . . . . . 24
Setting Up NetWare Direct on the Splash Server . . . . . . . . . . . . . . . . . . . . . . . . . . .27
NetWare Direct Notes . . . . . . . . . . . . . . . . . . . . . . . . . . . . . . . . . . . . . . . . . . . . . . . . 30
Setting up NetWare Directory Service . . . . . . . . . . . . . . . . . . . . . . . . . . . . . . . . . . . . . . 31
Setting Up an NDS Print Queue . . . . . . . . . . . . . . . . . . . . . . . . . . . . . . . . . . . . . . . . 32
Setting the Preferred Network Tree . . . . . . . . . . . . . . . . . . . . . . . . . . . . . . . . . . . . . .32
Setting Up NetWare NDS Direct at the Splash Server . . . . . . . . . . . . . . . . . . . . . . . 33
Calibrating With Splash ColorCal . . . . . . . . . . . . . . . . . . . . . . . . . . . . . . . . . . . . . . . . . .35
Why Calibrate with Splash ColorCal? . . . . . . . . . . . . . . . . . . . . . . . . . . . . . . . . . . . . . . 35
Calibrating the Printer/Copier . . . . . . . . . . . . . . . . . . . . . . . . . . . . . . . . . . . . . . . . . . . .36
Inverting the Calibration Image . . . . . . . . . . . . . . . . . . . . . . . . . . . . . . . . . . . . . . . .42
Creating Calibration Sets . . . . . . . . . . . . . . . . . . . . . . . . . . . . . . . . . . . . . . . . . . . . .43
Verifying Printer Color Accuracy . . . . . . . . . . . . . . . . . . . . . . . . . . . . . . . . . . . . . . . . . . 45
Setting the Verify Against Profile . . . . . . . . . . . . . . . . . . . . . . . . . . . . . . . . . . . . . . .46
Using ColorCal Profiles with Splash . . . . . . . . . . . . . . . . . . . . . . . . . . . . . . . . . . . . . . .47
Setting the Custom and Pass Through Profiles . . . . . . . . . . . . . . . . . . . . . . . . . . . . . . . .49
CMYK Custom Profiles . . . . . . . . . . . . . . . . . . . . . . . . . . . . . . . . . . . . . . . . . . . . . . 52
Pass Through Profiles . . . . . . . . . . . . . . . . . . . . . . . . . . . . . . . . . . . . . . . . . . . . . . . .53
Creating a Custom Color Profile . . . . . . . . . . . . . . . . . . . . . . . . . . . . . . . . . . . . . . . . . .54
Expert-Level Editing with ColorCal . . . . . . . . . . . . . . . . . . . . . . . . . . . . . . . . . . . . . 56
Contents Page 5
Page 6

Splash ColorCal Notes . . . . . . . . . . . . . . . . . . . . . . . . . . . . . . . . . . . . . . . . . . . . . . . . . . 57
Troubleshooting Scanner Problems . . . . . . . . . . . . . . . . . . . . . . . . . . . . . . . . . . . . . 57
Failure to Accurately Calibrate . . . . . . . . . . . . . . . . . . . . . . . . . . . . . . . . . . . . . . . . . 57
Managing the Profiles Folders . . . . . . . . . . . . . . . . . . . . . . . . . . . . . . . . . . . . . . . . . 58
Setting Up the Splash Web Queue Manager . . . . . . . . . . . . . . . . . . . . . . . . . . . . . . . . . . 59
Installing the Splash Web Queue Manager . . . . . . . . . . . . . . . . . . . . . . . . . . . . . . . . . . 60
Upgrading the Splash Server . . . . . . . . . . . . . . . . . . . . . . . . . . . . . . . . . . . . . . . . . . 61
Installing the WebSTAR Software . . . . . . . . . . . . . . . . . . . . . . . . . . . . . . . . . . . . . . 62
Installing the Splash Web Queue Manager Software . . . . . . . . . . . . . . . . . . . . . . . . 63
Setting Up the Web Queue Manager . . . . . . . . . . . . . . . . . . . . . . . . . . . . . . . . . . . . . . . 64
Configuring the TCP/IP Control Panel . . . . . . . . . . . . . . . . . . . . . . . . . . . . . . . . . . . 64
Enabling Web Access at the Splash Server . . . . . . . . . . . . . . . . . . . . . . . . . . . . . . . 66
Controlling Remote Queue
Management Privileges . . . . . . . . . . . . . . . . . . . . . . . . . . . . . . . . . . . . . . . . . . . . . . . . . 67
Using the Printer/Copier . . . . . . . . . . . . . . . . . . . . . . . . . . . . . . . . . . . . . . . . . . . . . . . . . . 69
Switching Between Printer and Copier Modes . . . . . . . . . . . . . . . . . . . . . . . . . . . . . . . 69
Changing the Paper Size in a Tray . . . . . . . . . . . . . . . . . . . . . . . . . . . . . . . . . . . . . . . . . 70
LEF Paper Substitution Notes . . . . . . . . . . . . . . . . . . . . . . . . . . . . . . . . . . . . . . . . . . . . 70
Correcting Out of Paper Errors . . . . . . . . . . . . . . . . . . . . . . . . . . . . . . . . . . . . . . . . . . . 71
Printing 12" x 18" Images . . . . . . . . . . . . . . . . . . . . . . . . . . . . . . . . . . . . . . . . . . . . . . . 71
DocuColor Pro Fuser Web Notes . . . . . . . . . . . . . . . . . . . . . . . . . . . . . . . . . . . . . . . . . . 71
DocuColor Pro Toner Dispenser Notes . . . . . . . . . . . . . . . . . . . . . . . . . . . . . . . . . . . . . 72
DocuColor Pro Servicing Notes . . . . . . . . . . . . . . . . . . . . . . . . . . . . . . . . . . . . . . . . . . 72
DocuColor Pro Failure Affects Server . . . . . . . . . . . . . . . . . . . . . . . . . . . . . . . . . . . . . . 72
Other DocuColor Pro Notes . . . . . . . . . . . . . . . . . . . . . . . . . . . . . . . . . . . . . . . . . . . . . . 72
A6 Message on DocuColor Pro Status Panel . . . . . . . . . . . . . . . . . . . . . . . . . . . . . . 72
DocuColor Pro Bookletmaker Not Supported . . . . . . . . . . . . . . . . . . . . . . . . . . . . . 72
Using a High-Capacity Feeder . . . . . . . . . . . . . . . . . . . . . . . . . . . . . . . . . . . . . . . . . . . . 73
Setting the DocuColor Pro Printer Timer . . . . . . . . . . . . . . . . . . . . . . . . . . . . . . . . . . . 73
Disconnecting the Splash Interface Cables . . . . . . . . . . . . . . . . . . . . . . . . . . . . . . . . . . 75
Page 6 Splash DC Series v4.0 Reference
Page 7

Splash Specifications. . . . . . . . . . . . . . . . . . . . . . . . . . . . . . . . . . . . . . . . . . . . . . . . . . . . . .77
Features . . . . . . . . . . . . . . . . . . . . . . . . . . . . . . . . . . . . . . . . . . . . . . . . . . . . . . . . . . . . . .77
Maximum Printing Speed . . . . . . . . . . . . . . . . . . . . . . . . . . . . . . . . . . . . . . . . . . . . . . . .78
Supported Paper Sizes . . . . . . . . . . . . . . . . . . . . . . . . . . . . . . . . . . . . . . . . . . . . . . . . . .79
Supported Software Applications . . . . . . . . . . . . . . . . . . . . . . . . . . . . . . . . . . . . . . . . . .80
List of Fonts. . . . . . . . . . . . . . . . . . . . . . . . . . . . . . . . . . . . . . . . . . . . . . . . . . . . . . . . . . . . .81
Splash Error Messages. . . . . . . . . . . . . . . . . . . . . . . . . . . . . . . . . . . . . . . . . . . . . . . . . . . .87
Installation Messages . . . . . . . . . . . . . . . . . . . . . . . . . . . . . . . . . . . . . . . . . . . . . . . . . . .87
Alphabetical Listing of Error Messages . . . . . . . . . . . . . . . . . . . . . . . . . . . . . . . . . . . . . 87
Splash File Locations . . . . . . . . . . . . . . . . . . . . . . . . . . . . . . . . . . . . . . . . . . . . . . . . . . . . 107
Splash Diagnostics. . . . . . . . . . . . . . . . . . . . . . . . . . . . . . . . . . . . . . . . . . . . . . . . . . . . . . .109
Before Running Splash Diagnostics . . . . . . . . . . . . . . . . . . . . . . . . . . . . . . . . . . . . . . .109
Running the Splash Diagnostics Utility . . . . . . . . . . . . . . . . . . . . . . . . . . . . . . . . . . . . 109
Returning the System to Normal . . . . . . . . . . . . . . . . . . . . . . . . . . . . . . . . . . . . . . . 111
Troubleshooting After a Completed Test . . . . . . . . . . . . . . . . . . . . . . . . . . . . . . . . . . .111
Adobe PostScript Language Printer Addendum. . . . . . . . . . . . . . . . . . . . . . . . . . . . . .113
Index. . . . . . . . . . . . . . . . . . . . . . . . . . . . . . . . . . . . . . . . . . . . . . . . . . . . . . . . . . . . . . . . . . 133
Contents Page 7
Page 8

Page 8 Splash DC Series v4.0 Reference
Page 9

Setting Up Network Printing to Splash
In this section:
Setting Up TCP/IP Direct Printing to Splash.................................... 10
Configuring the TCP/IP Control Panel ............................................. 10
Enabling TCP/IP Printing at the Splash Server................................ 12
Setting Up a Novell Server Print Queue .......................................... 14
Setting Up a Windows NT Server Print Queue for Splash...............15
Setting Up NetWare Direct Printing to Splash ................................ 24
Setting Up the Novell Server for Printing to Splash.........................24
Setting Up NetWare Direct on the Splash Server............................ 27
NetWare Direct Notes ..................................................................... 30
The Splash DC Series Server makes it easy for clients on a TCP/IP or Novell
NetWare network to print to the Xerox or Fuji Xerox copier. No AppleTalk bridge
software is needed.
For IPX printing from Novell NetWare, Splash creates a native Novell IPX
connection from the Splash Server to the Novell server. NetWare Direct delivers
print jobs from a print queue on the Novell NetWare server to the Splash Server for
processing. Once NetWare Direct is set up and activated, it operates automatically
on the Splash Server each time a Novell client prints to the designated queue on the
Novell server. Splash NetWare Direct is simple to set up and supports all Novell
Ethernet frame types.
When TCP/IP Direct is enabled at the Splash Server , the server becomes a network
printer. Splash accepts LPR/LPD print jobs and jobs from TCP/IP print queues set
up on Windows NT or Novell NetWare servers. In addition, clients on a TCP/IP
network can send TIFF, EPS, PDF, and text based PostScript files to the Splash
Server for printing.
Setting Up Network Printing to Splash Page 9
Page 10

All software needed for both TCP/IP and IPX printing is automatically installed
when you install the Splash Server software (pre-installed on Splash DC Servers).
The Enterprise Networking software includes one control panel and four system
extension files, which are automatically installed in the Mac OS System Folder
during Splash installation.
Setting Up TCP/IP Direct Printing to Splash
This section describes how to set up the Splash Server to receive print jobs from
clients on a TCP/IP network. To do this you need to connect the Splash Server to
the TCP/IP network using the appropriate network cable, and set up the TCP/IP
control panel. You can then enable TCP/IP print services in the Splash Server
application preferences.
Note:
TCP/IP, IPX, and AppleTalk networking can all run simultaneously on the
same cable, or on different cables. For example, you can run AppleT alk networking
on Ethernet and IPX networking on TokenRing at the same time.
Configuring the TCP/IP Control Panel
Use the TCP/IP control panel to set up an Internet address for the Splash Server.
You will need to assign the Splash Server a static Internet address so clients can
reliably locate the Splash Server on the network. (A static IP address is required if
you set up the server to use the Splash Web Queue Manager option.)
Before you begin, you need to have all address information available. Obtain a
static Internet address (and subnet mask number if needed) and name server address
from your network administrator.
Page 10 Splash DC Series v4.0 Reference
Page 11
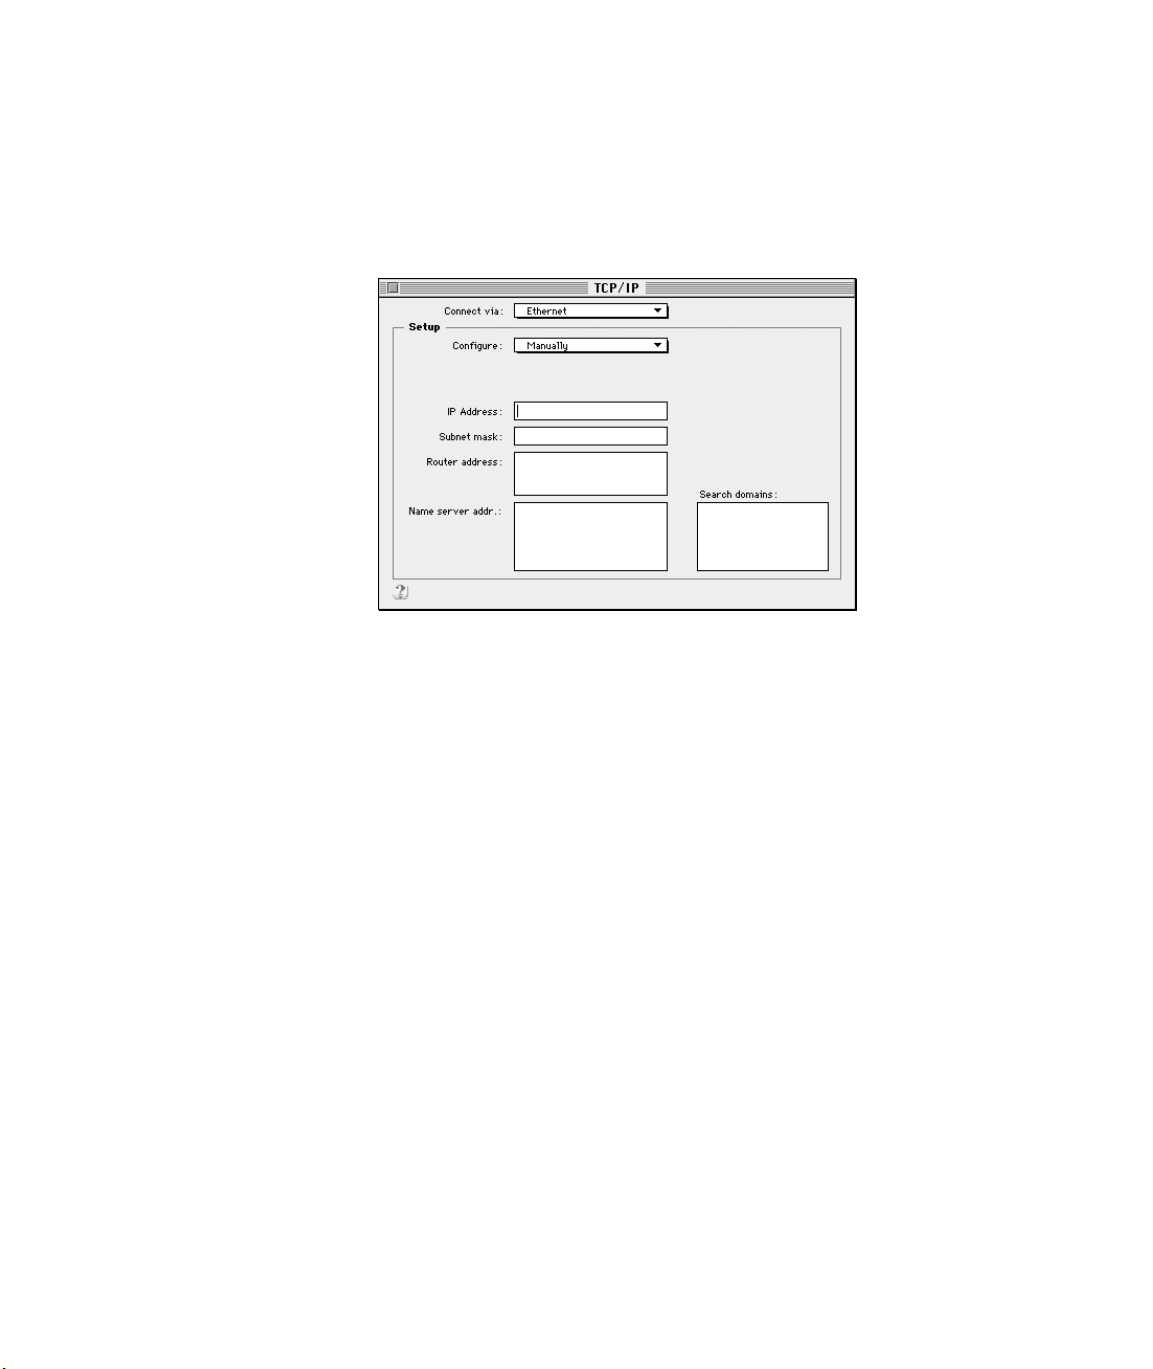
To set up an Internet address for the Splash Server:
1.
At the Splash Server, point to Control Panels in the Apple menu, then select
TCP/IP in the submenu.
The TCP/IP control panel appears.
2.
Choose the network connection type for the Splash Server’ s TCP/IP netw ork in
the
Connect via
3.
Select “Manually” in the
menu.
Configure
menu.
4.
Enter the
5.
Enter a
address information for some networks.
6.
Enter the
addresses for two or more groups of network devices. The router then uses
the list of addresses to direct network data to the appropriate location on the
network. To enter two or more router addresses, press the Return key after you
enter each address.
7.
Enter a
(for example, design.corp.com).
8.
When you have finished entering network information, close the TCP/IP
control panel. A dialog box asks you to confirm the new setup. Click OK.
You are ready to enable TCP/IP printing for the Splash Server.
IP Address
Subnet mask
Router address
Name server address
for the Splash Server.
number if needed. A subnet mask provides additional
if needed. A network router maintains a list of IP
for the DNS server on your network
Setting Up Network Printing to Splash Page 11
Page 12
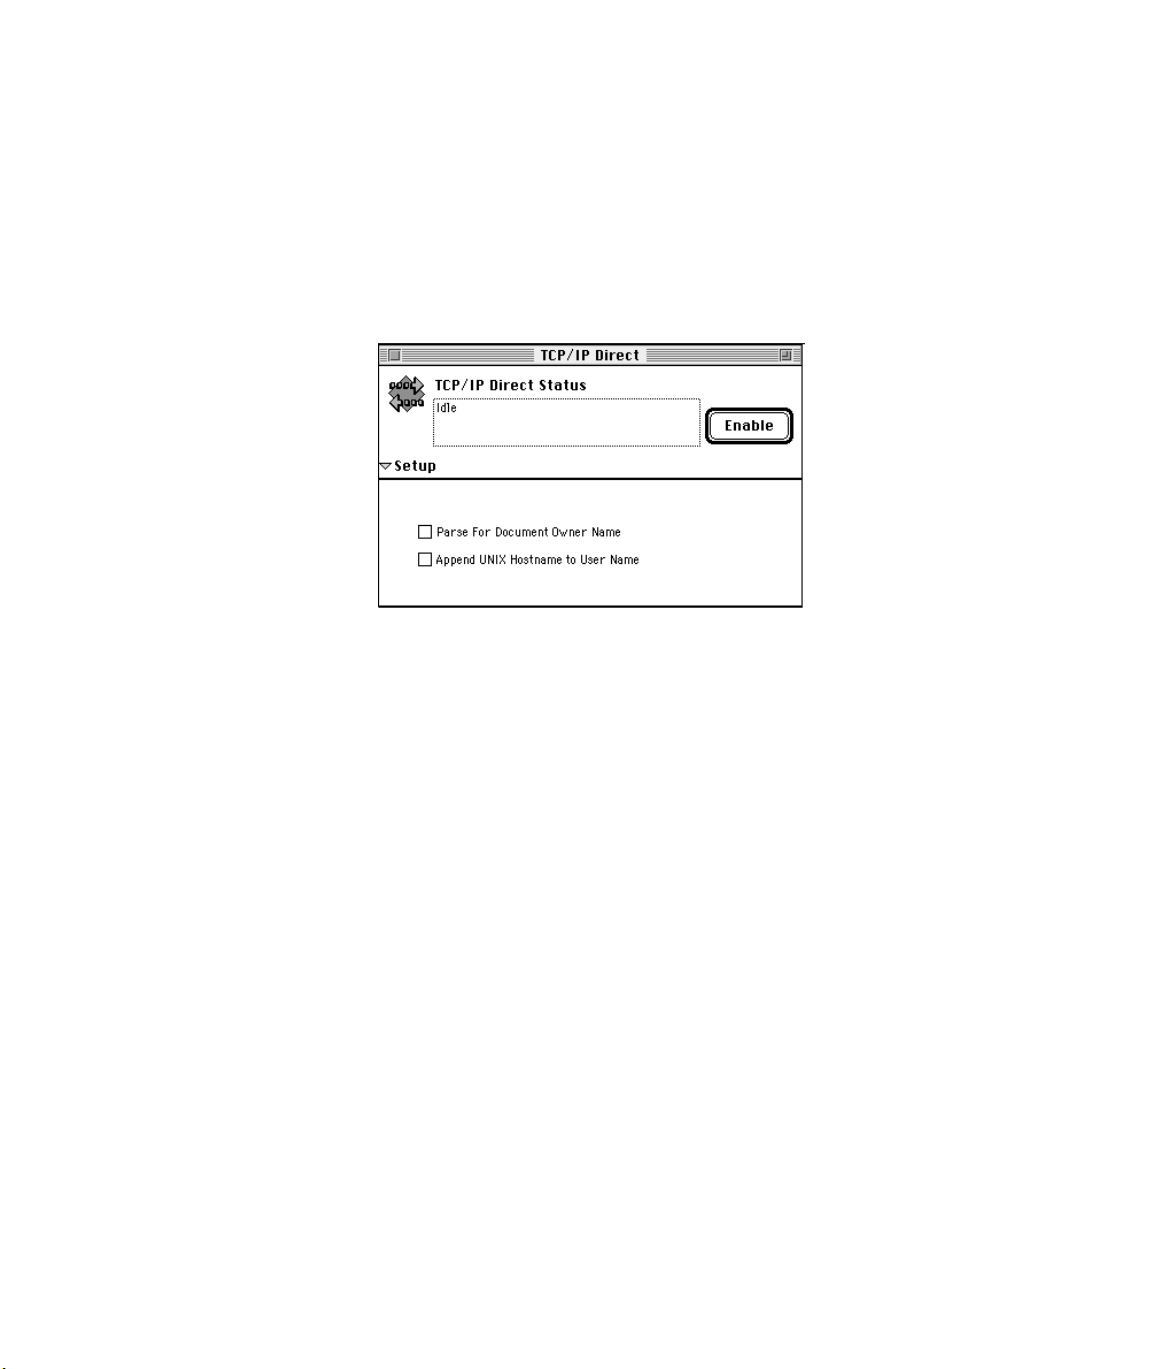
Enabling TCP/IP Printing at the Splash Server
After you set up the TCP/IP control panel, you can enable TCP/IP direct printing in
the Splash Server application. To do this:
1.
Start the Splash Server application.
2.
Choose Enterprise Networking from the Server menu. The TCP/IP Direct
window appears.
Note:
The NetWare Direct window appears also when you choose Enterprise
Networking. For information about how to use the NetWare Direct window to
set up Splash for IPX printing, see page 24.
3.
Click
Enable
.
4.
Click on the Splash Server window to bring the Splash Server application to
the foreground.
5.
Choose
appear.
Preferences
from the Server menu. The Splash Server Preferences
Page 12 Splash DC Series v4.0 Reference
Page 13
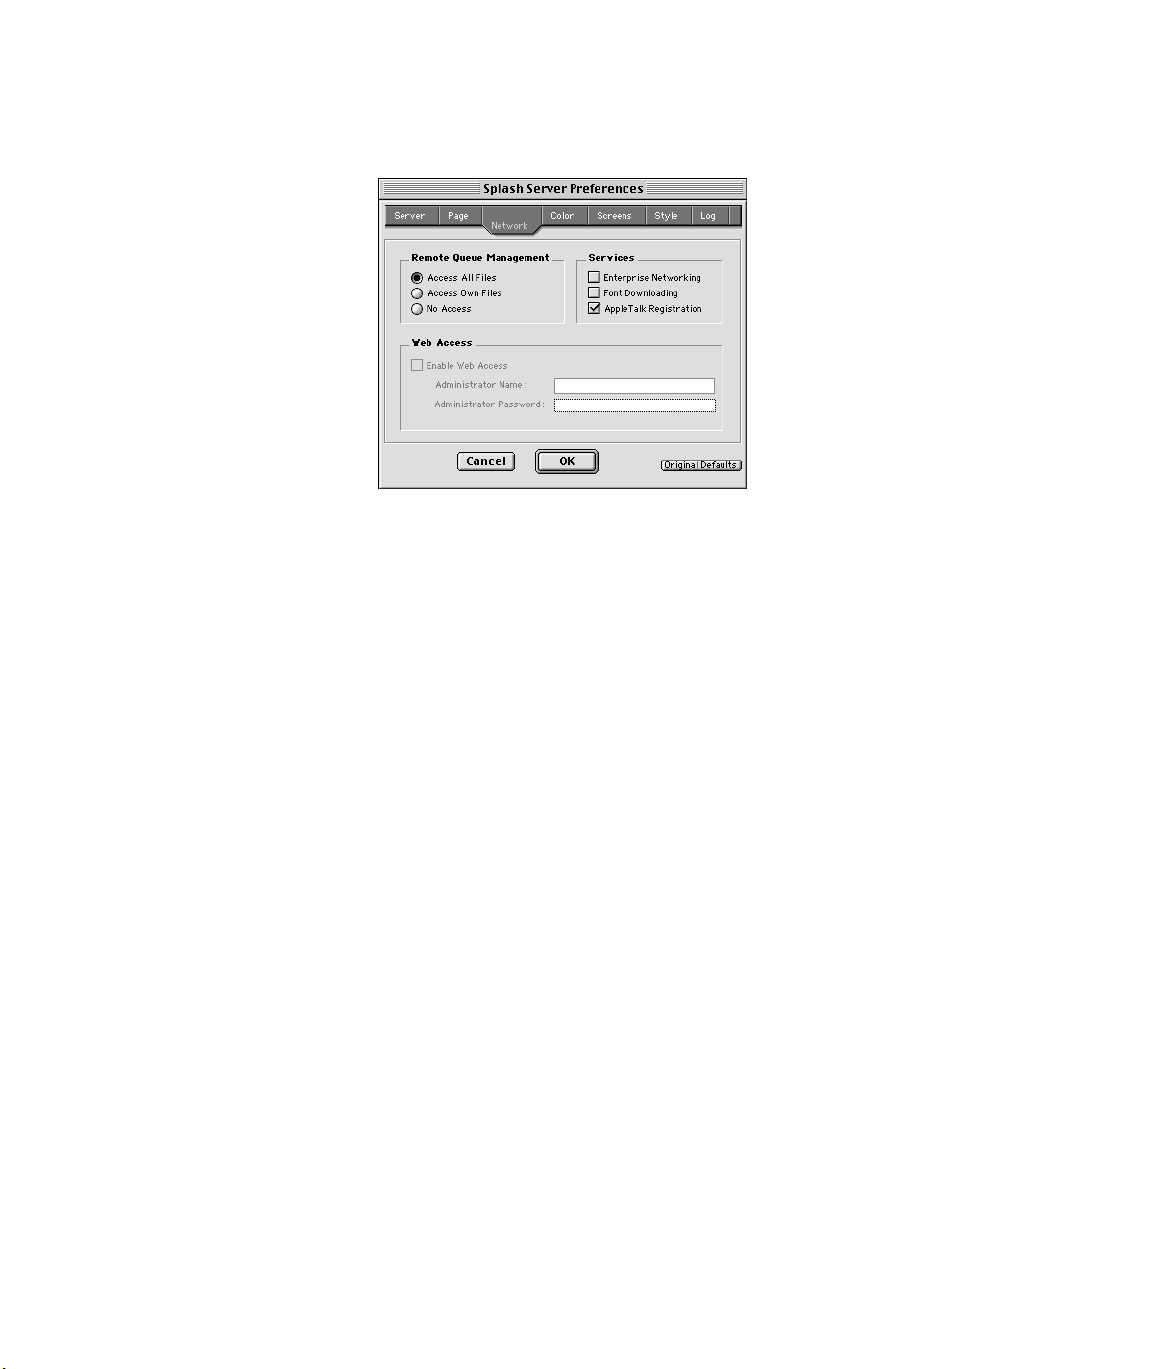
6.
Click Network at the top of the window to see Splash Network preferences.
7.
Select the Enterprise Networking checkbox, then click OK.
Splash is ready to receive network print jobs from TCP/IP clients.
Setting TCP/IP Direct Options
You can select the following options in the TCP/IP Direct window.
Note:
These options are unavailable when TCP/IP is enabled. To change an option,
first click Disable.
Parse For Document Owner Name
■
When selected, the Document Owner name is extracted from each print job as
it is received at the Splash Server. When this option is not selected, Enterprise
Networking determines the user name from the network connection.
■
Append UNIX Hostname to User Name
When selected, the network host name is added to the print job’s owner name
that appears in the print queue and job log at the Splash Server. For example,
when the user “Diane” prints from the UNIX host “Santana” the print job’s
owner name is “Diane@Santana.” When this option is not selected, the print
job’s owner name is “Diane.” For most situations, do not select this option.
Note:
This option is useful for UNIX environments where all users share the
same username, such as “root.”
Setting Up Network Printing to Splash Page 13
Page 14

Restricting TCP/IP Printing to Specific Machines
The Splash Server can be set up to accept TCP/IP print jobs from only the machines
you specify in the “Hosts.LPD” file. This file is located in the Extras folder within
the Splash Folder on the Splash Server. You can edit the Hosts.LPD file with any
text editor (such as SimpleText) to enable TCP/IP printing from only specific host
names, IP addresses, or ranges of IP addresses. This allows print access control at
the individual, group, and subnet levels. Specific examples of how to set up host
names are provided in the Hosts.LPD file on the Splash Server.
Setting Up a Novell Server Print Queue
This section describes how to set up a print queue on a Novell NetWare server for
printing to Splash using TCP/IP. The PCONSOLE Quick Setup option creates a
print queue object, a printer object, and a print server if one does not exist.
To set up a Novell NetWare print queue:
1.
From a workstation, log in to the server as a user with sufficient privileges to
create a print queue (Admin or Supervisor).
2.
From the client workstation, run PCONSOLE.EXE in SYS:PUBLIC
(D:\PUBLIC).
Note:
The root directory name or drive may be different for your computer.
3.
Select “Quick Setup.” PCONSOLE prompts you for information about the
print queue.
4.
Enter a Print Server name if prompted for one.
5.
Enter Print Queue and Printer names.
6.
Specify the print Queue volume.
7.
Choose the banner type (“No banner” is the recommended setting).
8.
Be sure to set the Printer Type field to “UNIX printer.” This causes the host
name and printer name fields to appear.
9.
Enter the Host Name for the Splash Server (the name server address specified
in the TCP/IP control panel at the Splash Server) or the static IP address for the
server .
10.
Enter the Printer Name “SplashLPD” when prompted.
11.
Press Enter to complete setup. PCONSOLE prompts you to save the new print
queue settings. Choose Yes.
Page 14 Splash DC Series v4.0 Reference
Page 15
Novell NetWare print queue setup for the Splash Server is complete.
Setting Up a Windows NT Server Print Queue for Splash
This section describes how to set up a TCP/IP print queue for Splash on a computer
running Microsoft W indows NT (4.0 or later). You can set up the Splash print queue
on either a Windows NT Server or a Windows NT Workstation system.
After the Splash TCP/IP print queue setup is complete, it becomes easy for other
Windows NT and Windows 95/98 clients on the network to use the print queue to
send jobs to Splash.
Note:
You must set up and enable TCP/IP Direct at the Splash Server before you
can set up an LPR print queue for Splash on W indo ws NT. W indo ws NT will report
an error during print queue setup if the Splash Server is not identified as an LPD
server on the network.
Enabling the Microsoft TCP/IP Print Service
Before you can connect to the Splash Server for printing over TCP/IP, you must
first enable TCP/IP print services in the Network control panel. To do this:
1.
Click the Start button, point to Settings, then choose Control Panel.
2.
Double-click the Network control panel to open it.
Setting Up Network Printing to Splash Page 15
Page 16
3.
Click the Services tab.
If “Microsoft TCP/IP Printing” appears in the Network Services list, this
service is already enabled. Close the Network control panel, then go on to
“Setting Up the Splash Server TCP/IP Print Queue” on page 17.
If this service does not appear, you must add it to the list of network services.
4.
Click Add. A list of the network services you can add appears.
5.
Select “Microsoft TCP/IP Printing” in the Network Service list, then click OK.
Page 16 Splash DC Series v4.0 Reference
Page 17
Windows NT displays a message. Windows NT must copy files needed to set
up TCP/IP printing from the Windows NT system CD-ROM.
6.
Enter the drive letter for your CD-ROM drive, place the Windows NT system
CD-ROM in the drive, then click Continue.
7.
When setup is complete, close the Network control panel.
8.
Restart Windows NT to enable the new network service.
Setup for TCP/IP printing from Windows NT is complete.
Setting Up the Splash Server TCP/IP Print Queue
Follow these steps to connect to the Splash Server and create a print queue that
sends jobs to Splash over the TCP/IP network. You need the following items to
complete this procedure:
■
TCP/IP address for the Splash Server
■
Splash CD
(provided with the Splash Server)
To set up the Splash TCP/IP print queue:
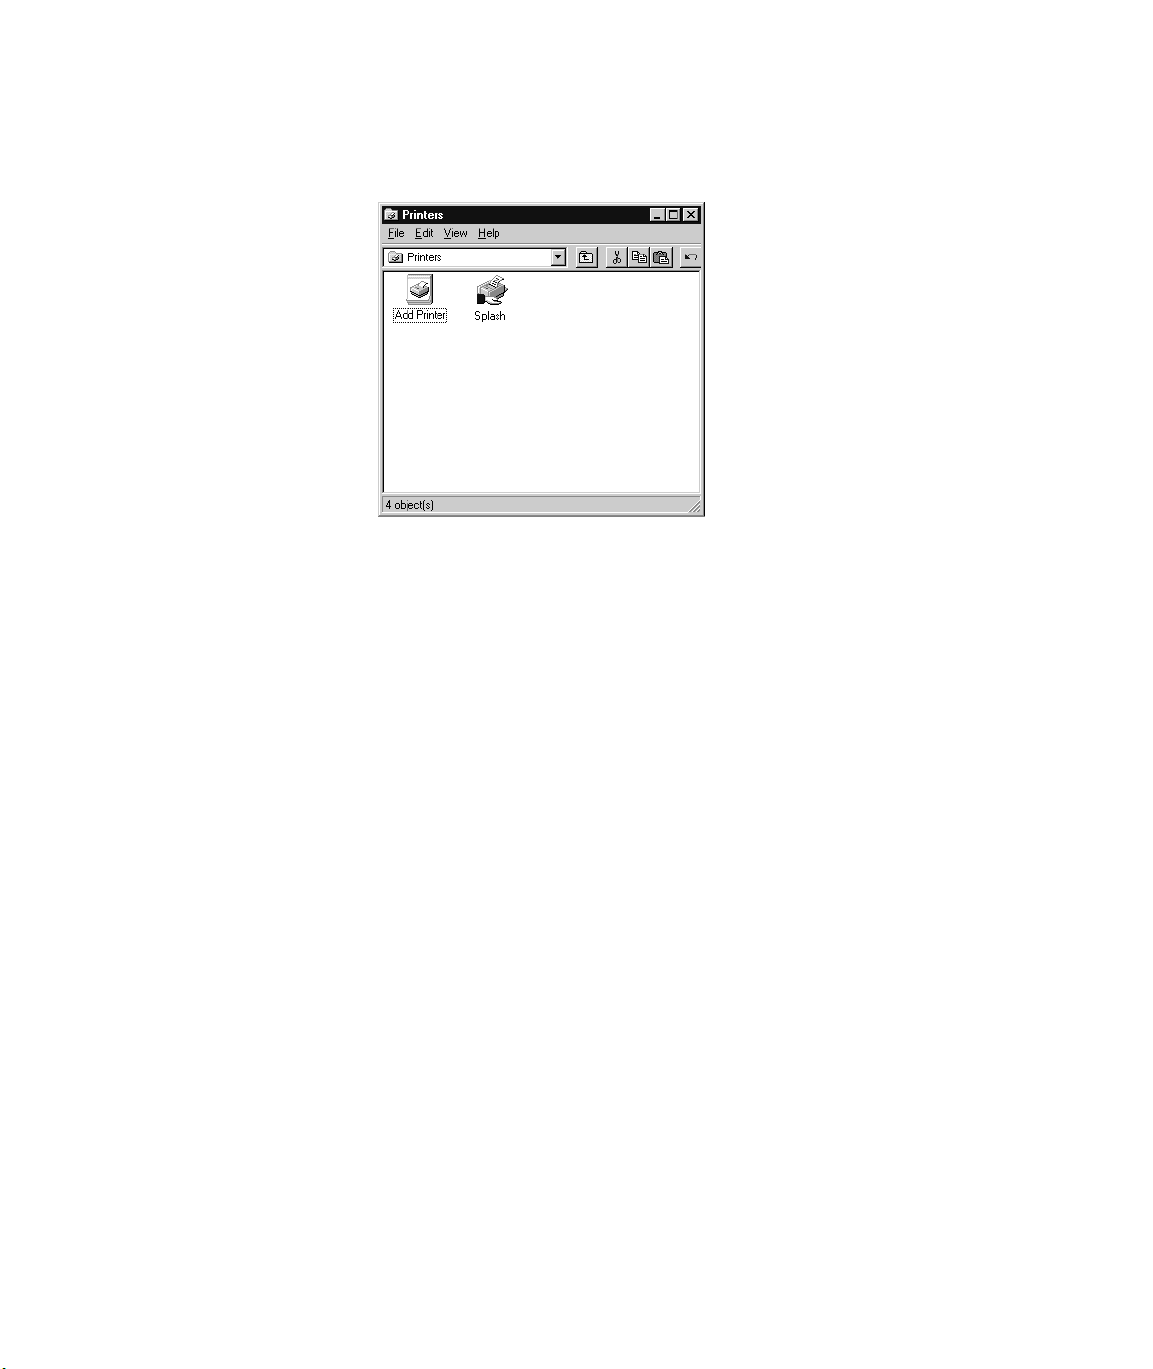
1.
Click the Start button, point to Settings, then choose Printers.
The Printers control panel appears.
Setting Up Network Printing to Splash Page 17
Page 18

2.
Click Add Printer. The Windows NT Add Printer Wizard appears.
3.
Select “My Computer” then click Next. A list of printer ports appears.
You must add an LPR port to support TCP/IP printing.
Page 18 Splash DC Series v4.0 Reference
Page 19
4.
Click Add Port. A list of printer port types appears.
5.
Select “LPR Port” then click New Port.
The Add Printer Wizard asks you to provide the TCP/IP address for the
Splash Server.
6.
Enter the address for the Splash Server and the name “SplashLPD” for the
server. (The name appears in the list of ports in the Add Printer Wizard.) Click
OK to continue.
The Splash Server TCP/IP address appears as a new port in the list.
Setting Up Network Printing to Splash Page 19
Page 20
7.
Be sure the Splash TCP/IP port is selected, then click Next.
8.
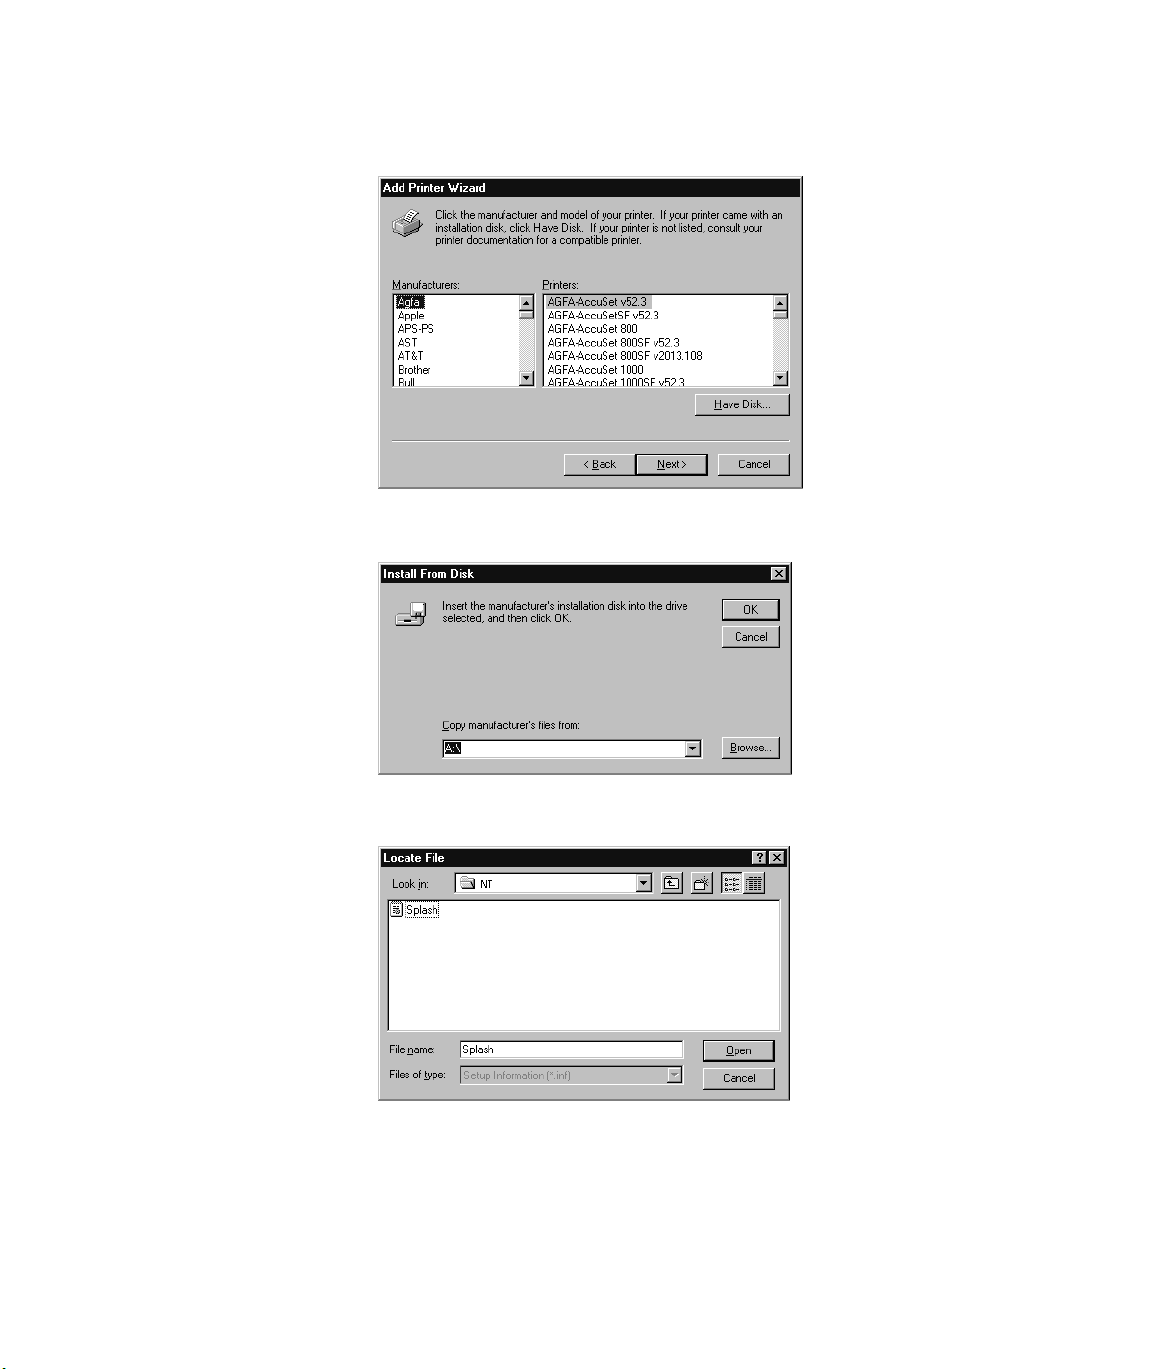
Click Have Disk.
9.
Insert the
Splash CD
in the computer, then click Browse.
Page 20 Splash DC Series v4.0 Reference
Page 21
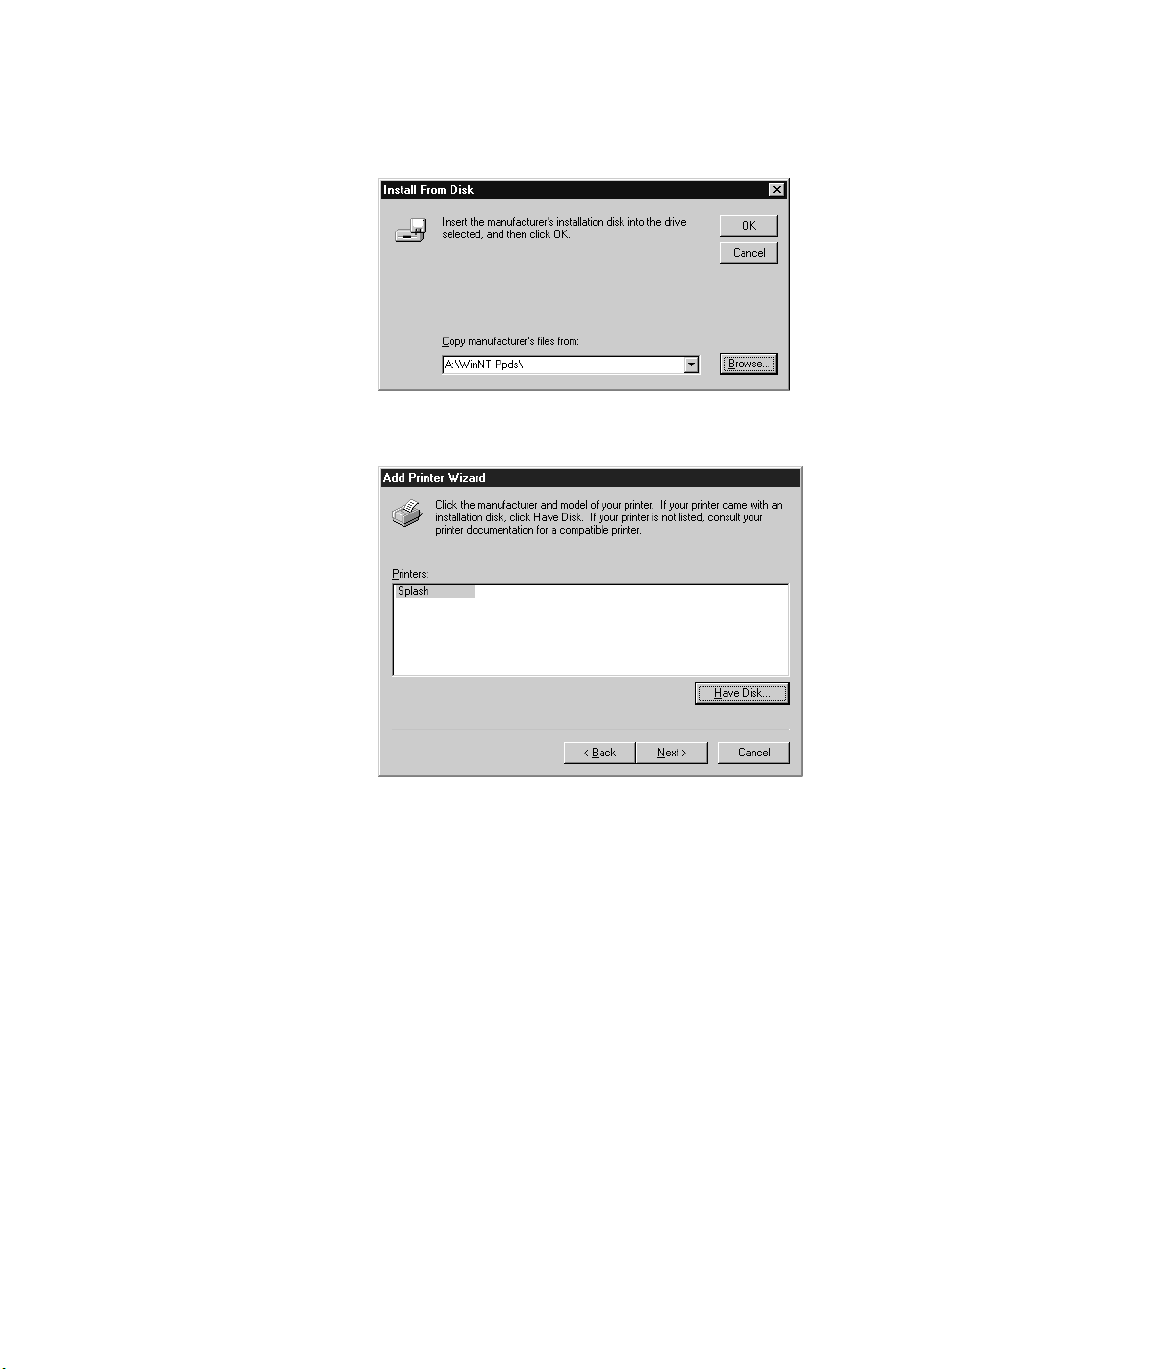
10.
Select the file “Splash” then click Open.
11.
Click OK. Windows NT asks you to select the model of your Splash printer.
12.
Select the printer/copier from the Printers list, then click Next.
Setting Up Network Printing to Splash Page 21
Page 22
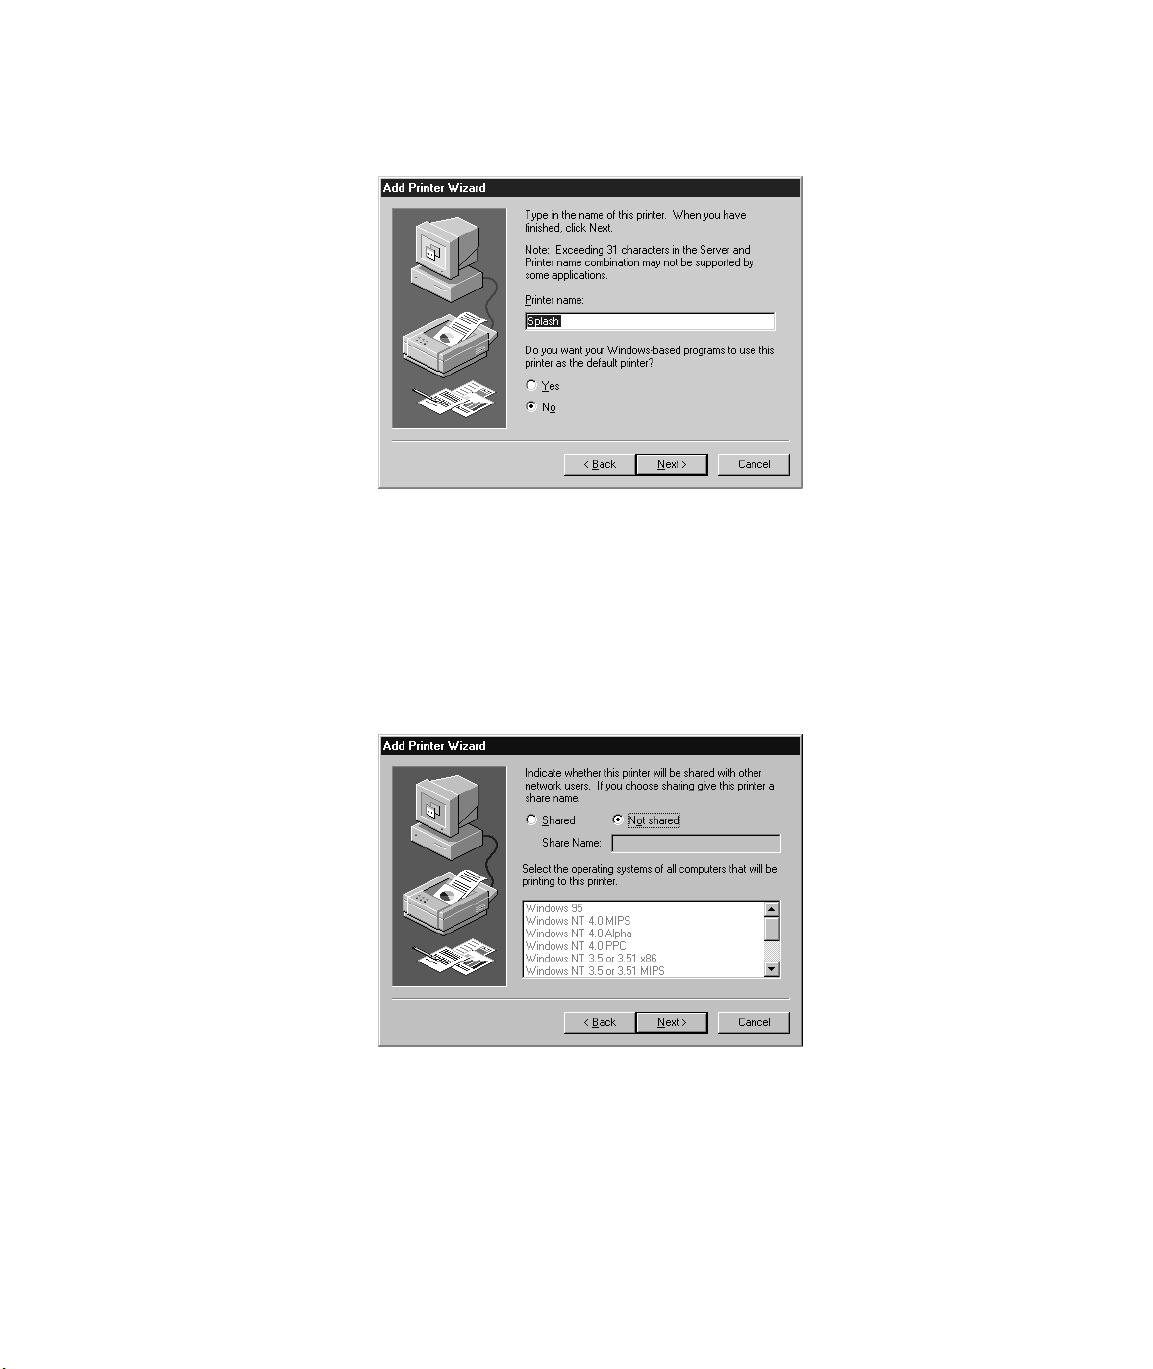
Windows NT displays more options for setting up the print queue.
■ If you want to change the name for the Splash printer/copier, type a new
name in the text box. (The name you enter becomes the name of the
printer as it appears in your applications and in the Printer control panel.)
■ If you want the Splash printer/copier to be the default printer for your
computer, choose Yes. Otherwise, choose No.
13. Click Next to continue.
14. Choose Shared to allow other Windows NT and Windows 95/98 clients to con-
nect to this print queue for printing to Splash. If you do not choose Shared,
only this computer will be able to use the LPR port to print to Splash.
If you choose Shared, select the operating systems for all computers that will
use the print queue from the list.
Page 22 Splash DC Series v4.0 Reference
Page 23
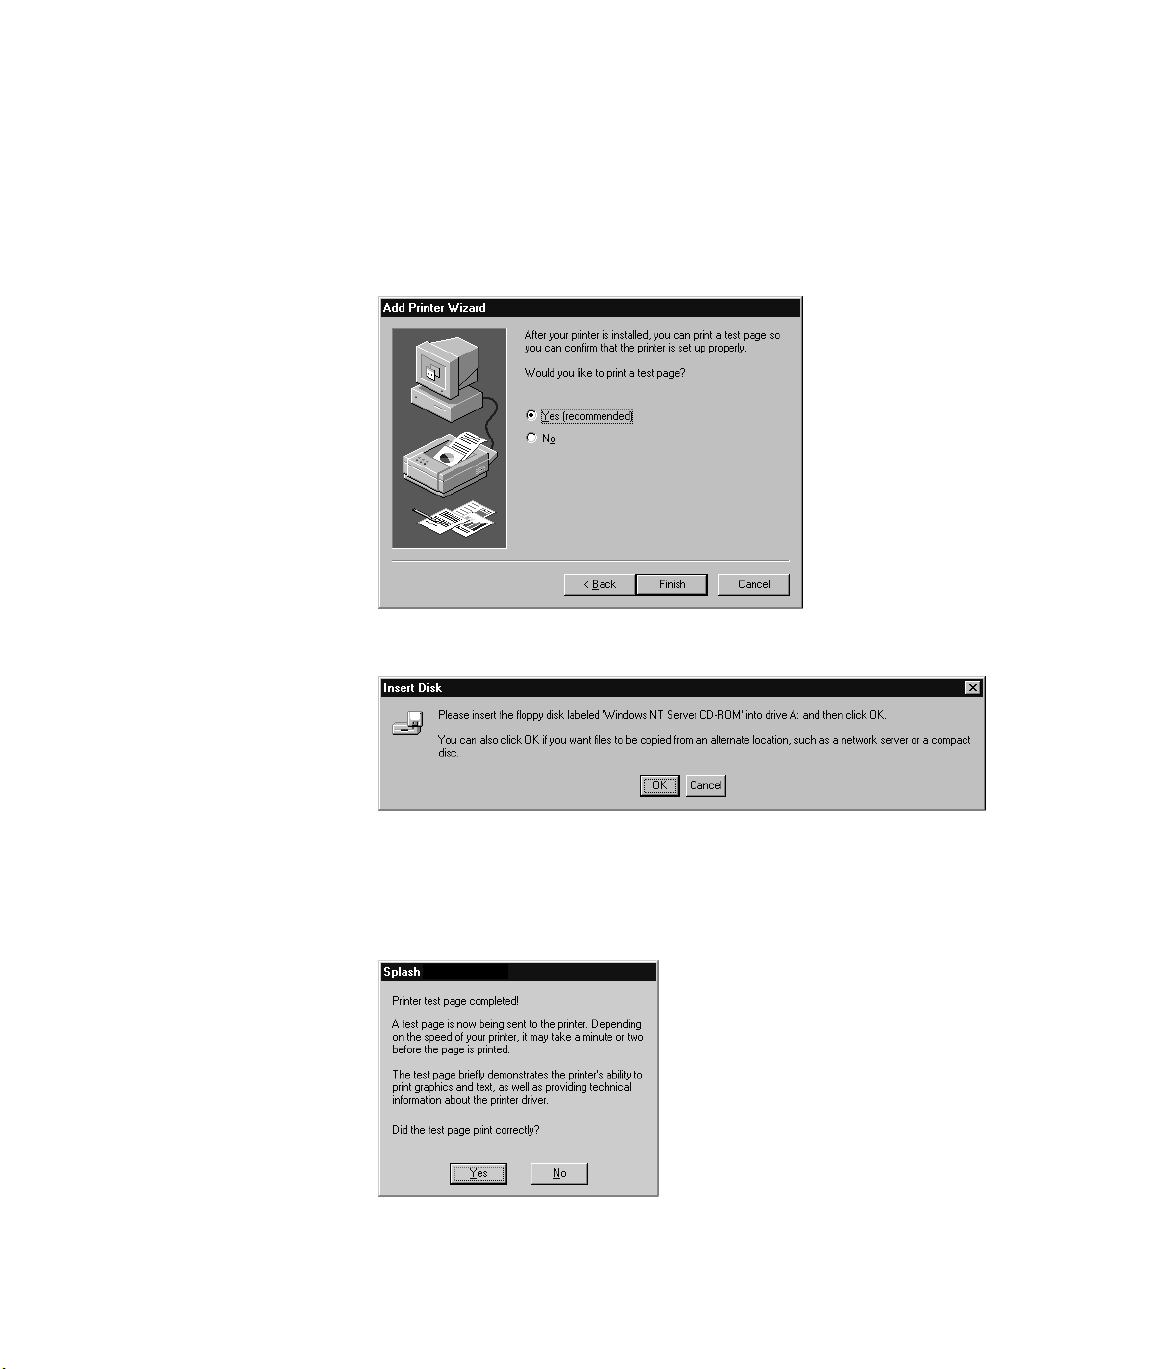
15. Click Next.
Windows NT asks you to insert system software disks for the operating
systems you selected in the previous step. Insert the floppy disks or CD-R OMs
and click OK as directed by the Add Printer Wizard. When all files are copied,
the Add Printer Wizard asks if you want to print a test page.
16. Select Yes to print a test page then click Finish.
17. Click OK, insert the Windows NT system software CD-ROM in your
computer’s CD-ROM drive then click OK.
Windows NT copies the files needed to set up the print queue. A test page
prints at the printer/copier to confirm that setup was successful.
Setting Up Network Printing to Splash Page 23
Page 24
18. Click Yes. The Splash TCP/IP print queue appears as a shared printer in the
Printers control panel.
Set up for the Splash TCP/IP print queue is complete. For instructions on how to
use the print queue from a Windows 95/98 or Windows NT client on the network,
see the on-line manuals Printing to Splash From Windows NT or Printing to Splash
Fr om Windows 95/98, provided with the Splash Server.
Setting Up NetWare Direct Printing to Splash
This section describes how to set up the Splash Server to receive print jobs from
clients on an IPX network.
Setting Up the Novell Server for Printing to Splash
To set up the Novell Server for NetWare Direct use PCONSOLE from a client connected to the Novell Server to create a print server and a print queue for Splash.
Instructions are provided for running PCONSOLE from a NetWare 3.1.x Server, a
NetWare 4.0.x Server, and a NetWare 4.1.x Server.
Creating a Print Server and Print Queue for a NetWare 3.1.x Server
To create a print server and print queue for the NetWare Direct connection:
1. From a workstation, log in to the server as a user with sufficient privileges to
create a print queue (Admin or Supervisor).
2. From the client workstation, run PCONSOLE.EXE in SYS:PUBLIC
(D:\PUBLIC).
Note: The root directory name or drive may be different for your machine.
Page 24 Splash DC Series v4.0 Reference
Page 25

3. Select “Print Server Information” and press Enter to show the list of
print servers.
4. Press Insert and type a name for the Splash print server (recommended
name: “SPLASH”).
5. Press Enter to create the print server, then press Escape to close the
Print Servers window.
6. Select “Print Queue Information” and press Enter to show the list of
print queues.
7. Press Insert and type a name for the Splash print queue (recommended
name: “SPLASH_Q”).
8. Press Enter to create the print queue.
9. Make sure the new SPLASH_Q print queue is highlighted, then press
Enter again.
10. Select “Queue Servers” and press Enter to show the list of Queue Servers
(it should be empty).
11. Press Insert to display a list of available print servers in the “Queue Server
Candidates” window.
12. Select the print server (“SPLASH”) that you created in Step 4. Press Enter
to copy it to the print queue.
13. Press Escape four times to close the windows, then press Enter (Yes) to
exit PCONSOLE.
Creating a Print Server and Print Queue for a NetWare 4.0.x Server
To create a print server and print queue for the NetWare Direct connection:
1. From a workstation, log in to the server as a user with sufficient privileges to
create a print queue (Admin or Supervisor).
2. From the client workstation, run PCONSOLE.EXE in SYS:PUBLIC
(D:\PUBLIC).
Note: The root directory name or drive may be different for your machine.
3. Select “Print Server” and press Enter to show the list of print servers.
4. Press Insert and type a name for the Splash print server (recommended
name: “SPLASH”).
Setting Up Network Printing to Splash Page 25
Page 26

5. Press Enter to create the print server, then press Escape to close the
Print Servers window.
6. Select “Print Queue” and press Enter to show the list of print queues.
7. Press Insert and type a name for the Splash print queue (recommended
name: “SPLASH_Q”).
8. Press Enter to create the print queue.
9. Make sure the new SPLASH_Q print queue is highlighted, then press
Enter again.
10. Select “Print Servers” and press Enter to show the list of Print Servers
(it should be empty).
11. Press Insert to display a list of available print servers in the “Print Queue
Server Candidates” window.
12. Select the print server (“SPLASH”) that you created in Step 4. Press Enter
to copy it to the Print Server window.
13. Press Escape four times to close the windows, then press Enter (Yes) to
exit PCONSOLE.
You are ready to set up NetW are Direct on the Splash Serv er. For more information
about PCONSOLE see your Novell NetWare manuals.
Creating a Print Server and Print Queue for a NetWare 4.1.x Server
To create a print server and print queue for the NetWare Direct connection:
1. From a workstation, log in to the server as a user with sufficient privileges to
create a print queue (Admin or Supervisor).
2. From the client workstation, run PCONSOLE.EXE in SYS:PUBLIC
(D:\PUBLIC).
Note: The root directory name or drive may be different for your machine.
3. Select “Print Server” and press Enter to show the list of print servers.
4. Press Insert and type a name for the Splash print server (recommended
name: “SPLASH”).
5. Press Enter to create the print server, then press Escape to close the
Print Servers window.
Page 26 Splash DC Series v4.0 Reference
Page 27

6. Select “Print Queue” and press Enter to show the list of print queues.
7. Press Insert and type a name for the Splash print queue (recommended
name: “SPLASH_Q”).
8. Press Enter. The “Print Queue’s Volume” window appears. If you know the
name of the volume needed for storing the print queue, enter it in the window.
If you do not know the volume name, press Insert, then select the
“Organizational Unit” for your server. The mounted volume names appear.
The volume names should correspond with the server name (for example,
TESTLAB_40.SYS). Select the volume for your server, then press Enter to
create the print queue.
9. Make sure the new SPLASH_Q print queue is highlighted, then press
Enter again.
10. Select “Print Servers” and press Enter to show the list of Print Servers
(it should be empty).
11. Press Insert to display a list of available print servers in the “Print Queue
Server Candidates” window.
12. Select the print server (“SPLASH”) that you created in Step 4. Press Enter
to copy it to the Print Server window.
13. Press Escape four times to close the windows, then press Enter (Yes) to
exit PCONSOLE.
You are ready to set up NetW are Direct on the Splash Serv er. For more information
about PCONSOLE see your Novell NetWare manuals.
Setting Up NetWare Direct on the Splash Server
The NetWare Direct application connects NetWare Direct to the Novell NetWare
server for delivering print jobs to Splash.
To set up NetWare Direct:
1. Start the Splash Server on the server computer.
2. Choose Enterprise Networking from the Server menu.
Setting Up Network Printing to Splash Page 27
Page 28
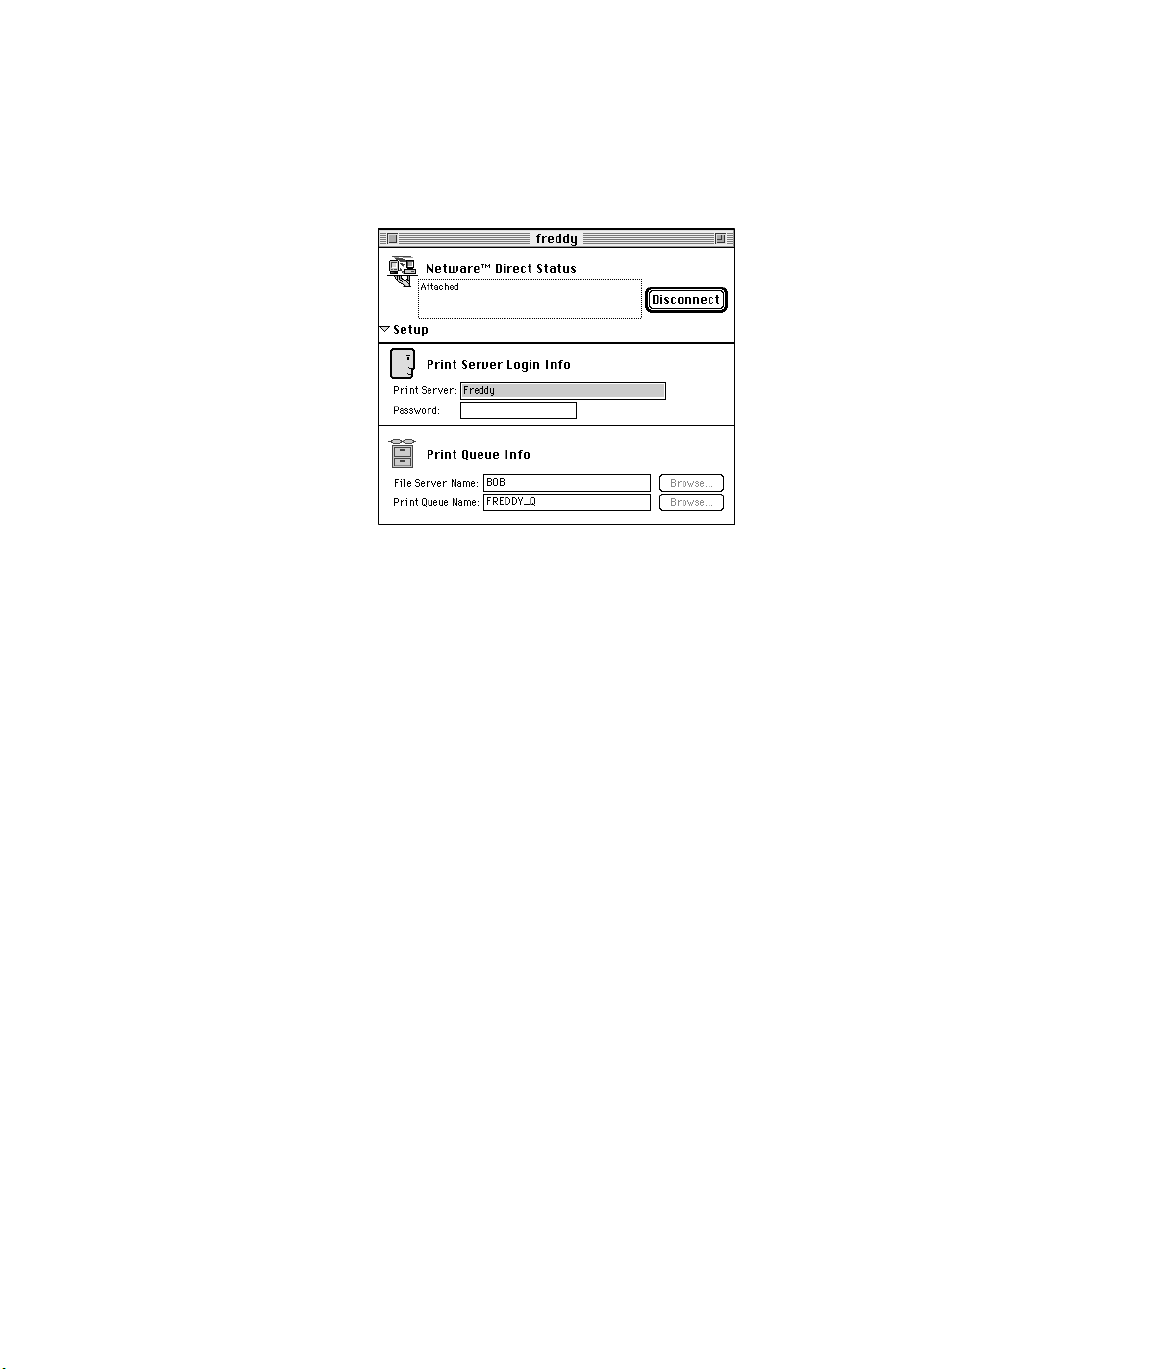
3. In the Print Server text box, type the name of the Novell print server you
created for Splash. (“SPLASH” was the print server name recommended in the
setup instructions.)
4. Type the password for the print server (if one was assigned).
5. Under Print Queue Info, click the Browse button next to the File Server Name
text box and select the name of the Novell NetWare file server where you
created the Splash print queue.
6. Click Browse next to the Print Queue Name text box and select the Splash
print queue. (“SPLASH_Q” was the print queue name recommended in the
setup instructions.)
7. Choose Save from the File menu to save the NetWare Direct connection
document.
IMPORTANT: The document must be saved to the IPX Direct folder inside the
Splash Extras folder on the Splash Server. Give the document a name that
describes the Novell print queue (for example: “SPLASH_Q on MARKETING
server”).
8. Click Connect.
9. Close the NetWare Direct setup window.
Setup for NetWare Direct is complete.
Page 28 Splash DC Series v4.0 Reference
Page 29

Activating NetWare Direct at Startup
You activate NetWare Direct from the Splash Server application. In the Server
menu choose Preferences, click the Network button, then select the “Enable Enterprise Networking” checkbox. This opens and connects NetWare Direct when the
Splash Server application starts, and disconnects and closes NetWare Direct when
the Server application is closed. NetWare Direct runs in the background while the
Server application is running. When a PC client workstation sends a print job to the
Splash print queue on the Novell file server, NetWare Direct automatically opens
and delivers the print job to the Splash Server.
Note: The NetWare Direct setup window does not need to be open for NetWare
Direct to run.
To deactivate NetWare Direct, uncheck the Enable Enterprise Networking checkbox in the Server Network Preferences.
Note: If NetWare Direct is not set up and opened, jobs sent to the designated
Splash print queue on the Novell server are held at the Novell server. To have these
jobs processed by the Splash Server, NetWare Direct must be opened.
Setting Up Network Printing to Splash Page 29
Page 30
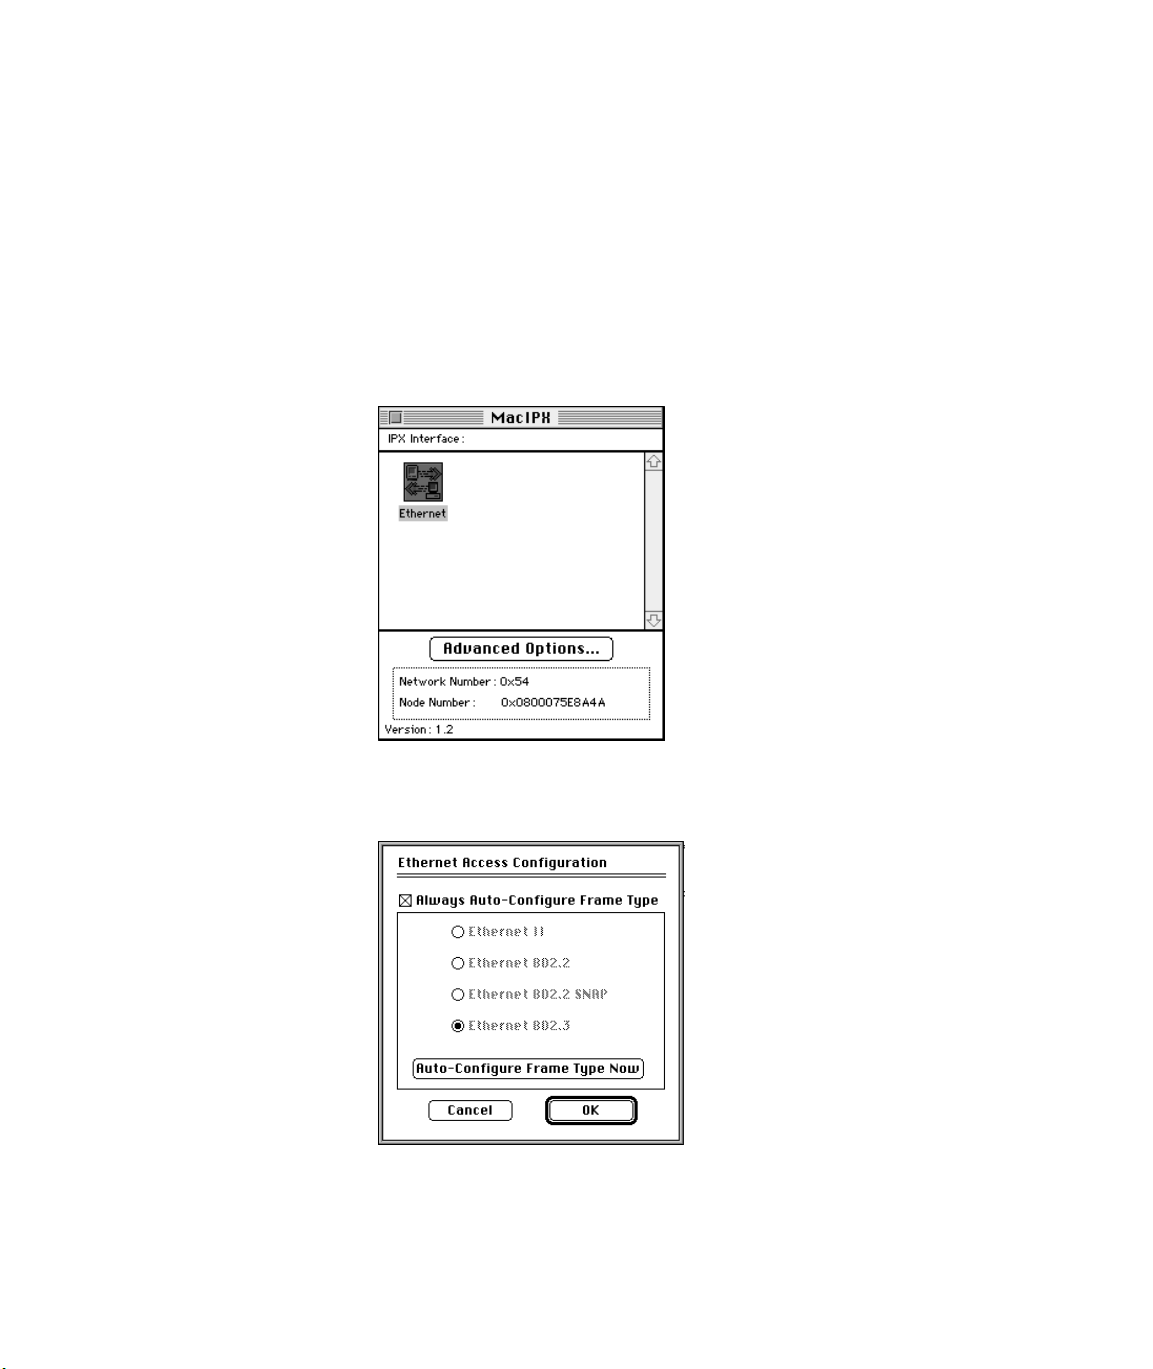
NetWare Direct Notes
If the Novell File Server Does Not Appear During NetWare Direct Setup
If, during NetWare Direct setup, a list of Novell file servers does not appear when
you click the Browse button under Print Queue Info, you may need to specify the
Novell server’s Ethernet frame type in the Mac IPX control panel. To do this:
1. On the Splash Server computer, open the Apple menu, point to the Control
Panels submenu, then choose the Mac IPX control panel. The Mac IPX
control panel appears.
2. Double-click the Ethernet icon under IPX Interface. The Ethernet Access
Configuration dialog box appears.
3. Deselect “Always Auto-Configure Frame Type.”
Page 30 Splash DC Series v4.0 Reference
Page 31

4. Select the option that matches the Novell file server Ethernet frame type.
5. Click OK.
Novell Network Number and Node Number Locations
If you need to find the Novell network or node numbers for the Splash Server, they
appear in the Mac IPX control panel on the Splash Server computer.
AppleTalk Network Protocol Changes
If the network protocol for the Splash Server is changed from Ethernet to
Modem Port or Printer Port (LocalTalk), this does not interfere with the ability of
Splash NetWare Direct to print jobs to Splash from Novell NetWare print queues.
Novell Server print jobs resume downloading to the Splash Server after the Server
is restarted.
Print Queue Connections
Enterprise Networking is configured to support up to three Novell NetWare print
queue connections and ten TCP/IP connections to Splash. You must install
additional memory on the Splash Server computer to support additional IPX and
TCP/IP print queues (about 100K per additional print queue).
Setting up NetWare Directory Service
Enterprise Networking provides native support for NetWare 4.1 and IntranetWare
NetWare Directory Services (NDS). This section describes how to create print
queues on NDS and how to set up the Splash Server for receiving print jobs from
NDS print queues.
Novell 4.x and IntranetWare servers include NetWare Directory Service (NDS)
support. NDS is a naming scheme and database that allows a company to put all of
its servers and services into one large, hierarchical database.
With NDS and the Splash software you can create a single print server object and
assign virtual printers to that print server. Virtual printers can have one or more
print queues associated with them. To change the printers or queues, change the
Print Server assignment in the NDS database. Splash Enterprise Networking reads
the NDS database for the print server information and services the specified queues.
This allows you to control print queues associated with the Splash Server without
making adjustments at the Splash Server.
Setting Up Network Printing to Splash Page 31
Page 32

Setting Up an NDS Print Queue
To create an NDS print queue:
1. From Microsoft Windows, run NWAdmin.
2. Navigate through the directory tree to find the container where you want to cre-
ate printing objects.
3. Highlight that container and select “Print Services Quick Setup” from the
Tools menu.
4. In the Print Services Quick Setup dialog box, enter a new print server name or
browse the directory tree to select an existing print server. This name, with its
full path (Fully Distinguished) is the name that you will use in the Novell NDS
setup window in Enterprise Networking.
5. Enter a name for the printer you want to create and the associated configuration
information.
6. Enter a Print Queue name.
7. Click the Browse button to the right of the volume field to browse the tree for
the volume where you want this print queue to be created.
8. When you finish, click Create to create the objects and have all of the neces-
sary assignments made (Printer to print server, Queue to printer).
You are ready to set up NetWare NDS Direct at the Splash Server.
Setting the Preferred Network Tree
Before creating a NetWare NDS connection, you must set the preferred tree in the
NetWare client configure window.
If you do not set the preferred tree, the NDS connection window displays an empty
list when you click the Browse button, and error -18000 may be returned when you
click the Enable button.
To set the preferred tree:
1. Select “Configure” from the Netware client “tree” menu to the right of the
Finder menu.
2. Select the preferred tree, then click the Set Preferred button. If this button is
dimmed, the preferred tree has already been set.
Page 32 Splash DC Series v4.0 Reference
Page 33

Setting Up NetWare NDS Direct at the Splash Server
To set up NetWare NDS Direct:
1. Choose Enterprise Networking from the Server menu in the Splash Server
application.
An untitled Novell document appears.
2. In the Print Server text box, type the Fully Distinguished name of the Novell
print server you created for Splash. Type the password for the print server (if
one was assigned).
If you click the Browse button next to the Print Serv er te xt box, Enterprise Networking displays a list of print servers.
Setting Up Network Printing to Splash Page 33
Page 34

3. Select a print server then click OK.
4. Click the Connect button to enable NetWare NDS Direct. A list of printers
appears at the bottom of the Novell document window.
The status area at the top of the document window shows the current queue
being checked.
The queues are checked in round-robin order and any waiting jobs are pulled
from the queues.
Splash NetWare NDS Direct setup is complete.
Page 34 Splash DC Series v4.0 Reference
Page 35

Calibrating With Splash ColorCal
In this section:
Why Calibrate with Splash ColorCal?.............................................. 35
Calibrating the Printer/Copier........................................................... 36
Verifying Printer Color Accuracy ..................................................... 45
Using ColorCal Profiles with Splash................................................ 47
Setting the Custom and Pass Through Profiles ............................. 49
Creating a Custom Color Profile ...................................................... 54
Splash ColorCal Notes......................................................................57
This section describes how to calibrate the DocuColor Pro printer/copier with
Splash ColorCal. Your Splash DC Series v4.0 Server includes a color scanner that
you connect to the server Power Macintosh to run ColorCal. For correct calibration
results, be sure to use only the scanner provided with Splash to perform calibration
with ColorCal.
Why Calibrate with Splash ColorCal?
A basic characteristic of all color copiers is that the output color drifts over time,
producing inconsistent color from day to day, or even hour to hour. This shift in
color can be caused by changes in humidity, temperature, and the number of copies
made. Splash ColorCal corrects this to ensure that output is consistent over time.
Splash ColorCal, unlike other calibration solutions, is an ideal tool for both
business graphics and other less-technical users, as well as for the more traditional
prepress users. Splash ColorCal requires no special color knowledge and does
not require the use or purchase of an expensive densitometer. Splash ColorCal is
more accurate than other calibration solutions because it automatically adjusts gray
balance in addition to accurate linearization. Further, it uses three times more color
Calibrating with Splash ColorCal Page 35
Page 36

patches, with over six times the resolution in critical regions to provide results
more accurate than competitive solutions. Splash ColorCal includes an option that
randomizes placement of the patches on the page to minimize the effects of print
density variations on a page. Splash ColorCal allows calibration on heavy stock
papers.
Splash ColorCal provides color calibration for your DocuColor Pro printer/copier.
ColorCal guides you step-by-step through a simple process to quickly calibrate
your printer/copier for consistent, accurate color.
Once calibration is complete, you can use Splash CMYK and RGB color correction
(selected in the Splash print driver), or use advanced features of ColorCal to create
and save custom color profiles. You can perform multiple calibrations, and save the
individual profiles for use with specific printing conditions and print media. Calibration takes only a few minutes to complete, so you can test your printer’s color
output and recalibrate as often as needed.
The ColorCal application is located in the Splash Calibration Folder within the
Splash Utilities Folder on the Splash Server. The Splash Calibration Folder can be
moved anywhere on the Splash Server hard disk. A folder containing the ColorCal
profiles is located in the Preferences Folder within the System Folder. (See“Managing the Profiles Folders” on page 58 for notes about moving Splash color profiles to
other folders.)
Calibrating the Printer/Copier
This section describes how to calibrate your printer/copier with Splash ColorCal.
The scanner provided with your Splash DC Series Server must be connected to the
Splash Server before you can calibrate. Follow the instructions provided with the
scanner to connect it to the Splash Server computer and set it up for scanning.
Note: Make sure the printer/copier is powered on during the entire Splash
ColorCal calibration process.
Note: If you leave the scanner powered on between calibrations, be sure to turn it
off and then back on before calibrating.
Page 36 Splash DC Series v4.0 Reference
Page 37

For best color printing results, recalibrate the printer/copier at least once daily.
If printer/copier use is heavy, you may want to recalibrate as frequently as several
times a day. ColorCal runs only on the Splash Server computer. The printer/copier
must have 8.5"x11", A4, or larger paper loaded to print the Calibration Target used
in this process.
Note: ColorCal calibration does not affect the quality of photocopies. Only files
printed with Splash are affected. (Always calibrate the printer after a service call.)
To calibrate with Splash ColorCal:
1. Double-click the ColorCal icon in the ColorCal folder on the Server.
(The Splash Server application can be running during calibration.)
Splash ColorCal appears.
2. If you are using ColorCal for the first time, or if the printer/copier has recently
been serviced, choose Calibrate Scanner from the ColorCal menu.
This command causes ColorCal to adjust the printer/copier to compensate for
scanning differences that could affect calibration quality. (This command
affects ColorCal operation only. It does not affect the scanning capability of
the printer/copier for other scanning operations.)
If you have calibrated at least once before, go to Step 8.
Calibrating with Splash ColorCal Page 37
Page 38

3. Choose Printing Options from the Splash menu. A dialog box appears.
4. Be sure the Randomize Patches option is selected.
This option averages out print density variations across the calibration target
page, and ensures high-quality calibration. For best results, be sure this option
is selected before you calibrate with ColorCal.
5. Select Calibrate Photographic or Calibrate T ext/Line Art to indicate the
types of jobs that will be printed and for which the copier should be calibrated.
If you select both, you will perform calibration for Text/Line Art mode and
then perform calibration a second time for Photographic Mode.
Note: If only one Original Type is selected, calibration information for the
other is removed when calibration is performed. Jobs at the server will be
printed in whichever mode was last selected in ColorCal.
6. Select Calibrate All Sets if you want to calibrate all calibration profile sets. Or
choose the profile set to calibrate from the Select Active Set menu. For information about creating Calibration Sets, see “Creating Calibration Sets” on
page 43.
7. Click OK.
8. Be sure that the copier platen cover is closed, then click Run Calibration.
Page 38 Splash DC Series v4.0 Reference
Page 39

9. Select a paper source for the ColorCal calibration target.
The paper size can be 8.5"x11", A4, or larger. If you select Manual Feed
you can select “Heavy Weight” paper.
If you select Manual Feed, choose a paper size from the menu that appears.
Note: For Manual Feed, you must orient the paper in the bypass tray so the
short-edge feeds into the copier first (SEF orientation).
ColorCal prints a calibration target on the printer/copier. The target always
shows uncalibrated printer performance—even if you have calibrated the
printer before.
ColorCal prompts you to examine the target for printing defects.
If printing defects (such as creased paper or uneven or flaking toner) appear on
the target, click Reprint to produce a new target on the printer/copier.
Calibrating with Splash ColorCal Page 39
Page 40

10. When you have printed an acceptable Calibration target, click Continue.
ColorCal prompts you to place the target on the scanner surface for scanning.
11. Place the Kodak Gray Scale target (provided with Splash ColorCal) and the
printed target face-down on the scanner glass. Allow a 0.25" to 0.5" margin
between the targets and the edge of the scanner surface.
Orient the target with the short edge of the paper along the left side of the scanner surface. The Gray Scale target must cover the grayscale patches in
the upper-left corner of the ColorCal target. (Place the Gray Scale target facedown on the glass first, then place the ColorCal target face-down on top of the
Gray Scale target.)
IMPORTANT: Handle the Gray Scale target by the edges to avoid smudging
the patches. Keep the target in its protective sleeve when it is not being used.
Replace the target if the patches become damaged. Contact Xerox Customer
Support to order a replacement Gray Scale target.
Note: Be sure to use the Gray Scale target for this step to produce the most
accurate scanning results. If the Gray Scale target is not present during
calibration, ColorCal uses default information to set grayscale densities.
12. Click Scan.
ColorCal scans the Target and determines current color performance based on
the acquired image. A progress bar appears while the target is being scanned.
Page 40 Splash DC Series v4.0 Reference
Page 41

When this process has concluded, ColorCal displays a graphic representation
of color performance for the printer.
The Desired Density lines represent accurate CMYK (cyan, magenta, yellow,
and black) printing for the current CMYK color profile selected in the Verify
Against pop-up menu in the Set Active Profiles dialog box (see page 46).
The Measured Density lines show actual uncalibrated printer performance
as measured from the scanned Target.
(Technical note: The vertical axis for each color curve is in units of Status-T
less the paper density. The horizontal axis is represented as dot percentage
from 0% to 100%.)
13. Click Update Profiles to have ColorCal adjust color output to match the
Desired Density levels for your color profiles.
ColorCal updates all profiles at the same time, even custom ones which
have been created, so you can use any color profile without repeating
color calibration.
Calibrating with Splash ColorCal Page 41
Page 42

When profile updating is complete, a message appears.
14. Click Verify to check calibration results for the printer (see “Verifying Printer
Color Accuracy” on page 45), or click Done to return to the ColorCal main
window.
Color calibration is complete. After you run calibration, you can select any of the
standard color profiles included with ColorCal for consistent, accurate color (see
“Using ColorCal Profiles with Splash” on page 47). If printer use is heavy, use
Splash ColorCal throughout the day to keep track of color printing performance and
recalibrate as needed (see “Verifying Printer Color Accuracy” on page 45).
To exit ColorCal, choose Quit from the File menu.
Inverting the Calibration Image
Splash ColorCal provides a special feature for calibrating to heat transfer paper
used for adhering color output to non-standard media such as rice paper, rag paper,
or T-shirts. To ensure consistent color output, use the original artwork for the
Calibration Target, and activate the “Mirror Image” option before calibrating
(see page 38). This inverts the scanned artwork “target” to match the final
transferred piece.
Page 42 Splash DC Series v4.0 Reference
Page 43

Creating Calibration Sets
You can perform multiple calibrations and save each one with a unique name. You
can then select one of the calibration sets to use with a particular tray. The same calibration can be used for multiple trays. Each calibration set contains all of the
Splash Profiles.
To create a calibration set:
1. Choose Edit Sets from the ColorCal menu.
2. Click Add.
3. Enter a name for the calibration set.
4. When you calibrate the printer/copier, choose the name of the calibration set to
calibrate from the ColorCal Options dialog box. Follow the instructions
described in “Calibrating the Printer/Copier” on page 36.
Note: If both Photographic and Text/Line Art Original Types are selected in the
ColorCal Printing Options, you must perform calibration for both modes—two calibrations per set. If only one is selected, ColorCal removes the calibration information for the other when the calibration is performed. Jobs at the server will print in
whichever mode was last selected in ColorCal.
Calibrating with Splash ColorCal Page 43
Page 44

To specify calibration from different sets to paper trays:
1. Choose Color Profile Sets from the Splash Server’s Server menu.
2. For each tray, choose the calibration set to use.
3. When you are done, click OK.
Page 44 Splash DC Series v4.0 Reference
Page 45

Verifying Printer Color Accuracy
T o verify the accurac y of the calibration process, or to determine the amount of drift
since the last calibration, click “Verify Accuracy” in the ColorCal main window (or
click “Verify” in the dialog box that appears when calibration is complete). Follow
the same steps used to initially calibrate the printer (see “Calibrating the Printer/
Copier” on page 36).
When the verification process has concluded, ColorCal displays the color
performance results. Compare the Desired Density lines with Measured Density
lines to determine color printing accuracy . The e xample below sho ws that measured
output closely matches desired color performance. Recalibration is not needed.
If the Measured Density levels do not match Desired Density levels, calibrate the
printer again (see page 36).
Calibrating with Splash ColorCal Page 45
Page 46

Setting the Verify Against Profile
If desired, you can change the calibrated profile Splash ColorCal uses to create the
Desired Density lines during verification. For example, you might want to set the
verification profile to CMYK SWOP if you use this profile frequently for printing.
1. In the Splash ColorCal application, choose Set Active Profiles from the Splash
menu. The Standard and Custom CMYK profiles appear.
2. Choose a profile in the Verify Against pop-up menu.
You can choose any calibrated CMYK profile, custom profile, or Pass Through
(standard output) profile for verification.
3. Click OK.
To verify the accuracy of standard color output for your DocuColor Pro
printer/copier, choose the MajestiK Standard or Regal Standard profile in the Verify
Against pop-up menu. This causes Splash ColorCal to verify measured densities
against a benchmark MajestiK or Regal printer at Xerox laboratories.
For most purposes the Pass Through profile should be set to “Visual Standard”
(the default setting). This selection produces the most visually smooth output.
Page 46 Splash DC Series v4.0 Reference
Page 47

Using ColorCal Profiles with Splash
Any network computer with the Splash client software installed can select a Splash
CMYK color profile for its print jobs. This section describes how to select a
profile for a Macintosh client with the custom Splash driver.
Note: Splash provides client software for computers running MacOS, Windows
3.1, Windows 95/98, and Windows NT. Refer to the appropriate Printing to
Splash... on-line manual for instructions on how to enable Splash color correction
for each of these client computers.
To select a Splash CMYK Press Profile with the custom Splash driver
on a Macintosh client:
1. From your application, choose Print from the File menu.
2. Click the Splash button to select the Splash print features available for your
printer/copier.
The Splash Default Options appear.
3. Deselect the Default Settings checkbox next to Splash Options, then click
Advanced Settings.
Calibrating with Splash ColorCal Page 47
Page 48

4. Click the Color button to see Splash color output options.
5. Set RGB Monitor color correction options, CMYK Press color correction
options, or both. See the Printing to Splash... on-line manuals for information
on how to select RGB Monitor color correction options.
To select a CMYK profile, select the CMYK Press Color Correction
checkbox, then select a Press Profile from the menu.
6. Select other print options as desired, then click OK to send the job to Splash.
The Custom1 through 10 options are set in the Splash ColorCal Active Profiles
dialog box or in the Splash Server application. (See the next section.)
To print to Splash with the printer/copier’s standard color characteristics (no color
correction applied), deselect both RGB and CMYK color correction checkboxes in
the Splash Color Options dialog box. This activates the Pass Through profile
selected in the Splash ColorCal Active Profiles dialog box (see page 53).
Page 48 Splash DC Series v4.0 Reference
Page 49

Setting the Custom and Pass Through Profiles
T o set custom color profiles for the ten Splash CMYK Custom options, or to choose
the Pass Through (standard output) setting:
1. In the Splash ColorCal application, choose Set Active Profiles from the Splash
menu. The Active Profiles dialog box appears.
You can set the active profiles for the ten custom CMYK color correction
options that appear in the printer driver when you print a job to Splash (for
descriptions of the color profiles, see page 49).
2. Set the Custom profiles with the pop-up menus.
Custom 1 through Custom 10 can be configured for any of the CMYK
profiles provided with Splash, or for any user-developed calibrated CMYK
color profiles (see “Creating a Custom Color Profile” on page 54 for
information about how to create your own CMYK custom profiles).
Calibrating with Splash ColorCal Page 49
Page 50

Profiles with a colored cube on the left in the menus are the Splash v2.0/3.x
multi-dimensional color correction profiles. Profiles with no symbol are
Splash v1.0 one-dimensional profiles. You can select either type of profile.
3. If desired, you can set the Pass Through profile.
The Pass Through profile is used when Splash Color Correction is not enabled
in the Splash printer driver. Pass Through can be set to use a smooth visual
standard that is optimized for RGB printing, or to use standard Regal or
MajestiK color output characteristics, either calibrated or uncalibrated.
4. If needed, you can change the profiles used for the three standard Splash
CMYK profiles.
Page 50 Splash DC Series v4.0 Reference
Page 51

For example, if you find that you prefer a v1.0-style CMYK SWOP profile or a
user-developed calibrated CMYK SWOP profile to the standard v2.0/3.x
SWOP profile, you can change it in Active Profiles.
Note: If you decide to change the standard SWOP profile, ColorCal limits
you to selecting another SWOP-type profile to avoid confusion at the
printer driver.
5. When you have finished selecting profiles, click OK.
Splash ColorCal enables your profile selections for client printing.
You can set the Splash CMYK profiles from the Splash Server application
as well. Choose Color Profiles from the Server menu to set profiles for Splash
color correction.
Calibrating with Splash ColorCal Page 51
Page 52

CMYK Custom Profiles
These profiles cause the colors for the printed job to match CMYK inks.
Profiles with a colored cube on the left in the menus are the Splash v2.0/3.x
multi-dimensional color correction profiles. Profiles with no symbol are
Splash v1.0 one-dimensional profiles.
■ Japanese Press Inks is a calibrated profile that simulates Toyo inks.
■ SWOP Enhanced is a calibrated, higher dot gain (darker) version of CMYK
SWOP. This profile prints vivid colors on your output, but remains similar to
press inks in the mid-tones. Flesh tones may appear darker than normal. This
profile is not intended for printing press proofs.
■ Japanese Press Enhanced is a calibrated, higher dot gain (darker) version of
Japanese Press Inks. This profile prints vivid colors on your output, but
remains similar to press inks in the mid-tones. Flesh tones may appear darker
than normal. This profile is not intended for printing press proofs.
■ CMYK SWOP simulates SWOP press inks.
■ CMYK Euroscale simulates Euroscale press inks.
■ CMYK Enhanced makes colors slightly more vivid in the output. This profile
is not recommended for printing press proofs.
■ SNAP - White Paper simulates newspaper inks. This profile is for printing to
white paper.
■ SNAP - Recycled Paper also simulates newspaper inks, but is for printing to
recycled paper stocks.
■ Uncalib. CMYK Process Inks is an uncalibrated older “fix ed” CMYK profile
that does not update when you calibrate with ColorCal. This option is provided
for customers who prefer the older profile. (Note: Uncalibrated profiles are not
recommended for printing jobs with RGB color to Splash.)
■ Uncalib. DIC is an uncalibrated “fixed” profile certified by DIC of Japan to
provide the closest possible match to Japanese DIC press inks. This profile
does not update when you calibrate with ColorCal. (Note: Uncalibrated
profiles are not recommended for printing jobs with RGB color to Splash.)
Page 52 Splash DC Series v4.0 Reference
Page 53

Pass Through Profiles
Includes a “Visual Standard” profile for RGB printing, profiles that return the
MajestiK, Regal, or Acolor printer/copier to standard color output, and an option
for uncalibrated printing. When you use a color management system (from Kodak,
Agfa, Apple, EFI, and others) for printing, mak e the appropriate “Standard” profile
(MajestiK or Regal) the active Pass Through profile in the Active Profiles dialog
box, and disable Splash color correction in the Splash Color Options dialog box at
the Client workstation.
■ Visual Standard provides the widest gamut and smoothest color transitions
when you print RGB colors. This is the default setting for the Pass Through
option, and is the best selection for RGB printing to Splash. (Note: For best
results when you print jobs that contain RGB data only, be sure to turn
Splash CMYK color correction off in the Splash Color Options dialog box.)
■ MajestiK Standard reconfigures a MajestiK or Acolor 630/635 to match
the color printing output of a “benchmark” MajestiK printer in the Xerox
laboratories in Webster, NY. This setting, used in combination with Splash
color correction disabled, should be used when MajestiK is selected with the
PANTONE ColorDrive software or the included PANTONE Toolkit and
MajestiK parameters are used to produce the most accurate PANTONE colors
with the MajestiK, Regal, or Acolor 630/635/930/935 printer/copiers.
This setting can also be used with the Regal or Acolor 930/935 to more closely
match the output characteristics of the MajestiK or Acolor 630/635. This can
be useful when printing files originally designed to be printed on a MajestiK or
Acolor 630/635 with Splash color correction disabled. This can be
useful also when using other commercially available color management
systems that provide MajestiK or Acolor 630/635 profile settings. Splash color
correction should be disabled when printing using other color management
systems. When a Regal or Acolor 930/935 is used with the MajestiK Standard
setting, a loss of detail in the shadows may occur with some images.
■ Regal Standard reconfigures a Regal or Acolor 930/935 printer/copier to
match the color printing output of a “benchmark” Regal printer in the Xerox
laboratories in Webster, NY. This setting, used in combination with Splash
color correction disabled, should be used when Regal is selected with the
PANTONE ColorDrive software with the MajestiK, Regal, or Acolor 630/635/
930/935 printer/copiers.
This setting can also be used with the MajestiK or Acolor 630/635 to more
closely match the output characteristics of the Regal or Acolor 930/935. This
can be useful when printing files originally designed to be printed on a Regal
Calibrating with Splash ColorCal Page 53
Page 54

or Acolor 930/935 with Splash color correction disabled. This can also be useful when using other commercially available color management systems that
provide MajestiK or Acolor 930/935 profile settings. Splash color correction
should be disabled when printing using other color management systems.
■ Uncalibrated sets the printer for uncalibrated color printing. This setting
causes the printer/copier to produce raw, uncalibrated output that reflects the
current state of the printer/copier.
Creating a Custom Color Profile
Splash ColorCal provides expert-level tools for creating custom CMYK userdefined profiles or modifying the calibrated CMYK profiles provided with
ColorCal. You can edit only the calibrated CMYK profiles. To create a new profile,
save an existing profile under a new name then modify the new profile. To use the
profile editor:
1. Click “Be an Expert” in the Splash ColorCal window. The Splash ColorCal
edit window appears.
Color
curve menu
Curve points
2. Select a color profile to edit from the pop-up menu on the right.
Note: You cannot edit the factory-installed profiles. If you select one of these
profiles, ColorCal forces you to save the new profile with a new name.
3. Select a color curve to edit from the pop-up menu in the upper-left corner.
Page 54 Splash DC Series v4.0 Reference
Color
profile menu
Locked
profiles
cannot
be edited
Page 55

4. To edit, drag the curve points with the mouse pointer. Output Percentage
(0% to 100%) and Input Percentage (0% to 100%) update instantly on the right
as you drag a curve point.
■ To add a curve point, click anywhere along the curve. ColorCal allows a
maximum of 32 control points for an individual color curve.
■ To remove a curve point, drag it over another point on the color curve.
■ To undo all changes to the curve, click Revert.
Note: The color curves you create with the Expert edit controls are similar to
those used in Adobe Photoshop, but cannot be directly exchanged with curves
created in Adobe Photoshop.
5. When you have finished editing all color curves (C, M, Y, and K) for the pro-
file, click Save.
6. Enter a profile name if you want to save your changes as a new profile.
7. Click Save.
8. If you are finished editing profiles, click Done.
Note: If you edit a v1.0-style profile, the color curve editor plots density (from 0.0
to 2.0) against input percentage (0% to 100%).
Calibrating with Splash ColorCal Page 55
Page 56

(Technical note: The vertical axis is in units of Status-T less the paper density.
The Horizontal axis is represented as dot percentage from 0% to 100%.)
If you saved your changes as a new profile, the new profile name appears in the list
of color profiles when you choose Set Active Profile in the Splash menu. Note that
the new profile is automatically calibrated to the last time calibration was run as it
is created.
Expert-Level Editing with ColorCal
This section describes a procedure you can use to tailor color output to your
environment with the ColorCal Expert-level tools.
1. If desired, use a reliable densitometer that can read Status-T density to measure
the 20 patches on the grayscale target.
2. Edit the file “Test Strip Adjust (In)” located in the Color Data folder in the
ColorCal folder. Enter ne w visual density values based on your measurements,
and save the edited file.
The visual density values are the first numbers in each line that begins:
“Kodak.” The density is rounded to the nearest .001 units and is approximately
0.05 for the first patch to 1.95 for the last patch, in increments of 0.10 units.
Actual measured values are typically less for the densest patches.
3. Start the ColorCal application, and select the CMYK profile you plan to
modify in the Active Profiles dialog box (see page 49).
4. Calibrate the printer with ColorCal as described on page 36.
5. When calibration is complete, quit the ColorCal application and print any
CMYK color file to compare with a film proof or printed material that you
want to match.
Before you print, be sure to choose the correct CMYK profile in the Color
Options dialog box (see page 47).
6. Start the ColorCal application, and click “Be an Expert” to open the color
curve editor.
7. Edit the color curves as described on page 54.
8. If you saved the edited profile with a new name, select the new profile in the
ColorCal Active Profiles dialog box.
9. Quit the ColorCal application and print the CMYK file again.
Page 56 Splash DC Series v4.0 Reference
Page 57

Repeat Steps 6 to 9 until you are satisfied with the color output.
You can also use the grayscale patches on a ColorCal Verification target as a
reference for adjusting curves. To do this, print a verification target in the ColorCal
application (see page 45). The first row of gray patches near the right side of the
page is composed of CMY colors mixed together. The second row of gray patches
consists of equivalent black (K) patches. These two rows should look similar for
good gray balance when you use a SWOP Coated profile. To change the data values
used to create these patches, edit the “Gray Patches (In)” file.
To simulate different paper stocks, change the “paper white” by moving up the
Cyan, Magenta, and Yellow curves at 0%. A typical film proof may appear slightly
yellow, so moving up 0% Yellow to 0.02 density will add yellow everywhere that
can be printed on the page. There will still be a white border where there is no toner
on the printed page. Trim this border from your proofs to prevent the appearance
that yellow is too strong.
Splash ColorCal Notes
Troubleshooting Scanner Problems
If you are unable to successfully scan the ColorCal target and complete calibration,
the scanner could be malfunctioning. Refer to the manual provided with the
scanner for troubleshooting information.
If you leave the scanner powered on between calibrations, be sure to turn it off and
then back on before calibrating.
Failure to Accurately Calibrate
If, during the verify process immediately after calibrating, the measured curve does
not closely correspond to the target curve, it may be that your printer/copier needs
servicing. Splash ColorCal cannot operate properly if the printer/copier is printing
unevenly or if the scanner is too far out of specification. To verify that this is the
case, set the active Pass Through profile to Uncalibrated in ColorCal, then print out
the full area on an A4 or 8.5”x11” page with 40% C, 40% M, and 40% Y color mix,
with Splash Color Correction disabled in the Splash print driver. Examine the
printed page to see if the output is an even gray with little variation. If there is
significant variation, this indicates that the printer/copier needs to be serviced. If the
printer/copier needs servicing, contact Xerox Service.
Calibrating with Splash ColorCal Page 57
Page 58

Managing the Profiles Folders
Splash color profiles are located in the “Splash Color Data” folder in the
Preferences Folder within the System Folder. This folder contains three
profiles folders:
■ Obsolete Profiles contains older versions of the Splash v1.0 color profiles.
(If you did not upgrade from Splash v1.0 to v2.0 or v3.x, this folder is empty.)
These profiles can be used with a Splash v1.0 server if needed. They are not
used for Splash v2.0/3.x color correction.
■ Old Style Profiles contains Splash v1.0 one-dimensional color profiles that
were updated for use with Splash v2.0/3.x. If you created any custom color
profiles with Splash v1.0 and then upgraded to Splash v2.0/3.x, your custom
profiles are updated by Splash for use with v2.0 and then placed in this folder.
■ Calibration Sources contains the Splash v2.0/3.x multi-dimensional
color profiles.
To delete a color profile, be sure it is not selected in the Set Active Profiles
dialog box (see page 49), then remove the file from the Old Style Profiles folder
or Calibration Sources folder.
Page 58 Splash DC Series v4.0 Reference
Page 59

Setting Up the Splash Web Queue Manager
In this section:
Installing the Splash Web Queue Manager...................................... 60
Upgrading the Splash Server...........................................................61
Installing the WebSTAR Software ....................................................62
Installing the Splash Web Queue Manager Software ...................... 63
Setting Up the Web Queue Manager ............................................... 64
Configuring the TCP/IP Control Panel ............................................. 64
Enabling Web Access at the Splash Server.....................................66
Controlling Remote Queue Management Privileges ..................... 67
If you purchased the optional Splash Web Queue Manager, clients on a TCP/IP
network can view and control print jobs at the Splash Server.
Clients can use the Splash Web Queue Manager to:
■ Review the status of print jobs that were sent to the Splash Server
■ Place a hold on print jobs to prevent printing
■ Release a print job on hold to print
■ Move print jobs up or down in the print queue
■ Review and change print options for a job in the print queue
■ Send graphics files (such as EPS, Acrobat PDF, and TIFF files) and text-based
PostScript files to the Splash Server for printing
Setting up the Splash Web Queue Manager Page 59
Page 60

The Splash Web Queue Manager upgrade kit comes with all software needed to
enable the Splash Web Queue Manager option at the server. Client computers must
have an established Intranet or Internet connection and Netscape Navigator (v ersion
3.0 or later) or Microsoft Internet Explorer (version 3.0 or later) installed to use the
Splash Web Queue Manager.
Note: Microsoft Internet Explorer versions 3.0 and earlier do not support sending
graphics or PostScript files to the Splash Server for printing.
This chapter explains how to install the Splash Web Queue Manager upgrade
and how to set up the Splash Server to allow remote clients (including MacOS,
Windows 3.1, Windows 95/98, Windows NT and UNIX-based systems) to connect
to Splash. Refer to the appropriate Printing to Splash... on-line manual for instructions on how to use the Splash Web Queue Manager from a client computer.
Installing the Splash Web Queue Manager
The Splash Web Queue Manager upgrade kit is available separately as an option for
the Splash DC Series v4.0 Server. The kit includes:
■ Splash Web Queue Manager Upgrade Key
■ StarNine’s WebSTAR server software
In addition to the above items, you will need the Splash DC Series v4.0 software
CD-ROM (provided with your Splash Server) to complete the Splash Web
Queue Manager installation.
To install the Splash Web Queue Manager you will:
1. Upgrade the Splash Server Power Macintosh with the provided Upgrade Key.
2. Install the StarNine WebSTAR software.
3. Install the Splash Web Queue Manager software from the Splash DC Series
v4.0 software CD-ROM.
Page 60 Splash DC Series v4.0 Reference
Page 61

Upgrading the Splash Server
To upgrade the Splash Server:
1. Quit the Splash Server application and shut down the Splash Server
Power Macintosh.
2. Unplug the Splash Key from the ADB port on the back panel of the
Splash Server Power Macintosh.
3. Connect the Splash Web Queue Manager Upgrade Key to the Splash Key and
to the ADB port on the Splash Server.
Upgrade Key
Splash Key
The mouse, keyboard, and the original Splash Key for the Splash server
system should all be connected in a chain to the ADB port on the back of the
Splash Server.
IMPORTANT: Do not remove the original Splash Key from the ADB chain.
Before proceeding with the next step, make sure that both the original Splash
Key and the Upgrade Key (and your ke yboard and mouse) are all connected to
the Splash server’s ADB chain.
4. Start up the Splash Server Power Macintosh.
5. If the Splash Server application opens automatically when you start up the
Splash Server, choose Quit from the File menu to quit the Splash Server application.
6. Open the Splash Utilities folder, then open the Splash Configuration folder.
Setting up the Splash Web Queue Manager Page 61
Page 62

7. In the Splash Upgrade Utility folder, double-click the Splash Upgrade icon.
The Upgrade utility activates the Web Queue Manager upgrade for the Splash
Server.
A message appears when the configuration has successfully completed.
8. Click OK, then choose Restart from the Special menu to restart the
Splash Server.
The Splash Server upgrade is complete. You are ready to install the WebST AR software and enable web services for the Splash Server.
After you complete the upgrade procedure, you can shut down the Splash Server
Power Macintosh and remove the Upgrade Key from the ADB chain. (Do not
remove the original Splash Key, and do not unplug devices from the ADB chain
while the server computer is powered-up.)
Note: Once the upgrade is complete, the Upgrade Key becomes inoperative and
cannot be used for additional Splash Server upgrades. If you prefer, you can leave
the Upgrade Key in place.
Installing the WebSTAR Software
Follow the instructions provided with the StarNine WebSTAR package to install
WebSTAR on the internal hard disk of the Splash Server Power Macintosh.
The WebSTAR installer creates a WebSTAR application folder. Splash will move
this folder to another location on the Splash Server when you install the Splash Web
Queue Manager software.
Page 62 Splash DC Series v4.0 Reference
Page 63

Installing the Splash Web Queue Manager Software
Locate the original Splash DC Series v4.0 software CD-ROM provided with your
Splash Server before you begin. To install the Splash Web Queue Manager:
1. Quit the Splash Server application if it is running.
2. Insert the Splash CD-ROM in the CD-ROM drive on your computer. Open the
Splash Install folder. Double-click the Splash Installer icon.
The Splash Installer welcome screen appears.
3. Click Continue. The Server Easy Install dialog box appears.
Setting up the Splash Web Queue Manager Page 63
Page 64

4. Choose Custom Install from the menu at the top of the Installer window.
The Splash Custom Install options appear.
5. Select the WebSTAR checkbox, then click Install.
6. When the Splash Installer is finished copying files to the server hard disk,
click Restart to restart the Splash Server Power Macintosh.
Installation of the Splash Web Queue Manager software is complete. You are ready
to set up and enable web services for Internet or Intranet clients.
Setting Up the Web Queue Manager
To set up the Splash Web Queue Manager you will:
1. Configure the MacOS TCP/IP control panel.
2. Enable web access in the Splash Server application preferences.
Configuring the TCP/IP Control Panel
Use the TCP/IP control panel to set up an Internet address for the Splash Server.
You will need to assign the Splash Server a static Internet address so clients can
reliably locate the Splash Web Queue Manager on the network.
Note: If your Splash Server has TCP/IP Direct printing enabled, the
MacOS TCP/IP control panel is already configured for the Splash Web Queue
Manager. Go on to “Enabling Web Access at the Splash Server” on page 66.
Before you begin, you need to have all address information available. Obtain a
static Internet address (and subnet mask number if needed) from your network
administrator.
Page 64 Splash DC Series v4.0 Reference
Page 65

To set up an Internet address for the Splash Server:
1. At the Splash Server, point to Control Panels in the Apple menu, then select
TCP/IP in the submenu.
The TCP/IP control panel appears.
2. Choose the network connection type for the Splash Server’ s TCP/IP netw ork in
the Connect via menu.
3. Select “Manually” in the Configure menu.
4. Enter the IP Address for the Splash Server.
5. Enter a Subnet mask number if needed. A subnet mask provides additional
address information for some networks.
6. Enter the Router address if needed. A network router maintains a list of IP
addresses for two or more groups of network devices. The router then uses
the list of addresses to direct network data to the appropriate location on the
network. To enter two or more router addresses, press the Return key after you
enter each address.
7. Enter a Name server address for the DNS server on your network
(for example, design.corp.com).
8. When you have finished entering network information, close the TCP/IP
control panel. A dialog box asks you to confirm the new setup. Click OK.
Configuration is complete. You are ready to enable web access at the Splash Server.
Setting up the Splash Web Queue Manager Page 65
Page 66

Enabling Web Access at the Splash Server
1. Start the Splash Server application, then choose Preferences from the Server
menu. The Splash Server Preferences dialog box appears.
2. Click Network at the top of the Preferences dialog box.
3. Under Web Access select the “Enable Web Access” checkbox.
4. Type an Administrator Name and Password into the text boxes provided.
The Administrator name and password allow a Splash administrator to
remotely edit any print jobs in the Splash queues with the Web Queue
Manager. The administrator name and password override the Remote Queue
Management setting.
When a user logs in as the Administrator, they can change all Splash Server
Preferences from the Splash Web Queue Manager.
5. Click OK.
The Splash Web Queue Manager is enabled. Clients on a TCP/IP network with
Netscape Navigator or Microsoft Explorer installed can connect to the Splash Web
Queue Manager to remotely view and manage print jobs on the Splash Server.
You will need to provide the Internet address for the Splash Web Queue Manager
to clients so they can connect to the Splash Server over the Internet or Intranet.
This address will include the IP address (or DNS assigned name) for the Splash
Server (entered in the TCP/IP control panel), followed by “/splash/”. For example:
http://design.corp.com/splashdc30/splash/
Page 66 Splash DC Series v4.0 Reference
Page 67

Controlling Remote Queue Management Privileges
The Remote Queue Management options in the Network Preferences dialog box
control a client’s ability to change or delete jobs in the Splash print queue. This
option affects clients who use the Splash Web Queue Manager and clients who use
the Macintosh Remote Status DA.
To set the Remote Queue Management option:
1. In the Splash Server application, choose Preferences from the Server menu.
2. Click Network in the Server Preferences.
3. Select a Remote Queue Management option.
The options are.
■ Access All Files means that client computers can put any job on hold,
delete any job, change its position in the queue, and change print options
for any job.
■ Access Own Files means clients can hold, delete, edit, or change the posi-
tion in the print queue for their own jobs only. Clients who use the Splash
Web Queue Manager must log on to make changes to the print queue.
■ No Access means clients can view information for print jobs, but they can-
not perform any queue management functions.
4. Click OK.
Setting up the Splash Web Queue Manager Page 67
Page 68

Page 68 Splash DC Series v4.0 Reference
Page 69

Using the Printer/Copier
In this section:
Switching Between Printer and Copier Modes ............................... 69
Changing the Paper Size in a Tray.................................................... 70
LEF Paper Substitution Notes..........................................................70
Correcting Out of Paper Errors ........................................................ 71
Printing 12" x 18" Images .................................................................71
DocuColor Pro Fuser Web Notes......................................................72
DocuColor Pro Toner Dispenser Notes............................................ 72
DocuColor Pro Servicing Notes ....................................................... 72
DocuColor Pro Failure Affects Server ............................................. 72
Other DocuColor Pro Notes.............................................................. 73
Using a High-Capacity Feeder.......................................................... 73
Setting the DocuColor Pro Printer Timer......................................... 74
Disconnecting the Splash Interface Cables....................................75
This chapter contains helpful tips for successful printing with Splash. For complete
instructions on how to use specific features of the printer/copier, refer to the
DocuColor Pro user manual.
Switching Between Printer and Copier Modes
To interrupt a print job to make copies:
1. Press the Interrupt button on the printer/copier. The green Interrupt light
flashes, and the display on the printer/copier tells you to wait. Printing stops
when the page in the printer/copier has finished printing.
Using the Printer/Copier Page 69
Page 70

2. When the Interrupt light goes out and the display on the printer/copier says
“Ready to make copies,” proceed with your copy job.
3. When you finish making copies, press the yellow Clear All button. The printer/
copier goes back to printer mode in a few seconds, and printing resumes where
it left off.
Note: If the Interrupt light is on, and you see the message “Ready to make copies, ”
press the Interrupt button to turn the Interrupt light off, then press the All Clear
button to resume printing.
If you do not press the Clear All button in step 3, a time-out feature returns the
printer/copier to the printer mode after you finish using the copier. The time-out
interval is one minute, by default, but can be changed in the Splash Server application. (See the Splash DC Series v4.0 Set-Up Manual for more information.) If the
time-out interval is allowed to pass, the Splash Server sends the next job in the
queue, or the next copy of the interrupted job, to the printer.
You cannot interrupt a copy job to print, then resume the copy job where you left
off once printing is completed. To cancel a copy job to print, press the Interrupt
button, then press the yellow Clear All button. Printing begins immediately.
Changing the Paper Size in a Tray
Before you change a paper size in a printer/copier paper tray, choose Stop
Processing on the Splash Server to avoid misprinting an active job. After you insert
a different size cassette, choose Continue Processing to resume printing. Refer to
the printer/copier manual for complete instructions on how to change the paper
size. See the Splash DC Series v4.0 Set-Up Manual for instructions on how to start
and stop the Splash Server.
LEF Paper Substitution Notes
If you are using Auto Tray Select, and you choose an SEF paper size that is unavailable, the Splash Server substitutes the corresponding LEF paper size. Conv ersely, if
you choose an LEF paper size that is unavailable, the Splash Server substitutes the
corresponding SEF paper. In either case, the job prints with incorrect margins and
the image may be clipped.
Page 70 Splash DC Series v4.0 Reference
Page 71

Note: Although both A5 LEF and A5 SEF paper sizes are supported by the
DocuColor copier, these sizes are not available when printing to the DocuColor
from the Splash DC Series Server.
Correcting Out of Paper Errors
After a job is active, if there is no paper in the tray, Splash waits until the error timeout expires for you to add paper. A dialog box displays the amount of time you
have to add paper. (The Status DA also displays a warning.) If no paper is inserted
before the error timeout, you receive an error. and the job is transferred to the Error
queue.
Note: The amount of time the Splash Server waits before transferring the job to the
Error queue is configured in the Splash Server application. The default time is four
minutes. See the Splash DC Series v4.0 Set-Up Manual for more information.
You receive an error message, and the job is immediately returned to the queue:
■ When you choose a specific tray in the Splash Print dialog box, and the paper
size you specified in the Page Setup dialog box is not available in the tray
■ When you choose Automatic tray selection in the Print dialog box, and no tray
is set for the correct size
To print the job successfully, correct the error condition, then highlight the job in
the Splash Status DA or Server Status window and choose Remove Hold from the
Jobs menu.
Note: When you print to the bypass tray on the DocuColor Pro, Splash waits five
minutes for you to insert paper into the bypass tray.
Printing 12" x 18" Images
The Tabloid Bleed and A3 Bleed page size options print images to 12" x 18" paper.
T abloid Bleed prints full bleed for Tabloid documents, up to 11.5"x17.7". A3 Bleed
prints full bleed for A3 documents up to 297mm x 435mm. If horizontal clipping
occurs for a document on 12" x 18" paper, print it using the A3 Bleed paper size. If
clipping does not occur for a document, print it using the Tabloid Bleed paper size.
Using the Printer/Copier Page 71
Page 72

DocuColor Pro Fuser Web Notes
If the Splash Server displays a message that the fuser web is low, this message can
refer to either the fuser oil level or the fuser web for the DocuColor Pro copier. Go
to the DocuColor and examine the message that appears at the copier to determine
which item is in low supply.
IMPORTANT: Do not allow the fuser web to completely run out at the
DocuColor Pro. This causes an internal failure at the copier. If the remaining
amount of fuser web for the copier is low, contact Xerox Technical Service
to replace the fuser web.
DocuColor Pro Toner Dispenser Notes
If the DocuColor Pro copier interface reports that a toner dispenser is “almost broken,” contact Xerox Technical Service to replace the toner dispenser. If the toner
dispenser needs to be replaced, you can continue to use the DocuColor Pro to create
color photocopies, but you will not be able to print to the DocuColor Pro with
Splash until the dispenser is replaced.
DocuColor Pro Servicing Notes
Before entering the Key Operator mode or the Diagnostics mode at the DocuColor
Pro copier, be sure to quit the Splash Server application and shut down the server
computer first. The Splash Server will lose contact with the DocuColor Pro if
Key Operator mode or Diagnostics mode is opened while the Splash Server
is running.
DocuColor Pro Failure Affects Server
If the DocuColor Pro copier experiences an internal failure, the Splash Server will
lose contact with the printer/copier. You must restart the Splash Server computer
and re-open the Splash Server application to resume print processing.
Page 72 Splash DC Series v4.0 Reference
Page 73

Other DocuColor Pro Notes
A6 Message on DocuColor Pro Status Panel
If there is an A6 message on the copier/printer status panel, the slider bar on the
paper tray is set incorrectly. When you fix the slider bar, the job will print correctly .
See your DocuColor Pro documentation for information about the slider bar.
DocuColor Pro Bookletmaker Not Supported
The Splash DC v4.0 Server does not support printing to the optional bookletmaker
Using a High-Capacity Feeder
If your copier/printer is equipped with a high-capacity feeder (HCF), you can print
supported page sizes and media types through it automatically by selecting Bypass
Tray as the paper source. For more information about the HCF, see your copier/
printer documentation.
The page sizes supported by the Splash Server through the HCF are:
■ Letter LEF
■ A4 LEF
■ A3
■ B4
■ 12" x 18"
■ Tabloid
The media types supported by the HCF and the Splash Server are:
■ Standard-weight paper
■ Heavy-weight uncoated paper
■ Hole-punched paper
■ Pressure-sensitive labels
■ Coated paper
■ Single-step transfer paper
■ Transparencies
Using the Printer/Copier Page 73
Page 74

Setting the DocuColor Pro Printer Timer
The DocuColor Pro includes two printer timer controls that affect Splash
printing to the DocuColor Pro. When copy or print controls are used at the DocuColor Pro, the Splash Server stops sending print jobs to the printer/copier until the
DocuColor Pro becomes available for Splash printing again. The Printer Rejection
and Printer Acceptance Timers together control the length of the pause between the
time the DocuColor Pro becomes available for Splash printing and the time Splash
printing resumes at the DocuColor Pro.
When the DocuColor Pro copier is set up and configured, these controls are set for
a one minute delay. This is the minimum pause allowed. If delays of more than one
minute occur, use this procedure to set the Printer Rejection Timer and Printer
Acceptance Timer to their recommended configurations. If setting these controls
does not resolve the problem, contact Xerox technical support.
To use this procedure, you must enter Tools Mode at the DocuColor Pro. Entering
Tools Mode requires a password. Contact the Key Operator for the DocuColor Pro
or contact Xerox technical support. For more information about Tools Mode, refer
to the DocuColor Pro Operators Manual.
To set the Printer Rejection Timer and Printer Acceptance Timer:
1. Quit the Splash Server application.
2. At the DocuColor Pro, open the Tools Mode on the control screen.
3. Touch Timer in the Tools Mode screen.
4. Enter 0 (zero) minutes for the Post Job Timeout.
5. Enter 1 (one) minute for the Programming Timeout.
6. Enter 10 (ten) minutes for the Power Saver.
7. Enter 10 (ten) minutes for the Screen Saver.
8. Touch Printer Timer.
Page 74 Splash DC Series v4.0 Reference
Page 75

9. Enter 0 (zero) minutes for the Rejection Timer.
10. Enter 1 (one) minute for the Acceptance Timer. (Setting this to zero causes an
infinite delay.)
11. Touch Save twice to save the settings and return to the Tools Mode screen.
12. Touch Exit to leave Tools Mode.
13. Open the Splash Server application to resume printing.
Disconnecting the Splash Interface Cables
To avoid risk of damage, always shut down the Splash Server and turn off power to
the printer/copier before you disconnect the printer cables from the Splash Server
or from the printer/copier.
To disconnect the interface cables from the Splash Server:
1. Shut down the Splash Server, and turn off the display and all SCSI devices.
2. Turn off the printer/copier.
3. Loosen the screws that hold the cables to the interface card port on the back of
the Splash Server Macintosh.
4. Gently pull the cables out of the port.
5. Restart the Macintosh and the printer/copier.
Using the Printer/Copier Page 75
Page 76

To disconnect the interface cables from the printer/copier:
1. Shut down the Splash Server, and turn off the display and all SCSI devices.
2. Turn off the printer/copier.
3. Loosen the screws that secure the interface cables.
4. Gently pull the cables out of the port on the back of the printer.
5. Restart the Macintosh and the printer/copier.
To reconnect the printer/copier to the Splash Server, see the Splash Set-up Manual
for instructions.
Page 76 Splash DC Series v4.0 Reference
Page 77

Splash Specifications
Features
All Splash Servers feature:
■ 32 bit full-color PostScript printing
■ Selectable screen-to-print color correction for RGB images
■ Press-to-print color correction for CMYK images
■ Accurate color correction for files with mixed RGB and CMYK data
■ Separations printing support
■ Composite print color correction for PANTONE, DIC, HKS, or Toyo spot
colors
■ Progressives printing support
■ Custom screening support
■ Save as TIFF capability
■ Support for PostScript Level 3-ready applications
■ High-performance custom Macintosh Adobe dri ver , plus LaserWriter 8 support
for applications that require the LaserWriter 8 driver
■ Full Macintosh networking features
■ Native IPX print support
■ Native TCP/IP print support
■ Optional Web Print Queue Management software
■ Windows 95/98, Adobe custom driver for Windows 95/98, Windows 3.1, and
Windows NT driver support
■ Optional Web Print Queue Status software
■ 136 Roman printer fonts standard
■ Ability to RIP-while-print on all jobs with accelerated rendering
Splash Specifications Page 77
Page 78

The Splash DC v4.0 Server features:
■ 512 MB on-board memory
■ 256 MB pipeline buffer memory
■ 400 x 400 dpi full contone printing for all page sizes
Maximum Printing Speed
DocuColor Pro printer/copier
A3 Short Edge Feed:
■ Simplex: 20 pages per minute
■ Duplex: 15 pages per minute
A4 Short Edge Feed:
■ Simplex: 30 pages per minute
■ Duplex: 15 pages per minute
A4 Long Edge Feed:
■ Simplex: 40 pages per minute
■ Duplex: 30 pages per minute
Page 78 Splash DC Series v4.0 Reference
Page 79

Supported Paper Sizes
Splash Page
Size Names
A3 297 x 420 11.7 x 16.5
A4 SEF 210 x 297 8.3 x 11.7
A4 LEF 297 x 210 11.7 x 8.3
A6 100 x 148
B4 257 x 364
B5 SEF 182 x 257
B5 LEF 257 x 182
Letter SEF 216 x 279 8.5 x 11
Letter LEF 279 x 216 11 x 8.5
Legal 216 x 356 8.5 x 14
Legal 13 216 x 330 8.5 x 13
9 x 12 9 x 12
8 x 10 LEF 8 x 10
4 x 6 4 x 6
mm inches
Tabloid 279 x 432 11 x 17
Tabloid Bleed 11.5 x 17.7
A3 Bleed 297 x 435
Docupac 662x820
Splash Specifications Page 79
Page 80

Supported Software Applications
The following Macintosh and Windows applications are tested and known to be
compatible with Splash:
■ QuarkXPress
■ Adobe Illustrator
■ Adobe PageMaker
■ Macromedia FreeHand
■ Adobe Photoshop
■ Deneba Canvas
■ Microsoft W ord
■ Microsoft PowerPoint
■ Microsoft Excel
■ CorelDRAW
Page 80 Splash DC Series v4.0 Reference
Page 81

List of Fonts
The Multi-Master fonts are:
■ AdobeSansMM
■ AdobeSerifMM
The following Adobe Roman Fonts are provided with the Splash software.
■ AlbertusMT
■ AlbertusMT-Italic
■ AlbertusMT-Light
■ AntiqueOlive-Bold
■ AntiqueOlive-Compact
■ AntiqueOlive-Italic
■ AntiqueOlive-Roman
■ Apple-Chancery
■ Arial-BoldItalicMT
■ Arial-BoldMT
■ Arial-ItalicMT
■ ArialMT
■ AvantGarde-Book
■ AvantGarde-BookOblique
■ AvantGarde-Demi
■ AvantGarde-DemiOblique
■ Bodoni
■ Bodoni-Bold
■ Bodoni-BoldItalic
List of Fonts Page 81
Page 82

■ Bodoni-Italic
■ Bodoni-Poster
■ Bodoni-PosterCompressed
■ Bookman-Demi
■ Bookman-DemiItalic
■ Bookman-Light
■ Bookman-LightItalic
■ Carta
■ Chicago
■ Clarendon
■ Clarendon-Bold
■ Clarendon-Light
■ CooperBlack
■ CooperBlack-Italic
■ Copperplate-ThirtyThreeBC
■ Copperplate-ThirtyTwoBC
■ Coronet
■ Courier
■ Courier-Bold
■ Courier-BoldOblique
■ Courier-Oblique
■ Eurostile
■ Eurostile-Bold
■ Eurostile-BoldExtendedTwo
■ Eurostile-ExtendedTwo
■ Geneva
■ GillSans
■ GillSans-Bold
■ GillSans-BoldCondensed
■ GillSans-BoldItalic
■ GillSans-Condensed
■ GillSans-ExtraBold
Page 82 Splash DC Series v4.0 Reference
Page 83

■ GillSans-Italic
■ GillSans-Light
■ GillSans-LightItalic
■ Goudy
■ Goudy-Bold
■ Goudy-BoldItalic
■ Goudy-ExtraBold
■ Goudy-Italic
■ Helvetica
■ Helvetica-Bold
■ Helvetica-BoldOblique
■ Helvetica-Condensed
■ Helvetica-Condensed-Bold
■ Helvetica-Condensed-BoldObl
■ Helvetica-Condensed-Oblique
■ Helvetica-Narrow
■ Helvetica-Narrow-Bold
■ Helvetica-Narrow-BoldOblique
■ Helvetica-Narrow-Oblique
■ Helvetica-Oblique
■ HoeflerText-Black
■ HoeflerText-BlackItalic
■ HoeflerText-Italic
■ HoeflerText-Ornaments
■ HoeflerText-Regular
■ JoannaMT
■ JoannaMT-Bold
■ JoannaMT-BoldItalic
■ JoannaMT-Italic
■ LetterGothic
■ LetterGothic-Bold
■ LetterGothic-BoldSlanted
List of Fonts Page 83
Page 84

■ LetterGothic-Slanted
■ LubalinGraph-Book
■ LubalinGraph-BookOblique
■ LubalinGraph-Demi
■ LubalinGraph-DemiOblique
■ Marigold
■ MonaLisa-Recut
■ Monaco
■ NewCenturySchlbk-Bold
■ NewCenturySchlbk-BoldItalic
■ NewCenturySchlbk-Italic
■ NewCenturySchlbk-Roman NewYork
■ Optima
■ Optima-Bold
■ Optima-BoldItalic
■ Optima-Italic
■ Oxford
■ Palatino-Bold
■ Palatino-BoldItalic
■ Palatino-Italic
■ Palatino-Roman
■ StempelGaramond-Bold
■ StempelGaramond-BoldItalic
■ StempelGaramond-Italic
■ StempelGaramond-Roman
■ Symbol
■ Tekton
■ Times-Bold
■ Times-BoldItalic
■ Times-Italic
■ Times-Roman
■ TimesNewRomanPS-BoldItalicMT
Page 84 Splash DC Series v4.0 Reference
Page 85

■ TimesNewRomanPS-BoldMT
■ TimesNewRomanPS-ItalicMT
■ TimesNewRomanPSMT
■ Univers
■ Univers-Bold
■ Univers-BoldExt
■ Univers-BoldExtObl
■ Univers-BoldOblique
■ Univers-Condensed
■ Univers-CondensedBold
■ Univers-CondensedBoldOblique
■ Univers-CondensedOblique
■ Univers-Extended
■ Univers-ExtendedObl
■ Univers-Light
■ Univers-LightOblique
■ Univers-Oblique
■ Wingdings-Regular
■ ZapfChancery-MediumItalic
■ ZapfDingbats
List of Fonts Page 85
Page 86

Page 86 Splash DC Series v4.0 Reference
Page 87

Splash Error Messages
Installation Messages
Some INITs and control panel devices (cdevs) can interfere with the proper
installation of your Splash software, resulting in an error message when you try to
start the Splash Server application. Different messages appear for conflicts caused
by different inits and cdevs.
If you see an error message when you try to launch the Server application and you
have just installed (or reinstalled) your Splash software (or any other software),
remove any unnecessary inits and cdevs from the Extensions and Control Panels
folders. (Do not remove the DocuColor Board Startup file or any of the “Splash”
files from the Extensions folder; these files are required for the Server to operate
properly.) Restart the Server and launch the Server application again. If this does
not solve the problem, follow the instructions in “Splash Diagnostics” on page 109.
Alphabetical Listing of Error Messages
This appendix contains an alphabetical list of messages that you may encounter
while using the Splash Server . The recommended user action follo ws each message.
These messages may appear in any of the following areas:
■ Server status message area in the Splash Server window
■ Copier status message area in the Splash Server window
■ Alert dialog box
■ Log file
■ Get Info window for a job in the print queue
A timeout occurred while waiting for a sheet of paper to be manually inserted
Puts the job on hold. Select the job and choose Remove Hold from the Jobs menu in
the Status DA to resend the job.
Splash Error Messages Page 87
Page 88

Access card or code not entered properly
Enter the correct access card or code into the DocuColor printer/copier.
Add Reference failed
Restart the Splash Server computer and open the Server application. Send the job
again. If the error still occurs, reinstall the Splash software and restart your Server.
Start up Splash and resend the job. If the error still occurs, run Splash Diagnostics.
Add Resource failed
Restart the Splash Server computer and open the Server application. Send the job
again. If the error still occurs, reinstall the Splash software and restart your Server.
Start up Splash and resend the job. If the error still occurs, run Splash Diagnostics.
Address was odd, or out of range
Restart the Splash Server computer and open the Server application. Send the job
again. If the error still occurs, reinstall the Splash software and restart your Server.
Start up Splash and resend the job. If the error still occurs, run Splash Diagnostics.
All paper trays out of paper: printer on hold
Add paper to the printer/copier and choose Continue Processing from the Server
menu in the Splash Server.
An internal consistency check has failed
Restart the Splash Server computer and open the Server application. Send the job
again. If the error still occurs, reinstall the Splash software and restart your Server.
Start up Splash and resend the job. If the error still occurs, run Splash Diagnostics.
A potentially fatal and unrecoverable condition has been detected within the
software; the operation has been aborted
Restart the Splash Server computer and open the Server application. Send the job
again. If the error still occurs, reinstall the Splash software and restart your Server.
Start up Splash and resend the job. If the error still occurs, run Splash Diagnostics.
Bad master directory block
Restart the Splash Server computer and open the Server application. Send the job
again. If the error still occurs, call an Authorized Apple Repair Center.
Page 88 Splash DC Series v4.0 Reference
Page 89

Black toner dispenser near broken
Refer to the printer/copier manual for instructions.
Black toner low - warning
Add toner. Refer to the printer/copier manual for instructions.
Block Check failed
Restart the Splash Server computer and open the Server application. Send the job
again. If the error still occurs, reinstall the Splash software and restart your Server.
Start up Splash and resend the job. If the error still occurs, run Splash Diagnostics.
Communication link error to the Splash card
Reconnect the cable between the copier and the server and choose Continue
Processing from the Server menu in the Splash Server. If the error still occurs, run
Splash Diagnostics.
Communications with the device has failed. Please check that the device is
powered up and that the cables are OK
Check the power source, On button, and cables for the printer/copier. Choose
Continue Processing from the Server menu in the Splash Server. If the error still
occurs, run Splash Diagnostics.
Copier is warming up or in use
Stops processing of the queue. Within a specific amount of time (which you set in
the printer/copier interface) after you are finished making copies, printing resumes.
Copier/printer door open: close door
Stops processing of the queue. Close the door of the printer/copier. This error can
also occur if the optional sorter is not attached properly.
Copier/printer failure
Run Splash Diagnostics. Call Technical Support, if needed.
Copier/printer IFU failure
Run Splash Diagnostics. Call Technical Support, if needed.
Splash Error Messages Page 89
Page 90

Copier in system adjustment
Temporarily stops processing of the queue. Printing resumes automatically after
system adjustment completes.
Copier is purging unusable sheets
Temporarily stops processing of the queue while the copier ejects sheets.
Cyan toner dispenser near broken
Refer to the printer/copier manual for instructions.
Cyan toner low - warning
Add toner. Refer to the printer/copier manual for instructions.
Device busy
Restart the Splash Server computer and open the Server application. Send the job
again. If the error still occurs, run Splash Diagnostics.
Device not found
Restart the Splash Server computer and open the Server application. Send the job
again. If the error still occurs, run Splash Diagnostics.
Drive volume already on-line at MountVol
Restart the Splash Server computer and open the Server application. Send the job
again. If the error still occurs, reinstall the Splash software, restart the Server
computer, open the Server application and send the job again. If the error still
occurs, run Splash Diagnostics.
Driver reported an error: “%% [error text]”
A PostScript error occurred during processing. Check that all printer description
files (PPDs) required by your application are properly installed, and that the proper
printer description file was selected in the Page Setup or Print dialog box in your
application.
If you are printing a PostScript file, try printing the file to another PostScript Level
2 printer. (If the file does not print successfully on this printer, the problem may be
in your application. Contact the publisher of the application for T echnical Support.)
Page 90 Splash DC Series v4.0 Reference
Page 91

If the file prints successfully, the PostScript file cannot be printed with Splash. Recreate the file using the Splash printer driver. (PostScript files created with other
drivers may not print reliably on Splash.) See the Printing to Splash... on-line
manuals for more information about creating and printing PostScript files to be
printed with Splash.
If you still have a problem, write down the error code that appears in the brackets,
then call Technical Support.
Driver reported an error: “Timed out during error condition....”
A correctable error (“out of paper,” for example) was detected after the job was
processed. The error was not corrected before the job timeout elapsed, so the job
was returned to the queue with an error. Highlight the job, then select Remo ve Hold
to rerun the job after ensuring the problem has been corrected.
Duplicate filename (rename) or File found instead of folder
Restart the Splash Server computer and open the Server application. Send the job
again. If the error still occurs, reinstall the Splash software, restart the Server
computer, open the Server application and send the job again. If the error still
occurs, run Splash Diagnostics.
End of file; no additional data in the format
Restart the Splash Server computer and open the Server application. Send the job
again. If the error still occurs, reinstall the Splash software, restart the Server
computer, open the Server application and send the job again. If the error still
occurs, run Splash Diagnostics.
Error during font declaration
Restart the Splash Server computer and open the Server application. Send the job
again. If the error still occurs, reinstall the Splash software, restart the Server
computer, open the Server application and send the job again. If the error still
occurs, run Splash Diagnostics.
Error in user parameter list
Restart the Splash Server computer and open the Server application. Send the job
again. If the error still occurs, reinstall the Splash software, restart the Server
computer, open the Server application and send the job again. If the error still
occurs, run Splash Diagnostics.
Splash Error Messages Page 91
Page 92

Error: Not responding. Please check that the printer/copier is on and that the
cable from the Splash card is properly connected.
Make sure that the printer/copier is plugged in and turned on and that the cable
from the Splash Server is properly connected.
Extended resource has a bad format
Restart the Splash Server computer and open the Server application. Send the job
again. If the error still occurs and you have added extended resources in the
Splash Folder:Resources folder, remo ve them, restart the Server computer and open
the Server application. If the error still occurs, reinstall the Splash software and
send the print job again. If the error still occurs, run Splash Diagnostics.
External file system identifier is nonzero
Restart the Splash Server computer and open the Server application. Send the job
again. If the error still occurs, reinstall the Splash software, restart the Server
computer, open the Server application and send the job again. If the error still
occurs, run Splash Diagnostics.
File already open with write permission
Restart the Splash Server computer and open the Server application. Send the job
again. If the error still occurs, reinstall the Splash software, restart the Server
computer, open the Server application and send the job again. If the error still
occurs, run Splash Diagnostics.
File is busy (delete); Section doing I/O
Restart the Splash Server computer and open the Server application. Send the job
again. If the error still occurs, reinstall the Splash software, restart the Server
computer, open the Server application and send the job again. If the error still
occurs, run Splash Diagnostics.
File not found; Folder not found; Edition container not found; Target not found
Restart the Splash Server computer and open the Server application. Send the job
again. If the error still occurs, reinstall the Splash software, restart the Server
computer, open the Server application and send the job again. If the error still
occurs, run Splash Diagnostics.
Page 92 Splash DC Series v4.0 Reference
Page 93

File not open
Restart the Splash Server computer and open the Server application. Send the job
again. If the error still occurs, reinstall the Splash software, restart the Server
computer, open the Server application and send the job again. If the error still
occurs, run Splash Diagnostics.
File system internal error: during rename the old entry was deleted but could not be restored.
Restart the Splash Server computer and open the Server application. Send the job
again. If the error still occurs, reinstall the Splash software, restart the Server
computer, open the Server application and send the job again. If the error still
occurs, run Splash Diagnostics.
Font not declared
Restart the Splash Server computer and open the Server application. Send the job
again. If the error still occurs, reinstall the Splash software, restart the Server
computer, open the Server application and send the job again. If the error still
occurs, run Splash Diagnostics.
Font substitution occurred
Check to make sure the font is properly installed in the Resources folder inside the
Splash Folder.
Fuser oil empty
Refer to the printer/copier manual for instructions.
Fuser oil near empty
Refer to the printer/copier manual for instructions.
Fuser web almost empty
Refer to the printer/copier manual for instructions.
Fuser web empty
Stops processing of the queue. Refer to the printer/copier manual for instructions.
Choose Continue Processing from the Server menu in the Splash Server after the
problem is corrected.
Splash Error Messages Page 93
Page 94

Get file position error
Restart the Splash Server computer and open the Server application. Send the job
again. If the error still occurs, reinstall the Splash software, restart the Server
computer, open the Server application and send the job again. If the error still
occurs, run Splash Diagnostics.
GetHandlSize failed on baseText or substitutionText; Nil master pointer
[handle was NIL in HandleZone or other]
Restart the Splash Server computer and open the Server application. Send the job
again. If the error still occurs, reinstall the Splash software, restart the Server
computer, open the Server application and send the job again. If the error still
occurs, run Splash Diagnostics.
I/O error
Restart the Splash Server computer and open the Server application. Send the job
again. If the error still occurs, reinstall the Splash software, restart the Server
computer, open the Server application and send the job again. If the error still
occurs, run Splash Diagnostics.
Magenta toner dispenser near broken
Refer to the printer/copier manual for instructions.
Magenta toner low - warning
Add toner. Refer to the printer/copier manual for instructions.
Manual feed timeout
Puts the job on hold. Put paper or transparencies in bypass tray. Select the job and
choose Remove Hold from the Jobs menu in the Status DA to resend the job.
Memory full (open) or file won’t fit (load)
Restart the Splash Server computer and open the Server application. Send the job
again. If the error still occurs, reinstall the Splash software, restart the Server
computer, open the Server application and send the job again If the error still
occurs, run Splash Diagnostics.
Page 94 Splash DC Series v4.0 Reference
Page 95

No Splash card could be found
No Splash card could be found. Please ensure that the card is properly
installed in your Macintosh.
Make sure the DocuColor Board Startup file is installed in the Extensions folder in
the System folder. Remove any inits and cdevs that you do not need from your
Server. Restart the Splash Server computer and open the Server application.
Send the job again. If this does not solve the problem, run Splash Diagnostics
(see page 109).
No such drive (tried to mount a bad drive num)
Restart the Splash Server computer and open the Server application. Send the job
again. If the error still occurs, reinstall the Splash software, restart the Server
computer, open the Server application and send the job again. If the error still
occurs, run Splash Diagnostics.
No such volume or volume not found
Restart the Splash Server computer and open the Server application. Send the job
again. If the error still occurs, reinstall the Splash software, restart the Server
computer, open the Server application and send the job again. If the error still
occurs, run Splash Diagnostics.
Not a Macintosh diskette (sig bytes are wrong)
Restart the Splash Server computer and open the Server application. Send the job
again. If the error still occurs, reinstall the Splash software, restart the Server
computer, open the Server application and send the job again. If the error still
occurs, run Splash Diagnostics.
Not returning proper status
Restart the Splash Server computer and open the Server application. Send the job
again. If the error still occurs, reinstall the Splash software, restart the Server
computer, open the Server application and send the job again. If the error still
occurs, run Splash Diagnostics.
Splash Error Messages Page 95
Page 96

Offset or count out of bounds
Restart the Splash Server computer and open the Server application. Send the job
again. If the error still occurs, reinstall the Splash software, restart the Server
computer, open the Server application and send the job again. If the error still
occurs, run Splash Diagnostics.
Operation has been aborted
Puts the job on hold. Select the job and choose Remove Hold from the Jobs menu in
the Status DA to resend the job.
Out of A3 paper
Stops processing of the queue until the error timeout is reached or until you add
paper to the A3 paper tray. After the error timeout is reached, the job is returned to
the queue with an error. Select the job and choose Remove Hold from the Jobs
menu in the Status DA to resend the job.
Out of A4 paper
Stops processing of the queue until the error timeout is reached or until you add
paper to the A4 paper tray. After the error timeout is reached, the job is returned to
the queue with an error. Select the job and choose Remove Hold from the Jobs
menu in the Status DA to resend the job.
Out of A4L paper
Stops processing of the queue until the error timeout is reached or until you add
paper to the A4L paper tray. After the error timeout is reached, the job is returned to
the queue with an error. Select the job and choose Remove Hold from the Jobs
menu in the Status DA to resend the job.
Out of B4 paper
Stops processing of the queue until the error timeout is reached or until you add
paper to the B4 paper tray. After the error timeout is reached, the job is returned to
the queue with an error. Select the job and choose Remove Hold from the Jobs
menu in the Status DA to resend the job.
Page 96 Splash DC Series v4.0 Reference
Page 97

Out of B5 paper
Stops processing of the queue until the error timeout is reached or until you add
paper to the B5 paper tray. After the error timeout is reached, the job is returned to
the queue with an error. Select the job and choose Remove Hold from the Jobs
menu in the Status DA to resend the job.
Out of B5L paper
Stops processing of the queue until the error timeout is reached or until you add
paper to the B5L paper tray. After the error timeout is reached, the job is returned to
the queue with an error. Select the job and choose Remove Hold from the Jobs
menu in the Status DA to resend the job.
Out of black toner
Stops processing of the queue. Refer to the printer/copier manual for
instructions. Choose Continue Processing from the Server menu in the
Splash Server.
Out of cyan toner
For color jobs, stops processing of the queue until the error timeout is reached or
until you add cyan toner . After the error timeout is reached, the job is returned to the
queue with an error. Add toner. Refer to the printer/copier manual for instructions.
Select the job and choose Remove Hold from the Jobs menu in the Status DA to
resend the job. Grayscale jobs can still print.
Out of LetterL paper
Puts the job on hold. Add paper to the LetterL size paper tray. Select the job and
choose Remove Hold from the Jobs menu in the Status DA to resend the job.
Out of magenta toner
For color jobs, stops processing of the queue until the error timeout is reached or
until you add magenta toner. After the error timeout is reached, the job is returned
to the queue with an error. Refer to the printer/copier manual for instructions on
how to add toner. Select the job and choose Remove Hold from the Jobs menu in
the Status DA to resend the job. Grayscale jobs can still print.
Splash Error Messages Page 97
Page 98

Out of yellow toner
For color jobs, stops processing of the queue until the error timeout is reached or
until you add yellow toner. After the error timeout is reached, the job is returned to
the queue with an error. Refer to the printer/copier manual for instructions on how
to add toner. Select the job and choose Remove Hold from the Jobs menu in the
Status DA to resend the job. Grayscale jobs can still print.
Paper jammed
Stops processing of the queue. Splash waits for you to remove the paper jam from
the printer/copier. The job automatically resumes when the paper jam is cleared. If
the paper jam is not cleared, the job returns to the queue with an error after the error
timeout is reached.
Paper tray 1 is not properly seated
When a job selects paper tray 1, the Server stops processing of the queue until the
error timeout is reached or until you reseat the paper tray. After the error timeout is
reached, the job is returned to the queue with an error. Select the job and choose
Remove Hold from the Jobs menu in the Status DA to resend the job.
Paper tray 2 is not properly seated
When a job selects paper tray 2, the Server stops processing of the queue until the
error timeout is reached or until you reseat the paper tray. After the error timeout is
reached, the job is returned to the queue with an error. Select the job and choose
Remove Hold from the Jobs menu in the Status DA to resend the job.
Paper tray 3 is not properly seated
When a job selects paper tray 3, the Server stops processing of the queue until the
error timeout is reached or until you reseat the paper tray. After the error timeout is
reached, the job is returned to the queue with an error. Select the job and choose
Remove Hold from the Jobs menu in the Status DA to resend the job.
Paper tray 1 out of paper
When a job selects paper tray 1, the Server stops processing of the queue until the
error timeout is reached or until you add paper to the paper tray. After the error
timeout is reached, the job is returned to the queue with an error. Select the job and
choose Remove Hold from the Jobs menu in the Status DA to resend the job.
Page 98 Splash DC Series v4.0 Reference
Page 99

Paper tray 2 out of paper
When a job selects paper tray 2, the Server stops processing of the queue until the
error timeout is reached or until you add paper to the paper tray. After the error
timeout is reached, the job is returned to the queue with an error. Select the job and
choose Remove Hold from the Jobs menu in the Status DA to resend the job.
Paper tray 3 out of paper
When a job selects paper tray 3, the Server stops processing of the queue until the
error timeout is reached or until you add paper to the paper tray. After the error
timeout is reached, the job is returned to the queue with an error. Select the job and
choose Remove Hold from the Jobs menu in the Status DA to resend the job.
Pointer Check failed
Restart the Splash Server computer and open the Server application. Send the job
again. If the error still occurs, reinstall the Splash software, restart the Server
computer, open the Server application and send the job again. If the error still
occurs, run Splash Diagnostics.
Please remove sheets from sorter
Stops processing of the queue. Splash waits for you to remove sheets in the sorter
bin. The job automatically resumes when the sheets are removed. If the server’s
error timeout elapses before the sheets are removed from the sorter, the job is
moved to the Server’s Error queue.
Printer error
Quit the Splash application, restart the Server, and restart Splash. resend the job.
If the error still occurs, call the key operator or Technical Support for your
printer/copier.
Publisher writing to an edition
Restart the Splash Server computer and open the Server application. Send the job
again. If the error still occurs, reinstall the Splash software, restart the Server
computer, open the Server application and send the job again. If the error still
occurs, run Splash Diagnostics.
Splash Error Messages Page 99
Page 100

Reference number invalid
Restart the Splash Server computer and open the Server application. Send the job
again. If the error still occurs, reinstall the Splash software, restart the Server
computer, open the Server application and send the job again. If the error still
occurs, run Splash Diagnostics.
Remove Reference failed
Restart the Splash Server computer and open the Server application. Send the job
again. If the error still occurs, reinstall the Splash software, restart the Server
computer, open the Server application and send the job again. If the error still
occurs, run Splash Diagnostics.
Remove Resource failed
Restart the Splash Server computer and open the Server application. Send the job
again. If the error still occurs, reinstall the Splash software, restart the Server
computer, open the Server application and send the job again. If the error still
occurs, run Splash Diagnostics.
Resource already in memory
Restart the Splash Server computer and open the Server application. Send the job
again. If the error still occurs, reinstall the Splash software, restart the Server
computer, open the Server application and send the job again. If the error still
occurs, run Splash Diagnostics.
Resource Attribute inconsistent with operation
Restart the Splash Server computer and open the Server application. Send the job
again. If the error still occurs, reinstall the Splash software, restart the Server
computer, open the Server application and send the job again. If the error still
occurs, run Splash Diagnostics.
Resource file not found
Restart the Splash Server computer and open the Server application. Send the job
again. If the error still occurs, reinstall the Splash software, restart the Server
computer, open the Server application and send the job again. If the error still
occurs, run Splash Diagnostics.
Page 100 Splash DC Series v4.0 Reference
 Loading...