

Page 1
Creo Color Server
for the Xerox DocuColor 242/252/260 Printer/Copier
731-01023A-EN Rev A
User Guide
English
Page 2

Page 3

Copyright
Trademarks
FCC Compliance
© Creo, 2007. All rights reserved.
This document is also distributed in Adobe Systems Incorporated's PDF (Portable Document Format). You may
reproduce the document from the PDF file for internal use. Copies produced from the PDF file must be reproduced in
whole.
Creo is a trademark of Creo.
Adobe, Acrobat, Adobe Illustrator, Distiller, Photoshop, PostScript, and PageMaker are registered trademarks of Adobe
Systems Incorporated.
Apple, AppleShare, AppleTalk, iMac, ImageWriter, LaserWriter, Mac OS, Power Macintosh, and TrueType are registered
trademarks of Apple Computer, Inc. Macintosh is a trademark of Apple Computer, Inc., registered in the U.S.A. and other
countries.
Kodak, Brisque, and InSite are trademarks of Kodak.
PANTONE, Hexachrome, PANTONE Hexachrome, and PANTONE MATCHING SYSTEM are the property of Pantone, Inc.
PEARL, PEARLsetter, PEARLhdp, PEARLdry, and PEARLgold are registered trademarks of Presstek, Inc.
XEROX is a trademark of XEROX CORPORATION.
Any Creo equipment referred to in this document complies with the requirements in part 15 of the FCC Rules for a Class
A digital device. Operation of the Creo equipment in a residential area may cause unacceptable interference to radio and
TV reception, requiring the operator to take whatever steps are necessary to correct the interference.
Product Recycling and Disposal
If you are managing the disposal of your Xerox product, please note that the product contains perchlorate, lead, mercury,
and other materials whose disposal may be regulated due to environmental considerations in certain countries or states.
The presence of perchlorate, lead and mercury is fully consistent with global regulations applicable at the time that the
product was placed on the market.
Application of this symbol on your equipment is confirmation that you must dispose of this equipment with agreed
national procedures.
In accordance with European legislation, end of life electrical and electronic equipment subject to disposal must be
managed within agreed procedures.
Xerox operates a worldwide equipment take back and reuse/recycle program. Contact your Xerox sales representative
(1-800-ASK-XEROX) to determine whether this Xerox product is part of the program. For more information about Xerox
environmental programs visit http://www.xerox.com/environment
For perchlorate disposal information, contact your local authorities. In the United States, you may also refer to the
California Department of Toxic Substances Control (DTSC) or see
http://www.dtsc.ca.gov/hazardouswaste/perchlorate
Limitation of Liability
The product, software or services are being provided on an "as is" and "as available" basis. Except as may be stated
specifically in your contract, Creo and its parents, subsidiaries, and affiliates expressly disclaim all warranties of any kind,
whether express or implied, including, but not limited to, any implied warranties of merchantability, fitness for a
particular purpose and non-infringement.
You understand and agree that, except as may be stated specifically in your contract, Creo and its parents, subsidiaries,
and affiliates shall not be liable for any direct, indirect, incidental, special, consequential or exemplary damages, including
but not limited to, damages for loss of profits, goodwill, use, data or other intangible losses (even if Creo has been
advised of the possibility of such damages), resulting from: (i) the use or the inability to use the product or software; (ii)
the cost of procurement of substitute goods and services resulting from any products, goods, data, software, information
or services purchased; (iii) unauthorized access to or alteration of your products, software or data; (iv) statements or
conduct of any third party; (v) any other matter relating to the product, software, or services.
The text and drawings herein are for illustration and reference only. The specifications on which they are based are
subject to change. Creo may, at any time and without notice, make changes to this document. Creo, for itself and on
behalf of its parents, subsidiaries, and affiliates, assumes no liability for technical or editorial errors or omissions made
.
.
Page 4

herein, and shall not be liable for incidental, consequential, indirect, or special damages, including, without limitation,
loss of use, loss or alteration of data, delays, or lost profits or savings arising from the use of this document.
www.printondemandsolutions.com
Internal 731-01023A-EN Rev A
Revised February 2007
Page 5

Contents
1 Welcome 1
Welcome to the Spire CX260 User Guide................................................................................................................................................2
Terminology...................................................................................................................................................................................................... 2
Overview of Guide...........................................................................................................................................................................................3
Introduction to the Spire CX260.................................................................................................................................................................4
Hardware and Software Components...............................................................................................................................................5
Supported Formats.................................................................................................................................................................................5
Workflow ..................................................................................................................................................................................................5
Spire CX260 Network Printers............................................................................................................................................................6
2 Getting Started 9
Overview..........................................................................................................................................................................................................10
Turning the Spire CX260 On and Off ......................................................................................................................................................10
Basic and Basic Pro Configurations..................................................................................................................................................10
Control Station and Pro Control Station Configurations ............................................................................................................. 11
Working from a PC Client Workstation .................................................................................................................................................. 12
Defining the Printer on the Client Workstation............................................................................................................................12
Printing from the Client Workstation..............................................................................................................................................12
Spire Print Driver Software................................................................................................................................................................. 13
Working from a Macintosh Client Workstation.................................................................................................................................... 21
Defining a Printer on Macintosh Client Workstations................................................................................................................21
Printing from a Macintosh Client Workstation............................................................................................................................ 23
Working Remotely .......................................................................................................................................................................................24
EZ Connect............................................................................................................................................................................................24
Remote Workspace............................................................................................................................................................................. 29
Spire Web Services .............................................................................................................................................................................. 31
Remote Scan Application ...................................................................................................................................................................37
Preparing PostScript Files Offline for the Spire CX260............................................................................................................. 46
3 Overview of Spire CX260 49
The Workspace.............................................................................................................................................................................................50
Opening the Spire CX260 Workspace from the Start Menu...................................................................................................50
Customizing the Workspace View...................................................................................................................................................51
The Server and Printer Monitors.............................................................................................................................................................. 52
Managing the Job Queues ......................................................................................................................................................................... 52
The Queues Window.......................................................................................................................................................................... 53
Status Information............................................................................................................................................................................... 55
Batching Jobs ........................................................................................................................................................................................ 55
Changing the Order of Jobs in the Queues................................................................................................................................... 56
Suspending and Resuming Queues................................................................................................................................................. 57
Aborting a Running Job ...................................................................................................................................................................... 57
Moving a Waiting Job to the Storage Window............................................................................................................................ 58
Unlocking a Job ....................................................................................................................................................................................59
Viewing and Editing Job Parameters ..............................................................................................................................................60
Deleting a Job .......................................................................................................................................................................................60
Managing the Storage Window.................................................................................................................................................................61
Discarding RTP Information.............................................................................................................................................................. 62
Handling Jobs in the Storage Window........................................................................................................................................... 62
Archiving and Retrieving Jobs ..........................................................................................................................................................64
Viewing a Job’s History...................................................................................................................................................................... 66
Page 6

vi Spire CX260 User Guide
Export as InSite Job..............................................................................................................................................................................66
Importing and Printing Files .......................................................................................................................................................................67
Reprinting Jobs ..............................................................................................................................................................................................68
The Settings Window ..................................................................................................................................................................................69
The Resource Center ...................................................................................................................................................................................70
The Job Parameters Window ....................................................................................................................................................................70
The Help Menu.............................................................................................................................................................................................. 72
The DFE Monitor........................................................................................................................................................................................... 72
The Printer Monitor...................................................................................................................................................................................... 73
Remote Desktop Application.....................................................................................................................................................................75
4 Tools and Utilities 77
Overview ......................................................................................................................................................................................................... 78
Job Editor.........................................................................................................................................................................................................78
Navigation Buttons ..............................................................................................................................................................................78
Previewing the Job ...............................................................................................................................................................................79
Viewing Pages in the Job Editor .......................................................................................................................................................79
Editing an RTP Job................................................................................................................................................................................82
Remote Tools.................................................................................................................................................................................................86
Working from the Remote Desktop Application .........................................................................................................................86
Web Center ............................................................................................................................................................................................91
Managing Fonts.............................................................................................................................................................................................93
Managing Virtual Printers ..........................................................................................................................................................................93
Tray Alignment..............................................................................................................................................................................................96
Printing on Tabs Using the Spire Tabs Plug-In for Acrobat.............................................................................................................100
Creating Tabs With the Tabs Plug-in............................................................................................................................................100
Printing the Job ...................................................................................................................................................................................105
Preflight ......................................................................................................................................................................................................... 107
Analyzing a PDF Job ..........................................................................................................................................................................107
Preflight Check....................................................................................................................................................................................109
Preflight Report....................................................................................................................................................................................110
5 Generating Reports 113
Printing Reports............................................................................................................................................................................................114
Job Accounting.............................................................................................................................................................................................114
Setting the Accounting/Message Viewer....................................................................................................................................114
Viewing the Accounting Information.............................................................................................................................................115
Exporting the Accounting Log.......................................................................................................................................................... 116
Printing the Accounting Log.............................................................................................................................................................117
Job Ticket Report .........................................................................................................................................................................................118
6 Color Workflow 121
Calibration .................................................................................................................................................................................................... 122
Overview .............................................................................................................................................................................................. 122
Off-the-glass Calibration.................................................................................................................................................................. 122
Eye-One Spectrophotometer Calibration .................................................................................................................................... 125
The Calibration Window................................................................................................................................................................... 131
Printing a Job with a Calibration Table......................................................................................................................................... 137
Color Tools ................................................................................................................................................................................................... 138
Profile Manager .................................................................................................................................................................................. 138
Spot Color Editor and Workflow ....................................................................................................................................................140
Gradation Tool .................................................................................................................................................................................... 145
Page 7

Contents vii
7 System Administration 153
Setting Up and Configuring the Spire CX260 ......................................................................................................................................154
Server Setup .........................................................................................................................................................................................154
Network Setup.....................................................................................................................................................................................156
Remote Tools Setup...........................................................................................................................................................................159
Security.................................................................................................................................................................................................. 161
System Disks........................................................................................................................................................................................163
Backing up the Configuration ..........................................................................................................................................................163
Calibration Device ..............................................................................................................................................................................166
Mail Service..........................................................................................................................................................................................166
Localization...........................................................................................................................................................................................167
Pre-RIP Preview...................................................................................................................................................................................168
General Defaults .................................................................................................................................................................................169
Printing Modes ....................................................................................................................................................................................169
Print Queue Manager ....................................................................................................................................................................... 170
Color........................................................................................................................................................................................................171
Messages..............................................................................................................................................................................................172
View Configuration ............................................................................................................................................................................173
JDF Outputs .........................................................................................................................................................................................174
Scan ........................................................................................................................................................................................................175
Storage Management ........................................................................................................................................................................176
System Messages........................................................................................................................................................................................177
The Alerts Window............................................................................................................................................................................ 177
Job History............................................................................................................................................................................................178
The Message Viewer.........................................................................................................................................................................179
8 Setting Parameters 181
Setting Parameters in the Job Parameters Window ..........................................................................................................................182
The Print Settings Tab .......................................................................................................................................................................182
The Paper Stock Tab ..........................................................................................................................................................................186
The Print Quality Tab.........................................................................................................................................................................187
The Color Tab......................................................................................................................................................................................189
The Imposition Tab ........................................................................................................................................................................... 194
The Services Tab...............................................................................................................................................................................200
The Finishing Tab.............................................................................................................................................................................. 204
The Exceptions Tab
Setting PPD File Parameters................................................................................................................................................................... 208
.......................................................................................................................................... 206
9 Reinstalling the Spire CX260 211
Overview........................................................................................................................................................................................................212
When to Back Up and Restore ........................................................................................................................................................212
Preloaded Software ............................................................................................................................................................................213
Disk Configuration..............................................................................................................................................................................213
Backing Up and Restoring the Spire CX260.........................................................................................................................................213
Backing Up the Job List Database ..................................................................................................................................................214
Backing Up the CX260 Last Image Configuration .....................................................................................................................216
The Spire CX260 restarts and the Windows XP desktop appears........................................................................................ 217
Restoring the Spire CX260...............................................................................................................................................................217
Restoring the Job List Database......................................................................................................................................................221
Adding the Spire CX260 Color Server to a Domain..........................................................................................................................222
Reinstalling the Spire CX260 ..................................................................................................................................................................223
Uninstalling the Spire Application Software...............................................................................................................................223
Installing the Spire Application Software ....................................................................................................................................225
Configuring the McAfee VirusScan (Optional).........................................................................................................................226
Configuring the Scan All Fixed Disks Settings............................................................................................................................227
Page 8

viii Spire CX260 User Guide
Configuring the On-Access Scan Settings.................................................................................................................................. 229
Installing and Configuring Novell Client ...............................................................................................................................................232
Installing Novell Client for Spire CX260 ......................................................................................................................................232
Configuring Novell Client for Spire CX260 .................................................................................................................................233
Uninstalling Novell Client for Spire CX260................................................................................................................................ 234
Backing Up the CX260 Last Image Configuration.....................................................................................................................235
Performing a Test Print.....................................................................................................................................................................235
Formatting the Image Disk...................................................................................................................................................................... 236
Glossary 239
Index 249
Page 9

Welcome
Welcome to the Spire CX260 User Guide.........................................................2
Terminology ...............................................................................................................2
Overview of Guide....................................................................................................3
Introduction to the Spire CX260......................................................................... 4
Page 10

2 Chapter 1 – Welcome
Welcome to the Spire CX260 User Guide
Welcome to your Creo® Color Server (Spire CX260) for the Xerox® DocuColor 242/
252/260 printer-copier User Guide.
The Spire CX260 is a powerful, comprehensive color server that provides high
throughput and print predictability to digital workflows. In combination with the
Xerox DocuColor 242/252/260 printer/copier, the Spire CX260 effectively
addresses the growth of on-demand printing needs and delivers the best output
quality available.
Throughout this guide, we look forward to supporting you all the way from prepress
to print.
This user guide will help you operate the Spire CX260. It can also be used as a
reference guide for questions or procedures. Study this user guide to take full
advantage of the many unique and advanced features of the Spire CX260.
This user guide is for Spire CX260 operators and system administrators. This guide
explains how you can quickly and easily print from the Spire CX260 or from a client
workstation. Step-by-step procedures are included for new and occasional Spire
CX260 users. Detailed information is provided for users who require in-depth
knowledge of the Spire CX260.
Te r m i n o l o g y
The Spire CX260 is available in four configurations:
Ta b le 1 : Ter m i n ol o g y
Configuration Description
Spire CX260 (“Basic
configuration”)
Spire CX260 with Control
Station Upgrade Kit (“Control
Station configuration”)
Spire CX260 with Professional
Upgrade Kit (“Pro Basic
configuration”)
Spire CX260 with Professional
Control Station Upgrade Kit
(“Pro Control Station
configuration”)
Spire CX260 mounted on the Xerox DocuColor 242/252/260 printer/
copier
Upgrade kit that includes the Spire CX260 mounted on a stand,
monitor, keyboard, mouse, and DVD-ROM. A dongle is required for this
configuration.
The Spire CX260 is a prerequisite for this configuration.
Note:
Upgrade kit that includes the GretagMacbeth® Eye-One®
spectrophotometer and advanced software features. A dongle is
required for this configuration.
The Spire CX260 is a prerequisite for this configuration.
Note:
Upgrade kit that includes the Spire CX260 mounted on a stand,
monitor, keyboard, mouse, DVD-ROM, Eye-One spectrophotometer
and advanced software features. A dongle is required for this
configuration.
The Spire CX260 and Control Station upgrade kit are prerequisites
Note:
for this configuration.
Page 11

Overview of Guide 3
Overview of Guide
Table 2: Guide Overview
Chapter Contents Description
Chapter 1 Welcome This chapter introduces the guide and the Spire
CX260 features and workflows.
Chapter 2 Getting Started This chapter introduces the basic workflows for users
of all Spire CX260 configurations, including defining
the Xerox DocuColor 242/252/260 printer/copier on
a client workstation, working remotely using the EZ
Connect, Remote Workspace and Spire Web Services
tools, off-the-glass calibration, and scanning.
Chapter 3 Overview of Spire CX260 This chapter provides explanations about the Spire
CX260 workspace and main windows.
Chapter 4 Tools and Utilities This chapter explains how to preview jobs, perform
preflight checks, manage fonts and virtual printers,
and use the Tray Alignment and Spire Tabs Plug-in for
Acrobat tools.
Chapter 5
Chapter 6
Chapter 7
Chapter 8
Chapter 9
Generating Reports This chapter explains how to generate reports from
the Spire CX260 and the Xerox DocuColor 242/252/
260 printer/copier.
Color Workflow This chapter explains how to work with color in the
Spire CX260, and includes calibration and RGB and
CMYK workflows. It also explains how to adjust
colors, and to use color tools and post-RIP controls.
System Administration This chapter explains how to administrate your
system using the Administration window utilities.
Setting Parameters This chapter describes how to set basic parameters in
the Job Parameters window. It also describes the PPD
file parameters.
Reinstalling the Spire
CX260
This chapter describes the software backup and
restore, reinstalling the system, installing and
configuring Novell Client™, and formatting the image
disk.
Page 12
4 Chapter 1 – Welcome
Introduction to the Spire CX260
The Spire CX260 is an on-demand prepress system that uses advanced Creo color
server prepress technologies to drive a Xerox DocuColor 242/252/260 printer/
copier.
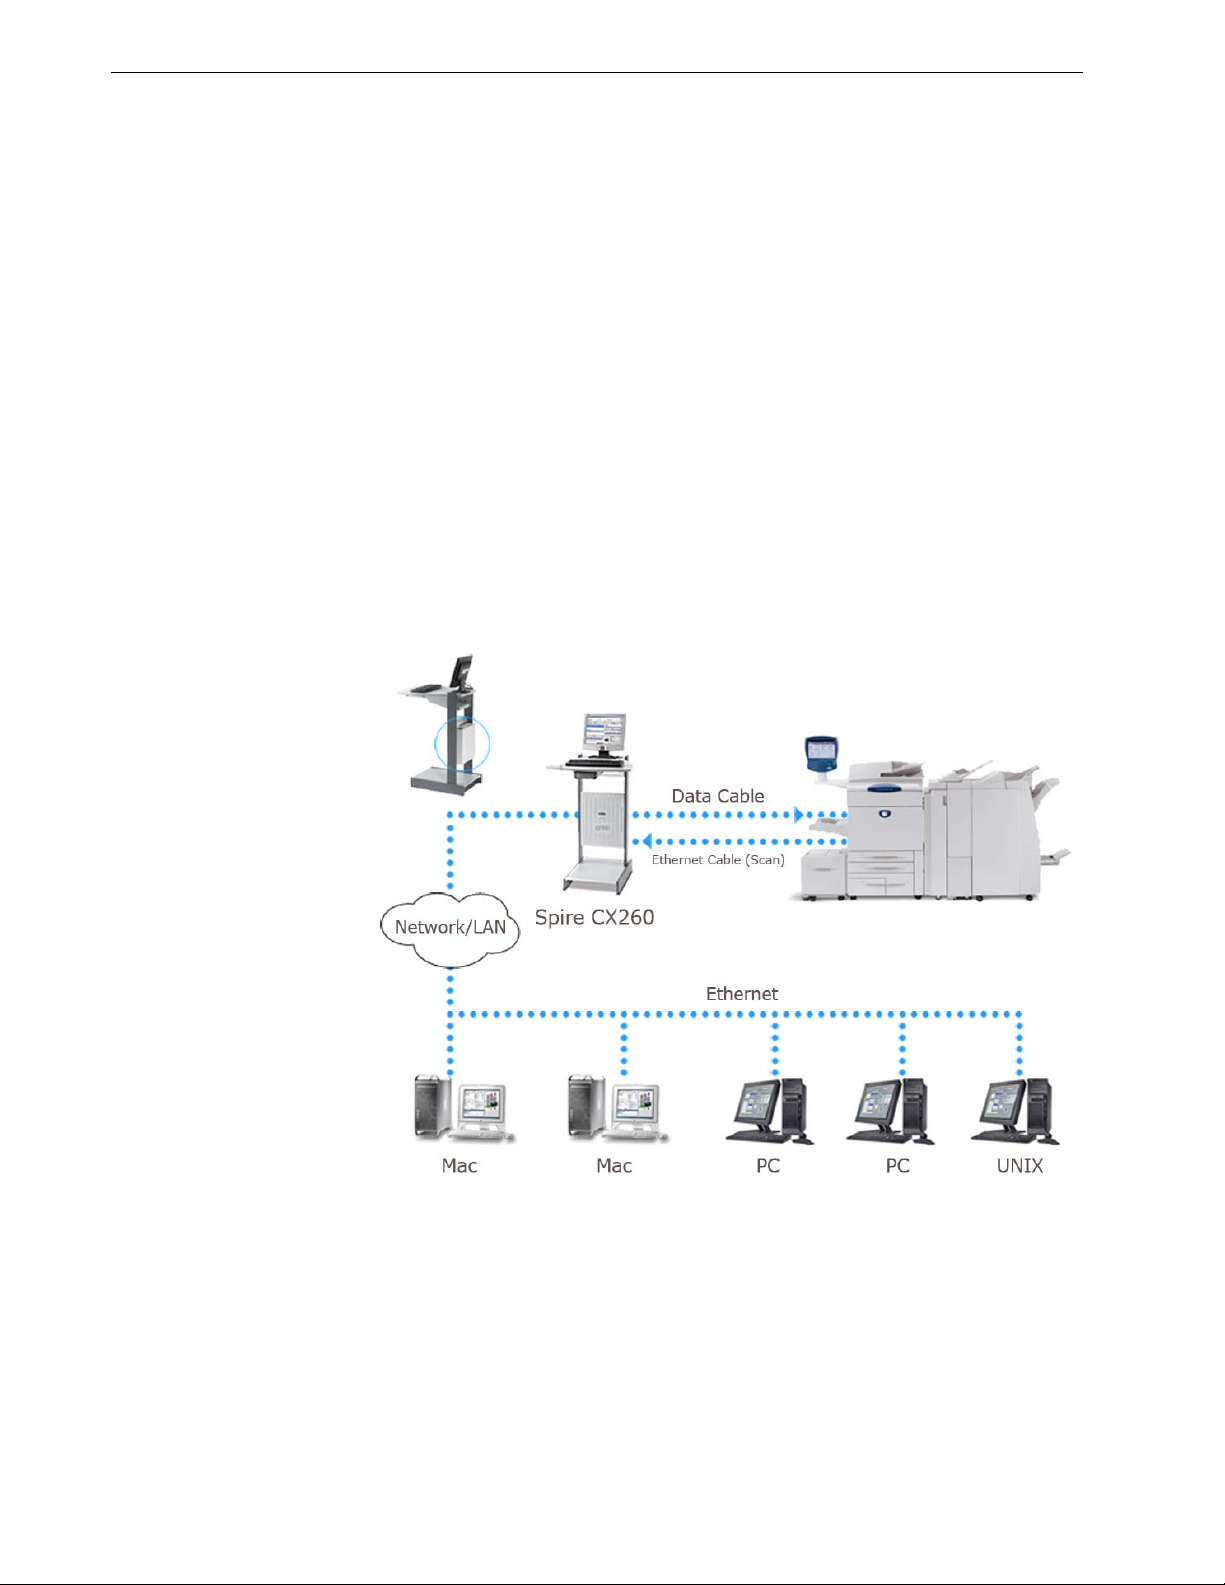
As an optimal digital color solution for printers, the Spire CX260 enables you to
print from Windows, Macintosh, and UNIX
processes image files in page-description language (PDL) formats—for example,
PostScript, PDF, and Variable Information—using RIP (Raster Image Processor)
technology. The system converts image files into a suitable RTP (ready-to-print)
format for direct, high-quality digital printing. The Spire CX260 also streamlines the
printing process by allowing printing with preset workflows.
In combination with the Xerox DocuColor 242/252/260 printer/copier, the Spire
CX260 enables you to efficiently print flyers, brochures, pamphlets, dummy
catalogs, short-run trials, and print-on-demand publications. When installed as a
fast, network printer with the Spire CX260, the Xerox DocuColor 242/252/260
printer/copier prints up to 50 color or monochrome pages per minute.
The Spire CX260 combines RIP functionalities, automation, control tools and
special hardware development capabilities with PC architecture.
®
client workstations. The Spire CX260
Figure 1: Spire CX260 for the Xerox DocuColor 242/252/260 printer/copier—Spire
CX260 with Pro Control Station configuration
Note: The image above shows the Pro Control Station configuration. In the
Control Station and Pro Control Station configurations, the Spire CX260 is
mounted on the back of the stand.
Page 13

Introduction to the Spire CX260 5
Hardware and Software Components
The Spire CX260 is a dedicated Creo platform running in a Windows environment.
The Spire CX260 includes:
• Creo hardware, including the interface board
• Software, including:
Spire CX260 application software
Windows XP Professional
Adobe
®
Acrobat® version 7.0
Supported Formats
The Spire CX260 supports the following file formats:
• PostScript
• PDF
• EPS
• Creo VPS (Variable Print Specification)
®
(composite or pre-separated files)
Workflow
• VIPP (Variable Data Intelligent PostScript Params)
• PPML (Personalized Print Markup Language)
• Creo CT & LW (these file formats are only supported if you have the Pro
configuration)
• JPG, TIFF
• GAP (Graphic Art Port) files (file formats from various prepress systems, for
example Brisque job and TIFF / IT) (this file format is only supported if you have
the Pro configuration)
• Pre-separated formats (this file format is only supported if you have the Pro
configuration)
The Spire CX260 receives and processes files from the following client
workstations:
• Macintosh – running Mac® OS 9.x or later and Mac OS X (10.4 and later)
• Windows – running 2000, 2000 Pro, XP and 2003
• UNIX workstations and servers
Page 14
6 Chapter 1 – Welcome
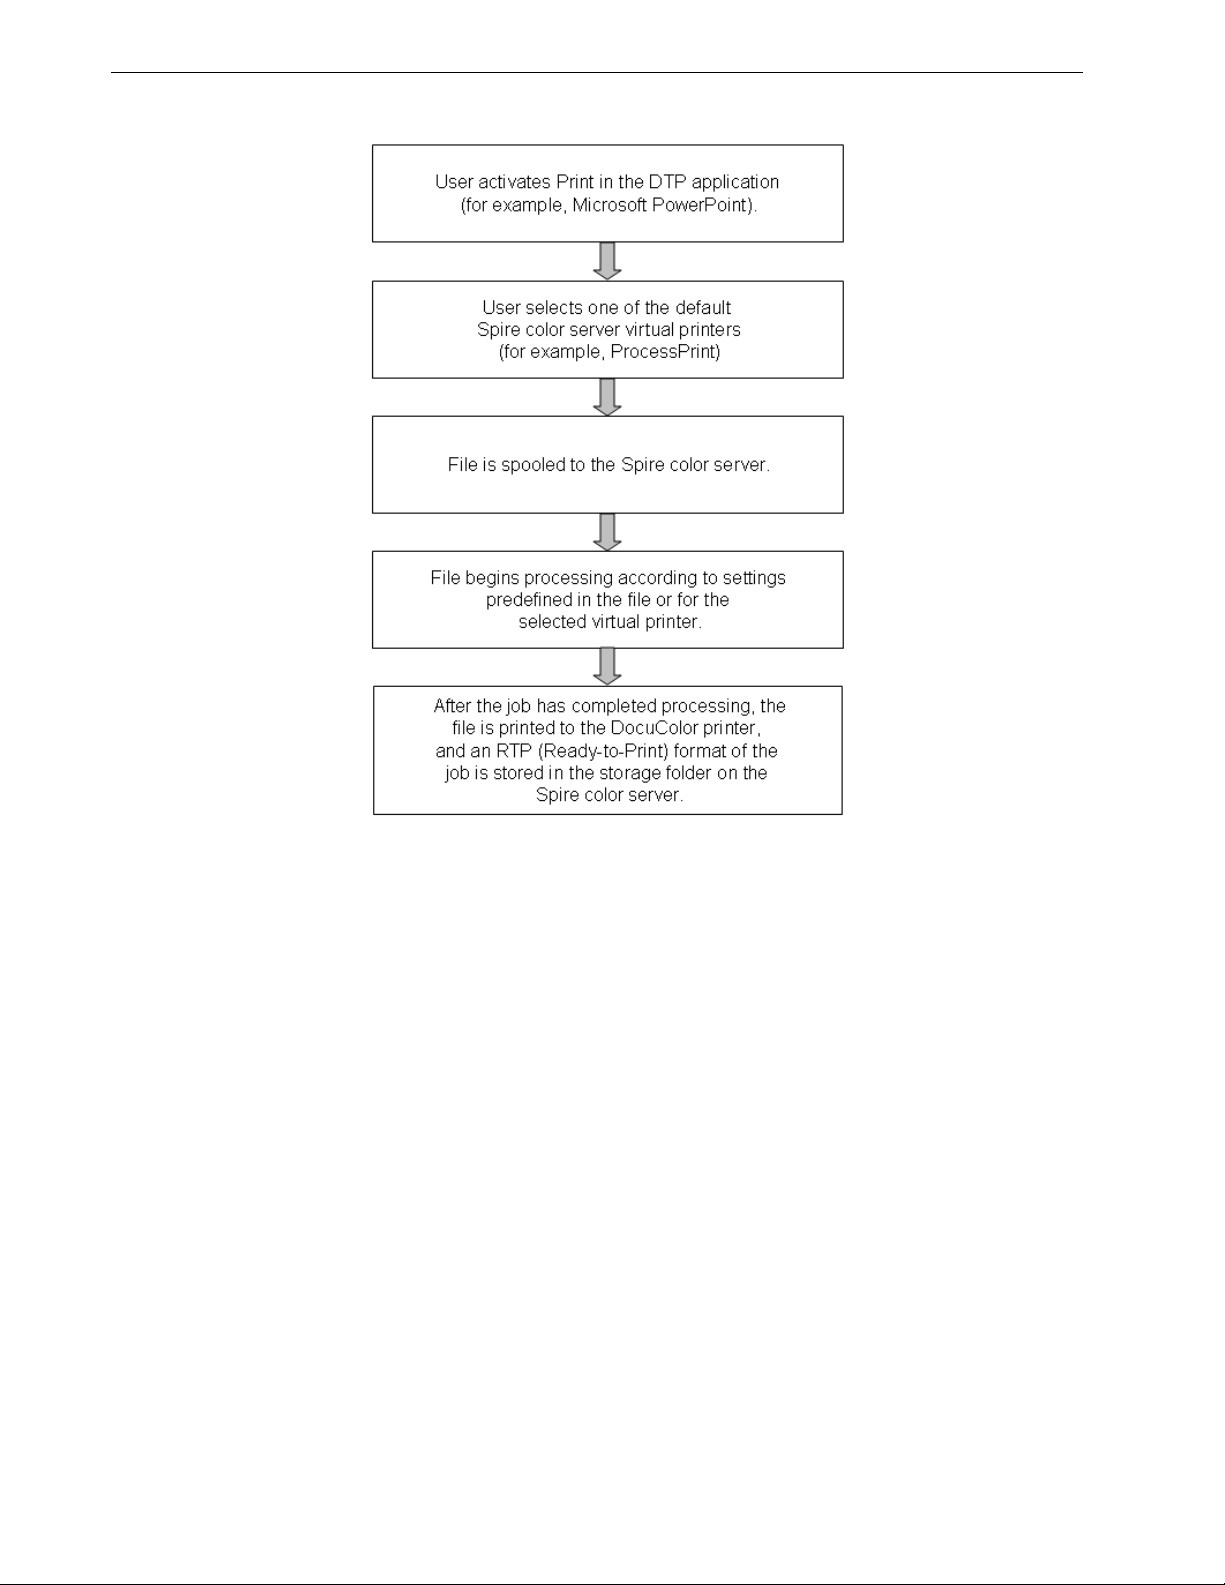
The basic workflow for the Spire CX260 is as follows:
Spire CX260 Network Printers
For Macintosh and Windows networks, the Spire CX260 provides three default
network printers, also known as virtual printers.
Virtual printers are used for automating workflows, which then define job streaming.
They contain preset workflows that are automatically applied to all print jobs
processed with that virtual printer. There is no need to reset job settings for each job,
thus increasing printing efficiency.
Note: The job (print) parameters set in the job (from the client) override the
parameters set in the virtual printer.
Page 15

Introduction to the Spire CX260 7
The three default virtual printers are:
• SpoolStore
Files are spooled directly to the Storage window and await operator processing.
You can only import PDL files (such as: PS, PDF, VIPP, VPS) to the spool store,
not RIPped - RTP files.
• ProcessPrint
Files are processed and printed directly to the Xerox DocuColor 242/252/260
printer/copier via the Spire CX260.
• ProcessStore
Files are automatically processed and stored in RTP format. After processing,
the files are stored in the Storage window of the Spire CX260 until the operator
re-submits them for printing.
With printing workflows tailored to your job requirements, the Spire CX260 enables
you to:
• Define new virtual printers
• Choose from which virtual printer to print
For information on defining and editing virtual printers, see Managing Virtual Printers
on page 93.
Page 16

8 Chapter 1 – Welcome
Page 17

Getting Started
Overview...................................................................................................................10
Turning the Spire CX260 On and Off................................................................10
Working from a PC Client Workstation............................................................ 12
Working from a Macintosh Client Workstation............................................. 21
Working Remotely................................................................................................. 24
Page 18

10 Chapter 2 – Getting Started
Overview
This chapter describes the main production workflows and procedures for the Spire
CX260.
Turning the Spire CX260 On and Off
Basic and Basic Pro Configurations
To turn on the Spire CX260:
Do one of the following actions:
¾
Turn on the Xerox DocuColor 242/252/260 printer/copier.
The Spire CX260 turns on automatically when the Xerox DocuColor 242/
252/260 printer/copier is turned on.
Push the green On/Off button on the front of the Spire CX260.
Note: The Spire CX260 can be turned on when the Xerox DocuColor 242/
252/260 printer/copier is turned off. In this state, the server runs until
turned off manually by the user. If the server is running and the printer is
then turned on, the server continues running and is not affected by this
action.
To turn off the Spire CX260:
1. Close the Spire CX260 software. From the Job menu, select Exit.
The Spire CX260 software closes, and you return to the Windows desktop.
Note: If there are jobs that are being processed or printed, a message is
displayed.
2. Verify that the Spire icon has disappeared from the taskbar.
Ta sk b a r w it h S p ir e i c on
3. Do one of the following actions:
Turn off the Xerox DocuColor 242/252/260 printer/copier.
The Spire CX260 automatically turns off when the Xerox DocuColor 242/
252/260 printer/copier is turned off.
Push the green On/Off button on the front of the Spire CX260.
Taskbar without Spire icon
Page 19

Turning the Spire CX260 On and Off 11
Control Station and Pro Control Station Configurations
To turn on the Spire CX260:
1. Turn on the monitor.
2. Push the green On/Off button on the back of the Spire CX260.
Note: The Spire CX260 can be turned on when the Xerox DocuColor 242/
252/260 printer/copier is turned off. In this state, the server runs until
turned off manually by the user. If the server is running and the printer is
then turned on, the server continues running and is not affected by this
action.
The power indicator on the front panel lights up. The Windows operating
system starts, and the Spire CX260 splash screen appears.
Notes:
• If the Spire CX260 is already turned on, open the workspace from the
Start menu.
• By default, the Auto Log On check box is selected in the Settings
window. This option enables you to open the workspace without
having to go through the logon process each time. If you want to
designate different access levels for each user, you need to set
security settings in the Settings window. For more information about
designating access levels, see Security on page 161.
If you are turning on the Spire CX260 after a reboot, a test page is automatically
printed. By default, this test page is printed each time the Spire CX260 is restarted.
For more information about changing settings for the test page, see General Defaults
on page 169.
The test page displays details about the Spire CX260, the Xerox DocuColor 242/
252/260 printer/copier, and the network setup.
To turn off the Spire CX260:
1. Close the Spire CX260 software. From the Job menu, select Exit.
The Spire CX260 software closes, and you return to the Windows desktop.
Note: If there are jobs that are being processed or printed, a message is
displayed.
2. Verify that the Spire icon has disappeared from the taskbar.
Ta sk b a r w it h S p ir e i c on
Taskbar without Spire icon
3. Select Start > Shut Down > Shut down.
Note: The Spire CX260 can be turned on when the Xerox DocuColor 242/
252/260 printer/copier is turned off. In this state, the server runs until
turned off manually by the user. If the server is running and the printer is
then turned on, the server continues running and is not affected by this
action.
Page 20
12 Chapter 2 – Getting Started
Working from a PC Client Workstation
Defining the Printer on the Client Workstation
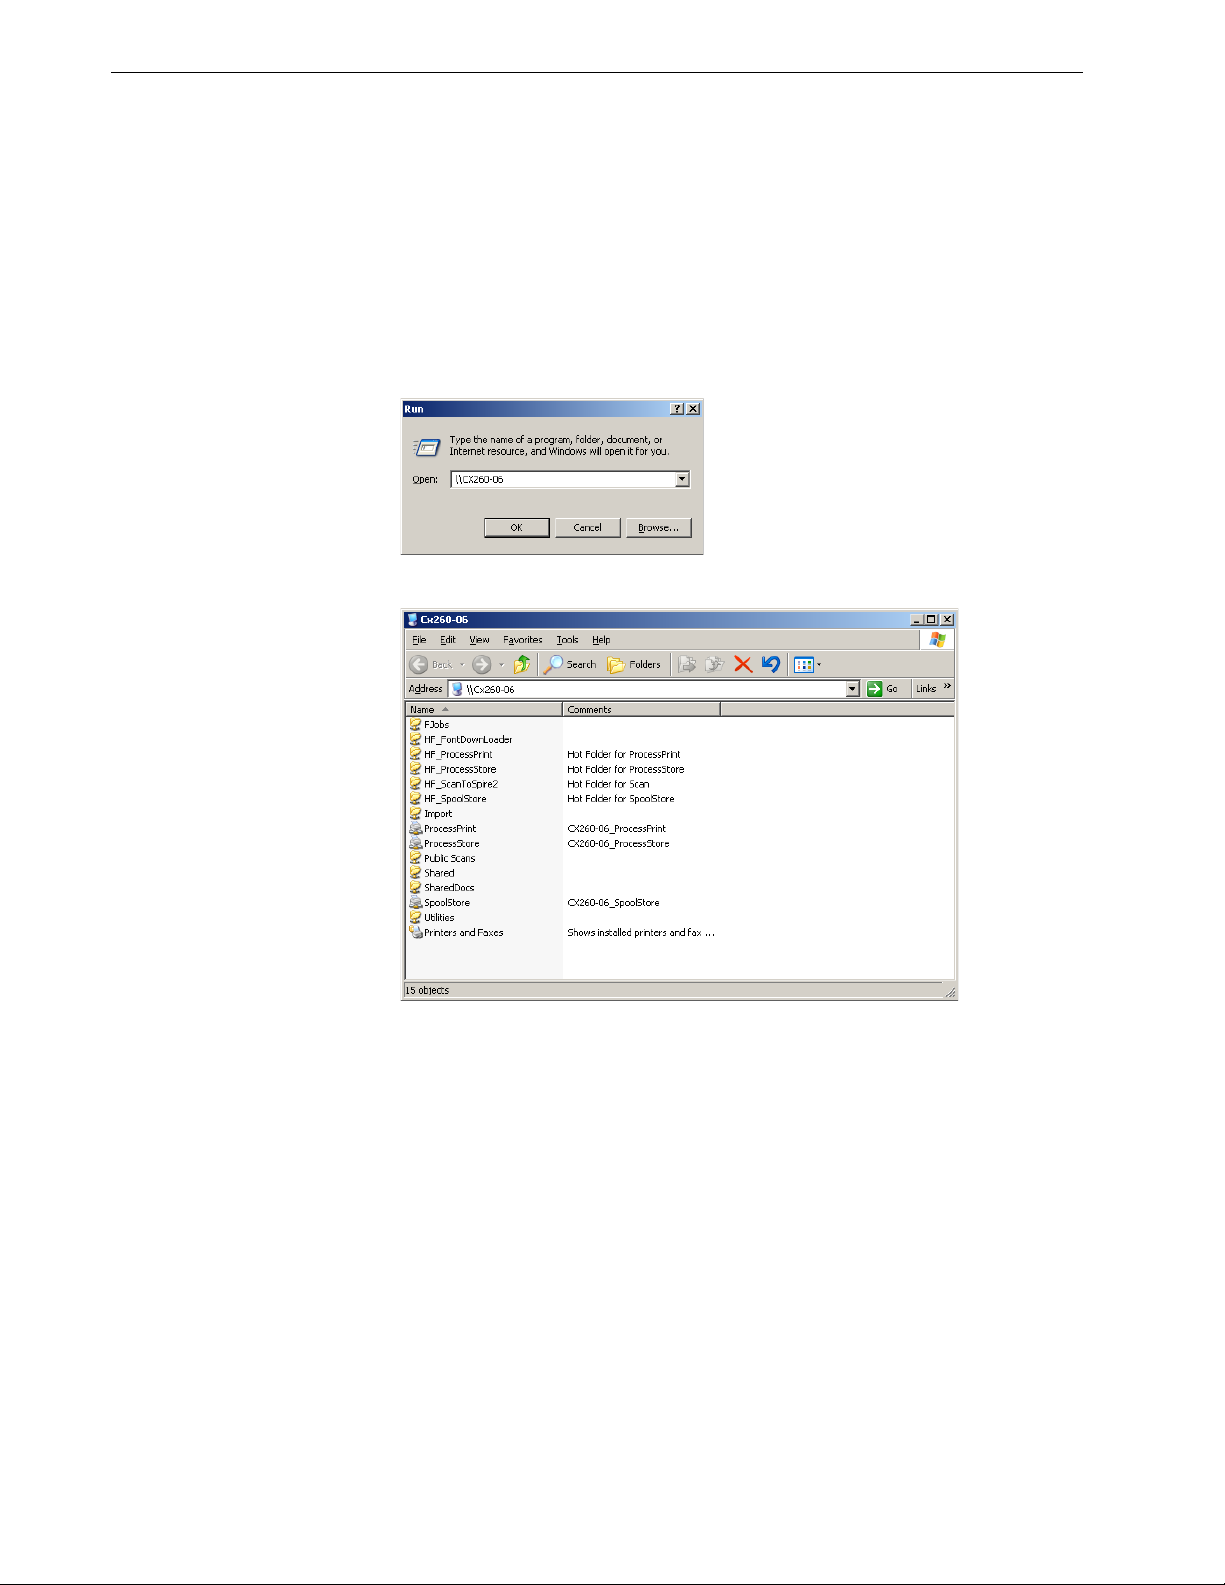
To define a network printer in Windows XP:
1. From the Start menu, select Run.
2. In the Open box, type \\, followed by the host name or IP Address of the color
server, and click OK.
The server window opens.
3. Double-click the desired network printer icon.
The network printer is defined on your Windows client workstation.
Printing from the Client Workstation
To print a job from a client workstation, print the job to one of the Spire CX260
network published printers—for example, ProcessPrint.
The job is spooled and then processed and printed (according to the selected job
flow of the published printer). If you use this method, you can print from any
application —for example, Microsoft Word— and use any file format from any client
workstation (Windows, Macintosh, or UNIX).
Note: Jobs that are spooled to the Spire CX260 must have the appropriate file
name extensions—for example, *.ps or *.pdf.
Page 21
Working from a PC Client Workstation 13
The Spire CX260 can receive print jobs from client workstations with one of the
following Windows operating systems:
• Windows 2000
• Windows XP
• Windows 2003
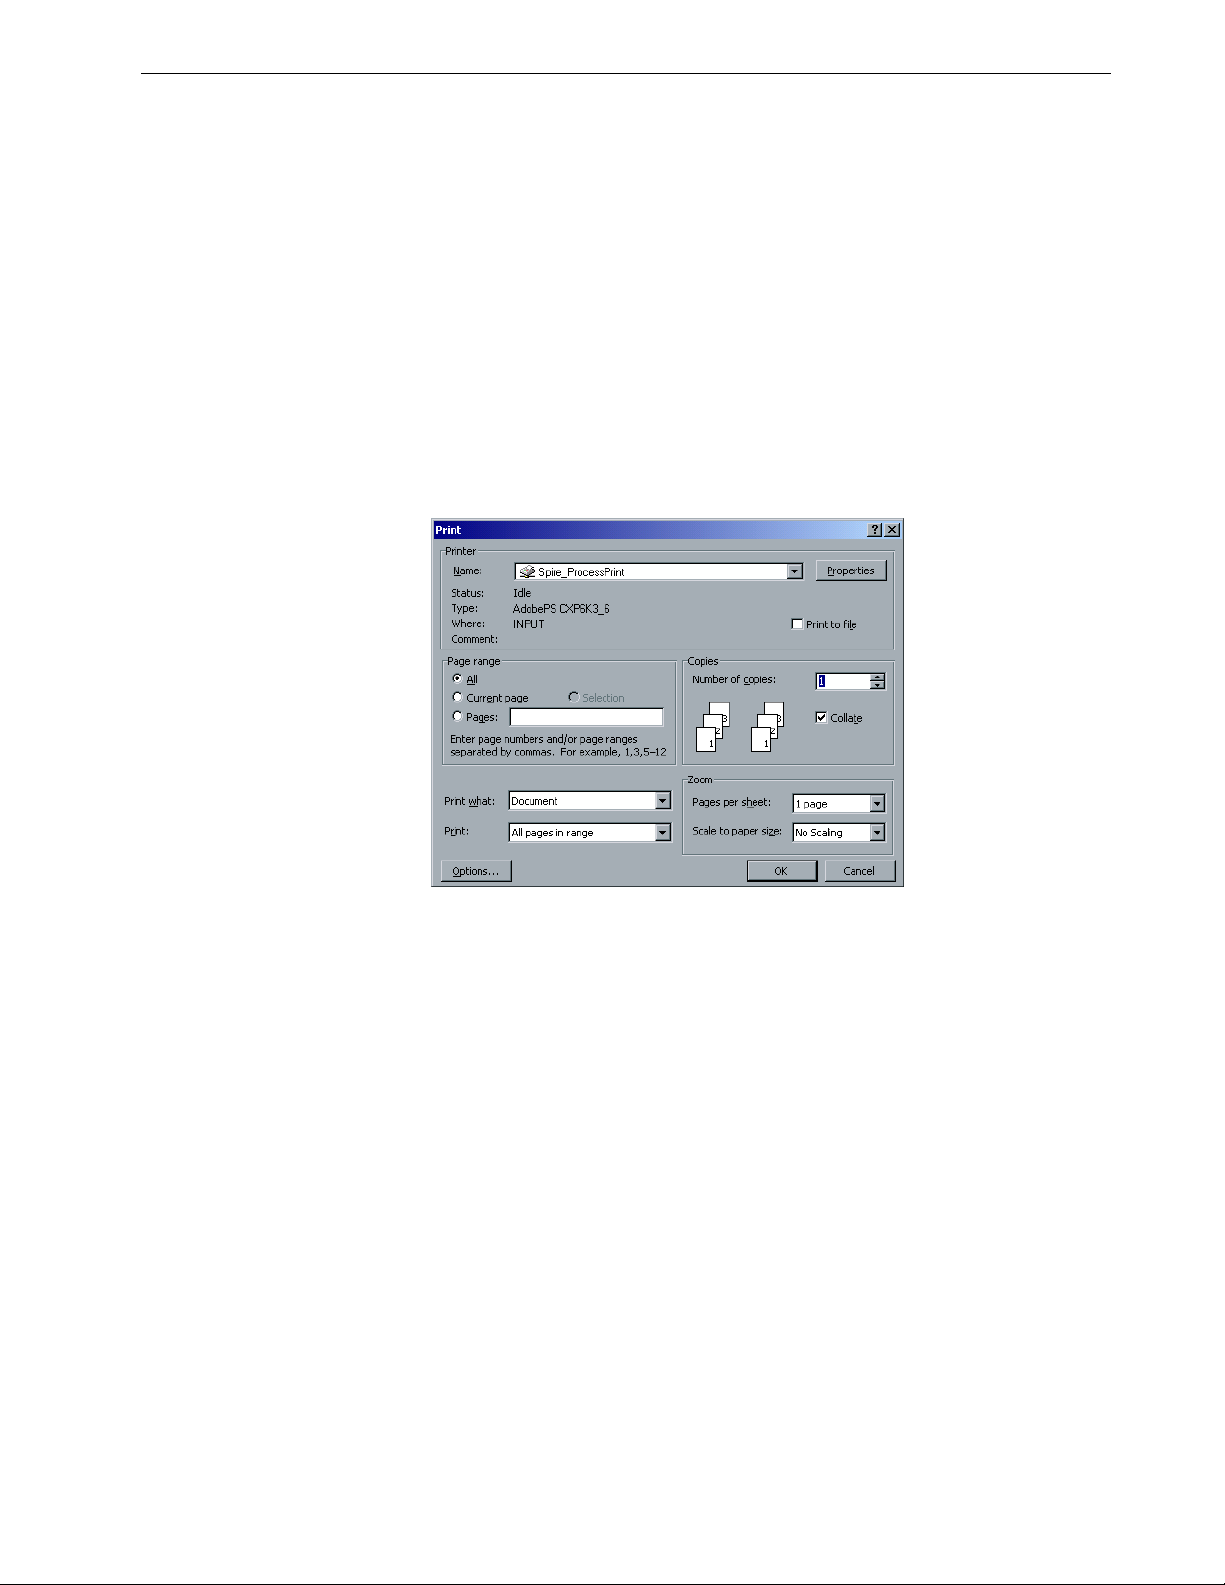
To print a file:
1. Open the file you would like to print in the corresponding application—for
example, open a PDF file in Adobe Acrobat.
2. From the File menu, select Print.
The Print dialog box appears.
3. From the Name list, select the desired Spire CX260 network printer—for
example, <servername>_ProcessPrint.
4. If desired, click Properties and modify the job parameters using the Spire Print
Driver software.
For more information about the Spire Print Driver software, see Spire Print Driver
Software on page 13.
Note: Printer's Default indicates that the value is taken from the settings
of the selected published printer on the Spire CX260.
5. Click OK.
6. Click OK in the Print dialog box.
The file is sent to the Spire CX260.
Spire Print Driver Software
About the Print Driver Software
The Spire CX260 Print Driver software enables you to set job parameters for jobs
that you send to the Xerox DocuColor 242/252/260 printer/copier from any
application on your PC client workstation.
Page 22
14 Chapter 2 – Getting Started
The Print Driver software also enables you to see the Xerox DocuColor
242/252/260 printer/copier configuration, monitor’s the printer status,
and save a set of print parameters for reuse.
Note: The job parameters available in the Print Driver software are the same
as the job parameters on your Spire CX260.
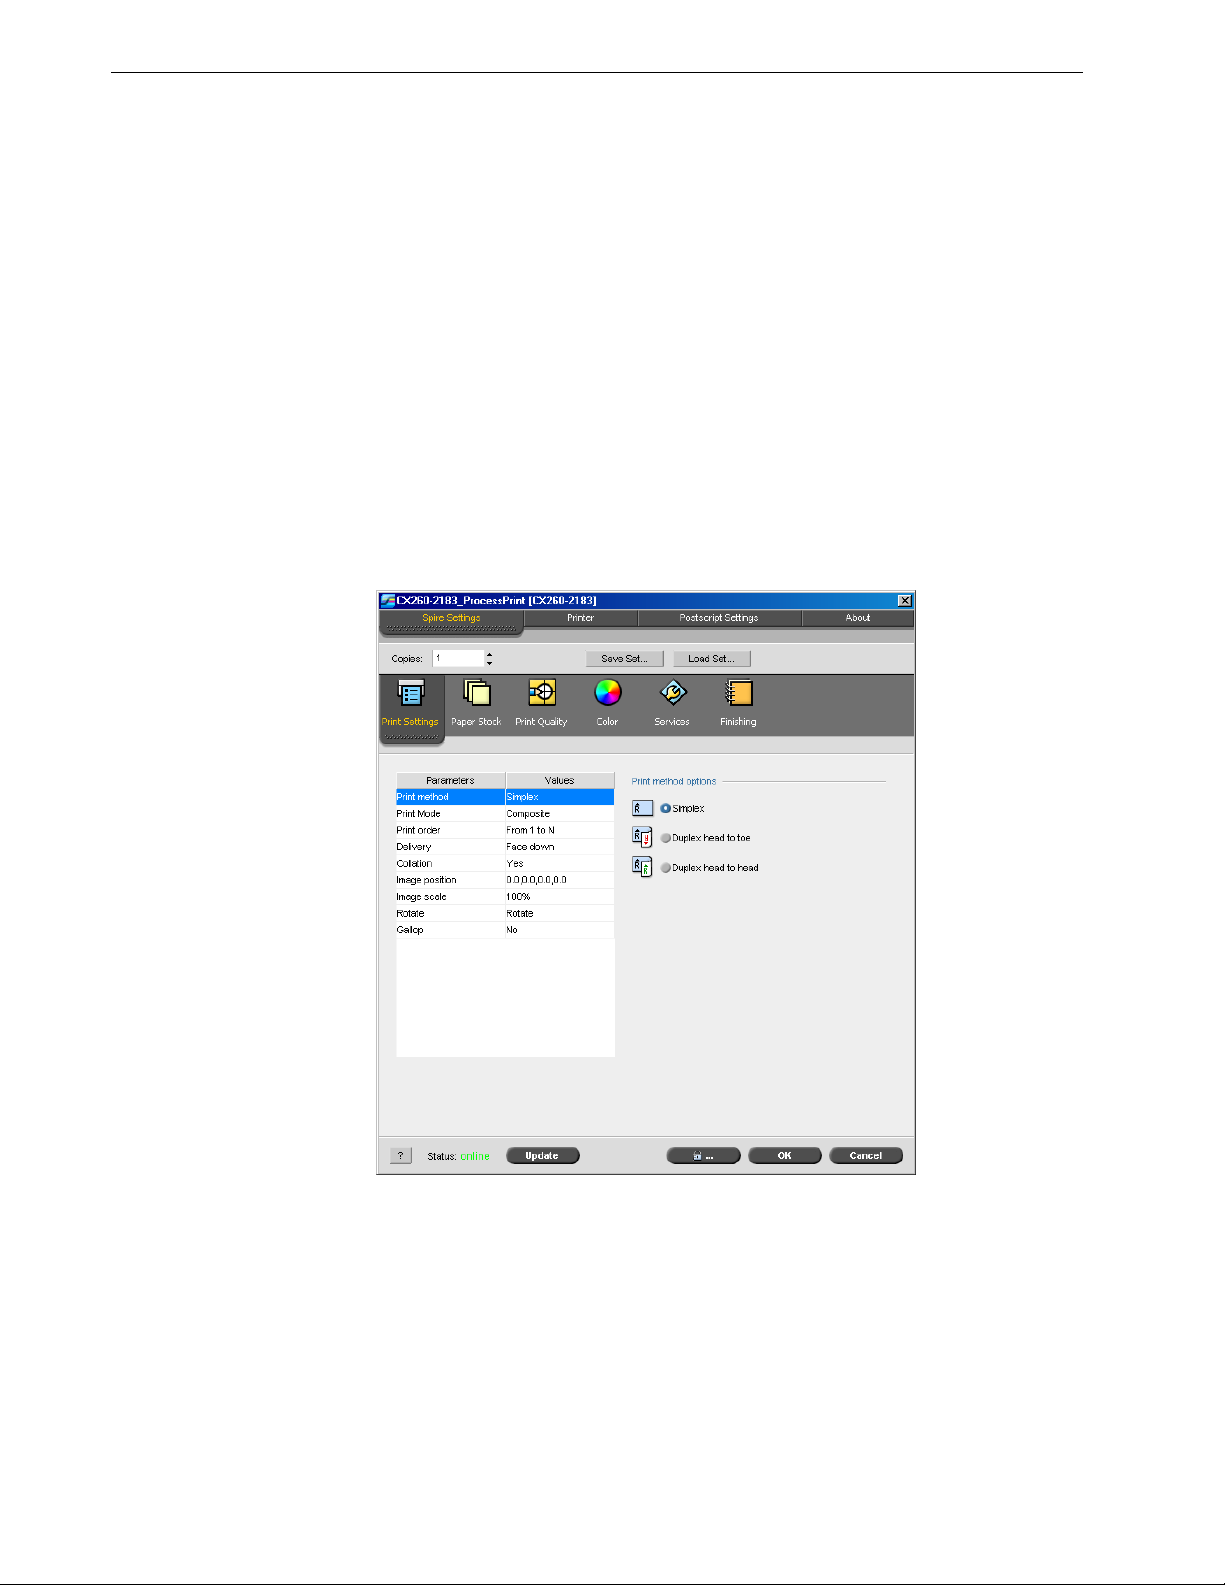
Using the Print Driver Software
1. Open the file that you want to print—for example, a PDF file.
2. From the File menu, select Print.
3. In the Print dialog box, click Properties.
If this is the first time that you are using the Print Driver software, a
message tells you that the software is loading. Then a dialog box
appears with the print parameters.
Note: The loading process might take a few minutes. Afterwards,
accessing the Print Driver software takes less time.
Page 23

Working from a PC Client Workstation 15
In the Print Driver software window, you can perform the following actions:
• Define job parameters
• Change parameters
• Lock a job
• Save a set of parameters
• Load a saved set of parameters
• Check the status of the Xerox DocuColor 242/252/260 printer/copier
• Define PostScript parameters for the job
Notes:
• Some of the job parameters in the Print Driver software appear in a
different place from the Spire CX260.
• The Copies parameter value (located at the top of the Print Driver
software window) reflects the number of copies that you selected in the
Print dialog box of the software that you are currently working in.
Setting Job Parameters in the Print Driver
1. Under Spire Settings, click the tab on which you want to change parameters:
• Print Settings
• Paper Stock
• Print Quality
• Color
• Services
• Finishing
For more information on setting the job parameters, see Setting Parameters in the
Job Parameters Window on page 182.
2. Click OK.
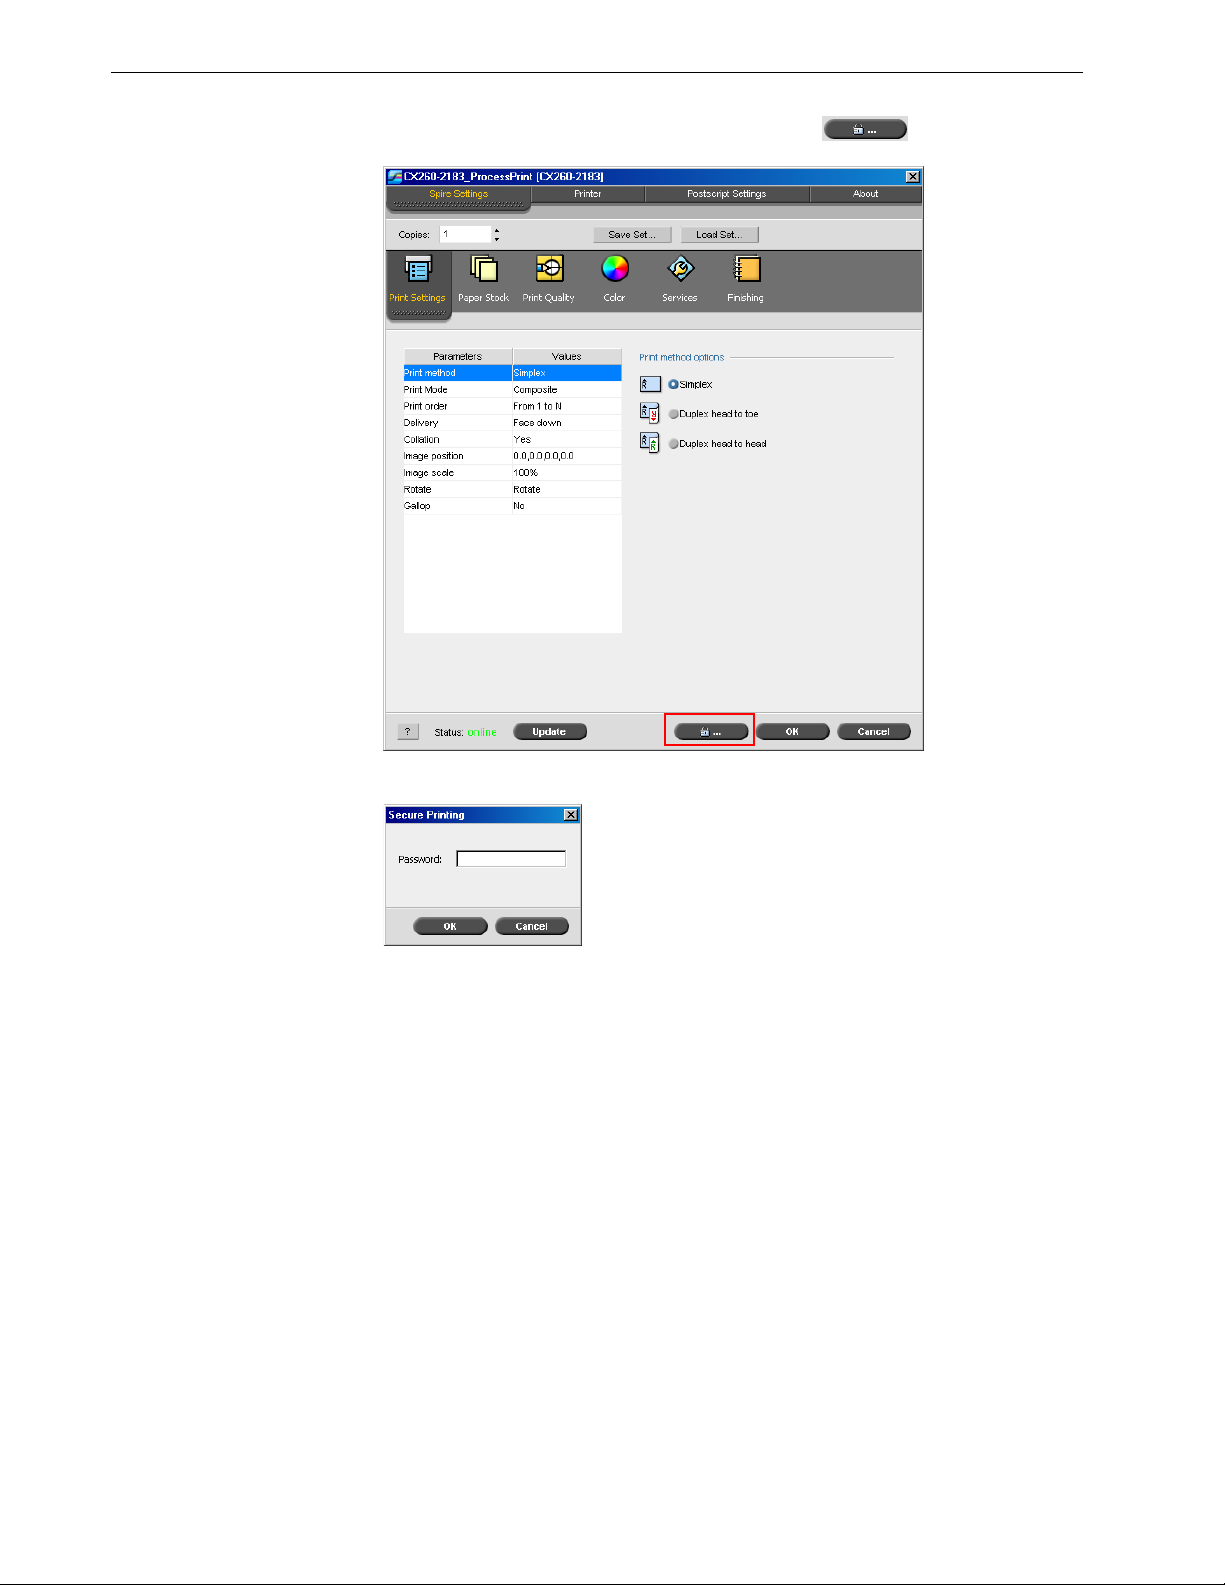
Locking a Job
Note: This feature is only available for the Pro Basic and Pro Control Station
configurations.
The Print Driver software enables you to lock a job. When the locked job is sent to
one of the queues, a Locked indicator appears next to the job. If you want to
access the job parameters or send the job to print, you will be prompted to enter the
password for the job. For more information about unlocking a job in a queue, see
Unlocking a Job on page 59.
Page 24
16 Chapter 2 – Getting Started
To l oc k a jo b:
1. In the Print Driver software window, click the Lock button.
The Secure Printing dialog box appears.
2. In the Password box, type a password consisting of four digits.
3. Click OK.
The job is locked.
Page 25

Working from a PC Client Workstation 17
Using Parameter Sets
Once you have chosen the parameters for a job, you can save this set of parameters
for future use. Sets are useful when you want to print different jobs with the same
parameters, or if you want to reprint a job.
To create a set:
1. Select all of the desired parameters for the job, and click Save Set.
2. Locate the folder in which you want to save the set.
3. In the File name box, type the desired file name for the set.
4. Click Save.
The parameters are saved as a set.
To retrieve a set:
1. Under Spire Settings, click Load Set.
2. Locate and select the desired set, and click Open.
The set of parameters are applied to the job.
Ti p : You can modify any of the parameters as desired.
Page 26
18 Chapter 2 – Getting Started
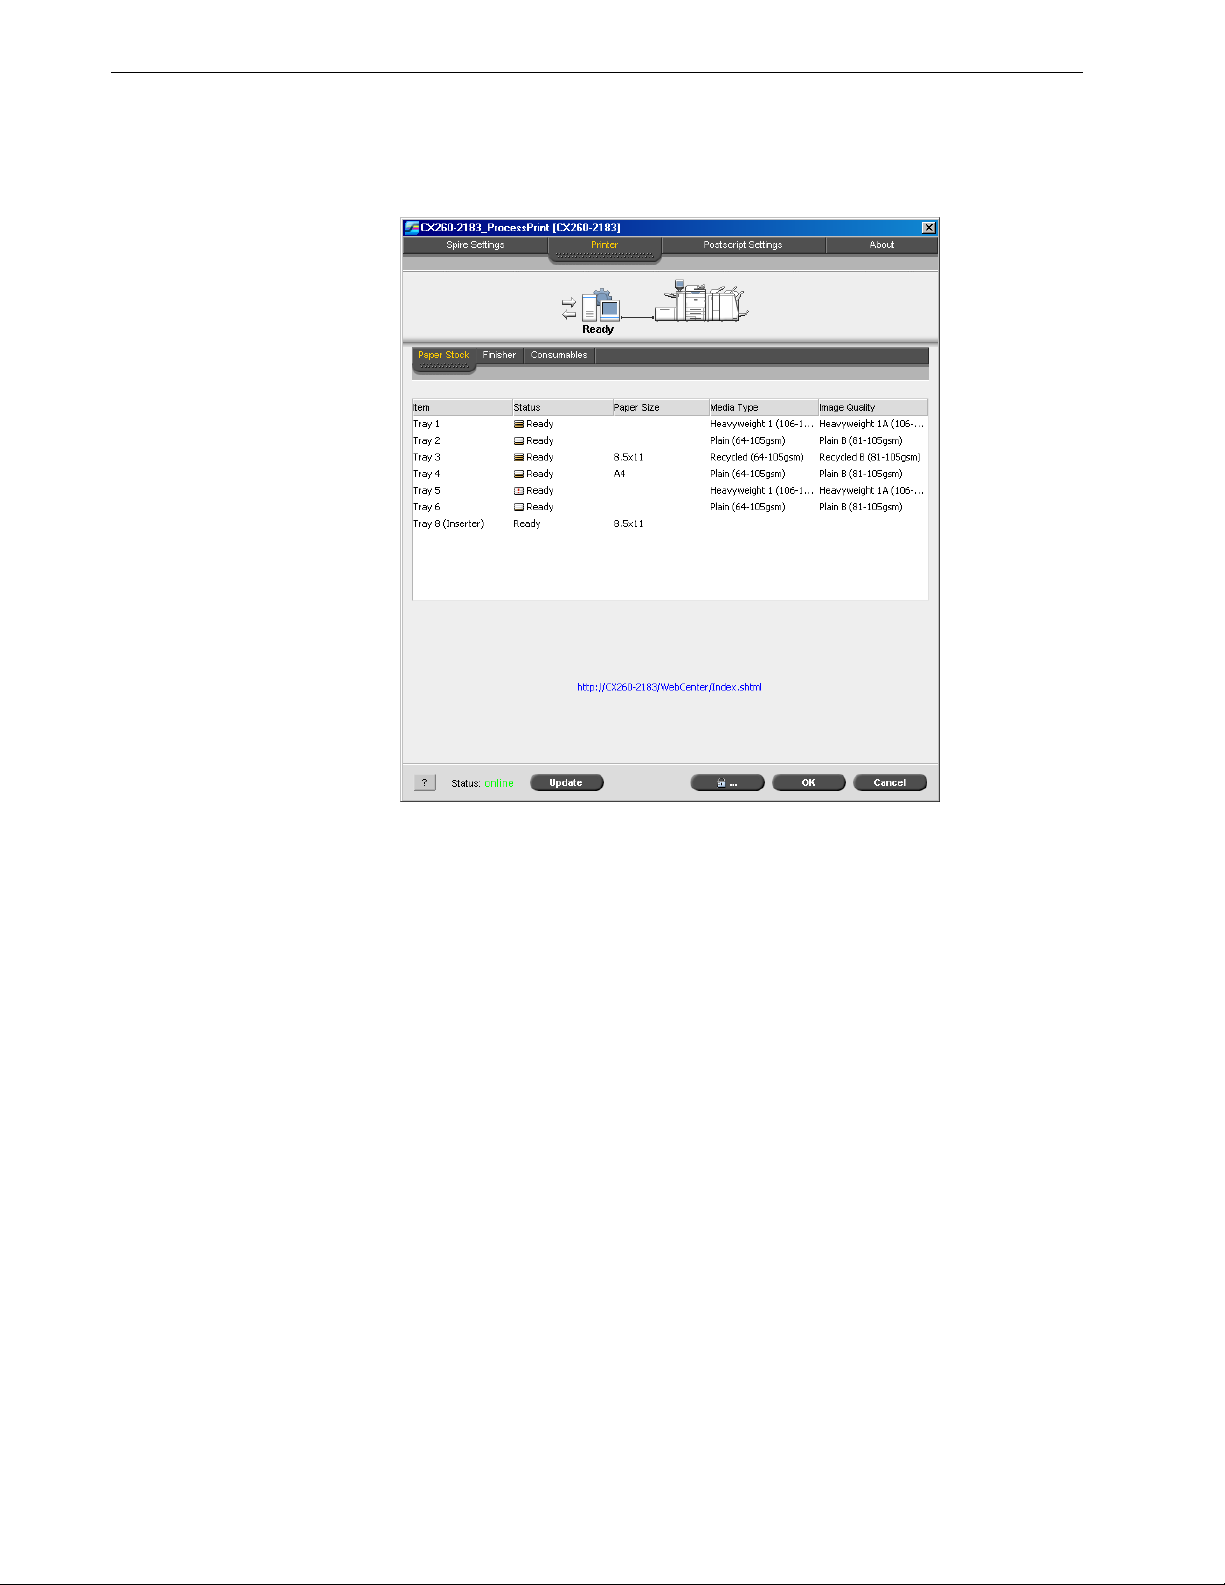
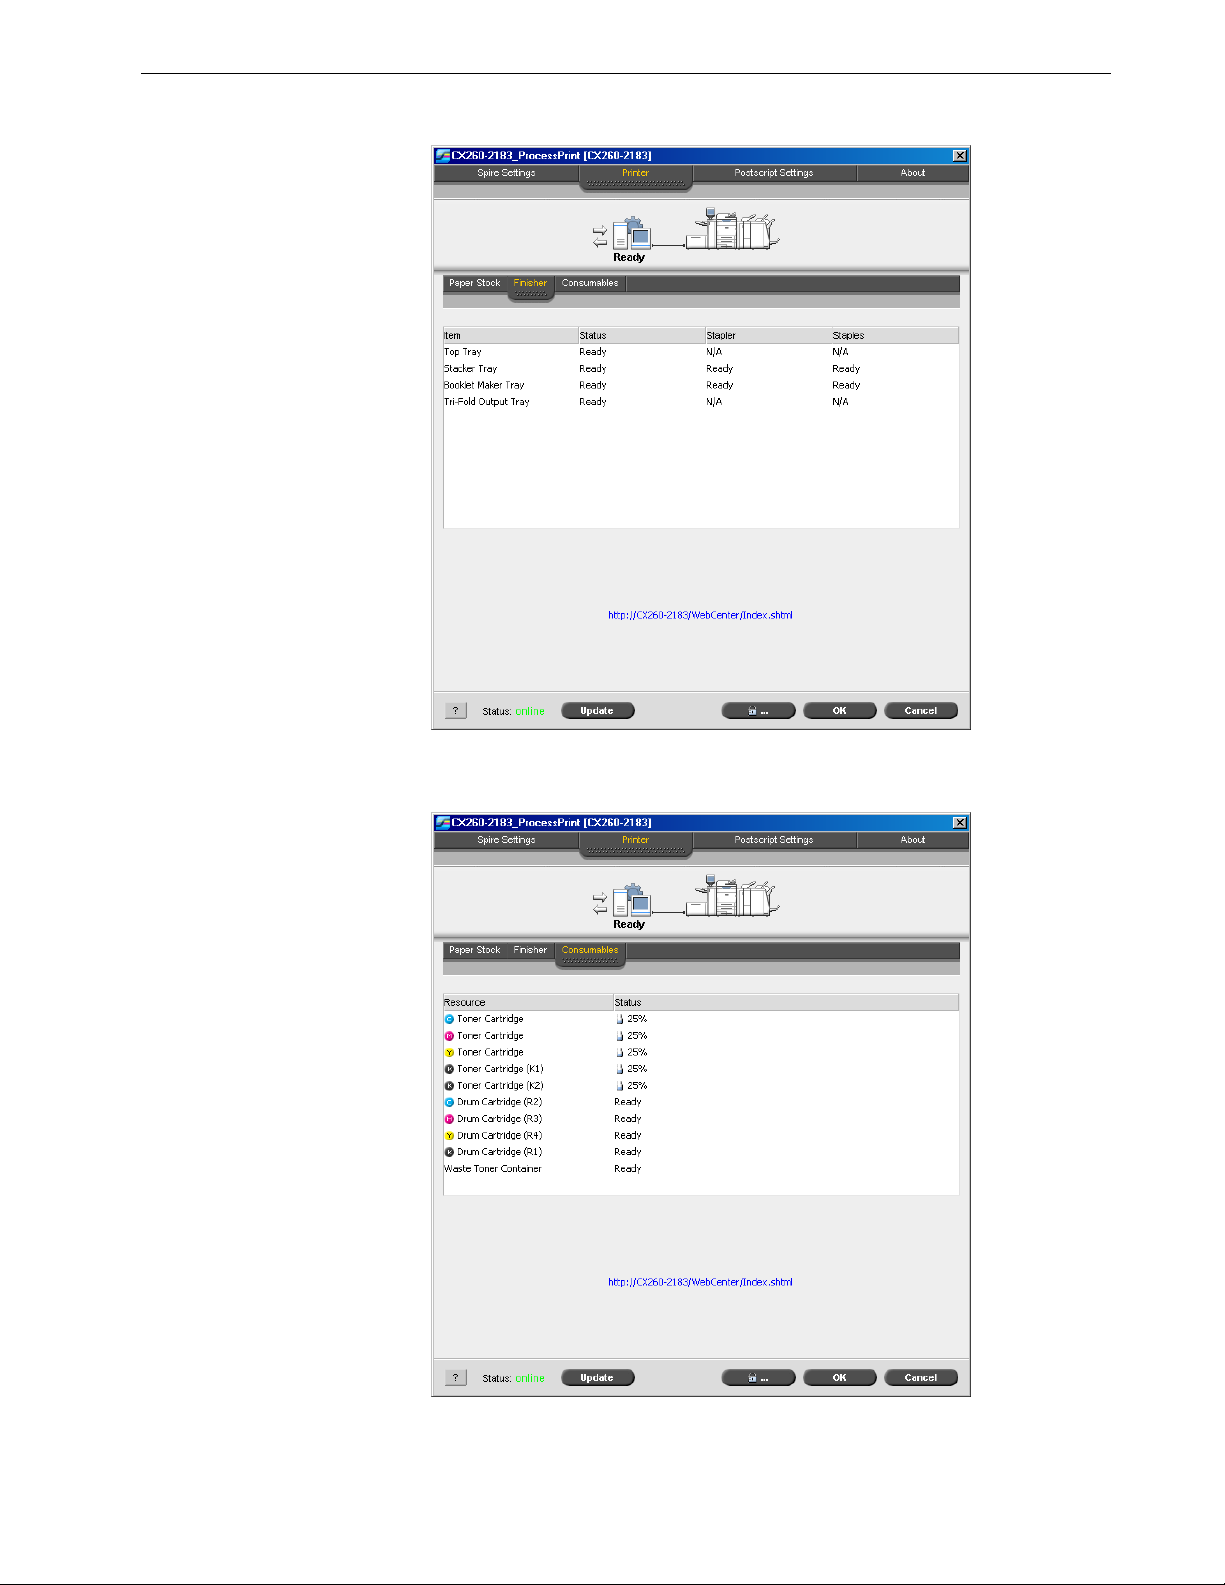
To v ie w th e pr i nt e r’s st at us :
1. Click the Printer tab.
2. Click the Paper Stock tab to view information on the paper stock in the trays.
Page 27
Working from a PC Client Workstation 19
3. Click the Finisher tab to view information on the finishing options.
4. Click the Consumables tab to view information on consumables such as bottles
and fuser oil.
Page 28
20 Chapter 2 – Getting Started
5. Click Update if you want the software to dynamically update the information
that it displays.
Notes:
• When you access the Print Driver software, the resource
information is only refreshed after you click Update.
• Clicking Update updates the gradation tables.
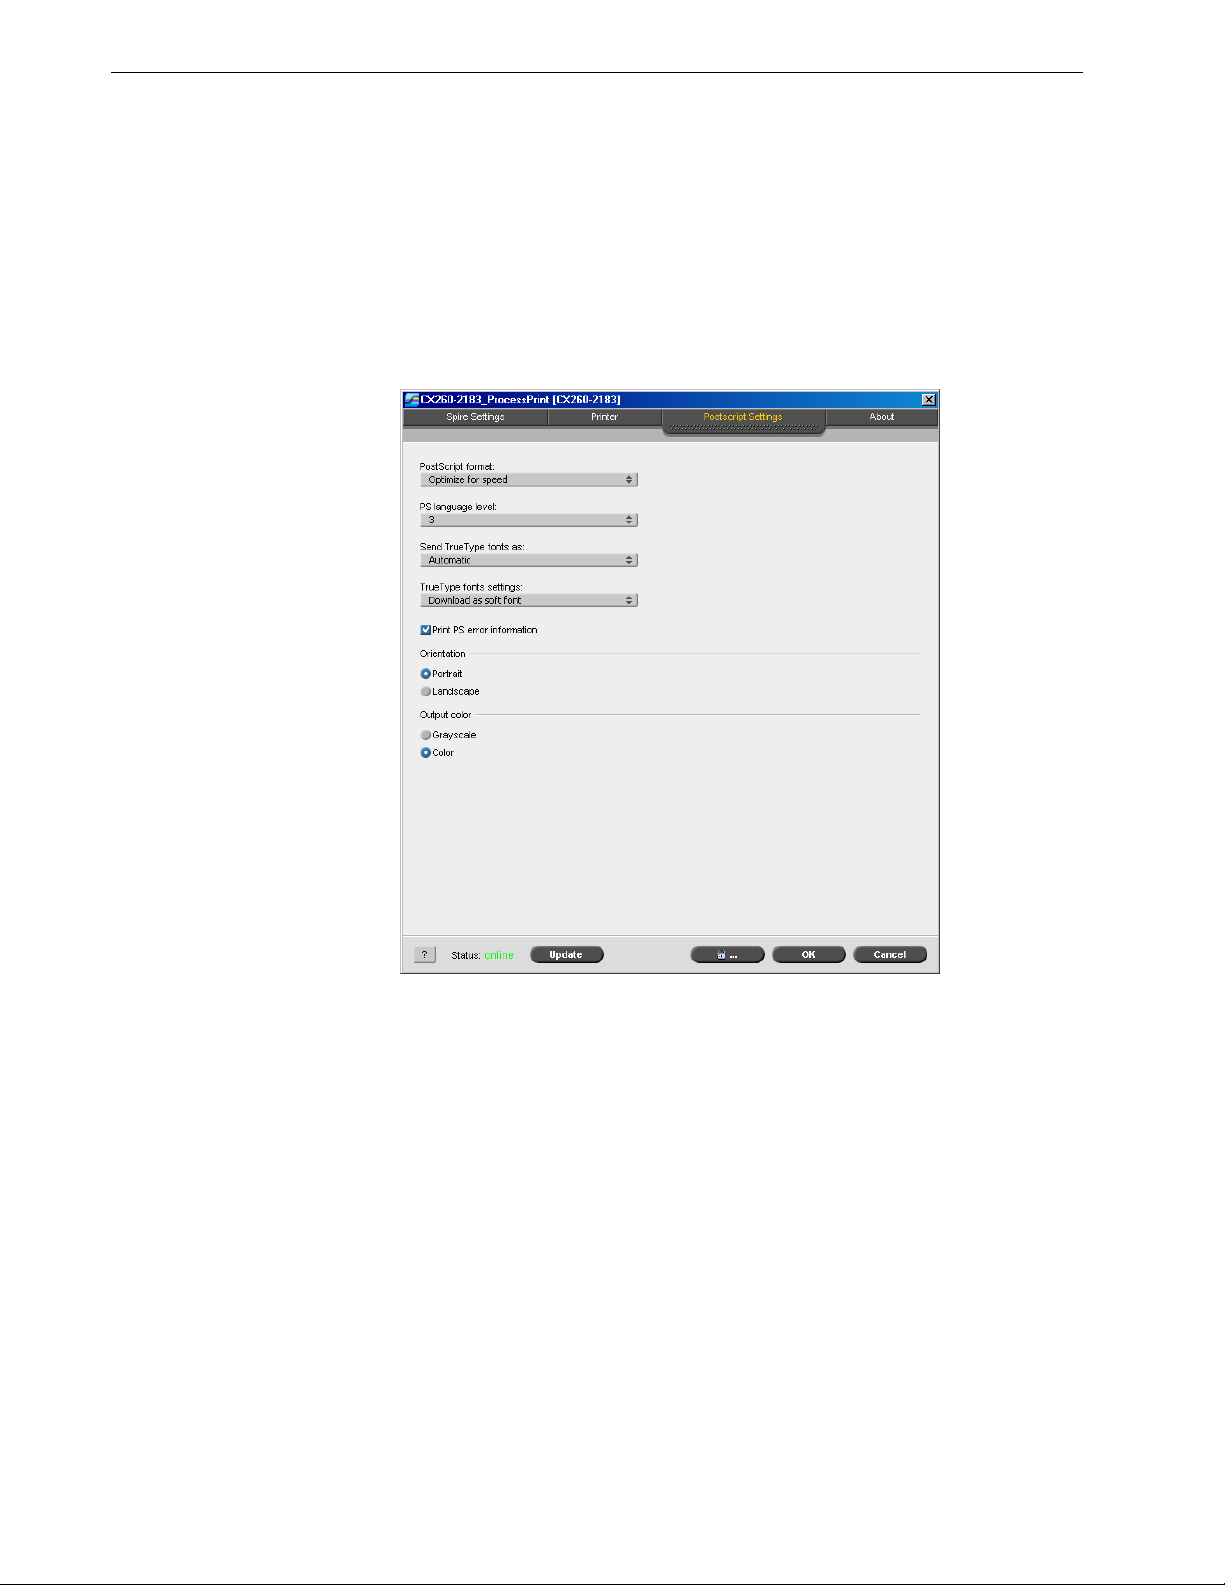
To select PostScript settings:
1. Click the PostScript tab and adjust the settings as desired.
2. Click OK to save the settings.
Workin g Offline
The printer is offline under the following circumstances:
• Your workstation is not connected to the Spire CX260.
• The Xerox DocuColor 242/252/260 printer/copier and the Spire CX260 are not
communicating.
• You are working in a non-TCP/IP environment such as a Novell environment.
• The selected virtual printer is not currently published on the Spire CX260.
When the Xerox DocuColor 242/252/260 printer/copier is offline, you can select
and save parameters in the Print Driver software for the selected virtual printer.
However, you cannot update the display of information about the printer
resources—for example, paper or toner.
Page 29
Working from a Macintosh Client Workstation 21
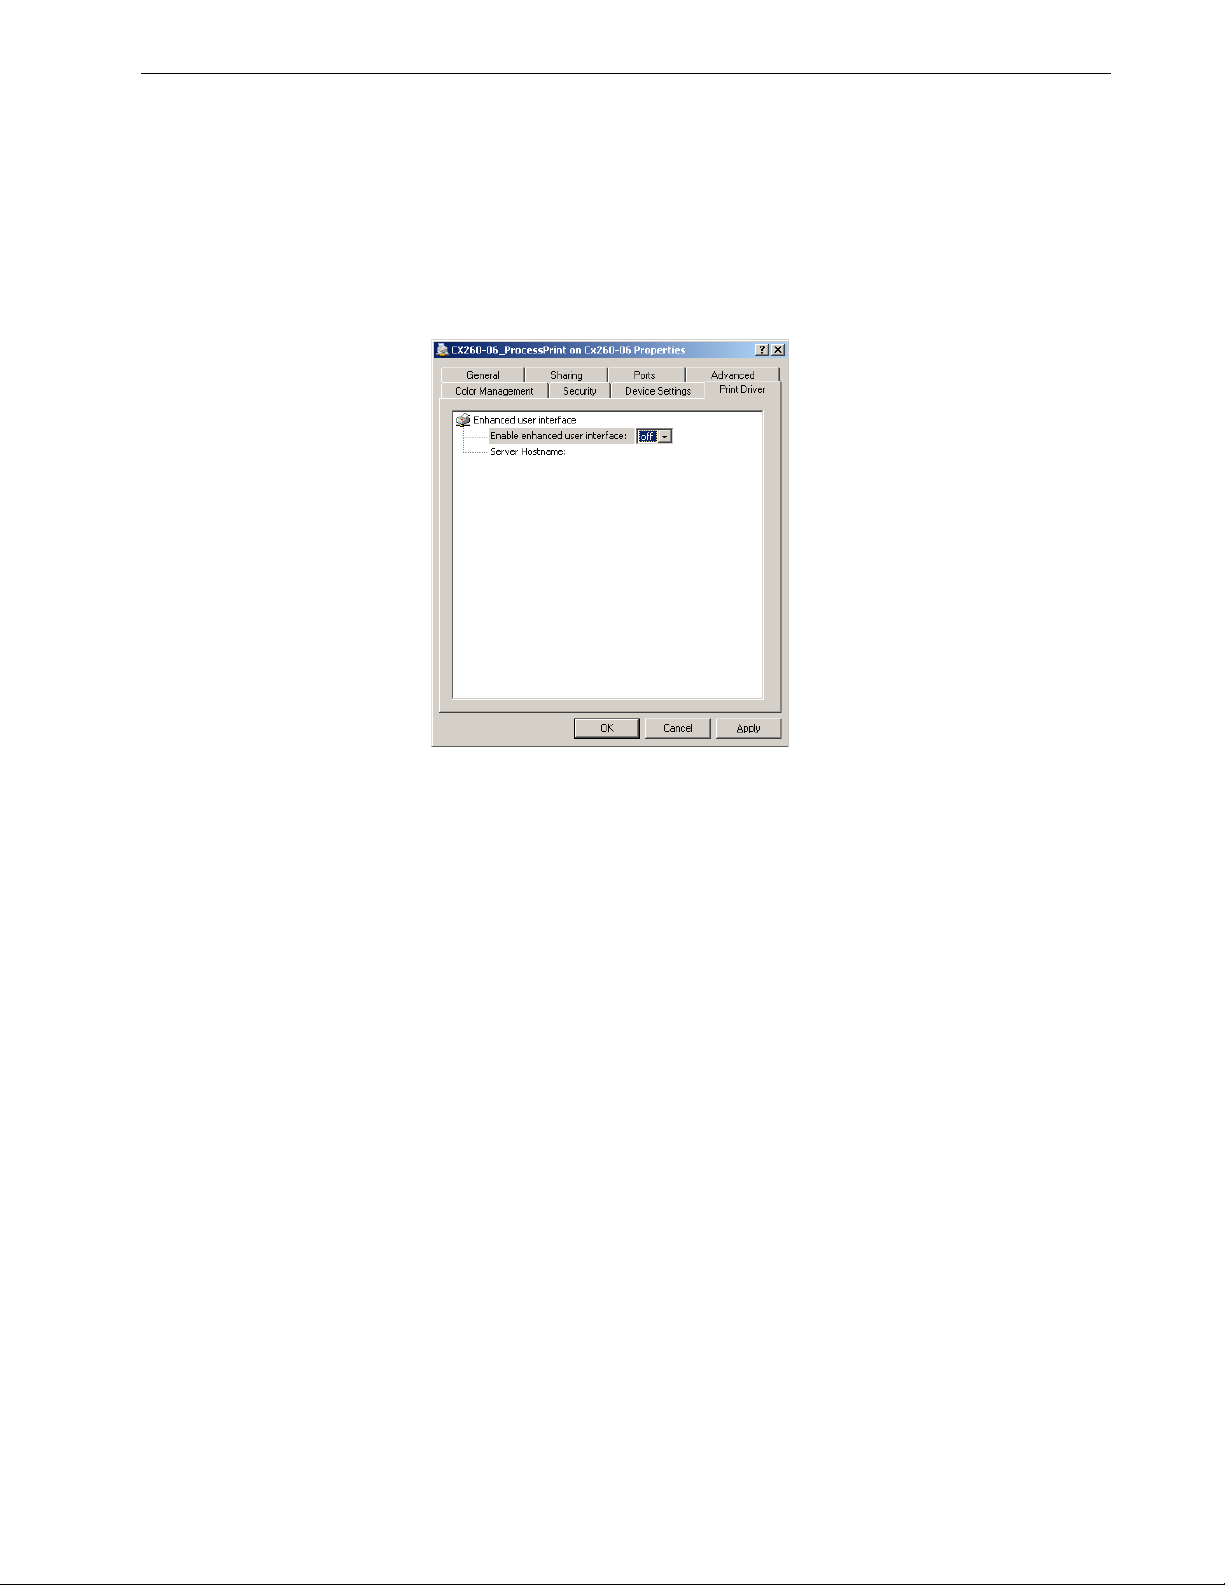
Deactivating the Print Driver Software
To deactivate the Print Driver software:
1. On the desktop, select Start > Settings > Printers and Faxes.
2. Right-click the printer icon, and select Properties.
3. Click the Print Driver tab.
4. In the Enable enhanced user interface list, select off.
5. Click Apply.
6. Click OK to close the dialog box.
Uninstalling the Print Driver Software
1. On the desktop, select Start > Settings > Printers and Faxes.
2. Right-click the Spire CX260 network printer, and select Delete.
The printer is deleted from your client workstation.
Working from a Macintosh Client Workstation
Defining a Printer on Macintosh Client Workstations
You can submit jobs using the Spire CX260 published printers over a TCP/IP
protocol. This connection enables a significantly higher spooling speed.
The Spire CX260 can receive print jobs from client workstations running Mac OS 9
and Mac OS X. As an example, the following section describes how to define a Spire
CX260 network printer for a client workstation with a Mac OS X operating system.
Page 30

22 Chapter 2 – Getting Started
Copying the Spire CX260 PPD File for Mac OS X
To print from your Macintosh computer to the Xerox DocuColor 242/252/260
printer/copier, you first need to manually copy the Spire CX260 PPD file to the
Macintosh.
To copy the PPD file:
1. From the Go menu, select Connect to Server.
The Connect to Server dialog box appears.
2. Locate the desired Spire CX260 in the network and then double-click it.
3. In the Connect to Server dialog box, select Guest.
4. Click Connect.
5. Select the Utilities volume, and click OK.
6. On the desktop, double-click the Utilities volume icon.
7. Double-click the PPD folder.
8. Double-click the desired language folder.
9. Double-click the desired computer type folder:
• If you are using Mac OS 9, select MAC
• If you are using Mac OS X 10.4 or later, select MacOSX
10. Double-click the desired location folder—for example, US-Letter.
11. Locate the CX260_V2.PPD file. It is recommended that you copy the PPD file
by dragging it to the specified folder in your local disk. To do this, open another
Finder window.
12. From the Go menu, select Computer.
13. Click your disk icon, and locate the required folder—for example,
Library\Printers\PPDs\Contents\Resources.
14. Select the desired language folder—for example, en.lproj for English.
15. Drag the CX260_V2.PPD file to the language folder.
Setting the Network Printer for Mac OS X (10.4 or Later)—IP, SMB, or Appletalk
Note: Some of the steps in this procedure may be different if you are using a
version older than Mac OS X 10.4.
1. Make sure that the Spire CX260 PPD file has been copied to the correct folder
on your client workstation.
For more information about copying the PPD file, see Copying the Spire CX260
PPD File for Mac OS X on page 22.
2. From the Go menu, select Applications.
3. Open the Utilities folder and then double-click Printer Setup Utility.
4. Click Add Printer button.
5. Select either Default Browser or IP Printer.
Page 31

Working from a Macintosh Client Workstation 23
6. Browse to the Spire CX260 network printer (if you are defining an IP printer,
enter the Spire CX260 IP address or host name, and the exact name of the
printer to which you want to print—for example, CX260_ProcessPrint.
7. I n t he Printer Using list, select Other.
8. Browse to the folder to which you copied the CX260_V2.PPD file and select it.
9. Click Open to assign the CX260_V2.PPD file to the selected network printer.
10. Click Add to add the new printer to the printer list.
You have successfully installed a network printer for the Spire CX260 and are
ready to start printing.
Printing from a Macintosh Client Workstation
1. Open the file you would like to print in the corresponding application—for
example, open a Quark file.
2. From the File menu, select Print.
3. From the Printer list, select the desired printer.
4. In the Copies & Pages list, select Printer Features.
Page 32

24 Chapter 2 – Getting Started
5. Adjust the printer options as desired.
Notes:
• The PPD parameters are divided into Sets in the Feature Sets list.
• The Printer's Default option indicates that the value is taken from the
6. After modifying the job settings, click Print.
The file is sent to the Spire CX260.
Working Remotely
EZ Connect
The EZ Connect application enables you to view information about any Spire color
server on your network.
You can:
• View the printer status—for example, the status of the connection, tray, cable,
and power
• Refresh the printer status
• Search for jobs
• Access the Remote Workspace or Web Center
published printer that is currently selected.
For more information about accessing the Remote Workspace, see Remote
Workspace on page 29. For more information about the Web Center, see Web
Center on page 91.
Note: You can only access the Remote Workspace or search for jobs on a Spire
color server that supports these features.
Page 33

Working Remotely 25
Installing EZ Connect
To install EZ Connect on your client workstation:
1. In the D:Utilites/PC Utilities folder on the Spire CX260, locate the
EZConnect_v1_0_Setup.exe file and copy it to your client workstation.
2. On your client workstation, double-click the EZConnect_v1_0_Setup.exe file.
After installation is complete, the EZ Connect application appears under Start >
Programs > EZConnect > EZConnect Runner.
Using EZ Connect
To l aun ch EZ C on ne c t:
1. Go to Start > Programs > EZConnect.
2. Select EZConnect Runner.
The EZ Connect icon appears on the taskbar.
3. Double-click the EZ Connect icon on the taskbar.
The EZ Connect window appears.
Ti p : The EZ Connect window can remain on your desktop while you are
working in other software applications. If you close the EZ Connect
window, the EZ Connect icon will remain on the taskbar.
Page 34
26 Chapter 2 – Getting Started
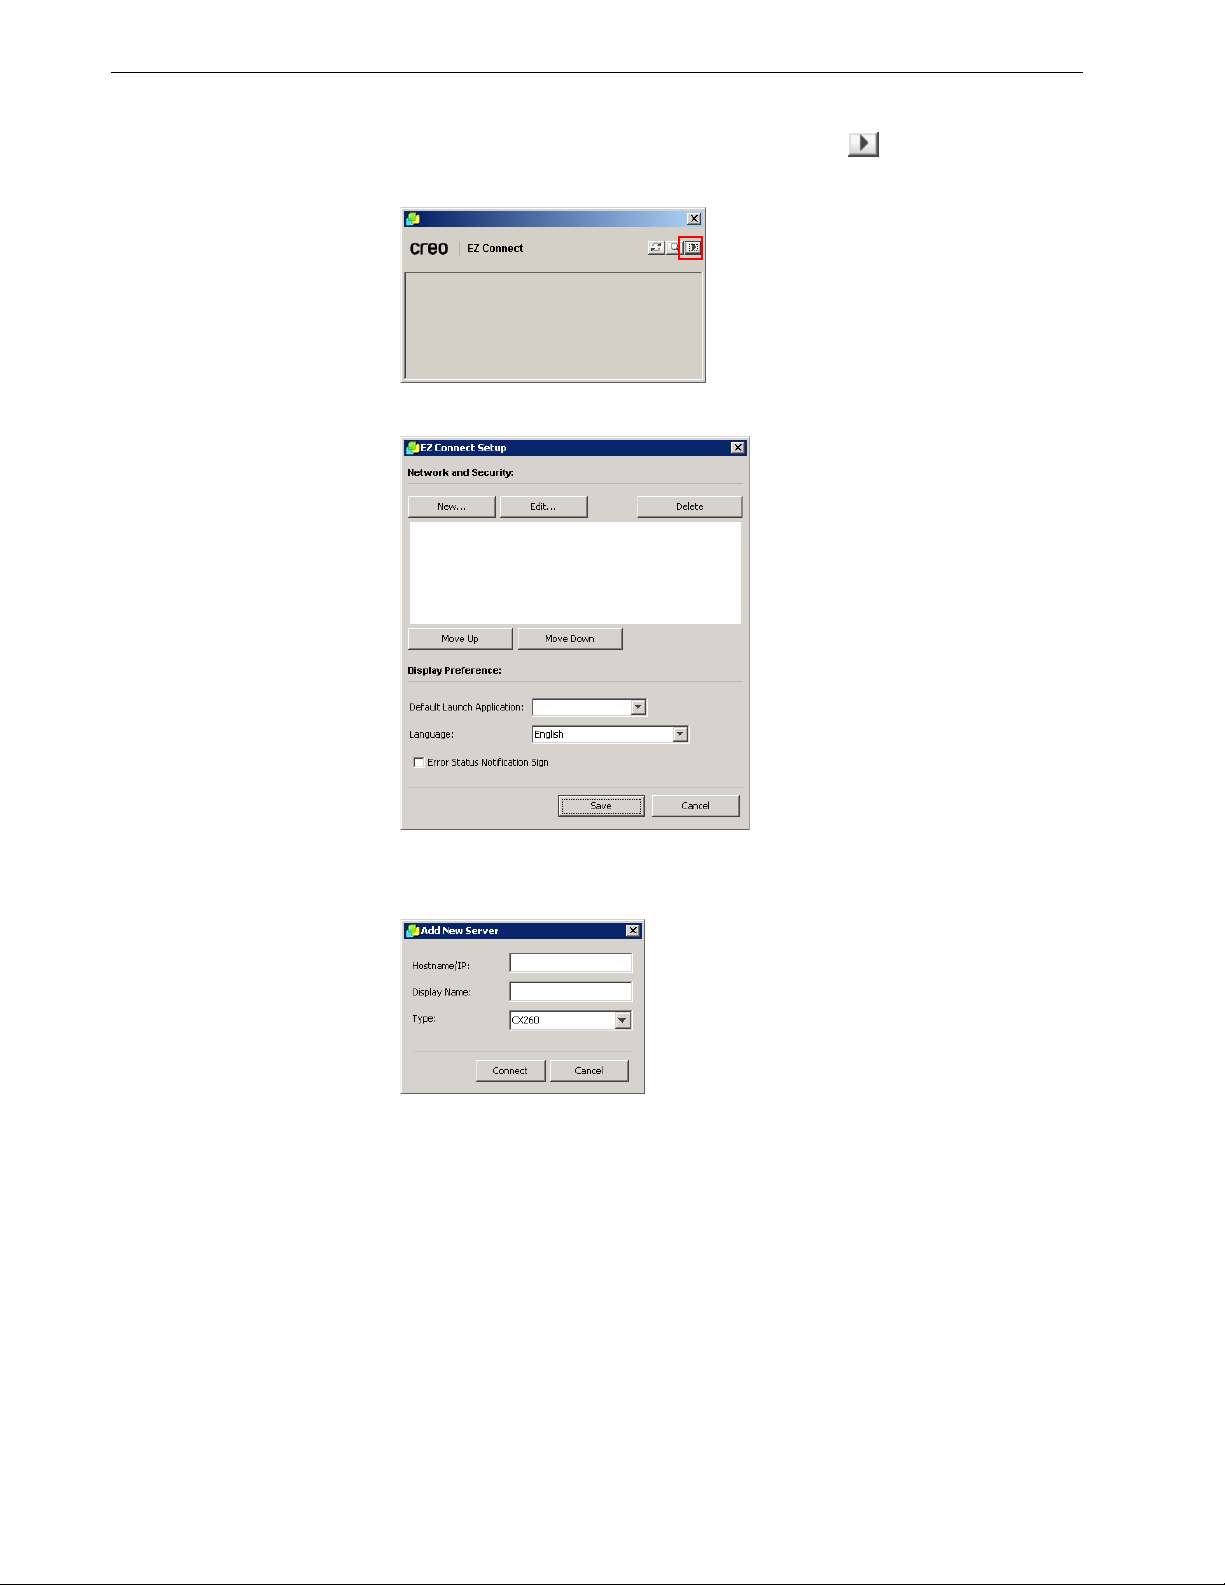
To add a new server to the EZ Connect window:
1. In the EZ Connect window, click the Settings button , and select Setup from
the list.
The EZ Connect Setup window appears.
2. Click New.
The Add New Server window appears.
3. In the Hostname/IP box, type the server’s name or IP address.
4. In the Display Name box, type the server name that you want to appear in the
EZ Connect window.
5. In the Ty p e list, select the Spire color server type.
6. Click Connect.
The new server is displayed in the EZ Connect window.
Page 35

Working Remotely 27
7. Select the new server that you just added.
8. Click the Move Up or Move Down buttons to change the position of the server
in the list, if desired.
9. From the Default Launch Application list, select the desired application
(Remote Workspace or Web Viewer) that you will use to access the server.
Note: The Remote Workspace application is only available for Spire color
servers that support this feature.
10. From the Language list, select the desired language.
11. Select the Error Status Notification Sign check box to display a sign for errors.
12. Click Save.
The server appears in the EZ Connect window.
To change a server’s display name:
1. In the EZ Connect window, click the Settings button , and select Setup from
the list.
2. In the list of servers, select the desired server.
3. Click Edit.
The Edit Server window appears.
Page 36

28 Chapter 2 – Getting Started
4. In the Display Name box, type the new display name for the server.
5. Click Save.
The new name appears in the EZ Connect Setup window.
To d el e te a se rv e r:
1. In the EZ Connect window, click the Settings button , and select Setup from
the list.
2. In the list of servers, select the desired server.
3. Click Delete.
The server is removed from the list.
To refresh the status of the EZ Connect window:
In the EZ Connect window, click the Refresh button .
¾
To search for a job on a server:
1. In the EZ Connect window, click the Search button .
The Search Job window appears.
2. From the server list, select one of the following to search for the job:
• All Servers
• A specific server
3. In the blank white box, type the exact name of the job and then click Search.
The job appears in the Search Job window.
Page 37

Working Remotely 29
4. Select the job to display information about the job.
The job information appears.
Remote Workspace
Notes:
• To use the Remote Workspace application, you must first install the EZ
Connect tool. For more information, see EZ Connect on page 24.
• The Remote Workspace application is only available for Spire color servers
that support this feature.
Using the Remote Workspace
The Remote Workspace application enables you to access any Spire color server
from a client workstation over the network. Multiple client workstations can access
a Spire color server at the same time using the Remote Workspace.
In the Remote Workspace window, you can:
• Import jobs
• View and manage job queues
• View printer information
• Set job parameters
• Perform tray alignment
• Perform Off-the-glass calibration
• Perform calibration using the Eye-One spectrophotometer connected to your
client workstation
Note: Calibration using the Eye-One spectrophotometer is only available
for the Pro Basic and Pro Control Station configurations.
Page 38

30 Chapter 2 – Getting Started
To l au n ch t he R e mo t e Wo r ks pa c e:
1. Launch the EZ Connect window.
For more information, see Using EZ Connect on page 25.
2. Click the desired server.
The first time that you access the Remote Workspace application, the
Downloading RWS dialog box appears.
Note: If you have already downloaded the Remote Workspace
application, proceed to step 4.
3. Click OK.
The following window appears.
The Logon dialog box appears.
Page 39

Working Remotely 31
4. Click Logon.
The Remote Workspace window appears.
Spire Web Services
From the Xerox DocuColor 242/252/260 printer/copier’s touch screen, you can use
Spire Web Services to view jobs in the Spire CX260 Print and Process queues, view
the calibration status of the printer, and perform Off-the-glass calibration.
Note: You can also calibrate the Xerox DocuColor 242/252/260 printer/
copier using your client workstation via the Remote Desktop Connection or
directly on the Spire CX260.
The type of calibration you can perform depends on the Spire CX260
configuration that you have.
For more information about calibration, see Calibration on page 122.
Page 40

32 Chapter 2 – Getting Started
To access Spire Web Services:
1. On the printer’s touch screen, touch All Services.
2. Touch Web Applications.
Page 41

Working Remotely 33
The Spire Web Services window appears.
To view jobs in the Print and Process queues:
1. From the Spire Web Services window, touch Job List.
The Job List window appears.
2. Do one of the following:
• Touch Process Queue to view jobs in the Spire CX260 Process queue.
• Touch Print Queue to view jobs in the Spire CX260 Print queue.
3. Touch Home to return to the Spire Web Services window.
Page 42

34 Chapter 2 – Getting Started
To view the calibration status of the printer:
1. From the Spire Web Services window, touch Calibration Status.
The Calibration Status window appears and displays the following information:
• Date and time of the last calibration
• If the calibration was completed successfully or failed
2. Do one of the following:
• Touch Home to return to the Spire Web Services window
• Touch New Calibration to perform a new calibration
Page 43

Working Remotely 35
Performing a New Calibration
To print the Off-the-glass calibration chart:
1. Do one of the following:
• From the Spire Web Services window, touch New Calibration.
• From the Calibration Status window, touch New Calibration.
The Print Calibration Chart window appears.
2. Touch the button next to the desired tray and then touch Continue.
Page 44

36 Chapter 2 – Getting Started
The following window appears.
3. In the Screening Method list, touch the arrow and select the screening method.
4. In the Gloss Enhanced list, touch the arrow and select Ye s or No.
5. In the No. of copies list, touch the arrow and select the number of copies that
you want to print.
6. Touch Print.
The Prepare for Scan window appears.
7. Touch Home to return to the Spire Web Services window.
Page 45

Working Remotely 37
To calibrate the scanner and printer:
1. On the platen glass of the printer, place the KODAK Gray Scale calibration chart
and the Off-the-glass calibration chart next to each other, facing down.
Notes:
• The KODAK Gray Scale calibration chart is in the Calibration Chart Kit
envelope (part #518-00961A). Use only the KODAK Gray Scale
calibration chart when calibrating the scanner and printer—do not use
the Scanner Calibration chart, which is also in this envelope.
• If you place only the Gray Scale calibration chart on the platen glass,
the printer is calibrated. If you place only the Off-the-glass chart on
the platen glass, the scanner is calibrated. It is recommended that you
place both the Off-the-glass and Gray Scale calibration charts on the
platen glass at the same time so that you calibrate both the printer
and scanner.
• If you need to calibrate a large paper size—for example, A3 or larger—
cut the paper in order to fit the Off-the-glass and Gray Scale
calibration charts on the platen glass.
2. On the printer’s touch screen, touch All Services.
3. Touch Network Scanning.
4. On the General Settings tab, touch the 001 Calibration scan box.
5. Touch the Image Quality tab.
6. Touch the Standard Color Space button to select the specific color space of the
Xerox DocuColor 242/252/260 printer/copier.
7. Touch the Device Color Space button.
8. Touch Save.
9. On the control panel, push Start to start scanning the charts.
The charts are scanned and measured and a calibration table is created.
If the calibration process is successful, two calibration tables are generated:
• Normal—maintains the gray balance throughout the range of colors in the print
job file
• Saturated—is the same as the normal table for 80% of the color range; but from
that point on, each color has a greater density
Remote Scan Application
Before you begin using the remote scan application, make sure that remote scanning
is enabled in the Spire CX260 Settings window. For more information, see
page 175.
Scan on
Page 46

38 Chapter 2 – Getting Started
Installing the Remote Scan Application on Your Client Workstation.
To install on a PC client workstation:
1. From the Start menu, select Run.
2. In the Open box, type \\, followed by the host name or IP Address of the color
server, and click OK.
3. On the Spire CX260, locate the D:\Utilities\PC Utilities folder.
4. Select and copy the RemoteScan.exe file to your desktop.
5. Double-click the RemoteScan.exe file to install the Remote Scan application.
To install on a Mac client workstation:
1. From the Go menu, select Connect to Server.
The Connect to Server dialog box appears.
2. Locate the desired Spire CX260 in the network and then double-click it.
3. In the Connect to Server dialog box, select Guest.
4. Click Connect.
5. Select the Utilities volume, and click OK.
6. On the desktop, double-click the Utilities volume icon.
7. Open the Mac Utilities folder, and copy the RemoteScanInstaller.pkg.zip to
your desktop.
8. Double-click the RemoteScanInstaller.pkg.zip file to extract the package
9. Double-click the RemoteScanInstaller.pkg file to install the Remote Scan
application.
Page 47

Working Remotely 39
Using the Remote Scan Application
To open the remote scan application and connect to the Spire CX260:
1. On your client workstation, select Start > Programs > Creo > Remote Scan
Application > Remote Scan.
The Remote Scan Application window appears.
2. When you connect the first time, or to connect to a different Spire CX260,
enter the server hostname or IP address in the Server Name or IP list, and click
Connect.
The remote scan application is connected to the Spire CX260 and you are ready
to begin working. By default, the last scan box you used is displayed.
Note: By default, the Remote Scan application remembers your last
connection.
The remote scan application enables you to:
• Create scan boxes either locally or from your client workstation, and then set
parameters that specify the location of your scanned data, the format in which it
is saved, and security settings
• Manage scanned images
The Spire CX260 has three default scan boxes:
• SpireBW200_1S—Jobs scanned to this box have the following settings:
OutputColor=Black and white, ScanResolution=200dpi, 2SidedOriginal=1 side
• SpireGrayScale200_1S—Jobs scanned to this box have the following settings:
OutputColor=Greyscale, ScanResolution=200dpi, 2SidedOriginal=1 side
• SpireColor200_1S—Jobs scanned to this box have the following settings:
OutputColor=Color, ScanResolution=200dpi, 2SidedOriginal=1 side
If you scan a job using one of the default scan boxes, the job is saved to the scan box,
and to D:\PublicScans on the Spire CX260.
Note: There is a fourth default scan box for calibration.
Creating Scan Boxes
1. In the remote scan application, click ScanBox Manager.
Note: The remote scan application must be connected to the server.
Page 48

40 Chapter 2 – Getting Started
The ScanBox Manager lists all the scan boxes that have been created.
2. Click Add to add a new ScanBox.
3. In the Scan Box Name box, type a name for the scan box.
4. Select the Automatic Copy check box to automatically save a copy of the
scanned job on your client PC.
Page 49

Working Remotely 41
5. Do one of the following actions:
• In the Network Path box, enter the location to which you want to save the
extra copy.
• Click Browse.
• Select the desired folder.
• Click Select.
Note: The network browser that opens is local to the Spire CX260.
6. In the File Type box, enter the format in which you want to save the data that is
saved to the scan box. The available options are JPEG, TIFF and PDF.
7. S el ec t Security.
8. Select the Secure Scan Box check box to secure the scan box, and specify a
password.
9. Click Apply.
10. Select Send to EMail.
Page 50

42 Chapter 2 – Getting Started
11. Click the Send to EMail check box to forward scanned jobs to an e-mail
address.
12. In the From box, type the e-mail address for the sender of the scanned image.
13. In the To box, type the e-mail addresses to which the scanned e-mail
attachment should be sent.
14. In the Subject box, type the text for the subject line of the e-mail.
15. In the Te x t box, type any desired message text.
16. Select one of the following:
• Send scan as link to send an e-mail message containing a link to the
scanned image. The e-mail message contains text instructing the recipient
how to access the scanned image, and the date in which the link expires.
Note: The expiration date of the link is set in Settings > Preferences
> Scan Delete Scan jobs after.
• Send scan as attachment to attach the scanned image to the e-mail
message.
17. Select Scan Parameters.
Page 51

Working Remotely 43
18. Select the desired output color from the OutputColor list.
Note: The output color cannot be changed during scanning.
19. Select the desired scan resolution from the ScanResolution list.
20. Select the desired print method in the 2SidedOriginal list.
21. Click Save.
The scan box is saved and appears in the ScanBox Manager.
Scanning Workflow
1. Position the original to be scanned on the Xerox DocuColor 242/252/260
printer/copier.
2. On the Xerox DocuColor 242/252/260 printer/copier touch screen, touch the
All Services button.
3. Touch Network Scanning.
Page 52

44 Chapter 2 – Getting Started
The Network Scanning window appears.
4. Touch Refresh to display all current scan boxes.
5. On the General Settings tab, touch the name of the scan box that you want to
save the scan to.
6. The Scanning Color and 2 Sided Originals settings are selected according to
the scan box settings.
7. I n t he General Settings, Image Quality, Layout Adjustment and Output Format
tabs, change the settings as desired.
Note: The Scanning Color settings cannot be changed.
Page 53

Working Remotely 45
8. Press the Start button.
The original is scanned. A beep is heard when the scan is complete. The scan is
saved in the selected scan box with the name <scan box name>001 and with
the relevant file extension.
Managing Scanned Images
Once a scan is performed, you can view the job using the remote scan application,
or browse to D:\PublicScans on the Spire CX260.
To view the scanned job from the scan box:
1. Open the Remote Scan application and ensure it is connected.
2. In the ScanBox list, select the scan box where the scanned job is saved.
All jobs scanned to the selected scan box are displayed.
To save the scanned job on your client workstation:
1. Open the remote scan application and ensure it is connected.
2. In the ScanBox list, select the scan box where the scanned job is saved.
Page 54

46 Chapter 2 – Getting Started
3. Select the desired job, and click Save as.
The Save dialog box opens.
4. Select a destination and click Save.
You can now open the scanned job on your client workstation, and work with
your scanned data.
To delete a scanned job from a scan box:
1. Open the remote scan application and ensure it is connected.
2. In the ScanBox list, select the scan box where the scanned job is saved.
3. Select the desired job, and click Delete.
The scanned job is deleted.
Preparing PostScript Files Offline for the Spire CX260
Perform this procedure if your client workstation is not on the same network as the
Xerox DocuColor 242/252/260 printer/copier, and you or your customer want to
create PostScript files using the Adobe PostScript Driver with the Spire CX260 PPD
file.
To copy the Adobe PostScript Driver:
1. Insert CD #3 into the CD-ROM drive and locate and select the Utilities\PC
Utilities folder.
Note: If you have server access, on the Spire CX260, locate the printer driver
folder under
2. In the PC Utilities folder, select and copy the AdobePS Driver.exe file to the
desktop.
D:Utilities\PC Utilities.
Page 55

Working Remotely 47
To copy the Spire CX260 PPD file:
1. Insert CD #3 into the CD-ROM drive and locate and select the Utilities\PC
utilities\Printer Driver\Printer driver application\Win2000_XP_2003 folder.
Note: If you have server access, on the Spire CX260, locate the
D:\Utilities\PC Utilities\Printer Driver\Printer driver
application\Win2000_XP_2003
folder.
2. Select either the Europe-A4 or US-Letter folder.
3. Select the desired language folder.
4. Select and copy the CX260_V2.PPD file to the desktop.
To install the Adobe PostScript Driver:
1. Deliver the AdobePS Driver.exe and CX260_V2.PPD files to the desired client
workstation or customer PC.
2. On the client workstation or customer PC, copy the AdobePS Driver.exe and
CX260_V2.PPD files to the desktop.
3. Double-click the AdobePS Driver.exe file to install the Adobe PostScript Driver.
4. Follow the instructions in the Adobe PostScript Driver Installer wizard. When
the wizard requests the location of the PPD file, browse to the desktop and
locate the CX260_V2.PPD file.
Page 56

48 Chapter 2 – Getting Started
Page 57

Overview of Spire CX260
The Workspace ......................................................................................................50
The Server and Printer Monitors....................................................................... 52
Managing the Job Queues .................................................................................. 52
Managing the Storage Window..........................................................................61
Importing and Printing Files................................................................................ 67
Reprinting Jobs.......................................................................................................68
The Settings Window ........................................................................................... 69
The Resource Center ............................................................................................70
The Job Parameters Window ............................................................................. 70
The Help Menu ...................................................................................................... 72
The DFE Monitor ................................................................................................... 72
The Printer Monitor .............................................................................................. 73
Remote Desktop Application ............................................................................. 75
Page 58

50 Chapter 3 – Overview of Spire CX260
The Workspace
Opening the Spire CX260 Workspace from the Start Menu
If the workspace has been closed, open it as follows:
¾ Select Start>CX260>CX260.
The splash screen appears followed by the Spire CX260 workspace.
1
2
3
8
4
7
5
6
Table 3 describes the Spire CX260 workspace.
Table 3: Spire CX260 workspace
Item Name Description
1 Menu Bar Consists of the Job, Selection, Tools, Control, View, and Help menus.
Click a menu name to open the corresponding menu.
2 Status Panel Contains the logo, Processing status area, Printing status area, server
icon, printer icon, and current time.
For more information on the server and printer icons, see The Server and
Printer Monitors on page 52.
3 Toolbar Consists of shortcut buttons for the Import window, Resource Center,
Message Viewer, and Calibration window
Page 59

The Workspace 51
Table 3: Spire CX260 workspace
Item Name Description
4 Queues Consists of the Process Queue, which lists the files to be processed.
After a file has been processed successfully, it moves to either the Print
Queue (the upper area) or the Storage window.
For more information on Queues, see Managing the Job Queues on
page 52.
5
6 Thumbnail Displays a thumbnail view of a specific page in an RTP job that has
7 Storage The Storage window contains files that:
Alerts
Lists the alert messages that are generated during the workflow.
For more information on the Alerts window, see The Alerts Window on
page 177.
finished processing
• were successfully printed
• were held, were aborted, or failed during processing or printing
• were sent directly from the client workstation to the Storage window
or were imported to the Storage window
For more information on the Storage window, see Managing the Storage
Window on page 61.
8
Paper Stocks
Displays information about the paper in each tray and also shows
whether the trays are ready for printing.
NOTE: This window is only included in Classic Plus view. For more
information, see Customizing the Workspace View on page 51.
Customizing the Workspace View
The Vi ew menu enables you to customize the workspace. From this menu, you can
open and close the Queues window. The menu also provides the following view
options:
• Spire classic view: Displays the status panel, toolbar, Storage window, Queues
window, Thumbnail window, and Alerts window
• Spire classic plus view: Displays the status panel, toolbar, Paper Stocks window,
Storage window, Queues window, Thumbnail window, and Alerts window
• Queues view: Displays only the Print Queue and Process Queue
Page 60

52 Chapter 3 – Overview of Spire CX260
• Refresh view: Reverts to the factory default view for the view that is currently
displayed
Note: The Spire CX260 always displays the workspace in the most recently
selected view.
Ti p : By default, the windows in the workspace are all docked-that is, attached
to the workspace. You can detach, or undock, a window from the workspace
by right-clicking the window’s title bar and selecting
Undock Window.
The Server and Printer Monitors
Server icon
The server and printer icons are on the right end of the status panel and indicate
(through animation) whether processing and printing are taking place. If a finishing
device is connected to the printer, the finishing device also appears in the printer
icon. You can click the printer or server icon to display status information. You also
view messages regarding the printer operation mode and status next to the printer
icon.
Printer icon
Managing the Job Queues
After entering the Spire CX260, a job resides either in the Queues window or in the
Storage window, depending on the job flow.
To display the Queues window:
¾
From the View menu, select Queues.
The Queues window consists of two areas, the Process Queue and Print Queue.
• The Process Queue lists the job that is currently being processed and the jobs
that are waiting to be processed.
• The Print Queue lists the currently printing job and the jobs that were processed
successfully and are waiting to be printed. The Print Queue also lists frozen jobs
(jobs for which the specified paper stock is not available).
Each queue holds jobs in the order in which they enter it. At any time, you can view
information regarding the number and status of the jobs in the queues. You can also
change the order of the jobs and suspend or resume the queue.
Page 61

Managing the Job Queues 53
After you start the Spire CX260, the Queues window is displayed. The Queues
window consists of the Print Queue and the Process Queue.
Each queue holds jobs in the order in which they enter it. The top job in the queue is
currently running, while all others are waiting to run.
Note: If there are very short jobs in the Print Queue, several jobs may be
running at the same time. The jobs marked as
printed in the order they are listed.
running are listed first and
If necessary, you can change the order the jobs that are waiting in the queues. You
can also view and edit the jobs’ parameters.
The Queues Window
After you submit PDL jobs (or resubmit PDL jobs), the Process Queue lists the files
to be processed.
Once a file has been processed successfully, it moves to the Print Queue and waits
to be printed or to the Storage window (depending on the current job flow or virtual
printer).
For more information about operations on the jobs residing in the Queue Manager,
see Aborting a Running Job on page 57.
Page 62

54 Chapter 3 – Overview of Spire CX260
The Queues window lists informations about the jobs that are being
processed. Status indicators indicate the status of each job. Table 4
describes the status indicators used in both the Process Queue and Print
Queue.
Table 4: Process Queue and Print Queue status indicators
This Status
Indicator
Right-click the column heading row to select the columns that you want to
view.
Table 5: Process Queue and Print Queue column descriptions
This Column Indicates This Information:
Job Type File format of the PDL job—for example, PS
Sender User name of the system from which this file
Indicates This:
The job is running.
The job is frozen and held in the Print Queue. If a job
is frozen, it indicates that the selected paper stock is
not available.
The job is waiting.
The job is locked. You need to enter the job’s password
before you can print or change job parameters.
(.ps), PDF(.pdf), VPS(.vps)
originated
Submitted Date and time this job was first submitted to
the Spire CX260
Pages Number of pages to be processed in a PDF job.
If the DTP application supported it, the
number of pages is indicated for other PDL
jobs
Sets Number of copies to be printed
Page Size Page size
Page 63

Managing the Job Queues 55
Table 5: Process Queue and Print Queue column descriptions
This Column Indicates This Information:
Media Type Media type
Status Information
Image Quality
File Size File size of the job
Account Account name taken from the Job info
Job Info Job info type taken from the Job info
Imposition Type of imposition used
Page Exception Whether or not the job has page exceptions
Server Name of the server being used
Virtual Printer
Names
The Processing and Printing status areas contains the following:
Image quality
parameter
parameter
Name of virtual printer being used
• The suspend and resume buttons (for more information see Suspending and
Resuming Queues on page 57)
Batching Jobs
• The queue name.
• If a job is currently being processed or printed, the name of the job and a process
indicator are displayed.
The Processing status area indicated the total number of pages for PDF
jobs. The number of pages is indicated for other PDL jobs only if the
desktop publishing application in which they were created supports this
feature.
• The number of jobs in the queue—for example, 2.
The job-batching workflow combines jobs with similar attributes into a single batch
to enable the printer to print the jobs continuously without pausing. This feature
saves printing time, especially for a large number of small jobs. Jobs that use paper
of the same size and weight are suitable for batching.
Page 64

56 Chapter 3 – Overview of Spire CX260
When a job enters the Print Queue, the Spire CX260 checks whether the
job is suitable for batching with the previous one.
• A job that can be batched appears with the running status indicator .
The printer prints both jobs without pausing between them.
• A job that cannot be batched with the previous one waits in the queue
and appears with the waiting status indicator . It is printed only when
the printer finishes the previous job and comes to a stop.
The Spire CX260 batches suitable jobs only if they are consecutive in the
queue. Two jobs are not batched if a job that is not suitable comes between
them in the queue.
The following types of jobs cannot be combined into one batch:
• Collated jobs and uncollated jobs
• Jobs that use different output trays
• Jobs with different staple positions
The job batching option is active by default.
To deactivate job batching:
In the Settings window (Tools > Settings), select Preferences > Print
¾
Queue Manager > Disable Job Batching.
For more information about job batching, see Print Queue Manager on
page 170.
Changing the Order of Jobs in the Queues
You can rearrange the jobs in a queue to change the order in which they will
be processed or printed. This feature is useful when you have an urgent job
that takes priority, for example.
Note: You can only move one job at a time.
To move a job up in the queue:
Right-click the job and select one of the following options:
¾
Promote: to move the job up one step
Promote to top: to move the job to the top of the queue
Note: The job is placed below the
Running job.
Page 65

Managing the Job Queues 57
To move a job down in the queue:
Right-click the job and select one of the following options:
¾
Demote: to move the job down one step
Demote to bottom: to move the job to the bottom of the queue.
Suspending and Resuming Queues
If necessary, you can stop a queue temporarily and then later continue its operation
afterwards. To do this, use the suspend and resume buttons:
To suspend a queue:
Click the suspend button .
¾
The button turns red (suspend mode), and the processing/printing stops after
the current job has finished running.
To resume a queue:
Click the resume button .
¾
The button turns green (resume mode), and the top job in the queue starts
processing/printing.
Aborting a Running Job
To stop processing or printing a running job:
Right-click the running job in the Queues window, and from the menu, select
¾
Abort.
The job moves from the queue to the Storage window, and the Alerts window is
updated.
The
running.
Aborted
status is assigned to the job, and the next job in the queue starts
Page 66

58 Chapter 3 – Overview of Spire CX260
Note: To return a job to the proper queue, right-click the job(s) in the Storage
window and from the
To return a job to the Process Queue or Print Queue:
Right-click the job in the Storage window and from the Job menu select Submit.
¾
Job menu select Submit.
Moving a Waiting Job to the Storage Window
To postpone processing or printing of one or more waiting jobs, use the Move to
storage option.
To move a waiting job to storage:
Note: You can only perform this action if the job is waiting in the queue. If the
job is active, this option is not available.
1. Select the job in the Queues window.
2. Right-click the job(s), and select Move to storage.
The job(s) move(s) from the queue to the Storage window and appears with the
held job
indicator .
Page 67

Managing the Job Queues 59
To return a held job from the Storage window to its original queue:
¾
Right-click the job, and from menu select Submit.
The job moves from the Storage window to the queue and appears with the
waiting job indicator.
Unlocking a Job
Note: This feature is only available for the Pro Basic and Pro Control Station
configurations.
A job that was locked in the Spire Print Driver software must be unlocked before you
can change job parameters or send the job to print.
A locked job appears with the Locked indicator .
For more information about locking a job, see Locking a Job on page 15.
To unlock a job:
1. Depending on the which queue the job is in, do one of the following:
• In the Print and Process queues, right-click the job that you want to unlock
and select either Job Parameters or Run immediately.
• In the Storage queue, right-click the job that you want to unlock and select
Job Parameters.
The Secure Printing dialog box appears.
Page 68

60 Chapter 3 – Overview of Spire CX260
2. In the Password box, type the password and click OK.
Viewing and Editing Job Parameters
¾ In the Queues or Storage window, double-click the job whose parameters you
want to view.
Note: In the Queues window, you can edit the parameters of jobs that have
not begun to run. If you want to edit the parameters of a running job, you
must first suspend the queue (click the suspend button).
The Job Parameters window appears.
Note: If you edit the parameters in of a job in the
changes require re-RIPing of the job, it automatically moves to the
.
Queue
Print Queue and the
Process
Deleting a Job
Once you delete a job from the Process Queue, Print Queue, or Storage window, you
need to resubmit it for processing and printing. To temporarily remove a job from a
queue, use the Move to storage
Window on page 58).
To d el e te a job :
Note: You can only perform this action if the job is waiting in the queue. If the
job is active, this option is not available.
1. Right-click the desired job in the queue or Storage window, and select Delete.
The following message appears.
2. Click Ye s .
The selected job is deleted.
Note: You can delete more than one job at a time: Select the jobs, and
from the
Job menu, select Delete.
option (see Moving a Waiting Job to the Storage
Page 69

Managing the Storage Window 61
Managing the Storage Window
The Storage window is displayed by default. If you close the Storage window, you
can reopen it by selecting Storage from the Vi ew menu.
The Storage window contains jobs of various types:
• Printed Jobs
• Jobs that you moved to the Storage window or aborted during processing or
printing
• Jobs that failed during processing or printing
• Retrieved jobs
• Jobs that were imported directly to the Storage window from the client
workstation (by selecting the Spool & Store option for the job flow)
In the Storage window, you can see the number of jobs that are in storage and their
status.
Each job in the Storage window is assigned a status as shown in Table 6:
Table 6: Storage window status buttons
Icon Status Indicates This
Completed The job has finished printing.
Held You moved the job from the Queues window to the
Storage window; or the current job flow or virtual
printer moved the job to the Storage window
automatically.
Failed The job failed during processing or printing.
Aborted You aborted the job in the Queues
the job was running.
Locked You locked the job in the Spire Print Driver
software.
By default, the Storage window shows all the jobs, whatever their status. All the
status buttons are selected—that is, they appear pushed in. If you click a status
button—for example, the Completed Jobs button—the button is released and the
list hides all the completed jobs:
window while
Page 70

62 Chapter 3 – Overview of Spire CX260
If you click the Completed Jobs button again, the button is pushed in and the list
shows the completed jobs.
Note: When all the status buttons are in the released (unselected) position,
The Storage window shows no jobs.
Discarding RTP Information
The RTP information can be discarded if desired. Under some circumstances, it is
necessary to discard RTP data—for example when you want to re-RIP a file, archive
a job without the RTP information, or edit tabs.
To discard RTP information from a job:
In the Storage window, right-click the relevant job and select Revert to source.
¾
The RTP data is discarded and the file returns to its original format—for example,
PostScript.
Handling Jobs in the Storage Window
In the Storage window you can perform the following actions:
• Submit a job. See Submitting Jobs on page 63.
• Preview and edit a job, using the Job Editor. See Job Editor on page 78.
• View and edit the parameters of a job. See Viewing and Editing Job Parameters on
page 60.
• Unlock a job. See Unlocking a Job on page 59.
• Archive a job. See Archiving and Retrieving Jobs on page 64.
• Duplicate a job. See Duplicating Jobs on page 63.
• Delete a job. See Deleting a Job on page 60.
• View a job’s history (in the Job History window). See Viewing a Job’s History on
page 66.
• Export a job as a PDF file.
Page 71

Managing the Storage Window 63
• Export a job as a Kodak® InSite™ remote proofing job. See Export as InSite Job on
page 66.
Note: This feature is only available for the Pro Basic and Pro Control Station
configurations.
• View the job ticket report for a job. See Job Ticket Report on page 118.
• View the preflight report for a job. See Preflight Report on page 110.
• Use the PDF analyzer to detect problems in imported PDF files that may affect
processing. See Analyzing a PDF Job on page 107.
• Forward a job. See Forwarding Jobs on page 63.
Submitting Jobs
¾ In the Storage window, right-click the job, and select Submit.
RTP jobs are submitted to the Print Queue; all other jobs are submitted to the
Process Queue.
Duplicating Jobs
¾ In the Storage window, right-click the job and select Duplicate.
The selected file is duplicated and is given the name of the original job followed
by the suffix _dup.
Notes:
• Duplicating an RTP job creates a PDL version of the job.
• Once you duplicate a job, you can only edit parameters in the Job Editor
that do not require re-RIP.
Forwarding Jobs
Note: This feature is only available for the Pro Basic and Pro Control Station
configurations.
1. In the Storage window, right-click the job and select Forward to > Other.
Note: If you select to forward a merged job, and you make changes to the
job, you will not be able to reRIP the job on the server to which you
forwarded the job.
The
Forward to
dialog box appears.
Page 72

64 Chapter 3 – Overview of Spire CX260
2. In the Host name / IP Address box, type the name or IP address of the desired
server that you want to forward the job to.
Note: The server name or server IP address that you enter will appear in
the list the next you forward a job. Instead of typing the name, you can
select it from the list.
3. Click Find.
4. Select one of the following:
• Send to Storage to send the job to the selected server’s Storage queue.
• Send to print to send the job to the selected server’s Print queue.
Note: If you send a PDF or PostScript job to the Print queue, it will be
sent to the Process queue first and then the Print queue.
5. Click Send.
Archiving and Retrieving Jobs
To keep enough disk space free, we recommend that you back up jobs and their
related files to an external server and then delete them from the Storage window.
This backup process is called archiving. You can retrieve archived jobs and related
files later for further use.
You can set a default archiving path that will automatically be displayed in the Open
dialog box when you select Archive from the Job menu. Set this path in the Settings
window under Preferences > General Defaults.
If a job includes VI elements, they are included when you archive or retrieve the job.
To archive a job on an external server:
1. In the Storage window, right-click the job that you want to archive and select
Archive.
The Archive dialog box appears.
Page 73

Managing the Storage Window 65
2. Locate the desired folder, and then click Archive.
A cabinet file (a compressed file) that contains all the files related to the archived
job is created at the selected location.
Notes:
• The archived job retains its current status (that is, completed, failed,
held, or aborted) and is archived with the information in its Job
Parameters and Job History windows.
• When retrieved, the archived job retains the original job name, not the
name assigned when archived.
3. In the Alerts window, verify that archiving has been completed.
4. Delete the job from the Storage window.
To retrieve an archived job:
1. From the Job menu, select Retrieve from Archive.
The Retrieve dialog box appears.
2. Locate the archived job under its archive name, select the related cabinet file,
and click Retrieve.
The selected job appears at the top of the list in the Storage window. It is assigned
the status indicator (
archival.
Notes:
completed, held, failed
, or
aborted
) that it had before
• You can retrieve more than one job at a time.
• The files related to the job (for example, PDL) are also retrieved.
• The job is retrieved with the information in its Job Parameters and Job
History windows.
• The cabinet file is not deleted.
3. In the Alerts window, verify that the file has been successfully retrieved.
Page 74

66 Chapter 3 – Overview of Spire CX260
Viewing a Job’s History
¾ In the Queues or Storage window, right-click the job and select Job History.
The Job History window appears.
For more information about the Job History window, see Job History on page 178.
Export as InSite Job
Note: This feature is available only for the Pro Basic and Pro Control Station
configurations.
InSite remote proofing provides an Internet-based communication between you and
your customers and enables you to proof jobs and receive approvals remotely.
If your site includes an InSite server, exporting your job as an InSite job from the
Spire CX260 allows you and your customers to proof online with geographically
dispersed users simultaneously, append annotations or comments, and approve or
reject pages over the World Wide Web using a standard browser.
After the RTP job is created on the Spire CX260, it can be exported as an InSite job
from the Storage window. When the customer logs on (using their unique user
name and password), they see the status of their jobs, view a thumbnail of all pages
in each job, and quickly identify which pages require further corrections. The
customer can measure color density, make annotated comments, and approve
pages. The online proofing cycle is shortened and accurate, and consequently, the
need for reprints is reduced.
To export as InSite:
1. Select the desired job in the Spire CX260 Storage window.
2. Right-click the job, and from the menu select Export as InSite Job.
The Export window appears.
3. Locate the file in which you want to export the job, and then click Export.
A Kodak Brisque® Job is created in the selected location. You can now register the
files on the InSite server and start the approval cycle.
Page 75
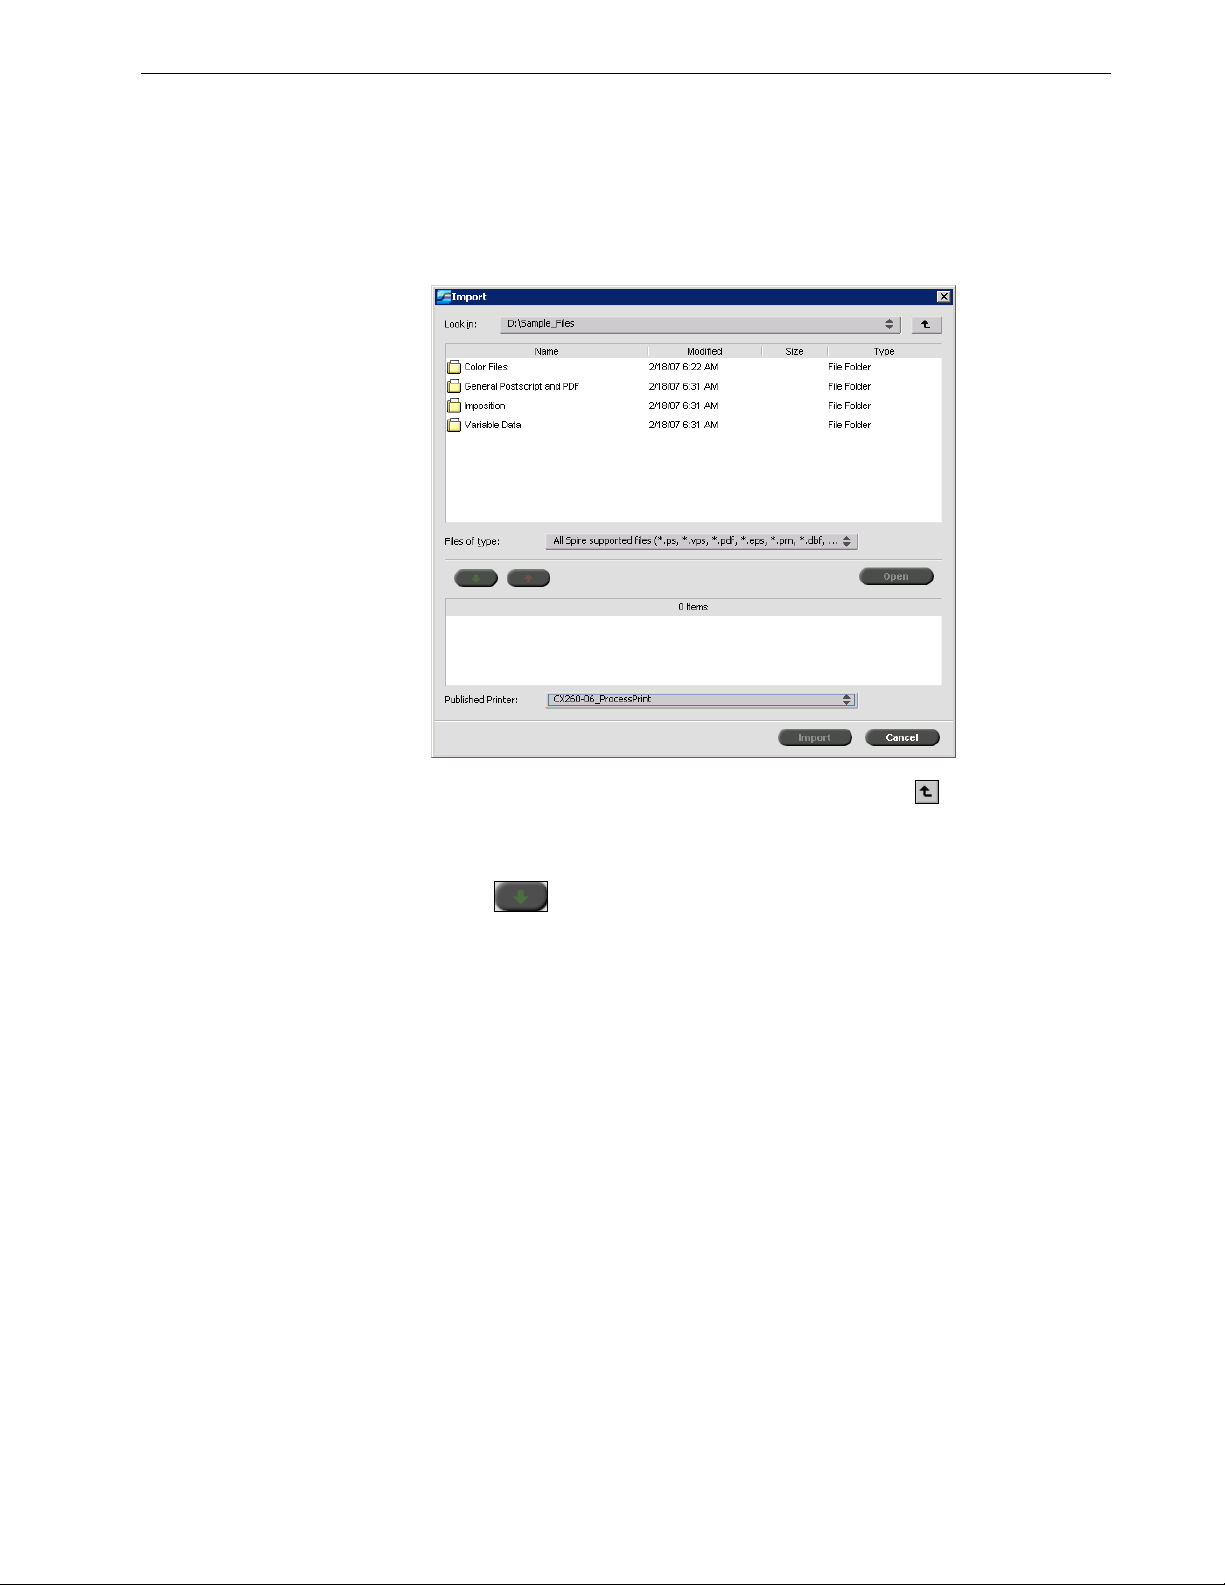
Importing and Printing Files 67
Importing and Printing Files
To import files to the Spire CX260:
1. From the Job menu select Import Job.
The Import window appears.
2. To access the desired files, click the up one level button , or double-click on
the file folders to go down the file tree.
3. In the upper list in the Import window, select the desired files and click the add
button .
Note: Use SHIFT or CTRL to select several files or CTRL+A to select all the
files. If required, add the same file more than once.
The file(s) appears in the lower list.
4. Select a printer from the Virtual Printer list.
Notes:
• To remove a file, select the desired file in the lower list in the Import Job
window and click the
remove button.
• Use SHIFT or CTRL to select several files at once.
5. Click Import.
All files currently listed on the lower list are sent to the Spire CX260 to be
processed and printed as defined in the selected virtual printer.
To check the status of imported jobs:
1. Click the Server icon arrow.
Page 76

68 Chapter 3 – Overview of Spire CX260
The Importing/Retrieving window appears.
The Importing/Retrieving window indicates the name of the file being imported,
its location and the job size. It also indicates the percentage of the job already
transferred, both numerically and graphically.
2. Select one of the following options:
• Click Skip This Job to stop importing the current file and import the next job
in the import queue.
Reprinting Jobs
• Click Abort All Jobs to stop importing all the files.
• Click Close to close the Importing/Retrieving window.
Submitting an RTP Job Requiring no Changes
¾ Select the job in the Storage window and from the Job menu select Submit.
Note: Use SHIFT or CTRL to select several jobs.
The job(s) are placed in the
Print Queue
.
Submitting a Job that Requires Re-RIPing
1. Double-click the job to open the Job Parameters window.
2. Change the desired parameter and click Submit.
The Spire CX260 automatically determines if your job needs to be re-RIPed and
places it in the appropriate queue.
Page 77

The Settings Window 69
The Settings Window
You can set all system preferences in the Settings window.
To open the Settings window:
From the Tools menu, select Settings.
¾
The window is divided into two areas:
• Administration: All users can view these settings, but only an administrator can
configure the settings.
• Preferences: All users can view these settings, but only an administrator or
operator can configure the settings.
Note: If you log on to the Spire CX260 as a guest, the Settings window is
unavailable.
For more information on the Settings window, see System Administration on
page 153.
Page 78

70 Chapter 3 – Overview of Spire CX260
The Resource Center
The Resource Center enables you to add, remove, and manage external resources
for the Spire CX260.
To open the Resource Center:
On the toolbar, click the Resource Center button .
¾
The Resource Center provides access to the following resources:
• Profile Manager, see Profile Manager on page 138
• Fonts, see Managing Fonts on page 93
• Virtu a l Printer s, see Managing Virtual Printers on page 93
The Job Parameters Window
The Spire CX260 enables you to edit imported PDL files and change the job
settings—for example, paper size, imposition, and color settings—in the Job
Parameters window.
Page 79

The Job Parameters Window 71
To open the Job Parameters window:
¾
Double-click a job in the Storage or Queues window.
The Job Parameters window title bar displays the following information:
• The name of the job
• The time of submission
• The name of the virtual printer
Table 7: Description of tabs in the Jobs Parameters window
This tab Enables you to
Print Settings Set print related job parameters—for example,
Print range and Print method. See The Print
Settings Tab on page 182.
Paper Stock
Print Quality Set job parameters related to print quality—for
Color Apply last minute color corrections, or set the
Set job parameters related to Paper size and
Media Type. See The Paper Stock Tab on page 186.
example, Tr a p p i n g and Image quality—and
improve the quality of printed jobs. See The Print
Quality Tab on page 187.
output job to match other output devices. See
Color Workflow on page 121 and The Color Tab on
page 189.
Imposition Set job parameters related to positioning, folding,
trimming, and binding of pages—for example,
Margins and Te m p l a t e . See The Imposition Tab on
page 194.
Page 80

72 Chapter 3 – Overview of Spire CX260
Table 7: Description of tabs in the Jobs Parameters window
This tab Enables you to
Services Set job parameters that will assist your job
workflow—for example, APR path and Preflight.
See The Services Tab on page 200.
Finishing Select from various options to finalize your printed
document—for example, define settings for the
front and back cover. See The Finishing Tab on
page 204.
Exceptions Define paper sets to include special exceptions in
a job, and add inserts or interleaves. See The
Exceptions Tab on page 206.
The Help Menu
The Help menu enables you to access the online help, which is based on this user
guide, and provides information about the current version of the Spire CX260
installed on your computer.
To open the About window:
¾
The About window displays the following information:
• Spire CX260 version number
• Date the version was installed
• Any updates that were installed on top of the version
To open the online help:
¾
The DFE Monitor
¾ To open the DFE Monitor window, click the server icon.
The DFE Monitor window displays information about disk space, network details,
and the virtual printers you have defined.
The Disk Usage tab shows how much space is available on the user disk and printer
disk.
From the Help menu, select About.
From the Help menu, select To p i c s .
Page 81
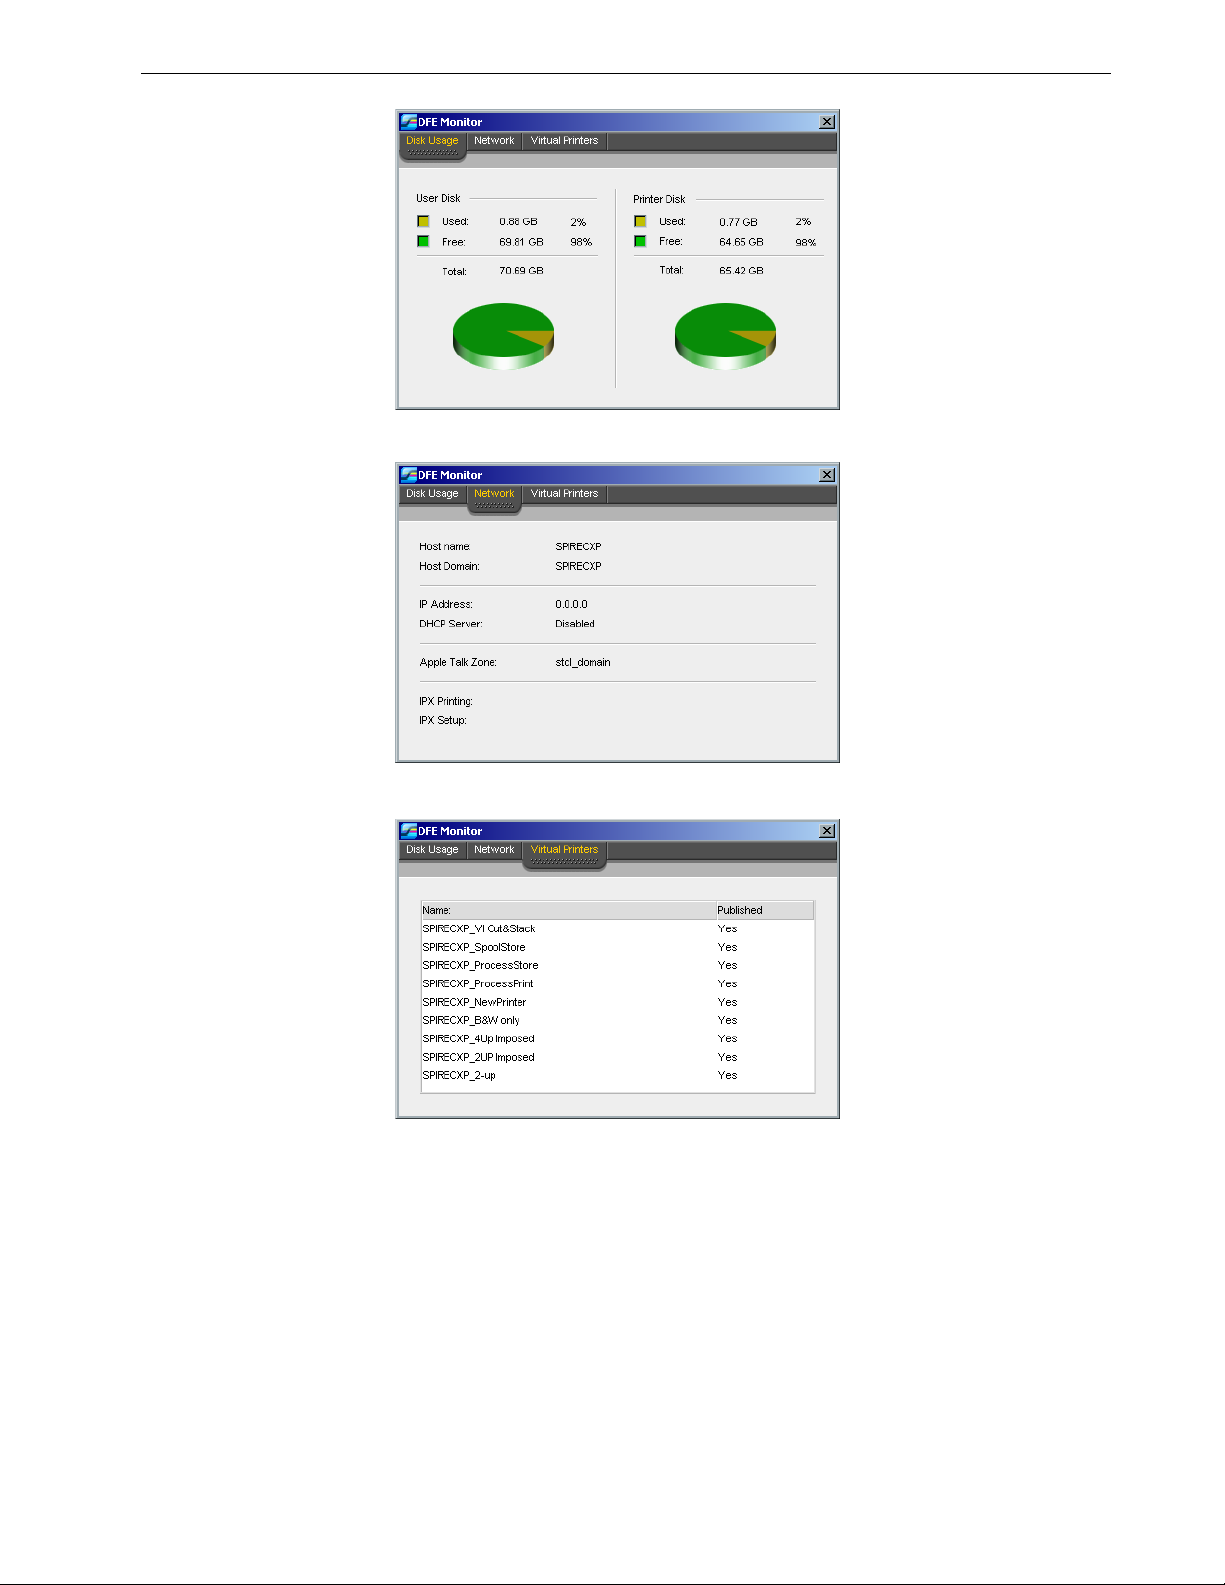
The Printer Monitor 73
The Network tab provides information about the network.
The Virtual Printers tab lists the virtual printers that you have defined.
The Printer Monitor
¾ To open the Printer Monitor window, click the printer icon.
The Printer Monitor window displays information about the size and type of paper in
each tray, the connected devices, and other aspects of the consumables.
The Paper Stock tab displays information about the paper in each tray and also
shows whether the trays are ready for printing.
Page 82

74 Chapter 3 – Overview of Spire CX260
The Finisher tab displays information about finishing devices that are connected to
the Xerox DocuColor 242/252/260 printer/copier.
The Consumables tab displays the status of other refillables.
Page 83

Remote Desktop Application 75
Remote Desktop Application
The Remote Desktop Connection (RDC) application enables you to connect, view,
operate, and perform administrative procedures on the Spire CX260 from a client
workstation. While the remote connection and operation takes place, the regular
operation of the Spire CX260 is not affected
Note: This tool is designed exclusively for the system administrator. Users that
want to connect to the Spire CX260 from a client workstation can use the
Remote Workspace. For more information about viewing jobs from a client
workstation, see Remote Workspace on page 29.
For more information about the Remote Desktop application, see Working from t he
Remote Desktop Application on page 86.
Page 84

76 Chapter 3 – Overview of Spire CX260
Page 85

Tools and Utilities
Overview.................................................................................................................. 78
Job Editor................................................................................................................. 78
Remote Tools ..........................................................................................................86
Managing Fonts ..................................................................................................... 93
Managing Virtual Printers ................................................................................... 93
Tray Alignment.......................................................................................................96
Printing on Tabs Using the Spire Tabs Plug-In for Acrobat.......................100
Preflight.................................................................................................................. 107
Page 86

78 Chapter 4 – Tools and Utilities
Overview
You import jobs for printing in the following situations:
• When a page-description language (PDL) file is created on a client workstation
that is not connected to the Spire CX260
• When a PDL file is located on an external medium, such as a CD-ROM
• When the desired file resides locally on the Spire CX260
Job Editor
The Job Editor tool enables you to preview a job before printing, delete, move or
insert pages. While you navigate to the various pages of a job, you can view
thumbnails of the job. For an imposed job, you can view the imposed sheets,
including the layout of the pages on each sheet. You can also view the pages’
orientation, crop marks, and fold marks.
To open the job editor:
Navigation Buttons
In the Storage window, right-click an RTP job that you want to preview, and
¾
select Job Preview&Editor.
The Job Editor window appears, displaying the first page of the selected job.
The navigation buttons enable you to select a specific booklet or page to view, and
to browse the pages of the current job.
Note: When the first page of a booklet is in view, the Previous Page navigation
button takes you to the previous booklet. When the last page of a booklet is in
view, the
Next Page button takes you to the next booklet.
Page 87

Job Editor 79
Previewing the Job
The preview buttons enable you to switch the display mode of the page.
Table 8: Preview Buttons
This button: Enables you to:
View a different area of the image.
Pan
Find out the CMYK values of a specific area on
the page. To find the values, first click the Eye
Eye Dropper
Zoom In
dropper button. Then move the pointer to the
point on the page where you want to measure
the color values, and click. The CMYK values
appear as a tool tip.
Magnify the selected area of the page.
Reduce the size of the selected area by 50%.
Zoom Out
One to One Zoom
Fit to Screen
Rotate View
Show/Hide
Separation
Viewing Pages in the Job Editor
View the actual size of the page one to one
(1:1).
Scale the page to fit the available screen space.
View the image at different preset levels of
magnification by selecting a percentage in the
list.
Rotate the page by 90°, 180° and 270°.
Turn on or off one or more separations.
The Job Editor window has three tabs—Booklets, Thumbnails and Imposed
Sheets—which enable you to switch between views.
Page 88
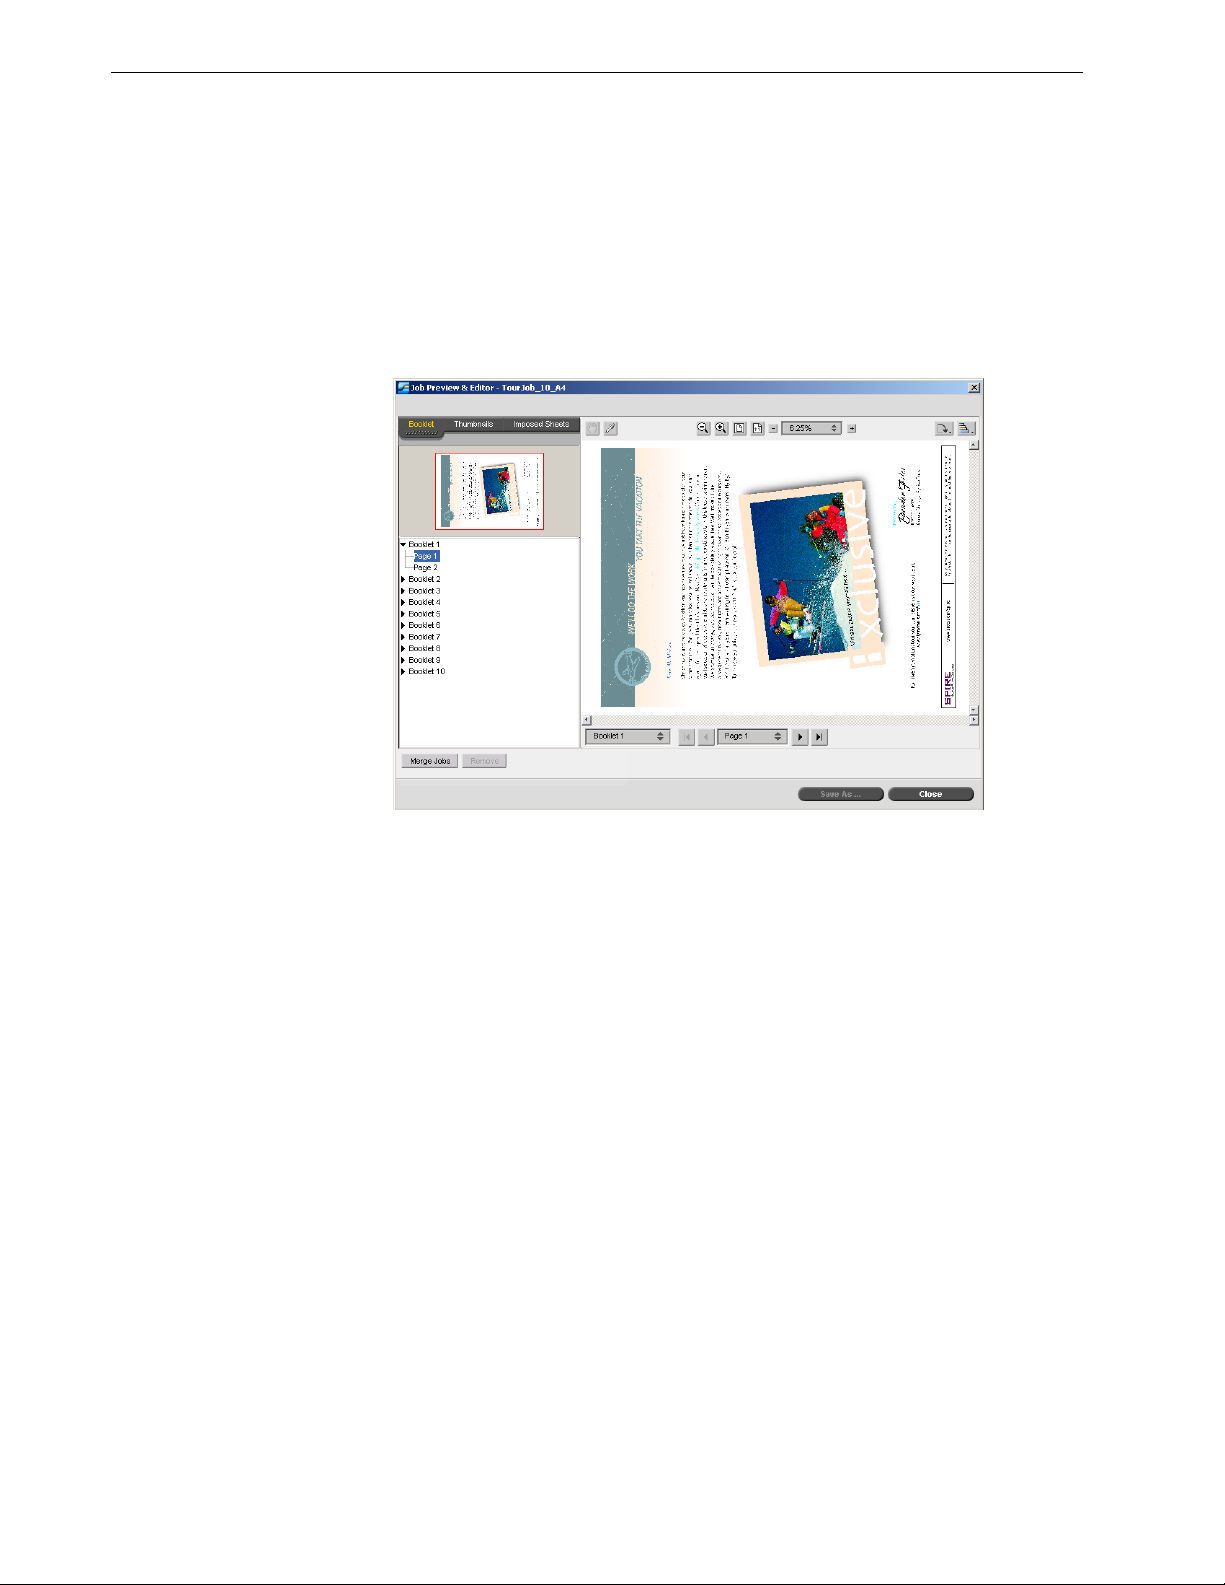
80 Chapter 4 – Tools and Utilities
The Booklets tab
The Booklets tab displays the booklets included in the selected job and the names
and numbers of the pages in each booklet. The Booklets tab opens by default when
you are previewing a nonimposed RTP job.
To view a page on the booklets tab:
¾
In the left pane of the Booklets tab, double-click the name of the page that you
want to view.
The page is displayed in the right pane.
The Thumbnails Tab
The Thumbnails tab displays miniature views (“thumbnails”) of each page in the
selected booklet. These thumbnails enable you to find a specific page more easily.
To view a page on the Thumbnails tab:
1. Click the Thumbnails tab.
Miniature versions of the pages appear on the left side of the tab, in the
thumbnail pane.
2. Use the scroll bar, as desired, to view all of the pages.
Page 89

Job Editor 81
3. To view the thumbnails side by side, resize the thumbnail pane by dragging the
bar that divides the panes in the tab.
4. Double-click the thumbnail of the page that you want to view.
The page is displayed in the right pane.
The Imposed Sheets Tab
Note: The Imposed Sheets tab is available only if you have the Pro
configuration.
The Imposed Sheets tab is available only for imposed RTP jobs. This tab enables you
to view the imposed sheets and check your imposition parameters. You cannot edit
the job on this tab.
Notes:
• In VI jobs, the booklet number appears in instead of the sheet number—for
example,
• In duplex jobs, each sheet is displayed twice, once for side A, and once for
side B. For example,
To display a page of an Imposed job:
1. Click the Thumbnails or Booklets tab.
2. Select the desired thumbnail or page.
3. Click the Imposed sheets tab.
The selected page of the imposed job appears.
Booklet 1, Page 15.
Sheet 1, Side A.
Page 90

82 Chapter 4 – Tools and Utilities
4. To edit the job, click the Booklets or Thumbnails tab.
Note: If you edit an imposed RTP job and then return to the Imposed sheet
view, the view will be updated according to the applied changes.
Editing an RTP Job
You can edit an RTP job in the following ways:
• Move pages within the job
• Delete pages from the job
• Merge pages from another job
Note: Jobs that you can edit in the Job Editor cannot be re-RIPed. Once a job
has been saved in the Job Editor, it is a new RTP file without an associated PDL
file. You cannot apply parameters that require re-RIPing to such jobs.
To move a page in a job:
1. Click the Thumbnails tab.
2. In the thumbnail pane, click the page that you want to move.
3. Drag the page to the target location.
Note: The red marker indicates where the page will be inserted.
Page 91

Job Editor 83
The page moves to the selected location, and the page numbers are updated
accordingly.
4. Click Save As to save the changes in the job.
To delete a page from a job
1. In the Job Editor window, click the page that you want to delete, and click
Remove.
The page is deleted and the page numbers are updated accordingly.
2. Click Save As to save the changes.
Merging Pages Into a Job
You can merge one page, multiple pages, or all pages from one job into another.
To merge one or more pages into a job:
1. In the Job Editor window, click the Thumbnails tab.
2. In the left pane of the Thumbnails tab, determine a location for the merged
page. Click the page preceding this location.
A blue outline appears around the selected page.
Page 92

84 Chapter 4 – Tools and Utilities
3. Click Merge Jobs.
The RTP Jobs window appears.
Note: The Spire CX260 displays only those RTP jobs that have the same
page size and orientation as the job that you are editing.
Page 93

Job Editor 85
4. Select the job with the page that you want to merge and click OK.
The job opens in a separate window.
5. Do one of the following:
• To merge one page, select the page that you want to merge and click Merge.
Ti p : You can also drag the page from the job window to the desired
location in the left pane of the
Thumbnails tab.
• To merge all pages, click Merge All to merge all pages into the job.
The merged pages are inserted into the desired location, and the page numbers
are updated accordingly.
Ti p : If you want to merge more than one page, repeat this step until all
desired pages are merged. You can also select different locations for the
merged pages in the Job Editor window.
Page 94

86 Chapter 4 – Tools and Utilities
6. Click Close to close the job window.
7. C l ic k Save As to save the changes.
Remote Tools
Working from the Remote Desktop Application
The Remote Desktop Connection (RDC) application enables you to connect, view,
operate, and perform administrative procedures on the Spire CX260 from a client
workstation. While the remote connection and operation takes place, the regular
operation of the Spire CX260 is not affected
Note: This tool is designed exclusively for the system administrator. Users that
want to connect to the Spire CX260 from a client workstation can use the
Remote Workspace. For more information about viewing jobs from a client
workstation, see Remote Workspace on page 29.
The Remote Desktop utility is integrated into the Windows XP Professional
operating system, while for Windows 9x 98/ME, 2000, and Mac OS, the remote
desktop must be set up.
For more information on installing the Remote Desktop utility on Windows
2000 and earlier, see the Creo Color Server for the Xerox DocuColor 242/
252/260 Printer-Copier Technical Manual (part number 731-01024A-EN).
Connecting from Windows
To connect to the Spire CX260 from your client PC:
1. From your desktop select Start > Programs > Accessories > Communications >
Remote Desktop Connection.
By default, the Remote Desktop Connection dialog box opens on the General
tab.
Ti p : If the tabs are not visible, click
Options.
Page 95

Remote Tools 87
2. On the General tab, type the following information:
a. The name of the Spire CX260 to which you want to connect
b. The Spire local user name; the default is operator
c. The Spire local password; the default is spire
Ti p : To shorten the connection process when a session to the selected remote
computer disconnects, select the
Save my password check box.
3. Select the Local Resources tab.
4. If you intend to install software via the remote desktop connection, in the Local
devices area select the Disk drives check box.
Page 96

88 Chapter 4 – Tools and Utilities
5. Click Connect.
The Log On to Windows dialog box appears on the Spire CX260.
6. Enter the User Name and Password, and click Connect.
You are now connected to the desired Spire CX260. The shared drives on your
client PC are published and appear locally on the desktop of the Spire CX260.
If the workspace is not open on the Spire CX260, see The Workspace on page 50.
Connecting from Macintosh
To connect to the Spire CX260 from your Mac client:
1. Double-click the Remote Desktop Connection application. By default, the
General tab appears.
Note: If the General tab does not appear, click the Options arrow to
display the entire window.
a. In the Computer box, type the name of the Spire CX260 to which you want
to connect.
Page 97

Remote Tools 89
b. Type the Spire local user name and password.
User name—operator
Password—spire
c. Select the Add to Keychain check box.
Note: Selecting the Add to Keychain check box automatically saves
your current connection settings, enabling a quick reconnection to the
Spire CX260.
2. Select the Display tab and verify that your settings are the same as the settings
in the following window.
3. Select the Local Resources tab.
Page 98

90 Chapter 4 – Tools and Utilities
4. If you intend to install software via the remote desktop connection, in the Local
Resources tab select the Disk Drives check box.
5. Select the Performance tab.
6. If you are connected via LAN, select the LAN (10Mbps or higher) setting.
7. C l ic k Connect.
8. A security message appears, click OK.
The shared drives on your Mac client are published and appear locally on the
desktop of the Spire CX260.
Page 99

Remote Tools 91
If the workspace is not open on the Spire CX260, follow the procedure for opening
it. See The Workspace on page 50.
Web Center
The Web Center is an Internet site that provides online information and can be
accessed from client workstations.
The Web Center enables you to view the status of jobs in the queues, the Messages
window in its current state, and the printer system information.
To connect to the Web Center from a client workstation:
Important: To connect to the Web Center from a client workstation, you
must first enable the web connect service on the Spire CX260, see Remote
Tools Setup on page 159.
1. On your desktop, click the Internet Explorer icon.
2. When the Internet Explorer starts, in the address field type:
http://<host name>—for example, if the CX260 station name is CX260_12,
type http://CX260_12.
Note: You can also use the Spire CX260 IP address—for example,
http://192.168.92.10.
Important: If you would like to connect to the Spire CX260 from a
Macintosh client workstation, contact your system administrator to add
the Spire CX260 name to the DNS. This is required since Windows name
resolution protocols are not supported in Macintosh. The DNS addition
is required when clients go through a main server on the network.
The Spire CX260 Web Center window appears.
The Web Viewer
Ti p : You can also access the Web Viewer using the EZ Connect application.
For more information, see EZ Connect on page 24.
The Web Viewer page consists of four tabs and enables you to view the jobs that
currently reside in the Spire CX260 Queues window and Storage window, and also
view messages that currently appear in the Messages window. This information is
important when you print from a client workstation because it enables you to
monitor your jobs in the queues and then make any necessary changes.
In addition, if you have a system that uses XML protocol, you can retrieve
information about the job list and printer status.
Table 9: Description of Web Viewer tabs
This tab Enables you to view
Queues Jobs that are currently running in the Spire CX260 Print
queue and Process queue.
Storage
The Spire CX260 Storage window and the jobs that reside in
this window.
Page 100

92 Chapter 4 – Tools and Utilities
Table 9: Description of Web Viewer tabs
Alerts The Spire CX260 Messages window. For example, if a job
that you sent to print from your client workstation has
failed—you can view the message in the Message window,
edit the job parameters (PPD file), and then resend it for
processing and printing on the Spire CX260.
Printer Shows the Spire CX260 system information.
Web Viewer API
If you have a system that uses XML protocol, the JobList.xml file and the Printer
Status.xml file enable you to retrieve information about the job list and the printer
status.
The JobList.xml file contains information about files in the Print Queue, Process
Queue, and the Storage window.
To see the Job List view, type the following path:
http://<ComputerName>/WebViewer/GetView.asp?View=JobList_xml.
The Printer Status.xml file contains information about the various printer states.
To see the Printer State view, type the following path:
http://<ComputerName>/WebViewer/GetView.asp?View=PrinterStatus_xml.
Downloads
The Downloads page enables you to access the Spire CX260 Utilities folder and
download available tools and files for Windows and Macintosh client
workstations—for example, the Spire CX260 PPD file.
 Loading...