

Page 1

Splash RPX-i Color Server
Color Guide
Page 2

© 2006 Electronics for Imaging, Inc. The information in this publication is covered
under Legal Notices for this product.
45054794
05 May 2006
Page 3
7
7
8
10
11
12
13
14
16
19
22
23
29
30
31
32
ONTENTS
ONTENTS
C
C
CONTENTS
NTRODUCTION
I
Terminology and conventions
Splash color tools
Splash color correction
ROFILE
P
Importing profiles
ANAGEMENT
M
3
9
Exporting profiles
Deleting profiles
CMYK press profiles
Output profiles
CopyCal
Other color management systems
ALIBRATION
C
Calibrating the Splash RPX-i
Verifying copier color accuracy
AutoGray
Splash Proof
Creating color profile sets
Setting ColorCal preferences
21
33
Page 4
39
40
42
43
44
CONTENTS
Editing custom color profiles (Be An Expert)
Editing the calibration curve 34
Editing the white point 36
Previewing a profile 38
C
OLOR
P
RINT
O
PTIONS
Splash Color options in the printer drivers
Splash Color default settings on the Splash RPX-i
Splash Color job settings on the Splash RPX-i
Two-Way Communication
Splash Color options
Color Model 46
4
34
46
Printer Mode (Color Mode) 46
RGB Profile 46
Press Simulation 48
CMYK Press Profile 48
Preserve Original GCR 49
Match Spot Colors 49
Use Black Ink Only 49
Overprint Black 49
Rendering Style 49
Output Profile 50
Splash Quality options
Dynamic Image Enhancement 51
Graphics Edge Enhancement 51
Text/Graphics Quality 51
Show Composite Overprints 51
Auto Trapping 52
Splash Proof 52
51
Gradient Smoothing 52
Apply ColorTuner 52
Page 5
55
56
58
59
60
61
62
68
69
CONTENTS
Splash Extras options
Separations 53
Print In Own Color 54
Print Progressives 54
Invert Image 54
Print Info Strip 54
Save As TIFF 55
Mirror Image 55
Color Postflight 55
Gloss Level option
Color print options in server preferences
Example color print option combinations
5
53
57
OLOR
C
UNING
T
Editing colors with ColorTuner
ColorTuner preview
ColorTuner tools
Selecting an area to tune
ColorTuner color modes
Editing in a substitution mode 62
Editing in a global mode 65
Combining global and substitution modes 67
ColorTuner filters
ColorTuner sets
ColorTuner job options
62
70
Page 6

71
71
74
CONTENTS
POT
S
I
OLOR
C
Editing spot colors
Renaming a spot color
Reverting spot color changes
NDEX
E
DITOR
6
74
75
Page 7
NTRODUCTION
I
Terminology and conventions
INTRODUCTION
This document describes how to use the color management tools in the Splash RPX-i Color
Server. It also describes the color print options supported by the Splash RPX-i Color Server
and the DocuColor 240/250.
This document uses the following terminology and conventions.
Term or convention Refers to
Copier DocuColor 240/250
Mac OS Apple Mac OS 9, Mac OS X
7
Splash RPX-i Splash RPX-i Color Server
Titles in italics
Windows Microsoft Windows 2000, Windows XP, Windows Server 2003
Other documents in this set
Page 8

INTRODUCTION
Splash color tools
The color tools in the Splash RPX-i consist of the following:
Profile management
•
easier and more customizable color management. You can also export color profiles from
the Splash RPX-i. You can manage CMYK profile associations, profile sets for calibration,
and associate output profiles with specific media types and screening methods.
•
CopyCal
output of any other color copier.
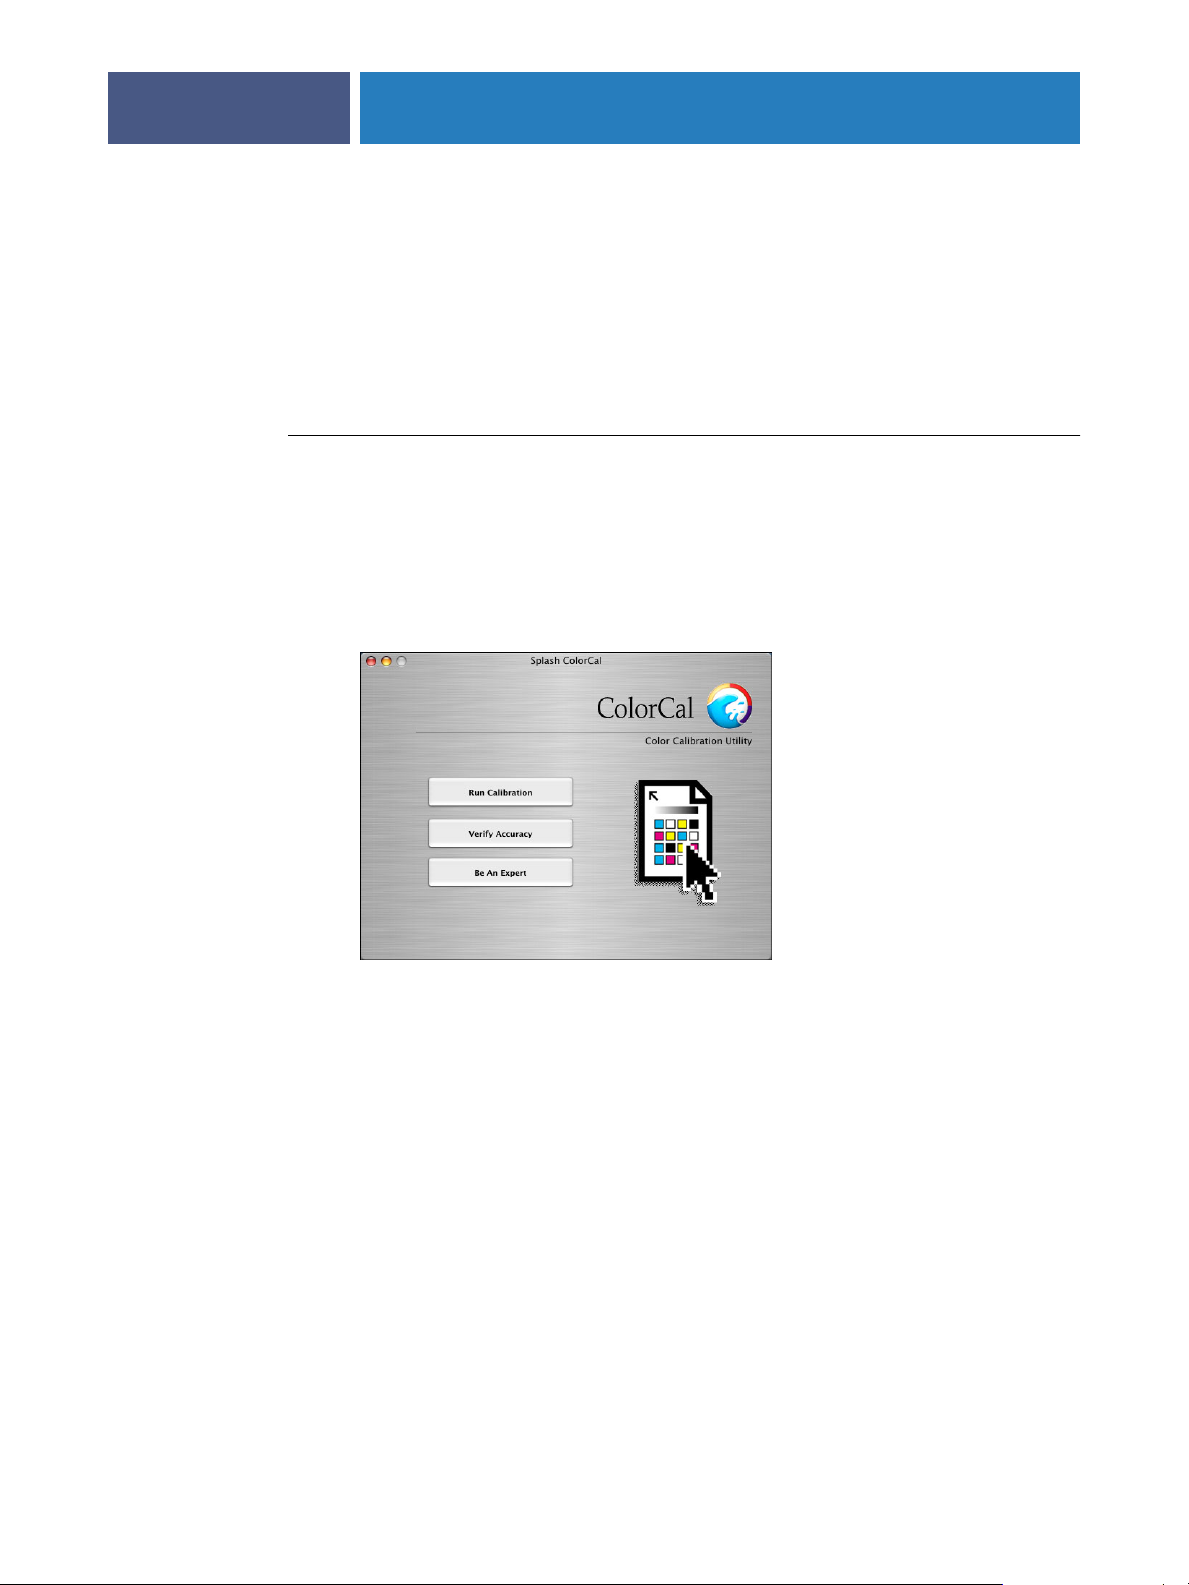
ColorCal
•
most accurate CMYK and RGB color output possible. ColorCal also offers two unique
calibration features: AutoGray and Splash Proof. AutoGray adjusts the gray balance of the
copier. Splash Proof uses a special set of selected print settings to output a specific proofing
style.
Color Tuner
•
document) at the Splash RPX-i without having to reopen and edit the original file in the
original application. You can make color (RGB or CMYK) or grayscale changes globally by
adjusting either the overall intensity of a specific color or the highlights, midtones, or
shadows. Direct color substitution changes the selected color to a new color for a single
page of a document or the entire document. Smoothed color substitution changes all
occurrences of a single color to another color, allowing you to adjust the dominant color in
an image.
8
allows you to import color profiles to the Splash RPX-i, providing
allows you to create color profiles that enable the copier to simulate the color
allows you to create custom CMYK profiles to calibrate the copier to produce the
allows you to make color changes to any document (a single page or the entire
Spot Color Editor
•
output for any particular spot color.
Before using any of these tools, you must log on to the Splash RPX-i.
allows you to add and delete spot colors, as well as change the value
Page 9

INTRODUCTION
Splash color correction
The Splash RPX-i has built-in color correction capabilities that allow you to match the colors
of the image on your computer monitor to process inks used on commercial printing presses.
CMYK color correction on the Splash RPX-i is optimized for matching mixed press ink
colors. Splash CMYK color correction automatically compensates for differences between
press ink colors to accurately simulate the selected press ink profile.
Splash color correction produces the same RGB color results for TIFF and EPS files.
Since color correction is applied by the Splash RPX-i, instead of the application, you can
color-correct any print job, whether the job was created with a pre-press application, such
as QuarkXPress, or an office application, such as Microsoft Word.
Documents that contain both RGB and CMYK graphics are a special problem for color
proofing. Correcting color for one type of graphic affects the quality of the other.
The Splash RPX-i provides RGB and CMYK color correction that produces accurate,
consistent color for both.
9
Page 10

ROFILE
P
ANAGEMENT
M
PROFILE MANAGEMENT
This chapter describes how to manage color profiles and adjust color output on the
Splash RPX-i.
Color profiles are descriptions of the color characteristics of a device. The Splash RPX-i uses
several types of profiles to manage color.
•
Output profile
250 in this case. The output profile is associated with a calibration target that defines the
expected density response of the copier.
•
Press profile
device, such as a printing press, that you want the Splash RPX-i to simulate. These color
characteristics are specified in CMYK color space.
describes the color characteristics of a printing device, the DocuColor 240/
, or
simulation profile
, describes the color characteristics of another printing
10
•
RGB profile
specified in a source digital image. These colors are specified in the RGB color space.
The Splash RPX-i comes with several ICC profiles installed. The ICC format is an industry
standard color profile format developed by the International Color Consortium (ICC) that
describes the color capabilities, including the gamut, of a color device based on the differences
between an ideal and the current device. The ideal is often provided by the manufacturer as a
color reference file.
is used by the Splash RPX-i to determine the characteristics of the color values
Page 11
:
PROFILE MANAGEMENT
Importing profiles
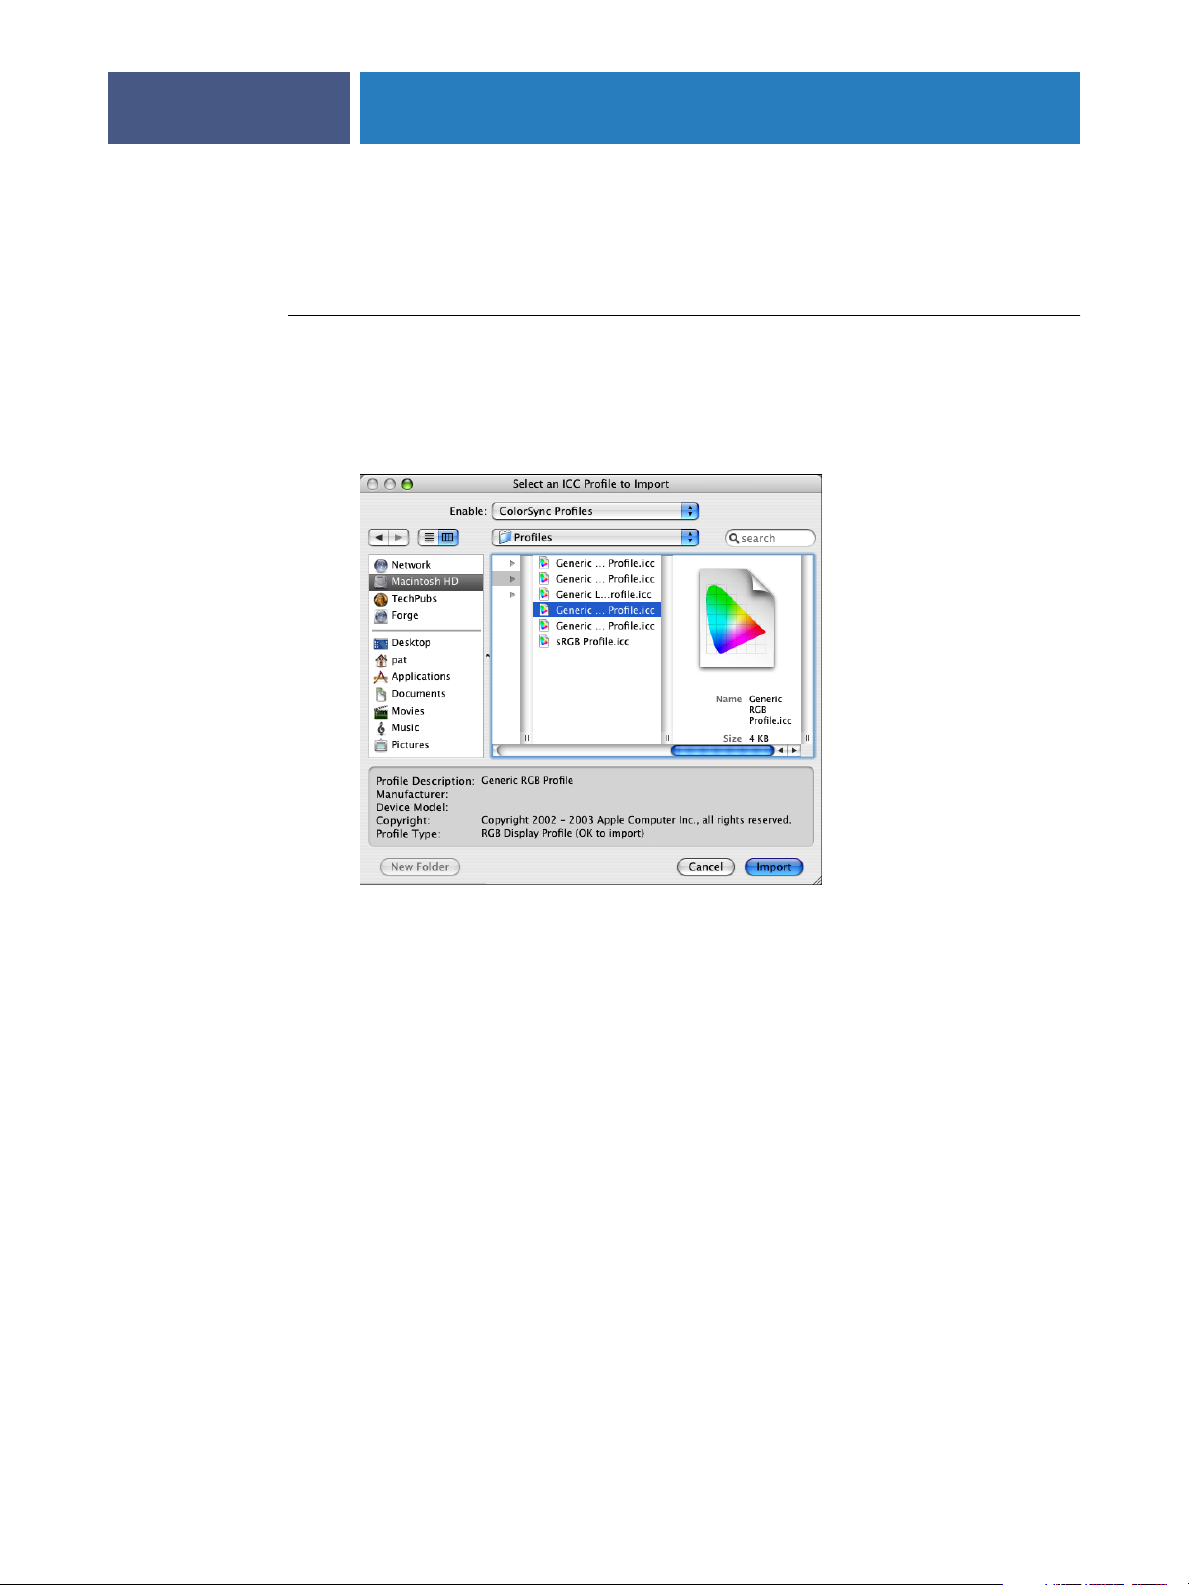
You can import an ICC profile to the Splash RPX-i from a file on your system.
T
O
IMPORT
A
PROFILE
1 Choose Import Color Profile from the Profiles menu.
You can import RGB and CMYK profiles. A CMYK profile can be used as a press profile or as
an output profile.
11
2Browse to the file location and select the file that you want to import.
Information about the selected profile appears at the bottom of the dialog box.
N
OTE
If you import a profile that has the same file name as a profile that already exists on the
Splash RPX-i, it replaces the existing profile. If you do not want to replace the existing profile,
change the file name before importing.
3 Click Import.
If you selected an RGB profile, the profile is imported.
If you selected a CMYK profile, a dialog box appears that allows you to set the profile type.
The profile type determines whether the profile is added to the Splash RPX-i CMYK press
profiles or to its output profiles. For a CMYK press profile, you can further specify whether
the profile is classified as a SWOP, Euroscale, Enhanced, or Custom profile.
For more information about CMYK press profiles, see “CMYK press profiles” on page 14.
For more information about Output Profiles, see “Output profiles” on page 16.
Page 12
PROFILE MANAGEMENT
4 Select a profile type and click OK.
For a CMYK press profile, the Color Profiles dialog box allows you to specify the imported
profile as one of the predefined settings for the CMYK Press Profile option.
For an output profile, the Output Profiles dialog box allows you to select whether you want
the imported profile to be used by default when printing with a specific media type and
printer mode.
5 If desired, choose the appropriate assignment for the new profile.
6 Click OK.
Exporting profiles
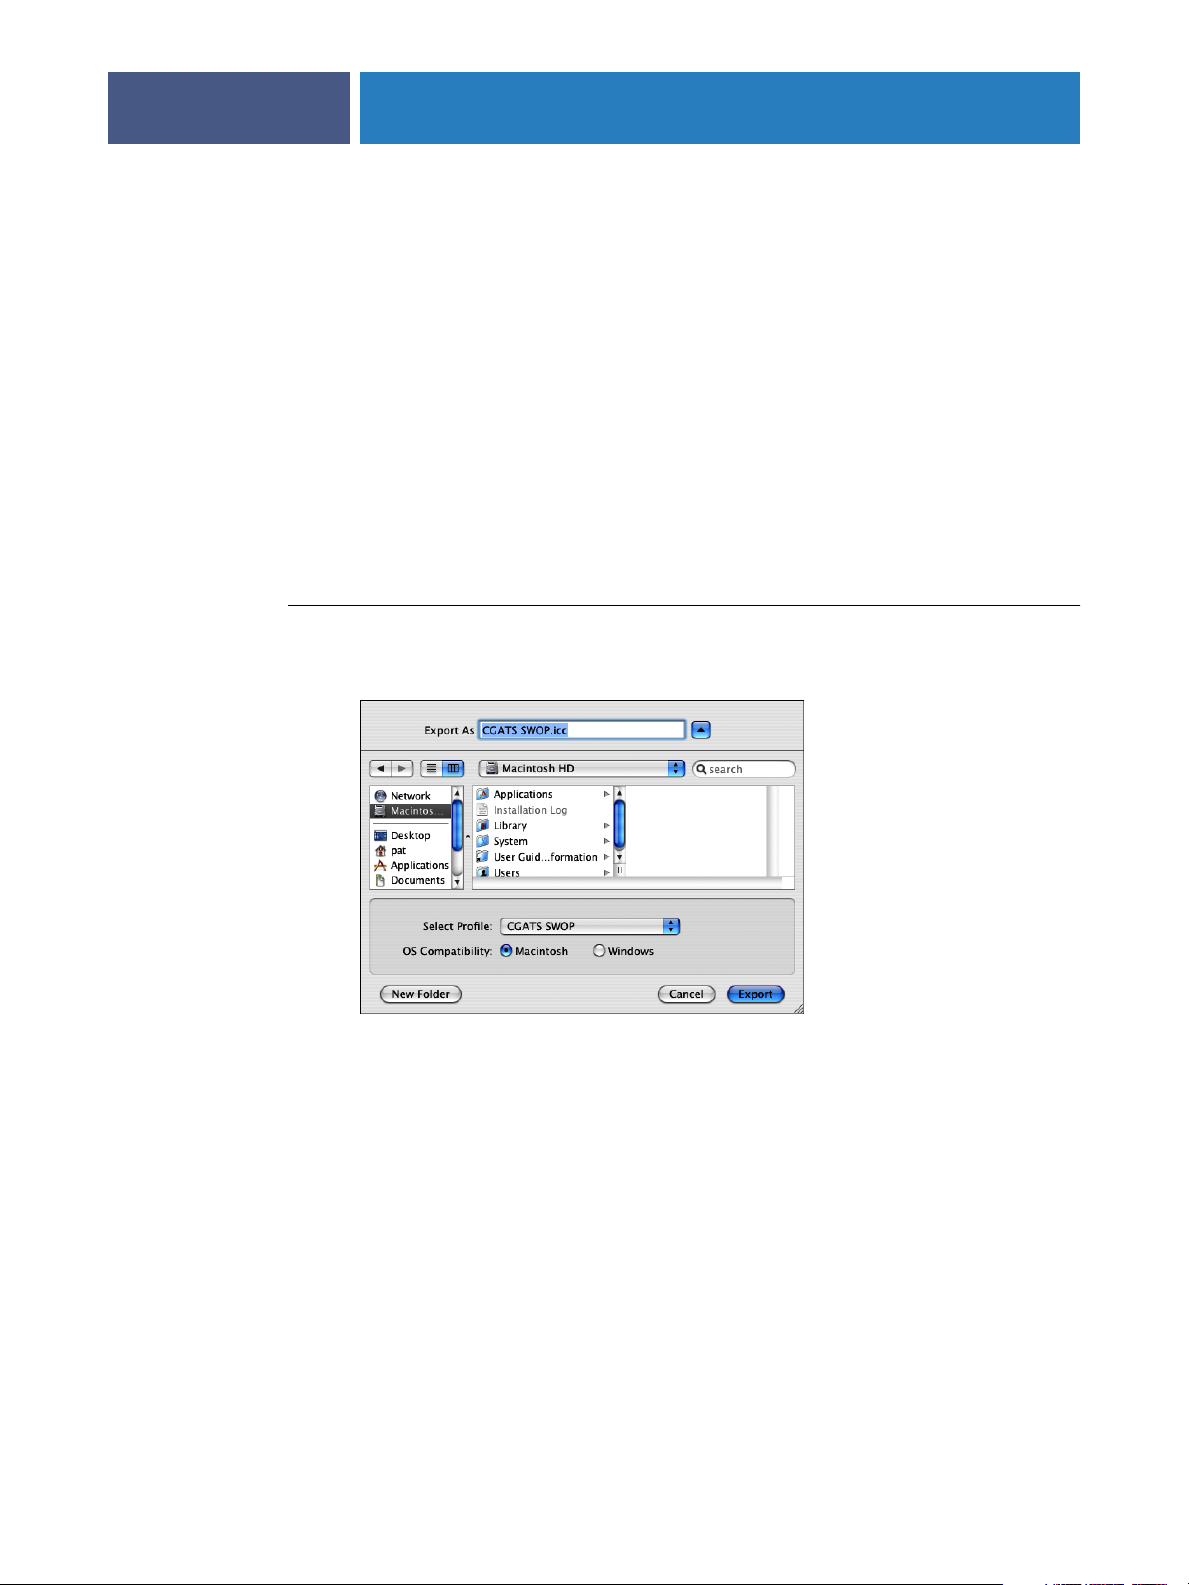
You can export any RGB, CMYK, or output profile and save it as a file.
TO EXPORT A PROFILE
1 Choose Export Color Profile from the Profiles menu.
12
2 Select the profile that you want to export.
3 Enter the file name or leave the default name.
4Browse to the location in which you want to save the file.
5 Select Macintosh or Windows compatibility.
If you are going to import the profile to another Splash RPX-i, select Macintosh
compatibility.
6 Click Export.
NOTE: If you export a custom profile that you created by editing a standard profile in the
ColorCal Expert tool, the edits you made are recognized only if you import the profile to
another Splash RPX-i. They are not recognized by other color management systems, such
as ColorSync.
Page 13
PROFILE MANAGEMENT
Deleting profiles
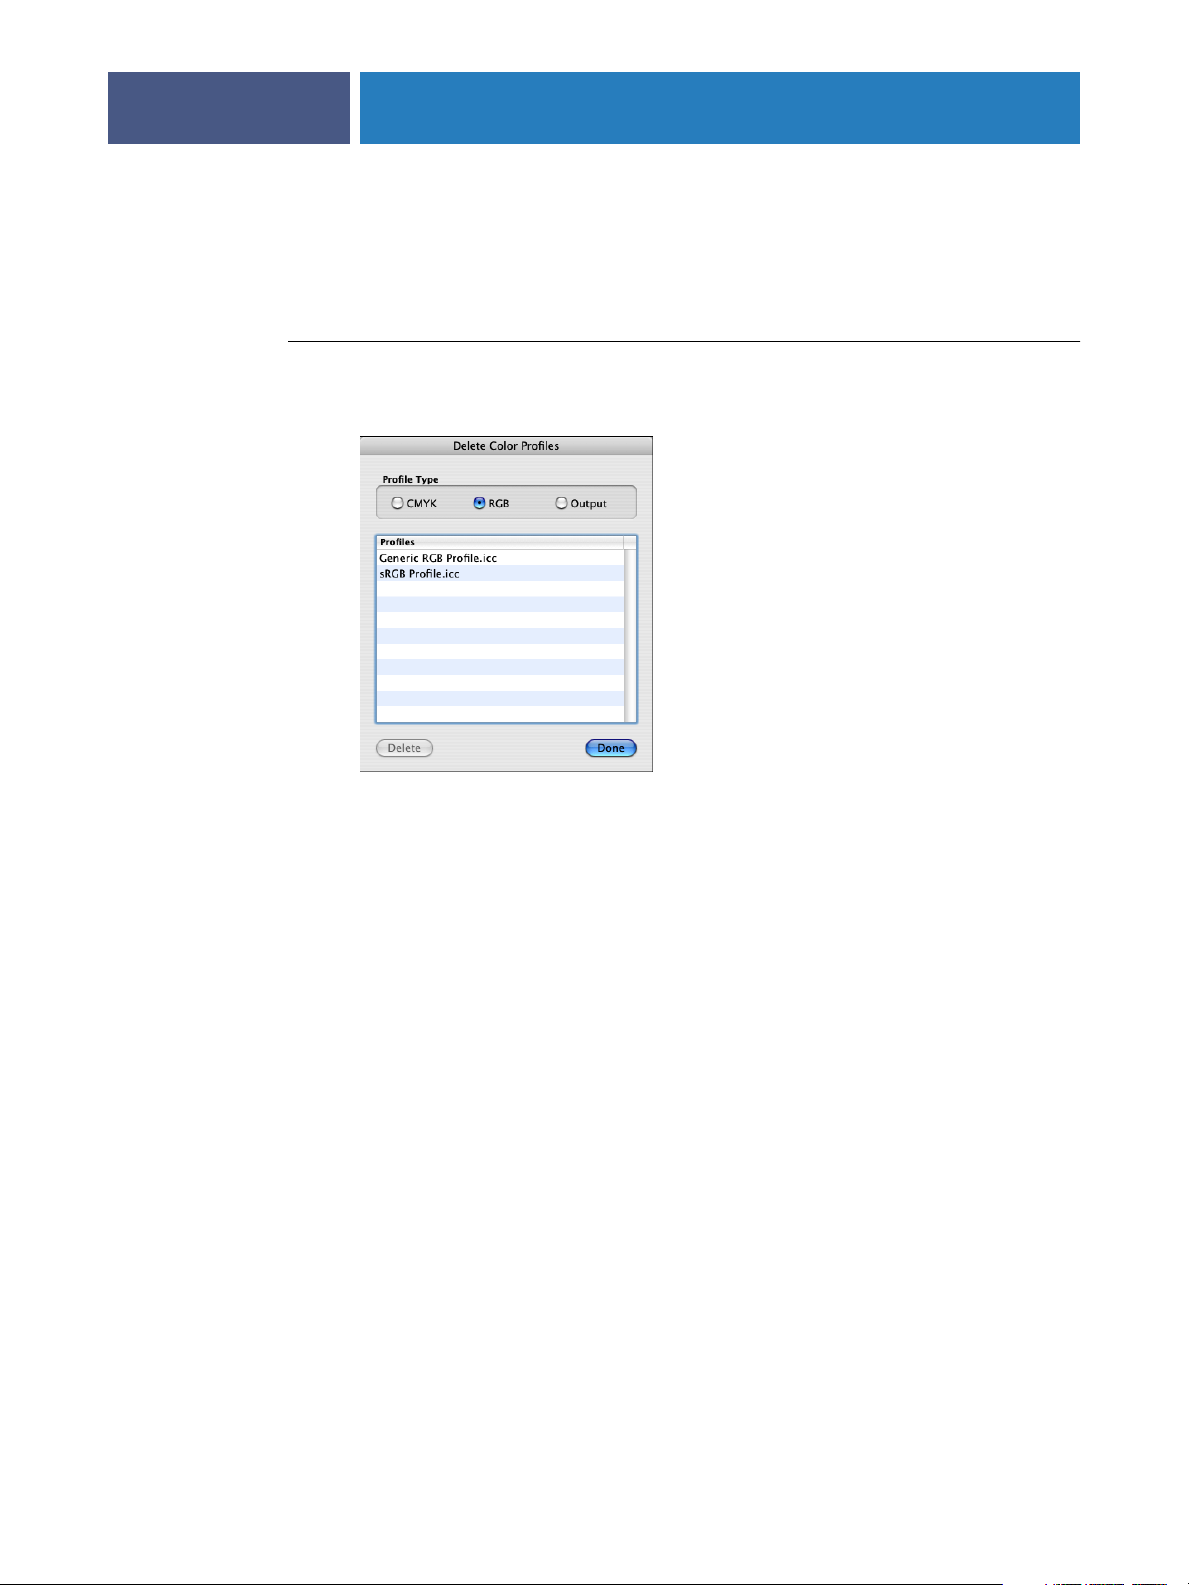
You can delete any custom RGB, CMYK, or output profile from the Splash RPX-i.
You cannot delete the profiles that are included with the Splash RPX-i by default.
TO DELETE A PROFILE
1 Choose Delete Color Profiles from the Profiles menu.
13
2 Select the type of profile: CMYK, RGB, or Output.
All profiles of that type that can be deleted are displayed.
3 Select the profile that you want to delete, click Delete, and then click Delete again
to confirm.
4 Click Done to close the window.
Page 14

PROFILE MANAGEMENT
CMYK press profiles
The Splash RPX-i provides standard CMYK press profiles. The following are 4D (new style)
profiles:
•Enterprise CMYK
•Euroscale Coated
•Euroscale Enhanced
•Japanese Press Enhanced
•Japanese Press Inks
• ISO Coated
• ISO Uncoated
•Newsprint Recycled Paper
•Newsprint White Paper
14
•SWOP Coated
•SWOP Enhanced
•Type D Enhanced
•Type D Inks
• Corel “RGB”
• CGATS SWOP
•Euro-Simulation
•Fogramat
The following are 1D (old style) profiles:
• CMYK Enhanced
• CMYK Euroscale
• CMYK SWOP
•Uncalibrated
•Visual Standard EHW
•Visual Standard
You can use these profiles as the basis for creating custom profiles using the ColorCal Expert
tool. For more information, see “Calibration” on page 22.
Page 15

PROFILE MANAGEMENT
When you print a job to the Splash RPX-i from a client computer with Two-Way
Communication enabled in the printer driver, you can set the CMYK Press Profile option
(see “CMYK Press Profile” on page 48) to any of these profiles or any CMYK profile you
have imported.
When you print a job to the Splash RPX-i from a client computer that does not have
Two-Way Communication enabled in the printer driver, the selections shown for the CMYK
Press Profile option are:
•Printer’s default
•SWOP
•Euroscale
•Enhanced
•Custom 1 - Custom 10
• Color Management Off
15
These selections correspond to actual CMYK profiles residing on the Splash RPX-i.
By default, the selections are defined as follows:
• CMYK SWOP: CGATS SWOP
• CMYK Euroscale: Euroscale Coated
• CMYK Enhanced: SWOP Enhanced
•Custom 1: Japanese Press Inks
•Custom 2: Euroscale Enhanced
•Custom 3: CMYK SWOP
•Custom 4: CMYK Euroscale
•Custom 5: CMYK Enhanced
•Custom 6: Euro-Simulation
•Custom 7: Fogramat
•Custom 8: Newsprint - White Paper
•Custom 9: Enterprise CMYK
•Custom 10: Uncalibrated
•Pass Thru (Color Management Off): Visual Standard
Page 16
PROFILE MANAGEMENT
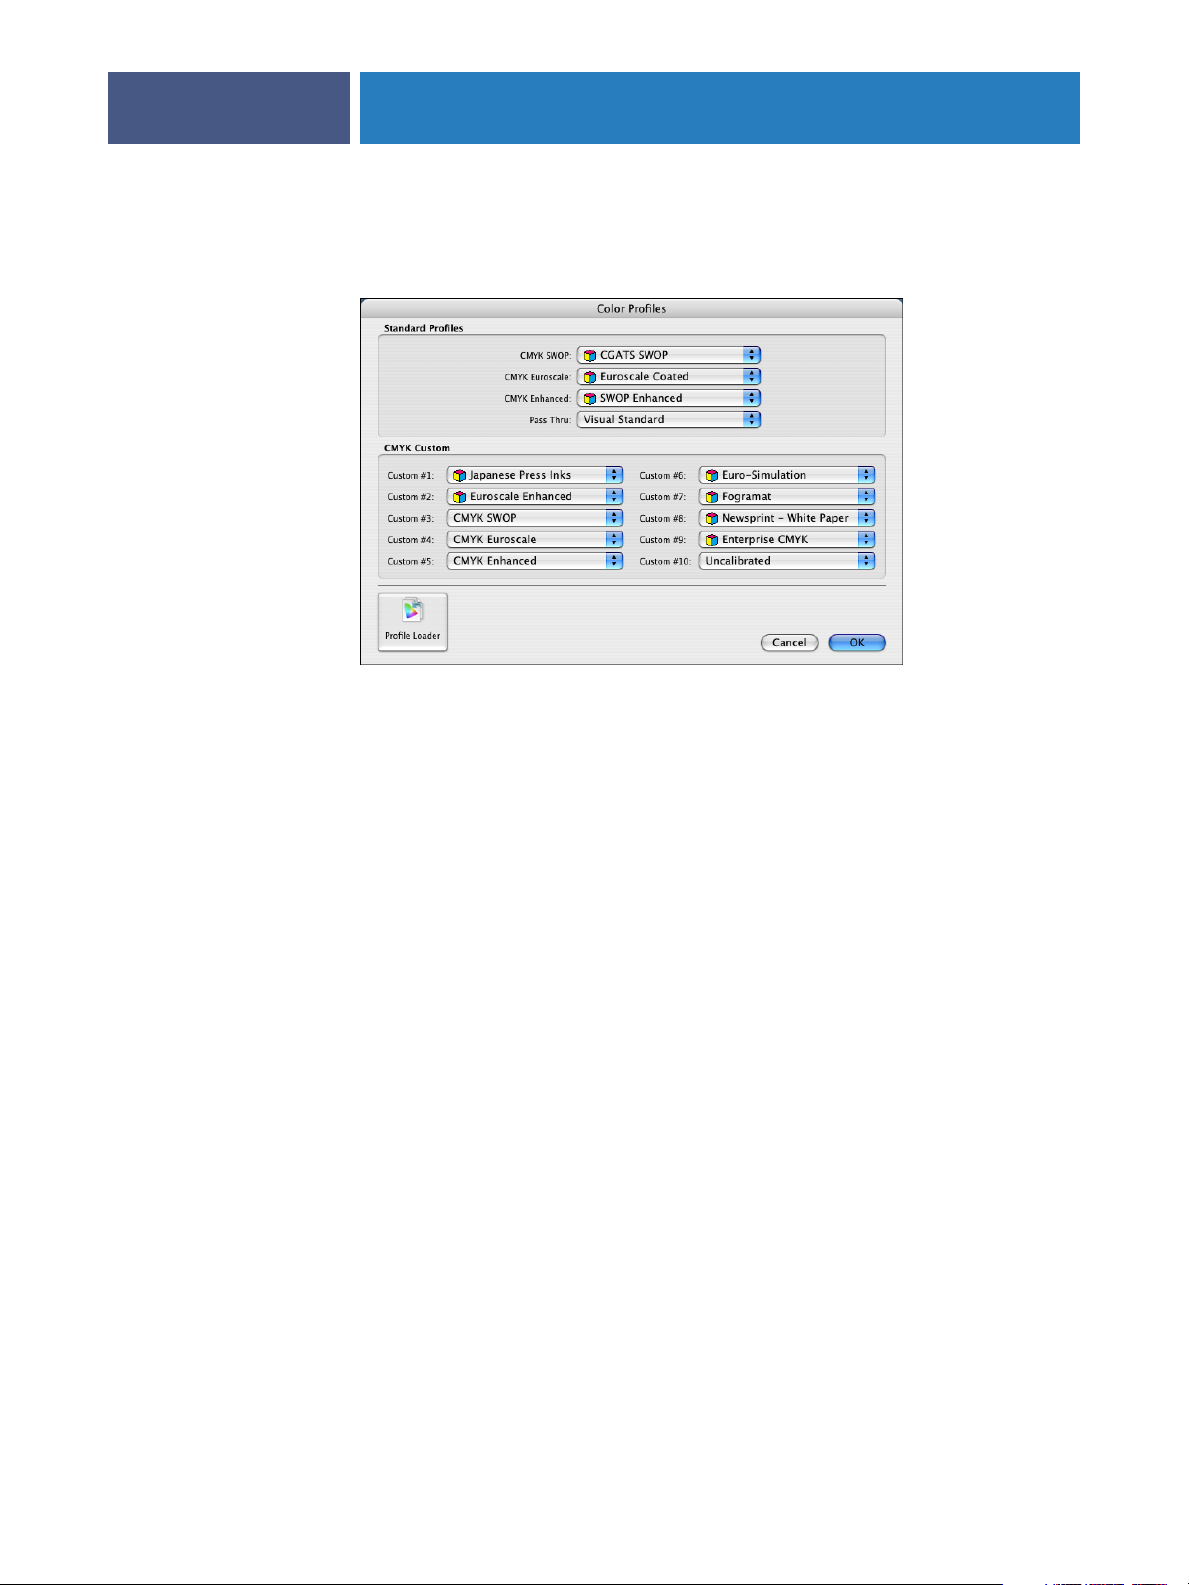
You can change the definition of any setting in the Color Profiles dialog box. To access this
dialog box, choose Color Profiles from the Profiles menu.
16
To import a new CMYK profile, click Profile Loader and browse for the file (see “Importing
profiles” on page 11). The new profile is added as a selection in the list of profiles available for
each setting.
Output profiles
When you print a job to the Splash RPX-i with the Output Profile option (see “Output
Profile” on page 50) set to Printer’s default rather than a specific profile, the Splash RPX-i
determines the output profile to use based on the Media Type and Printer Mode settings of
the job. You can set which output profile to use for each combination of Media Type and
Printer Mode.
Page 17
PROFILE MANAGEMENT
Printer Mode is either Contone or Screened. Media Type is grouped into Paper, OHP
(Transparency), and Extra Heavyweight groups, defined as follows:
Group Media type
Paper Plain
Plain (Side 2)
Recycled
Custom 1
Custom 2
Custom 3
Custom 4
Custom 5
OHP Transparency
Transparency Interleave
17
Extra
Heavyweight
Heavyweight 1
Heavyweight 1 (Side 2)
Coated 1
Coated 1 (Side 2)
Labels 1
Tab Stock 1
Heavyweight 2 (177-220 gsm)
Heavyweight 2 (Side 2) (177-220 gsm)
Heavyweight 2 (221-300 gsm)
Heavyweight 2 (Side 2) (221-300 gsm)
Coated 2 (177-220 gsm)
Coated 2 (Side 2) (177-220 gsm)
Coated 2 (221-280 gsm)
Coated 2 (Side 2) (221-280 gsm)
Labels 2
Tab Stock 2
Extra Heavy Weight
Page 18
PROFILE MANAGEMENT
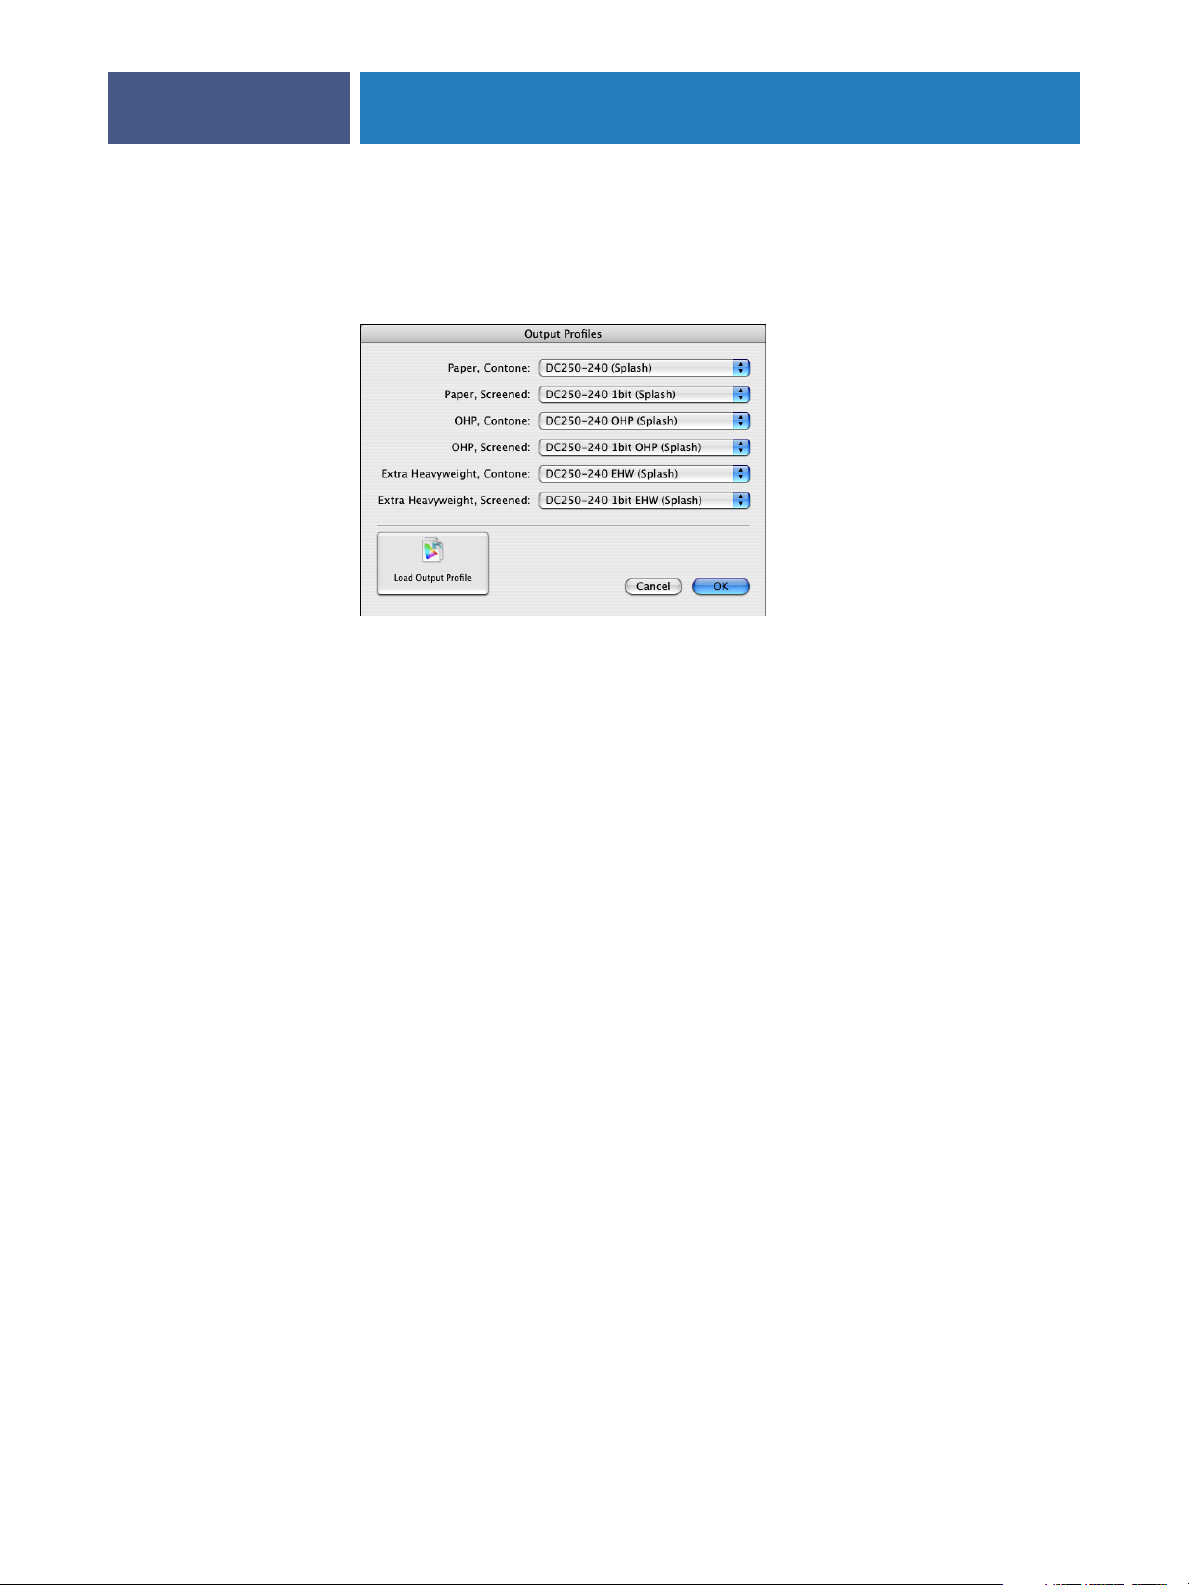
You can set the associations of output profiles with Media Type group and Printer Mode in
the Output Profiles dialog box. To access this dialog box, choose Output Profiles from the
Profiles menu.
To import a new output profile, click Load Output Profile and browse for the file (see
“Importing profiles” on page 11). The new profile is added as a selection in the list of profiles
available for each setting.
18
NOTE: The settings in the Output Profiles dialog box take effect when the Output Profile
setting for a job is set to Printer’s default. You can also select a specific output profile for a job,
although take care to select a profile that is appropriate for the job. For more information, see
“Output Profile” on page 50.
The Splash RPX-i provides versions of output profiles that preserve the original GCR settings
of CMYK data. You can select one of these profiles with the Preserve Original GCR print
option (see page 49).
Page 19
CopyCal
TO USE COPYCAL
PROFILE MANAGEMENT
CopyCal is a standalone application that creates profiles that allow the Splash RPX-i to
emulate the output of any color printer. CopyCal is started from the Splash RPX-i server
application main window. CopyCal and the Splash RPX-i server application can run at the
same time. The copier must be running during the entire profiling procedure.
CopyCal profiles are profiles that combine CMYK and RGB color correction into a single
selection. Choosing a CopyCal profile in the CMYK profile list overrides any RGB color
correction setting for that job.
The following procedure describes how to create a CopyCal profile for a color printer.
1 Open one of the files in the Splash Extras/CopyCal Target folder in Adobe Acrobat.
For Letter size output, open CopyCalTarget.pdf.
For A4 size output, open CopyCalTarget.A4.pdf.
19
2 Print the file on the printer that you want to emulate, using the color correction settings that
give you the desired output.
Pages 2, 3, and 4 of the reference target are printed. Print Page 1 of the reference target from
the CopyCal application.
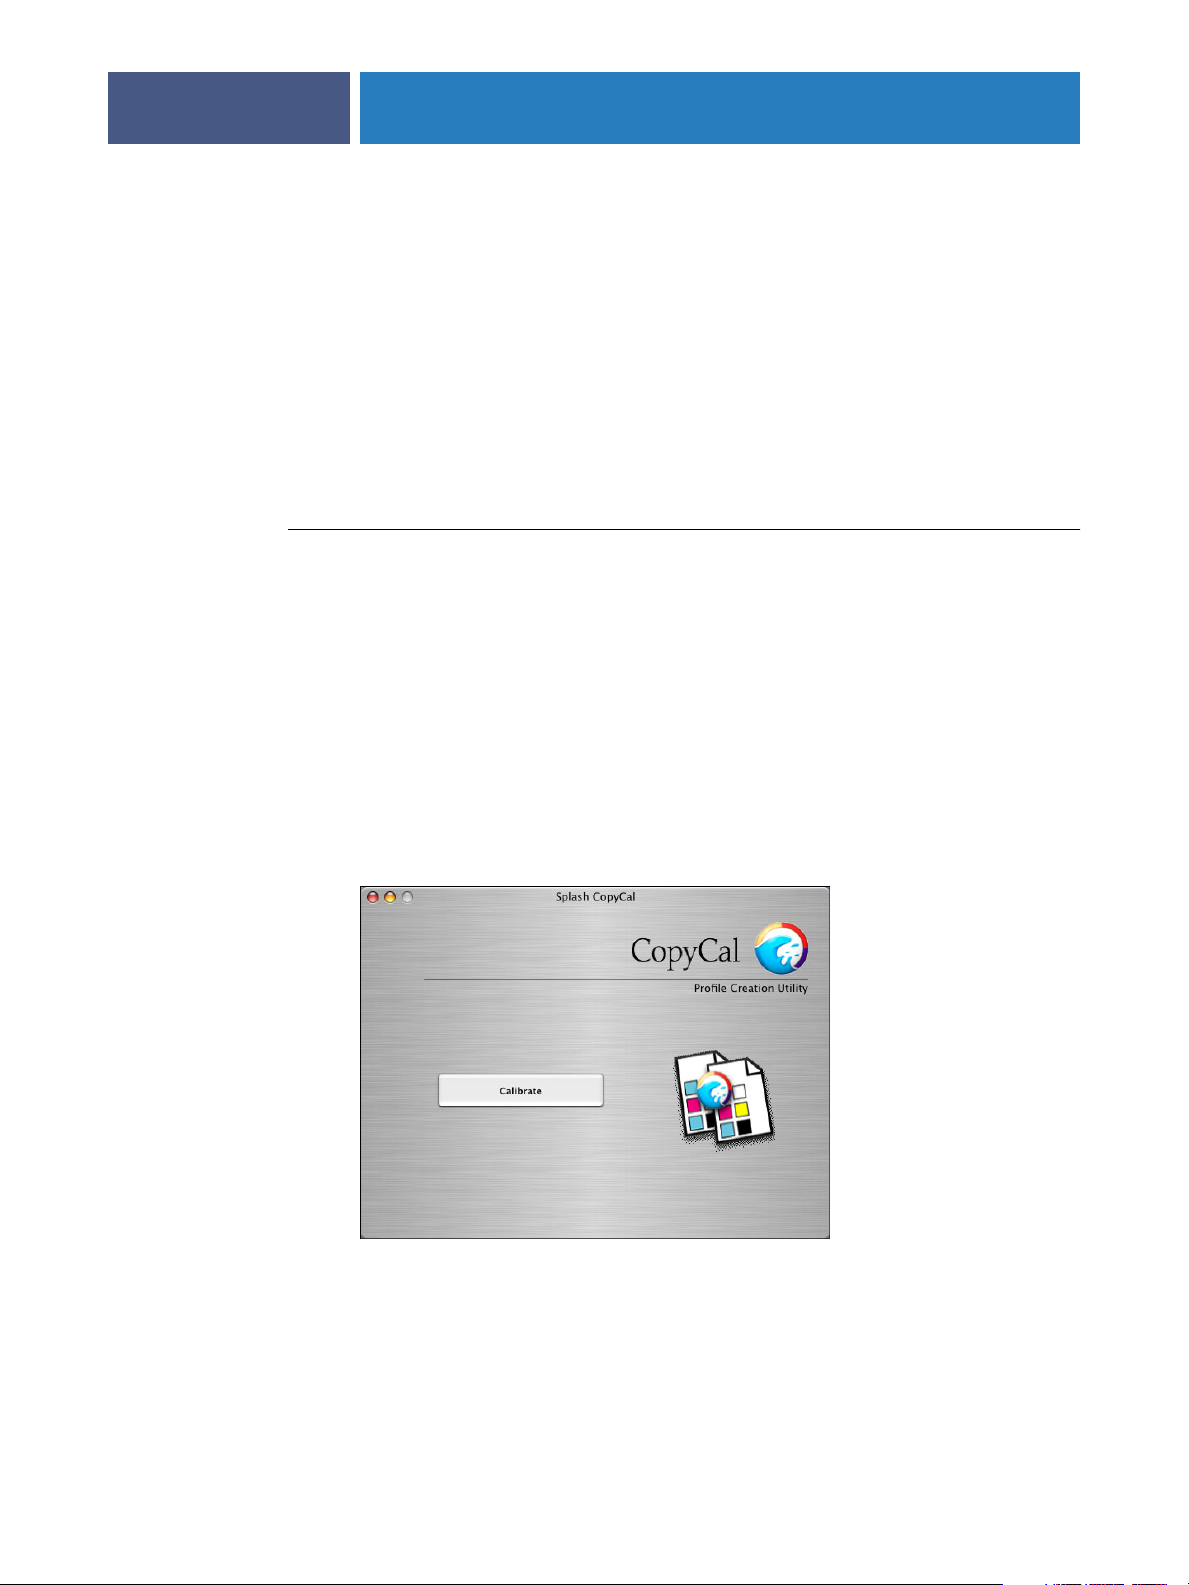
3 Click the CopyCal icon in the Splash RPX-i main window.
The CopyCal main window appears.
Page 20
PROFILE MANAGEMENT
4 Click Calibrate.
5 Select the input tray for printing the calibration target.
The paper size can be 8.5x 11, A4, or larger. Only page sizes large enough to fit the CopyCal
target are allowed.
If you select Tray 5/Manual Feed, choose a paper size from the menu that appears and feed
that paper size through the bypass tray.
6 Click Next.
7 Select the gloss level and, if you are printing from Tray 5, the media type.
For Tray 5, you must select the media type for printing the calibration target. The default
selection is Heavyweight 2 (221-300 gsm). The Tray Default setting is not allowed because
the copier setting for Tray 5 does not affect print jobs.
For input trays other than Tray 5, the media type is automatically set to the type of paper in
the tray.
8 Click Next.
20
CopyCal prints Page 1 of the reference target using the normal color correction settings of
the copier.
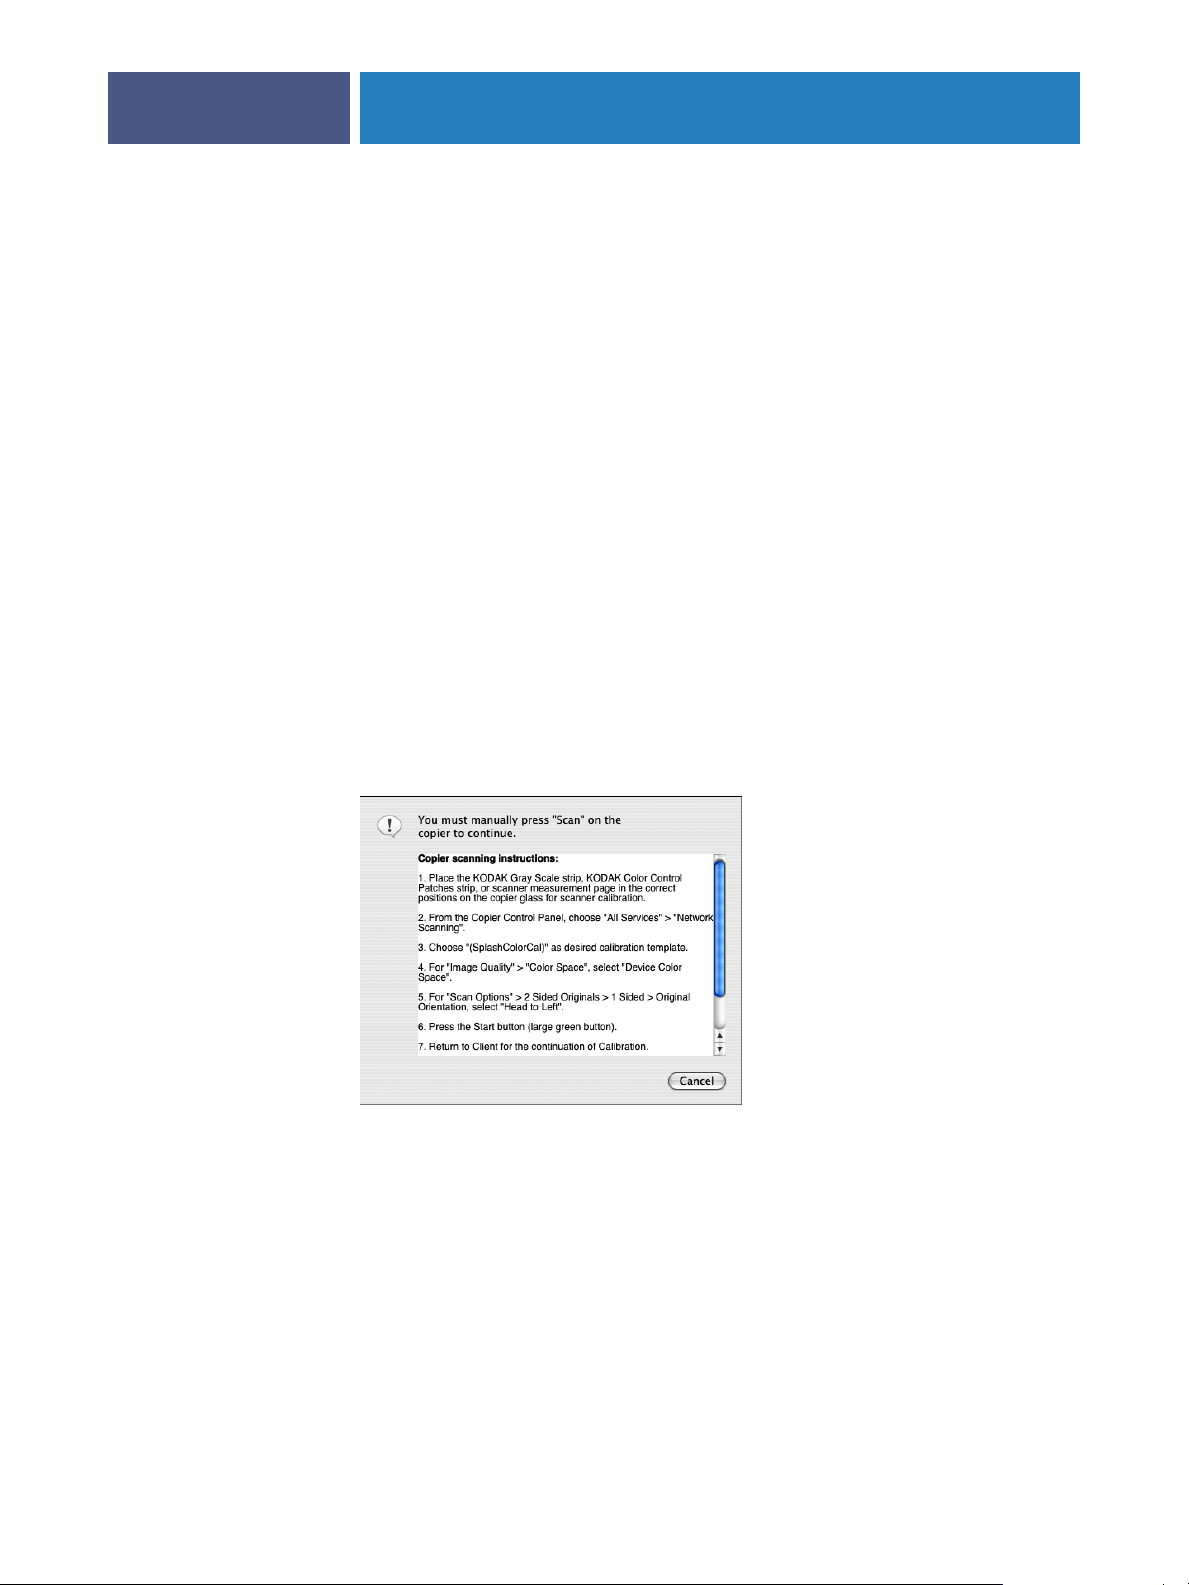
9 Click Scan and follow the instructions that appear.
For step 1 of the on-screen instructions, place Page 1 of the CopyCal reference target facedown on the scanner surface. Match the arrow on the target with the arrow at the back of the
copier glass, lining up the short edge of the target with the left side of the copier glass.
If the Color Space option does not appear, contact your system administrator.
If the image size is not recognizable, select the appropriate scan image size on the copier
control panel, and press the green Start button on the copier to begin scanning.
Page 21

PROFILE MANAGEMENT
CopyCal scans the target and determines current color performance based on the acquired
image.
NOTE: If you edit the other settings in the Splash template before the scan, you might get an
error message. In this case, repeat the scan sequence.
10 Repeat step 9 for pages 2, 3, and 4.
NOTE: If the pages are placed on the glass quickly, it may not be necessary to repeat steps.
NOTE: If the wrong target was placed on the glass, a CopyCal error message appears, stating
that it could not find registration marks. Restart the CopyCal procedure.
11 When prompted, name the profile and save it.
You can now select the CopyCal profile created as a custom CMYK profile. If the profile
already exists, CopyCal prompts you to replace the profile. If you do not want to overwrite
the existing profile, click Cancel.
Other color management systems
21
You can disable Splash color correction and use a third-party color management system to
correct screen-to-print or process ink-to-print jobs.
NOTE: Using a third-party color management system increases processing time.
The Splash RPX-i provides color profiles for Apple’s ColorSync color management software.
The Splash ColorSync color profiles are located in the Splash:Splash Extras:ColorSync folder.
These profiles enable ColorSync to print to the Splash RPX-i.
NOTE: Disable Splash Color Correction in the print driver before printing with ColorSync
color management software.
For best results with ColorSync, set the Splash Pass Through profile to Visual Standard with
the ColorCal application.
For more information about using ColorSync, see the documentation that accompanies the
ColorSync software.
Page 22

CALIBRATION
CALIBRATION
The color output on any color copier changes over time, producing inconsistent color from
day to day, or even hour to hour. ColorCal adjusts these changes, keeping output consistent.
Calibration takes only a few minutes, so the copier’s color output can be tested and
recalibrated as often as necessary.
You can calibrate using the scanner on the copier or using an ES-1000 spectrophotometer.
connected to the Splash RPX-i.
Profile sets allow you to save multiple calibrations for use with specific printing conditions
and print media.
ColorCal also offers AutoGray calibration to improve the gray balance of the calibrated copier
and Splash Proof calibration using specific print option settings intended for proofing.
22
In the ColorCal Expert interface, you can create and save custom color profiles.
Page 23
CALIBRATION
Calibrating the Splash RPX-i
This section describes how to calibrate the Splash RPX-i with ColorCal using the scanner on
the copier or an ES-1000 spectrophotometer connected to the Splash RPX-i. ColorCal runs
only on the Splash RPX-i.
For optimal color printing results, calibrate the copier at least once daily. Calibrate several
times a day during heavy use.
TO CALIBRATE THE SPLASH RPX-I WITH COLORCAL
1 If you are using an ES-1000 spectrophotometer, make sure it is installed and connected to
the Splash RPX-i.
2 With the copier running, click the ColorCal icon in the toolbar of the Splash RPX-i
main window.
The ColorCal main window appears.
23
NOTE: You can run the Splash RPX-i server application during calibration. However, you
should stop all processing.
Page 24
CALIBRATION
3 If you are using an ES-1000 to calibrate, choose Preferences from the ColorCal menu.
Otherwise, skip to step 5.
By default, the calibration procedure uses the copier’s scanner. To use an ES-1000, you must
change a ColorCal preference.
24
4 Select Use ES-1000 and click OK.
The ES-1000 is now the default method for calibration, AutoGray, and Splash Proof.
5 Choose Calibrate Scanner from the Splash menu.
If you are using ColorCal for the first time, or if the copier has recently been serviced, we
recommend that you calibrate the scanner.
Calibrating the scanner adjusts the copier to compensate for scanning differences that could
affect calibration quality. This command affects ColorCal operation only. It does not affect
the scanning capability of the copier for other scanning operations.
6 In the ColorCal main window, click Run Calibration.
7 If you have set the ColorCal preference for the calibration to affect only a selected profile
set, a list of the profile sets appears. Choose a profile set and click Next.
For more information about the ColorCal preference that determines which profile sets are
affected by calibration, see “Setting ColorCal preferences” on page 33.
8 Select the input tray for printing the calibration target.
If you select Tray 5, choose the paper size as well. For input trays other than Tray 5, the page
size is automatically set to the size of the paper in the tray.
9 Click Next.
Page 25

CALIBRATION
10 Select the gloss level and, if you are printing from Tray 5, the media type.
For Tray 5, you must select the media type for printing the calibration target. The default
selection is Heavyweight 2 (221-300 gsm). The Tray Default setting is not allowed because
the copier setting for Tray 5 does not affect print jobs.
For input trays other than Tray 5, the media type is automatically set to the type of paper in
the tray.
Choose the gloss level setting that you normally use to print.
11 Click Next.
The calibration target is printed.
12 For calibration using the copier’s scanner, refer to “To obtain measurements using the
copier’s scanner” on page 26. For calibration using an ES-1000, refer to “To obtain
measurements using the ES-1000” on page 27.
When the calibration target has been measured, ColorCal displays a graphic representation of
color performance for the copier.
25
The Desired Density lines represent accurate CMYK printing for the current CMYK color
profile selected from the Verify Against menu in the ColorCal Options dialog box.
The Measured Density lines show actual uncalibrated copier performance as measured
from the scanned target.
NOTE: The vertical axis for each color curve is in units of Status-T less the paper density.
The horizontal axis is represented as dot percentage from 0% to 100%.
If the Measured Density lines are jagged and do not increase linearly, there has been a
measurement error. In this case, do not accept the measurements. Click Cancel (rather than
Update Profiles), press and hold the Option key, and click Run Calibration. Follow the
instructions displayed to measure the target again.
Page 26

CALIBRATION
13 Click Update Profiles to have ColorCal adjust color output to match the Desired Density levels
for your color profiles.
ColorCal updates all profiles at the same time, even custom profiles, so you can use any color
profile immediately without repeating color calibration.
A message appears stating that profile updating is complete.
14 Click Verify to check calibration results for the copier, or click Done to return to the ColorCal
main window.
15 To exit ColorCal, choose Quit ColorCal from the ColorCal menu.
After running calibration, you can select any of the standard color profiles included with
ColorCal for consistent, accurate color.
TO OBTAIN MEASUREMENTS USING THE COPIER’S SCANNER
1Examine the calibration target for printing defects, such as creased paper or uneven or
flaking toner. If any defects appear, click Reprint to print a new calibration target.
26
2 When the calibration target prints successfully, click Next.
ColorCal prompts you to place the target on the copier glass.
3 Click Scan and follow the instructions that appear.
For step 1 of the instructions, place the Kodak Gray Scale target (provided with the
Splash RPX-i) and the calibration target face-down on the copier glass.
The Gray Scale target must cover the grayscale patches in the upper-left corner of the
calibration target. To do this, place the Gray Scale target face-down on the glass first, and
then place the calibration target face-down on top of the Gray Scale target. Position the
calibration target with the short edge of the paper along the left side of the scanner glass.
Page 27

CALIBRATION
NOTE: Handle the Gray Scale target by the edges to avoid smudging the patches. Keep the
target in its protective sleeve when it is not being used. Replace the target if the patches
become damaged.
If the Color Space option does not appear, contact your system administrator.
If the image size is not recognizable by the copier, select the appropriate scan image size on the
copier control panel, and press the green Start button on the copier to begin scanning again.
NOTE: If you edit the other settings in the ColorCal template before the scan, you might get
an error message and have to repeat the scan sequence.
ColorCal scans the target and determines current color performance based on the acquired
image.
TO OBTAIN MEASUREMENTS USING THE ES-1000
1 Retrieve the calibration target from the copier and click OK.
2 Calibrate the ES-1000 by placing it in its cradle and pressing the button on the side of the
instrument.
27
When you place the ES-1000 in the cradle, white point calibration is used to calibrate the
spectrophotometer and compensate for gradual drifts in its measurement. Make sure the
sample aperture is in full contact with the white tile on the cradle. If you do not place it
correctly in the cradle, the spectrophotometer does not return accurate measurements.
3 Click Scan.
Instructions for measuring the first strip of color patches on the calibration target (strip A)
appear.
4For a more accurate measurement, place several sheets of plain white paper beneath the
calibration target.
The extra sheets block underlying colors from being read by the instrument.
5 Orient the calibration target so that strips are horizontal and the scan direction (indicated by
the arrow) is left to right.
Page 28

CALIBRATION
6Position the ruler along the strip.
7 Hold the ES-1000 with its length perpendicular to the scan direction, and place the sample
aperture through the ruler’s track in the white space at the start of the strip.
8Press and hold the button, and slide the ES-1000 at a slow but consistent pace across
the strip.
Take about five seconds to slide the length of the strip.
9 Release the button when all the patches in the strip have been measured and you reach the
white space at the end of the strip.
When a strip is measured successfully, instructions for measuring the next strip appear.
10 Repeat steps 6 through 9 for each strip (A-F).
28
Page 29

CALIBRATION
Verifying copier color accuracy
To verify the accuracy of the calibration or to determine the amount of change since the last
calibration, click Verify Accuracy in the ColorCal main window or click Verify in the dialog
box that appears when calibration is complete. See the previous section and follow the steps
used to initially calibrate the copier.
When the verification process finishes, ColorCal displays the color performance results.
Compare the Desired Density lines with Measured Density lines to determine color printing
accuracy. The following example shows that measured output closely matches desired color
performance. Recalibration is not necessary.
29
If the Measured Density levels do not match Desired Density levels, calibrate the copier again
(see “Calibrating the Splash RPX-i” on page 23).
If the measured curve does not closely correspond to the target curve during the verify process
immediately after calibrating, the copier may require servicing. If the copier is printing
unevenly or if the scanner is not accurately calibrated, ColorCal cannot operate properly.
To v erify whether the copier is printing unevenly, print the full area on a page with a C=40%,
M=40%, and Y=40% color mix and set the CMYK press profile for this job to Uncalibrated.
Examine the printed page to see if the output is smooth with little variation. Repeat the test
on the full area of a page with K=40%, and verify that the output is smooth. Significant
variation indicates that the copier requires servicing. Contact your copier manufacturer
representative.
Page 30

AutoGray
TO PERFORM AUTOGRAY CALIBRATION
CALIBRATION
AutoGray is an additional calibration performed to improve the gray balance of the calibrated
copier. The AutoGray calibration procedure is similar to color calibration in that it prints and
measures a target and then uses the measurements to automatically adjust the calibrated
profile to improve gray balance. You can run AutoGray without preliminary configuration.
NOTE: If a copier has not been calibrated, AutoGray is disabled. For optimal accuracy,
calibrate AutoGray following every color calibration.
To r emove the current AutoGray calibration and reset AutoGray to the default, choose Delete
AutoGray in the Splash menu.
After calibrating using ColorCal (see “Calibrating the Splash RPX-i” on page 23), use the
following procedure to perform AutoGray calibration.
1 In the ColorCal main window, choose AutoGray from the Splash menu.
30
2 Go to step 7 of the procedure “To calibrate the Splash RPX-i with ColorCal” on page 23 and
follow the same steps as for color calibration.
Page 31

Splash Proof
TO PERFORM SPLASH PROOF CALIBRATION
1 In the ColorCal main window, choose Calibrate Splash Proof from the Splash menu.
2 Go to step 11 of the procedure “To calibrate the Splash RPX-i with ColorCal” on page 23 and
CALIBRATION
Splash Proof calibration is used in conjunction with the Splash Proof print option (see “Splash
Proof ” on page 52). Splash Proof calibration is similar to color calibration in that it prints and
measures a target, and then uses the measurements to automatically adjust the calibrated
profile to improve the color output of the copier.
The calibration process is the same for Splash Proof as AutoGray and ColorCal. However,
you do not have to select an input tray with Splash Proof. It prints from Tray 5 on Coated 2
(221 - 280 gsm) paper. Make sure to feed the correct paper into Tray 5 when you calibrate
with Splash Proof.
follow the same steps as for color calibration.
31
Page 32

CALIBRATION
Creating color profile sets
A profile set is a calibration that can be associated with one or more paper trays for the media
type loaded in that tray. Profile sets allow you to maintain separate calibrations for each media
type. However, you should perform calibration for each profile set each time you calibrate
the copier.
By default, the Splash RPX-i has one profile set (called Default) for all paper trays. You can
create more profile sets and assign each profile set to one or more paper trays. The same profile
can be used for multiple trays.
TO CREATE A PROFILE SET
1 With the copier running, click the ColorCal icon in the toolbar of the Splash RPX-i
main window.
The ColorCal main window appears.
2 Choose Edit Color Profile Sets from the Splash menu.
32
3 Click Add.
4 Enter a name for the profile set and click OK.
The Choose Color Profile Sets dialog box appears.
5 Choose the profile set to use for each paper tray and click OK.
The profile set you just created is available in each list of profiles.
6 Click Done to close the window.
You can also display the Choose Color Profile Sets dialog box by choosing Assign Color
Profile Sets from the Splash menu (in ColorCal) or by choosing Color Profile Sets from the
Profiles menu (in the Splash RPX-i main window).
After you create a profile set, you should calibrate it (see “Calibrating the Splash RPX-i” on
page 23). In ColorCal preferences, you select which profile sets are affected when you run
calibration. For more information, see “Setting ColorCal preferences” on page 33.
Page 33

CALIBRATION
Setting ColorCal preferences
ColorCal preferences are options that control the operation of the ColorCal functions.
TO SET COLORCAL PREFERENCES
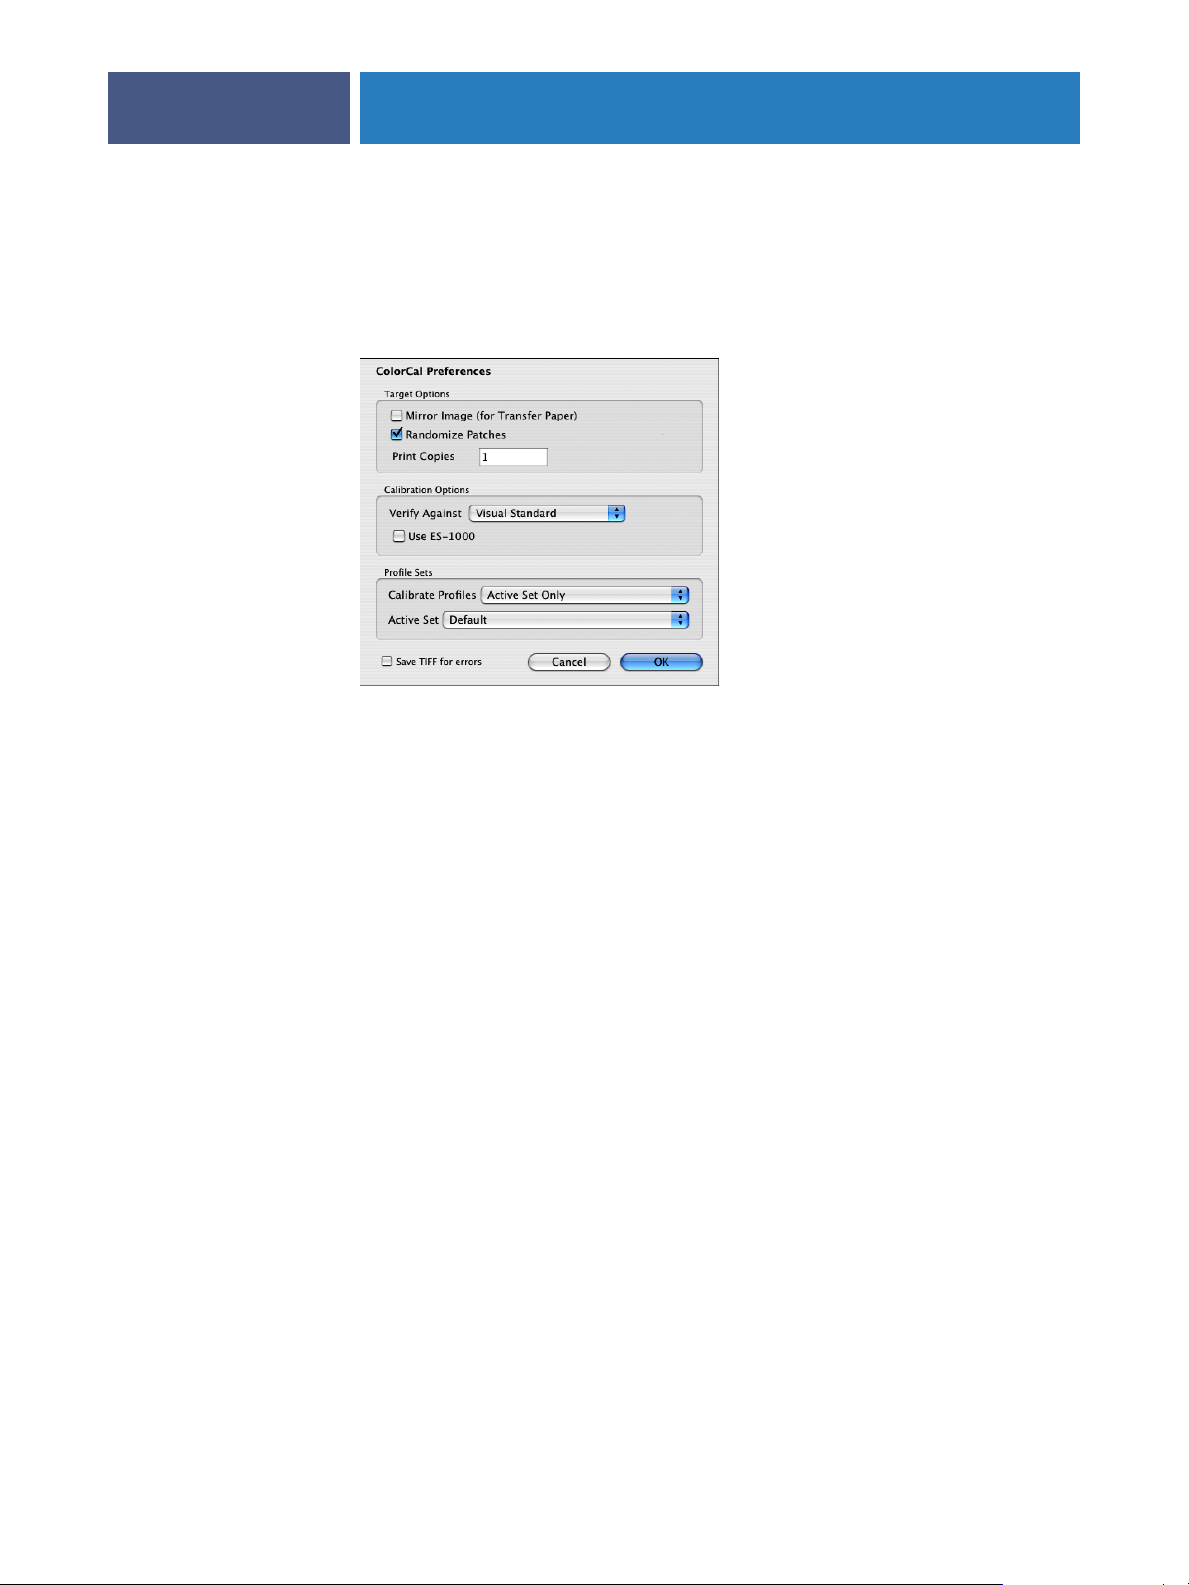
1 Choose Preferences from the ColorCal menu.
The ColorCal Preferences window appears.
33
2 Select the desired preferences and click OK.
Mirror Image: If you want to calibrate the copier to print to heat-transfer paper (for example,
T-shirt transfers), use the original artwork for the calibration target and select the Mirror
Image option before calibrating. This inverts the scanned artwork target to match the final
transferred piece. Then transfer the printed target to the final media and scan it for
calibration.
Randomize Patches: Randomizes placement of the patches on the calibration target to
minimize the effects of print density variations on a page.
Print Copies: Specifies the number of copies of the calibration target printed. Printing
multiple copies can prevent problems if the first print from the copier is not representative of
the normal output.
Verify Against: Sets the calibrated profile ColorCal uses to create the Desired Density lines
during verification. For example, if you use the CMYK SWOP profile frequently for printing,
select it as the Verify Against profile.
NOTE: Changing the Verify Against profile to something other than Visual Standard causes the
CMYK patches on the right side of the target to not accurately match the black patches.
Use ES-1000: Selects the calibration procedure that uses the ES-1000 spectrophotometer
rather than the copier’s scanner to measure printed color samples. For more information, see
“Calibrating the Splash RPX-i” on page 23.
Page 34

CALIBRATION
Calibrate Profiles: Selects which profile sets are affected by calibration. You define a profile set
in the ColorCal main window (see “Creating color profile sets” on page 32). Choose from the
following settings:
• Active Set Only selects the set defined as the Active Set in the same window.
• Selected Set Only lets the user select a set when running a calibration.
• All Active Sets selects all sets that are assigned to at least one paper tray.
• All Sets selects all profile sets.
Active Set: Defines the active set for the Calibrate Profiles option.
Save TIFF for errors: Saves a bitmap of the scanned calibration target as a TIFF file in the
Utilities subfolder of the Splash folder. If there are problems with calibration, this is useful for
technical support.
Editing custom color profiles (Be An Expert)
34
ColorCal provides expert-level tools for creating custom (user-defined) CMYK profiles or
modifying the calibrated CMYK profiles provided with ColorCal.
You can edit the calibration curve and the white point for a profile. For best results, calibrate a
CMYK profile before editing it.
To create a new profile, save an existing profile under a new name and then modify the
new profile.
Editing the calibration curve
ColorCal provides the following methods for editing a calibration curve:
•Adjusting gain in shadows, midtones, and highlights
•Editing control points on the calibration curve
•Entering percentages (for new-style profiles) or densities (for old-style profiles)
Page 35
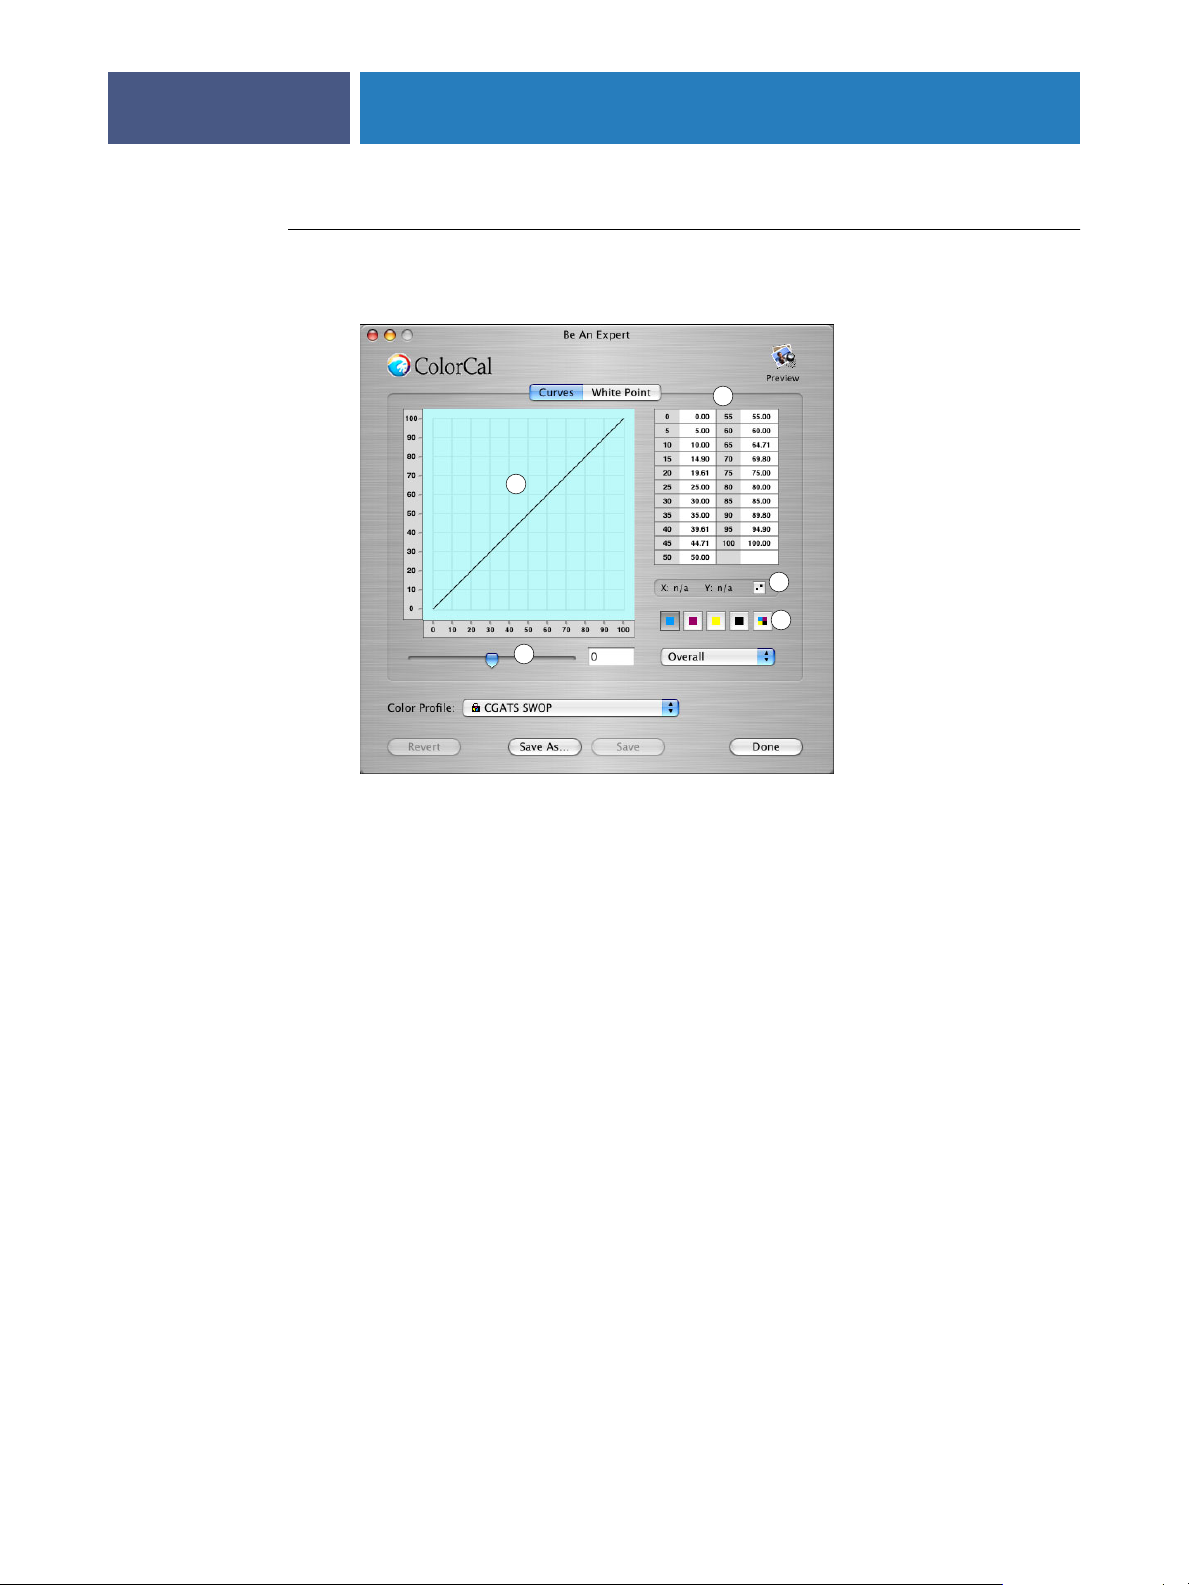
1 Color curve
2 Color slider
3Table of color values
4 Control points tool
5 Color palette
CALIBRATION
TO EDIT A PROFILE’S CALIBRATION CURVE
1 Select Be an Expert in the ColorCal main window.
1
2
35
3
4
5
2 Select a profile to edit from the Color Profile list.
NOTE: Factory installed profiles cannot be edited. If you select a factory installed profile, the
Save button is disabled. You must choose Save As and enter a new profile name.
3 Select a color curve to edit from the color palette.
The four color curves and the master curve are selectable.
4To edit the curve by adjusting gain, select Highlights, Midtones, or Shadows to choose a
portion of the curve, or Overall to adjust the entire curve, and move the slider to adjust
the gain.
5To edit the curve using control points, choose Expert > Edit Control Points (or click the icon
next to the X and Y coordinates) to turn control point editing on, and then click and drag the
curve points with the mouse pointer.
NOTE: Control point editing is not available for the master curve.
Output Percentage (0% to 100%) and Input Percentage (0% to 100%) update in the table of
X and Y values as a curve point is moved.
•To add a curve point, click anywhere along the curve. ColorCal allows a maximum of 32
control points for an individual color curve.
•To remove a curve point, drag it over another point on the color curve.
•To undo all changes to the curve, click Revert.
Page 36

CALIBRATION
36
•To change the curve to a straight diagonal line (X=Y), choose Expert > Set Channel to
Line.
NOTE: The color curves created with the Expert controls are similar to those used in
Photoshop, but cannot be directly exchanged with curves created in Photoshop.
6To edit the curve using percentages, choose Expert > Edit Table (or double-click in the table
of X and Y values), enter new values in the dialog box that appears, and click OK.
NOTE: The table of X and Y values is not available for the master curve.
If an out of range value is entered, it is corrected immediately to the nearest in range value.
For new-style, the range is 0.0 to 100.0. For old-style, the range is 0.0 to 2.0. The table does
not accept negative numbers.
NOTE: Undo is not supported in the Edit Table dialog box. To undo all changes, close the
table and click Revert.
7 Repeat steps 3 and 6 until all adjustments to all curves are complete.
Each color’s cumulative changes show in its own channel and in the master channel display.
8 Click Save to overwrite the existing profile or Save As to create a new profile.
9 Click Done.
NOTE: If you click Done before saving a profile, ColorCal prompts you to save changes or
cancel. The new profile is automatically calibrated to the last time calibration was run.
NOTE: Revert restores the previously saved profile.
Editing the white point
Use caution when changing the white point, because even a small change can cause a
significant change in color output. In general, change the white point only after taking
measurements on actual media and arriving at a specific number.
ColorCal provides the following methods of editing the white point:
•Visually selecting a white point from a color graph
•Entering numerical values for each component of the white point
TO EDIT THE WHITE POINT OF A PROFILE
1 Select Be an Expert in the ColorCal main window.
2 Select a profile to edit from the Color Profile list.
NOTE: Factory installed profiles cannot be edited. If you select a factory installed profile, the
Save button is disabled. You must choose Save As and enter a new profile name.
Page 37

CALIBRATION
3 Click White Point.
The White Point graphical display appears.
37
4To set the white point using numerical values, choose L*a*b*, HSV, RGB, or XYZ for the type
of values, and then enter new values in the fields.
5To set the white point visually, click and drag the circle to a new location in the color chart.
The color swatch in the upper-right corner updates to show the current white point.
Generally, however, only change the white point to a specific numerical value.
6To set the white point using the ES-1000 spectrometer, click the ES-1000 icon and follow the
on-screen instructions.
This option is available only if the ES-1000 is installed and connected to the Splash RPX-i.
7 Click Save to overwrite the existing profile or Save As to create a new profile.
NOTE: When factory installed profiles are selected, Save is the same as Save As.
8 Click Done.
NOTE: If you click Done before saving a profile, ColorCal prompts you to save changes or
cancel. The new profile is automatically calibrated to the last time calibration was run.
NOTE: Revert restores the previously saved profile.
Page 38

CALIBRATION
38
Previewing a profile
At any point while editing a profile, you can preview a document (in PDF, PostScript, EPS, or
TIFF format) with the edited profile applied by clicking the Preview icon in the upper-right
corner of the Be An Expert window. A preview pane appears that allows you to choose a file to
view. You can also drag and drop a file from the desktop directly into the preview pane.
This preview is intended to show relative change and is not intended as a proof of the final
color. The only proof is the printed page. Editing a profile is an iterative process. Make a
change, print a proof, and then check the proof to see if further changes are needed.
Use Print Page to print a proof. When you print, you can select the Rendering Style and Paper
Source to see the effects of those settings used with the profile you have edited.
Page 39

COLOR PRINT OPTIONS
COLOR PRINT OPTIONS
This chapter describes the Splash RPX-i color print options and other print options that affect
color output. You can control the settings for color print options as follows:
•Set the options for a specific print job when you print to the Splash RPX-i using the
Splash RPX-i printer description file.
•Set default values for color print options on the Splash RPX-i. If you set an option to
“Printer’s default” when you print a job, the default value on the Splash RPX-i is used.
•If you send a job to the Hold queue, you can modify the job’s options from the
Splash RPX-i before printing the job.
For more information about print options, see the Printing Guide.
39
Page 40

COLOR PRINT OPTIONS
Splash Color options in the printer drivers
The location of the color print options varies with each printer driver.
TO SELECT SPLASH COLOR OPTIONS IN THE MAC OS X PRINTER DRIVER
1From an application, choose Print.
2 Choose Splash Color from the list.
3 Click Expert Settings to view and edit color print options.
40
TO SELECT SPLASH COLOR OPTIONS IN THE MAC OS 9 PRINTER DRIVER
1 In the Chooser, select the Splash RPX-i as the printer.
2From an application, choose Print.
3 Choose Color from the list.
Page 41

COLOR PRINT OPTIONS
TO SELECT SPLASH COLOR OPTIONS IN THE WINDOWS PRINTER DRIVER
1From an application, choose Print.
2 Select the Splash RPX-i as the printer.
3 Click Properties and then click the Color tab.
4 Click Expert Settings to view and edit color print options.
41
Page 42
COLOR PRINT OPTIONS
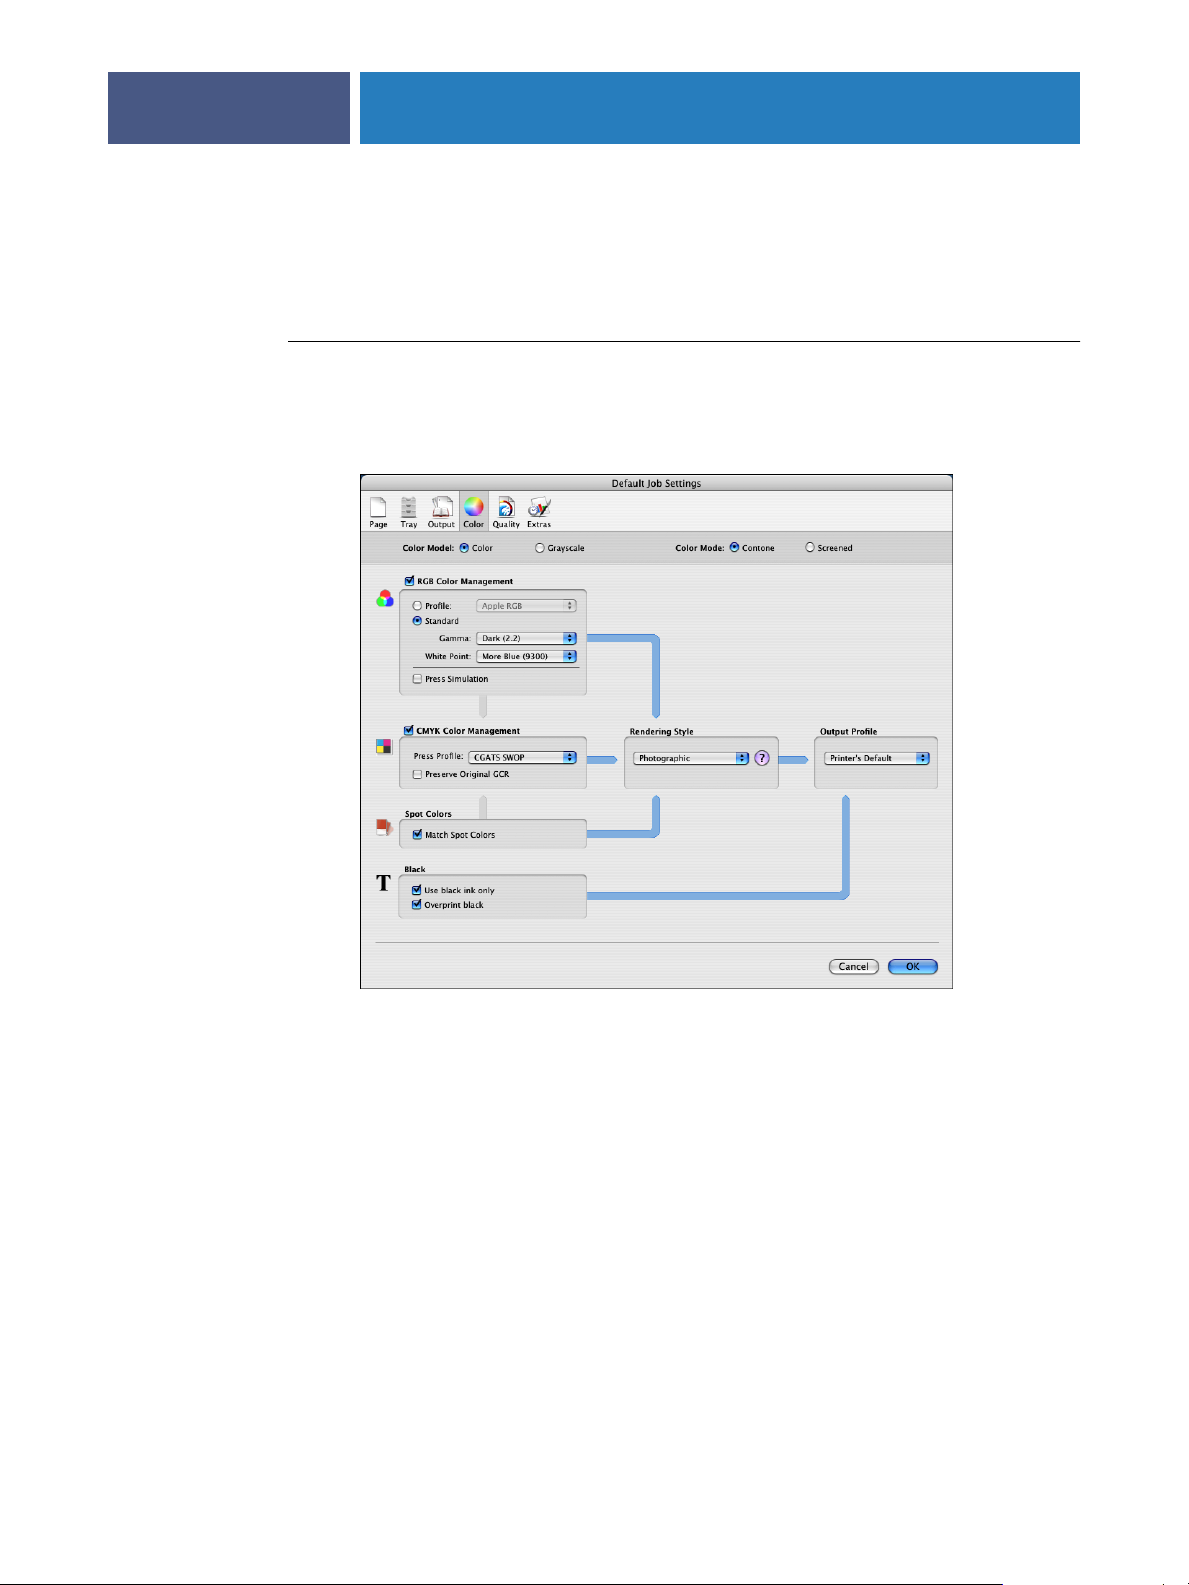
Splash Color default settings on the Splash RPX-i
The options on the Color tab in the Default Job Settings dialog box allow you to set the
default values for color print options.
TO SET DEFAULT SPLASH COLOR OPTIONS
1 In the Splash RPX-i main window, choose Edit Defaults from the Jobs menu.
The Default Job Settings dialog box appears.
42
2 Click the Color tab, select the settings that you want to be the defaults, and then click OK.
Page 43

COLOR PRINT OPTIONS
Splash Color job settings on the Splash RPX-i
When you edit a job on the Splash RPX-i, you can select new values for color print options.
TO SET SPLASH COLOR OPTIONS FOR A SPECIFIC JOB
1 In the Splash RPX-i main window, select the job.
2 Choose Edit Job from the Jobs menu.
43
3 Click the Color tab, select the settings you want for this job, and then click OK.
Page 44
COLOR PRINT OPTIONS
Two-Way Communication
Two-Way Communication retrieves the color print option default settings currently selected
on the Splash RPX-i and the color profiles currently residing on the Splash RPX-i, and
displays them in the printer driver when you start the printer driver (Mac OS X) or click
Update in the Expert Color Settings window (Windows). Two-Way Communication is
available on Mac OS X and Windows if you connect to the Splash RPX-i through a
TCP/IP network. The Mac OS 9 printer driver does not support Two-Way Communication.
NOTE: If Two-Way Communication is not enabled, the Printer’s default setting appears for
many print options. The Printer’s default setting means that the setting on the Splash RPX-i
is used.
NOTE: On Mac OS X, you must enable Two-Way Communication manually.
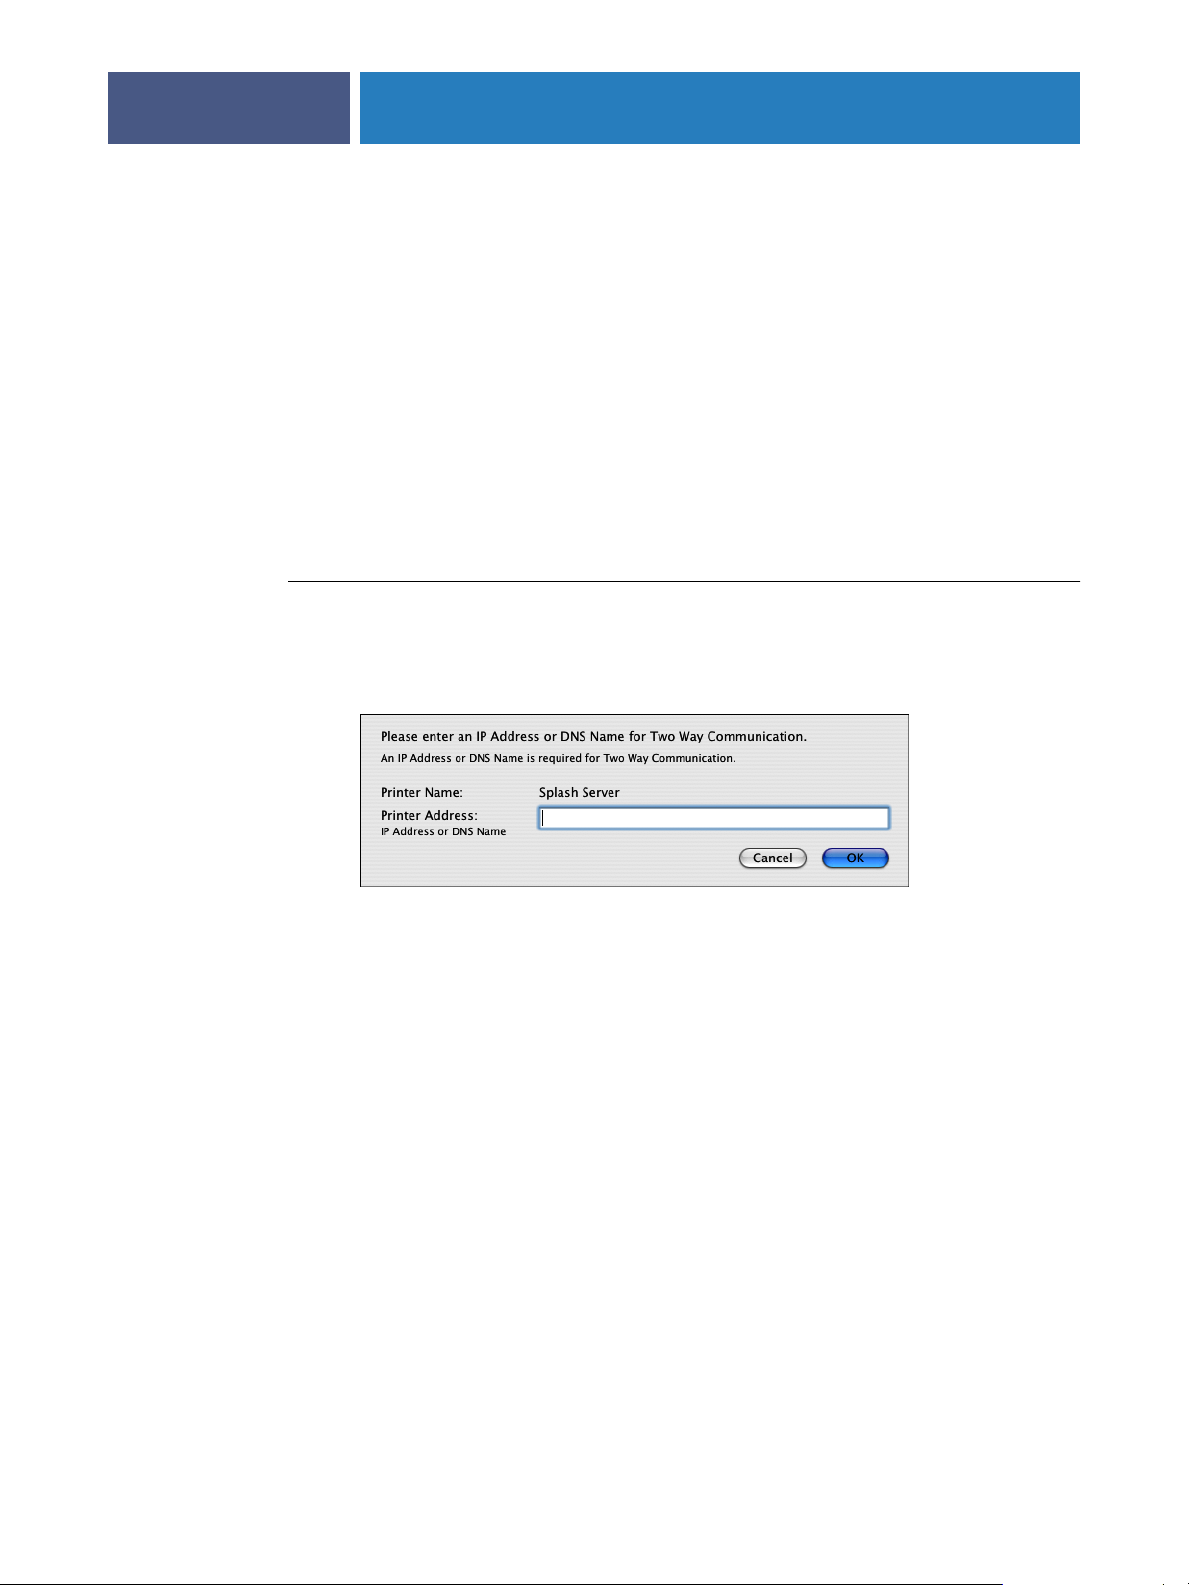
TO ENABLE TWO-WAY COMMUNICATION ON MAC OS X
1 In the Splash Color window of the printer driver, select the Two-Way Communication option.
44
A dialog box requests an IP address or DNS name.
NOTE: If the dialog box does not appear automatically, click Configure.
2Type the Splash RPX-i IP address or DNS name in the dialog box.
If you enter a DNS name, the network must support DNS.
3 Click OK.
On Windows, Two Way Communication is automatically enabled when you print through a
TCP/IP port. You can modify the server name or IP address, if necessary.
Page 45
COLOR PRINT OPTIONS
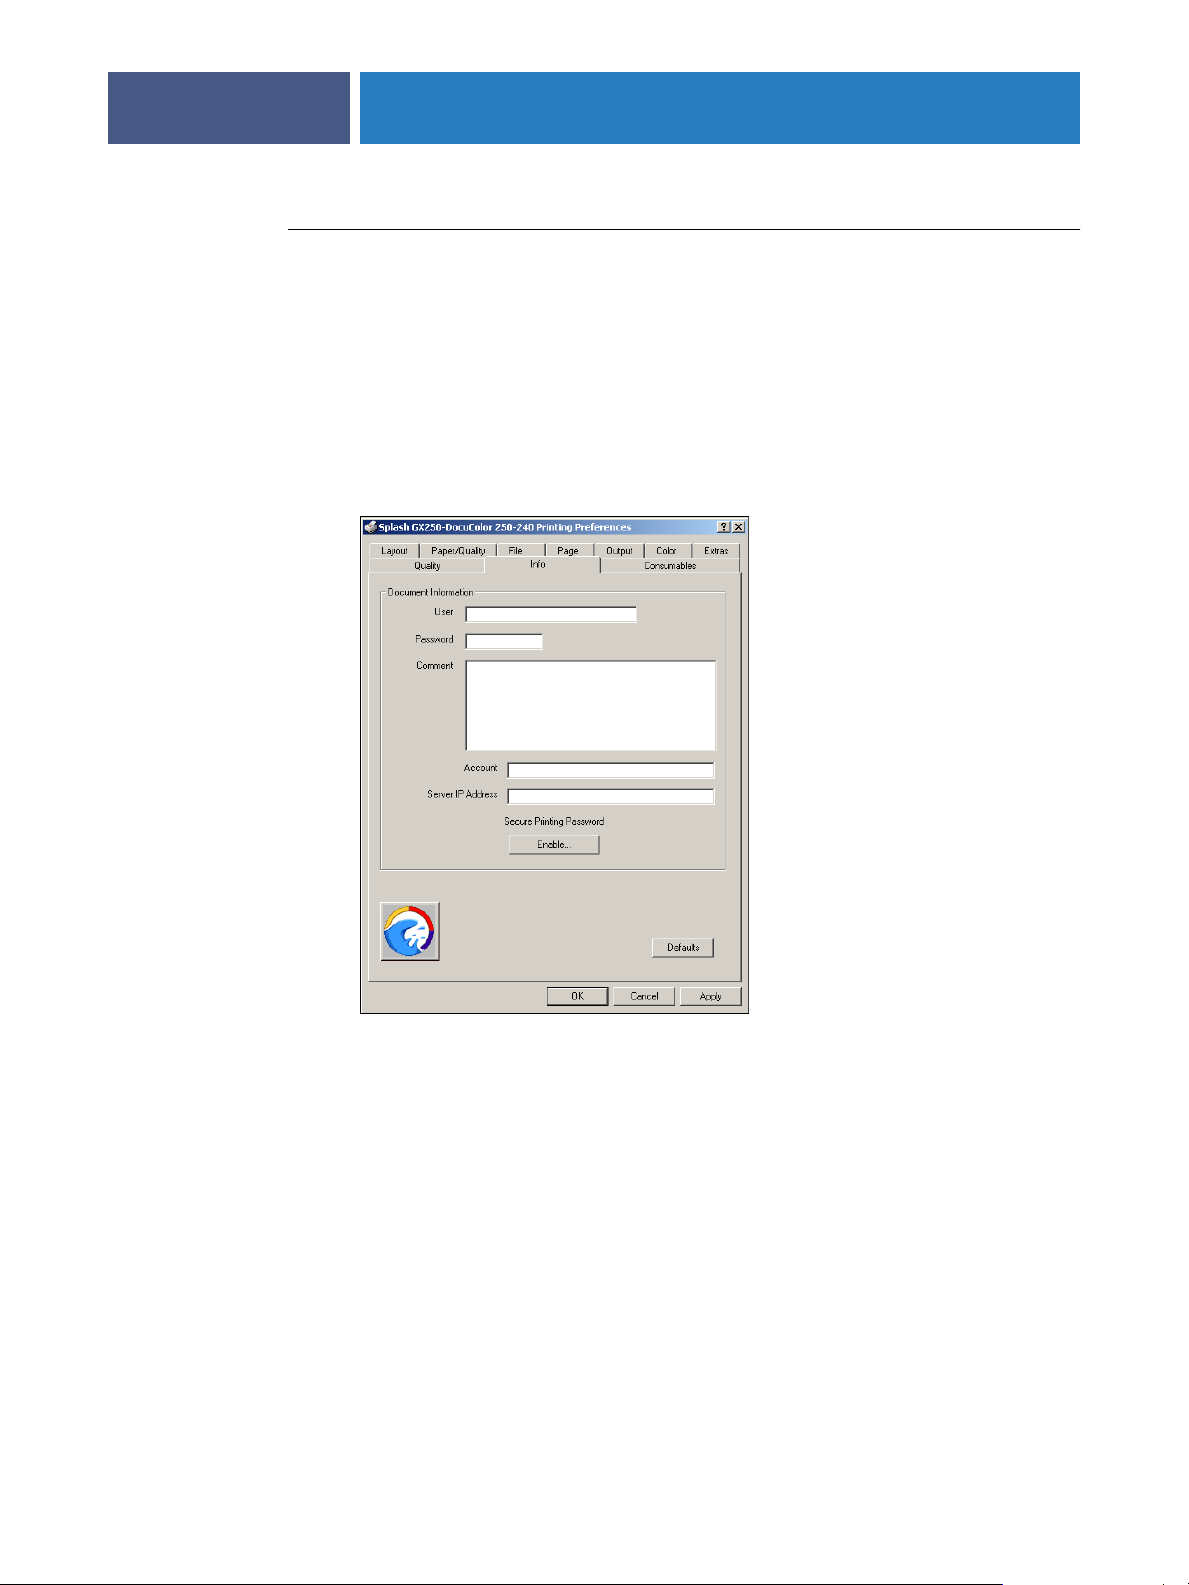
TO MODIFY TWO WAY COMMUNICATION ON WINDOWS
1 Windows 2000: Click Start, choose Settings, and then choose Printers.
Windows XP: Click Start and choose Printers and Faxes.
Windows Server 2003: Click Start, choose Control Panel, and then choose Printers and Faxes.
2 In the Printers window, select the Splash RPX-i printer driver icon.
3 Choose Printing Preferences from the File menu.
4 Click the Info tab.
5 Modify the Splash RPX-i IP address or DNS name.
45
6 Click OK.
Page 46

COLOR PRINT OPTIONS
Splash Color options
The Splash Color options in the printer driver allow four-pass color or grayscale printing with
contone or halftone screening and Splash color correction.
Color Model
Select Color (4 pass) or Grayscale (1 pass), for Color Model. Grayscale images produce
similar results with either model; however, the Grayscale model images print faster than in
Color mode.
Printer Mode (Color Mode)
The Printer Mode (in the printer driver) or Color Mode (on the Splash RPX-i) option
switches copier output between Contone (full color) output and Screened output. When
Screened is selected, the Splash RPX-i applies halftone screening to the color image.
The screening method is set in the Splash RPX-i preferences. For more information, see
“Color print options in server preferences” on page 56.
46
RGB Profile
RGB Profile simulates colors on a monitor or scanner. It can accurately color match mixed
RGB file formats independent of the application, platform, or print driver.
Default RGB profiles
You can always select the following profiles at the Splash RPX-i or a client computer. If other
RGB profiles are imported, you can select them at the Splash RPX-i or at a client computer in
the printer driver with Two Way Communication enabled.
•Apple RGB (default)
•Adobe RGB
•RGB 9300
•RGB D50
•RGB D65
•sRGB
NOTE: If a CopyCal profile is selected as the CMYK Press Profile, the RGB color matching
associated with the CopyCal profile is used instead of the RGB source profile selection.
For more information about CopyCal profiles, see “CopyCal” on page 19.
Page 47

COLOR PRINT OPTIONS
NOTE: Two “identical” but uncalibrated monitors may display an image differently enough to
exceed the ability of a color correction application to closely match them. In addition, the
colors on a printed page are affected by the light reflecting off the ink and by the particular
shade of white in the paper. To produce the closest possible color correction, use a monitor
calibrator to compensate for the variations of your individual monitor, the lighting conditions
in your office, and the white point of your paper.
RGB Custom Setup
If you set RGB Profile to Custom Setup in the printer driver, or Standard in the Color tab of
the Default Job Settings on the Splash RPX-i, you can set Gamma and white point values
manually. The Gamma and white point adjust Splash color correction to simulate the
monitor used to view and work with the document. The default settings satisfy most
configuration requirements.
•Gamma describes how a device reproduces tonal gradations. This setting applies to the
input and output device. This option lightens or darkens the RGB content of a particular
document to provide a more accurate match with the monitor.
47
Choose Lightest (1.0), Light (1.4), Normal (1.8), Dark (2.2), or Darkest (2.6). The default
is Dark (2.2).
• The white point simulates various lighting conditions for proofing color documents.
Use this option to adjust the RGB content in a particular document relative to the white
point of the monitor.
Choose More Yellow (D50 Proofing), Normal (D65), More Blue (9300). The default is
More Blue (9300). If flesh tones or red tones are too magenta, skies and other blues too
cyan, and grass and greens too dark (almost bluish), choose More Blue. If flesh tones and
reds are too yellow, blues too purple, and greens too yellow, choose More Yellow.
RGB Color Management Off
By default, the RGB Profile setting overrides any RGB profile embedded in a print job. If you
want to use the RGB profile information in a print job, disable the Override RGB Profiles
option in the server preferences (see “Color print options in server preferences” on page 56).
If you do not want Splash RGB color management for a job (for example, if you are using a
third-party color management system), set RGB Profile to Color Management Off. To make
Color Management Off the default setting for jobs, clear the RGB Color Management check
box in the Color tab of the Default Job Settings on the Splash RPX-i.
Page 48

COLOR PRINT OPTIONS
48
Press Simulation
Press Simulation constrains input RGB colors to the gamut of the selected CMYK press
profile to provide closer matching of RGB input to press output. Press output is usually less
saturated and vivid than RGB input colors. This option works with either 1D or 4D CMYK
press profiles. If CMYK color correction is not enabled, this option has no effect.
If the document contains no CMYK data, disable Press Simulation (the default setting in
the printer driver). If CMYK color correction is applied to these files, the RGB colors are
restricted to the CMYK profile color gamut and saturated colors may desaturate and hues
may shift.
NOTE: Most business application documents contain only RGB data. Disable Press
Simulation when you print these documents.
CMYK Press Profile
The Splash RPX-i provides CMYK color correction profiles that simulate commercial press
inks in your output when you print CMYK documents to the Splash RPX-i. The profiles
work with CMYK press color correction to automatically compensate for differences in press
ink colors.
To apply CMYK press color correction to a print job, select the appropriate CMYK press
profile from the list.
You can download your own CMYK profile to the Splash RPX-i (see “CMYK press profiles”
on page 14).
If you enable Two Way Communication in your printer driver, the names of the CMYK
profiles on the Splash RPX-i appear as selections in the CMYK Profile menu. If Two Way
Communication is not enabled, the actual profile names cannot be retrieved from the
Splash RPX-i. In this case, the selections are listed as SWOP, Euroscale, Enhanced, and
Custom 1 - Custom 10, which are placeholders for actual CMYK profiles. You can set each of
these selections to a specific CMYK profile at the Splash RPX-i (see page 14).
For more information about Two Way Communication, see page 44.
By default, the CMYK Profile setting overrides any CMYK profile embedded in a print job.
If you want to use the CMYK profile information in a print job, disable the Override CMYK
Profiles option in the server preferences (see page 56).
If you do not want Splash CMYK color management for a job (for example, if you are using a
third-party color management system), set CMYK Press Profile to Color Management Off.
To make Color Management Off the default setting for jobs, clear the CMYK Color
Management check box in the Color tab of the Default Job Settings on the Splash RPX-i.
Page 49

COLOR PRINT OPTIONS
49
Preserve Original GCR
Preserve Original GCR causes the CMYK press profile to be applied so the original GCR
settings of the CMYK data are preserved. This option only affects color matching with new
style 4D profiles. Old style profiles are automatically GCR preserving.
Match Spot Colors
The Splash RPX-i can simulate PANTONE, Toyo, HKS, or DIC spot colors and tints in
documents.
To enable this feature, set Match Spot Colors to On.
For more information about spot colors, see “Spot Color Editor” on page 71.
Use Black Ink Only
Use Black Ink Only substitutes a pure (CMY=0, K=100) black for any RGB black in the
document. This option prevents ink buildup on the page and alleviates shadows created by
misregistered mixed black. It also allows pages that contain only RGB black to count as
black-and-white pages rather than color.
Overprint Black
Overprint Black prevents the “halo” effect which occurs when black is printed on top of
another color. Selecting this option tells the Splash RPX-i to print black-only input colors
(including those that are black-only because of the Use Black Ink Only option) with no
knockout of underlying colors.
Rendering Style
Rendering Style affects how colors outside the copier gamut are mapped into the copier
gamut. Choose a Rendering Style that describes how the document was created:
• Graphics: For documents that were primarily created with a computer graphics
application. This option optimizes print jobs with highly saturated color and provides a
close screen-to-print match. This style is the same as the ICC Saturation style.
• Photographic: Matches the colors of scanned photographic images. Use this option for
proofing photographic material. This style is the same as the ICC Relative Colorimetric
style.
• Presentation: For documents that were created entirely with a computer graphics
application. This option creates bright, close to pure versions of the primary colors, but
provides a less accurate match to the screen and is less accurate for photographic images
than Graphics. This style does not have an ICC equivalent.
Page 50

COLOR PRINT OPTIONS
• Paper Simulation: Matches the RGB input to press output, to accommodate off-white
white point settings or paper. This style is the same as the ICC Absolute Colorimeric style.
• Spot: For documents containing spot colors, or to lighten the RGB color output. This style
is the same as the ICC Perceptual style.
NOTE: The default Rendering Style is Photographic.
50
Output Profile
The output profile for your copier describes its color characteristics and includes a calibration
target that describes the expected behavior of the copier. Because the output profile is applied
to all data in the print job, make sure the profile you select is the right one for your job.
You can download your own output profiles to the Splash RPX-i (see “Output profiles” on
page 16).
If you enable Two Way Communication in your printer driver, the names of the output
profiles on the Splash RPX-i appear as selections in the Output Profile menu. If Two Way
Communication is not enabled, only the names of the default profiles installed on the
Splash RPX-i appear.
In the printer driver, the Printer’s default setting means that the setting on the Splash RPX-i is
used. However, the Output Profile option also has a Printer’s default setting in the
Splash RPX-i’s Default Job Settings. This setting means that the output profile is determined
by the Media Type and Printer Mode selections. You configure the association between output
profiles, media types, and printer modes at the Splash RPX-i (see “Output profiles” on
page 16).
Page 51

COLOR PRINT OPTIONS
Splash Quality options
The Splash Quality options improve the quality of images, text, and graphics.
Dynamic Image Enhancement
Dynamic Image Enhancement enhances low resolution images (through interpolation) to
create a smoother appearance. It has the greatest effect for images with a resolution below 150
dpi.
NOTE: If this option is enabled, printing is slower.
Graphics Edge Enhancement
Graphics Edge Enhancement uses a copier feature to sharpen the edges of text and vector
graphics. This option does not affect rendering or printing speed.
Text/Graphics Quality
51
Text/Graphics Quality enhances text and graphics that contain fine lines, small text, and
inverted (white on black) text and graphics. The Best setting provides more improvement
than Graphics Edge Enhancement, but requires more processing time.
NOTE: This option affects 100% black text and graphics only if Overprint Black is also
enabled or if CMYK Color Management is off. It affects 100% CMY text and graphics only if
CMYK Color Management is off.
Show Composite Overprints
Show Composite Overprints prints composite documents which specify overprints for all
colors, including spot colors, with proper color correction applied. RGB colors and spot
colors are converted to CMYK values. To see trapping as well as overprinting, you must print
the document as separations from the application.
Overprints from the following applications and file types are supported: Quark Xpress,
Macromedia Freehand, Adobe InDesign, PDF (printed or dropped from Adobe Acrobat),
and Adobe Illustrator.
Page 52

COLOR PRINT OPTIONS
52
Auto Trapping
Auto Trapping automatically traps text and graphics independently of their application.
This option affects both composite and separations files.
NOTE: The Auto Trapping option improves the quality of output from the copier. It does not
serve as a proof of trapping for a printing press.
Splash Proof
Splash Proof provides a single step for selecting a combination of print options intended for
proofing. The options combine printing on specific paper with particular color correction and
screening. The print options are as follows:
• Copier Screening: 200 Cluster Dot
•Paper Source: Tray 5
•Media Type: Coated 2 (221 - 280 gsm)
•Printer Mode: Contone
• CMYK Press Profile: SWOP
Gradient Smoothing
Gradient Smoothing improves the smoothness of color gradients but reduces color accuracy.
It also ensures that pure input colors (Y, M, C, or K only) are output as pure colors, regardless
of the CMYK press profile selected. The output produced with this option might be more
visually pleasing but less color-accurate than the output produced without this option.
Apply ColorTuner
The Apply ColorTuner option is available only for jobs that have color tuning (see page 58).
Use this option to turn color tuning on and off. You can also use this option to compare
output to see the effects of color tuning.
NOTE: Apply ColorTuner does not appear in the printer driver.
Page 53

COLOR PRINT OPTIONS
Splash Extras options
The Prepress Features of the Extras print options provide better proofing for some
press environments.
Separations
Page layout applications, such as Adobe PageMaker and QuarkXPress, can print pages with a
single color isolated from the whole image. These pages, called separations, are then copied on
film image setters so that each page is converted to one or more (usually four) output grayscale
pages. Separations printed on a print device that does not have a special Separation feature
produce one grayscale page per color on the original page.
The Splash RPX-i can re-composite these individual pages back into multi-color pages to
produce a proof equivalent to the proof produced from films by conventional means. The
primary benefit of separation is to show overprinted objects with proper colors and to make
trapping visible.
The Separations print option prints a composite page from applications that support
separation printing.
53
• Automatic detects separation print jobs, composites the separations, and applies color
correction. This default option supports CMYK plates plus plates in PANTONE, Toyo,
HKS, or DIC if these press colors are supported by your separation application. This
option supports separation generated by any application. With Automatic selected,
the Splash RPX-i supports the full range of PANTONE, Toyo, HKS, or DIC colors
and tints.
NOTE: RGB graphics are converted to CMYK by both QuarkXPress prior to version 4.0
and PageMaker. RGB images in versions of Quark and PageMaker and RGB colors in
Quark 4.0 and later are converted to grayscale and appear as gray in the output. This is a
limitation of these applications.
• Automatic Single Page processes any separation job as a single page job. All color plates are
combined together, including spot color. This allows printing single-page spot color
separations from Macromedia Freehand, Deneba Canvas, and Adobe Illustrator.
If a multi-page separation job is sent with this option selected, the pages overlay, resulting
in undesirable output.
NOTE: The Automatic and Automatic Single Page settings are compatible with in-RIP
separations for applications that generate in-RIP separations.
• Disabled disables Separations and prints plates as grayscale pages.
Page 54

COLOR PRINT OPTIONS
• QuarkXPress 4 Style, QuarkXPress 3 Style, PageMaker Style, FreeHand Style, and Canvas
Style
, the remaining Separations options, use a separation technique from an earlier
version of the Splash RPX-i. These options require that the separation job be made up of
exactly four process-color plates. These options do not support additional spot color
plates. If problems occur in the output when printing separations with Automatic selected,
convert the colors in the document to four process plates, then select the separation option
that matches your application.
54
Print In Own Color
If Print In Own Color is selected, the Splash RPX-i prints each plate of a separations file by
itself in its own color. This option only affects jobs printed as separations. It has no effect on
composite jobs.
NOTE: This option is not compatible with Print Progressives. If Print In Own Color is
selected, Print Progressives is ignored.
Print Progressives
If Print Progressives is selected, the Splash RPX-i prints up to four separate sheets for a print
job. You can configure this print option to specify which color passes print on each sheet (see
“Color print options in server preferences” on page 56). This allows you to examine the result
of each color pass for a four-color document.
NOTE: For optimal results when creating press proofs using Print Progressives, select one of the
one-dimensional CMYK press profiles for the print job. For information about the current
CMYK profile settings, contact your Splash RPX-i administrator.
Invert Image
Select Invert Image to invert the CMYK data. When using RGB colors, the Invert Image
option inverts the selected color to its opposite. For many of the colors, this results in the
color black.
Print Info Strip
Print Info Strip allows you to print a customizable info strip along the edge of the output.
The default information on the info strip includes user, job, color and media type.
The customizable options are available when you select Print Info from the Server menu in
the Splash RPX-i main window.
The info strip is helpful for printing and tracking multiple variants of the same document.
You can specify its contents to include color settings, job comment, and other options that
identify the job’s characteristics.
NOTE: The Print Info Strip image may overwrite the job image if it occupies the same part of
the page in the output.
Page 55

COLOR PRINT OPTIONS
55
Save As TIFF
Save as TIFF saves a rasterized image file as an up to 600 dpi TIFF file. The TIFF file is placed
in the TIFF folder within the Splash folder on the Splash RPX-i.
To activate this feature, choose a resolution of 72, 300, or 600 in the DPI list in the printer
driver. Or, if you edit a job’s options on the Splash RPX-i, you can enter a resolution value
between 3 and 600 dpi.
Mirror Image
Mirror Image inverts the scanned artwork target to match the final transferred piece.
Use Mirror Image for heat transfer paper used for adhering color output to non-standard
media, such as rice paper, rag paper, or T-shirts.
Color Postflight
If Color Postflight is selected, the Splash RPX-i prints all input colors in tints of specific
primary colors depending on what types of objects and colors the input colors are. This
feature can help you diagnose color problems in files. The color key is printed on each page.
The Color Postflight mappings of input colors are as follows:
• CMYK:Cyan
•RGB:Red
•Spot color: Yellow
•Grayscale: Gray
NOTE: This option is not compatible with the following options: Grayscale, Progressives, Print
In Own Color (Separations), and Color Tuner. If you print with both Color Postflight and
one of these options enabled, the option is ignored.
NOTE: Color Postflight might overwrite part of the original page.
Gloss Level option
The Gloss Level print option, which appears in the Page tab of the printer driver under Media
Type, affects the color output of a job. If this option is set to Enhanced, the copier operates in
a mode that adds gloss to the output and also makes colors denser. If you print using this
option, be sure to calibrate the copier with the Gloss Level set to Enhanced.
NOTE: The Gloss Level option reduces printing speed by half.
Page 56
COLOR PRINT OPTIONS
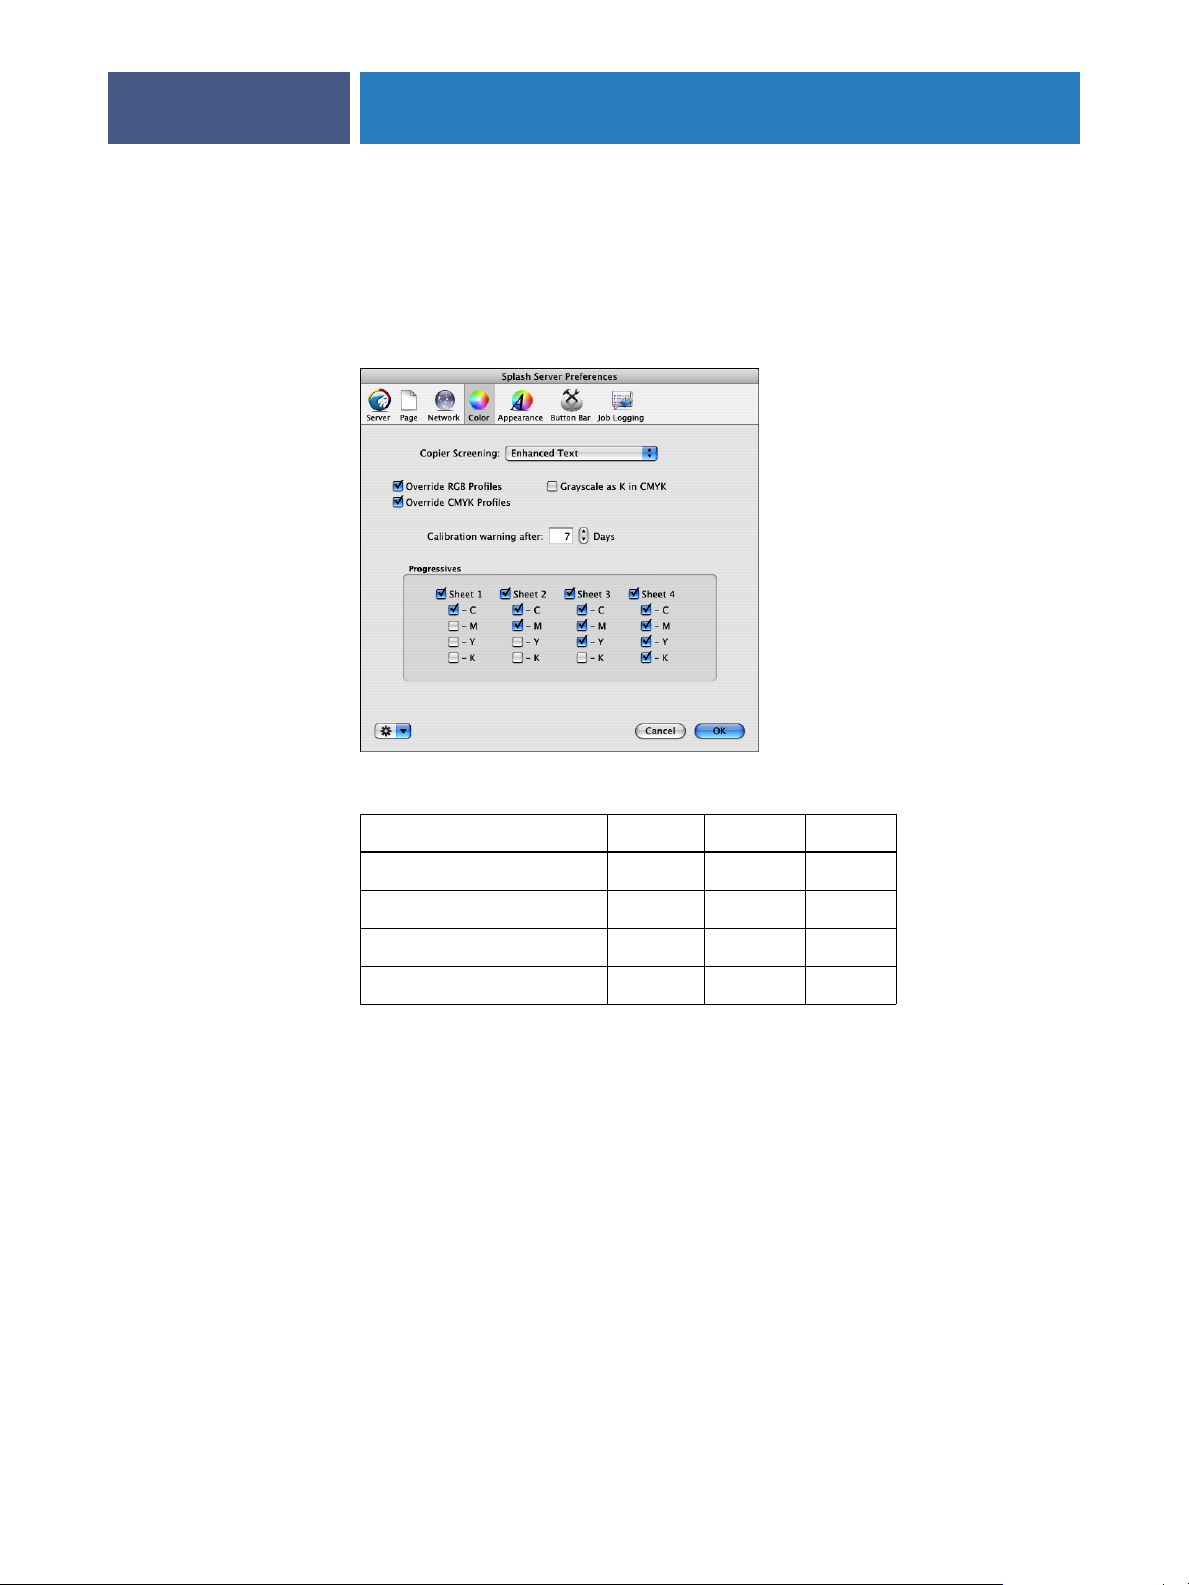
Color print options in server preferences
The options on the Color tab in the Splash Server Preferences dialog box allow you to set
some color print options for all jobs. You cannot modify these options for an individual job
either in the printer driver or at the Splash RPX-i.
56
Copier Screening sets the screening applied to text, graphics, and images.
Setting Text Graphic Image
200 Cluster Dot 200 dot 200 dot 200 dot
200 Rotated Line 200 line 200 line 200 line
Enhanced Text & Graphics 300 dot 300 dot 200 dot
Enhanced Text 300 dot 200 dot 200 dot
NOTE: We highly recommend that you recalibrate all profile sets after changing the Copier
Screening setting. If the Printer Mode option is set to Screened, the Copier Screening option
is ignored. Screened jobs are always printed using 600 lpi.
Override RGB Profiles sets a job to the RGB settings specified in Splash Color options.
If Override RGB Profiles is selected, Splash Color options are used instead of a document’s
RGB profile settings, if the document has any. If Override RGB Profiles is cleared, the
Splash RPX-i uses the RGB profile information directly from the file, if there is any.
Splash Color options are still applied to any untagged data.
Override CMYK Profiles sets a job to the CMYK settings specified in Splash Color options.
If Override CMYK Profiles is selected, Splash Color options are used instead of a document’s
CMYK profile settings, if the document has any. If Override CMYK Profiles is cleared, the
Splash RPX-i uses the CMYK profile information directly from the file, if there is any. Splash
Color options are still applied to any untagged data.
Page 57

COLOR PRINT OPTIONS
Grayscale As K in CMYK color corrects any grayscale input data as CMYK black. If this option
is off, grayscale input data is treated as RGB black. In general, use this option for documents
created in prepress applications. For documents created in office applications, such as
Microsoft Word, grayscale data is designed to be treated as an RGB monitor color. Do not use
this option for such documents.
Calibration Warning allows you to select a specific number of days from the last calibration
date to remind you to recalibrate the copier. When the time set in Calibration Warning
expires, the date and time listed in the Last Calibrated area of the Splash RPX-i main window
is displayed in red.
Progressives sets the output for the Progressives features. When you select the Print
Progressives option for a job, you can print up to four separate color passes per page.
Select the number of sheets to print (Sheets 1-4), and then select the number of colors to
print on each sheet (C, M, Y, or K).
Example color print option combinations
57
The factory default settings for Splash color print options are intended to provide a balance
between output quality and processing time. If you want higher quality or faster processing
speed than the defaults provide, try different settings.
For faster processing:
•Use a 1D CMYK press profile (CMYK SWOP, CMYK Euroscale, or CMYK Enhanced)
•Disable Overprint Black
For higher quality:
•Set Gloss Level to Enhanced
•Set Text/Graphics Quality to Best
•Enable Show Composite Overprints
•Enable Auto Trapping
Page 58

COLOR TUNING
COLOR TUNING
This chapter describes how to adjust the color output of an individual job using ColorTuner.
The ColorTuner application allows you to adjust the output color of RIPped pages before
printing all the copies of a job. You can use ColorTuner to make minimal corrections not
remedied by color profiles and calibration, or significant changes to the color content of a
page. You can correct problems caused by incorrect source content, such as printing CMYK
colors instead of spot colors.
ColorTuner edits are applied to a job after all simulation profiles and an output profile have
been applied. If you want to change the profile settings of a job that has been color tuned, you
must first delete the color tuning (see page 70), make the profile changes, and then color-tune
the job again (see “Editing colors with ColorTuner” on page 59).
58
After you save changes in ColorTuner, the job prints with these color tuning settings. You can
also save ColorTuner changes as a set to apply to other jobs.
Page 59

COLOR TUNING
Editing colors with ColorTuner
To edit colors in a print job with ColorTuner, use the following procedure.
TO EDIT COLORS IN A JOB USING COLORTUNER
1 In the Splash RPX-i main window, select the job in the Hold queue that you want to edit.
2 Start ColorTuner in one of the following ways:
• Choose ColorTuner from the Jobs menu.
• Click the ColorTuner icon in the toolbar.
•Press Apple +T.
• Choose ColorTuner from the arrow menu in the column header.
The first page is processed and the ColorTuner main window appears.
59
ColorTuner processes the job using the following job settings, regardless of the actual
job settings:
•1 copy
•Uncollated
•No staple
•No punch
•No duplex
•No booklet
•Forward page order
•No cover page
Page 60

COLOR TUNING
60
•Save as TIFF Off
•Progressives Off
•Text/Graphics Quality Normal
3 If the changes you want to make have already been saved as a ColorTuner set that is available
on the Splash RPX-i, apply the ColorTuner set.
The ColorTuner set is applied to the entire job, not only the first page. For more information,
see “ColorTuner sets” on page 69.
4 Select the desired color tuning.
For more information, see “ColorTuner color modes” on page 62. Changes you make appear
in the After thumbnail.
You can make color changes even if you have applied a ColorTuner set.
5 Apply one or more filters (optional).
Apply filters after applying color changes. For more information, see “ColorTuner filters” on
page 68.
6 Click Print Proof to print a proof page.
If another job is printing, the proof page prints after it finishes.
7 If you are satisfied with the proof, click Next Page.
ColorTuner processes the next page and displays it in the main window. Color changes from
the previous page are automatically applied to the current page.
8 Repeat step 4 through step 7 until you have color tuned all pages.
9 Click Save & Exit to save the changes to the job and return it to the Hold queue.
At any page, you can click Print End of Job to apply the settings of the current page to the rest
of the pages in the job and print them. The job is then returned to the Hold queue.
If you click Cancel Job before saving, the job reverts to the last saved color tuning or to an
untuned state if no tuning has been saved.
ColorTuner preview
ColorTuner displays Before and After thumbnails, which allow you to view the effect of the
changes you make. This preview is intended to show the relative color change being applied
and is not intended as a proof of the final color. Always use Print Proof to check any changes
you make in ColorTuner.
The preview shows the effect of filters less accurately than for color tuning. You must zoom in
to see the effect of filters. As with color tuning, always proof the printed output.
The ColorTuner main window can be resized. Click the window size control in the upper
right corner to change the window size from small to large or from large to small.
Page 61

COLOR TUNING
ColorTuner tools
ColorTuner tools are accessed through icons in the ColorTuner main window.
Tool Icon Description
Zoom Click the Zoom icon and then click either thumbnail to zoom in.
Color Picker Click the Color Picker icon to change the cursor to an eye
Global RGB Displays the Global Substitution dialog box for RGB values.
61
Option-click either thumbnail to zoom out. Allows 10 levels
of zoom.
dropper. Click the eye dropper in either thumbnail to select a
color. The Color Substitution dialog box appears, allowing you to
modify the color.
NOTE: Use the Zoom tool if necessary to help you pick a color at
a precise location.
Available in Global RGB mode for color jobs.
Global CMYK Displays the Global Substitution dialog box for CMYK values.
Available in Global CMYK mode for color jobs.
Global Gray Displays the Global Substitution dialog box for grayscale values.
Available in Global Gray mode for grayscale jobs.
Select Area Select an area in the thumbnail to apply color changes to. See
“Selecting an area to tune” on page 62.
Move Affects the selected area. Click the Move icon, and then click and
drag the selected area to another location.
Resize Affects the selected area. Click the Resize icon to activate handles
on the selected area, and then click and drag a handle to resize the
area.
Rotate 180 Click to rotate the Before and After thumbnails.
Freeze Global
Change
Click to preserve the current global (CMYK, RGB, or Gray) color
change and then edit an individual color using Direct Substitution
or Smooth Substitution.
Page 62

COLOR TUNING
Selecting an area to tune
When you select an area in the thumbnail, color changes are applied only within that area,
rather than to the entire page. You can select a different area for each color change.
To select an area, click and hold the Select Area icon, and then choose one of the following
shapes:
•Marquee defines a rectangle. Click in the After thumbnail and drag to the opposite corner
to define the rectangle.
• Circle defines an ellipse. Click in the After thumbnail and drag to the opposite corner to
define the ellipse.
• Lasso defines a polygon. Click in the After thumbnail at each vertex of the polygon, and
then double-click or press Return to close the shape.
ColorTuner color modes
62
ColorTuner operates in the following modes:
•Direct Substitution
•Smoothed Substitution
•Global RGB
•Global CMYK
•Global Gray
In Direct Substitution and Smoothed Substitution modes, you can also select spot colors.
Editing in a substitution mode
The substitution mode changes all occurrences of a single color to any other color.
• Direct Substitution changes all occurrences of a single color to any other color, without
constraints. This mode is designed for significant color changes to solid color areas.
Artifacts (color discontinuities) can and will appear if the color change is significant (for
instance, from red to blue or from 100% red to 50% red) and if the color occurs in areas
other than the solid color area.
• Smoothed Substitution changes all occurrences of a single color to any other color. All
colors within a range in CMYK space around the selected color are changed as well. This
feature allows you to adjust a dominant color in the image, such as one endpoint of a
background gradient, while limiting the range of color changes, to prevent discontinuities.
Page 63

COLOR TUNING
TO EDIT COLORS IN DIRECT SUBSTITUTION OR SMOOTHED SUBSTITUTION MODE
1 In the ColorTuner main window, make sure that Direct Substitution or Smoothed Substitution
mode is selected.
2 If you want to restrict the change to a specific region on the page, select an area.
For details, see “Selecting an area to tune” on page 62.
3 Click the Color Picker icon.
4 Click the end of the dropper on the color you want to change.
The corresponding CMYK values appear in the Color Substitution dialog box.
63
5 Enter the desired values in the CMYK fields by clicking the up or down arrows or typing
the numbers.
Color changes are reflected in the After thumbnail. To restore the original color if you have
not yet saved any changes, click Revert.
6 Click OK to save changes and close the dialog.
7 Repeat step 2 through step 6 for all colors you want to change.
TO SUBSTITUTE A PANTONE SPOT COLOR
1 In the ColorTuner main window, make sure that Direct Substitution or Smoothed Substitution
mode is selected.
2 Click the Color Picker icon.
3 Click the end of the dropper on the color you want to change.
The corresponding CMYK values appear in the Color Substitution dialog box.
Page 64
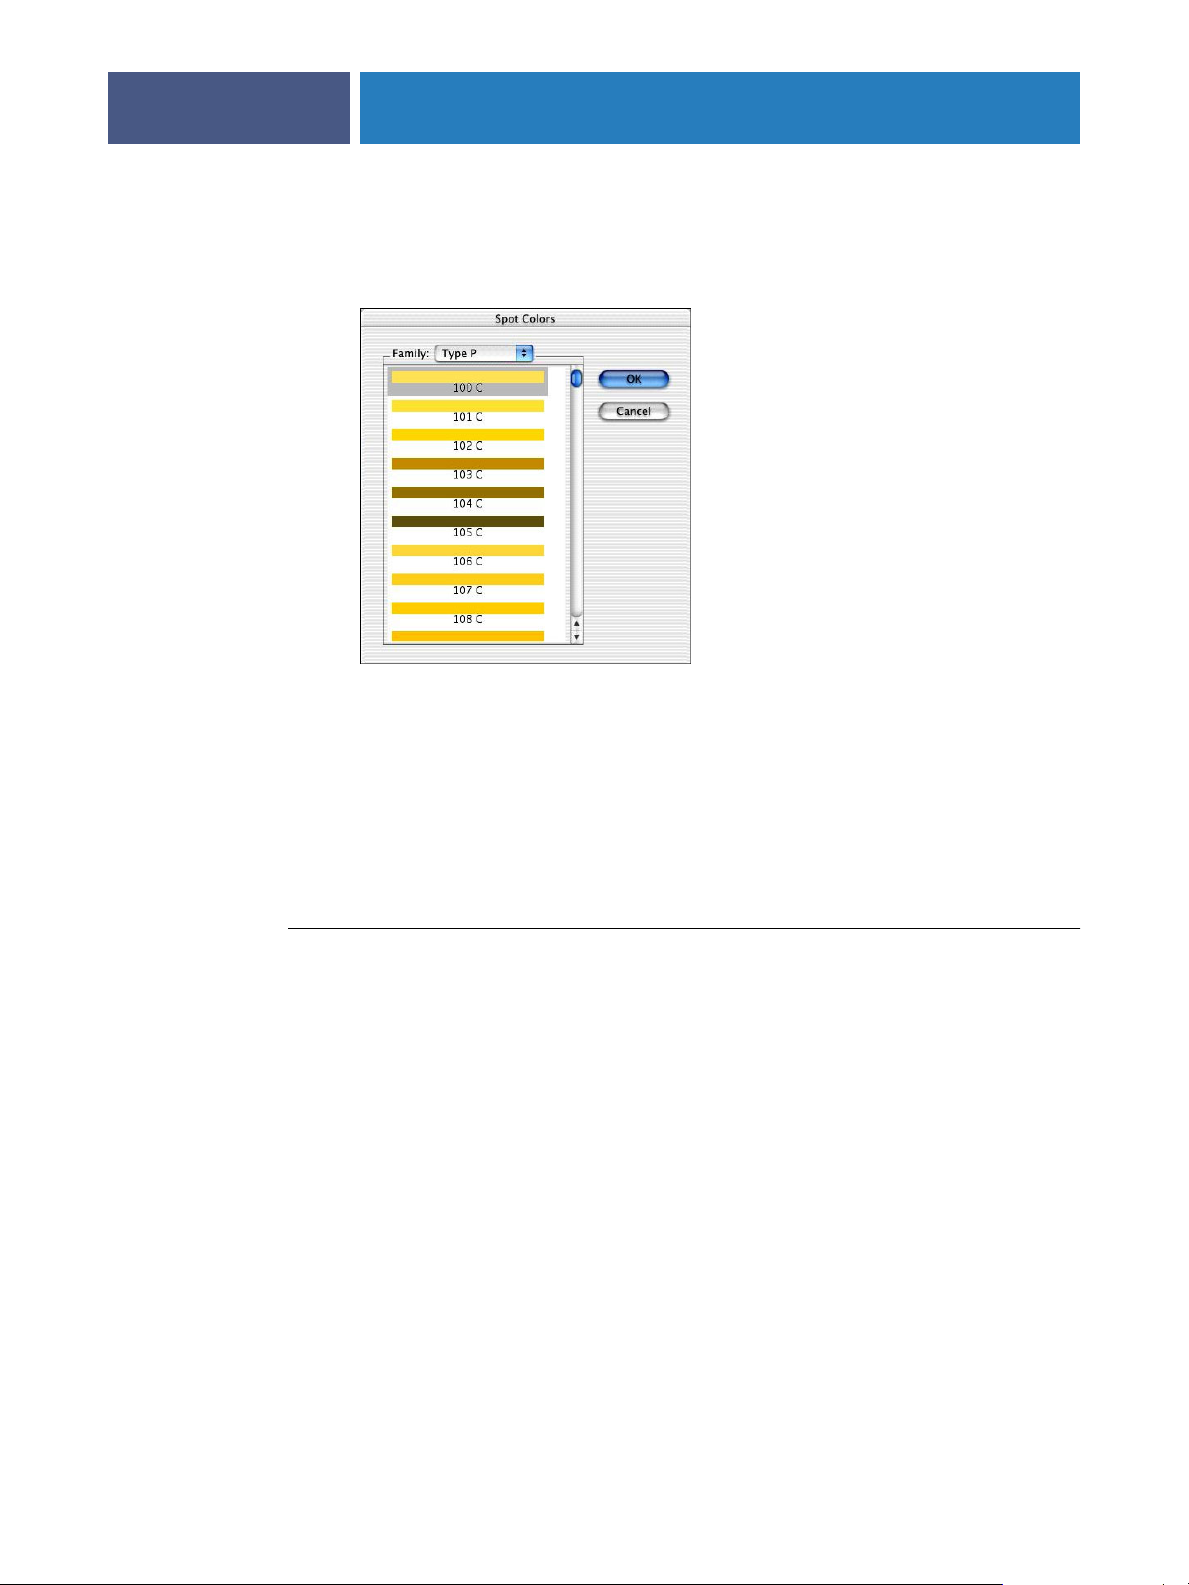
COLOR TUNING
4 Click Spot Colors.
The Spot Colors dialog box appears.
64
5 Select the PANTONE color and click OK.
The PANTONE color name appears below the new color swatch, and the CMYK values of
the PANTONE color appear in the CMYK fields.
6 Click OK to save changes and close the dialog.
The original color is substituted with the PANTONE color.
NOTE: If you modify the CMYK values of a PANTONE color, it changes to a CMYK color
and the PANTONE name disappears.
TO MODIFY A SAVED COLOR SUBSTITUTION
1 In the ColorTuner main window, click Edit Colors to display the Color Substitution dialog box.
NOTE: Do not use the color picker to pick the same color that you have already substituted.
It creates a new substitution rather than modifying the existing one.
2 Select the color substitution from the drop-down list.
All color substitutions that have been saved for the job are listed, numbered in the order they
were created. A color swatch shows the Before and After color values for each substitution.
3 Enter new values in the CMYK fields.
Color changes are reflected in the After thumbnail.
4 Click OK to save changes and close the dialog.
Page 65

COLOR TUNING
TO DELETE A SAVED COLOR SUBSTITUTION
1 Click Edit Colors in the ColorTuner main window to display the Color Substitution dialog box.
2 Select the color substitution from the drop-down list.
All color substitutions that have been saved for the job are listed, numbered in the order they
were created. A color swatch shows the Before and After color values for each substitution.
3 Click Delete and then click OK to confirm.
4 Click OK to close the window.
Editing in a global mode
The global mode changes the values of the underlying color model to affect all color output
on the page.
• Global RGB allows you to manipulate the individual RGB curves to affect all color output
on the page. All colors are affected regardless of the type of source data (RGB or CMYK).
The curve manipulation controls perform the same functions as the ColorCal Expert tool
(see “Editing custom color profiles (Be An Expert)” on page 34).
65
• Global CMYK allows you to manipulate the individual CMYK curves to affect all color
output on the page. All colors are affected regardless of the type of source data (RGB or
CMYK). The curve manipulation controls perform the same functions as the ColorCal
Expert tool (see “Editing custom color profiles (Be An Expert)” on page 34).
• Global Gray allows you to manipulate the grayscale curve to affect a grayscale job.
TO EDIT COLORS IN GLOBAL RGB, GLOBAL CMYK, OR GLOBAL GRAY MODE
1 In the ColorTuner main window, make sure Global RGB, Global CMYK, or Global Gray mode
is selected.
Global RGB mode and Global CMYK mode are available only for jobs printed in color mode.
You can make equivalent changes in either mode.
NOTE: Global Gray mode is available only for jobs printed in grayscale mode.
2 If you want to restrict the change to a specific region on the page, select the area.
See “Selecting an area to tune” on page 62.
Page 66
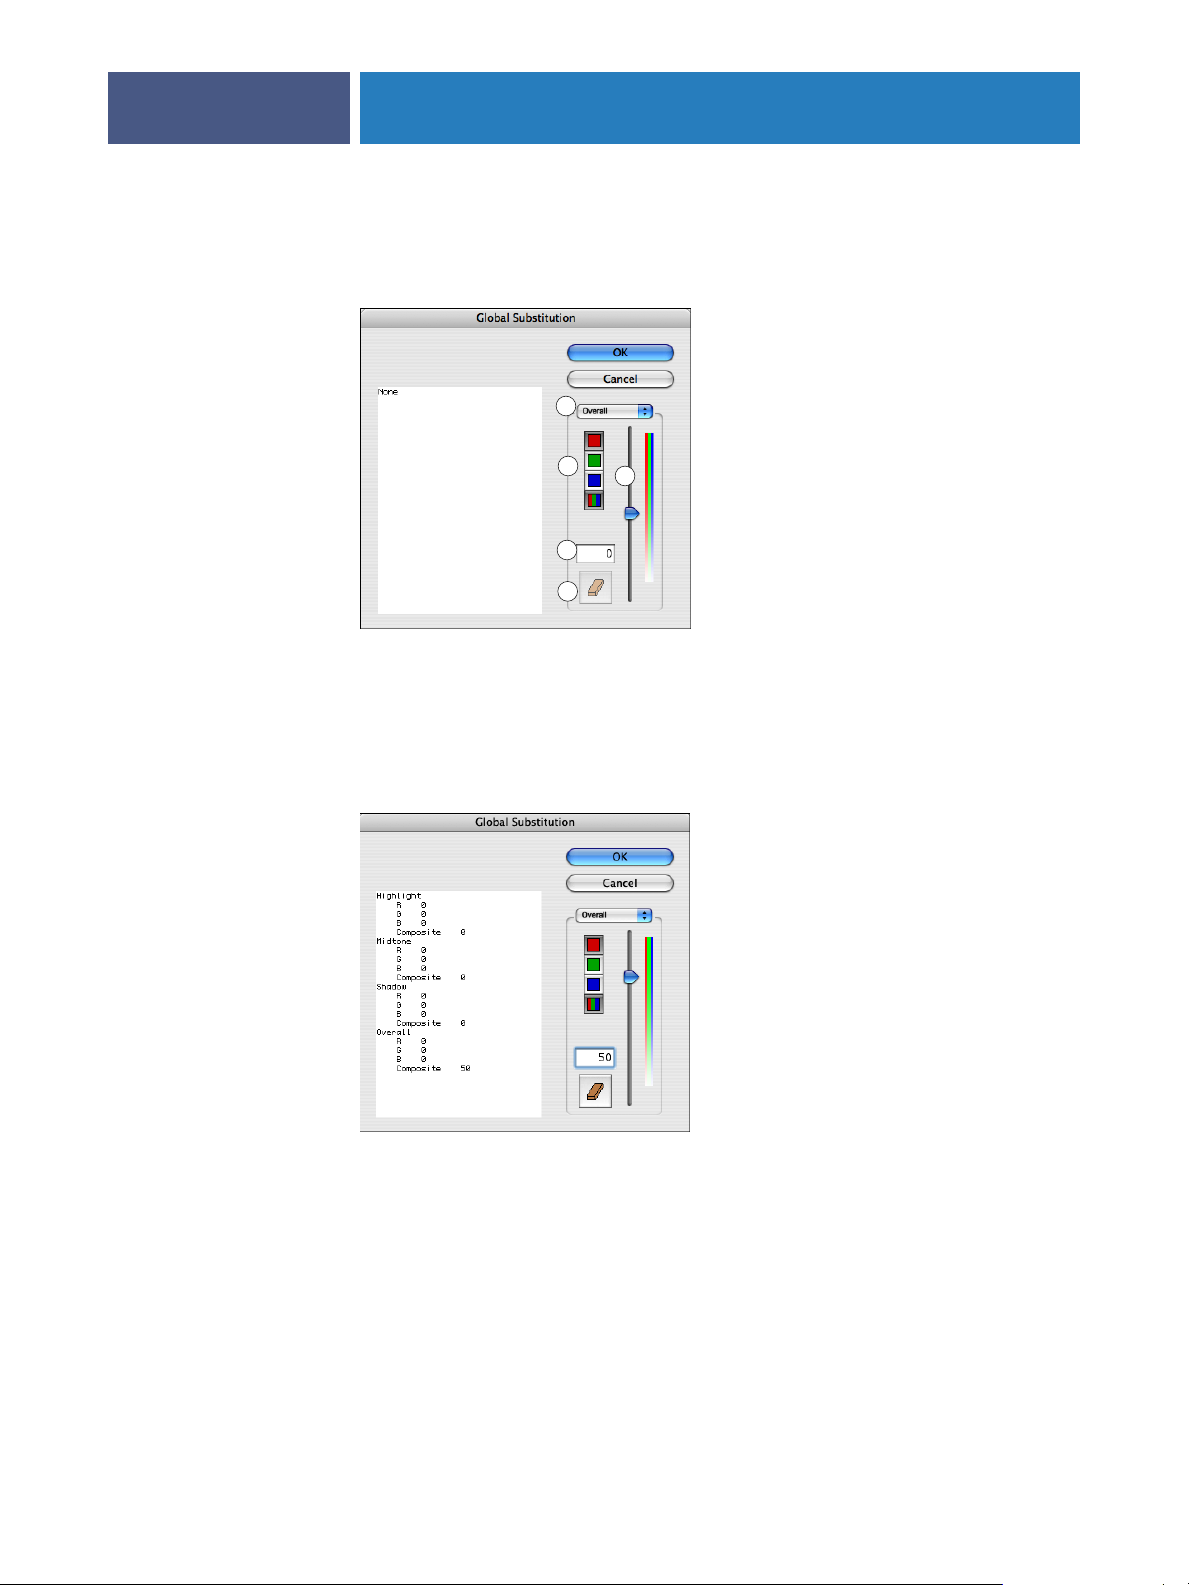
1Tonal range
2 Color channel
3 Slider
4 Numeric value
5Eraser icon (to revert)
COLOR TUNING
3 Click the Global RGB, Global CMYK, or Global Gray icon.
The Global Substitution dialog box appears.
1
2
3
4
5
4 Select a tonal range (Highlight, Midtone, Shadow) or Overall from the drop-down menu.
66
5 Select an individual color channel or the composite of all colors, and move the slider or type
a value directly in the field.
Once you make a modification, a list of the resulting values for all tonal ranges and color
channels appears on the left.
6 Repeat step 4 and step 5 for all tones and colors you want to change.
To revert all changes and reset all tonal ranges and color channels to 0, click the Eraser icon.
7 Click OK to save changes and close the dialog.
Page 67

COLOR TUNING
TO MODIFY A GLOBAL COLOR SUBSTITUTION
1 Click Edit Global Colors in the ColorTuner main window to display the Global Substitution
dialog box.
2 Select the color change from the drop-down list.
All color changes that have been saved for the job are listed, numbered in the order they were
created. When you select a change, a list of the values for all tonal ranges and color channels in
that change appears on the left.
3 Enter new values in the CMYK fields.
Color changes are reflected in the After thumbnail.
4 Click OK to save changes and close the dialog.
TO DELETE A SAVED GLOBAL COLOR SUBSTITUTION
1 Click Edit Global Colors in the ColorTuner main window to display the Global Substitution
dialog box.
67
2 Select the color change from the drop-down list.
All color changes that have been saved for the job are listed, numbered in the order they were
created. When you select a change, a list of the values for all tonal ranges and color channels in
that change appears on the left.
3 Click Delete and then click OK to confirm.
4 Click OK to close the window.
Combining global and substitution modes
Global color changes and individual color substitution can be used in combination on the
same page. Apply global color changes first, and then freeze those changes while editing
individual colors.
TO EDIT COLORS USING BOTH GLOBAL AND SUBSTITUTION MODES
1 Make sure Global RGB, Global CMYK, or Global Gray mode is selected.
2 Click the Global RGB, Global CMYK, or Global Gray icon.
3 Edit colors as described in “To edit colors in Global RGB, Global CMYK, or Global Gray mode”
on page 65.
4 Click the Freeze Global Change icon in the tool bar.
5 Edit colors as described in “To edit colors in Direct Substitution or Smoothed Substitution
mode” on page 63.
NOTE: Finalize any global color changes before applying individual color substitutions.
To modify a global color change after you have applied substitutions, you must delete all
the substitutions first, modify the global color change, and then re-create the substitutions.
Page 68

COLOR TUNING
ColorTuner filters
ColorTuner provides a number of predefined filters that you can apply to create special effects
or correct problems in print jobs. Apply a filter after you have made color substitutions and
global color changes. Once you apply a filter, you cannot make any further color changes.
The following filters are provided:
• Add Noise produces a rotogravure effect or enhance copier output over large
constant areas
• Blur smooths “noisy” or low-resolution print jobs
• Gaussian Blur smooths “noisy” or low-resolution print jobs
• Sharpen enhances detail in sections of a print job
• Sharpen Edges enhances detail in sections of a print job
• Unsharp Mask enhances detail in sections of a print job
68
TO APPLY A FILTER TO A JOB
1 Click Apply Filter in the ColorTuner main window.
The Filters dialog box appears.
2 Select a filter from the list.
3Move the Filter Adjustment slider to the right to increase the effect of the filter, or move it to
the left to decrease the effect of the filter.
4 Click OK to save changes and close the dialog box.
TO CHANGE THE FILTER(S) APPLIED TO A JOB
1 Click Edit Applied Filters in the ColorTuner main window.
The Filter List dialog box appears.
2 If more than one filter has been applied, select the one you want to edit from the
drop-down list.
3 Change the filter selection or the slider value, or click Delete and OK to remove the filter.
4 Click OK to save changes and close the dialog box.
Page 69

COLOR TUNING
ColorTuner sets
To apply the color changes from one job to another, save the current color changes in a job
as a set and then apply the set to the other job. The set is saved independently from the job,
whether or not you save the color tuning of the job.
The following buttons in the ColorTuner main window allow you to save and apply
ColorTuner sets.
• Save Set saves color tuning changes as a ColorTuner set with the name you specify.
This option is not available if no color changes have been made in a job.
• Apply Set selects a ColorTuner set and applies it to the job. You can apply further edits to
the job in addition to the ColorTuner set. This option is available on the first page of a job
only, when no color changes have been made or all color changes have been deleted or
reverted. For a grayscale job, only ColorTuner sets that contain grays are available. For a
color job, only ColorTuner sets that contain colors are available.
NOTE: If a ColorTuner set contains color changes that apply to selected areas rather than the
entire page, undesirable results may occur if you apply the set to a job that has a different page
size or orientation from the original job.
69
You can copy ColorTuner sets from one Splash RPX-i to another using the Import and Export
features in the main Splash RPX-i window. You can also delete ColorTuner sets from the
Splash RPX-i.
TO EXPORT A COLORTUNER SET
1 Choose ColorTuner Sets > Export Set from the File menu.
2 Select the set to export and click Export.
3 Enter the file name, browse to the location for the file, and then click Export.
4 Click Done to close the window.
TO IMPORT A COLORTUNER SET
1 Choose ColorTuner Sets > Import Set from the File menu.
2Browse to the file, select it, and then click Import.
The ColorTuner set is imported. If it has the same name as an existing set, “copy” is appended
to its name.
TO DELETE A COLORTUNER SET
1 Choose ColorTuner Sets > Delete Set from the File menu.
2 Select the set to delete and click Delete.
3 Click Delete again to confirm the deletion.
4 Click Done to close the window.
Page 70

COLOR TUNING
ColorTuner job options
You can control the color tuning for a job from the Splash RPX-i main window, without
opening the ColorTuner application.
•To delete any color tuning applied to a job, select the job and choose Clear ColorTuner
from the Jobs menu.
•To apply a ColorTuner set to a job, select the job and choose Apply ColorTuner Set from
the Jobs menu.
•To turn the color tuning of a job on or off, select the job, choose Edit Job from the Jobs
menu, and then select or clear the Apply ColorTuner option in the Quality tab. This
option does not delete the color tuning.
70
Page 71

SPOT COLOR EDITOR
SPOT COLOR EDITOR
This chapter describes how to edit spot colors on the Splash RPX-i. The Spot Color Editor
allows you to edit the output of existing spot colors and add new spot colors, ensuring that the
spot colors produced by the Splash RPX-i match those of particular printing devices. The
Spot Color Editor can also substitute patterns for spot colors, allowing you to use special
effects, such as metallic textures, for selected colors.
Editing spot colors
The Splash RPX-i includes the following spot color families:
Family type Family name
71
PPANTONE Coated, PANTONE Metallic, and PANTONE Pastels
UPANTONE Uncoated
D DIC
TToyo
HK, HN, HE, HZ HKS
The Splash RPX-i also includes a family for custom spot colors, called Custom. The Custom
family is empty initially. You can add custom spot colors to it.
For optimal results, make sure the copier is calibrated before adding or editing spot colors.
Use caution when editing spot colors. No constraints are imposed on the changes that you
make, so editing the original values of a color or substituting an EPS that looks very different
from the original color can result in significant changes to the output of your file.
Page 72
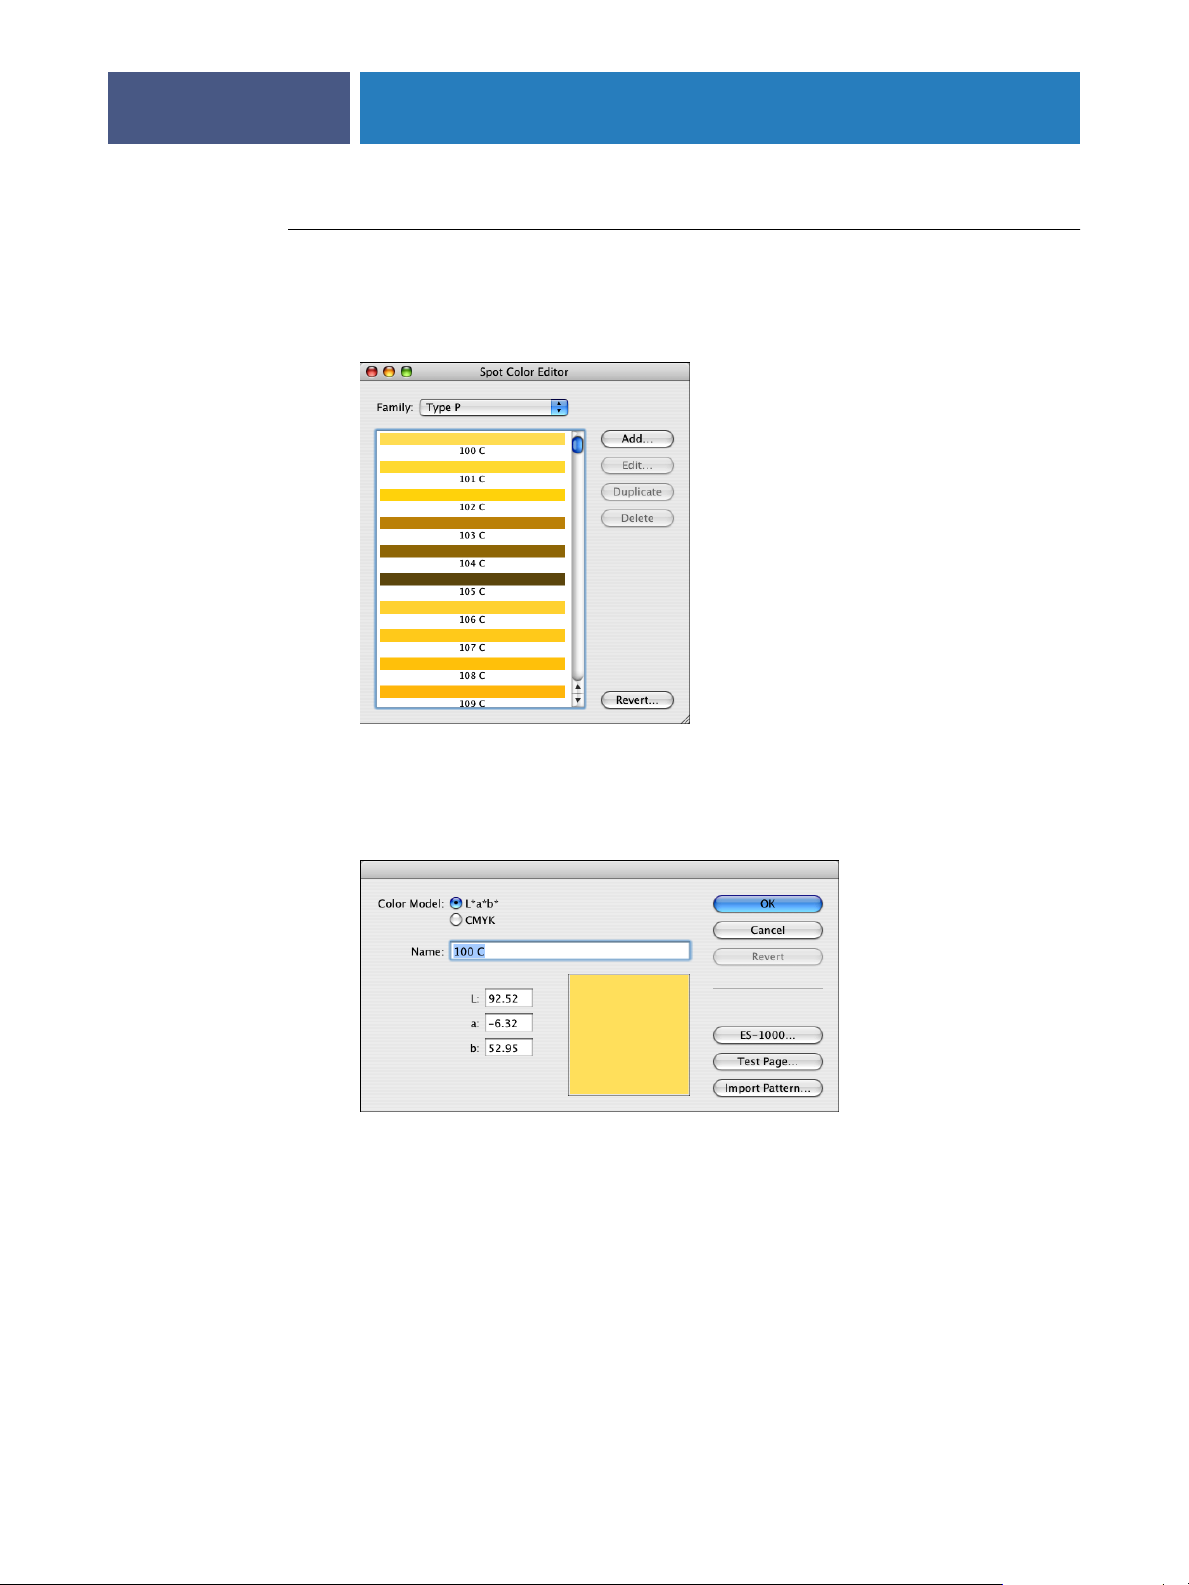
SPOT COLOR EDITOR
TO EDIT A SPOT COLOR
1 In the Splash RPX-i main window, choose Spot Color Editor from the Server menu.
The Spot Color Editor dialog box appears.
72
2 Choose a spot color family from the Family list.
3 Double-click a spot color within the family or select the color and click Edit.
The Edit dialog box appears.
4To enter numerical values for the color, choose a color model and edit the values in the
CMYK or L*a*b* fields.
Editing the CMYK values can provide a more intuitive means of editing colors than directly
editing L*a*b* values. It can also help to identify out-of-gamut spot colors (those with a
C, M, Y, or K value of 0 or 100). These colors do not output accurately.
NOTE: If you switch from L*a*b* to CMYK and back, there might be slight changes to the
original L*a*b* values, especially if the color is outside of the copier gamut.
Page 73

SPOT COLOR EDITOR
5To substitute an EPS pattern for a spot color, click Import Pattern and browse for the file.
Substituting a pattern is useful in creating special effects, such as metallic textures. The size of
the EPS is limited to 2" x 2". The pattern is mirrored and repeated across areas larger than
the EPS.
NOTE: Spot color patterns only appear in composite files, not in separations.
To change to a different pattern, or to change back from a pattern to a spot color, remove the
current pattern first.
6To sample a color with the ES-1000 spectrometer, click ES-1000 and follow the on-screen
instructions.
You can use the ES-1000 to sample a color from a physical object, such as a printed color
document. This option is available only if the ES-1000 is installed and connected to the
Splash RPX-i. The measurement is taken in L*a*b* values.
7To print a Test Page, click Test Page, enter a grid value, and then click OK.
Verify results by printing a test page and examining the middle patch. The test page prints
with the corresponding L*a*b* values shown, not the CMYK values.
73
TO ADD A SPOT COLOR
1 In the Splash RPX-i main window, choose Spot Color Editor from the Server menu.
2 Choose a spot color family from the Family list and click Add.
3Type a name for the color.
4 Enter L*a*b* or CMYK values in the fields, import an EPS pattern, or use an ES-1000 to
sample a color.
For more information, “To edit a spot color” on page 72.
5 Click OK.
TO DELETE A SPOT COLOR
1 In the Splash RPX-i main window, choose Spot Color Editor from the Server menu.
2 Choose a spot color family from the Family list.
3 Select the spot color and click Delete.
4 Click OK to confirm the deletion.
Page 74

SPOT COLOR EDITOR
TO DUPLICATE A SPOT COLOR
1 In the Splash RPX-i main window, choose Spot Color Editor from the Server menu.
2 Choose a spot color family from the Family list.
3 Select the spot color and click Duplicate.
The Spot Color Editor creates a copy of the color, adding “copy” to the name. You can then
edit the name and values of the new spot color.
Renaming a spot color
To change the name of a spot color, select the color, click Edit, and then type a new name.
The new name must match the name used in the application that defines the spot color. Use
caution when changing the name of a factory spot color because the standard name might be
referred to by many documents.
74
Reverting spot color changes
The Spot Color Editor allows you to revert changed colors back to the original factory settings
by clicking Revert. To revert only a selected color, select the Selected Color option in the
Revert dialog box. To revert the entire family, select the Selected Family option. Reverting the
entire spot color family changes any edited spot colors back to their original values and deletes
any new colors added to the family. Use caution when reverting the entire family.
Page 75

INDEX
INDEX
75
A
Apply ColorTuner option 52
Auto Trapping option 52
AutoGray calibration 30
C
calibration
AutoGray 30
ColorCal 23
profile sets 32
Splash Proof 31
verifying with ColorCal 29
calibration curve 34
Calibration Warning preference 57
CMYK color management off 48
CMYK Press Profile option
define settings 16
description 48
CMYK profile
definition 10
import 16
overriding 56
standard 14
color management
ColorSync 21
Splash 9
third-party 21
Color Mode option
See Printer Mode option
Color Model option 46
Color Postflight option 55
color preferences on server 56
color settings
server preferences 56
update 44
color substitution
delete 65
modify 64
color tuning options for a job 70
ColorCal
calibration 23
preferences 33
ColorSync color management 21
ColorTuner
apply ColorTuner set 70
area selection 62
combining modes 67
delete color tuning 70
filters 68
global modes 65
job options 70
preview 60
procedure 59
sets 69
settings for processing job 59
substitution modes 62
turn color tuning on and off 70
CopyCal
printer emulation 19
profile as press profile 46
custom profile 34
Custom Setup for RGB Profile option 47
D
delete custom profile 13
Direct Substitution mode 62
Dynamic Image Enhancement option 51
E
edit profile 34
ES-1000 spectrometer
spot color 73
white point 37
example color print options 57
export profile 12
F
Freeze Global Change 67
G
Gamma setting 47
Global CMYK mode 65
global color substitution
delete 67
modify 67
Global Gray mode 65
Page 76

INDEX
76
global modes in ColorTuner 65
Global RGB mode 65
Gloss Level option 55
Gradient Smoothing option 52
Graphics Edge Enhancement option 51
Grayscale As K in CMYK preference 57
I
ICC profile 10
import
CMYK profile 16
output profile 18
profile 11
Invert Image option 54
L
Load Output Profile 18
M
Match Spot Colors option 49
Media Type for Output Profile 17
Mirror Image option 55
O
options
accessing 39
Apply ColorTuner 52
Auto Trapping 52
CMYK Press Profile 48
Color Model 46
Color Postflight 55
Dynamic Image Enhancement 51
Gloss Level 55
Gradient Smoothing 52
Graphics Edge Enhancement 51
Invert Image 54
Match Spot Colors 49
Mirror Image 55
Output Profile 50
Overprint Black 49
Prepress Features 53
Preserve Original GCR 49
Press Simulation 48
Print In Own Color 54
Print Info Strip 54
Print Progressives 54
Printer Mode 46
Rendering Style 49
RGB Profile 46
Save as TIFF 55
Separations 53
Show Composite Overprints 51
Splash Color 46
Splash Extras options 53
Splash Proof 52
Text/Graphics Quality 51
Use Black Ink Only 49
output profile
definition 10
import 18
Output Profile option
about 50
Printer’s default 16
Overprint Black option 49
Override CMYK Profiles preference 56
Override RGB Profiles preference 56
P
preferences
Calibration Warning 57
ColorCal 33
Grayscale As K in CMYK 57
Override CMYK Profiles 56
Override RGB Profiles 56
Progressives 57
server 56
Prepress Features 53
Preserve Original GCR option 49
press profile
definition 10
standard 14
Press Simulation option 48
preview
ColorTuner 60
custom profile 38
Print In Own Color option 54
Print Info Strip option 54
Print Progressives option 54
Printer Mode for Output Profile selection 17
Printer Mode option 46
profile
CMYK profile 10
CopyCal 19
delete 13
editing 34
export 12
ICC 10
import 11
output 10
Page 77

INDEX
77
press 10
preview 38
RGB profile 10
Profile Loader 16
profile sets 32
Progressives preference 57
R
Rendering Style option 49
RGB color management off 47
RGB profile
definition 10
standard 46
RGB Profile option 46
S
Save as TIFF option 55
Separations option 53
server preferences 56
Show Composite Overprints option 51
simulation profile
See press profile
Smoothed Substitution mode 62
Splash Color options
in job on server 43
in printer driver 40
on server 42
Splash Extras 53
Splash Proof
calibration 31
option 52
Splash Quality options 51
spot color
add 73
color families 71
delete 73
rename 74
substitution 63
Spot Color Editor
CMYK values 72
procedure 71
substitution modes in ColorTuner 62
U
update color settings 44
Use Black Ink Only option 49
V
Verify Accuracy 29
W
white point
custom profile 36
RGB custom setup 47
T
Text/Graphics Quality option 51
third-party color management 21
Two Way Communication
CMYK press profile settings 15, 48
output profile settings 50
update color settings 44
Page 78

 Loading...