

Page 1

Quick Reference Guide
604P18210
MAXIMISE YOUR PRODUCTIVITY...
...by taking advantage of all the capabilities of your device. A
T raining and Information CD was supplied with your product.
The CD provides animated tutorials and interactive screens.
When installed on your network it will always be available to
everyone, or load it on your hard drive for easy access.
Page 2

Prepared by:
Xerox
GKLS European Operations
Bessemer Road
Welwyn Garden City
Hertfordshire
AL7 1HE
ENGLAND
©2005 by Xerox Corporation. All rights reserved.
Copyright protection claimed includes all forms and matters of copyrighted material and informa tion
now allowed by statutory or judicial law or hereinafter granted, inclu ding without limitations, material
generated from the software programs which are displayed on the screen, such as icons, screen
displays, looks etc.
All Xerox products mentioned in this publication are trademarks of Xerox Corporation. Product
names and trademarks of other companies are hereby acknowled
The information in this document is correct at the time of publication. Xerox reserves the right at any
time to change the information without notice. Changes and technical updates will be added in
subsequent editions of the documentation. For the latest information go to www.xerox.com.
ged.
Page 3

Contents
1 Welcome.................................................................................1-1
Introduction................................................................................................1-2
Additional Resources.... ... ... .... ... ... ... ... .... ... ... ... .........................................1-3
System Administration CD (CD1).................................................................1-3
Training and Information CD (CD2) .............................................................1-3
Utilities CD (CD3).........................................................................................1-3
Conventions ...............................................................................................1-4
Orientation....................................................................................................1-4
Overview of Features at the Machine.......................................................1-6
Overview of Features at the Workstation ................................................1-8
Safety ..........................................................................................................1-9
Introduction ..................................................................................................1-9
Electrical Supply............................... ..........................................................1-10
Operator Accessible Areas ........................................................................1-10
Maintenance...............................................................................................1-10
WARNING - Electrical Safety Information..................................................1-11
Laser Safety Information.................................. ... .... ... ... ... .... ... ... ... ... .... ... ...1-12
Operational Safety Information ..................................................................1-12
Maintenance Information............................................................................1-13
Ozone Safety Information ..........................................................................1-13
For Consumables.......................................................................................1-14
Radio Frequency Emissions ......................................................................1-14
Product Safety Certification........................................................................1-14
Regulatory Information............................................................................1-15
CE Mark........... .......................................... .......................................... ... ...1-15
Europe........................................................................................................1-16
Environmental Compliance.....................................................................1-17
USA............................................................................................................1-17
Canada.......................................................................................................1-17
Product Recycling and Disposal ................................................................1-18
European Union.........................................................................................1-18
North America............................................................................................1-18
Other Countries.........................................................................................1-18
Quick Reference Guide Page i
Page 4

2 Product Overview ................................................................. 2-1
Introduction................................................................................................2-2
CopyCentre.................................................................................................2-3
CopyCentre Options ....................................................................................2-3
WorkCentre.................................................................................................2-6
WorkCentre Options ...................... ... ... ... ... .... ... ... ... .... .................................2-6
WorkCentre Pro..........................................................................................2-9
WorkCentre Pro Options................ ... ... ... ... .......................................... .... ... .2-9
Finishing Devices ........................ ... ... ... ... .... ... ... ... .... ...............................2-13
3 Getting Started...................................................................... 3-1
Control Panel Overview.............................................................................3-2
Power On or Off ........................... ... ... ... ... .......................................... .... ... .3-3
Loading Paper............................................................................................3-4
Making Copies............................................................................................3-5
Sending an Embedded Fax.......................................................................3-6
Sending a Server Fax ................................................................................3-7
Sending an Internet Fax ............................................................................3-8
Scanning a Document to a File.................................................................3-9
Sending an E-mail....................................................................................3-10
Printing from a PC ...................................................................................3-11
Sending a LAN Fax ..................................................................................3-12
Printing with Internet Services ...............................................................3-13
Logging On / Logging Off .......................................................................3-14
Customising your Machine.....................................................................3-15
Further Assistance ..................................................................................3-16
4 Copy....................................................................................... 4-1
Copy............................................................................................................4-2
Basic Copying....................... ... .... ... ... ... .......................................... ... ........4-3
Output..........................................................................................................4-4
2-Sided.........................................................................................................4-6
Reduce/Enlarge...........................................................................................4-7
Paper Supply ............................. .... ... ... ... ... .... ... ... ... .....................................4-8
Image Adjustment....................................................................................4-10
Image Quality.............................................................................................4-11
More Image Quality................. ... .... ... ... ... .......................................... ... .... ..4-12
Bound Originals ................................ .........................................................4-13
Page ii Quick Reference Guide
Page 5

Edge Erase ................................................................................................4-14
Original Input..............................................................................................4-15
Image Shift.................................................................................................4-16
Output Format..........................................................................................4-17
Transparencies ..........................................................................................4-18
Booklet Creation............................ ... ... ... .... ... ... ... .... ... ... ... ..........................4-19
Multi-Up......................................................................................................4-20
Invert Image........... ... .... ... ... ... .... ... ... ..........................................................4-21
Covers........................................................................................................4-22
Annotation..................................................................................................4-23
Job Assembly...........................................................................................4-25
Build Job ....................................................................................................4-26
Sample Set.................................................................................................4-27
Stored Programming..................................................................................4-28
Inserts ........................................................................................................4-29
5 Fax...........................................................................................5-1
Fax...............................................................................................................5-2
Basic Faxing - Embedded Fax......... ... .... ... ... ... .... ... ... ... .... ... ... ... ... .... ... ... ..5-4
Dialing Options.............................................................................................5-5
Resolution....................................................................................................5-7
Sides Scanned.... ... ... .... .......................................... ... ... ... .... ... ... ... ... ............ 5-8
Image Adjustment... ...................................................................................5-9
Image Quality.............................................................................................5-10
Original Input..............................................................................................5-11
Bound Originals............................. ... ... .......................................................5-12
Added Fax Features.................................................................................5-14
Fax Sending Features................................................................................5-14
Fax Reports................................................................................................5-20
Mailboxes...................................................................................................5-21
Dial Directory Setup...................................................................................5-22
Advanced Fax Features.............................................................................5-23
Basic Faxing - Server Fax .......................................................................5-26
Dialling Options..........................................................................................5-27
Resolution..................................................................................................5-28
Sides Scanned.... ... ... .... .......................................... ... ... ... .... ... ... ... ... ..........5-29
More Fax Features ...................................................................................5-30
Image Quality.............................................................................................5-31
More Image Quality....................................... ... ... .... ... ... ... .... ... ... ... .............5-32
Original Input..............................................................................................5-33
Delayed Send.............................................................................................5-34
Authentication Mode................................................................................5-35
Quick Reference Guide Page iii
Page 6

6 Internet Fax............................................................................ 6-1
Internet Fax.................................................................................................6-2
Send:............................................................................................................6-3
Entering an E-mail Address for Internet Fax................................................6-4
Basic Settings .................................................... ... .... ... ..............................6-6
Sides Scanned........................ ... .... ... ... ... ... .... ... .......................................... .6-7
Original Type................................................................................................6-8
Advanced Settings.....................................................................................6-9
Image Quality.............................................................................................6-10
More Image Quality................. ... .... ... ... ... .......................................... ... .... ..6-11
Original Input..............................................................................................6-12
Resolution..................................................................................................6-13
Quality / File Size.......................................................................................6-14
Options .....................................................................................................6-15
File Format........................ ... ... .......................................... ... .... ... ...............6-16
Acknowledgment Report............................................................................6-17
Reply To.....................................................................................................6-18
Message Body ...........................................................................................6-18
Authentication Mode ...............................................................................6-19
7 Network Scanning................................................................. 7-1
Scan ............................................................................................................7-2
Scanning Resources...................... ... ... ... .......................................... ... .... ... .7-2
Network Scanning......................................................................................7-3
Repositories.................................................................................................7-4
Template Overview......................................................................................7-4
Template Destinations .................................................................................7-5
Destination Details.......................................................................................7-6
Basic Settings .................................................... ... .... ... ... ...........................7 -7
2 Sided Scanning....................... .... ... ... ... ... .... ... ... ........................................7-8
Original Type................................................................................................7-9
Scan Presets.............. ... .......................................... .... ... ... .........................7-10
Advanced Settings...................................................................................7-11
Image Quality.............................................................................................7-12
More Image Quality................. ... .... ... ... ... .......................................... ... .... ..7-13
Original Input..............................................................................................7-14
Edge Erase ................................................................................................7-15
Resolution..................................................................................................7-16
Quality / File Size.......................................................................................7-17
Options .....................................................................................................7-18
Document Name........................................................................................7-19
If File Already Exists ..................................................................................7-19
Page iv Quick Reference Guide
Page 7

File Format....... .......................................... ... ... ... .......................................7-20
Document Management Fields..................................................................7-21
Add File Destinations.................................................................................7-21
Build Job ....................................................................................................7-22
Refresh Destinations ...............................................................................7-23
Authentication Mode................................................................................7-24
8 E-mail...................................................................................... 8-1
E-mail ..........................................................................................................8-2
Send:............................................................................................................8-3
Address List .................................................................................................8-4
Entering an E-mail Address .........................................................................8-4
Basic Settings ................................... ... .... ... ... ... .... .....................................8-7
2 Sided Scanning.......... ... ... ... .... ... ... .......................................... ... ... .... ... ... ..8-8
Original Type................................................................................................8-9
Scan Presets.................................... ... ... .......................................... .... ... ...8-10
Advanced Settings...................................................................................8-11
Image Quality.............................................................................................8-12
More Image Quality....................................... ... ... .... ... ... ... .... ... ... ... .............8-13
Original Input..............................................................................................8-14
Edge Erase ................................................................................................8-15
Resolution..................................................................................................8-16
Quality / File Size.......................................................................................8-17
Options......................................................................................................8-18
File Format....... .......................................... ... ... ... .......................................8-19
Secure Send ..............................................................................................8-20
Reply To.....................................................................................................8-21
Message Body ...........................................................................................8-21
Authentication Mode................................................................................8-22
9 Print.........................................................................................9-1
Introduction to Print...................................................................................9-2
Print Driver Features..................................................................................9-3
Control Options............................................................................................9-3
Print Drivers.......................... .... ... ... ... ... .... .......................................... ... ... ..9-4
Paper/Output................................................................................................9-4
Special Pages..............................................................................................9-5
Advanced.....................................................................................................9-6
Image Options..............................................................................................9-6
Layout/Watermark........................................................................................9-7
Quick Reference Guide Page v
Page 8

10 LAN Fax ............................................................................... 10-1
Introduction to LAN Fax..........................................................................10-2
LAN Fax Setup .........................................................................................10-3
Control Options..........................................................................................10-3
Fax Recipients ...........................................................................................10-4
Fax Options................................................................................................10-5
Preferences................................................................................................10-5
11 Maintenance........................................................................ 11-1
Consumables ...........................................................................................11-2
Customer Replaceable Units .....................................................................11-2
Staple Cartridges .......................................................................................11-3
Cleaning the Machine........................ ... ... .......................................... .... ..11-4
Further Assistance ..................................................................................11-5
12 Troubleshooting.................................................................. 12-1
General......................................................................................................12-2
Fault Clearance ........................................................................................12-3
Paper jams........................ ... .......................................... ... ... .... ..................12-3
Document jams..........................................................................................12-3
Xerox Welcome and Support Centre......................................................12-4
Locating the serial number.........................................................................12-4
Troubleshooting Tips ..............................................................................12-5
Power.........................................................................................................12-5
Document Handler.....................................................................................12-5
Paper Handling ........................................................... ... ... ... .... ... ...............12-6
Finisher......................................................................................................12-7
Output Quality............................................................................................12-8
Fax...........................................................................................................12-11
Fault Messages will not clear...................................................................12-11
13 Index...............................................................................Index - i
Page vi Quick Reference Guide
Page 9

1 Welcome
¾ Introduction.....................................................1-2
¾ Additional Resources......................................1-3
¾ Conventions....................................................1-4
¾ Overview of Features at the Machine.............1-6
¾ Overview of Features at the Workstation........1-8
¾ Safety..............................................................1-9
¾ Regulatory Information .................................1-15
¾ Environmental Compliance...........................1-17
Quick Reference Guide Page 1-1
Page 10

Introduction
Welcome to your new Xerox machine.
This Quick Reference Guide provides you with an overview of the features and
options that may be available on your machine. To help you familiarise yourself with
your new machine please refer to:
Chapter 2 Product Overview
Chapter 3 Getting Started
Further chapters within this guide offer additional information on the features and
options available.
For additional assistance at the machine press the Help button. If your machine is
connected to the network, use the CentreWare Help system or click on the Help
button in the Print Driver.
NOTE: The graphic representations of the Touch Screen displayed throughout this
Quick Reference Guide are based on a fully configured WorkCentre
appearance of the Touch Screens may differ slightly on other configurations.
However, feature descriptions and functionality as described remain the same.
Pro. The
Page 1-2 Quick Reference Guide
Page 11

Additional Resources
System Administration CD (CD1)
Contained in the CD Pack delivered with your machine, the System Administration
CD (CD1) offers detailed information on configuring your machine for network
printing and instructions on installing any of the optional features.
The System Administration CD (CD1) is intended for System/Machine
Administrators.
Training and Information CD (CD2)
For detailed information on any of the features or functions available on your
machine, please refer to the Training and Information CD (CD2), contained in the
CD Pack delivered with your machine.
The Training and Information CD is intended for all users, including Machine
Administrators. It contains comprehensive information about your new product
including interactive how-to’s and tutorials. To ensure maximum productivity is
gained from your machine, please copy the programme contained on the CD onto
your network so that all users have access.
Utilities CD (CD3)
Contained in the CD Pack, the Utilities CD (CD3) contains a utility for upgrading to
new versions of software on the machine.
NOTE: This CD is not required during installation.
Welcome
Quick Reference Guide Page 1-3
Page 12
Conventions
Throughout this Guide, you will find that some terms are used interchangeably:
¾ Paper is synonymous with media.
¾ Document is synonymous with original.
¾ CopyCentre /WorkC en tr e/ Wo rkC en tr e Pro is synonymous with the machine.
The following pages offer further information about the conven tions used within this
Guide.
Orientation
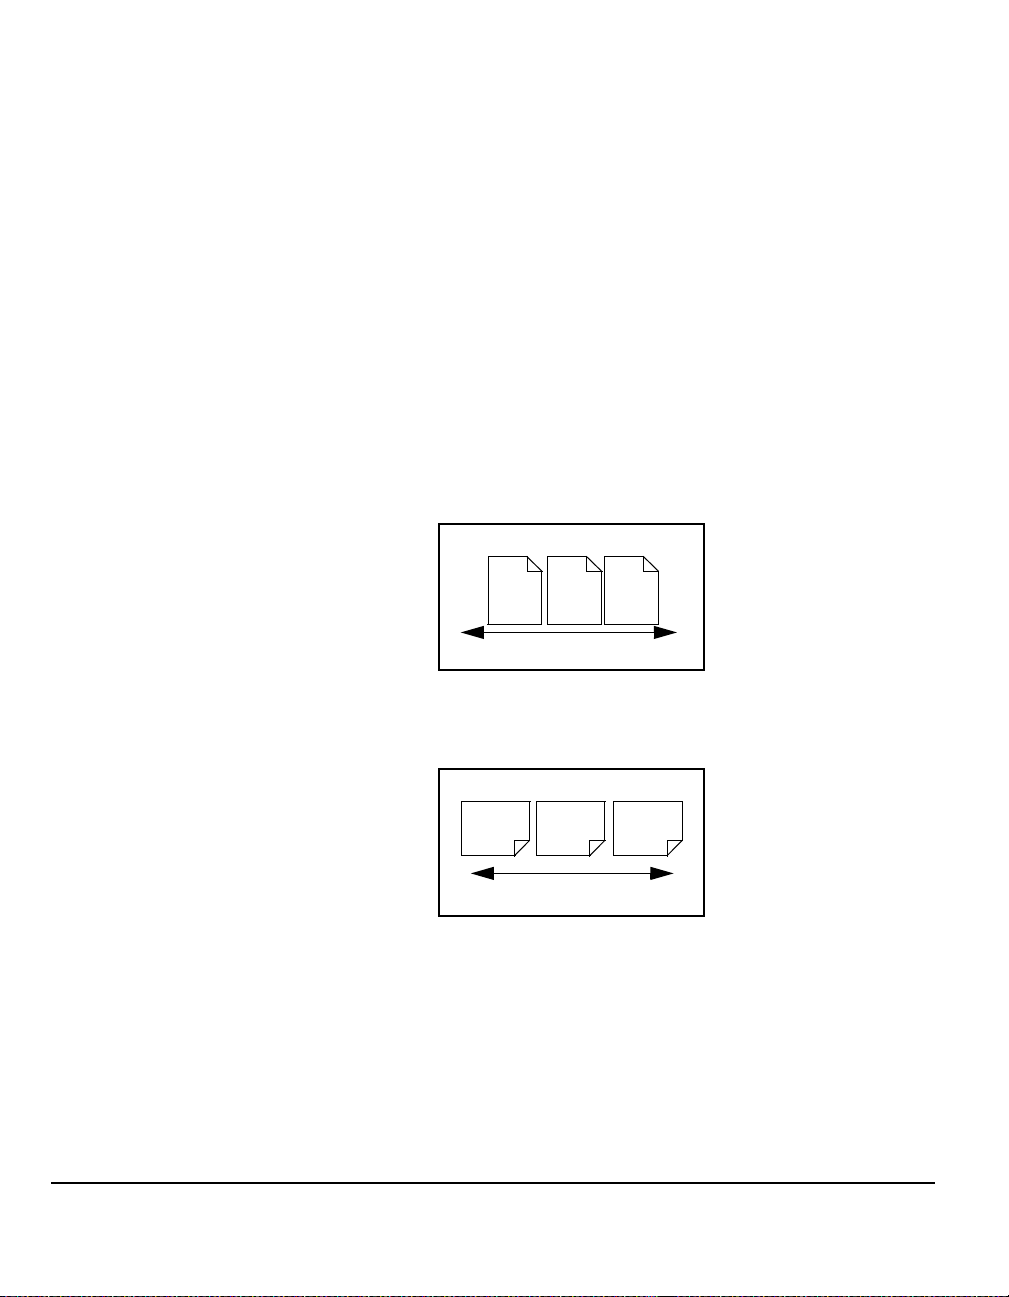
Orientation refers to the direction of images on the page. When the image is upright,
the paper (or other media) can be one of two ways:
Long Edge
Feed (LEF) /
Portrait
When observed from the front of the machine, paper or originals with the long edges
to the left and right of the paper tray or document handler.
LEF Orientation
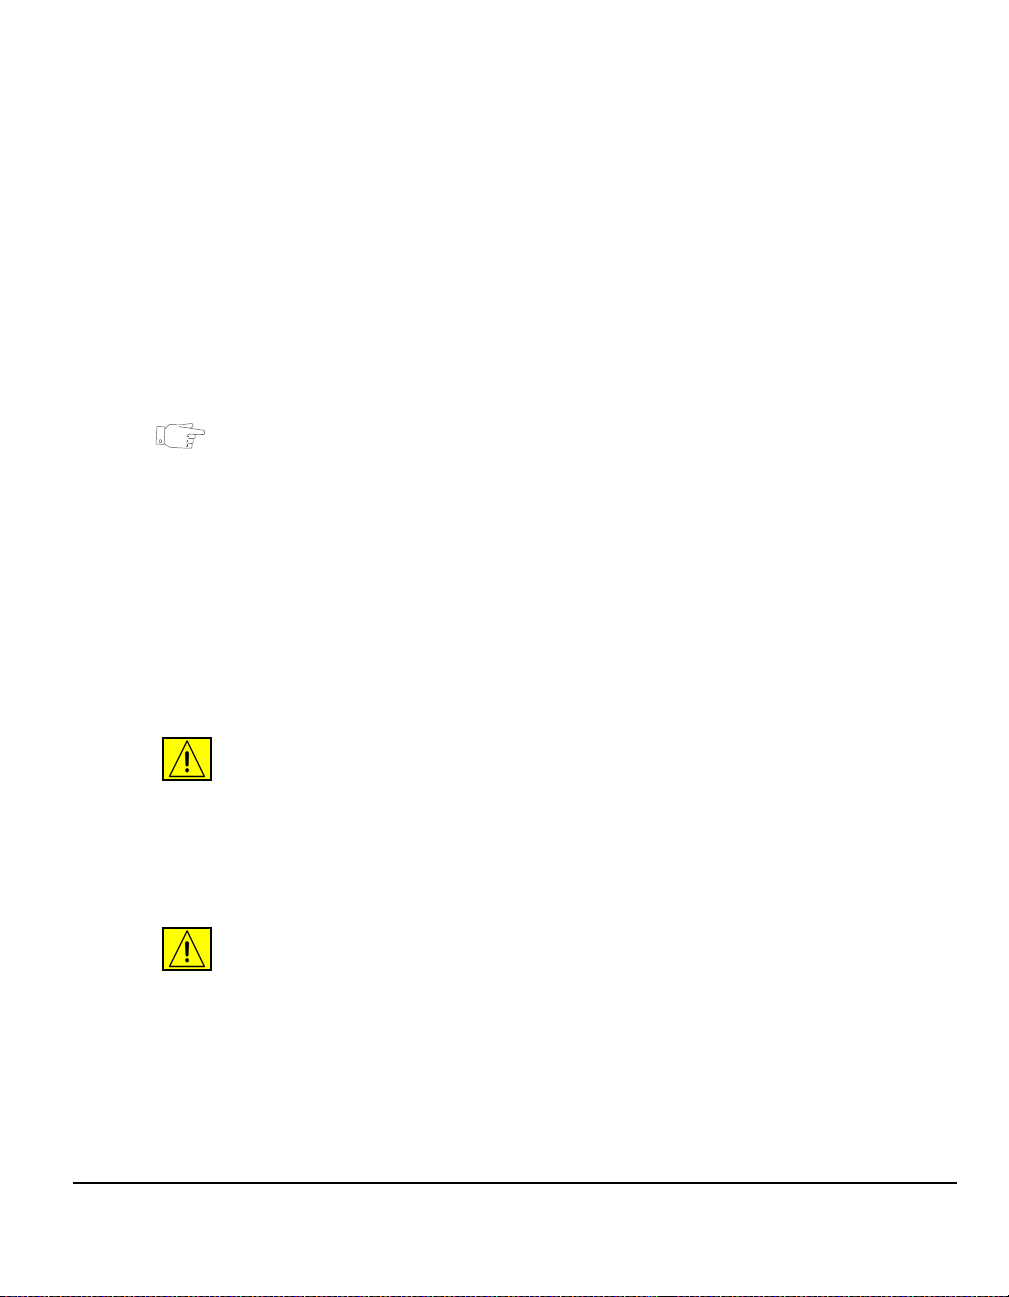
Short Edge
Feed (SEF) /
Landscape
A
A
Paper feed direction
When observed from the front of the machine, paper or originals with the short
edges to the left and right of the paper tray or document handler.
SEF Orientation
A
A
Paper feed direction
Italic typeface
The Italic typeface is used to emphasise a word or phrase. In addition, references
to other publications are displayed in Italic typeface. For example:
- For more information refer to the System Administration CD (CD1), contained
in the CD Pack delivered with your machine.
Page 1-4 Quick Reference Guide
Page 13
Bracket text typeface
The [Bracket Text] type face is used to emphasise the se lection of a feature mode
or button. For example:
¾ Select [Machine Details].
Notes
Notes are statements that provide additional information. For example:
NOTE: Originals must be loaded in the document handler when using this feature.
Hints
Hints help users to perform a task. For example :
HINT: This option is useful for saving toner consumption for images with a dark
background and white text.
Specification note
Offers more in-depth specification information relating to the machine. For example:
Tray 2 holds 500 sheets of 80 g/m
Sizes range from A5 LEF to A3 SEF.
2
paper. Weight ranges from 60 - 200 g/m2.
Cautions
Welcome
Cautions are statements that suggest mechanical damage as a result of an action.
For example:
CAUTION:Use of controls or adjustments or performance of procedures
other than those specified herein may result in hazardous radiation
exposure.
Warnings
Warnings are statements that alert users to the possibility of personal injury. For
example:
WARNING: This product must be connected to a protective earthing circuit.
Quick Reference Guide Page 1-5
Page 14

Overview of Features at the Machine
Using the powerful features available on your machine you can:
Scan Once and Print Many
When making copies your machine only has to scan a document once regardless
of the number of copies needed. This reduces the risk of jams and damage to
originals.
Perform Different Tasks Simultaneously
Your machine performs different tasks simultaneously. A job can be added to the
job queue by scanning it, even while the machine is printing another job.
Make Copies Look Like Originals
Your machine allows the reproduction of high quality images, especially
photographs, graphics, text, or a combination. Compare your output to that from
other copiers and see the difference.
Customise Image Size and Placement
You can manipulate the appearance of the image on the output stock.
- Shift the image to create margins for binding.
- Automatically reduce, enlarge, or centre your images.
- Print multiple reduced images on a single page.
Use Digital Features to Simplify your Work Process
Use the Build Job feature to divide a copy or embedded fax job into different
segments and apply different settings to each of the segments. This allows you to:
- Combine originals from the document glass and the document handler into a
single job.
- Create a single job, using different programming features for each original.
- Feed more than the maximum number of originals through the document
handler without reprogramming.
Use the Transparency feature to produce transparencies with transparency
separators in one step.
Use the Booklet Creation feature to automatically reduce o r enlarge and sequence
the images when making booklets.
Use the Covers feature to automatically add covers to your documents.
Use the Mixed Size Originals feature to copy mixed size originals simultaneously.
Produces copies on uniform size paper or mixed size paper.
Page 1-6 Quick Reference Guide
Page 15

Use the Annotation feature to add a comment, page number or da te to your co py
output.
Be Environmentally Friendly
This product complies with a variety of international standards for environmental
protection and is compatible with most recycled paper.
Scan Documents to Create Electronic Files (Optional)
This feature, available on the WorkCentre Pro, allows you to create electronic files
from your originals which can be:
- Filed on the server.
- Transferred over the network to your desktop.
- Distributed through an e-mail system.
- Automatically placed into a Document Management Application.
- Converted into an electronic digital document which can be edited, managed,
shared and distributed, using a wide variety of softw ar e ap p licat ion s.
Fax Documents (Optional)
The optional Embedded Fax service is a walk up feature that enables you to
transmit and receive hard copy faxes using a telephone network.
The optional Server Fax service is a walk up feature available only on the
WorkCentre Pro. When enabled you will be able to scan your documents and send
them to any type of fax machine that is connected to a telephone network, via your
fax server.
NOTE: Both Embedded and Server Fax can be inst alled on the WorkCentre
the same time, however only one service can be enabled for use.
Pro at
Welcome
The optional Internet Fax service, available only on the WorkCentre Pro, allows
users to transmit and receive documents as an e-mail attachment. This type of fax
travels over the internet or intranet.
Quick Reference Guide Page 1-7
Page 16

Overview of Features at the Workstation
If your machine is connected to a network you can use the following features.
Contact your System Administrator to get connected.
CentreWare Print Drivers
The Print Driver extends the productivity power of your machine to your desktop.
Options include:
• 1-sided or 2-sided
• Collated and stapled sets, depending on the finisher options available on the
machine
• Resolutions up to 1200x1200 dpi
• Adding standard or customised watermarks
• Printing multiple images on one page
CentreWare Tools
The CentreWare software suite also offers optional User Management Tools.
CentreWare Internet Services
A ‘built in’ web Home Page which allows print-ready files to be sent via the World
Wide Web. This feature is accessed via Internet Services.
FreeFlow™ SMARTsend™
The FreeFlow™ SMARTsend™ or FreeFlow™ SMARTsend™ Professional offer
optional Network Scanning tools.
Page 1-8 Quick Reference Guide
Page 17

Safety
Introduction
To ensure you operate the equipment safely please read these safety notes
carefully before using this product
Your Xerox product and recommended supp lies have been designed and tested to
meet strict safety requirements. These include safety agency approval, and
compliance to established environmental stan d ar ds . Pleas e read the follo wing
instructions carefully before operating the product and refer to them as needed to
ensure the continued safe operation of your product.
The safety and environment testing and performance of this product have been
verified using Xerox materials only.
WARNING:Any unauthorised alteration, which may include the addition of
new functions or connection of external devices, may impact the product
certification. Please contact your authorised local dealer for more
information
Warning Markings
All warning instructions marked on or supplied with the product should be followed.
This WARNING alerts users to areas of the product where there is the possibility of
personal injury
This WARNING alerts users to areas of the product where there are heated
surfaces, which should not be touched.
Welcome
Quick Reference Guide Page 1-9
Page 18

Electrical Supply
This product should be operated from the type of electrical supply indicted on the
data plate label located on the rear cover. If you are not sure that your electrical
supply meets the requirements, please consult your local power company for
advice.
WARNING:This product must be connected to a protective earth circuit.
This product is supplied with a plug that has a protective earth pin. This plug will fit
only into an earthed electrical outlet. This is a safety featur e. To avoid risk of electric
shock, contact your electrician to replace the electrical outlet if you are unable to
insert the plug into it. Never use an earthed adapter p lug to co nnect th e pr od uct to
an electrical outlet that lacks an earth connection terminal.
Operator Accessible Areas
This equipment has been designed to provide operator access to safe areas only.
Operator access to hazardous areas is restricted using covers or guards, which
require a tool to enable removal. Never remove these covers or guards.
Maintenance
Any operator maintenance procedures will be described in the customer
documentation supplied with the product. Do not to carry out any maintenance on
this product, which is not described in the customer documentation.
Cleaning Your Product
Before cleaning this product, unplug the product from the electrical outlet. Always
use materials specifically designated for this product, the use of other materials may
result in poor performance and may create a hazardous situation. Do not use
aerosol cleaners, they may be explosive an d flam ma b le un de r ce rta i n
circumstances.
Page 1-10 Quick Reference Guide
Page 19

WARNING - Electrical Safety Information
¾ Use only the power cord supplied with this equipment.
¾ Plug the power cord directly into a grounded electrical outlet. Do not use an
extension cord. If you do not know whether or not an outlet is grounded, consult
a qualified electrician.
¾ This equipment is to be used on an appropriate branch circuit/electrical outlet. If
this machine needs to be moved to a different location, contact a Xerox service
representative or your authorised local representative or service support
organisation.
¾ Improper connection of the equipment-grounding conductor can result in
electrical shock.
¾ Do not place this equipment where people might step on or trip on the power
cord.
¾ Do not place objects on the power cord.
¾ Do not override or disable electrical or mechanical interlocks.
¾ Do not obstruct the ventilation openings.
¾ Never push objects of any kind into slots or openings on this equipment.
¾ If any of the following conditions occur, switch off the power to the machine
immediately and disconnect the power cord from the electrical outlet. Call an
authorised local service representative to correct th e pr ob lem .
- The equipment emits unusual noise or odors.
- The power cord is damaged or frayed.
- A wall panel circuit breaker, fuse, or other safety device has been tripped.
- Liquid is spilled into the copier/printer.
- The equipment is exposed to water.
- Any part of the equipment is damaged.
Welcome
Disconnect Device
The power cable is the disconnect device for this equipment. It is attached to the
back of the machine as a plug-in device. To remove all electrical power from the
equipment, disconnect the power cable from the electrical outlet.
Quick Reference Guide Page 1-11
Page 20

Laser Safety Information
CAUTION:Use of controls, adjustments or performance of procedure other
than those specified herein may result in hazardous light exposure.
With specific regard to laser safety, the equipment complies with performance
standards for laser product set by government, national and intern ational agencies
as a Class 1 laser product. It does not emit hazardous light, as the beam is totally
enclosed during all phases of customer operation and maintenance.
Operational Safety Information
To ensure the continued safe operation of your Xerox equipment, follow these
safety guidelines at all times.
Do These:
¾ Always connect equipment to a correctly grounded power outlet. If in doubt,
have the outlet checked by a qualified electrician.
¾ This equipment must be connected to a protective earth circuit.
¾ This equipment is supplied with a plug that has a protective earth pin. This plug
will fit only into an earthed electrical outlet. This is a safety feature. To avoid risk
of electric shock, contact your electrician to replace the electrical outlet if you are
unable to insert the plug into it. Never use a plug that lacks an earth connection
terminal to connect the product to an electrical outlet.
¾ Always follow all warnings and instructions that are marked on or supplied with
the equipment.
¾ Always exercise care when moving or relocating equipment. Please contact your
local Xerox Service Department, or your local support organ isat ion to ar ra ng e
relocation of the product to a location outside of your building.
¾ Always locate the equipment in an area that has adequate ventilation, and the
room for servicing. See Install guide for minimum dimensions.
¾ Always use materia ls an d su pp lies spe c ifically designed for your Xerox
equipment. Use of unsuitable materials may result in poor performance.
¾ Always unplug this equipment from the electrical outlet before cleaning.
Do Not Do These:
¾ Never use a plug that lacks an earth connection terminal to connect the product
to an electrical outlet.
¾ Never attempt any maintenance function that is not specifically described in this
documentation.
Page 1-12 Quick Reference Guide
Page 21

¾ This equipment should not be placed in a built-in installation unless proper
ventilation is provided, please contact your authorised local dealer for further
information.
¾ Never remove covers or guards that are fastened with screws. There are no
operator serviceable areas within these covers.
¾ Never locate the equipment near a radiator or any other heat source.
¾ Never push objects of any kind into the ventilation openings.
¾ Never override or "cheat" any of the electrical or mechanical interlock devices.
¾ Never operate the equipment if you notice unusual noises or odors. Disconnect
the power cord from the electrical outlet and contact your local Xerox Service
Representative or Service Provider immediately.
Maintenance Information
Do not attempt any maintenance procedure that is not specifically described in the
documentation that is supplied with your copier/printer.
¾ Do not use aeroso l clea ne rs. The use of cleaners that are not approved may
cause poor performance of the equipment, and could create a dangerous
condition.
¾ Use supplies and cleaning materials only as directed in this manual. Keep all of
these materials out of the reach of children.
¾ Do not remove covers or guards that are fastened with screws. There are no
parts behind these covers that you can maintain or service.
¾ Do not perform any maintenance procedures unless you have been trained to do
them by an authorised local dealer or unless a procedure is specifically
described in the user manuals.
Welcome
Ozone Safety Information
This product will produce ozone during normal operation. The ozone produced is
heavier than air and is dependent on copy volume. Providing the correct
environmental parameters as specified in the Xerox installation procedure will
ensure that the concentration levels meet safe limits.
If you need additional information about ozone, please request the Xerox
publication Ozone by calling 1-800-828-6571 in the United States and Canada. In
other markets please contact your authorised local dealer or Service Provider.
Quick Reference Guide Page 1-13
Page 22

For Consumables
Store all consumables in accordance with the instructions given on the pa ckage or
container.
¾ Keep all consumables away from the reach of children.
¾ Never throw toner, toner cartridges or toner containers into an open flame.
Radio Frequency Emissions
United States, Canada, Europe:
NOTE: This equipment has been tested and found to comply with the limits for a
Class B digital device, pursuant to part 15 of the FCC Rules. These limits are
designed to provide reasonable protection against harmful interference in a
residential installation. This equipment generates, uses and can radiate radio
frequency energy and, if not installed and used in accordance with the instructions,
may cause harmful interference to radio communications. However, there is no
guarantee that interference will not occur in a particular installation. If this
equipment does cause harmful interference to radio or television reception, which
can be determined by turning the equipment off and on, the user is encouraged to
try to correct the interference by one or more of the following measures:
- Reorien t or relo ca te the rece ivin g an te nn a .
- Increase the separation between the equipment and receiver.
- Connect the equipment into an outlet on a circuit different from that to which
the receiver is connected.
- Consult the dealer or an experienced radio/TV technician for help.
Shielded interface cables must be used with this equipment to maintain compliance
with FCC regulations in the United States.
Product Safety Certification
This product is certified by the following Agency using the Safety standards listed.
Agency Standard
Underwriters Laboratories Inc UL60950-1 1st (2003) (USA/Canada)
IEC60950-1 Edition 1 (2001)
This product has been manufactured under a registered ISO9001 Quality system.
Page 1-14 Quick Reference Guide
Page 23
Regulatory Information
CE Mark
The CE mark applied to this product symbolizes Xerox's declaration of conformity
with the following applicable Directives of the European Union as of the dates
indicated:
January 1,
1995:
January 1,
1996:
March 9, 1999 Council Directive 99/5/EC on radio equipment and telecommunications terminal
Council Directive 73/23/EEC amended by Council Directive 93/68/EEC,
approximation of the laws of the member states related to low voltage equipment.
Council Directive 89/336/EEC, approximation of the laws of the member states
related to electromagnetic compatibility.
equipment and the mutual recognition of their conformity.
A full declaration of conformity, defining the relevant directives and referenced
standards, can be obtained from your authorised local dealer.
WARNING:In order to allow this equipment to operate in proximity to
Industrial Scientific and Medical (ISM) equipment, the external radiation from
the ISM equipment may have to be limited or special mitigation measures
taken.
WARNING:Shielded interface cables must be used with this product to
maintain compliance with Council Directive 89/336/EEC.
Welcome
Quick Reference Guide Page 1-15
Page 24

Europe
Radio Equipment & Telecommunications Terminal
Equipment Directive
This Xerox product has been self-certified by Xerox for pan-European single
terminal connection to the analogue public switched telephone network (PSTN) in
accordance with Directive 1999/5/EC. The product has been designed to wor k with
the national PSTNs and compatible PBXs of the following countries:
Austria Germany Luxembourg Sweden
Belgium Greece Netherlands Switzerland
Denmark Iceland Norway United Kingdom
France Ireland Portugal Finland
Italy Spain Poland Hungary
Slovakia Slovenia Latvia Lithuania
Estonia Cyprus Malta Czech Republic
In the event of a problem you should contact your local authorised local dealer in
the first instance. This product has been tested to and is compliant with TBR21, a
specification for terminal equipment for use on analogue-switched telephone
networks in the European Economic Area. The product may be configured to be
compatible with other country networks. Please contact your authorised local dealer
if it needs to be reconnected to another country's network. There are no useradjustable settings in the product.
Page 1-16 Quick Reference Guide
Page 25

Environmental Compliance
USA
Canada
Welcome
Energy Star
As an ENERGY STAR partner, Xerox Corporation has determined that (th e ba sic
configuration of) this product meets the ENERGY STAR guidelines for energy
efficiency.
The ENERGY STAR and ENERGY STAR MARK are registered United States
trademarks.
The ENERGY STAR Office Equipment Program is a team effort between U.S.,
European Union and Japanese governments and the office equipment industry to
promote energy-efficient copiers, printers, fax, multifunction machine, personal
computers, and monitors. Reducing product energy consumption helps combat
smog, acid rain and long-term changes to the climate by decreasing the emissions
that result from generating electricity.
Xerox ENERGY STAR equipment is preset at the factory to enter a “low power"
state and/or shut off completely after a specified period of use. These energy-saving
features can reduce product energy consumption in half when compared to
conventional equipment.
Environmental Choice
Terra Choice Environmental Serviced, Inc. of Canada has verified that this product
conforms to all applicable Environmental Choice EcoLogo requirements for
minimized impact to the environment.
As a participant in the Environmental Choice program, Xerox Corporation has
determined that this product meets the Environmental Choice guidelines for energy
efficiency.
Environment Canada established the Environmental Choice program in 1988 to
help consumers identify environmentally responsible products and services.
Copier, printer, digital press and fax products must meet energy efficiency and
emissions criteria, and exhibit compatibility with recycled supplies. Currently,
Environmental Choice has more than 1600 approved produ cts and 140 licensees.
Xerox has been a leader in offering EcoLogo approved products.
Quick Reference Guide Page 1-17
Page 26

Product Recycling and Disposal
If you are managing the disposal of your Xerox produ ct, please note that the product
contains lead, mercury and other materials whose disposal may be regulated due
to environmental considerations in certain countries or states. The presence of lead
and mercury is fully consistent with global regulations applicable at the time that the
product was placed on the market.
European Union
Application of this symbol on your equipment is confirmation that you must dispose
of this equipment in compliance with agreed national procedures.
In accordance with European legislation end of life electrical and electronic
equipment subject to disposal, must be managed within agreed procedures.
Prior to disposal please contact your loca l dealer or Xerox repr esentative for end of
life take back information.
North America
Xerox operates an equipment take back and re u se/ re cycle program. Contact your
Xerox sales representative (1-800-ASK-XEROX) to determine whether this Xerox
product is part of the programme. For more information about Xer ox environmental
programmes, visit www.xerox.com/environment or for recycling and disposal
information, contact your local authorities. In the United States, you may also refer
to the Electronic Industries Alliance web site: www.eiae.org.
Other Countries
Please contact your local waste authorities and request disposal guidance.
Page 1-18 Quick Reference Guide
Page 27

2 Product Overview
¾ Introduction.....................................................2-2
¾ CopyCentre.....................................................2-3
¾ WorkCentre.....................................................2-6
¾ WorkCentre Pro..............................................2-9
¾ Finishing Devices..........................................2-13
Quick Reference Guide Page 2-1
Page 28

Introduction
Your new machine is not simply a conventional copier, it is a digital device capable
of copying, faxing, printing and scanning, dependent on your model and
configuration.
There are three models available:
¾ CopyCentre - A stand-alone digital device capable of copying and faxing
(optional). The copying function provides all the features available on
conventional copiers, with the added advantages of digital copier technology. A
fax kit can also be purchased to enable faxing.
¾ WorkCentre - A multi-functional digital device capable of copying, printing and
faxing (optional).
¾ WorkCentre Pro - An advanced multi-functional device offering a high
specification of features and functions. This model is capable of copying,
printing, faxing (optional) and scanning (optional).
Each model has six configurations available which provide either 32, 38, 4 5, 55, 65
or 75 copies/prints a minute.
All configurations are fully upgradable so as to meet any future requirements you
may have. Please contact your local Xerox representative for further information.
For further assistance in identifying your model, configuration and the additional
options available please refer to the relevant pages.
NOTE: All features and functions described within this Quick Reference Guide
relate to a fully configured WorkCentre Pro and may not be available on your
machine. If you require further information on any of the optional components, or
information on any of the other machine configurations please contact your local
Xerox representative.
Page 2-2 Quick Reference Guide
Page 29
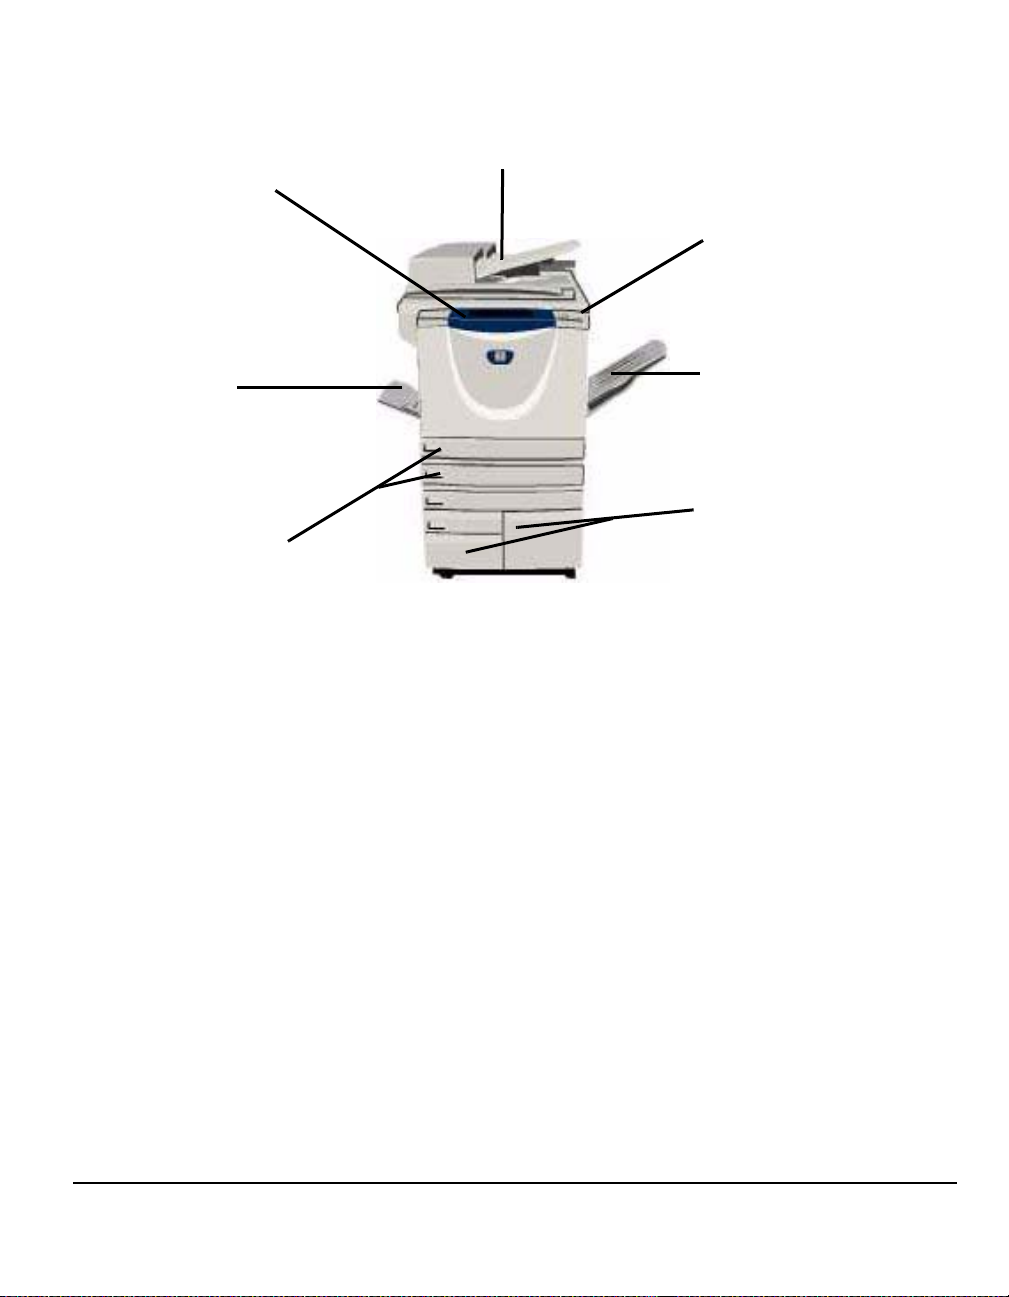
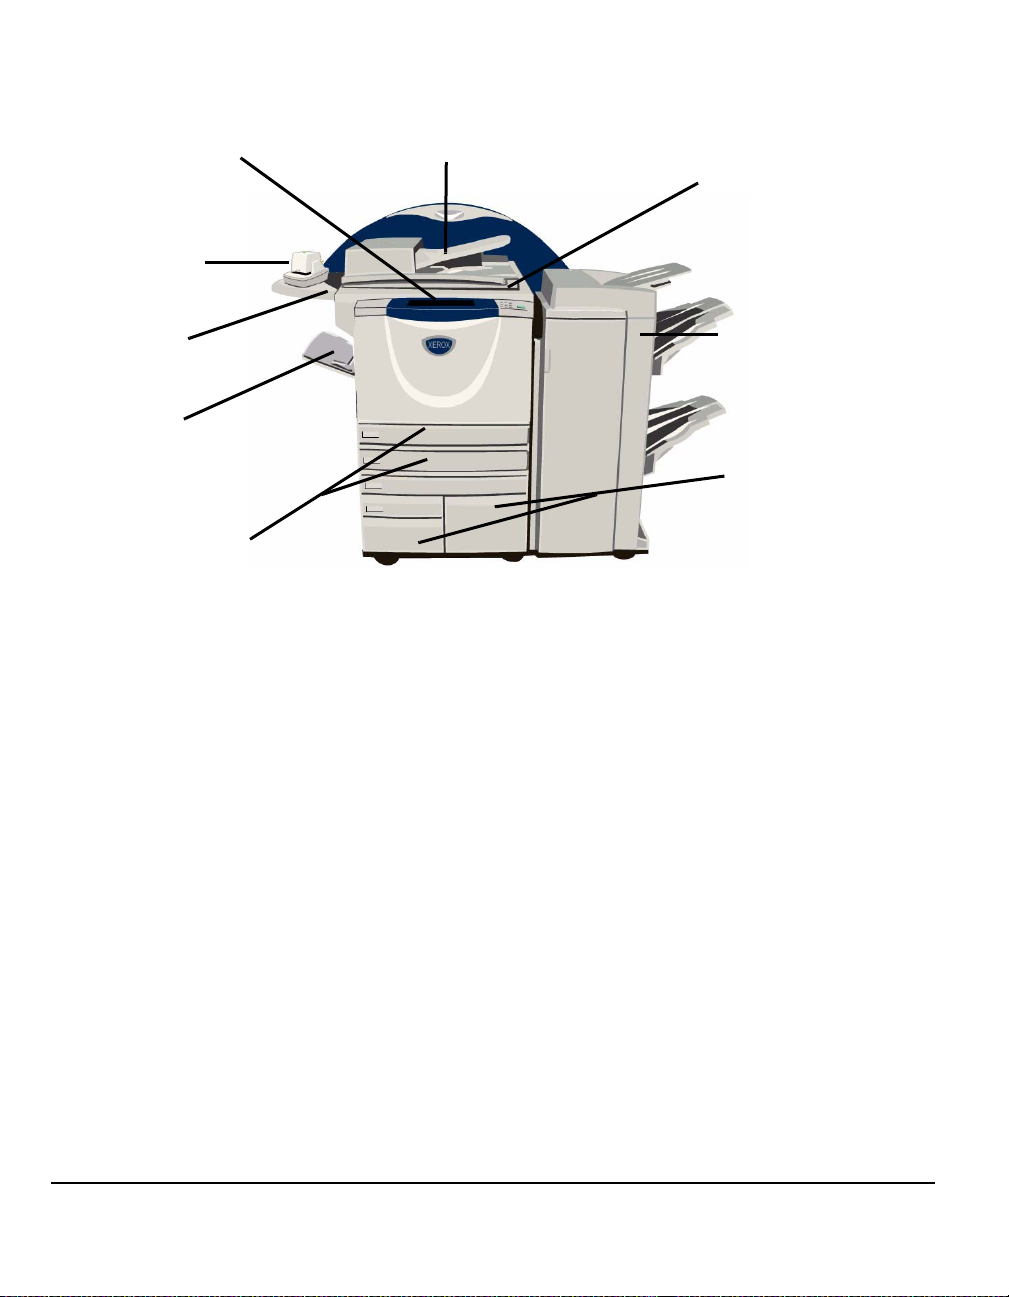
CopyCentre
Control Panel
Document Handler
(Touch Screen and
Numeric Keypad)
Bypass Tray
(folds up when not
in use)
Paper Trays 1 & 2
CopyCentre Options
The following options are available for the CopyCentre:
NOTE: To identify which options are compatible with your machine configuration,
please refer to “Option Compatibility” on page 2-5.
Document
Glass Cover
A flat hinged cover for the document glass. Fitted instead o f the docume nt handler.
Document Glass
(under the Document
Handler)
Offset Catch
Tray
High Capacity Feeder
(Paper Trays 3 & 4)
Product Overview
Document
Handler
High Capacity
Feeder
Offset Catch
Finisher There are 4 finisher types available:
Quick Reference Guide Page 2-3
Feeds up to 75 single or double sided documents. Documents from A5 to A3 can
be fed. Fitted instead of the document cover.
Holds paper trays 3 and 4. Both trays have a larger capacity than trays 1 and 2,
therefore reducing the number of times you need to replace paper in the machine.
Delivers output either face up or face down, collated or uncol lated. Each set or stack
Tray
will be offset from the previous to enable easy separation. Fitted instead of a
finisher.
- Basic Office Finisher
- Office Finisher
- Advanced Office Finisher
- Professional Finisher
Page 30

To identify your finisher type and for more information about e ach finisher, refer to
“Finishing Devices” on page 2-13.
Your chosen finisher is fitted instead of the Offset Catch Tray.
Hole Punch This option is available if your machine is equipped with any of the three finishers
fitted with a Hole Punch. The kits available are 2 Hole, 4 Hole or Swedish 4 Hole.
Each sheet is punched individually, so there is no limit to the number of sheets in
the set. Additional Hole Punch kits can be purchased as an option, although only
one kit can be fitted at one time.
Convenience
Stapler
Up to 50 sheets of 80g/m
Stapler. The staple cartridge holds 5000 staples.
2
paper can be stapled manually using the Convenience
NOTE: The Convenience Shelf must be fitted to your machine before the
Convenience Stapler can be installed.
Envelope Tray This tray is inserted inside paper tray 2 to enable envelope printing. Up to 55 C10
envelopes can be loaded in the tray.
Basic Fax Kit
(Embedded)
Extended Fax
Kit
(Embedded)
Foreign
Interface
Device
256MB
Electronic Pre-
Collation
(EPC) Memory
This kit enables a single telephone line connection. Basic Fax, also referred to as
Embedded Fax, will scan your documents and send them to most types of fax
machine connected to a telephone network. The images are sent from your
machine directly to the fax number entered. This type of fax uses normal teleph one
lines to transmit data and standard telephone rates will apply.
Enables two telephone lines to be attached to the machine. This provides all the
features of the Basic Fax kit plus the capability to send and receive faxes same time.
Enables the attachment of a third party access and accounting device, such as a
card swipe or coin operated unit.
Additional temporary storage area for scanned information.
Page 2-4 Quick Reference Guide
Page 31

Option Compatibility
CopyCentre
Option 32 38 45 55 65 75
Document Glass Cover zzz ---
Document Handler
High Capacity Feeder
Offset Catch Tray
Basic Office Finisher
Office Finisher
{{{
{{{{
{{{{{{
{{{
{{{{{{
Advanced Office Finisher---Professional Finisher
2 Hole Punch Kit
4 Hole Punch Kit
Swedish 4 Hole Punch Kit
Convenience Stapler & Shelf
Envelope Tray
Basic Fax Kit
Extended Fax Kit
Foreign Interface Device
Additional 256MB Electronic
{{{{{{
{{{{{{
{{{{{{
{{{{{{
{{{{{{
{{{{
{{{{{{
{{{{{{
{{{{{{
{{{{
Pre-Collation (EPC) Memory
zzz
zz
---
{{
--
zz
Product Overview
Key: z Standard { Optional - Not Available
Quick Reference Guide Page 2-5
Page 32
WorkCentre
Control Panel
(Touch Screen and
Numeric Keypad)
Convenience
Stapler
Convenience
Shelf
Bypass Tray
(Folds up when
not in use)
Paper Trays 1 & 2
WorkCentre Options
The following options are available for the WorkCentre:
NOTE: To identify which options are compatible with your machine configuration,
please refer to “Option Compatibility” on page 2-8.
Document Handler
Document Glass
(under the Document
Handler)
Advanced Office
Finisher
High Capacity
Feeder
(Paper Trays 3 & 4)
Document
Glass Cover
Document
Handler
High Capacity
Feeder
Offset Catch
Finisher There are 4 finisher types available:
Page 2-6 Quick Reference Guide
A flat hinged cover for the document glass. Fitted instead o f the document ha ndler.
Feeds up to 75 single or double sided documents. Documents from A5 to A3 can
be fed. Fitted instead of the document cover.
Holds paper trays 3 and 4. Both trays have a larger capacity than trays 1 and 2,
therefore reducing the number of times you need to replace paper in the machine.
Delivers output either face up or face down, collated or uncol lated. Each set or stack
Tray
will be offset from the previous to enable easy separation. Fitted instead of a
finisher.
- Basic Office Finisher
- Office Finisher
- Advanced Office Finisher
Page 33

- Professional Finisher
To identify your finisher type and for more information about each finisher, refer to
“Finishing Devices” on page 2-13.
Your chosen finisher is fitted instead of the Offset Catch Tray.
Hole Punch This option is available if your machine is equipped with any of the three finishers
fitted with a Hole Punch. The kits available are 2 Hole, 4 Hole or Swedish 4 Hole.
Each sheet is punched individually, so there is no limit to the number of sheets in
the set. Additional Hole Punch kits can be purchased as an option, although only
one kit can be fitted at one time.
Convenience
Stapler
Up to 50 sheets of 80g/m
Stapler. The staple cartridge holds 5000 staples.
2
paper can be stapled manually using the Convenience
NOTE: The Convenience Shelf must be fitted to your machine before the
Convenience Stapler can be installed.
Envelope Tray This tray is inserted inside paper tray 2 to enable envelope printing. Up to 55 C10
envelopes can be loaded in the tray.
Product Overview
Basic Fax Kit
(Embedded)
Extended Fax
Kit
(Embedded)
Foreign
Interface
Device
Xerox
Standard
Accounting
Image
Overwrite
Security
256MB
Electronic Pre-
Collation
(EPC) Memory
This kit enables a single telephone line connection. Basic Fax, also referred to as
Embedded Fax, will scan your documents and send them to most types of fax
machine connected to a telephone network. The images are sent from your
machine directly to the fax number entered. This type of fax uses normal telephone
lines to transmit data and standard telephone rates will apply.
Enables two telephone lines to be attached to the machine. This provides all the
features of the Basic Fax kit plus the capability to send and receive faxes same time.
Enables the attachment of a third party access and accounting device, such as a
card swipe or coin operated unit.
A tool which can be used by administrators to track the number of Copy, Print,
Network Scanning, Server Fax and Embedded Fax jobs for each user, provided
these services are installed on the machine. Usage limits can be applied to users
and the administrator can print a report which contains all Xerox Standard
Accounting data.
A security feature which provides On Demand Image Overwrite and Immediate
Image Overwrite. Both features offer the ability to overwrite the machine’s hard disk
to protect classified or private information.
Additional temporary storage area for scanned information.
Quick Reference Guide Page 2-7
Page 34

Option Compatibility
WorkCentre
Option 32 38 45 55 65 75
Document Glass Cover zzz ---
Document Handler
High Capacity Feeder
Offset Catch Tray
Basic Office Finisher
Office Finisher
{{{
{{{
{{{{{{
{{{
{{{{{{
Advanced Office Finisher---Professional Finisher
2 Hole Punch Kit
4 Hole Punch Kit
Swedish 4 Hole Punch Kit
Convenience Stapler
{{{{{{
{{{{{{
{{{{{{
{{{{{{
{{{{{{
Convenience Shelf zzzzzz
Envelope Tray
Basic Fax Kit
Extended Fax Kit
E-mail
{{{{
{{{{{{
{{{{{{
{{{{{{
Xerox Standard Accounting zzzzzz
Foreign Interface Device
Image Overwrite Security
Additional 256MB Electronic
{{{{{{
{{{{{{
{{{{
Pre-Collation (EPC) Memory
zzz
zzz
---
{{
--
zz
Key: z Standard { Optional - Not Available
Page 2-8 Quick Reference Guide
Page 35

WorkCentre Pro
Control Panel
(Touch Screen and
Numeric Keypad)
Convenience
Shelf
Bypass Tray
(Folds up when
not in use)
Paper Trays 1 & 2
Document Handler
High Capacity Feeder
(Paper Trays 3 & 4)
Document Glass
(under the Document
Handler)
Product Overview
Professional
Finisher
Booklet Maker
Tray
WorkCentre Pro Options
The following options are available for the WorkCentre Pro:
NOTE: To identify which options are compatible with your machine configuration,
please refer to “Option Compatibility” on page 2-12.
Document
Handler
High Capacity
Feeder
Offset Catch
Finisher There are 4 finisher types available:
Quick Reference Guide Page 2-9
Feeds up to 75 single or double sided documents. Documents from A5 to A3 can
be fed. Fitted instead of the document cover.
Holds paper trays 3 and 4. Both trays have a larger capacity than trays 1 and 2,
therefore reducing the number of times you need to replace paper in the machine.
Delivers output either face up or face down, collated or uncol lated. Each set or stack
Tray
will be offset from the previous to enable easy separation. Fitted instead of a
finisher.
- Basic Office Finisher
Page 36

- Office Finisher
- Advanced Office Finisher
- Professional Finisher
To identify your finisher type and for more information about each finisher, refer to
“Finishing Devices” on page 2-13.
Your chosen finisher is fitted instead of the Offset Catch Tray.
Hole Punch This option is available if your machine is equipped with any of the three finishers
fitted with a Hole Punch. The kits available are 2 Hole, 4 Hole or Swedish 4 Hole.
Each sheet is punched individually, so there is no limit to the number of sheets in
the set. Additional Hole Punch kits can be purchased as an option, although only
one kit can be fitted at one time.
Convenience
Stapler
Up to 50 sheets of 80g/m
Stapler. The staple cartridge holds 5000 staples.
2
paper can be stapled manually using the Convenience
NOTE: The Convenience Shelf must be fitted to your machine before the
Convenience Stapler can be installed.
Envelope Tray This tray is inserted inside paper tray 2 to enable envelope prin ting. Up to 55 C10
envelopes can be loaded in the tray.
Basic Fax Kit
(Embedded)
This kit enables a single telephone line connection. Basic Fax, also referred to as
Embedded Fax, will scan your documents and send them to most types of fax
machine connected to a telephone network. The images are sent from your
machine directly to the fax number entered.
Extended Fax
(Embedded)
Enables two telephone lines to be attached to the machine. This provides all the
Kit
features of the Basic Fax kit plus the capability to send and receive faxes same time.
LAN Fax Enables a document to be sent to a fax machine that is connected to a telephone
network. The images are sent from the PC directly to the fax number entered.
Server Fax Enables users to send and receive hard copy faxes via a fax server . The images are
sent from your machine to a third party fax server, which relays them to the fax
number entered.
Internet Fax Allows users to send or receive faxes over the internet or intranet.
E-mail Allows an image to be scanned and sent to any valid e-mail address. The scanned
image is sent as an e-mail attachment to the specified recipient(s).
Network
Scanning
Used to scan an original document and convert it into an electronic file. The file can
be distributed and archived in a variety of ways. The final destination of the
electronic file will depend on the scan path chosen by the user.
Network
Accounting
Enables the tracking of machine usage for Print, Copy and Scan jobs from multiple
machines over the network.
Page 2-10 Quick Reference Guide
Page 37

Xerox
Standard
Accounting
A tool which can be used by administrators to track the number of Copy, Print,
Network Scanning, Server Fax and Embedded Fax jobs for each user, provided
these services are installed on the machine. Usage limits can be applied to users
and the administrator can print a report which contains all Xerox Standard
Accounting data.
Foreign
Interface
Device
Image
Overwrite
Security
USB (Universal
Serial Bus)
Printing
256MB
Electronic Pre-
Collation
(EPC) Memory
Enables the attachment of a third party access and accounting device, such as a
card swipe or coin operated unit.
Product Overview
A security feature which provides On Demand Image Overwrite and Immediate
Image Overwrite. Both features offer the ability to overwrite the machine’s hard disk
to protect classified or private information.
Used for printing directly from a PC connected via a USB cable.
Additional temporary storage area for scanned information.
Quick Reference Guide Page 2-11
Page 38

Option Compatibility
WorkCentre Pro
Option 32 38 45 55 65 75
Document Glass Cover -----Document Handler zzzzzz
High Capacity Feeder zzzzzz
Offset Catch Tray
Basic Office Finisher
Office Finisher
Advanced Office Finisher---Professional Finisher
2 Hole Punch Kit
4 Hole Punch Kit
Swedish 4 Hole Punch Kit
Convenience Stapler
Convenience Shelf zzzzzz
Envelope Tray
Basic Fax Kit
Extended Fax Kit
LAN Fax
Server Fax
Internet Fax
E-mail
Network Scanning
Network Accounting
Xerox Standard Accounting zzzzzz
Foreign Interface Device
Image Overwrite Security
USB Printing
Additional 256MB Electronic
Pre-Collation (EPC) Memory
{{{{{{
{{{
{{{{{{
{{{{{{
{{{{{{
{{{{{{
{{{{{{
{{{{{{
{{{{
{{{{{{
{{{{{{
{{{{{{
{{{{{{
{{{{{{
{{{{{{
{{{{{{
{{{{{{
{{{{{{
{{{{{{
{{{{{{
{{{{
---
{{
--
zz
Key: z Standard { Optional - Not Available
Page 2-12 Quick Reference Guide
Page 39

Finishing Devices
Top Tray
Top Tray
Stacker Tray
Stacker Trays
Top Tray
Stacker Tray
Product Overview
Office FinisherBasic Office Finisher
Top Tray
Stacker Tray
Booklet Maker Tray
Advanced Office Finisher Professional Finisher
(with Booklet Maker)
Quick Reference Guide Page 2-13
Page 40

Basic Office
Finisher
Holds up to 250 sheets of paper in the Top Tray, and up to 1000 sheets in the
Stacker Tray.
The Stacker can collate, stack and staple your output, depending on the features
selected.
The staple cartridge for the Basic Office Finisher contains 3000 staples.
NOTE: Double Staple is not available with the Basic Office Finisher.
Office Finisher Holds up to 250 sheets of paper in the Top Tray, and up to 2000 sheets in the
Stacker Tray.
The stacker can collate, stack, staple and hole punch your output dep ending on the
features selected.
The staple cartridge for the Office Finisher contains 5000 staples.
Advanced
Office Finisher
Professional
Finisher
Holds up to 250 sheets of paper in the Top Tray, and up to 1500 sheets in each of
the 2 Stacker Trays.
The Advanced Office Finisher can collate, stack, staple and hole punch your output
depending on the features selected.
The staple cartridge for the Advanced Office Finisher contains 5000 staples.
Holds up to 250 sheets of paper in the Top Tray, and up to 1500 sheets in the
Stacker Tray.
The stacker can collate, stack, staple and hole punch your output dep ending on the
features selected.
The Professional Finisher also incorporates a Booklet Maker which can fold and
staple your output. The Booklet Maker stapler requires 2 staple cartridges, each
containing 2000 staples. The finisher stapler has 1 staple cartridge containing 5000
staples.
Page 2-14 Quick Reference Guide
Page 41

3 Getting Started
¾ Control Panel Overview..................................3-2
¾ Power On or Off..............................................3-3
¾ Loading Paper ................................................3-4
¾ Making Copies................................................3-5
¾ Sending an Embedded Fax ............................3-6
¾ Sending a Server Fax.....................................3-7
¾ Sending an Internet Fax .................................3-8
¾ Scanning a Document to a File.......................3-9
¾ Sending an E-mail ........................................3-10
¾ Printing from a PC ........................................3-11
¾ Sending a LAN Fax.......................................3-12
¾ Printing with Internet Services ......................3-13
¾ Logging On / Logging Off..............................3-14
¾ Customising your Machine............................3-15
¾ Further Assistance........................................3-16
Quick Reference Guide Page 3-1
Page 42

Control Panel Overview
NOTE: The Touch Screen displayed is for a fully configured WorkCentre Pro.
Touch Screen
Displays and selects all the available programming
features, plus fault clearance procedures and general
machine information.
Access
Accesses Tools, used to adjust the defaults of
the machine.
Clear All
Resets all the features to their default settings.
Help
Accesses additional information.
Language
Changes text to an alternative
language.
Features
Displays the job features on the
screen.
Job Status
Displays job progress
information.
Machine Status
Displays the current status of the
machine.
Power Saver Indicator
Indicates when the machine is in
Power Saver Mode.
Asterisk
*
Use to start a DTMF
(Dual Tone Multifrequency)
operation.
Dial Pause
Enters a pause in a
telephone number
when transmitting a
fax.
Interrupt
Temporarily stops the current job to allow a
priority job to be run.
Pause
Temporarily stops the current job.
Start
Starts the job.
Clear
Deletes numeric
values or the last digit
entered.
Hash
Indicates the dialling
character or designates
a group dial number.
Also used when entering
a password.
Page 3-2 Quick Reference Guide
Page 43

Power On or Off
To power ON:
1
¾ Press the [Power] switch. The
entire powering on process (to
power on all installed options) takes
less than 165 seconds.
NOTE: Certain functions of the
machine e.g. copying and scanning
will be available before others.
To power OFF:
2
¾ Press the [Power] switch. A
confirmation screen will appear
requesting a power down
option.
¾ If [Power Down] is selected the Power Down Confirmation screen displays a
warning that data may be lost if the machine is powered down.
3
NOTE: Confirmation of this screen will result in the deletion of any jobs currently in
the queue.
Getting Started
¾ Touch the [Confirm] button to power off the machine.
NOTE: The machine remains on for approximatel y 45 seconds before the power is
terminated.
¾ If [Enter Power Saver Mode] is selected, the machine will immediately enter
the Power Saver Mode appropriate to its configuration. If there are any jobs in
the queue, a second pop-up screen displays.
NOTE: To re-activate the machine when in this mode, touch a button on th e Touch
Screen or control panel.
¾ If [Quick Restart] is selected and confirmed the machine will restart. A pop-up
screen will appear warning that any jobs in the queue will be deleted.
NOTE: Any copy jobs in the queue will be deleted, print jobs in the queue are
recovered.
¾ If [Cancel] is selected the power down options will be cancelled and the
machine will be available for use.
Quick Reference Guide Page 3-3
Page 44
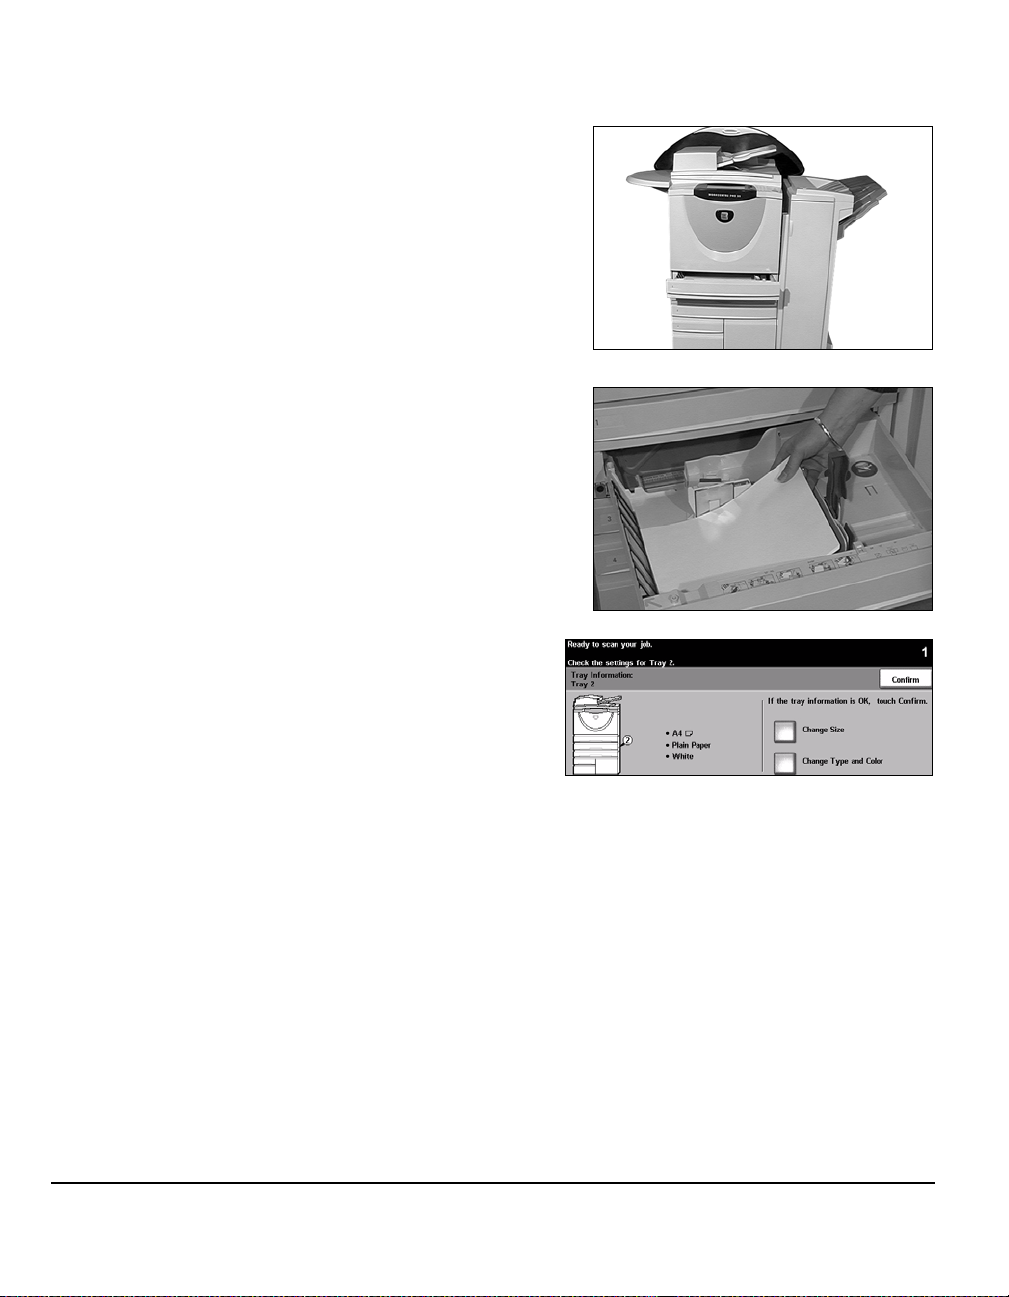
Loading Paper
¾ Open the required paper tray.
1
2
3
NOTE: Paper trays 1 and 2 are fully
adjustable for all stock sizes between
A5 and A3. Paper trays 3 and 4 are
dedicated paper trays which can be
adjusted to hold either A4 or 8.5" x
11" long edge feed paper only.
¾ Load paper. Paper must not be
loaded above the fill line.
¾ Close the tray.
NOTE: For paper trays 1 and 2,
ensure the guides are just touching
the paper, otherwise the size
automatically detected may be
incorrect.
¾ Select [Confirm] OR select
[Change Size] and/or [Change
Type and Colour] to
reprogramme the tray if the paper
size, type or colour has changed.
NOTE: Ensure the Size, Type and
Colour are all correct. For standard
copy paper the following should
apply:
Size - A4
Type - Plain paper
Colour - White
NOTE: Some machine configurations do not support envelope printing,
please refer to the Product Overview chapter for more information.
Page 3-4 Quick Reference Guide
Page 45

Making Copies
¾ Load the documents
1
either in the document
handler or on the
document glass.
NOTE: Documents are
only scanned once.
2
¾ Access the Basic Copy screen - if
necessary select the [Features]
button on the control panel.
¾ Select the required features on the
3
Touch Screen.
¾ Select the number of copies
required.
¾ Press [Start].
Getting Started
Copy features include...
¾ Producing stapled or hole punched sets, if there is a finisher available
¾ Image Quality adjustment
¾ Auto Reduce/Enlarge
¾ Copying mixed size originals
¾ Adding printed or blank dividers into transparency sets
¾ Arranging multiple images on a page
¾ Adding printed or blank covers
¾ Adding Annotations
¾ Inserting printed or blank sheets or tabs
¾ Image Shift
¾ Erasing edges and borders
¾ Build Job to apply different programming within a set of documents
¾ Storing the programming for frequently run jobs
¾ Creating booklets
Quick Reference Guide Page 3-5
Page 46

Sending an Embedded Fax
Embedded Fax is an optional walk up fax feature on your machine. If the Basic Fax
screen matches that displayed in step 2 then Embedded Fax is enabled. Please
contact your System Administrator for more information.
1
2
3
NOTE: Both Embedded and Server Fax can be installed on the WorkCentre
the same time, however only one service can be enabled for use.
¾ Load the documents
either in the document
handler or on the
document glass.
NOTE: Documents are
only scanned once.
¾ Select [Fax].
NOTE: You may need to select [All
Services] first to access the fax
option.
¾ Enter the telephone number.
¾ Select the required features on the
Touch Screen.
¾ Press [Start].
Pro at
Fax features include...
¾ Adjusting the Resolution
¾ Faxing double sided originals
¾ Programming the size of the originals being scanned
¾ Image Quality adjustment
¾ Delaying the start time of a fax
¾ Adding a Cover Letter
¾ Sending to more than one recipient
¾ Mailbox storage and polling to and from your machine
¾ Setting the transmission speed
Page 3-6 Quick Reference Guide
Page 47

Sending a Server Fax
Server Fax is an optional feature which is only available on the WorkCentre Pro. If
the Basic Fax screen matches that displayed in step 2 the n Server Fax is enabled.
Please contact your System Administrator for more information.
1
2
3
NOTE: Both Embedded and Server Fax can be installed on the WorkCentre
the same time, however only one service can be enabled for use.
¾ Load the documents
either in the document
handler or on the
document glass.
NOTE: Documents are
only scanned once.
¾ Select [Fax].
NOTE: You may need to select [All
Services] first to access the fax
option.
¾ Enter the telephone number.
¾ Select the required features on the
Touch Screen.
¾ Press [Start].
Pro at
Getting Started
Fax features include...
¾ Adjusting the Resolution
¾ Faxing double sided originals
¾ Programming the size of the originals being scanned
¾ Image Quality adjustment
¾ Delaying the start time of a fax
Quick Reference Guide Page 3-7
Page 48

Sending an Internet Fax
Internet Fax is an optional feature which is only available on the WorkCentre Pro.
Please contact your System Administrator for more information.
¾ Load the documents
1
2
either in the document
handler or on the
document glass.
NOTE: Documents are
only scanned once.
¾ Select [Internet Fax].
NOTE: You may need to select [All
Services] first to access the Internet
Fax option.
¾ Select [To.], enter the recipient
e-mail details and select [Save].
¾ Select [Edit Subject], enter a
subject and select [Save].
¾ Select the required features on the
3
Touch Screen.
¾ Press [Start].
Internet Fax features include...
¾ Setting up a Public or Internal Address Book
¾ Adjusting the Resolution
¾ Scanning double sided originals
¾ Programming the size of the originals being scanned
¾ Image Quality adjustment
¾ Changing the default file format setting
Page 3-8 Quick Reference Guide
Page 49

Scanning a Document to a File
Network Scanning is only available on the WorkCentre Pro. Please contact your
System Administrator for more information.
¾ Load the documents
1
2
3
either in the document
handler or on the
document glass.
NOTE: Documents are
only scanned once.
¾ Select [Network Scanning].
NOTE: You may need to select [All
Services] first to access the Network
Scanning option.
¾ Select the template required.
¾ Select the required features on the
Touch Screen.
¾ Press [Start].
¾ On completion access your job at
your workstation.
Getting Started
Network Scanning features include...
¾ Adjusting the image output requirements
¾ Adjusting the Resolution
¾ Scanning double sided originals
¾ Programming the size of the originals being scanned
¾ Changing the destination for the scanned image
Quick Reference Guide Page 3-9
Page 50

Sending an E-mail
E-mail is an optional feature which is only available on the WorkCentre Pro. Please
contact your System Administrator for more information.
¾ Load the documents
1
2
3
either in the document
handler or on the
document glass.
NOTE: Documents are
only scanned once.
¾ Select [E-mail].
NOTE: You may need to select [All
Services] first to access the e-mail
option.
¾ Select [To], enter the recipient
e-mail details and select [Enter].
¾ Select [Edit Subject], enter a
subject and select [Save].
¾ Select the required features on the
Touch Screen.
¾ Press [Start].
E-mail features include...
¾ Setting up a Public or Internal Address Book
¾ Adjusting the Resolution
¾ Scanning double sided originals
¾ Programming the size of the originals being scanned
¾ Image Quality adjustment
Page 3-10 Quick Reference Guide
Page 51

Printing from a PC
If your machine is connected to a network, docum ents can be pr inted dir ectly from
your PC using the CentreWare Print Driver supplied. The Print Driver must be
loaded on each PC which uses the machine for printing.
1
2
¾ Select [Print] in your application.
¾ Select your machine as the printer.
¾ Select [Properties], make your
selections and click [OK].
¾ Click [OK] to print your document.
NOTE: Instructions may vary depending
on the application being used.
Getting Started
Print features include...
¾ Printing 1 or 2 sided
¾ Producing stapled or hole punched sets, if available
¾ Changing the printing Resolution
¾ Adding a Banner Sheet
¾ Adding a front cover
¾ Adjusting the Image Quality
¾ Adding a Watermark
Quick Reference Guide Page 3-11
Page 52

Sending a LAN Fax
LAN Fax is an optional feature which is only available on the WorkCentre Pro.
Please contact your System Administrator for more information.
¾ Select [Print] in your application.
1
2
¾ Select your machine as the printer.
¾ Select [Properties].
¾ Select [Job Type] and then [Fax] from
the pull down menu.
¾ Enter the recipient details and select
the features required.
¾ Click [OK] to send your document.
NOTE: Instructions may vary depending
on the application being used.
LAN fax features include...
¾ Creating a Phone book
¾ Confirmation Sheet
¾ Send Speed
¾ Resolution
¾ Send Time
¾ Cover sheet
Page 3-12 Quick Reference Guide
Page 53

Printing with Internet Services
Printing with Internet Services is available on the WorkCentre Pro, and on the
WorkCentre if the postscript option is installed. Internet Services uses a Web User
Interface embedded in the machine to communicate between the HTTP server and
the machine. This option is only available when the machine is connected to a
network.
¾ Open your Web Browser, then enter:
1
2
http:// and the printer TCP/IP address.
¾ Press the [Enter] key on your
workstation keyboard.
The default Status window displays.
HINT: If you do not have the TCP/IP
address for your machine, contact your
System Administrator.
¾ Click on [Print] and make your
selections.
¾ Use the scroll bar on the right to move
to the bottom of the page.
Getting Started
¾ Click on [Browse] and locate the file
3
to be printed.
¾ Click on [Submit Job].
NOTE: For more detailed information on
using Internet Services please contact
your System Administrator.
Internet Services features include...
¾ Creating, modifying and deleting scan templates if Network Scanning is
available
¾ Promoting, deleting or releasing a job in the Print Queue
¾ Reviewing the status of your machine
Quick Reference Guide Page 3-13
Page 54

Logging On / Logging Off
If the Internal Auditron or the optional Network Accounting has been enabled, a
valid User Number needs to be entered in order to access the machine functions.
The Internal Auditron automatically tracks Copy jobs for billing purposes, as well as
preventing unauthorised access to the machine. Network Accounting is used to
track jobs completed over the network. Contact your System and/or Auditron
Administrator for more information.
¾ To Log On when the Internal
1
Auditron has been enabled, use
the keypad to enter a 4 digit
password and then select [Enter].
¾ To Log On when Network
Accounting has been enabled,
enter a valid User ID and Account
ID and select [Enter].
Internal Auditron
Log on screen
Network Accounting
Log on screen
¾ Complete your job.
2
To Log Off:
3
¾ Press [Access ] on the control panel.
¾ Select [Logout] on the Touch Screen.
Page 3-14 Quick Reference Guide
Page 55

Customising your Machine
Your machine can be customised to suit your working environment and practices.
The System Management Tools enable your System or Machine Administrator to
set-up, customise and maintain the machine.
After your machine is installed, it is recommended that the settings and options are
customised to fully meet the requirements of the Users. Please discuss your
requirements with your System or Machine Administrator to ensure you get
optimum performance from your machine.
The Tools facility is accessed using the Access button on the control panel.
Some of the settings within Tools are critical to the operation of the machine,
therefore the screens are password protected so they cannot be accidently
changed or corrupted.
Full instructions for accessing and customising the System Management Tools are
located in the Training and Information CD (CD2), contained in the CD Pack
delivered with your machine.
System Management Tools include...
¾ System Settings
¾ Screen Defaults
¾ Access and Accounting
¾ Feature Defaults
¾ Connectivity and Network Setup
¾ Consumables Management
¾ Machine Tests
¾ Power Saver Administration
¾ Fax Setups
Getting Started
Quick Reference Guide Page 3-15
Page 56

Further Assistance
Access the Job Queue
1
¾ Press the Job Status button on
the control panel. The All
Incomplete Jobs queue displays.
¾ Review the status of the job.
¾ Select [Other Queues] to access
and review the other queues
available.
Access the on-line Help
2
¾ Press Help at any time to
access the on-line help screens.
¾ Messages, screen instructions and
graphics provide additional
information.
For additional Help
3
Page 3-16 Quick Reference Guide
If you need any additional help on using your machine you can:
¾ Refer to the Training and Information CD (CD2), contained in the CD Pack
delivered with your machine.
¾ Contact your System and/or Machine Administrator.
¾ Visit ou r Customer Web Site at www.xerox.com or conta ct the Xerox
Welcome and Support Centre quoting the machine serial number
¾ Press the [Machine Status]
button on the control panel.
¾ Select [Machine Details] to
display the machine serial
number.
NOTE: The serial number can also
be found on a metal plate inside
the front door.
.
Page 57

4Copy
¾ Copy ...............................................................4-2
¾ Basic Copying.................................................4-3
¾ Image Adjustment.........................................4-10
¾ Output Format...............................................4-17
¾ Job Assembly ...............................................4-25
Quick Reference Guide Page 4-1
Page 58

Copy
The Copy feature is standard on your machine.
Access to the Copy features is gained using the Features button on the control
panel.
Depending on the options enabled and how your ma chine has been configured, you
may have to select All Services and Copy to display the Copy feature tabs.
This chapter contains information about th e op tio ns availa b le with i n Copy .
The tabs available for selecting the Copy features are:
¾ Basic Copying
¾ Image Adjustment
¾ Output Format
¾ Job Assembly
HINT: If some of the Copy feature tabs are not displayed, selecting tab 2 displays
them.
Page 4-2 Quick Reference Guide
Page 59

Basic Copying
The Basic Copying tab is the default Copy screen. Use the Basic Copying tab to
select the standard features for a copy job.
Depending on the options enabled and how your ma chine has been configured, you
may have to select All Services and Copy to display the Copy feature tabs.
Touch any of the top level buttons to select a feature. One button can be selected
in each column. Multiple options can be selected for each job if requir ed. To view all
the options for a feature, select More....
Copy
Most feature screens include three buttons to confirm or cancel your choices.
¾ The Undo button resets the current screen to the values that were displayed
when the screen was opened.
¾ The Cancel button resets the screen and returns to the previous screen.
¾ The Save button saves the selections made and returns to the previous screen.
Quick Reference Guide Page 4-3
Page 60

Output
Output is used to select the finishing requirements for the job. The options will
depend on the finishing output device installed.
HINT: For an explanation of all the finishing devices available refer to “Finishing
Devices” on page 2-13.
Options:
Collated Select Collated for output stacked in sets to match the sequence of the originals.
Uncollated Select Uncollated for output sorted into stacks of individual pages.
Hole Punching This option is available if your machine is equipped with a finisher and 2 Hole
Punch, 4 Hole Punch or Swedish 4 Hole Punch. Each sheet is punched individually,
so there is no limit to the number of sheets in the set. Additional Hole Punch kits can
be purchased as an option. Only one Hole Punch kit can be fitted at one time.
Hole punching can only be selected for A4 long edge feed and A3 paper.
NOTE: Some stapling options can be used in conjunction with Hole Punching.
Stapling The Stapling options are as follows:
No Staples The output will not be stapled.
Single Staple
Double Staple
Page 4-4 Quick Reference Guide
Use this option to add a single staple to your output.
Use this option to add 2 staples to your output. Staples can be added to the
Left Edge or Right Edge of your output.
This option is not available on the Basic Office Finisher.
Page 61

Use this option to add 3 or 4 staples to your output, depending on the size of
the paper being used. Multiple staples can be added to the Left Edge or
Multi-Staple
Right Edge of your output.
This option is only available on the Advanced Office Finisher and the
Professional Finisher.
Collated and uncollated stapled sets will be delivered offset.
NOTE: The staple positions available are dependent on the type of finisher
installed.
Basic Office Finisher stap les 2 - 30 sheets of 80 g/m
2 - 50 sheets of 80 g/m
2
paper. The maximum number of sheets is 20 when
2
paper. Other finishers staple
stapling heavyweight paper.
Booklet Maker If your machine is fitted with the Professional Finisher the Booklet Maker option can
be used to fold and staple (saddle stitch) your output to produce booklets. The
Booklet Maker options are as follows:
Off The Booklet Maker option is switched off.
Folded and Stapled
Folded Only Use this option to fold your booklet output.
Use this option to fold and staple your booklet. The Professional Finisher will
place 2 staples on the spine of the booklet.
The paper sizes that can be used are A3, 11" x 17", A4, 8.5" x 11", 8.5" x 13" and
8.5" x 14".
All paper must be loaded short edge feed in the paper tray.
The media types that can be used are Plain Paper, Bond, Index an d Co ve r.
If using the Folded and Stapled option, the maximum number of 80 g/m2 bond
sheets is 15.
If using the Folded Only option, the maximum number of 80 g/m2 bond sheets is 5.
The maximum number of sheets for both options is reduced when using heavier
weight paper.
Copy
HINT: For information about using the Booklet Creation option, refer to “Booklet
Creation” on page 4-19.
Quick Reference Guide Page 4-5
Page 62

2-Sided
Double-sided copies, ranging in size from A5 to A3 can be made automatically from
one or two-sided originals.
Options:
11 SidedUse this option for 1 sided originals when 1 sided copies are required.
12 SidedUse this option for 1 sided originals when 2 sided copies are required.
1 2 Sided,
Rotate Side 2
22 SidedUse this option for 2 sided originals when 2 sided copies are required.
2 2 Sided,
Rotate Side 2
21 SidedUse this option for 2 sided originals when 1 sided copies are required.
Page 4-6 Quick Reference Guide
This option produces 2 sided copies from 1 sided original s and rotates every second
side image. Use this option to create documents which can be read in a “head to
toe” manner, for example a calendar.
This option produces 2 sided copies from 2 sided original s and rotates every second
side image. The “read” orientation for this option varies depending on the input
originals. For example, if “head to head” orientation originals are scanned, the
output will be “head to toe”. If “head to toe” orientation originals are scanned the
output produced will be “head to head”.
Page 63

2 1 Sided,
Rotate Side 2
This option produces 1 sided copies from 2 sided orig inals and rotates every second
side image. It should be used for “head to toe” orien tation or calendar style originals,
to ensure the output images are all in the same orientation.
Reduce/Enlarge
The Reduce / Enlarge option provides a variety of reduction and enlargement
options. Originals placed on the document glass or sent to the machine
electronically can be reduced or enlarged between 25% an d 400%. Originals fed
through the document handler can be reduced or enlarged between 25% and
200%.
Options:
Copy
Normal Use this option to proportionately reduce or enlarge the output image in both
directions by the % selected.
Normal options are as follows:
100%
Auto %
% Set 25 - 200 / 400
Preset Options
Quick Reference Guide Page 4-7
Produces an image on the copies the same size as the image on the
original.
Proportionally reduces or enlarges the image on the copies based on the
size of the original and the size of the selected output paper.
Use this option to select the percentage of reduction or enlargement required
using the keypad on the control panel. To use the keypad, select the box
displaying the current reduce/enlarge percentage.
200% will be displayed when using the document handler and 400% when
using the document glass.
The up/down scroll buttons can also be used to adjust the reduce/enlarge
percentage, in 1% increments.
The most commonly used reduce/enlarge percentages have been provided
as preset options. These preset options can be customised by your System
or Machine Administrator to meet individual needs.
Page 64

Custom Use this option to adjust the height (Y) and the width (X) dimensions for reduction
or enlargement of each dimension independently.
NOTE: Output will NOT be reduced or enlarged proportionally.
Custom options are as follows:
Paper Supply
Use the Paper Supply options to select Auto Paper or a paper tray for the copy job.
100%
Auto % Automatically fits the image of the original onto the paper selected.
X50% Y100%
Produces an image on the copies the same size as the image on the
original.
Enables you to customise the width (x) and height (y) reduction or
enlargement to suit your own requirements. A percentage can also be
entered by touching the X or Y box and using the keypad.
Options:
Auto Paper With this option selected the machine chooses the correct paper for the copy job
based on the size of the originals being scanned.
Tray 1 Use this option to select the paper loaded in Tray 1.
Tray 1 holds 500 sheets of 80 g/m
Sizes range from A5 LEF to A3 SEF. Most stocks can be used, except for
transparencies, labels and envelopes.
Tray 2 Use this option to select the paper loaded in Tray 2.
Tray 2 holds 500 sheets of 80 g/m
Sizes range from A5 LEF to A3 SEF. Most stocks can be used, except for
transparencies and labels. The Envelope Tr ay mus t be used to loa d en ve lo pe s.
NOTE: Some machine configurations do not support envelope printing, please
refer to the Product Overview chapter for more information.
Tray 3 (Optional) Use this option to select the paper loaded in Tray 3.
Page 4-8 Quick Reference Guide
2
paper. Weight ranges from 60 - 200 g/m2.
2
paper. Weight ranges from 60 - 200 g/m2.
Page 65

Tray 3 holds 1900 sheets of 80 g/m
2
paper. Weight ranges from 60 - 200 g/m2.
The tray can be adjusted to hold either A4 or 8.5" x 11" LEF size paper.
Tray 4 (Optional) Use this option to select the paper loaded in Tray 4.
Tray 4 holds 1500 sheets of 80 g/m
2
paper. Weight ranges from 60 - 200 g/m2.
The tray can be adjusted to hold either A4 or 8.5" x 11" LEF size paper.
Bypass Tray Use this option when feeding individual types of stock, for example letterhead or
labels for one-off jobs.
The Bypass Tray holds 100 sheets of 80 g/m
2
g/m
. Sizes range from A6 SEF to A3 SEF. Most stocks can be used, except for
2
paper. Weight ranges from 60 - 216
envelopes.
Copy
Quick Reference Guide Page 4-9
Page 66

Image Adjustment
The Image Adjustment tab provides copy features used for adjusting the
appearance of the copy output.
HINT: If some of the Copy feature tabs are not displayed, selecting tab 2 displays
them.
Job
Review
Summary
Touch any of the top level buttons to select a feature. To view all the options for a
feature, select the feature required. Multiple options can be selected for each copy
job if required.
The text next to the feature button, called a Job Review Summary, reflects the
current settings for that feature. A checked circle indicates that this feature has been
modified from its initial default settings.
Most feature screens include three buttons to confirm or cancel your choices.
¾ The Undo button resets the current screen to the values that were displayed
when the screen was opened.
¾ The Cancel button resets the screen and returns to the previous screen.
¾ The Save button saves the selections made and returns to the previous screen.
Page 4-10 Quick Reference Guide
Page 67

Image Quality
Use this feature to enhance the quality of your output.
Options:
Original Type Use this option to enhance the copy quality of the output based on the type of
original being scanned.
Original Type options are as follows:
Normal This is the standard setting and can be used for most originals.
Text Use for originals containing text or line art.
Halftone Photo
Photo Use for continuous tone photographs or printed half-tone originals.
Use for high quality lithographic images or continuous tone photos with text
and/or graphics.
Copy
Lighten / Darken Adjusts the lightness or darkness of the output. To darken th e output, select the
scroll down button. To lighten the output, select the scroll up button.
Background
Suppression
Use to automatically reduce or eliminate the dark background resulting from
copying coloured paper or newspaper originals.
NOTE: Background Suppression is disabled if the Original Type is Photo.
Quick Reference Guide Page 4-11
Page 68

More Image Quality
Use this feature in addition to the settings selected using the Image Quality option,
to further enhance the quality of your output.
Options:
Contrast This option controls the differences between the image densities within the copy.
Select a lower setting to improve the copy quality of pictures. Select a higher setting
to produce more vivid blacks and whites for sharper text and lines.
Sharpness This option controls the balance between sharp text and moiré (wavy patterns within
the image). Use the up/down scroll buttons to adjust the sharpness values from
sharper to softer, based on the quality of the input images.
Screen This option is preset at the factory to be on with Normal, Text and Halftone Photo
Original Type options.
Screen options are as follows:
Eliminates the risk of blotches or small areas that have a different texture or
Auto
Special
Page 4-12 Quick Reference Guide
pattern appearance than the surrounding area, but produces a slightly
grainier picture than if Special is used.
Enhances continuous tone photographs or high frequency halftone images.
It is used to create smoother, less grainy output for continuous tone and
halftone images, but the risk of blotchy copy quality defects is higher.
Page 69

Bound Originals
This feature is used to copy pages from bound documents onto separate singlesided or double-sided pages.
The bound original is placed face down on the document glass with the spine lined
up with the marker on the rear edge of the glass. Align the top of the bound origina l
against the rear edge of the document glass. Do not close the document handler
during the copying process if Auto Reduce/Enlarge is selected.
NOTE: It is recommended that users avoid looking at the scan bar light when the
document handler is open.
HINT: If necessary, apply a little pressure to the centre of the bound original to
flatten it during scanning.
Options:
Copy
Off The feature is switched off.
Left Page Copies only the page on the left when looking at the open bound original, face up.
Right Page Copies only the page on the right when looki ng at the open bound origin al, face up.
Both Pages Copies both pages of an open bound original a nd pla ces ea ch page o n a separate
sheet of paper.
Quick Reference Guide Page 4-13
Page 70

Binding Erase Erases a specified area from the centre of the bound original to eliminate unwante d
marks caused by scanning the binding. When Left Page or Right Page is selected,
between 0 and 25 mm can be erased. When Both Pages is selected, between 0 and
50 mm can be erased.
Edge Erase
Use this feature to “refresh” the quality of an original that has become torn or frayed
at the edges, or that has hole punch, staple or other marks.
Options:
Border Erase Erases equal amounts on all edges of the copies. From 3 - 50 mm in 1 mm
increments can be erased.
Edge Erase Use to erase a specific amount from a specific edge of the copy. From 3 - 50mm in
1mm increments can be erased from each edge.
Print to Edge Use this option to print to the edge of the output stock.
NOTE: This option may reduce the ability of the system to clean itself and can
cause defects on the output if used excessively.
Page 4-14 Quick Reference Guide
Page 71

Original Input
Use this option to programme the size of the originals being scanned or en able the
machine to recognise the size of the originals.
Options:
Auto Use this option to allow the machine to recogn ise the size of the original s being fed
through the document handler.
NOTE: When originals are scanned using the docu ment glass and an Auto feature
such as Auto Paper, Auto% or Auto Centre is selected, the machine will scan the
original twice.
Copy
Manual Platen
Mixed Size
Originals
Quick Reference Guide Page 4-15
Use this option to specify the dimensions of the document scanning region when
Input
scanning from the document glass. There are several dimensions that correspond
to common document sizes and orientations.
Select a standard size or use Custom to manually adjust the scanning dimensions.
Use this feature to copy a document containing mixed size originals. The originals
must be the same width, for example A4 long edge feed and A3 short edge feed.
Load documents in the document handler when using this feature.
Page 72

Image Shift
This feature enables the position of the image on the page to be adjusted.
Options:
No Shift The image position is not adjusted.
Auto Centre Use to automatically centre the scanned image on the output paper.
Margin Shift Use to create a binding edge for the document. The image can be adjusted up or
down on the page and/or shifted to the right or left. Use the up/down scroll buttons
to adjust the amount of shift. The image can be shifted between 0 and 50 mm, in 1
mm increments.
Margin Shift options are as follows:
Side 1 Shifts the image on Side 1.
Side 2
Page 4-16 Quick Reference Guide
Shifts the image on Side 2. The shift on Side 2 can be set to mirror the shift
on Side 1 or adjusted independently.
Page 73

Output Format
The Output Format tab is used to produce different options for the finished output.
HINT: If some of the Copy feature tabs are not displayed, selecting tab 2 displays
them.
Job
Review
Summary
Touch any of the top level buttons to select a feature. To view all the options for a
feature, select the feature required. Multiple options can be selected for each copy
job if required.
The text next to the feature button, called a Job Review Summary, reflects the
current settings for that feature. A checked circle indicates that this feature has been
modified from its initial default settings.
Most feature screens include three buttons to confirm or cancel your choices.
¾ The Undo button resets the current screen to the values that were displayed
when the screen was opened.
¾ The Cancel button resets the screen and returns to the previous screen.
¾ The Save button saves the selections made and returns to the previous screen.
Copy
Quick Reference Guide Page 4-17
Page 74
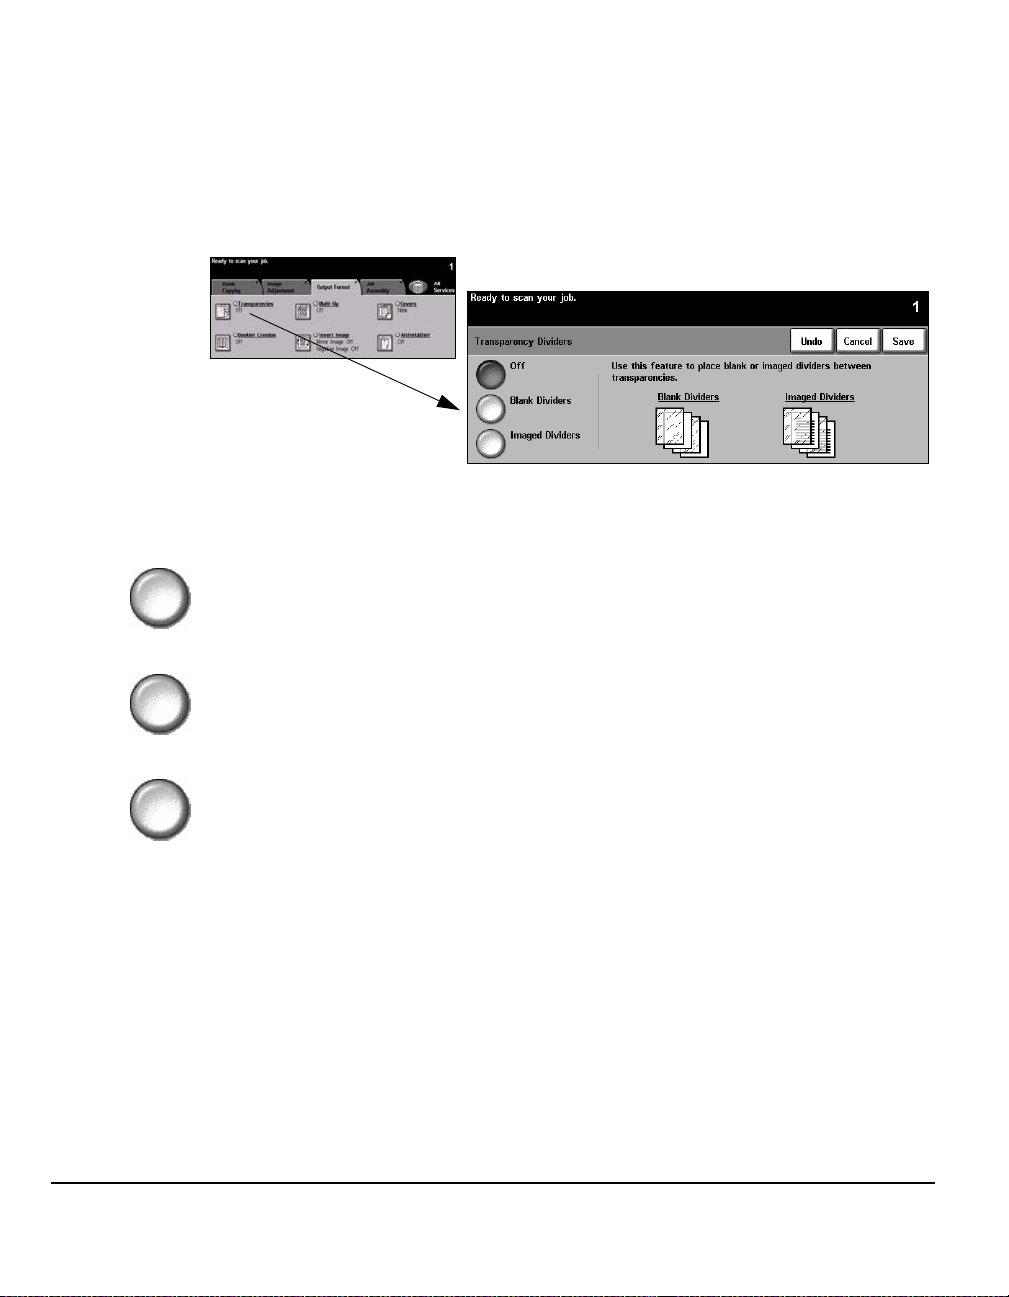
Transparencies
Use this feature to add either a blank or printed divider between each transparency
within a set. Always load transparencies in the Bypass Tray. Transparency jobs will
be delivered single-sided, and collated with no finishing.
The quantity can only be set to one for this feature.
Options:
Off The feature is switched off.
Blank Dividers Use this option to place a blank sheet between each transparency.
Imaged Dividers Use this option to place the same image on the divider sheet as printed on the
transparency.
Page 4-18 Quick Reference Guide
Page 75

Booklet Creation
Use this feature to create multipage booklets from a sequential set of either singlesided or double-sided originals. The machine produces 2 sided output
automatically, which when folded produces a booklet with all the pages in the
correct location. The machine will also reduce and correctly position each image to
fit on the selected paper.
NOTE: Your originals should be loaded Long Edge Feed (LEF) in the document
handler with the output paper loaded Short Edge Feed (SEF) in the paper tray.
Options:
Off The feature is switched off.
Copy
On Use this option to enable the Booklet Creation feature. Booklet Creation On options
are as follows:
1 Sided Originals Select this option if the originals are single-sided.
2 Sided Originals Select this option if the originals are double-sided.
A cover can be inserted onto the booklet automatically by selecting the Covers
option from the Output Format tab. Refer to “Covers” on page 4-22 for more
information.
If your machine is fitted with the Professional Finisher, you can use the Booklet
Maker feature to fold and if required, staple (sa ddle stitch) your bookle t output. For
more information, refer to “Booklet Maker” on page 4-5.
Quick Reference Guide Page 4-19
Page 76

Multi-Up
This feature is used to create documents with multiple images on each page. It is
ideal for creating handouts, storyboards or docum ents used for archival purposes.
NOTE: Originals must be loaded in the document handler when using this feature.
Options:
Off The feature is switched off.
On Use to enable the Multi-Up feature.
Multi-Up On options are as follows:
Orientation Use to select the image and load orientation of the input originals.
Rows Selects the required number of Rows, between 1 and 6.
Columns Selects the required number of Columns, between 1 and 6.
NOTE: The number of images will be limited by the minimum reduction value of
25% and the size of the selected output.
Page 4-20 Quick Reference Guide
Page 77

Invert Image
This feature enables Mirror Image or Negative Image copies to be produced.
Options:
Mirror Image Use this option to change the direction of the original image, creating a mirror of the
original. This option is primarily used to change the orientation of a graphic.
Negative Image Use Negative Image to create copies that are the inverse of the original document,
the white areas become black and the black areas beco m e whit e.
HINT: This option is useful for saving toner consumption for images with a dark
background and white text.
Copy
Quick Reference Guide Page 4-21
Page 78

Covers
Use this feature to automatically add covers to your copied set using stock taken
from a different tray than the copies. Covers must be the same size and orientation
as the main body of the job.
HINT: Covers and Inserts can be selected in the same job.
Options:
No Covers The feature is switched off.
Front Only Use this option to add a front cover to the copies.
Back Only Use this option to add a back cover to the copies.
Front and Back Use this option to add both a front and back cover to the copies.
Output Cover
Images
Page 4-22 Quick Reference Guide
Use this option to select the imaging requirements for the covers. Output Cover
Images options are as follows:
Blank Cover Adds Blank covers to the copies.
1 Sided
Places the first original in the job as the front cover image, and the last image
as the image on the inside back cover of the document.
Page 79

2 Sided
2 Sided, Rotate Side 2
Cover Paper Use this option to select the tray required for the cover stock.
Places the first two images of the original set on the front and back of the
front cover. The back cover will use the last two images in the job.
Produces 2 sided covers with the second side rotated to enable a “head to
toe” style output.
Annotation
Use this feature to add a comment, page number and a date to your copy output.
Select any or all of the annotation options and specify where on the copy output they
should appear. The Annotation feature enables you to organise groups of copied
output by marking them with related information such as Confidential or a Company
name.
Copy
Options:
Off The feature is switched off.
On Use to enable the Annotation feature.
Annotation On options are as follows:
Format
Date
Quick Reference Guide Page 4-23
Use to select whether your originals are Portrait or Landscape. Select the
Font Size required for your annotation, from 6 - 18 point.
Select Opaque or Transparent to specify the appearance of the Annotation.
Prints the current date on your copy output. The date printed is the current
date set in your machine.
Select Top or Bottom for the date location.
Select Left, Centre or Right for the date position.
Select the date format required and the pages you want printed with the
date.
Page 80

Comment
Pagination
Use to add a comment to your copy output. A new or existing comment can
be added.
Select Top or Bottom for the comment location and then Left, Centre or Right
for the comment position.
Select the comment required using the up/down scroll buttons or enter a new
comment using the Keypad button. To edit an existing comment, select the
comment in the list and select the Keypad button.
Select which pages you want to print on.
Use to print a page number on your copy output. A prefix can also be added
to the page number using the Bates Stamp option. Page numbers are
automatically sequenced by 1. For 2-sided output, the page number is
printed on both sides and count as 2 pages.
Select Page Number or Bates Stamp.
Select Top or Bottom for the number location and then Left, Centre or Right
for the number position.
Select the comment required using the up/down scroll buttons or enter a new
comment using the Keypad button. Enter the page number you wish to start
at in the Page Number box. If Bates Stamp is selected, use the keypad to
enter the prefix required. Up to 8 characters can be added.
Page 4-24 Quick Reference Guide
Page 81

Job Assembly
The Job Assembly tab is used to combine multiple documents into a single job,
produce a sample set of a job, store the programming of up to 10 jobs and add
inserts to your sets.
HINT: If some of the Copy feature tabs are not displayed, selecting tab 2 displays
them.
Job
Review
Summary
Touch any of the top level buttons to select a feature. To view all the options for a
feature, select the feature required. Multiple options can be selected for each copy
job if required.
The text next to the feature button, called a Job Review Summary, reflects the
current settings for that feature. A checked circle indicates that this feature has been
modified from its initial default settings.
Most feature screens include three buttons to confirm or cancel your choices.
¾ The Undo button resets the current screen to the values that were displayed
when the screen was opened.
¾ The Cancel button resets the screen and returns to the previous screen.
¾ The Save button saves the selections made and returns to the previous screen.
Copy
Quick Reference Guide Page 4-25
Page 82

Build Job
Use this feature to build a job that requires different settings for each page. For
example, if a set of documents consists of some pages with text and some with
photos, the appropriate setting for each original can be applied and the job can still
be completed as a single job. This feature is also useful if your job has more than
70 pages, which exceeds the maximum capacity of the document handler.
HINT: Quantity , S t apling and Collation options can be adjusted at any time and will
assume the values of the last job segment.
To use Build Job, split the job into programming and scanning seg ments. Select the
Build Job option and select On. Programme and scan the first segment. Continue
to programme and load segments until the whole job has been scanned. When the
entire job has been scanned, select Build Job Controls and select End Build Job.
The job is processed and printed as a single job.
Options:
Off The feature is switched off.
On Use to enable the Build Job feature.
Build Job
Controls
Page 4-26 Quick Reference Guide
Provides options which can be selected when using Build Job.
Build Job Controls options are as follows:
End Build Job
Sample Last Segment Select to see a proof of the last segment scanned.
Delete Last Segment Use to delete the last segment scanned.
Select this option after the last segment of the job has been scanned. The
job will be sent to print.
Page 83

Sample Set
Off The feature is switched off.
Cancel Sample
Printing
Delete All segments Use to delete the current job and return to the main Build Job screen.
This feature is used to review the output to ensure that it is exactly what is required
prior to printing a large quantity.
Use to stop and cancel the sample segment that is currently printing.
Options:
Copy
On Use to enable the Sample Set feature. One complete set of the job will be printed.
To print the whole job, press the Job Status button and select your job in the queue.
If the output is acceptable, select Release, the job will be completed.
If the output was not acceptable or the job is no longer required, select Delete to
delete the job from the queue. Reprogramme and rescan the entire job.
Quick Reference Guide Page 4-27
Page 84

Stored Programming
Use this feature to programme up to 10 commonly used programming sequences.
For example, combinations of selections such as Edge Erase and Bound Orig inals.
The machine stores only the programming features for the job, NOT the images.
Each time a stored job is used the images must be scanned.
To use this feature, use the up/down scroll buttons to select the required storage
location, then select a function button - Store or Recall Programming.
Options:
Job Number Use to scroll to a job number between 1 and 10.
Programming
Store
Recall
Programming
Page 4-28 Quick Reference Guide
Use this option to store the current programming selections. If a job has already
been stored under the selected Job Number, a confirmation pop-up screen
appears. If Confirm is selected, the new programming will be stored.
Use this option to retrieve programming that has been stored under a specified job
number. First select a Job Number, then select Recall Programming. The recalled
programming will overwrite the current copy programming.
After being recalled, the selection can be modified further and re-stored if required.
Page 85

Inserts
This feature enables different types of stock to be inserted within a set
automatically. Up to 40 inserts can be added per copy set. Inserts are useful for
separating or highlighting sections and can be blank or printed.
HINT: This feature can only be used with 1-1 or 2-2 sided copying and is not
available with Auto Paper. Inserts and Covers can be selected in the same job.
Up to two different stocks can be used for the inserts. Use a combination of standard
size media, tab stock, card or coloured paper. Load your insert stock into one of the
paper trays. If two different insert stocks are required, load them in different paper
trays. The recommendation is to use trays 1 and 2 for your inser t stocks. If using tab
stock and printed inserts, the image can be shifted to print on the tab.
Use the Tab Loading Instructions provided when loading ta b stock. Tab stock must
be placed in the Bypass Tray or trays 1 or 2. Ensure Tab Stock is selected as the
Paper Type on the Tray Information scree n .
To prepare your document for programming the inserts, identify the page number
where the insert is required by counting through the pages. If you require blank
inserts, add blank sheets to your document where the inserts are to be placed.
Copy
Options:
Off The feature is switched off.
First Insert Tray Select this option to programme the inserts requiring the first stock loaded.
Using the up/down scroll buttons, enter the page number of the first insert and select
Add Insert. The page number displays in the Insert Page as Side window. If a page
number is entered incorrectly, use the Delete Last Insert option to remove it from
the window. Continue entering page numbers until all the inserts requiring the first
stock have been programmed.
Quick Reference Guide Page 4-29
Page 86

Select the paper tray containing the first stock using the Insert Tray option on the
right of the screen.
If printing on tab stock and the image requires shifting, use the Tab Image Shift
option to enter the shift amount required.
Second Insert
Tray
If a second stock is required, use this option to programme the inserts requiring a
different stock.
Select the Second Insert Tray option. Using the up/down scroll buttons, enter the
page number of the first insert requiring the second stock and select Add Insert. The
page number displays in the Insert Page as Side window. If a page number is
entered incorrectly, use the Delete Last Insert option to remove it from the window.
Continue entering page numbers until all the inserts requiring the second stock
have been programmed.
Select the paper tray containing the second stock using the Insert Tray option on
the right of the screen.
If printing on tab stock and the image requires shifting, use the Tab Image Shift
option to enter the shift amount required.
HINT: You can switch between the First Inse rt Tray and Second Insert Tray
options at anytime during programming.
Page 4-30 Quick Reference Guide
Page 87

5Fax
¾ Fax..................................................................5-2
¾ Basic Faxing - Embedded Fax........................5-4
¾ Image Adjustment...........................................5-9
¾ Added Fax Features .....................................5-14
¾ Basic Faxing - Server Fax.............................5-26
¾ More Fax Features .......................................5-30
¾ Authentication Mode.....................................5-35
Quick Reference Guide Page 5-1
Page 88

Fax
Fax is an optional feature which may not be available on your machine. There are
two types of Fax service - Embedded Fax and Server Fax. Although both fax
services can be installed, only one fax service can be enabled. Your System
Administrator will set up the default fax service. This chapter contains information
about the options available within both fax services.
NOTE: Embedded Fax is the default service when both fax services are installed.
Embedded Fax Once enabled on your machine, you will be able to transmit and receive hard copy
fax jobs over the telephone network directly to and from ano ther fax machine. Your
images are sent from your machine directly to the fax number entered. This type of
fax travels over normal telephone lines and will therefore be charged at telephone
rates. If the Basic Faxing screen looks like the one shown below, with the Superfine
option shown, then Embedded Fax is enabled.
NOTE: An optional 2 line fax kit with more memory is available to replace the
single line fax if required.
For information about the Embedded Fax options available please refer to “Basic
Faxing - Embedded Fax” on page 5-4.
Page 5-2 Quick Reference Guide
Page 89

Server Fax Available on the WorkCentre Pro only. Once enabled on your machine, you will be
able to transmit and receive hard copy faxes witho ut a dedicated telepho ne line on
the machine. Your images are sent from your machine to a Third Party fax server
which forwards them on to the fax number you entered. This type of fax travels over
normal telephone lines and will therefore be charged at telephone rates. If the Basic
Faxing screen looks like the one shown below then Server Fax is enabled.
For more information about the Server Fax options available please refer to “Basic
Faxing - Server Fax” on page 5-26.
Fax
Quick Reference Guide Page 5-3
Page 90
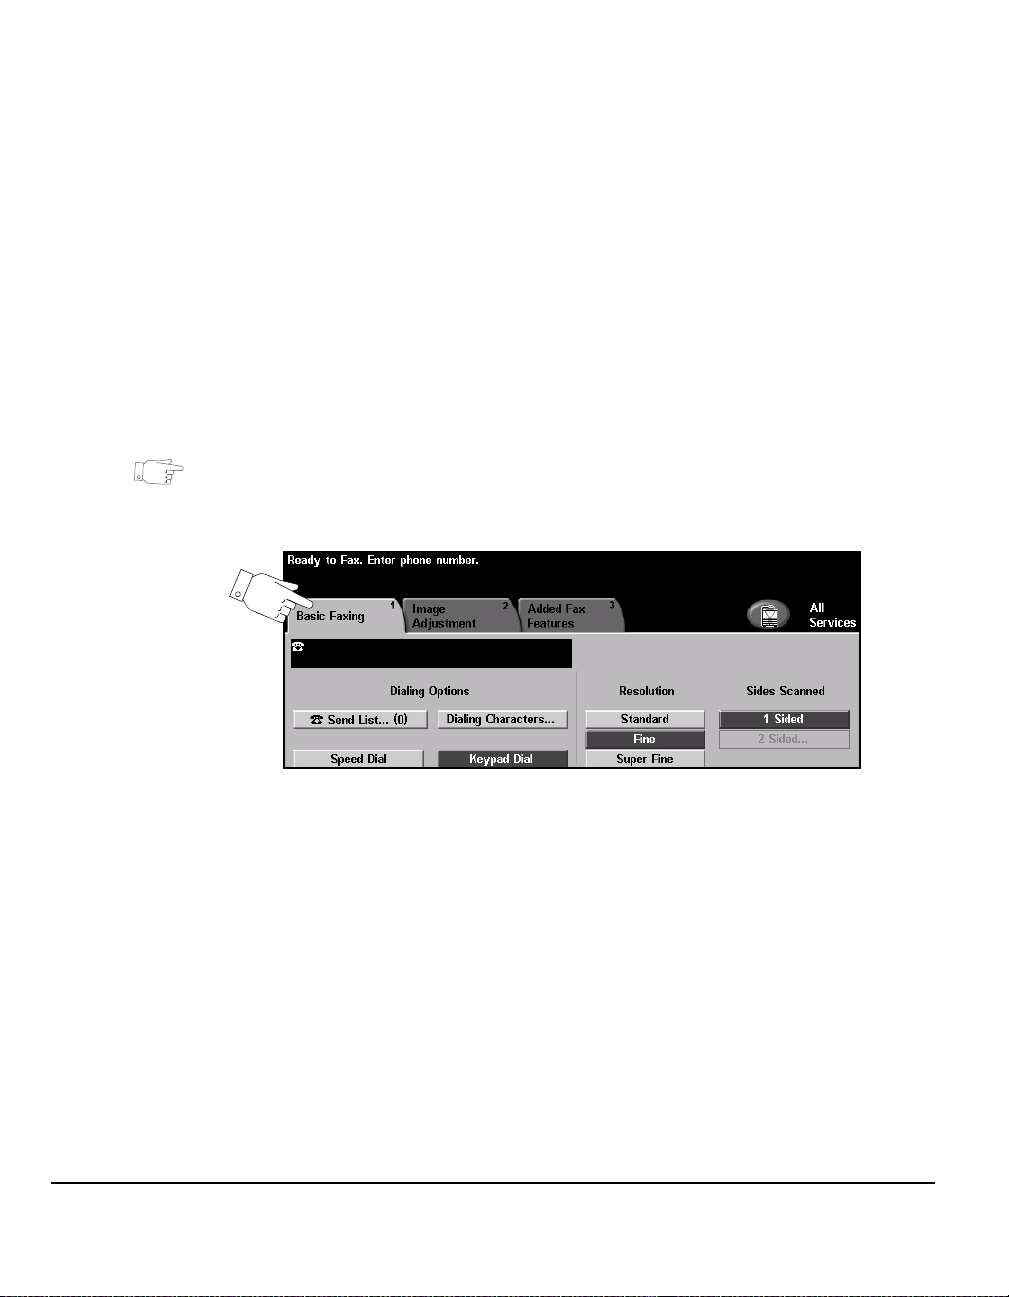
Basic Faxing - Embedded Fax
The Basic Faxing tab is the default Embedded Fax screen. Use the options
available on this screen to enter the recipient te lep hon e nu m be r an d to selec t the
standard features for your fax job.
Access to the Basic Faxing features is gained using the Features button on the
control panel.
Depending on the options enabled and how your ma chine has been configured, you
may have to select All Services and Fax to display the Fax feature tabs.
The tabs available for selecting Fax features are:
¾ Basic Faxing
¾ Image Adjustment
¾ Added Fax Features
HINT: If some of the Fax feature tabs are not displayed, selecting tab 2 displays
them.
Touch any of the top level buttons to select a feature. Multiple options can be
selected for each fax job if required.
Most feature screens include three buttons to confirm or cancel your choices.
¾ The Undo button resets the current screen to the default values that were
displayed when the screen was opened.
¾ The Cancel button resets the screen and returns to the previous screen.
¾ The Save button saves the selections made and returns to the previous screen.
Page 5-4 Quick Reference Guide
Page 91

Dialing Options
Use the Dialing Options to enter the destination fax number or numbers for the fax
job. Individual fax numbers can be entered using the keypad, using the Speed Dial
function or selected from the Directory.
The Directory is a listing of Individual or Group numbers which have be en previously
setup and stored. The Directory is accessible when the Send List option is selected.
Individual numbers can also be accessed from the Directory using the Speed Dial
function.
To send a fax to multiple destinations, the Send List option is used. Destination
numbers for the fax can be added to the Current Send List using any of the dialling
methods available.
Special dialing characters can also be added to your fax number using the Dialing
Characters option.
Options:
Fax
Keypad Dial There are many ways to enter a fax number, but the simplest method is to manually
enter the number using the numeric keypad. The number entered appears in the fax
window. If a pause is required, press the Dial Pause button on the control panel.
If an incorrect entry is made, use the C button to delete the number and then enter
the correct number.
Use the Keypad Dial option to return to using the keypad to enter fax numb ers after
using alternative methods.
Speed Dial Speed Dial numbers are automatically created when a fax number is stored in the
Individual Directory. Using the Speed Dial number saves time typing the complete
fax destination number. To use Speed Dial, select the Speed Dial option and enter
the 3 digit Speed Dial number required.
To find out the Speed Dial number for an entry in the Individual Directory, select the
Send List option and scroll through the Individual Directory to view the numbers
assigned.
Quick Reference Guide Page 5-5
Page 92

Send List The Send List is used when the fax is being sent to multiple destinations. Fax
numbers can be entered into the Send List manually using the keypad, using Speed
Dial or by using the Directory.
The Directory stores and displays the fax recipien t details. Informa tion includes the
recipient’s name, fax number and transmission preferences, for example the
resolution and communication mode. Individual and Group entries are stored in the
Directory.
The Group Directory allows a combination of specific individual names and
numbers to be stored within a group. Group members must first be programed into
the Individual Director y and then added to a Group. When sending a fax to a Group,
simply enter the group number assigned or select the Group from the directory, and
each individual within the Group will receive the document.
HINT: When Individual Directory numbers are deleted from the Directory they will
also be deleted from any Groups they have been assigned to.
The Current Send List displays a list of all the recipients for the fax. The list holds
up to 20 or 100 entries, depending on the memory installed.
Dialing
Characters
Dialing characters are special characters used for entering fax numbers. They are
entered as part of the telephone number:
Begin DTMF [*] Starts a sequence of DTMF (Dual Tone Multi-frequency) characters.
End DTMF [#] Ends a sequence of DTMF (Dual Tone Multi-frequency) characters.
Wait for Dial Tone [=]
Pulse to Tone Switch
Private Data Delimiter
[:]
Readability Digits
[( )]
Start Mailbox
Signalling
Pause [,]
Line Selection
Identifier [<1>]
[!]
[/]
Suspends dialing until an expected network dial tone is detected. Can also
be used to detect a specific tone when accessing an outside line or other
services.
Used to switch from pulse dialling to DTMF (tone or one-touch) dialling. After
switching from pulse to tone, you cannot switch back to the original mode
during the fax procedure.
Identifies the different components of the fax number, for example the
dialling code (1234) 56789.
Pauses regular fax dialling and starts DTMF (Dual Tone Multi-frequency)
procedure for the fax mailbox.
Gives the machine time to switch from an inside line to an outside line during
automatic dialing. For additional pause time, add multiple pauses. For
charge code numbers, enter a pause after the fax number but before the
charge code number.
Protects confidential information, For example, if a special charge code or
credit card number is required for a call. The / character should be selected
before and after entering confidential numbers. The numbers and characters
entered between this character will appear as asterisks (*).
Used to select Line 1 to dial the number. Selecting this character temporarily
overwrites the fax settings and is for the current job only.
Page 5-6 Quick Reference Guide
Page 93
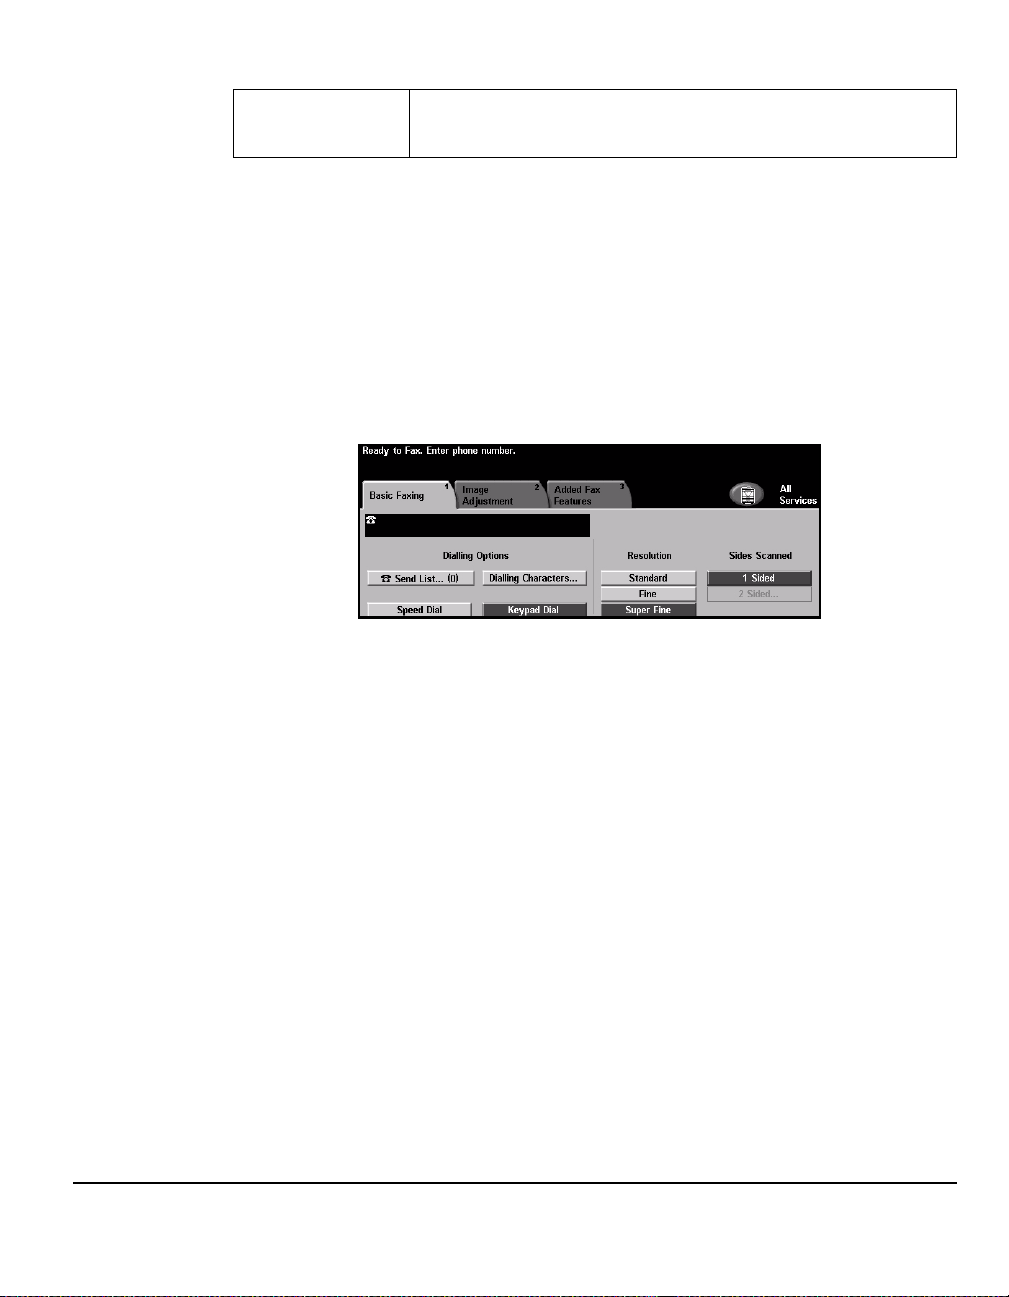
Line Selection
Identifier [<2>]
Chain Dialing This feature allows users to create a single fax recipient by adding two or more fax
Used to select Line 2 (if installed) to dial the number. If a second line is not
installed then this option will not be available. Selecting this character
temporarily overwrites the fax settings and is for the current job only.
numbers together. For example, an area code may be stored separately to the
telephone number, Chain Dialing combines these entries into a single fax number .
Chain Dialing is accessed from the Send List.
Resolution
The Resolution affects the appearance of the fax at the receiving fax terminal. A
higher resolution produces better quality for photos. However, a lower resolution
reduces communication time.
Options:
Fax
Standard 200 x 100 dpi - Recommended for text documents. It requires less commu nication
time, but does not produce the best image quality for graphics and photos.
Fine 200 x 200 dpi - Recommended for line art and photos. This is the default reso lution
and the best choice in most cases.
SuperFine 600 x 600 dpi - Recommended for p hotos a nd ha lfton es, or ima ges that have gr ey
tones. It requires more communication time, but produces the best image quality.
NOTE: Manufacturer’s definitions of Superfine may vary.
Quick Reference Guide Page 5-7
Page 94

Sides Scanned
This is used to specify whether the originals are single-sided or double-sided. For
2-sided originals the orientation can also be programmed.
Options:
1 Sided Use this option for originals that are printed on one side only.
2 Sided Use this option for originals that are printed on both sides.
Page 5-8 Quick Reference Guide
Page 95
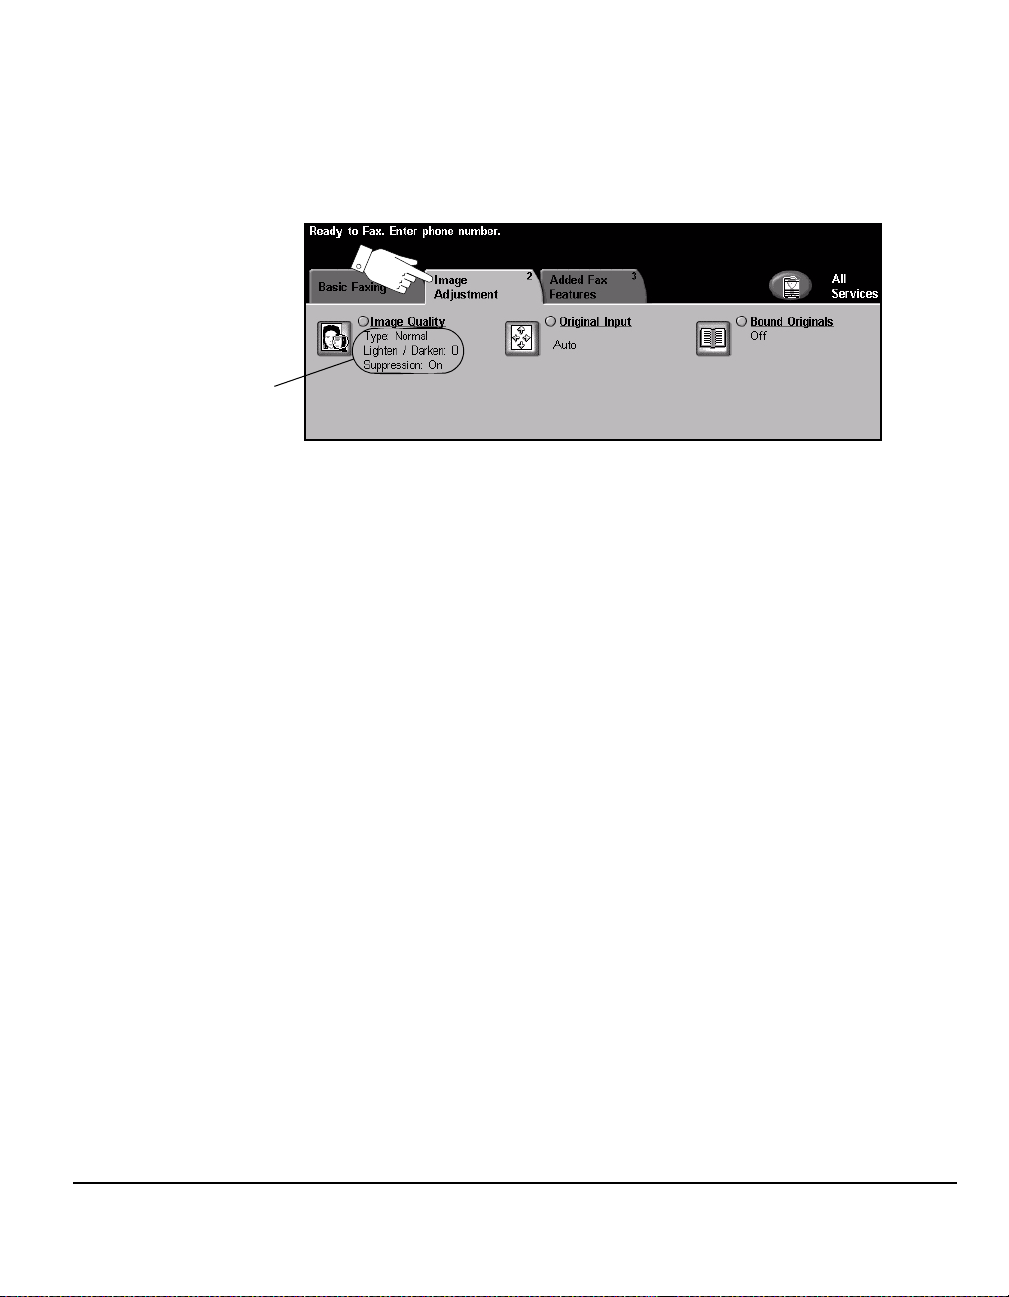
Image Adjustment
The Image Adjustment tab pr ovides further features that can be applied to your fax
job.
Job
Review
Summary
Touch any of the top level buttons to select a feature. To view all the options for a
feature, select the feature required. Multiple options can be selected for each fax
job if required.
The text next to the feature button, called a Job Review Summary, reflects the
current settings for that feature. A checked circle indicates that this feature has been
modified from its initial default settings.
Most feature screens include three buttons to confirm or cancel your choices.
¾ The Undo button resets the current screen to the default values that were
displayed when the screen was opened.
¾ The Cancel button resets the screen and returns to the previous screen.
¾ The Save button saves the selections made and returns to the previous screen.
Fax
Quick Reference Guide Page 5-9
Page 96

Image Quality
Use this feature to enhance the quality of the outgoing fax.
Options:
Original Type Use this option to enhance the quality of the fax based on the type of original being
scanned.
Original Type options are as follows:
Normal This is the standard setting and can be used for most originals.
Text Use for originals containing text or line art.
Halftone Photo
Photo Use for continuous tone photographs or printed half-tone originals.
Use for high quality lithographic images or continuous tone photos with text
and/or graphics.
Lighten / Darken Adjusts the lightness or darkness of the fax. To darken the fax, select the scroll
down button. To lighten the fax, select the scroll up button.
Background
Suppression
Use to automatically reduce or eliminate the dark background resulting from
scanning colored paper or newspaper originals.
NOTE: Background Suppression is disabled if the Original Type is Photo.
Page 5-10 Quick Reference Guide
Page 97

Original Input
This feature enables users to specify the size of the original document when
scanning from the document glass or document handler. The machine uses this
information to calculate the size of your original and the scanned image.
Options:
Auto This is the default option. Auto automatically detects the size of the originals in the
document handler.
Fax
Manual Platen
Mixed Size
Originals
Quick Reference Guide Page 5-11
Use this option to specify the dimensions of the document scanning region when
Input
scanning from the document glass. There are several pre-set dimensions that
correspond to common document sizes and orientations.
Use this feature to scan a document containing mixed size originals. The originals
must be the same width, for example 8.5 x 11" long edge feed and 11 x 17" short
edge feed. Load documents in the document handler when using this feature.
Page 98

Bound Originals
Use this option to program which page or pages of a bound document are to be
scanned and faxed.
The bound original is placed face down on the document glass with the spine lined
up with the marker on the rear edge of the glass. Align the top of the bound origina l
against the rear edge of the document glass. Do not close the document handler
during the faxing process.
NOTE: It is recommended that users avoid looking at the scan bar light when the
document handler is open.
HINT: If necessary, apply a little pressure to the center of the bound original to
flatten it during scanning.
Options:
Off The feature is switched off.
Left Page Faxes only the page on the left when looking at the open bound original, face up.
Right Page Faxes only the page on the right when looking at the open bound original, face up.
Both Pages Faxes both pages of an open bound original, in left to right order when looking at
the original face up. Each page is placed on a separate sheet of paper.
Page 5-12 Quick Reference Guide
Page 99

Binding Erase Erases a specified area from the center of the bound original to eliminate unwanted
marks caused by scanning the binding area. Up to 25mm can be erased.
Fax
Quick Reference Guide Page 5-13
Page 100
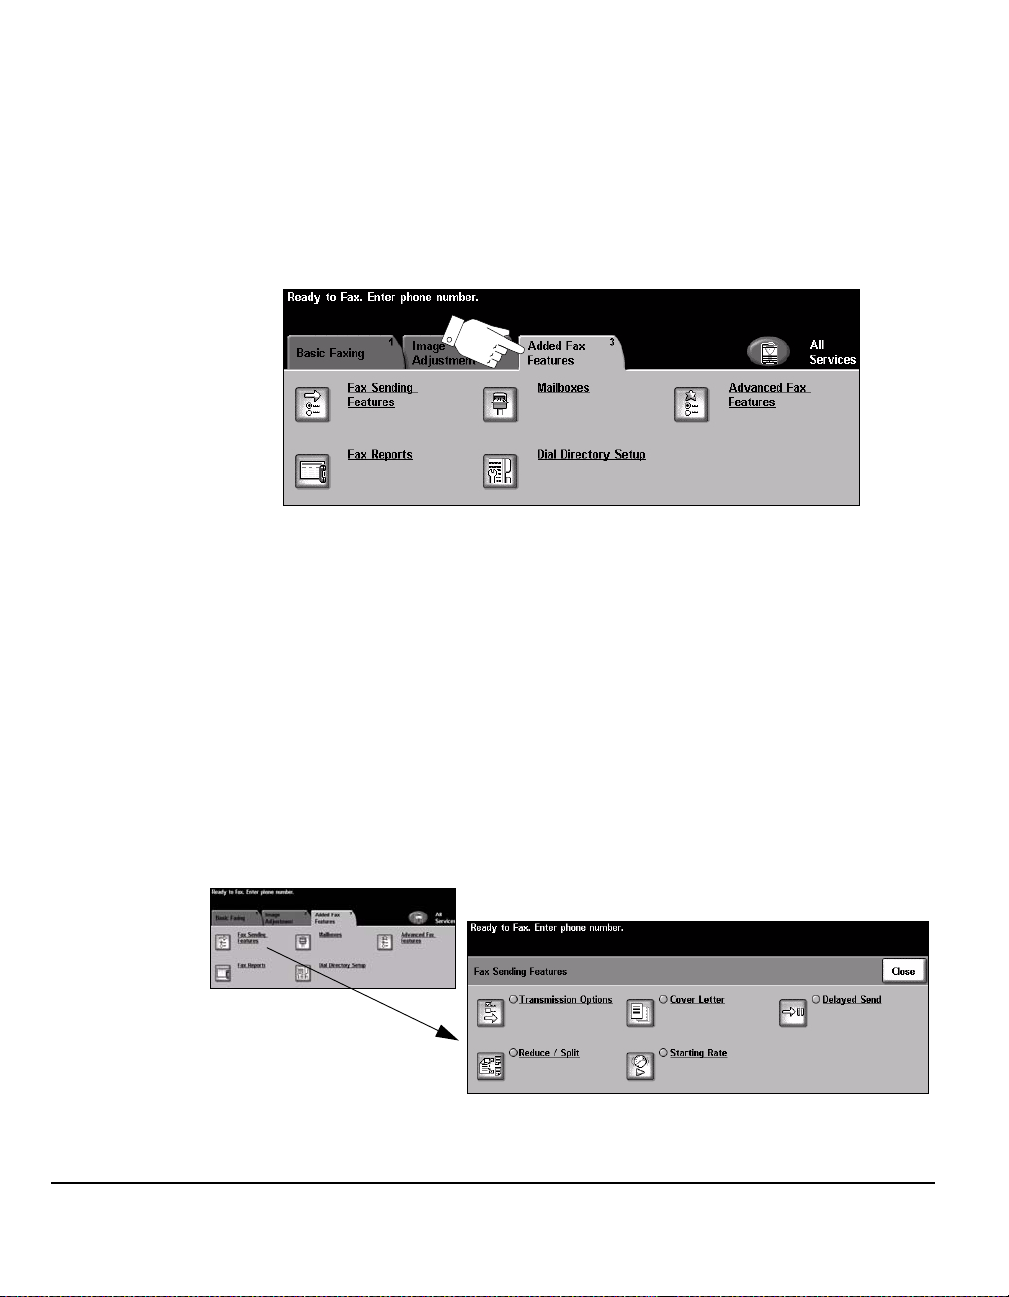
Added Fax Features
The Added Fax Features tab provides further fax features which can be used when
transmitting faxes.
NOTE: If the ’More Fax Features’ tab is displaying, this must be selected to access
the Added Fax Features tab.
Touch any of the top level buttons to select a feature. To view all the options for a
feature, select the feature required. Multiple options can be selected for each fax
job if required.
Most feature screens include three buttons to confirm or cancel your choices.
¾ The Undo button resets the current screen to the default values that were
displayed when the screen was opened.
¾ The Cancel button resets the screen and returns to the previous screen.
¾ The Save button saves the selections made and returns to the previous screen.
Fax Sending Features
Select this feature to access the options which enable you to apply additional
transmission features to your fax job.
Page 5-14 Quick Reference Guide
 Loading...