

Page 1

The Xerox
DocuPrint C11
Color Inkjet Printer
User Guide
Version 1.0
Page 2

Copyright © 1999 Xerox Corporation. All Rights Reserved.
Copyright protection claimed includes all forms of matters of
copyrightable materials and information now allowed by statutory or
judicial law or hereinafter granted, including without limitation, material
generated from the software programs which are displayed on the screen
such as styles, templates, icons, screen displays, looks, etc.
XEROX®, The Document Company®, the stylized X, DocuPrint, and
C11 are trademarks of Xerox Corporation or its subsidiaries.
PCL, HP, and LaserJet are trademarks of Hewlett-Packard Company.
IBM is a trademark of International Business Machines Corporation.
Microsoft, Microsoft Windows, Microsoft Word, MS, and MS-DOS are
trademarks of Microsoft Corporation. Univers is a trademark of Linotype
AG or its subsidiaries. WordPerfect is a trademark of Corel Corporation.
Centronics is a trademark of Centronics Corporation. Macintosh and
TrueType are trademarks of Apple Computer, Incorporated. OnPage is a
trademark of COMPUTER:applications, Inc. All other product names are
trademarks/tradenames of their respective owners.
PCL is a trademark of the Hewlett-Packard Company. This printer
contains an emulation of the Hewlett-Packard PCL command language,
recognizes HP PCL commands, and processes these commands in a
manner comparable with Hewlett-Packard LaserJet printer products.
Notice
Safety
Information
Specifications described in this publication are subject to change without
notice. Use of some features may be limited by your hardware or
software configuration. Contact your dealer or Xerox for details.
• If your product is not marked with this symbol , it MUST be
connected to an electrical outlet that is grounded properly.
• The power cord must be connected to an electrical outlet that is near
the product and easily accessible.
• Refer service or repairs, other than those described in the operating
instructions, to a professional service person.
• This product is designed, tested and approved to meet strict global
safety standards with the use of specific Xerox components. The
safety features of some parts may not always be obvious. Xerox is not
responsible for the use of other replacement parts.
Page 3

Contents i
Safety Notes ................................................................ 1
Note, Caution and Warning Symbols ...................................... 2
Electrical Safety ...................................................................... 3
Maintenance Safety................................................................ 4
Operational Safety ................................................................. 5
Chapter 1
Getting to Know Your Printer
Introduction ........................................................................ 1-2
Printer Features ................................................................... 1-3
Print Speed ...................................................................... 1-3
Print Quality .................................................................... 1-3
Resolutions with Selected Media ....................................... 1-4
Resident Font ................................................................... 1-4
Character Sets.................................................................. 1-5
Connectivity ..................................................................... 1-6
Printer Driver Software ..................................................... 1-6
Printer Components............................................................. 1-7
DocuPrint Documentation ................................................... 1-8
Printer Documentation ..................................................... 1-8
..................................
Contents ❖ TOC-1
1-1
Page 4

DocuPrint C11 Printer CD................................................. 1-8
Chapter 2
Loading Print Media
Printer Capacity................................................................... 2-3
Main Tray........................................................................ 2-3
Manual Feeder Slot .......................................................... 2-3
Output Tray ..................................................................... 2-3
Recommended Media .......................................................... 2-4
Media Weights................................................................. 2-4
Media Sizes...................................................................... 2-5
Loading Media .................................................................... 2-7
Feed Sequence.................................................................. 2-7
Loading the Main Tray ........................................................ 2-8
Loading Standard Size Media ........................................... 2-8
Loading Envelopes or Small Format Media ...................... 2-10
Loading Banners ............................................................ 2-12
Loading Media through the Manual Feeder Slot ................. 2-14
Media Selection Tips .......................................................... 2-15
Special Printing Media ....................................................... 2-17
Envelopes ....................................................................... 2-17
Coated Paper ................................................................. 2-17
...............................................
2-1
Photographic Paper........................................................ 2-17
Transparencies ............................................................... 2-17
T-shirt Transfers ............................................................. 2-18
Note Cards .................................................................... 2-18
Chapter 3
TOC-2 ❖ DocuPrint C11 Color Inkjet Printer User Guide
Printing
Printer Driver Settings .......................................................... 3-2
Operator Panel Features ...................................................... 3-7
Printer Buttons .................................................................... 3-8
...................................................................
Driver Features ................................................................. 3-2
Optimum Printer Driver Settings ....................................... 3-5
Basic Functions................................................................. 3-8
3-1
Page 5

Special Functions.............................................................. 3-9
Indicator Light................................................................ 3-10
Instructions on the Printer.................................................. 3-12
On the Printer Casing..................................................... 3-12
Inside of Cover ............................................................... 3-12
Chapter 4
Chapter 5
Appendix A
Appendix B
Maintaining the Printer
Print Cartridge Care and Precautions ................................... 4-2
Removing and Replacing Print Cartridges ............................. 4-3
Cleaning Print Cartridges ..................................................... 4-7
Troubleshooting
Introduction ........................................................................ 5-2
Error Condition Indicators ................................................. 5-2
Transporting the Printer ................................................... 5-2
Printer Problems .................................................................. 5-3
Printer Operation Problems............................................... 5-4
Print Cartridge Alignment .................................................... 5-8
Windows 95/98 and NT4.0 ............................................. 5-8
Windows 3.1x .................................................................. 5-9
Alignment Procedure Notes ............................................ 5-10
......................................................
Printer Specifications
Notices and Certifications
...........................................
...............................................
.......................................
4-1
5-1
A-1
B-1
Electronic Emission Notices .................................................. B-2
Contents ❖ TOC-3
Page 6

TOC-4 ❖ DocuPrint C11 Color Inkjet Printer User Guide
Page 7

Safety Notes
The Xerox DocuPrint C11 Color Inkjet Printer and its
recommended consumable supplies have been designed
and tested to meet strict safety requirements. Attention to
the following notes will ensure the continued safe
operation of your printer.
Safety Notes ❖ 1
Page 8
Note, Caution and Warning Symbols
Note, Caution and Warning
Symbols
Throughout this User Guide and the other DocuPrint
guides, several symbols are used to emphasize useful,
important and critical information. They are as follows:
This symbol indicates particularly useful or helpful
information about your printer.
This symbol indicates a caution against performing any
action that may damage your printer or degrade
performance.
This symbol indicates a warning against performing any
action that may lead to physical injury.
When these symbols are used within a step they are
smaller, but equally important.
2 ❖ DocuPrint C11 Color Inkjet Printer User Guide
Page 9

Electrical Safety
Electrical Safety
• Use the power cord supplied with your DocuPrint C11
printer.
• Do not place the printer where people may step on the
power cord.
• Do not place objects on the power cord.
• Do not override or disable electrical or mechanical
interlocks.
• Do not block or cover slots and openings on the
printer. Without adequate ventilation, the printer may
overheat.
Do not push objects into slots and openings on the
printer. Making contact with a voltage point or shorting
out a part could result in fire or electrical shock.
• If you notice unusual noises or odors, Power Off the
printer immediately and disconnect the power cord
from the electrical outlet. Call the Xerox Customer
Support Center to correct the problem.
• If you notice that the power cord is damaged or that
the printer may have been accidentally damaged,
Power Off the printer immediately, disconnect the
power cord and call the Xerox Customer Support
Center.
Safety Notes ❖ 3
Page 10

Maintenance Safety
Maintenance Safety
• Do not attempt any maintenance procedure that is not
specifically described in the documentation supplied
with your printer.
• Do not use aerosol cleaners. The use of unapproved
supplies can cause poor performance and could create
a dangerous situation.
• Do not let dust accumulate on the printer; use a
slightly damp cloth to remove dust.
• Use the supplies and cleaning materials only as
directed in this manual. Keep all these materials out of
the reach of children.
• Do not remove the covers or guards that are fastened
with screws unless you are installing optional
equipment. There are no parts that you can maintain
or service behind these covers.
• Follow the maintenance procedures provided in
Chapter 4.
4 ❖ DocuPrint C11 Color Inkjet Printer User Guide
Page 11

Operational Safety
Operational Safety
Your Xerox printer and supplies were designed and tested
to meet strict safety requirements. These include safety
agency examination, approval, and compliance with
established environmental standards.
Your attention to the following safety guidelines will help
to ensure the continued safe operation of your printer.
• Use the materials and supplies specifically designed for
your printer. The use of unsuitable materials may result
in poor performance and possibly a hazardous
situation.
• Follow all warnings and instructions marked on, or
supplied with, the printer.
• Place the printer in a dust free area where the
temperature range is 60 to 95
relative humidity is 20 to 80%.
• Choose a location for the printer with sufficient space
around it for operation and maintenance.
• Place the printer in an area where there is adequate
space for ventilation and servicing. The recommended
spacing is 10 in. (25cm) behind the printer, 10 in.
(25 cm) on either side of the printer, and 24 in.
(61 cm) in front of the printer.
• Do not subject your printer to severe changes in
temperature and/or humidity.
o
F (15 to 35oC) and the
Safety Notes ❖ 5
Page 12

Operational Safety
• Do not place the printer near a heat source or in direct
sunlight.
• Do not place the printer in line with the cold air flow
from an air-conditioning system.
• Place the printer on a level, solid surface with adequate
strength for the weight of the machine. The weight of
the machine without any packing materials is 13.2 lb
(6 kg).
• If you plan to move the printer, always make sure that
the print cartridge carrier is in its rest position. To
ensure this, Power Off your printer before you Power
Off your computer.
• Take care not to drop your printer.
• Repack your printer in its original carton, whenever
possible, to transport or ship it. Be sure to remove the
ink cartridges before packing the printer.
• Frequent operation of the Power switch is not
recommended.
• Do not Power Off the printer while printing.
• Do not move the printer while printing.
6 ❖ DocuPrint C11 Color Inkjet Printer User Guide
Page 13

Getting to Know Your Printer Chapter1
Introduction
Printer Features
Print Speed .................................................................... 1-3
Print Quality .................................................................. 1-3
Resolutions with Selected Media ..................................... 1-4
Resident Font ................................................................. 1-4
Character Sets ................................................................ 1-5
Connectivity ................................................................... 1-6
Printer Driver Software ................................................... 1-6
Printer Components
DocuPrint Documentation
Printer Documentation ................................................... 1-8
DocuPrint C11 Printer CD ............................................... 1-8
.....................................................................
................................................................
.........................................................
................................................
1-2
1-3
1-7
1-8
Chapter 1: Getting to Know Your Printer ❖ 1-1
Page 14

Introduction
Introduction
In this chapter, you will become familiar with the features
of your printer and learn where to locate specific printer
parts.
Before you use your printer, make sure that you perform
all of the steps outlined in the
came with your printer and that you connect the printer
to your computer and a power source.
Quick Installation Guide
that
1-2 ❖ DocuPrint C11 Color Inkjet Printer User Guide
Page 15

Printer Features
Printer Features
Your DocuPrint C11 has many features that will help you
achieve the printing results you need for your specific
print job. This section will help you become familiar with
your printer’s features and capabilities.
Print Speed
Print Quality
Throughput for the printer in a Windows environment is
up to nine pages per minute (black) and up to five pages
per minute (color).
Actual throughput may vary depending upon the print
mode, the software application and the type of computer
used.
Printer quality can be set at three levels:
•Fast/Save Ink
•Normal
• High Quality
Chapter 1: Getting to Know Your Printer ❖ 1-3
Page 16

Printer Features
Resolutions with
Selected Media
Table 1.1 lists resolution for selected media depending
upon the image setting and the quality selected from the
print driver.
Table 1.1 C11 Resolutions with selected media
Media Type Image Setting Fast/Save Ink Normal High Quality
Plain paper
Transparency
Coated paper
Photographic paper
T-shirt transfer
paper
1
600 x 300 dpi resolution
Intelligent color
Manual
Intelligent color
Manual
Intelligent color
Manual
Intelligent color
Manual
Intelligent color
Manual
300 dpi
300 dpi
n/a
n/a
n/a
n/a
n/a
n/a
n/a
n/a
1
1
600 dpi
600 dpi
600 dpi
600 dpi
600 dpi
600 dpi
600 dpi
600 dpi
600 dpi
600 dpi
600 dpi
1200 dpi
600 dpi
600 dpi
600 dpi
1200 dpi
600 dpi
1200 dpi
600 dpi
600 dpi
Resident Font
The resident Courier font on the printer has these
characteristics:
• Orientation: Portrait, Landscape
• Pitch: 5, 10, 20 cpi
• Size: 6, 12 points
• Style: Upright (Italic 5, 10, 20 cpi)
1-4 ❖ DocuPrint C11 Color Inkjet Printer User Guide
Page 17
Printer Features
Character Sets
The following table lists the supported character sets for
the DocuPrint C11 printer.
Table 1.2 Supported character sets
Character sets Character sets
CP 210 Greece ISO 11 - Sweden Names
CP 437 International ISO 14
CP 850 Multilingual ISO 15 - Italy
CP 851 Greece ISO 16
CP 852 Latin 2 ISO 17 - Spain
CP 857 Turkey ISO 21 - Germany
CP 860 Portugal ISO 60 - Norway 1
CP 862 Hebrew ISO 61 - Norway 2
CP 863 French Canadian ISO 69 - France
CP 866 Cyrillic Legal
ECMA - 94 Latin 1 PC Abicomp International
ISO 2
IRV PC Abicomp Portugal
-
JIS ASCII
-
Portugal
-
ISO 4 - United Kingdom PC 8 Denmark/Norway
ISO 6 - ASCI Roman 8
ISO - Sweden UNIX International
Chapter 1: Getting to Know Your Printer ❖ 1-5
Page 18

Printer Features
Connectivity
Printer Driver
Software
The DocuPrint C11 comes with a Centronics parallel port
that accepts a standard, bi-directional IEEE 1284 B-type
interface cable
The printer’s parallel port supports Windows 95/98 Plug
and Play standards.
Printer driver software is loaded on your computer during
installation. The printer driver gives you access to all its
features through easy-to-use property sheets.
.
1-6 ❖ DocuPrint C11 Color Inkjet Printer User Guide
Page 19
Printer Components
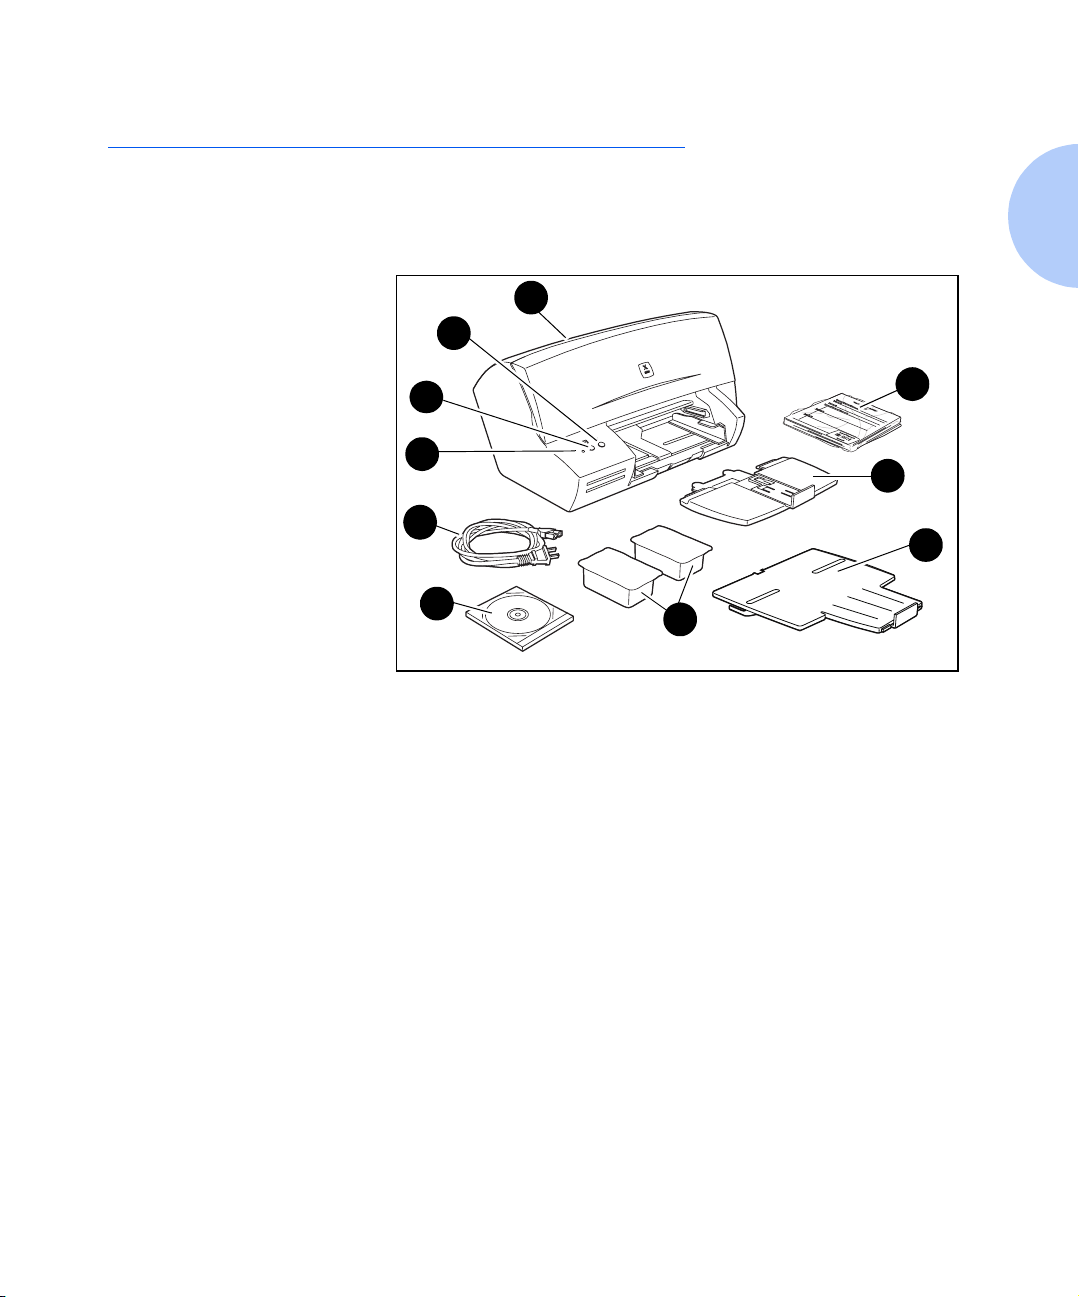
The major components of the DocuPrint C11 are
indicated in Figure 1.1 below.
Figure 1.1 DocuPrint C11 printer components
Printer Components
7
Power Button
1
Resume Button
2
Indicator Light
3
Power Cord
4
Main Tray
5
Output Tray
6
Manual Feeder Slot
7
Two Inkjet Print Cartridges
8
(Color and Black)
DocuPrint C11 CD-ROM
9
Documentation
10
1
2
10
3
5
4
6
9
8
Chapter 1: Getting to Know Your Printer ❖ 1-7
Page 20

DocuPrint Documentation
DocuPrint Documentation
Printer
Documentation
DocuPrint C11 Printer
CD
Your DocuPrint C11 was packaged with the following
pieces of printed documentation:
Quick Installation Guide
•
get your printer up and running
User Guide
•
information needed to use your printer
Supplies/Options Guide
•
your printer
• Software License Agreement
Your DocuPrint C11 was also packaged with a CD that
contains the following information:
User Guide
•
•Printer Drivers
The majority of driver documentation is provided via the Help
files included with the drivers.
Since the DocuPrint C11 CD contains so much important
information, please ensure that you store it in a safe place.
(this book) which provides you with the
(electronic version of this book)
which shows you how to
which lists consumables for
1-8 ❖ DocuPrint C11 Color Inkjet Printer User Guide
Page 21

Loading Print Media Chapter2
Printer Capacity
Main Tray ...................................................................... 2-3
Manual Feeder Slot ........................................................ 2-3
Output Tray ................................................................... 2-3
Recommended Media
Media Weights ............................................................... 2-4
Media Sizes .................................................................... 2-5
Loading Media
Feed Sequence ................................................................ 2-7
Loading the Main Tray
Loading Standard Size Media ......................................... 2-8
Loading Envelopes or Small Format Media .................... 2-10
Loading Banners .......................................................... 2-12
Loading Media through the Manual Feeder Slot
Media Selection Tips
Special Printing Media ..................................................... 2-17
Envelopes ..................................................................... 2-17
Coated Paper ............................................................... 2-17
...............................................................
.......................................................
.................................................................
....................................................
............
.......................................................
2-3
2-4
2-7
2-8
2-14
2-15
Photographic Paper ...................................................... 2-17
Transparencies ............................................................. 2-17
Chapter 2: Loading Print Media ❖ 2-1
Page 22

Loading Print Media
T-shirt Transfers ........................................................... 2-18
Note Cards .................................................................. 2-18
2-2 ❖ DocuPrint C11 Color Inkjet Printer User Guide
Page 23

Printer Capacity
Printer Capacity
This chapter will help you understand what kinds of
media you can use with the DocuPrint C11 and how to
properly load paper and other media to create the
documents you need.
Main Tray
Manual Feeder Slot
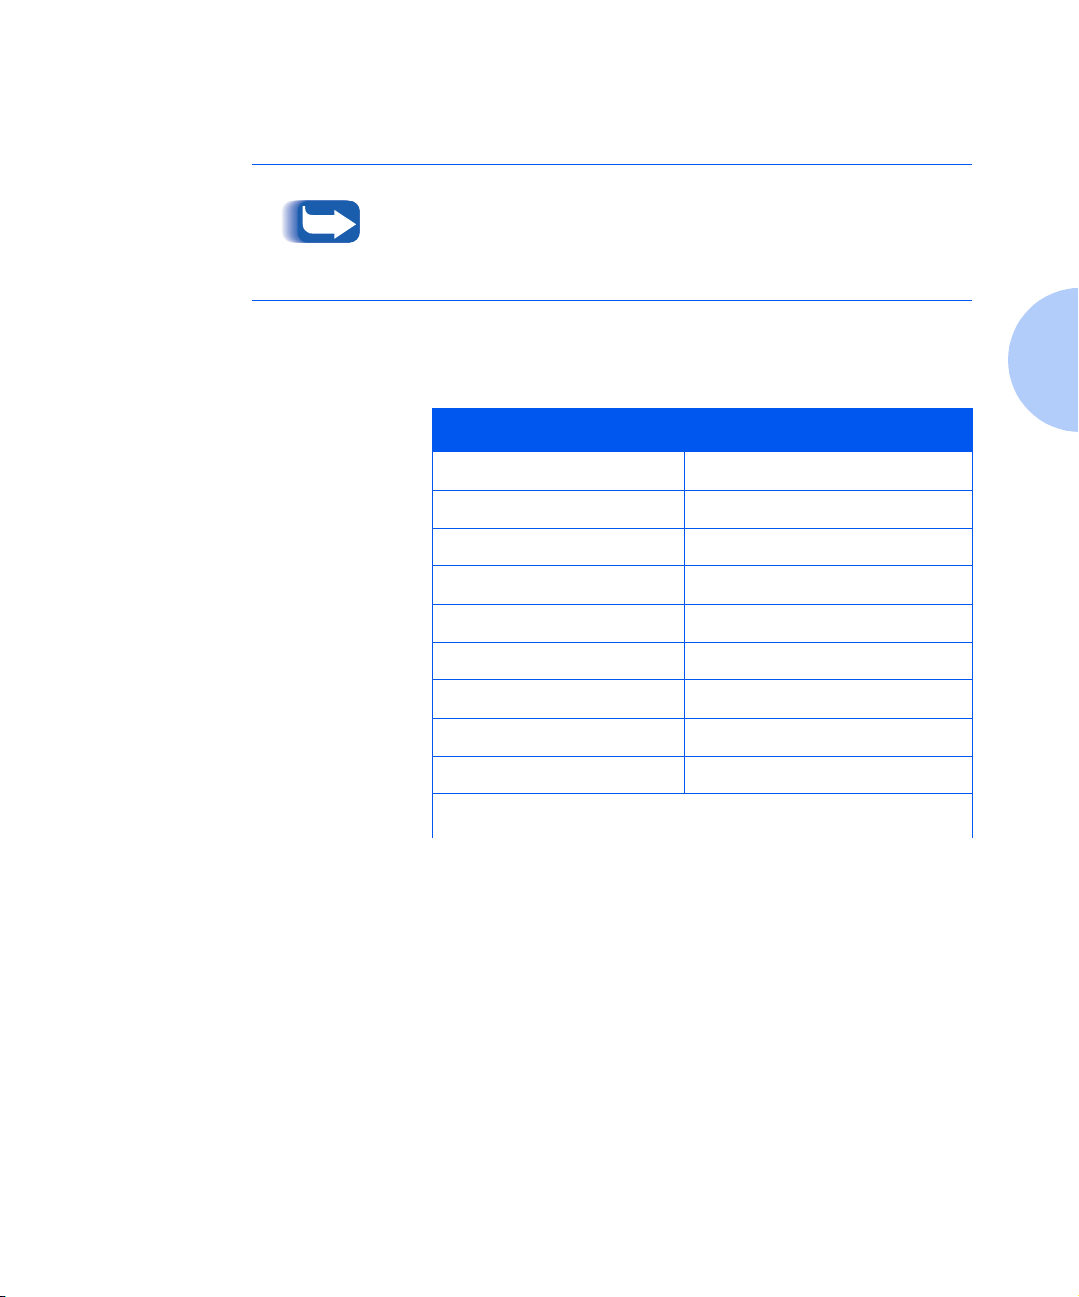
Table 2.1 lists the capacity of the Main Tray for various
media.
Table 2.1 Main Tray capacity
Media Type Tray Capacity
Plain 150 sheets 20 lb (75 g/m2)
2
Envelopes 25 envelopes 20 lb (75 g/m
Banner 18 banners up to 5 ft (1.5m) long
24 lb (75 g/m
Coated 90 sheets 24 lb (75 g/m
Photographic 25 sheets
Transparencies 50 sheets
Glossy 15 sheets
T-shirt transfers 5 sheets
Note Cards 60 plain and 25 photo cards
2
)
)
2
)
The Manual Feeder Slot accepts the same media as the
Main Tray one sheet at a time.
Output Tray
Output Tray capacity is 60 printed sheets 20 lb (75 g/m2).
Chapter 2: Loading Print Media ❖ 2-3
Page 24

Recommended Media
Recommended Media
The C11 supports printing on:
• Plain paper
• Transparencies
• High resolution/coated papers
• Photo/glossy papers
• Envelopes
•Note cards
•T-Shirt transfers
• Banner paper
Media Weights
The C11 supports the following media weights:
Main Tray
• Paper: 16-36 lb (60-135 g/m2)
• Envelopes: 20-27 lb (75-100 g/m
• Banner: 18-24 lb (70-90 g/m
• Note cards: 27-40 lb (100-150 g/m
2
)
2
)
2
)
Manual Feeder Slot
• Paper: 16-52 lb and 108 lb Index (60-200 g/m2)
• Envelopes: 20-27 lb (75-100 g/m
• Note cards: 27-53 lb (100-200 g/m
2
)
2
)
2-4 ❖ DocuPrint C11 Color Inkjet Printer User Guide
Page 25
Media Sizes
Recommended Media
The printer cannot detect the size of the media you are inserting.
Always verify that the size of the media you use corresponds to the
setting in your printer driver.
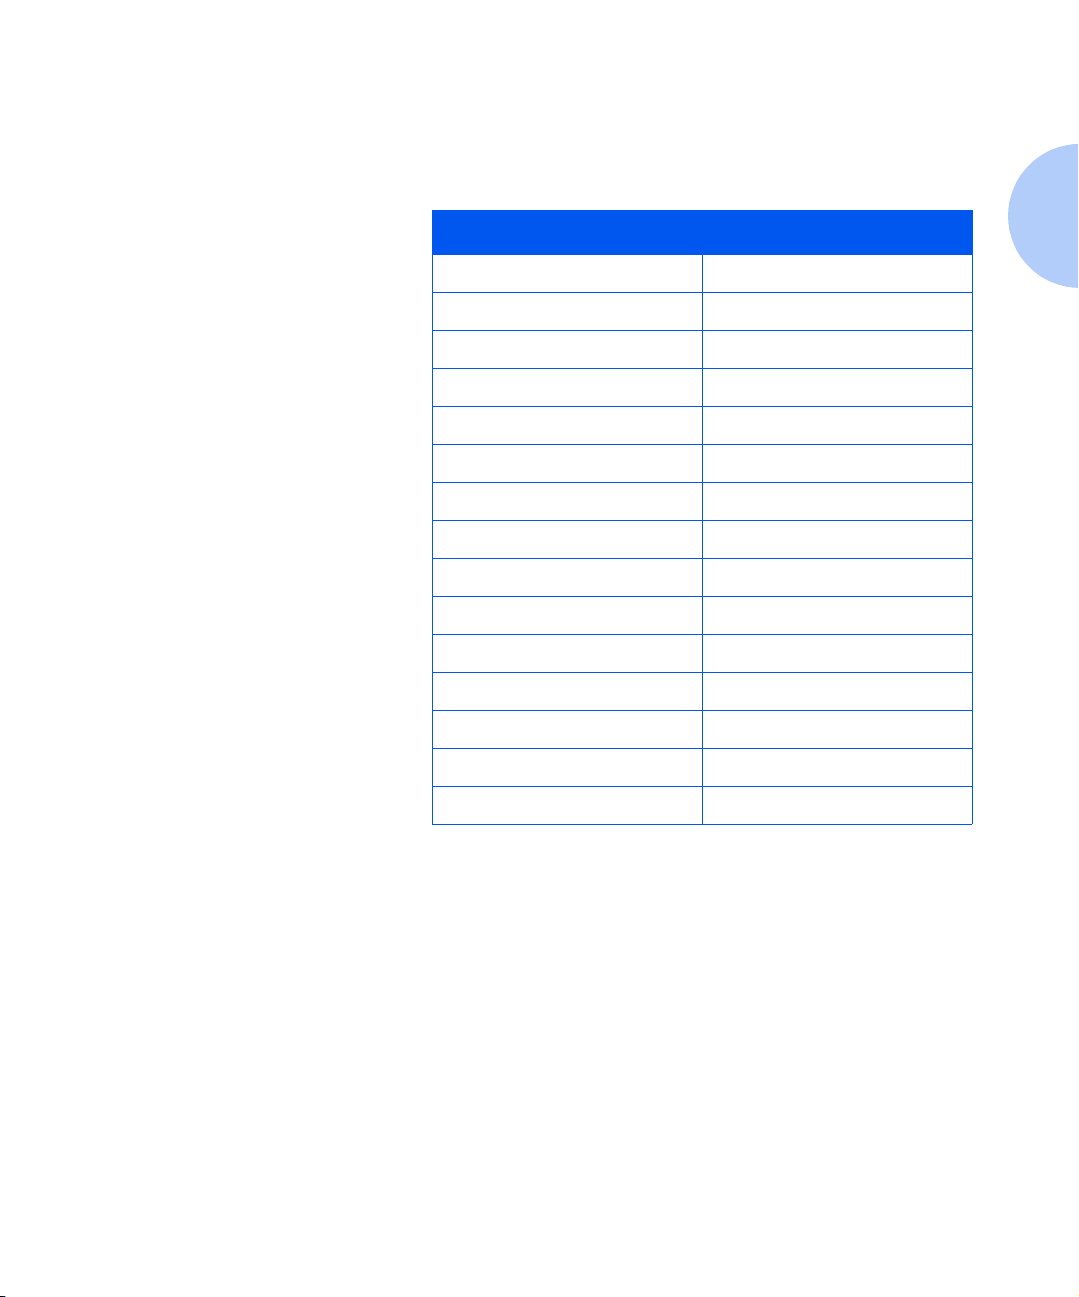
Table 2.2 lists the media sizes acceptable to the printer.
Table 2.2 Acceptable media sizes
Media Size Dimensions
Legal 8.5 x 14”
Letter 8.5 x 11”
A4 210 x 297mm
A5 148.5 x 210mm
A6 105 x 148mm
B5 182 x 257mm
Executive 7.25 x 10.5”
Folio 8.5 x 13”
Statement 5.5 x 8.5”
Table 2.2 Page 1 of 2
Chapter 2: Loading Print Media ❖ 2-5
Page 26

Recommended Media
Table 2.2 Acceptable media sizes
(continued)
Media Size Dimensions
Envelope B5 176 x 125mm
Envelope Com #10 4.13 x 9.5”
Envelope C5 162.1 x 228.9mm
Envelope C6 114 x 162mm
Envelope DL 110 x 220mm
Envelope Monarch 3.875 x 7.5”
Note Card 1 4 x 6”
Note Card 2 5 x 8”
Note Card A6 105 x 148.5mm
User defined:
•Maximum
•Minimum
Banner:
•Maximum
•Minimum
8.5” x 14” (216mm x 256 mm)
5.9 x 5.85” (149.7 x 148.5mm)
8.5” (216mm) x Unlimited length
5.9 x 5.85” (149.7 x 148.5mm)
2-6 ❖ DocuPrint C11 Color Inkjet Printer User Guide
Table 2.2 Page 2 of 2
Page 27

Loading Media
Loading Media
Feed Sequence
You can insert media in stacks of up to 150 sheets (20 lb/
75 g/m
the Manual Feeder Slot.
When paper is inserted into both the Main Tray and
Manual Feeder Slot at the same time and you select
Automatic
the following order:
If you select Manual in the printer driver, the paper can only be fed
through the Manual Feeder Slot. If there is no paper in the Manual
Feeder Slot, you must load a sheet before you can continue.
2
)
through the Main Tray or one at a time through
in the printer driver, the C11 will feed paper in
1. Manual Feeder Slot
2. Main Tray
Chapter 2: Loading Print Media ❖ 2-7
Page 28

Loading the Main Tray
Loading the Main Tray
This section includes instructions for loading paper into
the Main Tray.
Do NOT add new paper to paper that is already in the
Main Tray without first removing and fanning it
together with the paper you are loading.
When inserting paper for printing, make sure that the
printing surface faces the correct way. Refer to the
instructions on the package or container to determine
which side of the paper to print on.
Loading Standard
Size Media
1
Lift the Output Tray.
Slide the length guide out toward you. Push the width
2
guides open.
2-8 ❖ DocuPrint C11 Color Inkjet Printer User Guide
Page 29

Loading the Main Tray
Place a stack of paper in the tray with the print side down
3
and the top edge going in first.
Do not overload the tray.
Push the width guides until they touch the edges of the
4
paper.
Slide the length guide up until it touches the bottom edge
5
of the paper. Then lower the Output Tray.
Chapter 2: Loading Print Media ❖ 2-9
Page 30

Loading the Main Tray
Loading Envelopes or
Small Format Media
Lift the Output Tray.
1
Flip up the Small Format Media Guide.
2
Slide the length guide out toward you. Push the width
3
guides open.
2-10 ❖ DocuPrint C11 Color Inkjet Printer User Guide
Page 31

Loading the Main Tray
Place a stack of envelopes in the tray. Envelopes must be
4
inserted with their short side as the leading edge, the
printing side face down, and the sealing flap on the left.
Push the width guides until they touch the edges of the
5
envelope.
Do not overload the tray. Refer to Table 2.1 on
page 2-3 for information on tray capacity.
Slide the length guide forward until it touches the bottom
6
edge of the envelopes. Then lower the Output Tray
Chapter 2: Loading Print Media ❖ 2-11
Page 32

Loading the Main Tray
Loading Banners
The following figures illustrate how to load Banners.
Lift the Output Tray.
1
Slide the length guide out toward you. Push open the
2
width guides.
Load a stack of banner paper into the tray. Make sure the
3
banner paper is at least one letter-size page longer the
number of pages required to print your banner. Insert the
stack so that the cut edge of the paper faces into the
printer.
You can also use cut sheet paper to print the
banner and then tape the pages together after they
are printed.
2-12 ❖ DocuPrint C11 Color Inkjet Printer User Guide
Page 33

Loading the Main Tray
Push the width guides until they touch the edges of the
4
paper.
Slide the length guide forward until it touches the bottom
5
edge of the paper stack. Then lower the output tray and
pull down the End Stop.
Chapter 2: Loading Print Media ❖ 2-13
Page 34

Loading Media through the Manual Feeder Slot
Loading Media through the
Manual Feeder Slot
Single sheets can be loaded through the Manual Feeder
Slot.
This illustration demonstrates the loading positions for
feeding a single sheet into the printer through the Manual
Feeder Slot.
The printer will “beep” once to indicate when the sheet
has been inserted far enough into the slot.
When you insert media into the Manual Feeder
Slot make sure that you center the sheet an equal
distance from each end of the slot. This ensures
that the media is properly registered in the printer.
2-14 ❖ DocuPrint C11 Color Inkjet Printer User Guide
Page 35

Media Selection Tips
The following media tips can affect the productivity of
your printer. See the
recommendations.
• Sub-standard paper can affect the quality of printing.
• Make sure paper feeds smoothly. It should not be
• Do not feed any curled, crumpled or torn media into
• Printing on both sides of the paper may increase the
Media Selection Tips
Supplies/Options Guide
Buy quality paper designed for inkjet printer use with a
surface that will enhance your output. Paper designed
for laser printer use can smear because it is not able to
absorb ink.
restricted too tightly by paper guides nor should it be
too loose when it is fed into the printer.
the printer. Damaged media may jam the printer.
Always use paper in perfect condition and within the
specifications defined.
risk of misfeeds or paper jams and may cause
smudging.
for specific
• If you remove the paper from or add paper to the Main
Tray, you
operation. Always remove any paper that is already in
the printer and fan it together with the new paper you
are loading.
must
repeat the entire paper loading
Chapter 2: Loading Print Media ❖ 2-15
Page 36

Media Selection Tips
• When using user-defined, non-standard size paper,
remember to select the appropriate paper type in your
printer driver.
• Heavily printed pages tend to curl and may not stack
correctly. They also tend to stain the back of the page
stacked over them, since they require longer to dry.
Remove these pages as soon as they are output from
the printer. Set them aside to dry singly before
handling them.
Use the printer setting
Activate Dry Delay Time
to allow
more time between prints for drying. You can find this
setting in the “Printer Monitor” under the “Printer
Care” tab.
2-16 ❖ DocuPrint C11 Color Inkjet Printer User Guide
Page 37

Special Printing Media
For optimum printing quality, you should always use
printing media specifically indicated for inkjet printers.
See the
types.
Supplies/Options Guide
Special Printing Media
for recommended media
Envelopes
Coated Paper
Photographic Paper
Transparencies
You can insert up to 25 envelopes in the Main Tray. You
must
use the Small Format Media Guide when you insert
envelopes in the Main Tray. See
Small Format Media”
Coated paper has a very smooth finish on the printing
side. You can insert up to 90 sheets in the Main Tray.
Photographic paper has a glossy coating and gives a
professional finish to your print job. You can insert up to
25 sheets in the Main Tray.
Always use transparencies specifically designed for inkjet
printers so they can absorb the ink correctly. You can
insert up to 50 sheets in the Main Tray.
(page 2-10).
“Loading Envelopes or
Chapter 2: Loading Print Media ❖ 2-17
Page 38

Special Printing Media
T-shirt Transfers
Note Cards
Always use T-shirt transfers specifically designed for inkjet
printers so they can absorb the ink correctly. You can
insert up to five transfer sheets at a time through the
Main Tray.
Your printer can handle two types of note cards: plain
paper and photographic paper. You can insert up to 60
plain paper cards in the Main Tray. You can insert up to 25
photographic paper cards in the Main Tray.
You must use the Small Format Media Guide if you use
the Main Tray for printing note cards.
2-18 ❖ DocuPrint C11 Color Inkjet Printer User Guide
Page 39

Printing Chapter3
Printer Driver Settings
Driver Features ............................................................... 3-2
Optimum Printer Driver Settings ..................................... 3-5
Operator Panel Features
Printer Buttons
Basic Functions ............................................................... 3-8
Special Functions ............................................................ 3-9
Indicator Light .............................................................. 3-10
Instructions on the Printer
On the Printer Casing ................................................... 3-12
Inside of Cover ............................................................. 3-12
.................................................................
......................................................
...................................................
..............................................
3-2
3-7
3-8
3-12
Chapter 3: Printing ❖ 3-1
Page 40

Printer Driver Settings
Printer Driver Settings
Always make sure that you select the
type,
and
Paper size
features in your printer driver that
correspond to the printing media you intend to use. This
is particularly important for color printing.
A color calibration in the driver is set specifically for each
of the different types of media handled, so an incorrect
setting will result in less satisfactory output.
Driver Features
The DocuPrint C11 driver supports the features listed in
Table 3. 1 .
Table 3.1 DocuPrint C11 Driver features
Feature Description and Values
Copies
Orientation
Output
Specifies the number of copies to be printed.
Defines the way the image is printed on paper.
•
•
•
Specifies the order in which the pages of a job exit from the printer.
•
•
: For most paper types, Portrait is tall.
Portrait
Landscape
Mirror Effect
Collate
- 1,1; 2,2; 3,3; prints all the copies of each page in a set beginning with the first
page. This is the default.
- 1,2,3; 1,2,3; prints all the pages of each set beginning with the first page before
the next set of copies is generated.
Reverse page order
printing).
: For most paper types, Landscape is wide.
: Is applied automatically if you select
: Prints the job beginning with the first page. There are two choices:
: Prints the set beginning with the last page (last-to-first
Transfer
Paper source, Paper
in the
Paper type
list.
3-2 ❖ DocuPrint C11 Color Inkjet Printer User Guide
Table 3.1 Page 1 of 3
Page 41

Table 3.1 DocuPrint C11 Driver features (continued)
Feature Description and Values
Printer Driver Settings
Image settings
Paper size
Paper type
Print quality
Provides settings for printing the job.
•
Intelligent Color
settings according to the requested output. This is the default.
•
•
Provides a pull down list of the standard paper sizes that can be used on the printer.
You can select
listed.
Provides a list of paper types so that the printer can provide the best possible output
for the paper you select. Printer output will be different on photographic or coated
paper than on plain inkjet paper. The default value is
Affects how the printer lays the image upon the media. This option affects both the
quality and speed of printing.
•
•
•
: Opens the
Manual
that closely match the job requirements.
Grayscale
High Quality
paintings.
: Is a good compromise between speed and quality when the document is
Normal
composed of text and simple patterned graphics (grayscale and color). This is the
default.
Fast/Save Ink
with lower quality output.
: The printer analyzes the document in order to apply the best
Image Quality Option
: Causes the document to be printed in shades of gray (monochrome).
User Defined
: Is designed for printing pictures, shadowed graphics and computer
: Allows the fastest printer throughput and substantial ink savings
from this list to enter the size information for paper not
box to allow you to choose parameters
.
Plain
Table 3.1 Page 2 of 3
Chapter 3: Printing ❖ 3-3
Page 42

Printer Driver Settings
Table 3.1 DocuPrint C11 Driver features (continued)
Feature Description and Values
Paper source
Printer Monitor
Displays a pull-down list for selecting the paper input source.
•
Auto Select
•
Manual
inserted in the slot, the Printer Monitor displays the message “The printer is out of
paper” and the Indicator Light blinks. You must then insert paper into the Manual
Feeder Slot and press the
•
Banner
recommended that you print banners from the Main Tray.
Shows the progress of the current job and identifies printer status. Print controls
include:
•
Cancel Job
•
Pause
•
Restart
Printer Care
• New print cartridge installation
• Changing a print cartridge
• Aligning print cartridges
• Cleaning nozzles
• Printing a demo page
•Printing a test page
• Troubleshooting and How Do I on-line help to guide you through maintenance
procedures.
: Paper is fed automatically from the Manual Feeder Slot or Main Tray.
: Paper can only be fed from the Manual Feeder Slot. If paper is not
RESUME
: Paper will be fed either from the Main Tray or the Manual Feeder Slot. It is
: Lets you remove a job from the printer queue.
: Temporarily stops a job that is printing.
: Resumes printing a paused or stopped job.
functions are available on the Printer Monitor screen including:
button to print the job.
3-4 ❖ DocuPrint C11 Color Inkjet Printer User Guide
Table 3.1 Page 3 of 3
Page 43

Printer Driver Settings
Optimum Printer
Driver Settings
Table 3.2 lists recommended Printer Settings based upon
the document elements and the paper type.
Table 3.2 Printer Setting Recommendations
Document
Type
Black Text
Black Text with Color Graphics/Charts
Black Text, Color Graphics/Charts and Photos
Paper Type
Plain Fast/Save Grayscale &
Coated Normal Grayscale &
Plain Normal Intelligent Color 600 x 600 Photo realistic colors
Plain or coated Normal Manual > Vivid 600 x 600 Vibrant colors
Coated High Quality Manual > Vivid 1200 x 1200 Vibrant colors/
Plain Normal Intelligent Color 600 x 600 Photo realistic colors
Print
Quality
Setting
Image
Setting
Intelligent Color
Intelligent Color
Printing
Resolution
300 x 600 Fastest printing speed
600 x 600 Sharper text quality
Comments
Sharper detail
Coated Normal Manual > Vivid 600 x 600 Vibrant colors
Coated High Quality Intelligent Color 600 x 600 Photo realistic colors/
Sharper detail
Coated High Quality Manual > Vivid 1200 x 1200 Vibrant colors/
Sharper detail
Table 3.2 Page 1 of 2
Chapter 3: Printing ❖ 3-5
Page 44

Printer Driver Settings
Table 3.2 Printer Setting Recommendations (continued)
Document
Type
Photographs
Print
Paper Type
Quality
Setting
Plain Normal Intelligent Color 600 x 600 Photo realistic colors
Coated Normal Manual > Photo 600 x 600 Photo realistic colors
Photographic
High Quality Manual > Photo 1200 x 1200 Photo realistic colors/
Image
Setting
Printing
Resolution
Comments
Sharper detail
Table 3.2 Page 2 of 2
3-6 ❖ DocuPrint C11 Color Inkjet Printer User Guide
Page 45

Operator Panel Features
Figure 3.1 shows the DocuPrint C11 Operator Panel.
Figure 3.1 DocuPrint C11 Operator Panel
3
Indicator Light
1
Resume Button
2
Power Button
3
2
1
Operator Panel Features
Chapter 3: Printing ❖ 3-7
Page 46

Printer Buttons
Printer Buttons
The operation of the Power and Resume buttons depend
on the printer’s state.
Basic Functions
Table 3.3 lists the basic functions of the buttons on the
DocuPrint C11.
Table 3.3 Buttons–Basic functions
Function Description
Printer on/off
Paper control
Press the
Press the
“out of paper” condition or cleared a paper jam.
POWER
RESUME
If the printer has not been used for an extended period, it is
recommended that you clean the print cartridges before you begin
printing to ensure optimal print quality. See “Cleaning Print
Cartridges” (page 4-7).
button to toggle the printer ON or OFF.
button to restart printing after you have corrected an
3-8 ❖ DocuPrint C11 Color Inkjet Printer User Guide
Page 47

Printer Buttons
Special Functions
Table 3.4 describes printer maintenance and printing of
demonstration and test pages.
Table 3.4 Special functions
Function Description
Print cartridge carriage
movement
Cleaning print cartridges
Cleaning paper feed rollers
Printing a Test Page
• Press and hold down the
• Press and release the
• Then release the
The print cartridge carriage will automatically return to the left side of
the printer in about 60 seconds.
• Press and hold down the
• Press and release the
• Then release the
• Press and hold down the
• Press and release the
• Then release the
To exit from this function, you must Power Off the printer.
• Press and hold down the
• Press and release the
• Then release the
POWER
POWER
POWER
POWER
POWER
RESUME
button.
POWER
RESUME
button.
POWER
RESUME
button.
POWER
RESUME
button.
button.
button
button.
button
button.
button
button.
button
one
three
nine
two
time.
times.
times.
times.
Printing a Demo Page
• Press and hold down the
• Press and release the
• Then release the
RESUME
POWER
POWER
button
button.
button.
times.
four
Chapter 3: Printing ❖ 3-9
Page 48

Printer Buttons
Indicator Light
The indicator light signals different printer conditions.
Table 3.5 lists the possible states of the indicator lights
and what each state means.
Table 3.5 Indicator light states
Status of light Condition/Corrective Action
Lit
Flashing slowly
The printer is powered on.
The Indicator Light will flash rapidly if both print cartridges are not installed.
Once the cartridges are installed, the printer initializes and the Indicator Light
remains lit without flashing.
Each time the printer is powered on, the Indicator Light flashes rapidly while
the printer initializes. The light then remains on without flashing.
After approximately two minutes of inactivity, the printer enters Energy Saver
mode, but the Indicator light remains lit.
The printer is printing a job.
Table 3.5 Page 1 of 2
3-10 ❖ DocuPrint C11 Color Inkjet Printer User Guide
Page 49

Printer Buttons
Table 3.5 Indicator light states
(continued)
Status of light Condition/Corrective Action
Flashing rapidly
Check for the following conditions and perform the appropriate corrective action:
• If the printer is out of paper, load paper and press the
• If paper is jammed, clear the jam and press the
• If a print cartridge is installed in the incorrect carriage or not installed,
replace or reposition the cartridge. The printer will then initialize and the
Indicator Light will remain lit.
If none of these actions resolve the problem,
disconnect it from the electrical power supply.
• Make sure that the print cartridge carriage and feeder paths are not
obstructed.
• Then reconnect and
If the Indicator Light continues to flash rapidly, disconnect the printer and contact
the Xerox Customer Support Center.
Power On
the printer.
RESUME button
Power Off
RESUME button
the printer and
.
.
Table 3.5 Page 2 of 2
Chapter 3: Printing ❖ 3-11
Page 50

Instructions on the Printer
Instructions on the Printer
The DocuPrint C11 has two instruction templates: one on
the printer casing under the cover, the other inside the
cover.
On the Printer Casing
Inside of Cover
The large black dot indicates that a black print cartridge
should be installed in the right cartridge carriage.
The three small dots indicate that a color cartridge should
be installed in the left cartridge carrier.
The procedure for changing the print cartridges is
illustrated inside the printer cover.
3-12 ❖ DocuPrint C11 Color Inkjet Printer User Guide
Page 51

Maintaining the Printer Chapter4
Print Cartridge Care and Precautions
Removing and Replacing Print Cartridges
Cleaning Print Cartridges
.................................................
..............................
........................
4-2
4-3
4-7
Chapter 4: Maintaining the Printer ❖ 4-1
Page 52

Print Cartridge Care and Precautions
Print Cartridge Care and
Precautions
Follow these procedures for optimum care of the print
cartridges:
• Always keep print cartridges sealed in their packages
until they are ready to be used.
• Remember to remove the protective tape before
inserting a print cartridge in the printer. Take care not
to get ink on your clothes. The ink in the cartridge
stains.
•Do
•Do
• If print quality is less than optimum, perform the
• Always make sure that the print cartridge carriage is at
• When the printer is powered on, the print cartridge
not
attempt to refill the print cartridge with ink, as
this damages the cartridge and the printer.
not
shake the print cartridge. If it does not print,
perform the cleaning operations described in
Print Cartridges”
cleaning operations described in
Cartridges”
the left side of the printer before powering off your
computer. Always
Power Off
carriage will automatically return to the left side of the
printer position.
(page 4-7).
“Cleaning Print
(page 4-7).
Power Off
your computer to guarantee this.
your printer before you
“Cleaning
4-2 ❖ DocuPrint C11 Color Inkjet Printer User Guide
Page 53

Removing and Replacing Print Cartridges
You should remove a print cartridge from the printer
under only two conditions:
• To replace it, or
• To reinsert it in a situation where it is not printing
correctly.
As you handle print cartridges in the following steps, be
sure to observe these precautions:
• Do not touch either the electrical contacts or the
printing nozzles on the cartridges.
• Do not set the cartridges on either their contacts or
their ink nozzles.
Open the top cover.
1
Removing and Replacing Print Cartridges
Chapter 4: Maintaining the Printer ❖ 4-3
Page 54

Removing and Replacing Print Cartridges
To move the cartridge carrier into position:
2
• Press and
• Press and release the
• Then release the
If the cartridge carrier returns to the left side of the
printer, repeat the above steps.
Release the print cartridge by pushing down on the
3
release lever above the cartridge you are removing.
hold
If no ink cartridges are installed in the printer, the
carriage moves automatically to the center
position when the printer is Powered On.
the
POWER
POWER
RESUME
button.
button.
button one time.
Remove the cartridge by pulling it upwards using your
4
thumb and index finger.
4-4 ❖ DocuPrint C11 Color Inkjet Printer User Guide
Page 55

Removing and Replacing Print Cartridges
Open the package containing the same type of cartridge
5
you are replacing and remove it. Remove the sticker and
transparent tape covering the copper contact area.
Do not touch the copper contact area!
Hold the cartridge with the word Xerox towards you.
6
Insert the cartridge into the correct receptacle which is
labeled with three small dots above the color cartridge
receptacle and one large black dot above the black
cartridge receptacle.
Chapter 4: Maintaining the Printer ❖ 4-5
Page 56

Removing and Replacing Print Cartridges
Gently push the print cartridge down and back toward
7
the green release lever until the cartridge clicks into place.
There will be a pause of about 60 seconds, during which
8
Indicator Light
the
print cartridge carrier returns to the left side of the printer
and the Indicator Light remains on.
flashes. The printer is ready when the
When installing a new cartridge, select
9
Monitor, Printer Care
(page 3-4)
If you have problems inserting the print cartridge:
• Make sure the print carriage is in the cartridge loading
position.
• Check that both the print cartridge and its receptacle
are clean and free of foreign particles.
.
If you do not follow this step, the Printer Monitor
will not display the correct ink level.
tab. Refer to
New
“Printer Monitor”
in the
Printer
NEVER force the print cartridge into its receptacle.
Always remove it completely and repeat the entire
installation operation.
4-6 ❖ DocuPrint C11 Color Inkjet Printer User Guide
Page 57

Cleaning Print Cartridges
Print cartridges are cleaned automatically at regular
intervals when the printer is powered on. This operation
clears the print cartridge nozzles guaranteeing ink flow.
If you have a problem with the print quality that is not solved
by this automatic nozzle clearing operation, perform
“Cleaning print cartridges” (page 3-9)
If you have a print quality problem that is not resolved by
the printer’s cartridge cleaning procedure, try to clean the
print cartridge following these steps.
Open the printer cover.
1
Release and remove the print cartridge that is causing the
2
problem.
Cleaning Print Cartridges
.
See “Removing and Replacing Print Cartridges”
(page 4-3), Step 1 to Step 4.
Chapter 4: Maintaining the Printer ❖ 4-7
Page 58

Cleaning Print Cartridges
Clean the electrical contacts both on the print cartridge
3
and in the cartridge receptacle with a slightly damp,
lint-free cloth taking care not to touch the nozzles.
Re-insert the print cartridge into the printer, lock it into
4
position, and close the cover.
Print a test page and check the quality of the output. See
5
“Printing a Test Page”
(page 3-9).
4-8 ❖ DocuPrint C11 Color Inkjet Printer User Guide
Page 59

Cleaning Print Cartridges
If there is still no improvement in the print quality, try
cleaning the print cartridge nozzles.
The following operation MUST NOT be repeated often,
as it will damage the print cartridge. It should be
attempted ONLY as a last resort, before changing the
print cartridge.
Dampen a lint-free cloth with clean water. Squeeze it to
1
remove any excess water.
Open the printer cover.
2
Position, release and remove the print cartridge
3
See “Removing and Replacing Print Cartridges”
(page 4-3), Step 1 to Step 4.
.
Chapter 4: Maintaining the Printer ❖ 4-9
Page 60

Cleaning Print Cartridges
Holding the print cartridge with the nozzles facing
4
downwards, blot it against the cloth, pressing lightly.
Repeat the blotting operation a few times on different
5
areas of the cloth.
Reinsert the print cartridge in the printer, lock it into
6
place, and close the printer cover.
Print a test page and check the quality of the output. See
7
“Printing a Test Page”
(page 3-9).
4-10 ❖ DocuPrint C11 Color Inkjet Printer User Guide
Page 61

Troubleshooting Chapter5
Introduction
Error Condition Indicators ............................................... 5-2
Transporting the Printer ................................................. 5-2
Printer Problems
Printer Operation Problems ............................................. 5-4
Print Cartridge Alignment .................................................. 5-8
Windows 95/98 and NT4.0 ........................................... 5-8
Windows 3.1x ................................................................ 5-9
Alignment Procedure Notes .......................................... 5-10
.....................................................................
...............................................................
5-2
5-3
Chapter 5: Troubleshooting ❖ 5-1
Page 62

Introduction
Introduction
Your printer is designed to require only minimum
maintenance. However, frequent use requires a number of
simple printer-care operations.
Error Condition
Indicators
Transporting the
Printer
During normal printer operation, an error condition will
be signaled by the rapid flashing of the indicator light.
The error could be caused by a paper problem or by print
cartridge malfunction.
If you detect serious mechanical damage or a failure in
the printer, do not attempt to repair it yourself! Call the
Xerox Customer Support Center.
Always make sure that the print cartridge carrier is at the
left side of the printer. To ensure this,
printer
• Take care not to drop your printer.
• Repack your printer in its original carton, whenever
before
possible.
you
Power Off
your computer.
Power Off
your
5-2 ❖ DocuPrint C11 Color Inkjet Printer User Guide
Page 63

Printer Problems
Printer Problems
Sometimes printer problems are very simple to solve.
When you have a problem, make sure that:
• The power cord is plugged into the printer and an
electrical outlet.
• The electrical outlet is not turned off by any switch or
breaker.
• Other equipment plugged into the outlet is working.
In this section, you will find information to help you
solve most of the common operation problems that can
occur with your printer.
Chapter 5: Troubleshooting ❖ 5-3
Page 64

Printer Problems
Printer Operation
Problems
See Table 5.1 for corrective actions when the printer will
not print or when printed output is not what you expect.
Table 5.1 Printer operation problems
Problem Description/Corrective Action
Black area is not solid
black.
Color Misregistration
Image Smear
Missing or light color
A solid black area prints with part of the area white.
•Perform
• Check if your print cartridge is out of ink. Print a Test Page and a Demo Page
to see if the black output is uniform. Refer to
and
If this does not solve the problem, replace the print cartridge.
A color has shifted outside the designated area or has been superimposed over
another color area.
Perform
The ink is not sufficiently dry before the page is delivered to the output page.
• Use the printer setting
prints to provide more time for drying. You can find this setting in the
Monitor
When one or more colors are light or missing:
•Perform
• Check if your print cartridge is out of ink. Print a Test Page and a Demo Page
to see if a color is missing. Refer to
“Printing a Demo Page”
If this does not solve the problem, replace the print cartridge.
“Cleaning Print Cartridges”
“Printing a Demo Page”
“Print Cartridge Alignment”
Activate Dry Delay Time
under the
“Cleaning Print Cartridges”
Printer Care
(page 3-9).
(page 4-7).
“Printing a Test Page”
(page 3-9).
(page 5-8).
to allow more time between
tab.
(page 4-7).
“Printing a Test Page”
(page 3-9)
Printer
(page 3-9) and
5-4 ❖ DocuPrint C11 Color Inkjet Printer User Guide
Table 5.1 Page 1 of 4
Page 65

Printer Problems
Table 5.1 Printer operation problems
(continued)
Problem Description/Corrective Action
No printer reaction
Printer Care functions
in Printer Monitor not
active
Printer is not powered
When you press
1. Check that the carriage path is clear.
2. Try switching the printer off and then on again.
3. Unplug the printer and wait about 10 seconds, then plug the printer back in
and press
4. Disconnect the printer from the computer.
about 10 seconds.
If the problem persists, unplug the printer, disconnect it from your computer and
call the Xerox Customer Support Center.
You open the
• Check that the interface cable is of the correct type. It must be a
bi-directional IEEE 1284 B-type interface cable, no longer than 10 feet (3
meters)
• Check that the interface cable is connected securely both to your printer and
to your computer.
No power supply (The Indicator Light is not lit.)
1. Check that the printer is connected properly to the electrical power supply
socket, or try another outlet.
2. Press
If the problem persists, unplug the printer, disconnect it from your computer and
call the Xerox Customer Support Center.
POWER
POWER
Printer Monitor
. If you have any doubts, contact your computer dealer.
POWER
, the print cartridge carriage does not move.
.
POWER OFF
POWER ON
.
the printer and reconnect it to the computer.
, you find that the
Printer Care
the printer and wait
buttons are not active:
standard,
Table 5.1 Page 2 of 4
Chapter 5: Troubleshooting ❖ 5-5
Page 66

Printer Problems
Table 5.1 Printer operation problems
(continued)
Problem Description/Corrective Action
Problems with
connection to host
• Check that your interface cable is of the correct type. It must be a
bi-directional IEEE 1284 B-type interface cable
contact your computer dealer.
• Make sure you have secured the interface connectors properly both to the
printer and to the host.
• Make sure that bi-directional support for this printer is enabled.
- In Windows 95/98, check the
- In Windows NT 4.0, check the
- In Windows 3.1x, check the
• If you have an ECP-type computer, verify the printer port setting on it is LPT
Printer Port. If necessary, change this setting as follows:
1. Right click on the
2. Select
3. Double click on
4. Select Printer Port:
If
Ports
port does not solve your problem, you must change the LPT mode setting in your
computer BIOS to either [Standard] or [Bi-directional]. For further information on
the BIOS setting, refer to your computer documentation and/or contact your
computer dealer.
Properties
(COM&LPT) does not offer a standard LPTx port or if the selection of this
My Compute
, then the
(COM&LPT)
Ports
LPTx
Details tab/Spool
tab.
Ports
C11 Spool Manager
r icon
Device Manager
. If you have any doubts,
settings.
tab
standard,
settings.
5-6 ❖ DocuPrint C11 Color Inkjet Printer User Guide
Table 5.1 Page 3 of 4
Page 67

Printer Problems
Table 5.1 Printer operation problems
(continued)
Problem Description/Corrective Action
Test Page or Demo
Page did not print
1. Press
POWER
POWER
2. Repeat the correct key sequence
- Refer to
- Click the appropriate button on the
If the
Indicator Light
• There is no paper in the printer, or
• The print cartridge is not inserted correctly. (See
Printer
to switch the printer off, wait a few seconds and then press
again.
“Special Functions”
flashes rapidly, either:
.)
(page 3-9), or
Printer Care
Chapter 4: Maintaining the
tab in the
Printer Monitor
Table 5.1 Page 4 of 4
Chapter 5: Troubleshooting ❖ 5-7
Page 68

Print Cartridge Alignment
Print Cartridge Alignment
Whenever you insert or replace a print cartridge, you
must always check the horizontal and vertical printing
alignment to guarantee optimum printing quality.
You can also perform cartridge alignment if print quality
is not satisfactory. For example: a solid black area prints
with some white spots within it, or a color has shifted
outside the designated area or has been superimposed
over another color area.
Cartridge alignment takes about three minutes and
requires at least two sheets of paper: one for Test 1 and
one for Test 2.
Windows 95/98 and
NT4.0
To align print cartridges under Windows 95/98:
Select the
1
DocuPrint C11
Click on the
2
Click on the
3
Select
4
Click OK and follow the alignment instructions.
5
DocuPrint C11 Printer Monitor
program group.
Align
.
Printer Monitor
Printer Care
tab.
tab.
from the
Xerox
5-8 ❖ DocuPrint C11 Color Inkjet Printer User Guide
Page 69

Print Cartridge Alignment
Windows 3.1x
To align print cartridges under Windows 3.1x:
Double click the
1
Double Click the
2
Select the
3
Options/Printer Setup
Select
4
Select the
5
Select the
6
Click the
7
button.
Select the
8
Click on the
9
instructions.
Main
icon in the
Print Manager
DocuPrint C11
DocuPrint C11
Setup
button.
Paper/Output Tab
Printer Care
Align
printer driver from the list.
printer from the list.
tab.
button and follow the alignment
from the menu bar.
and click on the
Program Manager
icon.
Printer Monitor
.
Chapter 5: Troubleshooting ❖ 5-9
Page 70

Print Cartridge Alignment
Alignment Procedure
Notes
1. This operation takes about 3 minutes and requires at
least 2 sheets of paper. (The first sheet, for printing
Test 1, can be re-inserted before you print Test 2.)
2. From the Test 1 alignment, locate the letter under the
alignment pattern that
perfectly straight lines. Enter that letter and click OK.
Next, enter the number under the alignment pattern
comes closest
that
Enter that number and click OK.
3. From the Test 2 alignment, locate the letter under the
alignment pattern that
perfectly straight lines. Enter that letter and click OK.
Next, enter the number under the alignment pattern
comes closest
that
Enter that number and click OK.
4. A third page will print for you to confirm your
alignment selections. All the various alignment
patterns should be comprised of reasonably straight
lines.
5. If you are not satisfied with the alignment pattern,
repeat the alignment procedure. If the lines are not
printing completely, you may need to clean the print
cartridges. See
“Cleaning Print Cartridges”
comes closest
to forming perfectly straight lines.
comes closest
to forming a perfectly straight line.
to forming
to forming
(page 4-7).
5-10 ❖ DocuPrint C11 Color Inkjet Printer User Guide
Page 71

Printer Specifications Appendix A
Appendix A: Printer Specifications ❖ A-1
Page 72

Printer Specifications
Table A.1 DocuPrint C11 Features
Feature Description
Physical
Environmental
Electrical
Dimensions:
• Height: 6.69” (170mm)
• Width: 17.16” (436mm)
• Depth: 8.26” (210mm)
Weight:
• 13.2 lb (6 kg)
Temperature:
o
• 60 to 95
Relative Humidity:
• 20% - 80%
Sound level:
• Less than 52 dB in Fast printing mode
Power Requirements:
• Multi voltage from 115 VAC -15% to 240 V, +10%; 50-60 Hz
• Energy Star Compliant
Power Consumption:
• Printer off – maximum 2 watts
• Printer on standby – maximum 6 watts
• Typical printer operation – 26 watts
F (15 to 35oC)
A-2 ❖ DocuPrint C11 Color Inkjet Printer User Guide
Table A.1 Page 1 of 3
Page 73

Table A.1 DocuPrint C11 Features (continued)
Feature Description
Printer Specifications
Print addressibility
Maximum print
speed/pages per
minute (ppm)
Fonts
Paper input
Up to 1200 x 1200 dpi
9 ppm in black
5 ppm in color
Courier
Orientation: Portrait and Landscape
Pitch: 5, 10, 20 cpi
Size: 6, 12 points
Style: Upright (Italic 5, 10, 20 cpi)
Main Tray with the following print material capabilities:
2
• 150 sheets, 20 lb (75 g/m
)
• 25 envelopes, 20 lb (75 g/m2)
• Up to 90 sheets special printing media, 24 lb (90 g/m
• Banners, 18-24 lb (70-90 g/m2)
Manual Feeder Slot:
• One sheet at a time
2
)
Table A.1 Page 2 of 3
Appendix A: Printer Specifications ❖ A-3
Page 74

Printer Specifications
Table A.1 DocuPrint C11 Features (continued)
Feature Description
Paper output
Up to 60 printed sheets of paper,
20 lb (75 g/m
2
)
Media sizes
Printer memory
Interface
Minimum system
requirements
Legal, Letter, A4, A5, A6, B5, Executive, Folio, Statement
Envelope B5, Envelope C5, Envelope C6, Envelope DL, Envelope Com #10
Note Card 1, Note Card 2, Note Card A6
Custom:
• Minimum: 5.9 x 5.85” (149.7 x 148.5mm)
• Maximum: 8.5 x 14” (216 x 256mm)
Banner:
• Minimum: 5.9 x 5.85” (149.7 x 148.5mm)
• Maximum: 8.5 (216 mm) x unlimited length
2 MB
Parallel (Bi-directional IEEE 1284 B-type)
Windows 3.1x/95: 486 and 8 MB RAM
Windows 98/NT 4.0: Pentium and 16 MB RAM
Table A.1 Page 3 of 3
A-4 ❖ DocuPrint C11 Color Inkjet Printer User Guide
Page 75

Notices and CertificationsAppendix B
Appendix B: Notices and Certifications ❖ B-1
Page 76

Electronic Emission Notices
Electronic Emission Notices
Federal Communications Commission (FCC) Compliance Information Statement
The DocuPrint C11 has been tested and found to comply
with the limits for a Class B digital device, pursuant to
Part 15 of the FCC Rules. Operation is subject to the
following two conditions: (1) this device may not cause
harmful interference, and (2) this device must accept any
interference received, including interference that may
cause undesired operation.
The FCC Class B limits are designed to provide reasonable
protection against harmful interference in a residential
installation. This equipment generates, uses, and can
radiate radio frequency energy and, if not installed and
used in accordance with the instructions, may cause
harmful interference to radio communications. However,
there is no guarantee that interference will not occur in a
particular installation.
B-2 ❖ DocuPrint C11 Color Inkjet Printer User Guide
Page 77

Electronic Emission Notices
If this equipment does cause harmful interference to radio
or television reception, which can be determined by
turning the equipment off and on, the user is encouraged
to try to correct the interference by one or more of the
following measures:
• Reorient or relocate the receiving antenna.
• Increase the separation between the equipment and
receiver.
• Connect the equipment into an outlet on a circuit
different from that to which the receiver is connected.
• Consult your point of purchase or service
representative for additional suggestions.
The manufacturer is not responsible for any radio or
television interference caused by using other than
recommended cables or by unauthorized changes or
modifications to this equipment. Unauthorized changes
or modifications could void the user's authority to operate
this equipment.
To assure compliance with FCC regulations on
electromagnetic interference for a Class B computing
device, use a properly shielded and grounded cable. Use of
a substitute cable not properly shielded and grounded
may result in a violation of FCC regulations.
Appendix B: Notices and Certifications ❖ B-3
Page 78

Electronic Emission Notices
Industry Canada Compliance Statement
This Class B digital apparatus meets all requirements of
the Canadian Interference-Causing Equipment
Regulations.
Class “B” Product:
(Reference ICES-003 Annex)
This Class “B” digital apparatus complies with Canadian
ICES-003.
Cet appareil numérique de la classe “B” est conforme à la
norme NMB-003 du Canada.
European Community (EC) Directives Conformity
This product is in conformity with the protection
requirements of EC Council directives 89/336/EEC and
73/23/EEC on the approximation and harmonization of
the laws of the Member States relating to electromagnetic
compatibility and safety of electrical equipment designed
for use within certain voltage limits.
A declaration of conformity with the requirements of the
Directive has been signed by the manufacturer.
This product satisfies the Class B limits of EN 55022 and
safety requirements of EN 60950.
The manufacturer is not responsible for any radio or
television interference caused by using other than
recommended cables or by unauthorized changes or
modifications to this equipment. Unauthorized changes
or modifications could void the user's authority to operate
this equipment.
To assure compliance with EEC regulations on
electromagnetic interference for a Class B computing
device, use a properly shielded and grounded cable. Use of
a substitute cable not properly shielded and grounded
may result in a violation of EMC directives (89/336/EEC).
B-4 ❖ DocuPrint C11 Color Inkjet Printer User Guide
Page 79

Electronic Emission Notices
The United Kingdom Telecommunications Act 1984
This apparatus is approved under the approval number
NS/G/1234/J/100003 for the indirect connections to the
public telecommunications systems in the United
Kingdom.
German Acoustics Statement
The following measurements were made in accordance
with ISO 7779 and reported in conformance with ISO
9296.
Table B.1 1-Meter Average Sound Pressure, dBA
Printing
Idling
Fast/Save Ink Quality
(300 dots per inch [dpi])
52 dBA 50 dBA
The printer is silent while idling.
Normal Quality
(600 dpi)
Appendix B: Notices and Certifications ❖ B-5
Page 80

Electronic Emission Notices
Energy Star
The EPA ENERGY STAR Computers program is a
partnership effort with computer manufacturers to
promote the introduction of energy-efficient products
and to reduce air pollution caused by power generation.
Companies participating in this program introduce
personal computers, printers, monitors, or fax machines
that power down when they are not being used. This
feature will cut the energy used by up to 50 percent.
The DocuPrint C11 product meets the Energy Star
guidelines for energy efficiency.
B-6 ❖ DocuPrint C11 Color Inkjet Printer User Guide
Page 81

Index IX
A
Activate Dry Delay Time
Automatic feed setting
2-7
B
Banners
Loading
2-12
C
Centronics parallel port
Character sets
Cleaning Print Cartridges
4-7to4-10
Coated paper
Loading
Components
Connectivity
Copies
Driver setting
Courier font
Custom media sizes
2-17
1-7
1-6
1-4
1-5
3-2
2-6
1-6
2-16
D
Demo Page
Printing
DocuPrint C11 Printer CD
Driver settings
Printer Care
3-9
3-2
3-4
E
Envelopes
Loading in Main Tray
2-10to2-11
2-6
Sizes
Error condition indicators
F
Fast/Save Ink
Feed Rollers
Cleaning
Feed sequence
Automatic setting
Manual setting
1-4,3-3
3-9
2-7
2-7
1-8
5-2
Xerox DocuPrint C11 Color Inkjet Printer User Guide ❖ IX-1
Page 82

G
Font
Character sets
Orientation
Pitch
1-4
Size
Style
1-4
1-4
1-4
G
Grayscale
3-3
H
High Quality
1-4,3-3
I
Image setting
Driver setting
Intelligent color
Manual
Indicator Light
Location
States
Instructions
Inside printer cover
On printer casing
Intelligent color
Interface Cable
1-4
1-7,3-7
3-10to3-11
1-4
1-6
L
Loading
2-7
2-8to2-13
Main Tray
Media
M
Main Tray
Capacity
Loading
Media weights
Manual
Manual feed setting
2-3
2-8to2-13
Coated paper
Note cards
Photographic paper
Transparencies
T-shirt transfers
1-4,3-3
3-3
1-5
2-18
2-4
2-7
1-4,3-3
3-12
3-12
2-17
2-17
2-18
2-17
Manual Feeder Slot
2-5
2-7
2-6
2-6
2-4
2-6
Capacity
Loading single sheets
Media weights
Media
Supported types
Supported weights
Media selection tips
Media sizes
Custom
Envelopes
Note cards
Paper
Media weights
Main Tray
Manual Feeder Slot
Moving the printer
N
Normal
Normal Quality
Note card sizes
Note cards
1-4
Loading
2-18
3-3
2-6
O
Orientation
Driver setting
Output
Driver setting
Output Tray
Capacity
3-2
2-3
P
Paper Feed Rollers
2-5
3-9
Cleaning
Paper size
Driver setting
Paper sizes
Paper source
Driver setting
Paper type
Driver setting
3-2
3-2
3-3
3-4
3-3
2-4
5-2
2-4
2-15
2-4
2-4
2-14
IX-2 ❖ Xerox DocuPrint C11 Color Inkjet Printer User Guide
Page 83

Q
Parallel port
Photographic paper
Loading
Plain paper
Power Button
Functions
Location
Print Cartridges
Alignment
Care and precautions
Cleaning
Moving carriage
Removing and replacing
Print quality
Driver setting
Settings
Printer
Parallel port connectivity
Printer capacity
Main Tray
Output Tray
Printer Care
Functions
Printer components
Documentation
DocuPrint C11 CD-ROM
Indicator Light
Inkjet Cartridges
Main Tray
Manual Feeder Slot
Output Tray
Power Button
Power Cord
Resume Button
Printer driver
1-6
2-17
1-4
3-8to3-9
1-7,3-7
5-8to5-10
Windows 3.1x
Windows 95/98
3-9,4-7to4-10
1-4,3-3
1-3
2-3
2-3
3-4
1-7
1-7
1-7
1-7
1-6
3-9
1-7,1-8
1-7
1-7
1-7
5-9
1-7
5-8
4-2
4-3to4-6
1-6
1-7
Printer driver settings
Copies
Image setting
Output
Paper size
Paper source
Paper type
Print quality
Printer Care
Printer Monitor
Printer features
Speed
Printer font
Printer Monitor
Activate Dry Delay Time
Driver setting
Printer operator panel
Printer port
Printer problems
Trou bleshooting
Printer resolution
Printing
Demo Page
Test Page
3-2
3-2
3-3
1-3
1-4
1-6
Connectivity problems
Demo page does not print
Operational problems
Print quality problems
Printer Care problems
Test page does not print
3-9
3-3
3-4
3-3
3-3
3-4
3-4
3-4
5-4to5-7
1-4
3-9
3-2
3-7
2-16
5-5
5-5
5-6
5-4
5-7
5-7
Q
Quick Installation Guide
1-8
R
Recommended media
1-4
1-4
1-4
1-4
1-4
2-4
Media weights
Removing and replacing print cartridges
4-3to4-6
Resident font
Resolution
1-3,1-4
Fast Quality
High Quality
Image Setting
Normal
Xerox DocuPrint C11 Color Inkjet Printer User Guide ❖ IX-3
Page 84

S
Resume Button
Functions
Location
3-8to3-9
1-7,3-7
S
Single sheets
Loading in Manual Feeder
Small Format Media Guide
Software License Agreement
Special printing media
Selection criteria
Supplies/Options Guide
2-17
1-8
T
Test Page
Printing
Transparencies
Loading
Transporting the printer
T-shirt transfers
Loading
3-9
2-17
2-18
5-2
2-10
1-8
2-14
U
User Guide
IX-4 ❖ Xerox DocuPrint C11 Color Inkjet Printer User Guide
1-8
 Loading...