

Page 1

M Series
User’s Manual
Version 1.0
Splash
Color S ervers
Page 2

Page 3

© Copyright Splash Technology, Inc. 1998. All rights reserved.
Splash Technology, Inc.
555 Del Rey Avenue
Sunnyvale, CA 94086
Main Telephone: (408) 328-6300
Fax: (408) 328-6400
WWW: http://www.
splash
.com/
EMail: info@splash.com
Splash M Series Users Manual
Version 1.0
QA 25 Draft: July 29, 1998
The information and screens presented in this document are subject to change without notice. Every reasonable effort has been made to ensure
that Splash product manuals and promotional materials accurately describe Splash product specifications and capabilities at the time of
publication. However, because of on-going improvements and updating of Splash products, Splash cannot guarantee the accuracy of printed
materials and disclaims liability for changes, errors, or omissions.
Splash, Splash logo, M Series, ColorVantage, DiamondPress, and DiamondMerge are trademarks of Splash Inc. DocuColor, MajestiK, Regal, and
DocuPac are trademarks of XeroxIncorporated. Adobe PageMaker, Adobe PhotoShop, Adobe Type Manager, ATM, and PostScript are trademarks
of Adobe Systems Incorporated. AppleTalk, EtherTalk, LaserWriter, Macintosh, and TrueType are trademarks of Apple Computer, Inc. MS-DOS
and Windows are trademarks of Microsoft Corporation. Novell and NetWare are trademarks of Novell, Inc. Ethernet is a trademark of Xerox
Corporation. QuarkXPress is a trademark of Quark, Inc. ITC Avant Garde, ITC Bookman, ITC Zapf Chancery, and ITC Zapf Dingbats are
trademarks of International Typeface Corporation. Palatino, Times, and Helvetica are trademarks of Linotype-Hell AG and/or its subsidiaries. All
other brand or product names are trademarks of their respective holders.
Other product and brand names are trademarks of their respective holders. All the above trademarks may be registered in the U.S.A. and certain
jurisdictions.
Mention of third-party products is for informational purposes only and constitutes neither an endorsement nor a recommendation. Splash Inc.
assumes no responsibility with respect to the performance or use of these products.
This software is based in part on the work of the Independent JPEG Group.
Restricted Rights Legend
Use, duplication or disclosure by the Government is subject to restrictions as set forth in subparagraph (c)(1)(ii) of the Rights in Technical Data
and Computer Software Clause at Defense Federal Acquisition Regulation 252.227-7013 (OCT.88). Unpublished rights reserved under the
copyright laws of the United States. Splash Inc. / 555 Del Rey Avenue/ Sunnyvale/ CA 94086
Frequency Interference Statement
This equipment has been tested and found to comply with the limits for a Class A digital device, pursuant to Part 15 of the FCC Rules. These
limits are designed to provide reasonable protection against harmful interference when the equipment is operated in a commercial
environment. This equipment generates, uses, and can radiate radio frequency energy and, if not installed and used in accordance with the
instruction manual, may cause harmful interference to radio communications. Operation of this equipment in a residential area is likely to
cause harmful interference, in which case the user will be required to correct the interference at his own expense.
CAUTION: Changes or modifications to this equipment not expressly approved by the party responsible for compliance could void the user's
authority to operate the equipment.
Page 4

SPLASH TECHNOLOGY, INC.— LICENSE AGREEMENT
BY OPENING THE SEALED MEDIA PA CKAGE YOU ACCEPT ALL THE TERMS AND CONDITIONS OF THIS AGREEMENT. IF YOU DO NOT
AGREE WITH THE TERMS AND CONDITIONS OF THIS AGREEMENT, RETURN THE UNOPENED PACKAGE WITHIN 10 DAYS TO THE
LOCATION WHERE YOU OBTAINED IT FOR A FULL REFUND.
SPLASH TECHNOLOGY, INC.— LICENSE AGREEMENT
SPLASH TECHNOLOGY, INC.provides this program, and
licenses its use. The program includes the type software and
font outlines to which the type vendor retains all right, title and
interest. The type software and font outlines are licensed to
you as part of and under the terms and conditions of this
license agr e eme nt. You assu me resp on si bili t y f o r the se le cti on
of the program to achieve your intended results, and for the
installation, use and results obtained from the program.
You m a y:
a. use the program on a single machine;
b. copy the program in to any machine-readable or printed
form for backup or modification purposes in support of your
use of the program on the single machine. (Certain programs,
however, may include mechanisms to limit or inhibit copying.
They are marked “copy protected.”);
c. modify the program and/or merge it into another program for your use on the single machine. (Any portion of this
program merged into another program will continue to be subject to the terms and conditions of this Agreement.); and,
d. assign your rights under this Agreement to a third party
who notifies SPLASH TECHNOLOGY, INC.that it agrees to be
bound by this Agreement prior to assignment. At the same
time of such assignment, you must either transfer all copies of
the program whether in printed or machine-readable form to
the same party or destroy any copies not transferred; this
includes all modifications and portions of the program contained or merged into other programs.
If the program includes an M Series Vewer “Client Software” or Printer Description Files (“PPD”), for only the Viewer
and Printer Description Files software you may:
a. copy, install and use the Remote Viewer and Printer
Description Files software on an unlimited number of CPUs,
and
b. make one copy of the M Series Viewer disk in machinereadab le form for bac kup purposes only, in addition to c. and
d. above.
You must reproduce and include the SPLASH TECHNOLOGY, INC.copyright notice on an y co p y, modific at ion or porti on
merged into another program.
You may not use, copy, modify, or transfer the program, or
any copy, modification or merged portion, in whole or in part,
except as expressly provided in this license.
The lic ense is ef f ect i v e un til t ermina t ed . You ma y t ermin at e
it at any other time by destroying the program together with all
copies, modifications and merged portions in any form. It will
also terminate if you fail to comply with any term or condition
of this Agre ement . You agree upon such termin ati on to dest roy
the program together with all copies, modifications and
merged portions in any form.
DISCLAIMER AND LIMITED WARRANTY
SPLASH TECHNOLOGY, INC.warrants the media on
which the program is furnished to be free from defects in
materials and workmanship under normal use for a period of
ninety (90) days from the date of delivery to you as evidenced
by a copy of your receipt.
SPLASH TECHNOLOGY, INC.’s entire liability and your
exclusive remedy as to a medium shall be, at SPLAS H TECHNOLOGY, INC. ’ s op ti on , ei th er t he ret urn of t he pu r cha se price
or replacement of the medium that does not meet SPLASH
TECHNOLOGY, INC.’s “Limited Warranty” and which is
returned to SPLASH TECHNOLOGY, INC.or an authorized
SPLASH TECHNOLOGY, INC.dealer with a copy of your
receipt. If failure of any medium has resulted from accident,
abuse, or misapplication, SPLASH TECHNOLOGY, INC. shall
have no responsibility to replace the medium or refund the purchase price. Any replacement medium will be warranted for
the remainder of the original warranty period or 30 days,
whichever is longer. This warranty gives you specific legal
rights. Y ou may have other rights, which vary from state to state.
EXCEPT AS EXPRESSLY PROVIDED ABOVE, THE PROGRAM IS PROVIDED “AS IS” WITHOUT WARRANTY OF
ANY KIND, EITHER EXPRESSED OR IMPLIED, INCLUDING,
BUT NOT LIMITED TO, THE IMPLIED WARRANTIES OF
MERCHANTAB ILI TY AND FITNESS FOR A PARTICULAR
PURPOSE. THE ENTIRE RISK AS TO THE QUALITY AND
PERFORMANCE OF THE PROGRAM IS WITH YOU.
SHOULD THE PROGRAM PROVE DEFECTIVE, YOU (AND
NOT COLORAGE INC., ITS DISTRIBUTORS, OR DEA LERS)
ASSUME THE ENTIRE COST OF ALL NECESSARY SERVICING, REP AIR OR CORRECTION.
SPLASH TECHNOLOGY, INC.does not warrant that the
functions contained in the program will meet your requirements or that the operation of the program will be uninterrupted or error free. IN NO EVENT WILL COLORAGE INC.,
ANY DISTRIBUTOR OR DEALER BE LIABLE TO YOU FOR
ANY DAMAGES, INCLUDING ANY LOST PROFITS, LOST
SAVINGS OR OTHER INCIDENTAL OR CONSEQUENTIAL
DAMAGES ARISING OUT OF THE USE OR INABILITY TO
USE SUCH PROGRAM EVEN IF COLORAGE INC., ITS
DEALERS OR DISTRIBUTORS HAVE BEEN ADVISED OF
THE POSSIBILITY OF SUCH DAMAGES OR FOR ANY
CLAIM BY ANY OTHER PARTY. SOME STATES DO NOT
ALLOW THE EXCLUSION OR LIMITATION OF LIABILITY
FOR CONSEQUENTIAL OR INCIDENTAL DAMAGES,
THEREFORE, THE ABOVE LIMITATIONS MAY NOT APPLY
TO YOU.
You acknowledge that the structure and organization of the
program is the valuable trade secret of SPLASH TECHNOLOGY, INC.and is licensed to you on a non-exclusive basis. You
agree to hold such trade secrets in confidence. You further
agree not to translate, disassemble or reverse engineer the
program, in whole or in part. SPLASH TECHNOLOGY,
INC.retains title to the program.
You may not sublicense, assign or transfer the program or
license except as expre ssly provided fo r in this Agreement.
Any attempt otherwise to sublicense, assign or transfer any of
the rights, duties or obli gations hereunder is void.
This Agr eement will be governed by the laws of the Commonwealt h of Massachusetts.
Should you have any questions concerning this Agreement, you may contact SPLASH TECHNOLOGY, INC.by writing to SPLASH TECHNOLOGY, INC.Sales and Service, 555
Del Rey Avenue, Sunnyvale, CA 04086.
YOU ACKNOWLEDGE THAT YOU HAVE READ THIS
AGREEMENT, UNDERSTAND IT AND AGREE TO BE
BOUND BY ITS TERMS AND CONDITIONS. YOU FURTHER
AGREE THAT IT IS THE COMPLETE AND EXCLUSIVE
STATEMENT OF THE AGREEMENT BETWEEN YOU AND
COLORAGE INC. WHICH SUPERSEDES ANY PROPOSAL
OR PRIOR AGREEMENT, ORAL OR WRITTEN, AND ANY
OTHER COMMUNICATIONS BETWEEN YOU AND COLORAGE INC., RELATING TO THE SUBJECT MATTER OF THIS
AGREEMENT.
NOTICE TO GOVERNMENT END USERS
If this p rogram is acquired by or on behalf of any unit or
agency of the Un ite d S ta tes Gove rnment thi s pr ov is io n
applies. This software (a) was developed at private expense,
and no part of it was developed with government funds, (b) is a
trade secret of SPLASH TECHNOLOGY, INC.for all pur p oses
of the Freedom of Information Act, (c) is “restricted computer
software” submitted with restricted rights in accordance with
52.227-19(a)-(d) of the Commercial Computer SoftwareRestricted Rights Clause and its successors as expressly
stated in SPLASH TECHNOLOGY, INC.’s standard commercial agreement incorporated into the contract or purchase
order between SPLASH TECHNOLOGY, INC.and the government entity, (d) in all respects is proprietary data belonging
solely to SPLASH TECHNOLOGY, INC.and (e) is unpublished
and all rights are reserved under the copyright laws of the
United St ates.
For units of the Department of Defense (DOD), this program is licensed only with “Restricted Rights” as that term is
defined in the DOD Supplement to the Feder al Acquisition
Regulations, 252.227-7013(c)(1)(ii) and its successors and:
Use, duplication or disclosure by the Government is subject to
restrict ions as set forth in su bparagraph (c)( 1)(ii) of the Rights
in Technical Data and Computer Software clause at 252.227-
7013. SPLASH TECHNOLOGY, INC., 555 Del Rey Avenue,
Sunnyvale, CA 04086.
If this program was acquired under a GSA Schedule, the
Government has agreed to refrain from changing or removing
any insignia or lettering from the program or the documentation that is provided or fr om producing copies of manuals or
media (e x cep t f or b ac kup p urp oses an d i n ac cord an ce wi th the
terms hereof) and (1) Title to and ownership of this program
and documentation or any reproduction thereof shall remain
with SPLASH TECHNOLOGY , INC.; (2) Use of this program
and documentation shall be limited to the facility for which it is
acquire d; and (3) If the use of this program is discontinued at
the ins tall a ti on s pec ifi ed i n th e purc ha se /d elivery order and the
Government desires to use it at another location, it may do so
by giving prior written notice to SPLASH TECHNOLOGY, INC.,
specifying the type of equipment and new location site. Government users other than under a DOD contract or GSA
schedule are hereby notified that use of this program is subject
to restrictions that are the same or similar to those set forth
above.
EUROPEAN COMMUNITY PROVISIONS
If this Software is used within a country of the E uropean
Community, nothi ng in this Agreement shall be construed as
restricting any rights available under the European Community
Software Directive, O.J. Eur. Comm. (No. L. 122) 42 (1991).
Rev. 6/94
Page 5

Table of Contents
Preface
Chapter 1 - M Series Print Server Overview
Introduction . . . . . . . . . . . . . . . . . . . . . . . . . . . . . . . . . . . . . . . . . . . . . . . . . . . . . . . . . . . . . . . . . . .1-1
Features . . . . . . . . . . . . . . . . . . . . . . . . . . . . . . . . . . . . . . . . . . . . . . . . . . . . . . . . . . . . . . . . . . .1-1
System Requirements . . . . . . . . . . . . . . . . . . . . . . . . . . . . . . . . . . . . . . . . . . . . . . . . . . . . . . . . . . .1-3
Power Up/Power Down Procedure . . . . . . . . . . . . . . . . . . . . . . . . . . . . . . . . . . . . . . . . . . . . . . . . . .1-4
Print Server Status LEDs . . . . . . . . . . . . . . . . . . . . . . . . . . . . . . . . . . . . . . . . . . . . . . . . . . . . . . . .1-5
Viewer Security . . . . . . . . . . . . . . . . . . . . . . . . . . . . . . . . . . . . . . . . . . . . . . . . . . . . . . . . . . . . . . . .1-6
Adding A New Print Server To Your Workstation . . . . . . . . . . . . . . . . . . . . . . . . . . . . . . . . . . . . .1-6
Adding a Print Server to Windows Workstations . . . . . . . . . . . . . . . . . . . . . . . . . . . . . . . . . .1-8
Adding a Print Server to Macintosh Workstations . . . . . . . . . . . . . . . . . . . . . . . . . . . . . . . .1-15
Chapter 2 - Printing to the Print Se rver
Introduction . . . . . . . . . . . . . . . . . . . . . . . . . . . . . . . . . . . . . . . . . . . . . . . . . . . . . . . . . . . . . . . . . . .2-1
Basic Concepts . . . . . . . . . . . . . . . . . . . . . . . . . . . . . . . . . . . . . . . . . . . . . . . . . . . . . . . . . . . . . . . . .2-1
Hold and Print Queues . . . . . . . . . . . . . . . . . . . . . . . . . . . . . . . . . . . . . . . . . . . . . . . . . . . . . . .2-1
Connecting to a Queue from Windows 2-1
Connecting to a Queue from Macintosh 2-3
Page Options Set in the Print Server Configuration File . . . . . . . . . . . . . . . . . . . . . . . . . . . .2-3
Fonts . . . . . . . . . . . . . . . . . . . . . . . . . . . . . . . . . . . . . . . . . . . . . . . . . . . . . . . . . . . . . . . . . . . . . .2-4
Selecting Options for Print . . . . . . . . . . . . . . . . . . . . . . . . . . . . . . . . . . . . . . . . . . . . . . . . . . . . . . .2-6
Paper Size . . . . . . . . . . . . . . . . . . . . . . . . . . . . . . . . . . . . . . . . . . . . . . . . . . . . . . . . . . . . . . . . . .2-8
Paper Source . . . . . . . . . . . . . . . . . . . . . . . . . . . . . . . . . . . . . . . . . . . . . . . . . . . . . . . . . . . . . . . .2-9
Media Type . . . . . . . . . . . . . . . . . . . . . . . . . . . . . . . . . . . . . . . . . . . . . . . . . . . . . . . . . . . . . . . .2-10
Page Order . . . . . . . . . . . . . . . . . . . . . . . . . . . . . . . . . . . . . . . . . . . . . . . . . . . . . . . . . . . . . . . .2-11
Duplexing . . . . . . . . . . . . . . . . . . . . . . . . . . . . . . . . . . . . . . . . . . . . . . . . . . . . . . . . . . . . . . . . .2-15
Imposition . . . . . . . . . . . . . . . . . . . . . . . . . . . . . . . . . . . . . . . . . . . . . . . . . . . . . . . . . . . . . . . . . 2-16
Color Model . . . . . . . . . . . . . . . . . . . . . . . . . . . . . . . . . . . . . . . . . . . . . . . . . . . . . . . . . . . . . . . .2-18
Printer Mode . . . . . . . . . . . . . . . . . . . . . . . . . . . . . . . . . . . . . . . . . . . . . . . . . . . . . . . . . . . . . .2-19
RGB Monitor Color Correction . . . . . . . . . . . . . . . . . . . . . . . . . . . . . . . . . . . . . . . . . . . . . . . .2-19
RGB Rendering Style . . . . . . . . . . . . . . . . . . . . . . . . . . . . . . . . . . . . . . . . . . . . . . . . . . . . . . . .2-19
RGB Gamma . . . . . . . . . . . . . . . . . . . . . . . . . . . . . . . . . . . . . . . . . . . . . . . . . . . . . . . . . . . . . .2-19
RGB Whitepoint . . . . . . . . . . . . . . . . . . . . . . . . . . . . . . . . . . . . . . . . . . . . . . . . . . . . . . . . . . . .2-20
CYMK Press Profile . . . . . . . . . . . . . . . . . . . . . . . . . . . . . . . . . . . . . . . . . . . . . . . . . . . . . . . . .2-20
Brightness . . . . . . . . . . . . . . . . . . . . . . . . . . . . . . . . . . . . . . . . . . . . . . . . . . . . . . . . . . . . . . . .2-20
Black Control . . . . . . . . . . . . . . . . . . . . . . . . . . . . . . . . . . . . . . . . . . . . . . . . . . . . . . . . . . . . . .2-21
SpotMatch . . . . . . . . . . . . . . . . . . . . . . . . . . . . . . . . . . . . . . . . . . . . . . . . . . . . . . . . . . . . . . . . .2-21
Output Options . . . . . . . . . . . . . . . . . . . . . . . . . . . . . . . . . . . . . . . . . . . . . . . . . . . . . . . . . . . . .2-21
Create Form # . . . . . . . . . . . . . . . . . . . . . . . . . . . . . . . . . . . . . . . . . . . . . . . . . . . . . . . . . . . . .2-22
Use Form # . . . . . . . . . . . . . . . . . . . . . . . . . . . . . . . . . . . . . . . . . . . . . . . . . . . . . . . . . . . . . . . .2-22
Form Repeat Count . . . . . . . . . . . . . . . . . . . . . . . . . . . . . . . . . . . . . . . . . . . . . . . . . . . . . . . . .2-22
Account . . . . . . . . . . . . . . . . . . . . . . . . . . . . . . . . . . . . . . . . . . . . . . . . . . . . . . . . . . . . . . . . . . .2-23
Mirror . . . . . . . . . . . . . . . . . . . . . . . . . . . . . . . . . . . . . . . . . . . . . . . . . . . . . . . . . . . . . . . . . . . .2-23
Debug PS . . . . . . . . . . . . . . . . . . . . . . . . . . . . . . . . . . . . . . . . . . . . . . . . . . . . . . . . . . . . . . . . .2-23
About . . . . . . . . . . . . . . . . . . . . . . . . . . . . . . . . . . . . . . . . . . . . . . . . . . . . . . . . . . . . . . . . . . . . .2-24
QA 25 Draft: July 31, 1998 v
Page 6

Table of Contents
Chapter 3 - Managing Your Print Jobs
Introduction to the Viewer . . . . . . . . . . . . . . . . . . . . . . . . . . . . . . . . . . . . . . . . . . . . . . . . . . . . . . . . 3-1
Access Rights and Modes . . . . . . . . . . . . . . . . . . . . . . . . . . . . . . . . . . . . . . . . . . . . . . . . . . . . . .3-2
Starting the Viewer and Selecting a Print Server . . . . . . . . . . . . . . . . . . . . . . . . . . . . . . . . . . . . .3-3
Viewing the Status of the Copier. . . . . . . . . . . . . . . . . . . . . . . . . . . . . . . . . . . . . . . . . . . . . . . .3-3
Turning the Audio Alarm On and Off . . . . . . . . . . . . . . . . . . . . . . . . . . . . . . . . . . . . . . . . . . . .3-5
Pausing and Resuming the Copier . . . . . . . . . . . . . . . . . . . . . . . . . . . . . . . . . . . . . . . . . . . . . .3-5
Managing Print Jobs . . . . . . . . . . . . . . . . . . . . . . . . . . . . . . . . . . . . . . . . . . . . . . . . . . . . . . . . . . . .3-6
Viewing the Status of Jobs . . . . . . . . . . . . . . . . . . . . . . . . . . . . . . . . . . . . . . . . . . . . . . . . . . . .3-7
Pausing and Resuming the Copier from the Job Details Tab . . . . . . . . . . . . . . . . . . . . . . . . .3-8
Stopping a Job . . . . . . . . . . . . . . . . . . . . . . . . . . . . . . . . . . . . . . . . . . . . . . . . . . . . . . . . . . . . . .3-9
Deleting a Job . . . . . . . . . . . . . . . . . . . . . . . . . . . . . . . . . . . . . . . . . . . . . . . . . . . . . . . . . . . . . . .3-9
Moving Jobs from the Hold and Print Queues . . . . . . . . . . . . . . . . . . . . . . . . . . . . . . . . . . . .3-10
Viewing Job Errors . . . . . . . . . . . . . . . . . . . . . . . . . . . . . . . . . . . . . . . . . . . . . . . . . . . . . . . . .3-10
Reprinting Jobs . . . . . . . . . . . . . . . . . . . . . . . . . . . . . . . . . . . . . . . . . . . . . . . . . . . . . . . . . . . .3-12
Downloadin g a n d Printing Files Directly From the Viewer . . . . . . . . . . . . . . . . . . . . . . . . . . . .3-18
Switching to Operator Mode . . . . . . . . . . . . . . . . . . . . . . . . . . . . . . . . . . . . . . . . . . . . . . . . . . . . .3-20
Chapter 4 - Accounting And Error Logs
Introduction . . . . . . . . . . . . . . . . . . . . . . . . . . . . . . . . . . . . . . . . . . . . . . . . . . . . . . . . . . . . . . . . . . .4-1
Basic Concepts-Default Account Log . . . . . . . . . . . . . . . . . . . . . . . . . . . . . . . . . . . . . . . . . . . . . . . .4-1
Printing the Default Accounting Log . . . . . . . . . . . . . . . . . . . . . . . . . . . . . . . . . . . . . . . . . . . . . . .4 -2
Creating a Custom Accounting Report . . . . . . . . . . . . . . . . . . . . . . . . . . . . . . . . . . . . . . . . . . . . . .4-3
Error Log . . . . . . . . . . . . . . . . . . . . . . . . . . . . . . . . . . . . . . . . . . . . . . . . . . . . . . . . . . . . . . . . . . . . . .4-5
Chapter 5 - Administration
Introduction . . . . . . . . . . . . . . . . . . . . . . . . . . . . . . . . . . . . . . . . . . . . . . . . . . . . . . . . . . . . . . . . . . .5-1
Switching to Administrator Mode . . . . . . . . . . . . . . . . . . . . . . . . . . . . . . . . . . . . . . . . . . . . . . .5-1
Creating New Password . . . . . . . . . . . . . . . . . . . . . . . . . . . . . . . . . . . . . . . . . . . . . . . . . . . . . . . . . .5-2
Configure Users and Operator Rights . . . . . . . . . . . . . . . . . . . . . . . . . . . . . . . . . . . . . . . . . . . . . . .5-3
Set Print Server Time and Date . . . . . . . . . . . . . . . . . . . . . . . . . . . . . . . . . . . . . . . . . . . . . . . . . . .5-5
Print Color Test Pages and Diagnostics Report . . . . . . . . . . . . . . . . . . . . . . . . . . . . . . . . . . . . . . .5-6
Delete Jobs, Forms and Logs from the Print Server . . . . . . . . . . . . . . . . . . . . . . . . . . . . . . . . . . .5-7
Calibrating the Copier Using ColorCal . . . . . . . . . . . . . . . . . . . . . . . . . . . . . . . . . . . . . . . . . . . . . .5-8
Calibrating the Printer . . . . . . . . . . . . . . . . . . . . . . . . . . . . . . . . . . . . . . . . . . . . . . . . . . . . . . .5-8
Calibrating the Scanner . . . . . . . . . . . . . . . . . . . . . . . . . . . . . . . . . . . . . . . . . . . . . . . . . . . . .5-13
Chapter 6 - DiamondMerge Variable Data
Basic Concepts . . . . . . . . . . . . . . . . . . . . . . . . . . . . . . . . . . . . . . . . . . . . . . . . . . . . . . . . . . . . . . . . .6-1
Benefits . . . . . . . . . . . . . . . . . . . . . . . . . . . . . . . . . . . . . . . . . . . . . . . . . . . . . . . . . . . . . . . . . . . . . . .6-2
Limitations . . . . . . . . . . . . . . . . . . . . . . . . . . . . . . . . . . . . . . . . . . . . . . . . . . . . . . . . . . . . . . . . . . . .6-2
Procedure . . . . . . . . . . . . . . . . . . . . . . . . . . . . . . . . . . . . . . . . . . . . . . . . . . . . . . . . . . . . . . . . . . . . .6-2
Glossary
QA 25 Draft: July 31, 1998 vi
Page 7

List of F igures
Figure 1-1: Print Server Status LEDs . . . . . . . . . . . . . . . . . . . . . . . . . . . . . . . . . . . . . . . . . . . . . . 1-5
Figure 1-2: Print Server Queues—Windows Example . . . . . . . . . . . . . . . . . . . . . . . . . . . . . . . . . 1-7
Figure 1-3: Print Server Queues—Macintosh Example . . . . . . . . . . . . . . . . . . . . . . . . . . . . . . . . 1-7
Figure 1-4: Print Server Queues—Windows Example . . . . . . . . . . . . . . . . . . . . . . . . . . . . . . . . . 1-9
Figure 1-5: Printer Properties Dialog Box . . . . . . . . . . . . . . . . . . . . . . . . . . . . . . . . . . . . . . . . . . . 1-9
Figure 1-6: Details Tab . . . . . . . . . . . . . . . . . . . . . . . . . . . . . . . . . . . . . . . . . . . . . . . . . . . . . . . . . 1-10
Figure 1-7: Spool Settings Dialog Box . . . . . . . . . . . . . . . . . . . . . . . . . . . . . . . . . . . . . . . . . . . . . 1-10
Figure 1-8: PostScript Tab . . . . . . . . . . . . . . . . . . . . . . . . . . . . . . . . . . . . . . . . . . . . . . . . . . . . . . 1-11
Figure 1-9: Advanced PostScript Dialog Box . . . . . . . . . . . . . . . . . . . . . . . . . . . . . . . . . . . . . . . . 1-11
Figure 1-10: Device Options Tab . . . . . . . . . . . . . . . . . . . . . . . . . . . . . . . . . . . . . . . . . . . . . . . . . 1-12
Figure 1-11: Sample Chooser Control Panel . . . . . . . . . . . . . . . . . . . . . . . . . . . . . . . . . . . . . . . . 1-15
Figure 1-12: Curr en t Printer Description File Dialog Box . . . . . . . . . . . . . . . . . . . . . . . . . . . . . 1-15
Figure 1-13: Select PostScript Printer Description Dialog Box . . . . . . . . . . . . . . . . . . . . . . . . . 1-16
Figure 1-14: Installable Options Dialog Box . . . . . . . . . . . . . . . . . . . . . . . . . . . . . . . . . . . . . . . . 1-16
Figure 2-1: Sel ecting A Queue From An Application-Win dows Example . . . . . . . . . . . . . . . . . . 2-2
Figure 2-2: Sel ecting A Default Queue-Windows Exam ple. . . . . . . . . . . . . . . . . . . . . . . . . . . . . . 2-2
Figure 2-3: Selecting A Queue From An Application-Macintosh Example . . . . . . . . . . . . . . . . . 2-3
Figure 2-4: Printer Properties Dialog Box-Windows. . . . . . . . . . . . . . . . . . . . . . . . . . . . . . . . . . . 2-6
Figure 2-5: Device Options Tab-Windows . . . . . . . . . . . . . . . . . . . . . . . . . . . . . . . . . . . . . . . . . . . 2-7
Figure 2-6: Printer Specific Options-Macintosh . . . . . . . . . . . . . . . . . . . . . . . . . . . . . . . . . . . . . . 2-7
Figure 2-7: Group Example. . . . . . . . . . . . . . . . . . . . . . . . . . . . . . . . . . . . . . . . . . . . . . . . . . . . . . 2-11
Figure 2-8: Group Reverse Example . . . . . . . . . . . . . . . . . . . . . . . . . . . . . . . . . . . . . . . . . . . . . . 2-11
Figure 2-9: Collate Example . . . . . . . . . . . . . . . . . . . . . . . . . . . . . . . . . . . . . . . . . . . . . . . . . . . . . 2-12
Figure 2-10: Collate Reverse Example. . . . . . . . . . . . . . . . . . . . . . . . . . . . . . . . . . . . . . . . . . . . . 2-12
Figure 2-11: Group In Sorter Example. . . . . . . . . . . . . . . . . . . . . . . . . . . . . . . . . . . . . . . . . . . . . 2-13
Figure 2-12: Group In Sorter Reverse Example . . . . . . . . . . . . . . . . . . . . . . . . . . . . . . . . . . . . . 2-13
Figure 2-13: Collate In Sorter Example. . . . . . . . . . . . . . . . . . . . . . . . . . . . . . . . . . . . . . . . . . . . 2-14
Figure 2-14: Col late In Sorter Reverse Example. . . . . . . . . . . . . . . . . . . . . . . . . . . . . . . . . . . . . 2-14
Figure 3-1: Sample Viewer Window . . . . . . . . . . . . . . . . . . . . . . . . . . . . . . . . . . . . . . . . . . . . . . . . 3-1
Figure 3-2: Sample Pull-down Printer Menu. . . . . . . . . . . . . . . . . . . . . . . . . . . . . . . . . . . . . . . . . 3-3
Figure 3-3: Sample Copier Status Tab . . . . . . . . . . . . . . . . . . . . . . . . . . . . . . . . . . . . . . . . . . . . . . 3-3
Figure 3-4: Turning Off the Audio Alarm . . . . . . . . . . . . . . . . . . . . . . . . . . . . . . . . . . . . . . . . . . . 3-5
Figure 3-5: Sample Job Details Tab . . . . . . . . . . . . . . . . . . . . . . . . . . . . . . . . . . . . . . . . . . . . . . . . 3-6
Figure 3-6: Show Error or Reprint Job Dialog Box . . . . . . . . . . . . . . . . . . . . . . . . . . . . . . . . . . . 3-10
Figure 3-7: Show Error Dialog Box . . . . . . . . . . . . . . . . . . . . . . . . . . . . . . . . . . . . . . . . . . . . . . . 3-11
Figure 3-8: Sample Reprint Options Dialog Box—Simple Dialog Box. . . . . . . . . . . . . . . . . . . . 3-12
Figure 3-9: Sample Reprint Options Dialog Box—Advan ced Tab . . . . . . . . . . . . . . . . . . . . . . . 3-13
Figure 3-10: Selecting Options From The Advanced Tab . . . . . . . . . . . . . . . . . . . . . . . . . . . . . . 3-13
Figure 3-11: Pull-down Print Files Menu . . . . . . . . . . . . . . . . . . . . . . . . . . . . . . . . . . . . . . . . . . 3-18
Figure 3-12: Files Dialog Box . . . . . . . . . . . . . . . . . . . . . . . . . . . . . . . . . . . . . . . . . . . . . . . . . . . . 3-19
Figure 3-13: Pull-down Logon Menu . . . . . . . . . . . . . . . . . . . . . . . . . . . . . . . . . . . . . . . . . . . . . . 3-20
Figure 3-14: Logon Dialog Box . . . . . . . . . . . . . . . . . . . . . . . . . . . . . . . . . . . . . . . . . . . . . . . . . . . 3-20
Figure 4-1: Print Default Account . . . . . . . . . . . . . . . . . . . . . . . . . . . . . . . . . . . . . . . . . . . . . . . . . 4-2
Figure 4-2: Configure Accounting. . . . . . . . . . . . . . . . . . . . . . . . . . . . . . . . . . . . . . . . . . . . . . . . . . 4-3
QA 25 Draft: July 31, 1998 vii
Page 8

List of F igures
Figure 4-3: Configure Accounting Dialog Box . . . . . . . . . . . . . . . . . . . . . . . . . . . . . . . . . . . . . . . . 4-3
Figure 4-4: Save Accounting . . . . . . . . . . . . . . . . . . . . . . . . . . . . . . . . . . . . . . . . . . . . . . . . . . . . . . 4-4
Figure 4-5: Save Errors. . . . . . . . . . . . . . . . . . . . . . . . . . . . . . . . . . . . . . . . . . . . . . . . . . . . . . . . . . 4-5
Figure 4-6: Error Log Dialog Box . . . . . . . . . . . . . . . . . . . . . . . . . . . . . . . . . . . . . . . . . . . . . . . . . . 4-6
Figure 5-1: Pull-down Logon Menu . . . . . . . . . . . . . . . . . . . . . . . . . . . . . . . . . . . . . . . . . . . . . . . . 5 -1
Figure 5-2: Logon Dialog Box . . . . . . . . . . . . . . . . . . . . . . . . . . . . . . . . . . . . . . . . . . . . . . . . . . . . . 5-1
Figure 5-3: Configure Password . . . . . . . . . . . . . . . . . . . . . . . . . . . . . . . . . . . . . . . . . . . . . . . . . . . 5-2
Figure 5-4: Change Password Dialog Box . . . . . . . . . . . . . . . . . . . . . . . . . . . . . . . . . . . . . . . . . . . 5-2
Figure 5-5: Configure User Rights . . . . . . . . . . . . . . . . . . . . . . . . . . . . . . . . . . . . . . . . . . . . . . . . . 5-3
Figure 5-6: User Rights Dialog Box . . . . . . . . . . . . . . . . . . . . . . . . . . . . . . . . . . . . . . . . . . . . . . . . 5-4
Figure 5-7: Configure Time And Date . . . . . . . . . . . . . . . . . . . . . . . . . . . . . . . . . . . . . . . . . . . . . . 5-6
Figure 5-8: Time and Date Dialog Box. . . . . . . . . . . . . . . . . . . . . . . . . . . . . . . . . . . . . . . . . . . . . . 5-6
Figure 5-9: Print Submenu . . . . . . . . . . . . . . . . . . . . . . . . . . . . . . . . . . . . . . . . . . . . . . . . . . . . . . . 5-6
Figure 5-10: Delete Submenu . . . . . . . . . . . . . . . . . . . . . . . . . . . . . . . . . . . . . . . . . . . . . . . . . . . . . 5-7
Figure 5-11: Save Accounting . . . . . . . . . . . . . . . . . . . . . . . . . . . . . . . . . . . . . . . . . . . . . . . . . . . . . 5-7
Figure 5-12: Pull-down Print Printer Target Menu . . . . . . . . . . . . . . . . . . . . . . . . . . . . . . . . . . . 5-8
Figure 5-13: Sample ColorCal Print Target Window . . . . . . . . . . . . . . . . . . . . . . . . . . . . . . . . . . 5-9
Figure 5-14: Sample ColorCal Pull-down List For Selecting Media Type . . . . . . . . . . . . . . . . . 5-10
Figure 5-15: Sam ple Printer Calibration Target . . . . . . . . . . . . . . . . . . . . . . . . . . . . . . . . . . . . . 5-11
Figure 5-16: ColorCal Calibration Window . . . . . . . . . . . . . . . . . . . . . . . . . . . . . . . . . . . . . . . . . 5-12
Figure 5-17: Sample Scanner Calibration Target . . . . . . . . . . . . . . . . . . . . . . . . . . . . . . . . . . . . 5-13
QA 25 Draft: July 31, 1998 viii
Page 9

List of Tables
Table 1-1: M Series Hardware Features . . . . . . . . . . . . . . . . . . . . . . . . . . . . . . . . . . . . . . . . . . . . .1-1
Table 1-2: Summary of LED Activity . . . . . . . . . . . . . . . . . . . . . . . . . . . . . . . . . . . . . . . . . . . . . . .1-5
Table 3-1: Reprint Options . . . . . . . . . . . . . . . . . . . . . . . . . . . . . . . . . . . . . . . . . . . . . . . . . . . . . .3-14
Table 5-1: Summary of User/Operator Access Rights . . . . . . . . . . . . . . . . . . . . . . . . . . . . . . . . . .5-4
QA 25 Draft: July 31, 1998 ix
Page 10

List of Tables
x QA 25 Draft: July 31, 1998
Page 11

M Series
A
BOUT THIS MANUAL
The Splash M Series User’s Manual is for all users. It describes the M Series functions and
features and can be used as a guide or reference. This manual is organization as foll ows:
• Chapter 1 provides an overview of featur es and functions and describes the system
requirements fo r using th e M S e ries pri n t se rver on yo ur netw ork.
• Chapter 2 describes how to use the M Series print server to print your documents.
• Chapter 3 describes the M Series Viewer, which allows you to manage the print server
and control print jobs.
• Chapter 4 describes how to print the M Series system def ault accounting log, how to
create custom accounting reports, and how to generate error reports.
• Chapter 5 describes the system administration features for the print server.
• Chapter 6 describes the M410’s DiamondMerge feature that allows you to merge two
PostScript data st ream s to create a single document.
R
ELATED DOCUMENTS
Other M Series print server documents include the Initial Setup Card and Getting Started
Guide.
Preface
The Initial Setup Card lists the steps for connecti ng the M Series print server to your copier.
The Getting Started Guide provides step-by-step instructions for connecting the M Series
print server to the network and configuring the client workstation(s). A copy of the Getting
Started Guide (in pdf format ) can be fo und on the Splas h CD-ROM that shipped wi th the print
server.
In addition to the M Series pri nt server documentation, you may want to refer to the
documentation that was shipped with your copier, application softwa re, workstation system
software , and network operating system.
QA 25 Draft: July 31, 1998 xi
Page 12

Preface
xii QA 25 Draft: July 31, 1998
Page 13
Chapter 1
M Series
I
NTRODUCTION
The Spla s h M Serie s d ig ital col o r print server turns your Xe rox col o r co p i e r into a netw o rk
color printer. By connecting the print server to your copier, and the print server to your
network, you create an extremely efficient, high quality, color printing solution.
M Series print servers are very easy to set up and use. They support all of your color copier
features and can be configured to work with the following major Ethernet network types:
• Ethernet using IPX or TCP/IP protocols
• EtherTalk using AppleTalk protocol
The M Series print server has the ability to run multiple network protocols (IPX, TCP/IP and
AppleTalk). It also auto-senses the data transmissi on speeds and frame types. The supported
frame types are Ethernet 802. 3 and 8 02.2.
Features
There are two models of print servers in the M Seri es; M310 and M410. Table 1-1 is a
summary of the M Series hardware features.
M Series Print Server Overview
Table 1-1: M Series Hardware Features
M310 M410
233MHz Pentium II CPU 400MHz Pentium II CPU
64MB RAM 128MB RAM
3GB hard drive and 1.44MB floppy drive 6GB hard drive and 1.44MB floppy drive
EtherLink 10/100 netwo rk card EtherLink 10/100 network card
High speed PCI-bus copier interface card High speed PCI-bus copier interface card
QA 25 Draft: July 31, 1998 1-1
Page 14

M Series Print Server Overview
The M Series print server includes the following unique software features not found on other
digital print servers. All software features are supported on both the M310 and M410 unless
otherwise stated:
• Simple setup procedure
• Multiple-simultaneous netwo rk protocols.
• Full 400x400 dpi output
• Full 32-bit color depth
• Support for Color Rendering Dictionaries (CRDs) and ColorSync™ profiles
• Support for PostScript (PS) Level 2, Encaps ulated PostScript (EPS) V3.0, and Portable
Document File (PDF) files created by Acrobat 3.0
• A Viewer application for workstation-based control of print jobs and reprinting
• Extremely fast PostScript processing that occurs while other jobs are spooling and
printing
• RIP-once, electronic collation that does not require a sorter, including reverse order
• Continuous print with copier cycle-down when printing multiple, unique pages
• Color calibration to compensat e for copier drift using the built-in ColorCal application
• Extensive document-printing features, such as, one-step duplexing, imposition options
and booklet creation
• Instant reprint
• DiamondMerge variable data merge feat ure (supported on M410 only)
• Splash SpotMatch (supported on M410 only)
• Antialiasing
• Black text overprint
• C li ck sa v er
• RIP color pages only
• Support for DocuPac, special heavy paper (5750 only), coated paper, single step transfer,
and labels.
1-2 QA 25 Draft: July 31, 1998
Page 15

YSTEM REQUIREMENTS
S
The minimum system requirements for using M Series are as follows:
• Xerox color copier
— DocuColor
— DocuColor 5799
— Regal 5790
• Network types
—Windows
TM
—EtherTalk
— Novell NetW areTM—IPX over EtherNet
• Macintosh clients
— PowerMac
— System 7.5.5 or later
— EtherN e t networ k int e rface
— 8MB free RAM
— 4MB hard disk space
— 640x480 video resolution
— Open Transport 1.1.1 or above
— LaserWriter driver 8.3.4 or above
TM
5750
Networks—TCP/IP over EtherNetTM
TM
Phase II—AppleTalk over EtherNet
M Series Prin t S erv er Overview
• Windows Network clients
— Microsoft Windows Network client software installed on the workstation
— PostScrip t print driver (Microsoft recommende d)
— 2MB hard disk space
— Windows 95 or NT 3.51/4.0
— TCP/IP protocol on workstation
• Ad ditiona l min imum r eq u irement s fo r Novell Ne t W a r e
— NetWare client software installed on the workstation
— PostScrip t print driver (Microsoft recommende d)
— 2MB hard disk space
— NetWare file server running NetWare NOS version 3.11 or later.
• Application software on the Client that can produce PostScript language output.
• 10baseT (twisted-pair) or 100baseT network cable
If your networ k uses BNC/Thinnet media, you must use a 10/100baseT hub, that includes
a BNC port, to connect the M Series print server to the network.
For in format ion on h ow to i ns tall an d confi gure your M Seri es print se rver, refer to the Splash
M Series Initial Setup Card and Splash M Series Getting Started Guide, which is located on
the CD-ROM that shipped with the print server.
QA 25 Draft: July 31, 1998 1-3
Page 16

OWER UP/POWER DOWN PROCE DU RE
P
To power up the M Series print server for normal operation, follow these steps:
1. Turn on the copier and wait for it to reach a ready state.
2. Make sure there are no disks in the print server floppy drive.
3. Turn on the print server. As the print server powers up,
a. The green led illuminates, indicating that power is on.
b. The print server beeps—one long and two short.
c. After about 30 to 45 seconds, the green activity light on the floppy drive ill u m i-
nates briefly and the print server beeps—one short.
d. After about 45 seconds, the print server beeps again—two short, two long, two
short. This is a signal from the print server indicating that it is ready to accept
service utility disks. If a disk is not inserted, the print server will continue to initialize. The beeps are a normal part of the initi alization process.
e. The status indicator alternately flashes between yellow and red several times
then change to flashi ng yellow.
f. The print server prints its startup test page.
Be sure to power on the copier before turning on the print server. If the copier is not powered
on and ready, the print server may not set up proper communication with the copier.
To power down the M Series print server, follow these steps:
1. Wait for all jobs to finish.
2. Turn off the print server.
3. Turn off the copier.
1-4 QA 25 Draft: July 31, 1998
Page 17

M Series Prin t S erv er Overview
RINT SERVER STATUS
P
The M Series print server has two status LEDs loca ted on the front panel; one green and one
that illuminates red or amber. The location of the LEDs is shown in Figure 1-1. The LED
activity is summarized in Table 1-2.
LED
S
Power indicator
(green)
Status LED
(amber or red)
Figure 1-1: Print Server Status LEDs
Table 1-2: Summary of LE D Activity
LED Description
Green, not flashing Power indicator.
Amber, slowly flashing Panther/Cougar is idle. Normal operation.
Amber, quickly flashing Panther/Cougar activity, such as spooling, ripping, or printing.
Red, off No problems
Red, one flash Add paper.
Red, two flashes Toner or fuser oil problem.
Red, three flashes Paper jam.
Red, four flashes Door open, copier disconnected or other similar error.
No amber or red Hardware problem or floppy inserted at the wrong ti me.
QA 25 Draft: July 31, 1998 1-5
Page 18

M Series Print Server Overview
IEWER SECURITY
V
There are three class es of user modes (or privil eges) for the M Series print server; Ordinary
User, Operator, and Administrator. The print server system allows or restricts user ac cess
to specific print server functions depending on the users’ mode, as described below:
Administrator— Unlimited access to all Viewer features and functions, including the
ability to define the features and functions available to ordi nary users and operators.
Access to Administrator privil eges requires a password.
Operator—Restricted access to Administrator functions and other functions as defined
by the Administrator. Access to Operator privileges requires a password.
Ordinary User—Restricted acce ss to Administrator and Operator functi ons. Access t o
Ordinary User privileges does not require a password.
The print server can be configured with two passwords, one password for Administrator
access and one password for Operator access . I f you r site re quir es mult ipl e Administrator s
and Operators to manage the print server, these types of users must sha re the passwords.
Passwords are stored in a password file on the print server hard drive.When you log in as
Administrator or Operator, the print server system verifies the password against the pass-
word file before allowing you access to these privileges.
DDING
A
A NEW P
This section describes how to add new print servers to your workstation after the initial
workstation conf igurati on and s etup is per for med as des cribed i n the Splash M Seri es Ge tting
Started Guide (located on the CD-ROM that shipped with the print server). If your
workstation has not be setup and configured for the M Series print server, contact your
system administr ator.
As you read this section, keep in mind that the M Series print server can be configured with
two queu e s; Hold and Print. If you are connected to the Hold queue, all of the print jobs you
send to the printer are held (not printed) unt il they are moved from the Hold queue to the
Print queue. Th e Hold queue is useful for jobs that require some sort of user intervention,
such as, jobs that require unusual or special type of media.
On Windows networks, both queues are represent ed on the network with printer icons, but to
distinguish one queue from another, the printer icon name contains the word hold or print.
For example, the fac tory default names for the print and hold queues are Splash_hold and
Splash_print. Figure 1-2 is an example of how the queues appear on the network.
RINT SERVER TO YOUR WORKSTATION
1-6 QA 25 Draft: July 31, 1998
Page 19

M Series Prin t S erv er Overview
SA
SB
SplashM310
M310_hold
M310_print
S1
S2
S3
SplashM410
M410_hold
M410_print
SC
SD
SE
Figure 1-2: Print Server Queu es—Wind o ws Examp le
On Macintosh workstations, both queues are displayed by the Chooser as shown in
Figure 1-3.
Figure 1-3: Print Server Que ues— Macint osh Exampl e
You can add either queue, using the pro cedures described in this section. Procedures for
adding a new print server to Wi ndows Workstations are described in the subsection that
follows. If you have a Macintosh workstation, skip ahead to Adding a Print Server to
Macintosh Workstations on page 15.
QA 25 Draft: July 31, 1998 1-7
Page 20

M Series Print Server Overview
Adding a Print S er v er to W ind ows Workstat io ns
To add the print server to your workstation printer folder, complete the following steps:
1. If you are using NT, log in as a local NT administrator.
2. Start Add Printer Wizard and follow the prompts.
a. When Wizard prompts you to specify whether you are installing a Local Printer
or Network Printer, specify Network Printer and click Next.
b. When Wizard prompts you for a network path or queue name, click on Browse
and browse for the M Series icon.
c. When Wizard asks you for the manufacturer and model, and if your client config-
uration supports the Viewer and you installed it,
1 )Click on Have Disk, then Browse.
2 )Go to Program Files\Splash\M Series and select either the
Windows95 or Wi nnt folder.
If your client config uration does not support the View er,
1 )Insert Splash CD-ROM in your workstation CD-ROM drive.
2 )Click on Have Disk, then Browse .
3 )Open the Win95nt40 or Winnt3x folder on the CD-ROM, then open the
appropriate language folder.
4 )In the la n g u age folde r, choose the oe m s etup.inf file, and click OK.
e. When Wizard asks you to specify a printer name, specify a name and append the
name with “_hold” if you are adding a hold queue or “_ print” if you are adding a
print queue. The reason for adding “_hold” or “ _print” is because both queues are
represented on the networ k as printer icons, as shown in Figure 1-2.
1-8 QA 25 Draft: July 31, 1998
Page 21

M Series Prin t S erv er Overview
SA
SB
SplashM310
M310_hold
M310_print
S1
S2
S3
SplashM410
M410_hold
M410_print
SC
SD
SE
Figure 1-4: Print Server Queu es—Wind o ws Examp le
Adding “_print” or “_ hold” to the name identifies the queue type associated with
the icon.
f. When Wizard asks you if you want to print the test p age, click Yes. After the test
page prints, click Yes again (even if the test page print incorrectly).
After the print serv er is added to the workstation, follow these steps to configure it.
1. Open Printer Properties. The Printer Properties Dialog box, shown in Figure 1-5,
appears.
Figure 1-5: Printer Prop erties Dialog Box
2. Click on Details. T h e Details tab, shown in Figure 1-6, appears.
QA 25 Draft: July 31, 1998 1-9
Page 22

M Series Print Server Overview
Figure 1-6: Details T ab
3. Click on the Sp ool Setting button. The Spool Setting Dia log box, shown i n Fi gure 1-7,
appears.
Figure 1-7: Spool Settings Dialog Box
4. Click on Print directly to printer the n cli c k OK. The Spool Setting Dialog box closes,
but the Details tab (Figure 1-6) is still displayed.
5. On the Details tab, click Apply, then switch to the PostScript tab by clicking on
PostScript. The PostScript tab, shown in Figure 1-8, appears.
1-10 QA 25 Draft: July 31, 1998
Page 23

Figure 1-8: PostScript Tab
M Series Prin t S erv er Overview
6. On the Po stScript tab, click Advanced. The Advanced PostScript Dialog box,
shown in Figure 1-9, appears.
Figure 1-9: Advanced PostScript Dialog Box
7. Set the following optio ns:
• Use PostScript Level 2 features
• Pure Binary data
• Compress bitmap images
QA 25 Draft: July 31, 1998 1-11
Page 24

M Series Print Server Overview
8. Click OK. The Advanced PostScript Dialog box closes, but the PostScript tab is still
displayed.
9. On the Po stScript tab (Figure 1-8), set Job timeout and Wait timeout to 0 seconds and
click on Apply.
10. Switch from the PostScript tab to the Device Options tab by clicking on Device
Options. The tab shown in Figure 1-10 appears.
Installable
options
Change Setting
pull-down list
Figure 1-10: De vi ce Optio ns Tab
11. Follow these steps to configure all of the Installable options:
a. Select the M400 Series Features option from the Inst allable opti ons list. This
option enables/disables the M410 specific software options; SpotMatch and
DiamondMerge. M400 Series Features is enabled (Yes) by default.
If you have an M410 print server, use the default (Yes).
If you have an M310 print server, use the Change Setting pull-down list to set
this option to No.
Make sure you set this option cor rectly. If M400 Series Features is not set correctly,
options are not selectable or cause errors as described in the following t able.
1-12 QA 25 Draft: July 31, 1998
Page 25

M Series Prin t S erv er Overview
If the print server is ... And M400 is set to ... Then ...
M410 Yes
M410 No
M310 Yes
M310 No
SpotMatch
the PPD and
SpotMatch
from the PPD or
valid M410 fe atur es .
SpotMatc h
the PPD and
these options causes a job error.
SpotMatch
from the PPD or
DiamondMerge
and
Reprint Options
DiamondMerge
and
Reprint Options
DiamondMerge
and
Reprint Options
Diamondmerge
and
Reprint Options
are selectable from
and function correctly.
cannot be selected
, even though the are
are selectable from
. However, selecting
cannot be selected
.
b. Select the DocuColor 5750 Support option from the Installable options list. This
option en ables /d isabl e s 12in x 18in, Postcard, and Tray 4 support. This option
also disables/enabl es Group in Sorter and Group in Sorter Reverse , which are not
supported by the 5750. DocuColor 5750 Support is enabled (Yes) by default.
If your print server is connected to a 5750 copier, use the default (Yes).
If your print server is connected to a 5790 or 5799 copier, set this option to No.
Make sure you set this option cor rectly. If DocuColor 5750 Support is not set correctly,
options are not selec table or cause errors as described in the following table.
If the copier is ... And 5750 option is set to ... Then ...
5750 Yes
5750 No
12in x 18in, Postcard
the PPD and
correctly.
Group in Sorter
Also,
(which are not supported on the 5750) are not ava ila b le
for selection from the PPD and
12in x 18in, Postcard
from the PPD and
copier supports these features.
Group in Sorter
Also,
(which are not supported on the 5750) are available for
selection from the PPD and
options are selected, the resulting page order is
unpredictable.
Reprint Options
Reprint Options
Tray 4
, and
and
, and
and
are selectable from
and they function
Group in Sorter Reverse
Reprint
Tray 4
Group in Sorter Reverse
Reprint
options.
cannot be selected
, even thought the
options. If these
QA 25 Draft: July 31, 1998 1-13
Page 26

M Series Print Server Overview
If the copier is ... And 5750 option is set to ... Then ...
5799/5790 Yes 12in x 18in, Postcard, and Tray 4 are selectable from
the PPD and Reprint Options. However, selecting
these options causes a job error.
Also, Group in Sorter and Group in Sorter Reverse
are not a vail ab le f or sel ection from th e PPD and Reprint
options, even though these options are supported.
5799/5790 No 12in x 18in, Postcard, and Tray 4 cannot be selected
from the PPD and Reprint Options.
Group in Sorter and Group in Sorter Reverse are
available for selection from the PPD and Reprint
options and function correctly.
The installation is now com plete and you can start sending print jobs to the print server. The
print server PPD file ships with a set of default values. You can use these defaults, specify
new defaults (which will apply to all your print jobs), or select new values on a job-by- job
basis. For more in formation, refer to Chapter 2, Printing to the Print Server.
1-14 QA 25 Draft: July 31, 1998
Page 27

Adding a Print Server to Macintosh W orkstations
To add a print server to a Macintosh workstation, follow these steps:
1. From the Apple Menu, select Chooser. Th e Chooser Control Panel, show n in
Figure 1-11 appears.
M Series Prin t S erv er Overview
Figure 1-11: Sample Cho oser Contr ol Panel
2. Select a LaserWriter 8.4. 3 (or above) and a Zone (if configured).
3. Make sure that AppleTalk is enabled.
4. When the printer list appears, click on the M Series printer name and then click on
Setup. The Current Printer Description File Dialog box, shown in Figure 1-12,
appears.
Figure 1-12: Current Printer Description File Dialog Box
5. Click on Auto Setup. T h e Select PostScript Printer Description Dialog box,
shown in Figure 1-13, appears.
QA 25 Draft: July 31, 1998 1-15
Page 28

M Series Print Server Overview
Figure 1-13: Select PostScript Printer Description Di alog Box
6. Highlight the Splash M Series PPD and click on Select. The Current Printer
Description File Dialog box (F igure 1-12) re-appears when the workstation has
finished setting up the printer.
7. Click on Config ure. The Installable Options Dialog box, shown in Figure 1-14,
appears.
Figure 1-14: Ins tall ab le Options Dialog Box
8. Follow these steps to configure all of the Installable options:
a. Select the M400 Series Features option from the Inst allable opti ons list. This
option enables/disables the M410 specific software options; SpotMatch and
DiamondMerge. M400 Series Features is enabled (Yes) by default.
If you have an M410 print server, use the default (Yes).
If you have an M310 print server, set this option to No.
Make sure you set this option cor rectly. If M400 Series Features is not set correctly,
1-16 QA 25 Draft: July 31, 1998
Page 29

M Series Prin t S erv er Overview
options are not selec table or cause errors as described in the following table.
If the print server is ... And M400 is set to ... Then ...
M410 Yes
M410 No
M310 Yes
M310 No
SpotMatch
the PPD and
SpotMatch
from the PPD or
valid M410 fe atur es .
SpotMatc h
the PPD and
these options causes a job error.
SpotMatch
from the PPD or
DiamondMerge
and
Reprint Options
DiamondMerge
and
Reprint Options
DiamondMerge
and
Reprint Options
Diamondmerge
and
Reprint Options
b. Select the DocuColor 5750 Support option from the Installable options list. This
option en ables /d isabl e s 12in x 18in, Postcard, and Tray 4 support. This option
also disables/enabl es Group in Sorter and Group in Sorter Reverse , which are not
supported by the 5750. DocuColor 5750 Support is enabled (Yes) by default.
If your print server is connected to a 5750 copier, use the default (Yes).
If your print server is connected to a 5790 or 5799 copier, set this option to No.
Make sure you set this option cor rectly. If DocuColor 5750 Support is not set correctly,
options are not selec table or cause errors as described in the following table.
If the copier is ... And 5750 option is set to ... Then ...
are selectable from
and function correctly.
cannot be selected
, even though the are
are selectable from
. However, selecting
cannot be selected
.
5750 Yes
5750 No
5799/5790 Yes
12in x 18in, Postcard
the PPD and
correctly.
Group in Sorter
Also,
(which are not supported on the 5750) are not ava ila b le
for selection from the PPD and
12in x 18in, Postcard
from the PPD and
copier supports these features.
Group in Sorter
Also,
(which are not supported on the 5750) are available for
selection from the PPD and
options are selected, the resulting page order is
unpredictable.
12in x 18in, Postcard
the PPD and
these options causes a job error.
Group in Sorter
Also,
are not a vail ab le f or sel ection from th e PPD and
options, even though these options are supported.
Reprint Options
Reprint Options
Reprint Options
Tray 4
, and
and
, and
and
, and
and
are selectable from
and they function
Group in Sorter Reverse
Reprint
Tray 4
Group in Sorter Reverse
Reprint
Tray 4
. However, selecting
Group in Sorter Reverse
options.
cannot be selected
, even thought the
options. If these
are selectable from
Reprint
QA 25 Draft: July 31, 1998 1-17
Page 30

M Series Print Server Overview
If the copier is ... And 5750 option is set to ... Then ...
5799/5790 No 12in x 18in, Postcard, and Tray 4 cannot be selected
from the PPD and Reprint Options.
Group in Sorter and Group in Sorter Reverse are
available for selection from the PPD and Reprint
options and function correctly.
c. Select the Optional Sorter option from the Installable options list. This option
enables/disables the M Series sorter features. This option is disabled (Not
Installed) by default.
If the copier connected to your pri nt server has a sort er attach ed, set this option to
Installed.
If the copier does not have a sorter, use the default (Not Installed.)
Make sure this option is set correctly. If Optional Sorter is not set correctly, options are
not selectable or cause errors as described in the following table.
If a sorter is ... And Optional Sorter is set to ... Then ...
Installed Yes The sorter options (Collate in Sorter, Collate in Sorter
Reverse, Group in Sorter*, and Group in Sorter
Reverse*) are selectable and function correctly.
*Group in Sorter and Group in Sorter Reverse are not
supported on the 5750.
Installed No The sorter options are not selectable from the PPD and
Reprint Options, even though the copier has a sorter
installed.
Not installed Y e s Th e sorter options are sel ecta b le fro m the PPD and Rep rint
Options. Howe ver , if an option is selected, the job prints as if
one of the corresponding non-sor ter options (Collate
Collate Reverse, Group, Group Reverse) was selected.
Not installed No The sorter options are not selectable from the PPD and
Reprint Options.
,
The installation is now com plete and you can start sending print jobs to the print server. The
print server PPD file ships with a set of default values. You can use these defaults, specify
new defaults (which will apply to all your print jobs), or select new values on a job-by- job
basis. For more information, refer to Chapter 2, Printing to the Print Server.
1-18 QA 25 Draft: July 31, 1998
Page 31

Chapter 2
M Series
I
NTRODUCTION
This chapter describes how to select the PostScript Printer Description (PPD) file options,
access i b le throug h Printe r S pecifi c O p tions (M A C ) or the Prin t er Properties bo x (Wi n dows) .
B
ASIC CONCEPTS
Before you begin selec ti ng the M Ser ies PPD features f or yo ur print j obs, there are a few basic
concepts you should understand:
• How to use the M Series print server Hold and Print queues
• What page options are set in the print server configuration file and how they affect your
job output
• How the print server handles fonts
Hold and Print Queues
The M Series print server can be configured with two queues; Hold and Print. If you are
connected to the Hold queue , all of th e print j obs you send to t he pr inte r are hel d (not pri nted)
until they are moved from the Hold queue to the Print queue.
The Hold queue is useful for jobs that r equire some so rt of user inte rventio n, such as , jobs that
require unusual o r spec ial t ype of medi a. If t he traf fic to th e print s erve r is hea vy, you can also
move large print jobs fr om the Print queue to the Hold queue for printing at a later time.
(Refer to Chapter 3, Moving Jo bs from th e H o ld and Pr in t Queues for information on moving
jobs.)
Printing to the Print Server
Connecting to a Queue fr om Windows
You connect to a prin t server que ue by select ing the queue from inside your appl icati on’ s p rint
function, just as you would connect to any network printer. Figure 2-1 is an example for
connecting to a print queue in a Windows environment.
QA 25 Draft: July 31, 1998 2-1
Page 32

Printing to the P rint Server
Figure 2-1: Select ing A Qu eue From An Application-Windows Exampl e
In Windows, you can also select a queue as your default printer from the Start menu, select
Settings, then Printers. The Printers window opens. Figur e 2-2 is an example.
Figure 2-2: Select ing A Default Queue-Windows Exampl e
Click on the queue nam e, pull down the File menu, and select Set As Default.
2-2 QA 25 Draft: July 31, 1998
Page 33

Connecting to a Queue from Macintosh
In a Macintosh environment, you can also connect to a new print server queue. Figure2-1 is
an example.
Figure 2-3: Selecting A Queue From An Application-Macintosh Example
Printing to the Print Server
To select a new queue from inside the application, pull down the Print er li st.
Page Options Set in the Print Server Configuration File
Your administrator can configure the following Page options in the print server’s
configu ration file:
SEPARATOR—Specifies whether or not the print server prints a separator page at the
end of each job. Valid values are true (print separator page) and false (do not print
separator page). The default value is false.
FORCEPAGE—Causes the print server to convert certain page sizes from english to
metric or vice versa. Valid values are as follows:
• metric—Converts letter to A4 and converts legal and tabloid to A3.
• english—Converts A4 to letter and convert s A3 to tabloid.
• off —Default value. Does not convert page sizes.
DEFAULTPAGE—Specifies what paper size to use when the PostScript file does not
contain a page size. Valid values are letter (8.5in x 11in) and a4 (21.00cm x 29.70cm). The
default is letter (8.5in x 11in).
QA 25 Draft: July 31, 1998 2-3
Page 34

Printing to the P rint Server
Notes on Separator Page
The separator page contains the following information about the print job.
Title—Name of job. (The job name is inserted in this field by the application that sent the
job to print.)
For—The job owner. If the job was submitted from a Macintosh work station, this is the
name of the user assigned to the Macintosh to identify the Macintosh on the network. If
the job was submit ted from a Windows workstation, this is the user’s log in nam e.
Creator—The name of the application that created the file.
Creation Date—The date and time the job was created. If the application does not supply
this information, the print server inserts the date fr om i ts internal clock.
Spool Date & Time—Date and time job was spooled to the print server. This is the date
and time that the application sent the PostScript data stream to the print server.
M Series retrieves the spool time from one of two sources. If the application that created
the PostScript file put a spool time in the file, the print server uses the time from the file.
If the application di d not put the spool ti me in the f ile , t he pri nt serv er uses the t ime fr om
its internal clock, which is the time the job arrived at the server for processing.
Job Size—Job size in bytes.
Fonts
There are some conditions under which a separator page is not printed, even though
SEPARATOR is set to true. These conditions are as follows:
• When the job is sent to a DPI file instead of the copier.
• When the manual feed tray is being used for the job.
• When one of the sorter options i s selected. (For information on sorter options, Page Order
in this chapter.
• When a printing job is cancelled. (Recall that separator pages print at the end of jobs.)
Note that the separator page is part of the print job. If you reconfigure the print serve r from
SEPARATOR = true to SEPARATOR = false, and then reprint old jobs (jobs sent to print
while SEPARATOR = true), a separator page will print.
The M Series print server supports all Type 42 fonts and comes with 35 built-in PostScript
fonts that corre spond to the set bui lt into t he Appl e Las erWri ter II N T printer. The 35 built-in
fonts are listed below:
• Times-Roman
• Times-Italic
• Times-Bold
• Times-BoldItalic
•Helvetica
• Helvetica-Oblique
• Helvetica-Bold
• Helvetica-BoldOblique
2-4 QA 25 Draft: July 31, 1998
Page 35

Printing to the Print Server
• Courier
• Courier-Oblique
• Courier-Bold
• Courier-BoldOblique
• Palantino-Roman
• Palantino-Italic
• Palantino-Bold
• Palantino-BoldItalic
• AvantGarde-Book
• AvantGarde-Demi
• AvantGarde-BookOblique
• AvantGarde-DemiOblique
• Helvetica-Narrow
• Helvetica-Narrow-Bold
• Helvetica-Narrow-Oblique
• Helvetica-Narrow-BoldOblique
• Bookman-Light
•Bookman-Demi
• Bookman-LightItalic
• Bookman-DemiItalic
• NewCenturySchlbk-Roman
• NewCenturySchlbk-Bold
• NewCenturySchlbk-Italic
• NewCenturySchlbk-BoldItalic
• ZapfChancery-MediumItalic
• ZapfDingbats
•Symbol
Other fonts that ar e used in the j ob must be ava il able on the workstat io n when the j ob goes to
print. If a job uses a font th at is not built-in or is not available on the workstation, the print
server substitutes the font and records an error message in the accounting log, such as “Font
not found: Using Courier.”
An asterisk also appears next to the job’s Done stat e in the job list, which indicates there was
an error. For example,
mydoc Done* 23-Mar-1998
QA 25 Draft: July 31, 1998 2-5
Page 36

Printing to the P rint Server
Most Windows workstations have TrueType substituti ons for the above set of 35 fonts so that
users can see ac curate representations of the f onts on the screen. Users can view and edit the
font substation table fro m the Print er Pro pert ies tab . True Type fonts need to ge t downloaded
with the job.
For more information on the job list, refer to Chapter 3, Viewing the Status of Jobs.
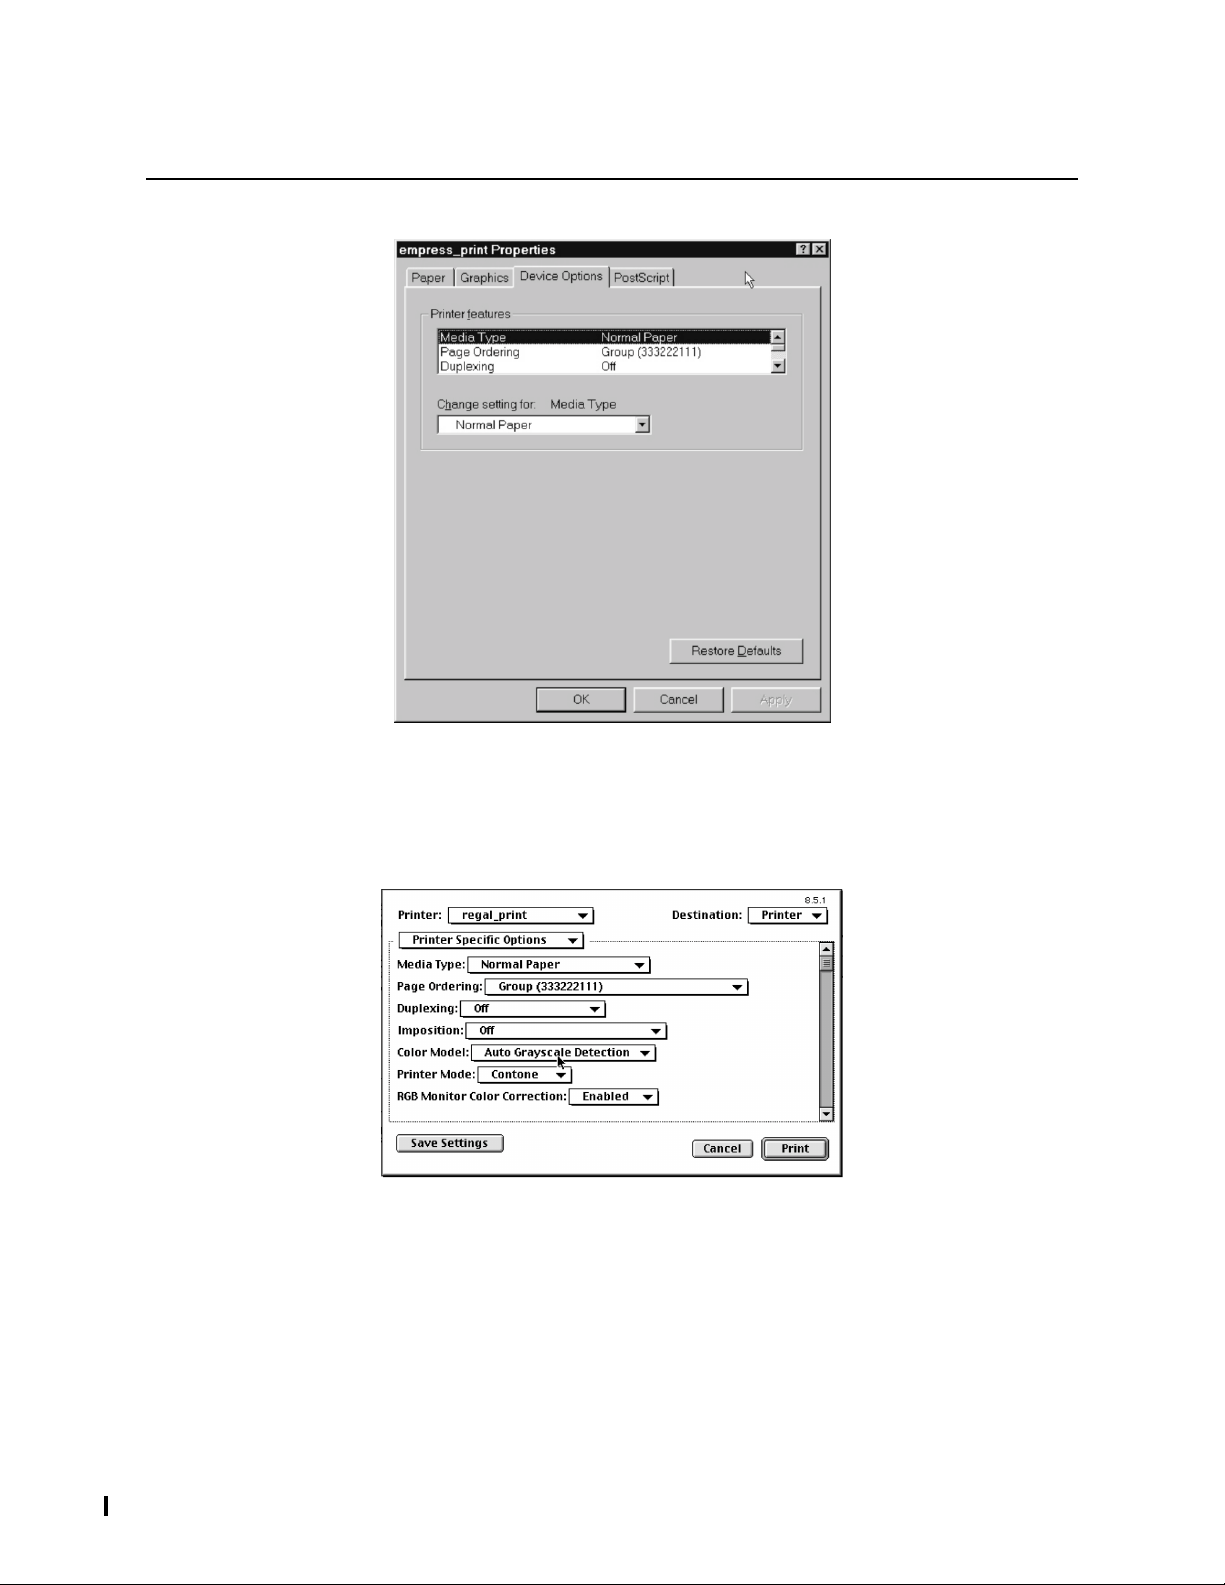
ELECTING OPTIONS FOR PRINT
S
For Windows, after you have selected the print server queue (Figure 2-1), click on Properties.
The Printer Properties dialog box , shown in Figure 2-4, appears .
Figure 2-4: Printer Prop erties Dialog Box-Windows
Click on the Device Options tab to access the PPD options described in this section.
Figure 2-5is an example of this tab.
2-6 QA 25 Draft: July 31, 1998
Page 37
Printing to the Print Server
Figure 2-5: Device Options Tab-Windows
For Macintosh, after you have selected the print server queue (Figure 2-3), pull down the
General list, and select Printer Specific Options. The dialog box in Figure 2-6 appears.
Figure 2-6: Printer Specific Options-Macintosh
From this dialog box, you can a ccess the PPD options described in this section.
QA 25 Draft: July 31, 1998 2-7
Page 38

Printing to the P rint Server
Paper Size
Page Size allows you to select a page size from one of the following options:
Letter—Default. 8.50in x 11.00in (21.59cm x 27.94cm). If the FORCEPAGE parameter in
the DP.INI file is set to metric, the print server converts this size to A4.
SEF Letter—8.50in x 11.00in (21.59cm x 27.94cm ) short edge feed.
Legal—8.50 x 14.00 (21.59cm x 35.56c m). If the FORCEPAGE parameter in the DP.INI
file is set to metric, the print server converts this size to A3.
Tabloid—11in x 17in (27.94cm x 43.18cm). If the FORCEPAGE parameter in the DP.INI
file is set to metric, the print server converts this size to A3.
Postcard—Available only on the 5750 with DocuColor 5750 support enabled. 5.83in x
3.93in (14.8cm x 9.98cm). This option is only available on print servers connected to the
5750 with DocuColor 5750 Support enabled.
DocuPac—Special paper size option for printing Xerox DocuPac folders. For information
on how to load, print, and assembl e Do cuPac folders, refer to the Xe rox documentation
shipped with the folde rs.
12x18——Available only on the 5750 with DocuColor 5750 support enabled. 2in x 18in
(30.48cm x 45.72cm).This option is only available on print servers connected to the 5750
with DocuColor 5750 Support enabled.
A5—5.85in x 8.26in (14.85cm x 21.00cm).
A4—8.26in x 11.69in (21.00cm x 29.70cm). If the FORCEPAGE parameter in the DP.INI
file is set to english, the print se rver con ve r ts this size to lette r.
SEF A4—8.26in x 11.69in (21.00cm x 29.70cm) short edge feed.
A3—11.69in x 16.54in (29.70cm x 42.00cm) the FORCEPAGE parameter in the DP.INI
file is set to english, the print se rver con ve r ts this size to tablo i d.
Unless specifically indicated with SEF (short edge feed) all Page Size options are long edge
feed.
2-8 QA 25 Draft: July 31, 1998
Page 39

Paper Source
Paper Source is a drop-down list that allows you to select a paper source fo r the job from one
of the following options:
Automatic—Default. Causes the print server to search for the proper size media in the
internal trays of the copier. The print server uses the media in the first tray it finds that
contains the proper size media (as specified by the PostScript print driver.)
Manual Feed—F orces the print server to print on the media loaded in the m anual feed
tray. You must use this setting when you print on the following media:
• Transparency media
• Heavy weight paper (up to 90lb)
• 12in x 17in size paper
• P o st card size paper
• Special heavy paper (90lb to 120lb)
• Coated paper
• Single step transfer stock
• Label stock
Tr ay 1—Forc es the print server to print on the media loaded into tray number 1 of the
copier’ s internal trays. Tray 1 is the top-most of the internal trays.
Printing to the Print Server
Hints
Tr ay 2—Forc es the print server to print on the media loaded into tray number 2 of the
copier’ s internal trays.
Tr ay 3—Forc es the print server to print on the media loaded into tray number 3 of the
copier’ s internal trays. Tray 3 is the bottom-most tray on the 5790 copier.
T ray 4—Avai lable only on the 5750 wi th DocuColor 5750 support enabled. F o rces the pri nt
server to print on the media loaded into tray number 4 of the copier’s internal trays. This
option is only available on print servers connected to the 5750 with DocuColor 5750
Support enabled.
If Automatic is selected, when the current tray is empty, the print server searches other
internal tray s for more paper that is of the same size and orientation (LEF or SEF). If the
print server finds the correct paper, it automatically switches to that tray and continues
printing. It will continue this cycle until the job is finished or it can’t find paper.
If the print server does not find the correct paper size/orientation, one of the following
conditions occ u r:
• If the job is not using the sorter, the job pauses and a message appears on the Copier
Status field that informs the user to add paper to any tray.
• If the job is using the sorter, the job pauses and a me ssage appear s on the Copie r Stat us
field that info rm s the user to add paper to the current tray.
This only works with Automatic. When specific tray (Manual Feed or Tray 1 through 4) is
selected, the pri n t server waits until the user reloads th e tray before it resumes printing .
To reduce paper relo ads, select Automatic and fill as many trays as possible with same paper
size required for the job. Make sure the paper is oriented the same way in every tray.
QA 25 Draft: July 31, 1998 2-9
Page 40

Printing to the P rint Server
Media Type
Media Type is a drop-down list that all ows you to select a media source for the job from one of
the following options:
Normal Paper—Default. Prints on standard paper media (16 to 28lb) that is loaded into
the internal trays of the copier or through the manual feed tray. This is the only option
that allows you to use the inte rnal paper trays.
Transparency—Prints on transparency media ( com mo nly used for overhead projection).
Hints
Transparency Interleave—Sam e as standard
inserts a blank sheet of paper (ta ken from the inte rnal paper tr ay s) bet ween each sheet of
transparency media. This helps keep the media from sticking together due to the static
generated from the plastic media.
Heavy Paper—Prints on thicker media (32lb to 90lb).
Speci al Heav y Pap er—Supported on the DocuColor 5750 only. Prints on 90lb to 120lb
paper. The copier fuses the media at a slower rate. Do not use this option on DocuColor
5799 or Regal 5790.
Coated Paper—Prints on 32l b or 60lb coated paper. The copier fuses the media at a slower
rate at a slightly hig her temperature.
Single Step Transfer—Prints on single st ep transfer stock. The co pier fus es the media at a
slower rate at a slightly lower temperature.
Labels—Prints on label stock. The copier fuses the media at a slower rate at a slightly
lower temperatur e.
Except for Normal Paper, all of the above media types must be printed through the manual
feed or manual feed tray on the copier. The print server forces Paper Source to Manual Feed
for all required media types.
The print server does not ch eck the Media Type to verify that it is supported on the copier.
Here are some things to keep in mind when selecting the media type:
Transparency
option, except the copier
• The copier fuses transparency , thick, heavy, coated, transfer, and label media at a slower
rate than standard paper, therefore, throughput decreases when you select these options.
• Because blank sheets of paper are inserted between pages, Transparency Interleave
throughput is decreased even more than that of Transparency.
• If you having trouble getting the copier to fuse the toner to pages contai ning large areas of
toner coverage, while pri n ting to standard thickness paper, change to Heavy Weight
Paper. This may temporarily correct the problem until your Xerox service technician can
service the copier.
2-10 QA 25 Draft: July 31, 1998
Page 41
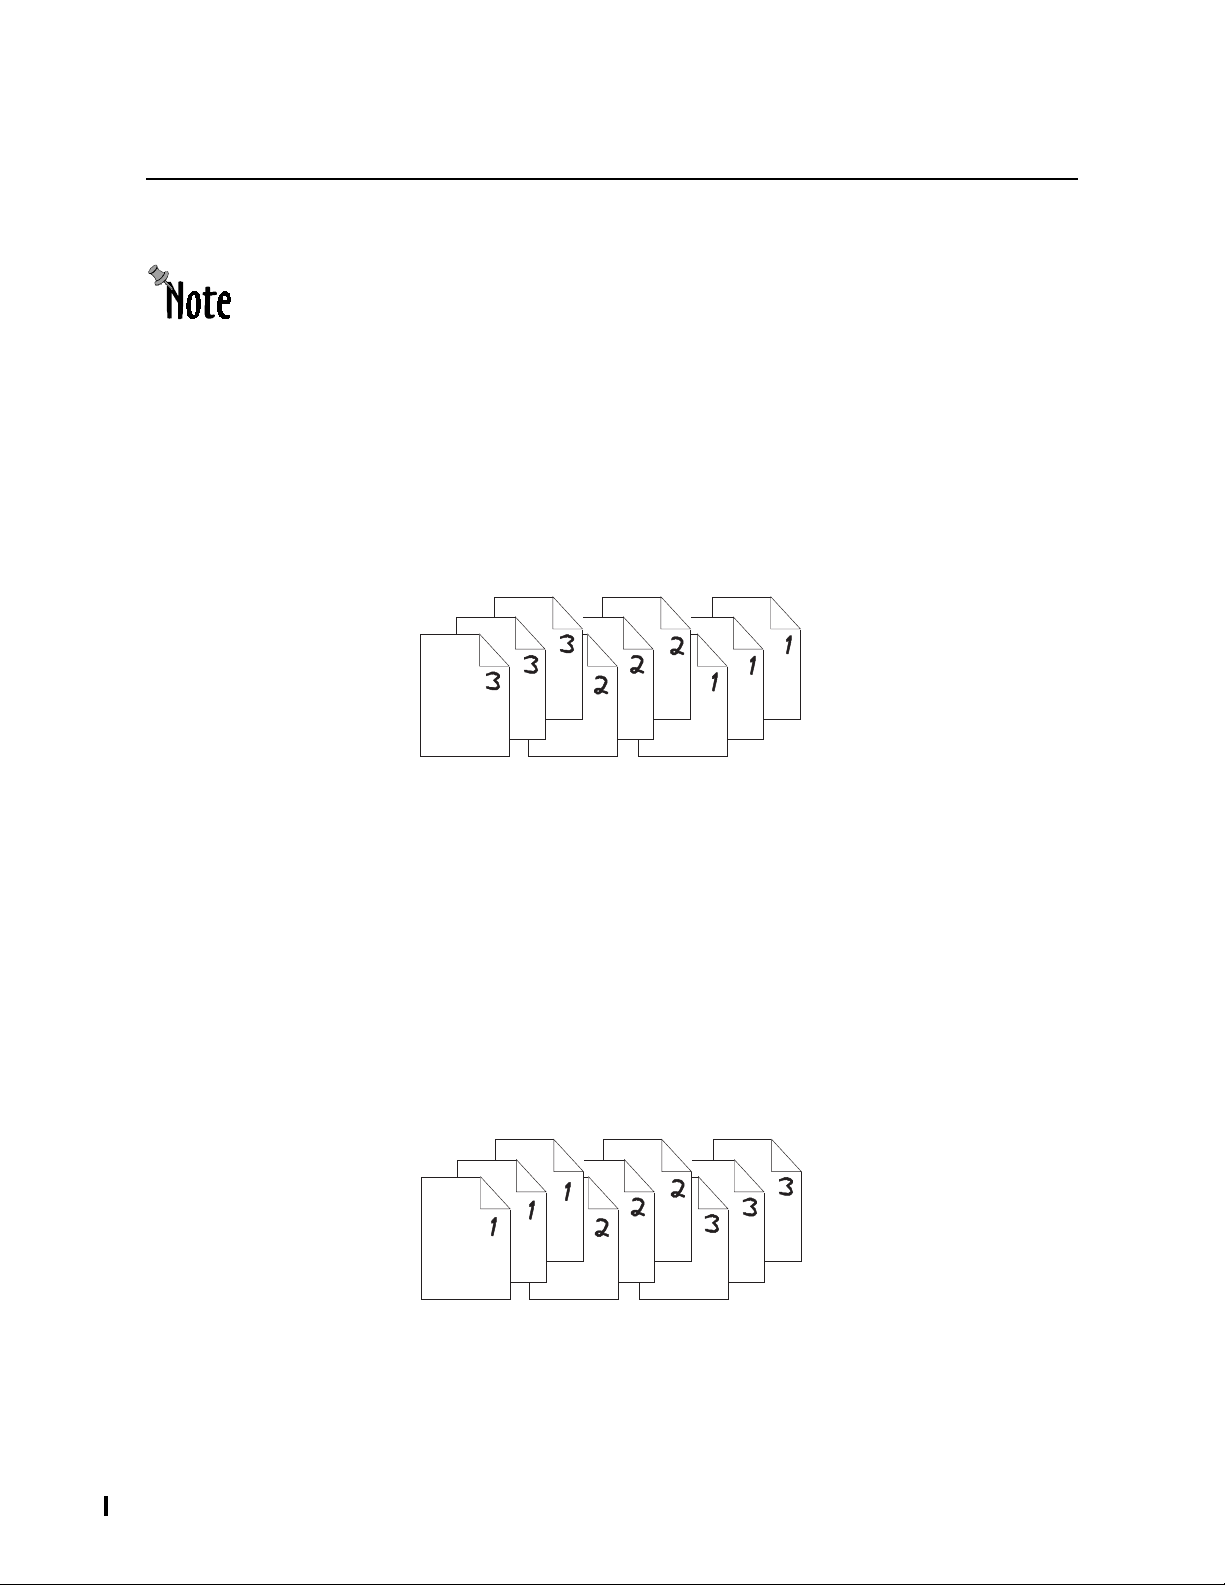
Page Order
Before you sele ct a Page Or der optio n, turn of f all co llating opt ions in t he applic ation. (Ref er
to your application’s documentation for inf o rm ation.) If the application’ s collation options
are not turned off, the ordering options will be applied from both sources (application and
PPD), causing unexpecte d results.
Page Order is a drop-down list that allows you to select the order in which the pages come off
the copier from one of the fo llowing options:
Group (333 222 1 11)—Default. Groups all copies of each page together and delivers pages
with the printed side up. All copies of the last page are on top of the stack. If you print
three c op i es of a three page do cumen t w i th Group, pages are ordered as shown in
Figure 2-7.
Printing to the Print Server
Figure 2-7: Grou p Example
Group is recommended when printing si ngle-page documents or documents that contain
pages, s uc h as for ms or le afl ets , where the page s of th e docum ent are not meant t o be kept
together in document sets.
Group does not require the job to complete ripping before the f irst page print s. This al lows
the job to print on the copier while other pages are ripped.
Group Reverse (111 222 333)—Groups all copies of each page together, but delivers the
pages in reverse order, so that all copies of the first page are on the top of the stac k. If you
print three copies of a three page document with Group Reverse, pages are ordered as
shown in Figure 2-8.
Figure 2-8: Group Reverse Ex ample
QA 25 Draft: July 31, 1998 2-11
Page 42
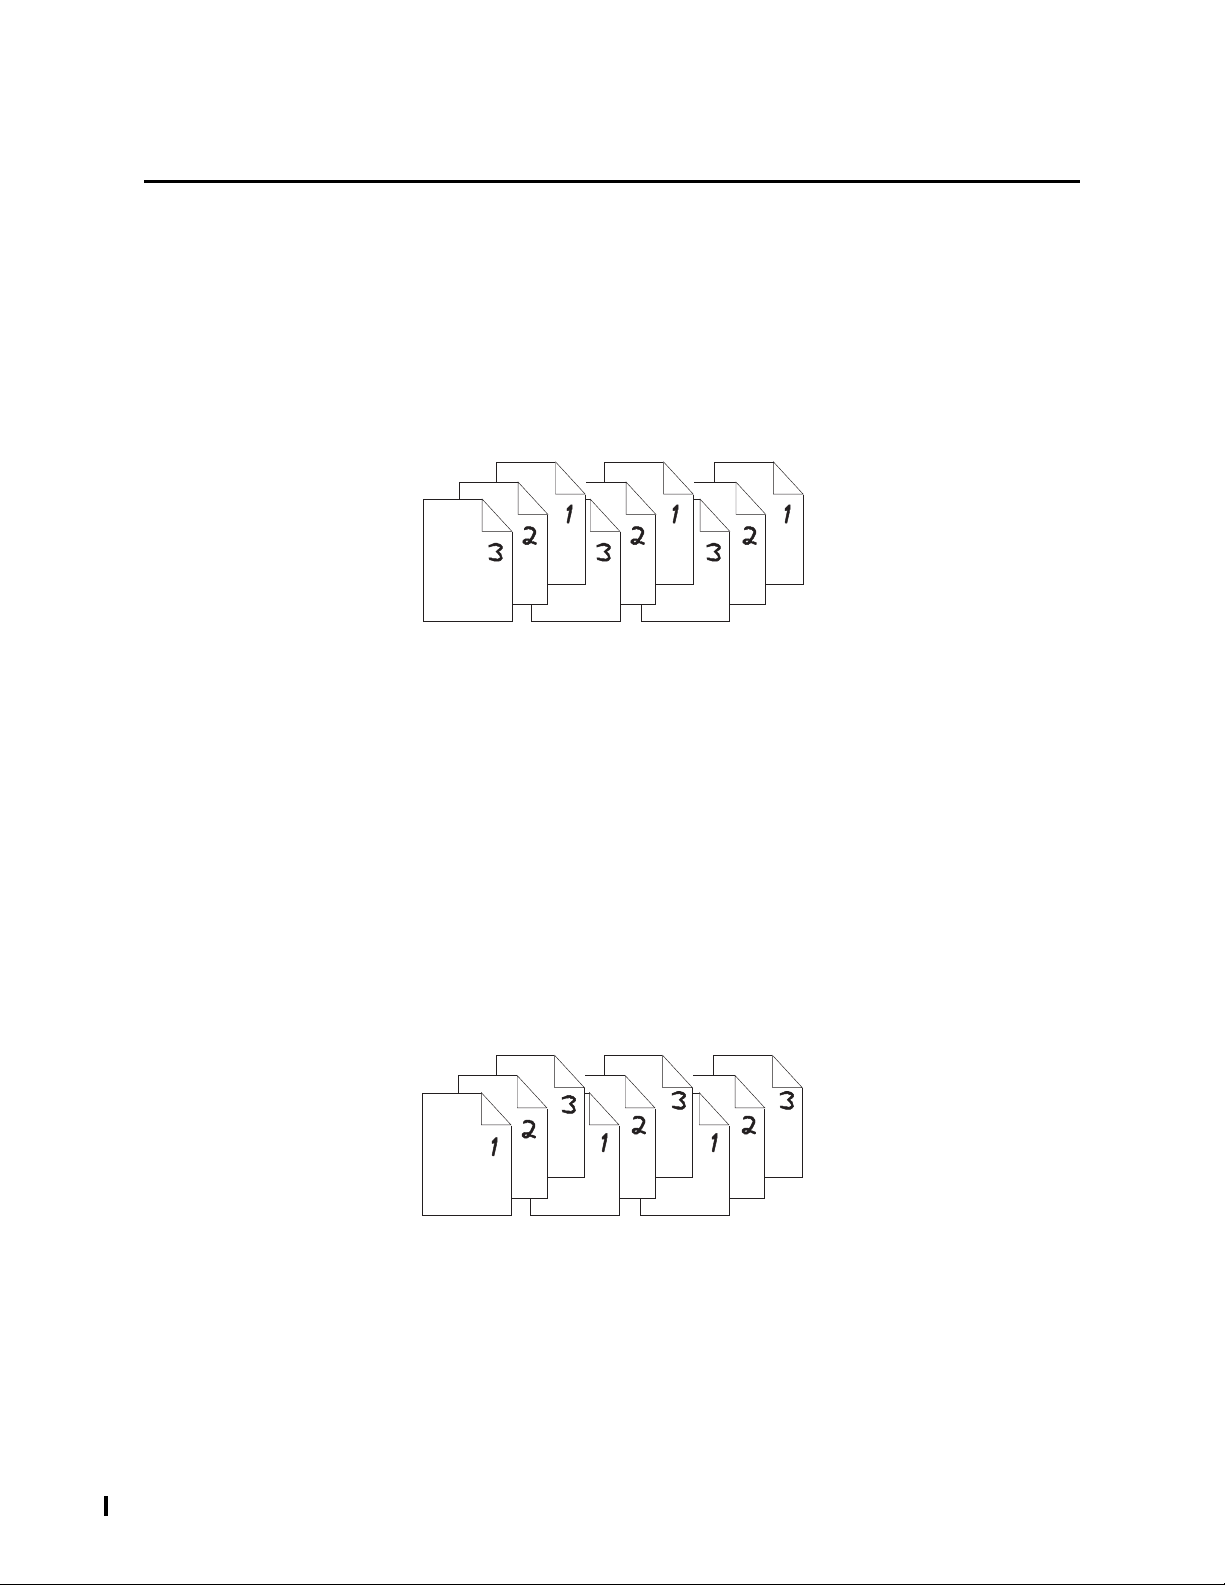
Printing to the P rint Server
Group Reverse requires that the job comp lete ripping before the first page prints. This
allows the print server to print the last page first, which is the last page ripped. This
option creates a DPI file.
Collate (321 321 321)—Collates all the copies into sets, with each set containing one
complete document.The pages are delivered printed side up so the last page of the
document is on the top of eac h set. If you print three copies of a thr ee page doc ument with
Collate, pages are ordered as shown in Figure 2-9.
Collate is not usually recommended, as it negates the benefit of electronic collation. That
is, pages are stacked in reverse order, so you have to reorder them. Use Collate for
duplexed jobs. Otherwise, use Collate Reverse when printing multiple copies of a
multipage document .
Figure 2-9: Collate Example
Collate requires that the job complete ripping before the first page prints. This option
creates a DPI file.
Collate Reverse (123 123 123)—Collates multiple copies of a mutlipage document into
sets that contain one complete document. Pages are delivered in reverse order with the
first page on top of each set. You don’t need a sorter and you don’t need to reorder. If you
print three copies of a three page document with Collate Reverse, the pages are ordered
as shown in Figure 2-10.
Figure 2-10: Collate Reverse Example
Collate Reverse req u ires that the job complete ripping before the first page prints. This
option creates a DPI file.
2-12 QA 25 Draft: July 31, 1998
Page 43

Printing to the Print Server
If Optional Sorter Support is disabled, the next four options are not available for selection
from the PPD and Reprint Options . The so rter s for t he 5790 a nd 5799 ha ve 2 0 bins that can
hold a maximum of 50 sheets each. The sorter for the 5750 has 10 bins that can hold a
maximum of 30 pages each.
Group In Sorter (111 222 333)—Not supported on DocuColor 5750. Groups all copies of
each page together in to separate sorter bins , with the firs t page of the document in the top
bin. If you print three copies of a three page document with Group In Sorter, pages are
ordered as shown in Figure 2-11.
Top Bin
Last Bin
Figure 2-11: Group In Sorter Example
This option does not require that the file complete ripping before the first page prints.
Group In Sorter Reverse (333-222-111)
copies of each page tog ether into separate sorter bins, with the last page of the document
in the top bin. If you print three copies of a three page document with
Reverse
This option requires that the jo b complet e ripping bef ore the first page pri nts. This option
creates a DPI file.
, pages are ordered as shown in Figure 2-12.
Top Bin
Figure 2-12: Group In Sorter Re verse Example
—Not supported on DocuColor 5750.Groups all
Group In Sorter
Last Bin
QA 25 Draft: July 31, 1998 2-13
Page 44

Printing to the P rint Server
Notes on Group In Sorter Options
The 5750 does not support Group In Sorter or Group In Sorter Reverse. These options are
grayed out if the DocuColor 5750 Support option is set correctly. (Refer to Chapter 1, Adding
a Print Server to Windows Workstations, or Adding a Print Server to Macintosh Workstations
for more informat ion on DocuColor 5750 Support.)
On 5790 and 5799 copiers, if you specify more than 50 copies , the print server truncates the
number of copies to 50 . If t he j ob contai ns mor e tha n 20 pag es , t he pri nt serv er pr int s only t he
first 20. In both cases, an asterisk appears in the job details list next to Done, indicating an
error. The error message in the Show Error dialog box states, “Sorter capacity exceeded.”
Collate In Sorter (321-321-321)—Collates all the copies of the document into sets in
separate bins. Each set contains one complete document. Pages are delivered printed side
up, with the last page on the top of each set. If you print three copies of a three page
document with Collate In Sorter, pages are ordered as shown in F igure 2-13.
Top Bin
Last Bin
Figure 2-13: Colla te In Sorter Example
Collate In Sorter requires that the job complete ripping before the first page prints. This
option creates a DPI file.
Collate In Sorter Rever se ( 123-1 23-123) —C ollate s all the c opi es of the doc ume nt i nto se ts
in separate bins. Each set contains one comple te document . Pages are delivered in re vers e
order, with the first page on the top of each set. If you print three copi es of a three page
document with Collate In Sorter Reverse, pages are ordered as shown in Figure 2-14.
Top Bin
t Bin
L
Figure 2-14: Colla te In Sorter Re ve rs e Example
Collate In Sorter Reverse requir es that the job complete ripping before the first page
prints. This option creates a DPI file.
2-14 QA 25 Draft: July 31, 1998
Page 45

Notes on Collate In Sorter Options
On 5750 copiers, if you specify more than 10 copies, the print server truncates the number of
copies to 10. If the document contains more than 30 pages, the print server only prints the
first 30 pages.
On 5790 and 5799 copiers, if you request more than 20 copies, the print server truncates the
number of copies to 20. If the docum ent contains more than 50 pages, the print server pri n ts
only the first 50 pages.
In all of the above cases , an asterisk appea rs in the job detail s lis t next to Done, indicating an
error. The error message in the Show Error dialog box states, “Sorter capacity exceeded.”
Hints
Here are some things to keep in mind when selecting Page Order:
• To determine the best page ordering option, consider how many pages are in your
document and how many copies you need. The default opt ion,
job to be pre-rippe d before it starts printing.
(Manually collating the job may take less time than waiting for th e job to complete
ripping.) If you need more than a few sets, Collate Reverse may be the best setting.
• The mechanical sorters for the 5790/5799 cannot handle more than 20 copies or
documents larger tha n 50 pages. The mechanic al so rters fo r the 5750 cannot hand le more
than 10 copies or documents larger than 30 pages. Use Collate Reverse (without the
sorter) for jobs that exceed these limits. Collate Reverse may also print fast.
• A mechanical sorter must be installed and the Optional Sorter option in the PPD must be
set to Installed in order to select a n y In S o r t e r options from the PPD.
Printing to the Print Server
Group,
may be the best choice for small jobs.
Group
does not require the
Duplexing
Duplexing is a drop-down list that allows you to select the type of duplexing for double-sided
printing from one of the following options:
Off—Default. All pages are printed on the front side of the page.
Duplex Fronts Only—Causes the entire print job to be ripped, but only the odd numbered
(front side) pages are print ed.This opt io n creates a DPI fi le so the back sides are read y for
reprint with Duplex Backs Only. The media source for Duplex Fronts Only is Automatic
or Manual Feed.
Duplex B acks On ly—Prints only the even numbered (back side) pages. Duplex Backs
Only always uses Manual Feed as the media source, because in most cases, users have
already printed the odd number ed (front side) pages and the pages are loaded into the
manual feed tray.
QA 25 Draft: July 31, 1998 2-15
Page 46

Printing to the P rint Server
Duplex Both Sides—Before selecting this option, make sure the manual feed tray is
empty. One-click duplexi ng. Rips th e enti re job and pri nts th e odd numbered ( fr ont) pages
using the interna l paper trays for media. After all the fro nt pages prin t, the message , “Add
paper to Manual Feed tray” appears in the Viewer’s Copier Status field to a lert you to
remove the front pages from the output tray, and flip and insert them into the copier’s
manual feed tray. The print server then prints the even numbered (back) pages using the
media in the manual feed tra y. As you use the Duplex Both Sides, keep the following
points in m ind:
• Before you send the job to print, make sure the manual feed tray is empty.
•If a Booklet option (Imposition) is used with Duplex Both Sides, print the back
sides by flipping the fr ont sides over, rotating the page 180
the manual feed tray.
•If a Booklet option (Imposition) is NOT used wi th Duplex Both Sides, print the
back sides by flipping the front sides over and inserting them into the manual feed
tray. Do not rotate the page.
This option creates a DPI fi le.
Imposition
Imposition is a drop-down list that allows you to select impos ition for the job from one of the
followin g options :
°, and inserting them into
Off—Default. No imposition. A ll pages print on the media size specifie d by the
application.
Signature—Imposes the pages two-up on 11in x 17in paper. The first page is imposed on
the left side of the paper while the next page is imposed on the right. The output is not
duplexed unless a duplexing option is specified. Any number of pages and copies can be
generated in this w ay.
Small Signature—Same as Signature, except the image is scaled down 50% and the job
prints on 8.5in x 11in paper.
Folded Booklet—Re-orders, imposes, and duplexes the pages onto 11in x 17in paper so
that the output can be folde d to create an 8.5in x 11in booklet. If the number of pages in
the original document is a multiple of four, the first and last page are imposed onto the
same sheet. If the number of pages is not a multiple of four, the print server pads the end
of the document with blank pages. Any number of pages and copies (booklet sets) can be
generated.
The output is automatical ly duplexed using Duplex Both Sides, so keep the following
points in m ind when you select Folded Booklet:
• If your copier is configured with an 11in x 17in paper tr ay, make sure the manual
feed tray is empty and that the 11in x 17in paper tray is specified as the paper
source. The odd numbered (front) pages print on the paper loaded in the copier’s
internal tray. After all the odd numbered (front) pages print, the message, “Add
paper to Manual Feed tray.” To print the even numbered (back) pages for the a job,
flip the front sides over, rotate the page 180
tray. The even number ed ( back) pag es wi ll print usi ng th e media i n the manual fee d
tray.
°, and insert them into the manual feed
2-16 QA 25 Draft: July 31, 1998
Page 47

Printing to the Print Server
• If your copier is not configured with an 11in x 17in paper tray, or the media type
requires that you use the manual feed tray, make sure that the manual feed tray is
loaded with the exact number of pages required to print the odd numbered (front)
pages. That is, if the file has 39 or 40 pages, load 20 pages of the correct media type
into the manual feed tray. After all the odd numbered (front) pages print, the
message, “Add paper to Manual Feed tr ay.” To print the even numbered (back)
pages for the a job , fli p the fro nt si des over, ro tat e the page 180
into the manual feed tray .
• If you wish to use Duplex Fronts Only instead, you must set this option explicitly.
Small Folded Booklet—Same as Folded Booklet, exce pt the image is scaled down 50%
and the job prints on 8.5in x 11in paper to create a 5.5in x 8.5in booklet.
Perfe ct Bound Bo oklet—S ame as Folded Booklet, except the first and the fourth page
are imposed on the same sheet. Both Folded Booklet and Perfect Bound Booklet are
offered because of a problem known as creep. Creep is when too many pages are folded
inside of one another, the inner-most sheets “creep” out of the center. Perf ect Bound
Booklet may require more manual finishing, but it can produce more professional results
for large documen ts.
Small Perfect Bound Booklet—Same as Perfect Bound Booklet except the image is
scaled down 50% and the job prints on 8.5in x 11in paper to create a 5.5in x 8.5in booklet.
Click Saver—Designed for multiple copies of a single page. Prints the same 8.5in x 11in
page twice, two-up on an 11in x17in sheet, saving copier-meter clicks. If Click Saver is
used for multi-page documents, it works the same as Signature, with one exception; for
documents with an odd number of pages, the last page is printed twice on the same sheet.
°, and re-insert them
Hints
Small Clic k Saver—S am e as Click Saver, except the image is scaled down 50% and the job
prints two-up on an 8.5in x 11in she et to save copier-meter clicks.
When the job contains a single page, the print server imposes the page as follows:
•If Signature, Folded Booklet, or Perfect Bound Booklet are selec ted, the imposition
option is ignored, and the page prints on 8.5in x 11in paper.
•If Small Signat u re , Small Folded Booklet, or Small Perfect Bound Booklet are
selected, the option works as expected. That is, the single page is scaled down %50
and printed on the left side of the sheet. the right side of the sheet is blank.
Here are some things to keep in mind when selecting Imposition:
• You do not need t o chang e the medi a s ize i n the ap plicat ion progra m to us e the I mpo s it ion
option. The print server automatically uses the correct size.
• You cannot use either booklet options with Transparency media type.
QA 25 Draft: July 31, 1998 2-17
Page 48

Printing to the P rint Server
Color Model
Color Model is a drop-down list with the following color mode options:
Auto Graysc ale Detecti on—Default. Output s e ach page using t he c olo r mode of the co pier
that corresponds to the color information on the page. That is, any pa ge that has color
information on it is printed using CMYK ; any page that contains only black, white, and
grayscale data is printed using black only.
Force All B&W Pages—Outputs each page using the black-only color mode of the copier.
Use Force All B&W Pages under the following circumstances:
• You want to print your document quickly or you want to proof your document text
and layout. Black-only pages print up to four times faster than CMYK pages.
• You want to save money. Xerox charges you less for black- only meter clicks.
• Your document contains color information that isn’t important.
Force All Color P ages—Outputs each page usi ng the CMYK color mode of the copier, even
if the page only contains b lack data. Force All Color Pages helps to avoid copier cycle downs (the time it takes to switch the copier from one color mode to another), which
speeds the printing of the document. For example, assume you have twelve page
document with the following page character istics:
• Page 1, the cover, contains a color logo and some colored text
• Pages 2, 3 and 4 contain only black text
• Page 5 contains a color chart
• Pages 6 and 7 contain only black text
• Page 8 contains colored text, used for empha sis
• Pages 9 contains only black text
• Page 10 contains a color chart and a color photograph
• Pages 11 and 12 contain only black text
In Automatic mode, the copier cycles down between color modes seven times. Each cycledown averages about 20 seconds , addi ng a total of more than 2 minutes to your print time.
When the Force All Color Pages option is set , the copi er is alw a ys in four-pass color mode
and does not need to cycle-down.
Print Color Pages Only—Outputs only the c olo r page s of the docu ment . Sele ct Print Color
Pages Only to pr oof only the color pages of your document.
Hints
Here are some things to keep in mind when selecting Color Model:
• Force All Color Pages and Force All B&W Pages reduce the number of times the copier
must cycle-down. This not only saves time, but saves wear-and-tear on your copier.
• In cases where there are large runs of pages that only contain black data, the copier’s
native black-only mode is fast enough to compensate for the ti me lost in cycling-down.
2-18 QA 25 Draft: July 31, 1998
Page 49

Printer Mode
Printer Mode is a drop-down list with two modes for color depth:
Contone—Default. Outputs the data using the full 8-bit per pixel capability of the copier.
For black-only output, this is 256 levels of grayscale. For color output, this is full 32-bit
color or millions of colors . All data, even data specified using screening, is output as
contone. However, the contone capability of the copier ma y g enerate output you don’t
expect. F or example, s ome applicat ions use P ostSc ript sc reening and halftones to g enerate
special effects and fill patterns. These effects may not print as you expect on a contone
device like your color copier. You may wish to use the Halftone option in these cases.
Screened—Emulates halftone output on your contone copier by creating a contone image
of the halftone output. Screened allows you to see the halftone dots and screening effects
as if they were printed on a 400 dpi halftone device.
The copier is a 400 dpi device and the print server can only emulate halftone effects. It is not
reasonable to use this feat ure to proo f hal ftone out put. Moire effect s, dot gain, and dot shape
may not be accurately represented because of these factors.
RGB Monitor Color Correction
RGB Monitor Color Correction is a drop-down list that allows users to enable/disable RGB
Monitor Color Correction. The default is Enabled. RGB Monitor Color Correction converts
your workstation’s RGB color data to the CYMK color space of the copier.
Printing to the Print Server
RGB Rendering Sty le
RGB Rendering Style is a drop-down list with two options; Photographic (default) to match
colors of variou s ph otographic image, and Graphics for jobs created with computer graphics
applications.
RGB Gamma
RGB Gamma is a pull-down list use d to lighten or dar ken yo ur wor kstatio ns RGB co lor b efor e
it is converted to the CMYK color space of the copier. Valid values are listed below:
• Lightest (1.0)
• Light (1.4 )
•Normal (1.8)
• Dark (2.2) default
• Darkest (2.6)
QA 25 Draft: July 31, 1998 2-19
Page 50

Printing to the P rint Server
RGB Whitepoint
RGB Whitepoint is a pull-down list used to simulate various lighting conditions for proofing
color documents. Valid values are listed below:
• More yellow (D50 proofing)
• Normal (D65)
• More Blue (9300) default
CYMK Press Profile
CYMK Press Profile i s a pul l-down l ist th at c onver ts colo r dat a to the col or s pace o f the co pie r.
Valid values are listed below:
• Visual Standard
• SWOP simulates SWOP inks (default)
• Euroscale simulates Euroscale press inks .
• Enhanced SWOP
• Enhanced Euroscale
Brightness
Brightn e s s is a pull-d o w n li s t us ed to adjust the over a ll bright n es s and sat u ra tion of th e
printed page. Valid Values are listed below.
• 2.2 (lightest)
•2.0
•1.8
•1.6
•1.4
•1.2
•1.0 (default)
•0.83
•0.71
•0.62
•0.55
• 0.45 (darkest)
2-20 QA 25 Draft: July 31, 1998
Page 51

Black Co n trol
Black Control is a drop-down list that allows you to select the type of black control for your
job. The black control type determines when the print server will substitute process black
(CYM) with K black for the text and graph ics in the file. The following options are available:
None—Default. Pri nts the text and line art using th e type of black assi gned; process bl ack
(CMY) or K bl a ck .
Force Blac k Text—Causes print server to search the file and substitute a pure
(C=Y=M=0) blac k for all R=G=B black.
Force Blac k Text & Graphics (default)—Causes pri nt se rver to sea rc h the fi le for text and
line art and substitute a pure (C=Y=M=0) black for all R=G=B black.
Black Text Overprint—Primarily for transparencies with color backgrounds. Prints the
color background over the entire page , and then overprints the bac kground with black
text and graphics . This printing method el im inates the halo affect around characters in
the text and graphics. When you select Black Text Overprint, the system also
automatically enab les Force Black Text & Graphics.
SpotMatch
SpotMatch is only available on the M410 print server. The SpotMatch option is a drop-down
list that enables and disables the SpotMatch feature. Enabled is the default.
Printing to the Print Server
When SpotMatch is enabled, the M410 performs a SpotMatch look-up for each spot color on
the page, looking for matc hes in Pantone, Toyo, DIC, and HKS. SpotMatch supports 100%
color an d tints.
Output Opt ion s
Output Options is a pull-down list with four options; To Copier, To DiamondPress File, To
Both, and Delete After Print.
To Copier—Default. Causes the print server to pri nt the job on the copier. The print server
does not create a DPI file for the document unless some other option in the job requires it.
To DiamondPress File—Causes the print server to create a DPI file from the job. The print
server do e s not prin t the job.
To Both—Causes the print server to print the job o n the copier, and create a DPI file from the
job.
Delete After Print —Causes the pr int ser ver to de let e th e file fr om the p rin t se rver after it has
printed. This feature causes the print server to delete the file from the spool and DPI drives
after it has printed. This option is a check box on the Reprint Option tab. In the PPD this
option is under the Output Options drop-down list.
Hints
Here are some things to keep in mind when using To DiamondPress File:
•Use both To Copier and To DiamondPress File if you need to proof a document before
producing large quant ities. After you have inspected the output, reprint the job with a
new number of copies (and any other settings you need). Since a DiamondPress file was
originally created, the job can start printing immediately (without ripping).
QA 25 Draft: July 31, 1998 2-21
Page 52

Printing to the P rint Server
• Changing some settings can cause a job to rerip, even if a DiamondPress file already
exists. Th e settings that require a rerip are any settings that change the actual content of
the pages, gamma, color rendering, etc.
•Use To DiamondPress File if the same documents are repri nted w ithout change. That
way, you can simply download the job to the print server and select new options from the
Reprint Options tab when you send the job to reprint.
Create Form #
Create Form # is only availab le on the M410 print server. This feature allows you to create a
form with a specif ic form number. The form is created as one complete do cum ent. Other print
options selected in conjunction to Create Form #, don’t affect the new form. For example, if
you select Folded Booklet and Create Form #, the new form does not retain the booklet
nature for the print j ob.
Valid values for Create Form # from the Reprint Option tab are Off, and 1 through 99. Valid
values for Create Form # from the PPD are Off, and 1 throug h 25. If you select the Off option,
no form is created.
For more inform a t ion on Create Form #, refer to Chapter 6, DiamondMerge Variable Data.
Use Form #
Use Form # is only available on the M410 print server. This feature allows you to specify
which form to use as the underlying data for your document. Valid values for Use Form # from
the Reprint Option tab are Off , and 1 through 99. Valid values fo r Use Form # from the PPD
are Off, 1 thr o u g h 10, 12, 16, 20, 24, 28, and 32.
For more inform a t ion on Use Form #, refer to Chapter 6, DiamondMerge Variable Data.
Form Repeat Count
Form Repeat Count is only available on the M410 print server. This feature allows you to
specify how to repeat the form that is used as the underlying data for your document. On the
Reprint Option tab, you can enter any numeric value in this field. In the PPD, this option is
a drop-down list with valid values of Off, and 2 through 32.
The default is Off. When Form Repeat Count is Off, the first pages of a multi-page form are
not repeated. If there are more pages in the document to print after whole the form is used
once, only t he last page of the f orm is used underneat h the res t of the doc ume nt. For example,
if you print a ten page document onto a four page form, pages four th rough ten of the
document are printed using the form’s last page.
Values 2 through 10 allow for Form Repeat Counts in one page increments. Valu es 12
through 32 allow for form repeat counts in four page increments. Four page increments are
important because they are the default boundaries for booklets.
2-22 QA 25 Draft: July 31, 1998
Page 53

Hints
Here are some things to keep in mind when using Form Repeat Count:
For more inform a t ion on Form Repeat Count, refer to Chapter 6, DiamondMerge Variable
Data.
Account
Account is a drop-down list used to add an account numbe r, which is entered in the print
server accounting log. Valid values are Unspecified (default), and Account 1 through
Account 25.
Printing to the Print Server
• Practice using Create Form # and Use Form # with two simple documents. Experiment
with various Form Repeat Counts gain an understanding of how this option affects your
output.
• Set the correct Form Repeat Count when using forms. It determines how the two merged
documents are synchronized.
• Valid values for Use Form # from the PPD are Off and Off, 1 through 10, 12, 16, 20, 24,
28, and 32. If you need to use a form count that is not availa ble from the PPD, print the
document with th e To DiamondPress File option under the PPD Output Options. You can
then use the Reprint Options tab of the Viewer, which allow you to set any value fo r
Form Repeat Count.
Mirror
Mirror is a drop-down list for selecting the mirror function. Valid values are Off(default) and
Mirror. Off causes all pages to print ri ght-facing. Mirror generates a mirror-image output. The
mirror function is most commonly used when printing onto some types of transfer material.
If the print driver also has a Mirror option, make sure only one is on. Enabling the Mirror
option in both the print driver and Panther/Cougar will cause the inverted image to be
inverted twice. That is, the print driver will invert the image and then the PPD will invert the
image again.
Debug PS
Debug PS turns the debug PostScript function off and on. Off is the default, which causes the
print server to stop processing the PostScript file when a fatal error occurs. No output is
generated for the curr ent and remaining pages in the print job. An error message is either
printed on a sheet of paper or ent ered into the account log, depending on the print driver.
Note that this optio n shoul d be used in lieu of any “i nclude er ror handle r” option s provi ded by
the user’s application.
On overrides the Pos tScript error handler and outputs the offending page up to the point of
the error. This is useful in identifying the item on the page that is causing the PostScript
error. In addition, a separate page is printed with the PostScript error information. This
includes the error, the offending command, and a dump of the PostScript stack up to the point
of the error.
QA 25 Draft: July 31, 1998 2-23
Page 54

Printing to the P rint Server
About
This pull-down menu displays the version number and date of release for the PPD software
you have installe d.
2-24 QA 25 Draft: July 31, 1998
Page 55

Chapter 3
M Series
I
NTRODUCTION TO THE VIEWER
The Viewer allows you to monitor and control your print jobs from your workstation. The
interface for the Viewer is a window with pull-down menus and tabs. A sample Viewer
window is shown in Figure 3-1.
Title bar displays
network
information
and your user
mode
Managing Your Print Jobs
Status bar
displays general
information about
copier status
Figure 3-1: Sample Viewer Windo w
The title bar displa ys network information about the print server to which the Viewer is
connected and indicates whether or not you are l ogged is as an opera tor or adminis trat or. The
status bar displays copier status.
The Viewer has three pull-down menus; Printers, Administration, and Help:
Printer Pull-down Menu—allows you to connect to a new M Series print server hold or
print queue.
Administration Menu—Allows authorized users to perform print se rver management
and administrative functions.
Help Menu—Displays the version number and release date of the Splash M Series
software.
QA 25 Draft: July 31, 1998 3-1
Page 56

Managing Your Print Jobs
The two Viewer tabs, Copier Status and Job Details, give you access to the features and
functions for managing and controlling print jobs. The extent of your access is dependent on
how the system administr ator configured user rights and your user mode.
Access Rights and Modes
The M Series system recognizes three types of users; ordinary users, operators, and system
administrator. The system gives system administrators unlimited access to all Viewer
features and functi ons, including the ability to define the features and functions available to
ordinary users and operat ors.
When the Viewer is started, the system recognizes you as an ordinary user and displays the
Viewer in ordinary user mode. In this mode, you can only access the functions the system
administrator configured for ordinary users. You stay in ordinary user mode until you switch
to operator or system administrator mode by logging in with the appropriate password. That
is, if you w a nt system administrator access to the system, you must log in with the system
administrator pass w ord. If you want operator access , you mus t login with the operator
password.
When you are in operator mode , the title bar of the Viewer window dis plays your user mode
as Operator. When you are in system administrator mode, the title bar displays
Administrator. When you are in ordinary user mode, no mode is displayed.
The system administ rator can con fi gure Viewer options so that ordinary users and ope rat ors
are granted or denied access to perform each of the following tasks:
• Pause/Resume the copier
• View jobs in th e Hol d queue having the user’s own name as Job Owner
• View jobs in th e Hol d queue having no Job Owner
• View jobs in th e Hol d queue having someone else’s name as Job Owner
• Delete jobs from the Hol d queue
• Move jobs from the Hold queue to the Print queue
• Move jobs from the Print queue to the Hold queue
• View jobs in th e Print queue having the person’s own name as Job Owner
• View jobs in th e Print queue having no Job Owner
• View jobs in th e Print queue having someone else’s name as Job Owner
• Stop jobs in the Print queue
• Delete jobs from the Print queue
• Reprint jobs in the Print queue
• Reprint jobs in the Hold queue
• Set up the accounting parameters
• All administrative operations except change passwords and configure user/operator rights
• Set Operator password
For more information on configuring ordinary user and operator access rights, refer to
Chapter 5.
3-2 QA 25 Draft: July 31, 1998
Page 57

TARTING THE VIEWER AND SELECTING A PRINT SERVER
S
To start the Viewer from Windows, cl ick on Start and click on M Series Viewer under the
Program menu. To start the Viewer from the Macintosh, click on the Viewer icon. Th e
Viewer window, shown in Figure 3-1, appears.
To conne ct the Viewer to a M Series print server, pull-down the Printers menu, as shown in
Figure 3-2.
Figure 3-2: Sample Pull-down Printer Menu
This menu list s all of the print server hold and print queues configured on your workstations.
Viewing the Status of the Copier .
Managing Your Print Jobs
The Copier Status tab, shown in Figure 3-3, is the first tab displayed when you start the
Viewer.
Copier Status fields
Figure 3-3: Sample Copier Status Tab
QA 25 Draft: July 31, 1998 3-3
Page 58

Managing Your Print Jobs
From this tab, you can view the status of the copier to which the print server is connected.
Also, if you have access, you can pause/resume the copier to stop print jobs or make copies off
the gla ss.
The Copier Status tab includes an image and model number of the copier. If there is an error,
a warning triangl e appears over the copier’s image and an audio alarm sounds at your
workstation. The audi o alarm is the sound associa ted with the Exclamation event in Windows
or Alter Sounds on the Macintosh. It sounds as long as Viewer displays the Copier Status
tab, even when the Vi ewer is minimize d to an icon. You can turn the alarm off by foll owing the
procedures in Turning the Audio Alarm On and Off.
Underneath the copier icon is a box that lists the trays configured on the copier, whether or
not the trays are load ed, and what size paper is in each tray. Note that the Viewer does not
update the paper sizes in the manual feed tray.
The display fields on the tab contain the following information:
Currently Printing Job—Name or ti tle of job now printing.
Job State—Shows Printing when pages in the job are ready to print.
Page #—Page from the job currently printing.
Copy #—Copy of currently printi ng.
# Copies—Total number of copies requested.
Currently Ripping Job—Name or title of the job now ripping.
% Ripping Complete—Percent of the file that has completed ripping (total number of
bytes ripped over the total number of bytes in the file).
Jobs Currently Spooling—Number of jobs currently being spooled to the print server.
% Storage used—Space that is currently used on the M Series hard drive over the total
size of the drive.
Copier Status—Current state of the copier and status of the copier print engine. Some
examples of copier states are listed in the table below.
State Description
Pause
Pending
Copier Paused print server is in a paused state. The copier may be used to
Warming Up Copier is warming up and is not yet ready to print.
Door Open Copier door is open.
Some examples of copier print engine status are Printing Black, Printing Cyan,
Printing Yellow, or Printing Magenta.
print server is waiting for the copier to finish its current print
cycle before pausing.
copy off the glass.
When an error occurs , text i n the Copier St atus field describes the error, such as, Paper Jam,
Add Manual Feed paper: Letter, etc.
3-4 QA 25 Draft: July 31, 1998
Page 59

Turning the Audio Alarm On and Off
The audio alarm is the sound associated with the Exclamation event in Windows or Alter
Sounds on the Macintosh. The audio alarms sounds as long as the Copier Status tab is
displayed by the Viewer, even when the Viewer is minimized to an icon.
To turn the audio alarm off, pull down the Administrator menu, and select Configure, then
Beep on Error, as shown in Figure 3-4.
Figure 3-4: Turning Off the Audio Alarm
The audio alarm is on, a check appe ars next to Beep on Error. When the audio alarm is off,
the check does not appear.
Managing Your Print Jobs
Pausing a nd Res uming the C opie r
If the system administr ator has given you permission, you can pause and resume the copier
by clicking on the Pause and Resume buttons. (If you don’t have permission, these buttons
are grayed out.)
The Pause button sends a pause request to the print server. This interrupts the printing of
the current job so the job can be stopped or so you can make copies off the glass.
Often, when this but ton is first clicked, the Copier State is Pause Pending. After the copier
has finished printing the pages in its memory, it cycles dow n and becomes idle. The Copier
State then reads Copier Paused.
Because of the continuous printing feature and page buffering, the print server does not
necessarily pause the job as soon as the current page prints. After the print server has
received the pause reque st, the job pauses as follows:
• If a sorter is not being used, the job pauses sometime within the next 4 pages.
• If a sorter is being used, the job pauses when the sorter changes the direction in which it
is indexing.
The print server behav es the sam e way if you pause the copier by pressing the copier
Interrupt button, but the Copier Status tab does not display the Copier State as Copier
Paused.
The Pause button and the copier Interrupt button cannot be used interchangeably.
The Resume button sends a resume request to the print server after it has been paused from
the Copier Status tab. When the Resume button is clicked, the Copier State, Copier
Paused, disappears and the copier begins printing where it left off.
QA 25 Draft: July 31, 1998 3-5
Page 60

Managing Your Print Jobs
ANAGING PRINT JOBS
M
The Job Details tab gives you access to the information and functions to manage your print
jobs. Depe nding on how the system ad minis trator c onf igured your ri ghts , y ou can pe rfo rm the
followin g tasks fro m th i s tab:
• View the status of jobs
• Pause and resume the copier
• Stop jobs
• Delete jobs
• Move jobs to and from the Hold and Print queues
•View job errors
•Reprint jobs
Figure 3-5 is a sample of the Job Details tab.
Figure 3-5: Sample Job Det ails Tab
3-6 QA 25 Draft: July 31, 1998
Page 61

Managing Your Print Jobs
The bottom of this tab has six buttons:
• Pause
•Resume
• Reprint Job
•Move
• Stop Job
• Delete Job
Note tha t th e Reprint, Move, Stop Job and Delete Job are grayed out until you select a job
from the job list.
As you view the jobs in the Job Details tab, keep the following points in mind:
• The maximum number of Done jobs kept by the print server and displayed in the Viewer
is 50.
• The maximum number of jobs in the Hold que ue kept by the pr int server and disp laye d in
the Viewer is 10.
• The maximum number of forms kept by the print server is 99. However, the maximum
number of forms disp laye d in t he Viewe r is 10. Eve n thoug h a for m does no t appe ar in the
list, it is still available for use as the underlying data for a Diamon dMe rge document. For
more information, refer to Chapter 6, Chapter DiamondMerge Variable Data.
The jobs in the job list can n ot be reordered or reprioritized. Jobs print in a first-in, first-out
order. The jobs appear in the job list in the following order:
1. All jobs in Print queue with the Job State of Spooled, Ripping, Printing
2. All jobs in the Print queue with the Job State of Done appear next.
3. All jobs in the Hold queue appear after Done jobs.
4. All forms (Job State is Form) appear at the bottom of the job list.
To speed up the printing of any given job, pause the print server and stop the jobs that are
ahead of it. Jobs in the job list of the Job Details tab can only be selected one at a time.
Viewing the Status of Jobs
The Job Details tab displays the following information about jobs on the print server:
Job Title—Name of job. (The job name is inserted in this field by the application that sent
the job to the print server.)
Queue—Indicates whether the jo b is in the Print or Hold queue. Jobs in the Hold queue do
not print until they are moved from the Print queue by an authorized user.
State—State of each job. Possible job states are as follows
— Spooled—Job that has been fully spooled from a workstation to the print
server but has not yet been proc essed. Spooled jobs are processed in the order
they are received.
— Ripping—Job that is being ripped by the PostScript interpreter. Jobs are
ripped one at a tim e. As soon as a page is ready to pri n t the job state changes to
Printing.
QA 25 Draft: July 31, 1998 3-7
Page 62

Managing Your Print Jobs
— Printing—Job that has pages ready to print on the copier. More than one job
can have a state of Printing, indicating that the print server’s memory contains multiple pages/jobs and is ready to print.
— Done—Job has either printed, generat ed an error, or was manually stopped.
Jobs with a state of Done are available for reprinting. If an error occurs during
job processin g, an aste risk (* ) appe ars ne xt to Done. User s can vi ew the erro r by
double-cli cking on the job name.
— Form—Special kind of job that contains the static pages of a DiamondMerge
variable data print job. Forms always show at the bottom of the job list and cannot be reprinted.
Date—Day, month, and year the job was spooled to the print server.
Time—Time the job was spooled to the print server in hours , minutes, and seconds.
Size—Size of the job in bytes.
Job Owner—If the job was submitted from a Macintosh workstation, this is the name of
the user assigned to the Macintosh to identify the Macintosh on the network. If the job
was submitted from a Windows workstation, this is the user’s log in name.
Creator—Name of application (or Viewer) that created the file.
M series retrieves the spool time from one of two sources. If the application that created the
PostScript file put a spool time in the file, the print server uses the time from the file . If the
applicatio n did not put the spool time in the file, print server uses the time from its inter n al
clock, which is the time the job arrived at the server.
Pausing and Resuming the Copier from the Job Details T ab
The Pause and Resume buttons at the bottom of the Job Details tab function just like the
Pause and Resume on the Copier Status tab. Refer to Pausing and Resuming the Copier on
page 5 for more information.
3-8 QA 25 Draft: July 31, 1998
Page 63

Stopping a Job
To stop a job, complete the following steps:
1. Pause the copier by clicking on the Pause button.
2. Wait for the copier status to change to Copier Paused, Idle. Highlight the job you
want to stop by clicking on the Job Title.
3. Click on the Stop Job button. The job is stopped when the Job State changes to Done.
Deleting a Job
To delete a job from the Hold or Print queue with a Job State of Done, complete the following
steps:
1. Highlight the job you want to delete by clicking on the Job Title.
2. Click on the Delete Job button.
To delete a job with a Job State of Spooled, Ripping, or Printing , comple te th e followin g
steps:
1. Pause the copier by clicking on the Pause button.
2. Wait for the copier status to change to Copier Paused, Idle. Highlight the job you
want to stop by clicking on the Job Title.
Managing Your Print Jobs
Hints
3. Click on the Stop Job button. The job is stopped when the Job State changes to Done.
4. Click on the Delete Job button.
• You cannot delete a job until its Job State is Done.
• You cannot delete Forms unless you are in Administrator mode. If you are in
Administrator mode, delete the form(s) by following th e steps for deleting Done jobs.
QA 25 Draft: July 31, 1998 3-9
Page 64

Managing Your Print Jobs
Moving Jobs from the Hold and Print Queues
If the system administrator gave you access rights, you can move jobs between the Hold and
Print queue.
To move a job from Hold to Print, highlight the Job Title and click on the Move button. When
the job mo v e s to th e Print queue, it immediately starts to print . Whe n the job has finished
printi n g, it transitions to a Done sta te an d remain s in th e Print queue.
Jobs in the Print queue must have a Job State of Done before they can be moved to the Hold
queue. To move a job from the Print queue to the Hold queue, follow these steps:
1. If the job is not in a Done state,
a. Pause the copier by clicking on the Pause button.
b. Wait for the copier status to change to Copier Paused, Idle. Highlight the job
you want to stop by clicking on the Job Title.
c. Click on the Stop Job button. The job is stopped when the Job State changes to
Done.
2. Highlight the Job Title and click on the Move button.
The job moves towards t he bo ttom o f the j ob l ist. If you repri nt the j ob withou t movi ng i t
from the Hold queue, when the job is done, it returns to the Hold queue.
Viewing Job Err ors
When a job encounters a PostScript error, the job’s state in the Job Detai l s tab list appears
as Done with an asterisk (*).
To view the error, complete the following steps:
1. Double-click on the Job Title. The Show Error or Reprint Job Dialog box, shown in
Figure 3-6, appears. This dialog box allows you to show the error or reprint the job:
2. To show the error, click on the Show Error button. A wait dialog box appears while the
print server retrieves the error information. When the information is retrieved, the
Show Error Dialog box, show n in Figure 3-7, appears.
Figure 3-6: Show Error or Reprint Job Dialog Box
3-10 QA 25 Draft: July 31, 1998
Page 65

Managing Your Print Jobs
Figure 3-7: Show Error Dialog Box
3. To close the dialog box, click OK.
If you choose to reprint the job instead of viewing the error, click Reprint Job and follow the
instructions described in Reprinting Jobs.
QA 25 Draft: July 31, 1998 3-11
Page 66

Managing Your Print Jobs
Reprinting J o bs
You can reprint a job directly from the Job Details tab by double-clicking on the Job Title or
highlighting the j ob in the job list and clicking on t he Reprint Job button at the bottom of the
dialog box. Either of these actions cause the Reprint Options Dialog box, shown in
Figure 3-8, to appear.
Figure 3-8: Sample Repri nt Options Dialog Box —Simple Di alog Box
Reprint Options lists all of the current settings for the job and allows you to change these
settings before submitting the job for reprinting.
Reprint Options has two tabs; Simple and Advanced. The Simple tab contains the
followin g in f or m a t io n :
Title—Job Title assigned to the selected job.
User—Job Owner assigned to the selected job. If the job was submitted from a Macintosh
workstation, this is the name of the user assigned to the Macintosh to identify the
Macintosh on the network. If the job was submitted from a Windows workstation, this is
the user’ s log in name.
Size—Size of the selected job in bytes
Non-Default Settings—Displays the PPD options you changed from their default values
when you first sent the job to print.
Also, the pull-down lists on the Simple tab allow you to respecify some of the basic print
options. To respecify the more adv anced print options, switch to th e Advanced tab, shown in
Figure 3-9.
3-12 QA 25 Draft: July 31, 1998
Page 67
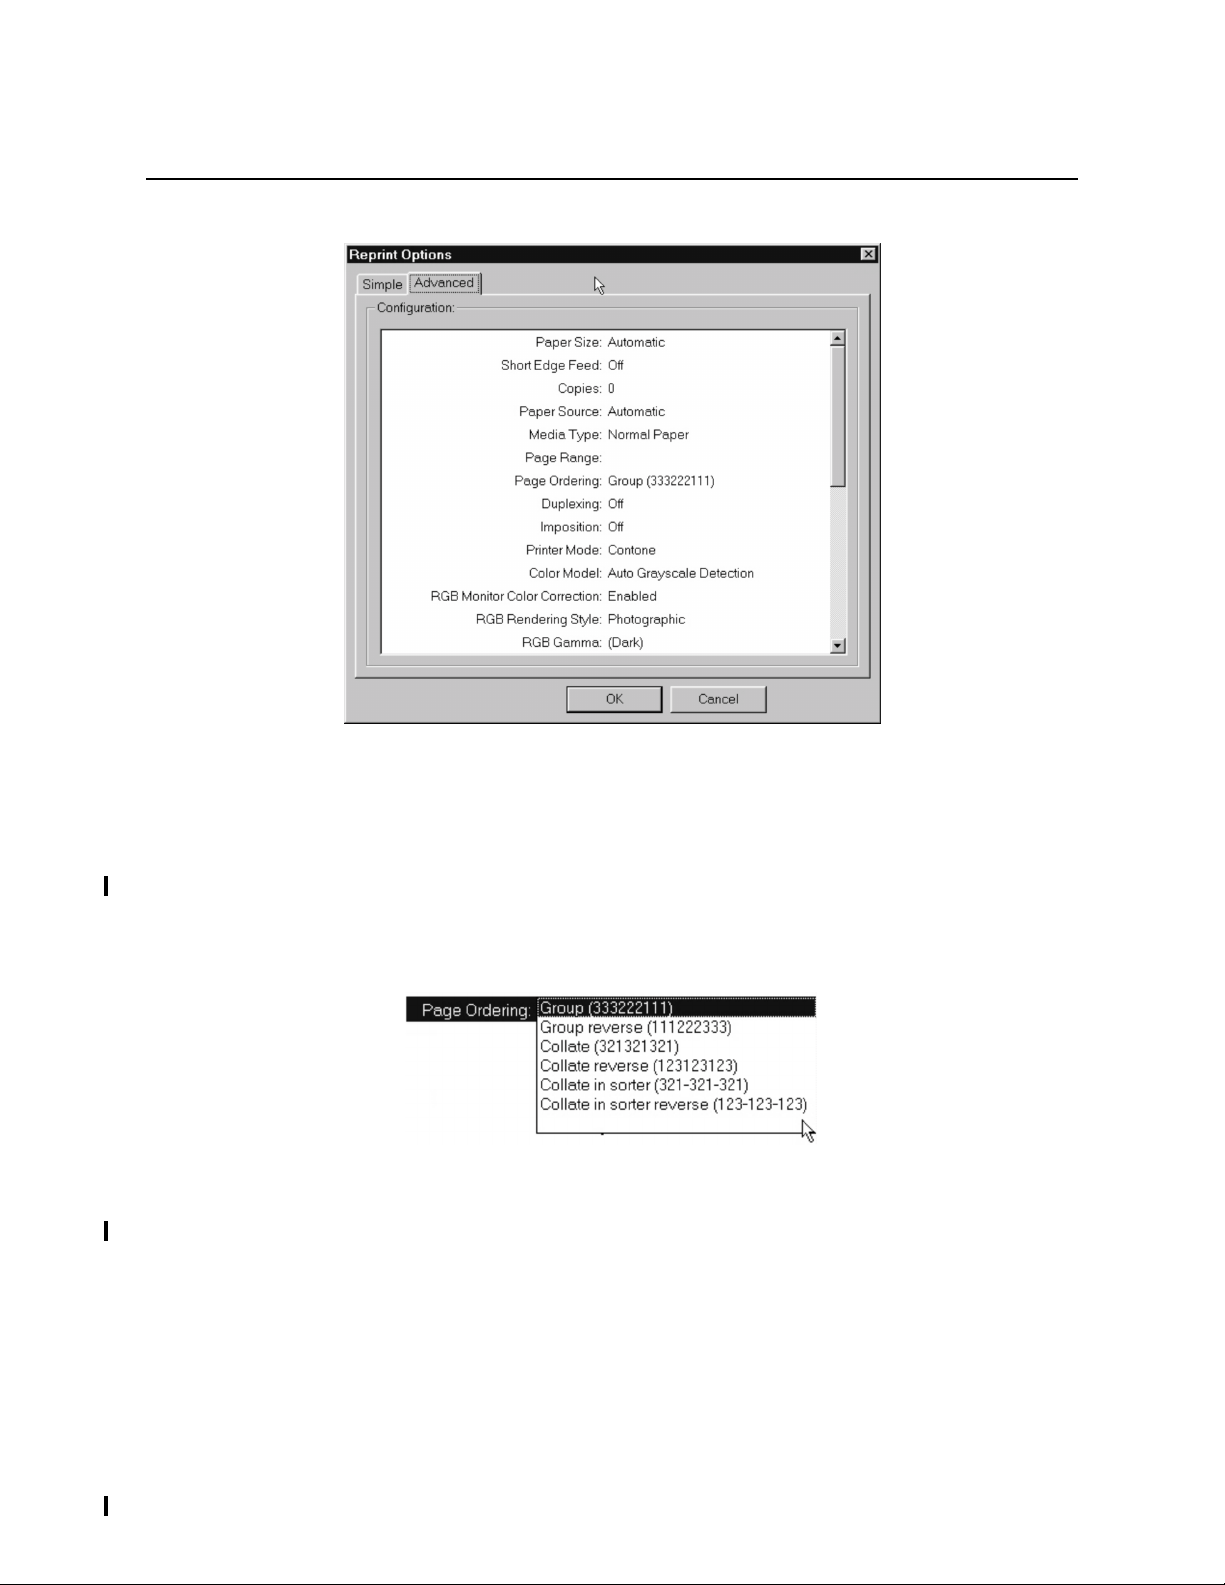
Managing Your Print Jobs
Figure 3-9: Sample Reprint Options Dial og Box—Advanced Tab
To change options in the Advanced tab, follow these steps:
1. Highlight the option by clicking on the option name.
2. Position the curs or arrow to the right of the col on (:) that appears after the option nam e
and click again. A drop down list of sett ings for the options appears, similar to the list
shown in Figure 3-10.
Figure 3-10: S elect ing Opt ions From The Advanced Tab
3. To select a new setting, click on the setting in the drop down list, then click on the next
option name, or if you are done, click OK.
Note th e Reprint Option Dialog box contains some options that are not available from the
PPD. Table 3-1 summarizes the reprint options available fr om the Simple and Advanced
dialog boxes , and notes the options that are exclusive to the Reprint Option.
QA 25 Draft: July 31, 1998 3-13
Page 68

Managing Your Print Jobs
Table 3-1: Reprint Options
Feature Options
Page Size Automatic—Re print option only. Causes the print server to use the page size specified
in the PostScript file. If that paper size is not loaded in the copi er, and add paper
message appears.
If the PostScript file does not specify a paper size, the print server prints the job on the
page size and orientation speci fied by the DEFAULTPAGE parameter in the DP.INI file.
Postcard—Available for the 5750 only. 5.83in x 3.93in (14.8cm x 9.98cm).
Letter—8.50in x 11.00 in (21.59cm x 27.94cm).
Legal—8.50 x 14.00 (21.59cm x 35.56cm).
11x17 (Tabloid)—11in x 17in (27.94cm x 43.18cm).
12x18—Available for the 5750 only. 12in x 18in (30.48cm x 45.72cm).
A5—5.85in x 8.26in (14.85c m x 21. 00cm).
A4—8.26in x 11.69in (21.00cm x 29.70cm).
A3—11.69in x 16.54in (29.70cm x 42.00cm).
B5—Reprint option only. 7.17in x 10.13in (18.20cm x 25.73cm).
B4—Reprint option only. 10.13in x 14.33in (25.73cm x 36.40cm).
NOTE: DocuPac is not explicitly supported as a Reprint option. However, the correct reprint
options (i.e., Page Size, SEF, Paper Source, Media Type) can be set manually. For information,
refer to the Xerox documentation shipped with the folders.
Short Edge
Feed (SEF)
Copies Data entry field. Maxi mum number of copi es is 9 9. Maxi mum number of charac ter s that
Paper Source Automatic—Causes the print server to search for the proper size media in the internal
Media Type Normal Paper
Not a separate option in the PPD. That is, the PPD has Letter and Letter SEF options,
etc.
On
Off
can be entered in this field is four.
trays of the copier. The server uses the media in the first tray it finds that contains the
proper size media (as specified by the PostScript print driver.)
Manual Feed Tray
Trays 1 through 4.
(Tray 4 is for 5750 only.)
Transparency
Transparency Interleave
Heavy Paper
Special Heavy Paper (Use with 5750 only)
Coated Paper
Single Step Transfer
Labels
3-14 QA 25 Draft: July 31, 1998
Page 69

Managing Your Print Jobs
Table 3-1: Reprint Options (Continued)
Feature Options
Page Range Reprint option only. Data entry fi eld. Allows you to specify the range of pages to be
printed. Maximum number of characters for this field is 20. Page numbers are
separated with commas (,). Page runs (inclusive page ranges) are separated with
hyphens (-). The followi ng li st is some examples of the page range setting:
Page Range Specified Pages Printed
1, 3, 9 Prints 1, 3 and 9 only
3-8 Prints 3 through 8
1-5, 7-10 Prints 1 through 10,
except for page 6.
4, 8-11, 21 Prints 4, 8, 9, 10, 11,
and 21
There is no error checking in this option. Therefore, you must specify the page ranges
precisely, using the comma (,) and hyphen (-) separators correctly.
You can mix page ranges with other features (like Folded Booklet, Duplex Both
Sides, etc.) for complete control over the job. Use Page Range to regenerate lost
pages after paper jams.
Page Order Group
Group Reverse
Collate
Collate Reverse
Group in Sorter
Group in Sorter Reverse
Collate in Sorter
Collate in Sorter Reverse
Duplexing Off
Duplex Fronts
Duplex Backs
Duplex Both Sides
Imposition O ff
Signature
Small Signature
Folded Booklet
Small Folded Booklet
Perfect Bound Booklet
Small Perfect Bound Booklet
Click Saver
Small Click Saver
Printer Mode Contone
Screened
QA 25 Draft: July 31, 1998 3-15
Page 70
Managing Your Print Jobs
Table 3-1: Reprint Options (Continued)
Feature Options
Color Model Auto Grayscale Detection
Force All B&W Pages
Force All C o lo r P a ges
Print Colo r P a g es On ly
RGB Monitor
Color
Correction
RGB
Rendering
Style
RGB Gamma Lightest (1.0)
RGB
Whitepoint
CYMK Press
Profile
Brightness 2.2 (lightest)
Enabled
Disabled
Photographic
Graphics
Light (1.4)
Normal (1.8)
Dark (2.2)
Darkest (2.6)
More yellow (D50 proofing)
Normal (D65)
More Blue (9300)
Visual Standard
SWOP
Euroscale
Enhanced SWOP
Enhanced Euroscale
2.0
1.8
1.6
1.4
1.2
1.0 (default)
0.83
0.71
0.62
0.55
0.45 (darkest)
SpotMatch
(M410 only)
Black Control None
3-16 QA 25 Draft: July 31, 1998
Enabled
Disabled
Force Black text
Force Black text & Graphics
Black text Overprint
Page 71

Feature Options
Output Options To Copier
To DiamondPress file
To Both
Delete after Print
Managing Your Print Jobs
Table 3-1: Reprint Options (Continued)
Create Form #
(M410 only)
Use Form #
(M410 only)
Form Repeat
Count
(M410 only)
Mirror Off
Account Data entry field. (In PPD Account is a pull-down list.) Account number and optional
User Name Reprint option only. Allows yo u to enter a user name for the job. This field is empty if
Debug PS On
Force RIP Reprint option only. Causes the job to be rerippe d. Use Force Rip to re rip a
Creates a form with a specific form number. Valid values for Create Form # from the
Reprint Option tab are Off, and 1 through 99. (Va lid val ues from the PPD are Off, and
1 through 25.)
Specifies which form to use as the under lying data for the document. Valid values for
Use Form # from the Reprint Option tab are Off, and 1 through 99.(Valid values from
the PPD are Off, 1 through 10.)
Specify how to repeat the form that is used as the underlying data for your document.
Valid values are Off, 1 through 10, 12, 16, 20, 24, 28, and 32.
Mirror
comments. Maximum length is 20 characters.
this is the first t ime you selected the job for reprint. Data entry field. User Name.
Maximum length is 20 characters.
Off
DiamondMerge job with an updated form.
On
Off
Force Print R eprint option only. Allows you to force an EPS file to print after it has been
downloaded from the Viewer. Unlike PostScript files, EPS files are not automatically
printed after they are downloaded because EPS files do not contain the showpage
command.
On
Off
QA 25 Draft: July 31, 1998 3-17
Page 72

Managing Your Print Jobs
OWNLOADING AND PRINTING FILES DIRECTLY FROM THE VIEWER
D
You can download one or more of the followin g file types to the M Series print server:
Postscript (PS) Level 2 Files—Generated for later printing on a PostScript printer.
These files can be created by redirecting the output to a file on your hard disk. In
Windows, this is done by setting the printer ’ s port setting to FILE:. On the Maci ntos h, thi s
is done by choosing the File option in the Print Dialog box. Another way to generate
PostScript print file is to create the file with text editor and name it with a .ps file
extension.
Encapsulated PostScript Files (EPS) Version 3.0 or later—Generated by an
application (such as Adobe Illustrator, CorelDRAW, or Adobe PhotoShop). EPS files are
meant to be imported into another applicat io n and are not meant to be print ed dir ect ly on
a PostScript printer. However, since these files are encoded in the PostScript language,
you can print them on the print server. EPS files most commonly have a .eps file
extension.
Portable Document File (pdf) Files—Created by Adobe Acrobat, Version 3.0 or later.
The Viewer cannot be used to download files that are not PS, EPS or pdf . To print bit map
image files , such as TIFF, import the image into a page layout or other program a nd then
print the document from that program.
Be aware of the following issues when printing EPS files:
• EPS files do not contain page size information so the job is printed on the default paper
size and o rientation spec ified in th e DP . INI file. (F o r m or e informa ti o n on th e default ,
refer to the Getting Started Guide.)
• EPS files do not normally contain the showpage command, which instructs the RIP to
print the page. If an EPS file downloads and appears to rip on the print server, but no
pages are printed, try reprinting the job with the Reprint Options tab’s Force Print
option.
To download files to the print server, follow these steps:
1. Pull down the Administrator menu and select Print, then Files, as shown in
Figure 3-11.
Figure 3-11: P ull-do wn Print Files Menu
The Files Dialog box, shown in Figure 3-12, appears.
3-18 QA 25 Draft: July 31, 1998
Page 73

Managing Your Print Jobs
Figure 3-12: Files Dialog Box
2. Click on the Select Files button. The file selection dialog box appears.
On Windows, by default, the fi le selection dialog displays all fil e s (*.*) in the chosen
directory. Yo u ca n cha nge t he fi le fi lter to dis play PS o nly (*. ps) us ing the dr op-d own list
at the bottom of the dialog box. Be aware, however, that files created on other platforms
may not have any extensions at all and files from Windows may have a .prn extension.
Hints
On Macinstosh, you can only select one file at a time.
3. In the file selection dialog box, select the file you wish to download and click Open. The
pathname and size of the file you selected appears in the list box of the Files Dialog
box.
You can select additional files by clicking the Select Files button again. However, be
aware that the Viewer does not allow you to pick and choose files from the list you
created. All files in the list are downloaded.
4. On ce th e list of files is comp l e te, click th e Download File(s) button. The files are
downloaded and printed in the order in which they appear in the list. Once a file has
completed spooling, it disappears from the top of the list.
Here are some things to keep in mind :
• On Windows, because the default is to display all files (*.*), you may be tempted to select
the source document for downloading. For example, you may select the .doc file for a
Microsoft Word document. Because the source documents are not in the PostScript
language, they do not print and the job fails with a PostScript error.
• On Windows, you can use standard Windows procedures to select multiple files.
• On Macinstosh, you can only select one file at a time.
QA 25 Draft: July 31, 1998 3-19
Page 74

Managing Your Print Jobs
• Files can be downloaded from any source that is att ached to your workstation. This
includes CD-ROM drives, net work serve rs, ZIP drives , and fl oppy disks. With t he additi on
of third-party software, Macintosh disks can also be used.
• You cannot set reprint options when you fir st download a file, but you may reprin t a job
that has been downloaded to change the number of copies, etc.
WITCHING TO OPERATOR MODE
S
To switch to operator mode, follow these steps:
1. Contact your system administrator for the operator password. You cannot log on
without a valid password.
2. Pull down the Administrator menu, and select Logon, as shown in Figure 3-13.
Figure 3-13: Pull-down Logon Menu
The Logon Dialog box, shown in Figu re3-14, appears.
Figure 3-14: Logon Dialog Bo x
3. Pull-down the User ID option and select Operator.
4. Enter the operator password and cl ick OK. The Logon Dialo g box closes and you are now
in operator mode.
If you attempt to logon usi ng an d invalid password, a “Password not accepted” message
appears and you do not switch int o Operator mod e. Try re -ent erin g the passw ord. If thi s fails,
contact your syste m administrator .
3-20 QA 25 Draft: July 31, 1998
Page 75

Chapter 4
M Series
I
NTRODUCTION
This Chapter describes how to perform the following tasks:
• Print the system default accounting log.
• Configure accounting parameter s for customized reports, which you can later retr ieve,
print, and save.
• Generate an error log, which lists all of the PostScript errors encountered during
processing.
B
ASIC CONCEPTS-DEFAULT ACCOUNT LOG
The system default account log contains the following information:
Spool Date—Date job was spooled to the print server.
Spool Time—Time job was spooled to the print server.
M Series retrieves the spool time from one of two sources. If the application that created the
PostScript file put a spool time in the file, the print server uses the time from the file . If the
application did not put the spool time in the file, the print server uses the time from its internal clock, which is the time the job arrived at the server.
Accounting And Error Logs
Job Size—Job size in bytes.
Creator—Application that created the file.
Job-For—The job owner. If the job was submitted from a Maci ntosh workstation, thi s is
the name of the user assigned to the Macintosh to identify the Macintosh on the network.
If the job was submitt ed from a Windows workstation, this is the user’ s log in name.
Creation Date—The date the job was created. If the application does not supply this
information, Panther/Cougar inserts the date from i ts internal date and time.
Job Title—Name of job. (The job name is inserted in this field by the application that sent
the job to print.)
Start Time—Time the job started ripping and printing.
Run-Time—Total time it took to rip or print the job.
Account—Account number specified for the job.
Copies—Number of copies printed.
Pages—Total num ber of pages in the job.
Black Pages—Total number of pages in the job printed with K black.
CMYK Pages—Total number of pages in the job that printed CMYK.
Paper Size—Page size used for the job.
QA 25 Draft: July 31, 1998 4-1
Page 76

Accounting And Error Logs
Special Media—Specifi es media type if the job used a media type other than Normal
Paper. If normal paper is used, this field is None.
Manual Feed—Specifies whether the Manual Feed tray w as used for the job. If the
Manual Feed tray was used, this field is ON. If the Manual Feed tray was not used, this
field is OFF.
Error String—Any error messag es that occurred while the job was processing.
RINTING THE DEFAULT ACCOUNTING LOG
P
To print the default accounting report, pull down the Administrator menu, and Print then
Accounting, as shown in Figure 4-1.
Figure 4-1: Print Defa ul t Accoun t
The report automatically prints to the print server and copier to which you are connected.
4-2 QA 25 Draft: July 31, 1998
Page 77

REATING A CUSTOM ACCOUNTING REPORT
C
Configure Account allows you to create customized Accounting Reports (if you are
authorized by the system administrator). The print server will extract the specified
information fro m the acc ounting log and save it in a text file. You can then export the
information into an application.
To create a custom accounting report, follow these steps :
1. Pull down the Administrator menu, and select Configure, then Accounting, as
shown in Figure 4-2.
Figure 4-2: Confi gure Ac coun ting
Accounting And Error Logs
The Configure Accounting Dialog box in Figure 4-3 appears.
Figure 4-3: Configure Accounting Dial og Box
QA 25 Draft: July 31, 1998 4-3
Page 78

Accounting And Error Logs
This box contains t he s ame para meters in cl uded in t he s yste m defa ult accounti ng r epor t, plus
the following parameters:
Job Error—Number of PostScript errors that occurred while processing job.
Collate—Page Order option for the job.
You can pick and choose the parameters for your custom report by sele cting and deselecting
the options. In additi on to spec if yin g the info rmati on fo r the report, you c an spec ify the reco rd
and field delimeters.
Record Delimeters—Three radio buttons; Carriage Return and Line Feed (CR & LF),
Carriage Return only (CR Only), and Line Feed only (LF Only). CR & LF is the default.
Field Delimeters—Three radio buttons; Tab (default), Comma, and Period.
File Type Selection—Three radio buttons that pre-select Record Delimeters and Field
Delimeters values as follows:
• When you select Text File Type (default) the Viewer software autom atically e nables
the LF Only and Comma options.
• When you select Database File Type the Viewer s oftware aut omatical ly enables the
CR&LF and Tab options.
• When you select Spreadsheet File Type the Viewer software automatically
enables the LF Only and Tab options.
You can go back and modify any of the options that the Viewer pre-selected after you
have set the File Type Selection.
2. Set the options you want to include in your custom report and click OK. The dialog box
disappears.
3. Save the data by pulling down the Administrator menu, and selecting Save, the n
Accounting, as shown in Figure 4-4.
Figure 4-4: Save Accounting
4. Specify the name and location for the file in the dialog box that appears. Note that all
accounting data is saved in text format.
The file can be saved to hard disk or floppy. After the file is saved, it can be opened in a
spreadsheet or database application program for printing and analysis.
4-4 QA 25 Draft: July 31, 1998
Page 79

RROR LOG
E
The Error Log feature extracts the error information from the Accounting log and creates a
formatted list of errors that includes:
• Title of the job
• Error message string
• Date and time the error occurred
• Owner of the job
This in fo rmatio n is d isplayed in th e Error Log dialog box, which in cl u des a Save Errors
option. The Save Errors opti on saves the Error Log to a text file, for mat ted like the
information displayed in the Error Log dialog box. You can also view the errors and exit the
dialog box w ithout saving.
To generate an error log, follow these steps:
Accounting And Error Logs
1. Pull down the Administrator menu, and select Save, then Errors, as shown in
Figure 4-5.
Figure 4-5: Sa ve Er ro rs
The Error Log dialog box, show in Figure 4-6, appears.
QA 25 Draft: July 31, 1998 4-5
Page 80

Accounting And Error Logs
2. To save the Error log, click on Save Errors. The file selection di alog box appears.
Figure 4-6: Error Log Dialog Box
3. Specify a name for the file and save the fil e. The Error log is saved in text format.
4-6 QA 25 Draft: July 31, 1998
Page 81

Chapter 5
M Series
I
NTRODUCTION
This chapter describes how to perform the following system administrator tasks:
• Configure Passwords
• Configure Users Rights
• Configure Time and Date
• Print Color Test Pages and Diagnostic reports
• Delete Jobs, forms and logs from the print server
• Run ColorCal to calibrate the copier
These tasks can only be performed by users in Administrator mode or when you configure
user rights so that users/operators are authorized to perform Administrative operations.
Switching to Administrator Mode
To switch to administrator mode, fol low these steps:
1. Pull down the Administrator menu, and select Log on, as shown in Figure 5-1.
Administration
Figure 5-1: Pull- down Logo n Men u
The Log on Dialog box, shown in Figure 5-2, appears. The default value for User ID is
Administrator.
Figure 5-2: Logon Di alog Box
QA 25 Draft: July 31, 1998 5-1
Page 82

Administration
2. If the default does not appear in User ID, pull-down the User ID list and select
Administrator.
3. Enter the system administrator password and click OK. The Logon Dialog box closes
and you are now in administrator mode.
If you attempt to logon usi ng an d invalid password, a “Password not accepted” message
appears and you do not switch int o ad ministrator mode.
REATING NEW PASSWORD
C
If you have just instal led the prin t server or yo u have upgr aded th e prin t serv er softw ar e , you
must cr e a te a new pa ssword for yourself. The factory de fault for t h e Ad m inist ra tor pas s w ord
is blank. Until you create a password any user can log on an perform administrator functions.
To create a new password, follow these steps:
1. Logon in Administrat or mode. Do not specify a password in the password field and cl ick
OK.
2. Pull down the Administrator menu, and select Configure, then Passwords, as
shown in Figure 5-3.
Figure 5-3: Configure Password
The Change Password Dialog box, shown in Figure 5-4, appears.
Figure 5-4: Change Password Dial og Bo x
3. Since the old password is blank, leave this field empty. Enter the new password in the
New Password field.
4. Re-enter the new password in the Verify field and click OK.
5-2 QA 25 Draft: July 31, 1998
Page 83

If the passwords you entered in the New P assword and Verify fields do not match, the
error message, “The new passwords don’t match” appears.
5. If the passwords do match, the message “Password accepted” appears. Click OK.
6. To create a new password for operators, select Operator from the User ID menu and
repeat steps 3 through 5.
7. When you have finished creating new passwords, cli ck Close .
ONFIGURE USERS AND OPERATOR RIGHTS
C
As a system administrator you can configure ordinary user and operator access ri ghts to
system functions to suit the needs of your installation.
To configure user rights, follow these steps:
1. Logon in Administrator mode.
2. Pull down the Administrator menu, and select Configure, then User Rights, as
shown in Figure 5-5.
Administration
Figure 5-5: Confi gure User Ri ghts
The User Rights Dialog box, shown in Figure 5-6, appears.
QA 25 Draft: July 31, 1998 5-3
Page 84

Administration
Figure 5-6: User Rights Dialog Box
The User ID pull-down list allows you to specify options for ordinary users or operators.
Note that the list of configurable options is the same for both types of users.
3. To enable an option, double-click on the option. The setting switches from No to Yes.
Table 5-1 describes the rights available when each option is selected. These rights are
the same for both modes.
Table 5-1: Summary of User/Operator Access Rights
Option
See own Hold Queue Jobs Allows users to see their jobs in the Hold queue.
See Hold Queue Jobs with no owner Allows users to see unowned jobs in the Hold queue.
See others Hold Queue Jobs Allows users to see jobs in the Hold queue that belong to all
Reprint Hold Queue Jobs Allows users to reprint the jobs they have permi ssion to see in
Delete Hold Queue Jobs Al lows users to delete the jobs they have permission to see
Description
other users.
the Hold queue.
from the Hold queue.
Move Jobs from Hold to Print Queue Allows users to move the jobs they have permission to se e
from the Hold queue to the Print queue.
See own Print Queue jobs Allows users to see their own jobs in the Print queue.
5-4 QA 25 Draft: July 31, 1998
Page 85

Table 5-1: Summary of User/Operator Access Rights
Administration
Option
See Print Queue Jobs with no owner Allows users to see unowned jobs in the Print queue.
See others Print Queue Jobs Allows users to see jobs in the Print queue that belong to all
Reprint Print Queue Jobs Allows users to reprint the jobs they have permission to see in
Stop Print Queue Jobs Allows users to stop the jobs the y h ave permission to see in
Move Jobs from Print to Hold Queue Allows users to move the jobs they have permission to see
Delete Print Queue Jobs Allows users to delet e the jobs they have permission to see
Pause/Resume Copier Allows users to Pause/Resume the copier.
Setup Accounting Parameters Allows users to configure the parameters they want to include
Perform Administrati ve operations Allows users to perform the oper ations described in this
Description
other users.
the Print queue.
the Print queue. These jobs have job states of spooling,
ripping, and printing. Users must also have permission to
Pause/Resume the copier in order to stop jobs.
from the Print queue to the Hold queue.
from the Print queue.
in a customized Accounting report .
Chapter without logging in as Administrators.
Set Operator Password Allows users to create new passwords for operators. With the
operator password, any user can log into Operator mode and
perform the tasks that you configure for operators.
SET P
RINT SERVER TIME AND DATE
You can set an inter nal time and d ate that wil l be used b y th e pr int server when r eco rdi ng
information in t he acc ounti ng lo g . If you w ant ti m es and dates to be acc urat e , se t the time
and date when you first set up the print server. It is recommended that you set the time
and date on a periodic basis, just to be sure it maintains its accuracy.
To set the time and date, follow these steps:
1. Pull down the Administration menu, and select Configure, then Time and Date, as
shown in Figure 5-7.
QA 25 Draft: July 31, 1998 5-5
Page 86
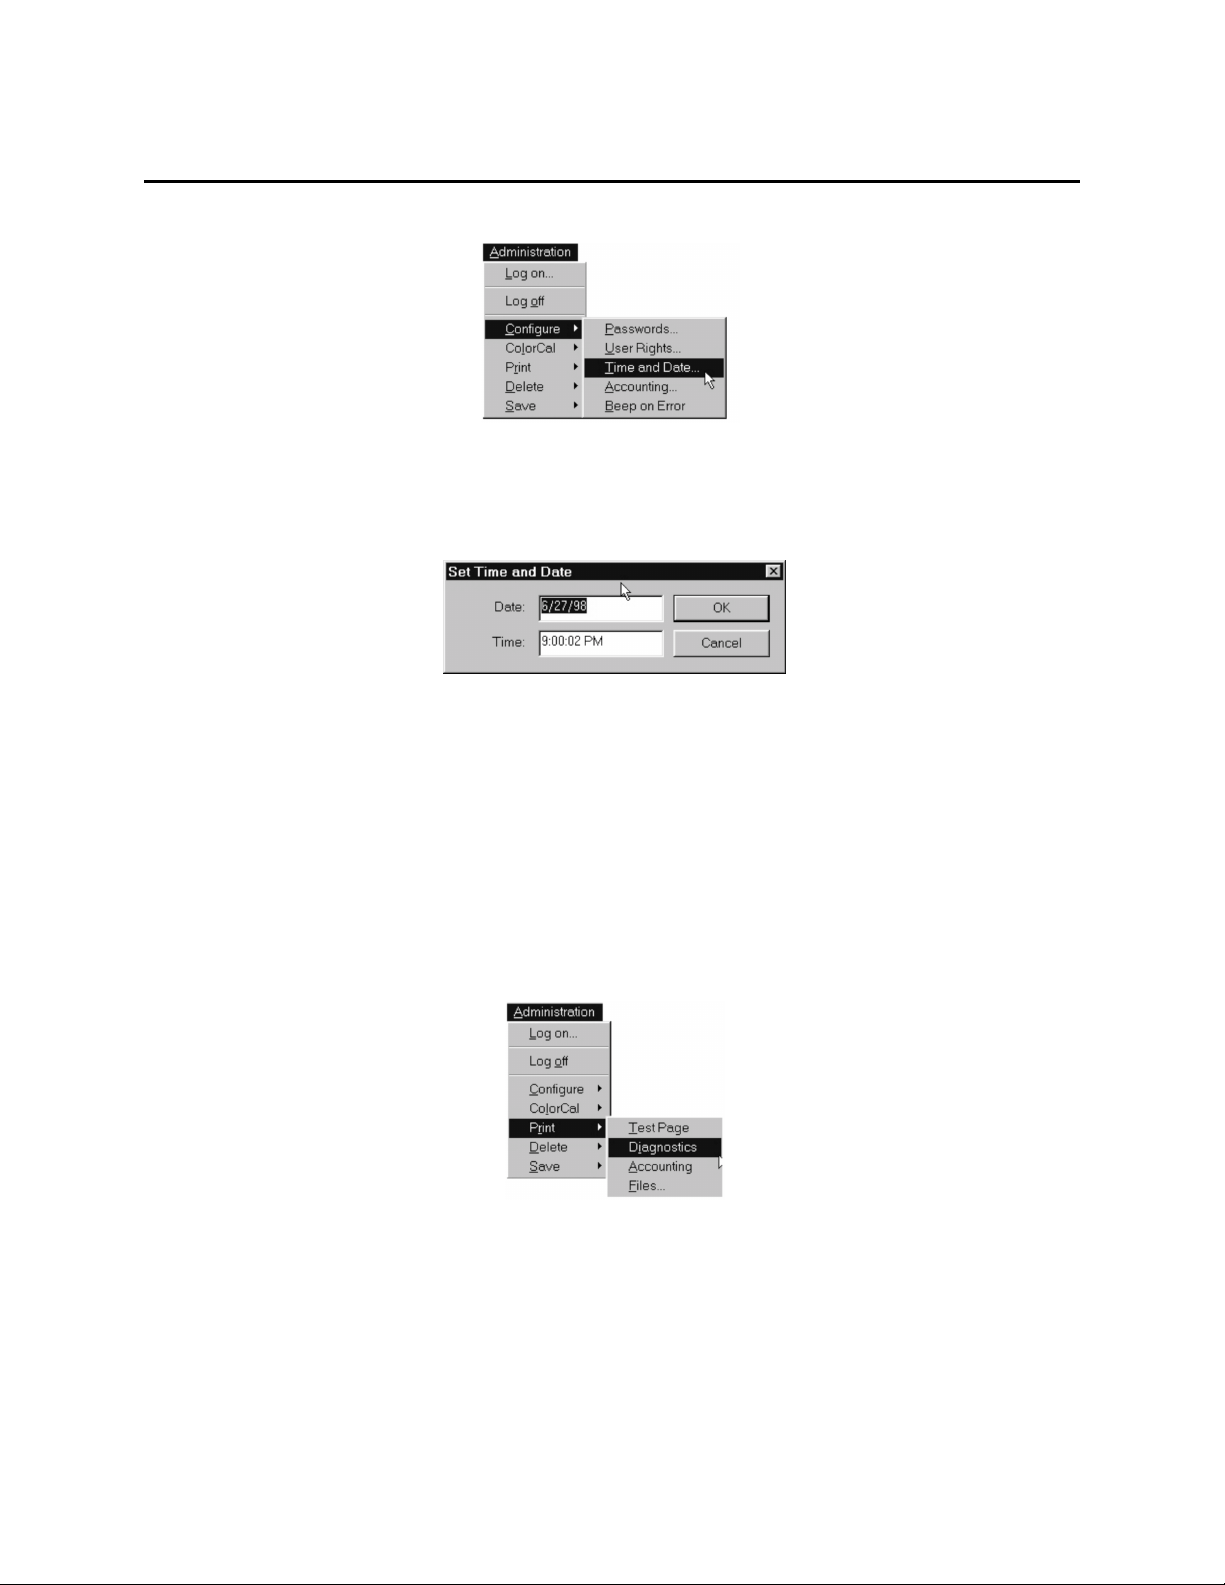
Administration
The Time and Date Dialog box, shown in Figure 5-8, appears.
Figure 5-7: Conf igure Time And Date
Figure 5-8: Time and Date Dialog Box
2. Verify that t he values listed in the edit boxes are accurate (these will reflect the current
date and time as set on your workstation) and change them if needed. Then click OK.
RINT COLOR TEST PAGES AND DIAGNOSTICS REPORT
P
The Color test P age and the Diagnostics Report contain information whic h is useful for your
service representative when troubleshooting problems. To print the color test page or
diagnostics report, pull down the Administration menu and select the appropriate option
under the Print submenu, show n in Figure 5-9.
Figure 5-9: P rint Submenu
When you select Test Page and/or Diagnostics, the automatically Test P age and/or
Diagnostic Log automatically print on the printer/copier to which you are connected.
5-6 QA 25 Draft: July 31, 1998
Page 87

Administration
ELETE JOBS
D
To delete files from the print server hard disk, pull dow n the Administration menu and sel ect
the appropriate option from the Delete submenu, as shown in Figure 5-10.
The Delete Jobs and Forms option deletes all jobs and forms from the job list, clearing the
print server. The print server must be paused before this option works. If the print server is
not paused, a pause prompt appears.
The Delete Accounting and Errors option deletes the accounting log and all records it
contains , whic h resets the acco unti ng log and frees up disk space. It is recommended that you
periodicall y delete the accounting log after you have successf ully saved the information to
disk using the following procedure:
ORMS AND LOGS FROM THE PRINT SERVER
, F
Figure 5-10: Delet e Submen u
1. Pull down the Administrator menu, and select Save, then Accounting, as shown in
Figure 5-11.
Figure 5-11: Sa v e Acc ounti ng
2. Specify the name and location for the file in a dialog box that appears. Note that all
accounting data is saved in text format.
QA 25 Draft: July 31, 1998 5-7
Page 88

Administration
ALIBRATING THE COPIER USING COLORCAL
C
ColorCal is a Viewer application that performs the following functions to calibrate the
copier:
• Print a printer calibration targe t page
• Print a scanner calibration target page
• Calibrate the printer
• Calibrate the scanner
Before you begin, verify that you have the envelope containing the Kodak test strips (Xerox
part number 1E039230). The envelope shipped with your print server and contains a Kodak
Gray Scale test strip and a Kodak Color Control Patch test strip.
Calibrating the Printer
To calibrate the copier printer, log in as Administrator and follow these steps:
1. Pull down the Administration menu, and select ColorCal, the Print Printer Target, as
shown in Figure 5-12.
Figure 5-12: Pull -down Print Printer Target Menu
The Color Cal Print Target window, shown in Figure 5-13, opens.
5-8 QA 25 Draft: July 31, 1998
Page 89

Administration
Figure 5-13: Sa mple Colo rCa l Print Target Window
The window has a pull-down list that allows you to select paper size/tray for the target.
The options availabe for paper sizes and the trays are dependent on the paper you have
currently loaded and the trays you have configured.
2. Pull down the Paper Size/Tray list and select the page size and tray for the Printer
Calibration Target.
If you selected an option using the m a nual feed tray, a second pull-down list, shown in
Figure 5-14, appears.
QA 25 Draft: July 31, 1998 5-9
Page 90

Administration
Figure 5-14: Sa mple Colo rCal Pul l-d o wn List For Sel ecti ng Media Type
The second pull down list a ll ows you to se lec t a medi a typ e for the tar get f rom one of the
following options:
• Normal Paper
• Heavy Weight
• Special Heavy Paper (use with the 5750 only)
• Coated Paper
3. Pull down the Media Type list and select a media type and click OK. The ColorCal
window disappears and the Printer Calibr ation Target page, shown in Figure 5-15,
prints on the copier.
5-10 QA 25 Draft: July 31, 1998
Page 91
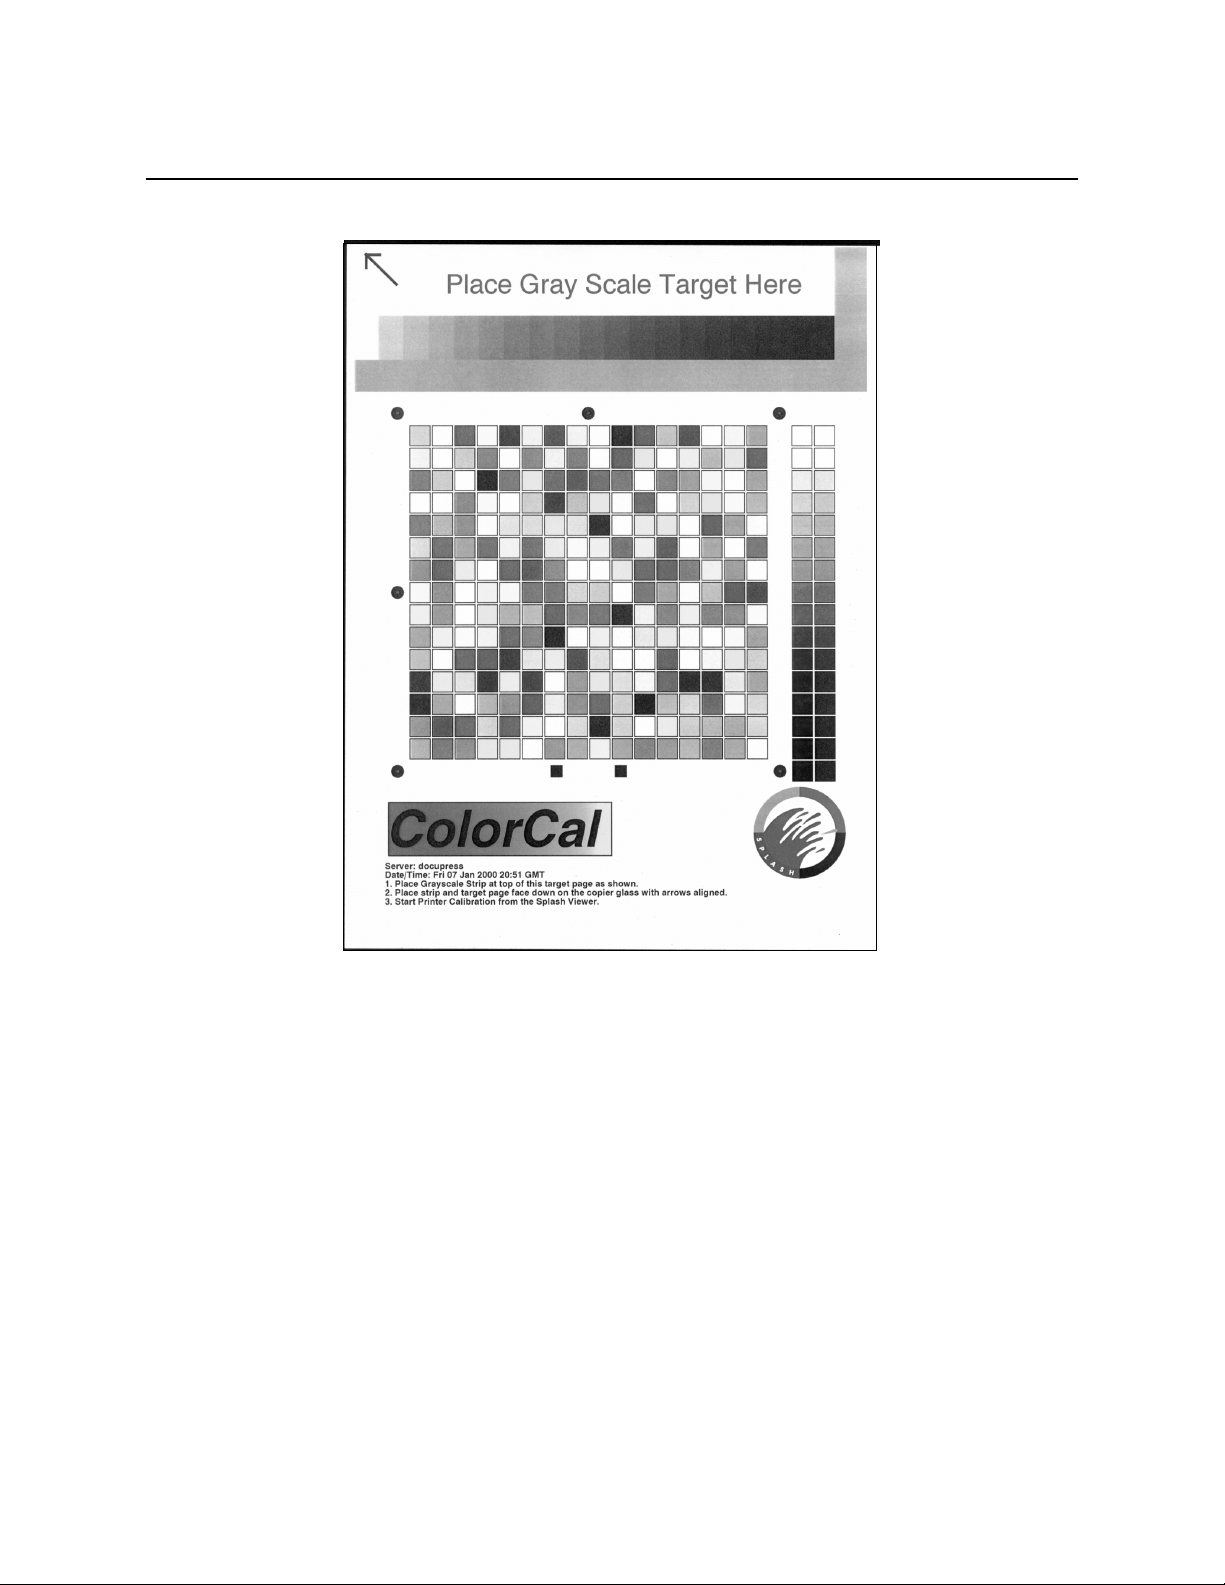
Administration
Figure 5-15: S ample Printer Calib rat ion Target
The bottom of the calibration target includes the print server name, the date/ti me , and
has numbered instructions on how to proceed.
4. Sw it ch to the Viewer Job Details tab and verify that there are no jobs currently
spooling, ripping, or printing at the copier. If there are jobs at the copier, wait for them
to complete processing before proceeding.
5. Locate the Kodak G ray Scale test strip and place the calibration target and gray scale
strip face down on the copier glass. Be sure to properly align the gray scale as indicated
on the calibration target.
6. Return to the workstation runni ng the Viewer. Pull down the Administration menu,
and select ColorCal, the Calibrate Printer. The ColorCal Calibrate window, shown in
Figure 5-16, appears.
QA 25 Draft: July 31, 1998 5-11
Page 92
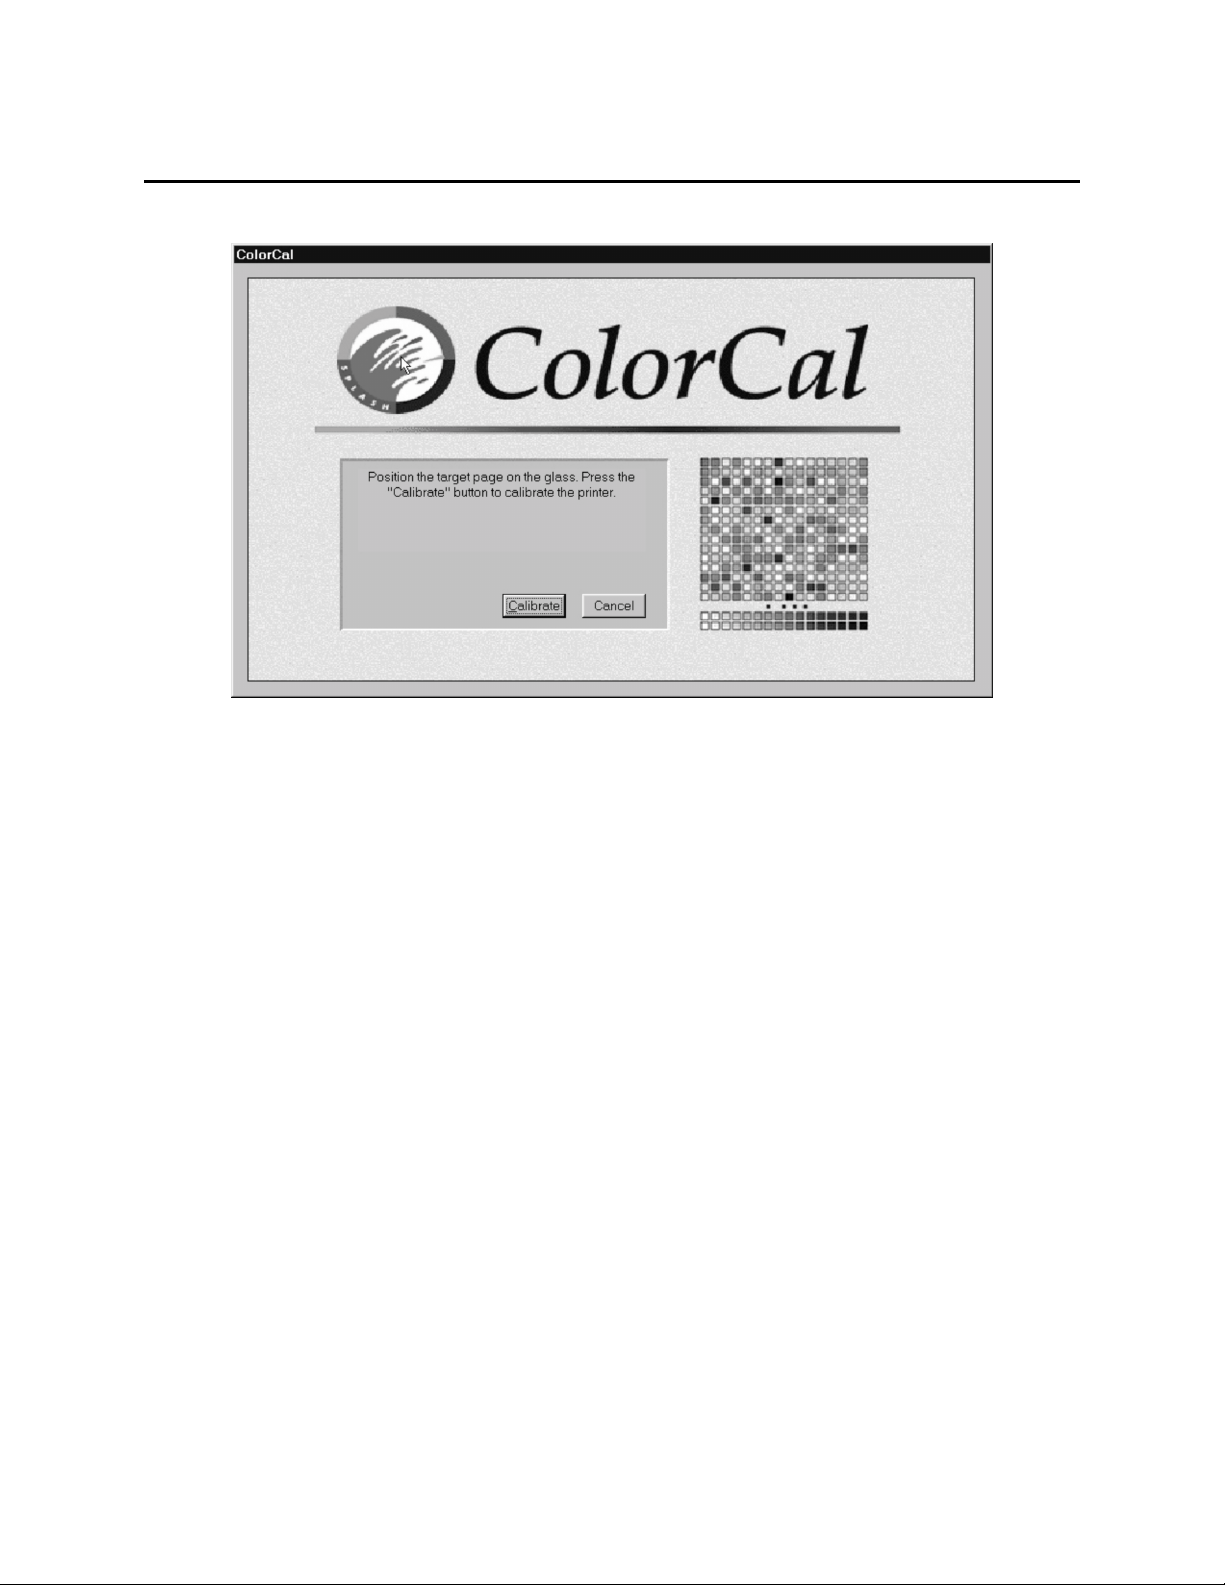
Administration
Figure 5-16: ColorCal Calibration Window
The Calibrate window allow has options that allow you to continue the calibration
procedure or cancel.
7. To continue calibration, click on Calibrate. The ColorCal windows disappears.
The print server attempts to cal ibrate the printer, and when complete, prints an
information page with the results. This page indicates whether or not the calibrat ion
was successful. The followi ng are the possible messages that could appear on the
information page when calib rating the printer:
• Calibration Successful
• Calibration Successful—No Kodak gary test strip was found -- defaults used instead
• Calibration Failed—All corner registration marks could not be locat ed
• Calibration Failed—The upper middl e reg istrat io n mark was not found. Orient ation
is wrong.
• Calibration Failed—No Kodak gray test strip was found
If the ca li bration failed, the pri n t se rver leav es the original calibr at ion inta ct. Repea t the
calibration procedure again, and if calibration is still unsuccessful, contact your Xerox service
representative.
5-12 QA 25 Draft: July 31, 1998
Page 93

Calibrating the Scanner
To calibrate the scanner, follow the printer calibration procedure. Note that the scanner
calibration target i s dif ferent fro m the pri nter tar get . A sampl e of t he scanner t arge t i s shown
in Figur e 5-17 .
Administration
Figure 5-17: Sample Scan ner Calibr at ion Target
Also note that scanner calibration requires both the gray scale and color scale test strips.
The following are the possible messages that could appear on the information page when
calibrating th e scanner:
• Calibration Successful
• Calibration Failed—No Kodak gray test strip was found
• Calibration Failed—No Kodak Color Control Patches test strip was found
If the ca li bration failed, the pri n t se rver leav es the original calibr at ion inta ct. Repea t the
calibration procedure again, and if calibration is still unsuccessful, contact your Xerox service
representative.
QA 25 Draft: July 31, 1998 5-13
Page 94

Administration
5-14 QA 25 Draft: July 31, 1998
Page 95

Chapter 6
M Series
B
ASIC CONCEPTS
This chapter describes M Series’ DiamondM erge Variable Data feature, which is availabe on
the M410 only. This feature is not limited to variable data applications; it is a general
technology for mer ging two documents together.
In concept, DiamondMerge is quite simple. The applications derived from this technology,
however, are boundless and can become quite compl ex.
DiamondMerge will merge any two PostScript data streams togethe r to c reat e a single out put
document.
One of these data streams is referred to as the form. The form’s image is used as the
underlying data for the final document. The second data stream is referred to as the overlay.
The overlay will be merged with the form in such a way as to make transparent any areas of
the page that are not explicitly marked upon. The merge follows PostScript imaging rules.
This allows you to “knock-out” data on the form with the data on the overlay page.
DiamondMerge can be used to create var iable cont ent documents . In this cas e, the form would
contain data that is static; letterhead, logos, images, form-fields, etc. The overlay document
would contain the perso nali zed or var iable da ta. Because thi s dat a is often t ext ba sed and can
be generated from applic ations that handle data well, the overlay data is quick to spool, rip,
and print.
There are three PPD/reprint options that control DiamondMerge:
DiamondMerge Variable Data
Create Form #—Allow you to create a form and choose a form number. That form numbe r
is later used to select the form you wish to merge onto using Use Form #. Create Form #
instructs the print server to rip the file, print it, and store the compressed DiamondPress
file. F o rms are lis ted as separate j obs in the Vi ewer and are posi tioned at the bo ttom of the
job list.
Use Form #—Once a form has been created, it is used by sele cti ng its for m number. When
you use a f orm , the job is ripped and merged with the form docum ent before printing. It is
important to set the correct Form Repeat Count when using Use Form #.
Form Repeat Count—Instructs the print server how to repeat the use of the form
underneath the overla y document. If the overlay document is the exact same number of
pages as the form, then it is not necessary to set this option. In some cases, however, the
overlay will contain more pages than the form (multiple record merge documents for
example). In this case, set the Form Repeat Count to the number of pages that comprise
the form document. For example, you may have a four-page brochure you are using as
your form document. If you wish to merge 5 customer records onto that form you would
create a four - page t emplat e in the appl ic ation t hat i s host ing the dat a and t hen merge the
data. This will, in this example, create a 20 page document. If you did not set a Form
Repeat Count, the four th page of the f orm woul d be r epeat ed for pag es 4 t hrough 20 of the
overlay document (this is default behavior of the print server at this point but may
change). To get the pro pe r results, you shou ld set a Form Repeat Count of 4 Pages. This
will cause the form to reset after each four pa ges. Note that the Form Repeat Count need
not match either the length of the form or overlay documents, givi ng rise to some
QA 25 Draft: July 31, 1998 6-1
Page 96

DiamondMerge Variable Data
interesting applications.
ENEFITS
B
DiamondMerge offers the following benefits over traditional merge and variable data
technologies:
• Because the form (static) data is stored in a post-ripped format on the print server, only
the overlay data needs to RIP before printing occurs. This saves time, especially if the
form data is complex or contains high-resolution images.
• Because the form data is stored on the hard disk of the print server, and not in RAM, the
form can be recalled at any time. In addition, form size is not limited by available RAM.
• Because any document can be used to create a form, any application program can be
enabled as a variabl e data appli cat ion. For example , any app li cation pr ogram can be used
for a mail-merge by overlaying the form pages with mail-merge pages generated by
Microsoft Word.
• DiamondMerge is a general technology and does not require any additional extensions,
macros, add-on s or other proprietary software.
• Because the print server can store mul tiple forms (up to 9 9 ), different versions of variable
documents can be available for on-demand printing. For example, two different versions
of a product brochure coul d be s tored as t wo separ ate forms . When th e sales pe rson want s
to create a personalized brochure, they simply select the correct form number and print.
• DiamondMerge can be used in conjunction with almost all of the other M Series features;
booklet making, du plexing, page ordering, etc.
As with any powerful technol ogy, however, there are some limitations.
IMITATIONS
L
DiamondMerge does impose some limitations on the merge process:
• The form (static) data and over lay documents must be created using the same paper size.
• While the print server can store up to 99 forms, the M Series PPD will only allow you to
ROCE DU RE
P
Below are listed the step s you will need to take to use the DiamondMerge feature. Note that
these steps define a general procedure and may not be appropriate to your particular
workflow.
1. Create or open the document that will become the form. This is the document that will
2. Print the form document to the print server. When printing the form, be sure to do the
They need not have the same number of pages, but their paper sizes must match. For
example, you cannot print a letter sized overlay document using a tabloid sized fo rm.
use up through form number 25. If you need to use a form whose number is greater than
25 you will need to print the job without using any form and then reprint the form and
specify the form number in the Reprint Options tab.
contain all of the static data (data that will not be changed from print to print.) Be sure
to use the paper size that you would li ke for your final output.
following:
6-2 QA 25 Draft: July 31, 1998
Page 97

DiamondMerge Variable Data
a. In the PP D, set th e Forms o p tion to Create Form # and choose a form number to
assign to the document. Check the Job Details tab listing in the Viewer to see
which form numbers are already in use.
b. Do not select any Page Ordering, Duplexing, or Imposition settings in the PPD.
These can be selected when you print y our overlay document.
c. Do not select Force All B&W Pages in the PPD . The form wi ll alwa ys be creat ed as
color. You may select Force All B&W Pages when you print your overlay document.
d. Do not set a multiple number of copies. Print only one copy when creating the
form. You can select a larger number of copies when printing the overlay document.
e. If you do not wa nt the copier to print the pages in the form document (as the form
is being created), be sure to set the Output Options setting to To DiamondPress.
3. After the form document has spoo led to and been ripped by the print server, confirm
that the proper form is listed in the job listing of the Job Details tab in the M Serie s
Viewer.
4. Create or open the document that will overlay the form. This will be the overlay
document. If you intend to use DiamondM erge for variable data printing, it is the
overlay document that will contain the variable data. This is most easily accomplished
by using the mail-merge functi on of a word processor, but you can also use the form
creation capability of many database and spreadsheet packages. While creating the
overlay document, keep the following in mind:
• The paper size used for your overlay document needs to match that of the form you
intend to use.
• There are currently no tools available that assist you in placing elements on the
page so they align to the form document. If you are using the same applic ation
program to create both the form and overlay document, you should be able to get
your placement exact by using two copies of the same document and deleti ng out the
items that don’t apply. If you are using different applications, check to see if the
applications suppo rt rulers that can help you place items. In general, placeme nt
using trial-and-error can yield very good results.
• Any item that is placed in your overlay document will “knock-out” the data beneath
it on the form document. Because of this, be careful not to image any white areas
accidentally. You may not see them on the screen, but you will notice them when
you use the form.
• In general, you will want to create the same number of pages in your overlay
document as you have in your form. This is not a requirement, but it is easier to
create the overlay document when there is a one-to-one relationship between the
overlay and form pages.
5. Print the overlay document to the print server. W hen printin g the over lay, be sure to do
the following:
a. In the PP D, set th e Forms o p tion to Use Form # and choose the proper form num-
ber. If you choose a form number that does not exist, your document will print but
no form data will be imaged. Check the Job Details tab listing in the Viewer to
QA 25 Draft: July 31, 1998 6-3
Page 98

DiamondMerge Variable Data
see which form numbers are a vailable for use.
b. Also in the PPD, set the Form Repeat Count option to the number of pages
desired . In most cases, th e Form Repeat Count will be set to the number of pages
contained in the d ocument . For example, if you have a fou r page form that you are
overlaying with a four page overlay document, the form Repeat Count would be 4
Pages. If you do not set a Form Repeat Count and the form document has fewer
pages than the overlay document, then the last page of the form will be repeated
for the extra overlay pages. This is useful for applications l ike letterheads.
c. Select any Page Ordering , Duplexing o r Impositi on settings yo u desire i n the PPD .
If you are performing a m ail-merge within your application as you pr int, you may
need to select a P age Ordering (Collate if you are also creating booklets, Reverse
Collate if you are not).
d. If you want your output to be black only, select Force All B&W Pages in the Color
Mode option of the PPD.
e. Select the number of copies you desi re. For a mail-merge type of application, you
will most likely print just one copy per merged record. You may wish to print two
copies initi ally to confirm that the form is being used properly. Printing just one
copy won’t show any effects that the page ordering might have. Once the two copies print correctly, you can reprint from the M Series Viewer.
f. Confirm that the Output Options setting in the PPD is set to T o Copier (the
default).
g. Set any other PPD options that you desire before printing.
Having followed the above steps, the form and overla y documents will be merged together and
printed as one document.
6-4 QA 25 Draft: July 31, 1998
Page 99

Glossary
M Series
Throughout this manual and the other M Seri es print server documentation there are terms
used tha t m a y n o t be fa m iliar to yo u . Below is a li st of terms th a t ma y fal l in to this ca te g ory,
along with a quick explanatio n of each.
Accounting Log
Usage data that is kept on the M Series print server, such as the name of the user that
submitted the job, the time the job was submitted, etc. Information about printing errors is
also kept in this log. The Viewer includes features that allow users to create standard or
customized accounting reports from the log . The Viewer also incl udes a feature that extracts
the error information from this log to create an error listing that can be viewed and saved.
In addition to the feature in the Viewer, the media shipped with the M Series print server
includes an Print Accounting Log diskette (part of the Utility Dis k s set), which will force the
print server to print the default Accounting log.
AppleTalk
Network protocol used to connect Apple Macintosh computers and their per ipherals together.
Many desktop printers are called AppleTalk printers because they can be easily connected to
a network that uses the AppleTalk protocols.
Application
Software application package. Applications reside on the workstation and are used to
generate the PostScript data used by the print server .
Booklet
Output that has been created by imposing sheets in such a way that when th e sheets are
folded, a multiple page booklet is made.
Calibration
Process of modifyin g the print ser ver’ s color data to compensat e for any chang es in how muc h
toner the copier is using to render a given color.
Chooser
Application on an Apple Macintosh computer that allows you to select which printer you
would like to print to. The
that printer.
Client
Workstation that is printing to the print server. The term workstation is also used in the M
Series documentation to refer to clients.
CMYK
Four-color color -space consisting of cyan, magenta , yellow, and black components. Because
these are the pr imary c ol ors sup port ed by the color c opi er, the copier is ref err ed to as a CMYK
output device .
Chooser
is also used to select the PPD you would like to use for
QA 25 Draft: July 31, 1998 G-1
Page 100

Glossary
Collate
CRD
DiamondPress Image File
DiamondMerge
Error Log
How the pages of a print job are output fr om the print ing device . T here are two ways the pri nt
server can order the pages it prints, in groups or collated. Collating will cause the print
server to output complete sets of the print job in the desired order.
Color Rendering Dictionary. CRDs are used to fine-tune color output for specific purposes.
A compressed image of the job that is saved on the pri n t server for later use. When the job is
reprinted, the prin t server uses the DPI file instead of re-ripping the original file so the job
starts printi ng immediately. DPI files are created when the user selects certain print options,
such as
PPD or Viewer.
Splash’s variable data feature for M410 only. DiamondMerge merges any two PostScript
data streams together to create a single output document.
Log file kept on the print server. This log file will record any errors that occur while
processing or printing each print job. The error log can be viewed or saved from inside the M
Series Viewer.
Reverse Collate
, or when the user selects
To DiamondPress Image File
from the
EtherTalk
Network that uses E thernet network cards and cabling to connect devices that use the
AppleTalk protocol. The current level of EtherTalk is called Phase II. The print server is an
EtherTalk Phase II printing device.
Form
Pre-ripped document that resides on the M410 print server and can be utilized as the
underlying data of a DiamondMerge. DiamondMerge is only availabl e on the M410.
Grouping
How the pages of a print job are output fr om the print ing device . T here are two ways the pri nt
server can order the pages it prints, in groups or collated. Grouping wil l cause the print
server to output all copies of a given page together in a group.
Hold Queue
A special queue for print jobs. When jobs are submitted to this queue they are not processed
(i.e., ripped) or printed by the print server until the job is moved from this queue to the print
queue by an authorized user. Authorized users are def ined by the system administrator.
Image
Par t of a print ed page that cont ains a pict ure or ot her i mage base d data. Gener all y an image
is a high-resoluti on bitmap or scan.
Instant Reprint
When a file is printed, the print server can save a processed image of the file in compressed
format. In most cases, reprint requests for the job can be handled without reprocessing the
PostScript file by printing the saved compressed image instead (instant reprint). If the user
makes changes, such as changing the Page Order from Collate to Reverse Collate, the job is
not instantly r epr inted be caus e t he job has to be r eproce sse d to includ e t he changes. Note that
changes such as # of Copies, does not cause the file to be reprocessed.
G-2 QA 25 Draft: July 31, 1998
 Loading...