

Page 1
- -. . - . .
.:~"..
' ,
XEROX
1186
USER'S
GUIDE
3101893
Februa
ry
1986
;.
~
. -
Page 2

Copyright
(C) 1986 by Xerox Corporation
All
rights reserved.
DEC, VAX, VMS, and VT100 are trademarks
of
Digital Equipment
Corporation.
IBM
is
a registered trademark
of
International Business Machines.
Page 3
Table
of
Contents
1.
Introduction
The 1186
Workstation
Getting
Started 3
Software
5
The
Lisp
Sysout
5
Starting Lisp
6
Installing a Sysout 7
Loading Interlisp-D Packages 7
Copying Floppies
to
a File Server
8
Cu
rsor Codes
9
Booting
the
Xerox 1186
10
The
Ethernet
11
Copying Files Between Machines
12
Advice For
the
Standalone User
12
References
13
2.
Equipment
15
Environmental
Requirements
15
Electrical Requirements
16
Standard
Equipment
16
Processor
16
Display
19
XEROX 1186
USER'S
GUIDE
Page 4
TABLE
OF
CONTENTS
Keyboard
20
Mouse
22
Optional
Equipment
23
Floppy Disk Drive 23
Ethernet
Transceiver and
Controller
24
Ethernet
Interface 24
Peripheral
Equipment
24
Cables 24
Power
Supply 25
3. Using
the
1186
27
Turning
the
1186 On
27
Booti
ng
the
1186 28
Booting
Sequence
for
Interlisp-D 28
Turning
the
1186
Off
29
Routine
Maintenance
29
Keyboard 29
Mouse
29
Display Screen 30
Floppy Disk Drive 30
Floppy Disks 30
Troubleshooting
31
Reporting
Problems 32
4.
Software
Installation 33
Installing Lisp
on
the
1186
Workstation
33
ii
XEROX
1186
USER'S
GUIDE
Page 5
TABLE
OF
CONTENTS
Floppy
Disks
Needed
33
Factory Configuration 34
Partitioning 34
Steps
for
Partitioning 34
Microcode and
System Tool Installation
35
Steps
for
Microcode and
System
Tool
InstallatIon
36
Installing
the
Lisp
Sysout from Floppies
38
Steps
for
Ins~alling
the
Lisp
Sysout from
Floppies 38
Installing
the
Lisp
Sysout from the
Network
39
Steps
for
Installing a
Lisp
Sysout from
the
Network
40
To Re-Install a Lisp Sysout from
the
Rigid Disk
43
Steps
for
Re-Installing a
Lisp
Sysout
43
Initializi ng
Lisp
44
Steps
for
Initializing
Lisp
45
Loading Interlisp-D Packages 46
Logging
Out
of
Lisp
48
Steps
for
Logging
Out
of
Lisp
48
Troubleshooting
for
Lisp
Installation 48
Rigid DiskFile
System
49
Disk
Partitions 49
File
System
Utility
Functions
50
File
Name Conventions
52
Disk
Scavengi ng
53
XEROX.1186
USER'S
GUIDE
iii
Page 6
TABLE
OF
CONTENTS
5.
System Tools
57
Introd u cti on
57
The Profile Tool
58
Parameter Items
61
Command Items
62
The
lisp
System Tool
63
Parameter Items
65
Command Items
68
The
On-line
Diagnostic Tool 74
Parameter
Items
76
Command Items
76
6.
Input/Output
77
Floppy Disk
Support
77
Naming, Erasing and Formatting Floppies 78
Copying Floppies
79
Loading Sysouts and
Other
Large
Files
onto
Floppies 79
Measuring Unused Floppy
Space
81
Testing
Whether
a Floppy
is
in
the
Drive
81
Scavenging Floppies
82
R5232
Support 82
Cable Configurations
for
RS232C
Port and
TTY
Ports
83
iv
XEROX
1186
USER'S
GUIDE
Page 7
TABLE
OF
CONTENTS
7. Diagnostics
Glossary
Index
Boot
Options
for
Running
Diagnostics
Preboot
Diagnostics
Boot
Diagnostics
Cursor Codes
Pilot
Operating
System Codes
Lisp Codes
Appendix A - Setting the Time
Setting
Date and Time
on
Standalone
.
Workstations
Appendix B - The Floppy Copy Utility
Copying
Floppy Disks
Appendix C - Library Guide
How
to
Load
from
the
Library Floppies
Library
Floppy
Index
HelpSys
Floppy
Index
XEROX
1186
USER'S
GUIDE
87
87
87
88
91
92
92
99
107
v
Page 8
TABLE
OF
CONTENTS
[This page
intentionally
left
blank.]
vi
XEROX
1186
USER'S
GUIDE
Page 9
1.
INTRODUCTION
The 1186
is
an artificial intelligence development
workstation
that
combines Xerox hardware and
software
to
provide a
wide
variety
of
user
applications.
This
chapter provides a
brief
overview
of
the
1186
workstation
and its software
environment.
The 1186 Workstation
Your workstation consists
of
the
components
described below.
Display Screen: When
the
power
is
turned on,
the
screen should display
the
boot
icons, on-screen
representations
of
the
10
function
keys
at
the
top
of
your keyboard.
Processor Unit: The central processor
(CP)
is
in
a
brown,
rectangular box
about
two
feet
tall
that
usually
sits
on
the
floor
dose
to
the screen and
keyboard.
The
power switch
is
on
the
front
of
the
processor
unit
(often
called the
front
panel) near
the
top,
just under
the
word
"Xerox". The switch
is
fabeled
with
a 0 and a
1; 0 is
off, 1 is
on. Also near
the
power
switch are
the
boot
button
(labeled B
Reset), a green
"power
on"
light,
and three red
lights which are
used
for
diagnostic purposes
(see
chapter
7,
Diagnostics).
XEROX
1186
USER'S
GU
IDE
Page 10
INTRODUCTION
2
If
your 1186 isn't
on,
you can
turn
it
on by pushing
the
power
switch
to
1.
The screen should flash and
after a minute
or
two
the
boot
icons should appear.
Contained in
the
processor
unit
is
the
Rigid Disk.
If
you purchased a Floppy Disk Drive,
it
will
probably
be sitting on
top
of
the
processor
unit
(for
complete
details on
the
rigid disk and
the
floppy
disk drive
see
chapter
2,
Equipment and chapter
3,
Using
the
1186).
Keyboard: The keyboard
is
attached
to
the display
by a cable and
is
the
way you interact
with
the
processor
(see
chapter
2,
Equipment).
Three-button
Optical Mouse: The mouse
is
attached
to
the
keyboard
with a thin
insulated wire.
It
guides a
pointer
(called
the
mouse cursor) across
the
screen
(see
chapter
2,
Equipment). The mouse
comes
with
a n optical mouse pad, and must be
on
the
pad when you move it.
Sometimes
the
mouse cursor
will
change shape and
display a series
of
four
numbers.
These
are cursor
codes and
the
numbers represent
both
progress and
error
conditions
(see
chapter 7, Diagnostics).
Together these components comprise
the
standard
1186 configuration.
You should read chapter
2,
Equipment and chapter
3,
Using
the
1186,
to
familarize yourself
with
the
care and
use
of
your
Xerox 1186 workstation's equipment.
XEROX
1186
USER'S
GU
IDE
Page 11
INTRODUCTION
Getting Started
Xerox 1186 workstations come
with
some software
(a
Lisp
sysout and
System
Tools) already installed
on
the
rigid disk.
If
you discover
that
software isn't installed,
that
you
cannot
load
it
due
to
some mishap
during
either
installation
or
shipping,
or
you decide
to
repartition
(i.e., erase and restructure) your disk, you
will
need
to
follow
the
procedures
found
in chapter 4,
Software
Installation.
Your workstation should be turned on and
the
boot
icons displayed.
Press
the
F1
key on your keyboard.
If a boot
icon
other
than
the one representing
the
F1
key
is
already darkened you must
press
the
boot
button
(B
Reset)
first.
Pressing the
F1
key begins
the
loading process
of
your Interlisp-D environment, called a sysout. (This
is
described in a subsequent section called The Lisp
Sysout.)
In
the
upper
left
hand corner
of
your
screen you
will
see
a small square containing
four
numbers.
These
numbers are called cursor codes
and are
used
to
inform
you
of
the
progress
of
the
operation you are running. The sysout
loading
process
takes one
to
two
minutes.
If
Interlisp-D loads successfully your screen
will
display three windows:
the
Interlisp-D Executive
window
(figure
1)
the
prompt
window
(figure
2)
and the Interlisp-D
logo
window
(figure 4).
XEROX
1186
USER'SGUIDE
3
Page 12
INTRODUCTION
4
nterllsp-O
Execl.!lIve
Figure
1.
The Interlisp-D Executive
window
The executive
window
is
the
window
where
you
interact
with
the
system by
typing
in
commands and
Lisp expressions
to
be evaluated.
You
will
also
see
the
prompt
window
(figure 2),
Figure
2.
The
prompt
window
The
prompt
window
is
where
system messages are
printed. For example,
if
you are
not
connected
to
a
network
that
has a time
server,
or
the
1186 cannot
get
the
time
for
any
other
reason,
the
prompt
window
will
print
a message (figure
3).
You should
always
work
in
an
environment
with
the
correct
time
set.
If
the
time
is
not
set on your
workstation
see
Appendix
A-Setting
the
Time.
Prom t ..,.Vin(Jow
Time
not
set]
Figure
3.
Prompt
window
with
message
indicating
that
time
is
not
set
XEROX
1186
USER'S
GU!DE
Page 13

Software
INTRODUCTION
Figure
4.
The Interlisp-D
logo
window
Xerox supplies several software systems
with
the
1186.
Each
system
is
recorded on one
or
more
floppy
disks. The major system
is
the
Interlisp-D
sysout.
Other
systems provided are a software
installation
utility,
Lisp
Library packages, and
machine diagnostics.
Two examples
of
Library packages are
the
text
editing
package called TEdit and
the
drawing
program called Sketch.
The
Lisp
Sysout
A sysout
is
a snapshot
of
an Interlisp-D
environment. The sysout contains all
the
information
needed
to
start
the
initial
state
of
the
Interlisp-D
system-a
sysout
is
the
initial
contents
of
virtual memory.
As
you run
Lisp,
its virtual
memory
grows
to
accommodate newly allocated data
structures, compiled code and
the
like.
If
you
want
to
stop
working
in
the
sysout and
want
to
save
the
state
of
your virtual
memory
(e.g.,
the
entire
environment
plus
the
software modules you
have loaded) you must
log
out
of
Interlisp-D. You
do
this by
typing
(LOGOUT).
XEROX
1186
USER'S
GUIDE
5
Page 14
INTRODUCTION
Starting
Lisp
6
Interlisp-D
Executive
94~
(LOGOUT)
Figure
5.
The Interlisp-D executive
window
during
execution
of a logout
After
you type
the
closing parenthesis, Interlisp-D
automatically begins saving
the
current state
of
your virtual memory. The state
of
the
virtual
memory
will
be stored in
the
logical volume
in
which
you were running. You
can
resume
your
Interlisp-D session
from
the
place where you logged
out
with
an Fl boot.
You can produce sysouts
of
your own,
which
capture
the
state
of
your
own
custom environment,
by using
the
function
SYSOUT
(See
chapter
6,
Input/Output
and the Interlisp-D Reference
Manual).
If
you
want
to
resume running from
the
point
of
the
most recent
LOGOUT,
simply
press
F1
while
the
boot
icons are displayed.
When
Interlisp-D
is
started
for
the
first time,
it
may
ask
you
to
supply
the
name
of
an
Init
file.
An
Init
file contains
information
that
configures Interlisp-D
for
your
installation.
For example,
the
file INIT.NONET configures
Interlisp-D
for
an 1186
that
is
not
connected
to
a
network
with
a file server. To
use
it,
put
the
Lisp
Library
floppy
containing INIT.NONET
into
the
floppy
drive and
type
{FLOPPY}I
NIT.
NON
ET
XEROX
1186
USER'S
GU
IDE
Page 15
INTRODUCTION
in response
to
the
prompt
for
an
Init
file.
If
you
prefer
not
to
specify an
Init
file,
press
the carriage
return.
You may also be prompted
for a PUP
host
10.
For an
expianation
of
this request,
see
the
section
of
this
chapter entitled The Ethernet.
After
you have run Interlisp-D once, you
will
probably
want
to
store
the
In
it
file
of
your choosing
on
the local disk,
so
that
it
is
loaded automatically
when
you start a fresh sysout.
After
the
initialization finishes, a caret
will
start
blinking
in
the
Interlisp-D Executive
window,
indicating you
can
now
enter expressions and
commands.
Installing a Sysout
Fresh
sysouts may be installed in logical volumes
Lisp, Lisp2, etc. by running
System
Tools
(see
chapter
5,
System
Tools).
Sysout.s
also
can
be installed from
floppy
disks
or
from a file server. You may also copy
a sysout
from
one logical volume
to
another
if
the
sysout on
the
source volume
has
never been started
(see
chapter 4, Software Installation).
Loading Interlisp-D Packages
Xerox supplies
two
sets
of
floppies containing
Interlisp-D software modules:
the
lisp
library,
which contains software supported by Xerox; and
lisp
Users,
which contains user-written software
not
supported by Xerox.
Please
consult Appendix C-library Guide, before
attempting
to
load a specific Library package
into
your virtual memory. Appendix C lists those·
packages
that
require you
to
load files from more
than one
floppy
disk, provides
the
sequence
of
XEROX
1186
USER'SGUIDE
7
Page 16
INTRODUCTION
loading, and contains an index indicating which
modules reside
on
which floppies
Each
module consists
of
one
or
more compiled files.
There are also floppies containing fonts and
the
on-line documentation (HelpSys).
To
load a module from these floppies
into
a
running Interlisp-D environment, insert
the
floppy
containing
the
module you need
into
the
floppy
disk drive, and
use
the
LOAD
function
to
read
it
into
virtual memory.
For
instance,
to
load
the
Grapher module, type
(LOAD '{FLOPPY}GRAPHER.DCOM)
to
the
Interlisp-D Executive.
If
you are
loading
many modules, you may find
it
convenient instead
to
first connect
to
the floppy device by
typing
CONN
{FLOPPY}
after
which you could type simply
(LOAD
'GRAP~ER.DCOM).
When a module
such
as
Grapher
is
loaded,
the
system attempts
to
automatically load all
the
files
on which
the
module depends
that
have
not
yet
been loaded.
If
the
required files are stored on a
floppy
disk
other
than
the
one currently loaded
in
the
floppy
disk drive,
the
system
will
fail
to
find
them.
Copying
Floppies
to a File
Server
8
Another
solution, which most
users
with
a
file
server
or
a large disk are likely
to
prefer,
is
to
copy
the
contents
of
the
floppies
to
the
file server
or
disk.
Then
the
system
can
load all
the
necessary files
directly
from
the
server
or
disk
with
no
further
intervention. You
can
either copy everything
on
the
floppies
or
just
the
modules you need. The
Library module Copyfiles
is
useful
for
loading
the
XEROX
1186
USER'S
GUIDE
Page 17
INTRODU
CTION
contents
of
the
floppies
to
a file server
or
a rigid
disk.
load
COPYFllES.DCOM from
the
library
and then,
for
each
floppy
you wish
to
copy type
(i
n the
executive
window),
(COPYFllES '{FLOPPY}
'{host} < directory»
where
{host} < directory>
specifies a directory on a
file server where you have set aside
space
for
library
files,
or
is
{DSK}<
lISPFllES>
if
you are
copying
the
files
to
your machine's rigid disk.
If
you only wish
to
copy selected files from the
floppies, you
can
copy them one at a time
with
the
function
COPYFllE,
or
more conveniently
use
the
library
module File Browser
to
browse
each
floppy
and copy
the
files you desire.
See
the
lisp
Library
documentation
for
the
CopyFiles and File Browser
modules
for
more details.
Note: The
HelpSys
file IRM.HASHFllE
is
an
exception:
it
spans three floppies and must be
copied in
"huge"
mode
(see
chapter 6,
Input/Output).
Cursor
Codes
Two types
of
codes are displayed in
the
four-digit
cursor code: progress codes and error codes.
These
codes are called cursor
codes
because
the
mouse
cursor changes shape
to
display a
four-digit
number.
Progress codes are
displayed
at
various stages
of
booting
and initialization.
These
codes vanish
when
initialization
is
finished,
or
halt
in some error
code.
XEROX
1186
USER'S
GUIDE
9
Page 18
INTRODUCTION
10
Error codes are indications
of
problems
in
the
program you are
attempting
to
run.
Codes
less
than 9000 are displayed by non-Lisp systems (e.g.,
the
booting
programs),
while
codes in
the
range
9000-9999 an? displayed while Lisp
is
running. Error
codes
usually indicate serious errors,
as
most
minor
errors
during
Lisp
operation are handled
within
the
Interlisp-D Break Package. Thus an error code
generally indicates a software
error
in a part
of
the
system where
it
would
be dangerous
to
signal a
normal
Lisp
error.
When
Lisp
encounters such an error,
it
halts,
displays a cursor code indicating
the
type
of
error,
and waits
for
you
to
take some action. You have a
choice
of
two
actions: (1) you
can
press
the
UNDO
key, which calls a debugging program called
TeleRaid
(a
Ubrary Module); from which
it
is
possible
to
inspect the halted machine's state
from
another
(network
connected)
workstation;
or
(2)
you
can
press
the
STOP
key, in which
case
the
system
attempts a "Hard Reset", which dears
the
state
of
any active computation and restarts all processes
from
the
top.
If
the
failure persists, please
note
the
cursor code
and
notify
Xerox AISupport.
It
is
also
helpful
to
gather
additional
information
by
running
TeleRaid.
Occasionally there are fundamental problems
during
booting
signaled by a combination
of
red
lights above
the
boot
button.
Refer
to
chapter
7,
Diagnostics
for
more
information
about
error codes and
boot
lights.
XEROX
1186
USER'S
GUIDE
Page 19
INTRODUCTION
Booting the Xerox 1186
Booting
Lisp
or
other
software on
the
Xerox 1186
is
a two-stage
process"
First,
press
the
boot
button
(labeled B
Reset)
on the
front
of
the
processor. The
screen
will display
the
boot
icons (The
boot
icons
are also displayed when you first
power
up
the
Xerox 1186,
or
after
performing
a (LOGOUT)
in
Lisp). Then
press
one
of
the
10
keyboard
function
keys, labeled
F1
through
F10.
Each
key specifies a
different
mode
of
booting.
Some ways
of
booting
are:
F1
Resumes
running Interlisp-D
from
the
most
recent
session.
When you
press
Fl
the
display
will
darken and
the
cursor
will
cycle numbers
in
the
upper left-hand corner
while
the
system
initializes memory.
If
you have aborted
the
previous Interlisp-D
session
without
logging
out,
an
Fl-boot
may fail; a typical cursor code
in
this
case
is0217.
F1
0 Invokes the
System
Tools which
allow
you
to
install a new environment on a volume,
or
run
the
saved
environment
from
a
different
volume
than
the
most recent one used. To
do
this,
press
Fl,
then
immediately
press
and
release
tbe zero key.
F2
Boots software
from
an
appropriately
configured
floppy
disk. The Installation
Utility,
supplied
with
the Xerox 1186,
is
such a floppy;
the
Lisp
Library Packages floppies are
not.
F6
Boots
the
Boot Diagnostics floppy, which runs
a comprehensive set
of
machine diagnostics
(See
chapter
7,
Diagnostics).
XEROX
1186
USER'S
GUIDE
11
Page 20
INTRODUCTION
The Ethernet
The Xerox 1186
is
equipped
with a controller
for
a
10MHz Ethernet. This permits
the
Xerox 1186
to
utilize
the
services
of
file serverst print
servers, and
other
equipment
that
speak
the
Xerox
Network
Services
(NS)
protocols.
The
Ethernet also allows
the
Xerox 1186
to
communicate
with
other
Xerox 1100
series workstations
on
the
network.
Each
Xerox processor
is
uniquely
identified
with
a
48-bit host num ber. This num ber
is
used
to
identify
the
Xerox 1186
in
every
NS
network
transaction.
Interlisp-D can also
use
PUP
protocols
to
communicate
with
certain servers. The
PUP
protocols
use
8-bit
host numbers
unique
only
within
one
network.
These
numbers are
not
hard-wired
in
the
processor itself,
but
are usually assigned
to
each
machine by a system administrator.
If
you
find
that
you need a
PUP
number
please consult your system
adm i nistrator.
Occasionally devices on
the
Ethernet may fail
to
communicate,
either
due
to a hardware
problem
with
the
network,
or
the
network
software on some
server.
If
you should experience
trouble
consult
your system administrator.
Copying Files Between Machines
12
On a
network
that
lacks a file server,
it
is
sometimes
convenient
to
be able
to
transfer files directly
between
two
Xerox 1186 workstations. The Library
module
FTPServer
provides
such
a capability. Please
consult
the
documentation
of
the
module
FTPServer
in
the
Lisp
library
Packages manual.
XEROX
1186
USER'S
GUIDE
Page 21
INTRODUCTION
Advice
For
the Standalone
User
If
your 1186
is
a standalone system, the
following
considerations are
important:
Back-up
your
critical files. In a very short
time
you
will
accumulate a large
number
of
files on
your
rigid disk.
Back
up
the
most
important
ones
on
floppy
disks. You
can
always reload software
into
your machine using
the
floppies
that
were
provided. But
if
you have created a critical
file,
saved
it
on your rigid disk
but
not
on floppies, you
run
the
risk
of
losing
the
file forever
if
you
experience an unrecoverable failure
of
the
rigid
disk.
Two Library packages are useful in backing
up
your
files;
the
Copyfiles package and
the
File
Browser
package:
Please
consult
the
Lisp
Library Packages
manual
for
information
on these packages.
Remember
to
set
the
time. Every
time
you
log
out
of
Interlisp you lose
the
time
setting. Saving files
when you are
working
in a sysout
without
the
time
set
is
a risky
business.
Always perform a (SETIIM
E)
when you first begin an Interlisp-D
session
(see
Appendix A-Setting theTime).
XEROX
1186
USER'S
GUIDE
13
Page 22
INTRODUCTION
[This page
intentionally
left
blank.]
14
XEROX
1186
USER'S
GUIDE
Page 23
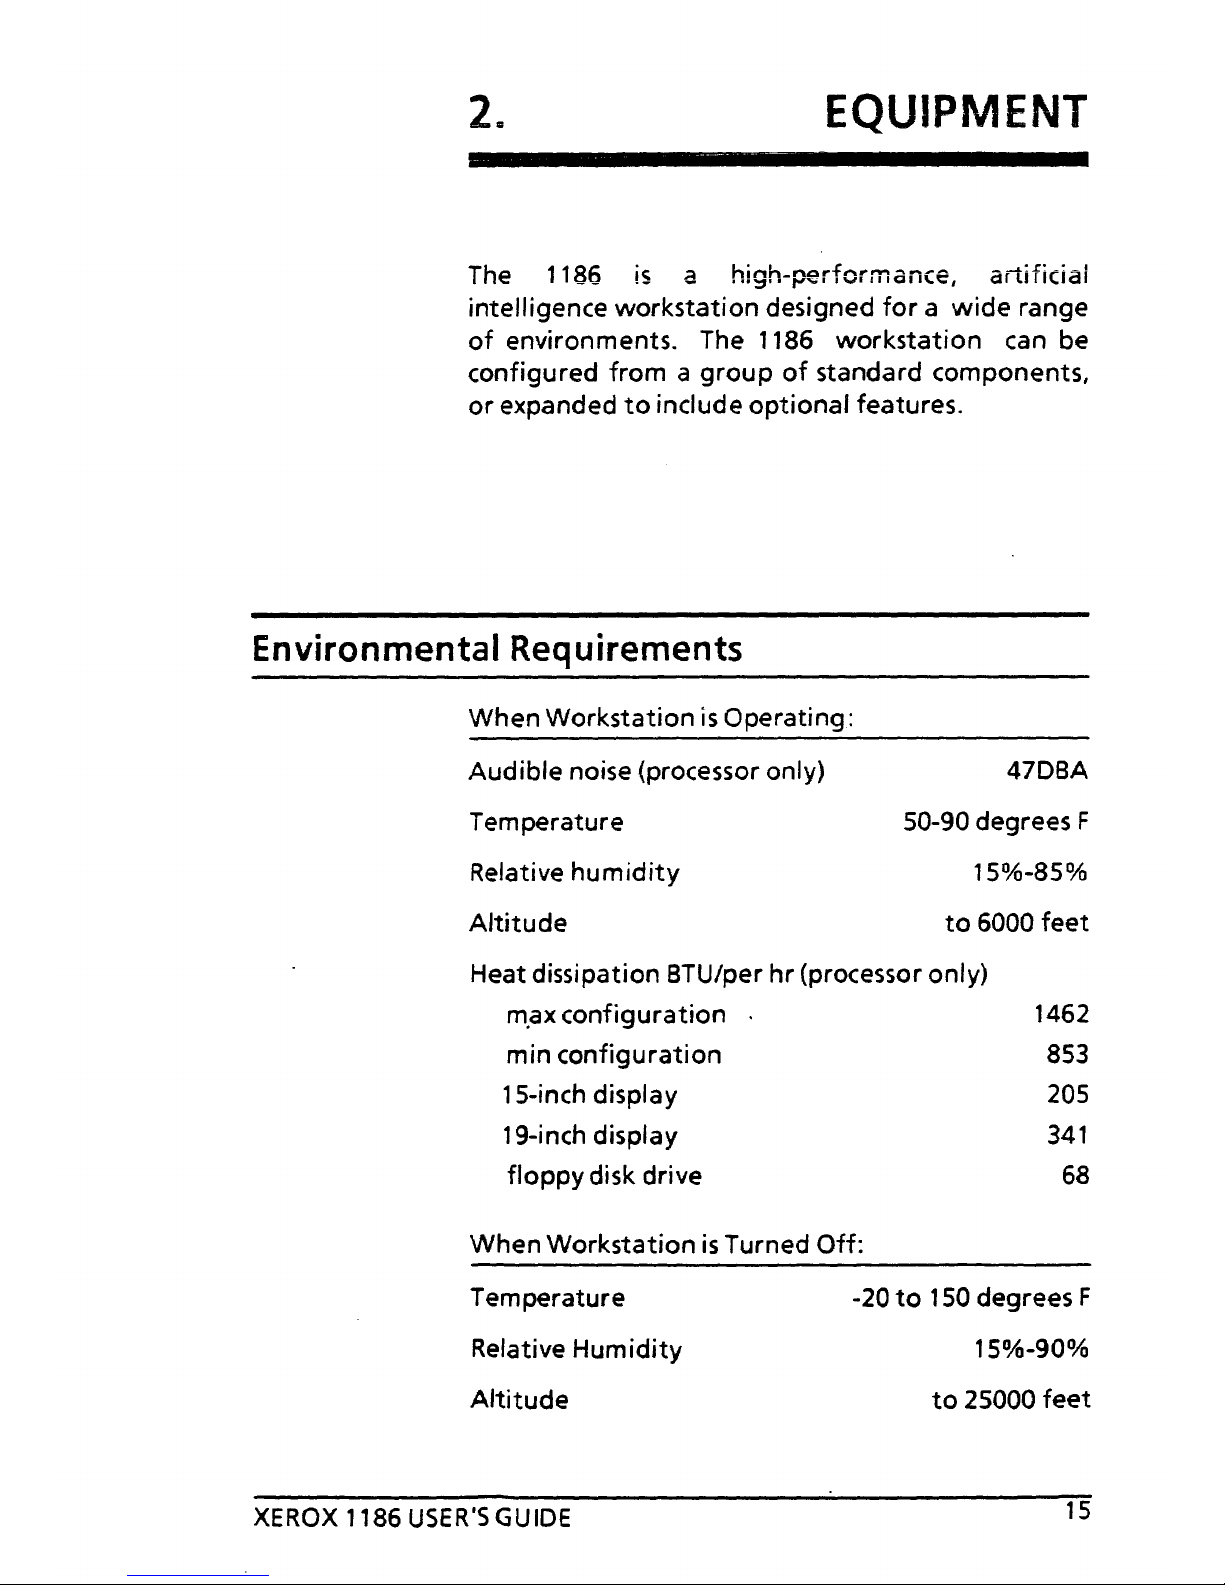
2.
EQUIPMENT
The
1186
is
a high-performance,
artifidai
intelligence workstation designed
for a wide
range
of
environments. The 1186
workstation
can be
configured
from a group
of
standard components,
or
expanded
to
include
optional
features.
Environmental Requirements
When Workstation
is
Operating:
Audible noise (processor
only)
Temperature
Relative
humidity
Altitude
47DBA
50-90 degrees F
15%-85%
to
6000
feet
Heat dissipation BTU/per
hr
(processor only)
m,ax
configuration
1462
853
205
341
min
configuration
1 5-inch display
19-inch display
floppy
disk drive
68
When Workstation
is
Turned
Off:
Temperature
Relative
Humidity
Altitude
XEROX
1186
USER'S
GUIDE
-20
to
150
degrees F
15%-90%
to
25000
feet
15
Page 24
EQUIPMENT
Safety Approvals
The 1186 has
the
agency approvals listed
below:
Electromagnetic Emissions
FCC-A,
VDE-A
Safety
U L 478,
IEC
380,
CSA
C22,
No.
154
Electrical Requirements
The 1186
uses
one
outlet
for
the
processor and
the
display. A second
power
outlet
is·
required
to
connect an
optional
local
printer.
An
outlet
on
the
back
of
the
processor
unit
provides
power
for
the
display. Nominal current
for
the
1186
workstation
is
3.0
Amperes,
with
the
processor generating 2.6
amperes, and
the
display generating 0.4 Amperes.
Standard Equipment
Your
1186
workstation
comes
with
four
standard
components:
• processor
• display
• keyboard
• mouse
16
XEROX
1186
USER'S
GUIDE
Page 25
Processor
EQUIPMENT
The 1186 electronics,
power
supply, and rigid disk
are housed in a floor-standing processor
unit.
At
the
rear of
the
processor an: ports for connecting
the
display and keyboard, and
the
floppy
disk drive,
printer,
and Ethernet
drop
cable.
The
front
of
the
unit
has one
boot
button,
labeled B
Reset,
a
power-on
switch, a green
power-on
indicator
light,
and three red lights
(LEOs).
Processor Physical Specifications
Height
Width
Depth
Weight(standard
configuration)
21.5 inches
9.5 inches
12.5 inches
50lbs
Processor
Memory
The 1186
workstation
has
a
minimum
of
1.6
Megabytes
of
processor memory,
with
additional
increments
of
512
Kilobytes available
as
options,
yielding a
total
of
3,712 kilobytes
of
memory.
The standard
workstation
can accommodate
the
maximum memory
configuration.
The first 1,152
Kilobytes can be installed
without
additional
printed
circuit boards. A
Memory
Expansion Board
is
required
to
attain
the
maximum
memory
capability.
Processor
Memory
Specifications
Main
memory cycle
time,
16-bit
word
Display memory cycle
time,
four
16-bit words
Word
size
XEROX
1186
USER'S
GUIDE
375 nanoseconds
750
nanoseconds
16
bits
17
Page 26
EQUIPMENT
Rigid
Disk
Real
memory address size
Virtual
memory
address size
Virtual
memory
page size
24 bits
24 bits
512
bytes
The basic 1186
workstation
includes a
20
Megabyte
(Mb)
rigid
disk drive,
which
is
housed in
the
processor cabinet. The system
can
be ordered
with
a 40-Mb,
or
80-Mb rigid disk
when
a larger capacity
is
needed.
The
20-Mb, 40-Mb, and 80-Mb rigid disks are each
contained
in
one cabinet. The 80-Mb disks are
full-height
s.2s-inch Winchester disk drives.
Rigid Disk
Specifications
Interface
Transfer rate
Bytes per sector
Unformatted
size (Mb)
Formatted size (M b)
Average
access
time
(ms)
10
20
ST412/sTs06
5 Mbps
512
40
80
7.8 15.7 31.4 62.8
60
45
45
35
RPM
3600 3600 3600 3600
RS-232-C
Serial Interface
18
The processor contains
two
RS-232-C
interfaces.
Asynchronous, byte-synchronous (IBM Bisync), and
bit-synchronous
(SDUH
DLC)
transfers are
supported.
One interface
is
configured
as
a Data
XEROX
1186
USER'SGUIDE
Page 27
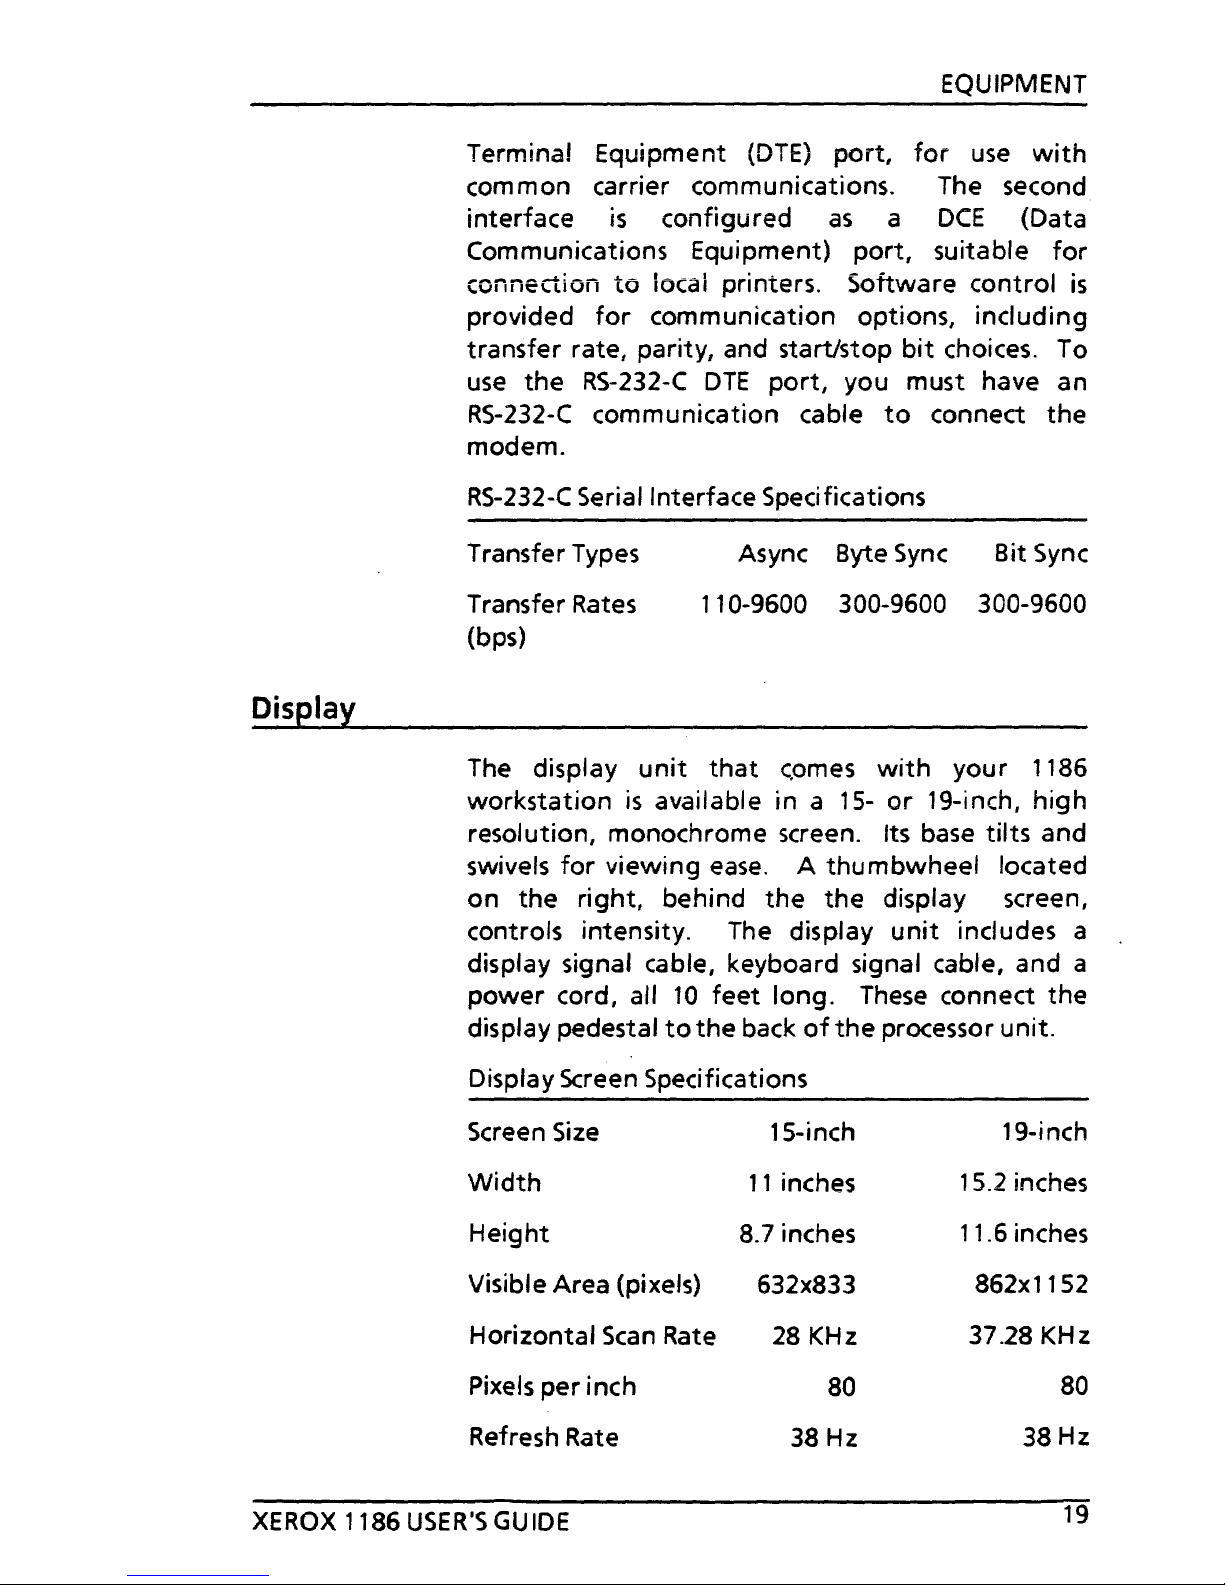
Display
EQUIPMENT
Terminal Equipment
(DTE)
port,
for
use
with
common carrier communications. The second
interface
is
configured
as
a
DeE
(Data
Communications Equipment)
port,
suitable
for
connection
to
locai printers. Software control
is
provided
for
communication options, including
transfer rate, parity, and start/stop
bit
choices. To
use
the
RS-232-C
OTE
port,
you must have an
RS-232-C
communication cable
to
connect the
modem.
RS-232-C
Serial Interface Specifications
Async Byte
Sync
Bit Sync
Transfer
Types
Transfer
Rates
(bps)
110-9600 300-9600 300-9600
The display
unit
that
c,omes
with
your 1186
workstation
is
available in a
15-
or
19-inch,
high
resolution, monochrome screen. Its
base
tilts and
swivels
for
viewing
ease.
A
thumbwheel
located
on
the right, behind
the
the
display screen,
controls intensity. The display
unit
includes a
display signal cable, keyboard signal cable, and a
power
cord, all
10
feet
long.
These
connect
the
display pedestal
to
the
back
of
the
processor unit.
Display Screen
Specifications
Screen
Size
15-inch
19-inch
Width
11
inches
15.2
inches
Height
8.7 inches
11.6 inches
Visible Area (pixels)
632x833
862x1152
Horizontal
Scan
Rate
28
KHz
37.28 KHz
Pixels
per inch
80
80
Refresh Rate
38
Hz
38Hz
XEROX
1186
USER'S
GU
IDE
19
Page 28
EQUIPMENT
Keyboard
20
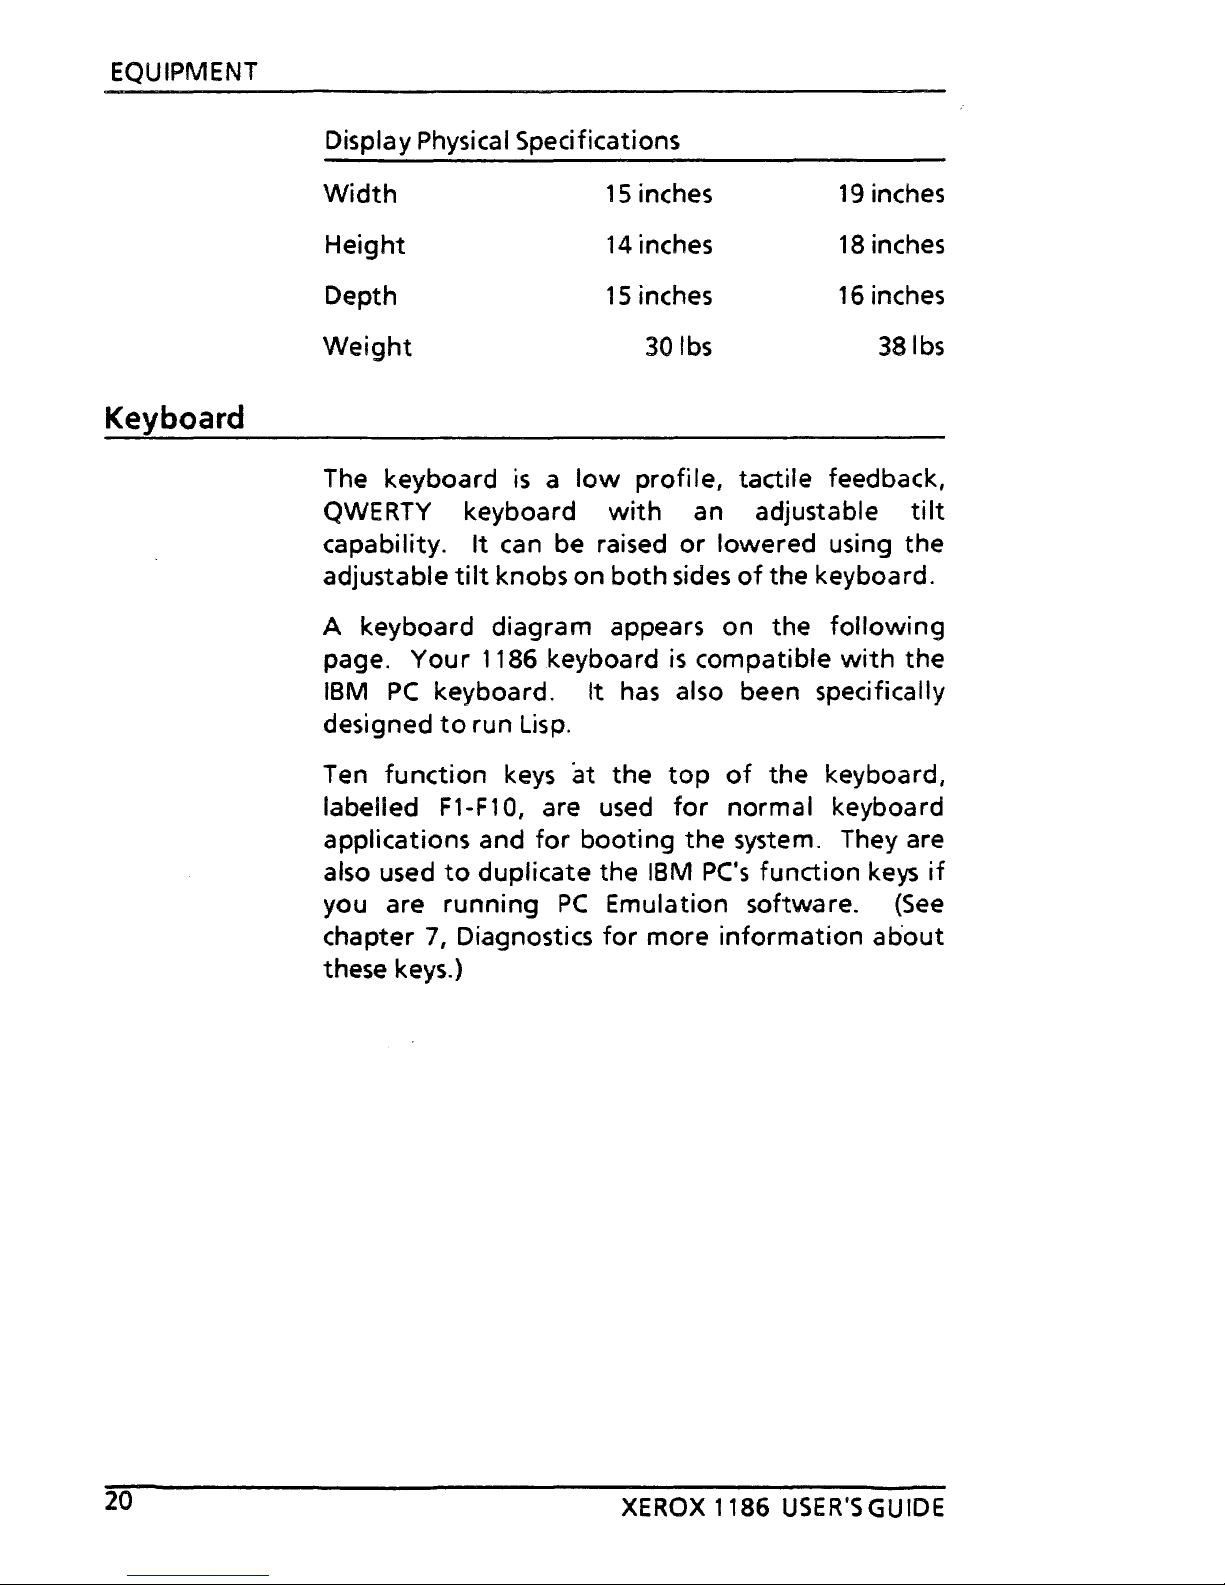
Display Physical Specifications
Width
Height
Depth
Weight
15 inches
14 inches
15 inches
30lbs
19
inches
18 inches
16 inches
381bs
The keyboard
is
a
low
profile, tactile feedback,
QWERTY
keyboard
with
an adjustable
tilt
capability.
It
can
be raised
or
lowered using the
adjustable
tilt
knobs on
both
sides
of
the keyboard.
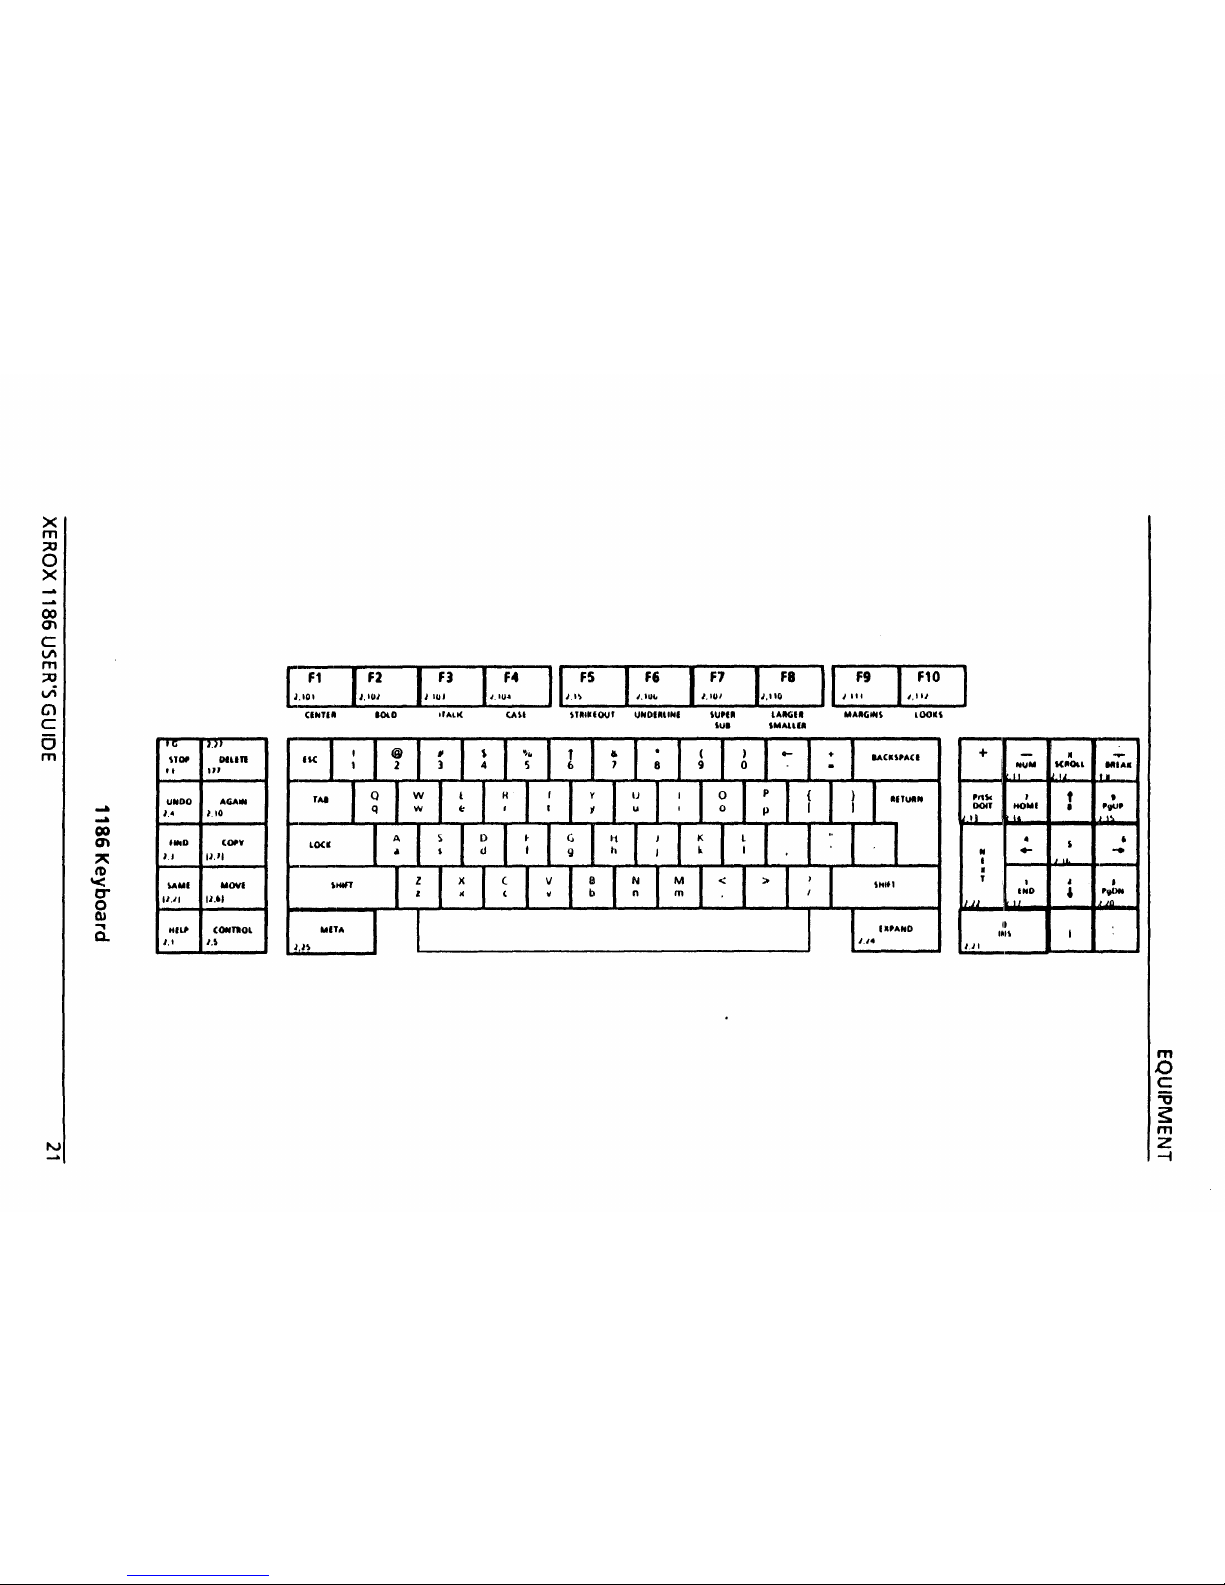
A keyboard diagram appears on the
following
page. Your 1186 keyboard
is
compatible
with
the
IBM
PC
keyboard. It
has
also been specifically
designed
to
run
Lisp.
Ten
function
keys
at
the
top
of
the
keyboard,
labelled Fl-F10, are
used
for
normal keyboard
applications and
for
booting
the
system. They are
also used
to
duplicate the IBM
PC's
function
keys
if
you are running
PC
Emulation software.
(See
chapter
7,
Diagnostics
for
more
information
about
these keys.)
XEROX
1186
USER'SGUIDE
Page 29
X
m
:;;0
o
x
00
'"
c
V\
m
:;;0
vi
Cl
c
a
m
-
-
co
0'\
~
tb
'<
c-
o
(l)
.,
a..
Hi
"Of'
"
UNDO
I.-
'INO
1.1
""MI
1/./1
H'LP
1.1
1/.,:'1
I/'~~
1/1~l
1/,:'4
I
L,\F5
I/'~:
I/.~~
Clllni
1Ol0
"AU(
UU
UIIUOU'
UNOIIllN'
'U,
..
'U'
J."
Dfun
IK
III
ACiAIN
1.10
(Of'Y
11.11
Mova
11."
cOttnol
u
t.lI:
a
lA1lCi1l
,MAUP
+
-
NUM
'rn,
I
OOIT
HOMI
1\
I.
.
N
.-
I
.
,
,
IHO
JJJ
II
II
I~"
1.11
•
KlIOll
t
•
•
,
,
I
....
1111
••
't.
t
'9l"
•
...
•
'.,0..
,n
m
J:)
C
:;;
s:
m
Z
-f
Page 30
EQUIPMENT
Mouse
22
Keyboard Specifications
Adjustable
tilt
Main
keyboard
keys
Left fu nction
keys
Top
function
keys
5 degrees
to
11
degrees
56
10
10
Right
function
keys (numeric pad) 18
Keyboard interface 9600
bps
async
Width
19 inches
Height
1.25 inches
Depth
7.5
inches
Weight
41bs
The mouse
is
an electronic
pointing
device which
provides
X-
and V-positioning
input
to
the 1186
workstation. The mouse guides a
pointer
on
the
screen
as
it
is
moved
across
the
mouse pad. The
pointer
is
generally represented by an arrow,
but
can
take on
different
shapes depending upon
the
function
being performed.
The mouse
is
used
to
select icons and menu items,
to
position
the
cursor
for
text
input
and
editing,
and
to
invoke commands.
Mouse Specifications
Width
Height
Depth
2.25 inches
1.25 inches
3.75 inches
XEROX
1186
USER'S
GUIDE
Page 31

EQUIPMENT
Optional Equipment
The
following
optional components are available
for
your
1186 workstation:
•
floppy
disk drive
• Ethernet transceiver and controller
• Ethernet interface
Floppy
Disk
Drive
The
floppy
disk drive
is
an
optional
feature, except
where
the
PC
emulation capability
is
used.
It
is
a
500
Kb, IBM-compatible,
half-height
floppy
disk
drive.
It
supports one s.2s-inch, double-sided,
single/double density
floppy
disk
at
a time. It
is
housed
in
a separate cabinet, and
is
designed
to
fit
on
top
of
the
processor,
or
it
can be placed
within
four
feet
of
the
processor.
An
optional 10-foot
cable set allows you
to
place
the
floppy
disk drive
on
your desktop.
Floppy Disk Drive Specifications
Interface
SA400
Transfer rate
250
Kbps
Bytes per sector
512
Unformatted
size
500
Kb
Formatted size
360
Kb
Average
access
time
93
ms
RPM
300
Width
9.5 inches
Height
2 inches
Depth
12.5
inches
Weight
61bs
XEROX
1186
USER'S
GU
IDE
23
Page 32

EQUIPMENT
Ethernet Transceiver and Controller
The
Ethernet
transceiver and
controller
are used
to
connect
workstations
to
the
Ethernet, a high-speed
(10
million
bits
per
second) communications
link
used by Xerox.
Ethernet Interface
The Ethernet interface supports
both
the
Ethernet
specification, Version 1.0, and
the
IEEE802.3
standard. The physical
network
hardware
can be
any standard coaxial cable
that
fully
meets
Ethernet's specification,
or
an
RG58
cable
Per
IEEE
802.3 1985
(ISO
DIS
88022/3). The
drop
cable
connector
can accept
either
the
Ethernet version 1.0
or
IEEE
802.3
drop
cables. The transfer rate using
this
interface
is
10
megabits
per
second.
Peripheral Equipment
Cables
24
The
following
peripheral
equipment
is
required
to
configure
your
1186
workstation.
A standard 1186
configuration
uses
the
following
five
cables:
•
workstation
power
cord
•
display
power
cord
•
display signal cable
•
keyboard
cable
•
mouse cable
XEROX
1186
USER'S
GUIDE
Page 33

Power Supply
EQUIPMENT
If
your
configuration
includes an
optional
Ethernet
interface, a
drop
cable
for
connection
to
the
Ethernet
is
required. A
workstation
with
an
optional
floppy
disk drive requires a
floppy
disk
drive
power
cord and signa! cable.
The
power
supply
that
comes
with
your standard
1186
configuration
supports all system
configurations. Therefore,
no
upgrade
is
necessary
if
you wish
to
expand
your
workstation's capability.
The
power
supply has a panel-mounted,
two-position
voltage selection switch. One position
supports
100/115
VAC,
and
the
other
supports
2201240
VAC.
Power Supply Specifications
Power consumption
Input
power
requirements
Range
U.S.
and Canada 98-127
Europe 194-264
Japan
90-100
Japan 90-100
270
watts
Nom inal Frequency
115
220/240
100
100
60
± 0.5
50
± 0.5
60
± 0.5
50
± 0.5
XEROX
1186
USER'S
GUIDE
25
Page 34

EQUIPMENT
[This page
intentionally
left
blank]
26
XEROX
1186
USER'S
GUIDE
Page 35

3.
USING THE
1186
Turning
the
1186
On
The power switch
is
on
the
front
of
the
processor
unit
near
the
top
Gust
under
"Xerox").
The switch
is
labeled
with
a 0 and a
1; 0 is
off, 1 is
on. Turn
the
1186
on by pushing
the
power switch
to
the
1
position. The screen should flash and
after
a
minute
or
two,
the
boot
icons (on-screen
representations
of
the
ten function keys
at
the
top
of
the
keyboard) should appear. Also on
the
front
of
the
processor
is
the
boot
button
(labeled B
Reset),
a green
"power
on"
light,
and three red
lights which are
used
for
diagnostic purposes
(see
chapter
7,
Diagnostics).
Note:
Wait
at
least three minutes
if
you decide
to
turn
the
processor
on
after
turning
it
off.
Booting
the
1186
The installation and diagnostic software delivered
with
your Xerox 1186
is
bound
into
a package called
a
boot
file. (The Lisp Library packages and
the
Lisp
Users
packages, among others, are
not
bootable
files. They must be explicitly
loaded
when
you are
running
Interlisp-D).
The
process
of
loading a
boot
file
into
the
1186
is
called
booting.
Boot files may be
booted from
either
the
rigid disk
or a floppy
disk.
Normally,
the
rigid disk
is
configured
so
that
powering
up
the processor resumes
the
last
Interlisp-D
session.
XEROX
1186
USER'S
GU
IDE
27
Page 36

USING
THE
1186
Booting
the
1186
is
performed
at
the
keyboard by
pressing one
of
the
ten function
keys
labeled F 1
through
FlO. Booting options are summarized
below:
Key
Function
Fl Rigid disk boot/Lisp
boot
F2
Floppy disk
boot
F3
Ether
boot
F4
Alternate Ether
boot
FS
Diagnostic rigid disk
boot
F6
Diagnostic
floppy
disk
boot
F7
Diagnostic Ether
boot
F8-F
10
currently
not
used
Pressing
the
Fl key and then immediately pressing
the
zero key activates
the
alternate rigid disk
bootlSystem Tools boot.
Booting Sequence for Interlisp-D
28
Cursor codes are displayed
on
the
1186
display
screen. They are
usually
in
the
upper
left
corner
of
the
screen,
or
they
can
replace
the
mouse pointer.
This
section describes the current sequence
of
cursor codes
for
booting
your workstation and
loading
Interlisp-D.
The
cursor code numbers are
arranged in
four
quadrants
of
a square,
with
two
characters
on
each side.
The
correct reading order
is
top
left,
top
right,
bottom
left,
and
bottom
right.
With
the
boot
icons displayed on
the
screen,
press
the
Fl key. The screen will
turn
black and
the
small
white
rectangle
will
be replaced by a
four-digit
number which
will
begin
to
count rapidly upwards.
XEROX
1186
USER'S
GU
IDE
Page 37

USING
THE
1186
If
no
errors are detected, the cursor code
will
start
incrementing
at
a slower rate, beginning
with
O.
During this phase, Interlisp-D
is
being loaded
into
virtual memory. Once Interlisp-D
is
loaded,
the
cursor code changes
to
i i
86.
The dispiay
is
activated almost immediately, and displays a
collection
of
random dots. A
few
seconds elapse,
and the
Interlisp-D screen appears.
Turning the 1186
Off
1.
Type (LOGOUT). In a
few
minutes
the
boot
icons
will
appear on screen.
2.
Put
the
power
switch
at
the
0 position.
Note: Remember
to
wait
at
least three minutes
before
turning
the
processor on again.
Routine Maintenance
Keyboard
Mouse
To keep your 1186 workstation in good
working
order, the
following
tasks should be performed
on
a
monthly
basis,
or
as
specified.
Brush
off
the
keyboard
to
keep dust
from
building
up
under the
keys.
Brush
or
wipe
the
dust from the surface
of
the
mouse pad, since dust
can
interfere
with
the
ball
XEROX
1186
USER'S
GUIDE
29
Page 38

USING
THE
1186
Display
Screen
bearings
of
the
two-button
mouse, and
the
lens
of
the
three-button
mouse.
Move
the
mouse
in
circles
on
the
mouse pad and
check
the
movem
ent
of
the
cursor on
the
display
screen
to
make sure
it
is
operating smoothly.
If
you
see
any hesitation in
the
movement
of
the cursor,
the
mouse should be cleaned by a Xerox technical
representative.
Lightly
wipe
your display screen
with
a damp cloth.
You may
use
a commercial
window
cleaner by
spraying cleaner on the cloth before cleaning
the
screen.
CAUTION: Do
not
allow
any
liquid
todrip
down
into
the
housing around
the
screen.
Floppy
Disk
Drive
Floppy
Disks
30
Clean
the
floppy
disk drive heads
as
needed.
If
the
heads are
not
kept
clean, deposits
can
accumulate
that
can
cause
scratching
or
erasure
of
data on
the
disks. Obtain a Xerox head cleaning
kit
from your
technical representative, and
follow
the
directions
that
come
with
the
kit.
Store
floppy
disks away from magnets, dust, and
heat. Do
not
bend them. Do
not
write
on
their
labels
with
ball-point
pens or pencils
of
any sort.
Any
of
these actions
can
result in
loss
of
data.
XEROX
1186
USER'S
GUIDE
Page 39

USING
THE
1186
Trou
blesh
ooting
This
section describes some
of
the
more common
problems
that
may occur
when
you are using
your
1186 workstation.
Problem: The display
is
black,
with
no
bouncing
white
rectangle.
1.
Check
the
intensity wheel
to
see
if
it
is
turned all
the
way
up. (The intensity
thumbwheel
is
located just behind
the
display screen,
on
the
right-hand side.)
2.
Make sure the processor
is
plugged in.
3.
Make sure
the
processor
is
turned
on.
Problem: The cursor
will
not
move.
1.
Test
the
mouse's sensors by
moving
it
in circles
on
the
plastic pad.
2.
Make sure
the
two-button
mouse
is
on
the
special plastic pad
or
other
non-slip surface. The
three-button
mouse must be on its special
optical paper (grey-colored
with
small,
hexagonal pattern.)
3.
Make sure the
thin
cable
is
attached securely
to
the
mouse and
the
keyboard.
4.
Check
the
cursor code
that
is
displayed on your
display screen.
If
the
code
is a number
other
than 1186,
write
the code
down
and
report
it
to
your system administrator,
or
the
Xerox service
representative.
XEROX
1186
USER'SGUIDE
31
Page 40

USING
THE
1186
Reporting Problems
32
The
Xerox
AIS
support team
is
committed
to
providing
full
support services
to
the
entire Xerox
AIS
user community.
Users
are encouraged
to
report
problems
with
the
system, errors in
the
documentation, and
their
general observations.
Messages may be sent
to
us
in several ways.
At
most Xerox
1100
sites, an experienced user
is
designated
as
the
Xerox
1100
System
Administrator.
If
the
system administrator
is
not
able
to
hel p you
with
your problem, he
or
she
should be able
to
contact
the
Xerox
AIS
support team
for
you.
Users
with
access
to
the
ARPANET
are encouraged
to
send mail
to
our
net address:
AISupport@XEROX
Users
without
ARPANET
sponsorship should call
(818) 351-2351 ext.
2222
collect
or
write
to:
Xerox
AIS
Support
Xerox Special
Information
Systems
250
North Halstead Street
Pasadena,
CA
91109
XEROX
1186
USER'S
GU
IDE
Page 41

4. SOFTWARE INSTALLATION
This
chapter describes
the
initial
software
installation and
the
1186 rigid disk file system.
Installing
Lisp
on
the 1186 Workstation
The procedures described in this section
supplement
the
installation
software's
on-line
script.
If
you run
into
a problem,
refer
to
the
section
titled
Troubleshooting
for
Lisp Installation.
Read
the
information
before
each procedure
to
find
out
what
conditions should exist
before
you
start (Prerequisites)'
when
that
procedure should be
performed (Usage), things
to
watch
out
for
(Warning), and
what
you should
do
before
starting
the
procedure (Special Instructions.)
This
is
a step-by-step
guide
to
installing
the
System·
Tools
and
Lisp
on
your
local disk. For a
comprehensive discussion
of
the
System Tools
please refer
to
chapter
5,
System Tools.
Floppy
Disks
Needed
Installation
Utility
System
Files
(There are five system files floppies
numbered
from
one
to
five).
XEROX
1186
USER'S
GUIDE
33
Page 42

SOFTWARE
INSTALLATION
0)
Factory
Configuration
(EEPROM) and
Bad
Page
Checkout
This procedure
is
usually
performed
at
the
factory
before
you receive
your
workstatfon.
If
you
detect
a
bad page
probl em, contact you r Xerox
representative.
1)
Partitioning
Prerequisites:
Usage:
• Assumes
that
proper
EEPROM
Configuration
and
Bad
Page Checkout (Procedure 0) have been
performed.
•
Know
the
disk size you are
working
wIth
(usually
40Mb). You
will
be
prompted
forthis
information.
Perform this procedure
only
when
the
disk
is
new,
or
when
you have experienced a catastrophic disk
failure.
Warning:
Partitioni
ng
the
disk
DESTROYS
all disk files.
If
the
disk
is
not
new, user files
must
be saved first.
Steps for Partitioning
34
a.
Turn
the
workstation
on
and insert
the
Installation
Utility
floppy
disk.
b.
Press
the
B Reset
button
on
the
front
of
the
workstati
on
•
Wait
(up
to
five seconds)
for
the
boot
icons
to
appear on
the
screen.
XEROX
1186
USER'S
GU
IDE
Page 43

SOFTWARE
INSTALLATION
•
Press
the
F2
key (Floppy Boot).
The
4-digit
cursor code
will
count
149,
199,910,920,
940, 990
then
the
Mai n
Menu
will appear.
Note:
if,
after
the
Main
ivienu appears, you are
asked
to
set
the
time,
please
refer
to
Appendix A for
time-setting
instructions.
c.
Type 1 (Lisp Installation) .
• The Installer menu
will
appear.
d.
Type
1,
2,
3, 4,
5,
or 6 depending
on disk size
(Partition xxMB disk
...
) and press < RETURN>.
You will
then
see
the
message:
WARNING·
PARTITIONING A DISK DESTROYS
ALL
ITS CONTENTS
CONTINUE?{Y/N)
If
the
disk
is
new
or
files have been
BACKE 0 UP
type
V,
and press <
RETU
RN
>.
After
about
5 minutes,
the
installer menu
will
reappear. Go
to
Procedure 2,
"Microcode
and System Tool
Installation."
2) Microcode and System Tool Installation
Prerequisites:
Usage:
Assumes
the
disk
is
partitioned
for
Lisp.
Can
be safely repeated,
but
only
needs
to
be
done
once
after
Partitioning.
XEROX
1186
USER'S
GUIDE,
July 1986
35
Page 44

SOFTWARE
INSTALLATION
Special Instructions :
If
you have
just
finished
partitioning
(Procedure 1),
go
to
step d.
Steps for Microcode and System Tool Installation
36
a.
Insert
the
Installation
Utility
floppy.
b.
Press
the
B Reset
button
on
the
front
of
the
processor
unit.
•
Wait
up
to
five
seconds
for
the
boot
device icons
to
appear
on
the
screen.
•
Press
the
F2
key (Floppy Boot).
The
4-digit
cursor code
will
count
149, 199,910,920,
940,990,
then
the
Main
Menu
will
appear.
c.
Type 1 (Lisp Installation) and press <
RETU
RN
>.
d.
When
the
Installer menu appears,
type
7
(Initialize
Workstation
System Tools volume) and
press
< RETURN>.
•
Wait
for
the
prompt
to
appear. This can
take
up
to
two
minutes.
• Insert
the
"System Files" floppies
as
prompted.
There are
five
System
Files
floppies. You
will
be
prompted
to
insert
the
System Files
floppies
into
the
floppy
disk drive by number, e.g.,
"Insert
Floppy Disk labeled 'System Files
#1'
in
the
floppy
disk
drive."
After
you have inserted
the
correct
floppy
press <
RETU
RN
>.
e.
When
the
installation
of
the System Tools
is
complete,
the
Installer menu
will
reappear.
f.
When
the
menu reappears, type 8
(Boot
System
Tools Volume) and press < RETURN>.
Note
that
System Files
floppy
#5
should still be in
the
disk
drive.
XEROX
1186
USER'S
GUIDE, July 1986
Page 45

SOFTWARE
INSTALLATION
After
you
perform
step f,
the
machine
will
illuminate,
running
Tajo.
Note:
At
the
top
of
the
screen you
will
see
"User:{}!
Invalid Password." Ignore this message.
An
icon,
labeled"
Executive 12.2c,"
will
appear
near
the
bottom
of
the
screen.
Move
the
cursor
to
the
center
top
of
this icon
(a
small
region
of
the
icon
will
invert)
and press
the
right
mouse
button.
The
icon
will
expand
into
the
Tajo executive
window.
Move
the
cursor
into
the
executive
window
and
press
the
left
mouse
button.
This
is
where
you
type:
Floppy
Read
Init.cm;@lnit.cm
and press <
RETU
RN
>.
The caret
will
turn
into
a small black
blinking
rectangle. A series
of
messages
will
be
printed
in
the
executive
window
informing
you
of
the
progress
of
the
installation.
After
the
above command
is
executed,
your
1186
will
go
into
the
base
state, a
bouncing
white
box
with
various messages regardi
ng
the
uses
of
the
System Tools.
You
may
remove
the
System Files
floppy
#5
from
the
floppy
disk
drive
now.
g.
Proceed
to
install
the
Lisp Sysout
from
Floppies
(Procedure
3)
or
from
the
Network
(Procedure 4).
XEROX
1186
USER'S
GUIDE, July 1986
37
Page 46

SOFTWARE
INSTALLATION
3)
Installing
the
Lisp Sysout
from
Floppies
Prerequisites:
Usage:
Assumes
the
Initial
Microcode
and Lisp Microcode
have been installed and
the
System Tools are
running
(Procedure
2,
above).
This procedure takes
about
30
minutes.
Warning:
Destroys
the
Lisp
Virtual
Memory
of
last
logout,
but
not
the
LispFiles.
Steps
for
Installing
the
Lisp
Sysout
from
Floppies
38
You should be in
the
base state,
with
the
bouncing
white
box
on
your screen.
a.
Press
the
left
mouse
button
to
enter
the
window
labeled Lisp System TooL
•
Wait
about
one
minute
for
the
Lisp
System Tool
window
to
appear.
b.
One
third
of
the
way
down
the
window
on
the
line
that
begins
with
the
Document:
parameter,
move
the
cursor over
the
Floppy choice.
Press
the
left
mouse
button.
Floppy should become
highlighted.
c.
Skip
the
next
line and
move
the
cursor over
the
Volume
Menu:
parameter
and press
the
left
mouse
button.
Type just
the
number
2,
which
will
be
added
to
the
word
Lisp.
After
you finish typing, the
Volume
Menu:
parameter
should
look
like:
Volume
Menu:
Lisp2.
XEROX
1186
USER'S
GUIDE, July 1986
Page 47

SOFTWARE
INSTALLATION
d. Skip
the
next
four
iines. Compiete
information
concerning
their
meaning
and
use
is
contained
in
chapter
7,
System Tools.
e.
On
the
seventh
line
put
the
cursor
over
the
Sysin!
command and press
the
left
mouse
button.
f.
You
will
get
the
message,
"creating
VM
file
...
Insert
floppy
labeled 'Lisp Sysout
#1'
Confirm
to
continue. "
•
The cursor
will
change
to
a mouse icon.
Press
the
left
button
to
continue
or
the
right
button
to
abort.
• When
the
contents
of a floppy
have been copied
into
the
volume
you have specified, you
will
be
prompted
to
insert
the
next
floppy.
•
Continue inserting
the
Lisp.Sysout floppies
as
prompted.
This
will
take
about
30
minutes.
(Obtain
these floppies
from
your
system admInistrator.).
g.
When you have finished
loading
the
sysout you
will
be asked
if
you
want
to
boot
the
sysout.
Press
the
right
mouse
button
to
abort
the
booting
operation.
h.
Proceed
to
the
section
titled
Continuing,
From
Servers
and
Floppies:.
4) Installing a
Lisp
Sysout from
the
Network'
Prerequisites:
Assumes
the
Initial
Microcode
and
lisp
Microcode
have been installed and
the
System Tools are
running
(Procedure
2,
above).
XEROX
1186
USER'S
GUIDE
39
Page 48

SOFTWARE
I NSTALLA TION
Warning:
Destroys
the
Lisp
Virtual
Memory
of
last
logout,
but
not
the
Lisp
Files.
Steps
for
Installing a Lisp Sysout
from
the
Network
40
You should be in
the
base state,
with
the
bouncing
white
box
on
your
screen.
Press
the
left
mouse
button
to
invoke
the
window
labeled
Lisp
System Tool.
From an
NS
Server:
a.
The system
tool
parameters begin
about a third
of
the
way
down
the
window.
Move
the
cursor
over
the
Device: parameter
entry
NS-FS
and press
the
left
mouse
button.
NS-FS
will
become
highlighted.
b.
Move
the
cursor
to
the
next
line
which
has File:
as
its first parameter.
This
is
where
you
will
enter
the
Information
the
system
tool
needs
to
fetch
your
Lisp sysout. For an
NS
server,
the
entry
you
type
would
look
similar
to
the
following:
[Pele:] <
Lisp>Koto>8asics>
full.sysout
c.
Move
the
cursor over
the
Volume
Menu:
parameter
and
press
the
left
mouse
button.
Type
just
the
number
2 which
will
be added
to
the
word
Lisp.
After
you finish
typing,
the
Volume
Menu:
parameter
should
look
like:
Volume
Menu:
Lisp2
d~
Skip
the
next
two
lines. Complete
information
concerning
their
meaning and
use
IS
contained In
chapter
7,
System Tools.
eo
Move
the
cursor over
the
User:
parameter
and
press
the I eft
mouse
button.
Type you r name.
XEROX
1186
USER'S
GUIDE
Page 49

SOFTWARE
INSTALLATION
f.
Move
the
cursor over
the
User Password:
parameter and press
the
left
mouse
button.
Type
you r password.
g.
Move
the
cursor over
the
Domain:
parameter
and press
the
left
mouse
button.
Type
the
name
of
your
clearinghouse
domain,
e.g.,
Pare.
h.
Move
the
cursor
over
the
Organization:
parameter and press
the
left
mouse
button.
Type
the
name
of
your
clearinghouse
organization,
e.g.,
Xerox.
i.
To
fetch and install
your
lisp sysout,
move
the
cursor over
the
Sysin! command and press
the
left
mouse
button.
The machine
will
load
the
sysout
you
pointed
it
at
in step b above. The
length
of
time
it
takes
to
fetch
the
sysout depends
on
how
busy
the
file server
is.
Skip past the
next
section,
to
the
section
titled
Continuing, From Servers and Floppies:.
From a
PUP
Server:
a.
The system"tools commands begin
about a third
of
the
way
down
the
window.
Move
the
cursor
over
the
Device:
parameter
entry
PUP-FS
and press
the
left
mouse
button.
PUP-FS
will
become
hrghlig~ted.
b.
Move
the
cursor
to
the
next
tine
which
has File:
as
its first parameter. This
is
where
you
will
enter
the
information
the
system tooi needs
to
fetch
your
lisp sysout. For a
PUP
server,
the
entry
you
type
would
look
similar
to
[Eris] <
Lisp>
Koto
> Basics> full.sysout.
C.
Move
the
cursor over
the
Volume
Menu:
parameter and press
the
left
mouse
button.
Type
Just
the
number
2 which
will
be added
to
the
word
XEROX
1186
USER'S
GUIDE
41
Page 50

SOFTWARE
I NSTALLA TION
42
Lisp.
After
you finish typing,
the
Volume
Menu:
parameter
should
look
like:
Volume
Menu:
Lisp2.
d.
Skip
the
next
two
lines. Complete
information
concerning
their
meaning and
use
is
contained in
chapter
5,
System Tools.
e
Move
th~
cursor over
the
User:
parameter
and
press
the
left
mouse
button.
Type
your
name.
f.
Move
the
cursor over
the
UserPassword:
parameter
and press
the
left
mouse
button.
Type
you r password.
g. To fetch and
install
your
lisp sysout, move
the
cursor
over
the
Sysin! command and press the
left
mouse
button.
The machine
will
load the sysout
you
pointed
it
at
in step b above. The
length
of
ti me
it
takes
to
fetch
the
sysout depends on
how
busy
the
file
server
is.
Continuing,
From Servers
and
Floppies:
1.
Move
the
cursor
over
the
Copy VMem!
command and press
the
left
mouse
button.
A
subwindow
will
appear called "CopyVMem.
II
2.
Move
the
cursor over
the
Source
Volume:
parameter
in
the
Copy VMem
subwindow
and
press
the
left
mouse
button.
Type Lisp2.
3.
Move
the
cursor over
the
Oeste
Volume:
entry
press
the
left
mouse
button
and
type
Lisp.
4.
Move
the
cursor over
the
the
Start! command
and press
the
left
mouse
button.
You
will
be asked
to
confirm
the
start
command.
Press
the
left
mouse
button
to
confirm
and
the
right
button
to
abort.
XEROX
1186
USER'S
GUIDE
Page 51

SOFTWARE INSTALLATION
5.
Aher
the
sysout
has
been copied and expanded,
you
will
be asked
if
you
want
to
boot
the
copied
sysout.
Press
the
right
mouse
button
to
abort.
6.
Then select
the
Quit!
command by pressi
ng
the
left
mouse
button.
'vVhen
the
Lisp System Toois
window
reappears, select
Boot!
by pressing
the
left
mouse
button.
7.
When
the
boot
icons appear
on
the
screen, press
the
Fl key. This
will
boot
the
sysout you just copied.
In one
or
two
minutes,
the
Interlisp-D
window
environment
will
appear. Go
to
Procedure
6,
Initializing
Lisp.
5) Re-Installing a
Lisp
Sysout
from
the
Rigid Disk
Prerequisites:
• Assumes Initial Microcode and Lisp
Microcode
were installed and
the
System Tools are
running.
• Assumes
there
is
an
unused and
unexpanded
Lisp
Sysout
on
the
Lisp2 vol ume.
• Assumes
the
boot
icons are displayed
on
the
screen
(if
the
icons are
not
displayed, press
the
B
Reset
button).
Steps
for Re-Installing a
Lisp
Sysout
from the
Rigid
Disk
a.
Do an
alternate
F 1
boot
by pressi
ng
the
F 1 key
and
immediately
pressing
the
zero key.
Note: The zero key must be pressed
while
the
4-digit
cursor code reads
149.
The
4-digit
cursor code
will
count
149, 199, 910,920,
940, 990
then
a bouncing
white
box
will
appear.
If
the
cursor code goes
to a number
higher
than
990,
the
alternate F 1
boot
has failed.
Press
the
B Reset
button
and
try
agai n.
XEROX
1186
USER'S
GU
IDE
43
Page 52

SOFTWARE
INSTALLAtiON
c.
Press
the
left
mouse
button
to
enter
Lisp
System
Tools.
d.
Move
the
cursor
over
the
Copy
VMem!
command
and press the
left
mouse
button. A subwindow
will
appear called CopyVMem.
e.
Move
the
cursor
over
the
Source
Volume:
parameter
in
the
Copy
VMem
subwindow
and press
the
left
mouse
button.
Type Lisp
2.
Move
the
cursor
over
the
parameter
Oest.
Volume:
and press
the
left
mouse
button.
Type Lisp.
f.
Move
the
cursor
over
the
the
Start!
command
and press
the
left
mouse
button.
You
will
be asked
to
confirm
the
Start: command.
Press
the
left
mouse
button
to
confirm
and
the
right
button
to
abort.
g.
After
the
sysout has been copied and expanded
(System Tools
automatically
expands
the
sysout
to
fit
into
the
Lisp
volume) I System Tools
will
ask
you
if
you
want
to
boot
the
copied sysout.
Press
the
left
mouse
button
to
confirm
the
booting
operation.
h.
When
the
boot
icons
appear
on
the
screen, press
the
F1
key. This
will
boot
the
sysout you
just
copied.
In
one
or
two
minutes
you should
see
the
Interlisp-D
window
environment
appear.
i.
Go
to
Procedure
6,
Initializing
Lisp.
6) Initiaiizing
Lisp
44
Prerequisites:
Assumes
Initial microcode was installed, and
that
Lisp
(on
Lisp
volume) was successfully loaded
from
the
network
or
floppies.
XEROX
1186
USER'S
GUIDE
Page 53

SOFTWARE
INSTALLATION
Special
Instructions :
If
you already have
the
Lisp
window
display on
your
screen,
go
to
step
c.
Steps for Initializing
lisp
a.
Press
the
B Reset
button
on
the
front
panel
of
the
processor unit.
Wait
for
the
boot
device icons
to
appear.
b.
Press
the
F 1 key (Rigid Disk Boot)
The
4-digit
cursor code
will
count
149, 199, 2000
..
. 2600, 1186
...
in
1 - 2 minutes.
The InterLisp - D
windows
will
appear
on
the
screen.
c
.•
Answer
the
next
prompt
by
furnishing
your
init
file designation. For example:
{taurus:aissouth}<softwaretest>pasa>
init.lisp
An
Init
file contains
information
that
configures
Interlisp-D
for
your
installation.
If,
for
example, you are
not
connected
to a network
with
a file server, use
the
file
INIT.NONET. To use
Init.nonet
put
the
Lisp
Library
floppy
containing
INIT.NONET
(see
-Appendix
C,
Library Guide; Lisp
Library
Packages Index,
for
the
number
of
the
Library
floppy
with
Init.nonet)
into
the
floppy
drive
and
type
{FLOPPY}INIT.NONET
in response
to
the
prompt
for
an
Init
file.
If
you
prefer
not
to
specify an
Init
file, press carriage
return.
XEROX
1186
USER'S
GUIDE
45
Page 54

SOFTWARE
INSTALLATION
7) Loading Interlisp-D Packages
46
Xerox supplies
two
sets
of
floppies
containing
Interlisp-D
software
modules:
the
Lisp
Library,
which
contains software_ supported by Xerox; and
Lisp
Users,
which
contains
user-written
software
not
supported by Xerox.
Please consult
Appendix
C,
Library Guide,
before
attempting
to
load
a specific library package
into
your
virtual memory.
Appendix
C lists those
modules
that
require
the
loading
of
files
from
more
than
one
floppy
disk, provides
the
sequence
of
loading,
and contains an index
indicating
which
modules reside
on
which
floppies.
Each
module
consists
of
one
or
more
compiled files
(indicated by
the
extension DCOM). There are also
floppies
containing
fonts
and
the
on-line
documentation
(HelpSys).
To
load a
module
from
these floppies
into
a
running
Interlisp-D
environment,
insert
the
floppy
containing
the
module
you need
into
the
floppy
disk drive, and use
the
LOAD
function
to
read
it
into
vi
rtual
memory.
For instance,
to
load
the
Grapher
module,
type'
(LOAD '{FLOPPY}GRAPHER.DCOM)
to
the
Interlisp-D Executive.
If
you are
loading
many
modules, you may
find
it
convenient instead
to
first connect
to
the
floppy
device by
typing
,-
CON
N {FLOPPY}
after
which
you could
type
simply
(LOAD 'GRAPHER.DCOM).
When a module
such
as
Grapher
is
loaded,
the
system
attempts
to
automatically
load all
the
files
on which
the
module
depends
that
have
not
yet
been loaded.
If
the
required
files are stored on a
XEROX
1186
USER'S
GUIDE
Page 55

SOFTWARE
INSTALLATION
floppy
disk
other
than
the
one curr:ently loaded in
the
floppy
disk drive,
the
system
will
fail
to
find
them.
Another
solution, which most users
with
a
file
server
or
a large disk are likely
to
prefer,
is
to
copy
the
contents
of
the
floppies
to
a fi
Ie
server
or
disk.
Then
the
system can load all
the
necessary files
directly
from
the
server
or
disk
with
no
further
intervention.
You can
either
copy everythi
ng
on
the
floppies
or
just
the·
modules you need. For
loading
the
contents
of
the
floppies
to
a file server
or
local disk,
the
Library
module
CopyFiles
is
useful.
Load
COPYFILES.DCOM
from
the
Library and
then
perform,
for
each
floppy
you wish
to
copy,
(COPYFILES
'{FLOPPY}
'{host}<directory»,
where
{host} < directory
> specifies a
directory
on
a
file server
where
you have set aside space
for
Library files,
or
is
{DSK}<
LlSPFILES > if
you are
copying
the
files
to
your
machine's local disk.
If
you
only
want
to
copy selected files
from
the
floppies, you
can
copy
them
one
at a time
with
the
function
COPYFILE,
or
more
conveniently, use
the
Library
module
File Browser
to
browse each
floppy
and copy
the
files you
want.
See
the
Lisp
Library
documentation
for
the
CopyFiles and File Browser
modules
for
more
details.
Note:
the
He/pSys file IRM.HASHFILE
is
an
exception:
it
spans
three
floppies and must be
copied in
"huge"
mode
(see
chapter
6,
Input/Output)
.
XEROX
1186
USER'S
GUIDE
47
Page 56

SOFTWARE
INSTALLATlON
8)
Logging
Out
of
Lisp
Steps
for
Logging
Out
of
Lisp
If
you
want
to
turn
off
your
processor you must
logout
of
Lisp first.
a.
Type (LOGOUT) in
the
Interlisp-D Executive
window.
b.
Wait
for
the
boot
icons
to
appear
on
the
screen
(about
one
to
two
minutes).
c.
Push
the
power
button
to
zero .
.
Troubleshooting
for
Lisp
Installation
48
Problem:
When
using Procedure 6,
Initiaiizing
Lisp,
the
cursor code freezes
at
199.
Solution:
Be
sure you have
performed
steps 9 and h
of
Procedure 2 in
the
correct order.
Problem:
When
doing
an
PUP
Fetch,
the
cursor
cod e freezes
at
981
.
Solution:
See
your
system
administrator.
Your
processor must be
properly
registered.
XEROX
1186
USER'S
GUIDE
Page 57

SOFTWARE
INSTALLATION UPDATE
Steps
for
Microcode Only Installation
If
you accidentally erase
your
Lispfiles volume, you
must reinstall your microcode. This step tells you
howtodo
so.
a.
Insert
the
Installation
Utility
floppy.
b.
Press
the B Reset
button
on
the
front
of
the
processor
unit
.
•
Wait
up
to
five seconds
for
the
boot
device icons
to
appear
on
the
screen.
•
Press
the
F2
key (Floppy Boot).
The
4-digit
cursor code
will
count
149,
199,
910, 920,
940,990,
then
the
Main
Menu
will
appear.
c.
Type
the
number
for
Lisp Installation and press
<RETURN>.
d. Type
the
number
for
Install
Lisp
Microcode Only
and press <
RETU
RN
> . You
wi
II
be prom
pted
to
insert "System
Files
Floppy
#1."
Insert
the
floppy
and press <
RETU
RN
> .
Note: Prolog users must choose
the
menu
option
"Install Prolog
Microcode"
after
installing
the
Lisp microcode.
XEROX
1186
USER'S
GUIDE, December 1986
48-1
Page 58

SOFTWARE INSTALLATION UPDATE
[This page
intentionally
left
blank.]
48-2 XEROX
1186
USER'S
GUIDE,
December
1986
Page 59

SOFTWARE
INSTALLATION
Rigid Disk File System
Disk
Partitions
The 1186 rigid disk file system
is
designed
to
provide
Interlisp-D users
with
a
flexible
mechanism
for
stoilng
and
accessing fiies. The i 186 fiie system
supports
such
features
as
random
access
and version
numbers
on
files.
In
addition,
the
1186 rigid
file
system supports a hierarchical
naming
structure
for
files.
The
rigid
disk used
with
the
1186 may be
partitioned
into
up
to
ten
regions called
logical
volumes. Logical volumes are like directories
on
the
disk device:
they
may be used
to
hold
Interiisp
virtual memories,
or
Interlisp files. You can
partition
the
disk
with
the
Installation
Utility
floppy. Because
partitioning
the
rigid disk erases ail
its contents, you are advised
to
partition
the
disk
appropriately
before
storing
anything
on
it.
Otherwise, you
will
have
to
move
all files
from
the
disk,
repartition
it, and
then
copy
the
files back
to
the
disk.
Although
an Interlisp virtual
memory
file can
coexist
on
a logical
volume
with
other
files,
it
is
generally advisable
to
give each virtual
memory
file
a logical
volume
that
it
does
not
share
with
anything
else. Otherwise,
the
resulting
fragmentation
adversely affects
swapping
performance. A logical
volume
intended
to
contain
an lnterlisp virtual
memory
should be
between
8,000 disk pages
(4
megabytes) and 64,000 pages
(32
megabytes) long. The closer
to
64,000 pages
you can make
your
virtual
memory
volume
the
better, provided there
is
still
enough
space on
the
disk
for
any
other
volumes you
might
need.
XEROX
1186
USER'S
GUIDE
49
Page 60

SOFTWARE
INSTALLATION
Note
that
to
store Interlisp files
on
a logical volume,
you must create a
Lisp
directory
on
that
volume
(see
below
for
instructions).
File System
Utility
Functions
50
So
long
as
there
is
a logical
volume
with
a Lisp
directory
on
it
(a
Lisp
directory
is
a place
that
Lisp
can store files
on
the
rigid disk) you
can
access
the
rigid
disk device
with
{DSK}.
If
you
do
not
have a
logical
volume
with a Lisp
directory
on it, Interlisp
emulates
the
{DSK}
device by a core device.
(A
core
device
is a file
device whose backing store
is
entirely
within
the
Lisp
virtual
memory.)
However, this causes three problems.
(1) The core
device provides
limited
space;
(2)
when
running
GREET,
Interlisp fails
to
find {DSK}lnit.Lisp and has
to
prompt
you
for
an
init
file; and (3) since
the
core
device
is
contained in virtual memory,
it
(and
the
files stored on
it)
can last only
as
long
as
you keep
your
virtual
memory
image.
To
create a
Lisp
directory
on a logical volume, call
(CREATEDSKDIRECTORY
VOLUMENAME) (Function]
CREATEDSKDIRECTORY
affects
only
the
specified
volume.
CREATEDSKDIRECTORY
returns
the
name
of
the
directory
created. You should install an
Interlisp
directory
only
the
first
time
the
logical
volume
is used.
After
that,
the
system
automatically
recognizes and opens
access
to
the
logical volumes
that
have Interlisp directories
on
them.
Should you ever
want
to
get
rid
of a Lisp
directory
(and all
the
files
in
it),
call
(PURGEDSKDIRECTORY
VOLUMENAME) (Function]
PURGEDSKDIRECTORY
affects
only
the
Lisp files
on
the
specified volume. An alternative
way
to
get
rid
XEROX
1186
USER'S
GUIDE
Page 61

SOFTWARE
INSTALLATION
of a Lisp
directory
is
to
use the System Tool
to
Erase
the
entire
logical volume.
To
find
out
if
a
particular
logical
volume
already has
a
Lisp
directory on it, call
(lISPDIRECTORYP
VOLUMENAME)
[Function1
To
find
out
what
logical volumes you have on
your
local disk, call
(VOLUMES)
[Function1
To
find
out
the
total
size
of
a logical
volume
in disk
pages,
call
(VOLUMESIZE
VOLUMENAME)
[Function]
To
find
out
the
number
of
free
pages
left
on a
volume, call
(DISKFREEPAGES
VOLUMENAME
RECOMPUTE) [Function] .
And
to
find
out
which logical volume contains
the
virtual
memory
you are
currently
running
in,
caU
(DISKPARTITION)
[Function1
There
is
a display
window
that
can keep track
of
the
information
provided by
L1SPDIRECTORYP,
VOLUMES, VOLUMESIZE, and
DISKFREEPAGES.
The
display
window
can be in
one
of
three
states: ON,
OFF,
or
CLOSED.
ON
means
the
display
window
is
updated
whenever
the
file
system state changes.
(This continuous
updating
can slow
down
the
file
. system significantly.)
OFF
means
that
the
display
window
is
open,
but
updated
only
when
you
left-button
it
with
the
mouse.
CLOSED
means
that
the
display
window
is
closed and never
updated.
The display
mode
is
initially
set
to
CLOSED.
To
change
the
state
of
the
display, call
(DSKDISPLAY
NEWSTATE)
[Function1
XEROX
1186
USER'S
GUIDE
51
Page 62

SOFTWARE
INSTALLATION
DSKDISPLA
Y returns
the
old state
of
the
file system
display, and
if
NEWSTATE
is
one
of
the
litatoms
ON,
OFF,
or
CLOSED,
then
the
display state
is
changed
to
NEWSTATE.
To
control
the
position
of
the
display
window,
call
(DSKDISPLA
Y PLACE) [Function]
Once
the
display
window
is
open, you
can
update
it
or
change its state by
putti
ng
the
mouse cursor in
the
window.
with
the
mouse. Pressing
the
left
button
updates
the
window,
and pressing
the
middle
button
brings
up
a menu
that
allows you
to
change
the
display state.
Finally, once an Interlisp
directory
has been installed
on a logical volume, any
program
running
in Lisp
has
access
to
the
Lisp files
on
the
volume.
Access
is
provided
through
the
usual device-independent file
interface:
CONN
(to
connect
to
any
directory
or
subdirectory
on
the
local disk),
OPENSTREAM,
CLOSEF,
DELFILE,
GETFILEINFO,
SETFILEINFO,
BIN,
BOUT, LOAD, etc.
File Name Conventions
52
Each
logical
volume
with a Lisp
directory on
it
serves
as a directory
of
the
device {DSK}.
Files
are referred
to
as
{DSK} < LOGICAL
VOLUMENAME > FileName
Thus
the
file Init.Lisp
on
the
volume LispFiles
would
be called
{DSK}<
LispFiles> Init.Lisp.
In
addition,
you
can
indicate subdirectories using
the
> character in file names
to
delimit
subdirectory names. Subdirectories
allow
you
to
group
files
to
a
finer
degree.
Files
with
subdirectories are
written
{DSK} < LOGICAL
VOLUMENAME > SubOirl
>
...
>
Su
bOirN>
FileName
XEROX
1186
USER'S
GUIDE
Page 63

SOFTWARE
INSTALLATION
For exampie, suppose you had a file LRdesign. TEdit
on the subdirectory ParserGenerator on
the
subdirectory Compiler on
the
directory
(logical
volume) LispFiies
of
the
rigid
disk device. Its name
would
be
written
as
follows:
{DSK}..;:
LispFiles>Compiler>ParserGenerator>
LR
Design. TEdit.
If
you
don't
explicitly
put a directory
in
the
file
name
for
{DSK},
the
system
will
default
to
a
directory
in a simple way.
If
the
file does
not
have a
subdirectory and you
omit
the
directory
(logical
volume
name),
the
directory
defaults
to
the
first
logical volume,
after
the
volume
that
contains
the
running
virtual memory,
that
has a Lisp directory.
Thus
if
your
disk has
the
logical volumes
Lisp,
rajo,
and LispFiles, and
the
Lisp
volume
contains
the
running
virtual memory, and
only
the
LispFiles
volume has a
Lisp
directory
on it,
then
{DSK}lnit.
Lisp
refers
to
the
fi
Ie
{DSK}<LispFiles>lnit.Lisp. All
the
utility
functions
presented above
default
logical
volume
names in a
similar way.
An
example
of a utility
function
that
doesn't
default
directory
names
is
CREATEDSKDIRECTORY.
If
you
want
to
find
out
what
the
default
Lisp
directory
is,
call
(DIRECTORYNAME '{DSK})
This
defaulting
convention
is
necessitated
by
several
parts
of
the
Interlisp system
that
create scratch files
on
the
device {DSK}
without
specifying a
directory
(logical volume).
Disk
Scavenging
The
Koto
release provides a disk scavenging service
to
help
you recover
from
the
unlikely
event
of
file
system failure. There are
two
classes
of
file system
failure:
Lisp
directory failure and lower-level, Pilot
operati
ng
system fail ure. Scavenging
for
Lisp
XEROX
1186
USER'S
GUIDE
53
Page 64

SOFTWARE
I NSTALLA
TION
54
directories
is
provided by
SCAVENGEDSKDIRECTORY;
scavenging
for
Pilot
is
provided by
the
System Tool.
Lisp
directory
failures show
up
as
infinite
looping
or
I
other
aberrant
behavior
while
the system
is
doing
a
directory
search
or
enumeration.
To
repair
the
directory,
return
to
the
top
level
(the
Interlisp-D
Executive) and call
(SCA
VENGEDSKDI
RECTORY
VOLUMENAME) [Function]
This
function
deletes
the
old
directory,
then
reconstructs
it
from
the
files
on
the
given logical
volume.
Pilot failures manifest themselves
as
"HARD
DISK
ERROR"
breaks
within
Lisp.
To
fix such a failure,
return
to
the
top
level,
log
out
of
Lisp
and
get
into
the
System Tool. Invoke
the
Scavenge! command
for
the
damaged logical volume.
If
the
System Tool
reports
that
there
were
no
problems, proceed back
to
Lisp
and call
SCAVENGEDSKDIRECTORY
as
described above.
On
the
other
hand, the System Tool may
report
problems.
Each
problem
is
described by a message
in
the
format
shown
below:
[filelO]
type = file
type;
problem
description
The filelD
is
a pair
of
numbers separated by a
comma. The file
type
is
a single number.
If
it
is
in
the
range 10048
to
i 0077 inclusive, the damaged file
belongs
to
the
Lisp
local file system.
Any
other
file
types may be safely
ignored.
If
the
file
is
in
the
Lisp
local file system, you should
examine
the
problem
description
to
determine
your
next
course
of
action. There are five possible
problems.
XEROX
1186
USER'S
GUIDE
Page 65

SOFTWARE
INSTALLATION
unreadable pages
[first
... iast pius one)
1.
This indicates a
hardware
problem. You should
run
the
disk diagnostics and
probably
have
the
pages marked bad.
missing pages
[first . .Jast
plus one)
2.
Some
of
the
file pages have
not
been allocated
correctly. You will
probably
see
this
aher
getting
VERIFY
ERRORS
in
Lisp.
duplicate
page
found
3.
Self-explanatory
orphan
page
found
4.
The scavenger
found
an allocated disk page
that
it
believes belongs
to
no
allocated file.
unknown
problem
5.
This
is
a catch-all
for
cases
not
covered by
the
previous four.
Return
to
the
top
level (Interlisp-D Executive) and
call
SCAVENGEDSKOIRECTORY
from
Lisp unless
case
1
or 2 reported
that
page 0
of
a fi Ie was damaged.
If
the
only
problems· were
of
class 3 or
4,
you shou I d
be able
to
resume normal
operation.
In
cases
1,
2,
and 5
we
recommend
that
you copy
the
files
from
the
local disk
to
floppies
or a file
server,
then
erase
the
volume using
the
System Tool's
Erase! command. Do
not
attempt
to
access
the
damaged files in any way. The
function
FILENAMEFROMID
will
let
you translate from Pilot
file
10's
into
file names.
(FILENAMEFROMID LOWHALF HIGHHALF
VOLUMENAME) [Function]
This
function
take a Pilot file
10,
as
printed
by
the
Scavenger and tries
to
find
that
file in the
LISp
directory
of
the
given volume,
returning
a string
XEROX
1186
USER'S
GUIDE
55
Page 66

SOFTWARE
INSTALLATION
56
with
the
file name
if
successful, NIL otherwise. Note
that
the
Pilot scavenger pri nts fi
Ie
lOs
in octal.
If
you have any
doubt
about
which
logical volumes
to
scavenge, scavenge
them
all. The scavenger does
not
harm
an
intact
volume.
XEROX
1186
USER'S GUIDE
Page 67

Introduction
5.
SYSTEM
TOOLS
When the Xerox 1186
is
in
the
base
state
(a
bouncing
white
rectangle
on
a dark background),
the
lisp
System
Tool, Profile Tool and On-line
Diagnostics
can
be invoked and
the
Lisp
Volume
can
be booted.
Base
state
is
entered by
doing
an
alternate
F1
0
boot
(see
chapter
4,
Software
Installation).
If
the
bouncing
white
rectangle does
not
appear, make sure you have correctly loaded
the
software
as
described
in
the
previous chapter.
Each
of
these tools displays its
own
window.
Although
not
specifically labeled, each
window
is
divided
into
the
following
regions, from
the
top
of
the
windowto
the
bottom,
respectively:
• Herald name displays
the
version date and
time
• Message
subwindow
displays any
error
messages
• Parameter
subwindow
specifies all data
parameters
• Command
subwindow
contains all available
commands
• File
subwindow
displays interactive
messages
Parameter fields are selected
with
the
left
mouse
button.
Parameter menus are available in some
cases,
and
they
can be selected by pressing
either
both
mouse
buttons
on a two-button
mouse,
or
XEROX
1186
USER'SGUIDE
57
Page 68

SYSTEM
TOOLS
using
the
middle mouse
button
on a three-button
mouse. Hereafter, parameter selection
will
be
referred
to
as
being available
through
the
middle
mouse
button.
The
DELETE
key
can
be used
to
delete a selection.
The mouse
button
or
the
NEXT
key
can
be
used
to
advance
to
the
next
field
in
the
window.
Using
the
NEXT
key
to
advance
the
cursor
will
delete
whatever
is
already
printed
in
that
parameter field.
However,
no
harm
will
result
if
you accidentally
erase one
of
these filled-in fields.
Users
unfamiliar
with
mouse and
window
manipulations are strongly encouraged
to
read
the
on-line
help
command
from
the
Diagnostics.
tool
which
provides in-depth details on
their
usage.
The Profile Tool
58
The Profile Tool enables you
to
set a number
of
parameters
that
are
used
by
the
Lisp
System
Tool
for
installing Interlisp-D sysouts.
For
example,
if
the
path
name
to
your
sysouts
is
always
the
same, you
may enter
that
name
into
the
Profile Tool. Entering
the
path name
into
the
Profile Tool changes
the
default
value
of
the
File: parameter in
the
Lisp
System
Tool.
Thus, every
time
you open
the
Lisp
System
Tool
to
fetch a sysout,
the
File: parameter
will
be
filled in.
You
can
change
the
default
values in
the
Lisp
System
Tool
window.
XEROX
1186
USER'SGUIDE
Page 69

SYSTEM
TOOLS
Summary:
• To activate
the
tool
from
the
base
state, press
the
middle mouse
button.
•
Select
the
parameters you
change.
,
...
: ..
1....
VVI~II
• Select
the
Set Profile! command.
to
set
or
• Confirm by pressing the
left
mouse
button
when
the
small mouse icon appears. Click
the
right
mouse
button
to
abort
the
command.
• Select Quit!.
XEROX
1186
USER'S
GUIDE
59
Page 70

CJ\
o
X
m
:::0
o
X
00
CJ\
C
V\
m
:::0
v\
C\
C
a
m
lUser:
VOUI"Nalie
User
Pasnord:
........
~in:
xs;s
1nrg.nization: Xerox
Device:
~~,
NS-FS,
Floppy,
Loc,'
Disk}
j Vol&.s
...,:
c...rent
Punord:
..
Pasnord:
1NS
File-Pa~:
(Local :Dom&in:Org&nization)Oirectory/SubOirectory/FileNa.e.sysout
l
Plf-
File-Pattw..:
[Host ]<Oirectory>SubOi,--ectory>Fil eNule.
sysout
~F1oppy
file
NYe: L
isp.sysout
.
lOef.ult
l
i.
Volt.e:
Lisp Boot
Vol~
For
STfF
Key:
Lisp
leopyw
Fro.
Vol..:: L isp2
CopyW
To
Vol..::
Lisp
.
l5et
Protilo!
aw.ga
Pasnord!
Quit!
...
....
...
.....
~
'"
-t
m
s:
-f
o
o
r-
V\
Page 71

SYSTEM
TOOLS
Parameter Items
The Profile Tool
has
the
following
parameter items:
User/User Password:
Your
NSIPUP
user and password names used
to
Login
to
the
remote file server. (For
PUP
users,
the
name should be
followed
by a registry, like
YourName.pa)
It
is
not
necessary
to
supply
the
password
in
the
Profile Tool.
It
can
be entered
in
the
System
Tool
Window.
If
a password
is
supplied,
it
is
stored
on
the
disk
in
an unencrypted form.
Domain/Organization:
Your
domain
and organization name.
If
you
do
not
use
an
NS
file server, these parameters are
irrelevant and should be
left
blank.
Device:
Selects
the
type
of
device
on
which
the
Lisp
sysout
file
is
stored. The choices are
PUP-FS,
NS-I=S,
Floppy
and
local
Disk.
Volume
Menu:
Volume name
for
changing
the
volume password.
Also used
to
select a particular volume
for
operations.
Current Password:
Current volume password string,
initially
set
to
the
volume name. Once
the
current password string
is
changed,
the
volume
is
password-protected.
Subsequent
access
to
the
volume
will
require
the
password
to
be typed from
the
Lisp System Tool
window.
New
Password:
New
volume password string, consisting
of
at
least
five characters.
XEROX
1186
USER'S
GUIDE
61
Page 72

SYSTEM
TOOLS
NS
File-Pathname:
Complete file pathname
of
the
Lisp sysout file
to
be
retrieved from an
NS
file server
(see
the
next
section, The
Lisp
System Tool,
for
examples
of
pathnames).
PUP
File-Pathname:
Complete file pathname
of
the
Lisp
sysout file
to
be
retrieved from a
PU
P file server
(see
the next
section, The
Lisp
System Tool,
for
examples
of
pathnames).
Floppy File Name:
The
file
name
on
the
floppy
diskette from which
the
Lisp sysout file
is
to
be loaded.
Default
Lisp Volume:
Sets
the
default
volume
for
the
Lisp
System
Tool
to
operate on.
Boot
Volume
for
Stop Key:
The name
of
the
volume
that
boots
with a STOP
key
or
Fl boot.
Copy
VM
from
Volume:
The name
of
the
logical volume (e.g., Lisp2)
that
will
be
the
source
of
the
virtual memory
to
be
copied.
Copy
VM
to
Volume:
The name
of
the
logical volume
to
which
the
virtual
memory
will
be copied.
Command
Items
62
Set Profile!
Writes
the
parameter
information
entered in
the
Profile Tool
window
to
the
Lisp
System
Tool.
Change
Password!
Changes
the
password
for
the
logical volume
named in
the
Volume
Menu:
parameter.
For
the
XEROX
1186
USER'S
GU
IDE
Page 73

SYSTEM
TOOLS
cha
nge
to
take effect
both
the
Current Password:
and
New
Password: parameter items must be
completed.
Note:
F1
and
STOP
key boots
will
not
work
on
a
protected volume.
To
reset
the
password
protection, change the volume password back
to
the
volume name.
Since
a password must consist
of
at least five characters, you
will
not
be able
to
reset
the password
for
volumes
with
short names (like
Lisp).
Quit!
Closes
the
Profile Tool
window.
Unless you have
selected
either
the
Set Profile!
or
the
Change
Password! command items,
no
changes
will
be
made
to
the
parameter items
of
the
Lisp
System
Tool.
The
Lisp
System
Tool
Summary:
• To activate
the
tool
from
the
base
state,
press
the
left
mouse
button.
• Select
the
parameters you wish
to
set
or
change.
• Select
the
appropriate command.
• Confirm by pressing
the
left
mouse
button
when
the
small mouse icon appears.
Press
the
right
mouse
button
to
abort
the
command.
XEROX
1186
USER'S
GU
IDE
63
Page 74

...
~.
"'0
'"
~
'"
r+-
ID
3
-f
0
2-
§
:l
C-
o
x
~
m
;;0
0
x
-
-
Q)
0\
C
V\
m
:;u
vi
G)
c
a
m
-. . •
'.
. . • , . .
r·· . ..
",
.
~
_--,:
• ,
&rorMIg}
DIriae:
{PlP-fS,
_.
flappy. Local Disk}
rn.:
[TaLrUI:AISSouth)<L IIp>Koto>Oasics)L
IIp.syswt
......
-.:
L;1p
UDl
...
Su.
• 16288
free
.....
• 10
... 1 ...
PF_cl:
.......
Su.
• 7981
WIllI
Si:za • 6368
u.
..........
file:
(TMrUS:AISSouth1<L isp)Koto)basics>Lisp.
syswt
(:24-Jan-86
10:e6:53
PST)
UIIP:
y~
u.r~:
.....
"in:
xs;s
....
tat.
..
: Xerox
'I~iftl
&..1
SMa-
......
!
-.c.
liM.I
1
""'1
"-1,1
f81dal
.................
1
sa
......
1
f.GP.t
w..,
Quit! .
flClflPf!
...
....
....
-
-
~
V\
-t
m
s:
-f
o
o
r-
V\
Page 75

SYSTEM
TOOLS
Parameter
Items
The
Lisp
System
Tool
has
the
following
parameter
items:
Document:
Used
in conjunction
with
the
Help! command.
Select
the
General document
to
display on-line
documentation
for
the
Lisp
System
Tool. Select
the
ErrorMsg
document
to
display
the
meanings
of
the
error messages you may encounter
from
commands
in the file subwindow. The
file
subwindow
may be
scrolled
.by
positioning
the
mouse
pointer
on
the
left
side
of
the
subwindow
and pressing
the
left
or
right
mouse buttons
to
scroll
up
or
down,
respectively.
Device:
Device
from
which
to
install
the
lisp
sysout. This
parameter also determines which
of
the
default
pathnames set in
the
Profile Tool
will
be used. For
example,
if
PUP-FS
is
chosen,
then
the
file specified
under
PUP
File-Pathname: in
the
Profile
window
is
selected.
File:
The
file pathname
of
the
Lisp
sysout
file
to
be
retrieved
from
the
selected device. The syntax
of
the file pathname depends
on
the
particular file
system
on
your
host machine. Note
that
Host names
are never enclosed
in
the curly brackets generally
used
in
Lisp.
On a Xerox
PUP
file server,
the
file pathname looks
like
[Host]
< Directory>SubDirectory > FileName.
ext!versi.on
A
typical example
would
be
[Rosebowl
%] < Lisp>
Fugue>
Lisp.sysout
XEROX
1186
USER'SGUIDE
65
Page 76

SYSTEM
TOOLS
66
On a Xerox product
(NS)
file server,
the
file
pathname looks like
(Host: Domain: Organization)Directoryl
SubDirectory/FileName.ext!version
A typical example
would
be
(Phylex:
XSIS
North:Xerox)Demo/Demo.sysout
An
equivalent
but
shorter way
would
be
(Phylex:)<Demo>Oemo.sysout
if
the
Domain: and
Organization: parameters are set appropriately
On a Unix file server
the
file pathname looks like
[host] </directorylsu bd i
rectoryl
> fi lenam e .ext
A typical example
would
be
[safe] </allisp/fugue4/ > lisp.sysout
On a VAX-VMS
file
server
the
file
pathname looks
like
[Host] < Directory.SubDirectory >
FileName.ext; version
A typical example
would
be
[Taos]
< DEIProd.Prior >
Lisp.sys
On a
DEC-2060
TOP5-20
file server,
the
file
pathname looks like
[Host] < Directory.SubDirectory>
FileName.Sys.version
A
typical example
would
be
[Sumex-2060] < Dolphin.Fugue6.BetaTest >
Lisp.sysout
Note:
If
a version
is
not
specified,
the
highest
version
wi
II
be fetched.
Volume
Menu:
Contains
the
menu
of
all
the
volume names
when
your disk
is
partitioned.
Use
the
middle
button
to
display
the
menu,
then
select
the
desired volume
name. The volume name displayed here
will
be
the
XEROX
1186
USER'S
GUIDE
Page 77

SYSTEM
TOOLS
object
of
all commands aimed
at
a specific logical
volume, e.g., Erase!.
Volume Size:
Shows
the
size! in pages,
of
the
logical volume
named by
the
Volume
Menu:
parameter.
Free
Pages:
Shows
the
available free pages on
the
logical
volume named by
the
Volume
Menu:
parameter.
Volume Password:
The password string
for
the
logical volume named
by
the
Volume Menu: parameter. A string
of
asterisks rather than
the
actual password
is
displayed.
Max
VMem Size:
Shows
the
maximum size
of
Interlisp's virtual
memory on
the
logical volume named by
the
Volume
Menu:
parameter.
VMem
Size:
Shows
the
actual
size
in pages
of
the
Lisp
virtual
memory on
the
logical volume named by
the
Volume
Menu:
parameter.
This
number
should be
the
same
as
returned by
the
function
VMEMSIZE
just
prior
to
logging
out
of
Interlisp.
Volume
Boot File:
Shows leader page
note
for
the
volume
boot
file,
indicating
the
origin
of
the
boot
file. The Lisp
System
Tool and Installation
Utility
fills this
in
automatically.
User/User Password:
Your
NSIPUP
user and password names associated
with
Login
to
remote file server. (For
PUP
uses
the
name should be
followed
by a registry,
for
example,
YourName.pa)
XEROX
1186
USER'S
GUIDE
67
Page 78

SYSTEM
TOOLS
Domain/Organization:
Your clearinghouse
domain
and organization.
If
you
do
not
use
an
NS
file server, these parameters
are irrelevant and should be
left
blank.
Command
Items
68
Sysin!
Installs
the
file
named in the File: parameter
from
the selected Device:
into
the
logical volume named
in
Volume
Menu:.
If
the
operation
is
successful,
the
VMem file
will
be automatically expanded
(to
your
volume size)
for
you.
If
you
want a different
VMem
size, you may
use
the
Set
Max
VMem! command
to
alter it.
This
command
can
be aborted
with
the
STOP
key.
Erase!
Erases
the contents
of
the
logical volume specified
by
the
Volume
Menu:
parameter.
Set
Max
VMem!
Alters
Interlisp's virtual memory file size on
the
logical volume named by
the
parameter Volume
Menu:. Your VMem
file
is
automatically created
for
you
during
the
Sysin! operation. The local file
system attempts
to
allocate contiguous
space
when
the
file
is
first created. There are
continuing
performance penalties
for
accessing a fragmented
file, which may result
from
growing
the
file one
or
more times.
Make
Script!
This
command allows you
to
set
up
your
own
customized disk
partitioning.
Make Script! brings
up a new
window
which
allows you
to
enter
the
volume names and
sizes.
Up
to
nine volumes may
be specified (one volume
is
reserved
fort
System
Tools).
'To
enter
your
partition,
first select
the
disk
type
that
corresponds
to
your disk type. Your disk
type should be one
of
10,20,40,
or
80
megabytes.
XEROX
1186
USER'S
GU
IDE
Page 79

SYSTEM
TOOLS
The
Free
Pages: parameter
will
be automatically
updated
when
the
next
volume name
is
entered.
When
partitioning
a disk,
it
is
imperative
to
use
all
the
disk pages available.
If
this
is
not
done
and
then
later
the
disk
is
damaged,
the
physical volume may
be unscavengeable.
For
this reason,
the
tool
assigns
all
unallocated disk pages
to
the
last logical volume.
When you are finished
with
the
volume
specification, select
the
Make Script! command (in
the
Make Script! subwindow,
not
the
Lisp
System
Tools
window)
and you
will
be
prompted
to
insert
the
Installation
Utility
floppy.
At
the
end
of
the
operation you
will
have added an
entry
to
the
Installer menu
that
appears
when
you
boot
the
Installation
Utility
floppy. In
order
to
actually
repartition
the
rigid disk, you must
do
an
F2
boot
of
the
Installation
Utility
floppy
and select
the
It
USER
SPECIFIED
PARTITION"
option
in
the
Installer menu
(See
chapter
4,
Software Installation; Partitioning).
Sysin & Boot!
Performs
the
Sysin
function
and
if
no
errors occur,
boots
the
system.
Remote
list!
Enumerates all
the
file
names
on
the
specified file
pathname
that
matches
the
wild
card. Wild card
characters are
* which matches zero
or
more
characters, and
# which matches exactly one
character.
CopyVMem!
Copies
the
Lisp
virtual memory
from
one logical
volume (Source)
to
another
logical volume
(Destination). This command does
not
copy
the
entire contents
of
the
logical volume,
but
only
the
number
of
pages specified by
the
VMemSize:
parameter
of
the
source volume. The Copy VMem!
XEROX
1186
USER'S
GUIDE
69
Page 80

SYSTEM
TOOLS
70
command brings
up
its
own
window,
explained
below.
Source Volume:
Enter
the
name
of
the
logical volume
that
is
the
sou
rce
of
the
VM
EM
yo u wa
nt
to
copy.
Oest. Volume:
Enter
the
name
of
the logical volume
to
which
you are copying
the
VMEM.
Source Volume Password:
Oest. Volume Password:
If
either
the
source
or
the
destination volumes
are password-protected,
the
appropriate
passwords must be entered in these parameter
fields.
Start!
Starts copying the virtual memory.
After
selecting Start! a mouse icon
will
appear.
Press
the
left
mouse
button
to
confirm
the
copy operation and
the
right
button
to
abort
the
command. When
the
virtual memory
has
been copied, you
can
respond
affirmatively
to
the
confirmation
message and
boot
the
Destination volume,
or
you can cancel
the
boot
and Quit!.
Quit!
Removes
the
CopyVMem
window.
Scavenge!
Scavenge performs a logical volume-scavenge on
the
volume named in
the
parameter item Volume
Menu:.
This command should be used whenever
you suspect
the
integrity
of
your
disk volume.
This
command
is
part
of
the local
file
system's error
recovery process.
For
complete details
see
the
disk
scavenging section in chapter 4, Software
XEROX
1186
USER'S
GUIDE
Page 81

SYSTEM
TOOLS
installation. The file
subwindow
message
will
iook
like:
Volume
= Lispn
Scavenging
...
done
Volume repaired,
log
file complete
N files on volume
No problems
found
Floppy!
Floppy disk
utility.
Brings up a
subwindow
with
several options.
Pattern:
The search
pattern
for
files stored
on
the
floppy.
See
List!, below.
Floppy Name:
The
name you gave
the
floppy
when
it
was
formatted.
Info!
Displays
floppy
name, single
or
double
density,
single
or
double
sided,
number
of
free pages
and largest free block. Automatically
fills in
the
Floppy Name: field.
List!
Lists
files
as
called
for
in Pattern: field. The
wildcards
* and # are allowed.
Format!
Formats
the
Floppy, giving
it
the
name
specified in
the
Floppy Name: field.
Duplicate!
Duplicates a floppy. This command
will
only
work
if
there
is
a rigid disk volume available
with
at
least 700 free pages.
Quit!
Removes
the
Floppy Tool
window.
XEROX
1186
USER'S
GUIDE
71
Page 82

SYSTEM
TOOLS
72
Boot!
Boots
the
volume specified by
the
Volume
Menu:
parameter.
Press
the
F1
key
when
the
boot
icons
appear.
Help!
Prints on-line help and
error
messages.
Quit!
Deactivates all
windows
and returns
to
the
bouncing rectangle.
Fetch Lisp Microcode!
Fetches microcode
from
the
file specified by
the
File: parameter and installs
it
on the logical volume
named
by
the
Volume
Menu:
parameter.
XEROX
1186
USER'S
GUIDE
Page 83

i
i
I
l
SYSTEM
TOOLS
•
...
It..
•
......
1
Dial
.. : {11Mb.
29Mb.
42*,
.a>
i
..
tw
St.-
&6274
,...
.....
6167.
IID1
...
1:
Sy$teaTools
*1
__
1
I'D
3618
1
....
1-.
I: - .... 1
... 1 lim-
8
' .... 1
..
3: .... 1
__ 3 Su.
8
' .... 1
...
4: .... 1
... 4 I'D
8
1_1
..
6:
1D1
... 6 Su.
e
1
....
1
...
I:
1D1
... I Su..
Ii
1
..
1
..
7:
-1D1
... 7 Iu.
8
!
....
1-.
I:
.... 1
... I Iu.
Ii
'
... 1 ...
I;
1D1
....
5
....
Ii
1
..
1
...
SI:
1D1
...
U
I'D
Ii
SaIne
.... 1
...
: L isp2
s..c.
1D1
...
Pt.
.......
:
-..c!
Quit.!
I
Quit.!
1IIIu.
\tD1
...
: Lisp
.....
1D1
...
~:
-
-
-
-
...
IWo!
LUcl
~t.!
a.
1icace
!
Quit.!
Make Script. Copy VMem and Floppy Subwindows
XEROX
1186
USER'S
GUIDE
73
Page 84

SYSTEM
TOOLS
The
On-Line Diagnostics Tool
74
The programs
for
these on-line diagnostics tests are
stored
on
the
System
Tools Volume, and are
accessible
from
the
bouncing
white
rectangle.
These
tests are
for
the
Display, Keyboard, Echo Test
(Ethernet),
RS232
Loopback~
Floppy Drive and
Ethernet Statistics.
.
All
of
the
tests are documented on-line, and
can
be
accessed
by selecting
the
the
Help! command.
Summary:
•
To
activate
from
the
base
state,
press
the
right
mouse
button
or
the
space
bar.
• Select
the
test
to
be executed.
• Select
the
parameter(s)
for
the
test.
• Select
the
Start! command.
• Select Help!
for
documentation.
Details:
To read
all
of
the
documentation, you may
find
it
convenient
to
adjust
the
height
of
the
File
subwindow
before you select Help!.
To
do
this,
position
the
cursor over
the
small box
at
the
right
of
the
line
that
divides
the
file
subwindow
from
the
other
subwindows.
Press
the
left
mouse
button
down,
and
while
still
holding
it
down,
move
the
cursor
up
or
down
to
adjust
the
boundary line.
XEROX
1186
USER'S
GUIDE
Page 85

X
m
:xJ
o
X
co
CJ\
C
V\
m
:xJ
vi
G'\
C
a
m
.......
V1
rr.~~~==~------------~----------------------------------·----~o
IHDlp!l
ICancel
II
1
Test:
{Oisphy,
Keyboard. Echo,
RS232C
Loopback. Floppy
Drive,
Ethernet
SUts,
IIDII:
I
~
V\
-f
m
s:
-f
o
o
r-
V\
Page 86

SYSTEM
TOOLS
Parameter
Items
Types
of
tests available:
Display, Keyboard, Echo,
RS232
Loopback,Floppy Drive, Ethernet Stats
For
deta ils, please
see
the
on-Ii ne docum
entation
before starti ng these tests.
Command Items
76
Help!
Used
with
parameter
II
None
",
displays
the
complete documentation on
how
to
use
the
Diagnostics
window,
including the
Window
Manager.
Used
with
one
of
the
test parameters,
displays
the
complete
documentation
for
that
test.
Start!
Start
the
selected test. Note
that
the
Start!
command
only
appears
after
you have selected one
of
the
tests.
Cancel!
Closes
the
Diagnostics
window
and returns
to
the
bouncing
white
rectangle. .
XEROX
1186
USER'S
GUIDE
Page 87

6.
INPUT/OUTPUT
Input/output
on the Xerox 1186
is
supported
in
many ways: by keyboard, display, mouse, rigid disk,
Ethernet, floppy disk, and
RS232
communications.
This
chapter only covers aspects
of
the
last
two:
the
floppy
disk and
RS232
communications.
Floppy
Disk
Support
This
section describes Interlisp-D's
file,
device
{Floppy}, which
is
used
to
interact
with
floppy
drives on Xerox 1186 machines.
Use a S±
inch double-sided, double-density, soft
sectored floppy disk.
Insert
the
floppy
into
the
floppy
drive face up,
the
edge
of
the
floppy
with
two
1t inch-long cover holes (one hole per side)
going
in first.
The
write-protect
notch
will
be
on
the
left
edge
as
you
look
down
on
the
floppy
from
above. You
write
protect a
floppy
by covering
the
write-protect
notch
with
the
tabs provided
with
the
floppies.
In general, Interlisp-D
can
be
used
to
read,
write,
and otherwise interact
with
files
on
Pilot-formatted
floppy
disks
through
standard Interlisp
input/output
functions. All familiar operations such
as
LOAD,
OPENFILE,
READ,
PRINT,
BIN,
BOUT,
GETFILEINFO,
SETFILEINFO,
GETFILEPTR,
SETFILEPTR,
etc.,
work
with
floppies.
COPYFILE
is
commonly
used
to
archive and unarchive files between
floppies and
other
file devices.
Files
on
floppies can
XEROX
1186
USER'SGUIDE
77
Page 88

INPUT/OUTPUT
be compiled, edited, and hard-copied just
as
files
may be on
all
other
ordinary file devices.
Naming,
Erasing, and Formatting Floppies
To
erase
and establish track
information
on a
floppy,
especially a
floppy
that
is
brand-new, call
(FLOPPY.
FORMAT
NAME
AUTOCONFIRMFLG
SLOWFLG) [Function]
The
NAME
argument
becomes
the
name
of
your
floppy.
It
can
be any string
or
atom
of
106
or
fewer
characters.
It's a good idea
to
label
the
outside
of
your
floppy
with
the
same
name using a sticky label
and a soft marker.
AUTOCONFIRMFLG controls questioning you
about
destroying
the
contents
of a floppy
that
appears
to
contain valid
information.
If
AUTOCONFIRMFLG
is
T,
y·ou
will
not
be asked
to
confirm.
SLOWFLG determines
how
thorough a formatting
job
is
to
be done on
the
floppy
you
format.
If
SLOWFLG
is
T,
FLOPPY.
FORMAT completely
erases
your floppy, setting
down
track
information
and
critical
Pilot records on
it.
When SLOWFLG
is
left
NIL, only the Pilot records needed
to
give your
floppy
an
empty
directory are
written.
Use
SLOWFLG = T
with
a brand-new floppy.
Typically you
will
leave AUTOCONFIRMFLG and
SLOWFLG
as
NIl.
For
example,
doing
(FLOPPY.FORMAT
"My
Floppy")
will
create a blank
floppy
named
II
My
Floppy. "
To reset
the
name
put
onto
a
floppy
by
FLOPPY.FORMA
T,
use
(FLOPPY.NAM
E
NAME)
[Function]
78
XEROX
1186
USER'S
GUIDE
Page 89

INPUT/OUTPUT
If
NAME
is
NIL,
then
FLOPPY.NAME
reads
the
name
put
onto
a
floppy
by
FLOPPY.
FORMAT
or
FLOPPY.NAM
E.
The
ability
to
copy Pilot floppies
is
supported
through
two
functions:
(FLOPPY.TO.FILE
TOFILE)
(FLOPPY.FROM.FILE
FROMFILE)
[Function]
[Function]
FLOPPY.TO.FILE
copies
the
contents
of
the
current
floppy
to
a file, and.
FLOPPY.FROM.FILE
is
FLOPPY.TO.FILE's
inverse.
For
instance,
to
copy
the
contents
of
one
floppy
onto
another,
insert
the
floppy
to
be copied
into
the
floppy
drive. Then
type
(FLOPPY.TO.FILE
'ToFile). Remove
the
first
floppy
and insert a blank floppy. Type
(FLOPPY.FROM.FILE
'From File). The first
floppy
has
now
been copied.
The
TOFILE
produced by
FLOPPY.TO.FILE
is
approximately
700
pages
long
and can be placed
on
a file server
or
a logical volume
of
your
machine.
FLOPPY.FROM.FILE
can
be used more than once
if
you
would
like
to
make more
than
one copy.
As
an
alternative
to
using
FLOPPY.SCAVENGE
(described
below),
the
TOFILE
produced
by
FLOPPY.TO.FILE
can
be usefully edited
to
salvage
the
contents
of
a
floppy
that
has
been damaged.
Loading
Sysouts
and
Other
Large
Files
Onto
Floppies
Sysouts may be created on floppies
through
Interlisp's
SYSOUT
or
MAKESYS
functions,
then
later
installed on
the
same
or
another
Xerox 1186 using
the
Installation Utility. Sysouts may also be
taken
from
other
file devices and
put
onto
floppies
through
the
use
of
the
function
FLOPPY.MODE
(see
XEROX
1186
USER'SGUIDE
79
Page 90

INPUT/OUTPUT
80
below). To copy a sysout
to
floppies, simply
do
one
of
the
following
functions:
(SYSOUT
'{FLOPPY})
(MAKESYS
'{FLOPPY})
[Function]
[Function]'
You
are prom
pted
to
insert
new
floppies
as
they
are
needed.
It
generally takes at least ten floppies
to
store a sysout. To load in a sysout from floppies,
you
can
use
the
Lisp
System
Tool.
The normal mode
of
operation
for
{FLOPPY}
is
(FLOPPY.MODE
'PILOT)
[Function]
Two special modes
of
operation
for
floppies,
SYSOUT,
and
HUGEPILOT
are also available. You
can
put
floppies
into
either
of
the
two
modes
to
copy sysouts
or
huge files
from
file servers
to
floppies
or
from
floppies
to
file servers.
In
SYSOUT
mode, you may
use
COPYFILE
to
move a
sysout
off
another file device
onto
floppies. To
do
this, you must first set
the
floppies
to
SYSOUT
mode, then
do
the
COPYFILE.
For
example,
(FLOPPY.MODE'SYSOUT)
(COPYFILE
'{FileServer}< Directory>USP.SYSOUT
'{FLOPPY})
will
put
the
current Interlisp-D
L1SP.SYSOUT
onto
floppies. While
in
SYSOUT
mode, you
can
copy
as
many sysouts
as
you like
onto
floppies.
The
Instal/ation
Utility
is
then used
to
load these sysouts
onto
a Xerox 1186. Similarly, sysouts
can
be copied
from
floppies
onto
another file device using
COPYFILE
when
in
SYSOUT
mode. For example,
(FLOPPY.MODE
'SYSOUT)
XEROX
1186
USER'S
GUIDE
Page 91

INPUT/OUTPUT
(COPYFILE'{FLOPPY}'{YourFileServer}<YourDirect
ory>
Your.Sysout)
will
copy
the
sysout
onto
your directory
on
a file
server. To
get
back
to
ordinary
floppy
operation,
type
(FLOPPY.MODE
'PILOT).
You
can
write
and read huge Pilot files (like
IRM.hashfile)
from
multiple
floppies
to,
for
example, your rigid disk in
HUGEPILOT
mode,
which'
can
be set by
typing
(FLOPPY.MODE
'HUGEPILOT).
(COPYFILE
'{FLOPPY}FileName '{DSK}FileName
This mode
is
practically identical
to
SYSOUT
mode,
with
the
exception
that
you have control over
the
names
of
files and floppies.
Measuring
Unused
Floppy Space
The
following
function
tells you
how
much space
is
left
on a floppy.
(FLOPPY.FREE.PAGES)
[Function]
returns
the
number
of
free pages on
the
current
floppy. Pilot
floppy
files are contiguously
represented on a
floppy
disk.
If
you are using
your
floppy
interactively
(not
just
doing
a simple series
of
COPYFILE
commands
after
a FLOPPY.FORMAT),
don't
fill
your
floppy
to
capacity. Try
to
keep such a
floppy
less
than
75
percent full.
Testing
Whether
a Floppy is in
the
Drive
Two functions are available
for
testing
whether
a
floppy
is
in
the
floppy
drive.
(FLOPPY
.CAN
.READP)
[Function]
XEROX
1186
USER'S
GUIDE
81
Page 92

INPUT/OUTPUT
tests
if
there
is
a
floppy
in
the
floppy
drive.
FLOPPY.CAN.READP
does
not
provide any
protection against
not
fully
closing the
floppy
drive
door.
(FLOPPY.CAN
.WRITEP)
[Function]
tests
if
there
is a floppy
in
the
floppy
drive and
the
floppy
drive
can
write
on
this floppy. (The
floppy
drive
can
only
write
on floppies whose
write-protect
notches are
not
covered
with
tape.)
Note: The 1186 can
not
tell
if
the
floppy
drive
door
has
been opened.
Scavenging
Floppies
(FLOPPY.SCA
VENG
E)
[Function]
attempts
to
repair a
floppy
whose critical records
have become
confl:Jsed. Also,
if
you accidentally
delete
floppy
files,
FLOPPY.SCAVENGE
retrieves
them (provided you
don't
wait
till
after
they
have
been
overwritten
by
new
files).
RS232 Support
82
There are
two
standard ports on
the
Xerox 1186
for
RS232
communications:
the
TTY
Port, and
the
RS232C
Port.
The
RS232
port
(DTE)
is
configured
for
standard
RS232
communications,
while
the
ITY
port
(DCE)
is
configured
for
use
with
local printers. The ports'
transfer rate, parity, start/stop
bit
and
flow
control
choices are software-controllable
to
provide a
wide
range
of
interface capabilities.
XEROX
1186
USER'S
GUIDE
Page 93

INPUT/OUTPUT
Cable
Configurations
for
the
RS232C
and
TIV Ports
There
are
several cable configurations
for
use
with
the
RS232
and
ITY
ports. Since
the
1186
has
female
connectors
for
both
ports, all cables must
terminate
with
the corresponding male connector (25-
pin
08-25)
on
the
1186 side.
There
are
four
configurations most
often
used;
•
RS232
to
modem
•
RS232
to
printer
•
TIY
port
to
printer
• modem eliminator (which allows
two
1186
machines
to
communicate via
the
RS232
or
TTY
ports)
RS232
to
Modem
1186
Modem
1
0-
Fr
...
Ground
-0
1
TO
2
0
RO
3
0
RTS
4 0
-------
CTS
5
OSR
6
0------
D----
0
2
TO
D
3
RO
D
4
RTS
D
5
CTS
D
6
OSR
SG
70-
Signal
Ground
- D 7
SG
RLSO
OTR
80------
19
0-------
20
0------
RI
22
0
-------
XEROX
1186
USER'S
GUIDE
D
8
RLSO
D
19
D 20
OTR
o 22
RI
83
Page 94

INPUT/OUTPUT
84
The next
two
configurations are used
for
connecting your workstation
to
printers.
RS232
to
Printer
'186
Printer
, 0 -
Fr
..
Ground -
0
1
TO
20
0
2
TO
30><
RO
0
3
RO
RTS
4
D
0
4
RTS
CTS
5
0 0
5
CTS
OSR
6
0
o 6
OSR
D 7
0 0
7
0
RLSO
80
o 8
RLSO
OTR
20 0 o 20
OTR
Signal
Ground
XEROX
1186
USER'S
GUIDE
Page 95

INPUT/OUTPUT
TTY
to
Printer
"86
Printer
'0
0'
TO
20
0
2
TO
RO
30
0
3
RO
RTS
4
0
0
4
RTS
CTS
5
0
0
5
CTS
OSR
6
0
0
6
OSR
70
0
7
RlSO
80
-
0
8
RLSO
OTR
20
0
-
o
20
OTR
XEROX
1186
USER'S
GU
IDE
85
Page 96

INPUT/OUTPUT
86
Modem
Eliminator
1186
1186
1 0 -
Fr
..
e Ground - 0 1
TO
RO
RTS
4
CTS
5
OSR
6 0
0
7
0
RLSO
80
OTR
20 0
TO
RO
4
RTS
5
CTS
0
6
OSR
0
70
0
8
RlSD
o 20
OTR
Signal
Ground
XEROX
1186
USER'S
GUIDE
Page 97

7.
DIAGNOSTICS
Diagnostics are performed
when
you are
rebooting
or
restarting
the
workstation. They are software
programs
that
are
used
to
indicate
how
well
the
hardware
is
operating. This chapter describes
the
types
of
diagnostics
that
are run
when
you
boot
the
1186. A summary
of
the
cursor codes
used
to
indicate progress and
error
conditions
is
also
included.
Boot Options
for
Running Diagnostics
There are
two
options
for
booting
the 1186;
Normal and Diagnostic Boot.
These
are described
below.
Preboot Diagnostics
Normal
booting
causes
the
workstation
to
run a
short diagnostic test,
called Preboot Diagnostics,
to
check
for
machine problems. Preboot Diagnostics
are
automatically executed whenever you
turn
the
workstation
on,
or
when
you
press
the
boot
button·
(B
Reset)
.
•
If
Preboot Diagnostics fail,
the
boot
icons
do
not
appear on
the
display screen .
•
If
Preboot Diagnostics succeed,
the
boot
icons
appear and normal
booting
can
begin.
Three
small red lights
below
the small green
light
on
the
workstation
front
panel indicate
the
operation
of
Preboot Diagnostics, which takes
XEROX
1186
USER'S
GUIDE
87
Page 98

DIAGNOSTICS
approximately five seconds
to
complete. All three
red lights are
lit
during
the
first phase
of
Preboot
Diagnostics. Then seven
additional
tests are run,
each
showing
different
combinations
of
lights.
The red lights
go
off
if
Preboot Diagnostics succeed,
but
remain
lit
if
a failure occurs. The system also
produces a beeping sound
if
it
detects a failure.
If
the
boot
icons
do
not
appear
within
10
seconds,
if
one
or
more red lights remain
lit,
or
if
a beeping
sound
is
heard, a failure
that
prevents
the
system
from
booting
has occurred. Note
the
pattern
of
lights (on-off-on,
on-on-off,
and
so
forth)
and
contact
your
technical support representative.
After
the
Preboot Diagnostics finish, you can
boot
your
workstation
by pressing one
of
the
function
keys
represented
by
the
boot
icons on
the
display.
During
booting,
cursor codes are displayed on
the
screen instead
of
the
normal mouse cursor. The
cursor codes are displayed
in
a small box
that
is
usually
in
the
upper
left
corner
of
the
display.
If
a
boot-time
error
is
detected,
the
cursor code
will
stop counting, and display
the
combination
of
numbers
that
indicate
the
error type. Refer
to
the
list
of
cursor codes
at
the
end
of
this chapter
for
an
explanation,
or
contact
your
system administrator.
Boot Diagnostics
88
A diagnostic
boot
provides a more specific and
extensive diagnostic test.
Boot
Diagnostics should
be
run
when:
.
• The
workstation
is
initially
installed,
or
moved
to
another
location.
•
Any
component
of
the
workstation
is
exchanged
or
replaced.
• A problem
is
suspected.
XEROX
1186
USER'S
GU
IDE
Page 99

DIAGNOSTICS
Running
Boot
Diagnostics
After
resetting
the
machine
by
pressing
the
B Reset
button,
six
function
key/boot
icons appear
on
the
screen;
three
of
these are specia! diagnostic
boot
icons
which
can be used
to
select
the
device
from
which
the
diagnostic
program
will
be
obtained.
To
run diagnostics
from:
• Rigid Disk - press
the
FS
Function key.
• Floppy Disk - load
the
floppy
disk
labeled"
Boot
Diagnostics"
into
the
floppy
disk drive, and press
the
F6
function
key/boot icon.
•
Network
- press
the
F7
function
key.
If
the
device does
not
have
the
diagnostic
program
available, the
function
key
for
that
device
will
not
do
anything.
Options
for
Boot
Diagnostics
There are
short
and
long
versions
of
Boot
D iagnosti
cs.
• Short diagnostics run
from 2 to
5 minutes, and
perform
routine
checks.
• Long diagnostics run
from
15
to
20
minutes. This
option
runs
more
thorough
tests, and
is
used
when
problems are suspected.
Running
the
Short
Option
of
Boot
Diagnostics:
To
run
the
short
version
of
Boot
Diagnostics:
1.
Press
the
B Reset
button
on
the
front
panel
of
the
workstation.
XEROX
1186
USER'S
GUIDE
89
Page 100

DIAG
NOSTles
2.
Press
the
function
key
(FS,
F6
or
F7)
corresponding
to
the
test you wish
to
run.
Running
the
long
Option
of
Boot Diagnostics:
To run
the
long
version
of
Boot Diagnostics:
1.
Press
the B Reset
button
on
the
front
panel
of
the
workstation.
2.
Press
the
function
key
(FS,
F6
or
F7)
corresponding
to
the
test you wish
to
run,
twice
in rapid succession.
B,ehavior
While Running Boot Diagnostics
The cursor codes
for
Boot Diagnostics always
contain one
or
more letters, ranging from A
to
F.
letters
are
unique
to
Boot Diagnostic cursor codes.
While Boot Diagnostics are running, the display
is
normally black. However,
during
memory test,
the
screen displays a variety
of
special patterns.
Each
test
has
an
identifier
that
contains
at
least one
letter.
If
test
Ax
(x
can
be any number) completes
successfully,
it
goes
to
test
Bx,
then ex, and
so
forth.
If
a test fails,
the
Boot Diagnostics terminate and
no
additional test are run.
Results
of
Boot
Diagnostics
90
Errors Detected When a hardware problem
is
detected,
the
cursor codes alternate continuously
between
two
numbers. The first number
is
the
"test
code" and contains one
or
more letters, from A
to
F.
The second
number
is
the
II
error code." Record
the
numbers exactly
as
they
appear.
Press
the
R key
on
the
keyboard. This
causes a third
test result
to
appear (and may contain digits 0-9,
or
XEROX
1186
USER'SGUIDE
 Loading...