

Page 1
Printer Kit Type 1075
Operating Instructions
Printer Reference 1
Getting Started
1
Installing the Printer Driver and Software
2
For safe and correct use of this machine, please be sure to read the Safety Information in the
“General Settings Guide” before you use it.
Page 2

Printer Kit Type 1075 Operating Instructions Printer Reference 1
Printed in Japan
UE USA G339-8607
Page 3

Introduction
This manual describes detailed instructions on the operation and notes about the use of this machine.
To get maximum versatility from this machine all operators are requested to read this manual carefully
and follow the instructions. Please keep this manual in a handy place near the machine.
Important
Contents of this manual are subject to change without prior notice. In no event will the company be liable for direct, indirect, special, incidental, or consequential damages as a result of handling or operating the machine.
Warning:
Use of controls or adjustment or performance of procedures other than those specified in this manual
might result in hazardous radiation exposure.
Trademarks
®
Microsoft
, Windows® and Windows NT® are registered trademarks of Microsoft Corporation in the
United States and/or other countries.
®
Adobe
, PostScript®, Acrobat® and PageMaker® are registered trademarks of Adobe Systems Incor-
porated.
®
is a registered trademark of Hewlett-Packard Company.
PCL
AppleTalk, Apple, Macintosh, Mac and TrueType are registered trademarks of Apple Computer, Incorporated.
©
IPS-PRINT™ Printer Language Emulation Copyright
2000, Oak Technology, Inc., All Rights Re-
served.
Ethernet
®
is a registered trademark of Xerox Corporation.
Other product names used herein are for identification purposes only and might be trademarks of their
respective companies. We disclaim any and all rights in those marks.
The proper names of the Windows operating systems are as follows:
• The product name of Windows
®
95 is Microsoft® Windows® 95
• The product name of Windows® 98 is Microsoft® Windows® 98
®
• The product name of Windows
• The product name of Windows® XP are as follows:
Microsoft
Microsoft
• The product name of Windows® 2000 are as follows:
Microsoft
Microsoft
Microsoft
• The product name of Windows® NT are as follows:
Microsoft
Microsoft
®
Windows® XP Professional
®
Windows® XP Home Edition
®
Windows® 2000 Advanced Server
®
Windows® 2000 Server
®
Windows® 2000 Professional
®
Windows NT® Server 4.0
®
Windows NT® Workstation 4.0
Me is Microsoft® Windows® Millennium Edition (Windows Me)
Notes:
Some illustrations in this manual might be slightly different from the machine.
Certain options might not be available in some countries. For details, please contact your local dealer.
Page 4

Note to users in the United States of America
Notice:
This equipment has been tested and found to comply with the limits for a Class B digital device, pursuant to Part 15 of the FCC Rules. These limits are designed to provide reasonable protection against
harmful interference in a residential installation. This equipment generates, uses and can radiate radio
frequency energy and, if not installed and used in accordance with the instructions, may cause harmful
interference to radio communications.
However, there is no guarantee that interference will not occur in a particular installation. If this equipment does cause harmful interference to radio or television reception, which can be determined by turning the equipment off and on, the user is encouraged to try to correct the interference by one more of
the following measures:
Reorient or relocate the receiving antenna.
Increase the separation between the equipment and receiver.
Connect the equipment into an outlet on a circuit different from that to which the receiver is
connected.
Consult the dealer or an experienced radio/TV technician for help.
Caution (in case of IEEE1284 environment) :
Properly shielded and grounded cables and connectors must be used for connections to host computer
(and/or peripheral) in order to meet FCC emission limits.
Caution (in case of 100BaseTX environment):
Network interface cable with ferrite core must be used for RF interference suppression.
Declaration of Conformity
Product Name: Printer Controller
Model Number: Printer Kit Type 1075, Printer/Scanner Kit Type 1075
Responsible party: Ricoh Corporation
Address: 5 Dedrick Place, West Caldwell, NJ 07006
Telephone number: 973-882-2000
This device complies with part 15 of FCC Rules.
Operation is subject to the following two conditions:
1. This device may not cause harmful interference, and
2. this device must accept any interference received,
including interference that may cause undesired operation.
Note to users in Canada
Note:
This Class B digital apparatus complies with Canadian ICES-003.
Remarque concernant les utilisateurs au Canada
Avertissement:
Cet appareil numérique de la classe B est conforme à la norme NMB-003 du Canada.
Copyright © 2002
Page 5

TABLE OF CONTENTS
Manuals for This Machine.....................................................................................1
How to Read This Manual .....................................................................................2
1. Getting Started
Features of This Machine......................................................................................3
Printer Drivers for This Machine ..........................................................................4
Software and Utilities Included on the CD-ROM.................................................6
Guide to This Machine...........................................................................................8
Control Panel ............................................................................................................. 8
Display Panel ............................................................................................................. 9
Connecting the Machine .....................................................................................12
Requirements ...........................................................................................................12
Connecting the Machine to the Host Using the Parallel Cable ................................ 12
Connecting the Machine to the Host Using the USB Cable ..................................... 13
Setting Paper on the Bypass Tray......................................................................14
Setting the Paper Size on the Display Panel ...........................................................16
2. Installing the Printer Driver and Software
Installation Method .............................................................................................. 21
Quick Install.......................................................................................................... 24
Installing the PCL 6/5e and RPCS™ Printer Driver...........................................27
Installing the PCL 6/5e and RPCS™ Printer Driver ................................................. 27
Setting Up Options ................................................................................................... 29
Installing the PostScript 3 Printer Driver...........................................................31
Windows 95/98/Me - Installing the PostScript 3 Printer Driver.................................31
Windows 2000/XP - Installing the PostScript 3 Printer Driver .................................. 33
Windows NT 4.0 - Installing the PostScript 3 Printer Driver..................................... 35
Mac OS - Installing the PostScript 3 Printer Driver and Utilities............................... 39
Mac OS X - Installing the PostScript 3 Printer Driver ............................................... 42
Installing the Printer Driver Using USB .............................................................43
Windows 98SE/Me - Installing the Printer Driver Using USB................................... 43
Windows 2000/XP - Installing the Printer Driver Using USB.................................... 44
Macintosh - Creating a Desktop Printer Icon ........................................................... 45
Installing the Printer Driver Using IEEE 1394....................................................46
Printing with SCSI Print............................................................................................ 46
Printing with IP over 1394 ........................................................................................ 48
Installing the SmartNetMonitor for Client/Admin.............................................. 51
Installing the Agfa Monotype Font Manager 2000 ............................................52
Using Adobe PageMaker Version 6.0, 6.5 or 7.0...............................................53
INDEX......................................................................................................... 54
i
Page 6

ii
Page 7

Manuals for This Machine
The following manuals describe the operational procedures and maintenance of
this machine.
To enhance safe and efficient operation of this machine, all users should read
and follow the instructions carefully.
❖❖❖❖ General Settings Guide
Provides an overview of the machine. This manual introduces the functions
of the machine. It also introduces the options that allow you to use additional
functions and describes how to access the system user tools to make the machine easier to use.
❖❖❖❖ Copy Reference
Describes the procedures and functions for using the machine as a copier.
❖❖❖❖ Printer Kit Type 1075 Printer Reference 1 (this manual)
Describes system settings, procedures and functions for using the machine as
a printer.
❖❖❖❖ Printer Kit Type 1075 Printer Reference 2
Describes procedures and provides information about using the machine as
a printer. This manual is included as a PDF file on the CD-ROM labeled “Operating Instructions”.
❖❖❖❖ Network Printing Guide Operating Instructions
Describes procedures and provides information about setting up and using
the machine as a printer in a network environment. We recommend you read
this manual first. It is included as a PDF file on the CD-ROM labeled “Operating Instructions” .
❖❖❖❖ PostScript 3 Board Type 1075 Operating Instructions Supplement
Describes menus and features you can set using the PostScript 3 printer driver. This manual is included as a PDF file on the CD-ROM labeled “Operating
Instructions”.
Note
❒ Printing with the PostScript 3 printer driver is available when the Post-
Script 3 board option is installed on your machine.
❖❖❖❖ UNIX Supplement
Provides information about setting up and using the machine as a printer in
a UNIX environment. For UNIX printing information, please visit our web
site or consult your authorized dealer.
❖❖❖❖ Scanner Reference
Describes system settings, procedures and functions for using the machine as
a scanner.
Note
❒ Scanner function is available when the Printer/Scanner option is installed
on your machine.
1
Page 8

How to Read This Manual
R
R
Symbols
In this manual, the following symbols are used:
WARNING:
This symbol indicates a potentially hazardous situation which, if instructions
are not followed, could result in death or serious injury.
CAUTION:
This symbol indicates a potentially hazardous situation which, if instructions
are not followed, may result in minor or moderate injury or damage to property.
* The statements above are notes for your safety.
Important
If this instruction is not followed, paper might be misfed, originals might be
damaged, or data might be lost. Be sure to read this.
Preparation
This symbol indicates the prior knowledge or preparations required before operating.
Note
This symbol indicates precautions for operation, or actions to take after misoperation.
Limitation
This symbol indicates numerical limits, functions that cannot be used together,
or conditions in which a particular function cannot be used.
Reference
This symbol indicates a reference.
[]
Keys and buttons that appear on the computer's display.
Keys that appear on the machine's panel display.
{}
Keys built into the machine's control panel.
Keys on the computer's keyboard.
2
Page 9

1. Getting Started
Features of This Machine
This machine is designed especially for office workgroups, both for shared usage within a network environment, and for one-to-one usage connected directly
to a computer.
❖❖❖❖ Standard compatibility with Windows 95/98/Me, Windows 2000, Windows XP and
Windows NT 4.0
As the printer drivers for the above operating systems are included, it is possible to print to maximum capacity by using the special features of this machine.
❖❖❖❖ Network Connectivity
This machine can be used as a network printer.
It can print from any environment as it supports at the same time NetWare
(TCP/IP, IPX/SPX), Windows 95/98/Me (TCP/IP, NetBEUI), Windows 2000
(TCP/IP, NetBEUI), Windows XP (TCP/IP), Windows NT 4.0 (TCP/IP, NetBEUI), UNIX (TCP/IP), and Macintosh (AppleTalk).
If you register the user code by using the client, you can keep track of printing
jobs done under each code.
❖❖❖❖ Use the Network Utilities included at your own convenience.
When you use “SmartNetMonitor for Client” and “SmartNetMonitor for Admin” network utilities, you can parallel print, allowing you to scatter large
amounts of print sets across multiple printers; or alternative print, which allows you to use another printer when you can not access the network printer
you are trying to use. Also, while at your workstation, the machine will notify
you when the print job is completed.
❖❖❖❖ Complete Paper Handling Option
With the optional finisher installed, you can collate, staple and punch. Also
with the optional mailbox tray installed, you can print and separate output
destinations.
❖❖❖❖ Using the Document Server
The document server stores files sent from the computer on the hard disk of
the machine. Later, the printer settings can be configured and the files printed. Even when this machine is used as a network printer, passwords can be
assigned to each file, providing a high level of security. Also, you can combine and print files scanned by this machine.
3
Page 10
1
Getting Started
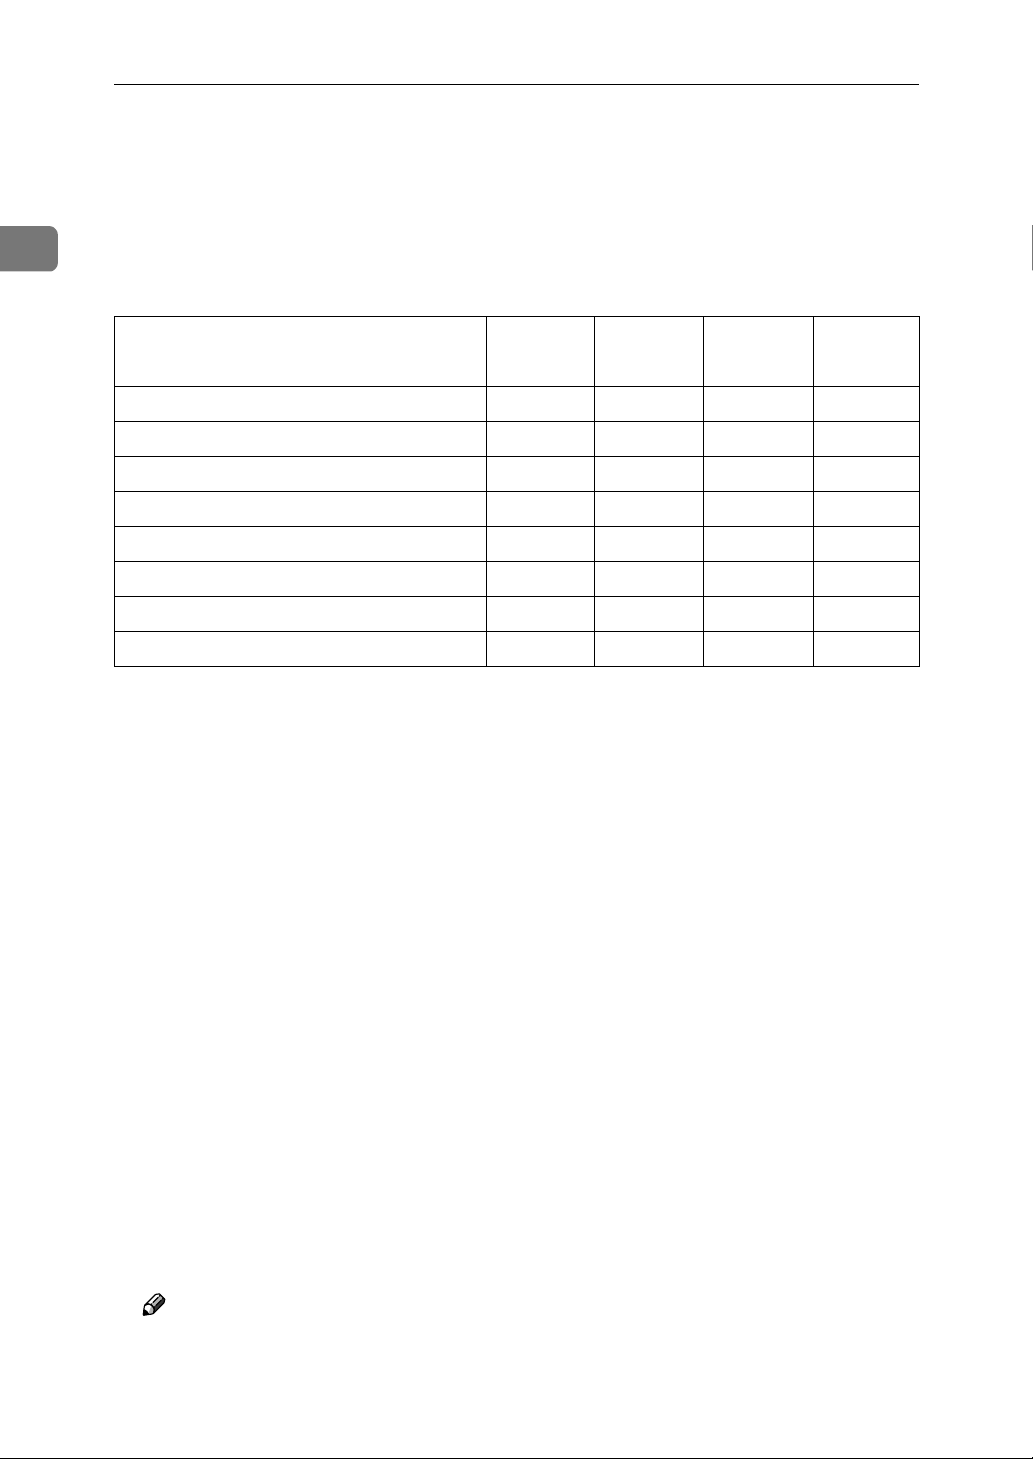
Printer Drivers for This Machine
Printing requires installation of a printer driver for your operating system. The
following drivers are included on the CD-ROM labeled “Printer Drivers and
Utilities” that comes with the printer option or printer/scanner option of this
machine.
Printer Language PCL 6 PCL 5e RPCS™
Operating system
Windows 95
Windows 98
Windows Me
Windows 2000
Windows XP
Windows NT 4.0
Mac OS
Mac OS X
*1
*2
*3
*4
*7
*8
Microsoft Windows 95 operating system
Microsoft Windows 98 operating system
Microsoft Windows Millennium Edition
Microsoft Windows 2000 Advanced Server
*1
*2
*3
*4
*5
*6
√√√√
√√√√
√√√√
√√√√
√√√√
*9
√
*9
√
*9
√
PostScript 3
√
Microsoft Windows 2000 Server
Microsoft Windows 2000 Professional
*5
Microsoft Windows XP Professional
Microsoft Windows XP Home Edition
*6
Microsoft Windows NT Server operating system version 4.0, Microsoft Windows NT
Workstation operating system version 4.0 in a computer using x86 processors.
*7
Versions 8.6 to 9.2 of the Mac OS (Mac OS X Classic mode is supported.)
*8
Mac OS X 10.1 or later (Native mode)
*9
Requires Service Pack 4 or later.
*10
Requires Service Pack 6 or later.
*11
The Adobe PostScript 3 printer drivers and PostScript Printer Description (PPD) files
are included on the CD-ROM labeled “Printer Drivers and Utilities”.
*12
The PostScript Printer Description (PPD) files are included on the CD-ROM labeled
“Printer Drivers and Utilities”.
*13
The Adobe PostScript Printer Description (PPD) installer is included on the CDROM labeled “Printer Drivers and Utilities”.
*11
*11
*11
*12
*12
*10 *11
*11
√
*13
√
❖❖❖❖ PCL printer drivers
Two kinds of PCL printer drivers: PCL 6 and PCL 5e, are included on the CDROM that comes with this machine. These drivers allow the computer to communicate with the machine via a printer language. We recommend PCL 6 as
your first choice.
Note
❒ Some applications may require installation of the PCL 5e printer driver. In
this case, you can install PCL 5e without having to install PCL 6.
⇒ p.27 “Installing the PCL 6/5e and RPCS™ Printer Driver”
4
Page 11

Printer Drivers for This Machine
❖❖❖❖ RPCS™ printer driver
The RPCS™ printer drivers are included on the CD-ROM that comes with
this machine. This printer driver allows the computer to communicate with
the machine via a printer language. The preset type user interface is provided
in addition to the conventional one.
⇒ p.27 “Installing the PCL 6/5e and RPCS™ Printer Driver”
❖❖❖❖ Adobe PostScript 3 Printer Drivers and PPD files
The Adobe PostScript 3 printer drivers and the PPD files are included on the
CD-ROM that comes with this machine. This printer driver allows the computer to communicate with the printer via a printer language. The PPD files
allow the printer driver to enable the printer specific functions.
⇒ p.31 “Installing the PostScript 3 Printer Driver”
1
5
Page 12

Getting Started
Software and Utilities Included on the CDROM
1
There are three CD-ROMs that come with the printer option or printer/scanner
option of this machine. These are labeled differently according to the option.
Note
❒ The Printer Kit Type 1075 package contains the following CD-ROMs:
• Printer Drivers and Utilities
• Document Management Utility
• Operating Instructions
❒ The Printer/Scanner Kit Type 1075 package contains the following CD-
ROMs:
• Printer Drivers and Utilities
• Scanner Driver and Document Management Utilities
• Operating Instructions
The CD-ROM labeled “Printer Drivers and Utilities” is mainly used for machine
printer functions. In this manual, “CD-ROM” refers to the “Printer Drivers and
Utilities” CD-ROM unless specified otherwise.
❖❖❖❖ SmartNetMonitor for Admin
This utility is for the system administrator to manage printers on the network.
Reference
See SmartNetMonitor for Admin online Help for more information about
using the SmartNetMonitor for Admin.
❖❖❖❖ SmartNetMonitor for Client
This utility is for users to manage their own print status on the network.
Reference
See SmartNetMonitor for Client online Help for more information about
using the SmartNetMonitor for Client.
❖❖❖❖ Agfa Monotype Font Manager 2000
This utility helps you to install new screen fonts, or organize and manage
fonts already installed on the system.
❖❖❖❖ 1394 Utility
This utility is for the IEEE 1394 Interface Board. For more information, see the
Readme file or the manual that comes with the IEEE 1394 Interface Board option.
6
Page 13

Software and Utilities Included on the CD-ROM
❖❖❖❖ USB Printing Support
This utility is for the USB2.0 Interface Board. Install this utility to use the USB
connection on computers running Windows 98SE/Me. For information about
installing, see p.43 “Installing the Printer Driver Using USB”.
❖❖❖❖ Acrobat Reader
This utility allows you to read PDF (Portable Document Format).
Note
❒ Documentation about using the machine is included on the CD-ROM in
PDF format. See Acrobat Reader online Help for more information about
using Acrobat Reader.
❖❖❖❖ Printer Utility for Mac
This utility allows users to download and manage a variety of fonts as well as
to manage their printers. For more information about this utility, see the Post-
Script 3 Board Type 1075 Operating Instructions Supplement which is provided
as a PDF file on the CD-ROM labeled “Operating Instructions”.
Important
❒ Software and utilities must be uninstalled before installing newer versions of
Windows. Reinstall software and utilities after upgrading Windows.
1
7
Page 14
Getting Started
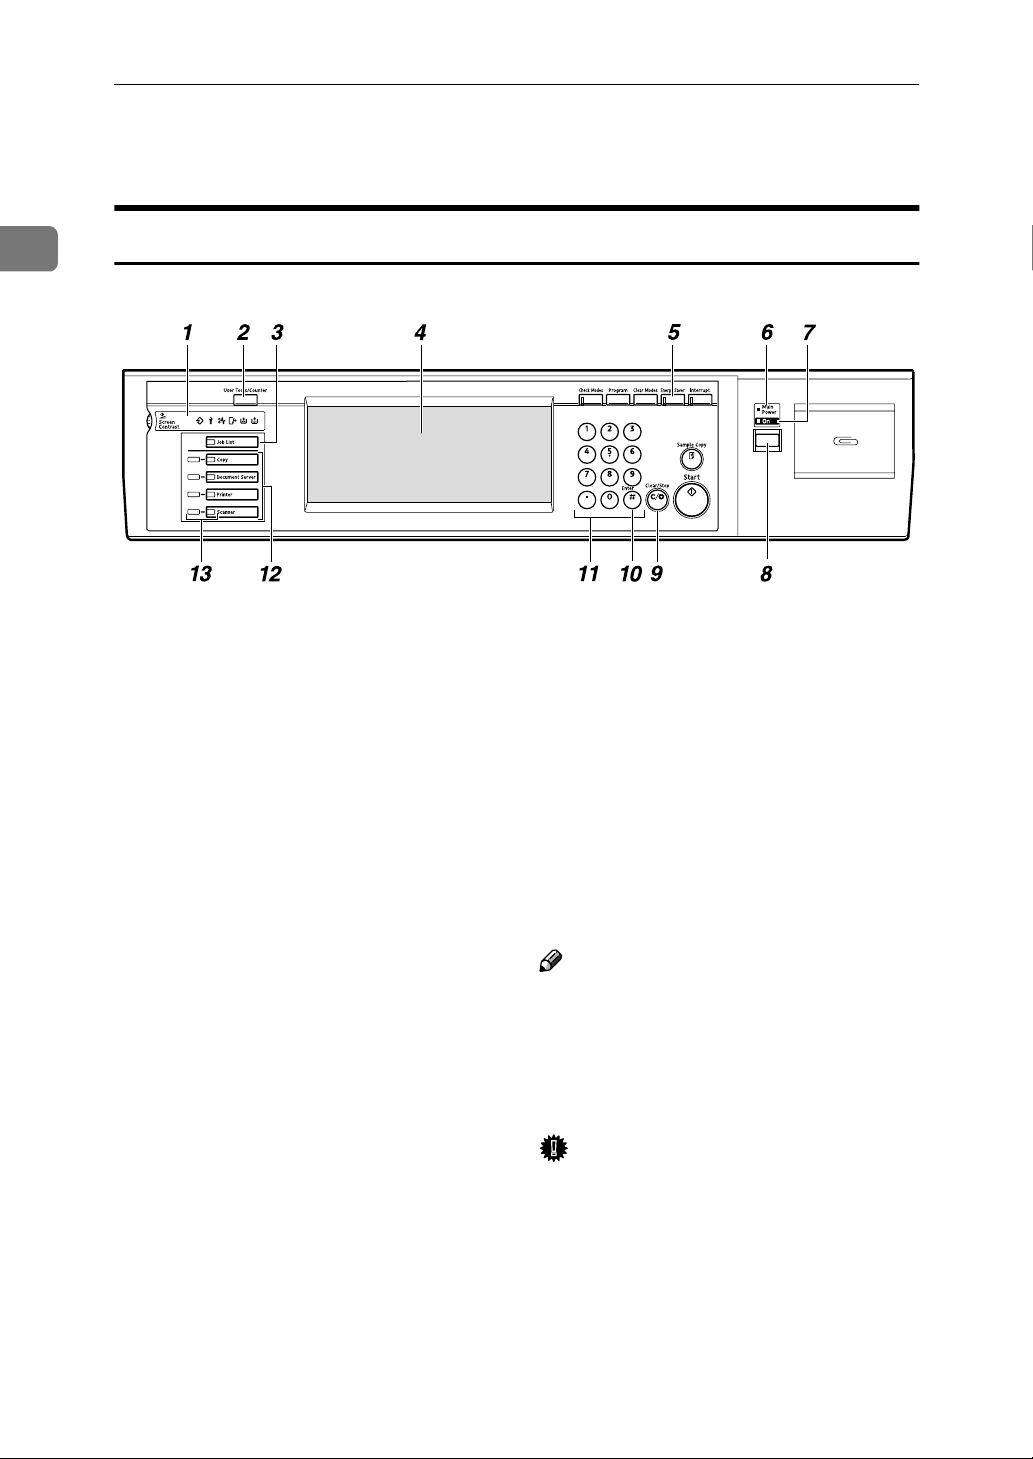
Guide to This Machine
1
Control Panel
1. Shows errors and machine status.
m: Data In indicator
The Data In indicator shows the status of
data reception from a computer.
• This indicator blinks when data is being received.
• This indicator goes on when there is
data remaining to be printed.
L: Service call indicator
x: Misfeed indicator
M: Cover indicator
d: Staple indicator
D: Toner indicator
2. {
{User Tools/Counter}}}} key
{{
• User Tools
Press to change the default settings
and conditions to meet your requirements.
• Counter
Press to display or print the total number of copies made.
• Inquiry
Press to check where to contact to
have the machine repaired or to order
toner.
ZGXS301N
{{{{Job List}}}} key
3.
Shows the job list. See “Job List”, General
Settings Guide.
4. Display panel
Shows operation status, error messages,
and function menus. ⇒ p.9 “Display Panel”
5. {
{Energy Saver}}}} key
{{
Press to switch to and from the Energy
Saver mode. See “ENERGY STAR Program”, General Settings Guide .
Note
❒ This key is ineffective during system
setting (User Tools) operations.
6. Main power indicator
This indicator goes on when the main
power switch is turned on.
Important
❒ Do not turn off the main power
while the On indicator is blinking.
Doing so may damage the hard
disk.
7. On indicator
This indicator goes on when the operation switch is turned on.
8
Page 15

Guide to This Machine
8. Operation switch
Press this switch to turn the power on
(the On indicator goes on). To turn the
power off, press this switch again (the On
indicator goes off).
9. {
{Clear/Stop}}}} key
{{
• Clear
Deletes one character or digit.
• Stop
Interrupts the current print job in
progress.
{{{{#}}}} key
10.
Press to enter a value.
11. Number keys
Use to enter the desired number of copies
and data for selected modes.
12. Function keys
Press the appropriate key to choose any
of the following functions:
• Copy
• Document Server
• Printer
• Scanner
13. Function status indicator
These show the status of the above functions:
• Yellow: the function is selected.
• Green: the function is active.
• Red: the function has been interrupt-
ed.
Display Panel
The display panel shows the status of the machine, error messages and function
menus.
1
Important
❒ Do not apply a strong shock or force of about 30 N
*1
(about 3 kgf
*2
) or more
to the display panel. Otherwise, the display can get damaged.
*1
N = Newton
*2
kgf = Kilogram force (1kgf 9.8N)
Note
❒ The function items displayed serve as selector keys. You can select or specify
an item by lightly pressing on it.
❒ When you select or specify an item on the display panel, it becomes highlight-
ed.
❒ Keys dimmed (ex. ) cannot be used.
OK
9
Page 16
1
Getting Started
Displays and Key Operations
Note
❒ The screen displayed when the power is turned on is the copier screen which
is the factory set default. This initial setting can be changed. See “User Tools
(System Settings)”, General Settings Guide.
❒ The following illustrations are examples for the machine with the options in-
stalled. See “External Options”, General Settings Guide.
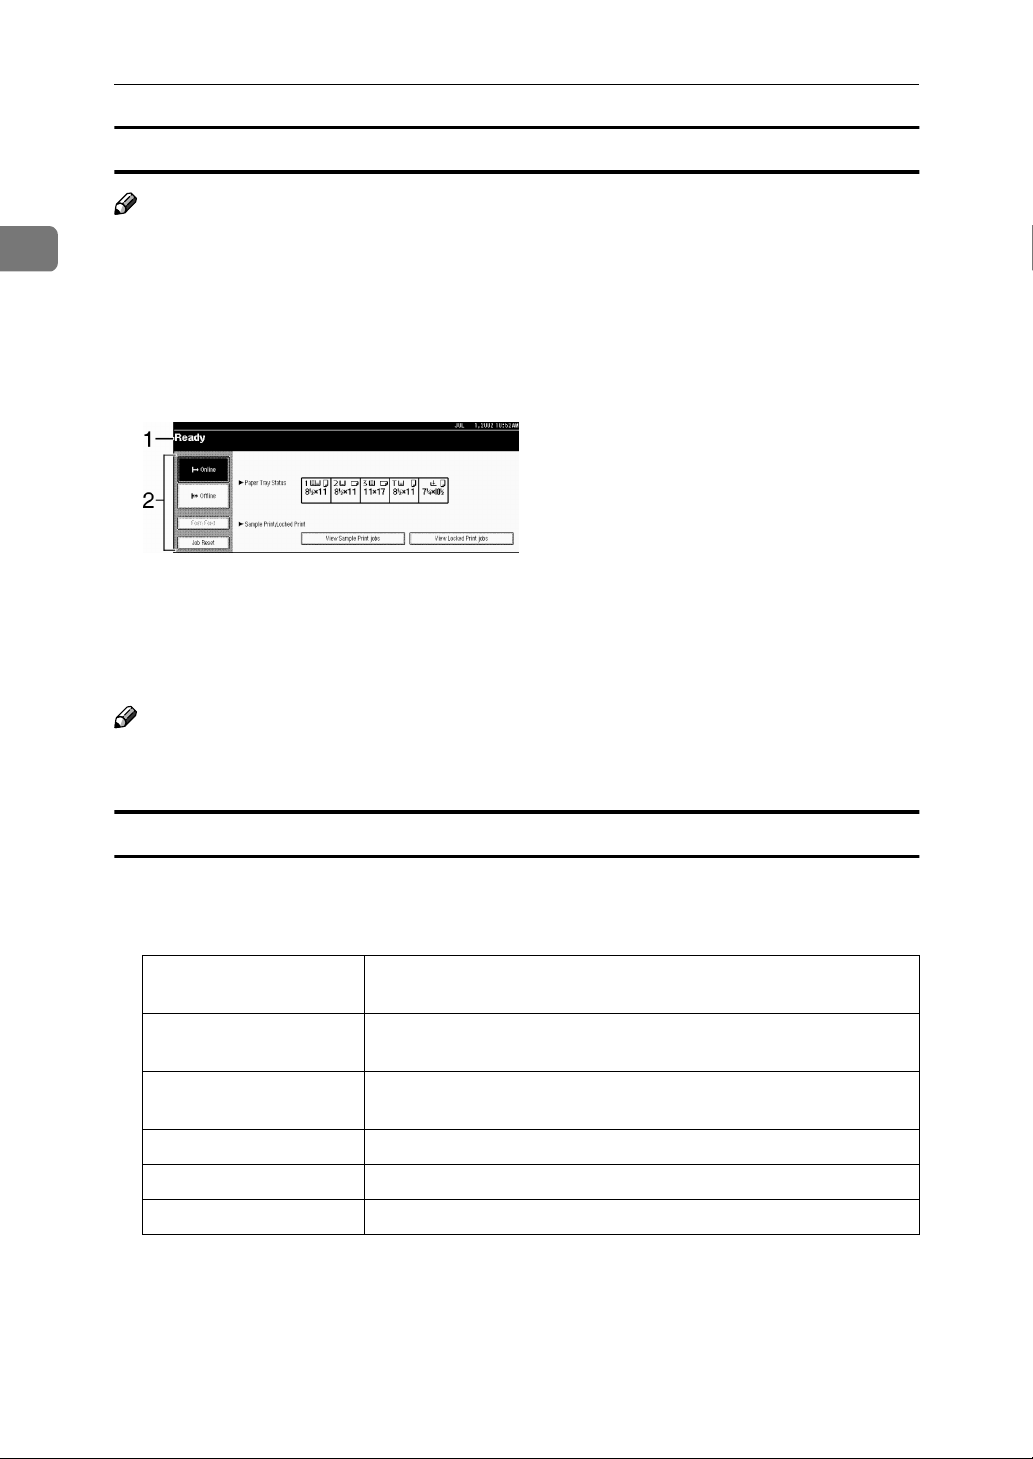
❖❖❖❖ Initial print display
1. Operational status or messages
2. The current settings as well as the
functions which can be selected are
displayed.
Note
❒ The item which is currently selected
or specified is highlighted.
Common Key Operation
The following keys can be used in all screens.
❖❖❖❖ Key explanations
[OK] Acknowledges a selected function or entered values, and then re-
turns to the previous screen.
[Cancel] Deletes a selected function or entered values, and then returns to
the previous screen.
[UUUUPrev.] [TTTTNext] Moves to the previous page or the next page when all the func-
tions cannot be displayed on one page.
[OK] [Yes] Closes message screens.
[Clear] Clears entered values and does not change the screen.
[Exit] Returns to the previous screen.
10
Page 17
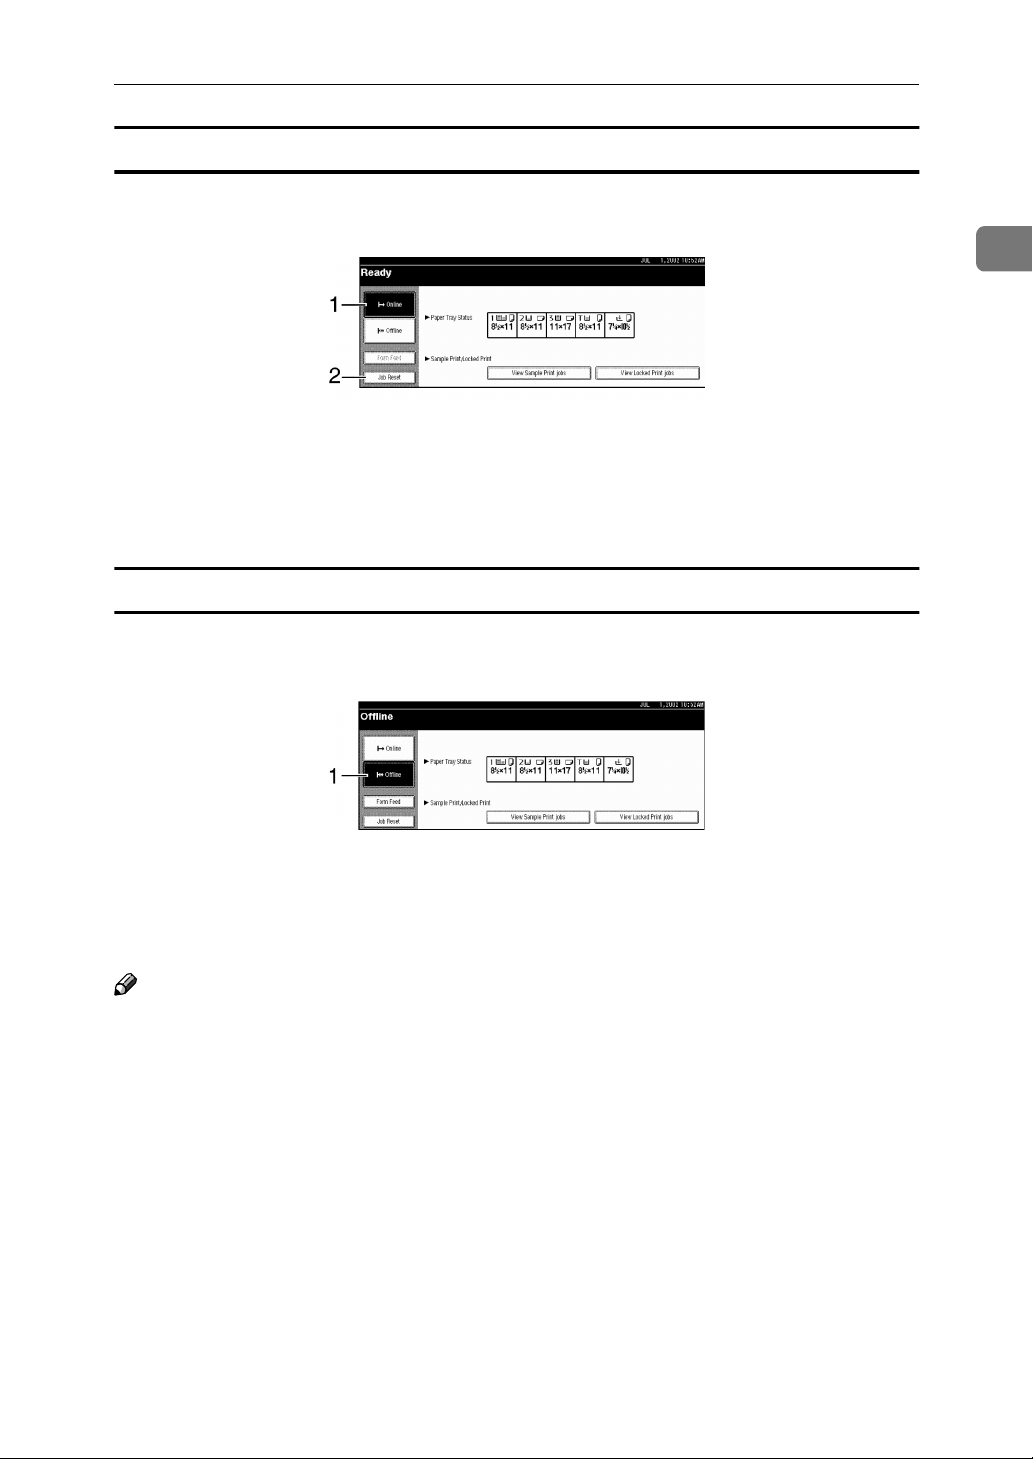
Guide to This Machine
Online
When the machine is online, it can receive data from the computer.
1
1.
[Online] key
Press this key to switch the machine online. The preceding illustration shows the
online status.
2.
[Job Reset] key
Press this key to cancel the current print
job.
Offline
When the machine is offline, it cannot receive data from the computer.
1.
[Offline] key
Press this key to switch the machine offline. The preceding illustration shows
the offline status.
Note
❒ If the machine cannot be switched to offline status, change the system setting
of [Signal Control] to “Printer priority”. For details about the setting, see “User
Tools (System Settings)”, General Settings Guide.
❒ When “Job acceptance priority” is set for the system setting of [Signal Control],
the machine accepts print jobs from computers even when the offline status
is indicated. For details about the setting, see “User Tools (System Settings)”,
General Settings Guide.
11
Page 18

1
Getting Started
Connecting the Machine
This section gives instructions for connecting the machine and computer using
the parallel port and the optional USB port.
Reference
For Ethernet and IEEE 1394 interface connections, see “Connecting the Machine (Network Connections)”, General Settings Guide.
Requirements
Before using this machine, make sure all environmental and electrical requirements met. Connect the machine to the host computer using the parallel port,
network interface unit, or both.
Make sure all cables, connectors, and electrical outlets necessary to attach the
machine to the host computer or network are present.
Connecting the Machine to the Host Using the Parallel Cable
Connect the machine to the host computer using the parallel port. This machine
does not come with a parallel cable to connect the machine to the host computer.
The machine's parallel interface is a standard bidirectional interface. It requires
a standard IEEE 1284 compliant 36-pin parallel cable and a parallel port on the
host computer. Make sure to purchase the appropriate cable for the machine and
your computer.
Note
❒ Do not use a parallel cable that is longer than 3 meters (10 feet).
❒ Rating voltage of the interface connector: Max. DC 5V
Follow the procedures below to connect the machine to the host computer using
a parallel cable.
Important
❒ Before connecting the machine and a computer using an interface cable, make
sure that the machine is not operating, and then turn off the main power
switches of the machine and computer.
❒ Be sure to use the designated interface cable. Other cables may cause radio in-
terference.
Turn off the main power switch.
AAAA
12
Important
❒ Before turning off the main power switch, see “Turning Off the Power”,
General Settings Guide.
Page 19
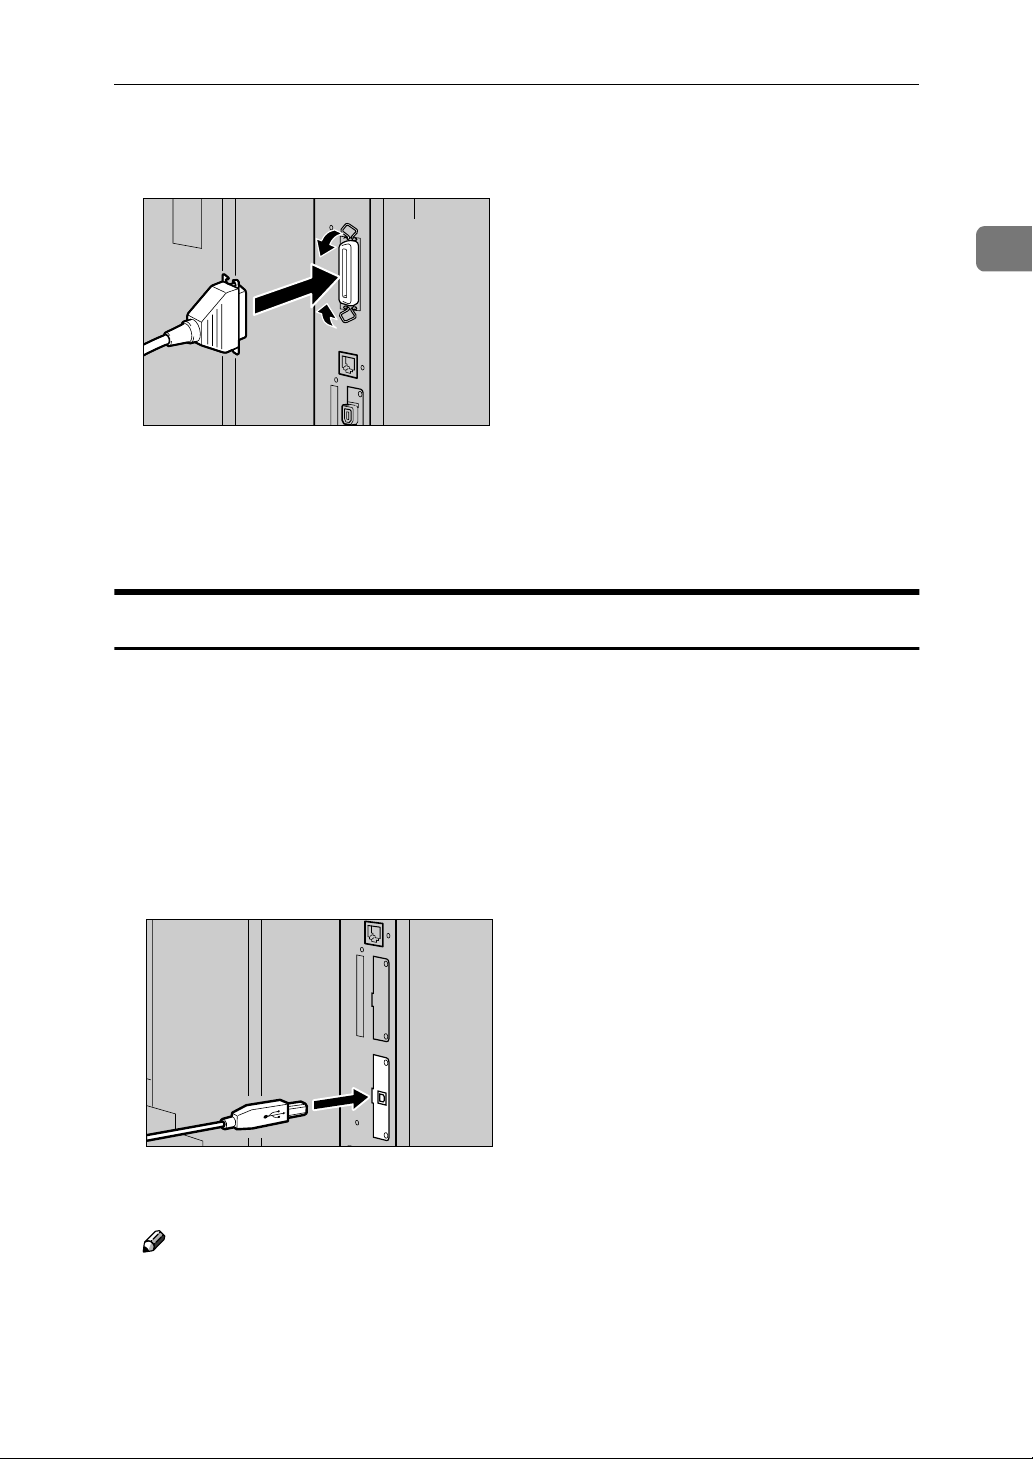
Connecting the Machine
Plug the 36-pin end of the parallel cable into the parallel port at the right
BBBB
side of the back cover of the machine.
ZGWH050E
Squeeze the wire clips on each side of the connector together until they
CCCC
snap into place. The clips hold the cable securely in place.
Plug the other end of the parallel cable into the computer's parallel port.
DDDD
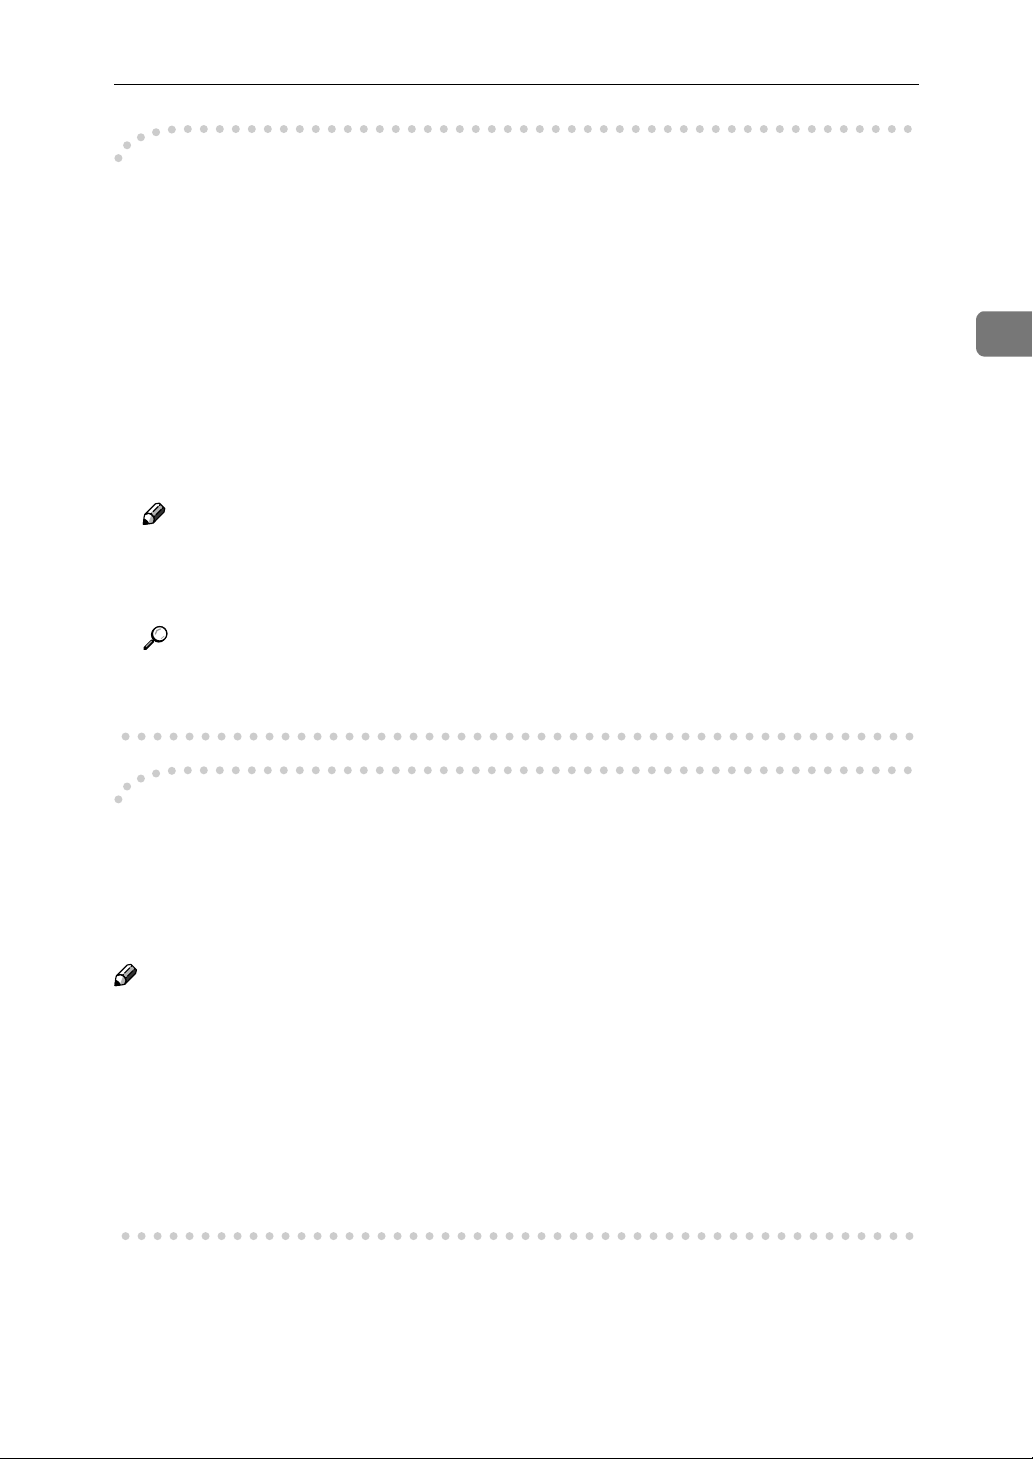
Connecting the Machine to the Host Using the USB Cable
1
You can connect the machine to the host computer using a USB interface cable
when the optional USB2.0 Interface Board is installed in the machine.
This machine does not come with a USB interface cable. Make sure to purchase
the appropriate cable for the machine and your computer.
Follow the procedures below to connect the machine to the host computer using
a USB interface cable.
Connect the USB2.0 interface cable to the USB2.0 port at the right side of
AAAA
the back cover of the machine.
ZGUH493E
Connect the other end to the USB port on the host computer.
BBBB
Note
❒ The optional USB2.0 Interface Board is supported by Windows 98SE/Me,
Windows 2000/XP, Mac OS 9.x and Mac OS X Classic mode.
• For Windows 98SE/Me:
Make sure to install “USB Printing Support”. When USB2.0 is used with
Windows 98SE/Me, only a speed equal to that of USB1.1 is possible.
• Macintosh supports only the standard USB port.
13
Page 20

1
Getting Started
Setting Paper on the Bypass Tray
This section gives instructions for setting paper on the bypass tray. Use the bypass tray to print onto OHP transparencies, labels, thick paper, letterheads and
envelopes that cannot be loaded in the paper tray.
Reference
For setting paper into the regular paper tray, see the General Settings Guide.
Note
❒ Paper within the following dimensions can be set in the bypass tray:
• Vertical: 100.0 - 305.0 mm (3.93 in. - 12.00 in.)
• Horizontal: 139.7 - 600.0 mm (5.50 in. - 23.62 in.)
❒ Be sure to set the paper with the side you want to print facing up in L orien-
tation in the bypass tray.
❒ OHP transparencies, thick paper, labels, or envelopes fed from the bypass
tray are delivered face up onto the output tray.
Limitation
❒ The following functions are disabled when printing from the bypass tray:
• Duplex Printing
• Auto Tray Select
• Auto Tray Switching
• Staple (when the optional unit is installed)
• Punch (when the optional unit is installed)
Important
❒ When printing using the printer function, original images are always rotated
by 180 degrees (the orientation of images to be printed is opposite to that of
the copier function). When printing onto paper with specific orientation requirements, such as envelopes and letterheads, make sure to rotate the paper
feed direction to 180 degrees.
❒ Make sure to set the paper size using the printer driver when printing data
from the computer. The paper size set using the printer driver has priority
over the one set using the display panel.
14
Page 21

Setting Paper on the Bypass Tray
Open the bypass tray.
AAAA
ZGUH030E
Adjust the paper guides to the paper size.
BBBB
Important
❒ If the paper guides are not flush against the paper, skewed images or paper
misfeeds might occur.
Gently insert the paper face up in the bypass tray until the beeper sounds.
CCCC
1
2
1
ZGWH071E
1. Extender
2. Paper guides
Note
❒ Be sure to set paper in L orientation as shown in the illustration above.
❒ The beeper will not sound if it is turned off. Gently insert the paper until it
stops.
❒ Do not stack paper over the limit mark, otherwise a skewed image or paper
misfeeds might occur.
❒
Open out the extender to support paper sizes larger than A4 L , 81/2"×11" L .
❒ Fan the paper to get air between the sheets to avoid a multi-sheet feed.
❒ When setting an OHP transparency, make sure that its front and back sides
are properly positioned.
❒ Select the paper type when printing on OHP transparencies or thick paper
(over 105g/m
encies”.
2
). For details, see p.18 “Setting thick paper or OHP transpar-
15
Page 22

1
Getting Started
Select the paper size.
DDDD
Note
❒ You can set paper size using the printer driver. The following procedures
are not necessary when setting paper size using the printer driver.
❒ The paper size set using the printer driver has priority over that set using
the display panel.
❒ When the printer driver is not used, make settings using the display panel.
Reference
For printer driver settings, see the printer driver's Help.
For setting custom sizes, see p.17 “Setting custom size paper”.
.
Setting the Paper Size on the Display Panel
Press the {{{{User Tools/Counter}}}} key on the control panel.
AAAA
16
Press [Printer Features].
BBBB
Press the [Paper Input] tab.
CCCC
Press [Bypass Paper Size].
DDDD
ZGXS030N
Page 23

Setting Paper on the Bypass Tray
Select the paper size.
EEEE
Note
❒ Press [UUUUPrev.] or [TTTTNext] to scroll through the list.
❒ When printing onto thick paper or OHP transparencies, select the paper
type. For details, see p.18 “Setting thick paper or OHP transparencies”.
Press [OK].
FFFF
Press the {{{{User Tools/Counter}}}} key.
GGGG
Setting custom size paper
Note
❒ Custom sizes can also be set using the printer driver. The following proce-
dures are not necessary when setting custom sizes using the printer driver.
1
❒ Custom size settings set using the printer driver have priority over those in
the display panel on the machine.
❒ When the printer driver is not used, make settings using the display panel.
Reference
For printer driver settings, see the printer driver's Help.
Press the {{{{User Tools/Counter}}}} key on the control panel.
AAAA
Press [Printer Features].
BBBB
Press the [Paper Input] tab.
CCCC
Press [Bypass Paper Size].
DDDD
Press [Custom Size].
EEEE
17
Page 24

1
Getting Started
Enter the vertical size of the paper with the number keys, and then press [#].
FFFF
Enter the horizontal size of the paper with the number keys, and then press
GGGG
[#].
Press [OK].
HHHH
The paper sizes you entered are displayed.
Press the {{{{User Tools/Counter}}}} key.
IIII
Setting thick paper or OHP transparencies
Note
❒ Paper settings can also be set using the printer driver. The following proce-
dures are not necessary when setting paper sizes using the printer driver.
❒ Paper size settings set using the printer driver have priority over those using
the display panel on the machine.
❒ When the printer driver is not used, make settings using the display panel.
Reference
For printer driver settings, see the printer driver's Help.
Press the {{{{User Tools/Counter}}}} key on the control panel.
AAAA
Press [System Settings].
BBBB
Press the [Tray Paper Settings] tab.
CCCC
Press [TTTTNext] to scroll the list.
DDDD
Press [Paper Type : Bypass tray].
EEEE
18
Page 25

Setting Paper on the Bypass Tray
Select [OHP] or [Thick Paper.]
FFFF
Press [OK].
GGGG
The paper type you selected is displayed.
Press the {{{{User Tools/Counter}}}} key.
HHHH
Note
❒ The settings made will remain valid until they are reset again. After print-
ing on OHP transparencies or thick paper, make sure to reset the settings
for the next person.
1
19
Page 26

1
Getting Started
20
Page 27

2. Installing the Printer Driver
and Software
This manual assumes that you are familiar with general Windows procedures
and practices. If you are not, see the documentation that comes with Windows
for details.
Installation Method
❖❖❖❖ Installing using Auto Run
Inserting the CD-ROM into the CD-ROM drive starts the installer automatically. The installer helps you install the following printer drivers and software easily.
The following table shows the printer drivers and software that can be installed using Auto Run.
*1
Utility Wizard
Quick Install Add Printer and
Network connection
with TCP/IP
Auto Run
Parallel connection
PCL 6 printer driver ❍❍❍
PCL 5e printer driver ❍
RPCS™ printer driver ❍❍❍
PostScript 3 printer
driver
Agfa Monotype Font
Manager 2000
SmartNetMonitor for
Admin
SmartNetMonitor for
Client
*1
Available operating systems are as follows: Windows 95/98/Me, Windows
2000/XP, Windows NT 4.0. Auto Run is unavailable with Macintosh.
Reference
❍❍
❍
❍
❍
When the machine is connected to the computer using the IEEE 1394 interface or the USB2.0 interface, install the printer drivers separately.
⇒ p.43 “Installing the Printer Driver Using USB”
⇒ p.46 “Installing the Printer Driver Using IEEE 1394”
21
Page 28

2
Installing the Printer Driver and Software
❖❖❖❖ Installing manually
The following printer drivers and software cannot be installed using Auto
Run.
For Macintosh
• PostScript 3 Printer Driver for Macintosh
⇒ p.39 “Mac OS - Installing the PostScript 3 Printer Driver and Utilities”
• PostScript Printer Descriptions Files (PPD)
The PPD files for Mac OS 8.6 to 9.2, and Mac OS X are different.
⇒ p.39 “Mac OS - Installing the PostScript 3 Printer Driver and Utilities”
⇒ p.42 “Mac OS X - Installing the PostScript 3 Printer Driver”
• Adobe Type Manager (ATM)
⇒ p.41 “Installing Adobe Type Manager (ATM)”
• Screen Fonts
⇒ p.41 “Installing screen fonts”
• Printer Utility for Mac
For installing the software, see the PostScript 3 Board Type 1075 Operating
Instructions Supplement.
For Windows
• 1394 Utility
For installing the utility, see the Readme file or the manual that comes with
the IEEE 1394 Interface Board option.
• USB Printing Support
For installing this utility, see p.43 “Installing the Printer Driver Using
USB”
Important
❒ Before starting the installation, close all documents and applications.
❒ After installing a printer driver, you must restart the computer.
Note
❒ If “plug and play” is started, click [Cancel] in the [New Hardware Found], [Device
Driver Wizard] or [Found New Hardware Wizard] dialog box, and then insert the
CD-ROM. The [New Hardware Found], [Device Driver Wizard] or [Found New Hard-
ware Wizard] dialog box appears depending on the system version of the Win-
dows 95/98/Me, Windows 2000/XP.
22
Page 29
Installation Method
----User Codes
User codes are eight digit codes that allow you to keep track of printing done under each code. To use this feature, the network administrator should assign user
codes and inform users of them before they install the printer driver.
Use the following methods to enter a user code for registration:
• For the PCL 6/5e or PostScript 3 printer drivers, enter the user code on the
[Statistics] tab in the Printer Properties dialog box.
• For the RPCS™ printer driver, click the [Printer Configuration] button on the
[Print Settings] tab in the Printer Properties dialog box. A window opens. Click
the [User Code] button in the opened window. A dialog box appears. Enter the
user code in the dialog box.
Note
❒ When using the RPCS™ printer driver on Windows 95/98/Me, the user
code cannot be changed once entered. To change an entered user code, uninstall the printer driver, reinstall it, and then enter a new user code.
Reference
For more information about user codes, see “User Codes”, General Settings
Guide.
2
----Additional Drivers (Alternate Drivers)
If you want to share the machine on a Windows 2000/XP, Windows NT 4.0 platform, install the printer drivers of other versions of Windows as additional drivers, so that users running different versions of Windows can download them
automatically when they connect.
Note
❒ When using the “additional driver” function in the PostScript 3 printer driver
with the Windows NT 4.0, Windows NT 4.0 Service Pack 6 or later is required.
For the PCL 6/5e and RPCS™ printer drivers with Windows NT 4.0, Service
Pack 4 or later is required.
For more information about installing the printer driver as an additional driver,
see p.27 “Installing the PCL 6/5e and RPCS™ Printer Driver”, p.33 “Windows
2000/XP - Installing the PostScript 3 Printer Driver”, p.35 “Windows NT 4.0 - Installing the PostScript 3 Printer Driver”
23
Page 30

2
Installing the Printer Driver and Software
Quick Install
Auto Run will start the installer automatically when you load the CD-ROM into
the CD-ROM drive. By selecting Quick Install, you can easily install the PCL 6
printer driver and the RPCS™ printer driver. The SmartNetMonitor for Client
can also be installed provided the machine and the computer are connected via
the network.
The following conditions are required:
• Windows 95/98/Me, Windows 2000/XP or Windows NT 4.0
For Ethernet connections:
• The machine must be connected to the network using an Ethernet cable.
• TCP/IP protocol must be configured.
• The IP address must be assigned to both machine and computer.
For parallel connections:
• The machine must be connected to the computer using a parallel cable.
• Bidirectional transmission must be enabled.
Limitation
❒ If your operating system is Windows 2000/XP or Windows NT 4.0, installing
a printer driver using Auto Run requires Administrators permission. When
you install a printer driver using Auto Run, log on using an account that has
Administrators permission.
❒ When the machine is connected to the computer using the IEEE 1394 interface
or the USB2.0 interface, Quick Install cannot be used. See p.43 “Installing the
Printer Driver Using USB”, p.46 “Installing the Printer Driver Using IEEE
1394”.
Important
❒ If your system is Windows NT 4.0, we recommend that you upgrade the Win-
dows NT 4.0 operating system to Service Pack 4 or later before installing the
PCL 6/5e or RPCS™ printer drivers. Contact your Windows retailer for more
information about the latest version available.
Note
❒ If you want to cancel Auto Run, hold down the {{{{SHIFT}}}} key (when your op-
erating system is Windows 2000/XP, hold down the left {{{{SHIFT}}}} key) while
inserting the CD-ROM. Keep the {{{{SHIFT}}}} key held down until the computer
has finished accessing the CD-ROM.
Close all applications that are running.
AAAA
24
Insert the CD-ROM into the CD-ROM drive.
BBBB
Auto Run will start the installer.
Page 31

Quick Install
Select a language for the interface language, and then click [OK].
CCCC
The following languages are available: Cestina (Czech), Dansk (Danish),
Deutsch (German), English (English), Espanol (Spanish), Francais (French),
Italiano (Italian), Magyar (Hungarian), Nederlands (Dutch), Norsk (Norwegian), Polski (Polish), Portugues (Portuguese), Suomi (Finnish), Svenska
(Swedish)
The default interface language is English.
Click [Quick Install].
DDDD
The software license agreement appears in the [License Agreement] dialog box.
After reading through all of the contents, click [I accept the agreement] to
EEEE
agree with the license agreement, and then click [Next].
Click a model name of the machine you are using when the [Select Printer]
FFFF
dialog box appears.
Note
❒ For a network connection with TCP/IP, select the machine whose IP ad-
dress is displayed in [Connect To].
2
❒ For parallel connection, select the machine whose printer port is displayed
in [Connect To].
Click [Install].
GGGG
Follow the instructions on the screen.
HHHH
Note
❒ During installation in Windows 2000, the [Digital Signature Not Found] dialog
box may appear. In this case, click [Yes] to continue the installation.
❒ During installation in Windows XP, the [Hardware Installation] dialog box
may appear. In this case, click [Continue Anyway] to continue the installation.
A message prompting you to restart your computer may appear. To complete
the installation, restart your computer.
Important
❒ If the machine is installed with the certain options, you should set the op-
tions using the printer driver. See p.29 “Setting Up Options”
25
Page 32

2
Installing the Printer Driver and Software
Note
❒ When you want to change the printer name, follow the procedure below.
• Windows 95/98/Me, Windows 2000, Windows NT 4.0
Click [Start] on the taskbar, point to [Settings], and then click [Printers].
The Printer window appears. Right-click the machine icon, and then select [Rename].
• Windows XP Professional
Click [Start] on the taskbar, and then [Printers and Faxes]. The Printers
and Faxes window appears. Right-click the machine icon, and then select [Rename].
• Windows XP Home Edition
Click [Start] on the taskbar, and then [Control Panel]. Click [Printers and
Other Hardware], and then [Printers and Faxes]. The Printers and Faxes
window appears. Right-click the machine icon, and then select [Re-
name].
26
Page 33

Installing the PCL 6/5e and RPCS™ Printer Driver
Installing the PCL 6/5e and RPCS™ Printer
Driver
This section describes basic instructions for installing the PCL 6/5e printer driver and RPCS™ printer driver without using Quick Install. Also, procedures are
described for setting up options installed on the machine using the printer driver. Follow the procedures below as appropriate.
Reference
See p.24 “Quick Install” for installing the PCL 6 printer driver or RPCS™
printer driver using Quick Install.
Installing the PCL 6/5e and RPCS™ Printer Driver
Limitation
❒ If your system is Windows 2000/XP or Windows NT 4.0, installing a printer
driver using Auto Run requires Administrators permission. When you install
a printer driver using Auto Run, log on using an account that has Administrators permission.
2
Important
❒ When updating to the latest version of the printer driver, you should unin-
stall any earlier versions. See “Uninstalling the Printer Driver”, Printer Refer-
ence 2.
❒ If your system is Windows NT 4.0, we recommend that you upgrade the Win-
dows NT 4.0 operating system to Service Pack 4 or later before installing the
printer drivers. Contact your Windows retailer for more information about
the latest version available.
Note
❒ If you want to share the machine on a Windows 2000/XP or Windows NT 4.0
platform, use the [Sharing] tab in the Printer Properties to specify the additional driver (alternate driver). For details, see the documentation that comes
with Windows 2000/XP, or Windows NT 4.0.
❒ When prompted for the additional driver (alternate driver) location, select the
following folders on the CD-ROM:
• Windows 95/98/Me
PCL 6: \DRIVERS\PCL6\WIN9X_ME\(Language)\DISK1\
PCL 5e: \DRIVERS\PCL5E\WIN9X_ME\(Language)\DISK1\
RPCS™: \DRIVERS\RPCS\WIN9X_ME\(Language)\DISK1\
• Windows 2000/XP
PCL 6: \DRIVERS\PCL6\WIN2K_XP\(Language)\DISK1\
PCL 5e: \DRIVERS\PCL5E\WIN2K_XP\(Language)\DISK1\
RPCS™: \DRIVERS\RPCS\WIN2K_XP\(Language)\DISK1\
27
Page 34

Installing the Printer Driver and Software
• Windows NT 4.0
PCL 6: \DRIVERS\PCL6\NT4\(Language)\DISK1\
PCL 5e: \DRIVERS\PCL5E\NT4\(Language)\DISK1\
RPCS™: \DRIVERS\RPCS\NT4\(Language)\DISK1\
Close all applications that are running.
AAAA
Insert the CD-ROM into the CD-ROM drive.
BBBB
2
Auto Run will start the installer.
Select a language for the interface language, and then click [OK].
CCCC
The following languages are available: Cestina (Czech), Dansk (Danish),
Deutsch (German), English (English), Espanol (Spanish), Francais (French),
Italiano (Italian), Magyar (Hungarian), Nederlands (Dutch), Norsk (Norwegian), Polski (Polish), Portugues (Portuguese), Suomi (Finnish), Svenska
(Swedish)
The default interface language is English.
Click [PCL/RPCS Printer Drivers].
DDDD
The software license agreement appears in the [License Agreement] dialog box.
After reading through all of the contents, click [I accept the agreement] to
EEEE
agree with the license agreement, and then click [Next].
Select the printer drivers you want to install when the [Select Program] dia-
FFFF
log box appears, and then click [Next].
Select the model of the machine you are using.
GGGG
To change the printer name, change it in the [Change settings for 'Printer Name']
box.
28
Double-click the machine name to display the printer settings.
HHHH
Note
❒ The details shown for [Comment:], [Driver:] and [Port:] vary depending on
the operating system being used, the model of machine selected, and the
port being used.
❒ Confirm that [LPT1:] is selected for [Port:].
❒ Check [Default Printer] if you want to set the machine as the default printer.
❒ Check [Shared] if you want to share the machine. See the Network Printing
Guide for information about setting up and using the machine in a network
environment.
Click [Continue] to start printer driver installation.
IIII
Follow the instructions on the screen.
JJJJ
Page 35

Installing the PCL 6/5e and RPCS™ Printer Driver
Note
❒ During installation in Windows 2000, the [Digital Signature Not Found] dialog
box may appear. In this case, click [Yes] to continue the installation.
❒ During installation in Windows XP, the [Hardware Installation] dialog box
may appear. In this case, click [Continue Anyway] to continue the installation.
Setting Up Options
If the machine is installed with certain options, you should set the options using
the printer driver.
Limitation
❒ In Windows 2000/XP, changing the printer settings requires Manage Printers
permission. Members of the Administrators and Power Users groups have
Manage Printers permission by default. When you set up options, log on using an account that has Manage Printers permission.
❒ In Windows NT 4.0, changing the setting of the printer requires Full Control
permission. Members of the Administrators, Server Operators, Print Operators, and Power Users groups have Full Control permission by default. When
you set up options, log on using an account that has Full Control permission.
When setting up options, you should access the Printer Properties dialog box
from Windows. You cannot set up options by accessing the Printer Properties dialog box from an application.
PCL 6/5e Printer Driver
Click [Start] on the taskbar, point to [Settings], and then click [Printers].
AAAA
2
The [Printers] window appears.
Note
❒ In Windows XP Professional, access the [Printers and Faxes] window from
[Start] on the taskbar.
❒ In Windows XP Home Edition, access the [Printers and Faxes] window by
clicking [Start] on the taskbar. Then click [Control Panel], [Printers and Other
Hardware] and then [Printers and Faxes].
Click the icon of the machine you want to use.
BBBB
On the [File] menu, click [Properties].
CCCC
The Printer Properties window appears.
Click the [Accessories] tab.
DDDD
Select the options you have installed from the [Options] group.
EEEE
Click [OK] .
FFFF
29
Page 36

2
Installing the Printer Driver and Software
RPCS™ Printer Driver
Click [Start] on the taskbar, point to [Settings], and then click [Printers].
AAAA
The [Printers] window appears.
Note
❒ In Windows XP Professional, access the [Printers and Faxes] window from
[Start] on the taskbar.
❒ In Windows XP Home Edition, access the [Printers and Faxes] window by
clicking [Start] on the taskbar. Then click [Control Panel], [Printers and Other
Hardware] and then [Printers and Faxes].
Click the icon of the machine you want to use.
BBBB
On the [File] menu, click [Properties].
CCCC
The Printer Properties window appears.
Note
❒ If the following message appears “Configure installed accessories in the
[Accessories] tab of [Printer Configuration], which will open next.”, click [OK]
and then go to step
.
E
Click the [Change Accessories] tab.
DDDD
Note
❒ In Windows 95/98/Me, click [Printer Configuration] on the [Print Settings] tab,
and then [Change Accessories].
Select the options you have installed from the [Select printer options] group.
EEEE
Click [OK] .
FFFF
30
Page 37

Installing the PostScript 3 Printer Driver
Installing the PostScript 3 Printer Driver
This section describes basic instructions for installing the PostScript 3 printer
driver. Actual procedures may differ depending on the operating system. Follow the procedures below as appropriate.
Reference
To use the PostScript 3 printer driver, the optional PostScript 3 Board must be
installed on the machine. See the PostScript 3 Board Type 1075 Operating In-
structions Supplement for details.
Important
❒ When updating to the latest version of the printer driver, you should unin-
stall any earlier versions. See “Uninstalling the Printer Driver”, Printer Refer-
ence 2.
Windows 95/98/Me - Installing the PostScript 3 Printer Driver
2
Installing the printer driver
Close all applications that are running.
AAAA
Insert the CD-ROM into the CD-ROM drive.
BBBB
Auto Run will start the installer.
Select a language for the interface language, and then click [OK].
CCCC
The following languages are available: Cestina (Czech), Dansk (Danish),
Deutsch (German), English (English), Espanol (Spanish), Francais (French),
Italiano (Italian), Magyar (Hungarian), Nederlands (Dutch), Norsk (Norwegian), Polski (Polish), Portugues (Portuguese), Suomi (Finnish), Svenska
(Swedish)
The default interface language is English.
Note
❒ The printer driver with the selected language will be installed.
❒ The printer driver will be installed in English if you select the following
languages: Cestina, Magyar, Polski, Portugues and Suomi.
Select [PostScript 3 Printer Driver].
DDDD
[Add Printer Wizard] starts.
Click [Next].
EEEE
Check [Local Printer], and then click [Next].
FFFF
A dialog box for selecting the printer appears.
31
Page 38

2
Installing the Printer Driver and Software
Select the model of the machine you are using, and then click [Next].
GGGG
In the [Available ports:] box, click [Printer Port], and then click [Next].
HHHH
Change the name of the machine if you wish to, and then click [Next].
IIII
Note
❒ Check [Yes] if you want to set the machine as the default printer.
Follow the instructions on the screen.
JJJJ
Setting up options
If the machine is installed with certain options, you should set the options using
the printer driver.
Click [Start] on the taskbar, point to [Settings], and then click [Printers].
AAAA
The [Printers] window appears.
Click the icon of the machine you want to use.
BBBB
On the [File] menu, click [Properties].
CCCC
The Printer Properties window appears.
Click the [Accessories] tab.
DDDD
Select the options you have installed from the [Options] group.
EEEE
Click [OK].
FFFF
32
Page 39

Installing the PostScript 3 Printer Driver
Windows 2000/XP - Installing the PostScript 3 Printer Driver
Installing the printer driver
Limitation
❒ Installing a printer driver requires Administrators permission. When you in-
stall a printer driver, log on using an account that has Administrators permission.
Note
❒ If you want to share the machine on a Windows 2000/XP platform, use the
[Sharing] tab in the Printer Properties to specify the additional driver (alternate driver). For details, see the documentation that comes with Windows
2000/XP.
❒ When prompted for the additional driver (alternate driver) location, select the
following folders on the CD-ROM:
• Windows 95/98/Me: \DRIVERS\PS\WIN9X_ME\(Language)\DISK1\
• Windows NT 4.0: \DRIVERS\PS\NT4\(Language)\DISK1\
2
Close all applications that are running.
AAAA
Insert the CD-ROM into the CD-ROM drive.
BBBB
Auto Run will start the installer.
Select a language for the interface language, and then click [OK].
CCCC
The following languages are available: Cestina (Czech), Dansk (Danish),
Deutsch (German), English (English), Espanol (Spanish), Francais (French),
Italiano (Italian), Magyar (Hungarian), Nederlands (Dutch), Norsk (Norwegian), Polski (Polish), Portugues (Portuguese), Suomi (Finnish), Svenska
(Swedish)
The default interface language is English.
Note
❒ The printer driver with the selected language will be installed.
❒ The printer driver will be installed in English if you select the following
languages: Cestina, Magyar, Polski, Portugues and Suomi.
Select [PostScript 3 Printer Driver].
DDDD
[Add Printer Wizard] starts.
Click [Next].
EEEE
33
Page 40

2
Installing the Printer Driver and Software
Check [Local Printer], and then click [Next].
FFFF
Note
❒ In Windows XP, check [Local printer attached to this computer], and then click
[Next].
A dialog box for selecting the printer port appears.
Select the check box of the port you want to use, and then click [Next].
GGGG
A dialog box for selecting the printer appears.
Select the model of the machine you are using, and then click [Next].
HHHH
Change the name of the machine if you wish to, and then click [Next].
IIII
Note
❒ Check [Yes] if you want to set the machine as the default printer.
Select whether or not you want to share the machine, and then click [Next].
JJJJ
Reference
See the Network Printing Guide for information about setting up and using
the machine in a network environment.
Follow the instructions on the screen.
KKKK
Note
❒ During installation, the [Digital Signature Not Found] dialog box may appear.
In this case, click [Yes] to continue the installation.
❒ During installation in Windows XP, the [Hardware Installation] dialog box
may appear. In this case, click [Continue Anyway] to continue the installation.
Setting up options
If the machine is installed with certain options, you should set the options using
the printer driver.
Limitation
❒ Changing the printer settings requires Manage Printers permission. Members
of the Administrators and Power Users groups have Manage Printers permission by default. When you set up options, log on using an account that has
Manage Printers permission.
Click [Start] on the taskbar, point to [Settings], and then click [Printers].
AAAA
The [Printers] window appears.
34
Page 41

Installing the PostScript 3 Printer Driver
Note
❒ In Windows XP Professional, access the [Printers and Faxes] window from
[Start] on the taskbar.
❒ In Windows XP Home Edition, access the [Printers and Faxes] window by
clicking [Start] on the taskbar. Then click [Control Panel], [Printers and Other
Hardware] and then [Printers and Faxes].
Click the icon of the machine you want to use.
BBBB
On the [File] menu, click [Properties].
CCCC
The Printer Properties window appears.
Click the [Device Settings] tab.
DDDD
Select the options you have installed from the [Installable Options] group.
EEEE
Click [OK].
FFFF
Windows NT 4.0 - Installing the PostScript 3 Printer Driver
2
Installing the printer driver
Limitation
❒ Installing a printer driver requires Administrators permission. When you in-
stall a printer driver, log on using an account that has Administrators permission.
Important
❒ The CD-ROM containing the Windows NT Server operating system version
4.0, or the Windows NT Workstation operating system is required for installing the printer driver.
❒ We recommend that you upgrade the Windows NT 4.0 operating system to
Service Pack 6 or later before installing the printer driver. Contact your Windows retailer for more information about the latest version available.
Note
❒ If you want to share the machine on Windows NT 4.0, use the [Sharing] tab in
the Printer Properties to specify the additional driver (alternate driver). For
details, see the documentation that comes with Windows NT 4.0.
❒ When prompted for the additional driver (alternate driver) location, select the
following folders on the CD-ROM:
• Windows 95/98/Me: \DRIVERS\PS\WIN9X_ME\(Language)\DISK1\
Close all applications that are running.
AAAA
35
Page 42

2
Installing the Printer Driver and Software
Insert the CD-ROM into the CD-ROM drive.
BBBB
Auto Run will start the installer.
Select a language for the interface language, and then click [OK].
CCCC
The following languages are available: Cestina (Czech), Dansk (Danish),
Deutsch (German), English (English), Espanol (Spanish), Francais (French),
Italiano (Italian), Magyar (Hungarian), Nederlands (Dutch), Norsk (Norwegian), Polski (Polish), Portugues (Portuguese), Suomi (Finnish), Svenska
(Swedish)
The default interface language is English.
Note
❒ The printer driver with the selected language will be installed.
❒ The printer driver will be installed in English if you select the following
languages: Cestina, Magyar, Polski, Portugues and Suomi.
Select [PostScript 3 Printer Driver].
DDDD
[Add Printer Wizard] starts.
After confirming that the [My Computer] option is selected, click [Next].
EEEE
A dialog box for selecting the printer port appears.
Select the check box of the port you want to use, and then click [Next].
FFFF
A dialog box for selecting the printer appears.
Select the model of the machine you are using, and then click [Next].
GGGG
Change the name of the machine if you wish to, and then click [Next].
HHHH
Note
❒ Check [Yes] if you want to set the machine as the default printer.
Select whether or not you want to share the machine, and then click [Next].
IIII
Reference
See the Network Printing Guide for information about setting up and using
the machine in a network environment.
Follow the instructions on the screen.
JJJJ
36
Page 43

Installing the PostScript 3 Printer Driver
Setting up options
If the machine is installed with certain options, you should set the options using
the printer driver.
Limitation
❒ Changing the printer settings requires Manage Printers permission. Members
of the Administrators and Power Users groups have Manage Printers permission by default. When you set up options, log on using an account that has
Manage Printers permission.
Click [Start] on the taskbar, point to [Settings], and then click [Printers].
AAAA
The [Printers] window appears.
Click the icon of the machine you want to use.
BBBB
On the [File] menu, click [Properties].
CCCC
The Printer Properties window appears.
Click the [Device Settings] tab.
DDDD
2
Select the options you have installed from the [Installable Options] group.
EEEE
Click [OK].
FFFF
----Bidirectional transmission
When bidirectional transmission is enabled, information such as paper size and
feed direction is automatically sent to the computer. You can also check the machine's status from your computer.
• Bidirectional transmissions are supported by Windows 95/98/Me, Windows
2000/XP and Windows NT 4.0.
• When bidirectional transmission is running, the machine status and information can be viewed by opening the printer driver screen.
To support bidirectional transmission, the following conditions are required:
❖❖❖❖ When connecting with a parallel cable
• The computer must support bidirectional transmission.
• The machine must be set to bidirectional transmission.
• The machine parallel port and computer parallel port are connected using
a parallel interface cable that supports bidirectional transmission.
Note
❒ In Windows 95/98/Me, [Enable bi-directional support for this printer] must be
selected in [Spool Settings] on the [Details] tab in RPCS™ printer driver.
❒ In Windows 2000/XP, or Windows NT 4.0, [Enable bidirectional support]
must be selected, and [Enable printer pooling] must not be selected on the
[Port] tab in RPCS™ printer driver.
37
Page 44

2
Installing the Printer Driver and Software
❖❖❖❖ When connecting with the network
• The machine must be set to bidirectional transmission.
• SmartNetMonitor for Client included on the CD-ROM must be installed.
One of the following conditions must also be satisfied besides the two requirements mentioned above.
• The port for SmartNetMonitor for Client and the TCP/IP protocol must be
used.
• The standard TCP/IP port is used without changing the port name (Win-
dows 2000/XP).
• The IP address specified in the Microsoft TCP/IP Print is used (Windows
NT 4.0).
• The IP address is included in port name when using IPP protocol.
Note
❒ In Windows 95/98/Me, [Enable bi-directional support for this printer] must be
selected in [Spool Settings] on the [Details] tab in RPCS™ printer driver.
❒ In Windows 2000/XP, or Windows NT 4.0, [Enable bidirectional support]
must be selected, and [Enable printer pooling] must not be selected on the
[Port] tab in RPCS™ printer driver.
❖❖❖❖ When connecting with IEEE 1394
• The port on the optional IEEE 1394 Interface Board and the IEEE 1394 port
on the computer are connected using an interface cable (Windows Me,
Windows 2000/XP).
Note
❒ [SCSI print (SBP-2)] must be set to “Active” and [Bidirectional SCSI print] must
be set to “On” in [IEEE 1394] on the [Interface Settings] tab in the machine's
System Settings.
❒ In Windows Me, [Enable bi-directional support for this printer] must be selected
in [Spool Settings] on the [Details] tab in RPCS™ printer driver.
❒ In Windows 2000/XP, or Windows NT 4.0, [Enable bidirectional support]
must be selected, and [Enable printer pooling] must not be selected on the
[Port] tab in RPCS™ printer driver.
❖❖❖❖ When connecting with USB2.0
• The port on the optional USB2.0 Interface Board and the USB port on the
computer are connected using a USB interface cable (Windows 98SE/Me,
Windows 2000/XP).
Note
❒ In Windows 98SE/Me, [Enable bi-directional support for this printer] must be
selected in [Spool Settings] on the [Details] tab in RPCS™ printer driver.
38
❒ In Windows 2000/XP, [Enable bidirectional support] must be selected, and
[Enable printer pooling] must not be selected on the [Port] tab in RPCS™
printer driver.
Page 45

Installing the PostScript 3 Printer Driver
Mac OS - Installing the PostScript 3 Printer Driver and Utilities
It is necessary to install a printer driver and a PPD file to print from a Macintosh.
Follow the procedures to install a printer driver and a PPD file on Macintosh
running OS 8.6 or later versions up to 9.2, and Mac OS X Classic mode.
Note
❒ For installing the PostScript 3 printer driver in Mac OS X, see p.42 “Mac OS X
- Installing the PostScript 3 Printer Driver”
Insert the CD-ROM into the CD-ROM drive.
AAAA
Double-click the CD-ROM icon.
BBBB
Double-click the [Mac OS 8 and 9] folder.
CCCC
Double-click the [PS Driver] folder.
DDDD
Double-click the folder of the language you use.
EEEE
Open [Disk 1] and double-click the installer icon.
FFFF
2
The PostScript 3 printer driver installer window appears.
Follow the instructions on the screen.
GGGG
Double-click [Extensions] in [System Folder].
HHHH
Double-click [Printer Descriptions].
IIII
Double-click the CD-ROM icon on the desktop.
JJJJ
Double-click the [Printer Descriptions] folder in the [Mac OS 8 and 9] folder.
KKKK
Double-click [Disk 1] in the folder of the language you use.
LLLL
Drag the PPD file into [Printer Descriptions] in [Extensions] in [System Folder].
MMMM
Drag the plugin file into [Printer Descriptions] in [Extensions] in [System Folder].
NNNN
Restart the Macintosh.
OOOO
39
Page 46

2
Installing the Printer Driver and Software
Setting Up the PPD File
Preparation
Make sure that the machine is connected to an AppleTalk network before performing the following procedure.
On the Apple menu, select [Chooser].
AAAA
Click the [Adobe PS] icon.
BBBB
In the [Select a PostScript Printer:] list, click the name of the machine you want
CCCC
to use.
Click [Setup].
DDDD
Click the printer description file you want to use, and then click [Select].
EEEE
The PPD file is set up, and the [Adobe PS] icon appears at the left of the machine name in the list. Next, follow the procedure on p.40 “Setting up options” to make the option settings, or close the [Chooser] dialog box.
Setting up options
On the Apple menu, select [Chooser].
AAAA
Click the [Adobe PS] icon.
BBBB
In the [Select the PostScript Printer:] list, click the name of the machine you
CCCC
want to use, and then click [Setup].
Click [Configure].
DDDD
A list of options appears.
Select the options you want to set up and select the appropriate setting for
EEEE
it.
Note
❒ If the option you want to set up is not displayed, the PPD file might not be
set up correctly. Check the name of the PPD file shown in the dialog box.
Click [OK].
FFFF
The list of options closes.
Click [OK].
GGGG
40
The [Chooser] dialog box appears.
Close the [Chooser] dialog box.
HHHH
Page 47

Installing the PostScript 3 Printer Driver
Installing Adobe Type Manager (ATM)
Note
❒ Close all applications that are running before installation. Install after restart-
ing.
Start the Macintosh.
AAAA
Insert the CD-ROM into the CD-ROM drive.
BBBB
Double-click the CD-ROM icon.
CCCC
Double-click the [Mac OS 8 and 9] folder.
DDDD
Double-click the [ATM] folder.
EEEE
Double-click the [ATM 4.6.2 installer] icon.
FFFF
Follow the instructions on screen.
GGGG
Restart the Macintosh.
HHHH
2
Note
❒ Make sure to restart the computer. ATM will be completely installed only
after restarting.
Select [Control Panel] from the Apple menu, and then select [ATM].
IIII
Open the ATM control panel.
JJJJ
Note
❒ For more information about installation, see the User's Guide in the ATM
folder.
Installing screen fonts
Start the Macintosh.
AAAA
Insert the CD-ROM into the CD-ROM drive.
BBBB
Double-click the CD-ROM icon.
CCCC
Double-click the [Mac OS 8 and 9] folder.
DDDD
Double-click the [Fonts] folder.
EEEE
Copy the fonts you want to install into the [System] folder.
FFFF
A confirmation dialog box appears.
Click [OK].
GGGG
The fonts are installed.
41
Page 48

2
Installing the Printer Driver and Software
Restart the Macintosh.
HHHH
Reference
For information about installing the Printer Utility for Mac, see the PostScript 3 Board Type 1075 Operating Instructions Supplement.
Mac OS X - Installing the PostScript 3 Printer Driver
It is necessary to install a PPD file to print from a Macintosh. Follow the procedures to install a PPD file on Macintosh running Mac OS X.
Preparation
You need an administrator name and a password (phrase). For more information, consult your administrator.
Insert the CD-ROM into the CD-ROM drive.
AAAA
Double-click the CD-ROM icon.
BBBB
Double-click the [Mac OS X] folder.
CCCC
Double-click the [PPD Installer] folder, and then double-click the installer
DDDD
icon.
Follow the instructions on screen.
EEEE
Setting Up the PPD File
Run Print Center.
AAAA
Click [Add Printer].
BBBB
Note
❒ Select [AppleTalk] in the first pop-up menu.
❒ If the zone has been set, select the zone in the second pop-up menu.
Select the PPD file for the model you are using from the “Printer Model:”
CCCC
pop-up menu.
Click [Add].
DDDD
Setting Up Options
Limitation
❒ You cannot make printer option settings in Mac OS X. Do not make settings
for options that have not been installed.
42
Page 49

Installing the Printer Driver Using USB
Installing the Printer Driver Using USB
This section gives basic instructions for installing printer drivers using USB. The
printer drivers can be installed from the CD-ROM that comes with this machine.
Preparation
Be sure that all other applications are closed and the computer is not printing
before installation.
Windows 98SE/Me - Installing the Printer Driver Using USB
The procedure below uses Windows 98 as an example. The procedure for Windows Me may be slightly different.
When the USB interface cable is used for the first time, the “plug and play” function starts and [New Hardware Found], [Device Driver Wizard] or [Found New Hardware
Wizard] dialog box appears, depending on the system used.
If printer drivers are already installed, the “plug and play” is displayed, and the
printer with its port directed to the USB interface cable is added to the “Printers”
folder.
2
Click [Next].
AAAA
Select [Search for the best driver for your device. {Recommended}.], and then click
BBBB
[Next].
Check [Specify a location:], and then click [Browse...].
CCCC
The [Browse for Folder] dialog box appears.
Insert the CD-ROM provided into the CD-ROM drive.
DDDD
Note
❒ When Auto Run starts, click [Exit].
❒ If you want to disable Auto Run, press {{{{Shift}}}} when inserting the CD-ROM
into the drive and keep it pressed until the computer completes transmission to the drive.
Select the drive where the printer driver is located according to the operat-
EEEE
ing system used, and then click [Next].
If the CD-ROM drive is D, the folder will be “D:\DRIVERS\USB-
PRINT\WIN98ME”.
Confirm the printer driver location, and then click [Next].
FFFF
“USB Printing Support” will be installed.
Click [Finish].
GGGG
43
Page 50

Installing the Printer Driver and Software
Follow the “plug and play” on the screen to install the printer drivers.
HHHH
Note
❒ Each printer driver is stored in the following folders on the CD-ROM:
• PCL 6: \DRIVERS\PCL6\WIN9X_ME\(Language)\DISK1
• PCL 5e: \DRIVERS\PCL5E\WIN9X_ME\(Language)\DISK1
2
• RPCS™: \DRIVERS\RPCS\WIN9X_ME\(Language)\DISK1
• PostScript 3: \DRIVERS\PS\WIN9X_ME\(Language)\DISK1
When installation is complete, the printer with its port directed to “USB00n”
appears on the [Printers] folder. (“n” is the number of printers connected.)
Windows 2000/XP - Installing the Printer Driver Using USB
Limitation
❒ Installing a printer driver requires the Administrators permission. When you
install a printer driver, log on using an account that has the Administrators
permission.
When the USB interface cable is used for the first time, the [Found New Hardware
Wizard] dialog box appears, and Windows 2000/XP's “USB Printing Support”
will be installed automatically.
If the printer driver is already installed, the “plug and play” is displayed, and
the printer with its port directed to the USB interface cable is added to the [Print-
*1
ers]
❒ In Windows XP, even if the printer driver has already been installed, [Found
folder.
Note
New Hardware Wizard] may start when connecting the printer and the computer
with the USB interface cable for the first time. In this case, install the printer
driver by following the procedure below.
44
Install the printer driver by referring to the instructions for installing using
AAAA
a Parallel/Ethernet connection.
Note
❒ Each printer driver is stored in the following folders on the CD-ROM:
• PCL 6: \DRIVERS\PCL6\WIN2K_XP\(Language)\DISK1
• PCL 5e: \DRIVERS\PCL5E\WIN2K_XP\(Language)\DISK1
• RPCS™: \DRIVERS\RPCS\WIN2K_XP\(Language)\DISK1
• PostScript 3: \DRIVERS\PS\WIN2K_XP\(Language)\DISK1
When installation is complete, the printer with its port directed to “USB00n”
appears on the [Printers]
*1
In Windows XP, the folder is [
*1
folder. (“n” is the number of printers connected.)
Printers and Faxes
].
Page 51

Installing the Printer Driver Using USB
Macintosh - Creating a Desktop Printer Icon
When you connect the machine and your computer using a USB2.0 connection,
create a Desktop Printer icon.
Limitation
❒ In Mac OS X Native mode, printing is disabled when connected to the ma-
chine using a USB connection.
Double-click [Desktop Printer Utility] in the [AdobePS Components] folder.
AAAA
Select [AdobePS] in [With:] and [Printer (USB)] in [Create Desktop], and then
BBBB
click [OK].
Click [Change] in [USB Printer Selection].
CCCC
Select the model of the machine you are using in [Select a USB Printer:], and
DDDD
then click [OK].
2
Click [Auto Setup] in [PostScript
EEEE
Click [Create].
FFFF
Enter the machine name, and then click [Save].
GGGG
The printer icon appears on the desktop.
Exit the Desktop Printer Utility.
HHHH
TM
Printer Description (PPD) File].
45
Page 52

2
Installing the Printer Driver and Software
Installing the Printer Driver Using IEEE 1394
This section gives basic instructions for installing printer drivers using IEEE
1394. SCSI Print and IP over 1394 are available when printing via IEEE 1394. The
printer drivers can be installed from the CD-ROM that comes with this machine.
Preparation
Be sure that all other applications are closed and the computer is not printing
before installation.
Important
❒ Do not connect new IEEE 1394 devices to the machine or turn on the machine
while installing the printer driver.
❒ Before uninstalling the printer driver, be sure to disconnect the IEEE 1394 in-
terface cable from the computer.
❒ The optional IEEE 1394 Interface Board is not supported by Windows 95/98
or Windows NT 4.0. If the “plug and play” function starts, click [Cancel] in the
[New Hardware Found] or [Device Driver Wizard] dialog box.
Printing with SCSI Print
Printing using a SCSI print device with the optional 1394 Interface Unit is possible under Windows 2000 or Windows XP.
Preparation
“SCSI print” must be enabled and “IP over 1394” must be disabled from the
machine's display panel. For more information about how to make machine
settings, see “Interface Settings/IEEE 1394 (Option)”, General Settings Guide.
Note
❒ If [Found New Hardware Wizard] appears every time the computer is started or
the cable is connected with Windows 2000 or Windows XP when the print
function that uses SCSI print is not installed, disable the device. See p.49 “Dis-
abling the Device” for more information.
Installing the Printer Driver
Note
❒ If you send data from your computer when data is being received from an-
other client computer, your data will be printed after completing the print job
from the other client computer.
❒ When the machine is connected to the computer properly via the 1394 Inter-
face, the appearance of the icon in the printer window changes.
46
Page 53

Installing the Printer Driver Using IEEE 1394
Windows 2000
Important
❒ In Windows 2000, the optional IEEE 1394 Interface Board can only be used
with Service Pack 1 or later. If the Service Pack is not installed, the connectable
number of devices in a IEEE 1394 bus is only one, and the client cannot access
the IEEE 1394 Interface Board without using an account that has Administrators permission.
Connect the machine and the computer using the IEEE 1394 interface cable.
AAAA
The [Found New Hardware Wizard] dialog box appears.
Click [Next].
BBBB
The message
Select [Optional search locations:], and then click [Next].
CCCC
When the [Locate Driver Files] message appears, check the [Optional search lo-
DDDD
cations.] checkbox and the [Specify a location] checkbox, and then click [Next].
[This wizard will complete the installation for this Device: Unknown]
appears.
2
Hold down the left {{{{SHIFT}}}} key on the keyboard and insert the CD-ROM
EEEE
into the CD-ROM drive.
Keep the left {{{{SHIFT}}}} key held down until the computer has finished accessing the CD-ROM.
If the Auto Run program starts, click [Cancel], and then [Exit].
Click [Browse].
FFFF
Select the printer driver you want to install. Each printer driver is stored in
GGGG
the following folders:
• PCL 6: \DRIVERS\PCL6\WIN2K_XP\(Language)\DISK1
• PCL 5e: \DRIVERS\PCL5E\WIN2K_XP\(Language)\DISK1
• RPCS™: \DRIVERS\RPCS\WIN2K_XP\(Language)\DISK1
• PostScript 3: \DRIVERS\PS\WIN2K_XP\(Language)\DISK1
Click [Open].
HHHH
Click [OK].
IIII
A printer model selection dialog box appears.
Follow the instructions on the screen.
JJJJ
Note
❒ During installation, the [Digital Signature Not Found] dialog box may appear.
In this case, click [Yes] to continue the installation.
❒ When the installation is complete, the printer with its port directed to
“1394_00n” appears on the [Printers] folder. (“n” is the number of printers
connected.)
47
Page 54

2
Installing the Printer Driver and Software
Windows XP
Connect the machine and the computer using the IEEE 1394 interface cable.
AAAA
The [Found New Hardware Wizard] dialog box appears.
Confirm that [This wizard helps you install software for: (printer name)] is dis-
BBBB
played, and select [Install from a list on specific location (Advanced)], and then
click [Next].
The message [Please choose your search and installation option.] appears.
Check the [Search for the best driver in these locations.] check box, and the [In-
CCCC
clude this location in the search:] check box.
Install the printer driver following the same procedures as steps
DDDD
Windows 2000.
Note
❒ During installation in Windows XP, the [Hardware Installation] dialog box
may appear. In this case, click [Continue Anyway] to continue the installation.
❒ When the installation is complete, the printer with its port directed to
“1394_00n” appears on the [Printers and Faxes] folder. (“n” is the number of
printers connected.)
EEEE-JJJJ
in
Printing with IP over 1394
You can print by setting the IP address for this machine and the computer on
which Windows Me (SmartNetMonitor for Client) or Windows XP (SmartNetMonitor for Client or Standard TCP/IP Port) is installed.
Preparation
“IP over 1394” must be enabled on the machine's display panel and an IP address for the IEEE 1394 must be configured. For more information about how
to make machine settings, see“Interface Settings/IEEE 1394 (Option)”, Gener-
al Settings Guide.
Limitation
❒ When using the IEEE 1394 (IP over 1394) interface in a network, the Ethernet
interface cannot be used in the same network.
Note
❒ Make sure that the IEEE 1394 interface and Ethernet interface subnet mask
range does not overlap.
❒ In Windows Me, if [Found New Hardware Wizard] appears every time the com-
puter is started or the cable is connected, disable the device. See p.49 “Dis-
abling the Device” for more information.
48
Page 55

Installing the Printer Driver Using IEEE 1394
----Disabling the Device
❖❖❖❖ If [Add New Hardware Wizard] appears every time you restart the computer with an
operating system that does not support SCSI print, or plug in/take out the cable, disable the device by the following procedures.
• Windows Me
In the [Add New Hardware Wizard] dialog box, confirm that [Windows has
A
found the following new Hardware: IEEE SBP-2 Device] is displayed, and se-
lect [Recommended search for a better driver [Recommended]], and then click
[Next].
When the [Windows was unable to locate the software for this device.] mes-
B
sage appears, click [Finish].
❖❖❖❖ If you do not want to install the printer when [Found New Hardware Wizard] starts
with an operating system that supports SCSI print, disable the device by the following procedures.
• Windows XP
2
In the [Found New Hardware Wizard] dialog box, confirm that [This wizard
A
helps you install software for: Unknown] is displayed, and select [Install from
a list on specific location (Advanced)], and then click [Next].
When the [Please choose your search and installation option.] message ap-
B
pears, remove all the selections from [Search for the best driver in these lo-
cations.], and then click [Next].
When the [The wizard could not find the software on your computer for..] mes-
C
sage appears, click [OK].
When the [Cannot Install this Hardware] message appears, select the [Don't
D
prompt again to install the software] check box, and then click [Finish].
• Windows 2000
In the [Found New Hardware Wizard] dialog box, click [Next].
A
When the [This wizard will complete the installation for this Device: Unknown]
B
message appears, select [Search for a suitable driver for my device [recom-
mended]], and then click [Next].
When the [Locate Driver Files] message appears, remove all the selections
C
from [Optional search locations.], and then click [Next].
When the [Driver Files Search Results] message appears, select the [Disable
D
the device. The Add/Remove Hardware Wizard in the control Panel can be able to
complete the driver installations.] check box, and then click [Finish].
49
Page 56

2
Installing the Printer Driver and Software
❖❖❖❖ If [Found New Hardware Wizard] appears every time you restart the computer with
an operating system that does not support IP over 1394 or plug in/take out the cable,
disable the device with the following procedure.
• Windows 2000
In [Found New Hardware Wizard] dialog box, click [Next].
A
When the [This wizard will complete the installation for this Device:] message
B
and “IP over 1394” appear, select [Search for a suitable driver for my device
[recommended]], and then click [Next].
When the [Locate Driver Files] message appears, remove all the selections
C
from [Optional search locations.], and then click [Next].
When the [Driver Files Search Results] message appears, select the [Disable
D
the device. The Add/Remove Hardware Wizard in the Control Panel can be able to
complete the driver installations.] check box, and then click [Finish].
50
Page 57

Installing the SmartNetMonitor for Client/Admin
Installing the SmartNetMonitor for
Client/Admin
Limitation
❒ If your operating system is Windows 2000/XP or Windows NT 4.0, installing
software using Auto Run requires Administrators permission. When you install a printer driver using Auto Run, log on using an account that has Administrators permission.
Close all applications that are running.
AAAA
Insert the CD-ROM into the CD-ROM drive.
BBBB
Auto Run will start the installer.
Select a language for the interface language, and then click [OK].
CCCC
The following languages are available: Cestina (Czech), Dansk (Danish),
Deutsch (German), English (English), Espanol (Spanish), Francais (French),
Italiano (Italian), Magyar (Hungarian), Nederlands (Dutch), Norsk (Norwegian), Polski (Polish), Portugues (Portuguese), Suomi (Finnish), Svenska
(Swedish)
The default interface language is English.
2
Click [SmartNetMonitor for Client/Admin].
DDDD
The software license agreement appears in the [License Agreement] dialog box.
After reading through all of the contents, click [I accept the agreement] to
EEEE
agree with the license agreement, and then click [Next].
Select the program you want to install when the [Select Program] dialog box
FFFF
appears.
Follow the instructions on the screen.
GGGG
51
Page 58

2
Installing the Printer Driver and Software
Installing the Agfa Monotype Font
Manager 2000
Limitation
❒ If your operating system is Windows 2000/XP or Windows NT 4.0, installing
software using Auto Run requires Administrators permission. When you install a printer driver using Auto Run, log on using an account that has Administrators permission.
Close all applications that are running.
AAAA
Insert the CD-ROM into the CD-ROM drive.
BBBB
Auto Run will start the installer.
Select a language for the interface language, and then click [OK].
CCCC
The following languages are available: Cestina (Czech), Dansk (Danish),
Deutsch (German), English (English), Espanol (Spanish), Francais (French),
Italiano (Italian), Magyar (Hungarian), Nederlands (Dutch), Norsk (Norwegian), Polski (Polish), Portugues (Portuguese), Suomi (Finnish), Svenska
(Swedish)
The default interface language is English.
Select [Agfa Monotype Font Manager 2000].
DDDD
Follow the instructions on the screen.
EEEE
52
Page 59

Using Adobe PageMaker Version 6.0, 6.5 or 7.0
Using Adobe PageMaker Version 6.0, 6.5
or 7.0
If you use the machine under Windows 95/98/Me, Windows 2000/XP or Windows NT 4.0 with Adobe PageMaker, you need to copy the PPD file to the PageMaker folder.
The PPD file is the file with extension “.ppd” in the folder “DRIV-
ERS\PS\WIN9X_ME\(Language)\DISK1\” on the CD-ROM.
The “WIN9X_ME” folder, inside the “PS” folder is for Windows 95/98/Me. Use
the folder at this level that is appropriate for the operating system you are currently using.
The third folder, “(Language)” may be substituted by an appropriate language
name.
Copy the file with extension “.ppd” to the PageMaker folder.
• For PageMaker 6.0 default installation
The directory is “C:\PM6\RSRC\PPD4”.
• For PageMaker 6.5 default installation
The directory is “C:\PM65\RSRC\USENGLISH\PPD4”.
The “USENGLISH” may vary depending on your language selection.
• For PageMaker 7.0 default installation
The directory is “C:\PM7\RSRC\USENGLISH\PPD4”.
The “USENGLISH” may vary depending on your language selection.
2
53
Page 60

INDEX
J
1394 Utility
, 6,
22
A
,
21
,
,
52
,
7
,
23
23
,
41
Acrobat Reader
Additional driver
Agfa Monotype Font Manager 2000
installing
Alternate Driver
,
ATM
Auto Run
22
Macintosh, installing
B
Bidirectional transmission
,
Bypass tray
14
,
37
C
CD-ROM
Clear/Stop key
Connection
Control Panel
Custom size paper
,
6
,
9
12
,
,
14
Ethernet board connection
IEEE 1394 interface board connection
12
Parallel interface connection
,
,
8
,
17
USB connection
printing, bypass tray
D
,
mData In indicator
Display panel
, 8,
8
9
E
Energy Saver key
,
8
F
Function keys
Function status indicator
,
9
,
9
I
IEEE 1394 connection
,
installing, printer driver
IP over 1394
,
46
46
12
,
12
, 6,
21
,
Job List key
Job Reset key
,
,
8
11
M
Macintosh
ATM, installing
Screen fonts, installing
Mac OS
PostScript 3, installing
Mac OS X
PostScript 3, installing
Main power indicator
N
Number keys
,
9
O
Offline
OHP Transparencies
On indicator
Online
Operation switch
,
11
,
,
8
,
11
11
Offline key
printing, bypass tray
,
11
Online key
,
P
PageMaker
,
PCL
PCL 5e
PCL 6
PostScript 3
,
53
4
Windows 2000/XP, installing
Windows 95/98/Me, installing
Windows NT 4.0, installing
Windows 2000/XP, installing
Windows 95/98/Me, installing
Windows NT 4.0, installing
,
5
Mac OS, installing
Mac OS X, installing
Windows 2000/XP, installing
Windows 95/98/Me, installing
Windows NT 4.0, installing
9
,
,
41
,
8
,
39
,
,
,
,
18
42
41
39
42
,
,
,
,
,
,
,
27
,
27
,
35
27
27
27
27
33
31
54
Page 61

Printer driver
,
,
,
4
24
, 7,
Installation method
installing, IEEE 1394 connection
installing, USB connection
,
,
,
4
4
4
PCL 5e
PCL 6
PostScript 3
Quick Install
RPCS
Printer Utility for Mac
Q
Quick Install
,
24
R
,
RPCS
5
Windows 2000/XP, installing
Windows 95/98/Me, installing
Windows NT 4.0, installing
S
,
,
46
22
,
24
Screen fonts
Macintosh, installing
SCSI print
SmartNetMonitor for Admin
SmartNetMonitor for Client
Software
Quick Install
21
22
,
41
, 6, 21,
,
43
,
27
,
,
27
, 6, 21,
,
27
51
51
46
T
Thick Paper
printing, bypass tray
U
USB connection
printer driver, installing
USB Printing Support
User Code
User Tools/Counter
,
23
W
Windows 2000/XP
PCL 5e, installing
PCL 6, installing
PostScript 3, installing
RPCS, installing
Windows 95/98/Me
PCL 5e, installing
PCL 6, installing
PostScript 3, installing
RPCS, installing
Windows NT 4.0
PCL 5e, installing
PCL 6, installing
PostScript 3, installing
RPCS, installing
, 7,
,
,
,
,
,
,
,
,
,
,
,
18
,
43
22
8
27
27
,
33
27
27
27
,
31
27
27
27
,
35
27
55
Page 62

MEMO
56
Page 63

MEMO
57
Page 64

MEMO
58
UE USA G339
 Loading...