

xeoos Twinfire Basic, Twinfire Solo, Twinfire Pur, Twinfire Matten Operating And Installation Instructions
Twinfire
!
!
Operating and Installation
Instructions
!
!
!
!
!
!
!
!
!
!
!
!
!
Manufactured by:
!
!
Specht Modulare Ofensysteme GmbH & Co. KG
Bahnhofstraße 2
35116 Hatzfeld-Reddighausen DE
T.+49 6452 92988-0
info@xeoos.de www.xeoos.de
Imported by: Retrospective Design Ltd
T. 03 3373086
info@xeooos.co.nz
www.xeoos.co.nz
Models
!
!
Basic
!
!
!
!
!
!
Solo
!
!
!
!
!
!
Pur
!
!
!
!
!
!
!
!
!
!
!
Read this manual carefully and save the instructions.
Matten

!
2!
!
Table of Contents
!
!
Description Page
General Information ......................................................................................... 3
Approvals and Basic Controls ........................................................................ 4
Installation of the Stove ................................................................................... 5
Heating Capacity and Space Requirements ............................................... 5
Outside Air Supply ..................................................................................... 5
Connection to the Chimney ......................................................................... 5/6
Technical Specifications and Clearances ................................................... 7
Clearances .................................................................................................. 8
Permitted Fuels .............................................................................................. 9
Initial Use ......................................................................................................... 9
Starting the Fire ............................................................................................ 10/11
Operation ...................................................................................................... 12/13
Shutdown and Restart .................................................................................. 14
Appropriate Usage ....................................................................................... 14
Cleaning and Maintenance .......................................................................... 15
Empty Out Ash Pan .................................................................................. 15
Cleaning or Replacing the Glass Pane .................................................... 15
Cleaning the Chimney and Baffle Plates ................................................... 15
Maintenance Activities ............................................................................... 15
Troubleshooting: Causes and Their Repair .................................................. 16
"Snap-Sounds" .......................................................................................... 16
Twinfire Replacement Parts ......................................................................... 17
Twinfire Warranty ........................................................................................... 17
!
3!
!
!
!
!
General Information
!
Thank you very much for choosing the xeoos Twinfire® System, which is a remarkable product
that utilizes two fires to create a most efficient product and it is easy to operate.
!
Specht from Germany has developed this stove with care and is happy to provide you with an
exceptionally high-quality and ecological product.
!
The purpose of this manual is to guide and instruct Twinfire® stove owners in proper burning
to achieve environmentally friendly combustion and to minimize the risk of incorrect use
and operation of the stove.
!
Please read these operating instructions carefully before the first initial use. It contains important
and beneficial information for the operation of your new Twinfire® stove. Failure to follow
instructions may result in property damage, bodily injury, or even death. It is therefore very
important to read this entire manual, and save the instructions. Correct operation is also vital
with regard to our applicable warranty terms.
!
Before you install your stove we recommend that you contact your dealer or local
Building Inspector to help you follow the rules and regulations in your local area. We
also recommend that your dealer check the stove before installation for completeness
and functionality.
!
If your stove is not installed properly, a home fire may result. To reduce the risk of fire, please
ensure that the fire is installed only by a professional installer. Contact local building or fire
officials about restrictions and installation inspection requirements in your area. Not approved
for use in a mobile home.
!
We wish you and your friends many enjoyable and comfortable hours with your xeoos Twinfire®.
!
!
!
!
!
Follow the manual during installation and operating of the stove.
!
!
!
!
Take particular note of this symbol throughout the manual.
This indicates special attention.
!

!
Approvals and Basic Controls.
!
The patented Twinfire® system of xeoos® is based on the principle of gasification with the use of
the furnace. The Twinfire® models have past CM1 (Canterbury Method 1), AS/NZ 4012:4013
and show compliance with AS/NZ 2918.
!
!
1. The door handle (1) has two functions. Firstly it ensures that the door is safely
locked during use and secondly it controls the ‘downdraft’ function.
!
2. The primary air control (2), located at the back left hand side of the unit can be pushed
fully back for high output and pulled forward for low heat output. It is not designed for
setting other than High or Low.
!
!
!
!
!
!
!
!
!
!
!
!
!
!
!
!
!
!
!
!
!
!
!
!
!
!
!
!
!
!
!
!
!
!
!
!
!
!
!
!
!
!
!
2.!Primary!air!control.!!
Fully!pushed!back!for!
High!setting.!!Fully!
pulled!forward!for!
Low!setting.!
1.!!Door!handle.!!Fully!
up,!door!is!open.!!
Handle!at!45°!angle,!
wood!heating!up.!!
Handle!fully!down,!as!
shown!in!image,!fire!in!
downdraft.!!Please!
refer!to!page!11!for!
images.!
!
Upper!chamber.!!This!is!where!
your!fire!runs.!
Lower!chamber.!!For!
secondary!burning!and!
catchment!of!ash!only.!!
Under!no!circumstances!must!
any!fuel!be!placed!in!this!
location.!
Thermometer!is!
located!in!front!of!
flue.!!This!is!used!to!
determine!when!unit!
should!be!put!in!
downdraft.!

!
!
5!
Required Installation Components
A
Chimney cap
B
Triple skinned chimney
C
Storm collar
D
Roof flashing
E
Ceiling support box
F
Chimney connector pipe
Installation of the Stove
!
Heating Capacity and Space Requirements
!
The room-heating capacity is highly dependent on the room’s location and interior as well as on
the operation method. In a newer air-tight building be prepared to calculate your heat demand.
In older buildings, the nominal heating capacity of approximately 27kBTU’s (8 kW’s) heats an
area from 430 - 1,076 ft2 (40 -100 m
2)
based on various conditions.
!
Outside Air Supply
!
Ensure that there is sufficient combustion air in the room in which the stove is installed, and that
there is an adequate supply of combustion air to the stove, which can be sourced from another
room or from an outside air supply. Rooms with negative pressure (e.g. use of exhaust fan) or
newer air-tight buildings are particularly suited for air supply from outside..
!
Connection to the Chimney
!
The Twinfire stove can only be flued from the top outlet in Clean Air
Zones. A rural, rear flued model can be made available.
The diameter of the stove pipe is 6” (15.2 cm). Do not use
connector pipes and chimneys with smaller clearance diameters or
less than 24 gauge steel (0.55mm). It must be installed using an
AS/NZS 2918:2001 approved chimney system or a code-approved
masonry chimney with a flue liner.
The chimney must extend through the roof for an assembled length
not less than 4m and be 600mm above any high section of roofing or
adjacent obstruction. If there is no obstruction or ridge within 3m the
flue must not be lower than the point at roofline 3m horizontal to the
flue center (see detail)
The condition of the chimney and height is very important. We
suggest a total minimum height of 4.8m where practical.
To reach the rated heat capacity, the minimum delivery pressure of the chimney must be 10
to 15 Pa (1.0 to 1.5 mm WC).
Follow the rules and regula-
tions in your local area.
!
!
!
IT IS VERY IMPORTANT TO ENSURE THAT YOUR CHIMNEY HAS A GOOD
DRAFT. YOUR DEALER OR CHIMNEY SWEEP WILL BE ABLE TO GUIDE
AND ADVISE YOU ON YOUR CHIMNEY CONDITIONS.
A"
D"
C"B"B"
E"
F"
!
!
6!
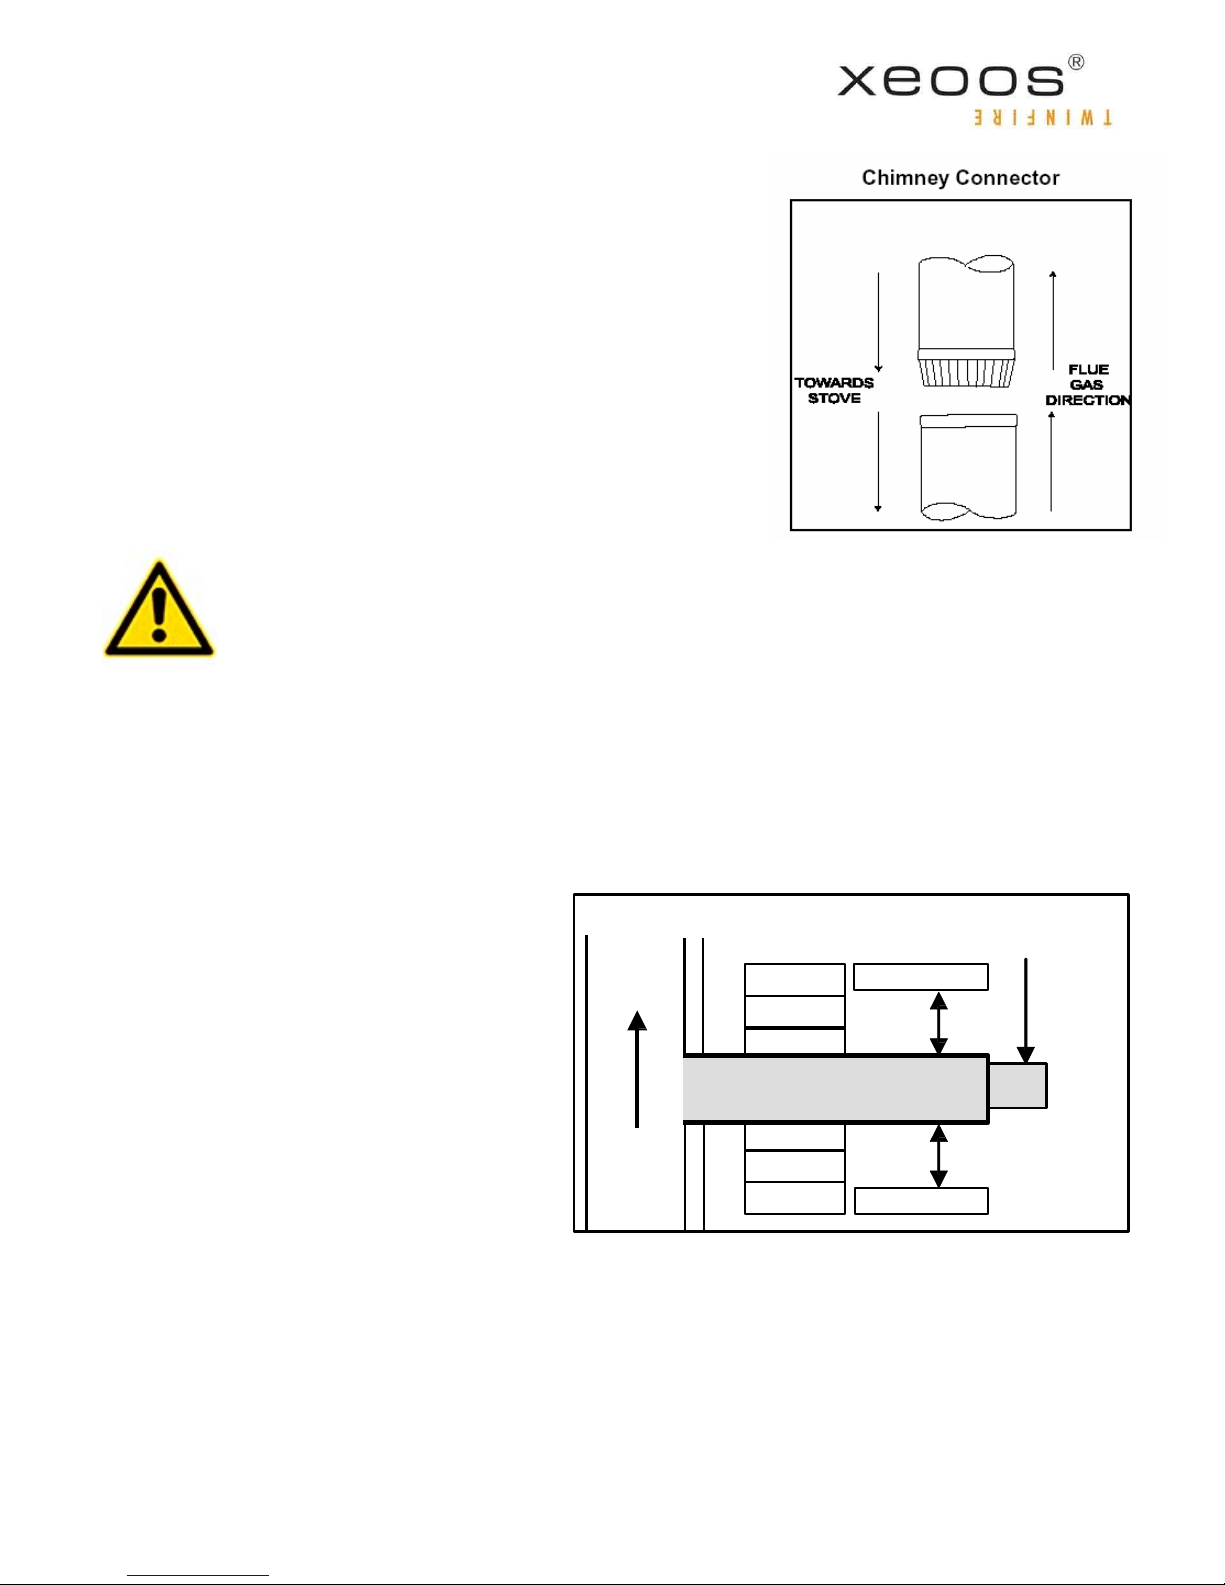
Each chimney connector or chimney connector section must
be installed to the stove flue collar and to each other with the
male (crimped) end toward the stove. This prevents any
amount of condensed or liquid creosote from running down the
outside of the pipe or the stove top. The flue collar connector
should be secured with approved fasteners to ensure that the
sections do not separate. For the best performance the
chimney connector should be as short and direct as possible,
with no more than two 90° elbows.
!
!
!
!
!
!
!
!
DO NOT CONNECT THIS STOVE TO ANOTHER CHIMNEY FLUE OR AIR
DISTRIBUTION DUCT OR ANY SYSTEM SERVING ANOTHER APPLIANCE.
!
!
!
For venting vertically into a masonry chimney, single wall stainless steel (at least 24 gauge and
6” in diameter) must be used in the room where the stove is installed. Refer to the manufacturer’s instructions for the connection to the listed chimney.
!
RURAL ONLY. For rear venting or other not listed configurations, consult the local building
codes.
!
If the chimney connector is fitted with a
baffle, it must be manually operated, visibly placed for ease of use, and must not
close completely. Consult your chimney
expert if you have any questions. Make
sure that there is easy access to the
!
!
!
!
Chimney
Flue
!
!
!
!
!
!
Masonry
!
!
!
!
!
!
Min.
2”(5cm)
!
!
Connector Pipe
18”(46cm)
below
ceiling
chimney cleanout door. Floor protection is
required under the chimney connector and
2" (51cm) beyond each side. Baffles
should only be fitted to fix situations
relating to over drawing.
Insulated
Chimney
!
Min.
2”(5cm)
 Loading...