


Quick Start Guide
1080P Digital Video Recorder
FRONT/REAR PANEL
CAMERA CONNECTION
After adjusting the time and date for the first time, it is highly
recommended to format your Hard Disk Drive.
1. Go to the System Menu and select the HDD submenu.
2. Select the Check box next to the HDDs.
3. Click the [HDD Clear] button.
4. When the HDD formatting is complete, exit the main menu and
reboot the DVR to save all changes.
Formatting the Hard Drive Disk
INITIAL SETUP
When all necessary cameras and monitors are setup in their permanent
locations, connect them to the DVR.
Use the diagram in the Quick Start Guide and manual for additional
information. When all connections have been made, connect the DVR to
an appropriate power supply. The DVR will boot up automatically.
1. Go to the System Menu and select SYSTEM INFO.
Click on the pencil icon next to the Date/ Time to enter edit mode.
2. Select the appropriate display format from the [DATE/TIME FORMAT]
drop down lists.
3. Select the appropriate date and local time in the [DATE/ TIME] section.
4. Select the appropriate time zone from the [TIME ZONE] drop down list.
5. If applicable, enable Daylight Savings mode.
The Quick Setup Menu offers an automatic recording and HDD calculator.
By entering your anticipated recording days, or the desired recording
resolution, the DVR will provide you with the estimated days recorded
on your current HDD space.
Initial Setup
Date and Time Setup
1. Select how many days you wish to record on your current storage.
The system will populate recommended recording resolution,
frame-rate, and quality.
2. Select the desired recording specifications.
The system will display the number of days that will be recorded on
your available storage.
Quick Setup
1. Make sure the cameras and the monitors are properly connected to
the DVR.
2. The DVR should be placed in a dust and moisture free environment.
It must never be exposed to direct sunlight. Server room temperature
is highly recommended to reduce the chance of overheating.
Overheating may cause the DVR to become unstable.
3. During the boot process, the DVR should not be interrupted by
pressing any buttons on the front keypad, mouse, or remote controller.
Do not unplug the power adapter or turn the DVR off during the boot
process.
A UPS (Uninterruptable Power Supply) is highly recommended to
prevent malfunctioning of the DVR during a power outage.
Connect camera which has UTC function and “V” check to
USE UTC/PTZ MENU and select proper protocol with camera.
Then MENU button is activated.
Click MENU button and set camera menu with direction key.
To use full screen Click the Menu icon in 'PTZ Control' tab in 'Show
Controller'
DVR Installation Safety Tips
The Main Menu (Setup Menu) system includes six (6) sub-menus:
System, Device, Record, Network, Backup, & Q. Setup. To access the
Setup Menu, press the [Menu] button on the front panel of the DVR,
or right-click anywhere on the screen and select 'Setup Menu'.
The DVR's default user ID and password are: admin/ no password.
Main Menu
Note: When Auto detection is not working well under improper
environment, select type of camera directly on Video Type.
UTC application
Camera connection (Auto detection)
Automatically detect the cameras such as HD Analog and 960H.
(Set Video Type as AUTO)
Front Panel
Rear Panel
No.
I/O
Please note that the Accessory kit and
Shipping Box contain the following items :
- Digital Video Recorder (1 ea)
- Power Supply (1 ea)
- Quick Start Guide (1 ea)
Default Login Information
(ID: Admin / No Password)
This document is intended to serve as a quick
reference page for initial set-up.
It is recommended that the user read the entire
instruction manual before beginning.
Basic programming can be accomplished by
simply reading the appropriate instructions first,
then scroll through the easy to operate “On Screen
Display” and make changes.
Description
1 Audio-In
2 Audio-Out
3 Sensor Input
4
5
6
7
9
10
11
Audio Input Device (with Amplifier)
Audio Output Device (with Amplifier)
Sensor Input
RS-485 Port
HD OUTPUT
VGA
SPOT
Alarm Output
PTZ Dome Camera or External Keyboard Controller connection
HD OUTPUT
SPOT Output
12
USB 3.0 Port
USB Port for Mouse Operation, Backup Device, or Firmware Update
LAN Port
1/10/100/1000M
Power Input
8
Video-In
12V
Alarm Output
VGA Output
212
ATTENTION PLEASE !!!
Note: To manually setup recording configurations, Quick Setup must be
DISABLED. If the "Use Quick Setup" option is enabled, the system will
ignore all other configurations set manually.
No.
Buttons Functions
1 LED Indicator
2 USB Port
Indicate System Status Power, Record, Network
USB Port for Mouse Operation, Backup Device or
Firmware Update
MADE IN KOREA
RISK OF ELECTRIC
SHOCK / DO NOT OPEN
3748261
5
VGA
HD OUTPUT
SPOT OUT
USB 3.0
CH17 CH18 CH19 CH20 CH21 CH22 CH23 CH24 CH25 CH26 CH27 CH28 CH29 CH30 CH31 CH32
12V
POWER
1
7 8 10 11 12
2
3
4 5 6
9
1
2
Camera inputs (Supports NTSC/PAL)
Note: 4K resolution is only available when 4K monitor is connected.
If it is set to 4K (3840X2160) resolution without connection of 4K
monitor, it is returned to previous resolution after 30sec screen out.
Display
HD resolution can be set by maximum 4K (3840X2160)
XHDAR
Quick guide
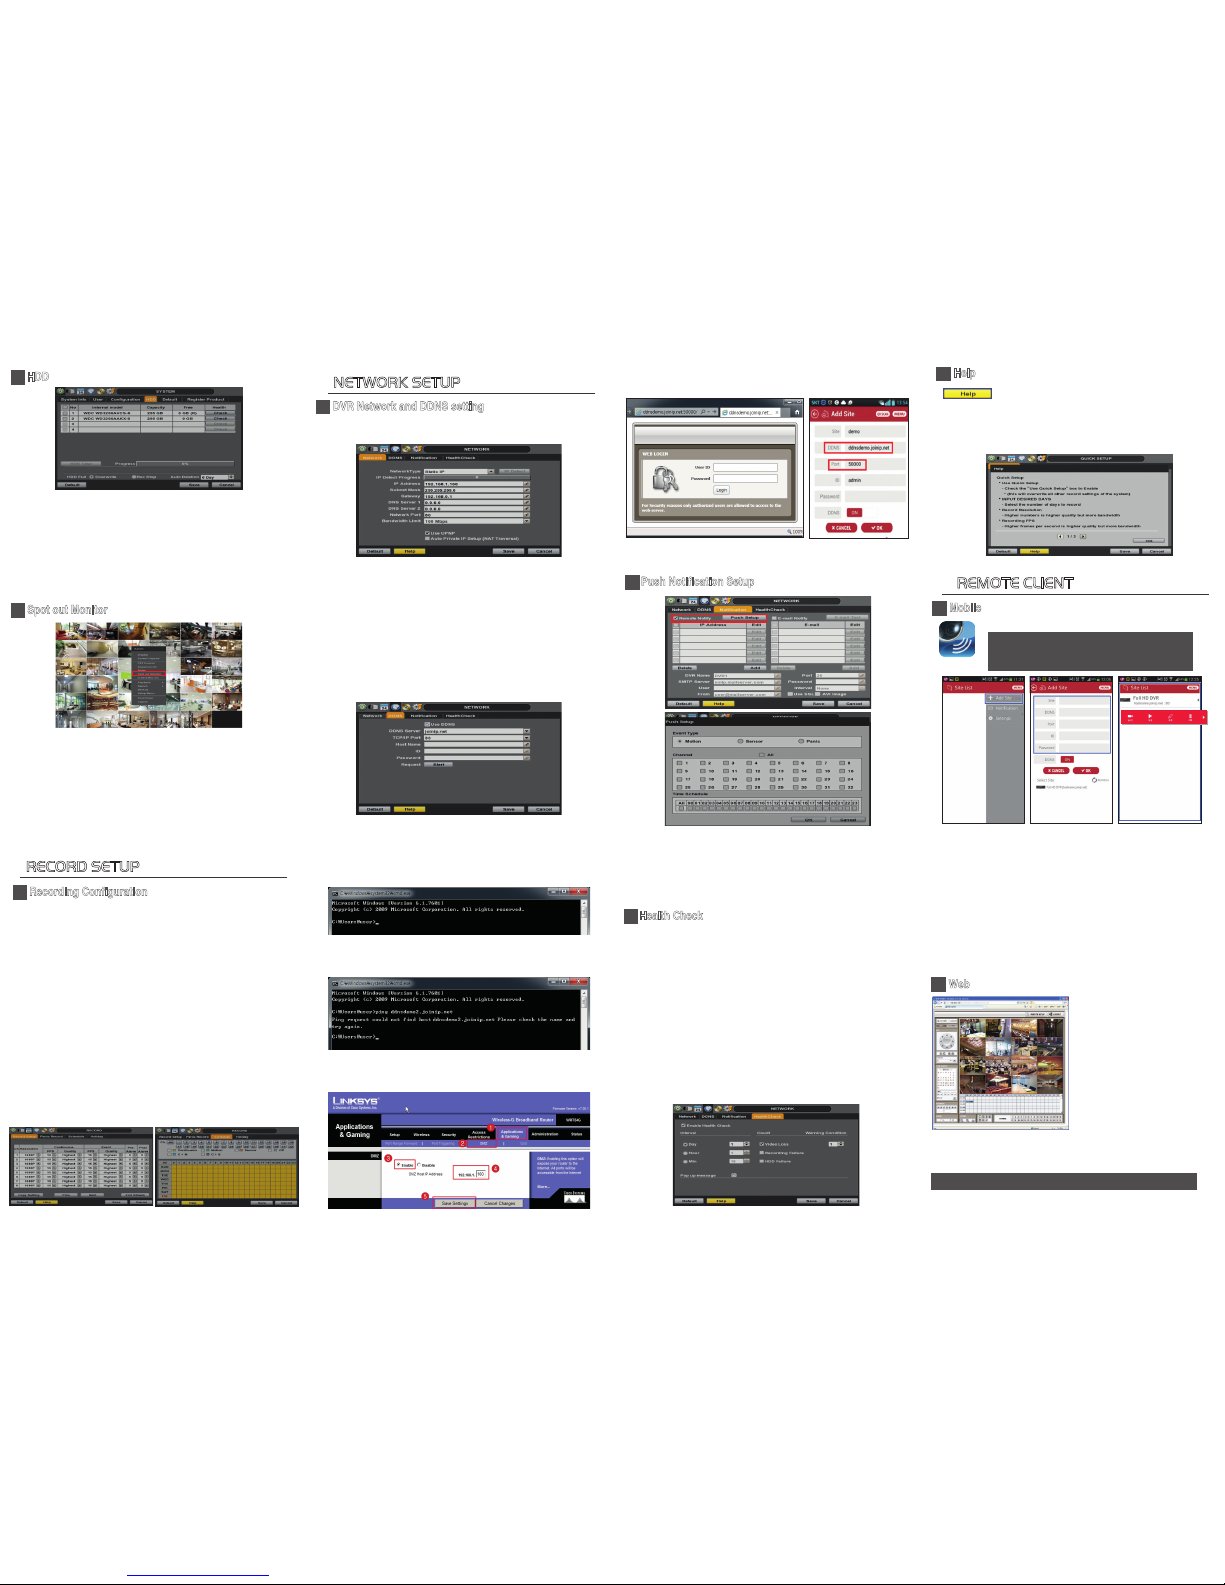
Web
Mobile
Note: If you are using IE, install all Active-X Control notifications
*To use CMS(Central Management System), contact to purchasing
office you bought.
1. When mobile application is installed successfully, you will see the
‘Mobile ACS+’ icon on your Phone and the loading page will be also
seen before you connect to the mobile application after you click the
icon.
2. Press ‘MENU’ button and then Click the ‘Add Site’ to add desired
device.
3. Fill in the new site information correctly and press “OK” button to
save.
(Default - DDNS : hostname.joinip.net, Port number : 80, ID : admin)
4. You can see site list you registered, after then you can click the
site you want see.
REMOTE CLIENT
NETWORK SETUP
1. Go to the Main Menu and select RECORD.
2. In the record window, select the Record Setup submenu.
3. Choose the desired resolution, frame rate, quality and recording type
for continuous recording. (Continuous)
4. Choose the desired frame rate, quality and recording type for Event
recording. (Event)
5. Individually configure the settings for each channel, or use the
[COPY SETTINGS] button to apply changes to multiple cameras.
6. To setup a specific recording schedule, go to the SCHEDULE submenu.
You can setup the record schedule by applying different recording
modes at different days and times.
a. Select a record mode from the options on the top of the screen.
b. Using your mouse, click, hold, and drag to select multiple days & hours.
c. You can setup a unique recording schedule for each channel or apply
the same recording settings to all channels.
d. You can setup special days as "holidays" either by their date
(December 24th) or by their time of the month
(Third Thursday of November).
Recording Configuration
The DVR offers a uniquely true DVR health monitoring, with pop-up
messages and e-mail notification on video loss, recording failure,
and storage failure.
To setup:
1. Check the box next to "Enable Health Check"
2. Check the box next to the conditions you would like to be notified on.
3. Set the occurrence intervals.
(For Example: when video loss occurs more than 1 time a minute)
4. Select whether to receive a pop-up message when conditions are met.
5. Go to Networka → Notifications.
6. Under e-mail notifications, make sure the Health Check option is
enabled.
When any of the failures occur beyond the set conditions, the system
will display a pop-up alert and send an e-mail notification.
Health Check
RECORD SETUP
Push Notification Setup
Mobile ACS+
Search the ‘Mobile ACS+’ application in the App store.
Note : Mobile ACS+ can be applied (search and
install) at the device which OS version is above
Android 3.2 (Honeycomb) and iOS 6.0.
Push notification setting
1. Check to “Remote Notify” and click “Push Setup” button
2. Check “Event Type”, “Channel”, “Time Schedule” for notification to
Mobile app and CMS.
1. In Network menu, allocate IP address by DHCP and change Network
Type as Static IP.
*Get IP/Subnet/gateway/dns1,2 information by DHCP and change
NetworkType to Static IP. It is the most convenient way to set up Static
IP without Internal IP information.
*To try port forwarding in router manually, DVR's IP and NetworkType
sould be Static IP.
*Auto Private IP Setup (NAT Traversal): when router is rebooted,
internal NAT information of Router may to be cleared.
*If there is DDNS failure, please check the Network state.
*TCP/IP Port of DDNS is selectable to 80 or 8245.
*If there is no host found, check the Network state and DDNS register page.
2. In DDNS menu, "V" check to Use DDNS and write Host Name and clisk
the Start. After DDNS Success, "hostname.joinip.net" domain is created.
3. After creation of the domain, check it by Ping test by DOS CMD.
4. Set port forwarding in Router. ex) Linksys
5. After completion of port forwarding, check the access of WebACS and
MobileACS.
DVR Network and DDNS setting
Open an Internet Explorer web
page.
To view the DVR's web page
using Google Chrome, please
install the "IE Tab" add-on.
After entering the DVR's IP
address, press the add-on's
button on the top right-hand
corner of the web viewer to
enable the web viewer to be
displayed on Google Chrome.
Enter the User ID and Password and click Enter.
(Default User/ Password: admin/ no password).
The DVR's web viewer will be displayed.
HDD
4pcs of HDD (max. 8TB) can be available to connect.
HDD sub-menu displays all relevant information regarding all
HDDs installed in the DVR.
Press ‘Check’ next to the HDD’s name to view that HDD’s
health status.
The system will display: To format the HDD, check the box next to
the HDD, and click“HDD Clear”
Spot out Monitor
Click the right button on the mouse and select the Spot out MONITOR
in order to enter call monitor control mode.
The numeric panel will pop up at the center of the screen.
Click the specific channel button on the numeric panel to display full
screen mode out of assigned spot out channels.
Press the close button on the bottom of the numeric panel.
It will go back to the previously programmed spot monitor mode.
The “HELP” button will help you understand how to
setup several important settings such as DDNS, NOTIFICATION,
BACKUP, SCHEDULE, NETWORK, and CAMERA.
For example, if you need help about how to set “BACKUP”, Click
“HELP” button at the right bottom of the BACKUP menu.
Help
 Loading...