

Page 1
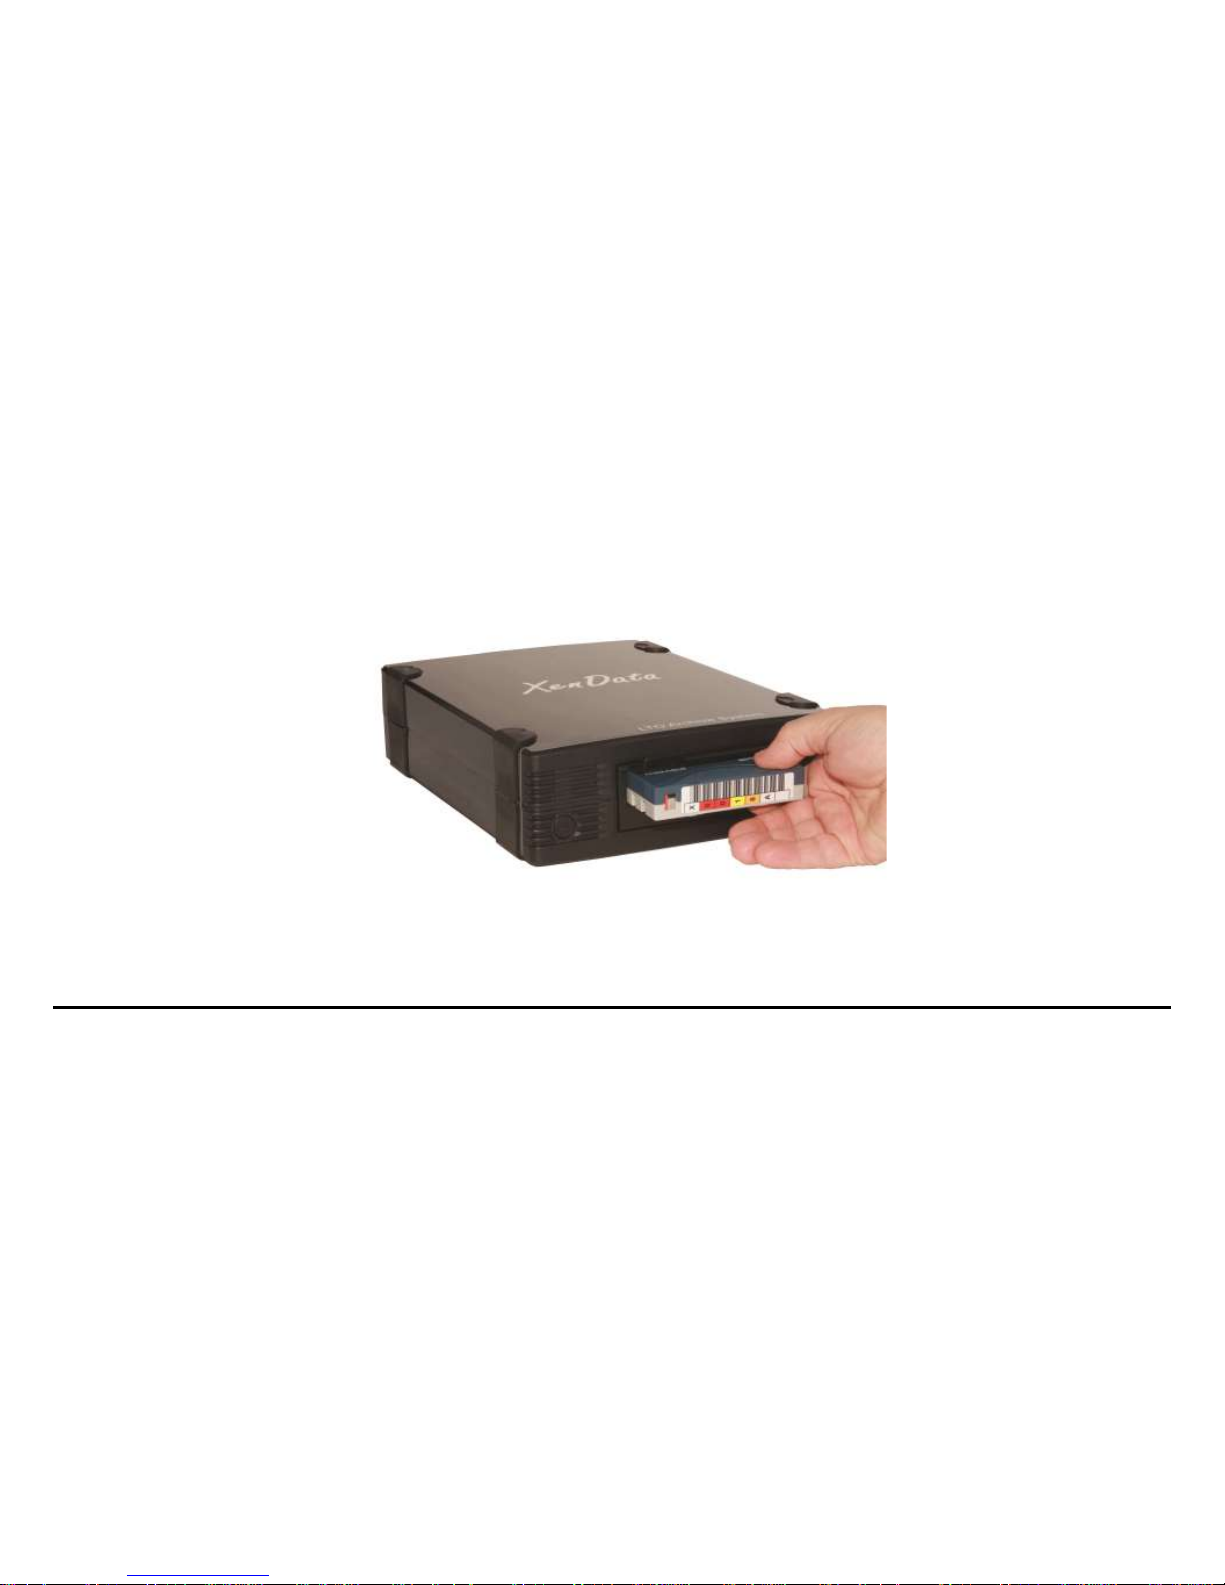
XenData6 Workstation
User Guide
© 2011 XenData Limited. All rights reserved.
XenData is a trademark of XenData Limited.
Document last modified date: 24-May-11
Page 2

2
XenData6 Workstation
User Guide
Version 6.00
Contents
1. Overview
1.1 Software Overview
1.2 About LTO
1.3 Software Licensing
1.3.1 About Licensing
1.3.2 How to License
1.4 Interchanging Tapes with Other Systems
1.5 About Partial File Restore
1.6 About File Search
1.7 How to Obtain Software Version
1.8 Language Support
Page 3

3
2. Volume Sets and Formatting Tapes
2.1 About Volume Sets
2.2 About Barcodes and Tape Volume Names
2.3 About Block Size
2.4 About File Fragmentation
2.5 About Tape Spanning
2.6 How to Configure a Volume Set
2.7 How to Format a Tape
3. Archiving and Restoring Files
3.1 Archiving Files to LTO
3.2 Restoring Files from LTO
Page 4

4
4. Offline Tapes
4.1 About Offline Tapes
4.2 How to Obtain Tape Cartridge Properties
4.3 How to Eject Tapes from a Tape Drive
4.4 About LTO Shelf
4.5 How to Forget a Tape
5. Tape Catalogs and Finalization
5.1 About Tape Catalogs
5.2 Build and Rebuild Catalog
5.3 About Finalizing Tapes
5.4 How to Finalize a Tape
Page 5

5
6. Report Generator
6.1 About the Report Generator
6.2 Starting the Report Generator
6.3 Creating, Saving and Restoring Reports
6.3.1 Creating Reports
6.3.2 Saving Reports
6.3.3 Restoring Reports
6.4 Tape Contents Report
6.4.1 How to Run a Tape Contents Report
6.4.2 How to Interpret a Tape Contents Report
6.5 File Search Report
6.5.1 How to Run a File Search Report
6.5.2 How to Interpret a File Search Report
6.6 Archive Status Report
6.6.1 How to Run an Archive Status Report
6.6.2 How to Interpret an Archive Status Report
Page 6

6
7. Problem Diagnosis
7.1 About Problem Diagnosis
7.2 Tape Status: XenData Protected
7.3 The XenData Activity Display
Page 7

7
1. Overview
1.1 Software Overview
XenData6 Workstation software provides high performance archiving to and restoring from LTO data tape
using Windows Explorer. It supports one or more LTO tape drives attached to a Window 7 computer and
manages an unlimited number of offline LTO tapes. Additionally, the software allows creation of reports for
management of the archive, including the ability to list the contents of any tape, the ability to search for files
and the generation of an archive status report.
Archive and restore operations are always performed using Windows Explorer. XenData6 extends
Windows Explorer's capabilities to transfer files to and from LTO using drag and drop or copy and paste.
Files may be archived to LTO from any accessible logical drive letter or network share. Similarly, files may
be restored to any accessible drive letter or share. The system maintains file and folder structures, allowing
the transfer of nested folders to and from LTO tape.
Archive and restore operations are described in Archiving Files to LTO (3.1) and Restoring Files from LTO
(3.2). XenData6 Workstation gives an option to copy to LTO only files that have changed or are new. This
is an easy way to create an updated copy of project folders on LTO.
XenData6 Workstation can manage a large offline LTO tape archive as the files and folder structure stored
on all tapes that have ever been inserted into the LTO tape drive (or drives) may be retained. The archive
system will allow browsing of all the offline tapes that are retained 'on the shelf'. This is described further in
About LTO Shelf (4.4). A file search report can generate a list of files that meet file search criteria specified
by the user and will identify the tapes that contain each match.
Page 8

8
XenData6 Workstation software writes to LTO tape using the open standard POSIX tar format. This is
important for long term archives because it means that files can be restored for decades to come using a
wide range of native Linux and Unix operating systems, Microsoft Services for Unix, as well as XenData
software. Tapes written with XenData6 Workstation software are interchangeable with server-based
systems running XenData6 Server software. Additional capabilities provided by XenData6 Workstation
software include the following.
All file types are supported. This includes non-video files.
Both rewritable and non-erasable WORM LTO tape cartridges are supported. For more information, see
About LTO (1.2).
LTO tapes may be grouped into XenData Volume Sets. This is particularly useful when tapes are
interchanged with server-based systems running XenData software.
1.2 About LTO
Linear Tape Open (LTO) is the leading tape format and uses technology developed by HP, IBM and
Quantum Corporation. The latest generation of LTO is LTO-5 which provides high storage capacity, high
speed file transfers and a long archival data life:
Huge storage capacity Each tape cartridge stores 1.5 TB without any compression. For video files, this
represents over 65 hours at a 50 Mbits/s recording rate.
High speed file transfers LTO-5 tape drives write to and read from tape at up to 140 MBytes/s.
Long archival data life LTO tape cartridges are available from multiple manufacturers that specify a 30
years archival data life.
LTO-5 tape drives are compatible with LTO-5 1500 GB, LTO-4 800 GB and LTO-3 400 GB tape cartridges.
LTO-5 and LTO-4 tapes are fully read-write compatible. Whereas LTO-3 tapes cannot be written but can be
read in LTO-5 tape drives.
Page 9
9
LTO-4 tape drives are compatible with LTO-4 800 GB, LTO-3 400 GB and LTO-2 200GB tape cartridges.
LTO-4 and LTO-3 tapes are fully read-write compatible. Whereas LTO-2 tapes cannot be written but can be
read in LTO-4 tape drives.
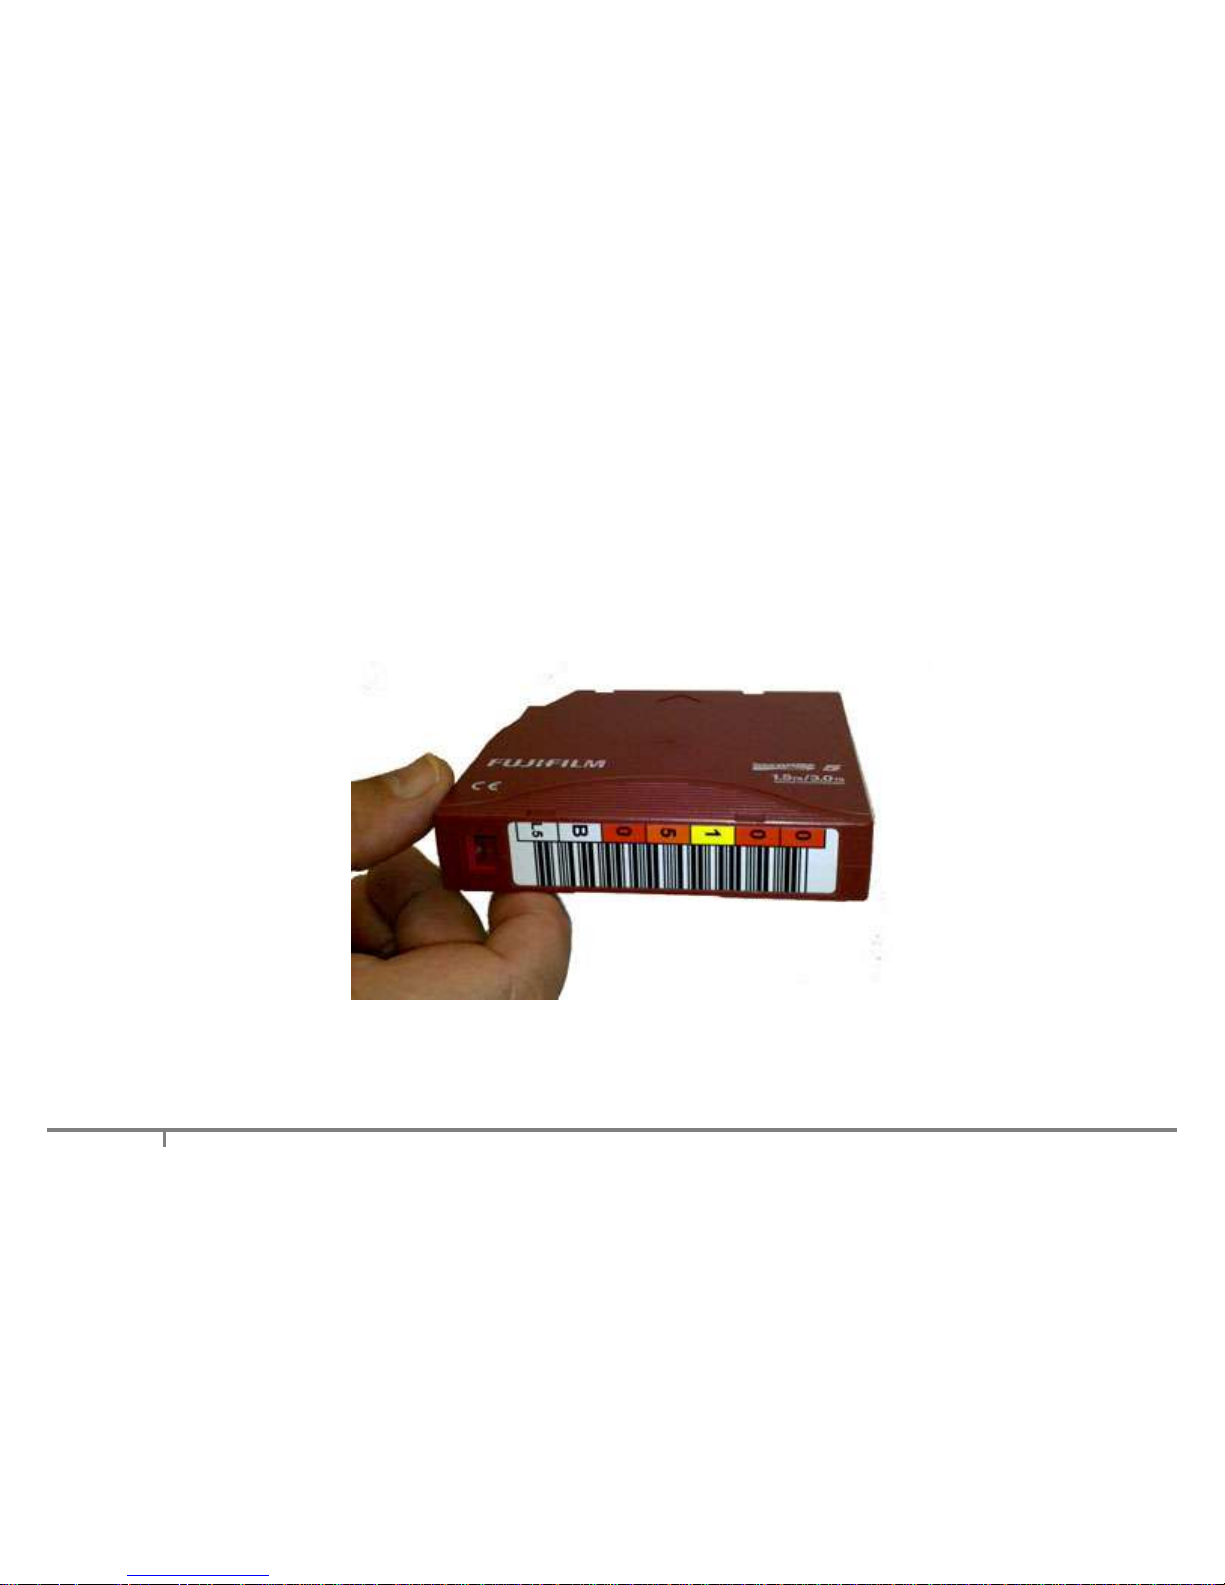
LTO tape cartridges are available as rewritable or WORM. WORM is an acronym for Write Once Read
Many and the data written to WORM LTO tape cartridges cannot be altered. This means that WORM tapes
cannot be reformatted and reused, unlike rewritable cartridges.
Page 10

10
1.3 Software Licensing
1.3.1 About Licensing
XenData6 Workstation is licensed under the terms of the End-User License Agreement (EULA) which
must be accepted when the software is installed. You may only use the XenData6 Workstation
software to access, read data from or write data to specific tape drives which have been assigned to
an authentic and valid license.
Under the terms of the EULA, if you have purchased one XenData6 Workstation license for use with
one tape drive, you will assign a specific tape drive to that license. Then, you may install the
XenData6 Workstation software on multiple computers and use the specific assigned tape drive on
any of those computers.
1.3.2 How to License
You will need a XenData Activation Code to be able to use XenData6 Workstation software. The
software is activated by using the XenData License Administration Utility which is displayed during
installation. It may also be launched after software installation as follows.
Click 'Start', then 'All Programs', then 'XenData'.
Click 'License Administration'.
Page 11

11
The License Administration Utility is shown below.
Page 12

12
If Internet access is available for the computer being licensed, enter the Activation Code, click on
'Apply' and then 'OK' to activate.
If Internet access is not available for the computer being licensed but is available on another
machine, perform the following steps to activate the software.
Enter the Activation Code.
Select the ‘Generate request for license’ option and click Apply.
The License Administration program prompts you for a file name. Choose a convenient name for
the file and click Save.
Transfer the file that you have just saved to a different machine that has Internet access.
Open the file in your Web browser by double clicking on it.
Right-click on the link in the file you have just opened and select ‘Save target as...’ and select a
location to save your license file.
Copy the saved license file back to the workstation that is being licensed.
In the license administration utility, select the ‘Import file’ option and click Apply.
Browse to the saved XML license file and open it.
1.4 Interchanging Tapes with Other Systems
Tape cartridges may be exchanged between XenData6 Workstation systems and other XenData systems:
Transferring from one XenData6 Workstation system to another XenData6 Workstation system
When a finalized tape is moved to another XenData6 Workstation system for the first time, the tape
catalog is automatically read by the other system and the tape catalog data is automatically stored on
the c: drive. With a finalized tape the contents become automatically available for restore in the other
system. However, if the tape has not been finalized, the tape catalog data must be built by scanning the
tape. This is performed by using the Build Catalog (5.2) operation.
Page 13

13
Transferring from a XenData6 Workstation system to a XenData6 Server system For a finalized
tape, the tape catalog is automatically read by the server system and the administrator must use the
'Import Folder Structure' option to make the contents of the tape available in the server archive file
system. If the tape is not finalized, the catalog must first be built on the server system using the 'Build
Catalog' operation.
Transferring from a XenData6 Server system to a XenData6 Workstation system For a finalized
tape, the tape catalog is automatically read by the workstation system. The tape cartridge contents
become automatically available for restore in the workstation system. If the tape is not finalized, the
catalog must first be built on the workstation system using the Build Catalog (5.2) operation.
Transferring from a XenData6 Workstation system to a Version 5 XenData server system Finalized
tapes created on a XenData6 Workstation system cannot be transferred to a version 5 XenData server
system. However, non-finalized tapes may be transferred. If the tape is not finalized, the catalog must
first be built on the server system and then the 'Import Folder Structure' operation should be used.
Transferring from a Version 5 XenData server system to a XenData6 WorkStation system For a
finalized tape, the tape catalog is automatically read by the workstation system. The tape cartridge
contents become automatically available for restore in the workstation system. If the tape is not finalized,
the catalog must first be built on the workstation system using the Build Catalog (5.2) operation.
Data is written to LTO tape each time a file is written, deleted or renamed. After writing data to a tape on a
different system and then returning it to a XenData6 Workstation system that already knows about it, the
tape catalog must be rebuilt using the Rebuild Catalog (5.2) operation and then ‘Check Filesystem’ must be
selected.
Page 14

14
1.5 About Partial File Restore
XenData6 Workstation can restore individual files but cannot restore just a portion of a file. The operation of
restoring only a portion of a file is known as partial file restore and is functionality which is supported by
XenData6 Server. XenData6 Workstation can be used to archive files to LTO tape cartridges which, at a
later time, can be used in a system running XenData6 Server. To support partial file restores when the
tape cartridges are moved to a system running XenData6 Server, the tapes must be formatted using a
Volume Set that has file fragmentation enabled. This is described further in About File Fragmentation (2.4),
About Volume Sets (2.1) and How to Configure a New Volume Set (2.6).
1.6 About File Search
This version of XenData6 Workstation does not support use of the Windows Explorer search function to
search for files stored on LTO tape. Please use the File Search Report (6.5).
1.7 How to Obtain Software Version
To determine the version of XenData6 Workstation, follow the steps described below.
Right click on 'LTO Drives' in the left navigation pane of Windows Explorer.
Select 'Properties'.
Select the 'General' tab.
The version will be displayed.
1.8 Language Support
This version of XenData6 Workstation is available only in English.
Page 15

15
2. Volume Sets and Formatting Tapes
2.1 About Volume Sets
A Volume Set is a group of tapes that are treated in the same way by the system. When a tape is formatted
using XenData6 Workstation, it is allocated to a selected Volume Set and the following properties are
defined:
Volume Set name
Media type: Rewritable or WORM.
Block Size. For more information, refer to About Block Size (2.3).
Enabling of File Fragmentation and Fragment File size. For more information, refer to About File
Fragmentation (2.4).
When tapes from the same Volume Set are transferred to a system running XenData6 Server, all the tapes
will appear grouped in that same Volume Set when displayed in the XenData Management Console.
To configure a new Volume Set, refer to How to Configure a Volume Set (2.6).
2.2 About Barcodes and Tape Volume Names
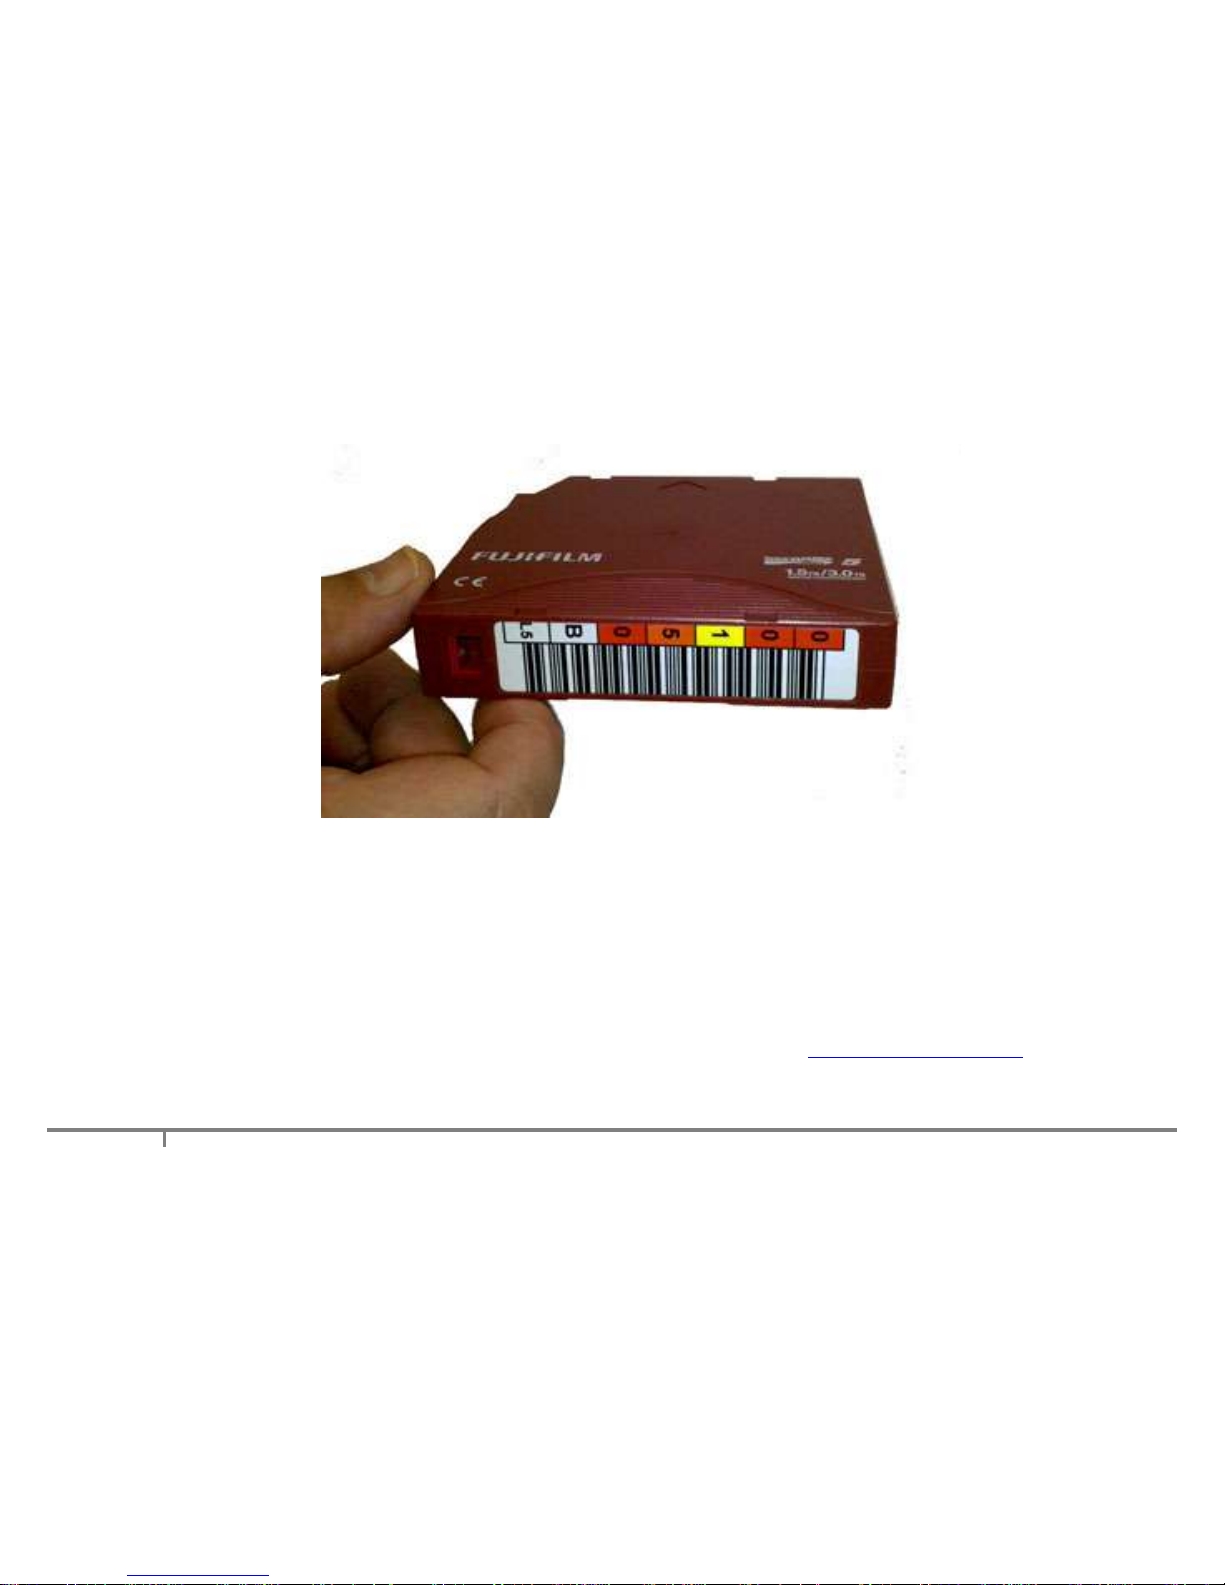
Barcode labels may be attached to LTO tape cartridges, as shown below.
Page 16
16
Barcodes labels are the preferred method for keeping track of tapes when in a tape library, as most tape
libraries include a barcode reader. However stand-alone tape drives do not have the capability of reading
barcode labels but they are able to read the in-cartridge memory chip that is present in all LTO tape
cartridges. When an LTO tape having a barcode label is formatted in a tape library under control of
XenData6 Server, the software writes the barcode information to the in-cartridge memory chip which allows
the barcode information to be displayed in Explorer by XenData6 Workstation.
When a tape cartridge is formatted using XenData6 Workstation, it is given a Volume Label. In this case,
the Volume Label is displayed in Explorer. This is further described in How to Format a Tape.
Page 17
17
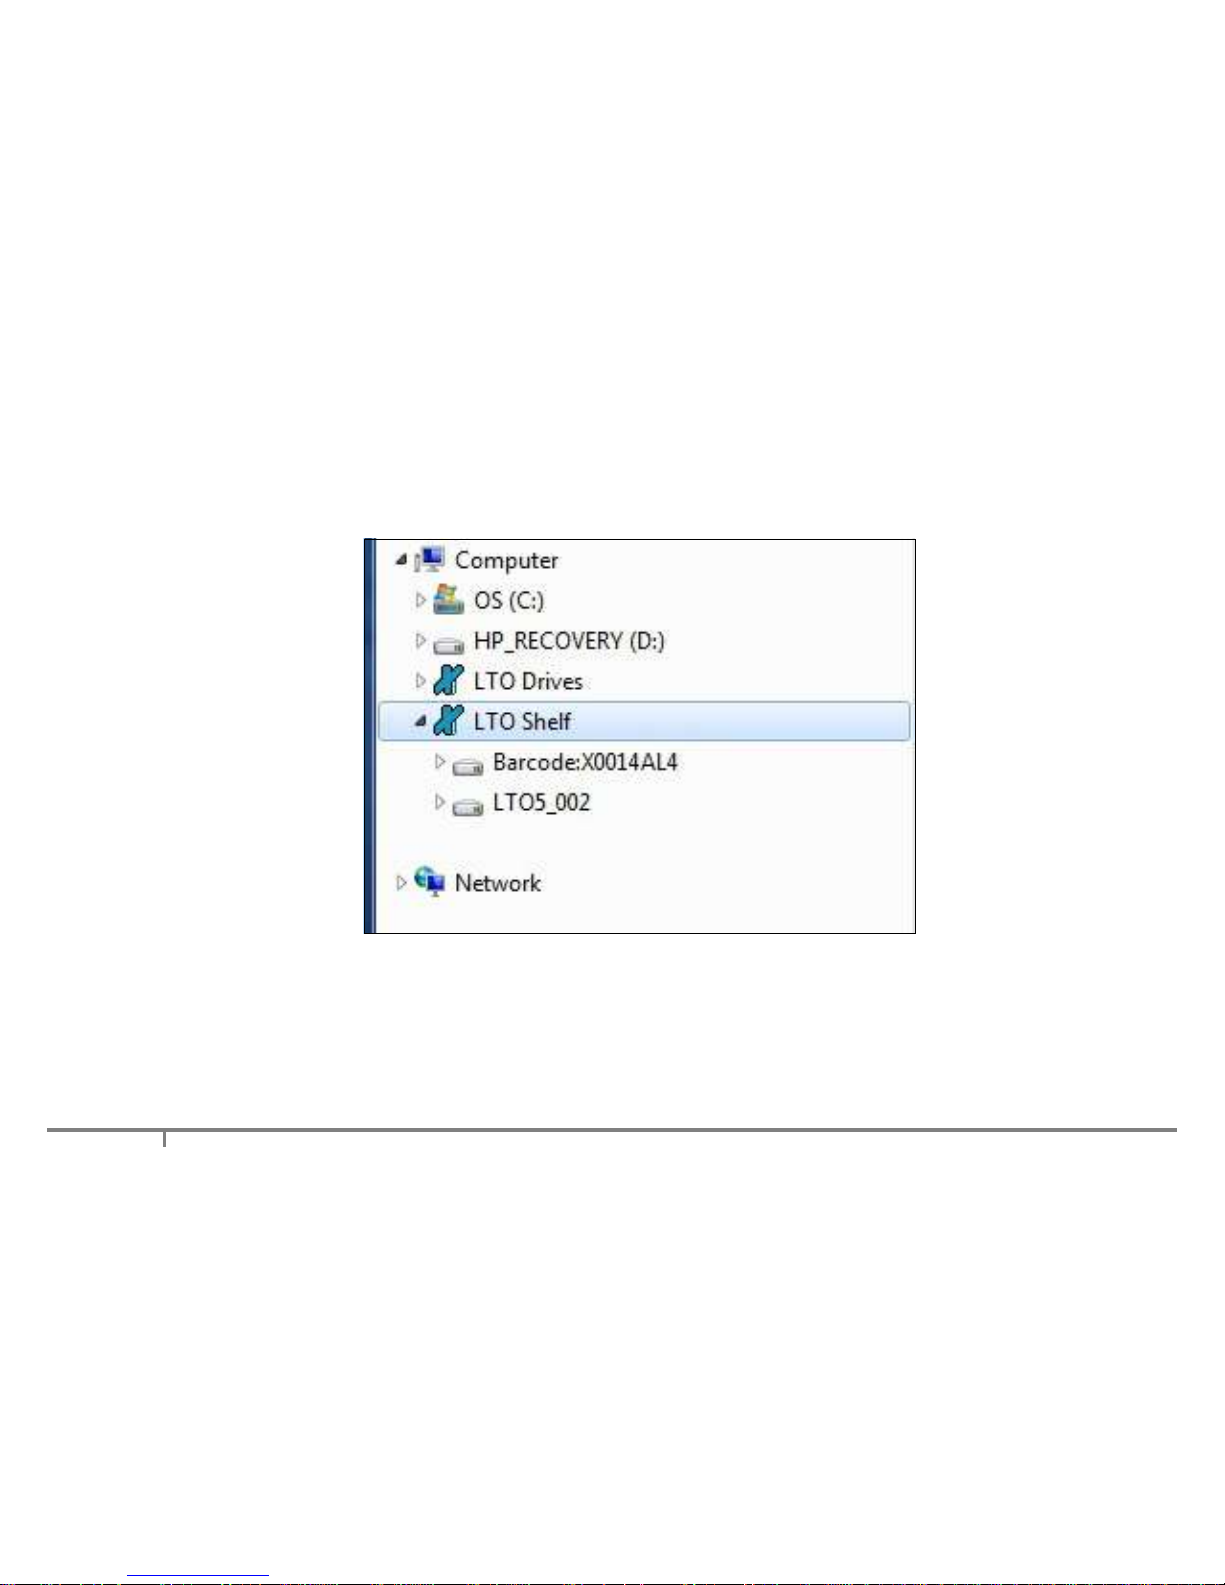
The image below shows how two tapes are displayed in Explorer. The first is identified by its barcode and
this was originally formatted in a tape library managed by XenData6 Server. The second was formatted
using XenData6 Workstation and was given the Volume Label 'LTO5_002'.
2.3 About Block Size
Data is written to LTO in blocks. Block size refers to the size of these blocks.
When a tape is formatted using XenData6 Workstation, the block size is defined by the selected Volume
Set. We recommend using the default block size as this provides high transfer rates for both archiving and
restoring while maximizing the usable capacity.
Page 18

18
2.4 About File Fragmentation
File fragmentation on LTO tape allows partial file restore when a tape is moved to a system running
XenData6 Server. When file fragmentation is enabled, any file larger than the fragment size is 'sliced' into
multiple fragment files before being written to tape. When restored, the fragment files are transparently
concatenated by XenData software to recreate the original archived file.
XenData6 Workstation does not support partial restore, but XenData6 Server does. File fragmentation
should be enabled for tapes that may be moved to a tape library under control of XenData6 Server when
partial file restores are required.
File fragmentation is enabled for a Volume Set and, when enabled, the fragment size must be defined.
Typically, a good value is in the range 5GB to 10GB. Configuring file fragmentation is described in How to
Configure New Volume Sets (2.6).
2.5 About Tape Spanning
The option to span a file across multiple tapes is not supported in this version of XenData6 Workstation.
2.6 How to Configure a Volume Set
Volume Sets are described in About Volume Sets (2.1). The properties defined for a Volume Set are
applied to a tape when it is formatted. This is described in How to Format a Tape (2.7).
To configure a new Volume Set, follow the steps described below.
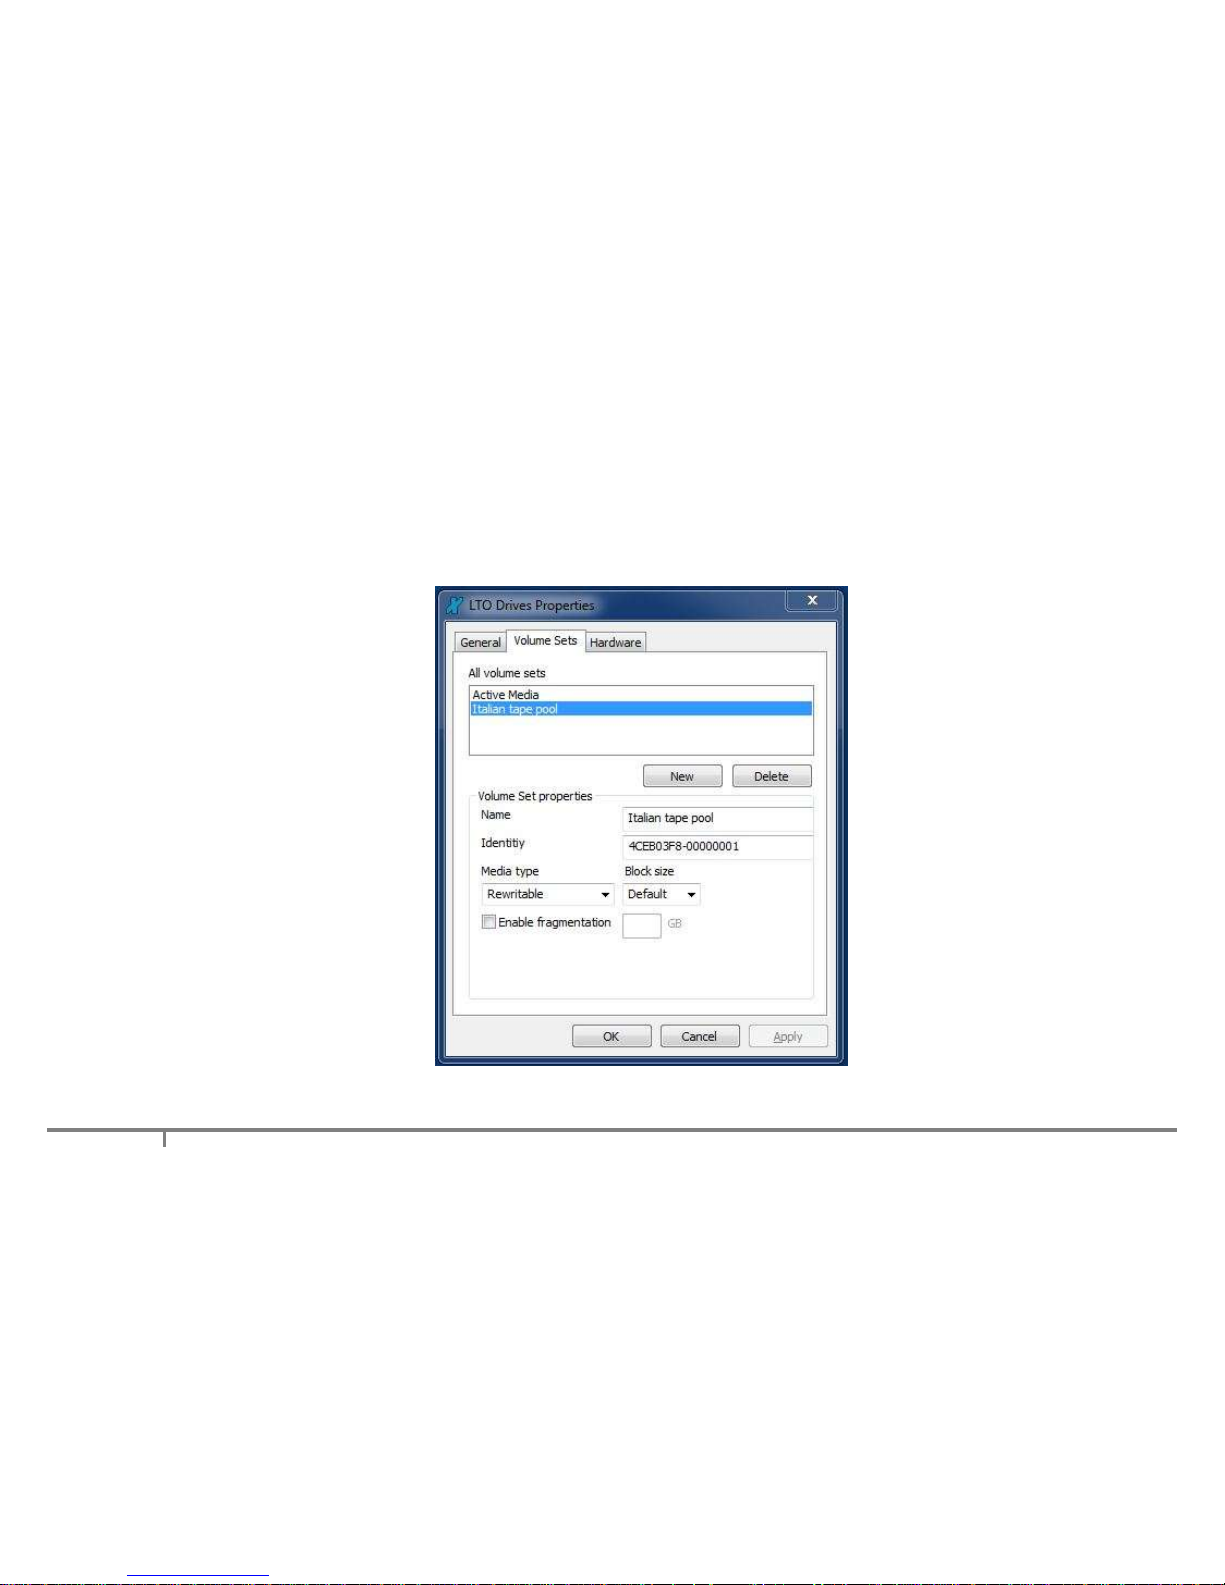
Right click on 'LTO Drives' in the left navigation pane of Windows Explorer.
Select 'Properties'.
Select the 'Volume Sets' tab.
Page 19
19
Click 'New' and select the new Volume Set shown in the 'All Volume Sets' panel.
Configure the Name, Block Size, Fragmentation and Rewritable/WORM settings.
Click 'Apply'.
This is illustrated below.
Page 20
20
2.7 How to Format a Tape
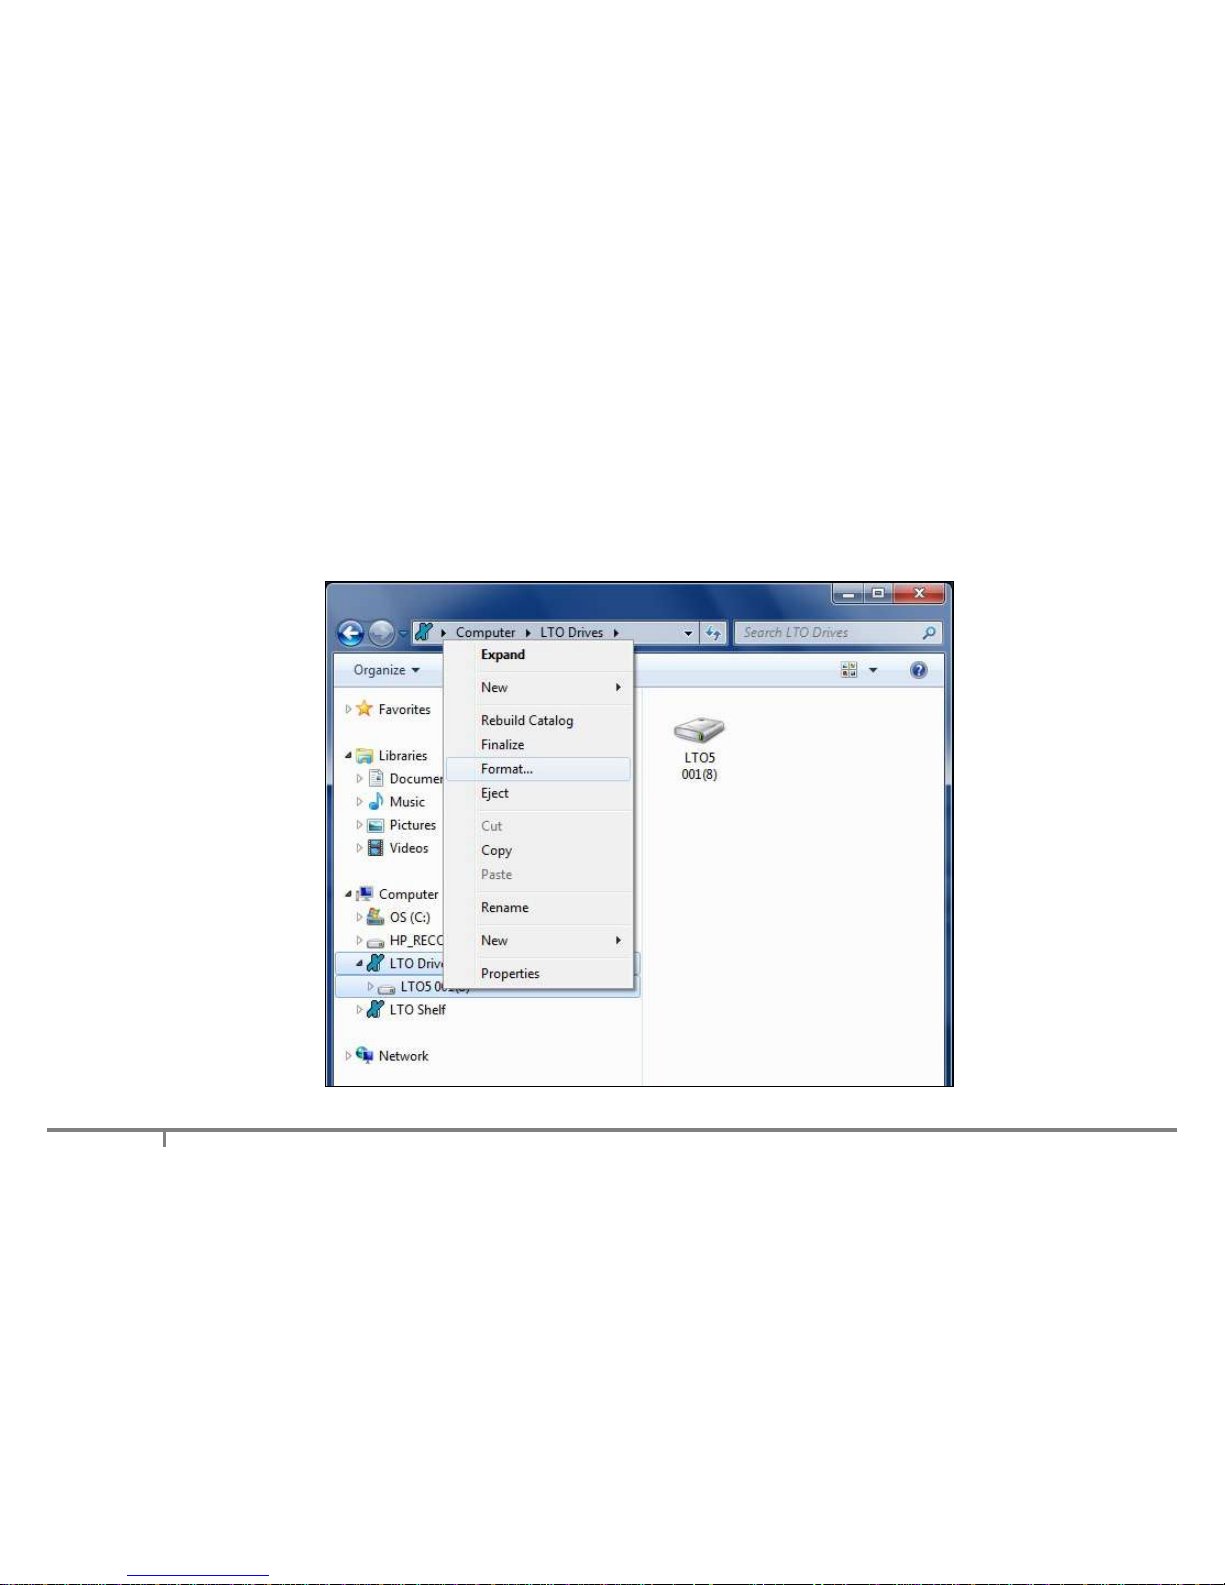
Insert the LTO tape cartridge that is to be formatted into an available tape drive. After about two minutes,
the tape cartridge will be identified in the left navigation pane of Explorer. Right click on the cartridge and
select 'Format...'.
Page 21
21
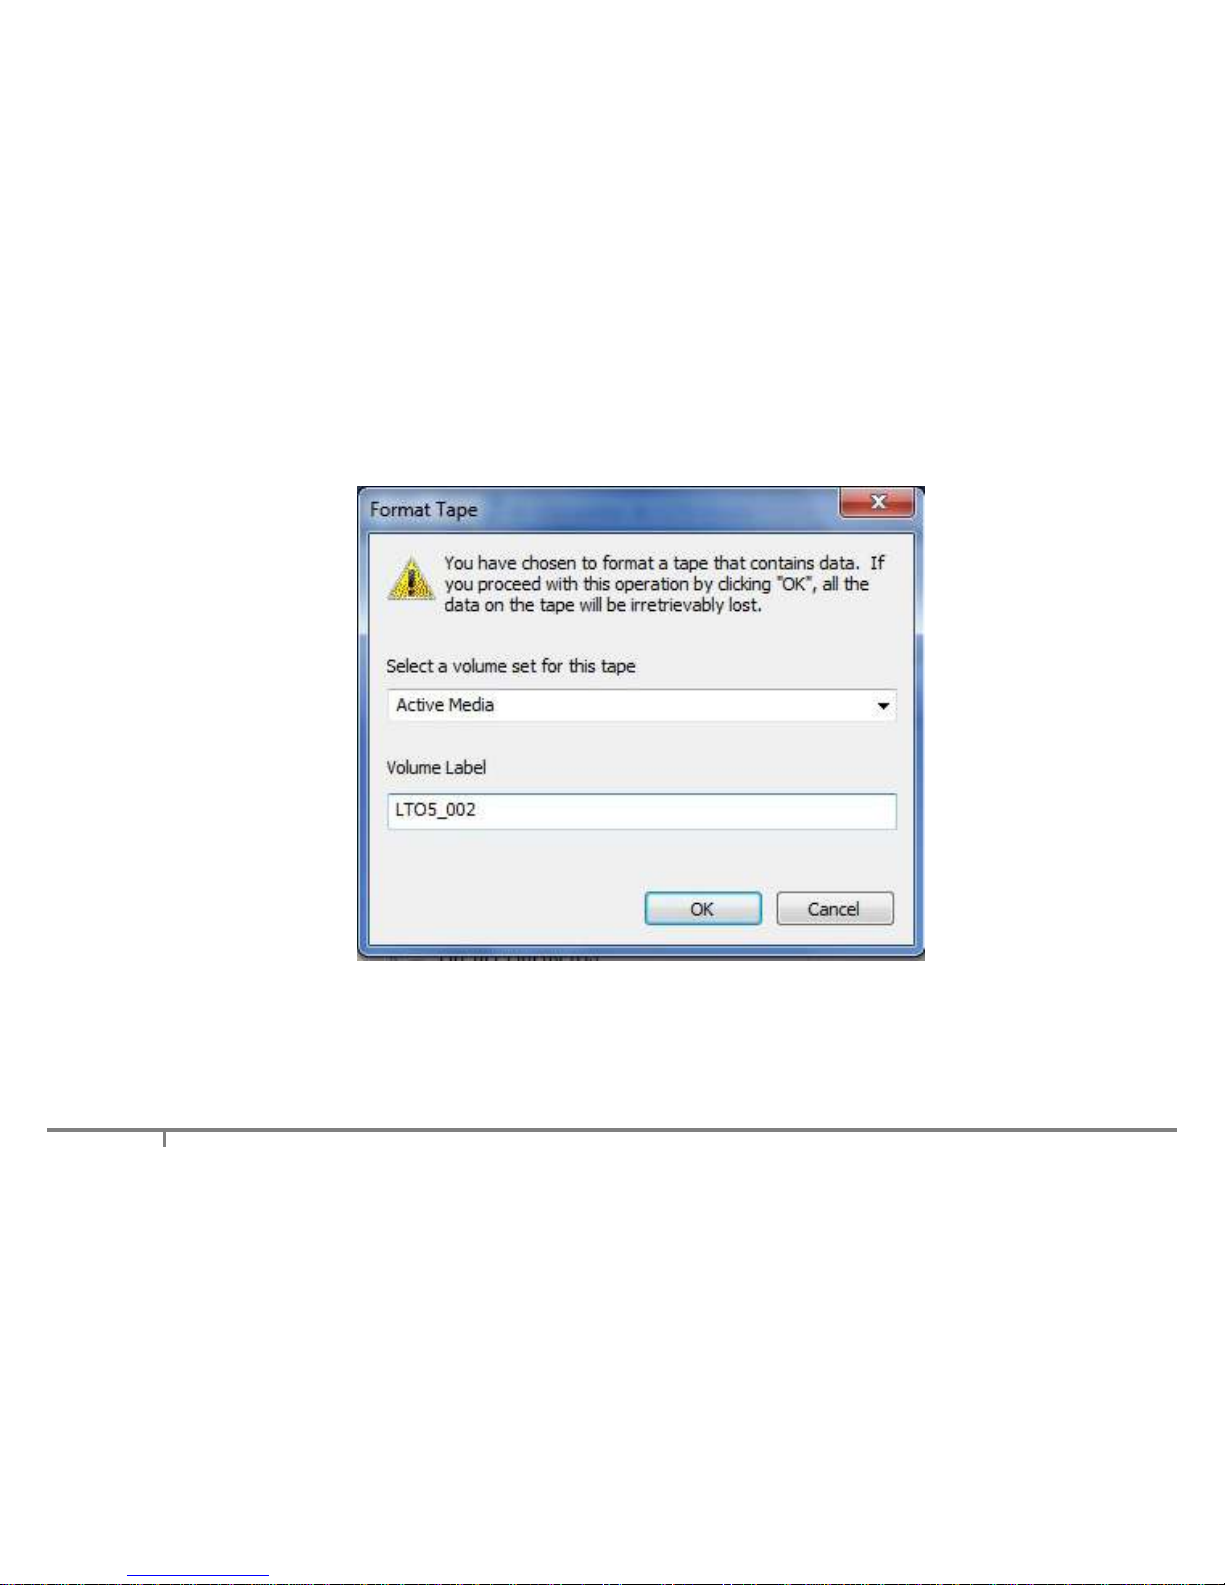
A window will appear as shown below which allows selection of a Volume Set and a Volume Label.
The Volume Set determines the format parameters including tape block size and enabling of file
fragmentation. More information about Volume Sets is provided in About Volume Sets (2.1) and How to
Configure New Volume Sets (2.6). After selecting the Volume Set and defining the Volume Label, click
'OK'. The system will then format the tape.
Page 22

22
3. Archiving and Restoring Files
3.1 Archiving Files to LTO
Archive and restore operations are always performed using Windows Explorer. This means that files cannot
be directly archived to LTO using other programs. XenData6 Workstation extends Windows Explorer's
capabilities to transfer files to and from LTO using drag and drop or copy and paste. The system maintains
file and folder structures, allowing the transfer of nested folders to and from LTO tape.
Before copying a file or folder to tape, ensure that the required tape cartridge is in a tape drive. The tape
will appear under 'LTO Drives' in the left navigation pane of Explorer and the existing folder structure may
be expanded and displayed in the left and right panes of Explorer.
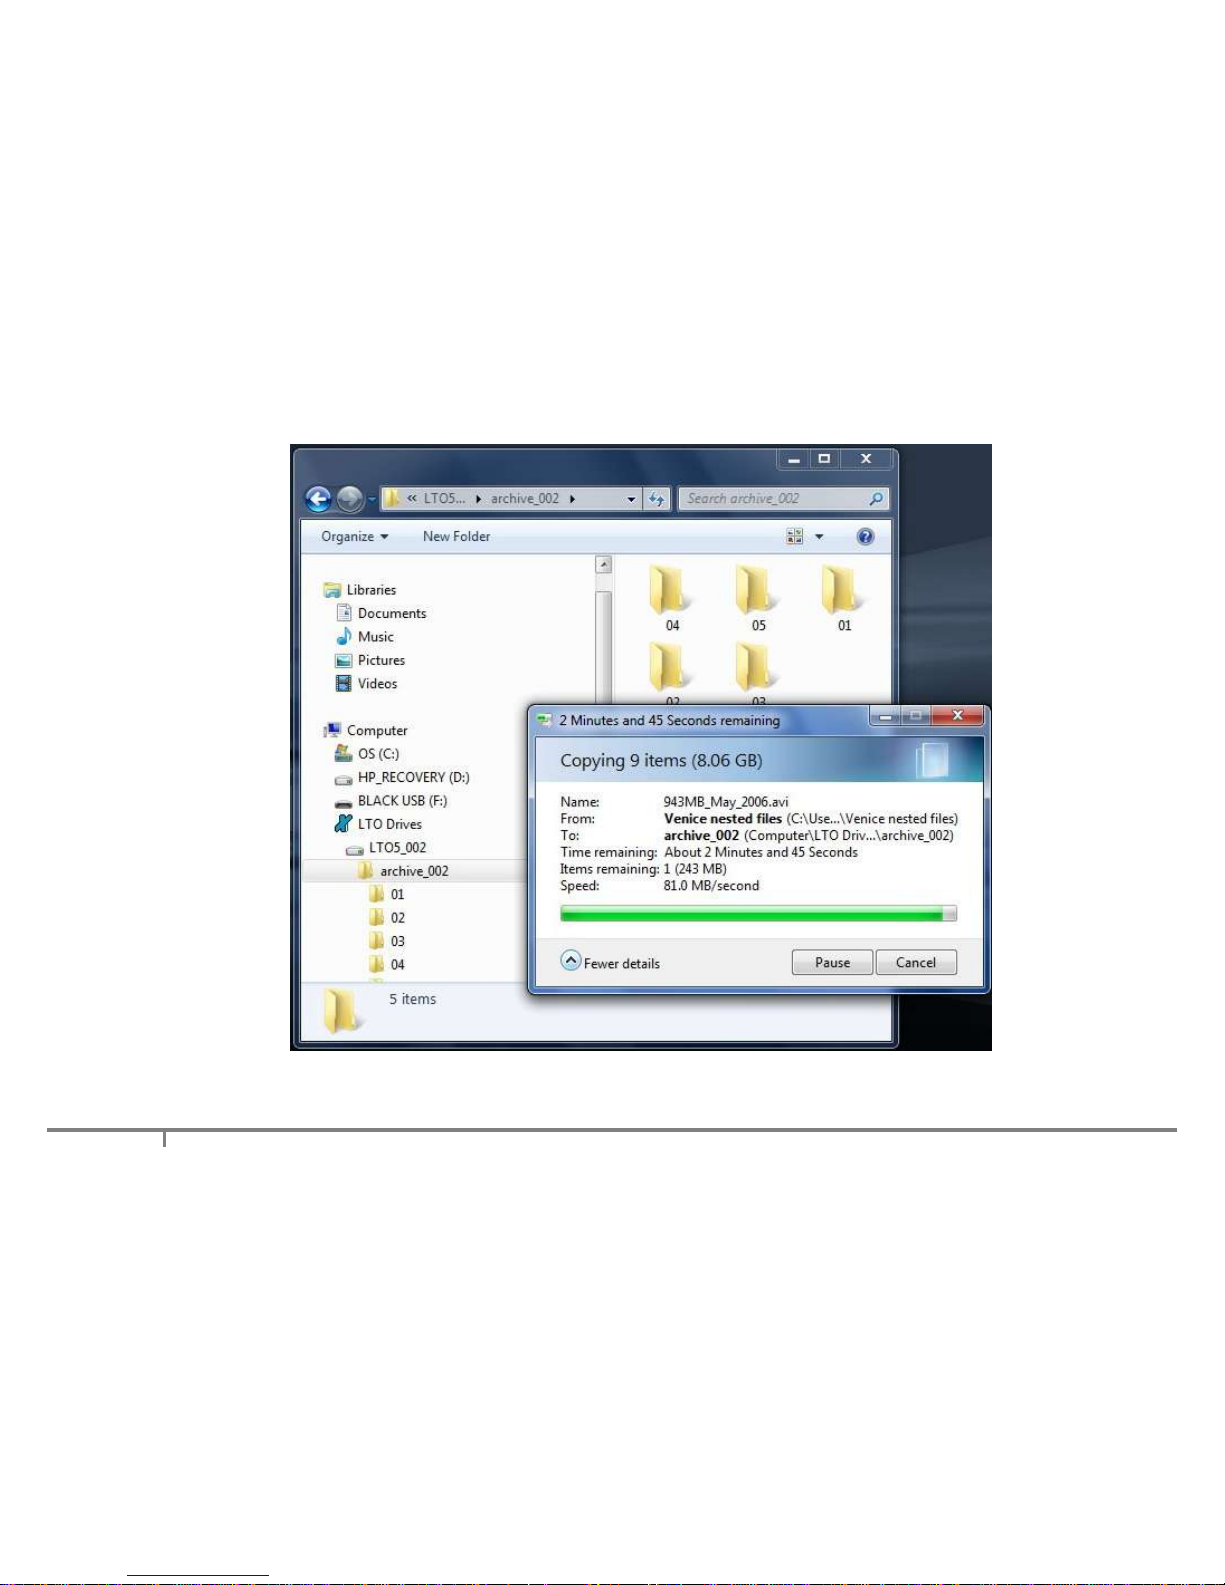
To archive to LTO, simply copy or cut the required files or folders from any accessible logical drive letter or
network share and paste to the LTO tape folder structure. Alternatively drag and drop the required files or
folders. A progress bar will be displayed during the archive operation, as illustrated below. Note that the
time remaining, as calculated by Windows Explorer, is often greatly over-estimated.
Page 23
23
When archiving multiple files to LTO, the operation may be paused or cancelled by clicking on the 'Pause'
or Cancel' buttons as shown above. Note that this does not affect the current file being written to LTO.
Page 24

24
XenData6 Workstation supports overwriting of files, file deletion and file rename using standard Windows
Explorer operations. Files on tape may be overwritten by copying and pasting or dragging and dropping a
file of the same name to the same position in the folder structure. In this case, a Window will appear which
gives the option to either 'Copy and Replace' or 'Don't Copy'. When files are overwritten, new versions are
saved to tape and only the latest version will be available for restore.
When compared to writing to an NTFS disk volume, the following three limitations apply:
Alternate Data Streams (ADS) are not written to LTO. ADS allows one or more extra streams of data to
be attached to a file in addition to the main data stream. When files with ADS are archived to LTO using
XenData6 Workstation, the main data stream is written to tape but any Alternate Data Streams are not
archived.
It is not possible to rename a folder on LTO after files or sub-folders have been added to it.
Copying empty folders or zero-size files to tape is not supported.
Note that the XenData6 Workstation system does support creation of new folders and displays the newly
created empty folders in Windows Explorer but does not write these to LTO tape until at least one file has
been written to that folder.
3.2 Restoring Files from LTO
Archive and restore operations are always performed using Windows Explorer. This means that files cannot
be directly restored from LTO using any other program. XenData6 Workstation extends Windows Explorer's
capabilities to transfer files to and from LTO using drag and drop or copy and paste. The system maintains
file and folder structures, allowing the transfer of nested folders to and from LTO tape.
Page 25
25
Before restoring a file or folder from tape, ensure that the required tape cartridge is in a tape drive. The
tape will appear under 'LTO Drives' in the left navigation pane of Explorer and the existing folder structure
may be expanded and displayed in the left and right panes of Explorer.
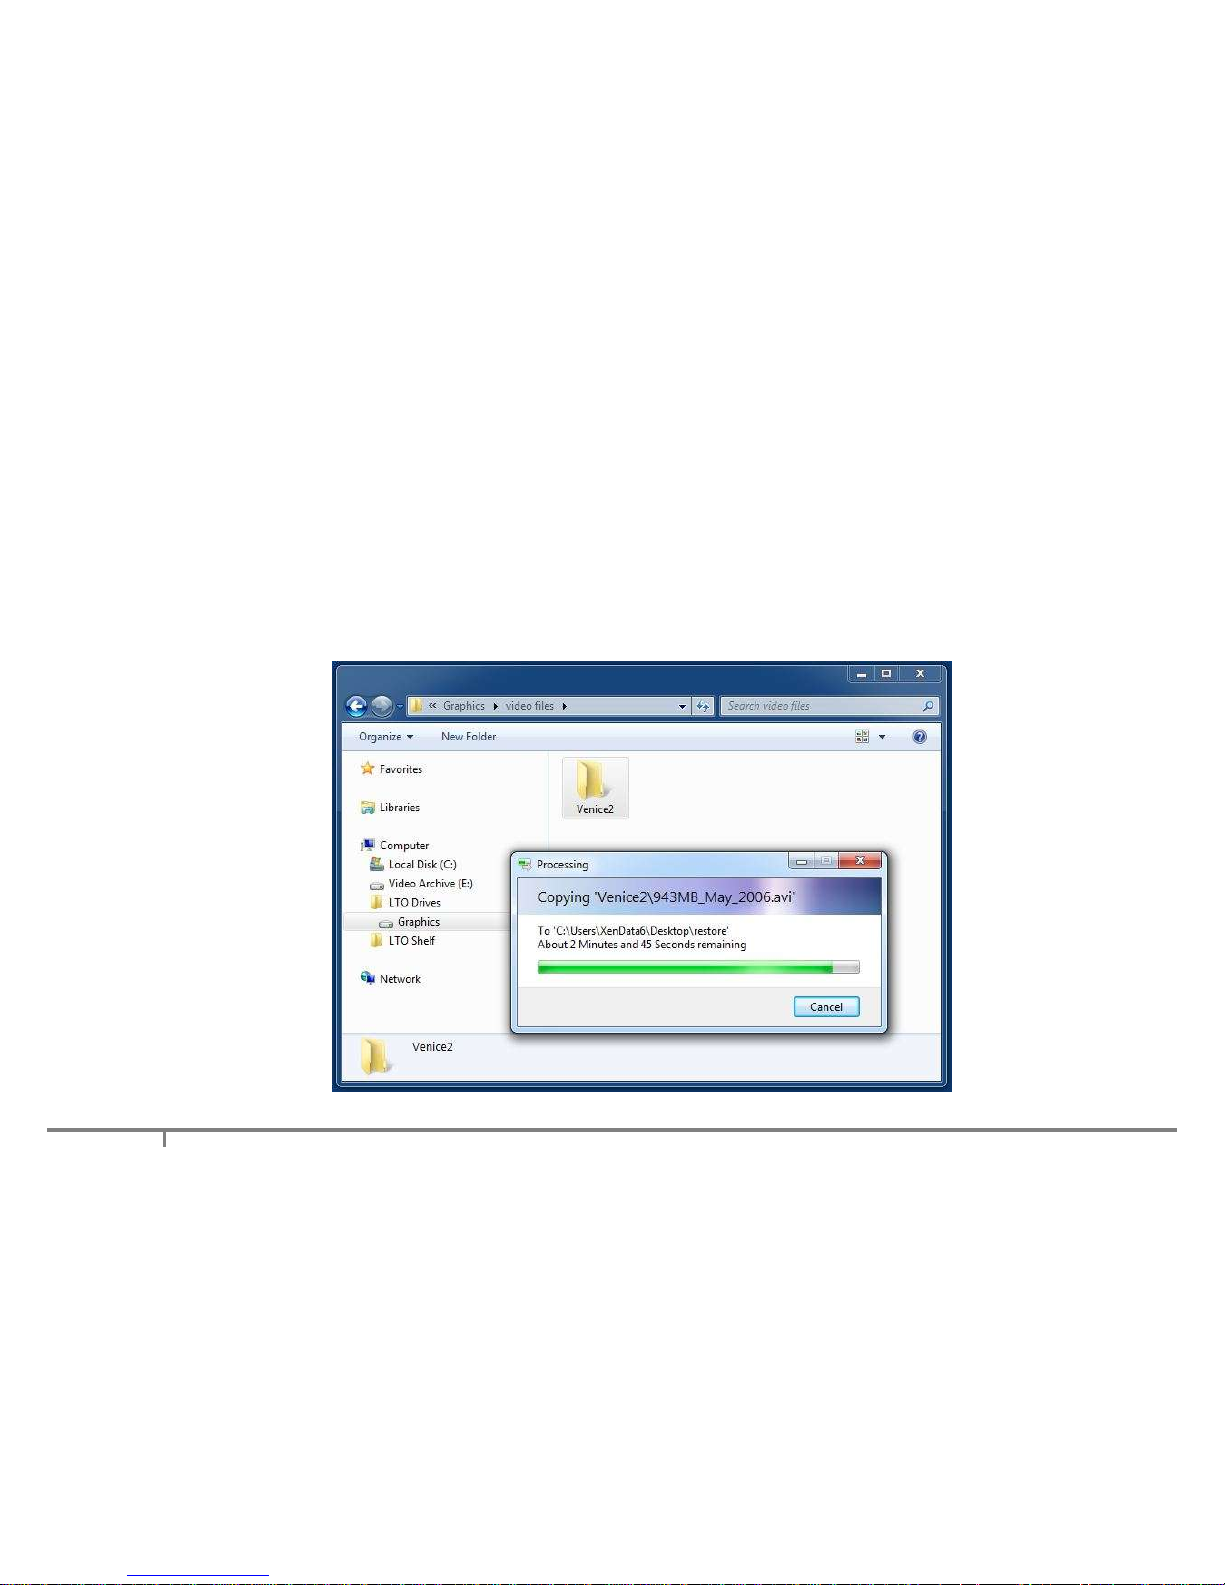
To restore from LTO, simply copy the required files from the LTO tape folder structure and paste to any
accessible logical drive letter or network share. Alternatively drag and drop the required files or folders. A
progress bar will be displayed during the restore operation. Note that the time remaining, as calculated by
Windows Explorer, is often greatly over-estimated.
Page 26

26
4. Offline Tapes
4.1 About Offline Tapes
When a tape is ejected from a drive, it becomes offline. XenData6 Workstation retains information about
the file and folder structure for all offline tapes. Of course, files cannot be restored until the offline tape is
inserted back into a tape drive.
Offline tapes are shown in the left navigation pane of Windows Explorer under 'LTO Shelf'. The folder and
file structure stored on each offline tape may be displayed in the left and right panes of Windows Explorer.
This is described further in About LTO Shelf (4.4).
Reports may also be run to list the contents of any offline tape, list the offline tape locations for files that
meet specified file search criteria and to list the status of all offline tapes.
There is an option to remove the data about an offline tape. This is operation is performed by using the
'Forget this Tape' (4.5) function.
4.2 How to Obtain Tape Cartridge Properties
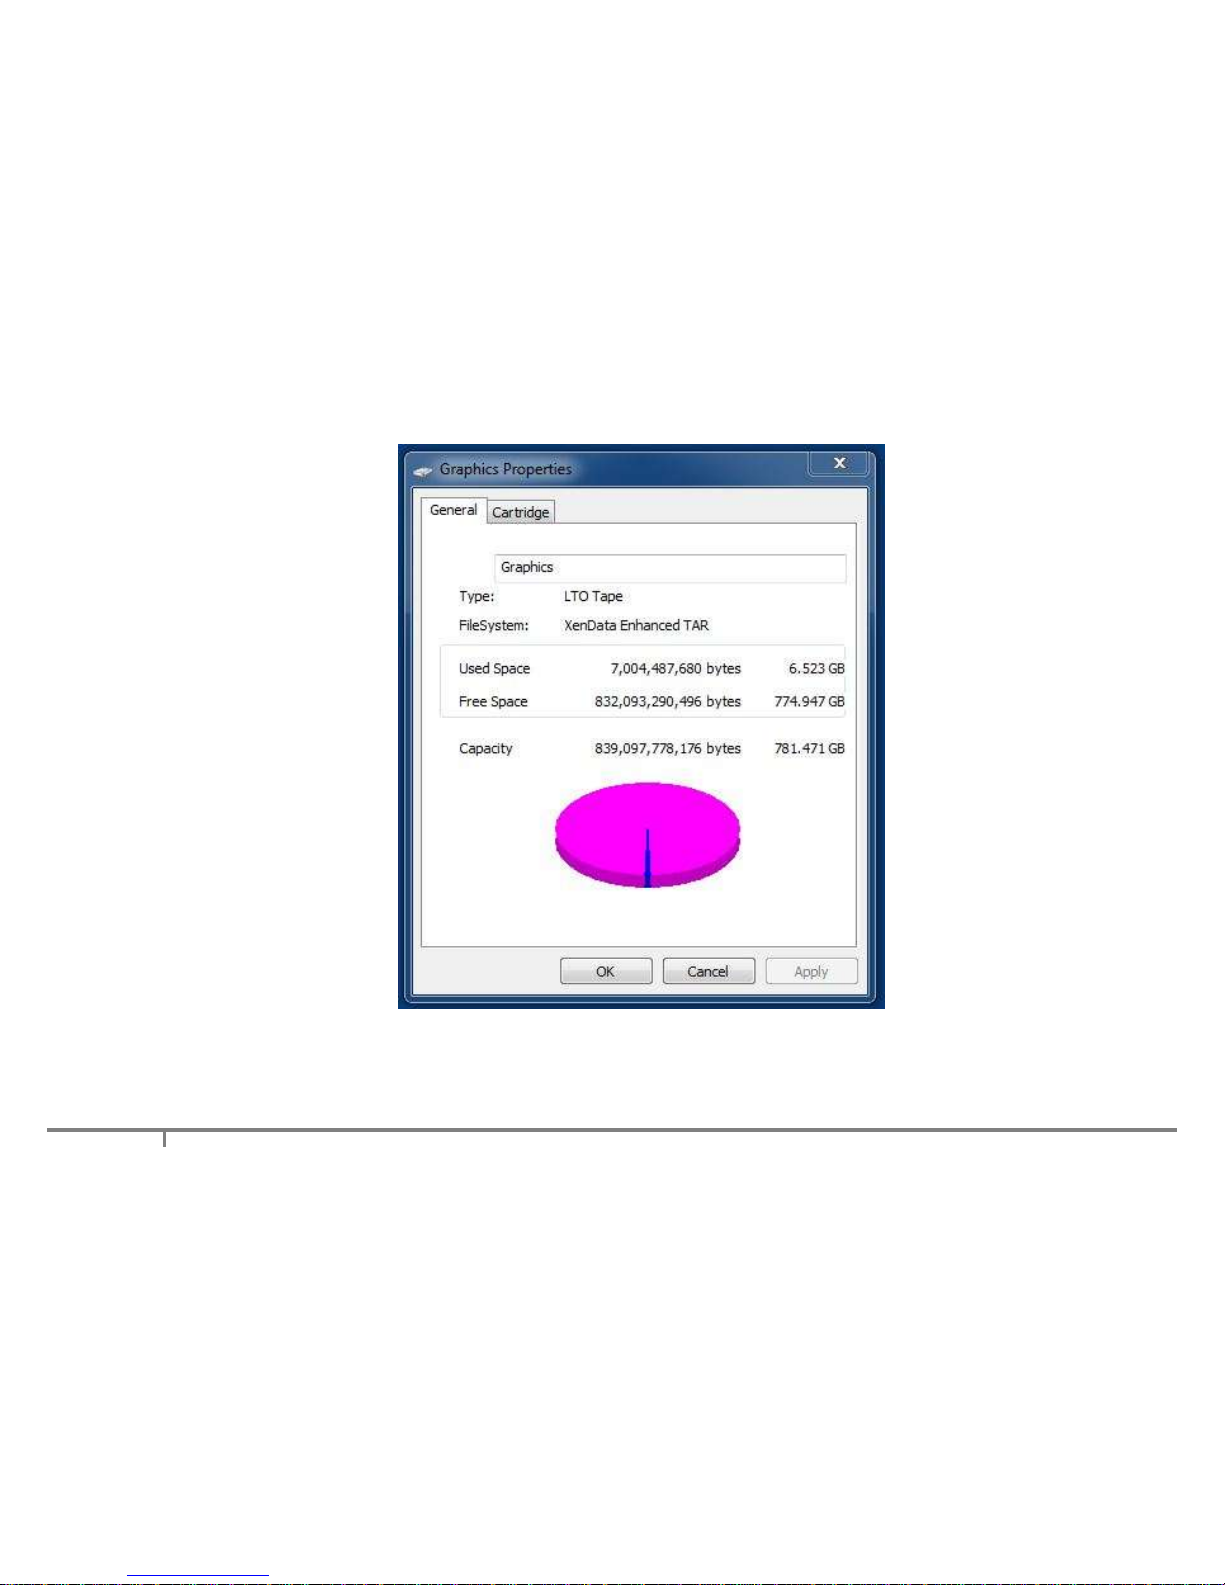
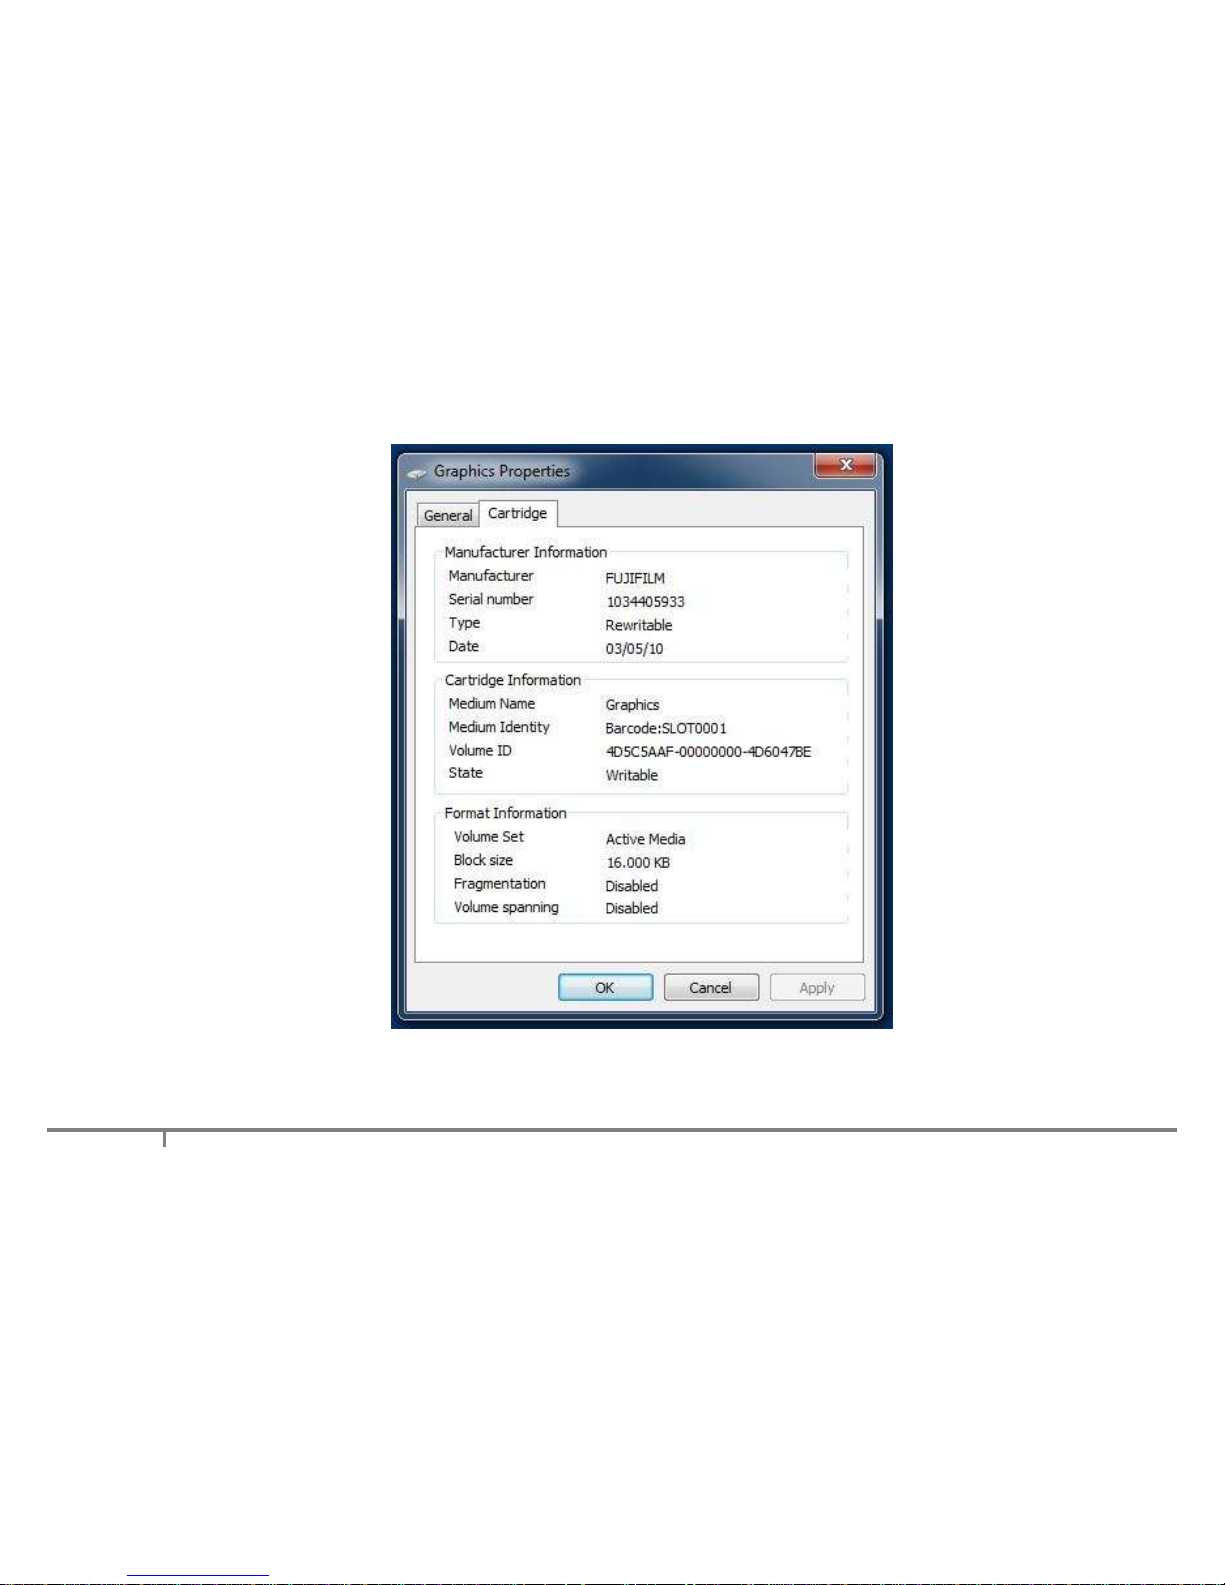
Tape cartridge properties may be obtained for tapes in a tape drive and for offline tapes as follows.
Launch Windows Explorer.
Right click on the tape under 'LTO Drives' or 'LTO Shelf' in the left hand navigation pane and select
Properties.
Select either the 'General' or 'Cartridge' Tab.
The available properties are shown below.
Page 27
27
Page 28
28
Page 29
29
4.3 How to Eject Tapes from a Tape Drive
When a tape is ejected from a tape drive, it becomes offline. It is no longer displayed under 'LTO Drives' in
Windows Explore but continues to be displayed under 'LTO Shelf".
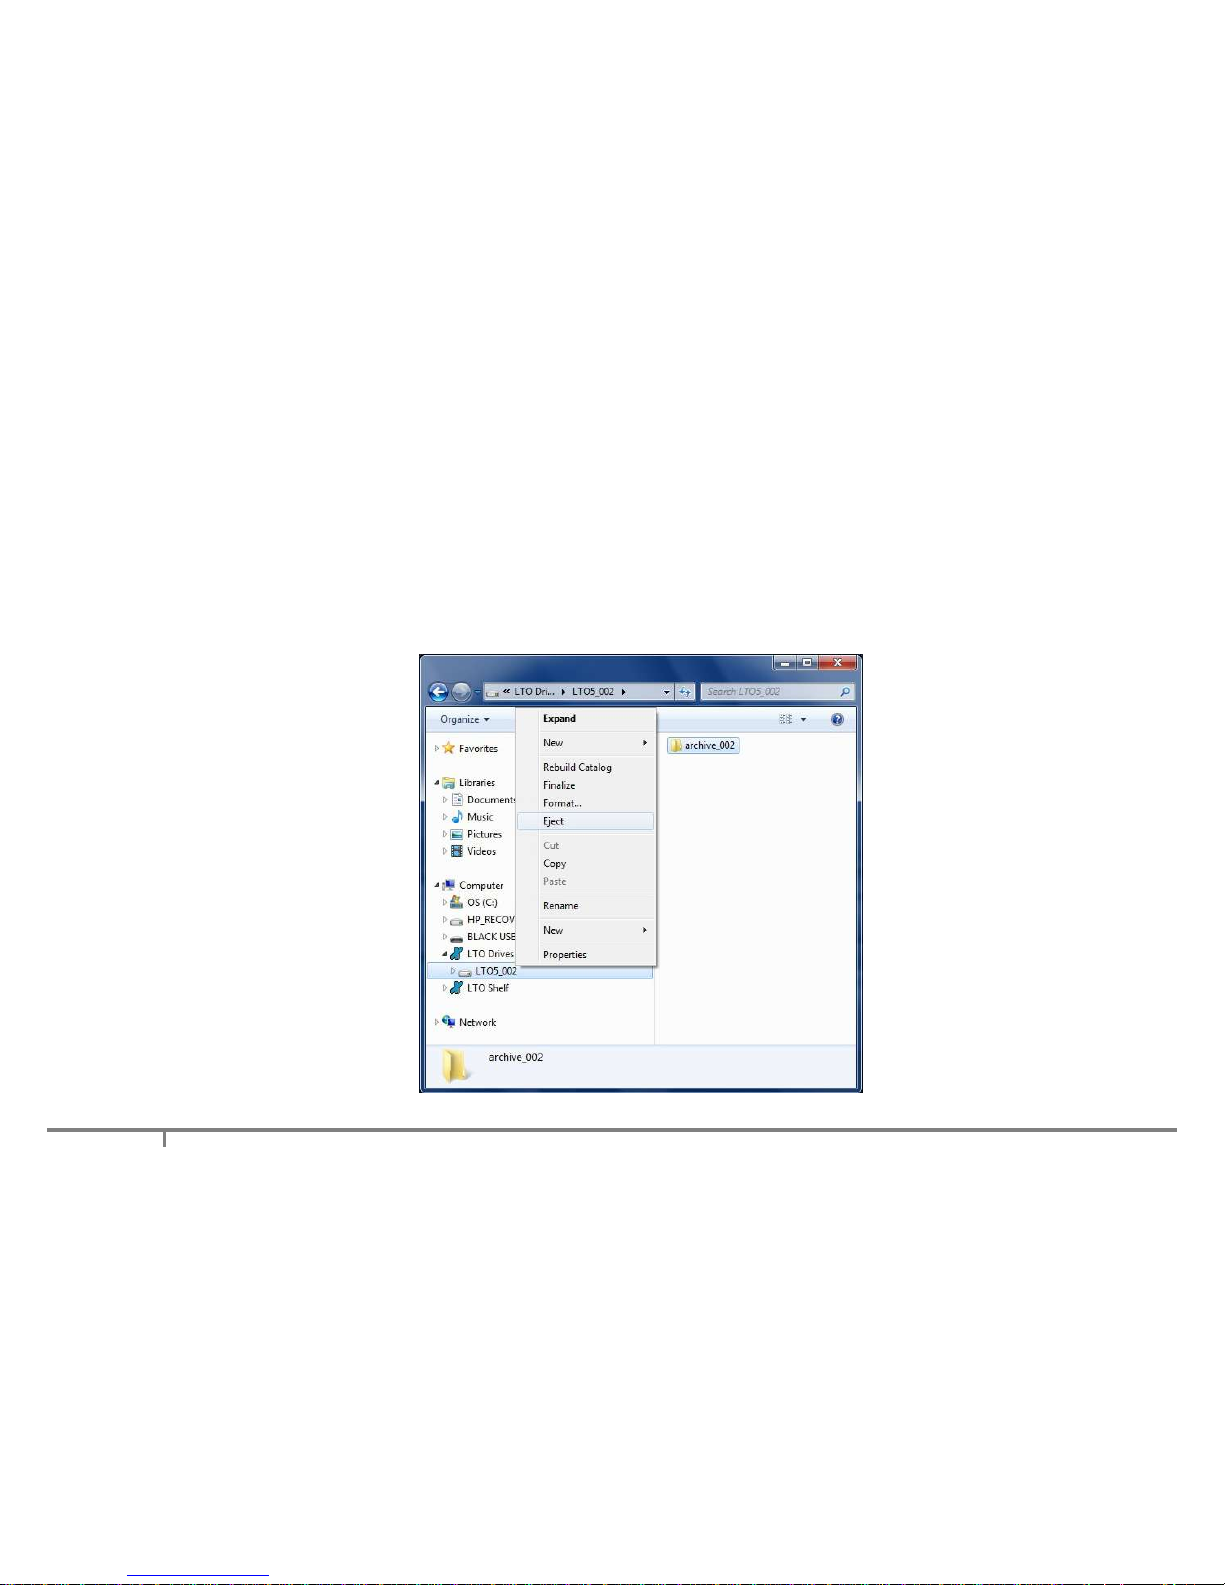
A tape cartridge may be ejected from a tape drive by either depressing the eject button on the drive or by
selecting the tape drive in the left navigation pane of Windows Explorer and clicking on 'Eject', as shown
below.
Page 30
30
4.4 About LTO Shelf
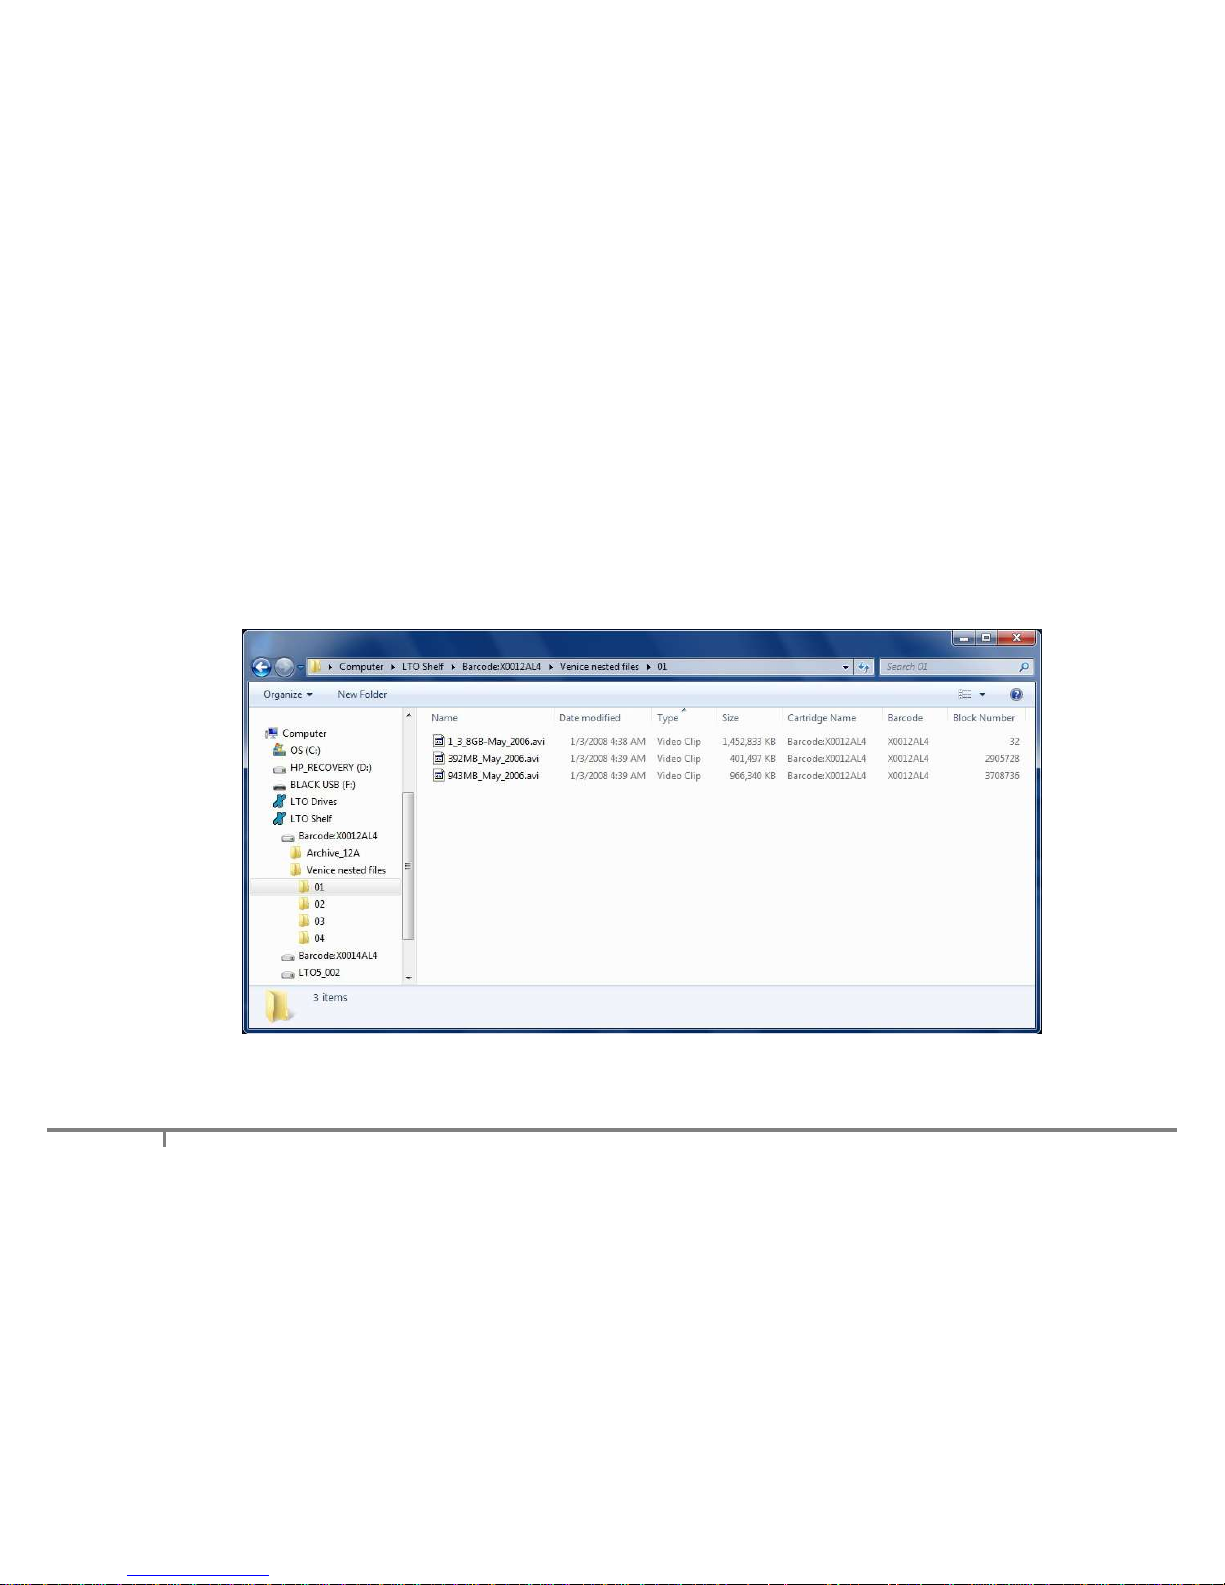
LTO Shelf appears in the left navigation pane of Windows Explorer and it contains all of the tapes that the
system knows about including the tapes that are currently in a tape drive.
The folder and file structure stored on each tape may be expanded and displayed in the left and right panes
of Windows Explorer as shown below.
Offline tapes may be removed from LTO Shelf by using the 'Forget this Tape' operation as described in
How to Forget a Tape (4.5).
Page 31
31
4.5 How to Forget a Tape
LTO Shelf displays the folder and file structure for all tape that the system knows about. To remove a tape
and its folder and file structure from the LTO Shelf display, use the Forget this Tape function, as described
below.
Ensure that the tape is offline. If necessary eject it from a tape drive as described in How to Eject a Tape
(4.3).
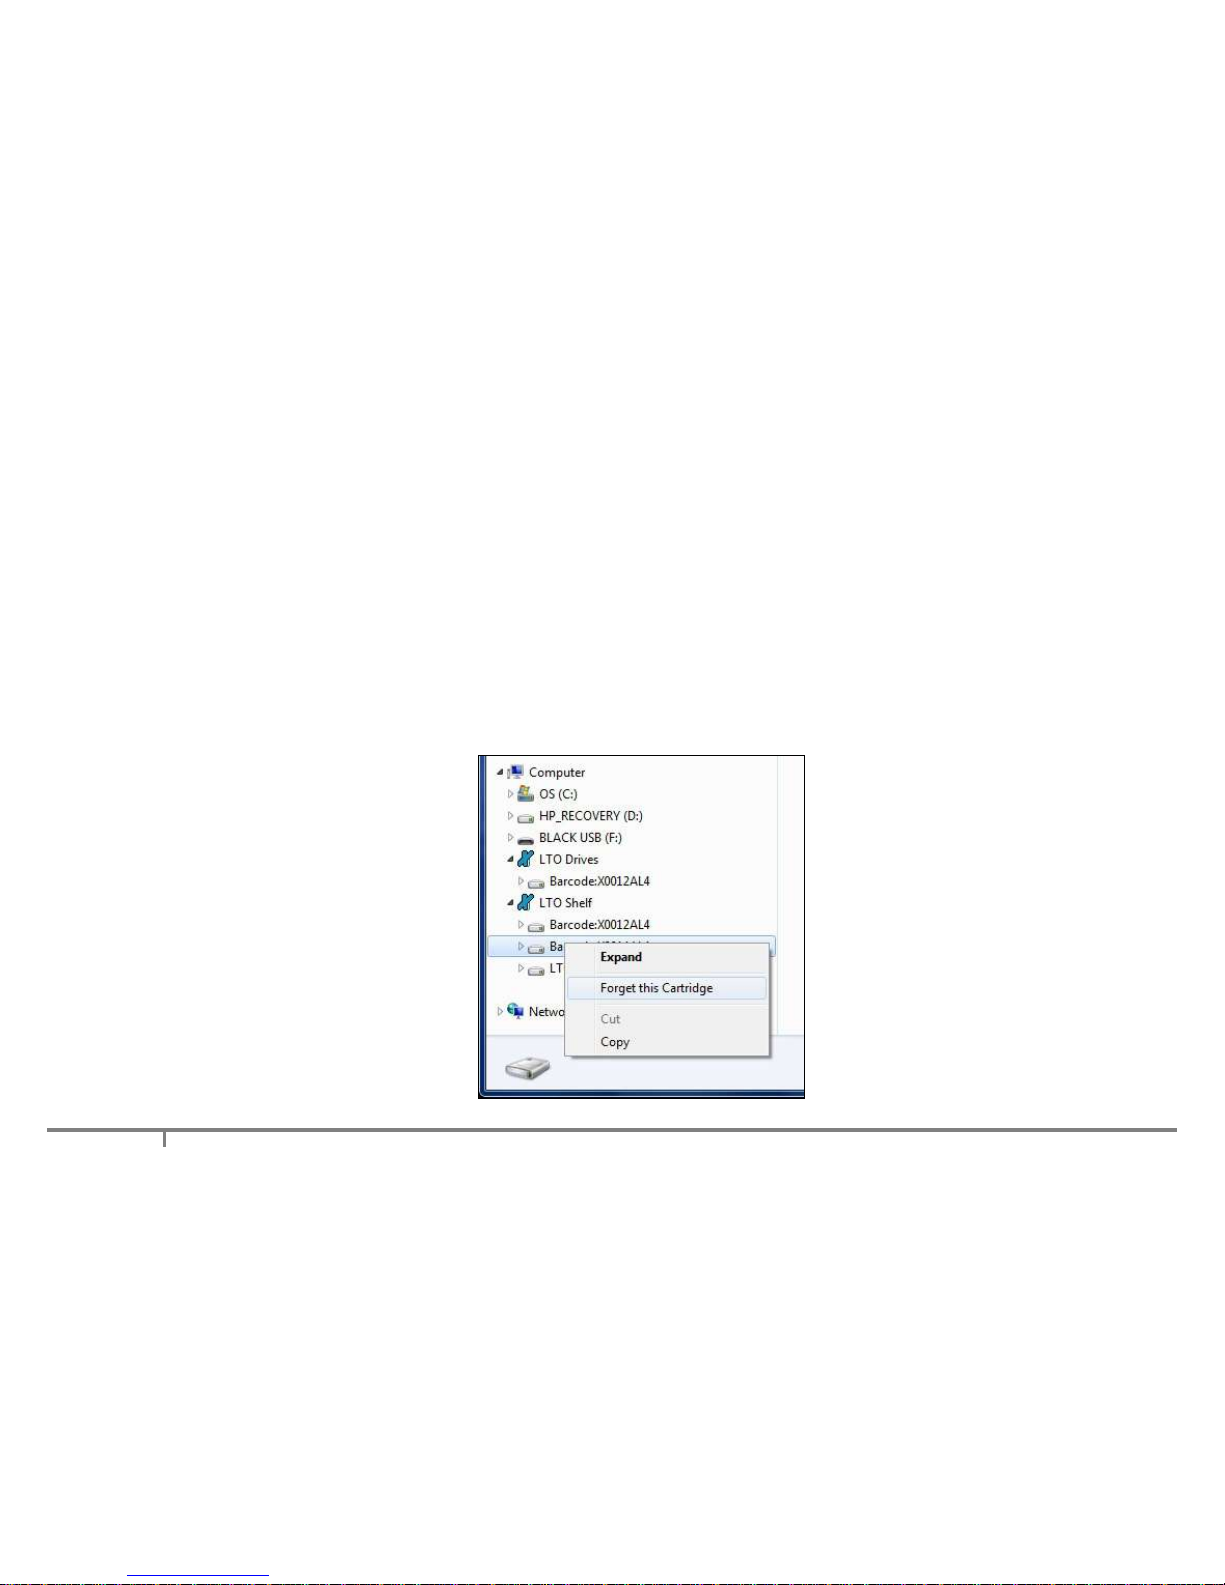
Right click on the tape under LTO Shelf in the left navigation pane of Windows Explorer and select
'Forget this Tape'.
This is illustrated below.
Page 32

32
5. Tape Catalogs and Finalization
5.1 About Tape Catalogs
A Tape Catalog contains the contents of a specific LTO tape cartridge. In XenData documentation, it is
termed either a 'Tape Contents Catalog' or a 'Tape Catalog' for short.
When a tape is formatted using XenData6 Workstation, tape catalog data is created for it which stored in
the following folder: c:\ProgramData\XenData\catalogs\. As files are written to a tape, its Tape Catalog is
updated. When a tape is finalized (5.3), a copy of the Tape Catalog is written to the end of the tape.
The presence of a Tape Catalog greatly reduces the time to move a tape from one XenData system to
another. When a tape containing a Tape Catalog is moved to a new system for the first time, the Tape
Catalog is read and the catalog data is automatically stored on the new system.
This means that there is no need to perform a Build Catalog (5.2) operation which can take several hours.
5.2 Build and Rebuild Catalog
A Tape Catalog (5.1) is automatically written to the end of a tape when it is finalized (5.3). If a finalized tape
is moved to another XenData system for the first time, the tape catalog is automatically read by the system
and the tape catalog data is automatically stored on the c: drive of the system. However, if the tape has not
been finalized, the tape catalog data must be built by scanning the tape. This is performed by using the
Build Catalog operation.
If a tape that the system already knows about has been updated by writing, deleting or renaming one or
more additional files on another system, the tape catalog must be rebuilt using the Rebuild Catalog
operation.
Page 33
33
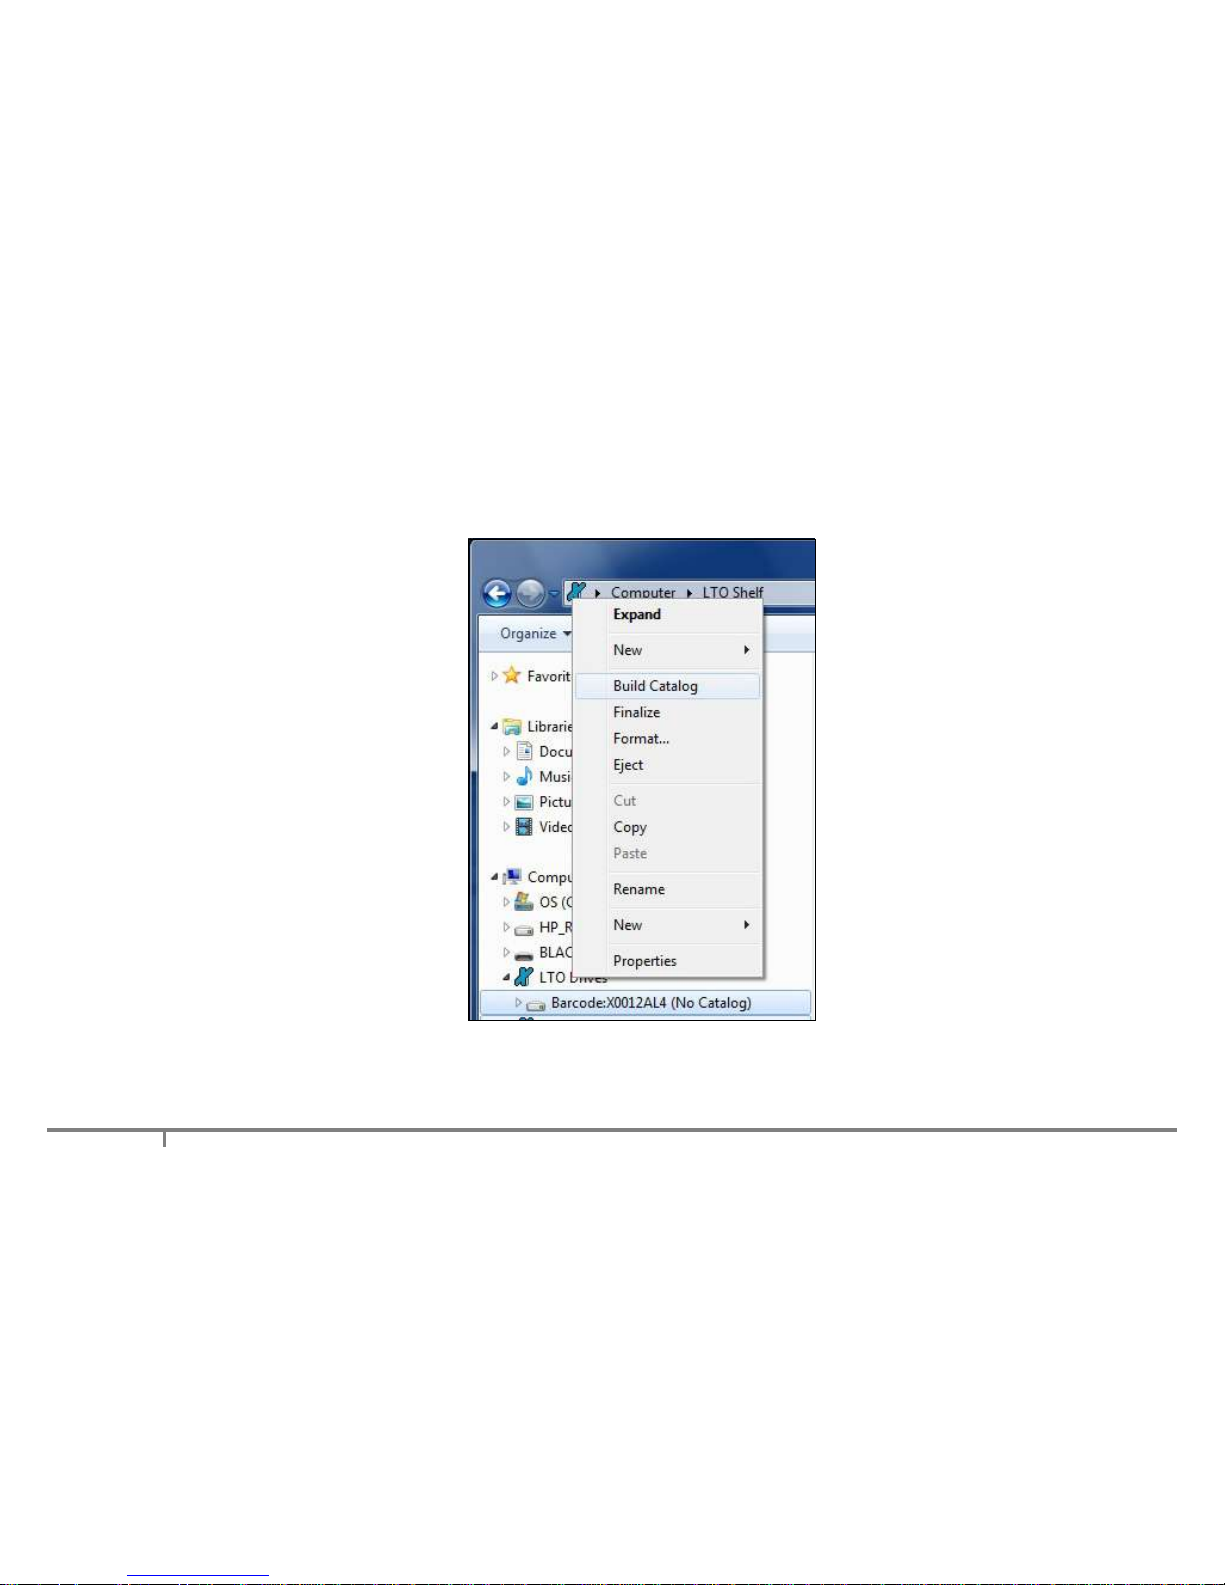
To build or rebuild the catalog data, right click on the applicable tape under 'LTO Drives' in the left
navigation pane of Windows Explorer and select Build Catalog or Rebuild Catalog, as illustrated below.
Page 34

34
5.3 About Finalizing Tapes
Finalizing a tape results in a Tape Contents Catalog (5.1) being written to the end of the tape, followed by
special tape marks that prevent further files being written to that tape. XenData6 Workstation automatically
finalizes a tape when it becomes 98% full. Partially filled tapes may also be finalized. This is described in
How to Finalize Tapes (5.4).
The presence of a Tape Content Catalog greatly reduces the time to move a tape from one XenData
system to another. When moving a tape that has not been finalized (and hence does not have a catalog on
the tape) to another XenData system for the first time, the catalog data must be built on that system by
using the Build Catalog (5.2) operation. This can take several hours. Whereas for a finalized tape, the
operation is automatic and takes only a few minutes.
5.4 How to Finalize a Tape
The finalize operation is described in About Finalizing Tapes (5.3). When a tape becomes 98% full, it is
automatically finalized by the system. A partially filled tape may be finalized as described below.
Ensure that the tape to be finalized is present in a tape drive and is shown under 'LTO Drives' in the left
navigation pane of Windows Explorer.
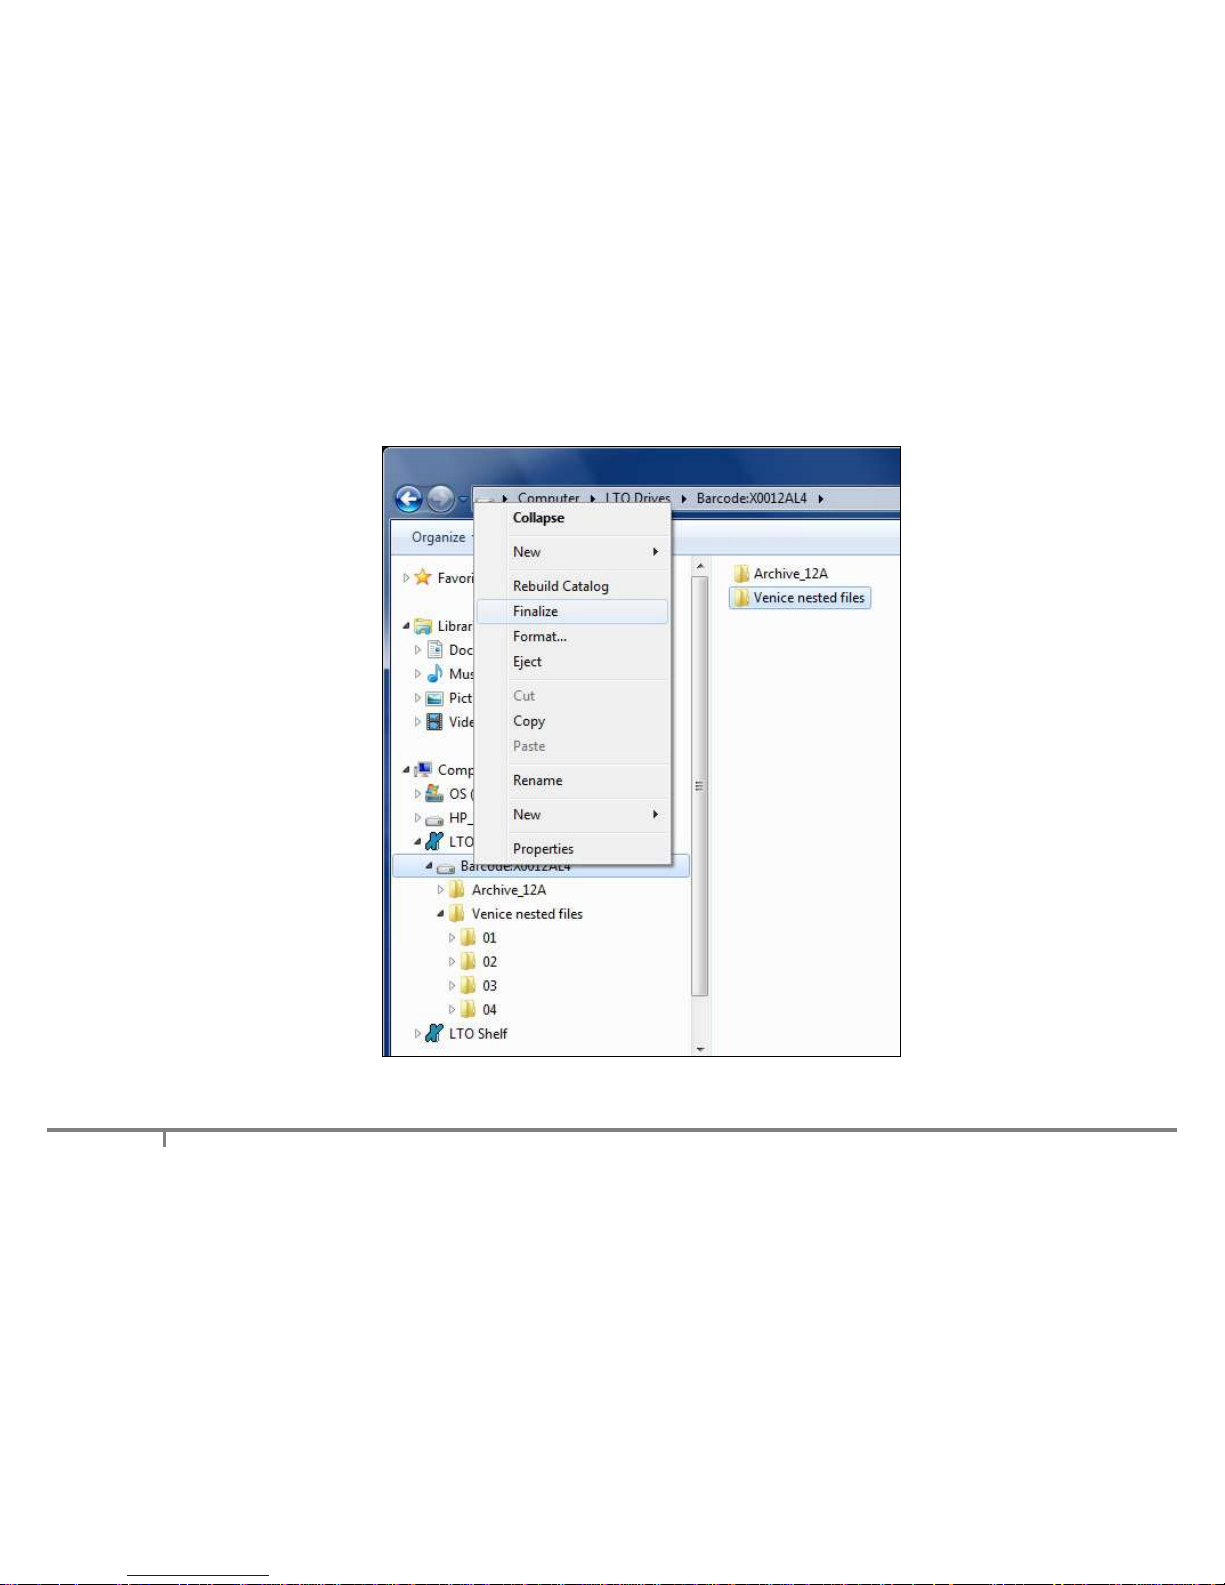
Right click on the tape under 'LTO Drives' and select Finalize.
This is illustrated below.
Page 35
35
Page 36

36
6. Report Generator
6.1 About the Report Generator
The XenData6 Workstation Report Generator may be used to create the following report types.
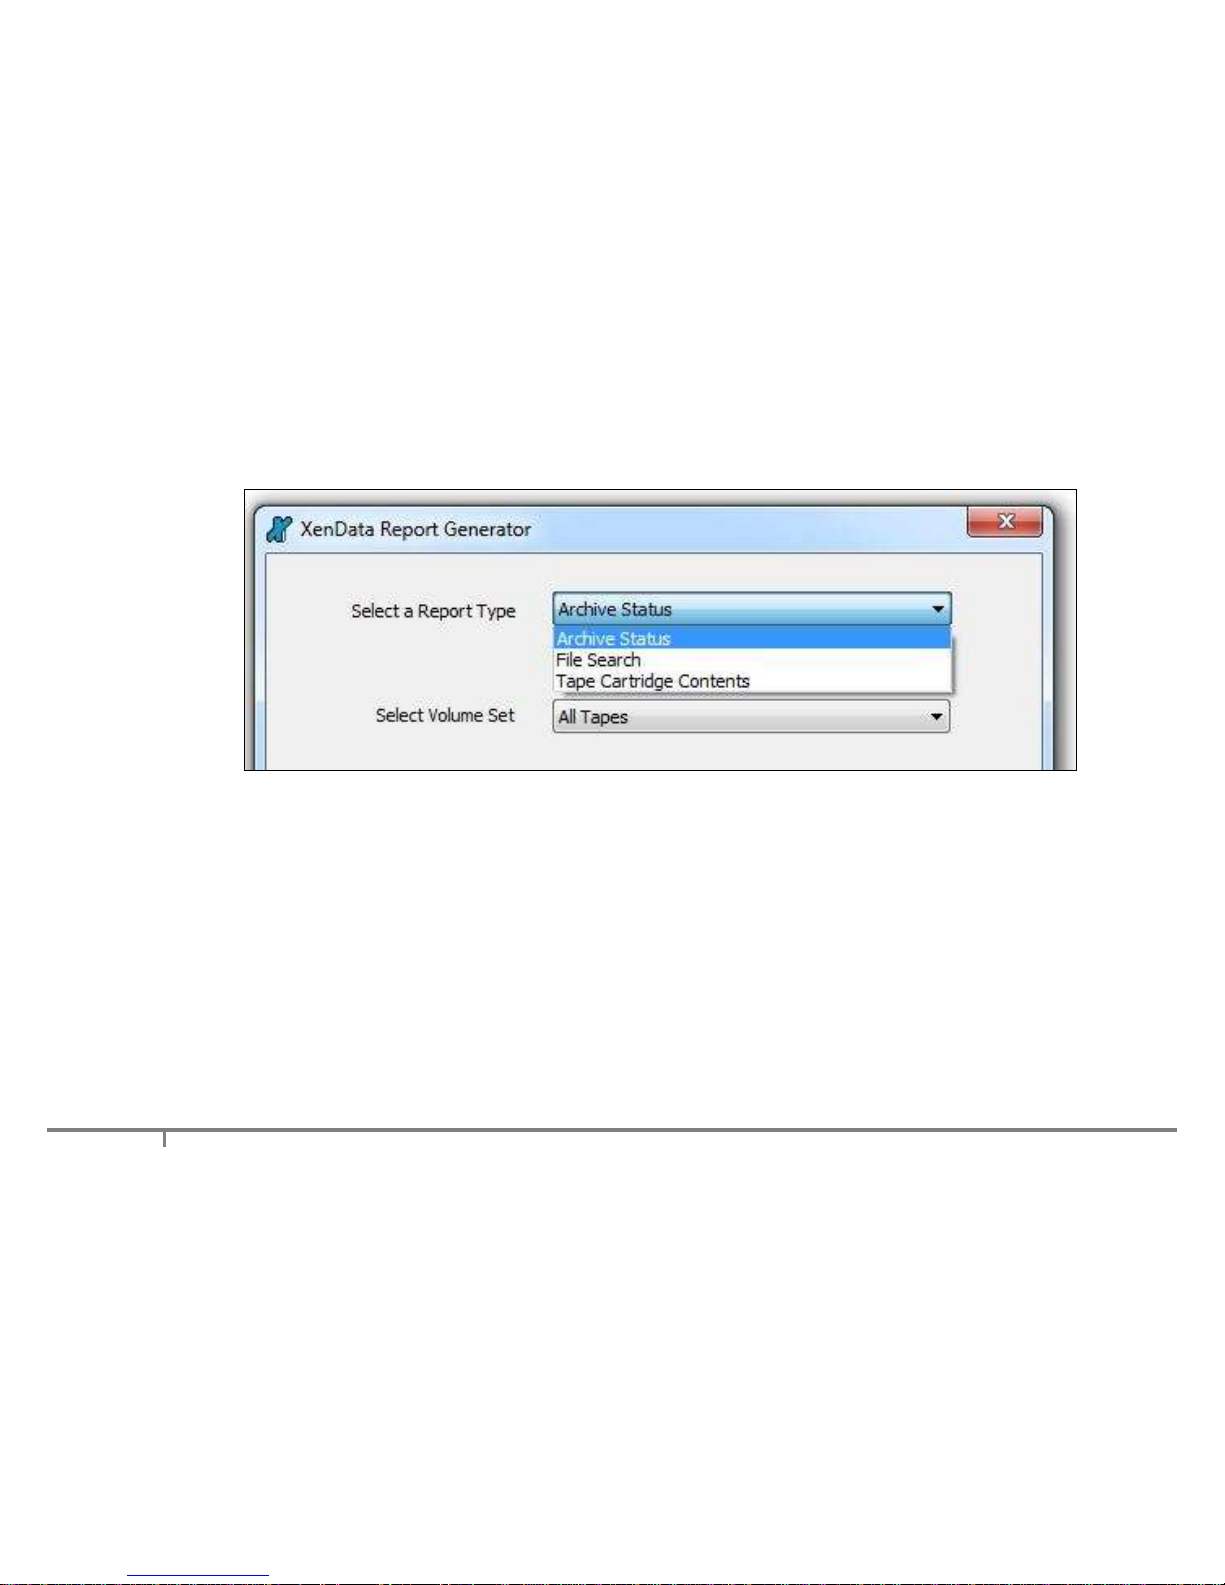
Archive Status This may be used to obtain capacity and free space for all tape cartridges that the
system knows about.
File Search This identifies all files that match user-defined search criteria and identifies the tapes on
which these files are located.
Tape Cartridge Contents This is used to list the files contained on any tape cartridge that the system
knows about. The list may be filtered to match user-specified search criteria.
Reports can be saved in a number of different formats, including as a text file that may be imported into
Microsoft Excel.
6.2 Starting the Report Generator
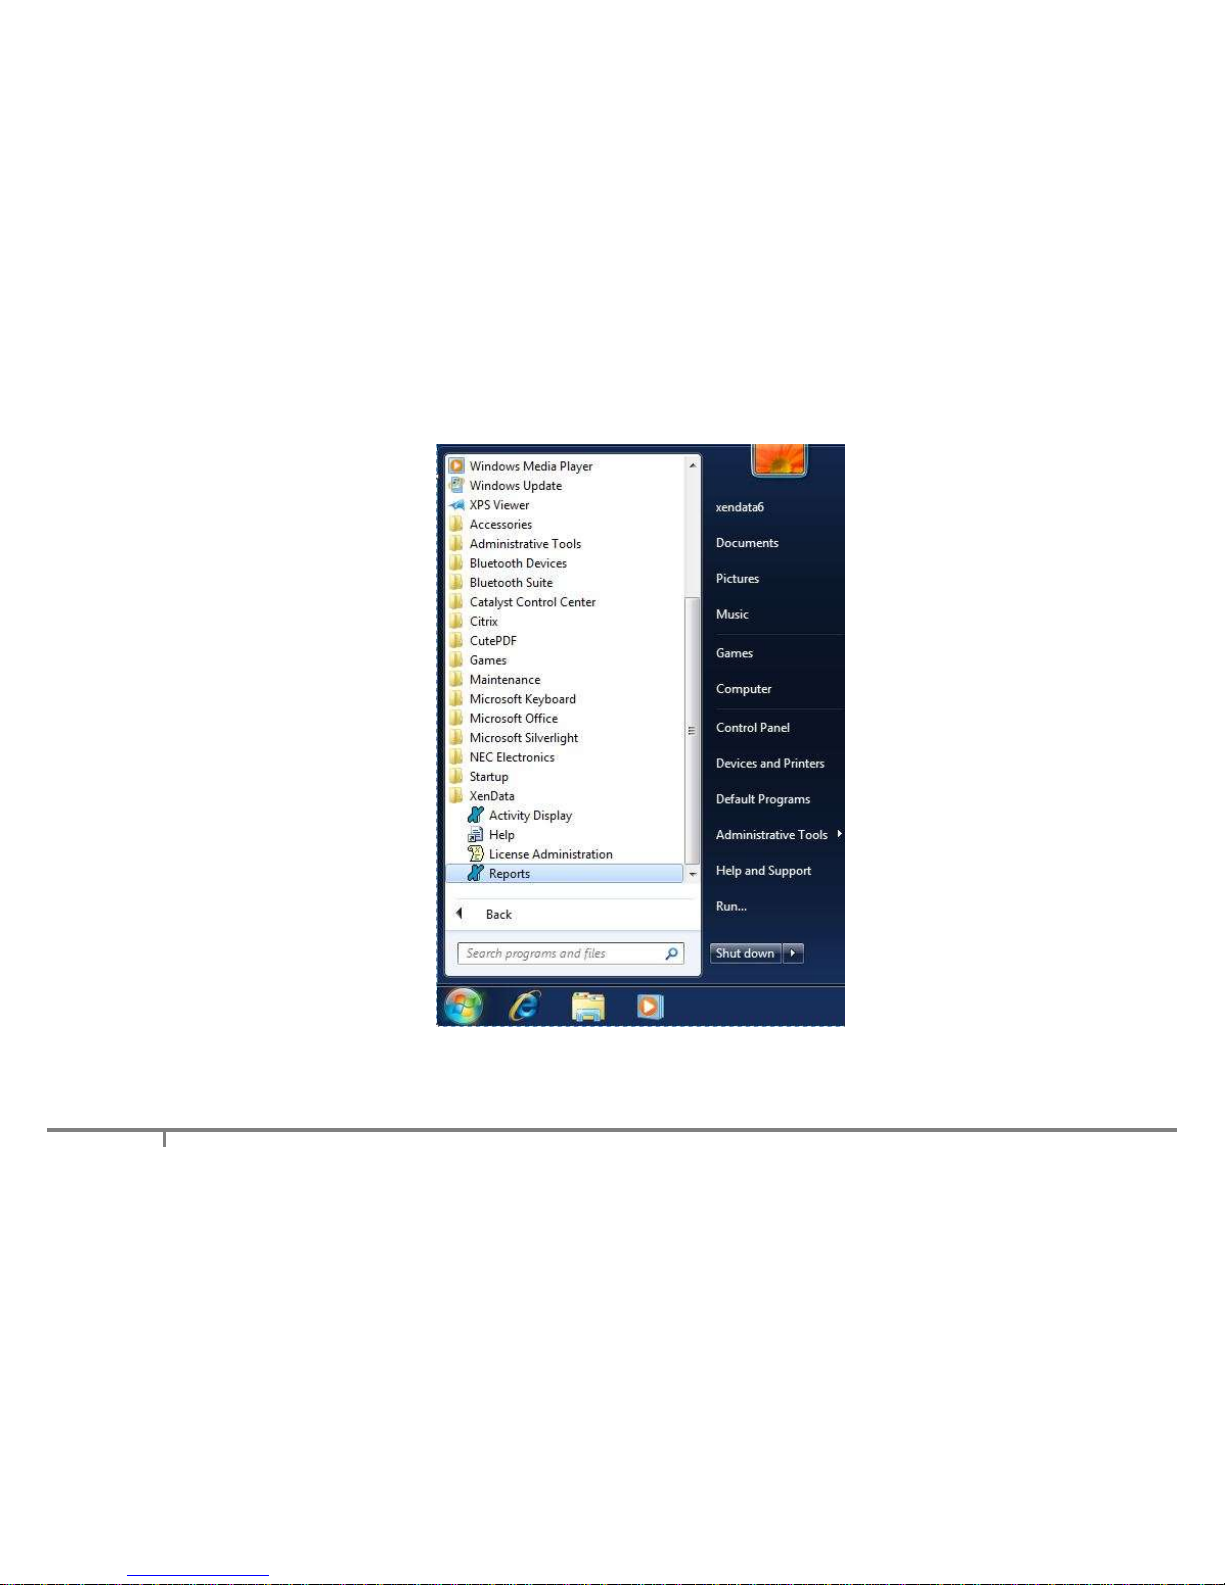
The Report Generator is launched as follows.
Click 'Start', then 'All Programs', then 'XenData'.
Click 'Reports', as illustrated below.
Page 37
37
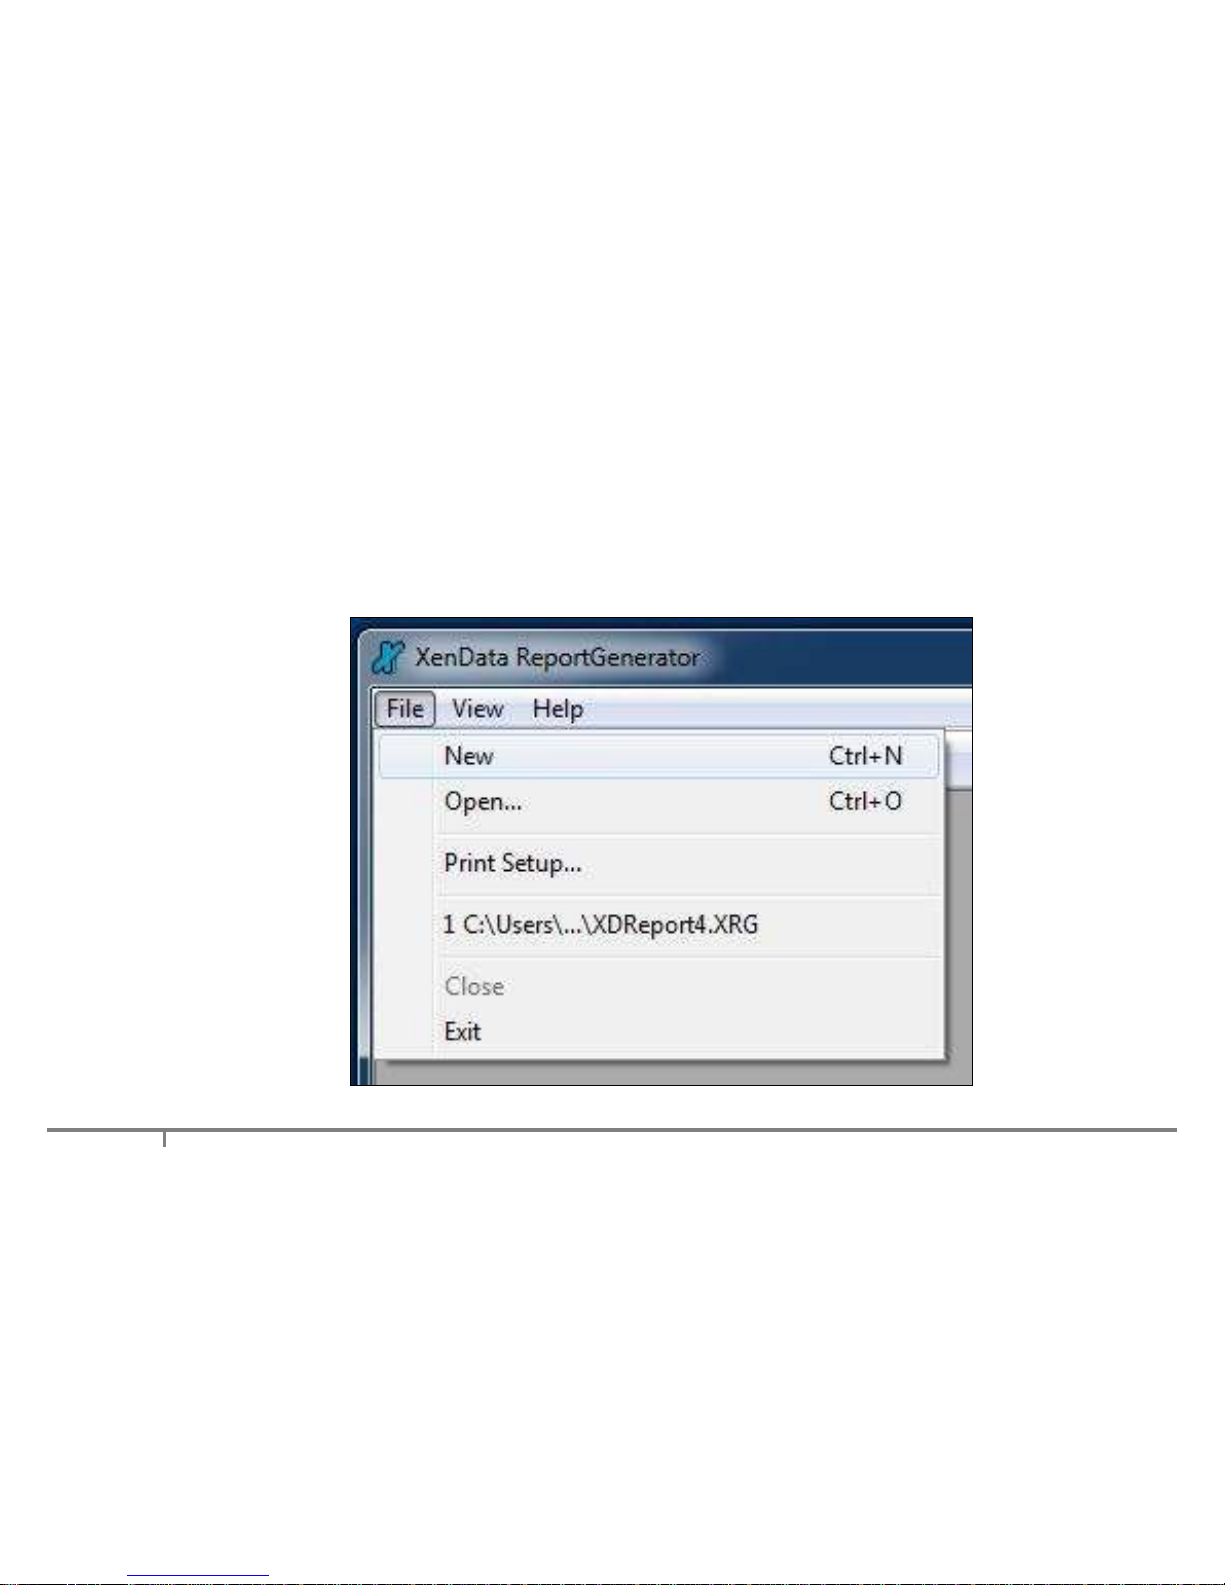
This launches the XenData Report Generator. Then click 'File' and select either 'New' to create a new
report or 'Open' open an existing report.
Page 38
38
6.3 Creating, Saving and Restoring Reports
6.3.1 Creating Reports
Start the Report Generator program and from the initial page, select 'File' and then 'New' as shown
below.
Page 39
39
Then select the required report type from the drop down menu as shown below.
6.3.2 Saving Reports
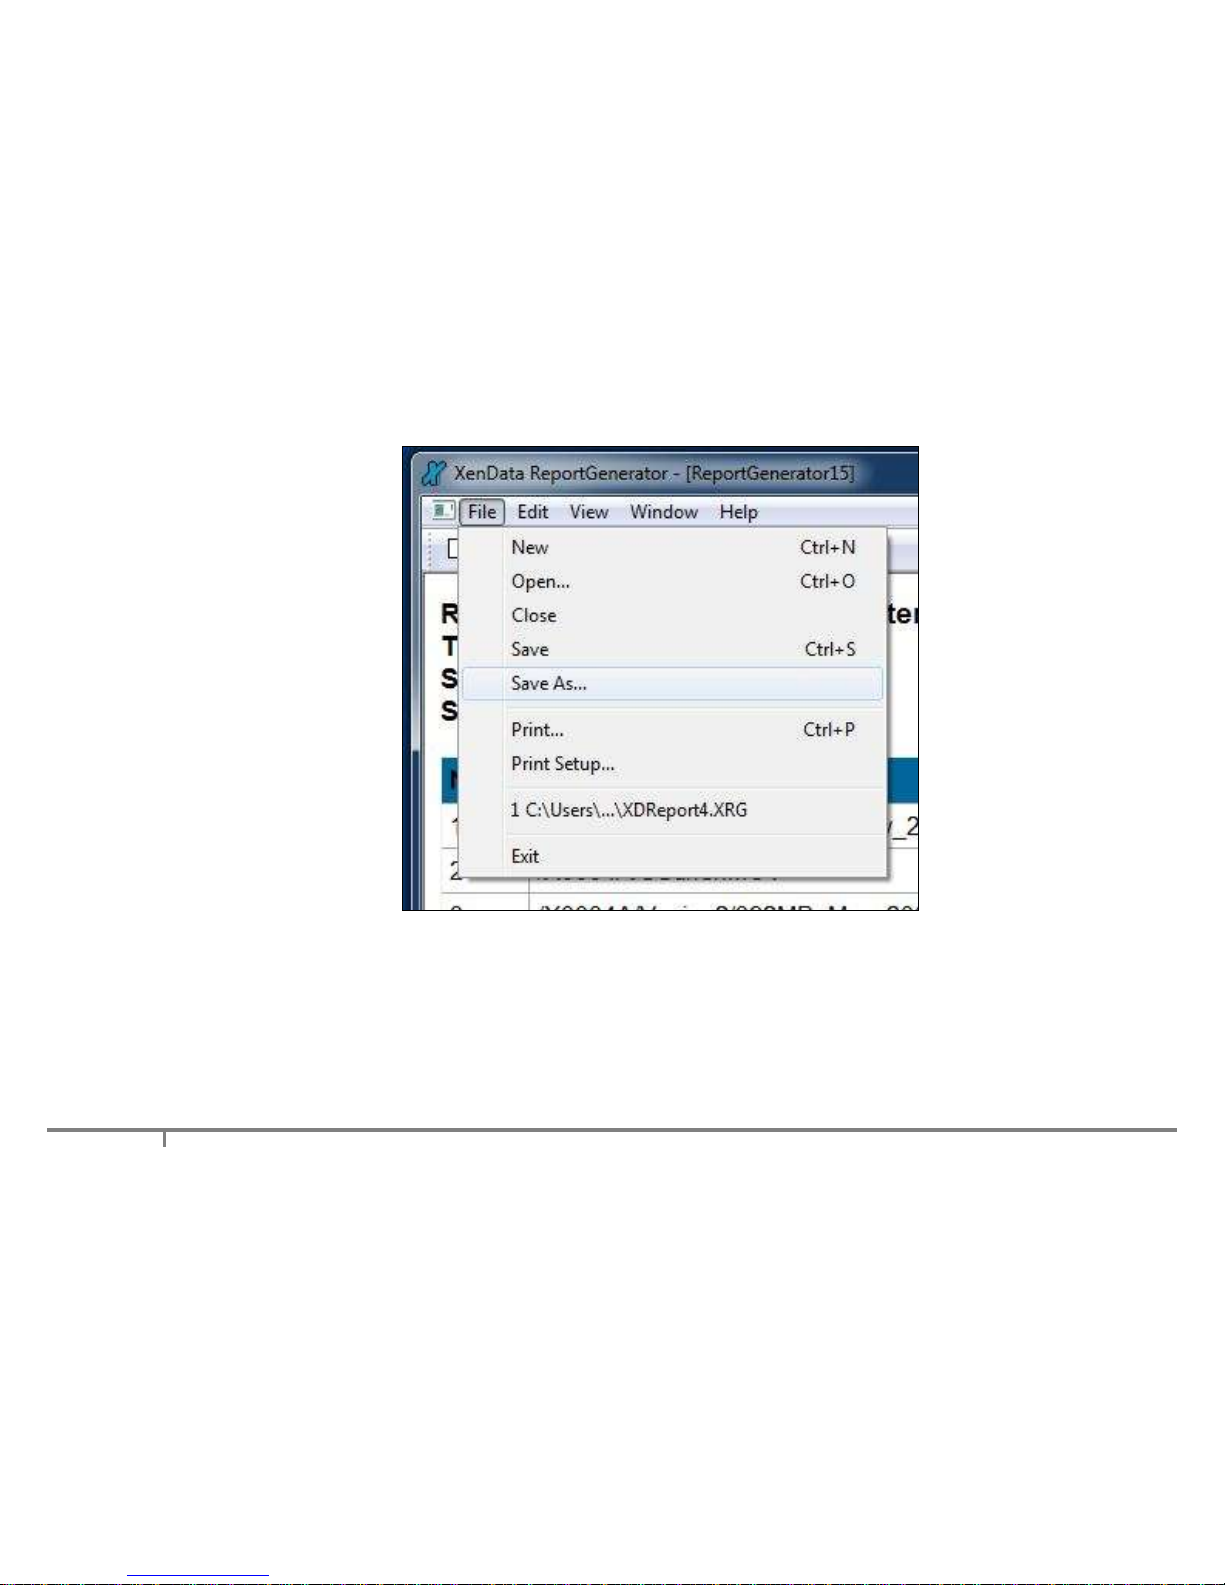
A report can be saved in three different formats: Report Generator format (.XRG), tab delimited plain
text (.txt) or XML. The XRG format is the only format which can be displayed by the Report
Generator. The text format is useful for exporting the results to Microsoft Excel.
To save a report, select 'File' and then 'Save As' as shown below.
Page 40
40
Then browse to the required location, select the file name and format and then click 'Save'.
6.3.3 Restoring Reports
The Report Generator will display reports saved in the XRG format only.
Page 41
41
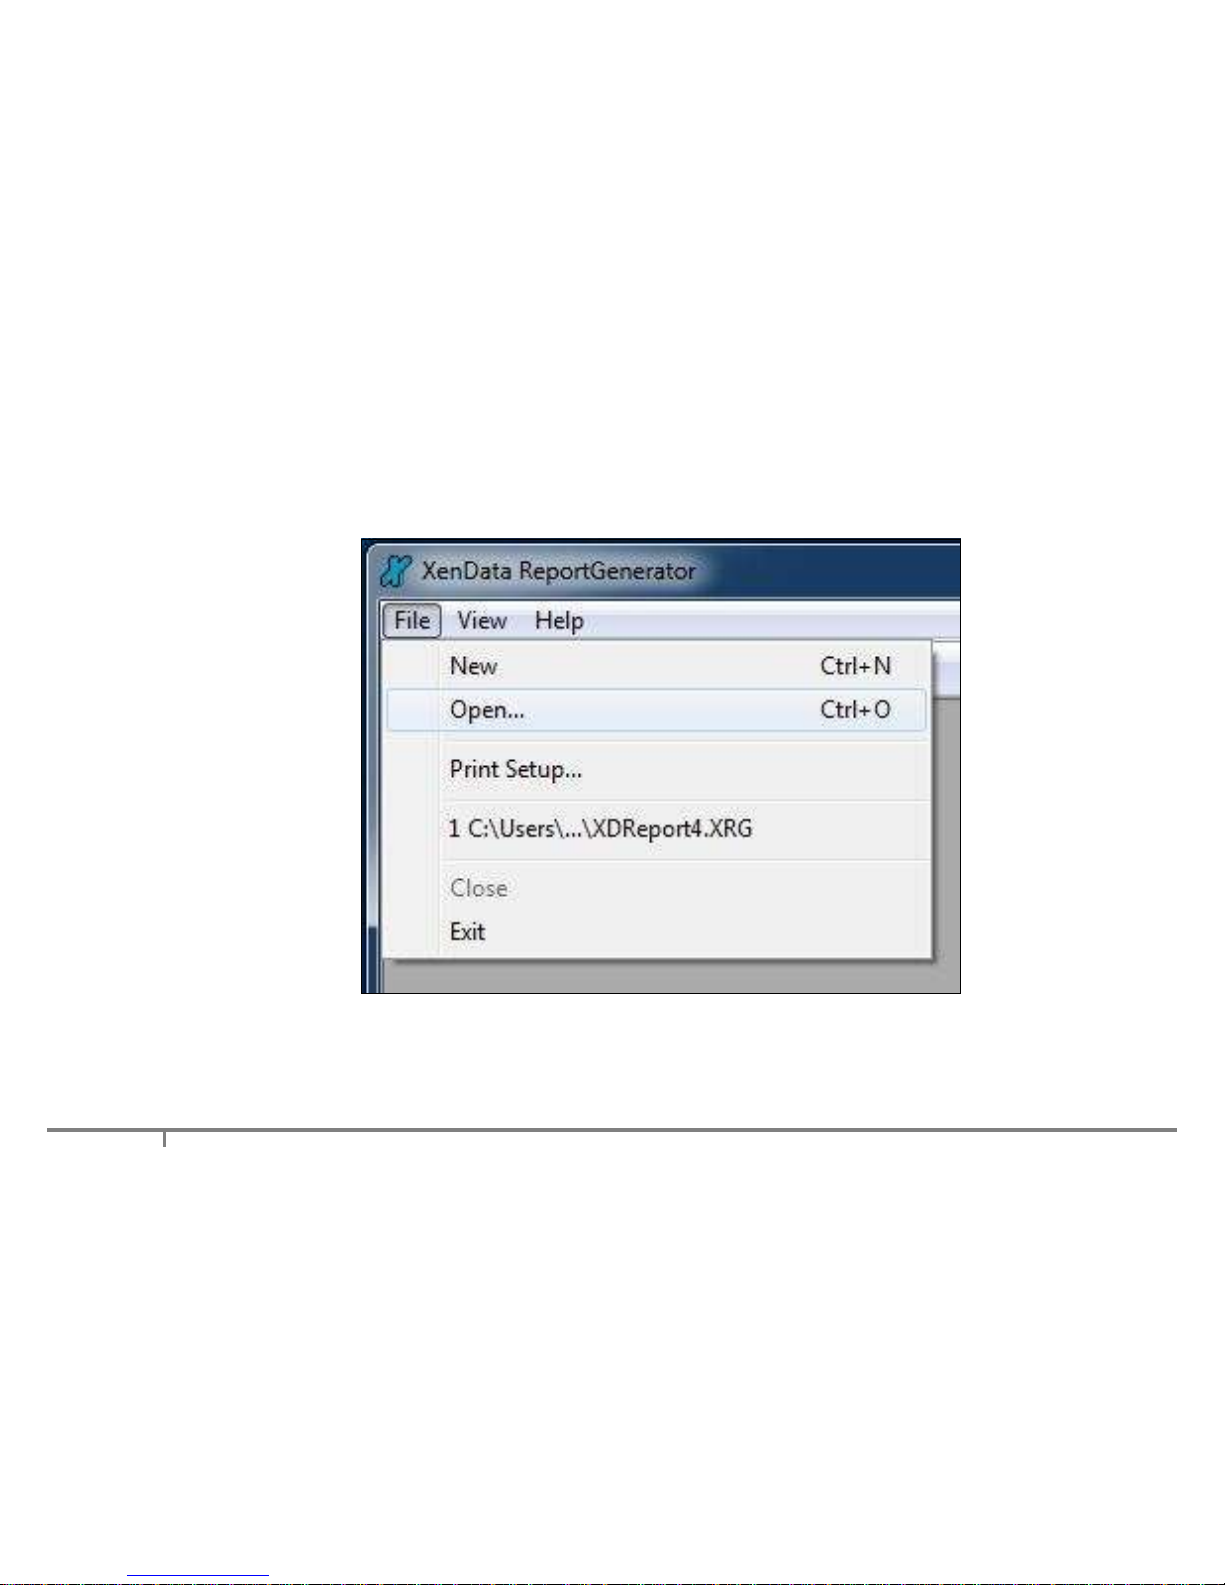
Start the Report Generator program and from the initial page, select 'File' and then 'Open' as shown
below.
Then browse to the location of the saved report; select the required XRG file and open it.
Page 42

42
6.4 Tape Contents Report
6.4.1 How to Run a Tape Contents Report
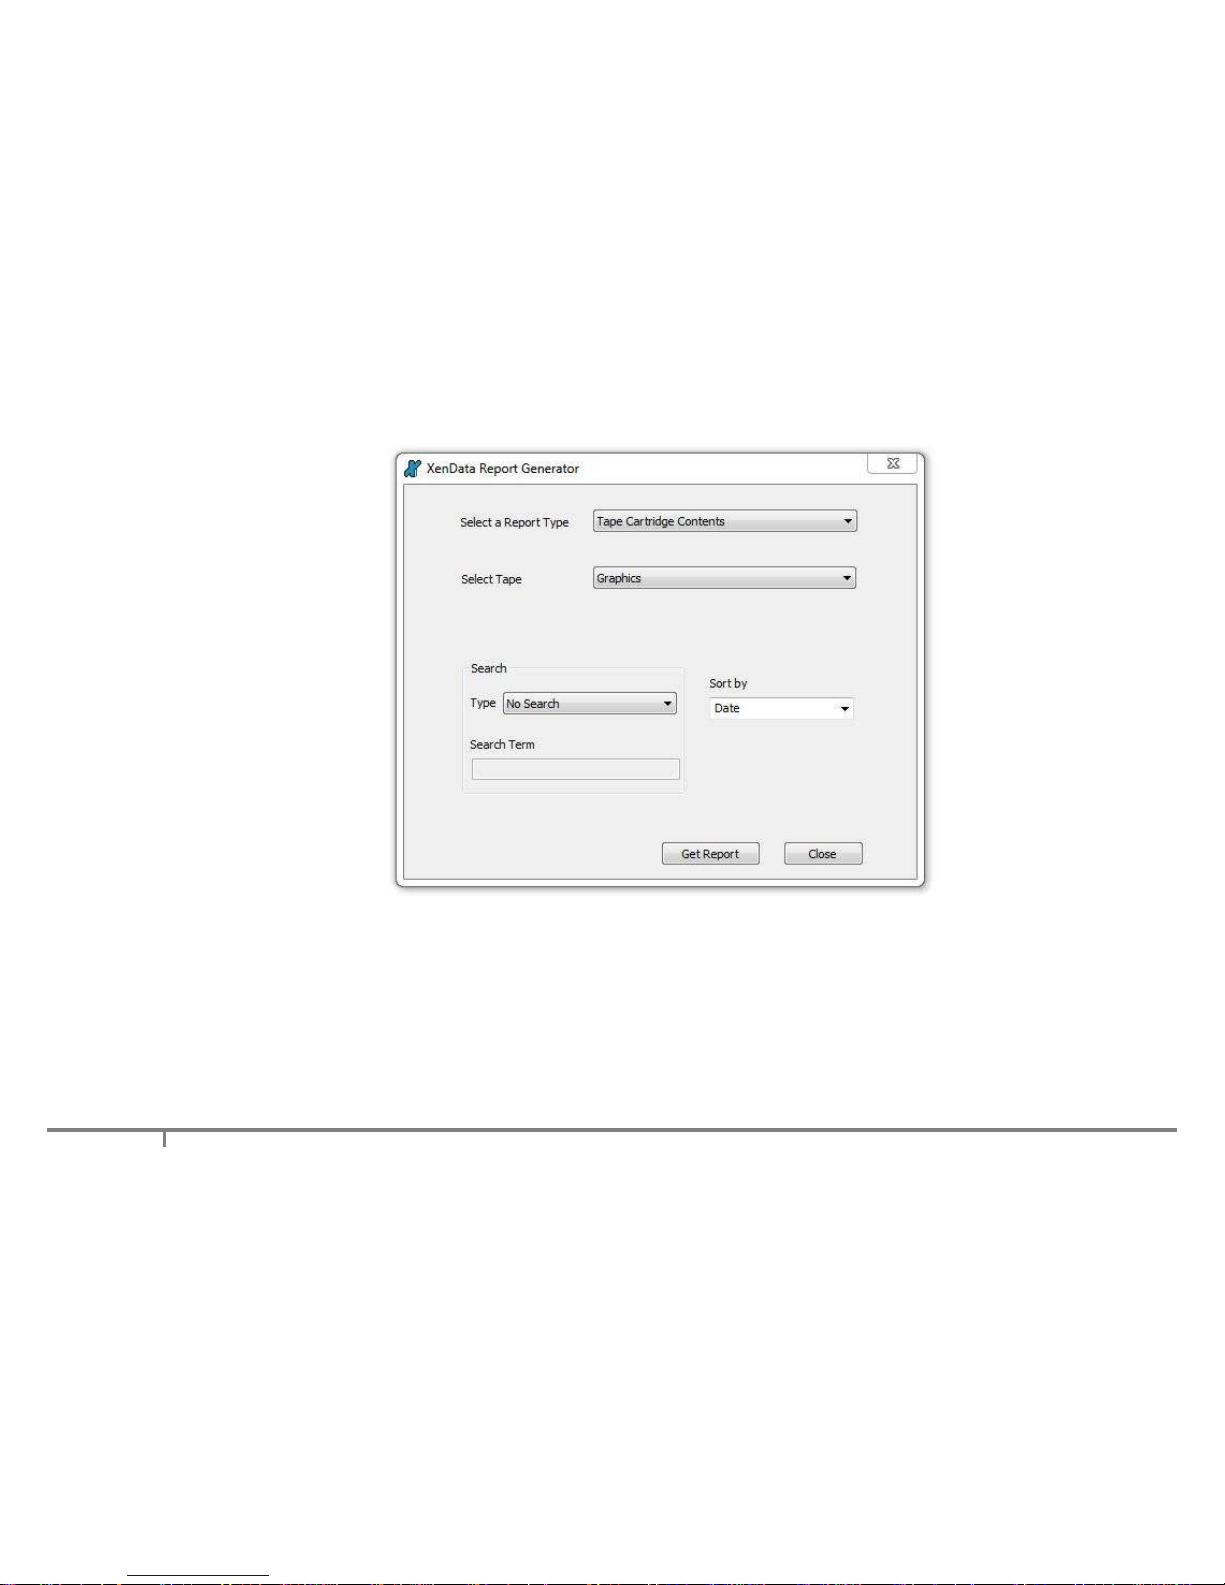
Start the Report Generator, select 'File' and 'New'. Then, select the following:
'Tape Cartridge Contents' as the report type
The tape by its Volume Label
Search criteria - Select 'No Search' to list all files on the selected tape; alternatively select 'File
Name Text Search' to filter the listed files using a text Search Term.
The 'sort by' type which sorts the report results by either the date that the file was written to tape or
the file name
This is illustrated below.
Page 43
43
Then click 'Get Report'.
The Search Term is case insensitive and the path folder divider may be entered as '\' or '/'. If you
enter a Search Term such as 'abc', all files written on the selected tape that contain 'abc' in the file
name or path will be listed in the report. An asterisk may be used as a wildcard character; for
example, '\venice2\*avi' will search for all files that contain a folder named 'venice2' in the path
followed by 'avi'.
Page 44
44
6.4.2 How to Interpret a Tape Contents Report
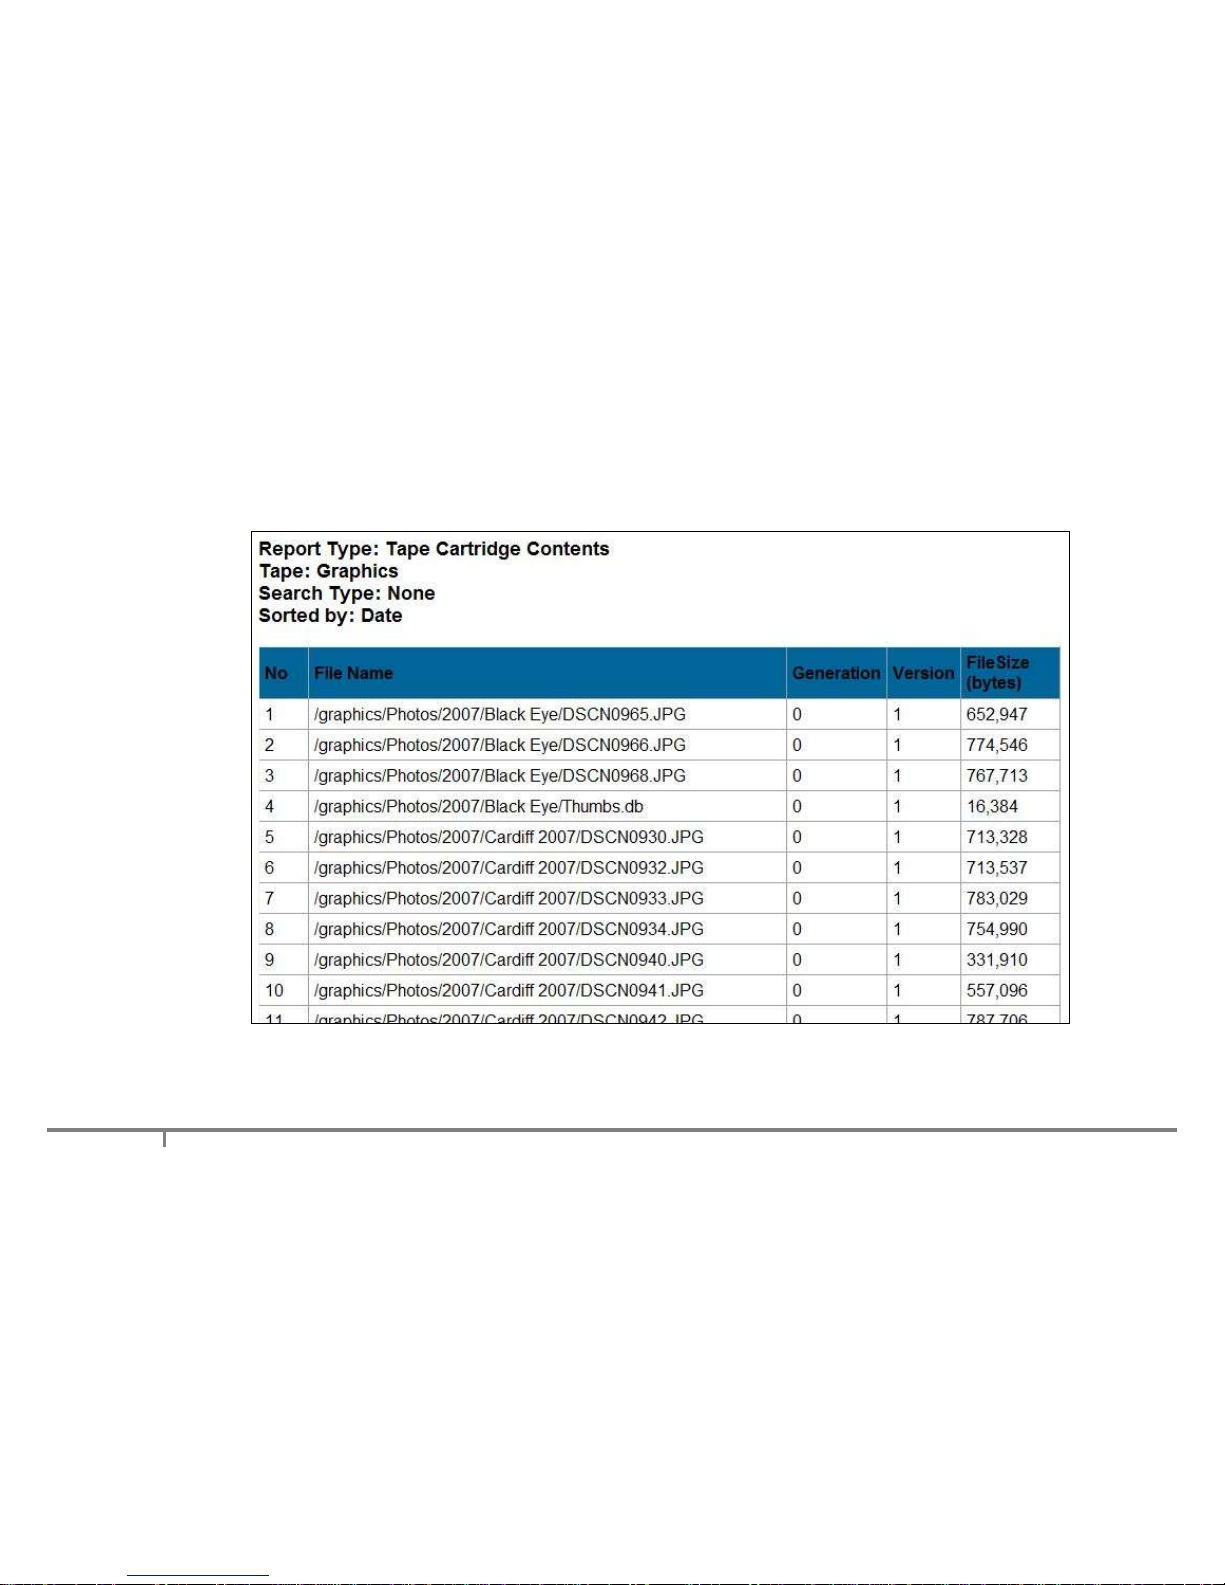
An example of a Tape Cartridge Contents report is shown below.
The display columns are explained below.
Page 45

45
No. This is the number of the file in the display sorted by either tape order or file name, as defined by
the 'Sort by' selection.
File Name This is the file name including the full path.
Generation When a file of a given name and path is first created, it is termed generation 0. Every
time the file is deleted and then a new file of the same name containing data is created, the system
increments the generation number. Note that each time the generation number is incremented, the
version starts again with version 1 of the new file.
Version If a file is updated with a newer version by overwriting or appending, the XenData software
assigns a new version number. A file's version number increases by one every time it has data written
to it. Note that the version number does not increase for every individual write operation, just for every
file open that is followed by a write. Version 0 of a file never contains any data; the first time an
application writes to the file, the version number is incremented to 1.
File Size in bytes
6.5 File Search Report
6.5.1 How to Run a File Search Report
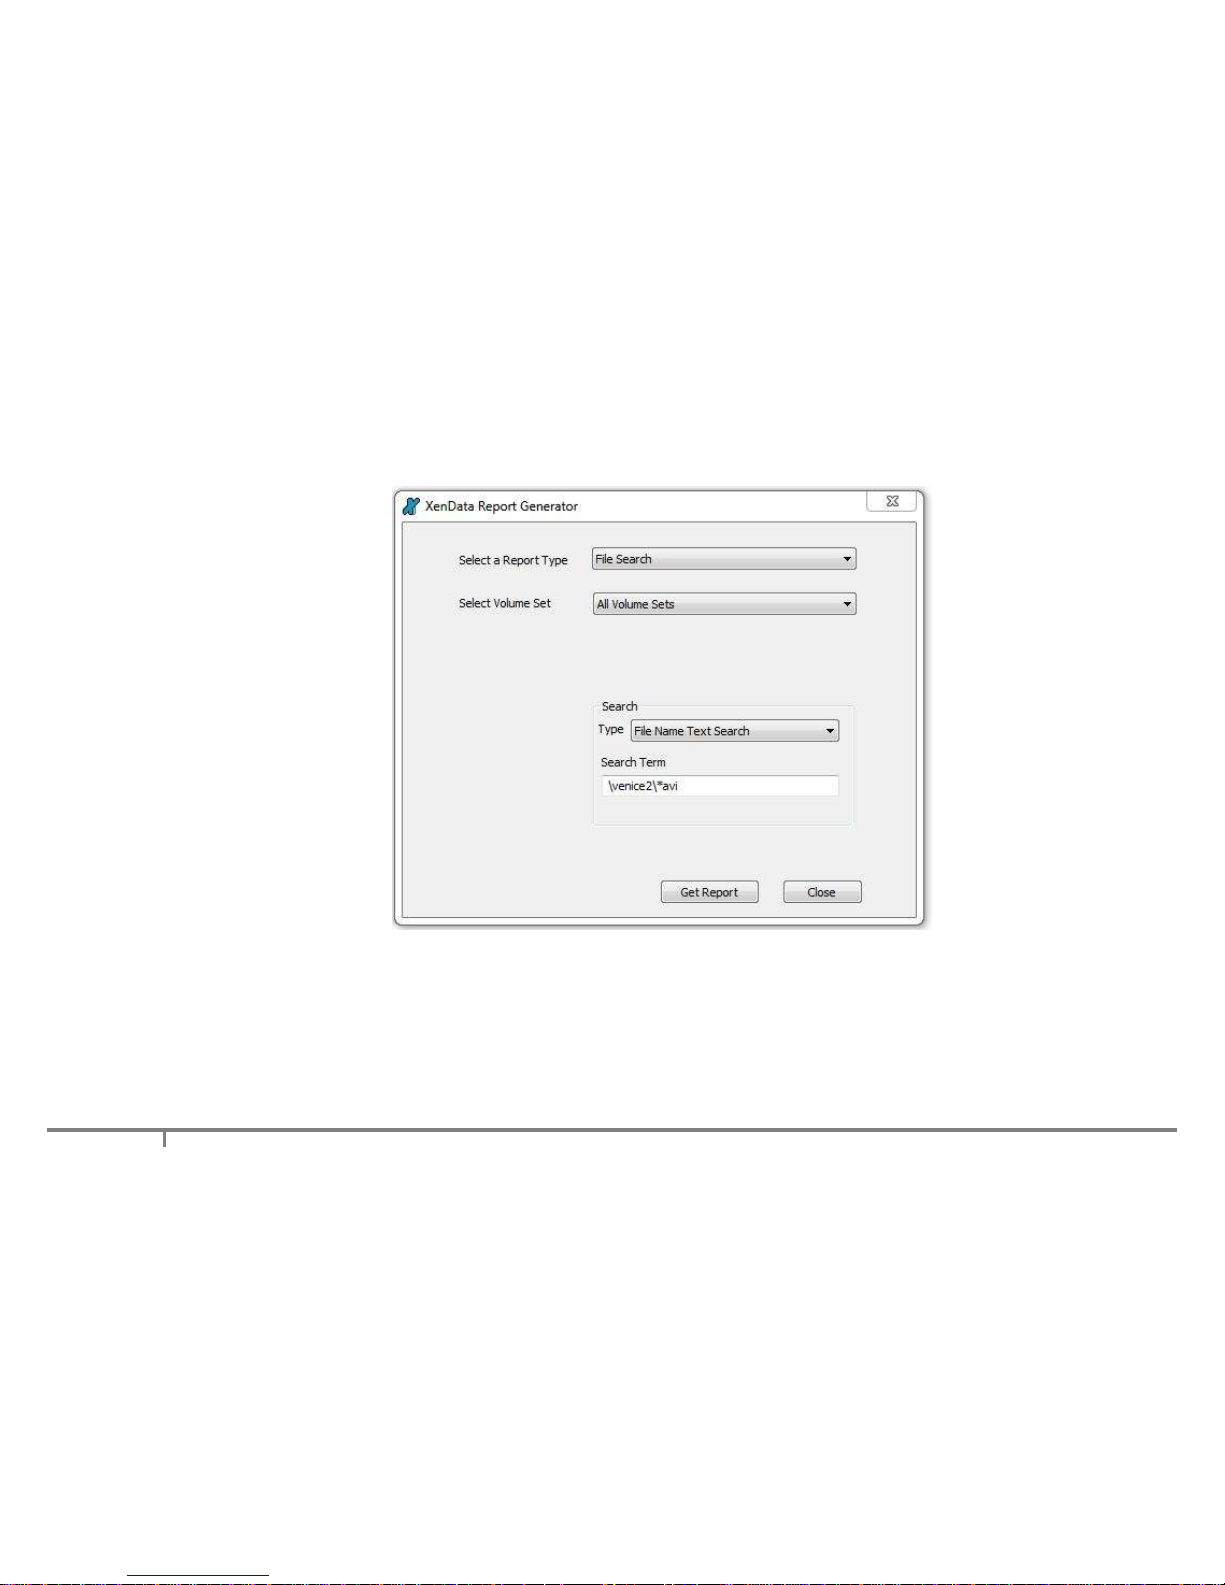
Start the Report Generator, select 'File' and 'New'. Then, select the following:
'File Search' as the report type
'All Volume Sets' or a specific Volume Set
Search - Select 'File Name Text Search' and enter a Search Term to search file name and path.
Page 46
46
This is illustrated below.
Then click 'Get Report'.
The Search Term is case insensitive and the path folder divider may be entered as '\' or '/'. If you
enter a Search Term such as 'abc', all archived files that contain 'abc' in the file name or path will be
listed in the search report. An asterisk may be used as a wildcard character; for example,
'\venice2\*avi' will search for all files that contain a folder named 'venice2' in the path followed by 'avi'.
Page 47
47
6.5.2 How to Interpret a File Search Report
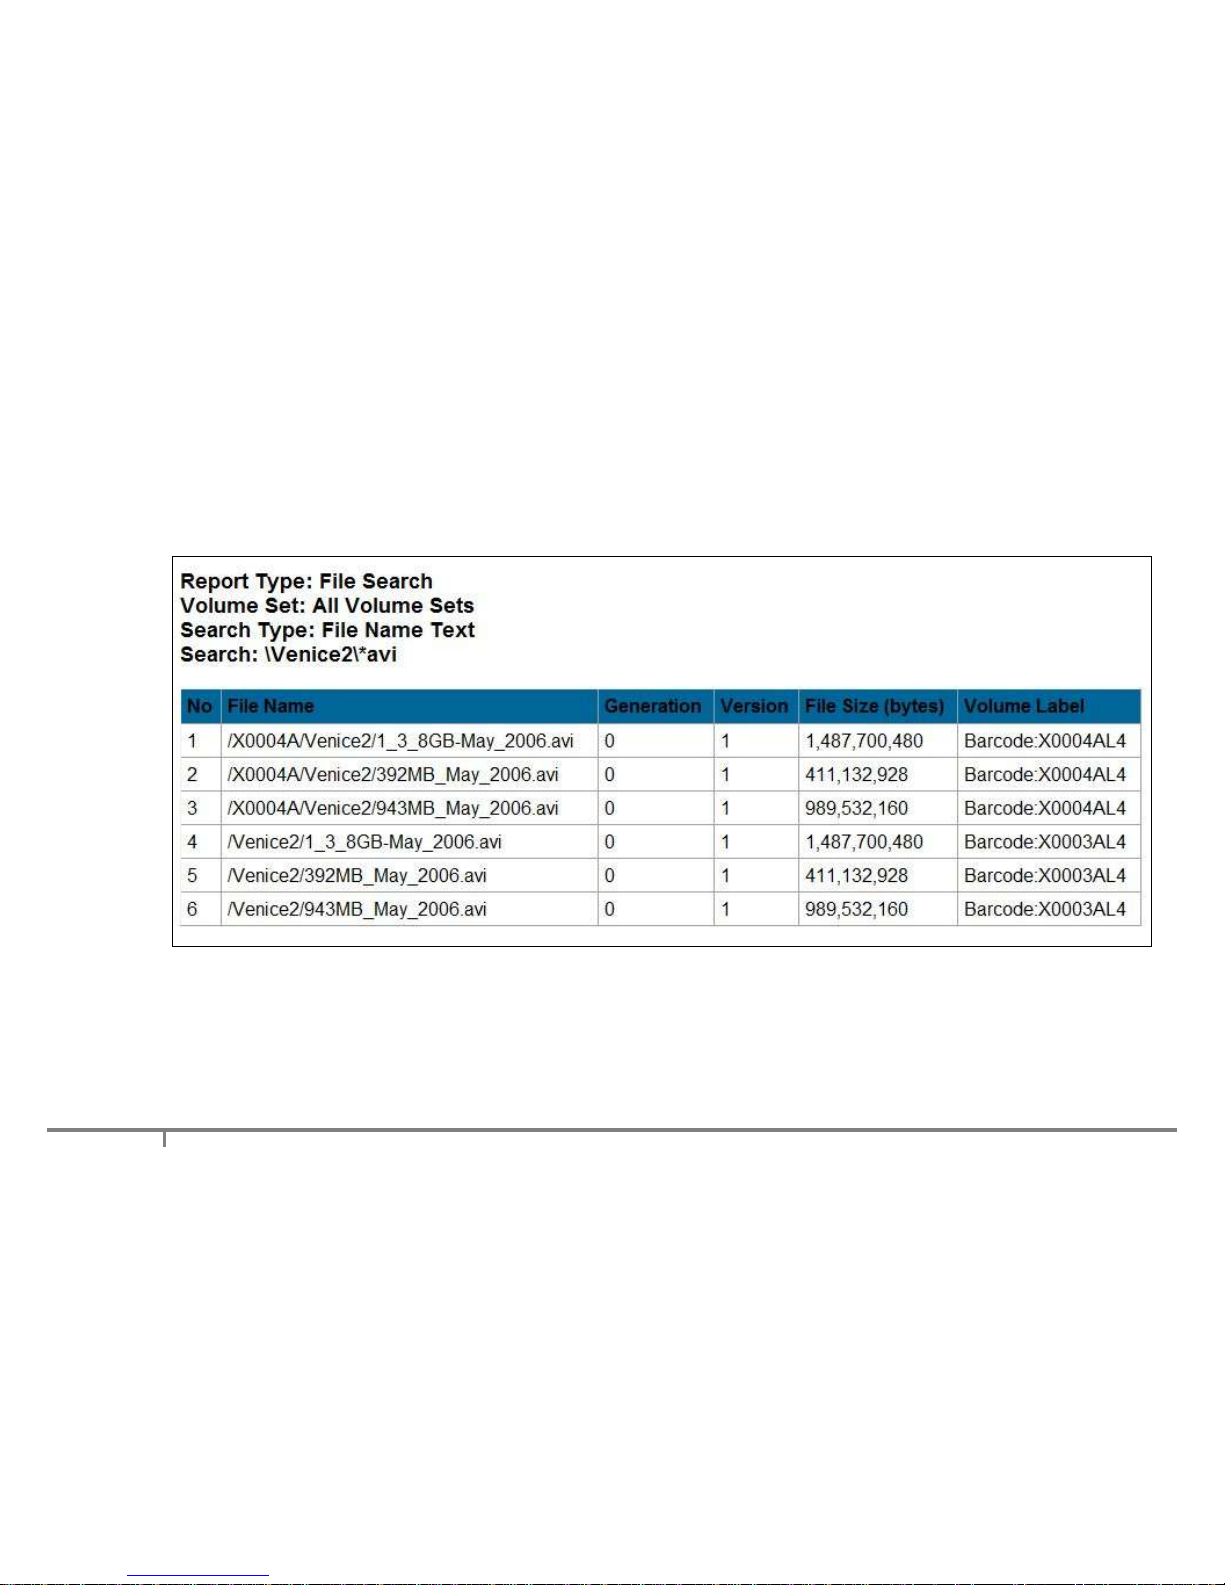
A File Search Report lists all the files that meet the search criteria. An example of a File Search
Report is shown below.
The display columns are explained below.
Page 48

48
No. This is the number of the file in the display.
File Name This is the file name including the full path.
Generation When a file of a given name and path is first created, it is termed generation 0. Every time the
file is deleted and then a new file of the same name containing data is created, the system increments the
generation number. Note that each time the generation number is incremented, the version starts again
with version 1 of the new file.
Version If a file is updated with a newer version by overwriting or appending, the XenData software
assigns a new version number. A file's version number increases by one every time it has data written to
it. Note that the version number does not increase for every individual write operation, just for every file
open that is followed by a write. Version 0 of a file never contains any data; the first time an application
writes to the file, the version number is incremented to 1.
File Size in bytes
Volume Label This is the volume label of the tape cartridge which contains the file.
6.6 Archive Status Report
6.6.1 How to Run an Archive Status Report
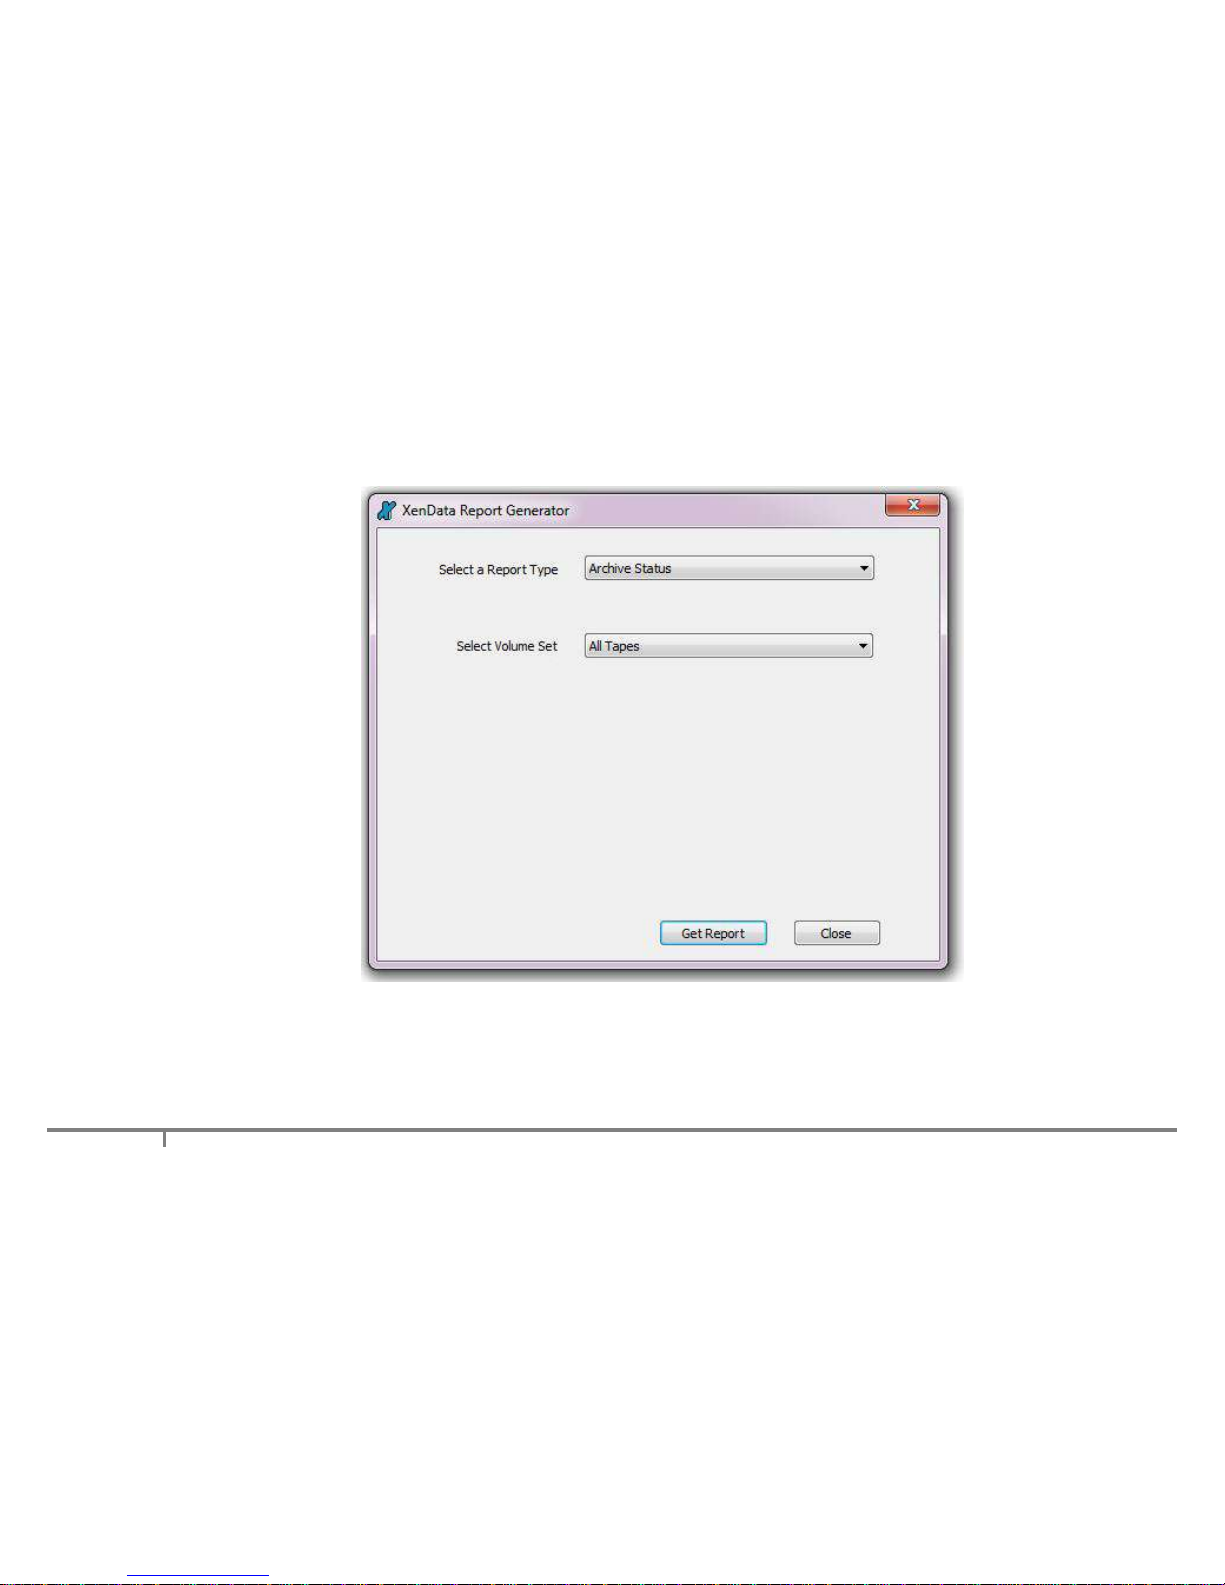
Start the Report Generator, select 'File' and 'New'. Then, select the following:
'Archive Status' as the report type
'All Tapes' or a specific Volume Set
Page 49
49
This is illustrated below.
Then click 'Get Report'.
Page 50
50
6.6.2 How to Interpret an Archive Status Report
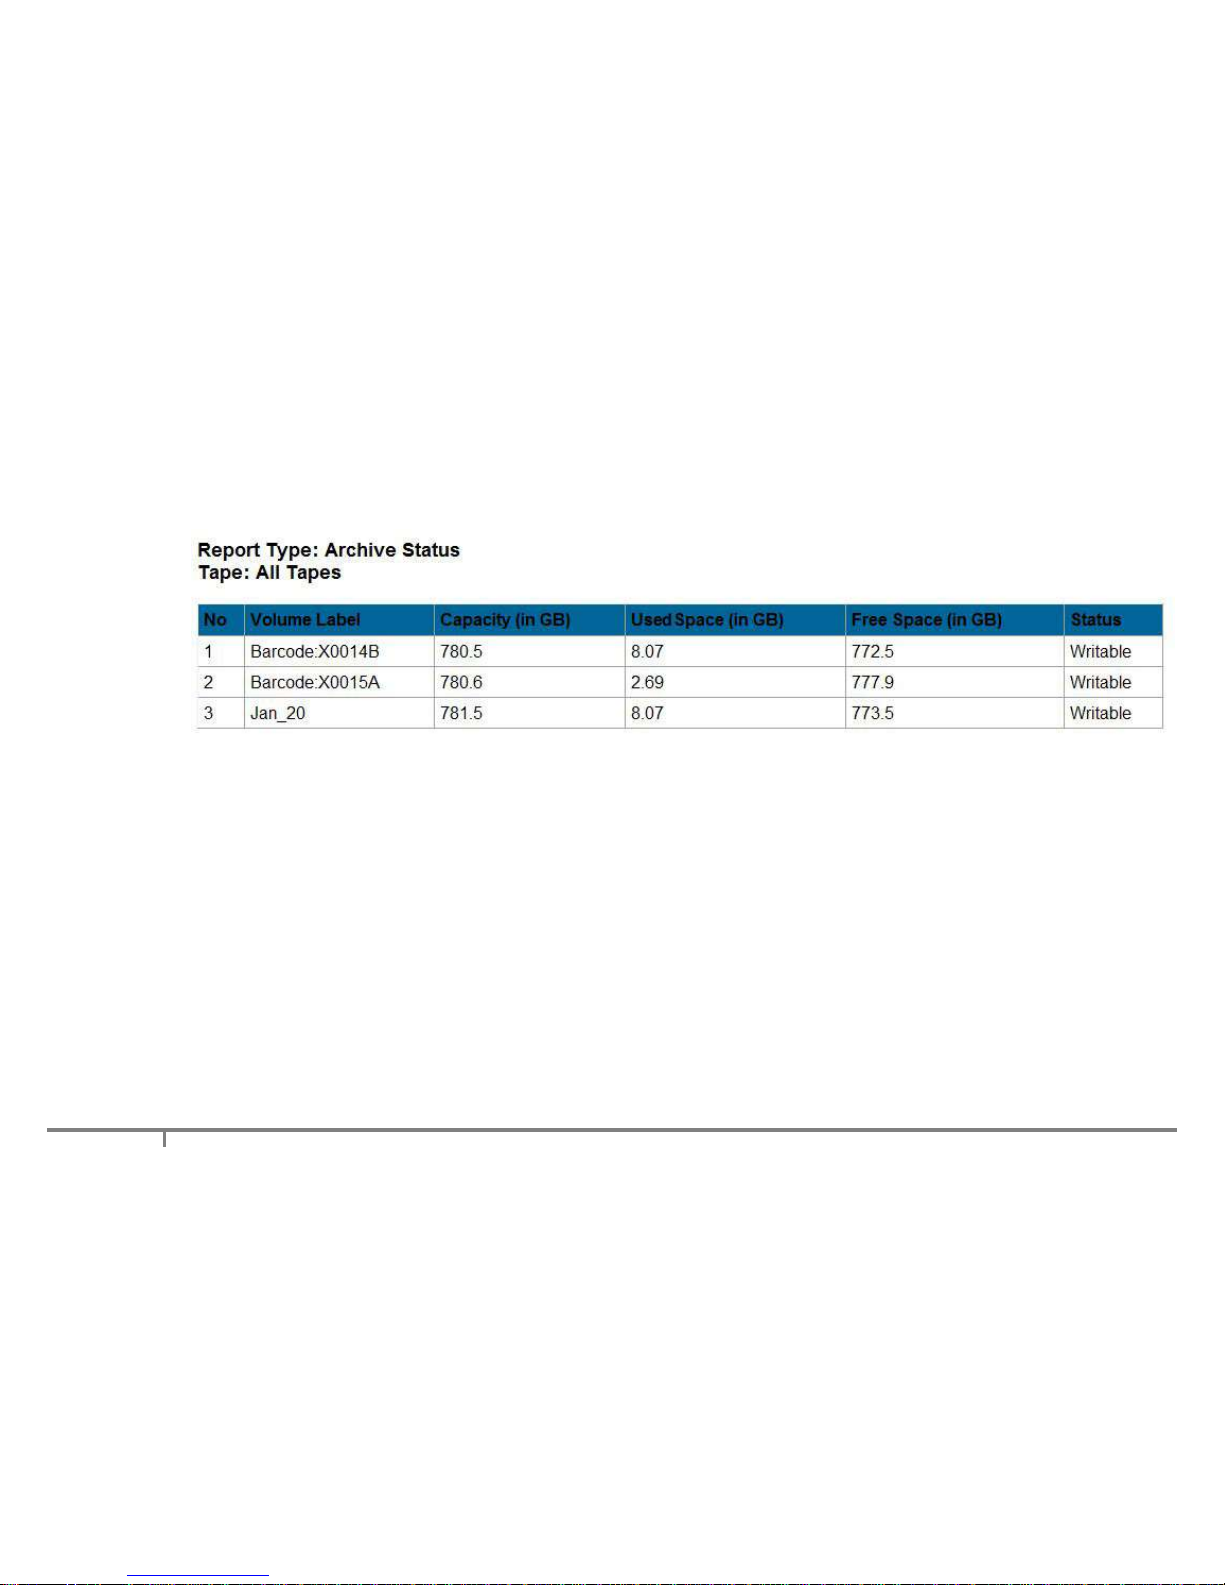
An example of an Archive Status Report is shown below.
The display columns are explained below.
No. This is the line number for the tape in the display.
Volume Label This is the Volume Label for the tape cartridge.
Capacity (in GB) This is the capacity of the tape cartridge.
Used Space (in GB) This is the used space for the tape cartridge.
Free Space (in GB) This is the available free space for the tape cartridge.
Status This gives status for the tape cartridge such as Writable or Finalized.
Page 51

51
7. Problem Diagnosis
7.1 About Problem Diagnosis
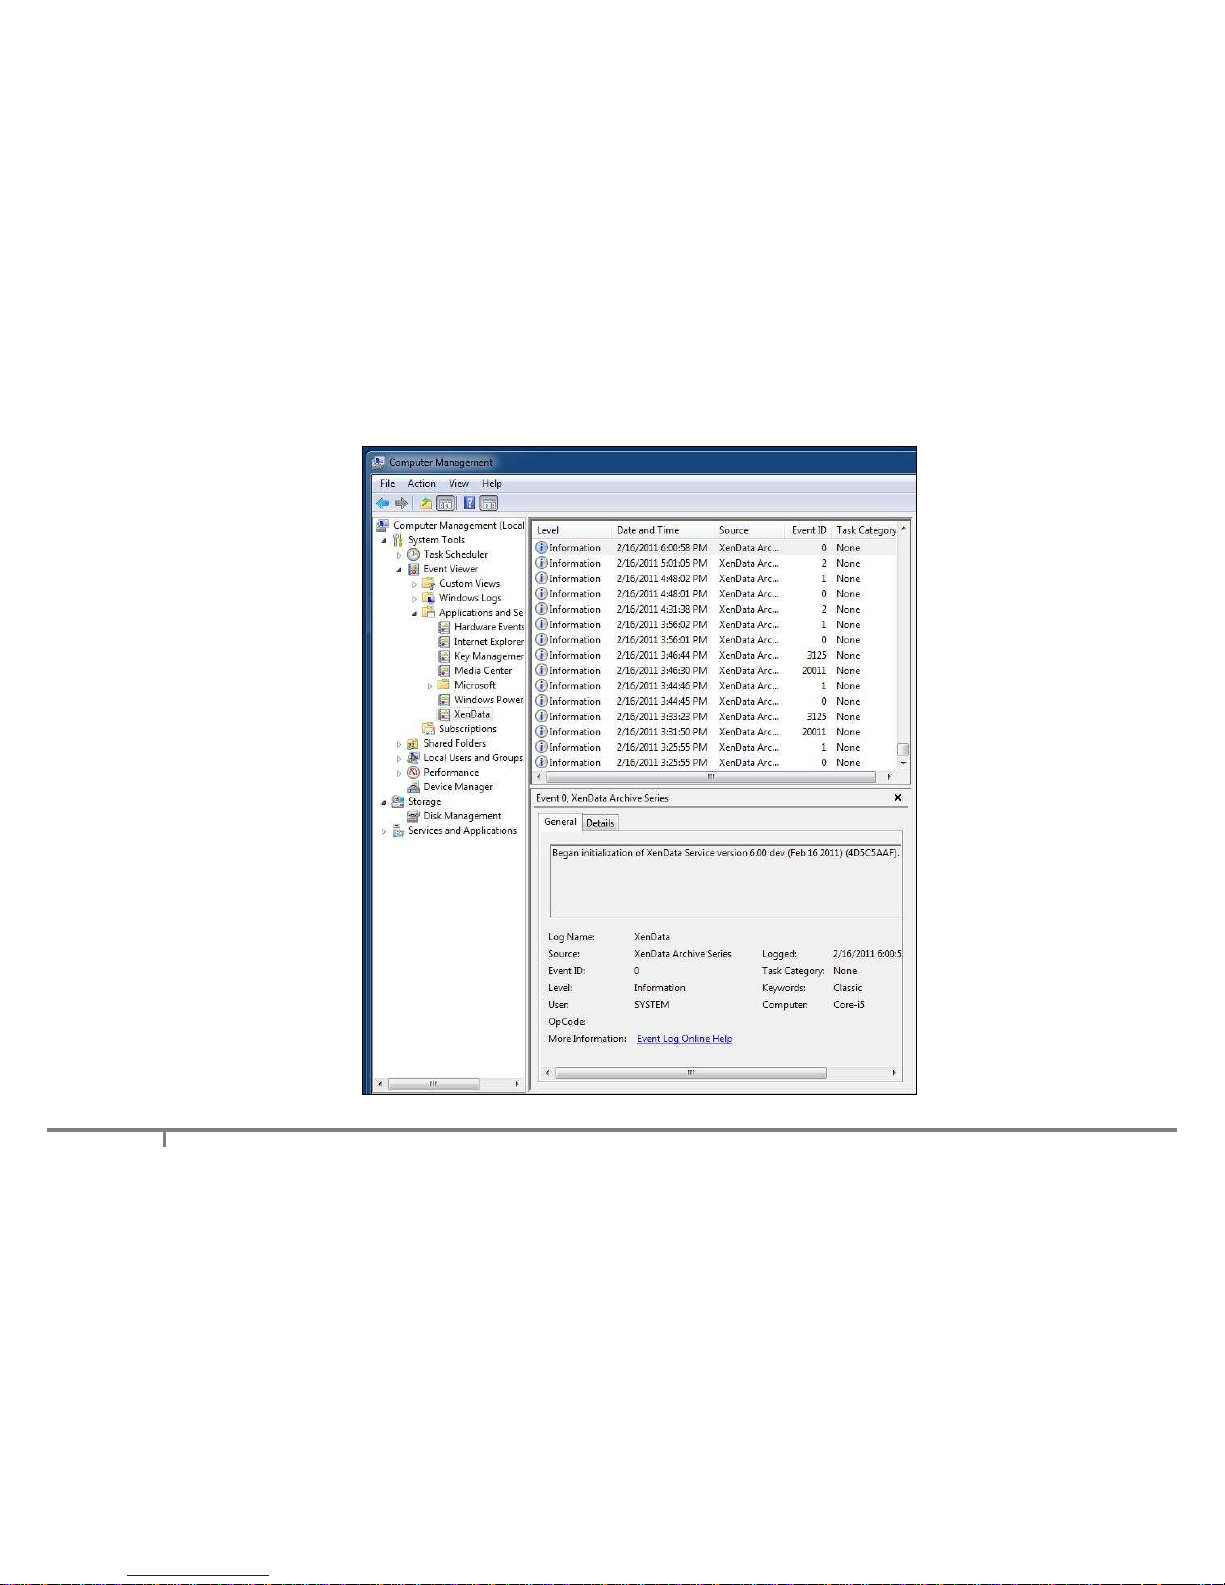
The main tool for diagnosing a problem is the Windows Event Viewer. This is launched as follows.
Click 'Start'
Right click 'Computer', and then 'Manage'.
Expand 'Event Viewer' in the left pane, and then expand 'Applications and Services Logs'
Click on 'XenData'
The XenData Event Log is illustrated below.
Page 52
52
Page 53
53
In addition, the XenData Activity Display (7.3) can provide diagnostic information in case of a problem.
7.2 Tape Status: XenData Protected
The system will put a tape into a ‘XenData Protected’ state if there is a problem associated with a tape
cartridge that must be corrected before additional data is written to that cartridge. The cartridge is identified
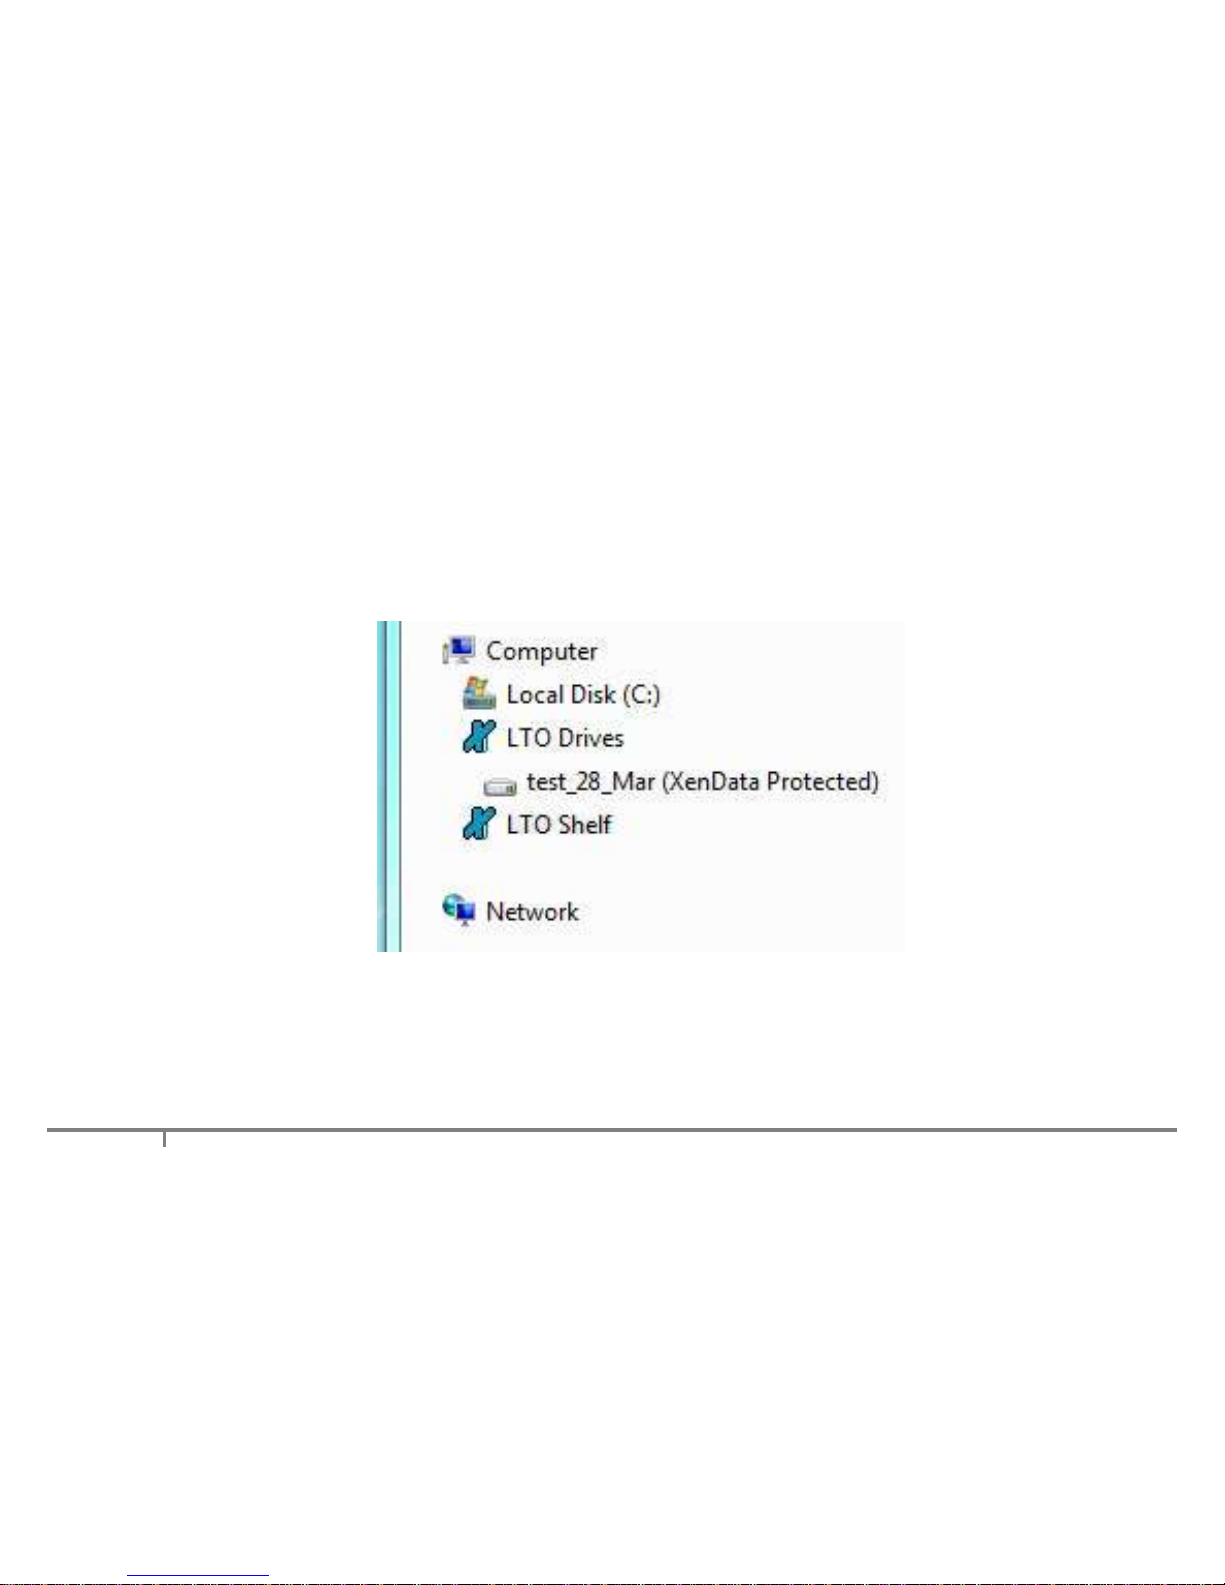
as ‘XenData Protected’ in the left navigation pane of Windows Explorer, as illustrated below.
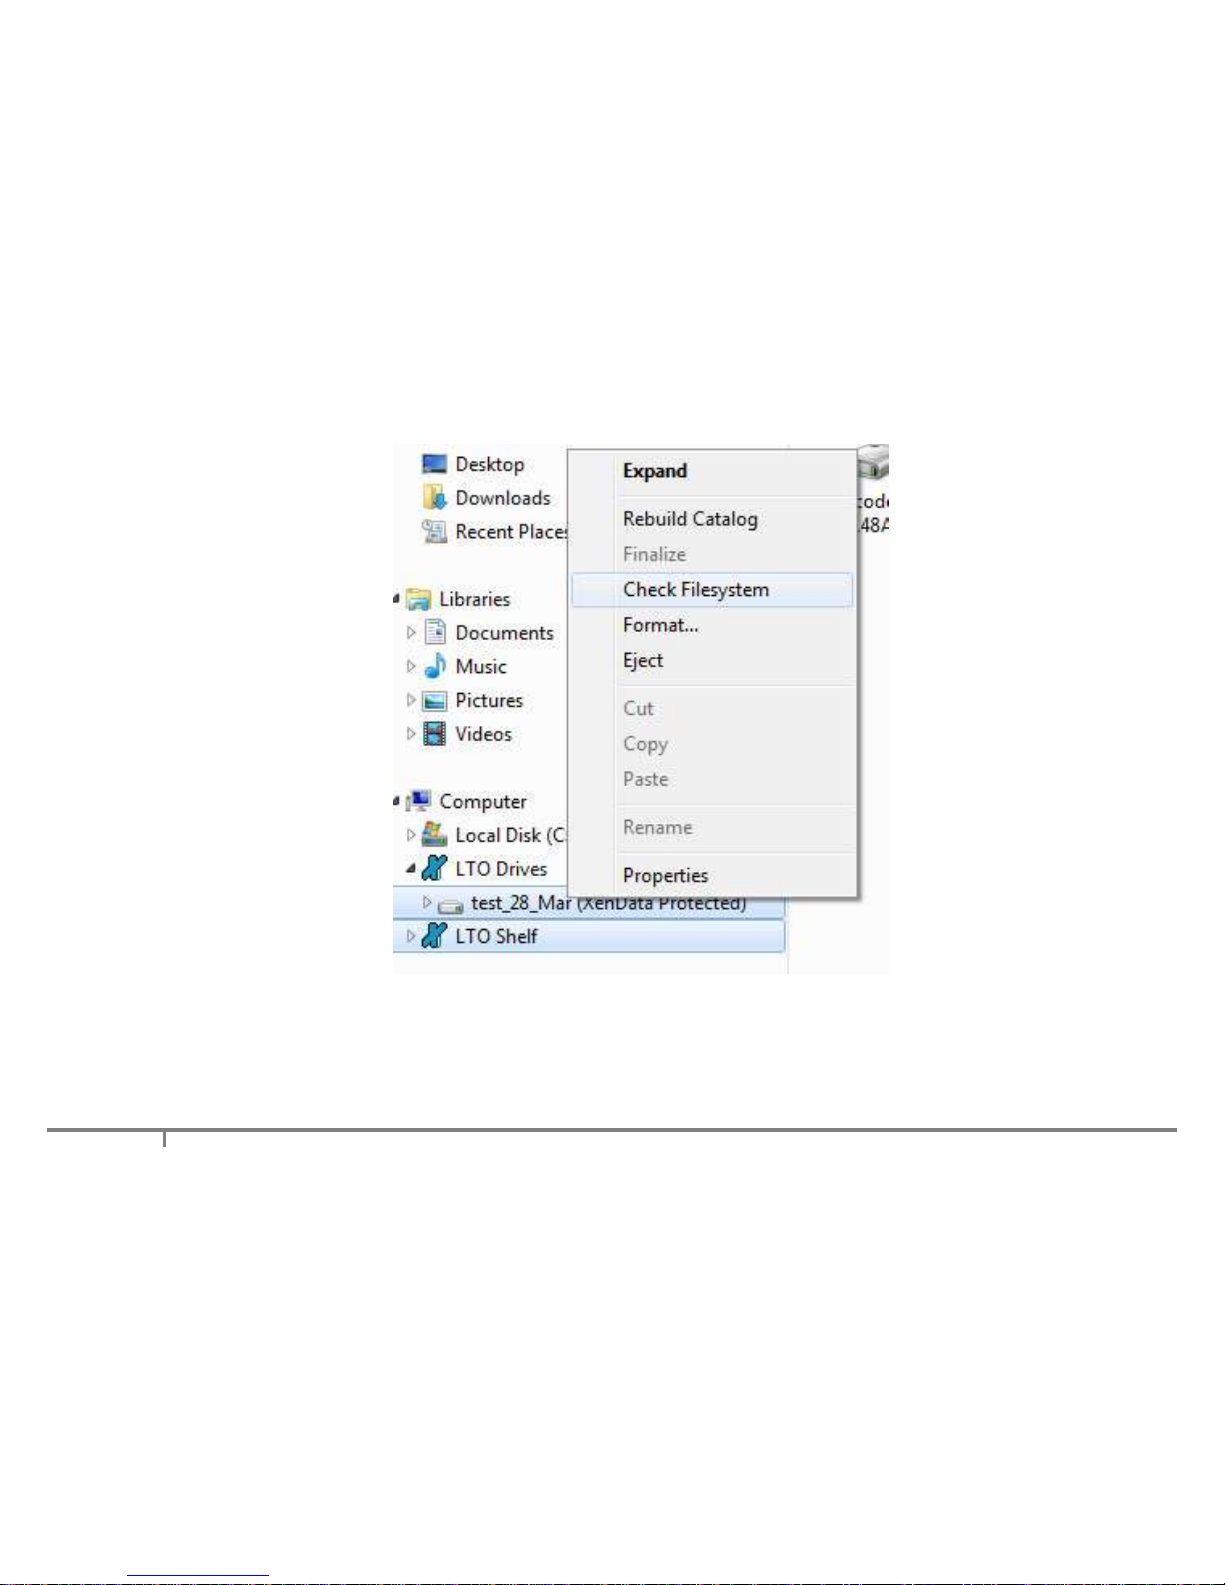
The problem may be corrected by selecting ‘Check Filesystem’ for the tape cartridge, as illustrated below.
Page 54
54
If this does not correct the problem, please obtain more information by viewing the Windows Event Log as
described in About Problem Diagnosis (7.1).
Page 55
55
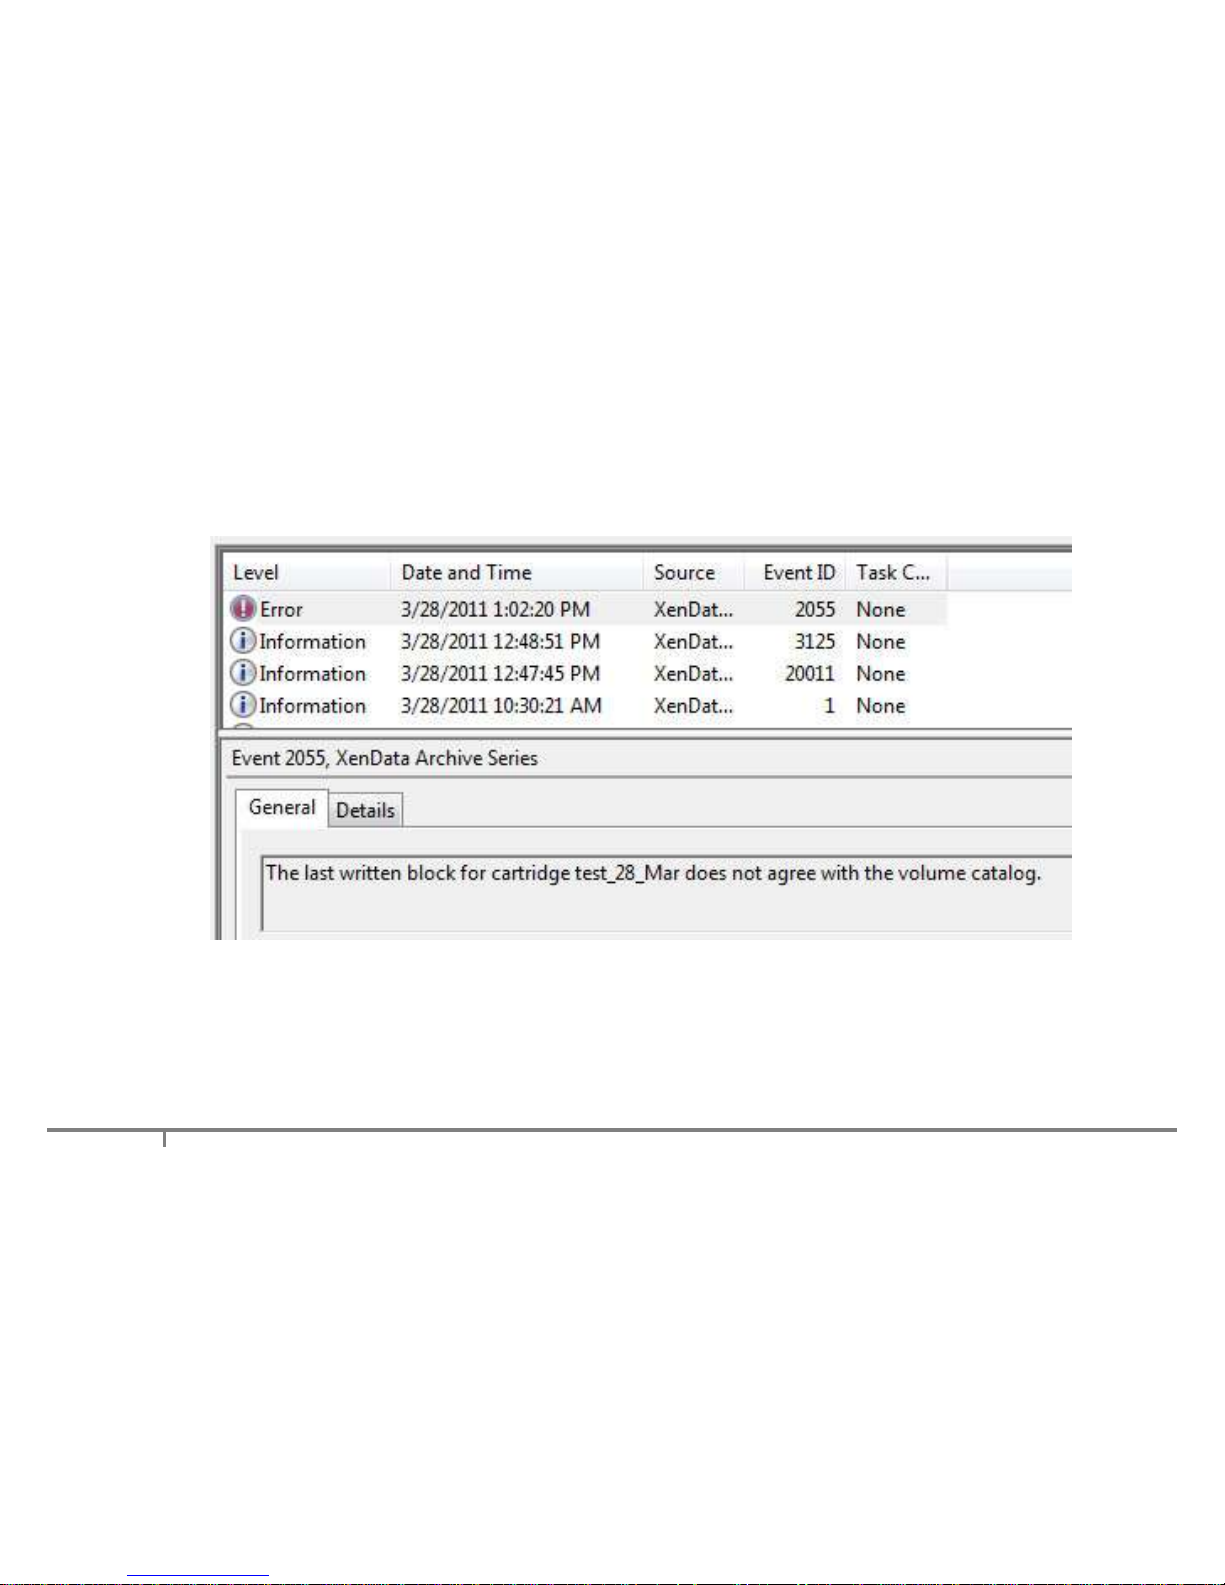
If the contents catalog gets out of synchronization with the actual tape cartridge, the system will put the
cartridge into a ‘XenData Protected’ state. In this case, the following message will be displayed in the
event log.
This will occur, for example, if additional data has been written to the cartridge using another system.
To correct this problem, rebuild the catalog (5.2) and then select “Check Filesystem’.
Page 56
56
7.3 The XenData Activity Display
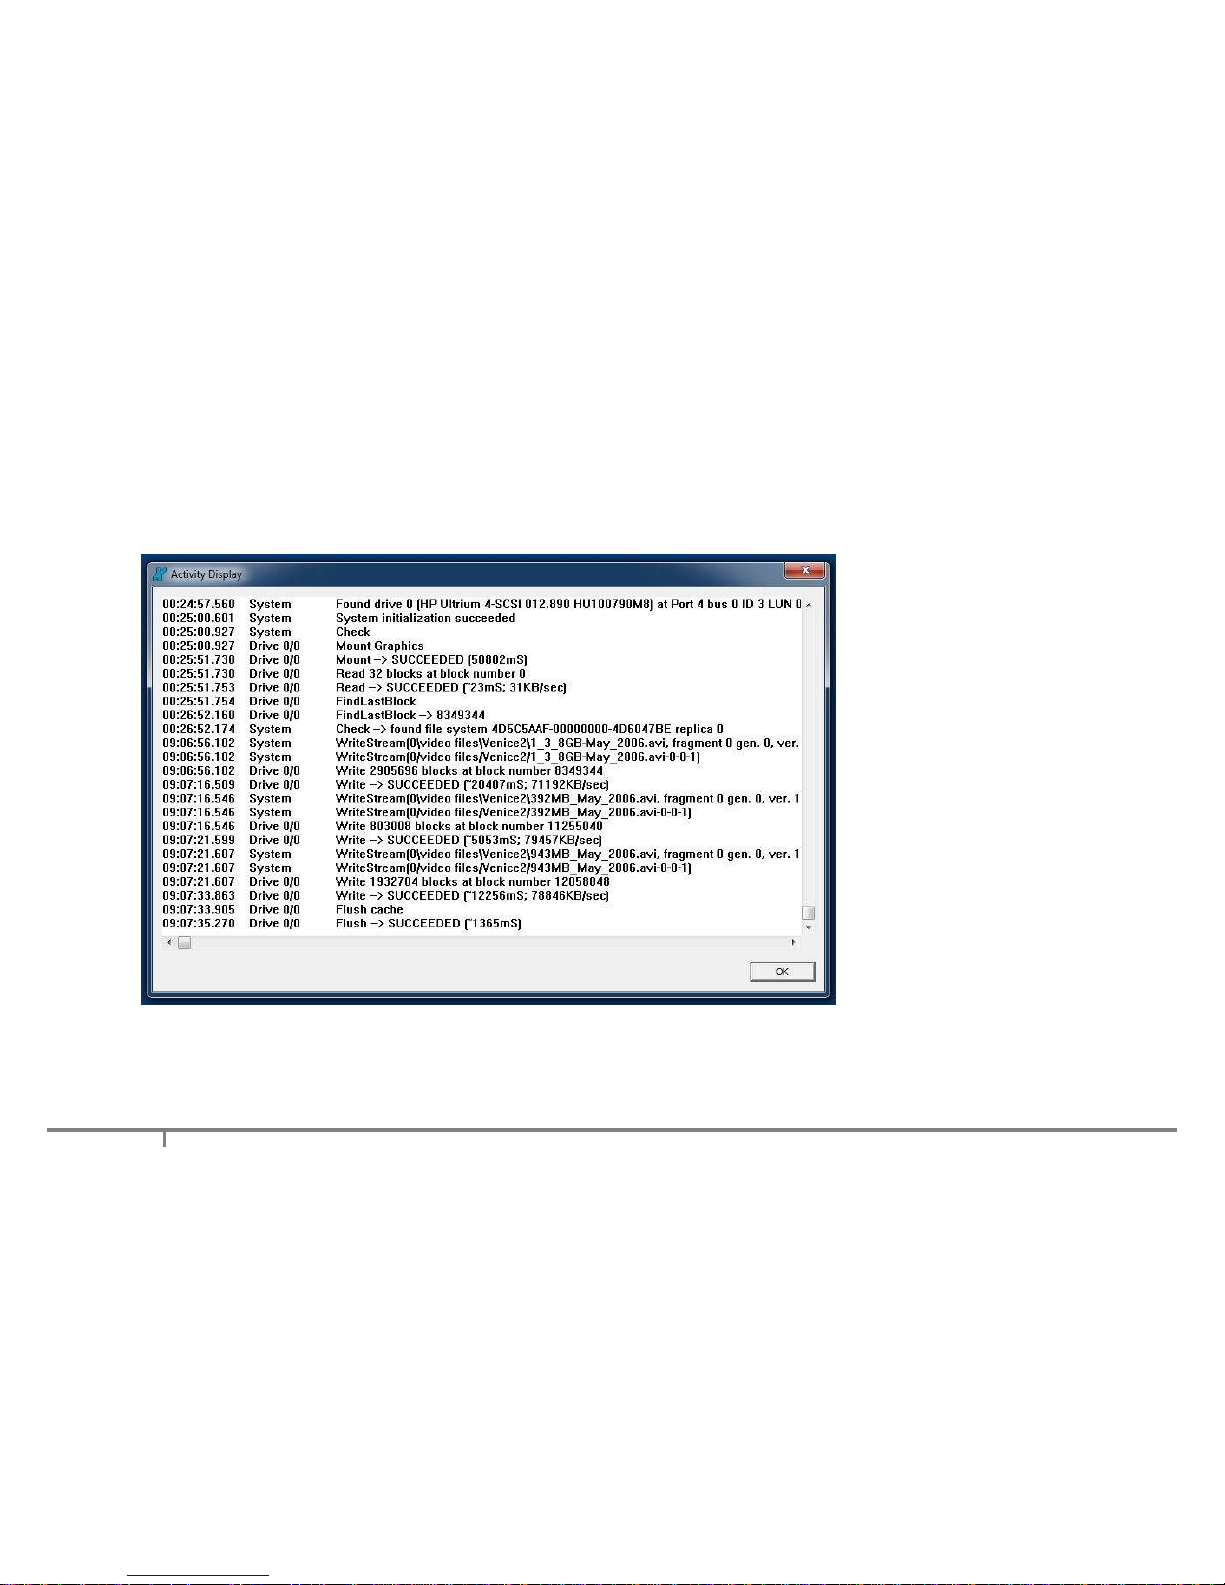
The Activity Display is a useful diagnostic for XenData support staff in case of problems and is illustrated
below.
It shows interaction of the archive system with the LTO tape drives and is launched as follows.
Click 'Start', then 'All Programs', then 'XenData'.
Click 'Activity Display'.
 Loading...