

Page 1

Header 1
Header 2
Header 3
Header 4
Header 5
Body Text
◦ Bullet Point
◦ Bullet Point
1. Number List
2. Number List
3. Number List Indent
Footer Text
The Outline
1. Section 1
A. Item 1
B. Item 2
1. sub item 1
2. sub item 2
3. sub item 3
2. Section 2
A. sub item 1
B. sub item 2
a. subber item 1
b. subber item 2
c. subber item 3
i. subbest item 1
ii. subbest item 2
iii. subbest item 3
1Evolve User Manual V1.0 by XDynamics Limited
Page 2
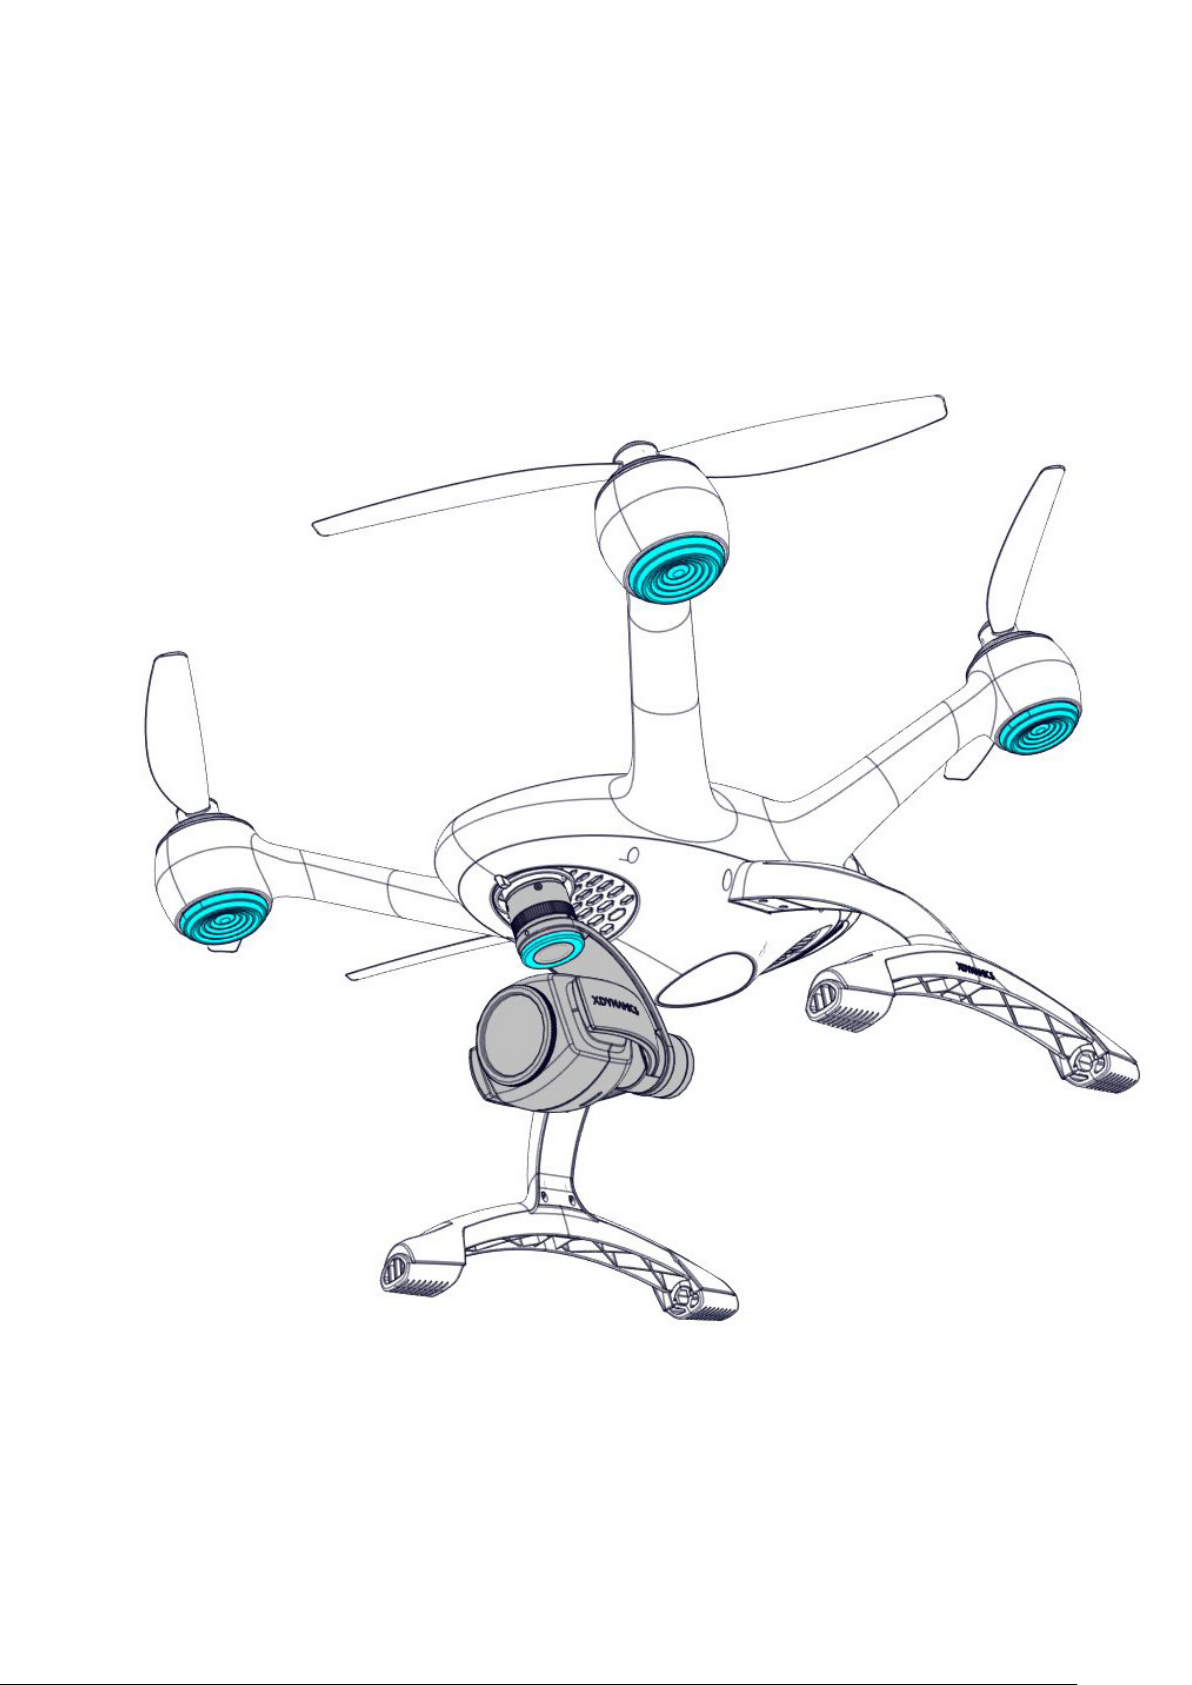
EVOLVE
User Manual V1.0
BY XDYNAMICS
2Evolve User Manual V1.0 by XDynamics Limited
Page 3

Using This Manual
Legends within this User Manual
Within this manual the following Legends are used:
Safety Warning
Important
User Hints and Tips
Reference
Requirements before First Flight
Read the following information before using the Evolve Product -
1. Evolve User Manual (This document)
2. What’s in the box
3. Quick Start Guide
4. Legal Disclaimer and User Safety Guidelines
5. Battery Safety guidelines
For further information we suggest visiting our Evolve website
LEGAL NOTICE REQUIRED HERE
Website
Please visit the safety page and related documentation related to the Evolve Product -
http://www.xdynamics.com/product/Evolve
To nd more information, tips, and troubleshooting, please browse our comprehensive articles at -
http://www.xdynamics.com/product/Evolve/info
3Evolve User Manual V1.0 by XDynamics Limited
Page 4

On-Line Video Tutorials
http://www.xdynamics.com/support/videos
Security Disclaimer
Security of information for drone products has become a major concern for UAS operators that
do not wish for their ight information and collected imagery to be accessed by outside entities
or governments. Most leading drone manufactures do not have the ability to secure this type of
information. A typical consumer drone sends all the Meta data information, such as aircraft position
history and copies of all video and photography les, to unsecured cloud accounts. Some drone
manufactures require the operator/owner of the drone to create an on line cloud account before the
drone can be activated. This cloud account downloads all the information history from the drone every
time the system is connected to the internet or when a rmware update is performed regardless if the
operator/owner gives consent. This raises serious security concerns for UAS operators that y their
drones near security sensitive locations, such as military installations and airports.
XDynamics uniquely oers secure drone products not available by many other drone manufactures.
We understand the need for secure drone systems and will never download secured or private Meta
data information without the consent of our customers. XDynamics believes in guarding our customers
privacy and will continue to strive for more secure drone products in the future.
THIS NEEDS TO BE CONFIRMED.
CHECK WITH LAWYERS IF ANY ADDITIONAL SECURITY INFORMATION FROM A LEGAL
STANDPOINT IS REQUIRED
4Evolve User Manual V1.0 by XDynamics Limited
Page 5

Contents
5Evolve User Manual V1.0 by XDynamics Limited
Page 6

About This Manual
What is in the Document
We will get you started quickly by creating an XDynamics account and making sure the Evolve Ground
station and Drone can connect to our server to download any latest updates and get your product
registered before your rst ight.
6Evolve User Manual V1.0 by XDynamics Limited
Page 7

Product Information Section
Product Description
Within this section, the Evolve Drone and Ground Station are explained and the individual components
listed. The Evolve Drone and Ground Station form a powerful system oering a true ultra low latency
FPV video downlink with 4K local video recording, combined with an out the box, ready to use fully
integrated dual screen controller.
Key Features
FHD Ultra Low Latency Live View
Evolve drone delivers incredible wireless live view performance including: 1080p Full HD video at 60
frames per second, with the latency as low as 10 milliseconds. With ultra low latency transmission over
distances up to 600 meters, videographers can capture the intended shots and never miss a critical
shot. It is ideal for video production of TV commercials, documentaries, feature movies and other
applications that require delay-free control of a camera and drone.
Dual-Screen Drone Controller
Aerial photography and lming experience with XDynamics Evolve begins at your ngertips. Drawing
inspiration from handheld game consoles, the foldable remote controller holds two separate high
brightness screens in the palm of your hand, a 7” FPV viewnder and a 5” multi-touch control panel,
which is complemented with uncluttered buttons and thumbstick stick gimbals.
Smart Pilot System (SPS)
The Evolve by XDynamics boasts the world’s most advanced dual screen pilot assistant system, an
integrated system which combines all the required assistant functions under a single interface.
◦ Drone Radar: know where your drone is.
◦ Alert Centre: fully understand your drone status.
◦ Map Preloading: ensure you can view your map at ight.
◦ Dual Screen Editing: retouch your aerial images and edit your footages more conveniently.
7Evolve User Manual V1.0 by XDynamics Limited
Page 8

Key Features Continued
Ultra-Precise Positioning System
Combined with algorithms and a comprehensive suite of positioning tools, including a GNSS module
that supports GPS/QZSS, GLONASS, Galileo and BeiDou navigation systems, covering 99% of the
world, as well as advanced optical ow and LiDAR sensors, Evolve provides position tracking with the
higher precision than general drones with ultrasonic or visual sensors.
Flight Battery 6700mAH Lithium Polymer battery providing ight times of up to 16 Minutes.
4K Camera with Sony CMOS Sensor
Equipped with a set of 21mm f/2.8 lens and Sony CMOS image sensor, with eective pixels of
12.4M, Evolve supports video capture at 4K@24fps, 2.7K@60fps, 1080p@120fps and 720p@240fps,
accommodating to various scenarios and themes, from peaceful landscape to dynamic sport shorts. It
supports RAW image le output (DNG format) and records video at 60Mbit/s, preserving sucient data
for post-production.
8Evolve User Manual V1.0 by XDynamics Limited
Page 9
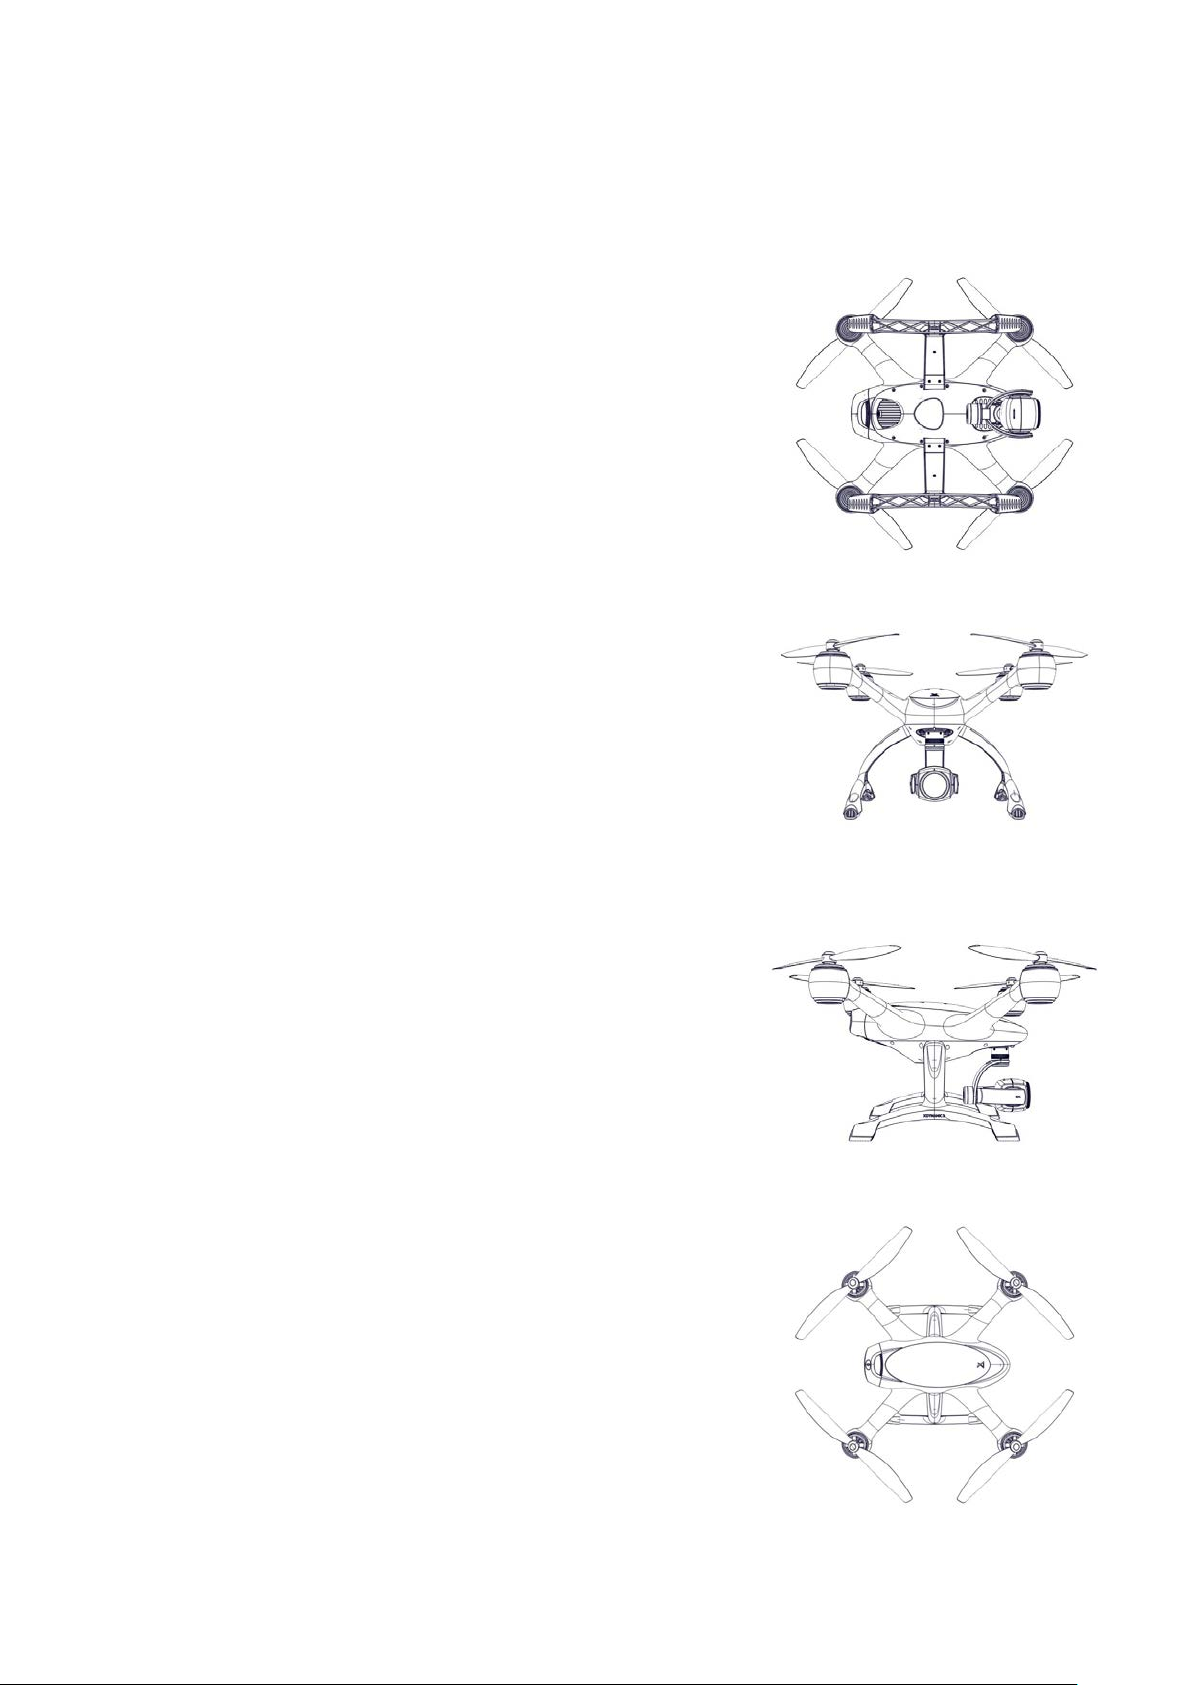
Drone Annotated Diagram
Detailed Schematic of the Evolve Aircraft
1. Propellers – 2 CW and 2 CCW
2. Motor
3. LED Light
4. Gimbal
5. 4K Camera LED Status
6. 4K Camera
7. Battery
8. Battery display
9. Battery release latch (Top)
10. Top Illuminated X Logo
11. Rear LED Indicator
12. FPV RF Heatsink
13. Optical Flow camera
14. USB Connection port
15. Pairing Button
16. Camera SD Data Card
17. Lidar (Altitude sensor)
18. Battery release latch (Lower)
9Evolve User Manual V1.0 by XDynamics Limited
Page 10
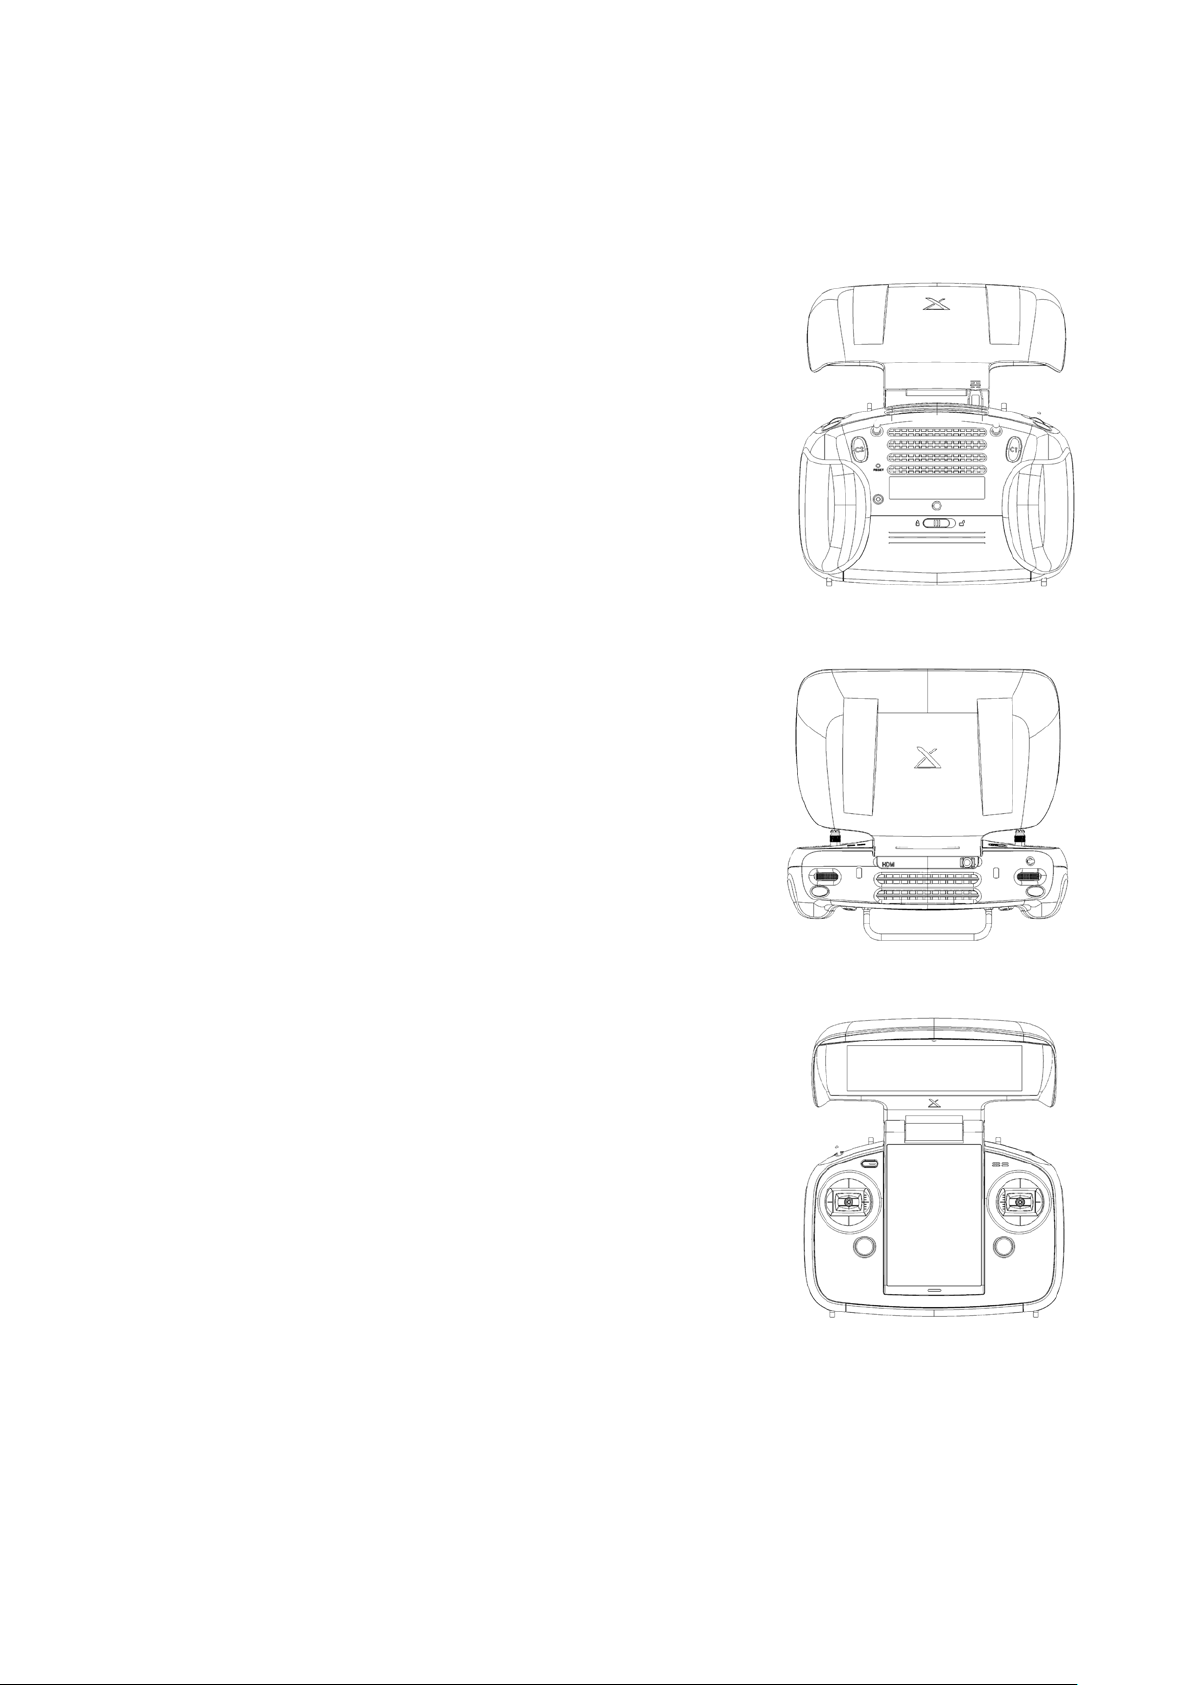
Remote Controller Annotated Diagram
Detailed Schematic of the Evolve Remote Controller
1. Sel Camera
2. FPV Display 7” Screen
3. Proximity and Ambient Light sensor
4. Power Button and LED Indicator
a. Blue = Battery Level is enough
b. Amber = Recharge Battery
5. Control Stick (Left)
6. Control Stick (Right)
7. Land immediately button
8. Camera Exposure Wheel
9. Photo? / Video Button?
10. Customisable user Button B1
11. Customisable user Button B2
12. Gimbal Pan Control Wheel
13. Mode Select Switch
a. G - GPS Mode
b. C - Custom Mode
c. A – Attitude Mode
14. Lanyard points
15. USB Connector
16. HDMI Output
17. Return Home Button
18. 5” Touch Screen
19. Microphone
20. Lanyard points
21. Reset Switch
22. External Power to Battery Charger
23. Battery Connector
24. Tripod Thread, (Standard Camera Thread)
25. Micro SD Storage Card
26. Desk Stand / Carrying Handle
10Evolve User Manual V1.0 by XDynamics Limited
Page 11
Aircraft Section
Preparing Drone for Flight
For the rst Flight of the Evolve be sure to have a level surface available that is clear of obstacles and
loose debris. Ensure that there are no overhead structures or trees that might interfere with the Evolve
connecting to GPS satellites. Do not place the Evolve on metal surfaces or with metal near bye (metal
interferes with the internal compass of the ight system and can cause directional errors). For the rst
ights of the Evolve be sure to y in low wind conditions (below 10kt) and high visibility. Avoid ying in
low visibility (like heavy fog) and rainy conditions.
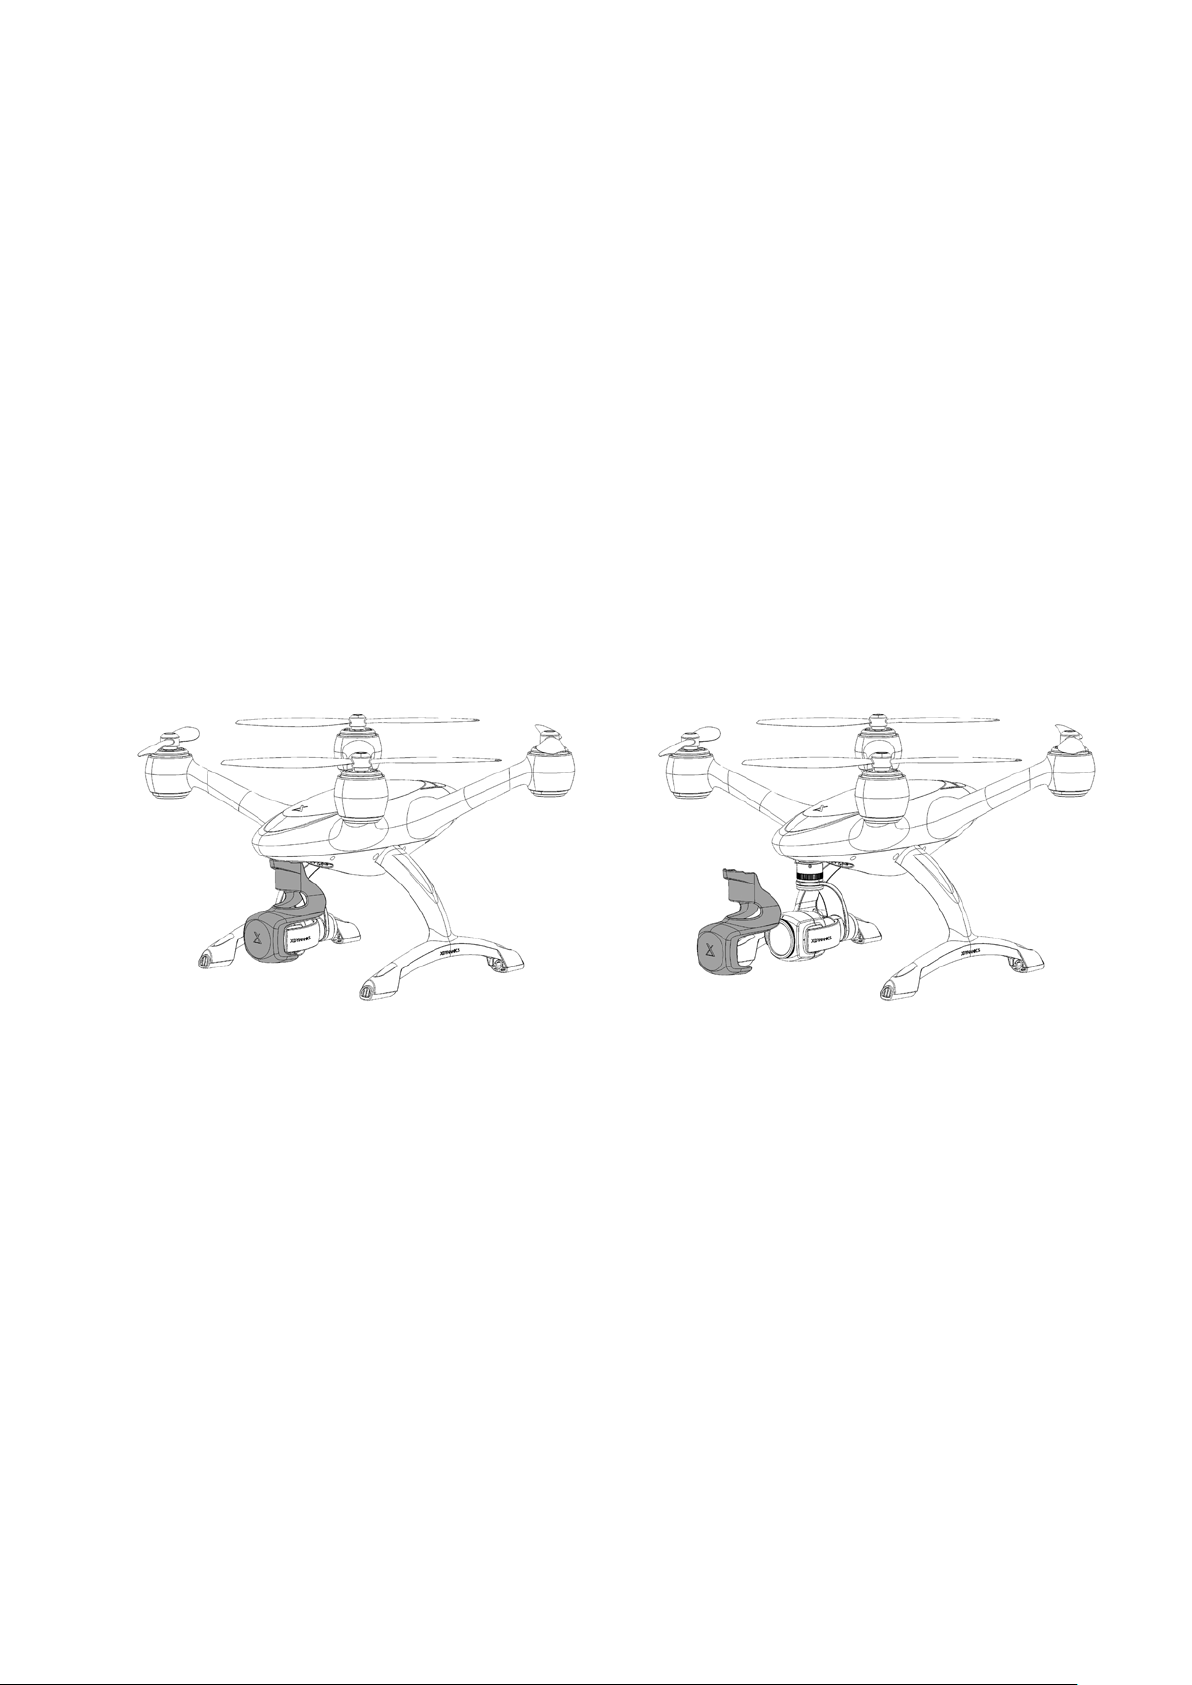
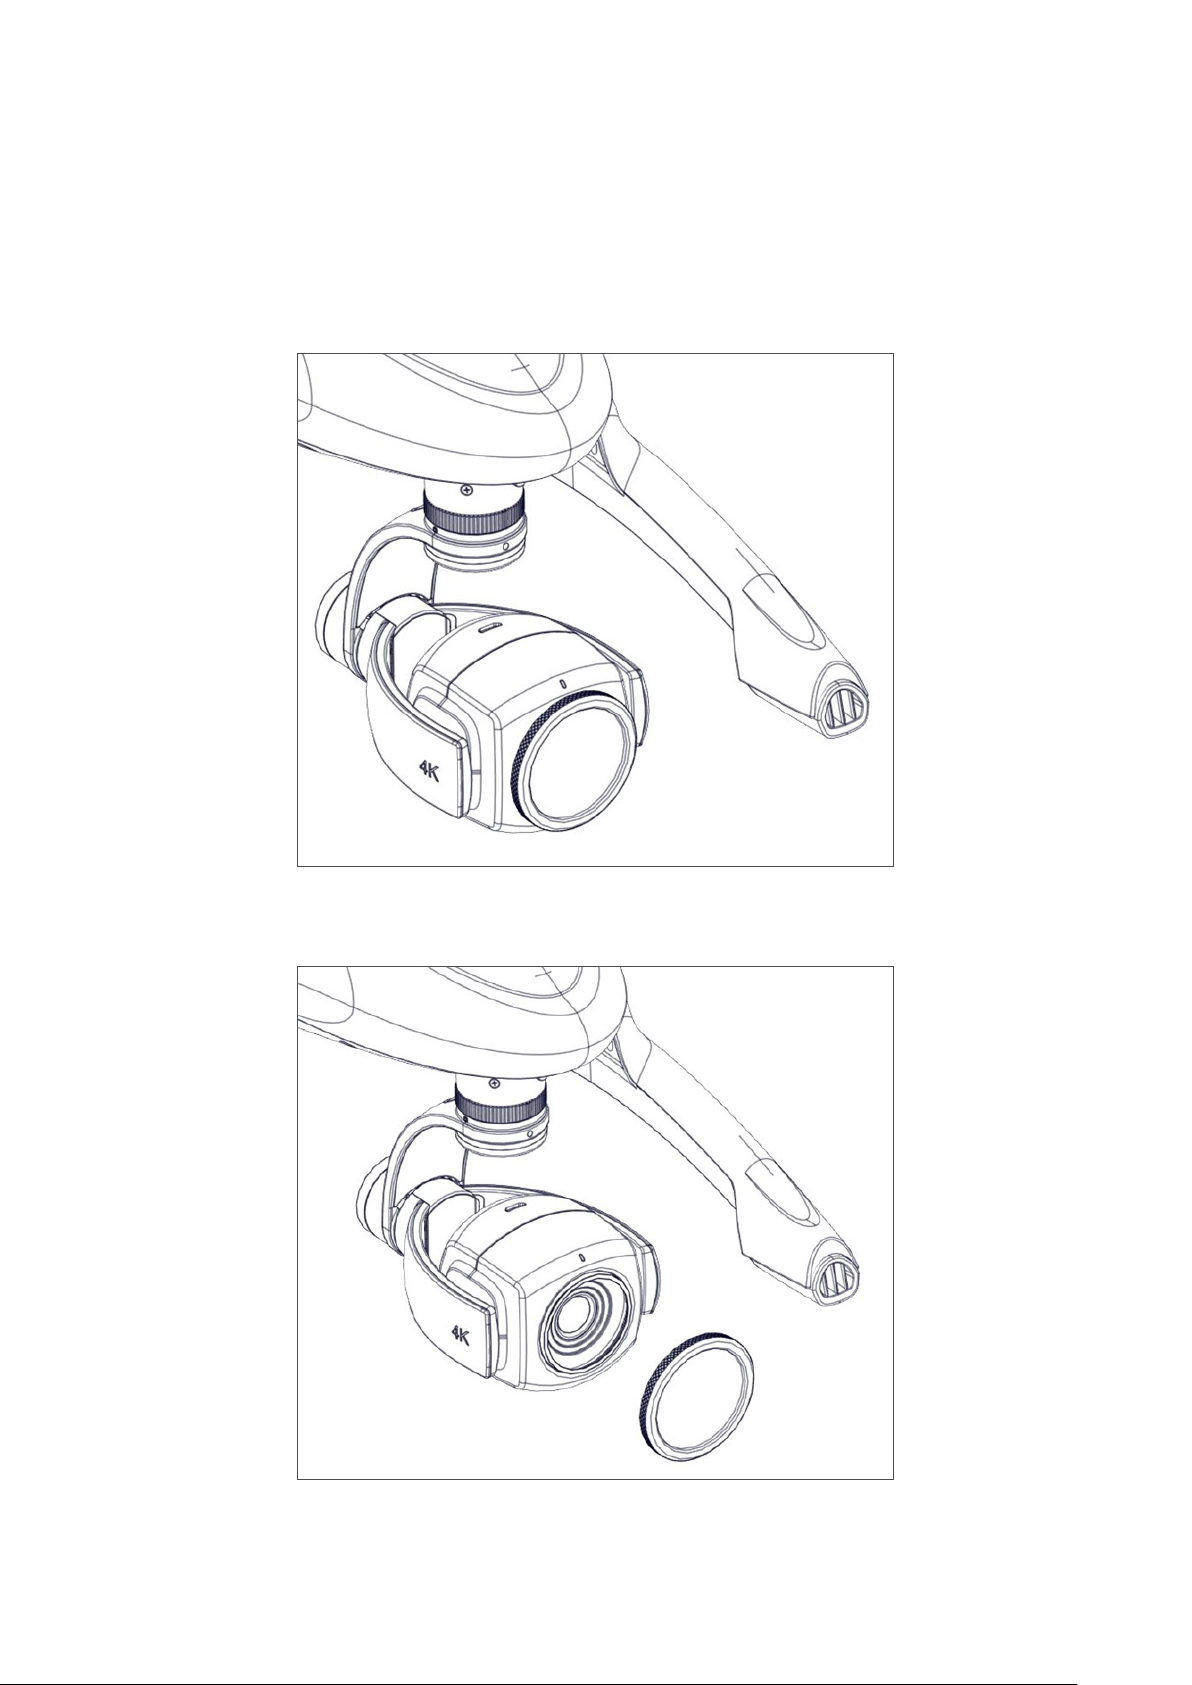
Removing Camera Protector
See diagram for removing the camera protector -
11Evolve User Manual V1.0 by XDynamics Limited
Page 12
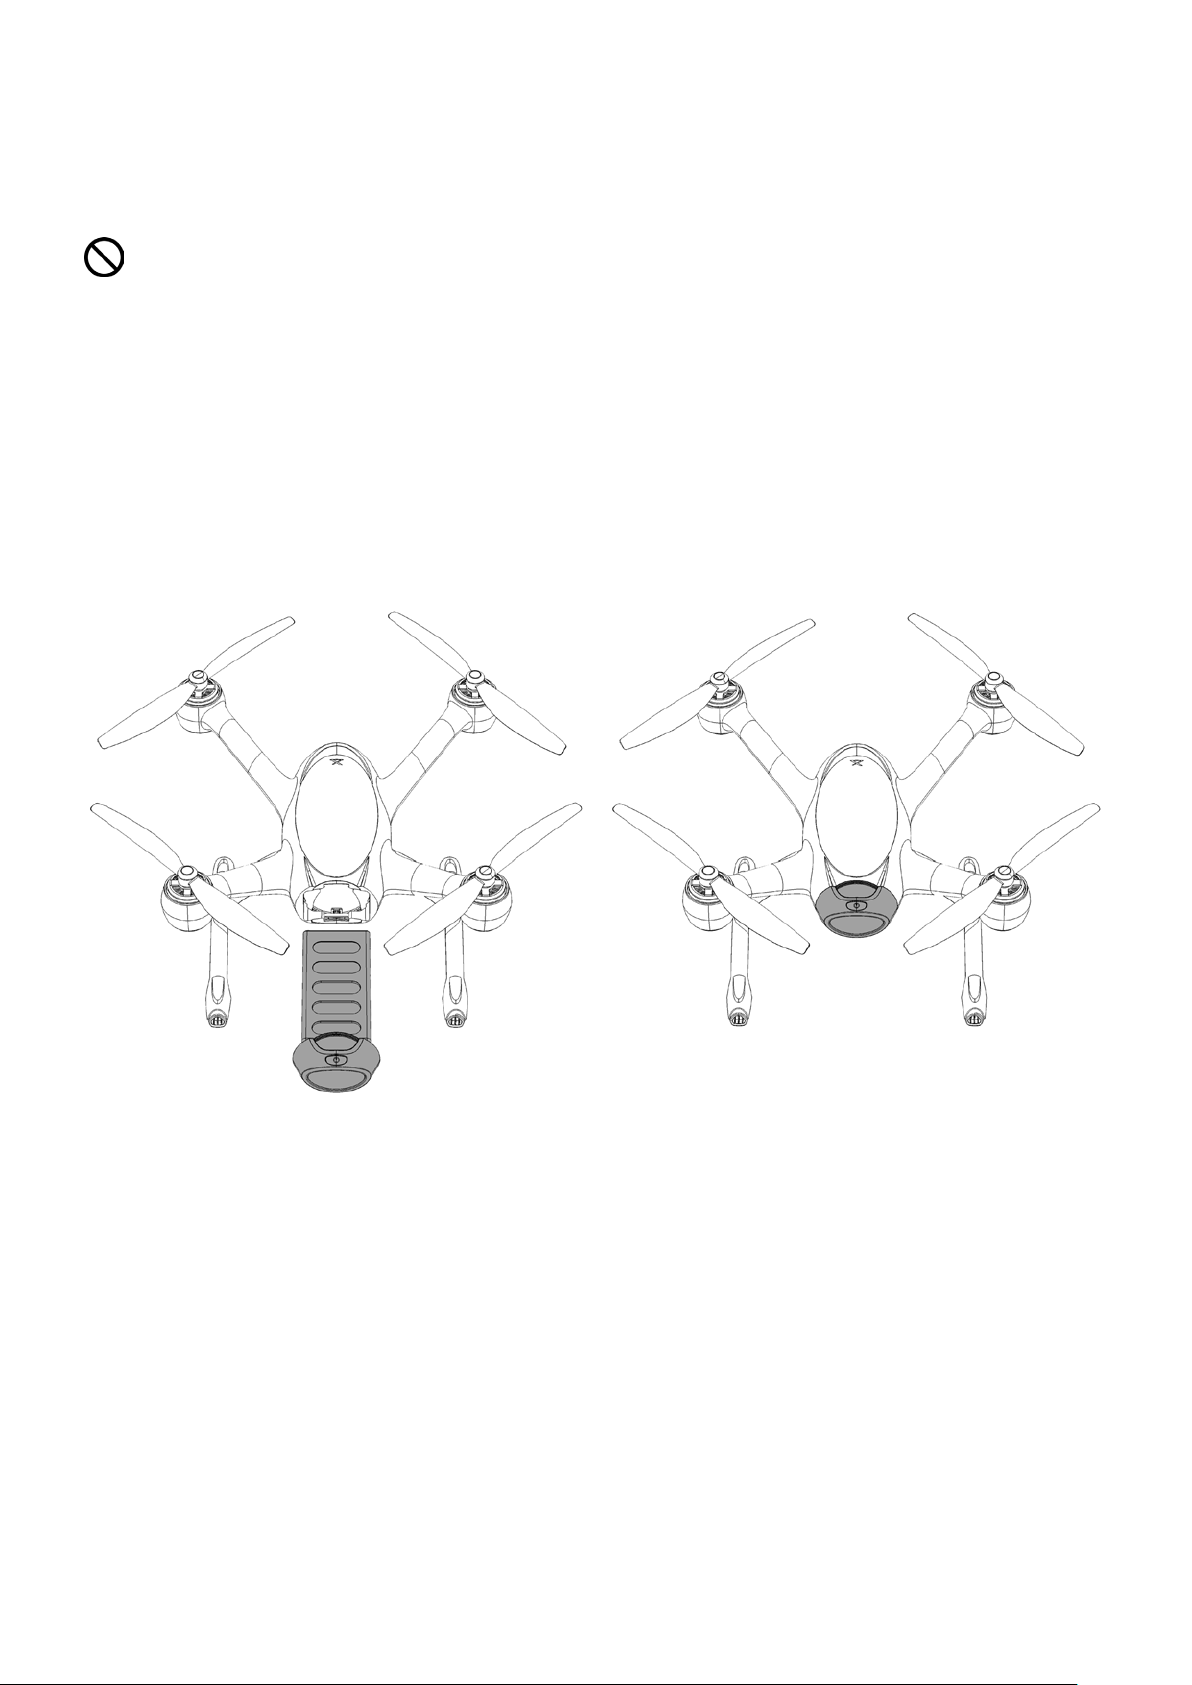
Inserting Drone Battery
Be sure the aircraft battery is fully charged (Refer to Charging the Drone Battery Section).
The drone battery contains a contact lubricant suitable for electronic connectors.
The grease is white in appearance and can be seen on the Drone power connector and
Drone battery. The lubricant is designed to last the life of the Drone and improve electrical
performance. The white appearance is normal.
The user MUST not attempt to replace the grease with any other product. No attempt should
be made to remove the lubricant.
See diagram for battery installation below -
Steps for drone battery installation -
1. First ensure the battery is turned OFF
2. Then ensure the orientation of the battery is with the OLED display of the battery is pointing
upwards
3. Insert by pushing the battery gently into the drone until the two latches of the battery engage
into the drone.
12Evolve User Manual V1.0 by XDynamics Limited
Page 13
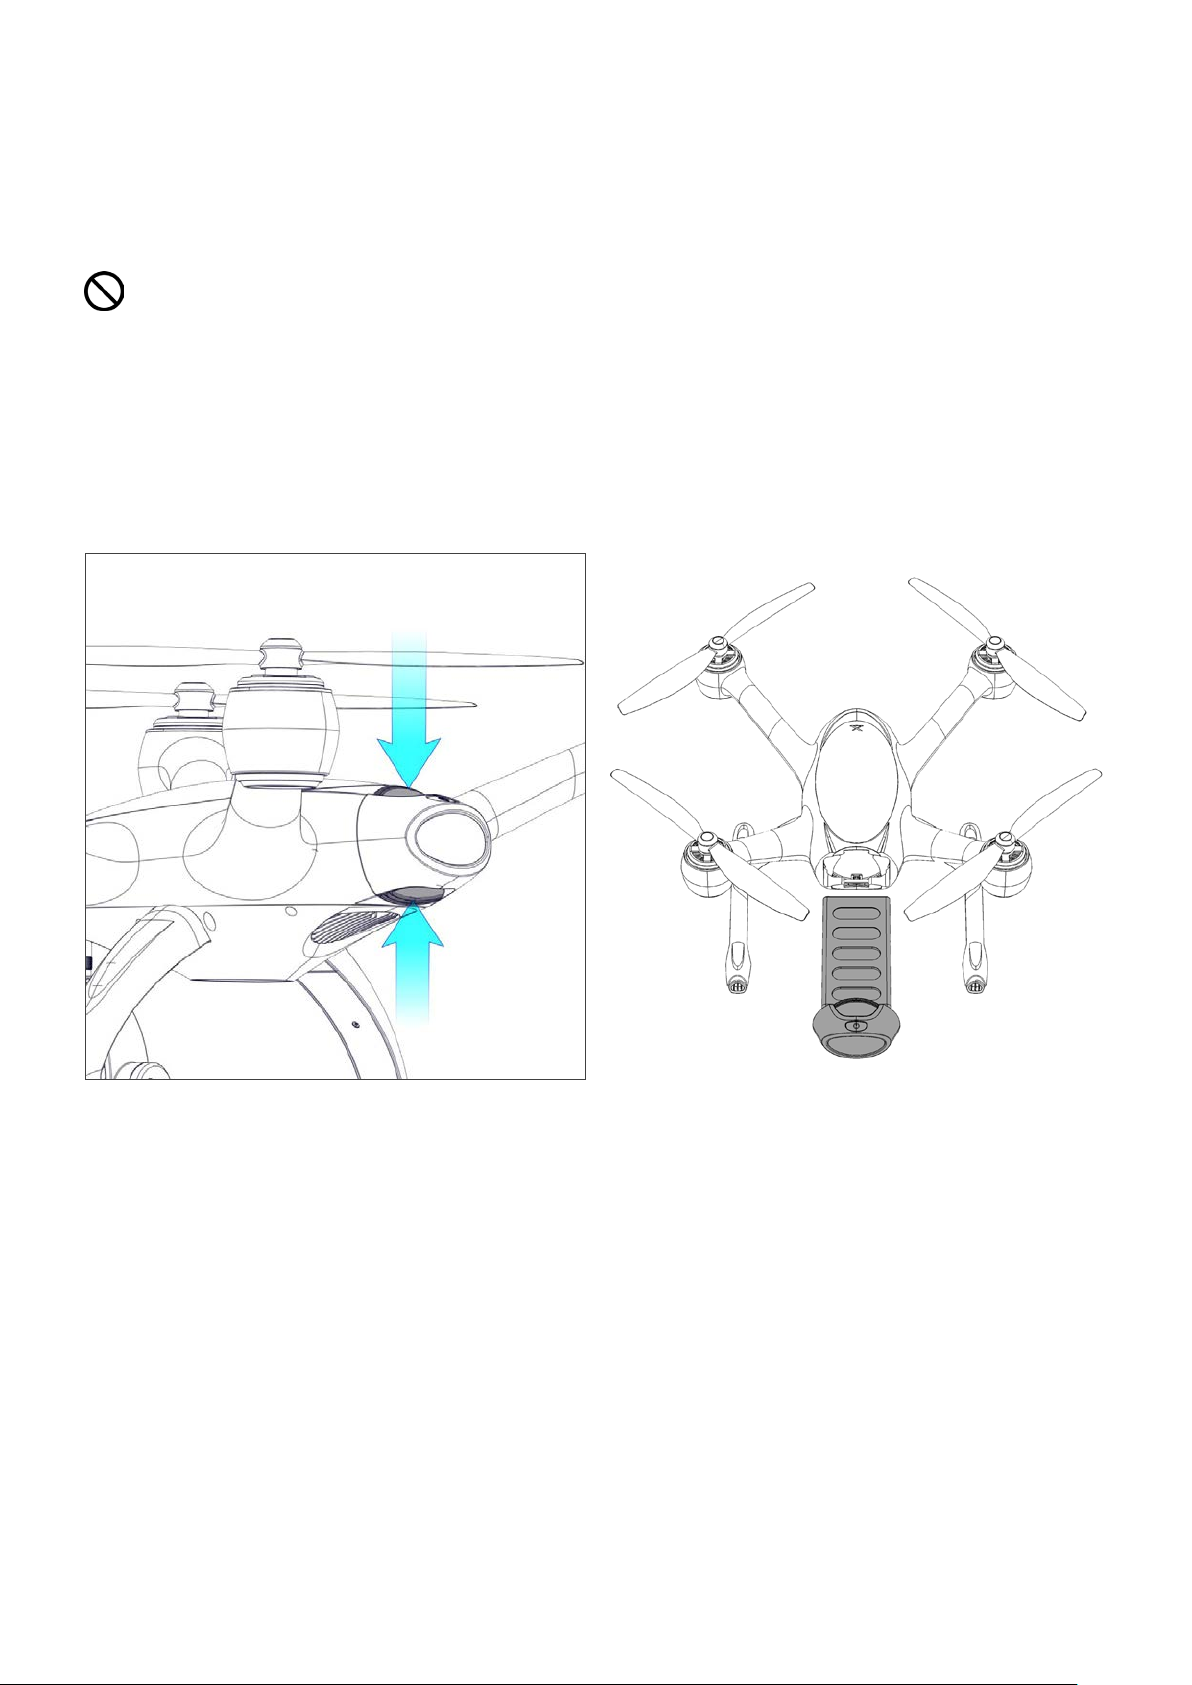
Removing the Drone battery
Remove the battery by squeezing the battery mechanical latches and pulling the battery out of the
drone.
Ensure the Drone battery is turned OFF before inserting or removing it from the Drone or
battery charger.
When removing the battery from the Drone allow the battery to cool to room temperature
before charging the battery with the supplied charger.
See diagram for removing the drone battery below -
Steps for removing the drone battery -
1. First ensure the battery is turned OFF
2. Squeeze the top and bottom latches to disengage the lock.
3. Remove by rmly gripping and pulling the battery from the drone.
13Evolve User Manual V1.0 by XDynamics Limited
Page 14
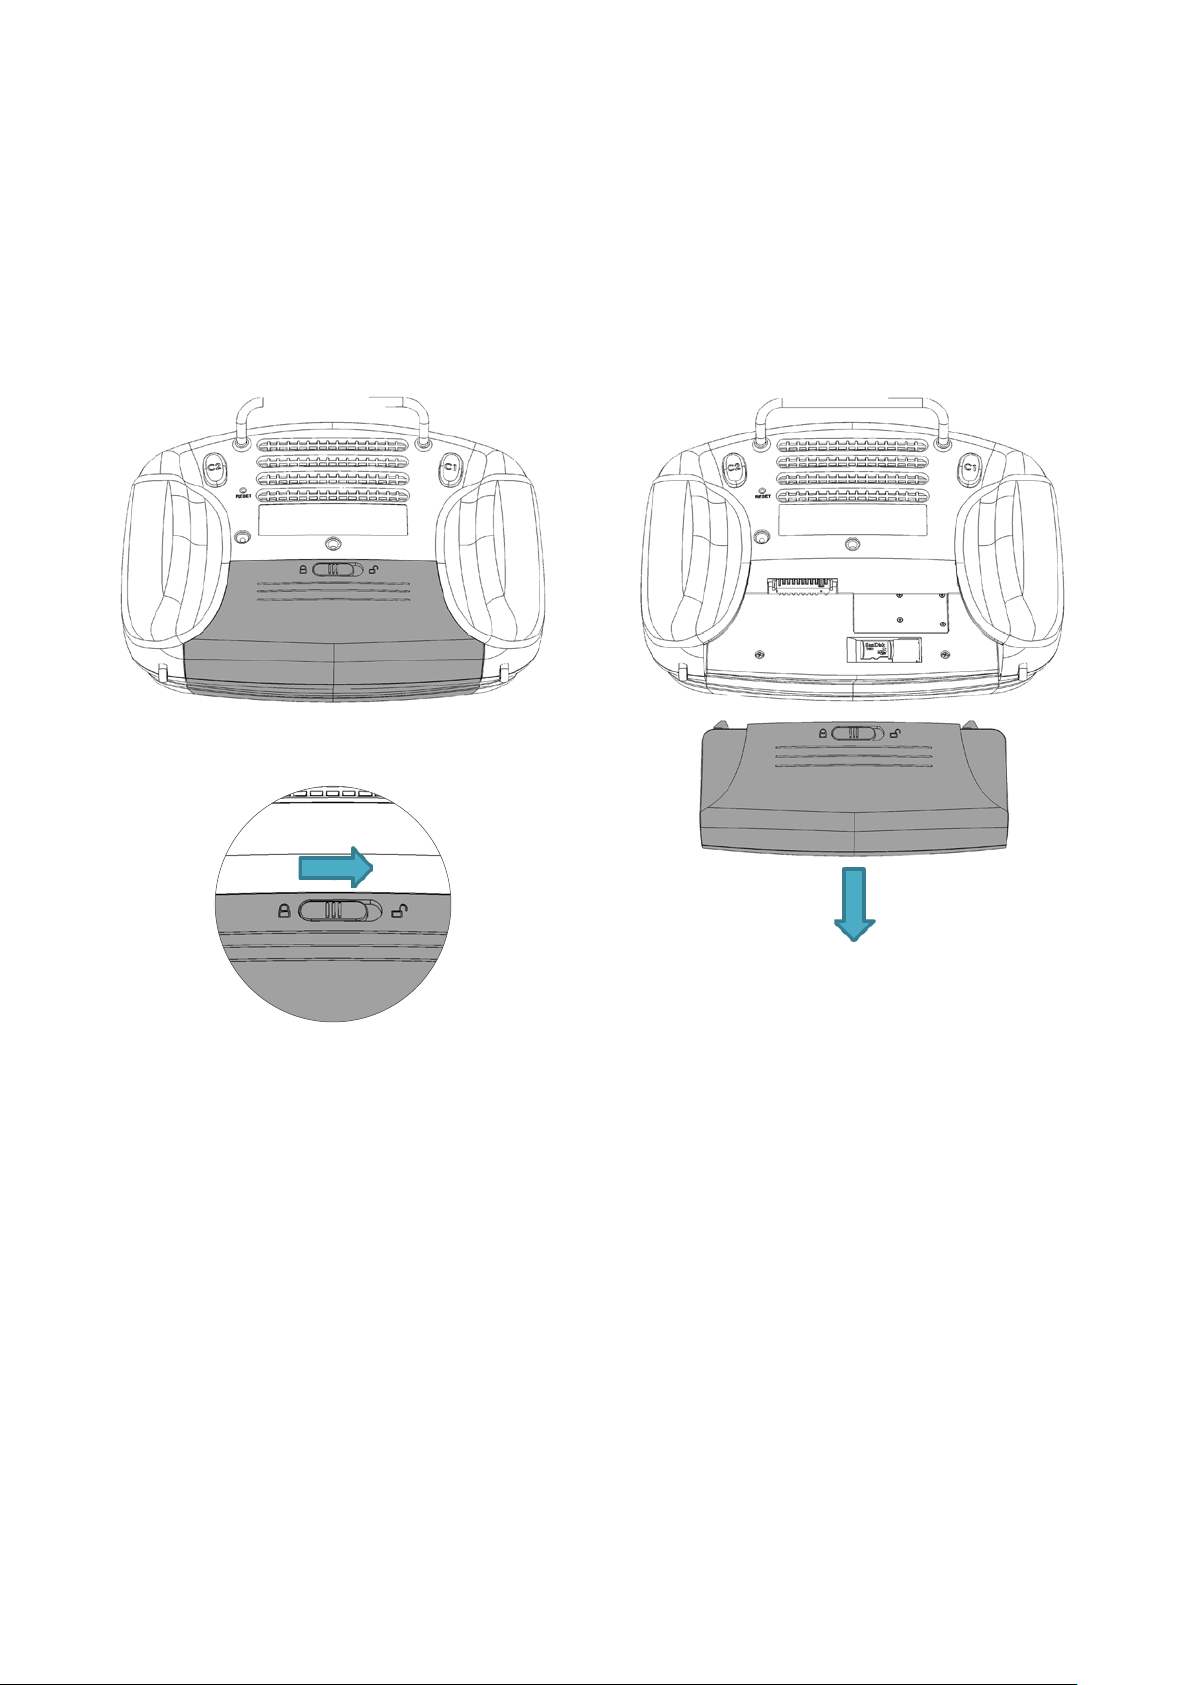
Removing the Drone battery
Remove the battery by squeezing the battery mechanical latches and pulling the battery out of the
drone.
See diagram for battery installation below -
Steps for preparing the Remote Controller -
1. First ensure the battery is turned OFF
2. Slide the latch to the right to disengage the lock.
3. Remove by rmly gripping and pulling the battery from the ground station.
14Evolve User Manual V1.0 by XDynamics Limited
Page 15
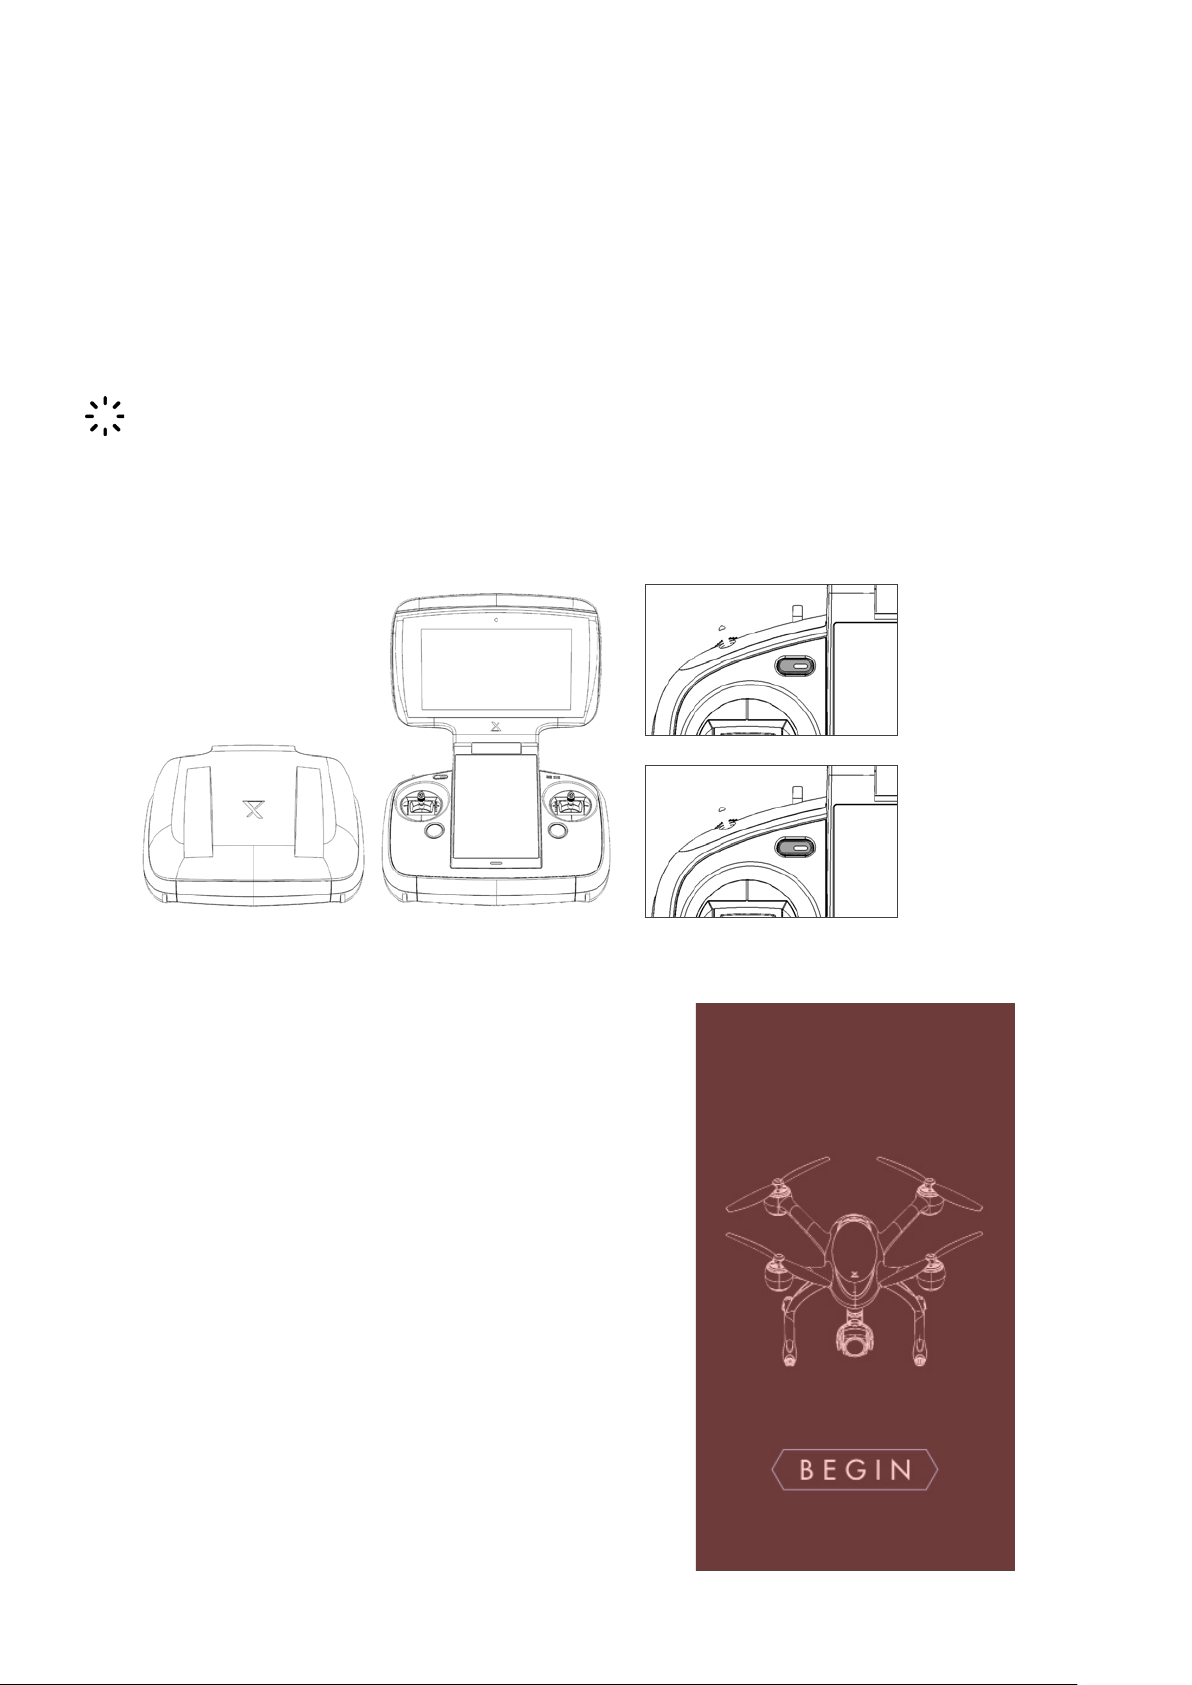
Turning On the Remote Controller
When powering on the Remote Controller be sure to provide at least 3 to 6ft of separation between
the controller and the aircraft. (If the controller and aircraft are too close together the system may not
properly connect).
Press and release the power switch and then press and hold the switch until the Remote Controller
screens come on (this double press procedure assures that accidental power up will not happen). While
the controller is initializing power on the aircraft battery (Refer to Turn On/O Aircraft).
It is important to power on the controller and then the aircraft, in that order, to achieve a proper
RC connection.
See diagram for turning on the Remote Controller below -
1. Quick press – Long
Press Power Button
See diagram for Remote Controller screen below -
Press ‘Begin’ on the Evolve home screen to
complete connection as instructed by the upper
screen notice.
2. Blue Light Indicates
Device Power On
15Evolve User Manual V1.0 by XDynamics Limited
Page 16
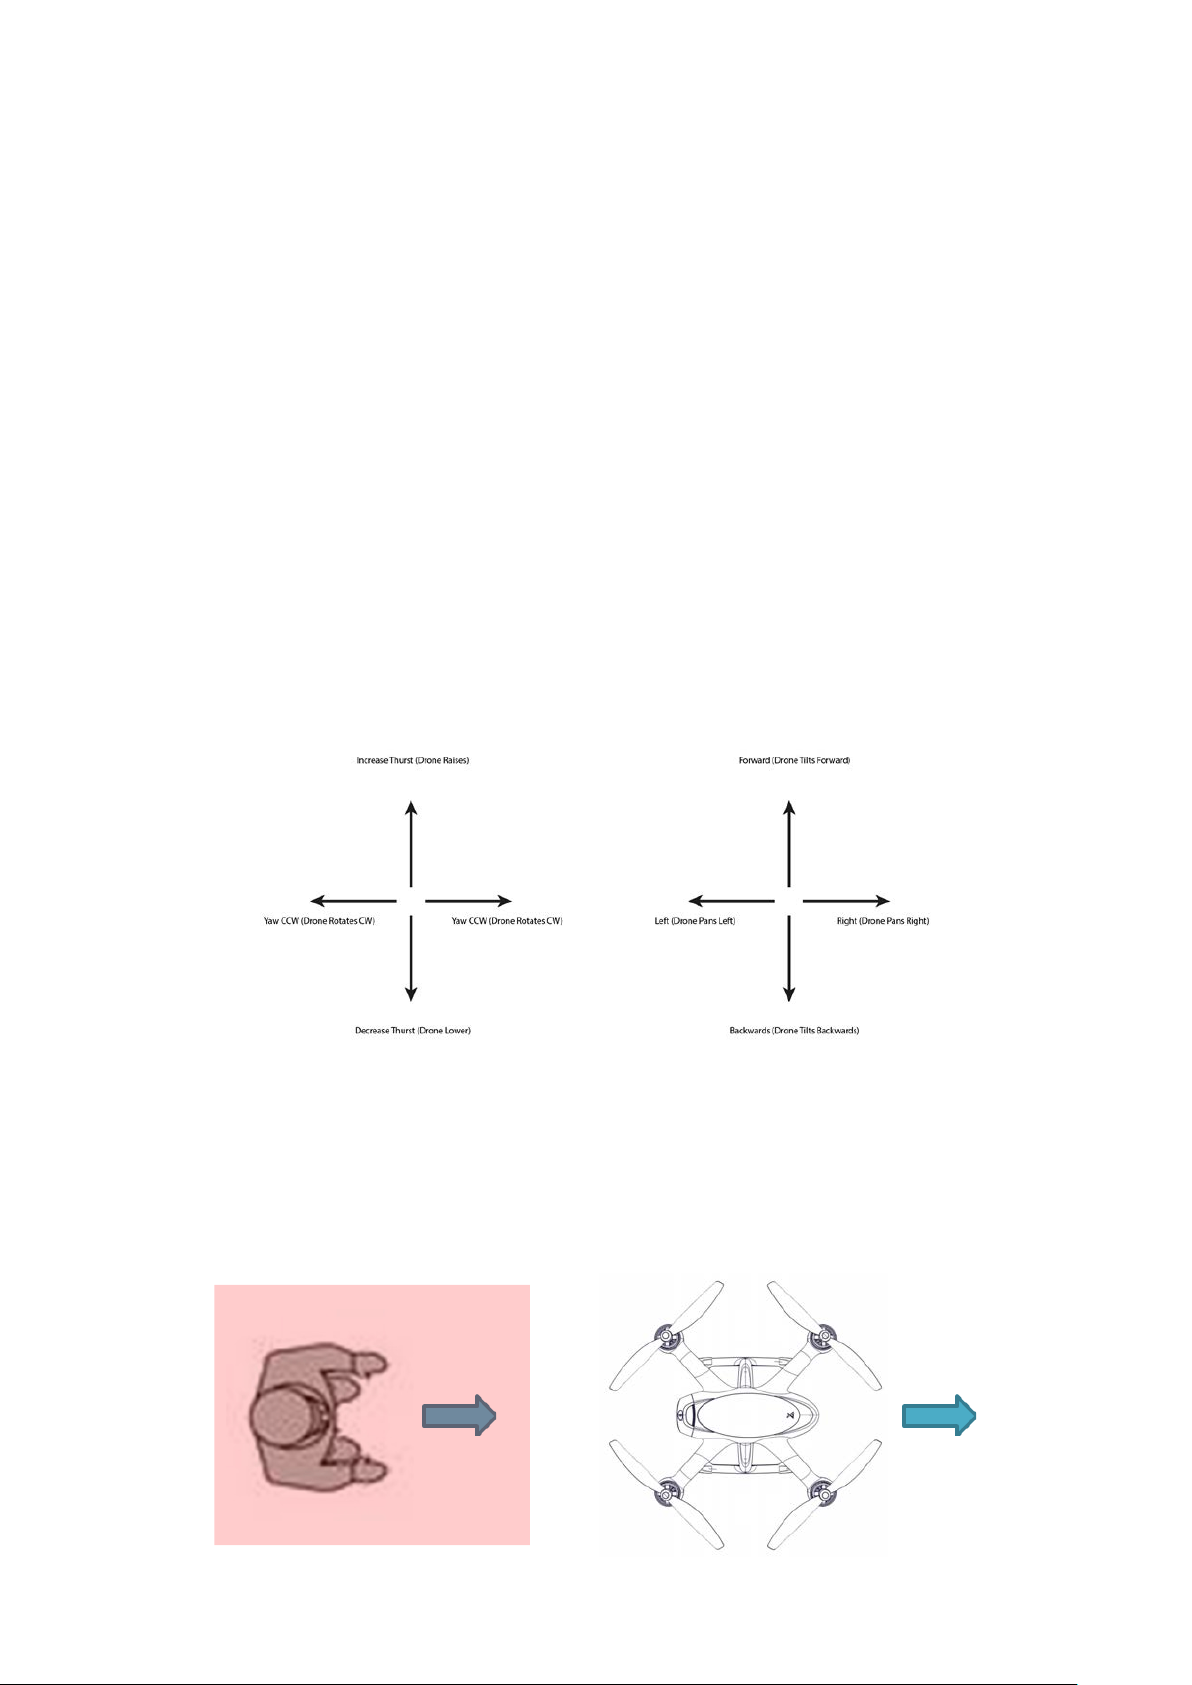
Aircraft Flight Control
Flight control of the Evolve is accomplished by manipulating the control sticks on the ground controller.
Proper orientation must always be considered when ying the drone. A basic rule of thumb when
remote piloting an aircraft is to realize that when the aircraft’s nose, or front end, is facing the pilot
the control inputs for roll and yaw are backwards. This disorientation is the leading cause of all drone
accidents that are due to pilot error. Therefore, it is very important to practice piloting in the proper
orientation. This includes -
◦ Positioning the drone’s nose, or front end, away from the pilot
◦ Be sure to stand at least 6ft directly behind the drone and keep the nose pointed away from
you
◦ Fly in an open area free of obstacles such as trees, power lines, and buildings
◦ Make sure you are ying in GPS mode (The drone will automatically hold position when the
control sticks are released)
◦ Insure all spectators are standing behind you
Drone and Pilot Orientation
Ensure operator and drone both face forward in the same direction prior to launch.
16Evolve User Manual V1.0 by XDynamics Limited
Page 17
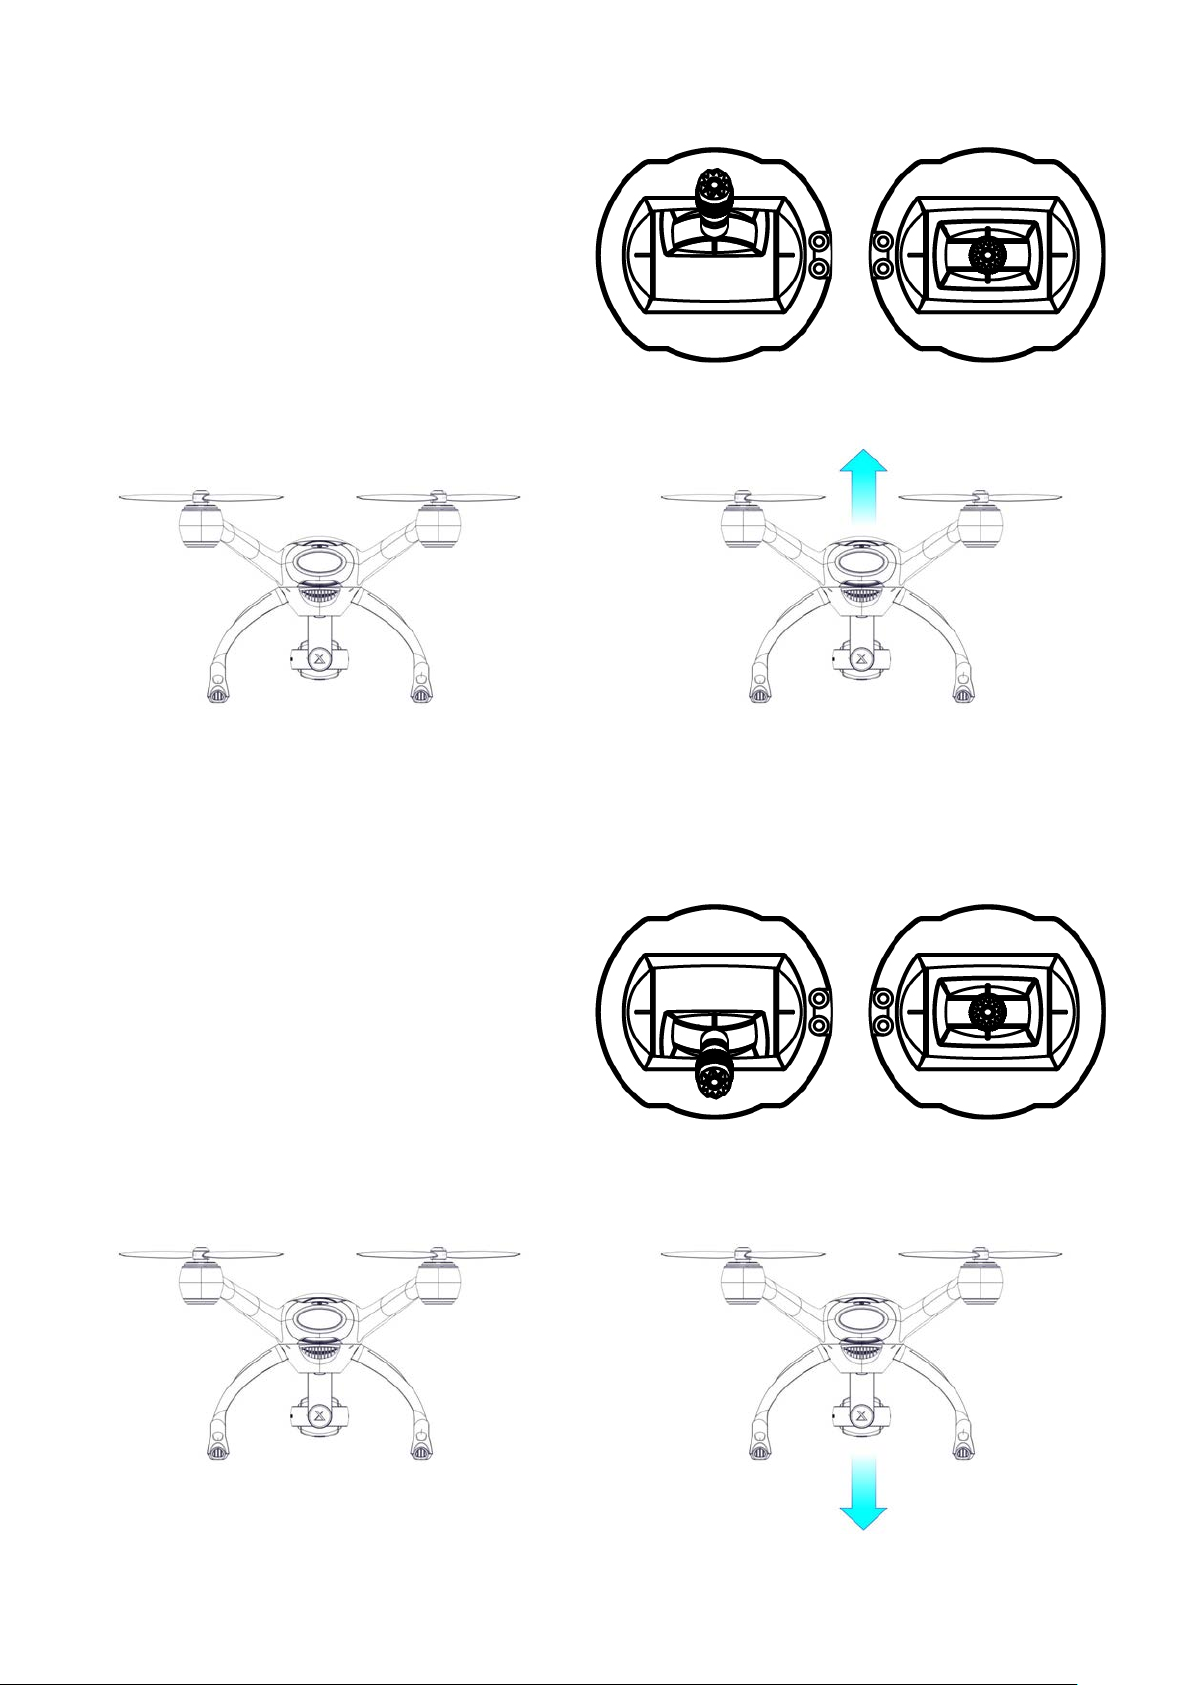
Throttle – Increase (Drone raises up)
Move left thumbstick up
Keep right thumbstick centred
Throttle – Decrease (Drone lowers down)
Move left thumbstick down
Keep right thumbstick centred
17Evolve User Manual V1.0 by XDynamics Limited
Page 18
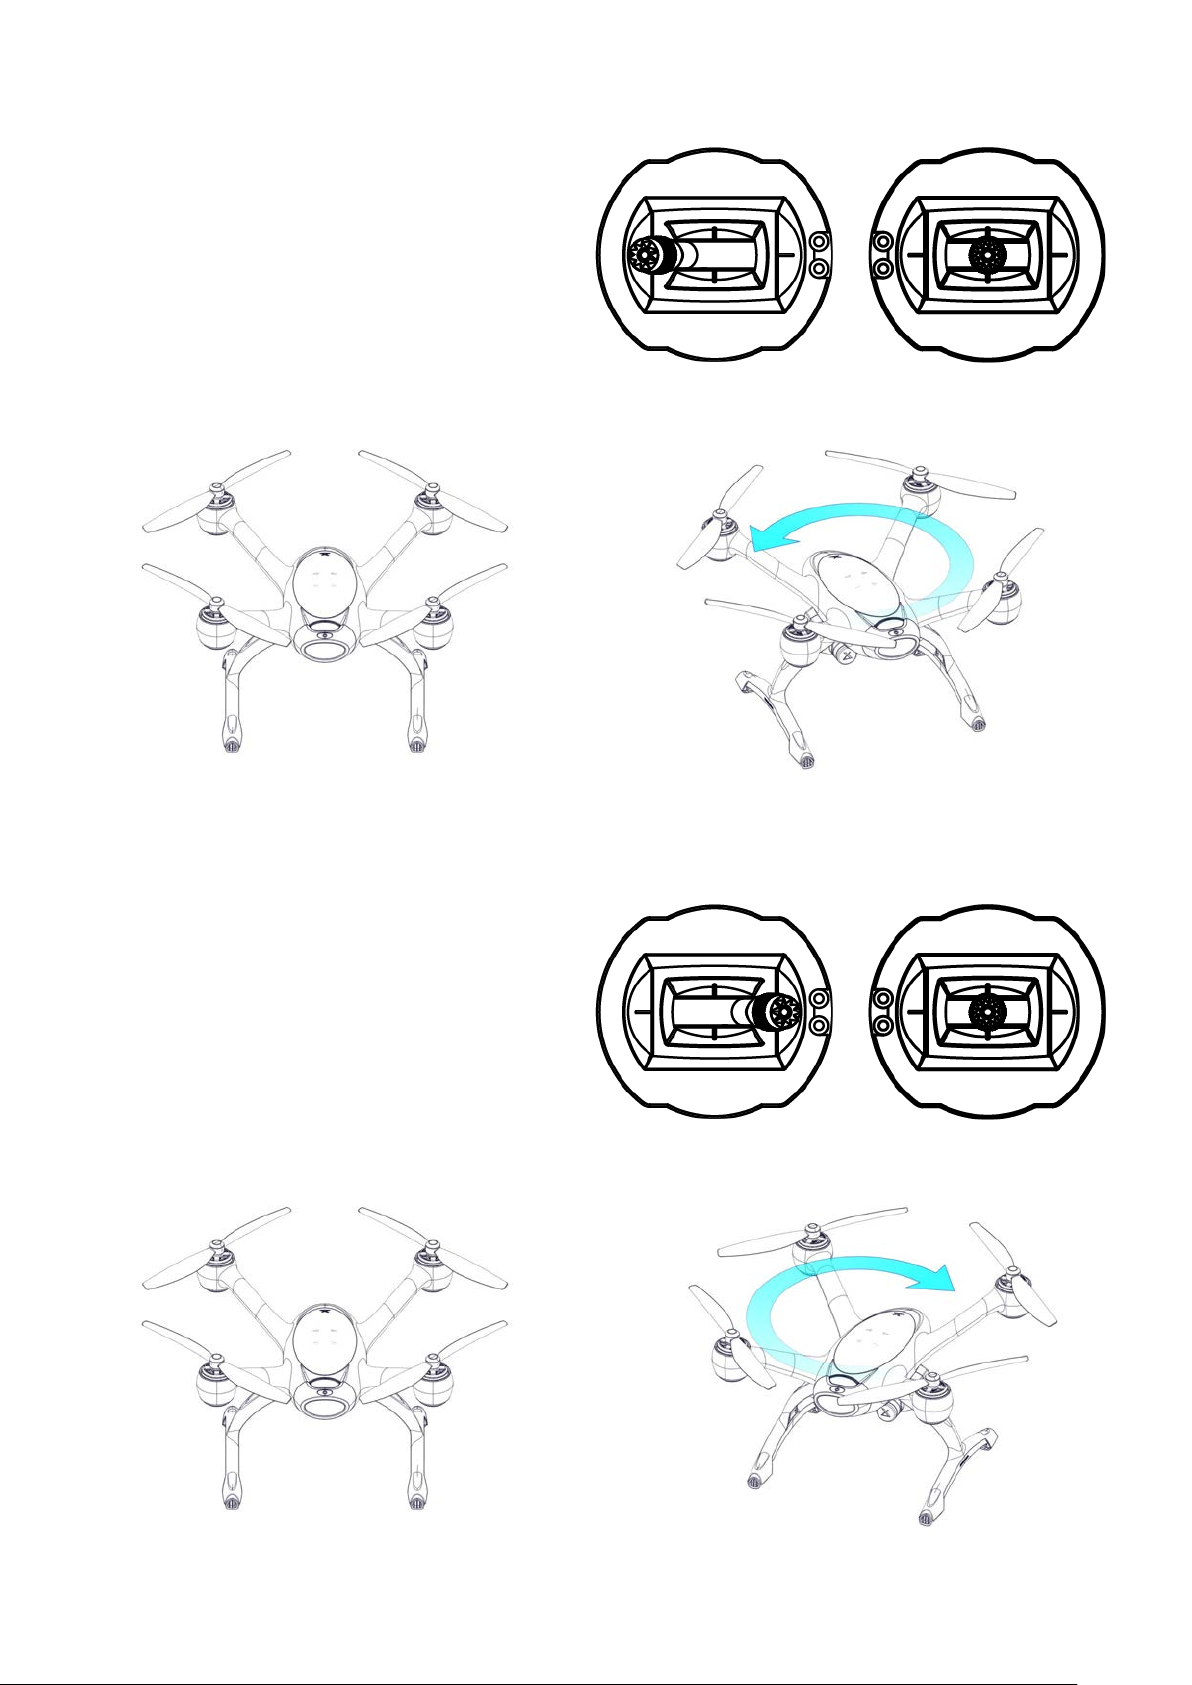
Yaw Counter Clockwise (Drone rotates CCW)
Move left thumbstick left
Keep right thumbstick centred
Yaw Clockwise (Drone rotates CW)
Move left thumbstick right
Keep right thumbstick centred
18Evolve User Manual V1.0 by XDynamics Limited
Page 19
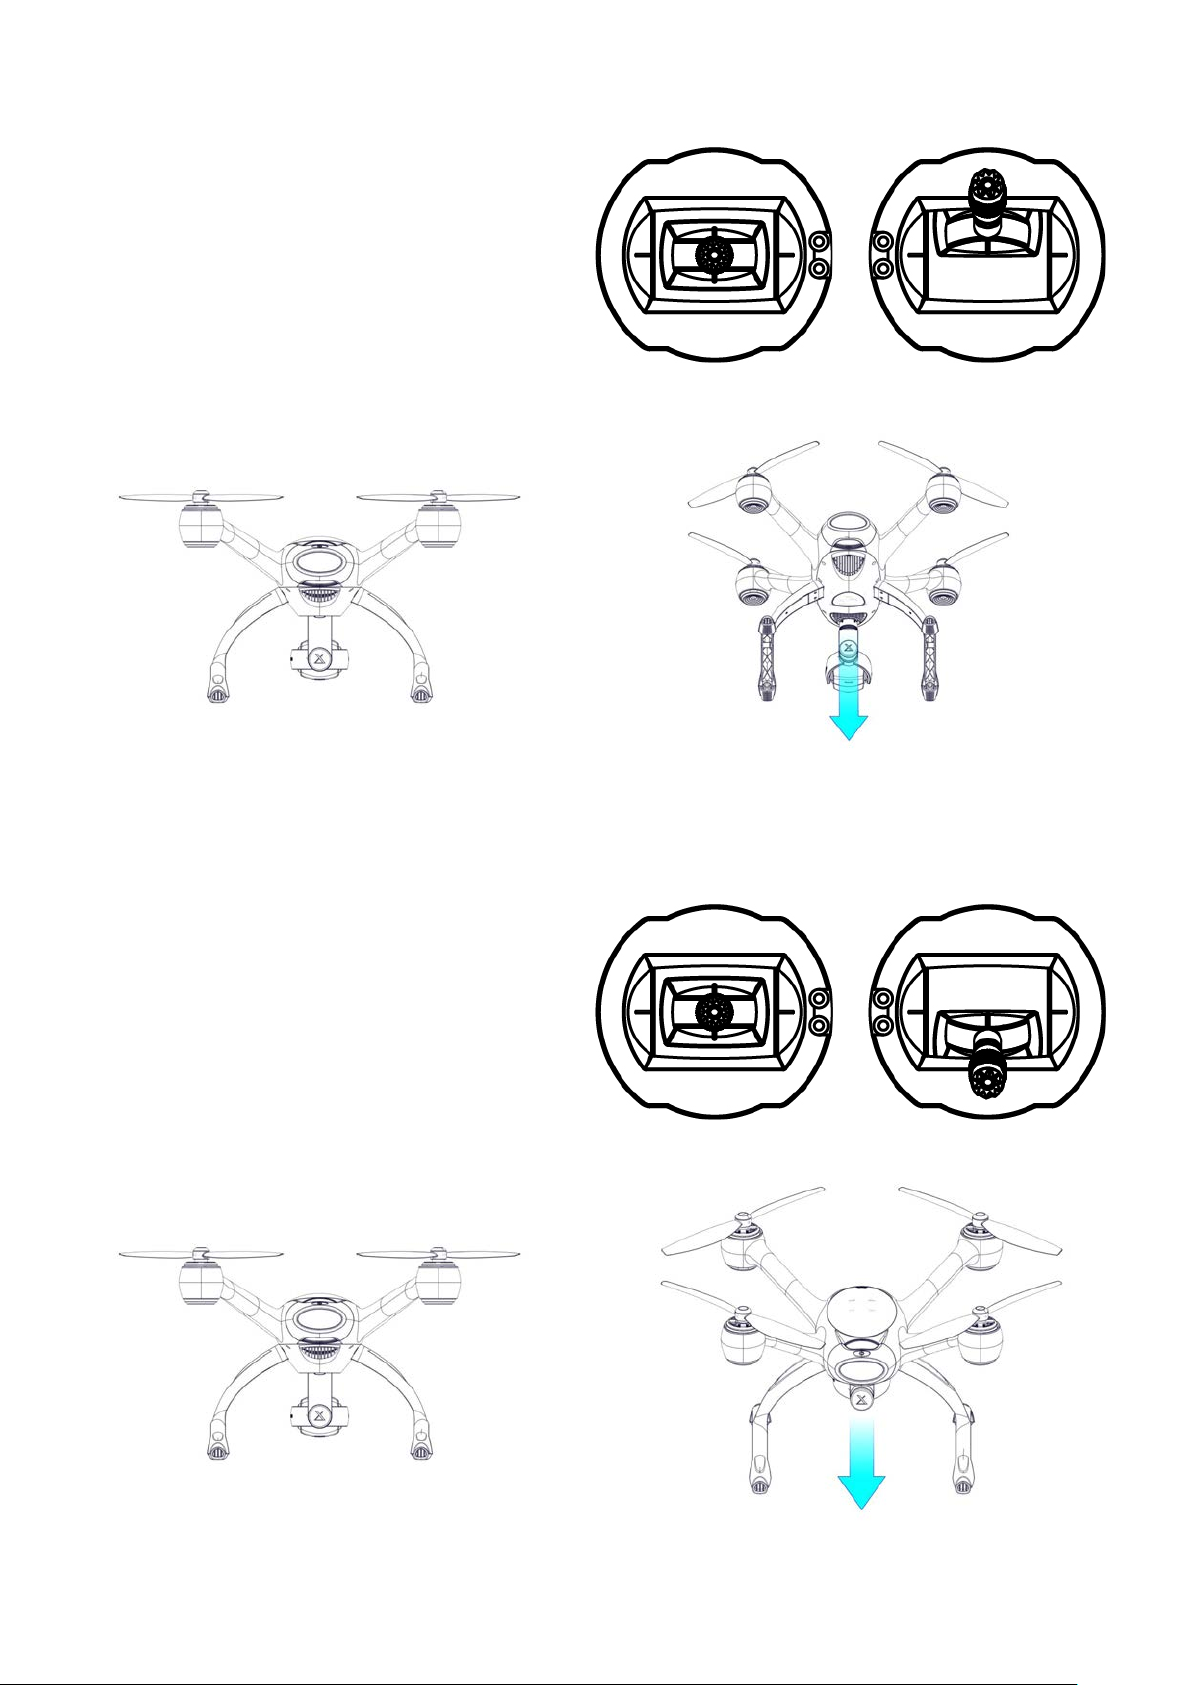
Forward Movement – (Drone tilts forward)
Keep left thumbstick centred
Move right thumbstick up
Backwards Movement – (Drone tilts backwards)
Keep left thumbstick centred
Move right thumbstick down
19Evolve User Manual V1.0 by XDynamics Limited
Page 20
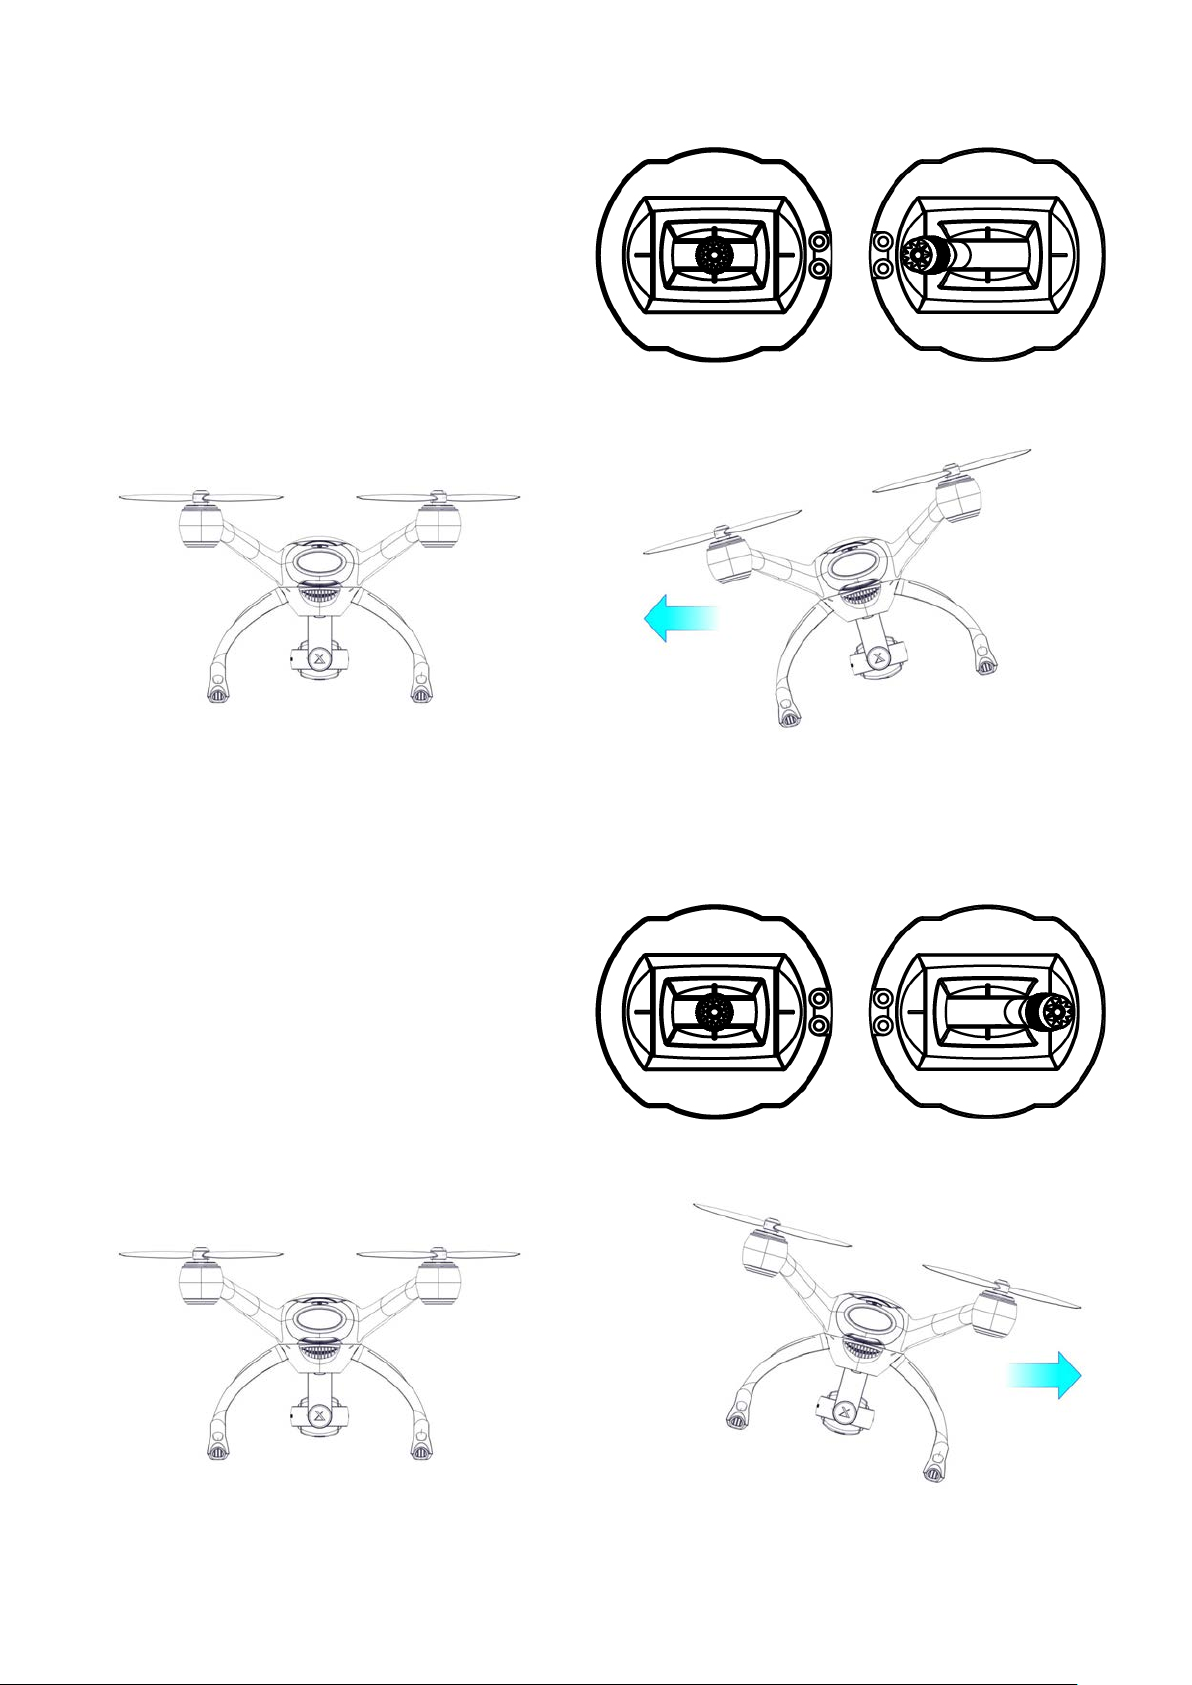
Roll Left – (Drone moves left)
Keep left thumbstick centred
Move right thumbstick left
Roll Right – (Drone moves right)
Keep left thumbstick centred
Move right thumbstick right
20Evolve User Manual V1.0 by XDynamics Limited
Page 21
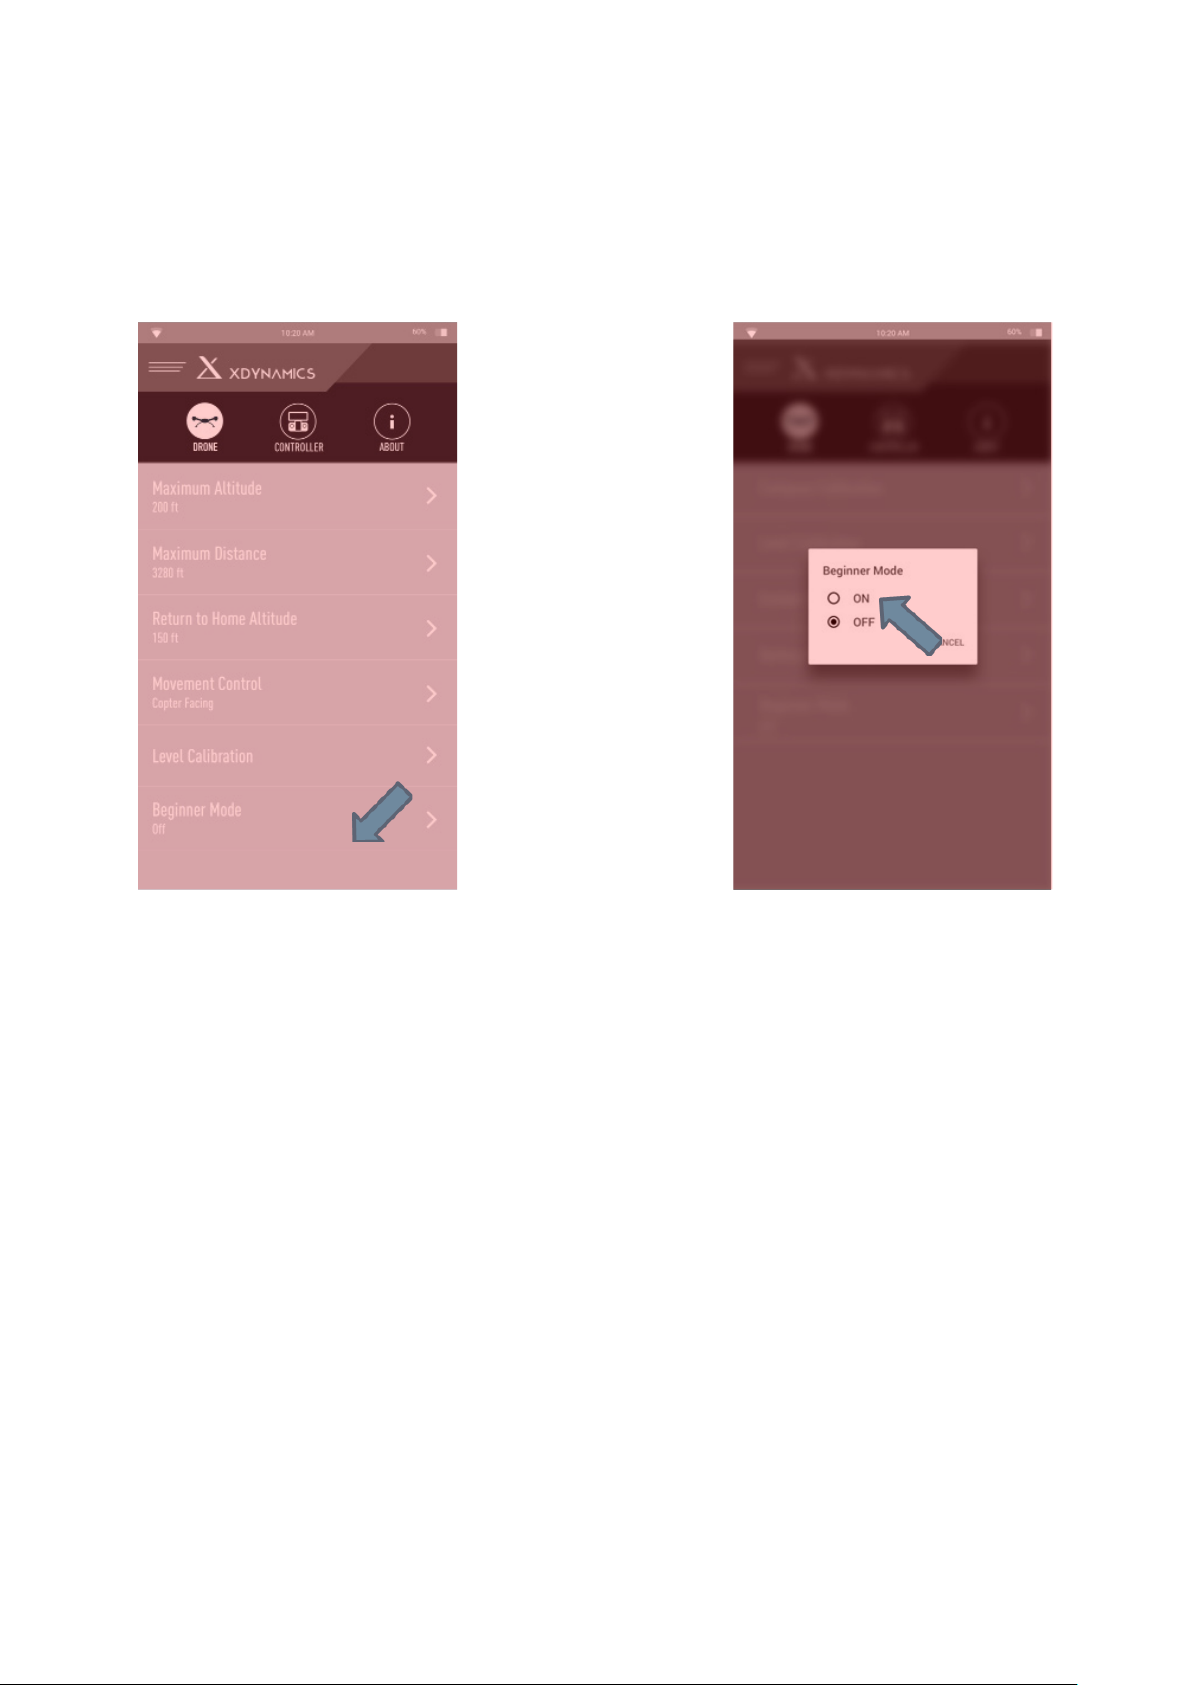
Flight Modes
Beginner Mode
User may enable beginner mode at Setting Page. After enabling the Beginner Mode, the drone can
only be own within a spherical radius of 30m from the take-o position.
21Evolve User Manual V1.0 by XDynamics Limited
Page 22
Flight Modes
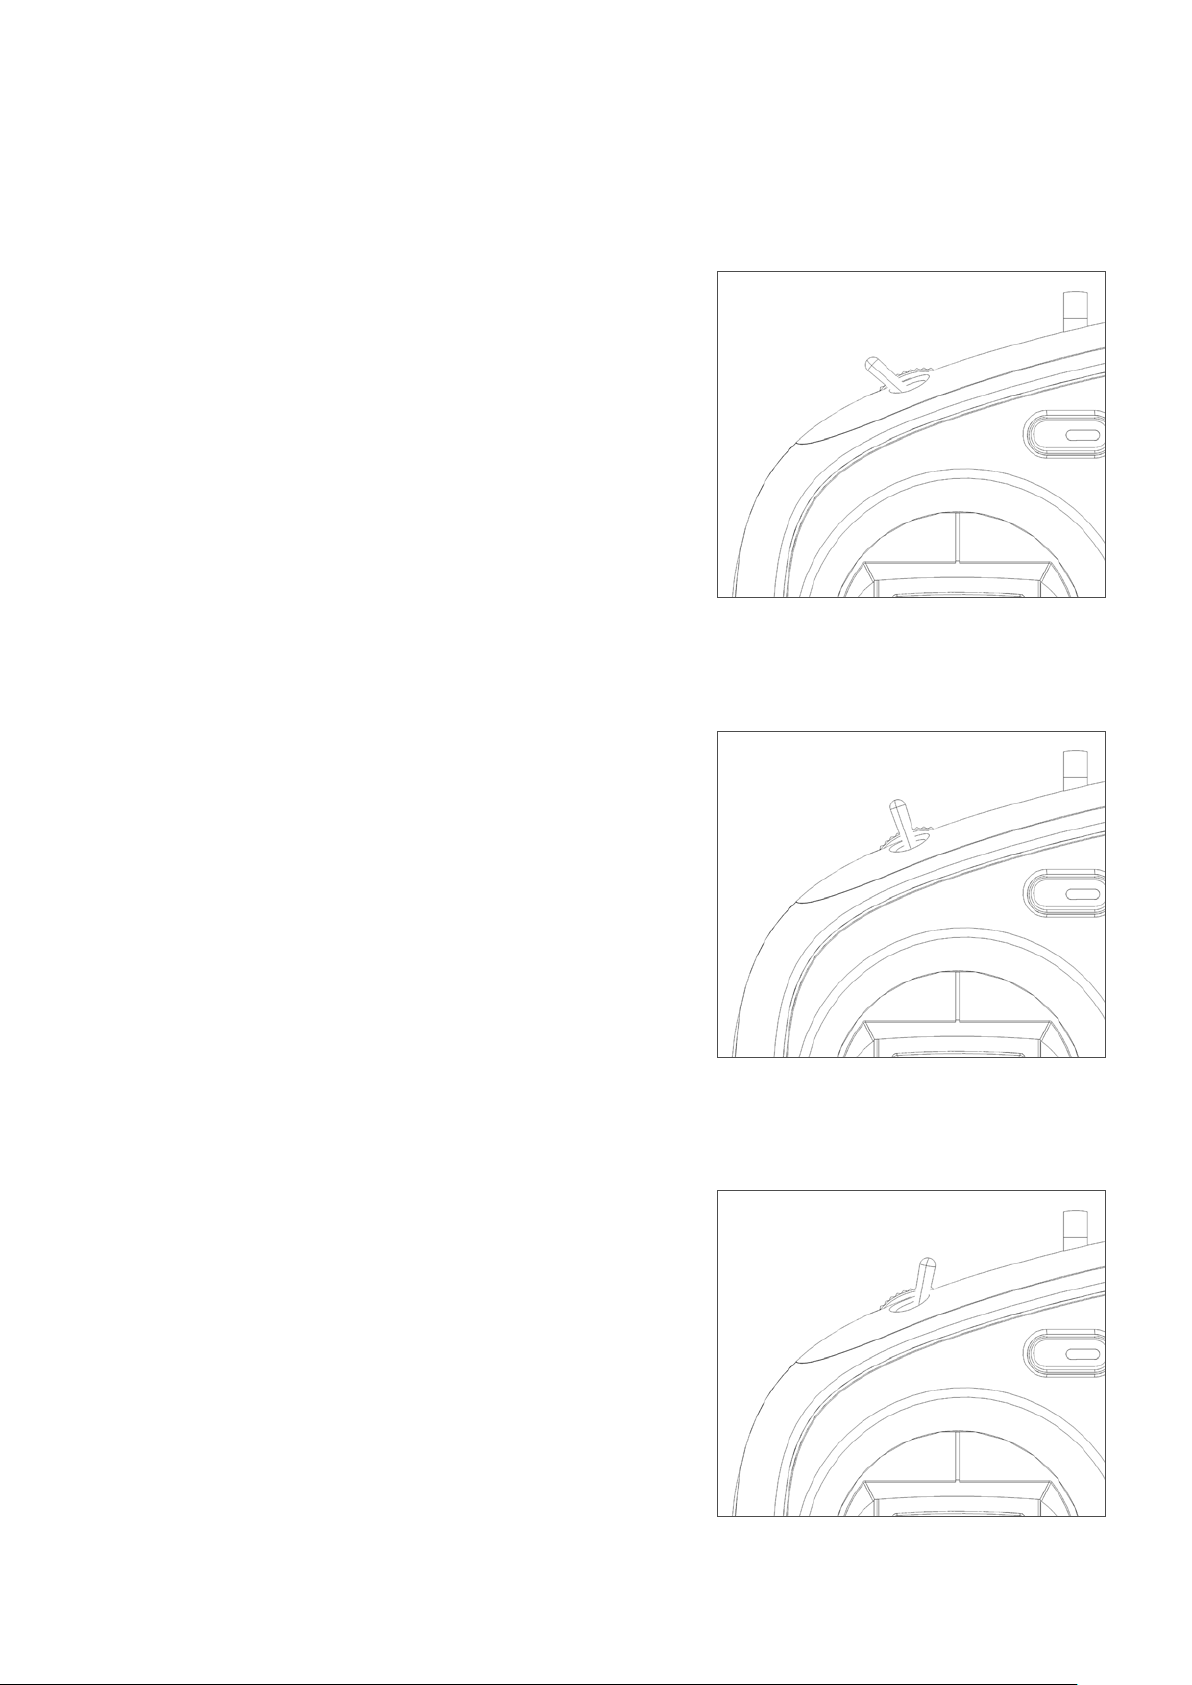
The Evolve drone has 3 ight modes that the operator can choose from. The modes are selected by a 3
position switch located on the top left of the Remote Controller. Below is a description of each:
1. GPS Mode (Left position on the 3 position Switch)
In this mode, with a strong GPS signal, the drone
will hold position when the control sticks are
released. This mode is suggested for beginner
operators.
Position 1 – GPS Mode
2. GPS Custom Mode (Centre position on 3 position Switch)
In this mode, with a strong GPS signal, the drone
can perform the Smart Pilot functions such as
Waypoint Operation, Easy Course and other
modes. When the drone is not performing a smart
function it will y in GPS Mode.
3. Free Mode (Right position on 3 position Switch)
In this mode the drone will hold in level attitude
orientation when the control sticks are released,
but it will not hold position. This results in the
drone drifting in the direction the wind is blowing
and the operator must control position at all times.
This mode is only recommended for experienced
operators. This mode is meant for smoother
breaking reactions and camera panning.
Position 2 – GPS Custom Mode
Position 3 – Free Mode
22Evolve User Manual V1.0 by XDynamics Limited
Page 23
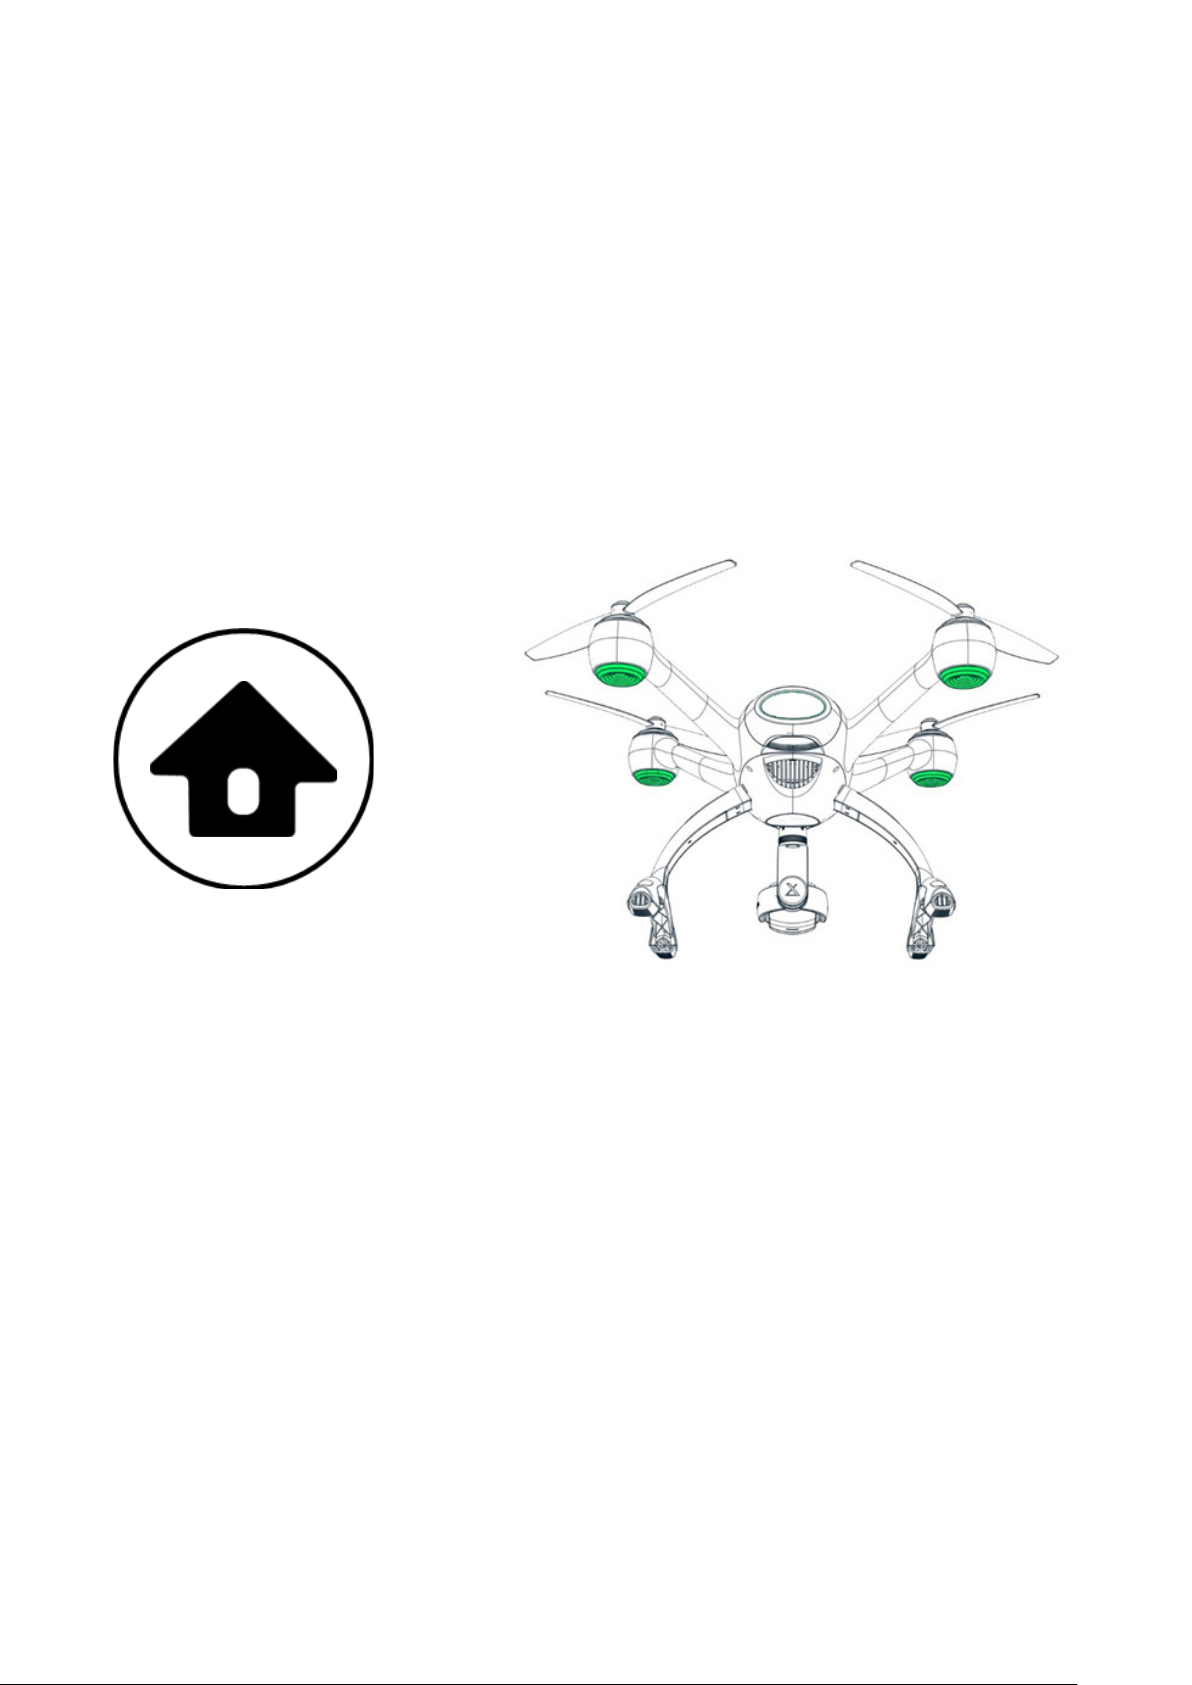
Return to Home
This feature brings the drone back to the location it rst acquired a home lock position utilizing the GPS
signal. Ensure GPS signal is xed before takeo (when all 4 LED lights located under the motors are
solid green a GPS home lock is achieved) to bring it back to your home point position, when it reaches
the home position the aircraft will hover for 5 seconds then land automatically. During the landing
decent the operator can move the drone’s position to clear and obstacles on the ground or land in a
preferred spot. On any stage the RTL mode can be modied by pressing the RTL button again and
conrming the RTL cancel, then the drone will state back into the mode which the 3 position switch
mode is selected.
The number of GPS satellites acquired and the health of the GPS signal can also be checked on the top
screen of the Remote Controller. 6 is the minimum number of satellites needed. The signal health will
be conrmed by a (Excellent / Good / Fair / Poor) message on the APP.
23Evolve User Manual V1.0 by XDynamics Limited
Page 24
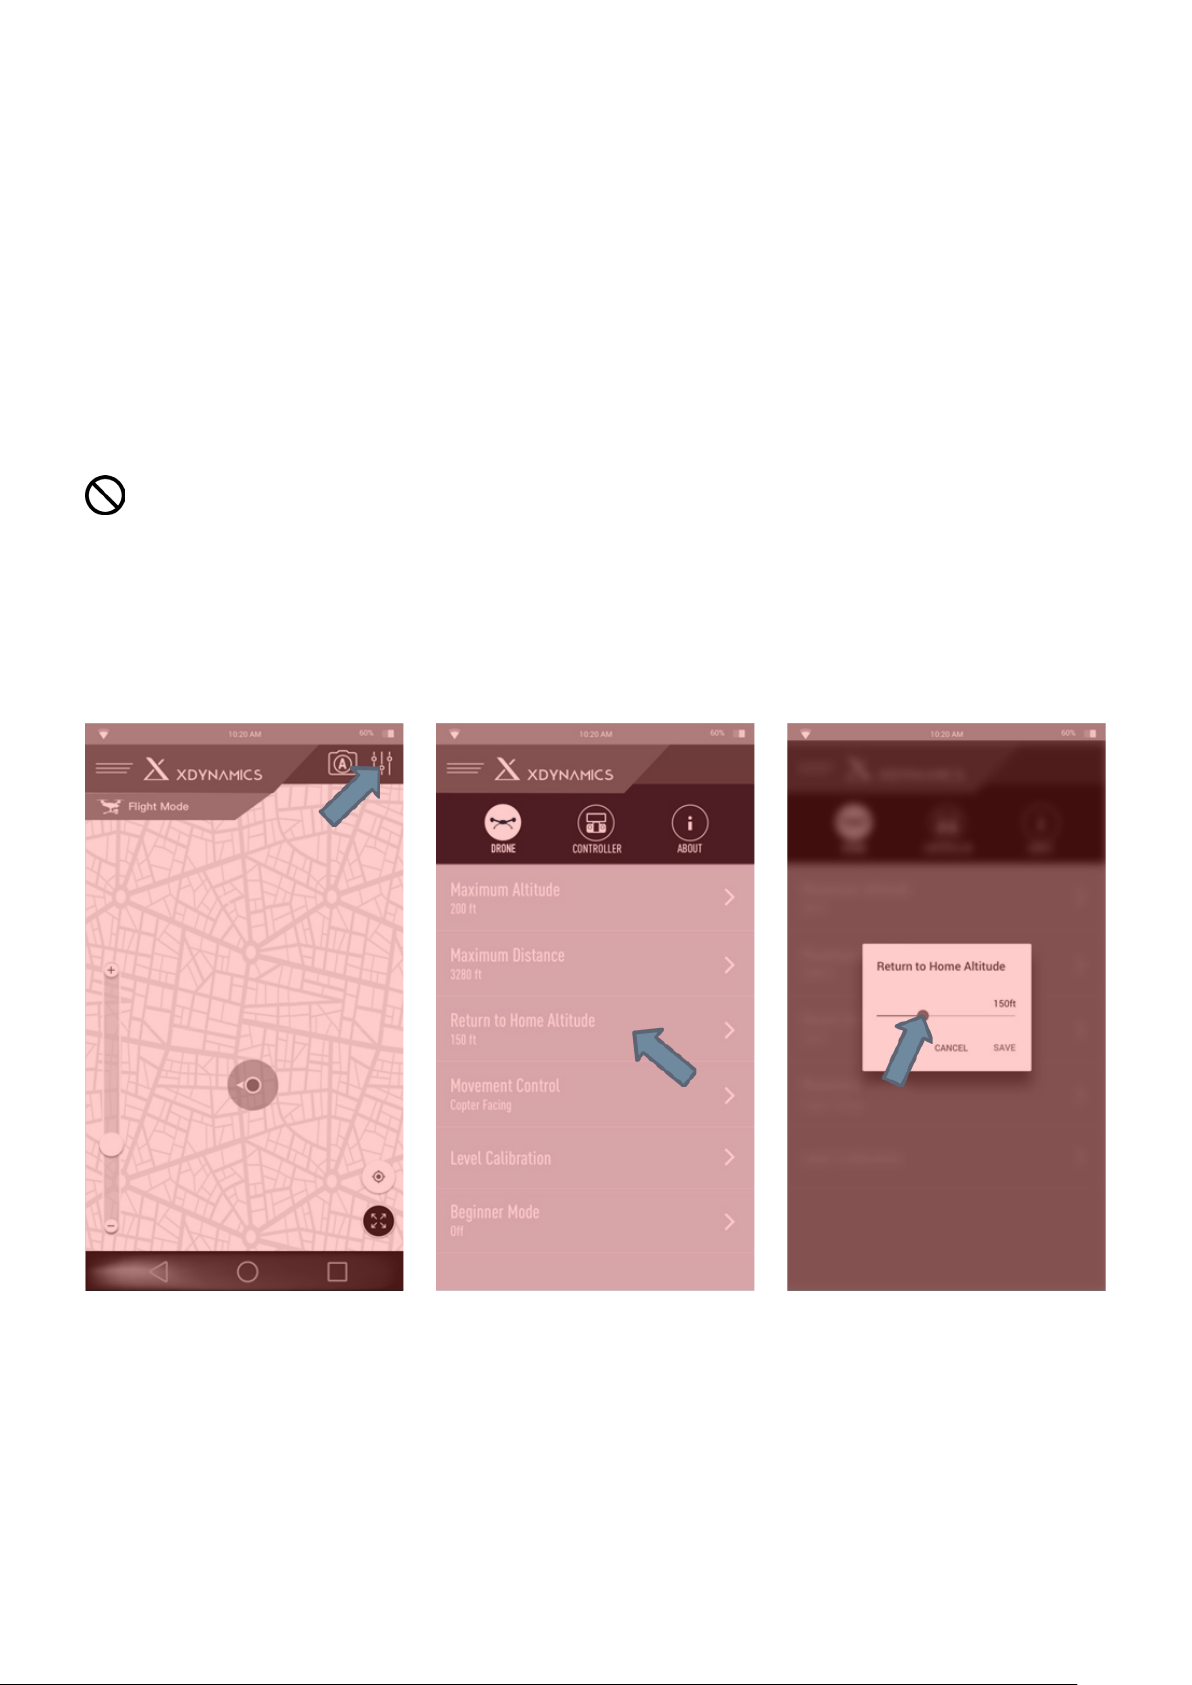
Determining the Return to Home Altitude
Depending on the ight conditions and obstacles in the return to home ight path, the operator can
choose a safe return altitude for the Return to Home function. This altitude should be set up before
ight under the APP conguration tab. A low altitude setting is not recommended for obstacle
clearance (such as tress or buildings). Also notice the maximum legal ight altitude. This conguration
allows the drone to reach a programed altitude before starting to ying back to the home position. If
the drone is below the programed altitude it will climb to the programmed altitude then proceed to
the home position. If the drone is above the programed altitude it will remain at that altitude and then
proceed to home position.
Note: This altitude setting is also used for Return to Home function in a case of failsafe
triggering do to loss of signal or power loss of controller.
To congure the Return to Home Altitude, user may enter the Setting Page. At the Drone section, there
is the RTH Altitude Setting, tap and change the value.
24Evolve User Manual V1.0 by XDynamics Limited
Page 25
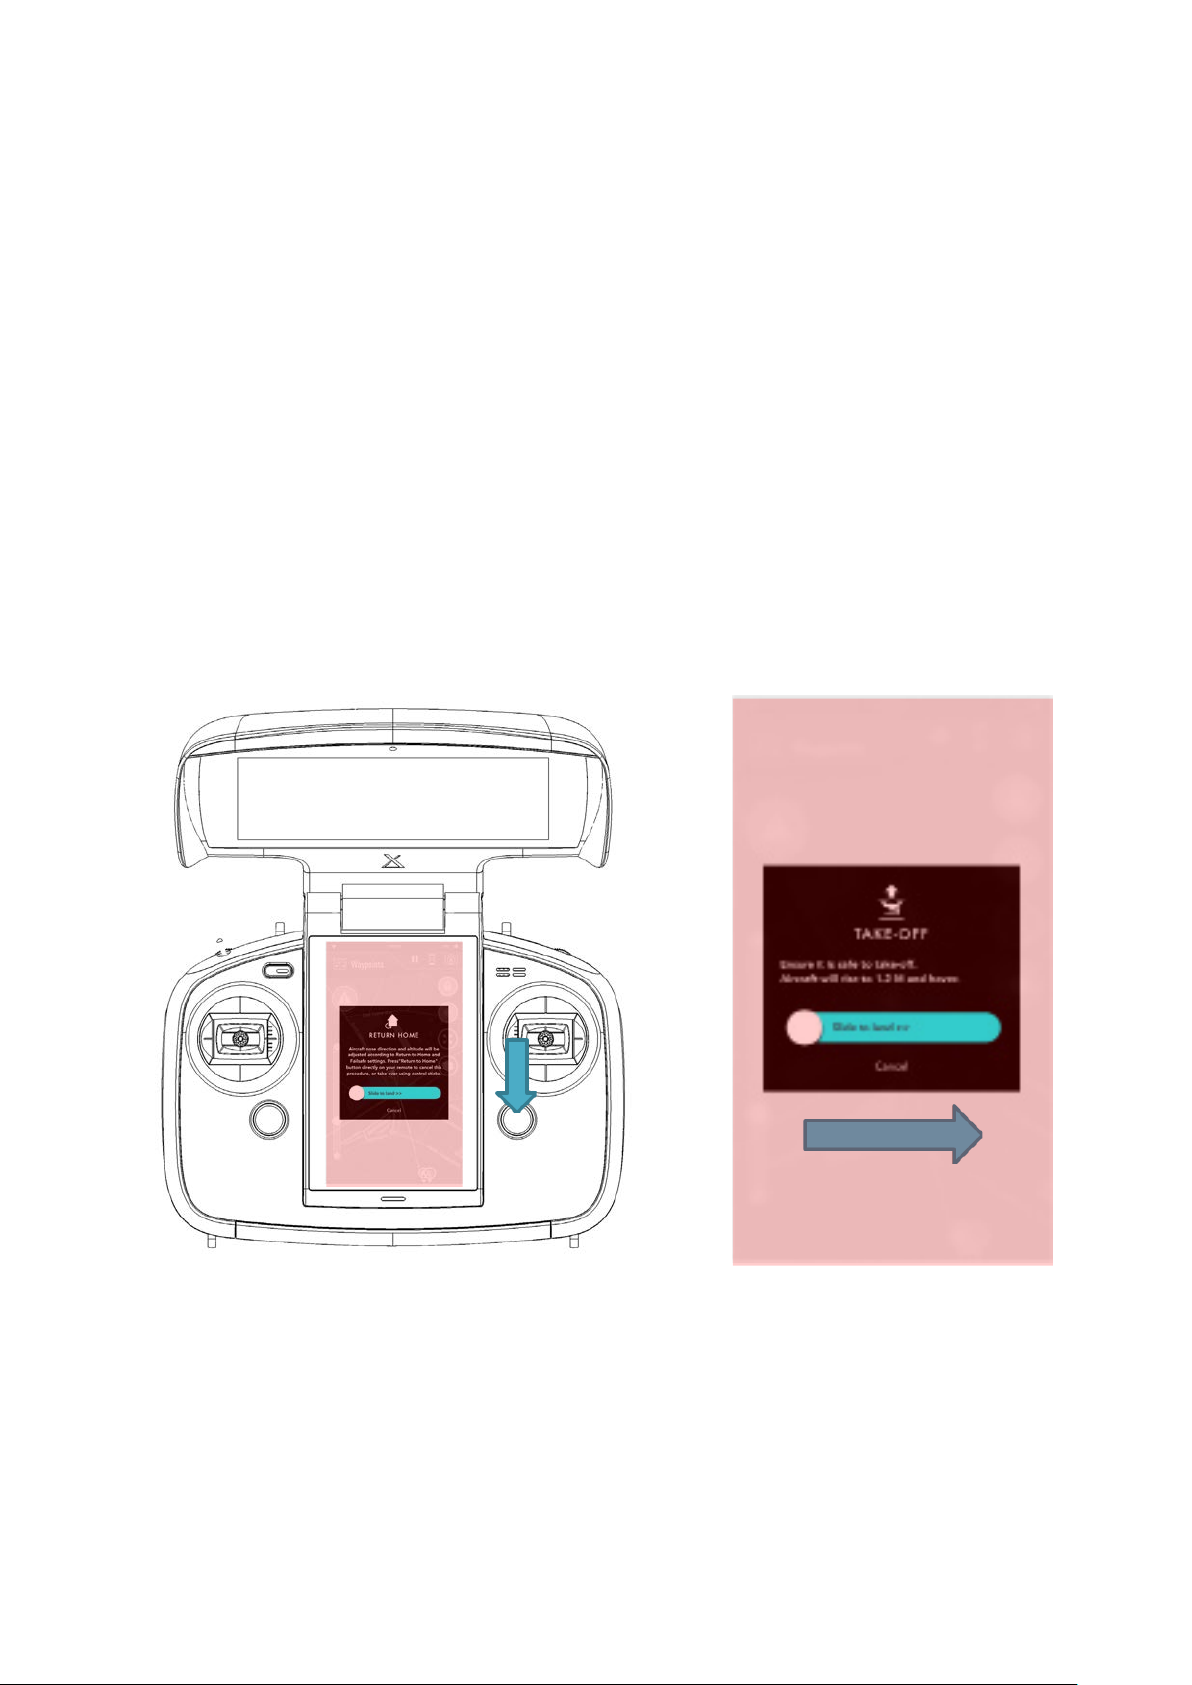
Using the Return to Home Button on the Controller
Follow the steps below:
1. Make sure GPS Signal is showing at least ‘Good’ (if not, visually track the drone as it
y back to home position).
2. Press and hold the Return to Home button for 3 seconds.
3. The drone will climb to pre-set altitude, or if at a greater altitude than the programed
altitude it will remain at that altitude, and then return to the Home Point in shortest
path (straight line).
4. Smart Pilot System indicates the Drone is under Return to Home Mode.
5. When reaching the home point the drone will hover for 5 seconds then proceed to
auto land (during the decent the operator can reposition the drone to clear obstacles
or land in preferred spot).
25Evolve User Manual V1.0 by XDynamics Limited
Page 26
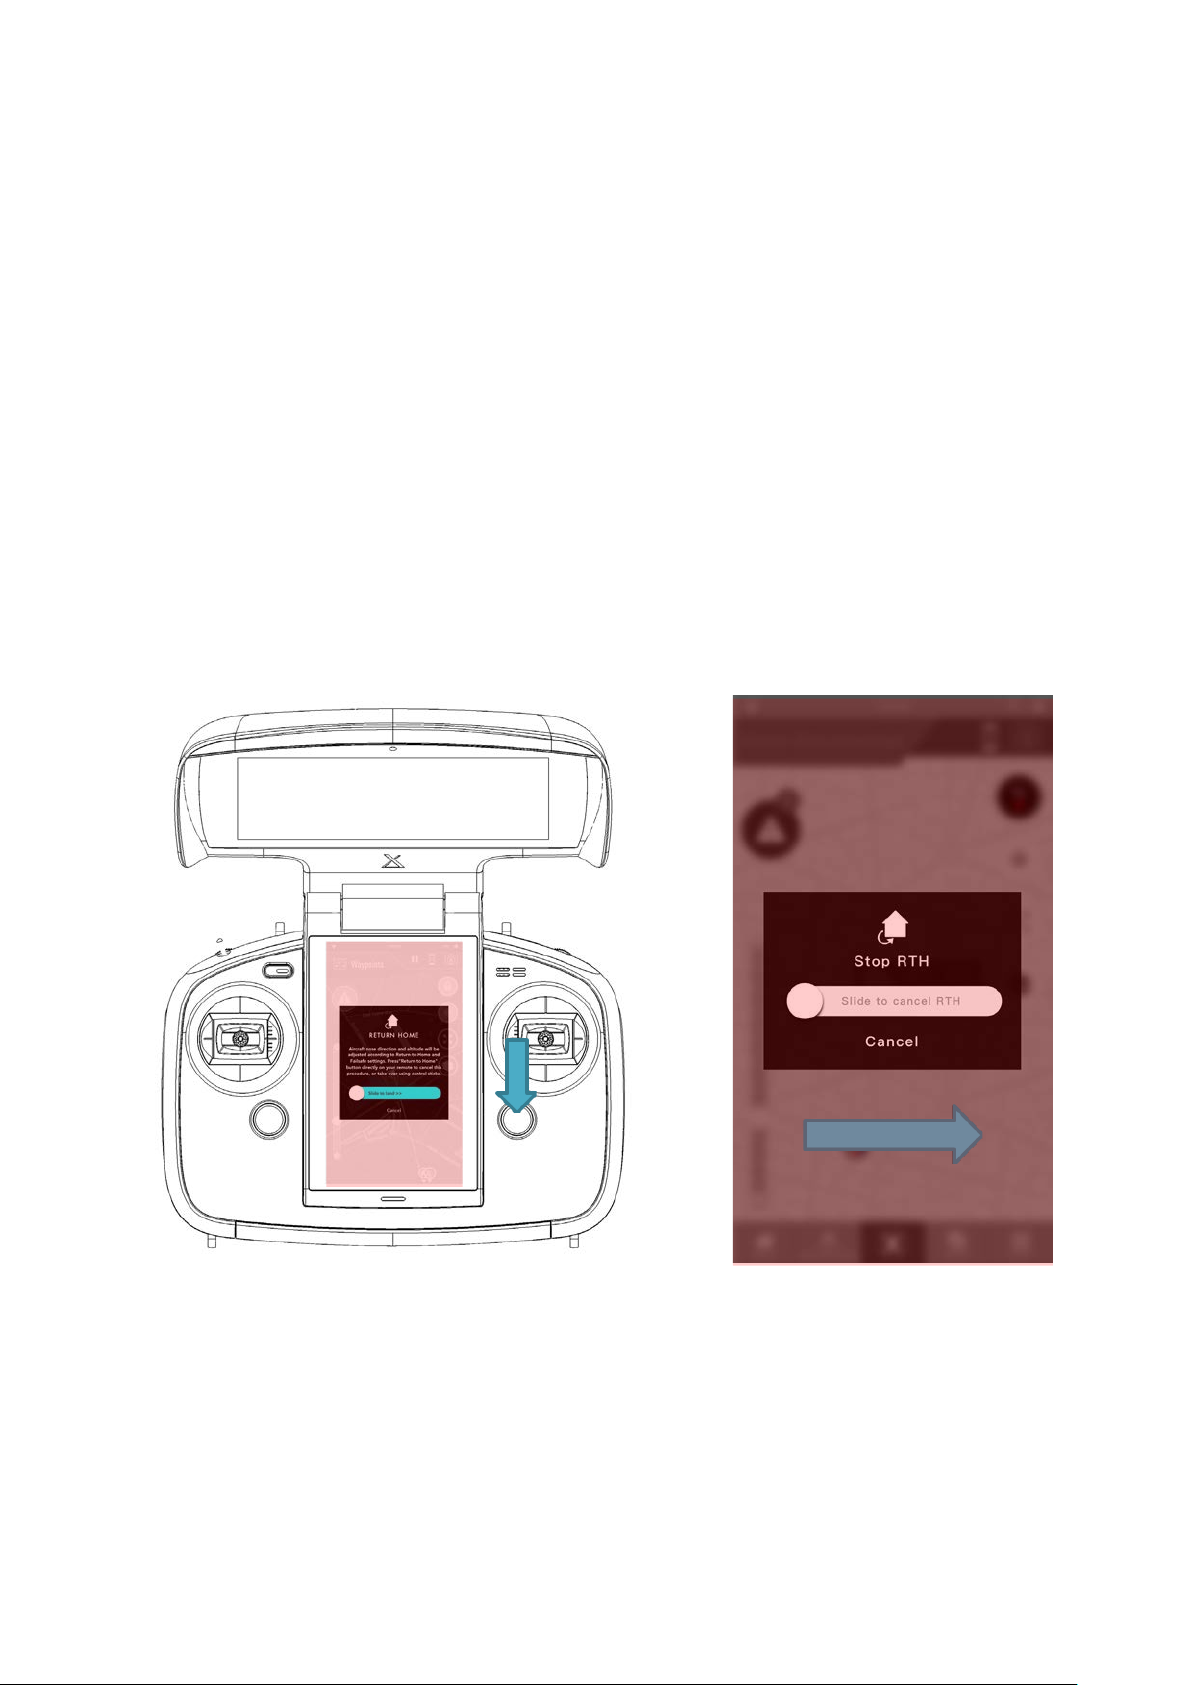
Return to Home Button Cancellation
During the return home ight the user may stop the RTH process by following the below steps:
1. Press and hold the Return to Home button for 3 seconds.
2. Smart Pilot System indicates the Drone Flight Mode.
3. The drone will continue in the mode at which the 3 position switch mode is selected.
26Evolve User Manual V1.0 by XDynamics Limited
Page 27
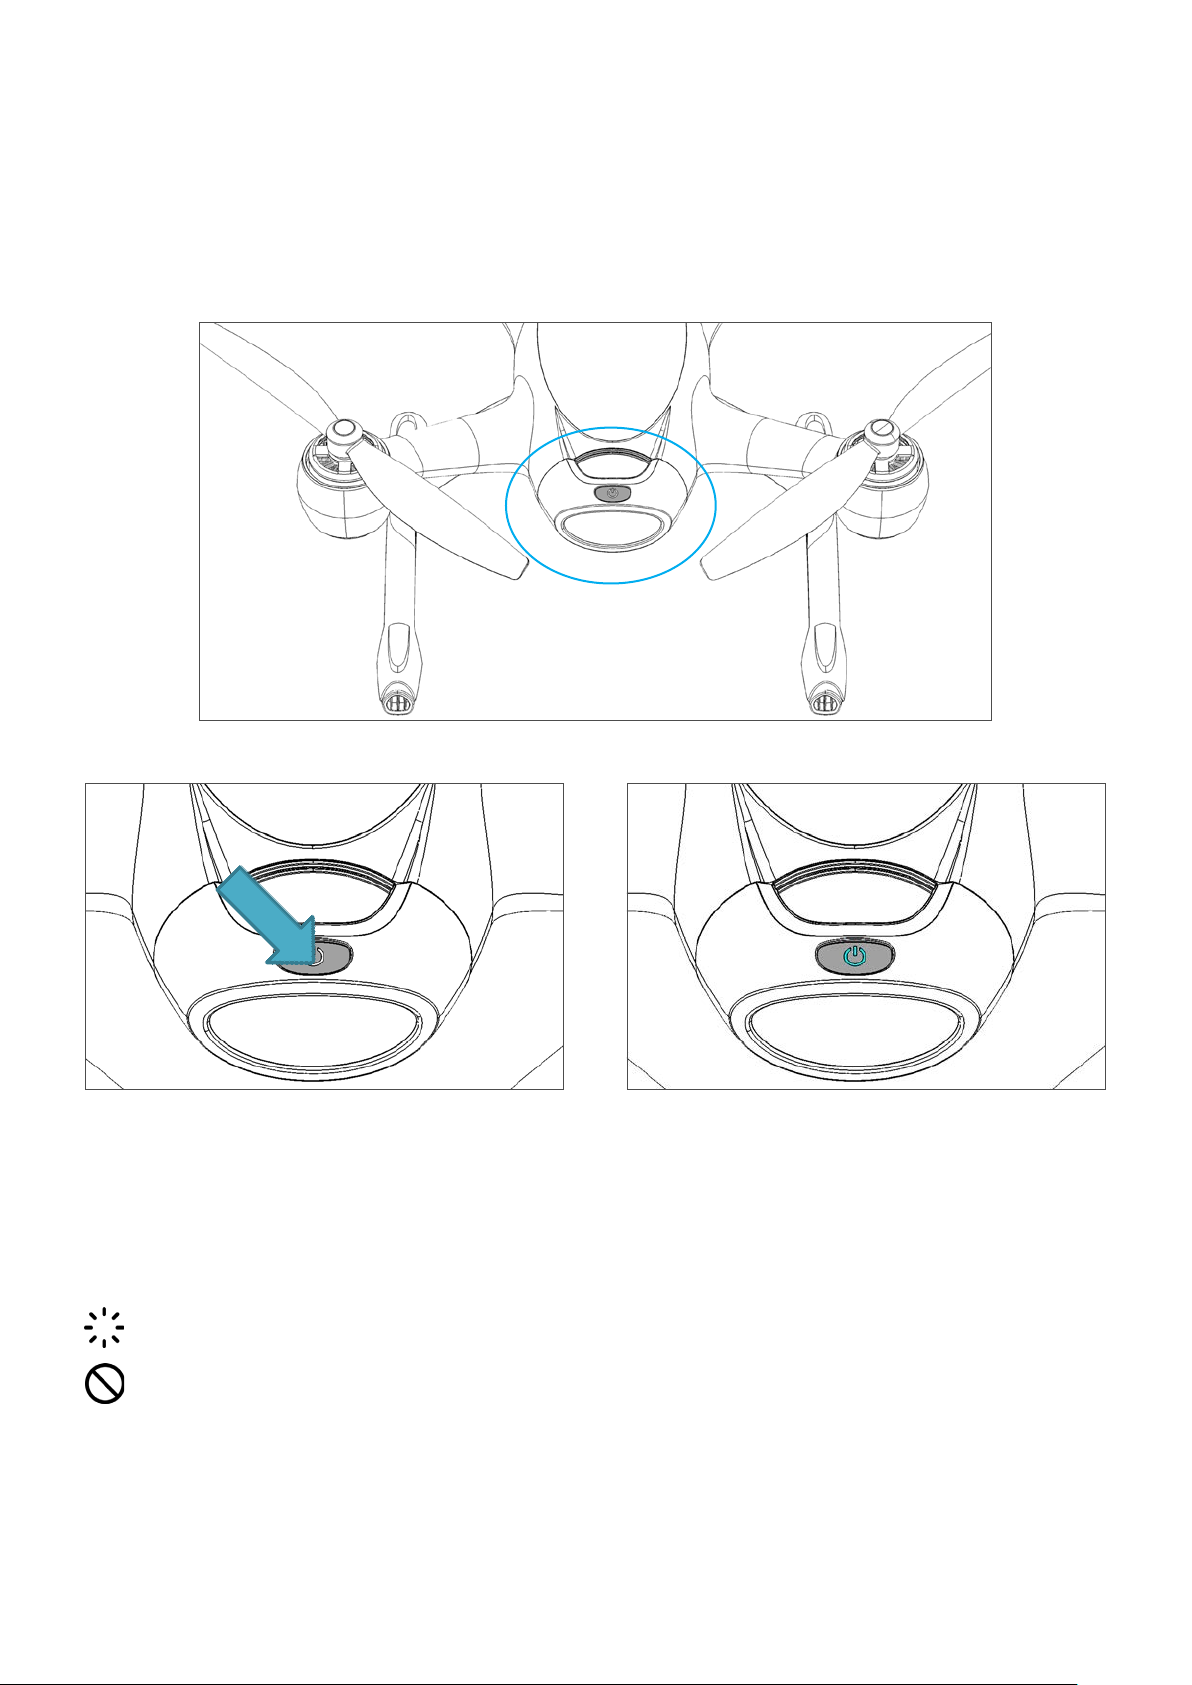
Turn On/O Aircraft
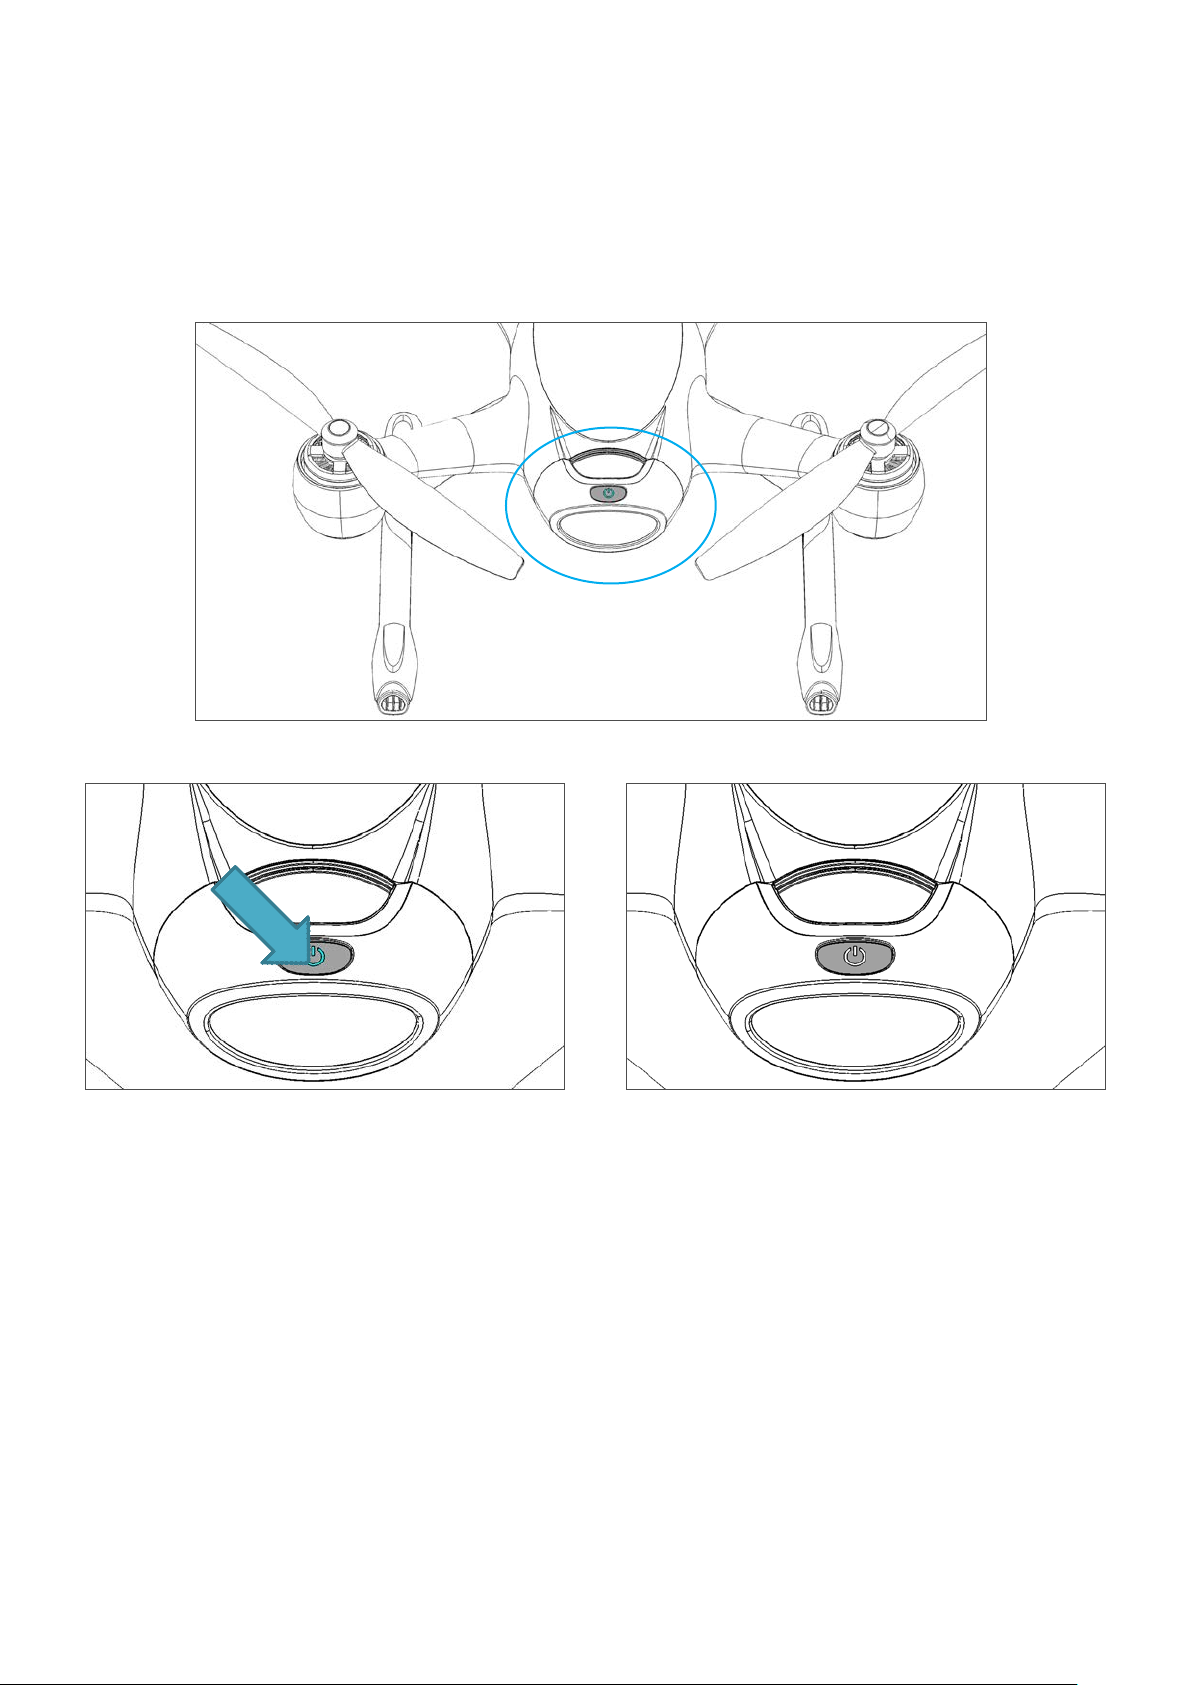
Turning On Drone
The battery has a dual press feature to avoid the user accidentally turning on the battery with a single
button press.
Press and release the battery switch then
press again and hold battery switch until the
XDynamics logo runs across the screen.
The battery will turn on if it is installed in the drone or not.
If the battery is still turn on when removed from the drone, ensure the battery connect terminals
are left unobstructed to prevent short circuiting.
XDYNAMICS
The drone is powered on when the battery light
is illuminated and the power percentage of
charge is displayed.
27Evolve User Manual V1.0 by XDynamics Limited
Page 28
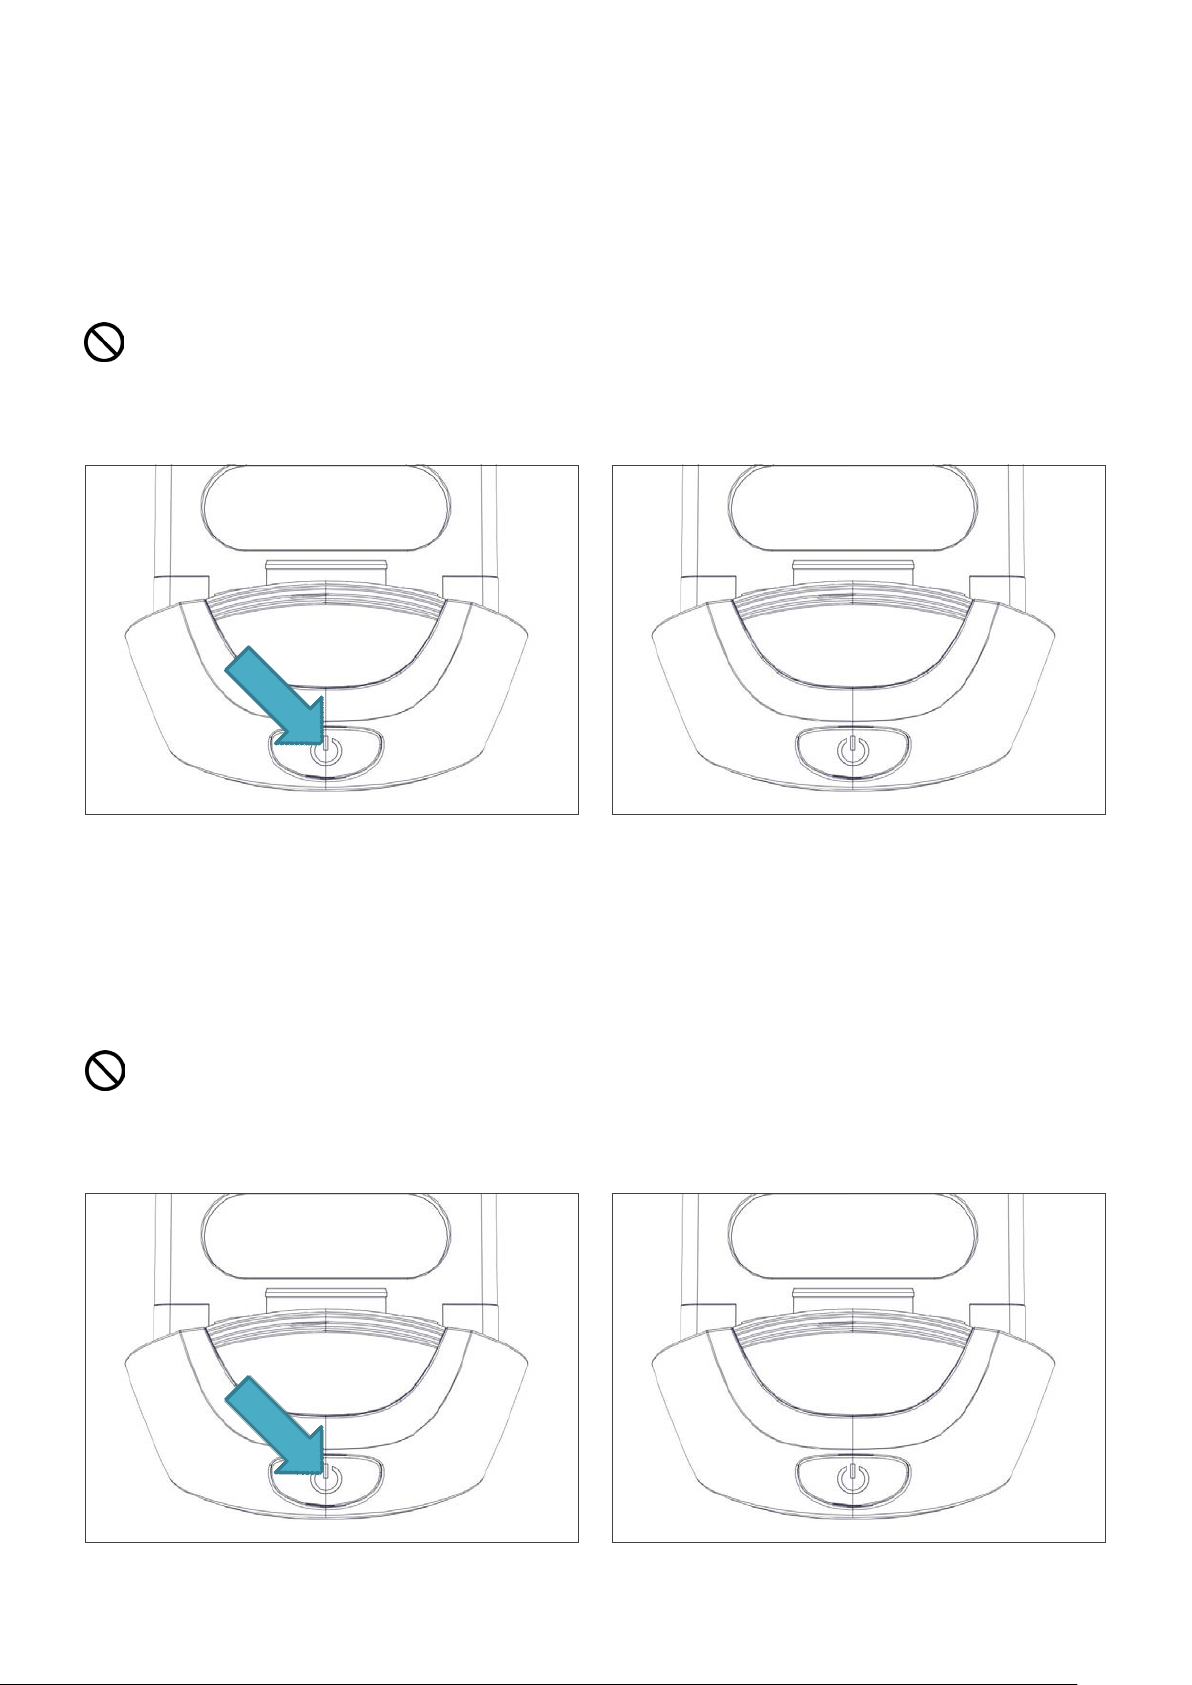
Turn On/O Aircraft
Turning OFF the Drone
Press and release the battery switch then press again and hold battery switch until the XDynamics logo
runs across the screen.
100%
100%
Press and release the battery switch then
press again and hold battery switch until the
XDynamics logo turns o.
The drone is powered o when the OLED Logo
and Power button LED are o.
28Evolve User Manual V1.0 by XDynamics Limited
Page 29
Turn On/O Aircraft Battery
Turning the Battery On When not Plugged into the Drone
Press and release the battery switch then press again and hold battery switch until the XDynamics logo
runs across the screen.
Note: Never short out any of the pins of the battery or try to connect to any other equipment
other than the Evolve Drone and the supplied charger.
100%
Turning the Battery O When not Plugged into the Drone
Press and release the battery switch then press again and hold battery switch until the XDynamics logo
runs across the screen.
Note: Never short out any of the pins of the battery or try to connect to any other equipment
other than the Evolve Drone and the supplied charger.
15%
29Evolve User Manual V1.0 by XDynamics Limited
Page 30
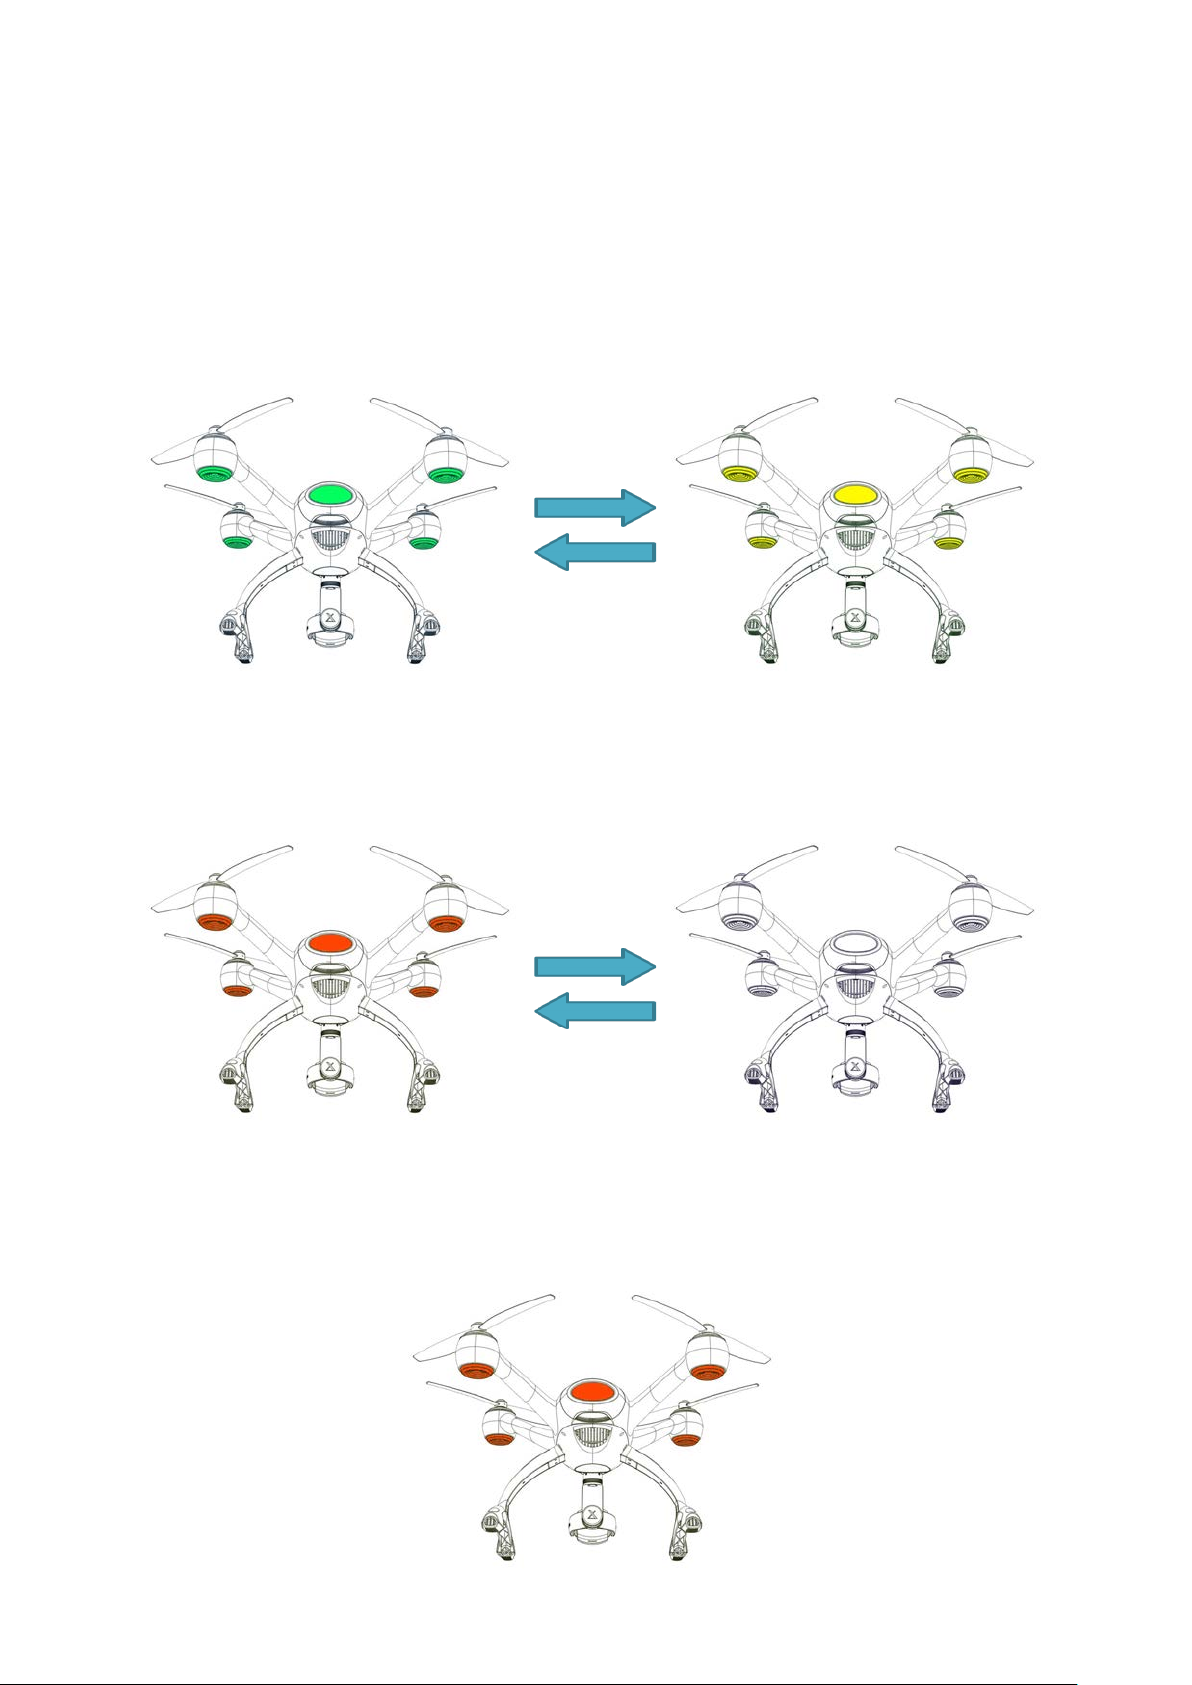
Aircraft LED Indicators
The aircraft LED indicators are located under each motor and at the rear of the drone. The LED
indicated the current state of the drone. See diagrams below for indications:
LED Powering Up / Arming Flight Control
(Green / Yellow Alternating Fast Blinking LED)
Initializing / Waiting for RC Signal
(Blinking Red LED)
Error State
(Solid Red LED) - Refer to Troubleshooting Section
30Evolve User Manual V1.0 by XDynamics Limited
Page 31
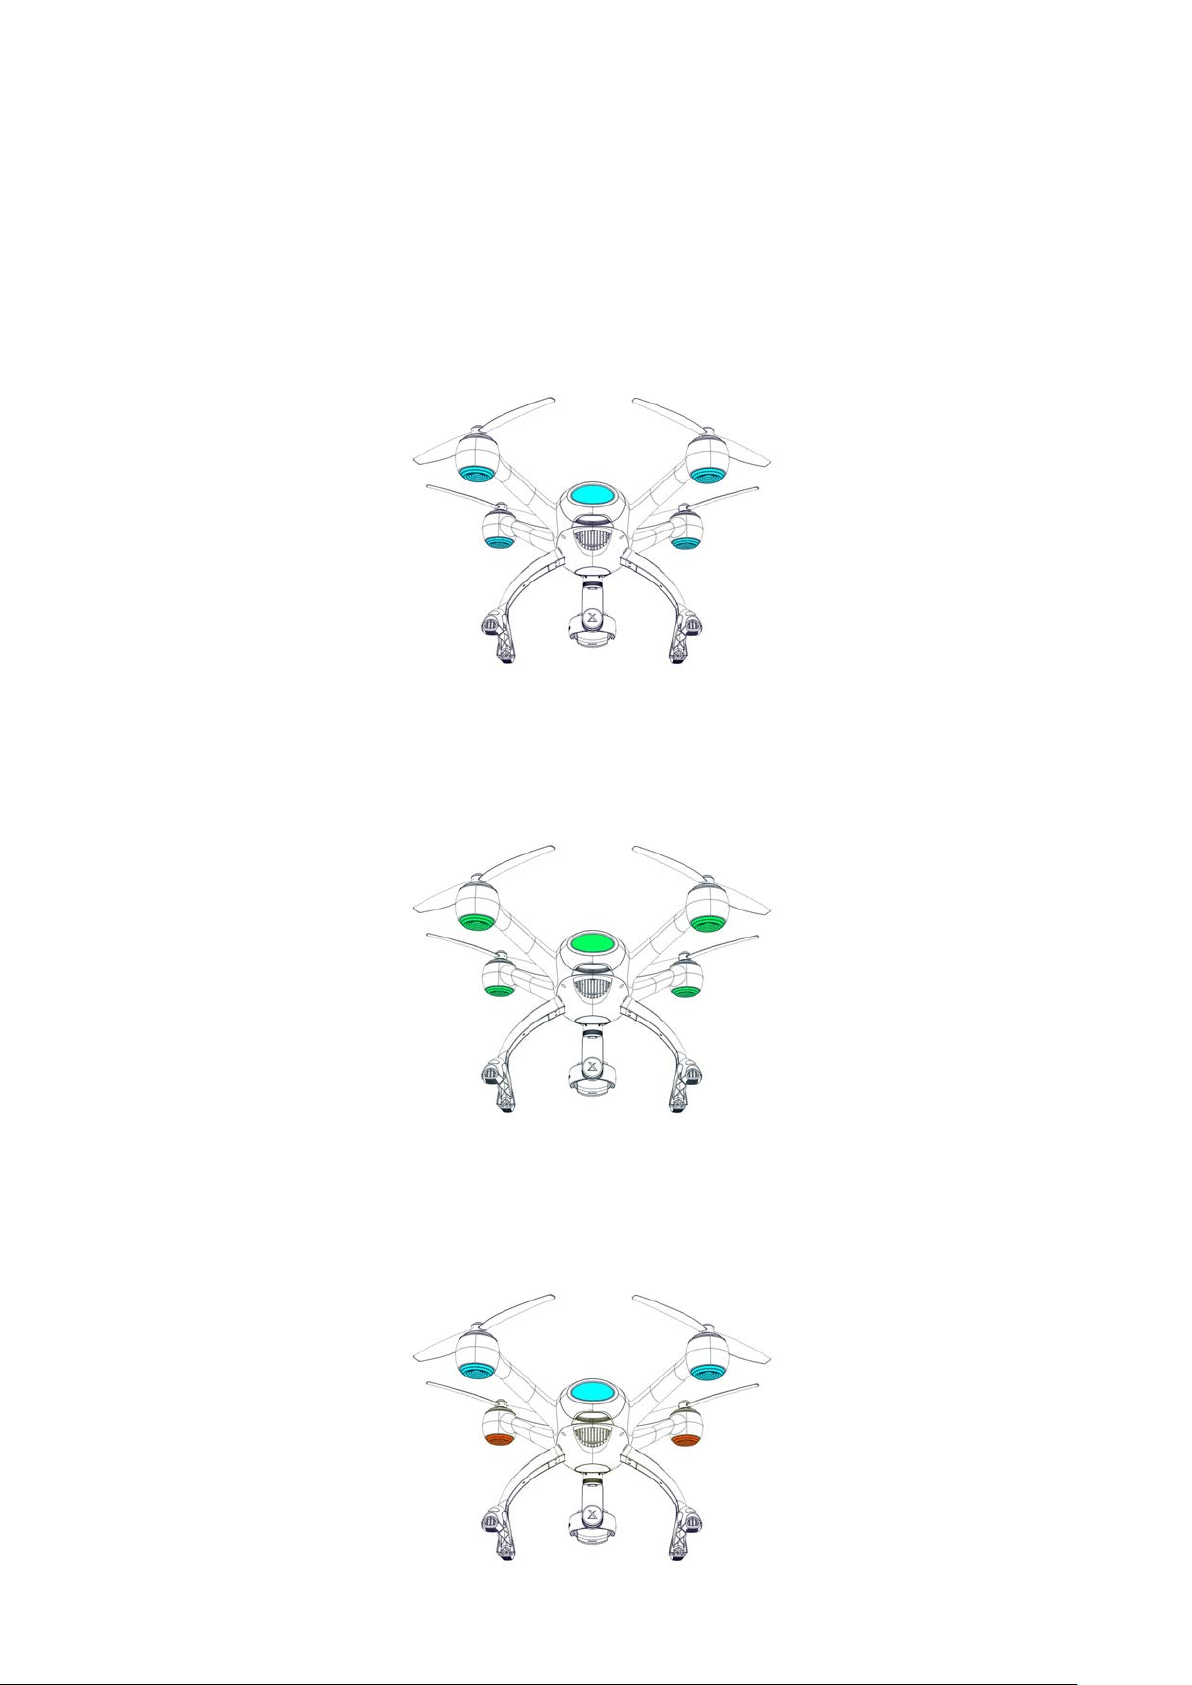
Aircraft LED Indicators
The aircraft LED indicators are located under each motor and at the rear of the drone. The LED
indicated the current state of the drone. See diagrams below for indications:
Ready for Flight (Free Mode)
(Solid Blue LED) – Ready for Smart Pilot App Launch
GPS Ready (Can be own in GPS Mode)
(Solid Green LED) - Set’s home position
Normal Flight Mode
(Red Front / Blue Rear Solid LED) - All systems functional
31Evolve User Manual V1.0 by XDynamics Limited
Page 32
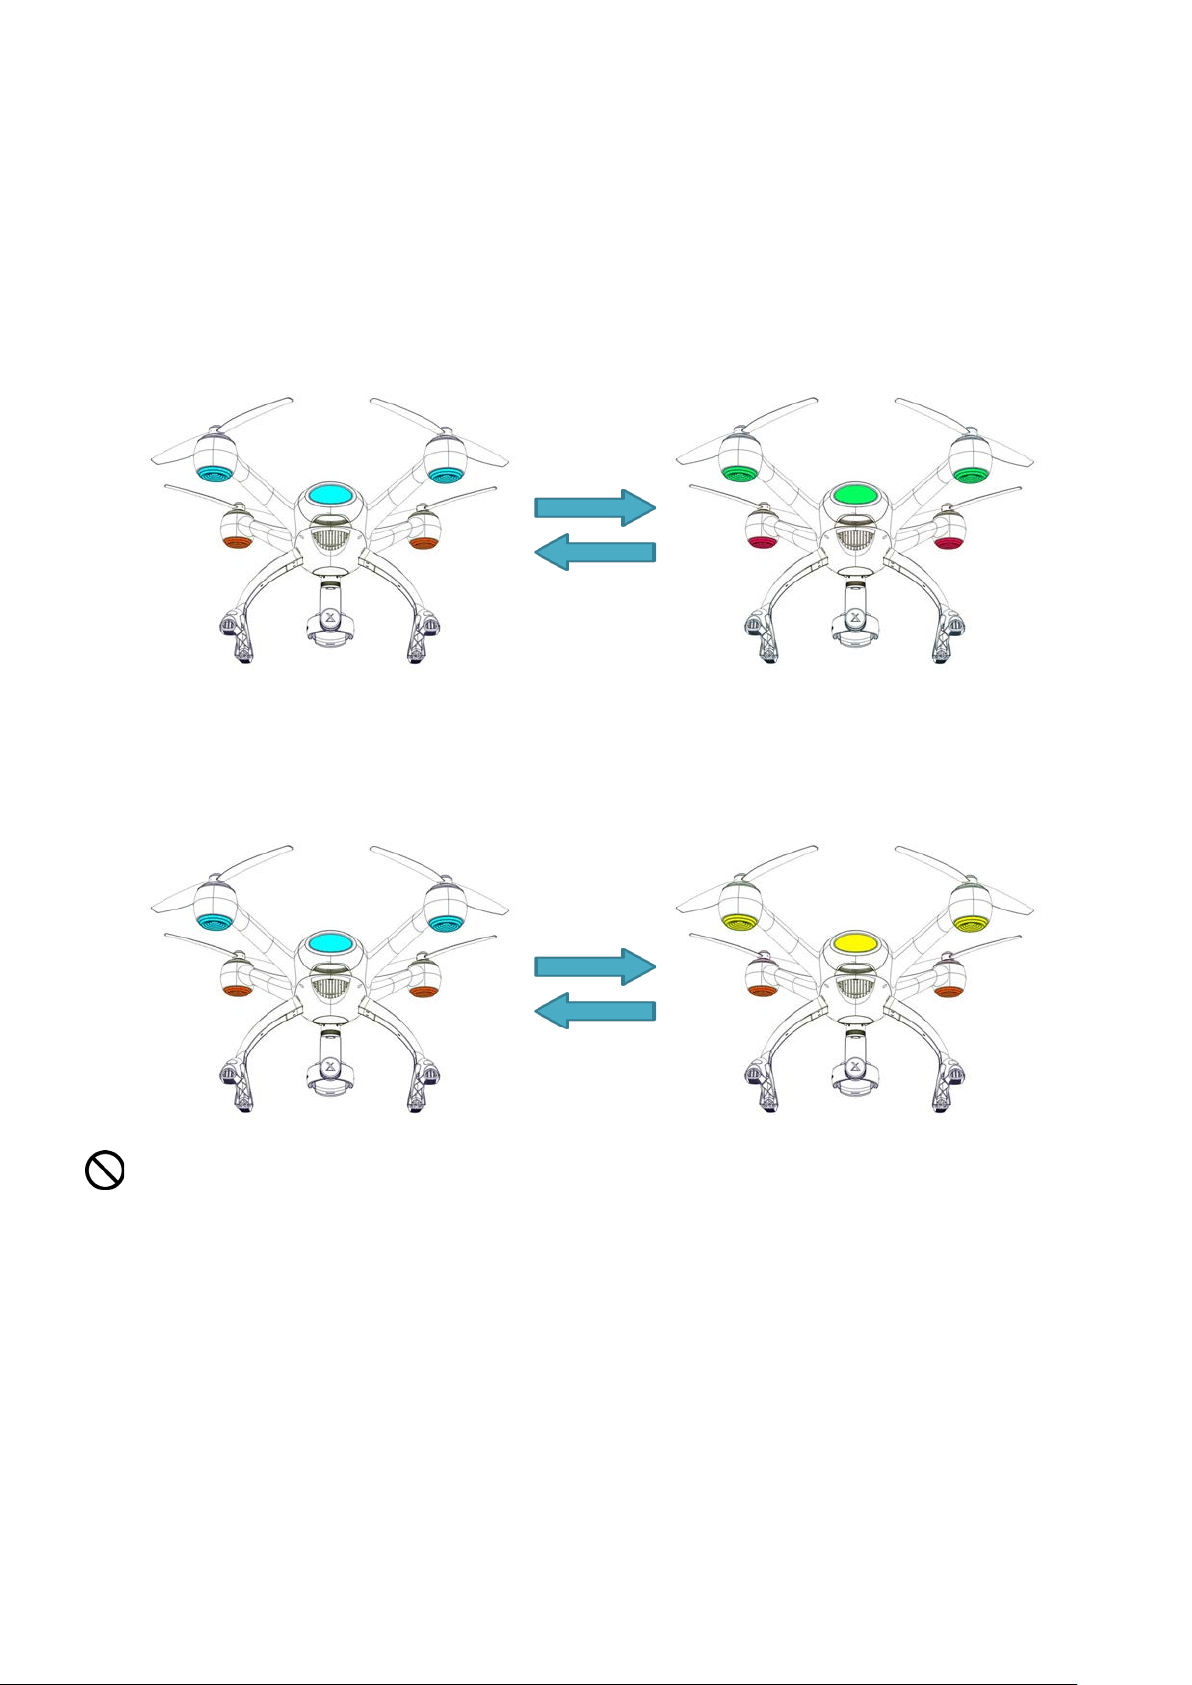
Aircraft LED Indicators
The aircraft LED indicators are located under each motor and at the rear of the drone. The LED
indicated the current state of the drone. See diagrams below for indications:
Landing Mode
(Red Front / Green Rear Solid LED) – Make sure landing zone is clear
Malfunction During Flight
(Consult smart pilot / troubleshooting for more details)
If the ‘Malfunctioning During Flight’ LED warning is showing land drone immediatley.
32Evolve User Manual V1.0 by XDynamics Limited
Page 33
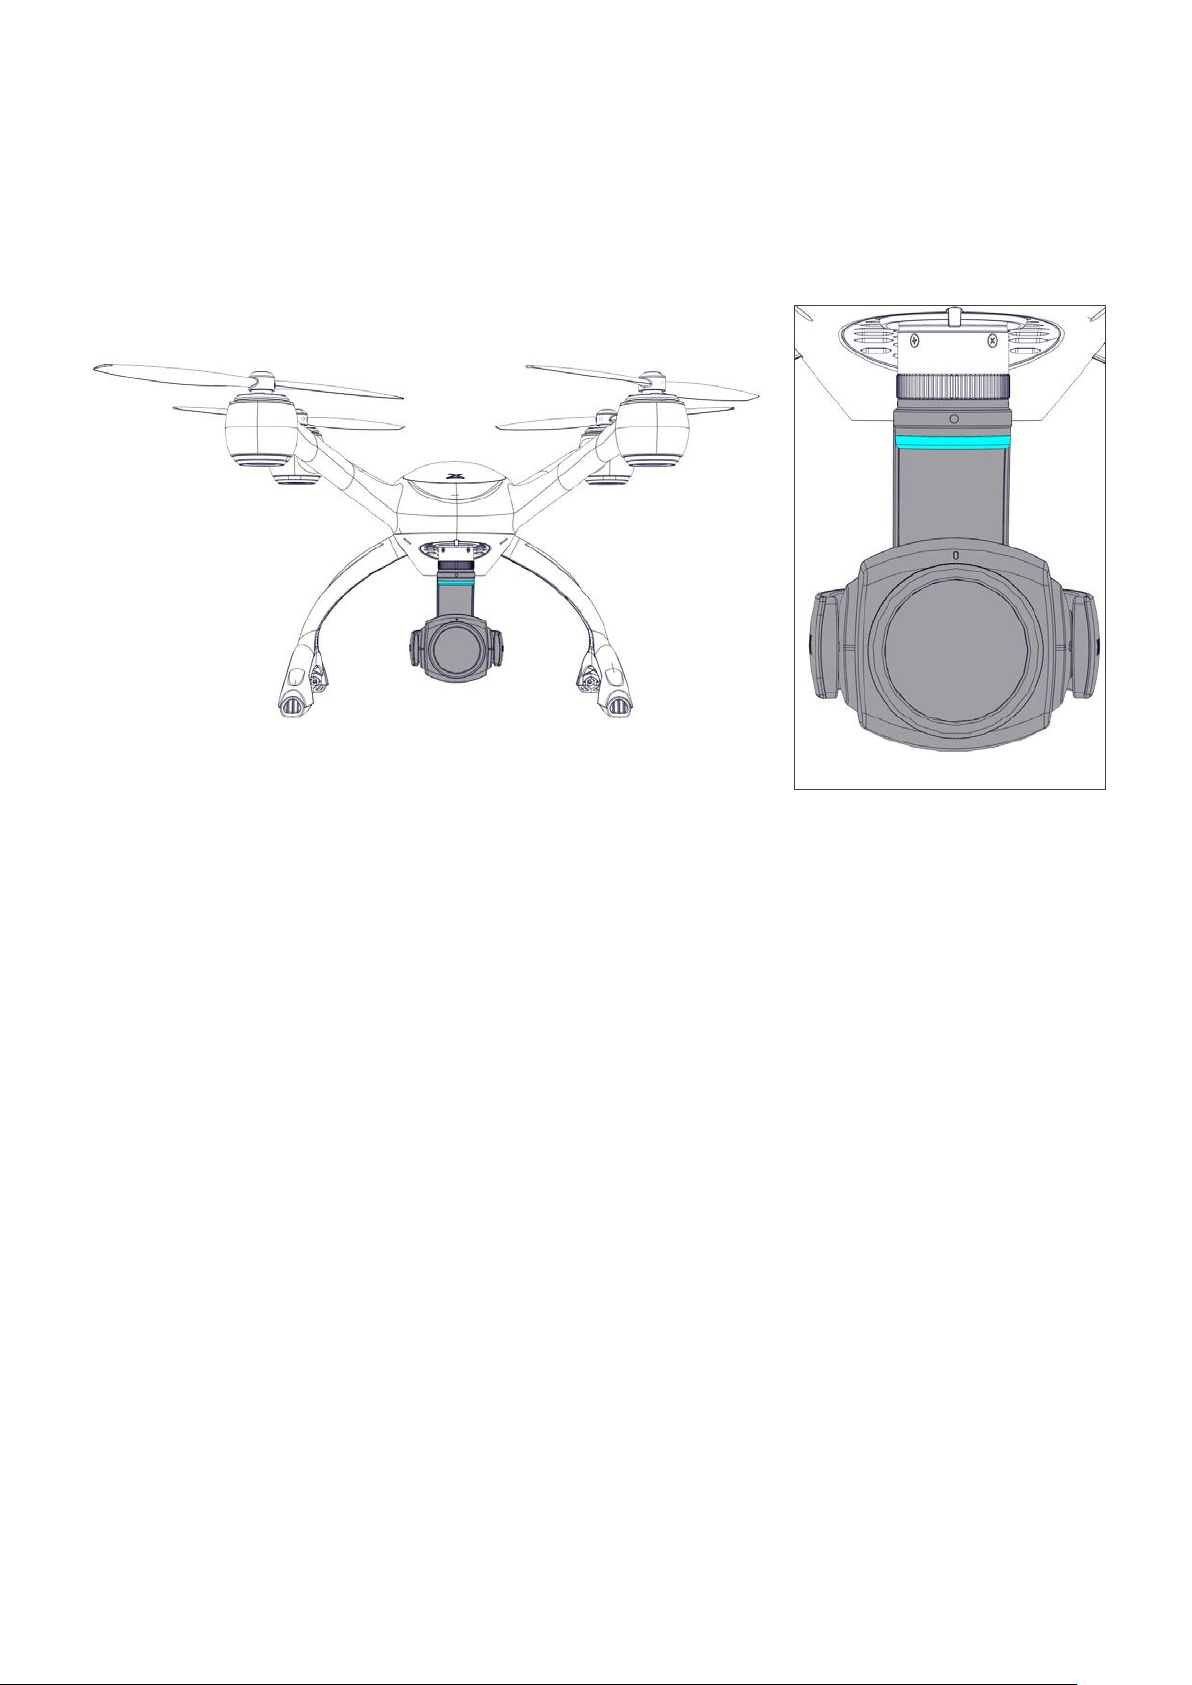
Aircraft LED Indicators
The camera gimbal has an LED indicator located below the base of the mount. This indicator states the
status of the camera. This is a visual reference for the operator to conrm the state of the camera such
as taking video or taking still photography.
Blinking Blue LED = Gimbal Initializing
Solid Blue LED = Gimbal Ready (Please note LED turns o when recording video or still images)
33Evolve User Manual V1.0 by XDynamics Limited
Page 34
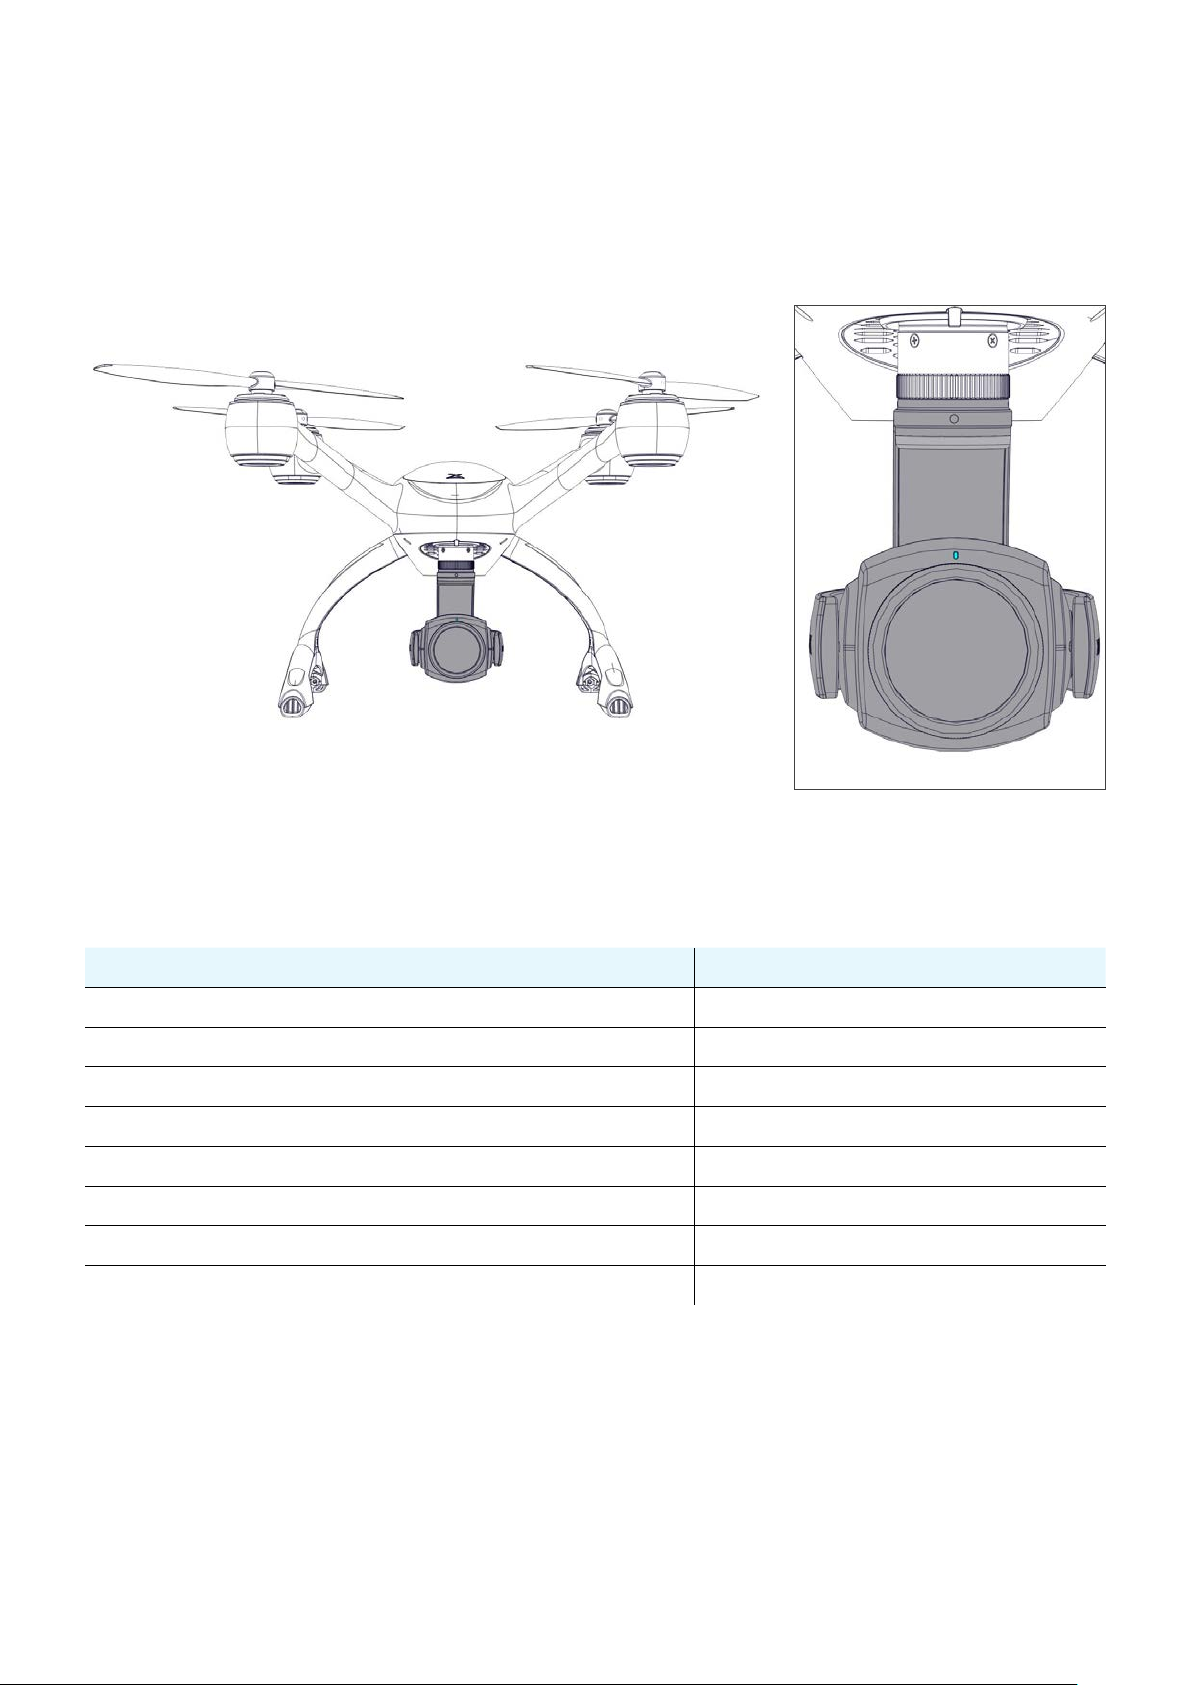
4K Camera Indicators
The camera gimbal has an LED indicator located below the base of the mount. This indicator states the
status of the camera. This is a visual reference for the operator to conrm the state of the camera such
as taking video or taking still photography.
LED Status Description
GREEN on Normal, idle
GREEN toggles once Single shot
GREEN toggles till shots complete (0.1” on every 0.3”) Burst
GREEN toggles gently (0.5” on every 1”) Video recording
RED toggles rapidly (0.2” on every 0.4”) System start up
RED toggles gently (0.5” on every 1”) SD card failure
RED on High temp / SD Card Missing
RED & GREEN toggles alternately Firmware upgrading
34Evolve User Manual V1.0 by XDynamics Limited
Page 35
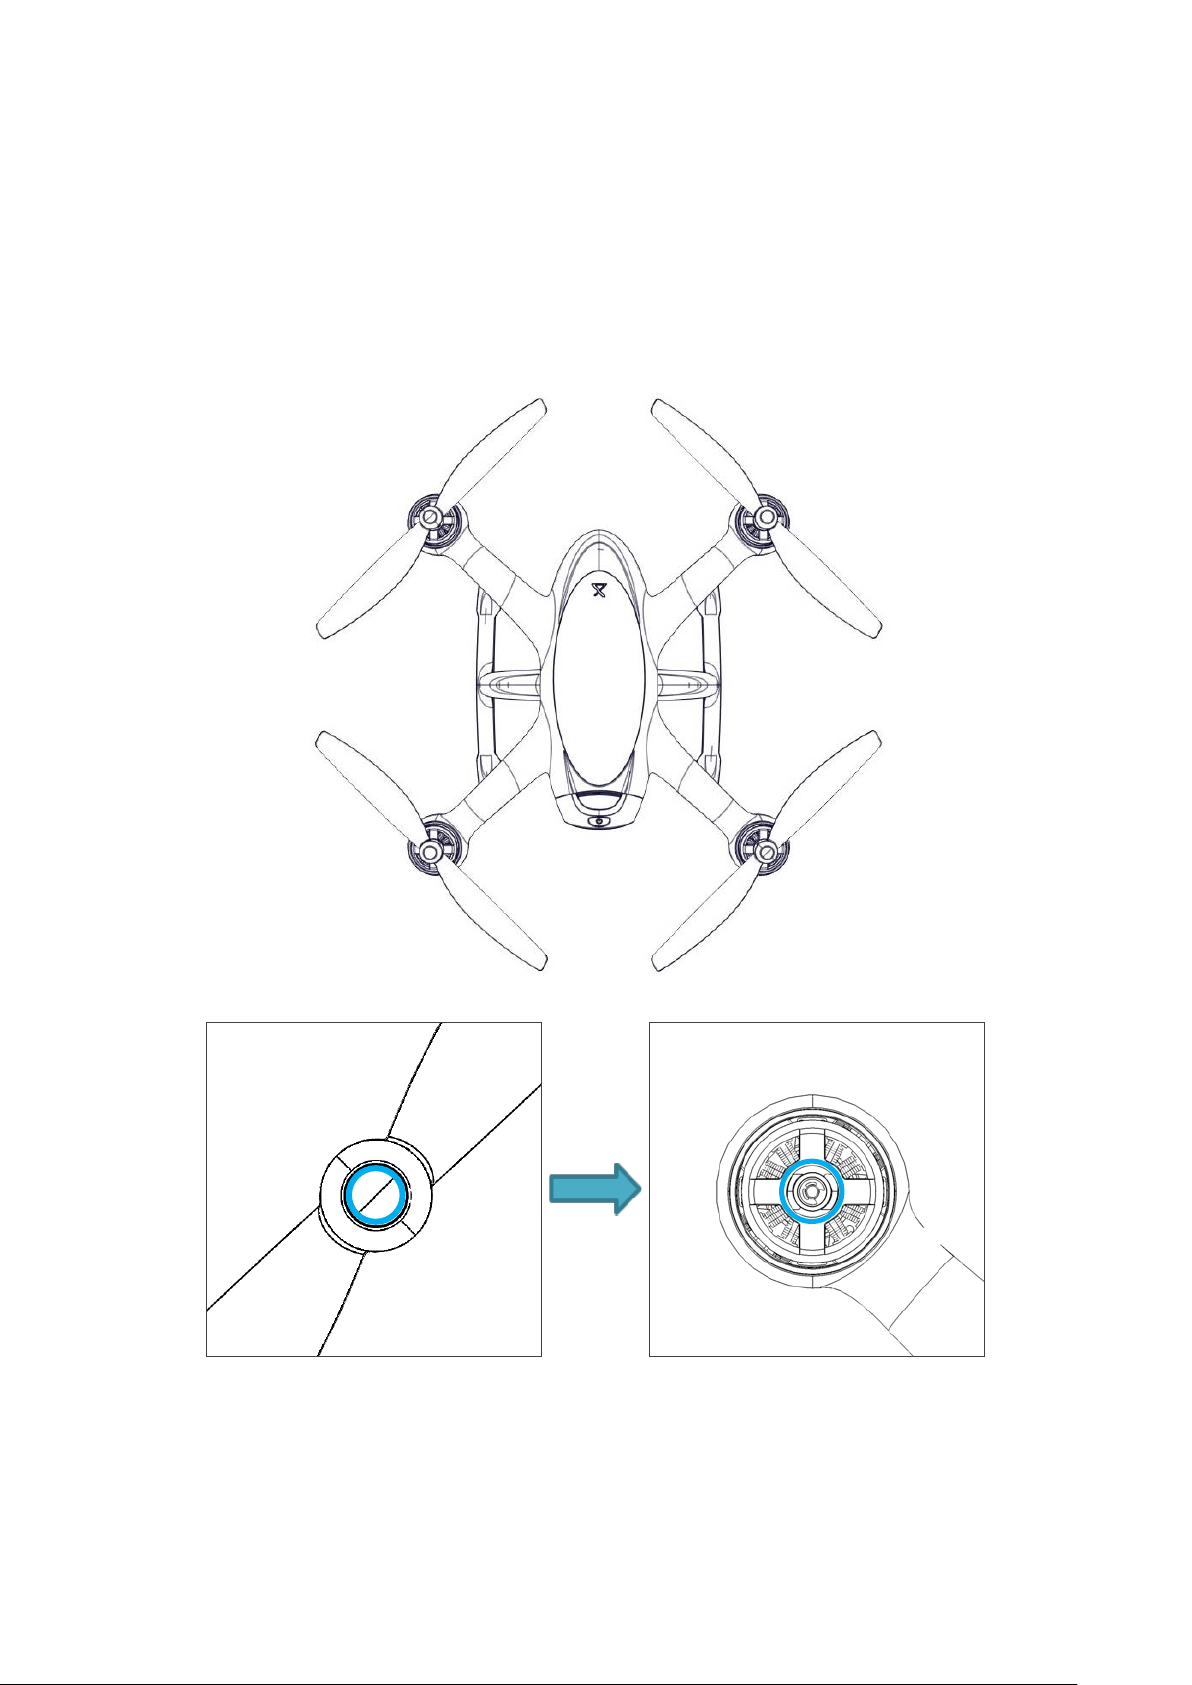
Ensure Correct Propeller Alignment
The propellers need to be mounted with the correct CW (Clock-Wise) and CCW (Counter-Clock-Wise)
conguration. Two propellers are marked with a white ring and two propellers have no markings. Mount
the propellers with the white ring to the motors with a white ring on top. Please follow the steps on the
following page to ensure all propellers are securely in place.
See diagram for attaching and detaching the propellers:
CW CCW
◦ Ensure to match both CW props with white circle marking to motors with white circle mark-
ing.
CWCCW
◦ Ensure to match both CCW props with no circle marking to motors with no circle marking.
35Evolve User Manual V1.0 by XDynamics Limited
Page 36
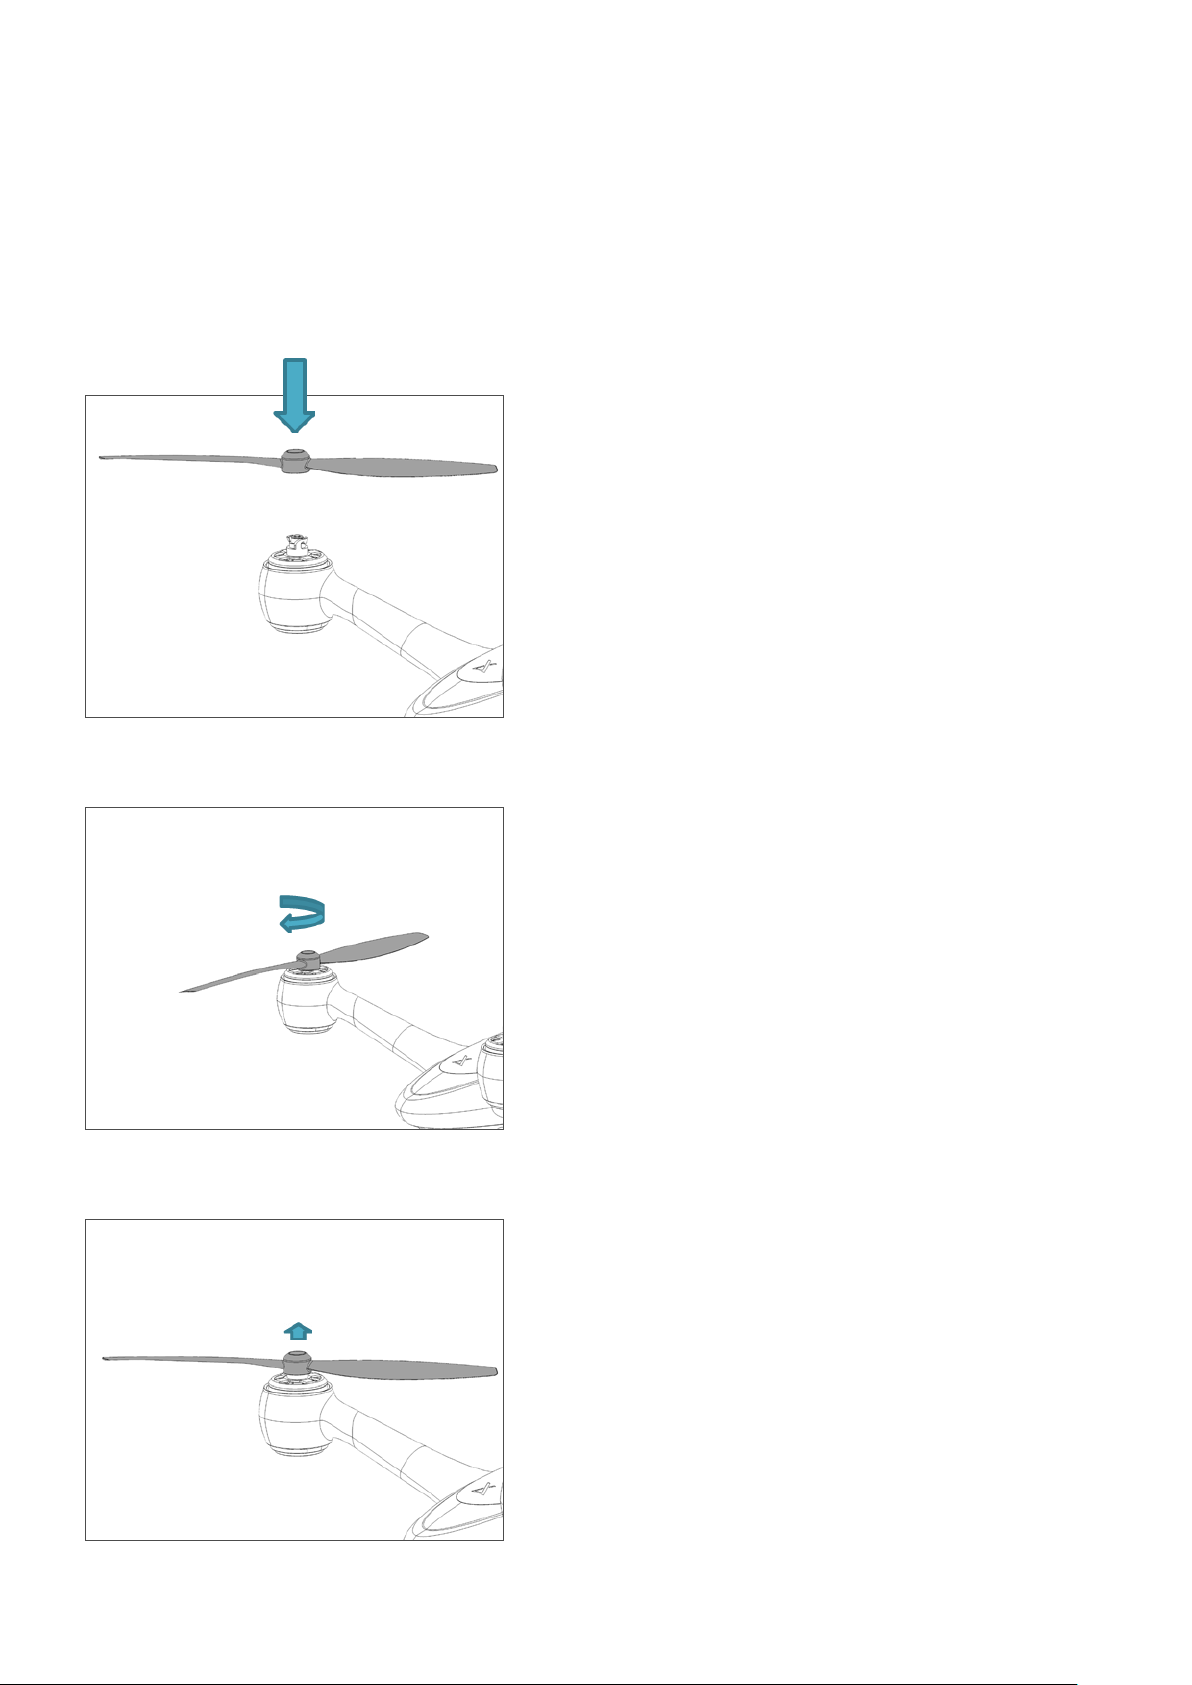
Attaching and Detaching the Propellers
The Evolve drone employs a sturdily constructed attach and detach propeller system. With a quick half
turn installation the drone can be ready to y within minutes of pulling it out of the pack. To detach the
propellers follow the step below in reverse.
See diagram for attaching and detaching the propellers:
Step 1 - Ensure that the CW / CCW direction of the
propeller is aligned with the direction of the motor.
Step 1
Step 2
Step 2 - Place the propeller on top of the motor and
apply a downwards twisting force that matches the
direction of the arrow shown on top of the propeller.
Step 3 - Keep twisting the propeller with downwards
force until the red dot on the propeller and the do
on the motor are aligned. Once you release the
downward force the propeller should pop up and lock
securely into place. Conrm this is secure by twisting
the propeller left and right and checking that the
propeller is securely xed to the motor.
Step 3
36Evolve User Manual V1.0 by XDynamics Limited
Page 37

Pre Flight Checklist
The below checklist is recommended before every drone ight. Drone operators are encouraged to add
more check list items that might be required for their particular operations.
1. Aircraft Pre-Flight Checklist
◦ Gimbal Clamp (Removed; Stowed)
◦ Micro SD Card (Installed; Available Space)
◦ Format SD Card (As Necessary)
◦ Battery (Installed; Status Check Fully Charged)
◦ Propeller (Check Condition; Installed Black on Black, Silver On Silver)
◦ CHECK COMPLETE
2. Remote Controller Pre-Flight Checklist
◦ Wi-Fi Internet Service (Connected)
◦ Maps (Loaded)
◦ Way Points (Loaded if necessary)
◦ Flight Mode Switch (GPS mode) VERY IMPORTANT for BEGINNERS
◦ Battery (Status Check Fully Charged)
◦ CHECK COMPLETE
3. Remote Controller Before Aircraft Initialization Checklist
◦ Power On (Controller)
◦ Drone initialization done. Blue or Green light states
◦ Pilot App (Launch)
◦ Camera Icon (Select)
◦ Camera Options (Checked, Set)
◦ Check for RF Interference (signal strength indicators on APP)
◦ CHECK COMPLETE
37Evolve User Manual V1.0 by XDynamics Limited
Page 38
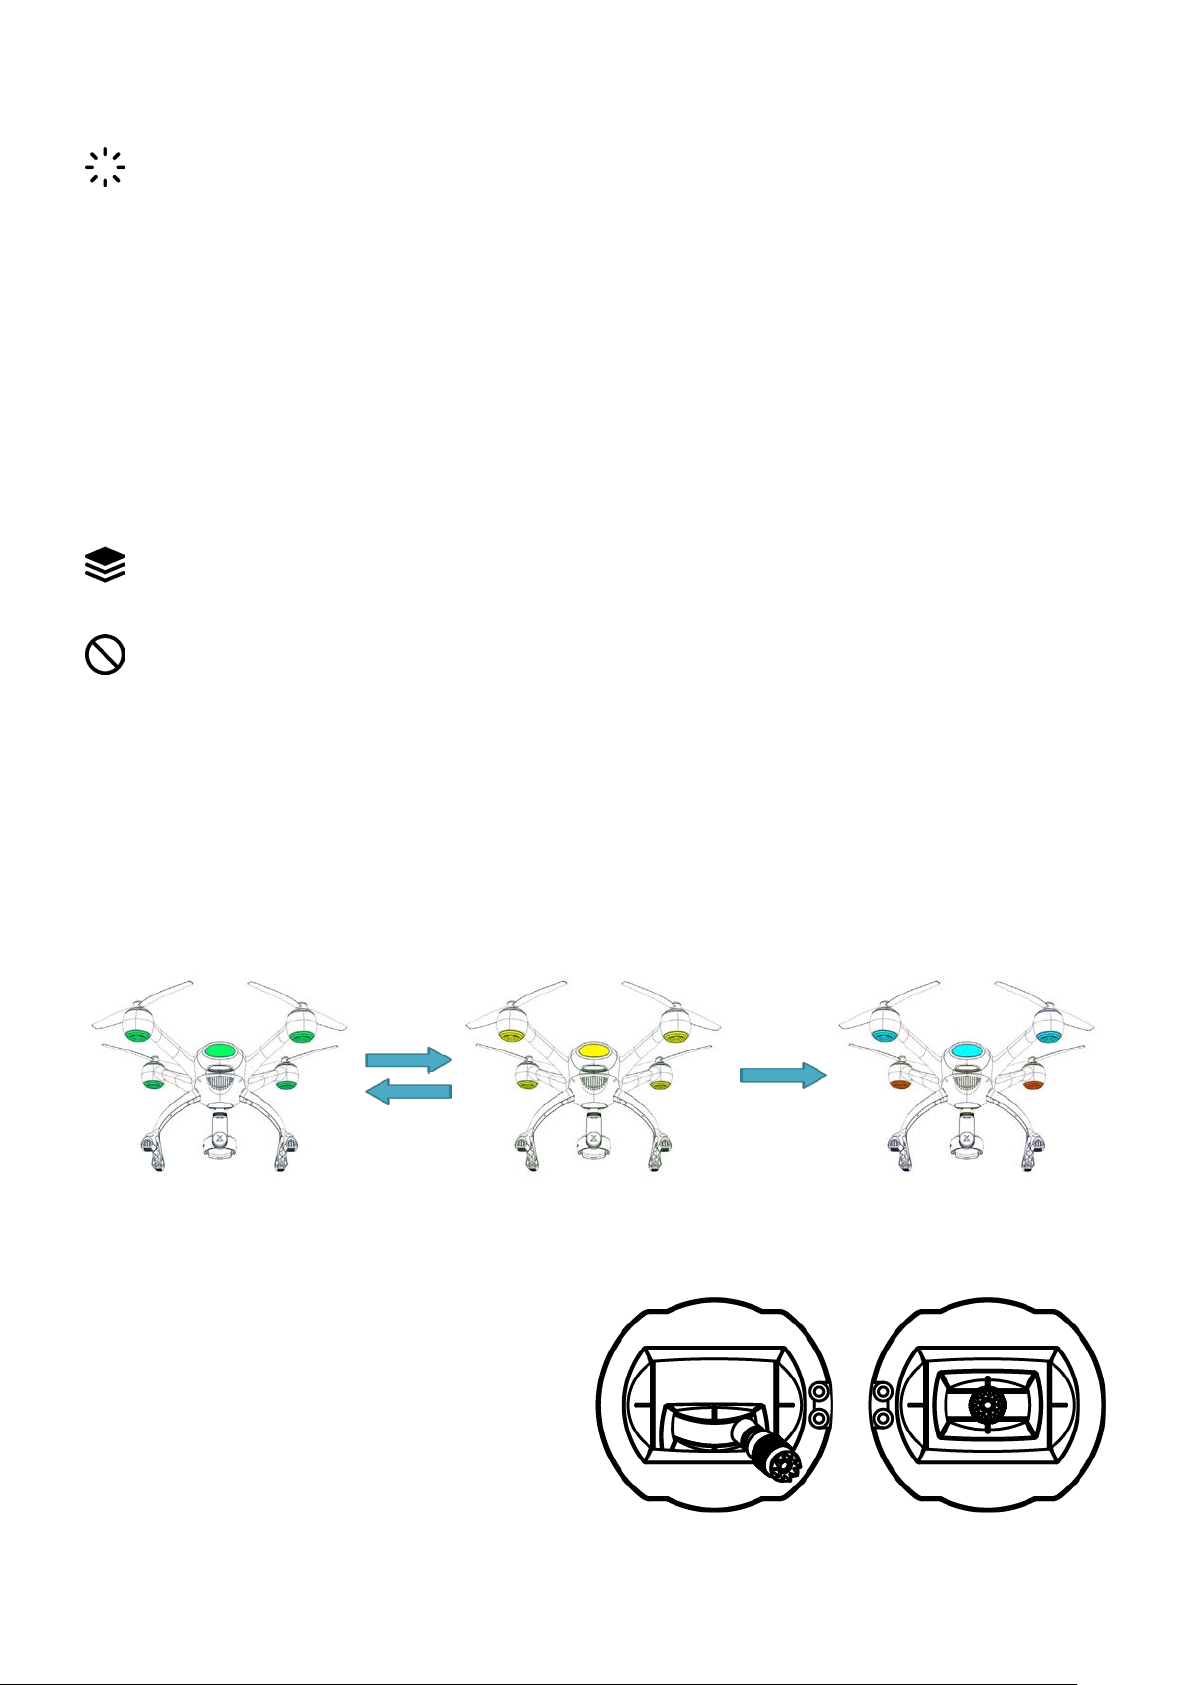
Arming the Drone
Whenever arming or disarming commands are given to the ight controller the drone’s state
may change suddenly requiring the operator to react immediately in order to keep positive
control of the drone.
Arming Pre-Check
The Evolve makes several internal calibrations and adjustments before each ight. If for any reason,
any of the vital sensors or internal equipment has a safety issue the drone will not ARM upon the ARM
command given by the operator’s stick and the LEDs under each motor will turn RED. Please refer to
the Smart Pilot screen to check for the diagnoses in order to correct the problem.
The most common reason for not arming is the calibration of compass on a dierent or
magnetically noisy environment. Please refer to Compass calibration and try again.
There is a 5 second delay on the arming and disarming of the stick commands to avoid
accidental spinning of the motors or disarming the drone in mid-air causing the drone to crash.
Arming:
Before arming the drone make sure pre-ight check lists are complete and the drone is in an area clear
of obstacles and loose debris, as loose debris can damage the propellers and possibly cause loose
debris to act as projectiles doing damage to surrounding property and personnel.
Push the throttle stick down and to the right
and wait for the LED’s light change. During
arming the LEDs color will fast blink dierent
colors followed by a long beep, the motors
will then engage and the propellers will
start spinning. Move the throttle stick to the
middle position and the drone is ready to
take o manually.
38Evolve User Manual V1.0 by XDynamics Limited
Page 39
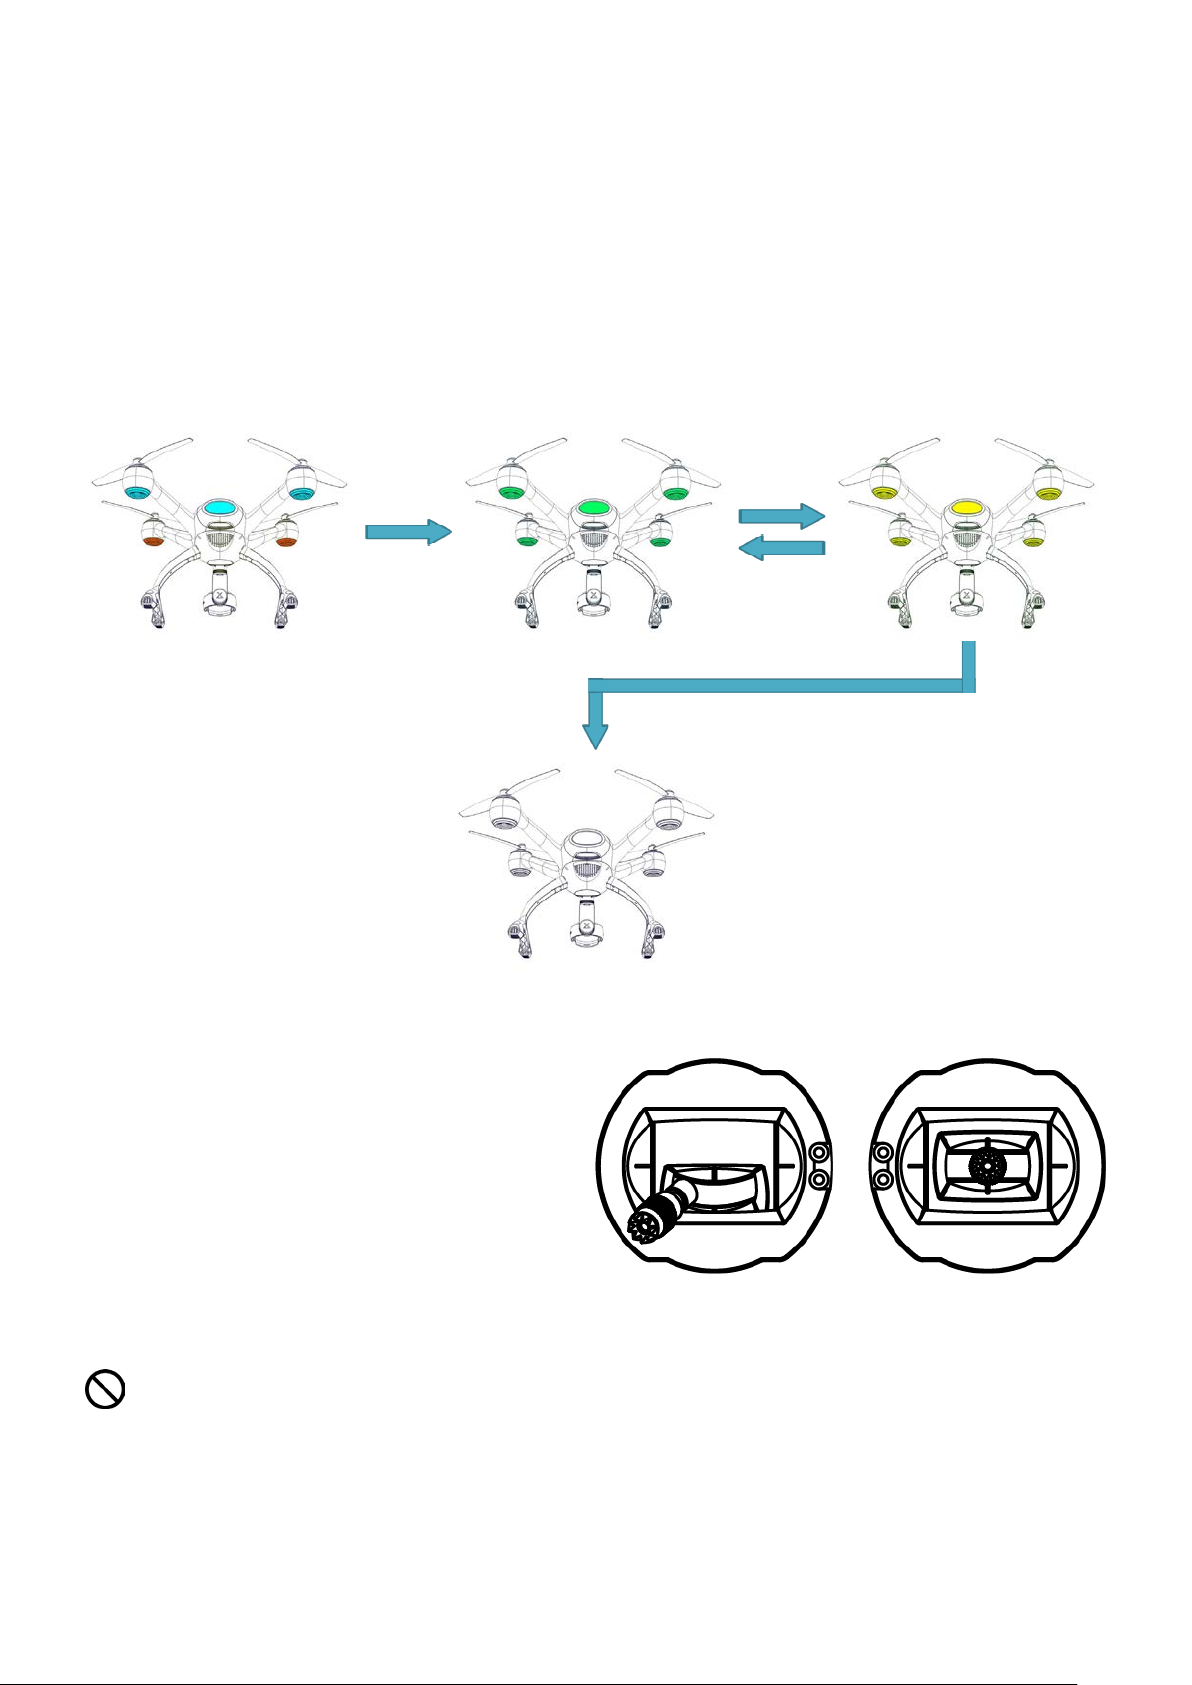
Disarming the Drone
Disarming:
After a landing the drone, hold the throttle stick down and to the left to disarm the motors. The LED
indicators will change color followed by a long beep and propellers will stop spinning. Make sure the all
the LED indicators are solidly lit by the same color (either Green or Blue) with no blinking before moving
the sticks back to central position. If the LEDs are blinking the drone is still in arming mode, keep the
sticks in the same position until all the LEDs are solid (either Green or Blue).
Push the throttle stick down and to the left
and wait for the LED’s light change. During
disarming the LEDs color will fast blink
dierent colors followed by a long beep, the
motors will then engage and the propellers
will start spinning. Move the throttle stick to
the middle position and the drone is ready to
take o manually.
Ensure the drone is fully disarmed (either solid Green or Blue LED) before returning the left
thumb stick is returned to the middle position.
39Evolve User Manual V1.0 by XDynamics Limited
Page 40
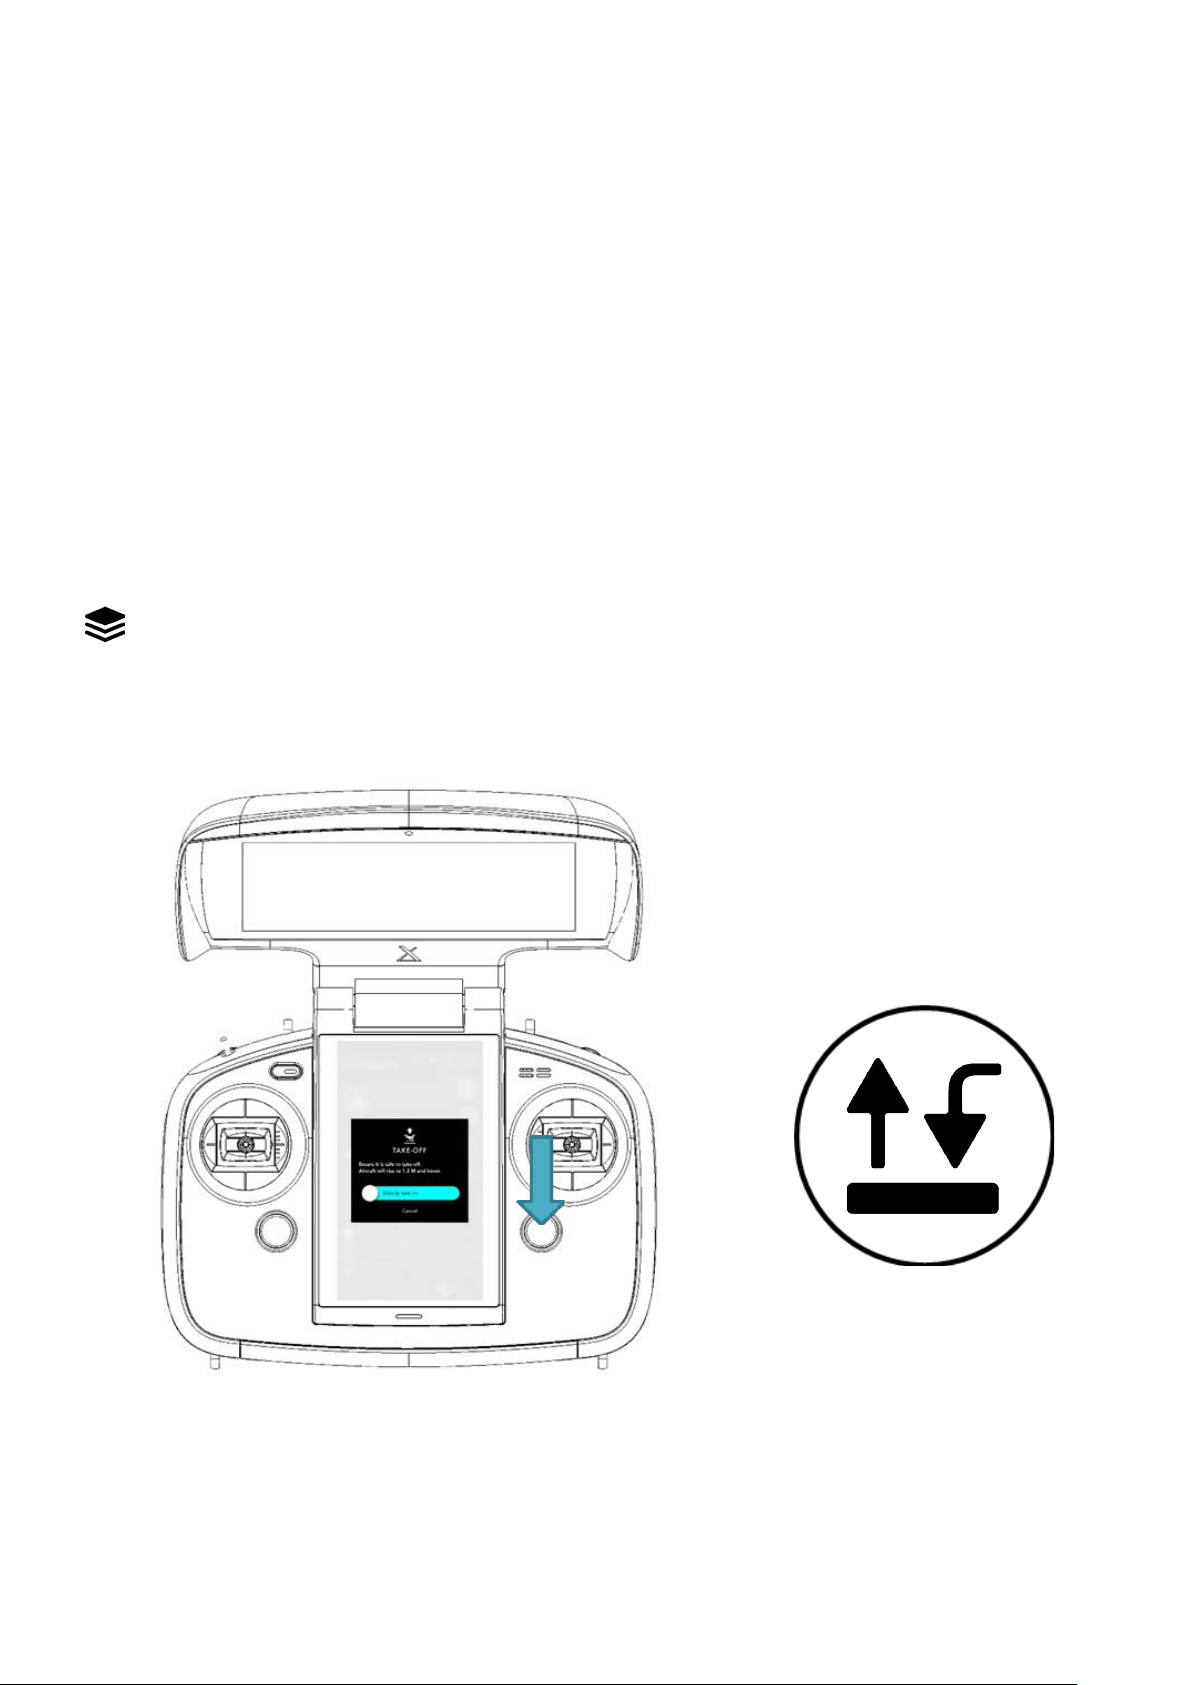
Auto Take O / Auto Landing
Auto Take O
For ease of operation and to assist beginner operators, the evolve drone can take o and land
automatically.
Follow the steps below:
1. Press the Auto Take O button for 3 seconds
2. The drone will arm itself and take o
3. The drone will rise to 4 to 5 feet (If the drone is in GPS mode it will hold position until the oper-
ator takes over, but if it is in manual mode the operators needs to correct for wind drift immedi-
ately)
Follow previous pre-ight check as stated in arming the drone above
40Evolve User Manual V1.0 by XDynamics Limited
Page 41
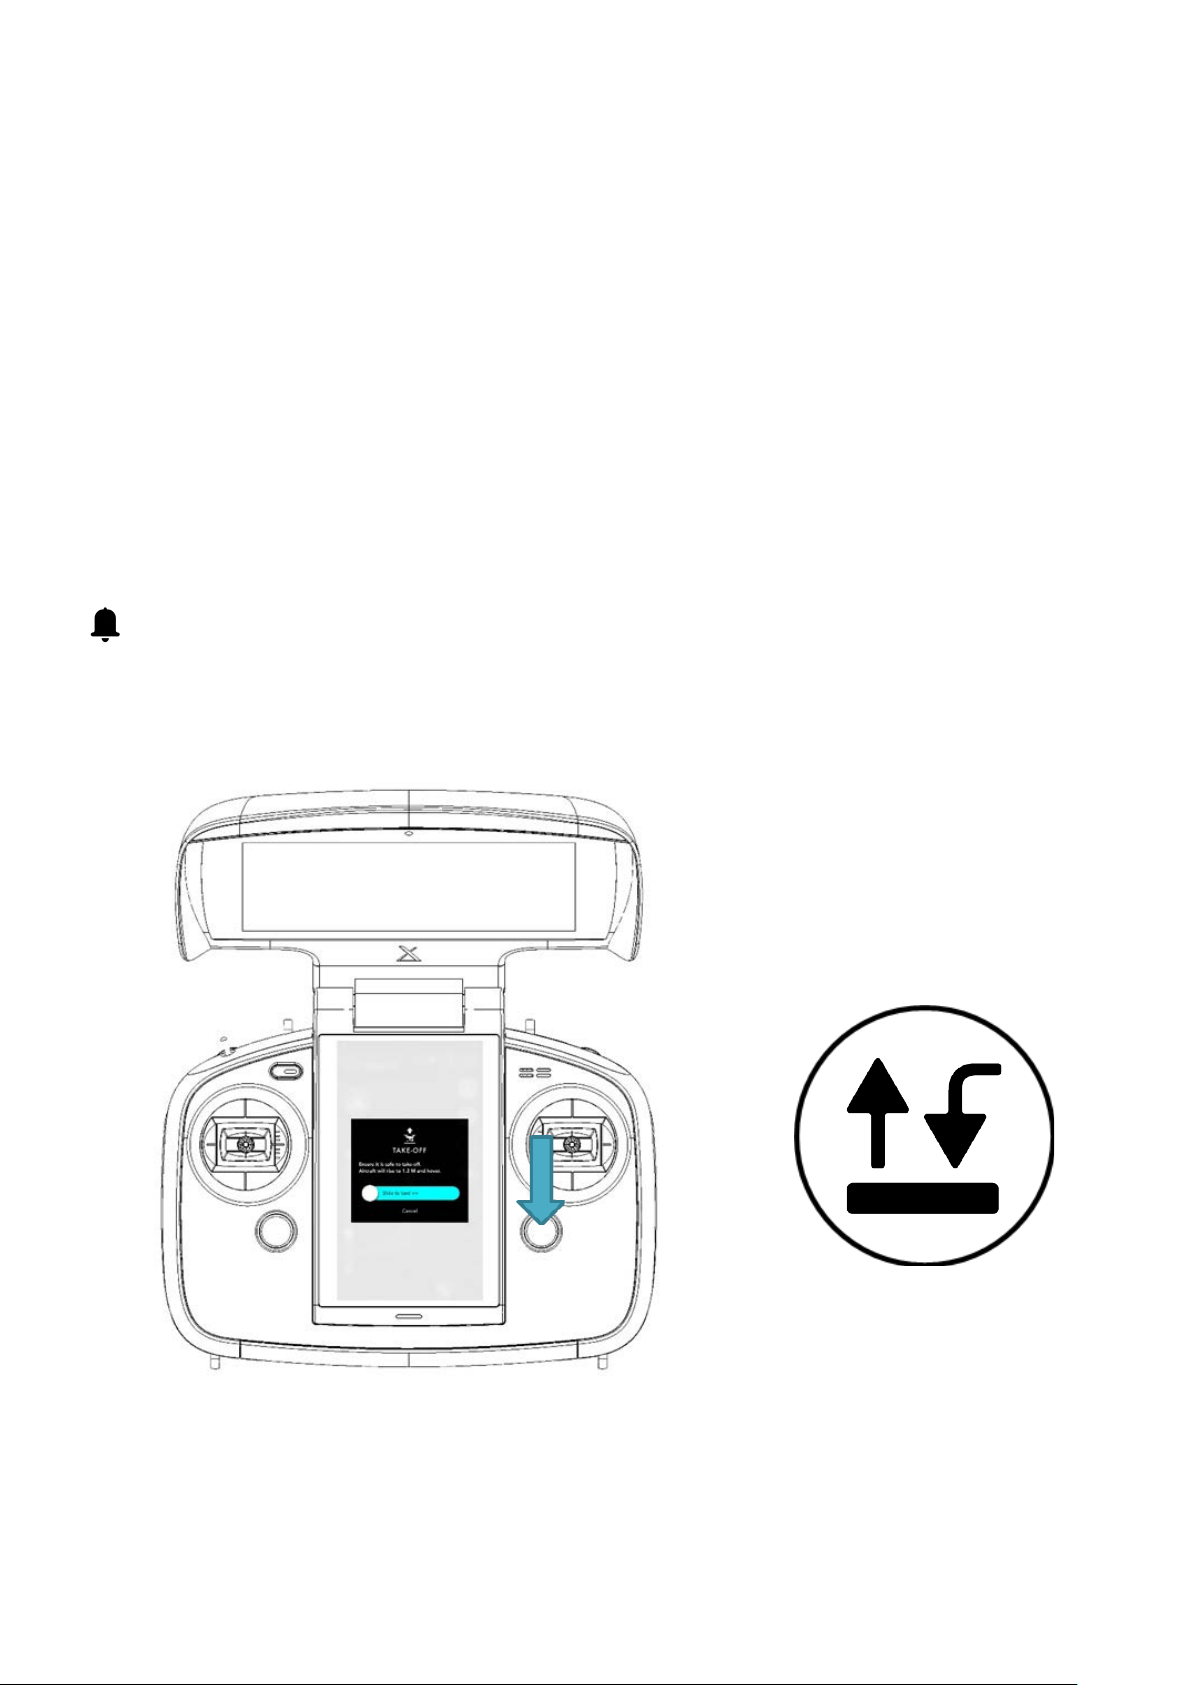
Auto Take O / Auto Landing
Auto Landing
For ease of operation and to assist beginner operators, the evolve drone can take o and land
automatically.
Follow the steps below:
1. Press the Auto Take O button for 3 seconds
2. The drone will blink green LEDs in the rear arms and will start descending immediately (during
the decent the operator can reposition the drone to clear obstacles or land in preferred spot).
3. When landed the drone will disarm automatically
After conrming the land operation, the Remote Controller will update the status to indicate the
Drone is landing.
41Evolve User Manual V1.0 by XDynamics Limited
Page 42
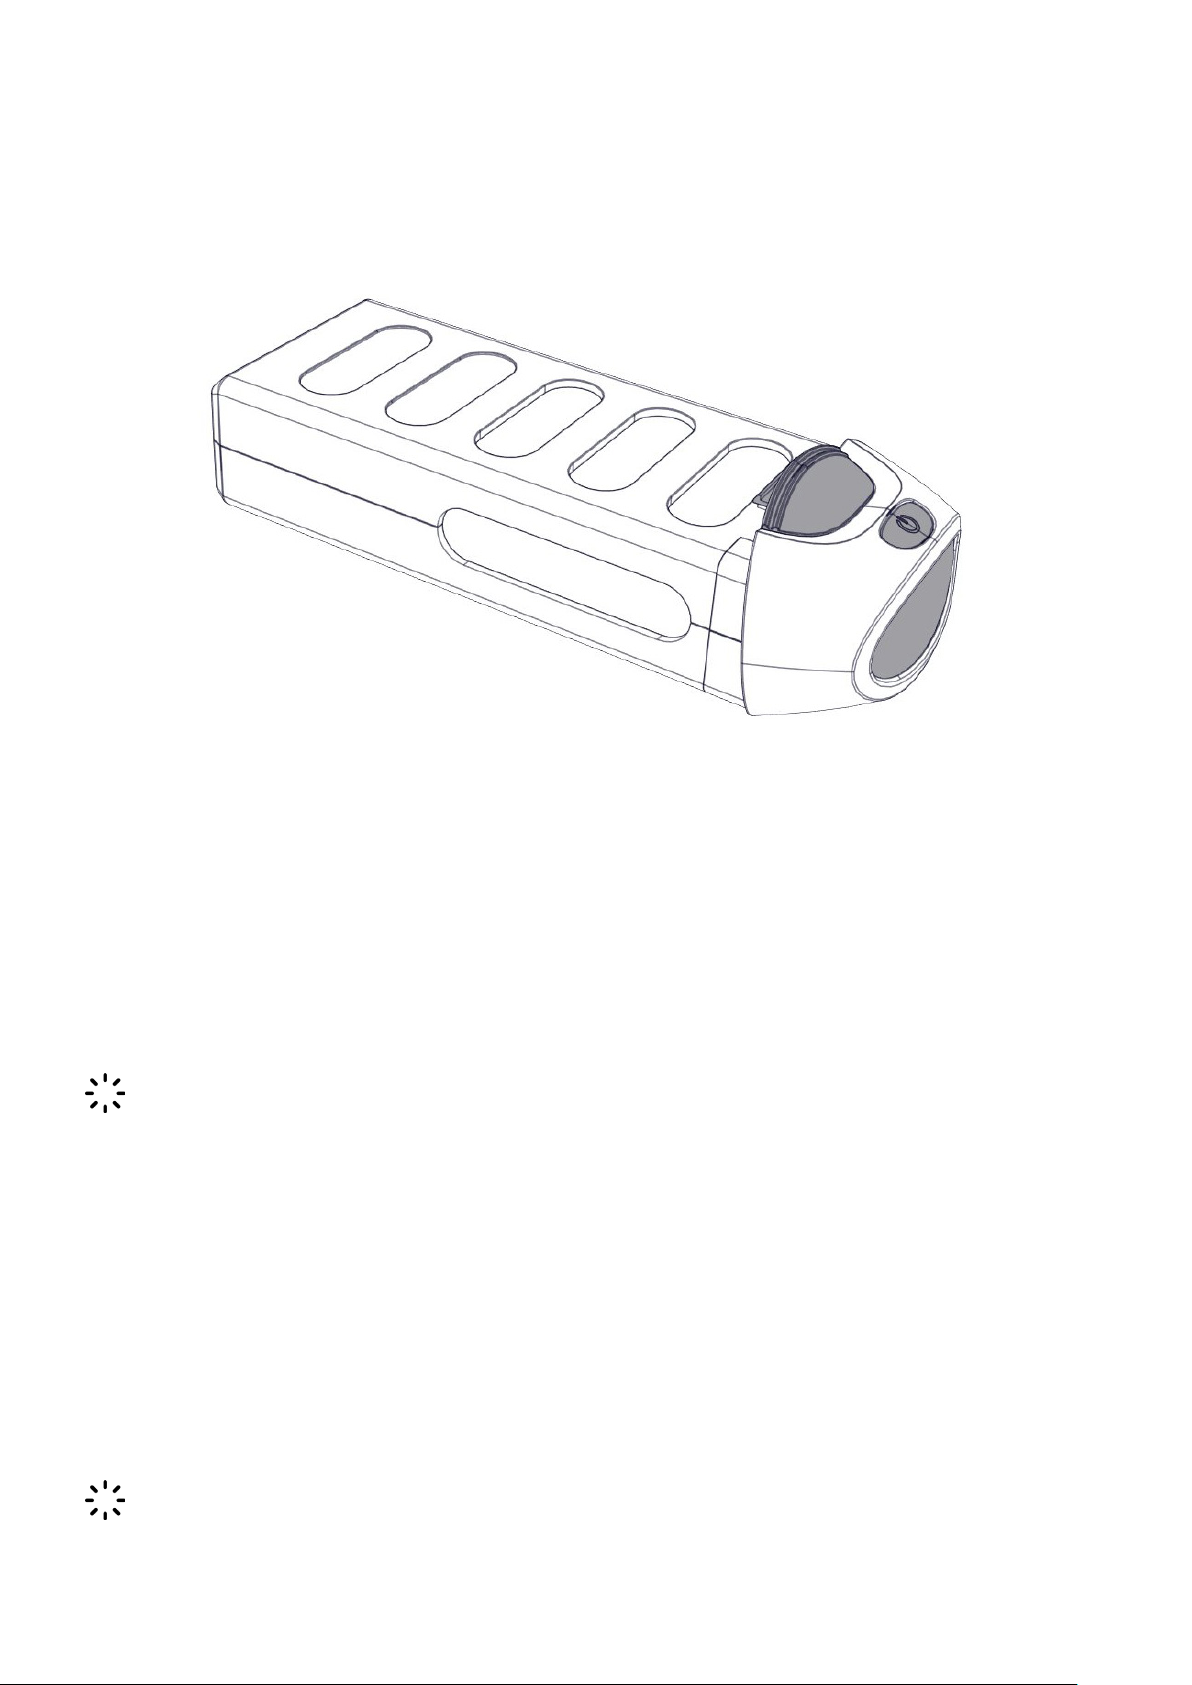
Drone Battery
Battery Overview
Below is a diagram identifying the dierent components of the drone battery:
Components of the drone battery:
1. Heat ventilation holes
2. Drone rear light
3. Power button
4. Battery Power Status (OLED Display)
5. Battery Connector
Auto Landing
Important – Monitoring battery level during ight is crucial to safety and ight planning.
There are several ways to monitor battery level during ight. The battery level can be visually checked
by the icon on top screen, also the user will nd the battery’s voltage on the clean top screen with the
information provided at the right bottom corner. The Evolve battery is made to last around 15 minutes
in low wind conditions and standard atmosphere pressure.
◦ The ight mode and environmental conditions should be considered while ying the drone
and monitoring battery level.
◦ The Drone’s battery level icon is found at the top right of the FPV screen on the Remote
Controller.
When the drone battery reaches 15% charge, an automatic Return to Home function will be
activated.
42Evolve User Manual V1.0 by XDynamics Limited
Page 43
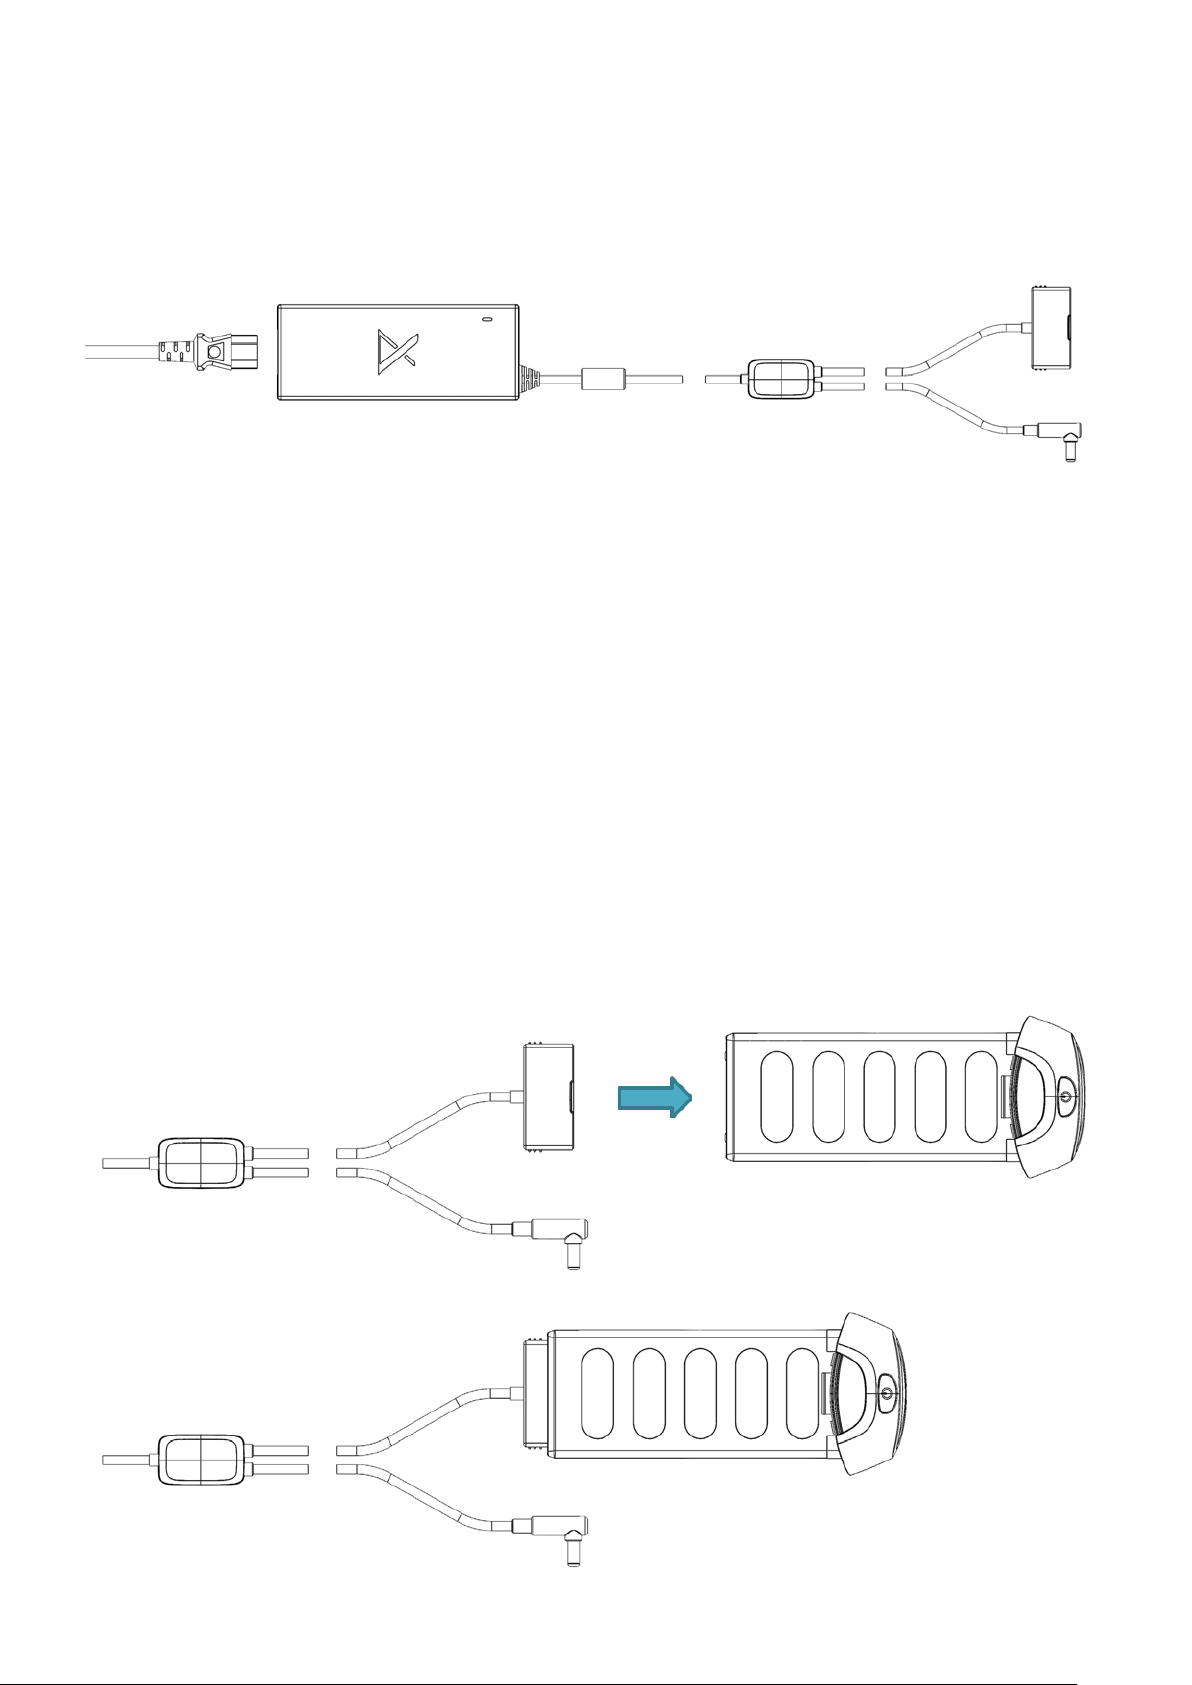
Charging the Drone Battery
Battery Charger Overview
Below is a diagram identifying the dierent components of the battery charger:
Components of the battery charger:
1. Heat ventilation holes
2. Drone rear light
3. Power button
4. Battery Power Status (OLED Display)
5. Battery Connector
Follow the below steps to charge the drone battery:
1. Plug in power supply to wall socket power supply
2. Plug square connector into the back of the battery
3. Battery display screen will show the percentage battery state during charge
4. When the percentage is at 100% the battery is fully charged
43Evolve User Manual V1.0 by XDynamics Limited
Page 44
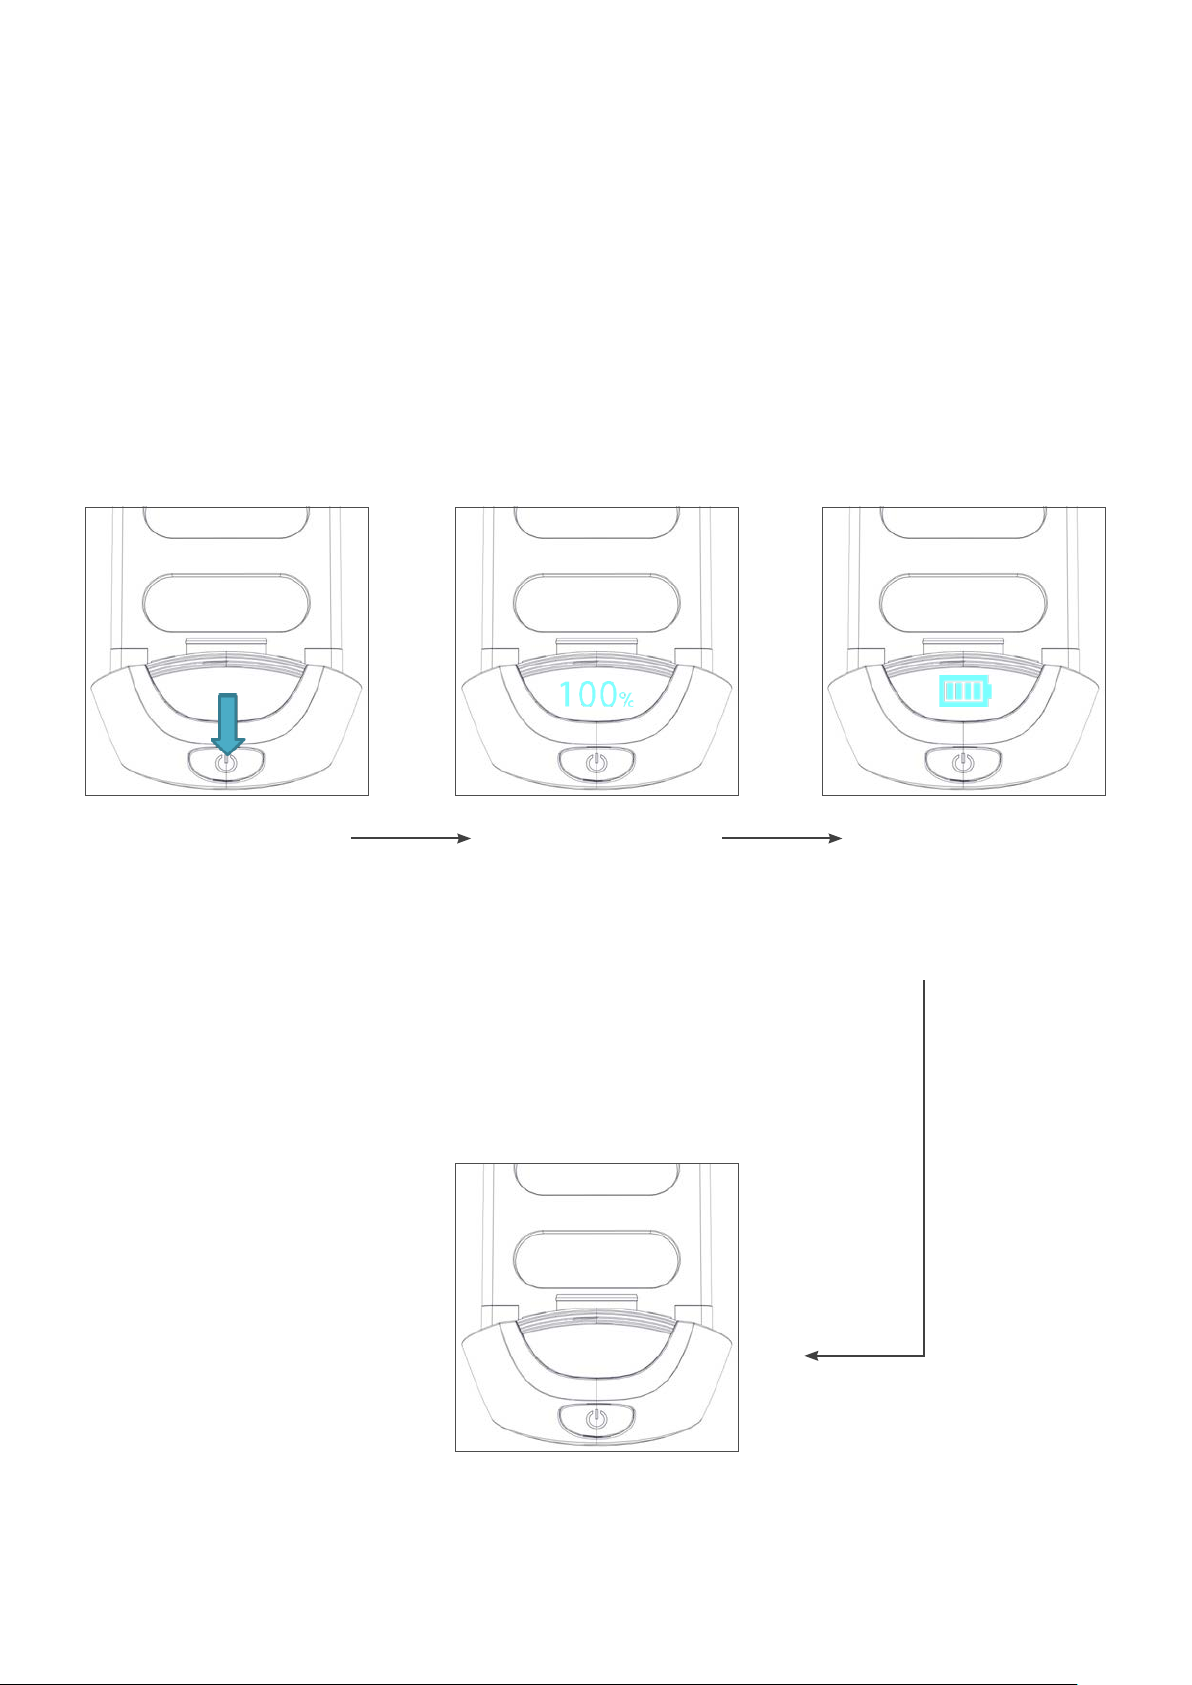
Charging the Drone Battery
Battery Charger Overview
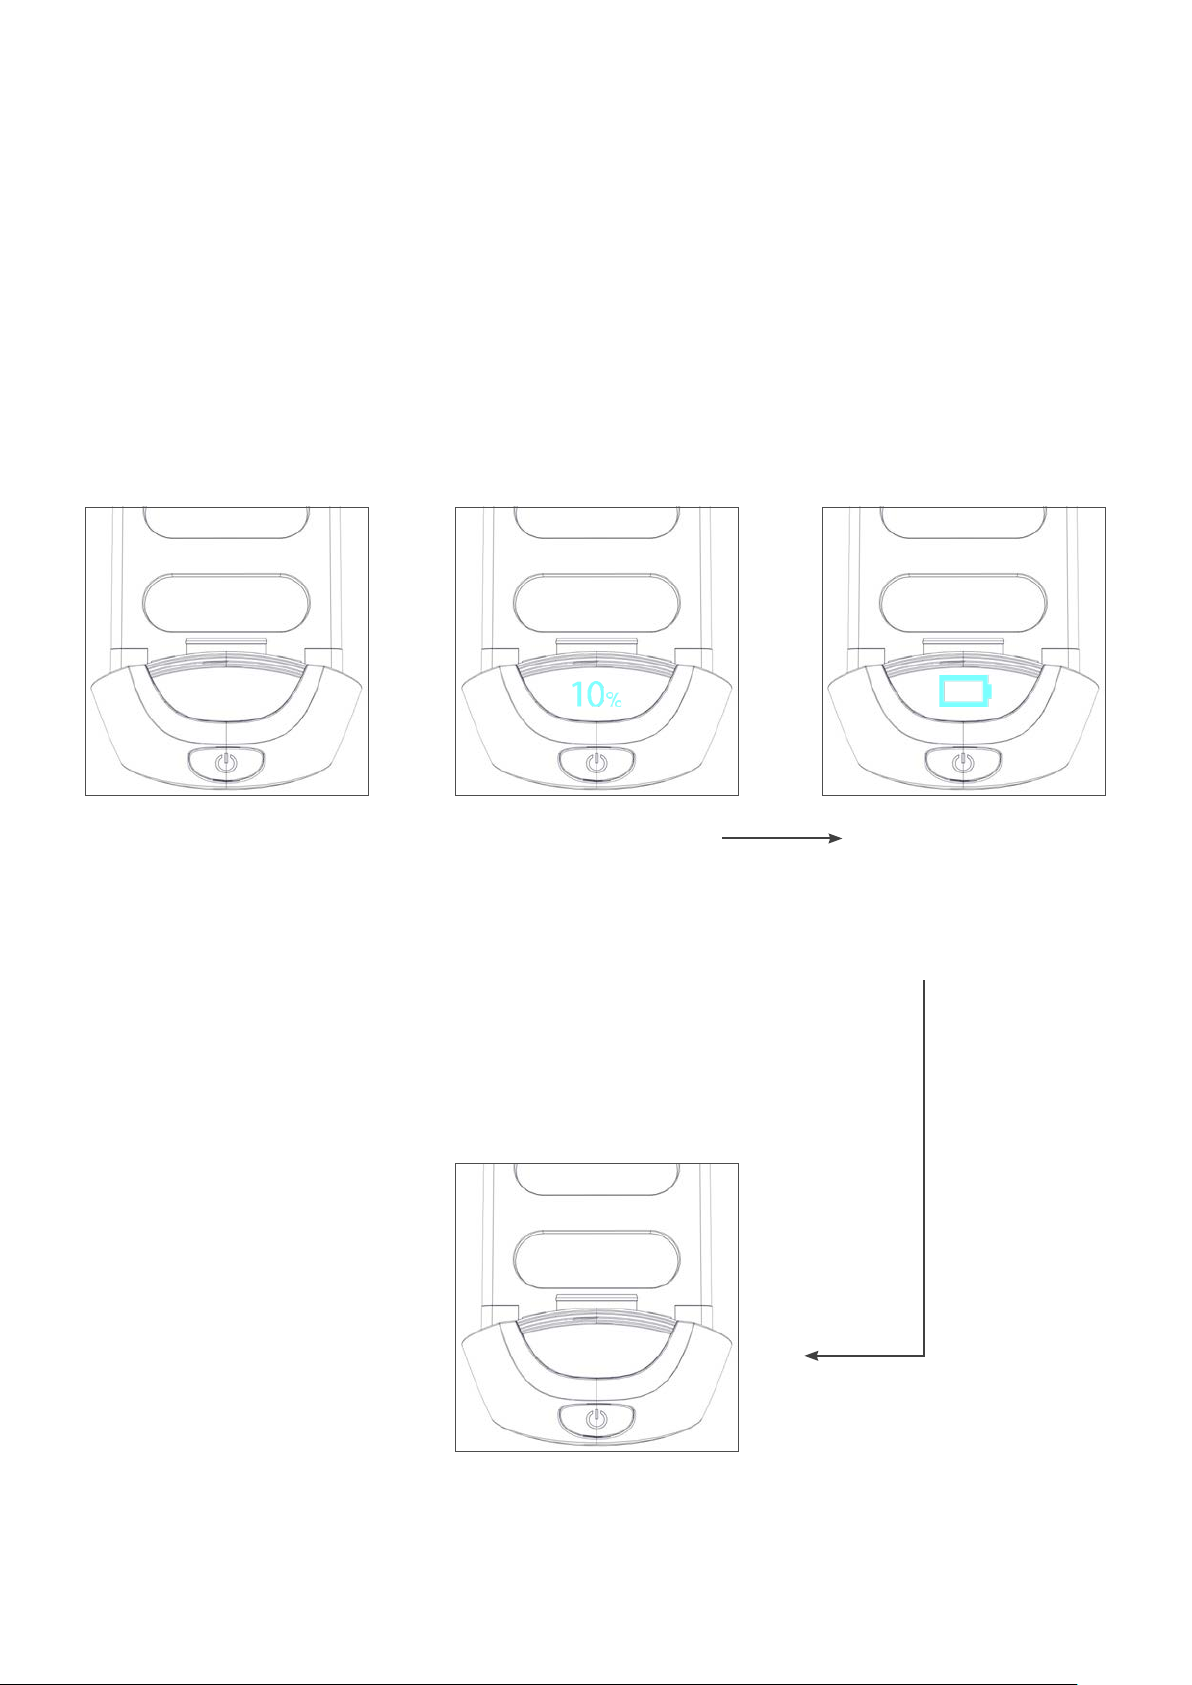
The battery charge level can be checked even if it is not installed in the drone by following these steps:
1. Press and release power switch
2. Battery level percentage will be displayed
3. Followed by a battery level icon
4. The display will go blank and the battery will power o
Fully Charged Battery
Press and release the
battery switch
The battery level percentage will
be displayed
Followed by a battery
level icon
Turn o the OLED display
after 10s
44Evolve User Manual V1.0 by XDynamics Limited
Page 45
Charging the Drone Battery
Battery Charger Overview
The battery charge level can be checked even if it is not installed in the drone by following these steps:
1. Press and release power switch
2. Battery level percentage will be displayed
3. Followed by a battery level icon
4. The display will go blank and the battery will power o
Low Power Battery
If the power status low (under 10%) the digits and icon will
blink to draw users attention. Blink interval 0.5s
Turn o the OLED display
after 10s
45Evolve User Manual V1.0 by XDynamics Limited
Page 46
Charging the Drone Battery
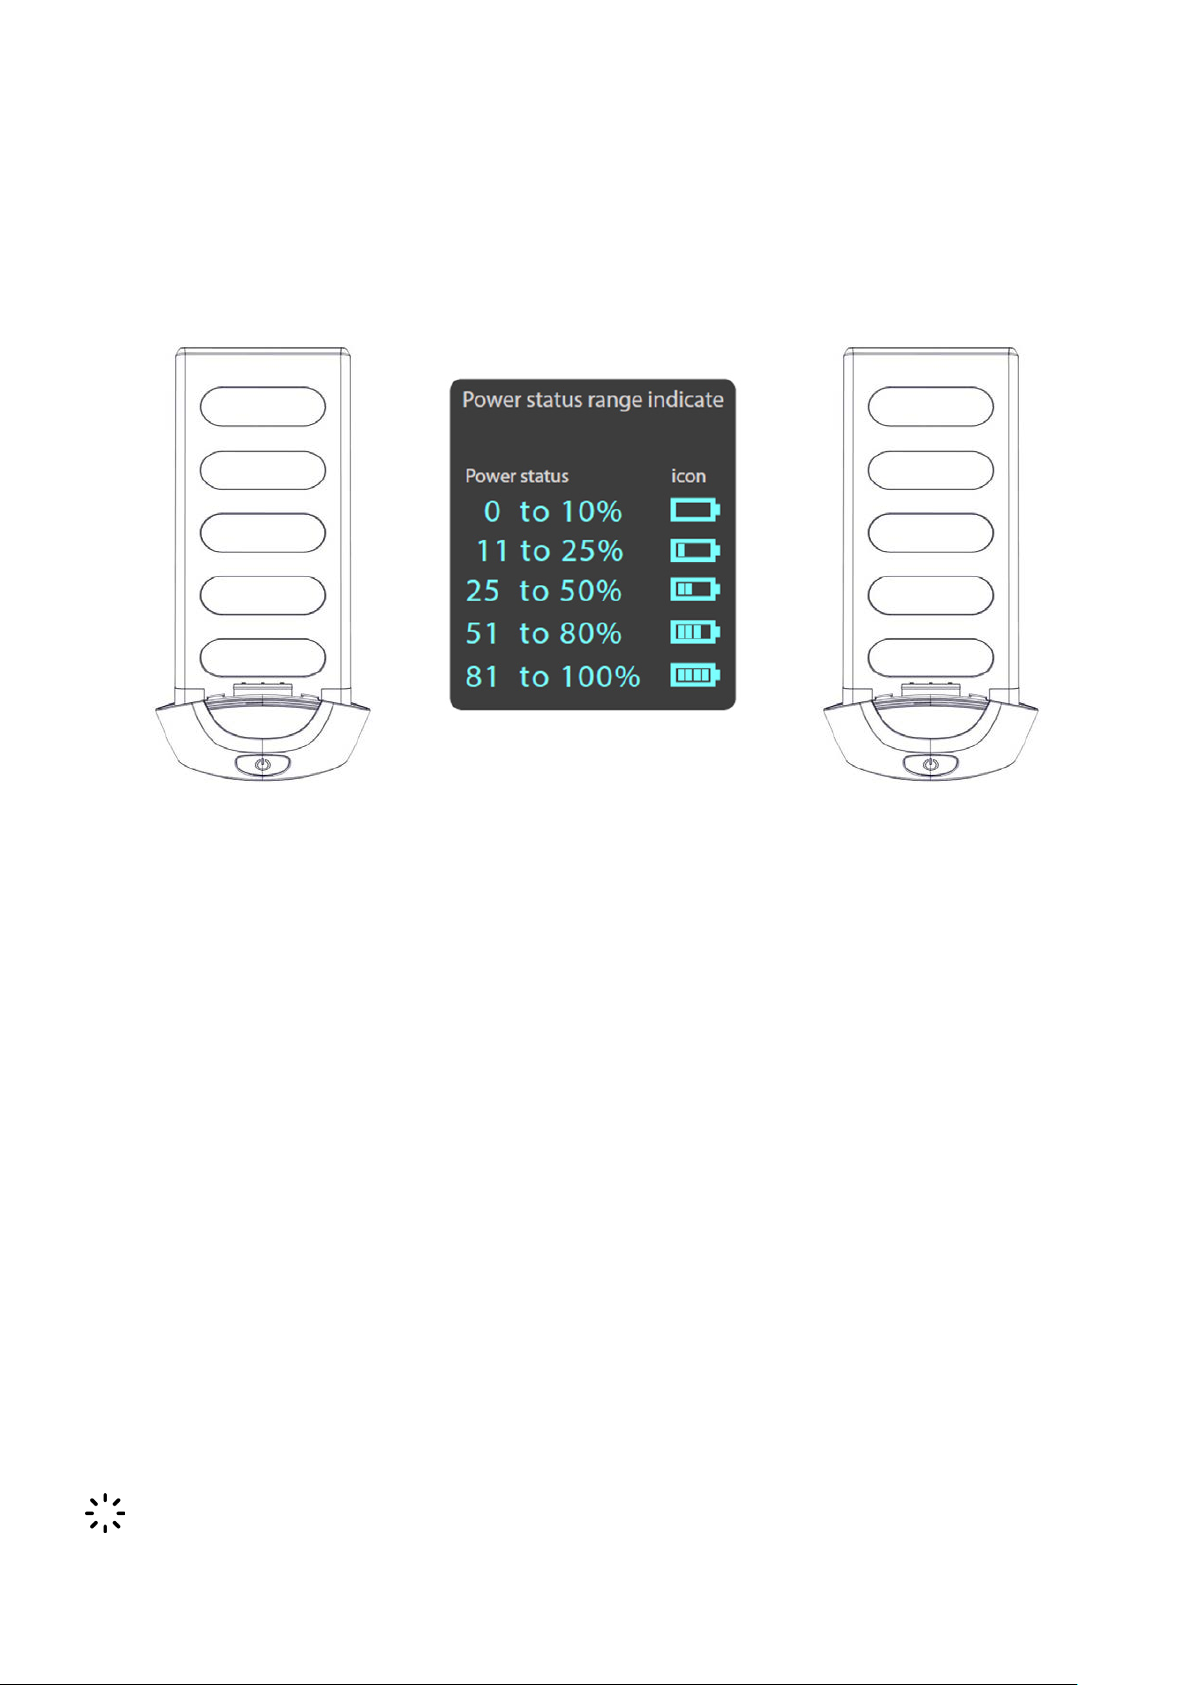
Power Status Range Indications
When determining the estimated ight time and distance range of any drone ight the operator needs
to have an idea of how much ight time is remaining according to the current power percentage left.
Below describes the estimated ight times for battery percentages.
Battery Level Status
Consider the following battery levels for decision making:
100% - Fully Charged
Flight time around 25 minutes
75% - Minimum Level Amount for a New Flight
Flight time around 17 minutes
50% - Half Charged
At this level voltage and current draw has the most eect on ight time
Approximately 10 minutes remaining.
30% - Low Charge Level
Consider returning home and landing soon.
15% - Land Immediately.
The battery failsafe mode is triggered and RTL happens
Warning: Never drain the battery to 5% or less, this may damage battery or make the battery
unreliable on next charge.
46Evolve User Manual V1.0 by XDynamics Limited
Page 47
Drone Calibration
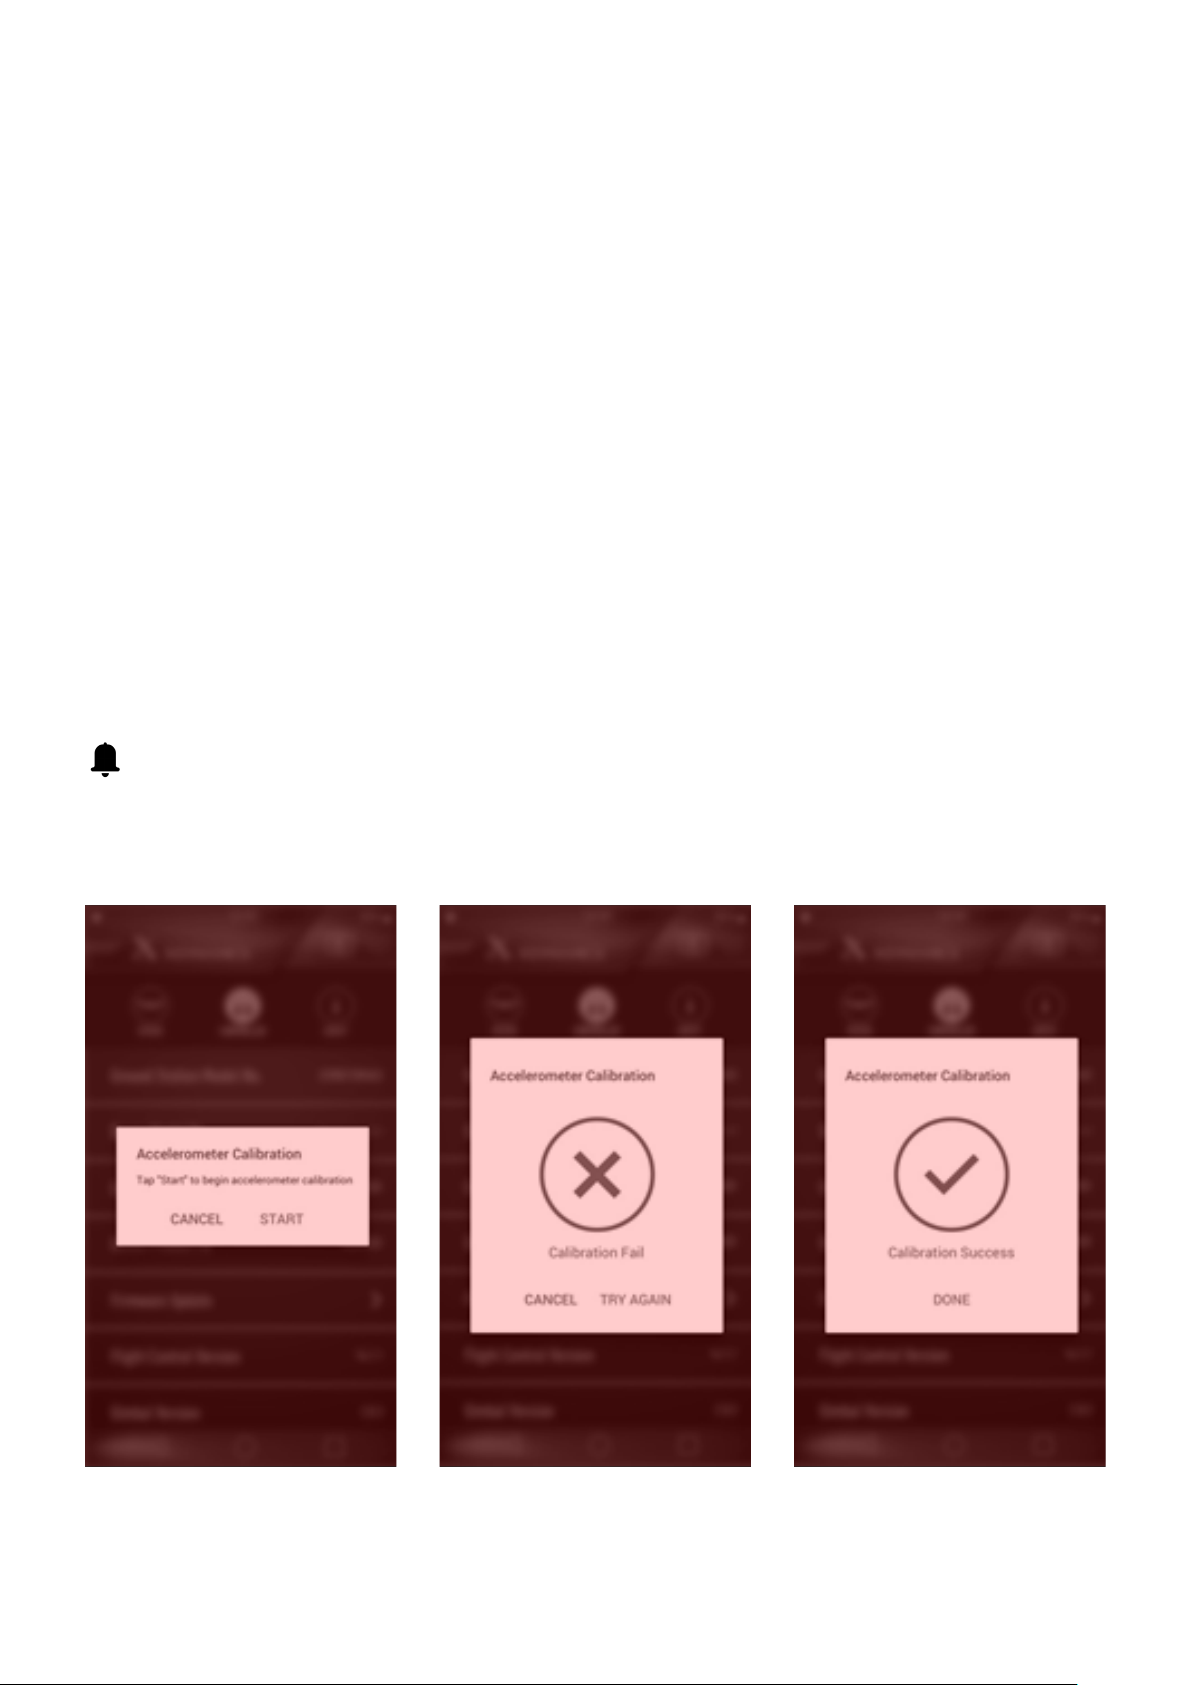
Accelerometer Calibration Procedures:
Please ensure all rmware is up to date and follow on screen instructions if any variance from the
instructions outlined below.
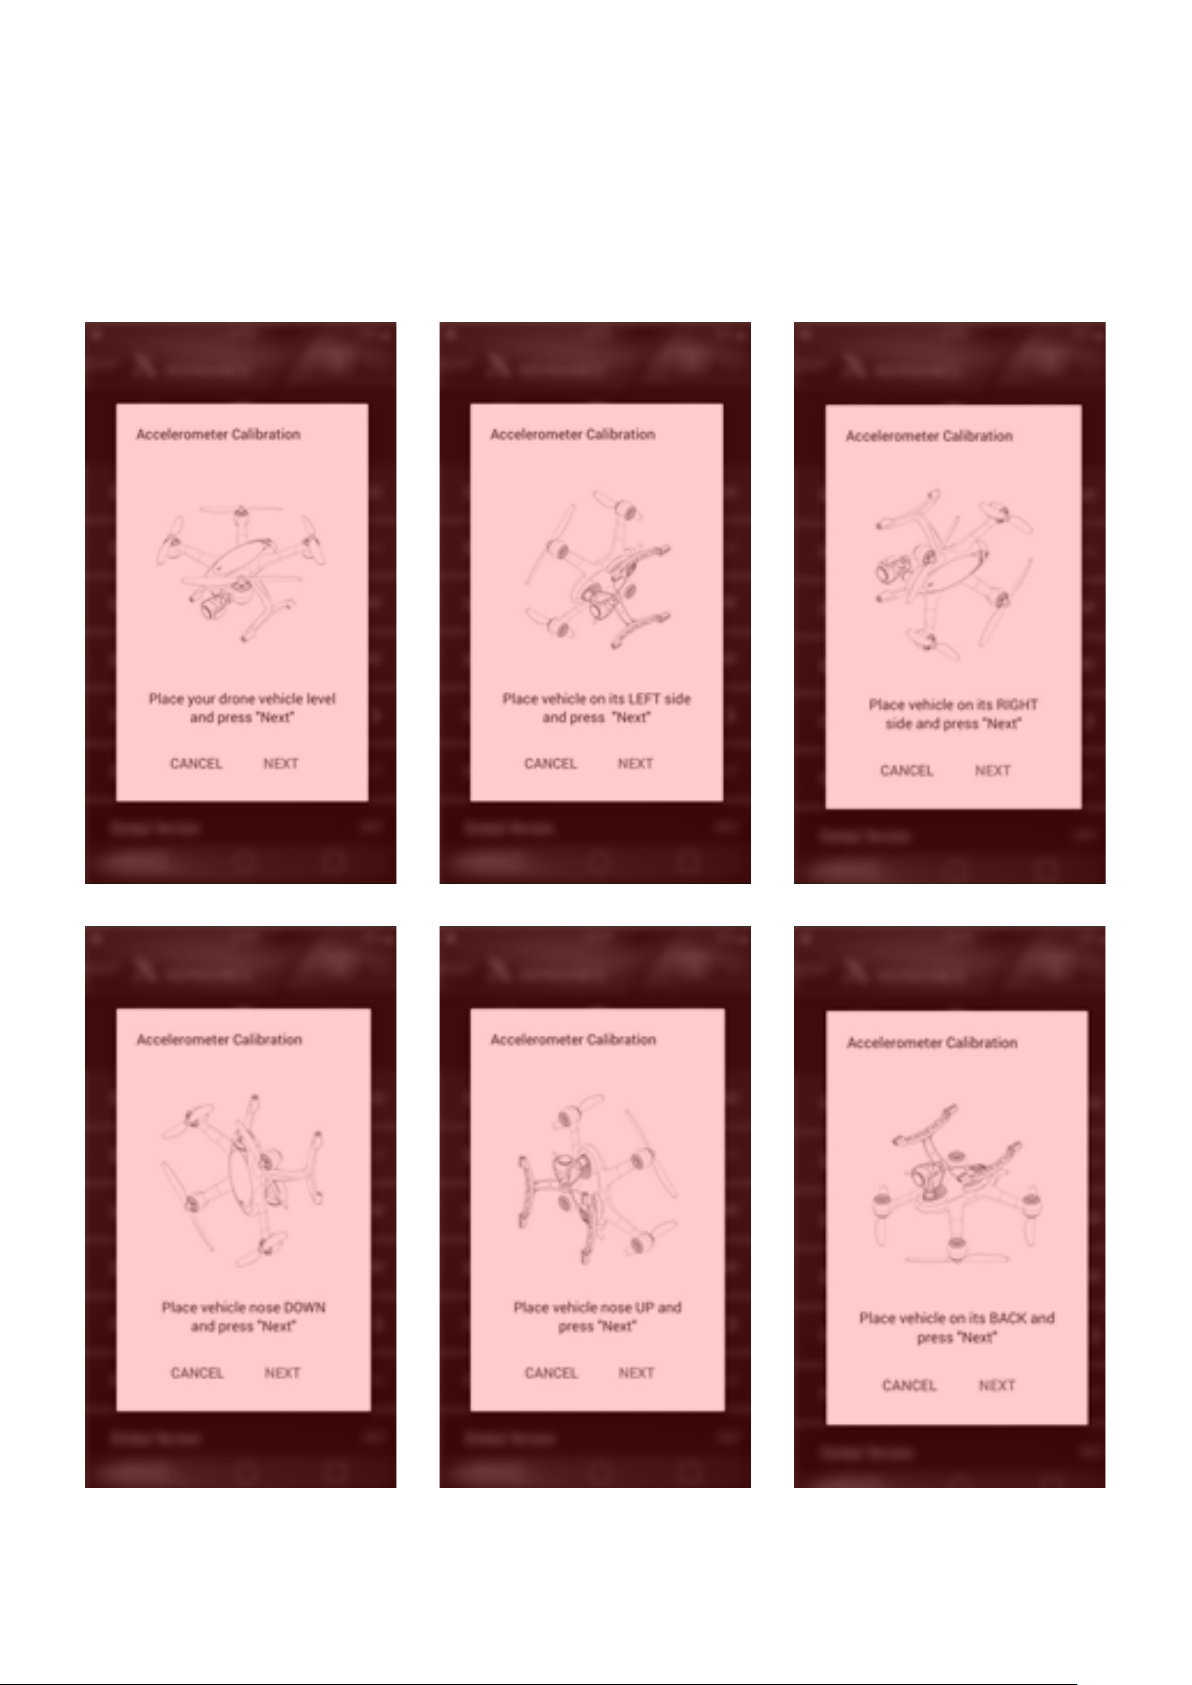
To calibrate the accelerometer follow these steps:
1. For safety remove the propellers from the drone
2. Make sure the GS and drone are powered on and connected
3. Navigate to the accelerometer calibration page on the smart pilot APP
4. Press “start” on the accelerometer calibration page
5. Ensure the drone is on a level surface and press “next”
6. Follow the on screen instructions for drone placement and push “next” when prompted
7. Once complete the APP will indicate a failed or successful calibration
8. If failed recycle the drone and controller power and restart at Step 1.
Accelerometer calibration is only required when requested by the Smart Pilot System.
47Evolve User Manual V1.0 by XDynamics Limited
Page 48
Drone Calibration
Accelerometer Calibration Procedures:
Please ensure all rmware is up to date and follow on screen instructions if any variance from the
instructions outlined below.
48Evolve User Manual V1.0 by XDynamics Limited
Page 49
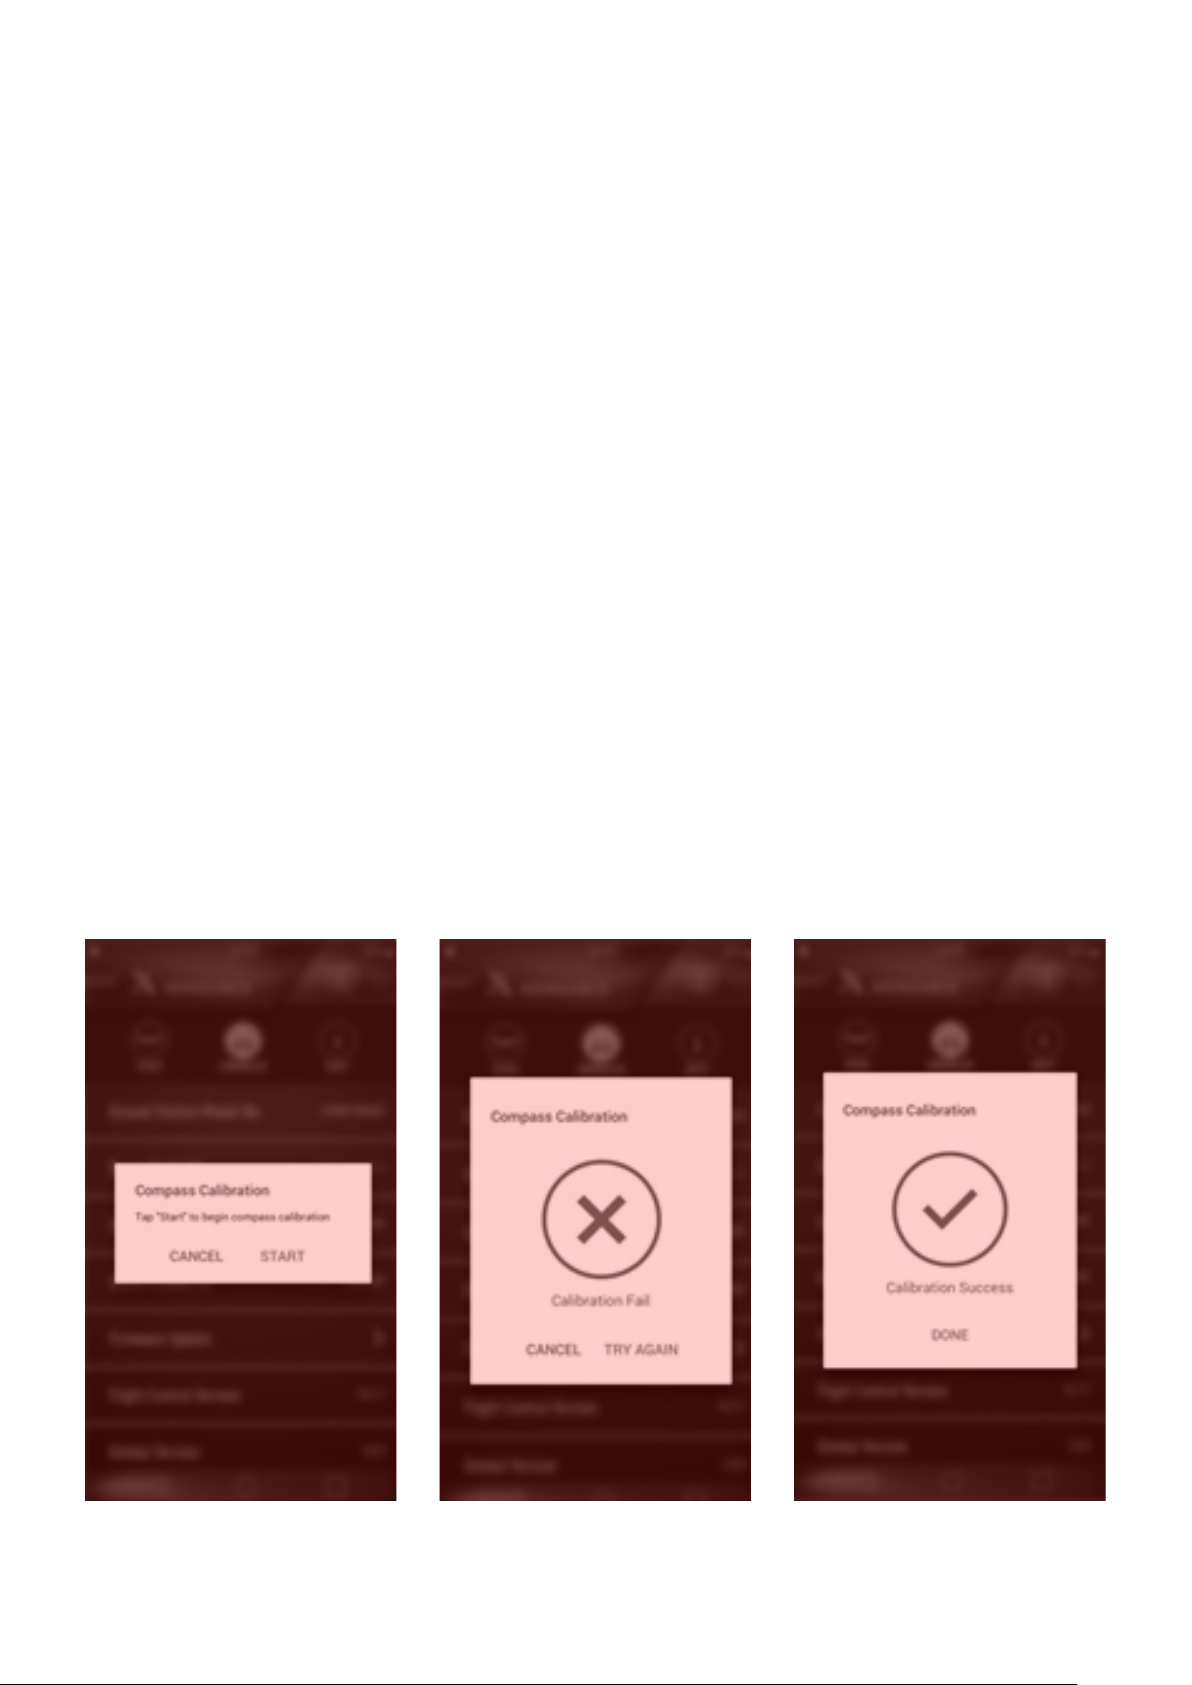
Drone Calibration
Compass Calibration Procedures:
The electronic compass on the Evolve drone is used to determine the direction the drone is pointing
in reference to true north. The compass is a sensitive sensor that is aected by electromagnetic
interference from sources such as radio towers and high voltage power lines. The compass can give
false readings if the drone is placed over a surface composed of metal or there is metal under the
surface, such as rebar under concrete. If a compass error occurs simply relocate the drone in a dierent
location until the metal interference is gone. If relocating the drone does not clear the compass error or
if the smart pilot APP requires a compass calibration follow the steps below.
To calibrate the compass follow these steps:
1. For safety remove the propellers from the drone
2. Make sure the GS and drone are powered on and connected
3. Navigate to the compass calibration page on the smart pilot APP
4. Press “start” on the compass calibration page
5. Follow the on screen instructions to rotate the drone on the proper plane
6. Listen for a tone during rotation and after each tone stop and proceed with the next rotation
until complete
7. When complete the APP will indicate calibration success or failed
8. If failed recycle the drone and controller power and restart at Step 1
49Evolve User Manual V1.0 by XDynamics Limited
Page 50
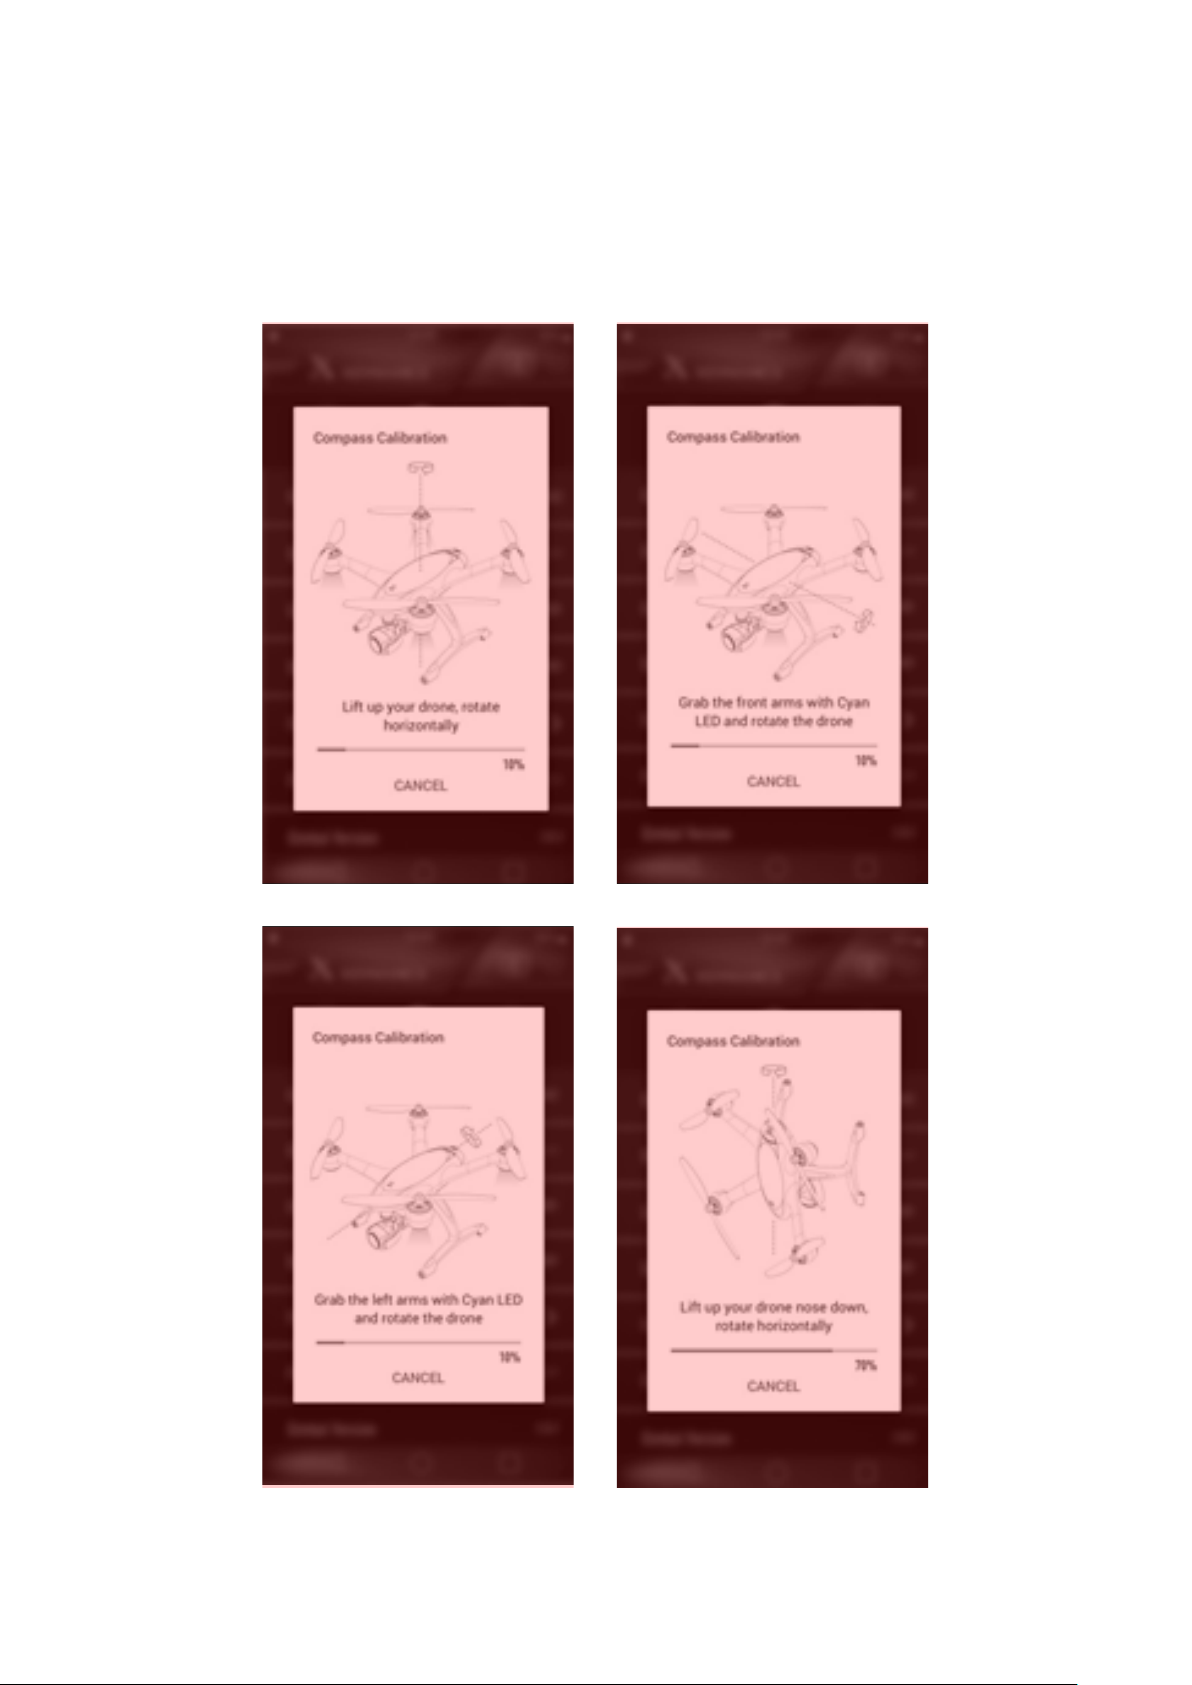
Drone Calibration
Compass Calibration Procedures:
Please ensure all rmware is up to date and follow on screen instructions if any variance from the
instructions outlined below.
50Evolve User Manual V1.0 by XDynamics Limited
Page 51
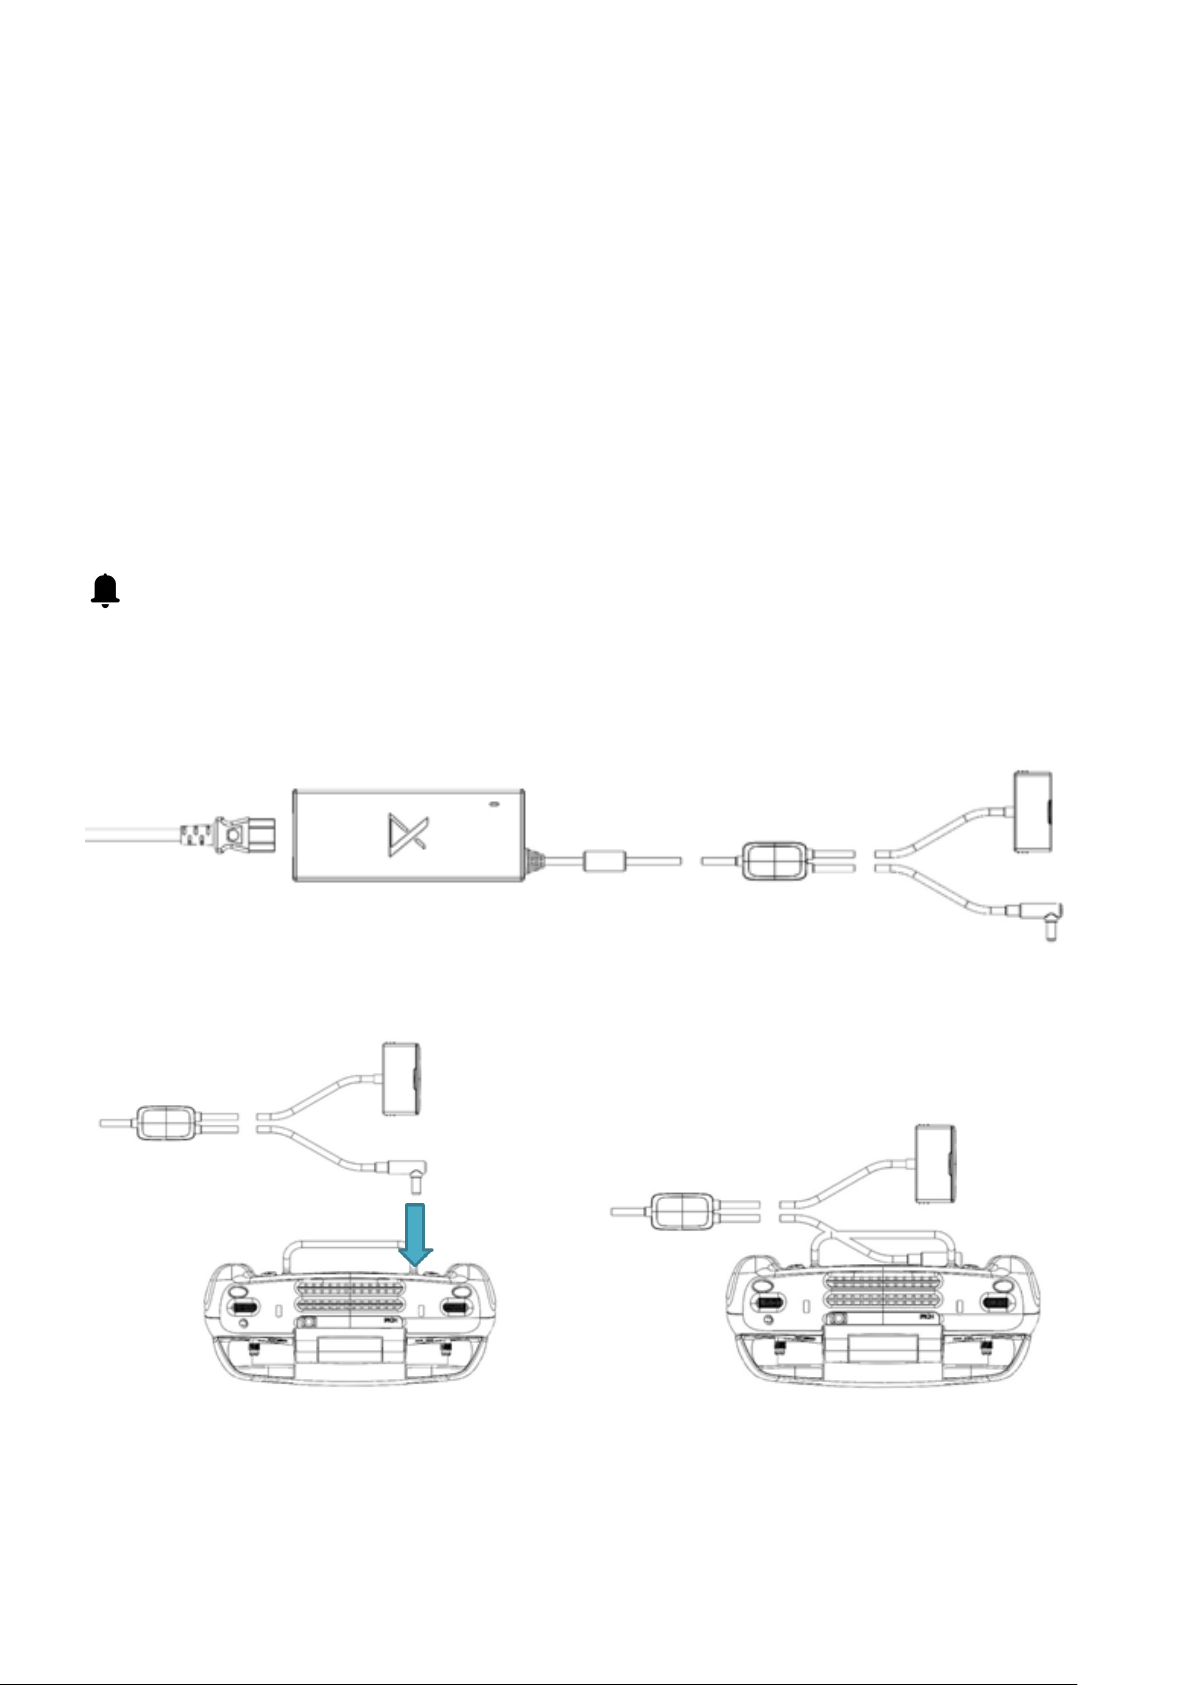
Remote Controller
Charging the Remote Controller Battery
The remote controller battery can be charged with the supplied battery charger whilst inserted into the
remote controller main housing.
Follow the below steps to charge the Remote Controller battery :
1. Plug in power supply to wall socket power supply
2. Plug silver round connector into Remote Controller
3. When the LED indicator on the GS turns o battery is fully charged
Please note the remote controller battery can also be charged simultaneously with the Evolve
drone battery.
51Evolve User Manual V1.0 by XDynamics Limited
Page 52
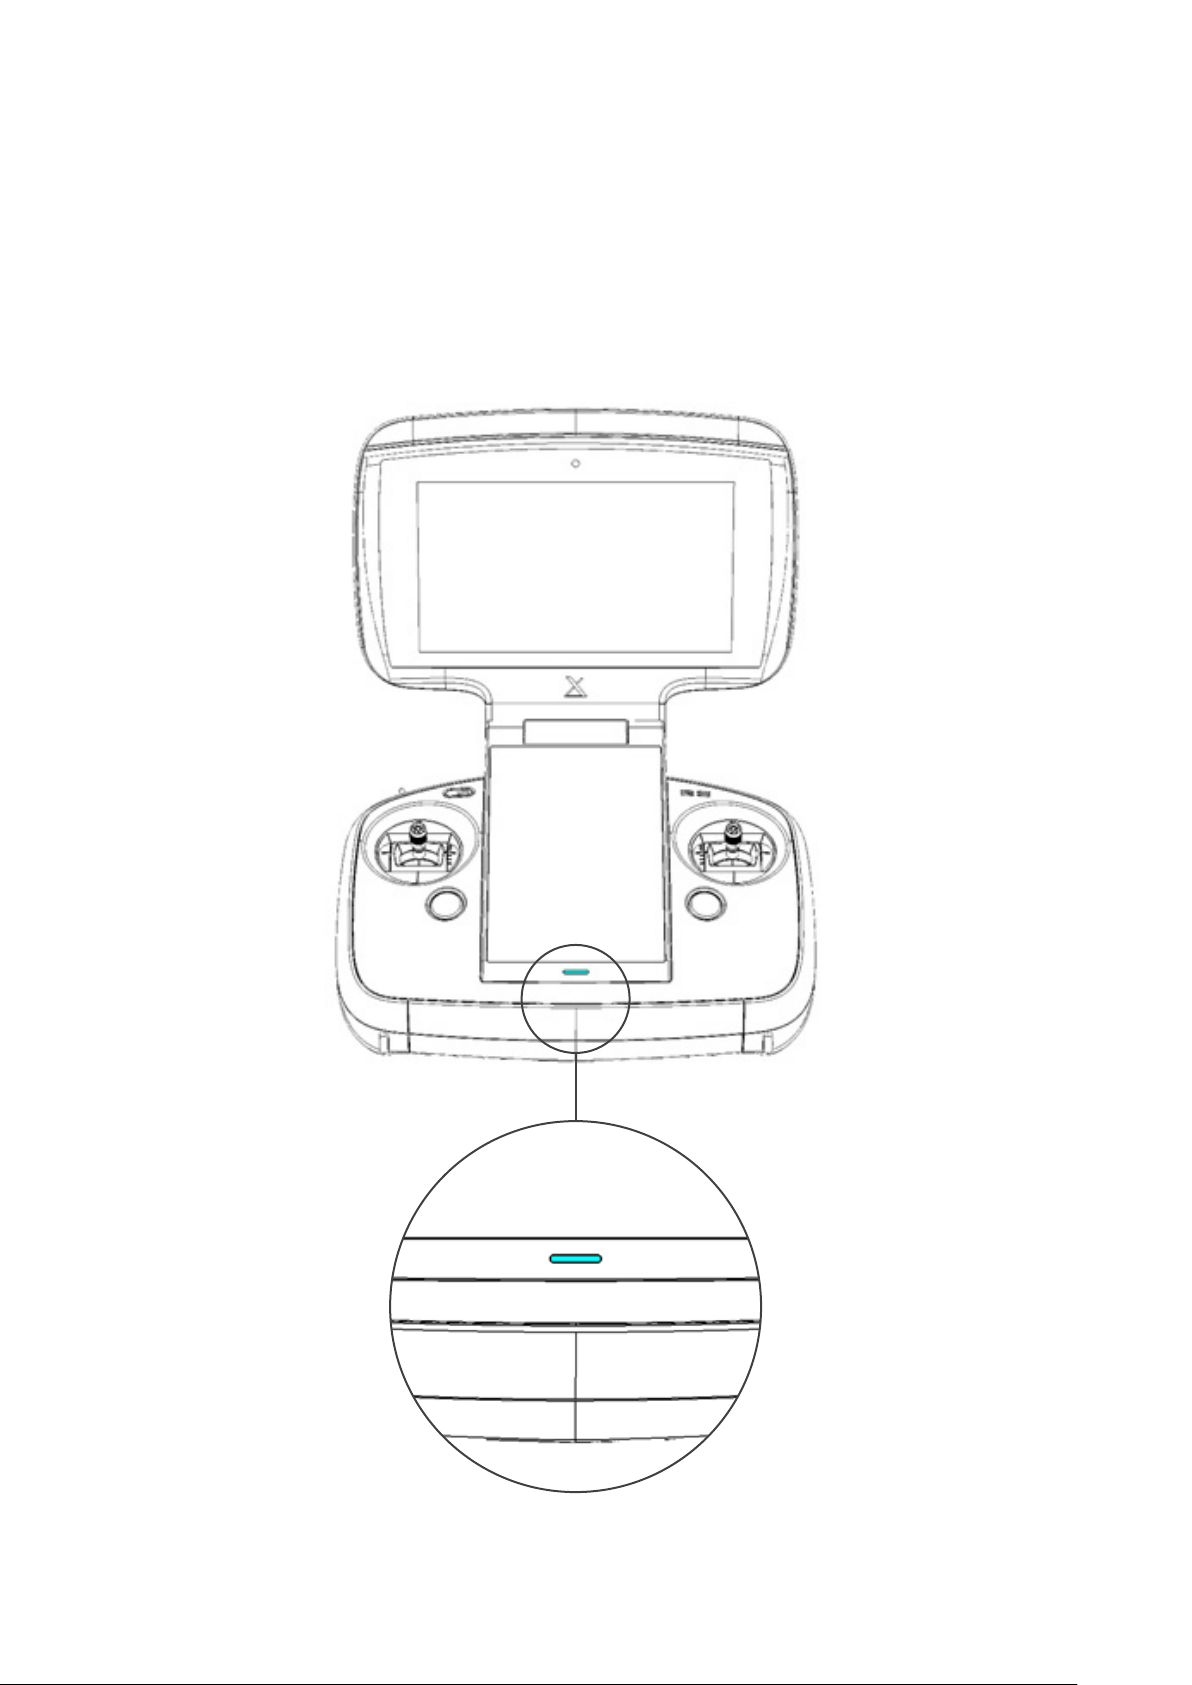
Remote Controller
Remote Controller LED Indicators
The Remote Controller LED indicator is located below the bottom screen. The LED indicated the current
state of the Remote Controller battery charge. During normal operating battery operating level the LED
will be blue. When the voltage has dropped to the point requiring immediate recharge, the LED will
turn to Amber. It is not recommended to start a new ight with an amber indication on the LED.
52Evolve User Manual V1.0 by XDynamics Limited
Page 53
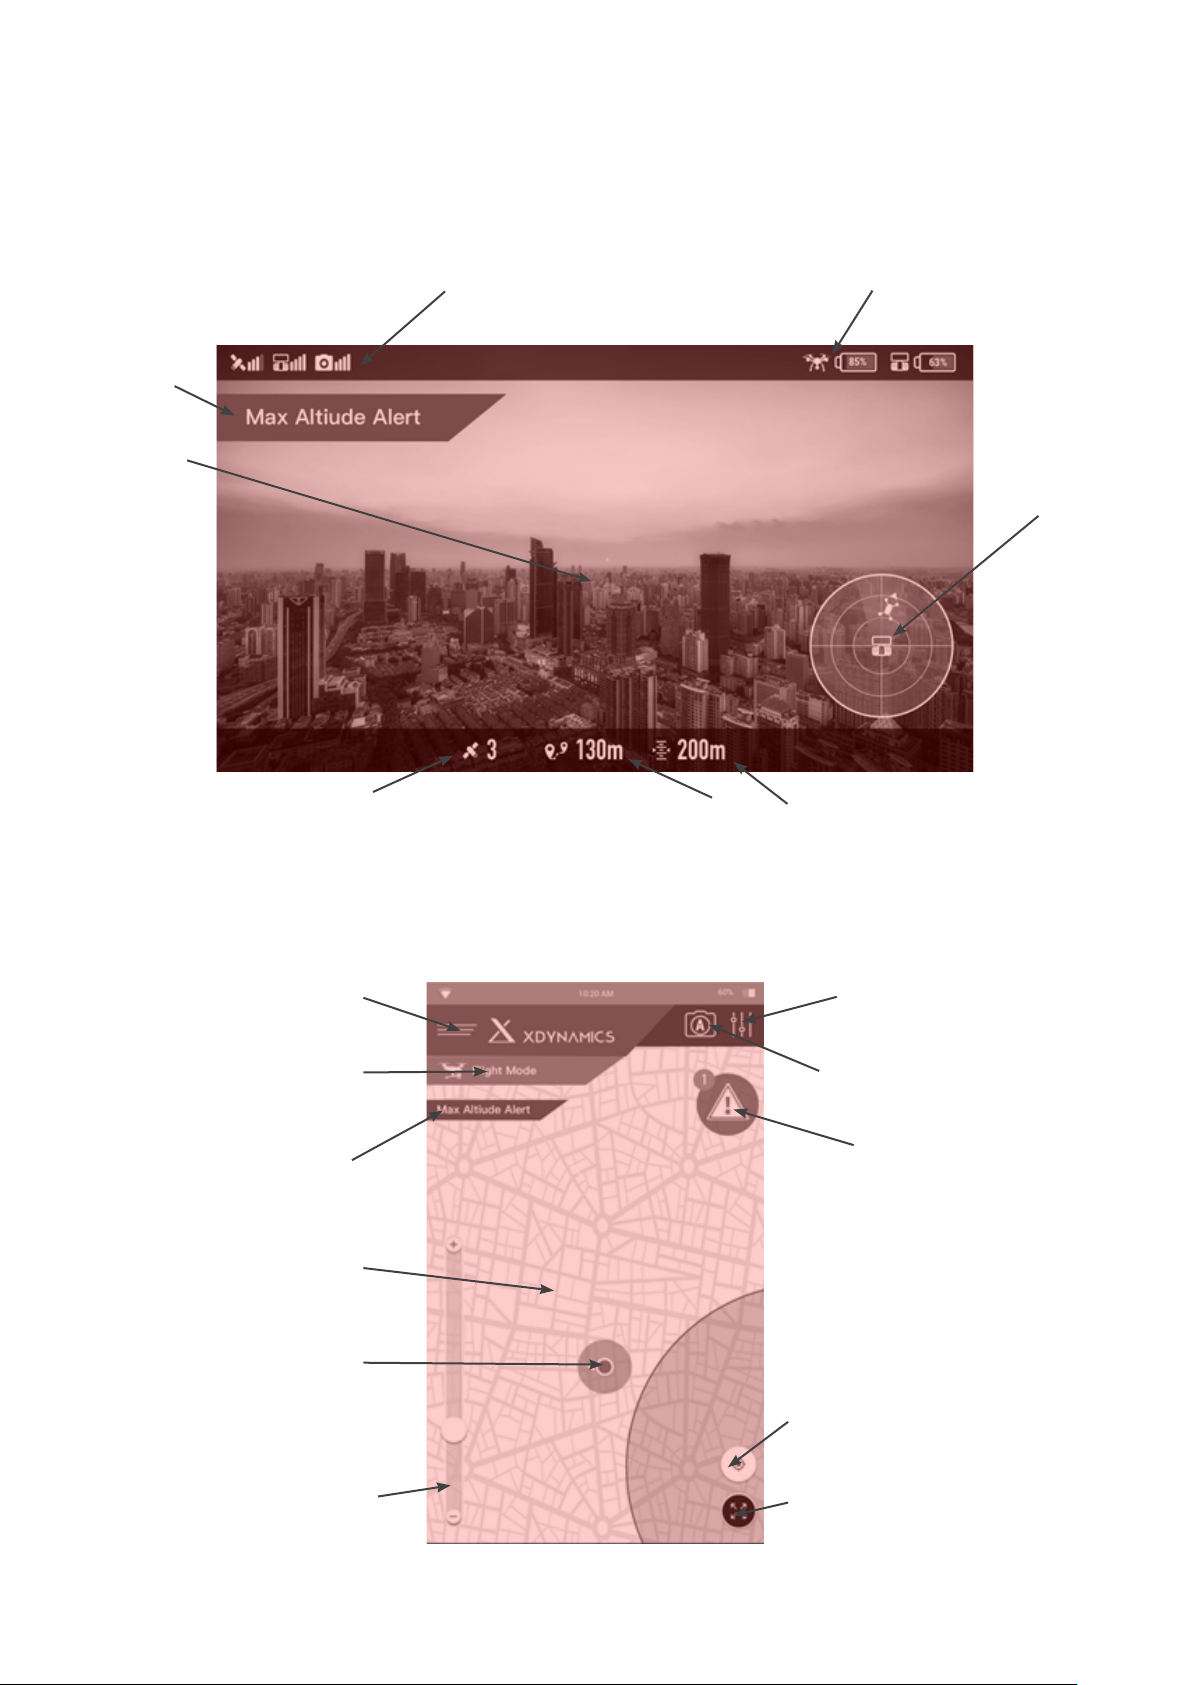
Remote Controller Application
Flight Data
Flight Data is displayed as below:
Warning
Message Box
Camera Video
Downlink Signal
GPS / RF / FPV Signal
GPS Satellite Height Frome Home
Distance From Home
Point
Drone / Remote
Controller Battery
Point
Radar
Menu
Flight Mode
Warning
Message Box
Map
Current Location
Map Zoom Control
Settings
Camera Settings
Alert
Centre The Map Around
Controller
Centre The Map Around
Drone
53Evolve User Manual V1.0 by XDynamics Limited
Page 54
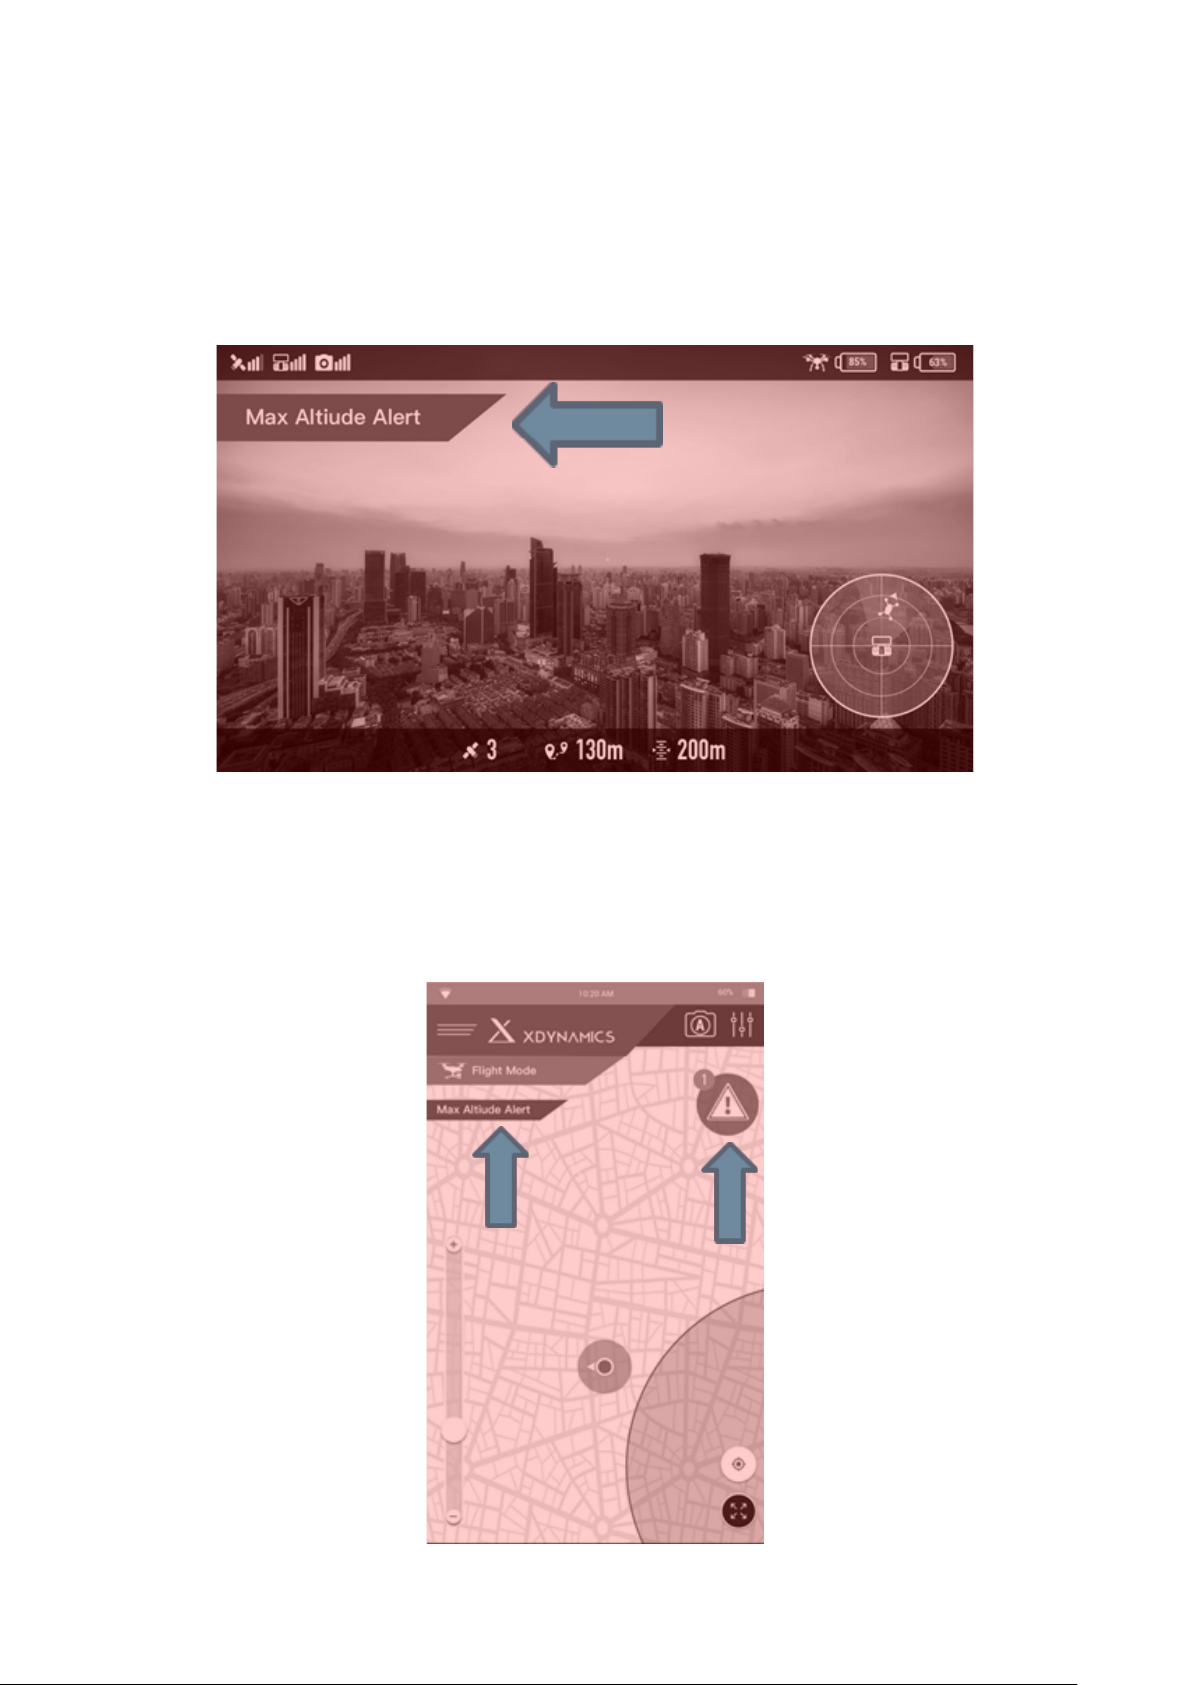
Remote Controller Application
Warnings and Alerts
Smart Pilot System provides notications on warnings and alerts, and will provide suggested actions on
solving the issues.
The top screen shows the warnings at the top left corner.
The bottom screen also shows the warnings at the top left corner. And, you may also notice the current
number of warnings on the Alert button at the top left corner. Tapping the Alert button on the screen
will bring you to the Warning List. You may check all the existing warnings and tap the suggested action
to solve the issue.
54Evolve User Manual V1.0 by XDynamics Limited
Page 55
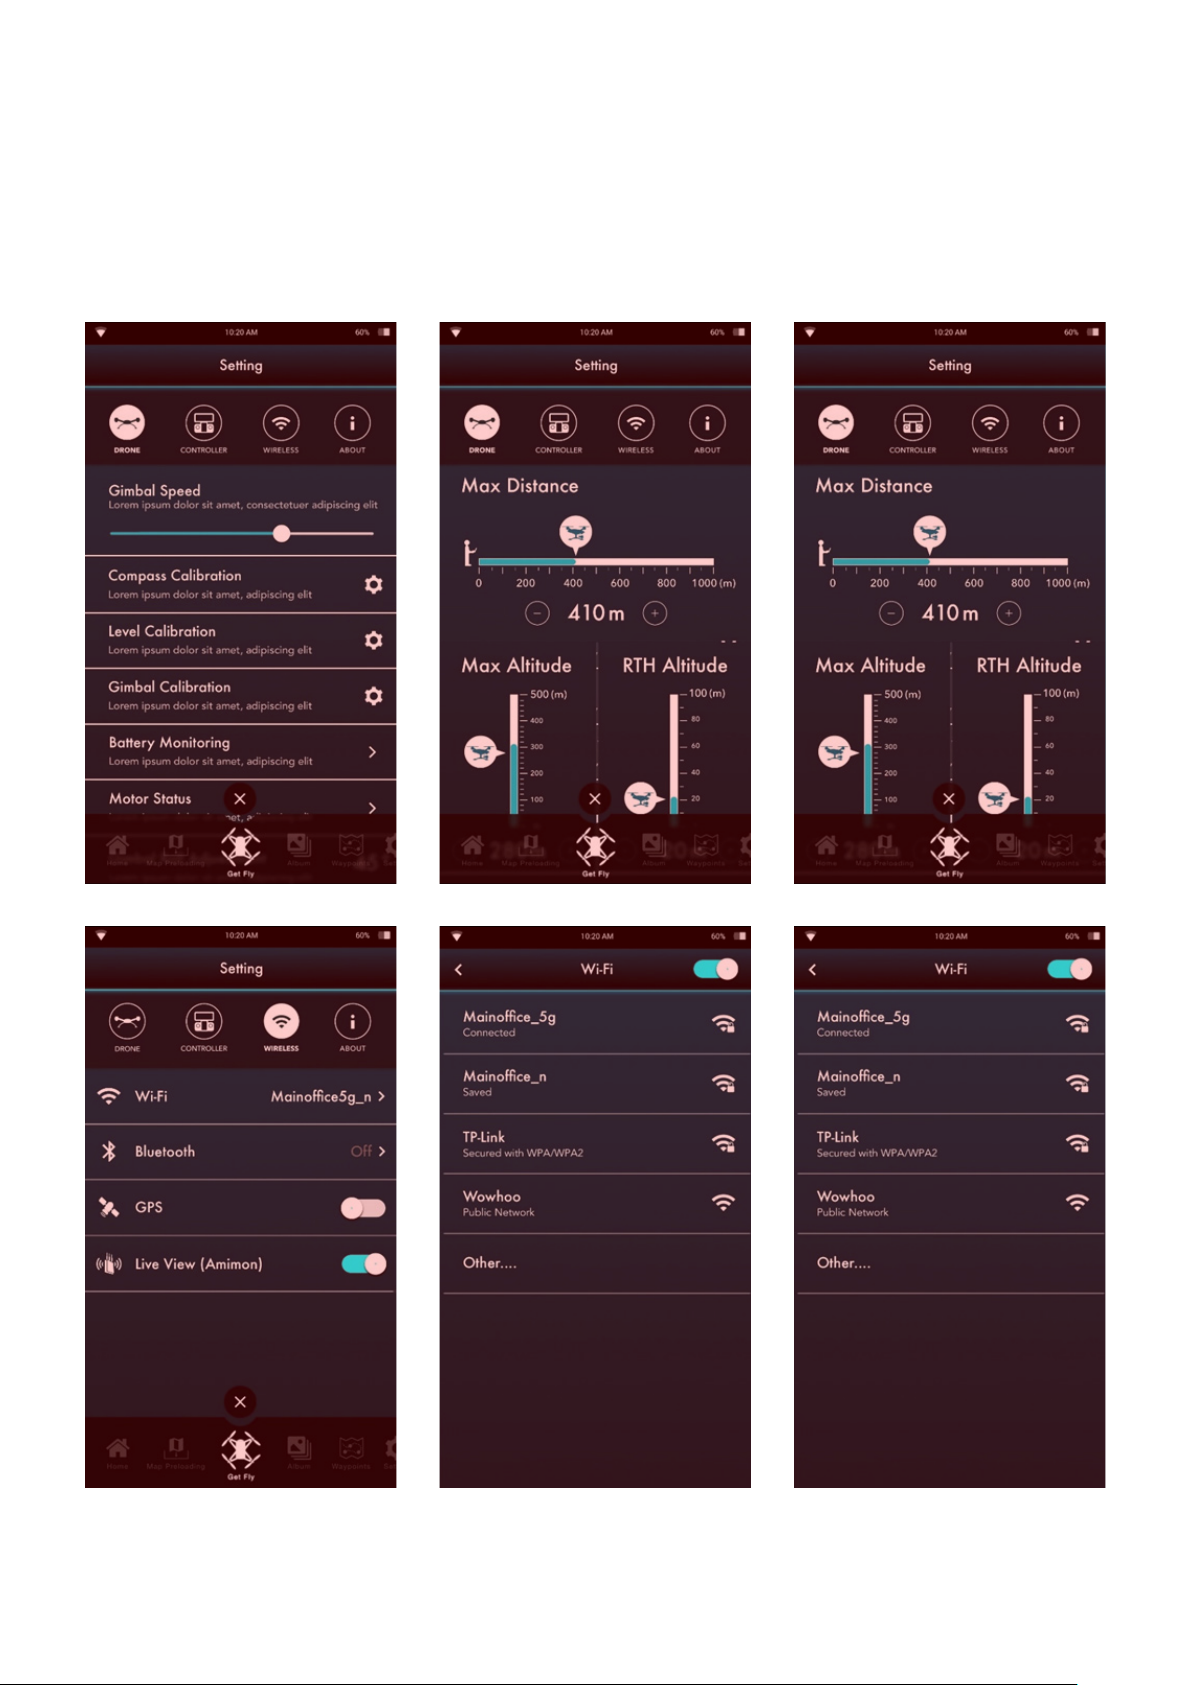
Remote Controller Application
Settings Menu
The settings menu allows the operator to congure the drone to suite their preferences. Settings
include Done, Controller, Wireless, and About.
55Evolve User Manual V1.0 by XDynamics Limited
Page 56
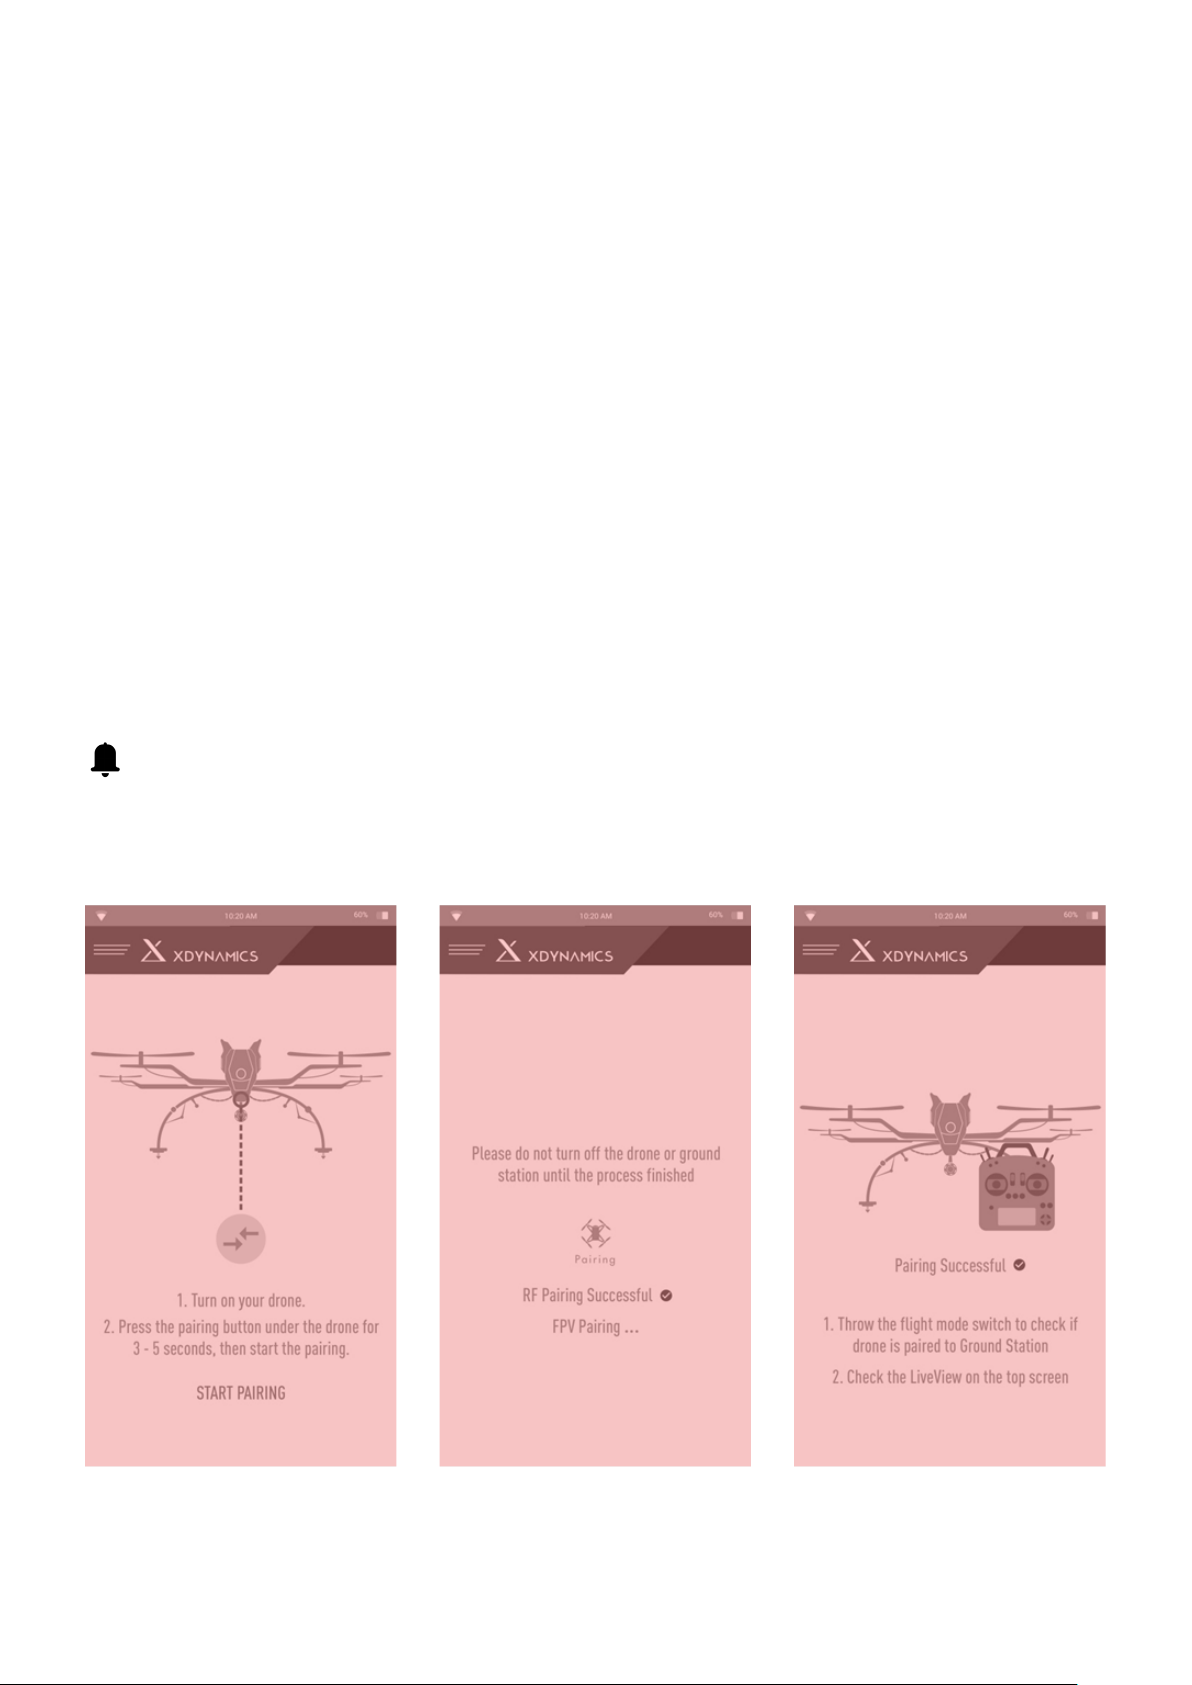
Remote Controller Application
Linking the Remote Controller
The Evolve drone system is pre linked from the factory. If there becomes a situation requiring the
Remote Controller and the drone to be re-linked Follow the below steps:
To pair the remote controller to a new drone follow these steps:
1. Navigate to the Smart Pilot System Drone Pairing Page.
2. Turn on the Drone.
3. Keep the Drone at least 3ft away from the Remote Controller.
4. Tap “Start Pairing” on the Remote Controller screen.
5. Follow the instructions on screen to complete the pairing.
6. The screen shows the modules pairing status.
7. The whole pairing process may take up to 2 minutes.
Only required if trying to pair a new drone to the remote controller or a new controller to the
drone.
56Evolve User Manual V1.0 by XDynamics Limited
Page 57
Camera and Gimbal Section
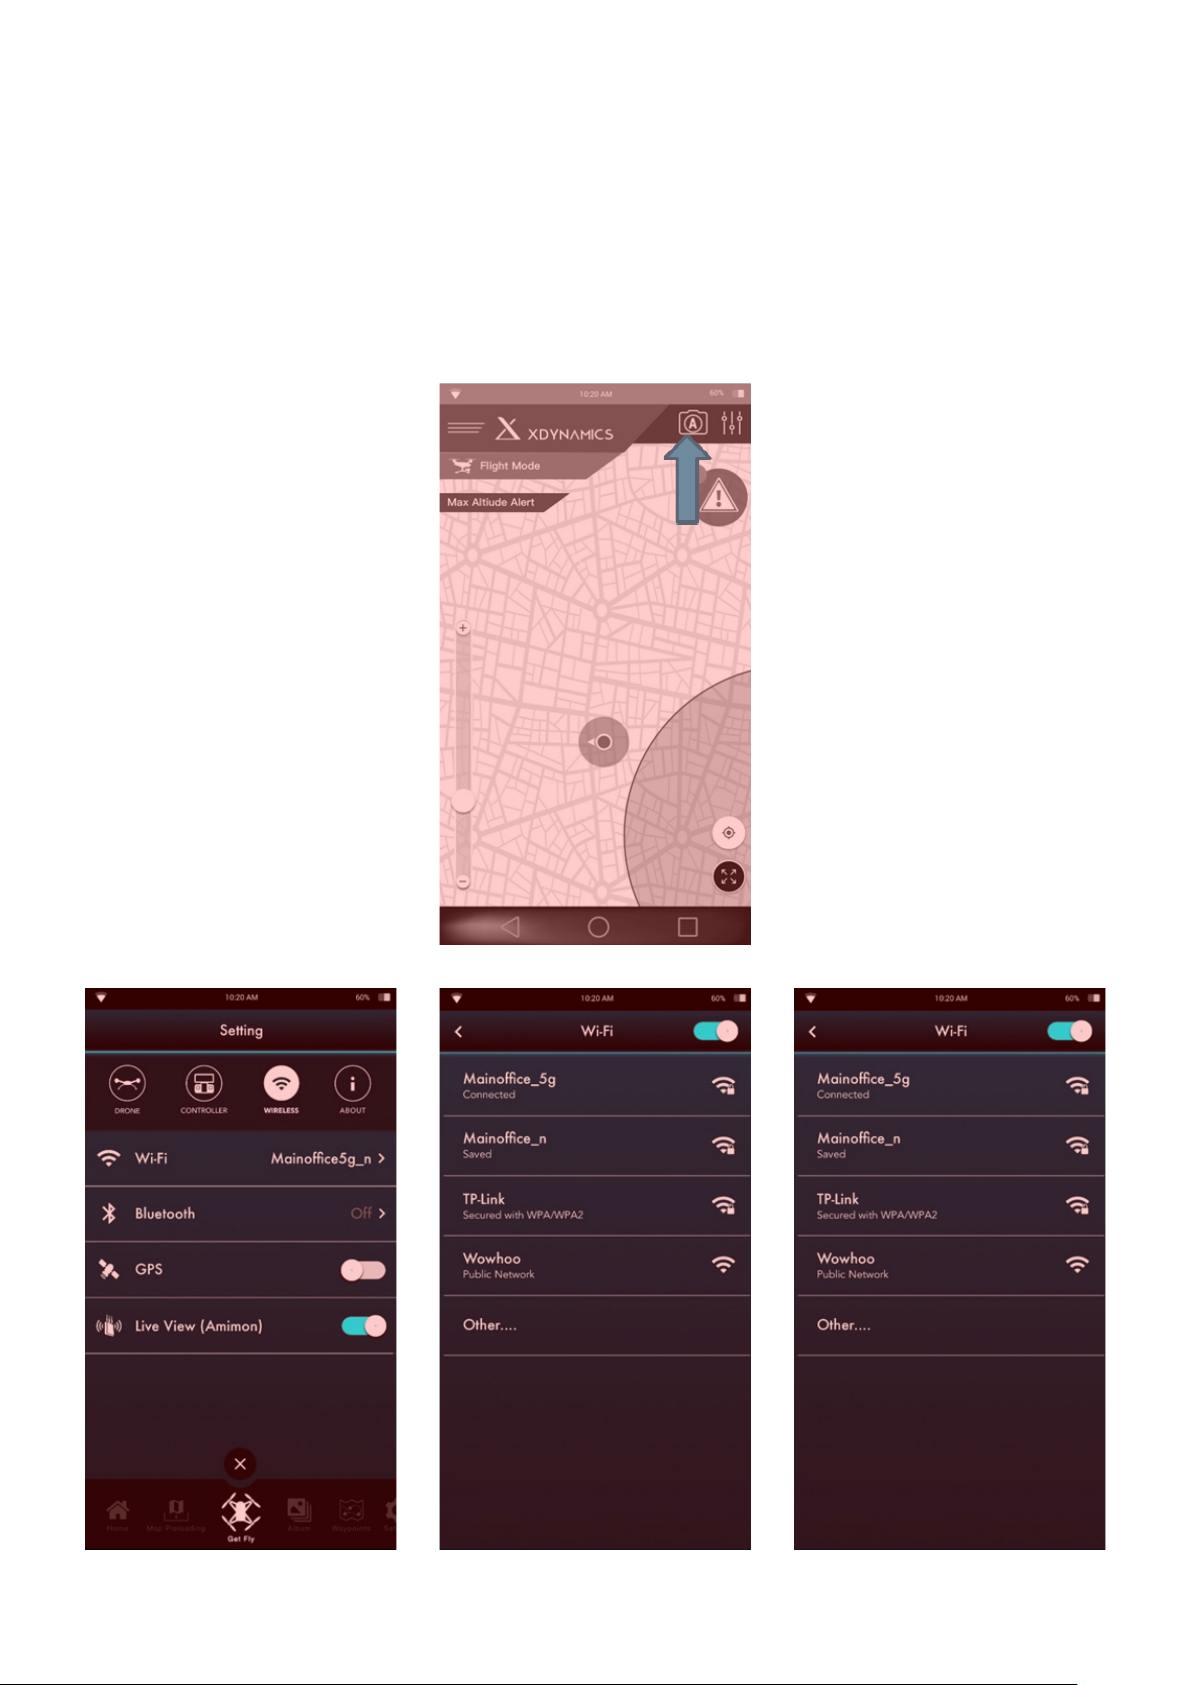
Camera Settings Page
The drone camera has full control of key video shooting settings, all of these settings can be found at
the camera setting page in the Smart Co-Pilot System.
Selecting the icon indicated in the below diagram will open the congure setting for the camera. The
standard settings are similar to those found in most digital camera systems, including ISO, shutter
speed, contrast, quality, format etc.
57Evolve User Manual V1.0 by XDynamics Limited
Page 58
Camera and Gimbal Section
Removing Filter Cover (Allows for cleaning)
To remove the camera lter unscrew CCW as shown in the diagram below.
58Evolve User Manual V1.0 by XDynamics Limited
Page 59
Flight Operations Section
Weather Limitations
Although the Evolve is a high performance drone, weather can be a crucial factor to ight performance
and safe operations. Caution must be observed when it comes to weather planning. Eective weather
planning breaks down to these criteria:
◦ Weather information gathering – This can be achieved be watching your local news weather
station and by using the web and APP tools like The Weather Channel and NOAA
◦ Knowledge of weather patterns in your operational area – Search for local weather patterns
with similar APP tools for forecasting weather
◦ Executing ight plan and go or no go situations based on the weather information – Be sure
to make informed decisions based on accurate weather information and remember no ight
is too important to ignore safely hazards created by inclement weather.
If these criteria are met the chances of a crash or close calls are substantially reduced.
Below is the weather limitation of the Evolve:
◦ Wind speed - 25 mph for maximum safe operations
◦ Outside temperature - 104°F hottest recommended / temperature 32°F for the coldest tem-
perature
◦ Visibility – At least 5 statute miles of clear visibility and a minimum cloud cover ceiling of
400ft
◦ Fog – Not Recommended to Fly
◦ Rain – Do Not Fly
59Evolve User Manual V1.0 by XDynamics Limited
Page 60

Flight Operations Section
Flight System Limitations
Below are the ight limitations of the Evolve:
Speed
◦ Accenting – 17.5 MPH
◦ Descending – 11MPH
◦ Horizontal – 45 mph (For higher top speeds contact customer support for signing of warran-
ty wavier prior to activation)
Distance
◦ 600 ft
Height
◦ 5000 ft above sea level
Weight
◦ 2.5 kg
Max. Flight time –
◦ 15 min
60Evolve User Manual V1.0 by XDynamics Limited
Page 61
Flight Operations Section
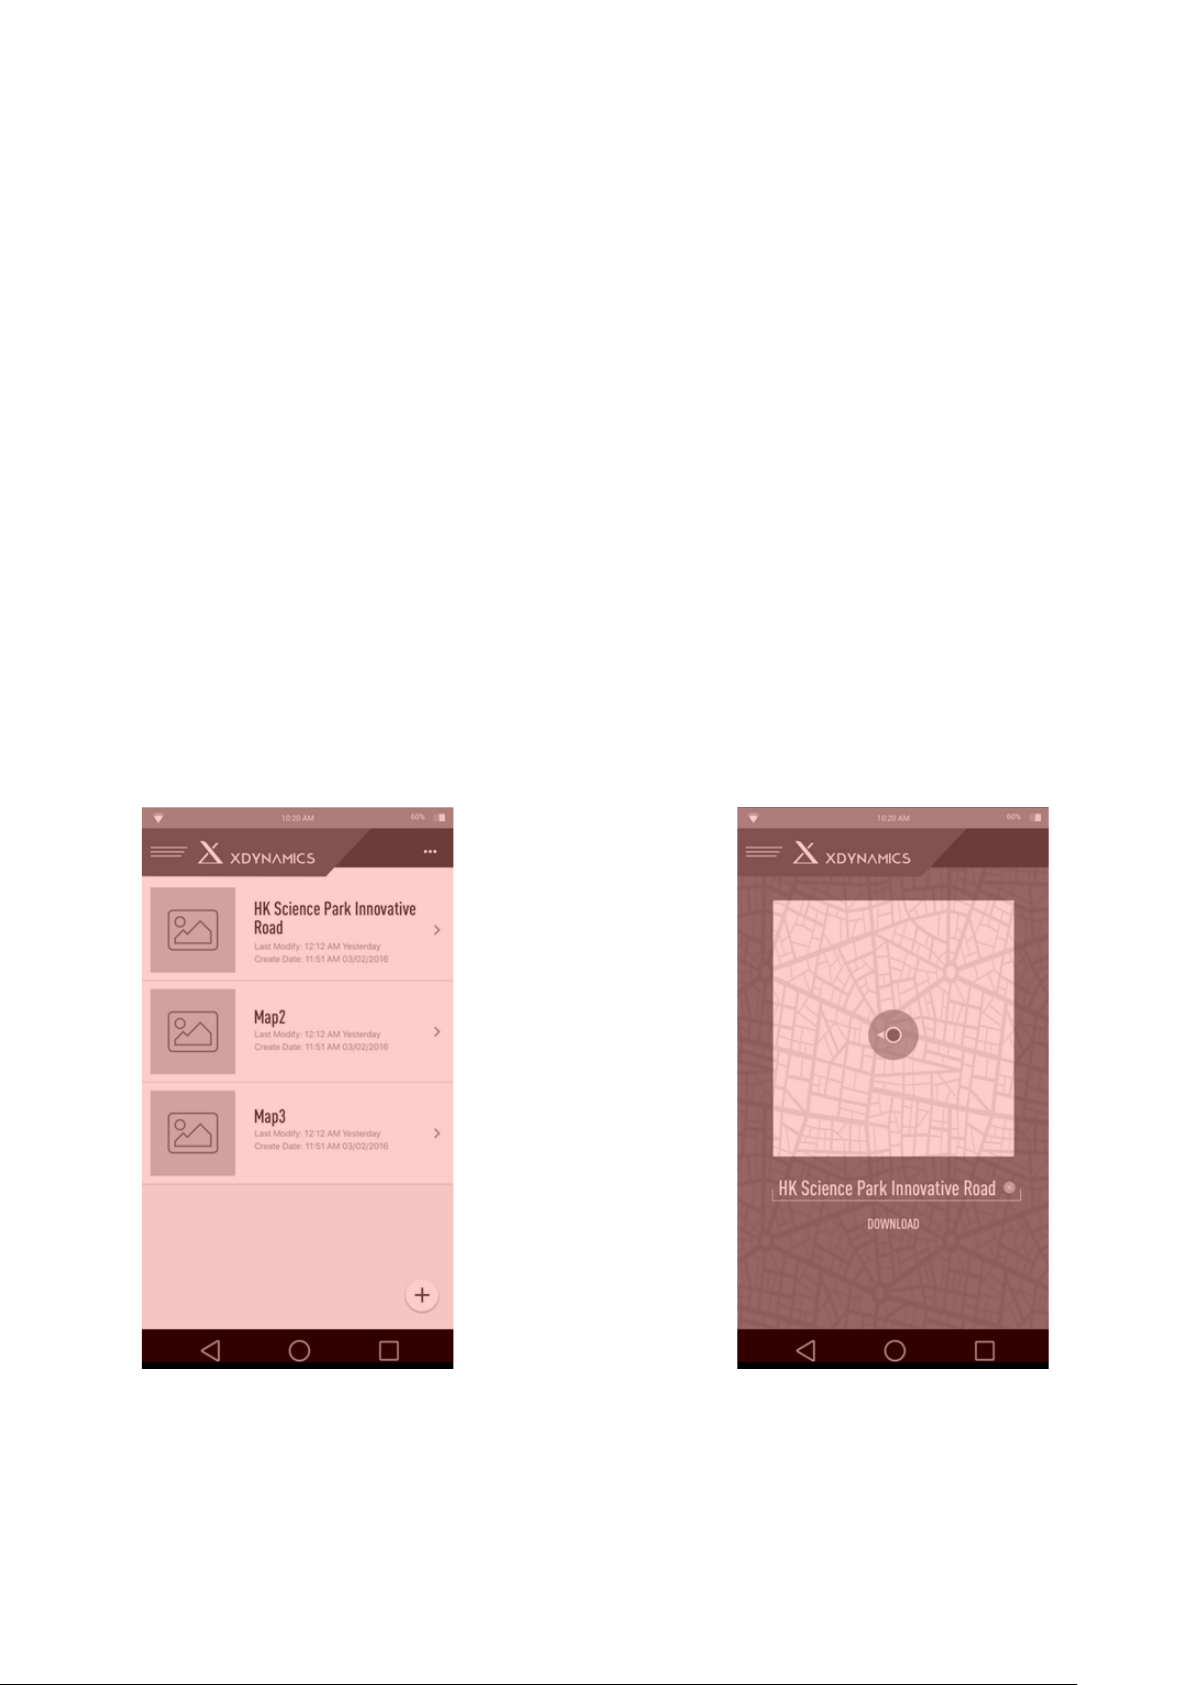
Map Preloading (Oine Map)
In order to ensure the map can be displayed outdoor without network, Smart Pilot System oers the
oine map download feature. Follow the below steps to download the map:
1. Connect Remote Controller to WiFi internet connection with download capabilities
2. Navigate to the Smart Pilot System Oine Map Page
3. Tap “+” to create a new oine map area
4. Enter the Area name
5. Drag and pinch the map to the designated area
6. Tap Download to start downloading
7. Smart Pilot System will indicate the download progress
61Evolve User Manual V1.0 by XDynamics Limited
Page 62
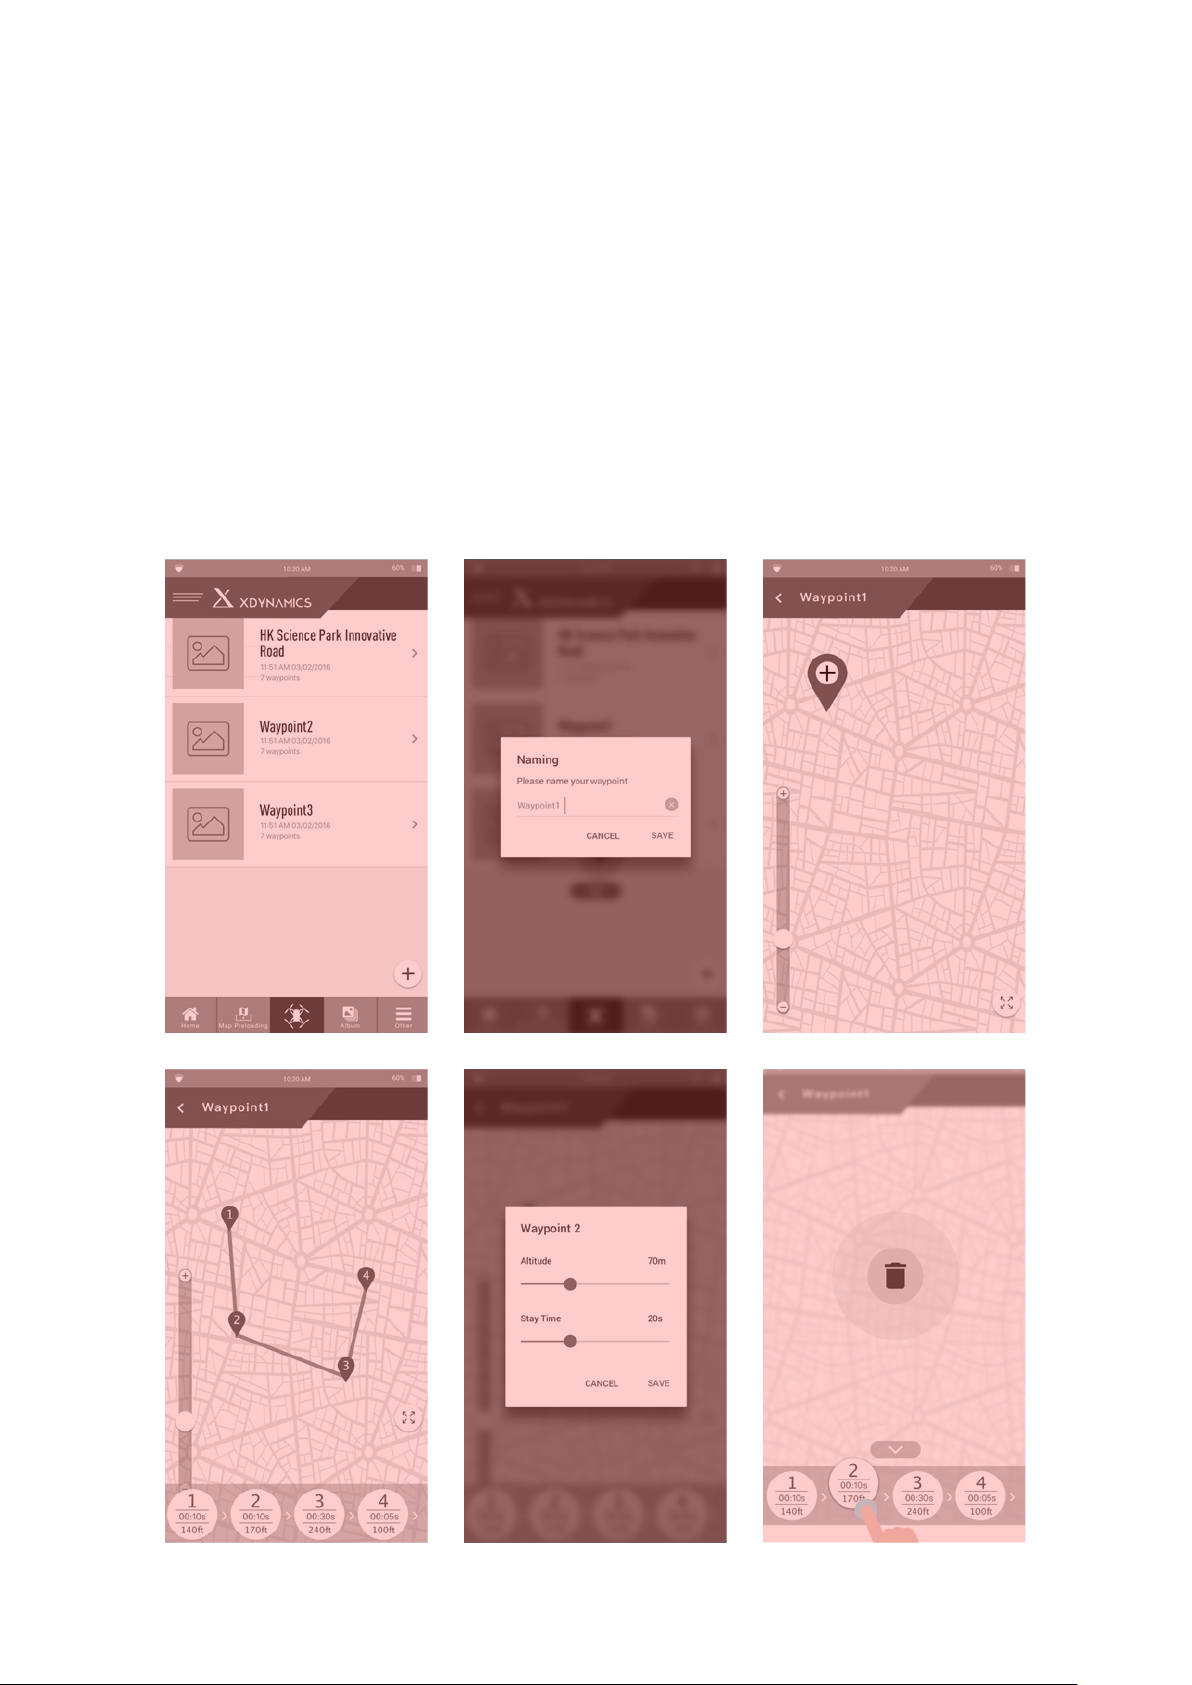
Flight Operations Section
Setting Waypoints
You may plan your automated ight path at the Smart Pilot System. Follow the below steps to Plan your
automated ight.
1. Navigate to the Smart Pilot System Path Planner Page.
2. Tap “+” to create a new plan
3. Enter the Plan name
4. At the plan editing, long tap on the map and tap “+” to place a waypoint on the map
5. Tap of the waypoint to edit the stay time and altitude
6. Long tap the bottom waypoint bubbles, drag to re-arrange the order or remove
7. The plan is auto saved, tap back to return
62Evolve User Manual V1.0 by XDynamics Limited
Page 63
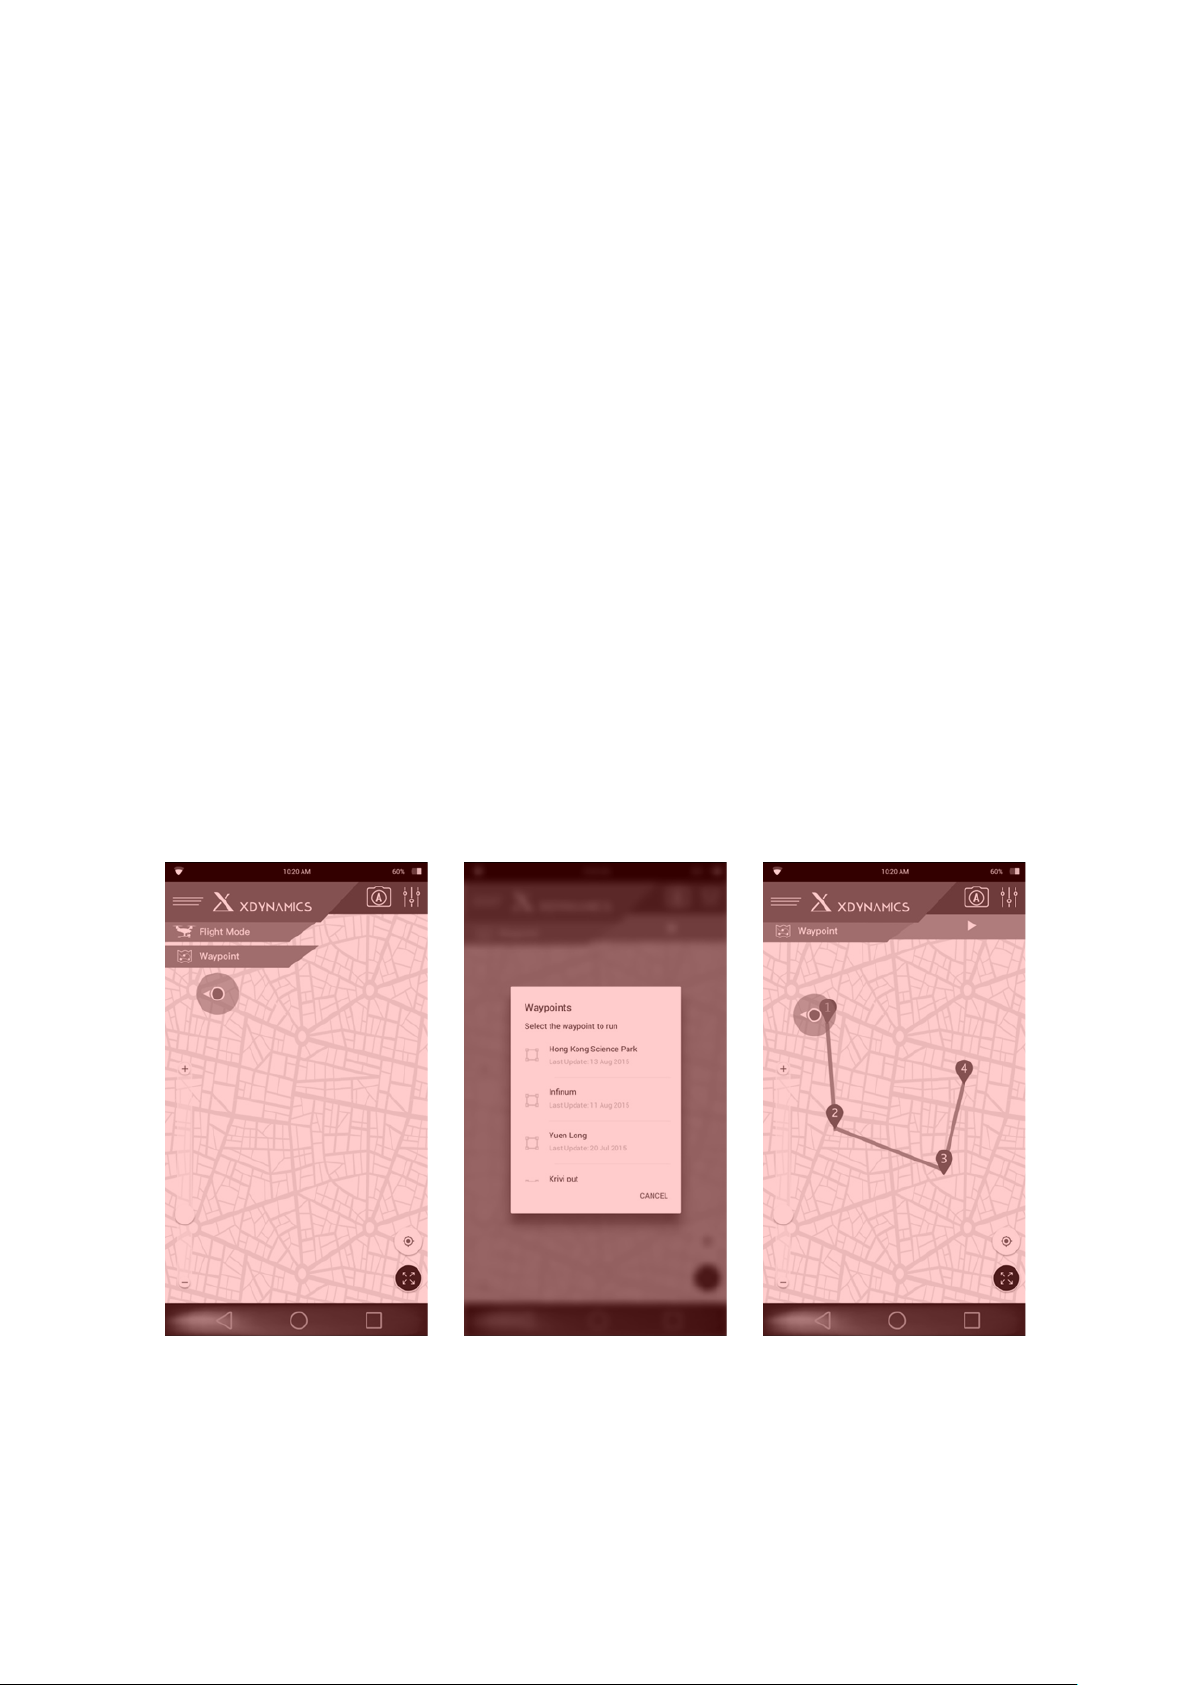
Run Waypoint Plan
Setting Waypoints
For executing the waypoint path, select Custom Mode by choosing the middle position on the ight
mode switch and then choose waypoint mode and follow the steps outlined below. By the end of the
execution of the whole plan the drone will hover in position at the last waypoint. Auto mode can be
cancelled at any time by switching back the ight mode switch to the left for GPS mode. The pilot has
full control of the position and yaw angle of the drone during auto ight.
To execute the plan, you may enter the Fly page by following these steps:
1. Navigate to the Smart Pilot System Fly Page.
2. Tap the Flight Mode and change to Waypoints
3. Select the desired plan
4. Smart Pilot System will upload the plan to the drone
5. Tap “Start” to execute
63Evolve User Manual V1.0 by XDynamics Limited
Page 64
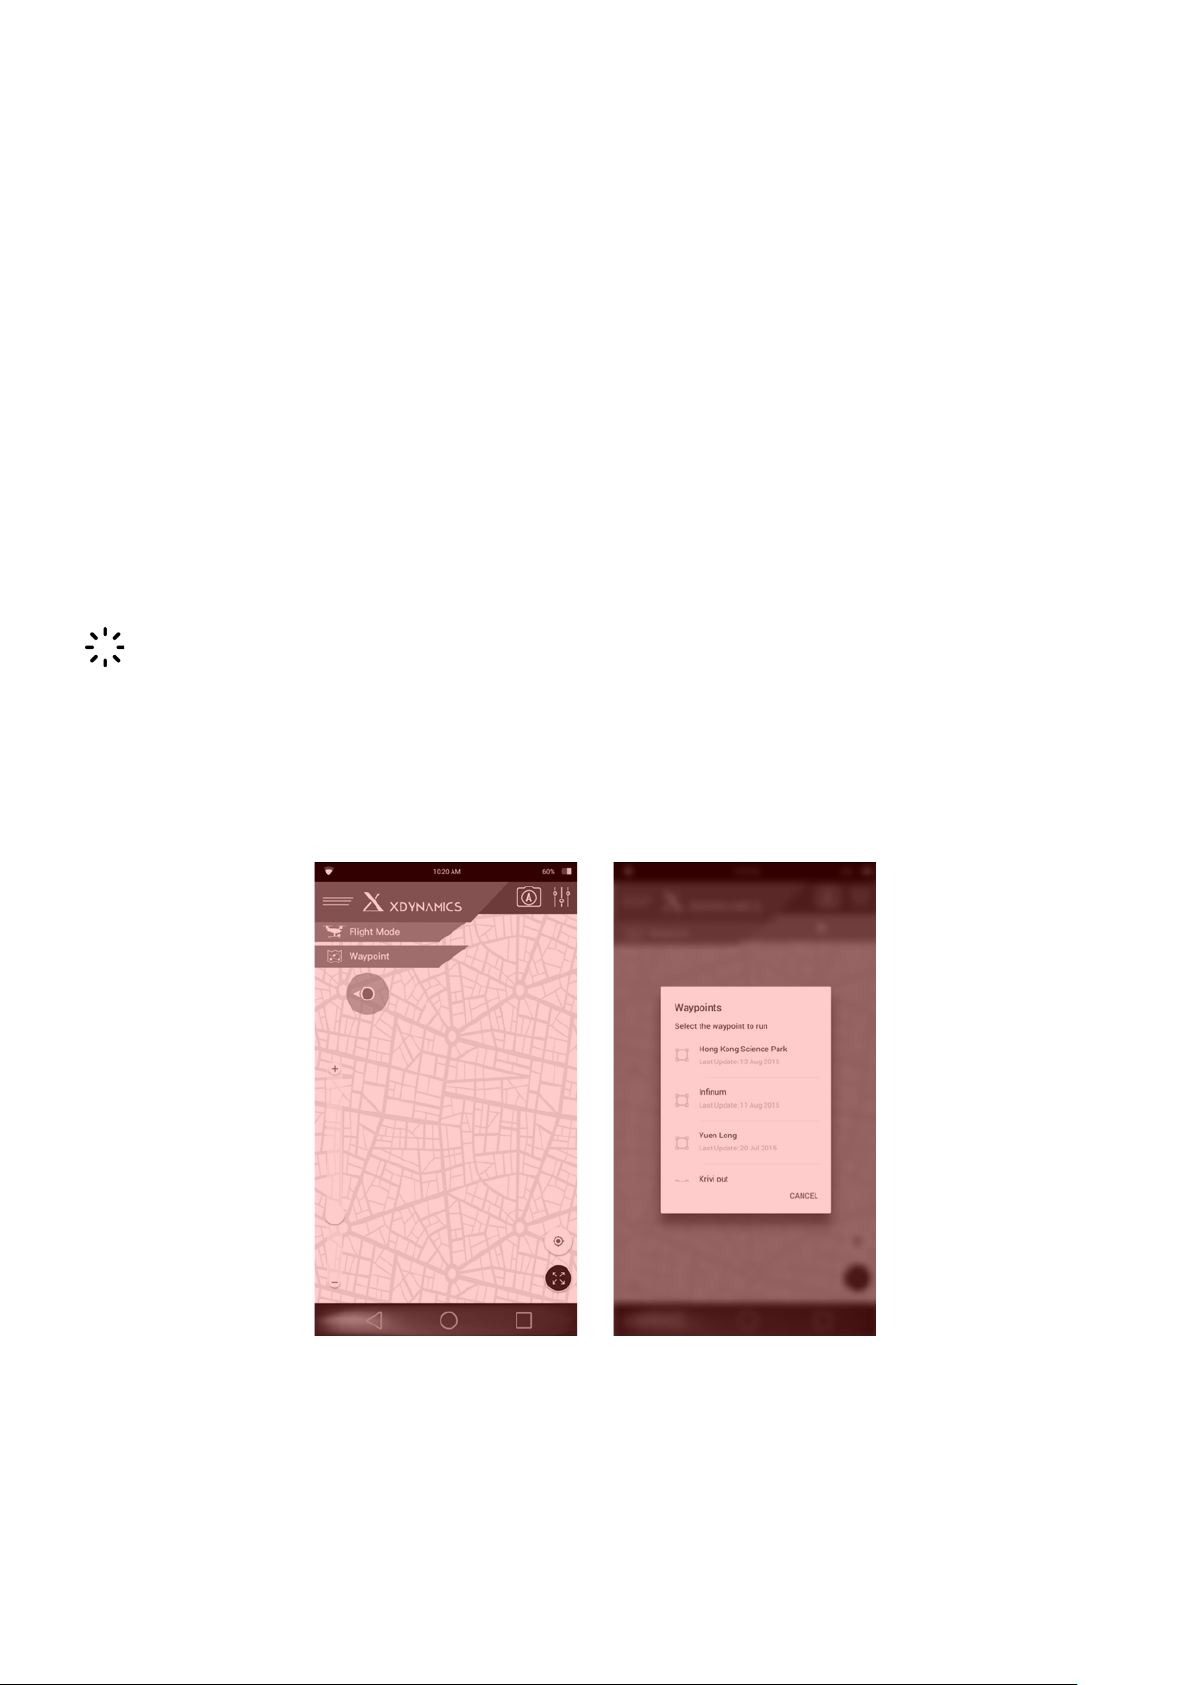
Flight Operations Section
No Fly Zones
Although the Evolve is a high performance drone, weather can be a crucial factor to ight performance
and safe operations. Caution must be observed when it comes to weather planning. Eective weather
planning breaks down to these criteria:
◦ Weather information gathering – This can be achieved be watching your local news weather
station and by using the web and APP tools like The Weather Channel and NOAA
◦ Knowledge of weather patterns in your operational area – Search for local weather patterns
with similar APP tools for forecasting weather
◦ Executing ight plan and go or no go situations based on the weather information – Be sure
to make informed decisions based on accurate weather information and remember no ight
is too important to ignore safely hazards created by inclement weather.
Flying in no-y zones can be potentially illegal, please insure ights are always conducted in a
safe to y area.
64Evolve User Manual V1.0 by XDynamics Limited
Page 65
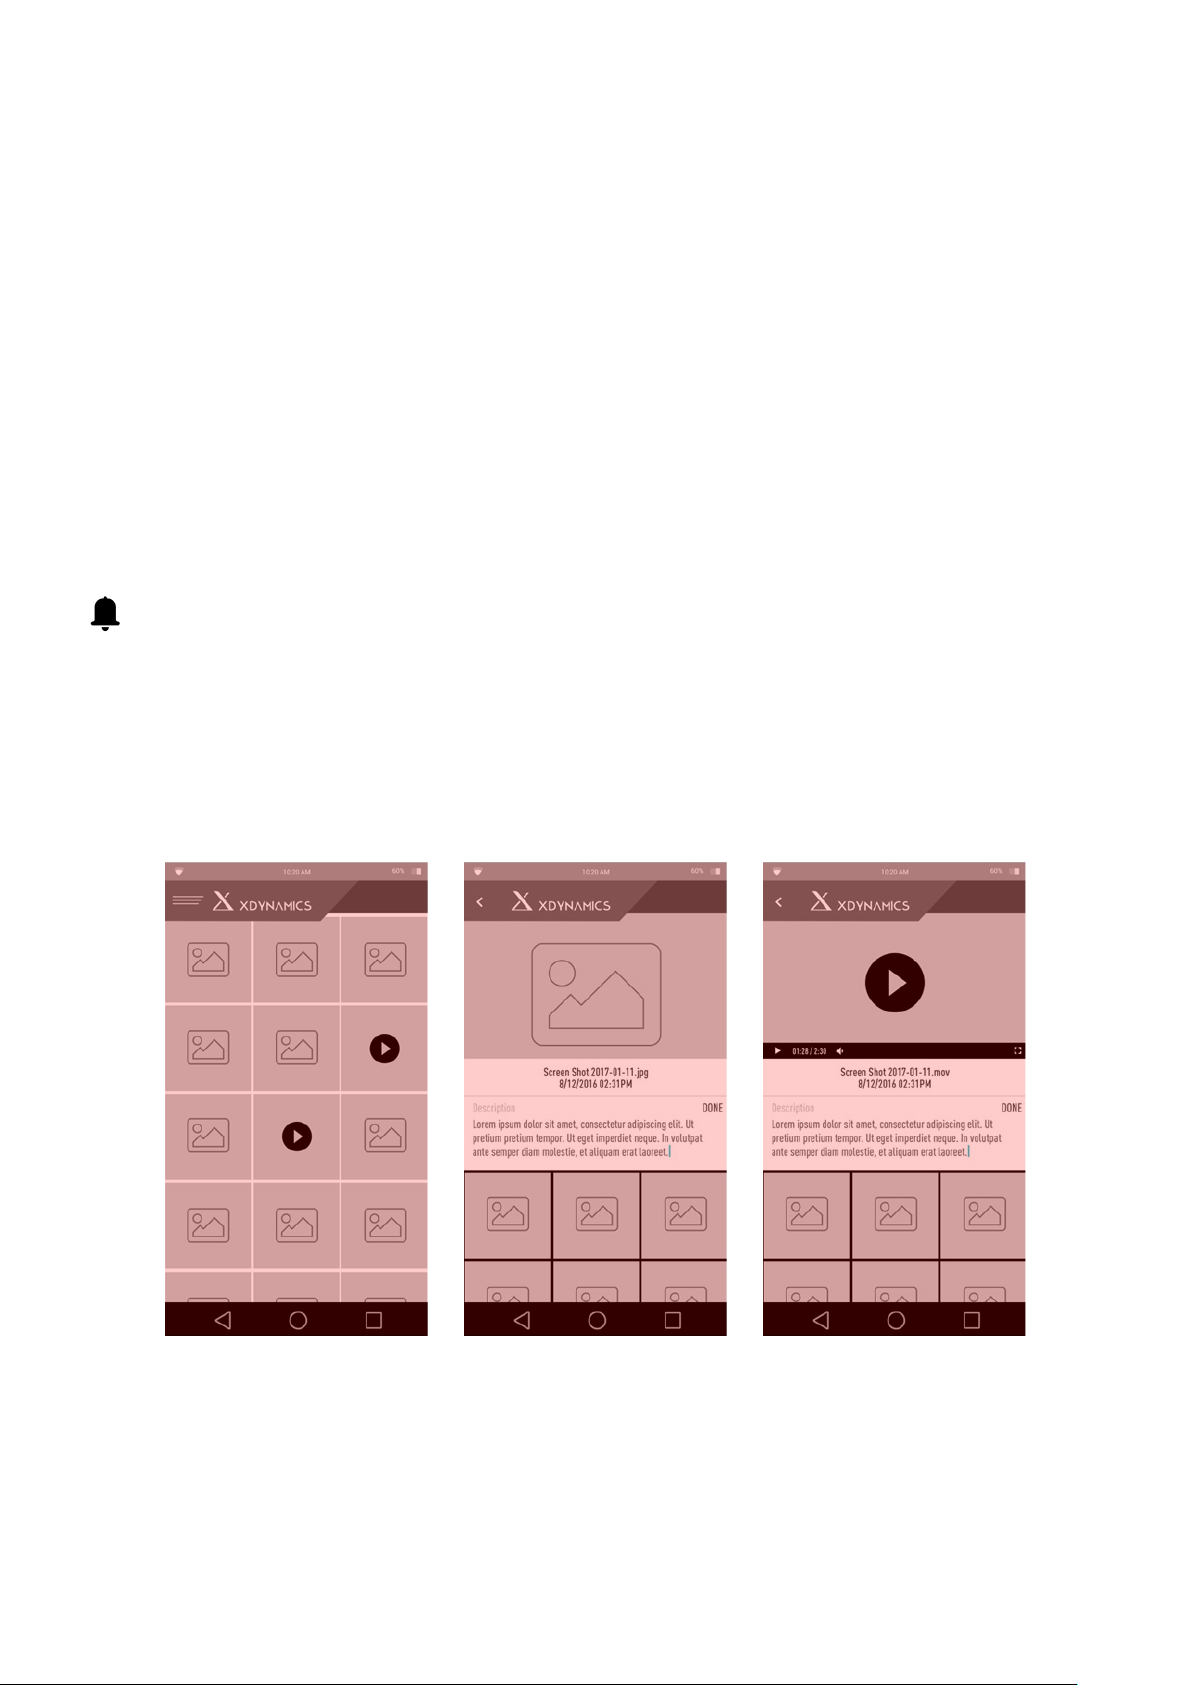
Content Options
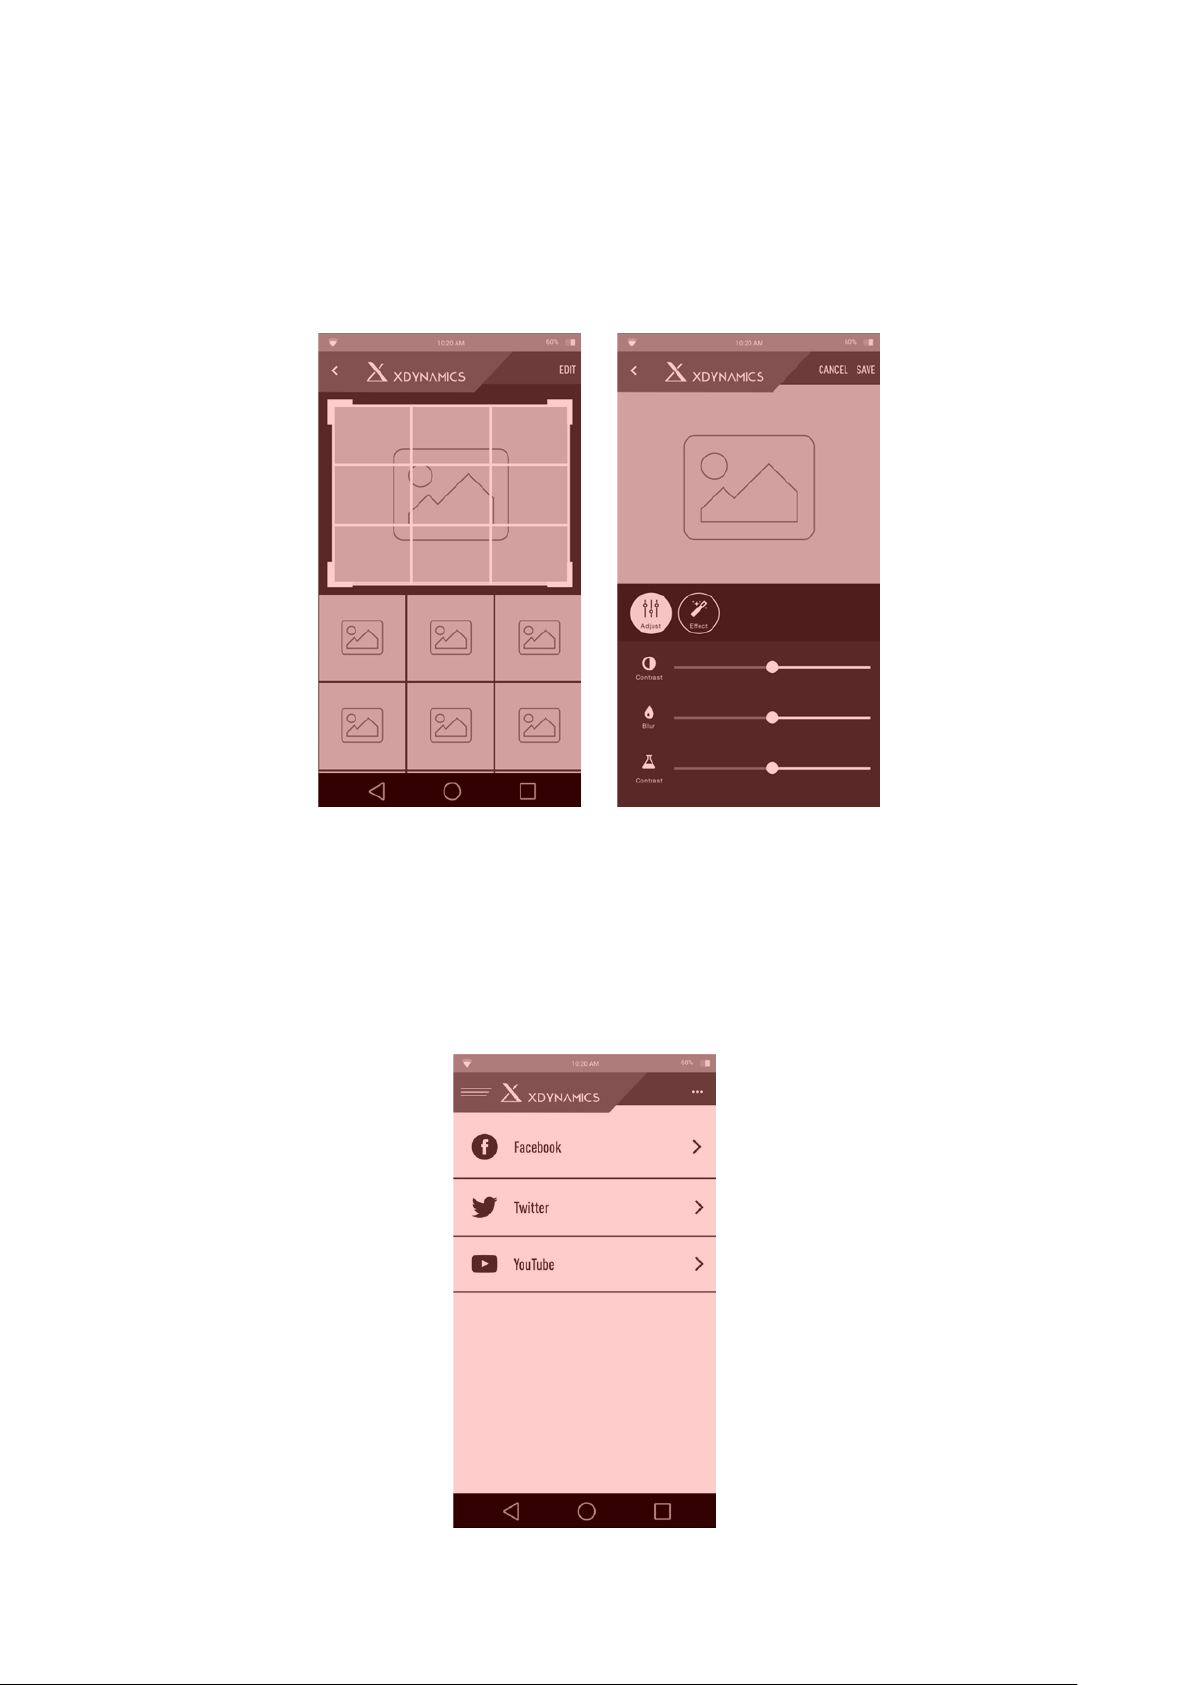
Album and Image Editing
You may view your photos and videos on the Smart Pilot Systems page. The editing tool is also
available for quick image editing.
1. Navigate to the Smart Pilot System Album Page.
2. The bottom screen shows the Images and Videos store at the Remote Controller.
3. Tap the media on the screen.
4. The top screen show the photo/video in full screen mode, while the bottom screen provide the
detail information and control for the photo/video
5. Tap the Pen on the top right corner to enter the photo editing section
6. Crop the image and tap next
7. Apply lter and save your image
Media on the controller is a DVR recording from the FPV downlink. For full quality images,
remove the SD card and upload to your computer.
65Evolve User Manual V1.0 by XDynamics Limited
Page 66
Content Options
Album and Image Editing (Continued)
You may view your photos and videos on the Smart Pilot Systems page. The editing tool is also
available for quick image editing.
No Fly Zones
Although the Evolve is a high performance drone, weather can be a crucial factor to ight performance
and safe operations. Caution must be observed when it comes to weather planning. Eective weather
planning breaks down to these criteria:
66Evolve User Manual V1.0 by XDynamics Limited
Page 67
Flight Operations Section
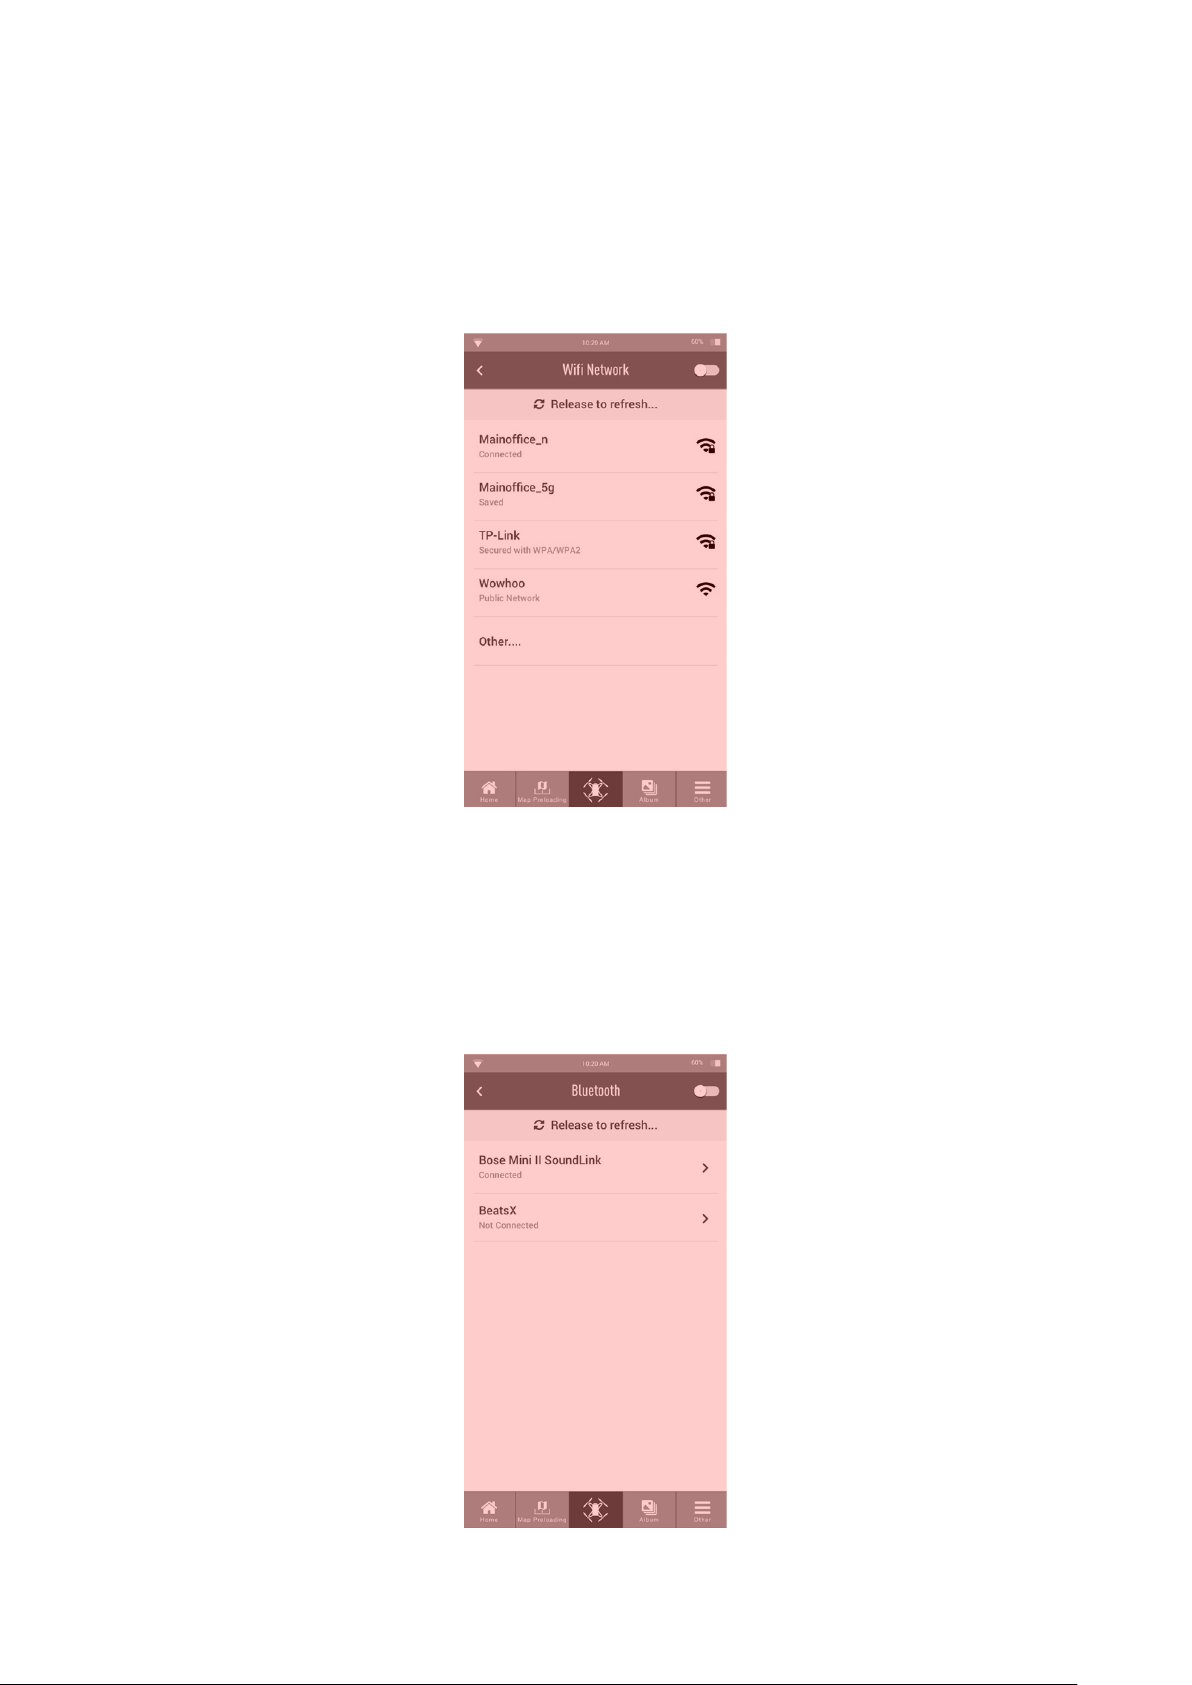
Wi-Fi Network
To download maps and connect to social media services the Remote Controller needs connect to a
Wi-Fi network. Navigate to the Wi-Fi Network page on the Smart Pilot APP and connect to the desired
Wi-Fi network.
Bluetooth
To listen to voice alerts form the Smart Piot APP the ground controller has the ability to connect to
Bluetooth capable devices. Navigate to the Bluetooth page on the Smart Pilot APP and connect to the
desired Bluetooth device. Be sure to make Bluetooth devices detectable to the Remote Controller.
67Evolve User Manual V1.0 by XDynamics Limited
Page 68
Controller Trouble Shooting
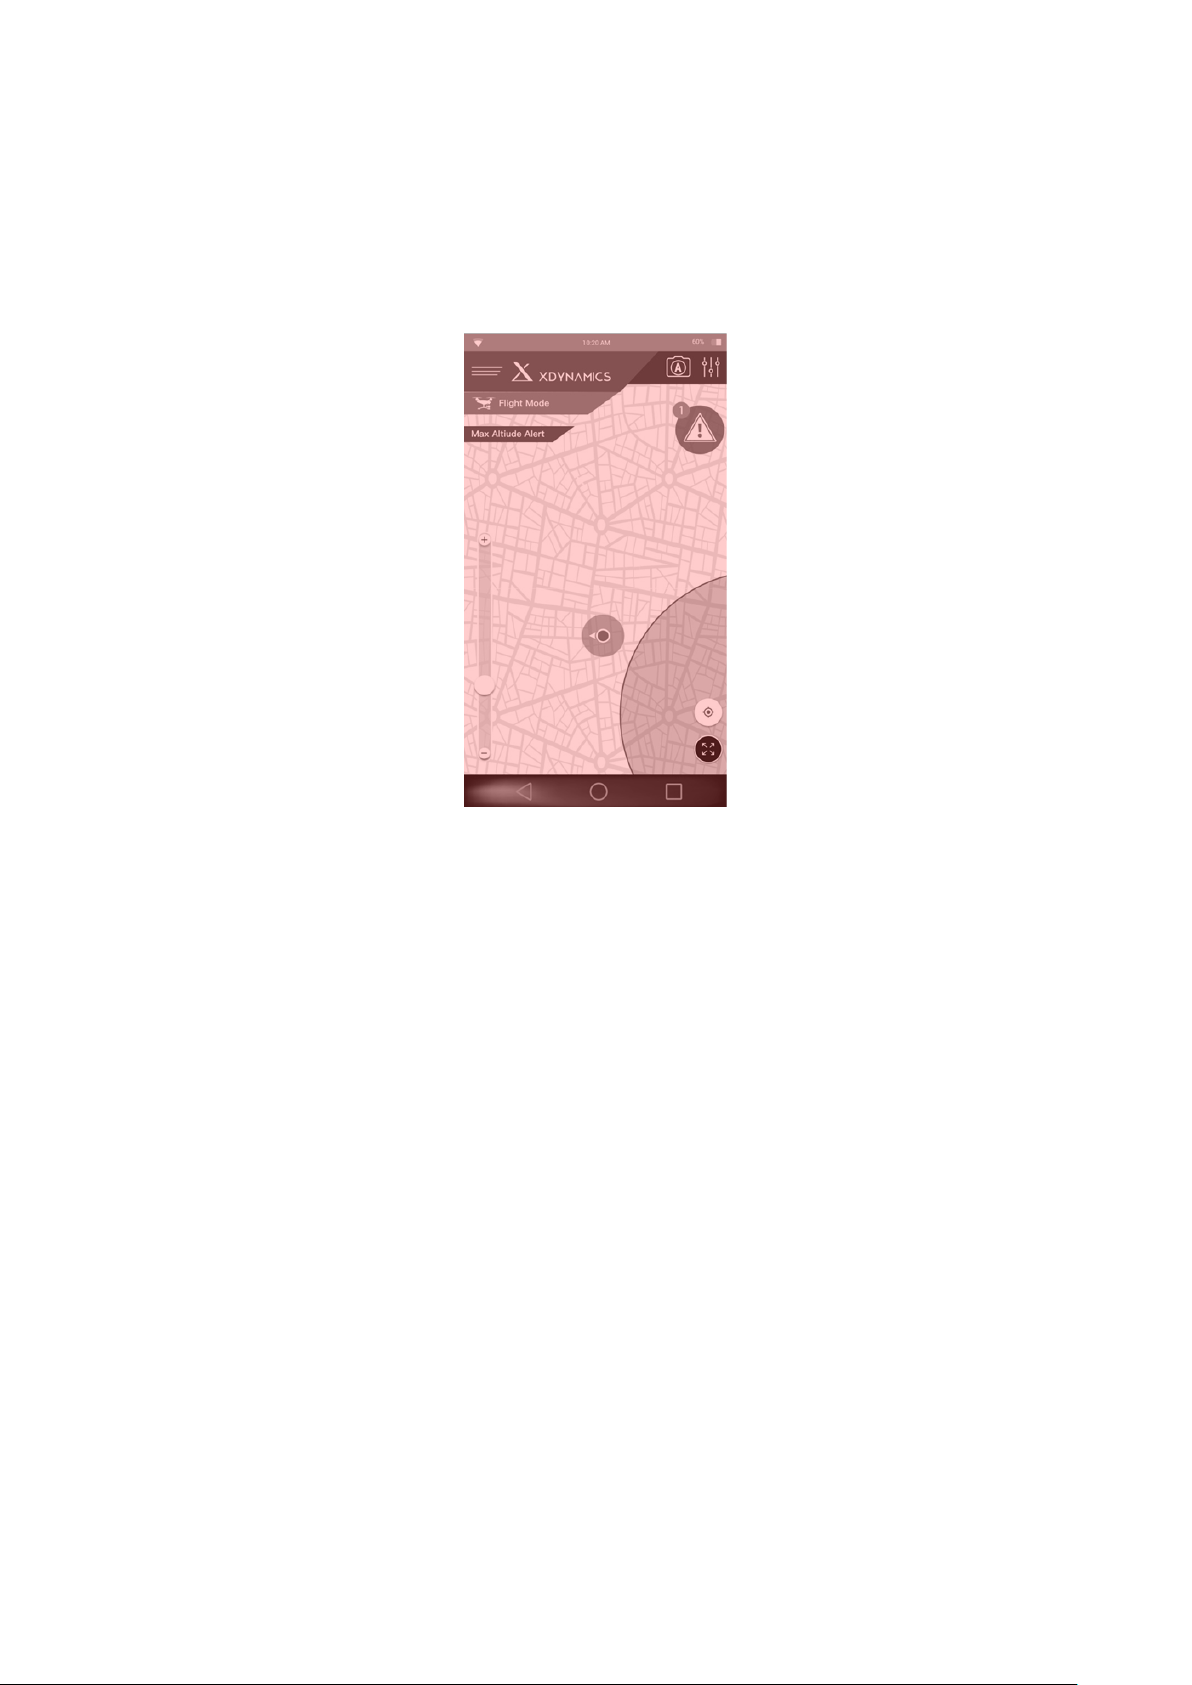
Trouble Shooting Remote Controller
To trouble shoot issues for the ground controller press on the alert icon and refer to the alert list for
corrective action.
68Evolve User Manual V1.0 by XDynamics Limited
Page 69
Updating the Controller
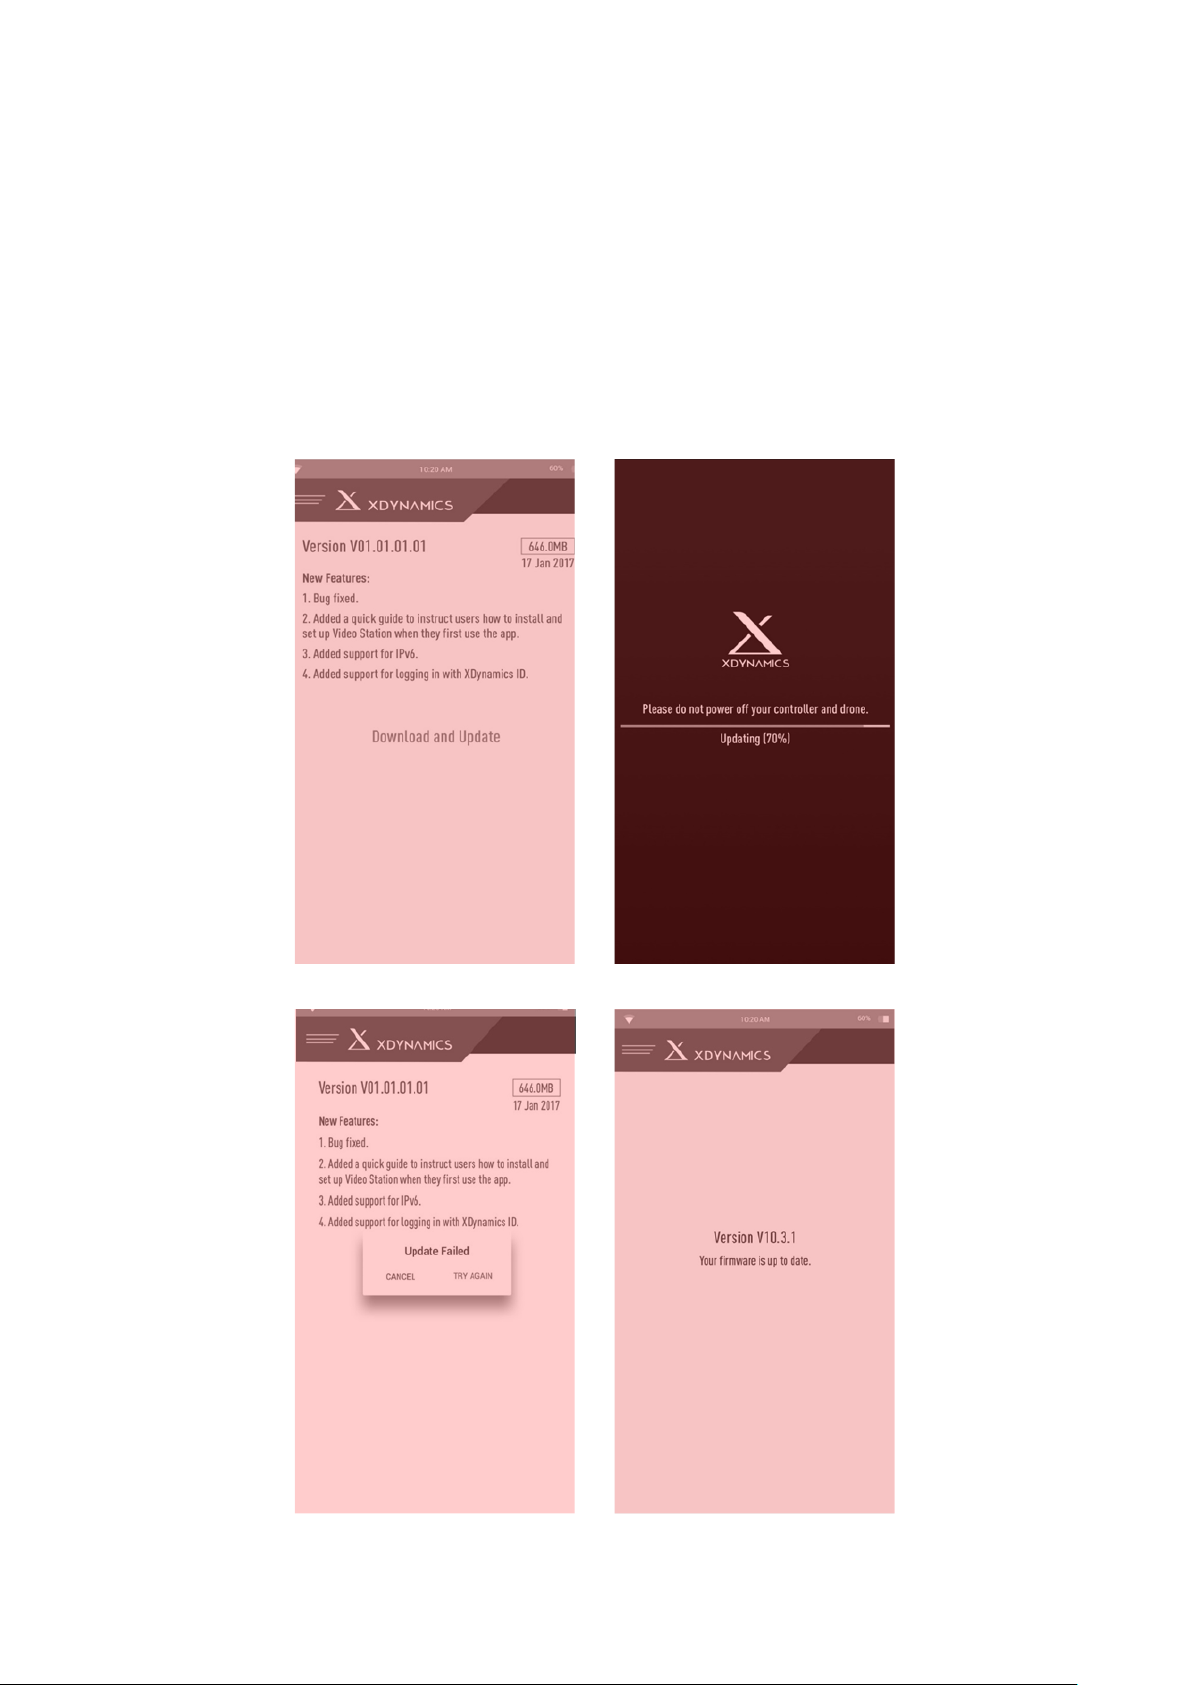
Firmware Updates
The Remote Controller App will guide the user through the Firmware Update process
Firmware Update requests are displayed on the Remote Controller screen.
Whenever an update is available, the Smart Co-Pilot system will request the operator perform the
update when the Remote Controller is connected to a Wi-Fi source. This process can be simply
accessed from the alert page by selecting update.
69Evolve User Manual V1.0 by XDynamics Limited
Page 70
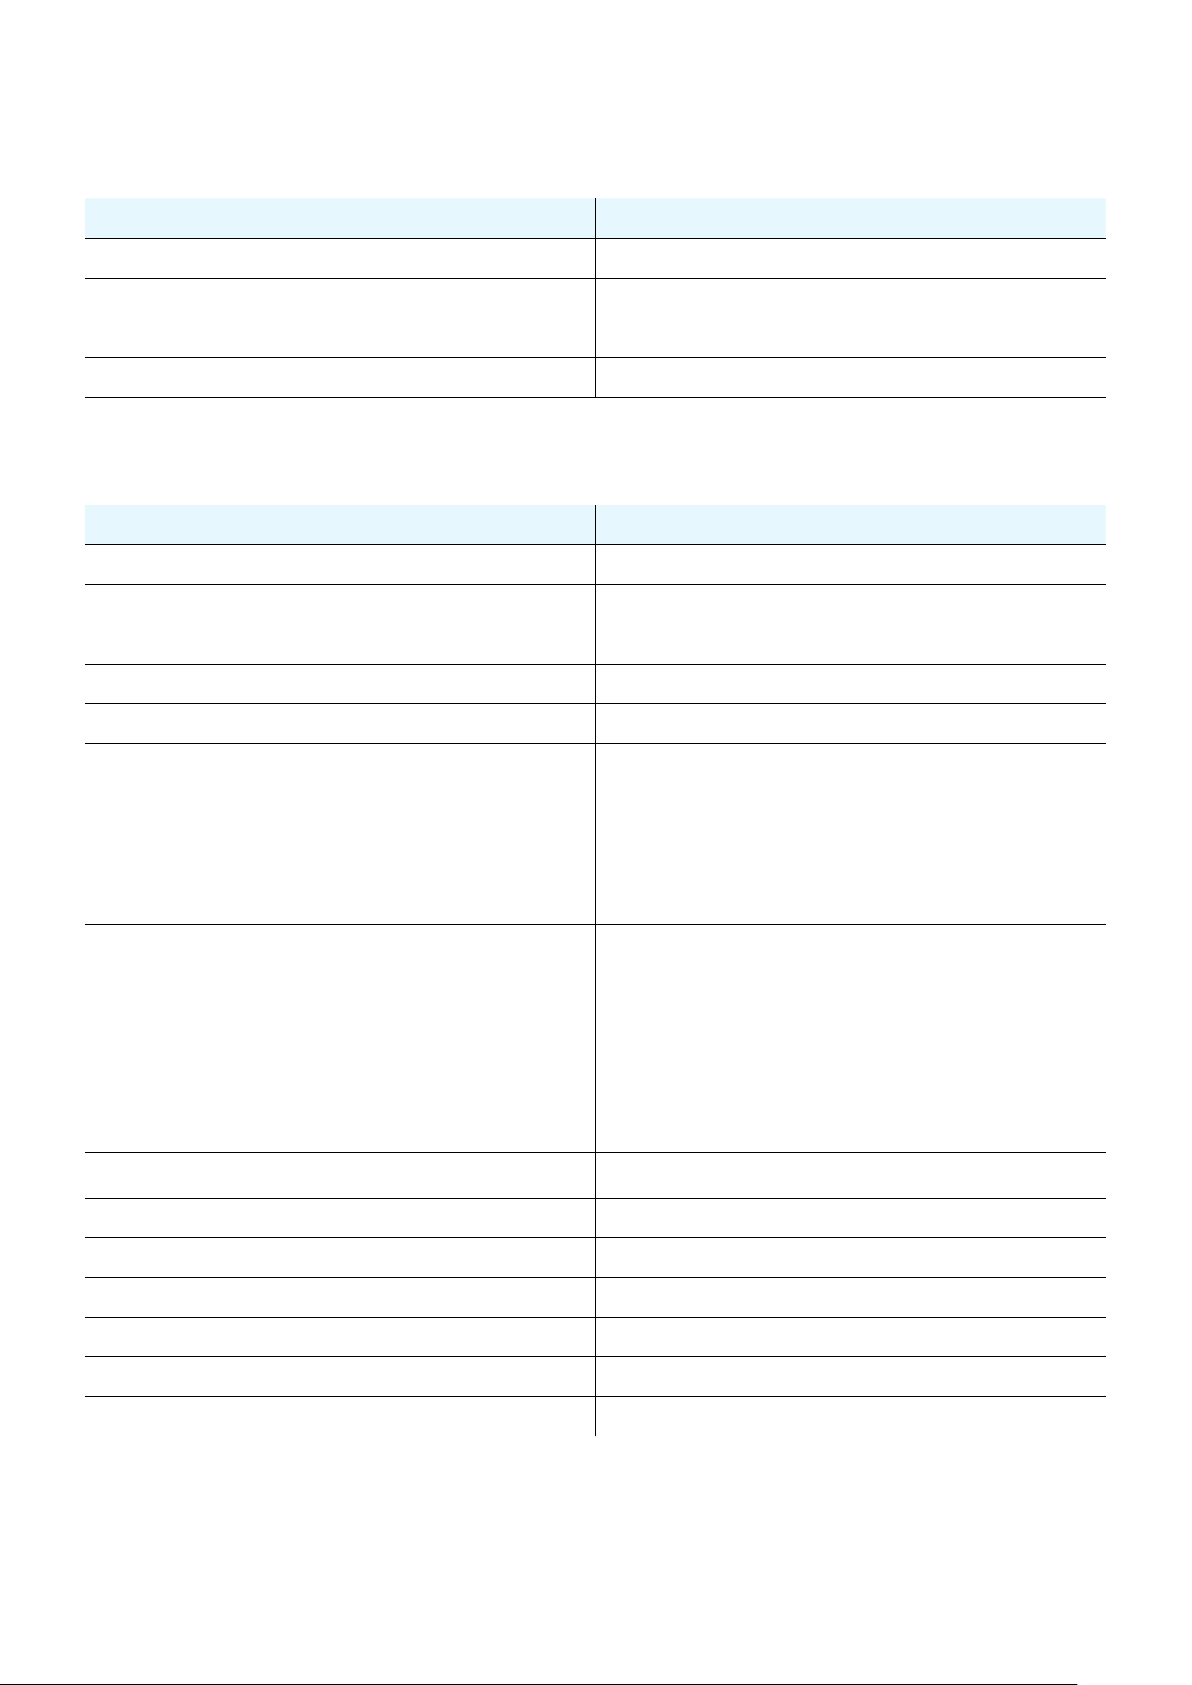
Product Specication
Gimbal
ITEM SPECIFICATION
Controllable Range Pitch -90° to +30°
Gimbal Accuracy Static stability: ±0.01°, motion stability: ±0.4°
Stabilization 3-axis (pitch, roll, yaw)
Camera
ITEM SPECIFICATION
CMOS Sensor Sony 1/2.3” CMOS, Eective pixels:12.4M
FOV: 94 Degree
Lens
21mm, f/2.8, focus at innite
ISO Range ISO 100-3200
Shutter Speed 1/8000s – 0.5s
4000 x 3000
3000 x 3000
Max Photo Resolution
3840 x 2160
2592 x 1944
4K: 3840 x 2160 @ 30 fps
2.7K: 2592 x 1520 @ 30 fps
Video Resolution
Max Video Bit Rate 60Mbit/s (60 is OK, but recommend 30)
Photo File Formats JPEG
Video File Formats MP4
Supported SD Card Types Micro SD (SD/SDHC/SDXC) / Max. 64GB
12M: 4000x3000@28fps
FHD: 1920 x 1080 @ 120 fps,
HD: 1280 x 720 @ 240 fps
Connectivity Micro USB 2.0
Weight 71.5 g (including RTC battery)
Dimensions 58mm x 58.8mm x 53mm
70Evolve User Manual V1.0 by XDynamics Limited
Page 71

Product Specication
Remote Controller
ITEM SPECIFICATION
Processor Quad Core 2.0GHz 64-bit CPU+ PowerVR GPU
Operating System Android 6.0
Memory 4GB DDR3
Internal Storage 64GB eMMC
Supported SD Card Types Micro SD (SD/SDHC/SDXC) / Max. 64GB
7” 720p Screen
Upper Display (View Finder)
Lower Display (Console)
Embedded Camera 5MP Front Camera
R/C & Telemetry Operating Frequency 2.404-2.467GHz
Max Transmission Distance 1 km, FCC Compliant, unobstructed and no
Live View Working Frequency 5.18-5.825GHz
Max Live View Distance 1000 m, FCC Compliant, unobstructed and no
Live View Quality 1080p @ 60 fps
Live View Transmission Latency <10ms
Wireless Connectivity
Anti-reective Coating
Luminance: 600 cd/m2
5” 1080p Multi-Touch Screen
Anti-reective Coating
Luminance: cd/m2
Bluetooth 2.1 EDR
4.0 BLE Wi-Fi (802.11b/g/n/ac)
Peripheral Connectors
Miracast & DLNA support
USB 3.0 OTG x 1
USB 3.0 Host x 1
Micro HDMI-out x 1
Microphone-in jack x 1
Headphone-out jack x 1
SD Card Slot x 1
DC-in x 1
71Evolve User Manual V1.0 by XDynamics Limited
Page 72
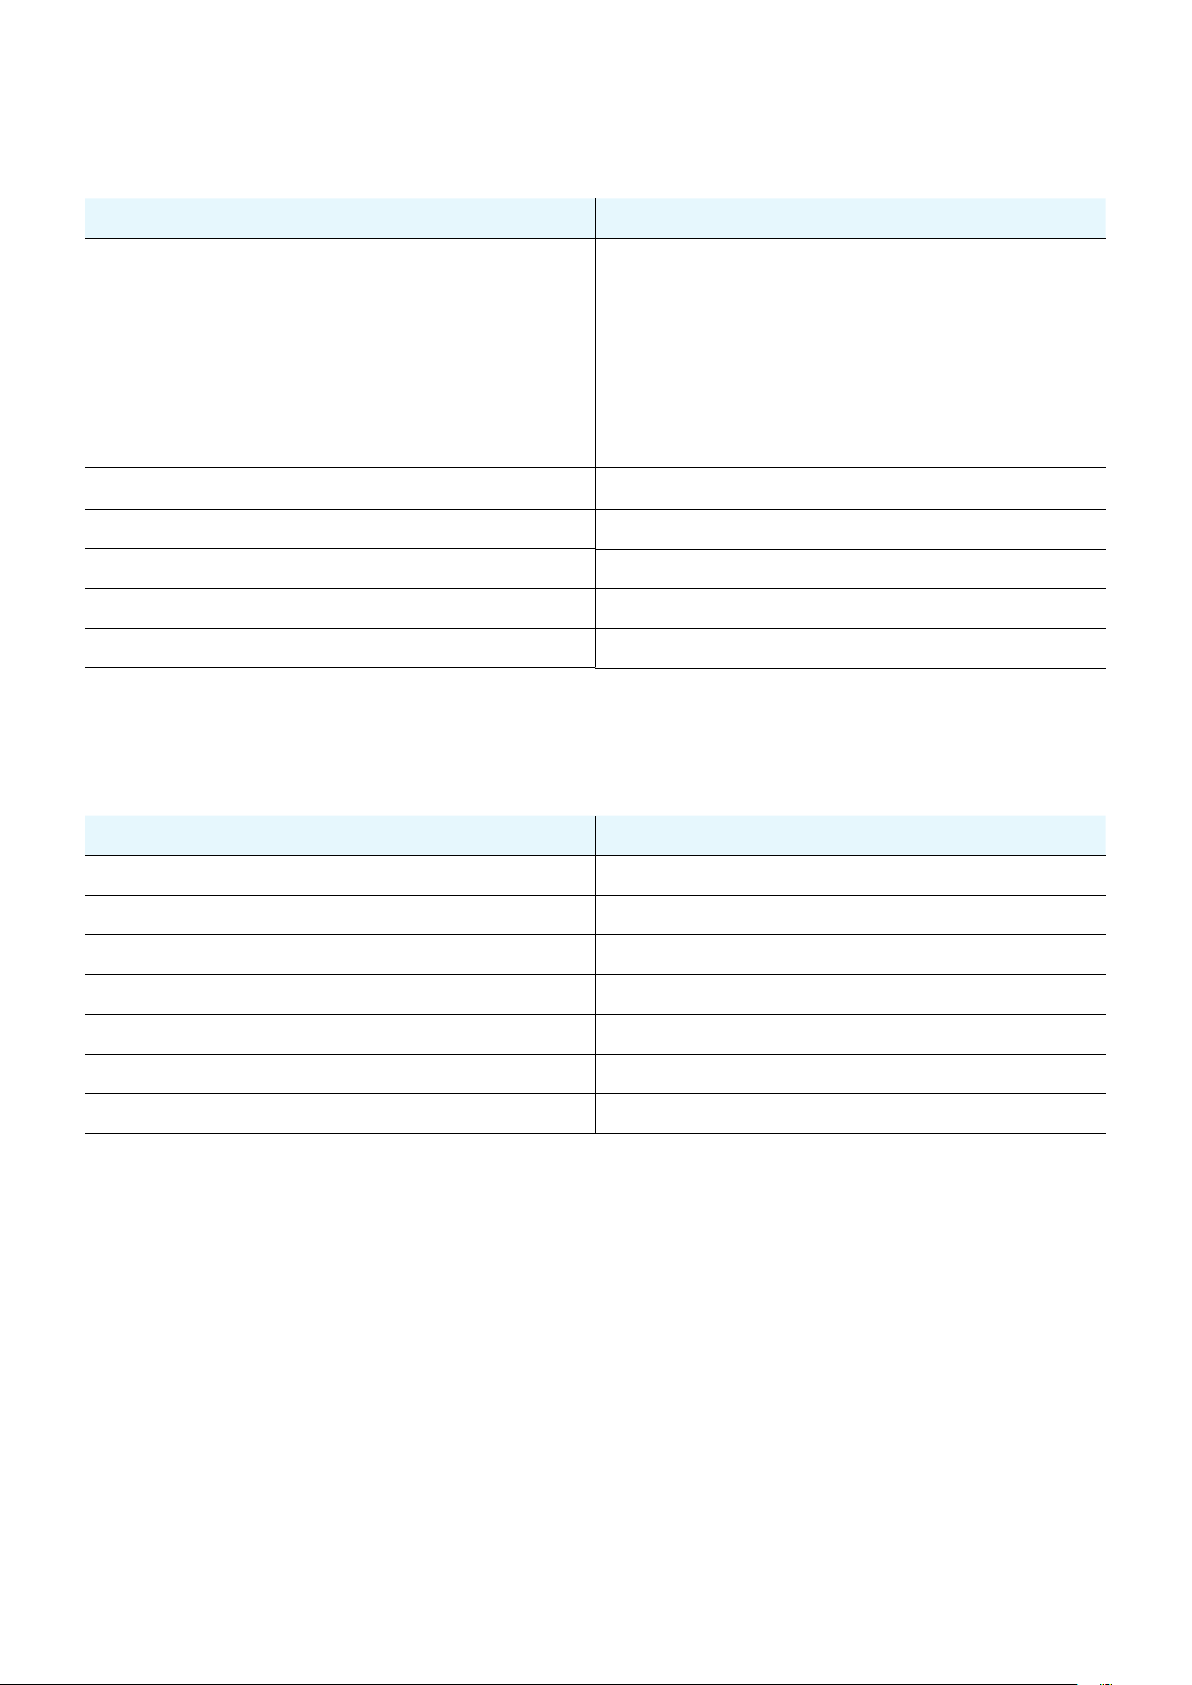
Product Specication
Remote Controller
ITEM SPECIFICATION
Magnetometer
Accelerometer
Sensors
Operating Temperature 0 - 40 degree C
Battery 6000 mAh Li-Po 3S
Operating Voltage 11.1V @ 4A (max)
Dimensions 199 mm* 176.4 mm* 106.9 mm
Weight 1622 g (including battery)
Three-axis gyroscope
Proximity Detector
Microphone
Gimbal
ITEM SPECIFICATION
Power Output 120W
Voltage 18 V
Output Current 6.6A
Net Weight 663g
Dimensions 190mm*67.5mm*40mm
Operating Temperature 0 to 40 degree C
Input Voltage 110V – 240V a.c. 50Hz/60Hz
72Evolve User Manual V1.0 by XDynamics Limited
Page 73
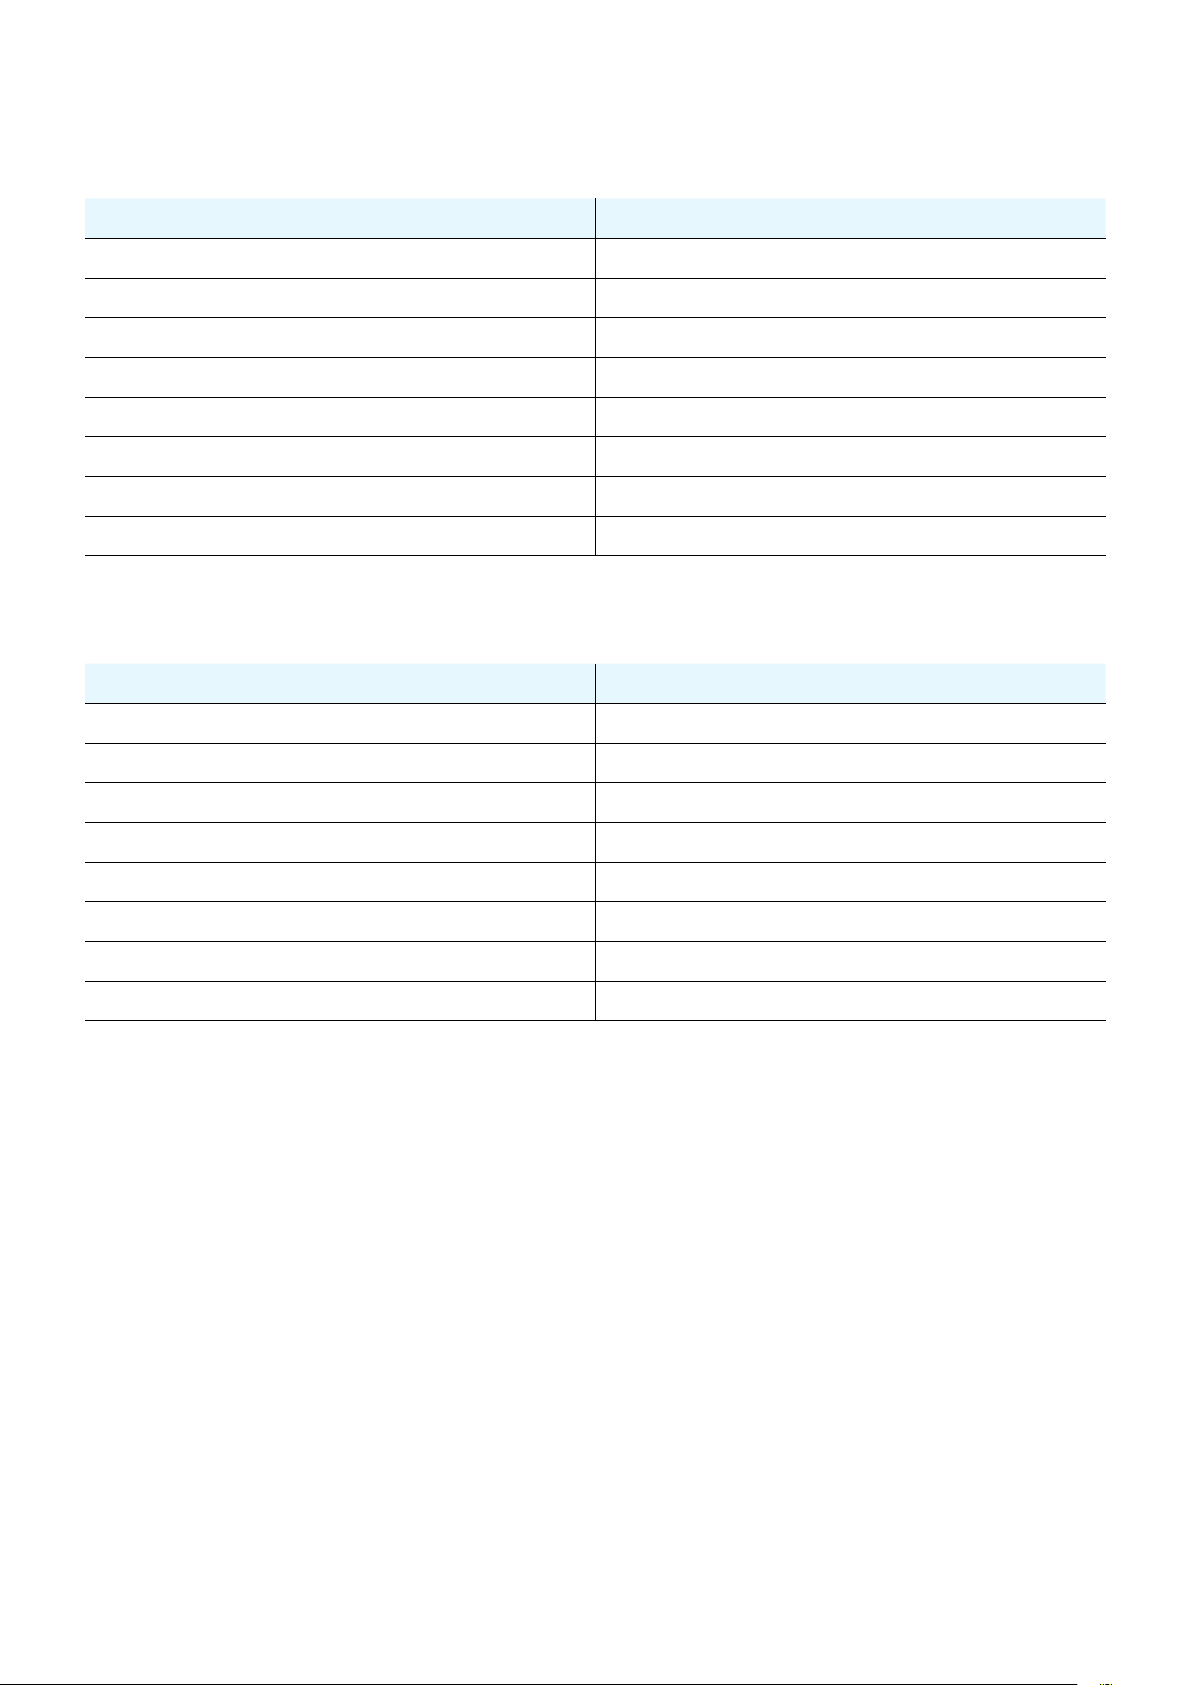
Product Specication
Drone Battery
ITEM SPECIFICATION
Capacity 6700 mAh 4 Cell LiPo
Voltage 14.8V
Battery Type Lithium-ion Polymer
Energy 99.16 Wh
Net Weight <650g
Dimensions 190mm*67.5mm*40mm
Operating Temperature 0 to 40 degree C
Max Charging Voltage 17.4V
Remote Controller Battery
ITEM SPECIFICATION
Capacity 6000 mAh Li-Po 3S
Voltage 11.1V @ 4A(max)
Battery Type Lithium-ion Polymer
Energy 66 Wh
Net Weight <440 g
Dimensions 156.7 mm*68.4 mm*40.7 mm
Operating Temperature 0 to 40 degree C
Max Charging Voltage 18V
73Evolve User Manual V1.0 by XDynamics Limited
Page 74

Product Disposal
Ensure Safe Disposal
Ensure the product is disposed of in line with local laws and environmental guidelines.
Separately dispose of LiPo batteries used for the product, in line with local laws and environmental
guidelines.
The RBRC® seal on the lithium-ion battery indicates that XDynamics. is voluntarily participating in an
industry program to collect and recycle these batteries at the end of their useful lives, when taken out
of service within the United States and Canada. The RBRC® program provides a convenient alternative
to placing used lithium-ion batteries into the trash or municipal waste, which may be illegal in your area.
XDynamic’s participation in RBRC® makes it easy for you to drop o the spent battery at local retailers
participating in the RBRC® program or at authorized XDynamics product service center. Please call
1 (800) 8 BATTERY® for information on Li-ion battery recycling and disposal bans/restrictions in your
area. XDynamic’s involvement in this program is part of its commitment to protecting our environment
and conserving natural resources. RBRC® and 1 (800) 8 BATTERY® are registered trademarks of the
Rechargeable Battery Recycling Corporation.
NEED TO VERIFY THIS SECTION / IF WE ARE GOING TO DO THIS.
74Evolve User Manual V1.0 by XDynamics Limited
Page 75

Safety
Safety Precautions
When using your equipment, basic safety precautions should always be followed to reduce the risk of
re, electric shock and injury, including the following:
◦ Follow all warnings and instructions marked on the product.
◦ Adult supervision is required.
◦ Do not use this product near water. For example, do not use it next to a bath tub, wash
bowl, kitchen sink, laundry tub or swimming pool, or in a wet basement or shower.
◦ If ying the drone over water monitor battery ight time to avoid a water landing
◦ Use only the batteries indicated in this manual
◦ Do not dispose of batteries in a re. They may explode.
◦ Dispose of used battery according to the information in The RBRC® seal.
◦ Use only the adapters included with this product. Incorrect adapter polarity or voltage can
seriously damage the product.
◦ Do not leave the batteries in a car left under direct sunlight.
75Evolve User Manual V1.0 by XDynamics Limited
Page 76

Safety
RF Radiation
RF radiation exposure statement The Product complies with FCC RF radiation exposure limits set for an
uncontrolled environment. Use of other unapproved accessories may not ensure compliance with FCC
RF exposure guidelines.
FCC Part 15 - This equipment has been tested and found to comply with the requirements for a
Class B digital device under Part 15 of the Federal Communications Commission (FCC) rules. These
requirements are intended to provide reasonable protection against harmful interference in a residential
installation. This equipment generates, uses and can radiate radio frequency energy and, if not installed
and used in accordance with the instructions, may cause harmful interference to radio communications.
However, there is no guarantee that interference will not occur in a particular installation.
This device complies with Part 15 of the FCC rules. Operation is subject to the following two conditions:
(1) This device may not cause harmful interference
(2) This device must accept any interference received, including interference that may cause undesired
operation.
To ensure safety of users, the FCC has established criteria for the amount of radio frequency energy that
can be safely absorbed by a user or bystander according to the intended usage of the product. This
product has been tested and found to comply with the FCC criteria.
NEED TO VERIFY THIS SECTION WITH SPECIALIST
76Evolve User Manual V1.0 by XDynamics Limited
Page 77

Safety
Drone
Changes or modications not expressly approved by the party responsible for compliance could void the user’s
authority to operate the equipment.
This equipment has been tested and found to comply with the limits for a Class B digital device, pursuant
to Part 15 of the FCC Rules. These limits are designed to provide reasonable protection against harmful
interference in a residential installation. This equipment generates, uses and can radiate radio frequency energy
and, if not installed and used in accordance with the instructions, may cause harmful interference to radio
communications. However,there is no guarantee that interference will not occur in a particular installation.
If this equipment does cause harmful interference to radio or television reception, which can be determined by
turning the equipment o and on, the user is encouraged to try to correct the interference by one or more of
the following measures:
◦ Reorient or relocate the receiving antenna.
◦ Increase the separation between the equipment and receiver.
◦ Connect the equipment into an outlet on a circuit dierentfrom that to which the receiver is
connected.
◦ Consult the dealer or an experienced radio/TV technician forhelp.
This equipment complies with FCC radiation exposure limits set forth for an uncontrolled environment.
This equipment should be installed and operated with minimum distance 20cm between the radiator and
your body. This transmitter must not be co-located or operating in conjunction with any other antenna or
transmitter.
NEED TO VERIFY THIS SECTION WITH SPECIALIST
77Evolve User Manual V1.0 by XDynamics Limited
Page 78

Safety
Ground Station
changes or modications not expressly approved by the party responsible for compliance could void the user’s
authority to operate the equipment.
This equipment has been tested and found to comply with the limits for a Class B digital device, pursuant
to Part 15 of the FCC Rules. These limits are designed to provide reasonable protection against harmful
interference in a residential installation. This equipment generates, uses and can radiate radio frequency energy
and, if not installed and used in accordance with the instructions, may cause harmful interference to radio
communications. However,there is no guarantee that interference will not occur in a particular installation.
If this equipment does cause harmful interference to radio or television reception, which can be determined by
turning the equipment o and on, the user is encouraged to try to correct the interference by one or more of
the following measures:
◦ Reorient or relocate the receiving antenna.
◦ Increase the separation between the equipment and receiver.
◦ Connect the equipment into an outlet on a circuit dierentfrom that to which the receiver is
connected.
◦ Consult the dealer or an experienced radio/TV technician forhelp.
This equipment complies with FCC radiation exposure limits set forth for an uncontrolled environment. End
user must follow the specic operating instructions for satisfying RF exposure compliance. This transmitter must
not be co-located or operating in conjunction with any other antenna or transmitter.
Theportable device is designed to meet the requirements forexposure to radio waves established by the
Federal CommunicationsCommission (USA). These requirements set a SAR limit of1.6 W/kgaveraged over one
gram of tissue. The highest SAR value reported underthis standard during product certication for use when
properly worn on the body
NEED TO VERIFY THIS SECTION WITH SPECIALIST
78Evolve User Manual V1.0 by XDynamics Limited
Page 79

Safety
Warrenty
What does this limited warranty cover? The manufacturer of this XDynamics Product warrants to the
holder of a valid proof of purchase (“Consumer” or “you”) that the Product and all accessories provided
in the sales package (“Product”) are free from defects in material and workmanship, pursuant to the
following terms and conditions, when installed and used normally and in accordance with the Product
operating instructions. This limited warranty extends only to the Consumer for Products purchased and
used in the United States of America and Canada. What will XDynamics do if the Product is not free
from defects in materials and workmanship during the limited warranty period (“Materially Defective
Product”)? During the limited warranty period, XDynamics’s authorized service representative will
repair or replace at XDynamics’s option, without charge, a Materially Defective Product. If we repair
the Product, we may use new or refurbished replacement parts. If we choose to replace the Product,
we may replace it with a new or refurbished Product of the same or similar design. We will retain
defective parts, modules, or equipment. Repair or replacement of the Product, at XDynamics’s option,
is your exclusive remedy. XDynamics will return the repaired or replacement Products to you in working
condition. You should expect the repair or replacement to take approximately 30 days. How long is the
limited warranty period? The limited warranty period for the Product extends for ONE (1) YEAR from the
date of purchase. If XDynamics repairs or replaces a Materially Defective Product under the terms of this
limited warranty, this limited warranty also applies to the repaired or replacement Product for a period
of either (a) 90 days from the date the repaired or replacement Product is shipped to you or (b) the time
remaining on the original one-year warranty; whichever is longer. What is not covered by this limited
warranty? This limited warranty does not cover: 1. Product that has been subjected to misuse, accident,
shipping or other physical damage, improper installation, abnormal operation or handling, neglect,
inundation, re, water or other liquid intrusion; or 2. Product that has been.
LIMITED WARRANTY NEEDS TO BE VALIDATED BY COMPANY POLICY
79Evolve User Manual V1.0 by XDynamics Limited
 Loading...