

Page 1

XDrum Junior/KIDS
Allgemeine Aufbauanleitung / Generally assembly instructions
Page 2

1
DEUTSCH
Einführung:
Vielen Dank, dass Sie sich für das XDrum Junior entschieden haben. Bitte bauen Sie das DrumSet anhand dieser Anleitung und den Illustrationen auf.
Bitte beachten:
Dieses Dokument ist eine allgemeine Anleitung, in der die typischen Schritte beim Aufbau eines
Drum-Sets dargestellt werden. Dieses Dokument ist eine allgemeine Anleitung,
in der die typischen Schritte beim Aufbau eines klassischen Drum-Sets dargestellt werden.
Je nach Modell können einzelne Komponenten und Mengenangaben variieren.
Die Modelle XDrum Junior Pro oder Junior Standard haben beispielsweise keinen separaten
Beckenständer im Lieferumfang enthalten, daher wird das Becken auf der Bassdrum montiert.
Das XDrum Junior Kids wird ohne Snaredrum und Standtom geliefert.
Bitte vergleichen Sie Ihr erworbenes Modell daher unbedingt mit den Bildern auf unserer Homepage.
Gegebenenfalls müssen nicht alle Arbeitsschritte ausgeführt werden und Missverständisse können
vermieden werden können.
Page 3
2
Auspacken:
Packen Sie alle Einzelteile aus und überprüfen Sie die Teile auf evtl. Beschädigungen die durch
den Transport entstanden sein könnten.
Montage:
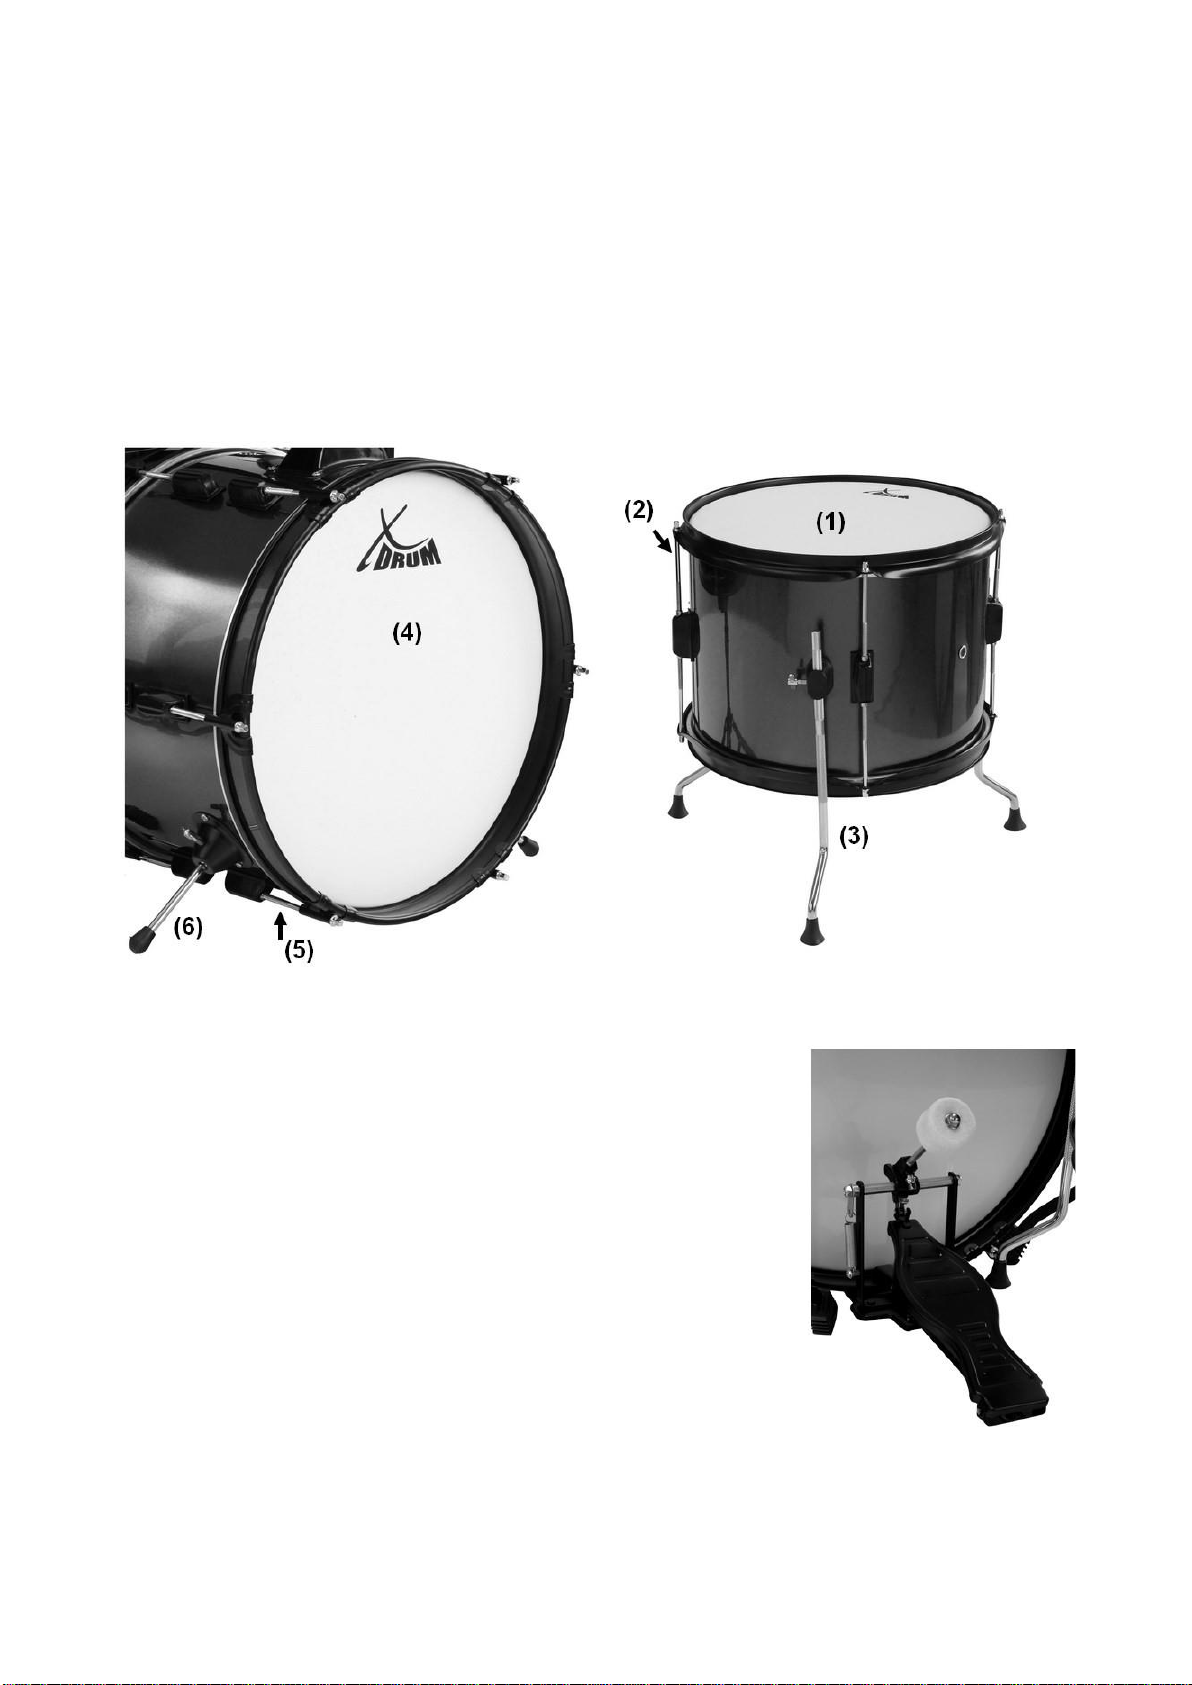
Setzen Sie das Fell für die Standtom (1) auf den Holzkorpus. Mit
den Spannringen und den Befestigungsschrauben (2) fixieren
Sie das Fell. Ziehen Sie alle Schrauben handfest an, überprüfen
Sie dabei die Stimmung. Befestigen Sie die Füße der Standtom.
Führen Sie diese Schritte mit Bassdrumfell (4), Befestigungsschrauben (5) und Standfüßen (6) für die Bassdrum nach
gleichem Schema durch. Befestigen Sie das Bassdrum Pedal
mit der Klemmvorrichtung.
Page 4
3
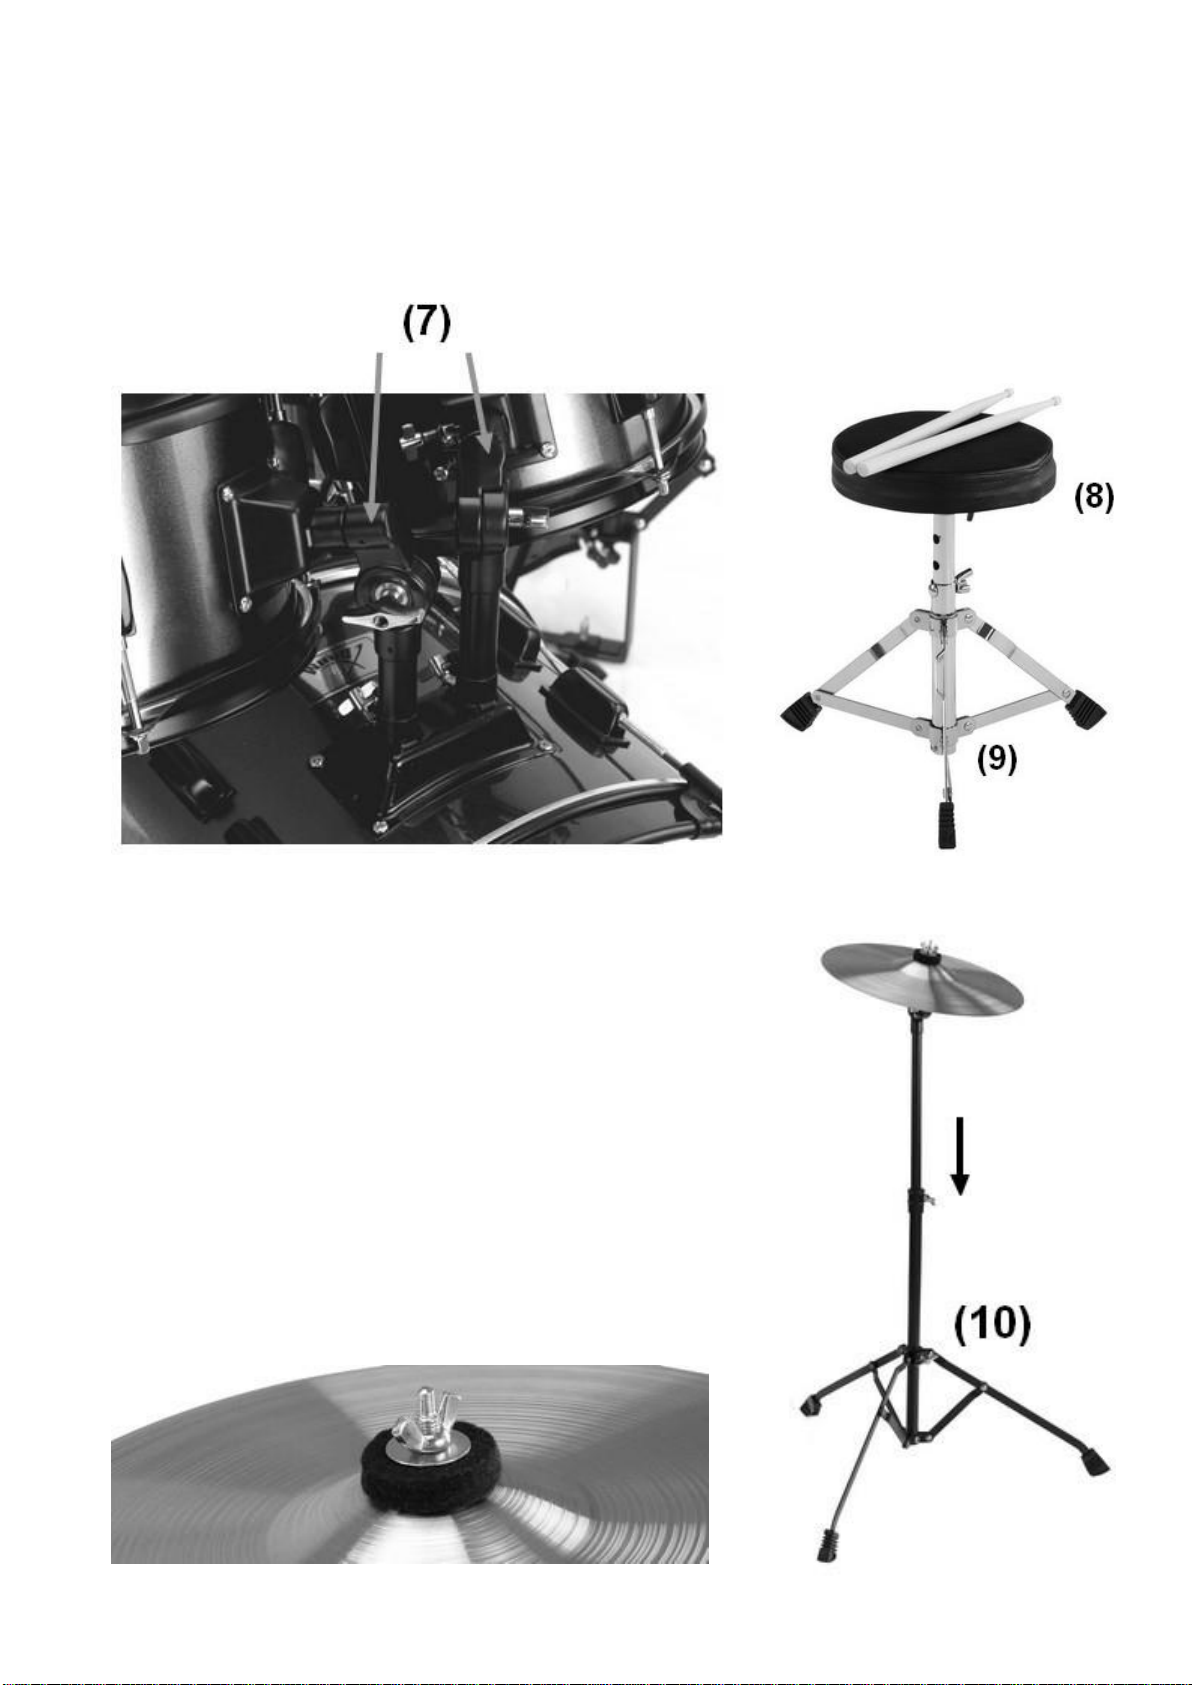
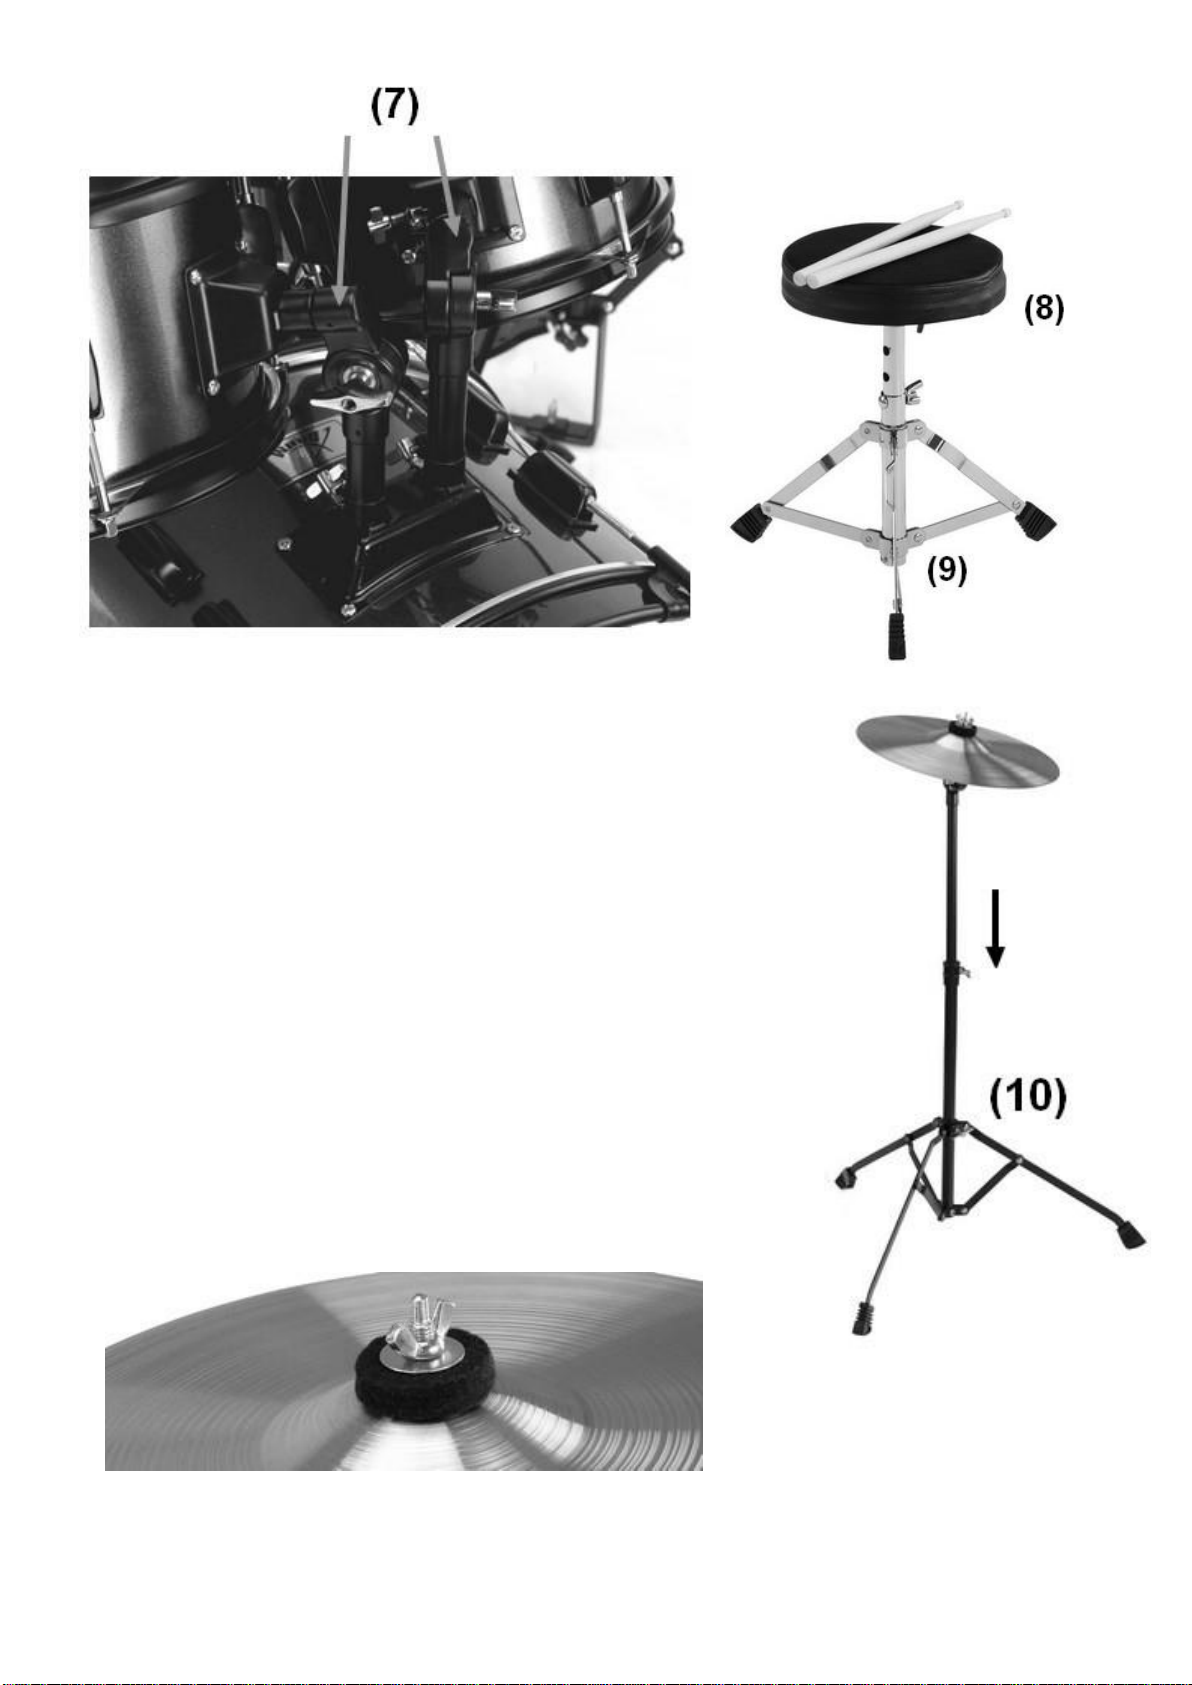
Stellen Sie die Bassdrum auf einer ebenen, sicheren Grundfläche auf. Befestigen Sie die
Tomhaltern (7) an den dafür vorgesehenen Haltern an der Bassdrum.
Befestigen Sie die zwei Toms (Schlagtrommeln) an den Haltern und richten Sie diese aus. Mit
den Flügelschrauben können Sie die Positionen fixieren.
Befestigen Sie das Oberteil (8) des Drumhockers am
Untergestell (9). Achten Sie auf gute, stabile Befestigung
mit der mitgelieferten Verbindungsschraube.
Stellen Sie das Unterteil des Beckenständers (10) auf und
fixieren Sie das Oberrohr mit der Feststellschraube im
Untergestell oder auf der Bassdrum. Montieren Sie das
Becken am Beckenständer.
Das Becken sollte frei schwingen können. Ziehen Sie die
obere Schraube entsprechend fest an
Page 5
4
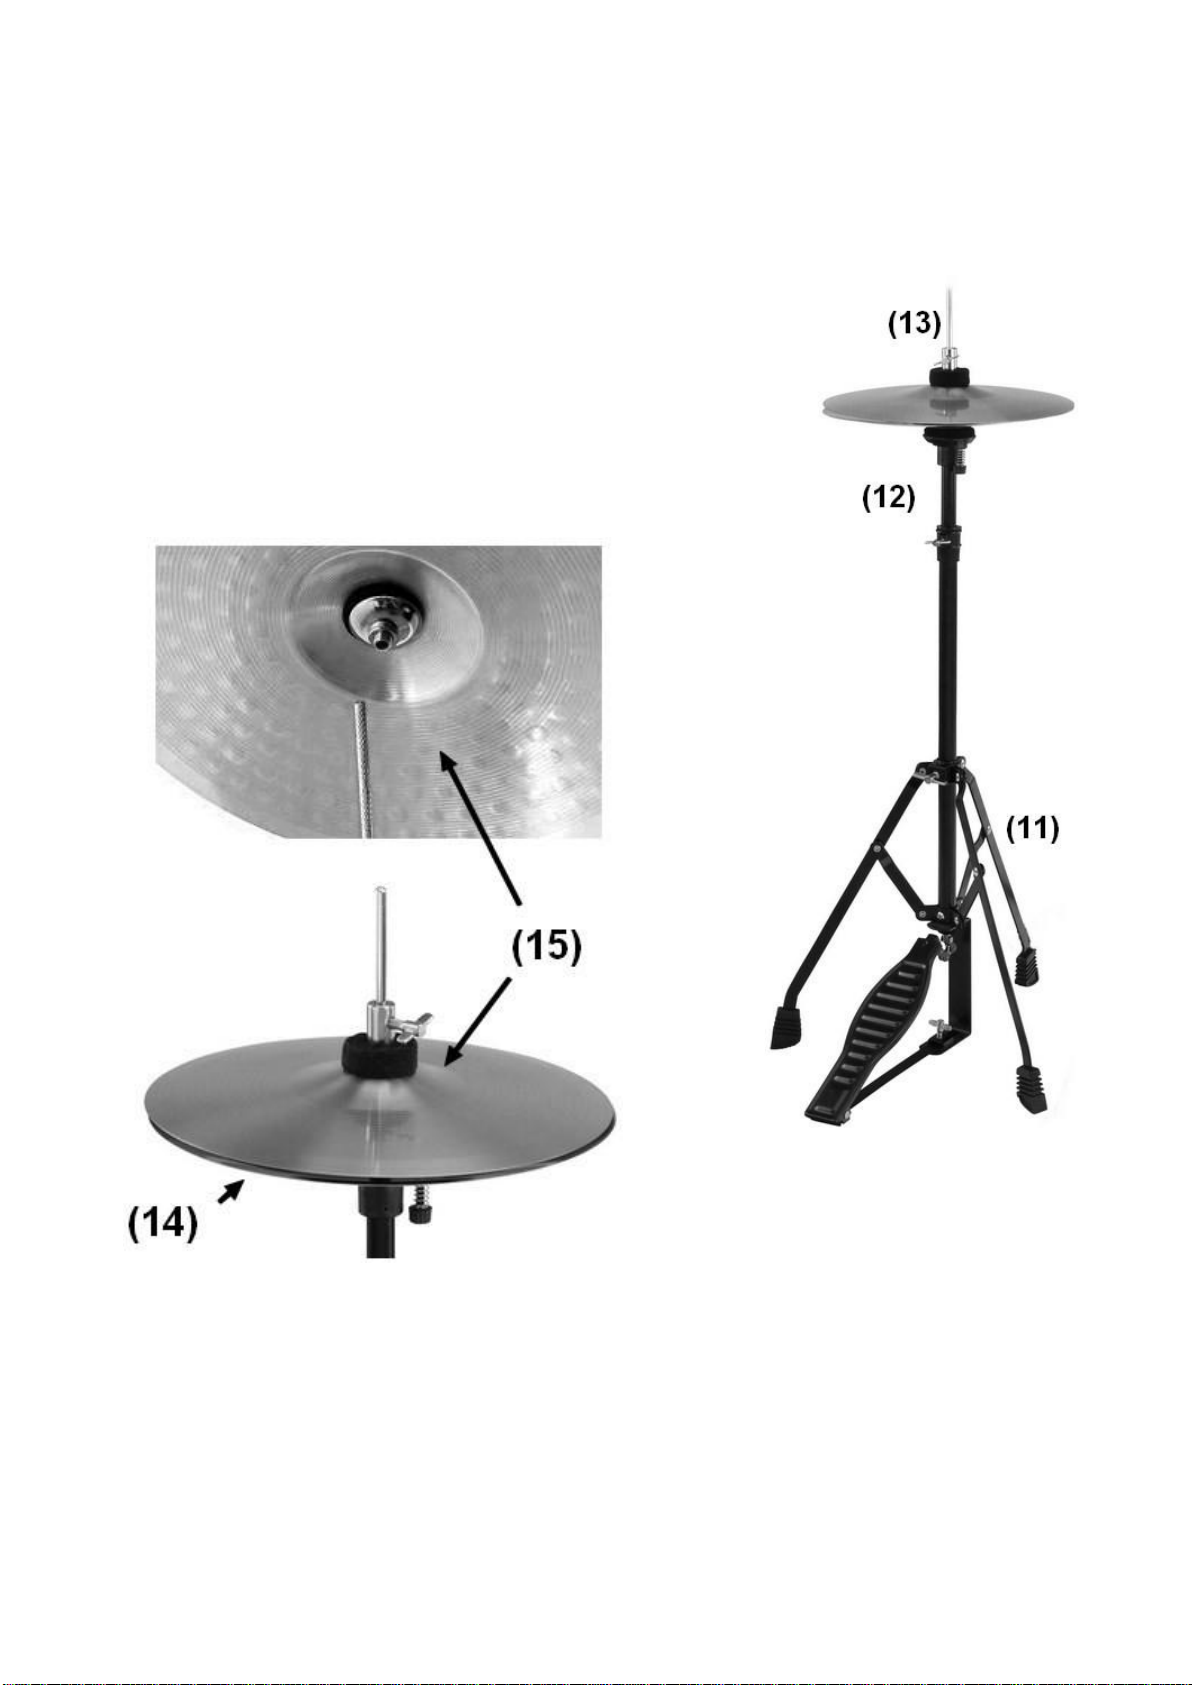
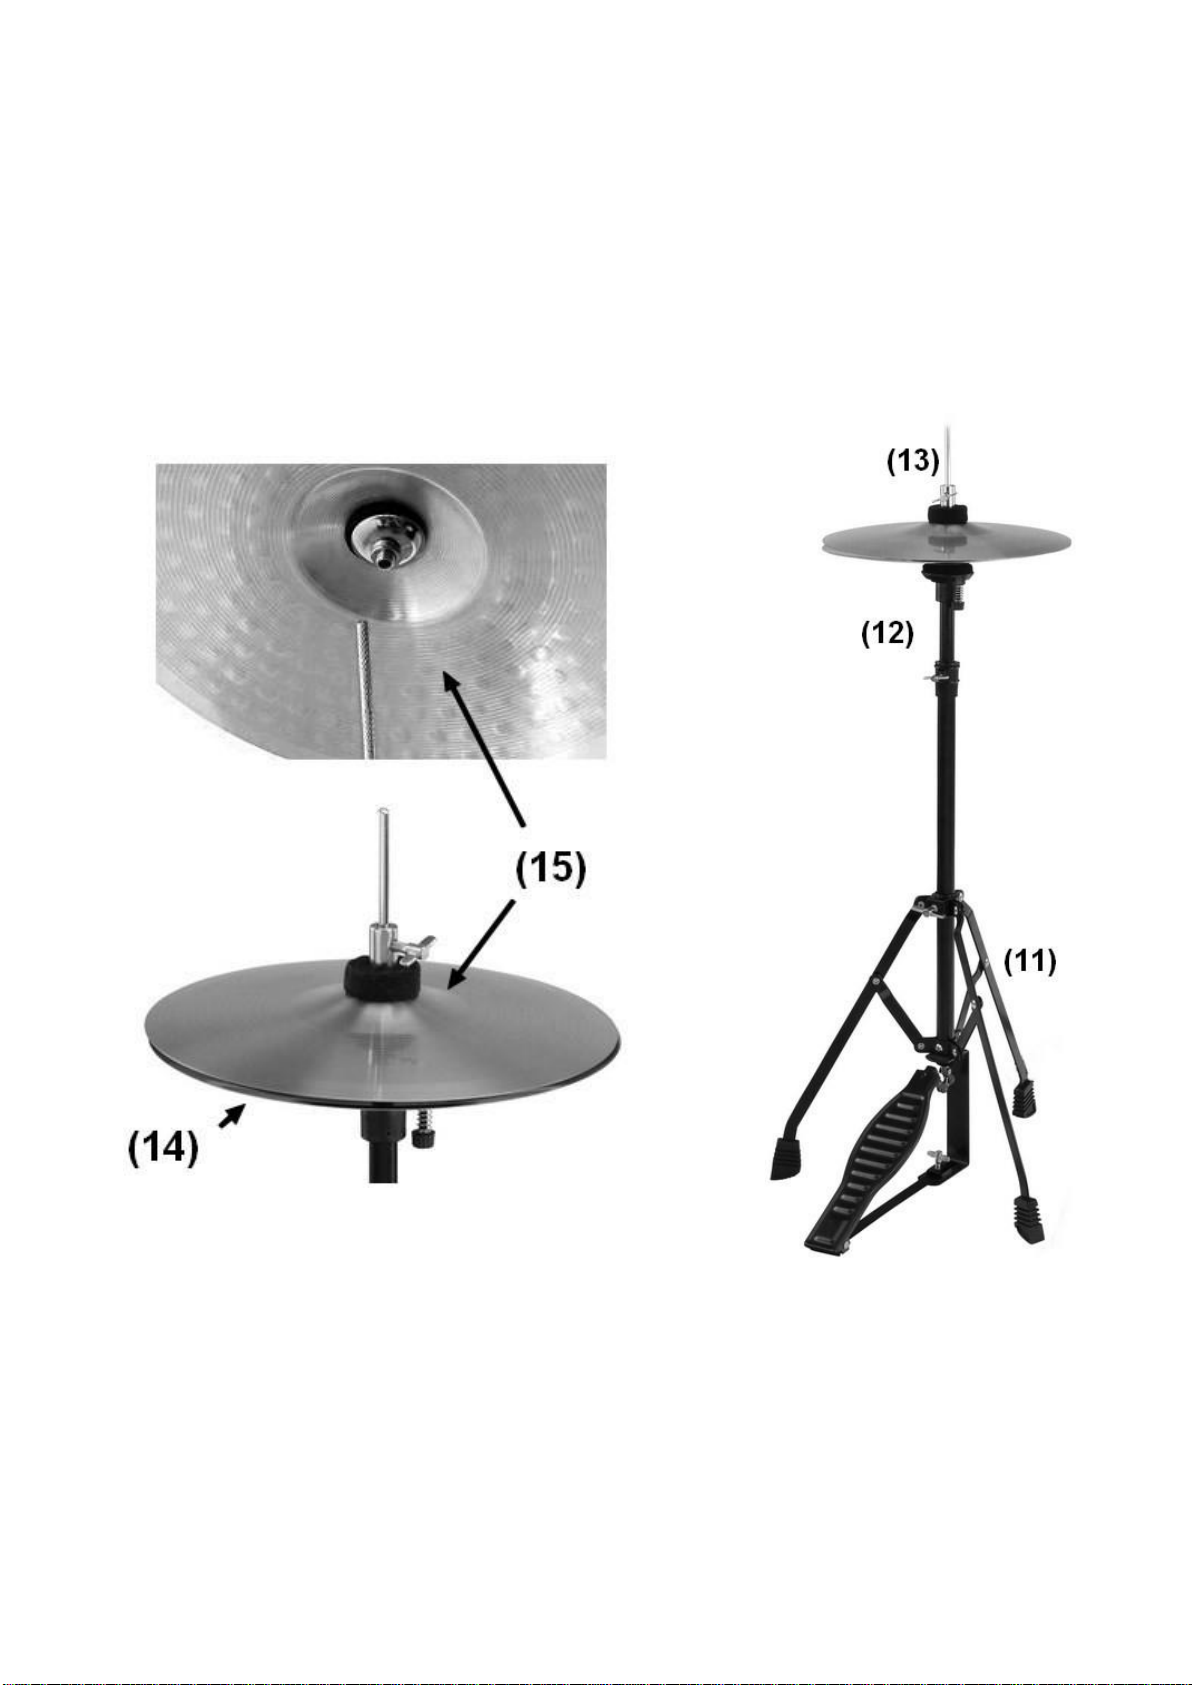
Stellen Sie das Untergestell der HiHat (11) auf. Montieren Sie das Oberteil (12) und drehen
Sie die bewegliche Stange (13) für das obere HiHat Becken ein. Setzen Sie das erste Becken
(14) mit der gewölbten Seite nach unten auf den Schaumstoffring des Ständers.
Montieren Sie die Befestigungsklemme inkl. Schaumstoffdämpfer und Kontermutter (Locking Nut, als
Ersatzteil mit verpackt) am Becken (15). Setzen Sie das
Becken auf die bewegliche HiHat-Stange. Ist das HiHatPedal durchgetreten muss die HiHat sauber schliessen.
Bei nicht betätigtem Pedal ist die HiHat offen.
Page 6

5
ENGLISH
Introduction:
Thank you for purchasing the XDrum Junior Drum Set.
We hope that you will enjoy the use of the XDrum Junior Drum Set.
Please read through this manual carefully before beginning to use, so that you will
be able to take full advantage of the XDrum Junior Drum Set features and enjoy
trouble-free operation for years to come.
Please note:
This assembly instruction is a general guide how to build up and assemble an acoustics drum
set and valid for different models of XDrum drum sets.
Pictures and instructions may vary as for example XDrum Junior Pro or Junior Standard sets
do not have separate cymbal stands, the cymbals are mounted on the bass drum.
The XDrum Junior Kids is without a snare drum and floor tom.
To prevent such confusion during the assembly, please compare your recently acquired
drumset with the product pictures on our homepage.
Page 7
6
Assembly:
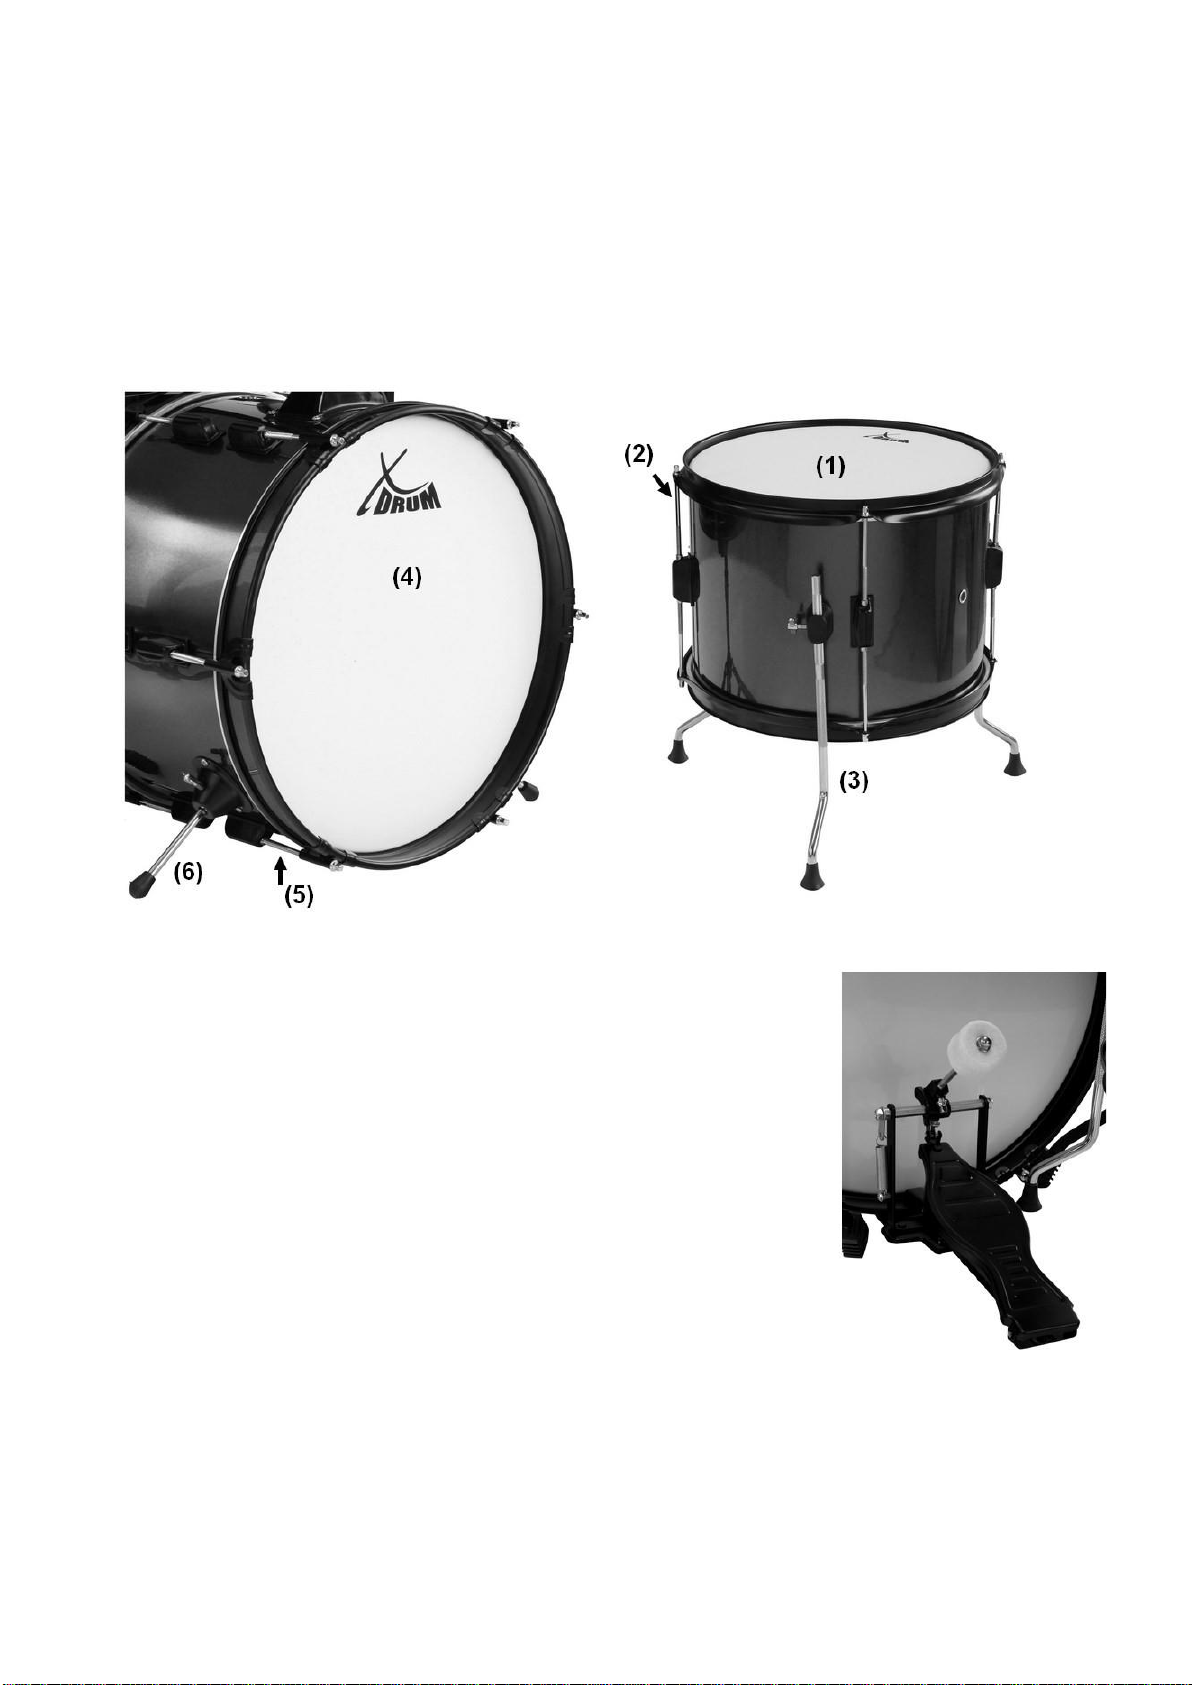
Place the floor tom head (1) on the floor tom. You can fix the
head (1) with hoops and screws (2). Screw down the screws
(2) slowly and check the tuning of the tom. Fix the feet (3) on
the floor tom.
Assemble the bass drum head (4), the screws (5) and the feet
(6) at the bass drum as same scheme of floor tom. Fix the
bass drum pedal to the bass drum with clamping device.
Place the bass drum on a secure and level ground.
Page 8
7
Fix the tom holders (7) into the socket of the bass drum.
Attach the two toms at the tom holders and position these.
Fix the toms with the wings screws.
Fix the seat (8) on the stand (9) with supplied screw.
Attention! Make sure, that the drum throne is mounted stable!
Build on the stand of the crash cymbal (10). Slide the pipe
into the stand or the hole on the bass drum and fix it with the
screw. Mount the crash cymbal on the assembled crash
cymbal stand and make sure, that the cymbal swings freely.
Page 9
8
Build on the stand of the hi-hat (11). Mount the pipe (12) into the stand and mount the pull rod
(13) for the upper hi-hat cymbal.
Put the bottom hi-hat cymbal (14) on the stand (see picture below).
To the upper hi-hat cymbal (15): Mount the mounting clamp incl. foam muffler and lock nut at
the cymbal (15). Slide the upper cymbal (15) onto the pull rod and tighten the wing screw so the
cymbal rests 2 cm above the bottom hi-hat cymbal.
Page 10
9
DEUTSCH
Kessel stimmen:
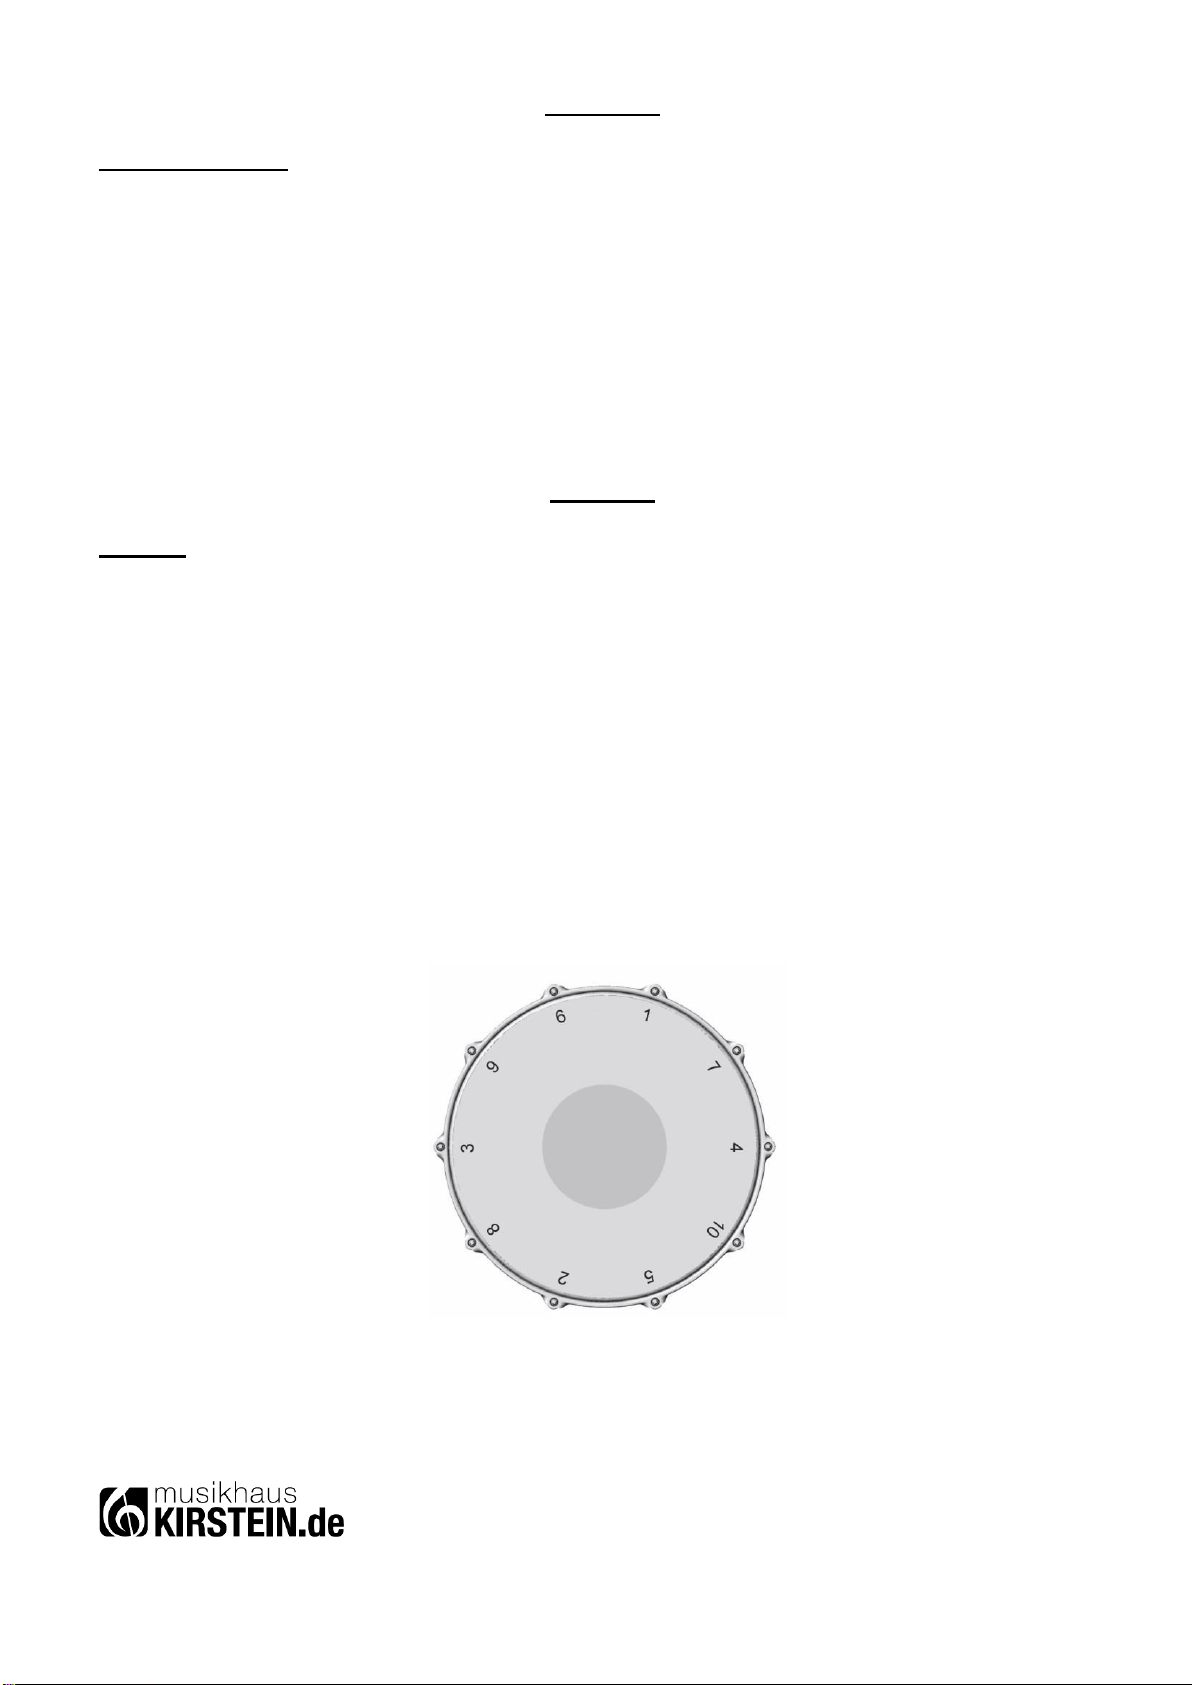
Spannschrauben werden immer über Kreuz angezogen, um eine gleichmäßige Spannung
zu gewährleisten. Alle Schrauben sollten gleichmäßig angezogen werden. Am Anfang dreht
man die Schraube nicht mehr als eine Umdrehung – zum Ende hin nimmt man ¼ - bis ⅛Drehungen vor. Dann folgt die Kontrolle des Tons. Der Ton wird überprüft, indem man mit dem
Finger ungefähr 3 cm vom Rand entfernt auf das Fell klopft – und zwar an der Schraube, die
man gerade einstellt. Schlagfell und Resonanzfell werden auf den gleichen Ton gestimmt. Eine
Veränderung der Tonhöhe nach persönlichem Geschmack ist selbstverständlich möglich.
ENGLISH
Tuning:
Tuning the drums is a delicate process. It takes years of experience to achieve satisfying results,
time and time again. However, here’s a tip how to start at _rst with the lowest tuning available
for your drum. Your taste may be different, but with drumming experience you will develop tuning
methods that suit you better. Press your index finger into the center of the batter head and keep
it pressed. Tighten the tension rods with the drum key in a criss cross pattern until the wrinkles
of the head at the bearing edge disappear. Do it the same on the opposite side of the drum. Now
you have the lowest tuning available for your drum. If you want to adjust the pitch, tighten the
tension rods (always in a criss cross attern.) To check for even tension, tap the head with your
finger in 2 cm distance to the tension rod. The appearing sound should have the same pitch for
every tension rod on the head. As a start, tighten the resonant head slightly higher in pitch than
the batter head. Tip: the Snare drum is tuned much higher than toms in most cases, so here you
should apply more tension.
Musikhaus Kirstein GmbH
Bernbeurener Strasse 11
86959 Schongau / Germany
Phone 0049-8861-909494-0 / Fax 0049-8861-909494-19
 Loading...