

Page 1
DD 650 Digital Drum
Art. Nr 00056971
Version 09/2018
Users Manual
Page 2

CAUTION
CAUTION
Any changes or modications in construction of this device which are not expressly approved by
the party responsible for compliance could void the user’s authority to operate the equipment.
WARNING
When using electrical products, basic safety precautions should always be followed, including the
following:
These limits are designed to provide reasonable protection against harmful interference in a resi-
dential installation. This equipment generates, uses, and can radiate radio frequency energy and, if
not installed and used in accordance with the instructions, may cause harmful interference to radio
communications. However, there is no guarantee that interference will not occur in a particular
installation. If this equipment does cause harmful interference to radio or television reception,
which can be determined by turning the equipment o and on, the user is encouraged to try to
correct the interference by one or more of the following measures:
- Reorient or relocate the receiving antenna.
- Increase the separation between the equipment and receiver.
- Connect the equipment into an outlet on a circuit dierent from that to which the receiver is
connected.
- Consult the dealer or an experienced radio/TV technician for help.
Page 3

TAKING CARE OF YOUR DRUM
!
DO NOT ATTEMPT TO OPEN THE UNIT OR MAKE ANY CHANGE IN THE CIRCUITS OR
!
PARTS OF THE UNIT.
SERVICE AND MODIFICATION
This product should be serviced by qualified
service personnel when,
the power supply cord or the plug has been
damaged,
liquid has been spattered into the unit or it has
been exposed to rain,
the instrument does not appear to operate
normally or exhibits a marked change in
performance,
the instrument has been dropped or the
cabinet has been damaged.
direct sunlight (near a window),
high temperatures (near a heat source,
outside, or in a car during the daytime),
excessive humidity,
excessive dust,
strong vibration.
The drum contains digital circuitry and may
cause interference if placed too close to radio
or television receivers. If interference occurs,
move the drum further away from the affected
equipment.
Do not attempt to open the unit or make any
change in the circuits or parts of the unit.
HANDLING AND TRANSPORT
Never apply excessive force to the controls,
connectors, pads or other parts of the
instrument.
Always unplug cables by gripping the plug
firmly, not by pulling on the cable.
Physical shocks caused by dropping,
bumping, or placing heavy objects on the
instrument can result in scratches and/or
more serious damage.
Carefully check the amplifier volume control
before stating to play. Excessive volume can
cause permanent hearing loss.
CLEANING
Clean the unit with a dry or light-wet soft cloth.
Do not use paint thinner or petrochemical
based polishes.
POWER
Turn the power switch off when the drum is
not in use.
To avoid damage to the drum and other
devices to which it is connected, turn the
power switches of all related devices off
prior to connection or disconnection of
audio cables.
Turn the power off if the main cable is
damaged or the instrument is spattered with
liquid.
Do not switch the unit on and off in quick
succession, this places an undue load on
the electronic components.
Unplug the AC power cord during an
electrical storm.
Avoid plugging the AC adaptor into the
same AC outlet as appliances with high
power consumption, such as electric
heaters or ovens.
LOCATION
Do not expose the drum to the following condi-
tions to avoid deformation, discoloration, or more
serious damage,
Page 4

CONTENTS TABLE
INSTALLATION ................................................................................................
SOUND MODULE .............................................................................................
Control Panel .....................................................................................................
Connectors .........................................................................................................
PLAYIN PAD ....................................................................................................
BEFORE START PERFORMANCE ................................................................
BASIC OPERATION .........................................................................................
Select Kit ............................................................................................................
Edit a Kit ............................................................................................................
Play a Drum Pattern (Demo song) ......................................................................
Record a Drum Track ........................................................................................
Use the Mixer ....................................................................................................
Restore Factory Settings ..................................................................................
SETUP ...............................................................................................................
Back Volume .....................................................................................................
Tune ...................................................................................................................
Local ..................................................................................................................
FX Set ................................................................................................................
MIDI Set .............................................................................................................
Advanced Settings ............................................................................................
Sensitivity........................................................................................................
Headroom .......................................................................................................
Sense Time .....................................................................................................
Trigger Curve ..................................................................................................
Cross Talk ......................................................................................................
Note Send .......................................................................................................
Rim Velocity ....................................................................................................
Pedal Velocity .................................................................................................
Calibration........................................................................................................
Reset .................................................................................................................
DRUM KIT EDIT ................................................................................................
Voice Type ........................................................................................................
Voice ..................................................................................................................
Volume ...............................................................................................................
Reverb ...............................................................................................................
Pitch ...................................................................................................................
Pan ....................................................................................................................
APPENDIX .......................................................................................................
Kit List ...............................................................................................................
Pattern List ........................................................................................................
Voice List ............................................................................................................
SPECIFICATIONS .............................................................................................
1
7
7
10
11
12
13
13
13
1 3
14
14
14
15
15
15
15
15
16
16
16
16
16
16
17
17
17
17
17
17
18
18
18
18
18
18
18
20
20
20
21
26
Page 5
INSTALLATION
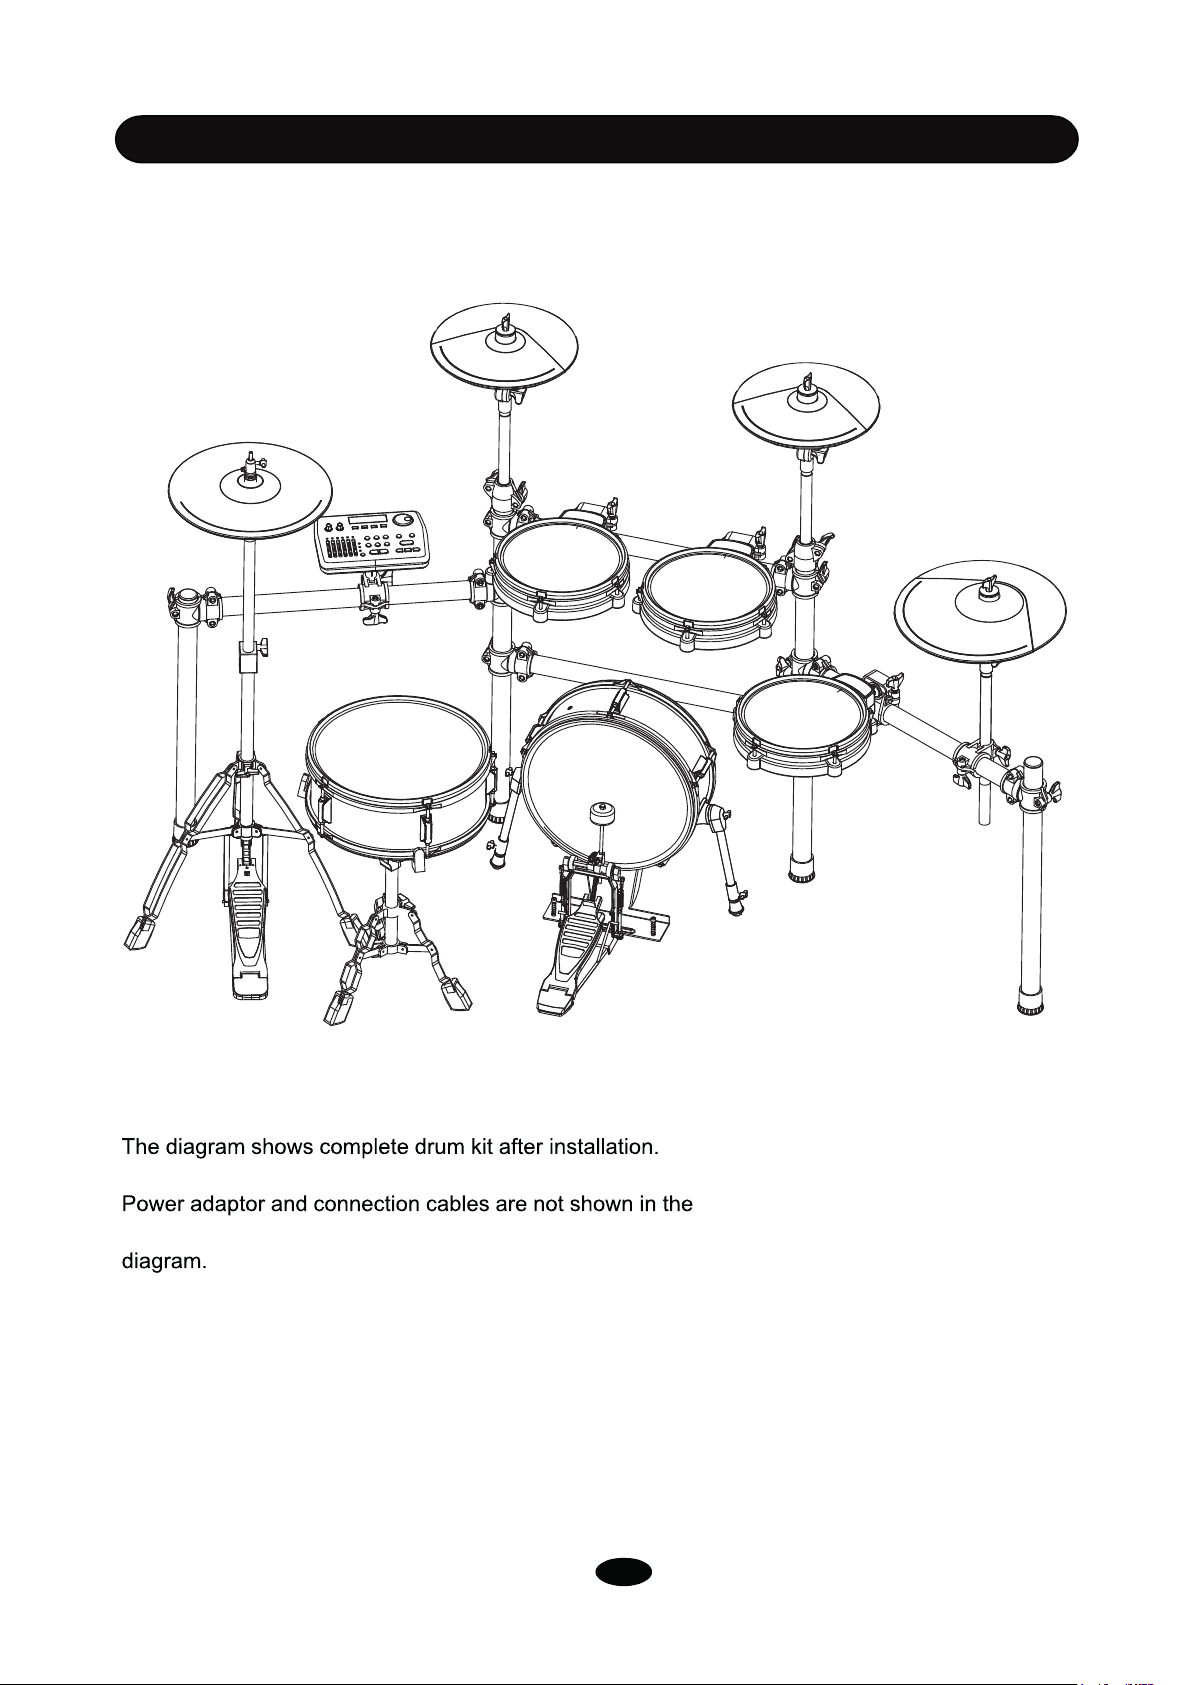
CRASH1
KICK PEDAL
HI-HAT
CRASH2
SOUND MODULE
SNARE
TOM1
TOM2
RIDE
KICK
TOM3
1
Page 6
INSTALLATION
④
②
①
③
⑤
1
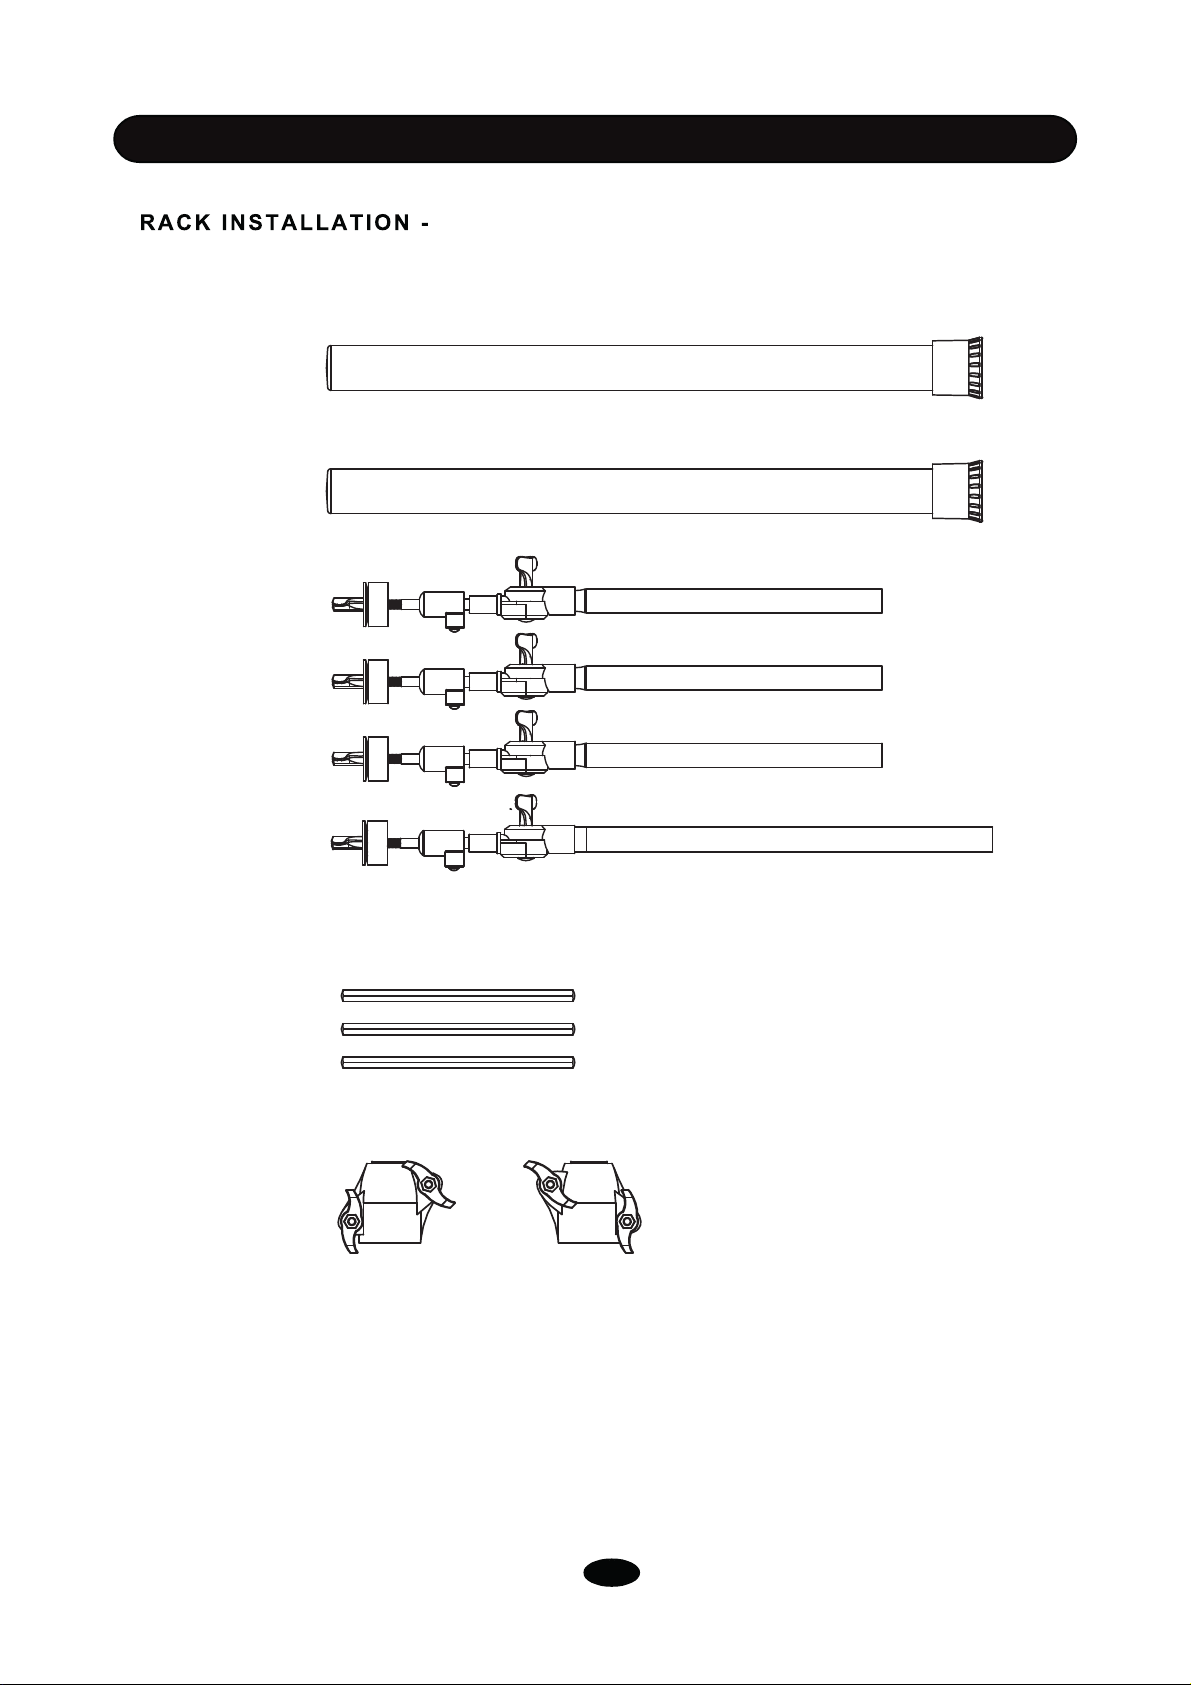
All components in the box are shown here.
Extra components after installation are for replacements.
2
Page 7
INSTALLATION
②
②
⑤
⑤
④
④
①
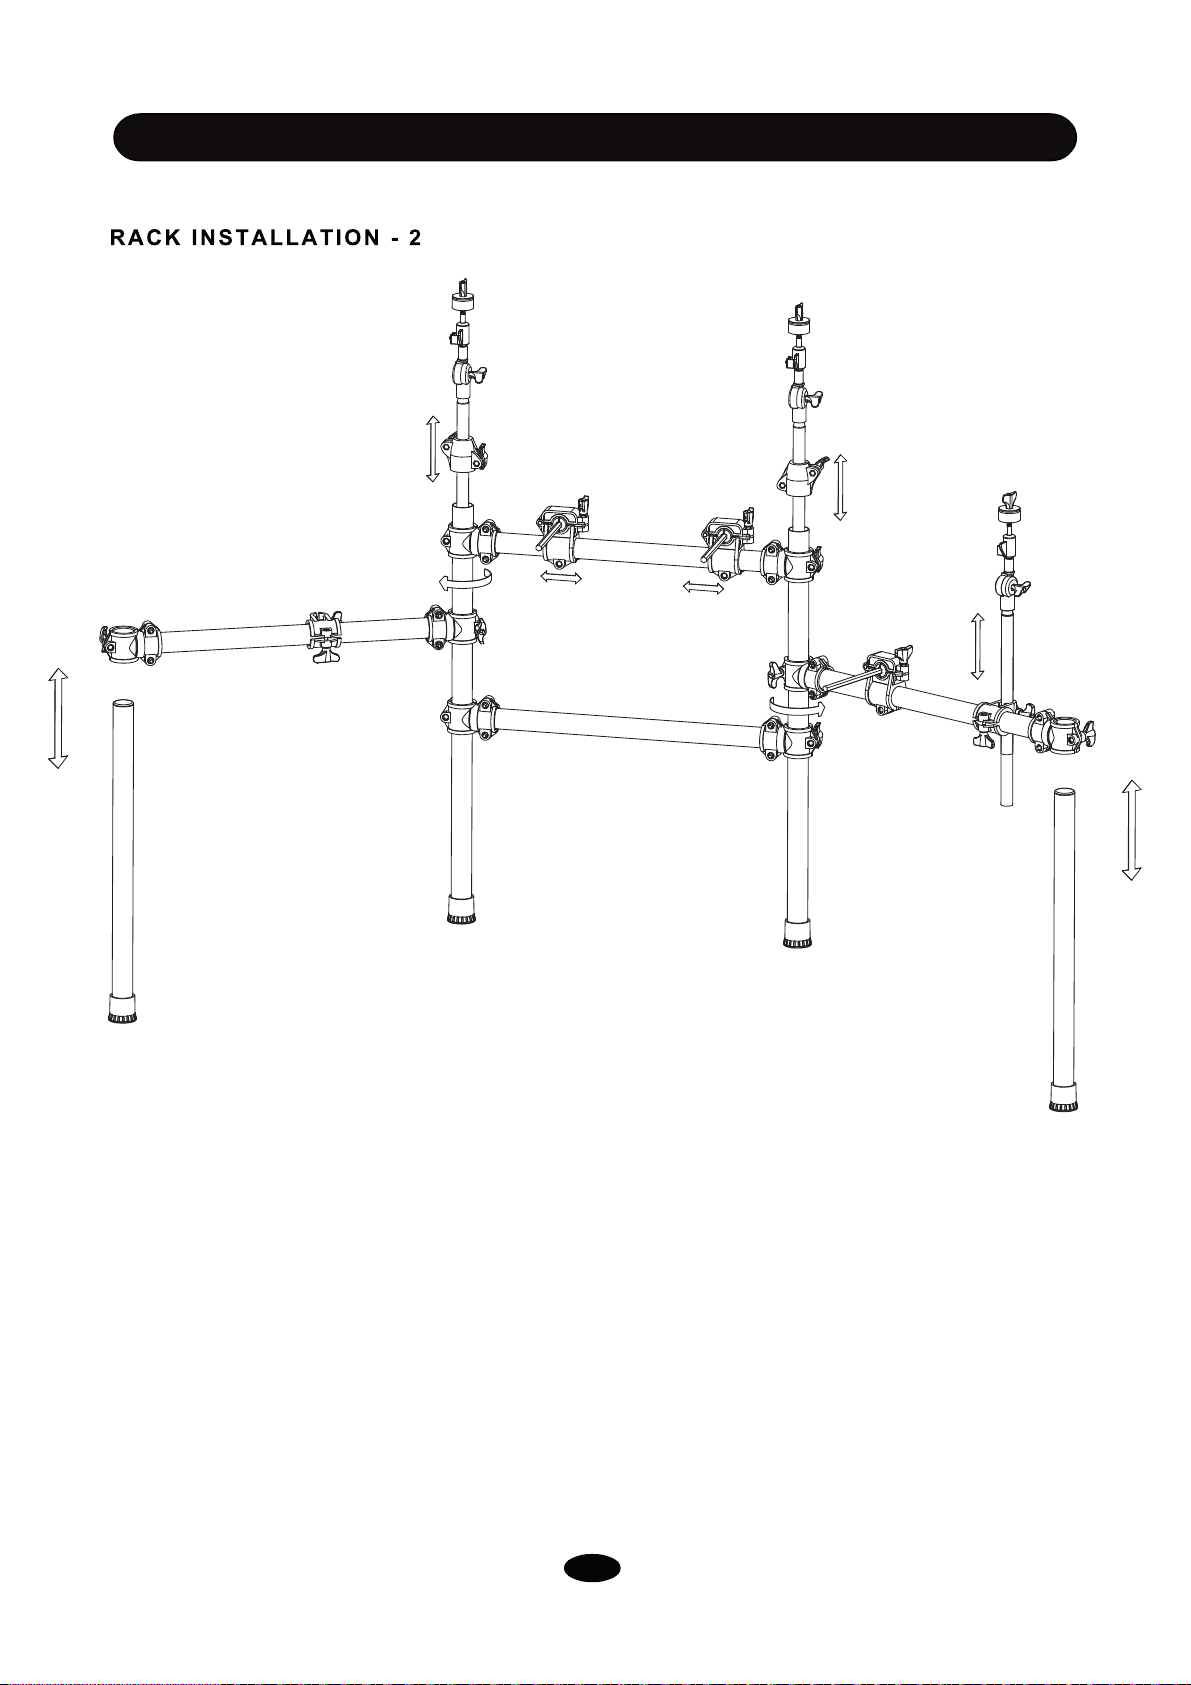
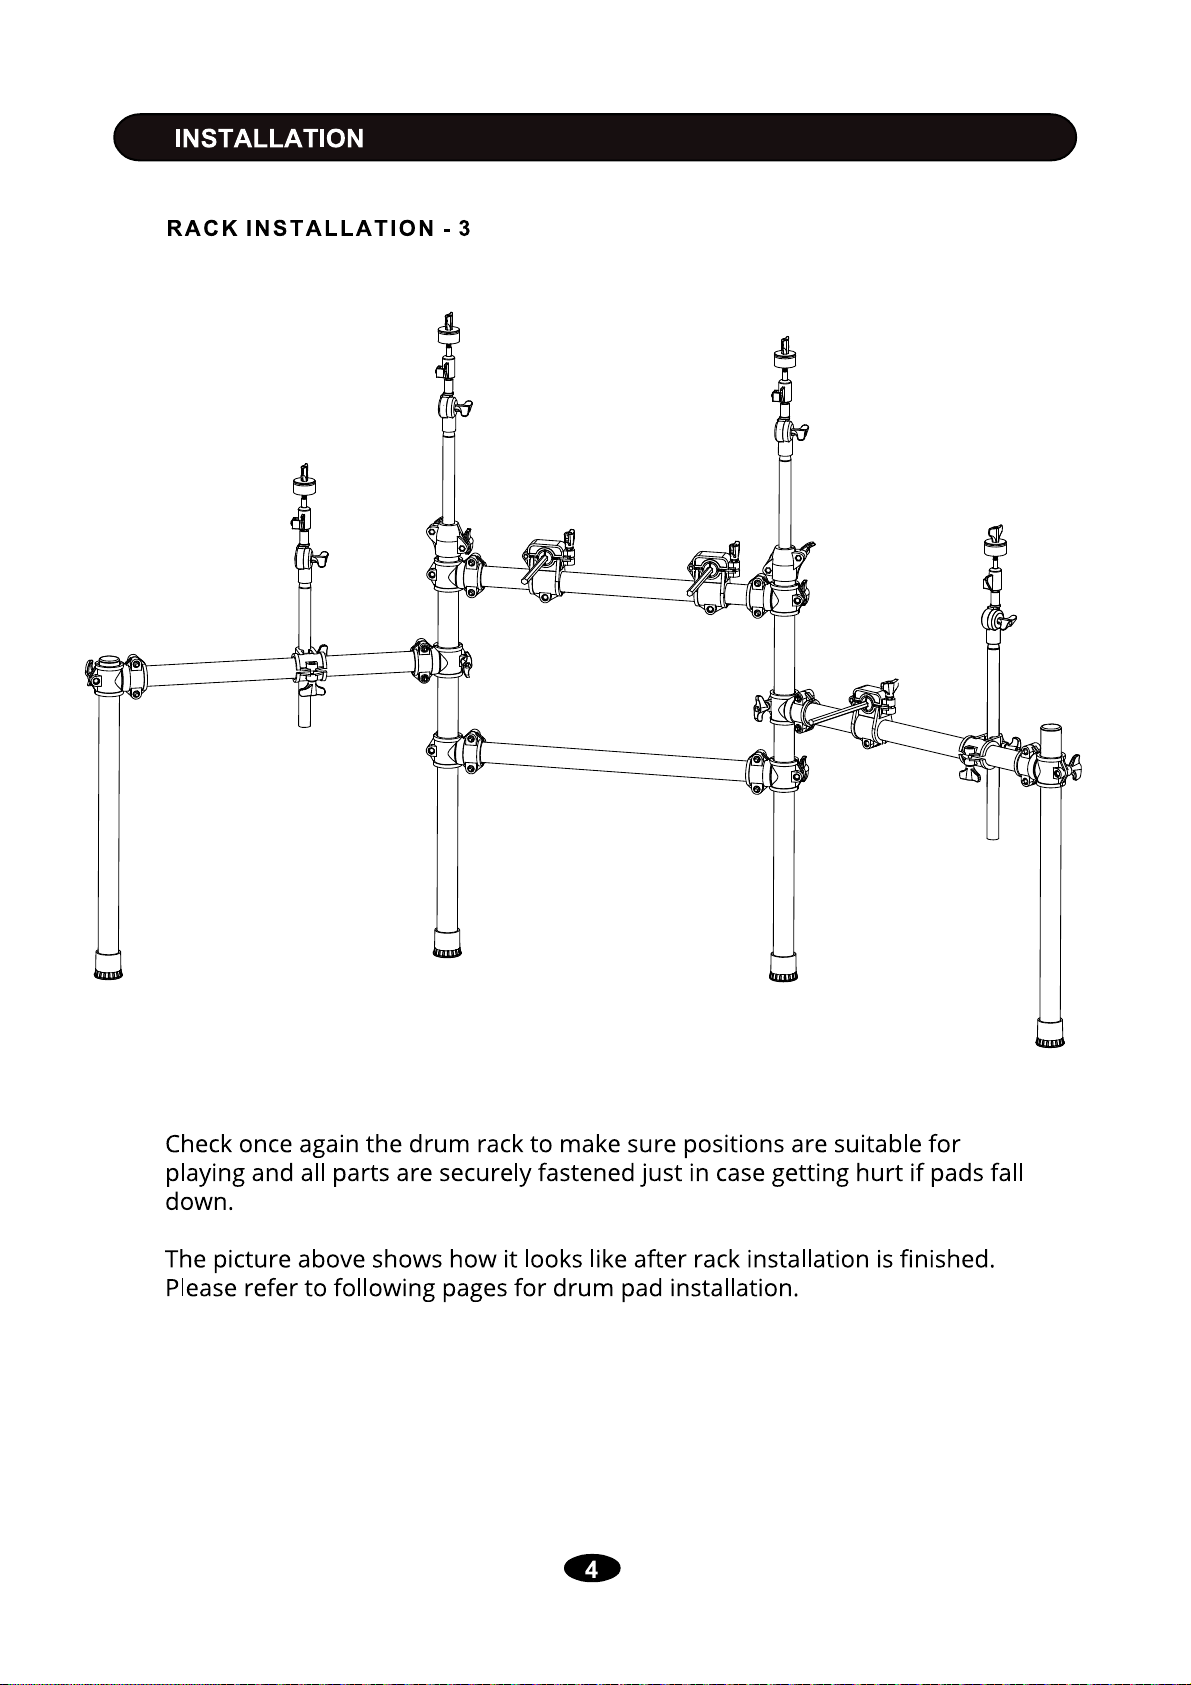
1.
Insert Cross Bar①② into Post⑤, adjust their position and make ①② in
parallel.
2.
Insert Side Cross Bar③④ into Post⑤ and mount Connector⑨ on both ends.
3.
Insert Side Post⑥ into connector⑨.
4. Make the drum rack stand firm and fasten all connectors on bars.
5.
Install Cymbal Connector⑩ as the picture shows.
6.
Insert Crash Arm⑦ to Connector⑩ and Ride Arm⑧ to another connector according
to the picture.
7.
Insert Tom Rod⑪ according to the picture, and adjust its connector to suitable
position.
③
④
①
3
Page 8
①
②
⑤
②
⑤
①
④
④
③
④
Page 9

INSTALLATION
DRUM INSTALLATION - 1
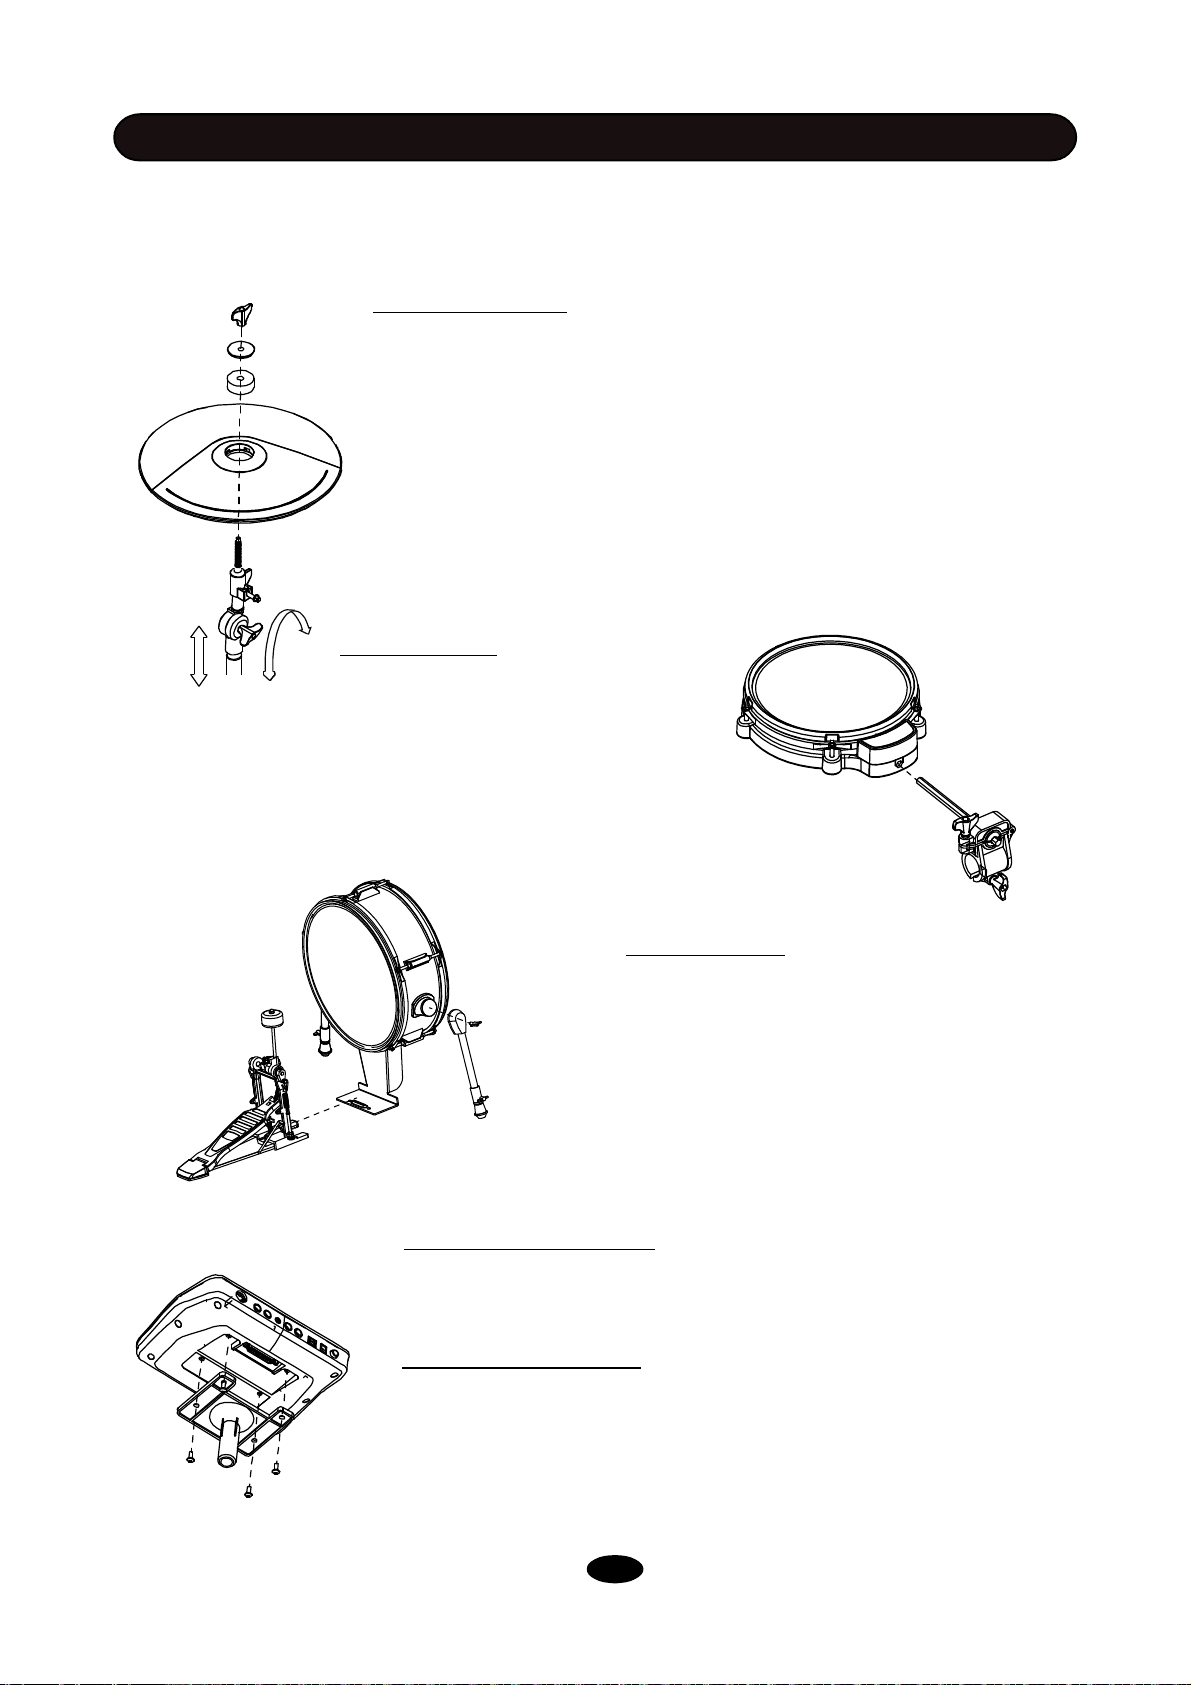
HiHat Installation
1.
Open HiHat Stand Legs① to suitable position and
make it standfirm.
2.
Insert Thin Rod② into screw thread on the Bottom
Stand according to dashed line here, and rotate it
clockwise to fasten it.
3.
Place Hollow Rod③ outside Rod②, and insert it into
Bottom Stand.
4.
Insert HiHat Cymbal Tray④ onto Thin Rod② and place
it aboveHollow Rod③
5.
Adjust Hollow Rod③ to suitable height and fasten
it. Insert HiHat Cymbal onto Thin Rod②. Make sure there is
enough space between the Cymbal and Tray④, and then
fasten the screw on Cymbal.
Note: If there is not enough space between Cymbal
and Tray④, the HiHat control function will be very short in
range or even notresponding.
⑤
④
③
②
①
②
Snare Installation
1.
Open Snare Stand Legs① to suitable
position and make it stand firm.
2.
Open Snare Stand Arms②, stretch it to
maximum, put the Snare upward on the stand.
The one with rubber band and white sensor spot
is the upside.
3.
Tighten Snare Stand Arms② by rotating
the rotary on the bottom side
①
5
Page 10
INSTALLATION
DRUM INSTALLATION - 2
Cymbal Installation
1.
Remove the Wing Nut, Washer and Felt ① from the top
①
②
of the rod.
2.
Put Cymbal Pad② into the Rod③, then place back
parts removed in the step 1. Fasten the wing nut but not
too tightly. It allows the pad a little bit wobbling like real
acoustic cymbal.
③
Tom Installation
1.
Loosen Pad Connector①, insert
Hex Rod②, and tighten Pad
Connector①.
2. Loosen the wing nut under Drum
Pad③, and insert it to Hex Rod②.
3. Adjust to suitable position and
fasten wing nut under Drum Pad
③
②
①
②
Kick Installation
1.
Install Kick Legs① on both sides
and then fasten the wing nut.
2.
Insert Kick Pedal② to Kick Drum,
adjust the pedal to suitable position and
then fasten wing nuts on the pedal.
①
Sound module Installation
Align holes in the sound module and the model mount then insert
1.
screws and fasten it.
2. Insert rod of the model mount into the clamp, then tighten the wing nut.
Finalizing the Installation
After install all components, fine adjust the arm, clamps and rods to the
best position you desire.
Electronic Connection
Connect the trigger connector cable plug to the bottom of the sound
module, and then connect all cable heads according to their name tags.
6
Page 11
SOUND MODULE
Control Panel
1 2
8
3 4 5 6
9
7
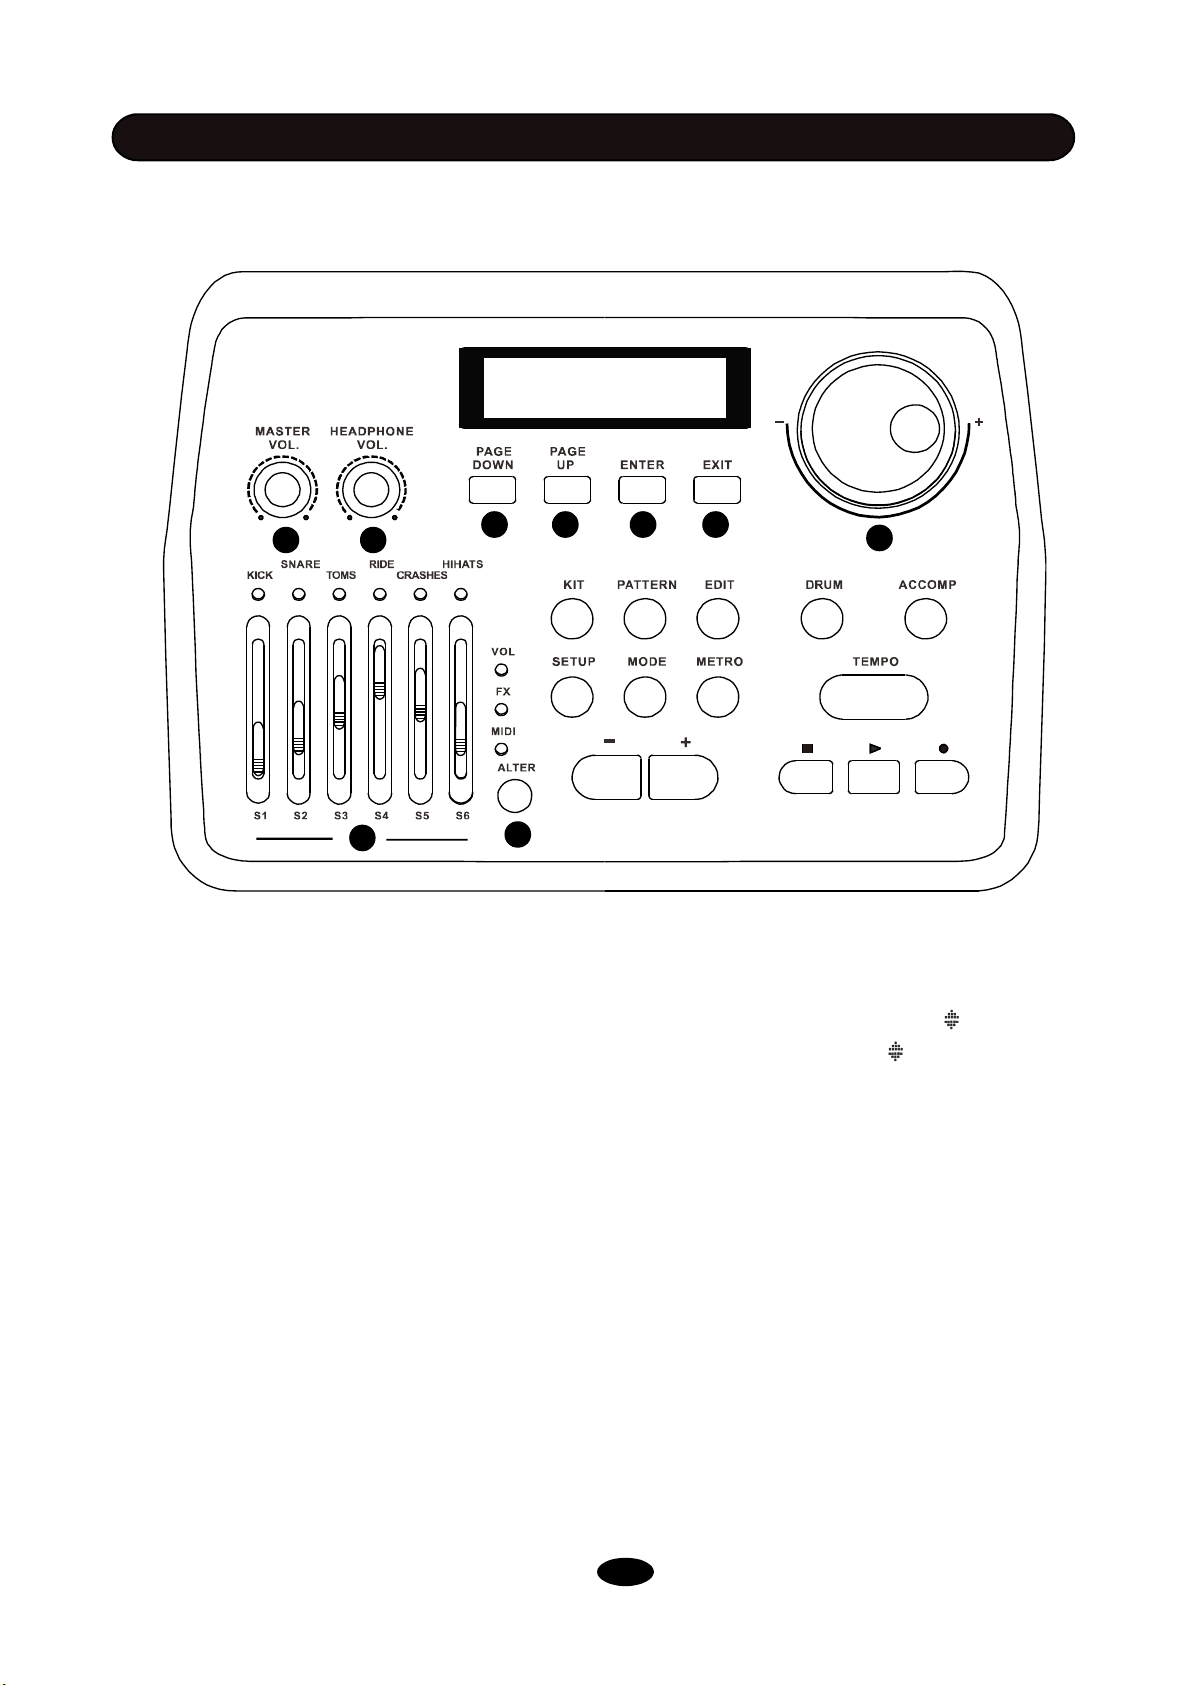
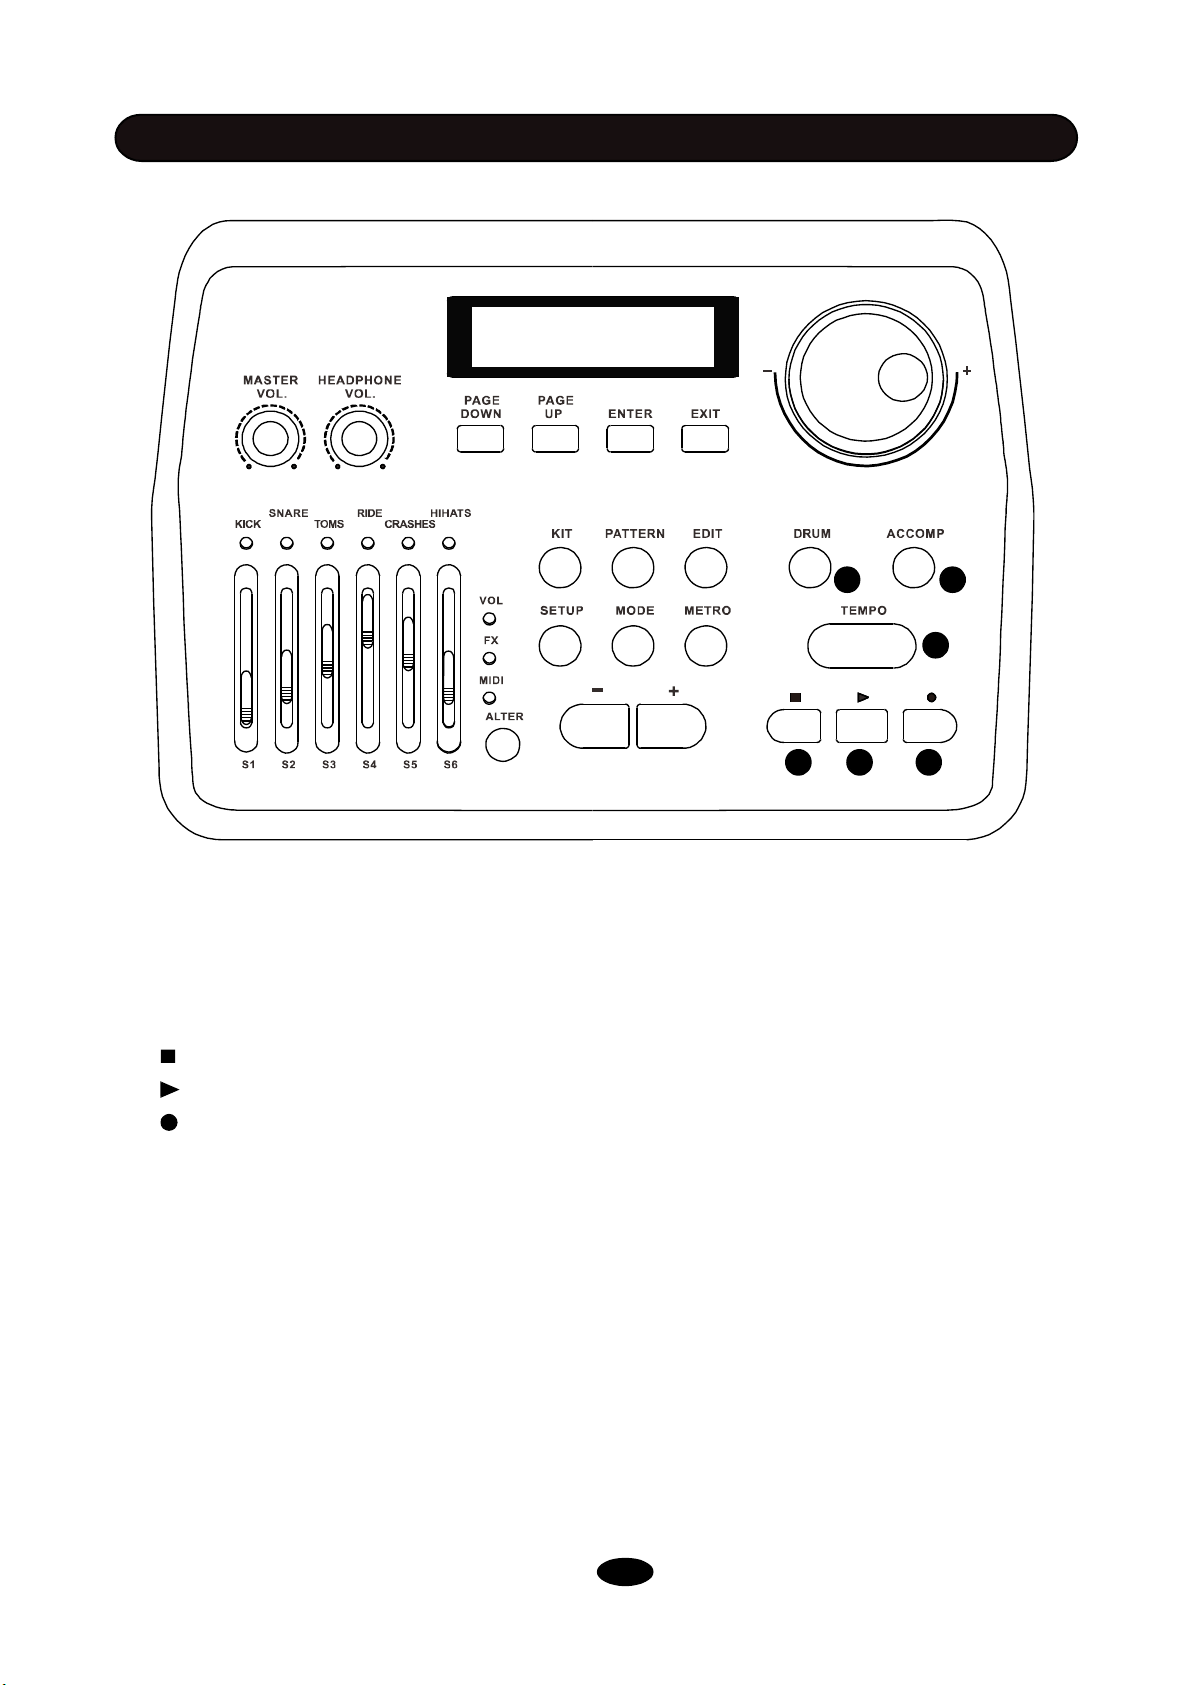
1. MASTER VOL.: Adjust the output level of LINE OUT. Rotate it clockwise to increase volume.
2. HEADPHONE VOL.: Adjust the output level of HEADPHONE , rotate it clockwise to increase
volume.
3.
PAGE DOWN: Switch to next option in current menu. Can be used when you see on screen.
4. PAGE UP: Switch to last option in current menu.Can be used when you see on screen.
5. ENTER: Proceed to submenu or to confirm operation.
6. EXIT: Proceed to root menu or to cancel operation.
7. SCROLL WHEEL: Turn this wheel to increase or decrease values or change kits quickly. Rotate
it clockwise to increase.
8. MIXER & 9. ALTER: Use ALTER button to switch 3 fader modes.
In VOL mode: S1-S6 are used to control volume of kick, snare, toms, ride, crashes, hi-hats, and also
their rim or edge volume.
In FX mode: S1 controls kit reverb level. Reverb type can be selected in FX SET
menu.
S2 controls kit compression ratio. Threshold can be set in FX SET menu.
S3-S6 control the gain of a 4-band equalizer. Frequency can be set in FX SET menu.
See the SETUP chapter for more information.
In MIDI mode: S1-S6 are assigned to 6 different midi controller. They can be used to control track
volume or effects on computer. Controller number can be set in MIDI SET menu.
(See chapter SETUP).
7
Page 12
SOUND MODULE
10 11 12
13 14 15
16
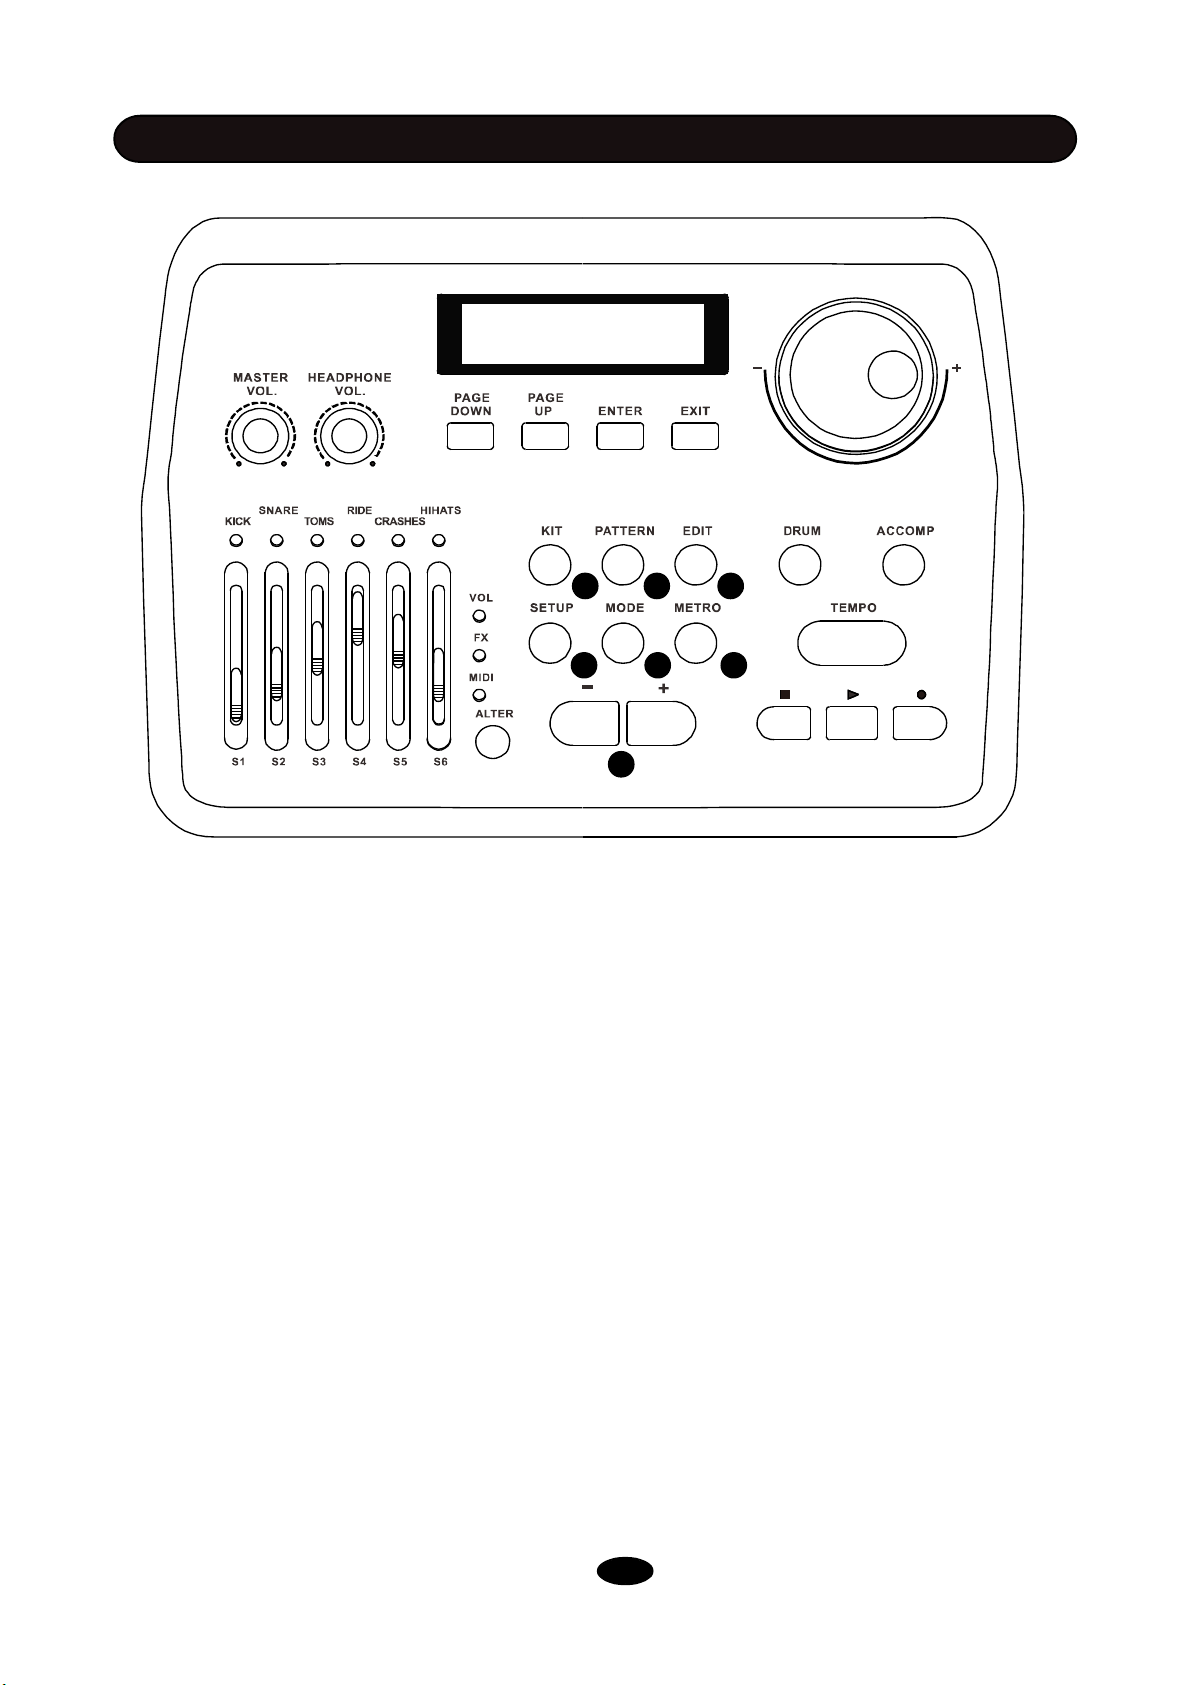
10. KIT: Press this button to engage kit mode. You can use -/+ button(15/16) or scroll wheel(7) to
select a kit in this mode.
11. PATTERN: Press this button to engage pattern mode, where you can play demo patterns,
exercise with patterns or do some drum recording.
12. EDIT: Press EDIT button to edit the current drum kit, including voice type, voice, volume, reverb
level, pitch and pan. (See chapter EDIT).
13. SETUP: Press SETUP button to adjust system settings, including BACK VOLUME, MASTER
TUNE, LOCAL, FX SET, MIDI SET, ADVANCE and RESET. (See chapter SETUP).
14. MODE: Change playing modes for demo patterns.
Play One: Play a single pattern once.
Repeat One: Loop a single pattern.
Play All: Play all patterns once.
Repeat All: Loop all patterns.
15. METRO: Press this button to set metronome on/off, volume, tempo, time signature and voice.
Use PAGE DOWN/UP to switch between options.
16. -/+: Use these two buttons to decrease or increase values and settings. Also you can select a kit
using these buttons.
8
Page 13
SOUND MODULE
17 18
19
20 2221
17. DRUM: Press this button to mute the drum track of a demo pattern.
18. ACCOMP: Press this button to mute accompaniment tracks of a demo pattern.
19.TEMPO: Tap this button at a desired rate to get a new tempo for demo pattern and metronome
after you have tapped it four times. You can also change the tempo using scroll wheel(7) or -/
+ button (16) after you have pressed TEMPO button.
20. : Pauses playback of the current demo pattern, press it again to cancel playing current pattern.
21. : Plays the current demo pattern.
22. : Record a drum sequence. You can use STOP button (20) to pause recording. Press STOP
button (20) again to finish recording and save the sequence to a user song. Press ENTER
to confirm. You can also record along with a demo pattern in PATTERN mode.
9
Page 14
SOUND MODULE
Connectors
DC 12V
23
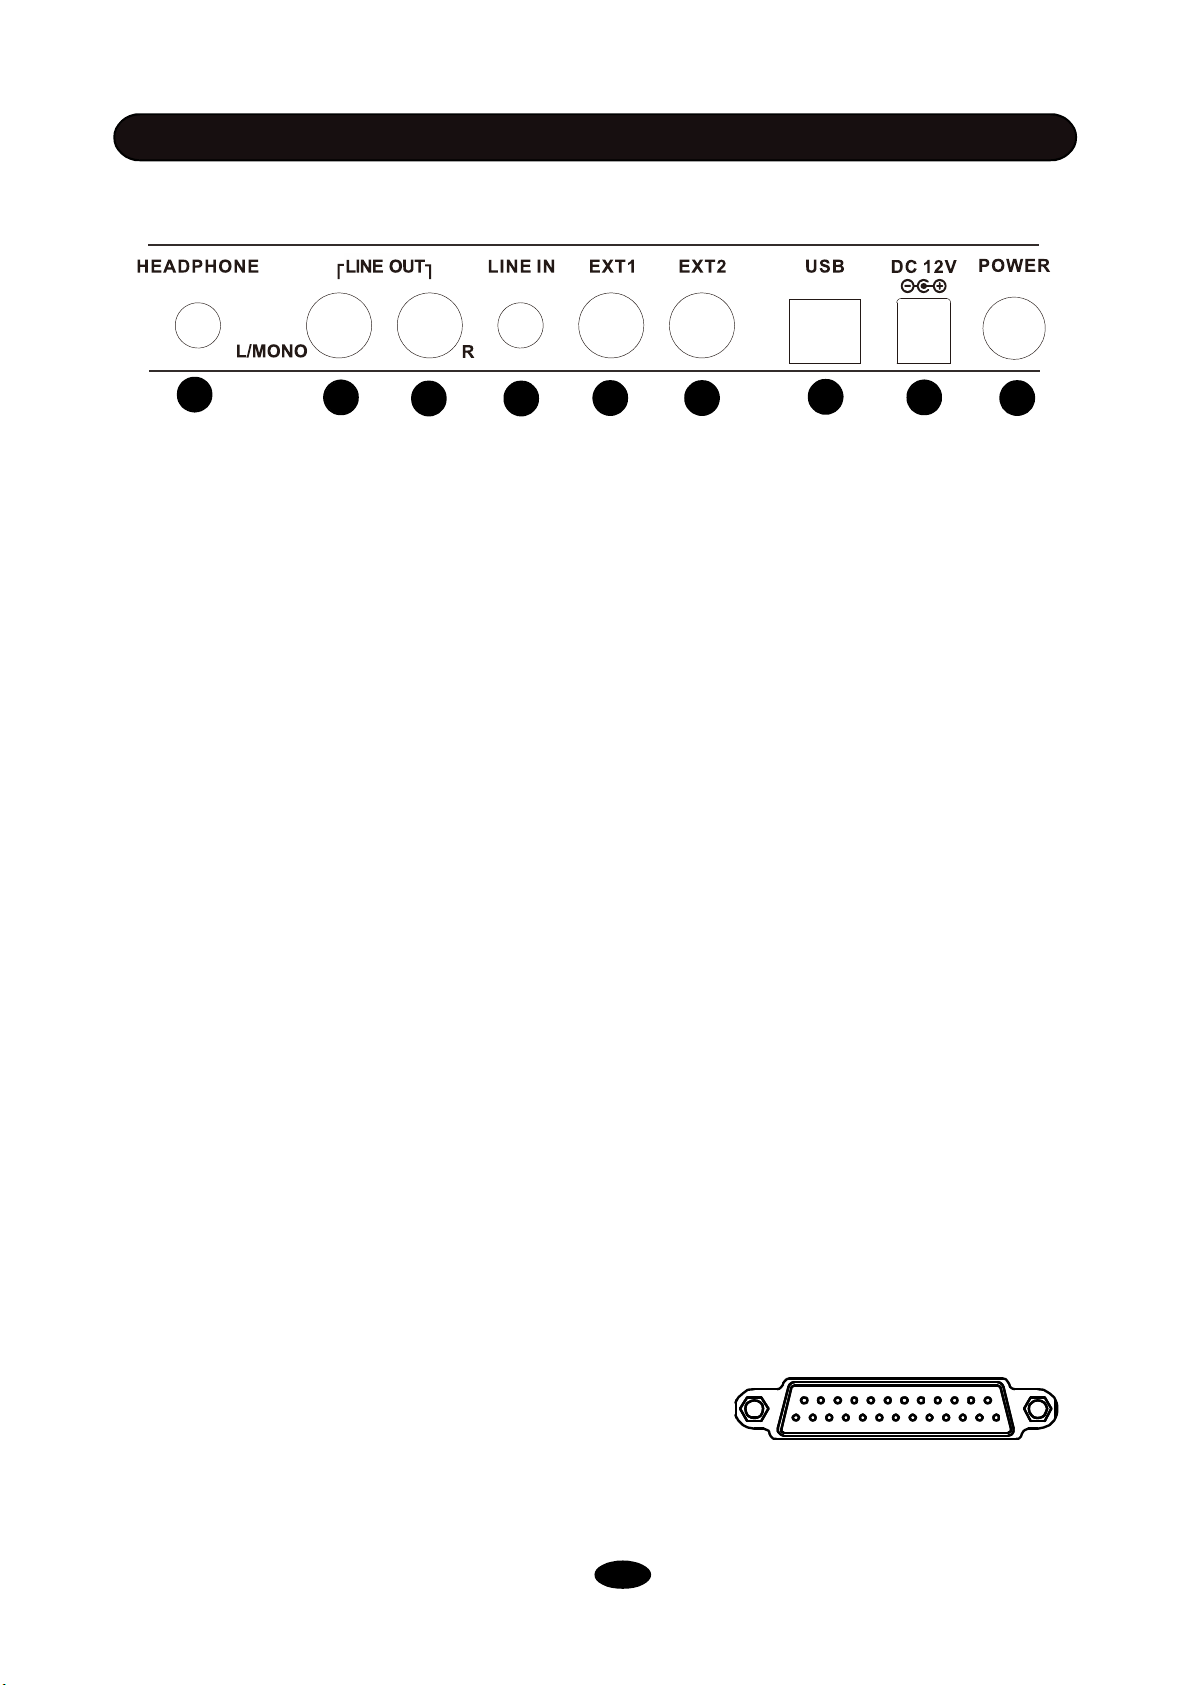
23. HEADPHONE: Connect your headphone here. 1/8”TRS output.
24. LINE OUT L/MONO: Left channel of main output. Connect this output to any amplifier using 1/4”
TS cable. For mono output, please connect this socket only.
25. LINE OUT R: Right channel of main output. Connect this output to any amplifier using 1/4” TS
cable. For stereo output, please connect both LINE OUT L/MONO (2) and LINE OUT R (3).
26. LINE IN: Analog input socket of the sound module, 1/8” TRS.
TIPS: An extra 1/8” male to male cable will be needed if you want connect your sound module to
any sound source such as iPod, iPad,CD player, mobile phone or computer. Play and practice with
your favorite music.
27. EXT1: Extended trigger socket 1, connect to Crash2 by default.
28. EXT2: Extended trigger socket 2, connect to Tom4 by default.
24
25 26
27 28
29
30
31
29. USB: Connect standard B type USB cable to this socket for updating firmware, gaming, recording
midi and using plug-ins for more sound on computer.
TIPS: Connect USB2.0 A male to B male cable to this socket, such cable is very common in
home printers.
30. DC 12V: Connect the attached DC 12V power adapter to this socket.
31. POWER: Turns the module on and off.
TRIGGER INPUTS: Trigger inputs socket is located at the bottom of sound module. Connect
the multi-trigger connector (AKA 25pin connector) to this socket and lock it.
10
Page 15
PLAYING PAD
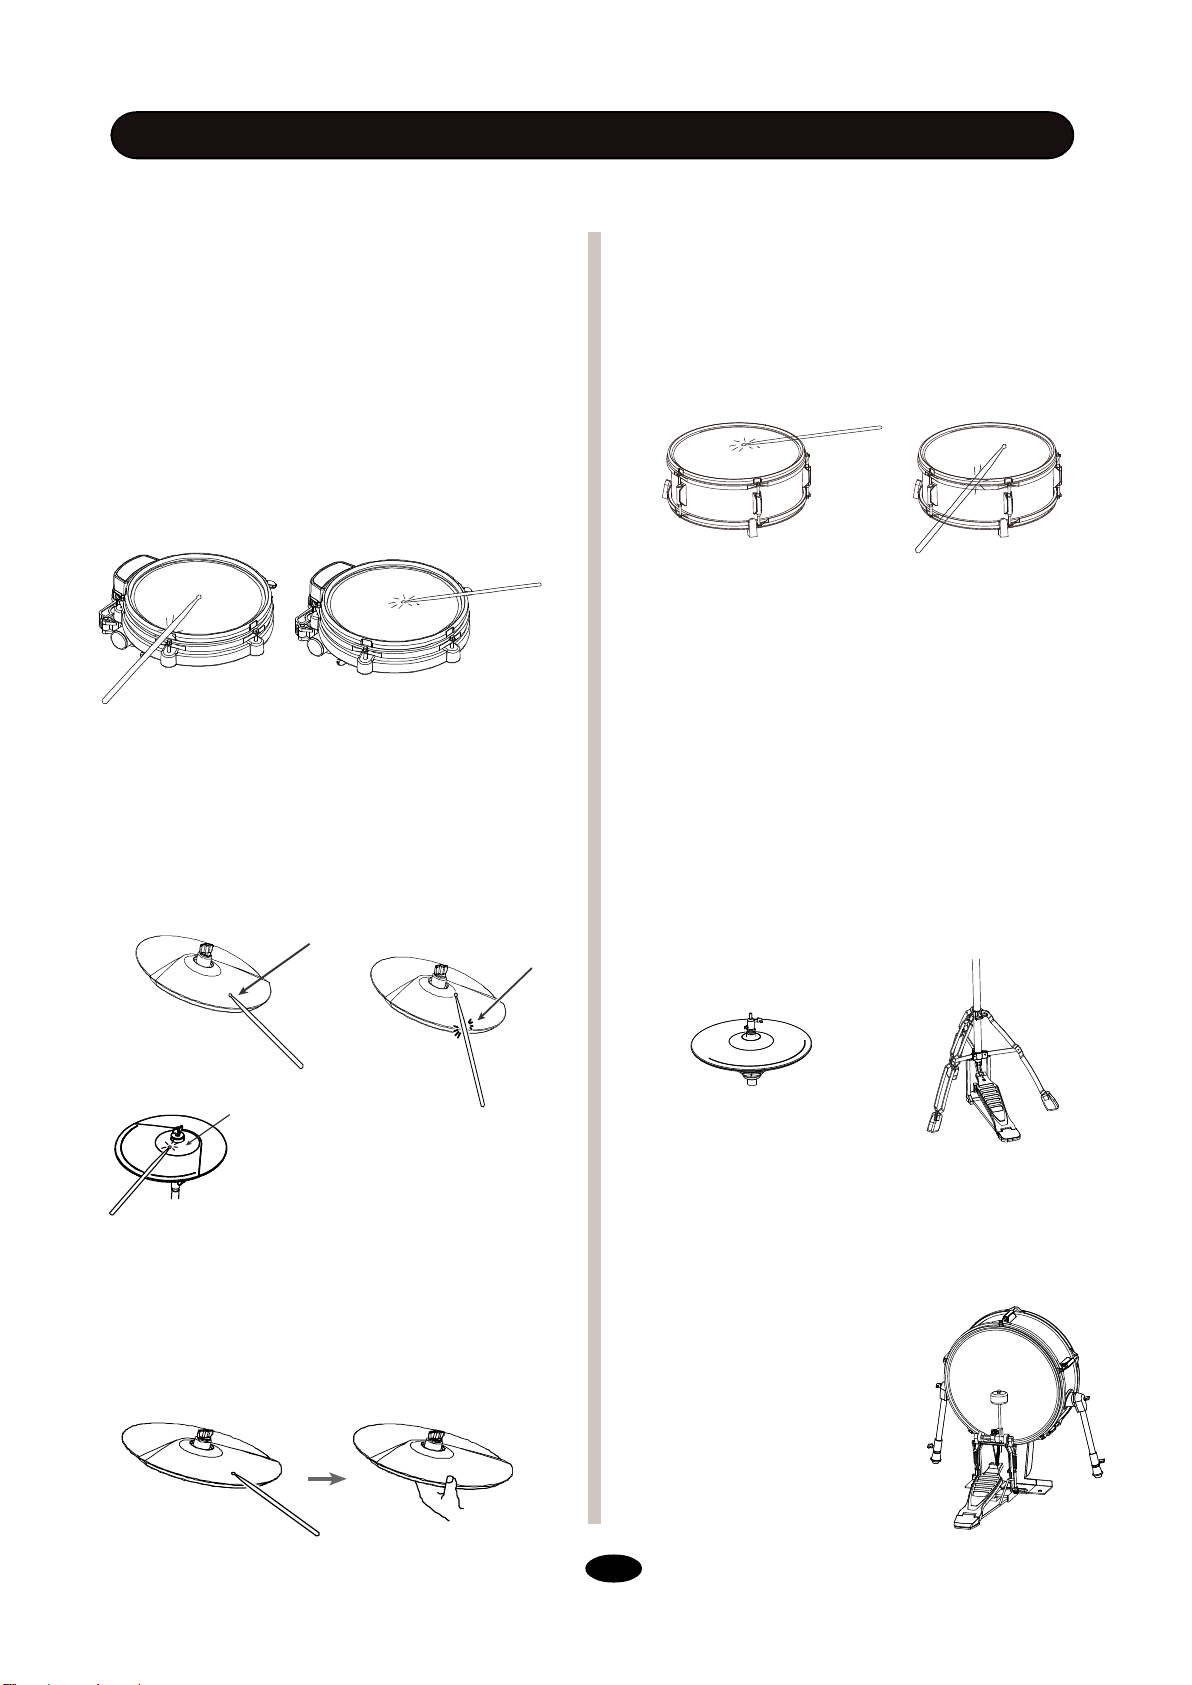
PLAYING PADS
All pads have striking force sensitivity feature.
Strike the pad harder to make higher volume
and strike the pad softer to make lower
volume.
Playing Tom Drum
Strike the central position (head) of the pad to
make head sound, strike the rim of the pad to
make rim sound.
Playing Cymbal
Strike the central position (bow) of the cymbal
to make cymbal bow sound, strike the edge of
the cymbal to make edge shot sound.
Bow
Edge
Playing Snare Drum
Strike the central position (head) of the pad to
make head sound, strike the rim of the pad to
make rim sound. The rim triggering is velocity
layered.
Playing Hi-Hat
(1) Strike the Hi-Hat pad without pressing the
Hi-Hat pedal to make open Hi-Hat sound.
(2) Strike the Hi-Hat pad with fully pressing
the Hi-Hat pedal to make close Hi-Hat sound.
(3) In certain position while you press the HiHat pedal, playing Hi-Hat cymbal will trigger
half open sound.
(4) Press the Hi-Hat pedal down quickly to
make Hi-Hat pedal chick sound.
(5) Press and release the Hi-Hat pedal down
very quick to make Hi-Hat foot splash sound.
Bell
There is Bell on Ride
Cymbal, strike it to trigger
Ride Bell.
Cymbal Choke
Strike a cymbal, its sound will sustain. Then
squeeze the edge portion to mute the
sound. Please note that the Hi-Hat has no
choke feature.
Playing Kick Drum
Press the Kick drum pedal to
make kick drum sound.
11
Page 16
BEFORE START PERFORMANCE
- Make sure the drum kit is stable and all the parts are well locked.
- Connect all the cables to the drum module according to their tags.
- Connect the multi-trigger connector to its socket at the bottom of the sound module and lock it.
- Power the sound module up.
Due to the difference of installation and environment, if
cross talk problem occurs, please follow the following
procedures.
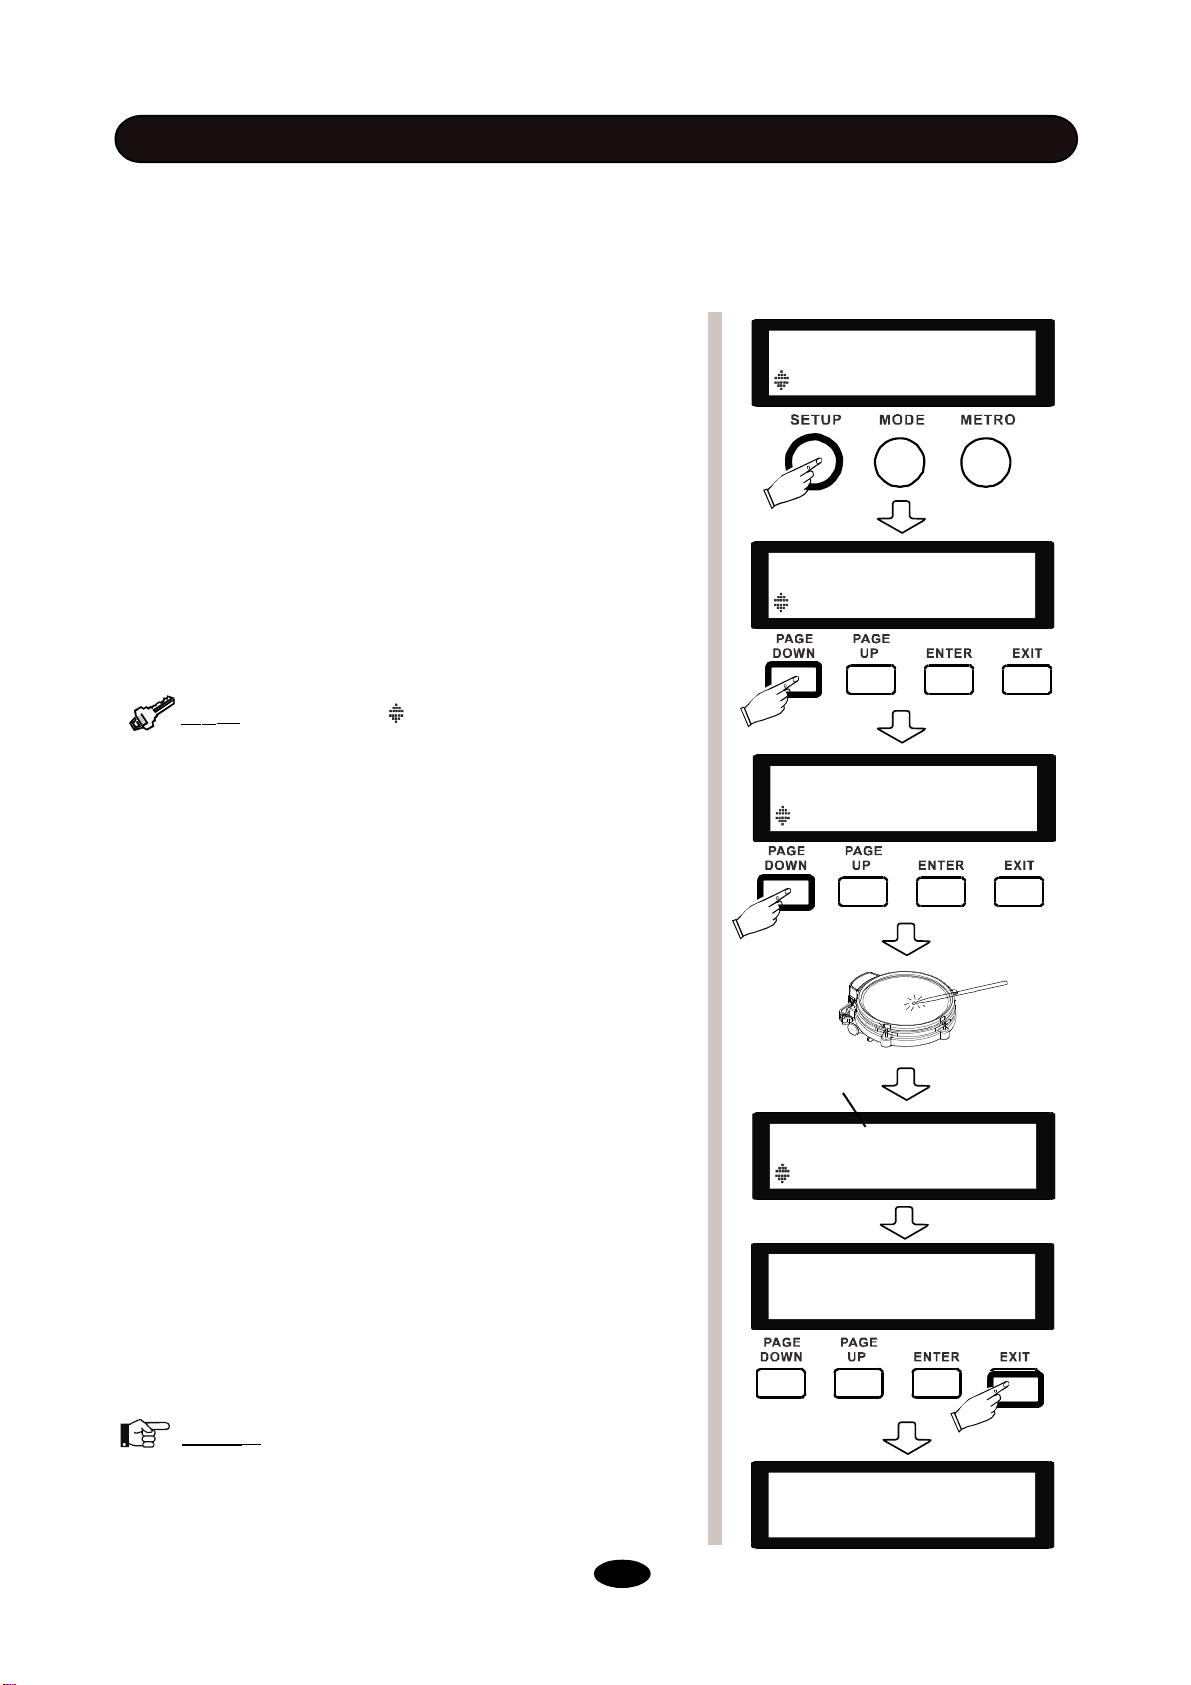
- Press SETUP button.
- Press the PAGE DOWN/UP button until the sub menu
ADVANCE appears.
:
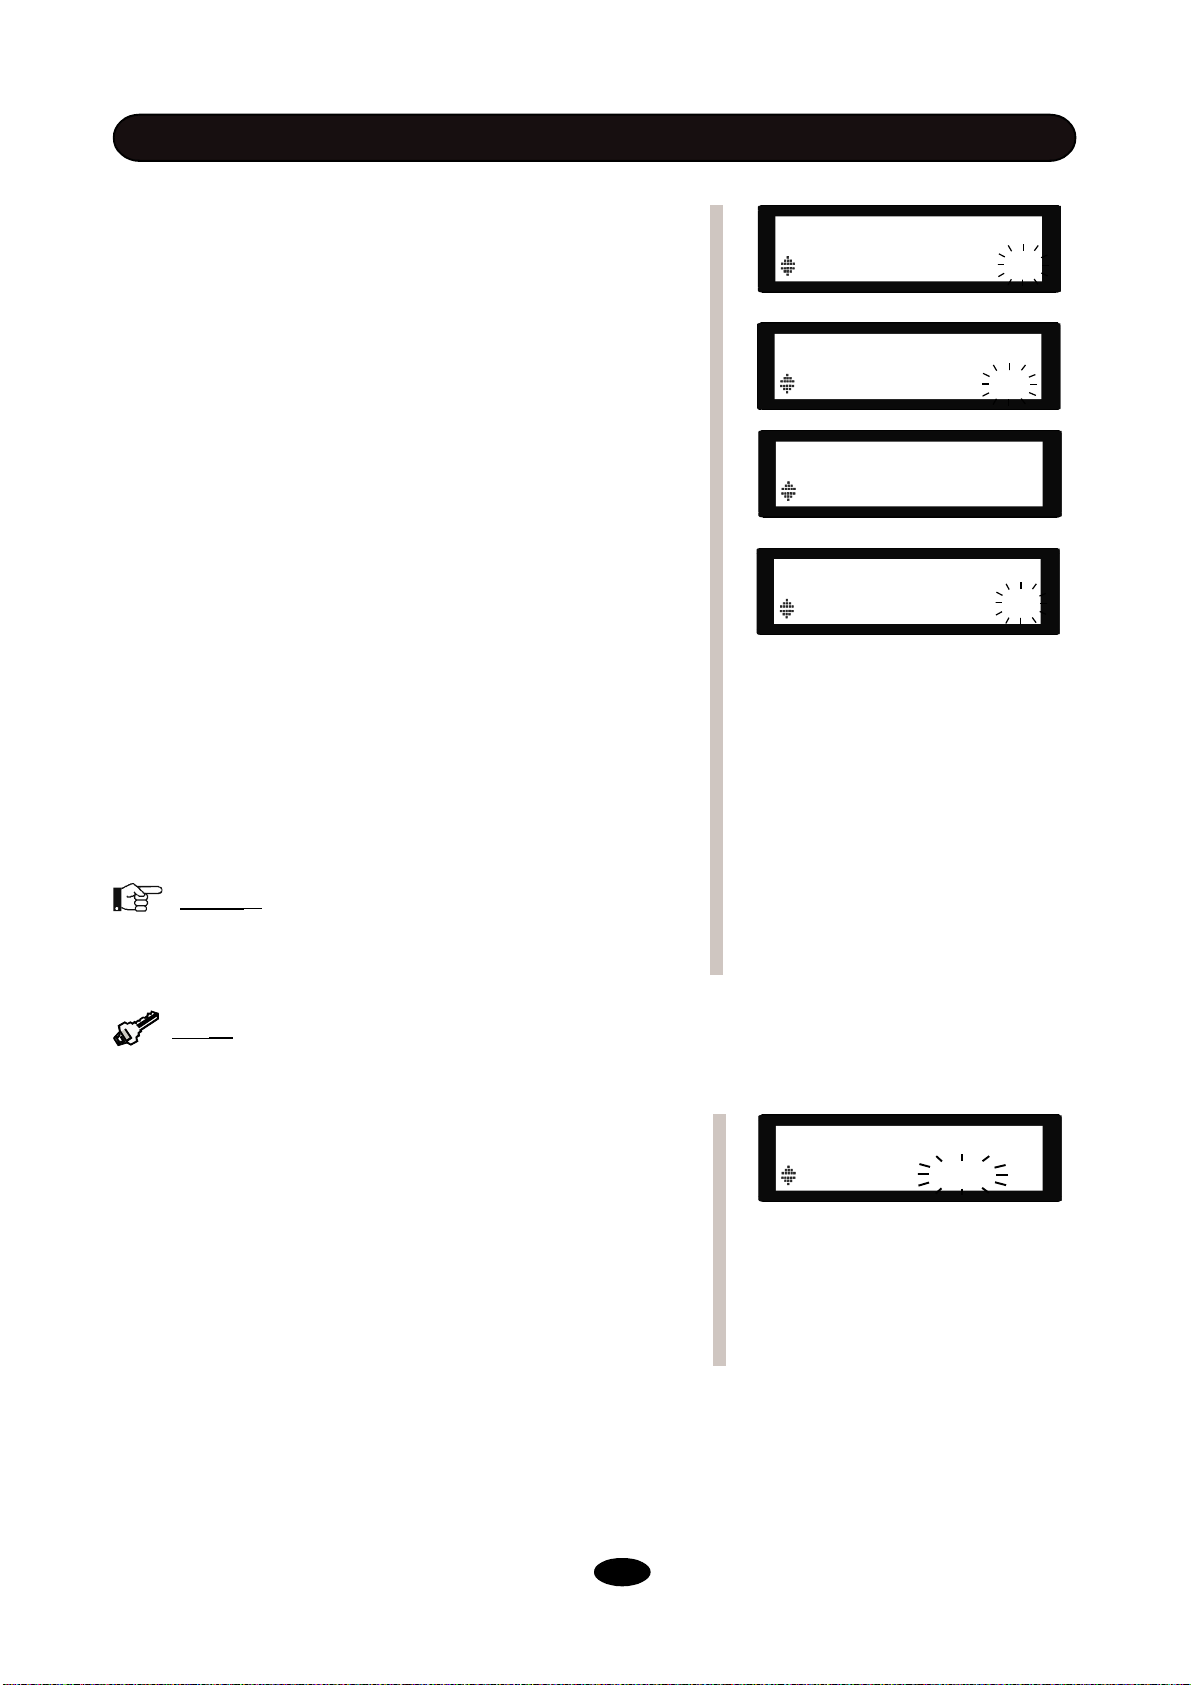
When you see on screen, you can use
Tip
PAGE DOWN/UP buttons to move to another option.
- Press ENTER button to confirm, then press the PAGE
DOWN/UP button to select item of Xtalk.
SETUP
BACK VOLUME 50
SETUP
ADVANCE [ENTER]
TOM1 ADV
Xtalk Auto
- Strike a pad you desire with maximum strength repeatedly
until “OK” is shown on the screen.
- Then change to another pad and repeat the third procedure
(Not including Hihat Pedal).
- Also, you can set the HEADROOM (aka Velocity Dynamic
range) of each pad. To reach a loud sound easier, simply
lower the HEADROOM value.
- Press EXIT to quit, when “Save Setups” appears, press
ENTER to confirm or select No to cancel saving . The display will show “Save OK” after saving.
Note
:
All the system settings in SETUP is global
parameter, they will affect all the kits and can be saved even
when rebooted.If the adjustment result is not good, do a
crosstalk reset according to next pages.
Part to setup
SNARE-Head ADV
Xtalk
Save Setups
NO YES
----Save OK ----
--------------------
OK
12
Page 17
BASIC OPERATION
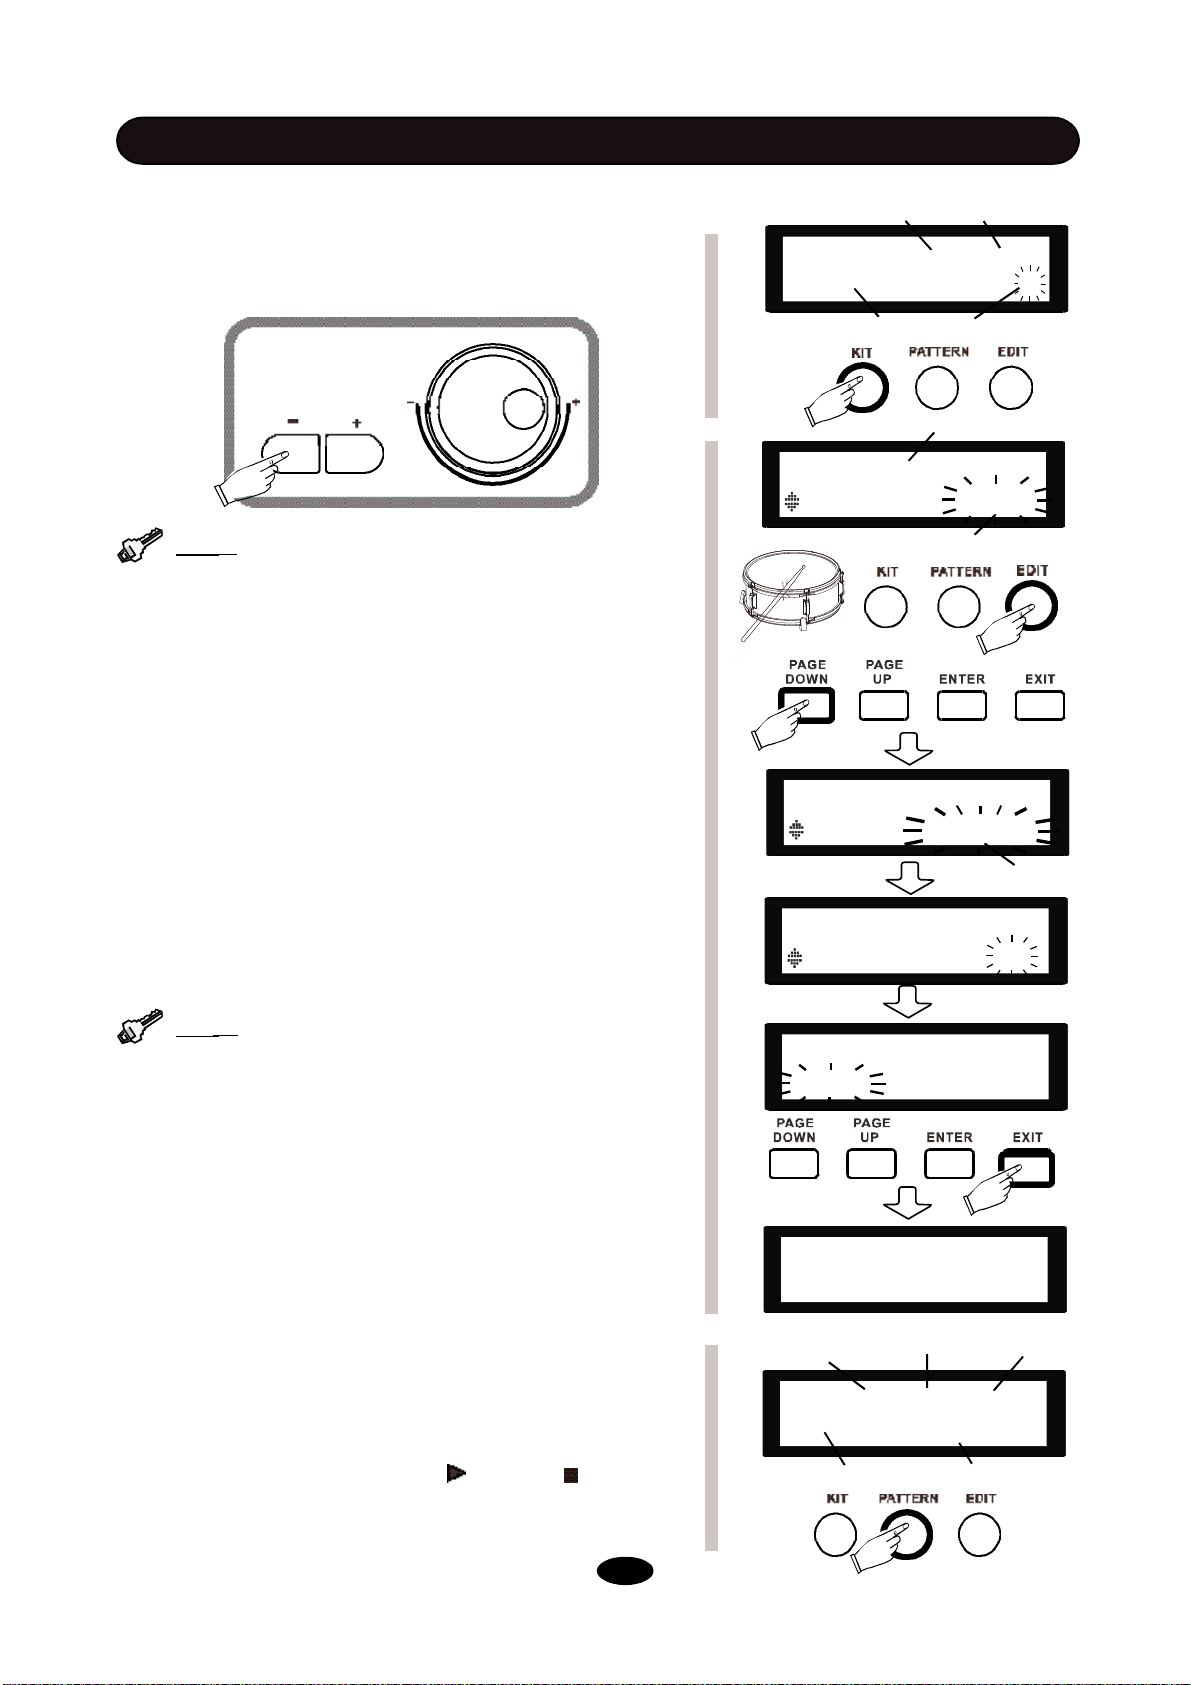
TO SELECT A KIT
- Press kit on the control panel and use the scroll wheel or /+ button to select a kit.
Select or Change
Tip
:
While adjusting parameters, you can change
its value by using -/+ buttons or scroll wheel also.
TO EDIT A KIT
- Press EDIT to enter EDIT MODE, where you can assign
different voices and adjust other parameters to make your
own kit. Strike on different part on each pad to select among
triggers, or use DRUM button to switch between drum
instruments.
- Use PAGE DOWN/UP to enter VOICE TYPE menu and
use scroll wheel or -/+ button to choose a voice category.
Choose “---” for a blank voice.
- Use PAGE DOWN/UP to enter VOICE menu and use scroll
wheel or -/+ button to choose a voice within the selected
category referring to Voice List in <APPENDIX> .
Tip
:
The meaning of shortened voice names: R
stands for Rim shot, X for Cross stick, E for Edge, B for
Bell, C for Close, O for Open, Half for Half Open, P for Pedal
Chick, Sp for Pedal Foot Splash.
- Use PAGE DOWN/UP to enter VOLUME menu to adjust
the volume level for a single trigger.
Time signatureTempo
KIT 120 4/4
Rock 6
Kit name
Kit No.
Part to edit
SNARE-Rim
VOICE TYPESNARE
Voice category
SNARE-Rim
VOICE Rock R
Voice name
SNARE-Rim
VOLUME 80
Save Kits to
Rock
- Press EXIT to quit the current menu and select a place to
save it using +/- button. You can either save it to a preset kit
or a user kit if you don’t want to overwrite the preset kit.
Press ENTER again to confirm or press EXIT to cancel.
TO PLAY A DRUM PATTERN (DEMO SONG)
- Press PATTERN button, use scroll wheel or -/+ button to
select a demo, and use the play and stop buttons to
play a demo. The display shows information about demo.
13
----Save OK ----
--------------------
Playing status Tempo
SONG 120 4/4
■
01 WalkWithTree
Song Number
Time Signature
Song Name
Page 18
BASIC OPERATION
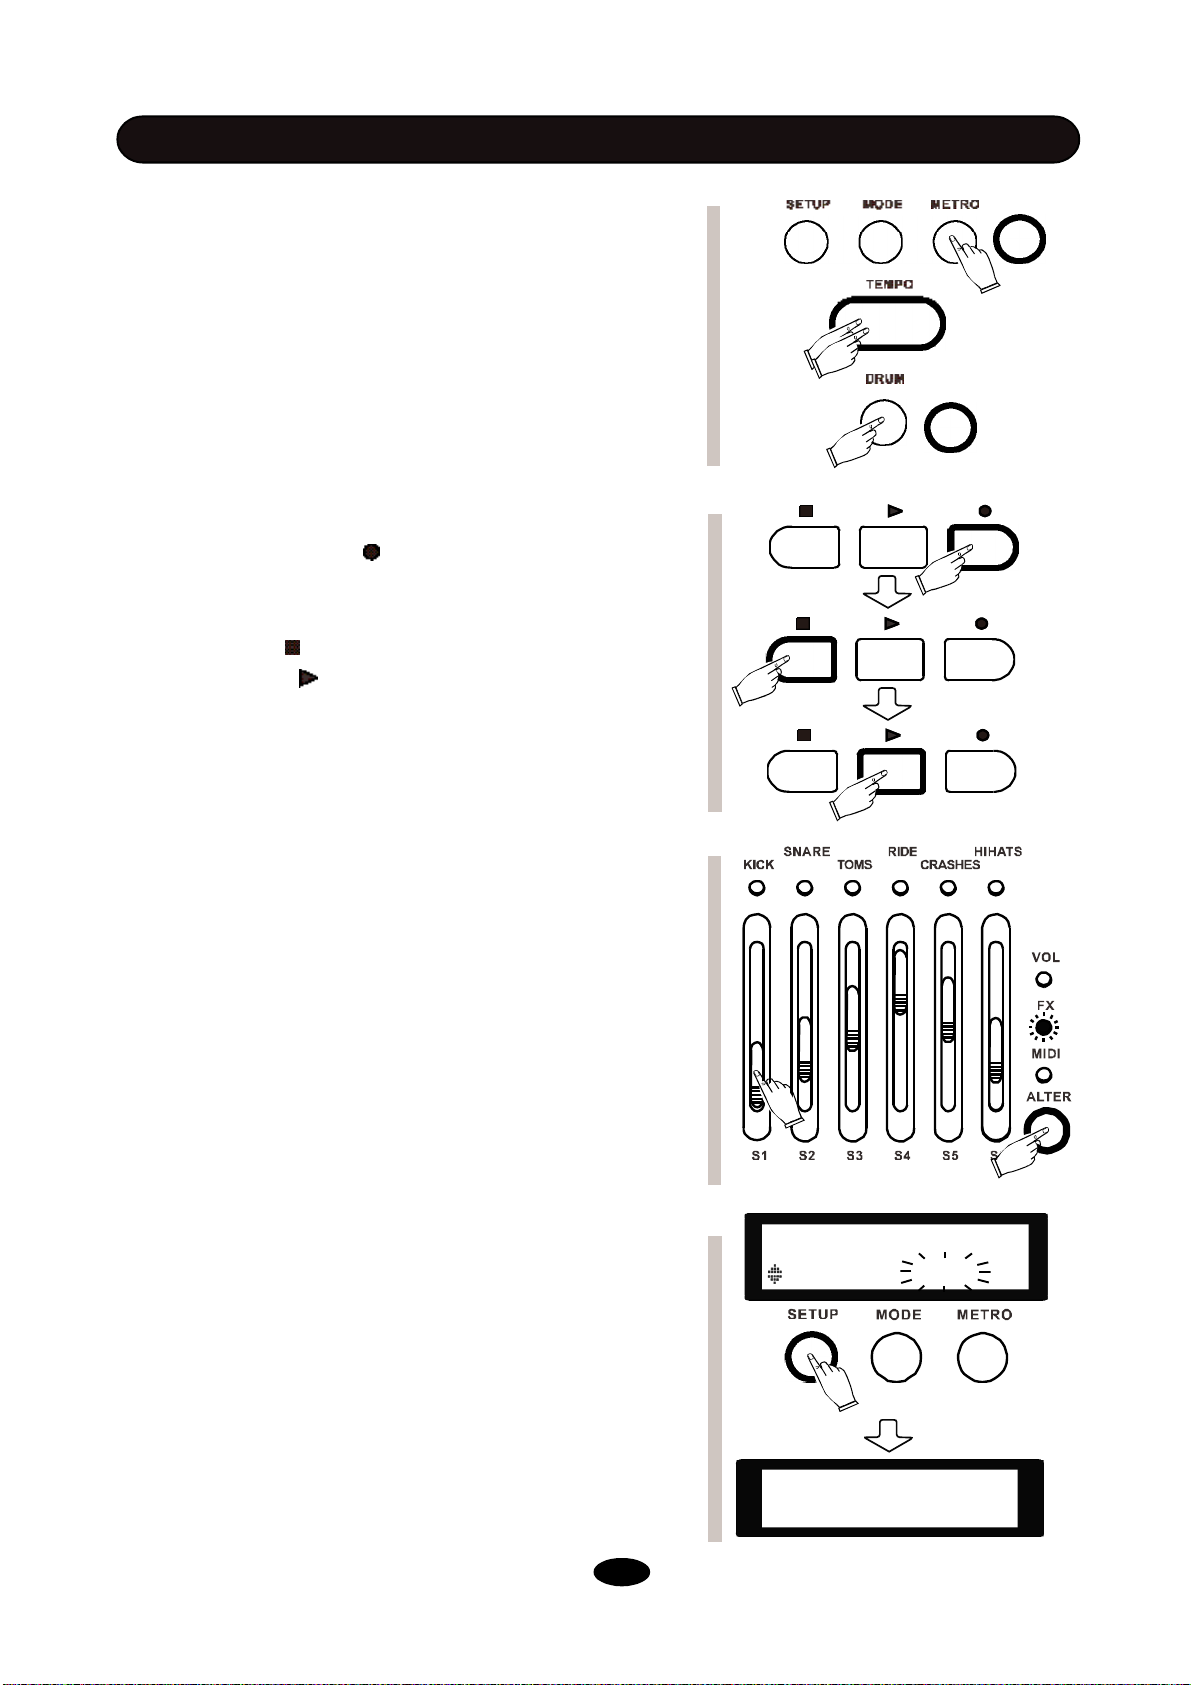
- Press METRO button, use -/+ button or scroll wheel to
activate metronome. Use PAGE DOWN/UP to adjust metronome volume, tempo, time signature and sound.
- Tap tempo button at a desired rate to get a new tempo.
You can also change the tempo by scroll wheel or -/+ button
after you press tempo button.
- Don’t need the drum track in the demo pattern? Simply
press DRUM button to mute it. You can also press ACCOMP
button to mute other accompaniment tracks.
TO RECORD A DRUM TRACK
- Press the record button in KIT mode, set the tempo for
recording, and press the record button again to start
recording.
- Use stop button to pause your recording. You can either
press play button to continue recording or press stop
button to finish and save your recording.
- While saving your recording, on the screen will show ”Save
the song to”, use scroll wheel or -/+ button to locate the place
for saving, and press enter to confirm.
- If you are in PATTERN mode, you can record along with
demo song.
TO USE THE MIXER
- Press the ALTER button to switch between 3 modes for
faders. In VOL mode, all the faders control the volume of
different pads.
- In FX mode, S1 controls reverb level, S2 controls compression ratio, and S3-S6 change to a 4-Bank equalizer.
- In MIDI mode, 6 faders are assigned to 6 different
controllers. You can use them to control track volume or
various effects in any DAWs or plug-ins.
TO RESTORE FACTROY SETTINGS
- Press SETUP, and use PAGE DOWN/UP to locate RESET menu.
- Use -/+ or scroll wheel to select what you want to restore.
Kits: Initialize all the kits, including user kits.
Settings: Initialize all system settings.
Xtalk: Initialize cross talk to default.
Songs: Initialize all user patterns.
All: Initialize everything to factory settings.
- Press ENTER to confirm. The screen will show RESET OK.
- Reboot the module to complete.
14
SETUP
RESET Kits
----Reset OK----
--------------------
Page 19
SETUP
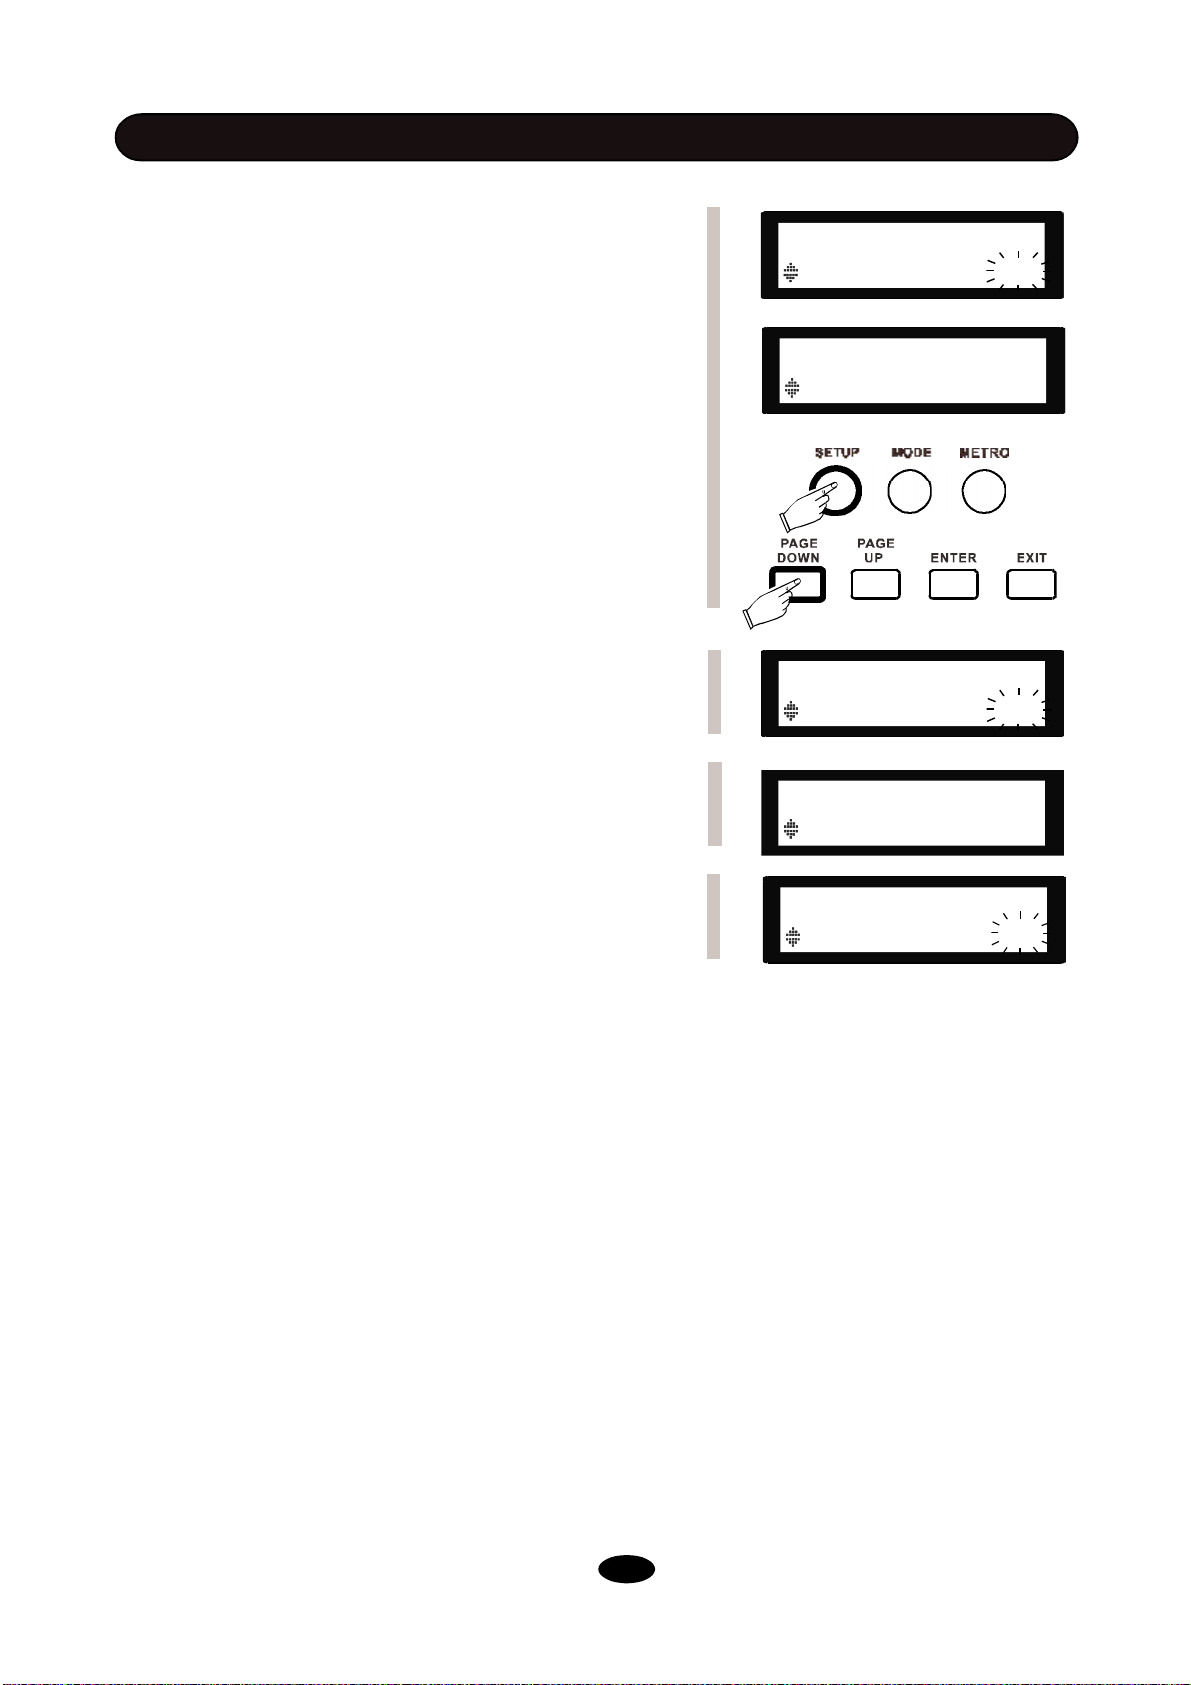
Press on the SETUP button to advance to system settings.
Use PAGE DOWN/UP to select an item to set.
If the item with blinking parameter, use -/+ button or scroll
wheel to change it directly. If the item has [ENTER] mark
after, press the ENTER button to enter the sub-menu for
further options.
After setting, press the EXIT to exit and the screen shows
“Save Setup”. Press the ENTER to save or press the EXIT
to give up.
All items can be setup are:
BACK VOLUME
Controls the volume of demo patterns and loops.
MASTER TUNE
Controls the overall pitch. It is A4, 440Hz by default.
LOCAL
Decides whether the module read the sound files or not. If
switched to OFF, the sound module will function as a midi
drum, which produce no sound but send midi messages.
TIPS: If you want to connect the sound module to computer
for gaming or using drum plug-ins, switch LOCAL to OFF
will lower latency.
SETUP
BACK VOLUME 53
Change parameter directly
SETUP
MIDI SET[ENTER]
Press ENTER to enter the sub-menu
SETUP
BACK VOLUME 53
SETUP
MASTER TUNE 0
SETUP
LOCAL ON
15
Page 20
SETUP
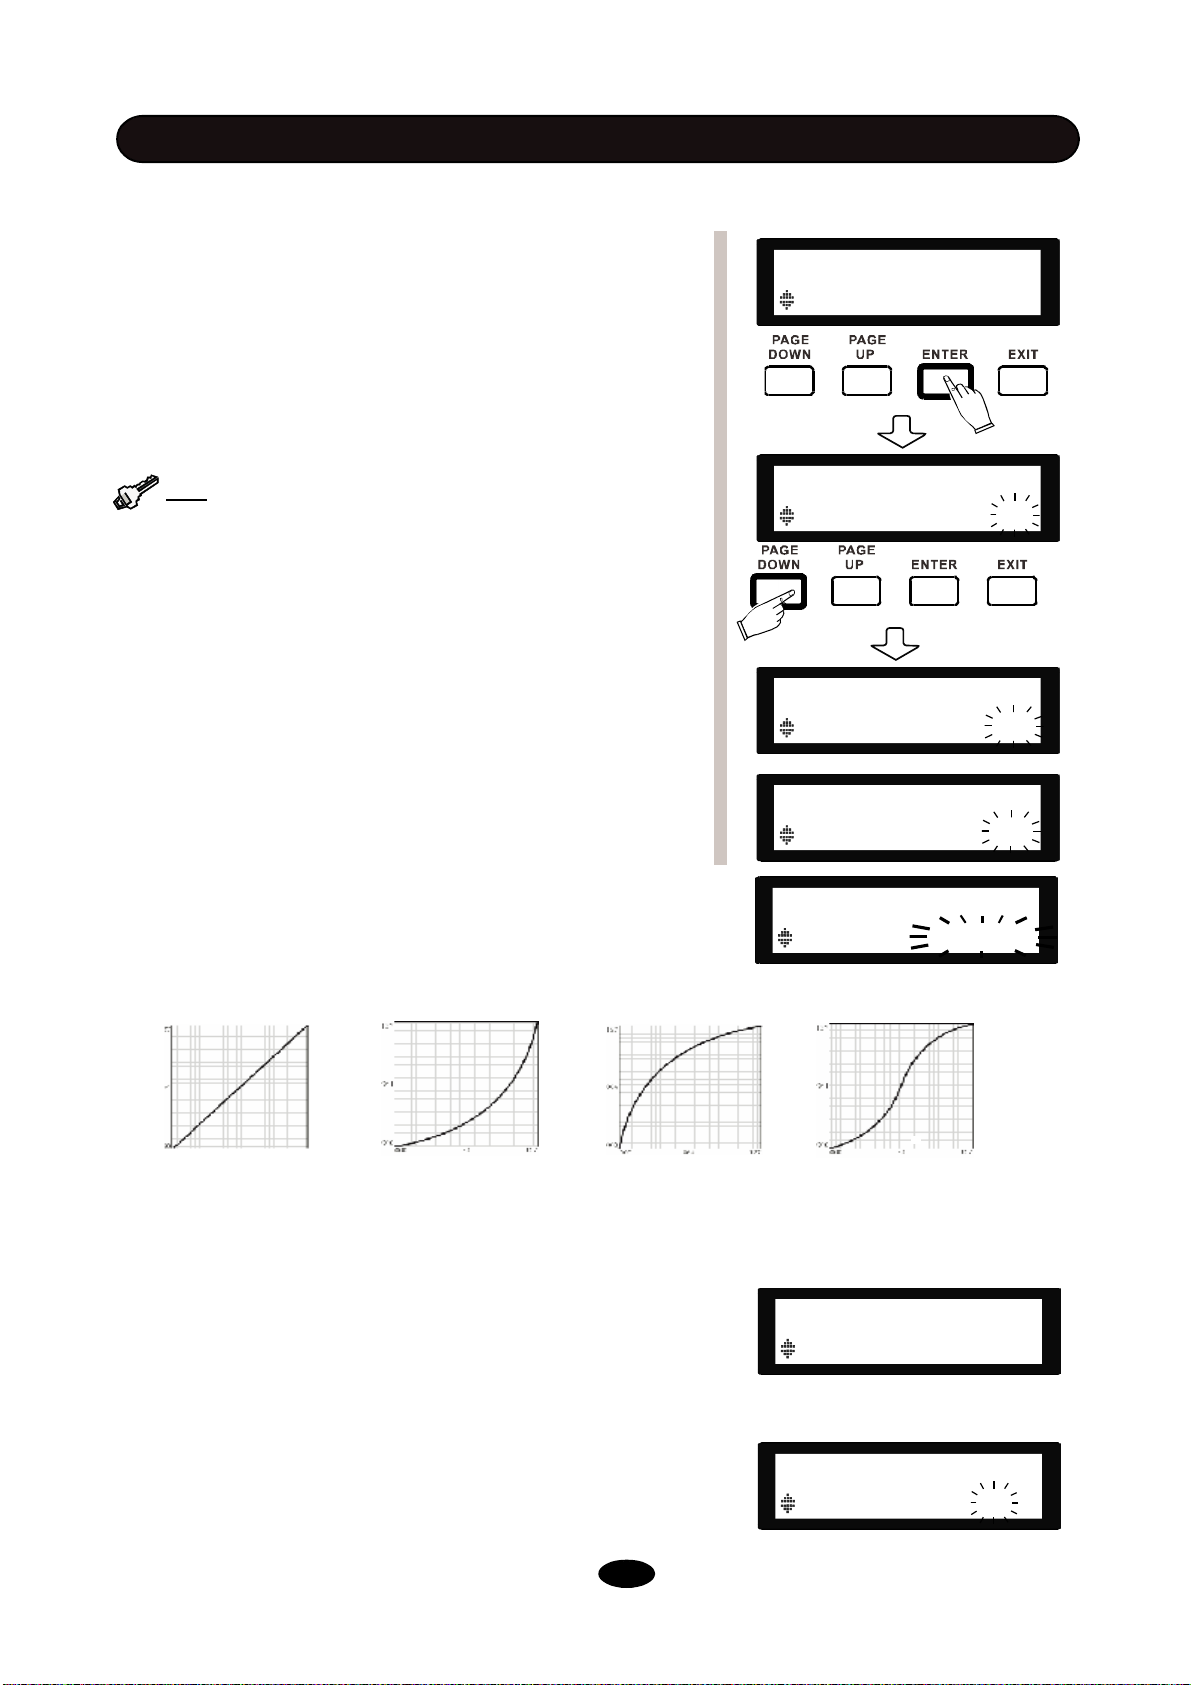
ADVANCED SETTINGS
Includes all the physical settings for pads/triggers.
- Sensitivity: The higher the value is, the easier it will be to
trigger. But if this value is too high, will cause some crosstalk
problems.
- Headroom: Set the velocity dynamic range. This value is
the velocity needed to get max volume, so the lower the
value is, the easier to get louder sounds.
TIP: You can use the faders to adjust the volume
quickly, but it will not be saved if you power off the sound
module. The concept of Headroom is essentially
different from Volume. Headroom decides the velocity to
reach the max volume, but cannot change the max level of
volume.
- SenseTime: Sets the interval between two triggering. Increase this value by certain amount may avoid being triggered multiple times by vibration in very short time.
- Trigger: Sets the velocity curve for pads, including Linear,
EXP1&2, LOG1&2 and Spline. On horizontal is the velocity
you strike, and on vertical is the volume after processed by
the trigger curve.
SETUP
ADVANCE [ENTER]
TOM1 ADV
Sensitivity 77
TOM1 ADV
Headroom 87
TOM1 ADV
SenseTime 50
TOM1 ADV
Trigger Linear
Diagram of 4 types of the velocity curve
Vol-
Vol-
ume
Strength
Linear Exp Log Spline
ume
Vol-
ume
Strength Strength
- Xtalk: Sets the crosstalk for pads. Use max power to strike
a pad repeatedly until the screen shows OK, and then change
to another pad and repeat the procedure. Velocity data on
other pads will be loaded automatically for reference in order
to avoid crosstalk.
- Note Send: Set the MIDI note for each trigger. When the
midi note is different between this module and other sound
sources, by adjusting this value they can be easily matched.
Strength
Vol-
ume
TOM1 ADV
Xtalk Auto
TOM1 ADV
Note Send 48
16
Page 21
SETUP
- Rim Velocity: Rim velocity correction option will appear
when you strike on the rim or edge parts. The higher the
value is, the louder it will become. Cymbal edges are also
included in this setting.
- Pedal Vel.: Decides the velocity triggered by hi-hat pedal.
The higher the value is, the louder Pedal Chick and Pedal
Splash sounds you get.
- Calib: Calibration for the pedal range. Select this option,
press down to the floor and then release the pedal slowly.
Repeat the procedure several times to get more precise
range and finish the calibration.
- Spilt Point: Sets the velocity split point of certain drum
pads. If you play the softer than this value, it will trigger
one sound. Above that value it will be trigger another
sound.
- Chick Time: Defines the trigger disabling time after you
press down the pedal. It can be used to avoid unwanted
triggering after physical contact.
- Splash Time: Defines the level of difficulty to trigger
Pedal Splash(Foot Splash)
TOM1-Rim
Rim Velocity 50
Pedal
Pedal Vel. 60
Pedal
Calib 751-3900
SNARE-X-StickADV
Split Point 50
ADV
:
Note
Velocity, Spilt Point.,Pedal Vel., Calib and etc., they will ap-
only if the matching part is struck. Or you can find them
pear
using DRUM button.
Tip
quickly in SETUP menu.
gers
RESET: Restore to factory settings. It is strongly recommended to reboot the sound module after reset in completed,
in order to avoid some unexpected behavior.
Kits: Initialize all the kits, including user kits.
Settings: Initialize all system settings.
Xtalk: Initialize cross talk to default value.
Songs: Initialize all user patterns..
All: Initialize everything to factory settings.
:
Som
Use
e
unique settings, such and Rim
DRUM button
can switch between trig-
TUP
SE
RESET Kits
17
Page 22
DRUM KIT EDIT
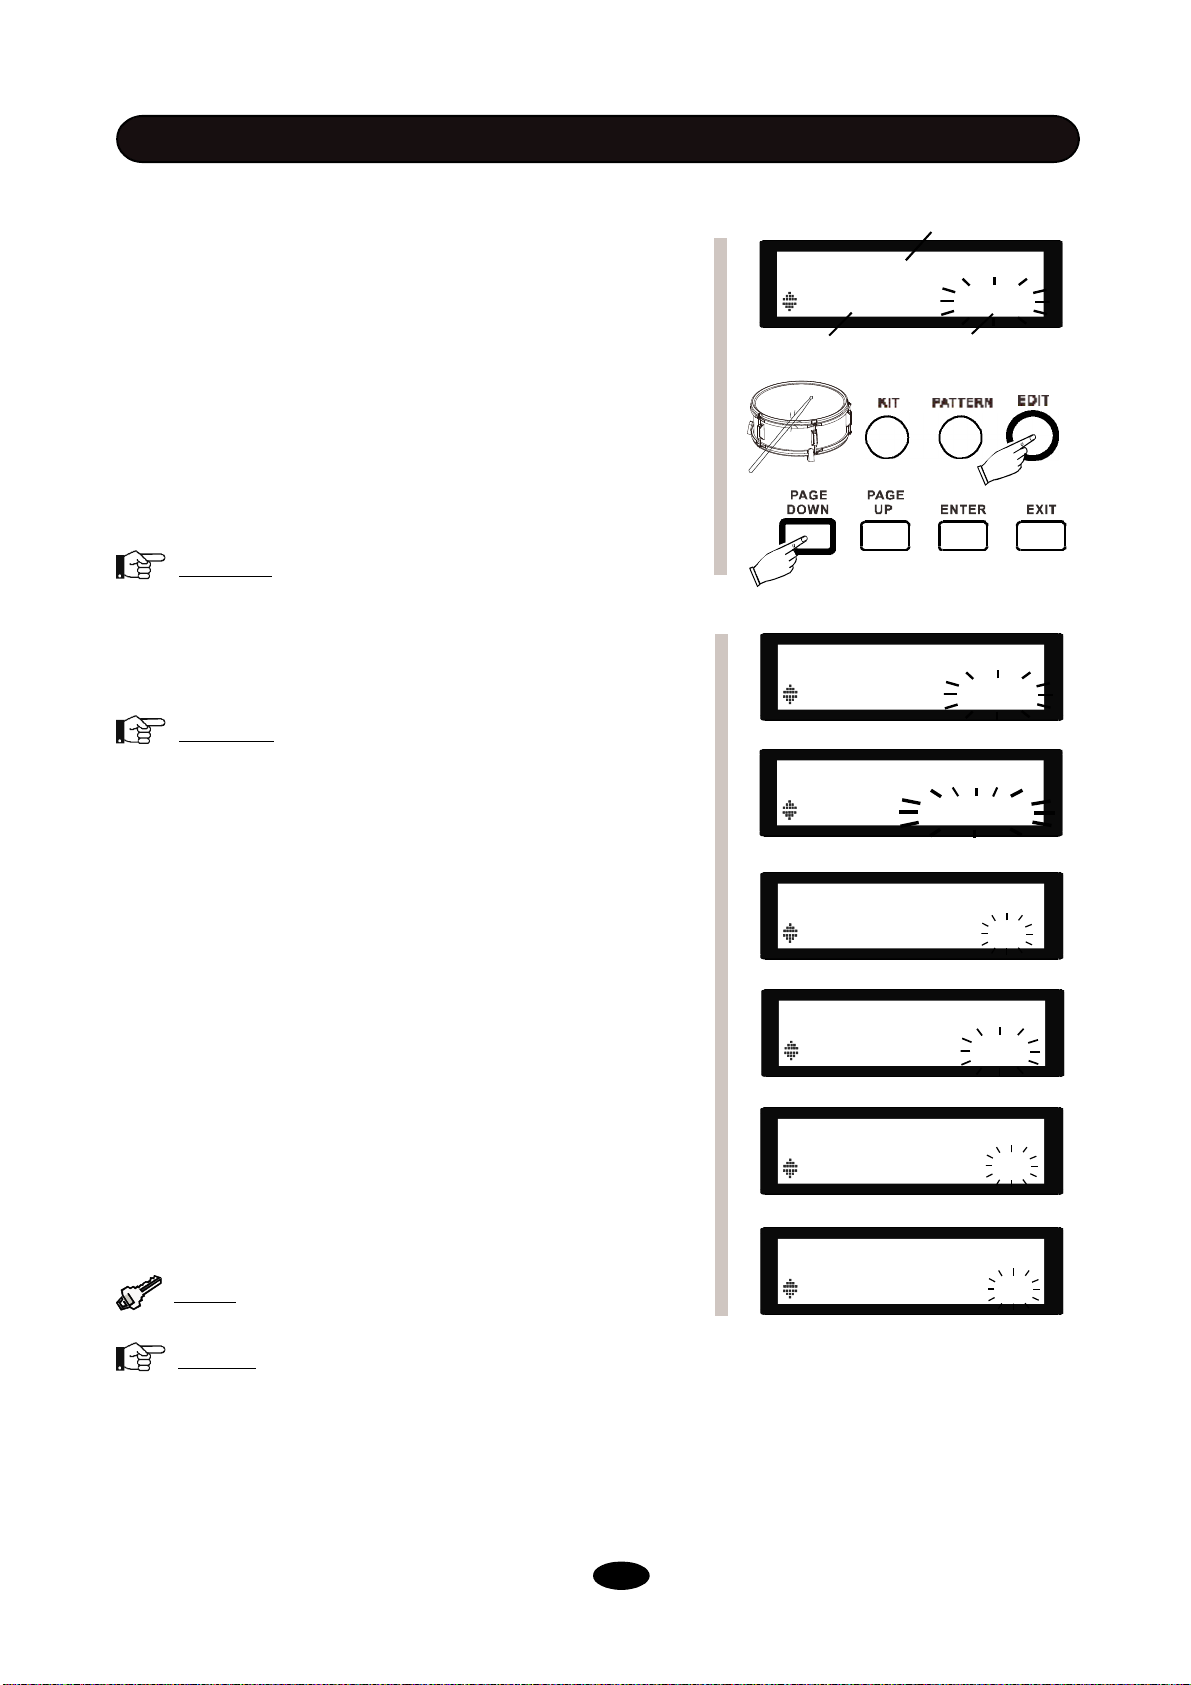
First, select a kit for editing. Press on the EDIT button to
enter drum kit edit menu. There are 6 items available for kit
editing.
The chapter <BASIC OPERATION> instructs how to enter the Edit mode, select part and item in details; this chapter offers more information.
VOICE TYPE: Select the category of the voice, including
KICK, SNARE, TOM, RIDE, CRASH, HIHAT, PERC
(Percussions and FXs), METRO (Metronome), --- (Blank).
Note: Select “--- ” for Pedal Splash if you don’t
need it.
VOICE: Select a voice in its category. Create your own kit
with voices you like.
Note: For hi-hats don’t have a matching Half-
Open sound, please set the HalfOpen voice the same to
HIHAT-Open sound.
Part to edit
SNARE-Rim
VOICE TYPESNARE
Item name
SNARE-Rim
VOICE TYPESNARE
SNARE-Rim
VOICE Rock R
Editable parametr
VOLUME: Adjust the volume of current trigger. The higher
the volume, the louder it will be.
REVERB: Adjust the reverb level of current trigger. Overall reverb can be adjusted by S2 in FX mode, this value
decides how much the current trigger will be affected by
fader S2.
PITCH: Adjust the pitch of current trigger, measured in semitones.
PAN: Adjust the panning of current trigger. Minus value
stands for left and 0 stands for middle position.
Tip
:
Use DRUM button can switch between trig-
gers quickly in EDIT menu.
Note
:
For drum kit settings in EDIT menu, each
setting affects one trigger. For multi-triggering pads, they
may have many triggers. For example, snare head, snare
rim and snare X-stick can have different volume settings.
SNARE-Rim
VOLUME 80
SNARE-Rim
REVERB 120
SNARE-Rim
PITCH 0
SNARE-Rim
PAN 25
18
Page 23
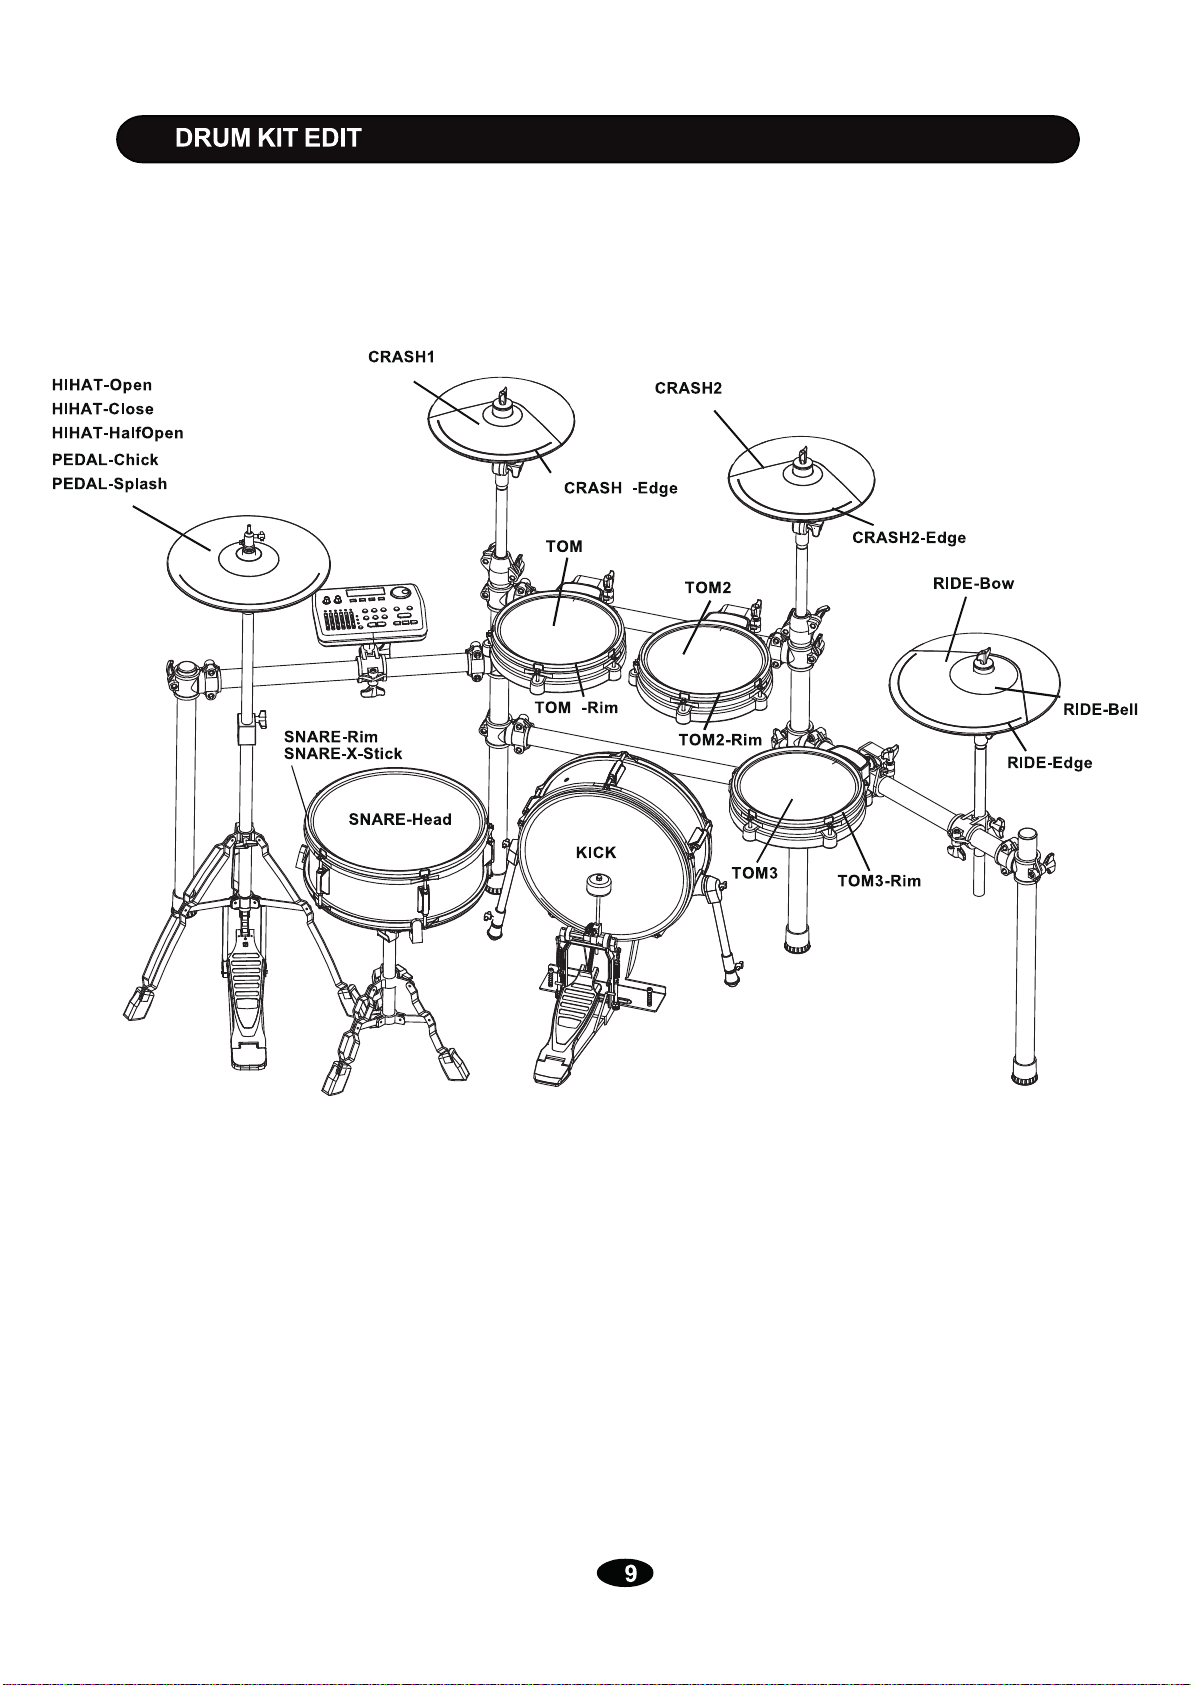
See to the picture below for trigger names:
1
1
1
1
Page 24
APPENDIX
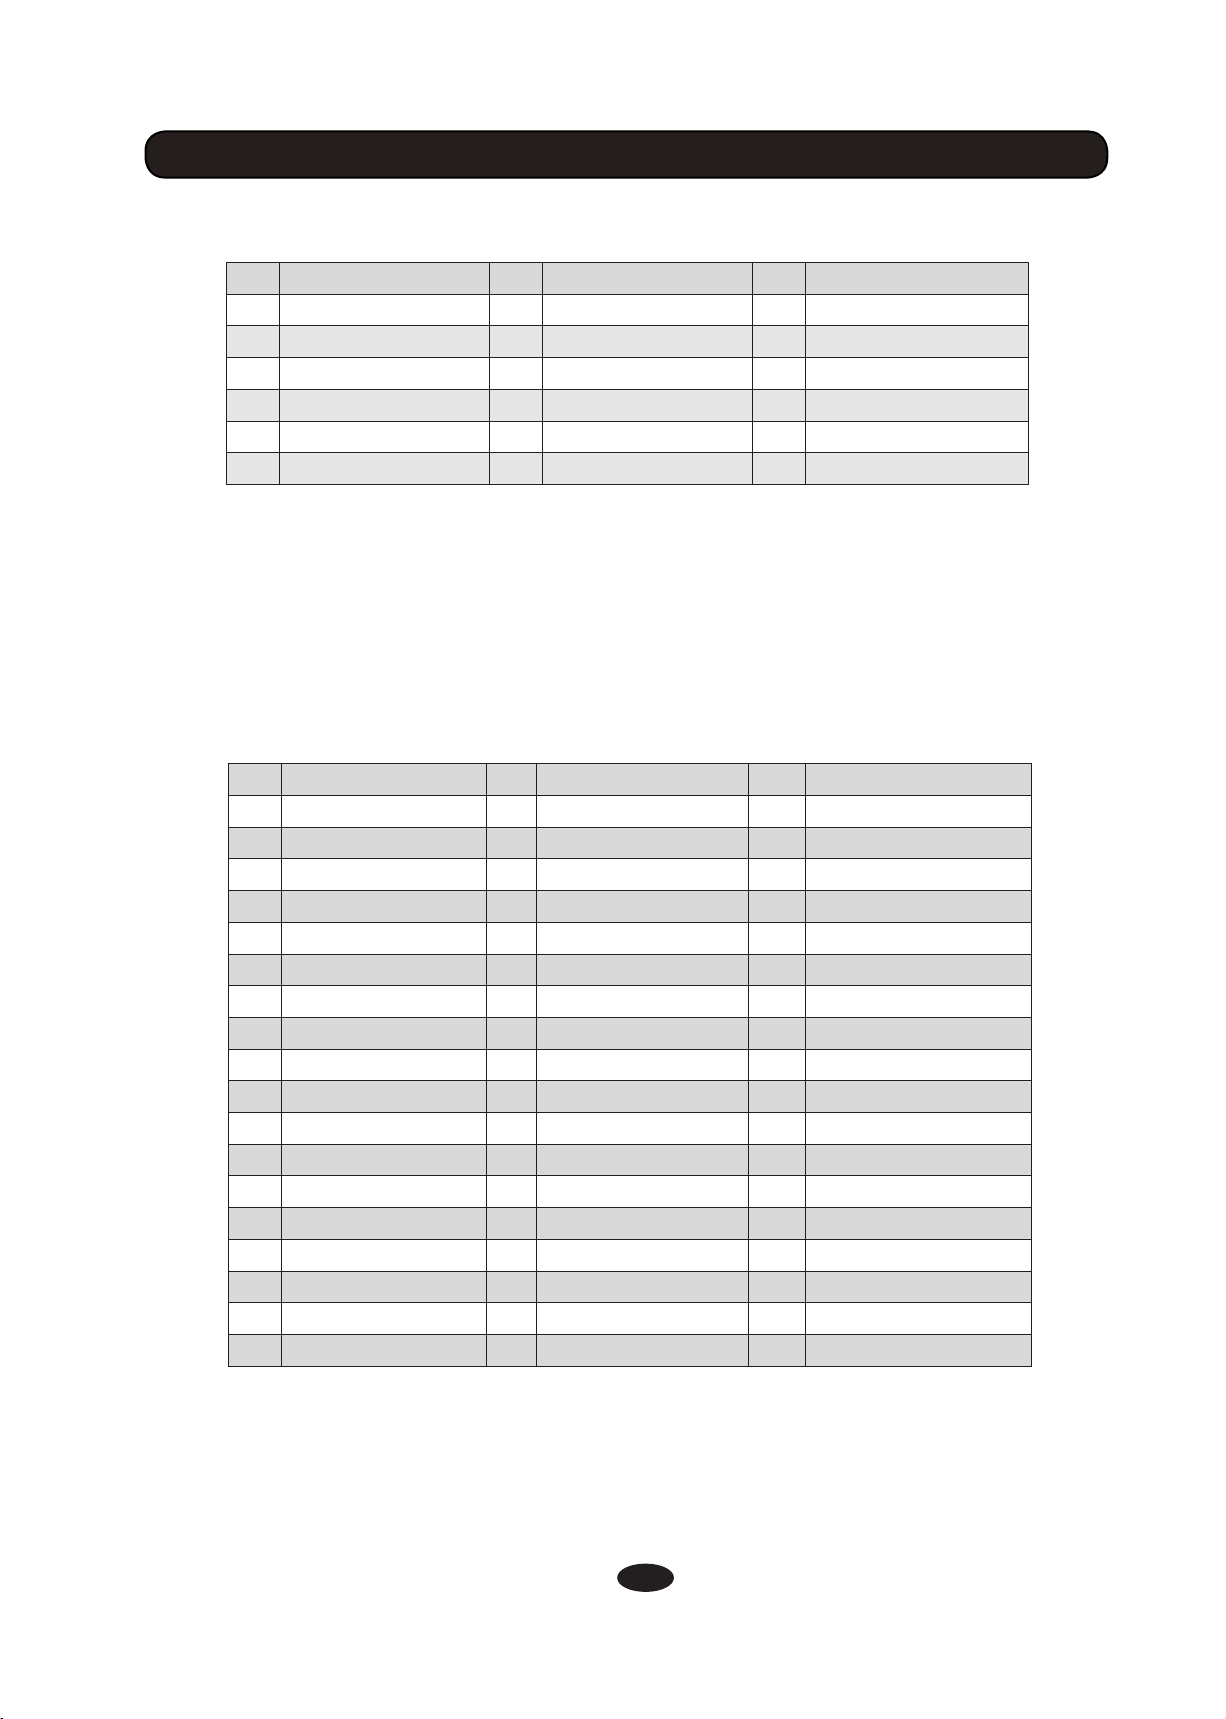
KIT LIST
1 Studio 8 Latin 15 DirtySouth
Standard
2
3 Pop 10 Sunray 17 Drumstep
4 Jazz 11 Fiesta 18 Jungle
5 Metal 12 Mario 19 Utopia
6 Rock 13 Impulse 20 BlueBay
7 80s 14 Loop
In kit 14 Loop, each tom contains a different loop. If you strike on it, a loop will be
played. Each loop is in 4 measures. At every fourth measure, if you strike on another
tom, a loop will be played automatically in next bar. To stop playing a loop, simply
strike on the tom corresponding to the loop current playing.
9 Brush 16 Nebula
PATTERN LIST
1 WalkWithTree 20 SoftAmour 39 Bartender
2 Soul 21 MelodicDeath 40 Celebration
3 Latin 22 SambaDance
4 Moskau 23 RockBlues
5 Heart 24 Fly
6 Fable 25 Bossa
7 theStorm 26 Tango
8 Beowulf 27 Dancing
9 Forever 28 CryintheRain
10 Acid 29 NightTrain
11 Arcane 30 Arriba
12 toBeLoved 31 Batteries
13 Rain 32 Revealite
14 PopAges 33 Breathe
15 ChaCha 34 BlueEyes
16 Life 35 HeyMan
17 Home 36 Firerain
18 Latina 37 NyanCats
19 Reality 38 Supreme
41 Discover
42 Shade
43 Echo
44 LiteGroove
45 River
46 Jazz
47 Love
48 Blues
49 Techno
50 OutofMyHeart
51 MellowTone
52 theLight
53 Take
54 Angel
55 Bridge
20
Page 25
APPENDIX
APPENDIX
VOICE LIST (1)
KICK
Rock Techno 03 Session Kiss
Jazz Techno 04 Vintage DDDclean
Indie 01 Trance 01 Jungle 01 MorMOOG
Indie 02 Trance 02 Jungle 02 Morschlag2
Metal Trance 03 Fiesta Morschlag3
Funk 01 Trance 04 Birch 01 Morschlag1
Funk 02 Trance 05 YAM18 Morschlag5
8Bit 01 Trap 01 JAZZ V Ballerako
8Bit 02 Trap 02 METAL V Rave309
House 01 Trap 03 POP V Y30
House 02 Trap 04 ROCK2V SOLI606
House 03 Trap 05 ROCK V SOLI808
RnB 01 Pop 01 ROCKBRIGHT Y909
RnB 02 Pop 02 DGs8 Rosa
RnB 03 Pop 03 Pik KissV
RnB 04 Pop 04 Sax DG3
Techno 01 Jungle Six TR66RIM
Techno 02 Latin Hot Soli909RIM
SNARE
Rock RnB 04 Latin Rimshot 02 POPV SS
Rock Rimshot RnB R 01 Session ROCKV2
Rock X RnB R 02 Session Rimshot ROCKV2 RS
Jazz 01 RnB X-Stick 01 Session X ROCKV2 SS
Jazz 01 Rimshot RnB X-Stick 02 Vintage ROCKV3
Jazz X-Stick Techno 01 Vintage Rimshot ROCKV3 RS
Jazz 02 Techno 02 Vintage X-Stick ROCKV3 SS
Jazz 02 Rimshot TechnoC 01 Jungle ROCKBRI
Indie 01 TechnoC 02 Jungle Rimshot ROCKBRIRS
Indie Rimshot 01 Trance 01 Fiesta 01 ROCKBRISS
Indie X-Stick Trance 02 Fiesta R 01 Soli8085
Indie 02 Trance 03 Fiesta X-Stick 01 FatschSd
Indie Rimshot 02 Trance 04 Fiesta 02 MBare
Metal Trap 01 FiestaRimshot 02 OrgCP
Metal Rimshot Trap 02 Fiesta Rimshot 03 SoliNoisy
Metal X-Stick Trap 03 Jungle2 909
Funk 01 Trap 04 Jungle2 R Abpunch
Funk Rimshot 01 Trap 05 BALLAD1 DD31
Funk X-Stick 01 Trap 06 RSBALLAD1 Dy2
Funk 02 Trap 07 SSBALLAD1 L9
Note:
display that is in light grey in the list.
The voice in the list is a full name; some letters are omitted on screen
21
Page 26
APPENDIX
VOICE LIST (2)
Funk Rimshot 02 Trap 08 BrushV Morball2
Funk X-Stick 02 Trap 09 BrushVSWIRL Morballcl
8Bit 01 Trap 10 BrushV RS X82
8Bit 02 Trap 11 BrushV SS Soli8084
House 01 Pop JAZZV Soli9095
House 02 Pop Rimshot JAZZV RS SoliFR2L
House 03 Pop X-Stick JAZZV SS Soli808
House 04 Brush METALV SoliRH5
House 05 Brush Rimshot METALV RS RimY10RIM
RnB 01 Brush X-Stick METALV SS RimSoli808R
RnB 02 Latin POPV SNSN80er
RnB 03 Latin Rimshot 01 POPV RS
TOM
Rock1 RnB3
Rock1 Rimshot
Rock2
Rock2 Rimshot
Rock3
Rock3 Rimshot
Rock4
Rock4 Rimshot
Jazz1
Jazz1 Rimshot
Jazz2
Jazz2 Rimshot
Jazz3
Jazz3 Rimshot
Jazz3
Jazz3 Rimshot
Indie1 Trap3 01 Brush12 Li_HTO 1
Indie2 Trap1 02 Brush14 Li_HTO 2
Indie3 Trap2 02 BrushRim8 Li_HTO 3
Indie3 Trap3 02 BrushRim10 Li_HTO 4
Metal1 Pop1 BrushRim12 80_TOM1
Metal2
Metal3
Metal4
Conga1
RnB4
Techno1
Techno2
Techno3
Techno4
Trance1 01
Trance2 01
Trance3 01
Trance4 01
Trance1 02
Trance2 02
Trance3 02
Trance4 02
Trap1 01 Brush8 yt808ana3
Trap2 01 Brush10 yt808ana4
Pop1 Rimshot
Pop2
Pop2 Rimshot
Pop3
Jungle2
Jungle2 Rimshot
Jungle3
Jungle3 Rimshot
Jungle4
Jungle4 Rimshot
Fiesta1
Fiesta1 Rimshot
Fiesta2
Fiesta2 Rimshot
Fiesta3
Fiesta3 Rimshot
Fiesta4
Fiesta4 Rimshot
BrushRim14 80_TOM2
10XNMas 80_TOM3
12XNMas 80_TOM4
14XNMas 80er1
Rim10SoliNat
Rim12SoliNat
Rim14SoliNat
Rim16SoliNat
10SoliJP1
12SoliJP1
14SoliJP1
16SoliJP1
Rim10SoliJP1
Rim12SoliJP1
Rim14SoliJP1
Rim16SoliJP1
yt808ana1
yt808ana2
22
Page 27
APPENDIX
VOICE LIST (3)
Conga2
Conga3
Conga4
Conga5 Brush1 Rim14XNMas NOV_808TOM1
Conga6 Brush2 Rim16XNMas NOV_808TOM2
Timbale1 Brush3 10BigReverb NOV_808TOM3
Timbale2 Brush4 12BigReverb NOV_808TOM4
8Bit1 Latin1 14BigReverb SDS7_4TO1
8Bit2 Latin2 16BigReverb SDS7_4TO2
8Bit3 Latin3 Rim10BigRev SDS7_4TO3
8Bit4 Latin4 Rim12BigRev SDS7_4TO4
House1 01 Session1 Rim14BigRev 909_TOM1
House2 01 Session2 Rim16BigRev 909_TOM2
House3 01 Session3 10MetaFilter 909_TOM3
House4 01 Session4 12MetaFilter 909_TOM4
House1 02 Vintage1 14MetaFilter TED_TOM1
House2 02
House3 02
House4 02
House1 03
House2 03
House3 03
House4 03
RnB1
RnB2
Pop3 Rimshot
Pop4
Pop4 Rimshot
Vintage1 Rimshot
Vintage2
Vintage2 Rimshot
Vintage3
Vintage3 Rimshot
Vintage4
Vintage4 Rimshot
Jungle1
Jungle1 Rimshot
16XNMas 80er2
Rim10XNMas 80er3
Rim12XNMas 80er4
16MetaFilter TED_TOM2
Rim12MetaFil TED_TOM3
Rim14MetaFil TED_TOM4
Rim16MetaFi X1_ETOM1
Rim10MetaFi X1_ETOM2
10SoliNathan X1_ETOM3
12SoliNathan X1_ETOM4
14SoliNathan
16SoliNathan
RIDE
Rock House 01 Jungle Bell Pst21Ny1
Rock Bell House 02 Fiesta Pst21Ny2
Rock Edge House 03 Fiesta Bell Pst21 B1
Jazz RnB Fiesta Edge Pst21 B2
Jazz Bell Techno 01 Pst20Ny1 Pst21 E
Jazz Edge Techno 02 Pst20Ny2 Pst21Br
Indie Trance Pst20Ny B Pst21Br B
Indie Bell Pop Pst20Ny E1 Pst21Br E
Indie Edge Pop Bell Pst20Ny E2 Pst21EDGMe
Funk 02 Brush Pst20Wd Pst2TNy
Funk Bell 02 Brush Bell Pst20Wd B Pst2TNy B
Funk Edge 02 Brush Edge Pst20Wd E Pst2TNy E1
Funk 01 Session Pst20Br Pst2TNy E2
Funk Bell 01 Vintage Pst20Br B
Funk Edge 01 Vintage Bell Pst20Br E
23
Page 28
APPENDIX
VOICE LIST (4)
CRASH
Rock1 8Bit2 SplashA12 Crash18
Rock1 Edge House 01 SplashA12E Crash18 E
Rock2 House 02 SplashB12 CrashB16 E
Rock2 Edge House 03 SplashB12E CrashB16 E
RockChina House 04 Splash8 CrashB16
RockSplash Trance1 Splash8E Crash18
Jazz1 Trance2 China12Mal Crash18 B
Jazz1 Edge 01 Trap1 01 China14Mal Crash18Br
Jazz2 Trap2 01 China16Mal Crash18 E1
Jazz2 Edge Pop1 China20Sti Crash18 E2
JazzSplash 01 Pop2 China30 Crash20
JazzSplash 02 Session1 Crash14 E Crash20Beat
Indie1 01 Session2 Crash14 Crash20Br
Indie2 01 Vintage1 Crash16 E Crash20EDGE
Indie1 02 Vintage2 Crash16 808_1CYM
Indie2 02 Jungle1 Crash17 NOV_CYMB
Funk1 02 Jungle2 Crash17br Y808crash
Funk2 02 Fiesta1 Crash17 E
8Bit1 Fiesta2 Crash17
HI-HAT
Rock Open House Open 03 Brush Pedal Splash BalHHSp
Rock Closed House Closed 03 Session Open CDHH O
Rock Pedal Chick RnB Open 01 Session Closed CDHH C
Rock Half-Open RnB Closed 01 Session Pedal Chick CDHH P
Rock Pedal Splash RnB Open 02 Session Pedal Splash CDHH Half
Jazz Open 01 RnB Closed 02 Vintage Open CDHH Sp
Jazz Closed 01 Techno Open 01 Vintage Closed CCO O
Jazz Pedal Chick 01 Techno Closed 01 Vintage Pedal Chick CCO C
Jazz Open 02 Techno Open 02 Vintage Half-Open CCO P
Jazz Closed 02 Techno Closed 02 Vintage Pedal Splash CCO Half
Jazz Pedal Chick 02 Trance Open 01 Jungle Open CCO Sp
Indie Open 02 Trance Closed 01 Jungle Closed 808_2HH O
Indie Closed 02 Trance Open 02 Jungle Pedal Chick 808_3HH O
Indie Pedal Chick 02 Trance Closed 02 Jungle Half-Open 808_HH C1
Metal Open Trap Open
Metal Closed Trap Closed 01 Fiesta Open 808HH P
Metal Pedal Chick Trap Open 02 Fiesta Closed 909HHOP2
Funk Open 01 Trap Closed 02 Fiesta Pedal Chick 909_HHCL
01 Jungle Pedal Splash 808_HH C2
24
Page 29
APPENDIX
VOICE LIST (5)
Funk Closed 01 Trap Open 03 Fiesta Half-Open
Funk Pedal Chick 01 Trap Closed 03 Fiesta Pedal Splash CR78_HHO
Funk Open 02 Pop Open CCMHH O CR78_HHC
Funk Closed 02 Pop Closed CCMHH C NOV_HHOP
Funk Pedal Chick 02 Pop Pedal Chick CCMHH P NOV_1HHC
8Bit Open Pop Half-Open CCMHH Half SakataHH O
8Bit Closed Pop Pedal Splash CCMHH Sp SakataHH C
House Open 01 Brush Open BalHH O SakataHH P
House Closed 01 Brush Closed BalHH C Y808HH O
House Open 02 Brush Pedal Chick BalHH P Y808HH C
House Closed 02 Brush Half-Open BalHH Half
PERCUSSION
Cowbell
FunkPercussion01
FunkPercussion02
8BitFX01
8BitFX02
8BitFX03
HouseFX01
HouseFX02
HouseFX03
HouseFX04
HouseFX05
HouseFX06
TranceFX01
TranceFX02
TranceFX03
TranceFX04
TranceFX05
TrapFX01
TrapFX02
ElectricShaker
ElectricCowbell
DubstepFX01
DubstepFX02
DubstepFX03
DubstepFX04
DubstepFX05
Agogo01
Agogo02
ShakerShort
ShakerLong
NoClp
SDS7_CLP
Soli909_CLAP
909Clp
808clp
Abs
Abs5
808congahi
808 claves
808 shaker
SakataAgogo
Elec9Clap
626_TAM
707_TAMB
ABcowbell
C78_Guiro
808congalo
808congame
Y30ZAP2
X10_ZAP
Bg
Cai1
Cai2
Cang
Gong1
Gong2
Gong3
Gong4
Guban
Tanggu1
Tanggu2
Tanggu3
Tanggu4
909HHCL2
Tanggu5
Tanggu6
DavulGum1
DavulGum2
DavulStik1
DavulStik2
DavulFingr
BendirDum1
BendirDum2
BendirTek1
BendirTek2
DarbukaGum
DarbukaTek
DarbukaTak
DarbukaTok
DarbukaTik
FingerCym1
FingerCym2
25
Page 30
SPECIFICATIONS
Configuration
3 X 10" Mesh Tom (with rim),14" Acoustic Mesh Snare (layered rims), 2 X
12" Crash Cymbal(with edge & choke), 14" Ride Cymbal(with edge, bell &
choke), 13" Hi-Hat with Stand, 14" Acoustic Mesh Kick
Voice
Drum Kit
720+ High Quality Sounds
20 Preset Kits and 20 User Kits
Pattern 55 Songs,Drum On/Off,Accomp On/Off
Sound Effect Reverb,Compressor,Equalizer with Professional DSP Processor
Equalizer
Metronome
4-Band Equalizer,Real-time Control
On/Off,Tempo,Voice,Time Signature,TapTempo
Back Volume,MasterTune,Local,Fader FX Setup,
FaderMIDISetup,Advanced(Sensitivity,Headroom,Trigger
SetupMenu
Curve,AutoCrosstalk,MIDI Note
Send,RimVelocity,Pedal,SnareRimSplitPoint),Reset
PadEdit
Voice,Volume,Pan,Pitch,Reverb
Record 15 Songs
Display
Back-light LCD, 2 Row X16 Characters
Power 12V DC
Aux. Socket
Headphone,Line In, Line Out(L/R),USB, Power,
External TriggerX2
New acoustic wooden snare and kick.6 faders in three
modes: Real-time pad volume control,FXcontrol(Reverb,
New Feature
compressor and 4 -band equalizer),MIDIcontrol. Kit with
loop function. 5 step Hihat Pedal with stand.
Specifications are subject to change without notice
26
Page 31
 Loading...