

XDrum DD-501 User Manual

00022173
Version 01/2010
DD
-
50
1 E-Drum Set
Users manual
Taking Care of Your Digital Drum Set
Thank you for purchasing this digital drum module. The drum module has been
developed to act and play like a drum set but with greater ease. Before you use
the instrument, we recommend you to read through this manual.
2
Location
Power Supply
Make sure to use the suitable AC ad aptor,
and also make sure the AC outlet voltage
at your country match es the input voltage
spec ified on the AC adaptor`s label.
Turn the power switch OFF when the
inst rument is not in use.
An AC adaptor should be unplugg ed fro m
the AC outlet if the instrument is not be
used f or an extended period of time.
Unpl ug the AC ada ptor du ring el ectric
stor ms.
Avoid plugging the AC adaptor into the
same A C outle t as appliance with high
power consum pti on, s uch a s e lec tric
heat ers or ovens. Also avo id usin g multiplug adapt ors since these c an result in
re ducing the sound quality, ope ratio n
erro rs, and possibly damage.
Turn Power OFF When Making
Connections
To avoid damag e to the ins trument and
othe r d evices to which it is connected,
turn the pow er switches of all related
dev i c e O FF p r i o r t o c o n necting o r
disc onnecting cables.
Handling and Transport
Cleaning
Electrical Interference
Nev e r a pply exce ssive f o rce to the
cont rols, connectors or other parts of the
inst rument.
Alwa ys un plug cables by gripping the
plug f irmly, but not pulling on the cab le.
Disc onnect a ll cable s before movin g the
inst rument.
Phys ical s hocks cause d by dropping,
bump ing, or placing h eavy objects on the
inst rument c an result in s cratches and
more s erious damage.
Clea n the unit with a dry soft cloth.
A slightly damp cloth may be us ed to
remo ve stubborn grime and dirt.
Neve r use cleaners such as alco hol or
thin ner.
Avoid placi ng vinyl obj ect on top of the
unit (vinyl can stick to and discolor the
surf ace).
This instrume nt c ontains digital circuitry
and may caus e interferenc e if placed too
clos e to radio or televi sion recei vers. If
this occurs, m ove the instru ment further
away f rom the affected equipment .
Do not exp ose the unit to the following
c o nd i t i o ns t o a v oi d d ef o rm a t i o n,
disc oloration, or more serious damage.
Dire ct sunlight.
High temperatur e (n ear a heat source, or
in a car d uring the day time).
Exce ssive humidity.
Exce ssive dust.
Stro ng vibration
Congratulations!
THIS DEVICE COMPLIES WITH PART 15 OF THE FCC RULES.
OPERATION IS SUBJECT TO THE FOLLOWING TWO CONDITIONS:
(1) THIS DEVICE MAY NOT CAUSE HARMFUL INTERFERENCE, AND
(2) THIS DEVICE MUST ACCEPT ANY INTERFERENCE RECEIVED,
INCLUDING INTERFERENCE THAT MAY CAUSE UNDESIRED OPERATION.
Radiated Immunity
The norma l function of the produc t may
be disturbed by Str ong El ectro
Magn etic Interference. If so, simply rese t
the product to resu me no rmal operation
by following the in struction manua l. In
ca se t he f uncti on c ould not res ume,
plea se use the product in other location.
ESD, Fast Transient and Surge may
caus e the un it to temporary mal function.
Swit ch off and on aga in to resume norm al
oper ation.

Panel Controls
- Front Panel
- Rear Panel
Setup
- Connect the Pads and the Pedals
- Connect the Power supply jack
- Connect a audio equipment
- Connect a CD player, etc.(Mix in jack)
- Connect Headphones
- Connect a MIDI and USB device
- MIDI out format
Functions
- Switch the power ON
- Set the main volume
- Select a drum kit
- Adjust the kit volume
- Select a pad voice
- Adjust the pad volume
- Save kit
- Select a pattern
- Listen to the pattern
- Adjust the pattern volume
- Recording
- Drum off
- Adjust the pattern tempo
- Click
- Select a click sound
- Adjust the click volume
- Factory reset
- Hi-Hat control
Specifications
Voice list
Pattern list
Percussion Set List
MIDI implementation chart
Contents
3
4
4
5
6
6
7
7
7
7
8
8
9
9
9
9
9
10
10
10
11
11
11
12-13
13
14
14
14
15
15
15
16
17
18
19
20

[volume] knob
Control the volume of phone.
Turn it clockwise to increase the volume
and anticlockwise to decrease it.
[ + ] and [ - ] buttons
Adjust the parameter of the current menu
(KIT, voice, pattern, click value, tempo
value, etc.).
[tempo] Button
Enter the tempo adjustment mode.
Pads indicators
It shows the trigger sound in process of
pattern play.
[click] Button and indicator
Turn on or off the metronome.
[drum off] Button and indicator
It is used to mute on or mute off the drum
part of the song.
[start/stop] Button
Start or stop song playing.
3
Panel Controls
4
Front Panel
[pattern] Button
Enter the pattern select mode and provide
MIDI output format choice.
[voice] Button
Enter the voice select mode.
[kit] Button
Enter the kit select mode.
3-digit LED
Display the parameters of current menu .
[volume] Button
Enter the volume adjustment mode and to
separately adjust the kit volume, voice
volume, click volume and pattern volume.
[save/rec] Button
Afford two modes:
Short pressing [save/rec] button to save the
current kit setting to a user kit.
Press and hold on [save/rec] button to enter
recording mode.
Power Switch
Turn the power on or off .
3
3
5
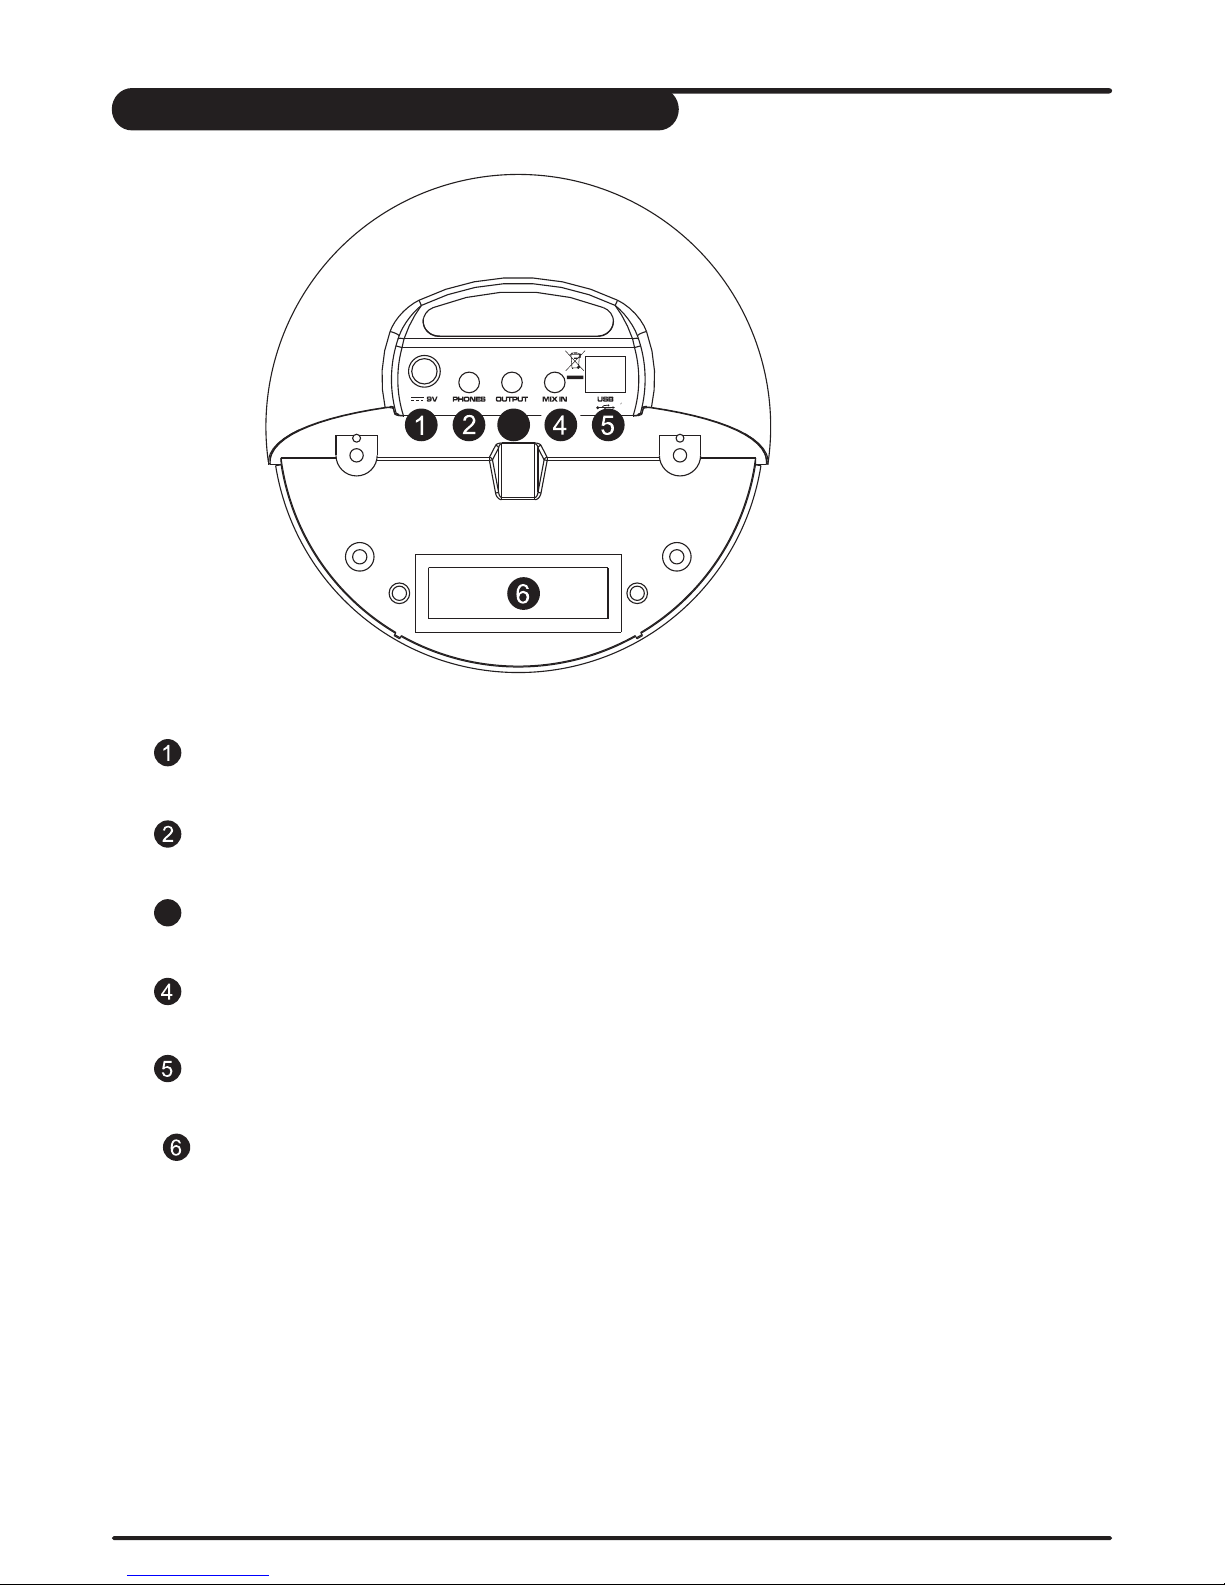
Rear Panel
Support DC 9V power.
Phone Jack
Connect headphone or loudspeaker.
Output Jacks
Support Line stereo output.
MIX Input Jacks
Connect with external sound source.
USB Port
Connect to computer or other USB host devices.
Trigger Input Jacks
Connect with kick, snare, tom1~tom3, ride,
crash, hi-hat, hi-hat control triggers.
DC Input
3
Using the provided cables,
Note:
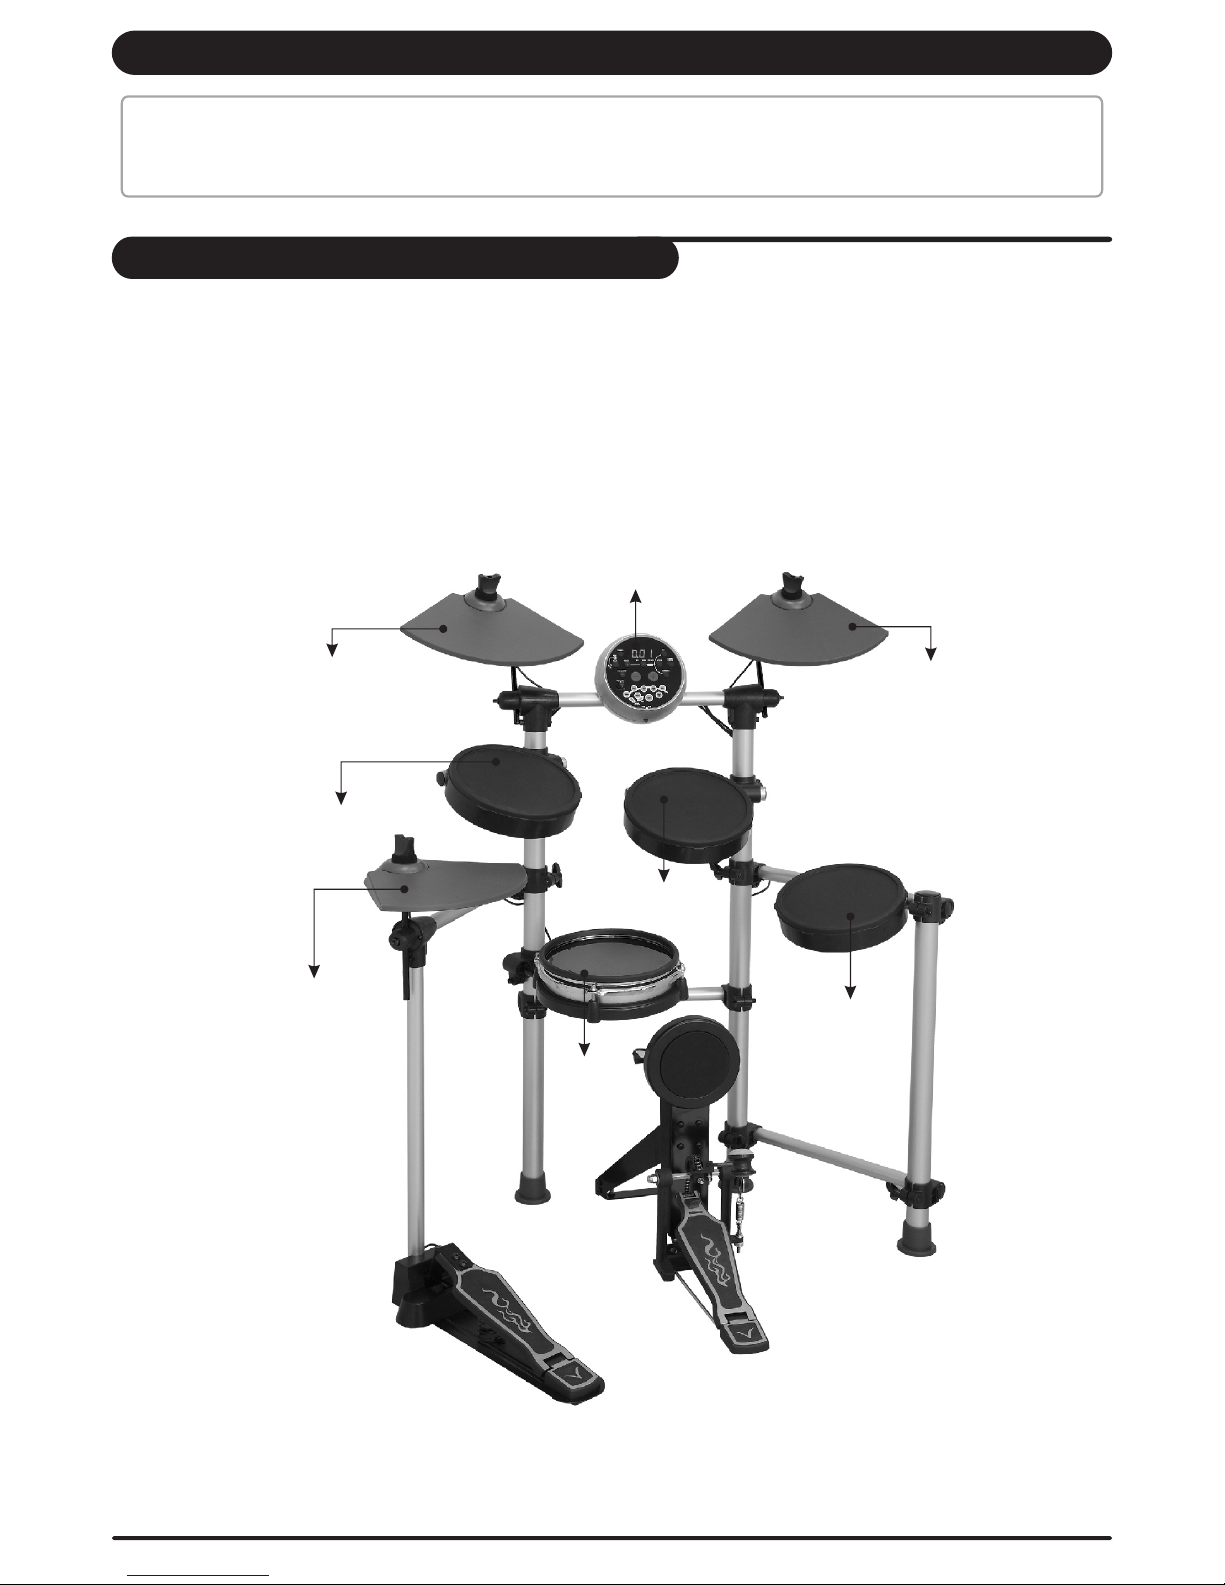
1. The voice of hi-hat pad hitting is controlled by hi-hat pedal. Similar to a real drum kit, the hi-hat pad functions
as an 'open hi-hat' when the pedal is released. When the pedal is stepped, it functions as a 'closed hi-hat' .
2. The valid striking area of a cymbal pad (ride, crash or hi-hat) is
connect with kick, snare, tom1~tom3, ride, crash, hi-hat, hi-hat control triggers.
Snare is stereo input, supports double triggering (increase edge triggering); cymbal (includes ride and crash)
kick, tom, Hi-Hat are mono input, which can't response edge triggering. Hi-Hat pedal is stereo input.
half part of the pad on the player side, which
is different from other pads.
Caution!
To prevent electric shock and damage to the device, make sure the power is switched OFF
on the drum and all related device before making any connection.
Setup
6
Connect the Pads and the Pedal
crash ride
tom 1
Drum Module
hi-hat
Hi- Hat con trol pe dal
Kic k Trigge r
tom 2
tom 3
snare
 Loading...