

Page 1

00039164
Version 09/2015
XDrum
DD
-
450
Digital Drum Set
Users manual
Page 2

INFORMATION FOR YOUR SAFETY!
THE FCC REGULATION WARNING (for USA)
This equipment has been tested and found to comply with
the limits for a Class B digital device, pursuant to Part 15 of
the FCC Rules.
These limits are designed to provide reasonable protection
against harmful interference in a residential installation. This
equipment generates, uses, and can radiate radio frequency
energy and, if not installed and used in accordance with the
instructions, may cause harmful interference to radio
communications. However, there is no guarantee that
interference will not occur in a particular installation.
If this equipment does cause harmful interference to radio or
television reception, which can be determined by turning the
equipment off and on, the user is encouraged to try to
correct the interference by one or more of the following
measures:
Reorient or relocate the receiving antenna.
Increase the separation between the equipment and
receiver.
Connect the equipment into an outlet on a circuit different
from that to which the receiver is connected.
Consult the dealer or an experienced radio/TV technician
for help.
Unauthorized changes or modification to this system can
void the user's authority to operate this equipment.
PRECAUTIONS
PLEASE READ CAREFULLY BEFORE PROCEEDING
Please keep this manual in a safe place for future reference.
Power Supply
Please connect the designated AC adaptor to an AC outlet
of the correct voltage.
Do not connect it to an AC outlet of voltage other than that
for which your instrument is intended.
Unplug the AC power adaptor when not using the
instrument, or during electrical storms.
Connections
Before connecting the instrument to other devices, turn off
the power to all units. This will help prevent malfunction and
/ or damage to other devices.
Location
Do not expose the instrument to the following conditions to
avoid deformation, discoloration, or more serious damage:
Direct sunlight
Extreme temperature or humidity
Excessive dusty or dirty location
Strong vibrations or shocks
Close to magnetic fields
Interference with other electrical devices
Radios and televisions placed nearby may experience
reception interference. Operate this unit at a suitable
distance from radios and televisions.
CAUTION
The normal function of the product may be disturbed
by Strong Electro Magnetic Interference. If so, simply
reset the product to resume normal operation by
following the owner's manual. In case the function
could not resume, please use the product in other
location.
2
Cleaning
Clean only with a soft, dry cloth.
Do not use paint thinners, solvents, cleaning fluids, or
chemical-impregnated wiping cloths.
Handling
Do not apply excessive force to the switches or controls.
Do not let paper, metallic, or other objects into the
instrument. If this happens, remove the electric plug from
the outlet. Then have the instrument inspected by qualified
service personnel.
Disconnect all cables before moving the instrument.
Page 3

Connects
Main Features.............................................................4
Panel & Display Description
Front Panel...................................................................5
Side Panel (Connecting)..............................................6
LCD Display..................................................................7
Setup
Connecting Pads and Pedals.......................................8
Getting Ready to Play
Setting Up the Power Supply........................................9
Turning the Power On/Off.............................................9
Quick Play
Drum Kits and Voices.................................................10
Playing Techniques.....................................................10
Auto Fill In(AFI)
Turn the AFI Function On/ Off.....................................16
Rules of AFI trigger.....................................................16
Coach
About Coach Mode.....................................................17
Coach Mode Control..................................................17
Qut Cnt (Quiet Count)................................................17
Change Up.................................................................18
Beat Check.................................................................19
DBT (Double Bass Trigger)
Turn the DBT Function On..........................................20
Tempo........................................................................20
Utility Mode (Utility)
The Drum Pad Trigger Settings..................................21
The Drum Module Settings.........................................22
Select a Preset Drum Kit and Create a User Drum
Kit
About the Preset and User Drum Kit..........................12
Edit the Drum Kit Parameters.....................................12
Edit the Voice Parameters..........................................12
Save User Drum Kit....................................................13
Playing Along with a Song
Playing Along with a Song..........................................14
Metronome.................................................................14
Record
Preparing Record.......................................................15
Start / Stop Recording................................................15
Download AFI Midi Styles from a Computer...........23
Troubleshooting.......................................................24
Prompt Messages.....................................................24
Specifications...........................................................24
Appendix
Drum Kit List...............................................................25
Drum Voice List ..........................................................26
Song List....................................................................28
GM Drum Kit List........................................................29
GM Melody Voice List.................................................30
MIDI Implementation Chart........................................31
3
Page 4

Main Features
Bring the Professional Experience to Your Performance
Natural and Realistic Voices
This digital drum has equipped with all new voices, which vastly improved sound quality and will reach a super natural and
realistic sense for your ears. No matter playing the stroke roll or striking pads with velocity dynamic, all of these let you enjoy
delicate nuances and natural voice, capture the unique characteristics of acoustic drum kit.
Fashionable Appearance
Compact, elegant appearance, only occupy a little place when fold it up. Except for a perfect learning assistant, it also can be
exquisite furniture decorated in your house.
Interesting AFI Function
There is an interesting way to suddenly become a master drummer. AFI means the auto fill in function, use this function you
can play a professional cool solo without any difficulties. What’s more, you can download your own AFI style solos to your
module through specified user software.
Amazing DBT Function
Easy to achieve double bass pedal techniques here. The frequency is adjustable.
Scientific COACH Practicing
Provide three coach modes with dozens of common beat practice. Automatically score function intuitively reflects practice
condition.
USB MIDI Output
This digital drum equipped with an USB MIDI output, it is available to connect with smart devices, such as an iPad, through a
Camera kit.
4
Page 5

Front Panel
Panel Description
15
1
2 3
6 7 8
10 11 12 13
1. [VOLUME] Knob
Adjust the phone volume level.
Note:
Rotate the [VOLUME] knob anticlockwise to the minimum
position before power on.
2. [POWER] Button
Press this button to power on/ off the module.
3. [DBT] (DOUBLE BASS TRIGGER) Button
Turn DBT function on/ off.
*Turn DBT function on. It can generate two or three
continuous kick sounds when you step on the bass drum
only once. Easy to achieve double bass pedal techniques.
4. [COACH] Button
Enter learning mode.
5. [AFI] (AUTO FILL IN) button
Turn AFI function on/ off.
*Turn AFI function on when play a song. Strike specified
AFI trigger to play intro/ ending or fill drum solos without
striking a pad.
6. [CLICK] Button
Start/Stop the metronome; enter the metronome
parameter setting mode.
4
14
7. [KIT/VOICE] Button
Shortly press: enter drum kit mode.
Press and hold: enter voice mode.
8. [SONG/REC] Button
Shortly press: enter the song mode.
Press and hold: enter the quick record mode.
9. [UTILITY] Button
Enter the utility mode.
10. [TEMPO] Button
Adjust the tempo value.
11. [SAVE/ENTER] Button
Save the drum kit / pad settings.
12. [START/STOP] Button
Start / Stop playing songs.
13. [PAGE] Button
Switch between the settings of different functions.
14. [+]/ [-] Button
Gradually increasing or decreasing the value of settings.
15. LCD Display
Shows the name and parameter settings of Kit, Voice,
Song and so on.
5
9
5
Page 6

Panel Description
Side Panel (Connecting)
Note:
To prevent malfunction and equipment failure, always turn down the volume, and turn off all the units before making any
connections.
16 18 19
16. USB MIDI Terminal
Connect the PC/USB host with audio devices.
Note:
Only transmit MIDI data.
17. AUX IN jack (1/8”)
For connecting an extra audio player, for example, MP3
and so on via a stereo plug. You can enjoy playing the
drum along with your favorite songs.
17
20
18. AFI Terminal
Connect the AFI trigger.
19. PHONES jack (1/8”)
Connect stereo headphones here.
20. DC IN jack
Connect the AC adaptor here. Plug the AC adaptor cable
into the DC IN jack.
6
Page 7

LCD Display
1
3 3
2
2
4
6 7
Panel Description
5
1. Mode
Display the current mode, such as KIT, VOICE, SONG,
and UTILITY and so on.
2. Coach Mode
Display current beat accuracy and rhythm type.
3. The Second Level Mode
When the mode is turned on, the LCD displays current
mode.
4. External Device and Strike Strength
Display the connected external device and current
striking strength.
5. Pad Name
Display the current selected pad name.
6. Parameter Type
Display current parameter type, for instance, Volume,
Curve and so on.
7. Parameter Value
Display the value which corresponding to the parameter
or the number of Song/Kit/Voice.
7
Page 8

Setup
Caution!
To prevent electric shock and damage to drum module or other devices, always turn off the power of all devices
before making any connections.
Connecting Pads and Pedals
Standard configuration: KICK, SNARE (Double trigger), TOM 1~3, CRASH 1 (Choke), RIDE (Choke), HI-HAT,
HI-HAT CONTROL PEDAL, AFI Triggers.
Hi-Hat
Crash
Snare
AFI Trigger
Tom1
Drum Module
Ride
AFI Trigger
Tom2
Tom3
Hi-Hat Control
Note:
1. Using the cables provided, connect each Trigger input jack on the rear panel of the module, and make sure
each pad is connected to its corresponding trigger input jack.
2. For details on assembling the drum stand, attaching the digital drum and connecting pads, refer to the
Installation Manual description.
8
Kick
Page 9

Getting Ready to Play
Setting up the Power Supply
1. Connect the DC plug of the AC power adaptor to the DC IN jack on
the rear panel.
2. Connect the other end of the power cord to the AC outlet.
Note:
1. Only use the voltage specified as correct for the drum module.
2. Even when the module is turned off, electricity is still flowing to the
module at the minimum level. When you are not using the drum
module for a long time, make sure to unplug the AC power adaptor
from the wall AC outlet.
Turning the Power On/Off
Turning the power on
1. Please make sure that the volume has been adjusted minimize.
2. Press the [POWER] button.
3. Listen through the headphone.
4. Striking the pads and adjust the volume by slowly turning the
[VOLUME] knob toward the right direction. Keep turning until you
get an appropriate value.
Note:
1. Make sure that you have made all necessary connections right
(trigger, audio and so on), turn down all volume controls of the
module and other audio equipments.
Turning the power off
1. Minimize the volume of the module and connected audio devices.
2. Turn the connected external audio device off.
3. Press the [POWER] button again.
Note:
The drum module automatically saves all current settings before it
turns off, you can also restore the factory setting by the following steps:
a) Press the [+] and [-] buttons simultaneously.
b) Press the [POWER] button.
c) When the LCD displays “FAC SET”, it indicates the factory setting is
finished.
About the Auto Power Off Function
To prevent unnecessary power consumption, this function automatically
turns the power off if no buttons or keys are operated for
approximately 30 minutes. If desired, you can disable or enable this
function. Refer to Utility Settings.
9
Page 10

Quick Play
Drum Kits and Voices
An acoustic drum has only a fixed kit, but the digital has a lot. It is a
particular characteristic of digital drum.
The structure of a drum kit is shown on the right:
Drum Kits and Voices
1. Shortly press the [KIT/ VOICE] button, enter the drum kit menu.
The screen is shown on the right:
2. Press the [+]/ [-] button to select your desired drum kit. (Refer to
Drum Kit List)
KIT xx
KICK
Head
TOM3
Head
SNARE
Head
Rim
HI-HAT
Head
TOM1 TOM2
Head Head
CRASH
Head
RIDE
Head
Selecting a voice
While striking the pads, you can enjoy the ensemble sound effect. If
you are not satisfied with the voice of any pads, change the voice as
you want.
1. Press the [KIT/ VOICE] button for 2 seconds to enter the voice
menu.
The screen displayed is shown on the right:
2. Strike the pad you want.
The screen will display the name of current pad.
3. While striking the pad, press the [+] / [-] button until you get an
appropriate voice for your pads. (Refer to Voice List)
10
Page 11
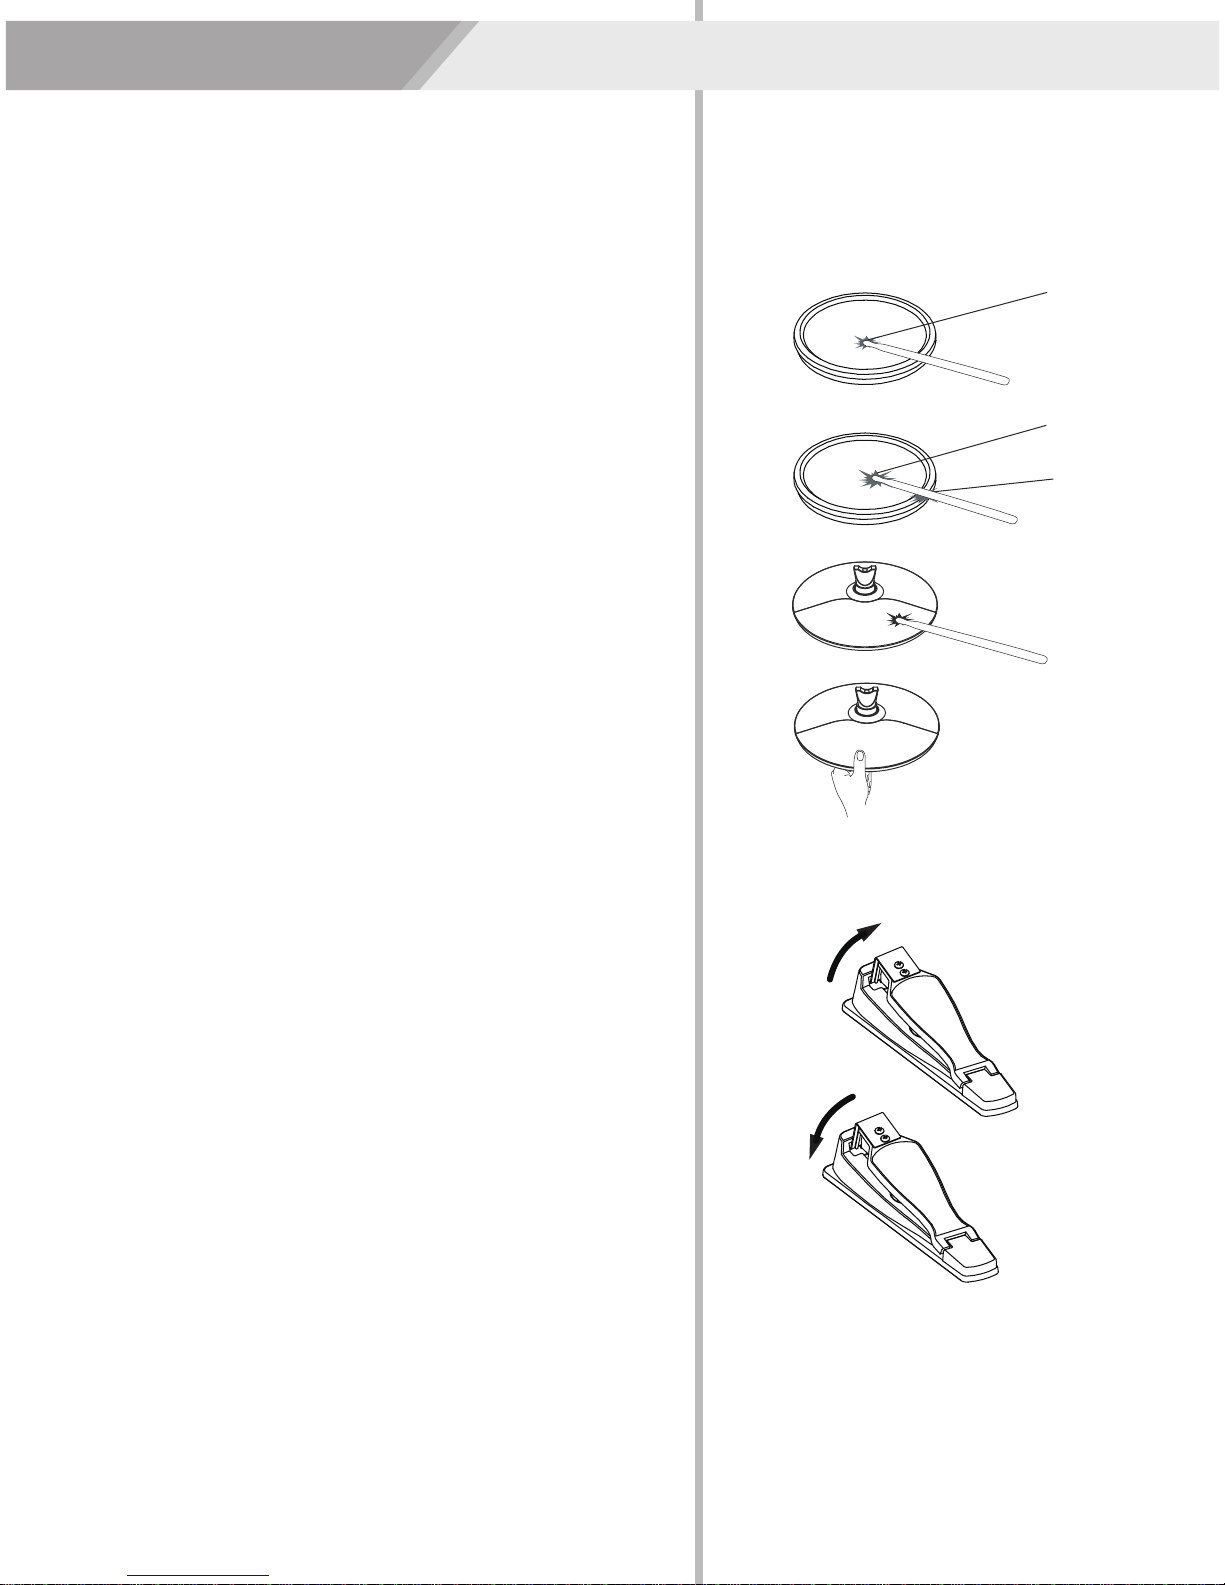
Playing Techniques
This section introduces various performance functions to make your
performance professional. Similar to an acoustic drum kit, the digital
drum responds differently to various playing techniques and dynamics.
All the pads are velocity sensitive. And some voices change timbre
depending on the striking force.
Pad
Only the snare drum can detect both head shot and rim shot.
Head Shot
Strike only the head of the pad.
Quick Play
Head
Head
Rim Shot
Strike the head and the rim of the pad simultaneously. Or you can only
strike the rim of the pad.
Cymbal
Cymbal Bow shot
Playing the middle area of the cymbal.
Choke Play
Both Ride and Crash cymbals have cymbal choke. But hi-hat don't
have the cymbal choke.
Choking the crash/ride edge with the hand immediately after hitting the
crash/ride mutes the crash/ride sound.
Hi-Hat
Hi-Hat Pedal Change
With different positions the pedal pressed down, the voice of pad
varied while you are striking the Hi-Hat pad. And this is similar to an
acoustic drum.
Open Hi-Hat
Strike the Hi-Hat pad without pressing the pedal.
Rim
Closed Hi-Hat
Strike the Hi-Hat pad with the pedal pressed completely down.
Hi-Hat Pedal
Press down the hi-hat controller’s pedal to create a foot-close sound
without having to strike the hi-hat pad.
Splash
Playing the hi-hat with the pedal fully pressed and then instantly
opening it.
11
Page 12
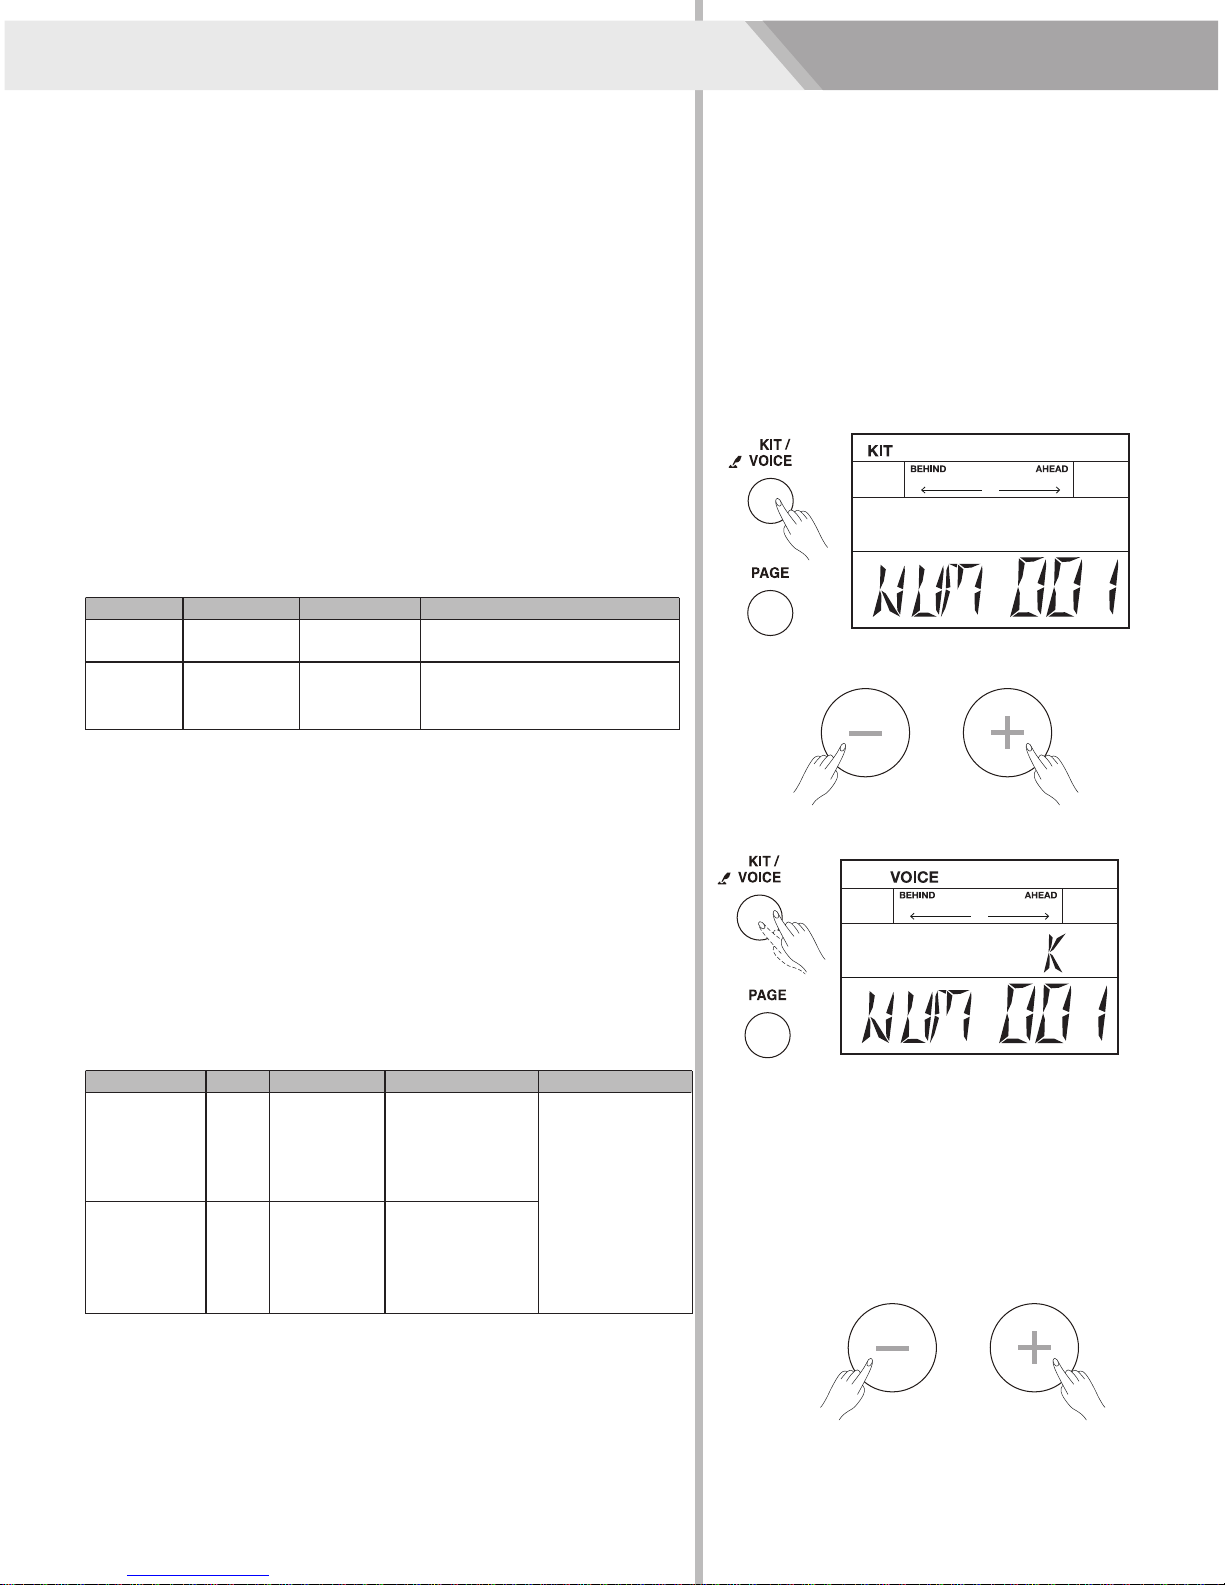
Select a Preset Drum Kit and Create a User Drum Kit
About the Preset and User Drum Kit
From No.1 to 20 are preset drum kits, and the drum kits from No.21 to
25 are user drum kits. You can edit the parameters of drum kit (from
No.1-20), and save them into user drum kits (from No.21-25).
Note:
Please save your own parameter or voice after edited, otherwise, all
data will lost.
Edit the Drum Kit Parameters
Change the drum kit volume, the overall effect of drum kit will be
affected. It means if you increase the volume of drum kit, all volume of
the pads will be increased.
1. Press the [KIT] button, the LCD will display the kit menu.
2. Repeatedly press the [PAGE] button to select the item that you want
to edit.
Parameter
KIT NAME
VOLUME
Value
Preset: 1~20
User: 21~25
0~8
LCD Display
NUM XXX
VOL XXX
Description
Drum kit selection.
Adjust the volume of drum kit;
the volume of each pad will be
changed.
3. Press the [+] / [-] button to adjust parameter value.
Edit the Voice Parameters
Edit parameters of one pad will not affect others. For example, if you
increased the volume of snare, the other pads wouldn’t change.
1. Press the [KIT/VOICE] button for 2 seconds and the LCD will display
the voice menu.
2. Strike the pad that you want to edit.
3. Repeatedly press the [PAGE] button to select an item you want.
Parameter
VOICE NAME
VOLUME
Value
1~226
0~8
LCD Display
NUM XXX
VOL XXX
Description
Select a voice.
Adjust the volume
of voice.
Triggers:
K (KICK)
Sn (Snare)
SnR (Snare Rim)
T1 (Tom1)
T2 (Tom2)
T3 (Tom3)
HH (Hi-hat)
C1 (Crash1)
Rd (Ride)
Pd(Hi-hat Pedal)
PS (Hi-hat Splash)
4. Press the [+]/ [-] button to adjust parameter value.
12
Page 13
Select a Preset Drum Kit and Create a User Drum Kit
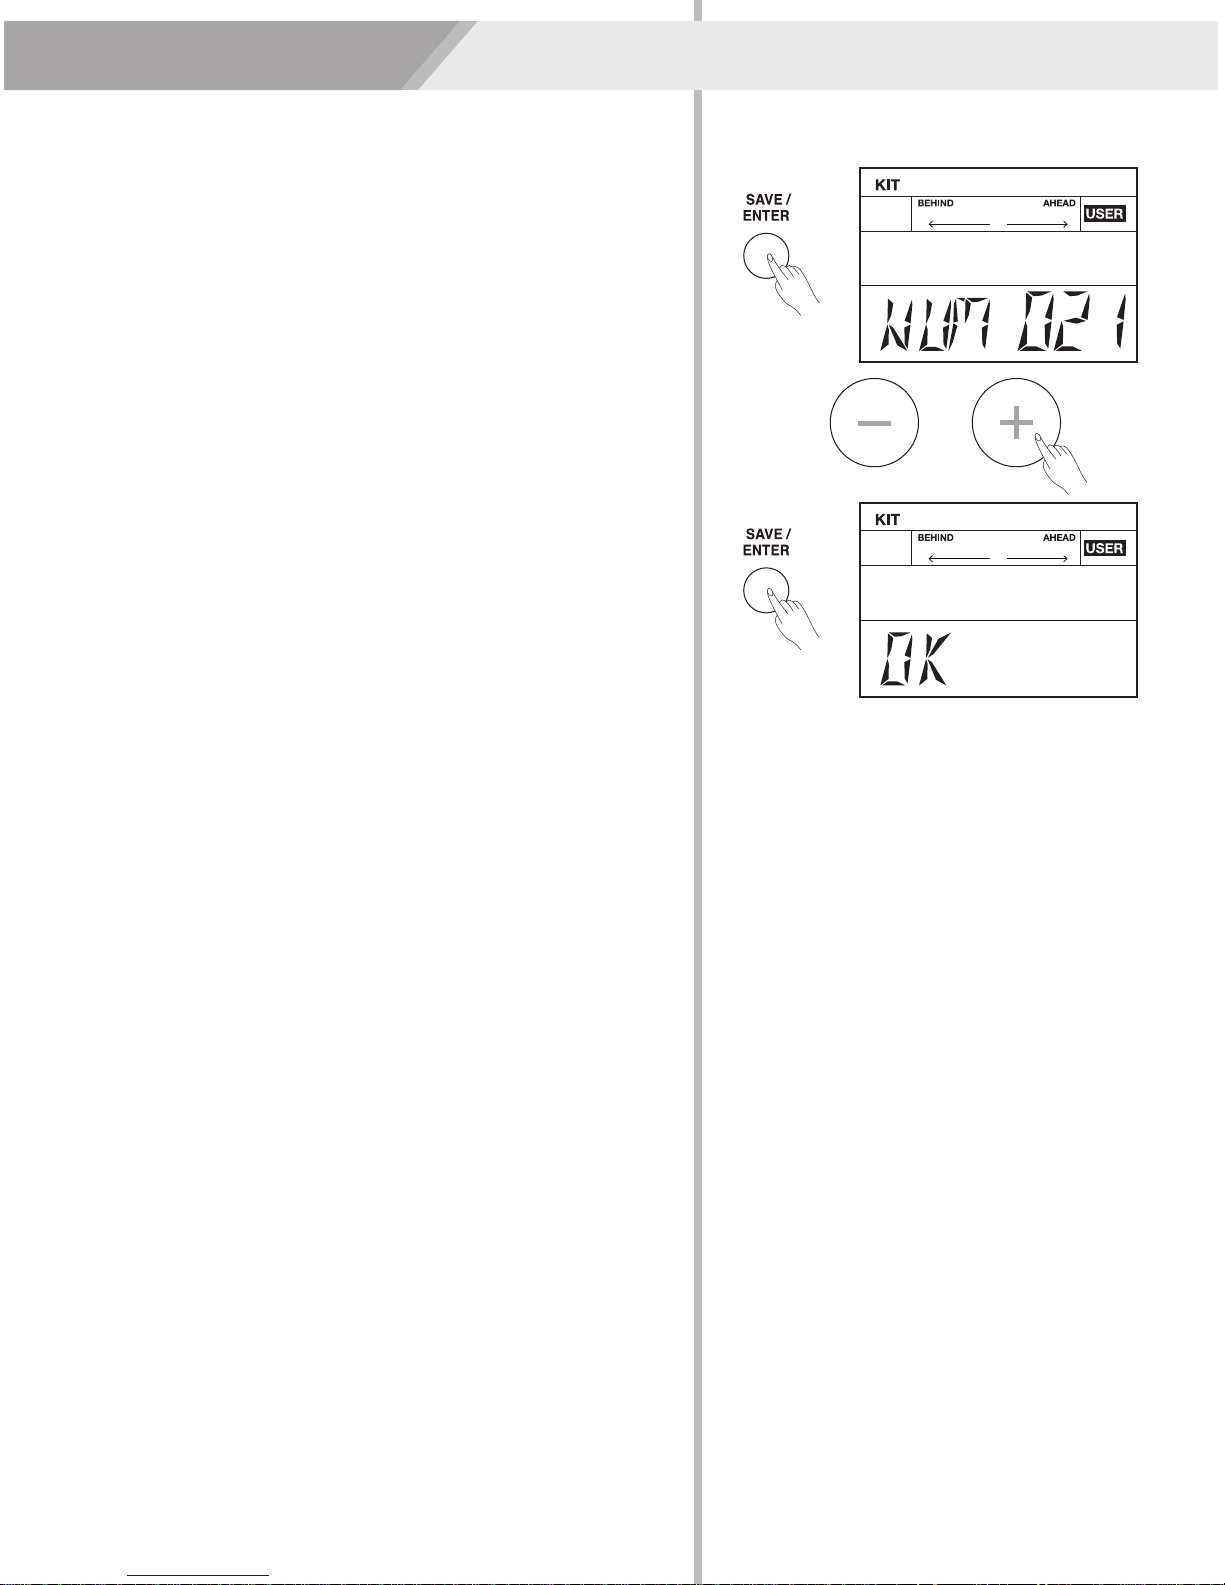
Save User Drum Kit
1. While in the drum kit and voice edit menu, press the [SAVE/ ENTER]
button to save all changes.
2. Use the [+] / [-] button to select a user drum kit (From No.21 to 25).
The number of kit starts flashing at the same time.
3. Press the [SAVE/ ENTER] button again; the LCD will display “OK”,
which indicates all data has been saved successfully.
13
Page 14
Playing Along with a Song
In order to have a better performance experience, a variety of styles can
be selected. Each one offers you to practice. (Refer to the Song List)
You can play the drums while listening to one of these songs.
A song contains Drum part and Accompaniment part. Drum part means
the rhythm you played on the pads; the Accompaniment part means
percussion and melody. The volume of each part can be adjusted.
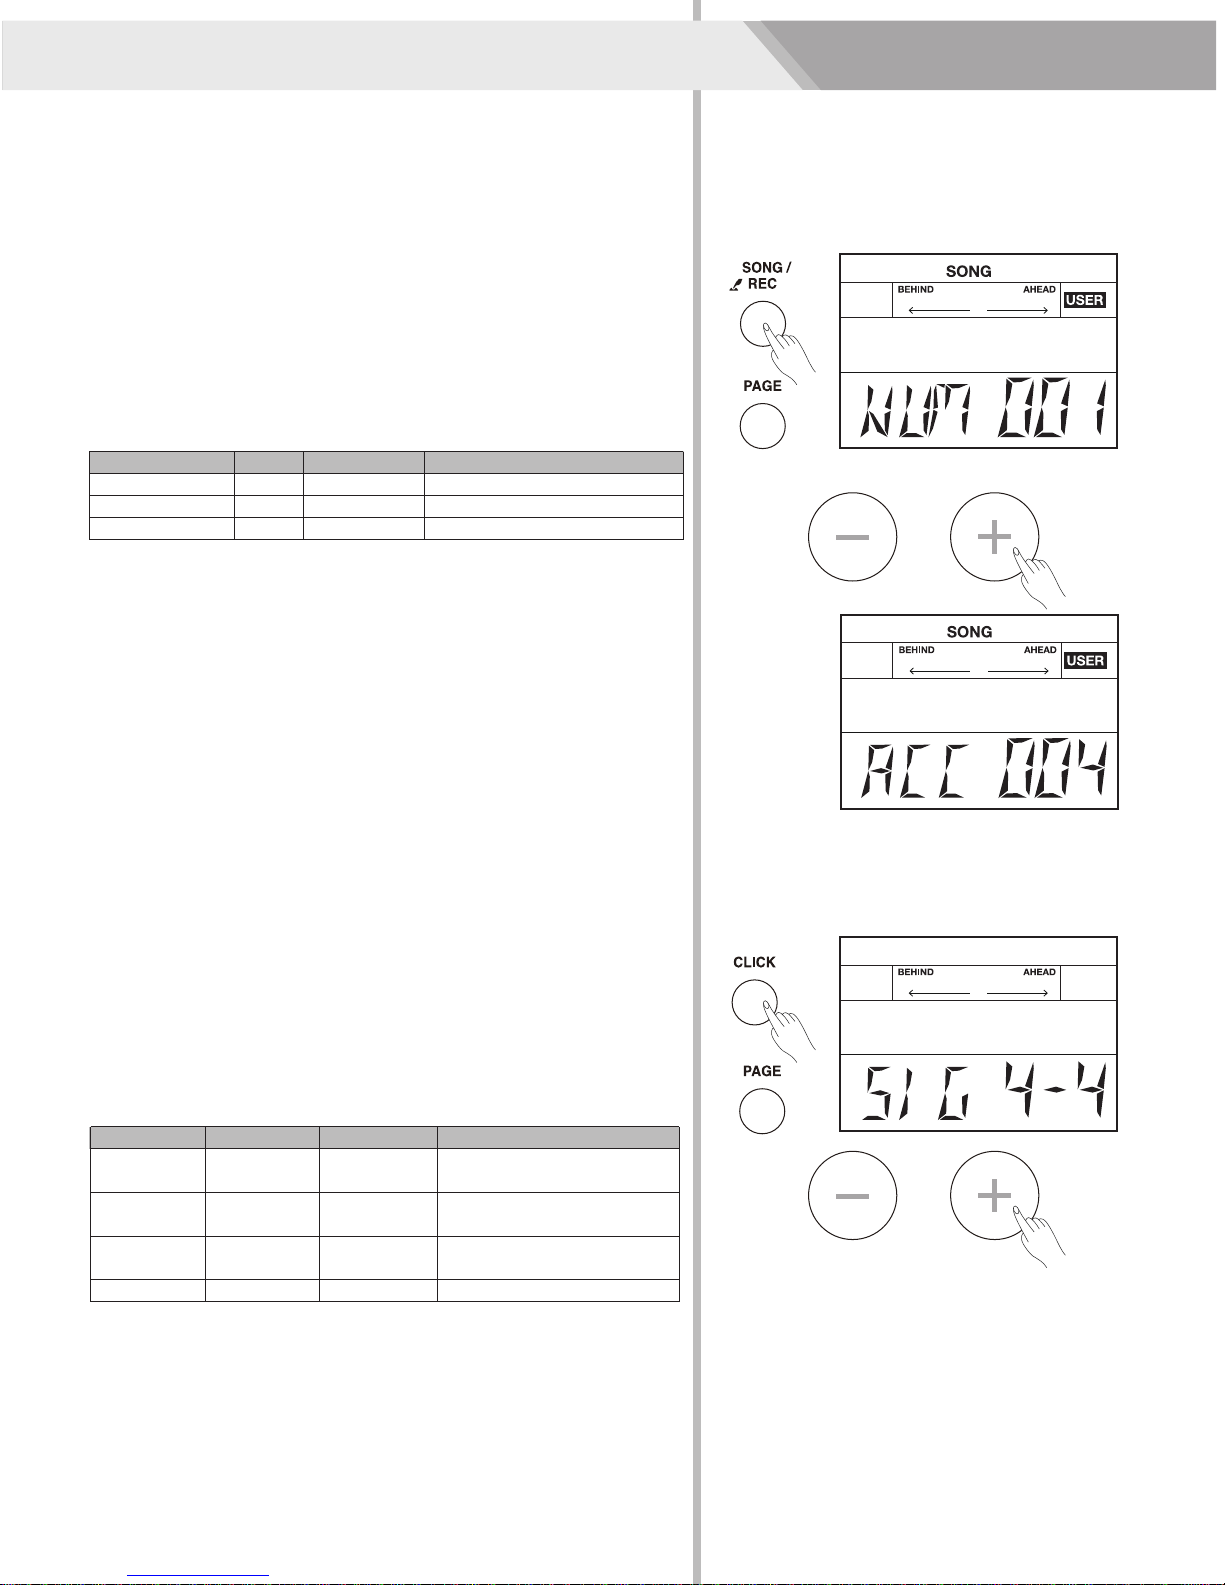
Playing Along with a Song
1. Press the [SONG] button to enter the selection menu.
2. Repeatedly press the [PAGE] button to select the parameter that you
want to edit.
Parameter
SONG SELECT
ACC VOLUME
DRUM VOLUME
3. Use the [+] / [-] button to adjust the parameter value.
Press the [+] / [-] buttons simultaneously to mute songs.
4. Press the [START/STOP] button to play/stop songs.
Value
1~61
0~8
0~8
LCD Display
NUM XXX
ACC XXX
DRM XXX
Description
Select a song.
Adjust the background volume.
Adjust the drum volume.
Metronome
Practicing with the metronome is the best way to follow the beats.
Choose a right tempo for your learning/ performance require.
Starting/ Stopping the Metronome and Its Feature
1. Press the [CLICK] button.
The metronome will start playing, and the light of the [CLICK] button
will blink with the tempo.
2. Repeatedly press the [PAGE] button to select the parameter you
want to edit. Adjustable parameters are shown below:
Parameter
TIME
SIGNATURE
INTERVAL
VOLUME
NAME
3. Use the [+] / [-] button to change the parameter value.
4. Press the [CLICK] button again to stop the metronome, the light will
be off.
Value
0-9/2, 0-9/4,
0-9/8, 0-9/16
1/2,3/8,1/4,
1/8,1/12,1/16
0~5
1~6
LCD Display
SIG XXX
INT XXX
VOL XXX
NUM XXX
Description
Adjust the time signature.
Adjust the rhythm interval.
Adjust the volume of
metronome.
Select the metronome voice.
14
Page 15
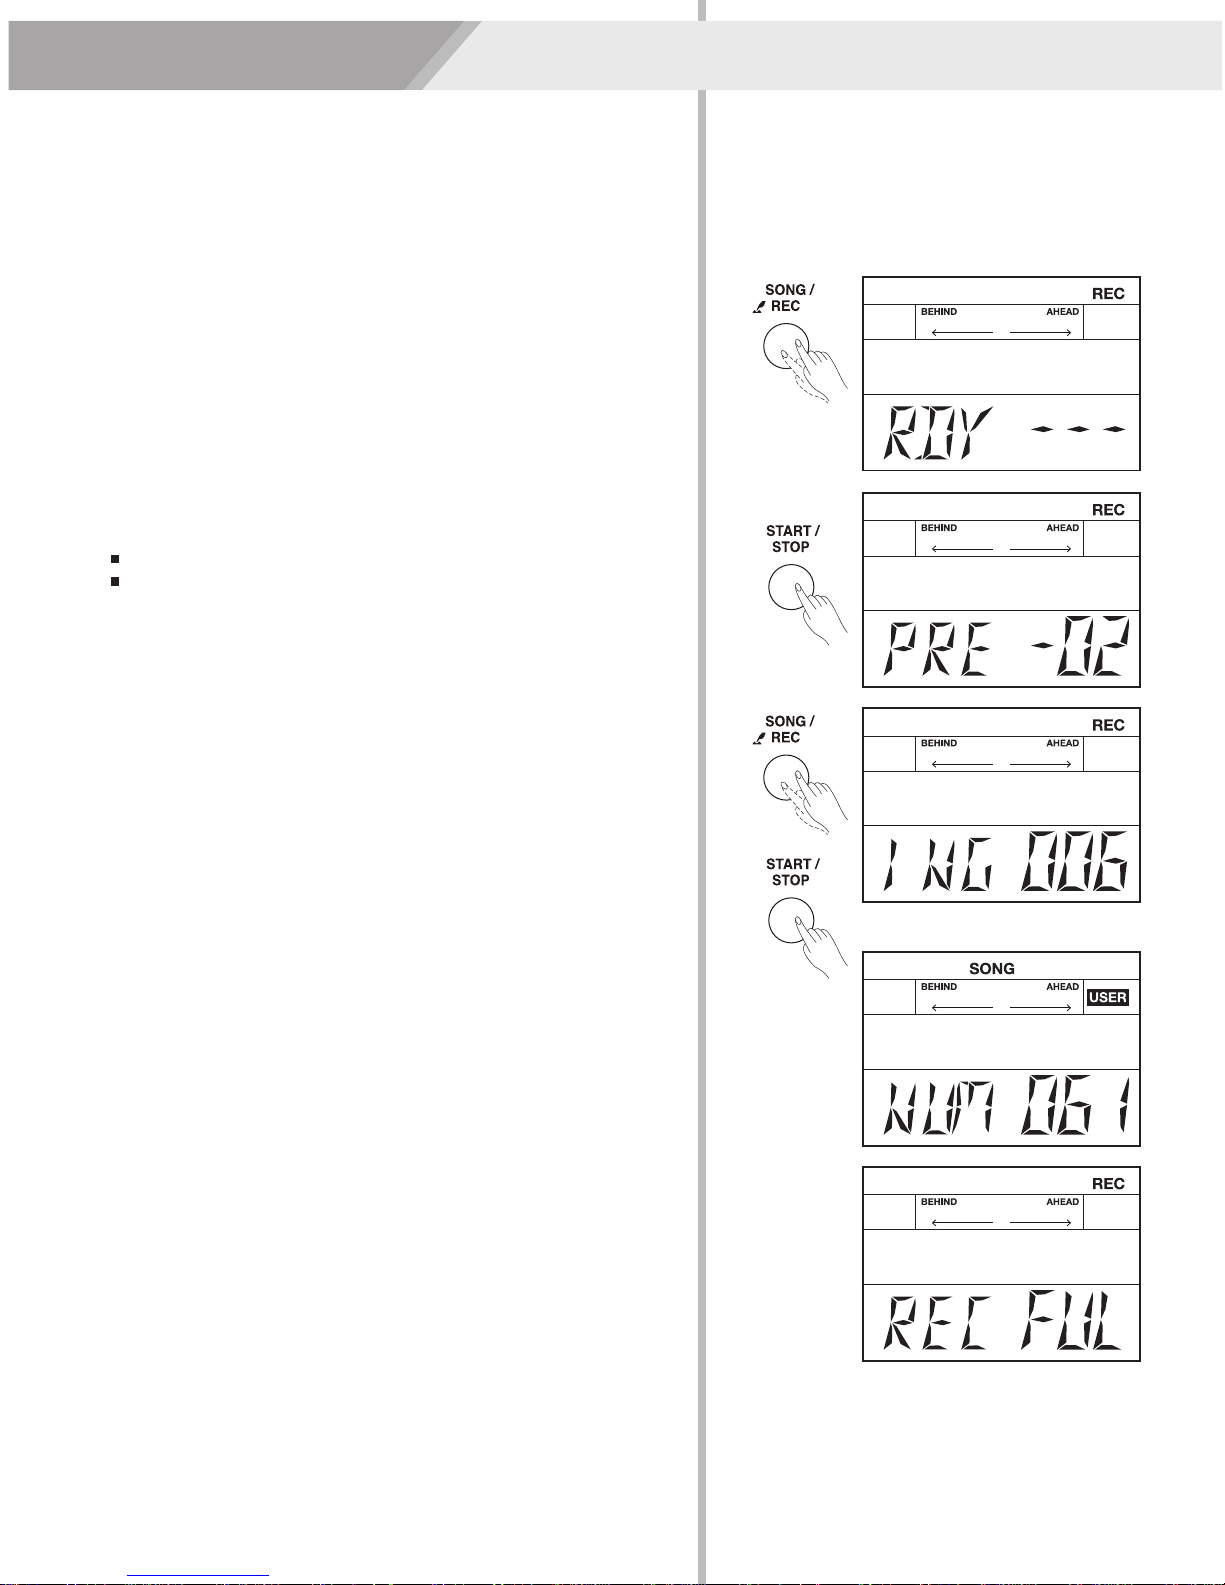
This digital drum offers you easily record your own performance.
Maximize 5000 notes could be recorded in one user song.
Preparing and starting record, refer to the details bellow:
Preparing Record
1. Press the [REC] button for 2 seconds to enter the Record-prepare
mode, the light of the [REC] button starts flashing, and it means the
record is standby. The “REC” icon on the LCD lights up and displays
“RDY---”.
2. If you want to exit the record-prepare mode, press the [SONG]/ [KIT]
button.
Start / Stop recording
1. You can start recording in real time while in the preparing record
menu, there are two ways to start record:
Press the [START/STOP] button.
Strike one pad.
2. Recoding begins after 4 beats count-in.
Record
3. While recording, the light of the [REC] button keeps lighting all the
time, and the LCD will display “ING xxx”, the “xxx” means measure
number.
4. Press the [START/STOP] button again to stop recording, and the
light of the [REC] button will be off.
5. The system returns to the last option automatically. The LCD will
display “NUM 061”. Press the [START/ STOP] button to play back
the recorded song.
Note:
While the record storage capacity is full, the LCD will temporarily display
“REC FUL”, the recording stops automatically.
15
Page 16
AUTO FILL IN (AFI)
There are 10 preset AFI styles, and each style contains 5 Intros, 10 Fills
and 5 Endings which triggered at random. When the AFI function is off,
the splash and cowbell will be triggered when strike the AFI trigger. Edit
voice in the voice menu. When the AFI function is on, strike the AFI
triggers to automatically play an intro, fill or ending.
There are 2 AFI triggers, one for triggering intro/ending, and one for fill.
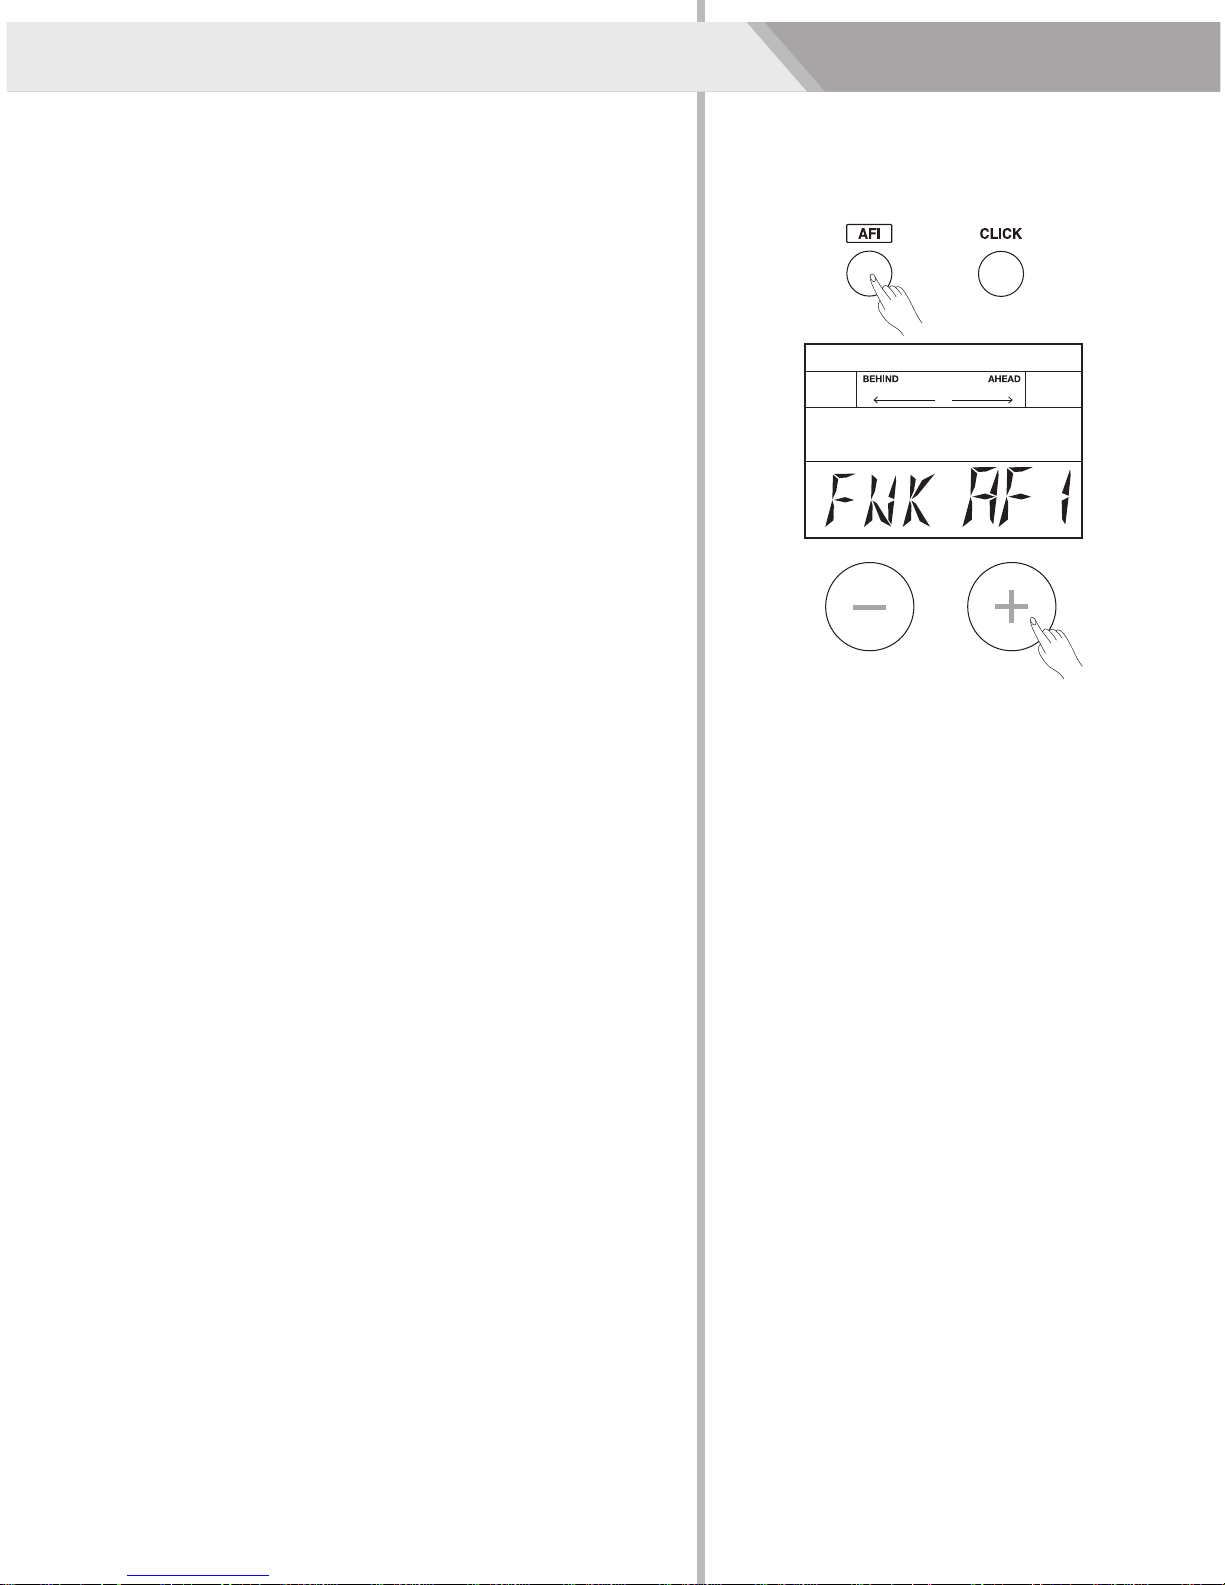
Turn the AFI Function On/ Off
1. Press the [AFI] button to turn AFI function on. The light of [AFI] keeps
lighting.
The light of the [CLICK] button starts flashing, but only indicates you
the current tempo value. Press the [CLICK] button, you can hear the
click voice.
2. Press the [PAGE] button to switch between the menu of solo type
and accompaniment type, and use the [+]/ [-] button to select an
appropriate setting for each of them.
Trigger the intro, sync start accompaniment. Trigger the ending, sync
stop accompaniment.
3. The light of the [AFI] button starts flashing when playing the intro, fill,
or ending.
4. Press the [AFI] button again to turn AFI function off.
Rules of AFI trigger
When the accompaniment is off:
1. Real-time respond current trigger.
2. Alternate trigger intro/ ending.
When the accompaniment is on:
1. Real-time respond the fill when the accompaniment is not playing.
2. When the accompaniment is playing and AFI is not playing, real-time
respond fill expect triggered at the last beat.
When triggered the fill at the last beat, start playing fill at the next bar.
3. When the accompaniment and AFI is playing, only triggered the fill at
the last beat, start playing fill at the next bar.
4. When trigger the intro, accompaniment automatically start playing.
5. Ending always responded at the next bar after triggered.
6. When trigger the ending, accompaniment playing will fade out and
stop.
Note:
Users can load their own AFI styles (MIDI format) into module and use
them in AFI function. Please refer to “Download AFI MIDI Styles from a
Computer” for more details.
16
Page 17
The Coach mode is a unique set of exercises. Specifically designed for
those learners who want to build a better tempo, accuracy and
stamina, as well as developing a better drum playing skills.
About Coach Mode
There are three types of exercises in Coach Mode: Quiet Count,
Change Up and Beat Check. Each exercise has its special practicing
characteristics. Automatic grading function is available for Change Up
and Beat Check types. Try to get a perfect score of 100!
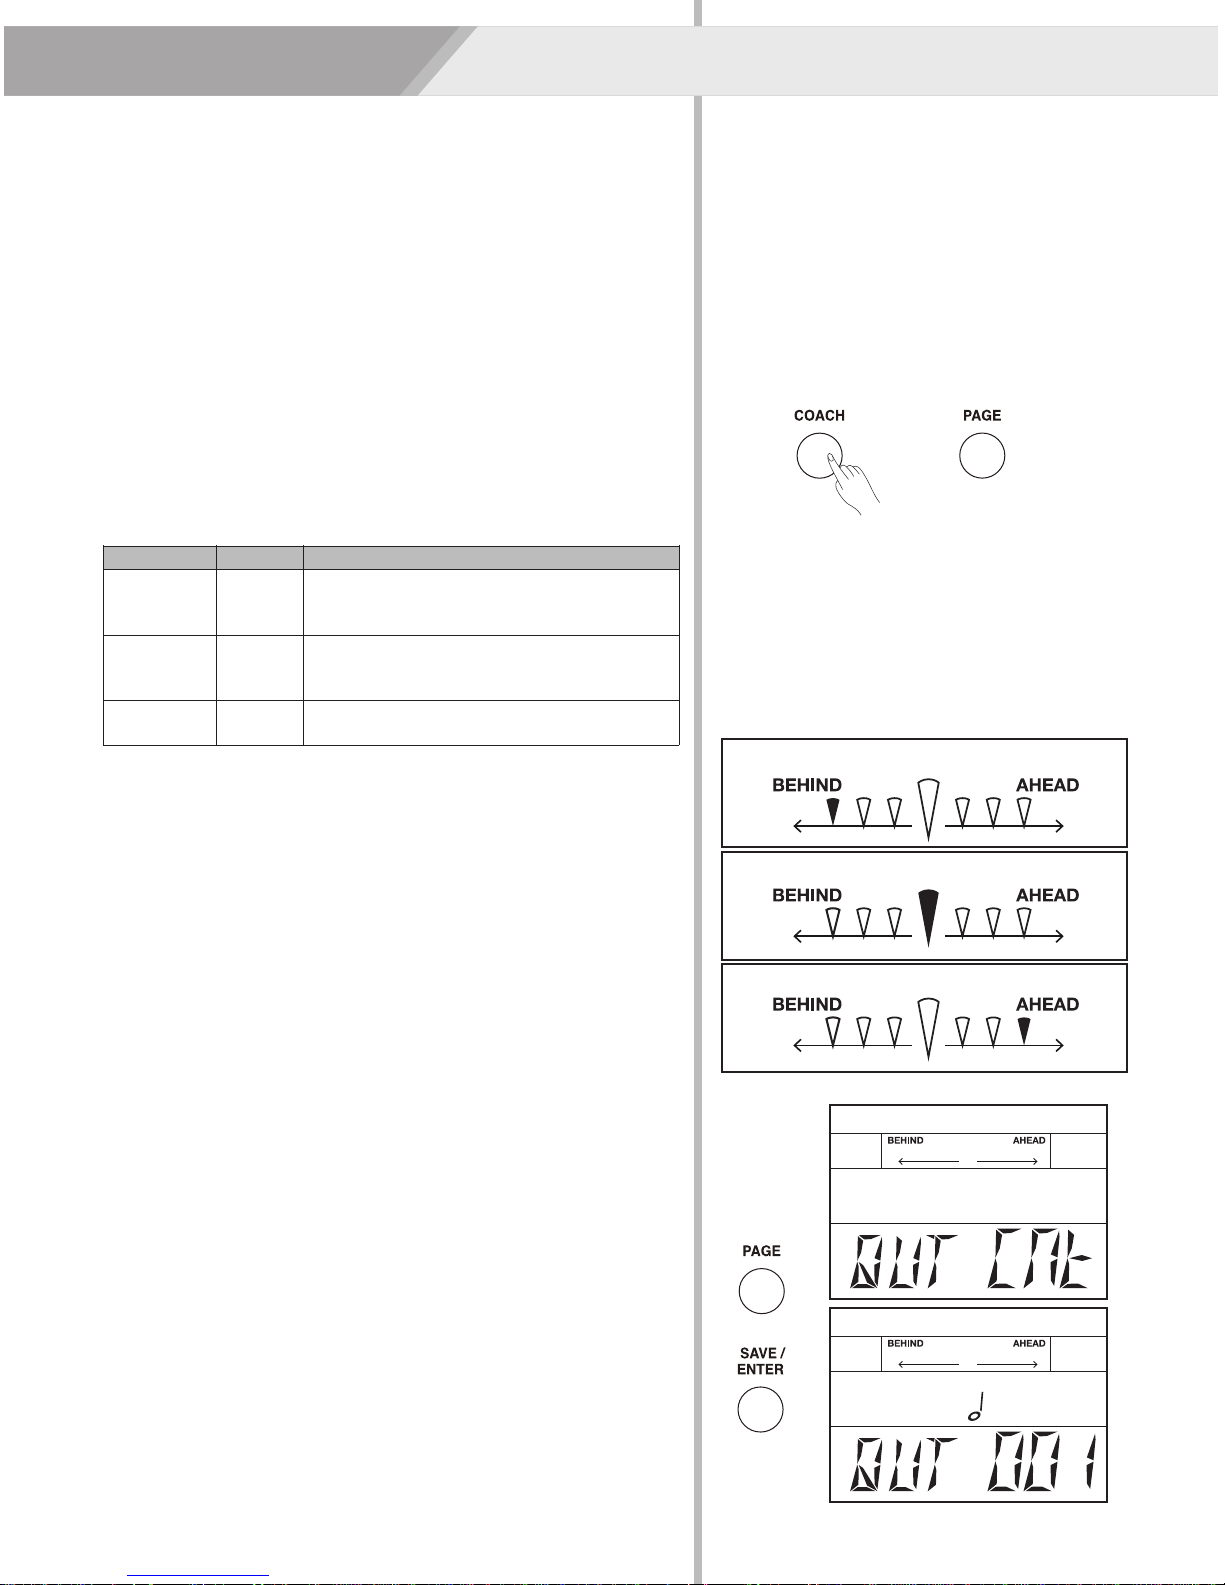
Coach Mode Control
1. Press the [COACH] button to enter coach mode. Then repeatedly
press the [PAGE] button to shift coach type among Quiet Count,
Change Up and Beat Check. In the meantime, you can set the
accent beat prompt for MEA.
According to your present playing skills, select an appropriate coach
type to practice.
Coach Type
Quiet Count
Change Up
Beat Check
2. Press the [ENTER] button to enter the selected coach type.
Display
QUT CNt
CHG UP
BEA CHE
Description
This helps to develop a good sense of time/
tempo. There are 3 types of quiet mode and
5 selectable rhythm types.
3 types of rhythm pattern to train your beat
accuracy. The rhythm type will change every
two measures.
Only metronome accuracy practice. There
are 15 selectable rhythm types.
Coach
Try to play fast
3. Use the [PAGE] button to select relevant parameters.
Throughout the Coach modes, you will discover that some of them
have programmable parameters, allowing you to adapt the functions
to your specific needs.
4. Press the [TEMPO] button to adjust practice speed at any time.
5. Pay attention to the LCD indicators of hitting accuracy when you are
practicing.
Note:
1. Set the automatic grading function to “ON”, only playing with
metronome guidance without bell.
2. Set the automatic grading function to “OFF”, playing with
conventional metronome sound with bell.
6. Press the [COACH] button to exit the Coach Mode.
QUT CNT (QUIET COUNT)
Practice with auto metronome on/ off circularly with several measures
to help you develop a good sense of time and tempo.
1. Repeatedly press the [PAGE] button to select quiet count mode.
2. Press the [ENTER] button to enter quiet count mode.
Good hit
Try to play slowly
3. Use the [PAGE] button switch between QUT and CNT parameters,
press the [+]/ [-] button to select a suitable quiet and count type.
17
Page 18
Coach
Parameters
QUT
CNT
Range
1~5
1-1/2-2/1-3
Display
QUT XXX
CNT XXX
Description
Use the [+]/ [-] button to select a
suitable quiet type.
Use the [+]/ [-] button to select a
suitable count type.
1-1: 1 measure counts, 1
measure quiets.
2-2: 1 measure counts, 2
measure quiets.
1-3: 1 measure counts, 3
measure quiets.
4. Press the [START/ STOP] button to start practicing.
There is a count-in about 1 measure length before starting. Metro
nome sound automatically on/ off, you have to catch up with every
beat you ought to play, come on!
5. If you want to change another QUT/CNT parameter or just exit
coach mode. Firstly, press the [START/ STOP] button again to stop
practicing.
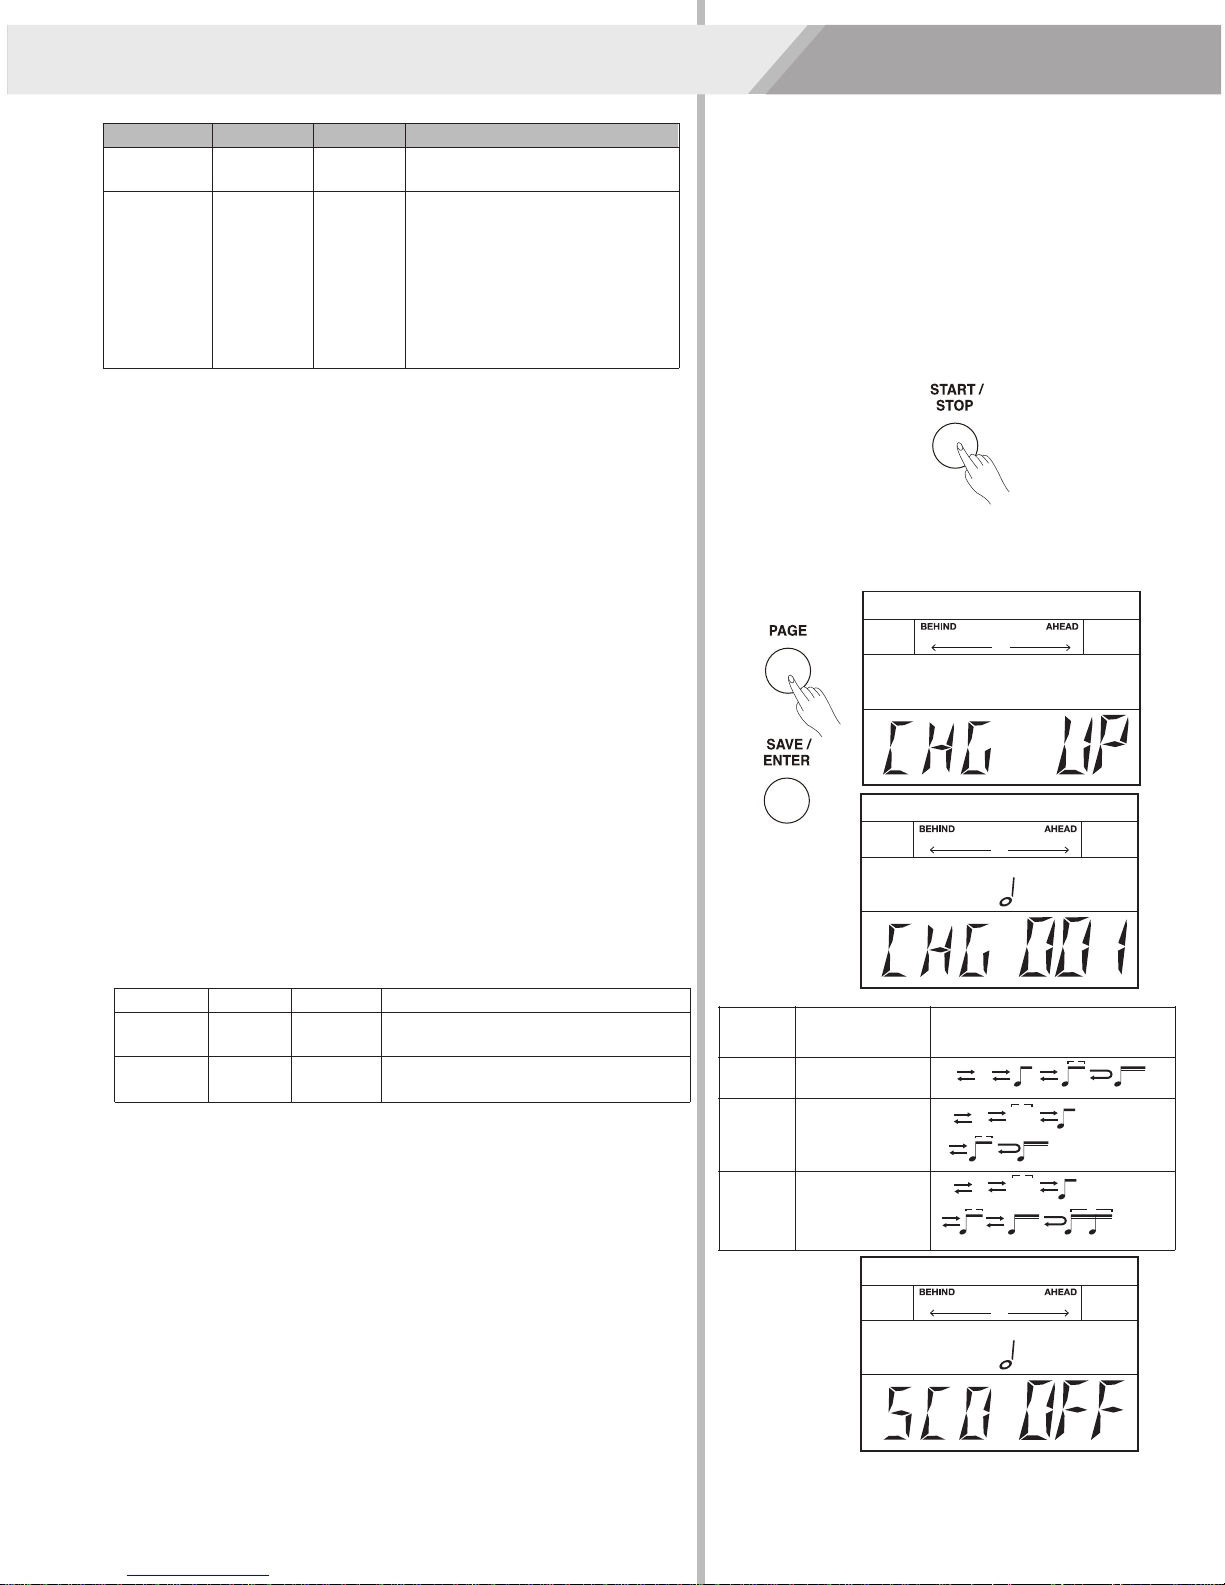
Change Up
In change up mode, system will automatic change the style every two
measures. The note value gradually becomes shorter from half note,
and then will return to half note in the end. This change will be
repeated. The icon on the LCD will flash for times when the rhythm
type is ready to change.
1. Repeatedly press the [PAGE] button to select change up mode.
2. Press the [ENTER] button to enter change up mode.
3. Use the [+]/ [-] button to select a suitable rhythm pattern.
4. Use the [PAGE] button to switch to score editing, press the [+]/ [-]
button to turn score function on/ off.
The default score setting is “OFF”.
Chang Up
CHG
SCO
Range
1~3
ON/ OFF
Display
CHG XXX
SCO XXX
Description
Use the [+]/ [-] button to select a
suitable rhythm type.
ON: The score setting is on.
OFF: The score setting is off.
5. Press the [START/ STOP] button to start practicing.
There will play a length of one measure count-in before starting.
This system automatic change the style every two measures. In
addition to, the next rhythm will flash for times on the LCD when the
rhythm type is ready to change.
6. If the score setting is “ON”: Auto stops practicing and displays your
score after circularly playing several times. Or, Press the [START/
STOP] button to stop practicing and back to the main page of
change up without display your score.
If the score setting is “OFF”: Press the [START/ STOP] button to
stop the practicing mode.
Rhythm
Pattern
P-1
P-2
P-3
Display
CHG 001
CHG 002
CHG 003
Description
h
h
q
q qq3qqq
3
q q
qqq
qq3qqq
3
h
q q
qqq
3
qq
qqq
6
qq qq
18
Page 19
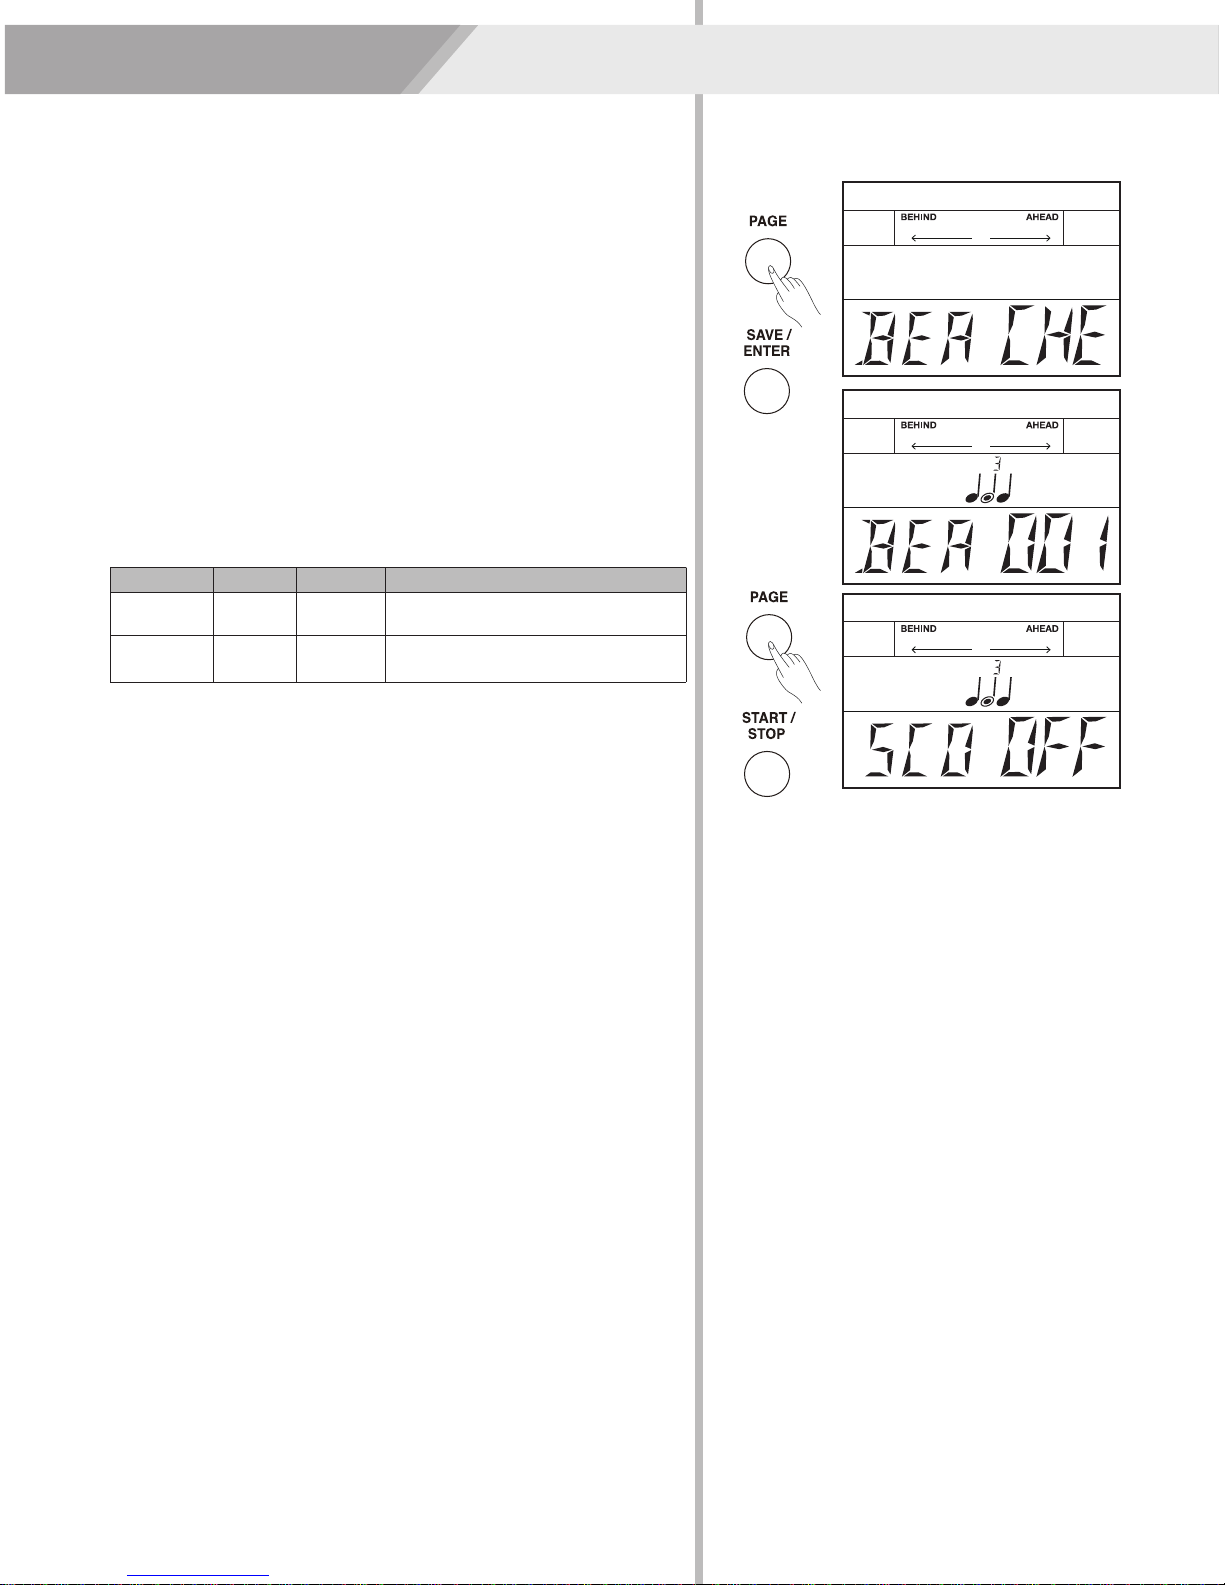
Beat Check
In order to improve playing accuracy of beat, practice with the
metronome basic beat type. If the score function is on, system will
display your practicing score after you have finished.
1. Repeatedly press the [PAGE] button to select beat check mode.
2. Press the [SAVE/ ENTER] button to enter beat check mode.
3. Use the [+]/ [-] button to select a beat type to practice. There are 15
beat types to choose from.
4. Use the [PAGE] button to switch to score editing, press the [+]/ [-]
button to turn score function on/ off.
The default score setting is “OFF”.
Coach
Beat check
BEA
SCO
Range
1-15
ON, OFF
Display
BEA XXX
SCOXXX
Description
Use the [+]/ [-] button to select a
suitable beat type.
ON: The score setting is on.
OFF: The score setting is off.
5. Press the [START/ STOP] button to start practicing.
There will play a length of one measure count-in before starting.
6. If the score setting is “ON”: Auto stops practicing and displays your
score after circularly playing several times. Or, Press the
[START/ STOP] button to stop practicing and back to the main page
of beat check without display your score.
If the score setting is “OFF”: Press the [START/ STOP] button to
stop the practicing mode.
19
Page 20
DBT (Double Bass Trigger)
Normally, it is too hard for beginners to play double bass, almost
impossible, but we make it possible now. Turn on DBT function on; it
can generate two or three continuous kick sounds when you step on
the bass drum only once. Easy to achieve double bass pedal
techniques.
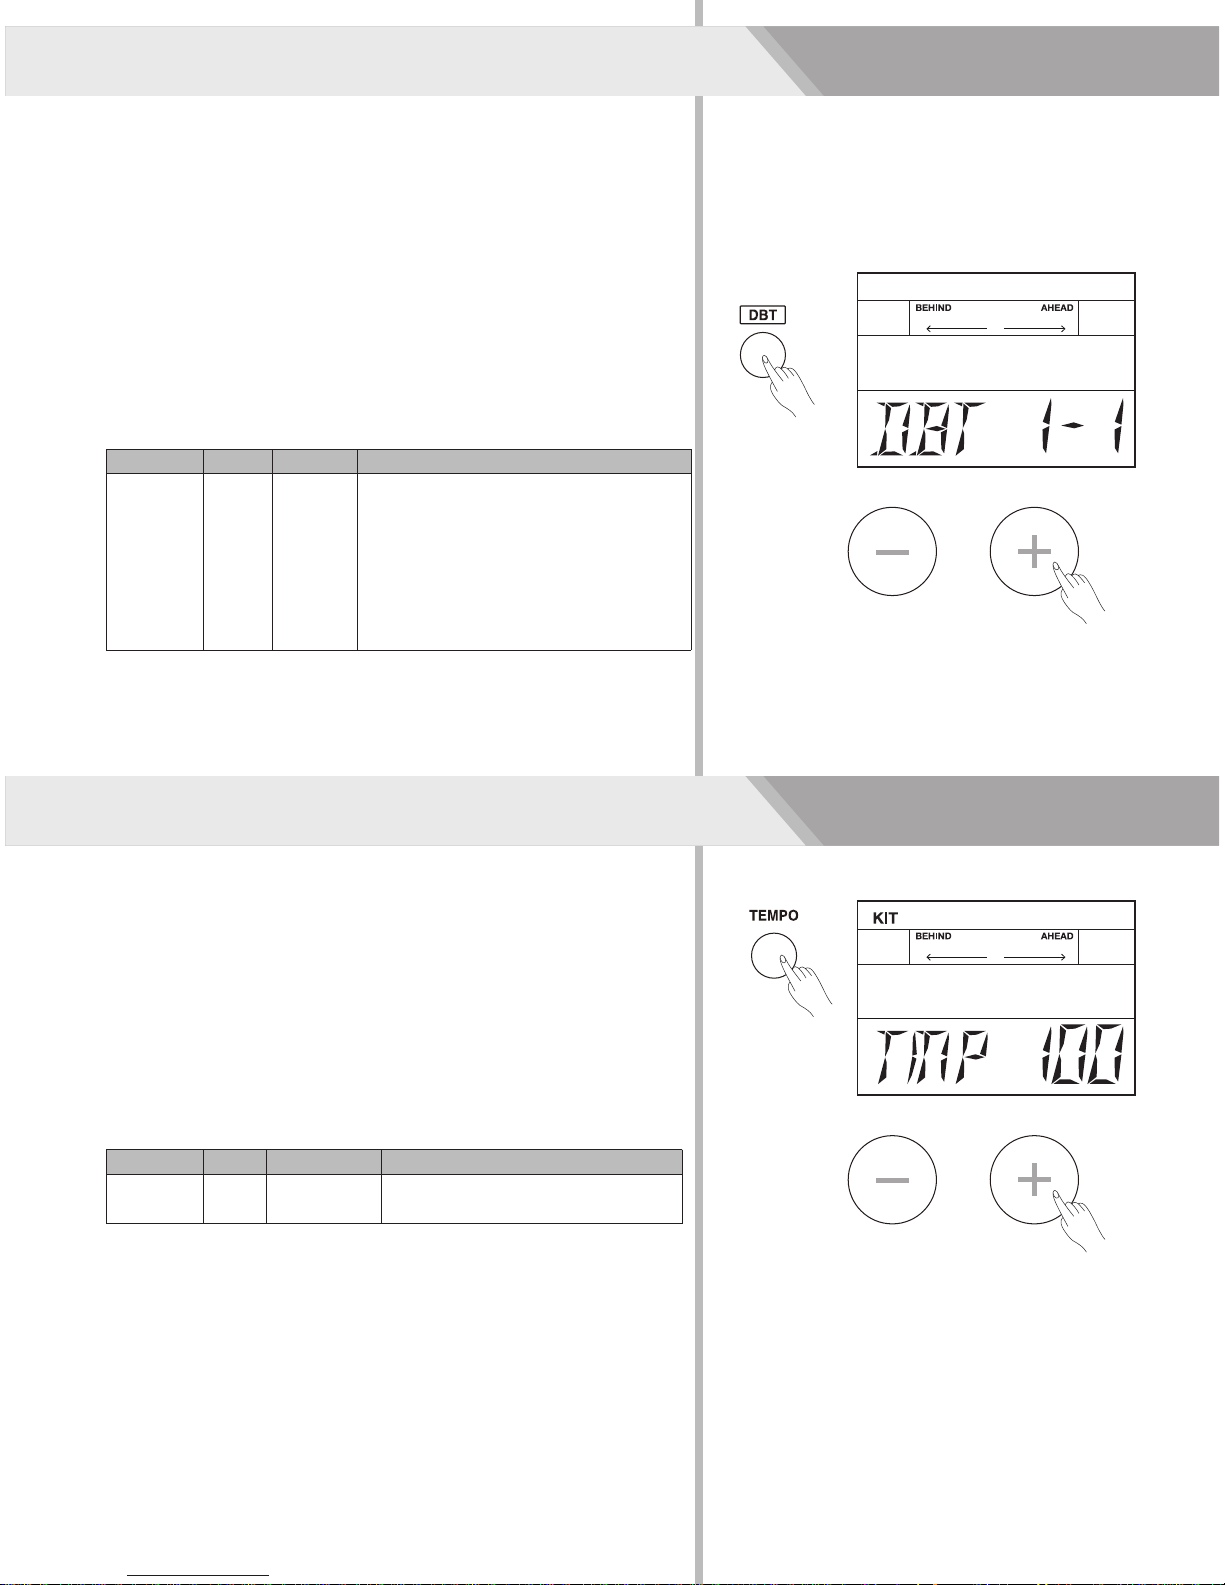
Turn the DBT Function On
1. Press the [DBT] button to turn DBT function on. The [DBT] button
lights up.
The screen will display “DBT 1-x”.
2. Use [+]/ [-] to adjust the second trigger time. This setting can be
remained even turn the module off.
Parameter
BEA
Range
1-1/1-2/
1-3/1-4
Display
DBT XXX
Description
1. Press the [+]/ [-] button to select a
rhythm type.
2. 1=original beat, trigger once.
2=original beat/ 2, trigger once.
3=original beat/ 3, trigger twice.
4=original beat/ 4, trigger once.
3. Power off protection. This setting can
be remained even turn the module off.
3. As you play the bass drum, it can produce a double bass technique.
4. Press the [DBT] button again, turn DBT function off.
Tempo
Press the [TEMPO] button to adjust the tempo value of metronome and
song playback.
1. Press the [TEMPO] button.
2. Use the [+] / [-] button to adjust tempo value.
3. Without any operation within 3 seconds, the system will be back to
previous menu automatically.
Parameter
Tempo
Value
30-280
LCD Display
TMP xxx
Description
Both metronome and song playback
are based on this tempo value.
20
Page 21
Utility Mode (UTILITY)
This mode contains two parts: the drum pad trigger settings and drum
module settings.
The Drum Pad Trigger Settings
As a professional drummer, you may be very pleased to set your drum
triggers carefully corresponding to your playing habits and feelings,
making your performance more interesting and professional. At the
meantime, your digital drum will be more operable.
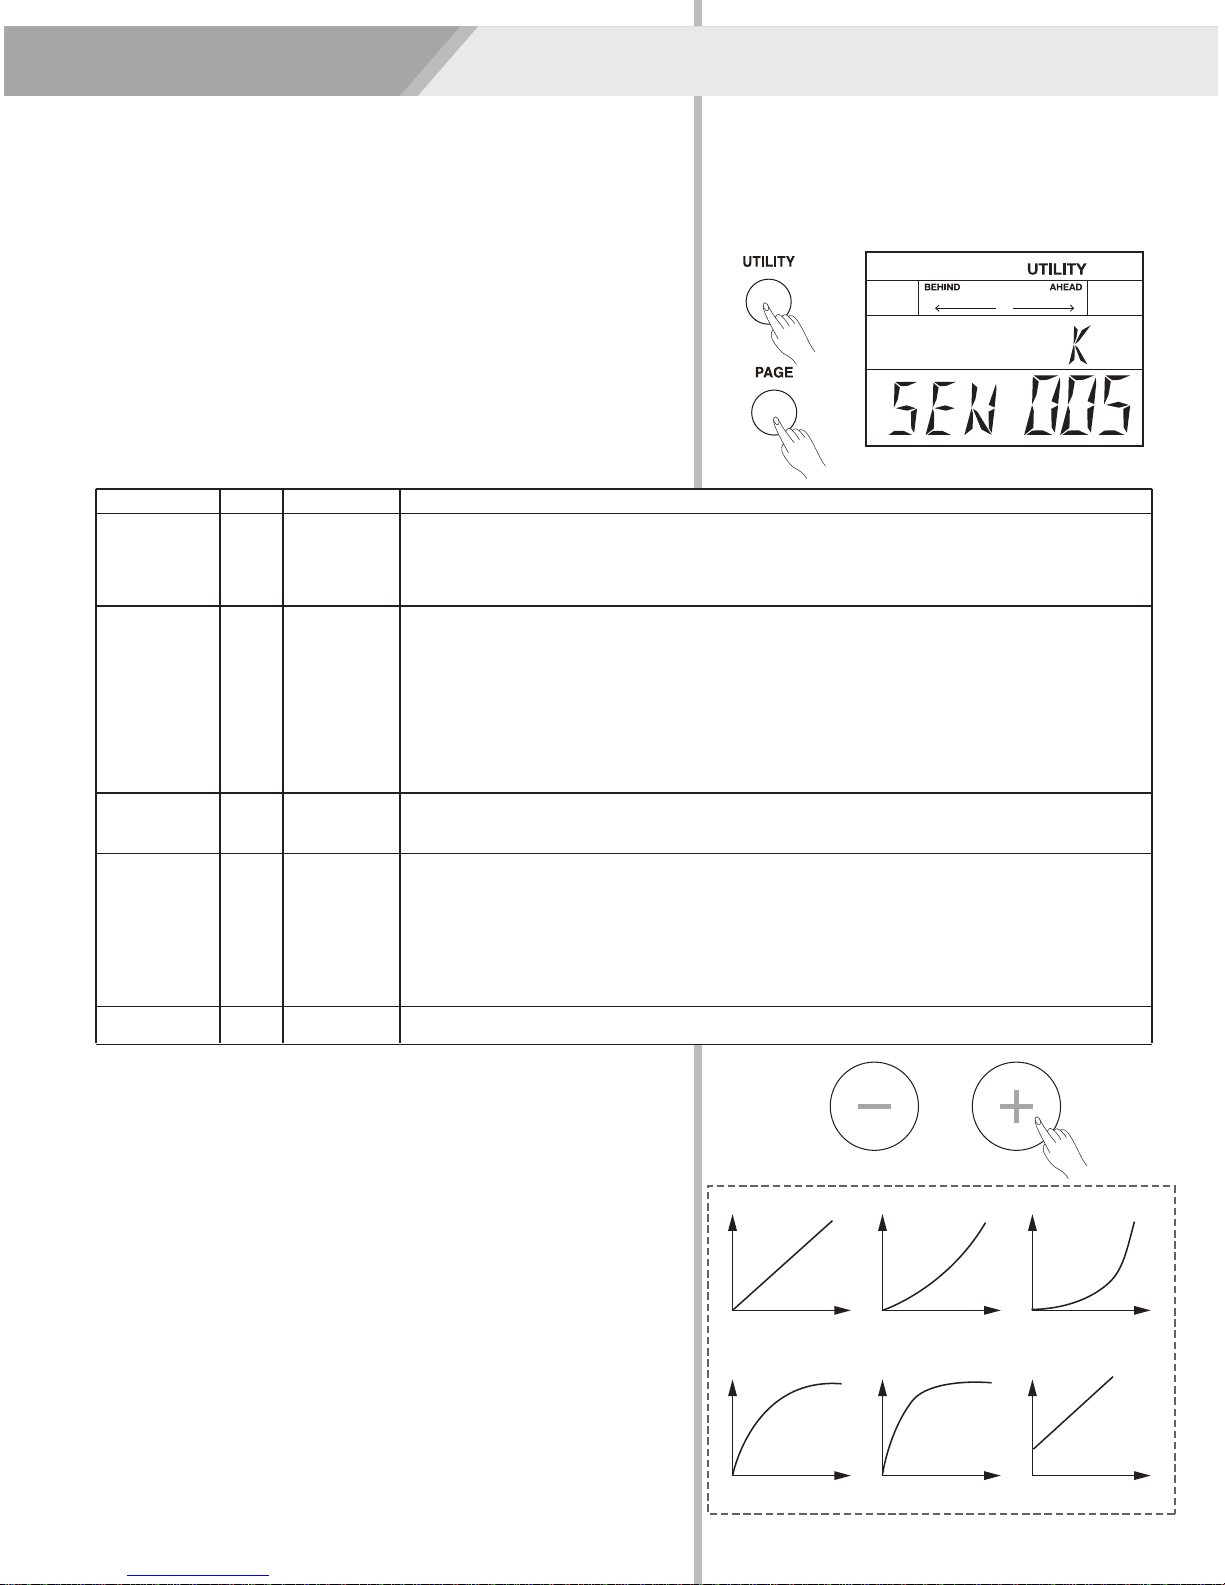
1. Press the [UTILITY] button, the LCD will display the UTILITY menu.
2. Repeatedly press the [PAGE] button to select the trigger parameters
that you want to edit.
The drum pad trigger settings are shown below:
Parameter
SENSITIVITY
Value
1~16
LCD Display
SEN XXX
Description
Adjust the sensitivity of the pad to regulate the pad response. Higher settings result in
higher sensitivity, so that the pad will produce a loud volume even when struck softly.
Lower sensitivity will keep the pad to producing a low volume even when played forcefully.
You can also adjust the sensitivity of the splash in Splash Sensitivity.
XTALK
1~8
XTK XXX
When two pads are mounted on the same stand, the vibration produced by hitting one
pad may trigger the sound from another pad unintentionally (This is called crosstalk.) You
can avoid this problem by adjusting Crosstalk on the pad that is sounding inadvertently. If
the value is set too high, then when two pads are played simultaneously, the one that is
struck less forcefully will not sound. So be careful and set this parameter to the minimum
value required to prevent such crosstalk. With a setting of "0”, crosstalk prevention does
not function.
CURVE
1~6
CUR XXX
You can control the relation betweeen striking force and response volume by this setting.
Adjust the curve to satisfy your playing requirement.Refer to the CURVE description.
RETRIG
CANCEL
1~16
RTG XXX
This setting avoids “re-triggering”, which means that when you strike a pad once, maybe
you can hear two hits coming from one strike. This may happen when pad vibrating.Adjust
the “Retrigger Cancel” value and strike the pad to see if there is any re-triggering. Be
careful to set it to a suitable value. If too high, some sounds may be omitted when played
fast; if too low, retrigger can’t be prevented effectively. It is best to set it to a value just
prevented retriggering.
MIDI NOTE
0~127
MID XXX
MIDI output key mapping.
3. Striking the specified pad, select the pad that you want to edit.
4. Use the [+] / [-] button to adjust the parameter value.
Note:
The Curve descriptions are shown below:
Curve 1: The most natural setting. There is a linear change between
playing dynamics and volume response.
Curve 2, 3: Compared to Curve 1, heavily strikings make greater
change.
Curve 4, 5: Compared to Curve 1, gentle strikings make greater
change
Curve 6: Even a soft strike can make strong volume, and the range of
dynamic response is small. Especially when a drum trigger is used as
an external pad, reliable triggering can be made.
VOL
VOL
Curve1
Striking
VOL
VOL
Curve2
Striking
VOL
VOL
Curve3
Striking
Curve4
Striking
Curve5
Striking
Curve6
Striking
21
Page 22
Utility Mode (UTILITY)
The Drum Module Settings
You can go further set the drum module function, do as the procedures
shown below:
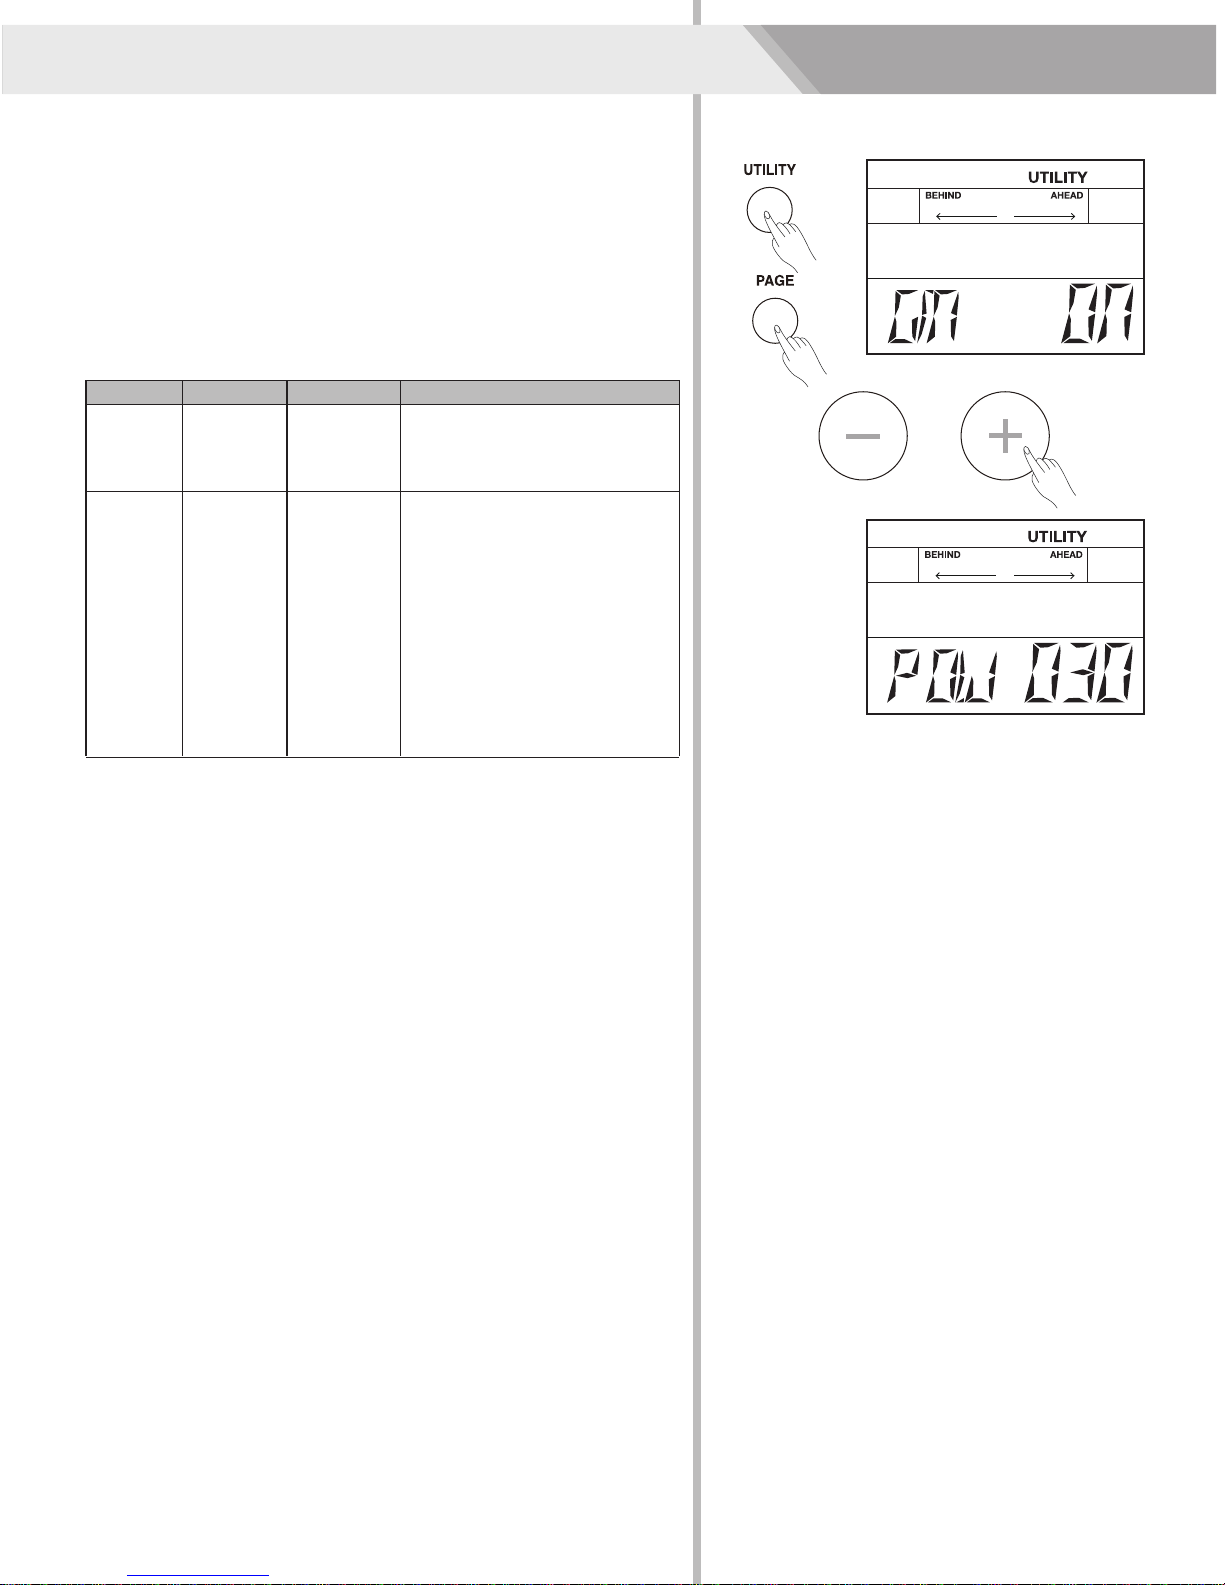
1. Press the [UTILITY] button, the LCD will display the UTILITY menu.
2. You can repeatedly press the [PAGE] button to select the function
menu and use the [+] / [-] button to adjust the parameter value.
The setting values of drum module are shown below:
Parameter
GM MODE
AUTO
POWER
Range
ON/OFF
30, 60 ,OFF
LCD Display
GM XXX
POW XXX
Description
ON: The channel 10 will respond
GM drum kit.
OFF: The channel 10 will
respond local drum kit.
Factory settings, approximately
30 minutes.
30: Automatically turns the power
off if no buttons or functions are
operated for approximately 30
minutes.
60: Automatically turns the power
off if no buttons or functions are
operated for approximately 60
minutes.
OFF: The power will not power
off automatically.
22
Page 23
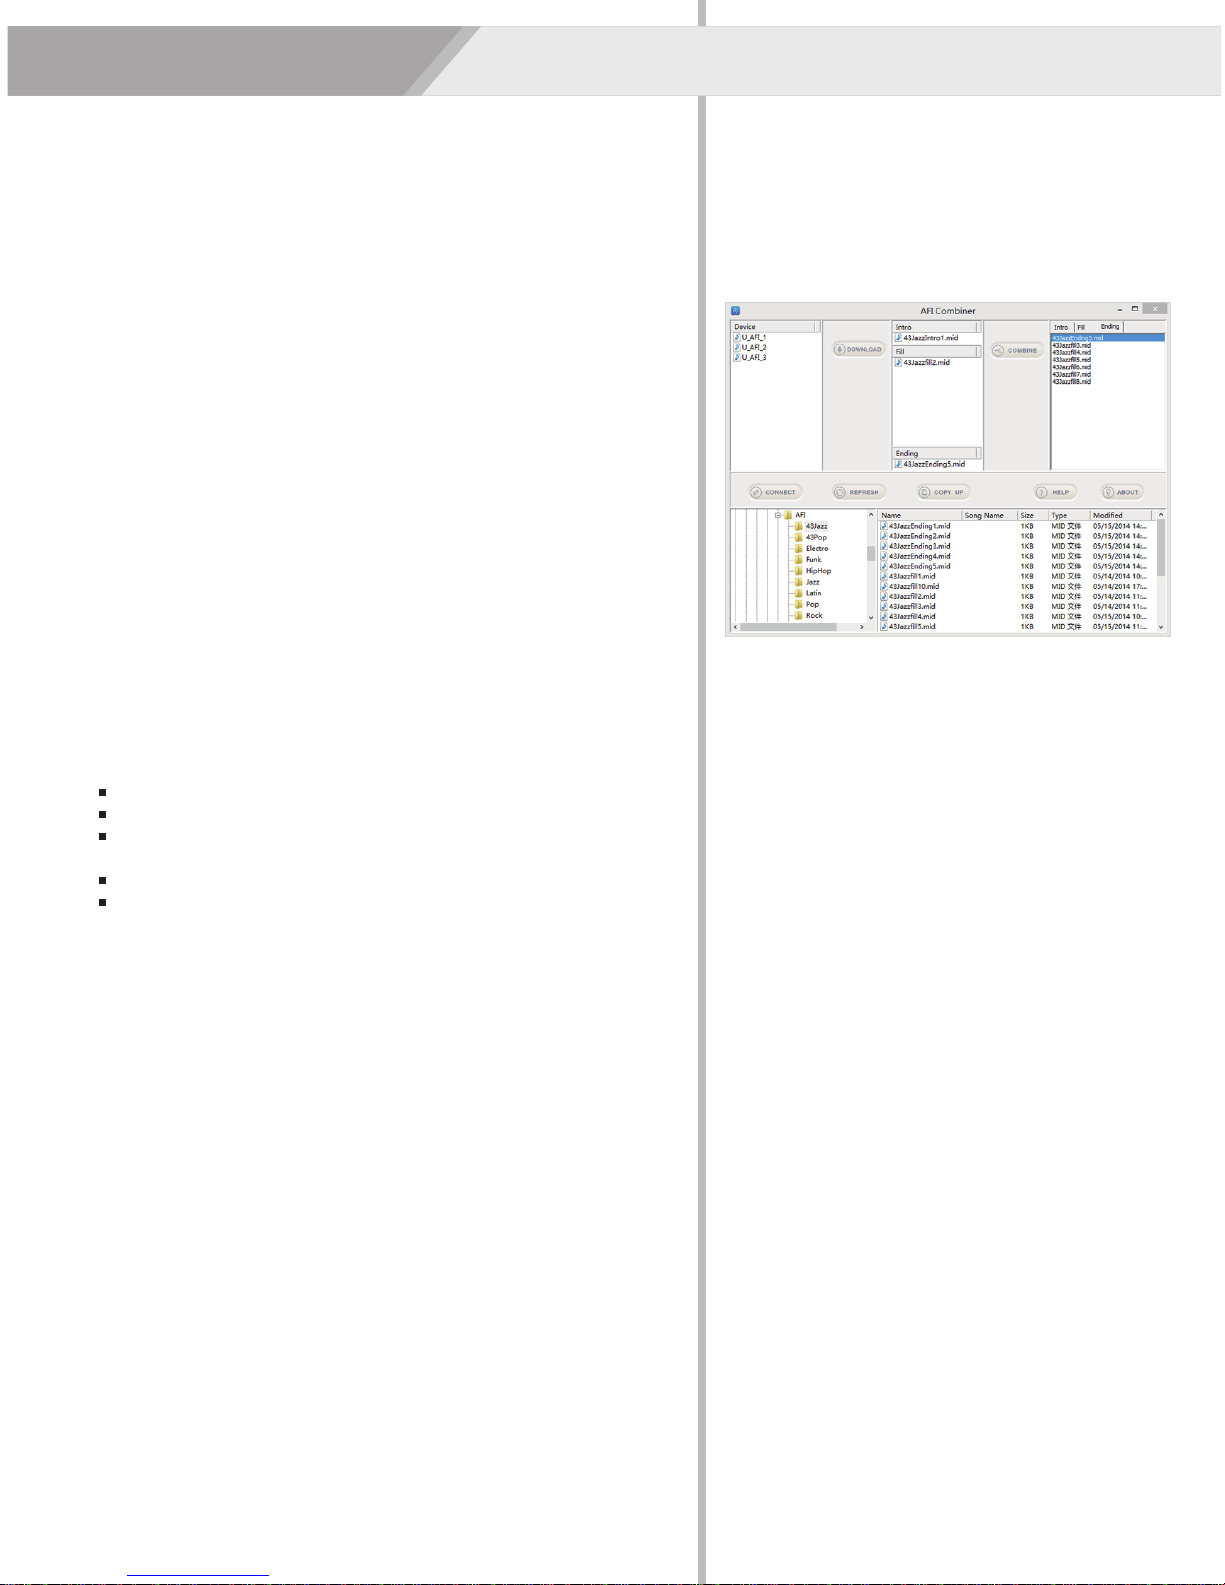
Download AFI MIDI Styles from a Computer
Up to 3 user AFI styles can be downloaded into module, and all saved
data will not be erased even power off immediately.
Note:
Prepare for computer, download software, USB cable to download user
MIDI data from computer.
The interface of download software is shown on the right:
1. Download AFI Combiner software:
Search the “AFI Combiner” on the website:
http://www.mecldata.com/download/apps/, download the software.
2. Connect to a computer (USB terminal)
The USB connector allows you to connect the digital drum directly
to your computer. It can be connected without installing a driver in
Windows and MAC OSX environments. The digital drum will be
recognized as a “USB Audio device” to receive and transmit MIDI
messages through a single USB cable. The USB port is used only
for MIDI messages (MIDI via USB).
Note:
Compatible USB connector: USB 3.0, USB 2.0 quick /high.
3. Download AFI MIDI styles from computer. (For more details, please
refer to PC help content).
Note:
Support SMF 0 MIDI file only.
Capacity less than 2K per MIDI file.
The time signature and tempo value of one AFI style MIDI file
should be the same.
The filename extension should be named as “ ***.MID”.
Available system: Window XP, Window 7 32bit, Window 7 64bit,
Window 8 32bit, Window 8 64bit system.
23
Page 24
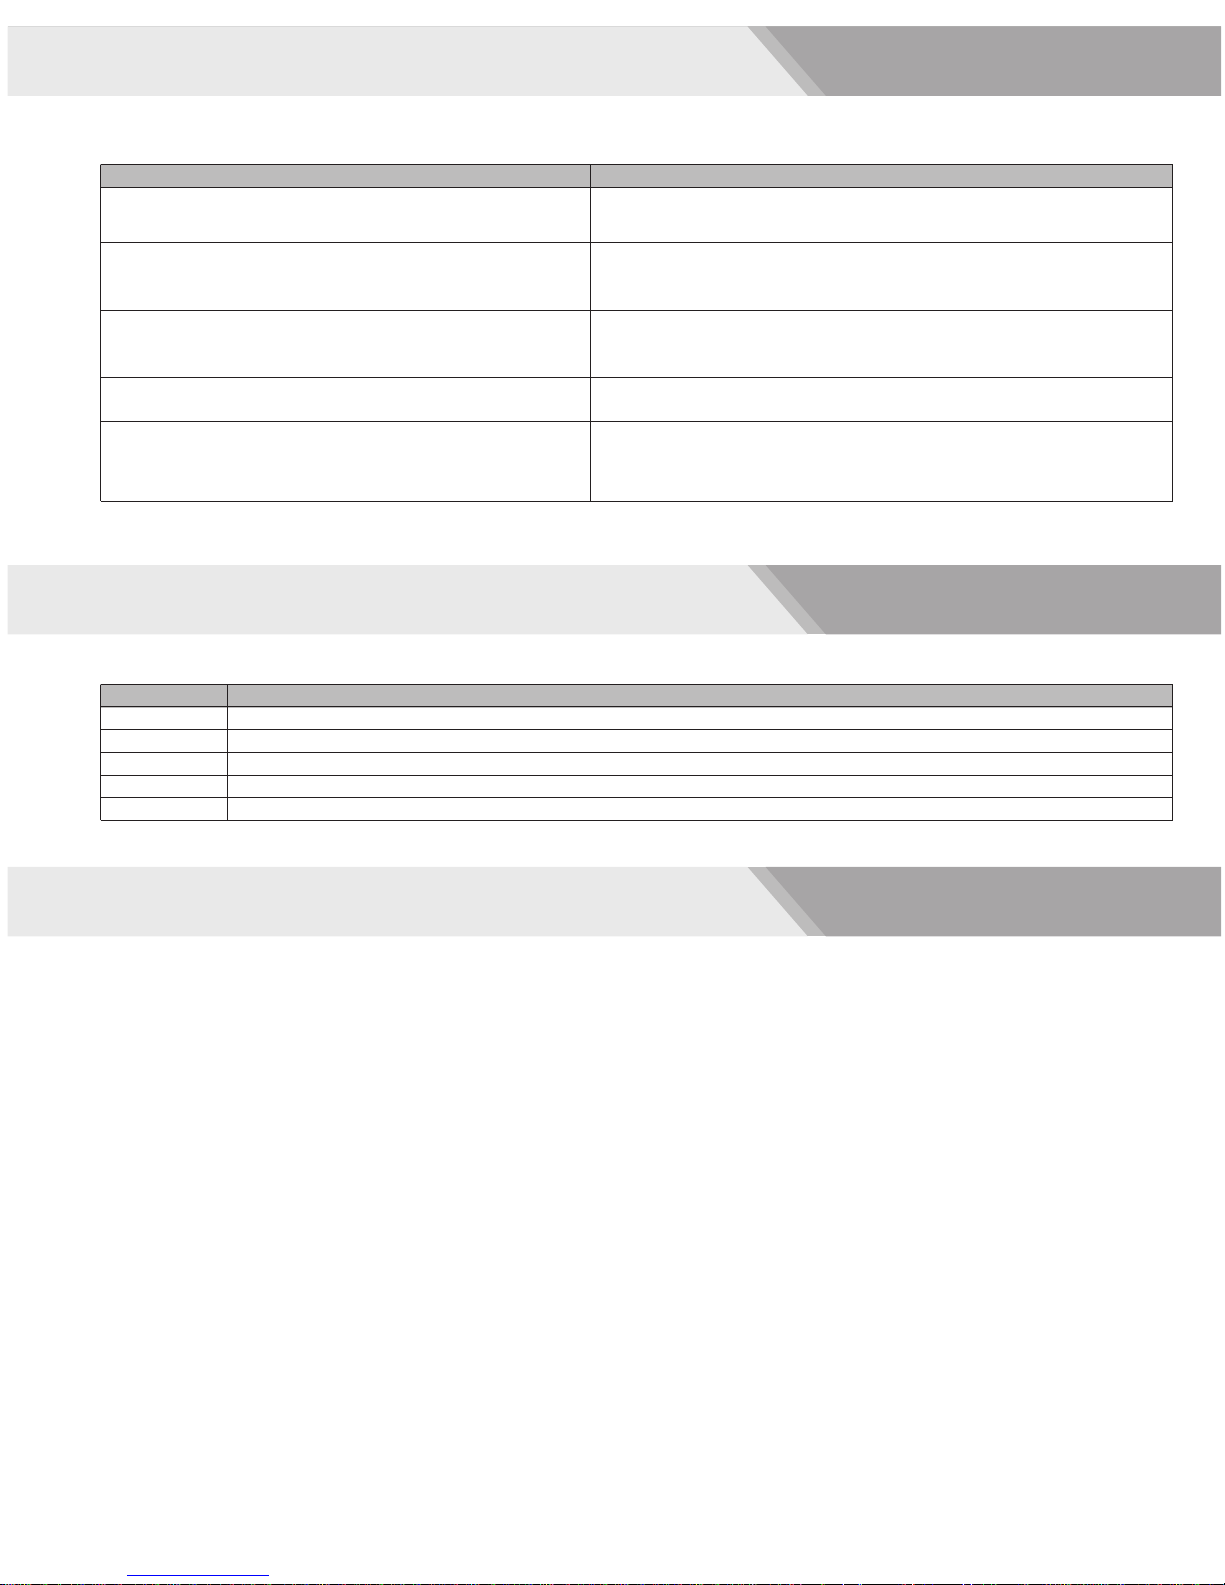
Troubleshooting
Problem
No sound
No sound from Pads
No click sound
The Pad volume doesn’t match the Song playback volume.
Cannot connect to the computer
Prompt Messages
Message
REC FUL
FAC SEt
EMP
OK
WAT
Meaning
The record data memory is full.
The factory reset of module is complete.
The user song is empty.
The drum kit and utility settings are saved.
The data is loading from flash ROM now, please wait.
Possible Cause and Solution
1. Rotate the [VOLUME] knob to be sure that the volume isn’t down.
2. To be sure that Local Mode should be set to “ON”
1. To be sure that the pad is connected correctly.
2. To be sure not set the volume of the pad to 0.
1. To be sure the metronome is turned on.
2. To be sure not set the volume of the click to 0.
1. Adjust the song playback volume to match the pad volume.
1. Make sure the USB has correctly connected.
2. Do the connect operation again (Keep the computer on, and then
turn the module on, connect the USB cable).
Specifications
Maximum Polyphony
64
Drum kits
Kit: 25 (20 Presets + 5 Users)
GM Drum Kit: 11 GM Drum Kits
Instruments
Instrument: 226
(Drum Voice, Percussion Voice, Effect Voice)
9 Hi-hat Companion
Sequencer
Preset Pattern: 60
User Song: 1
Tick: 192 ticks per beat
Record: Real-time Record
Data Capacity: About 5000 notes
Tempo
30~280
Display
Backlit LCD
Connectors
TRIGGER INPUT CONNECOR, PHONES, AUX IN, USB
Control Buttons
Power on/off, Master Volume, Click, Kit/ Voice, Save/ Enter,
AFI, DBT, Coach, Song/ Rec, Start/Stop, Utility, Tempo, +/-,
Page.
Power Supply
DC 9V, 500mA
Dimensions
125(W) X 187.5 (L) X 95 (H) mm
Module Weight
0.5 kg
* All specifications and appearances are subject to change
without notice.
24
Page 25
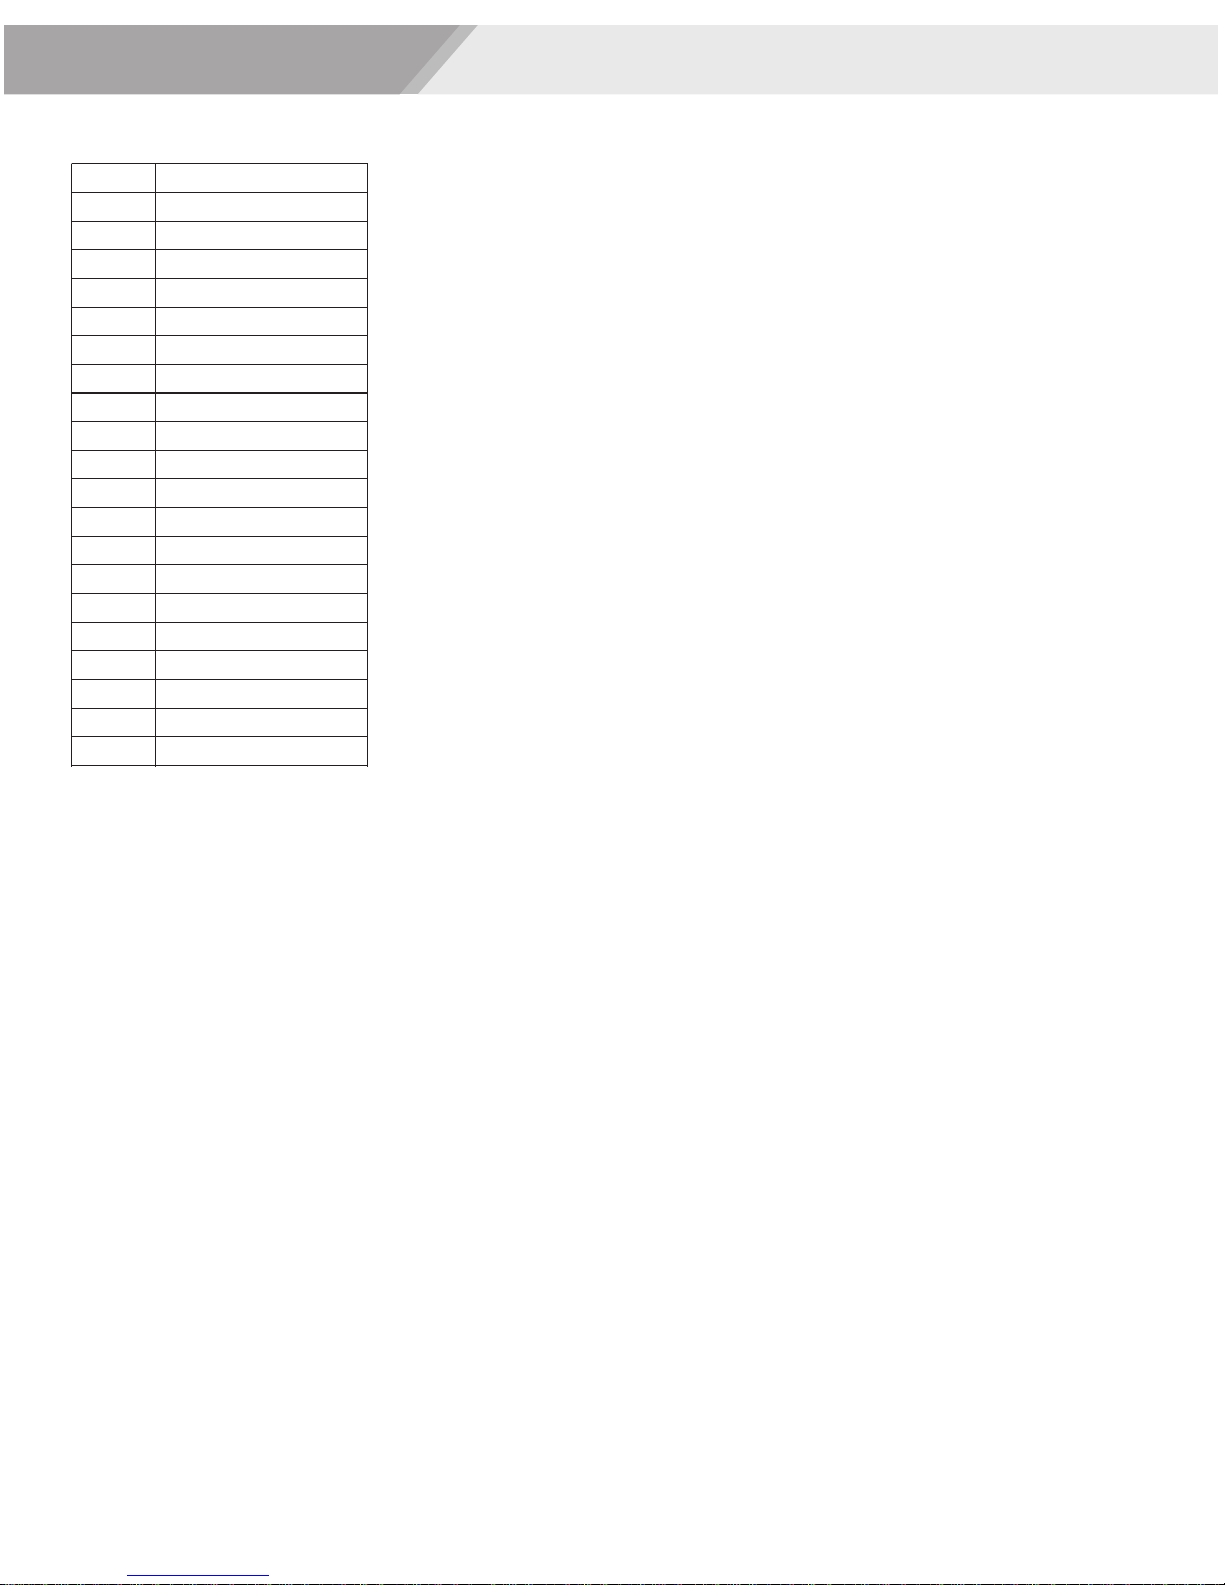
Drum Kit List
No.
1
2
3
4
5
6
7
8
9
10
11
12
13
14
15
16
17
18
19
20
PRESET KIT
Acoustic 1
Funk Band 1
Jazz Brush 1
Rock 1
808
909
Indian 1
Percussion 1
Acoustic 2
Funk Band 2
Jazz
Rock 2
Timbales
Electro
Indian 2
Percussion 2
Marimba
FX Mix 1
Stardust
FX Mix 2
25
Page 26
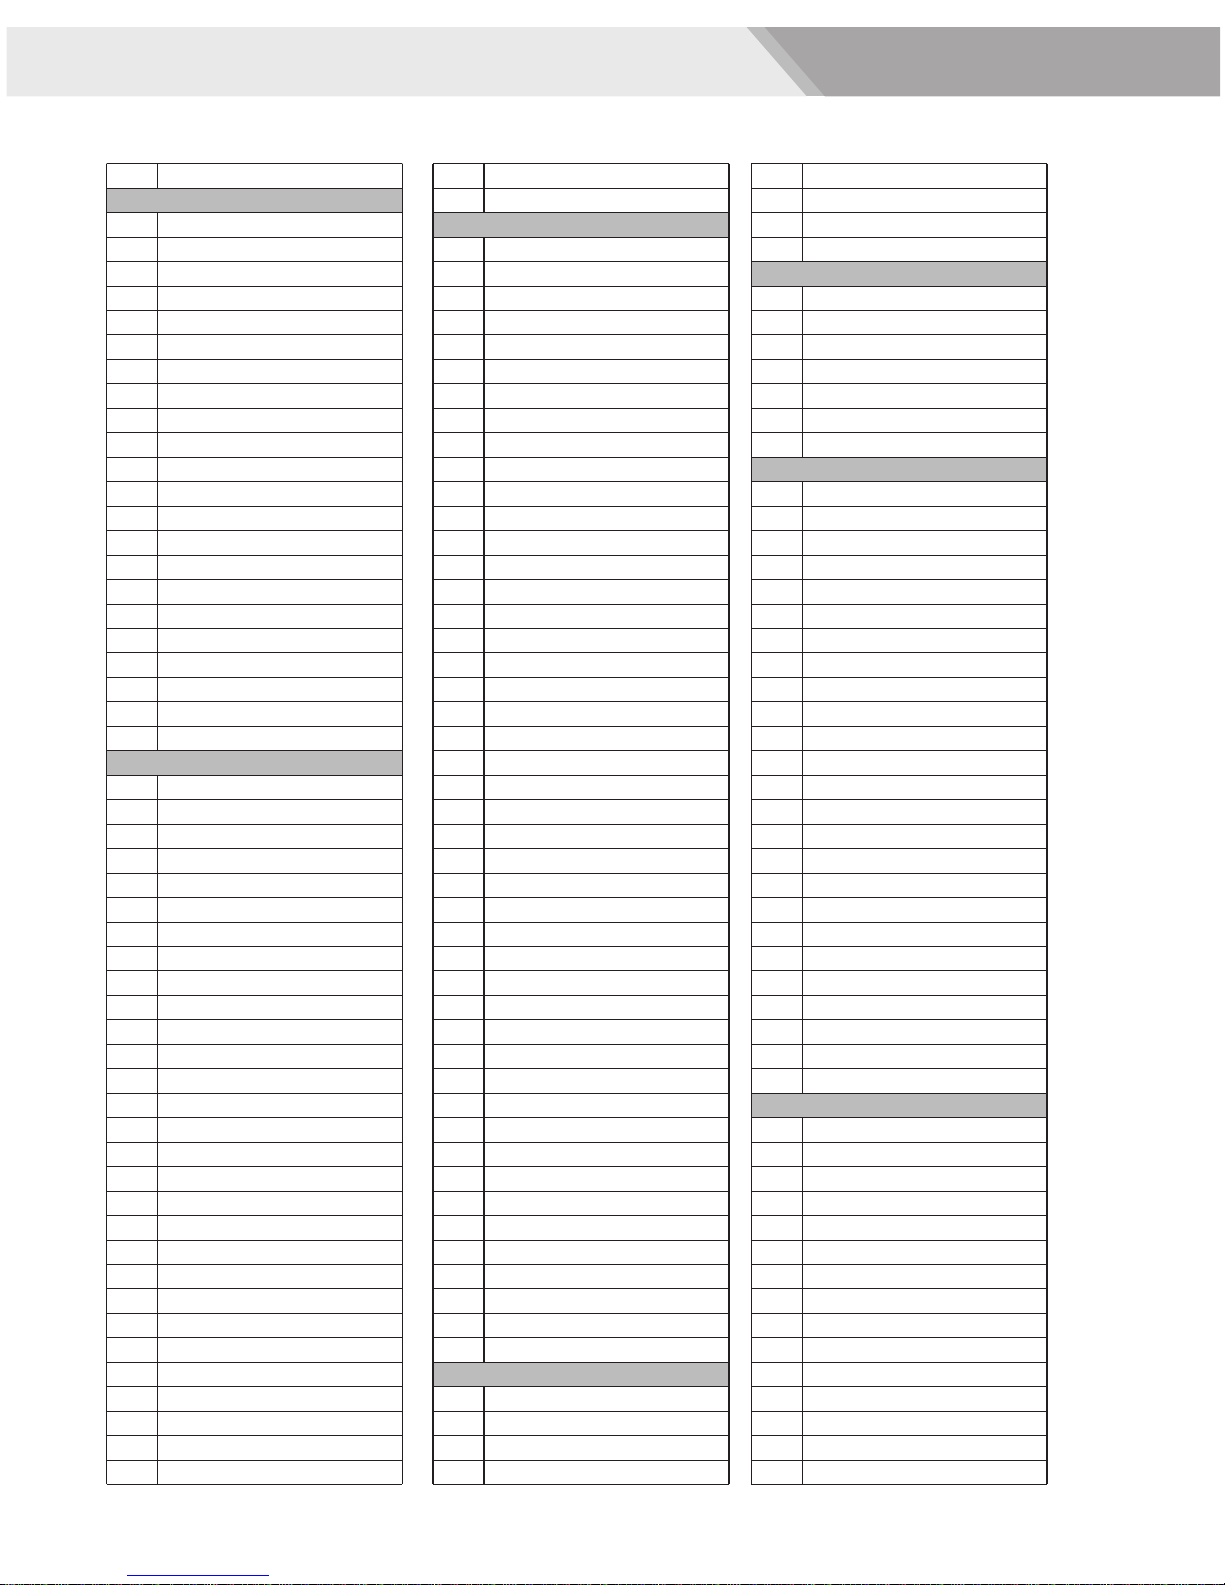
Drum Voice List
NAME
No.
KICK
22‘’ Acoustic Kick 1
1
22‘’ Acoustic Kick 2
2
Brush Kick 1
3
Brush Kick 2
4
22‘’ Rock Kick 1
5
22‘’ Rock Kick 2
6
Room Kick 1
7
Room Kick 2
8
Funk Kick
9
Vintage Kick
10
Reggae Kick
11
Fusion Kick
12
1970's Kick
13
Vintage Kick
14
Old School Kick
15
808 Kick
16
909 Kick
17
HipHop Kick
18
Dance Kick
19
Techno Kick
20
Magic Kick
21
FX Mix Kick
22
SNARE
14'' Acoustic Snare 1
23
14'' Acoustic Snare Rim 1
24
14'' Funk Snare 1
25
14'' Funk Snare R 1
26
14'' Funk Snare 2
27
14'' Funk Snare Rim 2
28
Brush Snare 1
29
Brush Snare Rim 1
30
Brush Snare 2
31
Brush Snare Rim 2
32
Orchestra Snare
33
Orchestra Snare Rim
34
14'' Jazz Snare
35
14'' Jazz Snare Rim
36
14'' Rock Snare
37
14'' Rock Snare Rim
38
Room Snare
39
Fusion Snare
40
Big Band Snare
41
Vintage Snare
42
Live Snare
43
Reggae Snare
44
R&B Snare 1
45
Old School Snare
46
Magic Snare
47
808 Snare
48
808 Snare Rim
49
909 Snare
50
909 Snare Rim
51
Electronic Snare
52
Electronic Snare Stick
53
TOM
Acoustic Tom 1
54
Acoustic Tom 2
55
Acoustic Tom 3
56
Acoustic Tom 4
57
Acoustic Tom 5
58
Acoustic Tom 6
59
Brush Tom 1
60
Brush Tom 2
61
Brush Tom 3
62
Brush Tom 4
63
Brush Tom 5
64
Brush Tom 6
65
Funk Tom 1
66
Funk Tom 2
67
Funk Tom 3
68
Funk Tom 4
69
Funk Tom 5
70
Funk Tom 6
71
Rock Tom 1
72
Rock Tom 2
73
Rock Tom 3
74
Rock Tom 4
75
Rock Tom 5
76
Rock Tom 6
77
808 Tom 1
78
808 Tom 2
79
808 Tom 3
80
808 Tom 4
81
808 Tom 5
82
808 Tom 6
83
909 Tom 1
84
909 Tom 2
85
909 Tom 3
86
909 Tom 4
87
909 Tom 5
88
909 Tom 6
89
909 Tom 7
90
909 Tom 8
91
Electronic Tom 1
92
Electronic Tom 2
93
Electronic Tom 3
94
Electronic Tom 4
95
Electronic Tom 5
96
Electronic Tom 6
97
Electronic Tom 7
98
Electronic Tom 8
99
RIDE
21'' Acoustic Ride
100
21'' Acoustic Ride 1 Bell
101
Brush Ride 1
102
Brush Ride 1 Bell
103
Brush Ride 2
104
Brush Ride 21 Bell
105
20'' Rock Ride
106
Electronic Ride
107
CRASH
16'' Acoustic Crash 1
108
16'' Acoustic Crash 2
109
Brush Crash 1
110
Brush Crash 2
111
Rock Crash 1
112
Rock Crash 2
113
Splash
114
HIHAT
14'' Acoustic HiHat
115
14'' Acoustic HiHat Edge
116
14'' Acoustic HiHat Pedal
117
14'' Standard HiHat
118
14'' Standard HiHat Edge
119
14'' Standard HiHat Pedal
120
Brush HiHat
121
Brush HiHat Pedal
122
Brush HiHat Splash
123
14'' Rock HiHat
124
14'' Rock HiHat Edge
125
14'' Rock HiHat Pedal
126
14'' Rock HiHat Splash
127
808 HiHat
128
808 HiHat Pedal
129
808 HiHat Splash
130
909 HiHat
131
909 HiHat Pedal
132
909 HiHat Splash
133
Dance HiHat
134
Dance HiHat Pedal
135
Dance HiHat Splash
136
Lo-Fi HiHat
137
Lo-Fi HiHat Edge
138
Lo-Fi HiHat Pedal
139
PERCUSSION
Maracas
140
Metronome Bell
141
Mute Hi Conga 1
142
Mute Hi Conga 2
143
Open Hi Conga 1
144
Open Hi Conga 2
145
Low Conga
146
High Timbale 1
147
High Timbale 2
148
High Timbale 3
149
Low Timbale 1
150
Low Timbale 2
151
Low Timbale 3
152
Low Timbale 4
153
High Agogo
154
26
Page 27
Drum Voice List
155
156
157
158
159
160
161
162
163
164
165
166
167
168
169
170
171
172
173
174
175
176
177
178
179
180
181
182
183
184
185
186
187
188
189
190
191
192
193
194
195
196
197
198
199
200
FX
201
202
203
204
205
206
207
Low Agogo
Claves
Jingle Bell
Tambourine
Indian 1
Indian 2
Indian 3
Indian 4
Indian 5
Indian 6
Indian 7
Indian 8
Indian 9
Indian 10
Indian 11
Indian 12
African
Marimba C3
Marimba A3
Marimba C4
Marimba Db4
Marimba D4
Marimba Eb4
Marimba E4
Marimba F4
Marimba Gb4
Marimba G4
Marimba Ab4
Marimba A4
Marimba Bb4
Marimba B5
Marimba C5
Marimba Db5
Marimba D5
Marimba Eb5
Marimba E5
Marimba F5
Marimba Gb5
Marimba G5
Marimba Ab5
Marimba A5
Marimba Bb5
Marimba B5
Marimba C6
Cowball
Tambourine
FX 1
FX 2
FX 3
FX 4
FX 5
FX 6
FX 7
FX 8
208
FX 9
209
FX 10
210
FX 11
211
One
212
Two
213
Three
214
Four
215
Five
216
Six
217
Seven
218
Eight
219
Nine
220
Ti
221
Ta
222
Ei
223
An
224
E
225
Mute
226
HIHAT COMBINATION
Acoustic
227
Jazz Brush
228
Rock
229
808
230
909
231
Dance
232
Marimba
233
Indian
234
African
235
27
Page 28
Song List
Name
No.
Blues Funk
1
Fusion1
2
Cool Jazz
3
Blues1
4
Samba1
5
Vintage Hip-Hop
6
Nu-Jazz Funk
7
Soul
8
Vintage Funk
9
Trance
10
Country Pop
11
Classic Rock
12
Hardcore Hip-Hop
13
Vintage Dance Pop
14
Latin Jazz1
15
Salsa
16
80's Metal
17
BossaNova
18
Raggae1
19
Punk
20
Swing
21
Latin Jazz2
22
Bigband1
23
3'4 Jazz
24
Standard Jazz
25
6'8 Ballad
26
Pop Ballad
27
Pop Bossa
28
16bt Dance
29
Pop shuffle
30
Samba2
31
Mambo
32
Latin Rock
33
Latin Pop
34
Gtr Bossa
35
Country Blues
36
Rock
37
Raggae2
38
60's Rock
39
Blues2
40
Fusion2
41
Dance Funk
42
Modern Pop
43
Hip-hop
44
Latin Jazz3
45
Funk1
46
Bigband2
47
Funk2
48
Pop Funk1
49
Fusion3
50
51
52
53
54
55
56
57
58
59
60
Funk3
Fusion4
Fusion5
Pop Funk2
R&B
Drum&Bass1
Break Beat1
Dance1
Drum&Bass2
Latin Dance
28
Page 29
GM Drum Kit List
Note No.
Eb1[27]
E 1[28]
F 1[29]
F#1[30]
G 1[31]
G#1[32]
A 1[33]
Bb1[34]
B 1[35]
C 2[36]
C#2[37]
D 2[38]
Eb2[39]
E 2[40]
F 2[41]
F#2[42]
G 2[43]
G#2[44]
A 2[45]
Bb2[46]
B 2[47]
C 3[48]
C#3[49]
D 3[50]
Eb3[51]
E 3[52]
F 3[53]
F#3[54]
G 3[55]
G#3[56]
A 3[57]
Bb3[58]
B 3[59]
C 4[60]
C#4[61]
D 4[62]
Eb4[63]
E 4[64]
F 4[65]
F#4[66]
G 4[67]
G#4[68]
A 4[69]
Bb4[70]
B 4[71]
C 5[72]
C#5[73]
D 5[74]
Eb5[75]
E 5[76]
F 5[77]
F#5[78]
G 5[79]
G#5[80]
A 5[81]
Bb5[82]
B 5[83]
C 6[84]
C#6[85]
D 6[86]
Eb6[87]
Standard (bank 00)
High Q
Slap
Scratch Push
Scratch Pull
Sticks
Square Click
Metronome Click
Metronome Bell
Acoustic Bass Drum
Standard Bass Drum
Side Stick
Standard Snare
Hand Clap
Standard Snare Rim
Standard Tom 6
Standard Hi-hat Close
Standard Tom 5
Standard Hi-hat Pedal
Standard Tom 4
Standard Hi-hat Open
Standard Tom 3
Standard Tom 2
Standard Crash 1
Standard Tom 1
Standard Ride
Chinese Cymbal 1
Ride Bell
Tambourine
Splash Cymbal
Standard Cowbell
Standard Crash 2
Vibra-slap
Ride Cymbal
Hi Bongo
Low Bongo
Mute Hi Conga
Open Hi Conga
Low Conga
High Timbale
Low Timbale
High Agogo
Low Agogo
Cabasa
Maracas
Short Whistle
Long Whistle
Short Guiro
Long Guiro
Claves
Hi Wood Block
Low Wood Block
Mute Cuica
Open Cuica
Mute Triangle
Open Triangle
Shaker
Jingle Bell
Bell Tree
Castanets
Mute Surdo
Open Surdo
Funk (bank 08)
Funk Bass Drum
Funk Snare
Funk Snare Rim
Funk Tom 6
Funk Tom 5
Funk Tom 4
Funk Tom 3
FunkTom 2
Funk Tom 1
Rock (bank 16)
Rock Bass Drum
Rock Snare
Rock Snare Rim
Rock Tom 6
Rock Tom 5
Rock Tom 4
Rock Tom 3
Rock Tom 2
Rock Tom 1
Electric (bank 24)
Electric Bass Drum
Electric Snare
Electric Snare Rim
Electric Tom 6
Electric Tom 5
Electric Tom 4
Electric Tom 3
ElectricTom 2
ElectricTom 1
Brush (bank 40)
Brush Bass Drum
Brush Snare
Brush Snare Rim
Brush Tom 6
Brush Tom 5
Brush Tom 4
Brush Tom 3
BrushTom 2
Brush Tom 1
29
Page 30
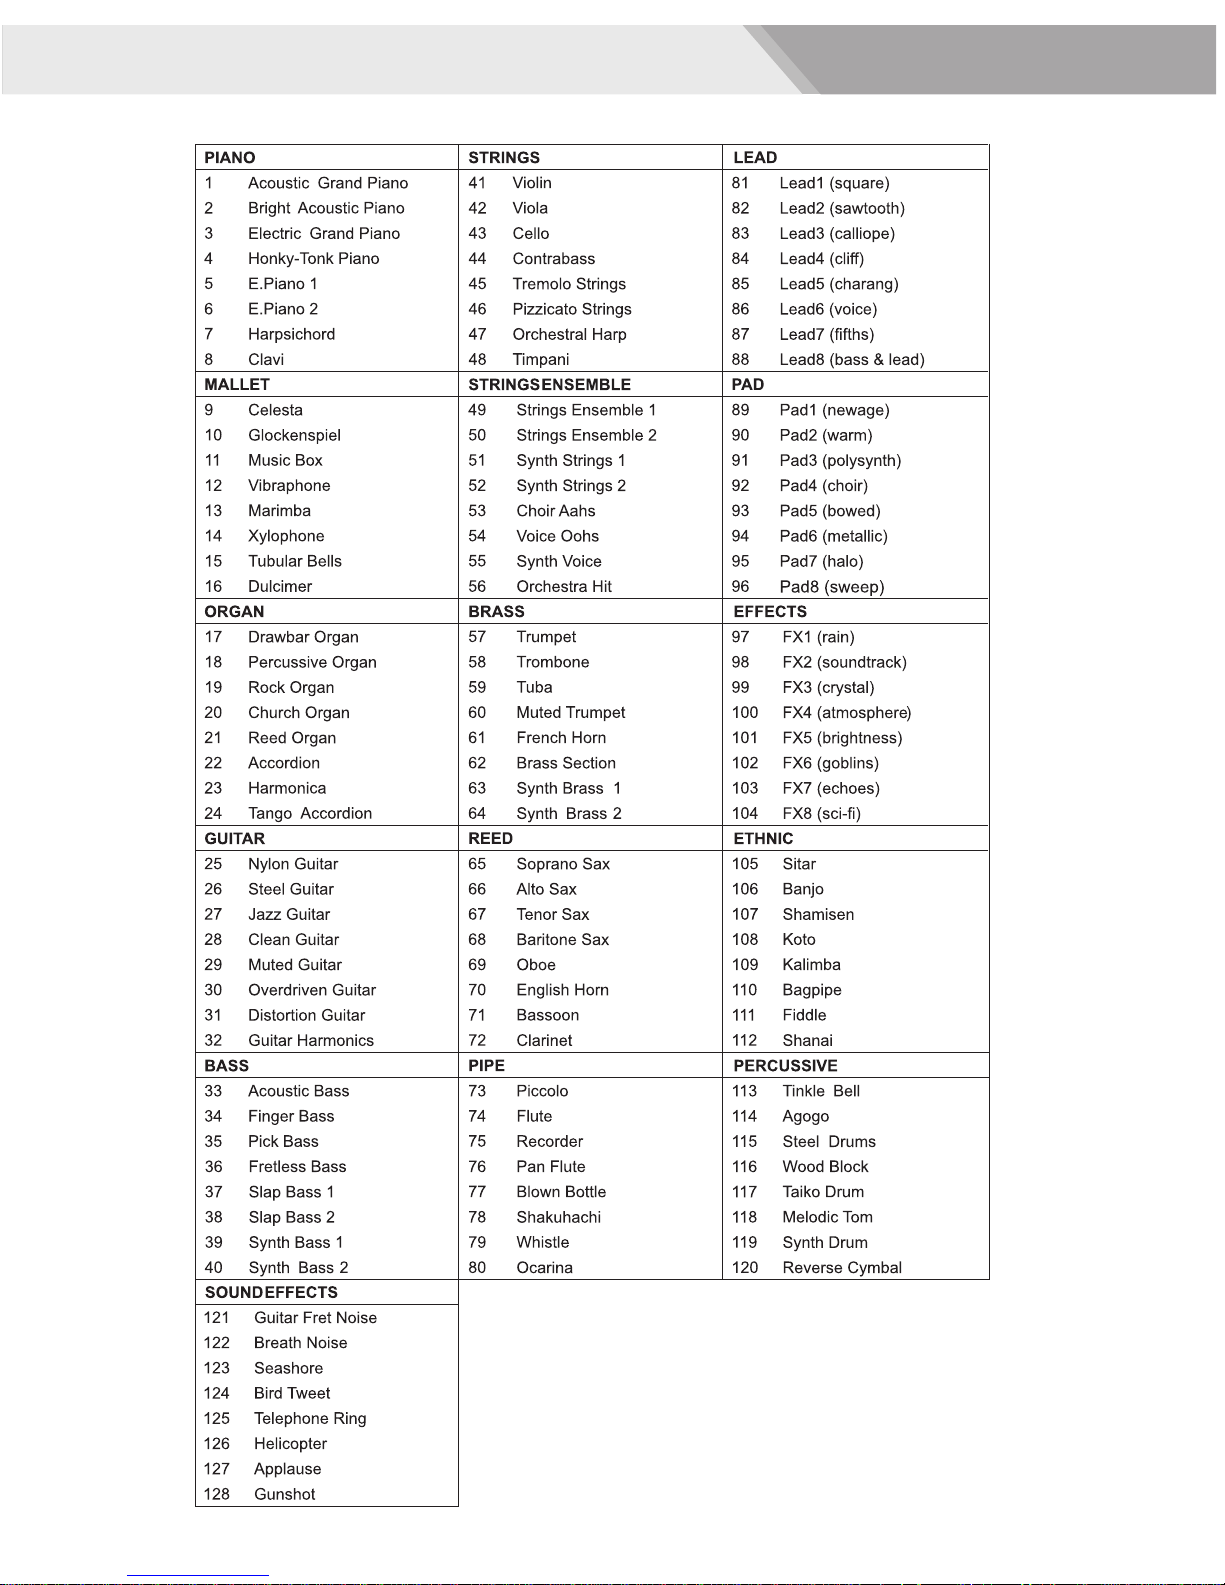
GM Backing Instrument List
30
Page 31
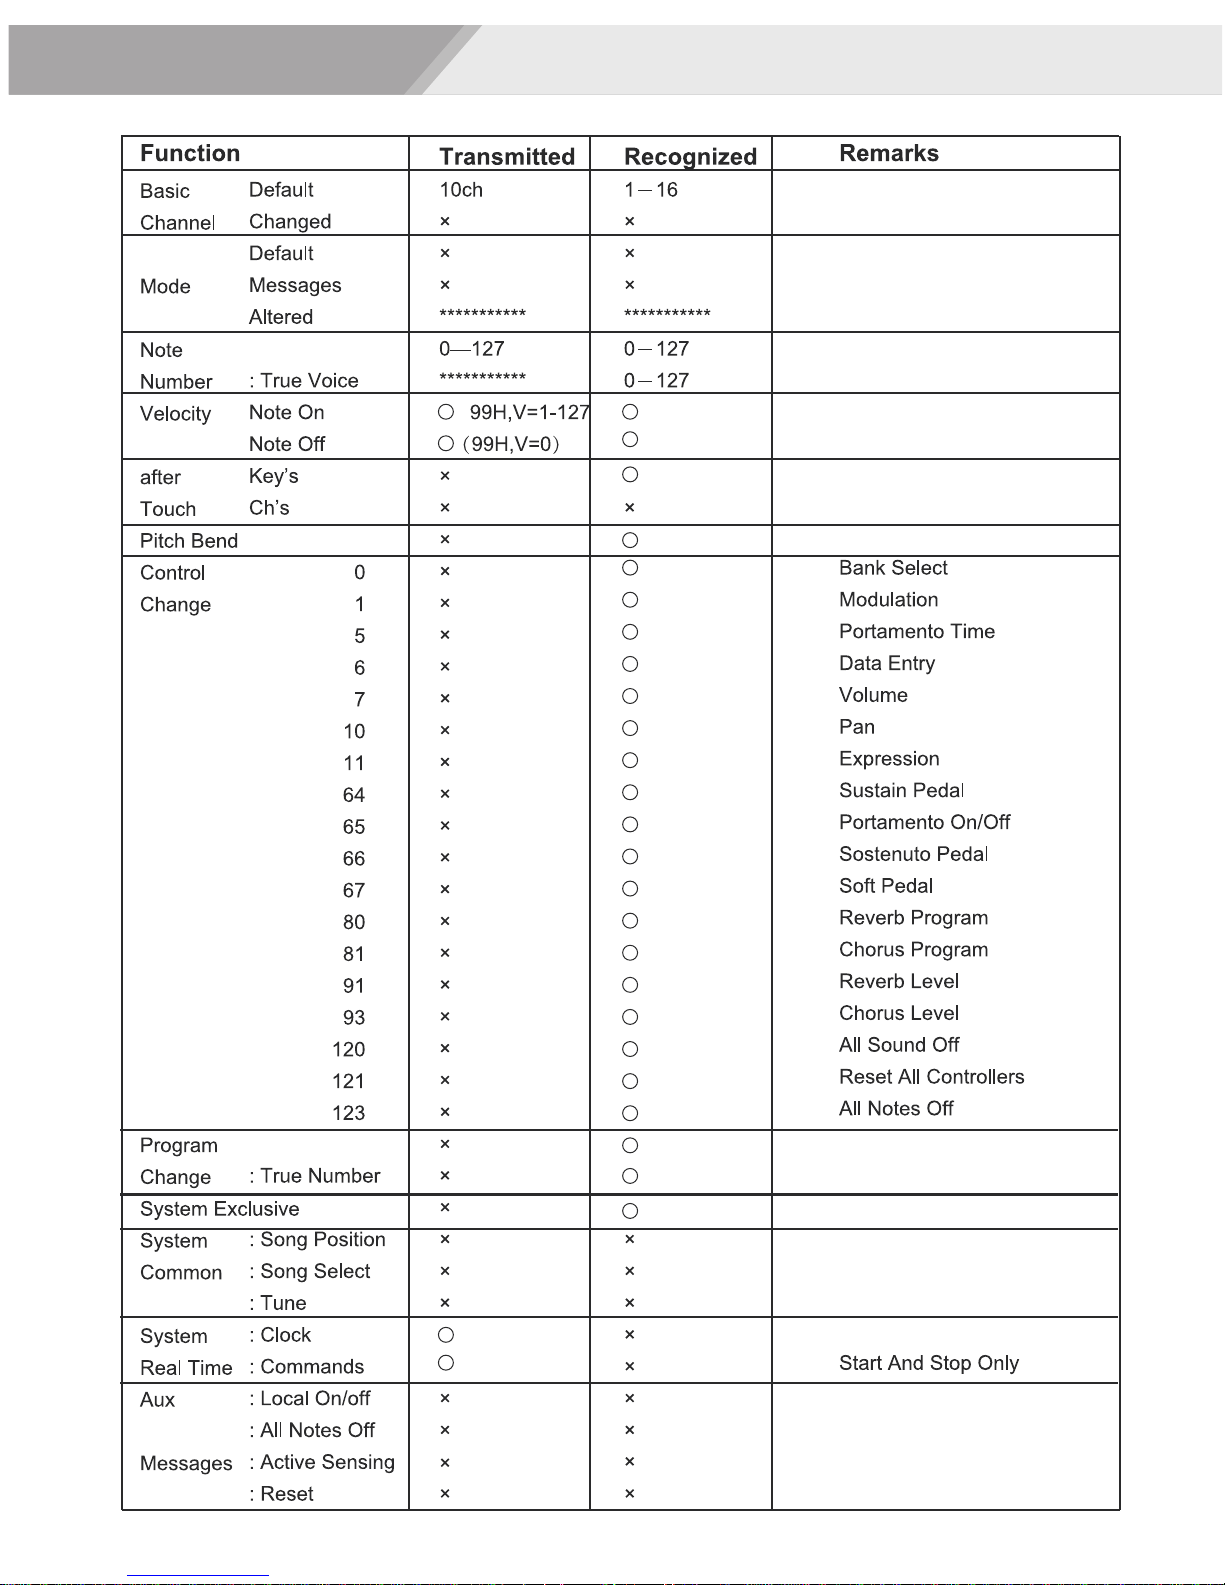
MIDI Implementation Chart
○: YES ×: NO
31
Page 32
WEEE-Declaration / Disposal
Your product is designed and manufactured with materials and components of high quality, which are recyclable
and can be reused. The symbol means that your product should be disposed of separately from household waste
when it reaches its end of life. Please dispose of this equipment at your local collection point or recycling center.
Please help to protect the environment in which we all live.
All specifications and appearances are subject to change without notice. All information was correct at time of printing.
Musikhaus Kirstein GmbH does not guarantee for the accuracy or completeness of any description, photograph or statement
contained in this manual. Printed colors and specifications may vary slightly from product. Products from Musikhaus Kirstein
GmbH are only sold through authorized dealer. Distributors and dealers are not agents of Musikhaus Kirstein GmbH and have
no authority to bind Musikhaus Kirstein GmbH legally in any way. This manual is protected by copyright. Any copying or reprint,
even in excerpts, is only allowed with written consent of Musikhaus Kirstein GmbH. The same applies to reproduction or copying
of images, even in altered form.
Musikhaus Kirstein GmbH
Bernbeurener Strasse 11
86956 Schongau
Telefon: 0049-909494-0
Telefax: 0049-909494-19
www.kirstein.de
 Loading...