

Page 1

000
41195
Version 01/2016
XDrum DD
-
200DG
Bedienungsanleitung /
User
manual
Page 2

Sicherheitshinweise
-
Stellen Sie die Empfangsantenne anders oder an einem anderen Ort auf.
-
-
-
Bitte beachten Sie, dass dieses Produkt durch starke elektromagnetische Interferenzen
und bewahren Sie die Bedienungsanleitung gut auf.
benutzen.
Stromversorgung
Bitte verbinden Sie das Netzteil nur mit einer Steckdose, die die vorgeschriebene Spannung
aufweist.
Trennen Sie das Netzteil von der Steckdose, wenn Sie das Instrument nicht benutzen. Gleiches
gilt auch bei Gewitter.
2
Sicherheitshinweise deutsch
Page 3

Aufbauort
Um Verformung, Verfärbung oder ernsthafte Schäden zu vermeiden, sollten Sie das Instrument
folgenden Dingen nicht aussetzen:
•
Sonnenlicht
•
hohen Temperaturen (z.B. einer Heizung oder tagsüber im Auto)
•
übermäßiger Feuchtigkeit
•
übermäßigem Staub
•
starken Vibrationen.
Elektrische Interferenzen
Dieses Instrument enthält digitale Schaltkreise und kann Interferenzen verursachen wenn es zu
nahe an Radio- oder Fernsehempfängern steht. Wenn dies passiert stellen Sie das Instrument
etwas weiter weg von solchen Geräten.
Reinigung
Sie können das Gerät mit einem trockenen weichen Tuch reinigen. Benutzen Sie niemals
Reinigungsmittel wie Alkohol oder Lösungsmittel und verwenden Sie keine mit Chemikalien
getränkten Reinigungstücher.
Handhabung
•
Wenden Sie keine Gewalt im Umgang mit Reglern, Steckern oder anderen Teilen des Gerätes.
•
Lassen Sie kein Papier oder irgendwelche Gegenstände in das Gerät gelangen. Sollte dies
passieren, trennen Sie es bitte von der Steckdose und lassen Sie das Instrument von einer
qualifizierten Werkstatt überprüfen.
•
Trennen Sie alle Steckverbindungen bevor Sie das Gerät bewegen.
3
Page 4

Inhaltsverzeichnis
Sicherheitshinweise 2
Aufbau 5
Stromversorgung 5
Kopfhörer-Anschluss 6
Bedienelemente 7
Vorderseite 7
Rückseite 8
Bedienung 8
Auswahl des Drum Kits 8
Pad-Sound 8
Pad-Lautstärke 9
Pad Panorama 9
MIDI Note 9
Sichern der Einstellungen 10
Abspielen eines Songs 10
Gesamt-Lautstärke 10
Lautstärke der Begleitung 11
Drum Off-Funktion 11
Tempo 11
Metronom 11
Percussion-Funktion 11
Demo 12
Reverb 12
Aufnahme 12
Playback 12
Anschlussmöglichkeiten 13
Pedal 13
Kopfhörer 13
USB 13
AUX IN 13
Übersicht über die Sounds 14
Verzeichnis der Kits 15
Songliste 16
MIDI-Implementierung 17
Spezifikationen 18
WEEE-Erklärung / Entsorgung 19
Herstellerangaben 19
4
Page 5

Aufbau
Stromversorgung
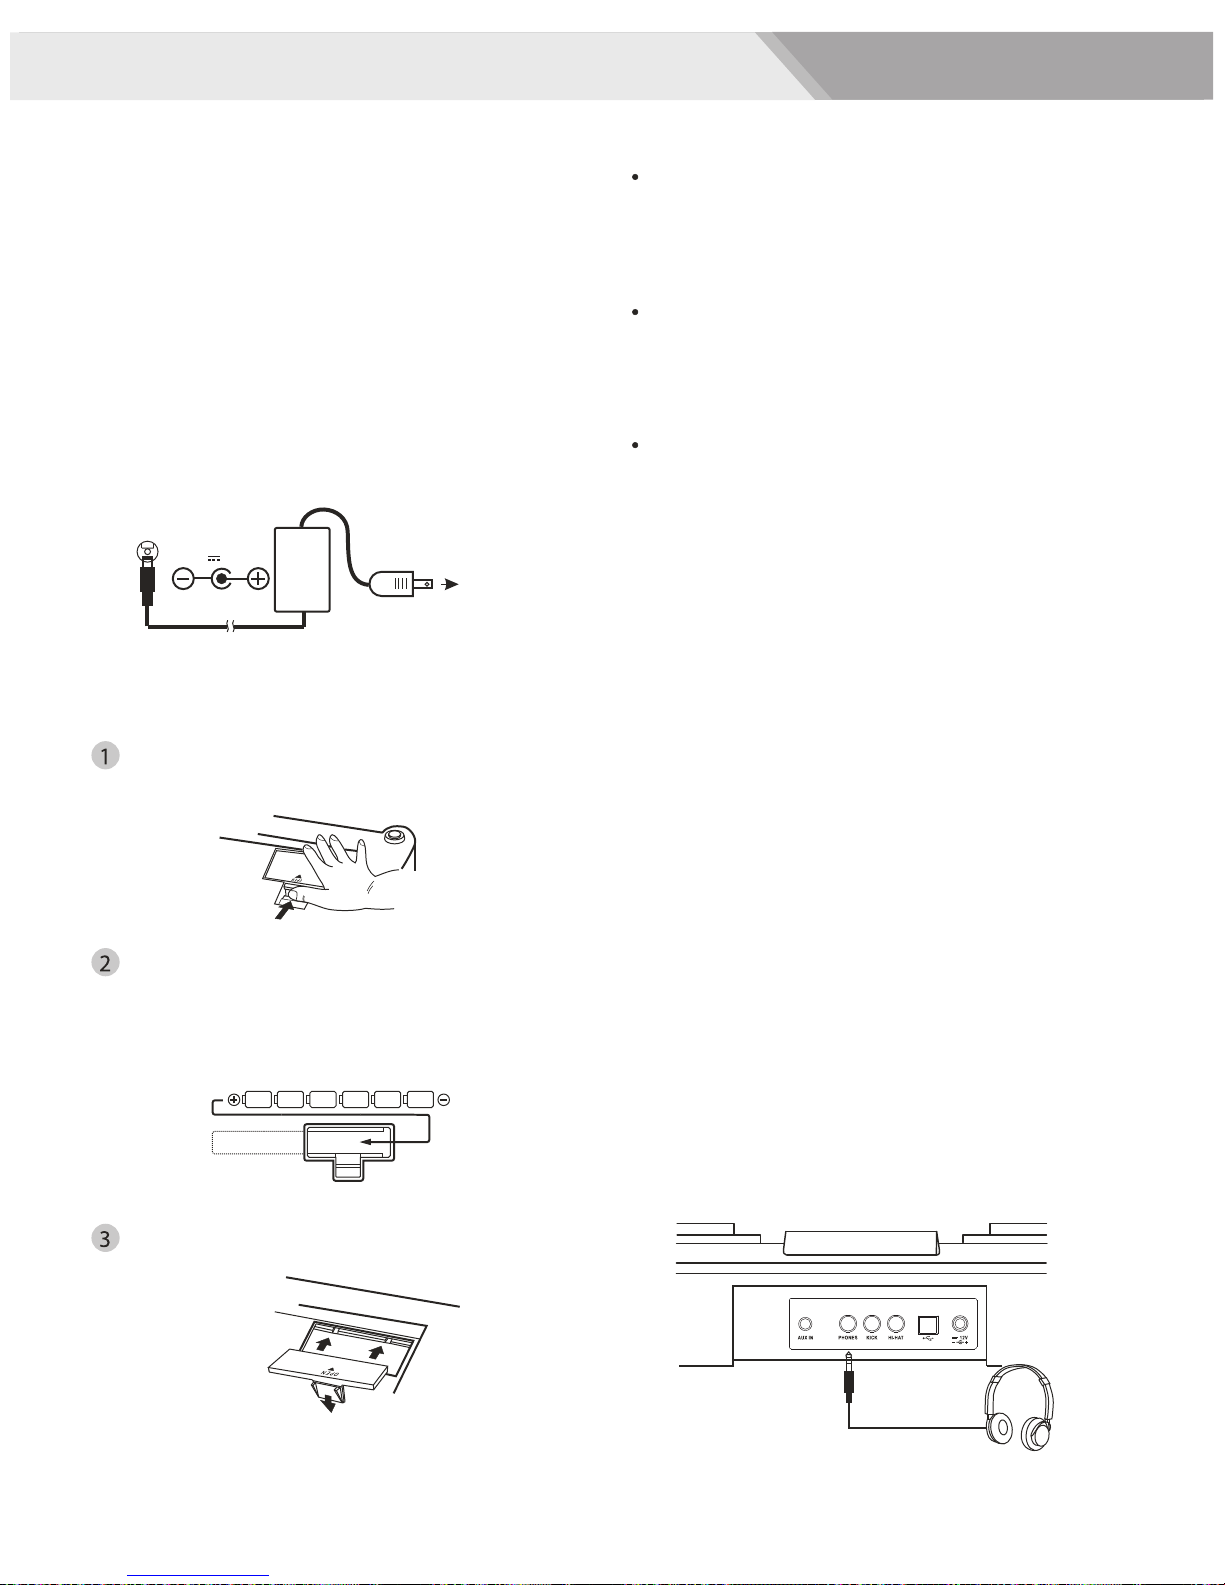
Sie können Ihre digitales Drumpad entweder mit Batterien oder mit Hilfe eines Netzteils am Strom
betreiben. Folgen Sie unten stehenden Anweisungen, je nachdem welche Energiequelle sie
benutzen möchten.
Netzteil
Verbinden Sie das Netzteil mit der entsprechenden Buchse an der
Rückseite des Gerätes und verbinden dann das Netzteil mit der
Steckdose.
Benutzen Sie nur dafür ausgewiesenen Netzteile. Die technische
Spezifikation für das Netzteil ist DC 12 V, Center-positiv.
Batteriebetrieb
1.
Öffnen Sie das Batteriefach auf der Unterseite des Geräts.
2.
Legen Sie 6 Batterien von folgendem Typ ein: Größe „C“, R14,
SUM-2. Bitte beachten Sie die Polarität (siehe Abbildung) beim
Einsetzen der Batterien. Wir empfehlen den Gebrauch von AlkalineBatterien.
3.
Schließen Sie das Batteriefach.
Bitte beachten Sie: Die Energie wird automatisch über das Netzteil bezogen, wenn ein
passendes Netzteil angeschlossen wird, auch wenn Batterien eingelegt sind.
5
Page 6

Vorsicht!
•
Es ist ratsam, verbrauchte Batterien so bald als möglich zu ersetzen. Wenn die Batterieladung
nachlässt, kann das Display dunkler oder der Sound verzerrt werden. Sollte dies der Fall sein,
ersetzen Sie die Batterien durch sechs neue des gleichen Typs.
•
Mischen Sie nie alte und neue Batterien oder unterschiedliche Batterie-Typen (Alkaline,
Magnesium, etc.) oder Batterien unterschiedlicher Hersteller. Missachtung dieser Empfehlung
könnte dazu führen, dass das Gerät heiß wird, Feuer ausbricht oder die Batterien auslaufen.
•
Um Schäden durch auslaufende Batterien zu vermeiden, entfernen Sie die Batterien aus dem
Gerät, wenn Sie es über längere Zeit nicht benutzen. Die Batterien verlieren auch an Ladung,
wenn sie im nicht benutzten Instrument verbleiben.
Ruhezustand
Um Energie zu sparen, schaltet sich das Gerät automatisch nach 30 Minuten ab, wenn Sie es nicht
benutzen. Wenn Sie diese Funktion nicht benötigen, können Sie sie abschalten, indem Sie beim
Einschalten des Geräts die Taste START/STOP gedrückt halten.
Kopfhörer-Anschluss
Ein Stereo-Kopfhörer kann an der PHONE/OUTPUT-Buchse an
der Rückseite des Gerätes angeschlossen werden. Wenn ein
Kopfhörer angeschlossen ist, werden die internen Lautsprecher
des Gerätes automatisch abgeschaltet, perfekt für privates
Üben oder Spielen in der Nacht. Wenn Sie ein externes
Soundsystem benutzen möchten, können Sie an der
Kopfhörerbuchse alternativ auch eine Stereoanlage oder einen
Mischer anschließen. Bitte schalten Sie Ihr gesamtes
Equipment aus, bevor Sie Verbindungen herstellen.
6
Page 7

Bedienelemente
Vorderseite
1.
POWER: Ein-/Aus-Schalter
2.
TEMPO + und -: mit diesen Tasten wird das Tempo geregelt
3.
MASTER VOLUME + und -: mit diesen Tasten wird die Gesamtlautstärke geregelt
4.
ACC VOLUME + und -: damit wird die Lautstärke der Begleitung geregelt
5.
REC und Indikatorleuchte: mit dieser Taste wird die Aufnahme gestartet oder beendet
6.
CLICK und Indikatorleuchte: hier wird das Metronom an- oder abgeschaltet
7.
3-stellige LED-Anzeige, auf der die Parameter des gegenwärtigen Menüs dargestellt werden
8.
Hand-Percussion mit Indikatorleuchte: mit dieser Taste kann die Funktion Hand-Percussion
ausgewählt werden
9.
DRUM OFF mit Indikatorleuchte: diese Taste wird benutzt um die DRUM OFF-Funktion an- oder
abzuschalten
10.
KIT: mit dieser Taste gelangen Sie ins Kit-Menü
11.
PAD ASSIGN: diese Taste wird benutzt um in das Menü für Sounds und Lautstärke zu gelangen
12.
SONG: drücken Sie diese Taste um ins Song-Menü zu gelangen
13.
START/STOP: startet oder stoppt einen Song
14.
VOLUME: hier wird die Lautstärke des Pads geregelt
15.
SELECT+ und -: mit diesen Tasten werden Werte nach oben oder unten verändert
16.
SAVE: durch Drücken dieser Taste sichern Sie die aktuell ausgewählten Einstellungen ins
Benutzerkit
17.
PAN: mit dieser Taste können Sie das Panorama des Pads verändern.
18.
PLAY/STOP: diese Taste wird benutzt um die Wiedergabe eines aufgenommenen Songs zu
starten oder zu beenden
19.
REVERB: hier können Sie den Level des Halls verändern
20.
PAD-Indikatoren: zeigt an, welches Pad gerade gespielt wird
21.
DEMO: mit dieser Taste wird der Demosong gestartet oder gestoppt
22.
NOTE: Diese Taste kann benutzt werden, um die MIDI Note des Pads zu verändern
7
Page 8

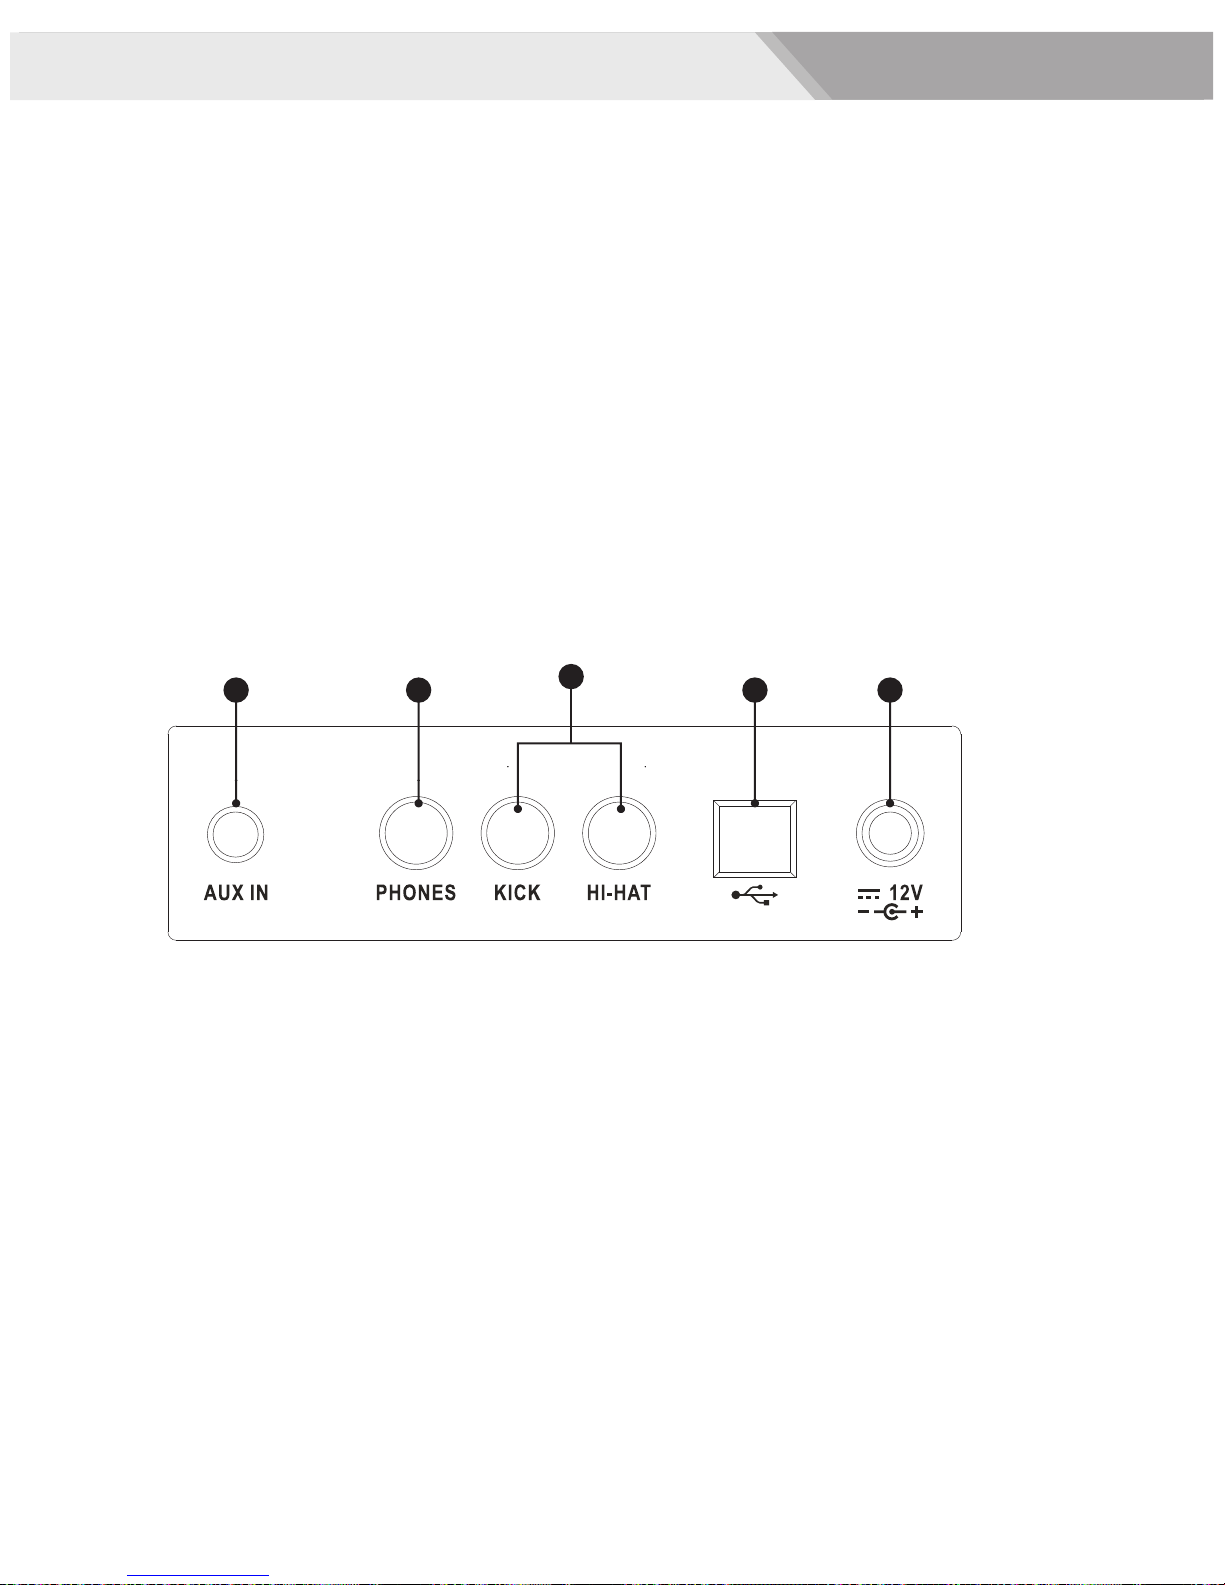
Rückseite
23.
AUX IN: hier können Sie externe Audio-Geräte anschließen, z.B. CD- oder MP3-Player
24.
Buchse für Kopfhöreranschluss
25.
Buchse für den Anschluss eines Pedals (Kick und Hi-Hat)
26.
USB-Anschluss für externes Laufwerk
27.
Buchse für Netzteil DC 12V
Bedienung
Auswahl des Drum Kits
Sobald Sie das Gerät anschalten, erscheint das
Menü Kit mit dem voreingestellten Wert 001.
Drücken Sie KIT um in das Kit-Menü zu
gelangen. Die Indikatorleuchte geht an und die
3-stellige Anzeige zeigt die gegenwärtig
ausgewählte Kit-Nummer. Sie können den Wert
entweder mit den Tasten SELECT + oder
SELECT- verändern, um ein Kit (voreingestellte
Kits 1-45; User-Kits 46-50) auszuwählen.
Pad-Sound
Drücken Sie Voice, um in das entsprechende Menü
zu gelangen. Im Display erscheint die Nummer des
Hi-Hat-Pads im jeweilig ausgewählten Kit. Sie rufen
z.B. Kit 001 auf, drücken abermals VOICE, im
Display erscheint der Wert 161. Dies ist der Wert für
das Hi-Hat-Pad.
Wenn das Pad Sound-Menü ausgewählt ist, leuchtet
die zugehörige Indikatorlampe auf.
In diesem Menü sehen Sie auf der 3-stelligen
Anzeige die Soundnummer des jeweils ausgewählten Pads, das durch Drücken der Pad-Taste
oder durch Schlagen auf das Pad ausgewählt werden kann. Mit Hilfe der SELECT-Tasten können
Sie einen beliebigen Sound (1-265, fortlaufend) für das ausgewählte Pad aussuchen.
8
Page 9

Pad-Lautstärke
Drücken Sie VOLUME um in das Menü zu
gelangen. Wenn das Menü ausgewählt ist, leuchtet
die zugehörige Lampe auf.
In diesem Menü sehen Sie auf der Anzeige die
gegenwärtig eingestellte Lautstärke des
ausgewählten Pads, das durch Drücken der PadTaste oder durch Schlagen auf das Pad ausgewählt
werden kann. Mit Hilfe der SELECT-Tasten können
Sie die Lautstärke (0-31) für das ausgewählte Pad
aussuchen.
Pad Panorama
Drücken Sie PAN um in das Menü zu gelangen.
Wenn das Menü ausgewählt ist, leuchtet die
zugehörige Lampe auf.
In diesem Menü sehen Sie auf der Anzeige das
gegenwärtig eingestellte Panorama des
ausgewählten Pads, das durch Drücken der Pad
Assign-Taste oder durch Schlagen auf das Pad
ausgewählt werden kann. Mit Hilfe der SELECTTasten können Sie das Panorama (-8 - +8) für das
ausgewählte Pad einstellen.
MIDI Note
Drücken Sie NOTE um in das Menü zu gelangen;
die entsprechende Kontrolllampe leuchtet auf.
Im Menü erscheint die MIDI Note des aktuellen
Pads, das Sie durch Schlagen auf das gewünschte
Pad auswählen können. Mit den SELECT-Tasten
können Sie die MIDI Note (n00-n99, fortlaufend)
verändern.
9
Page 10

Sichern der Einstellungen
Drücken Sie SAVE um in das entsprechendeMenü
zu gelangen. Die Tasten SELECT + und - können
benutzt werden um ein Benutzerkit (46-50,
fortlaufend) auszuwählen. Während Sie das Kit
auswählen, blinkt die Nummernanzeige.
Drücken Sie die SAVE-Taste abermals um die
gegenwärtigen Einstellungen im ausgewählten Kit
zu speichern. Sind die Daten erfolgreich
gespeichert, beendet das Gerät das
Sicherungsmenü und wechselt zum Kit-Menü, in
dem das frisch gespeicherte Kit ausgewählt ist.
Wenn die Sicherung nicht erfolgreich ist, erscheint
„ERR“ auf dem Display.
Wenn Sie die Kit-Einstellungen nicht sichern, gehen sie verloren, wenn Sie ein neues Kit
auswählen.
Abspielen eines Songs
Drücken Sie SONG um in das Song-Menü zu
gelangen. Der voreingestellte Wert lautet 001, die
Nummer erscheint im 3-stelligen Display und die
Indikatorlampe leuchtet auf. Mit Hilfe der SELECTTasten können Sie einen Song auswählen (1-100,
fortlaufend). Die ersten 80 Songs laufen im LoopModus. Drücken Sie START/STOP um das
Abspielen zu starten oder zu beenden. Wenn Sie
während des Abspielens den Song wechseln, wird
der neue erst abgespielt, wenn ein Takt zu Ende ist.
Jeder Song hat sein eigenes Tempo und sein
eigenes Drumkit. Der Player initialisiert Kit und
Tempo zu Beginn des Playbackss.
Gesamt-Lautstärke
Im Main Volume-Menü erscheint links der
Buchstabe „L“, rechts wird der Wert der aktuellen
Lautstärke angezeigt. Stellen Sie die Lautstärke mit
Hilfe der Tasten MASTER VOLUME + oder - auf den
gewünschten Wert ein (0-16, nicht fortlaufend). Der
Wert wird automatisch gespeichert.
10
Page 11

Lautstärke der Begleitung
In diesem Menü wird links der Buchstabe „A“
angezeigt, rechts die aktuell eingestellte Lautstärke.
Stellen Sie die Lautstärke mit Hilfe der Tasten ACC.
VOLUME + oder - auf den gewünschten Wert ein
(0-16, nicht fortlaufend). Der Wert wird automatisch
gespeichert.
Drum Off-Funktion
Mit Hilfe der Taste DRUM OFF können Sie die Schlagzeugspur aus- und anschalten.
Diese Funktion ist sehr nützlich, wenn Sie üben möchten. Wenn die Spur
abgeschaltet ist, leuchtet die DRUM OFF-Lampe.
Bitte beachten Sie: Die Taste ist während eines Playbacks nicht aktiv!
Tempo
Drücken Sie TEMPO + oder - um in das TempoMenü zu gelangen. Mit diesen Tasten können Sie
auch das gegenwärtig eingestellte Tempo verändern
(30-280, nicht fortlaufend). Dies beeinflusst auch
das Tempo des Clicks und des Songs. Wenn Sie die
Tasten TEMPO + und - gleichzeitig drücken, setzen
Sie das Tempo auf den ursprünglich eingestellten
Wert zurück.
Metronom
Drücken Sie CLICK um das Zählen durch eine menschliche Stimme zu hören.
Drücken Sie zweimal CLICK für einen Click-Sound. Drücken Sie abermals um den
Click auszuschalten.
Percussion-Funktion
Drücken Sie HAND PERC um in den Hand Percussion-Modus zu gelangen. Das
Indikatorlämpchen leuchtet auf. Die Songnummer lautet 77 und die Kitnummer 15.
11
Page 12
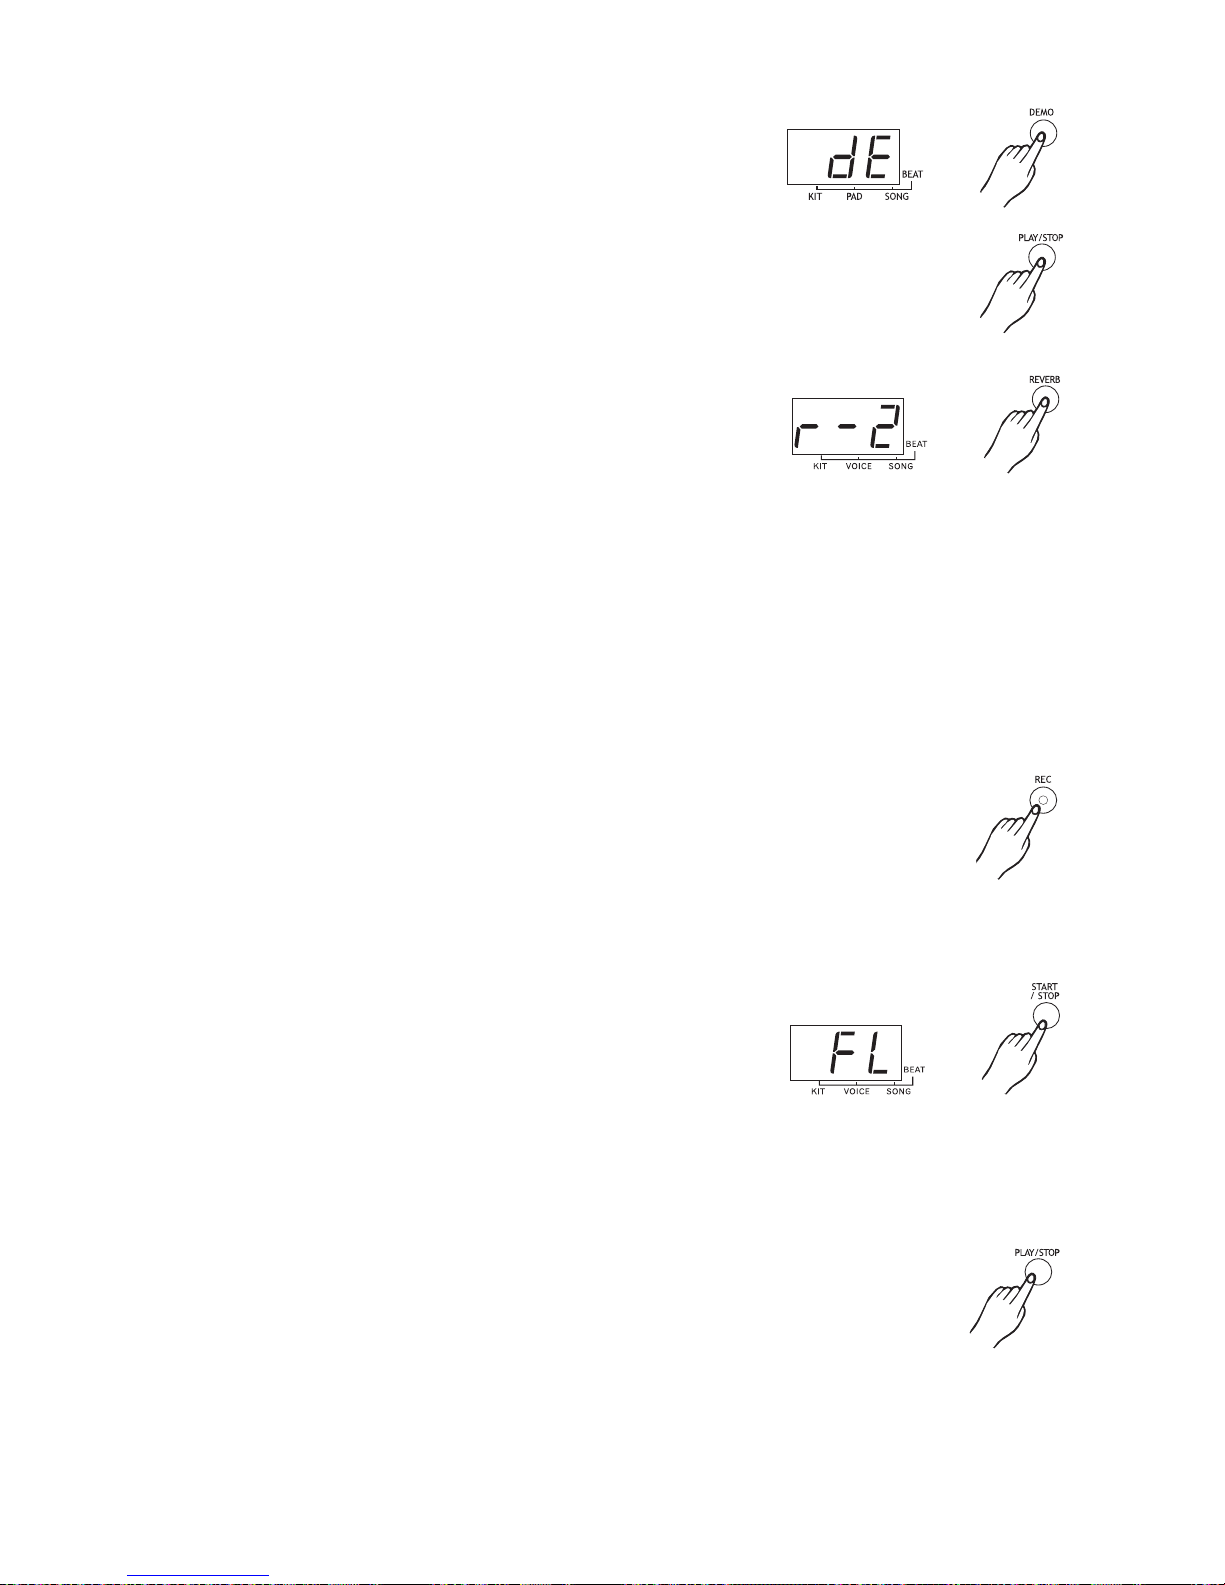
Demo
Drücken Sie DEMO um den Demosong zu starten oder zu
beenden. Im Display erscheint „dE“. Sie können den Demosong
auch mit Hilfe der START/STOP Taste starten oder beenden.
Reverb
Drücken Sie REVERB um zur Hall-Funktion zu gelangen. Links
im Display erscheint „r“, rechts der eingestellte Wert. Drücken Sie
SELECT + oder - um den Wert zu verändern (0-3, nicht
fortlaufend). Sie können auch das Wahlrad benutzen. Der Wert
wird nach der Einstellung automatisch gespeichert.
Aufnahme
Vorbereitung
Wählen Sie den gewünschten Song, das Drumkit, das Tempo, die Drum Off- und die ReverbEinstellungen aus.
Starten der Aufnahme
Drücken Sie REC, das Licht beginnt zu blinken. Drücken Sie START/STOP oder
schlagen Sie auf das Pad. Das Licht hört auf zu blinken und die Aufnahme beginnt.
Stoppen der Aufnahme
Um die Aufnahme zu stoppen, drücken Sie START/STOP oder REC. Die Indikatorlampe für
Record geht aus. Wenn der Speicher voll ist, erscheint „FL“ auf dem Display und die Aufnahme
stoppt automatisch.
Bitte beachten Sie: Wenn Sie mit der Aufnahme beginnen, läuft
auch das Metronom mit. Der Sound des Metronoms wird jedoch
nicht mit aufgenommen. Um das Metronom auszuschalten,
drücken Sie CLICK.
Playback
Drücken Sie PLAY/STOP um die Wiedergabe des aufgenommenen Songs zu starten
oder zu beenden.
Bitte beachten Sie: Wenn Sie einen neuen Song aufnehmen, wird der vorherige
ersetzt. Wenn Sie den Strom abschalten, gehen die aufgenommenen Song-Daten
verloren.
12
75
95
100
Page 13
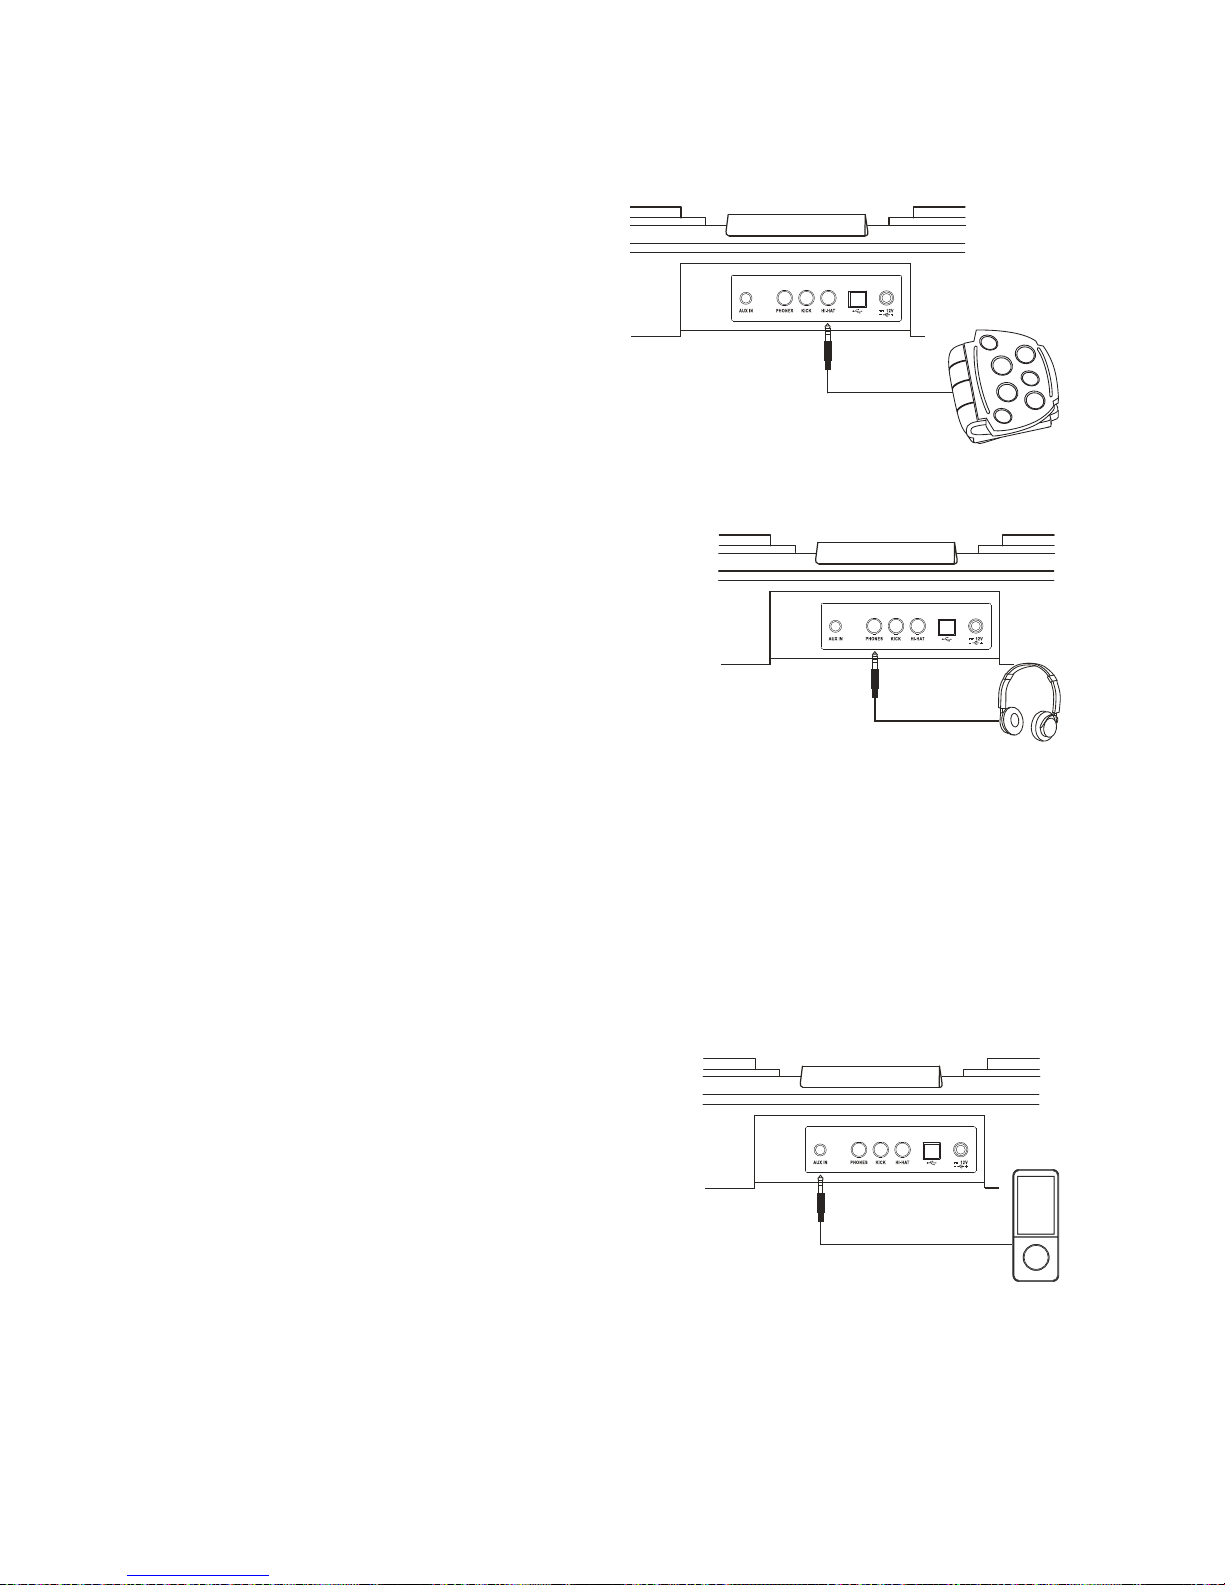
Anschlussmöglichkeiten
Pedal
Das Gerät unterstützt ein Hi-Hat und ein KickPedal als Eingabegeräte.
Kopfhörer
Das Gerät unterstützt einen Stereo-Kopfhörer als
Ausgangsgerät. Der Kopfhörer ist optional.
USB
Die USB-Buchse fungiert als MIDI-Ausgang. Alle MIDI-Daten, die durch Schlagen auf die Pads
oder Betätigen der Pedale erzeugt werden, werden hier übermittelt. Ausgenommen sind
Metronomsound und MIDI-Daten in den Songs. Hier werden auch externe Geräte für den
Datenempfang angeschlossen.
AUX IN
An dieser Buchse können Sie externe Audio-Player über
ein Stereo-Audiokabel anschließen, beispielsweise
einen MP3-Player, um Ihre Lieblingsstücke begleiten zu
können.
13
Input and Output
Input and Output
Input and Output
25
75
95
100
Page 14
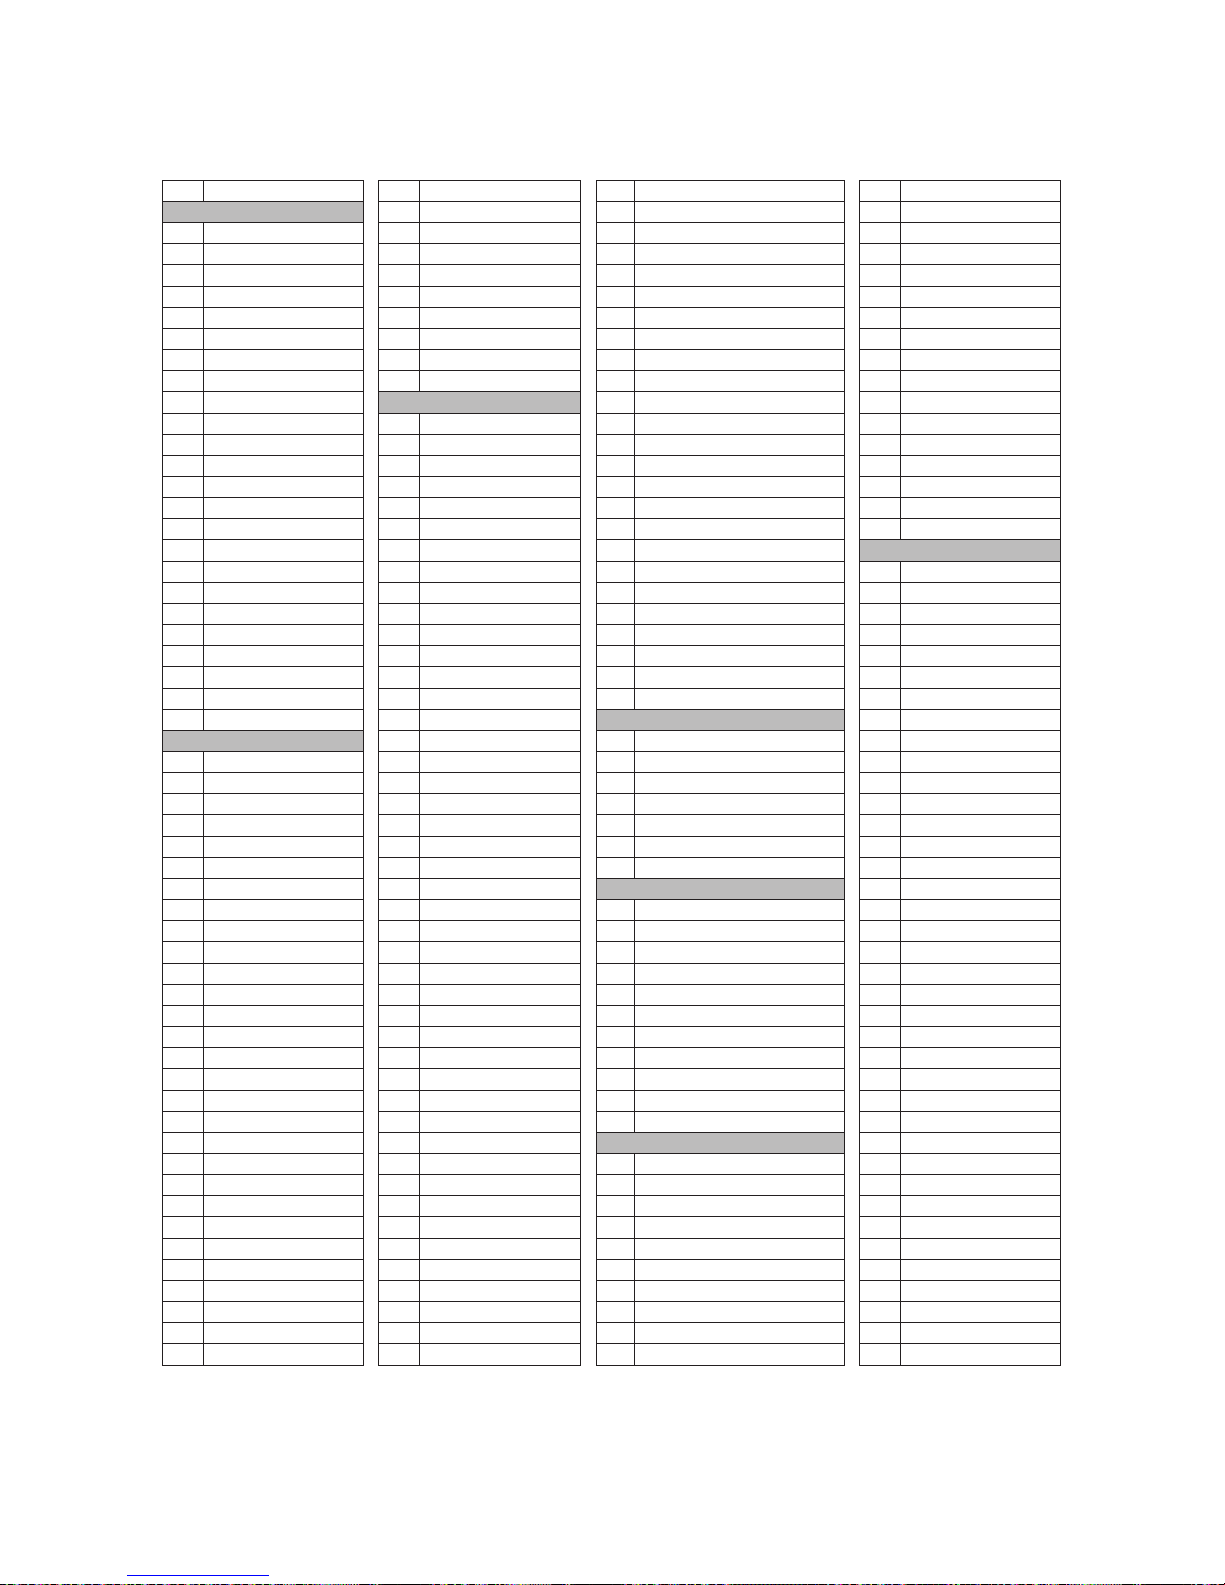
Übersicht über die Sounds
14
22''Acoustic Kick
24''Standard Kick
Brush Kick
Rock Kick
Jazz Kick
Room Kick
Fusion Kick
1970's Kick
Vintage Kick
HipHop Kick
Reggae Kick
Old School Kick
Lo-Fi Kick
Junkyard Kick
Noise Kick
Drum & Bass Kick
808 Kick
909 Kick
Electronic Kick 1
Dance Kick
FX Mix Kick
Techno Kick
Electronic Kick 2
Magic Kick
14'' Acoustic Snare
14'' Standard Snare
14'' Funk Snare
Brush Snare
14'' Jazz Snare
14'' Rock Snare
13'' Damped Snare
Orchestra Snare
Orchestra Snare Rim
Room Snare
Fusion Snare
Big Band Snare
Vintage Snare
Live Snare
Reggae Snare
R&B Snare 1
808 Snare
909 Snare
R&B Snare 2
Electronic Snare
Power Snare
Dance Snare
Old School Snare
House Snare
Lo-Fi Snare
Junkyard Snare
Noise Snare
Drum & Bass Snare
2
3
4
5
6
7
8
9
10
11
12
13
14
15
16
17
18
19
20
21
22
23
24
25
26
27
28
29
30
31
32
33
34
35
36
37
38
39
40
41
42
43
44
45
46
47
48
49
50
51
52
53
Techno Snare Rim
Magic Snare
Acoustic Snare Stick
Standard Snare Stick
Brush Snare Stick
Rock Snare Stick
Live Snare Stick
Room Snare Stick
Fusion Snare Stick
Brush Swirl
Acoustic Tom 1
Acoustic Tom 2
Acoustic Tom 3
Acoustic Tom 4
Acoustic Tom 5
Acoustic Tom 6
Brush Tom 1
Brush Tom 2
Brush Tom 3
Brush Tom 4
Brush Tom 5
Brush Tom 6
Jazz Tom 1
Jazz Tom 2
Jazz Tom 3
Jazz Tom 4
Jazz Tom 5
Jazz Tom 6
808 Tom 1
808 Tom 2
808 Tom 3
808 Tom 4
808 Tom 5
808 Tom 6
909 Tom 1
909 Tom 2
909 Tom 3
909 Tom 4
909 Tom 5
909 Tom 6
Electronic Tom 1
Electronic Tom 2
Electronic Tom 3
Electronic Tom 4
Electronic Tom 5
Electronic Tom 6
Power Tom 1
Power Tom 2
Power Tom 3
Power Tom 4
Power Tom 5
Power Tom 6
Lo-Fi Tom 1
Lo-Fi Tom 2
Lo-Fi Tom 3
54
55
56
57
58
59
60
61
62
63
64
65
66
67
68
69
70
71
72
73
74
75
76
77
78
79
80
81
82
83
84
85
86
87
88
89
90
91
92
93
94
95
96
97
98
99
100
101
102
103
104
105
106
107
108
Lo-Fi Tom 4
Lo-Fi Tom 5
Lo-Fi Tom 6
Junkyard Tom 1
Junkyard Tom 2
Junkyard Tom 3
Junkyard Tom 4
Junkyard Tom 5
Junkyard Tom 6
Noise Tom 1
Noise Tom 2
Noise Tom 3
Noise Tom 4
Noise Tom 5
Noise Tom 6
Techno Tom 1
Techno Tom 2
Techno Tom 3
Techno Tom 4
Techno Tom 5
Techno Tom 6
Magic Tom 1
Magic Tom 2
Magic Tom 3
Magic Tom 4
20'' Funk Ride
808 Ride
Ride
House Ride
Lo-Fi Ride
Junkyard Ride
Noise Ride
16'' Acoustic Crash
16'' Acoustic Crash Edge
16'' Rock Crash
16'' Rock Crash Edge
808Crash
909Crash
Electronic Crash
Brush Crash
Lo-Fi Crash
China
Splash
14'' Acoustic Hi-hat Close
14'' Acoustic Hi-hat Open
14'' Acoustic Hi-hat Edge Close
14'' Acoustic Hi-hat Edge Open
14'' Acoustic Hi-hat Pedal
14'' Acoustic Hi-hat Splash
Rock Hi-hat Close
Rock Hi-hat Open
Fusion Hi-hat Close
Fusion Hi-hat Open
109
110
111
112
113
114
115
116
117
118
119
120
121
122
123
124
125
126
127
128
129
130
131
132
133
134
135
136
137
138
139
140
141
142
143
144
145
146
147
148
149
150
151
152
153
154
155
156
157
158
159
160
161
808 Hi-hat Close
808 Hi-hat Open
808 Hi-hat Pedal
808 Hi-hat Splash
909 Hi-hat Close
909 Hi-hat Open
909 Hi-hat Pedal
909 Hi-hat Splash
Dance Hi-hat Close
Dance Hi-hat Open
Dance Hi-hat Pedal
Dance Hi-hat Splash
Lo-Fi Hi-hat Close
Lo-Fi Hi-hat Open
Lo-Fi Hi-hat Edge
Lo-Fi Hi-hat Pedal
Lo-Fi Hi-hat Splash
Nan Bang
Da Mu Yu
Xiao Bo
Xiao Luo
Peng Lin
Maracas
Metronome Bell
Vibra-slap
Synthesis Pecussion
High Q
Low Q
Mute Hi Conga
Open Hi Conga
Low Conga
High Bongo
Low Bongo
High Agogo
Low Agogo
Claves
Jingle Bell
Cowbell
Tambourine
Cabasa
Long Guiro
Short Guiro
162
163
164
165
166
167
168
169
170
171
172
173
174
175
176
177
178
179
180
181
182
183
184
185
186
187
188
189
190
191
192
193
194
195
196
197
198
199
200
201
202
203
204
205
206
207
208
209
210
211
212
213
214
215
216
KICK
Tom
Ride
PERCUSSION 1
Crash
Hihat
SNARE
Vib raphone C3
Vib raphone Db3
Vib raphone D3
Vib raphone Eb3
Vib raphone E3
Vib raphone F3
Vib raphone Gb3
Vib raphone G3
Vib raphone Ab3
Vib raphone A3
Vib raphone Bb3
Vib raphone B3
Vib raphone C4
Voice list
Techno Snare
1
NO.
Name
5
25
75
95
100
Page 15
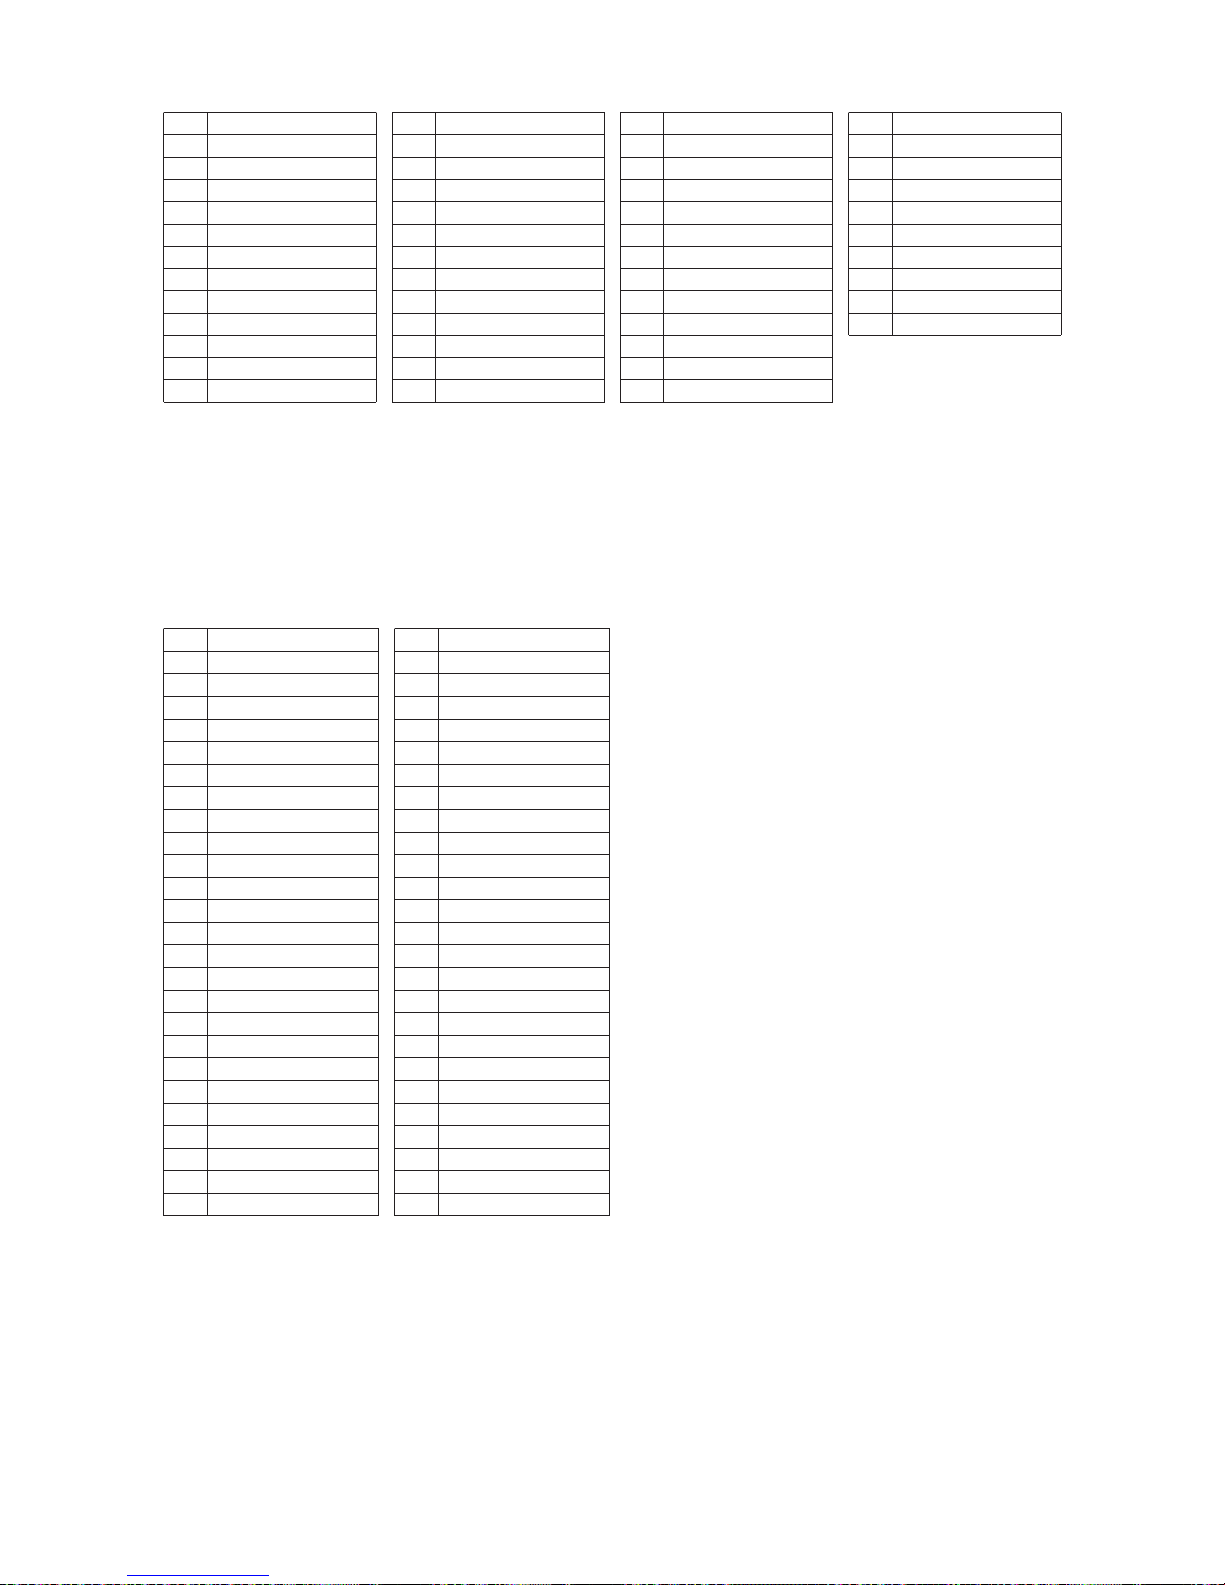
Verzeichnis der Kits
15
Voice List
Vibraphone Db4
Vibraphone D4
Vibraphone Eb4
Vibraphone E4
Vibraphone F4
Vibraphone Gb4
Vibraphone G4
Vibraphone Ab4
Vibraphone A4
Vibraphone Bb4
Vibraphone B4
Vibraphone C5
Vibraphone Db5
Orchestr a Tim p D2
Orchestr a Tim p Eb2
Orchestr a Tim p E2
Orchestr a Tim p F2
Orchestr a Tim p Gb2
Orchestr a Tim p G2
Orchestr a Tim p Ab2
Orchestr a Tim p A2
Orchestr a Tim p Bb2
Orchestr a Tim p B2
Orchestr a Tim p C3
Orchestr a Tim p Db3
Orchestr a Tim p D3
Orchestr a Tim p Eb3
Orchestr a Tim p E3
Orchestr a Tim p F3
Orchestr a Tim p Gb3
Orchestr a Tim p G3
Orchestr a Tim p Ab3
Orchestr a Tim p A3
Orchestr a Tim p Bb3
Orchestr a Tim p B3
Orchestr a Tim p C4
Vibraphone D5
Vibraphone Eb5
Vibraphone E5
Vibraphone F5
Vibraphone Gb5
Vibraphone G5
Vibraphone Ab5
Vibraphone A5
Vibraphone Bb5
Vibraphone B5
Vibraphone C6
Orchestr a Tim p C2
Orchestr a Tim p Db2
256
257
258
259
260
261
262
263
264
265
243
244
245
246
247
248
249
250
251
252
253
254
255
230
231
232
233
234
235
236
237
238
239
240
241
242
217
218
219
220
221
222
223
224
225
226
227
228
229
Voice List
Vibraphone D b4
Vibraphone D 4
Vibraphone E b4
Vibraphone E 4
Vibraphone F 4
Vibraphone G b4
Vibraphone G 4
Vibraphone Ab 4
Vibraphone A4
Vibraphone B b4
Vibraphone B 4
Vibraphone C 5
Vibraphone D b5
Orches tr a Timp D2
Orches tr a Timp Eb2
Orches tr a Timp E2
Orches tr a Timp F2
Orches tr a Timp Gb2
Orches tr a Timp G2
Orches tr a Timp Ab2
Orches tr a Timp A2
Orches tr a Timp Bb2
Orches tr a Timp B2
Orches tr a Timp C3
Orches tr a Timp Db3
Orches tr a Timp D3
Orches tr a Timp Eb3
Orches tr a Timp E3
Orches tr a Timp F3
Orches tr a Timp Gb3
Orches tr a Timp G3
Orches tr a Timp Ab3
Orches tr a Timp A3
Orches tr a Timp Bb3
Orches tr a Timp B3
Orches tr a Timp C4
Vibraphone D 5
Vibraphone E b5
Vibraphone E 5
Vibraphone F 5
Vibraphone G b5
Vibraphone G 5
Vibraphone Ab 5
Vibraphone A5
Vibraphone B b5
Vibraphone B 5
Vibraphone C 6
Orches tr a Timp C2
Orches tr a Timp Db2
26
27
28
29
30
31
32
33
34
35
36
37
38
39
40
41
42
43
44
45
46
47
48
49
50
NO.
1
2
3
4
5
6
7
8
9
10
11
12
13
14
15
16
17
18
19
20
21
22
23
24
25
Standa rd
Hard Roc k
Ballad
Acoust ic
Funk Ban d
Funk
Jazz Bru sh
Dance
Rock
Jazz
808
909
Latin
Room
Percus si on 1
Metal
Vibraphone
Electr on ic
Reggae
Fusion 1
Drum & Bas s
Pop
Brush
World
Orches tr a
Ska
Songo
Lo-Fi
1970's
HipHop
Big Band
Old Scho ol
R&B
Magic
Live
House
Jazz Lat in
Fusion 2
Percus si on 2
Teckno
Vintage
Junkya rd
Noise
Studio 1
Studio 2
User 1(S ta ndard)
User 2(H ar d Rock)
User 3(B al lad)
User 4(A co ustic)
User 5(F un k Band)
Name
256
257
258
259
260
261
262
263
264
265
243
244
245
246
247
248
249
250
251
252
253
254
255
230
231
232
233
234
235
236
237
238
239
240
241
242
217
218
219
220
221
222
223
224
225
226
227
228
229
Kit List
75
95
100
Page 16
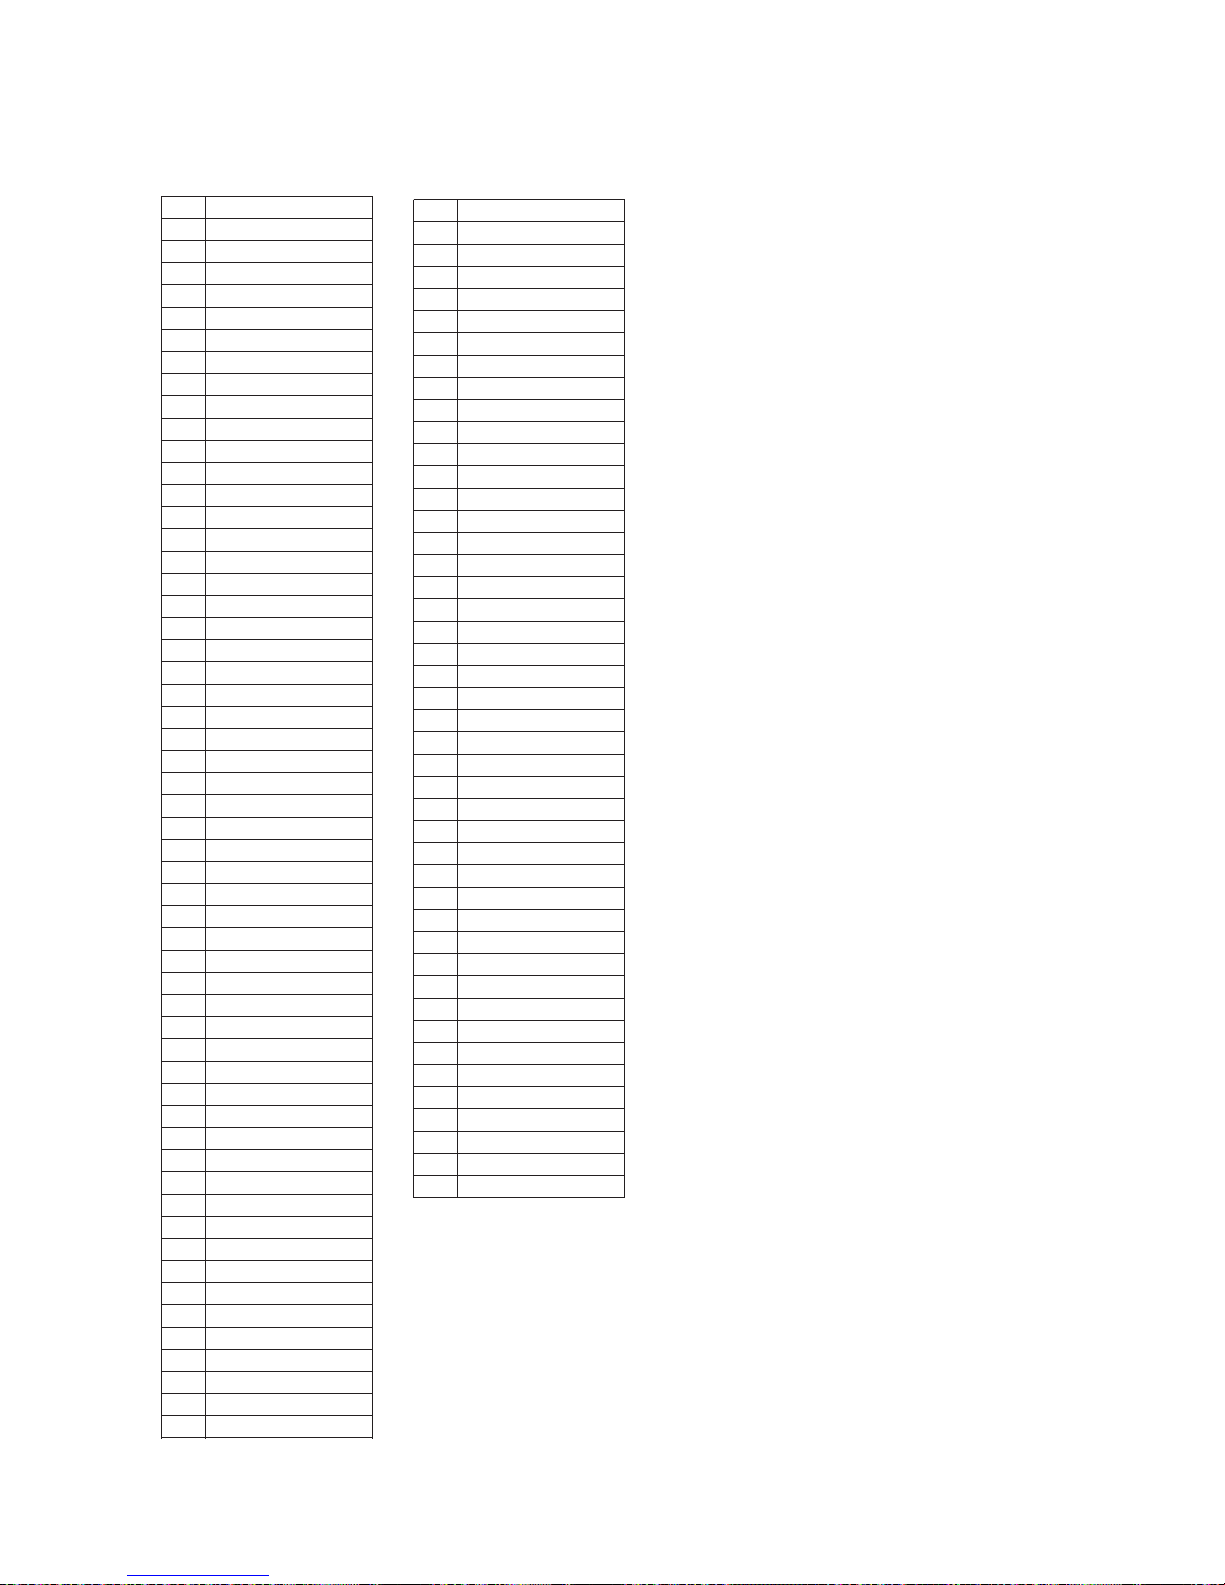
Songliste
16
56
57
58
59
60
61
62
63
64
65
66
67
68
69
70
71
72
73
74
75
76
77
78
79
80
81
82
83
84
85
86
87
88
89
90
91
92
93
94
95
96
97
98
99
100
1
2
3
4
5
6
7
8
9
10
11
12
13
14
15
16
17
18
19
20
21
22
23
24
25
26
27
28
29
30
31
32
33
34
35
36
37
38
39
40
41
42
43
44
45
46
47
48
49
50
51
52
53
54
55
BluesFun k
NuJazzFu nk
funk1
funk2
funk3
funk4
pop funk1
pop funk2
RetroFun k
Fusion1
Fusion2
Fusion3
Fusion4
Fusion5
Fusion6
CoolJazz
BigBand1
BigBand2
BigBand3
BigBand4
Swing
Bebop
3/4 jazz
Jazz
latin jazz 1
latin jazz 2
Dance 1
DiscoHou se
Tra nc e
Tri pH op
DrumNBas s
BreakBea t1
Dancefun k
Hiphop
Dance2
D N'B1
D N'B2
Break beat 2
ClassicR oc k
HeavyRoc k
RockBall ad
RockNRol l
Punk
Rock
80's Metal
Shuffle
60's rock
Smaba1
BossaNov a
Salsa
Ska
Reggae1
Reggae2
Reggae3
LatinRoc k1
LatinRoc k2
Mambo
Samba2
Latin pop
Gtr Bossa
LatinDan ce 1
LatinDan ce 2
R&B1
R&B2
JazzyFun k
Blues
Country
CountryP op
Country Bl ue s
Ballad1
BritPop
8BeatPop 1
60'sPop
8 Beat 1
8 Beat 2
8 beat balla d 1
8 beat balla d 2
16 beat ball ad 1
16 beat ball ad 2
world
funk1
funk2
modern jaz z
big band
swing
slow fusio n
country
latinjaz z
reggae
latin
boogie
disco
d n'b
metal
hardrock
8 beat 1
8 beat 2
16 beat 1
funk 3
funk 4
Name
NO.
Song List
5
25
75
95
100
Page 17
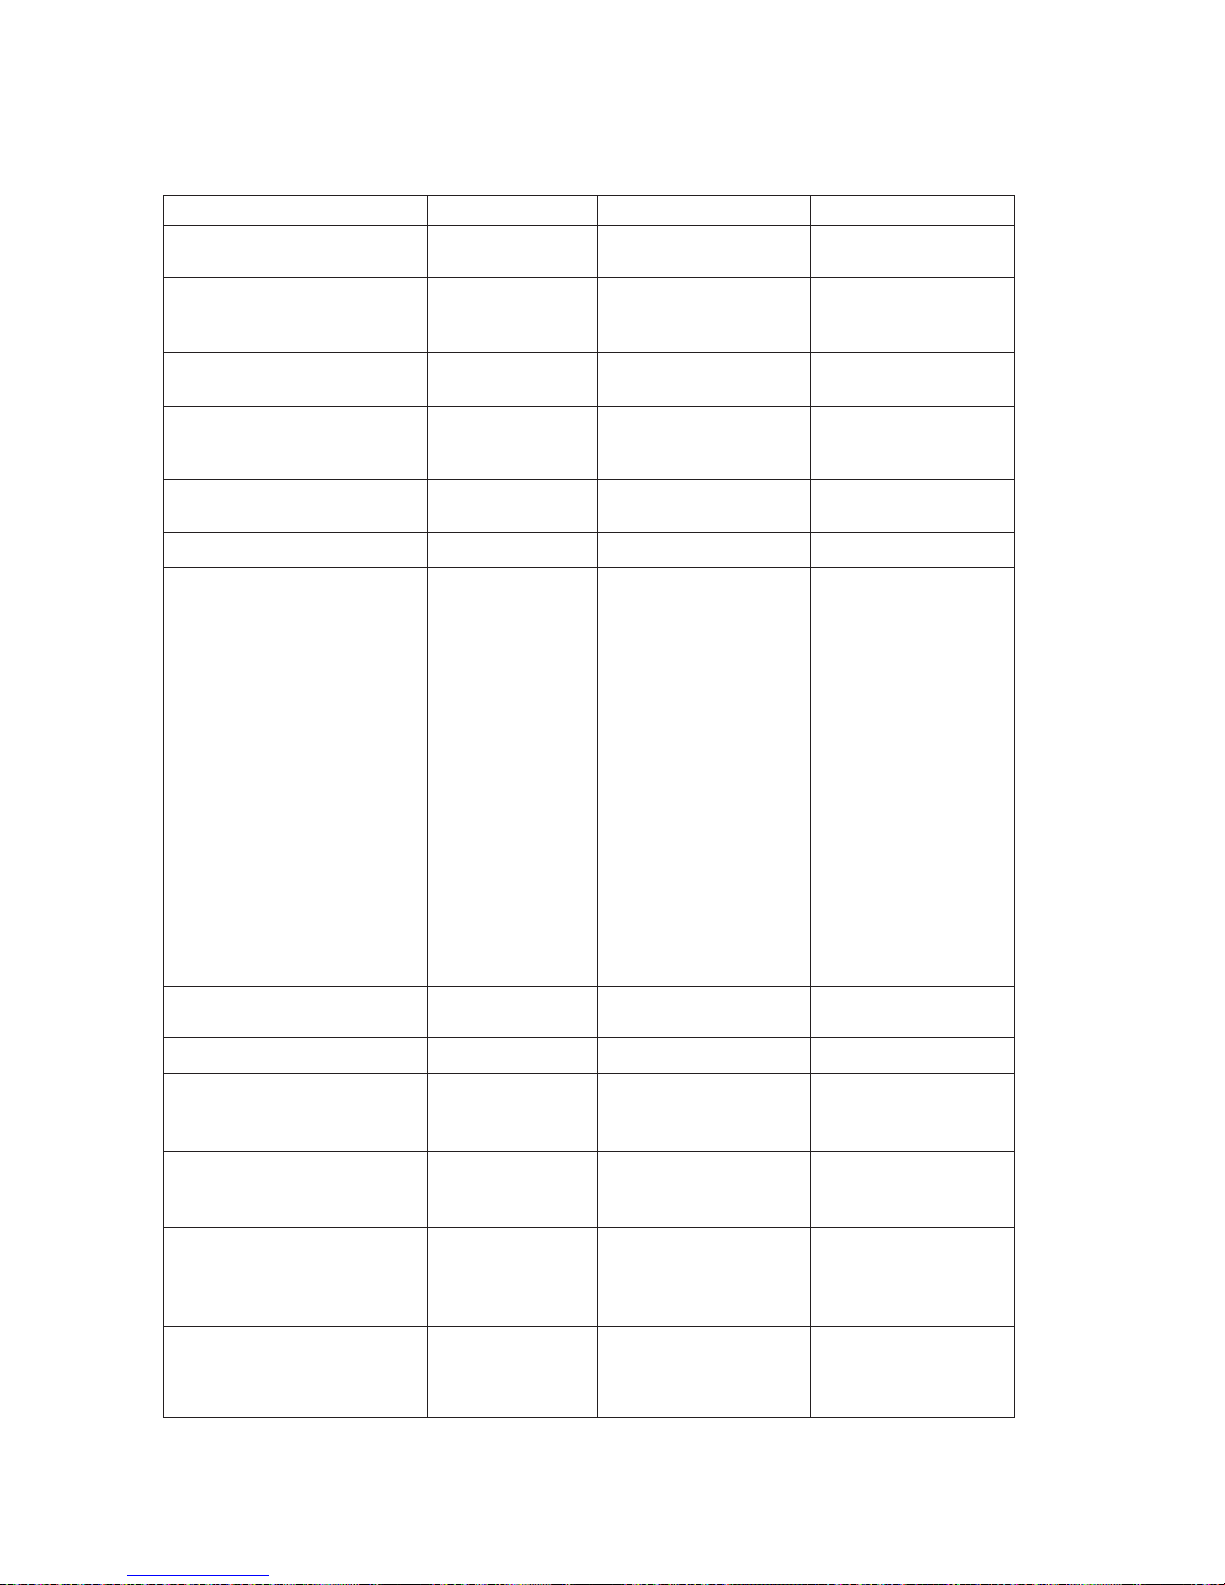
MIDI-Implementierung
17
Remarks
Bank select
Modulation
Portamento time
Volume
Pan
Expression
Rhythm allocation
Sustain Pedal
Portamento on/off
Sostenuto Pedal
Soft Pedal
Reverb Program
Chorus Program
Reverb level
Chorus level
All Sound Off
Reset all controllers
All notes off
O 9nH,V=1-127
× (9nH,V=0)
Transmitted Recognized
10ch
×
***********
***********
***********
× 1
×
×
×
×
×
×
×
×
× ×
× ×
×
×
×
×
×
×
×
×
×
×
×
×
×
×
27-88
Function
Basic Default
Channel Changed
Default
Mode Messages
Altered
System Exclusive
Pitch Bend
Velocity : Note on
Note off
Program
Change : true
Control 0
1
5
7
10
11
20
64
65
66
67
80
81
91
93
120
121
123
System : Song Position
: Song Select
Common : Tune
System : Song Position
: Song Select
Common : Tune
Mode 1: OMNI ON , POLY Mode 2 : OMNI ON , MONO 〇 : YES
Mode 3: OMNI OFF , POLY Mode 4 : OMNI OFF , MONO × : NO
Note
Number : True voice
After key s
Touch Ch's
'
System : Clock
Real Time : Commands
: Start
: Stop
Aux : LOCAL ON/OFF
: All Notes Off
Messages : Active sense
: Reset
1-16ch
×
0—127
0—127
O 9nH,V=1-127
× (9nH,V=0;
8nH,V=0-127)
×
×
×
×
×
×
×
×
×
×
×
×
×
×
×
O
O
O
O
×
×
×
×
×
×
O
0—127
O
O
O
O
O
O
O
O
O
O
O
O
O
O
O
O
O
O
O
×
×
MIDI Implementation Chart
0
5
25
75
95
100
Page 18

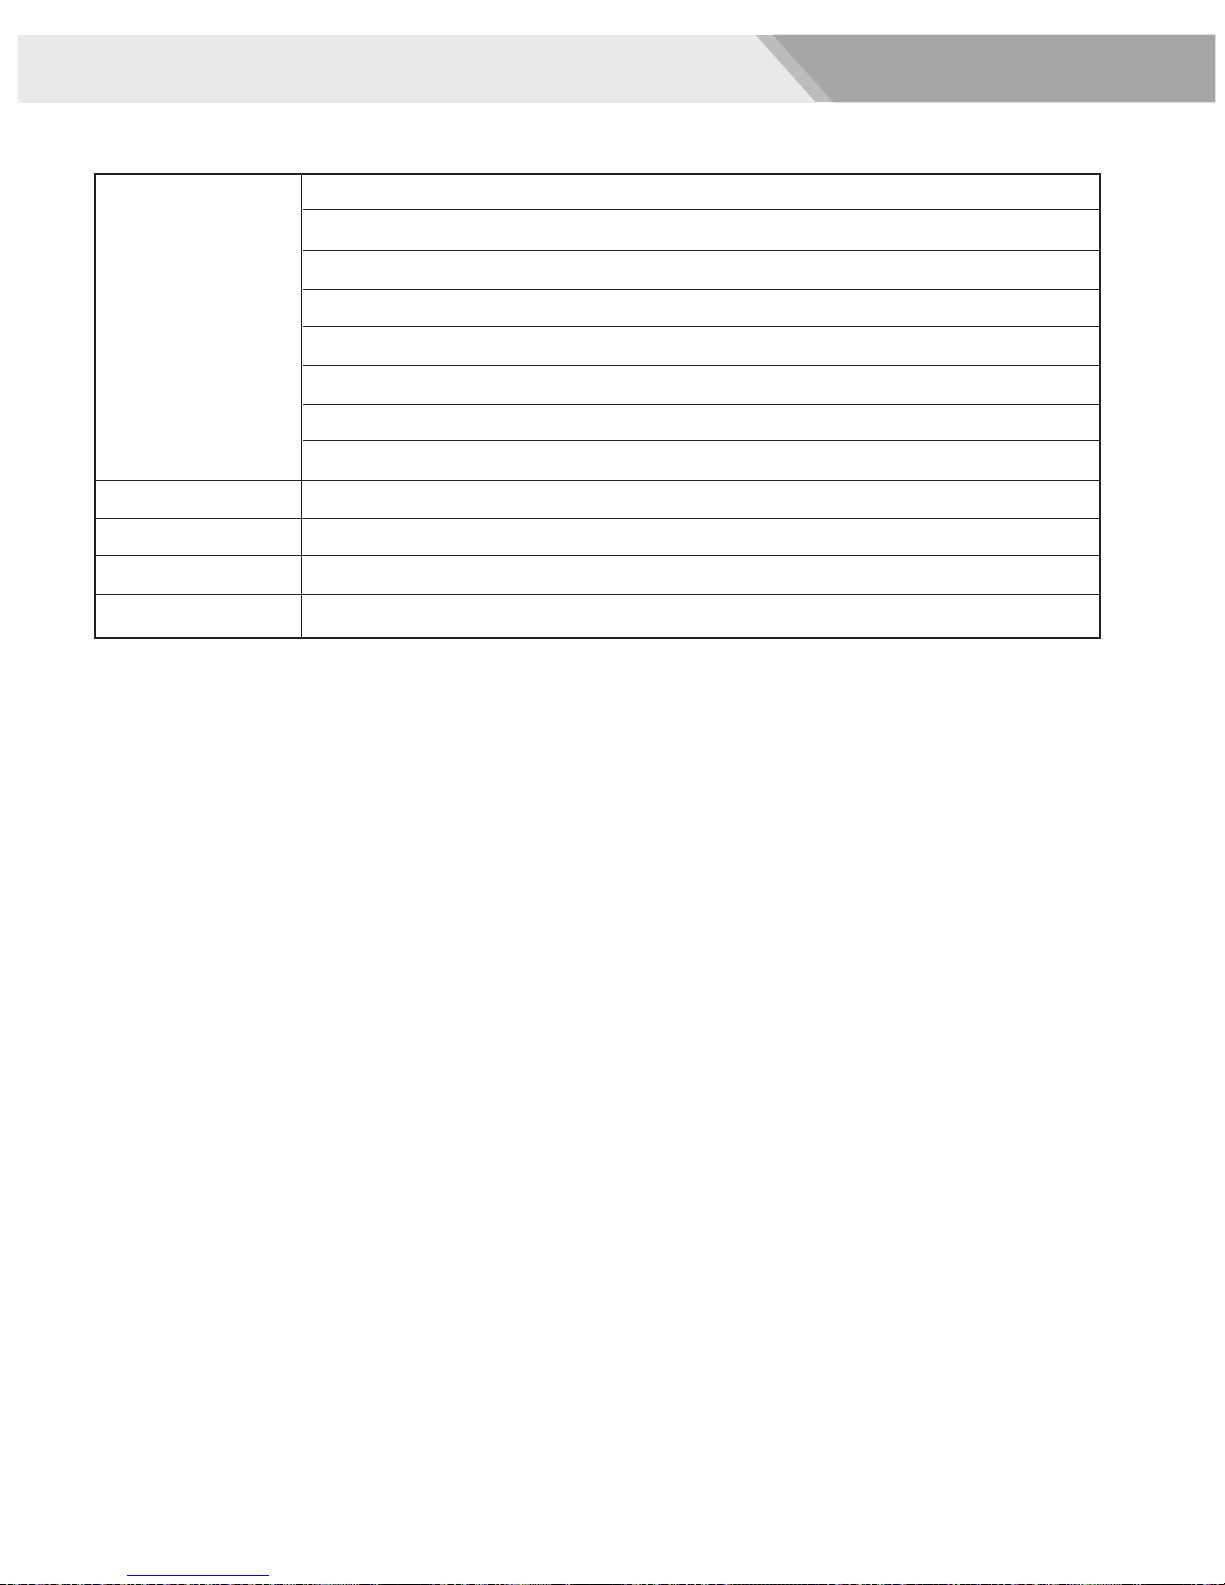
Spezifikationen
Hauptmerkmale
7 Drum Pads mit Touch-Sensitivity
2 Pedale (Kick und Hi-Hat)
1 Kopfhörerausgang, 1 USB-Buchse (MIDI IN/Out)
45 voreingestellte Drum Kits, 5 Benutzer-Kits
265 Percussion Sounds, 128 GM Sounds, 16 MB Sound-Daten
100 Songs (80 Styles, 20 Songs)
1 Demosong
1 Aufnahmespur
Handpercussion
Sie können mit den Händen auf den Pads spielen
Metronom
2 verschiedene Sounds
Maße (L x B x H)
500 x 370 x 157,4 mm
Gewicht
3,3 kg
18
Page 19
WEEE-Erklärung / Entsorgung
Ihr Produkt wurde mit hochwertigen Materialien und Komponenten entworfen und
hergestellt, die recyclebar sind und wieder verwendet werden können. Dieses Symbol
bedeutet, dass elektrische und elektronische Geräte am Ende ihrer Nutzungsdauer
vom Hausmüll getrennt entsorgt werden müssen. Bitte entsorgen Sie dieses Gerät bei
Ihrer örtlichen kommunalen Sammelstelle oder im Recycling Center. Bitte helfen Sie
mit, die Umwelt, in der wir leben, zu erhalten.
Technische Änderungen und Änderungen im Erscheinungsbild vorbehalten. Alle Angaben
entsprechen dem Stand bei Drucklegung. Für die Richtigkeit und Vollständigkeit der enthaltenen
Beschreibungen, Abbildungen und Angaben übernimmt Musikhaus Kirstein GmbH keinerlei
Gewähr. Abgebildete Farben und Spezifikationen können geringfügig vom Produkt abweichen.
Musikhaus Kirstein GmbH - Produkte sind nur über autorisierte Händler erhältlich. Distributoren
und Händler sind keine Handlungsbevollmächtigten von Musikhaus Kirstein GmbH und haben
keinerlei Befugnis, die Musikhaus Kirstein GmbH in irgendeiner Weise, sei es ausdrücklich oder
durch schlüssiges Handeln, rechtlich zu binden. Diese Bedienungsanleitung ist urheberrechtlich
geschützt. Jede Vervielfältigung, bzw. jeder Nachdruck, auch auszugsweise, und jede Wiedergabe
der Abbildungen, auch in verändertem Zustand, ist nur mit schriftlicher Zustimmung der Firma
Musikhaus Kirstein GmbH gestattet.
Herstellerangaben
Musikhaus Kirstein GmbH
Bernbeurener Strasse 11
86956 Schongau
Telefon: 0049-909494-0
Telefax: 0049-909494-19
www.kirstein.de
19
!
!
Page 20
2
PRECAUTIONS
P L E AS E R E A D C AR E FUL LY B E FO R E PR OC E E DING
Please keep this manual in a safe place for future
reference.
Power Supply
Please connect the designated AC adaptor to an AC
outlet of the correct voltage.
Do not connect it to an AC outlet of voltage other than
that for which your instrument is intended.
Unplug the AC power adaptor when not using the
instrument, or during electrical storms.
Interference with other electrical devices
Radios and televisi ons placed nearby may experience
reception interf eren ce. Op
erate thi s unit at a suitable
distan ce from rad ios and televisi ons.
Cleaning
Clean only wi th a soft, dr y cloth.
or chemical -impregnated wiping cloths.
Do not use pain t thinners, sol vents, cl eaning fluids,
Handling
Do not apply ex cessive force to the switc hes or
controls
.
Do not let pape r, metallic , or other object s into the
instrumen t. If this happens, remove the electric plu g
from the outlet. Then have t he instrument i nspected
by qualifie d service personnel
.
Disconnec t all cables befo re moving the instrument .
THE F CC R E GUL ATIO N WA R NIN G (F o r US A)
INF OR MATIO N F O R Y OUR S AFE TY !
This equipment has been tested and found to comply
with the limits for a Class B digital device , pursuant to
Part 15 of the FCC Rules.
These limits are desig ned to provid e reasonable
protection against harmful interference in a resid ential
installation. This equipment genera tes, uses, and can
radiate radio frequency energy and, if not installed
and used in accordance with the instru ctions, may
cause harmful interference to
radio communica tions.
However, there is no guarante e that interfe rence wil l
not occur in a parti cular installation. If this equipment
does cause harmfu l interference to radio or tele visio n
reception, which can be determ ined by turning the
equipment off and on, the user is encouraged to try to
corre ct the interfe rence by one or more of the foll owing
measures:
Connections
Before conn ecting the instrument to o ther devices,
turn off the p ower to all units . This will hel p prevent
malfunction and/or da ma ge t o other devices.
Location
Do not expose the instrument to the following
conditions to avoid deformation, discoloration, or
more serious damage:
Direct sunlight
Extreme temperature or humidity
Excessive dusty or dirty location
Strong vibrations or shocks
Close to magnetic fields
Reorient
or relocate the receiving antenna.
Connect the equipment into an outlet on a circuit
different from that to which the receiver is
connected
.
Consult the dealer or an experienced radio/TV
technician for
help.
Unauthorized changes or modification to this
system can void the user ’ s authority to operate
this equipment
.
Increase the separation between the equipment
and receiver.
C A UT I O N
The normal functi on of t he pr oduct may be disturbed
by Strong Elec tro M agn eti c Interference. If s o, si mpl y
reset the product t o res ume n ormal operation by
following the own er’ s manu al. I n case the function
could not resume, p lea se us e the product in other
location.
0
5
25
75
95
100
English
Page 21

Contents
Panel Controls
- Top Panel
- Rear Panel
Operation
- Select a Drum Kit
- Set Pad Voice
- Set pad volume
- Set pad pan
- Set pad midi note
- Save Kit
- Play Song
- Main Volume
- Accompaniment Volume
- Drum Off
- Tempo
5
5
6
7
7
7
7
7
8
8
8
8
9
9
9
- Metronome
- Hand Percussion
- Demo
- Reverb
- Record
- Playback
Input and Output
- Pedals
- Phones output
- USB jack
AUX IN input
-
Voice list
Kits list
Song list
MIDI implementation chart
9
9
10
10
10
10
11
11
11
11
11
12
13
14
15
Specifications
16
3
Page 22
Setting up
Power Supply
igital drum
Your d will run on either batteries or power
adaptor. Follow the instructions below according to the
power source you intend to use.
Using an AC- Adaptor
Connect the power adaptor to the DC IN jack located
on the rear panel of the unit,and plug the AC power
adaptor into an AC power outlet.
Do not use adaptors other than the one specified.
The technical specification of the adaptor is DC 12V
output, center positive type.
12V
Ac pow er
sock er
Using Batteries
Open the battery compartment conver on the
underside of the unit.
Notes
Power will be automatically drawn from the AC adaptor
if an optional AC adaptor is connected while batteries
are installed in the instrument.
Caution
It is recommended that you replace worn batteries as
soon as possible. When battery voltage drops, the
display will dim and / or the sound will become distorted,
when this occurs, replace the batteries with a complete
set of six new batteries of the same type.
Never mix old and new batteries, different types of
batteries (alkaline, magnesium, etc.), Batteries by
different makers, or batteries from the same maker but
of different types. Misuse may cause the instrument to
become hot, result in fire, or battery leakage.
Also, to prevent damage due to battery leakage, remove
all the batteries from the instrument when it is not to be
used for an extended period of time. Batteries left in an
unused instrument will also loose their power overtime.
Auto Power Off
In order to save energy, we have designed the “Automatic
Shutdown” function. With this function, this product will
shutdown automatically when you have left it idle for more
than 30 minutes.If you don't need this function, just press
and hold the [ /STOP] button then turn the drum on.START
Insert six “C” size, R14, SUM-2 or equivalent
batteries. When inserting the batteries, be care
to follow the polarity markings in the illustration.
Note: we suggest to use th e alkaline batteries.
Close the battery compartment securely.
Using Headphones
An optional set of stereo headphones can be connected
to the PHONES/OUTPUT jack located on the rear panel.
when a pair of headphones is connected to the jack, the
internal speakers of the unit will switch off automatically,
perfect for private practice or late night playing. if you
want to use an external sound system, the headphone
jack can also be used to connect the dightal drum to a
stereo system of mixing console.
Turn off the po wer on all equipment befor e making
any connections.
The headphone is optio nal.
4
Page 23
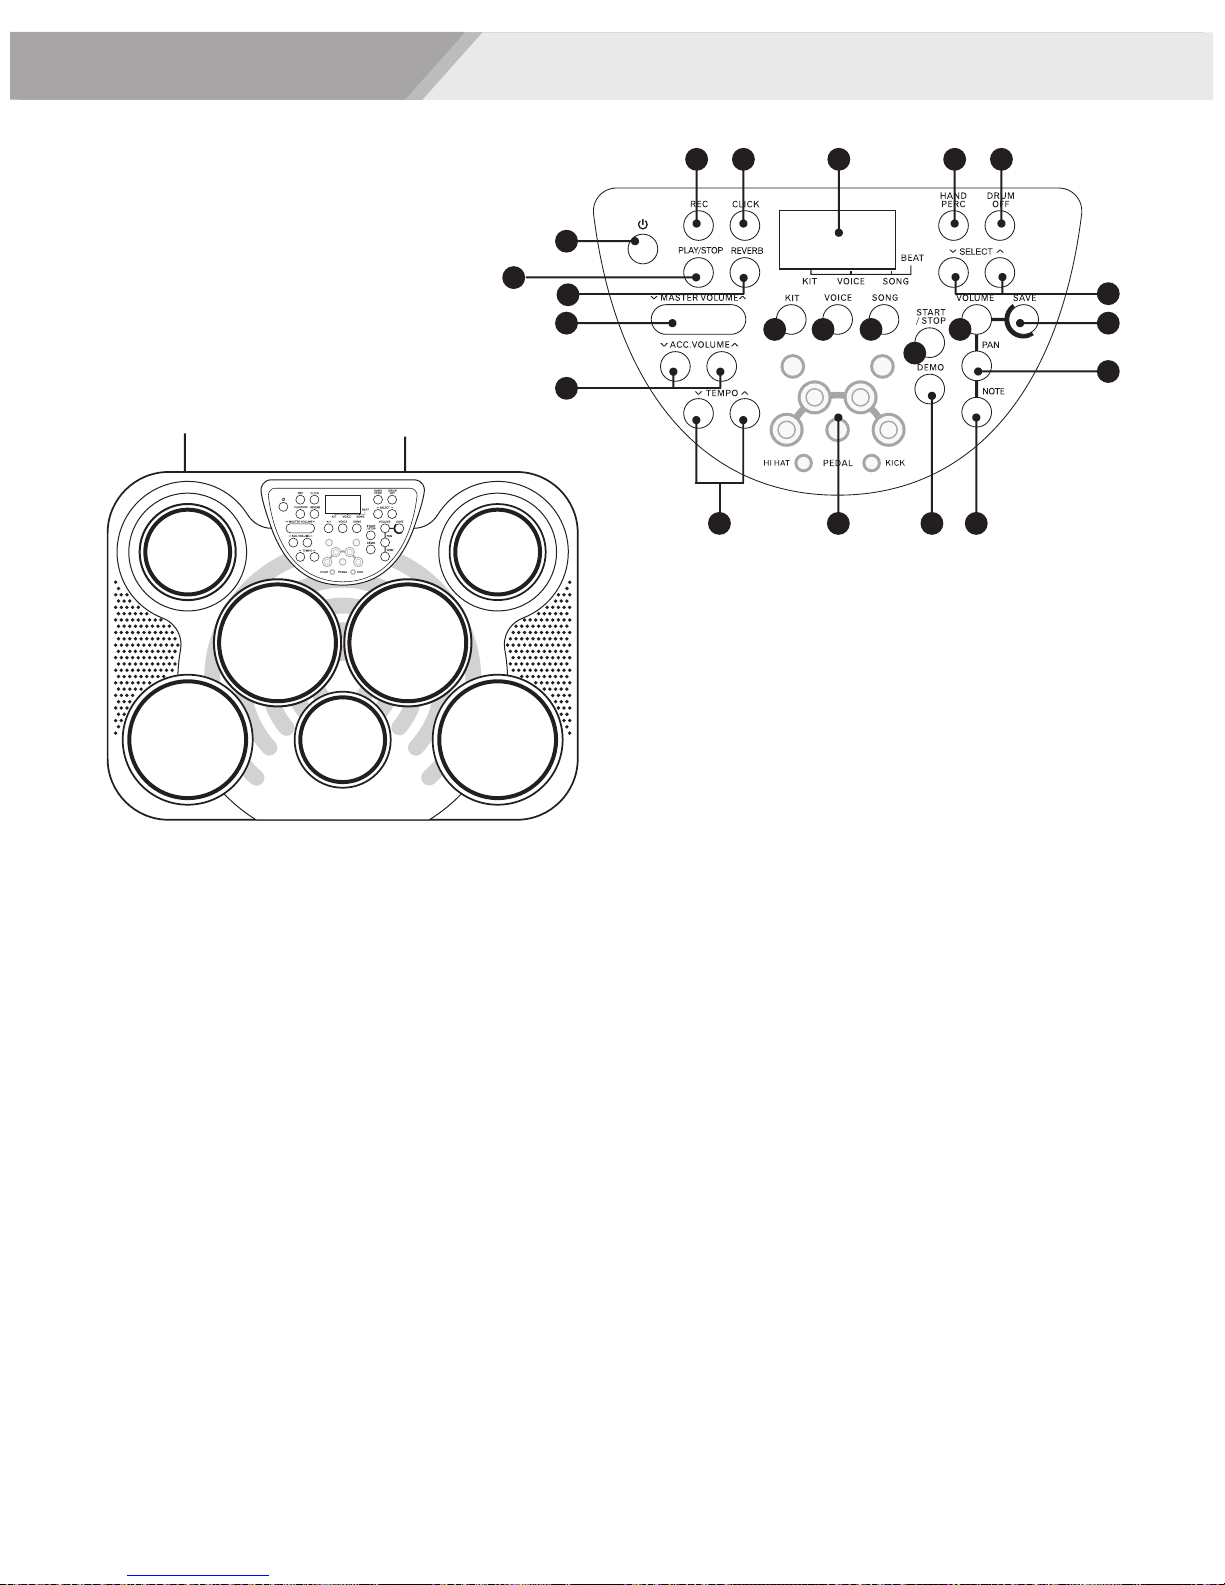
Panel Controls
Top panel
Drum pad (x7) Control panel
18
19
5 6 7 8 9
1
15
3
4
10 11 12
2
14
13
20 21 22
16
17
1.POWER BUTTON
This button set the power of module on or off.
2.TEMPO + & -
These buttons are used to change current tempo.
3.MASTER VOLUME + & -
These buttons can be used to change the master volumes.
4.ACC. VOLUME + & -
These buttons can be used to change the accompaniment
volumes.
5.REC AND LED INDICATOR
This button can be used to start or stop recording.
6.CLICK AND LED INDICATOR
This button is used to turn on or off the metronome.
7.3-DIGIT LED
This LED is the main display device of DD315, which will
show the parameters of current menu.
8.HAND PERCUSSION AND LED INDICATOR
This button can be used to turn on the hand percussion
function.
9.DRUM OFF AND LED INDICATOR
This button is used to enable or disable drum off function.
10.KIT
This button is used to enter kit menu.
11.VOICE
This button is used to enter voice or volume menu.
12.SONG
This button is used to enter song menu.
13.START/STOP
This button can be used to start or stop song playing.
14.VOLUME
This button can be used to change the volume of pad.
15. + & -SELECT
These buttons can be used to change values (kit number,
voice number, song number, etc.) when editing.
16.SAVE
This button is used to save current kit settings to a user kit.
17.PAN
This button can be used to change the pan of pad.
18.PLAY/STOP
This button can be used to start or stop recording replay.
5
Page 24
Panel Controls
19.REVERB
This button is used to change the reverb level.
20.PAD INDICATORS
Display the pad currently being played.
21.DEMO
This button can be used to start or stop demo song playing.
22.NOTE
This button can be used to change the midi note of pad.
Rear Panel
24 26 2723
23.AUXIN INPUT
This port is used to connect with the external audio device,like CD player or MP3 player.
24.PHONES JACK
This jack is used to connect with headphones
25.PEDAL INPUT JACKS
Kick and hi-hat pedal input jacks.
26.USB JACK
This port is used to connect with external device.
27.DC INPUT
Connect to a DC 12V.
25
6
Page 25
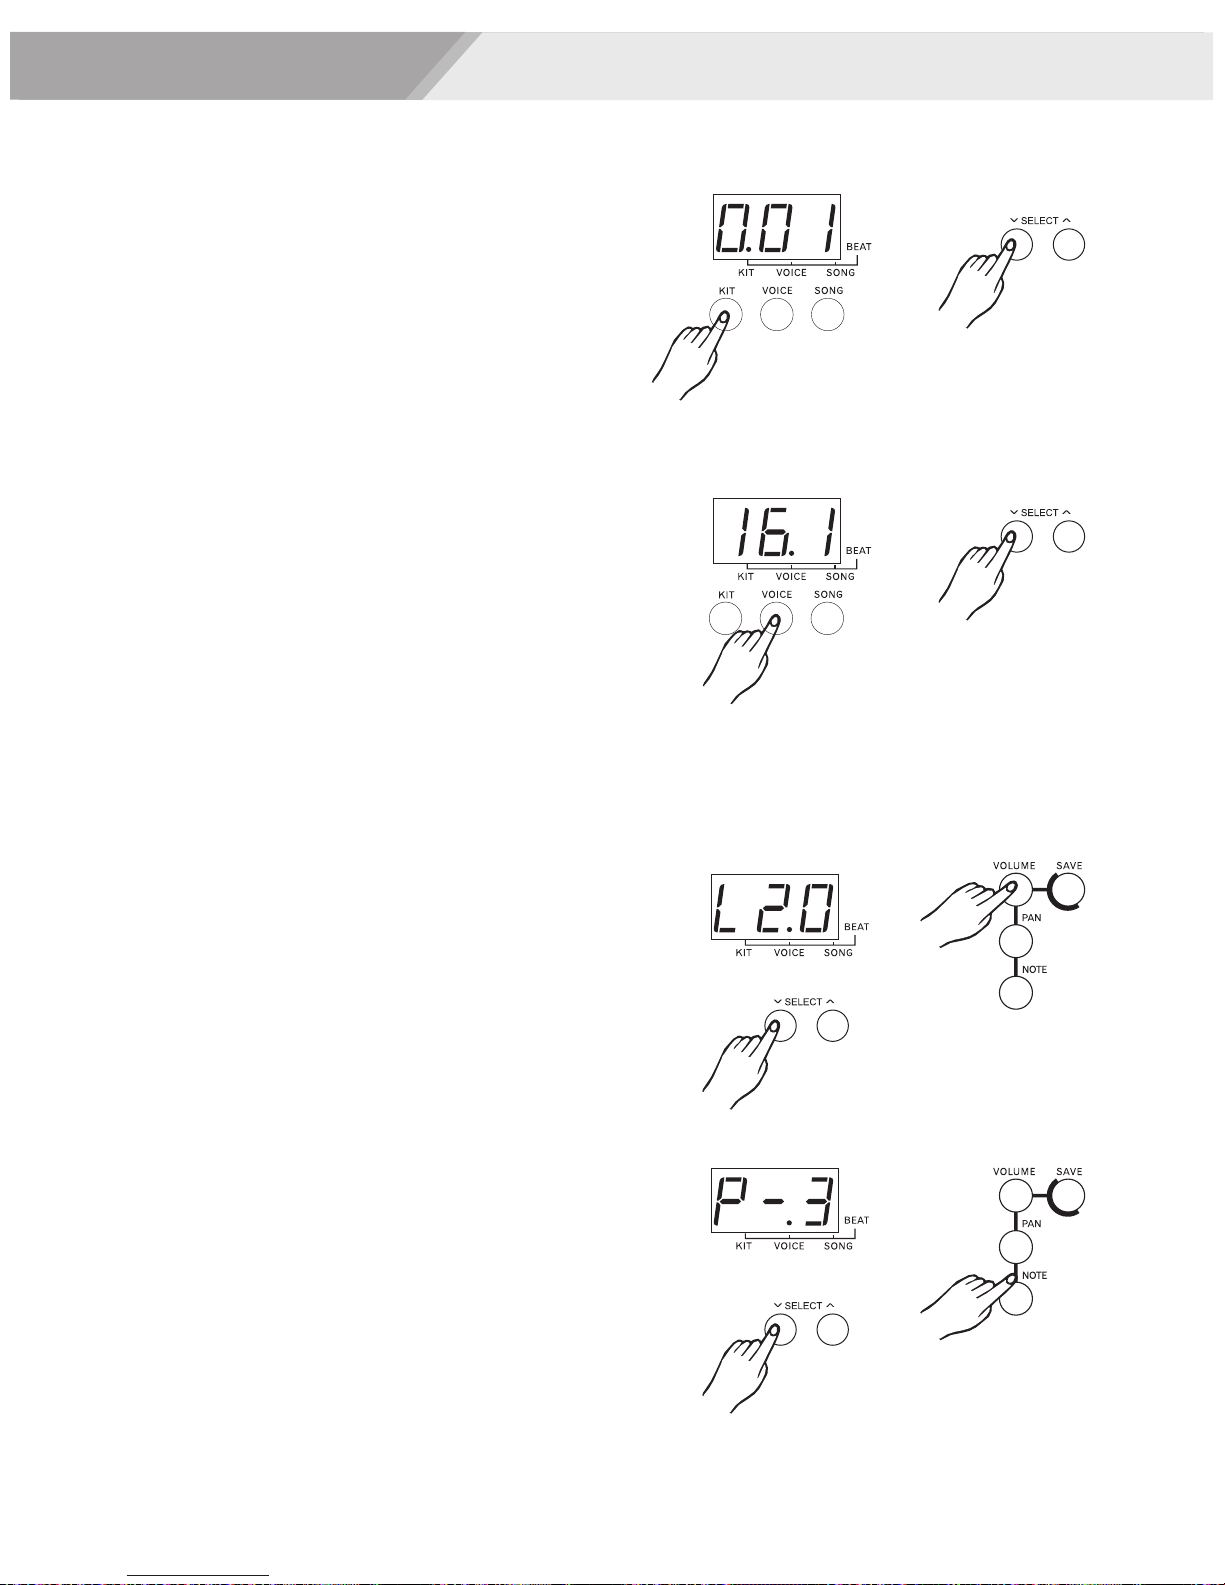
Select a Drum Kit
Kit menu is the default menu after power on, default
valueis 001.
Press [KIT] button to enter kit menu. The 3-digit LED
will show the current kit number with the corresponding
menu indicator lit up. The button [+] / [ ] can
be used to select any kit
as the current kit.
(preset kit 1-45, user kit 46-50)
SELECT
-
Set Pad Voice
Operation
Press [ ] button to enter menu. Default
value will be the voice value of the hi-hat pad based on
different kit selected. For example, if kit 001 has been
selected, then press voice, the value on LED will be
161, which is the voice value of the hi-hat pad.
If voice is selected the corresponding menu
indicator will be lit up.
In this menu, the 3-digit LED will show the voice number
of current pad, The button [+] / [ ] can be
used to select any voice(1-265, loop) for current pad.
VOICE voice
menu
-SELECT
Set pad volume
Press [VOLUME] button to enter menu. If
menu is selected,the corresponding menu indicator will
be lit up.
In this menu, the 3-digit LED will show the volume of
current pad, which can be selected by pad hitting. The
button [+] / [-] can be used to the
volume (0-31)
SELECT
of the current pad.
voice voice
change
Set pad pan
Press the [PAN] button to enter menu. If
menu is selected, the corresponding menu indicator will
be lit up.
In this menu, the 3-digit LED will show the pan of current
pad, which can be selected by pad hitting. The button
SELECT
of the current pad.
[+] / [-] can be used to change the pan(-8~+8)
voice voice
7
Page 26
Operation
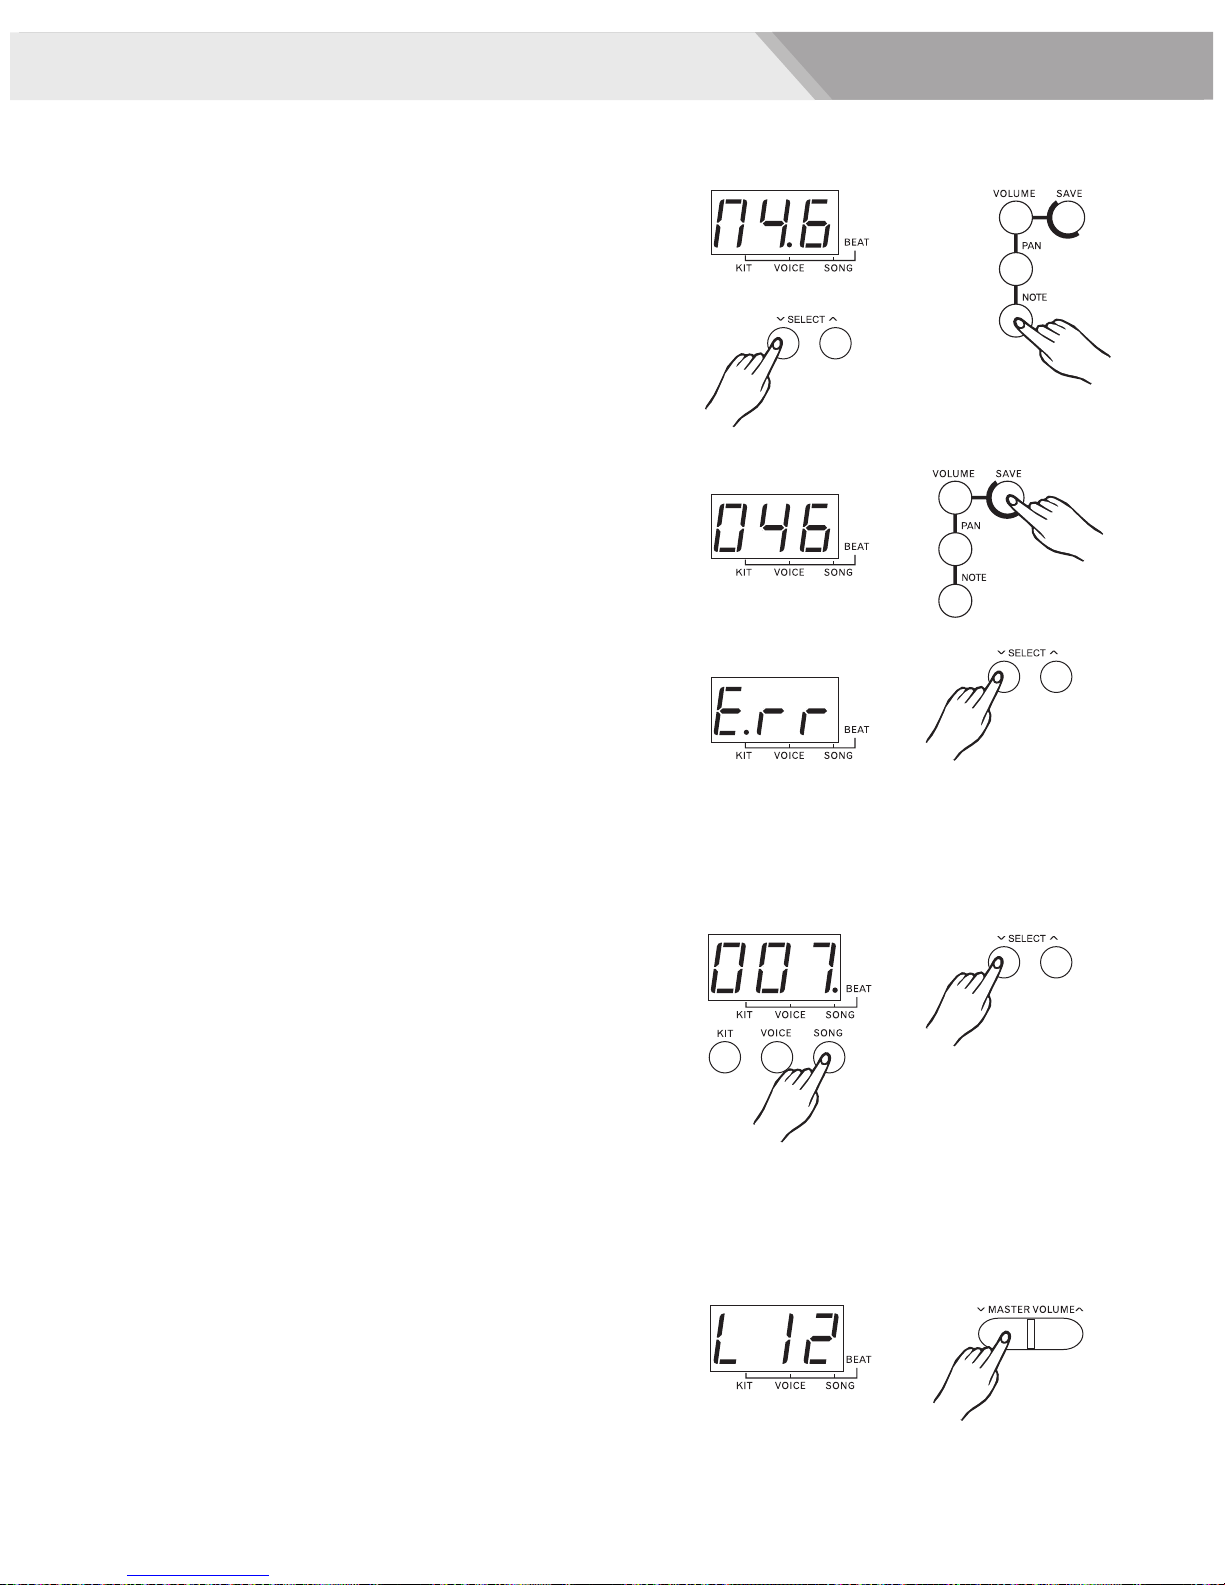
Set pad midi note
Press [NOTE] button to enter voice menu,If voice menu
is selected, the corresponding menu indicator will be lit
up.
In this menu, the 3-digit LED will show the midi note of
current pad, which can be selected by pad hitting. The
button SELECT [+] / [-] can be used to the midi
note (n00-n99, loop) of the current pad.
Save Kit
Press [SAVE] button to enter the kit save menu. The
button [+] / [ ]
(46-50, loop) current kit setting. During kit selecting the
user kit number will keep flashing.
Press [SAVE] button again, the current kit setting will
be saved to the selected kit. The machine will quit to
the kit menu and select this user kit as the current one,
if all the data has been saved successfully.
SELECT - can be used to select a user kit
change
If saving is failed due to error, an Err” will appear on
the LED.
Note: The unsaved kit setting will be lost after kit
changing.
“
Play Song
Press [SONG] butt on to enter song menu. Defau lt
value is 001, The 3-digit LED will show current song
number with cor responding menu indi cator lit up. The
button can be used to select c urrent
song (1-100, loop). First 80 styles are loop playing.
Press [START/STOP] to start or stop th e song player.
If song is switched while i t's playing, the new song
will not start until the end of current measur e.
Each song has its own defaul t tempo and drum kit,
the song player will initialize the current kit and current
tempo at the begi nning of son g playing.
SELECT [+] / [ ] -
Main Volume
In main volume menu, the digit on far left of LED will
display letter “L”. The two digits on the right will display
current main volume. The button MASTER VOLUME
can be used to adjust the volume (0-16, not
[+] / [ ] loop). And this value will be auto-saved after adjusted.
8
Page 27
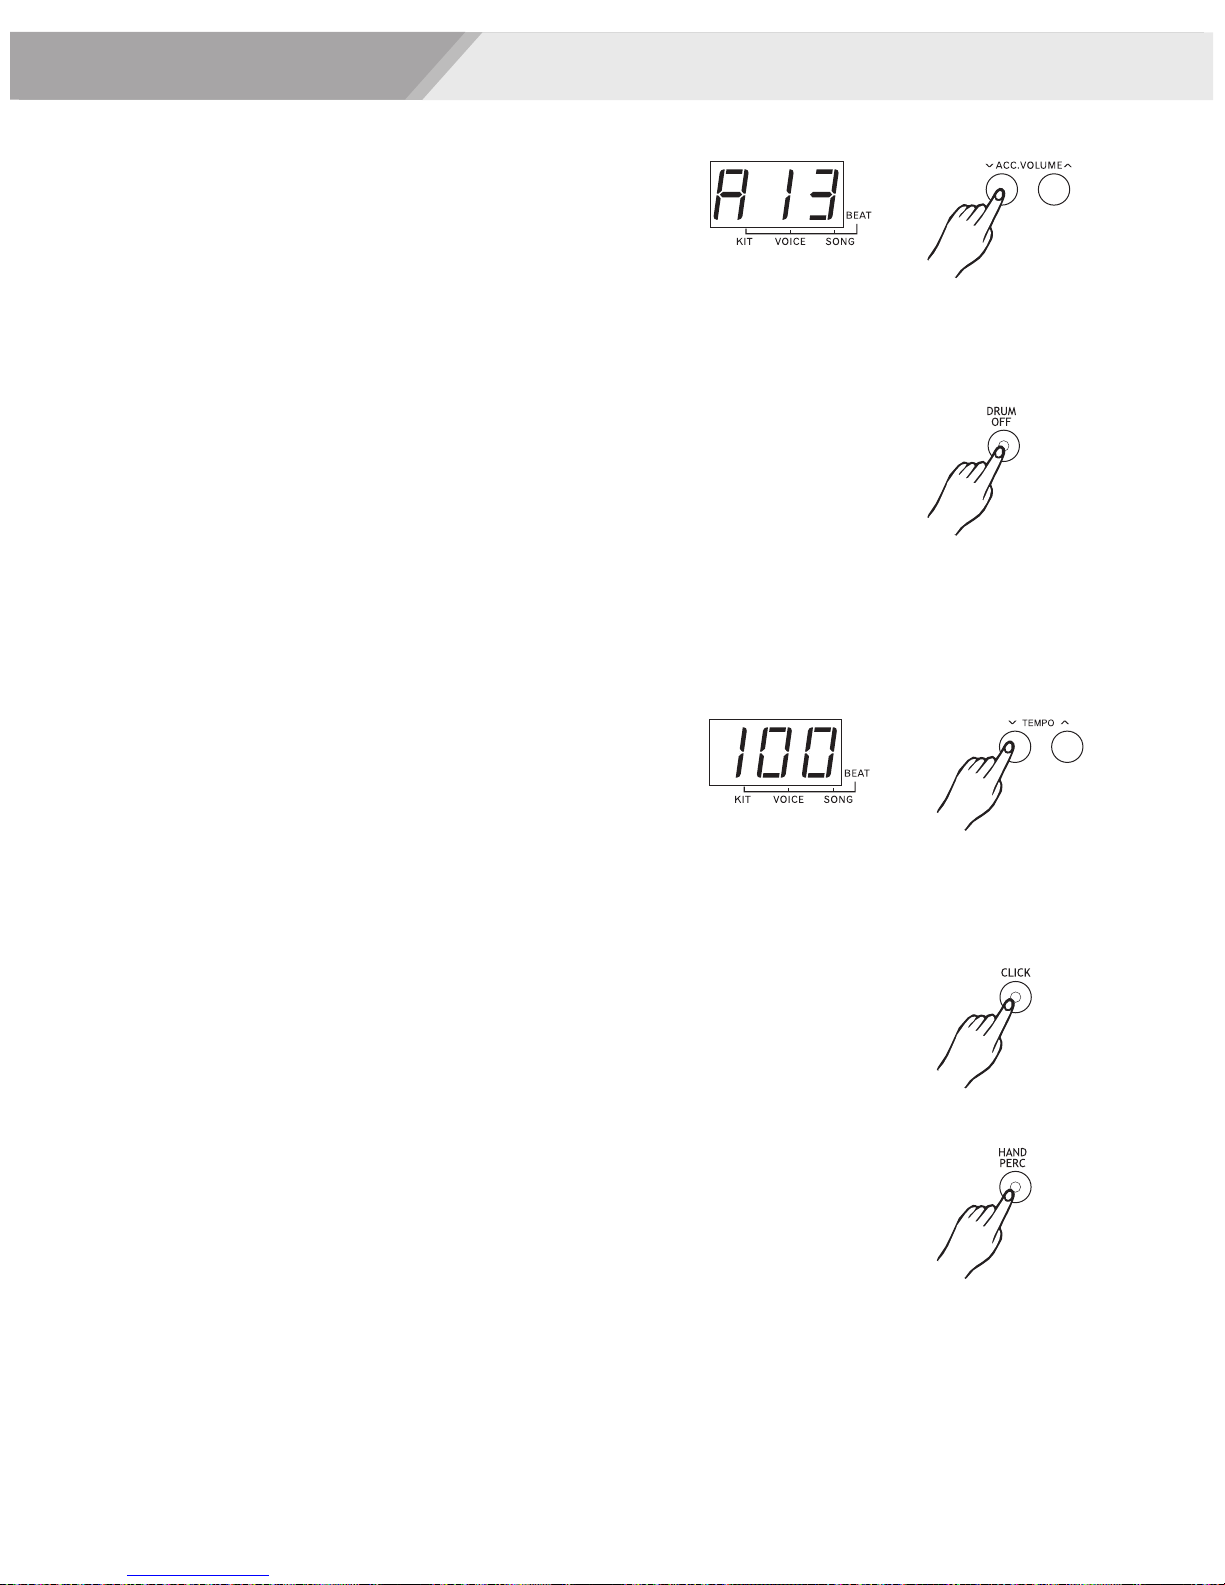
Accompaniment Volume
In accompaniment volume menu, the digit on far left
of LED will display letter “A”. The two digits on the right
will display current accompaniment volume. The
button can be used to adjust
ACC.VOLUME [+] / [ ]the volume (0-16, not loop). This value will be autosaved after adjusted.
Drum Off
Pressing [DRUM OFF] button will enable or disable the
drum off function when a song is playing. If drum off is
enabled, the drum voice will be turned off with the drum
off indicator lit on. This function is quite useful for
practicing. Drum off button cannot be manipulated
while play back record.
Note: If you can't play with the song, you can decrease the
tempo value, please see the [TEMPO] section.
Operation
Tempo
-
Press the TEMPO button to enter the tempo
menu. Button and can be used to change
current tempo (30-280, not loop), which affects the
speed of clicking, and song playing. Press both
-
[ ]
and will reset current tempo to its default value
(current song tempo).
Metronome
Press once on [CLICK] button for human voice counting.
Press twice on [CLICK] for clicking sound. Press again
to turn off the clicking.
[+] / [ ]
[+] [ ]
-
[+]
Hand Percussion
Press [HAND PERC] button to enter the hand
percussion mode with the hand mode indicator lit up.
The song number is 77 and the kit number is 15.
9
Page 28
Operation
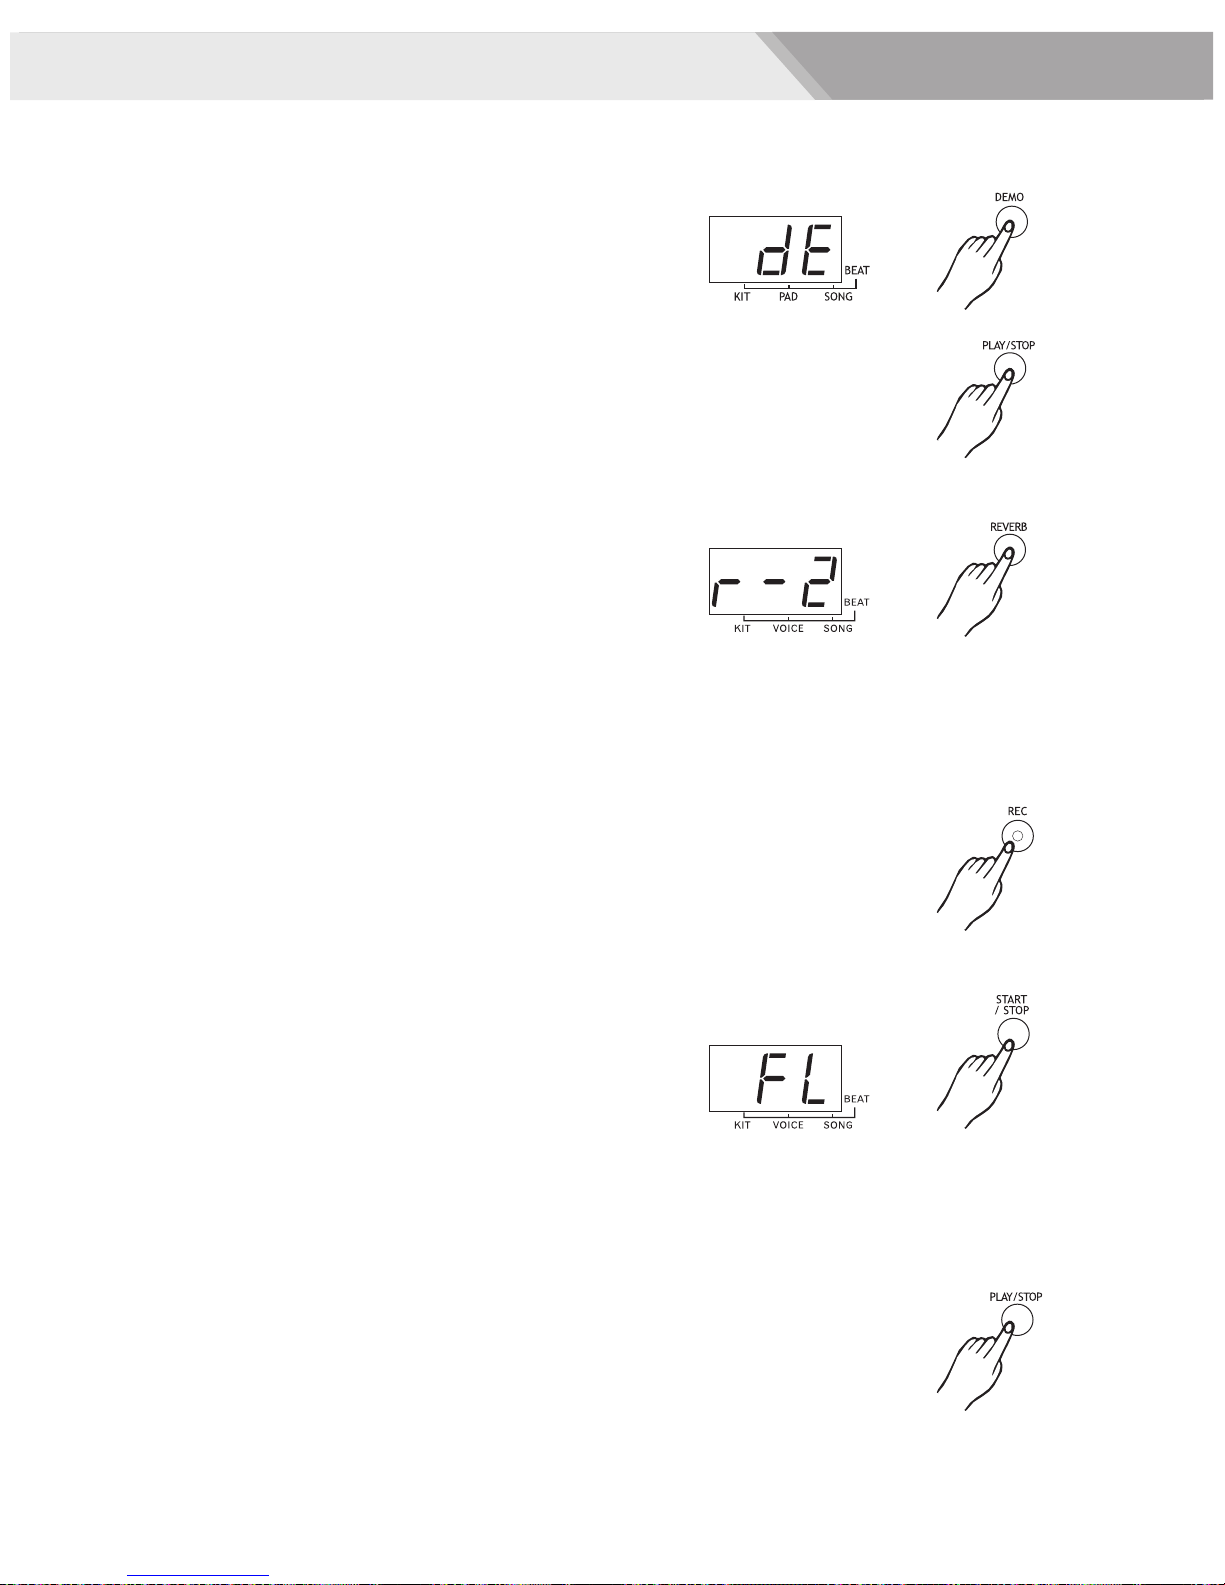
Demo
Press [DEMO] button to start or stop demo song
playing. The 3-digit LED will display “dE” , you can also
press [START/STOP] button to stop demo song playing.
Reverb
Press [REVERB] button to enter reverb function. In this
menu, the digit on far left of LED will display letter “R”.
The two digits on the right will display current reverb level.
The button can be used to adjust the
reverb level (0-3, not loop). This value will be auto-saved
after adjusted.
SELECT [+] / [ ]-
Record
Prepare to Record
Select the desired song, drum kit, tempo, drum off
setting, and reverb settings.
Start Recording
Press the [REC] button, the light start flashing.
Press the [START/STOP] button or strike the pad, the
light stop flashing and the recording process starts.
Stop Recording
To stop recording, press the [START/STOP] button or
[REC] button. The record indicator will turn off. If the
memory is full, "FL" will appear on the display and
recording process stops automatically.
Note: When you start recor ding, the vocal m etronome also
starts to count. But the sound of the vocal will not be record.
To stop the metronome, press the [CLICK] button.
Playback
Press the [PLAY/STOP] button will start or stop playing
recorded song.
Note: When you record a new song, it will replace the
previous recording. The song data recorded will be lost when
you turn off the power.
10
Page 29
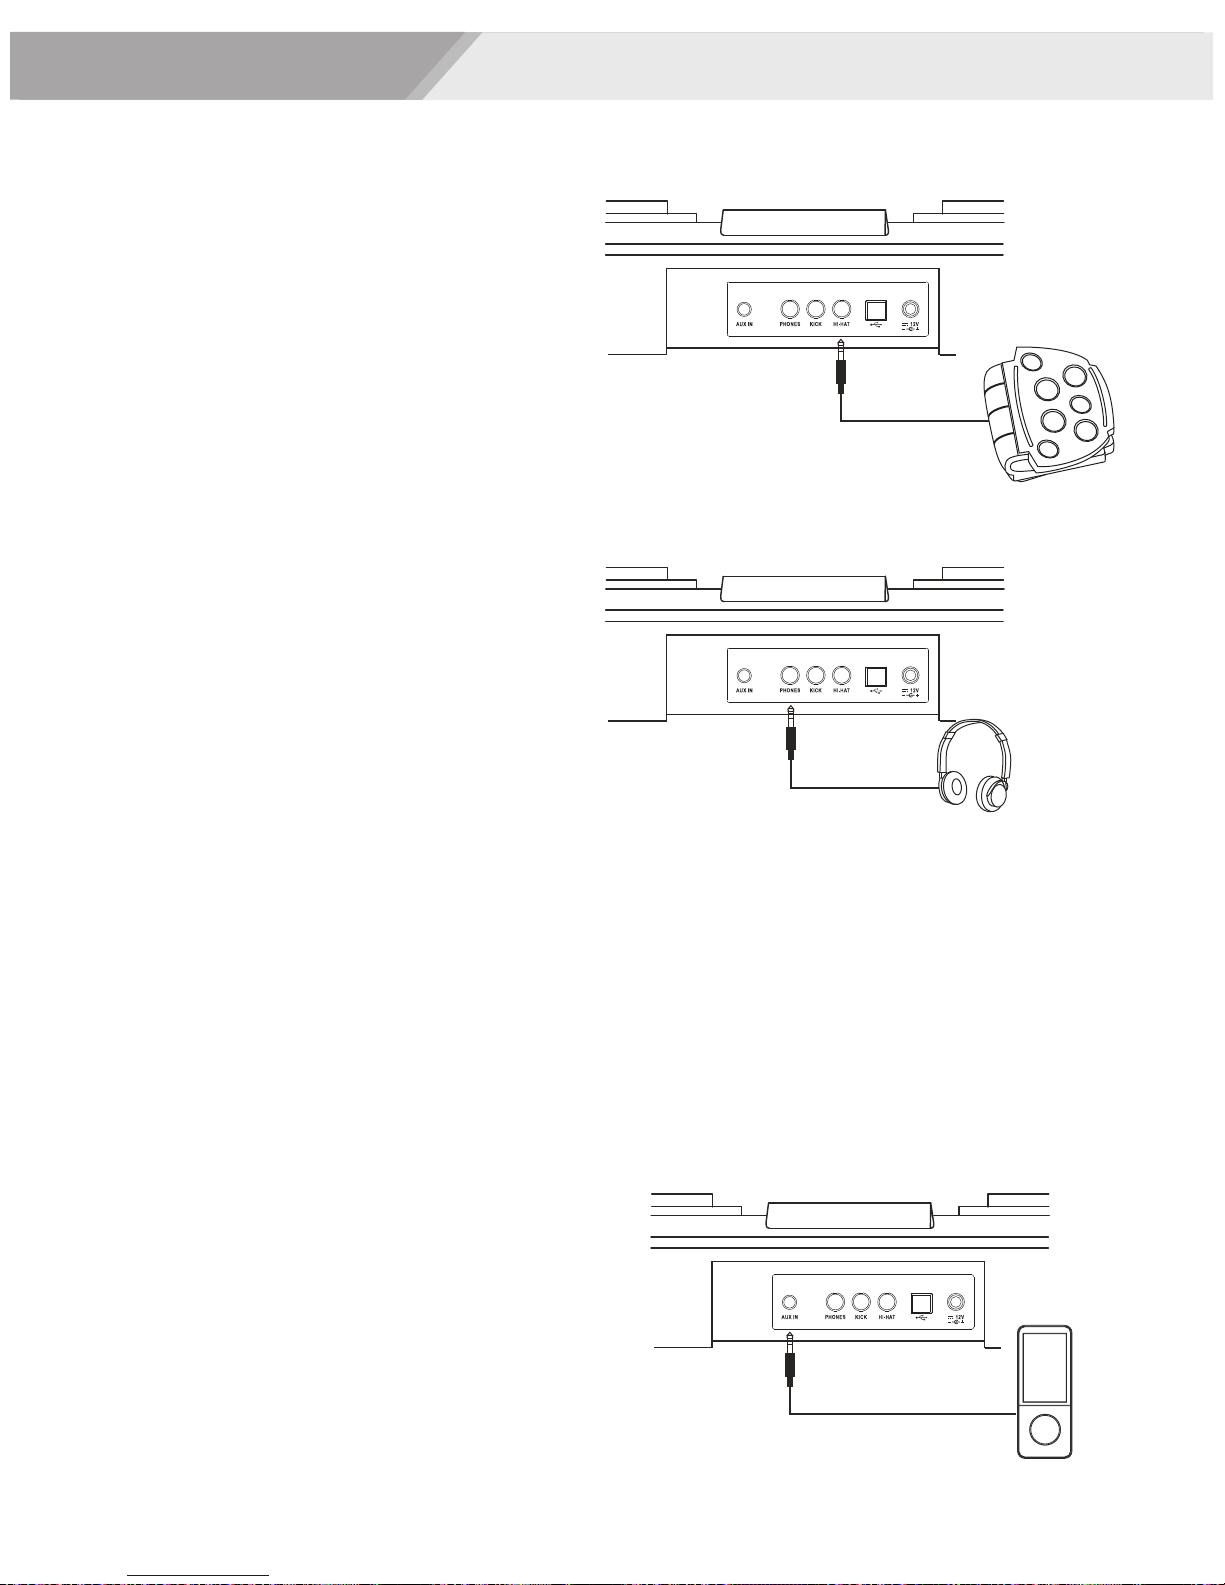
Pedals
this appliance supports 1 hi-hat pedal and 1 kick pedal
as input device.
Phones output
The phones output supports a stereo headphone as
output device.
Note: the headphone is optional.
Input and Output
USB jack
This appliance will output all the MIDI codes generated
by pads hitting or pedal stepping via the MIDI output
connector. clicking and the MIDI codes in songs are
excluded. It s also receive the MIDI data from external
device.
'
AUX IN input
For connecting an extra audio player, for example, MP3
and so on via a stereo plug. You can enjoy playing the
drum along with your favorite songs.
11
Page 30
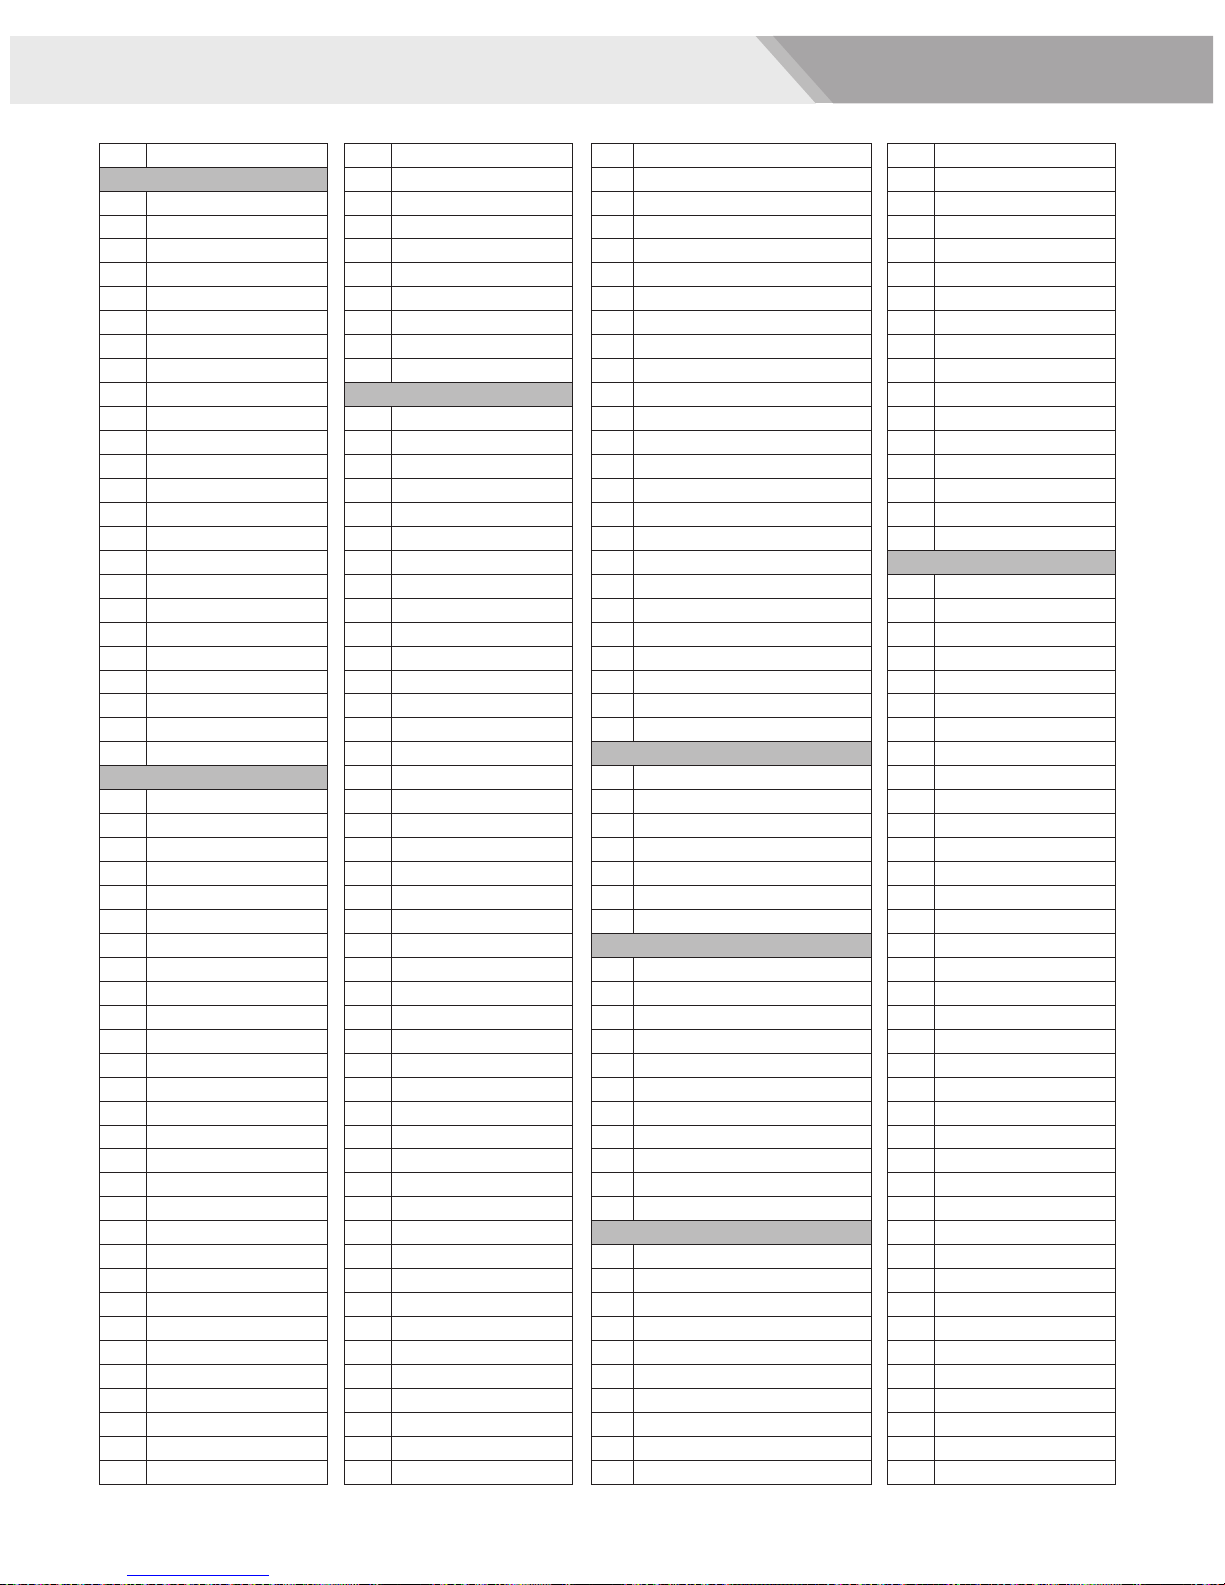
Voice list
Name
NO.
KICK
22''Acoustic Kick
1
24''Standard Kick
2
Brush Kick
3
Rock Kick
4
Jazz Kick
5
Room Kick
6
Fusion Kick
7
1970's Kick
8
Vintage Kick
9
HipHop Kick
10
Reggae Kick
11
Old School Kick
12
Lo-Fi Kick
13
Junkyard Kick
14
Noise Kick
15
Drum & Bass Kick
16
808 Kick
17
909 Kick
18
Electronic Kick 1
19
Dance Kick
20
FX Mix Kick
21
Techno Kick
22
Electronic Kick 2
23
Magic Kick
24
SNARE
14'' Acoustic Snare
25
14'' Standard Snare
26
14'' Funk Snare
27
Brush Snare
28
14'' Jazz Snare
29
14'' Rock Snare
30
13'' Damped Snare
31
Orchestra Snare
32
Orchestra Snare Rim
33
Room Snare
34
Fusion Snare
35
Big Band Snare
36
Vintage Snare
37
Live Snare
38
Reggae Snare
39
R&B Snare 1
40
808 Snare
41
909 Snare
42
R&B Snare 2
43
Electronic Snare
44
Power Snare
45
Dance Snare
46
Old School Snare
47
House Snare
48
Lo-Fi Snare
49
Junkyard Snare
50
Noise Snare
51
Drum & Bass Snare
52
53
Techno Snare
Techno Snare Rim
54
Magic Snare
55
Acoustic Snare Stick
56
Standard Snare Stick
57
Brush Snare Stick
58
Rock Snare Stick
59
Live Snare Stick
60
Room Snare Stick
61
Fusion Snare Stick
62
Brush Swirl
63
Tom
Acoustic Tom 1
64
Acoustic Tom 2
65
Acoustic Tom 3
66
Acoustic Tom 4
67
Acoustic Tom 5
68
Acoustic Tom 6
69
Brush Tom 1
70
Brush Tom 2
71
Brush Tom 3
72
Brush Tom 4
73
Brush Tom 5
74
Brush Tom 6
75
Jazz Tom 1
76
Jazz Tom 2
77
Jazz Tom 3
78
Jazz Tom 4
79
Jazz Tom 5
80
Jazz Tom 6
81
808 Tom 1
82
808 Tom 2
83
808 Tom 3
84
808 Tom 4
85
808 Tom 5
86
808 Tom 6
87
909 Tom 1
88
909 Tom 2
89
909 Tom 3
90
909 Tom 4
91
909 Tom 5
92
909 Tom 6
93
Electronic Tom 1
94
Electronic Tom 2
95
Electronic Tom 3
96
Electronic Tom 4
97
Electronic Tom 5
98
Electronic Tom 6
99
Power Tom 1
100
Power Tom 2
101
Power Tom 3
102
Power Tom 4
103
Power Tom 5
104
Power Tom 6
105
Lo-Fi Tom 1
106
Lo-Fi Tom 2
107
Lo-Fi Tom 3
108
Lo-Fi Tom 4
109
Lo-Fi Tom 5
110
Lo-Fi Tom 6
111
Junkyard Tom 1
112
Junkyard Tom 2
113
Junkyard Tom 3
114
Junkyard Tom 4
115
Junkyard Tom 5
116
Junkyard Tom 6
117
Noise Tom 1
118
Noise Tom 2
119
Noise Tom 3
120
Noise Tom 4
121
Noise Tom 5
122
Noise Tom 6
123
Techno Tom 1
124
Techno Tom 2
125
Techno Tom 3
126
Techno Tom 4
127
Techno Tom 5
128
Techno Tom 6
129
Magic Tom 1
130
Magic Tom 2
131
Magic Tom 3
132
Magic Tom 4
133
Ride
20'' Funk Ride
134
808 Ride
135
Ride
136
House Ride
137
Lo-Fi Ride
138
Junkyard Ride
139
Noise Ride
140
Crash
16'' Acoustic Crash
141
16'' Acoustic Crash Edge
142
16'' Rock Crash
143
16'' Rock Crash Edge
144
808Crash
145
909Crash
146
Electronic Crash
147
Brush Crash
148
Lo-Fi Crash
149
China
150
Splash
151
Hihat
14'' Acoustic Hi-hat Close
152
14'' Acoustic Hi-hat Open
153
14'' Acoustic Hi-hat Edge Close
154
14'' Acoustic Hi-hat Edge Open
155
14'' Acoustic Hi-hat Pedal
156
14'' Acoustic Hi-hat Splash
157
Rock Hi-hat Close
158
Rock Hi-hat Open
159
Fusion Hi-hat Close
160
Fusion Hi-hat Open
161
808 Hi-hat Close
162
808 Hi-hat Open
163
808 Hi-hat Pedal
164
808 Hi-hat Splash
165
909 Hi-hat Close
166
909 Hi-hat Open
167
909 Hi-hat Pedal
168
909 Hi-hat Splash
169
Dance Hi-hat Close
170
Dance Hi-hat Open
171
Dance Hi-hat Pedal
172
Dance Hi-hat Splash
173
Lo-Fi Hi-hat Close
174
Lo-Fi Hi-hat Open
175
Lo-Fi Hi-hat Edge
176
Lo-Fi Hi-hat Pedal
177
Lo-Fi Hi-hat Splash
178
PERCUSSION 1
Nan Bang
179
Da Mu Yu
180
Xiao Bo
181
Xiao Luo
182
Peng Lin
183
Maracas
184
Metronome Bell
185
Vibra-slap
186
Synthesis Pecussion
187
High Q
188
Low Q
189
Mute Hi Conga
190
Open Hi Conga
191
Low Conga
192
High Bongo
193
Low Bongo
194
High Agogo
195
Low Agogo
196
Claves
197
Jingle Bell
198
Cowbell
199
Tambourine
200
Cabasa
201
Long Guiro
202
Short Guiro
203
204
Vibrapho ne C3
205
Vibrapho ne Db3
206
Vibrapho ne D3
207
Vibrapho ne Eb3
208
Vibrapho ne E3
209
Vibrapho ne F3
210
Vibrapho ne Gb3
211
Vibrapho ne G3
212
Vibrapho ne Ab3
213
Vibrapho ne A3
214
Vibrapho ne Bb3
215
Vibrapho ne B3
216
Vibrapho ne C4
12
Page 31
Voice List
Vibrapho ne Db4
217
Vibrapho ne D4
218
219
Vibrapho ne Eb4
220
Vibrapho ne E4
221
Vibrapho ne F4
222
Vibrapho ne Gb4
223
Vibrapho ne G4
224
Vibrapho ne Ab4
225
Vibrapho ne A4
226
Vibrapho ne Bb4
227
Vibrapho ne B4
228
Vibrapho ne C5
229
Vibrapho ne Db5
Vibrapho ne D5
230
Vibrapho ne Eb5
231
232
Vibrapho ne E5
233
Vibrapho ne F5
234
Vibrapho ne Gb5
235
Vibrapho ne G5
236
Vibrapho ne Ab5
237
Vibrapho ne A5
238
Vibrapho ne Bb5
239
Vibrapho ne B5
240
Vibrapho ne C6
241
Orchestra Timp C 2
242
Orchestra Timp D b2
Orchestra Timp D 2
243
Orchestra Timp E b2
244
245
Orchestra Timp E 2
246
Orchestra Timp F 2
247
Orchestra Timp G b2
248
Orchestra Timp G 2
249
Orchestra Timp Ab 2
250
Orchestra Timp A2
251
Orchestra Timp B b2
252
Orchestra Timp B 2
253
Orchestra Timp C 3
254
Orchestra Timp D b3
255
Orchestra Timp D 3
Orchestra Timp E b3
256
Orchestra Timp E 3
257
258
Orchestra Timp F 3
259
Orchestra Timp G b3
260
Orchestra Timp G 3
261
Orchestra Timp Ab 3
262
Orchestra Timp A3
263
Orchestra Timp B b3
264
Orchestra Timp B 3
265
Orchestra Timp C 4
Kit List
NO.
1
2
3
4
5
6
7
8
9
10
11
12
13
14
15
16
17
18
19
20
21
22
23
24
25
Name
Standard
Hard Rock
Ballad
Acoustic
Funk Band
Funk
Jazz Brush
Dance
Rock
Jazz
808
909
Latin
Room
Percussion 1
Metal
Vibrapho ne
Electronic
Reggae
Fusion 1
Drum & Bass
Pop
Brush
World
Orchestra
26
Ska
27
Songo
28
Lo-Fi
29
1970's
30
HipHop
31
Big Band
32
Old School
33
R&B
34
Magic
35
Live
36
House
37
Jazz Latin
38
Fusion 2
39
Percussion 2
40
Teckno
41
Vintage
42
Junkyard
43
Noise
44
Studio 1
45
Studio 2
46
User 1(Standa rd)
47
User 2(Hard Roc k)
48
User 3(Ballad )
49
User 4(Acoust ic)
50
User 5(Funk Ban d)
13
Page 32
Song List
Name
NO.
BluesFunk
1
NuJazzFunk
2
funk1
3
funk2
4
funk3
5
funk4
6
7
pop funk1
8
pop funk2
9
RetroFunk
10
Fusion1
11
Fusion2
12
Fusion3
13
Fusion4
14
Fusion5
15
Fusion6
16
CoolJazz
17
BigBand1
18
BigBand2
19
BigBand3
20
BigBand4
21
Swing
22
Bebop
23
3/4 jazz
24
Jazz
25
latin jazz1
26
latin jazz2
27
Dance 1
28
DiscoHouse
29
Tra nce
30
Tri pHop
31
DrumNBass
32
BreakBeat1
33
Dancefunk
34
Hiphop
35
Dance2
36
D N'B1
37
D N'B2
38
Break beat2
39
ClassicRock
40
HeavyRock
41
RockBallad
42
RockNRoll
43
Punk
44
Rock
45
80's Metal
46
Shuffle
47
60's rock
48
Smaba1
49
BossaNova
50
Salsa
51
Ska
52
Reggae1
53
Reggae2
54
Reggae3
55
LatinRock1
LatinRock2
56
Mambo
57
Samba2
58
Latin pop
59
Gtr Bossa
60
61
LatinDance1
62
LatinDance2
63
R&B1
64
R&B2
65
JazzyFunk
66
Blues
67
Country
68
CountryPop
69
Country Blues
70
Ballad1
71
BritPop
72
8BeatPop1
73
60'sPop
74
8 Beat 1
75
8 Beat 2
76
8 beat ballad 1
77
8 beat ballad 2
78
16 beat ballad 1
79
16 beat ballad 2
80
world
81
funk1
82
funk2
83
modern jazz
84
big band
85
swing
86
slow fusion
87
country
88
latinjazz
89
reggae
90
latin
91
boogie
92
disco
93
d n'b
94
metal
95
hardrock
96
8 beat 1
97
8 beat 2
98
16 beat 1
99
funk 3
100
funk 4
14
Page 33
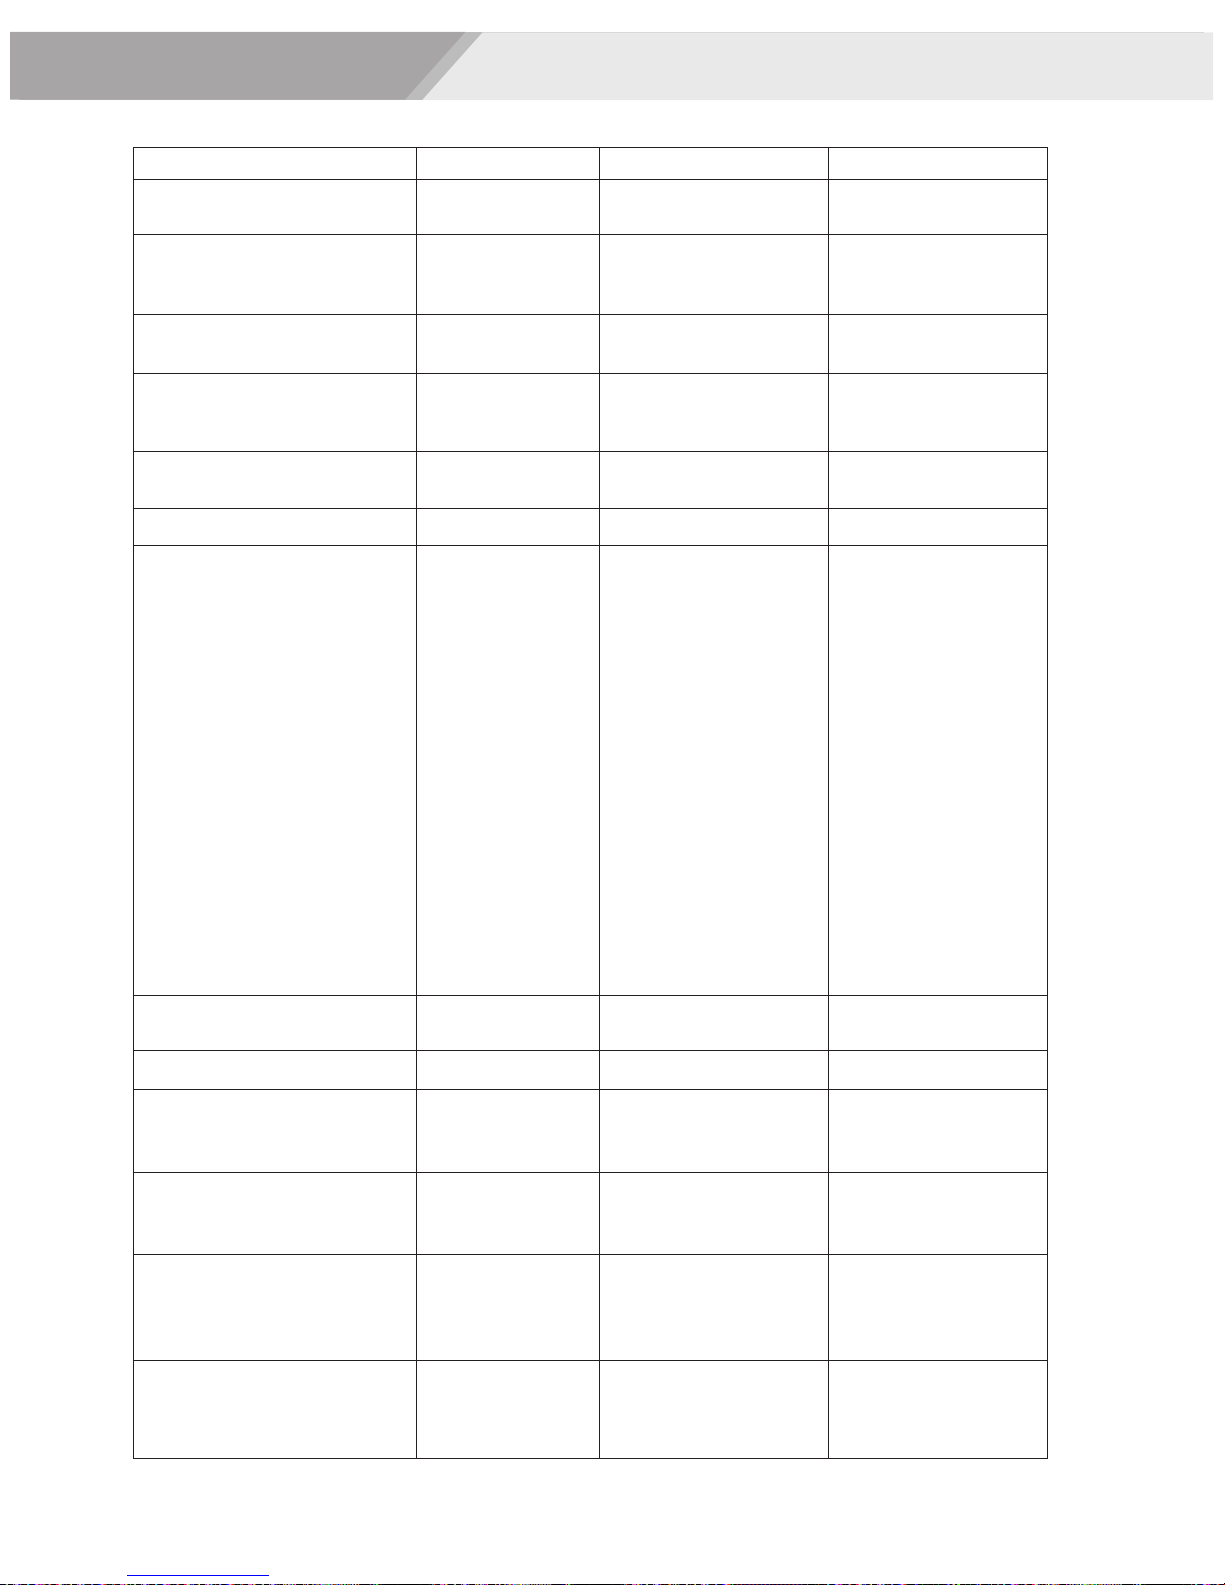
MIDI Implementation Chart
Function
Basic Default
Channel Changed
Default
Mode Messages
Altered
Note
Number : True voice
Velocity : Note on
Note off
After key s
Touch Ch's
Pitch Bend
Control 0
1
5
7
10
11
20
64
65
66
67
80
81
91
93
120
121
123
Program
Change : true
System Exclusive
System : Song Position
: Song Select
Common : Tune
System : Song Position
: Song Select
Common : Tune
System : Clock
Real Time : Commands
: Start
: Stop
Aux : LOCAL ON/OFF
: All Notes Off
Messages : Active sense
: Reset
Mode 1: OMNI ON , POLY Mode 2 : OMNI ON , MONO 〇 : YES
Mode 3: OMNI OFF , POLY Mode 4 : OMNI OFF , MONO × : NO
'
×
× 1
×
***********
27-88
***********
O 9nH,V=1-127
× (9nH,V=0)
×
×
×
×
×
×
×
×
×
×
×
×
×
×
×
×
×
×
×
×
×
×
×
***********
×
×
×
×
×
×
× ×
× ×
×
×
×
×
Transmitted Recognized
10ch
1-16ch
×
×
×
0—127
0—127
O 9nH,V=1-127
× (9nH,V=0;
8nH,V=0-127)
×
×
O
O
O
O
O
O
O
O
O
O
O
O
O
O
O
O
O
O
O
O
0—127
O
×
×
×
×
×
×
×
O
O
O
Remarks
Bank select
Modulation
Portamento time
Volume
Pan
Expression
Rhythm allocation
Sustain Pedal
Portamento on/off
Sostenuto Pedal
Soft Pedal
Reverb Program
Chorus Program
Reverb level
Chorus level
All Sound Off
Reset all controllers
All notes off
15
Page 34
7 drum pads with touch sensitivity and two pedals (kick and hi-hat)
3-digit LED displays
1 phones output and 1 USB jack (MIDI IN/OUT).
45 preset drum kits,5 user drum kits.
265 percussion voices and 128 GM voices, 16M bytes voice data
100 songs (include 80 styles and 20 songs).
1 demo song
1 track recording
use your hand to strike pads.
2 different voices.
500(L)×370(W)×157.4(H)mm
3.3kg
Main features:
Hand-percussion:
Metronome:
Dimensions:
Net W eight:
*Specifications may be changed or modified at any time without prior notice
S pecifications
0
5
25
75
95
100
 Loading...