


O
p
e
r
a
t
i
o
n
m
a
n
u
a
l
X
-
O
N
E
-
U
P
D
A
T
E
2
0
1
8
www.x-dreamfly.ch
www.x-dreamfly.ch
Stand Oktober 2014
www.x-dreamfly.ch
X-dream Fly | Geri Roschmann | Unterbach 9 | 6653 Bach | Österreich
Mail: info@x-dreamfly.ch | Tel: +43 (0) 676 9252780 | ATU67007115
X-dream Fly | Dani Loritz | Via Padrusa 32 | 7013 Domat/Ems | Schweiz
Mail: dani@x-dreamfly.ch | Tel: +41 (0) 77 4622791
X-ONE
Version 05|2018
Operation Manual

O
p
e
r
a
t
i
o
n
m
a
n
u
a
l
X
-
O
N
E
-
U
P
D
A
T
E
2
0
1
8
www.x-dreamfly.ch
Text: Daniel Loritz & Gerald Roschmann
Graphic and design: Manu Feuerstein
Copyright by:
X-dream Fly
Unterbach 9
A-6653 Bach | Tirol
Tel.: +43 676 92 52 780
Mail: info@x-dreamfly.ch
Web: www.x-dreamfly.ch
page 2 of 32

O
p
e
r
a
t
i
o
n
m
a
n
u
a
l
X
-
O
N
E
-
U
P
D
A
T
E
2
0
1
8
www.x-dreamfly.ch
Content
1. Forword ................................................................................................................................................................... 4
2. Introduction ............................................................................................................................................................ 5
Safety Instruction .......................................................................................................................................................... 5
Intended Use ................................................................................................................................................................. 5
3. Rescue Canopy X-ONE .......................................................................................................................................... 5
The construction ............................................................................................................................................................ 6
Necessary documentation ............................................................................................................................................ 7
Components of the delivery .......................................................................................................................................... 7
Quality assurance .......................................................................................................................................................... 8
Materials used .............................................................................................................................................................. 8
The components ............................................................................................................................................................ 8
Certification ................................................................................................................................................................... 8
Operational limits .......................................................................................................................................................... 8
4. Throwing the X-ONE ............................................................................................................................................. 9
Deployment oft the rescue canopy ............................................................................................................................... 9
After the opening .......................................................................................................................................................... 9
The scissors position ..................................................................................................................................................... 9
Landing with the rescue ................................................................................................................................................ 9
5. Maintenance and inspection of the X-ONE ...................................................................................................... 11
Behaviour if damaged ................................................................................................................................................... 11
Storage .......................................................................................................................................................................... 11
Cleaning and drying ...................................................................................................................................................... 11
Repairs ........................................................................................................................................................................... 11
Correct disposal of the rescue equipment .................................................................................................................... 11
6. Attachment to the harness ................................................................................................................................... 11
7. Packing interval for the X-ONE ........................................................................................................................... 12
8. Packing Manual for the X-ONE ........................................................................................................................... 12
9. Appendix Inspection records .............................................................................................................................. 29
Release .......................................................................................................................................................................... 31
page 3 of 32

O
p
e
r
a
t
i
o
n
m
a
n
u
a
l
X
-
O
N
E
-
U
P
D
A
T
E
2
0
1
8
www.x-dreamfly.ch
1. Forword
Dear Customer,
Thank you very much, that you have decided for a X-ONE. You have not only acquired one of the most modern
and innovative rescue equipment, you also opted for a brand that is committed to the sustainable use of the
earth’s resources. The ecological balance of our products is our priority.
As a responsible designer I brought the cross canopy first in the paragliding scene, probably before that we have
to deal with the development and design of rescue equipment in general and in particular with the cross canopy.
Dozen of prototypes, hundreds of test airdrops and measuring flights have enriched our experience and sharpened
insights. The product of this unique history is a unrivalled lightweight cross canopies rescue equipment such
as the X-ONE!
The use of a rescue system is complex and it requires some practice to complete a successful rescue deployment.
For this reason, I recommend intense workout for the use of the X-ONE. A perfect way for those who can learn
only by themselves by repeating the exercises in the event of an emergency in the prevailing difficult condition
and react correctly.
I naturally hope that the X-ONE must be used as little as possible. If nevertheless, the situation requires it, it
should not be hesitated and the rescue device should be activate immediately. For this rare moments we have
invested all our knowledge and our intelligence, so you can count completely on the reliability of the X-ONE.
I wish you much success and joy dealing with the X-ONE!
Dani Loritz & Geri Roschmann
Team X-dream Fly ...
... live your dream
page 4 of 32

O
p
e
r
a
t
i
o
n
m
a
n
u
a
l
X
-
O
N
E
-
U
P
D
A
T
E
2
0
1
8
www.x-dreamfly.ch
2. Introduction
Safety Instruction
The cross canopy X-ONE is a parachute to be release by hand for paraglider pilots who are in an emergency
sit-uation. Due to their design characteristics it is not suitable for the free-fall! The parachute, the suspension
lines and their connection are not designed for an abrupt opening, because the necessary shock absorbers are
missing. An unauthorized use is prohibited. It is essential to ensure the proper installation of the X-ONE in the
harness. In the direct connection, a compatibility test must be carried out by an entitled person, to exclude possible non-compatibility between the harness and rescue device. Only a correctly mounted rescue equipment can
function properly in case of an emergency and thus contribute to safety. In case of a release of the rescue device
above water, for example, as part of safety training, should pay attention to the fact that a harness foam protector
generates positive bouncy and can bring the pilots in the „head-down“ position in water. There is also the risk
that the foam protection soak water during a longer stay in the water and then pulls the pilot down.
Intended Use
This rescue device has been developed and constructed exclusively for the paragliding sport. The deployment
of the rescue device is carried out manually and is used for the paraglider pilot and provide if need it an
emergency descent.
3. Rescue Canopy X-ONE
Through to intensive development work, we have succeeded to develop a cross canopy for the sport of
paragliding.
The X-ONE is easy to pack, with a small size and weight and has very high pendulum stability. Despite a high
maximum towing capacity, we were able to achieve very good sink rate.
page 5 of 32

O
p
e
r
a
t
i
o
n
m
a
n
u
a
l
X
-
O
N
E
-
U
P
D
A
T
E
2
0
1
8
www.x-dreamfly.ch
The construction
Legend:
1. Suspension lines
2. Canopy
3. Corner openings
4. Main Riser
5. Base
page 6 of 32

O
p
e
r
a
t
i
o
n
m
a
n
u
a
l
X
-
O
N
E
-
U
P
D
A
T
E
2
0
1
8
www.x-dreamfly.ch
We use only the highest quality materials such as Cousin-Trestec lines or Liros and nylon Fabric from UTT in order
to achieve a unique product. All materials used are manufactured in Europe. Sophisticated and modern production
methods after ISO 9001 guarantee the best quality and long life. Due to the low pack size the compatibility is
guaranteed with most harnesses.
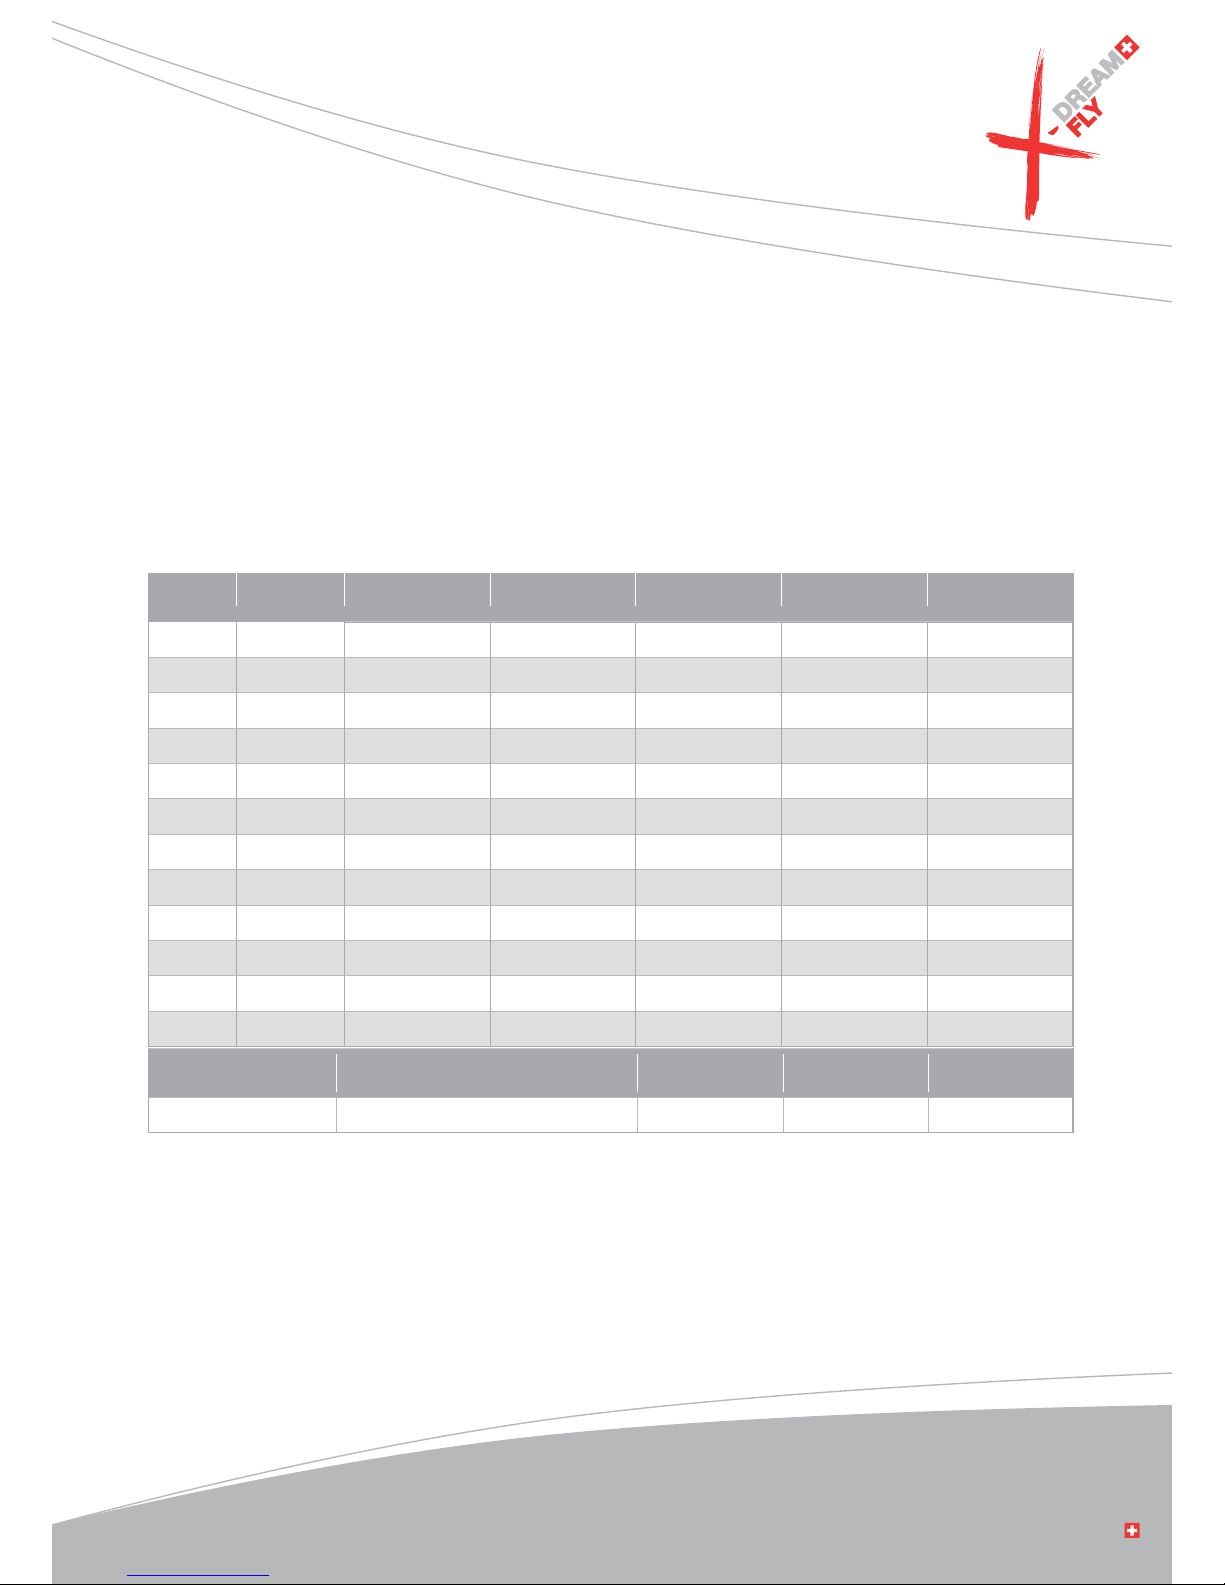
Specifications:
Necessary documentation
• Operation manual
• Inspection record
Components of the delivery
• X-dream Fly X-ONE rescue
• X-dream Fly X-ONE inner container
(tube container or 4-leaf container)
• X-dream Fly X-ONE pack instructions
(in the operations manual for free download)
• X-dream Fly X-ONE inspection record
• X-dream Fly X-ONE operation manual
• the operation manual is available for download at www.x-dreamfly.ch
X-ONE 120 X-ONE 160
X-ONE 120
Update 2018
X-ONE 160
Update 2018
max. load [kg]
LTF 120 | EN 105
LTF 160 | EN 140
LTF 120 | EN 105
LTF 160 | EN 140
number of panels
20 24 20 24
weight parachute incl. riser [kg]
1,45 1,95 1,24 1,64
area [m²]
34,5 44 34,5 44
number of lines
20 24 20 24
number of centerlines
1 2 1 2
sink rate max. load [m|s]
LTF 5,98 | EN 5,49 LTF 6,02 | EN 5,39 LTF 5,98 | EN 5,49 LTF 6,02 | EN 5,39
certification
LTF | EN (Air Turquoise) LTF | EN (Air Turquoise) LTF | EN (Air Turquoise) LTF | EN (Air Turquoise)
certification number
LTF RG 065.2012 LTF RG 068.2013 LTF RG 065.2012 LTF RG 068.2013
certification number
EN EP 128.2015 EN EP 129.2015 EN EP 128.2015 EN EP 129.2015
container size [cm]
L27 | B25 | H9,5 L28 | B26 | H11,5 L27 | B25 | H9,5 L28 | B26 | H11,5
container volume [cm³]
4.980
(incl. lines)
5.600
(incl. lines)
4.600
(incl. lines)
5.200
(incl. lines)
system lentgh [m]
6,5 7,3 6,5 7,3
max.area load [kg|m²]
3,48 3,64 3,48 3,64
page 7 of 32

O
p
e
r
a
t
i
o
n
m
a
n
u
a
l
X
-
O
N
E
-
U
P
D
A
T
E
2
0
1
8
www.x-dreamfly.ch
Quality assurance
The X-dream Fly rescue devices go through a step by step control during the whole production. After every step,
the product is accurately checked and only after a successful pass of the test the following step will be started.
The fabric, the straps, lines and also the sewing machines are verified before use. Continuous quality controls of
the production process ensure an error-free production. Each rescue unit is subjected to a strict final inspection
before it leaves our factory.
Materials used
The materials used were selected very carefully and under the strictest quality standards. So we choose a 26g
uncoated rip-stop nylon fabric from UTT|Delcotex. This meets the required strengths, convinced by good workmanship and promises a longer life.The main seams are including a webbing , which enhance the strength of the
canopy. The lines are made out of high-strength Dyneema for an enormous weight reduction. Only the middle lines
are made out of polyester. The connection of the lines to the canopy are also made out of polyester and corresponds to the international parachute workmanship.
The components
The X-ONE consists of 4 components.
• The canopy
(cross-canopy)
• The suspension lines
(side and middle line)
• Main riser
• Innercontainer
Certification
The rescue device X-ONE 120 and X-ONE 160 by X-dream Fly are approved by the German airworthiness requirement LTF. The X-ONE 90 is approved only by Shock-Loadtest. The approval is valid only in use with the original
X-dream Fly tube or 4-leaf Innercontainer. When using a X-ONE in the context of a non-original inner-container
please note the corresponding release note in the appendix of this manual.
Operational limits
X-ONE 120 and X-ONE 160
(LTF)
: Max. Service speed= 150km/h=41,6m/s. X-ONE 90: According to EN 12491 are
not suitable rescue equipment for use at speeds greater than 32m/s odder 115km/h.
Every 12 months the X-ONE rescue equipment need to aired and repackaged. It makes sense when you throw the
rescue package for training on this occasion in a clean, dry space. Currently, there is no verification requirement
for rescue equipment. However, we recommend every 24 months a review of the rescue system. After each case
of a real emergency opening the X-ONE rescue device should be checked by the manufacturer.
Permissible operating time: 12 years in compliance with the pack intervals and storage regulations. An extension
up to 15 years is possible after an inspection of the manufacturer.
page 8 of 32

O
p
e
r
a
t
i
o
n
m
a
n
u
a
l
X
-
O
N
E
-
U
P
D
A
T
E
2
0
1
8
www.x-dreamfly.ch
4. Throwing the X-ONE
The reserve is very often literally the lifesaver the “Second Chance“ for the paraglider pilots. In the close flown
airspace of many flying areas a collision should not be underestimated as a danger on good flying days. Collisions
with other aircraft are one of the principal reasons to pull the parachute. Disturbance in the glider as cravats,
which leave the glider in spirals, fast twisted rotation movements or line breaks that make the steering of the
glider impossible are other good reason for throwing the reserve.
Deployment oft the rescue canopy
You grab the handle of the rescue and throw the canopy with a strong lively movement slightly backwards. The
more hard the movement precipitates, the faster the lines stretches themselves and pulls the canopy out of the
container.
After the opening
When the reserve opens
(usually behind the pilot)
the glider is momentarily unable to fly, any prior rotation stops
immediately. The rescue rises above the pilot, the glider dives forward or sideways. Now you must immediately
attempt to deform the glider strongly
(B- or C-Stall, or pull one line in)
that the glider disturbs the rescue in his
movements as little as possible. If one does nothing at all, the glider rises above the pilot, the rescue shifts backwards and cannot carry properly. This can occur to the dreaded scissoring position
(Down Plane)
when the glider
and the rescue are at an angle of 45º to each other. The rescue canopy carries now only one part of the load, the
rate of descent is dangerously high. Try to deflate the glider and don´t let it fly anymore
(B- or C-Stall, pull one line
in)
. If the paraglider flutters only like a flag upwards, the rescue canopy can carry widely undisturbed and freely of
pendulum.
The scissors position
The X-ONE is extremely pendulum stable as a cross canopy can be. Nevertheless, the danger of a scissor position
(Down Plane)
should be reduced by stabilising or retraction the main glider. A scissor position increases the rate of
descent and produce an oblique pilot position when landing and increases the risk of injury!
Landing with the rescue device
Especially when triggered at low altitude the upright position in the harness is important. If you have a shoulder
mount to the harness, it usually brings you in an upright position. It is essential to ensure that the canopy is not
deform the rescue device just before the ground.
It is important to note the following when landing on the rescue:
• Upright pilot position
• Legs together and knees slightly bent
• be ready to roll over yourself
page 9 of 32

O
p
e
r
a
t
i
o
n
m
a
n
u
a
l
X
-
O
N
E
-
U
P
D
A
T
E
2
0
1
8
www.x-dreamfly.ch
Potential errors and hazards
Error in the Deployment Rescue response/hazard: Pilot reaction:
Release handle can not be
achieved
Rescue can not be triggered
Compatility-Check after each
complete new installation
Closure on the outer
container can not be opened
Rescue can not be triggered
C-Check after each complete
new installation
Inner container is not thrown
away aggressively
Rescue does not open or
very delayed
strongly pull on the lines or riser
of the rescue, pull second rescue
Error in the Deployment Rescue response/hazard: Pilot reaction:
No deformation of the paraglider
Scissor position, strong
commuting, uncontrolled impact
Deform the gilder, get rid of
the glider (Quick-Out)
Error in the Deployment Rescue response/hazard: Pilot reaction:
Too much concentration on the
glider, pilot forget the upright
position
pendulum, uncontrolled landing
Occupy upright pilot
position, prepare for landing
During the landing legs not
together, wrong pilot position
Uncontrolled landing Ouch!!!
page 10 of 32

O
p
e
r
a
t
i
o
n
m
a
n
u
a
l
X
-
O
N
E
-
U
P
D
A
T
E
2
0
1
8
www.x-dreamfly.ch
5. Maintenance and inspection of the X-ONE
Before each packing the parachute must be inspected by a packer. Was the emergency parachute opened for an
emergency case then the rescue must be subjected from the manufacturer.
Behaviour if damaged
If a check at the rescue system found some damage which affect the airworthiness of the device, the rescue
equipment has to be send to the manufacturer for repair. This also applies to damages whose impact on the
airworthiness of the system and cannot be uniquely determined.
Storage
A rescue device exists to save the life of the owner. It needs careful maintenance and care. UV radiation, moisture
and chemicals are the worst enemies of your X-ONE rescue device. Avoid unnecessary burdens and let your
X-ONE never unnecessarily lying in the sun. The rescue equipment should be dried in clean, dry and dark rooms.
Rescue packages that are no longer used should be stored loosely rolled in a bag.
Cleaning and drying
Dirty canopies and containers can be washed with clean clear water. Acids and mildew can affect the strength of
the components. Such polluted parachutes have to be sent to the manufacturer for investigation and repaired if
necessary.
Repairs
The manufacturer or authorized X-dream Fly Partners must perform all repairs.
Correct disposal of the rescue equipment
As an environmentally conscious manufacturer of rescue equipment we pay great attention to produce our products Eco social tolerated. The material we use in our products is evaluated according to environmental criteria
and subject to constant control. For the proper disposal the steel fittings should be separated at the metal
disposal point. The canopy, the lines and straps can be disposed with household waste.
6. Attachment to the harness
Each new combination of harness and rescue has to be checked
(Compatibility Check)
after the first packing by the
manufacturer of the harness or by a trained and appointed person. Deploying the rescue system has to be possible
out from each flying position according with the requirements of the building regulation. It should be noted that
the release force of 7daN is not exceeded. The X-ONE must be connected with a carabiner or by looping through
the V-line to the harness. When using a connection carabiner the breaking load of the carabiner must have a min.
of 2400 daN.
page 11 of 32

O
p
e
r
a
t
i
o
n
m
a
n
u
a
l
X
-
O
N
E
-
U
P
D
A
T
E
2
0
1
8
www.x-dreamfly.ch
7. Packing interval for the X-ONE
Before the rescue is repacked it must be subjected to a visual inspection by the packer. The reserve parachute
must therefore be aired at a humidity of 60 - 65% for 24 hours. The packing shall be done as possible on a packing
table, but at least on a clean, antistatic surface. The following photos are from a X-ONE. We remind you that you
fly at your own risk. This also applies to the use of this life-saving device.
8. Packing manual X-ONE
Before you start to pack, the X-ONE should be checked for any damage to the canopy, the lines and the main riser.
The lines should be checked for proper performance and to unravel if necessary. The X-ONE is a cross-canopy and
has four corners. One of these corners is at the bottom when folding, one corner on the left and right and the last
above.
picture 1
Before each packing slide on the packing
loops on a line
(packing cord)
. Now you pull the
whole rescue under tension, all the fabric and
lines are under tension except the 4 corner lines.
page 12 of 32

O
p
e
r
a
t
i
o
n
m
a
n
u
a
l
X
-
O
N
E
-
U
P
D
A
T
E
2
0
1
8
www.x-dreamfly.ch
picture 2
The reserve should now be well ordered. 10
panels
(blue arrows)
lay to the left and 10 panels
(green arrows) on the right. The corner line with
the two opposite (green and blue) arrows should
be located down on the bottom.
NOTE:
There are 8 panels at the X-ONE 90 and
12 panels at the X-ONE 160.
picture 3
Now we have to arrange panel by panel to the
right
(green arrows)
. The panels should be as
wrinkle-free as possible. Note that the lines
remain pooled on the basis below. The first
panel has come to be tapered at the top.
page 13 of 32

O
p
e
r
a
t
i
o
n
m
a
n
u
a
l
X
-
O
N
E
-
U
P
D
A
T
E
2
0
1
8
www.x-dreamfly.ch
picture 4
After follows four rectangular panels which will
be placed from the left to the right side
(X-ONE
120)
.
NOTE:
At the X-ONE 90 there are three panels and on the
X-ONE 160 there are five panels.
picture 5
The following panel and as the same time the
middle panel on the green side is the corner
panel and should be placed as a triangle. Here
the slot
(corner of the rescue)
, is visible on the
right side. This panel is wider than the under-
lying panels. The out looking area is inserted
later on the S-turns.
page 14 of 32

O
p
e
r
a
t
i
o
n
m
a
n
u
a
l
X
-
O
N
E
-
U
P
D
A
T
E
2
0
1
8
www.x-dreamfly.ch
picture 6
Keep on folding the panels on the green side till
the panels with the two arrows pointing to each
other is visible. Now we can fix the right side
panels with some sand bags, this recommended
especially for less experience packers.
picture 7
Then we must move the left
(blue arrow)
panels over to the right ones
(green arrow).
All panels are now right.
page 15 of 32

O
p
e
r
a
t
i
o
n
m
a
n
u
a
l
X
-
O
N
E
-
U
P
D
A
T
E
2
0
1
8
www.x-dreamfly.ch
picture 8
Same like we did with the right side panels now
the left ones with the blue arrow must be placed
according to the same procedure as the right side,
clean and wrinkle-free. Beginning with the first
at the bottom.
picture 9
Same as on the right side with the green
arrows the panels are defined with the blue
arrows. There are two rectangular panels
before the lateral corner panel. It should be
noted that the lines must be located in the cen-
tre of the base bellow. Here you a can
help yourself with sand bags.
NOTE: The X-ONE 90 has one panel and
the X-ONE 160 has three panels.
page 16 of 32

O
p
e
r
a
t
i
o
n
m
a
n
u
a
l
X
-
O
N
E
-
U
P
D
A
T
E
2
0
1
8
www.x-dreamfly.ch
picture 10
The fourth panel is a blue corner panel as already
on the right side and is accordingly also laid down
as flat as possible.
NOTE: In the X-ONE 90 it is the third panel and
on the X-ONE 160 it is the fifth panel.
picture 11
The other panels are placed clean down till
the top corner panel is achieved. This panel
is recognizable by the two arrows pointing to
each other. The X-ONE is now symmetrical
and nicely folded in front of you.
page 17 of 32

O
p
e
r
a
t
i
o
n
m
a
n
u
a
l
X
-
O
N
E
-
U
P
D
A
T
E
2
0
1
8
www.x-dreamfly.ch
picture 12
The base can be seen below with the centrally
located lines, all panels with the blue arrows are left
and all panels with green arrows are the right of the
lines. In the middle are the arrows which are
pointing to each other.
picture 13
In the center of the canopy the middle line
and the top should be recognizable
through the slot.
picture 14
Similar to round canopies the rescue is
now folded with the help of S-turns to
the width of the inner container.
page 18 of 32

O
p
e
r
a
t
i
o
n
m
a
n
u
a
l
X
-
O
N
E
-
U
P
D
A
T
E
2
0
1
8
www.x-dreamfly.ch
picture 15
The corner panel is simply folded back to
the left side.
picture 16
The entire parachute is now rotated around
it axis 180º to the left. This act is the most
difficult and it is easier if two people
working in sync for the rotation. At the
base edge the two arrows pointing away
from each other are now visible.
page 19 of 32

O
p
e
r
a
t
i
o
n
m
a
n
u
a
l
X
-
O
N
E
-
U
P
D
A
T
E
2
0
1
8
www.x-dreamfly.ch
picture 17
The left side panels with the green arrows
are defined as S-curve to the right on the
inner container width. The lines should now
be centrally located in the middle of the
rescue again.
picture 18
The triangle panel get´s folded to the left on
top to reach the inner container width. The
X-ONE is now longitudinal S-folded symme-
trically in front of you. The lines are in the
middle of the base edge.
page 20 of 32

O
p
e
r
a
t
i
o
n
m
a
n
u
a
l
X
-
O
N
E
-
U
P
D
A
T
E
2
0
1
8
www.x-dreamfly.ch
picture 19
The packing line for holding the packing loops
together can be removed now. It is important
that this line is removed completely.
Otherwise it will prevent the opening
of the X-ONE!
picture 20
The X-ONE should now be placed with
narrow S-curves to a tower.
The width of the S-turns should
be about 8 - 10 cm wide.
ATTENTION:
Our rescue series X- ONE and X- CURVE will be provided from mid 2015 on with the new 4- leaf container.
The packing method of the rescue is identical till image 19.
For further procedure of packing with the 4-leaf container, please go to image 26
th
.
page 21 of 32

O
p
e
r
a
t
i
o
n
m
a
n
u
a
l
X
-
O
N
E
-
U
P
D
A
T
E
2
0
1
8
www.x-dreamfly.ch
picture 21
The inner container is placing on top of the
existing S-turns. The slot of the inner container
should look towards the lines.
picture 22
The inner container should be closed now with
the lines. Note that the central rubber closes
first. First the slot and after the line container
flap, after you close both sides of the line
container flap. Laterally projecting loops of
the lines should be kept as small as possible.
page 22 of 32

O
p
e
r
a
t
i
o
n
m
a
n
u
a
l
X
-
O
N
E
-
U
P
D
A
T
E
2
0
1
8
www.x-dreamfly.ch
picture 23
The lines are collected in S-folds so that it gives
about 2 - 3 line bundles. Again, care should be
taken that the excess of the line loops behind the
rubber are kept as small as possible. From the last
line groups to the main riser should be left 15 cm
of lines for closing the cover part.
picture 24
The line bundles are stowed away in the
pocket of the line bag from the inner container.
page 23 of 32

O
p
e
r
a
t
i
o
n
m
a
n
u
a
l
X
-
O
N
E
-
U
P
D
A
T
E
2
0
1
8
www.x-dreamfly.ch
picture 25
The cover sheet of the inner container should be
closed with the rubber at the end of the slot and
a final short line loop. The X-ONE is now ready for
installation into the harness. The connection of
the X-ONE to the harness shall be made due
following the recommendations of the harness
manufacturer
(harness manual)
.
The riser of the X-ONE should be connected to the
suspension point of the harness. For the connection of the handle there are three loops on the
outside face of the inner container.
page 24 of 32

O
p
e
r
a
t
i
o
n
m
a
n
u
a
l
X
-
O
N
E
-
U
P
D
A
T
E
2
0
1
8
www.x-dreamfly.ch
picture 26
The X-ONE should now be placed in S- curves.
The length of the S- curves is depending on the
size of the container. The length of the inner
container from the X- ONE 90, X- ONE 120 and
X-ONE 160 are different.
picture 27
It is important that the base edge of the X- ONE
is placed at the top of the 4-leaf container
facing towards cover leaf No. 5.
page 25 of 32

O
p
e
r
a
t
i
o
n
m
a
n
u
a
l
X
-
O
N
E
-
U
P
D
A
T
E
2
0
1
8
www.x-dreamfly.ch
picture 28
The leafs 1 - 4 of the inner container will be
closed with the black rubber band in the correct
order. The black rubber band is fixed trough the
grommet with a line loop.
IMPORTANT: This line loop on the black rubber
band is made first, thereby the canopy is fixed
in the container. This packing method
ensures
maximum throwing power. The lines released
first, get stretched and opens the last line loop
with the black rubber band, afterwards the
canopy will be released from the container.
page 26 of 32
NOT CORRECT
CORRECT
Loop too long!
NO line knot on loopside!
Loop length max. 20 mm!
NOT CORRECT CORRECT
Line knot on loopside!
Loop too long!
NO line knot on loopside!
Loop length max. 20 mm!
Line knot on loopside!

O
p
e
r
a
t
i
o
n
m
a
n
u
a
l
X
-
O
N
E
-
U
P
D
A
T
E
2
0
1
8
www.x-dreamfly.ch
picture 29
The lines are collected in S- folds so that it gives
about 3 - 4 line bundles. Again, care should be
taken that the excess of the line loops behind
the rubber are kept as small as possible.
picture 30
The line bundles are stowed away in the
pocket of the cover sheet No. 5 from the inner
container. The first line bundle which fixed the
black rubber band should be tucked now into
the provided pocket in leaf 4.
picture 31
The cover sheet No. 5 of the inner container is
closed with the plastic stick. The plastic stick is
first pushed from the inside out trough
the smal hole.
page 27 of 32

O
p
e
r
a
t
i
o
n
m
a
n
u
a
l
X
-
O
N
E
-
U
P
D
A
T
E
2
0
1
8
www.x-dreamfly.ch
page 28 of 32
picture 32
Fold the cover sheet No. 5 to the right, push the
black rubber through the eye of cover sheet
No. 5and push the plastik stick trough the
black rubber band.
picture 33
Then insert the plastic stick back through the
small hole in leaf No. 5 and fix the bracket of
the cover sheet No. 5 in the intended pocket
in sheet No. 4.
picture 34
The X- ONE is now ready for installation into
the harness or the external container. The
connection of the X-ONE to the harness shall
be made due following the recommendations
of the harness manufacturer
(Harness manual)
.
The riser of the X- ONE should be connected
to the suspension point of the harness. For the
connection of the handle thereare three loops
on the outside face of the inner container.
O
p
e
r
a
t
i
o
n
m
a
n
u
a
l
X
-
O
N
E
-
U
P
D
A
T
E
2
0
1
8
www.x-dreamfly.ch
9. Appendix
Inspection records
Nr.:
No.:
Datum:
Date:
Tätigkeit:
Activity:
Notöffnung:
Emergency use:
Spezielles:
Specials:
Packwart:
Name:
Unterschrift:
Signature:
Wartung/Packnachweis
Packing Advice/Inspection Book
Nachprüfung Datum:
Inspection Date:
Beanstandung:
Result:
Spezielles:
Specials:
Prüfer:
Inspector:
Unterschrift:
Signature:
Serien Nr. Serial No.
page 29 of 32

O
p
e
r
a
t
i
o
n
m
a
n
u
a
l
X
-
O
N
E
-
U
P
D
A
T
E
2
0
1
8
www.x-dreamfly.ch
COPYRIGHT
© 2018 by X-dream Fly
All rights reserved. No part of this manual may be reproduced in any form without
permission form X-dream Fly.
Version 05|2018
We wish you continued great flights and many happy landings with
the X-dream Fly product X-TWO.
Team X-dream Fly ...
... live your dream
Development and construction:
X-dream Fly Schweiz
Via Padrusa 32
7013 Domat | Ems
X-dream Fly Österreich
Unterbach 9
A-6653 Bach | Tirol
Sales and administration
X-dream Fly Österreich
Unterbach 9
A-6653 Bach | Tirol
Tel: +43 676 92 52 780
UID: ATU67007115
Homepage: www.x-dreamfly.ch
page 30 of 32

O
p
e
r
a
t
i
o
n
m
a
n
u
a
l
X
-
O
N
E
-
U
P
D
A
T
E
2
0
1
8
www.x-dreamfly.ch
Release
Release of X-dream Fly rescue equipment for external containers
(harnesses with integrated reserve container)
Current status 10|09|2016
1. Content
This release is valid for all X-dream Fly rescue equipment including X-ONE-series, X-CURVE-series, X-TRIANGLEseries and X-TWO-series in conjunction with non-original inner containers.
2. Risk
The compatibility of a harness with integrated | solid inner container to an external emergency equipment must
be guaranteed by the manufacturer of the harness and is tested by internal tests with different bulky containers.
The opening processes of the rescue device are dependent on the type and size of the inner container. There is the
possibility that the rescue equipment have a slowed-down opening or not even open in use of a smaller inner container or inner container of other design. The original container of X-dream Fly have a separate line compartment
for the S-loop line packages for a defined opening sequence. In a container without a separated line compartment
the throwing power slows down by the early release of the entire rescue system. The X-dream Fly containers
provide a maximum of throwing power and quality of defined opening. This ensures a faster opening. In addition,
Dyneema lines are installed in most modern rescue equipment. These lines are coated with a polyurethane resin.
In our rescue manu-facturing (at X-dream Fly) we take care that different materials are handled separately. It is
possible that mini-mal parts of this coating are solved and get transferred on the fabric if the lines and the fabric
are packed together. This can lead to bonding and thus a delayed opening. Similarly, a defined packing method is
recommended which is not useful or possible in each inner container from other brands. Changes that differ from
the original packing method or the packaging size can increase the opening time and reduce the opening quality.
3. Implementation and installation
The implementation and installation of a X-dream Fly rescue unit in the inner container of a third-party may be
made only by trained personal by X-dream Fly. During the conversion and installation of the rescue the manual of
the rescue as also of the harness - or inside container manufacturer - has to exist and the corresponding installation and pack instructions need to be followed. The conversion in the non original inner container is to note in the
packing ID and signed by the pack manager.
page 31 of 32

O
p
e
r
a
t
i
o
n
m
a
n
u
a
l
X
-
O
N
E
-
U
P
D
A
T
E
2
0
1
8
www.x-dreamfly.ch
page 32 of 32
4. Changes | Pack Interval | Opening Quality
We would like to point out that we pay much attention to a uniform development of our rescue systems. This
refers to all system details and also includes the inner container. Who changes the inner container on our rescue
equipment or remodels, change the quality of opening under certain circumstances. We definitely recommend a
proper release during a compatibility-check. Take special care if the lines packed together with the canopy in the
container and recheck the eventual problem explained in point 2. On the usual precautions (dry storage, no compact packing, no moisture in the system etc.) in the handling of harness, inner container and rescue device should
be placed specialemphasis.
The operating manual as well as additional information can be found as download
under www.x-dreamfly.ch
Bach, 10|05|2018
Gerald Roschmann
X-dream Fly
Unterbach 9
A-6653 Bach/Tirol
 Loading...