

Page 1
and Maintenance Manual
Operating
© 2016, xCraft Enterprises, LLC. All Rights Reserved
www.xcraft.io
Page 2

Contents
1. Safety and Compliance .................................................................................................................. 1
a) Battery ................................................................................................................................................................... 2
2. In the Box ........................................................................................................................................ 3
3. Overview ......................................................................................................................................... 3
4. Checklists ........................................................................................................................................ 6
a) Normal Operation ................................................................................................................................................. 6
b) Emergency ............................................................................................................................................................ 7
5. Setup-Assembly Instructions ........................................................................................................ 8
6. Battery ........................................................................................................................................... 13
7. Operation-How to operate your X PlusOne .............................................................................. 14
Flight Modes ................................................................................................................................................................ 14
a) Controls ............................................................................................................................................................... 15
b) Hover Controls .................................................................................................................................................... 16
First Flight ................................................................................................................................................................... 19
a) Transition Flight.................................................................................................................................................. 20
b) Autonomous Flight ............................................................................................................................................. 21
Smart ................................................................................................................................................................... 21
Auto..................................................................................................................................................................... 21
Guided ................................................................................................................................................................. 21
Follow Me ........................................................................................................................................................... 21
8. Emergency .................................................................................................................................... 21
a) Lost Link ............................................................................................................................................................. 21
b) Bird Attack .......................................................................................................................................................... 21
9. Maintenance ................................................................................................................................. 22
a) Operational Limits .............................................................................................................................................. 22
b) Calibrating your X PlusOne ................................................................................................................................ 22
Software Updates .......................................................................................................................................................... 23
c) Repair .................................................................................................................................................................. 23
i. Propellers ........................................................................................................................................................... 23
Page 3

ii. Non-
Serviceable
Components ....... 23
iii. Replacing Components ................................................................................................................................. 24
d) Inspections .......................................................................................................................................................... 24
i Preflight Inspection ........................................................................................................................................... 24
ii Periodic Inspection............................................................................................................................................ 25
iii Control Check ................................................................................................................................................ 26
10. Legal Terms and Conditions ................................................................................................... 27
a) Limited Warranty ......................................................................................................................................... 27
b) Accessories ..................................................................................................................................................... 28
c) Limitation of Liability ...................................................................................................................................... 28
d) Indemnification.............................................................................................................................................. 28
e) Software ............................................................................................................................................................. 28
f) Additional Terms .............................................................................................................................................. 29
11. FCC Compliance ....................................................................................................................... 30
12. Government Regulations.......................................................................................................... 30
Page 4

FCC Compliance
This device complies with part 15 of the FCC Rules. Operation is subject to the following two conditions:
· This device may not cause harmful interference, and
· This device must accept any interference received, including interference that may cause undesired
operation.
This equipment has been tested and found to comply with the limits for a Class B digital device, pursuant
to Part 15 of the FCC Rules. These limits are designed to provide reasonable protection against harmful
interference in a residential installation. This equipment generates, uses and can radiate radio
frequency energy and, if not installed and used in accordance with the instructions, may cause harmful
interference to radio communications.
However, there is no guarantee that interference will not occur in a particular installation. If this
equipment does cause harmful interference to radio or television reception, which can be determined by
turning the equipment off and on, the user is encouraged to try to correct the interference by one or
more of the following measures:
· Reorient or relocate the receiving antenna.
· Increase the distance between the equipment and receiver.
· Connect the equipment to an outlet on a circuit different from that to which the receiver is connected.
· Consult the dealer or an experienced radio/TV technician for help.
Modifications not authorized by the manufacturer may void the purchaser’s authority to operate this
device.
Sincerely,
Team xCraft
Page 5
ATTENTION!
Prior to assembly and/or operation of this X PlusOne you must fully read and comply with all
instructions and warnings contained in the Operation and Maintenance Manual or any other
manual or documentation accompanying this X PlusOne product.
You must operate this X PlusOne safely, responsibly, and in accordance with any and all
applicable rules, laws and regulations as well as all checklists, emergency procedures and all
other instructions contained in the Operating and Maintenance Manual and any other manuals or
documentation that accompany this X PlusOne product.
FAILURE TO COMPLY WITH THE X PLUSONE OPERATING AND MAINTENANCE MANUAL
OR ANY OTHER MANUALS OR DOCUMENTATION THAT ACCOMPANY THIS PRODUCT
WILL RESULT IN THE LIMITED WARRANTY CONTAINED IN THE OPERATING AND
MAINTENANCE MANUAL TO BECOME VOID.
ADDITIONALLY, THE LIMITED WARRANTY CONTAINED IN THE OPERATING AND
MAINTENANCE MANUAL WILL BECOME VOID IF YOU FAIL TO COMPLY WITH SPECIFIC
NOTES OR WARNINGS CONTAINED IN THE OPERATING MAINTENANCE MANUAL,
INCLUDING BUT NOT LIMITED TO: ANY FAILURE TO CONDUCT PREFLIGHT OR OTHER
PERIODIC INSPECTIONS; SUBJECTING THE X PLUSONE TO ANYTHING BEYOND
ORDINARY AND INTENDED USE; MODIFYING THE X PLUSONE OR ITS SOFTWARE; OR
USE OF THE X PLUSONE IN VIOLATION OF ANY APPLICABLE LOCAL, STATE OR
FEDERAL RULES, LAWS OR REGULATIONS.
Sincerely,
Team xCraft
Page 6

Dear xCraft Pilot,
Please note that while the enclosed information is valid at the time of
shipping, it is important to check all of the appropriate and up to date legal
and nonlegal information on our website: xcraft.io
Please remember to register your X PlusOne at:
https://www.faa.gov/uas/registration/
Before you fly it is a good idea to read up on the regulations in your area at:
http://knowbeforeyoufly.org/
Sincerely,
Team xCraft
Page 7

xCraft Support
Contact xCraft Support for questions and technical help.
Online: http://xcraft.io/xplusone-contact-xcraft-vtol-drone-sandpoint-id/
Email: [email protected]
Call: +1 (208) 665-1353
Support line hours:
Mon-Fri, 8 am to 3 pm PST
xCraft Enterprises
313 E Sherman Ave
Coeur d’ Alene, ID 83814
+1 (208) 665-1353
xCraft.io
X PlusOne User Manual
X PlusOne is a trademark of xCraft Enterprises.
GoPro, HERO, the GoPro logo, and the GoPro Be a HERO logo are
trademarks or registered trademarks of GoPro, Inc.
Page 8

Page 9
1. Safety and Compliance
WARNING!
This X PlusOne unit can be dangerous. Read and follow all safety and operating instructions before using the X
PlusOne, and ensure that basic safety precautions are always followed during operation of the X PlusOne.
Failure to do so can result in damage to the product or personal property and cause serious injury. This is a
sophisticated product. It must be operated with caution and common sense and requires some basic
mechanical ability. Failure to operate this product in a safe and responsible manner could result in injury or
damage to the product or other property. This product is not intended for use by children without direct adult
supervision. DO NOT use incompatible components or alter this product in any way outside of the documents
provided by xCraft Enterprises. This Operating and Maintenance Manual contains instructions for safety,
operation and maintenance. It is essential to read and follow all of the instructions and warnings in the X
PlusOne user manual, prior to assembly, setup or use, in order to operate the product correctly and avoid
damage or serious injury. If situations occur that are not specifically covered in this Operating and Maintenance
Manual (this “Manual”), use care and good judgement.
Operators of the X PlusOne agree to operate the X PlusOne safely, responsibly and only for authorized and lawful
purposes. Operators of the X PlusOne are solely responsible for complying with, and by using this X PlusOne unit
each operator represents that it has read and agrees to comply with:
(i) All instructions, warnings and terms and conditions on the X PlusOne unit and in this Manual and any
other manuals or documentation that accompany the X PlusOne, the remote control unit (if applicable)
and any other accessory included with this x PlusOne unit (if applicable);
(ii) All checklists, emergency procedures, and preflight inspections and periodic inspections and maintenance
as indicated in this Manual; and
(iii) Any and all applicable governmental and administrative laws, rules, regulations, guidelines and flight
restrictions, whether federal, state, local or international, including, without limitation, any and all
applicable aviation, communication, data protection, safety, and privacy laws.
This manual and the legal terms and conditions contained in Section 8 of this Manual are subject to change at any
time without prior notice – please refer to www.xcraft.io for the latest version.
SAFETY
• Always keep the X PlusOne in a visual line of sight.
• Do not fly under the influence of drugs or alcohol.
• Do not fly indoors.
• Do not fly at night.
• Always fly outside in clear, open areas away from any people, houses, vehicles, buildings, power lines,
trees, etc.
• Do not fly over or near property owned by governmental entities or other individuals without their
express permission.
• Do not fly near international borders.
• Do not fly in bad weather conditions such as rain, snow, high winds, or fog.
• Take flying lessons, and practice flying often
v.1.1 Pg. 1
Page 10

a) Battery
Warning!
To avoid fire, serious injury, and property damage, observe the following safety guidelines when using, charging, or
storing your batteries.
Warning
Use caution when handling the X PlusOne battery; lithium polymer batteries can cause a fire if handled
incorrectly. Never alter, puncture, throw, bend, or impact the battery.
Keep the battery away from liquids, fire, microwaves, and other hazardous or combustible materials.
DO NOT expose the battery to extreme temperatures. If the battery is hot to the touch, wait for it to cool before
using or charging.
DO NOT use the battery if the plastic cover has been torn or compromised in any way.
Never disassemble or pierce the battery in any way or the battery may leak, catch fire, or explode.
Electrolytes in the battery are highly corrosive. If any electrolytes make contact with your skin or eyes,
immediately wash the affected area with fresh running water for at least 15 minutes, and then see a doctor
immediately.
If the battery falls into water with the aircraft during flight, take it out immediately and put it in a safe and open
area. Maintain a safe distance from the battery until it is completely dry. Never use the battery again, and
dispose of the battery properly as properly described below.
DO NOT heat batteries. Put out any battery fire using sand or a dry powder fire extinguisher.
DO NOT put batteries in a microwave oven or in a pressurized container.
DO NOT place loose battery cells on any conductive surface, such as a metal table.
DO NOT put the loose cells in a pocket, bag or drawer where they may short-circuit against other items or where
the battery terminals could be pressed against each other.
DO NOT drop or strike batteries. DO NOT place heavy objects on the batteries or charger.
Clean battery terminals with a clean, dry cloth.
Only use the X PlusOne battery for your craft. Inspect the battery before and after each flight. It is possible for the
battery to be damaged in shipping, use or charging. If you notice any abnormal features such as damage to the exterior
shell, swelling, deformation of the battery, abnormal smell, leakage, or other unexpected behavior, DO NOT use the
battery! These can be signs of serious damage that can cause the battery to catch fire or cause serious injury. To prevent
a hazard in case of fire or explosion, disconnect the battery, and place the battery in a safe area outside of any buildings
or vehicles and away from flammable materials. DO NOT dispose of the battery in the trash; dispose of the battery at
local battery recycling center as soon as possible. In the US and Canada, visit call2recycle.org to find a location.
Battery Charging
DO NOT attach the batteries to wall outlets or car charger sockets directly, and always use an xCraft approved
adapter. xCraft takes no responsibility if the battery is charged using a non-xCraft charger.
Never leave the battery unattended during charging. DO NOT charge the battery near flammable materials or on
flammable surfaces such as carpet or wood.
Pg. 2 v.1.1
Page 11

DO NOT charge battery immediately after flight, because the battery temperature may be too high. DO NOT
charge the battery until in cools down to near room temperature. Charging the battery outside of the
temperature range of 32° F to 104 ° F may lead to leakage, overheating, or battery damage.
Disconnect the charger when not in use. Examine the charger regularly for damage to the cord, plug, enclosure,
or other parts. DO NOT clean the charger with denatured alcohol or other flammable solvents. Never use a
damaged charger.
Battery Storage
Keep batteries out of the reach of children and pets.
DO NOT leave the battery near hear sources such as a furnace or heater. DO NOT leave the batteries inside of a
vehicle on hot days. The ideal storage temperature is 64° F to 82° F.
Keep the battery dry. Never drop the battery into water.
DO NOT drop, strike, impale, or manually short-circuit the battery.
Keep the battery away from metal objects such as glasses, watches, jewelry, and hairpins.
Never transport a damaged battery or a battery with power level higher than 50%.
For long term storage, store the battery in a 64° F to 82° F environment, between 45-85% relative humidity and with
50% charge. Always make sure to store the battery in a place where it won’t be exposed to extreme temperatures or
direct sunlight.
2. In the Box
Check that all of the following items are in your package. If any item is missing, please contact xCraft.
Battery charger
Transmitter
Transmitter AA batteries (4)
Nosecone
Fixed Mount for GoPro
Necessary hardware
Spinners (4)
Props (8)
Battery (1)
Telemetry module
Pylons (2)
Main wing
3. Overview
The X PlusOne is a hybrid platform that is capable of hovering and forward flight. The X PlusOne takes off, hovers,
and lands like a traditional quadcopter, but that's where the similarities with a multi-rotor stop. The key
differentiator is this: In place of the quadcopter frame is an upward facing wing. This allows the X PlusOne to
pitch over 90 degrees and fly nose-first at over 60 mph (100 km/h), twice as fast as a traditional quadcopter!
Flight control is handled by varying motor speed to provide pitch, roll, and yaw control, even in forward flight
mode. There are no traditional flight control surfaces on the X PlusOne. Thereby saving weight and complexity
and ensuring the overall design remains clean and efficient.
v.1.1 Pg. 3
Page 12
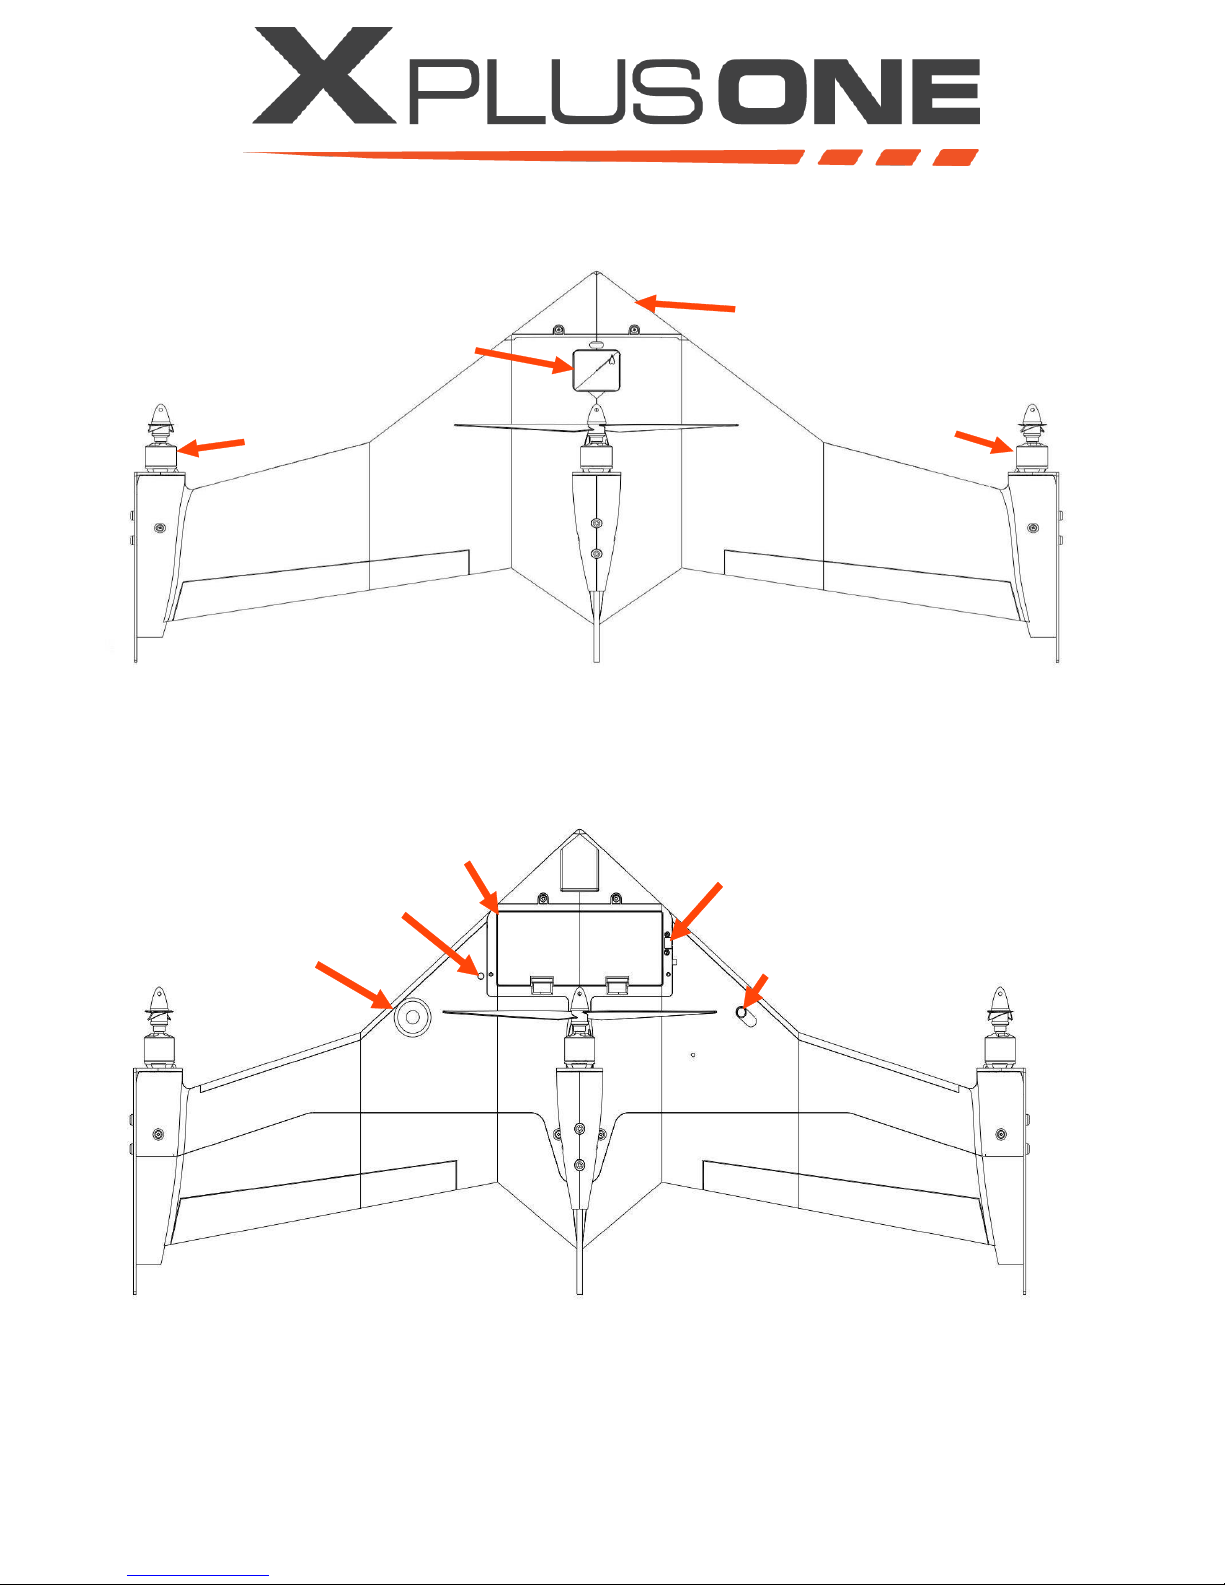
battery hatch
FPV antenna (FPV option)
telemetry antenna
safety switch
external USB (USB option)
left
motor
right
motor
left wing
right wing
payload (standard nosecone)
GPS antenna
front/nose
back/tail
All components will be defined as though the X PlusOne is in forward flight. The following images have the major
components labeled the way they will be referenced.
Top view
Pg. 4 v.1.1
Bottom view
Page 13
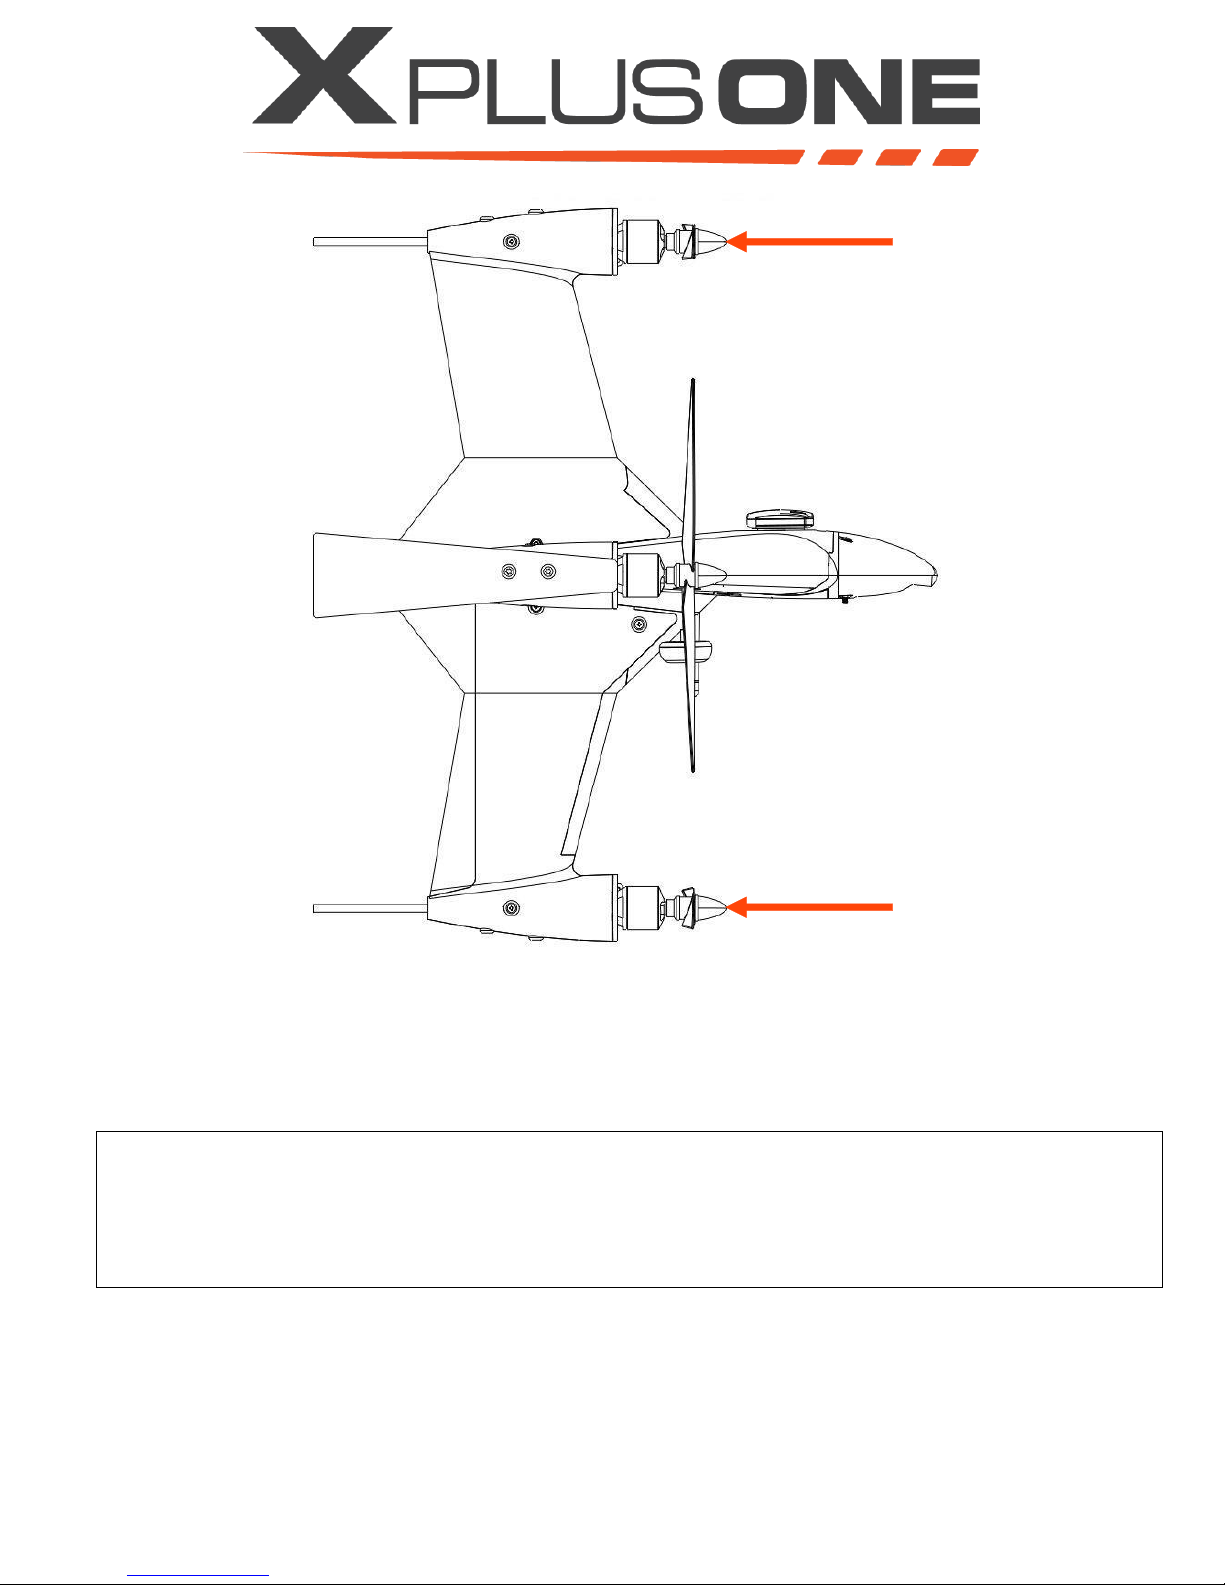
top pylon
top motor
bottom
motor
bottom pylon
Side view
Safety
Always fly at locations that are clear of building and other obstacles.
DO NOT fly above or near large crowds.
Avoid flying at altitudes above 400 ft.
Be very careful when flying 19,600 ft. or more above sea level.
Fly in moderate weather conditions with temperatures between 32° F to 104° F.
v.1.1 Pg. 5
Page 14

4. Checklists
a) Normal Operation
Preflight Checklist
1. Check that the pylons are properly installed onto the wing
2. Check for loose parts or wires
3. Check foam and plastic components for signs of damage
4. Propellers are tight and installed to rotate in the proper direction
5. Battery fully charged
6. Battery installed, power not connected
7. Battery hatch secured
8. Center of Gravity (CG) is within tolerance
9. Payload is within maximum allowable weight limit
Before Takeoff
1. Transmitter on
2. Transmitter charged
3. Correct flight mode selected
4. Area free of obstructions 10 ft. around craft
5. No obstructions overhead
6. Connect battery
7. Connect ground station (optional)
8. (Platinum option) Press and hold safety switch
9. Arm motors
10. Check motor direction
Takeoff
1. Increase throttle to climb
2. Climb vertically to 15 ft
3. Check control response
4. Proceed with flight
Before Landing
1. Check landing area for obstructions
2. Fly to landing site
3. Transition to hover
4. Descend to 50 ft
Landing
1. Descend vertically at a reasonable rate
2. Adjust position during descent to land at desired location
3. Reduce throttle to minimum after touchdown
4. Disarm motors
Pg. 6 v.1.1
Page 15

5. Disconnect ground station if connected
6. (Platinum option) Press and hold safety switch
7. Disconnect connector and remove battery
8. Turn transmitter off
Postflight
1. Check battery for overheating, or expansion
2. Check motors for overheating
3. Check airframe for damage or loose/missing components
Autonomous Flight
1. Perform Preflight check
2. Perform Before Flight check
3. Switch flight mode to “Auto”
4. Increase throttle to begin mission
5. Monitor aircraft visually
6. If necessary engage manual control by switching flight mode
a. Stabilize craft
b. Return to Auto mode at pilot’s discretion
7. Once craft lands, reduce throttle to minimum
8. Disarm motors
9. Disconnect ground station if connected
10. Disconnect and remove battery
11. Turn transmitter off
b) Emergency
Lost Link
1. Check controls
2. Check flight mode
3. Set throttle to half
4. Touchdown, set throttle to minimum
5. Retrieve aircraft
Control Failure
1. Check controls
2. Check flight mode
3. Set throttle to minimum
4. Retrieve aircraft
Bird Attack
1. If flying autonomously, engage manual control
2. Attempt to evade bird by making abrupt attitude changes
3. If attack continues, land
4. If attack stops, continue with flight
v.1.1 Pg. 7
Page 16
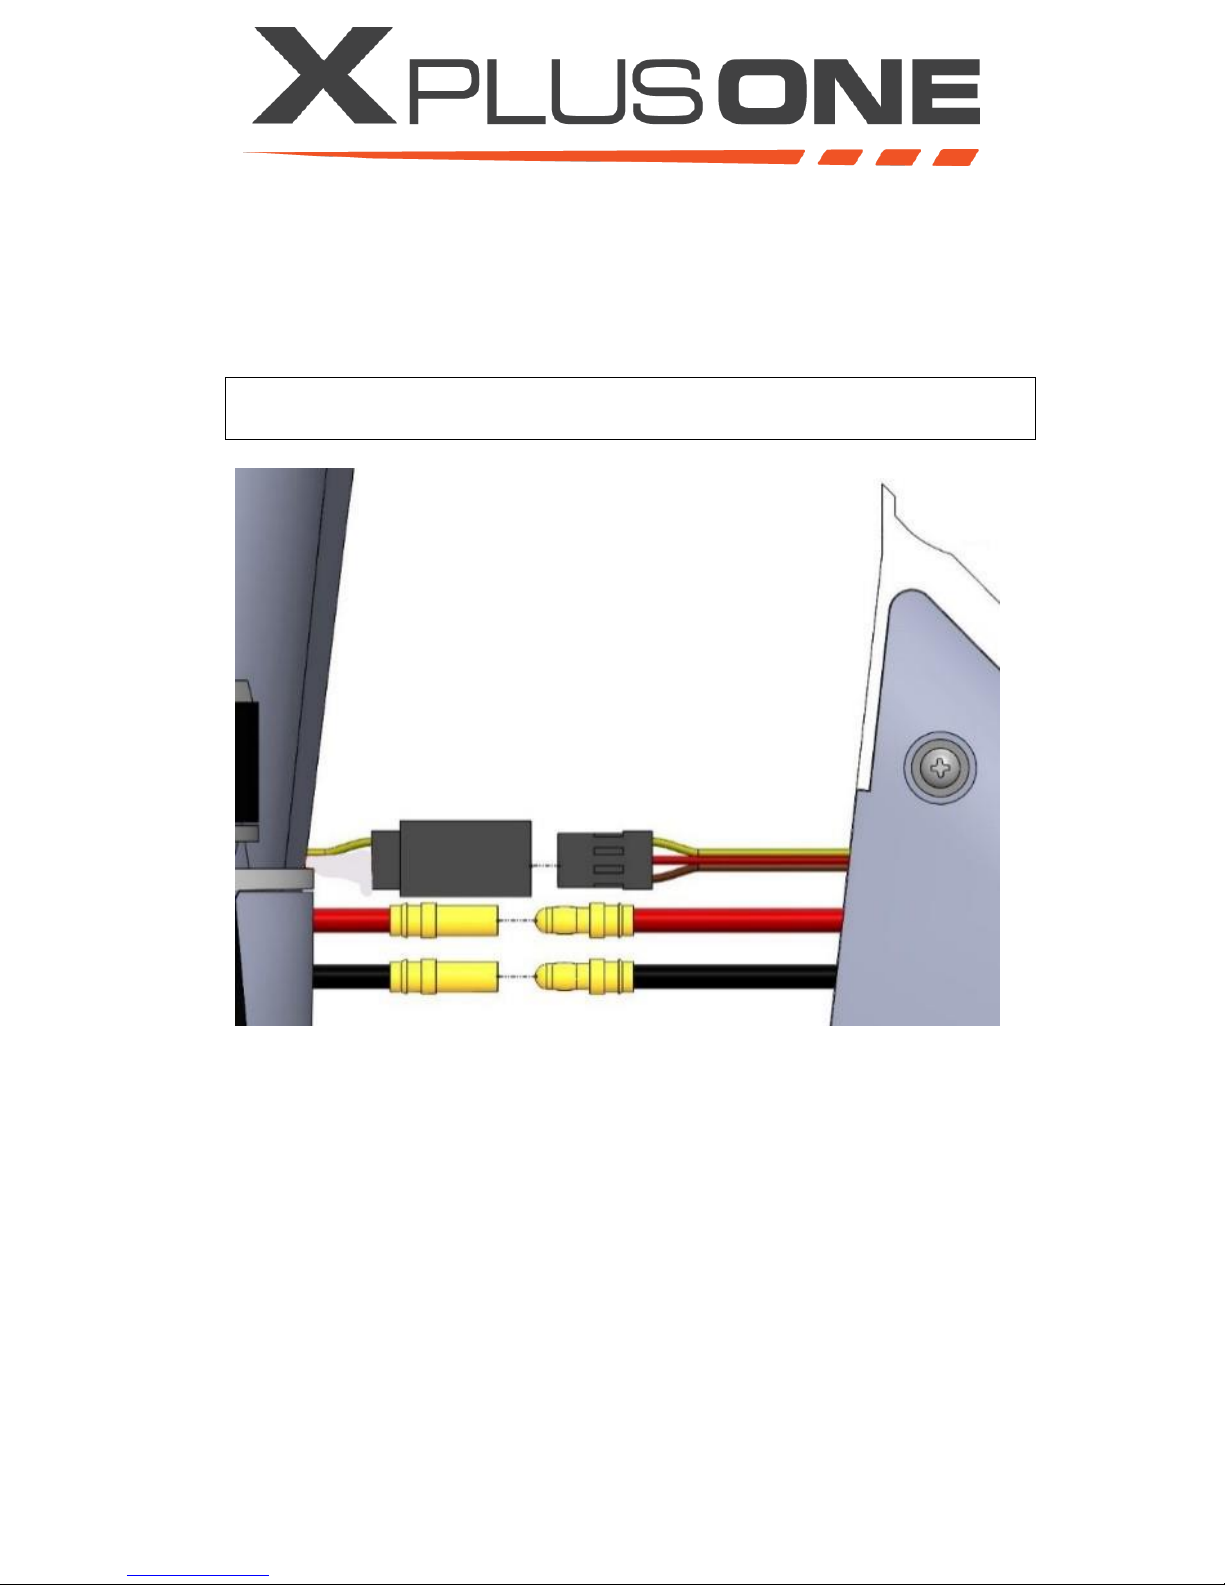
5. Setup-Assembly Instructions
To prepare for flight, observe the following steps:
Installing Pylons:
1. Connect the pylon wires to the wires in the top of the wing as shown below. Connect two bullet
connectors and single ESC wire. Ensure bullet connector polarity is correct.
Caution: Ensure wire polarity is correct or damage will result. (red to red, black
to black, etc…)
Pg. 8 v.1.1
Page 17
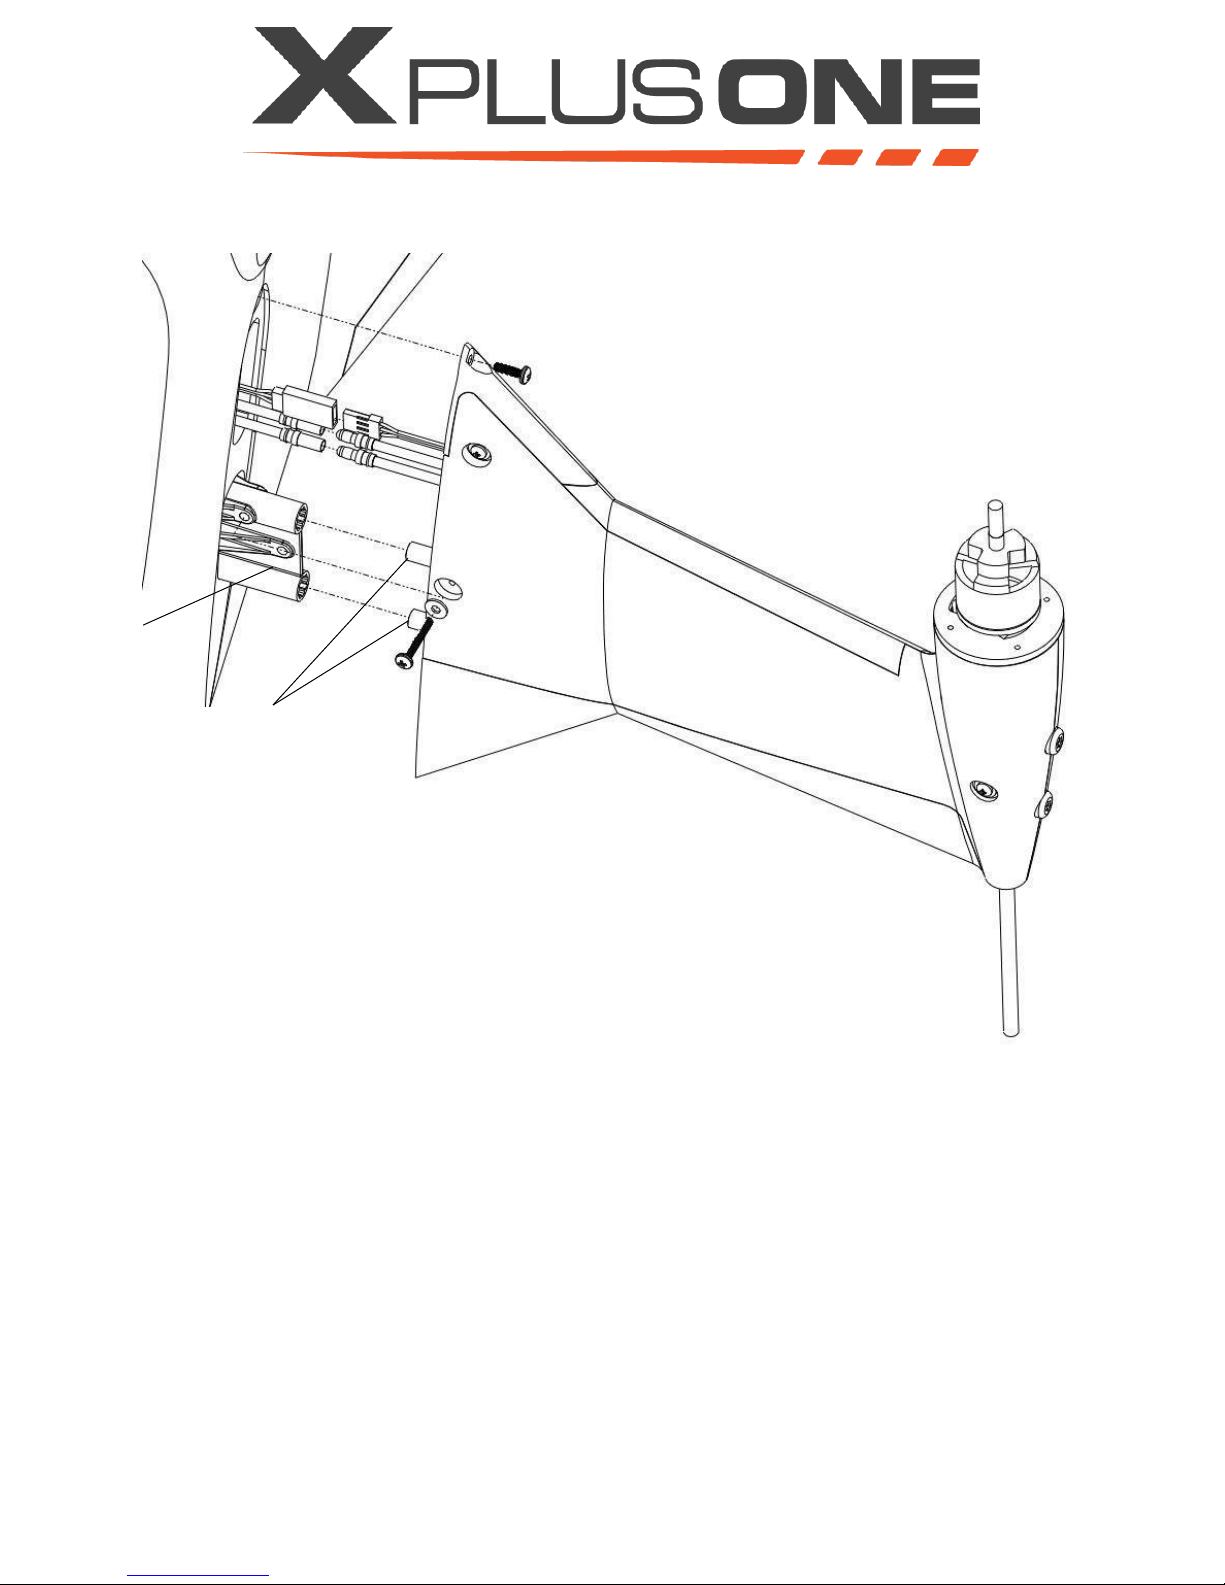
connector
pylon
spars
2. Insert the pylon spars and slide the pylon onto the wing connector. As you slide the pylon in place,
bundle the wires into the cavities in the wing and pylon.
v.1.1 Pg. 9
Page 18
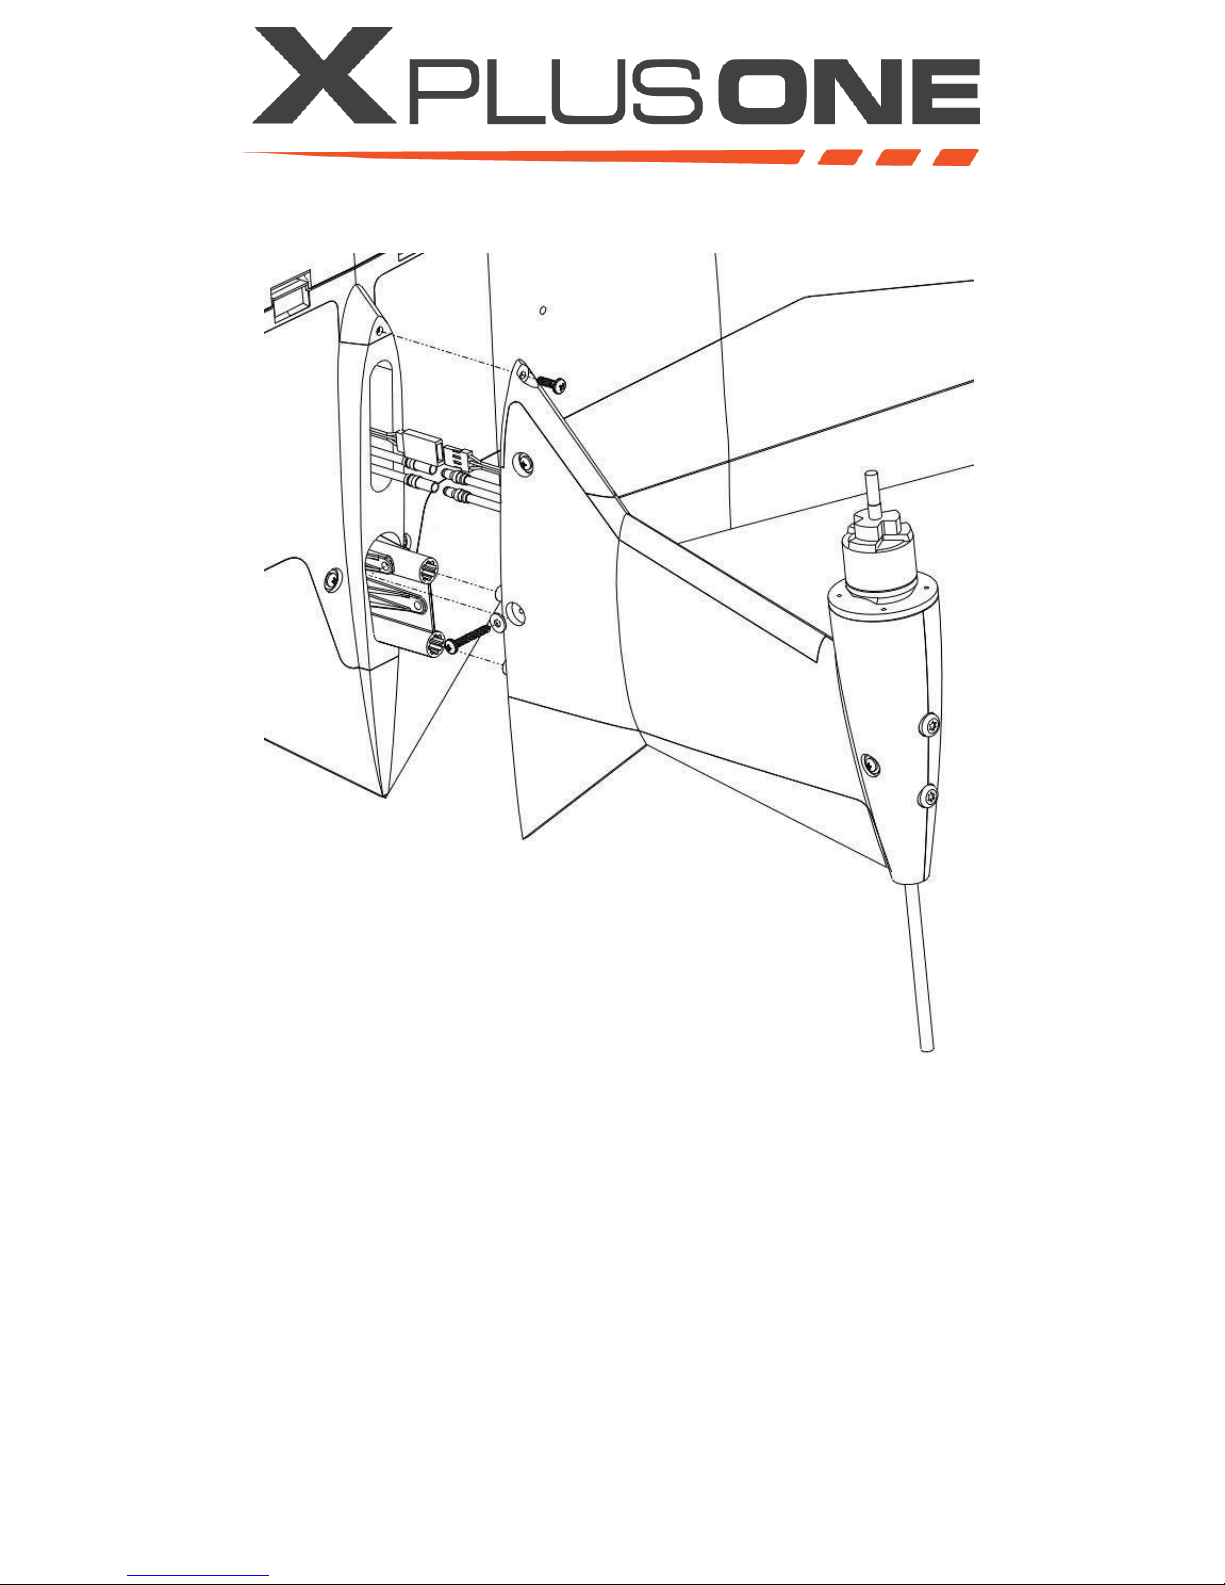
3. Insert pylon mounting screws as shown above
4. Install the second pylon onto the bottom of the wing by repeating steps 1 through 3.
Pg. 10 v.1.1
Page 19
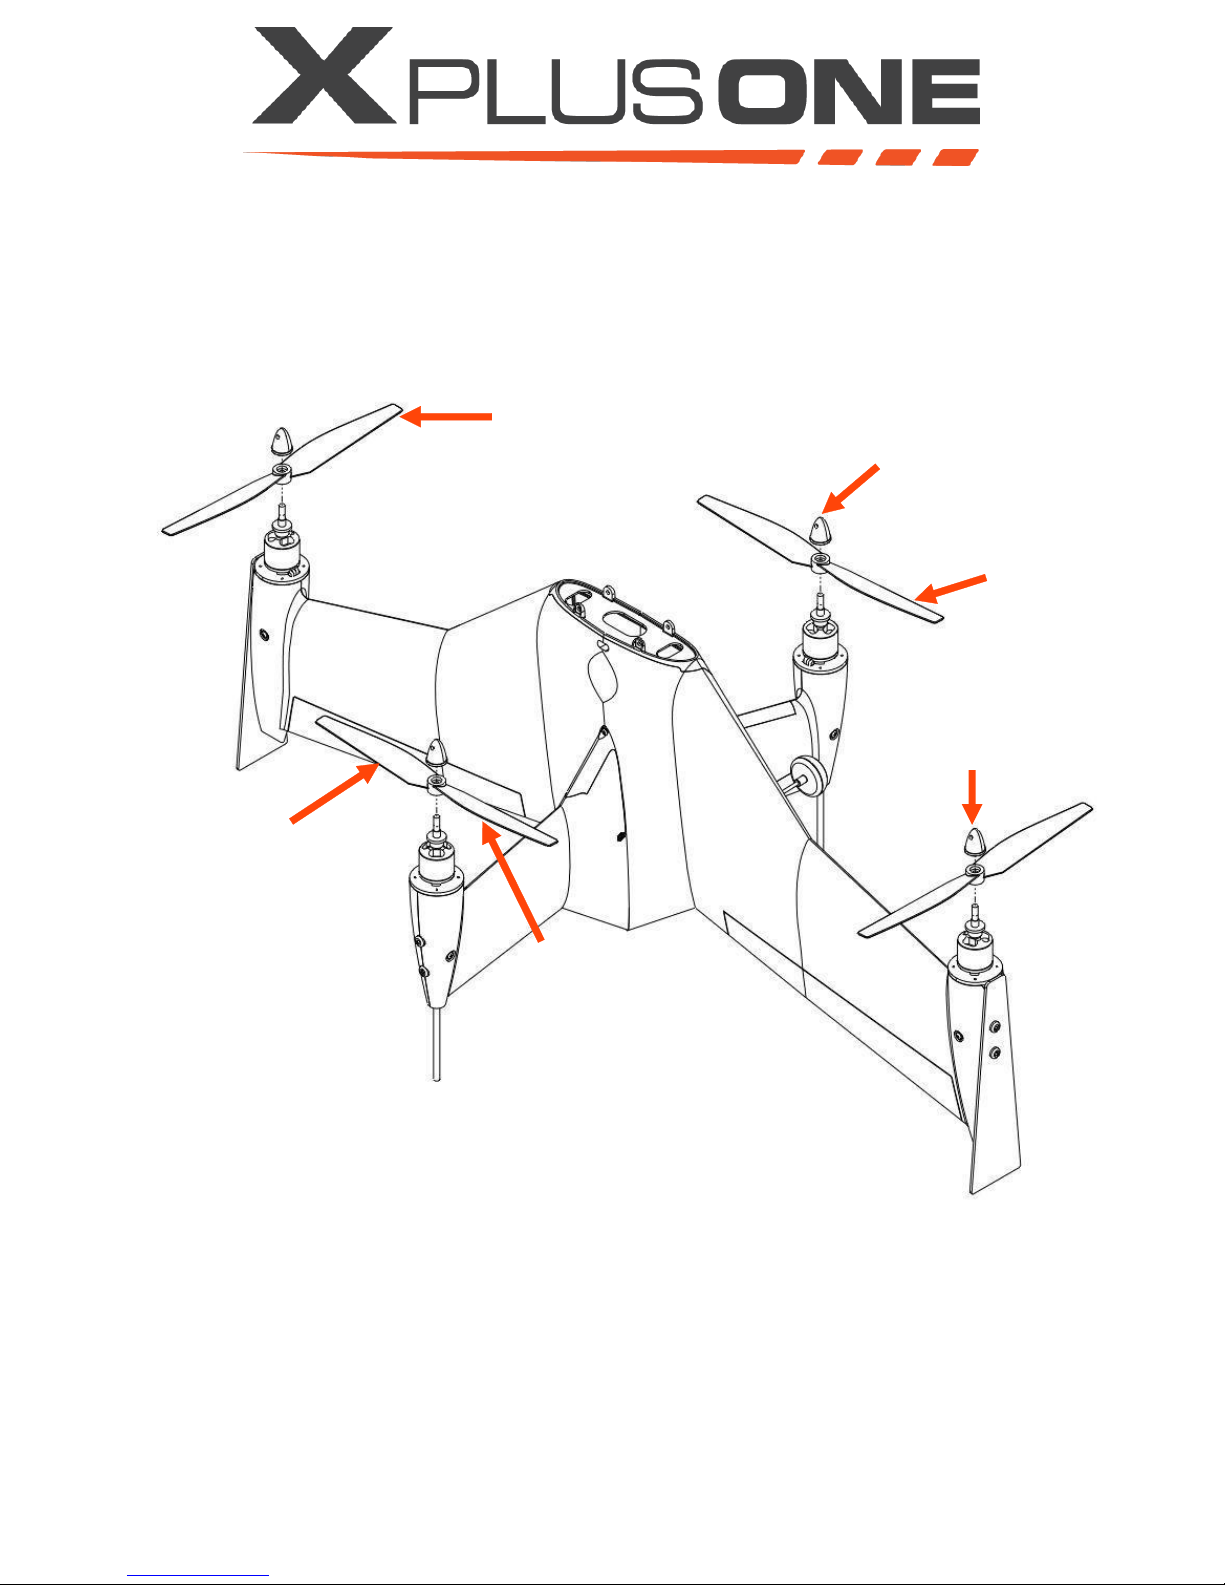
clockwise
propeller
( R )
spinner
clockwise
propeller
( R )
counterclockwise
propeller
counterclockwise
propeller
ensure
writing is
facing up
Installing Propellers:
The X PlusOne uses 2 clockwise spinning propellers and 2 counterclockwise spinning propellers.
Clockwise spinning propellers are marked with an “R” on the propeller blade.
1. Place the bottom half of the spinner onto the motor then set the propeller over it.
2. Attach the clockwise spinning propellers (R) onto the top and bottom pylon motors and the
counterclockwise spinning propellers (no R) onto the wing motors. Ensure writing is facing up.
v.1.1 Pg. 11
Page 20
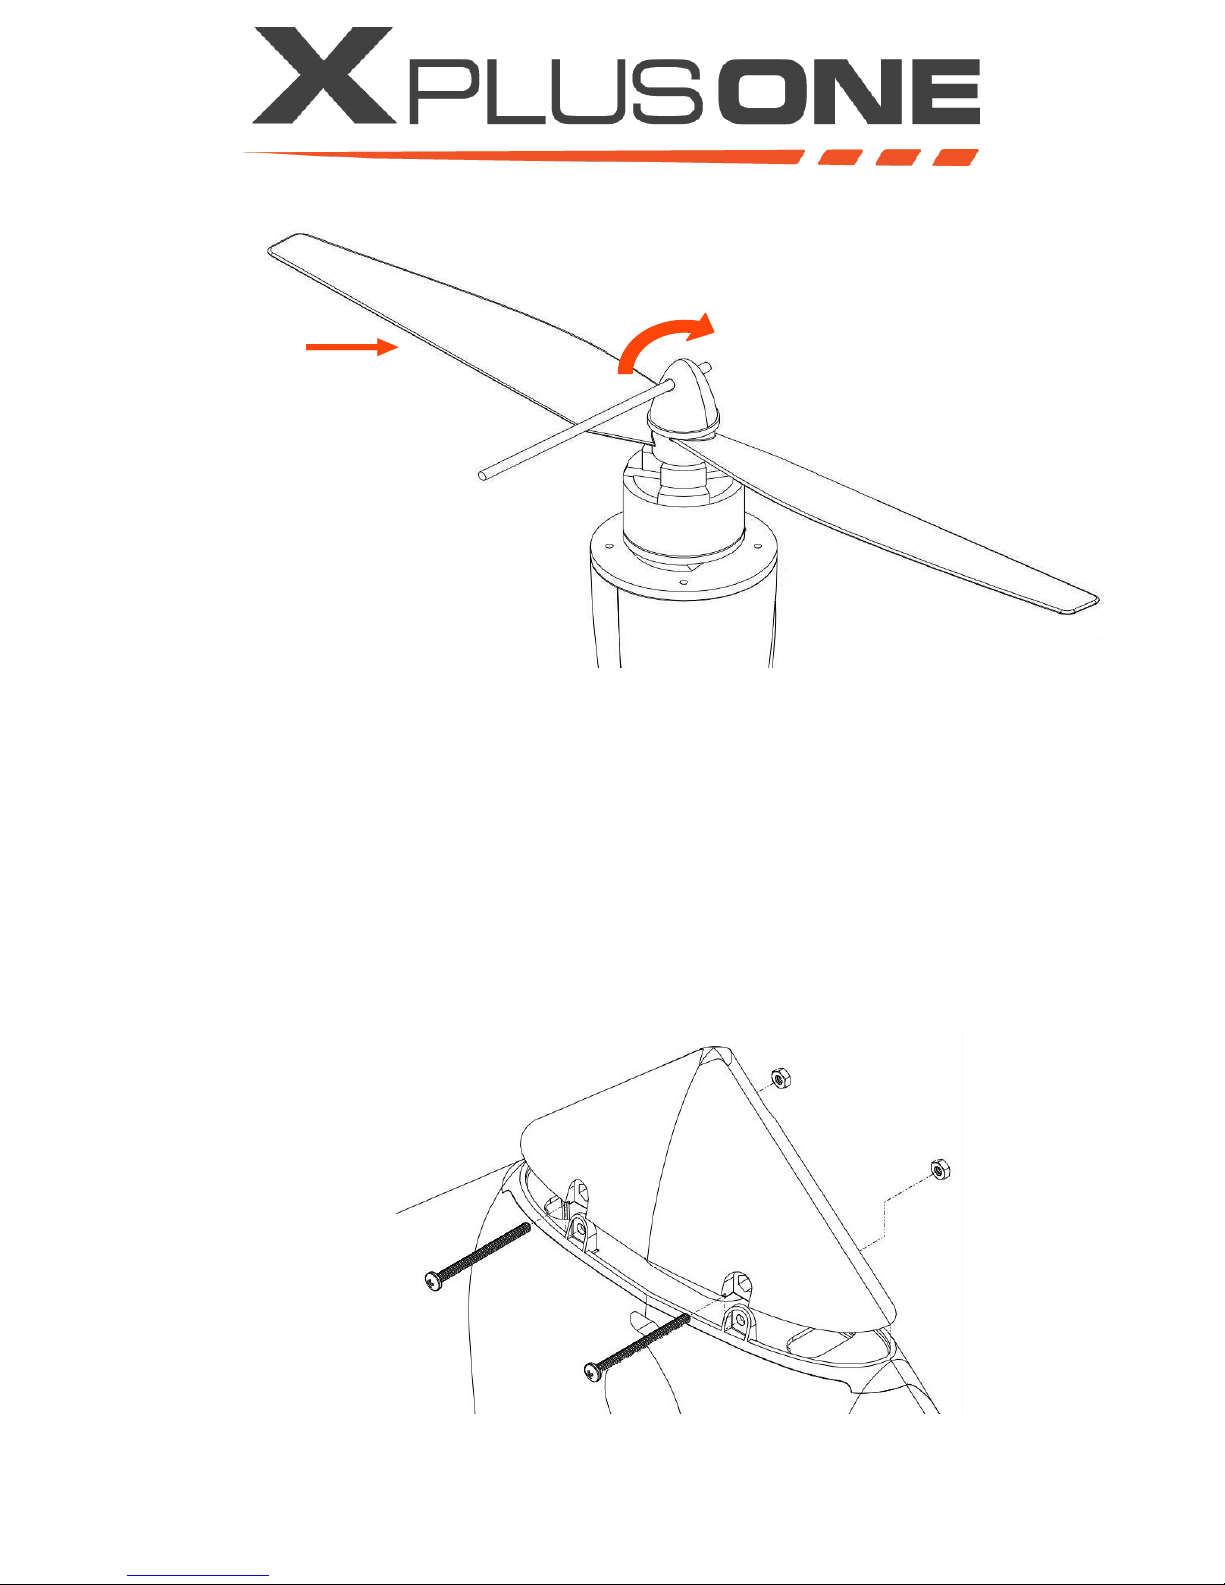
rotate clockwise
hold stationary
3. Screw the cap of the spinner on top of the propeller.
4. Tighten the spinner by holding the propeller stationary and rotating the spinner clockwise with a thin
metal rod, inserted into the hole in the top of the spinner. Ensure that spinners are tightened securely.
Install Payload
a. For the standard nosecone, install it as shown in the image below using the supplied hardware:
Long screws and nuts.
b. For all other payload options, follow the instructions included with the payload.
Pg. 12 v.1.1
Page 21
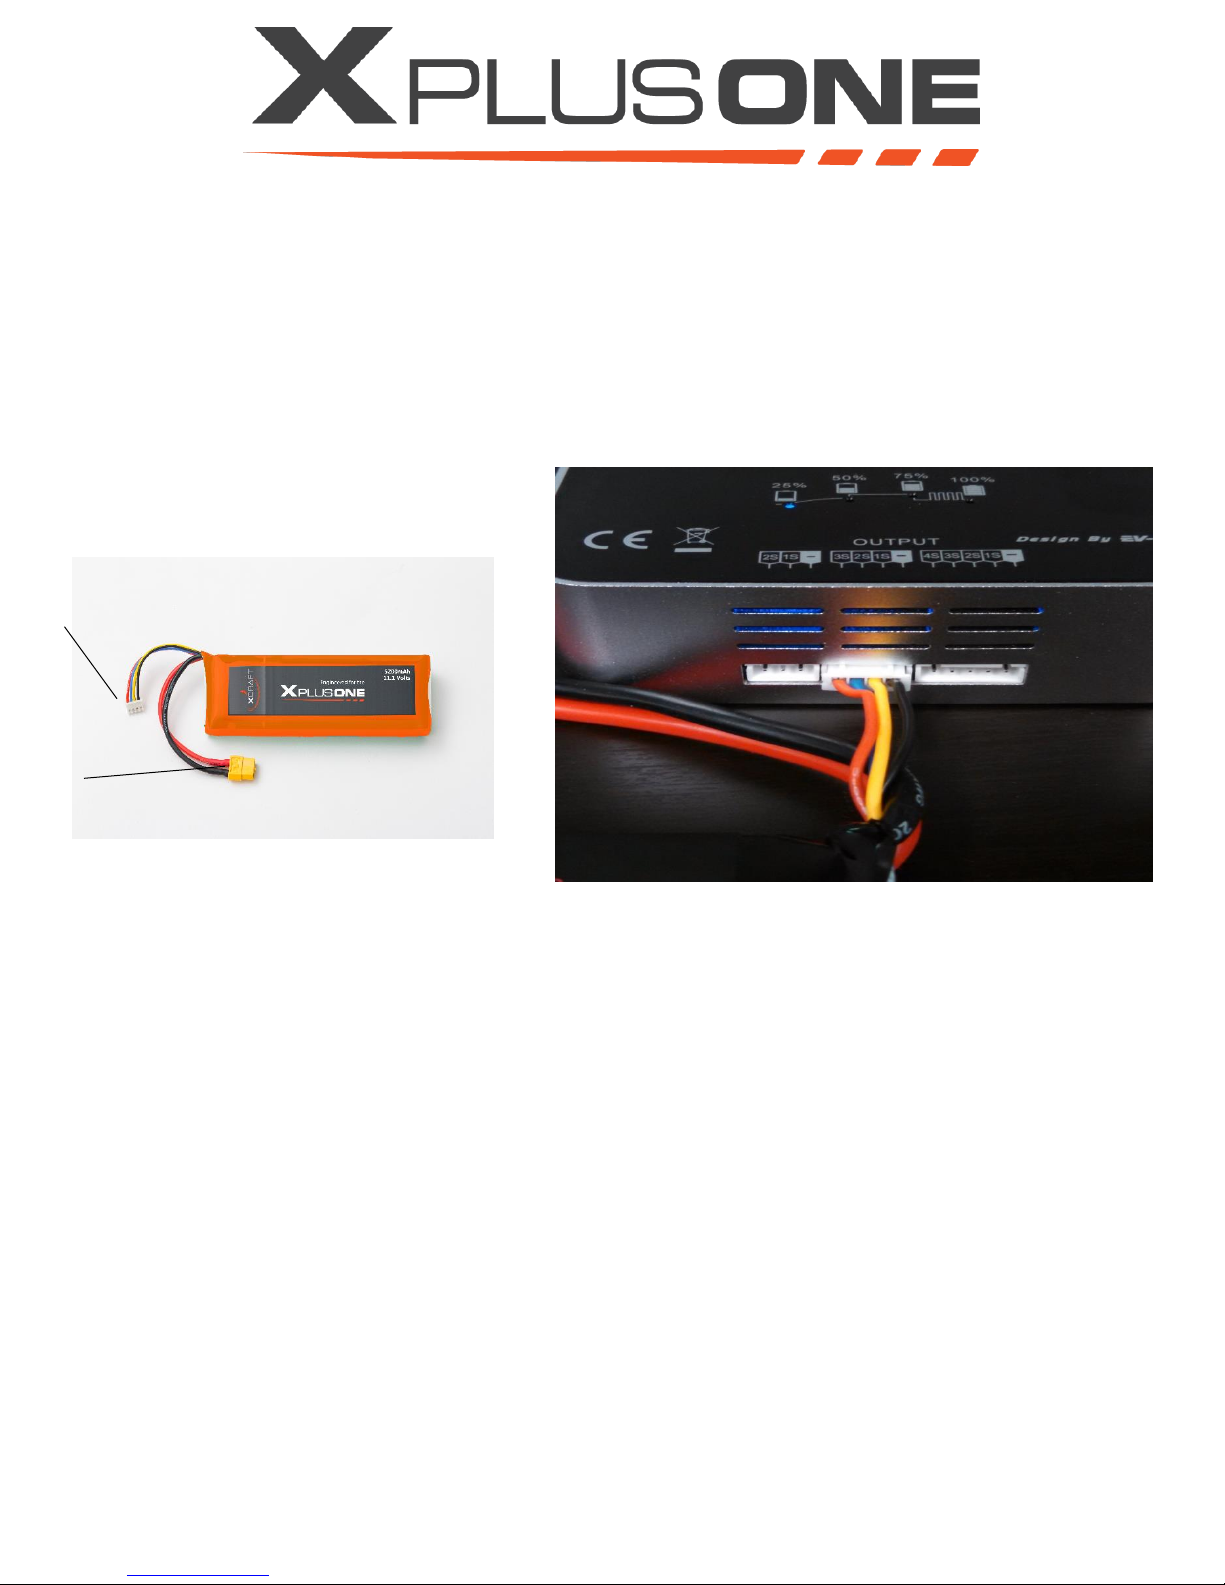
battery
balance
cable
power
cord
6. Battery
Charging the Battery
1. Connect charger power cord and plug the charger into wall outlet.
2. Check that blue lights flash on charger.
3. Plug the battery balance cable into the middle port of the charger. It is the only port that will fit that size plug
and it only goes in one way to ensure an easy connection.
4. Determine how charged your battery is by the light up indicators on the charger.
5. When fully charged, unplug the battery from the charger and the charger from the outlet.
Connecting the Battery
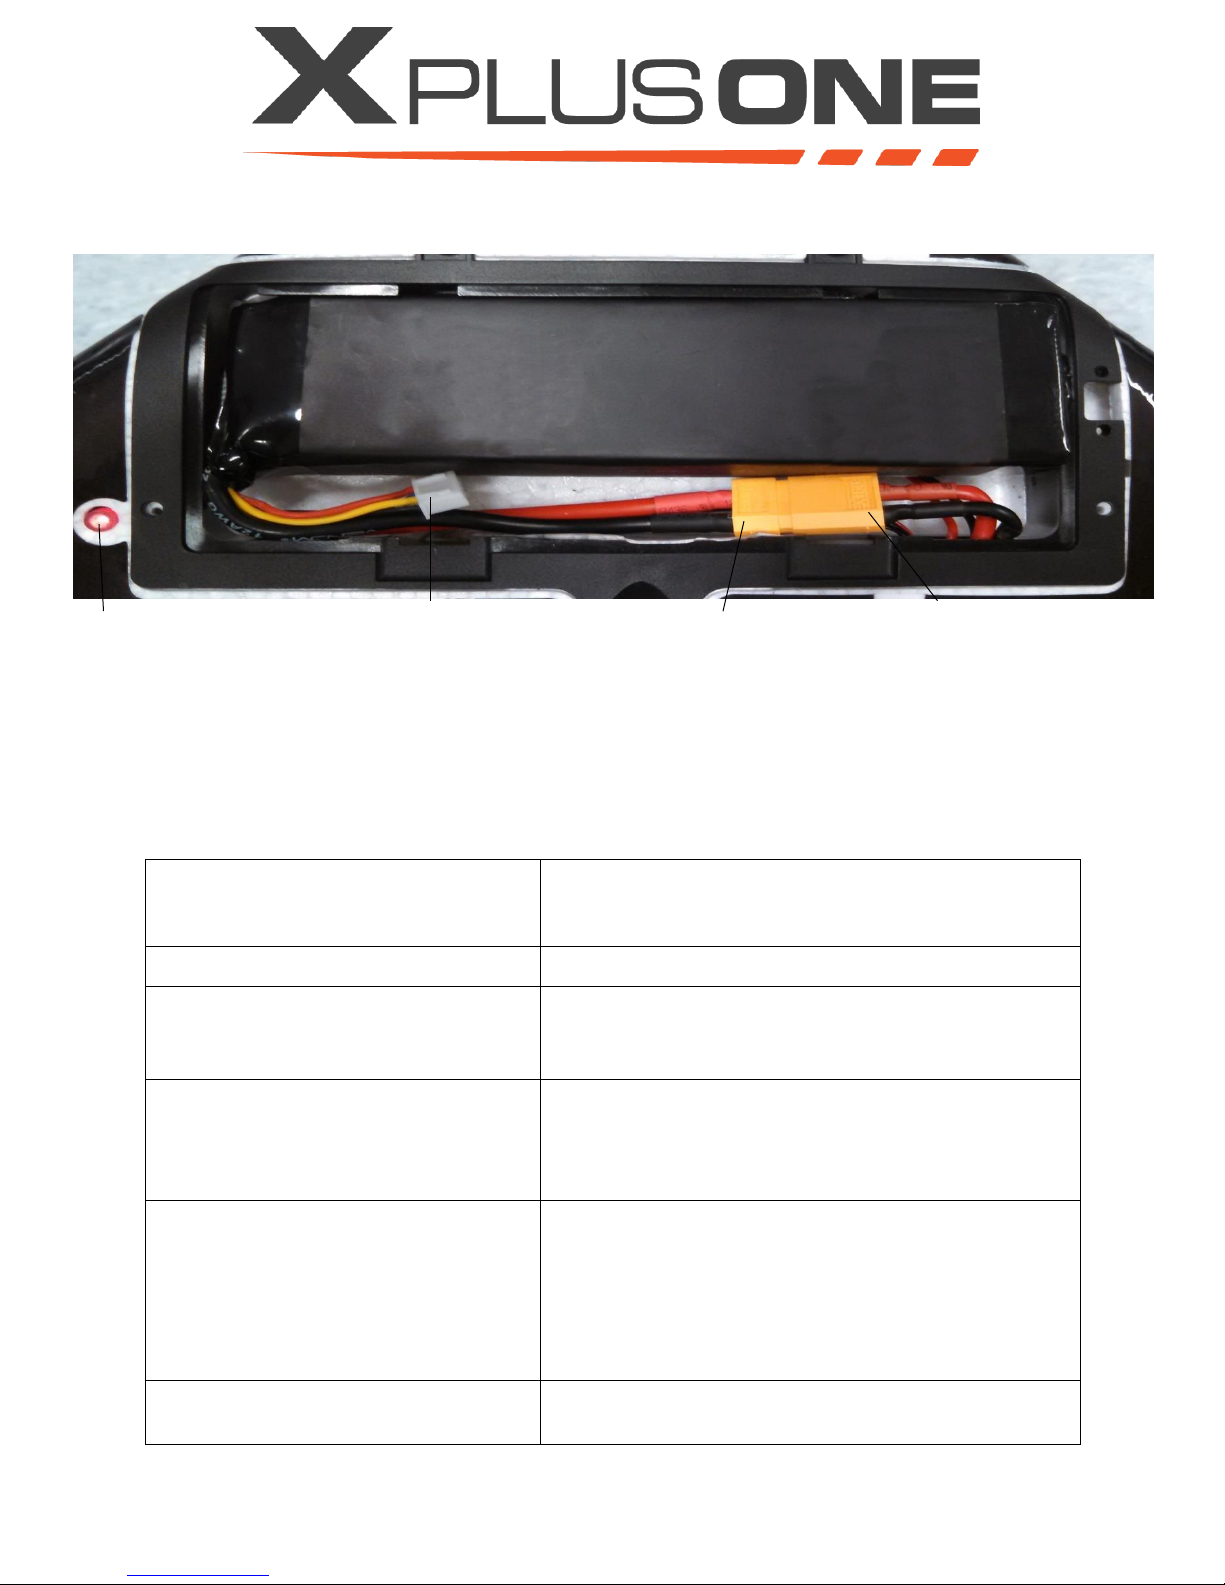
1. Install battery by facing the battery wires down and running the cable along the length of the
battery compartment, underneath the battery (see picture). Connect power to the craft by
matching the yellow ends of the both power cords together. The power cords will connect one
way. The battery balance cable is left loose.
v.1.1 Pg. 13
Page 22
Home
Return to Home
Craft will return to original take off location
Fly
Normal switch position for flight
Hover
Manual flight control
Auto-level will keep craft pointed up when right stick is
centered
Smart
Hover in place
Position can be controlled with hover controls. Craft uses
GPS to auto-stabilize itself. Ensure GPS has clear signal,
free of buildings and trees etc.
Acro
Acro mode uses the RC sticks to control the angular
velocity of the craft. Release the sticks and the vehicle
will maintain its current attitude and will not return to
level. Acro mode is useful for forward flight, aerobatics
such as flips or rolls, or FPV when smooth and fast
control is desired.
Auto (set via Mission Planner(PC) or
QGroundControl(MAC))
Autonomous mission
X PlusOne will fly the flight plan saved to the autopilot
red safety button
battery balance
cable
battery power
cord
craft power cord
2. Press and hold safety button, next to battery compartment, until it is solid red (If it does not
turn solid red, please disconnect the battery and restart the process). Indicator LED in the
center of the wing, should be flashing green; at connection of pylon.
7. Operation-How to operate your X PlusOne
Your X PlusOne has two standard flight modes (Hover and Forward Flight) and four flight modes (Smart, Guided,
Auto, and Follow Me) that rely on optional equipment:
Flight Modes
Pg. 14 v.1.1
Page 23
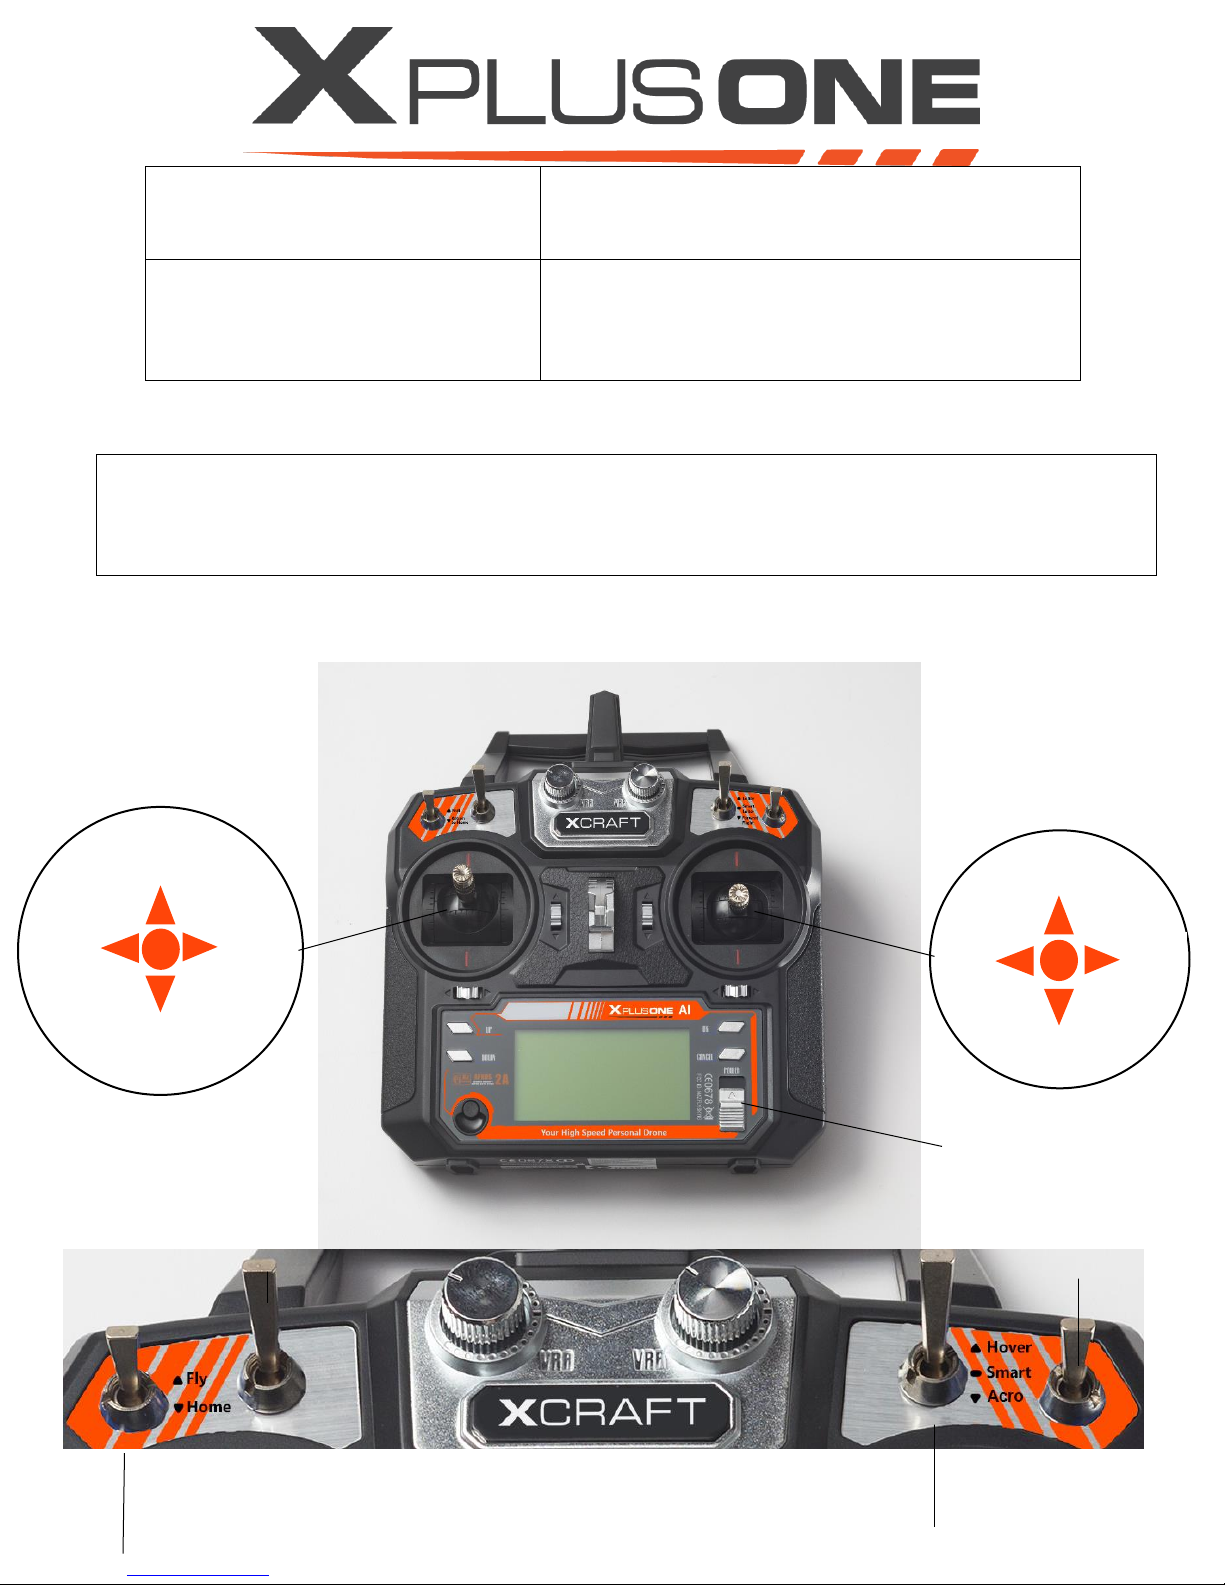
Guided (set via Mission Planner(PC) or
QGroundControl(MAC))
Ground station controlled flight
X PlusOne will fly to waypoints sent from the ground
station in real time
Follow Me (Ground station with GPS
required)
Follows ground station
X PlusOne will follow the ground station as you move.
Install “3DR Services” and “Tower” apps on smartphone
to connect with craft.
u
D
R
o
F
B
L
R
Up
Down
Rotate
Rotate
Right
Forward
Left
Right
Power Switch
Switch 1
Switch 2
(no function)
Switch 3
Switch 4
(no function)
Up – Hover
Safety
Always stay at least 15 feet away from the rotating propellers and motors.
Maintain line of sight of your aircraft at all times.
DO NOT fly under the influence of alcohols or drugs.
In the instance of a low battery warning, land the aircraft at a safe location.
a) Controls
v.1.1 Pg. 15
Page 24
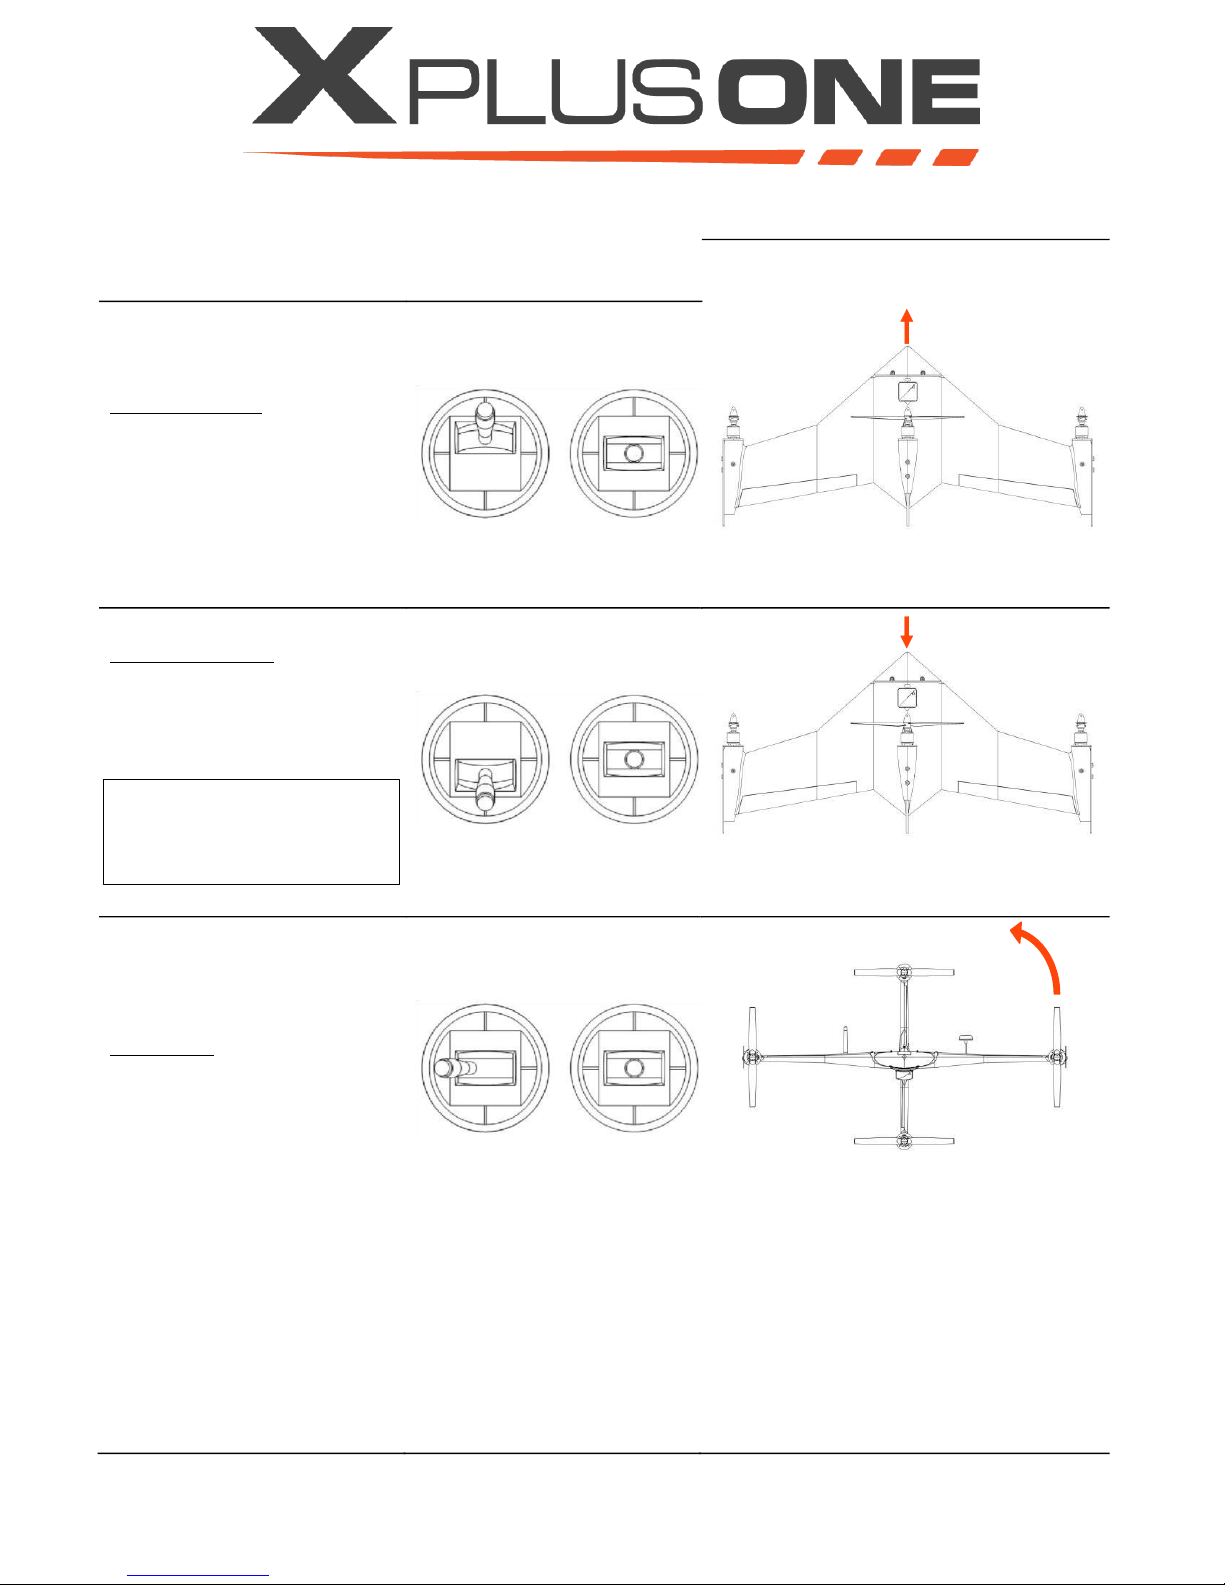
Throttle Forward
Increases motor speed
If throttle is above hover
position (varies with payload)
craft will climb
Back view
Throttle Backward
Decreases motor speed
If throttle is below hover
position (varies with payload)
craft will descend
Back view
WARNING: Do not fully
reduce throttle unless
your X PlusOne has landed
Rudder Left
Rotates wings
counterclockwise
b) Controls
The X PlusOne functions as a standard quadrotor.
Top view
Pg. 16 v.1.1
Page 25
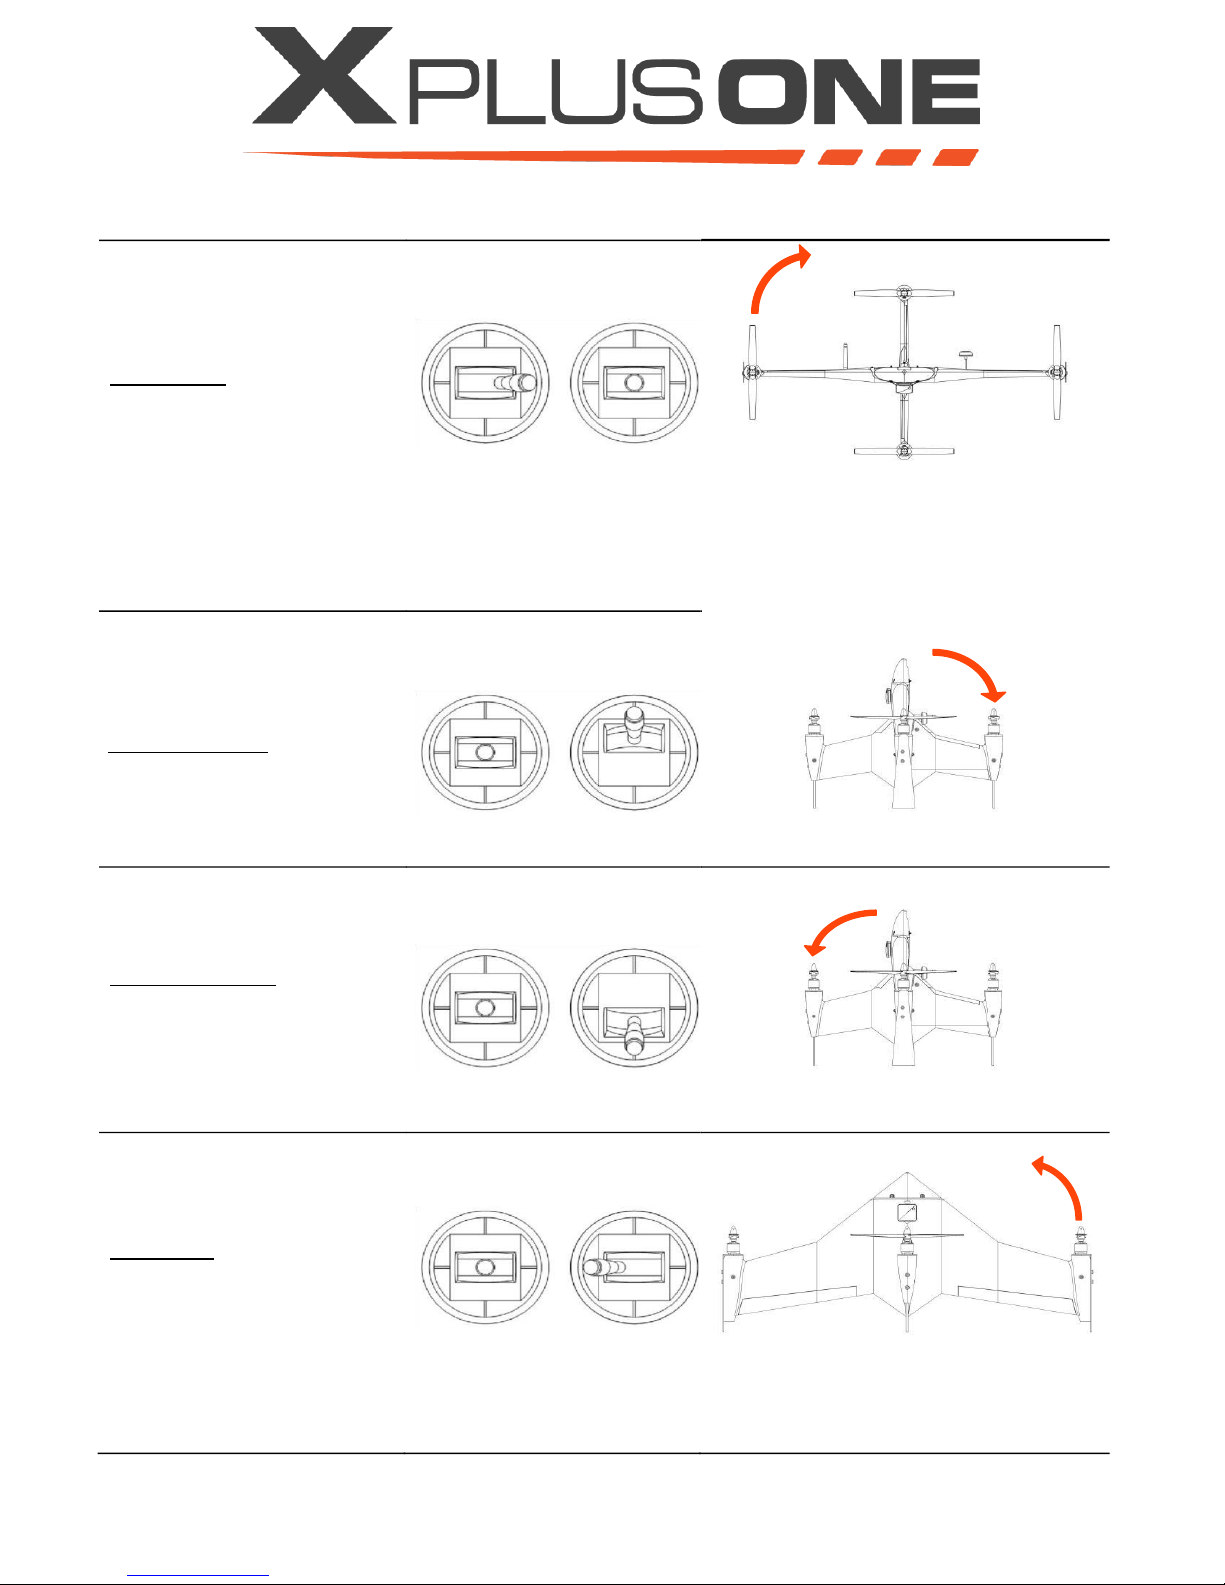
Rudder Right
Rotates wings clockwise
Elevator Backward
Pitches nose backward
craft will fly backward
Aileron Left
Rolls nose left
craft will fly to the left
Side view
Top view
Elevator Forward Pitches nose
forward craft will fly forward
Side view
v.1.1 Pg. 17
Back view
Page 26
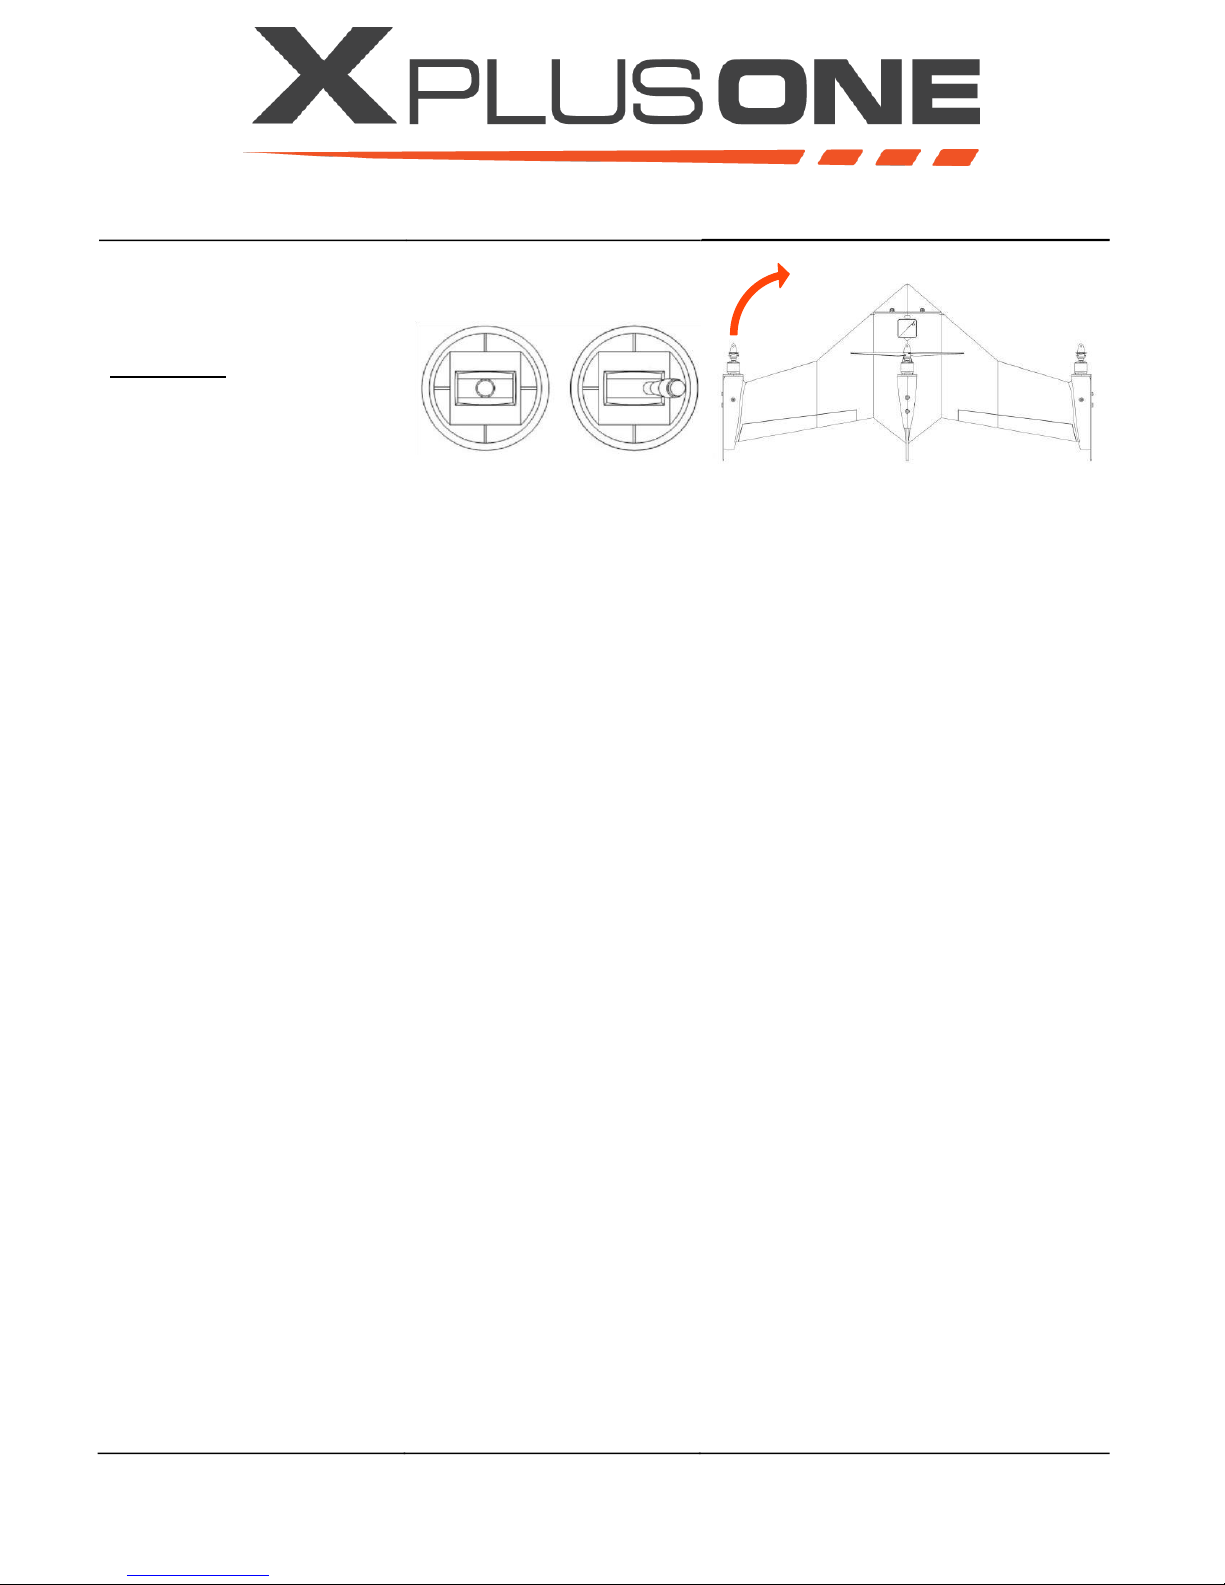
Aileron Right
Rolls nose right
craft will fly to the right
Back view
Back view
Pg. 18 v.1.1
Page 27
arming
craft
First Flight
Perform preflight inspection:
1. Put X PlusOne on flat, level surface
2. Power on transmitter
3. Install battery and connect power
4. Press and hold safety button, next to battery compartment, until it is solid red (If it does not turn solid
red, please disconnect the battery and restart the process). Indicator LED in the center of the wing,
should be flashing green; at connection of pylon
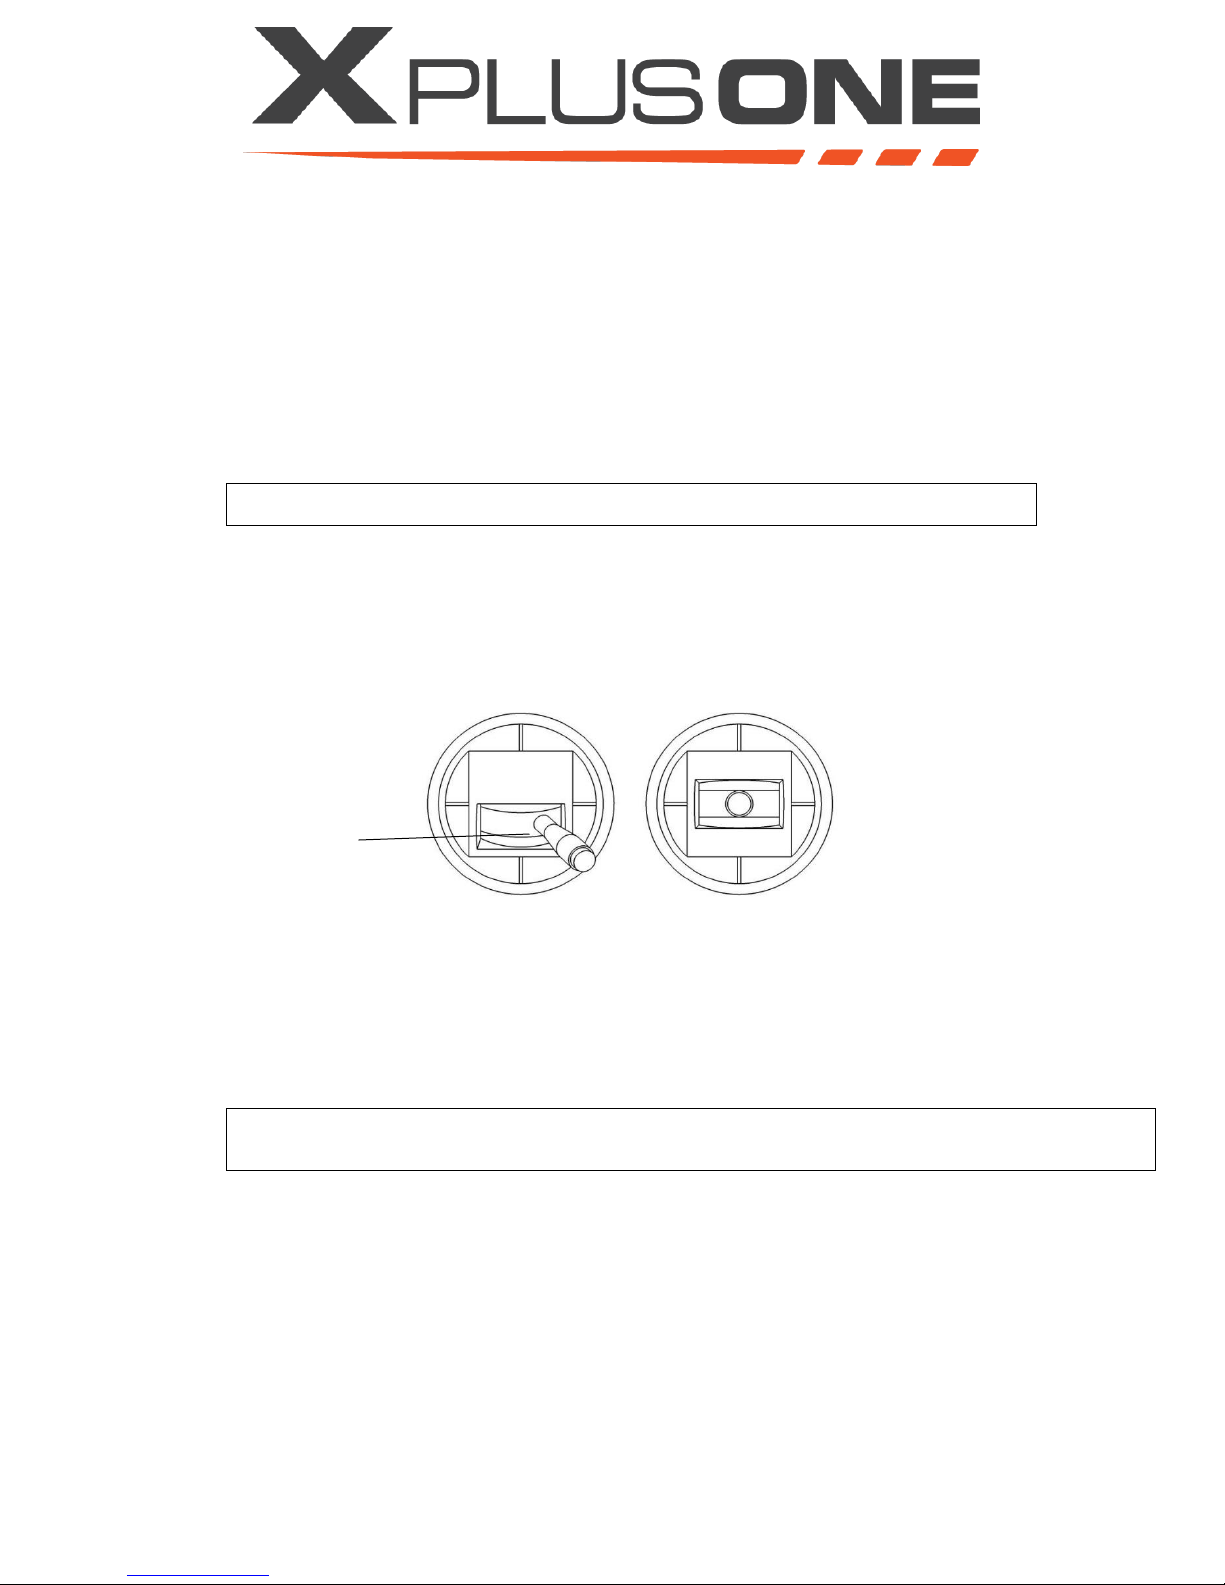
5. Arm the craft by holding the left stick down and right for several seconds
6. Once armed, the motors will begin spinning
WARNING: Never approach the craft when it is armed.
Rotating propellers can be dangerous. Do not start the motors when there are people nearby.
Always keep your hands on the remote controller so long as the motor is still spinning.
Never stop the motors mid-flight unless in emergency situations when doing so can reduce
the risk of damage or injury.
Always stay at least 15 feet away from the rotating propellers and motors.
8. Takeoff by increasing the throttle slightly above half
Maintain line of sight of your aircraft at all times.
DO NOT fly under the influence of alcohols or drugs.
In the instance of a low battery warning, land the aircraft at a safe location.
9. Familiarize yourself with how the X PlusOne responds to control inputs
TIP: It is suggested that you do not attempt to transition to forward flight until you are
comfortable with hover controls.
TIP: If at any time you lose orientation while in forward flight, switch to hover mode and set the throttle to full up and the
craft will right itself.
10. When ready, land by performing the following:
a. Return craft to takeoff point
b. Achieve stable hover at 10 ft.
c. Reduce throttle to smoothly descend
d. Fully reduce throttle once on the ground
Optional “Return to Land” Feature
a. Place Switch 1 in “Home” mode
b. Fully reduce throttle once on the ground
Pg. 19 v.1.1
Page 28
disarming
craft
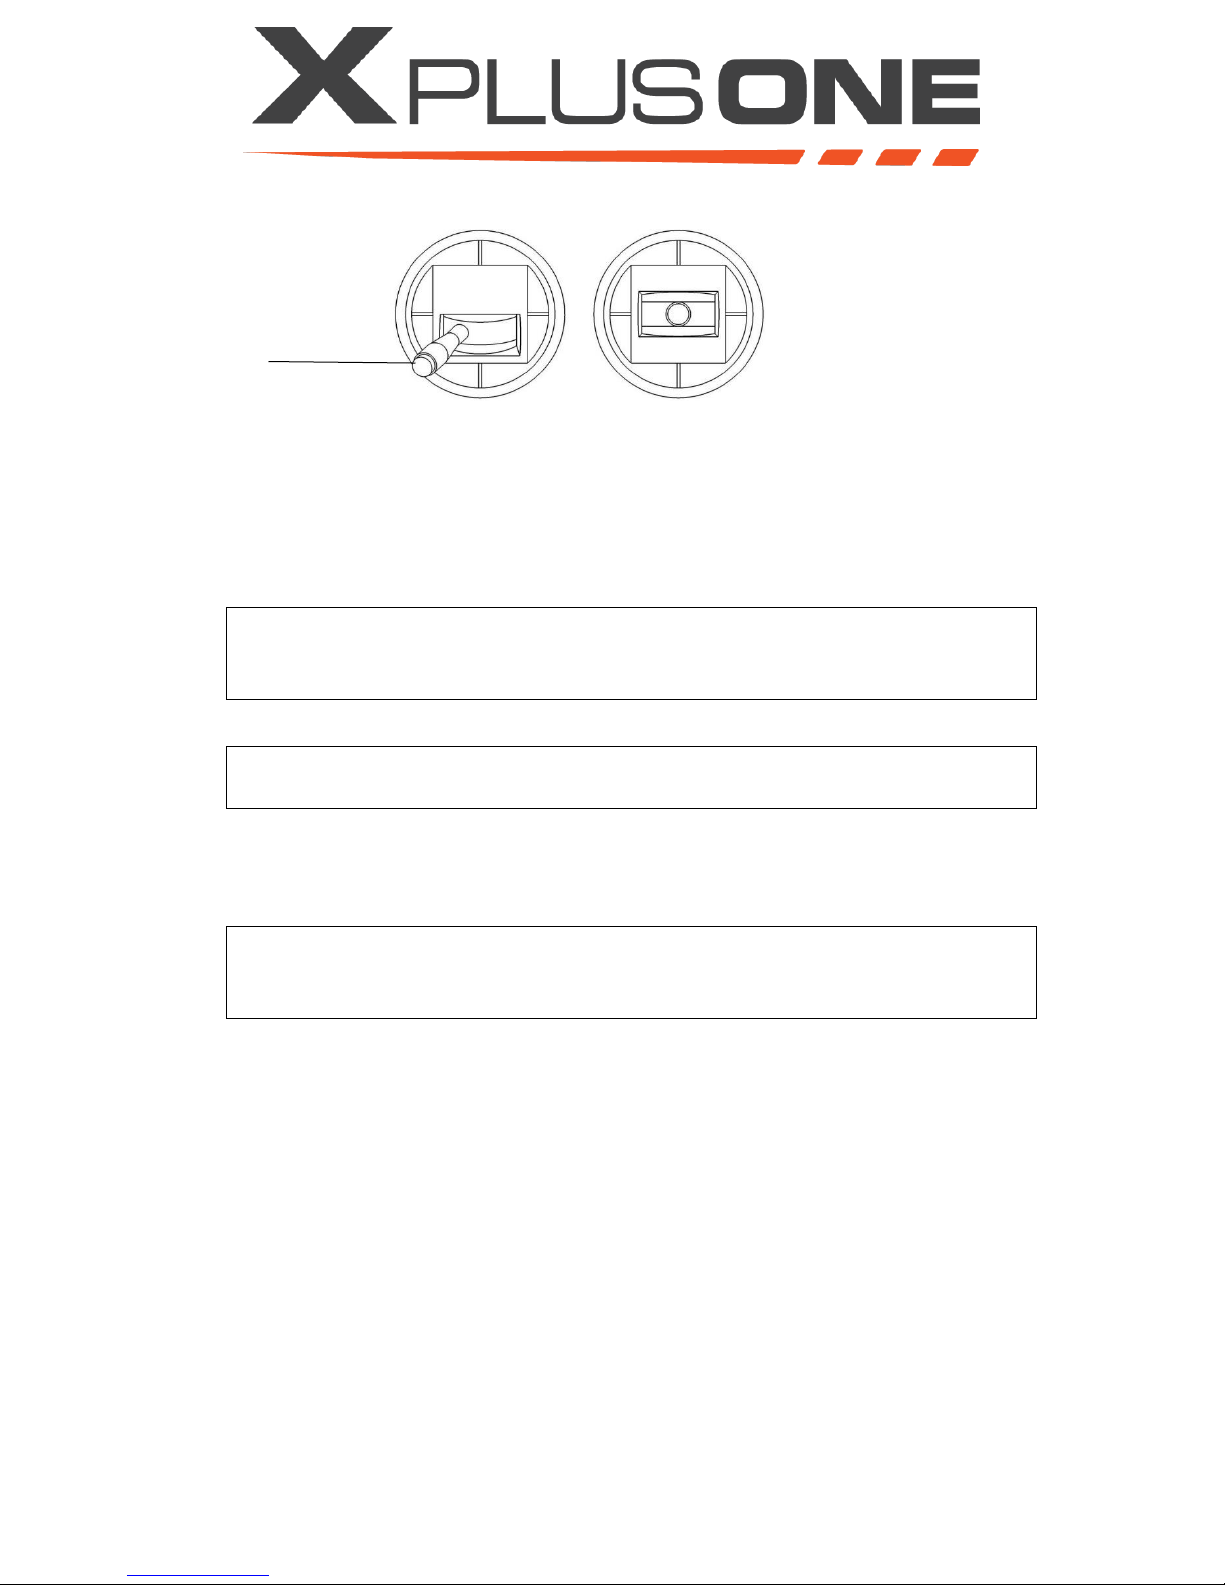
11. Disarm by holding the left control stick down and left for several seconds.
12. Press and hold the safety button until it begins flashing
13. Disconnect battery
14. Turn off transmitter
a) Transition Flight
Once you feel comfortable hovering your X PlusOne it is time to transition to forward flight.
1. Perform all preflight checks and prepare craft for takeoff
WARNING: Center of Gravity outside of acceptable range can lead to unsafe
flying characteristics. It is very important to check CG before each
flight.
2. Takeoff and climb to a suitable altitude for transition
TIP: For first transition flight climb to at least 100 ft. before transition to
forward flight.
3. Flip switch to Acro
4. Slowly (2-4 seconds) pitch nose forward until craft is horizontal
5. Continue flying and familiarizing yourself with the X PlusOne in forward flight
TIP: If at any time you lose orientation while in forward flight, switch to hover
mode and set the throttle to full and the craft will right itself. You can then
transition back to forward flight.
6. When transitioning back to hover, fly the craft straight and level with roughly half throttle at a safe
altitude (at least 100 ft. until you are familiar with transition) and flip the switch to hover mode
7. The X PlusOne will automatically transition back to hover
8. Perform the transition from hover to forward flight and back several times to familiarize yourself with
how the X PlusOne acts during the transition
9. When ready to land, set flight mode to hover and land as described above 10. Disarm
11. (Platinum only) Press and hold the safety button until it begins flashing
12. Disconnect battery
13. Turn off transmitter
Pg. 20 v.1.1
Page 29

b) Autonomous Flight
Once you have familiarized yourself with your X PlusOne you may want to fly it autonomously.
Smart
When in Smart mode your X PlusOne will hover in place. Using the hover controls on your transmitter
you can reposition the craft.
Auto
Auto mode is used to fly an autonomous mission. To fly the mission, prepare a series of waypoints in
mission planner and upload them to your X PlusOne. If the mission does not include a waypoint for
takeoff manually takeoff and switch to Auto mode in flight. If the mission does not include a waypoint
for landing the craft will hover at the last waypoint and wait for the pilot to disengage Auto mode and
land the X PlusOne manually.
Guided
Guided mode requires an active connection to a ground station and allows the operator to control their
X PlusOne through the ground station. Guided mode can be entered any time the motors are armed.
The operator can set the craft to fly entirely through the ground station including takeoff and landing.
Follow Me
Follow me allows the X PlusOne to follow a GPS equipped ground station. The craft will maintain a set
altitude above the ground station as the ground station moves. The craft must first be in the air before
entering Follow Me mode.
8. Emergency
In this section we discuss a number of possible in flight emergencies and how the pilot/operator should respond.
This is not intended to be a complete list but is instead meant to highlight several possibilities.
a) Lost Link
In the event that your X PlusOne loses contact with your transmitter it will enter a radio failsafe mode. Your
X PlusOne will respond as follows:
a. If the craft has a valid GPS position it will Return-to-Launch (RTL) this means it will return and
land at the spot it took off from
b. If the craft does not have a valid GPS position it will land in its current position
b) Bird Attack
If hovering, transition to forward flight. If in forward flight, transition to hover. Attempt to evade the attacker.
The method of attack will determine the best course of action. If the attack continues, land the craft. If the
attack stops, continue flight at your discretion.
v.1.1 Pg. 21
Page 30
Maximum altitude
400 ft
Range
0.5 miles
Maximum estimated flight time
22 min
Payload capacity
1 lbs
9. Maintenance
This section has information on how to keep your X PlusOne flight ready.
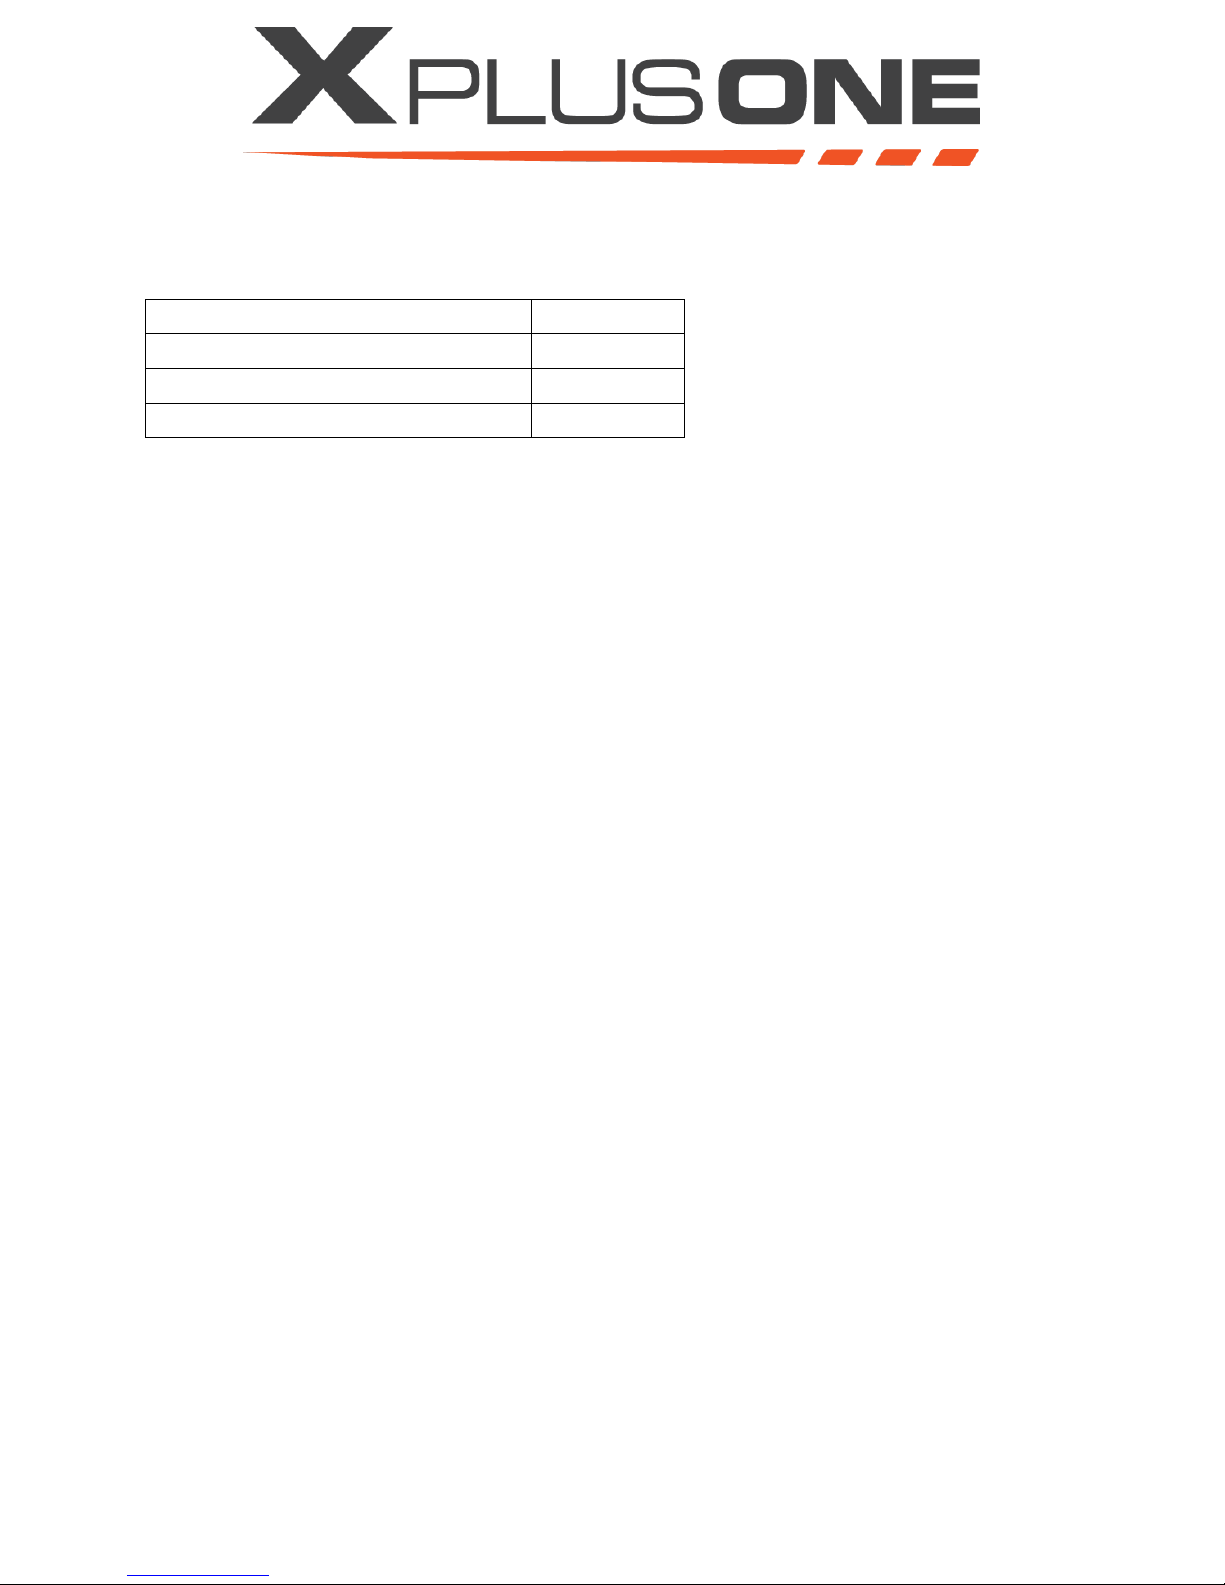
a) Operational Limits
b) Calibrating your X PlusOne
You will need to calibrate your craft regularly to ensure proper GPS and compass functionality. Anytime you
change payloads, the craft will also need to be calibrated, with that specific payload attached.
PC
You will need: Mission Planner Software, telemetry module with its USB power cord, fully charged
battery, X PlusOne.
i. Download and open Mission Planner Software
ii. Plug telemetry unit into computer with its USB power cord
iii. Connect battery to craft
iv. Set COMM Port (upper right hand corner) to specific telemetry COMM number
v. Set speed of connection to 57600ths
vi. Then press Connect
vii. Enter Initial Set-up>Mandatory Hardware>Accel Calibration
viii. Click and follow prompts for Calibrate Accel
ix. Set craft upright and select Calibrate Level, follow prompts
x. Select Compass (under Mandatory Hardware). Set Orientation to Manual-Rotation_Pitch_90
xi. Select Live Calibration and follow prompts
xii. Select Disconnect in Mission Planner (top right corner)
MAC
You will need: QGroundControl Software, VCP Driver installed on your computer, telemetry module
with its USB power cord, fully charged battery, X PlusOne.
i. Download and open QGroundControl Software
ii. Plug telemetry unit into computer with its USB power cord
iii. Connect battery to craft
iv. Select settings option (gear image)
v. Select Sensors>Accelerometer>set AutoPIlot Orientation to Roll180Pitch90>Okay>Follow prompts to
calibrate
vi. Select Compass>set Compass 1 Orientation to Pitch90>follow image prompts to orient
vii. Disconnect telemetry
Pg. 22 v.1.1
Page 31
light blade
heavy blade
Software Updates
Visit www.xcraft.io regularly to check for the latest version of all software
c) Repair
Information on user serviceable components and non-serviceable components
i. Propellers
Always balance all propellers used on your X PlusOne. Balanced propellers will greatly improve
performance and allow clearer images from onboard cameras. To balance propellers, follow the
recommended procedures below.
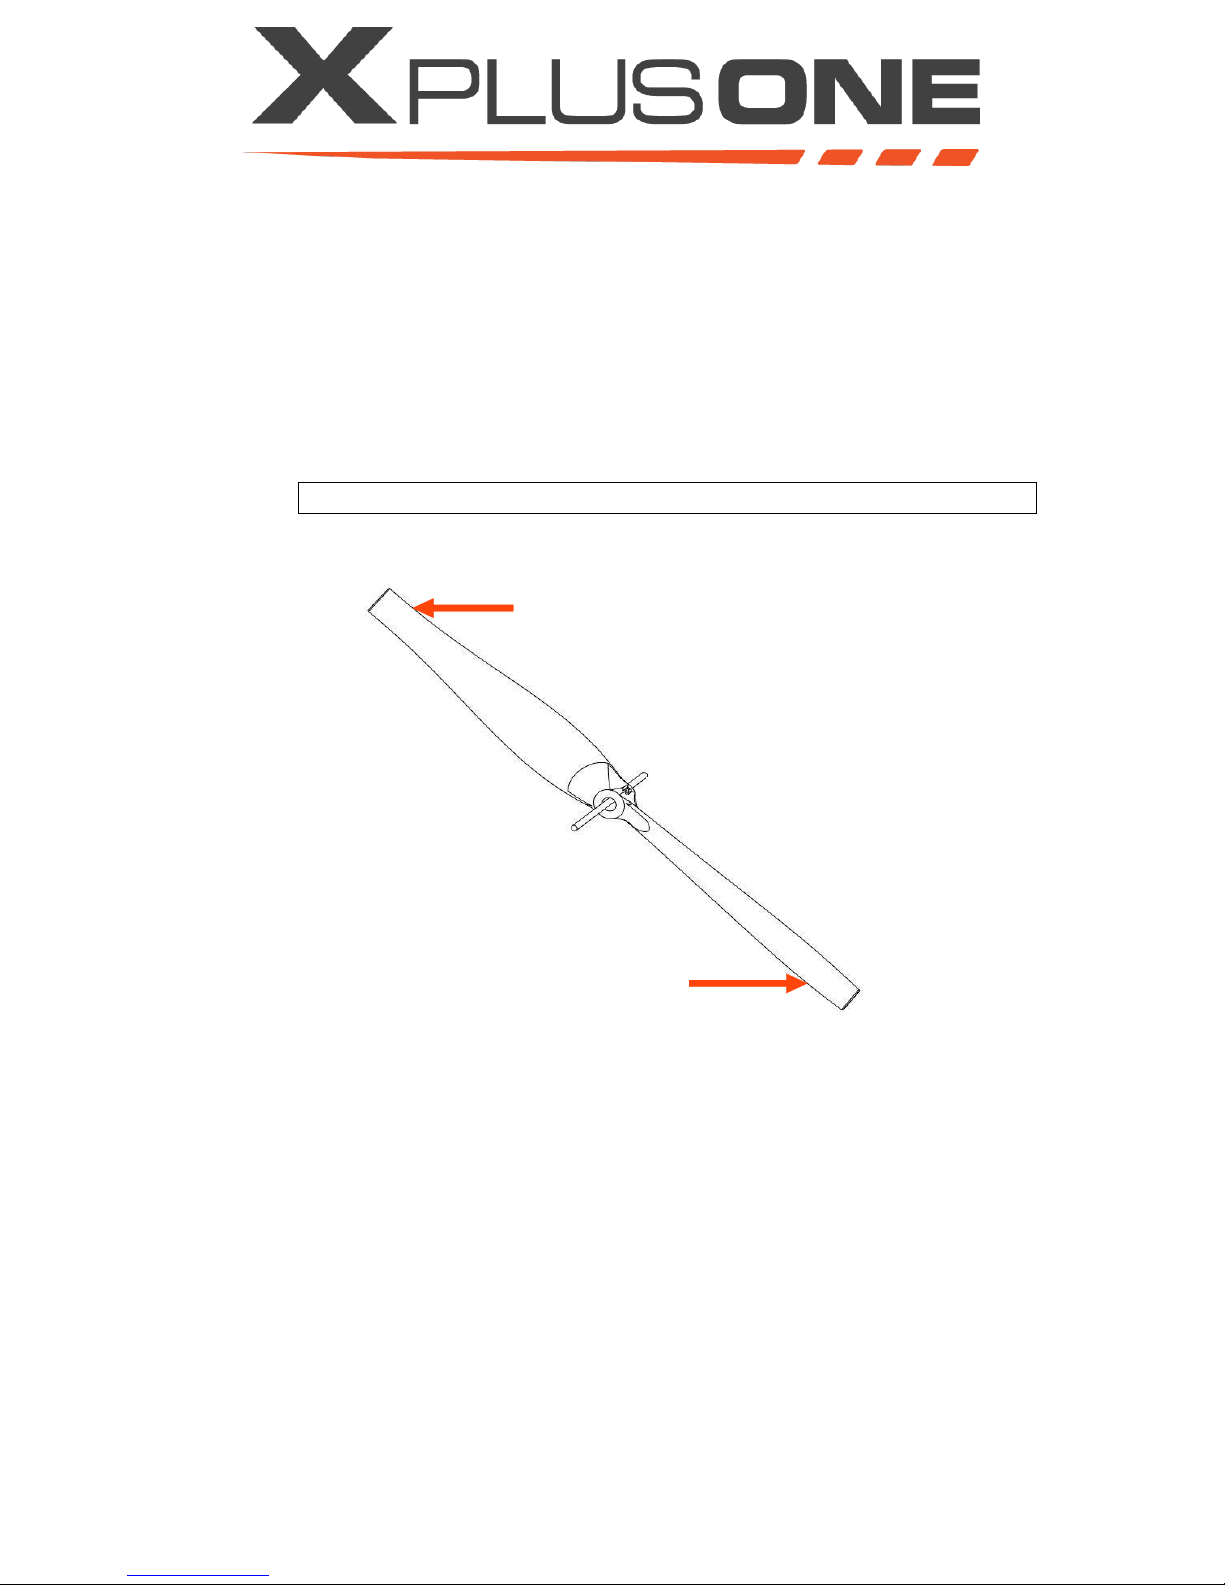
1. Insert a rod into the hole in the center of the propeller
TIP: For best results use a propeller balancer.
2. Allow propeller to freely rotate and make note of which blade points up, this is the “light” blade
3. Add weight to the light blade. This can be done by adding a small piece of tape or nail polish to
the underside of the propeller blade.
4. Repeat steps 2 and 3 until the propeller balances horizontally on the rod
ii. Non-Serviceable Components
There are several components of the X PlusOne that are not individually replaceable. These parts can be
found in the wing assembly (main wing foam, wing spars, battery compartment, and spar insert) and the
pylon assembly (main pylon foam, and pylon spars).
To replace these components:
1. If the component to be replace is in the wing, remove both pylons and set them aside
2. If the component is in a pylon, remove that pylon and set the other pylon and wing aside
3. Remove the cover (either wing cover or pylon cover) by removing the screws holding it in place
and sliding the cover off
v.1.1 Pg. 23
Page 32
TIP: You may want to take several pictures after removing the cover to
aid in reassembly.
4. Remove all electronics from damaged assembly
5. Make careful note of all connections to the removed components as well as wire routing
throughout the assembly
6. Unscrew motor mount(s) from spars and foam and remove motor mount(s)
7. Install motor mount into new wing or pylon assembly
8. Install electronics into new wing or pylon assembly
9. Check that all connections and wire routes are installed properly
10. Reinstall the cover
11. Reinstall the pylon(s)
iii. Replacing Components
1. If the component to be replace is in the wing, remove both pylons and set them aside If
the component is in a pylon, remove that pylon and set the other pylon and wing aside
2. Remove the cover (either wing cover or pylon cover) by removing the screws holding it
in place and sliding the cover off
d) Inspections
i Preflight Inspection
TIP: You may want to take several pictures after removing the cover to
aid in reassembly.
a. If the cover is damaged, simply replace it and reassemble your X PlusOne
3. Replace damaged component
a. For electrical components, make careful note of all connections to that component as
well as wire routing and make sure to reconnect all connections and run all wires as they
were before
b. For motors or motor mounts, remove the screws holding the motor mount to the spars
and the screws holding the mount to the wing or pylon foam
Reinstall the motor mount and reconnect the motor wires to the speed control (making
sure to reconnect the wires as they were before)
4. Reinstall the cover
5. Reinstall the pylon(s)
1. Check that the pylons are properly installed onto the wing
2. Check for loose parts or wires
3. Check foam and plastic components for signs of damage
4. Propellers are tight and installed to rotate in the proper direction
5. Install battery but do not connect power yet
6. Secure the battery hatch
7. Check that CG is within tolerance
8. Make sure all components are installed
9. Lift up your X PlusOne and find its center of gravity by attempting to balance it on two fingers
(one on either side of the pylon, the same distance from the nose)
Pg. 24 v.1.1
Page 33
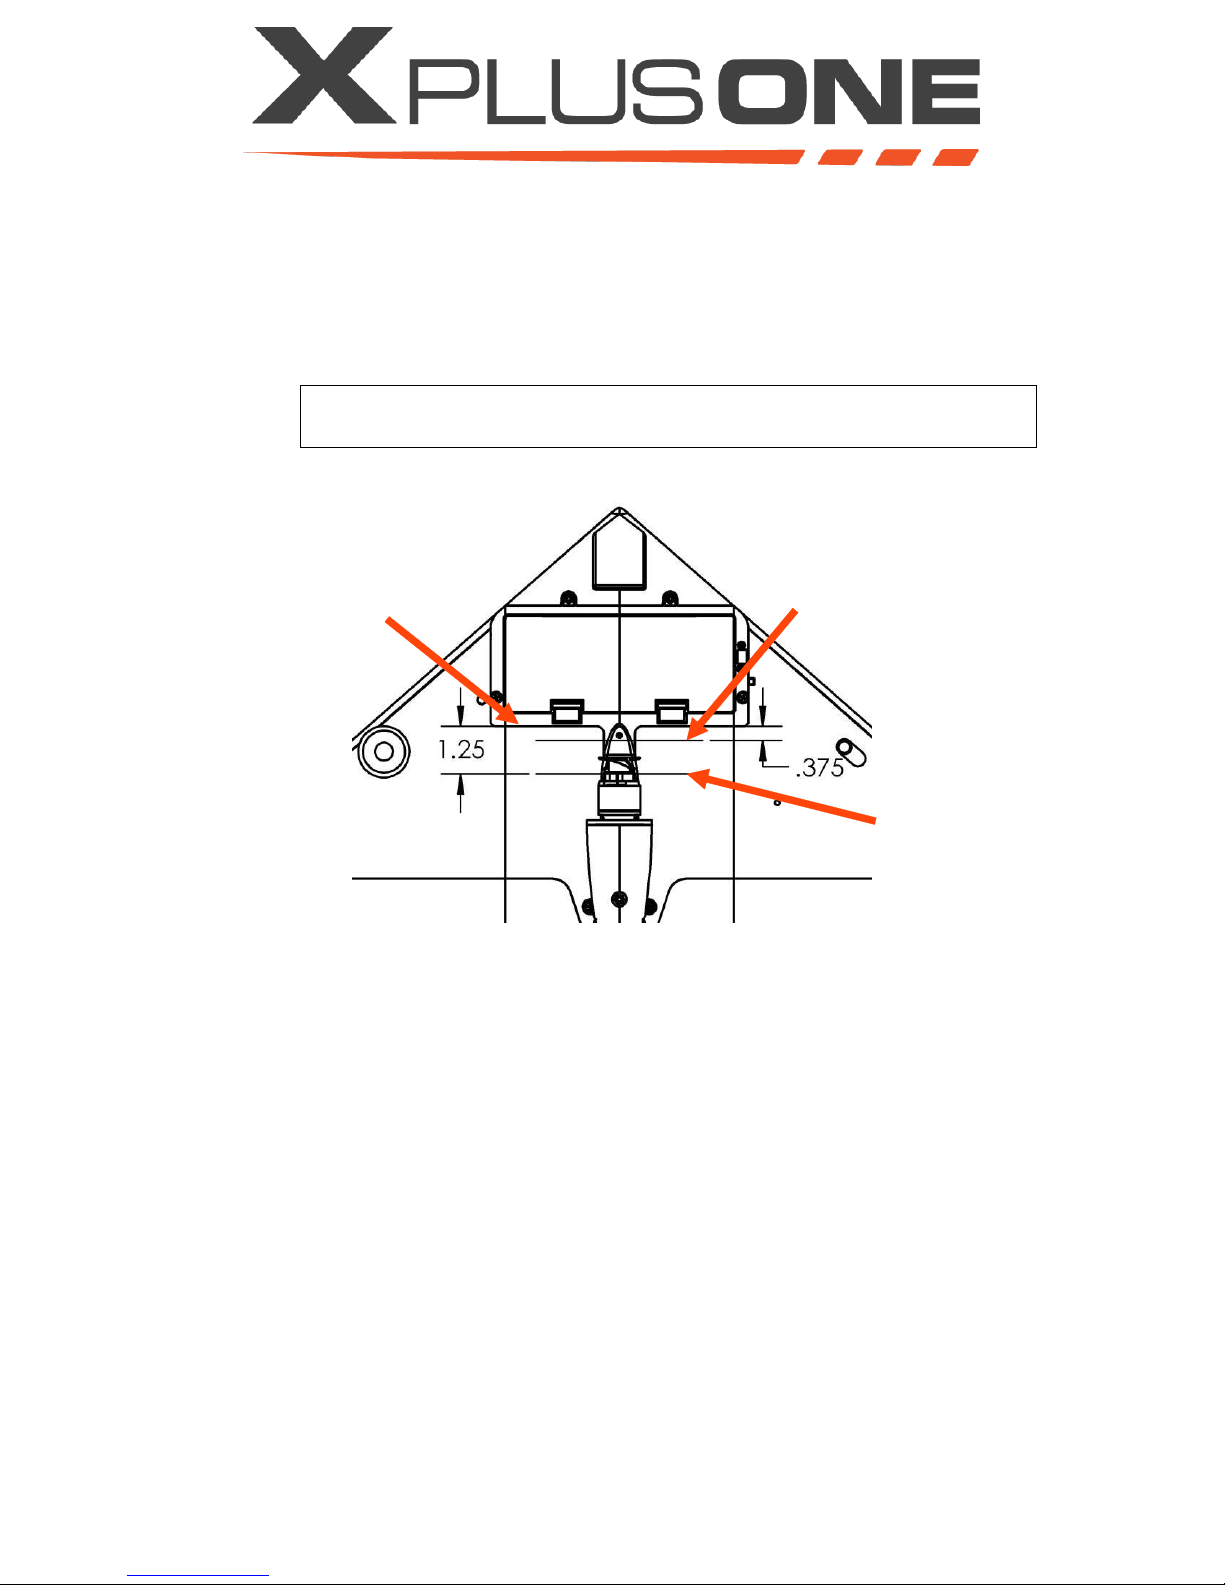
forward CG limit
aft CG limit
measure from here
10. If the nose tips down the CG is forward of your balance point
11. If it tips up the CG is behind your balance point
12. Adjust the position of your fingers until your X PlusOne balances and make note of the position
of your fingers, this is the CG
13. Measure the distance from the CG to the back edge of the battery compartment as shown
below
14. The acceptable range is ⅜” to 1 ¼” from the battery compartment to the CG
TIP: You may want to mark the forward and back CG limits to make
checking the CG easier.
ii Periodic Inspection
Performed every 10 flight hours
More detailed than Preflight Inspection
1. Spin each motor by hand and check that the motors spin smoothly and quietly 2.
Inspect airframe for damage.
3. If there is evidence of damage under a cover remove that cover and inspect the components
underneath
4. Remove propellers and perform the control check found on page 26
5. Check the rigidity between the top pylon and the wing
6. Hold the wing in one hand and keep it stationary
7. Hold the top pylon with your other hand
8. Apply light pressure to the pylon and verify that it does not flex more than a few degrees in any
direction
9. Repeat steps a-c on the bottom pylon
10. Remove both pylons
11. Inspect wires that go between the pylons and the wing
12. Check the wire insulation for any exposed wire
v.1.1 Pg. 25
Page 34
Control Input
Left Wing
Motor
Top Pylon
Motor
Bottom Pylon
Motor
Right Wing
Motor
Elevator forward
=
faster
slower
=
Elevator backward
=
slower
faster
=
Aileron right
faster
=
=
slower
Aileron left
slower
=
=
faster
Rudder right
faster
slower
slower
faster
Rudder left
slower
faster
faster
slower
iii Control Check
13. Check connectors, verify that connections are not loose
14. Check landing gear
15. Hold one of the pylons in one hand
16. Grasp the landing gear with the other hand
17. Verify that landing gear is firmly attached
18. Repeats steps a-c with the other pylon
19. Reinstall both pylons
20. Reinstall propellers
21. Perform a preflight inspection found on page 24 Platinum only:
22. Connect X PlusOne to mission planner
23. Connect battery and check battery voltage displayed
24. Disconnect the battery and measure its voltage with a volt meter
25. Verify that the measured value is within ±0.1 V of the value displayed in mission planner
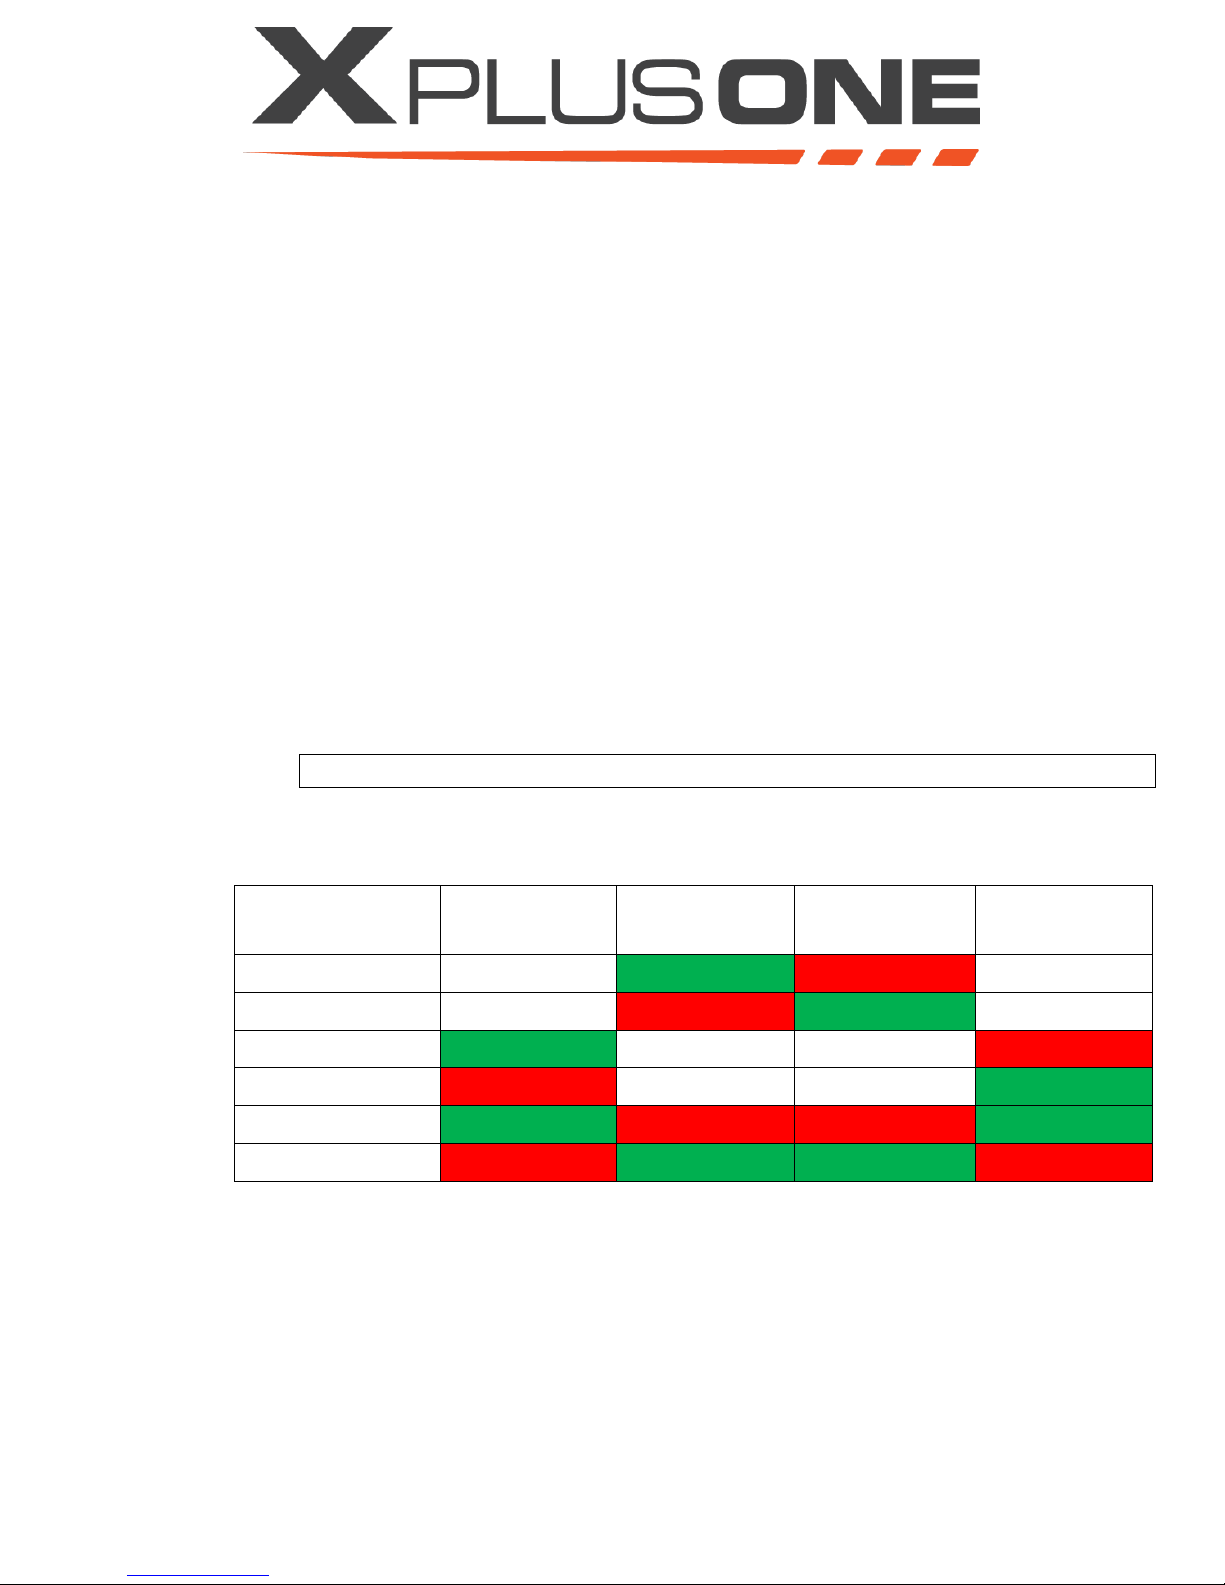
A control check should be performed during the periodic inspection
1. Remove the propellers
2. Power on transmitter
3. Install battery and connect power
WARNING: Remove propellers before arming
4. Arm the motors
5. Slowly increase the throttle until the motors begin spinning
6. Test each control input and check that the motors respond as shown in the table below
7. Disarm the motors
8. Disconnect battery
9. Power off transmitter
Safety
DO NOT use aged, chipped or broken propellers.
Recommended storage temperature: between 64° F to 82° F.
Refer to section 1.1 for more information about the safe use of the battery.
Pg. 26 v.1.1
Page 35

10. Legal Terms and Conditions
This section contains the legal terms and conditions relating to the use and operation of the X PlusOne. Please read
it thoroughly. The below terms and conditions affect and limit your legal rights.
a) Limited Warranty
XCraft Enterprises, LLC (“XCraft”) warrants to the first purchaser of this product that at the time of purchase the
X PlusOne product is free from material defects in materials and workmanship for a period of ninety (90) days.
In the event the X PlusOne product fails during the warranty period stated above, XCraft or its designee will have
the right, but not the obligation, to inspect and validate such defect, and, if the defect is confirmed by XCraft or
its designee, XCraft or its designee shall, in its sole discretion, repair or replace the defective product or
component with a new, repaired or overhauled product or component, without charge, as long as the defect
arises due to the result of normal use and the warranty is otherwise not void.
Notwithstanding the foregoing, the warranty of workmanship does not extend to the build-your-own X PlusOne
kit, and XCraft disclaims all liability relating to the workmanship and assembly of the resulting X PlusOne unit
built from a build-your-own kit.
This limited warranty does not extend beyond the first purchaser of this X PlusOne product. Additionally, this
limited warranty is conditioned upon compliance with all aspects of this Manual and any other manual or other
documentation accompanying the X PlusOne product. This limited warranty does not apply to
1. The product, or any components thereof, when it is subjected to anything beyond ordinary and
intended use, any accidents (including but not limited to collisions, crashes, mishandlings, etc.),
alterations, software modifications, improper repair or maintenance, improper or unauthorized use,
abuse, neglect, inclement weather, or acts of God;
2. Any damage caused by moisture, liquid, dirt, sand, battery liquid, or any other substance;
3. Damage caused by any failure to comply with notes or warnings contained in this Manual or any
other manual or documentation accompanying this X PlusOne, including, but not limited to, any
failure to conduct preflight or other periodic inspections;
4. Damage arising from any combined use with any other product;
5. Damage from improper usage of any electrical source; or
6. Use of the X PlusOne in violation of any applicable local, state or federal rules, laws or regulations.
OTHER THAN THE EXPRESS LIMITED WARRANTY PROVIDED ABOVE, XCRAFT MAKES NO OTHER WARRANTY OR
REPRESENTATION, EITHER EXPRESS OR IMPLIED, REGARDING THE X PLUSONE OR ANY COMPONENTS OR
ACCESSORIES THEREOF OR RELATED THERETO. XCRAFT HEREBY DISCLAIMS ANY AND ALL IMPLIED WARRANTIES,
v.1.1 Pg. 27
Page 36

INCLUDING, WITHOUT LIMITATION, THE IMPLIED WARRANTIES OF NON-INFRINGEMENT, MERCHANTABILITY
AND FITNESS FOR A PARTICULAR PURPOSE. THE PURCHASER ACKNOWLEDGES THAT THE PURCHASER ALONE
HAS DETERMINED THAT THE PRODUCT WILL SUITABLY MEET THE REQUIREMENTS OF THE PURCHASER’S
INTENDED USE. THE EXTENT OF XCRAFT’S LIABILITY UNDER THIS WARRANTY IS LIMITED TO THE REPAIR OR
REPLACEMENT AS PROVIDED ABOVE, AND IN NO EVENT SHALL XCRAFT’S LIABILITY EXCEED THE PURCHASE
PRICE PAID BY PURCHASER FOR THE X PLUSONE PRODUCT.
b) Accessories
The above limited warranty in Section 8.1 only extends to the X PlusOne unit accompanying this Manual and
does not extend to the radio controller, camera or any other accessory sold or provided with the X PlusOne (if
applicable). The radio controller, camera and any other accessories sold or provided with the X PlusOne (if
applicable) each have separate manuals or documentation that may or may not include warranties for such
accessory. Any representations or warranties provided for in those manuals or any associated documentation
are not representations or warranties made by XCraft, and in no case shall any such representations or
warranties extend to XCraft or the X PlusOne.
c) Limitation of Liability
XCraft’s total maximum aggregate liability for damages relating to the sale and operation of the X PlusOne
product shall not exceed the purchase price paid for the product. In no event shall XCraft be liable for, and
purchaser and all operators of the product waive and release any claim (in contract, tort, breach of statutory
duty or otherwise) against XCraft for, any and all indirect, special incidental or consequential damages as well as
any and all lost revenues, profits or prospective economic or non-economic advantage (whether direct or
indirect).
d) Indemnification
Purchaser and each operator hereby agrees to indemnify, save and hold XCraft and its officers, directors,
shareholders, agents, and employees harmless from any and all damages, injuries or any other loss which is
caused by the acts or omissions of purchaser or any operator of the X PlusOne, regardless of whether based
upon negligence, strict liability in tort, breach of warranty or other theory of recovery or any other cause of
action.
e) Software
The software included in this X PlusOne unit contains copyrighted software that is licensed in its entirety under
the GPLv3. You may obtain the complete Corresponding Source Code for the software from XCraft for a period
of three years after the last shipment of this product and/or spare parts therefore, which will be no earlier than
2015-11-19, on XCraft Enterprise’s website at http://xcraft.io. The licensed software contained herein was
modified by XCraft Enterprises, LLC on 2015-10-15. Future updates to the Corresponding Source Code will be
provided on XCraft Enterprise’s website with corresponding installation information. NOTWITHSTANDING THE
FOREGOING, ANY MODIFICATION OF THE SOFTWARE INCLUDED IN THIS X PLUSONE BY PURCHASER OR ANYONE
OTHER THAN XCRAFT WILL EFFECTIVELY VOID ANY AND ALL WARRANTIES CONTAINED HEREIN.
Pg. 28 v.1.1
Page 37

f) Additional Terms
These terms represent the entire understanding between XCraft and the purchaser and operators of the X
PlusOne product. In the event any provision of these terms is determined to be illegal or unenforceable, that
provision will be limited or eliminated to the minimum extent necessary so that the remaining terms and
conditions shall otherwise remain in full force and effect. The purchaser and operators agree that any legal
action taken in relation to the product shall be governed by and construed in accordance with the laws of the
State of Idaho, without regard to the conflict of laws provisions thereof. The exclusive jurisdiction and venue for
any legal proceedings or actions will be the State of Idaho and the U.S. federal courts located in Coeur d’Alene,
Idaho. The United Nations Convention on Contracts for the International Sale of Goods (CISG) is specifically
excluded and do not apply to this this Agreement nor the sale of this X PlusOne unit.
v.1.1 Pg. 29
Page 38

United States:
http://www.faa.gov/uas/
China:
http://www.caac.gov.cn/
New Zealand:
https://www.caa.govt.nz/rpas/index.html
Canada:
http://www.tc.gc.ca/eng/civilaviation/standards/general-recavi-uav-2265.htm
Czech Republic:
http://www.caa.cz/letadla-bez-pilota-na-palube/unmanned-aircraft?lang=2
11. FCC Compliance
This device complies with part 15 of the FCC Rules. Operation is subject to the following two conditions:
• This device may not cause harmful interference, and
• This device must accept any interference received, including interference that may cause undesired
operation.
This equipment has been tested and found to comply with the limits for a Class B digital device, pursuant to Part
15 of the FCC Rules. These limits are designed to provide reasonable protection against harmful interference in a
residential installation. This equipment generates, uses and can radiate radio frequency energy and, if not
installed and used in accordance with the instructions, may cause harmful interference to radio communications.
However, there is no guarantee that interference will not occur in a particular installation. If this equipment does
cause harmful interference to radio or television reception, which can be determined by turning the equipment
off and on, the user is encouraged to try to correct the interference by one or more of the following measures:
• Reorient or relocate the receiving antenna.
• Increase the distance between the equipment and receiver.
• Connect the equipment to an outlet on a circuit different from that to which the receiver is connected.
• Consult the dealer or an experienced radio/TV technician for help.
Modifications not authorized by the manufacturer may void the purchaser’s authority to operate this device.
12. Government Regulations
As an X PlusOne operator, you are solely responsible for assuring your operation of the X PlusOne is conducted
safely and in accordance with all local laws and regulations. Below are links for regulatory information on flying
unmanned devices in differing jurisdictions, which operators may use as a starting point to research and become
familiar with the applicable local laws and regulations. It is the operator’s sole responsibility to familiarize himself
or herself with all applicable rules, laws and regulations and other government guidance and information relating
to flying the X PlusOne. The below information and links are provided for convenience purposes only – XCraft does
not guarantee or warrant that the following links are accurate or exhaustive of all applicable rules, laws and
regulations relevant to the operation of the X PlusOne.
Pg. 30 v.1.1
Page 39

Denmark:
http://selvbetjening.trafikstyrelsen.dk/civilluftfart/Dokumenter/Love%20og%20bestem
melser/Bestemmelser%20for%20Civil%20Luftfart%20(BL)/BL%2009-serien/9_4_ud3.pdf
UK:
http://www.caa.co.uk/default.aspx?CATID=1995
France:
http://www.developpement-durable.gouv.fr/Effectuer-des-activites
Germany:
http://www.riot.ch/wp-content/uploads/2014/01/BMVBS-Kurzinformation-
unbemannte-Luftfahrtsysteme-10.2013.pdf
Italy:
http://www.enac.gov.it/repository/ContentManagement/information/N1220929004/R
eg%20SAPR%20english_022014.pdf
Ireland:
https://www.iaa.ie/index.jsp?p=100&n=107&a=406&pp=413&nn=428&lID=956
Poland:
http://www.ulc.gov.pl/pl/uav
Norway:
http://www.luftfartstilsynet.no/selvbetjening/allmennfly/RPAS-FAQ/
Singapore:
http://www.caas.gov.sg/caasWeb2010/export/sites/caas/en/ANS/aero-modelling.html
Australia:
https://www.casa.gov.au/operations/standard-page/remotely-piloted-aircraft-rpa
Austria:
http://www.austrocontrol.at/luftfahrtbehoerde/lizenzen__bewilligungen
/flugbewilligungen/unbemannte_lfz
UAE:
https://www.dcaa.gov.ae/sitepages/en/AviationLawsAndRegulations.aspx
Spain: http://www.seguridadaerea.gob.es/lang_castellano/cias_empresas/trabajos
/default.aspx
Korea: http://www.law.go.kr/lsInfoP.do?lsiSeq=157013&efYd=20150301#0000
v.1.1 Pg. 31
 Loading...