

Page 1
Windows Touch Pen
User Manual
Page 2

Xcellon Windows Touch Pens
WTP-10
WTP-20
Page 3

Thank you for choosing Xcellon.
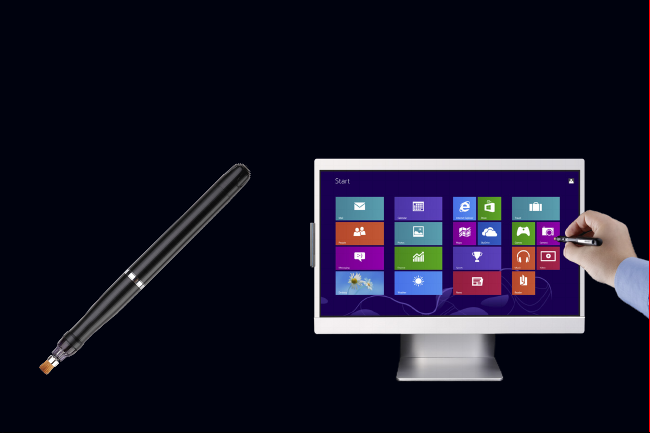
The Xcellon Windows Touch Pen turns your computer monitor into a virtual touch
screen, so you can take advantage of the touch features built into the Windows
8 Start screen. The pen works with the included IR receiver that mounts to your
monitor’s bezel, allowing you to tap, swipe, drag, zoom, and more.
Designed for the Windows 8 Start screen, the pen is also compatible with the
Windows desktop on Windows XP, 7, and 8 operating systems. The WTP-10 kit is
designed for screen sizes 9ʺ to 17ʺ and the WPT-20 is designed for screen sizes 9ʺ
to 27ʺ.
2
Page 4

Precautions
Please read and follow these instructions and keep this manual in a safe place.
Keep this product away from water and any flammable gases or liquids.
Clean this product with only a soft, dry cloth.
Keep this product away from children.
Use only parts provided by the manufacturer.
Make sure that this product is intact and that there are no missing parts.
To avoid damage to this product, be careful not to overtighten or improperly thread any of the
threaded fittings.
All photos are for illustrative purposes only.
3
Page 5

Specifications
Stylus tip: Brush
System requirements:
Windows XP/7/8
One free USB port
9" to 17" monitor (WTP-10)
9" to 27" monitor (WTP-20)
Power Source: Two SR41 batteries
Batterylife: 50 hr.
Length: 5.7" (14.5 cm)
Diameter: 0.5" (1.2 cm)
Weight (with batteries): 0.67 oz. (19 g)
4
Page 6

Contents Include
Windows Touch Pen
IR receiver
Metal strip (WPT-10)
USB Standard-A male to Mini-B male cable (WTP-10)
Metal bracket (WPT-20)
Extra brush
Two (2) SR41 batteries
Carrying pouch
Calibration software CD
User manual
5
Page 7

Before You Start
Installing Batteries
The Windows Touch Pen runs on two SR41 batteries. To install the
batteries, follow these steps:
1. Unscrew the rear cap.
2. If necessary, remove the old batteries by holding the pen upside
down and gently manipulating the metal tab.
3. Insert fresh batteries with the positive terminal facing up. Make sure
the batteries are fully inserted.
4. Screw the rear cap on until secure.
Replacing the Brush Tip
The Windows Touch Pen comes with a replacement brush tip in the event
that the original one wears out. To replace the brush, follow these steps:
6
Page 8

1. If necessary, remove the pen cap.
2. Remove the original brush by gently pulling on the metal ring connected to the bristles.
3. Insert the replacement brush until it is fully installed. Be careful not to damage the bristles.
Installing the IR Receiver
The touch system works with an IR receiver and a metal bracket or strip that mount to your monitor’s bezel.
The adhesive on the back of the metal bracket or strip is not designed to be reattached. Try
testing the optimal position by holding the IR receiver in place halfway down the left side of
your monitor’s bezel while you calibrate the screen. This way, you will be able to determine
whether the IR receiver can read the entire surface of the screen.
If you touch one of the calibration points with the pen and nothing happens, adjust the IR
receiver’s position higher or lower on your monitor’s bezel. See Calibrating the Screen on page
10 for instructions on how to calibrate your screen. Also, make sure the IR receiver’s USB cable
can reach your computer’s USB port.
7
Page 9

WTP-10
Some notebooks are equipped with an embedded magnet near the screen
surface that, when engaged, causes the notebook to enter sleep mode. If your
notebook has such a magnet, do not mount the metal strip near it.
1. Remove the backing from the adhesive strip on the metal strip.
2. Mount the metal strip halfway down the left side of your monitor’s bezel.
Press firmly so the strip stays in place.
3. Use the included USB cable to connect the IR receiver to a free USB port
on your computer.
4. Mount the IR receiver to the metal strip. The receded magnetic area
of the WTP-10 receiver should fit perfectly over the strip and lock into
place.
Make sure the IR receiver is facing the proper direction. The USB
cable should be pointing away from the screen, and the IR sensor
should be facing the screen perpendicularly.
8
Page 10

WTP-20
1. Remove the backing from the adhesive strip on the metal bracket.
2. Mount the metal bracket halfway down the left side of your monitor’s
bezel. The bracket should be perpendicular to the monitor. Press firmly so
the bracket stays in place.
3. Mount the IR receiver to the metal bracket or strip. The receded
magnetic area of the WTP-20 receiver should fit perfectly over the
folded outer edge of the bracket and lock into place.
Make sure the IR receiver is facing the proper direction. The USB
cable should be pointing down, and the IR sensor should be facing
the screen perpendicularly.
4. Plug the IR receiver’s USB plug into a free USB port on your computer.
9
Page 11

Calibrating the Screen
Before you use the Windows Touch Pen, you will need to calibrate the screen in order to ensure the pen’s
accuracy. You can do this two ways—via the included software or via your computer’s Control Panel.
When calibrating, make sure to hold the pen as you would during normal use.
Software calibration
1. Use your mouse to go to Control Panel/Tablet PC Settings.
Make sure the IR receiver is plugged into your computer's USB por t —otherwise the Tablet PC
Settings will not appear in your computer's Control Panel.
2. Click on the “Other” tab and select “Go to Pen and Touch.” This will open the Pen and Touch window.
3. In the Pen and Touch window, select the “Flicks” tab.
4. In the “Flicks” tab, make sure that “Use flicks to perform common actions quickly and easily” is
deselected. Click on “OK” to confirm your settings.
10
Page 12

5. Insert the included calibration software CD into your computer’s media drive and install the software.
6. Use your mouse to right-click on the software’s icon in your taskbar and select “Calibrate.”
7. Use the Windows Touch Pen to touch and hold on the center of each of the four red circles as they
appear consecutively in the corners of the screen. Each circle will flicker and then disappear once
your pen touches the mark.
11
Page 13

Control Panel Calibration
1. Use your mouse to go to Control Panel/Tablet PC Settings.
Make sure the IR receiver is plugged into your computer’s USB port, or Tablet PC settings will
not appear in your computer’s Control Panel.
2. Click on the “Other” tab and select “Go to Pen and Touch.” This will open the Pen and Touch window.
3. In the Pen and Touch window, select the
“Flicks” tab.
4. In the “Flicks” tab, make sure that “Use
flicks to perform common actions quickly
and easily” is deselected. Click on “OK” to
confirm your settings.
5. In the Tablet PC Settings window,
select the “Display” tab and then select
“Calibrate.” This will open the “Calibrate
pen or touch input screens” window.
12
Page 14

6. In the “Calibrate pen or touch input screens” window, select “Touch Input.”
7. If asked whether you want to allow the following program to make changes to this computer, select
“Yes.”
8. Follow the onscreen instructions to calibrate your Windows Touch Pen.
If you have calibrated the screen and the pen is not accurate, recalibrate the screen until you have achieved
satisfactory results.
Be careful not to move the metal bracket/strip or IR receiver
after calibration, or you will have to recalibrate.
!
13
Page 15

Using the Pen
Start Screen
Because the Windows Touch Pen turns your
monitor into a virtual touch screen, it gives
you access to the Windows 8 Start screen’s
integrated touch features.
14
Page 16

Feature Instructions
Select a tile Tap a tile to select or open it.
Move a tile Touch and hold a tile and then drag it across the screen to move it.
Browse tiles Swipe the pen horizontally across the Start screen in the direction you want to browse.
Charms bar To open the Charms bar, swipe the pen from the right edge of the screen to the left.
Close application Drag the pen from the top edge of the screen to the bottom edge.
Switch applications Swipe the pen from the left edge of the screen to the right edge.
Recent apps To view a list of recent apps, swipe the pen from the left edge of the screen to right, then back to
App commands To show the commands for an app, swipe the pen down from the top edge or up from the bottom
Zoom Touch the pen to the screen and press and hold the button, and then drag the pen in a straight line
the left edge, all without lifting the pen.
edge of the screen.
to another location on the screen. Drag the pen between the two points to zoom in and out. To
return to normal view, let go of the button and tap the screen.
For more information on touch actions and the Smart screen in general, refer to your Windows 8 manual.
15
Page 17

Desktop
You can use the Windows Touch Pen like a conventional mouse on your Windows desktop. This is
compatible with Windows XP, 7, and 8 operating systems.
Feature Instructions
Click/double click Tap once or twice on an object or icon by tapping the screen. This works just like left-clicking with a
Drag Touch and hold the pen on object and then drag it across the screen.
Right click Touch and hold the pen on an object for a few seconds until a menu or square appears. If a square
conventional computer-mouse.
appears, remove the pen from the screen to reveal the right-click menu.
16
Page 18

Troubleshooting
Problem Solution
The pen is not working. • Make sure the IR receiver is plugged into your computer's USB port.
• Make sure there are fresh batteries installed in the pen.
• Calibrate the screen.
• Replace the brush tip in the pen.
• Make sure the IR receiver is properly mounted and facing the proper direction.
The pen is not accurate. Recalibrate the screen. If you used the included software to calibrate, try
The pen is not calibrating properly.
17
recalibrating via the Control Panel or vice versa.
• Make sure the metal strip or bracket and the IR receiver are properly positioned
on your monitor's bezel. If they are too high or low, they will not be able to read
the signal from the pen.
• Replace the batteries in the pen.
Page 19

Problem Solution
The pen is not working properly after
calibration.
The touch point is lagging behind
the pen tip.
• Replace the batteries in the pen.
• Replace the brush tip in the pen.
• Recalibrate the screen. If you used the included software to calibrate, try calibrating via the Control Panel or vice versa.
Deselect the option "Use flicks to perform common actions quickly and easily" in
the Control Panel. Refer to Calibrating the Screen on page 10 for instructions on
how to deselect this option.
18
Page 20

One-Year Limited Warranty
This XCELLON product is warranted to the original purchaser to be free from defects in materials and workmanship under normal consumer use
for a period of one (1) year from the original purchase date or thirty (30) days after replacement, whichever occurs later. The warranty provider’s
responsibility with respect to this limited warranty shall be limited solely to repair or replacement, at the provider’s discretion, of any product
that fails during normal use of this product in its intended manner and in its intended environment. Inoperability of the product or part(s) shall
be determined by the warranty provider. If the product has been discontinued, the warranty provider reserves the right to replace it with a
model of equivalent quality and function.
This warranty does not cover damage or defect caused by misuse, neglect, accident, alteration, abuse, improper installation or maintenance.
EXCEPT AS PROVIDED HEREIN, THE WARRANTY PROVIDER MAKES NEITHER ANY EXPRESS WARRANTIES NOR ANY IMPLIED WARRANTIES,
INCLUDING BUT NOT LIMITED TO ANY IMPLIED WARRANY OF MERCHANTABILITY OR FITNESS FOR A PARTICULAR PURPOSE. This warranty
provides you with specific legal rights, and you may also have additional rights that vary from state to state.
To obtain warranty coverage, contact the Xcellon Customer Service Department to obtain a return merchandise authorization (“RMA”) number,
and return the defective product to Xcellon along with the RMA number and proof of purchase. Shipment of the defective product is at the
purchaser’s own risk and expense.
For more information or to arrange service, visit www.xcellongear.com or call Customer Service at 212-594-2353.
Product warranty provided by the Gradus Group.
www.gradusgroup.com
Xcellon is a registered trademark of the Gradus Group. © 2014 Gradus Group LLC. All Rights Reserved.
GG2
 Loading...