

Page 1
001
Powered
USB Hub
with Charging Ports
User Manual
Page 2

1
Xcellon Powered USB Hubs
Page 3

Thank you for choosing Xcellon
Xcellon Powered USB Hubs expand your computer’s USB 3.0 port into ten
ports. Seven USB 3.0 ports deliver SuperSpeed USB transfer rates up to 5
Gbps, while three power-only ports provide charging capability—two 2.1 A
ports for tablets and one 1 A port for smartphones. An independent power
supply provides stable power for critical USB devices like external hard disk
drives without overtaxing your computer’s own power supply, and LEDs
indicate the power status for each device. A built-in power switch and
internal current protection help safeguard the hub and connected devices.
The USB 3.0 ports support hot-swapping and plug-and-play, and are
backwards compatible with USB 2.0 and 1.1 devices.
2
Page 4

3
Precautions
• Please read and follow these instructions, and keep this manual in a safe place.
• Back up your data before using this product in order to prevent loss of important data. Xcellon
will not be responsible for any data loss.
• Keep this product away from water and any flammable gases or liquids.
• Make sure this product is powered o before plugging it into a power source.
• Handle this product with care.
• Use only the correct, recommended voltage.
• Do not attempt to disassemble or repair this product.
• Clean this product with only a soft, dry cloth.
• Keep this product away from children.
• All photos are for illustrative purposes only.
Page 5
Contents Include
• Powered USB hub
• Power adapter
• USB 3.0 cable
• User manual
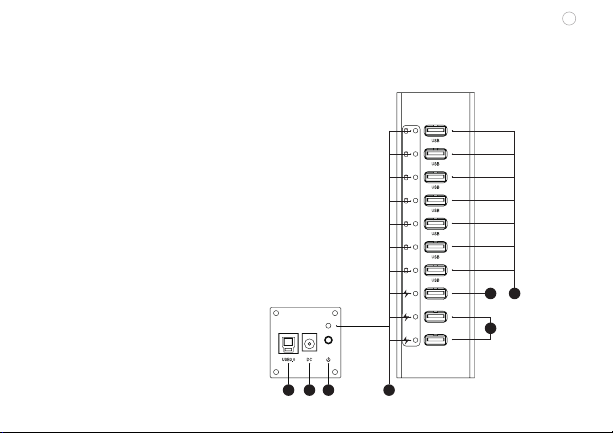
1. USB 3.0 B type interface
2. DC power port
3. Power switch
4. LED indicators
5. USB 3.0 type A ports
6. USB 2.1 A ports (power only)
7. USB 1 A port (power only)
1 2 3 4
4
5V1A
5V2A
5V2A
57
6
Page 6

5
Specifications
Construction Aluminum
USB compatibility
USB cable length
Ports
Dimensions (W × H × D)
Weight
System Requirements
• Available USB port on the computer
• Windows XP / Vista / 7 / 8 or Mac OS X
3.0, 2.0. 1.1
3.3’ (1 m)
Seven USB 3.0 type A
Two 2.1 A (power only)
One 1 A (power only)
One USB 3.0 type B
2” x 2” x 7.2” (5 x 5 x 18.4 cm)
11.4 oz. (322 g)
Page 7

Getting Started
1. Use the included power adapter to connect the USB hub to an AC power source.
2. Use the included USB 3.0 cable or a similar USB 3.0 cable to connect the USB hub to your
computer’s USB port.
In order for the USB hub to operate at maximum transfer rates, the hub must be connected
to a computer’s USB 3.0 port. Connecting to a computer’s USB 2.0 port will result in slower
performance.
3. Plug your USB device into an available USB port on the USB hub.
• For data transfer, plug the device into one of the blue USB 3.0 ports.
• To charge a tablet or a similar large USB-charging device, plug the device into one of the red
2.1 A USB ports.
• To charge a smartphone or any other small USB-charging device, plug the device into the red 1
A USB ports.
4. Press the power button on the USB hub to turn on the hub. The LED indicator on the hub that
corresponds to your device will glow, and your computer will notify you that new hardware has
been detected.
Before unplugging your USB device, make sure to follow your computer’s proper procedure
for safely removing hardware. You can also plug USB devices into the hub with its power on.
6
Page 8

7
One-Year Limited Warranty
This Xcellon product is warranted to the original purchaser to be free from defects in materials and workmanship under normal
consumer use for a period of one (1) year from the original purchase date or thirty (30) days after replacement, whichever occurs
later. The warranty provider’s responsibility with respect to this limited warranty shall be limited solely to repair or replacement, at the
provider’s discretion, of any product that fails during normal use of this product in its intended manner and in its intended environment.
Inoperability of the product or part(s) shall be determined by the warranty provider. If the product has been discontinued, the warranty
provider reserves the right to replace it with a model of equivalent quality and function. This warranty does not cover damage or
defect caused by misuse, neglect, accident, alteration, abuse, improper installation or maintenance. EXCEPT AS PROVIDED HEREIN,
THE WARRANTY PROVIDER MAKES NEITHER ANY EXPRESS WARRANTIES NOR ANY IMPLIED WARRANTIES, INCLUDING BUT NOT
LIMITED TO ANY IMPLIED WARRANTY OF MERCHANTABILITY OR FITNESS FOR A PARTICULAR PURPOSE. This warranty provides you
with specific legal rights, and you may also have additional rights that vary from state to state. To obtain warranty coverage, contact
the Xcellon Customer Service Department to obtain a return merchandise authorization (“RMA”) number, and return the defective
product to Xcellon along with the RMA number and proof of purchase. Shipment of the defective product is at the purchaser’s own
risk and expense. For more information or to arrange service, visit www.xcellongear.com or call Customer Service at 212-594-2353.
Product warranty provided by the Gradus Group.
www.gradusgroup.com
Xcellon is a registered trademark of the Gradus Group. © 2015 Gradus Group LLC. All Rights Reserved.
GG3
 Loading...