

Page 1
DDS-30
Dual Display
Docking Station
User Manual
Thank you for choosing Xcellon.
This easy-to-use dock allows you to connect multiple devices to your computer. A single
USB 3.0 cable connecting the docking station to your computer gives you access to multiple
devices.
This docking station features four USB 2.0 ports, two USB 3.0 ports including a charging
port, one HDMI port, one DVI port, and one Ethernet port. The docking station supports high
resolution video up to 2048 x 1152.
Page 2

With a single connection to your laptop, you can have access to dual
screen displays, printers, external hard drives, stereo speakers, optical disk
drives, mice, and any other USB device. Simply plug a USB 3.0 cable from
the Dual Display Docking Station into a USB 3.0 port on your computer,
plug your devices into the docking station, and you’ll be able to use
everything connected to the Dual Display Docking Station. Automatic
bandwidth prioritization of connected devices ensures smooth, stable
operation, even when every port is full.
Precautions
Please read and follow these instructions, and keep this manual in a safe place.
Keep this unit away from liquids and any flammable gases.
Use only the correct, recommended voltage.
Do not attempt to disassemble or repair the equipment—doing so will void the
warranty, and Xcellon will not be responsible for any damage.
Handle the unit with care.
Clean the unit with a soft, dry cloth.
Keep this unit away from children.
Make sure the item is intact.
All photos are for illustrative purposes only.
System Requirements
One available USB 3.0 port
One of the following operating systems: Windows XP / Windows 7 / Windows 8
1
Page 3

Contents Include
Xcellon Dual Display Docking Station
Power adapter
DVI to VGA Adapter
USB 3.0 cable
Driver CD with User’s Manual
Removable stand
User instruction manual
Warranty
Features
USB Downstream
USB 3.0- and USB 2.0 compliant.
Two USB 3.0 downstream ports support Low Speed, High Speed, Full
Speed, and Super Speed trac.
Four USB 2.0 downstream ports support Low Speed, High Speed, and
Full Speed trac.
Supports USB Charging Specification v1.2 (SDP, CDP, DCP) on 1 USB 3.0
downstream port.
Ethernet
IEEE 802.3, 802.3u, and 802.3ab compatible.
Supports IPv4/IPv6.
Supports full duplex operation with IEEE 802.3x flow control.
Video
Dual digital video outputs.
Extended Desktop (Default), Mirrored Desktop, Primary Display.
Supports High Resolution up to 2048 x 1152 pixels.
Audio
Two-channel stereo output and mic-in with a combo jack.
2
Page 4
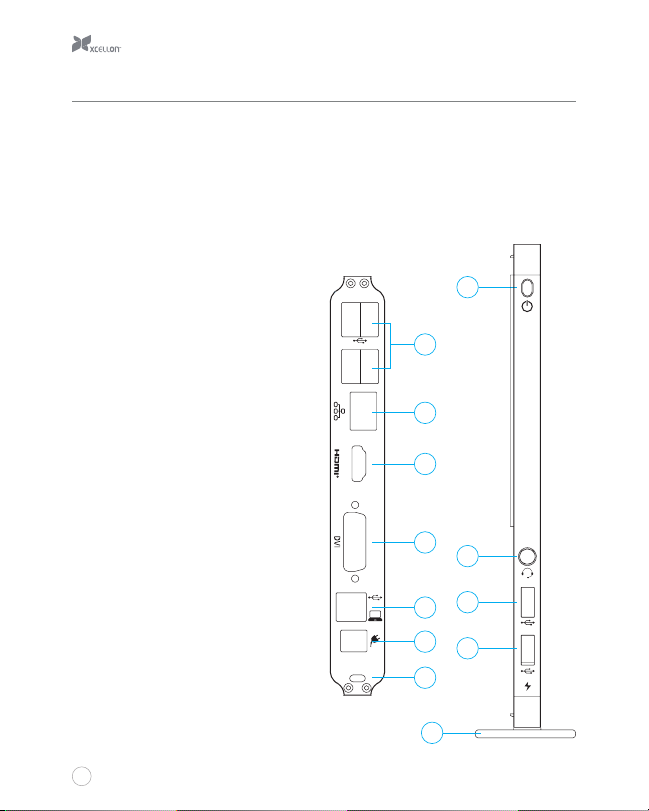
Overview
1. Power LED
2. 3.5 mm stereo audio output port
3. USB 3.0 downstream port
4. USB 3.0 downstream and charging combo port
5. Four USB 2.0 downstream ports
6. 10/100/1000 Mbps Ethernet port
7. HDMI video output port
8. DVI video output port
9. USB 3.0 upstream port
10. Power jack
11. Security lock slot (Kensington lock)
12. Removable stand
USB 2.0
1
5
6
7
8
2
USB 3.0
10
11
3
9
USB 3.0
4
USB 3.0
12
3
Page 5

Driver Installation
Caution: Do not connect the Xcellon Dual Display Docking Station to a computer before you
install the driver in the computer.
1. To install the driver insert the included Driver CD into your disc drive. Double-click on the
setup.exe file under x:\Driver\ (where x equals the letter of your disc drive).
A User Account Control dialog box will pop up when attempting to install the
program. Click Yes to start the installation.
2. Wait while Windows configures the DisplayLink Core Software. Your screen may
temporarily flash or go black during this process.
3. After the installation is complete, the installation screen will disappear, and the desktop
will appear.
You may need to reboot before being able to use the docking station. Follow the
instructions on the screen.
If an accessory isn’t recognized when connecting one to the docking station,
check the connecting cable to the docking station.
After you finish the installation, you can check whether the software has been properly
installed by opening the Windows Device Manager. Look under “USB Display Adapters”. You
should see “DisplayLink Display Adapter” listed.
If an exclamation mark or a question mark appears next to that name, the driver was not
properly installed. In that case, delete “DisplayLink Display Adapter” and select Delete the
driver software for this device if it’s provided. Unplug the docking station from your computer,
and repeat the installation.
4
Page 6

Hardware Installation
To connect the dual display docking station:
1. Plug the included USB 3.0 cable into the USB 3.0 connector on the back of the docking
station and into your computer. A pop-up message will appear on your desktop when
installation is complete.
To connect USB 2.0 or USB 3.0 accessories:
Connect USB devices to the USB ports on the
docking station.
To connect a DVI/HDMI monitor:
For DVI ports: Connect the DVI port of the docking
station to a monitor equipped with a DVI input
jack using a DVI cable (not included).
For HDMI ports: Connect the HDMI port to a
monitor equipped with an HDMI input jack using
an HDMI cable (not included).
To connect Microphones, Speakers, and
Headphones:
To connect headphones a microphone or
speakers, insert the 3.5 mm plug into the 3.5 mm
hole on the side of the docking station with the
power LED.
5
Page 7

Connecting an Ethernet network device:
Connect an Ethernet cable to the Ethernet port
on the docking station. Connect the other end of
the Ethernet cable to your network hub, switch,
or router.
Mounting the removable stand:
At the bottom of the Dual Display Docking Station, under the security lock slot, is a large
mounting slot. Insert the horizontal support post on the removable stand by sliding it into this
slot. The docking station will stand upright securely on the stand, making it easier to access
all of the ports.
Using the Dual Display Docking Station
Configuring Displays
When the Dual Display Docking Station is first connected, the firmware version will be checked
by the host’s software. If they don’t match, the firmware on the device will be updated. While
the firmware is updating, a window will pop up that tells you to wait while your device is being
updated.
Controlling the Display
When the Dual Display Docking Station is attached to your computer, an icon will appear in the
taskbar. This provides access to the DisplayLink Manager Menu.
6
Page 8

To use the DisplayLink Manager Menu:
From the taskbar, click the “Show hidden icons” arrow to show all available icons. Click the
DisplayLink icon. A menu will appear with several options. These are described in the table
below.
Menu Option Sub-Menu Option Description
DisplayLink
Manager
Check for updates Connects to the Microsoft Windows Update Server
DisplayLink
Devices
Audio setup Opens the Windows Audio Configuration window.
Video setup Opens the Windows Screen Resolution window.
Screen Resolution Displays a list of available resolutions. Some
Screen Rotation Normal No rotation is applied to the DisplayLink display.
7
Options to configure this
DisplayLink device
Rotated Left Rotates the extended or mirrored display by 270
Rotated Right Rotates the extended or mirrored display by 90
Upside-Down Rotates the extended or mirrored display by 180
This is the User Interface (UI) title. Clicking on this item
will open the Windows screen resolution.
to check for newer software versions and downloads
updates if available.
A list of connected DisplayLink devices will appear.
Each of these devices has its own sub-configuration
menu. These Sub-menu options are covered in the
table below.
resolutions may be enclosed by [ ]. This option is not
available in mirror mode since the resolution is defined
as the resolution of the main monitor.
degrees clockwise.
degrees clockwise.
degrees clockwise.
Page 9

Menu Option Sub-Menu Option Description
Extend To Right Extends the display to the right of the main display.
Left Extends the display to the left of the main display.
Above Extends the display above the main display.
Below Extends the display below the main display.
Extend Extends your Windows desktop onto this display.
Set as Main
Monitor
Notebook Monitor
O
Mirror Copies what is on the main display and reproduces it
Sets this screen as the main display.
Switches o the display of the notebook and makes
the DisplayLink display the main display.
This option will only appear when one DisplayLink
USB screen is connected. It will also only appear on
laptop computers.
on this display.
The resolution of this display and the primary one
must be the same in mirror mode. This may be lower
than the preferred resolution of the display.
It is only possible to mirror two displays. If a display is
already set to mirror mode, this option will be grayed
out for the other DisplayLink displays.
O Switches o this display.
Optimize for Video Select this option for better movie playback
Fit to TV If the Windows desktop does not completely appear
performance on the DisplayLink-enabled displays. Only
select this option when playing back video content.
on the TV, this option can be used to adjust the size of
the Windows desktop.
This option will only appear when one DisplayLink
USB screen is connected. This option will only work in
extended mode. Selecting the option in mirror mode
will extend the displays.
8
Page 10

It is possible to use the Windows Key+P to display a menu for an attached USB 3.0 Display
Dock or screen and cycle through the following options: Disconnect Projector, Duplicate, Extend, Projector Only.
Specifications
General
Host Interface Compliant with USB 3.0, 2.0 specifications
Supported Operating Systems Windows XP, Windows 7, Windows 8
Ports and Connectors
Upstream 1 x Upstream USB 3.0 Port (Type B female
USB Hub Downstream 2 x Downstream USB 3.0 Ports
Ethernet 1 x Ethernet Port (10/100/1000 Base-T
Video 1 x DVI-I Port (24-pin + female connector)
Audio 1 x Microphone/Speaker combo (3.5 mm
connector)
4 x Downstream USB 2.0 Ports
(Type A female connectors)
Ethernet RJ-45 connector)
1 x HDMI 19-pin female connector
stereo audio in)
9
Page 11

Security Lock Slot Industry-standard Kensington security slot
LED
Power LED (Blue) On: Power is supplied to the display dock.
O: No power is supplied to the display
dock.
Power
Power Mode Self-powered
Power Adapter Input: AC 100-240V, 50~60Hz
Output: DC 19V / 2A
Power Consumption Operation Mode: 14.43W
Suspended Mode: 0.5W
Features
USB Downstream Compatible with USB 3.0 and USB 2.0
Two USB 3.0 downstream ports support
Low Speed, Super Speed, High Speed, and
Full Speed trac
Physical Specifications
Dimensions (H × W × D) 8.5×4.0×1.2¨ (216×10.2×3.0 cm)
not including stand
Weight 12.6 oz. (357 g)
10
Page 12

One-Year Limited Warranty
This XCELLON product is warranted to the original purchaser to be free from defects
in materials and workmanship under normal consumer use for a period of one (1) year
from the original purchase date or thirty (30) days after replacement, whichever occurs
later. The warranty provider’s responsibility with respect to this limited warranty shall be
limited solely to repair or replacement, at the provider’s discretion, of any product that fails
during normal use of this product in its intended manner and in its intended environment.
Inoperability of the product or part(s) shall be determined by the warranty provider. If the
product has been discontinued, the warranty provider reserves the right to replace it with
a model of equivalent quality and function.
This warranty does not cover damage or defect caused by misuse, neglect, accident,
alteration, abuse, improper installation or maintenance. EXCEPT AS PROVIDED HEREIN,
THE WARRANTY PROVIDER MAKES NEITHER ANY EXPRESS WARRANTIES NOR ANY
IMPLIED WARRANTIES, INCLUDING BUT NOT LIMITED TO ANY IMPLIED WARRANY OF
MERCHANTABILITY OR FITNESS FOR A PARTICULAR PURPOSE. This warranty provides
you with specific legal rights, and you may also have additional rights that vary from state
to state.
To obtain warranty coverage, contact the Xcellon Customer Service Department to obtain
a return merchandise authorization (“RMA”) number, and return the defective product to
Xcellon along with the RMA number and proof of purchase. Shipment of the defective
product is at the purchaser’s own risk and expense.
For more information or to arrange service, visit www.xcellongear.com or call Customer
Service at 212-594-2353.
Product warranty provided by the Gradus Group.
www.gradusgroup.com
Xcellon is a registered trademark of the Gradus Group.
© 2014 Gradus Group LLC. All Rights Reserved.
GG3
 Loading...