

v2.0
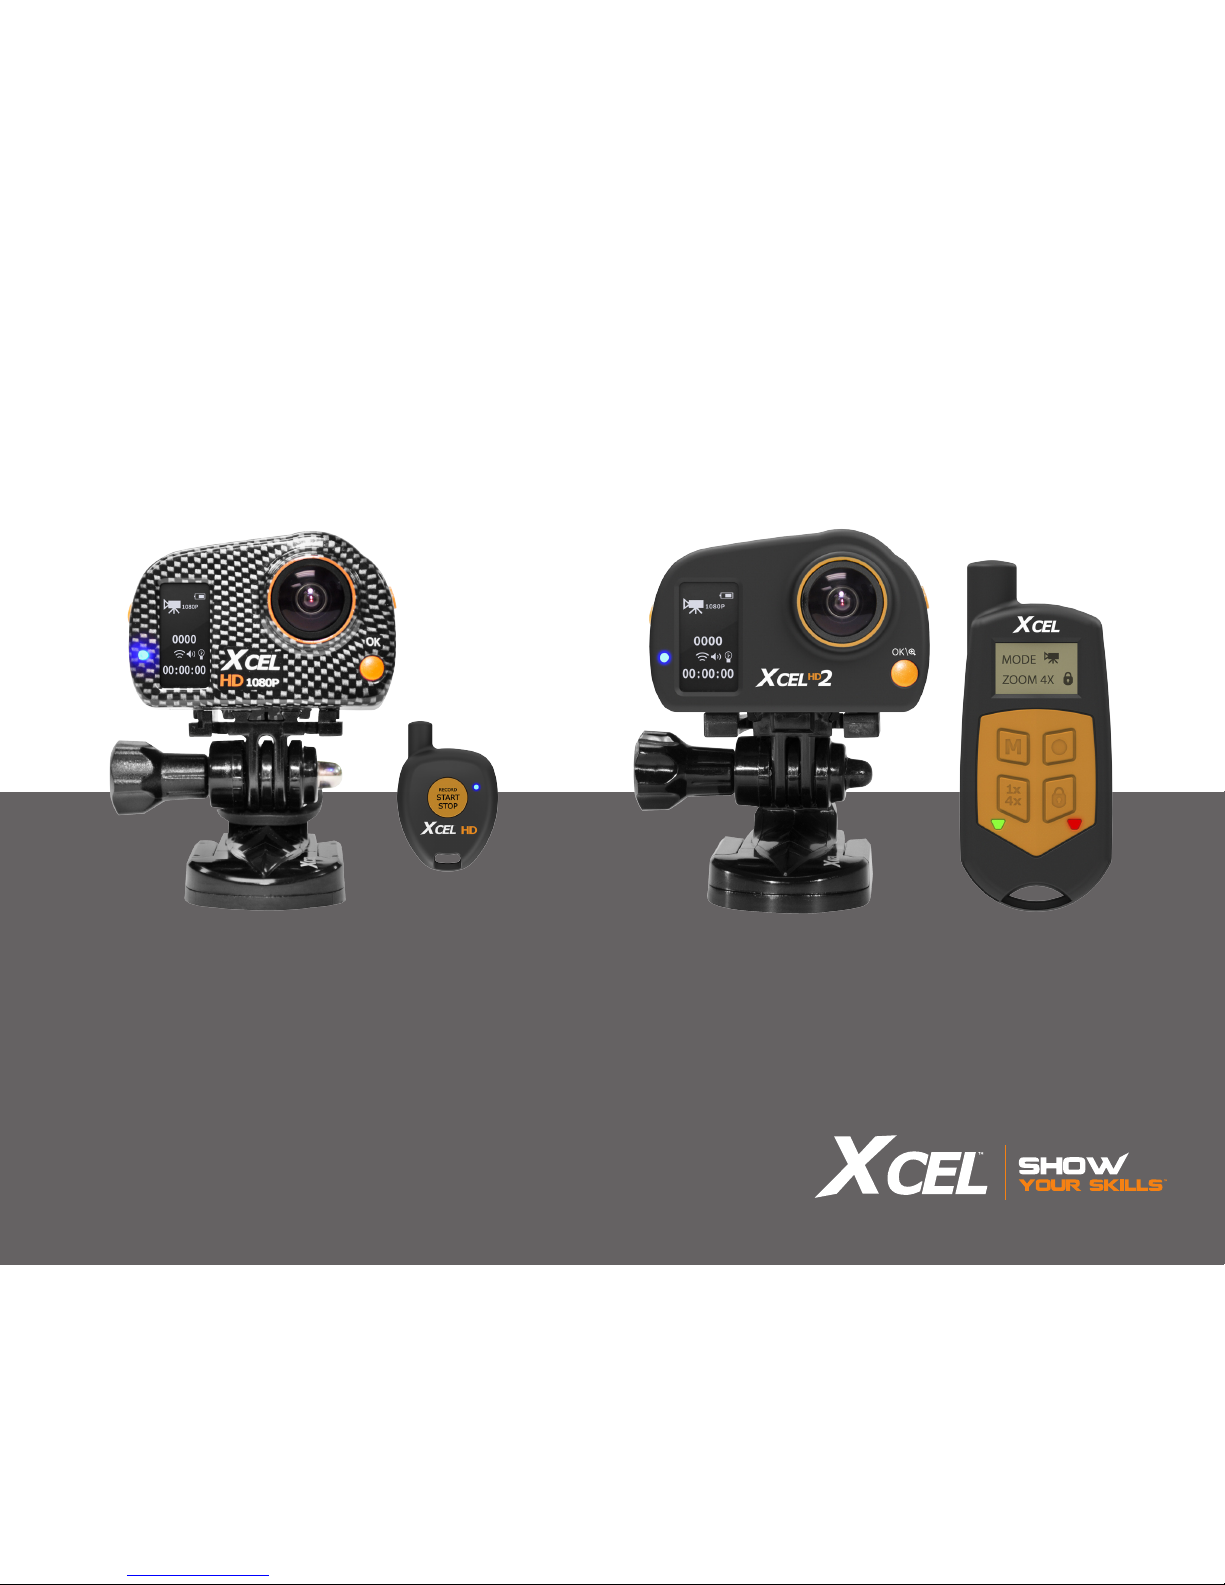
XCEL HD
XCEL HD2
USER MANUAL
XCEL
TM
ACTION CAMERAS
2
THANK YOU FOR CHOOSING A XCEL PRODUCT.
This manual will guide you through all the features of your device
so that you will get optimal use out of your product.
Our priority is to provide outstanding customer service. If you need
support for your product, please contact the XCEL technical service
or visit our website.
CONTACT
1-888-779-7646
tech@xcelcam.com
xcelcam.com
JOIN THE XCEL COMMUNITY
ABOUT US
For 10 years, GG Telecom, makers of XCEL products and
SPYPOINT surveillance cameras, has the mission to offer
products that are easy to use, innovative, affordable and of
exceptional quality. We promote family values and the involvement
of our employees in all stages of development, manufacturing and
product promotion. Our priority is to provide outstanding multilingual customer service.
Prosperous and respected, GG Telecom is a company that keeps
abreast of new technologies and listens to its customers. Our
XCEL products are constantly being developed. Our research and
development team works tirelessly to offer high performance
action cameras and a full range of innovative accessories that will
follow you everywhere and let you capture your best moments.
More than a dozen accessories are included with the XCEL camera.
Just install your camera to discover a world of possibilities.
XCEL | Show your skills

3
Package contents ............................................................. 4
Components ..................................................................... 5
Getting started ................................................................. 6
Installation of the accessories included ............................ 7
Operation modes .............................................................. 8
Conguration modes ...................................................... 11
Operation of the LED lights and screen depending on selected
options ........................................................................... 12
Remote control
XCEL HD .......................................................................... 14
XCEL HD2 ......................................................................... 15
Charging the battery ...................................................... 17
Memory card .................................................................. 18
Transferring les to a computer ..................................... 18
Maintenance of the camera ............................................. 19
Troubleshooting ............................................................. 20
Error messages............................................................... 20
Available accessories ...................................................... 21
Specications
XCEL HD .......................................................................... 23
XCEL HD2 ......................................................................... 24
Table of contents
Regulation (XCEL HD) ...................................................... 25
Limited warranty ............................................................ 26
Repair service ................................................................. 26
4
Package contents
ACCESSORIES INCLUDED:
Camo waterproof
housing
Bow
mount
Scope
mount
Head strap
mount
Clear waterproof
housing
Straight and
90° extender
360° Roll
bar mount
Curved adhesive
mount
Flat adhesive
mount
Lens cleaning
cloth
Carrying
case
HDMI and
USB cables
Lens
protector
Wrist strap
XCEL
stickers (3)
Camera with
slide adaptor
(XCEL HD)
Quick release stands
with safety ring (2)
1 button
remote control
(XCEL HD)
Lithium-ion
Polymer battery
2-way
remote control
(XCEL HD2)
Camera with
slide adaptor
(XCEL HD2)
MOUNTING ACCESSORIES INCLUDED:

5
Components
FRONT VIEW BOTTOM VIEW
MODE
BUTTON
ON/OFF &
START/STOP
BUTTON
BACK
BUTTON
MICRO
HDMI PORT
WIDE ANGLE LENS
MICRO
USB PORT
MIC IN
SLIDE ADAPTOR
ANCHORAGE
MICROSD
SLOT
OK
BUTTON
MIC
MICROSD
SLOT
HEAT
SINK
MOUNT
SYSTEM

6
Getting started
INSERTING THE MICROSD CARD
Insert a microSD memory card in the card slot, gold
contacts facing up. The card is inserted correctly when
a click is heard.
REMOVING THE MICROSD CARD
Lightly press the memory card into the camera once to pop it out of the slot
and remove it.
BATTERY INSTALLATION
Unlock the battery compartment cover by moving the lock
button to the right and remove the cover.
Insert the lithium-ion polymer battery (included) into
the battery compartment.
TURNING ON THE CAMERA
To turn on the camera, press and hold the button a few seconds
until the welcome screen appears.
To turn off the camera, press and hold the button a few seconds
until the shutdown screen appears.
BUTTON FUNCTION
1. : ON-OFF/ START-STOP
2. M: Changes mode/ Next
3. OK: Conrm entries/ Zoom (+)*
4. BACK: Exit the menu/ Previous/ Zoom (-)*
*XCEL HD2 only
USING THE CAMERA WITH THE WATERPROOF HOUSING
(XHD-OHT or XHD-OHC)
Insert the camera into the housing and close it tightly. The
housing can then be installed on any mount compatible
with XCEL action cameras. It protects the camera and
allows to use for underwater use. The housing is waterproof
up to 160 ft. (image: camera with XHD-OHT housing)
An access screw for the microphone is located at the
back of the housing. Remove the screw completely to
improve sound recording. Note that the housing is no longer
waterproof if the screw is loosened or removed, the water
will inltrate into the housing.
USING THE CAMERA WITHOUT THE WATERPROOF HOUSING
To use the camera without the housing, it is necessary to
use the slide adaptor. This allows you to attach the camera
on any mount compatible with XCEL action cameras. Install
the slide adaptor by sliding it in the anchorage system
located under the camera.
To remove the slide adaptor from the camera, press the
ends and slide the adaptor toward the back of the camera.
Note: The camera is compatible with microSD memory cards with
capacity up to 32 GB, class 4 or higher (not included). See AVAILABLE
ACCESSORIES section (p.22).
Note: The battery included with the camera is partially charged. It is
possible to use the camera as is, but for best results, recharge the
battery (see CHARGING THE BATTERY section p.17).
v1.0
Note: The slide adaptor has been designed to attach securely and
adequately to the anchorage system of the camera and resist to activities
with impact.
SHUTTING
DOWN
1
2
4
3
7
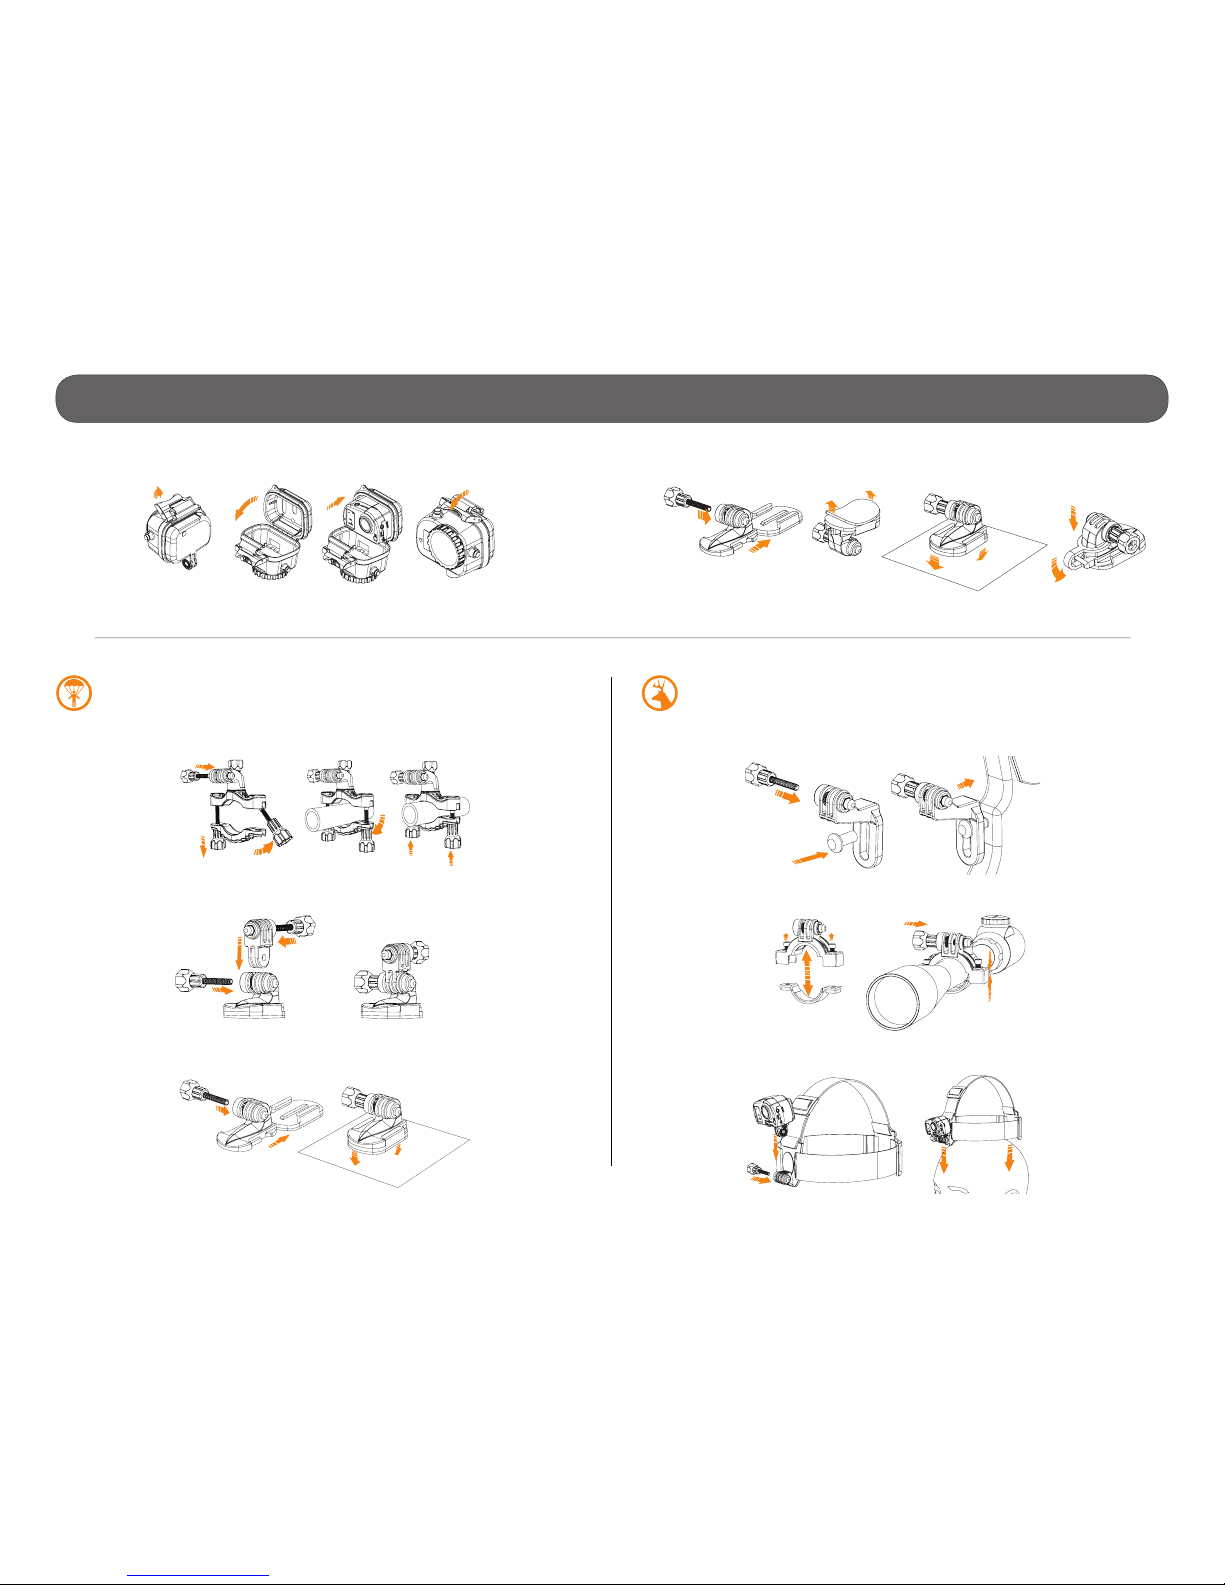
Installation of the accessories included
SPORT EDITION
360° ROLL BAR MOUNT
90° & STRAIGHT EXTENDERS
CURVED & FLAT ADHESIVE MOUNTS
HUNTING EDITION
BOW MOUNT
SCOPE MOUNT
HEAD STRAP MOUNT
WATERPROOF HOUSING
QUICK RELEASE STAND WITH SAFETY RING
8
Operation modes
DESCRIPTION OF ICONS
Turn on the device and switch from one mode to another by pressing the M
button. It is possible to see on the conguration screen 5 different modes.
VIDEO
HD video recording
(480p, 720p or 1080p)
PHOTO
Taking photos
• XCEL HD: 1mp, 3mp or 5 mp
XCEL HD2: 5mp, 8mp or 12mp
• 1 to 6 consecutive photos
TIME LAPSE
Taking photos at predened regular
intervals
(0.5, 2, 5, 10, 30 or 60 seconds)
VIEW
• Allows the user to see the number of
recorded les.
• Allows the user to view photos and
videos when the camera is connected
to a television using the HDMI cable.
SETTINGS
Allows the user to set the advanced settings of the camera.
See CONFIGURATION MODES section (p.11) for more details.
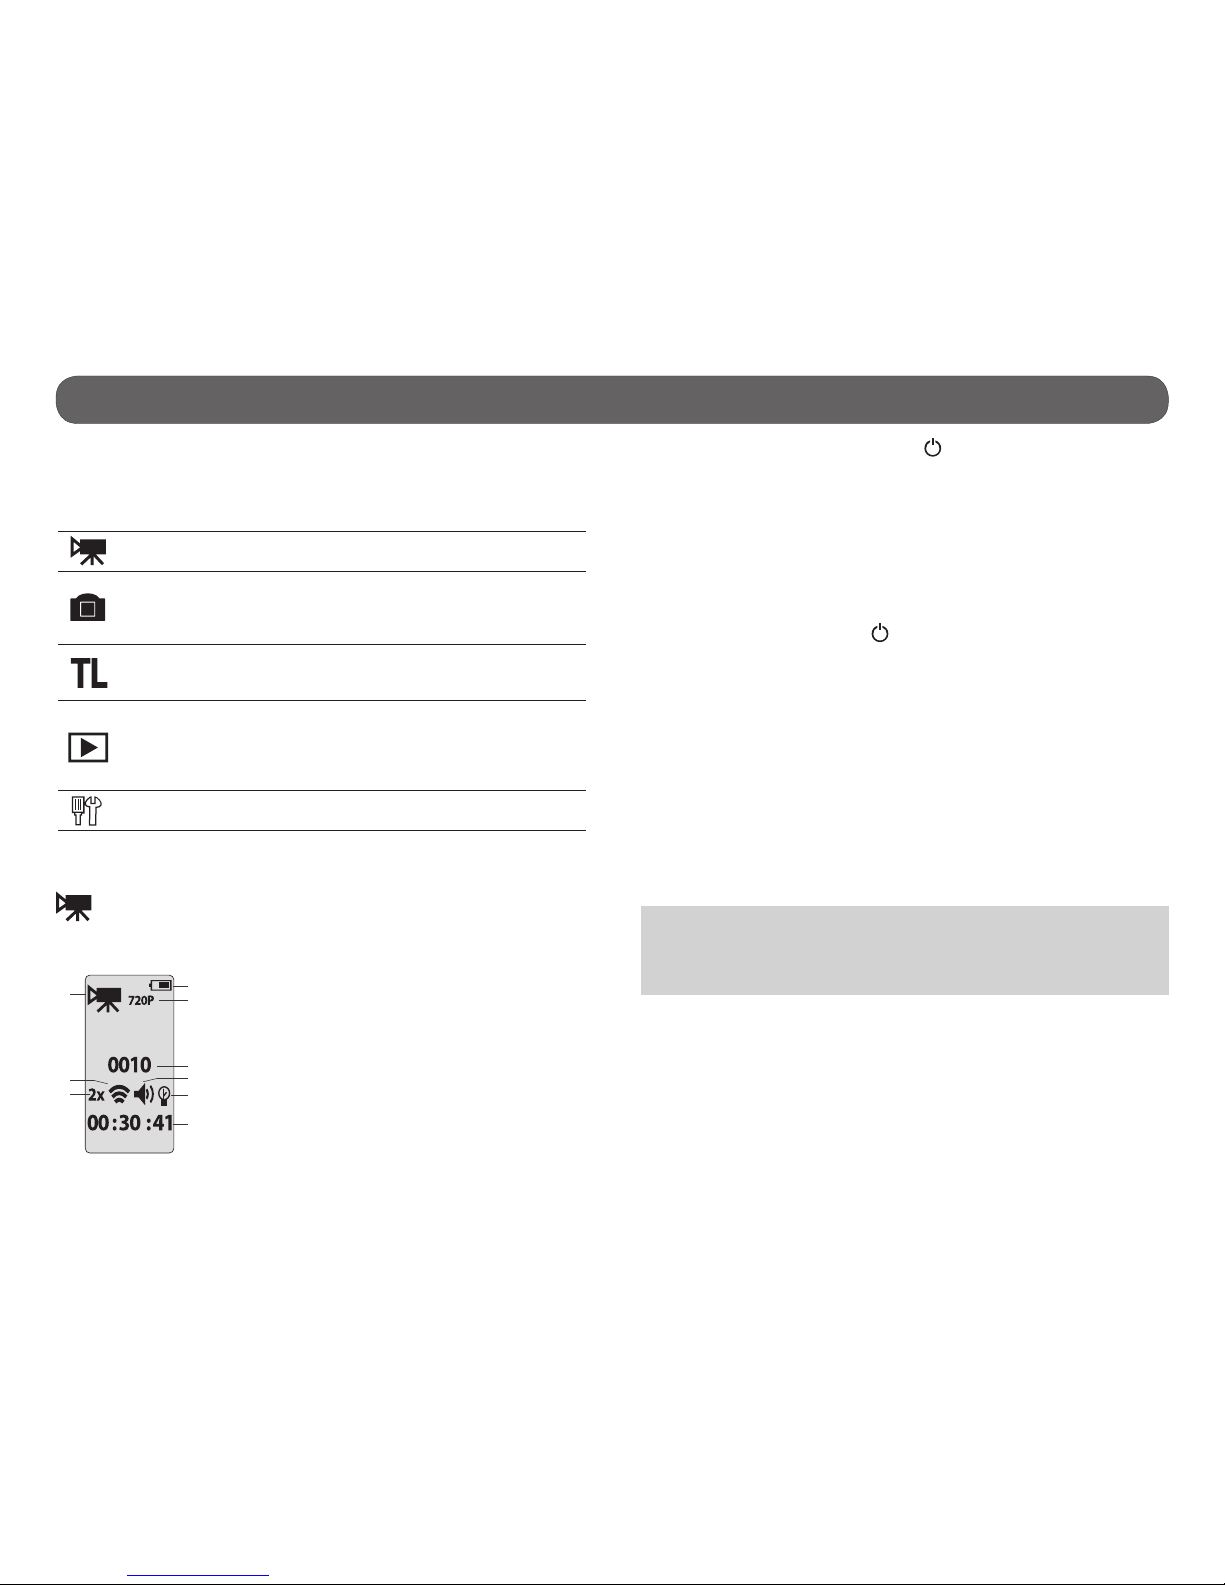
VIDEO MODE
• Allows the user to see the current conguration of the VIDEO mode.
1) Battery level
2) Video mode
3) Video resolution
4) Number of recorded videos
5) Remote control (wireless)
6) Zoom 1x to 4x (XCEL HD2 only)
7) Sound signal
8) LED lights
9) Estimated remaining recording time
• To start recording a video, press the button. The camera beeps if the
sound signal option is enabled. The recording time is displayed on the
screen and the LED lights ash while recording. See OPERATION OF THE
LED LIGHTS AND SCREEN DEPENDING ON SELECTED OPTIONS section
(p.12).
• To increase the zoom (XCEL HD2 only), press OK and to decrease, press
BACK. Refer to the subject distance table in the REMOTE CONTROL section (p.15) to nd which zoom level to use. The zoom adjustment can
be done while recording a video.
• To stop recording, press the button. The camera beeps if the sound
signal option is enabled. The remaining recording time on the memory
card will reappear on the screen.
When the microSD card is full, the camera automatically stops recording
and the current video will be saved.
When the battery is empty, the camera automatically stops recording and
the current video will be saved before the camera turns off.
It is possible to record a video with a maximum duration of approximately
45 minutes (3.66 GB) for the XCEL HD and approximately 30 minutes (3.66
GB) for the XCEL HD2. When this maximum is reached, the camera stops
recording and automatically starts a new video. The rst video will be identied XCEL0001 and the second XC010001.
Note: It is possible to take videos with the camera installed upside down.
The camera automatically displays the video in the right direction when
viewing on a computer or a TV. To do this, the camera must be installed
upside down before recording the video.
1
2
3
4
6
7
8
9
5

9
Operation modes
PHOTO MODE
• Allows the user to see the current conguration of the PHOTO mode.
1) Battery level
2) Photo mode
3) Photo resolution
4) Multi-shot option
5) Remote control (wireless)
6) Zoom 1x to 4x (only XCEL HD2)
7) Sound signal
8) LED lights
9) Estimated number of photos that can be taken
before the card is full
• To take a photo, press the button. The camera beeps if the sound
signal option is enabled and the LED lights ash to indicate that a photo
was taken. See OPERATION OF THE LED LIGHTS AND SCREEN DEPENDING ON SELECTED OPTIONS (p.12).
• To increase the zoom (XCEL HD2 only), press OK and to decrease, press
BACK. Refer to the subject distance table in the REMOTE CONTROL section (p.15) to nd which zoom level to use.
TIME LAPSE MODE
The TIME LAPSE mode allows to take photos at predened regular intervals.
• Allows you to see the current conguration of the TIME LAPSE mode.
1) Battery level
2) Time lapse mode
3) Time interval between each photo
4) Photo resolution
5) Remote control (wireless)
6) Zoom 1x to 4x (only XCEL HD2)
7) Sound signal
8) LED lights
9) Estimated number of photos that can be taken
before the card is full
• To start taking photos, press the button. The camera beeps if the
sound signal option is enabled and the LED lights ash to indicate that
photos are being taken. See OPERATION OF THE LED LIGHTS AND
SCREEN DEPENDING ON SELECTED OPTIONS section (p.12).
• To increase the zoom (only XCEL HD2), press OK and to decrease, press
BACK. Refer to the subject distance table in the REMOTE CONTROL section (p.15) to nd which zoom level to use.
• To stop taking photos, press the button.
Note: This option allows the user to obtain photos of fast moving subjects.
5
3
1
7
8
9
2
6
4
5
1
3
7
8
9
2
6
5
4

10
Here is the information displayed on the television screen depending on the
mode selected (VIDEO, PHOTO or TIME LAPSE).
MODE INFORMATIONS
VIDEO Mode icon, video resolution, battery level and remaining
recording time.
PHOTO Mode icon, photo resolution, battery level and number of
photos that can be taken before the card is full.
TIME LAPSE Mode icon, photo resolution, battery level and number of
photos that can be taken before the card is full.
SETTINGS
• Allows the user to see the battery level and access the settings menu by
pressing the OK button.
1) Battery level
2) Settings
Operation modes
VIEW MODE
• Allows the user to see the number of recorded les and view videos/
photos when the camera is connected to a television.
1) Battery level
2) VIEW mode
3) Number of recorded photos
4) Number of recorded videos
VIEWING ON A TELEVISION
Allows the user to view videos and photos directly on a television.
1) Connect the HDMI cable (included) to the HDMI port of the TV and to
the camera.
2) Turn on the camera by pressing the button.
3) Navigate on the interface to VIEW mode by pressing the M button.
4) Select the VIEW mode by pressing the OK button. The last video or photo
recorded will appear on the TV screen. To pass from one video (or photo)
to another, use the BACK and buttons. To view a video, press OK.
To fast forward a video, press BACK (x2/x4/x8) and to rewind the video,
press (x2/x4/x8) .
PHOTO
3
1
4
2
2
1
HDMI
Note: When the camera is connected to a television, it is also possible to
take videos and photos and access the settings menu. Navigate on the
interface to the desired mode by pressing the M button. See the respective section of each mode for the use of the buttons.

11
Date/Time
Allows the user to set the date (Year/Month/Day) and time (hour/minute).
Use the OK button to conrm the entry and use the M and BACK button
to adjust the digits.
Note: When the camera is not powered for approximately 48 hours, it is
possible that the date and time reset. So always verify the date and time
before using the camera when this occurs.
Remote control
Allows the user to remotely control the camera (Wireless mode).
Wireless actived. The reaction time between the camera and the
remote control can take a few seconds but gives a better battery
life. See note at page 13.
(XCEL HD2 only) Wireless activated in "Quick React" mode.
The reaction time between the camera and the remote control is
instantaneous. By cons, this option requires more energy consumption and lifetime of the battery will be affected.
Wireless deactivated.
Sound signal
Enable or disable the sound of the camera when using the buttons.
DEL lights
Enable or disable the LEDs lights. When the Remote control and LED lights
options are activated, the 4 LEDs ash slowly to indicate that the camera
is waiting for the signal from the remote control and ash rapidly during
record videos/photos. See OPERATION OF THE LED LIGHTS AND SCREEN
DEPENDING ON SELECTED OPTIONS section for more details (12).
Erase
Allows the user to erase the last le or all les.
Conguration modes
Allows the user to set the camera options.
Navigating in the menu:
-The M button to move among the choices
-The OK button to select an option
-The BACK button to return to the previous menu
Video mode
Allows the user to record video in the following resolutions:
Resolution Field of view
Screen
resolution
Advantage
480p Wide angle 848 x 480
Greater length of
recording
720p Ultra wide angle 1280 x 720
Largest eld of
view
XCEL HD 1080p
XCEL HD2 1080p
Wide angle
Ultra wide angle
1920 x 1080
1280 x 720
The highest
resolution
Photo mode (including the Multi-shot mode)
1. Allows the user to take photos in the following resolutions:
XCEL HD: 1mp, 3mp or 5 mp
XCEL HD2: 5mp, 8mp or 12mp
Changing this setting also affects photos taken in TIME LAPSE mode.
2. The Multi-shot mode allows the user to take 1 to 6 consecutive photos
with every shot with a delay of approximately 0,5 seconds between
each photo.
TIME LAPSE mode
Allows the user to take photos at regular predened intervals:
0.5, 2, 5, 10, 30, 60 seconds.

12
Conguration modes
OPERATION OF THE LED LIGHTS AND SCREEN DEPENDING ON SELECTED OPTIONS
REMOTE
CONTROL
OPTION
DEL
LIGHTS
OPTION
OPERATION OF THE LED LIGHTS AND SCREEN
BEFORE RECORDING VIDEOS/PHOTOS
OPERATION OF THE LED LIGHTS AND SCREEN
WHEN RECORDING VIDEOS/PHOTOS
ENABLED
( *
and
)
Enabled
( )
• The 4 LED lights ash every 2 seconds to indicate
that the camera is waiting for the signal from the
remote control (when the video, photo or time
lapse mode is shown on the screen).
• The screen turns off after 1 minute of inactivity
(ENERGY SAVING). To return to the screen, press the
OK button.
Video/
Time lapse
• The 4 LED lights ash rapidly.
• The screen turns off after 5 seconds
(ENERGY SAVING).
Photo • The 4 LED lights ash rapidly.
Disabled
( )
• The LED on the back ashes every 2 seconds to
indicate that the camera is waiting for the signal
from the remote control (when the video, photo or
time lapse mode is shown on the screen).
• The screen turns off after 1 minute of inactivity
(ENERGY SAVING). To return to the screen, press
the OK button.
Video/
Time lapse
• The LED light on the back ashes
rapidly.
• The screen turns off after 5 seconds.
(ENERGY SAVING).
Photo
• The LED light on the back ash twice.
DISABLED
( )
Enabled
( )
• The camera turns off after 2 minutes of inactivity
(AUTO SHUT DOWN).
Video/
Time lapse
• The 4 LED lights ash rapidly.
• The screen turns off after 5 seconds
(ENERGY SAVING).
Photo • The 4 LED lights ash rapidly.
Disabled
( )
• The camera turns off after 2 minutes of inactivity
(AUTO SHUT DOWN).
Video/
Time lapse
• The LED light on the back ashes
rapidly.
• The screen turns off after 5 seconds
(ENERGY SAVING).
Photo • The LED light on the back ash twice.
*See note on next page p.13
ENERGY
SAVING
ENERGY
SAVING
ENERGY
SAVING
ENERGY
SAVING
ENERGY
SAVING
ENERGY
SAVING
AUTO
SHUT
DOWN
AUTO
SHUT
DOWN

13
Conguration modes
Note: When the remote control option is enabled (wireless mode [ ]
ON), the camera goes into sleep after 2 minutes of inactivity to maximize
battery life.
To wake the camera from sleep, do one of the following actions:
1. Press the RECORD button on the remote control ( ).
2. Hold down the ON-OFF button on the camera for 3 seconds ( ).
14
Remote control • XCEL HD
When the camera is on and the REMOTE CONTROL option is
enabled, the remote control allows you to take videos and photos
in the mode shown on the screen by pressing the START/STOP
button. Wireless range up to 40".
SYNCHRONIZATION
The remote control synchronizes automatically when the START/STOP
button is used to take a video or photo. It is also possible to use only one
remote control to control multiple cameras.
Examples:
• When only one camera is on, the remote control automatically
synchronises to this camera when the START/STOP button is used to
take a video or photo.
• If multiple cameras are on, the remote control automatically synchro nizes to each camera when the START/STOP button is used to take a
video or photo. This means that the remote control will start recording
or taking photos simultaneously on each of these cameras.
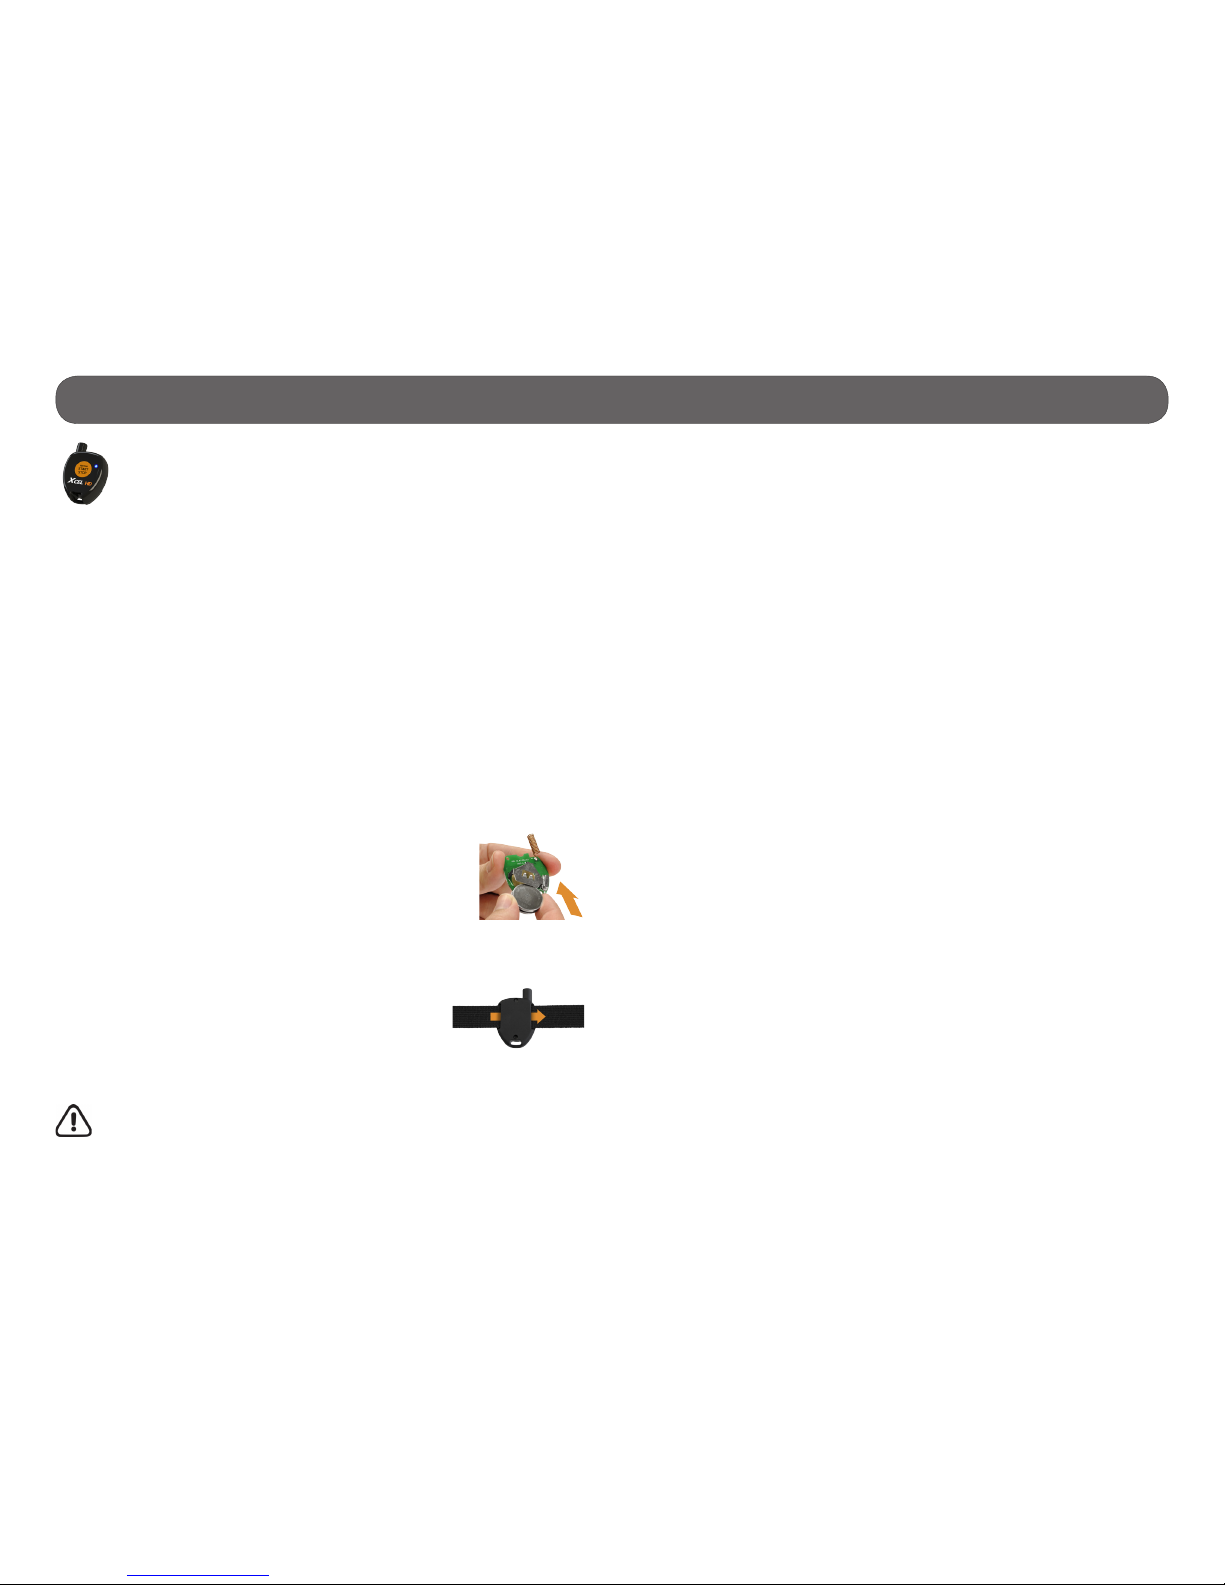
LITHIUM BUTTON BATTERY
The remote control must be powered by 2 lithium button batteries CR2032. Insert the batteries in the indicated
direction, the polarity of the battery must be respected
(+ upwards). DO NOT DISPOSE OF BATTERIES IN THE
GARBAGE.
ATTACHING THE REMOTE CONTROL
To attach the remote control using the Velcro strap
(included), just insert the Velcro strap into the slots on
each side of the back of the remote.
RECOMMENDATIONS
Do not submerge the remote control in the water.

15
Remote control • XCEL HD2
When the camera is on and the REMOTE CONTROL option is enabled,
the remote control allows the user to take videos and photos in the
mode shown on the screen. It is also possible to enlarge the image
up to 4x (720p and 480p only). The XCEL HD2 remote control is
water resistant up to 16".
REMOTE CONTROL UTILIZATION
Button
Allows the user to change the recording mode (Video,
photo or Time Lapse).
Button
Allows the user to start and stop the video and photo
recording. When a video or photo recording is started, the
«REC » message will appear on the remote's screen a
few seconds and when the recording stops, the ( ) icon
will appear on the screen for a few seconds.
1x
4x
Button
The zoom option enlarges the image up to 4x. The camera
remembers the last zoom used. To properly adjust the
zoom, see the following table:
Zoom Subject distance
(approximate)
Optical eld of view
1X Up to 50 ft 135°
2X Up to 100 ft 109°
3X Up to 150 ft 84°
4X Up to 200 ft 50°
Button
Hold to lock or unlock the keypad on the remote control.
Note: During a change of mode or zoom, the camera screen will be updated only when the recording starts.
4x
3x
2x
1x

16
Remote control • XCEL HD2
SCREEN
To access to the screen, press any button except the start/stop the video
and photo recording ( ). The screen turns off after 10 seconds in order to
preserve battery life.
1) Selected mode
2) Zoom selected
3) Recording status
4) Keypad lock
REMOTE CONTROL SYNCHRONIZATION
It is necessary to synchronize the remote control with the camera at the
rst use following the instructions below:
1. Verify that the remote control is off.
2. Turning on the camera.
3. Simultaneously press the and buttons on the remote control until
the wireless signal icon (sync) appears.
4. When the synchronization is complete, the wireless icon (OK) will appear
on the screen.
LITHIUM BUTTON BATTERY
The remote control must be powered by a lithium button bat-
tery CR2450. Insert the battery in the indicated direction,
the polarity of the battery must be respected (+ upwards).
Replacing the battery does not affect the last synchronization
performed with the camera. DO NOT DISPOSE OF BATTERIES
IN THE GARBAGE.
3
4
1
2
syncsync
okok
ATTACHING THE REMOTE CONTROL
To attach the remote control using the Velcro strap
(included), just insert the Velcro strap into the slots on
each side of the back of the remote.

17
BATTERY LIFE
When the battery of the camera is fully charged, it is possible to record
about 2 hours to 2.5 hours, depending of the different videos resolutions.
Video resolution Video recording hours
720p @ 30 fps (XCEL HD) 2h30
720p @ 60 fps (XCEL HD2) 1h50
1080p @ 30 fps 2h
480p @ 60 fps 2h15
USING THE CAMERA DURING THE CHARGING OF THE BATTERY
While charging, it is possible to take videos and photos and access the setup
menu. In addition, the VIEW mode can be used if the camera is also connected to a TV using the HDMI cable.
To use the VIEW mode, connect the camera to a TV using the HDMI cable.
See the respective section of this mode to use the buttons.
Charging the battery
The battery level is shown in the upper right corner of the screen in all
camera modes. When the battery level is low, we strongly suggest to charge
the battery before it is empty. If a video is being recorded and the battery
level reaches 0%, the camera saves the le before shutting down.
TO CHARGE THE BATTERY:
1. Using the USB cable included, connect the camera to a USB power
source:
-a computer -a booster pack
-a car charger XHD-CUSB -a USB adaptor XHD-A
(sold separately p.21) (sold separately p.21)
2. Select "CHARGE ONLY" with the M button and press the OK
button.
3. The battery icon displays the loading progress until the battery is fully
charged. We strongly suggest disabling the REMOTE CONTROL option to
maximize the charging time.
When the battery is empty, the charging time is about 5 hours for the battery
to be fully charged. Replacement batteries are also available (XHD-BATT, sold
separately p.21).
It is also possible to charge the battery by removing it from the camera and
using the dual battery charger (XHD-CHG, sold separately p.21).
CHARGE
ONLY
USB
TRANSFER
CAUTION: When charging the battery, the camera may become very hot
if it is plugged in for many hours.
Note: The video duration is affected when the REMOTE CONTROL option
is enabled.
USB
HDMI

18
Memory card/ Transferring les to a computer
MEMORY CARD
Using a memory card is required to record videos and photos. The camera
is compatible with microSD memory card, up to 32 GB capacity (Class 4 or
higher). Sold separately, see AVAILABLE ACCESSORIES section (p.22).
Before inserting or removing a card, turn off the camera to prevent damage
to the les.
The screen displays "no card" when there is no SD card in the camera and
"Card Ful" when it is full. In addition, when the memory card is full, the
screen displays "0000" in PHOTO and TIMELAPSE mode and "00:00:00" in
VIDEO mode for the remaining number of photos and the remaining video
recording time. If a video is being recorded, the camera automatically stops
recording and the video will be saved.
The following data shows the approximate quantity of photos or video length
that can be taken by the camera depending on the memory card capacity.
16 GB 32 GB
Photo
1 MP 50900 101800
3 MP 15100 30200
5 MP (XCELMC HD) 9400 18800
5 MP (XCELMC HD2) 6500 13000
8 MP 4950 9900
12 MP 3900 7800
Video
480p @ 60 fps 5h45 11h15
720p @ 30 fps (XCEL HD) 4h45 9h45
720p @ 60 fps (XCEL HD2)
1h55
3h50
1080p @ 30 fps
3h45
7h30
TRANSFERRING FILES TO A COMPUTER
Allows to transfer or to view videos/photos using a computer.
1. Connecting the camera to a computer using the USB cable included.
2. Select "USB TRANSFER" by pressing the OK button.
3. The USB icon appears on the screen to indicate that the le transfer is
in progress and the battery icon appears on the top right of the screen
to indicate the battery is charging.
4. The computer will recognize the camera and install the driver automatically. Click on "My Computer" and select "Removable Disk". Then
click on "DCIM" and "100MEDIA" in order to nd the videos and photos
stored.
5. Drag or save the les to the desired location.
Taking the memory card out of the camera and inserting it into the computer
slot will achieve the same results (a SD adapter may be required).
CHARGE
ONLY
USB
TRANSFER
Note: Videos in .MP4 format require the use of a compatible video player
software such as VLC, Windows Media Player or QuickTime.
HDMI
USB
TV
LAPTOP
PORTABLE
HDMI
USB
LAPTOP
PORTABLE

19
Maintenance of the camera
CLEANING THE LENS
Install the lens protector (included) on the lens of the camera when it is
used without the waterproof housing. To clean the lens, use an air blower
to remove dirt such as dust or sand. Then gently wipe the lens tissue
(included) on the lens.
CLEANING THE CAMERA
Gently wipe the camera with a soft, dry cloth. DO NOT use thinners or other
cleaners to clean the camera, these products can cause damage.
CLEANING THE WATERPROOF HOUSING
It is important that the rubber gasket is always clean to ensure a
perfect seal. Rinse the housing in fresh water and shake it to dry. Do not
use a cloth to dry the seal, as lint may settle there and compromise the
effectiveness of it. After the use of the housing in salt water, rinse it in fresh
water and dry it. The salt can build up on the seal and the buttons may rust.
Note: It is important to follow these tips, because the warranty does
not cover any GG Telecom products which has been subjected to water
damage due to user error.
WARNINGS
• Never place the camera or the battery inside or above a heating device
such as a microwave oven, a stove or a radiator. This could lead to over-
heating or the deformity of materials, or even cause a re or explosion.
• Protect the lens from ngerprints and scratches using the lens protector
or waterproof housing.
• Do not expose the memory card to extreme temperatures (below -20
°C or above 50 °C). This may cause the memory cards to malfunction.
• Insert the memory card in the correct direction, otherwise it may
damage the camera and the memory card.
• Do not bend, drop or subject the memory card to shock or pressure.
• Do not put the memory card into contact with liquids, dust or foreign
bodies. If the memory card is dirty, clean with a soft cloth before you
insert it into the camera.
• Do not place the camera on ammable surfaces such as bedding,
blankets, carpets, or electric blankets for extended periods.
• Use only replacement lithium-ion battery XHD-BATT (sold separately,
see AVAILABLE ACCESSORIES section p.21).
• Cold temperatures can affect battery life.
• If the camera is not used for an extended period, remove the battery.
The battery may leak or corrode over time and cause serious damage
to the camera.

20
Troubleshooting/ Error messages
The housing fogs • Use anti-fog inserts, sold separately (see
AVAILABLE ACCESSORIES section p.22)
• Apply an anti-drip solution on the lens of the
housing to prevent fogging when using the
camera in the rain or underwater.
The videos/photos
do not appear on the
television
• Verify if the camera is correctly connected to
the television using the HDMI cable (p.10).
• Verify if the memory card contains videos/
photos.
The computer does
not recognize the
camera
• Verify if the camera is properly connected to
the computer using the USB cable (p.18).
• Verify that camera is turned on (p.6).
The computer can’t
play videos
• The .MP4 video format requires the use of a
video playback software compatible such as
VLC, Windows Media Player or QuickTime.
ERROR MESSAGES
Error message Possible solutions
no card
• There is no memory card in the camera. The use of
a memory card is required to record video and
photos (p.18).
card ful
• The memory card is full. Delete the les or use a
new memory card.
SD error
The camera can not access the memory card.
• Turn off the camera and turn it on again
(p.6).
• Remove the memory card and insert it again.
(p.6)
• Verify if the gold contacts are not dirty.
• Format the memory card (p.11).
TROUBLESHOOTING
Problem Possible solutions
Impossible to turn on
the camera
• Verify if there is a battery in the camera.
• Charge the battery (p.17).
Impossible to turn on
the remote control
• Change the batteries (p.14/16).
The screen of the
camera turns off
(ENERGY SAVING)
• The screen turns off in order to preserve the
battery while still recording. To return to the
screen, press the OK button.
The camera turns off • Charge the battery (p.17).
• When the remote control option is disabled,
the camera turns off after 2 minutes of inacti-
vity. Press and hold the button a few
seconds to turn on the camera.
The camera does not
respond
• Remove the battery and reinstall it (p.6).
Impossible to take
videos/photos
• Verify if there is a battery in the camera.
• Charge the battery (p.17).
• Memory card is full (p.18).
• Verify if the camera is turned on (p.6).
The remote control
does not communicate with the XCEL HD
camera
• Respect the maximum wireless range (40 ft)
between the camera and the remote control.
• Change the battery in the remote control
(p.14).
The remote control
does not communicate
with the XCEL HD2
camera
• Turn off the camera (p.6).
• Turn on the camera and make a new synchro-
nization (p.16).
• Respect the maximum wireless range (40 ft)
between the camera and the remote control.
• Change the battery in the remote control
(p.16).
The camera heats • It is possible that the camera warms up during
extended use. (Heat sink located under the
camera p.5) This is normal and does not affect
the life or performance of the camera.
21
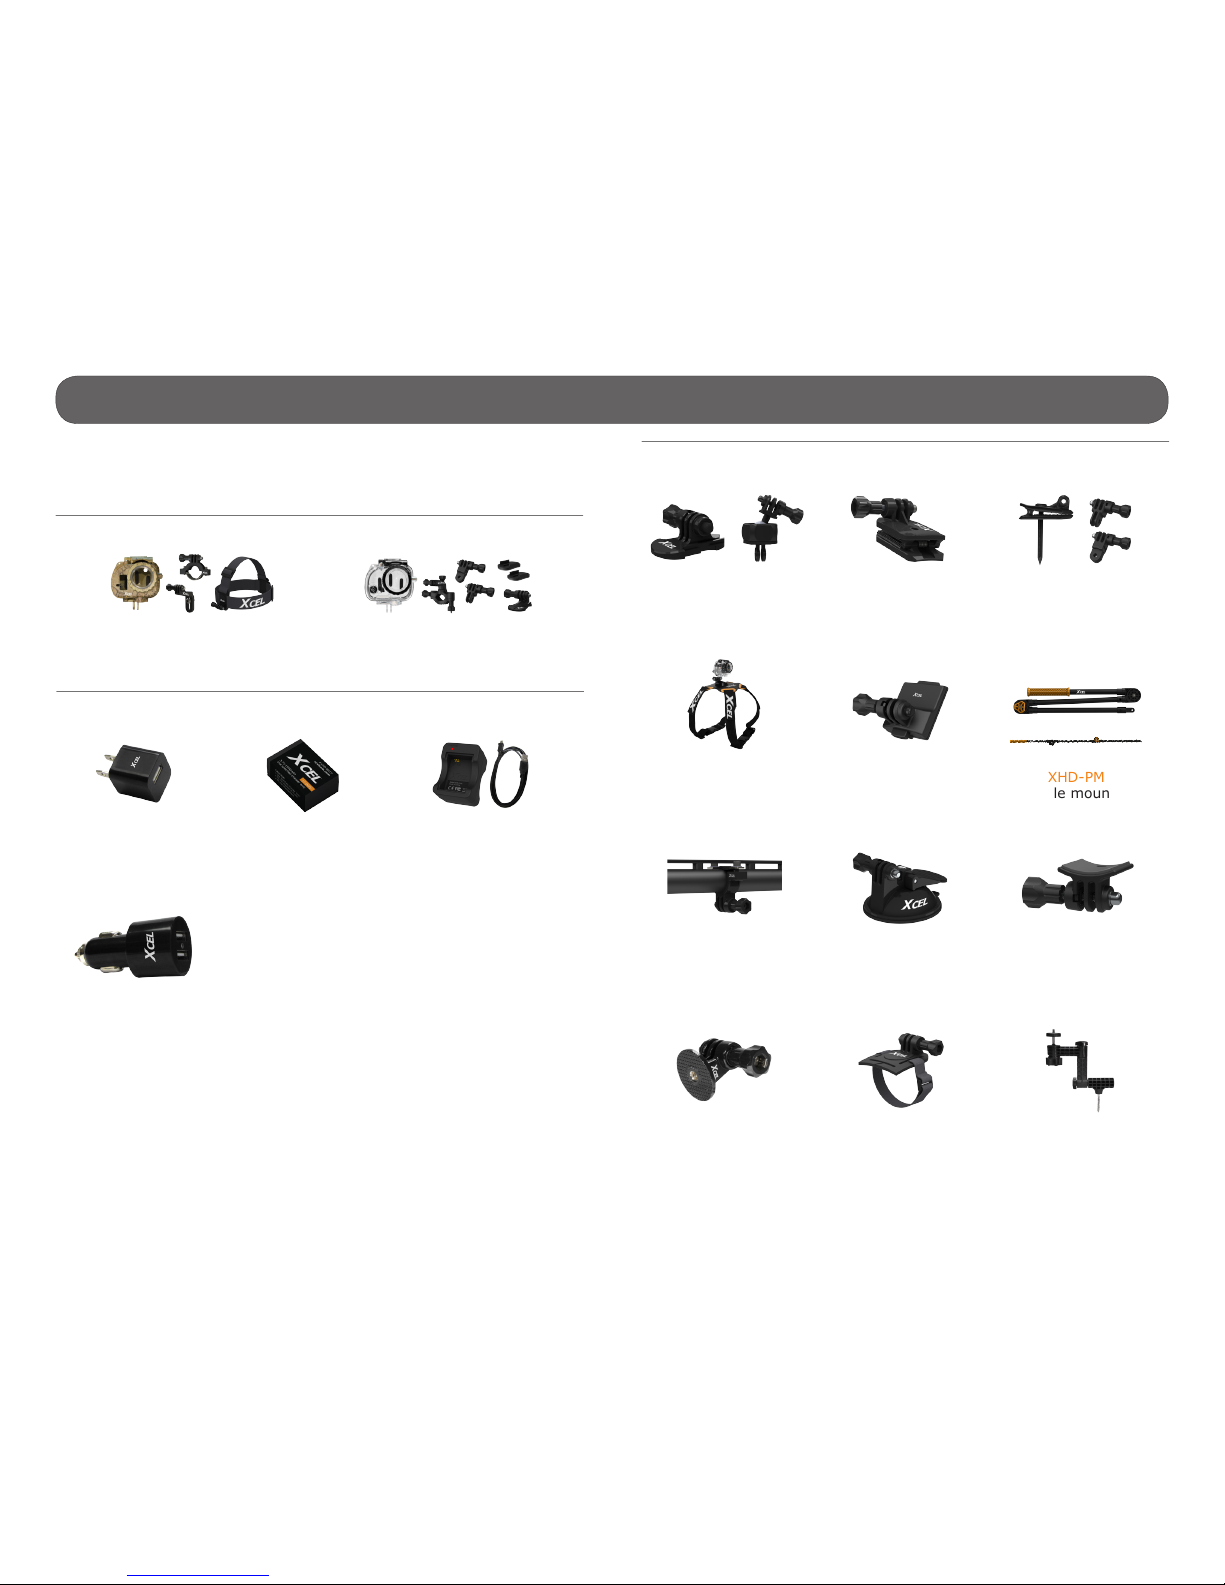
Available accessories
To obtain more information on the available accessories, go to
xcelcam.com. Here are the accessories available for the XCEL
cameras.
XHD-HUNTACC
Hunting accessories
XHD-SPORTACC
Sport accessories
KITS
POWER
XHD-BATT
Lithium-ion polymer
battery + cover
XHD-A
USB power
adaptor
XHD-CHG
Dual battery
charger
XHD-CUSB
Dual USB car
charger
MOUNTING ACCESSORIES
XHD-CM
Cap mount
XHD-DM
Decoy mount
XHD-SM
Suction mount
XHD-SSM
Sling stud
mount
XHD-VHM
Vented helmet
mount
MA-360
Camera mount
XHD-NVG
NVG helmet
mount
XHD-BJM
Ball joint mount and
low quick release
stand kit
XHD-DOG
Dog mount
XHD-PM
Pole mount
XHD-SGM
Shotgun mount
XHD-TPM
Tripod mount

22
Available accessories
MEMORY
32
GB
MEMORY
/
R
F
N
Adapter
Adaptateur
HIGH SPEED
HAUTE VITESSE
MICROSD
16GB/32GB
PROTECTION AND OTHERS ACCESSORIES
XHD-LP
Lens protector
XHD-MIC
External
microphone
XHD-FOG
Anti-fog inserts
XHD-TL
Tether leash
XHD-OHC
Camo waterproof
housing
XHD-OHT
Clear waterproof
housing

23
Specications • XCEL HD
Video recording
Video resolution 1080p/30ips
720p/30ips
480p/60ips
File format .MP4, codec H.264
Photo Recording
Photo resolution 1, 3, 5 MP
File format JPG
Time Lapse option Predened intervals from 0.5 to 60s
Lens
Optical eld of view • Ultra wide angle
720p
• Wide angle
480p, 1080p
Audio
Sound recording Stereo, MPEG AAC codec
Microphone input 2.5 mm input for external microphone
(optional)
Memory storage
Support •Internal memory: none
•External memory: microSD card,
up to 32 GB, class 4 or higher
(not included)
Viewing
TV output Micro-HDMI
Computer output Micro-USB
Power source
Lithium-ion polymer battery Rechargeable lithium-ion polymer
battery
Dimensions
2.4" W x 1.7" H x 1.6" D
Weight
2.9 oz (camera with battery)
5.7 oz (camera with battery and housing)
Remote control
Starts or stops the videos and photos recording up to 40 ft with the remote control.
Recommendations
Operating temperature (-4 °F to +104 °F) (-20 °C to + 40 °C)
Storage temperature (+59 °F to +77 °F) (+15 °C to + 25 °C)

24
Specications • XCEL HD2
Video recording
Video resolution 1080p/30ips
720p/60ips
480p/60ips
File format .MP4, codec H.264
Photo Recording
Photo resolution 5, 8, 12 MP
File format JPG
Time Lapse option Predened intervals from 0.5 to 60s
Lens
Optical eld of view • Ultra wide angle
720p, 1080p
• Wide angle
480p
Zoom 1x to 4x
Low light image sensor
Audio
Sound recording Stereo, MPEG AAC codec
Microphone input 2.5 mm input for external microphone
(optional)
Memory storage
Support •Internal memory: no
•External memory: microSD card,
up to 32 GB, class 4 or higher
(not included)
Viewing
TV output Micro-HDMI
Computer output Micro-USB
Power source
Lithium-ion polymer battery Rechargeable lithium-ion polymer
battery
Dimensions
2.4" W x 1.7" H x 1.6" D
Weight
2.9 oz (camera with battery)
5.7 oz (camera with battery and housing)
Remote control
Select the recording mode to take videos/photos. Enlarge the image up
to 4X (720p/480p).
Recommendations
Operating temperature (-4 °F to +104 °F) (-20 °C to + 40 °C)
Storage temperature (+59 °F to +77 °F) (+15 °C to + 25 °C)

25
Regulation
FCC AND IC REGULATIONS
FCC Part l5
This equipment has been tested and found to comply with the limits
for a Class B digital device, pursuant to Part 15 of the Federal
Communications Commission (FCC) rules. These limits are designed to
provide reasonable protection against harmful interference in a residential
installation. This equipment generates, uses and can radiate radio frequency
energy and, if not installed and used in accordance with the instructions,
may cause harmful interference to radio communications. However, there
is no guarantee that interference will not occur in a particular installation.
If this equipment does cause harmful interference to radio or television
reception, which can be determined by turning the equipment off and on,
the user is encouraged to try to correct the interference by one or more of
the following measures:
• Reorient or relocate the receiving antenna.
• Increase the separation between the equipment and receiver.
• Connect the equipment into an outlet on a circuit different from
that to which the receiver is connected.
• Consult the dealer or an experienced radio/TV technician for help.
Changes or modications to this equipment not expressly approved by the
party responsible for compliance could void the user’s authority to operate
the equipment.This device complies with Part 15 of the FCC rules. Operation is subject to the following two conditions: (1) this device may not cause
harmful interference, and (2) this device must accept any interference
received, including interference that may cause undesired operation.
Industry Canada
This device complies with Industry Canada licence-exempt RSS standard(s):
Operation is subject to the following Two conditions:(1) this device may
not cause interference, and (2) this device must accept any interference,
including interference that may cause undesired operation of the device.The
term "IC: " before the certication/registration number only signies that
the Industry Canada technical specications were met. This product meets
the applicable Industry Canada technical specications.
Hereby, GG Telecom declares that this camera is in compliance with
the essential requirements and other relevant provisions of Directive
1999/5/EC. The user can obtain a copy of the Declaration of Conformity by
e-mail at info@xcelcam.com.

26
Limited warranty and repair
This XCEL product designed by GG Telecom, is covered by a one (1) year
warranty on material and workmanship starting from the original date of
purchase. The sales receipt is your proof of purchase and must be presented
if warranty service is needed. This warranty will be honored in the country
of purchase only.
This warranty does not cover any GG Telecom product which has been subjected to misuse, neglect and accidents or has been improperly used or
maintained. In addition, this warranty is not applicable for all products pur-
chased online from an unauthorized dealer. Any modication or tampering
of the product will affect its operation, performance, durability and voids
this warranty.
INSTRUCTIONS FOR REPAIR SERVICE
GG Telecom will repair the product without charge or replace it at its discretion with an equivalent product, if it has a manufacturing defect covered by
the warranty described previously. We will pay the shipping costs only for
the return of the products covered by the warranty. The shipping costs for
an item sent to us will be assumed by the customer.
Repairs for damages not covered by the warranty will be subject to a reasonable charge. The customer will pay all shipping costs.
1. BEFORE sending a product for repair, please contact our
technical support team at 1-888-779-7646 or tech@xcelcam.com.
Clearly describe the problem and give a phone number where we
can reach you. It happens regularly that some problems can be
solved over the phone.
2. If a product needs to be sent, an RMA number will be given to the
customer (Return Merchandise Authorization).
3. Prepare a package for GG Telecom and include the original
receipt or a copy.
4. Write the RMA number on the outside of the package and send it
to:
CANADA United States
GG Telecom GG Telecom
120 J.Aurèle-Roux 555 VT route 78
Victoriaville, QC Swanton, Vermont
G6T 0N5 05488
IMPORTANT: Under no circumstances will GG Telecom accept returned products without a Return Material Authorization number (RMA). It is essential
to contact us before making a return.
The customer is liable for loss or damage to the product that may occur
during the transport to GG Telecom. We recommend you to use a traceable
method of shipping to ensure your protection.
WWW.XCELCAM.COM
 Loading...