

Page 1
NBA LIVE 2003
XBOX MANUAL
40 pages + REG CARD
209 Redwood Shores Parkway
Redwood City, CA 94065
Part #1453905
Page 2

ABOUT PHOTOSENSITIVE SEIZURES
A very small percentage of people may experience a seizure when exposed to certain
visual images, including flashing lights or patterns that may appear in video games.
Even people who have no history of seizures or epilepsy may have an undiagnosed
condition that can cause these “photosensitive epileptic seizures” while watching
video games.
These seizures may have a variety of symptoms including: lightheadedness, altered
vision, eye or face twitching, jerking or shaking of arms or legs, disorientation, confusion, or momentary loss of awareness. Seizures may also cause loss of consciousness
or convulsions that can lead to injury from falling down or striking nearby objects.
Immediately stop playing and consult a doctor if you experience any of these
symptoms. Parents should watch for or ask their children about the above symptoms—
children and teenagers are more likely than adults to experience these seizures.
The risk of photosensitive epileptic seizures may be reduced by sitting farther from
the television screen, using a smaller television screen, playing in a well-lit room,
and not playing when you are drowsy of fatigued.
If you or any of your relatives have a history of seizures or epilepsy, consult a doctor
before playing.
Other Important Health and Safety Information
The Xbox™video game system documentation contains important safety and health
information that you should read and understand before using this software.
Avoid Damage to Your Television
Do not use with certain televisions. Some televisions, especially front- or rearprojection types, can be damaged if any video games, including Xbox games, are
played on them. Static images presented during the normal course of game play
may “burn in” to the screen, causing a permanent shadow of the static image to
appear at all times, even when video games are not being played. Similar damage
may occur from static images created when placing a video game on hold or pause.
Consult your television owner’s manual to determine if video games can be safely
played on your set. If you are unable to find this information in the owner’s manual,
contact your television dealer or the manufacturer to determine if video games can
be played on your set.
Unauthorized copying, reverse engineering, transmission, public performance,
rental, pay for play, or circumvention of copy protection is strictly prohibited.
This product has been rated by the Entertainment Software Rating Board. For
information about the ESRB rating, or to comment about the appropriateness
of the rating, please contact the ESRB at 1-800-771-3772.
CONTENTS
USING THE XBOX VIDEO GAME SYSTEM . . . . . . . 2
USING THE XBOX CONTROLLER . . . . . . . . . . . . . . 3
BASIC CONTROLS . . . . . . . . . . . . . . . . . . . . . . . 4
INTRODUCTION . . . . . . . . . . . . . . . . . . . . . . . . . 5
COMPLETE CONTROL SUMMARY . . . . . . . . . . . . 6
EA SPORTS
SETTING UP THE GAME. . . . . . . . . . . . . . . . . . . 12
MAIN MENU. . . . . . . . . . . . . . . . . . . . . . . . . . . . . . . . . . . . . 12
PLAY NOW—STARTING AN EXHIBITION GAME. . . . . . . . . . 12
ON THE COURT . . . . . . . . . . . . . . . . . . . . . . . . 15
GAME SCREEN. . . . . . . . . . . . . . . . . . . . . . . . . . . . . . . . . . . 15
PAUSE MENU . . . . . . . . . . . . . . . . . . . . . . . . . . . . . . . . . . . . 17
SETTINGS . . . . . . . . . . . . . . . . . . . . . . . . . . . . . . . . . . . . . . 18
STRATEGY . . . . . . . . . . . . . . . . . . . . . . . . . . . . . . . . . . . . . . 20
USER PROFILES . . . . . . . . . . . . . . . . . . . . . . . . . . . . . . . . . . 21
GAME MODES. . . . . . . . . . . . . . . . . . . . . . . . . 22
SEASON. . . . . . . . . . . . . . . . . . . . . . . . . . . . . . . . . . . . . . . . 22
FRANCHISE . . . . . . . . . . . . . . . . . . . . . . . . . . . . . . . . . . . . . 25
PLAYOFFS . . . . . . . . . . . . . . . . . . . . . . . . . . . . . . . . . . . . . . 27
1 ON 1 . . . . . . . . . . . . . . . . . . . . . . . . . . . . . . . . . . . . . . . . . 27
PRACTICE . . . . . . . . . . . . . . . . . . . . . . . . . . . . . . . . . . . . . . 28
EA SPORTS
TEAM MANAGEMENT. . . . . . . . . . . . . . . . . . . . 28
ROSTER MANAGEMENT . . . . . . . . . . . . . . . . . . . . . . . . . . . 28
STATS CENTRAL. . . . . . . . . . . . . . . . . . . . . . . . . . . . . . . . . . 30
OPTIONS. . . . . . . . . . . . . . . . . . . . . . . . . . . . . 31
SAVING AND LOADING (LOAD /SAVE). . . . . . . . . . . . . . . . . 31
CONFIGURE CONTROLLER . . . . . . . . . . . . . . . . . . . . . . . . . . 31
LIMITED 90-DAY WARRANTY . . . . . . . . . . . . . . 32
™
FREESTYLE CONTROL . . . . . . . . . . . 8
™
FREESTYLE. . . . . . . . . . . . . . . . . . 28
-1
-
Page 3
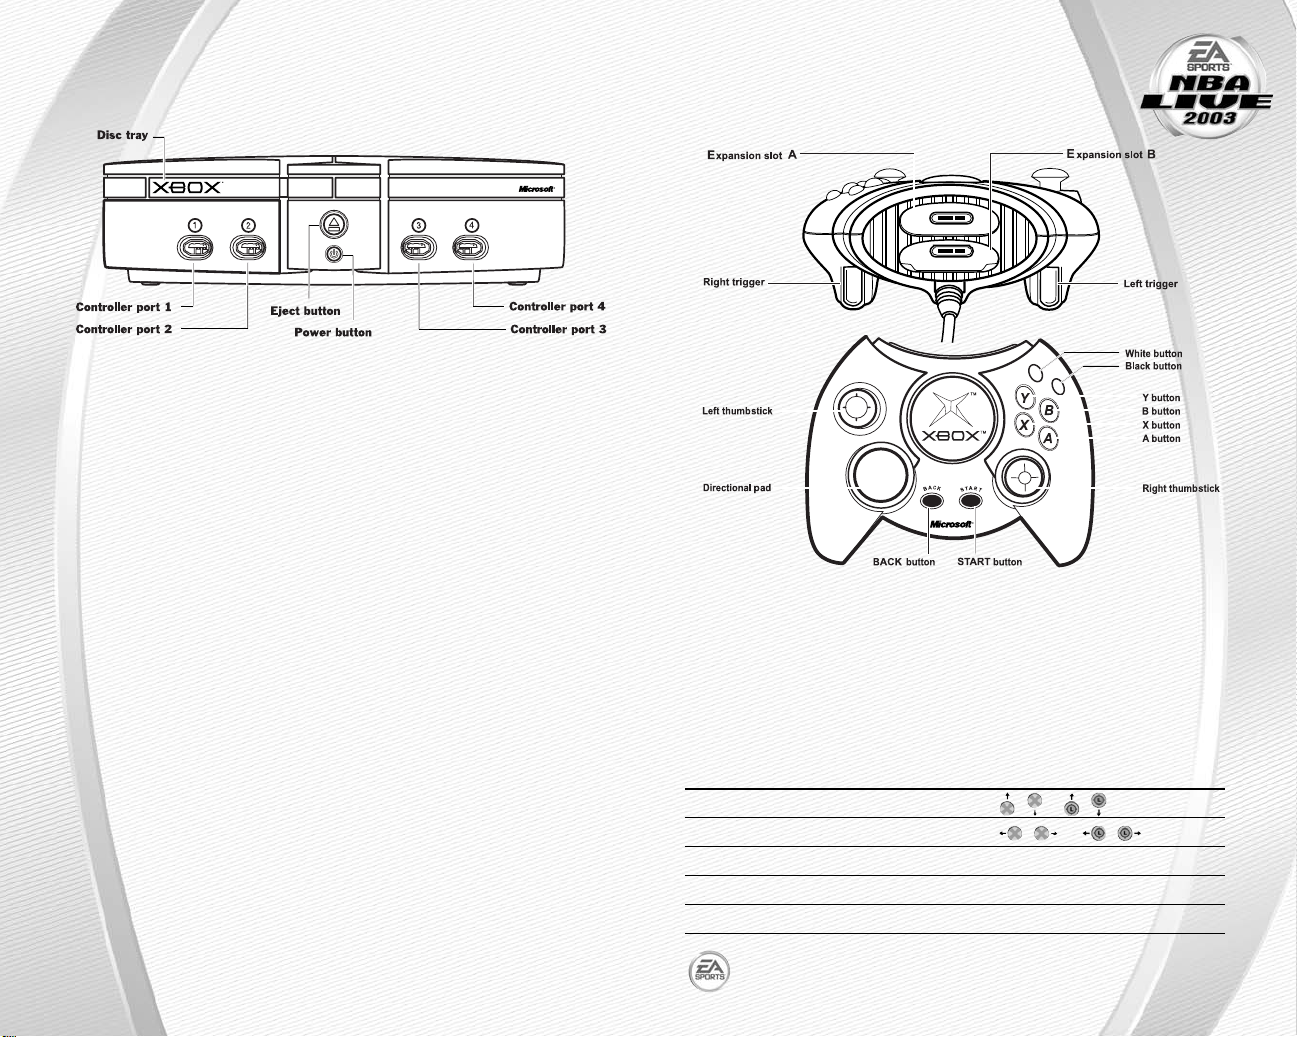
USING THE XBOX
VIDEO GAME SYSTEM
USING THE XBOX
CONTROLLER
XBOX CONTROLLER CONFIGURATIONS
1. Set up your Xbox
Xbox Instruction Manual.
™
video game system by following the instructions in the
2. Press the power button and the status indicator light will light up.
3. Press the eject button and the disc tray will open.
4. Place the NBA Live 2003 disc on the disc tray with the label facing up and close
the disc tray.
5. Follow on-screen instructions and refer to this manual for more information
about playing NBA Live 2003.
AVOIDING DAMAGE TO DISCS OR THE DISC DRIVE
To avoid damage to discs or the disc drive:
Insert only Xbox-compatible discs into the disc drive.
A
Never use oddly shaped discs, such as star-shaped or heart-shaped discs.
A
Do not leave a disc in the Xbox console for extended periods when not in use.
A
Do not move the Xbox console while the power is on and a disc is inserted.
A
Do not apply labels, stickers, or other foreign objects to discs.
A
-2
-
1. Connect the Xbox Controller to any controller port on the front of the Xbox
console. For multiple players, connect additional controllers to available
controller ports.
2. Insert any expansion devices (for example, Xbox Memory Units) into controller
expansion slots as appropriate.
3. Follow on-screen instructions and refer to this manual for more information
about using the Xbox Controller to play NBA Live 2003.
MENU CONTROLS
Highlight menu item / or /
Change highlighted item / or /
Select/Go to next screen A or G
Cancel/Return to previous screen B or H
Help menu J
™
For more info about this and other titles, visit EA SPORTS
at www.easports.com.
on the web
-3
-
Page 4
BASIC CONTROLS
Before you can run the floor and dunk with style, you must first master the
fundamentals of the court.
OFFENSE
ACTION COMMAND
Move player
Shoot B
Pass A
Crossover C
Spin D
Turbo F
DEFENSE
ACTION COMMAND
Move player
Switch players A
Steal C
Take a charge B
Block/Rebound D
Turbo F
NBA Live 2003 features many other moves—including all-new EA SPORTS
A
Freestyle Control—on both ends of the floor that can help push the outcome of any
game in your favor. For more information, ➤Complete Control Summary on p. 6.
™
INTRODUCTION
NBA Live 2003 lets you live your dream of being a NBA superstar.
When the game’s on the line, you’re the one everyone’s watching.
Featuring EA SPORTS Freestyle Control, call for the ball and drain
a buzzer-beating “3” and send your opponent packing, or “D-up” and
reject a last-ditch shot and show the world you own the paint. Lead your team to
victory in the biggest games imaginable, and do it year after year to create an NBA
dynasty and become an NBA legend. Totally enhanced gameplay brings the physically
challenging, fast-paced action of the NBA to life, and enhanced animations and audio
deliver the awesome drama and emotion of the NBA experience. NBA Live 2003—it’s
more than just basketball.
FEATURES
Revolutionary EA SPORTS Freestyle Control—Unprecedented control over
A
both hands lets you make lightning-quick steals, ankle-breaking crossover dribbles and a variety of post moves and ball fakes.
NBA Speed, NBA Power—Hundreds of new animations, including new
A
signature moves that showcase the explosive drives and thunderous jams
of the NBA.
“D Up”—With amazing control and new shot blocking animations, swatting
A
with authority can be just as fun as making a huge dunk.
Ground-Shaking Rebounding—The battle for the ball gets physical with
A
over 30 all-new rebounding animations.
The Show within the Show—Over 50 new cut scenes, from a coach jawing
A
at the ref to bench players erupting as a sweet three beats the buzzer.
Stylin’ Old-School Uniforms—Gear up like hardwood legends—check out
A
uniforms of the Elgin Baylor/Jerry West-era Lakers, Dr. J’s New York Nets, and
more.
-5
-4
-
-
Page 5
COMPLETE CONTROL
SUMMARY
After you figure out how to shoot, pass, and jump, take your game to another level
with these advanced moves.
OFFENSE
ACTION COMMAND
Move player
Shoot B (press and hold to jump then
release to shoot; tap to fake)
Pass (direction of chooses receiver) A (hold and release to execute
a Give-and-Go)
Crossover C (press and hold for
Hesitation move)
Spin move D
Turbo F
Back down defender (➤ p. 7 ) E
Alley-Oop pass (when teammate has J
a clear lane to the basket)
Direct pass (to a specific player) I then A, B, C, or D
Call timeout H
Pause game G
Call an offensive Quick Play (➤ p. 15 ) , ,
EA SPORTS
™
Freestyle Control (➤ p. 8 )
DEFENSE
ACTION COMMAND
Move player
Switch players A
Steal C
Take a charge B
Jump to block/Rebound D
Turbo F
or
,
Faceup/Boxout the player you are guarding E
Direct Player Switch (to a specific player) I then A, B, C,
or D
Switch to the closest defender to the basket J
Intentional foul H
Pause game G
Call a defensive Quick Play (➤ p. 15 ) , , , or
EA SPORTS
™
Freestyle Control (➤ p. 8 )
ADDITIONAL LOW POST MOVES
To back your defender down, pull and hold E and choose one of the following
➥➥
moves:
ACTION COMMAND
Jump hook/Slam dunk toward basket + B
Fade away jump shot away from basket + B
Drop step to side of direction you want to
step + B (tap to pump fake)
Spin move from back down in the direction you want to spin
and release E
“Up and Under” Finger roll/Slam dunk Drop step, pump fake then move
toward basket and press B
OFFENSE (PLAYER LOCKED)
In Player Lock mode, you control a single position for the entire game rather than
controlling the ball handler after every move. When you don’t have the ball, use the
special controls listed below:
ACTION COMMAND
Make computer ball handler shoot B
Call for pass from the computer ball handler A
Post up E +
NOTE:
(➤ p. 21).
You can turn Player Lock ON/OFF from the User Profile screen
-7
-6
-
-
Page 6
FREE THROWS
Use the T-Meter™to aim free throws when your player goes to the charity stripe.
Set the distance
Aim right/left
Press A or B
when the cursor
is in the center
of the meter for
best accuracy
EA SPORTS
™
FREESTYLE CONTROL
Take full command of your players with revolutionary EA SPORTS Freestyle Control.
For a detailed description of this new feature, be sure to view the EA SPORTS
Freestyle Control tutorial video (➤ p. 28 ).
NOTE:
visit www.nbalive2003.ea.com.
OVERVIEW
Basketball is a sport of individual expression and every player has their own style.
EA SPORTS Freestyle Control is designed to give you the opportunity to use the exact
set of moves that you want to execute at any given time. It lets you bring your style
of basketball to the court.
How it works
When you make a shape using EA SPORTS Freestyle Control ( ), a move is played
out on the court. Making the same shape will always result in the same move. This
means that you can decide exactly which move to use in a specified situation.
For more information on how to use the EA SPORTS Freestyle Stick
Dribbling In Place/Jab Step/Back Step
While your player is standing in one place and dribbling the ball, you
can execute a basic crossover between the legs.
When dribbling with the right hand, move . The player
➥➥
crosses the ball between his legs to his left hand.
If your player is dribbling the ball with his left hand, move . The player
➥➥
crosses the ball between his legs to his right hand.
To perform a jab step, move .
➥➥
To back step away from a defender, move . The back step move is a great move
➥➥
to use when you want to create space between yourself and the defender, or to
relocate your Player behind the 3-point line for a shot attempt from downtown.
Advanced Moves
You can perform more advanced moves by moving right thumbstick in more than one
direction. These moves take a little bit of practice, but once you get the timing right
you will be leaving defenders in the dust.
To try an advanced move, use a basic crossover to get your player dribbling the
➥➥
ball with his right hand. Without moving the ball carrier, move and then
(in the shape of the letter “J” in one smooth motion). The player crosses the ball
behind his back from his right hand to his left.
When dribbling with the right hand, you can also cross the ball in front of the
➥➥
body to the left hand by moving and then .
Cradle Move
Each of the crossover moves can be further enhanced with a cradle move.
Before executing a crossover, move from its centered position in the same
➥➥
direction as the hand that is dribbling the ball (i.e., to the right if you are
dribbling with your right hand). Next, quickly fire the ball over by performing
any of the three crossover moves described above.
NOTE:
which hand is dribbling the ball.
Any of these moves can be executed in either direction based on
OFFENSE
Every player likes to show off when they have the ball and this is where EA SPORTS
Freestyle Control shines best.
EA SPORTS Freestyle Control produces moves based on what your player is doing at
any given point during a game. However, different moves are performed depending
on which hand the ball carrier is holding/dribbling the ball with.
-8
-
TIP:
Not everybody is capable of pulling off dribble moves with the
same speed and effectiveness as a Jason Kidd, so be sure to try these
moves with players of varying abilities.
-9
-
Page 7
Dribbling On The Run
You can execute all of the crossover moves (described above) while your player is
in motion.
Moving while you are on the move executes two different spin moves.
➥➥
Moving executes a hesitation move.
➥➥
There is also a hidden spin move that only the best players in the league can
A
execute. See if you can figure it out!
Standing Without Dribbling (Triple Threat)
An important part of the game occurs after a player has received a pass or brought
down a rebound, but has not yet begun to dribble. At this point, a player is said to be
a “Triple Threat” which means he can drive, shoot, or pass—making him extremely
hard to defend.
There are eight different positions you can maneuver your player into in order to set
up for a drive past a defender.
Example One: Move and hold it there. Your player will step one foot back
➥➥
and palm the ball behind his body. From this position he is set up to drive past
a defender to the left or to the right.
In order to execute a drive from any of the Triple Threat positions:
From Triple Threat, move and hold .
➥➥
Move or and hold it there.
➥➥
Release . Your player executes an aggressive move in the direction you chose
➥➥
with . Each of the eight Triple Threat positions has its own unique drives in
either direction for a total of 16 different moves.
TIP:
If the defense begins to anticipate your moves and starts to back
away, move to execute a step-back dribble and hit the wide-open
shot. Now you’re a real Triple Threat!
Standing Without Dribbling (In The Post)
Another game situation in which the Total Player Control can be used with great
effectiveness is in the post.
From the Triple Threat position, move and your player turns his back to the
➥➥
basket. From here you will be able to execute moves similar to those described
above.
Linking Moves
After you have mastered the moves listed above, link the moves
together. Linking moves together is particularly effective when
combining Triple Threat drives with “dribbling on the run” crossovers.
Spend some quality time in Practice mode and you will realize the
staggering number of combinations that can be achieved by linking moves
from these two states.
DEFENSE
Of course, the game experience would be somewhat incomplete if EA SPORTS
Freestyle Control were not available to you while you are playing defense. Relative
to the arsenal of moves available on offense, the number of defensive moves is much
smaller since the primary objective on defense is to prevent your opponent from
scoring, however it is a skill that will take some time and effort for you to master.
Stealing The Ball/Intercepting Passes
In order to steal the ball or intercept an errant pass, you will have to pay close
attention to which hand you want to use.
In order to steal with your right hand, move .
➥➥
To steal using your left hand, move .
➥➥
Facing Up The Ball Carrier
Staying between your man and the basket is no easy feat, especially when that man
is someone like Jason Kidd. However, if you use the EA SPORTS Freestyle Control and
face up your opponent, you may force a turnover or an errant pass.
In order to face up the ball carrier, move and hold . Your player drops into an
➥➥
aggressive defensive stance. From here, you have full mobility with your Player
with .
TIP:
While facing up a ball handler, move or and quickly
again without returning it to it’s centered position. Your player executes
a steal without ever leaving the face up position.
Contesting Shots
In order to prevent your player from being aggressively backed down, or to alter an
offensive player’s shot, move and hold . Your player raises his arms above his
head to contest a shot. From here, you will have full mobility of your player with .
This is a great way to decrease your opponent’s shooting percentage without putting
yourself at risk for getting whistled for a foul like when attempting to block a shot.
-11
-10
-
-
Page 8

SETTING UP THE GAME
Life on the hardcourt begins from the NBA Live 2003 Main menu.
MAIN MENU
Skip all of the pre-game activities
and “Play Now” (➤below)
Get in the game
by playing in more
advanced game
modes (➤ p. 22)
Load or save your
game, or change
your controller
configurations
(➤ p. 31)
NOTE:
Default options are listed in bold in this manual.
EA SPORTS Extras: Get a Season
Preview and view game credits
EA SPORTS EXTRAS
Credits: See who made NBA Live 2003 the best basketball game in the
world.
Season Preview: Take an inside peek at the all-star lineup from
EA SPORTS for 2003.
PLAY NOW—
STARTING AN EXHIBITION GAME
Go straight to the court in an Exhibition game between any two teams.
To start a Play Now game:
From the Main menu, highlight PLAY NOW and press A. The Select Teams screen
➥➥
appears.
Get the scoop
with Basic and
Advanced
Freestyle stick
tutorials
(➤ p. 28)
Manage your
rosters and take
full control of
a team or check
out player, team,
and user stats
(➤ p. 28)
SELECT TEAMS SCREEN
Select the teams for the next game.
User Controlled team
(Player 1)
Away team
Team ranking
Press B or H
to go back to
the Main menu
Press D to
adjust the
starting lineups
Home team
Press J to
access the Help
menu
Pull E to access
the User Profile
screen (➤ p. 21)
Selecting the Teams
To run a team for the upcoming game, press / to move the controller
➥➥
icon beside the team logo of the team you wish to control. If a team doesn’t have
a controller icon positioned beside it, the CPU controls that team.
To play with teams other than the defaults (Nets vs. Lakers), highlight the current
➥➥
team logo and press / to scroll through the rest of the teams in the
league. Pull F to select a team at random.
Press G to continue on to the Select Jerseys screen.
➥➥
User Profiles
Keep track of your individual game stats for every contest played with the help
➥➥
of a User Profile. You can create a User Profile by pulling E from the Select Team
screens. For more information, ➤User Profiles on p. 21.
Starting Lineup
To adjust your starting lineup, press D. For more information, ➤Roster
➥➥
Management on p. 28.
-13
-12
-
-
Page 9

SELECT JERSEYS SCREEN
Select an “old school” retro jersey to wear for the upcoming game or sport your
team’s current uniform instead.
To choose a
throwback jersey,
Press C to
navigate the
home and away
teams
Press G to go to the Quick Settings screen.
➥➥
press /
Pull E or F to
rotate the jersey
QUICK SETTINGS SCREEN
Setup the basic setting for the upcoming game.
Skill Level Set your skill level to ROOKIE, STARTER, ALL-STAR, or
SUPERSTAR. The difficulty level increases with each
category.
Quarter Length Set the quarter length from 2-12 minutes. Default is
5 minutes.
Camera View Choose one of five camera views: CENTER COURT,
SIDELINE, BASELINE LOW, PRESS BOX, or BASELINE
HIGH.
Pull E to access the Settings screen (➤ p. 18)
➥➥
Press G to begin the game.
➥➥
ON THE COURT
Run the point, dominate the paint, and take full control of your
NBA Live 2003 experience.
GAME SCREEN
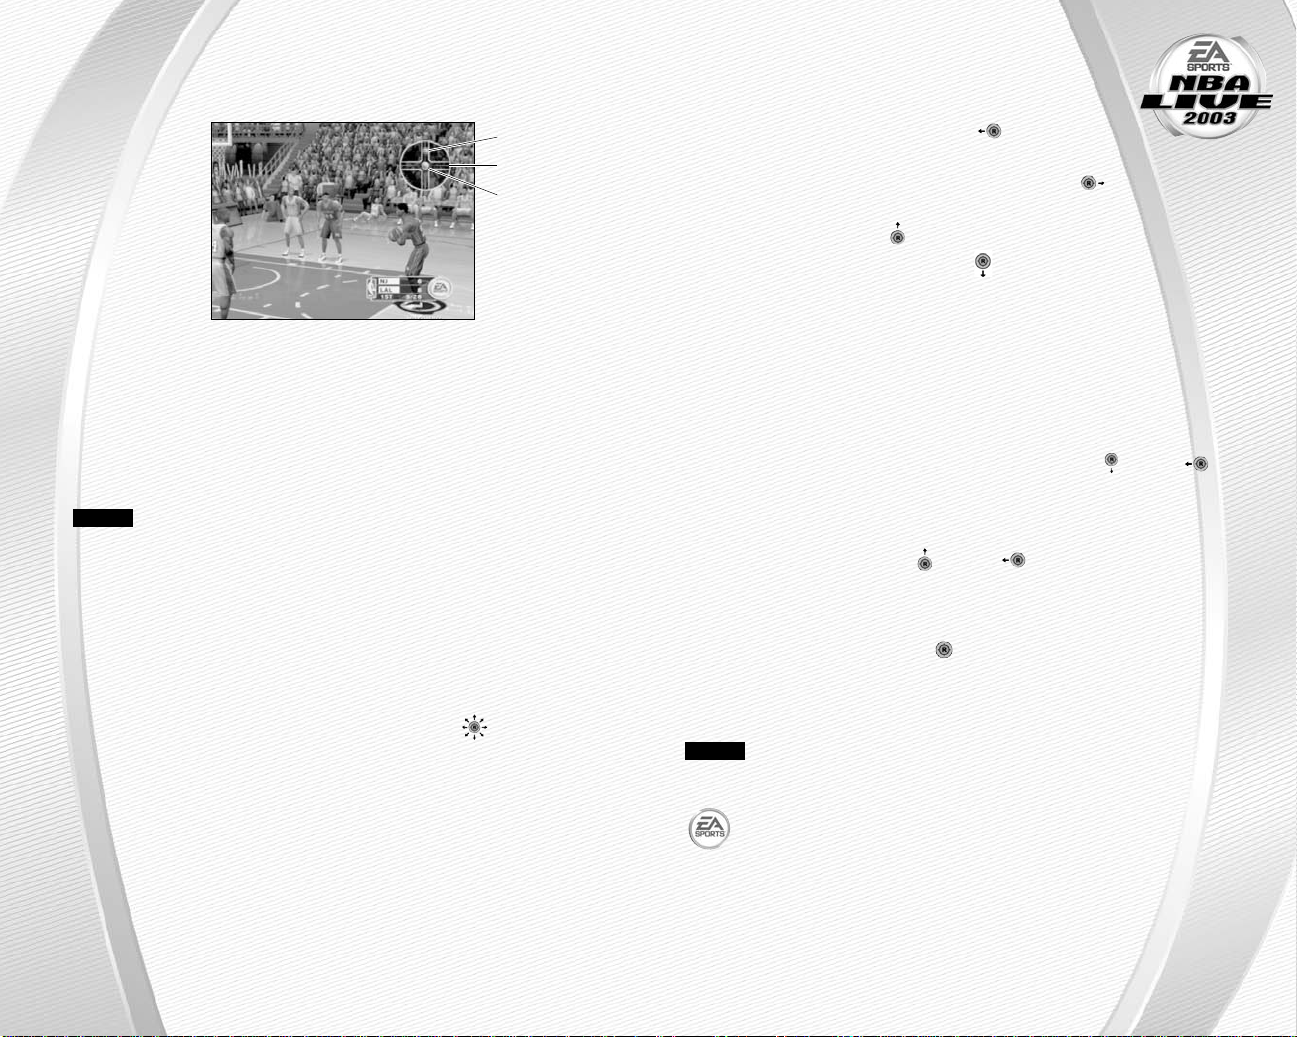
If your player is off-screen, an arrow the same color as your control indicator points
toward him from the edge of the screen. Move in the opposite direction of the
arrow to bring the player on-screen.
Controlled
Player
Game Clock
QUICK PLAYS
In NBA Live 2003 you can direct traffic on the court with the single touch of a button
using the new Quick Play feature. There are four default plays on both offense and
defense that give you unprecedented control over what your teammates are doing
on the court.
Current Play
Shot Clock
-15
-14
-
-
Page 10

OFFENSE
Isolation
If you want to show off your skills with the EA SPORTS Freestyle Control there is no
better way than with the isolation play. Get the ball to a teammate on either side of
the court and press . Your teammates relocate to the opposite side of the court,
leaving only you and your man to battle it out to the basket one-on-one.
Post up
If you want to try one of the new post moves like the “up-and-under” but no one is
positioned in the low post, press . One of your teammates relocates to the low
post and calls for a pass. Get him the ball and get to work!
Pick and Roll
If you like to stick to the basics and play old-school ball, run the pick and roll. Press
and one of your teammates sets a pick on your defender and then rolls toward
the basket. Blow around the screen with an EA SPORTS Freestyle Control move and
either take it to the basket, or dish to the roller—the choice is yours.
3-Point Play
Is the defense showing zone? Or, maybe your three-point specialist is on a hot
streak. Either way, pressing sends three of your teammates out to the perimeter
to spot up for a three-point attempt. Swing the ball around and let it fly!
TIP:
Tr y combining different Quick Plays for added effectiveness. For
example, call an isolation play, and once they have cleared out call for
a post up. Now you can run a two-man game against the defense for an
easy back down play or a quick kick-out for three.
DEFENSE
Man-to-Man
The most common defensive choice in the NBA is man-to-man defense. Every player
is assigned a specific player to guard from the opposing team. The man-to-man is
a strong defense against outside shooting but is vulnerable to isolation and post up
plays. To call a man-to-man defense, press .
Zone
When playing zone defense, players guard a specific area of the court rather than a
particular player. The zone is a strong defense against isolations and post up plays
but is vulnerable to outside shooting. To call a zone press .
Double Team
If you feel one your teammates is having difficulty guarding the ball carrier, press
and one of your teammates will come over and double-team the ball carrier until
he shoots or passes the ball.
Full Court Press
If you want to pressure your opponent from the moment he inbounds
the ball, press to call a full court press and your teammates pick
up the player they are guarding in the frontcourt. The press is a good
way to generate turnovers but is vulnerable to the fast break.
To assign different set plays, ➤ Strategy on p. 20
➥➥
PLAYER ICONS
During gameplay, all ball-handlers and user-controlled defensive players are
represented with a player icon indicating their skill specialty. Use these players
to your advantage.
ICON FEATURE/NAME
Shoe with wings Big dunker
Lock Tight D
3 Ball 3 Point Shooter
Hand Shot Blocker
INDICATORS
A Player Indicator—an illuminated ring located under the player’s feet—tells you
which player you or your opponent is controlling.
A Star Player Indicator represents the team’s best player on the floor.
PAUSE MENU
Access the Pause menu to reset game settings and options, call a timeout, make
player substitutions, and more.
To access the Pause menu, press G at any time during gameplay.
➥➥
Resume Game Return to the current game.
Home Timeout Call one of six timeouts per game (home team).
The number listed in parentheses changes to reflect
the number of timeouts remaining.
Away Timeout Call one of six timeouts per game (away team).
Substitutions Go to the bench and sub in some reserves for your
starters. (➤ Team Management on p. 28).
Select Controller Switch the user-controlled teams mid-game.
Camera Options Choose your camera view and set your camera options.
-17
-16
-
-
Page 11

Settings Adjust the rules and game preferences (➤ Settings
below).
Stats Central View Player, Team, User Stats and Shot Display for the
current game.
Strategy Set your Team, Offensive, Defensive, or Defensive
Matchup Strategy (➤ Strategy on p. 20).
Instant Replay View the action from the last few seconds of the game.
Rematch Start a new game between the same two teams without
exiting out to the Main menu.
Quit Game Abort the current game and return to the Main menu.
SETTINGS
Change your game settings to fit your playing style.
You can also access this screen from the Pause menu.
A
RULES
Tweak the rules to enhance your NBA Live 2003 experience.
Defensive Fouls Adjust the frequency of defensive fouls called.
Offensive Fouls Adjust the frequency of offensive fouls called.
Foul Out Adjust the number of fouls allowed before a player fouls
out of a game. You can set the number of fouls between
0–9. The Default is 6.
Shot Clock When ON, you must take a shot attempt before the
24 second shot expires. The ball must, at the very least,
hit the rim to be considered a shot attempt.
Out of Bounds When ON, players can’t dribble out of bounds.
Backcourt Violation When ON, the offense can’t return the ball to the
backcourt after crossing the midcourt line.
Traveling When ON, players can’t take more than two steps
without a dribble.
Goaltending When ON, defenders can’t block a shot attempt after the
ball descends toward the basket.
Defensive 3 Seconds When ON, any defensive player, who is positioned in the
16-foot lane or the area extending 4 feet past the lane
endline, must be actively guarding an opponent within
three seconds.
3 in the Key When ON, offensive players are not
allowed to stand in the key for more
than three seconds at a time.
5 Second Inbounding When ON, you must inbound the ball
within five seconds.
8 Second Half Court When ON, you have eight seconds to advance the ball
over the half court after inbounding in the backcourt.
PREFERENCES
Adjust the preferences to suit your mood or game style.
Menu Music Volume Adjust the volume of the music that plays at menu
screens.
In-Game Music Volume Adjust the volume of the music that plays during the
game.
Commentary Volume Set volume levels for the play-by-play and analyst
commentary.
On-Court Speech VolumeSet volume levels for the players and their coaches.
Sound F/X Volume Set volume levels for the game and player sound effects.
Arena Volume Set volume levels for the arena announcer and the
hometown fans.
Automatic Replays Set the frequency at which highlight plays are shown
after made baskets.
Player Cut Sequences Determine the amount of non-interactive cut scenes.
Score Overlay Toggle continuous score display during gameplay
ON/OFF.
Player Indicator Select player indicators from NAME, POSITION,
NUMBER, POSITION NO., USER NAME, or NONE.
GAMEPLAY SETTINGS
Game Style Choose SIMULATION or ARCADE style. An ARCADE style
game has a quicker pace. SIMULATION style plays more
like a real NBA game.
Injuries When set to YES, players can become injured and must
be substituted accordingly.
Fatigue When set to YES, players tire and you must substitute
accordingly. The default is set to NO.
-19
-18
-
-
Page 12

CPU Assistance When set to YES, the comeback abilities of the team that
is trailing in the game increases. The default is set to NO
Shot Control Set shot control to USER or CPU.
STRATEGY
Set your team, defensive, and offensive strategies and your defensive matchups for
the game.
You can access the Strategy screens from the Pause menu.
➥➥
DEFENSIVE MATCHUPS
Set up your defensive assignments when playing man-to-man type defenses.
To set a defensive matchups:
1. From the Defensive Matchups screen, highlight the logo of the team (located
on the left side of the screen) whose player assignments you want to adjust by
pressing / . You can only adjust defensive matchups for user-controlled
teams.
2. Press C to navigate screens. The cursor moves to the opponent’s lineup (located
on the right side of the screen).
3. While the cursor is highlighting the first player in the opposing team’s lineup,
press / and select a player that you wish to edit. Press A and the name
of the player will be highlighted.
4. While highlighted, press / again and move the player to a different row
(matching him up with a player from your team) and press A. The players swap
places in the lineup.
To change the double team and press assignments, pull E or F when a player
➥➥
is highlighted.
DEFENSIVE STRATEGY
Choose and assign different Defensive Strategies or return to the default setup.
OFFENSIVE STRATEGY
Choose and assign different Offensive Strategies or return to the default setup.
TEAM STRATEGY
Set up your team strategies, auto subs, and notifications.
USER PROFILES
Set up a user profile to keep track of your stats, settings, and more.
Pull E from the Select Teams menu to access the User Profiles
➥➥
screen.
USER PROFILES SCREEN
User Profiles Select a user profile to play with.
Create New Profile Create and enter a new profile name.
Player Lock Set to a specific position or choose UNLOCKED to rotate
between all positions.
Skill Level Set your skill level to DEFAULT (your skill level is
determined by the skill level set in Game Settings),
ROOKIE, STARTER, ALL-STAR, or SUPERSTAR.
Shot Control Set shot control to DEFAULT (shot control is determined
by the skill level set in Game Settings), CPU, or USER.
Vibration Toggle vibration mode ON/OFF.
Configure Controller Configure your game controller with non-DEFAULT
gameplay commands. For more information,
➤ Configure Controller on p. 31.
To create a user profile:
1. From the User Profiles screen, press / to highlight CREATE NEW PROFILE
and press A.
2. Enter your profile name and then press A again.
When creating a name, press / to scroll through the alphabet.
➥➥
Press / to move to/from the next available space.
3. Adjust all your profile options and then press G to accept the settings.
-21
-20
-
-
Page 13

GAME MODES
In addition to Play Now (Exhibition mode), you can test your hoops skills in other
game modes. You can play a full Season, build a 10-year Franchise, participate in the
Playoffs, take on an NBA superstar in 1-on-1 mode, or polish your game in Practice.
SEASON
Play through an entire NBA Season and make a run for the championship.
Schedule Type When set to NBA, the season schedule
is set based on the real 2002 NBA
season. You can also set a RANDOM
schedule.
Fantasy Draft When set to YES, teams create a custom roster
by drafting players from the entire pool of active NBA
players. For more information, ➤Fantasy Draft below.
SEASON SETUP SCREEN
Change divisions
Press /
to highlight
a team in the
division
Press A to toggle
the highlighted
team to either
CPU or User
control
To begin a season:
Set up a custom
or default NBA
league
Set the length of
your season
Choose a random
or NBA type
schedule
Press C to
navigate the
screen
1. From the Season Setup screen, set up the new season by selecting at least one
user-controlled team and selecting the season options, located on the right side
of the Season Setup screen (➤ above). Press G to advance to the Season
Settings screen.
2. From the Season Settings screen (➤ p. 24), adjust your settings and press G to
advance to the Season Central screen.
3. From the Season Central screen, start your first game by choosing PLAY GAME.
Continue as you would in a Play Now/Exhibition game (➤ p. 12).
SEASON SETUP SCREEN OPTIONS
Division Toggle between the PACIFIC, MIDWEST, CENTRAL, and
ATL AN TIC divisions.
League Type When set to DEFAULT NBA, the divisions are aligned
as normal. You can also set the League Type to CUSTOM
and rearrange the divisions.
Season Length When League Type is set to Default NBA, play a 28, 56,
or a full 82-game season. When set to CUSTOM, you can
play a SHORT, MEDIUM, or LONG season.
FANTASY DRAFT
With this option set to YES, all active NBA players are thrown into a
single draft pool. Teams then add players to their rosters in a 12-round
Fantasy Draft. Once the draft is concluded, the league begins.
To run a Fantasy Draft:
1. After you set up your Season or Franchise (with Fantasy Draft option
set to YES), press G to begin the draft. The Fantasy Draft Order
screen appears.
2. The team listed first is on the clock.
You can reorder the draft positions. To switch, highlight the name of
A
the team that you wish to move and press A. Press
select a new slot in the draft order. Press A again to relocate the
team in the new draft spot.
You can also pull F to randomize the draft order.
A
/ and
3. Press G to begin the draft (The CPU drafts players for CPU-
controlled teams).
4. To draft a player from the player pool, highlight a name of the player
you wish to select and press A. You can sort players by stats by
selecting the desired column and pressing D. Move through the
available players by pressing the
/ .
5. After you select a player, he is added to the team roster and the draft
continues.
NOTE:
To simulate the draft at any time, press G.
-23
-22
-
-
Page 14

SEASON SETTINGS
Sim Quarter Length Set the simulated quarter length from 2–12 minutes.
Default is 12 minutes.
Playoff Length Set the Playoff format to a 5-7-7-7, 1-1-1-1, 1-3-3-3,
or a 3-5-5-5 game series.
Switch teams When set to YES, you are allowed to change
user-controlled teams mid-season.
Modify CPU Rosters When set to YES, you are able to change the
CPU-controlled teams’ rosters.
Trade Restrictions When trade restrictions are set to YES, the CPU checks
for unfair trades involving its own teams.
Trade Deadline The trade deadline is enforced when this option is set to
YES. All trades must take place before a certain deadline. For example, the trade deadline for NBA Live 2003
is in February.
CPU Initiated Trades When set to YES, the computer prompts users with trade
offers.
SEASON CENTRAL SCREEN
Simulate the
next game on
the schedule
View the season
schedule by
month or by team.
You can simulate
multiple games
from here
Reorder your
rosters, trade
players, sign
and release
players, or create
or edit a player
(➤ p. 28)
View player, team,
or user stats, or view
league leaders
Advance to the Select Teams
screen and play the next game
Skip the rest of the regular
season and begin the playoffs
Adjust rules,
preferences, and
season settings
(➤ Settings on
p. 18 or Season
Settings above)
Load or save your
season, settings,
profile, or rosters
(➤ p. 31)
Check out the
NBA News, mvp
candidates, Season
Standings, or
Matchup Review
POST SEASON
To start the Playoffs:
1. When all the games on the schedule have been played or
simulated, choose BEGIN PLAYOFFS from the Season Central
menu and press A. The Playoff Central menu appears.
If you jump to the playoffs mid-season, a prompt asks if you are you sure
➥➥
you want to go to the playoffs. Highlight YES and press A.
2. Play or simulate through the playoffs as you would the normal season.
3. When the Playoffs are over, highlight EXIT PLAYOFFS from the Playoff Central
screen. The Finals MVP screen appears. Press g to advance to the NBA
Champions screen. Press / to select a player and pull f to view the
player’s stats. Press G to return to the Main menu.
FRANCHISE
Build a team from the ground up and then manage it from season to season.
Setting up a league in Franchise mode is similar to setting up one in Season
➥➥
mode (➤ Season on p. 22).
POST SEASON
Once all of the regular season games have been played or simulated, you are
prompted to return to the Franchise Central menu.
To start the playoffs, choose BEGIN PLAYOFFS. The Awards screens appear.
➥➥
Awards screens
See who won the awards for MVP, Most Improved, Sixth Man, Defensive Player,
Rookie, and GM of the Year. You can also see who was named to the All NBA Team,
the All Defensive Team, and the All Rookie Team.
When you’re finished press G to advance to the Playoff Central screen.
➥➥
Play through the Playoffs as you would in a Season.
➥➥
When the Playoffs are over, choose EXIT PLAYOFFS from Playoff Central screen
➥➥
and press A. The Finals MVP screen and NBA Champions screen appear.
After reviewing the NBA Champions screen, press G to advance to the Off
➥➥
Season Hub screen.
OFFSEASON SCREEN
Before you start the next season, build up your team in the offseason by signing free
agents, drafting young rookies, and making blockbuster trades.
-25
-24
-
-
Page 15

TEAM ROSTER
Begin the offseason by reviewing your current team roster. Find out which players
are under contract and who may leave via free agency.
RETIRING PLAYERS
View the list of players who have decided to hang it up. Here you can view and
compare player stats.
DRAFT LOTTERY
Find out which selection your team will have for the upcoming rookie player draft.
The 13 teams that fail to make the playoffs the previous season are thrown into a
draft lottery. The league distributes draft positions at random. Although the team
with the worst record has a better chance at receiving the number one pick, it’s not
guaranteed.
RE-SIGN PLAYERS
Re-sign your players from last season whose contracts are up.
To r e-sign a player:
From the Re-sign Players screen, press / to highlight the player to re-sign.
➥➥
Then press A to re-sign him. When you’re finished, press G to return to the
off season hub screen.
To change the number of years a player is signed for, press C to highlight the
➥➥
contract length area and then press / to adjust the contract length.
ROOKIE DRAFT
Fill your roster spots with NBA rookies who are coming into the league for the first
time.
To draft a rookie:
From the Rookie Draft screen, press / to highlight a player from the player
➥➥
pool that you want to draft. Press A to add him to your squad.
To view the scouting report, pull F to get additional information on a rookie
➥➥
player. From the Scouting Report screen, you can view player strengths,
weaknesses, and projected draft position.
SIGN FREE AGENTS
Add a free agent to your team by signing him with a lucrative contract.
To sign a free agent:
At the Sign Free Agents screen, press / to select a player and then
➥➥
press A.
To change the number of years a player is signed for, press C to highlight the
➥➥
contract length area and then press / to adjust the contract length.
-26
-
TRADE PLAYERS
For information on trading players, ➤Roster Management on p. 28.
START NEXT SEASON
After all the offseason activities have been completed, start the next
season of Franchise mode.
PLAYOFFS
Skip the regular season and participate in a Playoff.
Current Playoff
Conference
Playoff Tree
Playoff mode works similarly to Season mode. Use the information provided in
A
Season mode (➤ p. 22) to set up your playoff.
settings
1 ON 1
Take it to the rim and battle it out 1-on-1 against any of the league’s finest players or
All-Stars from the past. You can play against All-Stars from the 50’s, 60’s 70’s 80’s
and 90’s.
To start a 1 on 1 game:
1. From the 1 ON 1 Select Players screen, press / to choose a team from
the team selector.
You can switch the location of 1 on 1 mode to GYM, BEACH, or URBAN.
A
2. Once the player pool is highlighted, press A to select a player. At the prompt
menu, highlight HOME or AWAY and press A. The new player is selected for the
next game.
3. Follow step 2 above to choose a second player.
4. Press G to advance to the Select Controller screen. Continue from there as you
would in a Play Now (Exhibition) game (➤ p. 12).
-27
-
Page 16

PRACTICE
Practice the new EA SPORTS Freestyle Control moves here!
To start a practice:
1. From the Game Modes menu, choose PRACTICE. The Select Player screen
appears.
To change teams, press / when the team bar is highlighted.
➥➥
2. To select a player, press C to highlight the player list and then press /
to cycle through the current team’s players.
3. Press A to select a player and then press G to advance to the Select Controller
screen. Continue from there as you would in a Play Now game (➤p. 12).
™
EA SPORTS
Get a tutorial on the new EA SPORTS Freestyle Control feature. Play-by-play
announcer Marv Albert narrates both tutorials.
FREESTYLE
BASIC TUTORIALS
Receive a tutorial on the basic moves such as jab steps, back steps, crossover
dribbles, and more.
ADVANCED TUTORIALS
Receive a tutorial on the more advanced moves such as cradle moves and dribbling
while on the run.
TEAM MANAGEMENT
Take complete control over your team by managing your rosters.
ROSTER MANAGEMENT
REORDER ROSTERS
To r eorder your rosters:
1. From the Reorder Rosters screen, select the team whose roster you want to
reorder by pressing / .
2. To move the cursor to the player pool (or back to the team selection bar),
press C.
3. From the player pool, press / to highlight a player to move and then
press A.
4. Press / to select the second player who will swap places with the first player
and then press A.
5. When you’re finished reordering the roster, press G to accept
the change and return to the Roster Management screen.
6. Press b to cancel the change and return to the Roster
Management screen.
TRADE PLAYERS
To trade players:
1. From the Trade Players screen, select the two teams who will be involved in the
trade by navigating between the team selection bars (press C to move the
cursor from one side of the Trade Players screen to the other).
2. When the team selection bar is highlighted, press / to scroll the team
rosters.
3. Once a team roster is located, press / to select a player to trade and then
press A. The player’s name is highlighted and placed on the trading list.
4. Press C again to jump team rosters.
5. Follow step 3 and then press D to execute the trade.
6. Press G to accept the change and return to the Roster Management screen.
Press b to cancel the change and return to the Roster Management screen.
➥➥
SIGN/RELEASE PLAYERS
To sign or release a player:
1. From the Sign/Release Players screen, press C to toggle between the team
selection bar and the Free Agent pool.
2. When the team roster or Free Agent list is highlighted, press / to select
a player to sign or release. Press A and the player is either added to the team
roster, or released to the Free Agent pool.
3. Press G to accept the transaction.
Press b to cancel the change and return to the Roster Management screen.
➥➥
CREATE PLAYER
To create a player:
From the Create Player screen, highlight one of the create player options and
➥➥
press A.
From the Bio screen, create a first and last name, select a nickname, a birthdate,
A
and a birth city and state. Highlight DONE and press A when the bio is
complete.
-29
-28
-
-
Page 17

From the Info screen, select your player’s height, weight, primary and secondary
A
positions, hand, jersey number, former school, and years pro. Highlight DONE
and press A when the player info is complete.
From the Ratings screen, set the slider on a respective attribute between 50–99.
A
The higher the rating, the better the player. Highlight DONE and press A when
the player ratings are complete.
From the Looks screen, adjust all of your player look features. Highlight DONE
A
and press A when the looks are complete.
From the Gear screen, set your player’s gear from headbands, to tattoos, to
A
shoes and shorts. Highlight DONE and press A when the player gear is
complete.
To save a created player:
After your player is created, highlight DONE from the Create Player screen and
➥➥
press A. Your created player is saved and added to the Free Agent Pool.
EDIT PLAYER
To edit a player:
1. From the Edit Player screen, press / and toggle to the player that you
wish to edit. Highlight TEAM and press / to change team rosters.
2. Highlight one of options that you wish to edit and press A. For non-created
players, you can only edit Info, ratings, and Gear options.
3. Once the edits are made, highlight DONE and press A.
CREATED PLAYERS LIST
View the entire list of created players. You can create up to 50 players at one time.
RESET ROSTERS
Cancel all trades, signings, and other transactions and reset all team rosters back
to their defaults.
STATS CENTRAL
View Player Stats, Team Stats, or User Stats.
OPTIONS
SAVING AND LOADING (LOAD /SAVE)
Load and save your game files to and from the hard disk or a Memory
Unit (MU), or changer you controller configuration.
NOTE:
To save a file:
1. From the Load/Save menu, press / to highlight the type of file you want
2. Select where you want to save your file and press a.
3. Name your save file and press A. After your file is named, press C to toggle
4. A pop-up screen appears indicating if the save was successful. Press A
To load a file:
1. From the Load/Save menu, press / to highlight the type of file you want
2. Select where you want to load your file from and press a.
3. Press / to highlight file you want to load and then press A.
4. A pop-up screen appears asking again if you want to load the file to the game.
5. Highlight YES and press A to begin loading the file.
To delete a file:
1. From the Load/Save menu, press / , highlight DELETE FILES, and press A.
2. Specify the location of the file you want to delete and press a.
3. Press / and highlight the file you want to delete and press A. A pop-up
CONFIGURE CONTROLLER
Change your user configuration on your game controller.
To change your controller figuration:
1. Press / and choose from 4 different preset controller configurations.
2. Press G to accept the change.
Never insert or remove an MU when loading or saving files.
to save and press a.
to the save box and press A again. The file is saved.
to acknowledge it and return to the Load/Save menu.
to load then press a.
screen appears asking if you are sure you want to delete the file. Select YES and
press A to acknowledge it and return to the Delete Files screen.
NOTE:
at least one controller icon beside a team logo on the Select Teams screen.
-30
-
Before you can access the Configure Controller screen, you must move
-31
-
Page 18

LIMITED 90
-
DAY
WARRANTY
ELECTRONIC ARTS LIMITED WARRANTY
Electronic Arts warrants to the original purchaser of this product that the recording medium
on which the software program(s) are recorded (the “Recording Medium”) and the
documentation that is included with this product (the “Manual”) are free from defects in
materials and workmanship for a period of 90 days from the date of purchase. If the
Recording Medium or the Manual is found to be defective within 90 days from the date of
purchase, Electronic Arts agrees to replace the Recording Medium or Manual free of charge
upon receipt of the Recording Medium or Manual at its service center, postage paid, with
proof of purchase. This warranty is limited to the Recording Medium containing the software
program and the Manual that were originally provided by Electronic Arts. This warranty shall
not be applicable and shall be void if, in the judgment of Electronic Arts, the defect has
arisen through abuse, mistreatment or neglect.
This limited warranty is in lieu of all other warranties, whether oral or written, express or
implied, including any warranty of merchantability or fitness for a particular purpose, and no
other representation of any nature shall be binding on or obligate Electronic Arts. If any such
warranties are incapable of exclusion, then such warranties applicable to this product,
including implied warranties of merchantability and fitness for a particular purpose, are
limited to the 90-day period described above. In no event will Electronic Arts be liable for any
special, incidental, or consequential damages resulting from possession, use or malfunction
of this Electronic Arts product, including damage to property, and to the extent permitted by
law, damages for personal injury, even if Electronic Arts has been advised of the possibility
of such damages. Some states do not allow limitation as to how long an implied warranty
lasts and/or exclusions or limitation of incidental or consequential damages so the above
limitations and/or exclusion of liability may not apply to you. In such jurisdictions, the
Electronic Arts’ liability shall be limited to the fullest extent permitted by law. This warranty
gives you specific rights. You may also have other rights that vary from state to state.
returns within the 90-day warranty period
Please return the product along with (1) a copy of the original sales receipt, showing the date
of purchase, (2) a brief description of the difficulty you are experiencing and (3) your name,
address and phone number to the address below and Electronic Arts will mail a replacement
Recording Medium and/or Manual to you. If the product was damaged through misuse or
accident, this 90-day warranty is rendered void and you will need to follow the instructions
for returns after the 90-day warranty period. We strongly recommend that you send your
product using a traceable delivery method. Electronic Arts is not responsible for products not
in its possession.
returns after the 90-day warranty period
If the defect in the Recording Medium or Manual resulted from abuse,
mistreatment or neglect, or if the Recording Medium or Manual is found
to be defective after 90 days from the date of purchase, please return
the product along with (1) a check or money order for $15.00 made
payable to Electronic Arts, (2) a brief description of the difficulty you are
experiencing and (3) your name, address and phone number to the address below, and
Electronic Arts will mail a replacement Recording Medium and/or Manual to you. We strongly recommend that you send your product using a traceable delivery method. Electronic Arts
is not responsible for products not in its possession.
ea warranty mailing address
Electronic Arts Customer Warranty
P.O. Box 9025
Redwood City, CA 94063-9025
ea warranty contact info
Email and Web Page: http://techsupport.ea.com
Phone: (650) 628-1900
NOTICE
Electronic Arts reserves the right to make improvements in the product described in this
manual at any time and without notice. This manual and the software described in this
manual are copyrighted. All rights are reserved. No part of this manual or the described
software may be copied, reproduced, translated, or reduced to any electronic medium or
machine-readable form without the prior written consent of Electronic Arts.
-33
-32
-
-
Page 19

NEED A HINT?
Call the EA HINTS & INFORMATION HOTLINE for recorded hints, tips, and
passwords 24 hours a day, 7 days a week! In the US, dial 900-288-HINT
(4468). 95c per minute.
In CANADA, dial 900-451-4873. $1.15 (Canadian) per minute.
If you are under 18, be sure to get a parent’s permission before calling.
Hotline requires a touch-tone telephone. Call length determined by user;
average length is four minutes. Messages subject to change without
notice.
TECHNICAL SUPPORT
If you need technical assistance with this product, call us at (650) 628-4322 Monday through
Friday between 8:30–11:45 AM or 1:00–4:30 PM, Pacific Standard Time. No hints or codes are
available from (650) 628-4322. You must call the EA Hints & Information Hotline for hints,
tips, or codes.
ea tech support contact info
Email and Web Page: http://techsupport.ea.com
FTPSite: ftp.ea.com
If you live outside of the United States, you can contact one of our other offices.
In Australia, contact: In the United Kingdom, contact:
Electronic Arts Pty. Ltd. Electronic Arts Ltd.
P.O. Box 432 P.O. Box 181
Southport Qld 4215, Australia Chertsey, KT16 OYL, UK
Phone (0870) 2432435
In Australia: For Technical Support and Game Hints & Tips, phone: 1 902 261 600 (95 cents
per min.) CTS 7 days a week 10:00 AM–8:00 PM. If you are under 18 years of age parental
consent required.
Package Cover Photography: Noren Trotman, Getty Images/ NBAE
Album Soundtrack Producer: Steve Schnur
This product contains Font Software licensed from Agfa Monotype
Corporation and its suppliers, which may not be distributed, copied,
reformatted, reverse engineered, or decompiled for any purpose. You
may transfer the Font Software as part of the product to a third party provided that (i) the
third party agrees to all the terms of this agreement and (ii) you have destroyed all copies of
the Font Software in your custody or control, including any installed in your computer, immediately upon transferring such product.
The Font Software is also protected by copyright and any copying or distribution of the Font
Software, with or without the product, constitutes both copyright infringement and a theft of
valuable property. You acquire no right, title or interest in the Font Software except the personal right to use such software, consistent with this agreement, as part of the product when
installed in your computer. All rights reserved.
To see Agfa Monotype's complete Font software End User License Agreement please go to
their website www.agfamonotype.com.
Software and documentation © 2002 Electronic Arts Inc. Electronic Arts,
EA SPORTS, and the EA SPORTS and are trademarks or registered trademarks of Electronic
Arts Inc. in the U.S. and/or other countries. All rights reserved.
The NBA and individual NBA member team identifications used on or in this product are
trademarks, copyrighted designs and other forms of intellectual property of NBA Properties,
Inc. and the respective NBA member teams and may not be used, in whole or in part, without
the prior written consent of NBA Properties, Inc. ©2002 NBA Properties, Inc. All rights
reserved. The NBA member team rosters in this product are accurate as of August 31, 2002.
All photos and video used in this product are from the 2001–2002 NBA Season.
Microsoft, Xbox, and the Xbox logos are either registered trademarks or trademarks of
Microsoft Corporation in the United States and/or other countries and are used under
license from Microsoft.
All other trademarks are the property of their respective owners.
-35
-34
-
-
Page 20

Proof of Purchase
NBA LIVE™2003
-37
-36
-
-
Page 21

-reg1
-
14539
 Loading...