

XAVi X7868r User Manual
X7868r/X7868r+ User’s Manual Version 1.1
- 1 -

X7868r/X7868r+ User’s Manual Version 1.1
XAVi Technologies Corporation
Tel: +886-2-2995-7953
9F, No. 129, Hsing Te Road, Sanchung City,
Taipei County 241,
Taiwan
Copyright © 2006, XAVi Technologies Corporation
Information in this manual is subject to change without notice. No part of this manual
may be reproduced or transmitted in any form or by any means, electronic or
mechanical, including photocopying or scanning, for any purpose, without the written
permission of XAVi Technologies Corporation.
XAVi Technologies Corporation provides this documentation without warranty of any
kind, implied or expressed, including, but not limited to, the implied warranties of
merchantability and fitness for a particular purpose.
- 2 -

X7868r/X7868r+ User’s Manual Version 1.1
TTaabbllee ooff CCoonntteennttss
CHAPTER 1 – GETTING STARTED
I OVERVIEW................................................................................5
II FEATURES ................................................................................ 6
III PACKAGING.............................................................................. 7
IV SAFETY GUIDELINES ..............................................................9
V APPEARANCE.........................................................................10
VI HARDWARE INSTALLATION .................................................. 12
VII MANAGEMENT....................................................................... 13
VIII DEFAULT VALUES.................................................................14
IX SOFTWARE UPGRADE..........................................................15
CHAPTER 2 – COMMAND LINE INTERFACE
1. MAIN MENU COMMANDS ...................................................... 18
2. LAN MENU COMMANDS ........................................................ 19
CHAPTER 3 – WEB MANAGEMENT INTERFACE
I OVERVIEW..............................................................................31
II PREPARATION ........................................................................ 31
1. LOGIN ...................................................................................... 32
1.0 System
1.1 Users……………………………………………………..34
1.2 Event Log………………………………………………..34
1.3 One-click Update………………………….……………..35
- 3 -

X7868r/X7868r+ User’s Manual Version 1.1
1.4 Remote Access…………………………………………..35
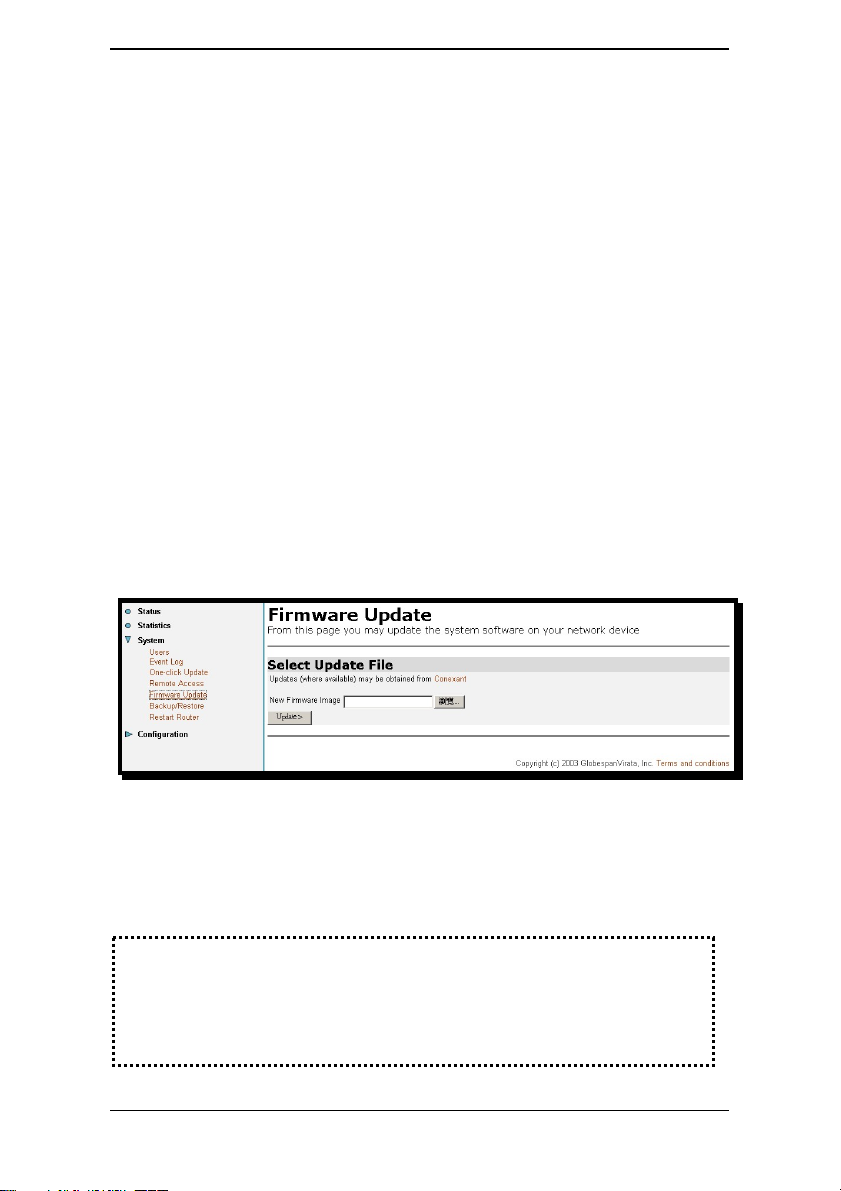
1.5 Firmware Update………………………………………..36
1.6 Backup/Restore………………………………………….36
1.7 Restart Router……………………………………………37
2.0 Configuration…………………………………………….38
2.1 Save config……………………………………………….38
2.2 LAN connections………………………………………...38
2.3 EMUX connections………………………………………47
2.4 Portpvc connections……………………………..……….49
2.5 WAN connections……………………………..…………50
2.6 Security…………………………………….….…………91
2.7 802.1x……………………….……………….………….104
2.8 WPA…………………………………..…….…………..106
2.9 Routing Table…………………………..…….…………107
2.10 DHCP server………………………..…….…………...108
2.11 DNS client……………………………….…………….113
2.12 DNS relay……………………………….……………..114
2.13 SNTP client……………………………………………118
2.14 IGMP Proxy………………………………………...…119
2.15 Wireless Mac Filter……………………………………120
2.16 RADIUS Client…………………………………..……120
2.17.0 Ports
2.17.1 Adsl………………………………………………….122
2.17.2 Switch Ether…………………………………………124
2.17.3 Wireless……………………………………………...124
- 4 -

X7868r/X7868r+ User’s Manual Version 1.1
Chapter 1
Getting Started
I Overview
The X7868r/X7868r+ is a multi-mode ADSL/ADSL2/ADSL2+ router
that complies with ANSI T1.413 Issue 2, ITU G.992.1
(X7868r/X7868r
only), and X7868r
provides a 10/100BaseTX Ethernet interface on the DTE side. The
broadband line interface supports ADSL Annex A. The
X7868r/X7868r
telecommuters, home, and remote office workers with high-speed
data transmission requirements. It supports multiple protocols such
as PPP (RFC 2364), IP (RFC 2225/RFC 1577), and RFC 1483 over
ATM over ADSL, and PPP (RFC 2516) over Ethernet.
X7868r/X7868r
locally by telnet, SNMP, and a Web-browser through the Ethernet
interface, and remotely through the ADSL interface.
+
), ITU G.992.2, G.992.3, G.992.4, G.994.5 (X7868r+
+
supports ADSL2+ as well. The X7868r/X7868r+
+
delivers broadband Internet access for enterprises,
+
offers convenient configuration and management
- 5 -

X7868r/X7868r+ User’s Manual Version 1.1
II Features
9 High Speed Asymmetrical Data Transmission on Twisted
Copper Pair Wire
9 Service providers can deploy ADSL rapidly over existing wire
infrastructure (POTS or ISDN line)
9 Interchangeable between Bridge and Router mode
9 RFC 1483 Bridge and Routing over ATM over ADSL
9 PPPoE, and IPoA, and PPPoA Routing over ADSL
9 Built-in four-port 10/100BaseTX Ethernet switch for PC or
LAN connection
9 802.11b/g WLAN supports up to 54Mbps
9 Allow/Deny Wireless MAC address list
9 WEP and TKIP Cipher suits are supported:
9 64, 128, 256 bit WEP key lengths are supported:
9 Supports Wi-Fi WPA
9 High quality, simple operation, and low power consumption
9 Compatible and interoperable with most central office side
ADSL DSLAM or Multi-service Access Systems
9 Configuration and management with Telnet through the
Ethernet interface, and remote Telnet through ADSL
interface
9 Firmware upgradeable through TFTP, HTTP
9 Interoperability complies with TR-48
- 6 -

X7868r/X7868r+ User’s Manual Version 1.1
III Packaging
This package consists of the following items:
X7868r/X7868r
+
ADSL device unit
RJ-45 Cable
RJ-11 Cable
AC Adapter
User’s Manual CD
- 7 -

X7868r/X7868r+ User’s Manual Version 1.1
- 8 -

X7868r/X7868r+ User’s Manual Version 1.1
IV Safety Guidelines
In order to reduce the risk of fire, electric shock and injury, please
adhere to the following safety guidelines.
9 Carefully follow the instructions in this manual; also follow
all instruction labels on this device.
9 Except for the power adapter supplied, this device should not
be connected to any other adapters.
9 Do not spill liquid of any kind on this device.
9 Do not place the unit on an unstable stand or table. This unit
may drop and become damaged.
9 Do not expose this unit to direct sunlight.
9 Do not place any hot devices close to this unit, as they may
degrade or cause damage to the unit.
9 Do not place any heavy objects on top of this unit.
9 Do not use liquid cleaners or aerosol cleaners. Use a soft dry
cloth for cleaning.
- 9 -
X7868r/X7868r+ User’s Manual Version 1.1
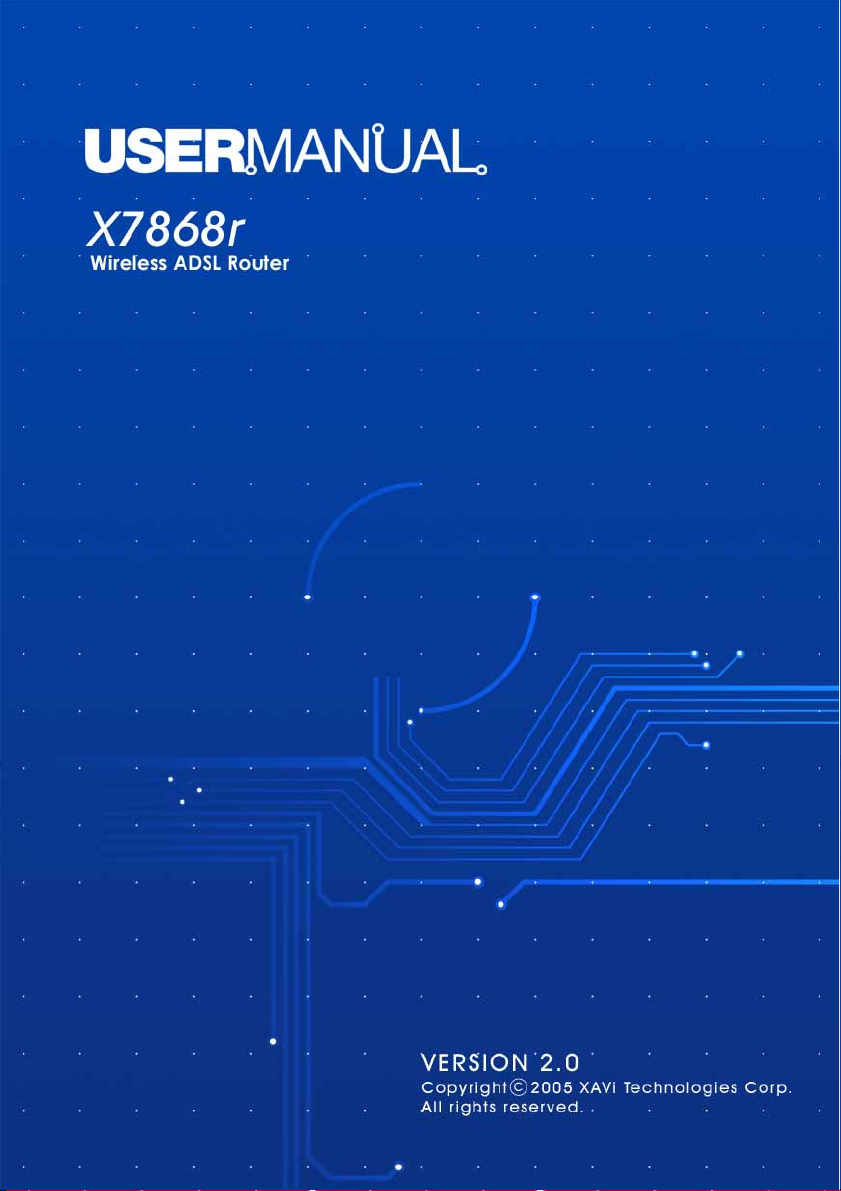
V Appearance
1 2 3 4 5
Front Panel
Label LED
Status
Ethernet ON Green Ethernet transmitting.
1
2
3
4
5
WLAN
Encendido ON Green Power supply is connected.
ADSL
Alarma Blinking RED Device Booting up. The LED
Blinking Green WLAN transmitting.
ON Green WLAN port is active
Blinking Green Training with DSLAM.
ON Green ADSL link is ready.
Color Description
will turn-off after boot-up
- 10 -
X7868r/X7868r+ User’s Manual Version 1.1
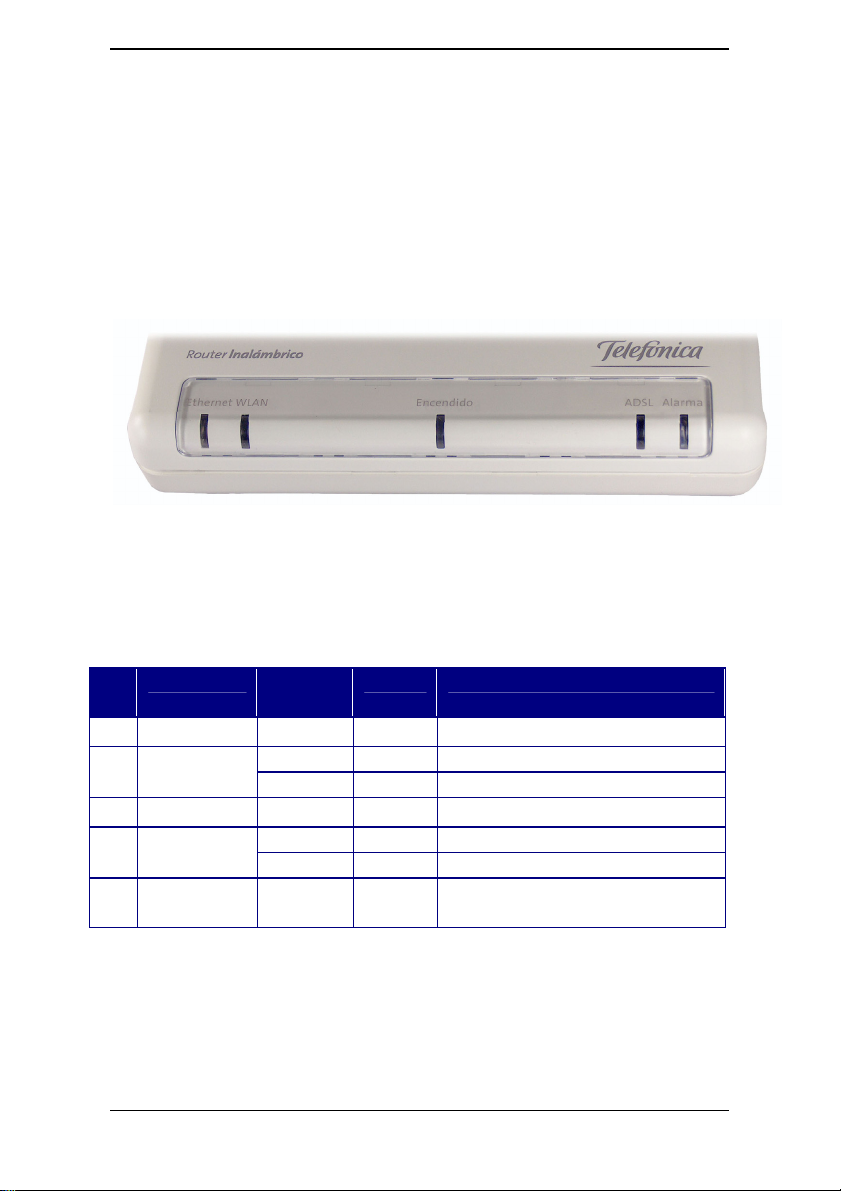
Rear Panel
1
2
3
Label Description
1 POWER Power jack; connect to a power adapter.
2 ETHERNET RJ-45 ports; connect to a PC or LAN.
3 RESET Reset the modem back to factory settings by
holding down on this button.
4 LINEA
5
Aerial
RJ-11 port; connect to the ADSL outlet.
External Dipole Antenna
4
5
- 11 -
X7868r/X7868r+ User’s Manual Version 1.1
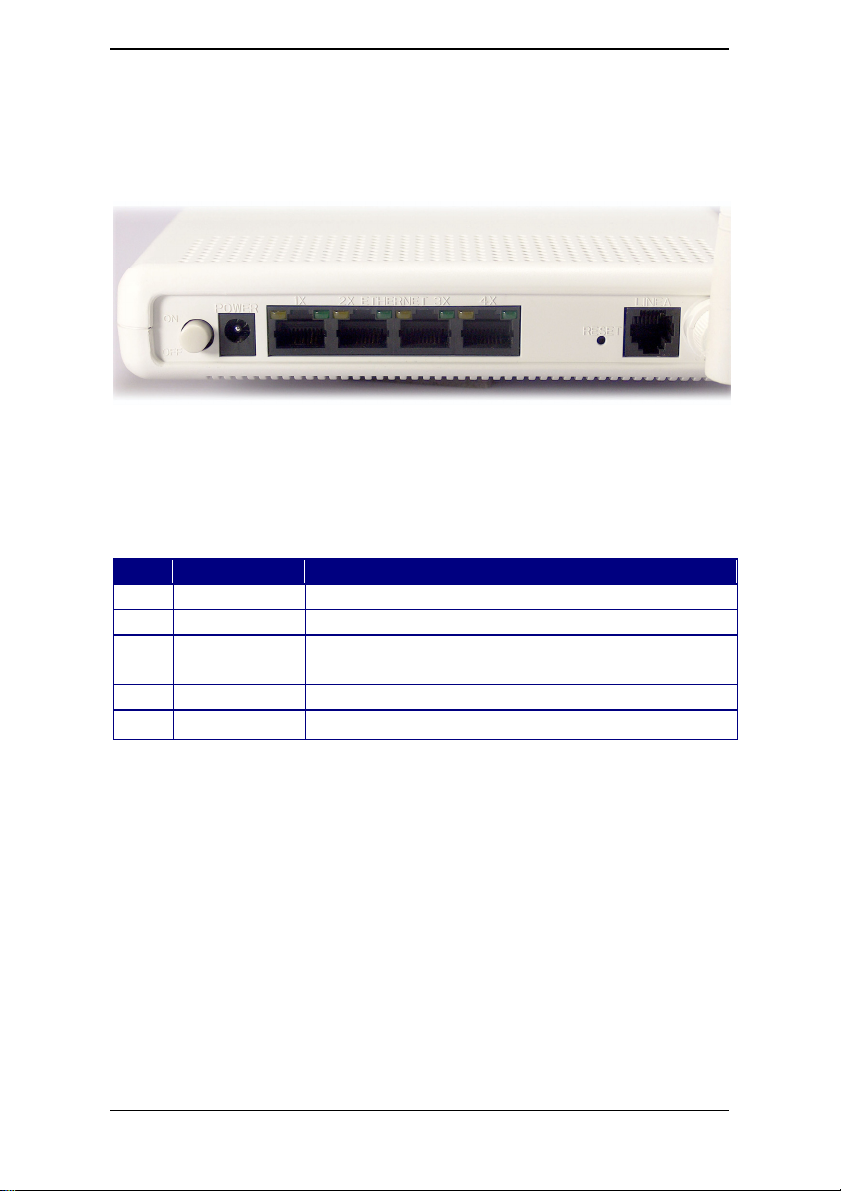
VI Hardware Installation
1. Connect one end of the ADSL cable to the WAN port of
X7868r/X7868r
2. Using an RJ-45 cable, connect one end to the Ethernet port of
X7868r/X7868r
Ethernet adapter installed.
3. Plug the AC adapter into the AC power socket, and then
connect the DC jack to the PWR inlet of X7868r/X7868r
+
and the other end to the ADSL wall outlet.
+
and the other end to the LAN or a PC with an
+
.
2
3
1
Power Supply
Management
Terminal/PC
- 12 -
ADSL Outlet

X7868r/X7868r+ User’s Manual Version 1.1
VII Management
9 Local Ethernet Port (telnet) – connect the Ethernet port to
your local area network or directly to a PC, “Telnet”
X7868r/X7868r
default local Ethernet IP address is “192.168.1.1”. See
Chapter 2, Command Line Interface, for more details.
9 Local Ethernet Port (web-browser) – connect the
Ethernet port to your local area network or directly to a PC.
Launch your web browser and enter default local Ethernet
IP address “192.168.1.1” into the address bar.
9 ADSL Port from Remote Site – while the ADSL
connection is in service, you may remotely “Telnet”
X7868r/X7868r
equipment.
+
from any workstation in the LAN. The
+
from a workstation connected to the CO
Note: As operating an ADSL device requires technical know-how and
experience, it is recommended that only qualified technical staff manage
X7868r/X7868r
when you enter the command line and Web interface. See the Default
Values section to obtain the password.
+
. Therefore, a password authentication is required
- 13 -

X7868r/X7868r+ User’s Manual Version 1.1
VIII Default Values
X7868r/X7868r+ is pre-configured with the following parameters; you
may also re-load the default parameters by pressing the reset button
of the modem for about 10 seconds or by using the System
Commands link in the Web interface.
Username/Password: admin
Default IP Address WAN and ADSL
Ethernet (local) IP: 192.168.1.1 Local Line Code: Multi Mode
Subnet mask: 255.255.255.0 DHCP Server: Enable
Protocol 192.168.1.2~192.168.1.22
RFC1483 Bridge: VPI/VCI: 8/35 DNS Relay: Disable
Class (QoS): UBR
Note: The Username and Password are case-sensitive.
- 14 -

X7868r/X7868r+ User’s Manual Version 1.1
IX Software Upgrade
You may easily upgrade X7868r/X7868r+ embedded software by
obtaining the compressed upgrade kit from the service provider and
then following the steps for upgrading through either a DOS prompt
or a Web-browser:
Software upgrade through a DOS prompt
Step 1. Extract the ZIP file for updated firmware.
Step 2. Connect X7868r/X7868r
remote ADSL link, making sure that the X7868r/X7868r
Ethernet IP address and your terminal are properly
configured so that you can successfully “ping”
X7868r/X7868r
+
. The default local IP address is
“192.168.1.1”.
+
via the local Ethernet port or
+
Step 3. Under the DOS prompt, execute the command “xupgrade
<IP address of X7868r/X7868r
+
>”, for instance, “xupgrade
192.168.1.1”.
Step 4. This upgrading process may last as long as 60 seconds.
Step 5. Reboot X7868r/X7868r
+
with new software.
Note: Strictly maintain stable power to X7868r/X7868r+while upgrading
its software. If the power fails during the upgrading process, contents in
the memory could be destroyed, and the system may hang. In such a
case, you must call the dealer or system integrator for repairs.
- 15 -
X7868r/X7868r+ User’s Manual Version 1.1
Software upgrade through a Web-browser
Step 1. Extract the ZIP file for updated firmware.
Step 2. Connect X7868r/X7868r
+
via the local Ethernet port or
remote ADSL link, making sure that the X7868r/X7868r
Ethernet IP address and your terminal are properly
configured so that you can successfully “ping”
X7868r/X7868r
+
. The default local IP address is
“192.168.1.1”.
Step 3. Launch the Web browser (IE or Netscape), and enter the
default IP address 192.168.1.1 into the address bar to
access the Web management page.
Step 4. Click on the Maintenance link in the navigation bar and
then on the Modem Upgrade link below it.
Step 5. Click on the Browse button to select the upgrade file.
Step 6. Click on the Update button when completed.
+
Note: Strictly maintain stable power to X7868r/X7868r+while upgrading
its software. If the power fails during the upgrading process, contents
in the memory could be destroyed, and the system may hang. In
such a case, you must call the dealer or system integrator for repairs.
- 16 -

X7868r/X7868r+ User’s Manual Version 1.1
Chapter 2
Command Line Interface
Setup
1. Start "Hyper-terminal" program
On Windows 98 or Windows NT:
Click on the Start button Æ Programs Æ Accessories Æ Hyper
Terminal Group Æ Double Click “Hypertrm.exe” Æ Enter a
Connection Name Æ Select Icon Æ Click OK
+
2. Select a port to communicate with X7868r/X7868r
Choose TCP/IP and click OK
3. Set Connection Properties
Connect To:
Host address: 192.168.1.1
Port number: (Choose the port corresponding to the
hardware connection)
Connect using: TCP/IP (Winsock)
Settings:
Function, arrow, and ctrl keys act as: Windows keys
Backspace key sends: Delete
Emulation: Auto-detect
Telnet terminal: ANSI
Back-scroll buffer lines: 500
ASCII Setup:
Echo typed characters locally: enable
Line delay: 0 milliseconds
Append line feeds incoming line ends: enable
Wrap lines that exceed terminal width: enable
- 17 -
X7868r/X7868r+ User’s Manual Version 1.1
CLI Commands
1. Main Menu Commands
Type “?” following the “→” to retrieve a list of commands under the
main menu to begin the configuration.
Command Syntax Description / Parameters
System info → display Display current version
Ip list interface → display Displays the configuration of IP
Restart → restart Reboots the modem
Restore → restore Sets all configurations to default
Ping → ping
<ipAddress>
[<subnetMask>]
Save → save Saves the current configuration
How to DISPLAY
Displays the IP address, subnet mask and software version.
Syntax: display
Ip list interface
ID | Name | IP Address | DHCP | Transport
-------|--------------|--------------------|-------------|----------------
1 | eth0 | 192.168.1.1 | disabled | <BRIDGE>
2 | ppp-0 | 0.0.0.0 | disabled | ppp-0
3 | ppp-1 | 0.0.0.0 | disabled | ppp-1
----------------------------------------------------------------------
-->system info
Software ver: 1.03APF2.7868A-D.79.52.25f 1/December/2005 23:20
Pings a specified IP address.
Syntax: ping <ipAddress>
Example: ping 192.168.0.81
→ ping 192.168.1.1
ping: PING 192.168.1.1: 32 data bytes
ping: 40 bytes from 192.168.1.1: seq=0, ttl=128, rtt<10ms192.168.0.81
- 18 -
Pings the specified IP address
for testing purposes

X7868r/X7868r+ User’s Manual Version 1.1
RESTART
Restarts the modem.
Syntax: restart
→ system config restart
Login:
RESTORE
Sets all configurations to factory default settings.
Syntax: restore
→ system config restore factory
Restoring factory defaults...
→
SAVE
Saves the current configuration.
Syntax: save
→ system config save
Saving configuration...
Configuration saved.
→
2. LAN Menu Commands
Type “lan” following the “→” to enter the LAN menu.
Command Syntax Description / Parameters
Setip lan→ setip
<ipAddresss>
[<subnet mask>]
Home lan→ home Returns to the main menu
Configures IP settings
SET IP
- 19 -

X7868r/X7868r+ User’s Manual Version 1.1
Configures the IP address and subnet mask of X7868r/X7868r+.
Syntax:
ip set interface <interface> ipaddress <ipaddress>[<subnet mask>]
Example:
ip set interface eth0 ipaddress 192.168.1.1 255.255.255.0
HOME
Returns to the main menu in console
Syntax: home
adsl> home
List cli command and help.
ATMOS CLI Help
--------------
Within the CLI, the following functions can be used:
Hitting ?
*
*
*
* The
history
*
Pressing ? at the top-level prompt
available.
subcommands within that group, and so on.
802.1x 802.1x port based authentication
802.1x authenticator 802.1x authenticator settings
acl snmp remote management
halfway through a word shows all valid completions of that prefix
Hitting ?
after a word shows a list of the words that can follow it
Hitting TAB
LEFT
CTRL+E
halfway through a word completes it, if it is unique
UP
and
DOWN cursor keys
and
RIGHT cursor keys
move the cursor to the start and end of the line respectively
Typing one followed by a space and then hitting ?
move back and forward through the command
can be used for line-editing, and
will display a list of the command groups
CTRL+A
will show the
and
- 20 -

X7868r/X7868r+ User’s Manual Version 1.1
acl add write management ipaddr
acl delete delete management ipaddr
acl disable disable acl fuction
acl enable enable acl fuction
acl list list management ipaddr
agent Get a file from a remote host
agent get Get a file from a remote host
agent methods
ald Configuration commands for ald
ald add Adds an ald profile
ald clear Clear all ald profiles
ald delete Deletes an ald profile
ald list List ald profiles
ald show Show an ald profile
bridge Configure layer 2 bridge
bridge add Add an interface/unicast entry/egress interface.
bridge attach Attach an interface to a transport.
bridge clear Clear interfaces/unicast entries/egress interfaces.
bridge delete Delete an interface/unicast entry/egress interface.
bridge detach Detach an interface from the transport it is attached to.
bridge flush Flush all the dynamic entries for an interface.
bridge list List interfaces/unicast entries/egress interfaces.
bridge set Set Bridge/Interface level parameters.
bridge show Show an interface/unicast entry/egress interface.
classifier Packet classifier configuration commands
classifier add Add a new classifier profile
classifier clear Clear all classifier profiles
classifier delete Delete a classifier profile
- 21 -

X7868r/X7868r+ User’s Manual Version 1.1
classifier list List all classifier profiles
classifier profile Commands to edit rules in the specified profile
classifier show Show all rules in the specified profile
console Console access
console enable Enter console mode
console process Execute console command
dhcpclient DHCP client configuration commands
dhcpclient add …… If you want informations, please press “Tab” key.
dhcpclient clear ……
dhcpclient delete ……
dhcpclient interfaceconfig ……
dhcpclient list ……
dhcpclient set ……
dhcpclient show ……
dhcpclient update ……
dhcpserver DHCP server configuration commands
dhcpserver add …… If you want informations, please press “Tab” key.
dhcpserver clear ……
dhcpserver delete ……
dhcpserver disable ……
dhcpserver enable ……
dhcpserver forcerenew ……
dhcpserver list ……
dhcpserver set ……
dhcpserver show ……
dhcpserver subnet ……
dhcpserver update ……
dnsclient DNS client configuration commands
- 22 -

X7868r/X7868r+ User’s Manual Version 1.1
dnsclient add Add search domains or DNS servers
dnsclient clear Clear groups of DNS client settings
dnsclient delete Remove specific client settings
dnsclient list List DNS client settings
dnsrelay DNS relay configuration
dnsrelay add Add DNS server address
dnsrelay clear Clear DNS relay table of DNS server addresses
dnsrelay delete Remove single DNS server
dnsrelay disable
dnsrelay enable
dnsrelay list List known DNS servers
dnsrelay set
dnsrelay show Show DNS relay state
emux Ethernet Switch Multiplex configuration commands
emux add Add some ...
emux clear Clear some ...
emux del Delete some ...
emux list List some ...
emux set Set some ...
emux version Display version
ethernet Commands to configure ethernet transports
ethernet add Create ethernet transport
ethernet clear Remove all ethernet transports
ethernet delete Remove single ethernet transport
ethernet list List ethernet ports/transports
ethernet set Set port of an existing ethernet transport
ethernet show Display existing ethernet transport
firewall Firewall configuration commands
- 23 -

X7868r/X7868r+ User’s Manual Version 1.1
firewall add …… If you want informations, please press “Tab” key.
firewall clear ……
firewall delete ……
firewall disable ……
firewall enable ……
firewall list ……
firewall set ……
firewall show ……
firewall status ……
help Top level CLI help
igmp …… If you want informations, please press “Tab” key.
imdebug Directly access the information model
imdebug get Display a single attribute of an object
imdebug list List children of a parent object
imdebug set Set the value of an attribute of an object
ip Configure IP router
ip add …… If you want informations, please press “Tab” key.
ip attach ……
ip attachbridge ……
ip attachvirtual ……
ip clear ……
ip delete ……
ip detach ……
ip interface ……
ip list ……
ip ping ……
ip set ……
ip show ……
- 24 -

X7868r/X7868r+ User’s Manual Version 1.1
ipoa IP over ATM configuration
ipoa add Add IPoA transport
ipoa clear Remove all IPoA transports
ipoa delete Remove single IPoA transport
ipoa list ARP/transport listing
ipoa set Set transport parameters
ipoa show Display transport details
ipoa transport Configure PVCs for specific transport
logger Log to a remote host using syslog
logger set Configure syslog
logger show Show syslog config
meter Packet metering configuration command
meter add Add a profile
meter clear Clear all meter profiles which are not being used
meter delete Delete a profile
meter list List all configured profiles
meter set Set action in a profile
meter show Show a profile
nat NAT configuration commands
nat add …… If you want informations, please press “Tab” key.
nat clear ……
nat delete ……
nat disable ……
nat enable ……
nat iketranslation ……
nat list ……
nat show ……
nat status ……
- 25 -

X7868r/X7868r+ User’s Manual Version 1.1
port Physical port configuration commands
port dsl Port name
port ethernet Port name
port list List ports by type
port raw_ethernet Port name
port wireless Port name
port wlan_filtered Port name
pppoa PPP over ATM configuration
pppoa add Create PPPoA transport
pppoa clear Remove all PPPoA transports
pppoa delete Remove single PPPoA transport
pppoa list List existing PPPoA transports
pppoa set Set existing PPPoA transport properties
pppoa show Show single PPPoA transport's properties
pppoe PPP over ethernet configuration
pppoe add …… If you want informations, please press “Tab” key.
pppoe clear ……
pppoe delete ……
pppoe list ……
pppoe off ……
pppoe on ……
pppoe set ……
pppoe show ……
radclient RADIUS Client Configuration commands
radclient add Add a server
radclient delete Delete a server
radclient disable Disable RADIUS client module
radclient enable Enable RADIUS client module
- 26 -

X7868r/X7868r+ User’s Manual Version 1.1
radclient get Display the current accounting interval
radclient list List the configuration of all the servers
radclient set Change accountng interval or the configuration of a radclient
server
radclient show Show the configuration of a server
radclient status Show the current status ( true=enabled, false=disabled)
reboot reboot modem
restore_defaults set all configuration to factory setting
rfc1483 Commands to configure RFC1483 transports
rfc1483 add …… Create a new transport
rfc1483 clear ……
rfc1483 delete ……
rfc1483 list ……
rfc1483 set ……
rfc1483 show …… If you want informations, please press “Tab” key.
save_and_exit SAVES changes closing telnet session
save_and_reboot SAVES changes and reboots modem.
save_config Save configuration
scheduler Configuration commands for scheduler
scheduler add Adds a scheduler profile
scheduler clear Clear all scheduler profiles
scheduler delete Deletes a scheduler profile
scheduler list Lists all configured scheduler profiles
scheduler profile Sets queue attributes in scheduler profile
scheduler set Sets attributes in scheduler profile
scheduler show Show a scheduler profile
security Security configuration commands not specific to NAT or firewall
security add …… If you want informations, please press “Tab” key.
- 27 -

X7868r/X7868r+ User’s Manual Version 1.1
security application ……
security clear ……
security delete ……
security disable ……
security enable ……
security list ……
security set ……
security show ……
security status ……
snmp If you want informations, please press “Tab” key.
snmp add ……
snmp delete ……
snmp list ……
snmp set ……
snmp show ……
sntpclient Simple Network Time Protocol Client commands
sntpclient add If you want informations, please press “Tab” key.
sntpclient clear
sntpclient delete
sntpclient list
sntpclient set Set existing SNTP client properties
sntpclient show Show SNTP client status and configuration
sntpclient sync Synchronize the SNTP client with external source
sntpclient source Read a file of commands
system System administration commands
system add Add a user to the system
system auto-update Update device firmware automatically from a remote server
system config Configuration file maintenance
- 28 -

X7868r/X7868r+ User’s Manual Version 1.1
system cpuload Show current CPU loading
system delete Remove system users
system info Display hardware/software information
system legal
system list List system information
system log Set logging options
system restart Restart system (same as pressing reset)
system set Set user privileges
system tftpc TFTP client commands
transports Transport configuration commands
transports clear …… If you want informations, please press “Tab” key.
transports delete ……
transports list ……
transports set ……
transports show ……
upnp UPnP configuration commands
upnp disable Disable UPnP IGD
upnp enable Enable UPnP IGD
upnp set
upnp show
user User commands
user change Switch user
user logout Logout from system
user password Change current user's password
wanacl snmp remote management
wanacl add write management ipaddr
wanacl delete delete management ipaddr
wanacl list list management ipaddr
- 29 -

X7868r/X7868r+ User’s Manual Version 1.1
wanacl webserver Webserver configuration commands
wlanmacfilter set Wireless Mac Filter Table.
wlanmacfilter add [mac address]
wlanmacfilter delete [mac table list number]
wlanmacfilter disable wlanmacfilter disable true or false
wlanmacfilter list List Mac Filter Table
wpa Configure WPA (Wireless Protected Access)
wpa get …… If you want informations, please press “Tab” key.
wpa set ……
You can login in this way,
and give
Then you will see CLI page.
username, password
telnet 192.168.1.1 (It is LAN ip.)
.
Within the CLI, the following functions can be used:
* Hitting ? halfway through a word shows all valid completions of that prefix
* Hitting ? after a word shows a list of the words that can follow it
* Hitting TAB halfway through a word completes it, if it is unique
* The UP and DOWN cursor keys move back and forward through the command
history
* LEFT and RIGHT cursor keys can be used for line-editing, and CTRL+A and
CTRL+E move the cursor to the start and end of the line respectively
Pressing ? at the top-level prompt will display a list of the command groups
available. Typing one followed by a space and then hitting ? will show the
subcommands within that group, and so on.
- 30 -
 Loading...