

Page 1
X5821 User’s Manual Version 1.0
i
Page 2

X5821 User’s Manual Version 1.0
ii
XAVi Technologies Corporation
Tel: +886-2-2995-7953
Fax: +886-2-29957954
9F, No. 129, Hsing Te Road, Sanchung City,
Taipei County 241,
Taiwan
Copyright © 2005, XAVi Technologies Corporation
Information in this manual is subject to change without notice. No part of this manual
may be reproduced or transmitted in any form or by any means, electronic or
mechanical, including photocopying or scanning, for any purpose, without the written
permission of XAVi Technologies Corporation.
XAVi Technologies Corporation provides this documentation without warranty of any
kind, implied or expressed, including, but not limited to, the implied warranties of
merchantability and fitness for a particular purpose.
Page 3

X5821 User’s Manual Version 1.0
i
TTaabbllee ooff CCoonntteennttss
CChhaapptteerr 11 –– GGeettttiinngg SSttaarrtteedd
CHAPTER 1...............................................................1
I. OVERVIEW ........................................................................................ 1
II. FEATURES........................................................................................ 2
III. PACKAGING ................................................................................... 3
IV. SAFETY GUIDELINES .................................................................. 4
V. APPEARANCE ................................................................................. 5
VI. HARDWARE INSTALLATION ..................................................... 7
VII. MANAGEMENT........................................................................... 8
VIII. DEFAULT VALUES .................................................................... 9
IX. SOFTWARE UPGRADE ........................................................... 10
CHAPTER 2............................................................. 11
I. OVERVIEW .................................................................................... 11
II. PREPARATION ................................................................................ 11
1. LOGIN ........................................................................................... 12
2. QUICK SETUP ................................................................................ 13
3. DEVICE INFO ................................................................................. 14
4. ADVANCED SETUP......................................................................... 19
Page 4

X5821 User’s Manual Version 1.0
ii
4.1 WAN ..................................................................................... 19
4.1.1 BRIDGE CONFIGURATION....................................... 22
4.1.2 PPPoE CONFIGURATION.......................................... 25
4.1.3 MAC Encapsulation Routing (MER)............................ 27
4.2 LAN ...................................................................................... 28
4.3 NAT ...................................................................................... 29
4.4 Security ................................................................................ 33
4.5 Routing................................................................................. 34
4.6 DNS...................................................................................... 36
4.7 DSL ...................................................................................... 38
5. DIAGNOSTICS ................................................................................ 39
6. MANAGEMENT .............................................................................. 40
6.1 Settings................................................................................. 40
6.2 System Log ........................................................................... 40
6.3 Internet Time ........................................................................ 42
6.4 Access Control ..................................................................... 42
6.5 Update Software................................................................... 45
6.6 Save/Reboot.......................................................................... 46
APPENDIX A – TECHNICAL SPECIFICATIONS............................................. 47
APPENDIX B – WARRANTIES ...................................................................... 50
APPENDIX C – REGULATIONS .................................................................... 52
CONTACT INFORMATI ON ........................................................................... 54
CONTACT INFORMATI ON ........................................................................... 55
Page 5

X5821 User’s Manual Version 1.0
1
Chapter 1
Getting Started
I. Overview
The X5821 is a multi-mode ADSL2+ router/modem, which is
designed to interoperate with DSLAMs from major vendors to meet
the worldwide ADSL CPE market requirements.
It complies with ANSI T1.413 issue 2, ITU-T G.dmt, G.lite, G.dmt.bis
(ADSL2) and ADSL2+ with up to 24 Mbps downstream link rate.
The integrated Ethernet switch features automatic
crossover-correction and speed sensing for easily connecting to
user’s PCs or LAN environment.
Page 6

X5821 User’s Manual Version 1.0
2
II. Features
Support up to ADSL2+ (G.992.5) with 24 Mbps downstream and
1 Mbps upstream rates
Integrated one Ethernet port with automatic speed-sensing and
crossover correction
Support Networking protocols such as PPP, NAT, Routing,
DHCP server/relay/client
Configuration and management by Web-browser through the
Ethernet interface and remotely through ADSL interface
Firmware upgradeable through HTTP/TFTP
Page 7

X5821 User’s Manual Version 1.0
III. Packaging
This package consists of the following items:
X5821
ADSL device unit
RJ-45 Cable
RJ-11 Cable
AC Adapter
User’s Manual CD
3
Page 8

X5821 User’s Manual Version 1.0
4
IV. Safety Guidelines
In order to reduce the risk of fire, electric shock and injury, please
adhere to the following safety guidelines.
Carefully follow the instructions in this manual; also follow
all instruction labels on this device.
Except for the power adapter supplied, this device should
not be connected to any other adapters.
Do not spill liquid of any kind on this device.
Do not place the unit on an unstable stand or table. This
unit may drop and become damaged.
Do not expose this unit to direct sunlight.
Do not place any hot devices close to this unit, as they may
degrade or cause damage to the unit.
Do not place any heavy objects on top of this unit.
Do not use liquid cleaners or aerosol cleaners. Use a soft
dry cloth for cleaning.
Page 9
X5821 User’s Manual Version 1.0
1 2 3 4 5
V. Appearance
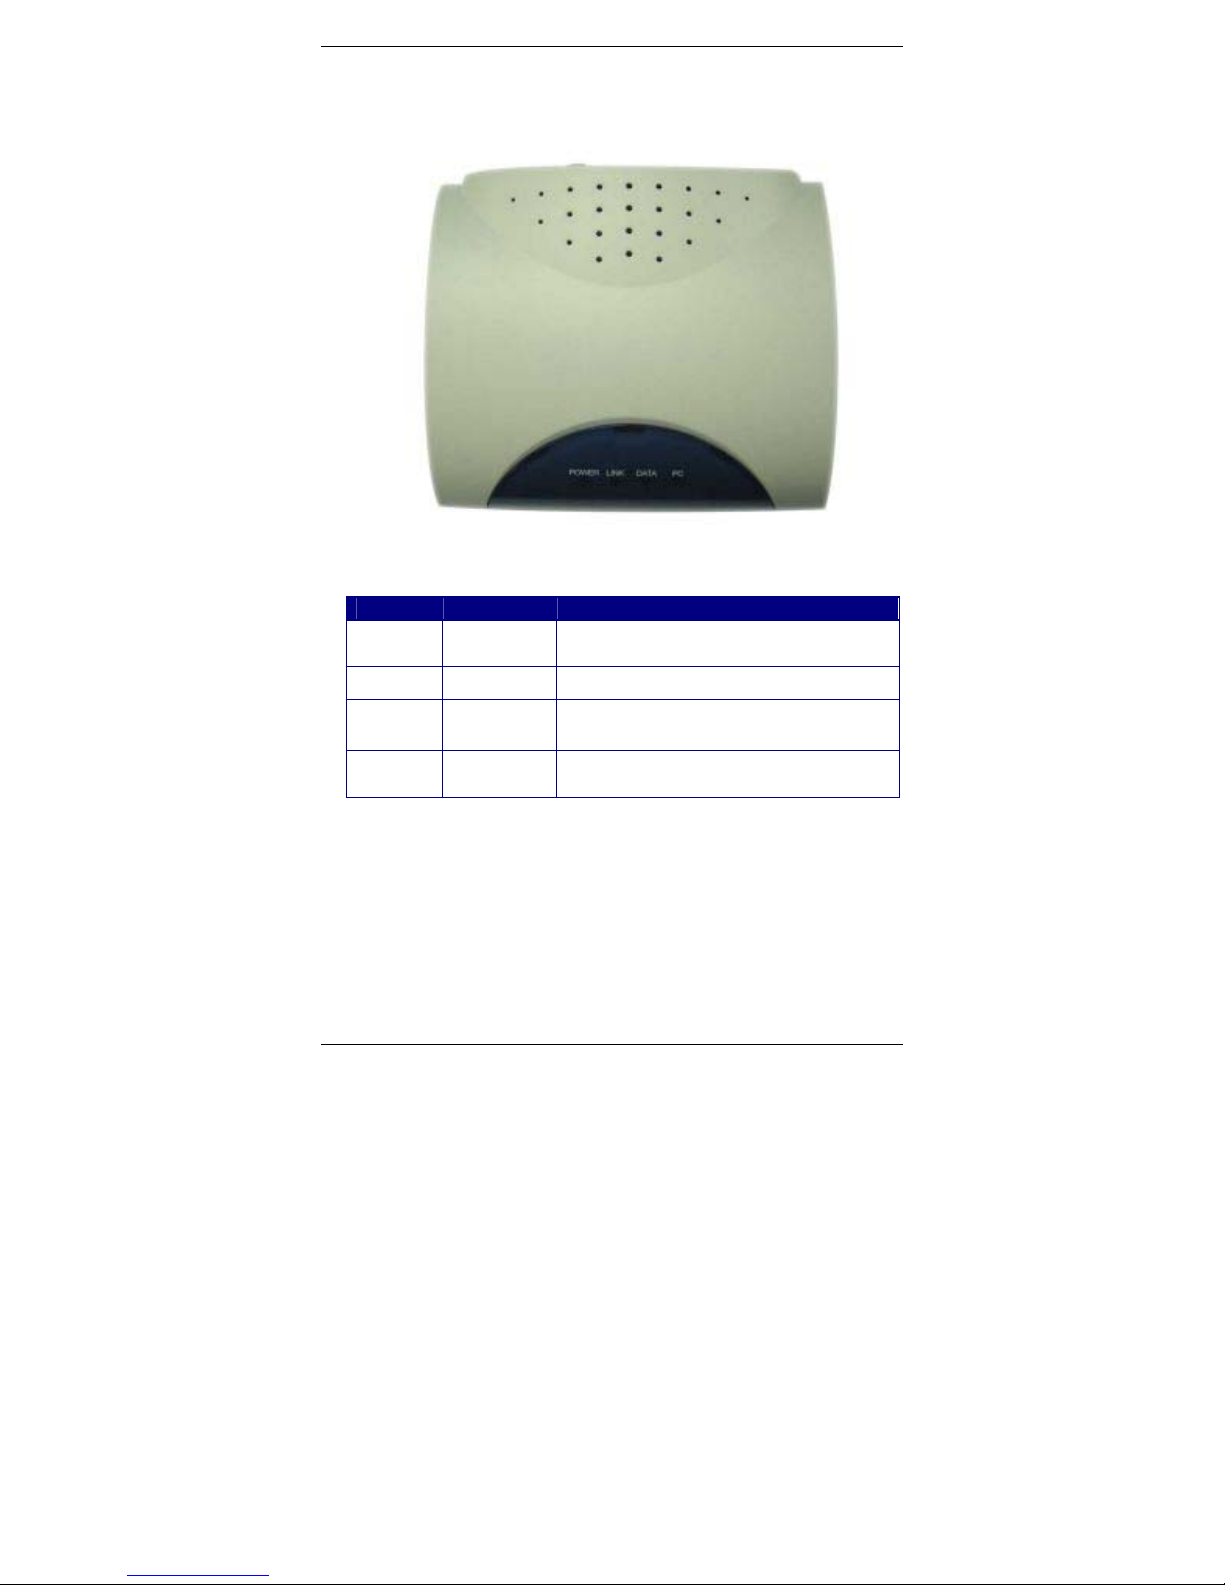
Front Panel
f
c d e
Label Description
1 POWER
A steady red light means the power connection
works properly.
2 LINK
Yellow, shows DSL line status.
3 DATA
Green, Flashing means the Modem is
transmitting or receiving data.
4 PC
Green, Indicates status of connection to the PC
network card.
5
Page 10

X5821 User’s Manual Version 1.0
Rear Panel
c d e g f
Label Description
1
LINE Connected with phone line or “ADSL” port of the
splitter.
2
ETHERNET To be connected to a PC network card by a
straight-through network cable, also can use a
crossover cable to connect to Hub, Switch or Router.
3
RST Reset to default settings is located at bottom of
router.
Press the reset button for 1 second while the router
is up and running.
Then you can reset the modem with the default
settings.
4 SWITCH To turn on / off the power.
g POWER Power interface, Connect with power adapter.
6
Page 11
X5821 User’s Manual Version 1.0
VI. Hardware Installation
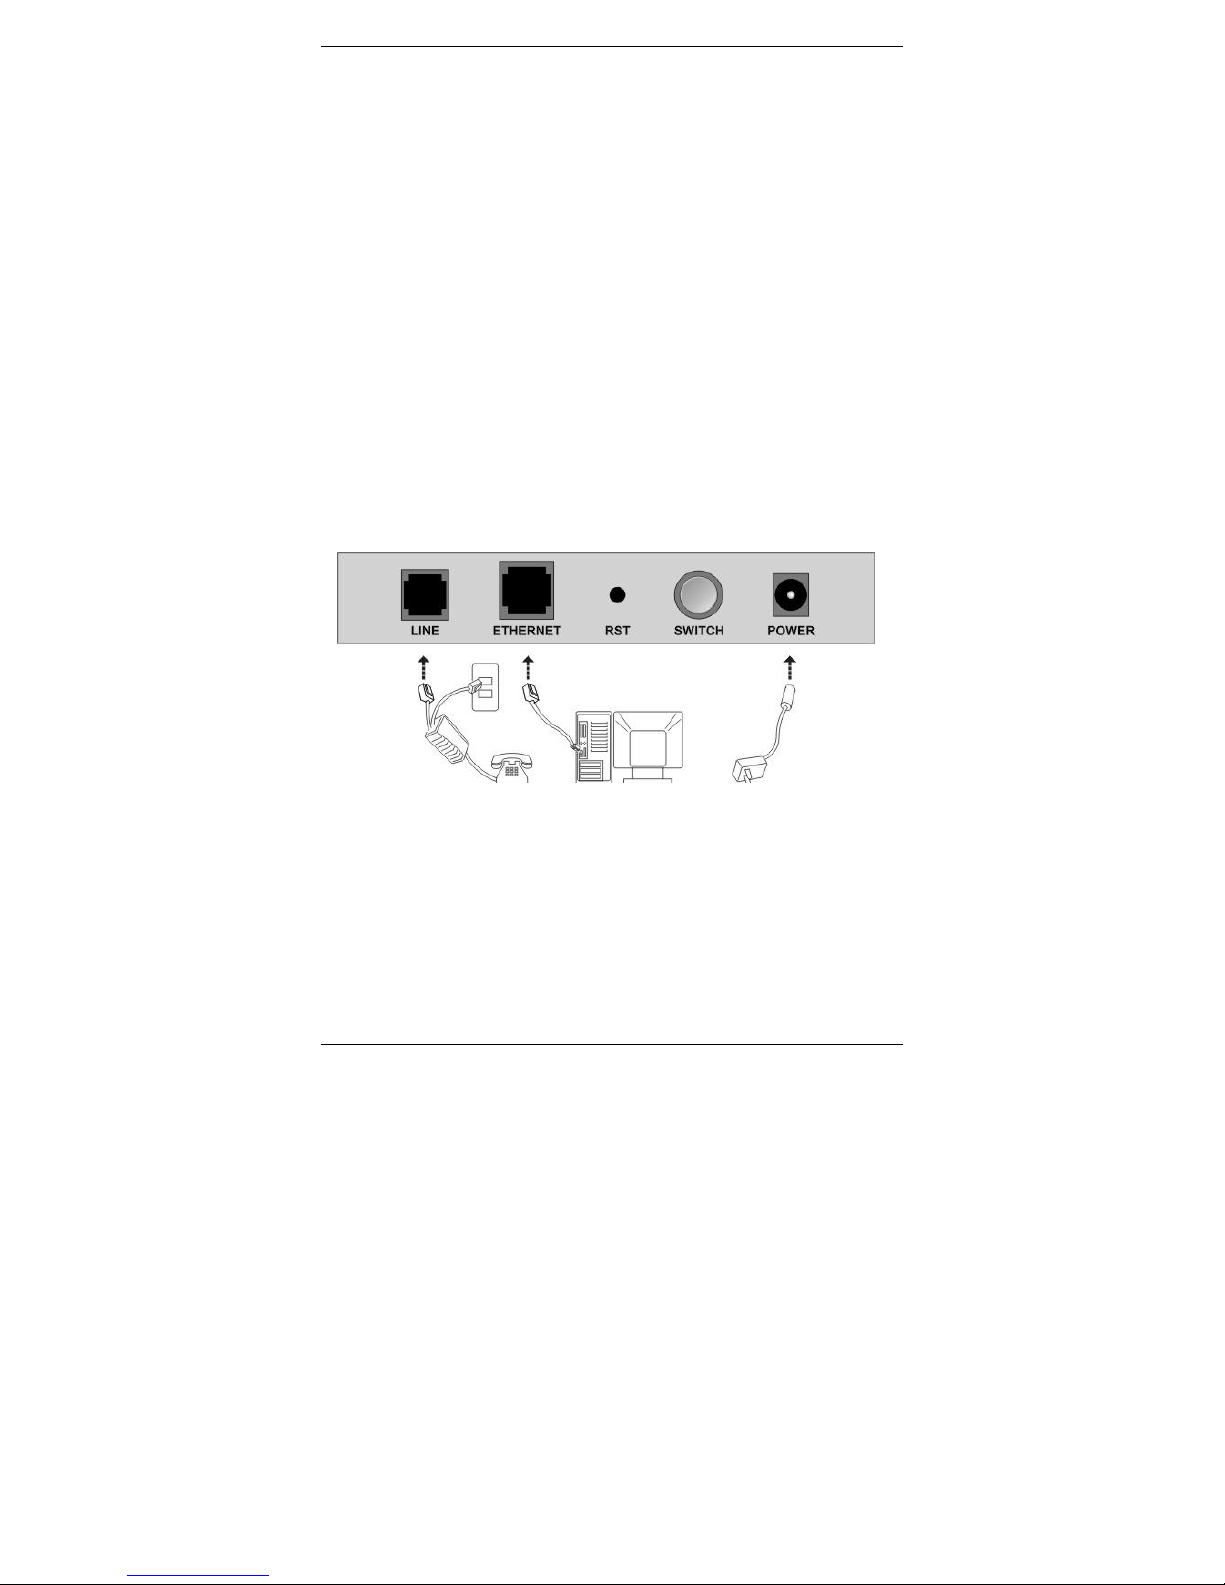
Follow the steps below to set up your device:
Step 1: Connect one end of the ADSL cable to the LINE port of
X5821 and the other end to the ADSL wall outlet.
Step 2: Use a RJ-45 cable to connect one end to an ETHERNET
port of X5821 and the other end to the LAN or a PC with an
Ethernet adapter installed.
Step 3: Plug in the AC adapter to the AC power socket, and then
connect the DC jack to the POWER inlet of X5821. Push
the SWITCH button to turn it on.
7
Page 12

X5821 User’s Manual Version 1.0
VII. Management
There are several ways that you can make the configuration:
Local Ethernet Port (telnet) – connect the Ethernet port to
your local area network or directly to a PC, “telnet” X5821
from any workstation in the LAN. The default local Ethernet
IP address is “192.168.1.1”. See Chapter 2, Command Line
Interface, for more details.
Local Ethernet Port (Web browser) – connect the Ethernet
port to your local area network or directly to a PC. Launch
your Web browser and enter default local Ethernet IP
address “192.168.1.1” into the address bar.
ADSL Port from Remote Site – while the ADSL connection
is in service and it is set to router mode, you may remotely
“telnet” X5821 from a workstation connected to the
equipment.
8
Note: As operating an ADSL device requires technical know-how and
experience, it is recommended that only qualified technical staff manage
X5821 Therefore, a password authentication is required when you enter
the command line and Web interface. See the Default Values section to
obtain the password.
Page 13

X5821 User’s Manual Version 1.0
VIII. Default Values
X5821 is pre-configured with the following parameters; you may also
re-load the default parameters by pressing the reset button on the
real panel or by using the System Commands link on the Web
interface.
Username/Password: admin/admin
Default IP Address WAN and ADSL
Ethernet (local) IP: 192.168.1.1 Local Line Code: Multi Mode
Subnet mask: 255.255.255.0 DHCP Server: Disable
Protocol DHCP start IP: 192.168.1.2
RFC1483 Bridge: VPI/VCI: NA/NA DHCP end IP: 192.168.1.254
Class (QoS): NA
Note: The Username and Password are case-sensitive.
9
Page 14
X5821 User’s Manual Version 1.0
IX. Software Upgrade
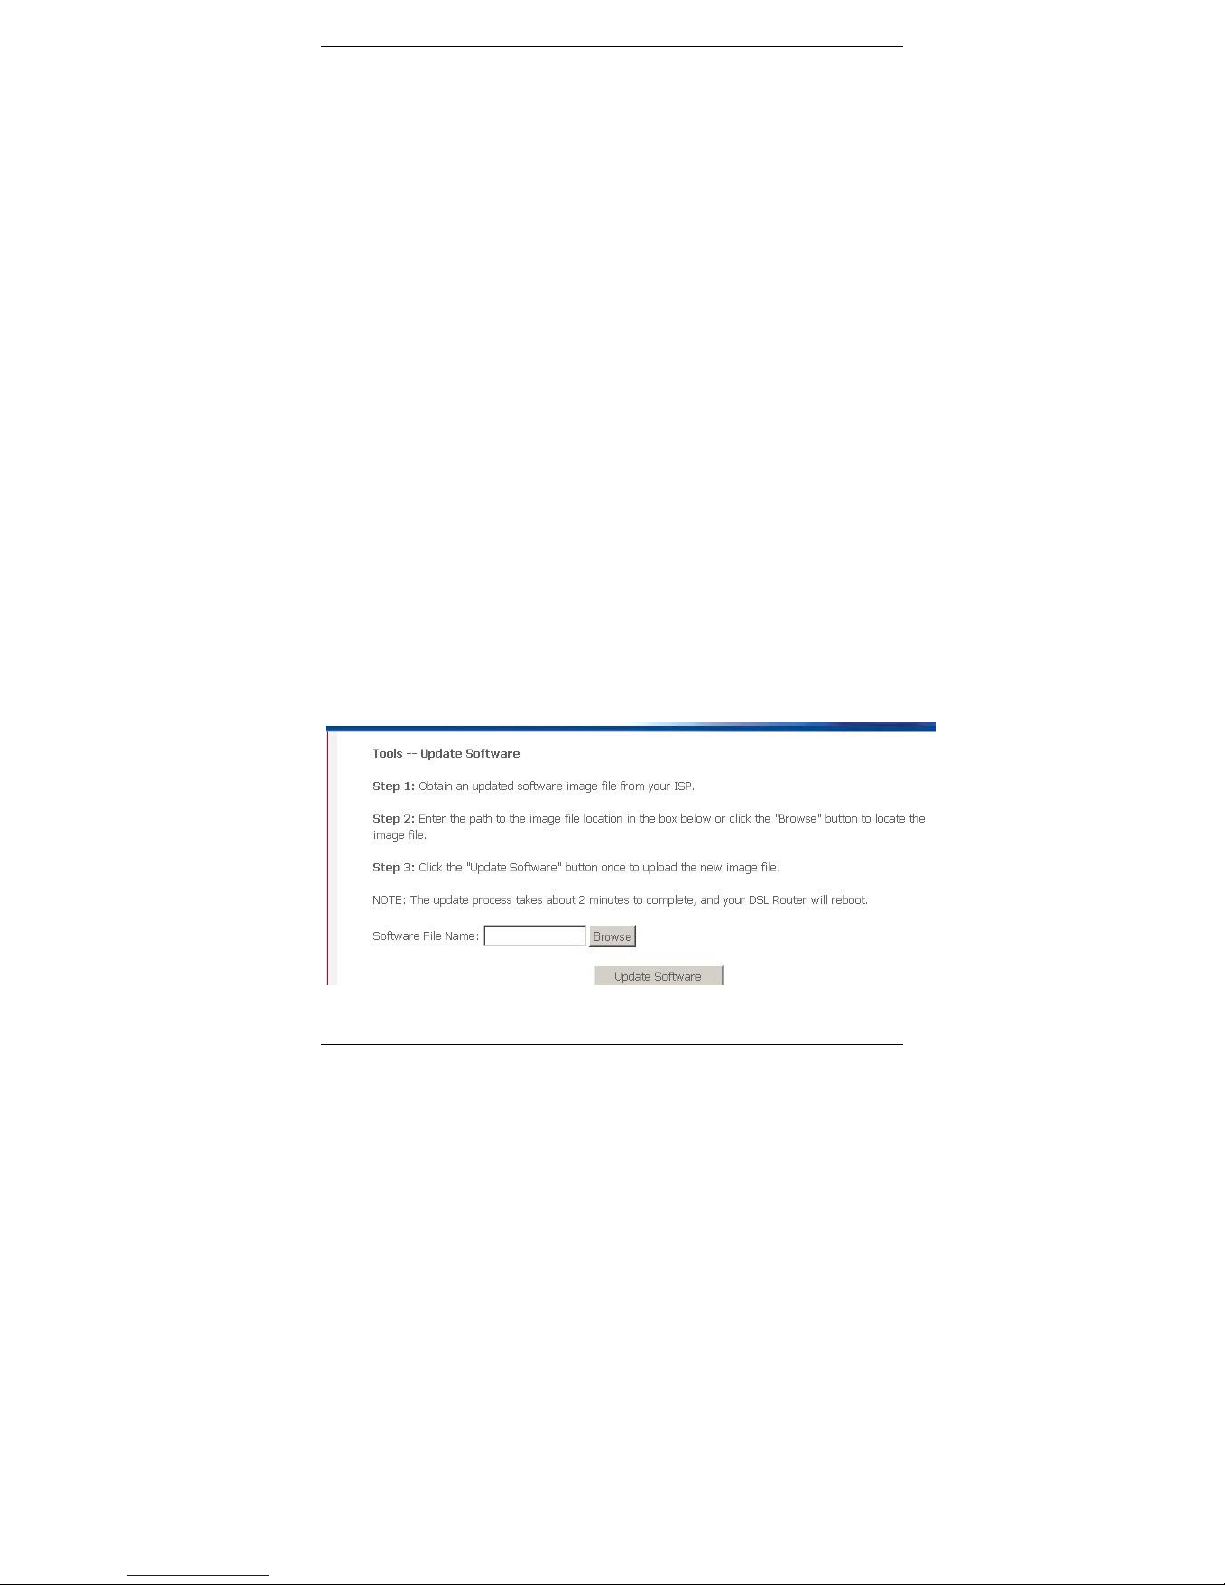
You may easily upgrade X5821 embedded software by obtaining the
compressed upgrade kit from the service provider and then following
the steps for upgrading through a Web-browser:
Step 1: Extract the ZIP file for updated firmware.
Step 2: Connect X5821
via the local Ethernet port or remote ADSL
link, making sure that the X5821 Ethernet IP address and
your terminal are properly configured so that you can
successfully “ping” X5821. The default local IP address is
“192.168.1.1”.
Step 3: Launch the Web browser (IE or Netscape), and enter the
default IP address 192.168.1.1 into the address bar to
access the Web management page.
Step 4: Click on the Management link on the navigation bar and
then on the Update Software link below it.
Step 5: Click on the Browse to select the appropriate firmware and
then click on the Update Software button. The upgrade
process may take about 60 seconds. Do not reset the
device while
10
Page 15

X5821 User’s Manual Version 1.0
11
Chapter 2
Web Management Interface
I. Overview
The Web Management Interface is provided to let the configuration
of X5821 as easily as possible. It provides a user-friendly graphical
interface through a Web platform. You can configure bridge or router
functions to accommodate your needs. In the section below, each
configuration item is described in detail.
II. Preparation
Step 1: Please refer to the hardware installation procedure in
Chapter 1 to install X5821.
Step 2: You should configure your PC to the same IP subnet
as the X5821.
Example: X5821: 192.168.1.1
Your PC: 192.168.1.2
Step 3: Connect your PC to X5821 and make sure that the
PING function is working properly. The default IP
address of this device is 192.168.1.1
Step 4: Launch the Web browser (IE or Netscape), and enter
the default IP address 192.168.1.1 into the address
bar to access the Web management page.
Step 5: The Login dialog box will appear first.
Page 16
X5821 User’s Manual Version 1.0
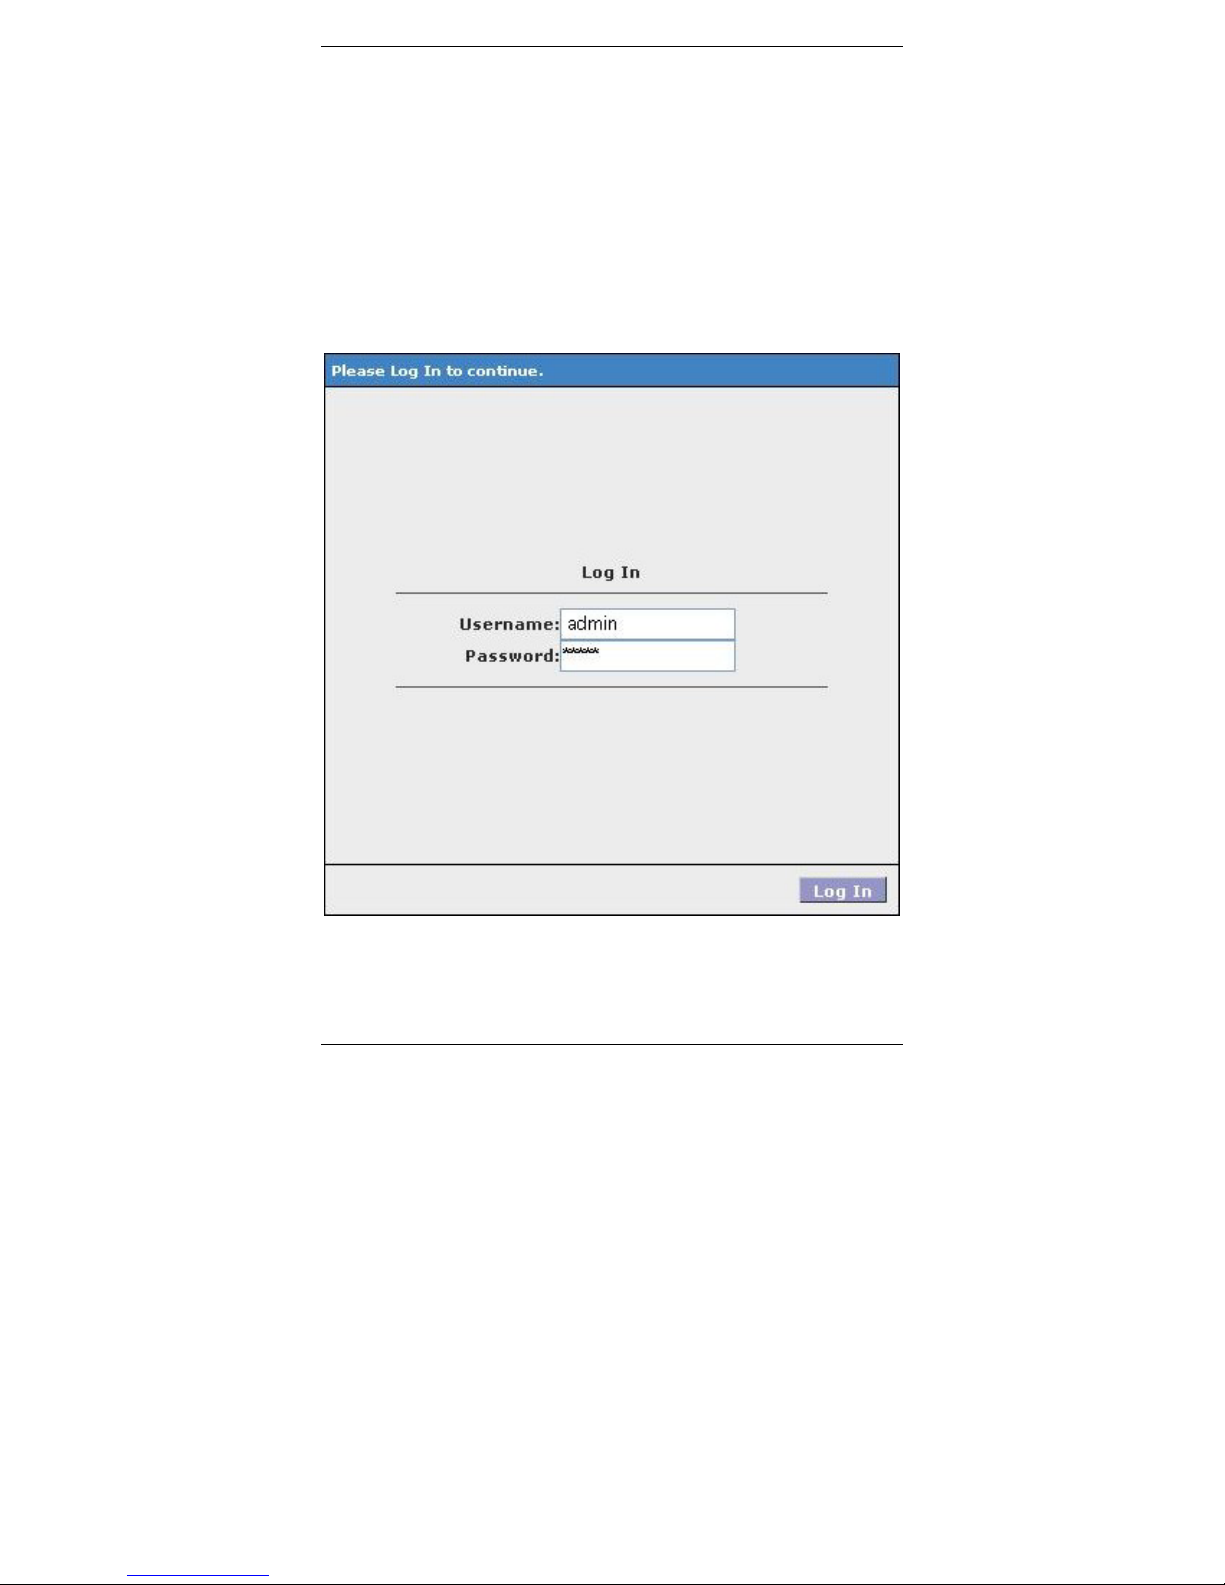
1. Login
The Enter Network password window will appear when
starting the configuration. With the window active, type admin
for both User name and Password, and then click on the OK
button.
Note: The username and password are case-sensitive.
12
Page 17

X5821 User’s Manual Version 1.0
13
2. Quick Setup
This model supports Quick Setup for user to set up the
modem/router to work with the provide service from ISP or TELCO.
STEP1> Click the “Quick Setup”, This Quick Setup will guide
you through the steps necessary to configure your DSL Router.
STEP2> Select the check box “DSL Auto-connect” to enable
DSL Auto-connect process. If you want to input VPI/VCI and choose
the protocol to connect your service, just leave this check box
disable, then input VPI, and VCI numbers. Click “Next” to go to next
step.
STEP3> Choose the Connect Type, the specific page will show
up, refer to chapter “WAN Setup” to go ahead next STEP for different
configuration.
<Note> If the configuration is bridge encapsulation, there is no
need to configure any more parameters. Only need to use the third
party dial-up software to connect the Internet.
This model supports:PPPoA、PPPoE、MER、IPoA、Bridging.
For detail configuration information, please check the following
chapters configuration guide.
Page 18
X5821 User’s Manual Version 1.0
3. Device Info
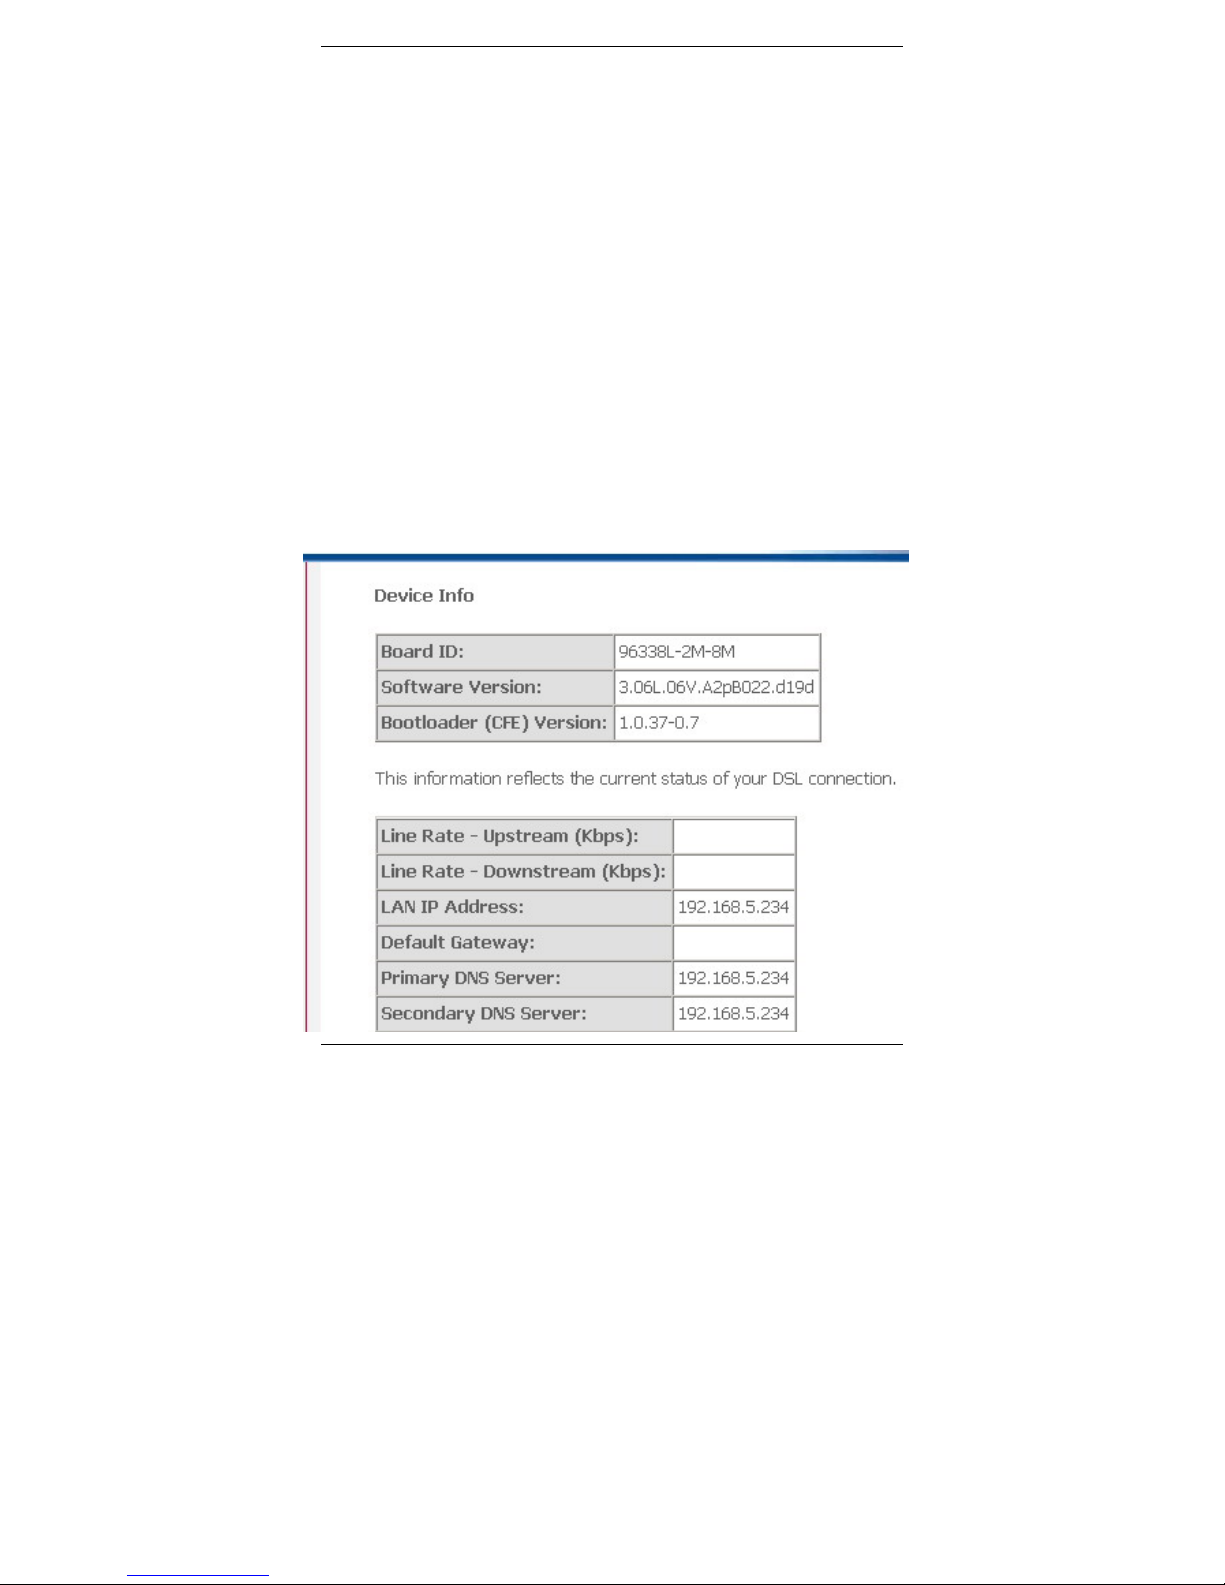
Device Info is used to show the main information inside the router.
There are 5 pages below will be provided for the detailed data.
“Summary” will show
a. Board ID
b. Software Version
c. Bootloader Version
d. Line Rate
e. LAN IP Address
f. Default Gateway
g. Primary DNS Server
h. Secondary DNS Server
14
Page 19
X5821 User’s Manual Version 1.0
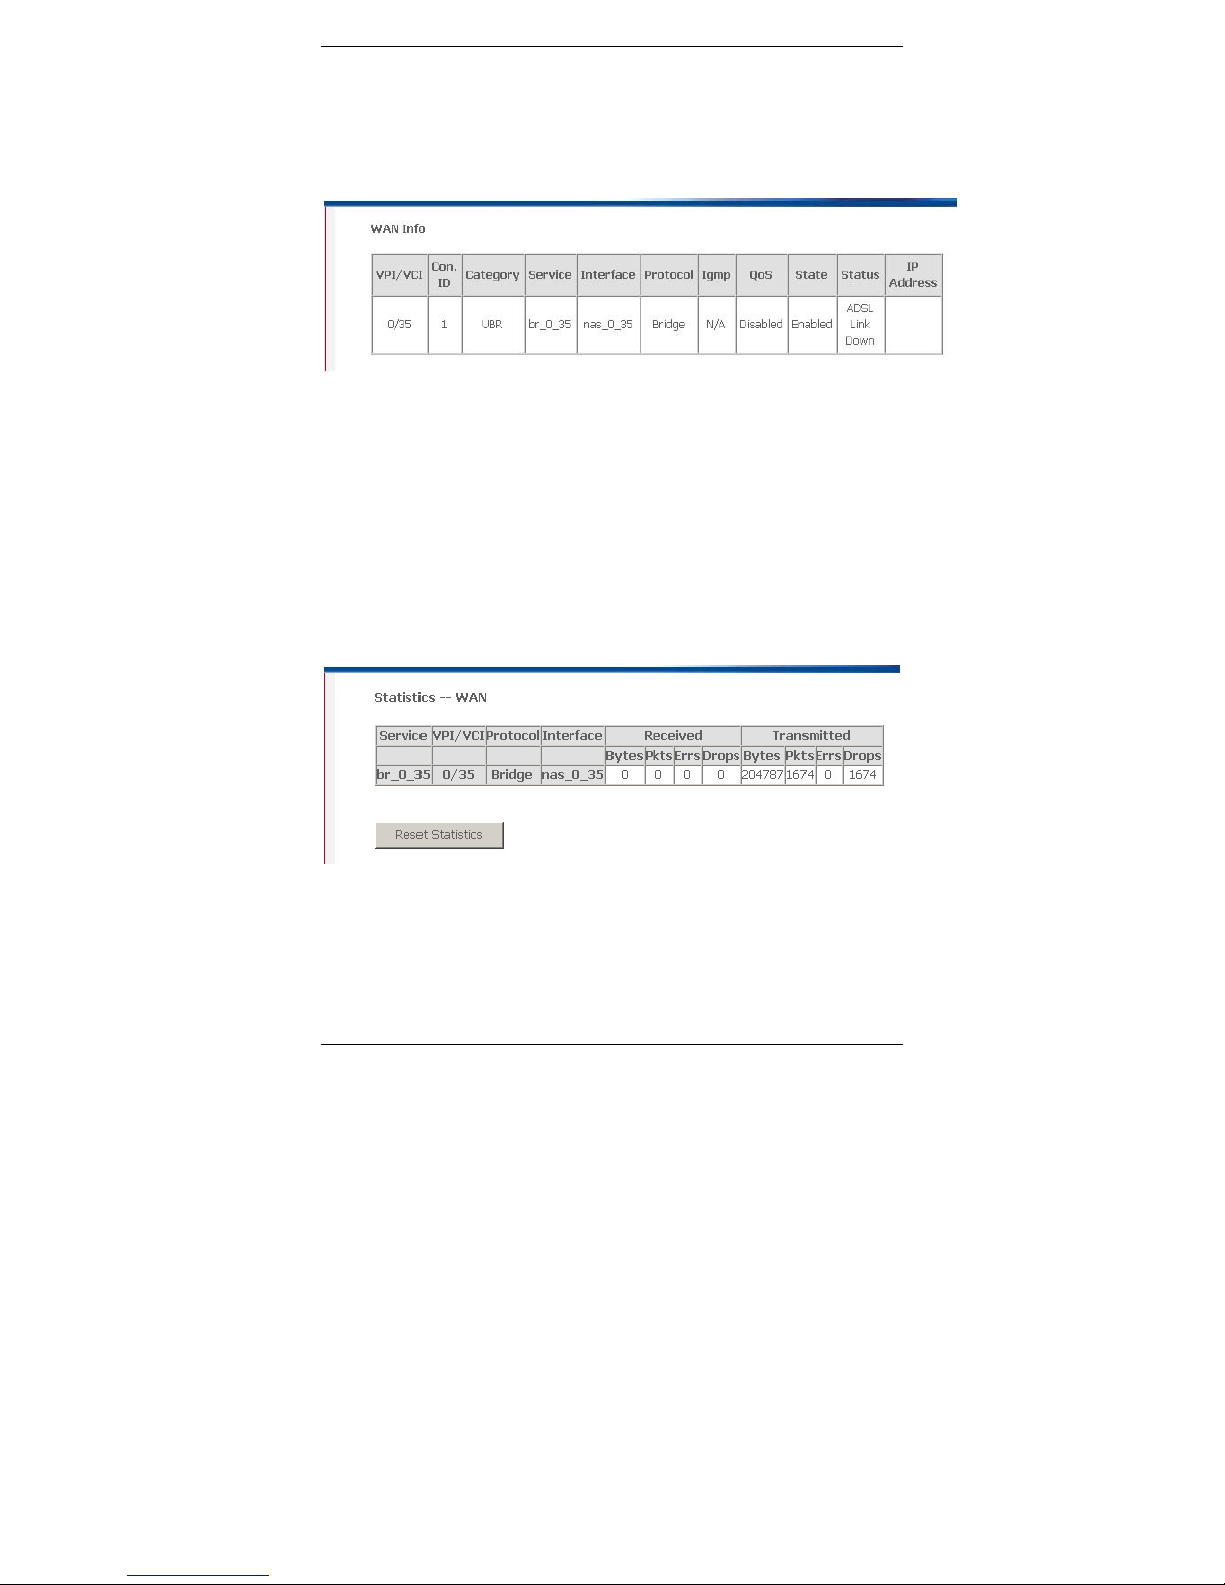
“WAN Info” will show the related information about connection ID,
ATM QoS setting if the VPI/VCI is configured already.
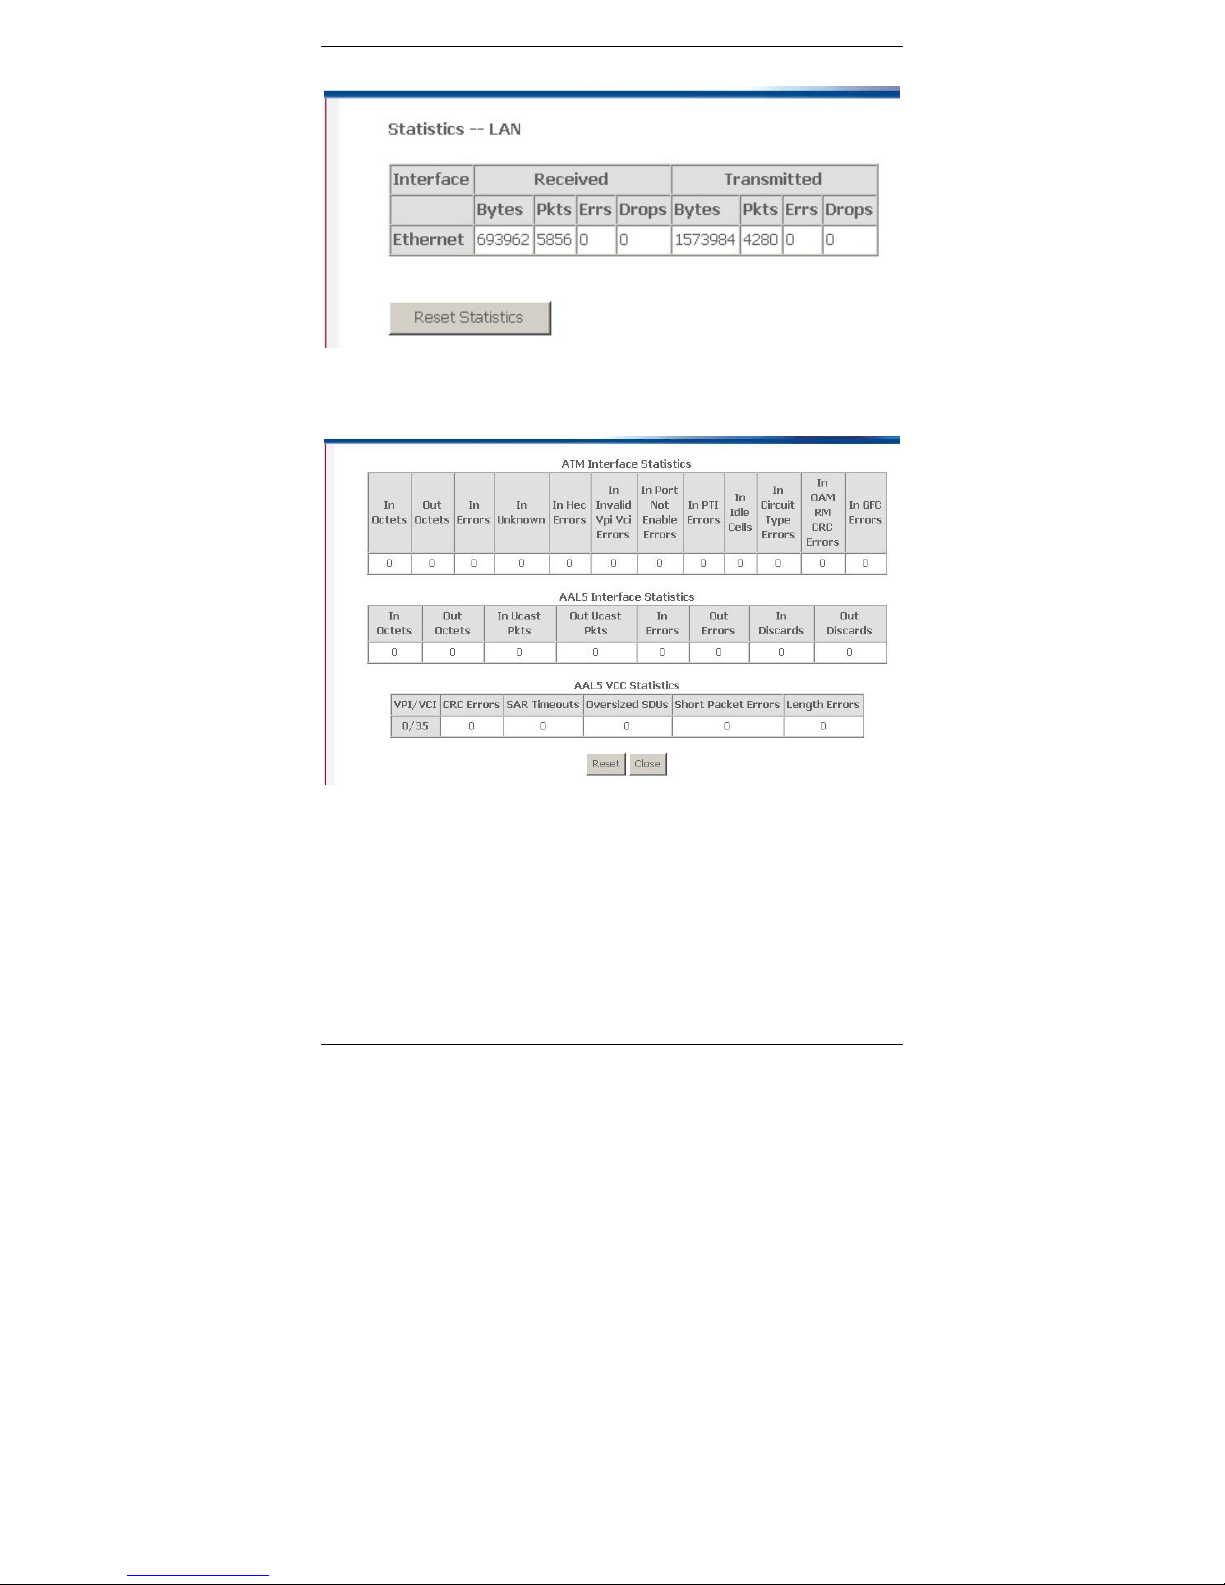
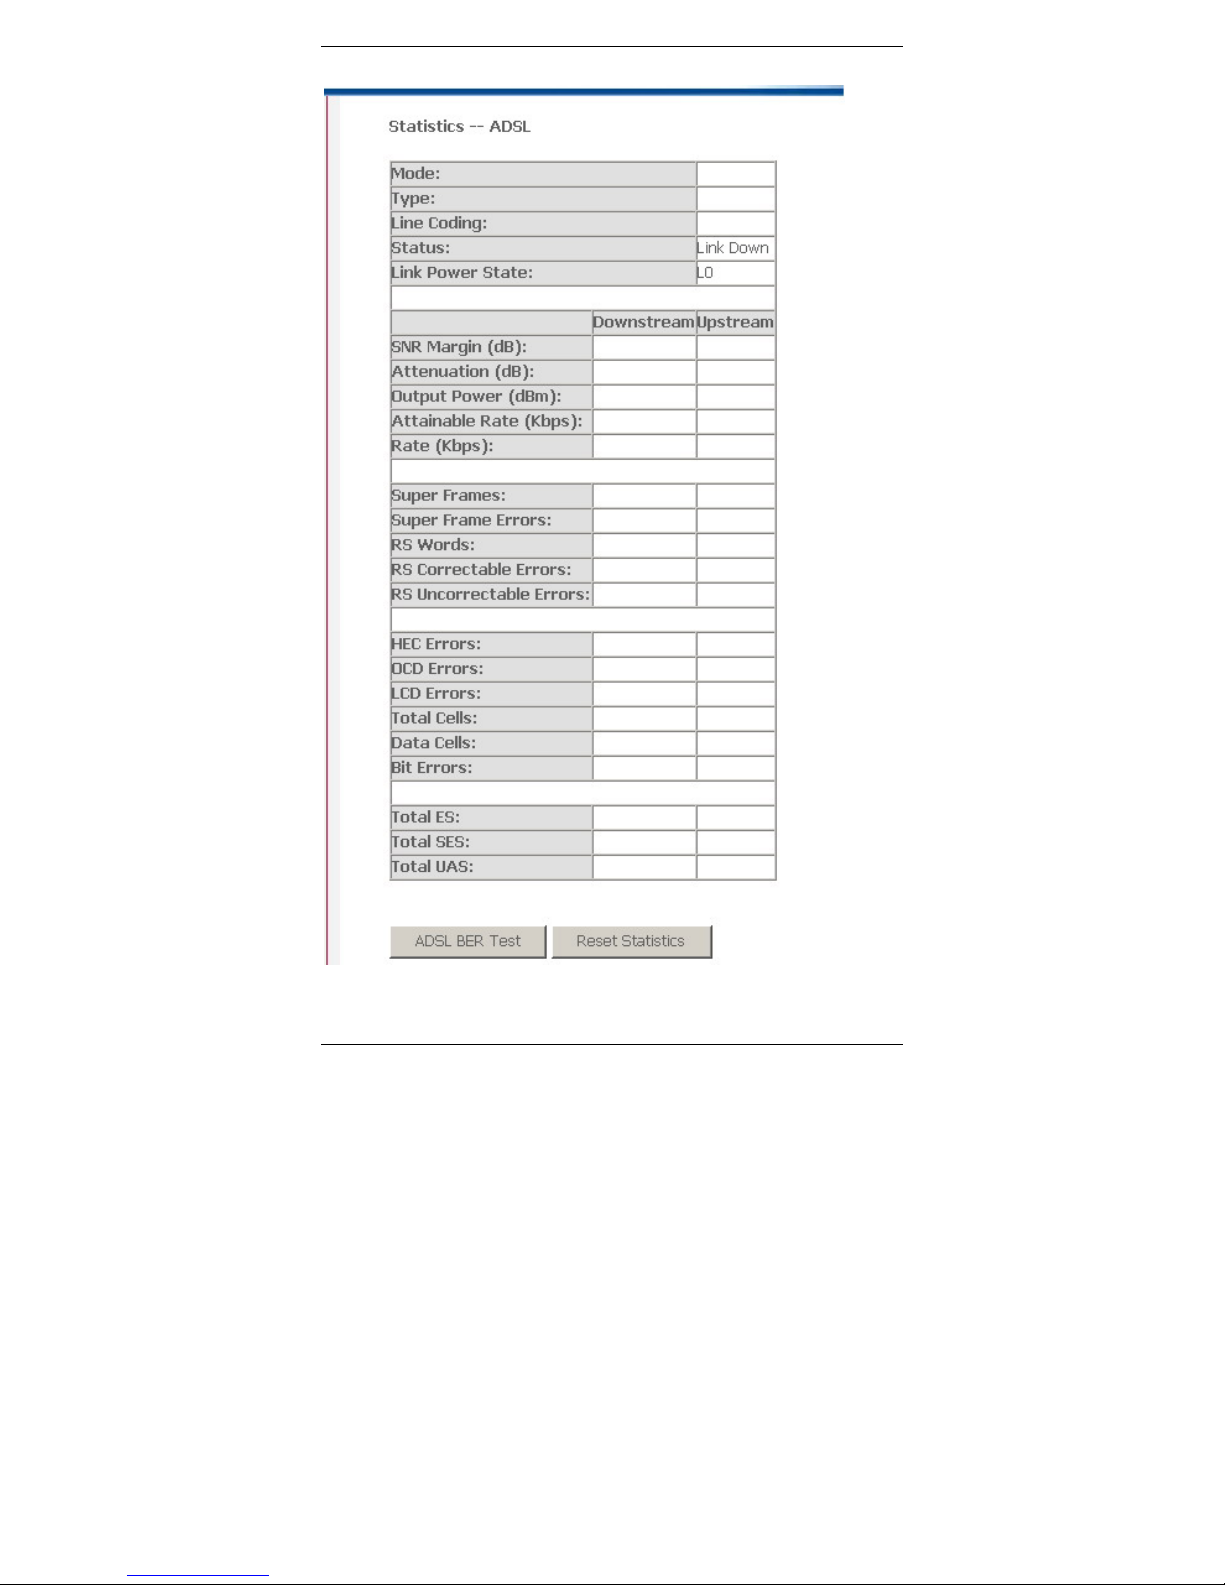
“Statistics” will show the receive/transmit packets on LAN side and
WAN side, ATM related interface statistics, ADSL physical layer
related data. On the page, BER test on ADSL can be done by click
the button “ADSL BER Test”
15
Page 20
X5821 User’s Manual Version 1.0
16
Page 21
X5821 User’s Manual Version 1.0
17
Page 22
X5821 User’s Manual Version 1.0
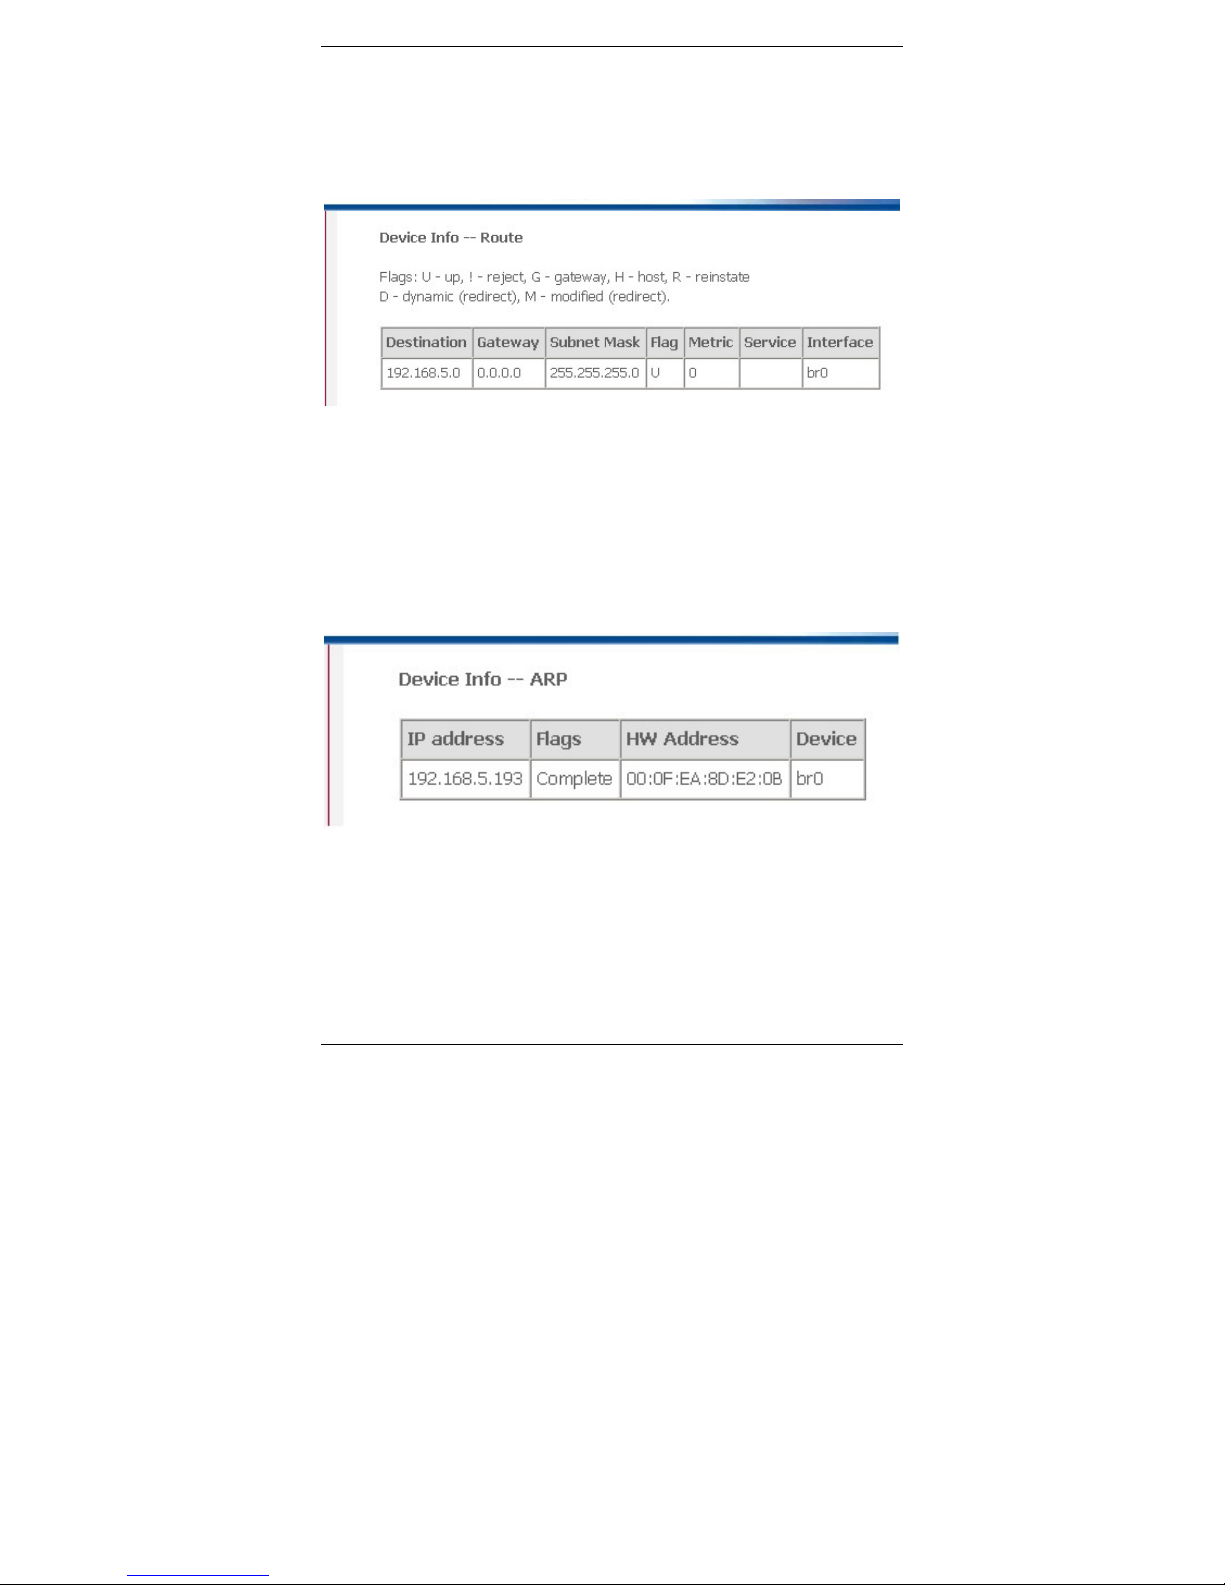
“Route” will show the configured routing rules.
“ARP” will show the current ARP data.
18
Page 23
X5821 User’s Manual Version 1.0
4. Advanced Setup
To check “Advance Setup”, there are 4 sub-menus will show
up. They are “WAN”, “LAN”, “Routing”, “DSL”. The different
sections will introduce the setting for each page.
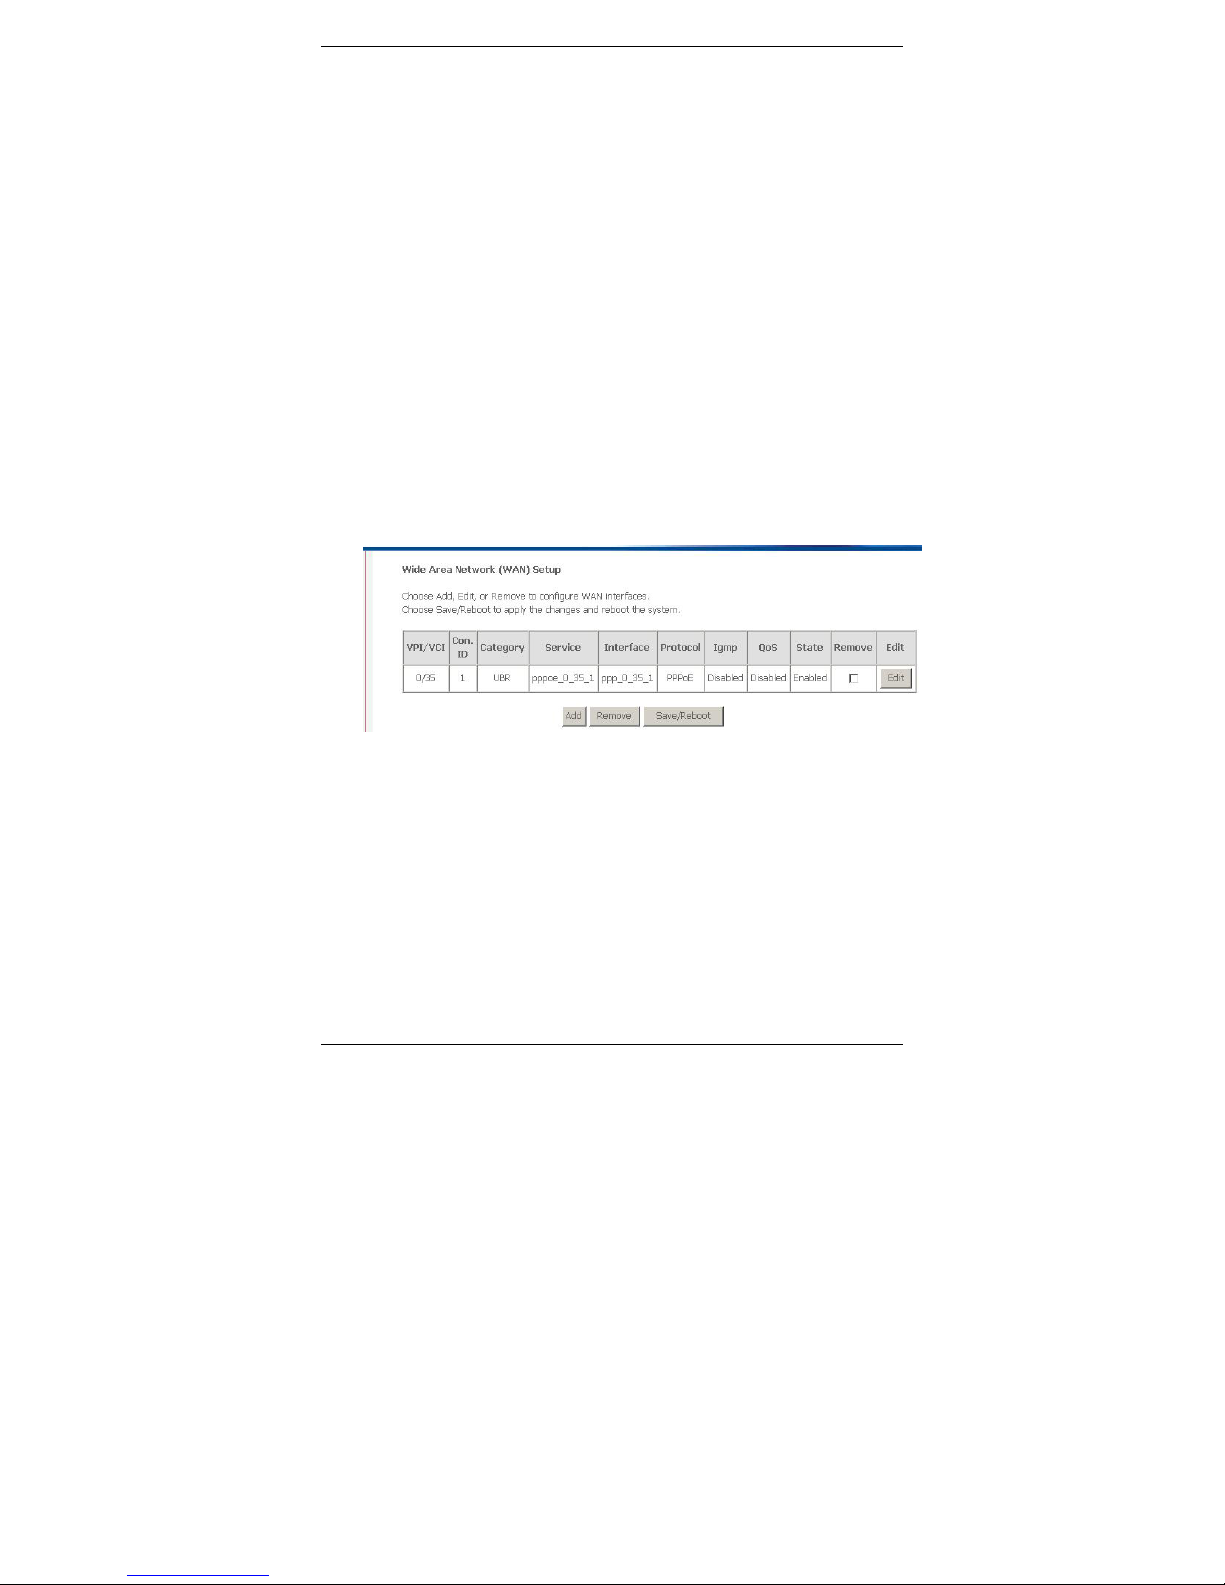
4.1 WAN
Click “WAN” on the left manual. Access “WAN” configuration
page.
z Note: At most eight connections can be set. If you need to add a
new connection, please delete or modify an existing connection.
19
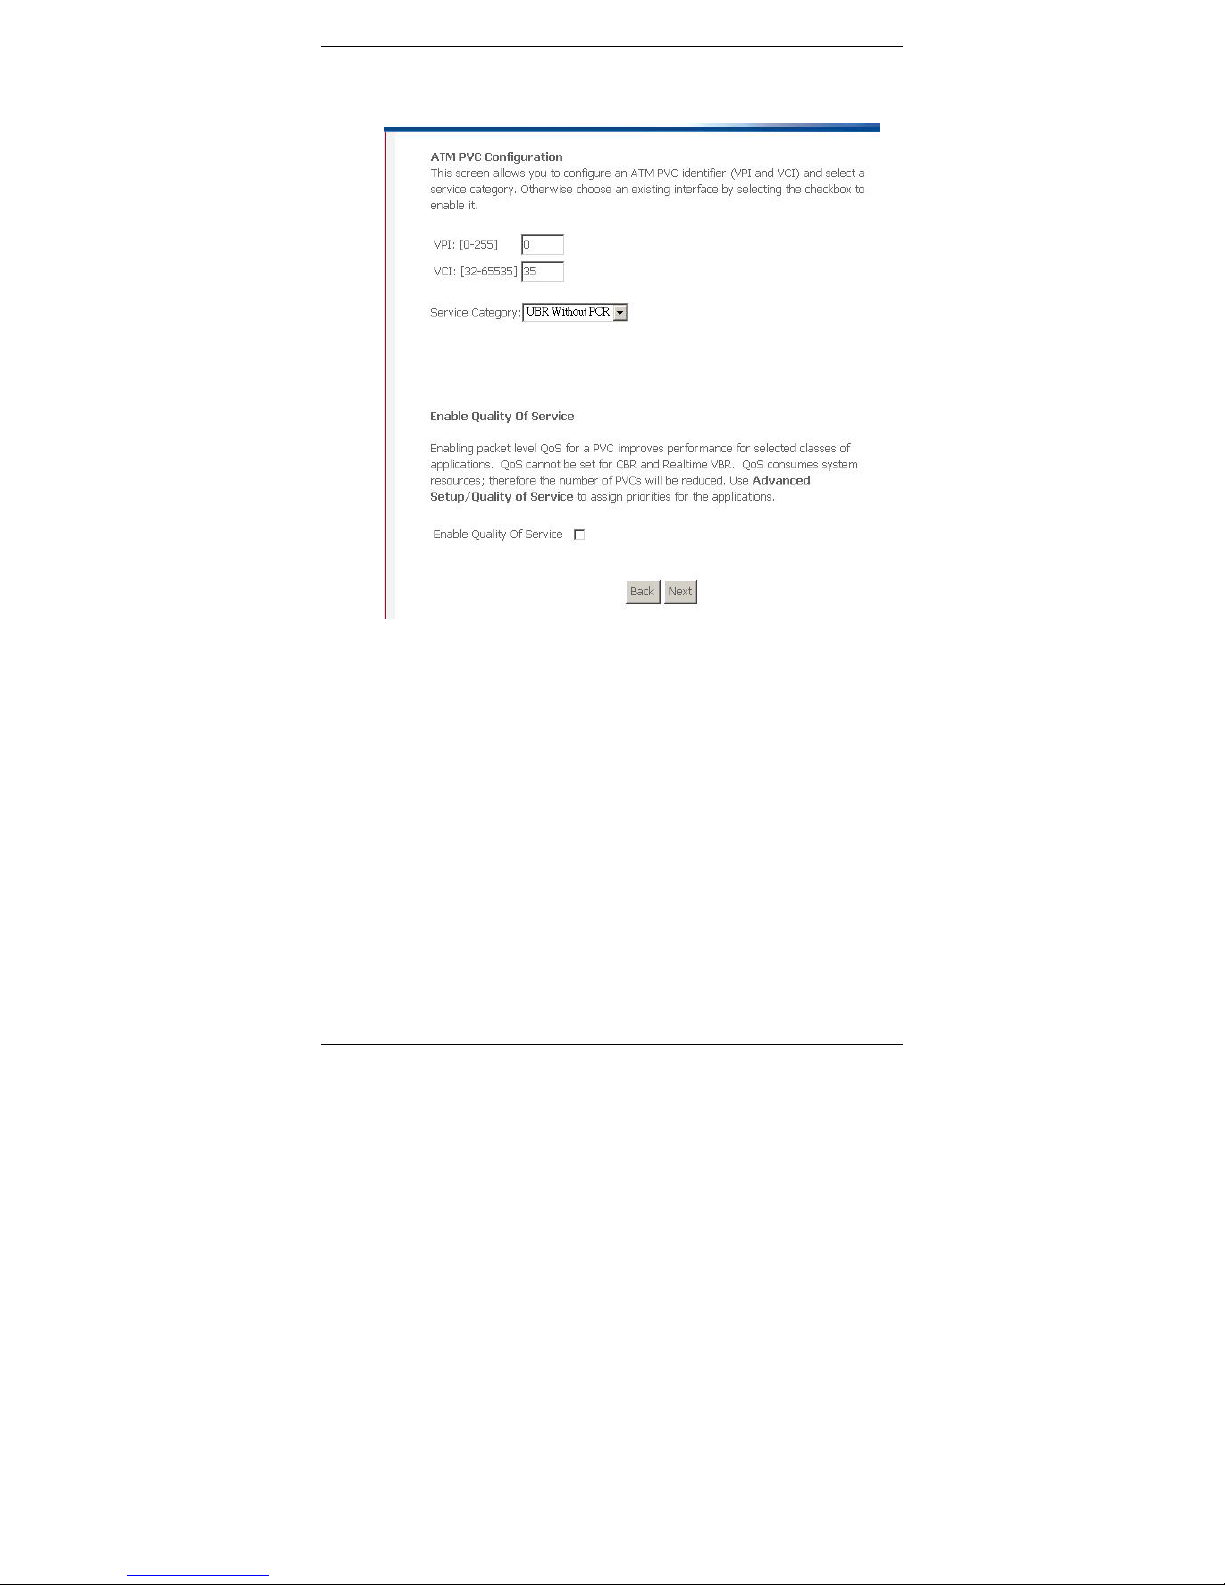
Click on the next connection, which you want to modify. Press
Page 24
X5821 User’s Manual Version 1.0
“Edit” button, enter the configure guide, as the figure below.
20
Page 25
X5821 User’s Manual Version 1.0
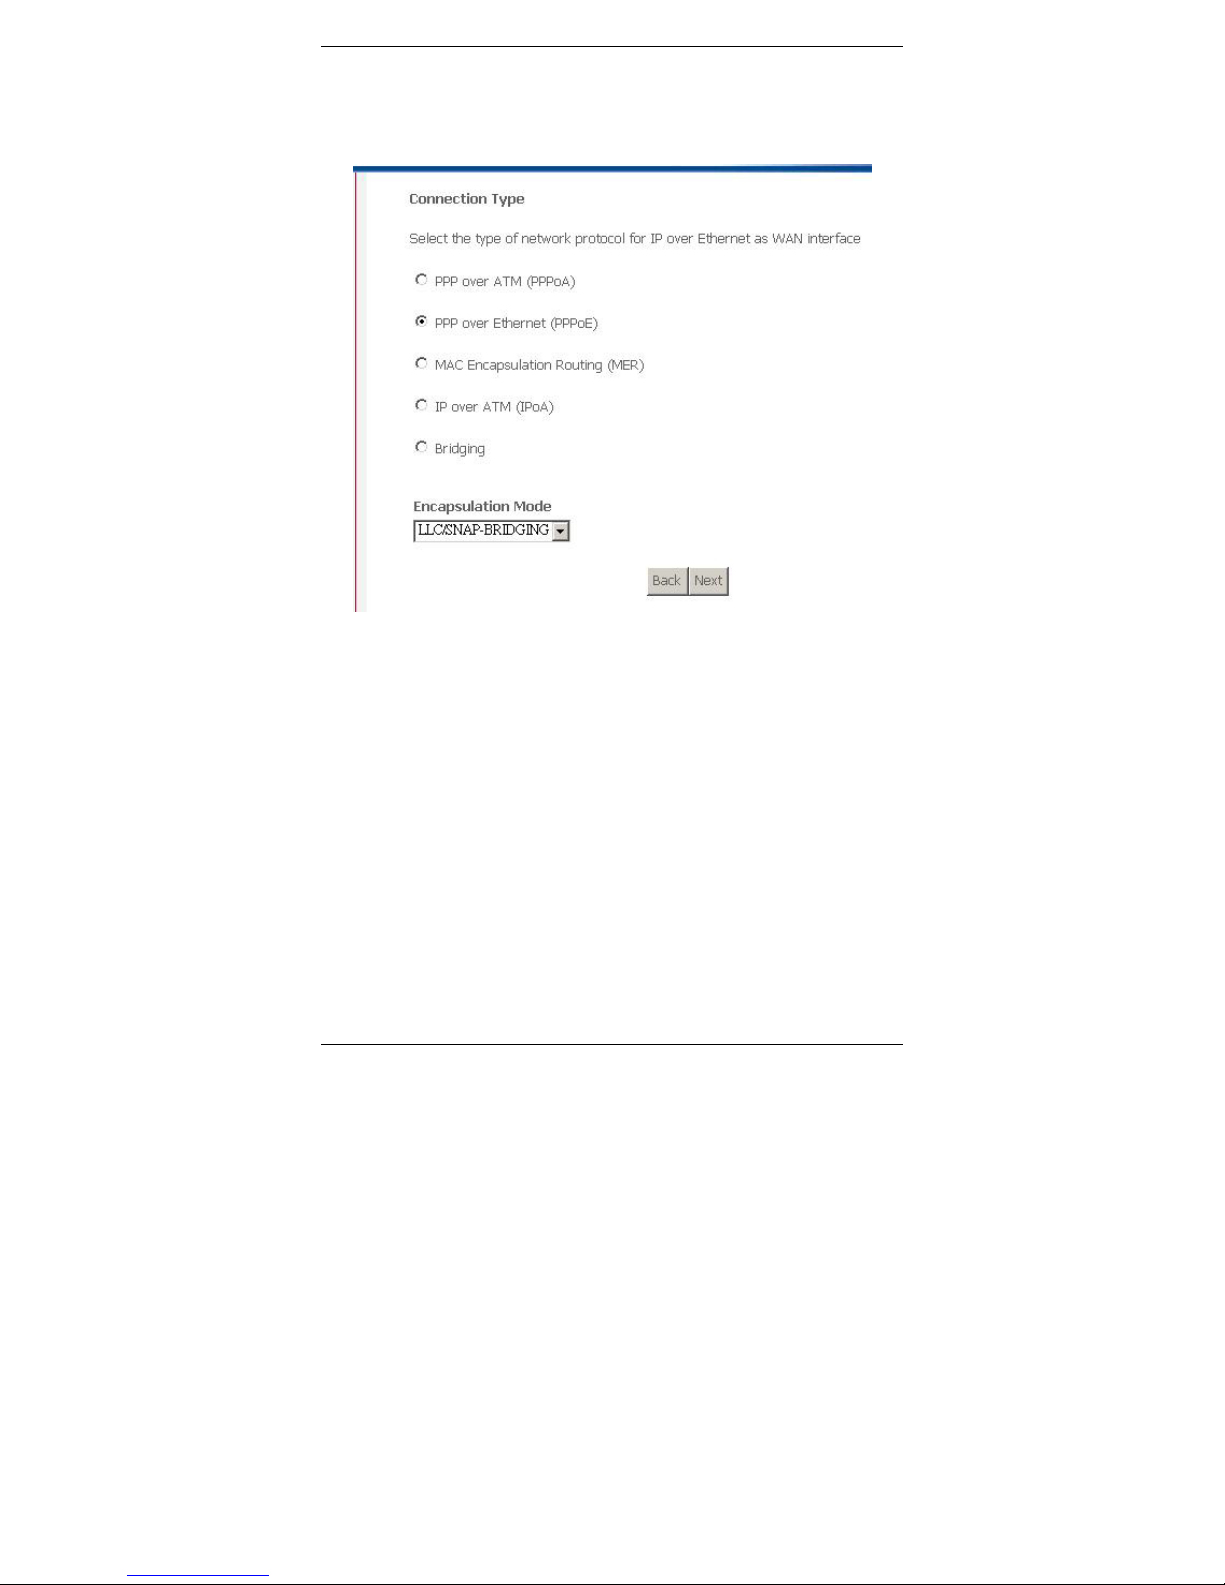
z The value of VPI/VCI should be provided by your ISP. After to
input the PVC value, press “Next” into “connection type”.
The model supports five protocols. Choose the protocol which
is provided by ISP and PVC encapsulation, click “Next” enter to
the protocol configure. Below, the configuration of the five
protocols is introduced.
• PPP over ATM (PPPoA)
• PPP over Ethernet (PPPoE)
• MAC Encapsulated Routing (MER)
• IP over ATM (IPoA)
• Bridging
21
Page 26
X5821 User’s Manual Version 1.0
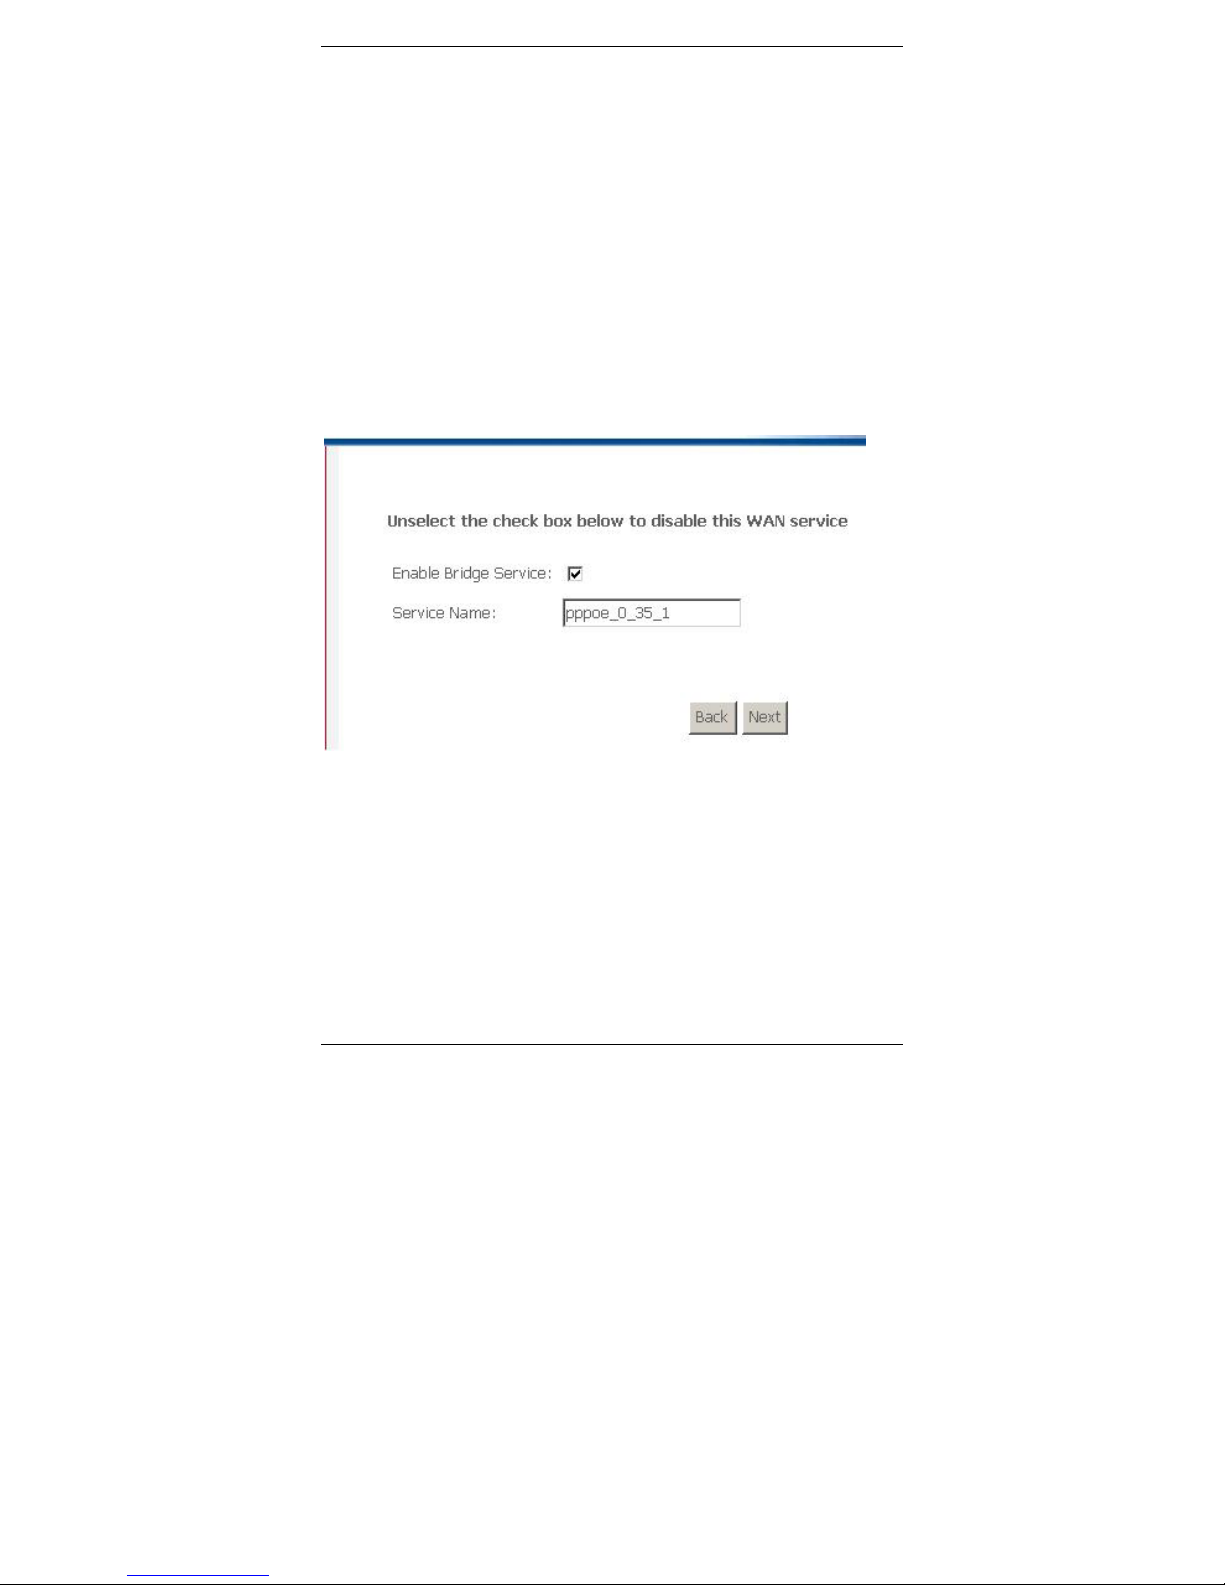
z Some connection lines need to confirm the LLC or VC, if you
can’t confirm, please don’t modify the default value or ask your
ISP.
4.1.1 BRIDGE CONFIGURATION
Select the Bridging mode. Then press “Next” to specify the Service
Name, and select the “Enable Bridge Service”.
22
Page 27
X5821 User’s Manual Version 1.0
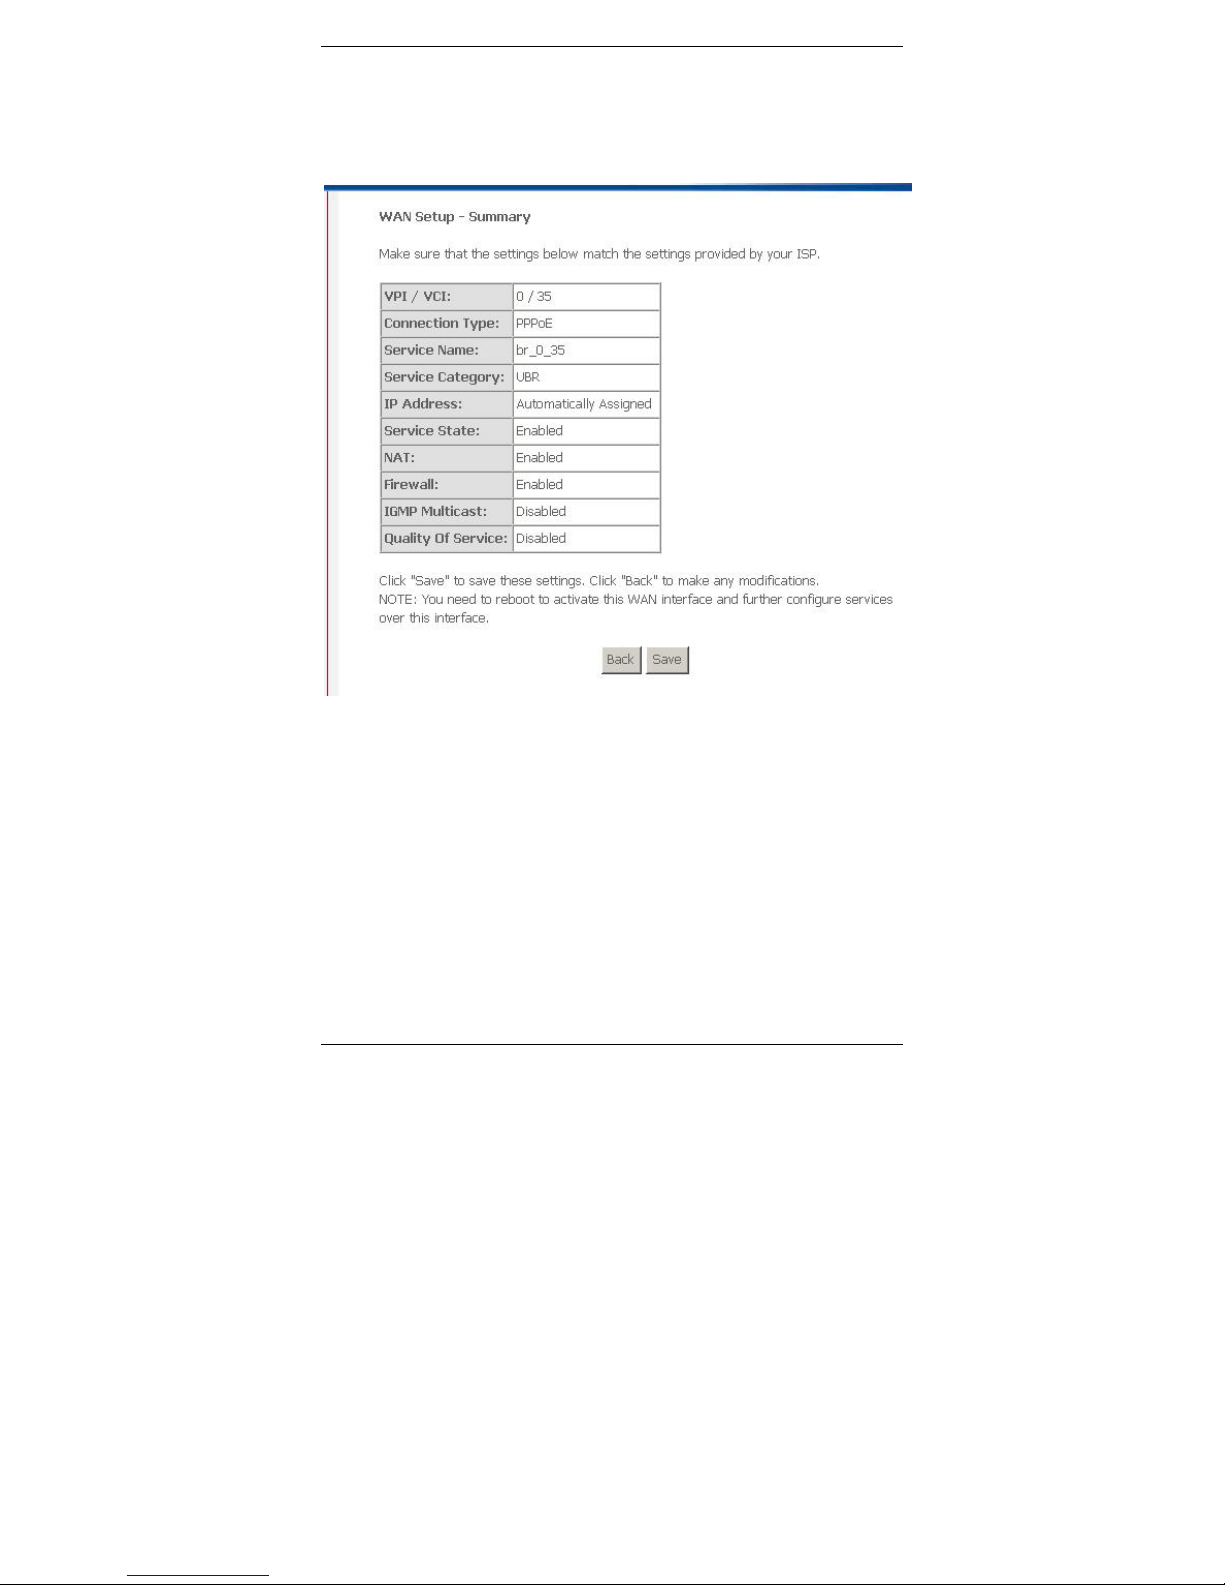
Press “Next” to “WAN configuration”, click “save” to save
configuration, if you need to modify the parameter, click “back”.
Note:When you use bridge mode, please close “DHCP SERVER”.
23
Page 28
X5821 User’s Manual Version 1.0
24
Page 29
X5821 User’s Manual Version 1.0
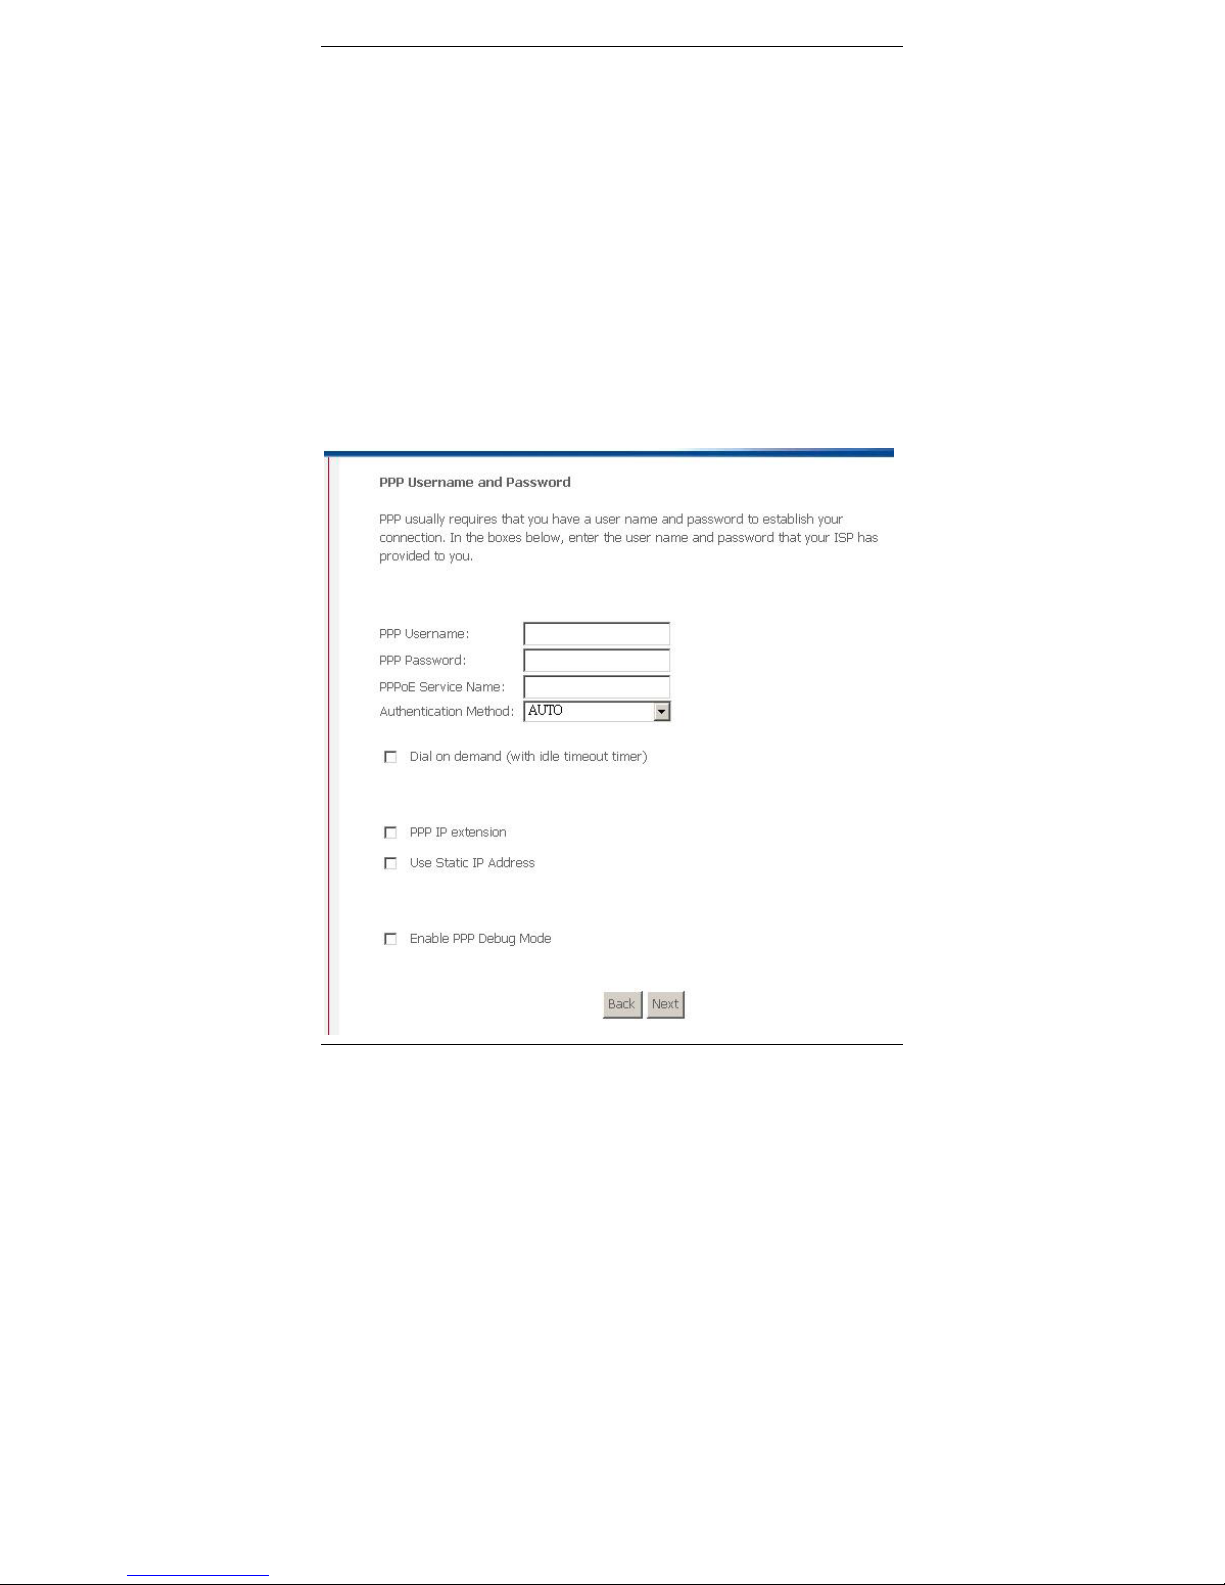
4.1.2 PPPoE CONFIGURATION
PPPoE is also known as RFC 2516. It is a method of
encapsulating PPP packets over Ethernet.
PPPoA is also known as RFC2364 and named as Peer to Peer
Protocol over ATM. As PPPoE, it also includes all the features of PPP.
Although it’s based on ATM protocol, the setting of all the other
parameters is similar with PPPoE. So we only describe PPPoE in
detail here.
Select PPP over Ethernet (PPPoE), press “Next step”.
25
Page 30

X5821 User’s Manual Version 1.0
26
z PPP Account: Your account from ISP to access Internet.
z Password: Input the password assigned by your ISP.
z PPPoE server name: Server name of network ISP. No need to
set.
z Authentication Mode: Authentication mode of network ISP.
Default is AUTO.
z Connection on demand: When this mode is selected, the
connection that has no traffic within assigned
disconnect timeout (e.g. 1 minute) will be automatically
disconnected. The connection will be activated again when
traffic arrives. This function is advantageous for users who are
charged with online time. It should be noticed that some
programs automatically link to Internet. Computer will send data
to network when infected by virus. Connection will not be
disconnected under these data streams.
z Disconnect timeout: When “Connection on demand” is selected,
this input box indicates that after how
long the connection will be disconnected in the absence of
traffic. If the value is 0, connection will not be disconnected.
Press “Next step” when configuration is finished. The following
operation is same with Figure 3.5. Notice that PPPoE mode does not
work until the modem is reset.
Page 31
X5821 User’s Manual Version 1.0
4.1.3 MAC Encapsulation Routing (MER)
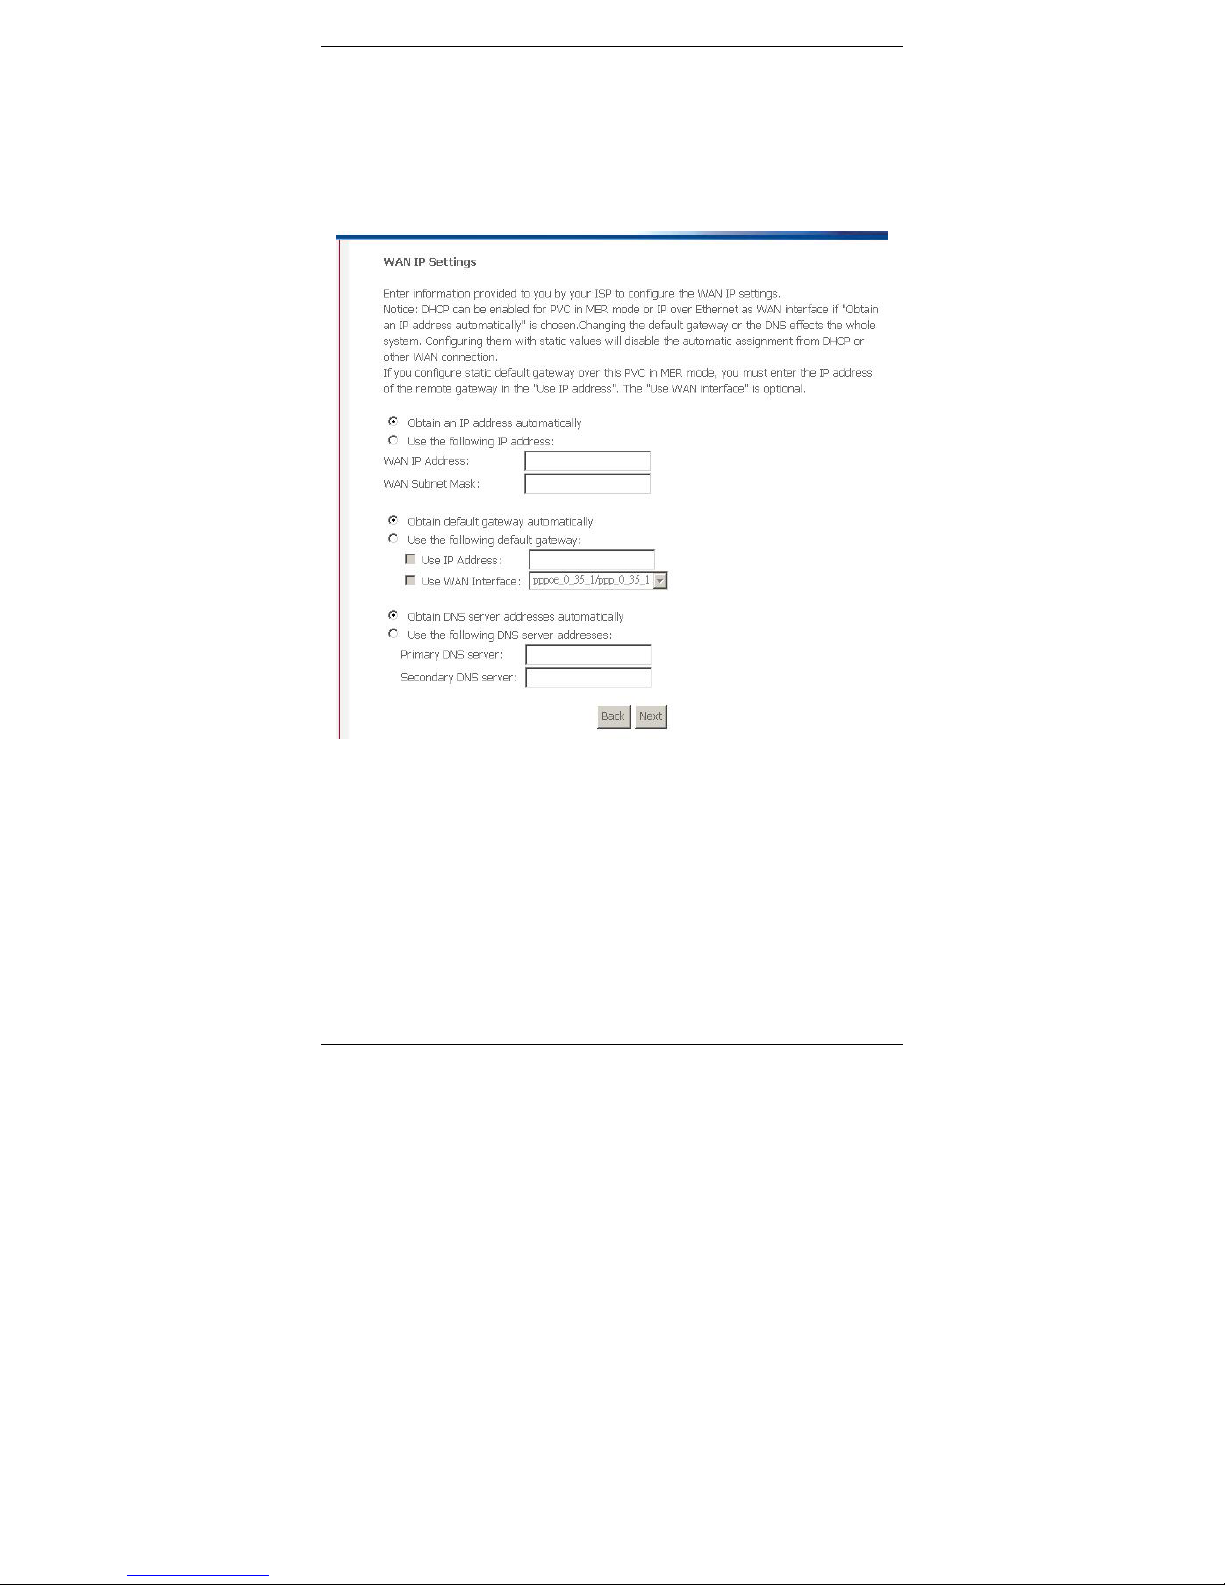
Select MAC Encapsulation Routing (MER), press “Next”, and the
configuration can be queried from your ISP.
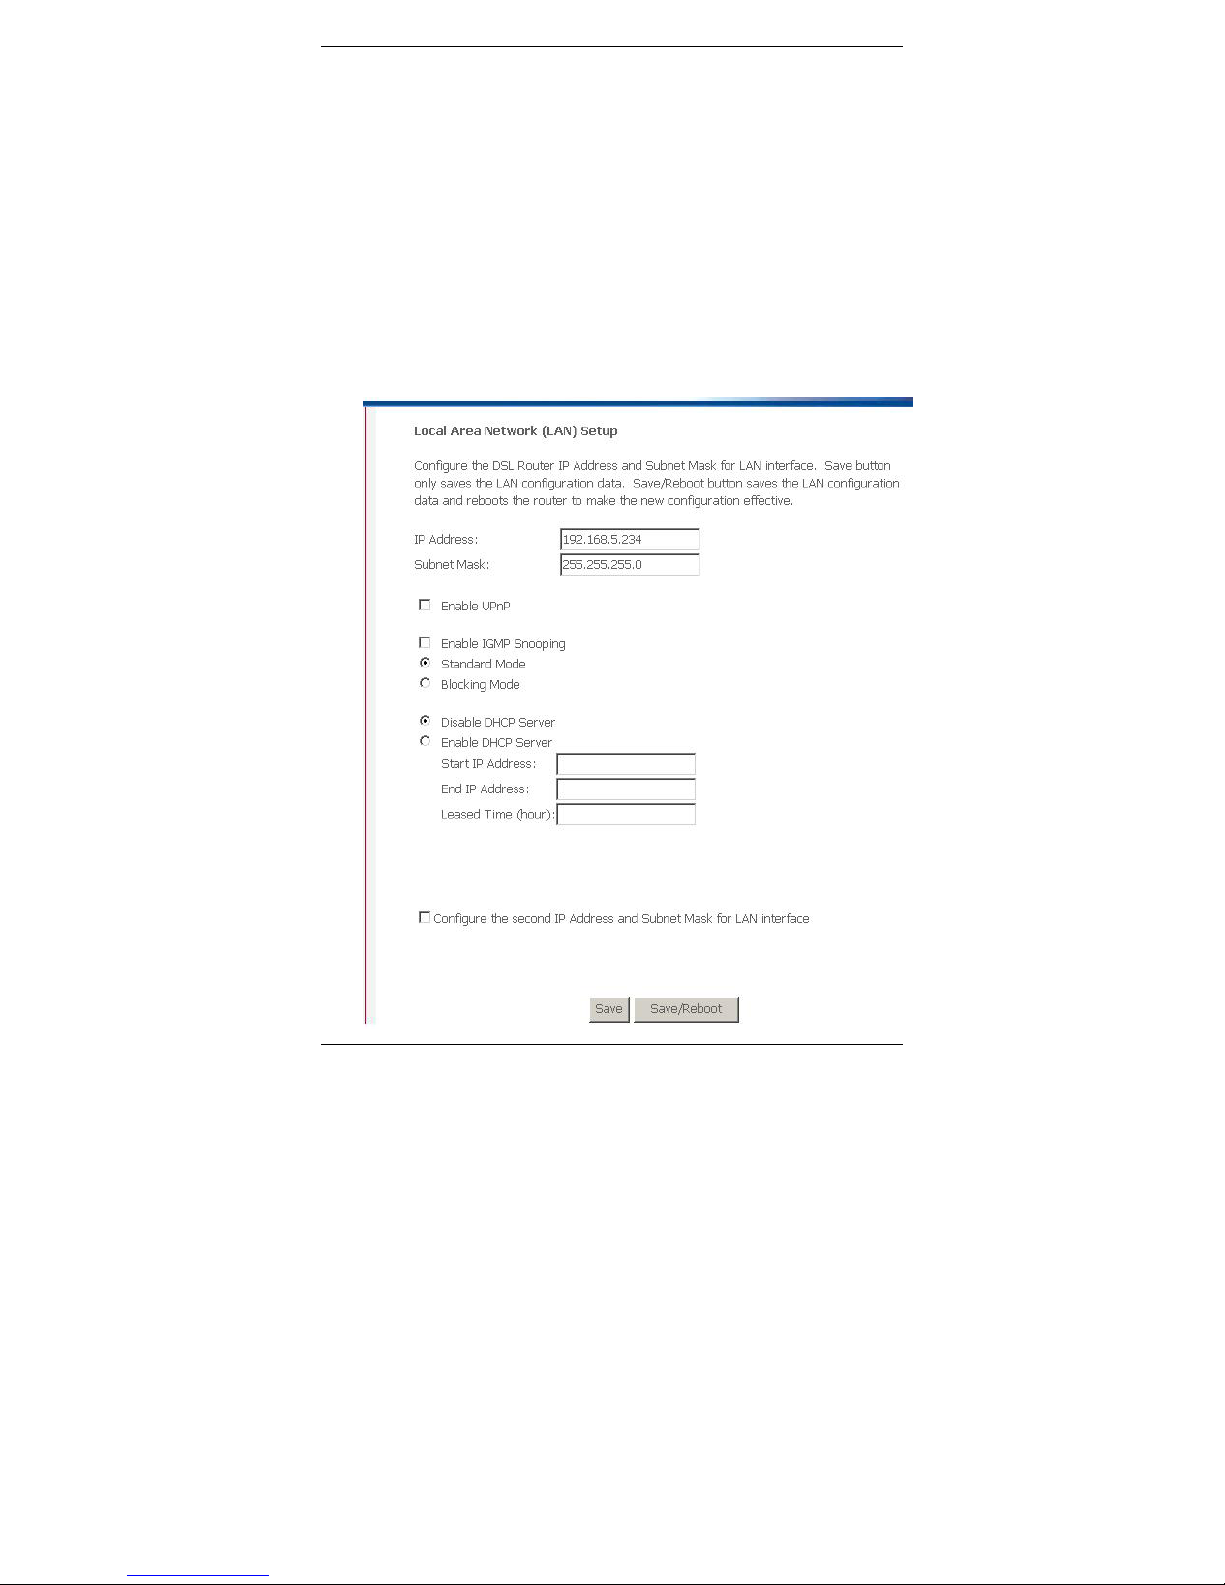
Enter information provided to you by your ISP to configure the WAN
IP settings.
27
Notice: DHCP can be enabled for PVC in MER mode or IP over
Ethernet as WAN interface if "Obtain an IP address automatically" is
chosen. Changing the default gateway or the DNS, this will effect the
whole system. Configuring them with static values will disable the
automatic assignment from DHCP or other WAN connection.
Page 32
X5821 User’s Manual Version 1.0
If you configure static default gateway over this PVC in MER mode,
you must enter the IP address of the remote gateway in the "Use IP
address". The "Use WAN interface" is optional.
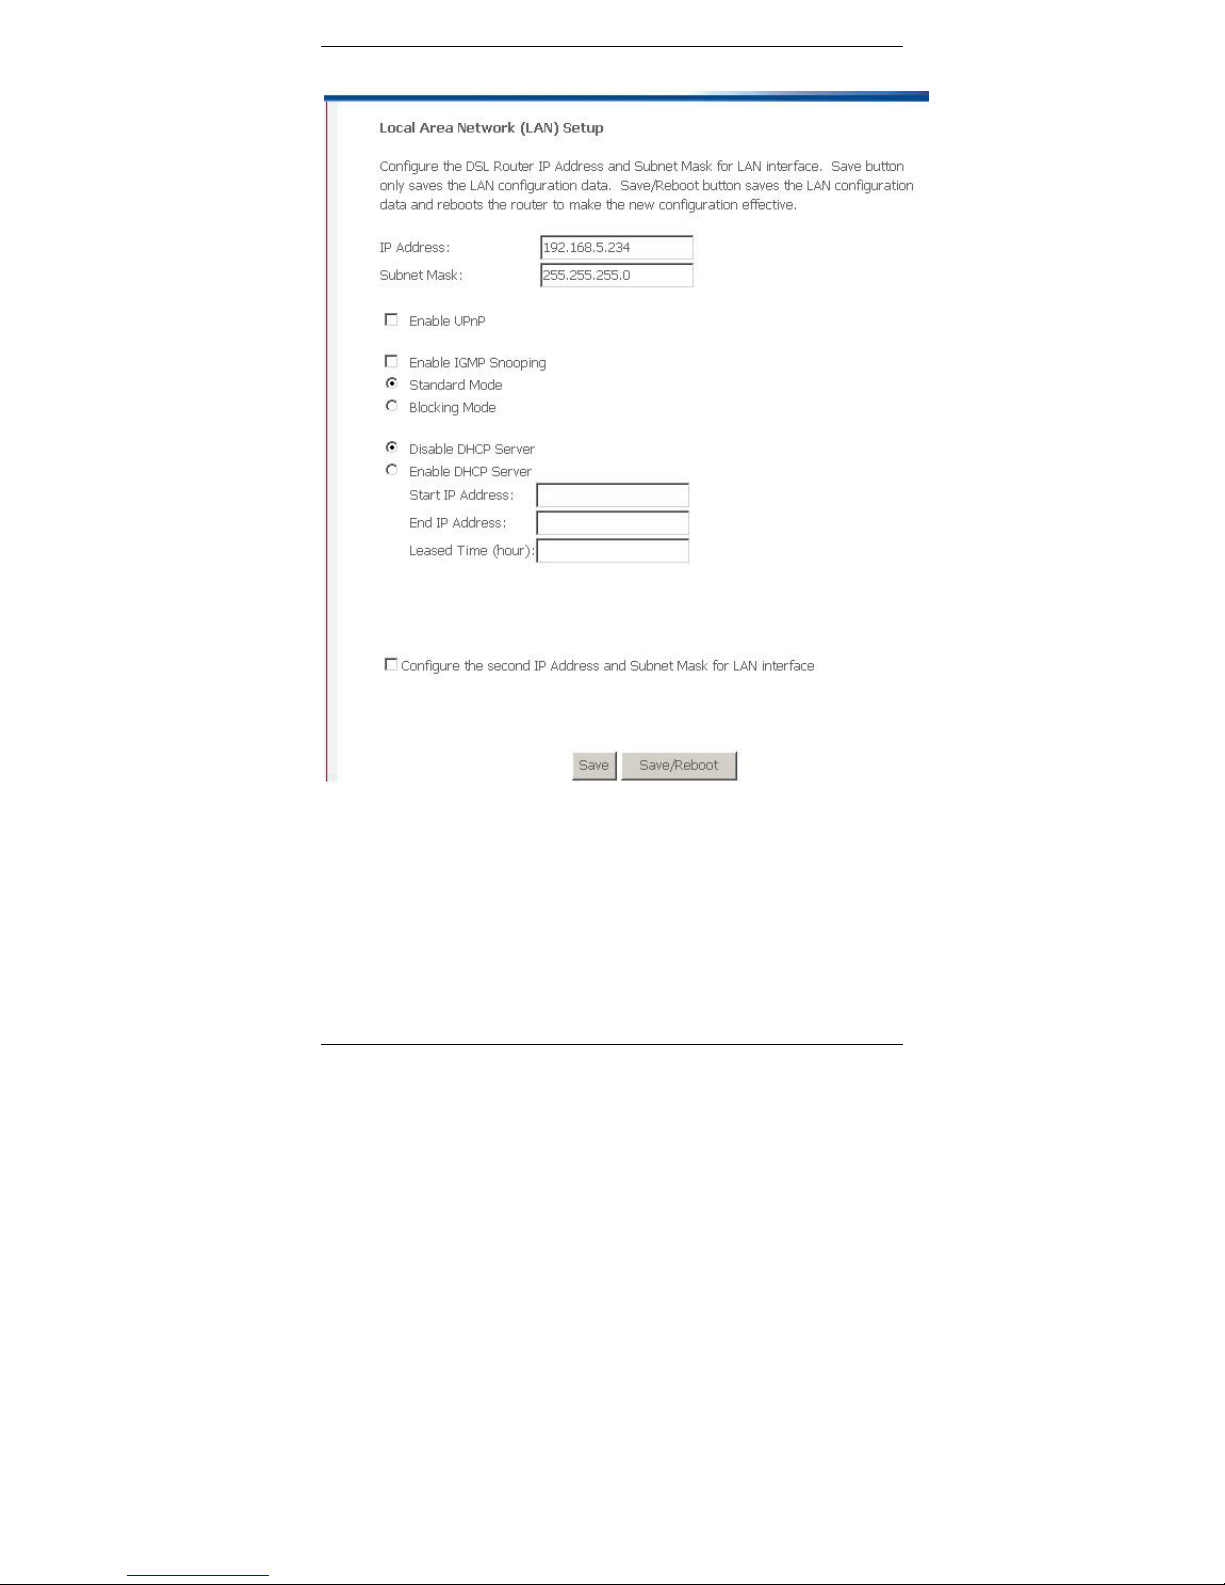
4.2 LAN
Click “LAN” below “Advanced Setup” on the left manual. Access
“LAN” configuration page. The local port settings are used to
28
Page 33

X5821 User’s Manual Version 1.0
29
configure the LAN IP address, DHCP server and relay settings.
IP Address: Enter the IP address.
Netmask: Enter the subnet mask for the IP address.
Enable IGMP Snooping: To enable or disable IGMP Snooping
by this setting. When the setting is enalbe, the model will snoop
IGMP packets and set the related setting on switch to make
sure the packets form video server will be multi-casted to the
join port not all ports. This way will prevent the video streams
generate packets storm.
Enable DHCP Server: This setting to enable/disable DHCP
server.
Start IP Address: Enter the first IP for the address pool.
End IP Address: Enter the last IP for the address pool.
Lease Time: Enter the value in hours definign how long an IP
address can be assigned to a host.
Enable DHCP Relay: This setting to enable/disable DHCP
server.
Relay IP: Enter the IP address of the DHCP relay server.
4.3 NAT
There are three pages to set NAT related functions include
Virtual Servers, Port Triggering, DMZ Host. The following
sections will describe page by page.
4.3.1 Virtual Servers
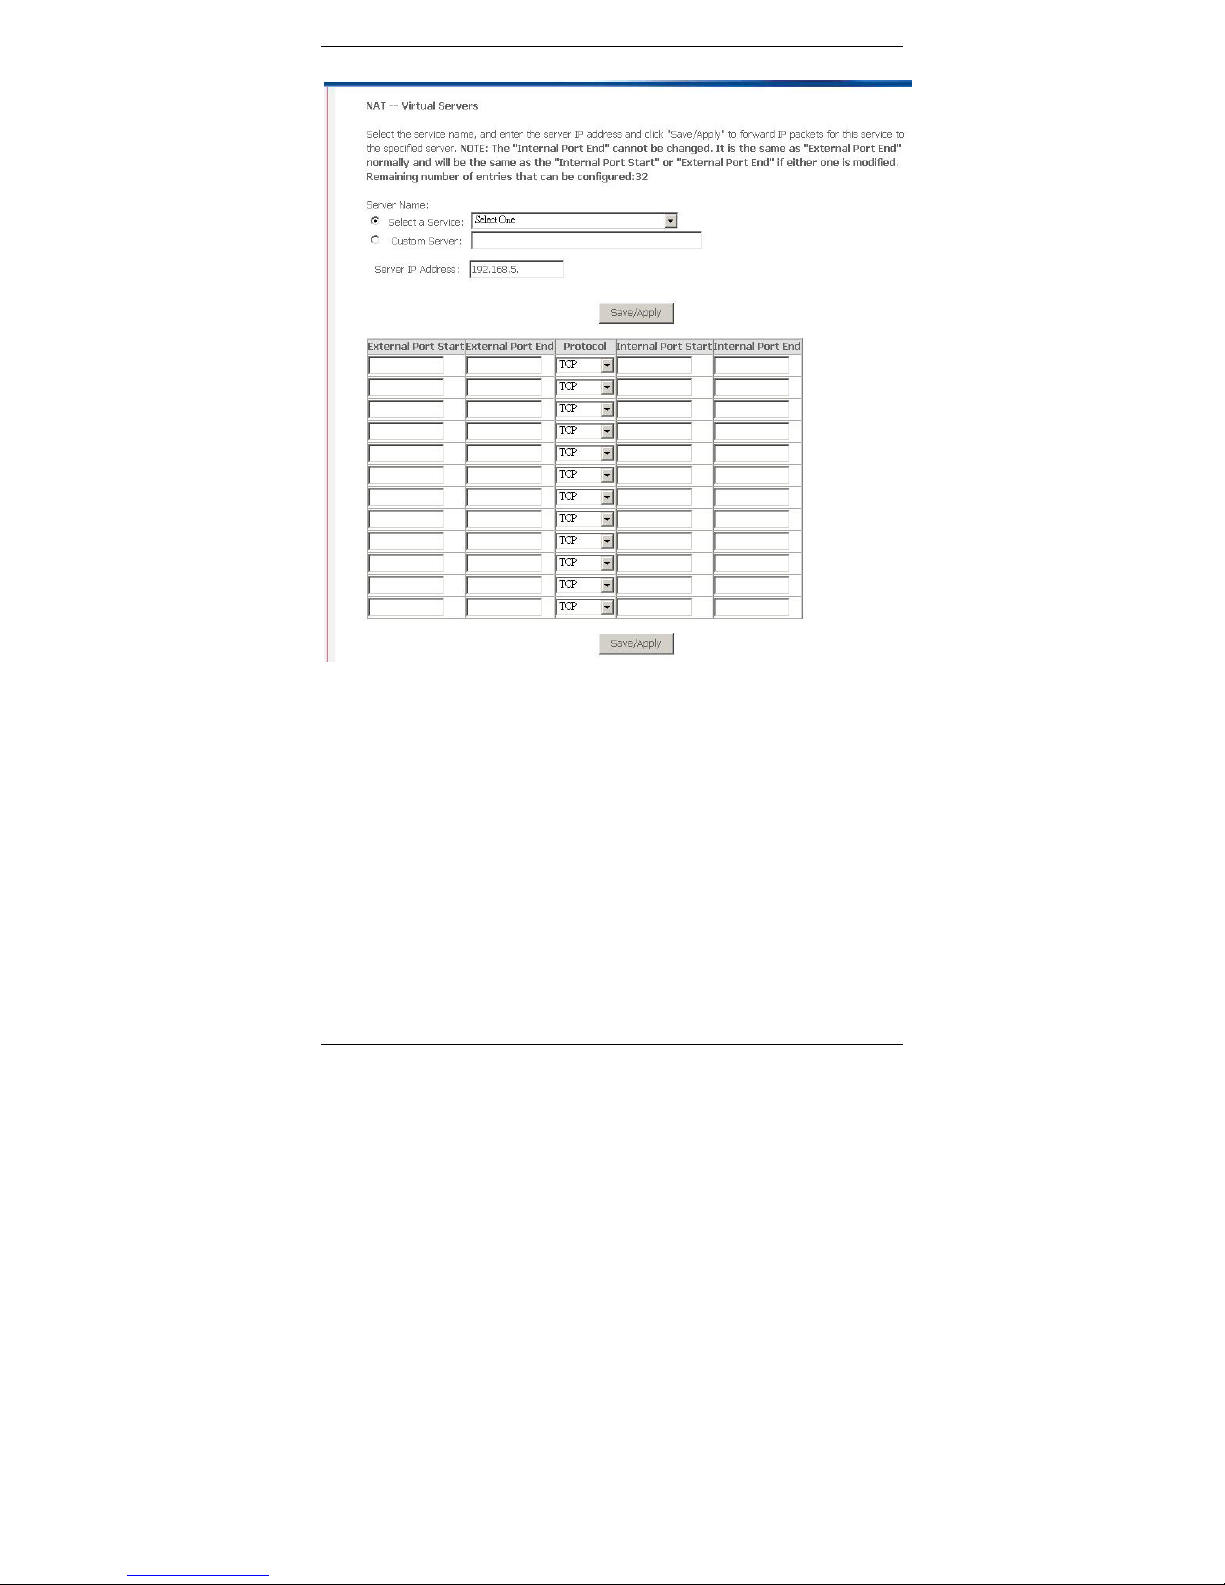
Access “Virtual Servers” to enter the page below. This
page is to open related ports for specific applications. This
page allows you to configure the port forwarding feature of
this device. This feature works in conjuction with NAT/PAT
and the firewall.
Page 34

X5821 User’s Manual Version 1.0
Port fowarding can be used to provide local services for
networks or node on the Internet in order to use special
applications or play games.
Virtual Server allows you to direct incoming traffic from
WAN side (identified by Protocol and External port) to the
Internal server with private IP address on the LAN side.
The Internal port is required only if the external port needs
to be converted to a different port number used by the
server on the LAN side. A maximum 32 entries can be
configured.
30
Page 35
X5821 User’s Manual Version 1.0
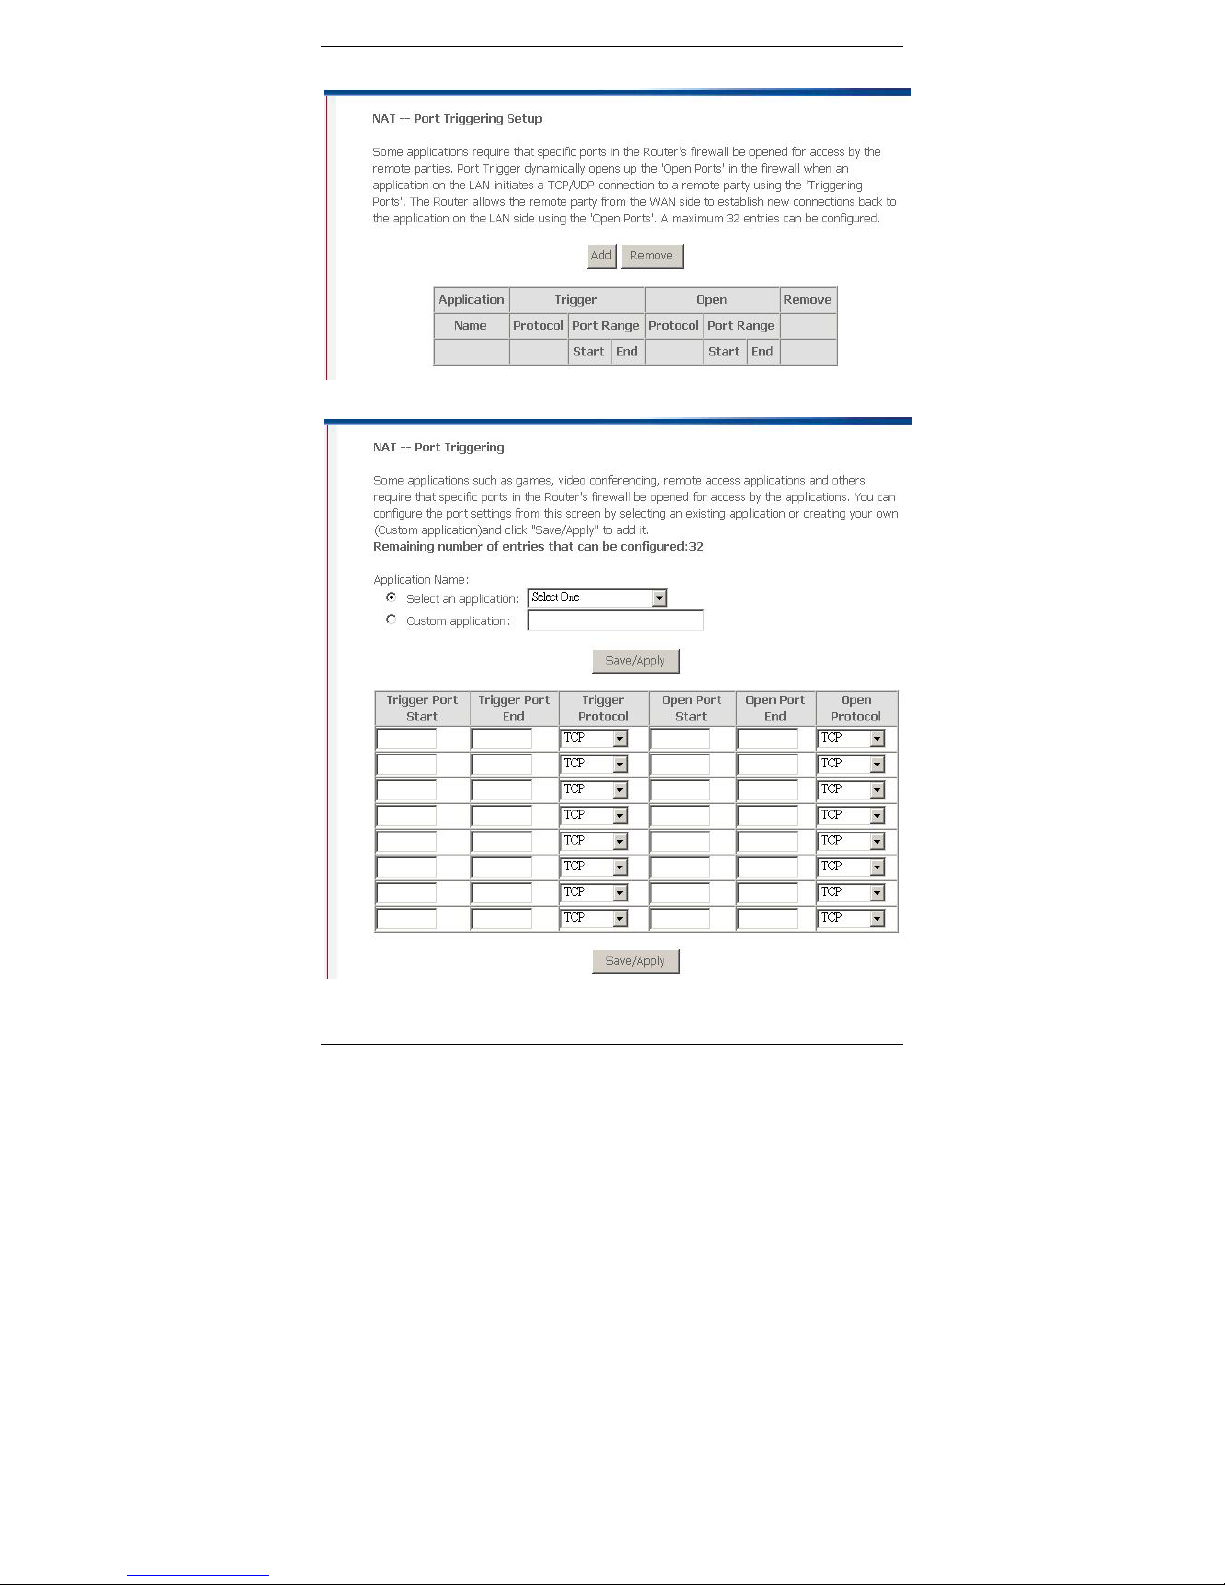
4.3.2 Port Triggering
Some applications require that specific ports in the Router's firewall
be opened for access by the remote parties. Port Trigger dynamically
opens up the 'Open Ports' in the firewall when an application on the
LAN initiates a TCP/UDP connection to a remote party using the
'Triggering Ports'. The Router allows the remote party from the WAN
side to establish new connections back to the application on the LAN
side using the 'Open Ports'. A maximum 32 entries can be
configured.
31
Page 36
X5821 User’s Manual Version 1.0
32
Page 37
X5821 User’s Manual Version 1.0
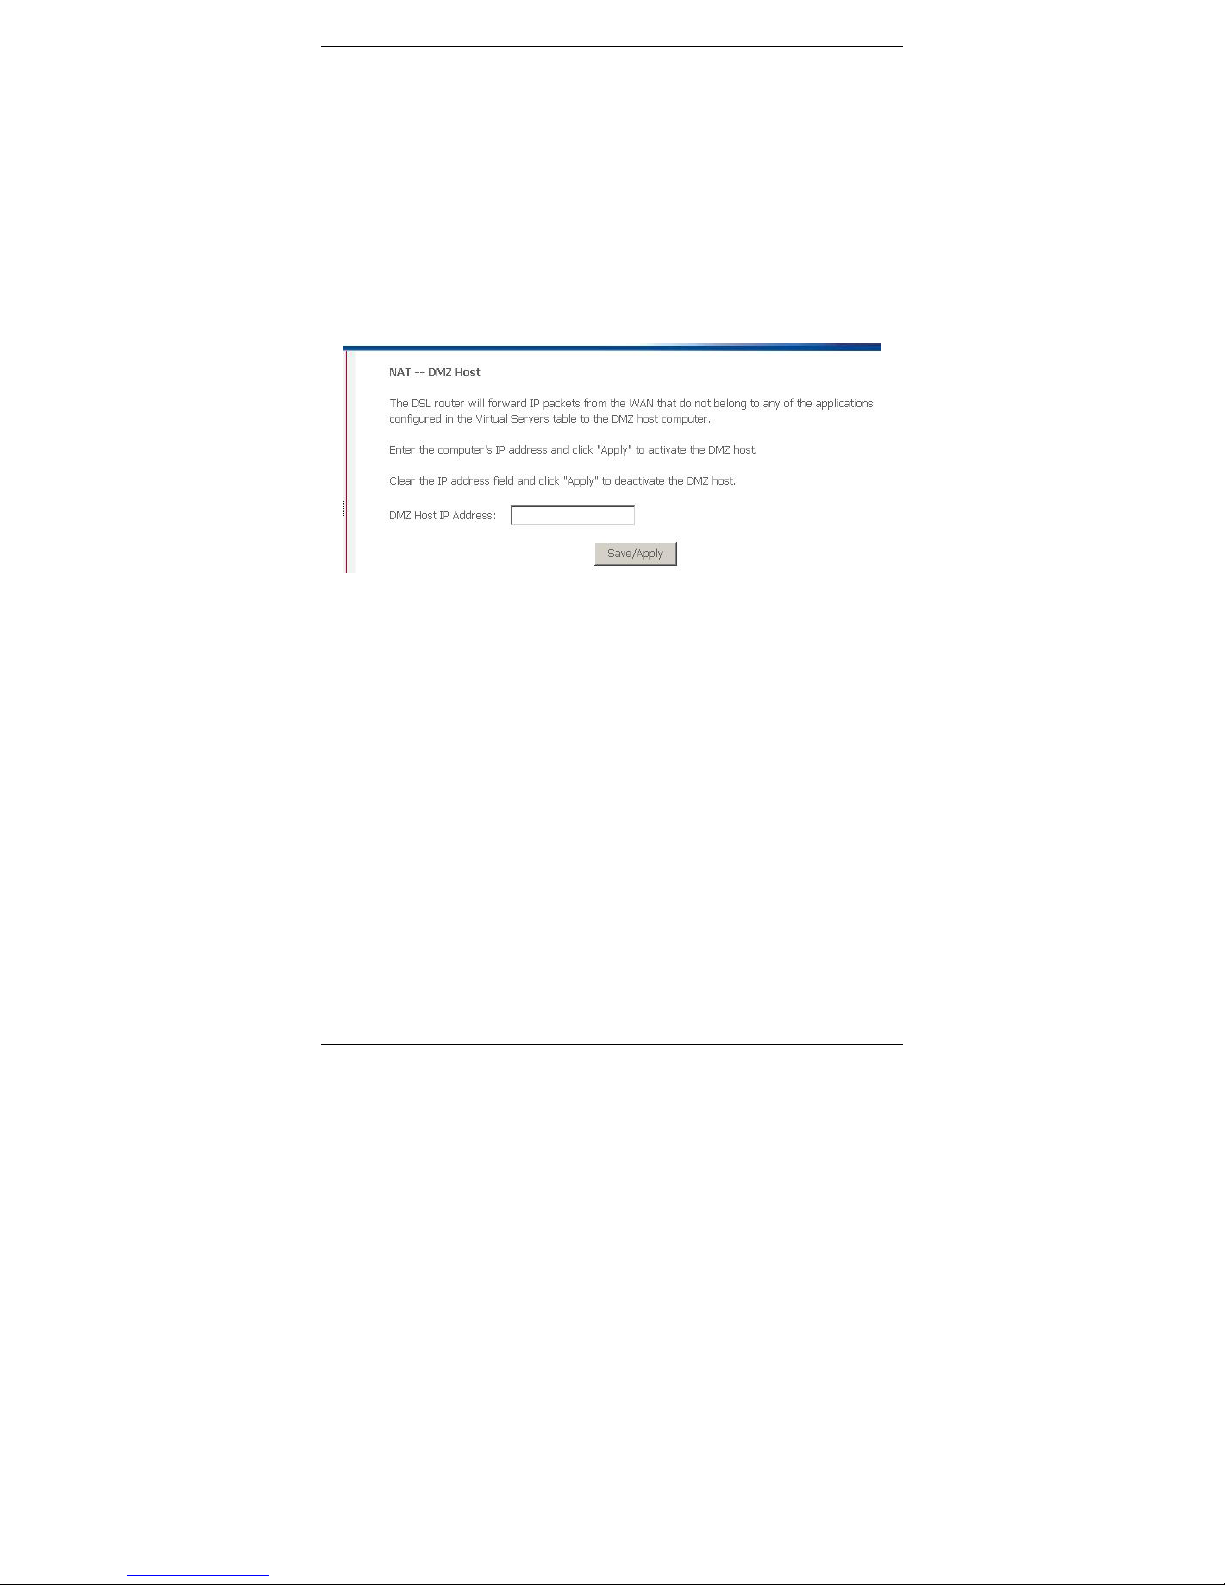
4.3.3 DMZ Host
The DSL router will forward IP packets from the WAN that do not
belong to any of the applications configured in the Virtual Servers
table to the DMZ host computer. Enter the computer's IP address
and click "Apply" to activate the DMZ host. Clear the IP address field
and click "Apply" to deactivate the DMZ host.
4.4 Security
Click “Security” below “Advanced Setup” on the left manual.
There are two setting items, MAC Filtering or IP filtering
and Parental Control.
33
Page 38

X5821 User’s Manual Version 1.0
34
4.5 Routing
Click “Routing” below “Advanced Setup” on the left manual.
Access “Routing” configuration page. There are two sub-pages,
“Default Gateway” and “Static Route”.
4.5.1 Default Gateway
If Enable Automatic Assigned Default Gateway checkbox is selected,
this router will accept the first received default gateway assignment
from one of the PPPoA, PPPoE or MER/DHCP enabled PVC(s). If the
checkbox is not selected, enter the static default gateway AND/OR a
WAN interface. Click 'Save/Apply' button to save it.
NOTE: If changing the Automatic Assigned Default Gateway from
“unselected” to “selected”, You must reboot the router to get the
automatic assigned default gateway.
Page 39
X5821 User’s Manual Version 1.0
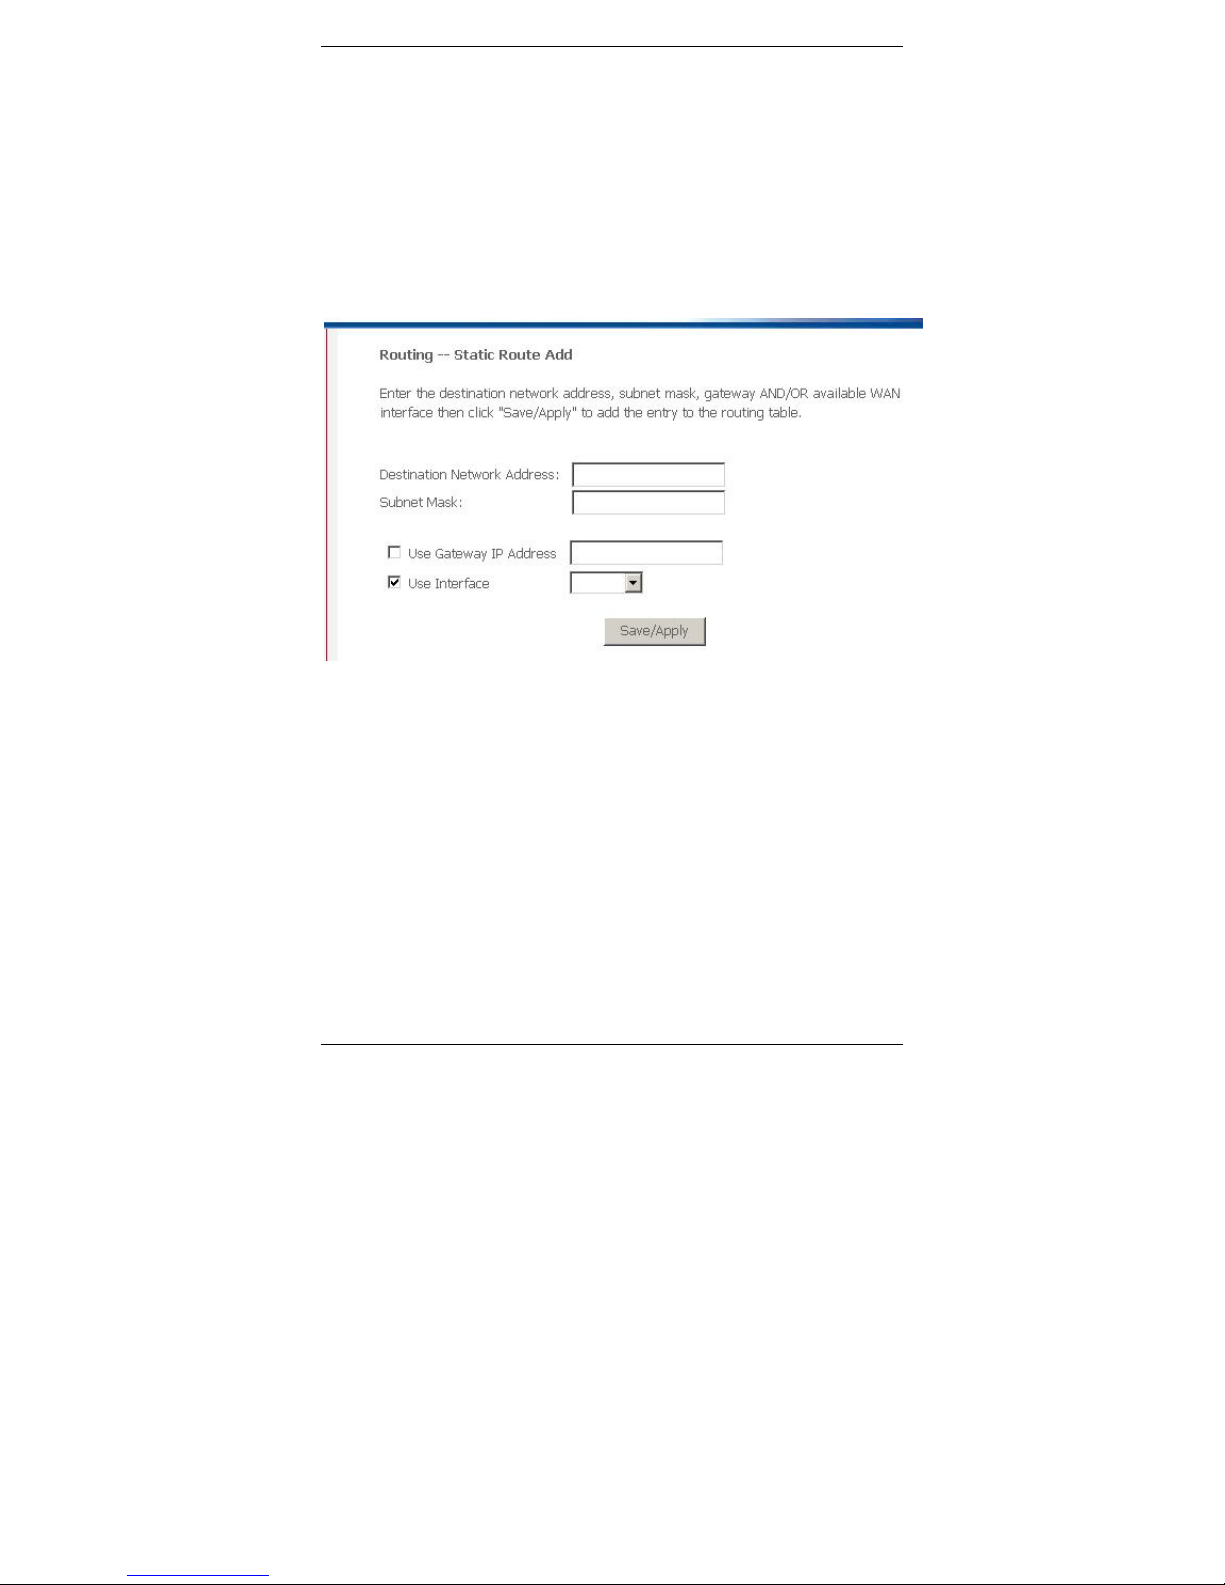
4.5.2 Static Route
Click on the Static Routes link on the navigation bar to view the
static routes table and configure this setting.
Press “Add” to add the routing table for static routing.
Enter the destination network address, subnet mask, gateway
AND/OR available WAN interface then click "Save/Apply" to add
the entry to the routing table.
35
Page 40
X5821 User’s Manual Version 1.0
4.6 DNS
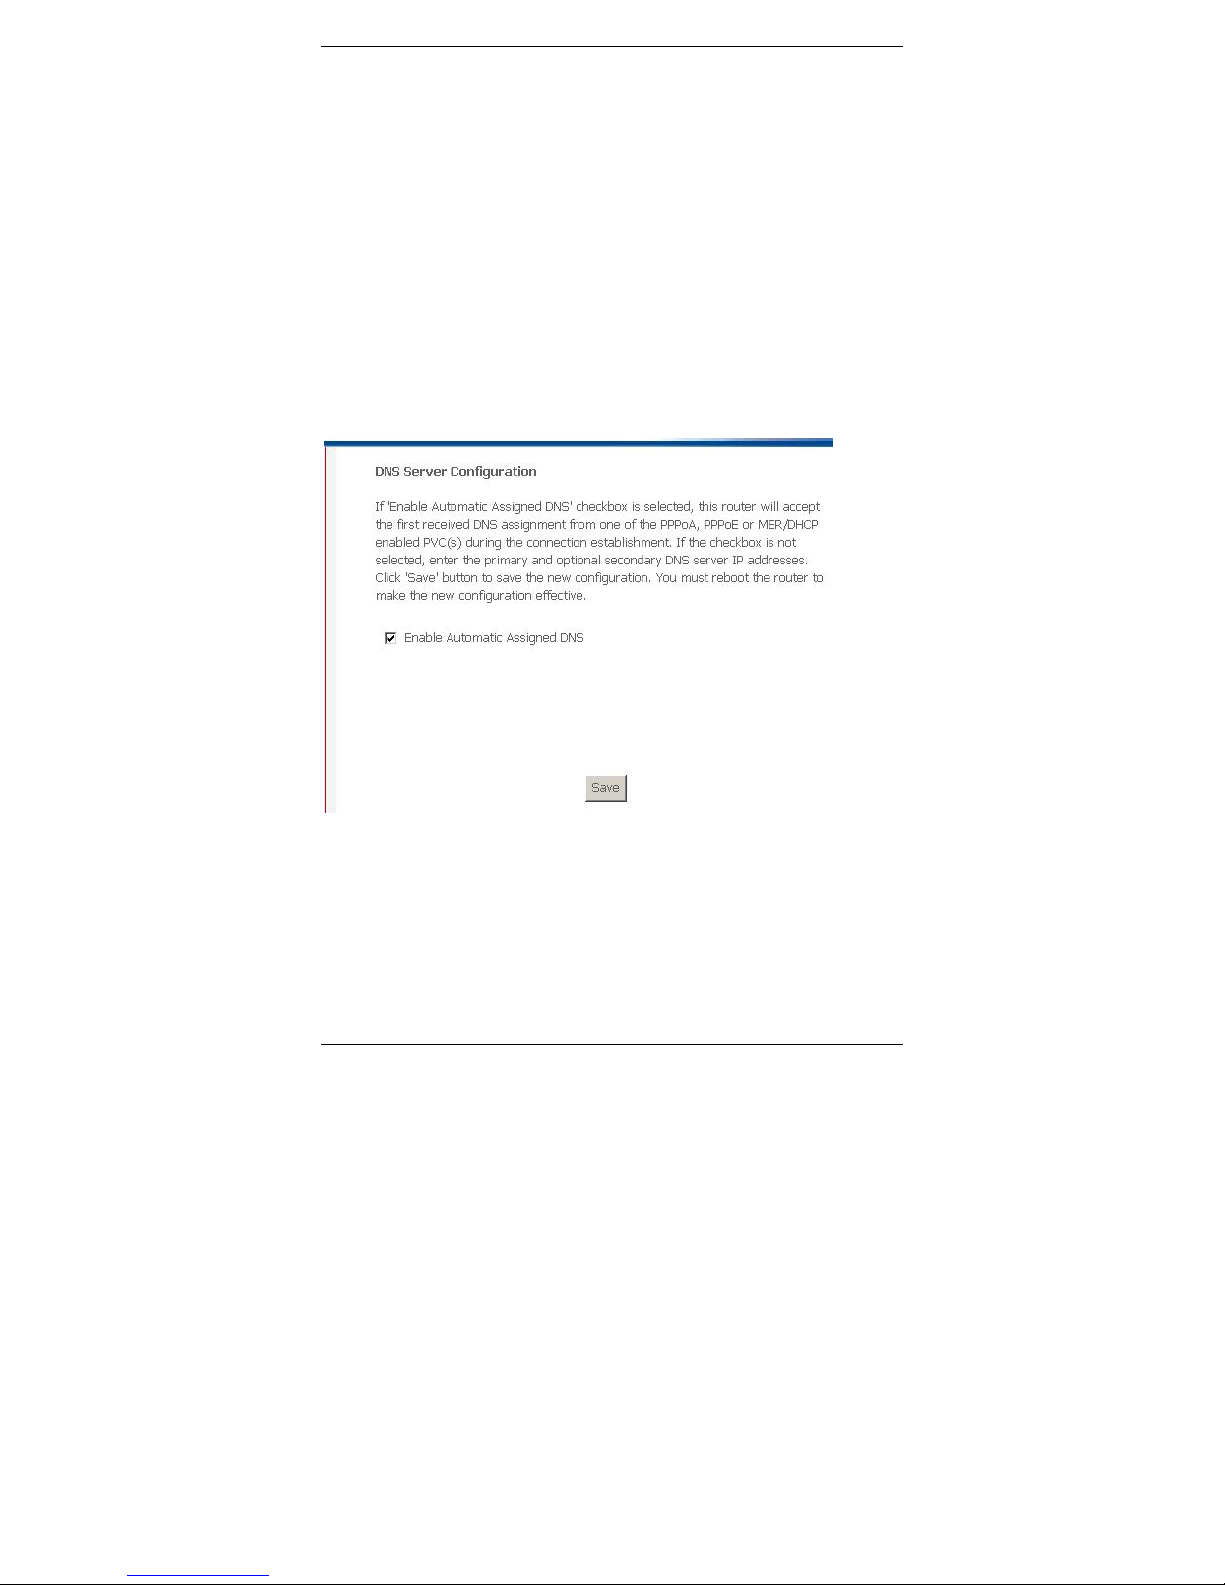
4.6.1 DNS Server
If 'Enable Automatic Assigned DNS' checkbox is selected, this router
will accept the first received DNS assignment from one of the
PPPoA, PPPoE or MER/DHCP enabled PVC(s) during the
connection establishment. If the checkbox is not selected, enter the
primary and optional secondary DNS server IP addresses. Click
'Save' button to save the new configuration. You must reboot the
router to make the new configuration effective.
36
Page 41
X5821 User’s Manual Version 1.0
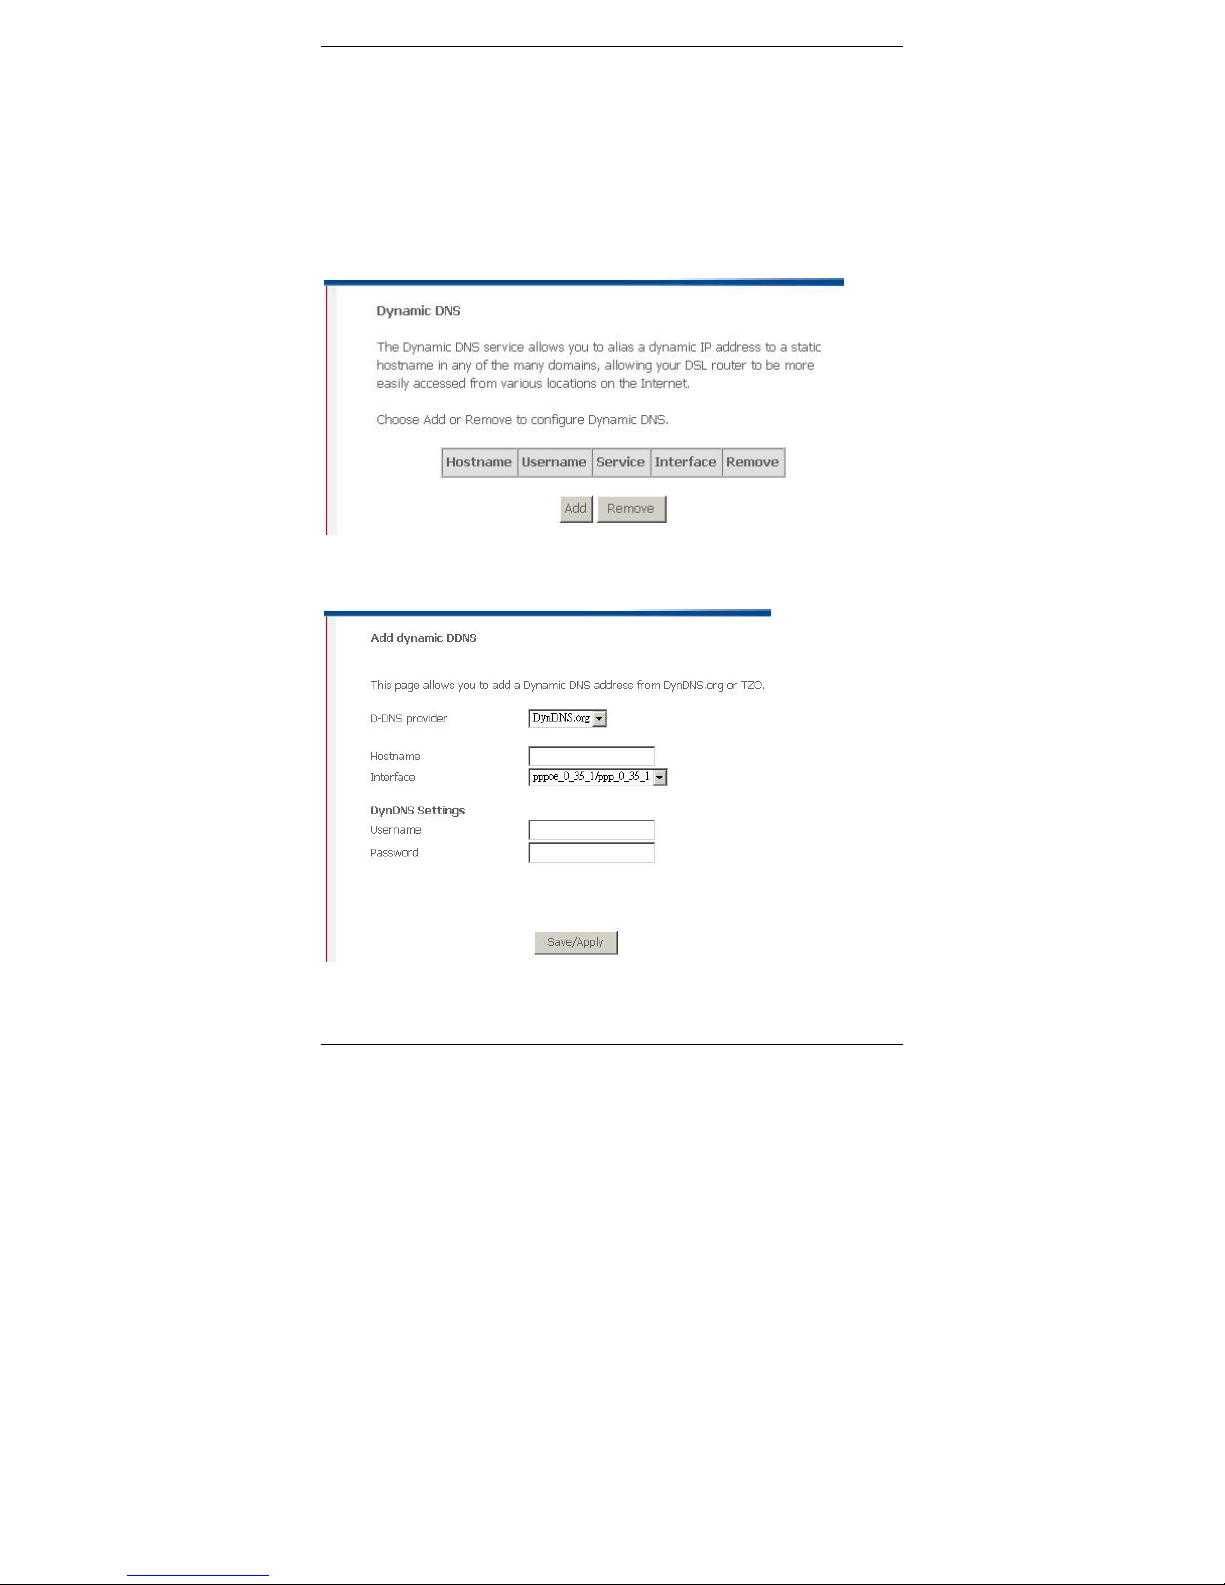
4.6.2 Dynamic DNS
The Dynamic DNS service allows you to alias a dynamic IP address
to a static hostname in any of the many domains, allowing your DSL
router to be more easily accessed from various locations on the
Internet.
Choose Add or Remove to configure Dynamic DNS.
37
Page 42
X5821 User’s Manual Version 1.0
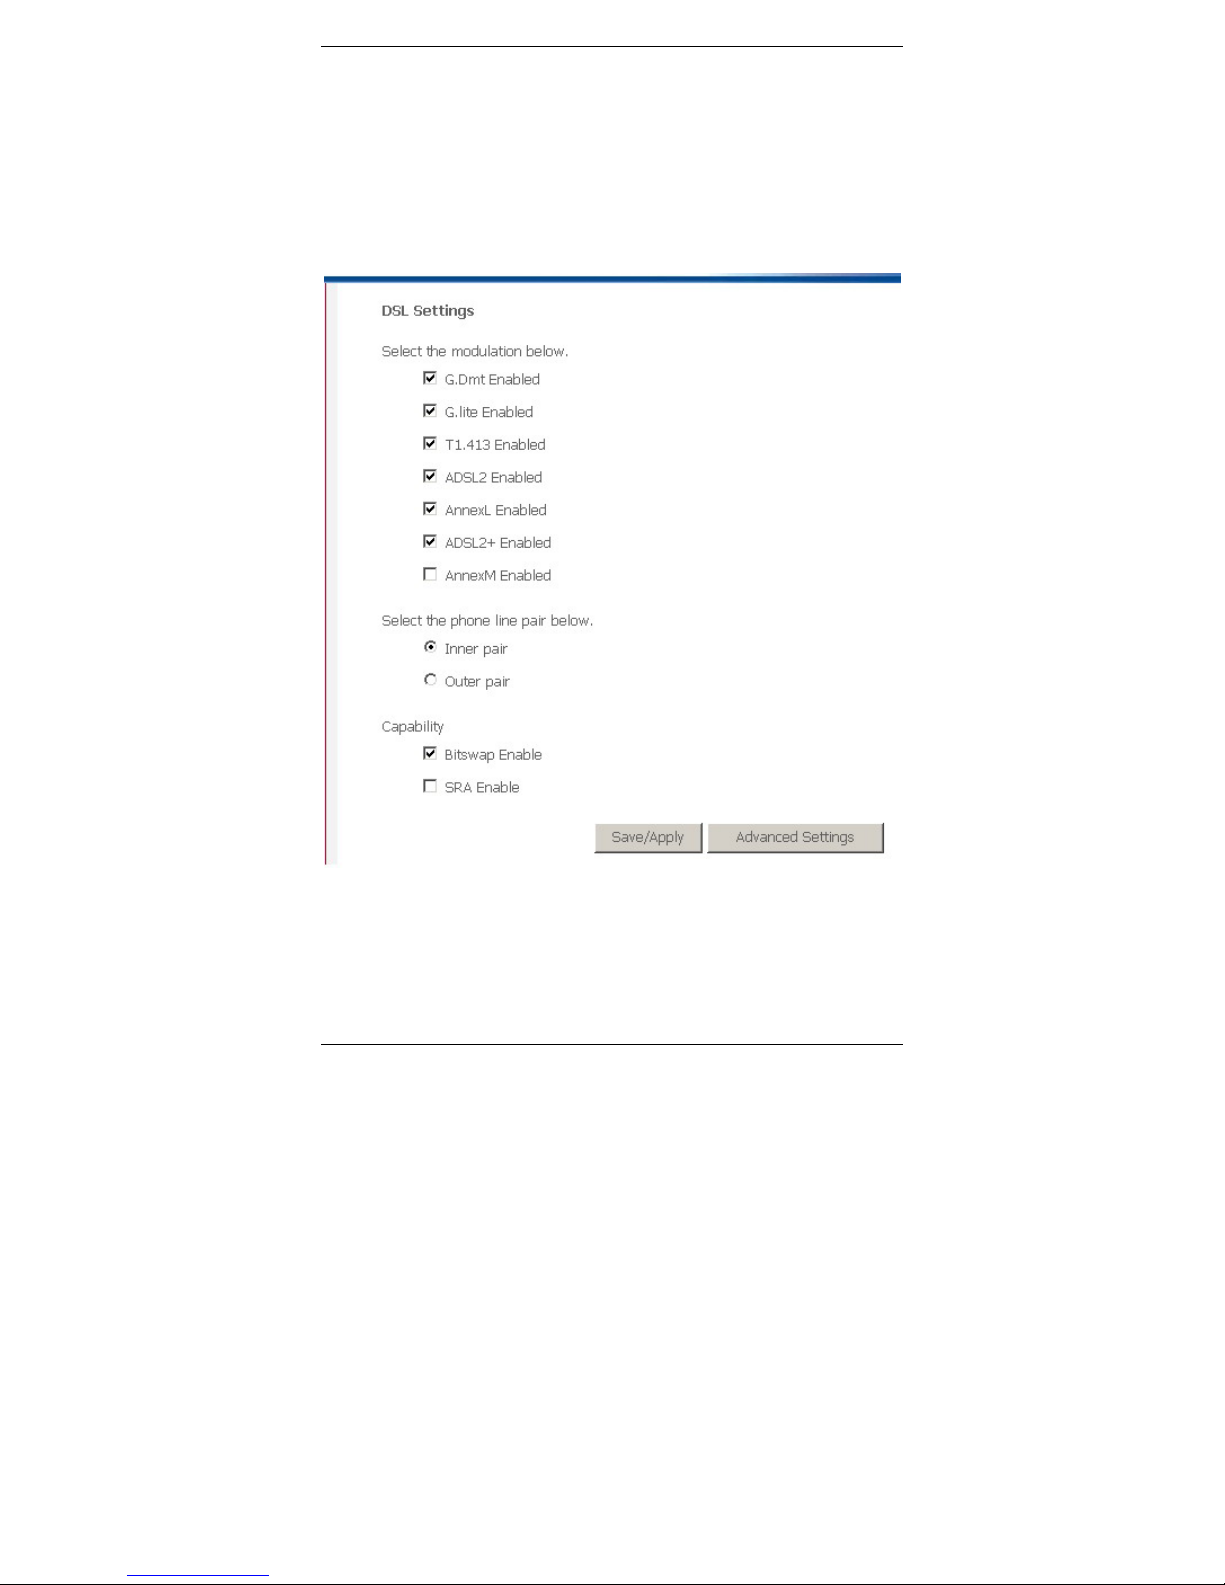
4.7 DSL
Click “DSL” below “Advanced Setup” on GUI. There are DSL related
settings on the page. The detailed, please check to your service
provider.
38
Page 43
X5821 User’s Manual Version 1.0
5. Diagnostics
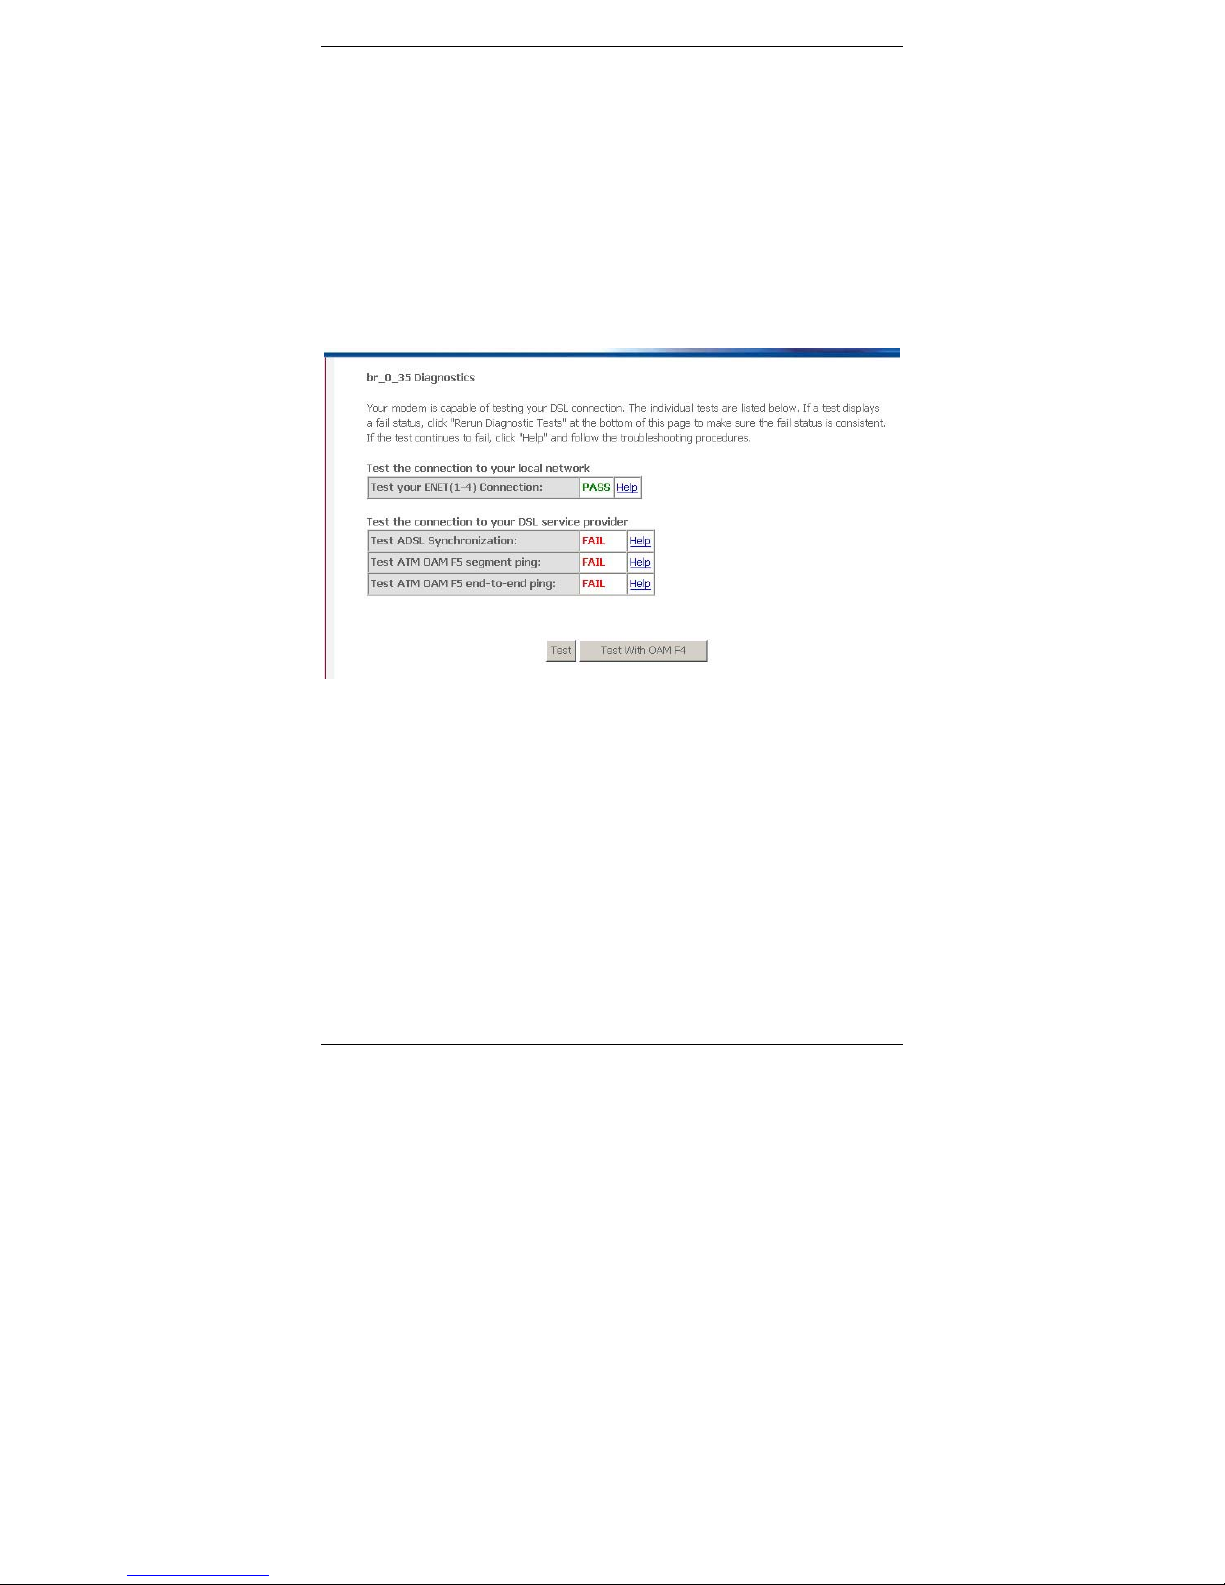
Your modem is capable of testing your DSL connection. The
individual tests are listed as the table on web GUI. If a test displays a
fail status, click "Rerun Diagnostic Tests" at the bottom of this page to
make sure the fail status is consistent. If the test continues to fail,
click "Help" and follow the troubleshooting procedures.
39
Page 44

X5821 User’s Manual Version 1.0
40
6. Management
The model supports 5 management setting. They are
1) Settings Backup
2) System Log
3) Access Control
4) Update Software
5) Save/Reboot
The sections below will describe these setting page by page.
6.1 Settings
When you click Settings, another 3 items will show up, there are
1) Backup
2) Update
3) Restore Default
First one, the page “Backup” is used to backup DSL router
configurations. You may save your router configurations to a file on
your PC.
To access page “Update”, this is use to update DSL router settings.
You may update your router settings using your saved files.
To restore all setting to factory default, you can access page
“Restore Default” to recovery all setting as factory initialised values.
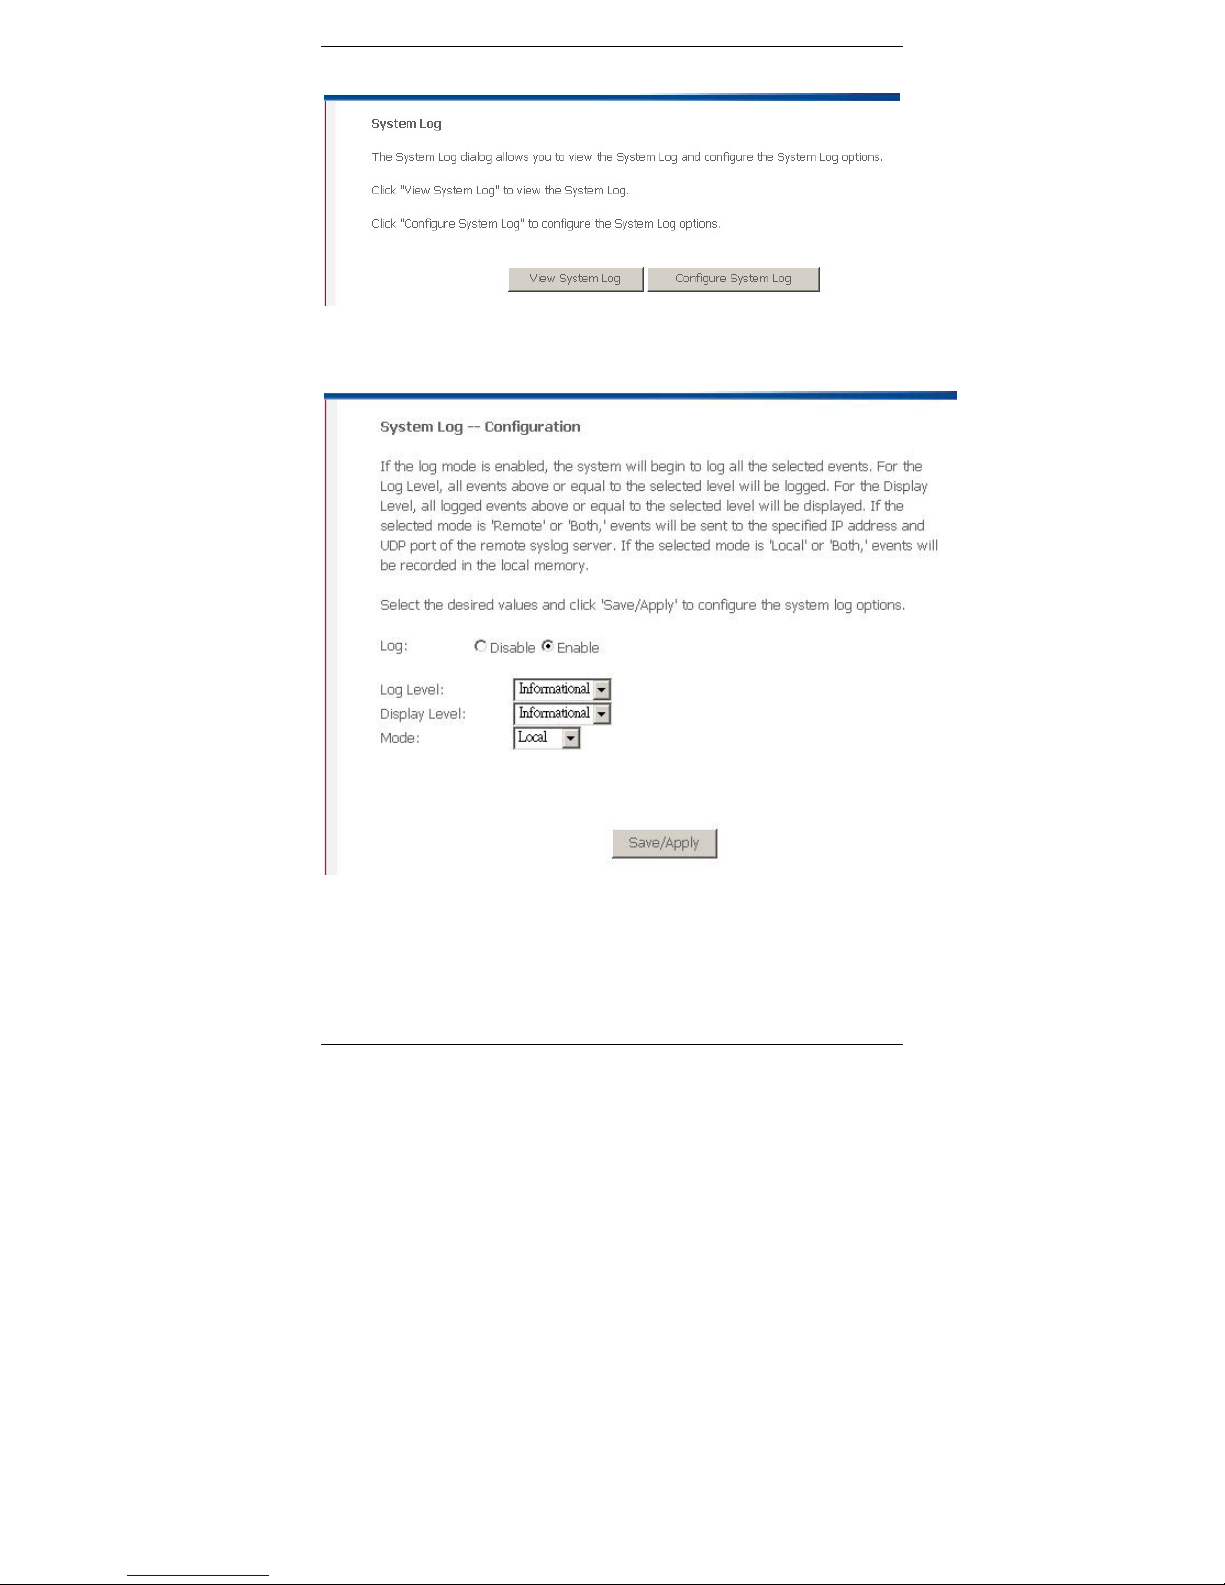
6.2 System Log
To use System Log function, user must at first enable the feature by
button “Configure Syslog”. The page below will show up.
Page 45
X5821 User’s Manual Version 1.0
To check “Enable” to enable this function and choose Log Level,
Display Level, Mode, then press “Save/Apply”. To check “View
System Log” to check the logged data on table.
41
Page 46

X5821 User’s Manual Version 1.0
42
6.3 Internet Time
To check “Automatically synchronize with Internet time servers”, two
NTP server setting will show up for user to choose one of servers in
list or assign by self.
“Time zone offset” must be assigned your time zone for your
router/modem to get your real local time.
6.4 Access Control
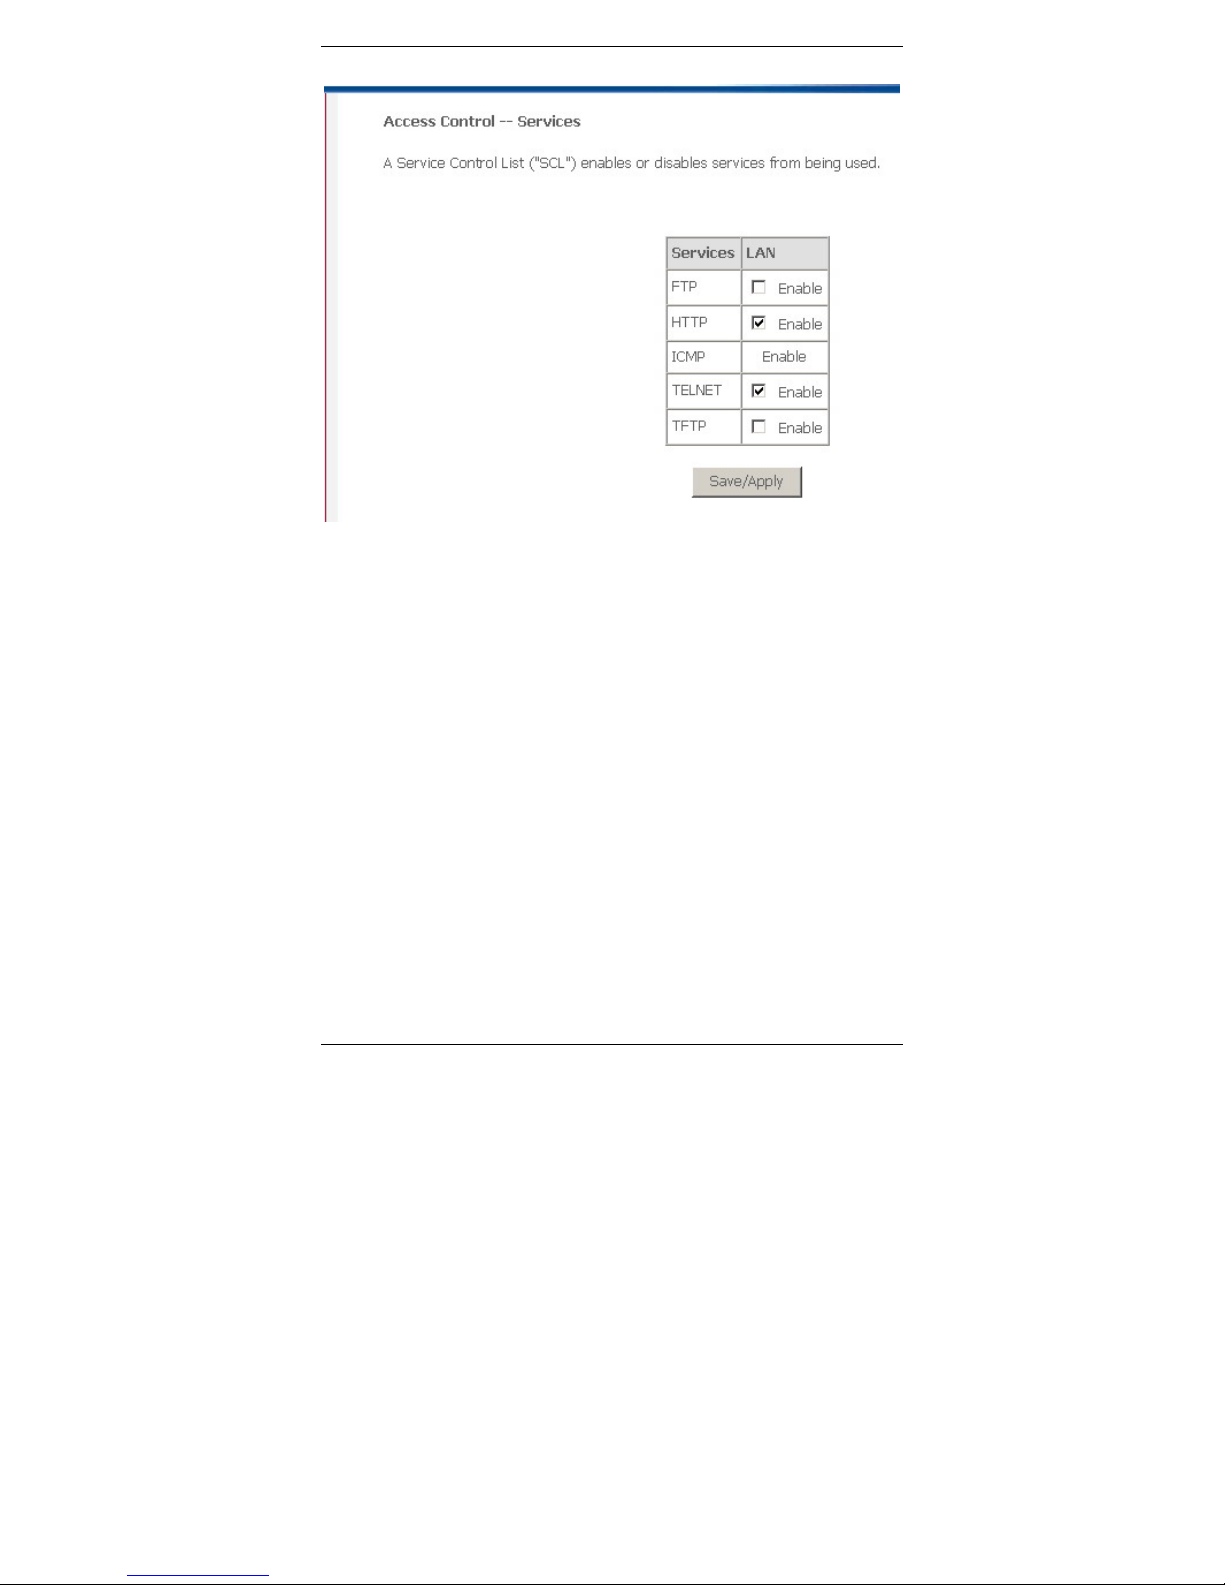
A Service Control List ("SCL") enables or disables services from
being used.
Page “Service” is used to enable/disable the specified service such
as FTP, HTTP, ICMP, TELNET and TFTP. User also can specify the
service is from LAN to WAN or WAN to LAN.
Page 47
X5821 User’s Manual Version 1.0
Page “IP address” is used to specify the permission of the local IP
address to access web GUI and re-edit the configuration for the
managed router/modem. If to leave it blank, then every LAN address
can access the device.
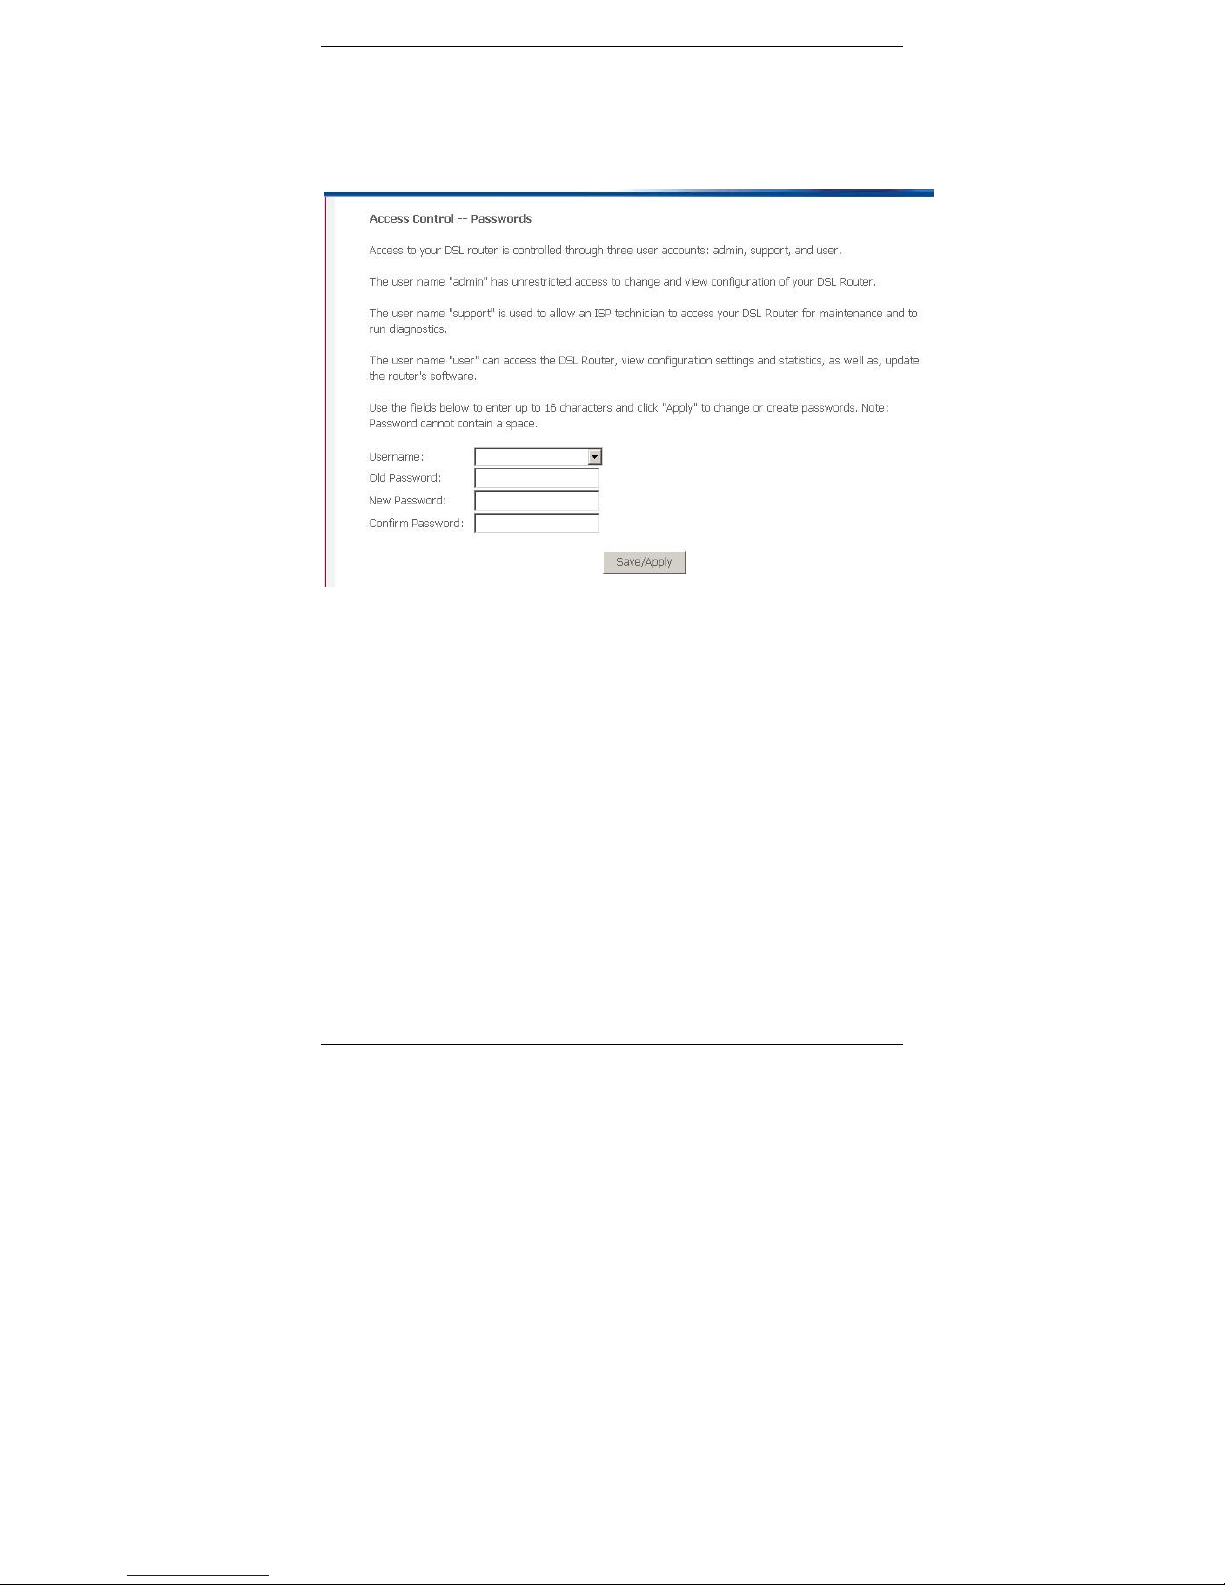
Page “Passwords”, Access to your DSL router is controlled through
three user accounts: admin, support, and user.
The user name "admin" has unrestricted access to change and view
configuration of your DSL Router.
The user name "support" is used to allow an ISP technician to
access your DSL Router for maintenance and to run diagnostics.
The user name "user" can access the DSL Router, view
configuration settings and statistics, as well as, update the router's
software.
Use the fields below to enter up to 16 characters and click "Apply" to
43
Page 48
X5821 User’s Manual Version 1.0
change or create passwords. Note: Password cannot contain a
space.
44
Page 49
X5821 User’s Manual Version 1.0
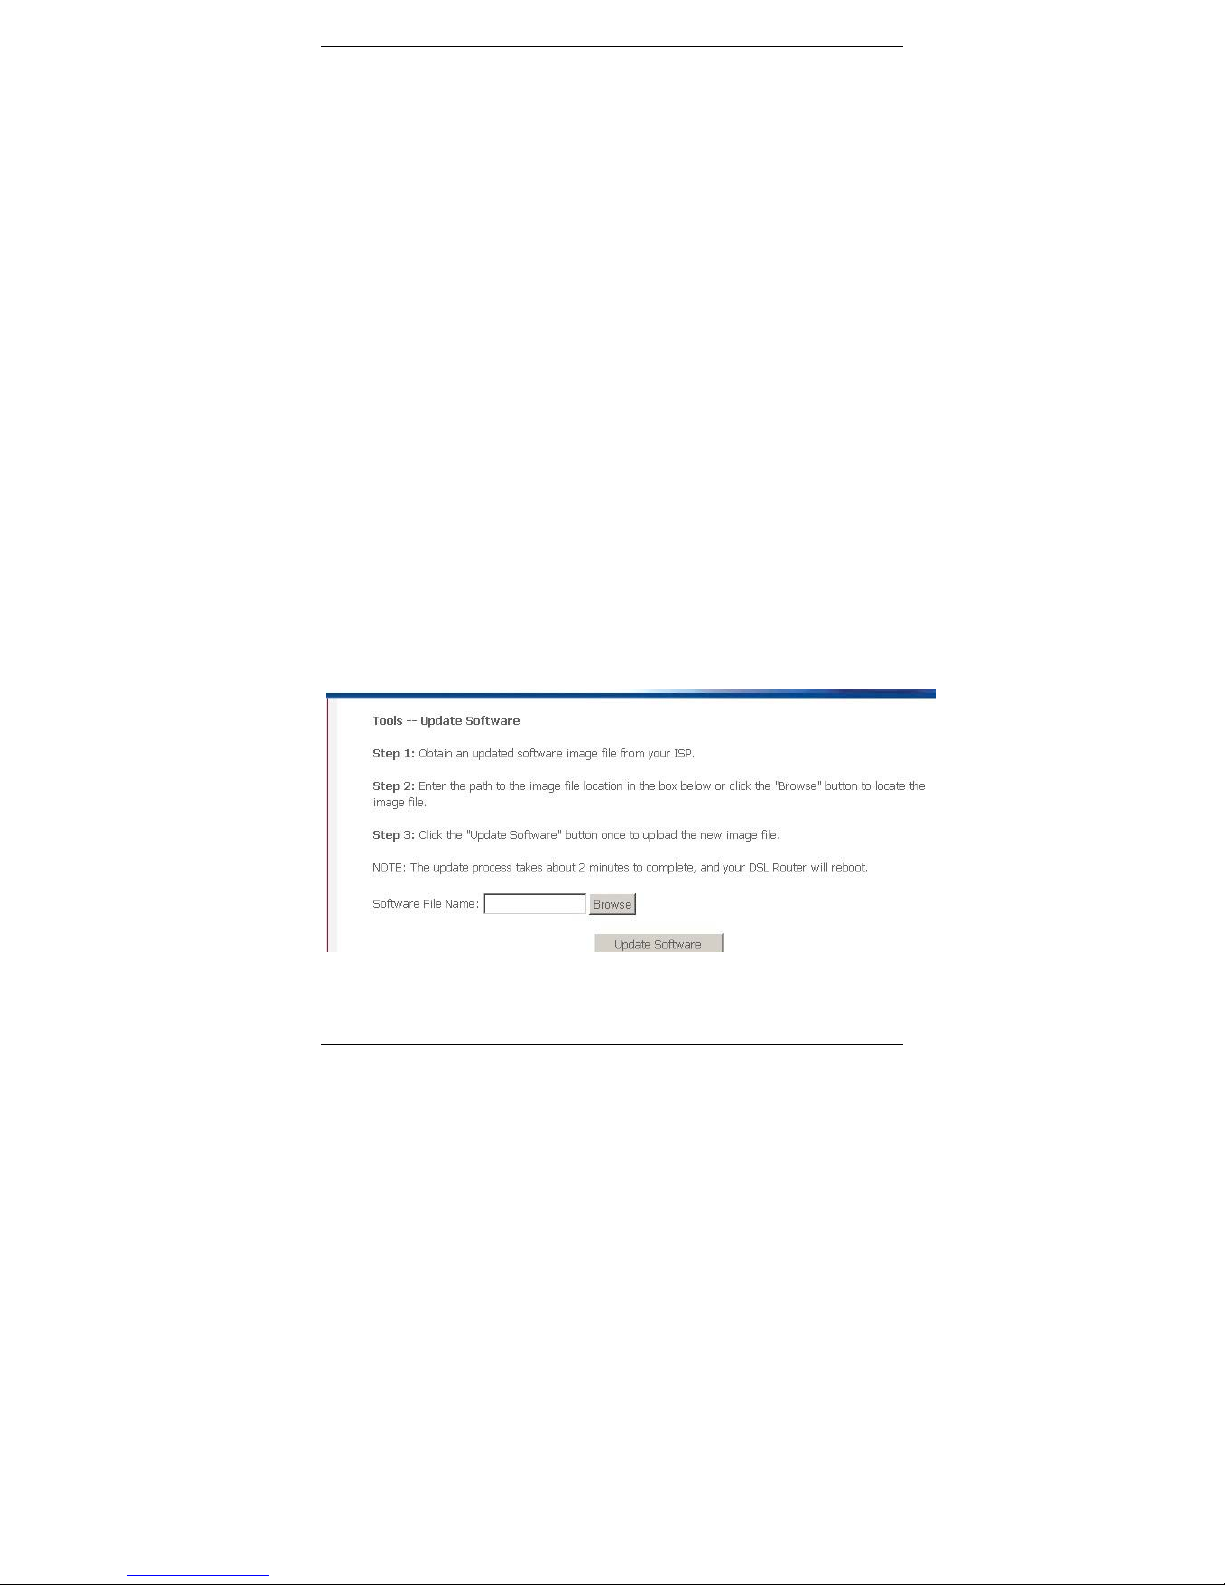
6.5 Update Software
You may easily upgrade X5821 embedded software by obtaining the
compressed upgrade kit from the service provider and then following
the steps for upgrading through a Web-browser:
Step 1: Extract the ZIP file for updated firmware.
Step 2: Connect X5821
via the local Ethernet port or remote ADSL
link, making sure that the X5821 Ethernet IP address and
your terminal are properly configured so that you can
successfully “ping” X5821. The default local IP address is
“192.168.1.1”.
Step 3: Launch the Web browser (IE or Netscape), and enter the
default IP address 192.168.1.1 into the address bar to
access the Web management page.
Step 4: Click on the Management link on the navigation bar and
then on the Update Software link below it.
Step 5: Click on the Browse to select the appropriate firmware and
then click on the Update Software button. The upgrade
process may take about 60 seconds. Do not reset the
device while
45
Page 50

X5821 User’s Manual Version 1.0
46
6.6 Save/Reboot
Click “Save/Reboot” button to store the setting before and
reboot system to use the setting.
Page 51

X5821 User’s Manual Version 1.0
47
Appendix A – Technical Specifications
Hardware Specifications
LAN Interface
• One 10/100 Base-TX Ethernet port, IEEE 802.3/3u, RJ-45 connector
DSL Interface (ADSL line)
• One pair (2-wire) loop, 100 Ω line impedance with RJ-11 connector
• Complies with ITU-T G.992.1, G.992.2 and ANSI T1.413 Issue 2
Indicators
• POWER – A steady red light means the power connection works properly
• LINK – Yellow, shows DSL line status.
• DATA – Green, Flashing means the Modem is transmitting or receiving data
• PC – Green, Indicates status of connection to the PC network card
Power
• AC Adapter :Input 100 ~ 240 VAC, 50/60Hz ;
Output 5VDC/1A
• Power Consumption: std. 3Watts / max. 3.5 Watts
Environment
• Temperature:
- 0 to 40 degrees C (Standard Operating)
- -40 to 70 degree C (Non-operating)
• Humidity:
- 10% to 90% (Non-condensing, Standard Operating)
- 5% to 95% (Non-condensing, Non-operating)
Physical Dimensions
• (W × D × H) 128 mm × 110 mm × 30 mm
Certificates
• CE.
Software Specifications
ATM
• ATM cells over ADSL, AAL5
• Supports 8 PVCs under bridge mode and 5 PVCs under router mode
• Supports UBR, CBR, rt-VBR, nrt-VBR and GFR traffic classes
• ADSL-aware CAC (Connection Admission Control)
• Support for F5 AIS, RDI, and loopback cells
• Payload encapsulation
− RFC2684 / RFC1483, Multiprotocol Encapsulation over ATM Adaptation
Page 52

X5821 User’s Manual Version 1.0
48
Layer 5
− RFC2225 / RFC1577, Classical IP and ARP over ATM (IPoA)
− RFC2364, PPP over AAL5 (PPPoA)
ADSL standard
• Support ANSI T1.413 Issue 2
• Support ITU G.992.1 Annex A (G.dmt)
• Support ITU G.992.2 Annex A (G.lite)
• Support ITU G.994.1 (G.hs)
• Maximum Rate: 8 Mbps for downstream and 1 Mbps for upstream
ADSL2 standard
• Support ITU G.992.3 Annex A(G.dmt.bis)
• Support ITU G.992.3 Annex L(Reach Extended ADSL2)
• Maximum Rate: 12 Mbps for downstream and 1.5 Mbps for upstream
ADSL2+ standard
• Support ITU G.992.5 Annex A
• Maximum Rate: 24 Mbps for downstream and 3 Mbps for upstream
Networking Protocols
• Support ATM Forum UNI 3.1 / 4.0 Permanent Virtual Circuits (PVCs)
• Support ATM Forum UNI 3.1 / 4.0 Permanent Virtual Circuits (PVCs)
• Support UBR Without PCR/UBR With PCB/CBR/nrt_VBR/rt_VBR
• Support RFC2684 LLC Encapsulation and VC Multiplexing over AAL5
• Support RFC2364 Point-to-Point Protocol (PPP) over AAL5
• Support RFC2225 Classical IP and ARP over ATM
• Support RFC2516 PPP over Ethernet: support Relay (Transparent Forwarding)
and Client functions
• Support PPPoA or PPPoE Ip extension
• PPPoA/PPPoE support AUTO, PAP, CHAPauthentication
• Support multiple PPPoE sessions on one PVC
• Support RFC1661 Point-to-Point Protocol
• Support AM F4/F5 End-to-End/Segment Loopback Cells
• Supports both ATM QoS, 8 tx queues in soft-SAR and supports packet level
priority queuing in ATM driver.
Bridging feature
• Support self-learning bridge (IEEE 802.1D Transparent Bridging
• Support 4096 learning MAC addresses
Routing feature
• Support NAPT
• Support ALGs (Application Level Gateways): such as NetMeeting, MSN
Messenger,
• FTP, QuickTime, mIRC, Real Player, CuSeeMe, VPN pass-through IPsec VPN
etc.
• Support DMZ
• Support Port forwarding
• Support Port Triggering
• Support UPnP IGD (Internet Gateway Device) with NAT traversal capability
• Support static routing, RFC1058 RIPv1, RFC1723 RIPv2
Page 53

X5821 User’s Manual Version 1.0
49
• Support DNS Relay/Dynamic DNS
• Support DHCP Server/Relay/Client
• Support IGMP Proxy
• Support IGMPv1/v2 snooping in bridge mode
• Support IP/Bridge/802.1p QoS
Security feature
• Three level login including local admin, local user and remote technical support
access
• Firewall support IP packets filtering based on IP address/Port number/Protocol
type
• Support Three level login including local admin,local user and remote technical
support access
• Support DOS (Denial of service) which detect & protect a number of attacks
(such as SYN/FIN/RST Flood, Smurf, WinNuke, Echo Scan, Xmas Tree Scan
etc.)
Diagnostics
• Responds and initiates ATM OAM F4/F5 end to end, segment to segment
loopback tests
• ADSL BER Test based on idle cell bit error detection
• RDI response to receiving AIS
• PPPoE server discovery
• Ping DNS server and Default Gateway
• Statistics display for ADSL PHY, ATM, LAN (USB, Ethernet) and WAN
interfaces
• Diagnostics for multiple PVCs and PPPoE sessions
Management
• User-friendly embedded web configuration interface with password protection
• Remote management access control
• Firmware upgrades through HTTP or TFTP
•
SNMPv1/v2 agent with rfc2662 ADSL line MIB, rfc2515 ATM MIB, MIB-II
•
Support diagnostic function (ADSL BER test /PPPOE server discovery etc.)
•
Interface via serial port, telnet, or ssh
•
Menu-driven CLI via serial port or telnet
•
PSI configuration file upload and download
Date/time update from SNTP Internet Time Server
Page 54

X5821 User’s Manual Version 1.0
50
Appendix B – Warranties
B1. Product Warranty
XAVi Technologies warrants that the ADSL unit will be free from
defects in material and workmanship for a period of twelve (12)
months from the date of shipment.
XAVi Technologies shall incur no liability under this warranty if
- The allegedly defective goods are not returned prepaid
to XAVi Technologies within thirty (30) days of the
discovery of the alleged defect and in accordance with
XAVi Technologies’ repair procedures; or
- XAVi Technologies’ tests disclose that the alleged
defect is not due to defects in material or workmanship.
XAVi Technologies’ liability shall be limited to either repair or
replacement of the defective goods, at XAVi Technologies’
option.
XAVi Technologies MARKS NO EXPRESS OR IMPLIED
WARRANTIES REGARDING THE QUALITY,
MERCHANTABILITY, OR FITNESS FOR A PARTICULAR
PURPOSE BEYOND THOSE THAT APPEAR IN THE
APPLICABLE USER’S DOCUMETATION. XAVi SHALL NOT
BE RESPONSIBLE FOR CONSEQUENTIAL, INCIDENTAL,
OR PUNITIVE DAMAGE, INCLUDING, BUT NOT LIMITED TO,
LOSS OF PROFITS OR DAMAGES TO BUSINESS OR
BUSINESS RELATIONS. THIS WARRANTY IS IN LIEU OF
ALL OTHER WARRANTIES.
Page 55

X5821 User’s Manual Version 1.0
51
B2. Warranty Repair
1. During the first three (3) months of ownership, XAVi
Technologies will repair or replace a defective product
covered under warranty within twenty-four (24) hours of
receipt of the product. During the fourth (4th) through twelfth
(12th) months of ownership, XAVi Technologies will repair or
replace a defective product covered under warranty within
ten (10) days of receipt of the product. The warranty period
for the replaced products shall be ninety (90) days or the
remainder of the warranty period of the original unit,
whichever is greater. XAVi Technologies will ship surface
freight. Expedited freight is at customer’s expense.
2. The customer must return the defective product to XAVi
Technologies within fourteen (14) days after the request for
replacement. If the defective product is not returned within
this time period, XAVi Technologies will bill the customer for
the product at list price.
B3. Out-of-Warranty Repair
XAVi Technologies will either repair or, at its option, replace a
defective product not covered under warranty within ten (10)
working days of its receipt. Repair charges are available from
the Repair Facility upon request. The warranty on a serviced
product is thirty (30) days measured from date of service.
Out-of-warranty repair charges are based upon the prices in
effect at the time of return.
Page 56

X5821 User’s Manual Version 1.0
52
Appendix C – Regulations
C1. FCC Part 15 Notice
Warning: This equipment has been tested and found to comply with
the limits for a Class B digital device, pursuant to Part 15 to the FCC
rules. These limits are designed to provide reasonable protection
against harmful interference when the equipment is operated in a
residential environment. This equipment generates, used, and can
radiate radio frequency energy, and, if not installed and used in
accordance with the instruction manual, may cause harmful
interference to radio communications. Operation of this equipment in
a residential area is unlikely to cause harmful interference. But if it
does, the user will be required to correct the interference at his or her
own expense. The authority to operate this equipment is conditioned
by the requirement that no modifications will be made to the
equipment unless XAVi expressly approves the changes or
modifications.
Page 57

X5821 User’s Manual Version 1.0
C2. IC CS-03 Notice
The Industry Canada label identifies certified equipment. This
certification means that the equipment meets certain
telecommunications network protective, operational, and safety
requirements as prescribed in appropriate Terminal Equipment
Technical Requirements document(s). The Department does
not guarantee that the equipment will operate to the user’s
satisfaction.
Before installing this equipment, users should make sure that it
is permissible to be connected to the facilities of the local
telecommunications company. An acceptable method of
connection must be used to install the equipment. The
customer should be aware that compliance with the above
conditions might not prevent degradation of service in some
situations.
Repairs to certified equipment should be coordinated by a
representative designated by the supplier. Any repairs or
alterations made by the user to this equipment, or equipment
malfunctions, may give the telecommunications company
cause to request the user to disconnect the equipment.
Users should ensure for their own protection that the electrical
ground connections of the power utility, telephone lines, and
internal metallic water pipe system, if present, are connected
together. This precaution may be particularly important in rural
areas.
Warning: Users should not attempt to make such connections
themselves, but should contact the appropriate electrical inspection
authority or an electrician.
53
Page 58

X5821 User’s Manual Version 1.0
C3. UL Safety Regulations
Disconnect TNV circuit connector or before removing cover or
equivalent.
Disconnect TNV circuit connector(s) before disconnecting power.
Do not use this product near water for example, near a bathtub,
washbowl, and kitchen sink or laundry tub, in a wet basement, or
near a swimming pool.
Avoid using a telephone (other than a cordless type) during an
electrical storm. There may be a remote risk of electric shock
from lightening.
Do not use the telephone to report a gas leak in the vicinity of the
leak.
Use only the power cord batteries indicated in this manual. Do
not dispose of batteries in a fire, as they may explode. Check
with local codes for possible special disposal instructions.
No. 26 AWG Telephone Line Cord shall either be provided with the
equipment or shall be described in the safety instruction. If fuse (F1)
is not present, see the caution statement listed below:
CAUTION: To reduce the risk of fire, use only No. 26 AWG or larger
UL Listed or CSA Certified Telecommunication Line Cord.
54
Page 59

X5821 User’s Manual Version 1.0
55
Contact Information
You can help us serve you better by sending us your comments and
feedback. Listed below are the addresses, telephone and fax
numbers of our offices. You can also visit us on the World Wide Web
at www.xavi.com.tw for more information. We look forward to hearing
from you!
WORLD HEADQUARTER
XAVi Technologies Corporation
9F, No. 129 Hsing Te Road, Sanchung City
Taipei County 241, Taiwan
Tel: +886-2-2995-7953 Fax: +886-2-2995-7954
USA BRANCH OFFICE
53 Parker
Irvine, CA 92618
Tel: +1-949-380-7550 Fax: +1-949-380-9204
S.AME RICA OFFICE
Tel: +55 -11-4485-3143
EUROPEAN BRANCH OFFICE
Oehleckerring 6B, 22419 Hamburg, Germany
Tel: +49-40-514400-53 Fax: +49-40-514400-79
5, Place de la Pyramide
Tour Ariane, La Defense 9
92088 Paris-La Defense Cedex
France
Tel 1: +33-1-55-68-11-08 Fax: +33-1-55-68-10-00
Tel 2: +33-1-55-68-11-09
CHINA SUBSIDIARY
Room 401, Floor 4, #608 ZhaoJiaBang Road,
Shanghai, 200031
Tel: +86-21-6431-8800 Fax: +86-21-6431-7885
Issued Date: October 10, 2006
 Loading...