

Page 1

Digitales Bluetooth®-Grill-Thermometer
Digital Bluetooth® BBQ Thermometer
F
D
H
FIN
PL
S
Bedienungsanleitung
Operating Instructions
Mode d‘emploi
Návod k použití
Návod na použitie
Руководство по эксплуатации
Istruzioni per l‘uso
Gebruiksaanwijzing
Instrukcja obsługi
Használati útmutató
Οδηγίες χρήσης
Manual de utilizare
Instrucciones de uso
Manual de instruções
Kullanma kılavuzu
Bruksanvisning
Käyttöohje
GB
CZ
SK
RUS
I
NL
GR
RO
E
P
TR
00
111593
Page 2

Page 3

1
2
3 4
5
Page 4

2
D Inhaltsverzeichnis
1. Bedienungselemente und Anzeigen .......................................................................3
2. Sicherheitshinweise ...............................................................................................3
3. Inbetriebnahme ....................................................................................................4
4. Benutzung des Thermometers ...............................................................................5
5. Startseite der App .................................................................................................5
6. Hauptmenü: .........................................................................................................5
6.1 Profil ..................................................................................................................6
6.2 Temperatur .......................................................................................................6
6.3 Timer ...............................................................................................................7
6.4 Historie ..............................................................................................................7
7. Kamera ................................................................................................................7
8. Einstellungen .......................................................................................................8
9. Haftungsausschluss ..............................................................................................8
10. Service und Support ...........................................................................................8
11. Technische Daten ...............................................................................................8
12. Entsorgungshinweise ..........................................................................................8
13. Konformitätserklärung ........................................................................................8
Page 5

3
D Bedienungsanleitung
1. Bedienungselemente und Anzeigen
1. LCD Display
2. Funktionstaster
3. Edelstahlsonde 1
4. Edelstahlsonde 2
5. Batterieabdeckung
2. Sicherheitshinweise
• Das Produkt ist für den privaten, nicht-gewerblichen Haushaltsgebrauch vorgesehen.
• Schützen Sie das Produkt vor Schmutz, Feuchtigkeit und Überhitzung und verwenden Sie es nur in
trockener Umgebung.
• Betreiben Sie das Produkt nicht außerhalb seiner in den technischen Daten angegebenen
Leistungsgrenzen.
• Dieses Produkt gehört, wie alle elektrischen Produkte nicht in Kinderhände.
• Öffnen Sie das Produkt nicht und betreiben Sie es bei Beschädigung nicht weiter.
Warnung
• Legen Sie das Thermometergehäuse nicht in den Backofen.
• Das Thermometer ist nicht wasserdicht, schützen Sie es daher vor Wasser!
• Die Edelstahlsonden werden sehr heiß! Nur mit Topflappen herausziehen.
Warnung - Batterien
• Verwenden Sie ausschließlich Akkus (oder Batterien), die dem angegebenen Typ entsprechen.
• Beachten Sie unbedingt die korrekte Polarität (Beschriftung + und -) der Batterien und legen
Sie diese entsprechend ein. Bei Nichtbeachtung besteht die Gefahr des Auslaufens oder einer
Explosion der Batterien.
• Bewahren Sie Batterien außerhalb der Reichweite von Kindern auf.
• Akkus und Batterien nie öffnen, beschädigen, verschlucken oder in die Umwelt gelangen lassen.
Sie können giftige und umweltschändliche Schwermetalle enthalten.
• Verändern und/oder deformieren/erhitzen/zerlegen Sie Akkus/Batterien nicht.
• Entfernen und entsorgen Sie verbrauchte Batterien unverzüglich aus dem Produkt.
• Schließen sie Akkus/Batterien nicht kurz und halten Sie sie von blanken Metallgegenständen fern.
Page 6

4
3. Inbetriebnahme
• Halten Sie ein Bluetooth 4.0 fähiges Endgerät (Smartphone oder Tablet) mit Betriebssystemen
(ab Android 4.3 oder neuer / ab iOS 7 oder neuer) bereit.
• Für Android:
• Starten Sie den Google Play Store auf Ihrem Smartphone / Tablet
• Installieren Sie die App Grill-T für Ihr Betriebssystem
• Für Apple (iOS) Geräte:
• Starten Sie den App Store auf Ihrem Smartphone / Tablet
• Installieren Sie die App Grill-T für Ihr Betriebssystem
• Öffnen Sie die Batterieabdeckung auf der Rückseite des Thermometers und nehmen Sie den
Kontaktunterbrecher heraus. Das Thermometer ist nun aktiviert und zeigt die aktuelle Temperatur an.
• Schließen Sie die Batterieabdeckung wieder.
• Starten Sie die App. Tippen Sie anschließend auf Suchen, sobald das Thermometer
gefunden wird, verbindet es sich automatisch mit Ihrem Smartphone / Tablet.
Hinweis
• Um das Thermometer einzuschalten drücken Sie kurz auf den Funktionstaster.
• Um die Einheit (°C oder °F) auszuwählen drücken Sie in eingeschaltetem Zustand kurz auf den
Funktionstaster.
• Um das Thermometer auszuschalten halten Sie den Funktionstaster für ca. 3 Sekunden gedrückt.
Page 7

5
5. Startseite der App
Auf der Startseite der App stehen Ihnen verschiedene Funktionen
zur Auswahl:
• BBQ: Hauptmenü des Thermometers (siehe Punkt 6)
• Kamera: Machen Sie Bilder von Ihrem Grillgut und
teilen sie Ihre Kreationen (siehe Punkt 7)
• Einstellungen: Menü für Einstellungen (siehe Punkt 8)
• Hilfe: Kurzbedienungsanleitung
6. Hauptmenü:
• Im Hauptmenü können Sie verschiedene Einstellungen
vornehmen. In diesem Menü können Sie drei verschiedene
Modi auswählen Profil, Temperatur, Timer.
• Um den Modus zu wechseln tippen Sie auf
und wählen
Sie den entsprechenden Modus aus.
4. Benutzung des Thermometers
• Verbinden Sie die Messsonde(n) mit dem Thermometer.
• Führen Sie die Spitze der Edelstahlsonde(n) an der stärksten Stelle des Grillguts ein, wobei Sie darauf
achten müssen, dass sie nicht an der anderen Seite heraustritt.
Drücken Sie Start, um mit einem der wählbaren Programme (Profil / Temperatur / Timer) zu beginnen.
Nach Erreichen der Zieltemperatur / Ablauf der Zeit ertönt ein Alarmsignal.
Hinweis
• Kein Teil der Sonde darf mit offener Flamme in Berührung kommen.
Page 8

6
6.2 Temperatur
• Stellen Sie hier die gewünschte
Gartemperatur ein (-30 – 250°C).
• Tippen Sie auf und
stellen Sie die gewünschte
Temperatur ein.
• Tippen Sie Start, um die
Temperaturüberwachung zu
starten. Sobald die eingestellte
Gartemperatur erreicht ist, ertönt
am Smartphone/Tablet ein Alarm
Ton.
6.1 Profil
• Tippen Sie auf Rind (Sonde 1) oder Rind (Sonde 2) , um die Einstellungen zu öffnen.
• Wählen Sie die unterschiedlichen Fleischvarianten und Garstufen aus. Über die Regler + / - können
Sie die voreingestellten Temperaturen der Garstufen verändern.
• Tippen Sie den Button Neu, um neue Varianten und Garstufen hinzuzufügen.
• Tippen Sie den Button Löschen, um Ihre selbsterstellten Varianten wieder zu löschen.
• Tippen Sie Start, um die Temperaturüberwachung zu starten. Sobald die eingestellte Gartemperatur
erreicht ist, ertönt am Smartphone/Tablet ein Alarm Ton.
Page 9

7
6.3 Timer
• Stellen Sie mit der Timer-Funktion
einen beliebigen Countdown ein
(bis zu 23h 59m 59s).
• Tippen Sie auf und
stellen Sie ihren gewünschten
Countdown ein.
• Tippen Sie Start, um den
Countdown zu starten. Sobald die
eingestellte Zeit abgelaufen ist,
ertönt am Smartphone/Tablet ein
Alarm Ton.
6.4 Historie
• Während des Grillvorgangs
können Sie jederzeit den
Temperatur- / Zeitverlauf
nachvollziehen.
Tippen Sie hierzu auf die
Temperatur (Sonde 1 oder Sonde 2).
Anschließend öffnet sich:
7. Kamera
Mit Hilfe dieser Funktion können Sie Ihre Speisen fotografieren und direkt mit Ihren Freunden teilen
(Facebook / Twitter / Email).
• Tippen Sie auf der Startseite auf Kamera
• Fotografieren Sie Ihre Speisen
• Tippen Sie auf den Teilen-Button und wählen Sie zwischen Facebook / Twitter / Email aus
Hinweis
• Um über Facebook / Twitter / Email Ihre Bilder zu teilen muss ihr Smartphone / Tablet mit Ihrem
jeweiligen Benutzerkonto verbunden sein
Page 10

8
9. Haftungsausschluss
Die Hama GmbH & Co. KG übernimmt keinerlei
Haftung oder Gewährleistung für Schäden, die
aus unsachgemäßer Installation, Montage und
unsachgemäßem Gebrauch des Produktes oder
einer Nichtbeachtung der Bedienungsanleitung
und/ oder der Sicherheitshinweise resultieren.
10. Service und Support
Bitte wenden Sie sich bei Fragen zum Produkt
gerne an die Hama-Produktberatung.
Hotline: +49 9091 502-115 (Deu/Eng)
Weitere Supportinformationen finden Sie hier:
www.xavax.eu
11. Technische Daten
Stromversorgung: 1x 3V Knopfzelle CR2032
Messbereich: -30 – 250°C / -22 – 483°F
12. Entsorgungshinweise
Hinweis zum Umweltschutz:
Ab dem Zeitpunkt der Umsetzung der
europäischen Richtlinien 2012/19/EU
und 2006/66/EG in nationales Recht gilt
folgendes:
Elektrische und elektronische Geräte sowie
Batterien dürfen nicht mit dem Hausmüll
entsorgt werden. Der Verbraucher ist gesetzlich
verpflichtet, elektrische und elektronische Geräte
sowie Batterien am Ende ihrer Lebensdauer
an den dafür eingerichteten, öffentlichen
Sammelstellen oder an die Verkaufsstelle
zurückzugeben. Einzelheiten dazu regelt das
jeweilige Landesrecht. Das Symbol auf dem
Produkt, der Gebrauchsanleitung oder der
Verpackung weist auf diese Bestimmungen
hin. Mit der Wiederverwertung, der stoichen
Verwertung oder anderen Formen der Verwertung
von Altgeräten/Batterien leisten Sie einen
wichtigen Beitrag zum Schutz unserer Umwelt.
13. Konformitätserklärung
Hiermit erklärt Hama GmbH & Co. KG,
dass sich dieses Gerät in
Übereinstimmung mit den
grundlegenden Anforderungen und den anderen
relevanten Vorschriften der Richtlinie 2014/53/EU
befindet. Die Konformitätserklärung gemäß der
entsprechenden Richtlinie finden Sie unter
www.xavax.eu.
8. Einstellungen
In den Einstellungen können Sie folgende Änderungen vornehmen.
• Sie können auswählen in welcher Einheit die Temperatur in der
App angezeigt werden soll (°C oder °F)
• Sie können das Profil / die Temperatur oder den Timer der
Edelstahlsonden 1 + 2 einstellen
• Sie können aus verschiedenen Tönen den Alarmton für die
Edelstahlsonden 1 + 2 einstellen
Page 11

9
Page 12

9
G Contents
1. Controls and Displays..........................................................................................10
2. Safety Notes .......................................................................................................10
3. Getting Started ...................................................................................................11
4. Using the Thermometer .......................................................................................12
5. Start Page of the App..........................................................................................12
6. Main menu: .......................................................................................................12
6.1 Profile ..............................................................................................................13
6.2 Temperature ....................................................................................................13
6.3 Timer .............................................................................................................14
6.4 History .............................................................................................................14
7. Camera ..............................................................................................................14
8. Settings..............................................................................................................15
9. Warranty Disclaimer ............................................................................................15
10. Service and Support .........................................................................................15
11. Technical Data .................................................................................................15
12. Recycling Information .......................................................................................15
13. Declaration of Conformity .................................................................................15
Page 13

10
G Operating instructions
1. Controls and Displays
1. LCD display
2. Function button
3. Stainless steel probe 1
4. Stainless steel probe 2
5. Battery cover
2. Safety Notes
• The product is intended for private, non-commercial use only.
• Protect the product from dirt, moisture and overheating, and only use it in a dry environment.
• Do not operate the product outside the power limits given in the specifications.
• Keep this product, as all electrical products, out of the reach of children!
• Do not open the device or continue to operate it if it becomes damaged.
Warning
• Do not put the thermometer housing in the oven.
• The thermometer is not watertight, therefore, protect it from water!
• The stainless steel probes get very hot. Always use a potholder to remove them.
Warning - Batteries
• Only use batteries (or rechargeable batteries) that match the specified type.
• When inserting batteries, note the correct polarity (+ and - markings) and insert the batteries
accordingly. Failure to do so could result in the batteries leaking or exploding.
• Do not tamper with batteries or spill liquid onto them.
• Never open, damage or swallow batteries or allow them to enter the environment. They can
contain toxic, environmentally unfriendly heavy metals.
• Do not tamper with or damage/heat/disassemble the batteries/rechargeable batteries.
• Immediately remove and dispose of dead batteries from the product.
• Do not short circuit the batteries/rechargeable batteries and keep them away from uncoated
metal objects.
Page 14

11
3. Getting Started
• Have a Bluetooth 4.0-enabled terminal device ready (either a smartphone or tablet running Android
4.3 / iOS 7 or higher).
• For Android:
• Start the Google Play Store on your smartphone/tablet.
• Install the Grill-T app for your operating system.
• For Apple (iOS) devices:
• Start the App Store on your smartphone/tablet.
• Install the Grill-T app for your operating system.
• Open the battery cover on the back of the thermometer and remove the contact breaker. The
thermometer is now activated and displays the current temperature.
• Close the battery cover.
• Start the app. Then tap Search; once found, the thermometer automatically connects to your
smartphone/tablet.
Note
• To turn the thermometer on, press the function button briefly.
• To select the unit (°C or °F), press the function button briefly when the thermometer is turned on.
• To turn the thermometer off, press and hold the function button for approximately 3 seconds.
Page 15

12
5. Start Page of the App
Various functions may be selected on the start page of the app:
• BBQ: Thermometer main menu (see Point 6)
• Camera: Take pictures of your barbecue food and share your
creations. (see Point 7)
• Settings: Menu for settings (see Point 8)
• Support: Quick reference guide
6. Main menu:
• In the main menu, you can make various settings. You
can select between three different modes: Profile,
Temperature, Timer.
• To switch the mode, tap
and select the desired mode.
4. Using the Thermometer
• Connect the measuring probe(s) to the thermometer.
• Insert the tip of the stainless steel probe(s) into the thickest part of the food you are grilling, making
sure that it does not come out the other side.
Press Start to begin one of the selectable programmes (Profile/Temperature/Timer). An alarm signal
will sound once the target temperature has been reached or the set time has elapsed.
Note
• No part of the probe may come into contact with open flames.
Page 16

13
6.2 Temperature
• Here you set the desired cooking
temperature (-30–250°C).
• Tap the desired
temperature.
• Tap Start to start temperature
monitoring. An alarm tone
will sound on the smartphone/
tablet as soon as the set cooking
temperature is reached.
6.1 Profile
• Tap Beef (Probe 1) or Beef (Probe 2) to open the settings.
• Select from the different meats and cooking levels. You can use the + / - controls to change the
preset temperatures of the cooking levels.
• Tap the New button to add new variants and cooking levels.
• Tap the Delete button to delete your own variants.
• Tap Start to start temperature monitoring. An alarm tone will sound on the smartphone/tablet as
soon as the set cooking temperature is reached.
Page 17

14
6.3 Timer
• Use the Timer function to set a
countdown of your choice (up to
23 h 59 m 59 s).
• Tap your desired
countdown.
• Tap Start to start the countdown.
An alarm tone will sound on the
smartphone/tablet as soon as the
set time has elapsed.
6.4 History
• During the grilling process, you
can track the temperature course
/ time course. To do this, tap the
temperature (probe 1 or probe 2).
This will open
7. Camera
You can use this function to take photos of your food and share them directly with your friends
(Facebook/Twitter/e-mail).
• Tap Camera on the start page.
• Photograph your food.
• Tap the Share button and select between Facebook, Twitter and e-mail.
Note
• In order to share your pictures via Facebook, Twitter or e-mail, your smartphone/tablet must be
connected to your respective user account.
Page 18

15
9. Warranty Disclaimer
Hama GmbH & Co. KG assumes no liability and
provides no warranty for damage resulting from
improper installation/mounting, improper use
of the product or from failure to observe the
operating instructions and/or safety notes.
10. Service and Support
Please contact Hama Product Consulting if you
have any questions about this product.
Hotline: +49 9091 502-115 (German/English)
Further support information can be found here:
www.xavax.eu
11. Technical Data
Power supply: 1x 3 V button cell battery
Measuring range: -30 – 250 °C / -22 – 483 °F
12. Recycling Information
Note on environmental protection:
After the implementation of the
European Directive 2012/19/EU and
2006/66/EU in the national legal
system, the following applies: Electric
and electronic devices as well as batteries must
not be disposed of with household waste.
Consumers are obliged by law to return electrical
and electronic devices as well as batteries at the
end of their service lives to the public collecting
points set up for this purpose or point of sale.
Details to this are defined by the national law of
the respective country. This symbol on the
product, the instruction manual or the package
indicates that a product is subject to these
regulations. By recycling, reusing the materials or
other forms of utilising old devices/Batteries, you
are making an important contribution to
protecting our environment.
13. Declaration of Conformity
Hama GmbH & Co. KG hereby declares
that the device complies with the
essential requirements and other
relevant provisions of Directive 2014/53/EU. See
www.xavax.eu for the declaration of conformity
with the relevant directive.
8. Settings
You can make the following changes in the settings.
• You can select the unit in which the app is to display the
temperature (°C or °F).
• You can set the profile/temperature or the timer of stainless steel
probes 1 and 2.
• You can select one of several alarm tones for stainless steel probes
1 and 2.
Page 19

16
Page 20

17
F Sommaire
1. Éléments de commande et d'affichage ................................................................18
2. Consignes de sécurité .........................................................................................18
3. Mise en service ...................................................................................................19
4. Utilisation du thermomètre .................................................................................20
5. Page d’accueil de l’application ...........................................................................20
6. Menu principal : .................................................................................................20
6.1 Profils .............................................................................................................21
6.2 Température ....................................................................................................21
6.3 Minuterie .......................................................................................................22
6.4 Historique ........................................................................................................22
7. Caméra ..............................................................................................................22
8. Paramètres .........................................................................................................23
9. Exclusion de garantie ..........................................................................................23
10. Service et assistance .........................................................................................23
11. Caractéristiques techniques ..............................................................................23
12. Consignes de recyclage ....................................................................................23
13. Déclaration de conformité ................................................................................23
Page 21

18
F Mode d‘emploi
1. Éléments de commande et d'affichage
1. Écran LCD
2. Touche de fonction
3. Sonde en inox 1
4. Sonde en inox 2
5. Couvercle du compartiment à batteries
2. Consignes de sécurité
• Ce produit est destiné à une installation domestique non commerciale.
• Protégez le produit de toute saleté, humidité, surchauffe et utilisez-le uniquement dans
des locaux secs.
• N‘utilisez pas le produit en dehors des limites de puissance indiquées dans les
caractéristiques techniques.
• Cet appareil, comme tout appareil électrique, doit être gardé hors de portée des enfants !
• Ne tentez pas d‘ouvrir le produit en cas de détérioration et cessez de l’utiliser.
Avertissement
• Ne mettez pas le boîtier du thermomètre dans le four.
• Le thermomètre n’est pas étanche à l’eau, donc : protégez-le de l’eau !
• Les sondes en inox deviennent très chaudes ! Retirez-les uniquement avec des maniques
Avertissement concernant la pile
• Utilisez exclusivement des batteries (ou des piles) du type indiqué.
• Respectez impérativement la polarité de la pile (marquage + et -) lors de l‘insertion dans le
boîtier ; risques d‘écoulement et d‘explosion des piles si tel n‘est pas le cas.
• C onservez les piles hors de portée des enfants.
• Ne tentez pas d‘ouvrir les piles ou les batteries, faites attention à ce que des petits enfants ne les
avalent pas et ne les jetez pas avec les ordures domestiques. Elles sont susceptibles de contenir
métaux lourds toxiques et nocifs pour l‘environnement.
• Ne modifiez pas et/ou ne déformez/chauffez/désassemblez pas les batteries/piles.
• Retirez les piles usagées immédiatement du produit pour les recycler.
• Ne court-circuitez pas les batteries/piles et éloignez-les des objets métalliques.
Page 22

19
3. Mise en service
• Préparez un appareil compatible avec Bluetooth 4.0 (smartphone ou tablette) disposant d’un
système d’exploitation (à partir d’Android 4.3 ou plus récent / d’iOS 7 ou plus récent).
• Pour Android :
• Lancez Google Play Store sur votre smartphone / tablette
• Installez l’application Grill-T correspondant à votre système d’exploitation.
• Pour les appareils Apple (iOS) :
• Lancez l’App Store sur votre smartphone / tablette
• Installez l’application Grill-T correspondant à votre système d’exploitation.
• Ouvrez le couvercle du compartiment à piles, au dos du thermomètre, et retirez le film de protection.
Le thermomètre est désormais activé et ache la température actuelle.
• Refermez le couvercle du compartiment à piles.
• Lancez l’application. Appuyez ensuite sur Recherche. Dès que le thermomètre a été trouvé, il se
connecte automatiquement à votre smartphone / tablette.
Remarque
• Pour mettre le thermomètre sous tension, appuyez brièvement sur la touche de fonction.
• Pour sélectionner l’unité (°C ou °F), appuyez brièvement sur la touche de fonction lorsque le
thermomètre est sous tension.
• Pour mettre le thermomètre hors tension, maintenez la touche de fonction enfoncée pendant
env. 3 secondes.
Page 23

20
5. Page d’accueil de l’application
Sur la page d’accueil de l’application, différentes fonctions sont à
votre disposition :
• Barbecue: Menu principal du thermomètre (voir point 6)
• Caméra: Prenez vos grillades en photo et partagez vos
créations (voir point 7)
• Paramètres: Menu pour les réglages (voir point 8)
• Aide: Mode d'emploi succinct
6. Menu principal :
• Dans le menu principal, vous pouvez configurer différents
paramètres. Dans ce menu, vous pouvez sélectionner trois
modes Profil, Température, Minuterie.
• Pour changer de mode, appuyez sur
et sélectionnez le
mode correspondant
4. Utilisation du thermomètre
• Reliez la/les sonde(s) de mesure au thermomètre.
• Insérez la pointe de la/des sonde(s) en inox dans la partie la plus épaisse de l’aliment à griller, mais
veillez à ce que la pointe ne ressorte pas de l’autre côté.
Appuyez sur Démarrage pour commencer avec un des programmes sélectionnables (profils /
température / minuterie). Une fois la température désirée atteinte / le temps écoulé, une sonnerie
retentit.
Remarque
• Aucune partie de la sonde ne doit entrer en contact avec une flamme nue.
Page 24

21
6.2 Température
• Réglez ici la température de
cuisson désirée (-30 – 250°C)
• Cliquez sur et réglez la
température désirée.
• Appuyez sur Démarrage
pour lancer la surveillance de
la température. Dès que la
température de cuisson réglée est
atteinte, une sonnerie retentit sur
le smartphone / la tablette.
6.1 Profils
• Appuyez sur Bœuf (Sonde 1) ou Bœuf (Sonde 2) pour ouvrir les paramètres.
• Sélectionnez les différentes variantes de viande et les différents niveaux de cuisson. Avec le bouton
+ / -, vous pouvez modifier les préréglages de température pour les niveaux de cuisson.
• Appuyez sur le bouton Nouveau, pour ajouter de nouvelles variantes et de nouveaux niveaux de
cuisson.
• Appuyez sur le bouton Suppression pour supprimer les variantes que vous avez créées.
• Appuyez sur Démarrage pour lancer la surveillance de la température. Dès que la température de
cuisson réglée est atteinte, une sonnerie retentit sur le smartphone / la tablette.
Page 25

22
6.3 Minuterie
• Réglez un compte à rebours
quelconque avec la fonction de
minuterie (jusqu’à 23 h 59 m
59 s).
• Cliquez sur et réglez le
compte à rebours désiré.
• Appuyez sur Démarrage pour
lancer le compte à rebours. Dès
que le temps réglé est écoulé,
une sonnerie retentit sur le
smartphone / la tablette.
6.4 Historique
• Pendant le processus de cuisson,
vous pouvez suivre à tout moment
l’évolution de la température / du
temps. Appuyez sur la température
à cet effet (sonde 1 ou sonde 2).
Ensuite, ... s’ouvre :
7. Caméra
Grâce à cette fonction, vous pouvez photographier vos mets et les partager directement avec vos amis
(Facebook / Twitter / E-mail).
• Sur la page d’accueil, appuyez sur Caméra
• Photographiez vos mets
• Appuyez sur le bouton Partager et choisissez entre Facebook / Twitter / E-mail
Remarque
• Pour partager vos photos sur Facebook / Twitter ou par e-mail, votre smartphone / tablette doit
être connecté(e) à votre compte d’utilisateur correspondant
Page 26

23
9. Exclusion de garantie
La société Hama GmbH & Co. KG décline toute
responsabilité en cas de dommages provoqués
par une installation, un montage ou une
utilisation non conformes du produit ou encore
provoqués par un non respect des consignes du
mode d‘emploi et/ou des consignes de sécurité.
10. Service et assistance
En cas de question concernant le produit, veuillez
vous adresser au service de conseil produits de
Hama. Ligne téléphonique directe : +49 9091
502-115 (allemand/anglais)
Vous trouverez ici de plus amples informations
concernant l‘assistance : www.xavax.eu
11. Caractéristiques techniques
Alimentation en électricité :
1 pile bouton 3V de type CR 2032
Plage de mesure : -30 – 250°C / -22 – 483°F
12. Consignes de recyclage
Remarques concernant la protection de
l’environnement:
Conformément à la directive européenne
2012/19/EU et 2006/66/CE, et afin
d‘atteindre un certain nombre d‘objectifs
en matière de protection de
l‘environnement, les règles suivantes
doivent être appliquées: Les appareils électriques
et électroniques ainsi que les batteries ne doivent
pas être éliminés avec les déchets ménagers. Le
pictogramme “picto” présent sur le produit, son
manuel d‘utilisation ou son emballage indique
que le produit est soumis à cette réglementation.
Le consommateur doit retourner le produit/la
batterie usager aux points de collecte prévus à
cet effet. Il peut aussi le remettre à un revendeur.
En permettant enfin le recyclage des produits
ainsi que les batteries, le consommateur
contribuera à la protection de notre
environnement. C‘est un acte écologique.
13. Déclaration de conformité
La société Hama GmbH & Co. KG
déclare par la présente que cet appareil
est conforme aux exigences essentielles
et aux autres dispositions de la directive 2014/53/
UE. Voss trouverez la déclaration de conformité
selon la directive correspondante sur notre site:
www.xavax.eu.
8. Paramètres
Dans les Paramètres, vous pouvez procéder aux modifications
suivantes :
• Vous pouvez choisir l’unité dans laquelle la température doit être
achée dans l’application (°C ou °F)
• Vous pouvez régler le profil / la température ou la minuterie des
sondes 1 + 2
• Vous pouvez régler la sonnerie d’alarme des sondes 1 + 2 en
choisissant parmi différentes sonneries
Page 27

24
Page 28

25
C Obsah
1. Ovládací prvky a indikace ....................................................................................26
2. Bezpečnostní pokyny ...........................................................................................26
3. Uvedení do provozu ............................................................................................27
4. Použití teploměru ................................................................................................28
5. Úvodní stránka aplikace ......................................................................................28
6. Hlavní menu:......................................................................................................28
6.1 Profile: .............................................................................................................29
6.2 Temperature ....................................................................................................29
6.3 Timer .............................................................................................................30
6.4 History .............................................................................................................30
7. Camera ..............................................................................................................30
8. Settings..............................................................................................................31
9. Vyloučení záruky .................................................................................................31
10. Servis a podpora ..............................................................................................31
11. Technické údaje ...............................................................................................31
12. Pokyny k likvidaci .............................................................................................31
13. Prohlášení o shodě ...........................................................................................31
Page 29

26
C Návod k použití
1. Ovládací prvky a indikace
1. LCD displej
2. Funkční tlačítko
3. Sonda z ušlechtilé oceli 1
2. Sonda z ušlechtilé oceli 2
3. Provozní kryt
2. Bezpečnostní pokyny
• Výrobek je určen k nekomerčnímu použití v domácnosti.
• Výrobek chraňte před znečištěním. Nepoužívejte ve vlhkém prostředí a zabraňte styku s vodou.
Používejte pouze v suchých prostorách.
• Přístroj nepoužívejte mimo rozsah předepsaných hodnot v technických údajích.
• Výrobek nepatří do rukou dětem, stejně jako i všechny elektrické přístroje.
• Výrobek neotvírejte a v případě poškození již dále nepoužívejte.
Upozornění
• Pouzdro teploměru neumisťujte do trouby.
• Teploměr není vodotěsný, chraňte ho proto před vodou!
• Sondy z ušlechtilé oceli se velmi zahřívají! Vytahujte je jen za použití chňapky.
Upozornění – baterie
• Používejte výhradně akumulátory (nebo baterie) odpovídající udanému typu.
• Při vkládání baterií vždy dbejte na správnou polaritu (+ a -). Při nesprávné polaritě hrozí
nebezpečí vytečení baterií nebo exploze.
• Baterie uchovávejte mimo dosah dětí.
• Akumulátory a baterie nikdy nerozebírejte, nepoškozujte, nepolykejte a likvidujte dle platných
předpisů. Mohou obsahovat jedovaté těžké kovy škodící životnímu prostředí.
• Na akumulátorech/bateriích neprovádějte změny a/nebo je nedeformujte/nezahřívejte/
nerozebírejte.
• Vybité baterie bez odkladu vyměňte a zlikvidujte dle platných předpisů.
• Akumulátory/baterie nezkratujte a zabraňte jejich umístění v blízkosti neizolovaných kovových
předmětů.
Page 30

27
3. Uvedení do provozu
• Mějte připravené koncové zařízení s Bluetooth 4.0 (smartphone nebo tablet) s operačním systémem
(od Android 4.3 nebo novější/od iOS 7 nebo novější).
• Pro Android:
• Spusťte na vašem smartphonu/telefonu aplikaci Google Play Store
• Instalujte si aplikaci Grill-T pro Váš operační systém.
• Pro přístroje Aplle (iOS):
• Spusťte na vašem smartphonu/telefonu aplikaci App Store
• Instalujte si aplikaci Grill-T pro Váš operační systém.
• Otevřete kryt baterie na zadní straně teploměru a vyjměte přerušení kontaktu. Teploměr je nyní
aktivní a ukazuje aktuální teplotu.
• Opět uzavřete kryt baterie.
• Spusťte aplikaci. Následně stiskněte Search jakmile je teploměr nalezen, automaticky se spojí s
Vašim smartphonem / tabletem.
Poznámka
• Pro zapnutí teploměru krátce stiskněte funkční tlačítko.
• Pro výběr jednotek (°C nebo °F) stiskněte v zapnutém stavu krátce funkční tlačítko.
• Teploměr vypnete podržením funkčního tlačítka po dobu cca 3 sekund.
Page 31

28
5. Úvodní stránka aplikace
Na úvodní stránce aplikace si můžete vybrat různé funkce:
• BBQ: Hlavní menu teploměru (viz bod 6)
• Camera: Udělejte si obrázky grilovaného jídla a sdílejte své
kreace (viz bod 7)
• Settings: Menu pro nastavení (viz bod 8)
• Support: Stručný návod k použití
6. Hlavní menu:
• V hlavním menu můžete provést různá nastavení. V tomto
menu si můžete vybrat ze tří režimů Profile, Temperature,
Timer.
• Pro změnu režimu stiskněte
a vyberte odpovídající režim.
4. Použití teploměru
• Spojte měřící sondu/sondy s teploměrem.
• Zaveďte špičku sond/y z ušlechtilé oceli do nejsilnější části grilovaného jídla, dávejte přitom pozor,
aby na druhé straně nevyčnívala ven.
Stiskněte Start pro zahájení jednoho z volitelných programů (Profile / Temperature / Timer). Po
dosažení cílové teploty/uplynutí doby zazní signál alarmu.
Poznámka
• Žádná část sondy se nesmí dostat do kontaktu s otevřeným ohněm.
Page 32

29
6.2 Temperature
• Zde nastavte požadovanou
teplotu pečení (- 30 – + 250 °C).
• Stiskněte a nastavte
požadovanou teplotu.
• Stiskněte Start pro spuštění
kontroly teploty. Jakmile je
dosaženo nastavené teploty
pečení, zazní na smartphonu/
tabletu alarm.
6.1 Profile:
• Stiskněte Beef (Probe 1) nebo Beef (Probe 2) pro otevření nastavení.
• Zvolte si variantu masa a stupeň pečení. Pomocí regulátoru + / - můžete měnit přednastavené
teploty stupňů pečení.
• Stiskněte tlačítko New pro přidání nových variant a stupňů pečení.
• Stiskněte tlačítko Delete pro smazání vámi zadaných variant.
• Stiskněte Start pro spuštění kontroly teploty. Jakmile je dosaženo nastavené teploty pečení, zazní na
smartphonu/tabletu alarm.
Page 33

30
6.3 Timer
• Pomocí funkce časovače nastavte
libovolnou dobu odpočítávání (až
23h 59m 59s).
• Stiskněte a nastavte
požadované odpočítávání.
• Stiskněte Start pro spuštění
odpočítávání. Jakmile uplyne
nastavený čas, zazní na
smartphonu/tabletu alarm.
6.4 History
• Během grilování můžete kdykoliv
zjistit průběh teploty/času. Za
tímto účelem klikněte na teplotu
(čidlo 1 nebo čidlo 2). Následně
se otevře
7. Camera
Pomocí této funkce můžete fotografovat vaše jídla a můžete je sdílet s Vašimi přáteli (Facebook, Twitter,
email).
• Klikněte na úvodní stránce na camera
• Vyfotografujte Vaše jídlo
• Klikněte na tlačítka sdílení a vyberte mezi Facebookem / Twitterem / emailem.
Poznámka
• Pokud chcete sdílet vaše fotografie přes Facebook / Twitter / email musí být Váš smartphone/
tablet propojeným s příslušným uživatelským účtem.
Page 34

31
9. Vyloučení záruky
Hama GmbH & Co. KG nepřebírá žádnou
odpovědnost nebo záruku za škody vzniklé
neodbornou instalací, montáží nebo neodborným
použitím výrobku nebo nedodržováním návodu k
použití a/nebo bezpečnostních pokynů.e
10. Servis a podpora
Máte otázky k produktu ? Obraťte na na
poradenské oddělení Hama.
Horká linka: +49 9091 502-115 (německy/
anglicky) Další podpůrné informace naleznete
na adrese: www.xavax.eu
11. Technické údaje
Napájení: 1y 3 V knoflíkový akumulátor CR2032
Rozsah měření: -30 – 250°C / -22 – 483°F
12. Pokyny k likvidaci
Ochrana životního prostředí:
Evropská směrnice 2012/19/EU a
2006/66/EU ustanovujete následující:
Elektrická a elektronická zařízení stejně
jako baterie nepatří do domovního
odpadu. Spotřebitel se zavazuje odevzdat
všechna zařízení a baterie po uplynutí jejich
životnosti do příslušných sběren. Podrobnosti
stanoví zákon příšlušné země. Symbol na
produktu, návod k obsluze nebo balení na toto
poukazuje. Recyklací a jinými způsoby zužitkování
přispíváte k ochraně životního prostředí.
13. Prohlášení o shodě
Tímto prohlašuje společnost Hama
GmbH & Co. KG, že tento přístroj
odpovídá základním požadavkům a
ostatním relevantním předpisům směrnice
2014/53/EU. Prohlášení o shodě podle příslušné
směrnice najdete na webových stránkách
www.xavax.eu.
8. Settings
V nastavení můžete provést následující změny.
• Můžete vybrat, v jakých jednotkách má být zobrazována teplota v
aplikaci (°C nebo °F)
• Můžete nastavit profil / teploty nebo časovač čidla z ušlechtilé
oceli 1 + 2
• Z různých tónů můžete nastavit tón alarmu pro čidla z ušlechtilé
oceli 1 + 2
Page 35

32
Page 36

33
Q Obsah
1. Ovládacie prvky a indikácie .................................................................................34
2. Bezpečnostné upozornenia .................................................................................34
3. Uvedenie do prevádzky .......................................................................................35
4. Používanie teplomera ..........................................................................................36
5. Úvodná stránka aplikácie ....................................................................................36
6. Hlavné menu: .....................................................................................................36
6.1 Profile ..............................................................................................................37
6.2 Temperature ....................................................................................................37
6.3 Timer .............................................................................................................38
6.4 History .............................................................................................................38
7. Camera ..............................................................................................................38
8. Settings..............................................................................................................39
9. Vylúčenie záruky .................................................................................................39
10. Servis a podpora ..............................................................................................39
11. Technické údaje ...............................................................................................39
12. Pokyny pre likvidáciu ........................................................................................39
13. Vyhlásenie o zhode ..........................................................................................39
Page 37

34
Q Návod na použitie
1. Ovládacie prvky a indikácie
1. LCD displej
2. funkčné tlačidlá
3. sonda z ušľachtilej ocele 1
4. sonda z ušľachtilej ocele 2
5. kryt batérie
2. Bezpečnostné upozornenia
• Výrobok je určený na nekomerčné použitie v domácnosti.
• Výrobok chráňte pred znečistením. Nepoužívajte vo vlhkom prostredí a zabráňte styku s vodou.
Používajte iba v suchých priestoroch.
• Prístroj nepoužívajte mimo rozsahu predpísaných hodnôt v technických údajoch.
• Výrobok nepatrí do rúk deťom, rovnako ako všetky elektrické prístroje.
• Výrobok neotvárajte a v prípade poškodenia ho ďalej nepoužívajte.
Upozornenie
• Teleso teplomera nikdy nevkladajte do rúry.
• Teplomer nie je vodotesný, chráňte ho preto pred vodou!
• Sondy z ušľachtilej ocele môžu byť veľmi horúce! Vyťahujte ju iba pomocou chňapiek.
Upozornenie – batérie
• Používajte výhradne akumulátory (alebo batérie) zodpovedajúce udanému typu.
• Pri vkladaní batérií vždy dbajte na správnu polaritu (+ a -). Pri nesprávnej polarite hrozí
nebezpečenstvo vytečenia batérií alebo explózie.
• Batérie uchovávajte mimo dosahu detí.
• Akumulátory a batérie nikdy nerozoberajte, nepoškodzujte, neprehĺtajte a likvidujte podľa
platných predpisov. Môžu obsahovať jedovaté ťažké kovy škodiace životnému prostrediu.
• Na akumulátoroch/batériách nerobte žiadne zmeny a/ani ich nedeformujte/nezahrievajte/
nerozoberajte.
• Vybité batérie bezodkladne vymeňte a zlikvidujte podľa platných predpisov.
• Akumulátory/batérie neskratujte a zabráňte ich umiestneniu v blízkosti neizolovaných kovových
predmetov.
Page 38

35
3. Uvedenie do prevádzky
• Pripravte si koncové zariadenie s technológiou Bluetooth 4.0 (smartfón alebo tablet) s operačnými
systémami (od Android 4.3 alebo novšieho/od iOS 7 alebo novšieho).
• Pre Android:
• Spustite Google Play Store na svojom smartfóne/tablete
• Inštalujte aplikáciu Grill-T pre váš operačný systém.
• Pre zariadenia Apple (iOS):
• Spustite App Store na svojom smartfóne/tablete
• Inštalujte aplikáciu Grill-T pre váš operačný systém.
• Otvorte kryt batérií na zadnej strane teplomera a vyberte prerušovač kontaktu. Teplomer je teraz
aktivovaný a zobrazuje aktuálnu teplotu.
• Kryt batérie opäť zatvorte.
• Spustite aplikáciu. Následne stlačte tlačidlo Search. Keď aplikácia nájde teplomer, spojí ho
automaticky s vašim smartfónom/tabletom.
Poznámka
• Na zapnutie teplomera stlačte krátko funkčné tlačidlo
• Na výber jednotky (°C alebo °F) stlačte v zapnutom stave krátko funkčné tlačidlo.
• Na vypnutie teplomera podržte funkčné tlačidlo stlačené cca 3 sekundy.
Page 39

36
5. Úvodná stránka aplikácie
Na úvodnej stránke aplikácie si môžete vybrať rôzne funkcie:
• BBQ: Hlavné menu teplomera (pozrite bod 6)
• Camera: Odfoťte si svoje grilované výtvory a podeľte sa s nimi
(pozrite bod 7)
• Settings: Menu pre nastavenia (pozrite bod 8)
• Support: Stručný návod na používanie
6. Hlavné menu:
• V hlavnom menu môžete urobiť rôzne nastavenia. V tomto
menu môžete zvoliť tri rôzne režimy Profile, Temperature,
Timer.
• Na zmenu režimu stlačte
a vyberte príslušný režim
4. Používanie teplomera
• Spojte meraciu sondu/sondy s teplomerom.
• Hrot sondy zaveďte do grilovanej potraviny v najhrubšom mieste, pričom musíte dávať pozor, aby
nevyšiel na druhej strane.
Stlačte tlačidlo Start a môžete začať s jedným z voliteľných programov (Profil/Teplota/Časovač). Po
dosiahnutí cieľovej teploty/uplynutí času zaznie signál alarmu.
Poznámka
• Žiadna časť sondy sa nesmie dostať do kontaktu s otvoreným ohňom.
Page 40

37
6.2 Temperature
• Tu môžete nastaviť požadovanú
teplotu tepelnej úpravy (-30 –
250 °C).
• Stlačte nastavte
požadovanú teplotu tepelnej
úpravy.
• Na spustenie monitorovania
teploty stlačte Start. Po
dosiahnutí nastavenej teploty
tepelnej úpravy zaznie na
smartfóne/tablete tón alarmu.
6.1 Profile
• Otvorte nastavenia stlačením Beef (Probe 1) alebo Beef (Probe 2).
• Vyberte rozličné mäsové varianty a stupne tepelnej úpravy. Pomocou ovládačov + / - môžete meniť
prednastavené teploty jednotlivých stupňov tepelnej úpravy.
• Ak chcete pridať nové varianty a stupne tepelnej úpr
avy
, stlačte tlačidlo New.
• Ak chcete zmazať varianty, ktoré ste vytvorili, stlačte tlačidlo Delete.
• Na spustenie monitorovania teploty stlačte Start. Po dosiahnutí nastavenej teploty tepelnej úpravy
zaznie na smartfóne/tablete tón alarmu.
Page 41

38
6.3 Timer
• Prostredníctvom funkcie časovača
nastavte ľubovoľné odpočítavanie
(až 23 h 59 min 59 s).
• Stlačte a nastavte
požadované odpočítavanie.
• Odpočítavanie spustite stlačením
tlačidla Start. Po dosiahnutí
nastaveného času zaznie na
smartfóne/tablete tón alarmu.
6.4 History
• Počas grilovania môžete
kedykoľvek sledovať priebeh
teploty/času. Ťuknite na tento účel
na teplotu (sonda 1 alebo sonda
2). Následne sa otvorí
7. Camera
Pomocou tejto funkcie môžete vyfotografovať svoje jedlá a podeliť sa o fotografie so svojimi priateľmi
(Facebook/Twitter/e-mail).
• Kliknite na úvodnej stránke na camera
• Odfotografujte svoje jedlá
• Kliknite na tlačidlo Zdieľať a vyberte medzi Facebook/Twitter/E-mail
Poznámka
• Aby ste sa mohli podeliť o svoje fotografie prostredníctvom Facebooku/Twittera/e-mailu, musí byť
váš smartfón/tablet spojený s vaším príslušným užívateľským účtom
Page 42

39
9. Vylúčenie záruky
Firma Hama GmbH & Co KG neručí/nezodpovedá
za škody vyplývajúce z neodbornej inštalácie,
montáže alebo neodborného používania výrobku
alebo z nerešpektovania návodu na používanie a/
alebo bezpečnostných pokynov.
10. Servis a podpora
S otázkami týkajúcimi sa výrobku sa prosím
obráťte na poradenské oddelenie firmy Hama.
Hotline: +49 9091 502-115 (nem./angl.)
Ďalšie informácie o podpore nájdete tu:
www.xavax.eu
11. Technické údaje
Napájanie elektrickým prúdom: 1 x 3 V
gombíková batéria CR2032
Rozsah merania: -30 – 250°C / -22 – 483°F
12. Pokyny pre likvidáciu
Ochrana životného prostredia:
Európska smernica 2012/19/EU a
2006/66/EU stanovuje: Elektrické a
elektronické zariadenia, rovnako ako
batérie sa nesmú vyhadzovať do
domáceho odpadu. Spotrebiteľ je zo zákona
povinný zlikvidovať elektrické a elektronické
zariadenia, rovnako ako batérie na miesta k tomu
určené. Symbolizuje to obrázok v návode na
použitie, alebo na balení výrobku. Opätovným
zužitkovaním alebo inou formou recyklácie
starých zariadení/batérií prispievate k ochrane
životného prostredia.
13. Vyhlásenie o zhode
Spoločnosť Hama GmbH & Co. KG týmto
vyhlasuje, že toto zariadenie spĺňa
základné požiadavky a ostatné
relevantné predpisy smernice 2014/53/EÚ.
Vyhlásenie o zhode podľa príslušnej smernice si
môžete pozrieť na adrese www.xavax.eu.
8. Settings
V nastaveniach môžete vykonať nasledujúce zmeny.
• Môžete vybrať, v akej jednotke sa má zobrazovať teplota na
aplikácii (°C alebo °F)
• Môžete nastaviť profil/teplotu alebo časovač sond z ušľachtilej
ocele 1 + 2
• Môžete z rôznych tónov nastaviť tón alarmu pre sondy z ušľachtilej
ocele 1 + 2
Page 43

40
Page 44

41
R Комплект
1. Органы управления и индикации .....................................................................42
2. Техника безопасности .......................................................................................42
3. Ввод в эксплуатацию ........................................................................................43
4. Работа с термометром ......................................................................................44
5. Главная страница программного приложения ................................................44
6. Главное меню: ..................................................................................................44
6.1 Profile ..............................................................................................................45
6.2 Temperature ....................................................................................................45
6.3 Timer .............................................................................................................46
6.4 History .............................................................................................................46
7. Camera ..............................................................................................................46
8. Settings..............................................................................................................47
9. Отказ от гарантийных обязательств .................................................................47
10. Отдел техобслуживания .................................................................................47
11. Технические характеристики ..........................................................................47
12. Инструкции по утилизации .............................................................................47
13. Декларация производителя ...........................................................................47
Page 45

42
R Руководство по эксплуатации
1. Органы управления и индикации
1. ЖК-дисплей
2. Функциональная кнопка
3. 1 датчик из нержавеющей стали
4. 2 датчик из нержавеющей стали
5. Крышка отсека батарей
2. Техника безопасности
• Изделие предназначено только для домашнего применения.
• Беречь от грязи, влаги и источников тепла. Эксплуатировать только в сухих условиях
• Соблюдать технические характеристики.
• Не давать детям!
• Изделие не открывать. Запрещается эксплуатировать неисправное изделие.
Внимание
• Не помещайте корпус термометра в духовку.
• Термометр не является водоустойчивым, беречь от воды!
• Щупы из нержавеющей стали сильно нагреваются! При извлечении всегда используйте
кухонную прихватку.
Батареи. Техника безопасности
• Разрешается применять аккумуляторы только указанного типа.
• Соблюдать полярность батарей (+ и -). Несоблюдение полярности может стать причиной
взрыва батарей.
• Батареи хранить в безопасном месте и не давать детям.
• Аккумуляторы и батареи не открывать, не разбирать, не глотать, не утилизировать с
бытовым мусором. В батареях могут содержаться вредные тяжелые металлы.
• Батареи не деформировать, не нагревать, не разбирать.
• Израсходованные батареи немедленно удалять из прибора и утилизировать.
• Не закорачивать контакты батарей. Не хранить рядом с металлическими объектами.
Page 46

43
3. Ввод в эксплуатацию
• Подготовьте устройство с поддержкой Bluetooth (смартфон, планшет), на котором
установлена соответствующая операционная система (Android 4.3 и более поздние / iOS 7 и
более поздние).
• Для Android:
• На смартфоне/планшетном компьютере запустите Google Play Store.
• Установите программное приложение Grill-T.
• Для Apple (iOS):
• На смартфоне/планшетном компьютере запустите App Store.
• Установите программное приложение Grill-T.
• На задней панели термометра откройте отсек батарей и удалите изолятор. Термометр готов к
работе и показывает текущую температуру.
• Закройте крышку.
• Запустите программное приложение. Нажмите Search. Как только термометр будет найден,
произойдет его автоматическое соединение со смартфоном/планшетом.
Примечание
• Чтобы включить термометр, нажмите функциональную кнопку.
• Чтобы выбрать единицу измерения температуры (°C или °F), во включенном состоянии
устройства нажмите функциональную кнопку.
• Чтобы выключить термометр, нажмите и ок. 3 секунд удерживайте функциональную
кнопку.
Page 47

44
5. Главная страница программного приложения
На главное странице программного приложения имеются
следующие функции:
• BBQ: Главное меню термометра (см. пункт 6)
• Camera: Позволяет фотографировать приготовляемое
блюдо и делиться фотографиями с друзьями (см. пункт 7)
• Settings: Меню настроек (см. пункт 8)
• Support: Краткое руководство
6. Главное меню:
• В главном меню устанавливаются различные настройки
Выбор режимов: Profile, Temperature, Timer.
• Чтобы включить режим, нажмите на него
.
4. Работа с термометром
• Соедините датчик с термометром.
• Вставьте наконечник датчика из нержавеющей стали в самое толстое место блюда. Следите
за тем, чтобы он не выступал с другой стороны.
Нажмите Start, чтобы запустить один из режимов программы (Профиль / Температура /
Таймер). При достижении установленной температуры или окончании отсчета времени
устройство подаст звуковой сигнал.
Примечание
• Части датчика не должны контактировать с открытым огнем.
Page 48

45
6.2 Temperature
• Установите температуры
приготовления (от -30 до
250°C).
• Нажмите и установите
требуемую температуру.
• Чтобы включить мониторинг
температуры, нажмите Start.
При достижении установленной
температуры смартфон/
планшет подаст звуковой
сигнал.
6.1 Profile
• Настройки следующих режимов: Beef (Probe 1), Beef (Probe 1).
• Установите настройки мяса и уровни приготовления. Регулятор + / - позволяет
отрегулировать стандартные настройки температуры.
• Чтобы добавить собственные настройки, нажмите New.
• Чтобы удалить собственную настройку, нажмите Delete.
• Чтобы включить мониторинг температуры, нажмите Start. При достижении установленной
температуры смартфон/планшет подаст звуковой сигнал.
Page 49

46
6.3 Timer
• Настройте обратный отсчет
времени (до 23 часов 59 минут
59 секунд).
• Нажмите и настройте
обратный отсчет времени
• Чтобы начать обратный отсчет,
нажмите Start. При окончании
отсчета смартфон/планшет
подаст звуковой сигнал.
6.4 History
• Во время приготовления
пищи можно в любой момент
просмотреть динамику
изменения температуры и
времени. Для этого нажмите
на температуру (датчик 1 или
датчик 2). Откроется
7. Camera
Функция позволяет сфотографировать блюдо и разослать его друзьям (Facebook / Twitter / эл.
почта).
• На главной странице нажмите значок camera.
• Сделайте снимок приготовленного блюда.
• Нажмите кнопку «Поделиться» и выберите способ отправки снимка (Facebook / Twitter / эл.
почта).
Примечание
• Для отправки снимка смартфон/планшетный компьютер должен быть подключен к
учетной записи
Page 50

47
9. Отказ от гарантийных обязательств
Компания Hama GmbH & Co. KG не несет
ответственность за ущерб, возникший
вследствие неправильного монтажа,
подключения и использования изделия
не по назначению, а также вследствие
несоблюдения инструкции по эксплуатации и
техники безопасности
10. Отдел техобслуживания
По вопросам ремонта или замены
неисправных изделий обращайтесь к
продавцу или в сервисную службу компании
Hama. Горячая линия отдела техобслуживания:
+49 9091 502-115 (немецкий, английский)
Подробнее смотрите здесь: www.xavax.eu
11. Технические характеристики
Питание: 1x батарея CR2032, 3 В
Диапазон измерения: -30 – 250°C / -22 –
483°F
12. Инструкции по утилизации
Охрана окружающей среды:
С момента перехода национального
законодательства на европейские
нормативы 2012/19/EU и 2006/66/EU
действительно следующее:
Электрические и электронные
приборы, а также батареи запрещается
утилизировать с обычным мусором.
Потребитель, согласно закону, обязан
утилизировать электрические и электронные
приборы, а также батареи и аккумуляторы
после их использования в специально
предназначенных для этого пунктах сбора,
либо в пунктах продажи. Детальная
регламентация этих требований
осуществляется соответствующим местным
законодательством. Необходимость
соблюдения данных предписаний
обозначается особым значком на изделии,
инструкции по эксплуатации или упаковке.
При переработке, повторном использовании
материалов или при другой форме
утилизации бывших в употреблении приборов
Вы помогаете охране окружающей среды. В
соответствии с предписаниями по обращению
с батареями, в Германии вышеназванные
нормативы действуют для утилизации батарей
и аккумуляторов
13. Декларация производителя
Компания Hama GmbH & Co. KG
настоящим подтверждает, что данное
изделие полностью соответствует
основным и другим соответствующим
нормативам Директивы 2014/53/ЕС.
Декларация о соответствии товара
нормативам смотрите на вебсайте
www.xavax.eu.
8. Settings
Программа позволяет настраивать следующие параметры.
• Единица измерения температуры (°C или °F)
• Настройка профиля / температуры / таймера датчиков 1 + 2.
• Настройка звука сигнализации для датчиков 1 +2.
Page 51

48
Page 52

49
I Contenuto
1. Elementi di comando e indicazioni ......................................................................50
2. Indicazioni di sicurezza: ......................................................................................50
3. Messa in funzione ...............................................................................................51
4. Utilizzo del termometro .......................................................................................52
5. Pagina iniziale dell’app .......................................................................................52
6. Menu principale .................................................................................................52
6.1 Profile ..............................................................................................................53
6.2 Temperature ....................................................................................................53
6.3 Timer .............................................................................................................54
6.4 History .............................................................................................................54
7. Camera ..............................................................................................................54
8. Settings..............................................................................................................55
9. Esclusione di garanzia .........................................................................................55
10. Assistenza e supporto .......................................................................................55
11. Dati tecnici .......................................................................................................55
12. Indicazioni di smaltimento ................................................................................55
13. Dichiarazione di conformità ..............................................................................55
Page 53

50
I Istruzioni per l‘uso
1. Elementi di comando e indicazioni
1. Display LCD
2. Tasto funzione
3. Sonda in acciaio inox 1
4. Sonda in acciaio inox 2
5. Coperchio batterie
2. Indicazioni di sicurezza:
• Il prodotto è concepito per l’uso domestico privato, non commerciale.
• Proteggere il prodotto da sporcizia, umidità e surriscaldamento e utilizzarlo solo in ambienti asciutti.
• Non mettere in esercizio il prodotto al di fuori dei suoi limiti di rendimento indicati nei dati tecnici.
• Tenere questo apparecchio, come tutte le apparecchiature elettriche, fuori dalla portata dei bambini!
• Non aprire il prodotto e non utilizzarlo più se danneggiato.
Attenzione
• Non inserire il corpo del termometro nel forno.
• Il termometro non è impermeabile, proteggere dall’acqua!
• Le sonde in acciaio inox diventano roventi! Estrarle esclusivamente con una presina.
Attenzione – Batterie
• Utilizzare unicamente accumulatori (o batterie) conformi al tipo indicato.
• Attenersi sempre alla corretta polarità (scritte + e -) delle batterie e inserirle di conseguenza. La
mancata osservanza comporta la perdita di potenza o il rischio di esplosione delle batterie.
• Conservare le batterie al di fuori della portata dei bambini.
• Non aprire mai batterie o batterie ricaricabili, non danneggiarle, ingerirle, né disperderle
nell‘ambiente. Possono contenere metalli pesanti dannosi e tossici.
• Non modificare, né deformare, surriscaldare, smontare le batterie/le batterie ricaricabili.
• Rimuovere e smaltire immediatamente le batterie scariche.
• Non cortocircuitare le batterie e tenerle lontano da oggetti metallici.
Page 54

51
3. Messa in funzione
• Predisporre un terminale compatibile Bluetooth 4.0 (smartphone o tablet) con sistemi operativi (da
Android 4.3 o successivi / iOS 7 o successivi).
• Per Android:
• Avviare il Google Play Store sul proprio smartphone / tablet.
• Installare l’app Grill-T per il proprio sistema operativo.
• Per dispositivi Apple (iOS):
• Avviare l’App Store sul proprio smartphone / tablet.
• Installare l’app Grill-T per il proprio sistema operativo.
• Aprire il coperchio del vano batterie sul retro del termometro e rimuovere l’interruttore di contatto.
Adesso il termometro è attivo e indica la temperatura attuale.
• Chiudere nuovamente il coperchio.
• Avviare l’app. Toccare su Search. Quando viene trovato il termometro si connette automaticamente
con lo smartphone / tablet.
Avvertenza
• Per accendere il termometro, premere brevemente il tasto funzione.
• Per selezionare l’unità (°C o °F), premere brevemente il tasto funzione con il terminale acceso.
• Per spegnere il termometro, tenere premuto il tasto funzione per ca. 3 secondi.
Page 55

52
5. Pagina iniziale dell’app
Sulla pagina iniziale dell’app sono disponibili diverse funzioni:
• BBQ: menu principale del termometro (vedi punto 6)
• Camera: fotografate la vostra grigliata e condividete le vostre
creazioni (vedi punto 7)
• Settings: menu per le impostazioni (vedi punto 8)
• Support: brevi istruzioni d’uso
6. Menu principale
• Nel menu principale è possibile effettuare diverse
impostazioni. In questo menu è possibile selezionare tre
diverse modalità Profile, Temperature, Timer.
• Per cambiare la modalità toccare
e selezionare la
modalità corrispondente.
4. Utilizzo del termometro
• Collegare la/e sonda/e di misurazione al termometro.
• Introdurre la punta della/e sonda/e in acciaio inox nel punto più resistente del cibo da grigliare,
prestando attenzione che non esca dall’altro lato.
Premere Start, per avviare uno dei programmi selezionabili (Profilo / Temperatura / Timer). Al
raggiungimento della temperatura impostata / allo scadere del tempo viene emesso un segnale di
allarme.
Avvertenza
• Nessuna parte della sonda deve entrare a contatto con la fiamma viva.
Page 56

53
6.2 Temperature
• Impostare la temperatura di
cottura impostata desiderata (-30
– 250°C).
• Toccare su e impostare la
temperatura desiderata.
• Toccare Start per avviare il
controllo della temperatura.
Non appena viene raggiunta la
temperatura di cottura impostata,
sullo smartphone/tablet viene
emesso un segnale di allarme.
6.1 Profile
• Toccare Beef (Probe 1) or Beef (Probe 2) per aprire le impostazioni.
• Selezionare i diversi tipi di carne e livelli di cottura. Mediante il regolatore + / - è possibile
modificare le diverse temperature preselezionate dei livelli di cottura.
• Toccare il pulsante New per aggiungere nuove varianti e livelli di cottura.
• Toccare il pulsante Delete per cancellare nuovamente le varianti impostate.
• Toccare Start per avviare il controllo della temperatura. Non appena viene raggiunta la temperatura
di cottura impostata, sullo smartphone/tablet viene emesso un segnale di allarme.
Page 57

54
6.3 Timer
• Impostare mediante la funzione
Timer un conto alla rovescia a
piacere (fino a 23h 59m 59s).
• Toccare su e impostare
il conto alla rovescia desiderato.
• Toccare Start per avviare il
conto alla rovescia. Non appena
viene raggiunta la temperatura
impostata, sullo smartphone/
tablet viene emesso un segnale
di allarme.
6.4 History
• Durante il processo di grigliata,
è possibile seguire in qualsiasi
momento l’andamento della
temperatura/del tempo. Toccare
sulla temperatura (sonda 1 o
sonda 2). Si apre
7. Camera
Mediante questa funzione è possibile fotografare i propri cibi e condividerli direttamente con i propri
amici (Facebook / Twitter / E-mail).
• Toccare la pagina iniziale sulla camera
• Fotografare i propri cibi
• Toccare il pulsante Condividi e scegliere tra Facebook / Twitter / E-mail
Avvertenza
• Per condividere le proprie foto su Facebook / Twitter / E-mail, il proprio smartphone / tablet deve
essere connesso all’account corrispondente
Page 58

55
9. Esclusione di garanzia
Hama GmbH & Co.KG non si assume alcuna
responsabilità per i danni derivati dal montaggio
o l‘utilizzo scorretto del prodotto, nonché dalla
mancata osservanza delle istruzioni per l‘uso e/o
delle indicazioni di sicurezza.
10. Assistenza e supporto
In caso di domande sul prodotto, rivolgersi alla
Consulenza prodotto Hama.
Hotline: +49 9091 502-115 (ted./ing.)
Ulteriori informazioni sul supporto sono disponibili
qui: www.xavax.eu
11. Dati tecnici
Alimentazione elettrica:
1 batteria a bottone 3V CR2032
Campo di misurazione:
-30 – 250°C / -22 – 483°F
12. Indicazioni di smaltimento
Informazioni per protezione ambientale:
Dopo l’implementazione della Direttiva
Europea 2012/19/EU e 2006/66/EU nel
sistema legale nazionale, ci sono le
seguenti applicazioni:
Le apparecchiature elettriche ed elettroniche
e le batterie non devono essere smaltite con i
rifiuti domestici. I consumatori sono obbligati
dalla legge a restituire I dispositivi elettrici ed
elettronici e le batterie alla fine della loro vita
utile ai punti di raccolta pubblici preposti per
questo scopo o nei punti vendita. Dettagli
di quanto riportato sono definiti dalle leggi
nazionali di ogni stato. Questo simbolo sul
prodotto, sul manuale d’istruzioni o sull’imballo
indicano che questo prodotto è soggetto a queste
regole. Riciclando, ri-utilizzando i materiali o
utilizzando sotto altra forma i vecchi prodotti/
le batterie, darete un importante contributo alla
protezione dell’ambiente.
13. Dichiarazione di conformità
Hama GmbH & Co. KG dichiara che
questo apparecchio soddisfa i requisiti
essenziali ed alle altre disposizioni
pertinenti stabilite della direttiva 2014/53/UE. La
dichiarazione di conformità secondo la direttiva
corrispondente è riportata all´indirizzo www.
xavax.eu.
8. Settings
Nelle impostazioni è possibile effettuare le seguente modifiche.
• È possibile selezionare con quale unità deve essere visualizzata la
temperatura nella app (°C o °F)
• È possibile impostare il profilo / la temperatura o il timer delle
sonde in acciaio inox 1 + 2
• È possibile impostare tra diversi toni il tono di allarme per le sonde
in acciaio inox 1 + 2
Page 59

56
Page 60

57
N Inhoud
1. Bedieningselementen en weergaven ...................................................................58
2. Veiligheidsinstructies...........................................................................................58
3. Inbedrijfstellen ....................................................................................................59
4. Gebruikmaking van de thermometer ....................................................................60
5. Startpagina van de app .......................................................................................60
6. Hoofdmenu ........................................................................................................60
6.1 Profile ..............................................................................................................61
6.2 Temperature ....................................................................................................61
6.3 Timer .............................................................................................................62
6.4 History .............................................................................................................62
7. Camera ..............................................................................................................62
8. Settings..............................................................................................................63
9. Uitsluiting van garantie en aansprakelijkheid .......................................................63
10. Service en support ............................................................................................63
11. Technische specificaties ....................................................................................63
12. Aanwijzingen over de afvalverwerking ..............................................................63
13. Conformiteitsverklaring.....................................................................................63
Page 61

58
N Gebruiksaanwijzing
1. Bedieningselementen en weergaven
1. LCD-display
2. Functiedruktoets
3. Roestvast stalen sonde 1
2. Roestvast stalen sonde 2
3. Batterijdeksel
2. Veiligheidsinstructies
• Het product is bedoeld voor niet-commercieel privegebruik in huiselijke kring
• Bescherm het product tegen vuil, vocht en oververhitting en gebruik het alleen in droge
omgevingen.
• Gebruik het product niet buiten de in de technische gegevens vermelde vermogensgrenzen.
• Elektrische apparaten dienen buiten het bereik van kinderen gehouden te worden!
• Open het product niet en gebruik het niet meer als het beschadigd is.
Waarschuwing
• Plaats de thermometerbehuizing niet in de oven.
• De thermometer is niet waterdicht, bescherm het om die reden tegen water!
• De roestvast stalen sondes worden zeer heet! Uitsluitend met ovenhandschoenen eruit trekken.
Waarschuwing – batterij
• Gebruik uitsluitend accu’s (of batterijen), welke met het vermelde type overeenstemmen.
• Let absoluut op de correcte polariteit (opschrift + en -) van de batterijen en plaats deze
dienovereenkomstig in het batterijvakje. Indien de batterijen verkeerd worden geplaatst kunnen
deze gaan lekken of zelfs exploderen.
• Batterijen buiten het bereik van kinderen opbergen.
• Accu‘s en batterijen nimmer openen, beschadigen, inslikken of in het milieu terecht laten komen.
Zij kunnen giftige en zware metalen bevatten welke schadelijk zijn voor het milieu.
• De accu‘s/batterijen niet wijzigen en/of vervormen/verhitten/demonteren.
• Lege batterijen direct uit het product verwijderen en afvoeren.
• De accu‘s/batterijen niet kortsluiten en uit de buurt van blanke metalen voorwerpen houden.
Page 62

59
3. Inbedrijfstellen
• Houd een eindtoestel met Bluetooth 4.0 functie (smartphone of tablet) met besturingssystemen
(vanaf Android 4.3 of nieuwer / vanaf iOS 7 of nieuwer) gereed.
• Voor Android:
• Start de Google Play Store op uw smartphone / tablet.
• Installeer de app Grill-T voor uw besturingssysteem.
• Voor Apple (iOS) apparatuur:
• Start de App Store op uw smartphone / tablet
• Installeer de app Grill-T voor uw besturingssysteem.
• Open het batterijvak aan de achterzijde van de thermometer en neem de contactonderbreker eruit.
De thermometer is nu geactiveerd en toont de actuele temperatuur.
• Sluit het batterijvakdeksel weer.
• Start de app. Tip vervolgens op Search, zodra de thermometer wordt gevonden, verbindt deze zich
automatisch met uw smartphone / tablet.
Aanwijzing
• Teneinde de thermometer in te schakelen drukt u kort op de functiedruktoets.
• Teneinde de eenheid (°C of °F) te selecteren drukt u tijdens een ingeschakelde toestand kort op
de functiedruktoets.
• Teneinde de thermometer uit te schakelen houdt u de functiedruktoets gedurende ca. 3 seconden
ingedrukt.
Page 63

60
5. Startpagina van de app
Op de startpagina van de app zijn er verschillende functies ter
beschikking:
• BBQ: Hoofdmenu van de thermometer (zie punt 6)
• Camera: Maakt u foto‘s van uw braadstuk en deelt u uw
creaties (zie punt 7)
• Settings: Menu voor instellingen (zie punt 8)
• Support: Beknopte bedieningsinstructies
6. Hoofdmenu
• In het hoofdmenu kunt u verscheidene instellingen
uitvoeren. In dit menu kunt u drie verschillende modi
selecteren Profile, Temperature, Timer.
• Teneinde de modus om te schakelen tipt u
en selecteert
de betreffende modus.
4. Gebruikmaking van de thermometer
• Verbind de meetsonde(s) met de thermometer.
• Steek de punt van de roestvast stalen sonde(s) op de stevigste plaats van het braadstuk naar binnen
en let er daarbij op, dat de sonde(s) niet aan de andere kant eruit steekt/steken.
Tip op Start, teneinde met één van de te selecteren programma‘s (Profile / Temperature / Timer) te
beginnen. Na het bereiken van de streeftemperatuur / afloop van de tijd weerklinkt een alarmsignaal.
Aanwijzing
• Geen enkel onderdeel van de sonde mag met een open vlam in contact komen
Page 64

61
6.2 Temperature
• Stelt u hier de gewenste
gaartemperatuur in
(-30 – 250°C).
• Tip op
en stel de
gewenste temperatuur in.
• Tip op Start, teneinde de
temperatuurbewaking te
starten. Zodra de ingestelde
gaartemperatuur is bereikt, klinkt
er op de smartphone/tablet een
alarmsignaal.
6.1 Profile
• Tipt u op Beef (Probe 1) of Beef (Probe 2), teneinde de instellingen te openen.
• Selecteert u de verschillende vleesvarianten en de mate van garen. Via de regelaar + / - kunt u de
vooraf ingestelde temperaturen van de mate van garen wijzigen.
• Tip op de button New, teneinde nieuwe varianten en maten van garen toe te voegen.
• Tip op de button Delete, teneinde de door uzelf aangemaakte varianten weer te wissen.
• Tip op Start, teneinde de temperatuurbewaking te starten. Zodra de ingestelde gaartemperatuur is
bereikt, klinkt er op de smartphone/tablet een alarmsignaal.
Page 65

62
6.3 Timer
• Stelt u met de Timer-functie een
willekeurige countdown in (max.
23h 59m 59s).
• Tip op en stel uw
gewenste countdown in.
• Tip op Start, teneinde de
countdown te starten. Zodra de
ingestelde tijd is bereikt, klinkt
er op de smartphone/tablet een
alarmsignaal.
6.4 History
• Tijdens het grillen kunt u op
ieder moment de temperatuur
/ verstreken tijd nagaan. Tip
hiervoor op de temperatuur
(sonde 1 of sonde 2). Aansluitend
opent zich
7. Camera
Met behulp van deze functie kunt u uw gerechten fotograferen en direct met uw vrienden delen
(Facebook / Twitter / e-mail).
• Tip op de startpagina op Camera
• Fotografeer uw gerechten
• Tip op de Delen-button en kies uit Facebook / Twitter / e-mail
Aanwijzing
• Teneinde via Facebook / Twitter / e-mail uw foto‘s te delen dient uw smartphone / tablet met uw
respectievelijke gebruikersaccount verbonden te zijn.
Page 66

63
9. Uitsluiting van garantie en
aansprakelijkheid
Hama GmbH & Co. KG aanvaardt geen enkele
aansprakelijkheid of garantieclaims voor schade
of gevolgschade, welke door ondeskundige
installatie, montage en ondeskundig gebruik van
het product ontstaan of het resultaat zijn van het
niet in acht nemen van de bedieningsinstructies
en/of veiligheidsinstructies.
10. Service en support
Neem bij vragen over het product contact op met
de afdeling Productadvies van HAMA.
Hotline: +49 9091 502-115 (Duits/Engels)
Meer support-informatie vindt u hier:
www.xavax.eu
11. Technische specificaties
Spanningsvoorziening: 1x 3V knoopcel CR2032
Meetbereik: -30 – 250°C / -22 – 483°F
12. Aanwijzingen over de afvalverwerking
Notitie aangaande de bescherming van het
milieu:
Ten gevolge van de invoering van de
Europese Richtlijn 2012/19/EU en
2006/66/EU in het nationaal juridisch
system, is het volgende van toepassing:
Elektrische en elektronische apparatuur, zoals
batterijen mag niet met het huisvuil weggegooid
worden. Consumenten zijn wettelijk verplicht om
electrische en elctronische apparaten zoals
batterijen op het einde van gebruik in te dienen
bij openbare verzamelplaatsen speciaal opgezet
voor dit doeleinde of bij een verkooppunt.
Verdere specificaties aangaande dit onderwerp
zijn omschreven door de nationale wet van het
betreffende land. Dit symbool op het product, de
gebruiksaanwijzing of de verpakking duidt erop
dat het product onderworpen is aan deze
richtlijnen. Door te recycleren, hergebruiken van
materialen of andere vormen van hergebruiken
van oude toestellen/batterijen, levert u een grote
bijdrage aan de bescherming van het mileu.
13. Conformiteitsverklaring
Hama GmbH & Co. KG verklaart hierbij
dat dit toestel zich in overeenstemming
met de essentiële eisen en aan de
overige relevante bepalingen van de Richtlijn
2014/53/EU bevindt. De conformiteitsverklaring
overeenkomstig de desbetreffende Richtlijn vindt
u onder www.xavax.eu.
8. Settings
In de instellingen kunt u de volgende wijzigingen uitvoeren.
• U kunt selecteren in welke eenheid de temperatuur in de app dient
te worden weergegeven (°C of °F)
• U kunt het profiel / de temperatuur of de temperatuur van de
roestvast stalen sondes 1 +2 instellen
• U kunt kiezen uit verschillende geluiden om het alarmsignaal voor
de roestvast stalen sondes 1 + 2 in te stellen
Page 67

64
Page 68

65
P Zawartość
1. Elementy obsługi i sygnalizacji ............................................................................66
2. Wskazówki bezpieczeństwa .................................................................................66
3. Uruchamianie .....................................................................................................67
4. Korzystanie z termometru ....................................................................................68
5. Strona startowa aplikacji .....................................................................................68
6. Główne menu:....................................................................................................68
6.1 Profile ..............................................................................................................69
6.2 Temperature ....................................................................................................69
6.3 Timer .............................................................................................................70
6.4 History .............................................................................................................70
7. Camera ..............................................................................................................70
8. Settings..............................................................................................................71
9. Wyłączenie odpowiedzialności ...........................................................................71
10. Serwis i pomoc techniczna ................................................................................71
11. Dane techniczne ...............................................................................................71
12. Informacje dotycząca recyklingu .......................................................................71
13. Deklaracja zgodności........................................................................................71
Page 69

66
P Instrukcja obsługi
1. Elementy obsługi i sygnalizacji
1. Ekran LCD
2. Przycisk funkcyjny
3. Sonda ze stali nierdzewnej 1
4. Sonda ze stali nierdzewnej 2
5. Pokrywa schowka na baterie
2. Wskazówki bezpieczeństwa
• Produkt jest przeznaczony do prywatnego, niekomercyjnego użytku domowego.
• Chronić produkt przed zanieczyszczeniem, wilgocią i przegrzaniem oraz stosować go tylko w suchym
otoczeniu.
• Nie stosować produktu poza zakresem mocy podanym w danych technicznych.
• Trzymać urządzenie, jak wszystkie urządzenia elektryczne, z dala od dzieci!
• Nie otwierać produktu i nie używać go, gdy jest uszkodzony.
Ostrzeżenie
• Nie wkładać obudowy termometru do piekarnika.
• Termometr nie jest wodoszczelny, chronić przed wodą!
• Sondy ze stali nierdzewnej nagrzewają się do bardzo wysokiej temperatury! Wyjmować tylko przy
użyciu łapek do gorących naczyń.
Ostrzeżenia dotyczące baterii
• U ż ywać wyłącznie akumulatorów (lub baterii) odpowiadających podanemu typowi.
• Wkładając baterie, zwrócić koniecznie uwagę na właściwe podłączenie biegunów (znak + i -).
Nieprzestrzeganie grozi wyciekiem lub wybuchem baterii.
• Przechowywać baterie poza zasięgiem dzieci.
• Nie otwierać, uszkadzać ani nie połykać akumulatorów lub baterii oraz chronić je przed
kontaktem ze środowiskiem. Mogą one zawierać toksyczne i szkodliwe dla środowiska metale
ciężkie.
• Nie modyfikować / deformować / podgrzewać / rozkładać akumulatorów / baterii.
• Natychmiast usunąć z produktu zużyte baterie i poddać je utylizacji.
• Nie zwierać akumulatorów / baterii oraz trzymać je z dala od odkrytych przedmiotów
metalowych.
Page 70

67
3. Uruchamianie
• Przygotować urządzenie końcowe z łączem Bluetooth 4.0 (smartfon lub tablet) z systemem
operacyjnym (od Android 4.0 lub nowszy / od iOS 7 lub nowszy).
• Android:
• Uruchomić Google Play Store w smartfonie / tablecie.
• Zainstalować aplikację Grill-T dla odpowiedniego systemu operacyjnego.
• Urządzenia Apple (iOS):
• Uruchomić App Store w smartfonie / tablecie.
• Zainstalować aplikację Grill-T dla odpowiedniego systemu operacyjnego.
• Otworzyć pokrywę schowka na baterie z tyłu termometru i usunąć przerywacz stykowy. Termometr
jest teraz aktywny i wskazuje aktualną temperaturę.
• Ponownie zamknąć pokrywę schowka na baterie.
• Uruchomić aplikację. Następnie dotknąć Search, po znalezieniu termometru łączy się on
automatycznie ze smartfonem / tabletem.
Wskazówki
• Aby włączyć termometr, nacisnąć krótko przycisk funkcyjny.
• Aby wybrać jednostkę miary (°C albo °F), nacisnąć krótko przy włączonym urządzeniu przycisk
funkcyjny.
• Aby wyłączyć termometr, nacisnąć przez 3 sekundy przycisk funkcyjny.
Page 71

68
5. Strona startowa aplikacji
Na stronie startowej aplikacji można wybrać różne funkcje:
• BBQ: Główne menu termometru (patrz punkt 6)
• Camera: Zrób zdjęcia grillowanej potrawy i podziel się swoimi
kreacjami z innymi (patrz punkt 7)
• Settings: Menu ustawień (patrz punkt 8)
• Support: Krótka instrukcja obsługi
6. Główne menu:
• W głównym menu dokonuje się różnych ustawień.
W tym menu można wybrać trzy różne tryby Profile,
Temperature, Timer.
• Aby zmienić tryb, dotknąć
i wybrać odpowiedni tryb.
4. Korzystanie z termometru
• Połączyć sondę/ y pomiarowe z termometrem.
• Wprowadzić końcówkę sondy ze stali nierdzewnej w najgrubsze miejsce grillowanej potrawy,
uważając przy tym, aby nie wyszła ona z drugiej strony.
Nacisnąć Start, aby rozpocząć jeden z wybieranych programów (profile / temperatura / timer).
Po osiągnięciu docelowej temperatury / upływie czasu rozlega się sygnał alarmowy.
Wskazówki
• Żadna część sondy nie może mieć kontaktu z otwartym płomieniem
Page 72

69
6.2 Temperature
• Ustawić tutaj wybraną
temperaturę gotowania
(-30 – 250°C).
• Dotknąć i ustawić
wybraną temperaturę.
• Dotknąć Start, aby uruchomić
monitorowanie temperatury.
Po osiągnięciu ustawionej
temperatury gotowania na
smartfonie/tablecie rozlega się
sygnał alarmowy.
6.1 Profile
• Dotknąć Beef (Probe 1) lub Beef (Probe 2), aby otworzyć ustawienia.
• Wybrać różne rodzaje mięsa i stopnie gotowania. Regulatorem + / - można zmieniać ustawione
temperatury i stopnie gotowania.
• Dotknąć przycisk New, aby dodać nowe warianty i stopnie gotowania.
• Dotknąć przycisk Delete, aby ponownie usunąć dodane przez siebie warianty.
• Dotknąć Start, aby uruchomić monitorowanie temperatury. Po osiągnięciu ustawionej temperatury
gotowania na smartfonie/tablecie rozlega się sygnał alarmowy.
Page 73

70
6.3 Timer
• Za pomocą funkcji timera ustawić
dowolne odliczanie czasu (do 23h
59m 59s).
• Dotknąć i ustawić
wybrane odliczanie czasu
• Dotknąć Start, aby uruchomić
odliczanie czasu. Po upływie
ustawionego czasu na smartfonie/
tablecie rozlega się sygnał
alarmowy.
6.4 History
• Podczas grillowania można
przez cały czas monitorować
temperaturę / czas grillowania.
Dotknąć w tym celu temperaturę
(sonda 1 albo sonda 2). Następnie
otwiera się
7. Camera
Za pomocą tej funkcji można fotografować potrawy i udostępniać zdjęcia znajomym (Facebook / Twitter
/ e-mail).
• Na stronie startowej dotknąć camera.
• Sfotografować potrawy.
• Dotknąć przycisk Udostępnij i wybrać opcję Facebook / Twitter / e-mail.
Wskazówki
• Aby udostępnić zdjęcia poprzez Facebook / Twitter / e-mail, smartfon / tablet musi być połączony
z kontem użytkownika.
Page 74

71
9. Wyłączenie odpowiedzialności
Hama GmbH & Co. KG nie udziela gwarancji ani
nie odpowiada za szkody wskutek niewłaściwej
instalacji, montażu oraz nieprawidłowego
stosowania produktu lub nieprzestrzegania
instrukcji obsługi i/lub wskazówek
bezpieczeństwa.
10. Serwis i pomoc techniczna
W razie pytań dotyczących produktu prosimy
zwrócić się do infolinii Hama.
Gorąca linia: +49 9091 502-115 (niem./ang.)
Dodatkowe informacje są dostępne na stronie:
www.xavax.eu
11. Dane techniczne
Zasilanie elektryczne:
1 bateria guzikowa 3 V CR2032
Zakres pomiarowy: -30 – 250°C / -22 – 483°F
12. Informacje dotycząca recyklingu
Wskazówki dotyczące ochrony środowiska:
Od czasu wprowadzenia europejskiej
dyrektywy 2012/19/EU i 2006/66/EU do
prawa narodowego obowiązują
następujące ustalenia: Urządzeń
elektrycznych, elektronicznych oraz baterii
jednorazowych nie należy wyrzucać razem z
codziennymi odpadami domowymi! Użytkownik
zobowiązany prawnie do odniesienia zepsutych,
zniszczonych lub niepotrzebnych urządzeń
elektrycznych i elektronicznych do punktu zbiórki
lub do sprzedawcy. Szczegółowe kwestie regulują
przepisy prawne danego kraju. Informuje o tym
symbol przekreślonego kosza umieszczony na
opakowaniu. Segregując odpady pomagasz
chronić środowisko!
13. Deklaracja zgodności
Hama GmbH & Co. KG oświadcza
niniejszym, że niniejsze urządzenie jest
zgodne z podstawowymi wymaganiami i
innymi właściwymi przepisami dyrektywy
2014/53/UE. Deklaracja zgodności wg
odpowiedniej dyrektywy dostępna jest na stronie
www.xavax.eu.
8. Settings
W ustawieniach można dokonać następujących zmian.
• wybrać, w jakiej jednostce miary ma być wskazywana temperatura
w aplikacji (°C albo °F)
• ustawić profil / temperaturę albo timer sond ze stali nierdzewnej
1 + 2
• ustawić różne sygnały alarmowe dla sond ze stali nierdzewnej
1 + 2
Page 75

72
Page 76

73
H Tartalma
1. Kezelőelemek és kijelzők .....................................................................................74
2. Biztonsági előírások: ...........................................................................................74
3. Üzembe vétel .....................................................................................................75
4. A hőmérő használata ..........................................................................................76
5. Az alkalmazás kezdőoldala ..................................................................................76
6. Főmenü .............................................................................................................76
6.1 Profile ..............................................................................................................77
6.2 Temperature ....................................................................................................77
6.3 Timer .............................................................................................................78
6.4 History .............................................................................................................78
7. Camera ..............................................................................................................78
8. Settings..............................................................................................................79
9. Szavatosság kizárása ...........................................................................................79
10. Szerviz és támogatás ........................................................................................79
11. Műszaki adatok ................................................................................................79
12. Ártalmatlanítási előírások .................................................................................79
13. Megfelelőségi nyilatkozat .................................................................................79
Page 77

74
H Használati útmutató
1. Kezelőelemek és kijelzők
1. LCD kijelző
2. Funkciógomb
3. 1. nemesacél szonda
4. 2. nemesacél szonda
5. Akkumulátorfedél
2. Biztonsági előírások:
• A termék a magánháztartási, nem üzleti célú alkalmazásra készül.
• Óvja meg a terméket szennyeződéstől, nedvességtől és túlmelegedéstől, és kizárólag zárt
környezetben használja.
• Ne üzemeltesse a terméket a műszaki adatokban megadott teljesítményhatárain túl.
• Ez a készülék, mint minden elektromos készülék, nem gyermekek kezébe való!
• Ne nyissa ki a terméket és sérülés esetén ne üzemeltesse tovább.
Figyelmeztetés
• A hőmérőházat ne tegye sütőbe.
• A hőmérő nem vízálló, óvja a víztől!
• A nemesacél szondák rendkívül felmelegednek! Csak edényfogó kendővel vegye ki.
Figyelmeztetés - Elemet
• Kizárólag a megadott típusnak megfelelő akkumulátort (vagy elemet) használjon.
• Feltétlenül ügyeljen az elemek megfelelő polaritására (+ és - felirat), és ennek megfelelően tegye
be őket. Ennek figyelmen kívül hagyása esetén az elem kifolyásának vagy felrobbanásának
veszélye áll fenn.
• Az elemeket gyermekek számára elzárt helyen tárolja.
• Az akkumulátorokat és elemeket soha ne nyissa fel, károsítsa, nyelje le vagy juttassa a
környezetbe. Mérgező és környezetre káros nehézfémeket tartalmazhatnak.
• Ne módosítsa és/vagy deformálja/hevítse/szedje szét az akkumulátorokat/elemeket.
• Haladéktalanul távolítsa el a lemerült elemeket a termékből, majd ártalmatlanítsa őket.
• Ne zárja rövidre az akkumulátorokat/elemeket és tartsa őket távol csupasz fémtárgyaktól.
Page 78

75
3. Üzembe vétel
• Készítsen elő egy Bluetooth 4.0-kompatibilis eszközt (okostelefon vagy táblagép), amelyen legalább
Android 4.3 / legalább iOS 7 operációs rendszer fut.
• Android készülékek esetén:
• Jelenítse meg a Google Play Store áruházat az okostelefonon/táblagépen
• Telepítse az operációs rendszerének megfelelő Grill-T alkalmazást
• Apple (iOS) készülékek esetén:
• Jelenítse meg az App Store áruházat az okostelefonon/táblagépen
• Telepítse az operációs rendszerének megfelelő Grill-T alkalmazást
• Nyissa ki az elemtartót a hőmérő hátulján, és vegye ki a kontaktmegszakítót. A hőmérő ezzel
aktiválódik, és kijelzi az aktuális hőmérsékletet.
• Csukja vissza az elemtartó fedelét.
• Indítsa el az alkalmazást. Koppintson ezután a Search gombra, amint megtalálta a hőmérőt, és az
automatikusan csatlakozik az okostelefonhoz/táblagéphez.
Hivatkozás
• A hőmérő bekapcsolásához nyomja meg röviden a funkciógombot.
• A mértékegység (°C vagy °F) kiválasztásához nyomja meg röviden a funkciógombot bekapcsolt
állapotban.
• A hőmérő kikapcsolásához tartsa nyomva a funkciógombot kb. 3 másodpercig.
Page 79

76
5. Az alkalmazás kezdőoldala
Az alkalmazás kezdőoldalán különböző funkciók érhetők el:
• BBQ: A hőmérő főmenüje (lásd: 6. pont)
• Camera: Készítsen felvételeket az ételről, és ossza meg őket
(lásd: 7. pont)
• Settings: Beállítás menü (lásd: 8. pont)
• Support: Rövid használati útmutató
6. Főmenü
• A főmenüben különböző beállításokat adhat meg. Ebben a
menüben három különböző módot választhat ki: Profile,
Temperature, Timer.
• A mód kiválasztásához koppintson a
gombra, és
válassza ki a megfelelő módot.
4. A hőmérő használata
• Kösse össze a mérőszondát a hőmérővel.
• Vezesse a nemesacél szonda hegyét a hús legvastagabb részébe, eközben ügyeljen arra, nehogy a
másik oldalon kilógjon.
Nyomja meg a Start gombot egy választható program (Profil/Hőmérséklet/Időzítő) elindításához. A
célhőmérséklet elérése/az idő lejárta után riasztási hangjelzés hallatszik.
Hivatkozás
• A szonda egyetlen alkotóeleme sem érintkezhet nyílt lánggal.
Page 80

77
6.2 Temperature
• Állítsa be a kívánt hőmérsékletet
(-30–250°C).
• Koppintson a gombra, és
állítsa be a kívánt hőmérsékletet.
• Koppintson a Start gombra
a hőmérséklet-figyelés
elkezdéséhez. Amint elérte a
beállított sütési hőmérsékletet, az
okostelefon/táblagép hangjelzést
ad.
6.1 Profile
• Koppintson a Beef (Probe 1) vagy Beef (Probe 2) gombra a beállítások megnyitásához
• Válasszon a különböző húsváltozatok és fokozatok közül. A + / - szabályozóval a fokozatok előre
beállított hőmérsékleteit módosíthatja.
• Koppintson a New gombra új változatok és fokozatok hozzáadásához.
• Koppintson a Delete gombra a saját maga által létrehozott változatok törléséhez.
• Koppintson a Start gombra a hőmérséklet-figyelés elkezdéséhez. Amint elérte a beállított sütési
hőmérsékletet, az okostelefon/táblagép hangjelzést ad.
Page 81

78
6.3 Timer
• Az időzítő funkcióval állítson be
egy tetszőleges visszaszámlálást
(23 óra 59 perc 59 mp-ig).
• Koppintson a
gombra, és állítsa be a kívánt
visszaszámlálást.
• Koppintson a Start gombra a
visszaszámlálás elkezdéséhez.
Amint lejárt a beállított idő, az
okostelefon/táblagép hangjelzést
ad.
6.4 History
• A sütési művelet alatt a
hőmérséklet-/időgrafikon
követhető. Koppintson ehhez a
hőmérsékletre (1. vagy 2. szonda).
Ezután kinyílik
7. Camera
Ennek a funkciónak a segítségével lefényképezheti az ételeket, és megoszthatja közvetlenül a
barátaival (Facebook / Twitter / E-mail).
• Koppintson a kezdőoldalra a camera
• Fényképezze le az ételeket
• Koppintson a Megosztás gombra, és válasszon: Facebook / Twitter / E-mail.
Hivatkozás
• A képek Facebookon/Twitteren/E-mailben történő megosztásához az okostelefont/táblagépet
össze kell kapcsolni az adott felhasználói fiókkal.
Page 82

79
9. Szavatosság kizárása
A Hama GmbH & Co. KG semmilyen felelősséget
vagy szavatosságot nem vállal a termék
szakszerűtlen telepítéséből, szereléséből és
szakszerűtlen használatából, vagy a kezelési
útmutató és/vagy a biztonsági előírások be nem
tartásából eredő károkért.
10. Szerviz és támogatás
Kérjük, hogy a termékkel kapcsolatos kérdéseivel
forduljon a Hama terméktanácsadásához.
Közvetlen vonal Közvetlen vonal:
+49 9091 502-115 (Deu/Eng) További támogatási
információt itt talál: www.xavax.eu
11. Műszaki adatok
Áramellátás: 1x 3 V CR2032 gombelem
Mérési tartomány: -30 – 250°C / -22 – 483°F
12. Ártalmatlanítási előírások
Környezetvédelmi tudnivalók:
Az európai irányelvek 2012/19/EU és
2006/66/EU ajánlása szerint, a megjelölt
időponttól kezdve, minden EU-s
tagállamban érvényesek a következők:
Az elektromos és elektronikai készülékeket és
az elemeket nem szabad a háztartási szemétbe
dobni! A leselejtezett elektromos és elektronikus
készülékeket és elemeket, akkumulátorokat
nem szabad a háztartási szemétbe dobni. Az
elhasznált és működésképtelen elektromos és
elektronikus készülékek gyűjtésére törvényi
előírás kötelez mindenkit, ezért azokat el kell
szállítani egy kijelölt gyűjtő helyre vagy visszavinni
a vásárlás helyére. A termék csomagolásán
feltüntetett szimbólum egyértelmű jelzést ad erre
vonatkozóan a felhasználónak. A régi készülékek
begyűjtése, visszaváltása vagy bármilyen
formában történő újra hasznosítása közös
hozzájárulás környezetünk védelméhez.
13. Megfelelőségi nyilatkozat
A Hama GmbH & Co. KG ezúton
kijelenti, hogy a jelen készülék
összhangban van az 2014/53/EU
irányelv alapvető követelményeivel és egyéb
vonatkozó előírásaival. A megfelelő irányelv
szerinti megfelelőségi nyilatkozatot a
www.xavax.eu oldalon találja.
8. Settings
A beállításokban a következő módosításokat végezheti.
• Kiválaszthatja, hogy az alkalmazásban a hőmérséklet milyen
mértékegységben jelenjen meg. (°C vagy °F)
• Beállíthatja a profilt/hőmérsékletet vagy az 1+2 nemesacél szonda
időzítőjét
• Kiválaszthatja az 1+2 nemesacél szonda riasztási hangját több
hang közül.
Page 83

80
Page 84

81
J Περιεχόμενα
1. Στοιχεία χειρισμού και ενδείξεις ...........................................................................82
2. Υποδείξεις ασφαλείας .........................................................................................82
3. Έναρξη χρήσης ..................................................................................................83
4. Χρήση του θερμόμετρου .....................................................................................84
5. Αρχική σελίδα της εφαρμογής .............................................................................84
6. Κύριο μενού: ......................................................................................................84
6.1 Profile ..............................................................................................................85
6.2 Temperature ....................................................................................................85
6.3 Timer .............................................................................................................86
6.4 History .............................................................................................................86
7. Camera ..............................................................................................................86
8. Settings..............................................................................................................87
9. Απώλεια εγγύησης ..............................................................................................87
10. Σέρβις και υποστήριξη ......................................................................................87
11. Τεχνικά χαρακτηριστικά ....................................................................................87
12. Υποδείξεις απόρριψης ......................................................................................87
13. Declaration of Conformity .................................................................................87
Page 85

82
J Operating instructions
1. Στοιχεία χειρισμού και ενδείξεις
1. Οθόνη LCD
2. Πλήκτρο λειτουργιών
3. Aισθητήρας ανοξείδωτου χάλυβα 1
4. Aισθητήρας ανοξείδωτου χάλυβα 2
5. Κάλυμμα μπαταριών
2. Υποδείξεις ασφαλείας
• Το προϊόν προορίζεται για σκοπούς οικιακής χρήσης.
• Πρέπει να προστατεύετε το προϊόν από βρομιά, υγρασία και υπερθέρμανση και να το χρησιμοποιείτε
μόνο σε στεγνά περιβάλλοντα.
• Μην χρησιμοποιείτε τη συσκευή εκτός των ορίων απόδοσης που περιγράφονται στα τεχνικά
χαρακτηριστικά.
• Μην αφήνετε τα παιδιά να αγγίζουν αυτή ή οποιαδήποτε άλλη ηλεκτρική συσκευή.
• Μην ανοίγετε το προϊόν και μην το χρησιμοποιείτε αν χαλάσει.
Προειδοποίηση
• Μην τοποθετείτε το περίβλημα του θερμομέτρου στο φούρνο.
• Το θερμόμετρο δεν είναι αδιάβροχο, προστατέψτε έτσι τη συσκευή από το νερό!
• Οι ακροδέκτες ανοξείδωτου χάλυβα αναπτύσσουν υψηλές θερμοκρασίες! Πρέπει να αφαιρείται
μόνο με πιάστρα κουζίνας.
Προειδοποίηση - Μπαταρίες
• Χρησιμοποιείτε αποκλειστικά απλές ή επαναφορτιζόμενες μπαταρίες του προβλεπόμενου τύπου.
• Προσέξτε οπωσδήποτε τη σωστή πολικότητα (επιγραφή + και -) των μπαταριών και τοποθετήστε
τις ανάλογα. Η μη τήρηση μπορεί να οδηγήσει σε διαρροή του υγρού ή σε έκρηξη των μπαταριών.
• Φυλάτε τις μπαταρίες μακριά από παιδιά.
• Οι απλές και επαναφορτιζόμενες μπαταρίες δεν πρέπει να ανοίγονται, να καταστρέφονται, να
καταπίνονται ή να καταλήγουν στο περιβάλλον. Μπορεί να περιέχουν δηλητηριώδη και βλαβερά
για το περιβάλλον βαρέα μέταλλα.
• Μην μετατρέπετε και/ή μην παραμορφώνετε/θερμαίνετε/ανοίγετε τις απλές/επαναφορτιζόμενες
μπαταρίες.
• Αφαιρέστε και απορρίψτε τις χρησιμοποιημένες μπαταρίες αμέσως από το προϊόν.
• Μην βραχυκυκλώνετε τις απλές/επαναφορτιζόμενες μπαταρίες και μην τις φέρνετε σε επαφή με
γυμνά μεταλλικά αντικείμενα.
Page 86

83
3. Έναρξη χρήσης
• Έχετε έτοιμη μια συσκευή συμβατή με bluetooth 4.0 (smartphone ή tablet) με λειτουργικά
συστήματα (από Android 4.3 και πέρα / iOS 7 και πέρα).
• Για Android:
• Πραγματοποιήστε εκκίνηση του Google Play Store στο smartphone ή στο tablet σας
• Εγκαταστήστε την εφαρμογή Grill-T για το λειτουργικό σας σύστημα.
• Για συσκευές Apple (iOS):
• Πραγματοποιήστε εκκίνηση του App Store στο smartphone ή στο tablet σας
• Εγκαταστήστε την εφαρμογή Grill-T για το λειτουργικό σας σύστημα.
• Ανοίξτε το καπάκι της θήκης μπαταριών στην πίσω πλευρά του θερμομέτρου και βγάλτε έξω
τη λωρίδα διακοπής μπαταριών. Το θερμόμετρο τώρα είναι ενεργοποιημένο και προβάλλει την
τρέχουσα θερμοκρασία.
• Κλείστε πάλι το καπάκι της θήκης μπαταριών.
• Ξεκινήστε την εφαρμογή. Στη συνέχεια πατήστε το Search, και όταν βρεθεί το θερμότερο συνδέεται
αυτόματα με το smartphone / tablet.
Υπόδειξη
• Για να ενεργοποιήσετε το θερμόμετρο πατήστε στιγμιαία το πλήκτρο λειτουργιών.
• Για να επιλέξετε τη μονάδα (°C ή °F) πατήστε στιγμιαία το πλήκτρο λειτουργιών, σε κατάσταση
ενεργοποίησης.
• Για να απενεργοποιήσετε το θερμόμετρο κρατήστε πατημένο το πλήκτρο λειτουργιών για περίπου
3 δευτερόλεπτα.
Page 87

84
5. Αρχική σελίδα της εφαρμογής
Στην αρχική σελίδα της εφαρμογής μπορείτε να επιλέξετε
διάφορες λειτουργίες:
• BBQ: Κύριο μενού του θερμομέτρου (βλέπε σημείο 6)
• Camera: Βγάλτε φωτογραφίες του ψητού και μοιραστείτε τις
δημιουργίες σας (βλέπε σημείο 7)
• Settings: Μενού για ρυθμίσεις (βλέπε σημείο 8)
• Support: Σύντομες οδηγίες χειρισμού
6. Κύριο μενού:
• Στο κύριο μενού μπορείτε να πραγματοποιήσετε
διαφορετικές ρυθμίσεις. Σε αυτό το μενού μπορείτε
να επιλέξετε τρεις διαφορετικές ρυθμίσεις Profile,
Temperature, Timer.
• Για να αλλάξετε λειτουργία πατήστε το
και επιλέξτε την
αντίστοιχη λειτουργία.
4. Χρήση του θερμόμετρου
• Συνδέστε τους αισθητήρες μέτρησης με το θερμόμετρο
• Εισάγετε την κορυφή του αισθητήρα ανοξείδωτου χάλυβα στο πιο σκληρό σημείο του ψητού
προσέχοντας να μη βγει από την άλλη πλευρά του.
Πατήστε Start, για να ξεκινήσετε με ένα από τα επιλεγόμενα προγράμματα (Προφίλ / Θερμοκρασία
/ Χρονοδιακόπτης). Αφού επιτευχθεί η τελική θερμοκρασία / ολοκληρωθεί ο χρόνος ακούγεται ένα
ηχητικό σήμα.
Υπόδειξη
• Κανένα μέρος του αισθητήρα δεν πρέπει να έρθει σε επαφή με ελεύθερη φλόγα.
Page 88

85
6.2 Temperature
• Ρυθμίστε την επιθυμητή
θερμοκρασία ψησίματος
(-30 – 250°C).
• Κάντε κλικ στο και
ρυθμίσετε την επιθυμητή
θερμοκρασία.
• Πατήστε Start για να ξεκινήσετε
τον έλεγχο θερμοκρασίας.
Όταν επιτευχθεί η ρυθμισμένη
θερμοκρασία ψησίματος ακούγεται
ένας ήχος συναγερμού στο
smartphone/tablet.
6.1 Profile
• Πατήστε το Beef (Probe 1) ή Beef (Probe 2) για να ανοίξετε τις ρυθμίσεις.
• Επιλέξτε διαφορετικά είδη κρέατος και βαθμίδες ψησίματος. Μέσω του διακόπτη + / - μπορείτε να
αλλάξετε τις προρυθμισμένες θερμοκρασίες των βαθμίδων ψησίματος.
• Πατήστε το κουμπί New για να προσθέσετε νέες βαθμίδες ψησίματος.
• Πατήστε το κουμπί Delete για να διαγράψετε τις θερμοκρασίες που ορίσατε.
• Πατήστε Start για να ξεκινήσετε τον έλεγχο θερμοκρασίας. Όταν επιτευχθεί η ρυθμισμένη
θερμοκρασία ψησίματος ακούγεται ένας ήχος συναγερμού στο smartphone/tablet.
Page 89
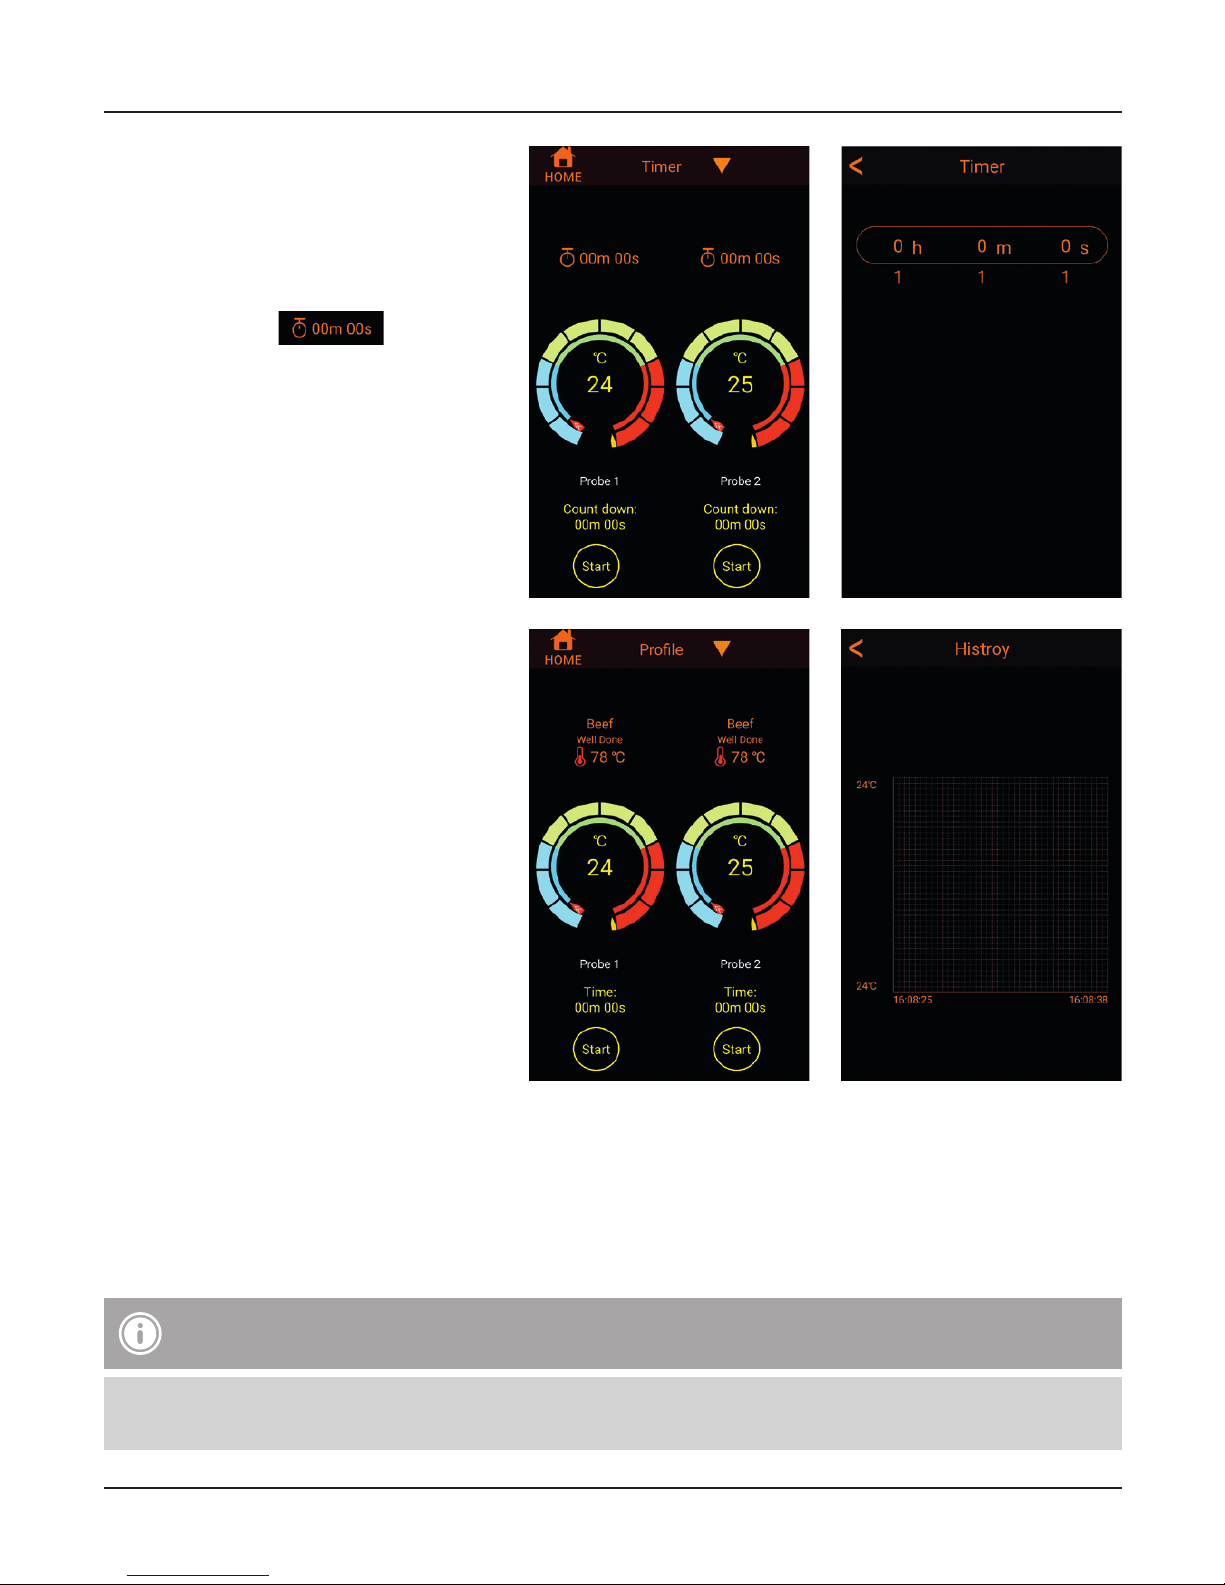
86
6.3 Timer
• Ρυθμίστε με τη λειτουργία
χρονοδιακόπτη το χρόνο
αντίστροφης μέτρησης που
επιθυμείτε (έως 23h 59m 59s).
• Κάντε κλικ στο και
ρυθμίσετε τον χρόνο αντίστροφης
μέτρησης που επιθυμείτε
• Πατήστε Start, για να εκκινήσετε
την αντίστροφη μέτρηση. Όταν
ολοκληρωθεί ο ρυθμισμένος
χρόνος ακούγεται ένας ήχος
συναγερμού στο smartphone/tablet.
6.4 History
• Κατά τη διαδικασία ψησίματος
μπορείτε να δείτε οποιαδήποτε
στιγμή το ιστορικό θερμοκρασίας
και χρόνου. Πατήστε εδώ στη
θερμοκρασία (αισθητήρας 1 ή
αισθητήρας 2). Στη συνέχεια,
ανοίγει
7. Camera
Χάρη σε αυτήν τη λειτουργία μπορείτε να φωτογραφίζετε τα πιάτα σας και να τα μοιράζεστε κατευθείαν
με τους φίλους σας (Facebook, Twitter ή email).
• Πατήστε στην επιλογή «Αρχική σελίδα» στην camera
• Φωτογραφίστε τα πιάτα σας
• Πατήστε το πλήκτρο «Κοινή χρήση» και επιλέξτε μεταξύ Facebook, Twitter ή email
Υπόδειξη
• Για να μοιράζεστε τις φωτογραφίες σας μέσω Facebook, Twitter ή email πρέπει το smartphone ή
το tablet σας να είναι συνδεδεμένο με τον αντίστοιχο λογαριασμό χρήστη
Page 90

87
9. Απώλεια εγγύησης
Η εταιρεία Xavax GmbH & Co. KG δεν
αναλαμβάνει καμία ευθύνη ή εγγύηση για
ζημιές, οι οποίες προκύπτουν από λανθασμένη
εγκατάσταση και συναρμολόγηση ή λανθασμένη
χρήση του προϊόντος ή μη τήρηση των οδηγιών
λειτουργίας και/ή των υποδείξεων ασφαλείας.
10. Σέρβις και υποστήριξη
Για ερωτήσεις σχετικά με το προϊόν απευθυνθείτε
στην υπηρεσία εξυπηρέτησης πελατών της Hama.
Γραμμή υποστήριξης: +49 9091 502-115
(Γερμανικά/Αγγλικά) Περισσότερες πληροφορίες
υποστήριξης θα βρείτε στη διεύθυνση:
www.xavax.eu
11. Τεχνικά χαρακτηριστικά
Ηλεκτρική τροφοδοσία:
1x μικρή μπαταρία CR2032 3V
Εύρος μέτρησης: -30 – 250°C / -22 – 483°F
12. Υποδείξεις απόρριψης
Υπόδειξη σχετικά με την προστασία
περιβάλλοντος:
Από τη στιγμή που η Ευρωπαϊκή Οδηγία
2012/19/EU και 2006/66/EE
ενσωματώνεται στο εθνικό δίκαιο
ισχύουν τα εξής:
Οι ηλεκτρικές και οι ηλεκτρονικές συσκευές
καθώς και οι μπαταρίες δεν επιτρέπεται να
πετιούνται στα οικιακά απορρίμματα. Οι
καταναλωτές υποχρεούνται από τον νόμο να
επιστρέφουν τις ηλεκτρικές και ηλεκτρονικές
συσκευές καθώς και τις μπαταρίες στο τέλος της
ζωής τους στα δημόσια σημεία περισυλλογής
που έχουν δημιουργηθεί γι’ αυτό το σκοπό ή στα
σημεία πώλησης. Οι λεπτομέρειες ρυθμίζονται
στη σχετική νομοθεσία. Το σύμβολο πάνω στο
προϊόν, στο εγχειρίδιο χρήσης ή στη συσκευασία
παραπέμπει σε αυτές τις διατάξεις. Με την
ανακύκλωση, επαναχρησιμοποίηση των υλικών
ή με άλλες μορφές χρησιμοποίησης παλιών
συσκευών / Μπαταριών συνεισφέρετε σημαντικά
στην προστασία του περιβάλλοντος. Στη Γερμανία
ισχύουν αντίστοιχα οι παραπάνω κανόνες
απόρριψης σύμφωνα με τον κανονισμό για
μπαταρίες και συσσωρευτές.
13. Declaration of Conformity
Η εταιρεία Hama GmbH & Co. KG
δηλώνει πως η συσκευή αυτή πληροί τις
βασικές προϋποθέσεις και τις άλλες
σχετικές προδιαγραφές της Οδηγίας 2014/53/ΕΕ.
Στη διεύθυνση www.xavax.eu θα βρείτε τη
δήλωση συμμόρφωσης που αντιστοιχεί στην
οδηγία.
8. Settings
Στις ρυθμίσεις μπορείτε να πραγματοποιήσετε τις ακόλουθες αλλαγές.
• Μπορείτε να επιλέξετε σε ποια μονάδα θα προβάλλεται η
θερμοκρασία στην εφαρμογή (°C ή °F)
• Μπορείτε να ρυθμίσετε το προφίλ / τη θερμοκρασία ή το
χρονοδιακόπτη των αισθητήρων ανοξείδωτου χάλυβα 1 και 2
• Μπορείτε να επιλέξετε τον ήχο ειδοποίησης, μεταξύ διαφορετικών
ήχων, για τους αισθητήρες ανοξείδωτου χάλυβα 1 και 2
Page 91

88
Page 92

89
M Conținutul
1. Elemente de comandă și afișaje ..........................................................................90
2. Instrucțiuni de siguranță .....................................................................................90
3. Punere în funcțiune .............................................................................................91
4. Utilizarea termometrului ......................................................................................92
5. Pagina de pornire a aplicației ..............................................................................92
6. Meniu principal ..................................................................................................92
6.1 Profile ..............................................................................................................93
6.2 Temperature ....................................................................................................93
6.3 Timer .............................................................................................................94
6.4 History .............................................................................................................94
7. Camera ..............................................................................................................94
8. Settings..............................................................................................................95
9. Excludere de garanție .........................................................................................95
10. Service și suport ...............................................................................................95
11. Date tehnice ....................................................................................................95
12. Informații pentru reciclare ................................................................................95
13. Declarație de conformitate ...............................................................................95
Page 93

90
M Manual de utilizare
1. Elemente de comandă și afișaje
1. Display LCD
2. Buton de funcții
3. Sondă din oțel inoxidabil 1
4. Sondă din oțel inoxidabil 2
5. Capac baterie
2. Instrucțiuni de siguranță
• Produsul este conceput numai pentru utilizare privată și nu profesională.
• Protejaţi produsul de impurităţi, umiditate, supraîncălzire şi utilizaţi-l numai în mediu uscat.
• Nu exploataţi produsul în afara limitelor de putere indicate în datele tehnice.
• Acest aparat, ca de altfel toată aparatura electronică, nu are ce căuta în mâinile copiilor!
• Nu deschideți produsul și nu-l utilizați în continuare în caz de deterioare.
Avertizare
• Nu introduceți carcasa termometrului în cuptor.
• Termometrul nu este etanș la apă, protejați de aceea de apă!
• Sondele din oțel inoxidabil devin foarte fierbinți! Scoateți-le numai cu cârpe atermice.
Avertizare - baterii
• Utilizaţi numai acumulatoare (sau baterii) corespunzătoare tipulului indicat.
• Atenţie în mod obligatoriu la polaritatea corectă (marcajele + şi -) și introduceți-le corespunzător
cu acestea. În cazul nerespectării vă expuneți pericolului scurgerilor sau exploziei bateriilor.
• P ă straţi bateriile astfel încât să nu fie la îndemâna copiilor.
• Nu deschideți niciodată, nu deteriorați, înghițiți sau lăsați să ajungă în mediul înconjurător
acumulatoare și baterii. Pot conține metale grele și toxice nocive mediului înconjurător.
• Nu modificați, deformați, încălziți sau dezmembra bateriile/acumulatoarele.
• Îndepărtați și salubrizați imediat bateriile folosite din produs.
• Nu scurtcircuitați bateriile/acumulatoarele și nu le apropiați de obiecte metalice neizolate.
Page 94

91
3. Punere în funcțiune
• Trebuie avut la dispoziție un aparat final adecvat Bluetooth 4.0 (Smartphone sau tabletă) cu sisteme
de operare (de la Android 4.3 sau mai nou / de la iOS 7 sau mai nou).
• Pentru Android:
• Porniți Google Play Store pe Smartphone / tabletă
• Instalați aplicația Grill-T pentru sistemul de operare.
• Pentru aparate Apple (iOS):
• Porniți App Store pe Smartphone / tabletă.
• Instalați aplicația Grill-T pentru sistemul de operare.
• Deschideți capacul bateriei și scoateți întrerupătorul de contact. Termometrul este activat și afișează
temperatura actuală.
• Închideți capacul bateriei.
• Porniți aplicația. Apăsați pe Search, de îndată ce termometrul a fost găsit acesta se conectează
automat cu Smartphone/tableta.
Instrucțiune
• Pentru conectarea termometrului apăsați scurt butonul de funcții.
• Pentru selectarea unității (°C sau °F), în stare conectată, apăsați scurt butonul de funcții.
• Pentru deconectarea termometrului apăsați butonul de funcții cca 3 secunde.
Page 95

92
5. Pagina de pornire a aplicației
Pe pagina de pornire a aplicației vă stau la dispoziție mai multe
funcțiuni:
• BBQ: Meniul principal al termometrului (vezi Punct 6).
• Camera: Faceți poze preparatelor de pe grătar și împărțiți cu
alții creațiile personale (vezi Punct 7)
• Settings: Meniu pentru setări (vezi Punct 8)
• Support: Scurte instrucțiuni de folosire
6. Meniu principal
• În meniul principal puteţi efectua diferite setări. În
acest meniu puteți selecta trei regimuri diferite: Profile,
Temperature, Timer.
• Pentru a schimba regimul apăsați pe
și selectați regimul
corespunzător.
4. Utilizarea termometrului
• Conectați sonda/ele de măsurare cu termometrul.
• Introduceți vârful sondei/lor în partea cea mai masivă a preparatului având grijă să nu iasă în
cealaltă parte.
Pentru a începe cu unul din programele selectabile (Profil / Temperatură / Timer) apăsați Start. După
atingerea temperaturii dorite / expirarea timpului se aude un semnal de alarmă.
Instrucțiune
• Nicio parte a sondei nu are voie să intre în contact cu flacăra.
Page 96

93
6.2 Temperature
• Setați temperatura de rumenire
dorită (-30 – 250°C).
• Apăsați pe și setați
temperatura dorită.
• Pentru pornirea supravegherii
temperaturii apăsați Start. Când
temperatura setată pentru un
anumit grad de rumenire este
atinsă, la Smartphon/tabletă se
aude un semnal de alarmă.
6.1 Profile
• Pentru deschiderea setărilor apăsați pe Beef (Probe 1) sau Beef (Probe 2).
• Selectați varietățile diferite de carne și gradul de rumenire. Cu regulatorul + / - puteți modifica
temperaturile vorprogramate ale gradului de rumenire.
• Pentru adăugarea de variante noi și graduri de rumenire apăsați butonul New
• Pentru ștergerea variantelor personale produse apăsați butonul Delete.
• Pentru pornirea supravegherii temperaturii apăsați Start. Când temperatura setată pentru un
anumit grad de rumenire este atinsă, la Smartphon/tabletă se aude un semnal de alarmă
Page 97

94
6.3 Timer
• Cu funcția Timer puteți seta un
Countdown la alegere (până la
23h59m59s).
• Apăsați pe și setați
Countdown-ul dorit.
• Pentru a porni Countdown-ul
apăsați Start. De îndată ce timpul
setat este expirat la Smartphon/
tabletă se aude un semnal de
alarmă.
6.4 History
• În timpul procesului de frigere
puteți oricând să repetați evoluția
temperaturii / a timpului. Pentru
aceasta apăsați pe temperatură
(sonda 1 sau sonda 2). În final
se deschide
7. Camera
Cu ajutorul acestei funcții puteți fotografia bucatele și distribui direct prietenilor (Facebook / Twitter /
Email).
• Pe pagina de start apăsați pe camera.
• Fotografiați bucatele.
• Apăsați pe butonul de distribuție și selectați între Facebook / Twitter / Email.
Instrucțiune
• Pentru distribuirea imaginilor prin Facebook / Twitter / Email, Smartphon-ul / tableta trebuie să
fie conectat/ă cu contul respectivului utilizator.
Page 98

95
9. Excludere de garanție
Hama GmbH & Co. KG nu îşi asumă nici
o răspundere sau garanție pentru pagube
cauzate de montarea, instalarea sau
folosirea necorespunzătoare a produsului sau
nerespectarea instrucțiunilor de folosire sau/și a
instrucțiunilor de siguranță.
10. Service și suport
Dacă aveți întrebări adresaţi-vă la Hama
consultanță privind produsul.
Hotline: +49 9091 502-115 (Ger./Ang.)
Alte informații de suport găsiți aici:
www.xavax.eu
11. Date tehnice
Alimentare cu curent:
1 x 3V baterie plată CR2032
Domeniu de măsurare:
-30 – 250°C / -22 – 483°F
12. Informații pentru reciclare
Instrucţiuni pentru protecţia mediului
înconjurător:
Din momentul aplicării directivelor
europene 2012/19/EU şi 2006/66/EU în
dreptul național sunt valabile
următoarele:
Aparatele electrice şi electronice nu pot fi
salubrizate cu gunoiul menajer. Consumatorul
este obligat conform legii să predea aparatele
electrice și electronice la sfârșitul duratei de
utilizare la locurile de colectare publice sau
înapoi de unde au fost cumpărate. Detaliile sunt
reglementate de către legislaţia țării respective.
Simbolul de pe produs, în instrucţiunile
de utilizare sau pe ambalaj indică aceste
reglementări. Prin reciclarea, revalorificarea
materialelor sau alte forme de valorificare a
aparatelor scoase din uz aduceți o contribuție
importantă la protecția mediului nostru
înconjurător.
13. Declarație de conformitate
Hama GmbH & Co. KG, declară prin
prezenta că acest aparat este în
conformitate cu cerințele esențiale și cu
celelalte instrucțiuni relevante ale Directivelor
2014/53/EU. Declarația de conformitate conform
directivei corespunzătoare o găsiți la
www.xavax.eu.
8. Settings
În setări puteți efectua următoarele modificări:
• Puteți selecta în ce unitate se afișează temperatura în aplicație
(°C sau °F).
• Puteți seta profilul / temperatura sau Timer-ul sondelor din oțel
inoxidabil 1 sau 2.
• Puteți seta dintre sunete diferite semnalul de alarmă al sondelor
din oțel inoxidabil 1 și 2.
Page 99

96
Page 100

97
E Contenido
1. Elementos de manejo e indicadores ....................................................................98
2. Contenido del paquete ........................................................................................98
3. Puesta en funcionamiento ..................................................................................99
4. Utilización del termómetro................................................................................100
5. Página de inicio de la app ................................................................................100
6. Menú principal .................................................................................................100
6.1 Profile ............................................................................................................101
6.2 Temperature ..................................................................................................101
6.3 Timer ...........................................................................................................102
6.4 History ...........................................................................................................102
7. Camera ............................................................................................................102
8. Settings............................................................................................................103
9. Exclusión de responsabilidad.............................................................................103
10. Servicio y soporte ...........................................................................................103
11. Datos técnicos ................................................................................................103
12. Instrucciones para desecho y reciclaje .............................................................103
13. Declaración de conformidad ...........................................................................103
 Loading...