


Chapter 1 - Introduction
Chapter Overview
PlateMaker 3 Printer ....................................................................... 1-3
About This Manual .........................................................................1-4
Manual Conventions.................................................................1-5
Printer Features ...............................................................................1-6
Printer Configuration ...................................................................... 1-7
Warranty and Product Registration .................................................1-9
Other Helpful Documentation......................................................... 1-9
_________________________________________ Introduction 1-1

Notes
1-2 Introductionbb ________________________________________

PlateMaker 3 Printer
Fig. 1.1 PlateMaker 3 Printer
The PlateMaker 3 (Fig. 1.1) provides a complete prepress solution
for graphics professionals. It offers high resolution, true Adobe
PostScript 3 output on up to 13 inches x 35.5 inches media. A
proprietary process, using XANTÉ’s plate imaging technology and
patented X-ACT, allows you to print quality plates that are
immediately ready for the press with no intermediate steps required.
Plus, this printer prints on film, envelopes, and paper.
_________________________________________ Introduction 1-3

About This Manual
This user’s guide covers PlateMaker 3 installation, setup, and
operation.
Chapter 1 —Introduction summarizes this manual, PlateMaker 3
features, optional configurations, and the printer warranty.
Chapter 2 — Installation covers printer setup and connection to
Macintosh, PC, and Ethernet interfaces.
Chapter 3 — Macintosh Setup describes the contents and use of
the XANTÉ Utilities CD-ROM for the Macintosh. This includes
installation for the Adobe PostScript printer drivers, your printer’s
PPD, XANTÉ Command Center, and the Adobe Downloader as well
as procedures for using printer features.
Chapter 4 — PC Setup describes the contents and use of the
XANTÉ Utilities CD-ROM for the PC. This includes installation
instructions for the Adobe PostScript printer drivers, your printer’s
PPD, XANTÉ Command Center, and procedures for using printer
features.
Chapter 5 — Ethernet Setup describes EtherTalk, Novell Print
Server, Line Printer, and NetBEUI protocol configuration on the
printer’s optional Ethernet interface.
Chapter 6 — Configuration describes using the front panel keys
and menus and the Print dialog box to configure many printer
features.
Chapter 7 — Media Options describes media sizes and types for
your printer and provides suggestions for creating high quality output
with the various media.
Chapter 8 — Printing with Various Media Types describes the
steps for printing on film, plates, and envelopes.
Chapter 9 — Maintenance and Technical Specifications describes
printer care, technical specifications, XANTÉ service options, and
the printer warranty.
1-4 Introductionbb ________________________________________

Chapter 10 — Printer Options describes optional upgrades
available for your XANTÉ printer.
Chapter 11 — Troubleshooting provides troubleshooting tips and
XANTÉ Technical Support options.
Appendix — Application Notes and Page Design describes using
the printer with common applications and offers page design tips.
Glossary — defines terms related to your printer, XANTÉ utilities,
and the printing industry.
Index — alphabetically lists major manual topics with their
corresponding page numbers and some cross-references.
The PlateMaker 3 Menu quick reference sheet illustrates the
printer’s front panel menu structure and lists XANTÉ support.
Manual Conventions
The following conventions are used in this manual:
Courier indicates information you must type or that
displays on screen.
↵ indicates that you need to press the Return key
on a Macintosh or the Enter key on a PC.
Note: indicates additional or emphasized information.
Caution: indicates instructions that must be followed to
avoid damage to files or equipment.
Warning! indicates instructions that must be followed
exactly to avoid personal injury.
: indicates the path for a file or folder and links
procedure steps.
_________________________________________ Introduction 1-5

Printer Features
The PlateMaker 3’s true Adobe PostScript 3 allows you to work
from virtually any software or hardware environment. It features
smooth shading, expanded font sets, international font support, and
advanced page processing for fast, high quality imaging. PostScript
typefaces work with the leading operating system including
Windows (95, 98, and NT) and Macintosh OS.
The PlateMaker 3 features a standard input capacity of 650 sheets:
500 sheets in the standard paper cassette and 150 sheets in the
multipurpose feeder. You can add up to two optional paper feeders to
expand the capacity to a maximum of 1650 sheets. Advanced paper
handling capabilities include tray chaining, which allows you to
switch to a second paper source when the first source is empty.
The printer allows you to use media from 3.94" x 5.83" (100 mm x
148 mm) to 13.00" x 35.50" (330 mm x 901 mm). Paper weights
from 16 - 28 lb bond (60 -105 g/m
cassettes and the envelope cassette; weights from 16 to 36 lb (60 135 g/m2) bond can be used in the multipurpose feeder. You can feed
envelopes, Myriad film, and Myriad 2 plates from the multipurpose
feeder. The optional envelope cassette allows you to feed multiple
envelopes and postcards.
2
) can be used in both the paper
With Positive Film Technology and XANTÉ’s patented NEIT
(Negative Enhanced Imaging Technology), you can create high
quality positive and negative output on Myriad film. After
processing Myriad film through XANTÉ’s FilmStar 2, you can use it
to burn metal plates or silk screen emulsions.
The PlateMaker 3 expands these media options by allowing you to
print directly to Myriad 2 plates, which are manufactured by Agfa
for XANTÉ. XANTÉ’s computer-to-plate technology reduces costs,
time, and manpower by eliminating expensive chemicals and many
traditional print shop steps such as paste-up, negative production,
halftone stripping, and plate burning.
1-6 Introductionbb ________________________________________

Simultaneously active serial, parallel, LocalTalk, and optional
Ethernet interfaces allow Macintosh and PC computers to send files
concurrently to the printer. You do not have to send software
commands or manually set hardware switches to use a different
interface.
Standard features include mirror and negative printing. With an
optional hard disk, you can spool multiple jobs and use XANTÉ’s
Font Accelerator to increase printing performance of printer disk
based fonts.
The Graphic Software Package offers the following advanced features:
• XANTÉ’s patented Accurate Calibration Technology (X-ACT)
allows you to calibrate printer line lengths and to correct
inaccuracies in printing width, height, skew, and angle.
• Halftone Calibration Technology and densitometer support allow
you to adjust image grayscale values and to calibrate printer
output for specific ink, media, and environmental conditions.
• Enhanced Screening increases the number of gray levels
produced for a line screen setting.
The Gripper Offset feature allows you to adjust image placement on
the media to ensure correct alignment for a press.
The XANTÉ Utilities include easy-to-use, menu-driven programs
and files to make working with your new printer more efficient.
Printer Configuration
Processor NEC VR 4310 166 MHz
RAM Standard - 64 MB
Upgradeable to 256 MB
Adobe PostScript 3: 136 PostScript Fonts
Resolution: Standard - 600 x 600 dpi, 1200 x 1200 dpi
Optional - 2400 x 2400 dpi
_________________________________________ Introduction 1-7

Engine Speed: 10 ppm (letter/A4 output)
Interfaces: Standard - LocalTalk, Serial, Parallel
Optional - Ethernet
Paper Sizes: From 3.94" x 5.83" (100 mm x 148 mm)
to 13.00" x 35.5" (330 mm x 914 mm)
Media Handling: Standard - Built-in Paper Feeder
Standard - Multipurpose Feeder
Optional - Up to Two Paper Feeders
Standard Features: Mirror Print
Negative Print
Adjustable Fusing Temperature
Graphic Software Package
Halftone Calibration Technology
Enhanced Screening Technology
Accurate Calibration Technology
Densitometer Support
Gripper Offset Feature
Positive Film Technology
Spooling *
Font Accelerator *
XANTÉ Utilities
NetBEUI PC support
(PC and Macintosh)
Options: NEIT
Internal IDE Hard Disk
Ethernet with Unshielded Twisted Pair
(10/100BaseT)
* An optional internal hard drive is required
1-8 Introductionbb ________________________________________

Warranty and Product Registration
Chapter 9 contains your PlateMaker 3 warranty. Please return the
warranty sheet included with your printer package to register your
printer and to receive a free subscription to XANTÉ’s Accel-a-
Writing newsletter. Our publication features articles on printing, new
options, and tips for using your printer effectively.
Other Helpful Documentation
Please visit our Web site at www.xante.com for the latest
information about XANTÉ products and services. You may find the
following publications helpful when working with Adobe PostScript
printing.
PostScript Language Reference Manual, Second Edition. This manual,
published by Addison Wesley, is designed for advanced users, such as
programmers, who work with Adobe PostScript operators.
PostScript Language Tutorial and Cookbook. This manual,
published by Addison Wesley, is designed for those who want to
learn about working directly in the Adobe PostScript language.
Most bookstores and many computer businesses either keep these
books in stock or can order them for you.
◊ ◊ ◊
_________________________________________ Introduction 1-9

1-10 Introductionbb ________________________________________

Chapter 2 - Installation
Chapter Overview
Introduction.....................................................................................2-3
Printer Location ..............................................................................2-3
Printer Package ...............................................................................2-4
PlateMaker 3 Printer Overview ......................................................2-5
Toner Cartridge ...............................................................................2-7
Handling the Toner Cartridge ...................................................2-7
Removing and Installing the Toner Cartridge ..........................2-8
Paper Cassette ...............................................................................2-13
Multipurpose Feeder .....................................................................2-17
Multipurpose Feeder Tip ........................................................2-20
Printer Ports ..................................................................................2-21
Selecting the Printer Interface ................................................2-21
Connecting to the LocalTalk Port...........................................2-21
Connecting to the Parallel Port...............................................2-23
Connecting to the Serial Port..................................................2-24
Connecting to the Ethernet Ports............................................2-25
Connecting the Power Cord ..........................................................2-26
Turning the Printer On ..................................................................2-27
Turning the Printer Off.................................................................. 2-28
__________________________________________ Installation 2-1

Notes
2-2 Installationbb_________________________________________
Introduction
This chapter describes selecting a printer location; installing toner and
paper; connecting the printer to Macintosh, PC, and network hardware;
and connecting the power supply.
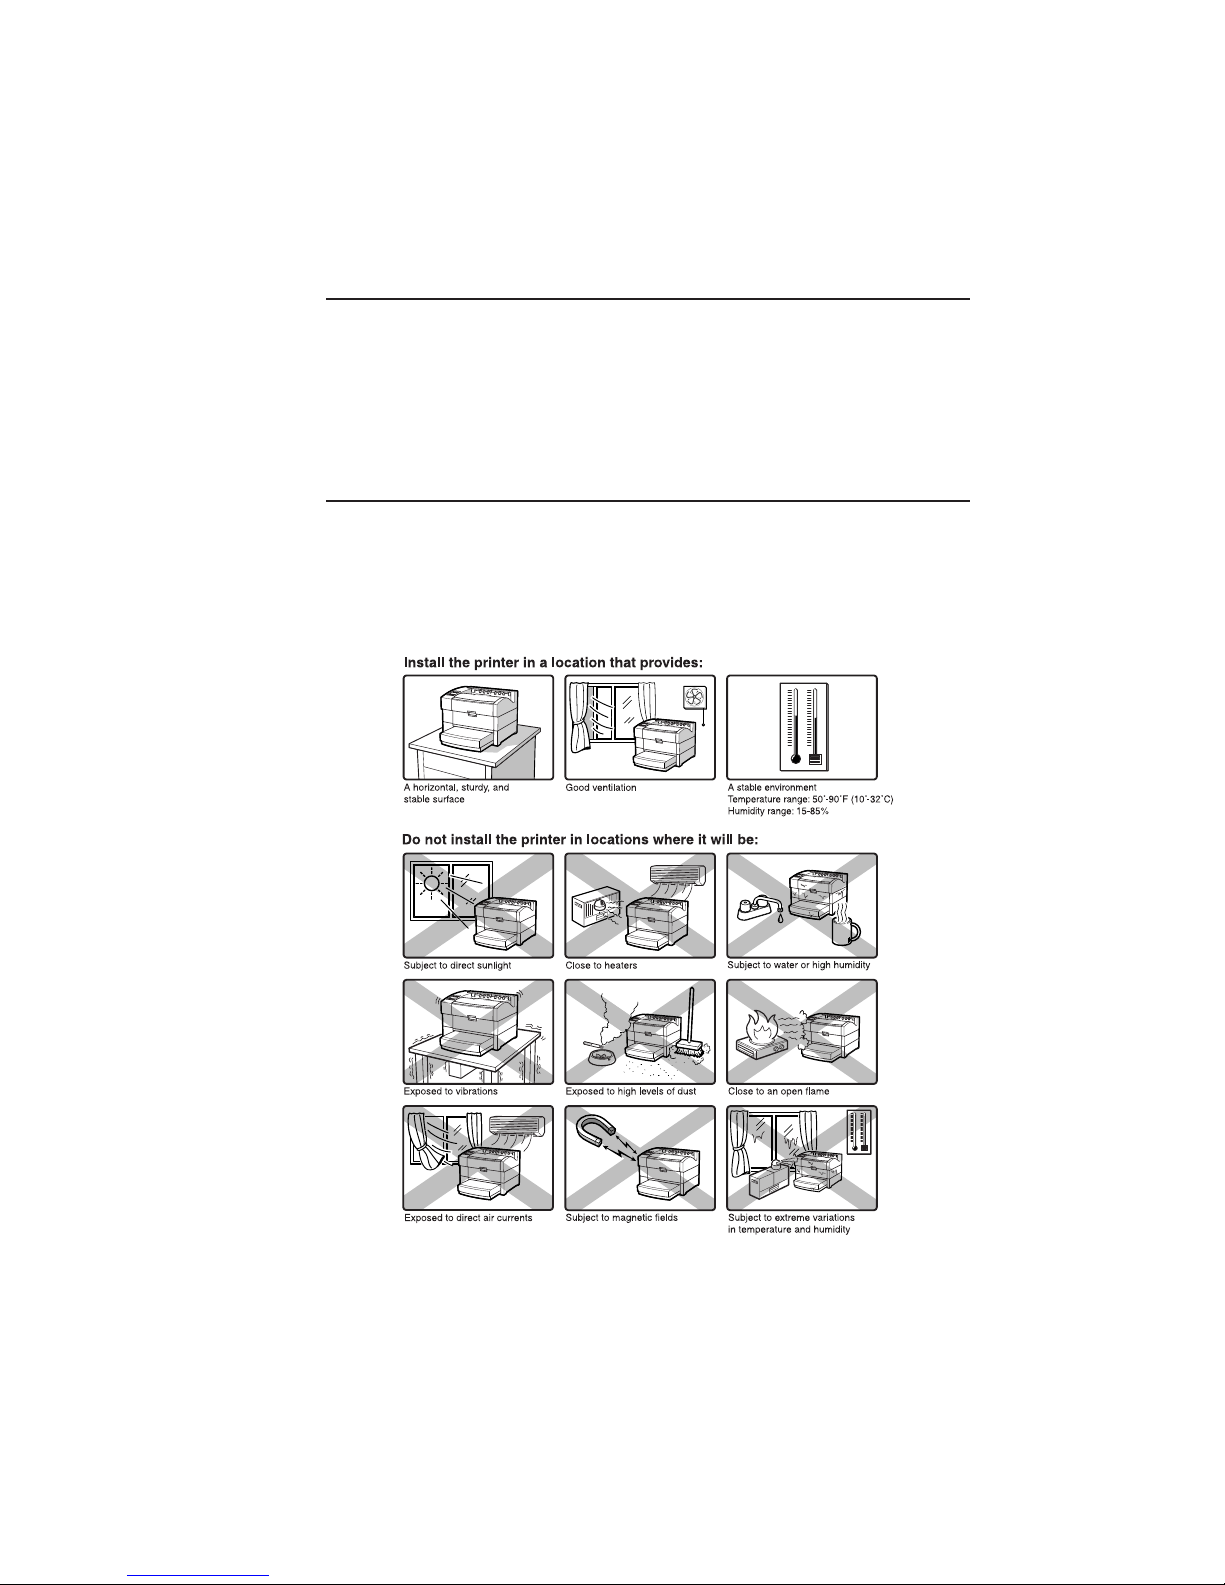
Printer Location
Set up your printer in a location that can support its weight and
provide sufficient operation and maintenance clearance. To prevent
overheating, allow at least 8.0" (200 mm) clearance for the printer’s
side vent.
__________________________________________ Installation 2-3
Fig. 2.1 Location Guidelines

Printer Package
Unpack the printer and save the packing materials.
1. Remove the items packed on top of the printer.
Warning! The printer weighs approximately 58.5 lbs (26.5 kg)
without toner, cassettes, and media installed. Always
have two people lift the printer, using the recessed grip
areas on the right and left sides.
2. Remove the shipping stabilizer on top of the printer; then, lift
the printer out of the box (fig. 2.2).
3. Remove the plastic wrap, tape, and shipping stabilizers from
all of the items.
Your printer package contains the following items:
• Your XANTÉ printer
• 500-sheet cassette
• Power cord
• PlateMaker 3 User’s Guide (this manual)
2-4 Installationbb_________________________________________
Fig. 2.2 Lifting the Printer
• XANTÉ Utilities CD-ROM
• Toner cartridge
The following optional items are packaged separately.
• Additional paper cassettes
• Additional paper feeders
RAM, internal hard disk, resolution, Ethernet, 10/100BaseT, and
NEIT upgrades ordered with your printer are installed at the factory
before shipping.
If you do not receive your full shipment or if anything is damaged,
call XANTÉ Customer Support at 800-926-8393 (US and Canada) or
your XANTÉ vendor.
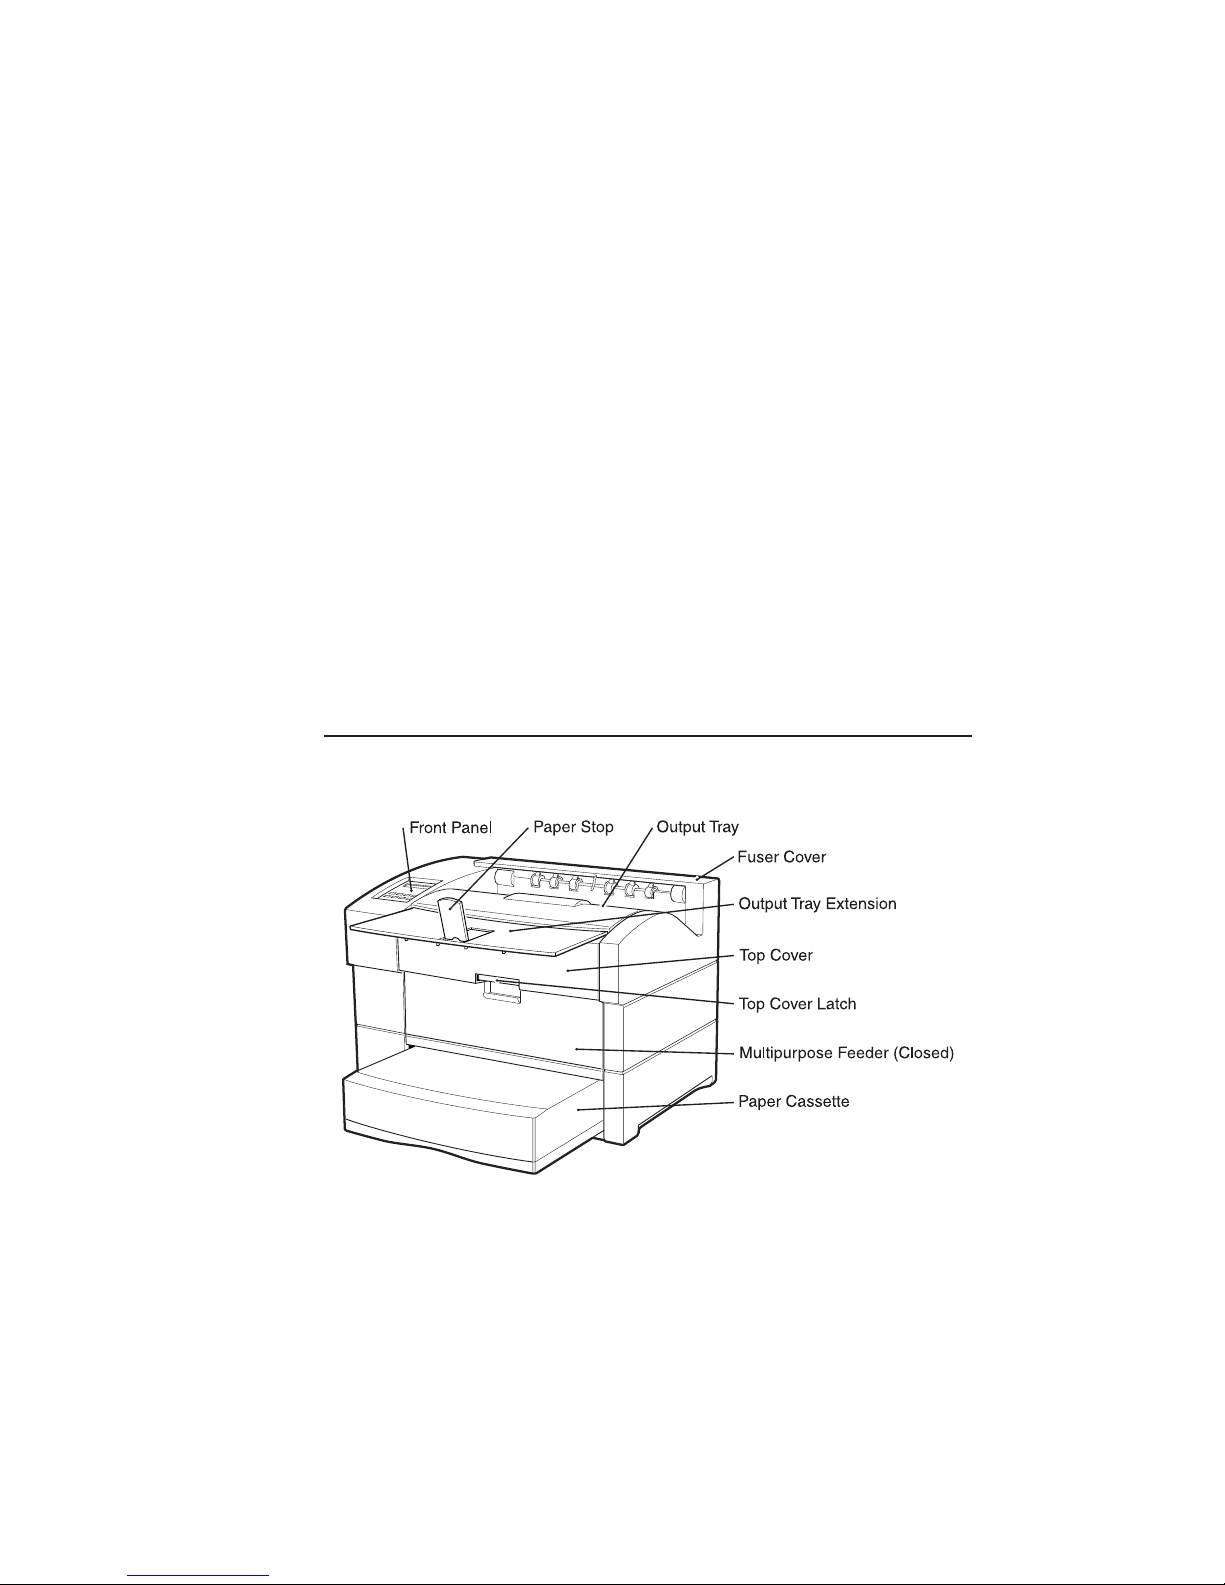
PlateMaker 3 Printer Overview
Use Figures 2.3, 2.4, and 2.5 to become familiar with your new printer.
__________________________________________ Installation 2-5
Fig. 2.3 Front View of the Printer
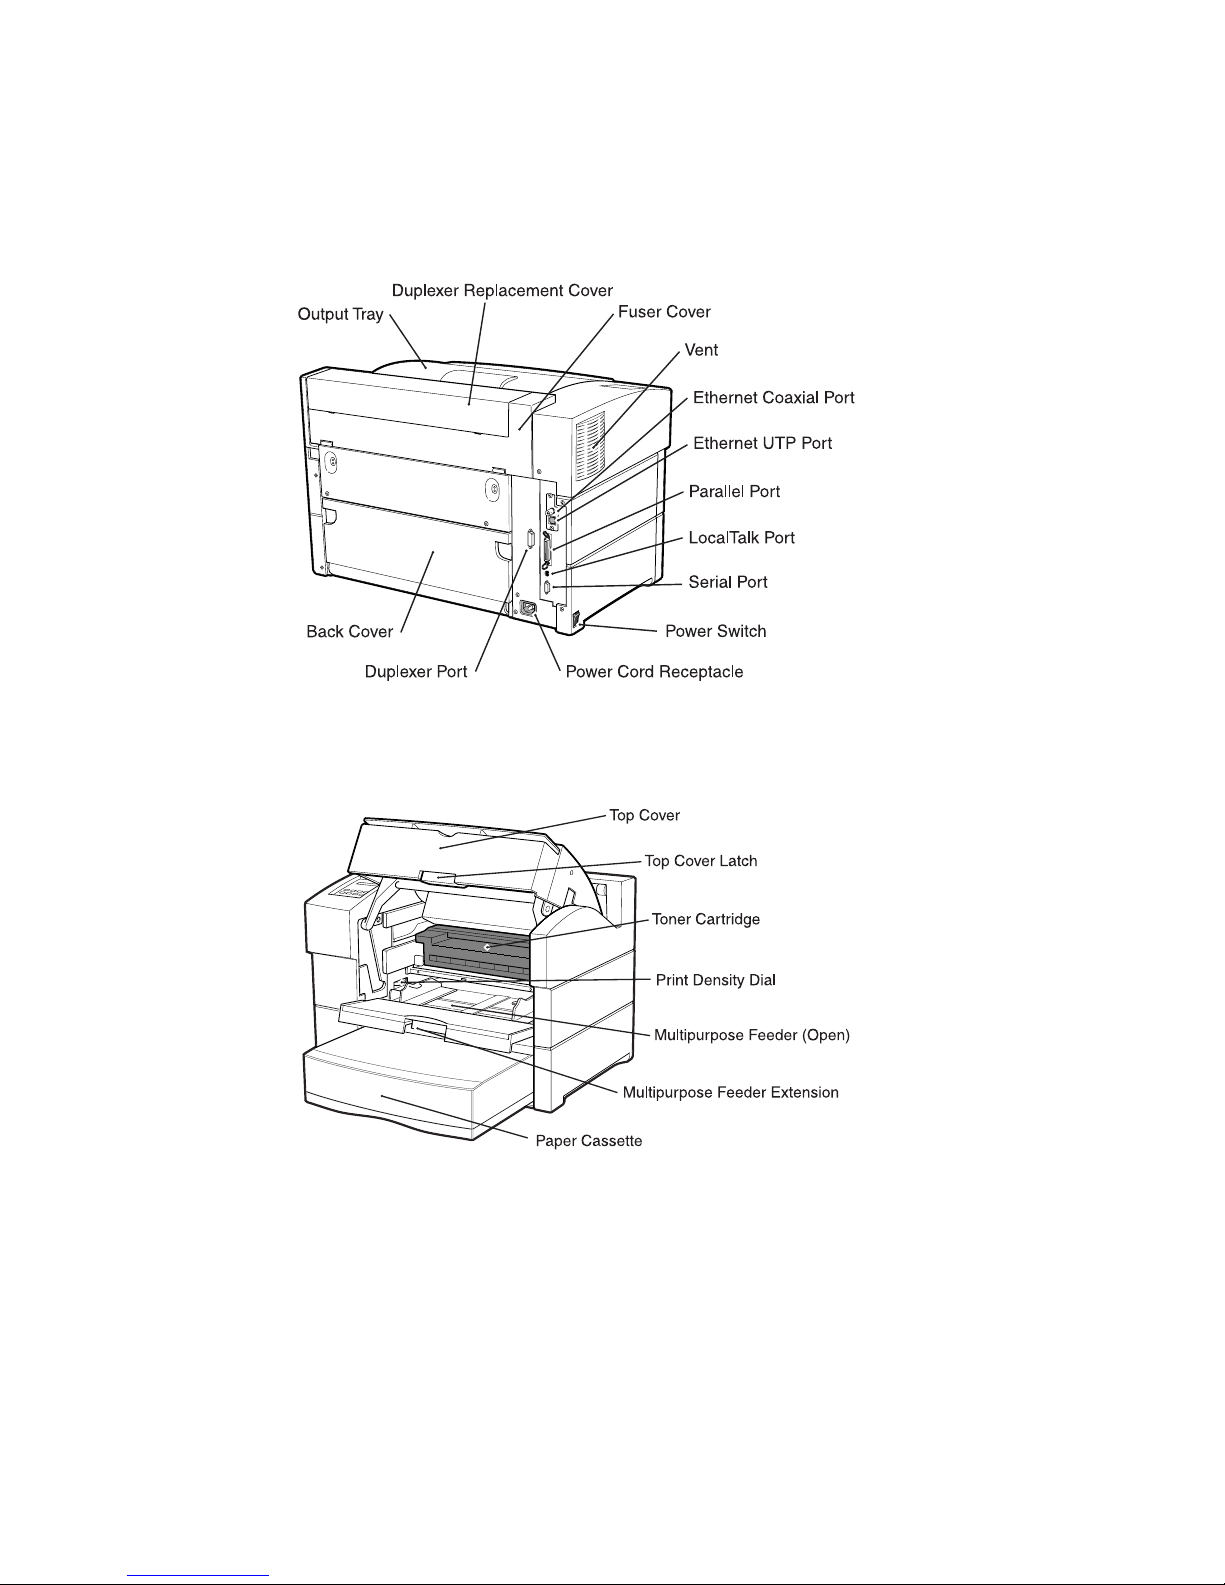
Fig. 2.4 Rear View of the Printer
Fig. 2.5 Inside Front View of the Printer
2-6 Installationbb_________________________________________

Toner Cartridge
The printer’s toner cartridge combines the toner and drum. This
cartridge can print approximately 14,000 sheets of letter/A4 size paper
at 5% coverage.
Quality and reliability of refilled toner cartridges vary; XANTÉ
recommends not using them. Printer damage caused by these products is
not covered by your printer warranty.
Handling the Toner Cartridge
Use these guidelines to ensure maximum life and print quality from
your toner cartridge and to prevent cartridge or printer damage:
• Use toner cartridges before their expiration date. Cartridge shelf
life is approximately 2 years unopened or 6 months opened.
• Never move the printer with the cartridge installed. Toner spills
can damage the printer.
• Do not expose the cartridge to bright lights or direct sunlight.
Keep the cartridge in its protective bag until installation. If you
remove the cartridge temporarily, place it in the original bag or
wrap it well to protect it from light.
• Do not open the drum shutter or touch the drum’s surface. The
shutter protects the photosensitive drum from light.
• Keep cartridge away from computer hard disks and monitors. It
contains a magnet that can cause data loss or equipment damage.
• Store unopened cartridges right side up on a level surface.
• Always set the cartridge flat with the handles on the top.
• Dispose of the cartridge following safety laws and regulations.
Warning! Toner is highly combustible. Never dispose of it by
incineration.
__________________________________________ Installation 2-7
Removing and Installing the Toner Cartridge
1. Remove all media from the output tray.
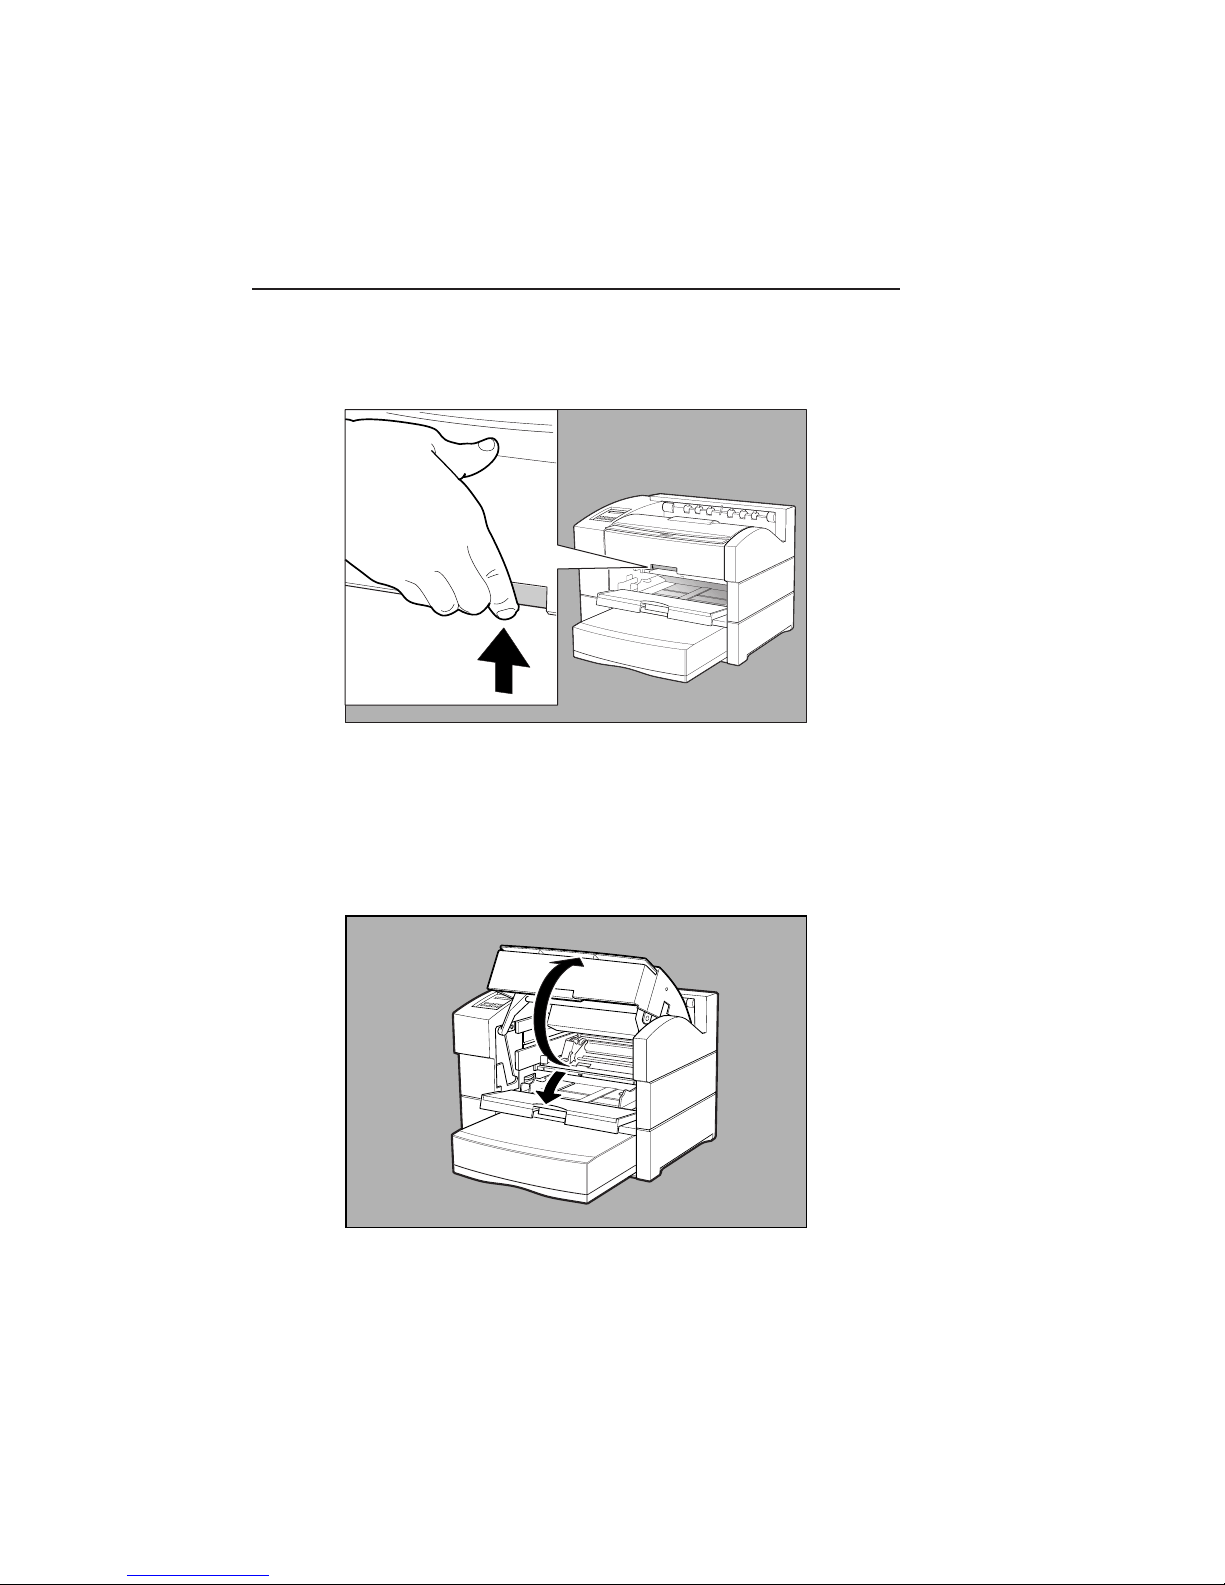
2. Squeeze the latch on the top cover to release the lock (fig. 2.6).
Fig. 2.6 Release the Top Cover Latch
3. Lift the top cover. The multipurpose feeder opens
automatically as you open the top cover (fig. 2.7).
Caution: Do not touch any parts inside the printer.
Fig. 2.7 Open the Top Cover and the Multipurpose Feeder
2-8 Installationbb_________________________________________
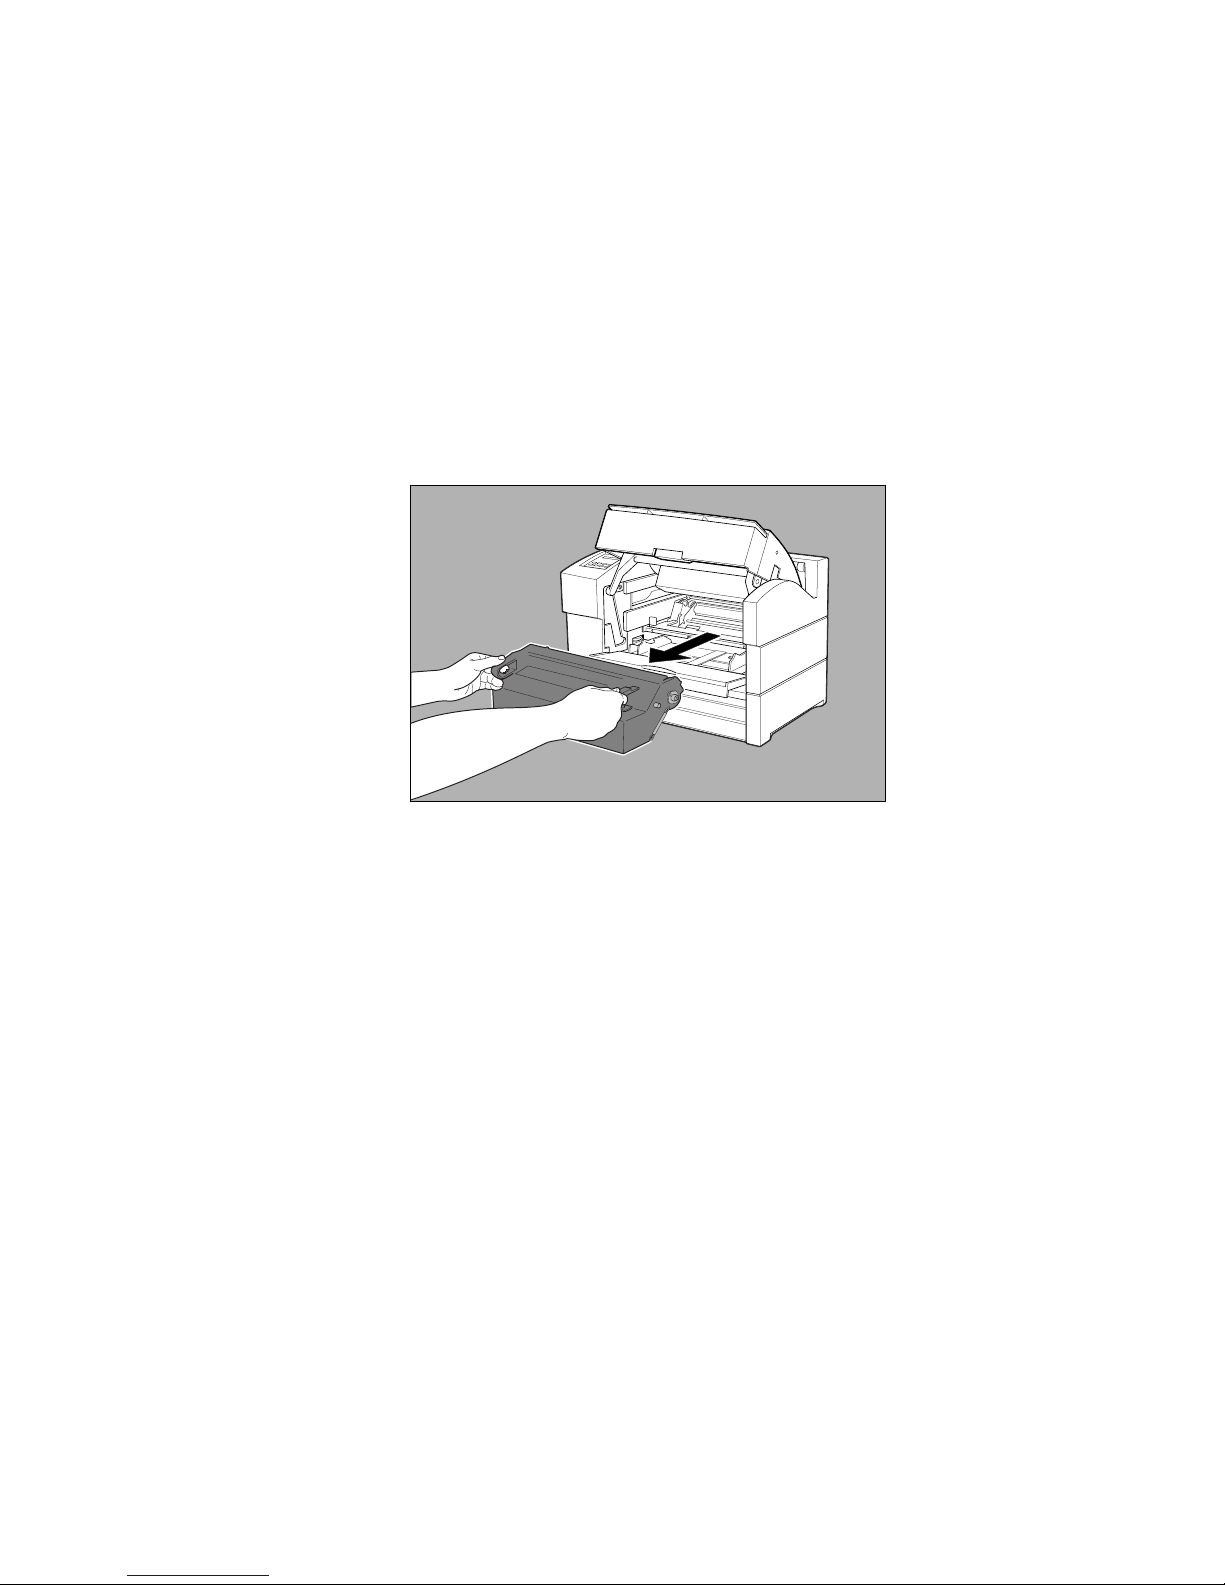
4. Remove the toner cartridge if it is in the printer by grasping its
handles and pulling it slowly out of the printer (fig. 2.8).
Caution: Once you begin pulling the cartridge out of the
printer, remove it completely. The cartridge’s
shutter may not open properly if the cartridge is
pulled partially out and then pushed back in the
printer.
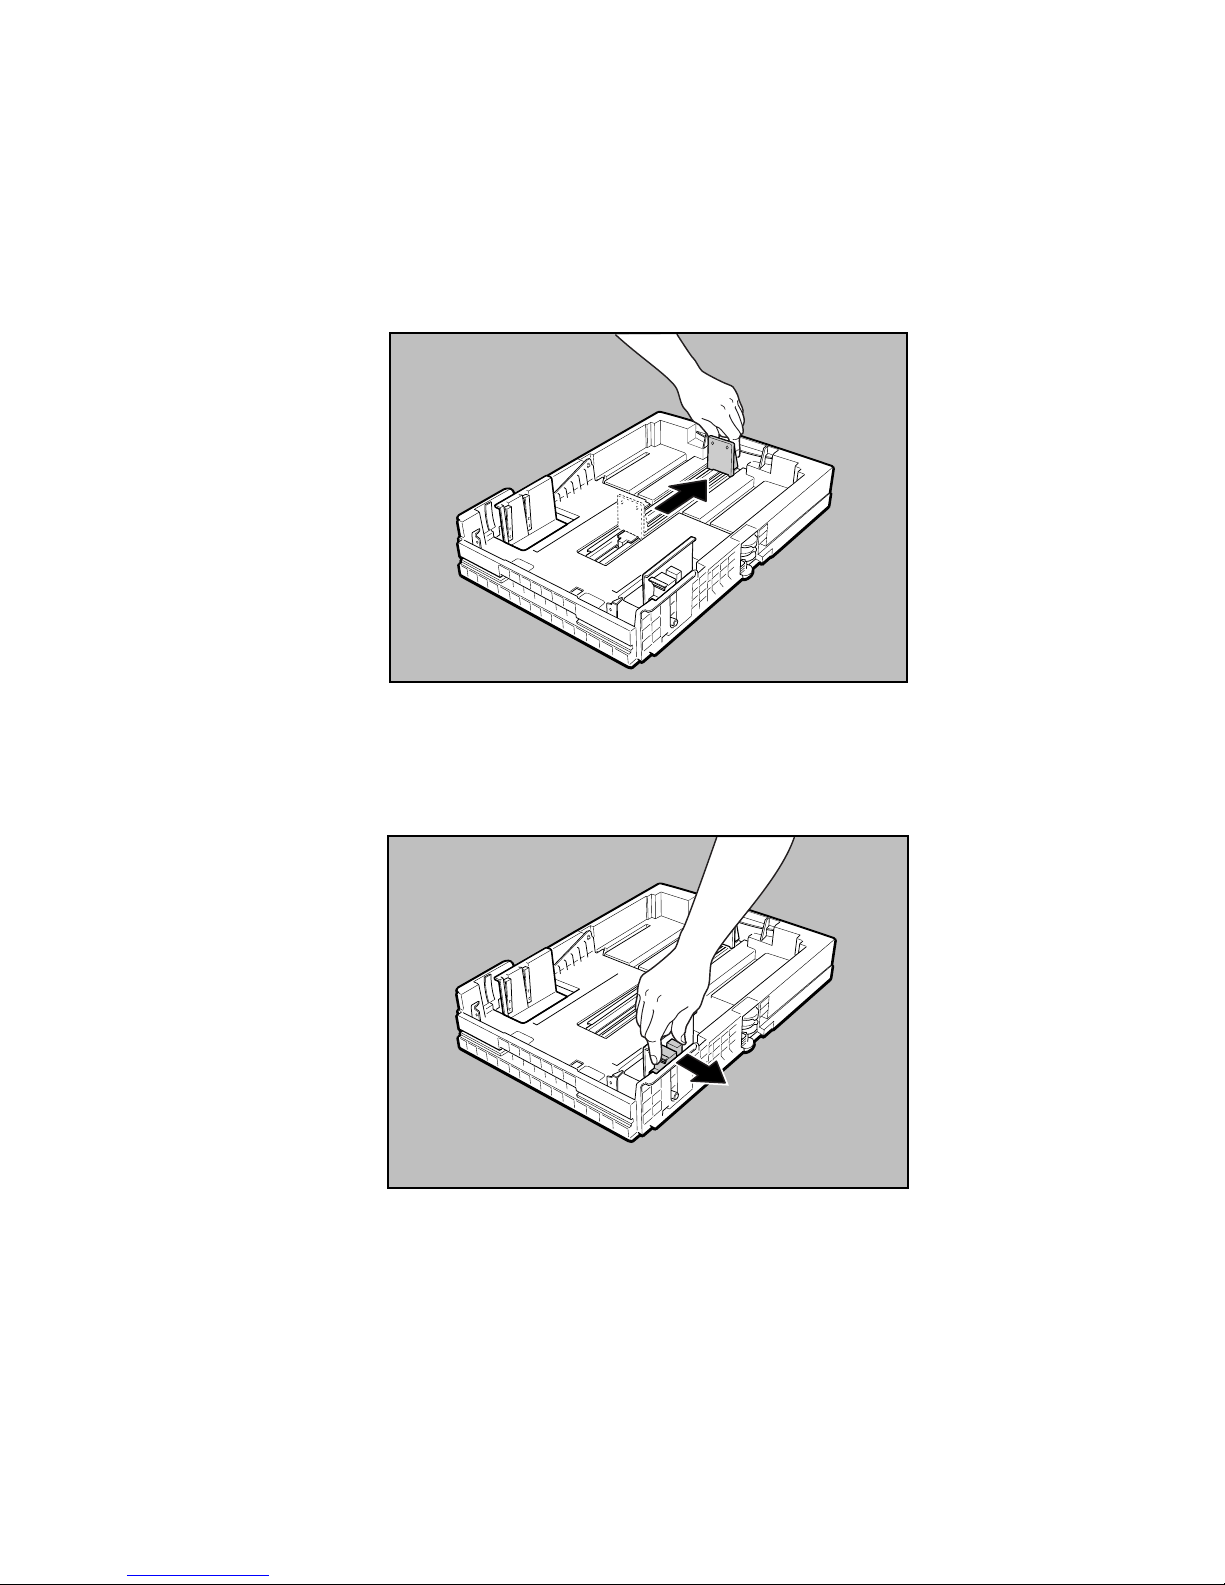
Fig. 2.8 Remove the Toner Cartridge
5. Remove the new toner cartridge from the package.
__________________________________________ Installation 2-9
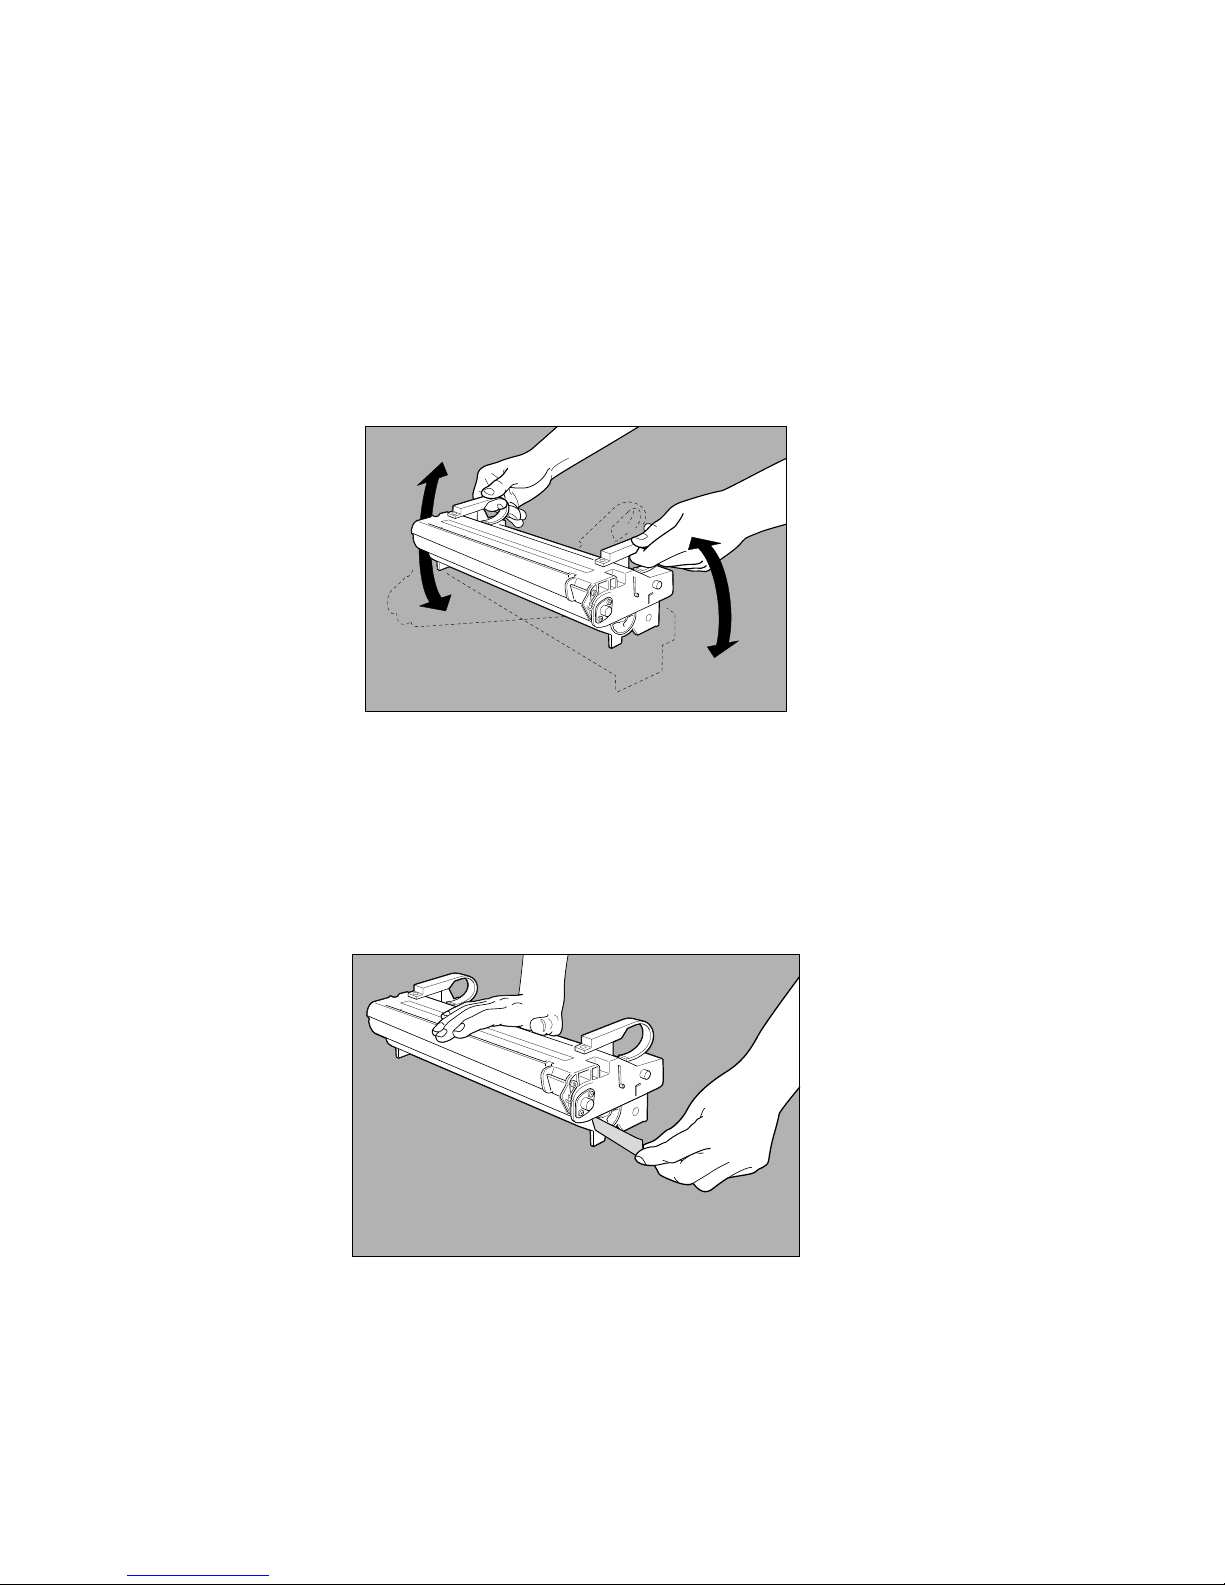
6. Gently shake the toner cartridge several times to distribute
toner throughout the cartridge (fig. 2.9).
Caution: Shake the cartridge enough to free any compacted
toner. Turning on the printer with toner still
compacted may damage the cartridge.
Fig. 2.9 Shake the Toner Cartridge
7. Place the toner cartridge on a flat surface, holding it in place
with one hand. Grasp the sealing tape’s end tab and pull the
tape straight out (fig. 2.10).
Caution: If the tape is pulled out at an angle, it may break
off inside the cartridge.
Fig. 2.10 Remove the Sealing Tape
2-10 Installationbb_________________________________________
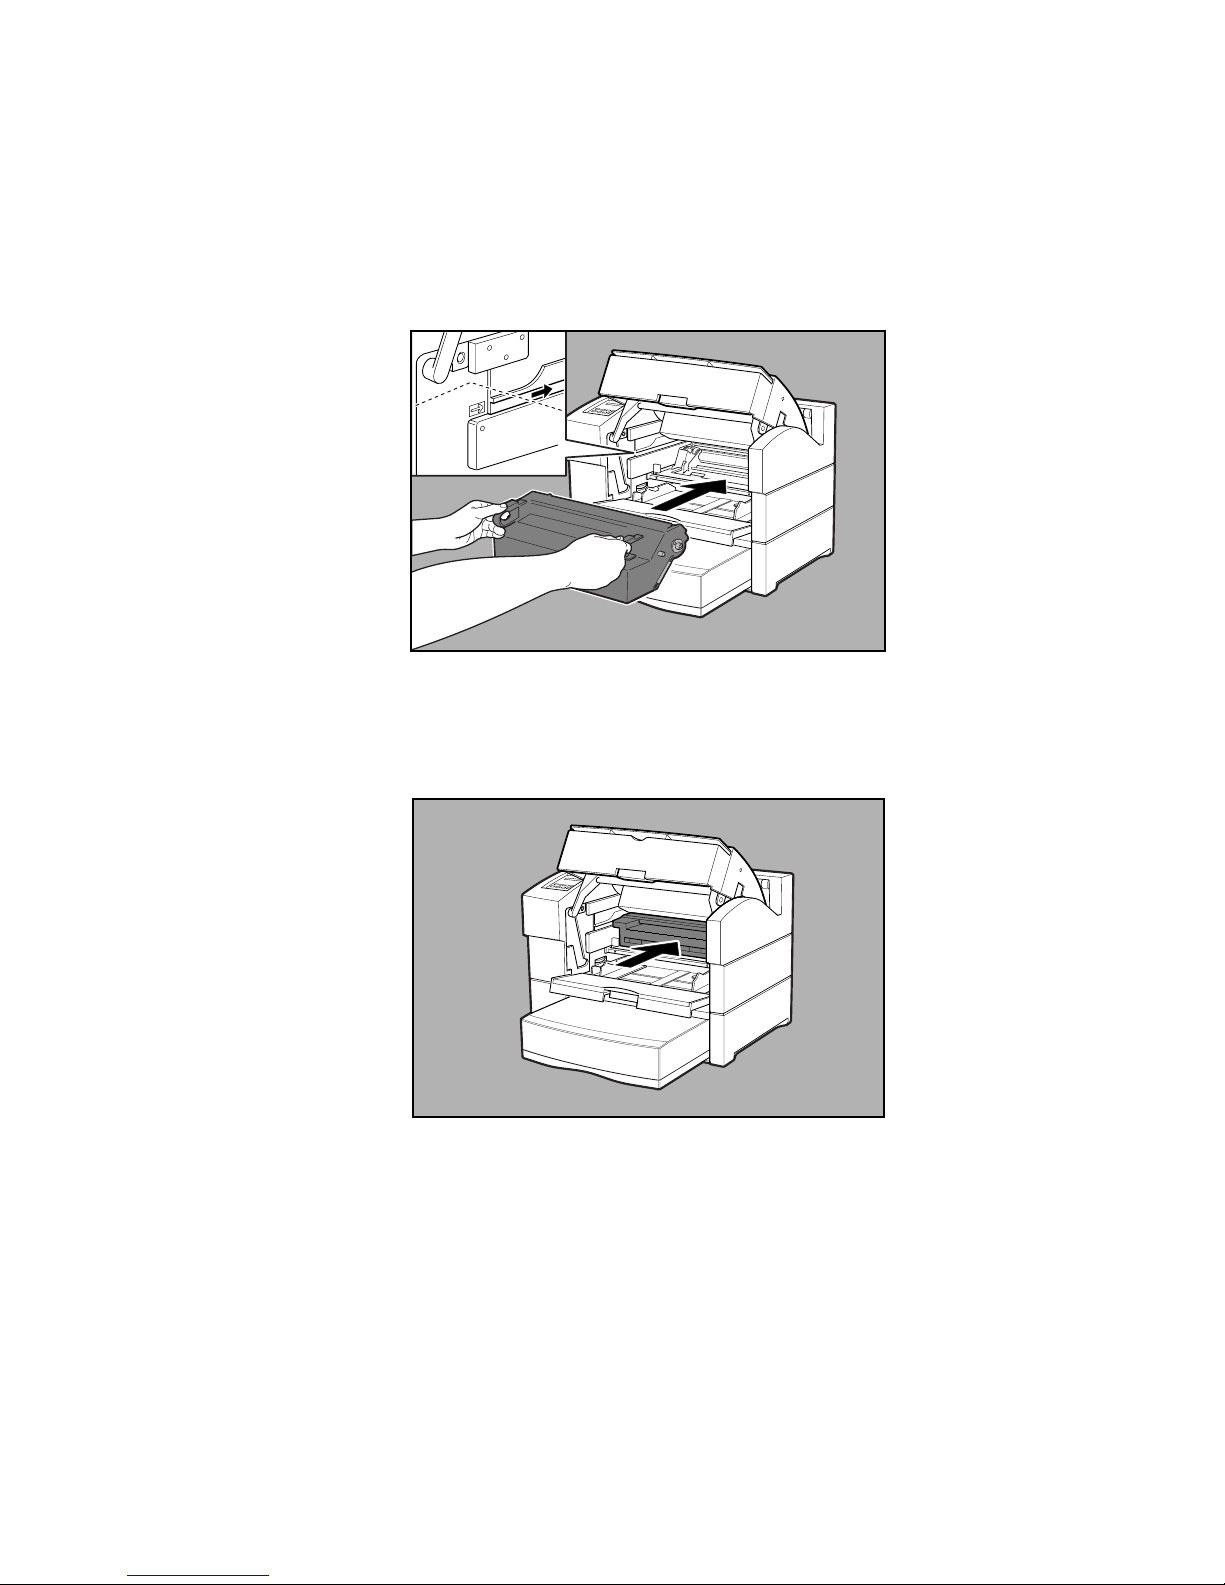
8. Insert the pins on both sides of the cartridge into the guide
channels in the printer (fig. 2.11).
Fig. 2.11 Insert the Pins into the Guide Channels
9. Slide the cartridge into the printer until it stops, making sure it
is seated properly (fig. 2.12).
__________________________________________ Installation 2-11
Fig. 2.12 Insert the Toner Cartridge
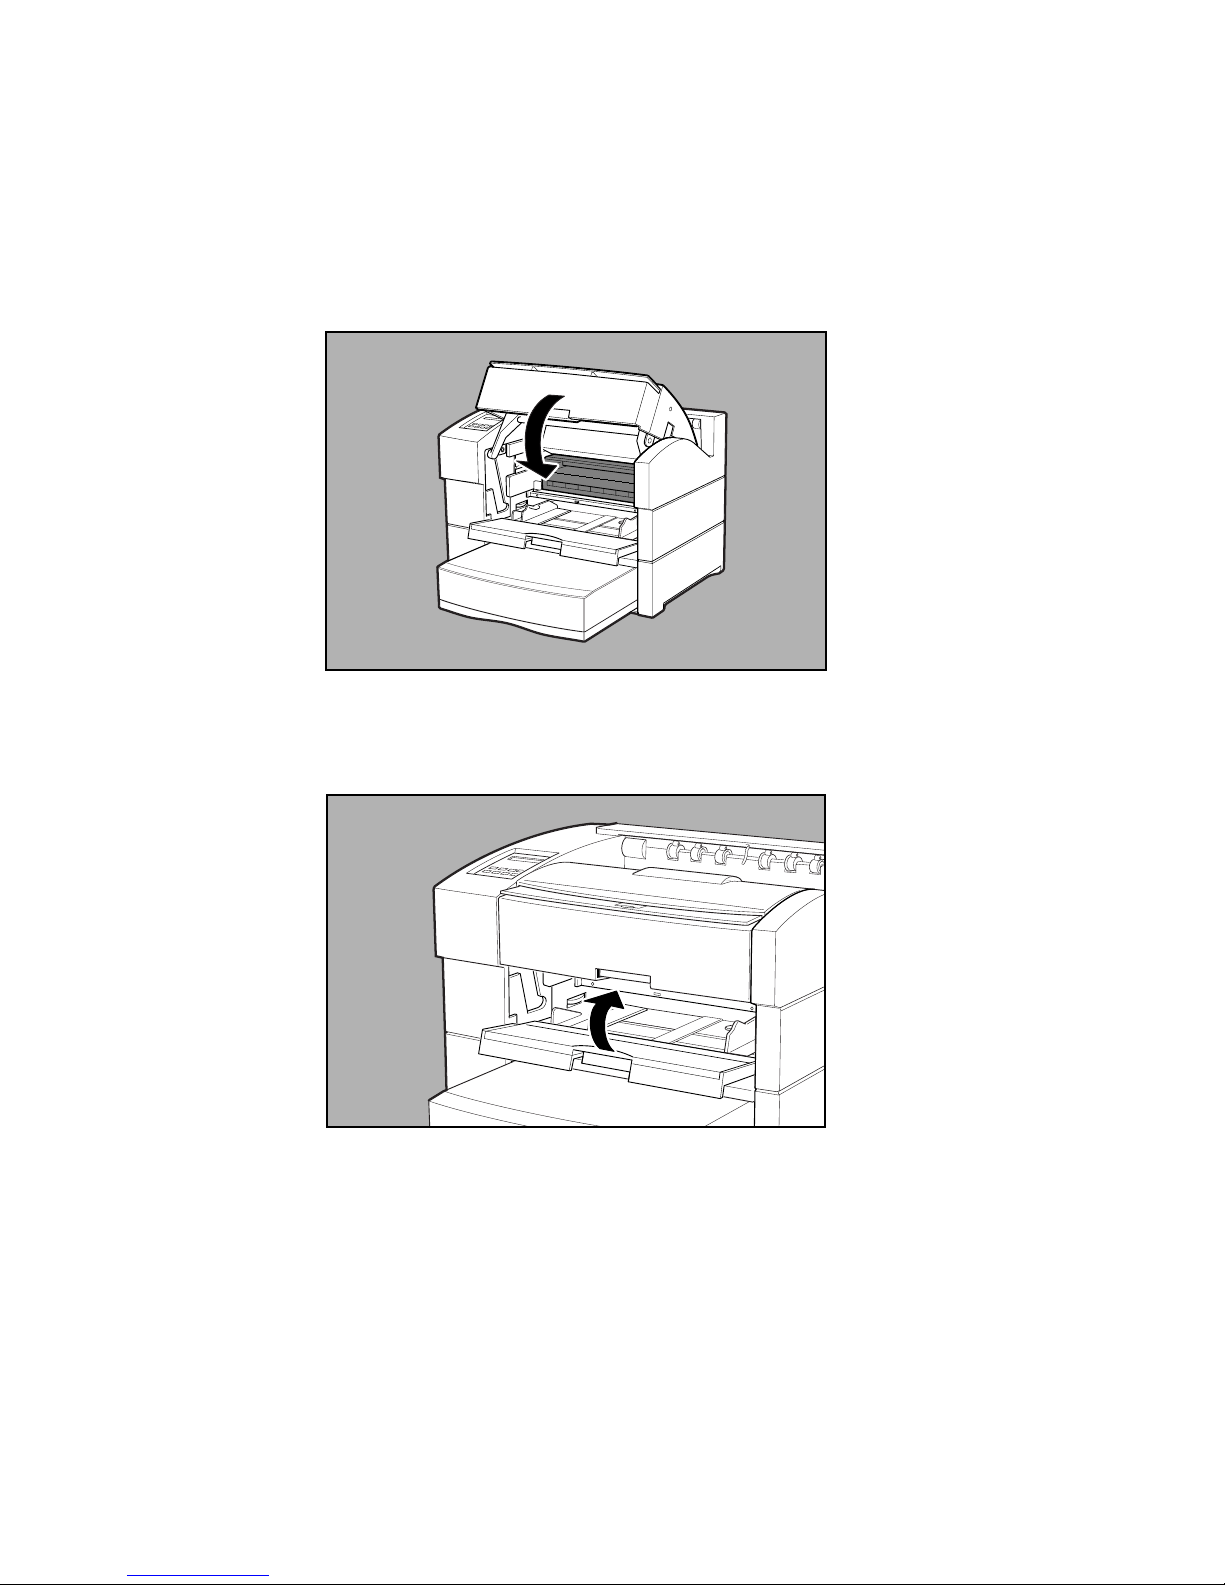
10. Close the top cover, pressing down on the center section until
the latch engages (fig. 2.13).
Fig. 2.13 Close the Top Cover
11. Close the multipurpose feeder (fig. 2.14).
Fig. 2.14 Close the Multipurpose Feeder
2-12 Installationbb_________________________________________

Paper Cassette
The universal paper cassette feeds up to 500 sheets of 20 lb bond/60
lb text weight (65 g/m2) paper or other paper to a stack height of
2.13" (54 mm). This cassette can handle media weights from 16-28
lb (60 -105 g/m
Note: An envelope cassette designed to feed up to 75 envelopes
can be purchased as an option for your printer.
This section describes loading and installing the standard paper
cassette. Chapter 7 covers media types and sizes for use in the paper
cassettes and available optional cassettes. Chapter 10 describes
installing optional paper feeders.
Caution: Make sure all paper used in your printer meets the
1. Remove the cassette if it is in the printer. To do this:
a. Pull the cassette straight out until it stops (fig. 2.15).
2
).
guidelines in “Media Specifications” in chapter 7.
__________________________________________ Installation 2-13
Fig. 2.15 Pull Out the Cassette

b. Lift up slightly on the cassette; then pull it from the
printer (fig. 2.16).
Fig. 2.16 Remove the Cassette from the Printer
2. Place the cassette on a flat surface and remove the cassette
cover (fig. 2.17).
2-14 Installationbb_________________________________________
Fig. 2.17 Remove the Cassette Cover
3. Lift the paper length guide to release it. Then, slide it forward
(fig. 2.18).
Fig. 2.18 Move the Length Guide
4. Squeeze the sides of the paper width guide to release it. Slide it
to the outside of the cassette (fig. 2.19).
__________________________________________ Installation 2-15
Fig. 2.19 Move the Width Guide

5. Align the paper stack and load it into the cassette print side up,
leading edge to the back (fig. 2.20). See “Media Sources” in
chapter 7 to determine whether to load media short or long
edge first.
Fig. 2.20 Load the Paper
6. Adjust the media guides to the size of the paper stack.
Caution: To prevent paper jams, make sure the paper fits
between the paper guides and under the cassette’s
retaining clips (fig. 2.20).
7. Replace the cassette cover.
8. Slide the cassette into the printer until it snaps into place.
Note: You will feel a slight resistance as you push the
cassette into the printer caused by the catch that
prevents the cassette from being dropped.
9. Pull out the output tray extension and turn up the paper stop
for paper sizes larger than letter/A4 (fig. 2.21).
2-16 Installationbb_________________________________________
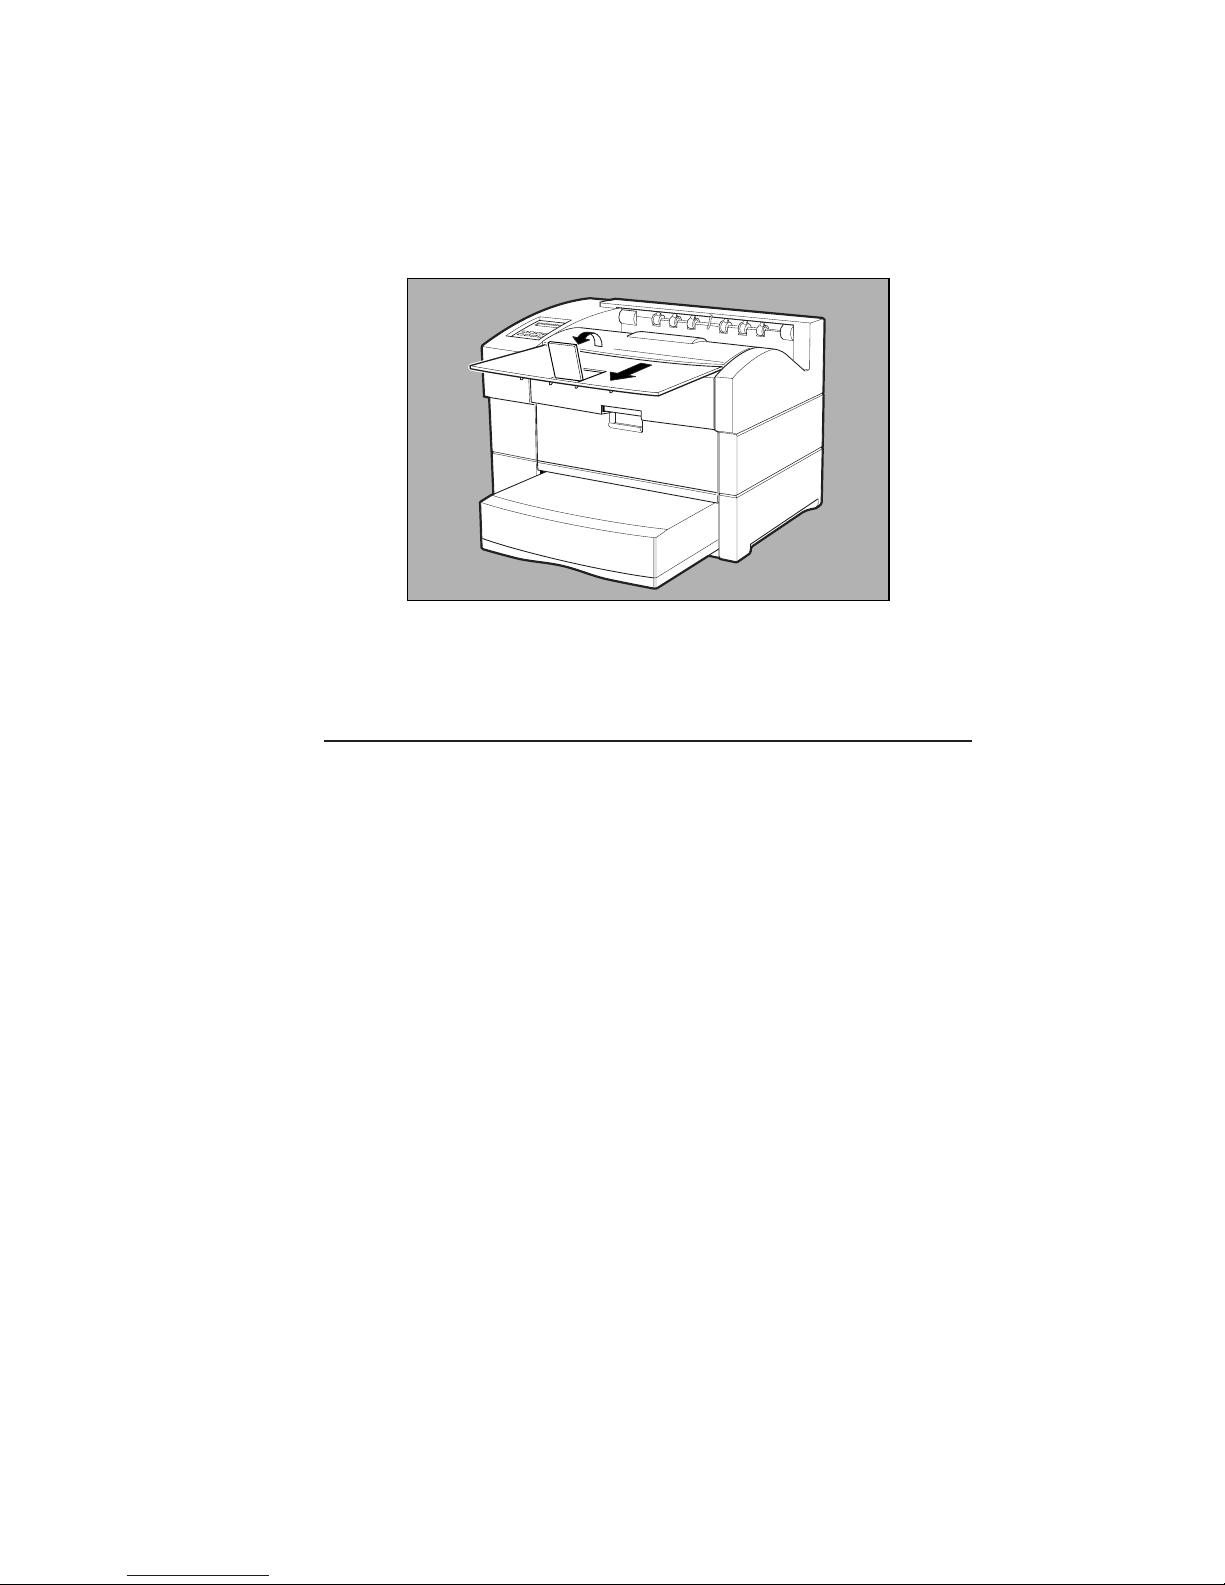
Fig. 2.21 Adjust the Output Tray Extension
Multipurpose Feeder
The printer’s multipurpose feeder holds up to 150 sheets of 20 lb bond/
60 lb text weight (65 g/m2) paper or media such as Myriad 2 plates or
Myriad film to a stack height of about .70" (18 mm).
The multipurpose feeder supports nonstandard size media, including
envelopes from 3.94" x 5.83" (100 mm x 148 mm) to 13.00" x 35.50"
(330 mm x 902 mm). This feeder can handle media weights from 1636 lb (60 - 135 g/m
To load the multipurpose feeder
Caution: Make sure all media used meets the guidelines in “Media
Specifications” in chapter 7.
1. Open the multipurpose feeder by grasping the cover’s top
center handle and pulling down (fig. 2.22).
Caution: The multipurpose feeder does not open to a 90°
2
).
angle. To prevent damage, do not exert strong
pressure or place heavy objects on the feeder.
__________________________________________ Installation 2-17
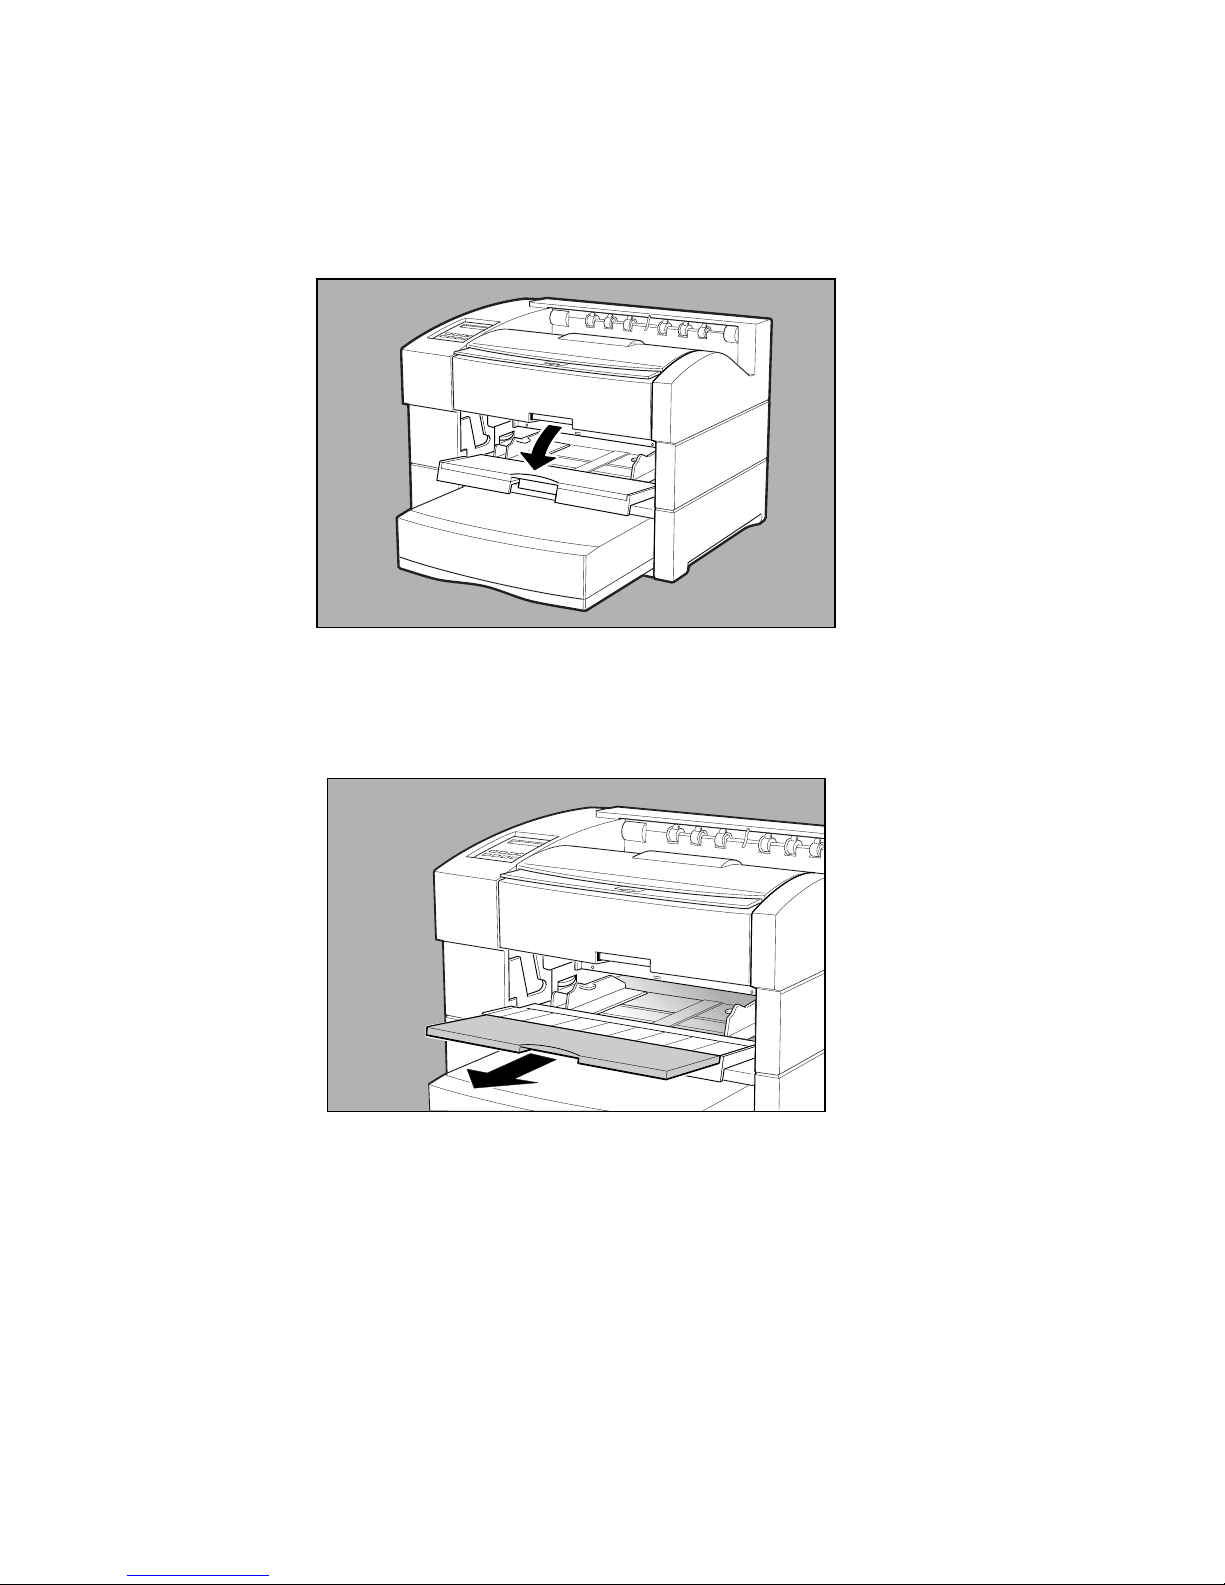
Fig. 2.22 Open the Multipurpose Feeder
2. Pull out the tray extension for media larger than letter/A4 size
(fig. 2.23).
Fig. 2.23 Pull Out the Tray Extension
3. Align the edges of the media stack and load it into the cassette
print side up, leading edge toward the back of the printer (fig.
2.24). See “Media Sources” in chapter 7 to determine whether
to load media short or long edge first.
2-18 Installationbb_________________________________________
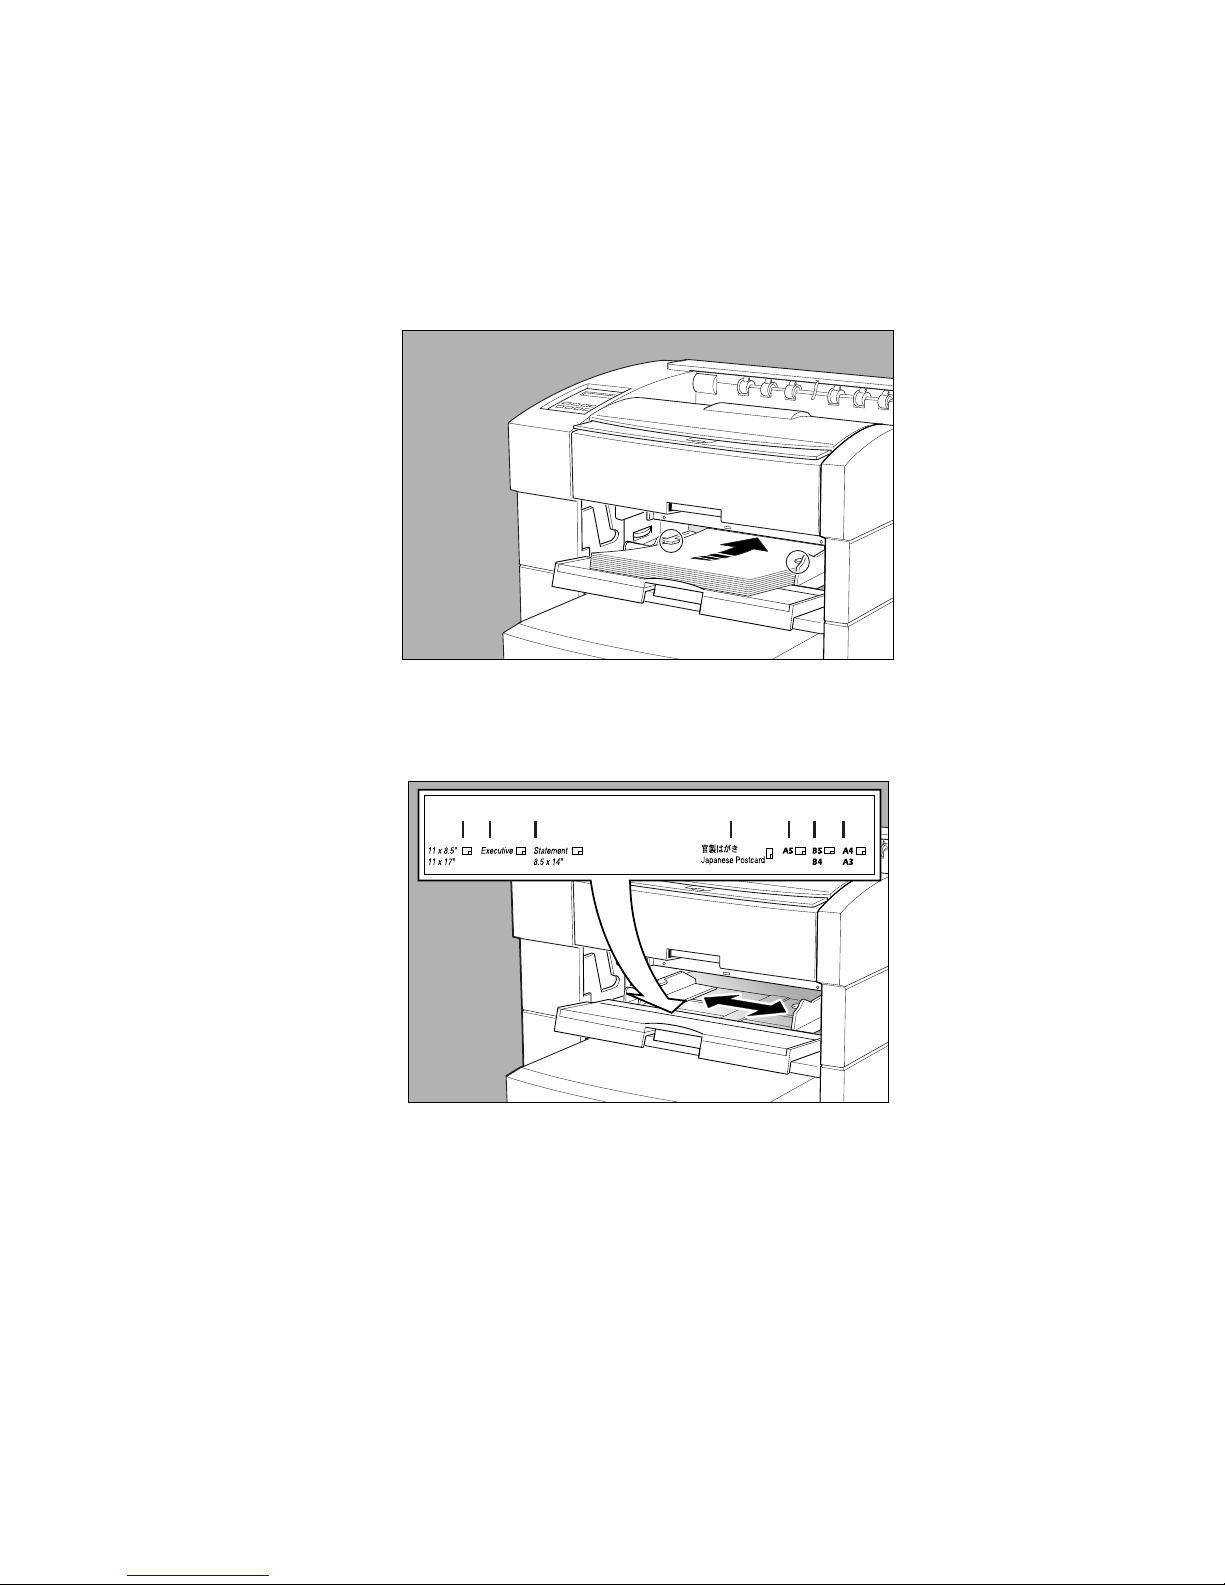
Caution: To prevent jams, make sure the media stack fits
under the media guide’s retaining clips (fig. 2.24).
Fig. 2.24 Load the Paper
4. Adjust the media guide to the size of the media stack (fig. 2.25).
5. Close the multipurpose feeder if the media fits completely
__________________________________________ Installation 2-19
Fig. 2.25 Adjust the Media Guide
inside the printer (fig. 2.14).
Multipurpose Feeder Tip
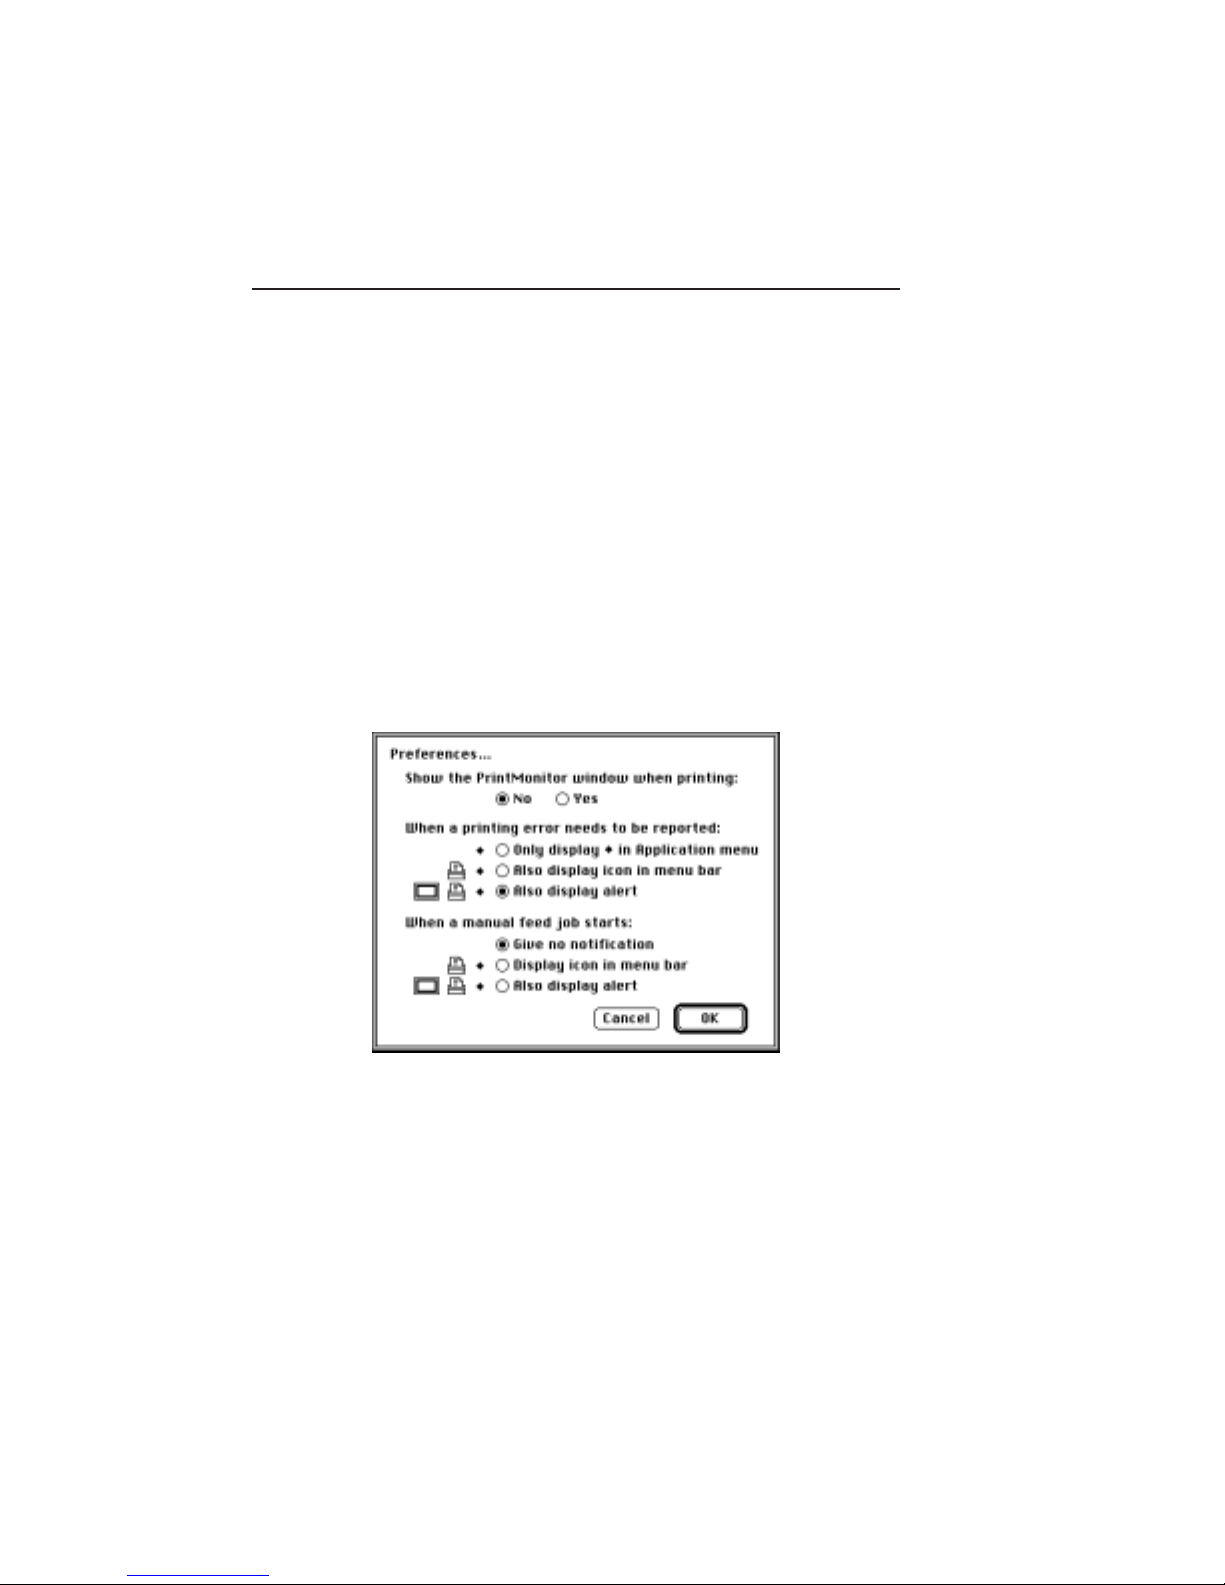
Occasionally, in a Macintosh environment if media is in the
multipurpose feeder, the system’s Print Monitor sends a prompt
message to put paper into the manual feed tray and click OK. To
disable this prompt
Note: This prompt can only be turned off in Print Monitor. You
cannot turn the manual feed message off on the Desktop
Print Monitor.
1. Go to System Folder: Extensions: PrintMonitor.
2. Double click Print Monitor to open it. Then, select File:
Preferences.
3. Select Give no Notification under When a manual feed job
starts; then, click OK (fig. 2. 26).
Note: This prompt only can be turned off in Print Monitor. You
cannot turn the manual feed message off on the Desktop
Print Monitor.
2-20 Installationbb_________________________________________
Fig. 2.26 Print Monitor Preferences
 Loading...