


110/220 volt edition
CS - v1
5/21/01
100-100509
_____________________________________________________ i

Trademarks
XANTÉ®, and ScreenWriter® are registered trademarks of XANTÉ
CORPORATION, registered in the United States Patent and Trademark
Office. X-ACT™ and FilmStar™ are trademarks of XANTÉ
CORPORATION.
Adobe®, Adobe® Illustrator®, Adobe® PageMaker®, Adobe® Photoshop®,
Adobe® PostScript®, Adobe Type Manager®, and the ATM® and PostScript
logos are registered trademarks of Adobe Systems Incorporated, registered
in the United States Patent and Trademark Office. Adobe® Acrobat™,
Adobe® PostScript® 3™, and Adobe® Separator™ are trademarks of Adobe
Systems Incorporated which may be registered in certain jurisdictions.
EtherHelp™ is a trademark of the AG Group. Aldus® is a registered
trademark of Aldus Corporation, registered in the United States Patent and
Trademark Office. Apple®, AppleTalk®, ColorSync®, EtherTalk®,
LaserWriter®, iMac®, and Macintosh® are registered trademarks of Apple
Computer, Inc., registered in the United States Patent and Trademark
Office. LocalTalk™, Balloon Help™, QuickDraw™, Power Mac™, and
SimpleText™ are trademarks of Apple Computer, Inc. AutoCAD® is a
registered trademark of Autodesk, Inc., registered in the United States
Patent and Trademark Office.
DEC® and Digital® are registered trademarks of Digital Equipment
Corporation, registered in the United States Patent and Trademark Office.
Imation™ is a trademark of Imation Corporation. Intel® and Pentium® are
registered trademarks of Intel Corporation registered in the United States
Patent and Trademark Office. Token Ring® is a registered trademark of
International Business Machines Corporation, registered in the United
States Patent and Trademark Office. ITC Avante Garde Gothic®, ITC
Bookman®, and ITC Zapf Chancery® are registered trademarks of
International Typeface Corporation, registered in the United States Patent
and Trademark Office and some foreign countries. ITC typefaces are
copyrighted © by the International Typeface Corporation.
®
Kodak® is a registered trademark of Eastman Kodak Company.
Lexmark® is a registered trademark of Lexmark International, Inc.
Helvetica®, New Century Schoolbook®, and Times® are registered
trademarks of Linotype AG and/or its subsidiaries, registered in the United
States Patent and Trademark Office.
iibb ____________________________________________________

FreeHand™ is a trademark of Macromedia, Inc. Microsoft®, MS-DOS®,
Windows
Corporation, registered in the United States Patent and Trademark Office.
MultiAd Creator® is a registered trademark of MultiAd Services, Inc.,
registered in the United States Patent and Trademark Office.
Novell® and NetWare® are registered trademarks of Novell, Inc., registered
in the United States Patent and Trademark Office.
Quark® and QuarkXPress® are registered trademarks of Quark, Inc.,
registered in the United States Patent and Trademark Office.
Preps® is a registered trademark of ScenicSoft, Inc., registered in the United
States Patent and Trademark Office. ScenicSoft is a trademark of
ScenicSoft, Inc. Solaris™ is a trademark of Sun Micro Systems, Inc.,
registered in the United States Patent and Trademark Office.
UL® is a registered trademark of Underwriters Laboratory, registered in the
United States Patent and Trademark Office. UNIX® is a registered
trademark of UNIX Systems Laboratories, Inc., registered in the United
States Patent and Trademark Office. ENERGY STAR® is a registered
trademark of the US EPA, registered in the United States Patent and
Trademark Office.
Ethernet® and Xerox® are registered trademarks of Xerox Corporation,
registered in the United States Patent and Trademark Office.
®
, and Windows NT® are registered trademarks of Microsoft
All other brand and product names are trademarks, registered
trademarks, or service marks of their respective holders.
Manual Notice
XANTÉ CORPORATION reserves the right to make changes to this
manual and to the equipment described herein without notice. Every
effort has been made to ensure that this manual is free of
inaccuracies and omissions. However, XANTÉ CORPORATION
makes no warranty of any kind including, but not limited to, any
implied warranties of merchantability and fitness for a particular
purpose with regard to this manual.
_____________________________________________________ iii

XANTÉ CORPORATION assumes no responsibility for, or liability
for, errors contained in this manual or for incidental, special, or
consequential damages arising out of the furnishing of this manual,
or the use of this manual in operating the equipment, or in
connection with the performance of the equipment when so operated.
Proprietary
The digitally encoded software included with the XANTÉ Colour
ScreenWriter printer is copyrighted © 2001 by XANTÉ
CORPORATION. All Rights Reserved. Patent Pending. This
software may not be reproduced, modified, displayed, transferred, or
copied in any form or manner or on any media, without the express
written permission of XANTÉ CORPORATION.
Copyright
This manual is Copyrighted © 2001 by XANTÉ CORPORATION. All
Rights Reserved. Printed in the USA. This manual may not be copied in
whole or in part, nor transferred to any other media or language without the
express written permission of XANTÉ CORPORATION.
Safety Information
The printer generates a small amount of ozone gas during image transfer
in the printing process. When shipped from the factory, the printer
meets the Underwriter’s Laboratory (UL) standard for ozone emission.
Warning! An invisible laser beam which radiates inside the laser
printer’s scanner unit can cause permanent eye damage. DO
NOT disassemble or try to adjust the laser scanner unit.
FCC Classification
Warning! Changes or modifications to this unit not expressly
approved by the party responsible for compliance could
void the user’s authority to operate the equipment.
This equipment has been tested and found to comply with the limits for a
Class A digital device, pursuant to Part 15 of the FCC Rules. These limits
are designed to provide reasonable protection against harmful interference
when the equipment is operated in a commercial environment. This
equipment generates, uses, and can radiate radio frequency energy and, if
ivbb ____________________________________________________

not installed and used in accordance with the instruction manual, may cause
harmful interference to radio communications. Operation of this equipment
in a residential area is likely to cause harmful interference in which case the
user will be required to correct the interference at his own expense.
Shielded cables must be used with this unit to ensure compliance with the
FCC Class A limits.
Power Information
100/120 V Version:100/120 VAC (90-132 V), 50/60 Hz (47-63 Hz), 6.5 A
220/240 V Version:220/240 VAC (198-264 V), 50/60 Hz (47-63 Hz), 3.2 A
Power Cord
The power cord is the main disconnect device. It should be plugged into an
easily accessible outlet.
For 115 Volt Configuration:
The power cord to be used with 115 Volt configuration is minimum type
SJT (SVT) 18/3, rated 250 Volts ac, 10 Amps with a maximum length of 15
feet. One terminated in an IEC 320 attachment plug. The other end is
terminated in a NEMA 5-15P plug.
For 230 Volt Configuration
The power cord to be used with 230 Volt configuration is minimum type
SJT (SVT) 18/3, rated 250 Volts ac, 10 Amps with a maximum length of 15
feet. One terminated in an IEC 320 attachment plug. The other end is
terminated as required by the country where it will be installed.
Le cable de transport d'energie que doit etre utilis'e la configuration 230
Volts est le type minimum SJT (SVT), 18/3, nominal 250 Volts ac, 10
Amps, 4.5 m long maximum. Un bout est raccorde comme exige par le pays
ou il sera utilis'e.
Das Netzkabel ist das haupfsachliche Diskonnektionsmittel, es sollte in eine
leicht erreichbare steckdos gesteckt werden.
Das Netzkabel kann mit einer 230 Volts Konfiguration verwonder werden
vom typ: Minimum VDE or HAR, 3 X 1.00 mm2, 250 V ac, 10 Amps,
maximal 4.5 m long. Ein Ende ontspriche dem Stecker IEC 320. Das andoro
Ende entspricht den Anfoderungen des entsprechenden Landes.
_____________________________________________________ v

Power Conservation
As an ENERGY STAR® Partner, XANTÉ
CORPORATION has determined this product
meets the ENERGY STAR® guidelines for
energy efficiency. This printer enters a lowpower state after 30 minutes of inactivity. This
complies with the U.S. EPA ENERGY STAR
Program, but is not an EPA endorsement of the
product.
Manufacturer’s Declaration of Conformity
The Product XANTÉ Colour ScreenWriter has been designed and
manufactured in accordance with the following international standards:
EN 50081-1 “Generic Emissions Standard for Residential,
Commercial and Light Industrial Products of” 01,
Feb. 1991
EN 50082-1 “Generic Immunity Standard for Residential,
Commercial and Light Industrial Products of” 01,
Feb. 1991
EN 55022 “Limits and Methods of Measurement of Radio
Interference Information Technology Equipment of”
14, April 1987
IEC 1000-4-2 “Testing Measurement Techniques, Electrostatic
Discharge of” 1995, First Edition
IEC 1000-4-3 “Testing and Measurement Techniques, Radio
Frequency, Electromagnetic Field Immunity Test of”
1995 First Edition
IEC 1000-4-4 “Testing and Measurement Techniques, Electrical
Fast Transient/Burst Immunity Test of” 1995 First
edition
MIL-STD-45662A “Calibration System Requirements”
EN 60950 “Safety of Information Technology Equipment
including Electrical Business Equipment”
I, the undersigned, hereby declare that the equipment specified above
conforms to the above Directives and Standards
Place Mobile, Alabama
Date December 7, 1995 Robert C. Ross, Jr.
vibb ____________________________________________________
President

Colophon and Credits
This manual was written using Adobe PageMaker, Adobe Acrobat, Adobe
Photoshop, Adobe Illustrator, and FreeHand. Typefaces for the main body
of the manual are Times, Helvetica, and Courier.
Credits: edited by Lesa Moore; written by Lane Crume, Ashley
Lauber, and Stephanie Wright; designed by Gene Everette;
illustrated by Todd Till, Susie Simmons, and Paula Sirk; special
thanks to XANTÉ Engineering, XANTÉ Technical Support, and all
of our reviewers.
◊◊◊
_____________________________________________________ vii

viiibb ____________________________________________________

Table of Contents
Chapter 1 - Introduction .............................................................. 1-1
XANTÉ Colour ScreenWriter Printer ...................................... 1-3
About This Manual .................................................................. 1-4
Manual Conventions.......................................................... 1-5
Printer Features ........................................................................ 1-6
Printer Configurations.............................................................. 1-8
Warranty and Product Registration .......................................... 1-9
Other Helpful Documentation................................................ 1-10
Chapter 2 - Installation ................................................................ 2-1
Introduction .............................................................................. 2-3
Printer Location ....................................................................... 2-3
Printer Package ........................................................................ 2-4
Printer Overview ...................................................................... 2-6
Toner Cartridges ...................................................................... 2-8
Handling Toner Cartridges ................................................ 2-8
Redistributing Toner ................................................... 2-9
Removing and Installing a Toner Cartridge ...................... 2-9
Removing or Installing an OPC Belt Cartridge ..................... 2-11
Installing or Replacing the Fuser Oil Bottle .......................... 2-14
Installing or Replacing the Cleaning Roller........................... 2-16
Paper Cassette ........................................................................ 2-17
Printer Ports ........................................................................... 2-20
Selecting the Printer Interface ......................................... 2-21
Connecting to the LocalTalk Port ................................... 2-21
Connecting to the Parallel Port ........................................ 2-23
Connecting to the Serial Port........................................... 2-24
Connecting to the Ethernet Ports ..................................... 2-24
Unshielded Twisted Pair (10BaseT and 10/100BaseT) 2-24
Connecting the Power Cord and Verifying Setup.................. 2-26
Connecting the Power Cord ............................................ 2-26
Turning the Printer On .............................................. 2-27
Turning the Printer Off ............................................. 2-27
Verifying Setup ............................................................... 2-28
_____________________________________________________ ix

Verifying a LocalTalk Setup..................................... 2-28
Verifying a Parallel Setup ......................................... 2-28
Verifying the Serial Setup......................................... 2-29
Colour Density Calibration .................................................... 2-29
Chapter 3 - Macintosh Setup ....................................................... 3-1
Introduction .............................................................................. 3-3
XANTÉ Utilities CD-ROM ..................................................... 3-3
Adobe Acrobat Reader ............................................................. 3-5
XInstaller.................................................................................. 3-5
Adobe PostScript Printer Drivers............................................. 3-8
Selecting the Adobe PostScript Printer Driver .................. 3-8
AdobePS 8.7.X ........................................................... 3-9
AdobePS 8.6 ............................................................. 3-10
AdobePS 8.5.1 .......................................................... 3-10
AdobePS 8.7.X ................................................................ 3-11
Installing AdobePS 8.7.X ......................................... 3-11
Installing the PPD for AdobePS 8.7.X ..................... 3-12
AdobePS 8.6 .................................................................... 3-12
Installing AdobePS 8.6 ............................................. 3-13
Installing the PPD for AdobePS 8.6 ......................... 3-13
AdobePS 8.5.1 ................................................................. 3-14
Installing AdobePS 8.5.1 .......................................... 3-14
Installing the PPD for AdobePS 8.5.1 ...................... 3-14
Configuring the PPD ....................................................... 3-15
Configuring the Printer .................................................... 3-17
App Drivers Folder ................................................................ 3-18
PageMaker 5 PPD Folder ................................................ 3-18
QuarkXPress PDF Folder ................................................ 3-18
ScenicSoft Preps .............................................................. 3-19
Downloads Folder .................................................................. 3-20
XANTÉ Command Center ..................................................... 3-21
General Menu .................................................................. 3-21
Printer Status ............................................................. 3-22
Printer Information ................................................... 3-22
Spooling .................................................................... 3-22
Margin Adjustment ................................................... 3-22
X-ACT ...................................................................... 3-23
Download Postscript File .......................................... 3-23
xbb ____________________________________________________

Test Directory ........................................................... 3-23
Reboot Printer ........................................................... 3-23
Startup Page .............................................................. 3-23
Configure .................................................................. 3-23
Networking Menu............................................................ 3-24
Novell Print Server ................................................... 3-24
AppleTalk ................................................................. 3-25
TCP/IP ...................................................................... 3-25
Graphics Menu ................................................................ 3-25
CRD Directories ....................................................... 3-25
Linearization ............................................................. 3-26
Enhanced Screen Calibration .................................... 3-26
ICC Profiling............................................................. 3-26
Adobe Downloader ................................................................ 3-26
File Menu ........................................................................ 3-27
Download Fonts ........................................................ 3-27
Download Postscript File .......................................... 3-27
Special Menu ................................................................... 3-27
Printer Status ............................................................. 3-27
Printer Font Directory ............................................... 3-27
Other Special Menu Options..................................... 3-28
Procedures .............................................................................. 3-28
Color Linearization (Calibration) .................................... 3-28
Advanced Linearization ............................................ 3-32
EEROM Configuration.................................................... 3-32
Enhanced Screen Calibration .......................................... 3-34
Profiling ........................................................................... 3-36
Printer Margin Adjustment .............................................. 3-40
Downloaded Fonts ........................................................... 3-42
Downloading Fonts ................................................... 3-42
Reviewing and Removing Downloaded Fonts ......... 3-43
Chapter 4 - PC Setup ................................................................... 4-1
Introduction .............................................................................. 4-3
XANTÉ Utilities CD-ROM (PC)............................................. 4-3
Adobe Acrobat Reader ............................................................. 4-4
XANTÉ Utilities Installer ........................................................ 4-5
XANTÉ Utilities and Application Drivers ........................ 4-6
Adobe PostScript Printer Drivers............................................. 4-9
Deleting Previous Driver Versions.................................... 4-9
_____________________________________________________ xi

Deleting AdobePS 4.1.X and Later............................. 4-9
Deleting AdobePS 4.0 and Earlier ............................ 4-11
Windows 95, 98, Me, 2000, and NT 4.0 Drivers ............ 4-12
Installing the AdobePS Printer Driver and Printer PPD 4-12
Installing AdobePS 4.4 and the Printer PPD ............ 4-13
Configuring the PPD for Windows 95, 98, Me, 2000, or NT
4.X............................................................................. 4-20
Configuring the Printer .................................................... 4-24
PDFs Folder ........................................................................... 4-25
PS_Files Folder ...................................................................... 4-26
XANTÉ Command Center ..................................................... 4-27
Launching Command Center........................................... 4-28
Shortcut Icons .................................................................. 4-29
Options Menu .................................................................. 4-31
Controller Menu .............................................................. 4-31
General ...................................................................... 4-32
Align Paper ............................................................... 4-34
CRD Directory .......................................................... 4-34
Configure .................................................................. 4-34
Linearize ................................................................... 4-34
Enhanced Screen Calibration .................................... 4-34
ICC Profiling............................................................. 4-34
Spooler ...................................................................... 4-34
Novell........................................................................ 4-35
Test Directory ........................................................... 4-36
More X-ACT............................................................. 4-36
Ports Menu ...................................................................... 4-36
Procedures .............................................................................. 4-36
Color Linearization (Calibration) .................................... 4-36
Advanced Linearization ............................................ 4-40
EEROM Configuration.................................................... 4-41
Enhanced Screen Calibration .......................................... 4-42
Profiling ........................................................................... 4-44
Printer Margin Adjustment .............................................. 4-47
Managing Fonts on an Optional Hard Disk..................... 4-49
Chapter 5 - Ethernet Setup.......................................................... 5-1
Introduction .............................................................................. 5-3
EtherTalk Network Configuration ........................................... 5-3
Select the EtherTalk Phase 2 Driver.................................. 5-3
xiibb ____________________________________________________

Change the EtherTalk Zone Name .................................... 5-4
Using XANTÉ Command Center ............................... 5-4
Novell NetWare Configuration ................................................ 5-5
Configure the Novell Server.............................................. 5-5
Selecting the Novell Names ........................................ 5-6
Configure the Novell Server (NetWare 3.X and 4.X) 5-7
Configure the Novell Server (NetWare 5.X) .............. 5-9
Configure the Print Server Emulation ............................. 5-15
Using XANTÉ Command Center (PC) .................... 5-15
Using XANTÉ Command Center (Macintosh)......... 5-17
Configure the Novell Print Server Interface.................... 5-20
Using XANTÉ Command Center (PC) .................... 5-20
Using XANTÉ Command Center (Macintosh)......... 5-20
Install the Adobe PostScript Driver................................. 5-21
Line Printer Configuration ..................................................... 5-22
Configure the Line Printer Interface................................ 5-22
TCP/IP Addresses............................................................ 5-22
Reserved IP Addresses.............................................. 5-24
Network Masks ......................................................... 5-24
Broadcast Addresses ................................................. 5-25
Subnet Addresses ...................................................... 5-25
Set the TCP/IP Address ................................................... 5-25
Using XANTÉ Command Center (PC) .................... 5-26
Using XANTÉ Command Center (Macintosh)......... 5-27
Configure the Printer Setup on the Network ................... 5-28
Windows NT 4.X Configuration............................................ 5-29
LPR Port Setup for TCP/IP ............................................. 5-29
AppleTalk Setup for EtherTalk ....................................... 5-30
Chapter 6 - Configuration ........................................................... 6-1
Introduction .............................................................................. 6-3
Front Panel ............................................................................... 6-3
Window ............................................................................. 6-3
Status Lights ...................................................................... 6-4
Control Keys...................................................................... 6-4
Configuration Menus ............................................................... 6-5
Selecting Menu Options .................................................... 6-5
Resetting to Factory Defaults ............................................ 6-6
_____________________________________________________ xiii
Level 1 Reset .............................................................. 6-6
Level 2 Reset .............................................................. 6-6

Menu Structure .................................................................. 6-7
The PPD ................................................................................... 6-8
Selecting PPD Options (Macintosh).................................. 6-8
Selecting PPD Options (Windows 95, 98, and Me) ........ 6-10
Selecting PPD Options (Windows 2000) ........................ 6-11
Selecting PPD Options (Windows NT 4.0) ..................... 6-13
PPD Menus ...................................................................... 6-14
Configuring Printer Features.................................................. 6-15
AccelaFont....................................................................... 6-15
Accurate Calibration Technology (X-ACT).................... 6-15
Front Panel X-ACT ................................................... 6-16
Colour Density Calibration and Verification .................. 6-17
Target Calibrate ........................................................ 6-18
Target Verify............................................................. 6-20
Colour Mode.................................................................... 6-21
Colour Model .................................................................. 6-21
Colour Output .................................................................. 6-22
XANTÉ TrueColour ................................................. 6-22
Direct ........................................................................ 6-22
Press Profiling ........................................................... 6-22
Color Profile .................................................................... 6-22
Source ....................................................................... 6-23
Destination ................................................................ 6-23
Intent ......................................................................... 6-23
Colour Separations .......................................................... 6-23
Configure (EEROM Settings) ......................................... 6-23
Interface Control.............................................................. 6-24
Enable Menus ........................................................... 6-25
RS232 Configuration ................................................ 6-25
DHCP Configuration ................................................ 6-25
Parallel Configuration ............................................... 6-26
Novell Print Server Configuration ............................ 6-26
IP Address Configuration ......................................... 6-26
Job Timeout ..................................................................... 6-27
Language ......................................................................... 6-27
Laser Power ..................................................................... 6-28
Lines Per Inch (LPI) ........................................................ 6-28
Maintenance (Clearing Messages) .................................. 6-28
Media Options ................................................................. 6-29
Mirror Print...................................................................... 6-29
xivbb ____________________________________________________

Power Save ...................................................................... 6-30
RAM Disk ....................................................................... 6-30
Registration ..................................................................... 6-30
Resolution Options (DPI) ................................................ 6-30
Screen Shape ................................................................... 6-31
Spot Function (Screen Type) ........................................... 6-31
Start-up Page ................................................................... 6-32
Tray Selection Options .................................................... 6-32
Selecting a Specific Tray .......................................... 6-32
Enabling Tray Chaining ............................................ 6-34
UCR (Under Color Removal).......................................... 6-35
Utility Pages .................................................................... 6-35
Advanced Calibration ............................................... 6-35
Font Names ............................................................... 6-35
Font Sample .............................................................. 6-36
Target Calibrate ........................................................ 6-36
Target Verify............................................................. 6-36
TrueColour Calibrate ................................................ 6-36
TrueColour Verify .................................................... 6-36
Registration ............................................................... 6-37
Verify Registration ................................................... 6-37
XANTÉ Screen Weight ............................................ 6-37
Chapter 7 - Media: Handling and Printing................................ 7-1
Introduction .............................................................................. 7-3
Media Specifications ................................................................ 7-3
Guidelines for Selecting and Storing Media ..................... 7-3
XANTÉ Myriad 2 Media ............................................ 7-3
Selecting Media .......................................................... 7-4
Storing Media ............................................................. 7-5
Media Sizes ....................................................................... 7-5
Imageable Area ........................................................... 7-5
Media Types ...................................................................... 7-7
Media Handling ....................................................................... 7-7
Media Path ......................................................................... 7-8
Media Sources ................................................................... 7-8
Optional Paper Feeders ............................................... 7-9
Paper Cassettes ........................................................... 7-9
Loading Media ............................................................ 7-9
Tray Chaining ........................................................... 7-10
_____________________________________________________ xv

Duplex Printing ...................................................................... 7-11
Manual Duplexing ........................................................... 7-11
Optional Duplexer ........................................................... 7-12
Guidelines for Using the Duplexer ........................... 7-12
Coated Stock Printing ............................................................ 7-12
Coverstock Printing ............................................................... 7-13
Film Printing .......................................................................... 7-14
Envelope Printing................................................................... 7-16
Installing and Removing the Envelope Adapter.............. 7-16
Installing the Envelope Adapter................................ 7-16
Removing the Envelope Adapter .............................. 7-17
Guidelines for Printing Envelopes .................................. 7-18
Label Printing......................................................................... 7-19
Transfer Media Printing ......................................................... 7-20
Transparency Printing ............................................................ 7-20
Chapter 8 - Color Printing........................................................... 8-1
Introduction .............................................................................. 8-3
Color Printing Technology ...................................................... 8-3
Color Printing Concepts and Variables.................................... 8-5
Color Theory ..................................................................... 8-5
Additive Theory .......................................................... 8-5
Subtractive Theory ...................................................... 8-6
Ink Density Variables ........................................................ 8-6
CRD ............................................................................ 8-6
Transfer Curves........................................................... 8-6
Application Variables ........................................................ 8-7
Media Variables ................................................................ 8-7
Setting Variables ............................................................... 8-8
Color Gamut Variables ...................................................... 8-9
Human Variables ............................................................. 8-10
Color Management................................................................. 8-10
Destination....................................................................... 8-11
ICC Profiles ..................................................................... 8-11
CRDs ............................................................................... 8-12
Intent ................................................................................ 8-12
Source .............................................................................. 8-13
Color Printing Procedures ...................................................... 8-13
Color Density Calibration and Verification .................... 8-14
xvibb ____________________________________________________

Target Calibrate ........................................................ 8-14
Target Verify............................................................. 8-16
Color Registration ........................................................... 8-17
TrueColour Calibration (Linearization) .......................... 8-19
Chapter 9 - Maintenance and Specifications ............................. 9-1
Introduction .............................................................................. 9-3
Maintenance ............................................................................. 9-3
Handling the Printer .......................................................... 9-3
Storing the Printer ............................................................. 9-4
Moving the Printer............................................................. 9-5
Repacking the Printer ............................................................... 9-6
Before You Begin .............................................................. 9-7
Removing Cables and Cassette(s) ..................................... 9-7
Removing Toner Cartridges .............................................. 9-8
Plug the Auger Opening .................................................... 9-8
Prepare the Toner Auger Area......................................... 9-10
Remove the Oil Bottle and Cleaning Roller .................... 9-12
Changing the Toner Waste Pack ..................................... 9-14
Removing a Duplexer ...................................................... 9-15
Removing an LFU (Lower Feeder Unit) ......................... 9-17
Packing the Printer .......................................................... 9-20
Replacing Consumables ......................................................... 9-21
Replacing the Drum Cleaner ........................................... 9-22
Replacing the Ozone Filter .............................................. 9-23
Replacing the Fuser Unit ................................................. 9-24
Replacing the Toner Waste Pack..................................... 9-25
Replacing the Transfer Roller ......................................... 9-26
Cleaning the Printer ............................................................... 9-27
Transfer Unit Cleaning .................................................... 9-28
Registration and Transfer Roller Cleaning ............... 9-28
OPC Belt Cartridge Cleaning .......................................... 9-30
Optical Unit Lens Cleaning ............................................. 9-32
Interior Cleaning.............................................................. 9-34
Exterior Cleaning ............................................................ 9-36
Technical Specifications ........................................................ 9-37
Printer Memory Requirements ........................................ 9-40
Warranty and Service Options ............................................... 9-41
Limited Warranty ................................................................... 9-42
_____________________________________________________ xvii

Effect of Consumables on Warranty ...................................... 9-43
Chapter 10 - Options .................................................................. 10-1
Introduction ............................................................................ 10-3
Printer Options ....................................................................... 10-3
Paper Handling Options ......................................................... 10-3
Lower Feeder Unit (LFU) ............................................... 10-4
Installing the LFU ..................................................... 10-4
Removing the LFU ................................................. 10-12
Duplexer ........................................................................ 10-13
Installing the Duplexer............................................ 10-13
Removing the Duplexer .......................................... 10-17
Controller Board Upgrades .................................................. 10-18
Removing the Controller Board .................................... 10-18
Installing SODIMM and Firmware Upgrades ............... 10-20
RAM Upgrades (SODIMMs) ................................. 10-20
Common Specifications for all Densities ............... 10-21
Supported Densities and Organizations .................. 10-21
Resolution Firmware Upgrade ................................ 10-22
Installing SODIMMs or SIMMs ............................. 10-22
10/100BaseT Upgrade ................................................... 10-25
Internal IDE Hard Drive Upgrade ................................. 10-28
Replacing the Controller Board Panel ........................... 10-28
Chapter 11- Troubleshooting .................................................... 11-1
Introduction ............................................................................ 11-3
Status Messages ..................................................................... 11-3
Power and Setup Issues........................................................ 11-13
Color Issues .......................................................................... 11-17
Print Quality Issues .............................................................. 11-19
Mechanical Issues ................................................................ 11-30
Media Jams .......................................................................... 11-31
Preventing Jams ............................................................. 11-31
Locating Jams ................................................................ 11-32
Clearing Jams ................................................................ 11-34
Clearing an Output Area Jam.................................. 11-34
Clearing a Paper Cassette Area Jam ....................... 11-35
Clearing a Back Cover Area Jam ............................ 11-36
xviiibb ____________________________________________________

Clearing a Paper Exit Fuser Area Jam .................... 11-37
Clearing a Duplexer Top Cover Area Jam.............. 11-38
Clearing a Duplexer Lower Cover Area Jam.......... 11-40
Technical Support ................................................................ 11-42
Appendix — Application Notes and Page Design..................... A-1
Introduction ............................................................................. A-3
Application Notes ................................................................... A-3
Screen Frequency and Angle ............................................ A-3
QuarkXPress ........................................................................... A-4
QuarkXPress (PC) ............................................................ A-4
QuarkXPress 3.X Page Setup (PC) ............................ A-4
QuarkXPress 4.X Page Setup (PC) ............................ A-5
QuarkXPress (Macintosh) ................................................ A-5
QuarkXPress 3.X Page Setup (Macintosh) ................ A-5
QuarkXPress 4.X Page Setup (Macintosh) ................ A-6
PageMaker .............................................................................. A-7
PageMaker Setup (PC) ..................................................... A-7
PageMaker Setup (Macintosh) ......................................... A-7
Using PageMaker 6.0 and 6.5 .......................................... A-9
AutoCAD 12 for PostScript .................................................. A-10
Configuring AutoCAD 12 .............................................. A-10
Printing from AutoCAD 12 ............................................ A-11
MultiAd Creator .................................................................... A-13
Page Design .......................................................................... A-13
Typefaces and Fonts ....................................................... A-13
Italic, Oblique, Bold, Demi, Medium and Light FormsA-15
Other Elements of Design ..................................................... A-16
Orientation ...................................................................... A-16
Pitch ................................................................................ A-17
Point Size and x-Height .................................................. A-17
Spacing ........................................................................... A-18
Page Design Tips ............................................................ A-19
Glossary ........................................................................................ G-1
Index ..................................................................................................... I-1
_____________________________________________________ xix
◊◊◊

xxbb ____________________________________________________

Chapter 1 - Introduction
Chapter Overview
XANTÉ Colour ScreenWriter Printer ............................................. 1-3
About This Manual .........................................................................1-4
Manual Conventions................................................................. 1-5
Printer Features ...............................................................................1-6
Printer Configurations..................................................................... 1-8
Warranty and Product Registration .................................................1-9
Other Helpful Documentation....................................................... 1-10
_________________________________________ Introduction 1-1

Notes
1-2 Introductionbb ________________________________________
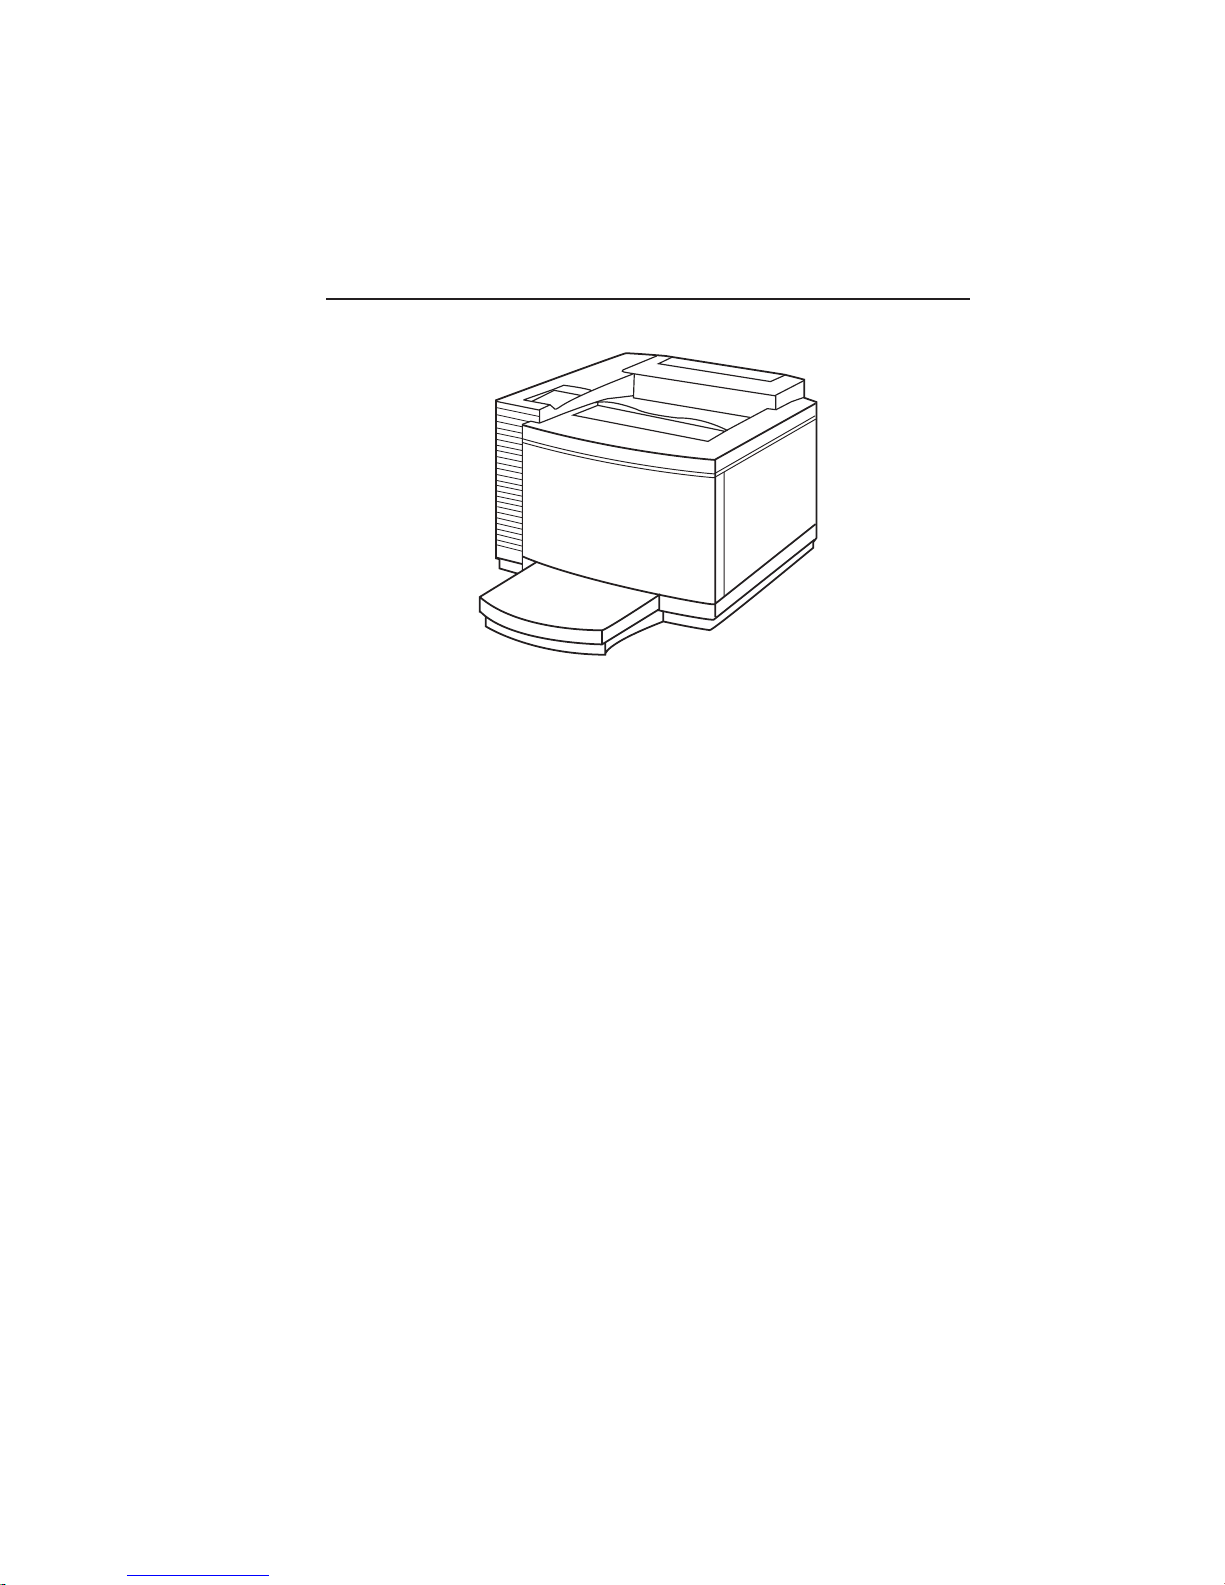
XANTÉ Colour ScreenWriter Printer
Fig. 1.1 Colour ScreenWriter Printer
XANTÉ’s tradition of innovative printing technologies, outstanding
versatility, price, and performance now combine in the XANTÉ
Colour ScreenWriter series printers. Three XANTÉ Colour
ScreenWriter models are designed to meet the needs of a broad user
base, from corporate offices and small work groups, to high end
graphics professionals.
The XANTÉ Colour ScreenWriter printers provide a premium
quality black and white and full four color printing solution. They
offer high resolution, true Adobe PostScript 3 output on up to 13.00"
x 19.00" (330 mm x 482 mm) media.
• The XANTÉ Colour ScreenWriter 600 provides versatile paper
handling and fast, high quality color printing. Designed for
business professionals and general office use, this printer is the
ideal choice for creating color reports, presentations, and other
visual documents.
• The XANTÉ Colour ScreenWriter 1200 is for professionals
requiring higher resolution and predictable, consistent,
reproducible color matching between the printer and other
CMYK devices.
_________________________________________ Introduction 1-3

• The XANTÉ Colour ScreenWriter Pro delivers the tools
demanded by graphic and printing professionals requiring the
highest standard in printing. XANTÉ’s ColourMatch Software
controls color beyond the standard settings. It allows you to
modify colors on the XANTÉ Colour ScreenWriter Pro to more
closely match color generated on the final output device. You
can print press accurate proofs, presentations, tabloid/A3
newsletters, and oversized spreadsheets for a fraction of the cost
of outsourcing to a service bureau.
About This Manual
This user’s guide covers XANTÉ Colour ScreenWriter installation,
setup, and operation.
Chapter 1 — Introduction summarizes this manual, printer
features, optional configurations, and the printer warranty.
Chapter 2 — Installation covers printer setup and connection to
Macintosh, PC, and Ethernet interfaces.
Chapter 3 — Macintosh Setup describes the XANTÉ Utilities for the
Macintosh. This includes installation for the Adobe PostScript printer
drivers, your printer’s PPD, XANTÉ Command Center, and the Adobe
Downloader as well as procedures for using printer features.
Chapter 4 — PC Setup describes the XANTÉ Utilities for the PC.
This includes installation of the Adobe PostScript printer drivers,
your printer’s PPD, and XANTÉ Command Center as well as
procedures for using printer features.
Chapter 5 — Ethernet Setup describes EtherTalk, Novell Print
Server, and Line Printer protocols on the printer’s Ethernet interface.
Chapter 6 — Configuration describes using front panel keys and
menus and the Print dialog box to configure many printer features.
Chapter 7 — Media Handling and Printing describes media
specifications, handling, and duplexing as well as providing
suggestions for creating high quality output on various media.
1-4 Introductionbb ________________________________________

Chapter 8 — Color Printing describes some basics of color
printing, such as color theories, ICC profiles, and tips.
Chapter 9 — Maintenance and Technical Specifications describes
printer care, technical specifications, service options, and the warranty.
Chapter 10 — Options describes available printer upgrades and
their installation.
Chapter 11 — Troubleshooting provides troubleshooting tips and
technical support options.
Appendix — Application Notes and Page Design describes using
the printer with some applications and offers page design tips.
Glossary — defines terms related to your printer, XANTÉ Utilities,
color theory, and the printing industry.
Index — alphabetically lists major manual topics with
corresponding page numbers and some cross-references.
The XANTÉ Colour ScreenWriter Menu quick reference sheet
illustrates the printer’s front panel menu structure and lists XANTÉ
support.
Manual Conventions
The following conventions are used in this manual:
Courier indicates information you must type or that
displays on screen.
Courier Italic
↵ indicates that you need to press the Return key
_________________________________________ Introduction 1-5
indicates variables that you must replace with
printer, host, or environmental specific
information. For example, in the following
command, you need to provide the drive
containing the XANTÉ Utilities CD-ROM.
COPY
C:\XPRESS\PDF ↵
on a Macintosh or the Enter key on a PC.
Drive
:\PPDFS\XANTE_3S.PDF

Note: indicates additional or emphasized
information.
Caution: indicates instructions that must be followed
exactly to avoid damage to files or equipment.
Warning! indicates instructions that must be followed
exactly to avoid personal injury.
: indicates the path for a file or folder and links
procedure steps.
Printer Features
XANTÉ Colour ScreenWriter’s true Adobe PostScript 3 allows you to
work from virtually any software or hardware environment. PostScript 3
features smooth shading, fast imaging, expanded font sets, international
font support, and advanced page processing for fast, quality imaging.
PostScript typefaces work with leading operating systems including
Windows (95, 98, 2000, and NT) and Macintosh OS.
XANTÉ’s photo grade color provides predictable, consistent,
reproducible color at 600 x 600 dpi and 1200 x 1200 dpi.
The standard paper cassette’s input capacity is 250 sheets of 20 lb
(75g/m
each of which can handle 500 sheets of 20 lb (75g/m2) bond paper, to
expand capacity to 1,250 sheets. Advanced paper handling
capabilities include tray chaining and optional duplexing.
Media flexibility allows printing from sizes as small as 4.1" x 9.5"
(105 mm x 241 mm) and 4.3" x 8.7" (110 mm x 220 mm) up to
oversize 13.00" x 19.00" (330 mm x 482 mm) on ordinary bond
paper or specialty stocks including coated, card, transparencies,
transfer media, laser-quality labels, and envelopes.
Simultaneously active serial, parallel, LocalTalk, and Ethernet
interfaces allow Macintosh and PC computers to send files
concurrently to the printer without sending software commands or
setting manual hardware switches.
1-6 Introductionbb ________________________________________
2
) bond paper. You can add up to two optional paper feeders,

X-ACT, XANTÉ’s patented Accurate Calibration Technology, gives
you precise control over horizontal and vertical dimensions on page
images, ensuring unmatched output accuracy.
XANTÉ Utilities include easy-to-use, menu-driven programs and
files to make working with your new printer more efficient.
In keeping with our tradition of pioneering printing innovations,
XANTÉ includes our three new color correction technologies with
the Colour Screen Writer, as well as our Positive Film technology for
outstanding film positives:
• XANTÉ’s TrueColour Correction— (for the XANTÉ Colour
ScreenWriter 600) allows you to select the desired proof mode
when printing, requiring no changes to files or software.
TrueColour includes ICC Profiles for sRGB.
• XANTÉ’s TrueColour Calibration (Linearization)— (for the
XANTÉ Colour ScreenWriter 1200 and Pro) allows you to use a
densitometer to linearize your printer; this linearization
technology provides predictable, consistent, and reproducible
color matching between the XANTÉ Colour ScreenWriter and
other CMYK devices. This helps ensure the proof and the color
on the press match. You can match sRGB printing inks on coated
paper.
• XANTÉ’s ColourMatch Software — (for the XANTÉ Colour
ScreenWriter Pro) allows you to build custom color profiles for
monitors, scanners, and printers. These profiles modify colors on
the printer to more closely match the color generated on the final
output device.
• XANTÉ’s Positive Film Technology — (for all models) allows
you to create high quality, quick turn-around film positives on
XANTÉ Myriad film directly from your desktop.
_________________________________________ Introduction 1-7

Printer Configurations
XANTÉ Colour ScreenWriter
Models
Features 600 1200 Pro
NEC VR 4310 166 MHz Processor Std. Std. Std.
RAM:
Standard (in MB) 64 256 256
Maximum (in MB) 256 256 256
Adobe PostScript 3 Std. Std. Std.
136 PostScript Fonts Std. Std. Std.
Resolution:
Standard Monochrome 1200 dpi 1200 dpi 1200 dpi
Standard Color 600 dpi 1200 dpi 1200 dpi
Standard Screenprinting 1200 dpi 1200 dpi 1200 dpi
Engine Speed (letter/A4):
Monochrome 24 ppm 24 ppm 24 ppm
Color 6 ppm 6 ppm 6 ppm
Interfaces:
LocalTalk Std. Std. Std.
Serial Std. Std. Std.
Parallel Std. Std. Std.
Ethernet 10BaseT Std. Std. NA.
(EtherTalk, Novell, TCP/IP)
Ethernet 10/100BaseT Opt. Opt. Std.
(EtherTalk, Novell, TCP/IP)
Paper Sizes:
Up to 13.00" x 19.00" Std. Std. Std.
(330 mm x 482 mm)
1-8 Introductionbb ________________________________________

XANTÉ Colour ScreenWriter
Models
Features (continued) 600 1200 Pro
Media Handling:
Built in Paper Feeder Std. Std. Std.
(with 250 sheet cassette)
Additional Paper Feeder(s) Opt Opt. Opt.
(with 500 sheet cassette;
up to two feeders can be added)
Duplexer
§
Opt. Opt. Opt.
XANTÉ Utilities
Internal IDE Hard disk Opt. Opt. Std.
AccelaFont* Std. Std. Std.
Mirror Print Std. Std. Std
Accurate Calibration Technology Std. Std. Std.
(X-ACT)
Color Control Technologies
XANTÉ TrueColour Correction Std. Std. Std.
XANTÉ TrueColour Calibration N/A Std. Std.
XANTÉ ColourMatch Software N/A N/A Std.
Positive Film Technology Std. Std. Std
§ Requires 500 sheet feeder and cassette
* Requires an optional internal hard drive
(PC and Macintosh) Std. Std. Std.
Warranty and Product Registration
Chapter 9 contains your Colour ScreenWriter warranty. Please return
the warranty sheet included with your printer package to register
your printer and to receive a free subscription to XANTÉ’s Xclusive
e-mail newsletter. Our publication features articles on printing, new
options, and tips for using your printer effectively.
_________________________________________ Introduction 1-9

Other Helpful Documentation
Please visit our Web site at www.xante.com for the latest
information about XANTÉ products and services. You may find the
following publications helpful when working with Adobe PostScript
printing.
PostScript Language Reference Manual, Second Edition. This manual,
published by Addison Wesley, is designed for advanced users, such as
programmers, who work with Adobe PostScript operators.
PostScript Language Tutorial and Cookbook. This manual,
published by Addison Wesley, is designed for those who want to
learn about working directly in the Adobe PostScript language.
Most bookstores and many computer businesses either keep these
books in stock or can order them for you.
◊◊◊
1-10 Introductionbb ________________________________________

Chapter 2 - Installation
Chapter Overview
Introduction .....................................................................................2-3
Printer Location ..............................................................................2-3
Printer Package ............................................................................... 2-4
Printer Overview .............................................................................2-6
Toner Cartridges .............................................................................. 2-8
Handling Toner Cartridges .......................................................2-8
Removing and Installing a Toner Cartridge ............................. 2-9
Removing or Installing an OPC Belt Cartridge ............................ 2-11
Installing or Replacing the Fuser Oil Bottle ................................. 2-14
Installing or Replacing the Cleaning Roller.................................. 2-16
Paper Cassette ...............................................................................2-17
Printer Ports ..................................................................................2-20
Selecting the Printer Interface ................................................2-21
Connecting to the LocalTalk Port ...........................................2-21
Connecting to the Parallel Port ............................................... 2-23
Connecting to the Serial Port.................................................. 2-24
Connecting to the Ethernet Ports ............................................2-24
Connecting the Power Cord and Verifying Setup .........................2-26
Connecting the Power Cord ...................................................2-26
Verifying Setup ....................................................................... 2-28
Colour Density Calibration ...........................................................2-29
__________________________________________ Installation 2-1

Notes
2-2 Installationbb_________________________________________

Introduction
This chapter describes selecting a printer location; installing toner and
paper; connecting the printer to Macintosh, PC, and network hardware;
and connecting the power supply.
Printer Location
Before unpacking your XANTÉ Colour ScreenWriter printer, you
need to choose a good location for it.
When you face the printer, make sure it has the following operation
and maintenance clearance around it.
• Front: 28" (70 cm) • Left: 4" (10 cm)
• Back: 8" (20 cm) • Right: 20" (50 cm)
Right Side
Table
50cm (20")
20cm (8")
16cm
20cm (8")
Paper Exit Side
80cm (32")
(6.4")
Front Side
10cm (4")
Left Side
70cm
(28")
70cm
(28")
Fig. 2.1 Operation and Maintenance Clearance
__________________________________________ Installation 2-3

The area should meet the following guidelines
• Be a level (± 1°), sturdy surface capable of supporting the printer
and consumables: 145 lb (66 kg) plus added options
• Maintain an environment without rapid changes:
— Temperature: 50° to 90.5° Fahrenheit (10° to 32.5° Celsius)
— Relative humidity: 20% to 80%
— Altitude: 0 to 8202 ft. (0 to 2500 m)
• Be away from direct sunlight, open flames, refrigerators, water
faucets, humidifiers, heaters, or similar equipment
• Be away from strong vibrations or electromagnetic fields
• Maintain a proper host-printer distance for communications:
within 10 feet (3 m) for parallel; within 25 ft. (7.5 m) for serial;
within 1000 feet (305 m) for LocalTalk
• Be close to a surge protected, grounded electrical outlet with the
proper voltage. (A surge protected outlet helps prevent power
source fluctuations from damaging your printer. Surge protectors
are available through most office supply and computer stores.)
Printer Package
Unpack the printer using the following procedure and save the
packing materials.
1. Cut the shipping straps, lift the top of the carton off the printer,
and remove the plastic bag around the printer.
Warning! The printer weighs approximately 101 lbs (46 kg)
without toner, cassettes, and media installed. Always
have two people lift the printer by the recessed grip
areas on the bottom sides.
2. Lift the printer free of the carton and place it in a location
meeting the requirements in the preceding section (fig. 2.2).
2-4 Installationbb_________________________________________

Recessed
Grip Areas
Fig. 2.2 Lift the Printer
3. Make sure you received the following items:
• Printer
• 250 sheet cassette
• Power Cord
• Envelope adaptor
• XANTÉ Utilities CD-ROM
• Documentation (user’s guide)
• Consumables (4 starter toner cartridges*, OPC belt
cartridge, oil bottle, oil syringe, cleaning roller)
*Starter cartridges are rated at half-life.
Note: If you ordered the following items, they shipped
separately.
• Additional cassettes and feeders
• Duplexer
RAM, internal hard disk, and 10/100BaseT upgrades ordered with
your printer are installed at the factory before shipping.
If your shipment is incomplete or damaged, call XANTÉ Customer
Support at 800-926-8393 (US and Canada) or your XANTÉ vendor.
__________________________________________ Installation 2-5

Printer Overview
Use Figures 2.3 through 2.6 to become familiar with your new printer.
Front Panel
Power Switch
Front Cover
Paper Exit Unit
Back Cover
Top Cover
Paper Exit Cover
Top Cover Latch
Front Cover Latch
Paper Cassette
Fig. 2.3 Front View
Paper Exit Cover
Power Cord
2-6 Installationbb_________________________________________
Printer Ports
Power Outlet
Fig. 2.4 Back View

Toner Cartridges
Front Cover Unit
Oil Bottle
Transfer Roller
Back Cover
Toner Waste Pack
Fig. 2.5 Inside Front View
Top Cover
Cleaning Roller
Fusing Unit
OPC Belt Slot
Registration
Roller
Transfer Roller
Lock Lever
Transfer Unit
__________________________________________ Installation 2-7
Fig. 2.6 Inside Top and Back Views

Toner Cartridges
The standard cyan, magenta, and yellow toner cartridges print
approximately 8,500 letter/A4 size pages at 5% coverage while the
black cartridge prints approximately 14,000 pages.
Note: Cyan, magenta, and yellow starter cartridges included in the
printer package print approximately 4,200 letter/A4 size
pages at 5% coverage while the starter black cartridge prints
approximately 7,000 pages.
Quality and reliability of refilled toner cartridges vary; XANTÉ
recommends not using them. Printer damage caused by these products is
not covered by your printer warranty.
Handling Toner Cartridges
Use these guidelines to ensure maximum life and print quality from
your toner cartridges and to prevent cartridge or printer damage:
• Use toner cartridges before their expiration date. Cartridge shelf
life is approximately 2 years unopened or 6 months opened.
• Never move the printer with the cartridges installed. Toner spills
can damage the printer.
• Keep cartridges away from computer hard disks and monitors.
Cartridges contain magnets that can cause data loss or equipment
damage.
• Store cartridges right side up, flat on a level surface away from
salt air or aerosol gases which can cause corrosion.
• Store an opened cartridge with the orange protective cover
reinstalled.
• Dispose of the cartridge following all applicable safety laws and
regulations.
Warning! Toner is highly combustible. Never dispose of it by
incineration.
2-8 Installationbb_________________________________________

Redistributing Toner
If your printer does not produce the rich, monochrome and color
images that you expect or if the printer has not been used in several
days and toner has settled, try redistributing toner in the cartridges.
Remove the cartridge from the printer, shake it gently horizontally to
redistribute toner throughout the cartridge. Then, reinstall it
following the procedure in the next section.
Removing and Installing a Toner Cartridge
1. Press the printer’s front cover latch and tilt the cover out and
down (fig. 2.7).
Front Cover
Fig. 2.7 Open the Front Cover
Front Cover Latch
2. Remove any toner cartridge if it is in the printer by grasping its
handle and pulling it slowly out of the printer (fig. 2.8).
Toner Cartridge
Fig. 2.8 Remove Toner Cartridge if Installed
__________________________________________ Installation 2-9

3. Remove the new cartridge from its package and gently shake
the cartridge horizontally several times to loosen and distribute
toner throughout the cartridge (fig. 2.9).
Caution: Always shake and hold the cartridge horizontally.
Never hold it vertically on end.
SealingTape
Ta b
Fig. 2.9 Shake the Cartridge and Remove the Tape
4. Grasp the sealing tape’s end tab and pull the tape off the
cartridge (fig. 2.9).
5. Remove the orange protective cover (fig. 2.10).
Note: Save the protective cover in case you need to store the
cartridge later.
Cover
6. Locate the printer’s color coded bay for the toner color you are
installing (fig. 2.11). The bays are lettered C (cyan), M
(magenta), Y (yellow), and K (black).
2-10 Installationbb_________________________________________
Fig. 2.10 Remove the Protective Cover

K
Y
M
C
Fig. 2.11 Toner Cartridge Bays
7. Aligning the cartridge with its color bay slot, slowly slide the
cartridge in until it stops, seating firmly in place (fig. 2.12).
Repeat this for the remaining 3 cartridges.
Toner Cartridge
Fig. 2.12 Insert the Toner Cartridge into Its Bay
8. Close the printer’s front cover.
Removing or Installing an OPC Belt
Cartridge
The OPC (Organic Photoconductor) belt cartridge usually needs
replacing after 120,000 single-sided pages print, depending on job
sizes and run lengths.
__________________________________________ Installation 2-11

Caution: Never touch the OPC belt’s surface; only handle the
cartridge by its top handle. Leave the cartridge in its
protective package until installation. Touching the belt
and exposing it to bright light (over two minutes) may
cause permanent damage. If the belt is over exposed to
light, there is a chance you may be able to salvage it by
placing it in a dark room for several hours.
1. Open the printer’s front cover (fig. 2.7) if necessary. This pulls
the toner bays forward, making room for the OPC belt
cartridge behind the bays.
Caution: If you do not open the front cover before the OPC
belt cartridge installation, permanent damage may
occur to the OPC belt cartridge.
2. Open the printer’s top cover by pulling the top cover latch
forward and lifting the cover up and back (fig. 2.13). Then, pivot
the OPC guides straight up, toward the front of the printer.
OPC
Guide
Guide
(Left)
Top Cover
Guide
(Right)
Front Cover
Fig. 2.13 Open the Top Cover and OPC Guides
3. Remove the OPC belt cartridge from its package, pull the 2
tension pins straight out from each side, and remove the black
protective sheet (fig. 2.14).
2-12 Installationbb_________________________________________

Note: The OPC belt has white powder on it for lubrication.
Do not try to remove this powder.
Protective Sheet
Tension
Release Pin
Fig. 2.14 Remove the Tension Pins and Protective Sheet
Tension
Release Pin
Belt Cartridge
4. Hold the OPC cartridge over the printer, aligning the
cartridge’s side tabs with the printer’s OPC guides (fig. 2.15).
OPC Guide
Guide
Gear
5. Lower the cartridge gently into the printer until you feel a
6. Close the OPC guides by pushing them toward the back of the
__________________________________________ Installation 2-13
Fig. 2.15 Align the OPC Cartridge over the OPC Guides
slight resistance as the cartridge’s gear engages with the gear
in the printer.
printer and down (fig. 2.15).

7. Close the printer’s top and front covers. If this is the printer’s
initial installation skip to step 2 in the next section, “Installing
or Replacing the Fuser Oil Bottle.”
Installing or Replacing the Fuser Oil
Bottle
The fuser oil bottle usually needs replacing after printing
approximately 12,000 single-sided pages at 5% coverage.
Caution: Always remove the fuser and oil bottle before moving,
transporting, or storing the printer for extended periods
to prevent printer damage due to an oil spill. Such
damage is not covered under the printer warranty.
1. Turn off the printer if you are replacing the fuser oil bottle and
the printer is on.
2. Open the printer’s top cover if it is closed (fig. 2.13).
3. Open the 2 oil bottle locks by turning them out toward the
sides (fig. 2.16).
Cleaning Roller Locks
Oil Bottle Locks
Front of Printer
Fig. 2.16 Open the Oil Bottle Locks
2-14 Installationbb_________________________________________

4. Remove the old oil bottle from the printer if you are replacing
it using the following procedure.
a. Slide a clean sheet of paper under the oil bottle as you
pull it up and out to prevent a spill.
b. Use a clean, lint-free cloth or paper towel to absorb any
remaining oil from the bottle area inside the printer.
Note: If a large spill occurs, use the oil syringe
included with the printer’s starter kit to remove
the majority of the excess oil; then use the cloth
or paper towel to absorb the rest.
c. Dispose of the old oil bottle following all applicable
safety laws and regulations.
5. Hold the new oil bottle nozzle down and lower it into the
printer (fig. 2.17).
Oil Bottle
6. Close the oil bottle locks (fig. 2.16). If this is the initial printer
7. Turn on the printer’s power.
__________________________________________ Installation 2-15
Fig. 2.17 Install the Oil Bottle
installation, skip to step 3 in the next section, “Installing or
Replacing the Cleaning Roller.” If not, close the printer’s top
cover and continue to step 7.

Installing or Replacing the Cleaning
Roller
The cleaning roller usually needs replacing after printing
approximately 12,000 single-sided pages at 5% coverage.
1. Turn off the printer if you are replacing the cleaning roller and
the printer is on.
2. Open the printer’s top cover if it is closed (fig. 2.13).
3. Open the two cleaning roller locks (fig. 2.16).
4. Remove the old cleaning roller if it is in the printer.
5. Align the new cleaning roller as shown in figure 2.18 and
lower it into place.
Cleaning Roller
Roller Tension
Lever
Roller Tension
Lever
Fig. 2.18 Install the Cleaning Roller
6. Close the two cleaning roller locks (fig. 2.16). Then, close the
printer’s top cover.
2-16 Installationbb_________________________________________

Paper Cassette
The standard paper cassette holds up to 250 sheets of 20 lb bond/60
lb text weight (75 g/m2) paper or other media to the stack heights
indicated on the cassette’s media label (fig. 2.19).
PAPER
LABEL
OHP FILM
Fig. 2.19 Cassette Media Label
This cassette handles paper weights from 16-24 lb bond (60 -90 g/m2)
up to heavy stocks that weigh as much as 43 lb bond (157 g/m2).
Note: Duplexing can be done on media up to 28 lb bond (105
2
).
g/m
This section describes loading and installing the standard paper
cassette. Chapter 7 covers media types and sizes for use in the paper
cassette and available optional cassettes. Chapter 10 describes
installing optional paper feeders.
Caution: Make sure all paper used in your printer meets the
guidelines in “Media Specifications” in chapter 7.
__________________________________________ Installation 2-17

1. Unpack the paper cassette if this is the initial setup or remove
the cassette if it is in the printer. To remove the cassette from
the printer, do the following.
a. Pull the cassette straight out until it stops (fig. 2.20).
Cassette Cover
Paper Cassette
Fig. 2.20 Pull Out the Cassette
b. Lift up slightly on the cassette; then pull it from the
printer.
2. Place the cassette on a flat surface and remove the cassette
cover (fig. 2.21).
Cassette Cover
Paper Cassette
Fig. 2.21 Remove the Cassette Cover
2-18 Installationbb_________________________________________

3. Squeeze the media length guide clasp, slide the guide to the
size (marked on the cassette) for the media you are using, and
release the clasp (fig. 2.22).
Length Guide
Fig. 2.22 Move the Length Guide
4. Squeeze the media width guide clasp, slide the guide to the
size (marked on the cassette) for the media you are using, and
release the clasp (fig. 2.23).
Width Guide
Fig. 2.23 Move the Width Guide
5. Align the media stack and load it into the cassette print side up,
leading edge to the back (fig. 2.24). See “Media Sources” in
chapter 7 to determine whether to load media short or long
edge first.
Loading Limit Mark
PAPER
LABEL
OHP FILM
Media
Fig. 2.24 Load the Paper
__________________________________________ Installation 2-19

Note: Make sure the media guides fit against the stack
without causing the media to buckle.
6. Replace the cassette cover.
7. Slide the cassette into the printer until it snaps into place.
Note: You will feel a slight resistance as you push the
cassette into the printer caused by the catch that
prevents the cassette from being dropped.
Printer Ports
XANTÉ Colour ScreenWriter printers have standard LocalTalk,
serial, parallel, and Ethernet ports (fig. 2.25). The following chart
indicates which ports are standard and which are optional according
to the printer model.
XANTÉ Colour ScreenWriter
Models
Interfaces:
LocalTalk Std. Std. Std.
Serial Std. Std. Std.
Parallel Std. Std. Std.
Ethernet 10BaseT Std. Std. N/A
(EtherTalk, Novell, TCP/IP)
Ethernet 10/100BaseT Opt. Opt. Std.
(EtherTalk, Novell, TCP/IP)
600 1200 Pro
These simultaneously active interfaces can receive jobs from
different operating environments without hardware switching.
2-20 Installationbb_________________________________________

10BaseT (UTP)
or10/100BaseT (UTP)
Fig. 2.25 Printer Ports
Selecting the Printer Interface
Connect to the appropriate printer interface for your host computer
or network environment:
Macintosh without Ethernet LocalTalk Port
PC without Ethernet
PC/Printer distance < 10 ft. (3 m) Parallel Port
PC/Printer distance > 10 ft. (3 m), Serial Port
< 25 ft. (7.6 m)
Ethernet connection RJ-45 or Coaxial
Connecting to the LocalTalk Port
Use the following equipment to connect your printer to a Macintosh
computer via the LocalTalk port (fig. 2.26).
__________________________________________ Installation 2-21

Note: iMacs and Power Mac G4s do not have LocalTalk ports. These
computers can be connected using Crossover/patch cables and
the Ethernet port or they can be connected to LocalTalk
networks using Ethernet to LocalTalk adapters. See
“Connecting to the Ethernet Ports” later in this chapter for
details.
• Two LocalTalk connector boxes with DIN-8 connectors
• A standard phone cable (RJ-11)
• Two terminating resistors
DIN-8 Connector
RJ-11 Cable
Connector
Box
Fig. 2.26 LocalTalk Connector Boxes, Resistors, and Cable
Terminating
Resistor
Connector
Box
1. Turn off your computer.
2. Plug the DIN-8 connector on one LocalTalk connector box
into the printer’s 8-pin LocalTalk port.
3. Plug the DIN-8 connector on the second LocalTalk connector
box into the Macintosh’s printer port (refer to your Apple
Macintosh manual).
4. Connect the two LocalTalk connector boxes with the RJ-11
phone cable.
2-22 Installationbb_________________________________________

5. Plug the terminating resistors into the open sockets in the
connector boxes (fig. 2.26).
Note: Terminate open sockets (one on each end of your
LocalTalk network) with terminators supplied with
your LocalTalk connectors (fig. 2.26). Closing open
sockets helps speed data transmission and ensure the
printer is available in the Chooser.
6. Go to “Connecting the Power Cord and Verifying Setup” later
in this chapter.
Connecting to the Parallel Port
Use a bidirectional parallel cable to connect your PC and printer via
the parallel port (fig. 2.27). The cable’s printer end has a 36-pin male
connector; the computer end has a 25-pin male connector.
36-pin Connector
To Printer
Fig. 2.27 Bidirectional Parallel Cable
25-pin Connector
To Host Computer
1. Turn off your PC.
2. Plug the cable’s 36-pin connector into the printer’s parallel
port and the 25-pin connector into the computer’s parallel port
(fig. 2.27).
3. Go to “Connecting the Power Cord and Verifying Setup” later
in this chapter.
__________________________________________ Installation 2-23

Connecting to the Serial Port
Use a straight-through serial cable (fig. 2.28) with either a 9-pin or
25-pin female connector to attach to the computer and a 9-pin male
connector to attach to the printer.
Connector to Printer: 9-pin
Fig. 2.28 Serial Cables
Connector to PC:
25-pin
or
9-pin
1. Turn off your PC.
2. Plug the serial cable’s 9-pin male connector into the printer’s
serial port.
3. Plug the other connector (either a 25-pin or a 9-pin female
connector) into the computer’s serial port.
4. Go to “Connecting the Power Cord and Verifying Setup” later
in this chapter.
Connecting to the Ethernet Ports
Using the Ethernet port, you can connect to a network using
unshielded twisted pair cable.
Unshielded Twisted Pair (10BaseT and 10/100BaseT)
Each device in a network installation using UTP cable must be
connected to a hub. The maximum length for a UTP cable
connection from device to hub is 328 feet (100 m). Larger networks
are formed by linking hubs to repeaters, routers, gateways, or other
hubs.
2-24 Installationbb_________________________________________

UTP cable is the wire used in many telephone installations. The
connectors used for an Ethernet network using UTP cable are RJ-45
plugs, which are similar to, but larger than ordinary telephone jacks.
Note: You can connect two Ethernet devices, bypassing a hub,
using a 10BaseT crossover/patch cable where pin 1 is
crossed to pin 3 and pin 2 is crossed to pin 6. Crossover/
patch cables must be used with blue and white Power Mac
G3 and G4 computers and with iMac computers; these
computers do not have LocalTalk ports.
To connect your printer to the Ethernet Interface
1. Turn off your host.
2. Plug one end of the UTP cable into the Ethernet port on your
printer (fig. 2.29).
10BaseT or
10/100BaseT
Unshielded
Twisted Pair
(UTP)
RJ-45
Fig. 2.29 Connect to the Ethernet UTP Port
3. Plug the cable’s other end into your network hub.
Note: Before using your printer, you need to set up the printer for
your network environment and configure the Ethernet
interface. See chapter 5 for details.
__________________________________________ Installation 2-25

Connecting the Power Cord and
Verifying Setup
Once your printer is connected to your host, you need to connect the
power cord and verify your setup.
Connecting the Power Cord
1. Make sure the printer’s power switch is off.
2. Connect the power cable’s female connector to the back of the
printer and the male connector to the power source outlet (fig.
2.30).
Warning: Plug the printer into a dedicated, properly grounded AC
outlet. Do not use an extension cord. Use a surge
protected outlet to help prevent power source fluctuations
from damaging your printer.
Power Outlet
Power Cord
Power Source
Fig. 2.30 Connect the Power Cord
2-26 Installationbb_________________________________________

Warning: Never use a power cord that is damaged. Check the
cord and plug monthly and replace immediately if you
find rust, tears, cracks, or other damage.
Turning the Printer On
Press the power switch in to turn (toggle) on the printer (fig. 2.31).
Power Switch
Fig. 2.31 Turn the Printer On
Printer initialization takes approximately 3 minutes. When READY/
IDLE displays, the printer is ready to accept print jobs.
Note: Due to movement during shipping, XANTÉ recommends
calibrating your printer after setup. See “Accurate
Calibration Technology (X-ACT)” and “Colour Density
Calibration and Verification” in chapter 6.
Following initialization, a start-up page prints if that feature is
enabled. This page lists selected resolution, installed RAM, hard disk
identities, page count, enabled interfaces, and network information (if
Ethernet is used). Review this page for proper printer configuration. See
“Start-up Page” in chapter 6 for details.
Turning the Printer Off
To turn the printer off
1. Verify that the READY/IDLE message displays.
2. Press the power switch to turn (toggle) off the printer (fig. 2.31).
Note: When printer is turned off, job information in memory is lost.
__________________________________________ Installation 2-27

Verifying Setup
If you have an Ethernet connection, skip to chapter 5 for setup and
verification details. This section covers LocalTalk, parallel, and
serial setup verifications.
Verifying a LocalTalk Setup
If you have a Macintosh G4 or iMac, you will not be able to print via
LocalTalk without an Ethernet to LocalTalk adaptor.
To verify your LocalTalk setup
1. Turn on your printer and Macintosh.
2. Verify that the Macintosh is set to communicate using LocalTalk.
• For operating systems prior to 7.5, go to Control Panels:
Network. Select LocalTalk.
• For operating systems 7.5 and later, go to Control Panels:
AppleTalk. From the Connect via menu, select Printer Port.
3. Verify that the printer’s LocalTalk interface is enabled and
configured properly. See “Interface Control” in chapter 6 and
“XANTÉ Command Center” in chapter 3.
Before using your printer, install and configure the Adobe PostScript
printer driver and your printer’s PPD. See “Xinstaller” and “Adobe
PostScript Printer Drivers” in chapter 3.
Verifying a Parallel Setup
To verify your Parallel setup
1. Turn on your printer and PC.
2. Verify that the printer’s parallel interface is enabled and
configured properly. See “Interface Control” in chapter 6.
Before using your printer, install and configure the Adobe PostScript
printer driver and your printer’s PPD. See “XANTÉ Utilities
Installer” and “Adobe PostScript Printer Drivers” in chapter 4.
2-28 Installationbb_________________________________________

Verifying the Serial Setup
To verify your serial setup
1. Turn on your printer and PC.
2. Verify that the PC and printer communication settings match.
• Check your PC documentation to determine how to check
and set the PC settings.
• Check and set your printer settings using the front panel
configuration menus. See “Interface Control” in chapter 6.
3. Verify that the printer’s serial interface is enabled and
configured properly. See “Interface Control” in chapter 6.
Before using your printer, install and configure the Adobe PostScript
printer driver and your printer’s PPD. See “XANTÉ Utilities
Installer” and “Adobe PostScript Printer Drivers” in chapter 4.
Colour Density Calibration
After installing, moving, or storing the printer for extended periods
or after installing new toner cartridges, you should verify that your
printer’s colour density is calibrated. See “Color Density Calibration
and Verification” in chapter 8 for details.
◊◊◊
__________________________________________ Installation 2-29

2-30 Installationbb_________________________________________

Chapter 3 - Macintosh Setup
Chapter Overview
Introduction .....................................................................................3-3
XANTÉ Utilities CD-ROM ............................................................3-3
Adobe Acrobat Reader ....................................................................3-5
XInstaller.........................................................................................3-5
Adobe PostScript Printer Drivers....................................................3-8
Selecting the Adobe PostScript Printer Driver .........................3-8
AdobePS 8.7.X .......................................................................3-11
AdobePS 8.6 ...........................................................................3-12
AdobePS 8.5.1 ........................................................................3-14
Configuring the PPD .............................................................. 3-15
Configuring the Printer ........................................................... 3-17
App Drivers Folder ....................................................................... 3-18
PageMaker 5 PPD Folder .......................................................3-18
QuarkXPress PDF Folder .......................................................3-18
ScenicSoft Preps .....................................................................3-19
Downloads Folder .........................................................................3-20
XANTÉ Command Center ............................................................ 3-21
General Menu .........................................................................3-21
Networking Menu................................................................... 3-24
Graphics Menu ....................................................................... 3-25
Adobe Downloader .......................................................................3-26
File Menu ...............................................................................3-27
Special Menu ..........................................................................3-27
Procedures .....................................................................................3-28
Color Linearization (Calibration) ...........................................3-28
EEROM Configuration........................................................... 3-32
Enhanced Screen Calibration ................................................. 3-34
Profiling ..................................................................................3-36
Printer Margin Adjustment .....................................................3-40
Downloaded Fonts .................................................................. 3-42
_____________________________________ Macintosh Setup 3-1

Notes
3-2 Macintosh Setupbb ____________________________________

Introduction
This chapter describes Macintosh XANTÉ Utilities as well as setup
procedures for your XANTÉ Colour ScreenWriter printer. This
includes installation and configuration of the Adobe PostScript
printer driver, your printer’s PPD (PostScript Printer Description)
file, XANTÉ Command Center, and the Adobe Downloader. The
last section describes procedures using XANTÉ Command Center
and Adobe Downloader.
Note: Before beginning this setup, you should be familiar with
standard Macintosh operation.
XANTÉ Utilities CD-ROM
This section describes Macintosh files and folders on the XANTÉ
Utilities CD-ROM.
The Acrobat folder contains specific language folders which have
an Adobe Acrobat Reader Installer. See “Adobe Acrobat Reader”
later in this chapter. The installer loads a ReadMe-Reader file
describing system requirements and use of Acrobat Reader.
The App Drivers folder contains printer drivers required by some
versions of PageMaker, QuarkXPress, and ScenicSoft Preps. See
“App Drivers Folder” later in this chapter for details.
The ATM 4.0.2 folder contains an installation program, a user guide,
and an associated file for Adobe Type Manager; these files are for
Macintoshes running System 7 and higher with the exception of
OS9, which uses ATM Light 4.6. To install, open the ATM 4.0.2
folder and double-click the installation icon. Use Adobe Acrobat
Reader to view and print the user guide.
The ATM Light 4.6 folder contains an installation program, a user
guide, and associated files for Adobe Type Manager for use with
Macintoshes running 8.2 through OS9. To install, open the ATM
Light 4.6 folder and double-click the installation icon. Use Adobe
Acrobat Reader to view and print the user guide.
_____________________________________ Macintosh Setup 3-3

The Downloads folder contains PostScript files that can be
downloaded to your printer. See the Overview.pdf file in the
Downloads folder and “Downloads Folder” later in this chapter.
The ICC Data folder contains destination and source profiles for
advanced, device independent color management control. See “ICC
Profiling” later in this chapter and “Color Profile” in chapter 6.
The NetPeeks folder contains self-extracting files for two network
utility programs and associated documentation. Use EtherHelp 3.1
and LocalHelp 2.0 to capture packets on an Ethernet or a LocalTalk
network respectively. Double-click on each icon to install that utility
on your Macintosh. Read all documentation installed with the
software before using these programs.
The PostScript 3 Fonts folder contains an installation program and
screen fonts used on XANTÉ PostScript 3 printers for display on
Macintosh systems.
Note: Do not overload the Macintosh OS Fonts folder. On
Macintosh operating systems prior to 8.0, you have to
remove some of these fonts; these system Fonts folders can
contain no more than 128 fonts.
The Printer Descriptions folder contains the PPD (PostScript
Printer Description) file for your XANTÉ printer; this file provides
software applications access to printer specific features.
The Printer Drivers folder contains a folder with the current Adobe
PostScript driver, its installation program, and a Readme file. See
this Readme file as well as “XInstaller” and “Adobe PostScript
Printer Drivers” later in this chapter to load this driver.
The Manuals folder contains PDF files of your printer’s manual,
configuration menu, and if applicable, last minute updates. Use
Adobe Acrobat Reader to view on screen or print these documents.
Read1st.txt provides last minute updates and should be read before
you install the utilities.
Readme.pdf summarizes Macintosh XANTÉ Utilities. Open this file
using Acrobat Reader.
3-4 Macintosh Setupbb ____________________________________

The XANTÉ Utilities folder contains XANTÉ Command Center,
Adobe Downloader, and a Downloader readme file. See
“XInstaller,” “XANTÉ Command Center,” and “Adobe
Downloader” later in this chapter to load and use these files.
XInstaller is an installation program for XANTÉ Command Center,
Adobe Downloader, your printer’s PPD, and the appropriate PDF
(Printer Description File) for QuarkXPress (if installed on your
system). See “XInstaller” later in this chapter. Always check the
Readme files before printing.
Adobe Acrobat Reader
XANTÉ Utilities CD-ROM documentation is in Adobe Acrobat
Portable Document Format (PDF). To install Acrobat Reader 4.0.5
1. Insert the XANTÉ Utilities CD-ROM into your Macintosh;
the CD-ROM’s main window should open. If not, doubleclick the CD-ROM’s icon.
2. Double-click the Acrobat icon. Then, double-click the
appropriate language folder.
3. Double-click the Acrobat Reader Install icon and follow the
on screen installation instructions.
4. Check the ReadMe file for updates and tips before using this
program.
XInstaller
Use XInstaller to load XANTÉ Utilities, your printer’s PPD and
QuarkXPress PDF (if QuarkXPress is on your system), and to
launch the Adobe 8.7.X driver installer.
_____________________________________ Macintosh Setup 3-5

1. Insert the XANTÉ Utilities CD-ROM. The XANTÉ Colour
ScreenWriter utilities window appears.
2. Click Continue. The Read Me window appears.
3. Read the welcome note; then, click Continue. The XInstall
window appears (fig. 3.1).
Fig. 3.1 XInstall Window
4. Select the desired type of installation by clicking the dropdown menu arrows to the right of Easy Install (fig. 3.1). If you
select Easy Install, skip to step 6. If you select Custom Install,
continue to step 5.
Note: Use the XInstall window’s drop-down menu Uninstall
option if you ever need to remove the utilities (fig.
3.1).
5. Select the desired utilities installation options from the
following list; if necessary, change the installation destination
for the files in the Install Location box.
Note: Easy Install automatically installs all four installation
options. This is the default selection.
Installation options:
• XANTÉ Utilities — installs XANTÉ Command Center,
Adobe Downloader, and support files.
3-6 Macintosh Setupbb ____________________________________

• Printer Drivers and Support Files — installs the printer’s
PPD as well as application-specific printer files for
QuarkXPress, PageMaker, and ScenicSoft Preps.
• ICC Profiles installs ICC source and destination profiles.
• AdobePS Driver Installation — installs the Adobe
PostScript driver.
6. Click Install (or quit installation by clicking Quit).
7. Wait until the selected utility programs, PPD, and PDF(s) are
installed. When the installation was successful message
appears, select Quit and go to the appropriate section listed
below.
• If you chose only to install the XANTÉ utilities, go to
“Adobe PostScript Printer Drivers” later in this chapter to
load the printer driver and your printer’s PPD manually.
• If you chose Printer Drivers and Support Files, the Adobe
PostScript Driver window appears; go to step 7 to proceed
with the AdobePS 8.7.X installation.
• If you chose ICC Profiles, go to “Adobe PostScript Printer
Drivers” later in this chapter to load the printer driver and
your printer’s PPD manually.
• If you chose Easy Install, the Adobe PostScript Driver
window appears; continue to step 8 to proceed with the
AdobePS 8.7.X installation.
8. Click Continue in the AdobePS introduction screen.
Note: On most systems the AdobePS 8.7.X program
automatically launches unless this version is installed
already. If not, you can open it manually by doubleclicking Adobe 8.7.X Installer in the Printer Drivers:
AdobePS 8.7.X folder.
_____________________________________ Macintosh Setup 3-7

9. Read the license agreement and select Accept to bring up the
AdobePS Installer window (fig. 3.2).
Fig. 3.2 AdobePS Installer Window
10. Change the destination disk (if necessary) for the driver in the
Install Location box; then, click Install. An Installation was
successful message appears when installation is complete.
11. Click Quit and restart your computer. After the restart,
complete setup following procedures in “Configuring the
PPD” and “Configuring the Printer” later in this chapter.
Adobe PostScript Printer Drivers
The XANTÉ Utilities CD-ROM contains the AdobePS printer driver
and printer PPD. Before using your printer, install and configure this
driver and PPD.
Selecting the Adobe PostScript Printer Driver
The Xinstall setup utility will install the newest Adobe PostScript
Printer (8.7.X) driver. Older versions are available through XANTÉ
or your XANTÉ Vendor.
Select the driver that best fits your needs and system configuration
(AdobePS 8.7.X, 8.6, or 8.5.1). If the chosen driver is not compatible
with your system, try one of the other three drivers.
3-8 Macintosh Setupbb ____________________________________

AdobePS 8.7.
X
The AdobePS 8.7.X driver requires the following system setup:
• Apple Power Macintosh running System 8.1 or later (AdobePS
8.7.X does not run on Macintosh 68K computers)
• At least 4 MB of memory
• At least 2.1 MB of hard disk space plus the space required for
the PPDs (each PPD is approximately 75 K)
• Apple ColorSync 2.0.1 or higher, if using the AdobePS
ColorSync features (AdobePS does not support ColorSync 1.X)
Note: AdobePS is not compatible with Apple QuickDraw GX.
AdobePS 8.7.X provides
• Adobe PostScript 3 and Adobe PostScript Level 2 support
• Full ColorSync 2.1 or higher support
• Simplified printer setup and printing interface
• Ability to change printers from the Print dialog box
• Collation to print multiple document copies as opposed to
multiple groups of the same page
• Reverse order printing to control the order in which the
document pages are printed
• Poster printing of enlarged pages on multiple sheets that can be
combined to create a poster
• Manual duplexing to split a print job into two segments: one
segment for each side of the document
• Booklet printing to create brochure-like printouts
• OpenType fonts support using Adobe Type Manager 4.6
• Transverse option support for printers supporting custom page
sizes
• Support for PostScript printers with a Universal Serial bus
_____________________________________ Macintosh Setup 3-9

AdobePS 8.6
The AdobePS 8.6 driver requires the following system setup:
• Macintosh running System 7.6.1 or later (AdobePS 8.6 does not
run on Macintosh 128K, 512K, or 512Ke computers)
• At least 4 MB of memory
• At least 2.1 MB of hard disk space plus the space required for
the PPDs (each PPD is approximately 75 K)
• Apple ColorSync 2.0.1, if using the AdobePS ColorSync
features (AdobePS does not support ColorSync 1.x)
Note: AdobePS is not compatible with Apple QuickDraw GX.
AdobePS 8.6 provides
• Adobe PostScript 3 and Adobe PostScript Level 2 support
• Full ColorSync 2.1 support
• Simplified printer setup and printing interface
• Ability to change printers from the Print dialog box
• Collation to print multiple document copies as opposed to
multiple groups of the same page
• Reverse order printing to control the order in which the
document pages are printed
• Poster printing of enlarged pages on multiple sheets that can be
combined to create a poster
• Manual duplexing to split a print job into two segments: one
segment for each side of the document
• Booklet printing to create brochure-like printouts
AdobePS 8.5.1
The AdobePS 8.5.1 printer driver requires the following system
setup:
• Macintosh running System 7.1 or later (AdobePS does not run
on Macintosh 128K, 512K, or 512Ke computers)
3-10 Macintosh Setupbb ____________________________________

• At least 4 MB of memory
• At least 2 MB of hard disk space plus the space required for the
PPDs; each PPD is approximately 75K in size)
• Chooser version 7.3 or later (supplied with the PSPrinter
installation)
AdobePS 8.5.1 provides
• Adobe PostScript 3 and Adobe PostScript Level 2 support
• Full ColorSync 2.1 support
• Simplified printer setup and printing interface
• Ability to change printers from the Print dialog box
• Single-pass foreground printing for faster printing of large or
complex documents
AdobePS 8.7.
Following installation of the XANTÉ Utilities and your printer’s
PPD, AdobePS launches automatically.
Note: AdobePS also can be launched manually from the Printer
Drivers: AdobePS 8.7.X: US.sea (or appropriate language)
file by opening the compressed language file and doubleclicking the AdobePS Installer icon.
The AdobePS installation program loads AdobePS, an AdobePS
Readme file, an AdobePS driver Custom Page extension into the
Printer Descriptions folder, and other files required for the Adobe
PostScript printer diver. It does not load PPD files automatically.
Installation overwrites any earlier AdobePS version but will not
overwrite other printer drivers. Check the Readme First file in the
AdobePS 8.7.X folder before beginning driver installation.
Installing AdobePS 8.7.
1. Insert the XANTÉ Utilities CD-ROM into your Macintosh.
X
X
_____________________________________ Macintosh Setup 3-11

2. Double-click the utilities icon.
3. Locate and launch the AdobePS Installer. This installer is in
the Printer Drivers: AdobePS 8.7.X: US.sea (or appropriate
language) file; double-click the compressed file and then
double-click the AdobePS Installer icon.
4. Follow steps 7 through 10 in “XInstaller” earlier in this
chapter; then, after your Macintosh restarts, install your
printer’s PPD (see the next section).
Installing the PPD for AdobePS 8.7.
1. Insert the XANTÉ Utilities CD-ROM into your Macintosh.
2. Double-click the utilities icon.
3. Select your printer’s PPD in the Printer Descriptions folder.
4. Drag the PPD to the System Folder: Extensions: Printer
Descriptions folder on your Macintosh.
The AdobePS printer driver and your printer’s PPD are installed. See
“Configuring the PPD” later in this chapter to complete driver setup.
X
AdobePS 8.6
Following installation of the XANTÉ Utilities and your printer’s
PPD, AdobePS 8.6 needs to be launched manually from the Printer
Drivers folder.
Note: You can download the AdobePS 8.6 driver from XANTÉ’s
or Adobe’s web site (www.xante.com or www.adobe.com)
or contact XANTÉ for a copy.
3-12 Macintosh Setupbb ____________________________________

The AdobePS installation program loads AdobePS, an AdobePS
Readme file, an AdobePS driver Custom Page extension into the
Printer Descriptions folder, and other files required for the Adobe
PostScript printer diver. It does not load PPD files automatically.
Installation overwrites any earlier AdobePS version but will not
overwrite other printer drivers. Check the Readme First file in the
AdobePS 8.6 folder before beginning driver installation.
Installing AdobePS 8.6
1. Download the AdobePS 8.6 driver from XANTÉ’s or Adobe’s
web site (www.xante.com or www.adobe.com) or contact
XANTÉ for a copy.
2. Locate and double-click the AdobePS Installer on your system.
3. Follow steps 7 through 10 in “XInstaller” earlier in this
chapter; then, after your Macintosh restarts, install your
printer’s PPD (see the next section).
Installing the PPD for AdobePS 8.6
1. Insert the XANTÉ Utilities CD-ROM into your Macintosh.
2. Double-click the utilities icon.
3. Open the Printer Descriptions folder and select your printer’s
PPD.
4. Drag the PPD to the System Folder: Extensions: Printer
Descriptions folder on your Macintosh.
The AdobePS printer driver and your printer’s PPD are installed. See
“Configuring the PPD” later in this chapter to complete the driver
setup.
_____________________________________ Macintosh Setup 3-13

AdobePS 8.5.1
Following installation of XANTÉ Utilities and your printer’s PPD,
AdobePS 8.5.1 needs to be launched manually from the Printer
Drivers folder.
Note: You can download the AdobePS 8.5.1 driver from XANTÉ’s
or Adobe’s web site (www.xante.com or www.adobe.com)
or contact XANTÉ for a copy.
The AdobePS installation program loads AdobePS, an AdobePS
Readme file, an AdobePS driver Custom Page extension into the
Printer Description folder, and other files required for the Adobe
PostScript printer driver. It does not load PPD files automatically.
Installation overwrites any earlier AdobePS version but will not
overwrite other printer drivers. Check the appropriate language
folder’s Readme First file in the AdobePS 8.5.1 folder before
beginning driver installation.
Installing AdobePS 8.5.1
1. Download the AdobePS 8.5.1 driver from XANTÉ’s or
Adobe’s web site (www.xante.com or www.adobe.com) or
contact XANTÉ for a copy.
2. Locate and double-click the AdobePS Installer on your system.
3. Follow steps 7 through 10 in “XInstaller” earlier in this
chapter; After your Macintosh restarts, install your printer’s
PPD (see the next section).
Installing the PPD for AdobePS 8.5.1
1. Insert the XANTÉ Utilities CD-ROM into your Macintosh.
2. Double-click the utilities icon.
3. Open the Printer Descriptions folder and select your printer’s
PPD.
4. Drag the PPD to the System Folder: Extensions: Printer
Descriptions folder on your Macintosh.
3-14 Macintosh Setupbb ____________________________________

The AdobePS printer driver and your printer’s PPD are installed.
Continue to the next section to configure the PPD and complete the
driver setup.
Configuring the PPD
1. Select Chooser from the Apple menu. The Chooser window
appears (fig. 3.3).
Fig. 3.3 AdobePS Chooser Window
2. Select AdobePS from the box on the left (top left in a network
environment); a list of available printers appears to the right.
Note: If the printer does not appear in the list, verify that
—the printer is on and cable connections are secure
—LocalTalk or EtherTalk (depending on your setup)
is enabled on the printer front panel
—the correct protocol (AppleTalk or EtherTalk) is
selected on the front panel.
—your Macintosh is setup for LocalTalk or EtherTalk
in the AppleTalk Control panel.
—Power Mac G3 and G4 computers and iMac
computers do not have LocalTalk ports.
_____________________________________ Macintosh Setup 3-15

3. Highlight your printer and double-click. If the setup reminder
dialog box appears, click OK. The Adobe PostScript printer
driver automatically selects and configures the correct PPD for
your printer.
Note: If multiple PPDs are installed for your printer, select
the correct PPD when prompted.
4. Close the Chooser window to complete the PPD setup unless
the following window appears (fig. 3.4). If this window
appears, continue with step 5.
Fig. 3.4 Autosetup Failed Message
5. Click Ok in the Autosetup failed dialog box. The Installable
Options window appears (fig. 3.5).
6. Configure the printer’s options.
a. Select Installed for the upgrades installed on your
printer.
Note: If your printer has two cassette trays, select
b. Select the amount of RAM installed on your printer.
3-16 Macintosh Setupbb ____________________________________
Fig. 3.5 Installable Options Window
Upper Optional Tray: Installed; If it has three
cassettes, select Upper Optional Tray: Installed
and Lower Optional Tray: Installed.

c. Select the highest resolution available on your printer.
7. Click OK twice. The Chooser window reappears; then, close
this window.
Note: When you add a printer from the network, go through either
the Auto Setup or manual setup procedure to ensure that the
printer is recognized by the network.
Configuring the Printer
If necessary, configure the printer’s communication interface using
the front panel. See Chapter 6, “Configuration,” for details.
1. Select the SETUP: I/F menu.
2. Select the menu for the printer interface connected to your
computer (LOCALTALK or ETHERTALK).
3. Select the ENABLE menu. Then, select YES.
4. Press the Online key until READY/IDLE appears.
5. Verify the setup.
a. Make sure your Macintosh is connected to the printer
with a LocalTalk or Ethernet cable.
Note: Power Mac G3 and G4 computers and iMac
computers do not have LocalTalk ports.
b. Double-click the XANTÉ Command Center icon in the
XANTÉ Utilities folder.
c. Choose General: Printer Status. A dialog box displays
the current printer status.
Note: If the status dialog box does not appear, check
all cable connections and be sure the printer
interface you are using is enabled on the printer.
_____________________________________ Macintosh Setup 3-17

d. Click OK in the dialog box; then, choose File: Quit.
Command Center closes.
App Drivers Folder
Some Adobe PageMaker and FreeHand versions, QuarkXPress, and
ScenicSoft Prep applications require special files in addition to the
standard PPD supplied for your printer. These files are in the CDROM’s App Drivers folder.
Note: Some advanced XANTÉ printer features may not be
available when using older application versions.
PageMaker 5 PPD Folder
The PageMaker 5 PPD folder contains the XANTÉ Colour
ScreenWriter PM5 PPD for Aldus PageMaker versions 4.2 to 5.0 and
Aldus FreeHand versions 3.0 and 3.1. To install these PPDs
1. Load and configure the Adobe PostScript printer driver and
your printer’s PPD following instructions in “Adobe PostScript
Printer Drivers” earlier in this chapter.
2. Copy your printer’s PPD from the CD-ROM’s App Drivers:
PageMaker 5 PPD folder to the System: Aldus PPD folder on
your Macintosh.
3. Check your application documentation for instructions on
selecting and using the PPD.
QuarkXPress PDF Folder
The App Drivers: QuarkXPress PDF folder contains the XANTÉ
Colour ScreenWriter file which is your printer’s PDF (Printer
Description File). QuarkXPress versions 3.3.X and earlier require
this file in addition to the PPD to ensure the highest quality output
from your printer and QuarkXPress.
3-18 Macintosh Setupbb ____________________________________

XInstaller loads the QuarkXPress PDF if you choose Easy Install or
XANTÉ Colour ScreenWriter printer installation. To load these
PDFs manually
1. Load and configure the Adobe PostScript printer driver and
your printer’s PPD following the instructions in “Adobe
PostScript Printer Drivers” earlier in this chapter.
2. Copy your printer’s PDF from the CD-ROM’s App Drivers:
QuarkXPress PDF folder to the appropriate folder on your
Macintosh.
• For versions 3.3.X and earlier, copy your printer’s PDF to
the QuarkXPress application: PDF folder.
QuarkXPress 4.X uses your printer’s PPD file (it does not need a
PDF). To load a PPD file manually, copy your printer’s PPD from
the CD-ROM’s Printer Descriptions folder to the System Folder:
Extensions: Printer Descriptions folder on your Macintosh.
Note: Remove “Balloon Help” from the Quark folder for
QuarkXPress 3.3.2.
See the QuarkXPress section in the appendix for additional
information.
ScenicSoft Preps
The App Drivers: ScenicSoft Preps folder contains PPD and PDX
files for XANTÉ Colour ScreenWriter printers. The XInstaller
installs these files automatically if you have the ScenicSoft Preps
application on your system.
_____________________________________ Macintosh Setup 3-19

Downloads Folder
The Downloads folder contains Adobe PostScript files and
Overview.pdf which describes these files. Download the PostScript
files to your printer using Adobe Downloader or XANTÉ Command
Center.
FONTS.PS3 prints a list of the Adobe PostScript 3 fonts resident on
XANTÉ PostScript 3 printers.
Note: You also can print this list using the front panel Setup:
Utility: Utility Pages: Font Names option.
FONTSAMP.PS3 prints samples of Adobe PostScript 3 fonts
resident on XANTÉ PostScript 3 printers.
Note: You also can print this list using the front panel Setup:
Utility: Utility Pages: Font Samples option.
FTP.PS prints instructions for uploading and downloading files to
XANTÉ’s FTP (File Transfer Protocol) site.
INITDSK.PS file initializes hard disks attached to or installed in
your printer.
You must initialize a hard disk before it can be used to store
downloaded fonts. Initializing a disk erases all information stored on
the disk.
NOVELL34.PS prints instructions for setting up a XANTÉ printer
on a Novell network.
PARMDUMP.PS prints a list of settings for communication devices
currently configured for your printer.
SETZONE.PS allows you to set your printer’s EtherTalk zone
name. Open the file in a text editor, such as SimpleText, and change
“name of zone” in the parentheses to the name of your EtherTalk
zone. Save the file and download it to your printer. Restart the
printer to make the change effective.
3-20 Macintosh Setupbb ____________________________________

SET_IP.PS allows you to set your printer’s IP address. Open the file
in a text editor, such as SimpleText, and change the IP address in the
parentheses to your printer’s IP address. Save and download the file
to your printer. Restart the printer to make the change effective.
STARTPG.OFF disables the printer’s start-up page feature,
preventing the page from printing automatically each time the printer
is restarted (see “Start-up Page” in chapter 6).
STARTPG.ON enables the printer’s start-up page feature, causing
the page to print automatically each time the printer is restarted (see
“Start-up Page” in chapter 6).
SYSPARM.PS prints a list of current system parameters.
XANTÉ Command Center
XANTÉ Command Center allows you to check and control many
printer functions from your Macintosh. Use XInstaller to install
Command Center or copy the program from the CD-ROM’s XANTÉ
Utilities folder to a folder on your Macintosh.
The File and Edit menus are similar to other Macintosh applications
and are not described in detail in this section.
General Menu
The General menu allows you to communicate with the printer to
perform margin adjustment, get printer settings and status, download
PostScript files to the printer, and change some printer default
settings (fig. 3.6).
_____________________________________ Macintosh Setup 3-21

Fig. 3.6 General Menu Options
Printer Status
This option provides current printer status information on screen. For
example, the status may indicate that the printer is idle (ready to
receive a job). If the printer is receiving data or processing a job, the
message lists the interface source.
Printer Information
This option allows you to send current printer settings to the screen
or the printer. The list includes printer configuration, storage devices
on the printer, and network configuration information.
Spooling
This option is not for use with XANTÉ Colour ScreenWriter
printers.
Margin Adjustment
This option allows you to adjust the printer margin. Printer margin
refers to the imageable area, not to margin settings for a document in
an application. The imageable area is the portion of a page on which
the printer can lay down toner. Margin Adjustment allows you to
adjust the position of this imageable area. See “Printer Margin
Adjustment” later in this chapter for detailed instructions.
3-22 Macintosh Setupbb ____________________________________

X-ACT
This option is not for use with XANTÉ Colour ScreenWriter
printers. However, X-ACT is available through the printer’s front
panel. See “Accurate Calibration Technology (X-ACT)” in chapter 6
for details.
Download Postscript File
This option allows you to download PostScript files to your printer.
Test Directory
This option is not for use with XANTÉ Colour ScreenWriter
printers.
Reboot Printer
This option allows you to reboot the printer from your computer.
This reboot causes the printer to go through the initialization process.
Startup Page
This option allows you to enable (On) or disable (Off) automatic
start-up page printing after your printer goes through initialization.
The Print One option allows you to print a start-up page regardless of
whether the feature is enabled. The factory default is to print the
start-up page after initialization.
See “Downloads Folder” earlier in this chapter and “Start-up Page”
in chapter 6 for other methods to control the start-up page feature.
Configure
This options allows you to find out the EEROM settings for a
particular printer. You can save these settings to a file and later
reload them to that printer or to another printer. See “EEROM
Configuration” later in this chapter for details.
_____________________________________ Macintosh Setup 3-23

Networking Menu
The Networking menu (fig. 3.7) allows you to configure your
printer’s optional Ethernet interface for Novell Print Server
emulation, AppleTalk, and the TCP/IP communication. Only the
Network Administrator should use these options. See chapter 5,
“Ethernet Setup,” for details.
Fig. 3.7 Networking Menu
Novell Print Server
Novell Print Server options allow you to configure the Novell Print
Server emulation on your printer’s optional Ethernet interface.
• Login & Printing allows you to enable your printer to login and
accept print jobs from a designated Novell file server.
• File Servers allows you to specify up to four Novell file servers
for your printer to poll for print jobs.
• Print Server Name allows you to specify the name your printer
will use to log in to the Novell file server.
• Set Print Server Password allows you to specify the password
required for your printer to log in to the Novell file server.
• Network Protocol allows you to configure the Novell Print
Server emulation for your network protocol. The printer’s front
panel Novell Print Server menu is another way to set the network
protocol. See “Interface Control” in chapter 6 for details.
3-24 Macintosh Setupbb ____________________________________

AppleTalk
AppleTalk menu options allow you to configure the AppleTalk
protocol on your printer’s optional Ethernet interface:
• Printer Name allows you to set the name your printer advertises
on the network.
• EtherTalk Zone Name allows you to change your printer’s
default zone assigned by the network router.
TCP/IP
TCP/IP options allow you to enable the TCP/IP protocol and to set
the TCP/IP address on your printer’s optional Ethernet interface.
• Address allows you to change your printer’s default TCP/IP
address to agree with your network TCP/IP addressing system.
See “TCP/IP Addresses” in chapter 5 for details.
• LPR Enable allows you to enable or disable the Line Printer
protocol on your printer’s optional Ethernet interface. The
printer’s front panel Line Printer menu is another way to enable
or disable LPR. See “Interface Control” in chapter 6 for details.
Graphics Menu
The Graphics menu (fig. 3.8) allows you to calibrate (linearize) your
printer and change enhanced screen values for advanced color
management.
Fig. 3.8 Graphics Menu
CRD Directories
This option is not for use with XANTÉ Colour ScreenWriter
printers.
_____________________________________ Macintosh Setup 3-25

Linearization
The Linearization option allows you to color calibrate (linearize)
your printer’s performance to eliminate color inconsistencies. See
“Color Linearization (Calibration)” later in this chapter for details.
Enhanced Screen Calibration
This option allows you to change the enhanced screen values to
achieve the best output according to the lpi (lines per inch) used for a
particular job. (See “Enhanced Screen Calibration” later in this
chapter for details.)
ICC Profiling
The ICC Profiling option allows you to select an ICC profile to use
for system level, device independent color management. This allows
exchanging and matching of color information between input
devices, monitors, printers, and applications. An individual profile
contains information about a specific device’s color reproduction
capabilities. See “Profiling later in this chapter.
ICC Profiling is only active if the internal IDE hard drive upgrade is
installed on your printer.
Adobe Downloader
Use Adobe Downloader (fig. 3.9) to load and manage font files on
your printer’s hard drive and to send PostScript files to your printer.
Fig. 3.9 Adobe Downloader Menu
3-26 Macintosh Setupbb ____________________________________

File Menu
The File menu allows you to download fonts and PostScript files to
the printer and quit Adobe Downloader.
Download Fonts
This menu allows you to download fonts to an optional hard disk on
your printer or to printer memory. Fonts downloaded to your printer
are considered resident, which means applications do not have to
bundle these fonts with print jobs. Fonts downloaded to printer
memory only remain during the current power cycle. Fonts
downloaded to an optional hard disk survive a power cycle. See
“Downloaded Fonts” later in this chapter for detailed instructions.
Download Postscript File
This option allows you to select a PostScript file on your Macintosh
and send it to the printer. XANTÉ Command Center’s General menu
also has this option.
Special Menu
The Special menu allows you to check printer status and manage
fonts downloaded to your printer.
Printer Status
This option allows you to check current printer status. XANTÉ
Command Center’s General menu also has this option.
Printer Font Directory
The Printer Font Directory provides access to fonts downloaded to
the printer. Using this menu, you can print a list or view (on screen)
all fonts downloaded to printer ROM, memory, or an optional hard
disk. Delete allows you to remove fonts that have been downloaded
to memory or the optional hard disk. You cannot remove fonts from
ROM. See “Downloaded Fonts” later in this chapter for detailed
instructions.
_____________________________________ Macintosh Setup 3-27

Other Special Menu Options
We recommend that you use XANTÉ Command Center’s General:
Reboot Printer option instead of Clear Font Cache or Restart Printer
options in the Special menu. See the PostScript Reference Language
Manual about the Use Different Password option.
Procedures
This section provides instructions for performing special procedures
using XANTÉ Command Center and Adobe Downloader.
Color Linearization (Calibration)
Using a densitometer capable of reading dot area and XANTÉ
Command Center, you can color calibrate (linearize) your printer’s
performance to eliminate color inconsistencies due to resolution and
lpi (lines per inch) settings; to replacement of OPC belt and toner
cartridges; to different media types; and to environmental conditions.
To linearize your printer’s colors
1. Print a color calibration page either from the printer’s front
panel or from XANTÉ Command Center using one of the
following procedures:
Note: Always print the calibration page using the same
media and toner as used for final copy.
3-28 Macintosh Setupbb ____________________________________

Fig. 3. 10 Color Calibration Page
a. Front Panel: Select the LPI (lines per inch), resolution , and
screen type (Spot Function) that will be used for final
output. Then, select Setup: Utility: Utility Pages:
TrueColour Calibrate from the printer’s front panel. A
color calibration page prints with patches for all colors
(CMYK). Then, open Command Center and select
Graphics: Linearization. When the Linearization window
appears (fig. 3.11), go to step 2.
_____________________________________ Macintosh Setup 3-29
Fig. 3.11 Linearization Window

b. Command Center: Open Command Center and select
Graphics: Linearization. When the Color Printer
Linearization window appears (fig. 3.11), select the LPI,
resolution, and screen type settings that will be used for
final output. Then, click Print Calibration Page. A color
calibration page prints.
Note: You can reset the printer to the factory default
by clicking Reset in the Linearization window.
2. Select the individual color(s) or All in the Linearization
Options box, depending on what color(s) will be used in the
final output.
3. Click Linearize in the Linearization window (fig. 3.11). A
Data Entry window for a selected color appears (fig. 3.12).
Note: Each color has its own Data Entry window. If you select
more than one color, windows appear in sequence,
allowing you to enter patch numbers for each color in its
corresponding box. For example, if you chose All in step
2, the black data entry window appears first. After you
enter the appropriate black patch numbers and click
Linearize Black, the data entry window for the next color
appears.
4. Measure individual calibration page patches using your
densitometer (see your densitometer’s documentation for
details).
3-30 Macintosh Setupbb ____________________________________
Fig. 3.12 Data Entry Window

5. Enter the number of the patch whose densitometer
measurement most closely matches the corresponding
percentage to the right of the Box # field.
For example, when you are reading for 10%, if box number 7
measures 10%, enter 7 under Box # in the 10% line.
Note: If the desired percentage falls between two boxes,
always enter the number of the higher box (round up).
6. Click Linearize Black (or the color you are linearizing). The
selected color is calibrated (linearized) and you proceed to the
next color, or you return to the Linearization window (fig. 3.11.)
Note: To verify linearization, click Print Verification Page
(fig. 3.13) before you close the Linearization window.
When this page prints, measure its patches using your
densitometer. Patch measurements should match or
just be slightly above the desired percentage. The
page’s colors run from 10% at the top to 100% at the
bottom for each color row. If measurements are out of
range, repeat the linearization process.
_____________________________________ Macintosh Setup 3-31
Fig. 3.13 Verification Page

7. Click OK to close the Linearization window.
Advanced Linearization
Advanced linearization gives you more precise linearization control.
The only difference between the regular and advanced linearization
process is that you select Advanced Linearization in the
Linearization window (fig. 3.11) before clicking Linearize and the
Data Entry window that appears (fig. 3.14) has a slightly different
layout. Otherwise, the process is the same.
Fig. 3.14 Advanced Data Entry Window
EEROM Configuration
XANTÉ Command Center’s General menu offers a Configure option
that allows you to find out the EEROM settings for a particular
printer. You can save these settings to a file and later reload them to
that printer or to another printer.
To use the Configure feature
1. Open XANTÉ Command Center and select General:
Configure. The Configuration window appears (fig. 3.15).
3-32 Macintosh Setupbb ____________________________________

Fig. 3.15 Configuration Window
2. Click Get Configuration. A message similar to the one in
figure 3.16 appears letting you know how many configurable
items are in the controller.
Fig. 3.16 Configuration Message Window
Note: The Configuration Message window appears to let you
know how many configurable items are in the
controller. Because there are many configurable items,
it may take a long time to load this information. If you
do not want to do this at this time, click Cancel to quit.
3. Click Ok to continue (fig. 3.16). Information uploads 10 items
at a time.
_____________________________________ Macintosh Setup 3-33

Note: The uploads progress appears in the middle of the
Configuration Message window (fig. 3.16). For
example the message says “10 configurable items,”
“20 Configurable items,” and so on until the number
reaches the total number of configurable items
originally listed on your controller. The cursor stops
spinning when uploading is finished.
4. Click Save As (fig. 3.16). When the Save dialog box appears,
select the directory to which you want to save the file; then,
name the file and click Save. You return to the Configuration
window (fig. 3.15). If you want to load the file, go to step 5; if
not, skip to step 8.
5. Click Load (fig. 3.15), locate and select the appropriate file,
and click Open. You return to the Configuration window (fig.
3.15).
Note: The name of the file now appears below Using
Configuration File in the Configuration window. If
<<no file>> appears there, no file has been selected.
6. Click Update Configuration (fig. 3.15) to download the file to
a printer. A Configuration updated message appears when the
download is complete.
Note: The Save As and Update Configuration options are
disabled until the file finishes downloading.
7. Click Close (fig. 3.15). The Configuration window closes.
8. Select File: Quit; Command Center closes.
Enhanced Screen Calibration
XANTÉ Command Center’s Graphics menu has a Enhanced Screen
Calibration option. This option allows you to change the enhanced
screen values to achieve the best output according to the lpi (lines
per inch) used for a specific job.
3-34 Macintosh Setupbb ____________________________________

To use Enhanced Screen Calibration
Note: To reset enhanced screen values to factory defaults setting,
click Reset in the Enhanced Screen Calibration window (fig.
3.17).
1. Open XANTÉ Command Center. Then, select Enhanced
Screen Calibration from the Graphics menu (fig. 3.8). The
Enhanced Screen Calibration window appears (fig. 3.17).
Fig. 3.17 Enhanced Screen Calibration Window
2. Click Print Calibration Page. A page similar to figure 3.18 prints.
_____________________________________ Macintosh Setup 3-35
Fig. 3.18 Sample Screen Calibration Page

3. Locate the LPI setting box for the LPI that you are using on the
XANTÉ Screen Calibration page (fig. 3.18).
4. Find the highest value for each color in the job where that
color can no longer be seen; then, enter that number in the box
next to its corresponding color in the Values box (fig. 3.17).
For example, if you are printing at 95 lpi using cyan and magenta,
locate the 95 LPI box on the Screen Calibration page (fig. 3.18).
In the Cyan column if the color disappears in box 5, enter 5 in the
C: values box in the Enhanced Screen Calibration window (fig.
3.17). If the color in the magenta column disappears in box 4,
enter 4 in the M: value box of the window.
5. Enter the job’s lpi in the LPI box (fig. 3.17). Then, click
Update to send the new values to the printer.
6. Click Close (fig. 3.17). The Enhanced Screen Calibration
window closes. Then, select File: Quit (Macintosh) or File:
Exit (PC); Command Center closes.
Profiling
ICC Profiling allows you to select an ICC profile to use for system
level, device independent color management. This allows
exchanging and matching of color information between input
devices, monitors, printers, and applications. An individual profile
contains information about a specific device’s color reproduction
capabilities.
This profile procedure is only for the XANTÉ Colour ScreenWriter
Pro printer using ColourMatch software to build profiles or using
XANTÉ supplies custom profiles.
To download or delete source and destination profiles, use XANTÉ
Command Center.
1. Open Command Center.
3-36 Macintosh Setupbb ____________________________________

2. Select Graphics: ICC Profiling. The ICC Profiling window
appears (fig. 3.19). To download a source profile, continue to
step 3. To delete a source profile, skip to step 4. To download
a destination profile, skip to step 5. To delete a destination
profile, skip to step 6.
Fig. 3.19 ICC Profiling Window
3. Use the following procedure to download a source profile.
a. Click Download Source Profile (fig. 3.19). When the
next window appears, go to your ICC profile directory.
A window similar to the following appears (fig. 3.20).
_____________________________________ Macintosh Setup 3-37
Fig. 3.20 ColorSync Profiles
b. Select the XANTÉ sRGB source profile, and click Open.
A progress window appears and next you get a message
when downloading is done.
Note: You can cancel downloading in the progress
window before downloading is complete.
c. Click OK. The ICC Profiling window reappears (fig.
3.19).

d. Click OK. Then, skip to step 7.
4. Use the following procedure to delete a source profile.
a. Click Delete Source Profile (fig. 3.19). A window
similar to the following appears (fig. 3.21).
Fig. 3.21 ICC Profiles Source Directory Window
b. Select the desired file to delete in the ICC Profiles
(source directory): box; the Delete button becomes
active.
c. Click Delete. When the window appears asking if you
are sure you want to delete the selected source, click
Yes.
d. Click Close in the ICC Source Directory window. The
ICC Profiling window reappears.
e. Click OK and skip to step 7.
5. Use the following procedure to download a destination profile.
a. Click Download Destination Profile (fig. 3.19). When
the next screen appears, go to your ICC profile directory.
A window similar to figure 3.20 appears.
b. Select the desired destination file, and click Open. A
progress window appears and next you get a message
when downloading is done.
3-38 Macintosh Setupbb ____________________________________

Note: You can cancel downloading in the progress
window before downloading is complete.
c, Click OK. The ICC Profiling window reappears (fig.
3.19).
d. Click OK. Then, skip to step 7.
6. Use the following procedure to delete a destination file.
a. Click Delete Destination Profile (fig. 3.19). A screen
similar to the following appears (fig. 3.22).
Fig. 3.22 ICC Profiles Destination Directory Window
b. Select the desired destination profile to delete in the ICC
Profiles (destination directory): box; the Delete button
becomes active.
c. Click Delete. When the window appears asking if you
are sure you want to delete the selected profile, click
Yes.
d. Click Close in the ICC Profiles Destination Directory
window. The ICC Profiling window reappears.
e. Click OK and go to step 7.
7. Select File: Quit. Command Center closes.
_____________________________________ Macintosh Setup 3-39

Printer Margin Adjustment
Use Margin Adjustment to adjust the position of the imageable area
on the media.
Note: Use standard size paper (letter or A4) in your paper cassette
with the Margin Adjustment function.
1. Open XANTÉ Command Center. Select General: Margin
Adjustment. The Printer Margin Control window (fig. 3.23)
appears.
Fig. 3.23 Printer Margin Control Window
2. Select Standard to use 1/32-inch units or Metric for 1 mm units
for adjustments.
3. Select Set & Print. Click Send to Printer. Click Ok in the
warning dialog box (fig. 3.24). An alignment test page prints.
Fig. 3.24 Margin Alignment Warning
4. Turn the test page so that -x is to the left and -y is at the top of
the crossed lines.
3-40 Macintosh Setupbb ____________________________________
 Loading...