

Page 1
QUICK START INSTRUCTIONS
MRC88m & XT1
Multi-Room Controller and Tuner Integration
DESCRIPTION
This document describes how to integrate the XT1 with the MRC88m, using Dragon-Drop software.
For this example, we are going to connect the XT1 to the MRC88m as Source Input 1, and are going
to use the COM RS232 port of the MRC88m for communications with the XT1.
PHYSICAL CONNECTIONS
Connect the RED and WHITE analog stereo connectors from the XT1 to the appropriate SOURCE 1
inputs of the MRC88m.
Connect the RS232 port of the XT1 to the COM port of the MRC88m, using the RJ45-to-DB9
connector included with the XT1. No additional adaptors are necessary.
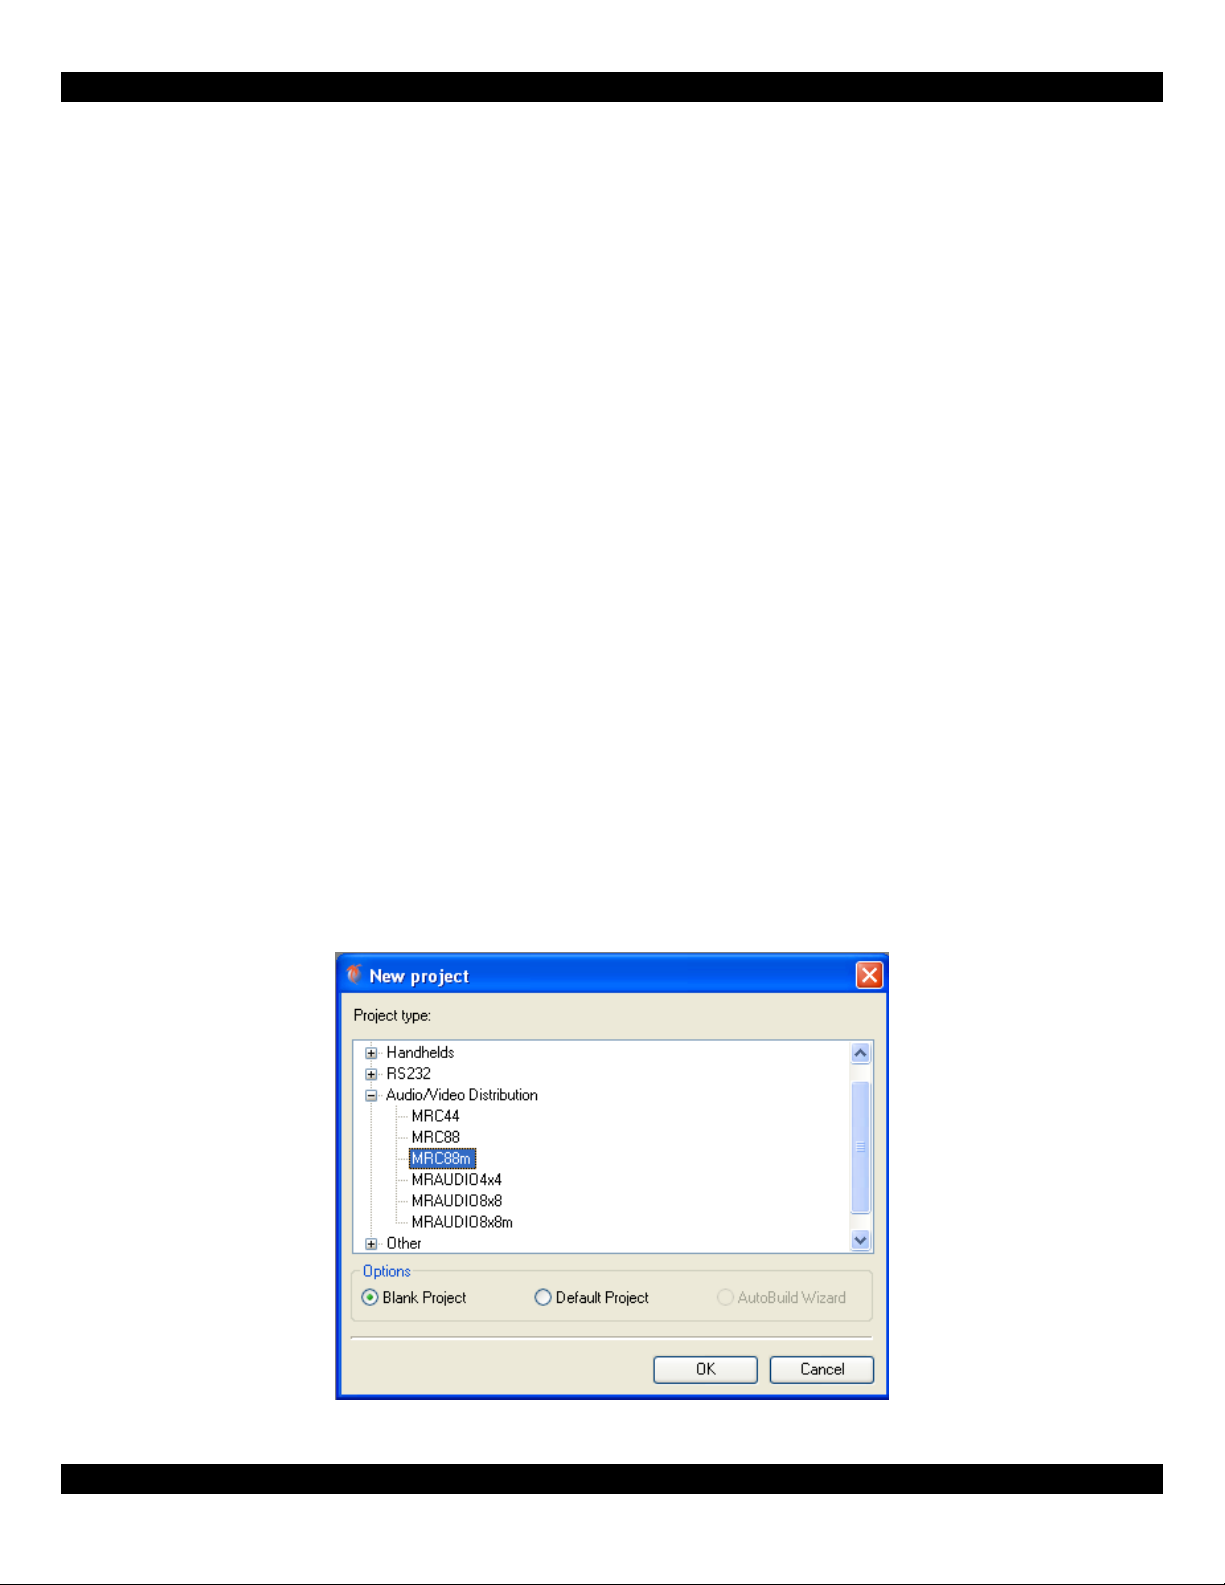
CREATING A NEW MRC88m PROJECT
1) Start Dragon-Drop.
2) Select the New Project item under the File Menu (“File->New Project”).
3) Open the Audio/Video Distribution project type and select “MRC88m”.
4) Select the “Blank Project” Option, and then click “OK”. You should now see the MRC88m basic
keypad.
- 1 -
Page 2

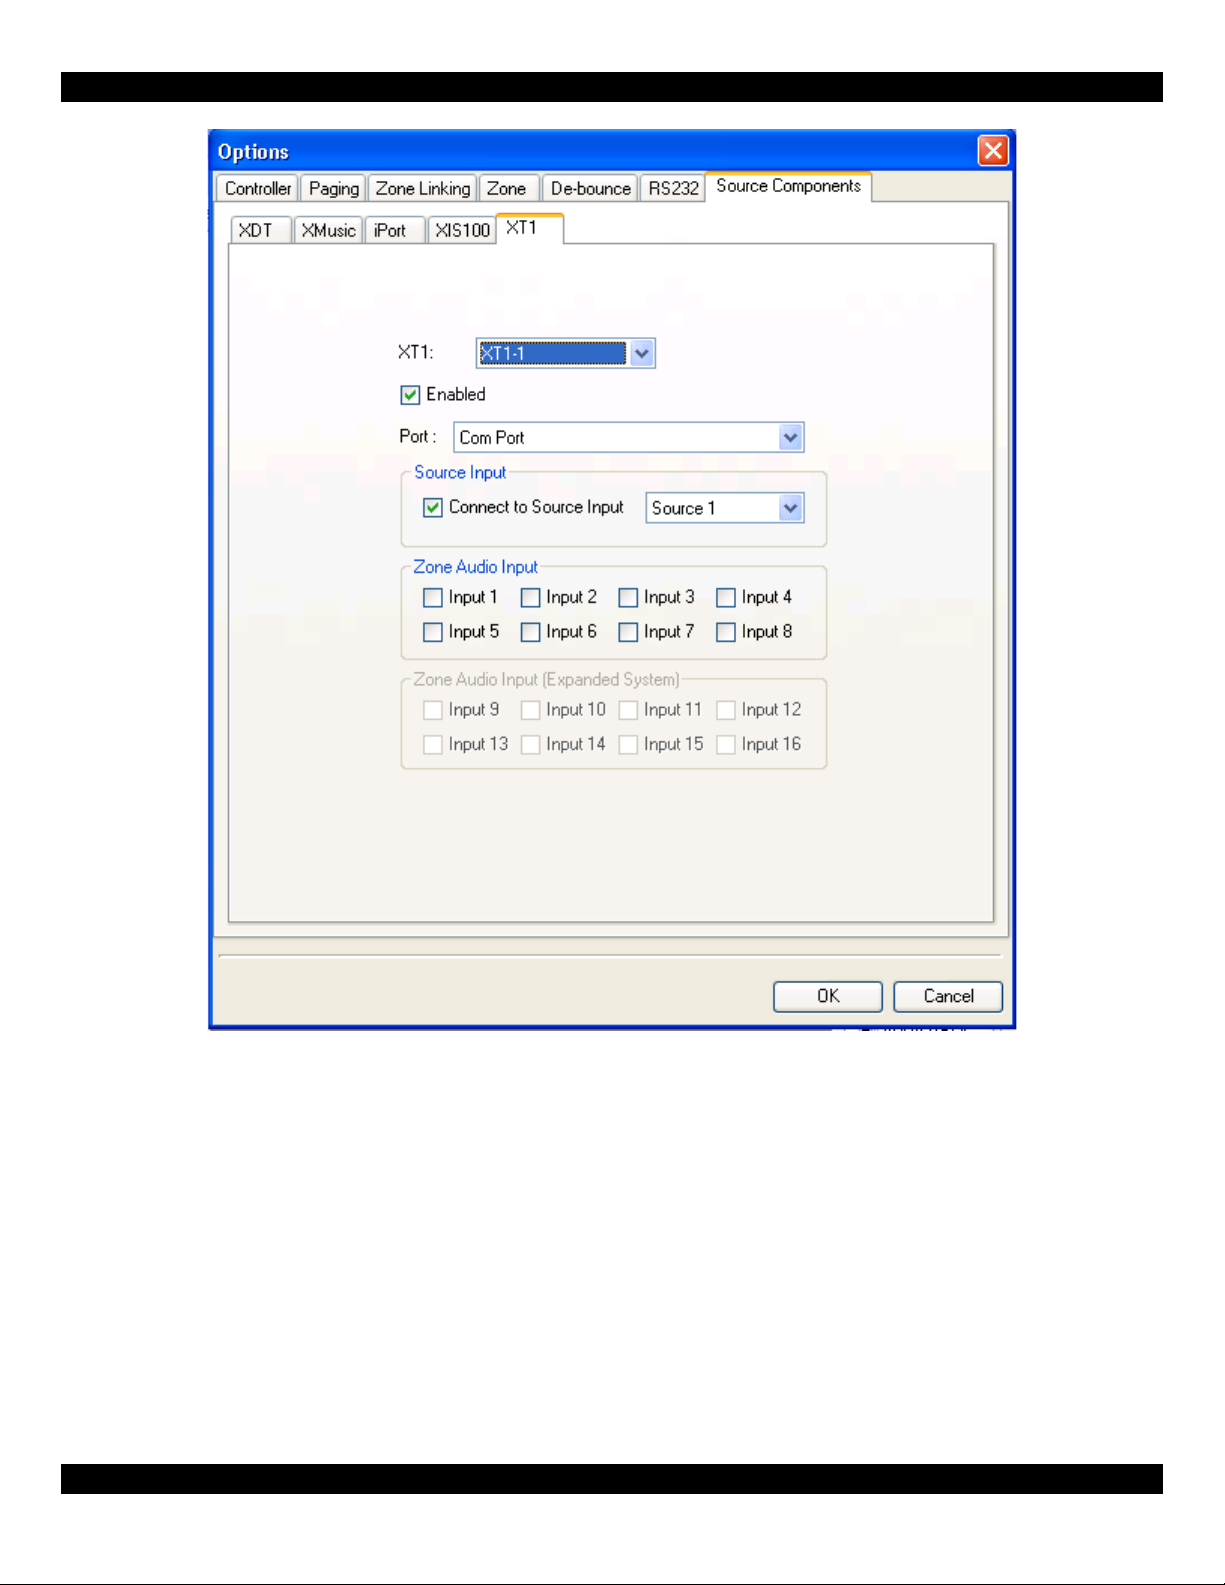
ENABLING THE XT1 DRIVER
1) Open the Project Options dialog box (“File->Project Options”).
2) Select the “Source Components” tab.
3) Select the “XT1” tab.
4) Click the “Enabled” check box to enable XT1-1. (Note that the MRC88m supports up to 6 XT1’s,
denoted XT1-1 thru XT1-6. For this example we are going to be using XT1-1.)
5) In the “Port” field, make sure that “Com Port” is selected. This lets the driver know how the XT1 is
connected to the MRC88m.
TELLING THE MRC88m WHICH SOURCE INPUT IS CONNECTED TO THE XT1
1) In the “Source Input” region, click the check box next to the “Connect to Source Input” text.
2) Make sure that “Source 1” is selected in the drop-down box to the right. This let’s the MRC88m
know that Source 1 in the system is the XT1.
3) Click “OK” at the bottom of the dialog box to close the “Options” dialog.
- 2 -
Page 3
At this point you have successfully told the MRC88m that an XT1 is connected, and how it is
connected.
- 3 -
Page 4

CONFIGURING THE MRC88m KEYPAD TO CONTROL THE XT1
The XT1 is controlled by using the new “Metadata” Internal Commands. These new commands can
be used to control the XT1, XIS100, the XMusic, and the iPort. See Figure 1 at the end of this
document that describes how each Metadata internal command maps to the XT1 function.
1) Just above the Virtual Keypad (under the “Keypad” tab), select “Zone 1” from the drop-down box.
2) On the Virtual keypad, select SRC1.
3) On the right-hand portion of the Dragon window, make sure that the “Internal Commands” tab near
the bottom of the window is selected.
4) On the Virtual Keypad, select the “Ç PAUSE” button.
5) In the “Internal Commands” window, select the “Metadata Up” command.
6) In the “Zone” area, select the current zone, Zone 1.
- 4 -
Page 5

7) In the “Source” box, select “1”, since the XT1 we want to control is connected to Source 1.
8) Click the “Accept” Button.
You have now successfully programmed the“Ç PAUSE” button in Zone 1 perform the
“Frequency Up” function of the XT1. Continue programming the rest of the MRC88m keypad
buttons to the other desired XT1 functions. (See Figure 1 at the end of this document that
shows how the Metadata commands map to an XT1 function.
Please pay attention to Figure 2 at the end of this document that shows how buttons on the
SPLCD-MRC-KP Tuner page to map the MRC88m Virtual Keypad buttons.
- 5 -
Page 6

CONFIGURING SOURCE 1 CORRECTLY FOR THE “AUTO CONFIGURATION” FEATURE OF
THE SPLCD WHEN CONNECTED TO A MRC88m
1) On the Virtual Keypad, select SRC1.
2) On the right-hand portion of the Dragon window, select the “Properties” tab near the bottom of the
window.
3) Click the “Source Type” field in the “Button” property. This enables the drop-down box in the field
to the right.
4) Click on the down arrow to expose the drop-down menu, and select Tuner. This will be used to tell
any connected SPLCD’s that Source 1 is a Tuner type of source, so that the SPLCD can display the
appropriate page for this source.
5) Now click on the text box to the right of the “Source Name” field. Type in the name of this source,
such as “Radio”. This text will be used to label the Source 1 button of the SPLCD.
6) Finally, click on the “Apply” button. Note that no changes to these properties will be made until the
“Apply” button is clicked!
- 6 -
Page 7

Figure 1: Below, Mapping the Internal Metadata commands to XT1 functions
XT1 Function
Frequency Up Metadata Up
Frequency Down Metadata Down
Preset Up Metadata Next Track
Preset Down Metadata Prev Track
Preset 01 Metadata Pause
Preset 02 Metadata Fast Forward
Preset 03 Metadata Stop
Preset 04 Metadata Rewind
Metadata Internal
Command
Figure 2: Below, Mapping the “Tuner” page buttons of the SPLCD-MRC-KP to the MRC88m
Virtual Keypad buttons
SPLCD Button Maps To: MRC88m Keypad Button
Preset 1 Pause Tier 2
Preset 2 Fwd Tier 2
Preset 3 Stop Tier 2
Preset 4 Rew Tier 2
Preset - ChPreset + Ch+
Tune - Stop
Tune + Pause
Vol Up Vol +
Vol Down Vol Mute Mute
Power Pwr
Xantech Corporation
13100 Telfair Avenue
Instr, Quick Start, MRC88m & XT1 Tuner
© 2009 Xantech Corporation, Document #08905220B
This document is copyright protected. No part of this manual may be copied or reproduced in any form without prior written consent from Xantech
Xantech Corporation shall not be liable for operational, technical, or editorial errors/omissions made in this document.
Sylmar, CA 91342
Corporation.
- 7 -
 Loading...