

Page 1

MODEL
282TP
Mouse Emitter, Twin Plug
INSTALLATION INSTRUCTIONS
DESCRIPTION
The 282TP "Twin-Plug" Emitter is based on Xantech's
standard 282M Mouse emitter with two 3.5mm MonoMini plugs each with 'diode' isolation. The twin plug feature
allows a single emitter to be shared by two IR sources. For
instance, one mouse emitter can now be connected to both
an IR receiver and a Xantech Multi-Zone Controller without
having to place two emitters on the front of the IR
Controllable component.
Internally, the 282TP contains components that are
designed to keep the IR signal path directed towards the
emitter only, allowing both control systems to be completely
isolated. The plugs are gold plated to increase durability
and connectivity
.
INSTALLATION
•
•
component’s front panel.
• fficult to find the location of
• pe is included. If you move the
• ough dark in appearance, is transparent to
Each emitter has a clear adhesive layer on the bottom
flat surface of the shell. The rounded side faces the
user and emits visible light when a command is sent.
Simply peel off the adhesive cover and affix the emitter
to the center of the IR sensor window on the controlled
In some cases it may be di
the IR sensor on the component. Consult the owner’s
manual of the unit, or the manufacturer, for the exact IR
sensor window location.
Double-sided adhesive ta
emitter to a different component, use this tape to
replace the current adhesive layer for the best
adhesion.
The shell, th
infrared light, allowing commands from a handheld
remote control to pass through it. This permits direct
control of the equipment from a handheld remote as
well as from the 282TP.
13100 Telfair Ave. 2/F
Sylmar, CA 91342
www.xantech.com
08901676X3
Page 2
•
•
•
•
CONNECTING THE EMITTERS
Simply insert the mono mini plug of the 282TP emitter
into the “EMITTERS” or “OUT” jacks on any of the
Xantech Connecting Blocks or Controllers.
CAUTION: DO NOT plug emitters into the IN/OUT or
HIGH OUT jacks on the 790-00 and 791-44
Connecting Blocks. To do so will destroy the emitters!
The 282TP mouse emitter will also indicate the
presence of stray IR or RF interference by randomly
blinking when no IR control signal is being sent.
Reposition the IR receiver of the interfering source to
eliminate or reduce the random blinking. The more the
random blinking is reduced, the better the system will
function.
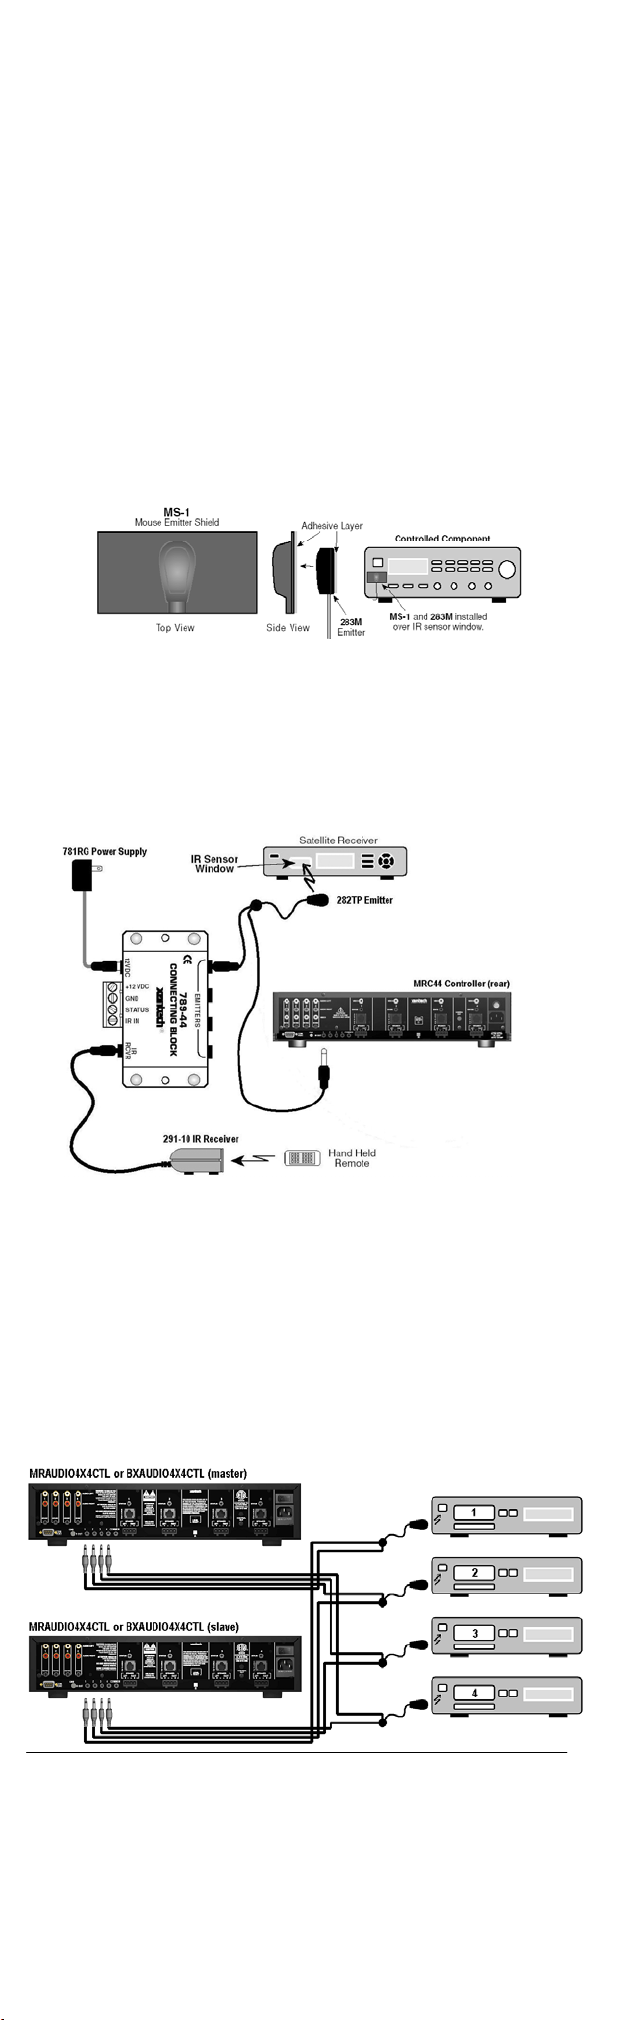
An optional shield, available from Xantech as model
MS-1, fits over the emitter head and the sensor window
of the controller component.
INSTALLATION SETUP #1:
Home Theater \ Multi-room Controller
The setup below shows two IR signals connected to a
single source. This allows the source to be controlled from
two areas. One mono plug goes to the connecting block.
The other mono plug is connected to the MRC44 Controller.
INSTALLATION SETUP #2:
Expanded Multi-room Controller
The setup below shows two MRAUDIO4X4 Controllers
connected in Expansion mode. Expansion mode doubles
the number of zones while using the same number of
sources. The benefit of the 282TP is that you only need to
place one emitter at each source. One mono plug is
connected to the ‘master’ controller. The other mono plug is
connected to the ‘slave’ controller. This application can
apply to the entire product line of Xantech controllers.
Limited Warranty
Xantech® warrants its products to be free pf defects in materials or workmanship. This warranty extends for
one year from the date of purchase by the original consumer. Any products returned to Xantech and found to
be defective by Xantech within the warranty period will be repaired or replaced, at Xantech’s option, at no
charge. Xantech will not be responsible for the actual cost of installation or removal of the product, nor for
any incidental or consequential damages. Some states do not allow the exclusion or limitation of incidental or
consequential damages, so the above limitation may not apply to you. This warranty gives you specific legal
rights. You may have additional legal rights that vary from state to state.
 Loading...