

Page 1

XANTÉ
®
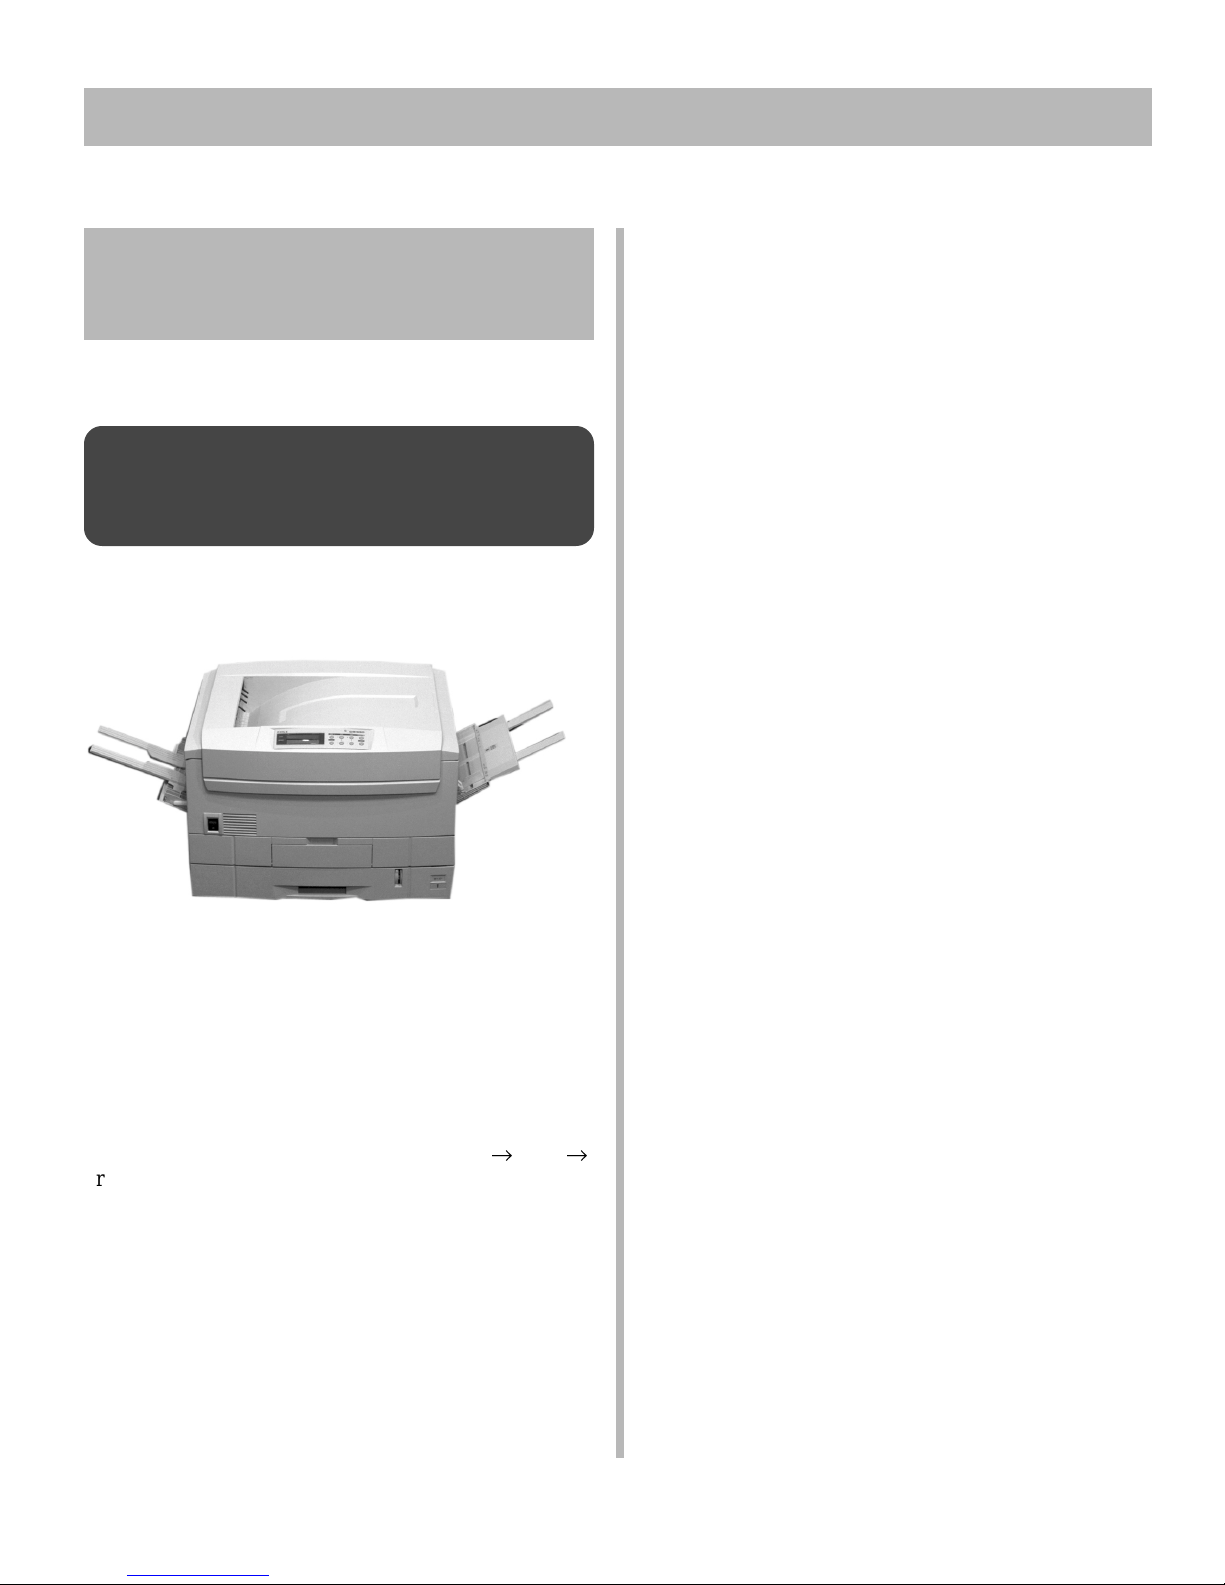
ColourLaser™ 21 Series
Setup Guide
Installation Checklist:
Please cut this page out and use it as a guide when installing your printer.
1 Install the Printer
h
Select a Location (see p. 3)
h
Unpack (see p. 4)
h
Check Components (see p. 5)
h
Record the Serial No. (see p. 5)
h
✁
Remove Shipping Materials
(see p. 6)
h
Prepare Image Drums (see p. 6)
h
Install Toner Cartridges (see p. 7)
h
Load Print Media (see p. 8)
h
Open the Straight-Through Exit
(see p. 9)
h
Connect to Power (see p. 9)
h
Print the Demo Page (see p. 9)
2 Make the Computer Connection &
Install the Software
Windows
• Network Install (see pp. 10-12)
• USB Install (see pp. 13-16)
• Parallel Install (see p. 17)
Macintosh
• Network Install (see pp. 18-19)
• USB Install (see pp. 20-21)
Complete
h
3 Finish the Setup
h
Set Color Balance (see p. 22)
h
Check Media Settings (see pp. 23-26)
h
Check the Printer Settings (see p. 27)
h
Print a Sample File (see p. 28)
Congratulations!
This completes the installation of your XANTÉ ColourLaser 21 Printer. Now it’s
time to let your imagination run free and enjoy some colorful printing!
For more information, see the documents listed on the back of this checklist.
h
Install the Handy Reference (see p. 28)
Page 2
Documentation
rinted n-Line
PO
Setup Guide
The document you’re holding. Gets you up and
running.
XANTÉ ColourLaser 21 Handy
Reference Guide
For help with day-to-day operation, including:
• Loading Print Media
• Usable Print Media
• Walk-up Functions
(Proof & Print, Secure Print, etc.)
• Operator Panel
• Clearing Paper Jams, etc.
®
Attaches to the printer with Velcro
fasteners.
Customer Safety &
Certification Booklet
• Safety Information
• FCC/IC/CE
• Material Safety Data Sheets, etc.
XANTÉ ColourLaser 21 Series
User’s Guide
The XANTÉ ColourLaser 21 Series User’s Guide
is located on the printer’s driver CD, and includes
information on:
• Print Media
• The Control Panel
• Printer Menus
• Using Print Features
• Proof & Print, Secure Print
• Problem Solving
• Maintenance
• Working with Color
• Specifications
• Service & Support, etc.
2
XANTÉ Network User’s Guide
The Network User’s Guide is also located on the
printer’s driver CD. It includes information on
printer networking, including:
• Setting the Printer’s IP Address
• Advanced Management Features
• Novell Netware
• TCP/IP, etc.
Page 3

Installation
Select a location
1
For Orientation Purposes:
Back
Left
(Straight-Through
Exit, Connections)
(Control Panel, Tray 1)
• Firm, level surface capable of supporting
at least 160 lbs (72 kg).
• Clearance:
- Left & Right: 24 inches (60 cm)
- Front: 39½ inches (100 cm)
- Back: 8 inches (20 cm)
- Top: 27½ inches (70 cm)
Right
(Multi-Purpose T ray ,
Side Cover)
Front
• Nearby power source
• Room temperature:
– Ideal: 62.6 to 80.6°F (17 to 27°C):
– Maximum Permissible: 50 to 89.6°F (10 to 32°C)
• Relative humidity:
– Ideal: 50 to 70% RH
– Maximum Permissible: 20 to 80% RH
• Away from direct sunlight
3
Page 4

2
Unpack
Caution!
!
• The printer weighs 160 pounds.
• Use more than one person to lift the printer.
• Use appropriate lifting techniques.
It’s a good idea to save all the packing materials in case you
!
ever need to ship the printer.
Remove the hand holds.
Remove the top shipping
cushions.
Lift the shipping container off
the printer.
Grasp the printer using the hand
holds on the sides and back, and
carefully remove it from the
shipping tray.
Lift off the accessory tray and
set it aside.
Place the printer on a suitable
support, then remove it from the
plastic bag.
4
Page 5

3
Check Components
Cyan, Magenta, Yellow & Black
Toner Cartridges with LED Lens
Cleaners
CD(s)
With Drivers, Utilities &
On-Line User’s Guides
Power Cord
Printer
Record the Serial Number
4
Before proceeding, locate the silver ratings plate on
the back of the printer. Record the serial number you
find there at the back of the Handy Reference Guide.
You’ll need this number to register your printer and to
take advantage of XANTÉ’s technical support service.
Light-Shield Bags
(Used to protect image
drums
from light when they are
removed from printer.)
Documentation
(see page 2):
Setup Guide
Handy Reference Guide
Customer Safety &
Certification Booklet
www.xante.com
Web-based support* for the XANTÉ products
you own: 24 hours a day, 7 days a week—no
waiting!
Log on and check for
• Product News
• What’s Changed?
* English Only.
You can
• Register your XANTÉ products
• Download or view manuals online
• Download drivers
• … and more!
Just point your browser to
click on Support.
www.xante.com and
5
Page 6

5
Remove the Shipping Materials
Remove any shipping
tape and external
packaging materials.
Pull up on the release
latch and open the
cover.
Prepare the Image Drums
6
Remove (grasp, twist,
lift) the cardboard
shipping restraint from
behind the LED heads.
A
Pull the blue fuser roller lever to the right (away
from the open cover) and remove the orange
transport lock, then push the fuser roller lever to
the left as far as it will go (toward the open cover).
B
Lift out the black
image drum (the one
furthest to the right).
6
a. Remove the protective sheet.
b. Remove the tape.
c. Push the tab (1) in the direction of the arrow
and remove the blanking plate.
C
Place the drum back into
the printer, then repeat this
process for each of the
three remaining drums.
Page 7

7
Install the Toner Cartridges
Unpack the black toner cartridge
and shake it back and forth.
Carefully remove the tape.
Lower the port end of the cartridge into the image drum
closest to the right end of the printer, so that the tube (1)
on the drum slides into the port (2) on the toner
cartridge.
Lightly press the cartridge against the image drum port,
then lower the lock lever end, aligning the white tab with
the groove in the drum.
Push the lock lever (3) to the left (toward the open
printer cover) until it stops.
To avoid damage to the printheads, be sure to push the
lock lever as far as it will go.
!
Port end (1).
Lock lever end (2).
Cyan
Magenta
Yellow
Black
Repeat the process for each toner cartridge, being
careful to match the toner color to the drum
color.
Before closing the cover, check to be sure all the
toner cartridge lock levers (blue) are pushed
!
back as far as they will go.
Close the cover.
7
Page 8

8
Load Print Media
For information on usable print media, see the Handy Reference.
Pull the tray out of the printer.
For legal size or larger print media, position the media supports:
a. Press the spring release
b. Slide and lift the support
c. Snap into the correct position (refer to the markings in the tray).
Slide the guides to fit the size media you are using.
If necessary, lift out the media
indicator and reinsert it with the
proper media size showing.
Media Gauge:
Indicates the amount of
media left in the tray .
Load the print media (default is 8½ x 11", long edge feed) keeping it below the
Fan the paper
(max. 550 sheets
20-lb. paper).
8
“PAPER FULL” mark (1), then push the tray back in gently.
Default: 8½ x 11", long edge feed
Option: 8½ x 11", short edge feed
Option: Tabloid (11 x 17")
Page 9

9
Open the Straight-Through Exit
Normally the printer feeds documents face
down into the top exit tray . If you will be
printing special media such as transparencies,
thick paper or labels, open the
straight-through exit path, then specify it in
the driver when you are printing on special
media (see “Selecting the Straight-Through
Exit Path in the Driver” under Exit Paths in
the on-line User’s Guide).
If you always want to use the straight-through
exit, you can set it as the default (see
Changing the Default Exit Path in the on-line
User’s Guide).
10
T o open the straight-through exit, pull the tray down
and pivot out the extenders.
Connect to Power
Attach the power cord to the
left side of printer.
Be sure to use the cable
supplied with the printer.
!
Print the Demo Page
11
Connect to
grounded power
socket.
Turn the printer on and wait for it to warm up.
The display will read
Print out the Demo page:
a Press Menu repeatedly until
appears.
b Press ITEM - repeatedly until
c Press Select.
The Demo page prints. The printer goes back on
line.
ONLINE .AUTO
TRAY1
INFORMA TION MENU
DEMO1 displays.
9
Page 10
12
Network Install: Windows
®
Network Connection
No Ethernet® cable is supplied with the printer. Use
an Ethernet cable with two twisted wire pairs and an
!
RJ45 plug.
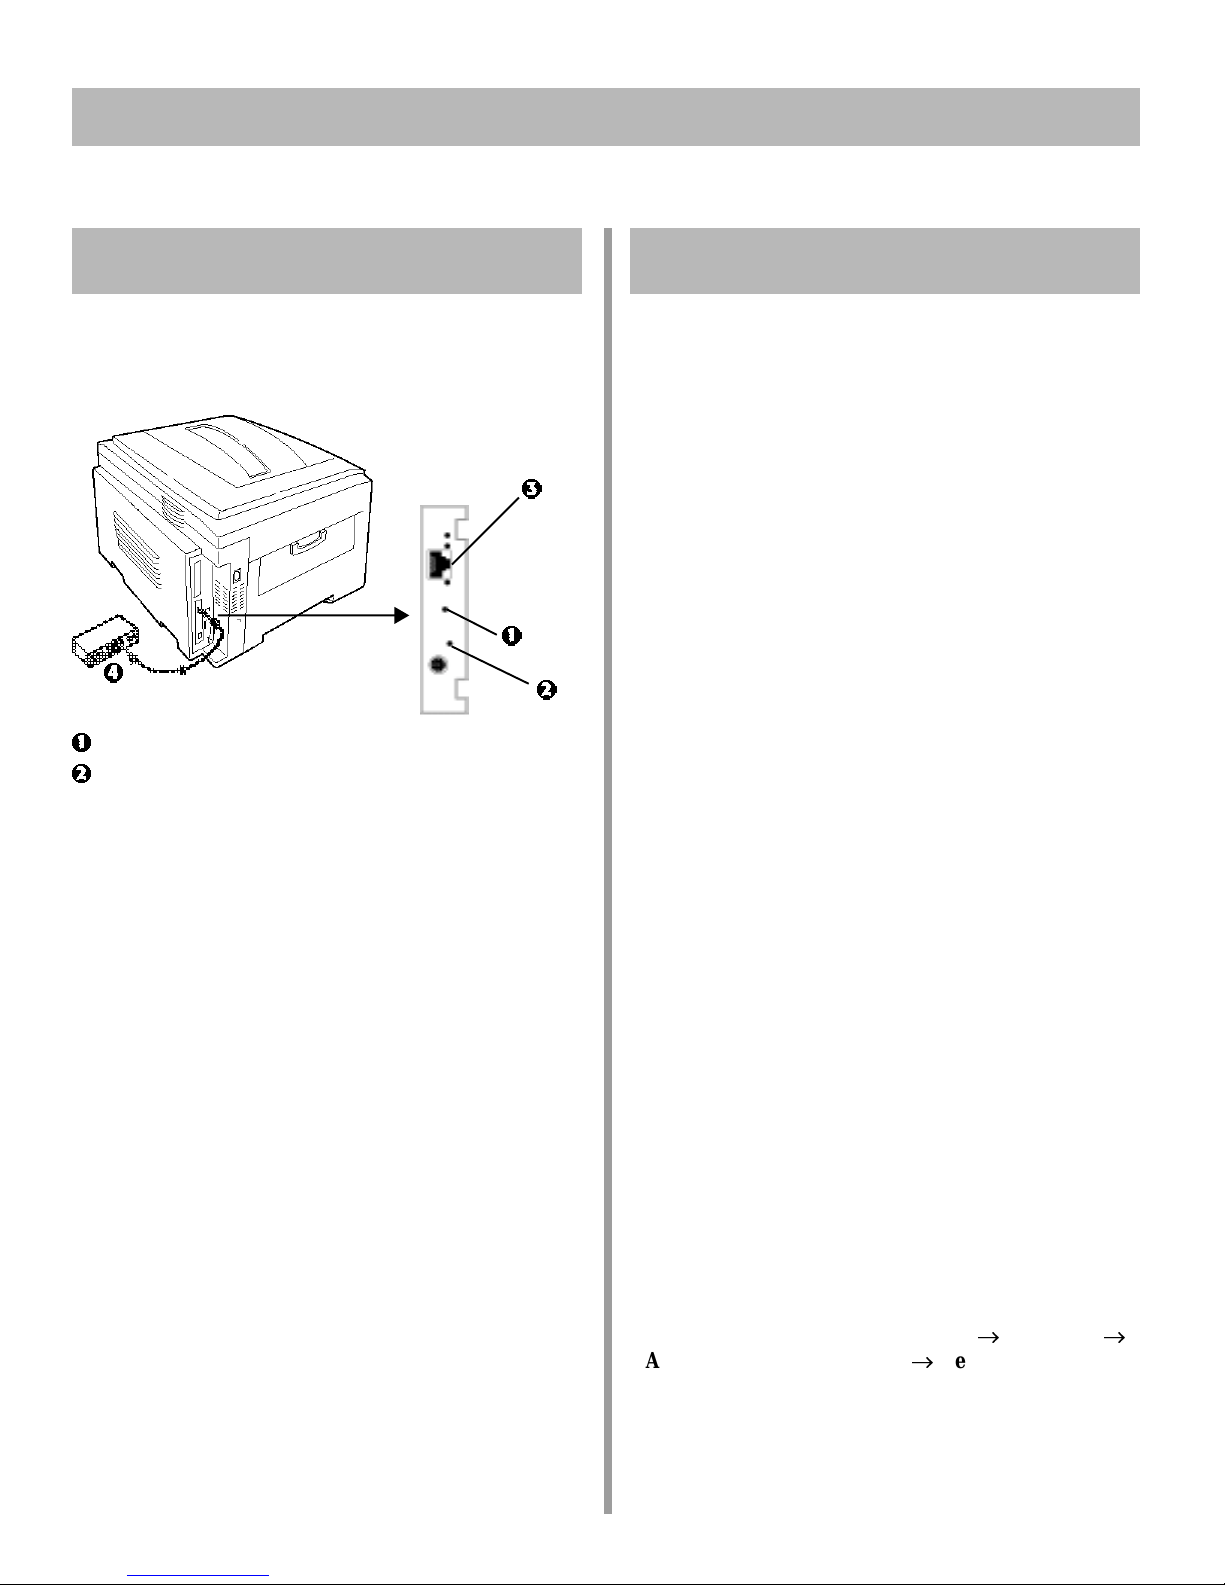
= Test Button
= Status Light
Turn the printer off.
Connect your Ethernet cable to the network port on
the print server (3).
Connect the other end of the Ethernet cable to the
network port (4).
Turn the printer on and wait for the print server status
light to stop blinking.
Press the Test button on the print server.
A Configuration Sheet prints. This sheet contains
information you need to set up the printer on your
network.
Setting Up the Network
Installing the Printer Drivers
The printer drivers are located on the CD supplied with
the printer.
For Windows 2000:
\Drivers\Win2K\English\Pcldrv and/or \Psdrv
For Windows Me, 98, and 95:
\Drivers\Win9x\English\Pcldrv and/or \Psdrv
For Windows NT 4.0:
\Drivers\Nt40\English\Pcldrv and/or \Psdrv
Installing the Drivers on Client Computers
Clients with Windows 2000 & Windows NT 4.0:
Push Installation
Copy the driver files from the XANTÉ ColourLaser
21 CD (\Drivers\Nt40 or Win2K\English\Pcldrv or
Psdrv) to the network directory of your choice.
At the host computer, open Network Neighborhood,
then double-click the client computer on which you
wish to install the drivers.
Double-click the Printers folder, then click Add
Printer.
Make sure Print Server/[Computer Name] is
selected, then click Next.
Follow the Add Printer Wizard to add the drivers
from the network directory where you installed them
onto the selected client computer.
Click the driver to be installed, then click Next.
10
Click Next and follow the on-screen instructions to
complete the installation.
Repeat the process for each client computer, then do a
quick check of the client computers to be sure that the
driver was installed.
T o view the XANTÉ Network User’s Guide once it is
installed on your computer, click Start ® Programs
XANTÉ Network User Guide ® Network User’s
Guide.
®
Page 11

12
Network Install: Windows (cont.)
Clients with Windows Me &
Windows 98/95: Pull Installation
Copy the driver files from the XANTÉ ColourLaser
21 CD (\Drivers\Win9x\English\Pcldrv or Psdrv) to a
shared network directory of your choice.
On the client computer, click Start ® Settings
Printer ® Add Printer.
Use the Add Printer W izard to install the drivers
from the network directory to the client computer.
®
Printing Directly from a Windows
Workstation
To use this feature, you must have an IP address
established and the printer driver installed.
!
T o configure a Windows workstation to print directly to
your networked XANTÉ printer:
Insert the XANTÉ ColourLaser 21 CD in the
CD-ROM drive.
Click Start ® Run, then browse to the main
directory on the CD and double-click install.exe.
Click OK.
Click the Direct Network Printing button.
Follow the on-screen instructions to install ExtendNet
Connect, then exit the Menu Installer.
Use ExtendNet Connect to create a new port.
Configure each client’s printer driver(s) to the
network port (see the on-line XANTÉ Network User’s
Guide).
Activating the Duplex Unit and Hard
Drive in the Driver
If you have the XANTÉ ColourLaser 21D or the XANTÉ
ColourLaser 21HC, you must activate the duplex unit and
hard disk drive in the drivers before using them.
These procedures are also used when installing
optional memory SIMMs, auxiliary paper trays and
!
High Capacity Feeder. See “Accessories” in the online XANTÉ User’s Guide.
To activate the Duplex Unit and Hard Disk
Drive in the PCL driver:
Click Start ® Settings ® Printer.
Right click the XANTÉ PCL printer icon, then click
Printing Preferences (Windows 2000), Properties
(Windows Me/98/95) or Document Defaults
(Windows NT 4.0).
In the Paper tab, click Device options, then click
Duplex option unit and Printer hard disk.
Click OK twice, then close the Printers dialog box.
To activate the Duplex Unit and Hard Disk
Drive in the PostScript driver:
Click Start ® Settings ® Printer.
Right click the XANTÉ PostScript printer icon, then
click Properties.
Windows 2000 and NT 4.0:
- Click the Device Settings tab.
- Scroll down to Installable Options.
- Click Duplex, then click Installed in the box
below; do the same thing for Hard Disk.
Windows Me, 98 and 95:
- Click the Device Options tab.
- Click Duplex, then click Installed in the box
below; do the same thing for Hard Disk.
Click OK, then close the Printers dialog box.
11
Page 12

12
Network Install: Windows (cont.)
Installing the Network Software
T o load the XANTÉ ExtendView 2000 software:
Insert the XANTÉ ColourLaser 21 CD in the
CD-ROM drive.
Click Start ® Run, then browse to the main
directory on the CD and double-click install.exe.
Click OK.
Select the printer model, then click Continue.
Click the Network and Admin Software button.
Click the ExtendView 2000 button.
Follow the on-screen instructions.
For more information on installing the software utilities
and setting up the printer on various network systems, see
the on-line XANTÉ Network User’s Guide.
Accessing the On-Line XANTÉ
Network User’s Guide
Minimum requirements: i486™ processor, 16 MB RAM,
Microsoft Internet Explorer 4.0 or higher.
You can either view the XANTÉ Network User’s Guide
directly from the printer CD or install it on your
computer:
Insert the XANTÉ ColourLaser 21 CD in the
CD-ROM drive.
Click Start ® Run, then browse to the main
directory on the CD and double-click install.exe.
Click OK.
Click the Network and Admin Software button.
Click the Network Documentation button.
Click your choice:
Install Network User’s Guide
(follow the on-screen instructions.)
or
View Network User’ s Guide.
Viewing the Installed Network User’s Guide
T o view the XANTÉ Network User’s Guide once it is
installed on your computer, click Start ® Programs
XANTÉ Network User Guide ® Network User’s
Guide.
®
12
Page 13
13
USB Install: Windows
Windows Drivers Supplied
The printer comes with two W indows drivers: Adobe
PostScript and PCL. USB Drivers are supplied for the
following systems:
• Windows 2000 Professional
• Windows Me
• Windows 98
USB Port Connection
No USB interface cable is supplied with the printer.
Use a USB cable that is compatible with USB
!
specification 1.1.
Notes:
• A USB interface will only operate using Windows 2000,
Windows Me and Windows 98. It will not operate using
MS-DOS, Windows 95, 3.1, or NT 4.0.
• Printer operation is not assured if another USB
compatible device is connected concurrently with it.
• If a USB hub is used, it must be connected directly to
the computer.
Turn the computer and the printer off.
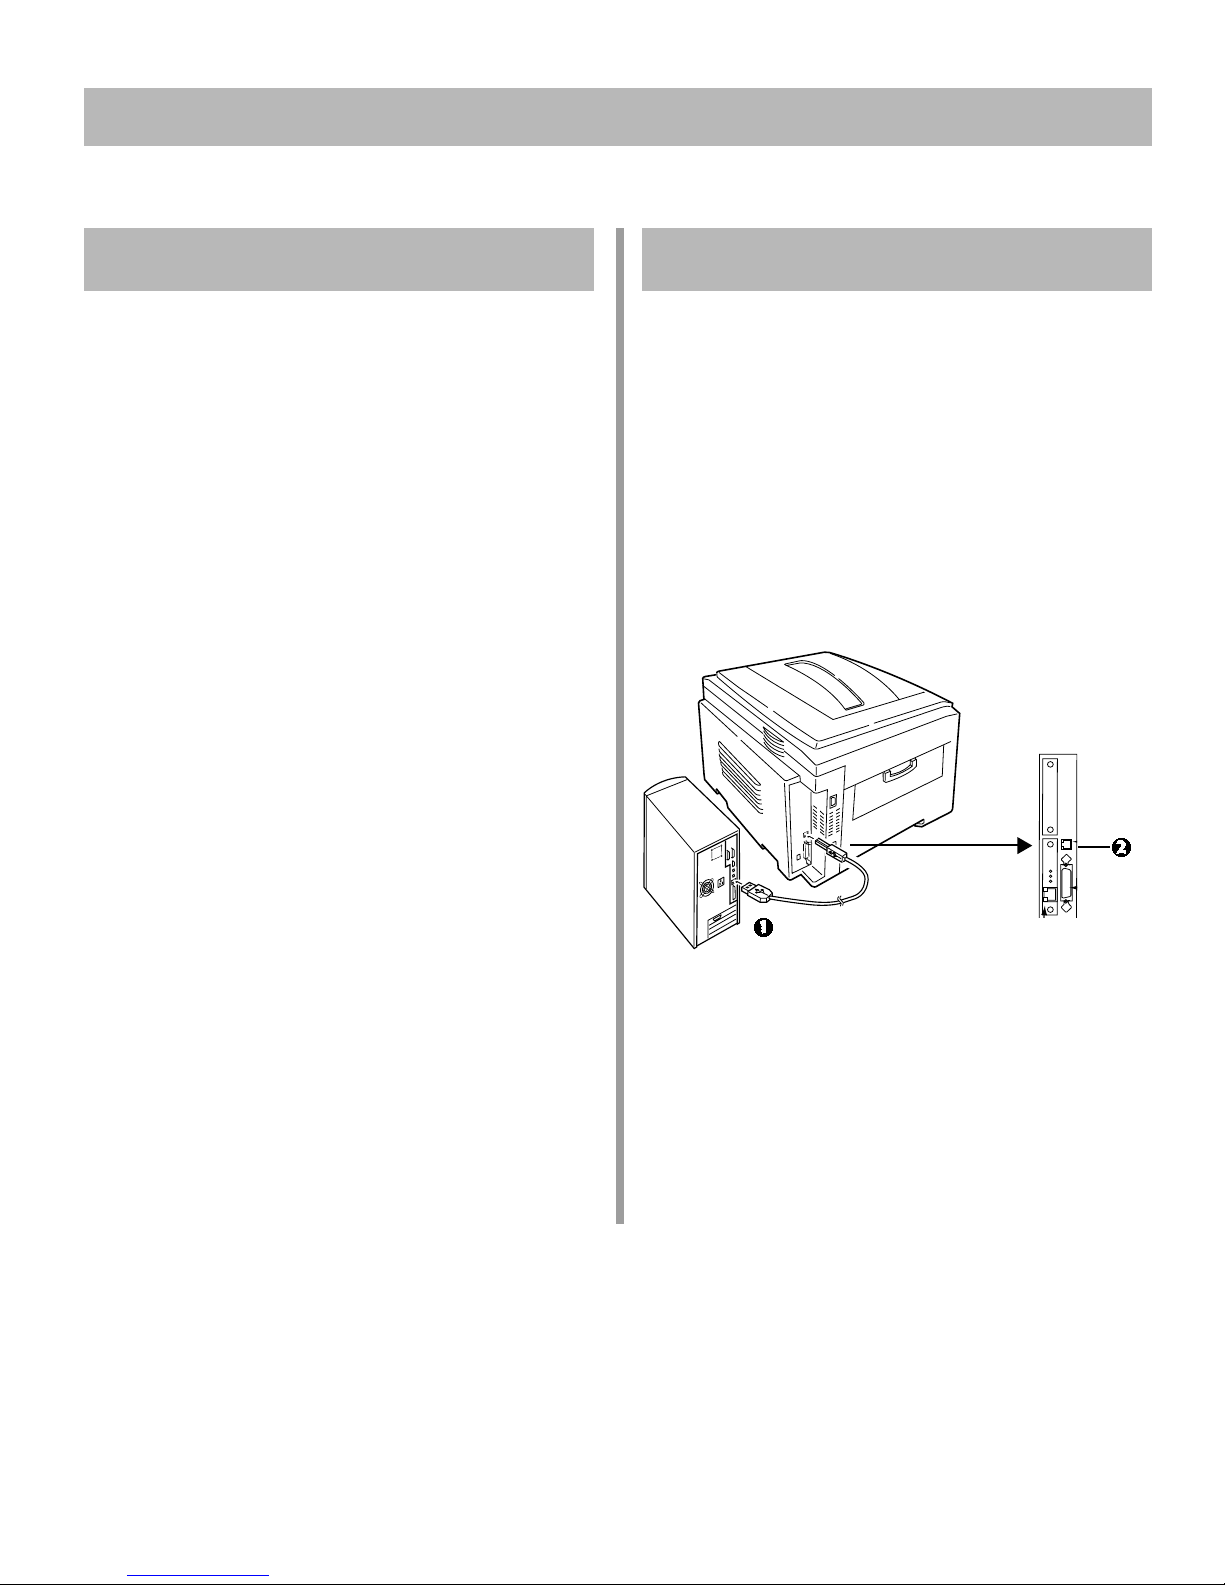
Connect the USB cable to the USB port on the
computer (1).
Connect the other end of the cable to the USB port on
the printer (2).
13
Page 14
USB Install: Windows (cont.)
13
USB Install: Windows 2000
©
Printer Drivers (Adobe PostScript, PCL)
©
On-Line XANTÉ ColourLaser 21 Series
User’s Guide
• Minimum requirements: i486 processor, 16 MB
RAM, Microsoft Internet Explorer 4.0 or higher.
• Can also be viewed directly from the CD (click the
“View User’s Guide” button in the Menu Installer
dialog box).
©
Color Swatch Utility
Provides a printout of color samples with RGB
settings. Use the settings in application software to
precisely match the sample color in printed files.
Install the Software
First, Install the PostScript Driver
Turn the computer on and wait for it to boot up.
Turn the printer on.
Insert the XANTÉ ColourLaser 21 CD into the
CD-ROM drive.
The printer is detected and the Found New Hardware
Wizard window appears.
Click Next.
Select Search for a suitable driver for my device
(recommended), then click Next.
Select Specify a location and clear the other choices,
then click Next.
Click Browse and navigate to your CD-ROM drive.
Browse to \Drivers\Win2K\English\PSDRV on the
XANTÉ CD and click Printer.inf, then click Open.
Click OK.
Click Next.
The Digital Signature Not Found window appears.
Click Yes.
Follow the on-screen instructions to complete the
installation.
Second, Install the PCL Driver and/or
Additional Software
With the XANTÉ ColourLaser 21 CD in your
CD-ROM drive, click Start ® Run.
Browse to your CD-ROM drive and double-click
install.exe in the root directory , then click OK.
Click the button beside Printer Software and follow
the on-screen instructions.
When the Port Selection window appears, leave
LPT1 selected, then click Next.
!
Exit the Menu Installer.
Third, If You Installed the PCL Driver
If you installed the PCL driver, you need to associate it
with the USB port. To do this:
Click Start ® Settings ® Printers.
Right click the Xante ColourLaser 21 PCL driver
icon, then select Properties.
On the Ports tab, select USB ... Xante ColourLaser
21 port, then click OK.
Close the Printers window.
Using the Installed Software
To View the Printer User’s Guide
Click Start ® Programs ® XANTÉ ColourLaser 21
Series ® ColourLaser 21 User’s Guide.
To Open the Color Swatch Utility
Click Start ® Programs ® XANTÉ ColourLaser 21
Series ® Color Swatch Utility. (For more information
on the Color Swatch Utility , see the on-line XANTÉ
ColourLaser 21 Series User’s Guide.)
Activate the Duplex Unit and
Internal Hard Drive in the Printer
Driver
See page 11 for instructions on how to do this.
14
Page 15

USB Install: Windows (cont.)
13
USB Install: Windows Me
©
Printer Drivers (Adobe PostScript, PCL)
©
On-Line XANTÉ ColourLaser 21 Series
User’s Guide
• Minimum requirements: i486 processor, 16 MB
RAM, Microsoft Internet Explorer 4.0 or higher.
• Can also be viewed directly from the CD (click the
“View User’s Guide” button in the Menu Installer
dialog box).
©
Color Swatch Utility
Provides a printout of color samples with RGB
settings. Use the settings in application software to
precisely match the sample color in printed files.
Install the Software
First, Install the USB Port and PostScript
Driver
Turn the computer on and wait for it to boot up.
Turn the printer on.
The Add New Hardware W izard for USB Device
window appears.
Second, Install the PCL Driver and/or
Additional Software
With the XANTÉ ColourLaser 21 CD in your
CD-ROM drive, click Start ® Run.
Browse to your CD-ROM drive and double-click
install.exe in the root directory , then click OK.
Click the button beside Printer Software and follow
the on-screen instructions.
When the Port Selection window appears, leave
LPT1 selected, then click Next.
!
Exit the Menu Installer.
Third, If You Installed the PCL Driver
If you installed the PCL driver, you need to associate it
with the USB port. To do this:
Click Start ® Settings ® Printers.
Right click the Xante ColourLaser 21 PCL driver
icon, then select Properties.
On the Details tab, select XECUSB1 (ColourLaser
21) in the Print to the following port drop down list.
Click Apply.
Click OK.
Close the Printers window.
Insert the XANTÉ ColourLaser 21 CD into the
CD-ROM drive, then click Next.
Select Automatic search for a better driver
(Recommended), then click Next.
Make sure XANTÉ USB Driver is selected, then
click OK and follow the on-screen instructions to
finish the USB port installation.
The printer is detected and the Add New Hardware
Wizard for XANTÉ ColourLaser 21 appears.
Select Specify the location of the driver
(Advanced), then click Next.
Make sure Search for the best driver for your
device (Recommended) is selected, then clear
Removable Media and click Specify a location.
Click Browse and navigate to your CD-ROM drive.
Browse to \Drivers\Win9x\English\Psdrv on the
XANTÉ CD, then click OK.
Click Next and complete the installation following the
on-screen instructions.
Using the Installed Software
To View the Printer User’s Guide
Click Start ® Programs ® XANTÉ ColourLaser 21
Series ® ColourLaser 21 User’s Guide.
To Open the Color Swatch Utility
Click Start ® Programs ® XANTÉ ColourLaser 21
Series ® Color Swatch Utility. (For more information
on the Color Swatch Utility , see the on-line XANTÉ
ColourLaser 21 Series User’s Guide.)
Activate the Duplex Unit and
Internal Hard Drive in the Printer
Driver
See page 11 for instructions on how to do this.
15
Page 16

USB Install: Windows (cont.)
13
USB Install: Windows 98
©
Printer Drivers (Adobe PostScript, PCL)
©
On-Line XANTÉ ColourLaser 21 Series
User’s Guide
• Minimum requirements: i486 processor, 16 MB
RAM, Microsoft Internet Explorer 4.0 or higher.
• Can also be viewed directly from the CD (click the
“View User’s Guide” button in the Menu Installer
dialog box).
©
Color Swatch Utility
Provides a printout of color samples with RGB
settings. Use the settings in application software to
precisely match the sample color in printed files.
Install the Software
First, Install the USB Port & PostScript Driver
Turn the computer on and wait for it to boot up.
Turn the printer on.
The Add New Hardware W izard for USB Device
window appears.
Insert the XANTÉ ColourLaser 21 CD into the
CD-ROM drive, then click Next.
Select Search for the best driver for your device
(Recommended), then click Next.
Select CD-ROM drive, then clear the other devices
and click Next.
When XANTÉ USB Driver appears, click Next.
The USB port information is copied to the system.
When the USB port install is complete, click Finish.
The printer is detected and the Add New Hardware
Wizard for XANTÉ ColourLaser 21 appears.
Click Next.
Make sure Search for the best driver for your
device (Recommended) is selected, then click Next.
Click Specify a location, making sure other choices
are cleared.
Click Browse and navigate to your CD-ROM drive.
Browse to \Drivers\Win9x\English\Psdrv on the
XANTÉ CD, then click OK.
Click Next and complete the installation following the
on-screen instructions.
Second, Install the PCL Driver and/or
Additional Software
With the XANTÉ ColourLaser 21 CD in your
CD-ROM drive, click Start ® Run.
Browse to your CD-ROM drive and double-click
install.exe in the root directory , then click OK.
Click the button beside Printer Software and follow
the on-screen instructions.
When the Port Selection window appears, leave
LPT1 selected, then click Next.
!
Exit the Menu Installer.
Third, If You Installed the PCL Driver
If you installed the PCL driver, you need to associate it
with the USB port. To do this:
Click Start ® Settings ® Printers.
Right click the Xante ColourLaser 21 PCL driver
icon, then select Properties.
On the Details tab, select XECUSB1 (ColourLaser
21) in the Print to the following port drop down list.
Click Apply.
Click OK.
Close the Printers window.
Using the Installed Software
To View the Printer User’s Guide
Click Start ® Programs ® XANTÉ ColourLaser 21
Series ® ColourLaser 21 User’s Guide.
To Open the Color Swatch Utility
Click Start ® Programs ® XANTÉ ColourLaser 21
Series ® Color Swatch Utility. (For more information
on the Color Swatch Utility , see the on-line XANTÉ
ColourLaser 21 Series User’s Guide.)
Activate the Duplex Unit and
Internal Hard Drive in the Printer
Driver
See page 11 for instructions on how to do this.
16
Page 17
Parallel Install: Windows
14
Drivers Supplied
To Install the Software
Turn the computer on and wait for it to boot up.
The printer comes with two drivers: Adobe PostScript
and PCL. Both are supplied for the following systems:
• Windows 2000 Professional
• Windows Me, 98, 95
• Windows NT 4.0
Parallel Port Connection
Make sure that all softwar e applications ar e closed .
Turn the printer on.
With the XANTÉ ColourLaser 21 CD in your
CD-ROM drive, click Start ® Run.
Browse to your CD-ROM drive and double-click
install.exe in the root directory , then click OK.
For Windows 2000, the PostScript driver must be
installed through the Add Printer wizard (Start
!
Settings ® Printers ® Add Printer; follow
instructions; when appropriate, click Have Disk
and browse to \Drivers\Win2K\English\Psdrv\ on
the CD, selecting the inf file in that folder; at
“Digital Signature not Found,” click Yes.)
Click the button beside Printer Software and follow
the on-screen instructions.
Exit the Menu Installer.
To View the User’s Guide
Click Start ® Programs ® XANTÉ ColourLaser 21
Series ® ColourLaser 21 User’s Guide.
®
Turn off both the computer and the printer.
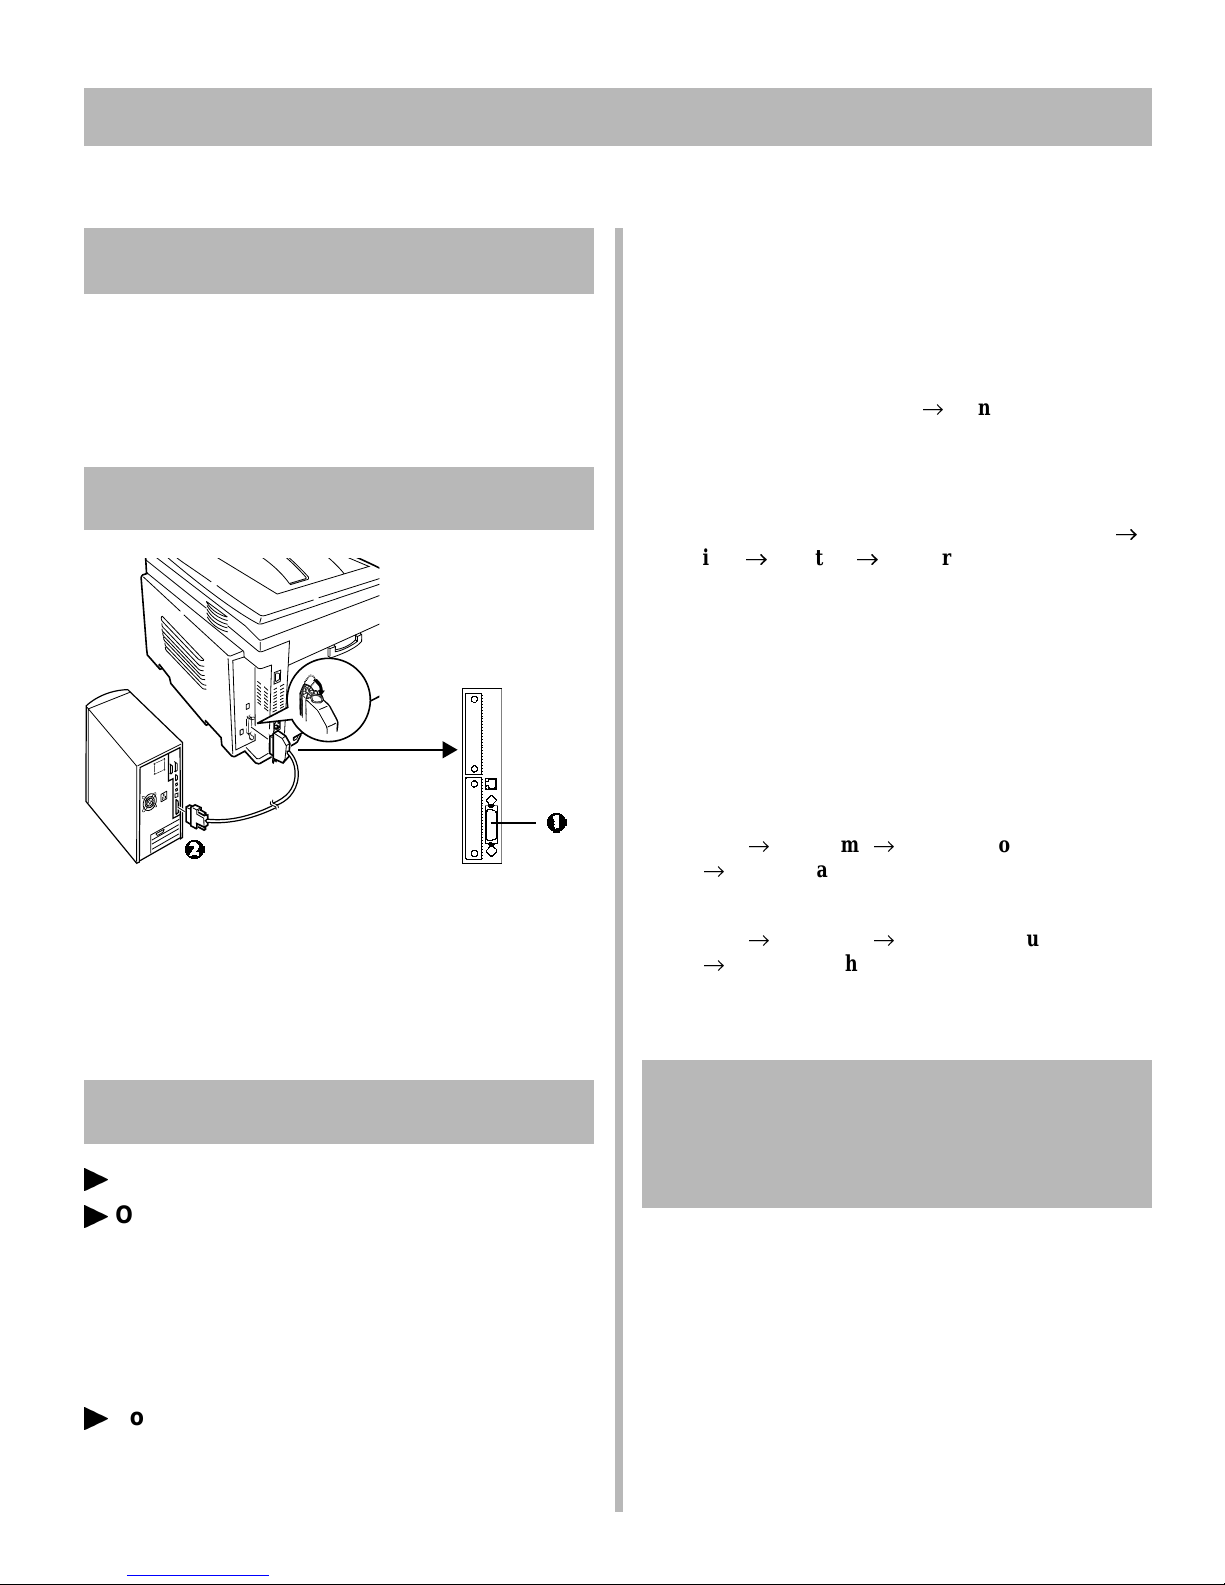
Attach a standard IEEE-1284 parallel cable (not
supplied) to the parallel port on the printer (1),
securing it with the spring clips.
Attach the other end to the parallel port on the
computer (2) and secure it in place with the screws.
Parallel: Install the Software
©
Printer Drivers (Adobe PostScript, PCL)
©
On-Line XANTÉ ColourLaser 21 Series
User’s Guide
• Minimum requirements: i486 processor, 16 MB
RAM, Microsoft Internet Explorer 4.0 or higher.
• Can also be viewed directly from the CD (click the
“View User’s Guide” button in the Menu Installer
dialog box).
©
Color Swatch Utility
Provides a printout of color samples with RGB
settings. Use the settings in application software to
precisely match the sample color in print.
To Open the Color Swatch Utility
Click Start ® Programs ® XANTÉ ColourLaser 21
Series ® Color Swatch Utility. (For more information
on the color utilities, see the on-line XANTÉ
ColourLaser 21 Series User’s Guide).
Activate the Duplex Unit and
Internal Hard Drive in the
Printer Driver
See page 11 for instructions on how to do this.
17
Page 18
15
Network Install: Macintosh
®
Network Connection
Requires Mac® OS 7.x or above, running on a
Macintosh computer with EtherTalk interface.
!
The Ethernet cable is not supplied with the printer.
Use an Ethernet cable with RJ45 connectors at
either end. If the printer will be connected directly
into a network port, a crossover-type cable is
required.
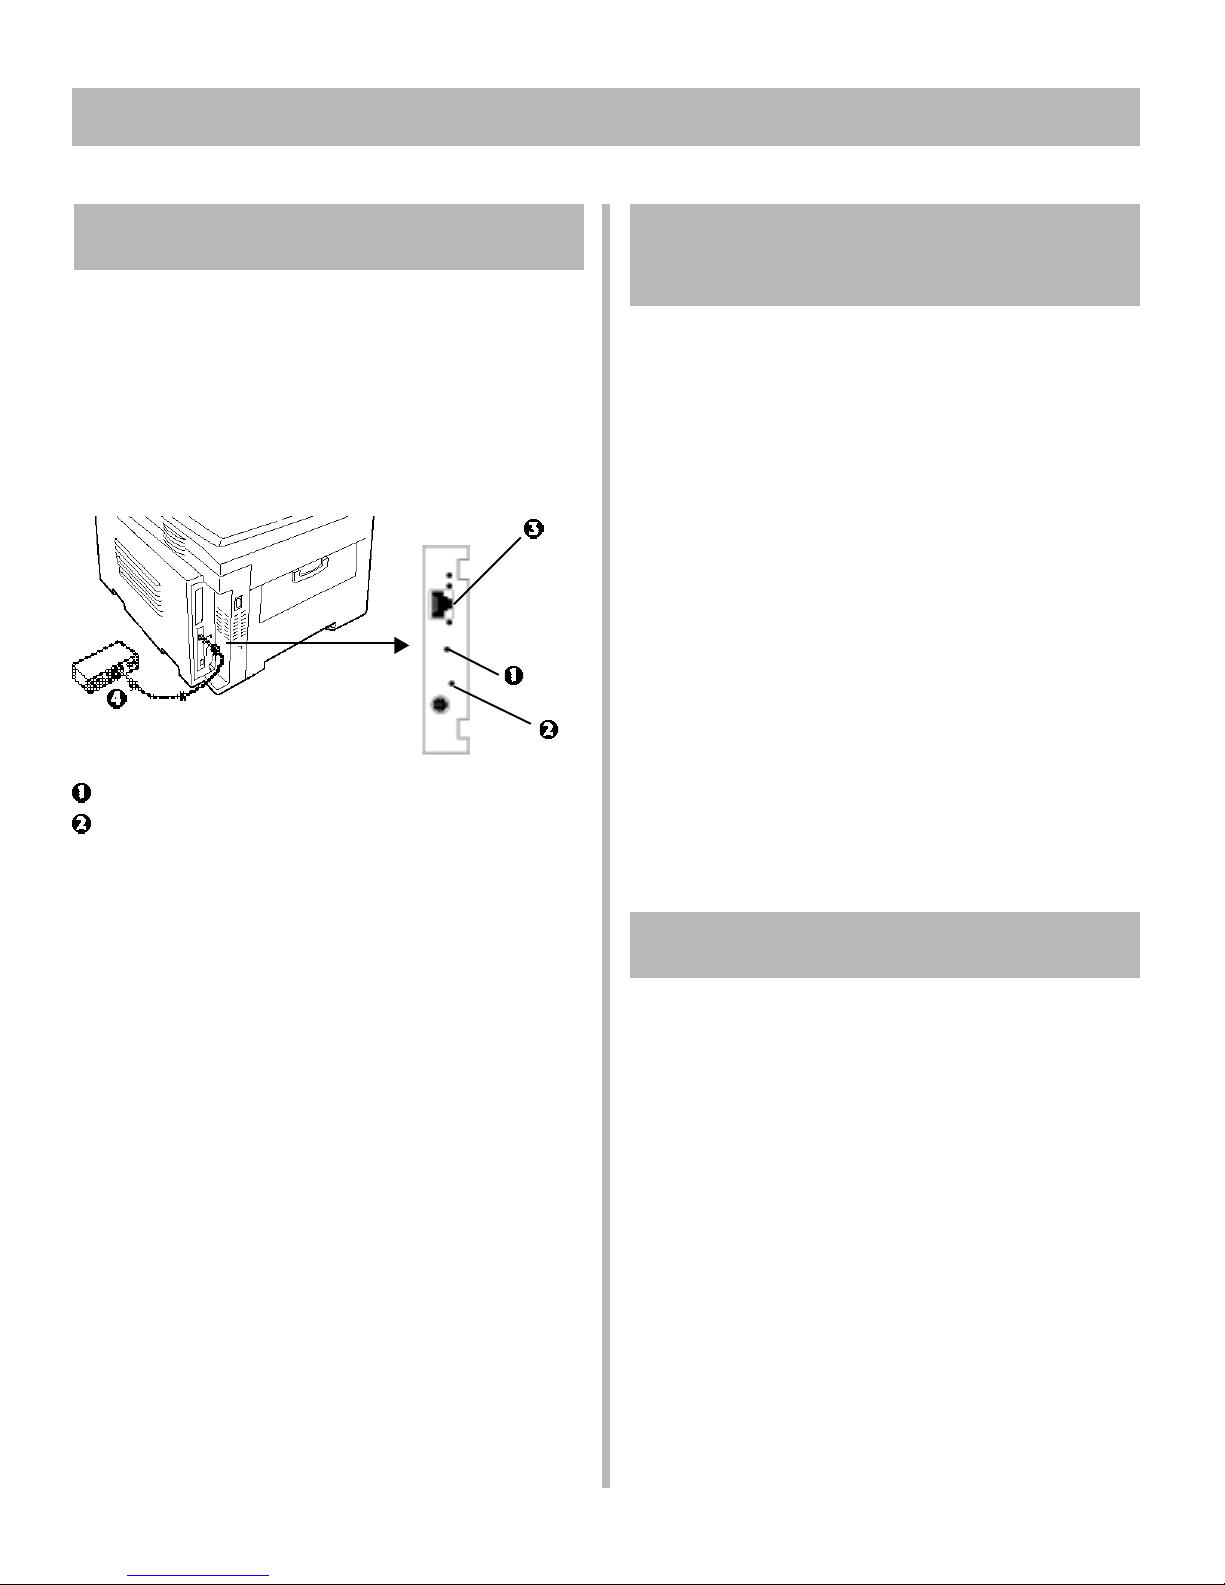
= Test Button
= Status Light
Network: Install the Driver &
Software Utilities
Be sure to switch off antivirus software before
!
installing a printer driver.
Turn the printer on, then turn the computer on.
Place the CD supplied with the printer in the
CD-ROM drive, then double-click the CD icon that
appears on the desktop.
Open the MAC folder, then the PSDrv folder, then
the ENGLISH folder.
Double-click the XANTÉ PSInstaller icon, then click
Continue.
If you wish to install only the driver, click Install.
If you wish to install the driver and the utilities, select
Custom Install from the drop-down box, then select
the items you wish to install (XANTÉ Colourlaser
21, XANTÉ Swatch Utility [see page 11 for more
information] and/or Fonts Downloader), and click
Install.
When the installation is complete, click Quit.
Turn the printer off.
Connect your Ethernet cable to the network port on
the print server (3).
Connect the other end of the Ethernet cable to the
network port (4).
Turn the printer on and wait for the print server status
light to stop blinking.
For more information on the Print Server, see the
on-line Network User’s Guide.
!
Network: Create the PPD
Activate Chooser from the Apple menu, then select
the LaserWriter
printer model you have.
Click Create, then click Select PPD.
Highlight the PPD for the printer model you have
installed, then click Select.
Close Chooser.
®
8 icon and highlight the XANTÉ
18
Page 19
15
Network Install: Macintosh (cont.)
Activate the Duplex Unit and
Internal Hard Drive in the
Printer Driver
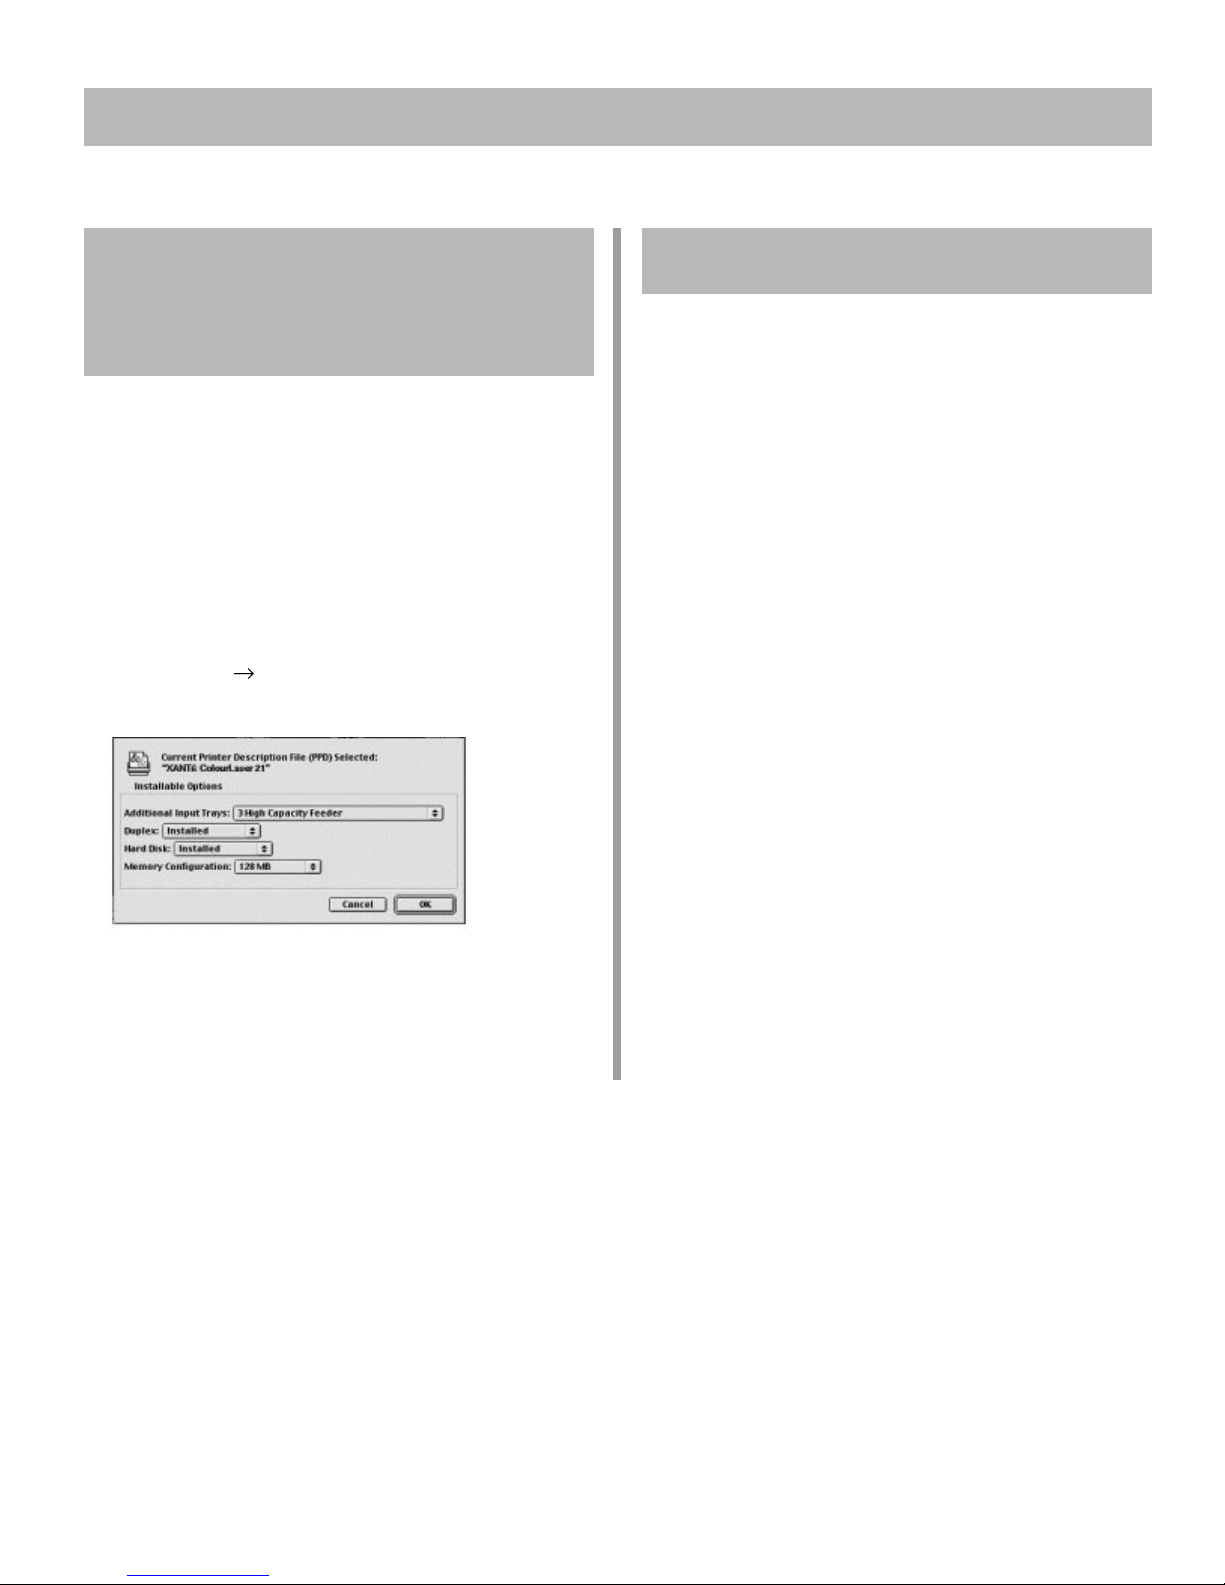
If you have the XANTÉ ColourLaser 21D or the XANTÉ
ColourLaser 21HC, you must activate the duplex unit and
hard disk drive in the drivers before using them.
These procedures are also used when installing
!
optional memory SIMMs, auxiliary paper trays and
High Capacity Feeder. See “Accessories” in the
on-line XANTÉ ColourLaser 21 Series User’s Guide.
1. Activate Chooser from the Apple menu.
2. Select LaserWriter 8.
3. Click Printer ® Setup.
4. Click Configure.
Network: On-Line Manuals
Requirements
• Microsoft Internet Explorer version 5.0 or higher
To Load the Manuals
In order to open the on-line manuals, you must have
your Macintosh set to run .htm extension files under
!
your browser.
Create folders in which to store the XANTÉ
ColourLaser 21 Series User’s Guide and the Network
User’s Guide.
Place the CD supplied with your printer in your
CD-ROM drive.
Copy the files from the CD folder
Manuals\UserGuid\Html\English to the folder you
created for the XANTÉ ColourLaser 21 Series User’s
Guide.
Copy the files from the CD folder
Manuals\Network\Html\English to the folder you
created for the Network User’s Guide.
5. Change the Duplex setting to Installed.
6. Change the Hard Disk setting to Installed.
7. Click OK twice.
8. Close Chooser.
For the latest information, double-click the
ReadmeMac.htm file in the Readme folder on the CD
!
supplied with your printer.
To View the Manuals
To view the on-line manuals, go to the folder where you
stored the manual, then double-click the start_e.htm file.
19
Page 20
16
USB Install: Macintosh
USB Port Connection
No USB interface cable is supplied with the printer.
Use a USB cable that is compatible with USB
!
specification 1.1.
Notes:
• Requires Mac OS 9.04 or higher
• Printer operation is not assured if another USB
compatible device is connected concurrently with it.
• If a USB hub is used, it must be connected directly to
the computer.
• Depending on the size of the document, if the memory
setting for the print monitor is low, you may not be
able to print in the background. To correct for this,
increase the memory setting for the print monitor.
• Depending on the model you have, you may need to
install updates to the operating system in order to use
USB, e.g., iMac Update 1.0, iMac Update 1.1, iMac
Firmware Update, etc. For further information, contact
Apple Computers.
USB: Install the Driver &
Software Utilities
Be sure to switch off antivirus software before
installing a printer driver.
!
Turn the printer on, then turn the computer on.
Place the CD supplied with the printer in the
CD-ROM drive, then double-click the CD icon that
appears on the desktop.
Open the MAC folder, then the PSDrv folder, then
the ENGLISH folder.
Double-click the XANTÉ PSInstaller icon, then click
Continue.
If you wish to install only the driver, click Install.
If you wish to install the driver and the utilities, select
Custom Install from the drop-down box, then select
the items you wish to install (XANTÉ Colourlaser
21, XANTÉ Swatch Utility [see page 11 for more
information] and/or Fonts Downloader), and click
Install.
When the installation is complete, click Quit.
Turn the computer and the printer off.
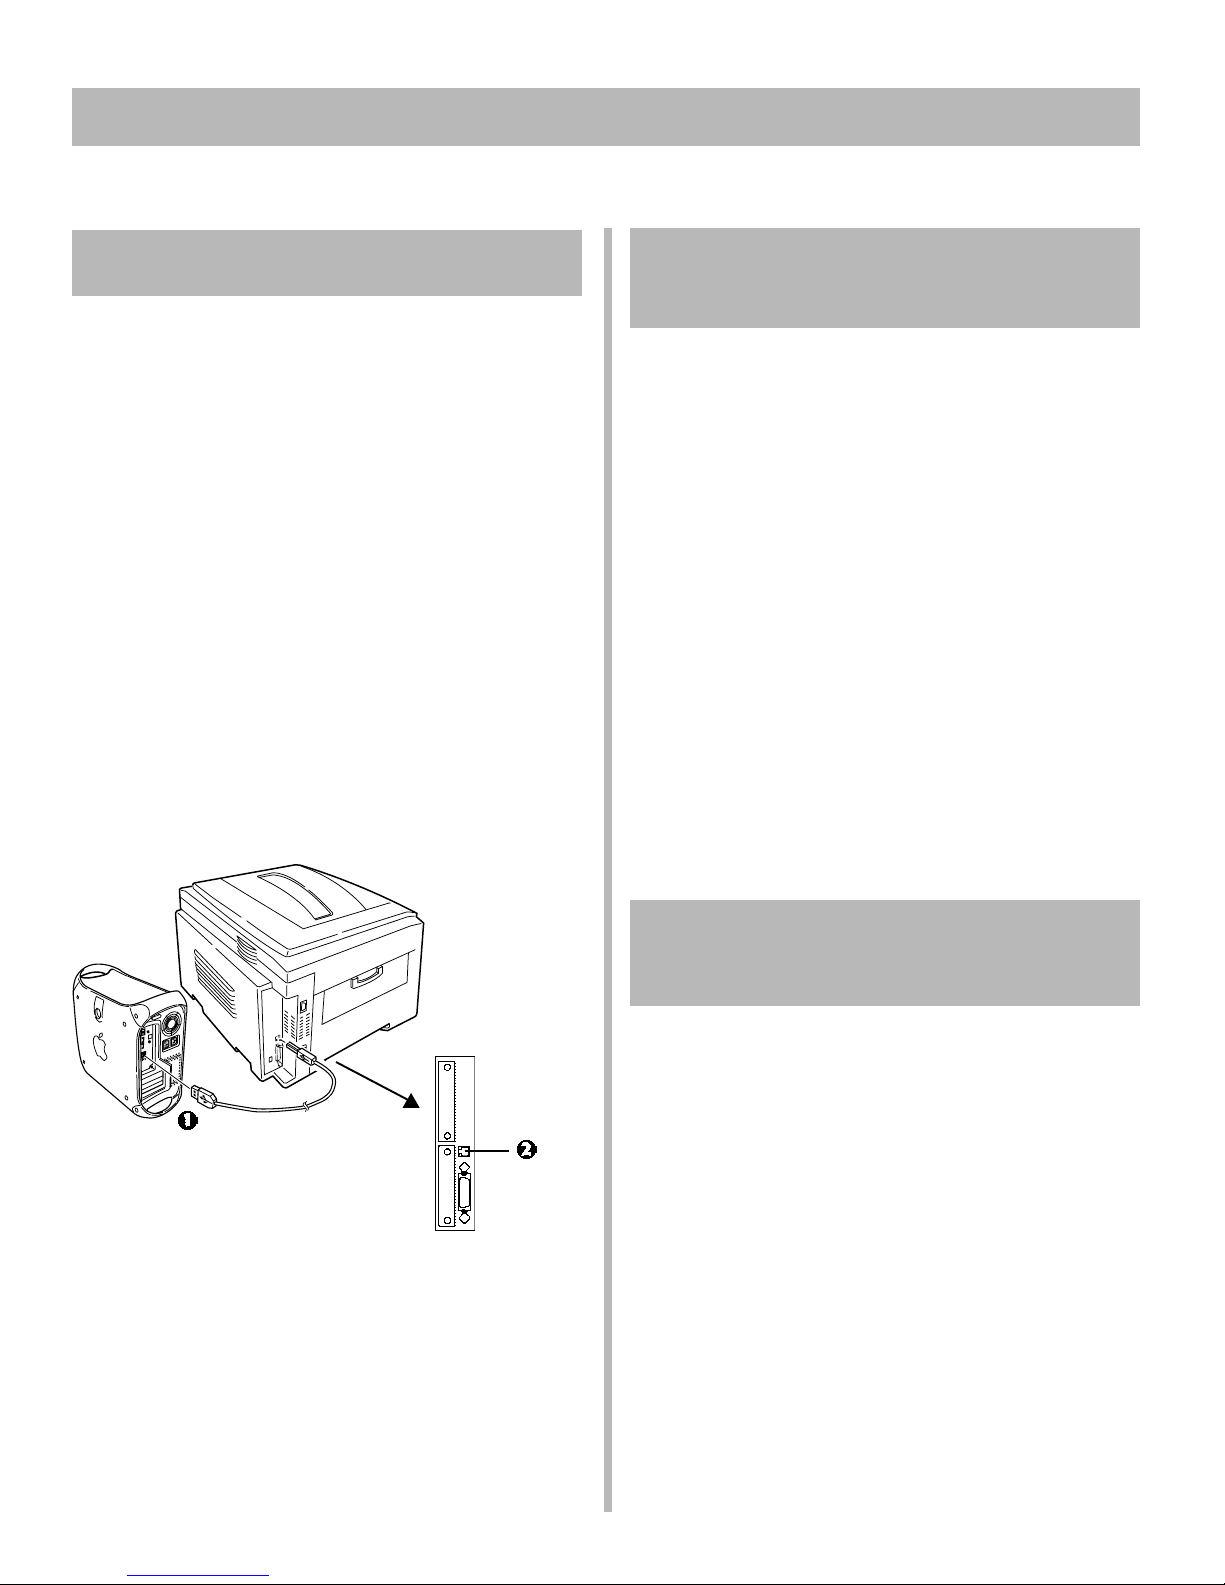
Connect the USB cable to the USB port on the
computer (1).
Connect the other end of the cable to the USB port on
the printer (2).
20
USB: Create the Desktop
Printer
Double-click the Apple Extras folder on your local
hard drive, then double-click the Apple LaserWriter
Software folder.
Double-click the Desktop Printer Utility icon.
Highlight Printer (USB) under Create Desktop.
In the drop-down box, select LaserWriter 8 and click
OK.
Under PostScript Printer Description (PPD) file,
click Change.
Make sure the “Printer Descriptions” folder is
selected in the drop-down box.
Highlight your XANTÉ printer model, then click Select.
Under USB Printer Selection, click Change.
Highlight your XANTÉ printer model, then click OK.
Click Create.
The XANTÉ printer icon appears on the desktop.
Page 21
16
USB Install: Macintosh (cont.)
Activate the Duplex Unit and
Internal Hard Drive in the
Printer Driver
If you have the XANTÉ ColourLaser 21D or the XANTÉ
ColourLaser 21HC, you must activate the duplex unit and
hard disk drive in the drivers before using them.
These procedures are also used when installing
!
optional memory SIMMs, auxiliary paper trays and
High Capacity Feeder. See “Accessories” in the
on-line XANTÉ ColourLaser 21 Series User’s Guide.
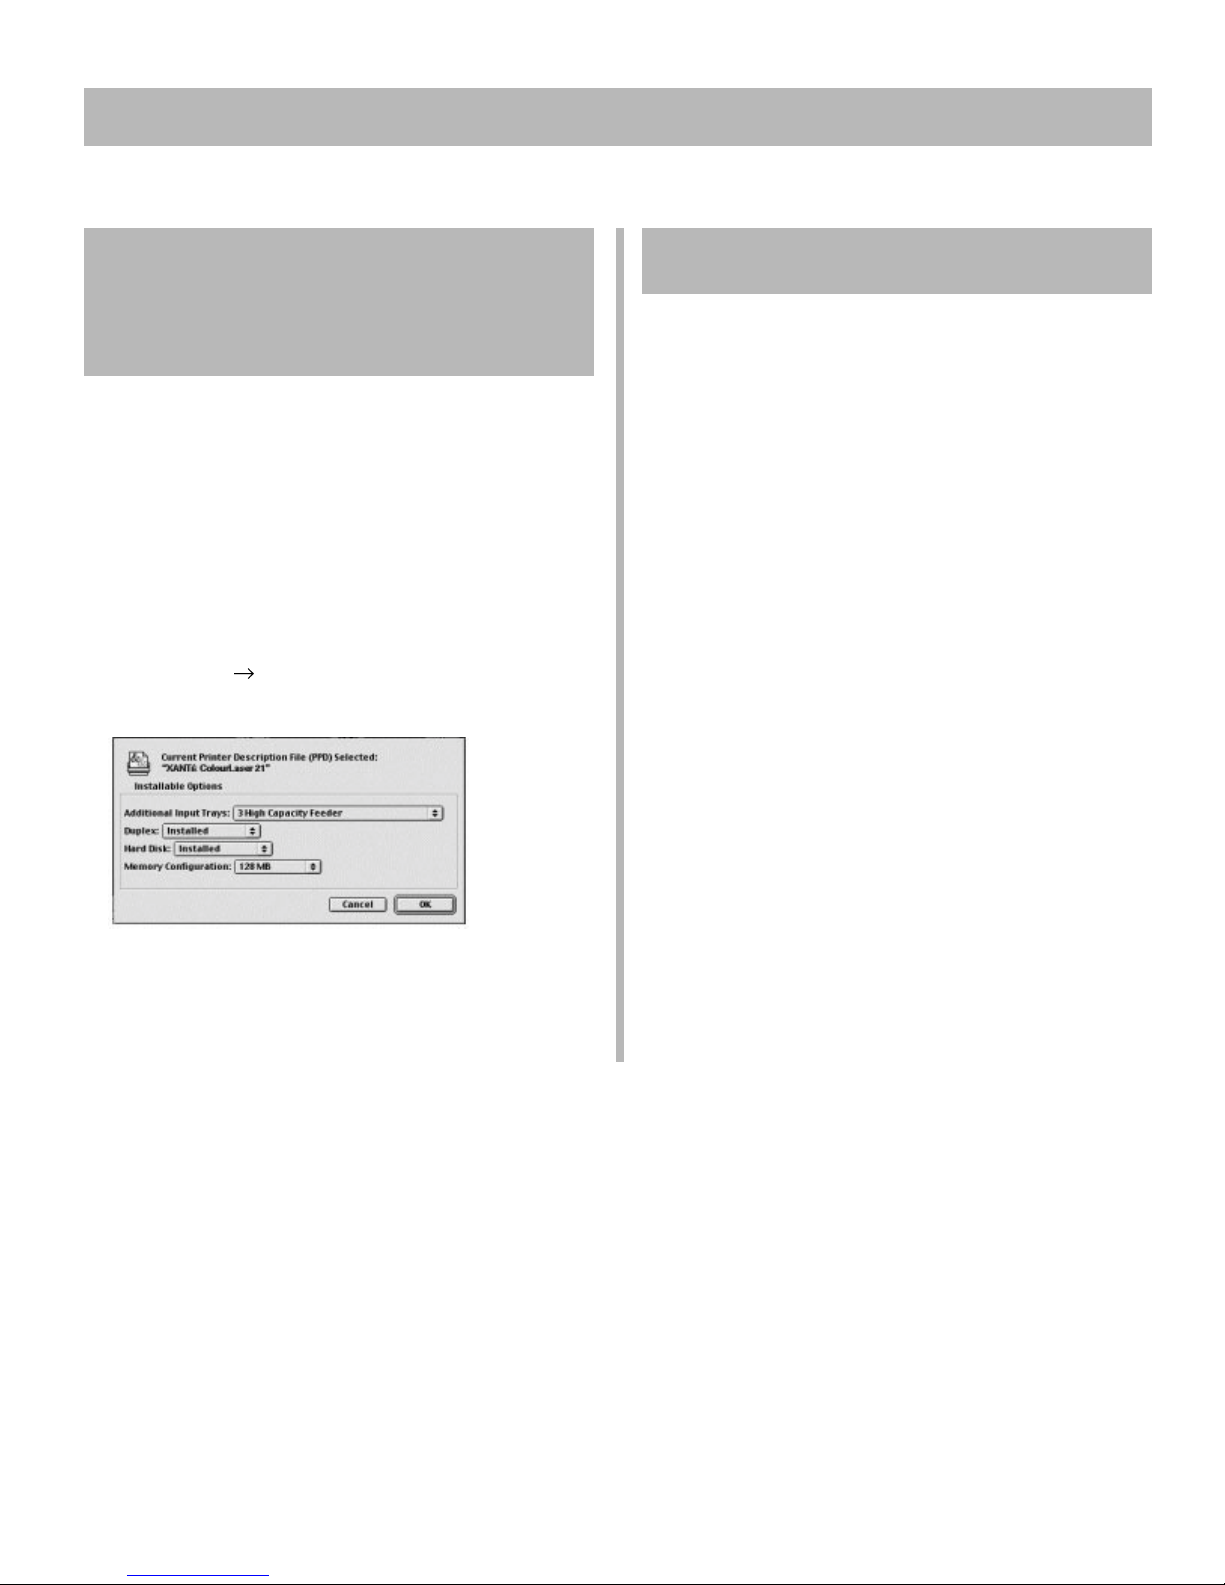
1. Activate Chooser from the Apple menu.
2. Select LaserWriter 8.
3. Click Printer ® Setup.
4. Click Configure.
USB: On-Line Manuals
Requirements
• Microsoft Internet Explorer version 5.0 or higher
To Load the Manuals
In order to open the on-line manuals, you must have
your Macintosh set to run .htm extension files under
!
your browser.
Create folders in which to store the XANTÉ
ColourLaser 21 Series User’s Guide and the Network
User’s Guide.
Place the CD supplied with your printer in your
CD-ROM drive.
Copy the files from the CD folder
Manuals\UserGuid\Html\English to the folder you
created for the XANTÉ ColourLaser 21 Series User’s
Guide.
Copy the files from the CD folder
Manuals\Network\Html\English to the folder you
created for the Network Print Server User’s Guide.
5. Change the Duplex setting to Installed.
6. Change the Hard Disk setting to Installed.
7. Click OK twice.
8. Close Chooser.
For the latest information, double-click the
ReadmeMac.htm file in the Readme folder on the CD
!
supplied with your printer.
To View the Manuals
To view the on-line manuals, go to the folder where you
stored the manual, then double-click the start_e.htm file.
21
Page 22
Set the Color Balance
17
Why Set the Color Balance?
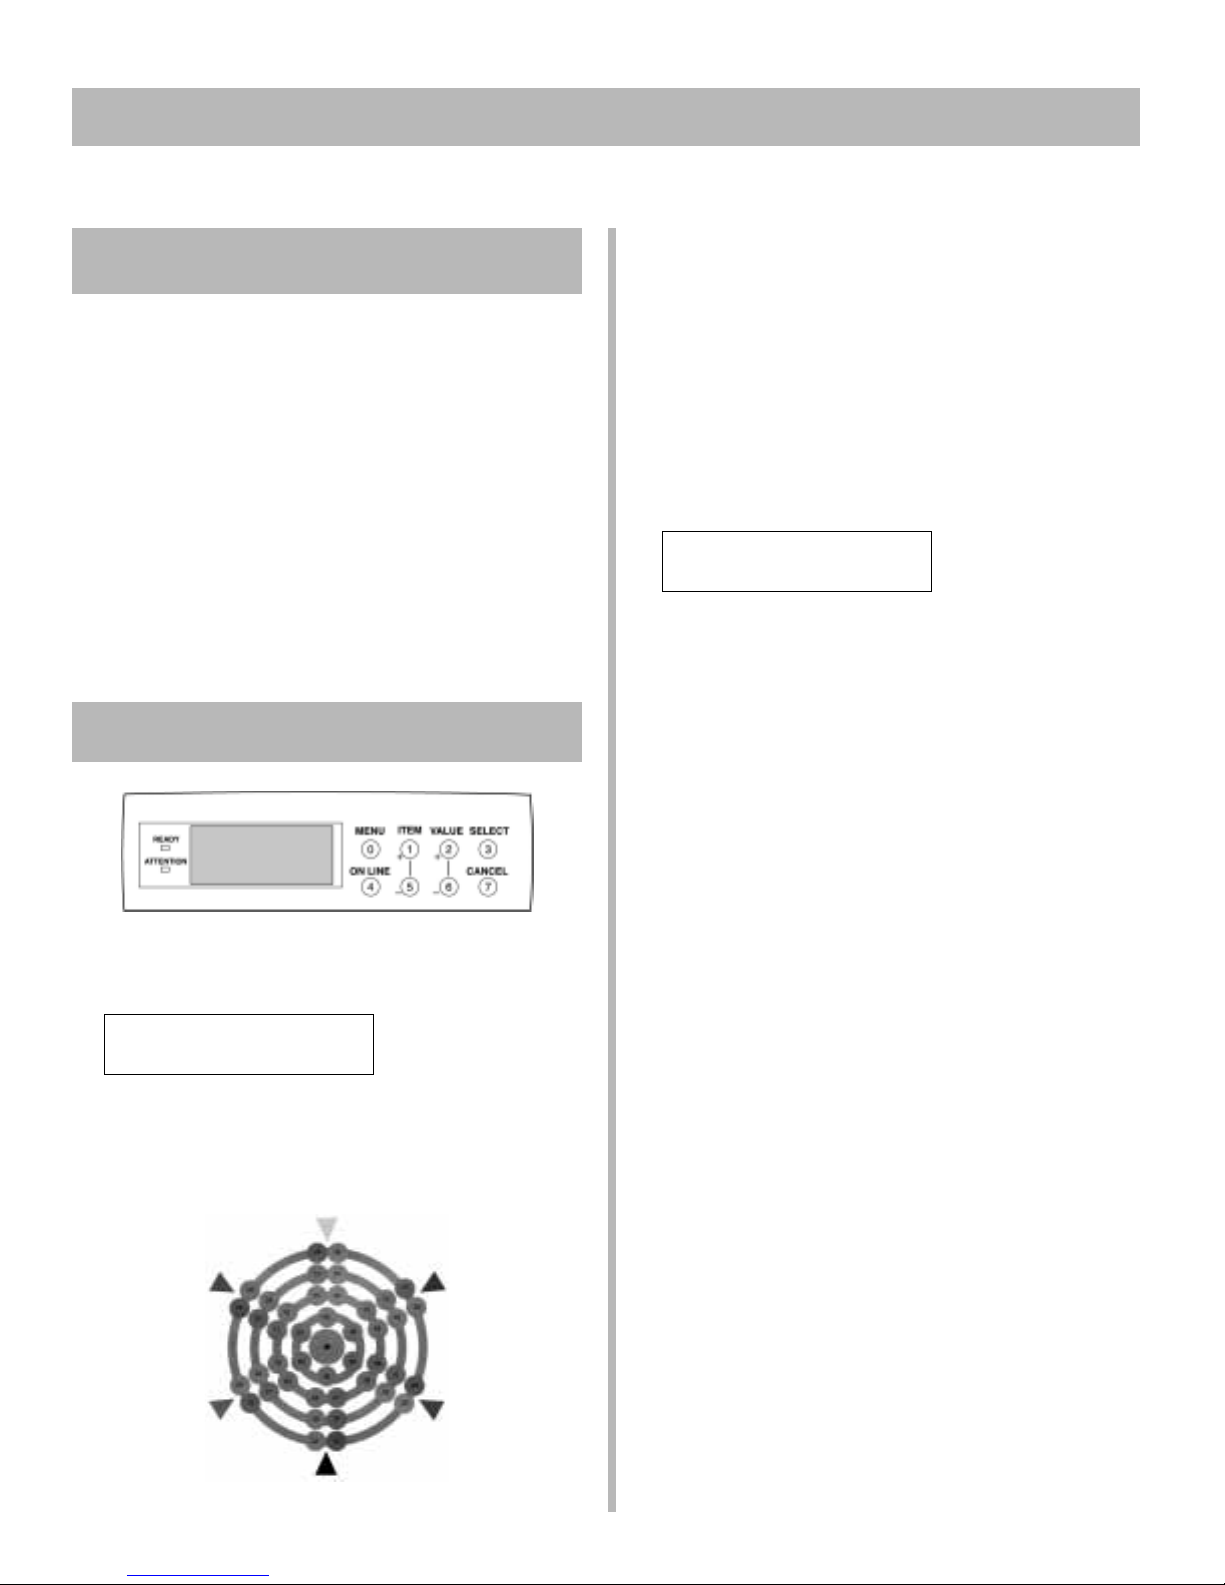
4. Check the color of the center circle in the printout
against the surrounding circles:
Setting the color balance after shipment ensures that the
three primary colors your printer uses are properly
balanced. If they are not balanced, one color may
dominate, and printed pictures will not be as lifelike as
they could be.
The color balance should be set
• when the printer is installed
• any time the print quality seems to have
deteriorated
• when image drums are replaced
• if you switch to a significantly different print media
(e.g., from white to media of various colors)
• if the printer is moved to a new location
Setting the Color Balance
1. Press MENU repeatedly until COLOR MENU displays.
2. Press ITEM + repeatedly until
COLOR BALANCE ADJUST
RESET TO DEF AULT
• If the center circle matches the circles labeled 00,
the color balance is correctly adjusted and you’re
done. Press ON LINE (the printer will go back on
line)
• If the center circle does not match circle 00,
determine which surrounding circle most closely
matches the center circle and note its number.
5. Press VALUE (+ to increase # or - to decrease #)
repeatedly until
COLOR BALANCE ADJUST
SELECT PATTERN #
displays, where # represents the number determined in
step 4.
6. Press SELECT.
The new value is engaged; a new test pattern prints.
7. Check the pattern again and repeat steps 4 through 6
until the color of the center circle most closely
matches the circles labeled 00.
The color balance process is subjective. It is
unlikely that you will get an exact match of the
!
center circle to the circles labeled 00. Repeat the
color balance process until you feel you have a
match, but no more than four times before
pressing ON LINE to exit the color balance
process.
8. Press ON LINE.
The printer goes back on line.
displays.
3. Press SELECT. This restores the factory color balance
settings, which form a baseline for the adjustment.
The Color Balance test pattern prints.
22
Page 23
Check the Media Settings
18
Default Media Settings
Multi-Purpose Tray (MP Tray)—for Special Media
The default printer setting for print media is Medium (20
to 24 lb.).
Individual Print Jobs
If you are using special media for an individual print job,
make the temporary media setting changes in the driver
as you print the job from your application.
Printer Defaults
If you consistently use another type of media in Tray 1 or
the Multi-Purpose (MP) Tray, change the media settings
in the printer menu (see page 26). If you do not, the print
quality will be reduced and you could damage the printer.
Media Weight Settings
Media Weight
Setting US Bond Metric Index
Light 16 lb. 62 g/m
Medium Light 17-19 lb. 63-73 g/m
Medium* 20-24 lb. 74-92 g/m
Medium Heavy 25-27 lb. 93-103 g/m
2
2
2
2
33 lb.
34-40 lb.
42-50 lb.
51-56 lb.
Print media
must be able
!
to withstand
392°F (200°C)
for 0.1 second.
The Multi-Purpose Tray is used for special media such as
labels and card stock up to 110 lb. Index (54 lb. US
Bond). It can also be used for letterhead stationery,
transparencies, light paper and plain paper.
Output
Top Exit (Default)
Heavy 28-32 lb. 104-122 g/m258-67 lb.
Ultra Heavy 33-54 lb. 123-200 g/m
2
67-110 lb.
Print Paths
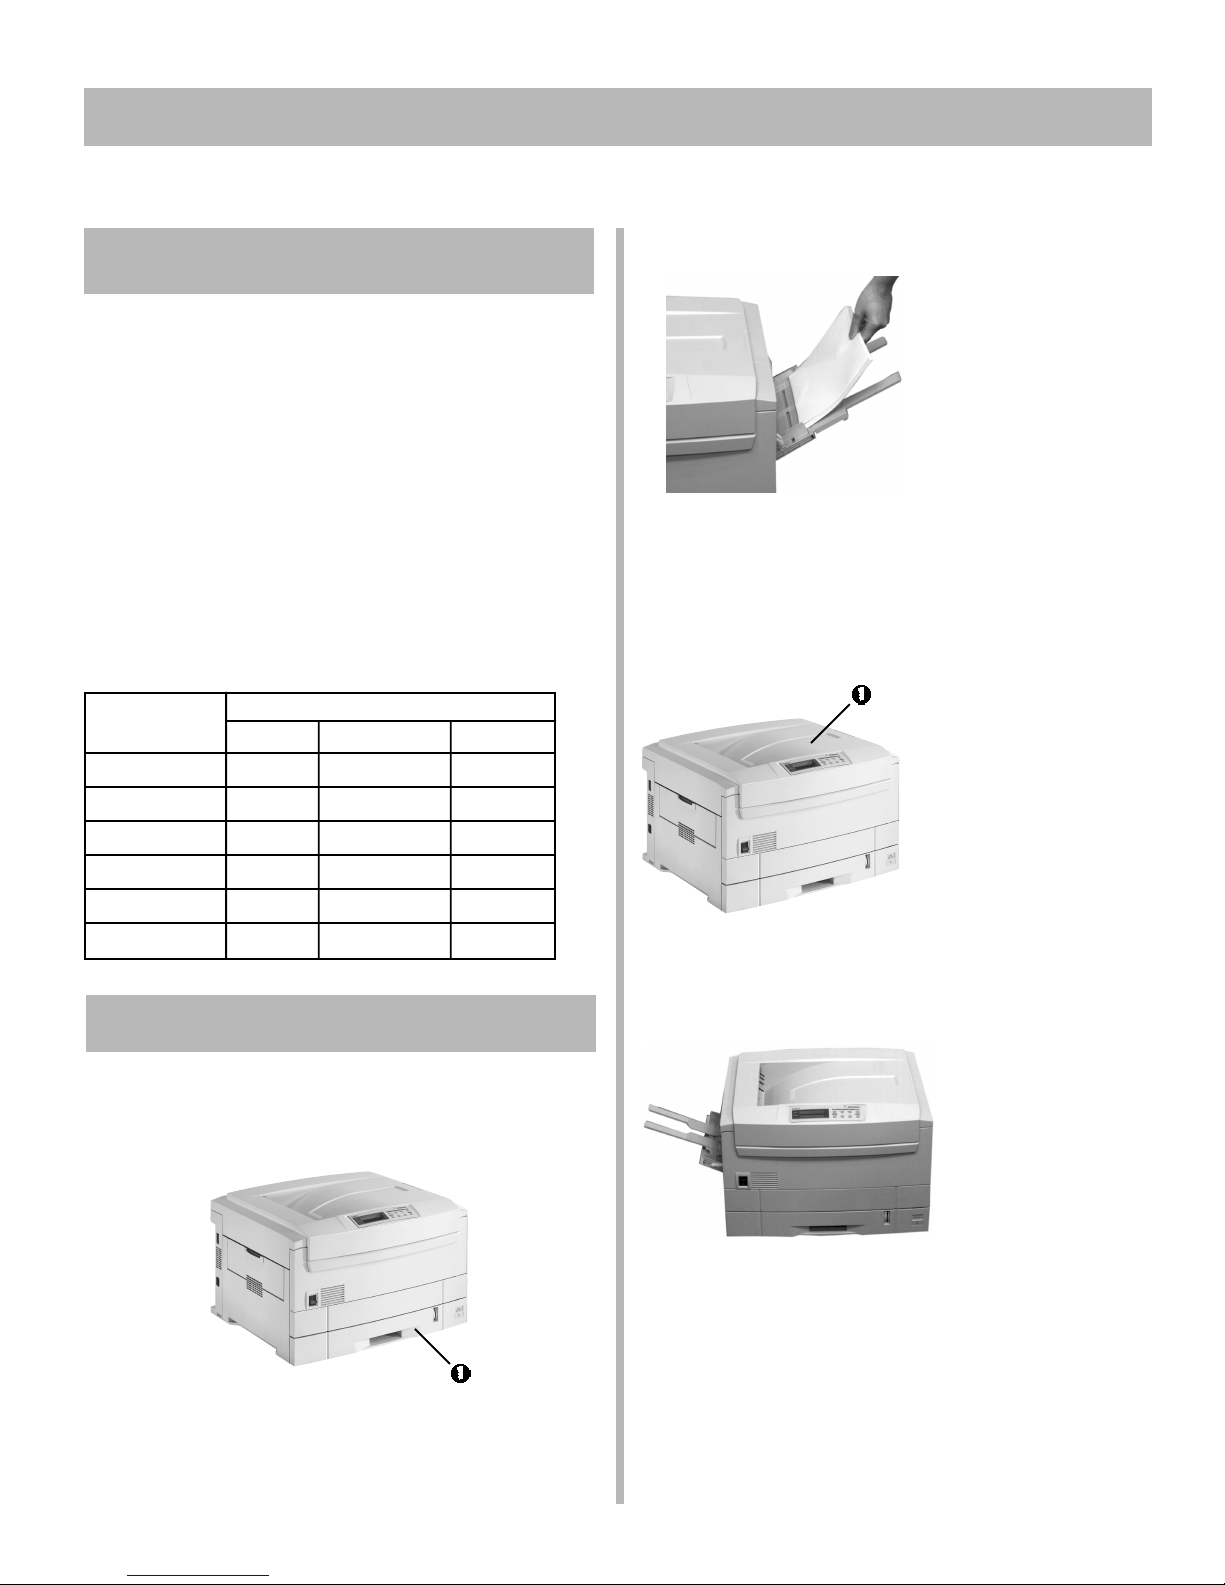
Input
Tray 1
Tray 1 (1) is used for paper, range 17 to 47 lb. US Bond
(63 to 174 g/m
2
), and transparencies.
The top exit (1) is used for plain paper and letterhead fed
in from Tray 1. Sheets feed in face down.
Straight- T hrough Exit—Required for Special Media
Always use the
straight-through
!
exit when feeding
media in from the
Multi-Purpose
Tray or when
printing
transparencies.
The straight-through exit on the left side of the printer
provides a curl-free print path. Sheets feed in face up (set
your print job for reverse page order to get multi-page
print jobs to stack in normal page sequence).
To print a particular job using the straight-through
exit path, click Properties from the Print dialog box,
!
then select Stacker (Face-Up) for the Output Bin in
the driver.
23
Page 24
18
Check the Media Settings (cont.)
For information on usable print media,
see the Handy Reference Guide.
!
Printing Transparencies
Caution! Use only recommended transparencies: 3M
CG3720 or Folex® BG67.
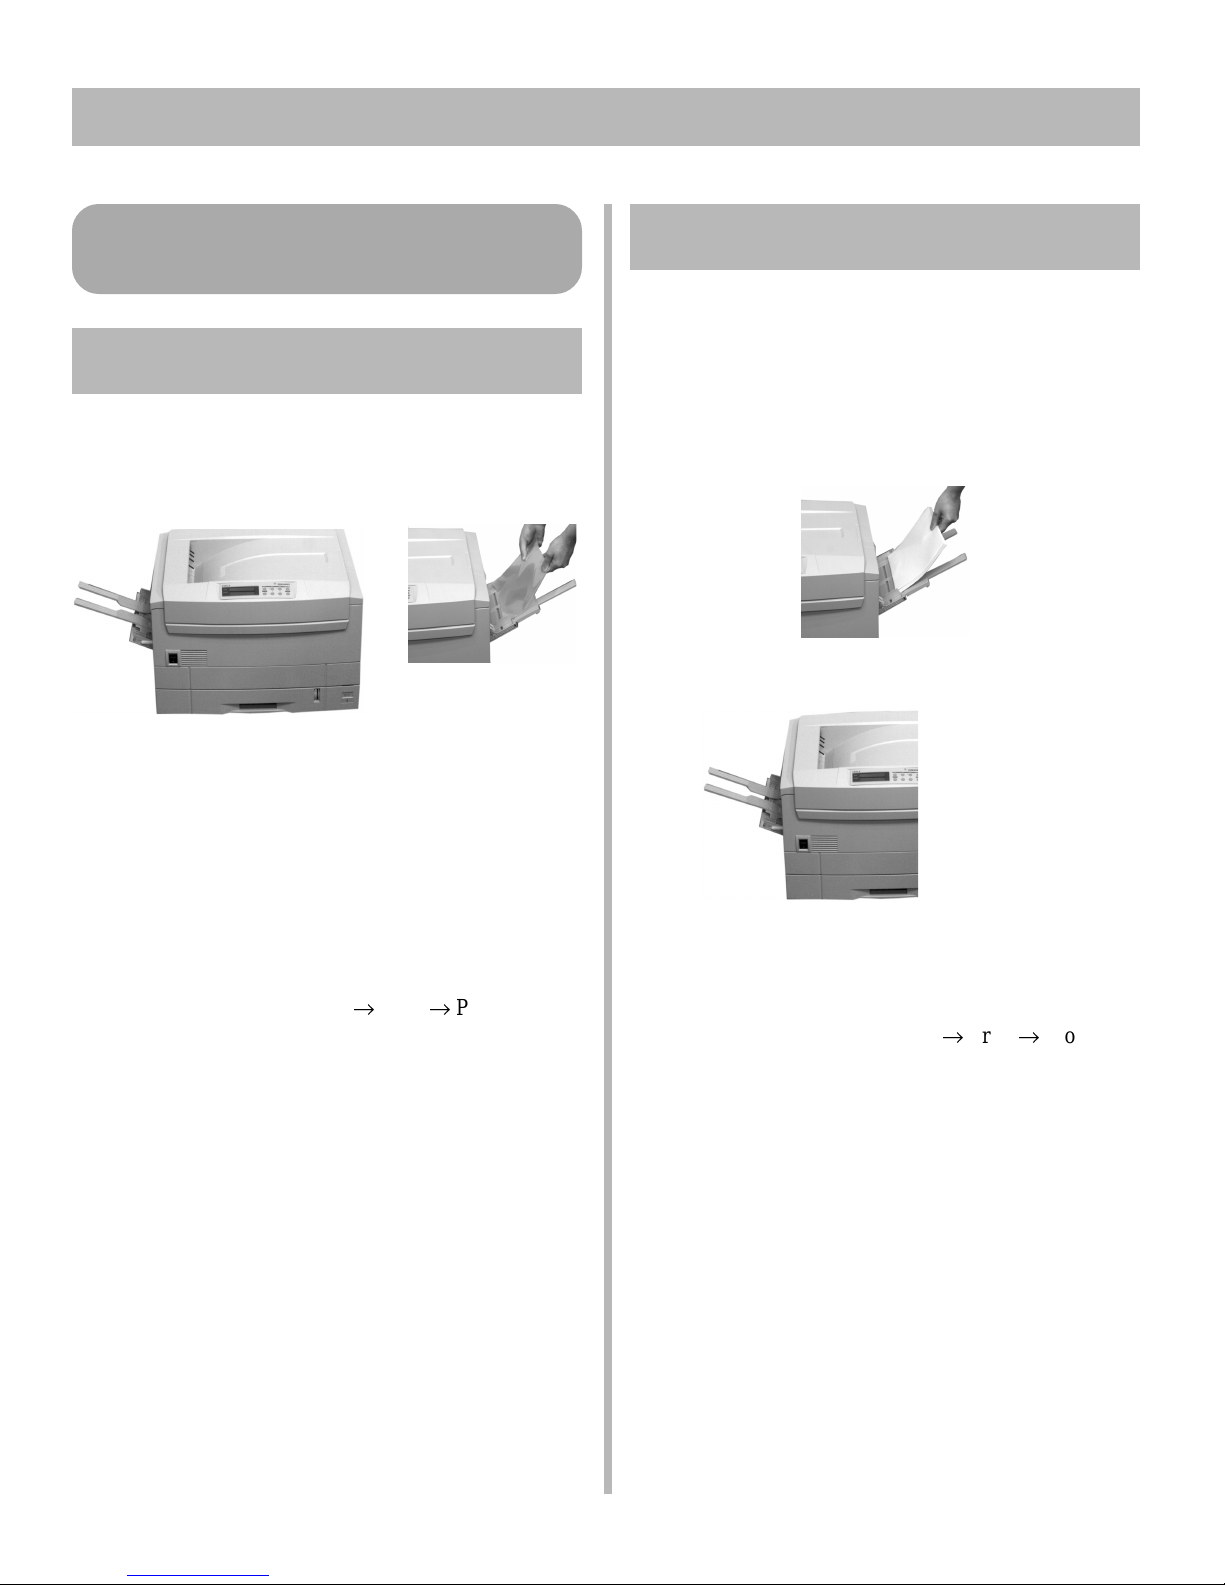
Print Path
• Input: Tray1 or Multi-Purpose (MP) Tray
• Output: Rear Exit Only [Stacker (Face-up)]
Printing Labels
Caution!
• Labels must be able to withstand 392°F (200°C)
for 0.1 second
®
• Labels must cover entire carrier sheet
Print Path
• Input: Multi-Purpose (MP) Tray Only
Transparencies can be loaded in either Tray 1 or the
Multi-Purpose Tray. The printer automatically detects that
transparencies are being used and processes the media
differently from standard paper.
Individual Print Jobs
T o optimize the print speed for individual multi-page
print jobs, make the following settings in the printer
driver as you print the job (File ® Print ® Properties [or
your application’s equivalent]):
• Source: Tray1 or MP Tray
• Size: Letter or Tabloid
• Type: Transparency
• Output bin: Stacker (Face-up)
Changing the Default Settings
If the MP Tray or Tray 1 is always loaded with
Transparencies, you should enter the printer menu (see
page 26) and change the settings for the paper path you
are using for the transparencies as indicated below. This
will provide the best printer performance.
Printer Menu Settings: Transparencies in Tray 1
• Tray1 MediaType: Transparency
Printer Menu Settings: Transparencies in MP Tray
• MP T ray PaperSize: Letter or Tabloid
• MP Tray MediaType: Transparency
• Output: Rear Exit Only [Stacker (Face-up)]
Individual Print Jobs
For individual print jobs on labels, change the settings in
the driver as you print the job (File ® Print ® Properties
[or your application’s equivalent]):
• Source: MP Tray
• Size: Letter
• Type: LABEL1 (Heavy) or LABEL2 (Ultra Heavy)
• Output bin: Stacker (Face-up)
Changing the Default Settings
If you consistently use labels in the MP Tray, enter the
printer menu (see page 26) and change the settings as
indicated below .
Printer Menu Settings: Labels in MP T ray
• MP T ray PaperSize: Letter
• MP T ray MediaWeight: Heavy (LABEL1) or
Ultra Heavy (LABEL2)
24
Page 25
Check the Media Settings (cont.)
18
Printing Thick Paper
(Card Stock, Index Paper)
The maximum usable paper weight for duplex
printing is 28 lb.
!
Failure to change the printer’s media
settings before printing on thick paper
!
will damage the printer.
Print Path
Changing the Default Settings
If you consistently use thick paper in T ray 1 or the MP
Tray, enter the printer menu (see page 26) and change the
settings for the paper path you are using for the thick
paper as indicated below .
Printer Menu Settings: Thick Paper in Tray 1
• Tray 1 MediaWeight: Medium Heavy to Ultra Heavy
(see table on page 23)
Printer Menu Settings: Thick P aper in MP Tray
• MP Tray Paper Size: Letter Short Edge, Letter Long
Edge, Legal-13, Legal-14,
Legal-13.5, T abloid, Tabloid
Extra, Executive, A3, A4 Short
Edge, A4 Long Edge, A5, A6,
B4, B5 Short Edge, B5 Long
Edge, or Custom (must be
defined and saved in driver)
• MP T ray MediaWeight: Medium Heavy
• Input: Tray1 (up to 27 lb US Bond)
or Multi-Purpose (MP) Tray (up to 110 lb
Index)
• Output: Rear Exit Only
Individual Print Jobs
For individual print jobs on thick paper, change the
settings in the driver as you print the job (File ® Print
Properties [or Settings, or your application’s equivalent]):
• Source: Tray1 (up to 27 lb)
or Multi-Purpose Tray (up to 110 lb)
• Size: Letter Short Edge, Letter Long Edge, Legal-13,
Legal-14, Legal-13.5, Tabloid, Tabloid Extra,
Executive, A3, A4 Short Edge, A4 Long Edge,
A5, A6, B4, B5 Short Edge, B5 Long Edge, or
Custom (must be defined and saved in driver)
• Type: Medium Heavy to Ultra Heavy
(see table on page 23)
®
25
Page 26
18
Check the Media Settings (cont.)
Changing Media Settings for
Tray1 in the Printer Menu
Transparencies Only:
Set Media Type
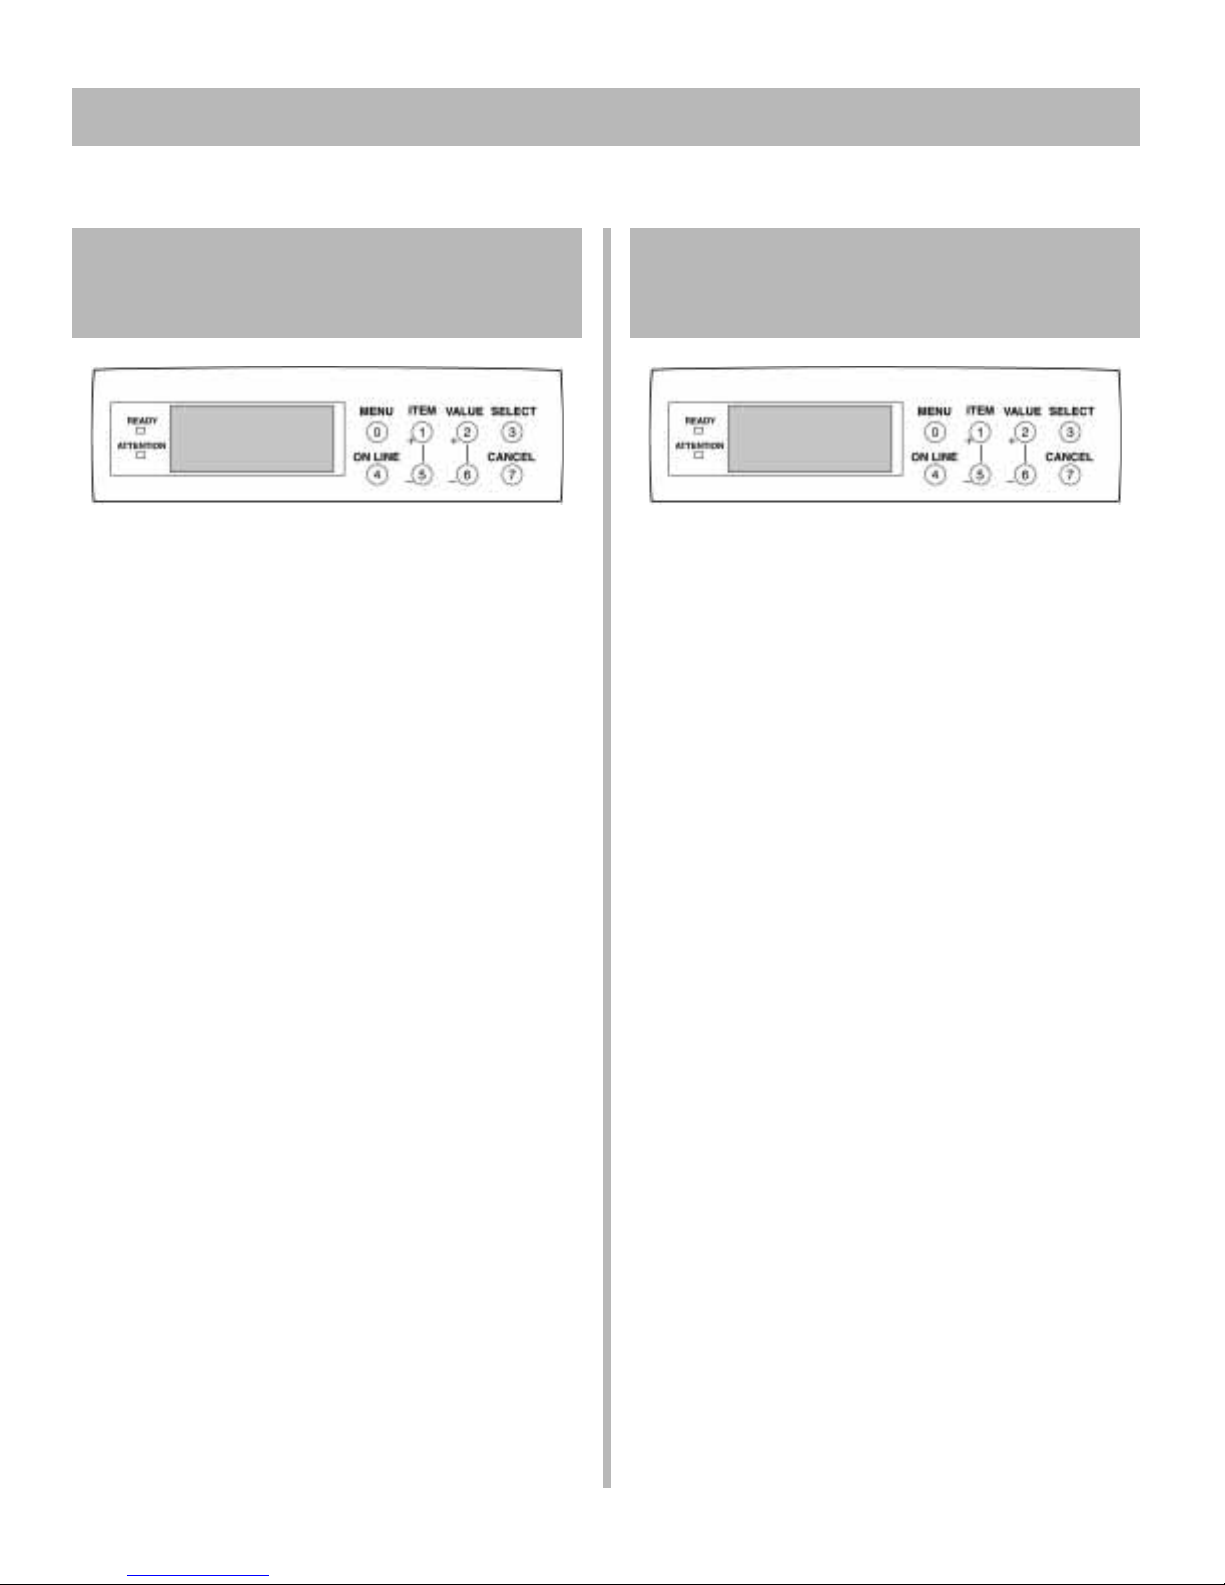
Press MENU repeatedly until MEDIA MENU appears
on the display.
Press ITEM repeatedly until TRA Y1 MEDIATYPE
appears on the display.
Press VALUE (+ or -) repeatedly until
TRANSP ARENCY appears on the second line of the
display.
Press SELECT to engage the new setting.
An Asterisk (*) appears next to the new setting.
Press ON LINE to save the setting and exit the menu.
Other Special Media:
Set Media Weight
(Not used for Transparencies)
Press MENU repeatedly until MEDIA MENU appears
on the display.
Press ITEM repeatedly until
appears on the display.
Press VALUE (+ or -) repeatedly until the desired
setting appears on the second line of the display.
Press SELECT to engage the new setting.
An Asterisk (*) appears next to the new setting.
Press ON LINE to save the setting and exit the menu.
TRA Y1 MEDIAWEIGHT
Changing Media Settings for
MP Tray in the Printer Menu
First, Set Media Size
Press MENU repeatedly until MEDIA MENU appears
on the display .
Press ITEM repeatedly until MP TRAY PAPERSIZE
appears on the display.
Press VALUE (+ or -) repeatedly until the desired
setting appears on the second line of the display.
Press SELECT to engage the new setting.
An Asterisk (*) appears next to the new setting.
Next, Set Media Type or Weight:
Transparencies Only: Set Media Type
Press ITEM repeatedly until MP TRA Y
MEDIATYPE appears on the display.
Press VALUE (+ or -) repeatedly until
TRANSP ARENCY appears on the second line of
the display .
Press SELECT to engage the new setting.
An Asterisk (*) appears next to the new setting.
Other Special Media: Set Media Weight
(Not used for Transparencies)
Press ITEM repeatedly until MP TRA Y
MEDIAWEIGHT appears on the display.
Press VALUE (+ or -) repeatedly until the desired
setting appears on the second line of the display.
Press SELECT to engage the new setting.
An Asterisk (*) appears next to the new setting.
26
Finish by Saving the Settings
Press ON LINE to save the setting and exit the menu.
Page 27
Check the Printer Settings
19
Power Save Mode
The printer is set at the factory to enter the Power Save
mode after 1 hour. You can change this setting to 5, 15,
30 or 240 minutes.
To change the interval:
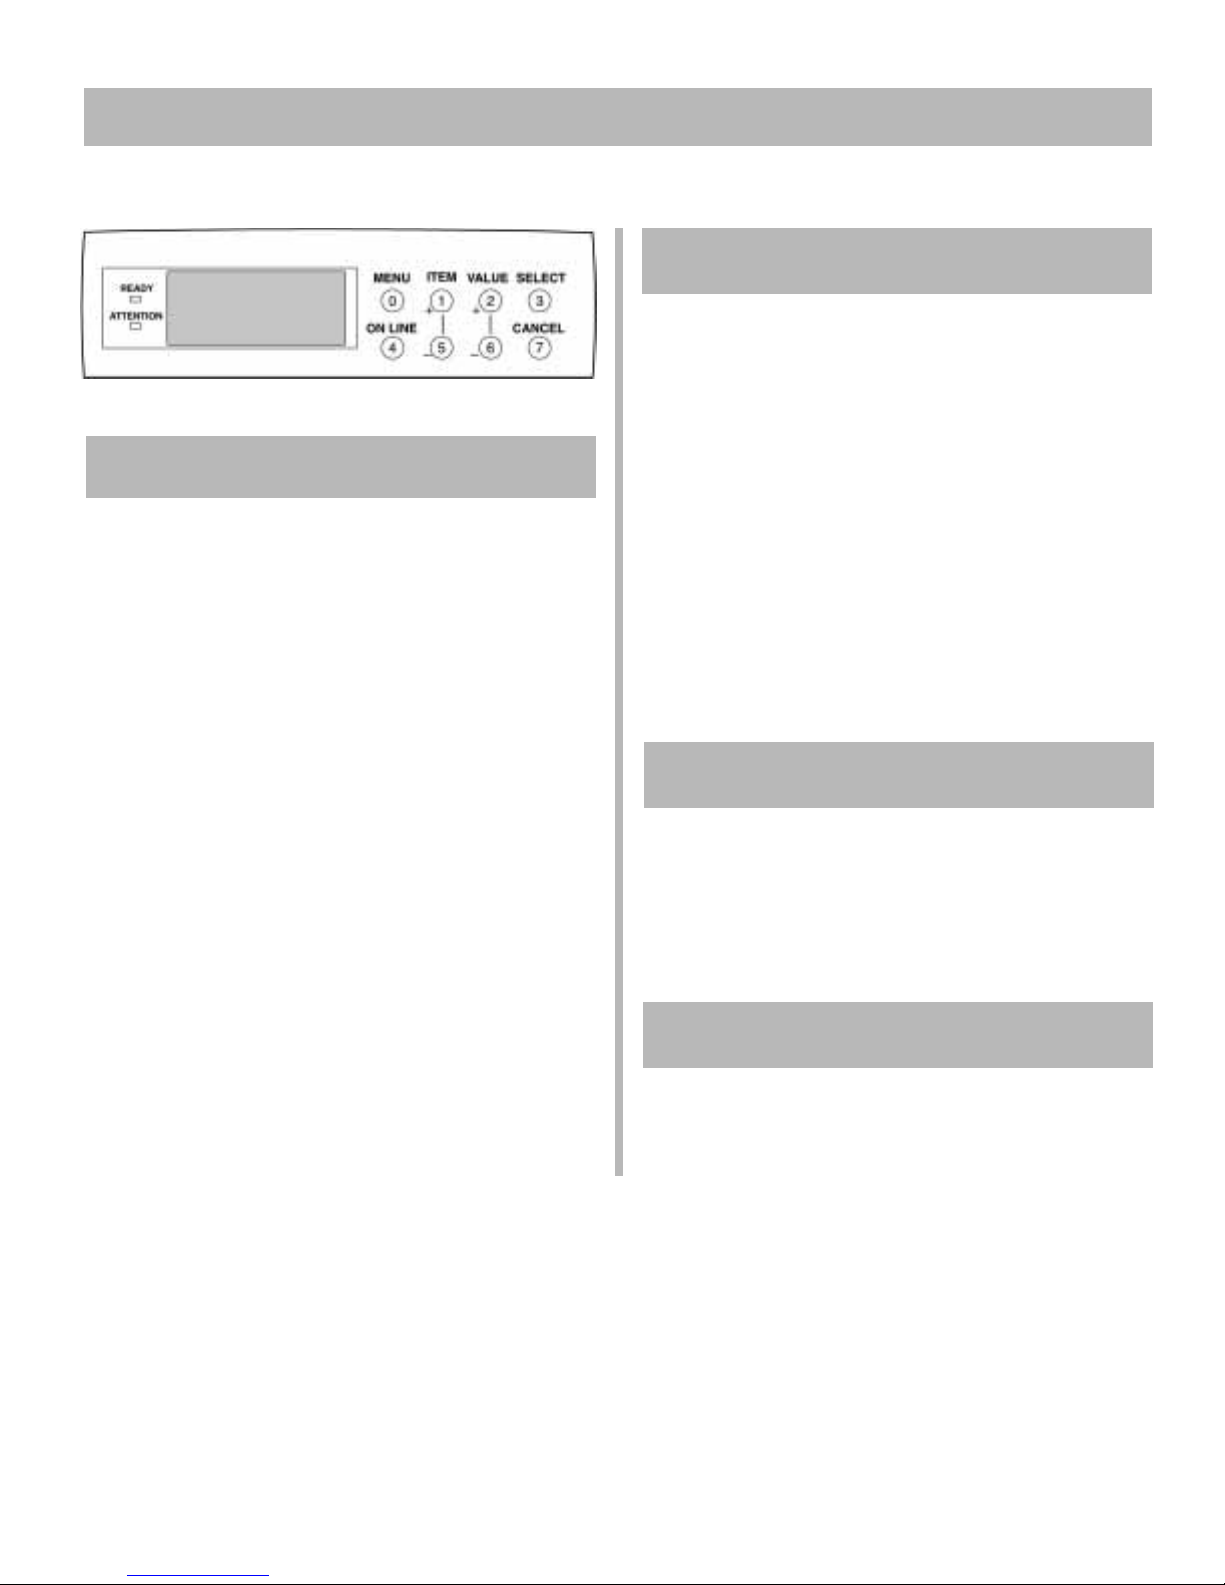
Press MENU repeatedly until
MENU appears on the display.
Press ITEM + repeatedly until
TIME appears on the display.
Press VALUE (+ or -) repeatedly until the desired
setting appears on the second line of the display.
Press SELECT.
An Asterisk (*) appears next to the new setting.
Press ON LINE to save the setting and exit the menu.
SYSTEM CONFIG
POWER SAVE DELAY
Duplex Mode
If you experience curling when printing a file in
duplex mode, switch to 28-lb. US Bond paper.
!
If your printer is equipped with a duplex unit and you
want duplex printing to be the printer default:
Press MENU repeatedly until
on the display .
Press ITEM + repeatedly until
the display .
Press VALUE +.
ON will appear on the second line of the display.
Press SELECT.
An Asterisk (*) appears next ON.
Press ON LINE to save the setting and exit the menu.
PRINT MENU appears
DUPLEX appears on
Printer Emulation
The printer is set at the factory to automatically detect the
emulation of an incoming print job. To change it to
always be PCL or Adobe PostScript, see “Setting the
Emulation” under Control Panel, Walk-up Functions in
the on-line XANTÉ ColourLaser 21 Series User’s Guide.
Display Language
If you wish to choose a display language other than
English, see “Setting the Control Panel Display
Language” under Control Panel, Walk-up Functions in
the on-line XANTÉ ColourLaser 21 Series User’s Guide.
27
Page 28
Print a Sample File
20
Open a file in your software application.
Click File ® Print.
In the Print dialog box, select the appropriate
XANTÉ ColourLaser 21 printer driver, then click
OK.
Install the Handy Reference Guide
21
Remove the backing from the Velcro
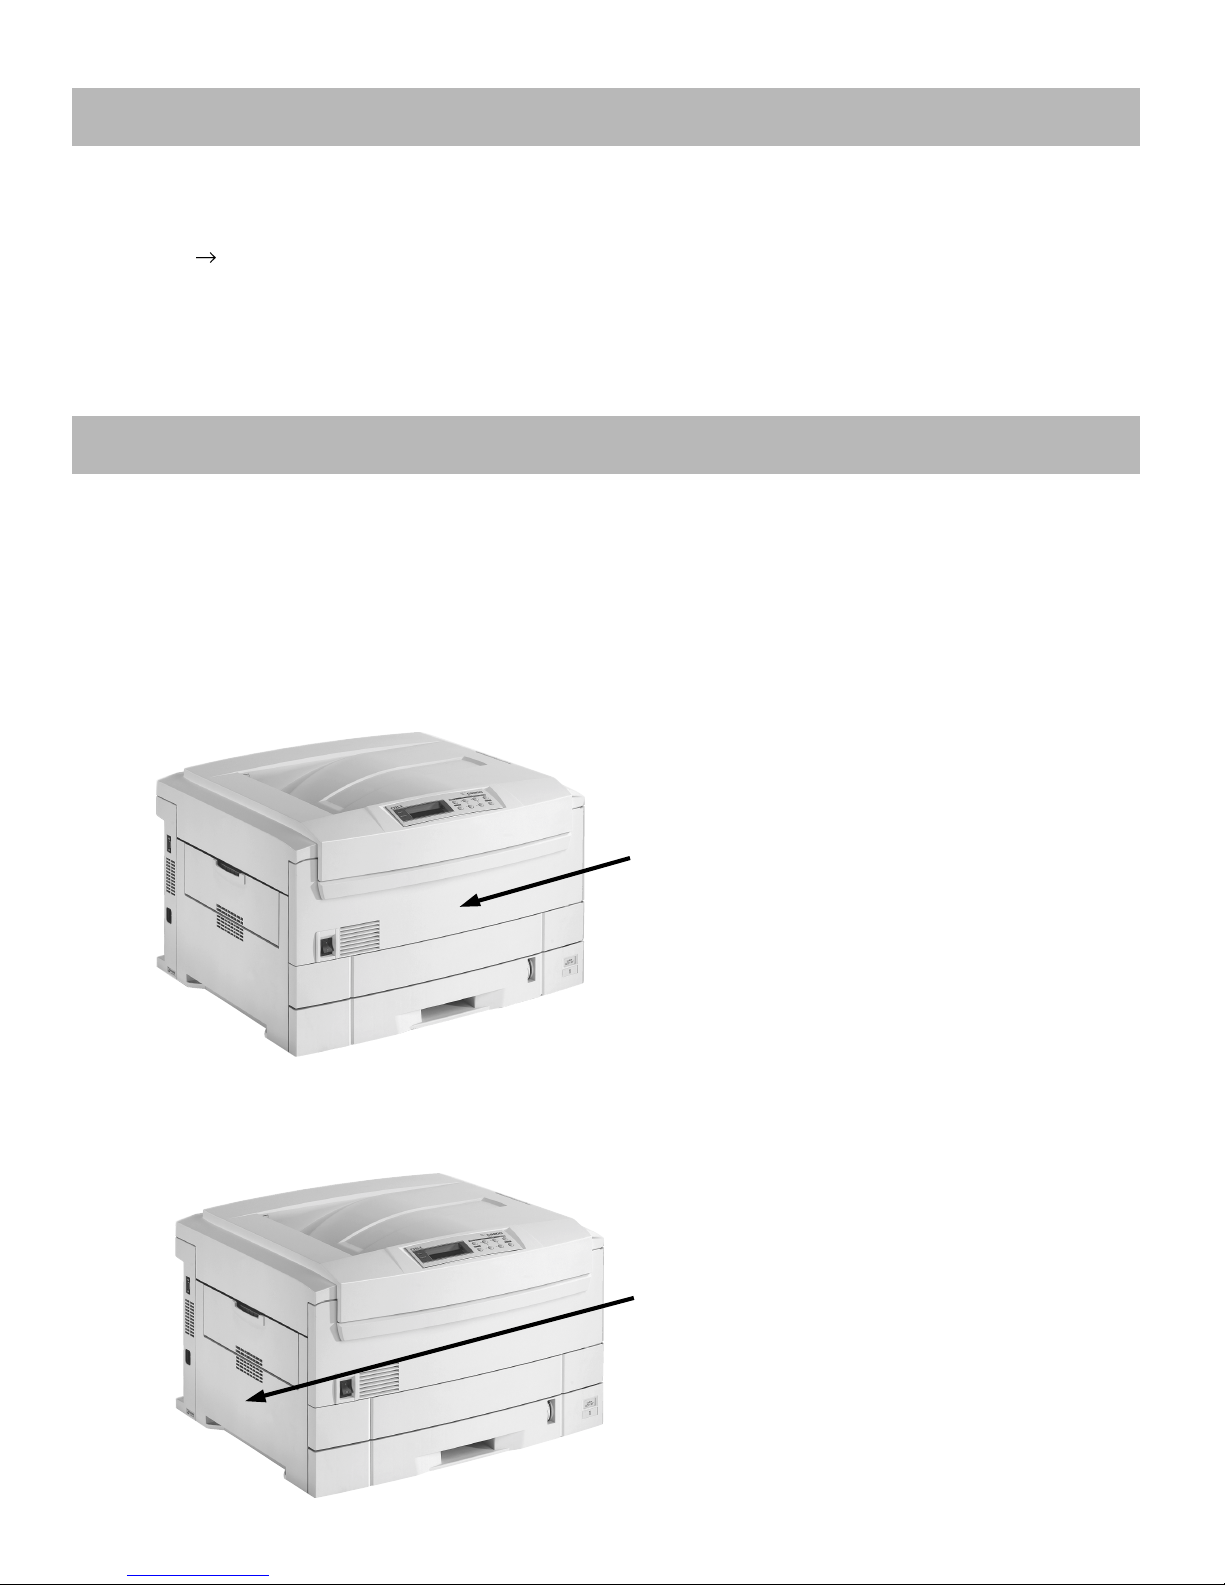
back of the Handy Reference Guide and apply it to the
front or left side of the printer:
Front Location
®
strip on the
Left Side Location
28
Page 29

Page 30

Page 31

XANTÉ and ColourLaser are trademarks or registered trademarks of XANTÉ
CORPORATION.
3M is a trademark or registered trademark of 3M Company.
Adobe and PostScript are trademarks of Adobe Systems, Inc. which may be registered in
certain jurisdictions.
Ethernet is a registered trademark of Digital Equipment Corporation.
EtherTalk, LaserWriter, Mac and Macintosh are registered trademarks of Apple Computer, Inc.
Folex is a registered trademark of Folex Imaging.
i486 is a trademark of Intel Corporation.
Microsoft and Windows are either registered trademarks or trademarks of Microsoft
Corporation in the United States and other countries.
Novell and NetWare are registered trademarks of Novell Corporation in the United States and
other countries.
PCL is a registered trademark of Hewlett Packard Company.
Velcro is a registered trademark of V elcro Industries B.V.
Page 32

XANTÉ CORPORATION, 2800 Dauphin Street, Suite 100, Mobile, AL 36606-2400
Tel: (251) 473-6502 FAX: (251) 473-6503 http://www.xante.com
XANTÉ Europe, P.O. Box 314, 1200 AH Hilversum, The Netherlands
Tel: 31 35-626-1313 FAX: 31 35-626-1316
© 2001 XANTÉ CORPORATION
59339501
 Loading...