

Page 1
100-100621
Page 2

2
Trademarks
XANTÉ® is a registered trademark of XANTÉ
CORPORATION.
Adobe®; Adobe® PageMaker®; Adobe® PostScript®,
the PostScript®, and Adobe® logos are registered
trademarks of Adobe Systems Incorporated. Adobe®
Acrobat™ is a trademark of Adobe Systems
Incorporated which may be registered in certain
jurisdictions.
Macintosh® and Mac® are registered trademarks of
Apple Computer, Inc.
Microsoft®, Windows®, and Windows NT® are
registered trademarks of Microsoft Corporation.
QuarkXPress® and Quark® are registered
trademarks of Quark, Inc.
Ethernet® is a registered trademark of Xerox
Corporation.
Preps® is a registered trademark and ScenicSoft™ is
a trademark of ScenicSoft, Inc.
All other brand and product names are trademarks,
registered trademarks, or service marks of their
respective holders.
Copyright
This manual is Copyrighted © 2003 by XANTÉ
CORPORATION. All Rights Reserved. Printed in
the USA. This manual may not be copied in whole
or in part, nor transferred to any other media or
language without the express written permission of
XANTÉ CORPORATION.
Manual Notice
XANTÉ CORPORATION reserves the right to make
changes to this manual and to the equipment
described herein without notice. Every effort has
been made to ensure that this manual is free of
inaccuracies and omissions. However, XANTÉ
CORPORATION makes no warranty of any kind
including, but not limited to, any implied warranties
of merchantability and fitness for a particular
purpose with regard to this manual.
XANTÉ CORPORATION assumes no responsibility
for, or liability for, errors contained in this manual
or for incidental, special, or consequential damages
arising out of the furnishing of this manual, or the
use of this manual in operating the equipment, or in
connection with the performance of the equipment
when so operated.
Page 3

3
Trademarks ......................................................... 2
Getting Started ................................................... 4
Removing the Printer ................................... 4
Installing Toner Cartridges........................... 5
Installing OPC Belt Cartridge ..................... 5
Installing the Fuser Oil Bottle ...................... 6
Installing the Cleaning Roller....................... 6
Installing the Paper Cassette......................... 6
Connecting to Printer Ports ......................... 7
LocalTalk Connection (Macintosh) ...... 8
Parallel Connection (PC) ......................8
Serial Connection (PC) ......................... 8
Ethernet Connection (PC and Mac) ...... 9
Connecting the Power Cable........................ 9
Media Types .................................................. 9
Installing Adobe Acrobat Reader ..................... 10
Adobe Acrobat Reader-PC ......................... 10
Adobe Acrobat Reader-Mac ....................... 10
Installation - Windows 98/Me ......................... 11
IP Address Configuration........................... 11
Local Printer-Windows 98/Me ...................13
Win95/98/Me LPR Tool.............................. 14
Network Printer-Windows 98/Me ............. 15
Configuring IP, SubNet, and
Gateway Addresses .................................... 17
PPD Configuration ..................................... 18
Installation - Windows NT/2000/XP............... 19
IP Address Configuration........................... 19
Configuring IP, SubNet, and
Gateway Addresses .................................... 21
PPD Configuration ..................................... 22
Installation - Macintosh (7.5 or higher) ......... 23
Installing the PostScript Driver.................. 24
Installation - Macintosh OS X ......................... 25
OS X (version 10.1.5) ................................. 26
Mac OS X Printer Configuration ............... 27
Page Setup .......................................... 27
Printer Features................................... 27
OS X (version 10.2.1) ................................. 28
Mac OS X Printer Configuration ............... 29
Page Setup .......................................... 29
Printer Features................................... 30
Service and Support ......................................... 31
Table of Contents
Page 4

4
Getting Started
Removing the Printer
Fig. 1 Removing the Printer
Always use two people to lift the
printer. Place printer on a stable surface
with adequate ventilation and operation
clearance.
Do not install the printer where it
will be:
• Subject to direct sunlight, air
currents, magnetic fields, water,
or high humidity
• Close to heaters
• Exposed to vibrations or high
dust levels
• Close to an open flame
• Subject to extreme temperature
and humidity variations.
Your printer package contain the
following items:
• Printer
• 250 sheet cassette
• Power cord
• Envelope adapter
• Utilities and Manual CD-ROM
• Consumables (4 starter toner
cartridges*, OPC belt cartridge,
oil bottle, oil syringe, cleaning
roller).
*Starter cartridges are rated at half-
life.
Note: If you do not receive your full
shipment or if anything is
damaged, call XANTÉ Customer
Service at 1-800-926-8393 (US
and Canada) or your XANTÉ
dealer.
Page 5
5
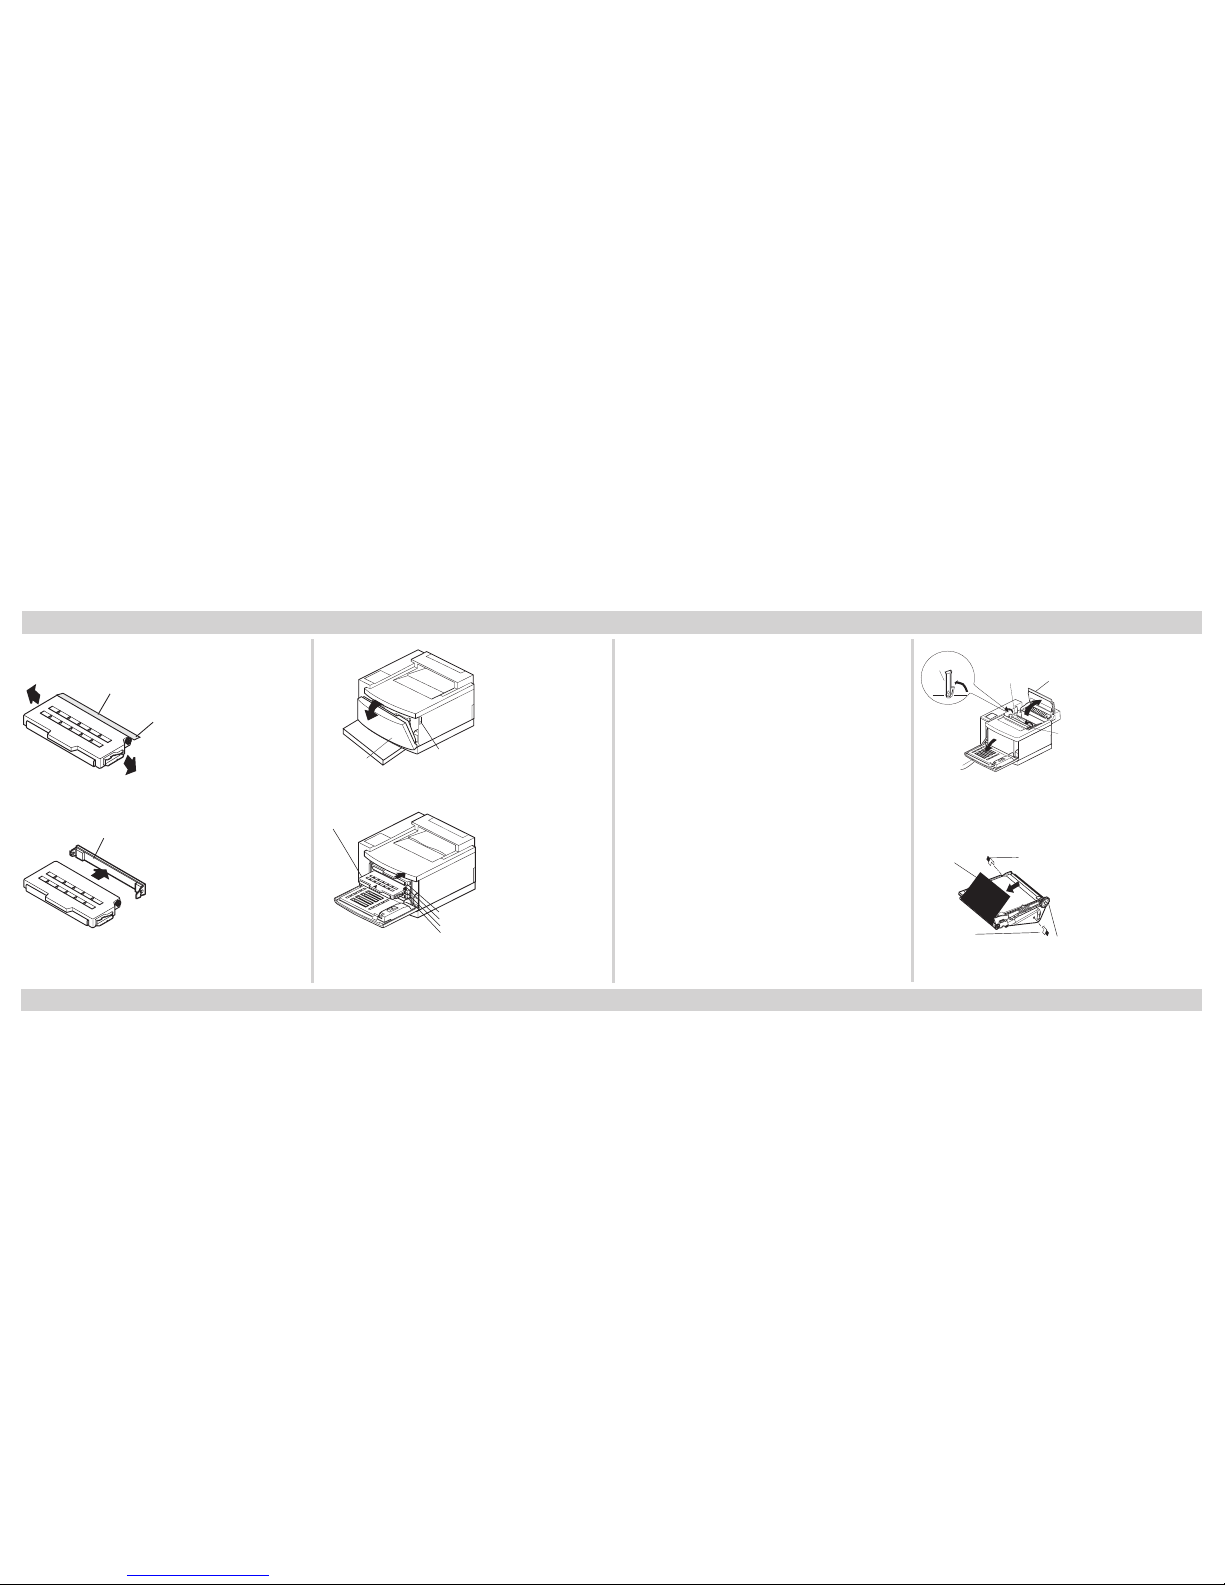
Installing Toner Cartridges
SealingTape
Ta b
Fig. 2 Shake toner cartridge.
Cover
Fig. 3 Remove orange protective cover.
Getting Started (continued)
Front Cover
Front Cover Latch
Fig. 4 Open front cover.
K
Y
M
C
Toner Cartridge
Fig. 5 Align and insert each cartridge into it’s
corresponding color slot.
Installing OPC Belt Cartridge
Note: Never touch the OPC belt’s
surface; only handle the cartridge by the top handle.
Touching the belt and exposing
it to bright light (over two
minutes) may cause permanent
damage.
If the belt is over exposed to
light, there is a chance you may
be able to salvage it by placing it
in a dark room for several
hours.
Front Cover
Guide
(Right)
Guide
(Left)
Top Cover
OPC
Guide
Fig. 6 Pivot OPC guides up toward the
printer’s front.
Protective Sheet
Belt Cartridge
Tension
Release Pin
Tension
Release Pin
Fig. 7 Pull 2 pins out from sides; remove sheet.
Page 6
6
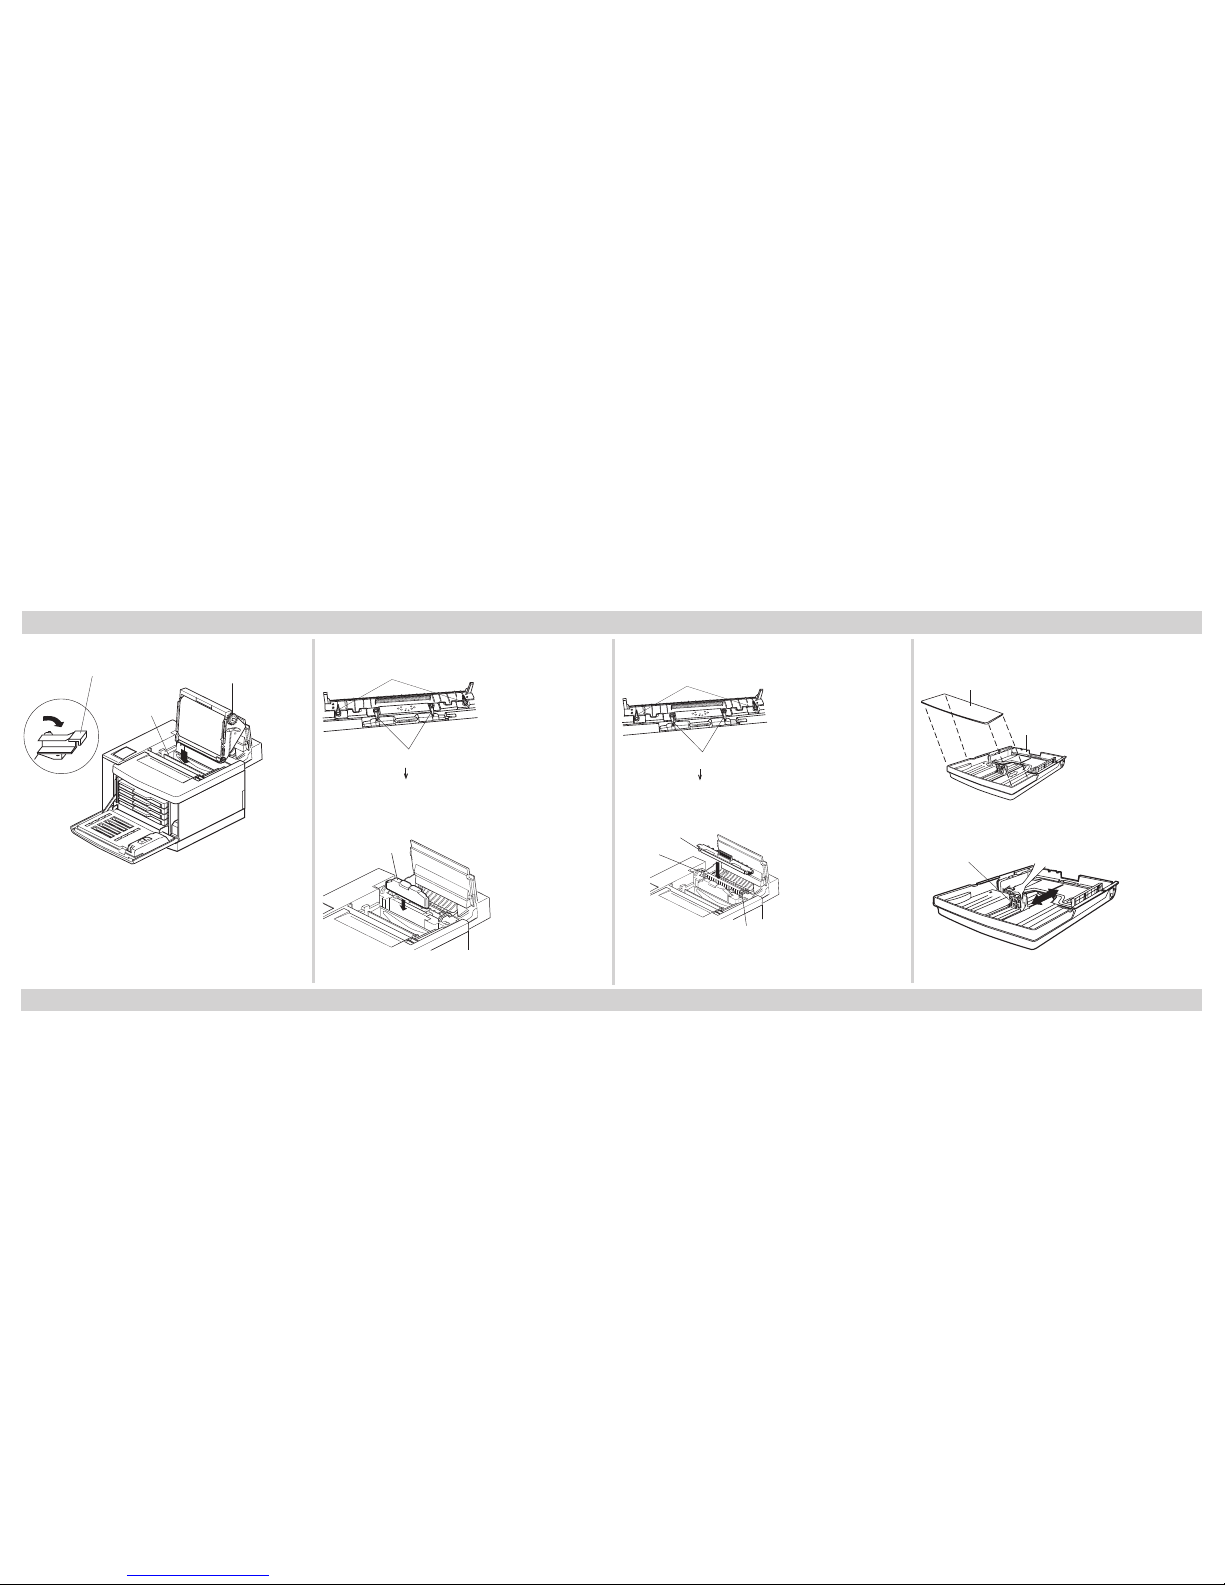
Guide
OPC Guide
Gear
Fig. 8 Align the OPC cartridge’s side tabs with
the printer’s OPC guides. Then, lower cartridge
into place and close guides.
Getting Started (continued)
Installing the Fuser Oil Bottle
Oil Bottle Locks
Cleaning Roller Locks
Front of Printer
Fig. 9 Open the two oil bottle locks by turning out to
the sides.
Oil Bottle
Fig. 10 Insert bottle nozzle down; close locks.
Installing the Cleaning Roller
Oil Bottle Locks
Cleaning Roller Locks
Front of Printer
Fig. 11 Open cleaning roller locks.
Cleaning Roller
Roller Tension
Lever
Roller Tension
Lever
Fig. 12 Align and insert the cleaning roller into
place. Close cleaning roller locks.
Installing the Paper Cassette
Cassette Cover
Paper Cassette
Fig. 13 Remove cassette cover.
Length Guide
Fig. 14 Adjust length guide.
Page 7
7
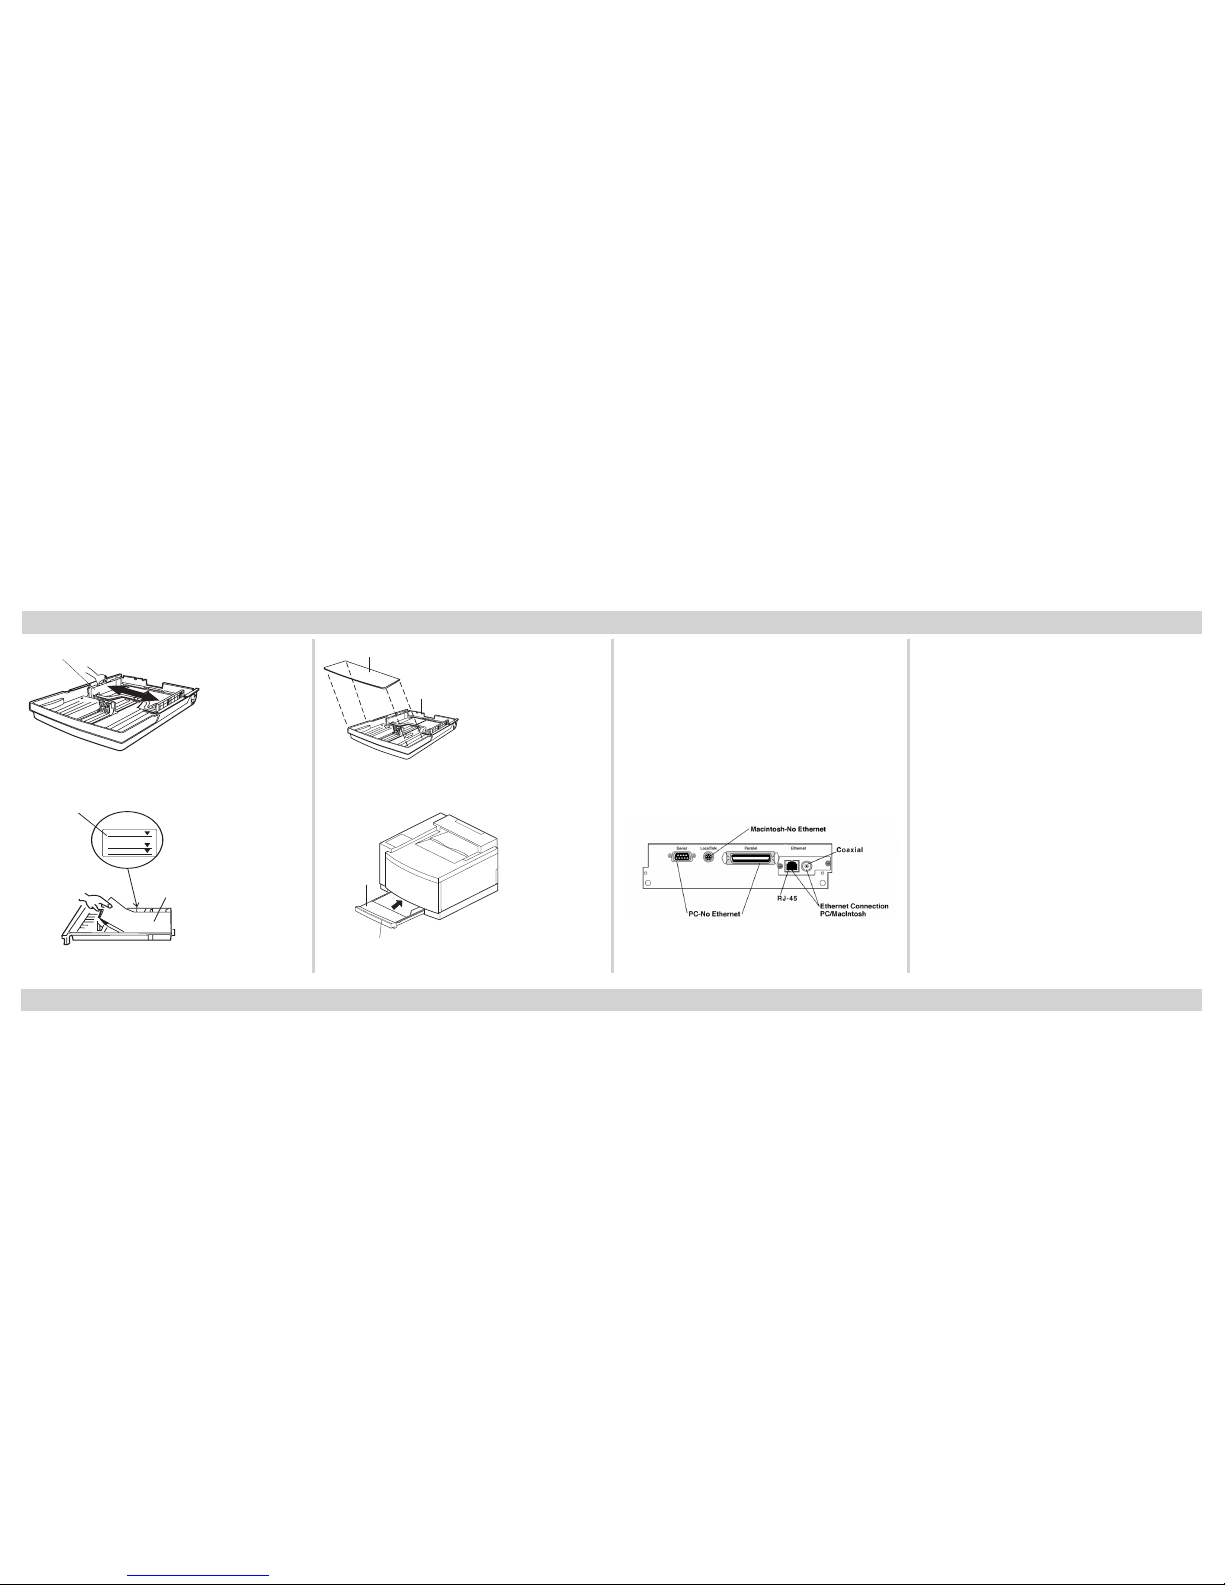
Width Guide
Fig. 15 Adjust width guide.
Media
Loading Limit Mark
PAPER
LABEL
OHP FILM
Fig. 16 Load media print side up.
Getting Started (continued)
Cassette Cover
Paper Cassette
Fig. 17 Replace the cassette cover.
Paper Cassette
Cassette Cover
Fig. 18 Place cassette back into the printer.
Connecting to Printer Ports
XANTÉ ColourLaser printers have
standard LocalTalk, serial, parallel, and
Ethernet ports (fig. 19).
These simultaneously active interfaces can receive jobs from different
operating environments without
switching hardware.
Fig. 19 Connect to appropriate interface.
Note: Consult your user’s manual for
more information regarding the
selection of the different interfaces.
Page 8
8
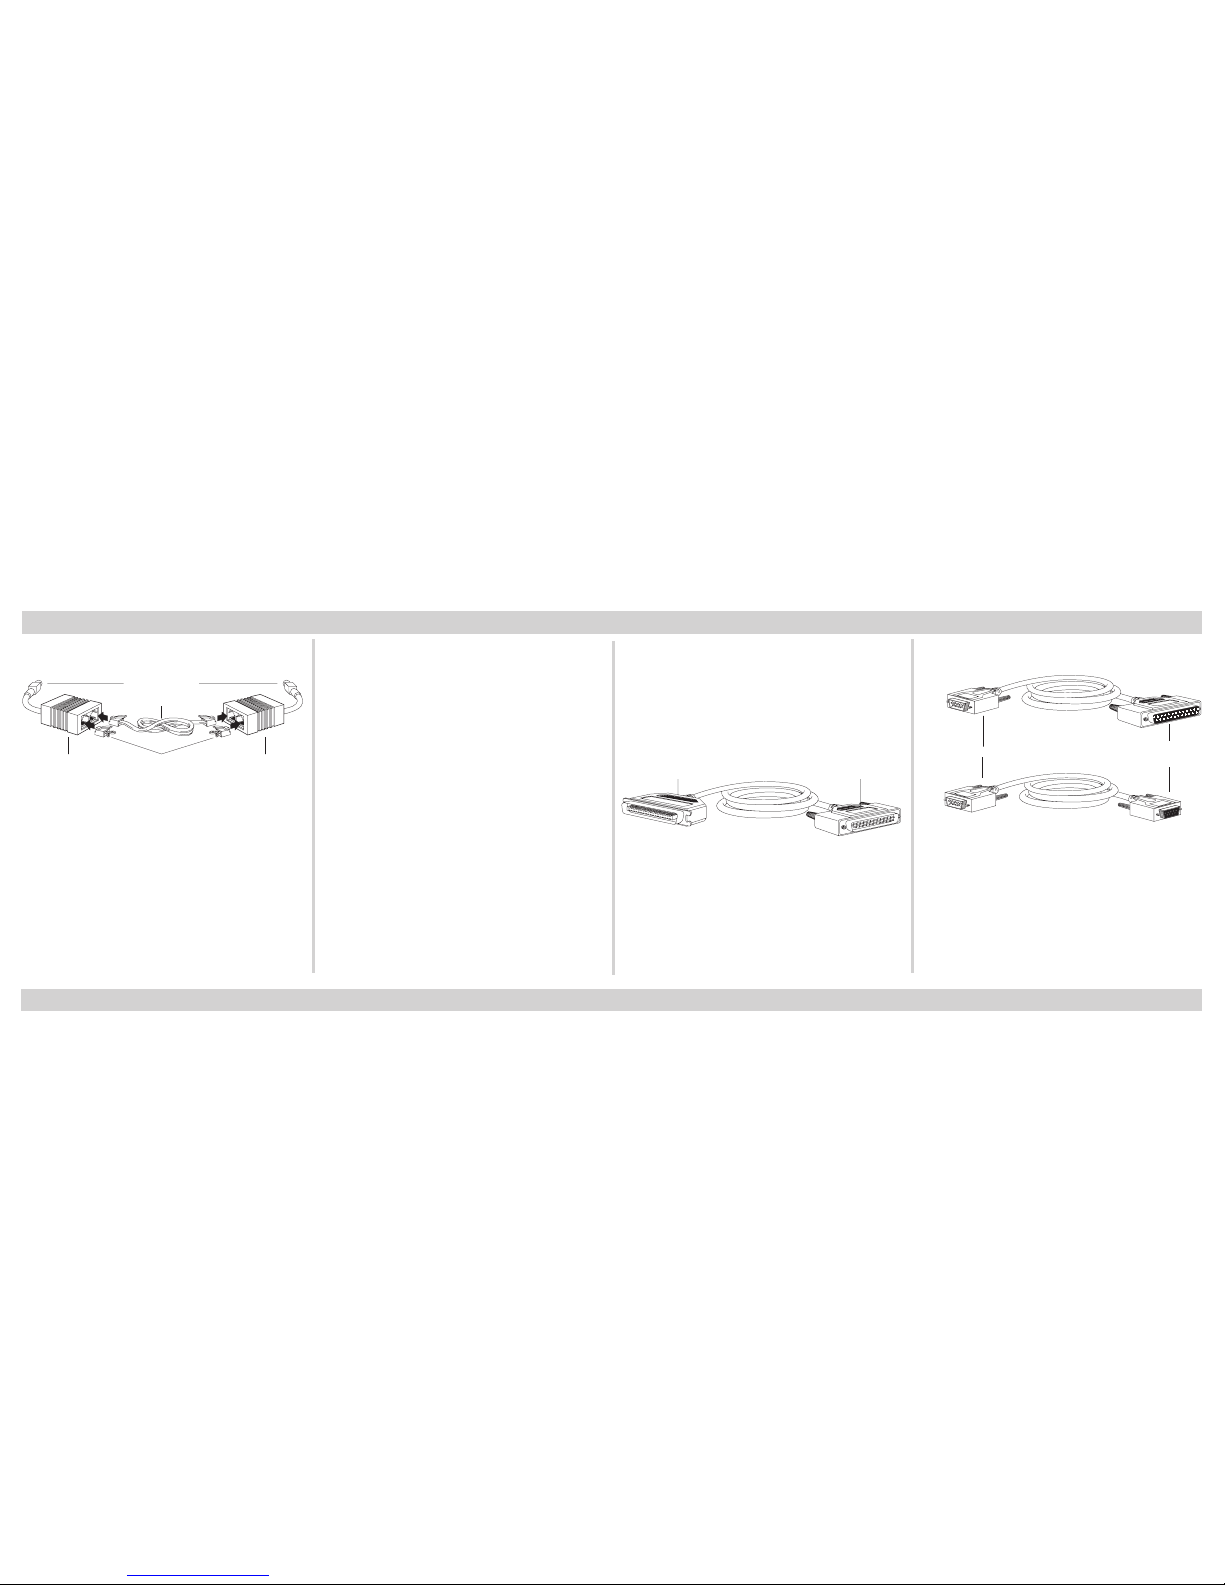
LocalTalk Connection (Macintosh)
Connector
Box
Connector
Box
Terminating
Resistor
RJ-11 Cable
DIN-8 Connector
Fig. 20 LocalTalk Connector Boxes, Resistors,
and Cable
1. Turn off your computer.
2. Plug the DIN-8 connector on one
LocalTalk connector box into the
printer’s 8-pin LocalTalk port.
Getting Started (continued)
3. Plug the DIN-8 connector on the
second LocalTalk connector box into
the Macintosh’s printer port.
4. Connect the two LocalTalk connector boxes with the RJ-11 phone cable
(standard phone cable).
5. Plug the terminating resistors into
the open sockets in the connector
boxes.
Note: iMacs and Power Mac G4s do
not have LocalTalk ports. These
computers can be connected
using Crossover/patch cables
and the Ethernet port or they
can be connected to LocalTalk
networks using Ethernet to
LocalTalk adapters. Check your
user’s manual for more information.
Parallel Connection (PC)
36-pin Connector
To Printer
25-pin Connector
To Host Computer
Fig. 21 Bidirectional Parallel Cable
1. Turn of your computer.
2. Plug the cable’s 36-pin connector
into the printer’s parallel port and
the 25-pin connector into the
computer’s parallel port.
Serial Connection (PC)
Connector to Printer: 9-pin
Connector to PC:
25-pin
or
9-pin
Fig. 22 Serial Cables
1. Turn off your computer.
2. Plug the serial cable’s 9-pin male
connector into the printer’s serial
port.
Page 9
9
3. Plug the other connector (either a
25-pin or a 9-pin female connector)
into the computer’s serial port.
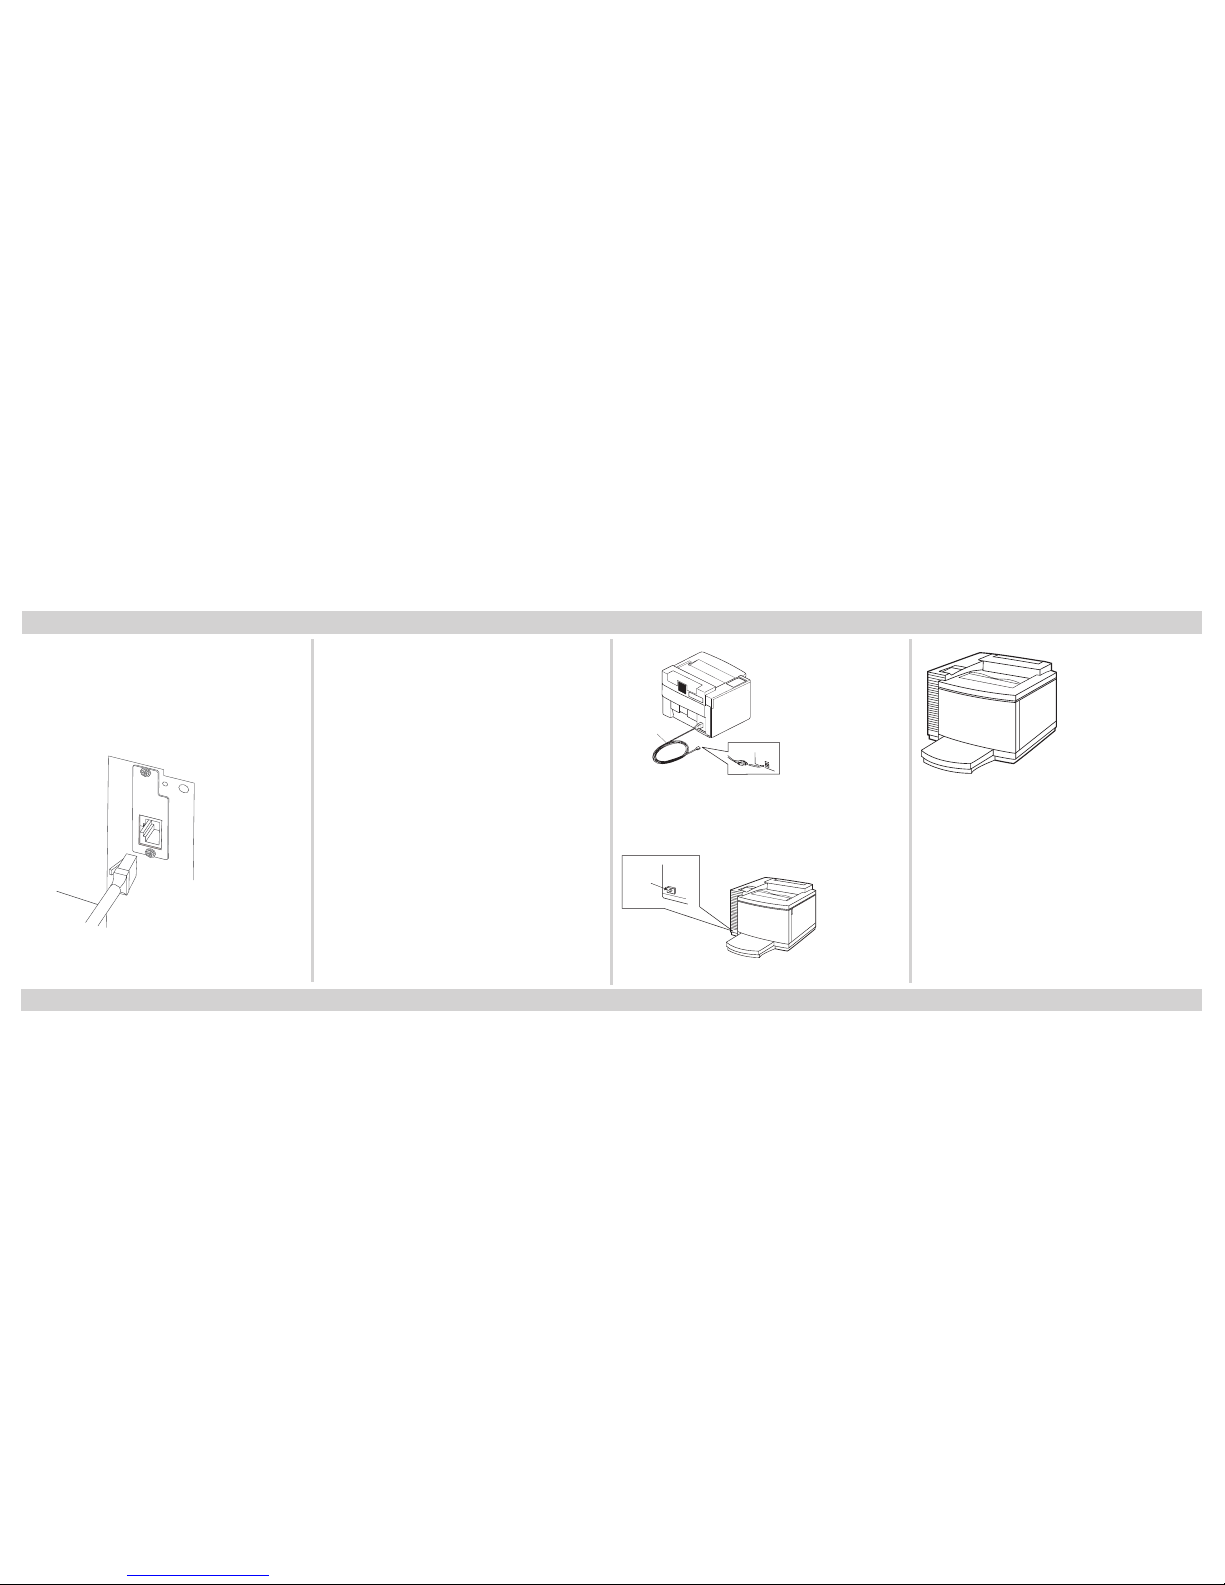
Ethernet Connection (PC and Mac)
10BaseT or
10/100BaseT
Unshielded
Twisted Pair
(UTP)
RJ-45
Fig. 23 Connect to Ethernet port.
Getting Started (continued)
1. Turn off your computer.
2. Connect one end of the CAT 5
Ethernet cable to your printer’s
Ethernet port.
3. Connect the cable’s other end to the
appropriate port on your network.
Connecting the Power Cable
Warning! Be sure to plug the printer
into a properly grounded AC
outlet. Do not use and
extension cord. Use a surge
protected outlet to help
prevent power source
fluctuations from damaging
your printer.
Power Outlet
Power Cord
Power Source
Fig. 24 Connect power cord to printer.
Power Switch
Fig. 25 Press the power switch on.
Fig. 26 Start-up page prints (if enabled).
Media Types
Your XANTÉ printer supports plain
paper, transparencies, laser-quality labels,
thick paper stock, and envelopes; up to
16 to 24 lb. bond plain paper (60 - 90 g/
m2); thick stock: 60 lb. cover or 90 lb.
index (163 g/m2).
Page 10
10
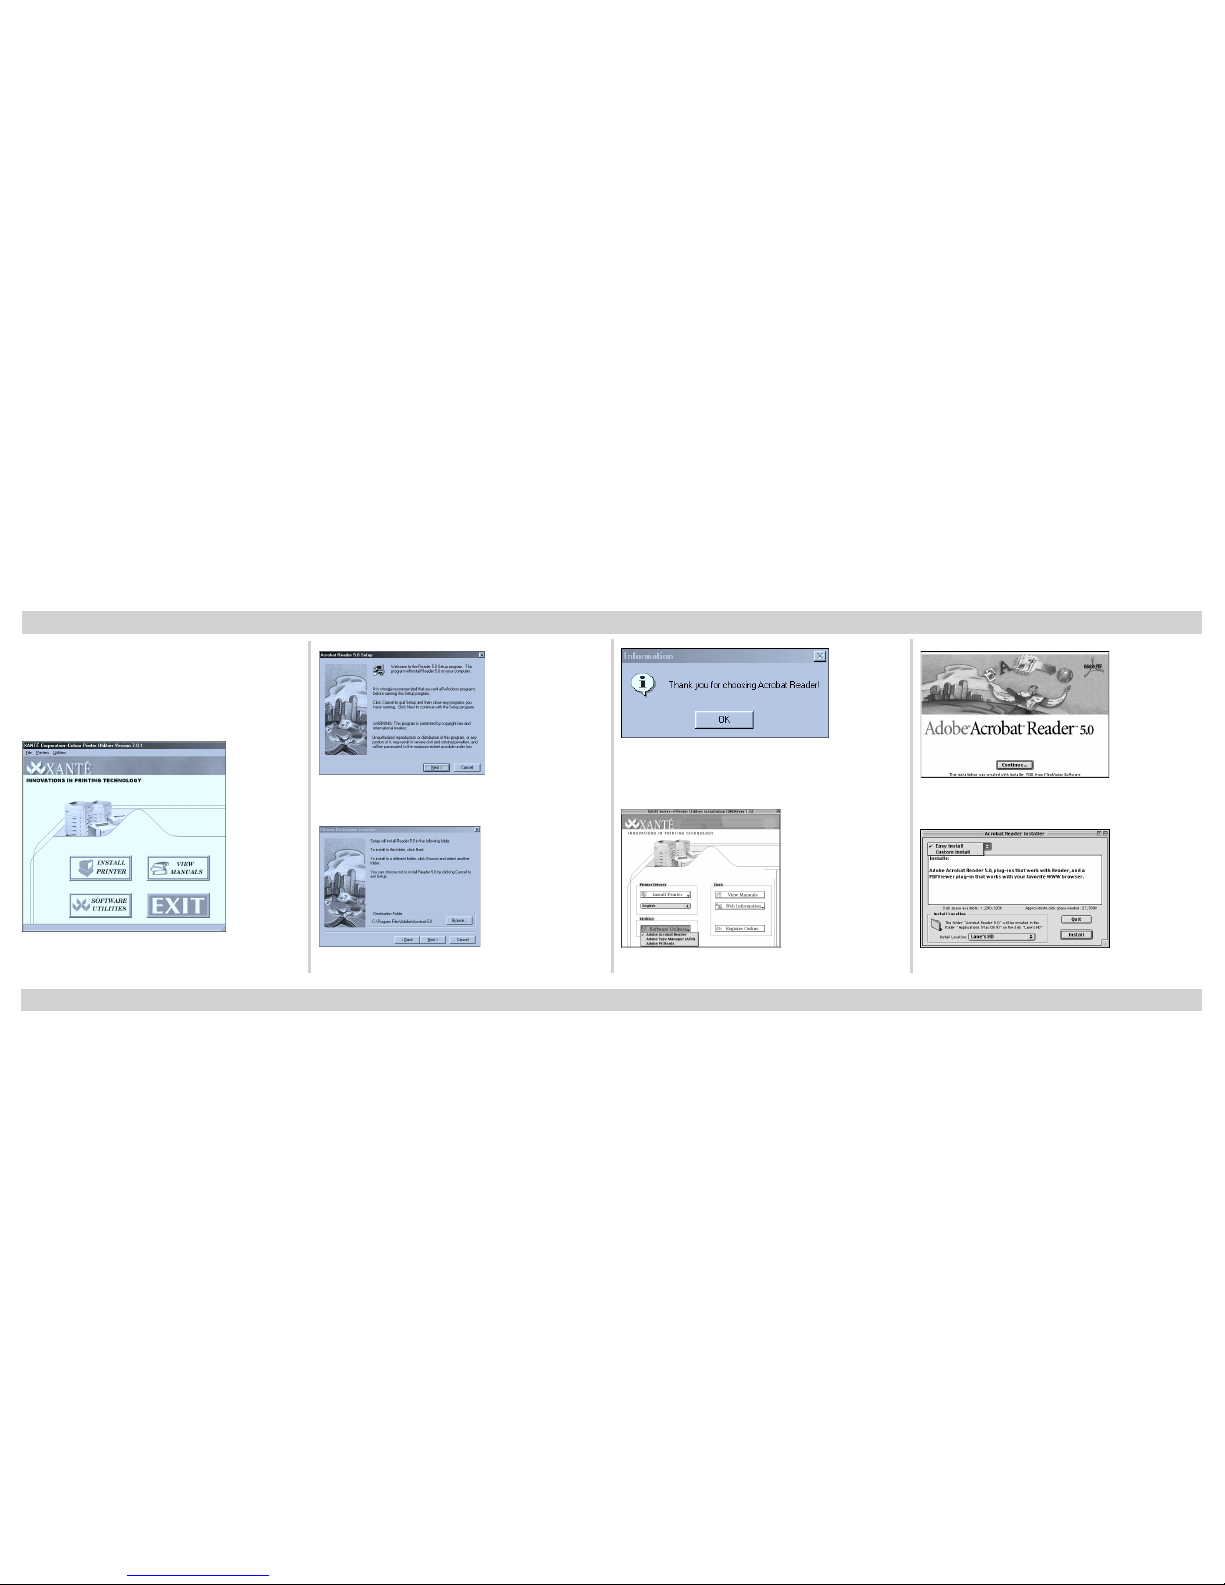
Adobe Acrobat Reader-PC
You will need to install Adobe Acrobat
Reader to view or print your printer documentation.
Fig. 27 Select Software Utilities: Adobe Acrobat
Reader.
Installing Adobe Acrobat Reader
Fig. 28 Acrobat Reader Setup; click Next
Fig. 29 Choose Destination Location.
Fig. 30 Setup Complete; click OK.
Adobe Acrobat Reader-Mac
Fig. 31 Select Acrobat Reader.
Fig. 32 Click Continue.
Fig. 33 Select Desired Installation.
Page 11
11
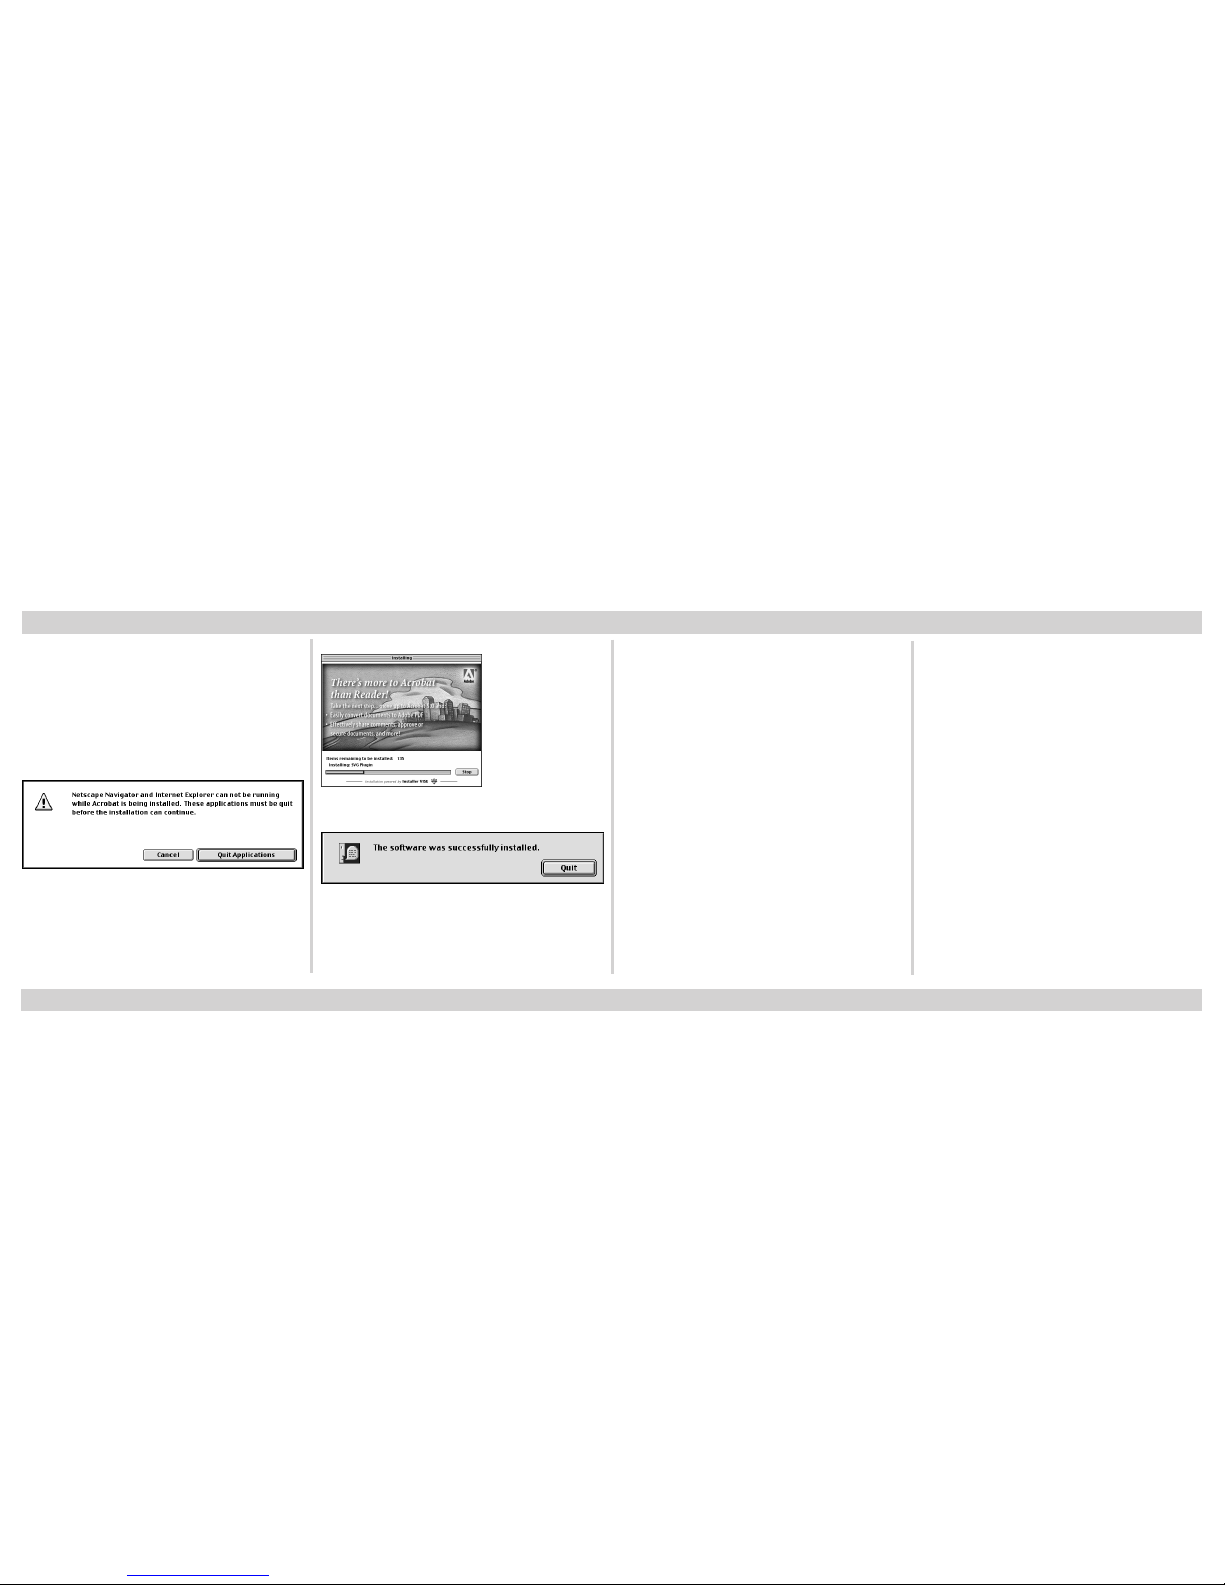
Note: If you are online, a caution
window appears which allows
you to quit Netscape Navigator
or Internet Explorer if they are
running. In this case, click Quit
Applications.
Fig. 34 Caution Window; click Quit
Applications.
Fig. 35 Installation Progress Window Appears.
Fig. 36 Click Quit to End Acrobat Reader
Installation.
Installation - Windows 98/Me
This section will take you step-by-
step through the installation process.
IP Address Configuration
When using the IP Address interface,
use the keys on the front panel to set the
address as follows:
• Reset key increases the current
number flashing by one.
• Menu key moves to the next
number to the right of the
current number flashing.
Installing Adobe Acrobat Reader (continued)
• Test key moves to the next
number to the left of the current
number flashing.
• Enter key accepts new address (if
valid) and returns to I/F:IP
Address menu. The menu will
display a message if the address
entered is invalid.
Note: You must turn off the printer
and restart it for the new IP
address to take effect.
Page 12
12
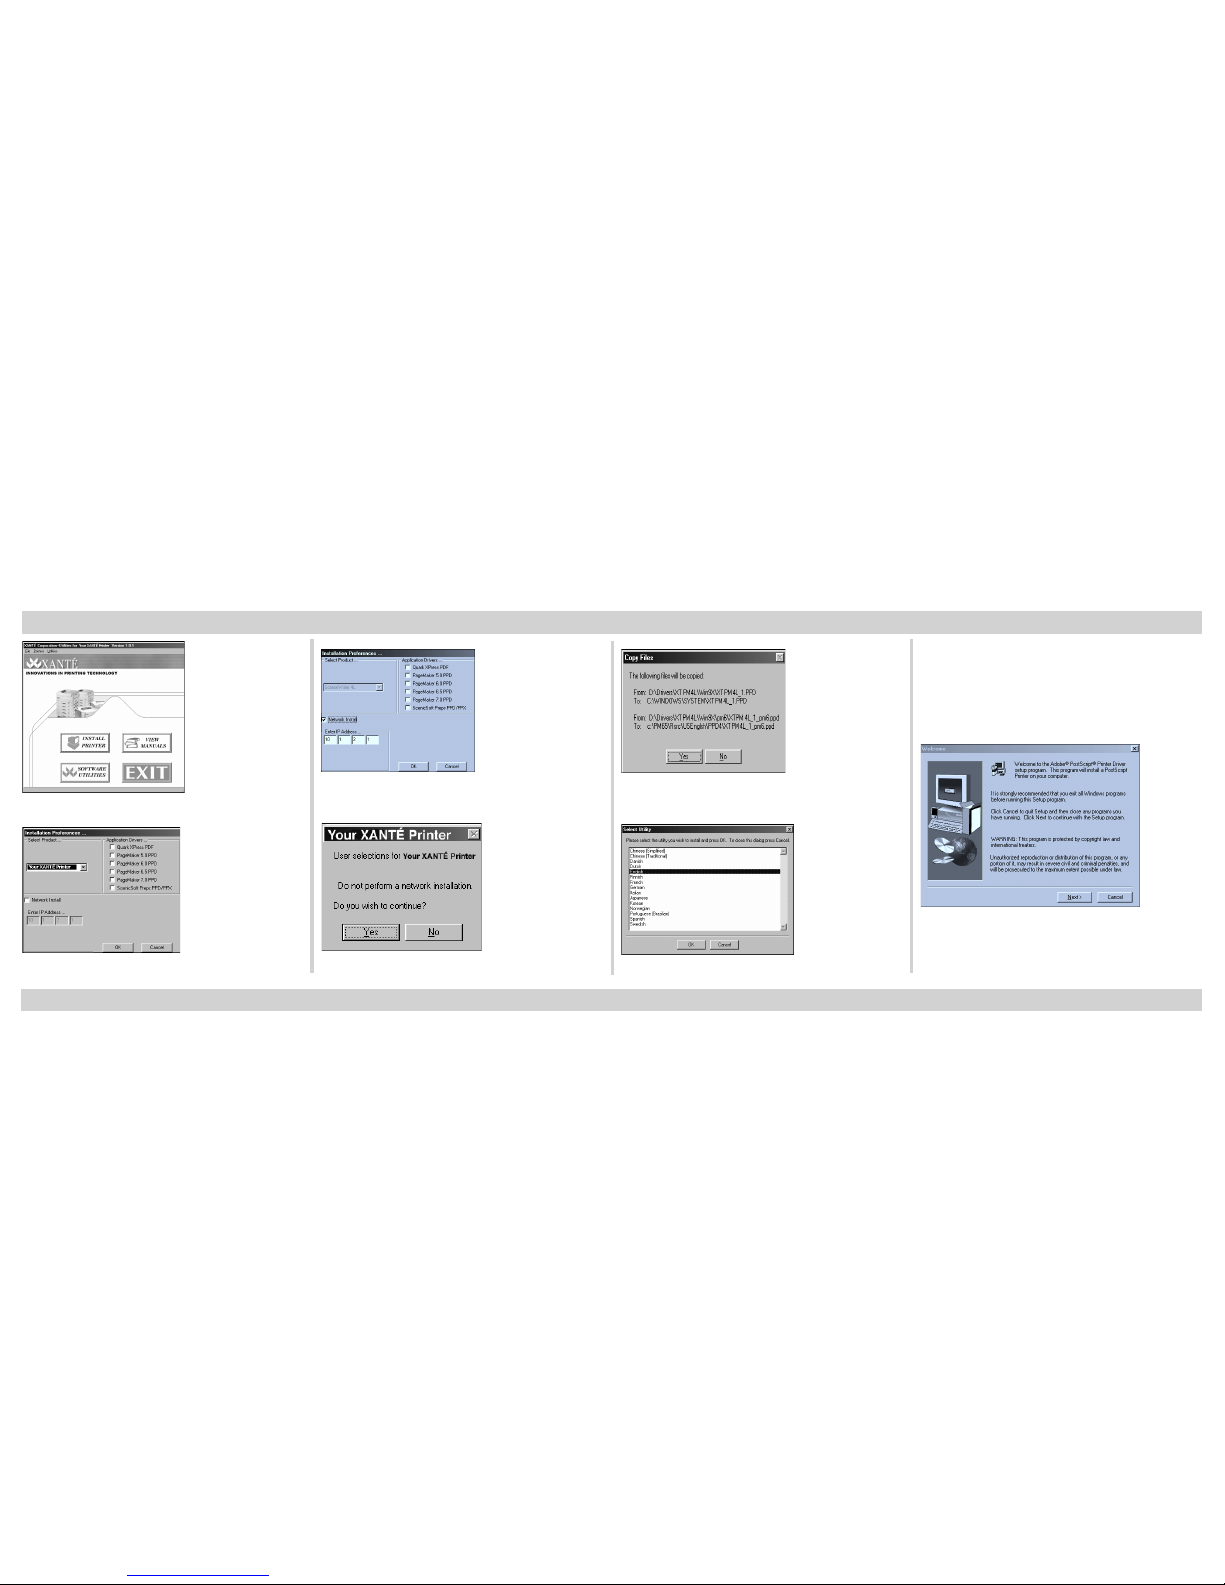
Fig. 37 Click Install Printer.
Fig. 38 Make Appropriate Selections, Click OK.
Fig. 39 Enter IP Address (Network Install only).
Fig. 40 Read Setup Information. Click Yes.
Fig. 41 Read File Destination. Click Yes.
Fig. 42 Choose Language. Click OK.
Note: After clicking OK, Windows
launches the Adobe® PostScript®
Printer Driver setup program.
This may take a few moments.
Fig. 43 Read Adobe Window. Click Next.
Installation - Windows 98/Me (continued)
Page 13
13
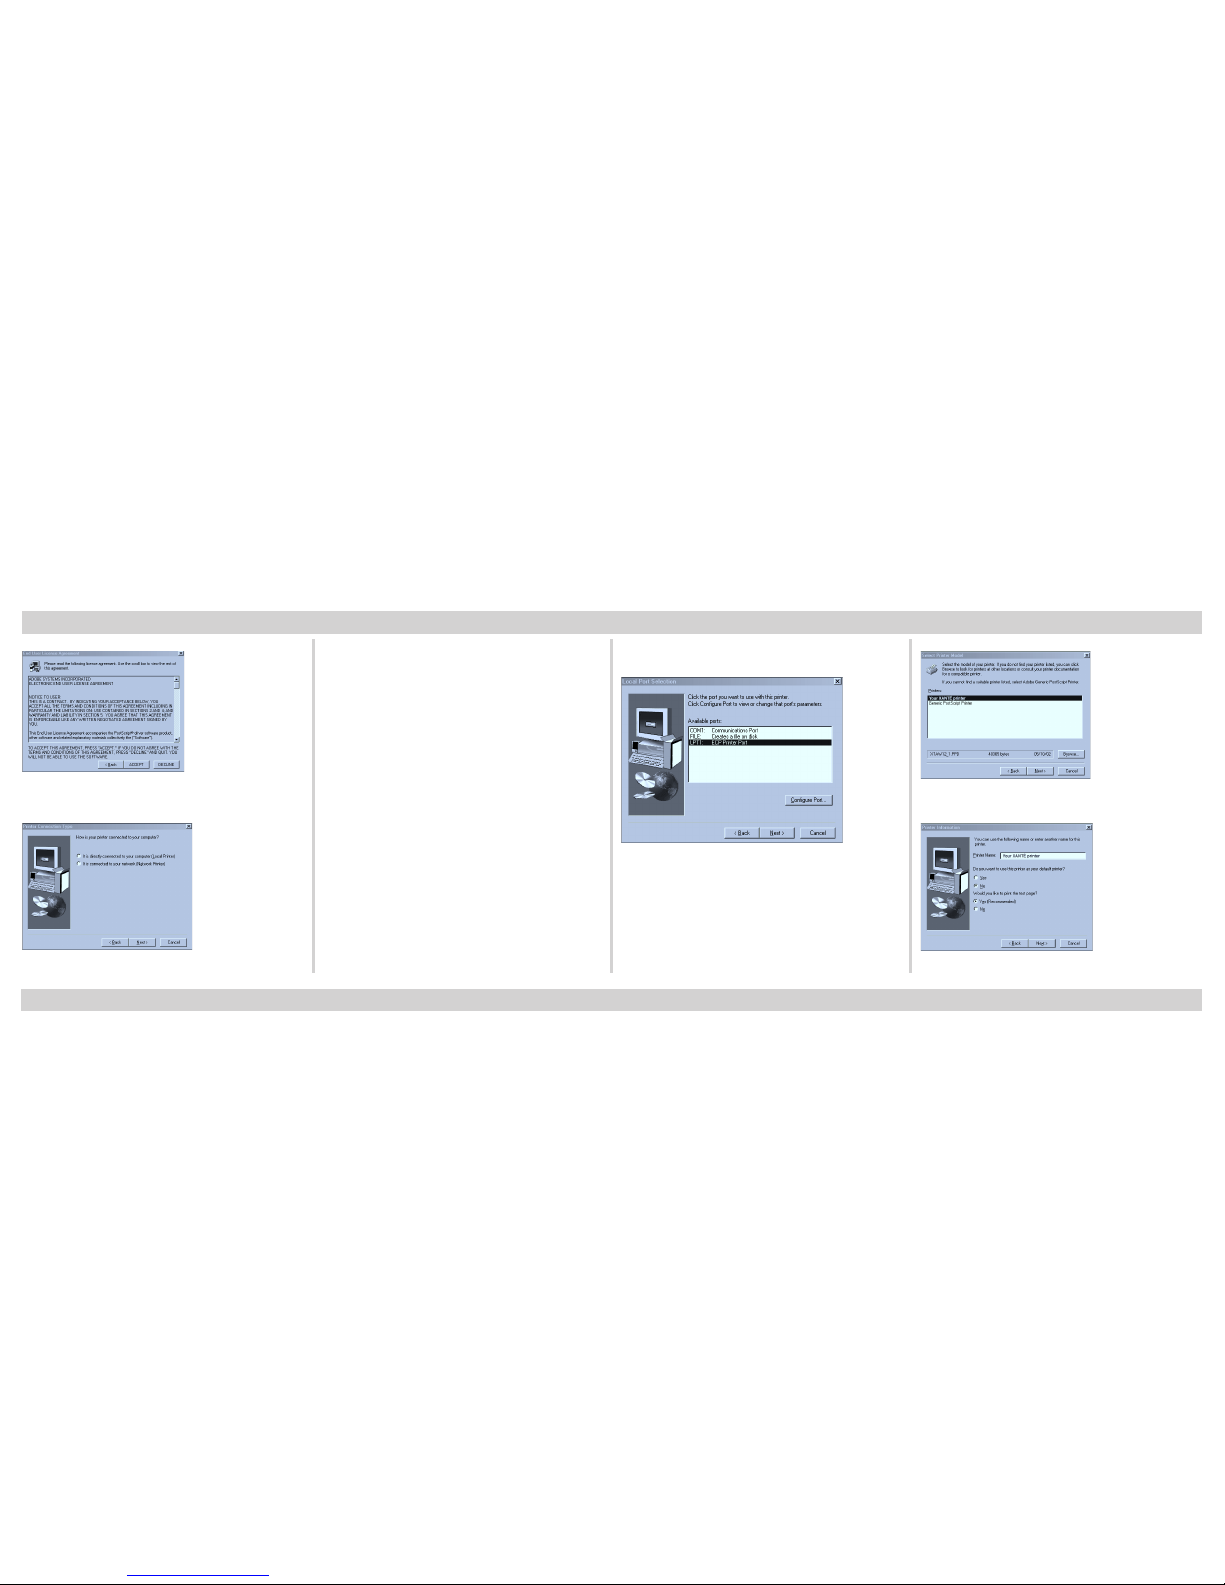
Fig. 44 Read License Agreement. Click Accept.
Fig. 45 Choose Connection Type. Click Next.
Note: If your printer is directly con-
nected to your computer, click
“Local Printer” in figure 45;
then, click Next to continue to
figure 46. If your printer will be
connected to your network, skip
to the “Network Printer” section
later in this chapter.
Local Printer-Windows 98/Me
Fig. 46 Select Appropriate Port. Click Next.
Fig. 47 Select Printer Model. Click Next.
Fig. 48 Enter Printer Name. Click Next.
Installation - Windows 98/Me (continued)
Page 14
14
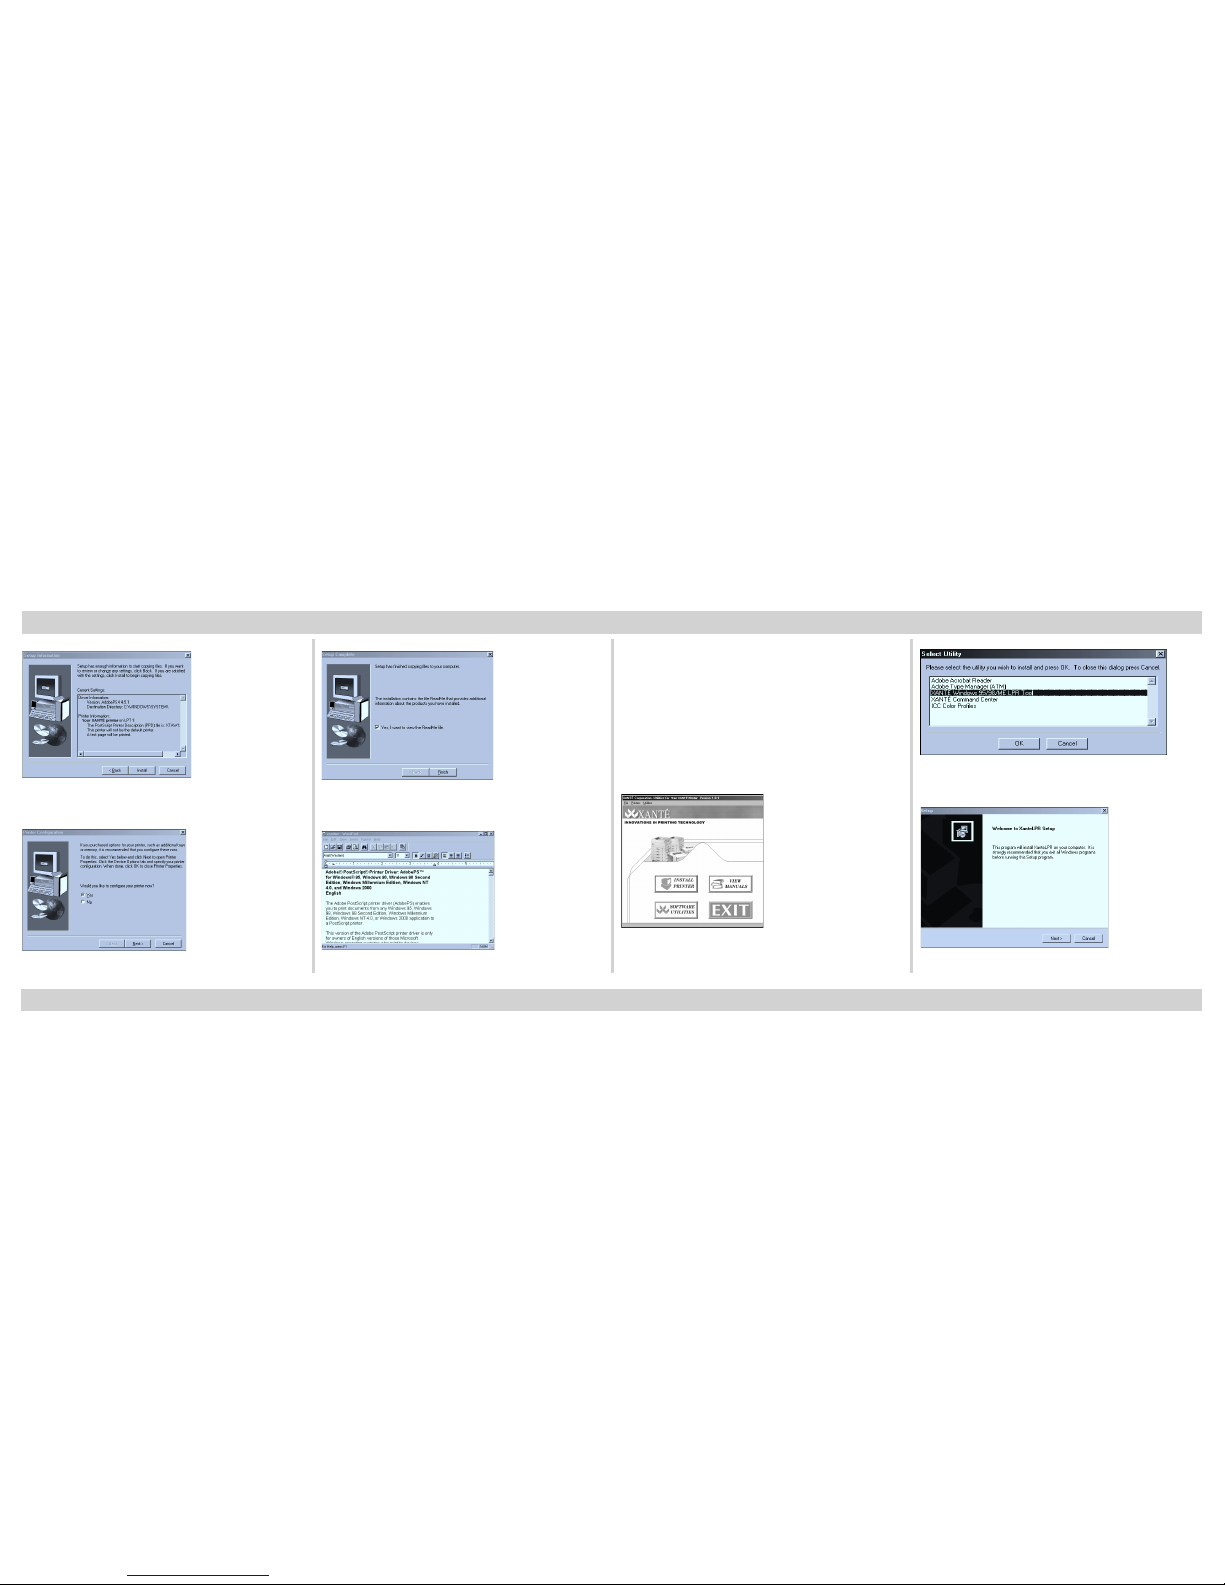
Fig. 49 Read Current Settings. Click Install.
Fig. 50 Configure Your Printer. Click Next.
Fig. 51 Setup Complete. Click Finish.
Fig. 52 ReadMe file. Close Window.
Win95/98/Me LPR Tool
This allows you to communicate to
your printer through the LPR port
Note : For Windows 98 and Me users, you
must install this utility to set up your
IP, SubNet, and Gateway addresses.
Fig. 53 Select Software Utilities.
Fig. 54 Highlight LPR Tool. Click OK.
Fig. 55 Read Setup Window. Click Next.
Installation - Windows 98/Me (continued)
Page 15
15
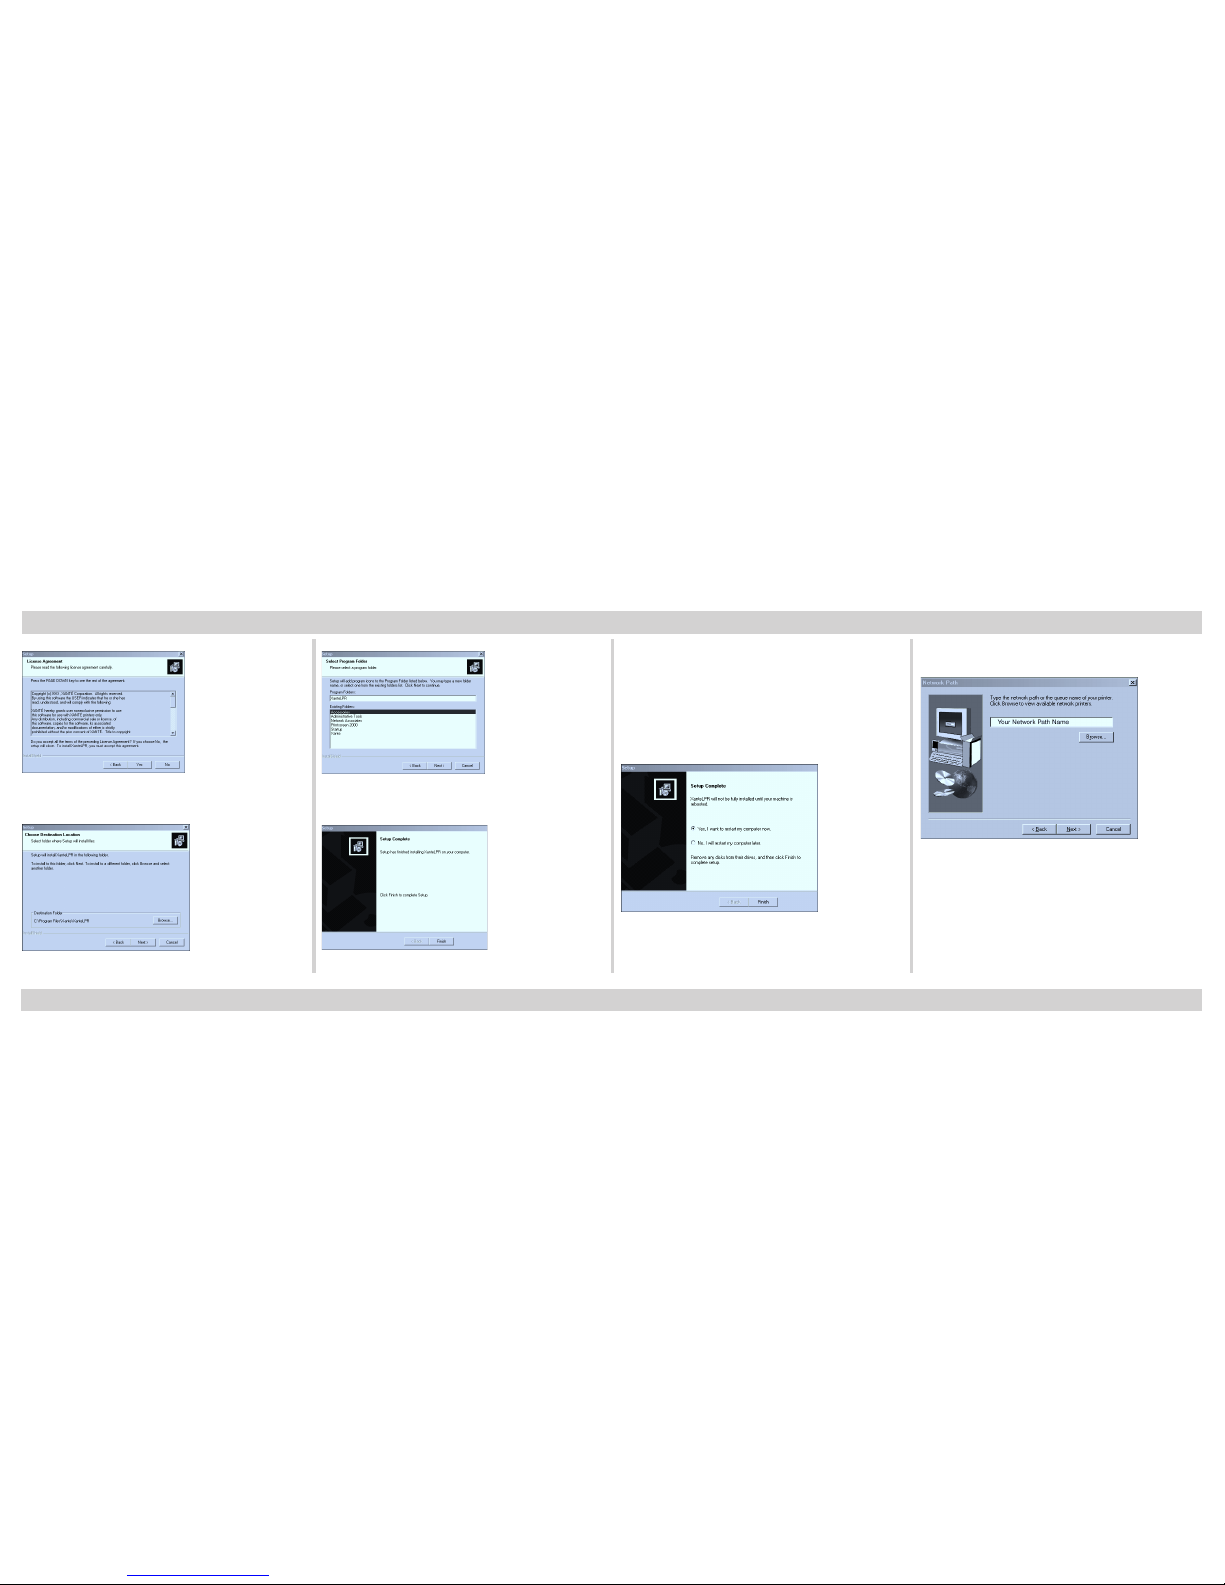
Fig. 56 Read License Agreement. Click Yes.
Fig. 57 Select Location. Click Next.
Fig. 58 Select Folder(s). Click Next.
Fig. 59 Setup Complete. Click Finish.
Note: After you click Finish (fig. 59), a
ReadMe file window appears.
Read it carefully and then close
the window. The Restart Computer window appears (fig. 60).
Fig. 60 Restart Your Computer. Click Finish.
Network Printer-Windows 98/Me
Fig. 61 Type Network Path for your Printer.
Click Next.
Installation - Windows 98/Me (continued)
Page 16
16
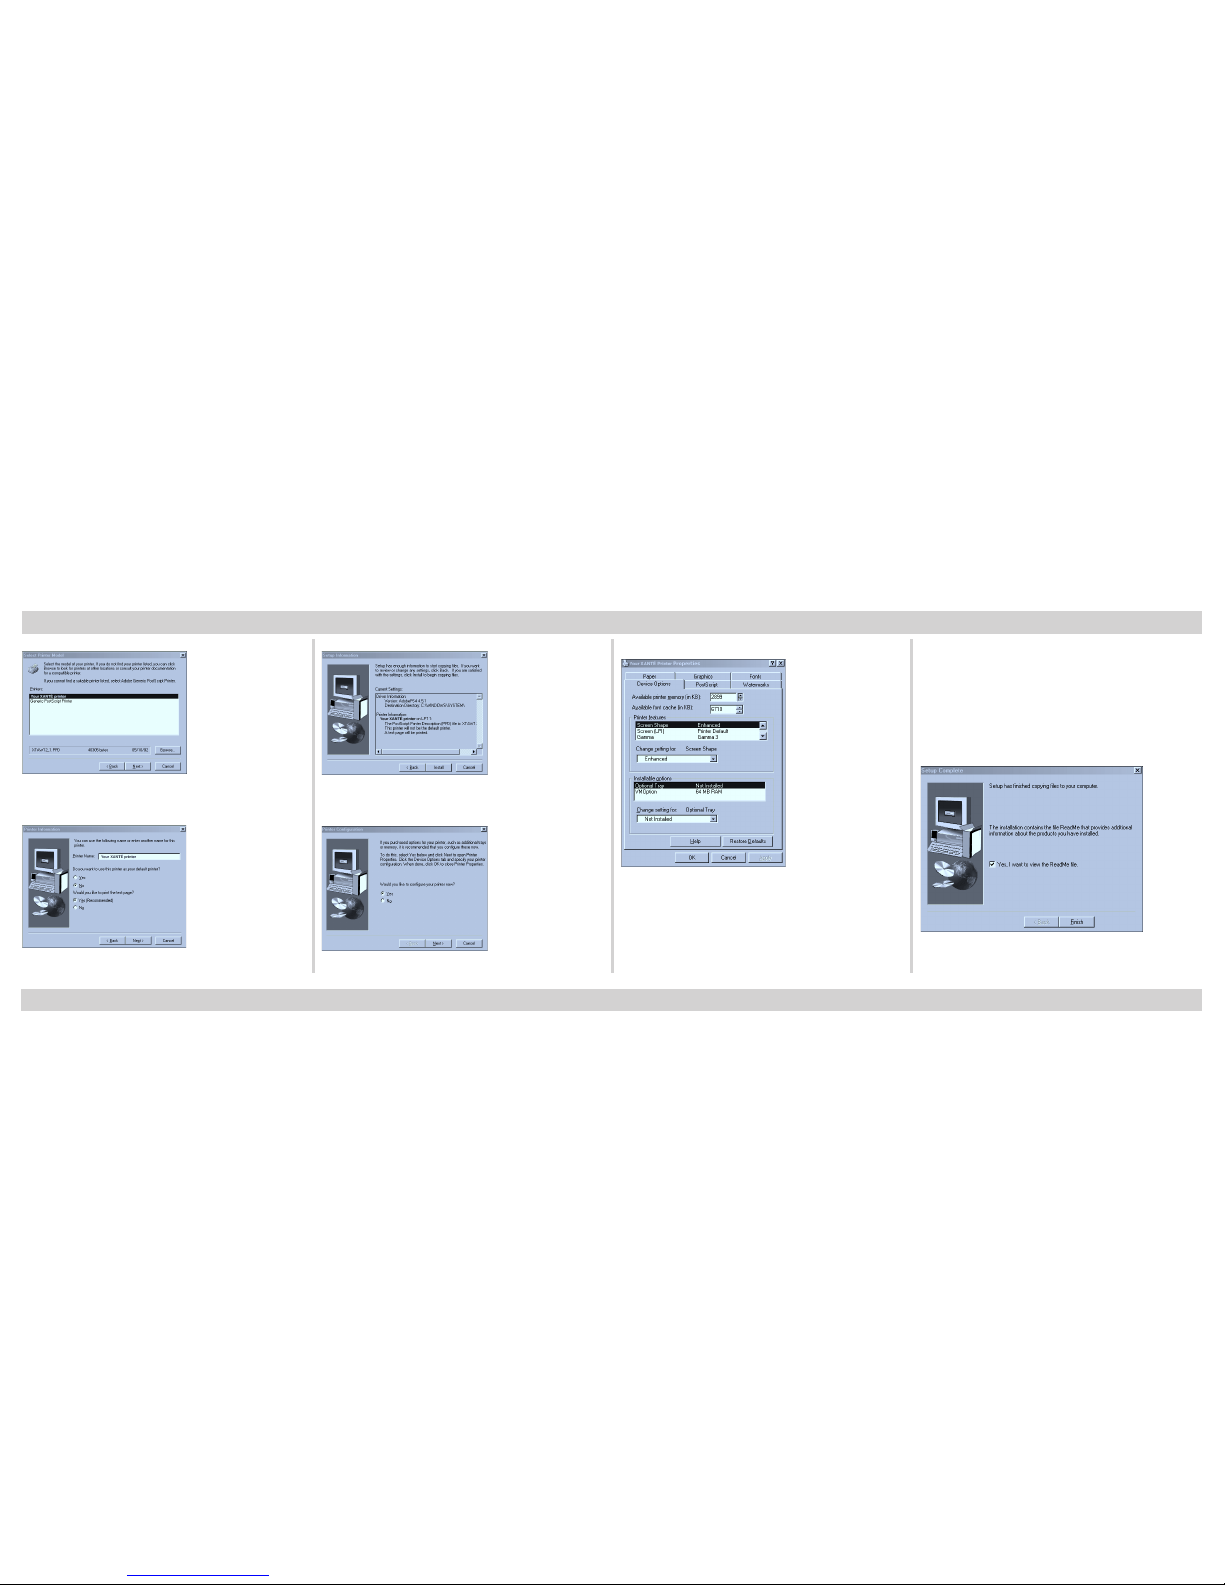
Fig. 62 Select Printer Model. Click Next.
Fig. 63 Name Your Printer. Click Next.
Fig. 64 Read Current Settings. Click, Install.
Fig. 65 Configure Your Printer. Click Next.
Fig. 66 Select Device Options to Configure
your Printer. Click Apply, then OK.
Note: Make changes for options
installed on your printer by first
highlighting the option. Then,
select the setting under Change
Setting.
Fig. 67 Setup Complete. Click Finish.
Installation - Windows 98/Me (continued)
Page 17
17
Note: If you selected to read the
ReadMe file, do so and then,
close the window.
Configuring IP, SubNet, and Gateway
Addresses
1. From the ps_files folder on the
XANTÉ CD-ROM, copy dhcpoff.ps
to your c:\ drive.
2. Go to DOS (Command) Prompt.
3. Type copy dhcpoff.ps lpt1.
4. Power cycle the printer (turn off,
then back on).
5. Using a word processing application,
open setipsub.ps file from the
ps_files folder. Edit the file so it
contains the IP, Subnet, and Gateway
address you obtained from your
network administrator. Save the file
to your c:\ drive.
6. Go to DOS (Command) Prompt.
7. Type copy setipsub.ps lpt1.
8. Power cycle the printer again and
verify that the start-up page contains
your IP, Subnet, and Gateway
addresses.
9. Go to DOS (Command) Prompt to
ping the printer.
c:\ping (IP Address)
Note: If you can ping the printer, go on
to step 10. If you cannot ping
your printer, contact your
Network Administrator.
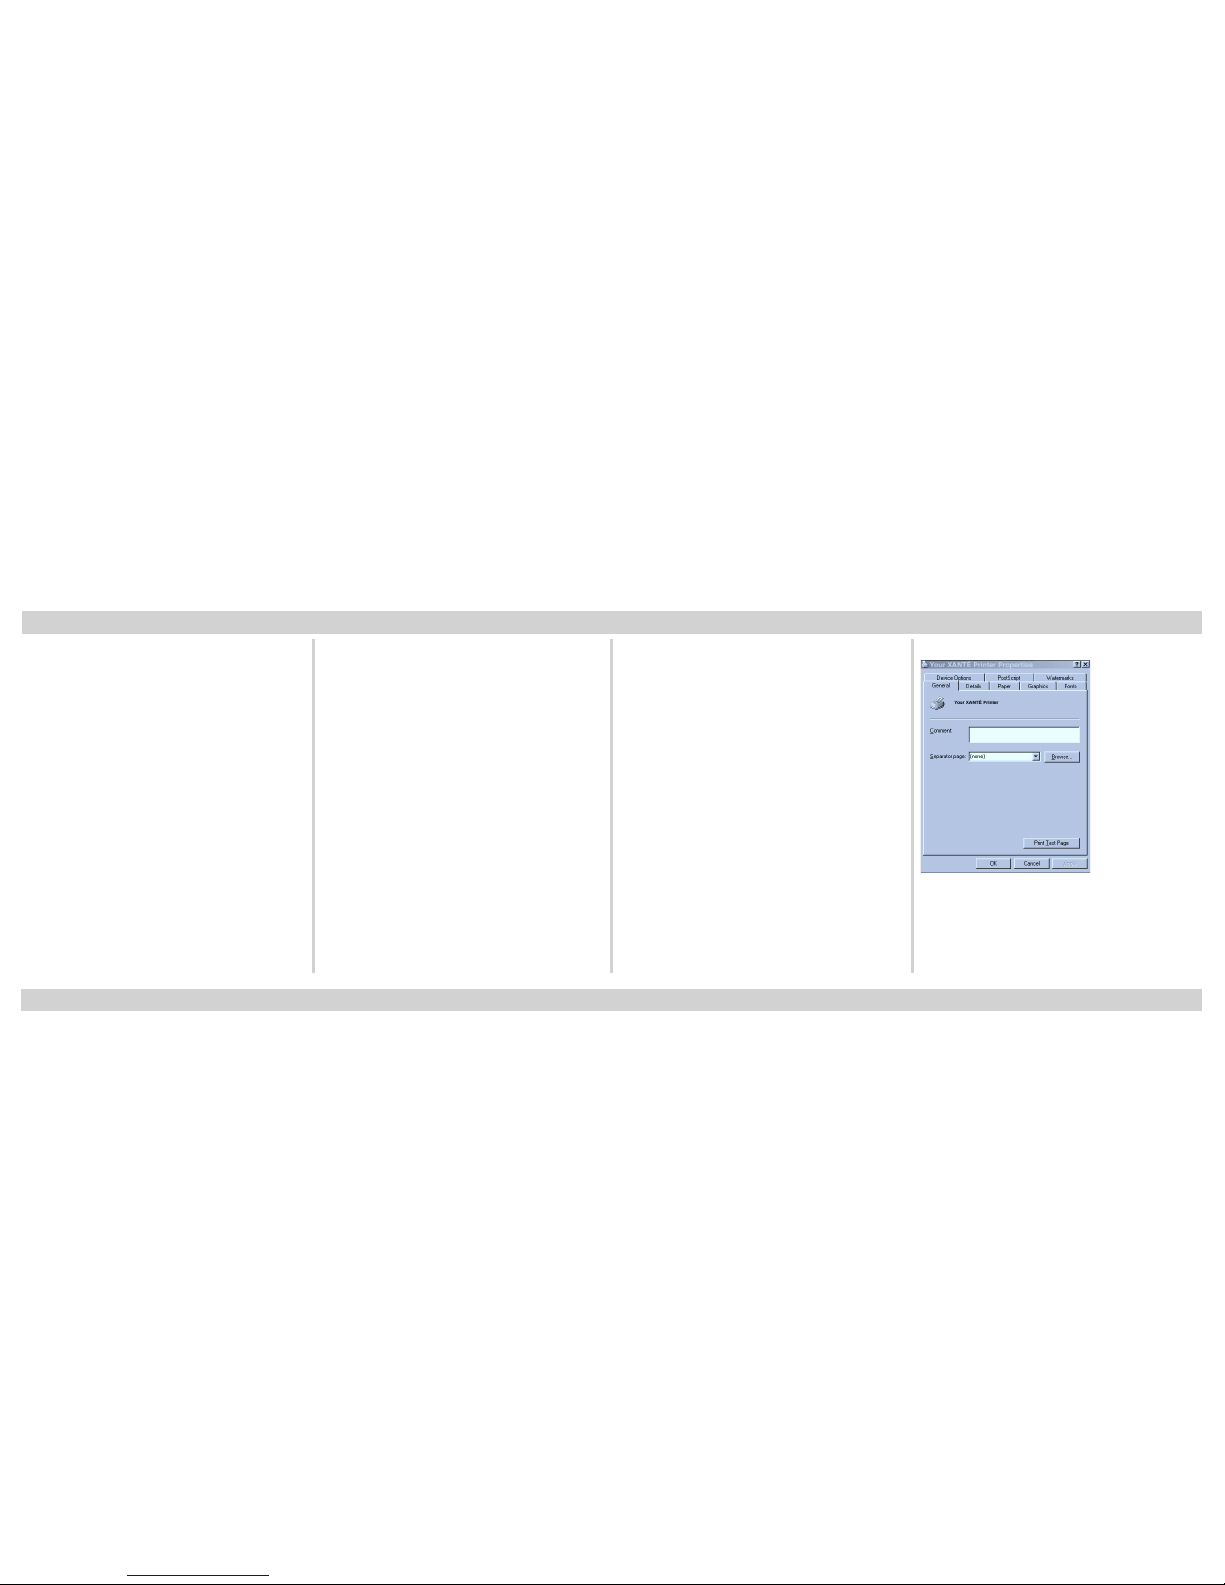
10. Go to your Printer Properties (fig. 68)
and select the Details Tab (fig. 69).
Fig. 68 Printer Properties Window.
Installation - Windows 98/Me (continued)
Page 18
18
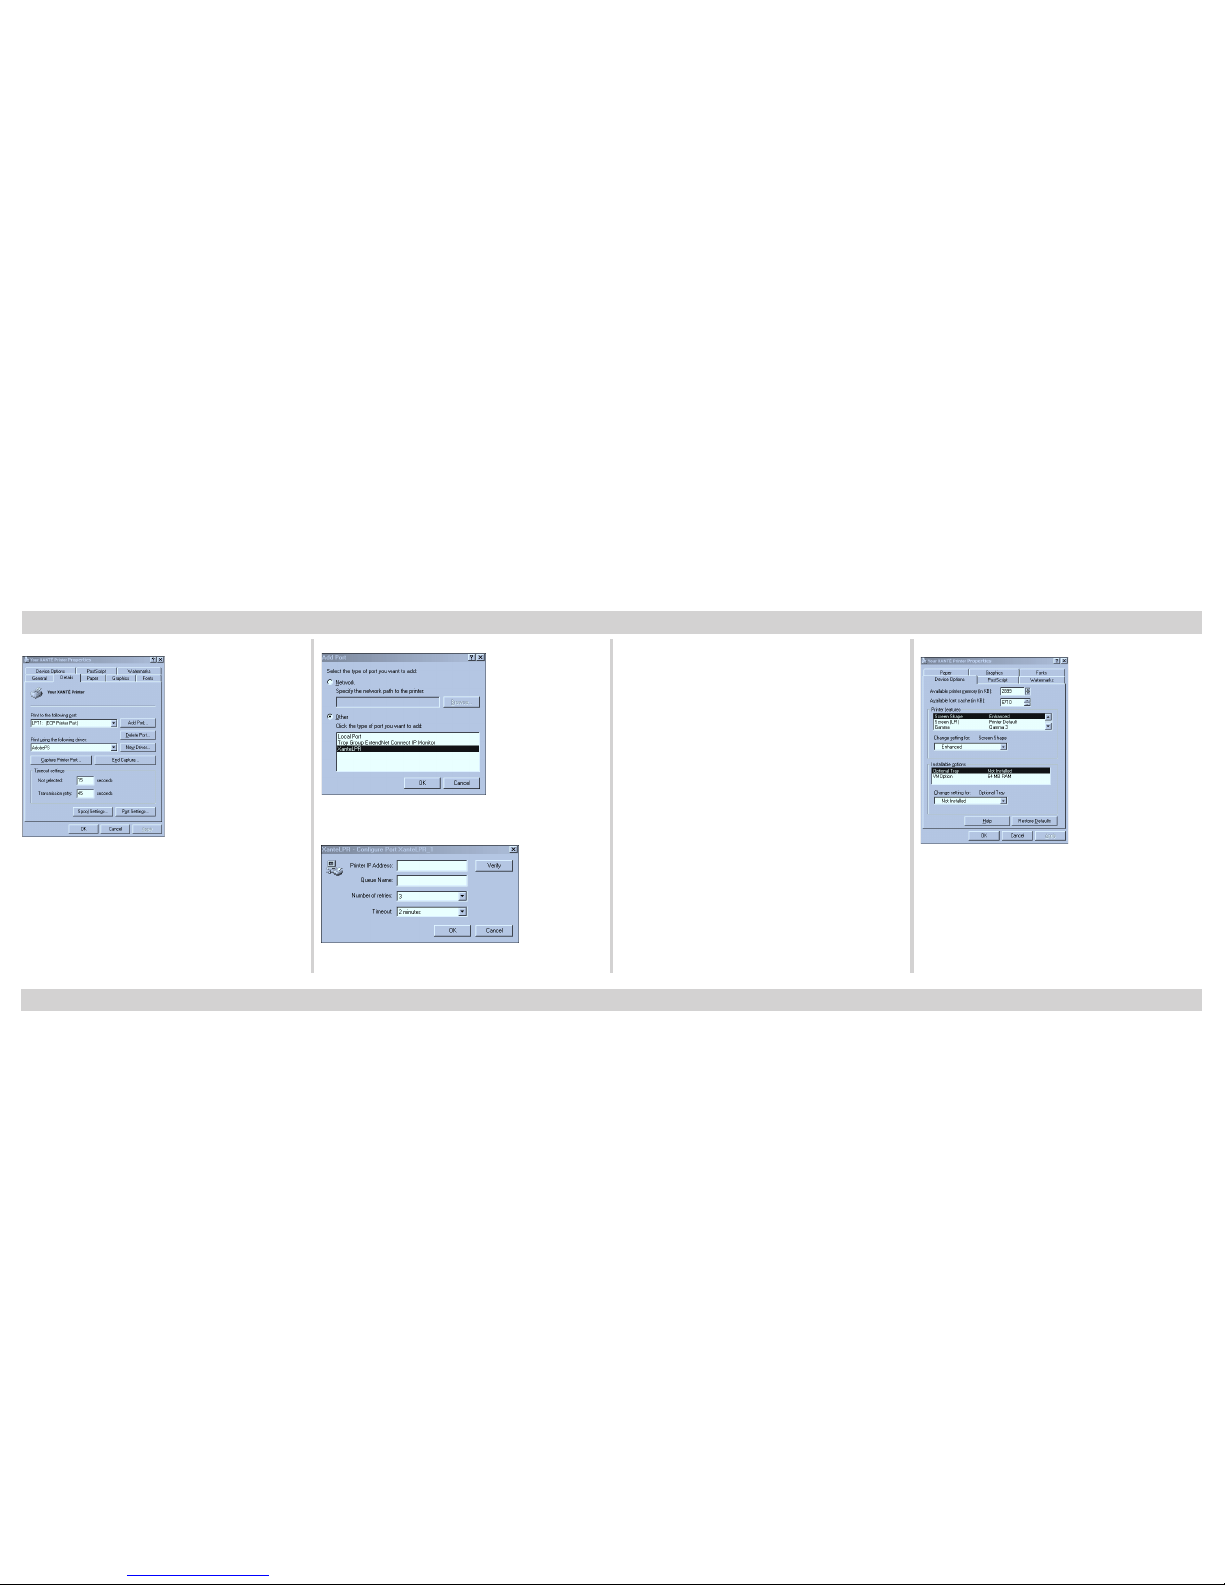
Fig. 69 Select Details Tab.
11. Select Add Port from the Details Tab
(fig. 69).
12. Select Other and highlight XanteLPR;
then, click OK.
Fig. 70 Highlight XanteLPR; click OK.
Fig. 71 Enter IP Address and Queue Name.
13. Enter your printer’s IP address and
Queue name; then, click OK (fig. 71).
14. Click Apply when the Printer Properties window reappears; then, click
OK.
PPD Configuration
1. Select Start: Settings: Printer
2. Highlight your printer and click the
right mouse button. Select Properties from the drop-down menu.
3. Click the Device Options tab (fig. 72).
Installation - Windows 98/Me (continued)
Fig. 72 Device Options Window
4. Select Installed for each option your
printer may have; then, click Apply.
5. Click OK.
Page 19
19
This section is the installation
instructions for Windows NT/2000/XP
only.
IP Address Configuration
When using the IP Address interface,
use the keys on the front panel to set the
address as follows:
• Reset key increases the current
number flashing by one.
• Menu key moves to the next
number to the right of the
current number flashing.
Installation - Windows NT/2000/XP
• Test key moves to the next
number to the left of the current
number flashing.
• Enter key accepts new address (if
valid) and returns to I/F:IP
Address menu. The menu will
display a message if the address
entered is invalid.
Note: You must turn off the printer
and restart it for the new IP
address to take effect.
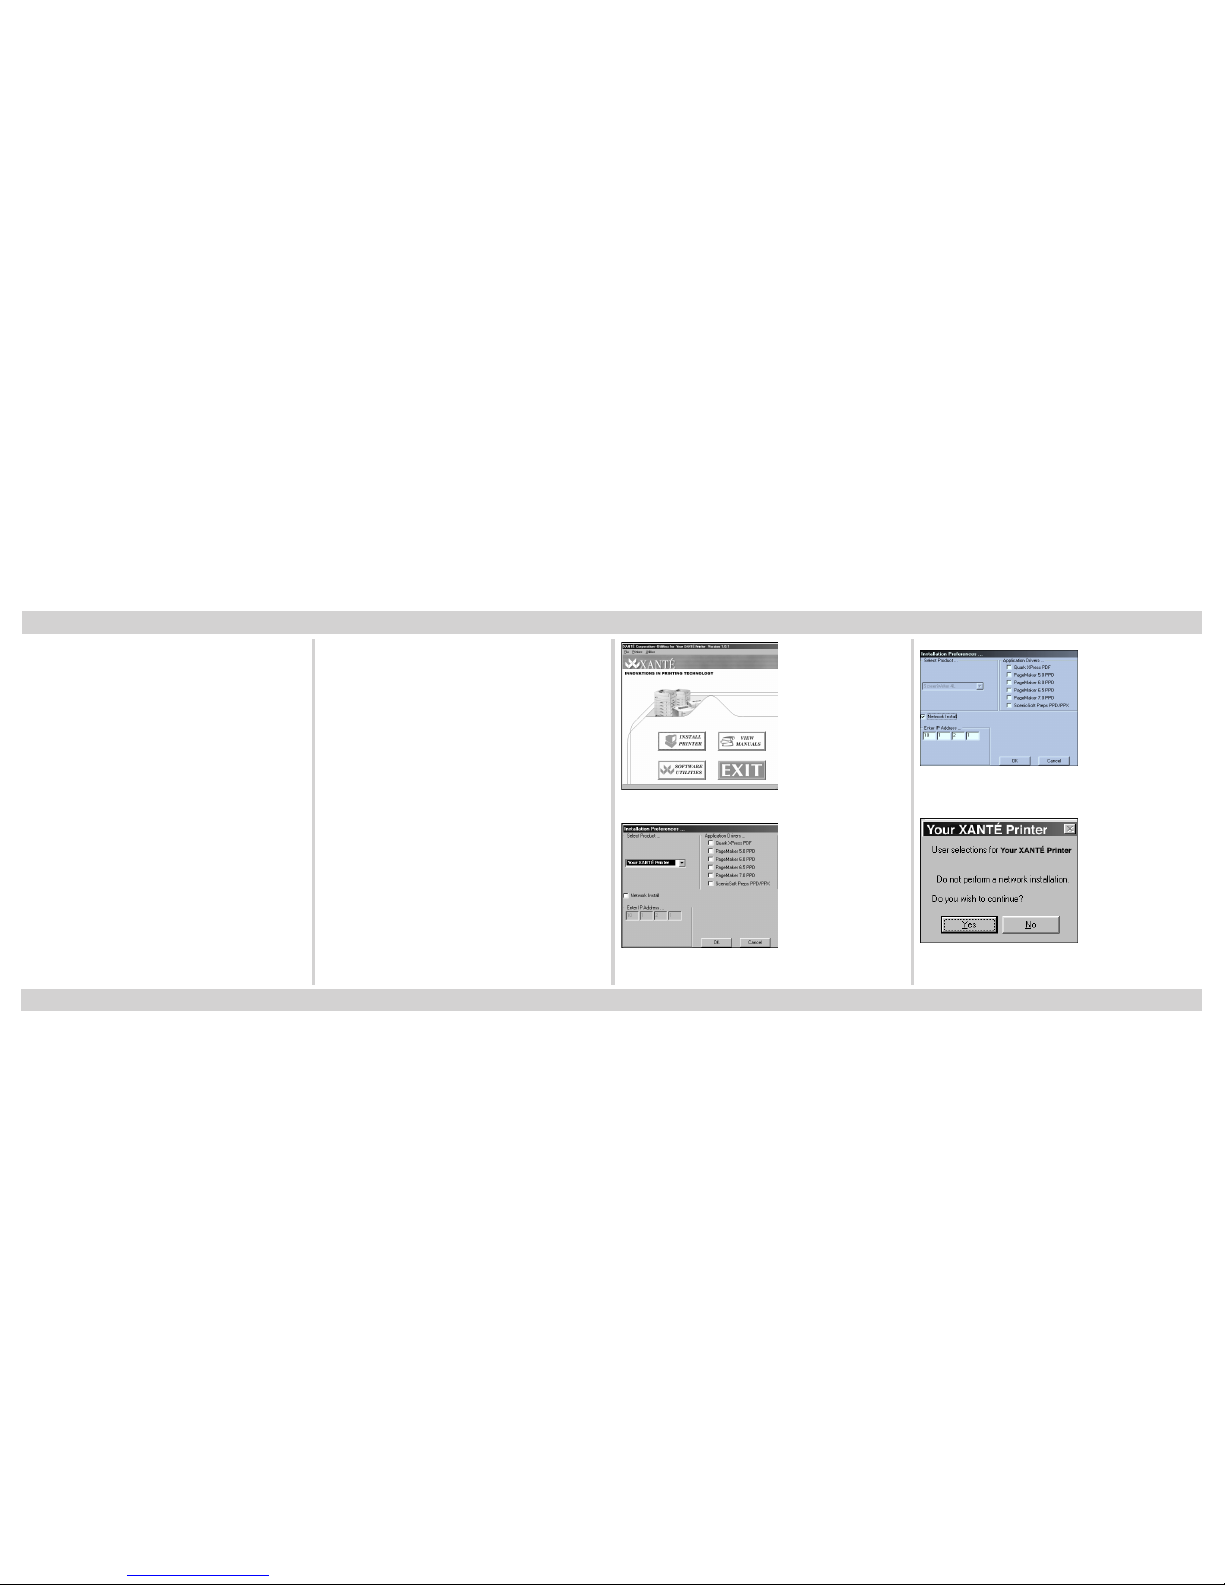
Fig. 73 Click Install Printer.
Fig. 74 Make Appropriate Selections. Click OK.
Fig. 75 Enter IP Address (Network Installation
only).
Fig. 76 Read Setup Information. Click Yes.
Page 20
20
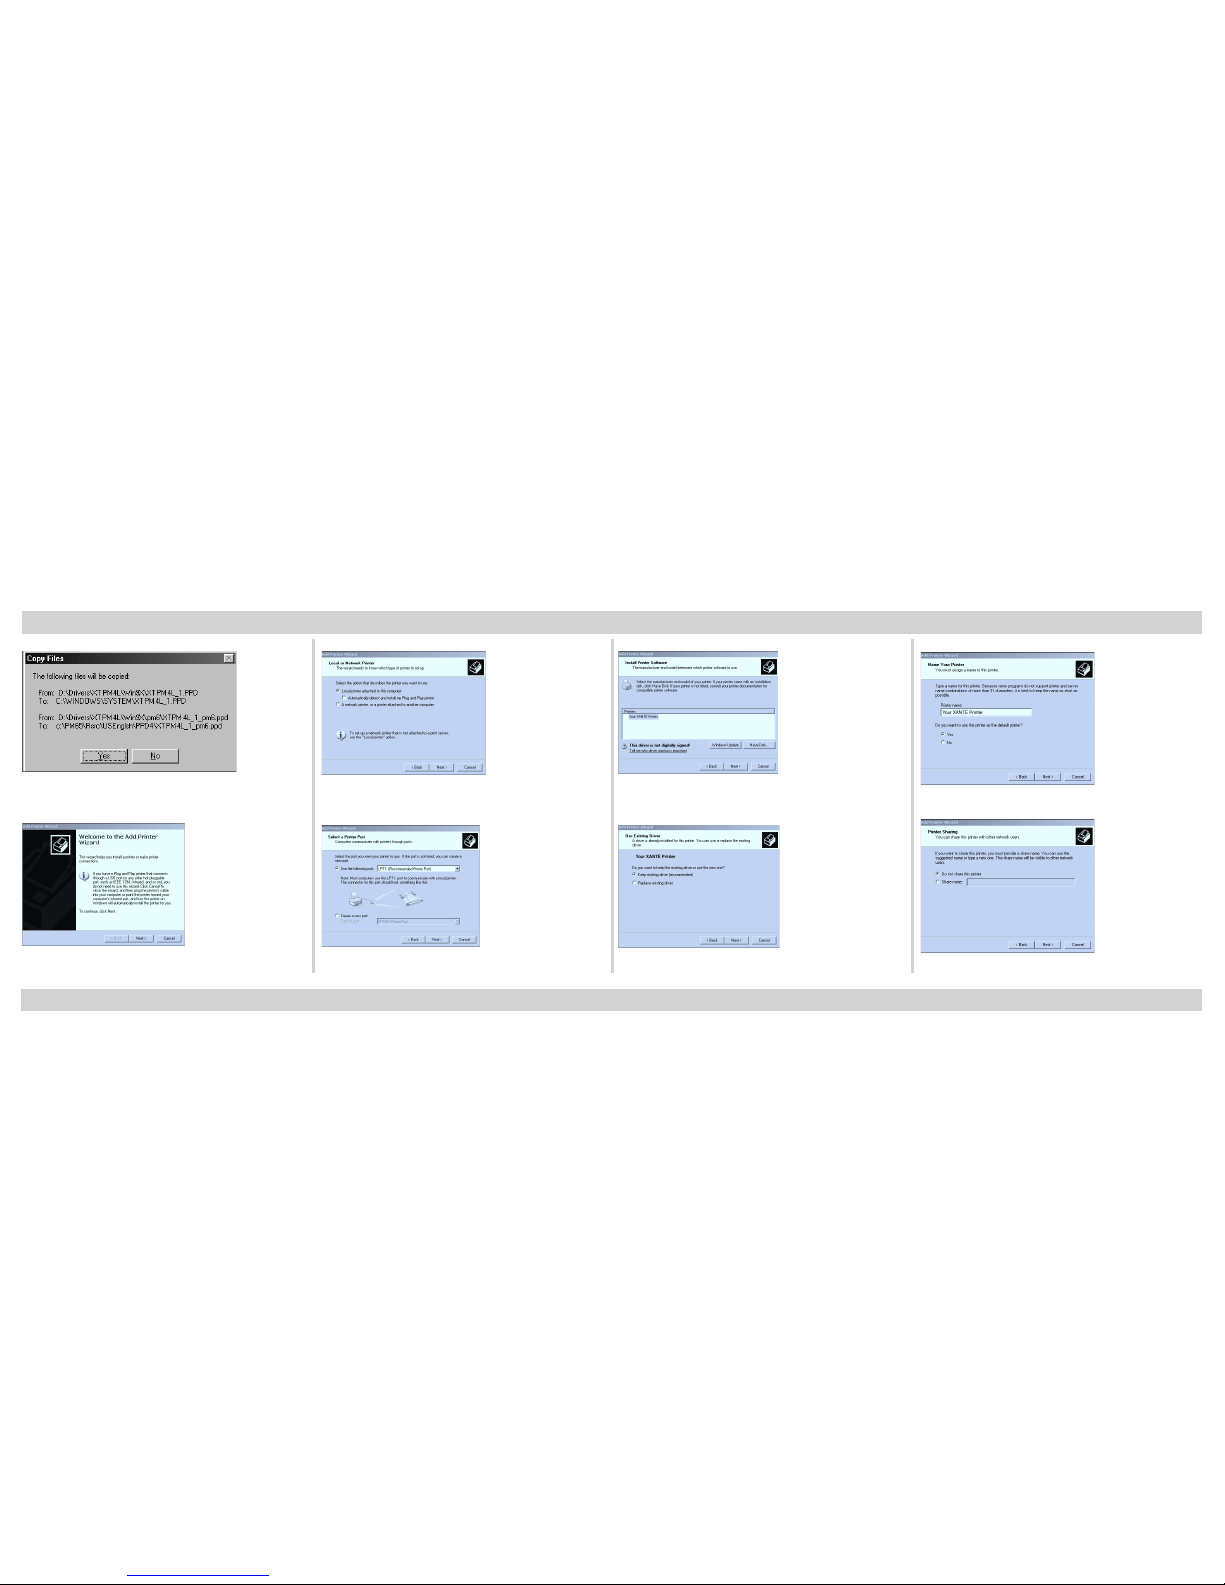
Fig. 77 Read File Destination. Click Yes.
Fig. 78 Read Welcome Window. Click Next.
Fig. 79 Select Local or Network. Click Next.
Fig. 80 Select LPT1 Port. Click Next.
Fig. 81 Select Printer. Click Next.
Fig. 82 Select Keep Existing Driver. Click Next.
Fig. 83 Set Your Default Printer.
Fig. 54 Choose a Sharing Option. Click Next.
Installation - Windows NT/2000/XP (continued)
Page 21
21
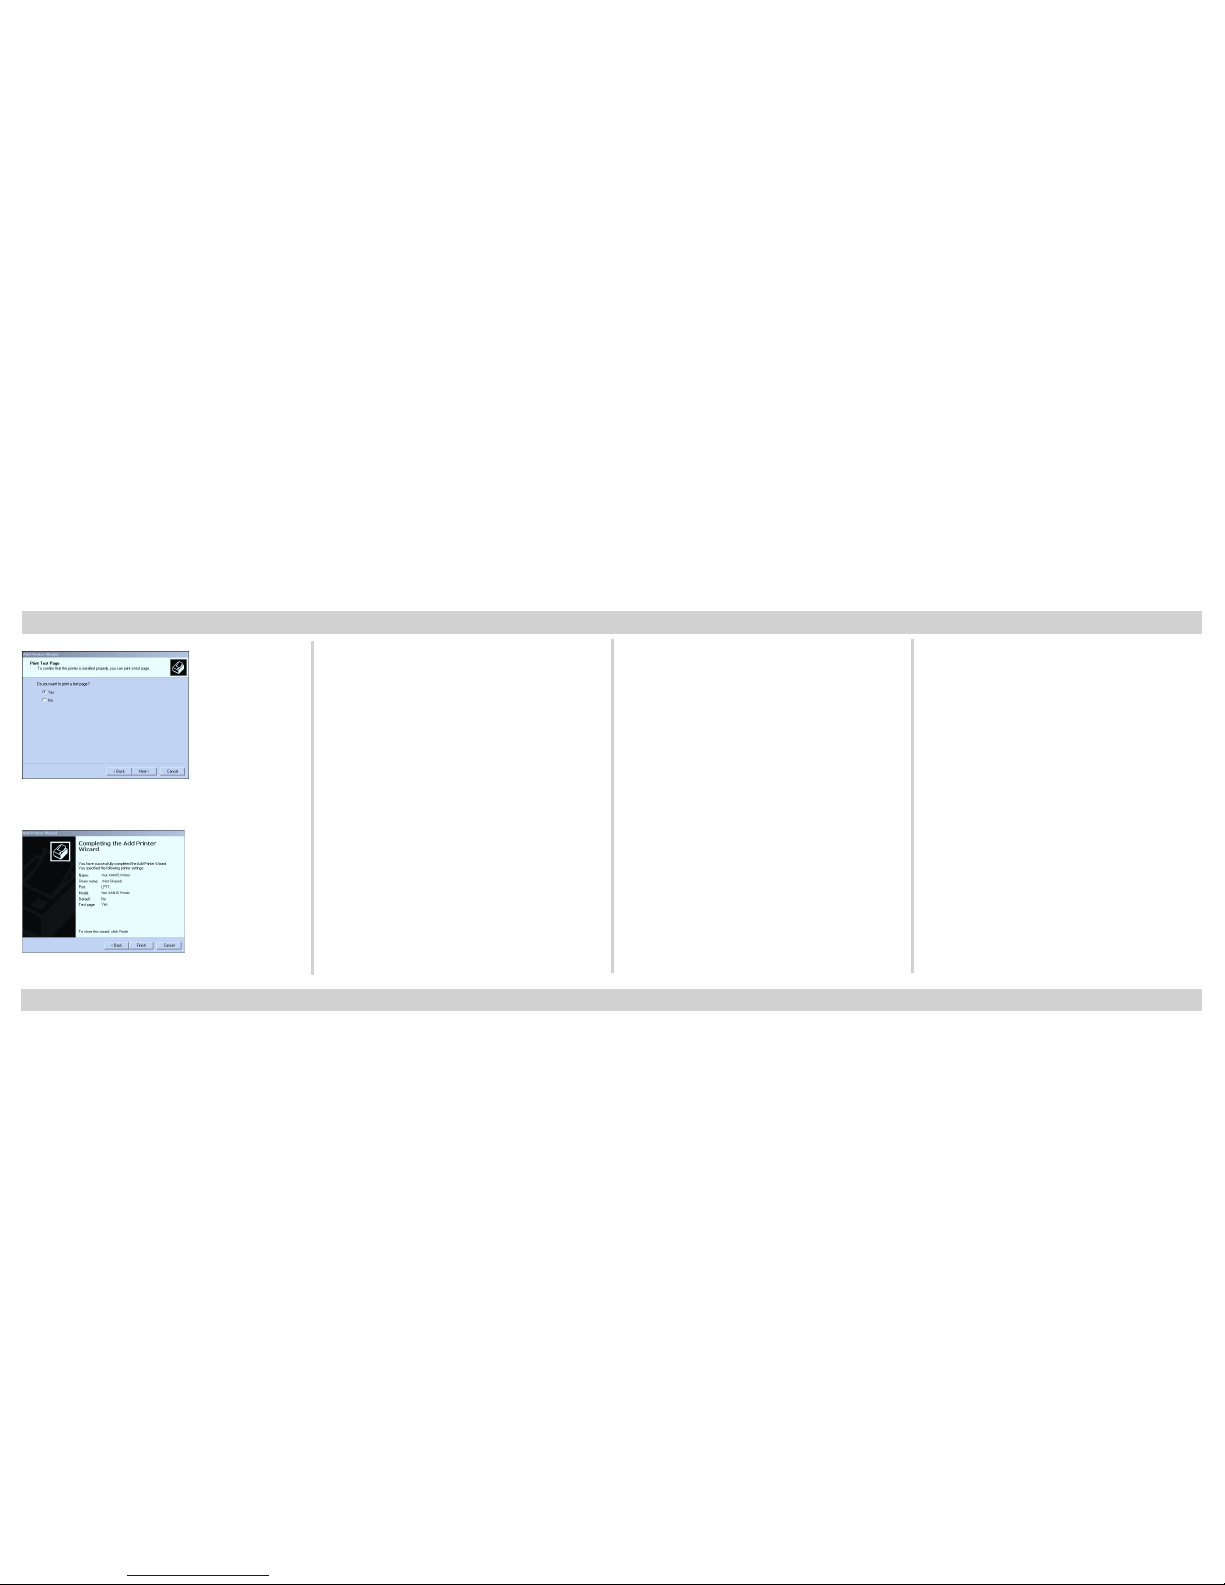
Fig. 85 Print Test Page. Click Next.
Fig. 86 Setup Complete. Click Finish.
Configuring IP, SubNet, and Gateway
Addresses
1. From the ps_files folder on the
XANTÉ CD-ROM, copy dhcpoff.ps
to your c:\ drive.
2. Go to DOS (Command) Prompt.
3. Type copy dhcpoff.ps lpt1.
4. Power cycle the printer (turn off,
then back on).
5. Using a word processing application,
open setipsub.ps file from the
ps_files folder. Edit the file so it
contains the IP, Subnet, and Gateway
address you obtained from your
network administrator. Save the file
to your c:\ drive.
6. Go to DOS (Command) Prompt.
7. Type copy setipsub.ps lpt1.
8. Power cycle the printer again and
verify that the start-up page contains
your IP, Subnet, and Gateway
addresses.
9. Go to DOS (Command) Prompt to
ping the printer.
c:\ping (IP Address)
Note: If you can ping the printer, go on
to step 10. If you cannot ping
your printer, contact your
Network Administrator.
10. Go to your Printer Properties (fig. 87)
and select the Port Tab (fig. 88).
Installation - Windows NT/2000/XP (continued)
Page 22
22
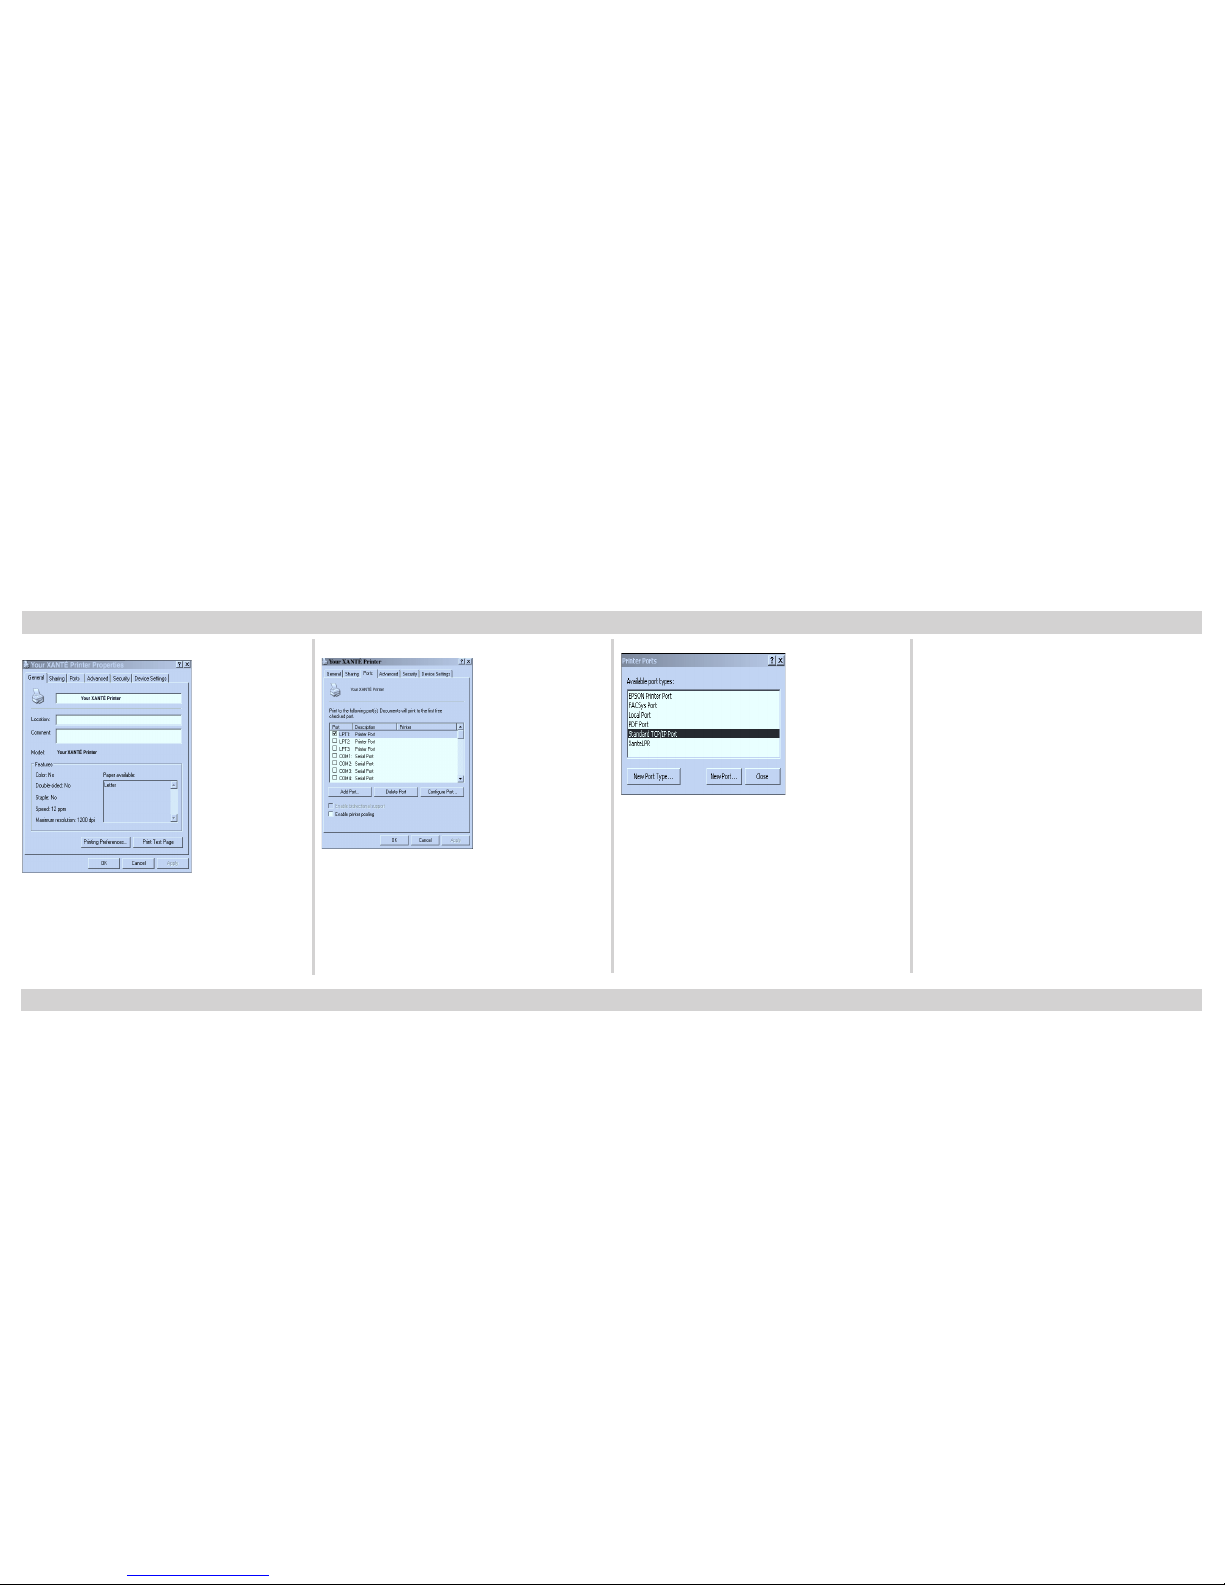
Fig. 87 Printer Properties Window.
Fig. 88 Select Ports Tab.
11. Select Add Port from the Ports Tab.
12. Highlight Standard TCP/IP Port; then,
click New Port (fig. 89).
Fig. 89 Highlight Standard TCP/IP Port, click
New Port.
13. Follow the on-screen directions.
Then, enter your printer’s name or
IP address when prompted.
14. Click Finish when complete. Then
close all remaining windows.
PPD Configuration
1. Select Start: Settings: Printers and
Faxes.
2. Highlight your printer and click the
right mouse button. Select Properties from the drop-down menu.
3. Click the Device Settings tab (fig. 90).
Installation - Windows NT/2000/XP (continued)
Page 23
23
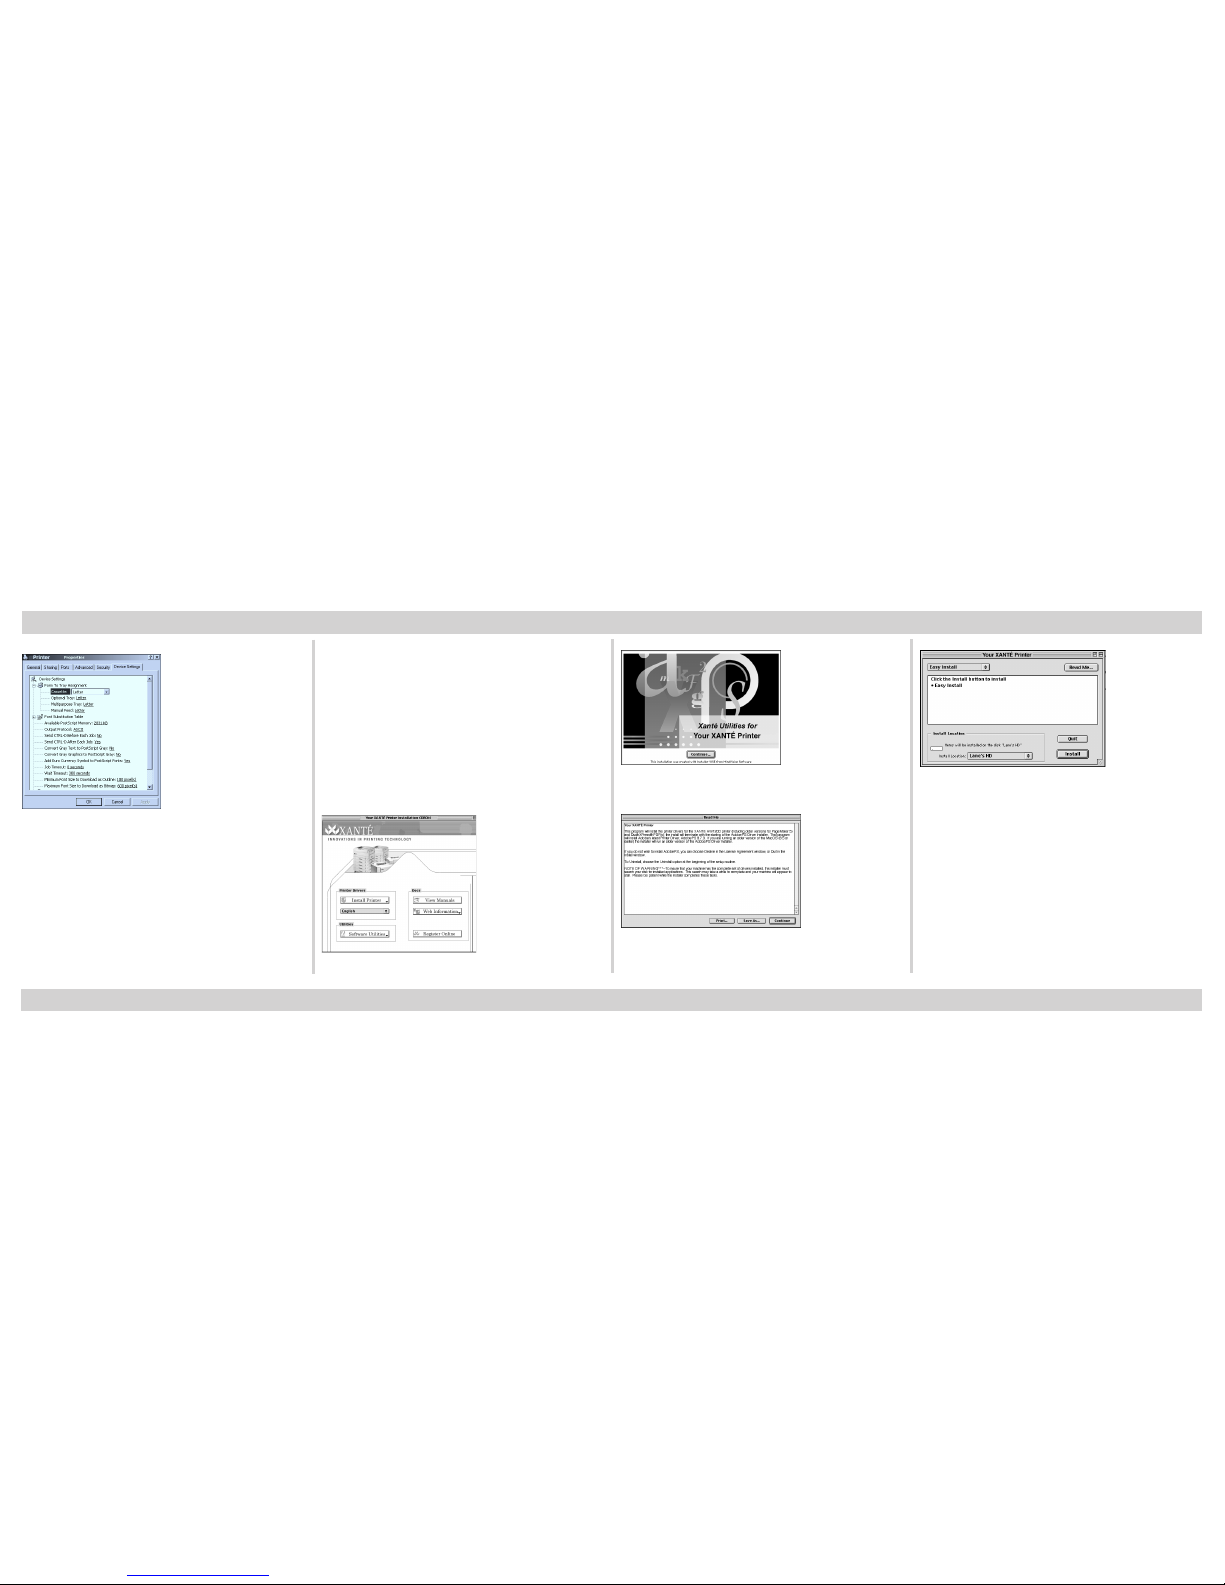
Fig. 90 Device Settings Window
4. Select Installed for each option your
printer may have; then, click Apply.
5. Click OK.
Installation - Macintosh (7.5 or
higher)
If your Mac version is less than 8.1,
some libraries required by setup are not
available. If your system falls under this,
select Pre MacOS 8.1 Setup from the
CD-ROM.
Fig. 91 Select Install Printer.
Installation - Windows NT/2000/XP (continued)
Fig. 92 XANTÉ Utilities. Click Continue.
Fig. 93 Read the Read Me window. Click
Continue.
Fig. 94 Select Easy Install. Click Install.
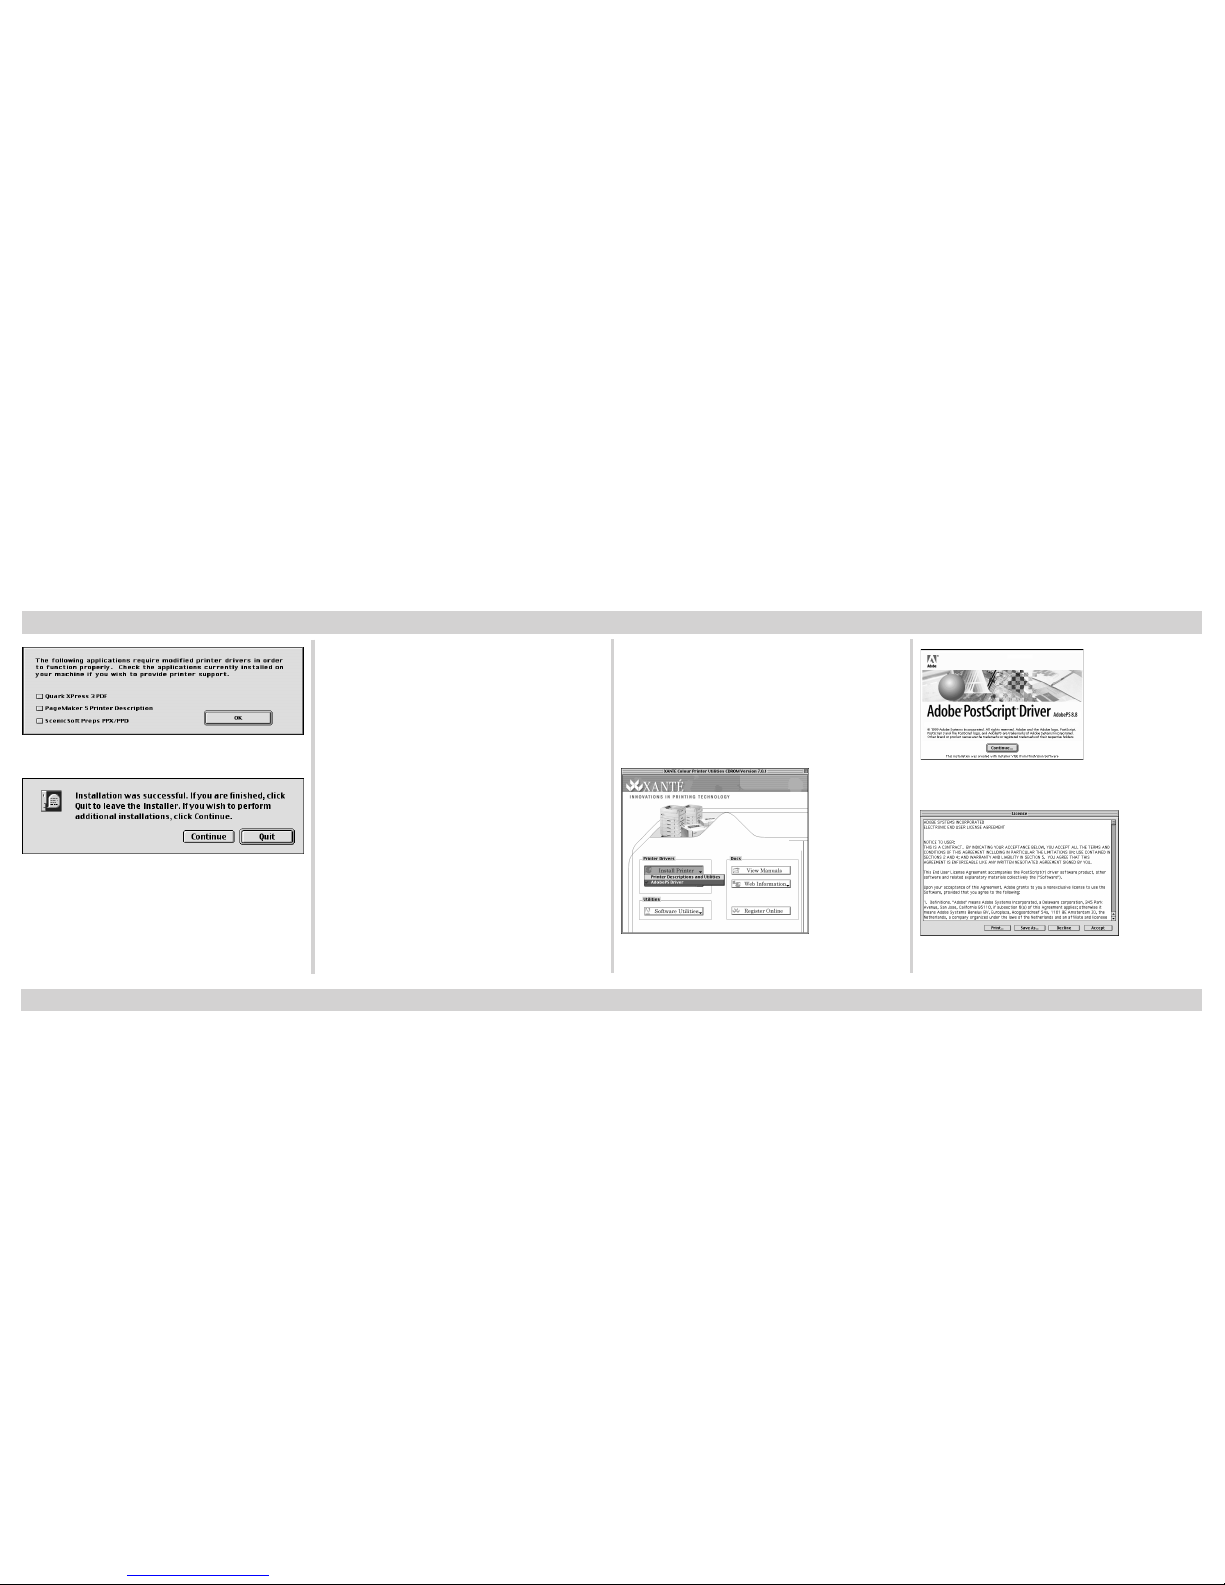
Note: A warning window indicates a
search for particular software on
your system is about to begin
(fig. 95). If you have some or all
the designated software, select
the appropriate application(s);
click OK.
Page 24
24
Fig. 95 Warning Window.
Fig. 96 Installation Complete; click Quit.
Note: If AdobePS doesn’t open, simply
double-click AdobePS Installer
in the Printer Drivers: AdobePS
8.8: (appropriate language)
folder on the CD.
Installing the PostScript Driver
You can install the Adobe PostScript
Driver (Adobe PS) in two ways from the
XANTÉ Utilities disk, via the Utilities
menu or via the PostScript Driver link.
Fig. 97 Select AdobePS Driver.
Fig. 98 AdobePS Window. Click Continue.
Fig. 99 Read License. Click Accept.
Installation - Macintosh (continued)
Page 25
25
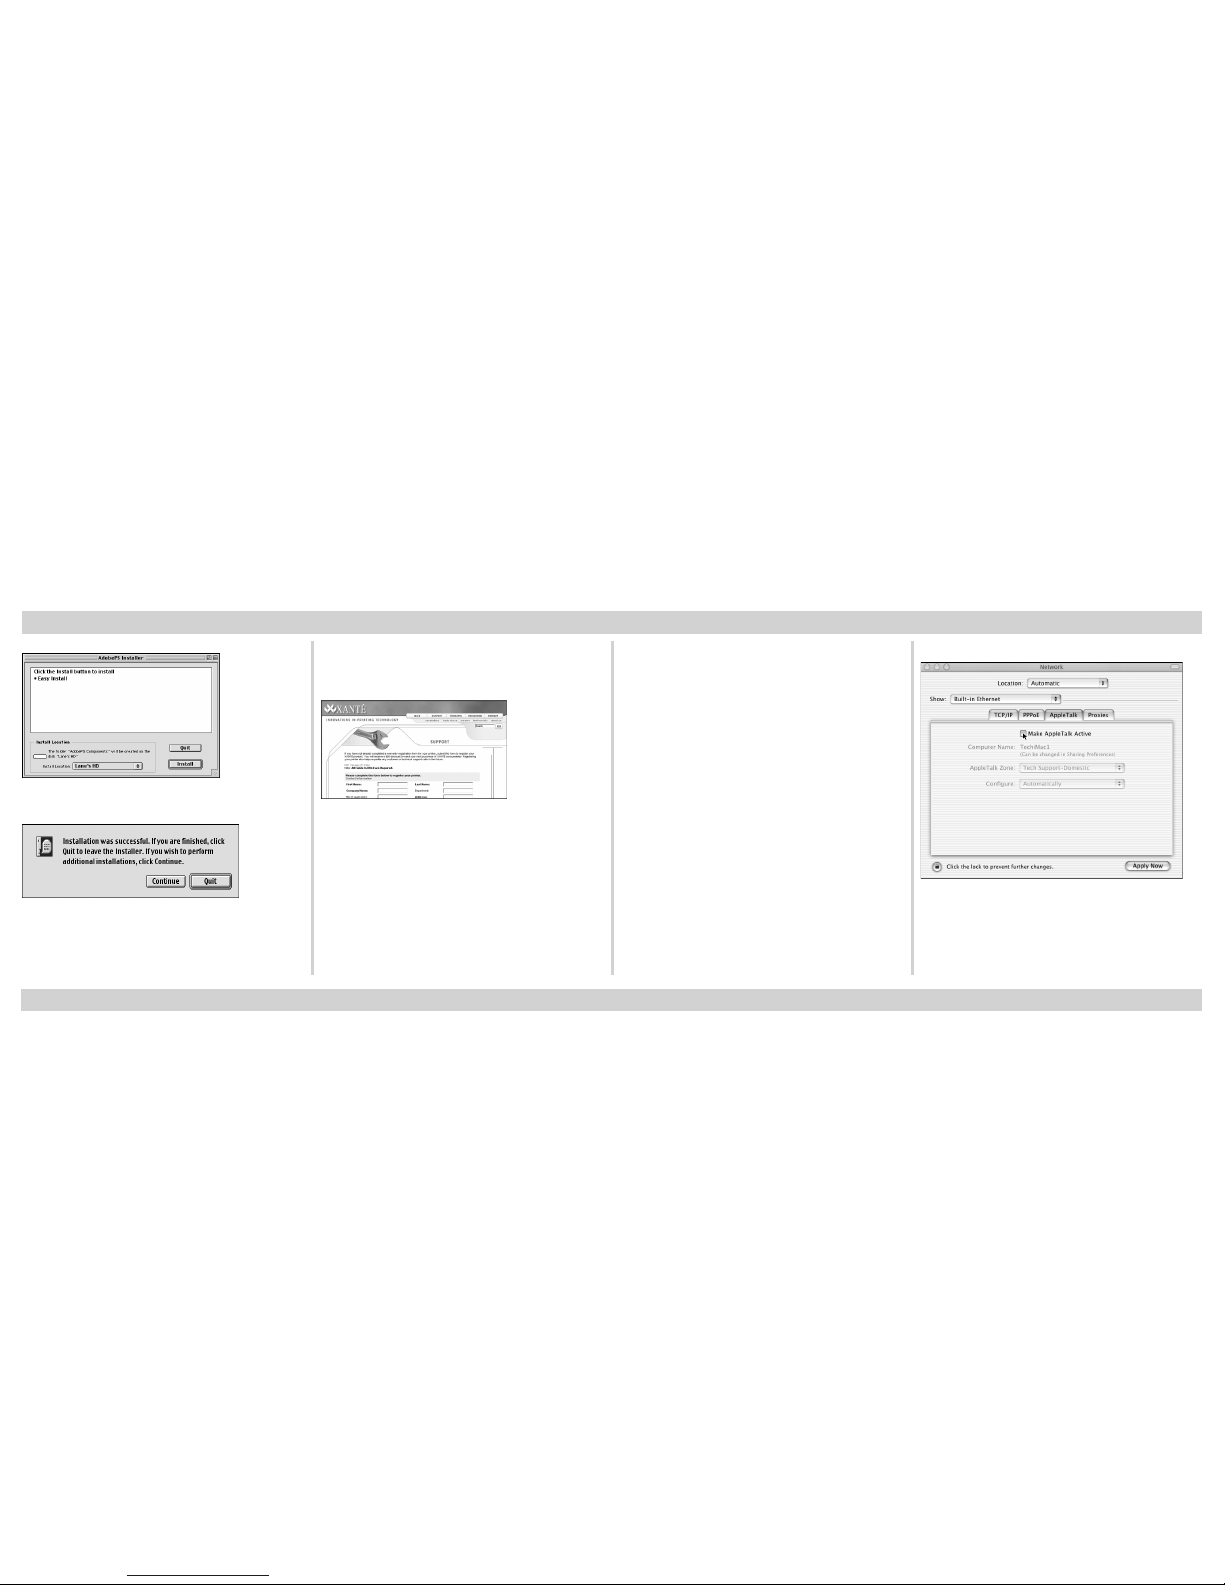
Fig. 100 Review Settings. Click Install.
Fig. 101 Installation Complete. Click Quit.
When the Main Screen reappears,
you can register your printer (if online).
Fig. 102 Complete Registration Form.
Note: After registering your printer,
you may continue installing
other parts of the Utilities by
continuing on to the appropriate
installation sections.
Installation - Macintosh OS X
You must have the latest Mac OS X version to properly install this printer.
Note: You must first verify that
AppleTalk is enabled to continue
OS X installation.
1. Select Apple Menu: System Prefer-
ences: Network.
2. Select Built-in Ethernet from the
drop-down Show menu (fig. 103).
Next, select the AppleTalk tab, select
Make AppleTalk Active, and click
Apply Now. Then, close the window.
Installation - Macintosh (continued)
Fig. 103 Network Window
Page 26
26
OS X (version 10.1.5)
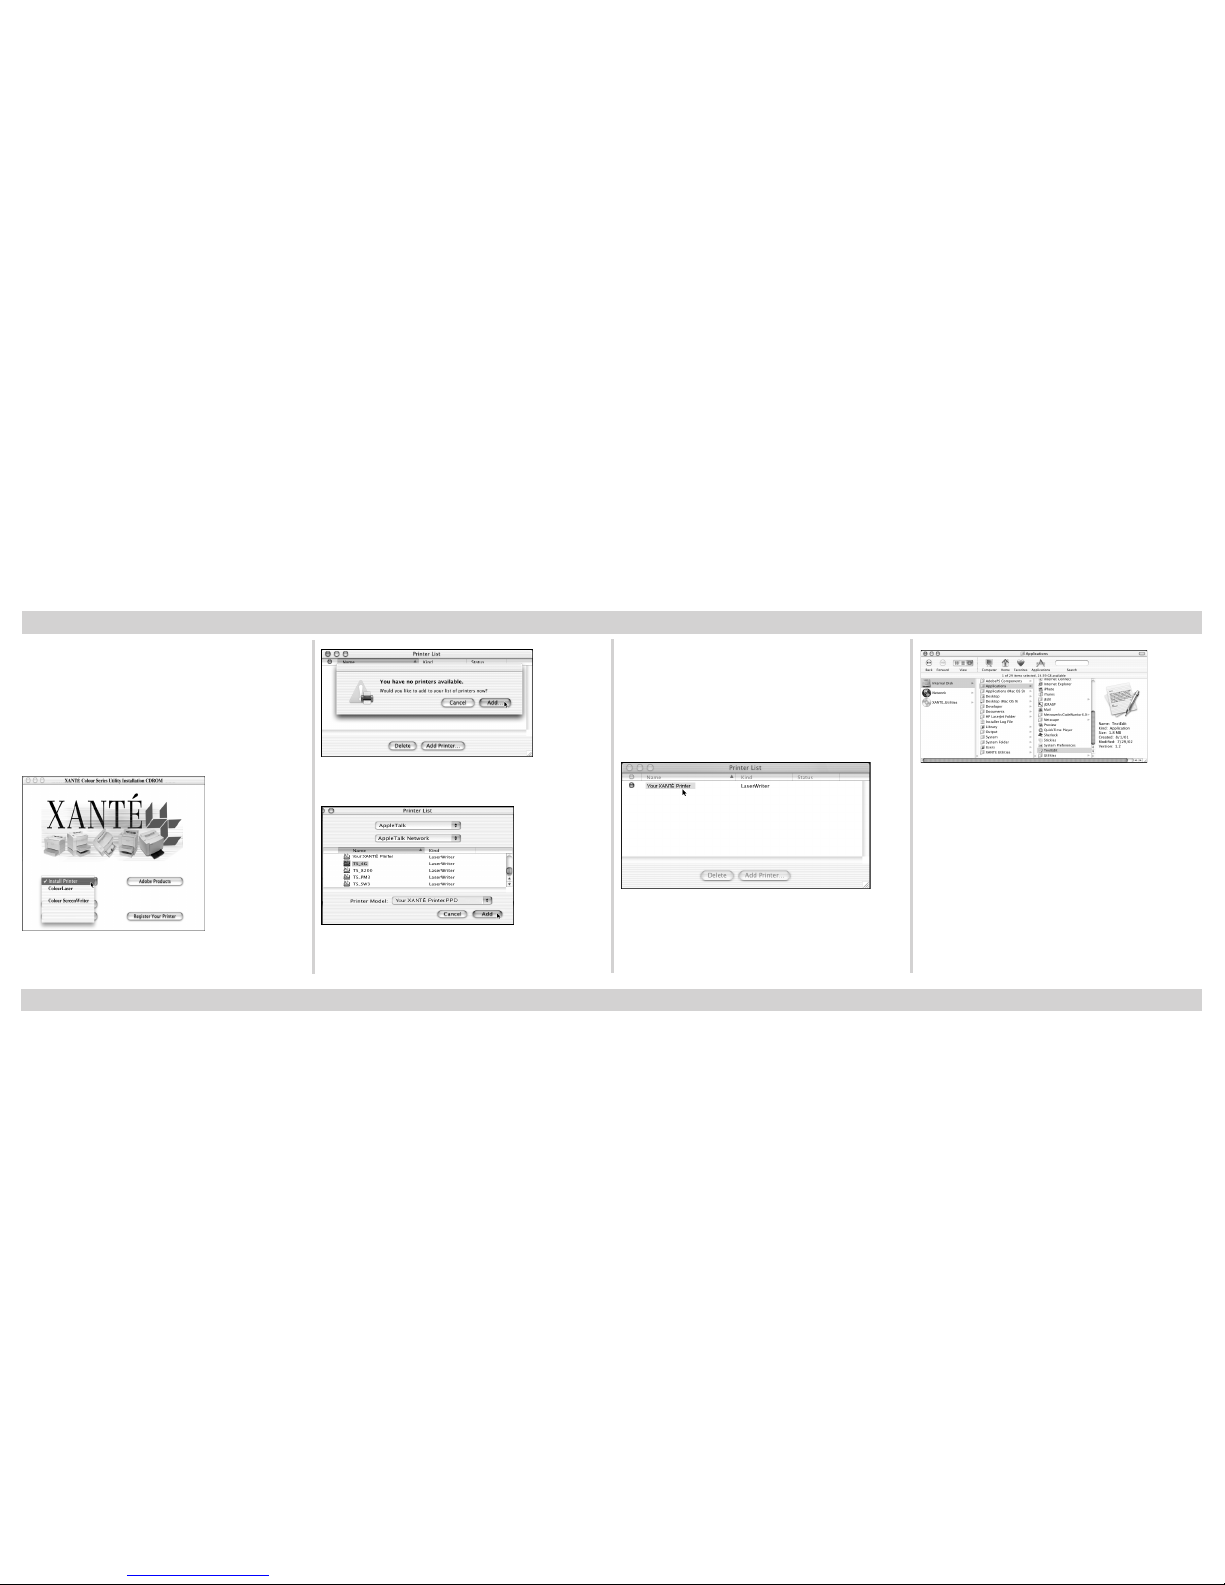
Note: You must double-click the
OSX_setup icon The installation
window does not open automatically.
Fig. 104 Click Install Printer.
Fig. 105 Click Add Printer.
Fig. 106 Select AppleTalk, AppleTalk Network, your
printer, and your printer’s PPD; then, click Add.
Note: The install location for your
printer’s PPD is Hard Drive:
Library: Printers: PPDS: Contents: Resources: EN.LPROJ
Folder.
Fig. 107 Make sure your printer is listed.
Fig. 108 Locate Text Edit.
Note : Go to File: Page Setup to make sure
your printer appears in the Format
For drop-down menu. If it says
Generic, call XANTÉ Technical
Support at 800-926-8393 (US and
Canada).
Installation - Macintosh OS X (continued)
Page 27
27
Mac OS X Printer Configuration
You can configure your printer by
selecting Page Setup and Printer Features.
1. Close the Print Center window to
return to your desktop.
2. Follow this path to access the
ReadMe file:
CD: OSX_Installer: XANTÉ Utilities:
ColourLaser_OSX: readme.rtf.
3. Read the ReadMe file; then, click
close or select File and go to Page
Setup.
Page Setup
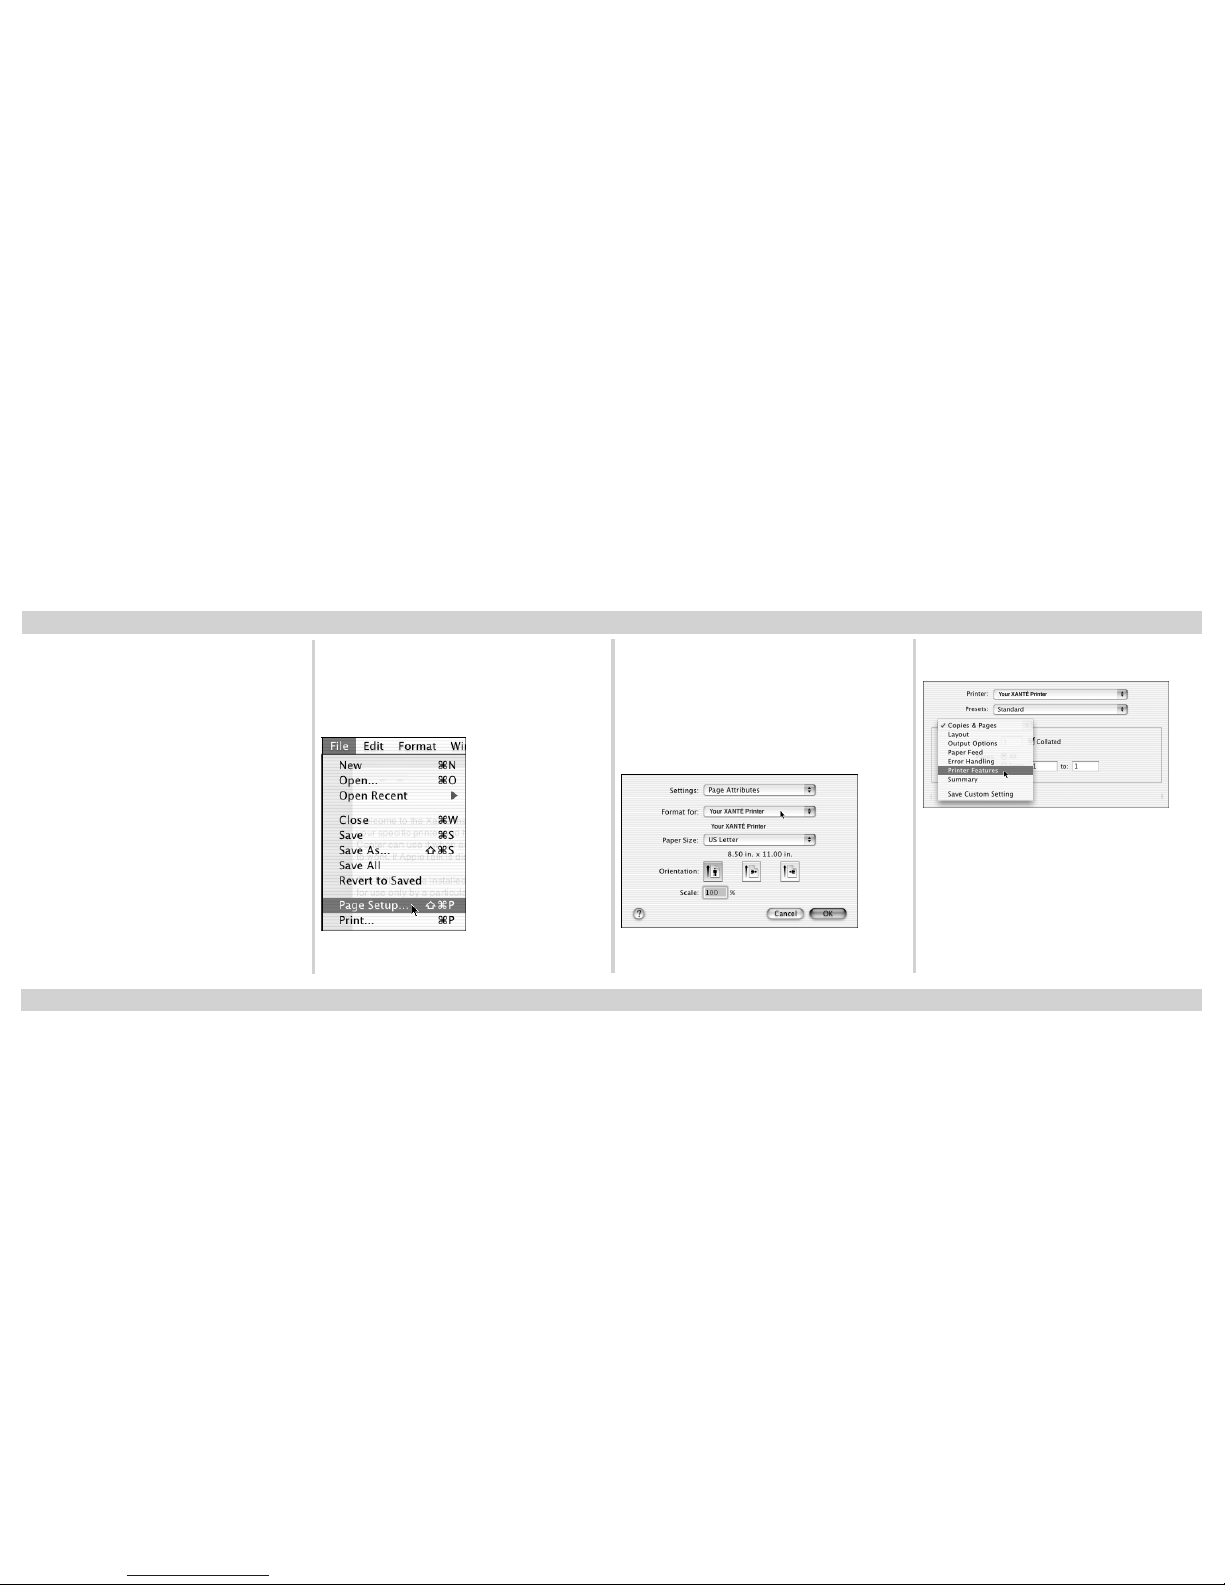
1. Select File from the top menu bar;
then, select Page Setup.
Fig. 109 Page Setup Window
2. Select Format For: ColourLaser in the
Page Attributes window (fig. 110).
3. Click OK once you have selected the
desired paper size, orientation, and
scale for your print job.
Fig. 110 Page Attributes Window
Printer Features
Fig. 111 Select File: Print; click Printer
Features.
Installation - Macintosh OS X (continued)
Page 28
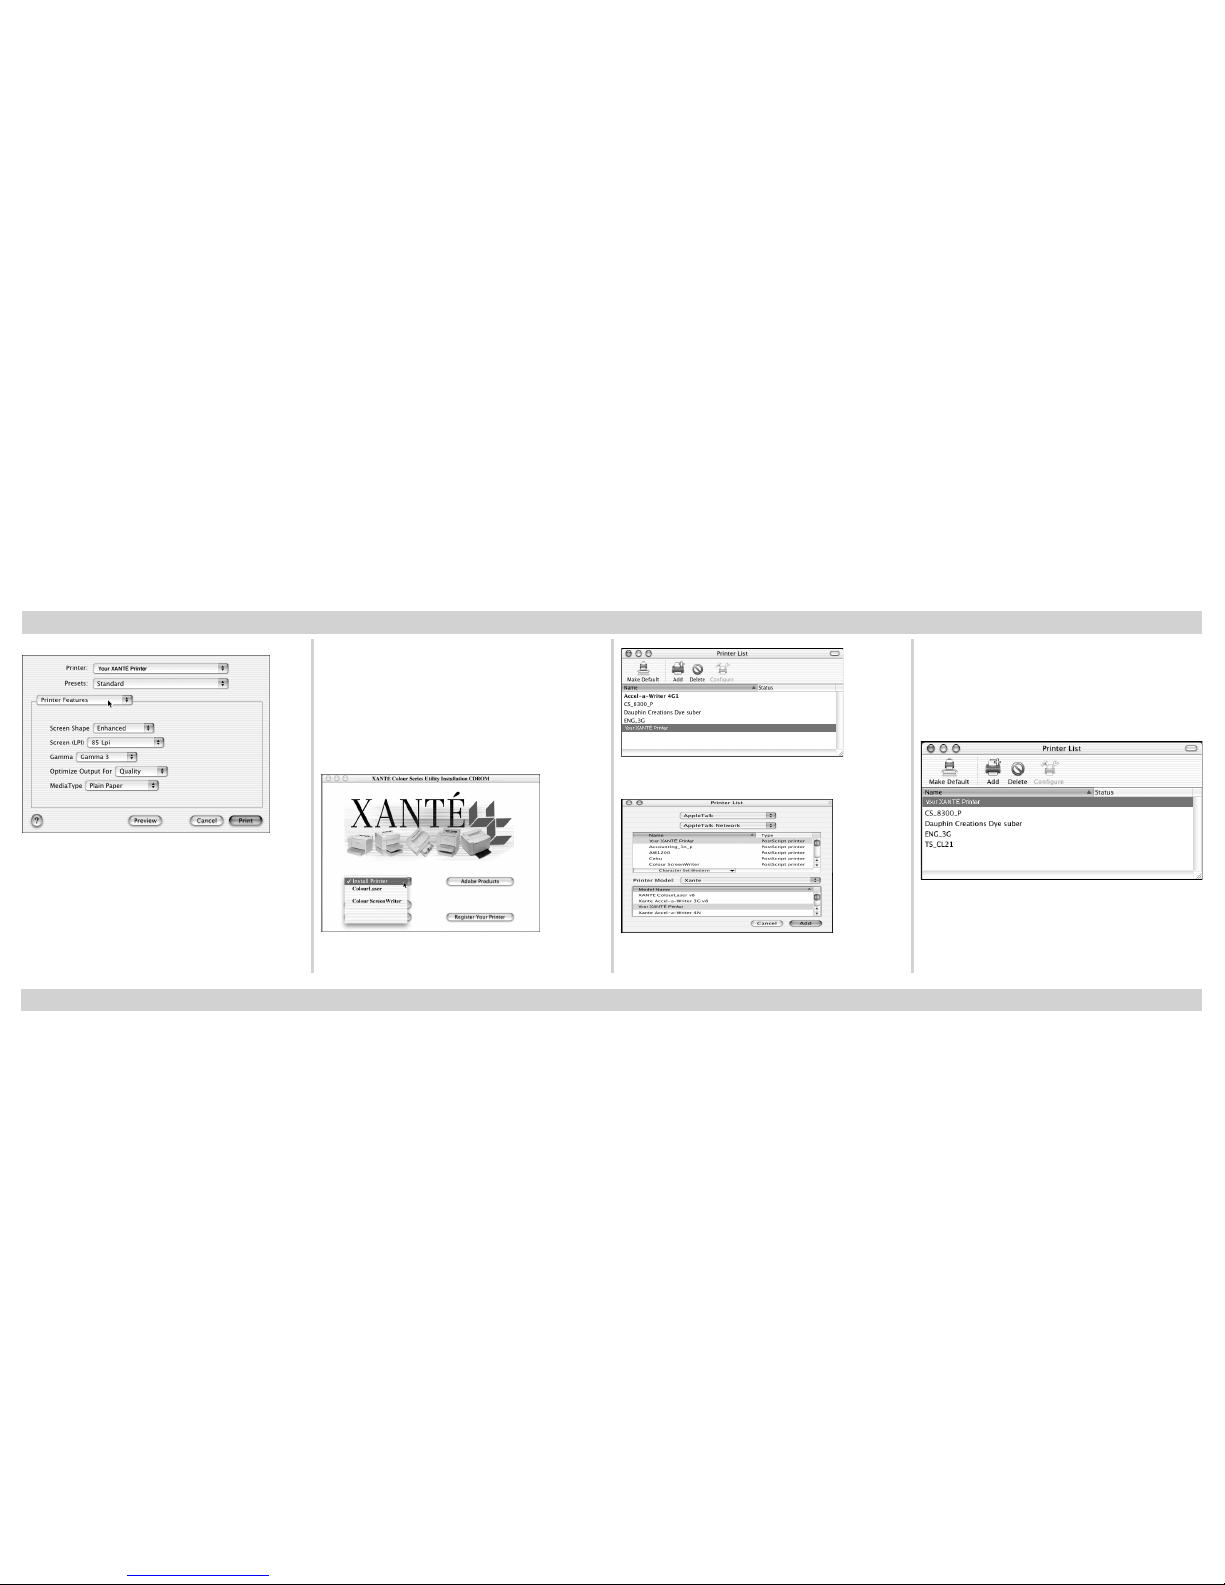
28
Fig. 112 Select Appropriate Features; click
Print.
OS X (version 10.2.1)
Note: You must double-click the
OSX_setup icon The installation
window does not open automatically.
Fig. 113 Click Install Printer.
Fig. 114 Click Add Printer.
Fig. 115 Select AppleTalk, AppleTalk Network, your
printer, and your printer’s PPD; then, click Add.
Note : The install location for your printer’s
PPD is Hard Drive: Library:
Printers: PPDS: Contents: Resources: EN.LPROJ Folder.
Fig. 116 Select Printer Menu: Show Options.
Installation - Macintosh OS X (continued)
Page 29
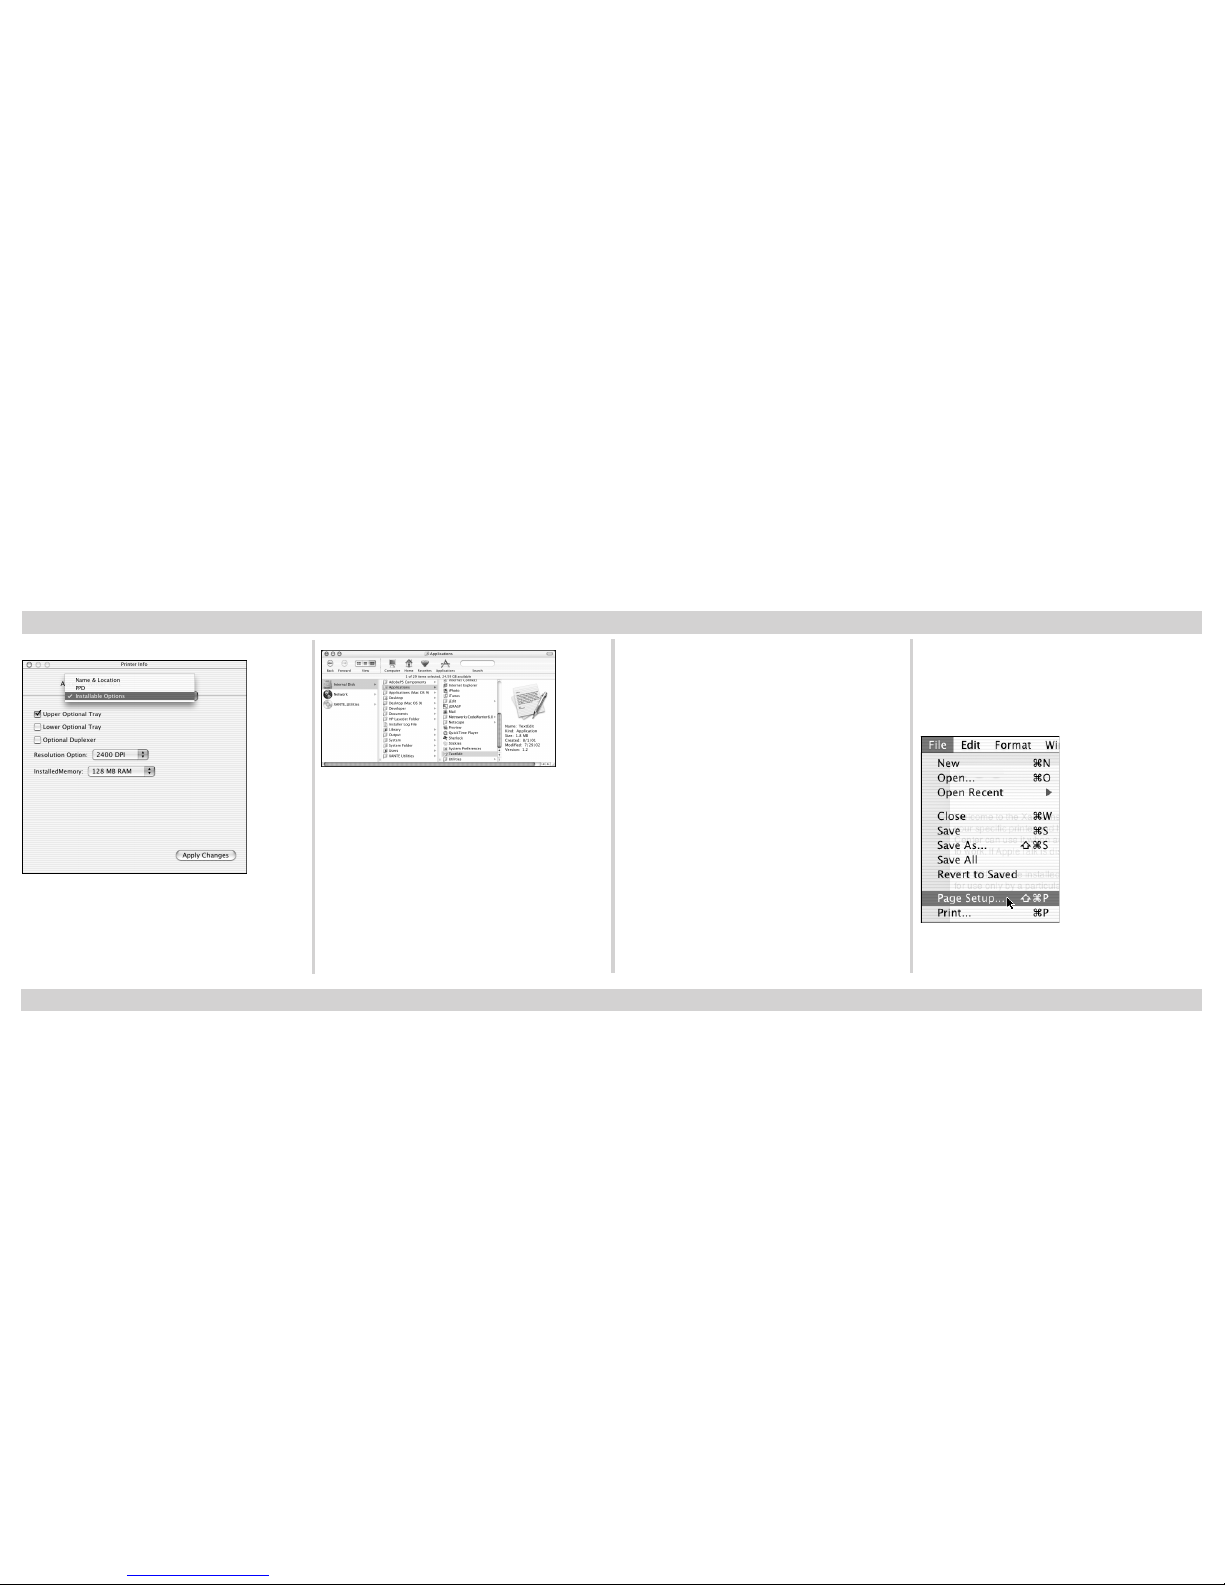
29
Fig. 117 Select Installable Options to configure
your printer’s options, resolution, and memory.
Then, click Apply Changes.
Fig. 118 Locate Text Edit.
Note : Go to File: Page Setup to make sure
your printer appears in the Format
For drop-down menu. If it says
Generic, call XANTÉ Technical
Support at 800-926-8393 (US and
Canada).
Mac OS X Printer Configuration
You can configure your printer by
selecting Page Setup and Printer Features.
1. Close the Print Center window to
return to your desktop.
2. Follow this path to access the
ReadMe file
CD: OSX_Installer: XANTÉ Utilities:
ColourLaser_OSX: readme.rtf.
3. Read the ReadMe file; then, click
close or select File and go to Page
Setup.
Page Setup
1. Select File from the top menu bar;
then, select Page Setup.
Fig. 119 Page Setup Window
Installation - Macintosh OS X (continued)
Page 30
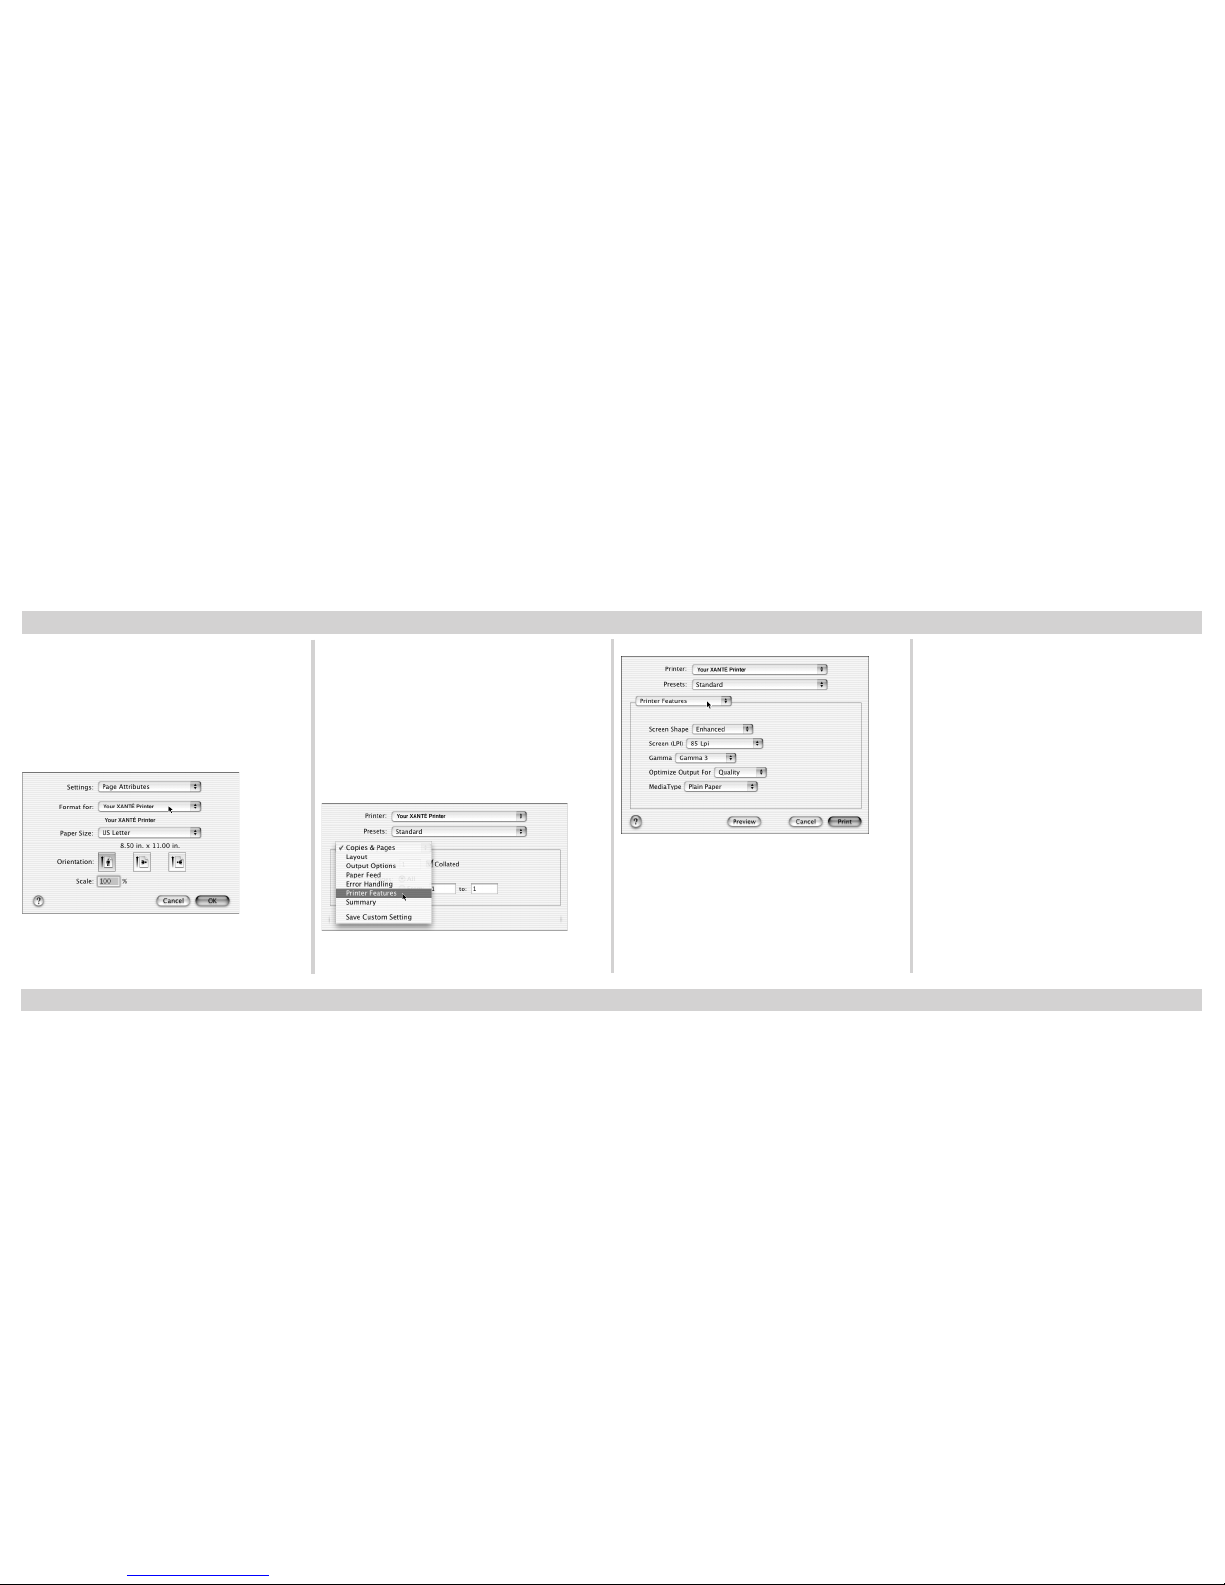
30
2. Select Format For: ColourLaser in the
Page Attributes window (fig. 120).
3. Click OK once you have selected the
desired paper size, orientation, and
scale for your print job.
Fig. 120 Page Attributes Window
Note: If the word Generic appears
below the Format For dropdown menu, the installation
process must be restarted. Please
call XANTÉ Technical Support
for assistance.
Printer Features
Fig. 121 Select File: Print; click Printer Features.
Fig. 122 Select Appropriate Features; click
Print.
Installation - Macintosh OS X (continued)
Page 31

31
• Tech Support
1-800-926-8393 (US and Canada)
Other areas, call your XANTÉ
vendor.
• Fax
251-473-6503
• Hours of Operation
7 a.m.- 6 p.m. Mon.—Fri. (CST)
• E-mail
For more information about the
ColourLaser or other XANTÉ printers,
please log onto our website:
www.xante.com/help
◊◊◊
Service and Support
Please Record Your Printer’s Serial Num-
ber Here
________________________________________
ColourLaser QRM 5-1-2003 v1
 Loading...