


Chapter 1 - Introduction
Chapter Overview
The Accel-a-Writer 3 Series Printers .............................................. 1-3
About this Manual...........................................................................1-4
Manual Conventions.................................................................1-5
Printer Features ...............................................................................1-6
Printer Configuration ...................................................................... 1-8
Warranty and Product Registration ...............................................1-10
Other Helpful Documentation.......................................................1-10
_________________________________________ Introduction 1-1

Notes
1-2 Introductionbb ________________________________________

The Accel-a-Writer 3 Series Printers
Fig. 1.1 Accel-a-Writer 3 Series Printer
Accel-a-Writer 3 printers are available in three models designed to
meet the needs of a broad user base from corporate offices and small
workgroups, to large volume producers, through high-end desktop
publishers and graphics professionals. XANTÉ’s flexible design
provides the ability to upgrade from one model to the next, allowing
your printer to grow with your business.
• The Accel-a-Writer 3N features a standard Ethernet interface,
Adobe PostScript 3, and many other XANTÉ features to make it
the ideal choice for corporate offices and small networked
workgroups.
• The Accel-a-Writer 3DN offers all the features of a 3N plus a
standard duplexer and additional paper feeder with a 500 sheet
cassette for a standard input capacity to 1150 sheets, perfect for
large volume printing.
• The Accel-a-Writer 3G is designed for users that require
XANTÉ’s advanced graphical support technologies.
_________________________________________ Introduction 1-3

About this Manual
This user’s guide covers installation, setup, and operation of Accel-aWriter 3 series printers.
Chapter 1—Introduction summarizes this manual, printer features,
model configurations, and the printer warranty.
Chapter 2—Installation covers printer setup and connection to its
Macintosh, PC, and Ethernet interfaces.
Chapter 3—Macintosh Setup describes the contents and use of the
XANTÉ Utilities CD-ROM for the Macintosh. This includes
installation for the Adobe PostScript printer drivers, your printer’s
PPD, XANTÉ Command Center, and the Adobe Downloader as well
as procedures for using many printer features.
Chapter 4—PC Setup describes the contents and use of the
XANTÉ Utilities CD-ROM for the PC. This includes installation for
the Adobe PostScript printer drivers, your printer’s PPD, XANTÉ
Command Center, and procedures for using many printer features.
Chapter 5—Ethernet Setup describes EtherTalk, Novell Print
Server, Line Printer, and NetBEUI protocols on the printer’s
Ethernet interface.
Chapter 6—Configuration describes using the front panel keys and
menus and the Print dialog box to configure many printer features.
Chapter 7—Media Options describes media sizes and types for
your printer and provides suggestions for creating high quality output
with the various media.
Chapter 8—Printing with Various Media Types describes printing
on envelopes, labels, film, and transparencies.
Chapter 9—Maintenance and Technical Specifications describes
printer care, technical specifications, XANTÉ service options, and
the printer warranty.
Chapter 10—Printer Options describes optional upgrades available
for you printer.
1-4 Introductionbb ________________________________________

Chapter 11—Troubleshooting provides troubleshooting tips and
XANTÉ Technical Support options.
Appendix A—HP PCL5 and HP-GL 7475A Commands lists
supported HP PCL5 and HP-GL 7475A commands.
Appendix B—Application Notes and Page Design details using
the printer with some applications and offers page design tips.
Glossary—defines terms related to your printer, XANTÉ utilities,
and the printing industry.
Index—alphabetically lists major manual topics with their
corresponding page numbers and some cross-references.
The Accel-a-Writer 3 Menu quick reference sheet illustrates the
printer’s front panel menu structure and lists XANTÉ support.
Manual Conventions
The following conventions are used in this manual:
Courier indicates information you must type or which
displays on screen.
↵ indicates that you need to press the Return key
on a Macintosh or the Enter key on a PC.
Note: indicates additional or emphasized information.
Caution: indicates instructions that must be followed
exactly to avoid damage to files or equipment.
Warning! indicates instructions that must be followed
exactly or personal injury can occur.
: indicates the path for a file or folder and links
steps in procedures
_________________________________________ Introduction 1-5

(model) indicates when a feature is available only on the
listed model(s) and if that feature is optional on
the listed model(s).
Examples: (3G) = available only on the 3G
(3G; 3DN and 3N optional) = standard on the
3G; optional on the 3DN and 3N
Printer Features
The printers feature true Adobe PostScript 3, allowing you to work from
virtually any software or hardware environment. Adobe PostScript 3
features smooth shading, fast imaging, expanded font sets, international
font support, and advanced page processing for fast, high quality
imaging. PostScript typefaces work with the leading operating systems
including Windows (95, 98, and NT) and Macintosh OS
The 3N and 3G printers feature a standard input capacity of 650
sheets—500 sheets in the standard paper cassette and 150 sheets in the
multipurpose feeder. You can add up to two optional paper feeders (500
sheets each) to expand capacity to a maximum of 1650 sheets. An
optional 2,000 sheet paper feeder can be installed as one of the optional
feeders, providing these models with an input capacity of 3150 sheets.
The 3DN features a standard capacity of 1150— two 500 sheet standard
cassettes and the 150 sheet multipurpose feeder. Plus, you can add the
optional 2,000 sheet paper feeder to increase capacity to 3150 sheets.
Advanced paper handling capabilities on the printers include tray
chaining, which allows you to switch to a second paper source when
the first source is empty. And, the duplexer (3DN; 3N and 3G
optional) allows you to print automatically on both sides of the
paper.
The Accel-a-Writer 3N and 3DN printers allow you to use media
from 3.94" x 5.83" (100 mm x 148 mm) to 13.00" x 18.50" (330 mm
x 470 mm). With the 3G, you can use media up to 13.00" x 35.50"
(330 mm x 901 mm).
1-6 Introductionbb ________________________________________

Paper weights from 16 - 28 lb bond (60 - 105 g/m
the paper cassettes and from 16 - 36 lb bond (60 - 135 g/m
2
) can be used in
2
) in the
multipurpose feeder. You can feed transparencies, labels, envelopes,
and Myriad film (3G) from the multipurpose feeder. The optional
envelope cassette allows you to feed multiple envelopes and
postcards.
XANTÉ’s optional patented NEIT upgrade can be added to the
Accel-a-Writer 3G. With NEIT, you can print images directly to
XANTÉ’s Myriad film, process the output through XANTÉ’s
FilmStar 2, and then use the film to burn metal plates or silk-screen
emulsions.
Simultaneously active serial, parallel, LocalTalk, and Ethernet
interfaces, allow Macintosh and PC computers to send files
concurrently to the printer. You do not have to send software
commands or manually set hardware switches to use a different
interface.
Standard features include mirror and negative printing. With an
optional hard disk, you can spool multiple jobs and use XANTÉ’s
Font Accelerator to increase printing performance of printer disk
based fonts.
The Graphic Software Package on the Accel-a-Writer 3G offers
advanced features designed for desktop publishers, graphics users, and
prepress professionals.
• XANTÉ’s patented Accurate Calibration Technology (X-ACT)
allows you to calibrate the printer’s line lengths and to correct
inaccuracies in printing width, height, skew, and angle.
• Halftone Calibration Technology and densitometer support allow
you to adjust an image’s grayscale values and to calibrate printer
output for specific ink, media, and environmental conditions.
• Enhanced Screening increases the number of gray levels
produced for a line screen setting.
The XANTÉ Utilities include easy-to-use, menu driven programs
and files to make working with your new printer more efficient.
_________________________________________ Introduction 1-7

Printer Configuration
Accel-a-Writer Models
Features 3N 3DN 3G
NEC VR 4310 166 MHz Processor Std. Std. Std.
RAM:
Standard (in MB) 16 32 64
Maximum (in MB) 256 256 256
Adobe PostScript 3 Std. Std. Std.
HP PCL 5e and HP-GL 7475A Emulation Opt. Opt. Opt.
(with 8 scalable, 7 bitmap HP PCL
compatible fonts)
136 PostScript Fonts Std. Std. Std.
Resolution:
600 x 600 dpi Std. Std. Std.
1200 x 1200 dpi Opt. Opt. Std.
2400 x 2400 dpi
Engine Speed (letter/A4):
20 ppm up to 1200 dpi Std. Std. Std.
10 ppm with 2400 dpi upgrade N/A N/A Opt.
Interfaces:
LocalTalk Std. Std. Std.
Serial Std. Std. Std.
Parallel Std. Std. Std.
Ethernet Std. Std. Std.
Paper Sizes:
Up to 13.00" x 18.50" Std. Std. Std.
(330 mm x 470 mm)
Up to 13.00" x 35.50" N/A N/A Std.
(330 mm x 901 mm)
†
N/A N/A Opt
1-8 Introductionbb ________________________________________

Accel-a-Writer Models
Features (continued) 3N 3DN 3G
Media Handling:
Multipurpose Feeder Std. Std. Std.
Built in Paper Feeder Std. Std. Std.
Second Paper Feeder Opt Std. Opt.
2,000 Sheet Paper Feeder
Duplexer
§
Mirror Print Std. Std. Std.
Negative Print Std. Std. Std.
§
Opt. Opt. Opt.
Opt. Std. Opt.
XANTÉ Utilities
(PC and Macintosh) Std. Std. Std.
Internal IDE Hard disk Opt. Opt. Opt.
Spooling* Std. Std. Std.
Font Accelerator* Std. Std. Std.
NEIT
†
N/A N/A Opt.
Graphic Software Package
Halftone Calibration Technology N/A N/A Std.
Enhanced Screening Technology N/A N/A Std.
Accurate Calibration Technology N/A N/A Std.
Densitometer Support N/A N/A Std.
* Requires an optional internal hard drive
† Requires the printer engine speed be set to 10 ppm (letter/A4 output)
§ Not available on 10 ppm models
_________________________________________ Introduction 1-9

Warranty and Product Registration
Chapter 9 contains your printer’s warranty. Please return the
warranty sheet included with your printer to register your printer and
to receive a free subscription to XANTÉ’s Accel-a-Writing
newsletter. Our publication features articles on printing, new options,
and tips for using your printer effectively.
Other Helpful Documentation
Please visit our Web site at www.xante.com for the latest information
about XANTÉ products and services. You may find the following
publications helpful when working with Adobe PostScript printing.
PostScript Language Reference Manual, Second Edition. This manual,
published by Addison Wesley, is designed for advanced users, such as
programmers, who work with Adobe PostScript operators.
PostScript Language Tutorial and Cookbook. This manual,
published by Addison Wesley, is designed for those who want to
learn about working directly in the Adobe PostScript language.
Most bookstores and many computer businesses either keep these
books in stock or can order them for you.
◊ ◊ ◊
1-10 Introductionbb ________________________________________

Chapter 2 - Installation
Chapter Overview
Introduction .....................................................................................2-3
Printer Location ..............................................................................2-3
Printer Package ............................................................................... 2-4
Accel-a-Writer 3 Series Printer Overview ......................................2-5
Toner Cartridge ............................................................................... 2-7
Handling the Toner Cartridge ...................................................2-7
Removing and Installing the Toner Cartridge .......................... 2-8
Paper Cassette ...............................................................................2-13
Multipurpose Feeder .....................................................................2-17
Multipurpose Feeder Tip ........................................................2-20
Printer Ports ..................................................................................2-21
Selecting the Printer Interface ................................................2-21
Connecting to the LocalTalk Port ........................................... 2-21
Connecting to the Parallel Port ............................................... 2-23
Connecting to the Serial Port..................................................2-24
Connecting to the Ethernet Port .............................................2-25
Connecting the Power Cord ..........................................................2-26
Turning the Printer On ..................................................................2-27
Turning the Printer Off.................................................................. 2-28
__________________________________________ Installation 2-1

Notes
2-2 Installationbb_________________________________________

Introduction
This chapter describes selecting a printer location; installing toner and
paper; connecting the printer to Macintosh, PC, and network hardware;
and connecting the power supply.
Printer Location
Set up your printer in a location that can support its weight and
provide sufficient operation and maintenance clearance. To prevent
overheating, allow at least 8.0" (200 mm) clearance for the printer’s
vent.
__________________________________________ Installation 2-3
Fig. 2.1 Location Guidelines

Printer Package
Unpack the printer, saving the packing materials.
1. Remove the items packed on top of the printer.
Warning! The printer weighs approximately 58.5 lb (26.5 kg)
without the toner, cassettes, and media installed.
• Always have two people lift the printer.
• Only lift the printer using the recessed grip areas on
the right and left sides.
2. Remove the shipping stabilizer on top of the printer; then, lift
the printer out of the box (fig. 2.2).
3. Remove the plastic wrap, tape, and shipping stabilizers from
all of the items.
Your printer package contains the following items:
• Your XANTÉ printer
• 500 sheet cassette
• Power cord
• Accel-a-Writer 3 Series Printers User’s Guide (this manual)
2-4 Installationbb_________________________________________
Fig. 2.2 Lifting the Printer
• XANTÉ Utilities CD-ROM
• Toner cartridge
The following items are packaged separately.
• Additional paper cassettes and feeders
• Duplexer
RAM, internal hard disk, resolution, 10/100BaseT, and NEIT
upgrades ordered with your printer are installed at the factory before
shipping.
If you do not receive your full shipment or if anything is damaged,
call XANTÉ Customer Support at 800-926-8393 (US and Canada) or
your XANTÉ vendor.
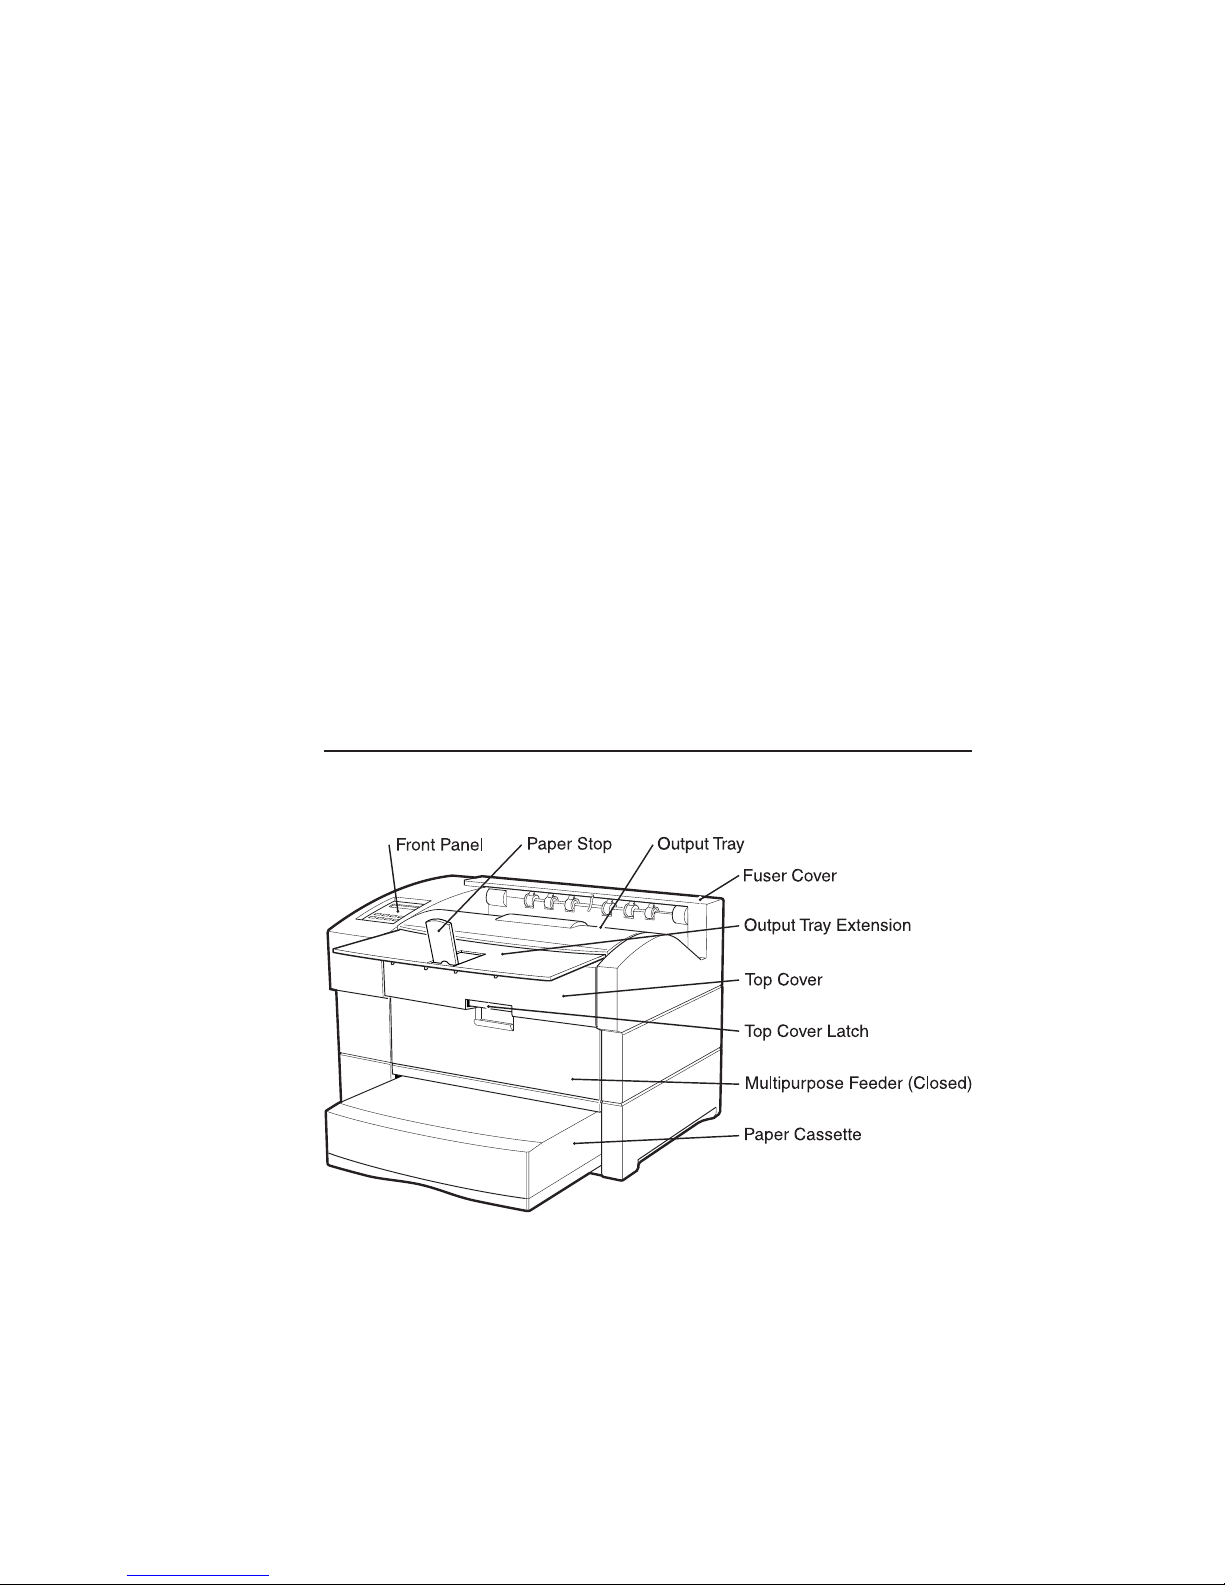
Accel-a-Writer 3 Series Printer Overview
Use Figures 2.3, 2.4, and 2.5 to become familiar with your new printer.
__________________________________________ Installation 2-5
Fig. 2.3 Front View of the Printer
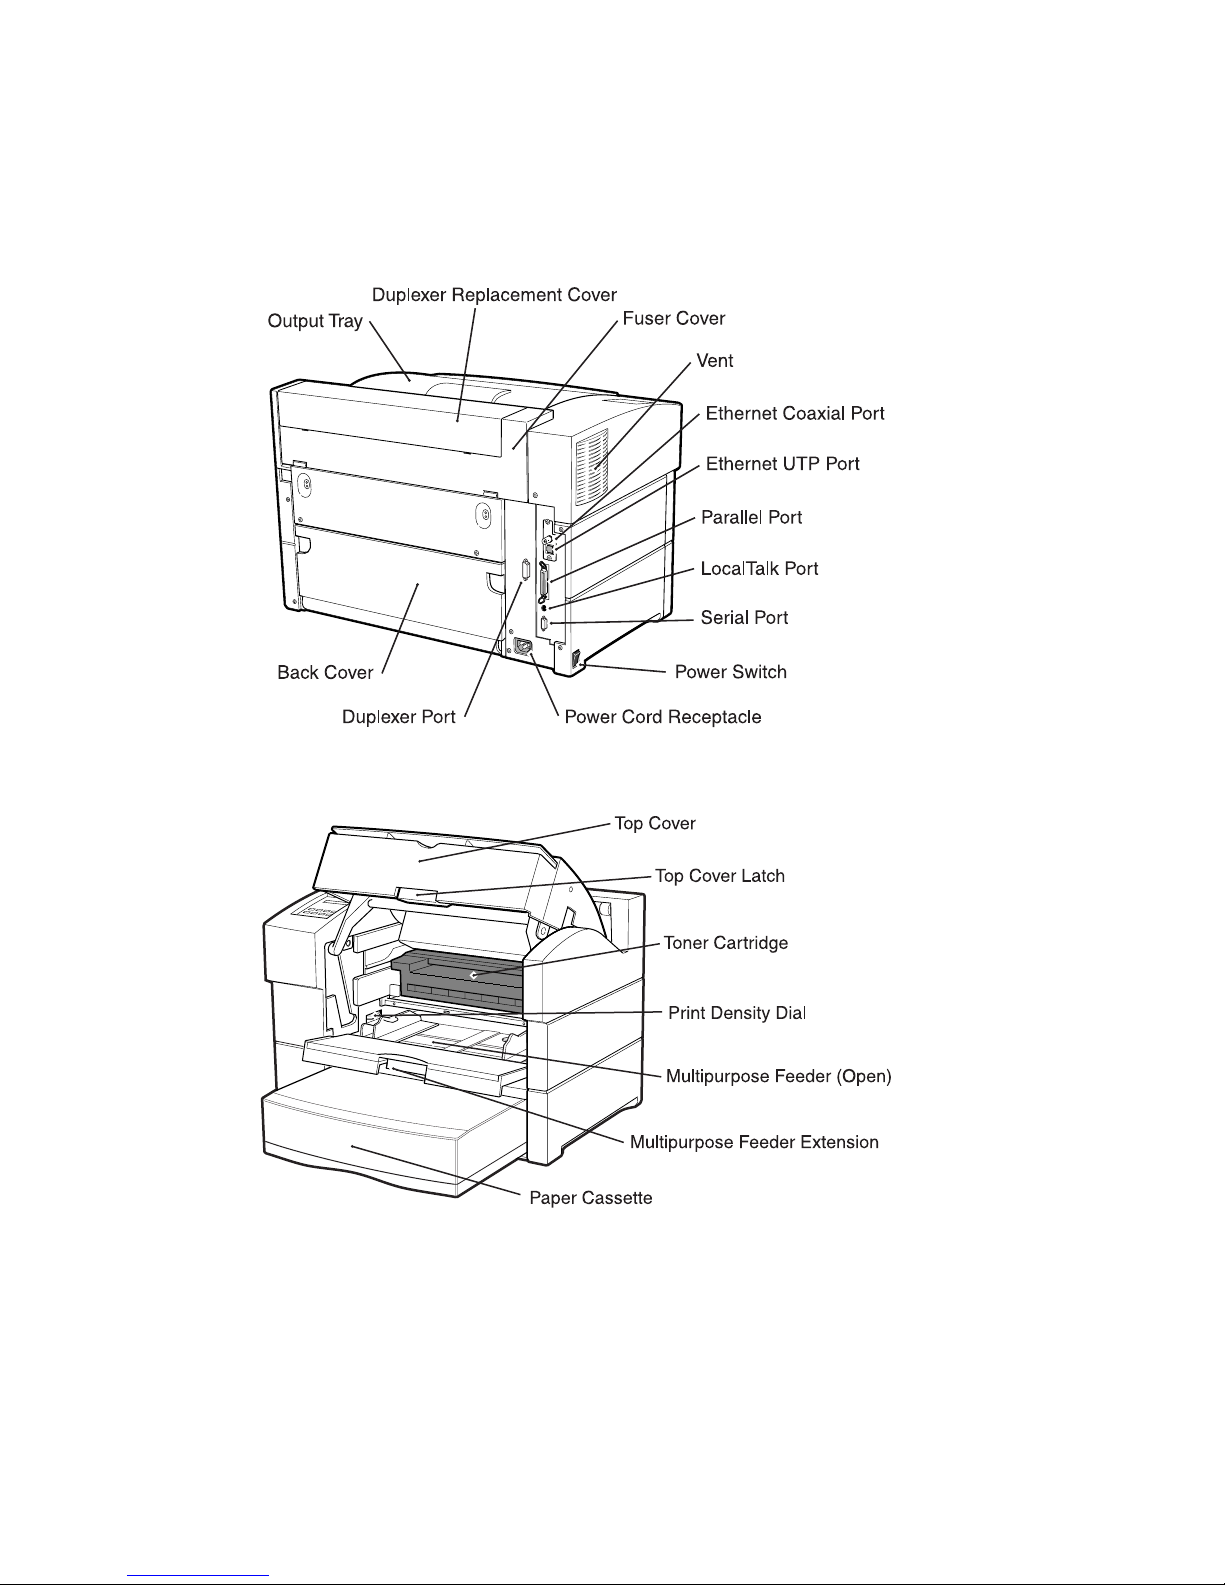
Fig. 2.4 Rear View of the Printer
Fig. 2.5 Inside Front View of the Printer
2-6 Installationbb_________________________________________

Toner Cartridge
The printer’s toner cartridge combines the toner and drum. This
cartridge can print approximately 14,000 sheets of letter/A4 size pages
at 5% coverage.
Quality and reliability of refilled toner cartridges vary; XANTÉ
recommends not using them. Printer damage caused by these products is
not covered by your printer warranty.
Handling the Toner Cartridge
Use these guidelines to ensure maximum life and print quality from
your toner cartridge and to prevent cartridge or printer damage:
• Use toner cartridges before their expiration dates. Cartridge shelf
life is approximately 2 years unopened or 6 months opened.
• Never move the printer with the cartridge installed. Toner spills
can damage the printer.
• Do not expose the cartridge to bright lights or direct sunlight.
Keep the cartridge in its protective bag until installation. If you
have to remove the cartridge temporarily, place it in the original
bag or wrap it well to protect it from light.
• Do not open the drum shutter or touch the drum’s surface. The
shutter protects the photosensitive drum from light.
• Keep the cartridge away from computer hard disks and monitors. It
contains a magnet that can cause data loss or equipment damage.
• Store unopened cartridges right side up on a level surface.
• Always set the cartridge flat with the handles on the top.
• Dispose of the cartridge following safety laws and regulations.
Warning! The toner is highly combustible. Never dispose of it by
incineration.
__________________________________________ Installation 2-7
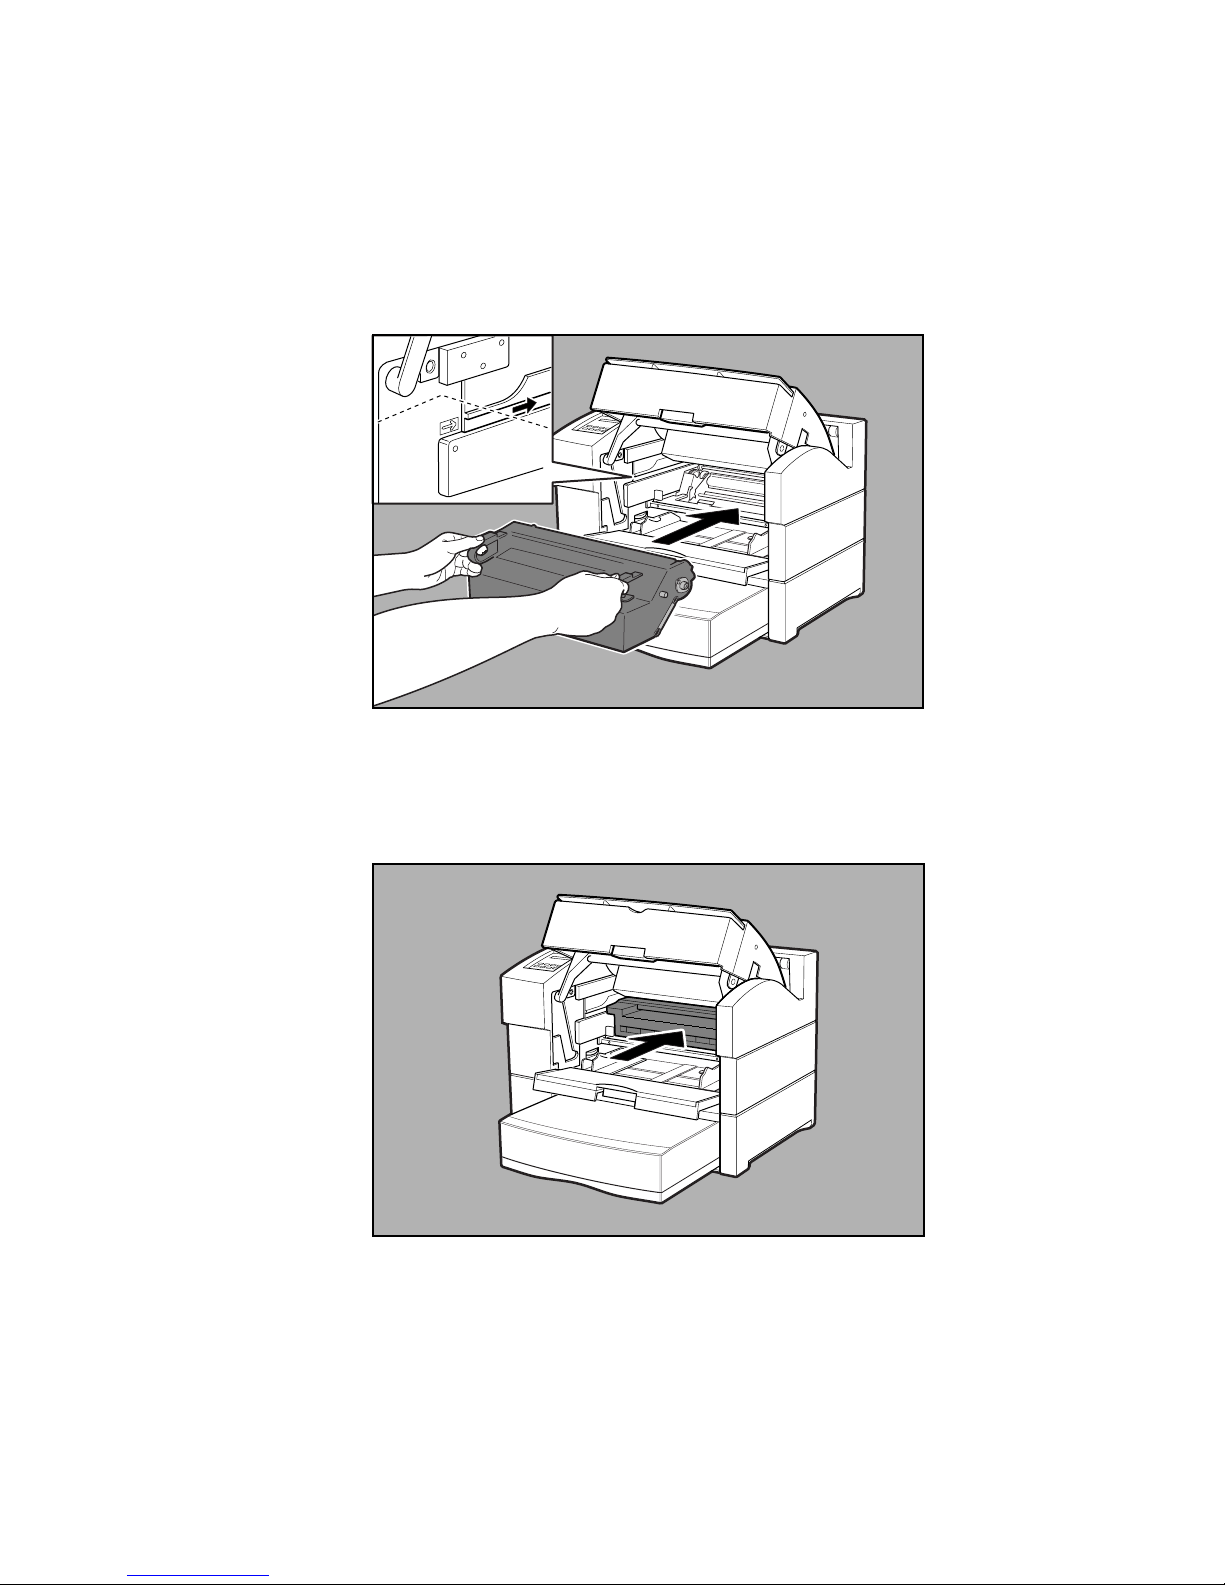
Removing and Installing the Toner Cartridge
1. Remove all media from the output tray.
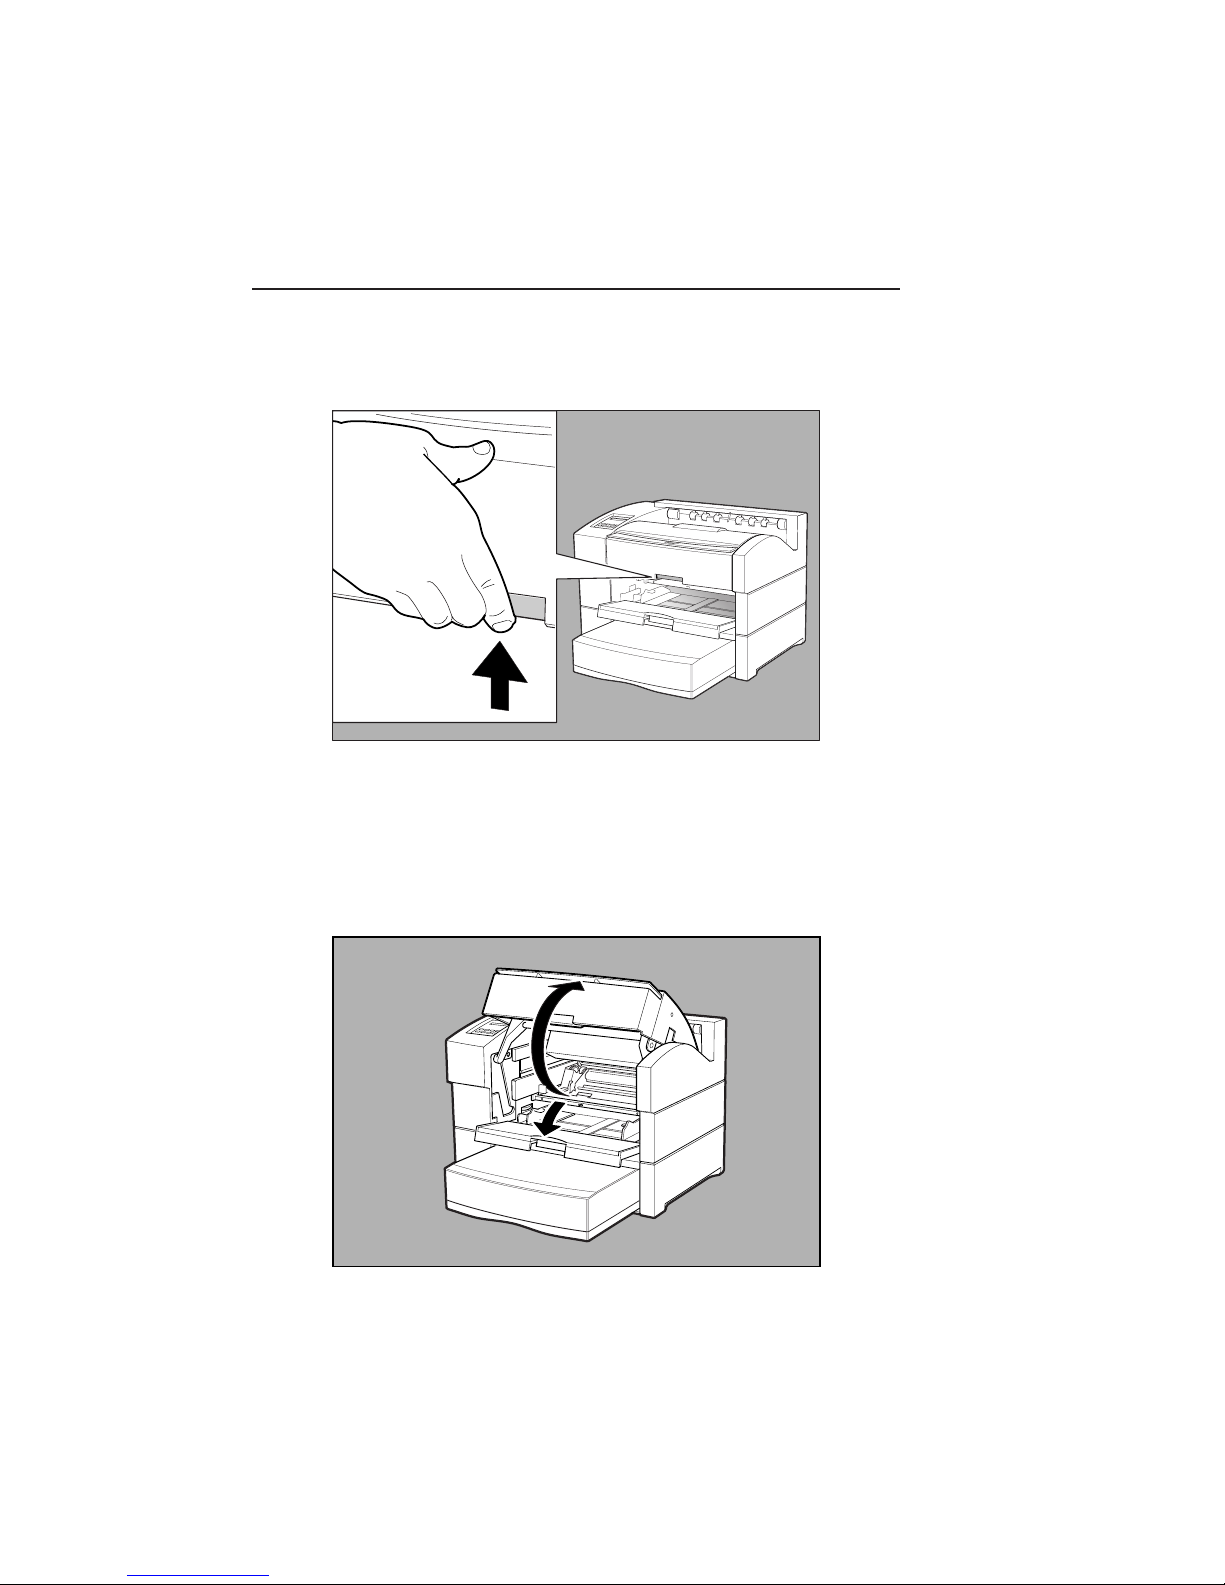
2. Squeeze the top cover latch to release the lock (fig. 2.6).
Fig. 2.6 Release the Top Cover Latch
3. Lift the top cover. The multipurpose feeder opens
automatically as you open the top cover (fig. 2.7).
Caution: Do not touch any parts inside the printer.
Fig. 2.7 Open the Top Cover and the Multipurpose Feeder
2-8 Installationbb_________________________________________

4. Remove the toner cartridge if it is in the printer by grasping its
handles and pulling it slowly out of the printer (fig. 2.8).
Caution: Once you begin pulling the cartridge out of the
printer, remove it completely. The cartridge’s
shutter may not open properly or be damaged if
the cartridge is pulled partially and then pushed
back in the printer.
Fig. 2.8 Remove the Toner Cartridge
5. Remove the new toner cartridge from the package.
__________________________________________ Installation 2-9
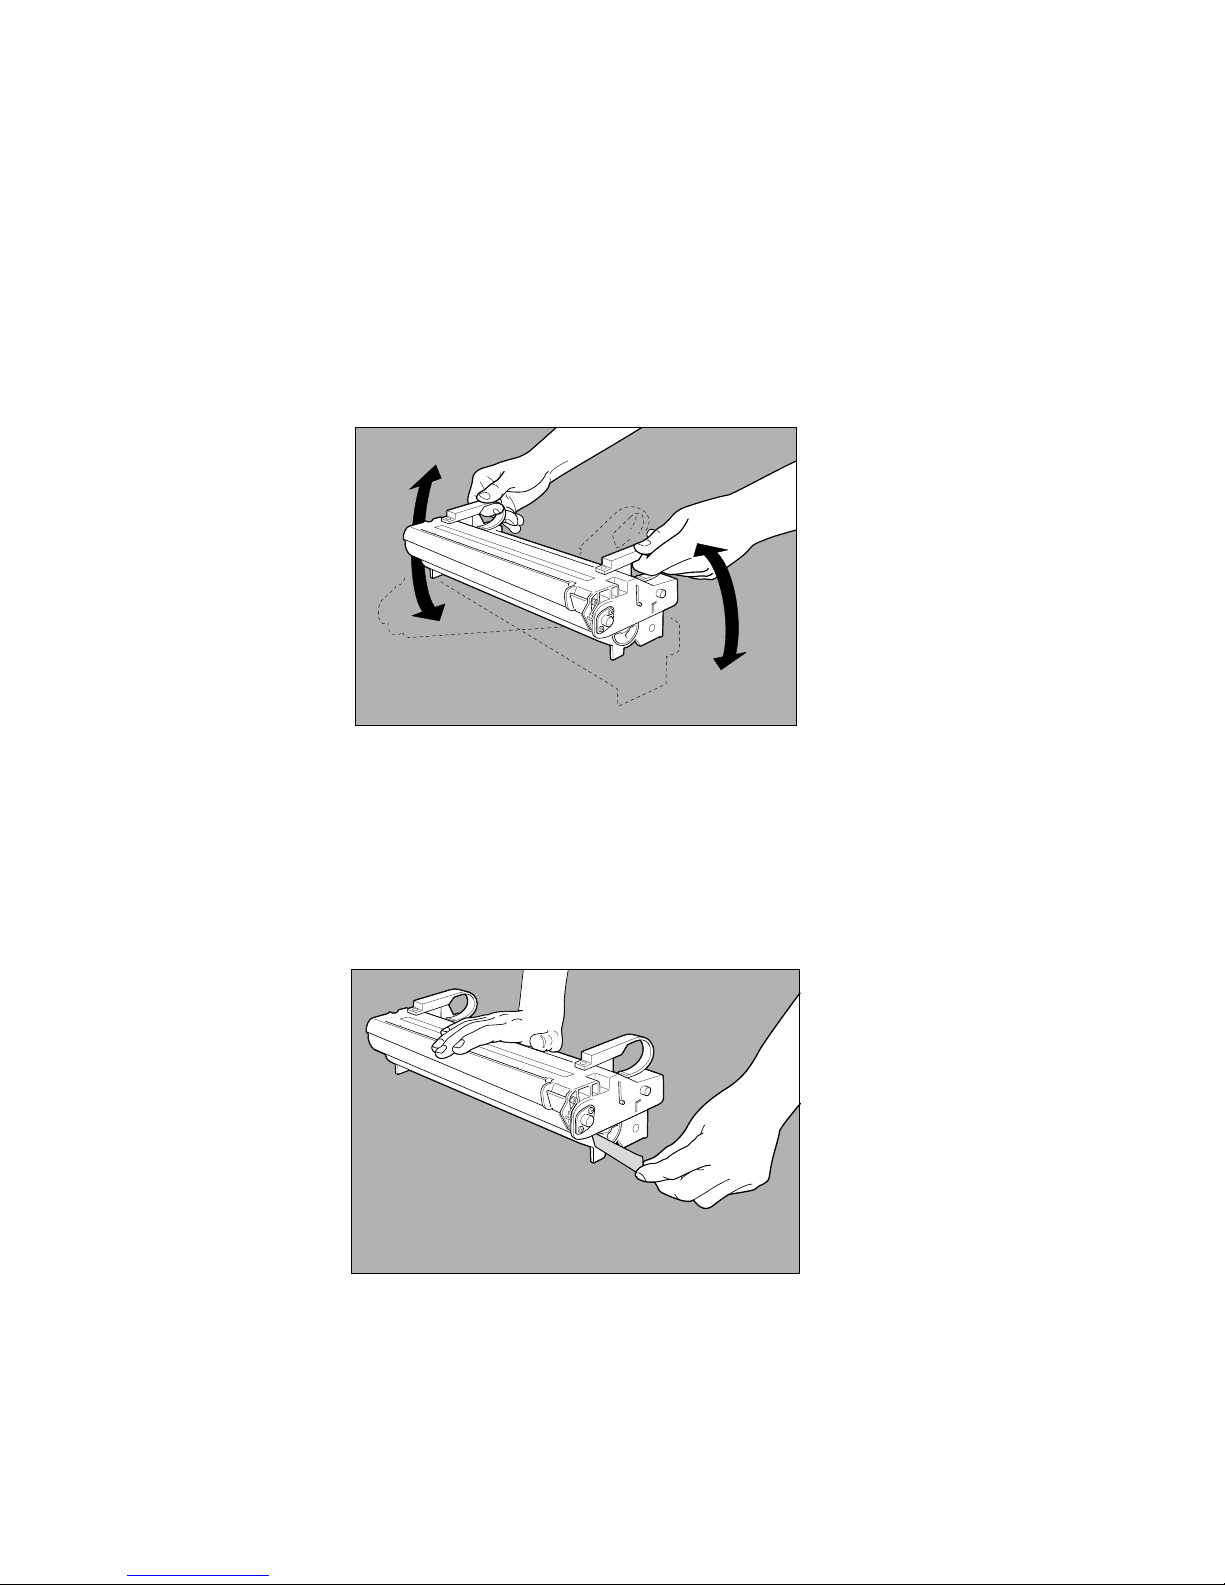
6. Gently shake the toner cartridge several times to distribute
toner throughout the cartridge (fig. 2.9).
Caution: Shake the cartridge enough to free any compacted
toner. Turning on the printer with toner still
compacted may damage the cartridge.
Fig. 2.9 Shake the Toner Cartridge
7. Place the toner cartridge on a flat surface, holding it in place
with one hand. Grasp the sealing tape’s end tab and pull the
tape straight out (fig. 2.10).
Caution: If the tape is pulled out at an angle, it may break
off inside the cartridge.
Fig. 2.10 Remove the Sealing Tape
2-10 Installationbb_________________________________________
8. Insert the pins on both sides of the cartridge into the guide
channels in the printer (fig. 2.11).
Fig. 2.11 Insert the Pins into the Guide Channels
9. Slide the cartridge into the printer until it stops and is seated
properly (fig. 2.12).
__________________________________________ Installation 2-11
Fig. 2.12 Insert the Toner Cartridge
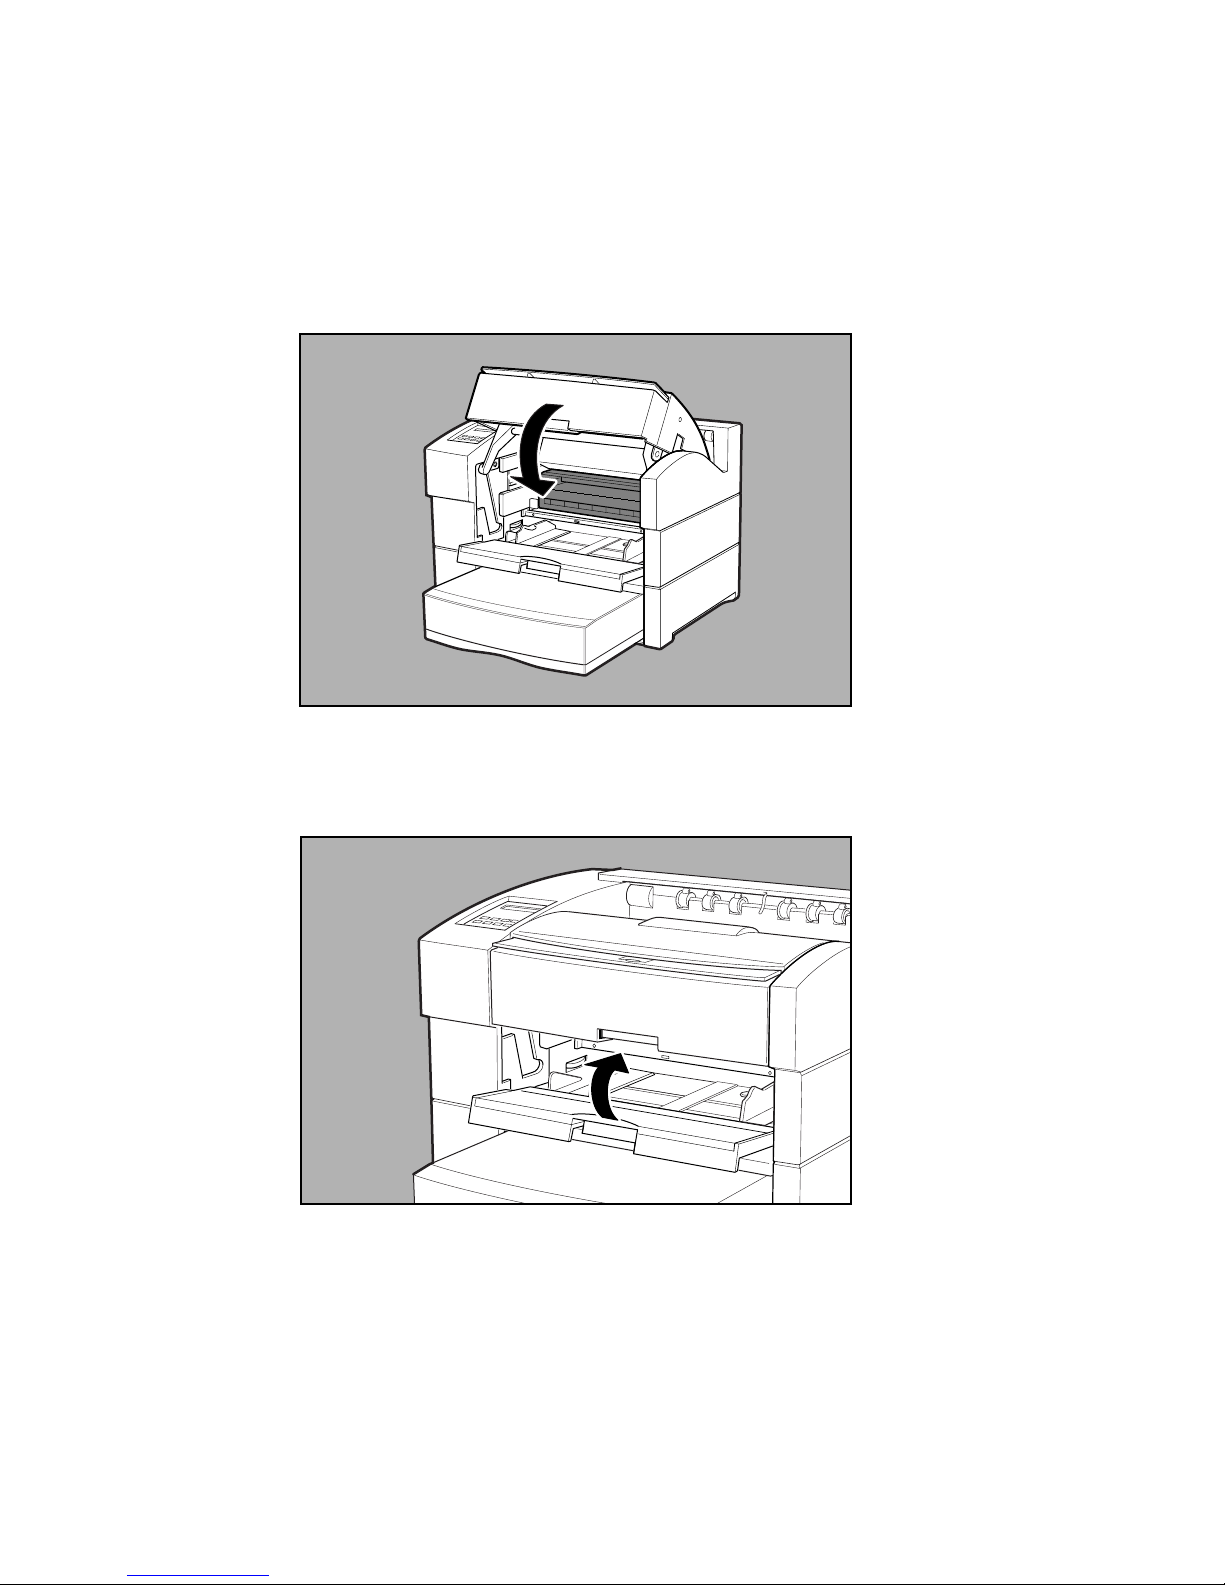
10. Close the top cover by pressing down on the center section
until the latch engages (fig. 2.13).
Fig. 2.13 Close the Top Cover
11. Close the multipurpose feeder (fig. 2.14).
Fig. 2.14 Close the Multipurpose Feeder
2-12 Installationbb_________________________________________
Paper Cassette
The standard universal paper cassette feeds up to 500 sheets of 20 lb
bond/60 lb text weight (65 g/m2) paper or other paper to a stack height
of 2.13" (54 mm). This cassette can handle media weights from 16 28 lb (60 to 105 g/m
Note: An envelope cassette designed to feed up to 75 envelopes
can be purchased as an option for your printer.
This section describes loading and installing the standard paper
cassette. Chapter 7 covers media types and sizes for use in the paper
cassettes and available optional cassettes. Chapter 10 describes
installing optional paper feeders and the duplexer.
Caution: Make sure all paper used in your printer meets the
guidelines in “Media Specifications” in chapter 7.
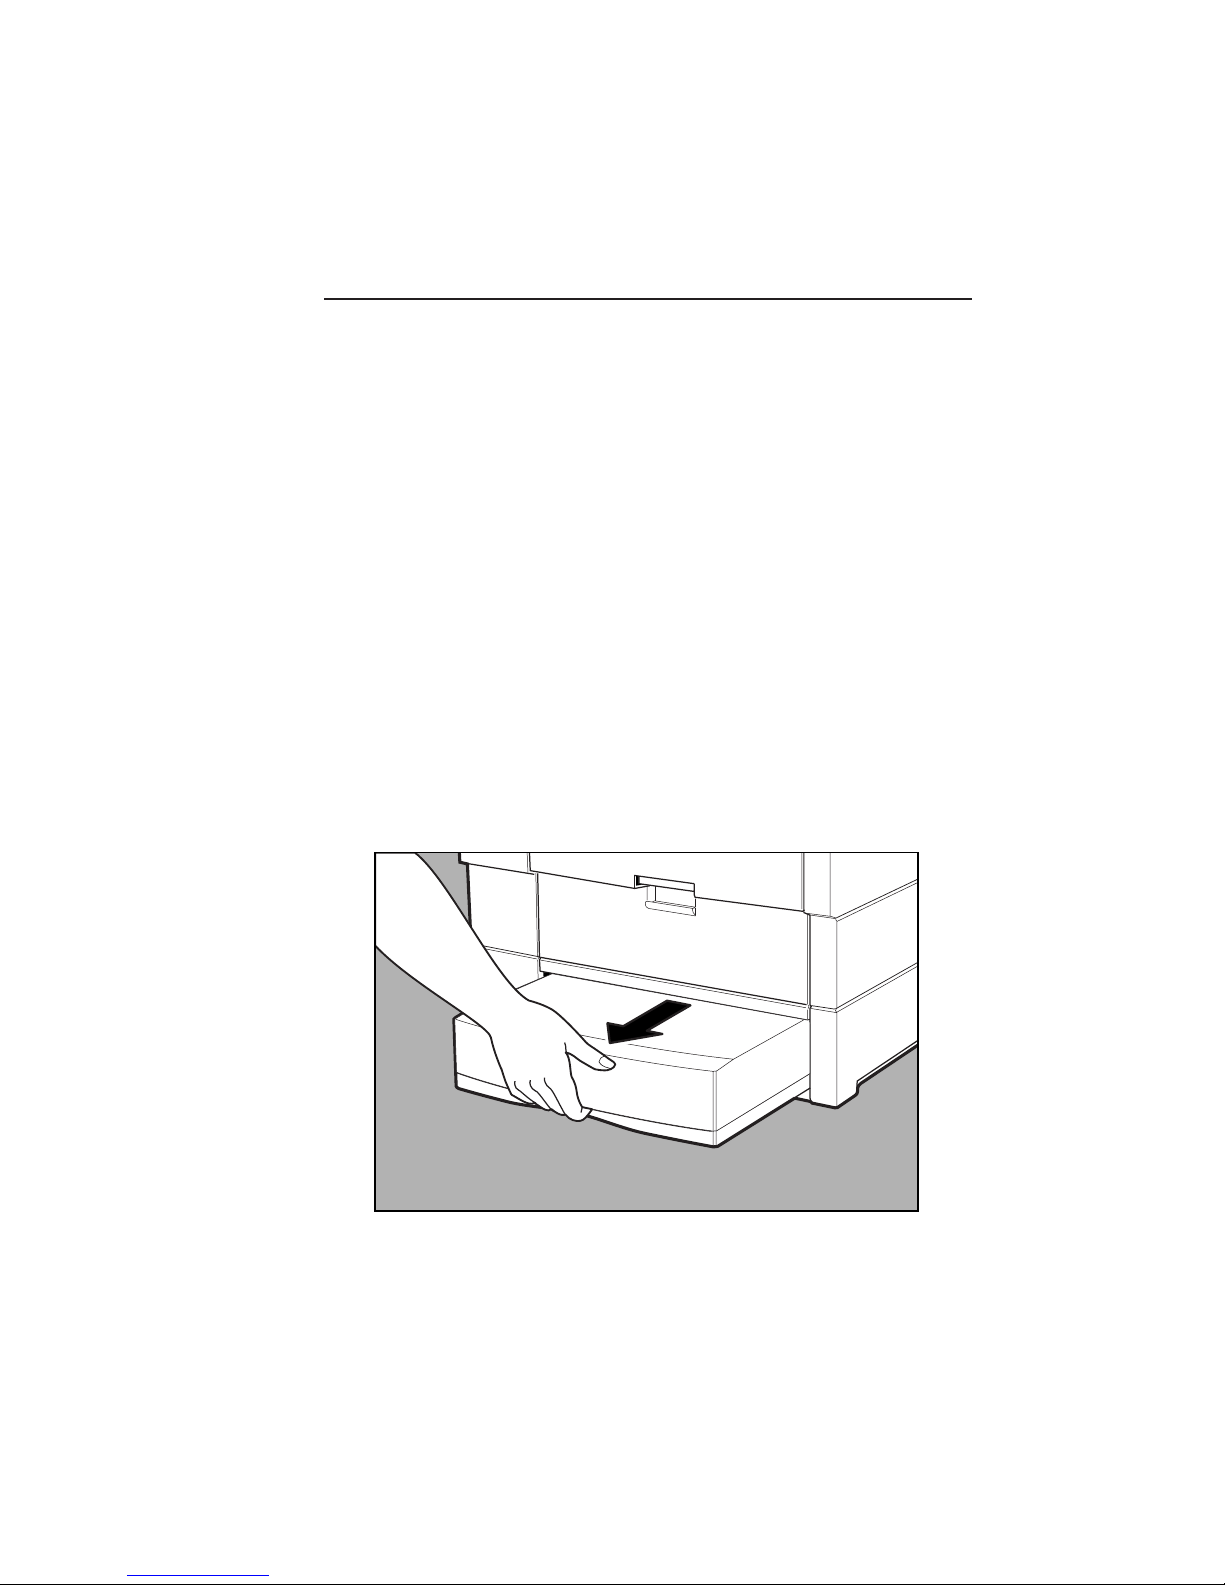
1. Remove the cassette if it is in the printer. To do this:
a. Pull the cassette straight out until it stops (fig. 2.15).
2
).
__________________________________________ Installation 2-13
Fig. 2.15 Pull Out the Cassette

b. Lift up slightly on the cassette; then pull it from the
printer (fig. 2.16).
Fig. 2.16 Remove the Cassette from the Printer
2. Place the cassette on a flat surface and remove the cassette
cover (fig. 2.17).
2-14 Installationbb_________________________________________
Fig. 2.17 Remove the Cassette Cover
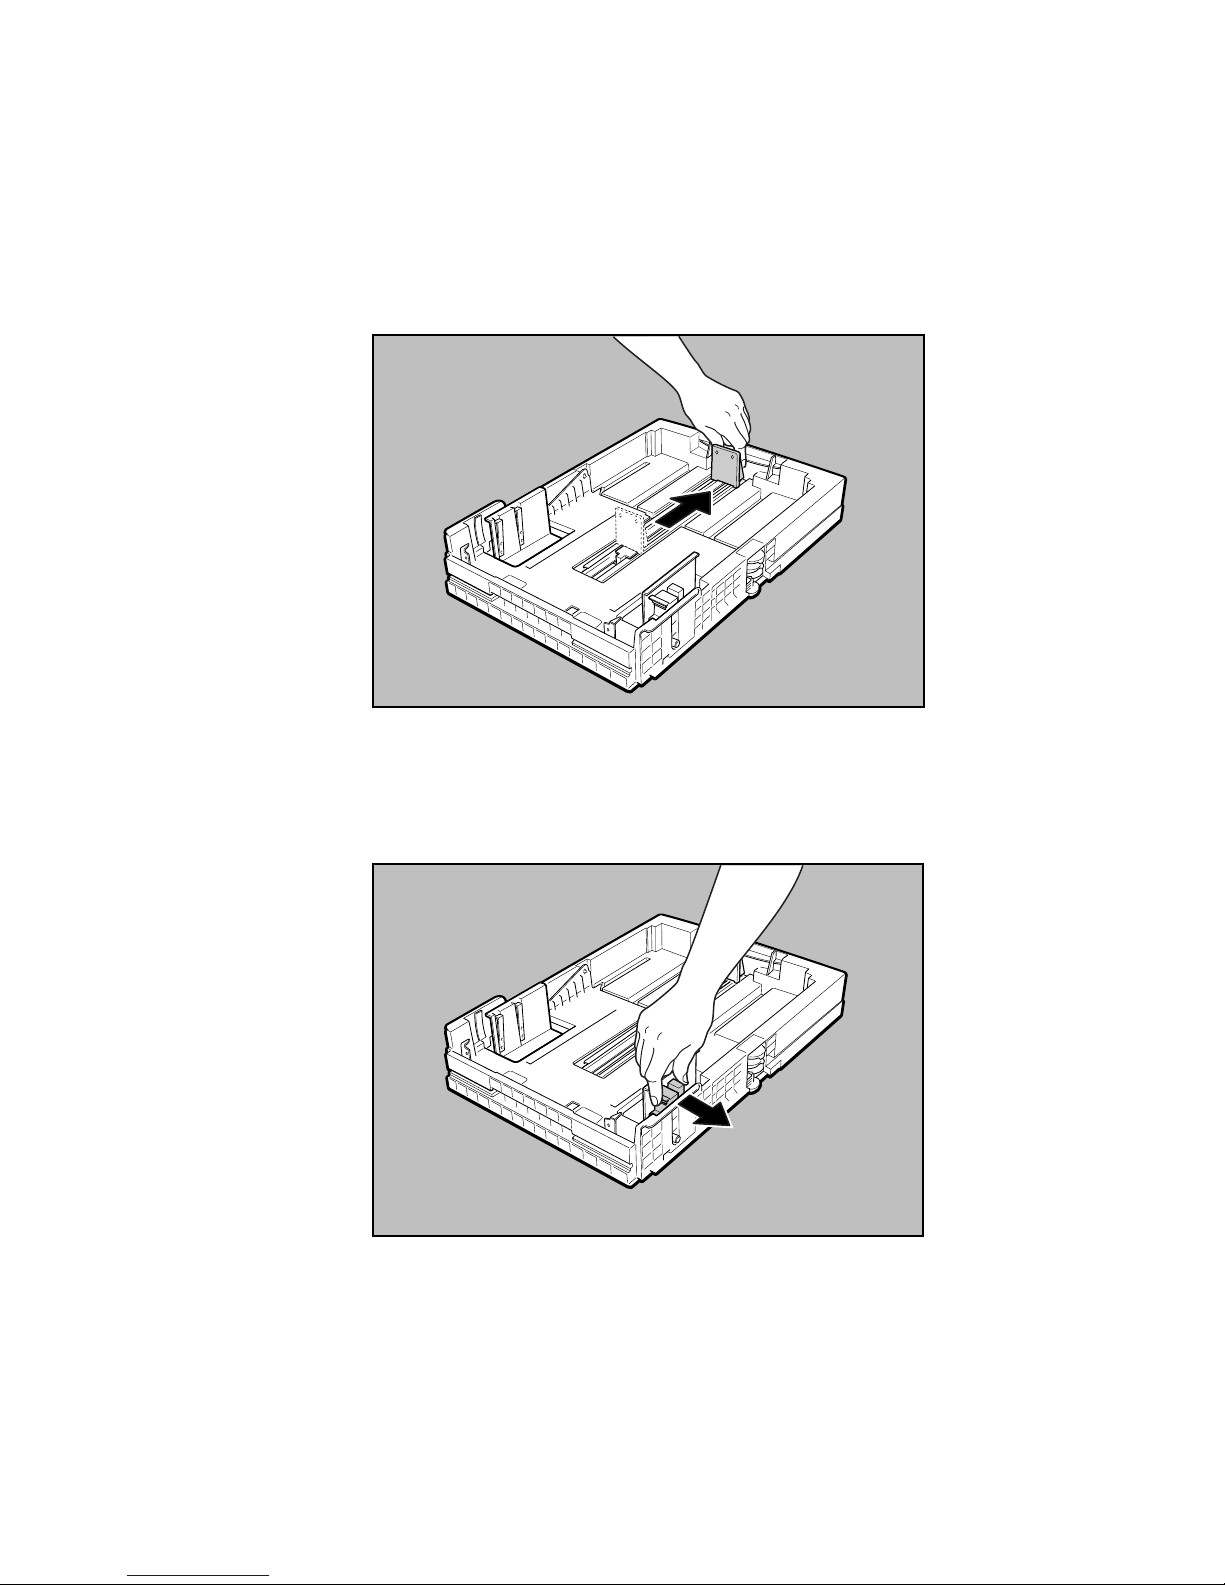
3. Lift the paper length guide to release it. Slide it forward (fig.
2.18).
Fig. 2.18 Move the Length Guide
4. Squeeze the sides of the paper width guide to release it. Slide it
to the outside of the cassette (fig. 2.19).
__________________________________________ Installation 2-15
Fig. 2.19 Move the Width Guide

5. Align the paper stack and load it into the cassette print side up,
leading edge to the back. See “Media Sources” in chapter 7 to
determine whether to load media short or long edge first (fig.
2.20).
Fig. 2.20 Load the Paper
6. Adjust media guides to the size of the paper stack.
Caution: To prevent paper jams, make sure the paper fits
between the paper guides and under the cassette’s
retaining clips (fig. 2.20).
7. Replace the cassette cover.
8. Slide the cassette into the printer until it snaps into place.
Note: You will feel a slight resistance as you push the
cassette into the printer caused by the catch that
prevents the cassette from being dropped.
2-16 Installationbb_________________________________________
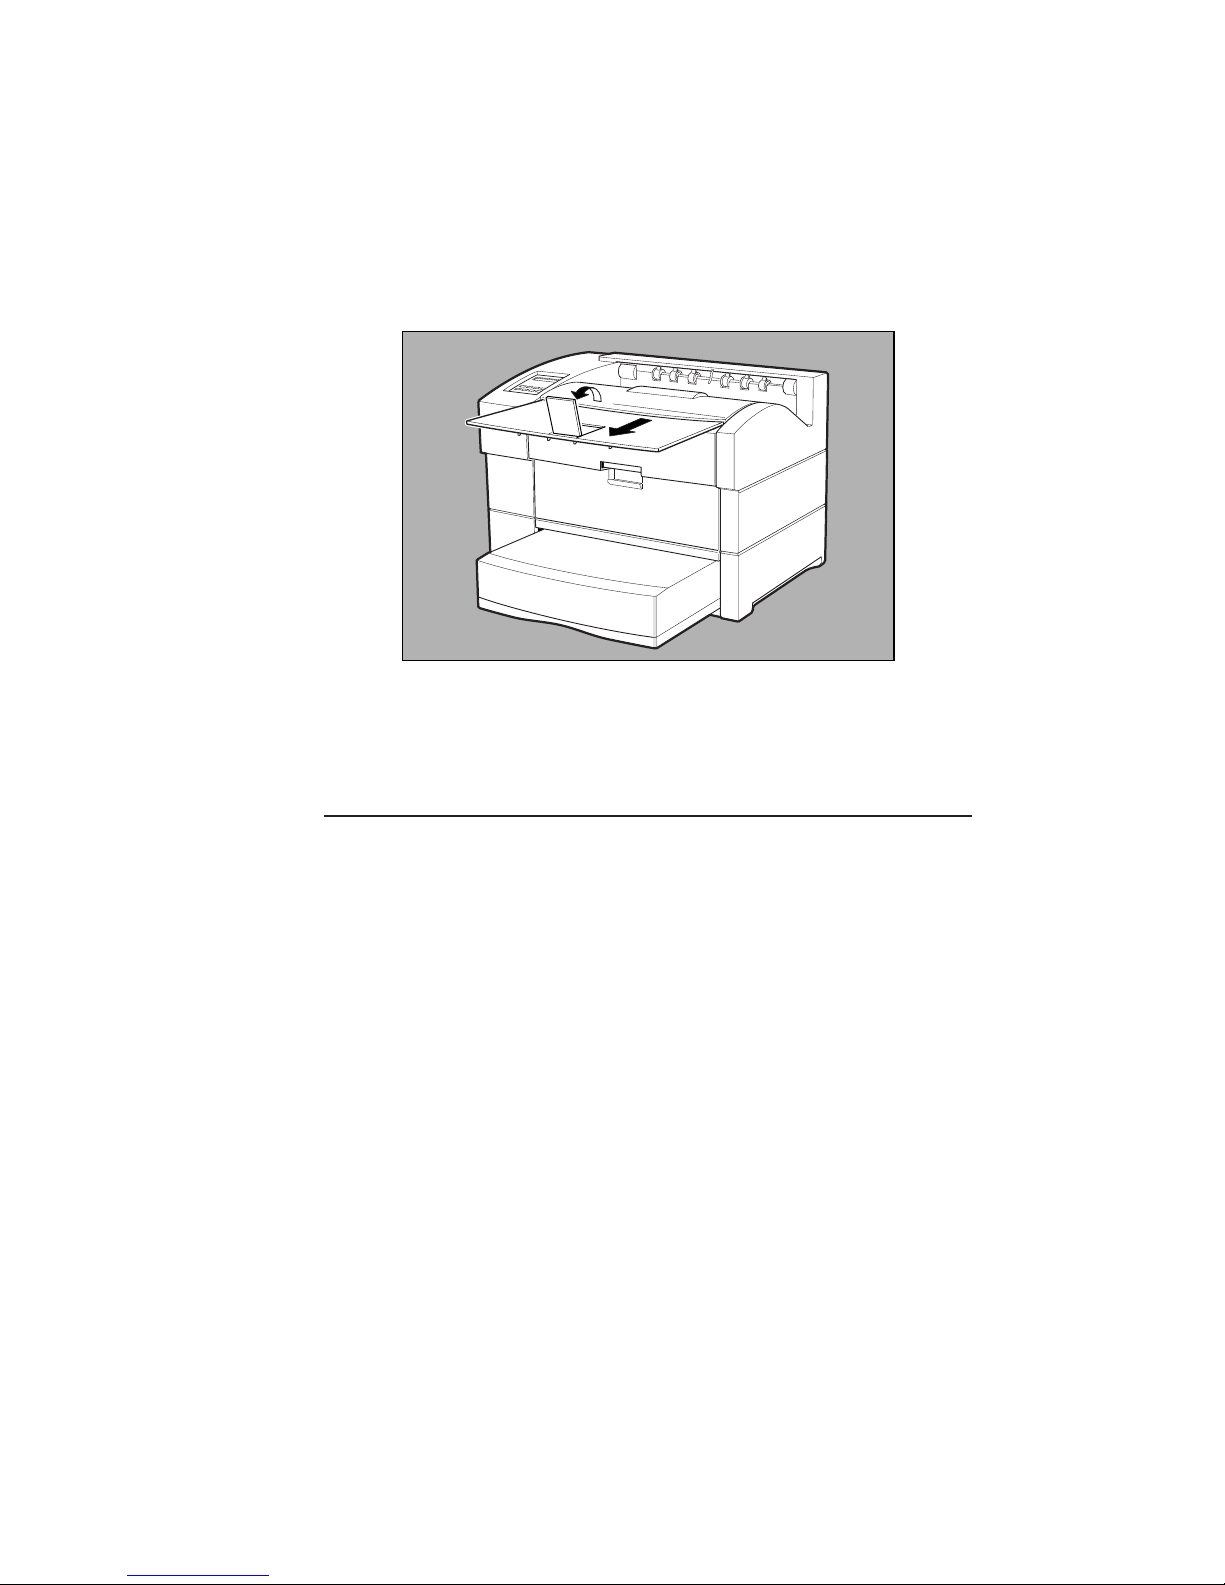
9. Pull out the output tray extension and turn up the paper stop
for paper sizes larger than letter/A4 (fig. 2.21).
Fig. 2.21 Adjust the Output Tray Extension
Multipurpose Feeder
The printer’s multipurpose feeder feeds up to 150 sheets of 20 lb bond/
60 lb text weight (65 g/m2) paper or media such as Myriad Film, labels,
and transparencies to a stack height of about .70" (18 mm).
The multipurpose feeder supports non-standard size media, including
envelopes from 3.94" x 5.83" (100 mm x 148 mm) to 13.00" x 18.50"
(330 mm x 470 mm). With the Accel-a-Writer 3G, you can feed
media up to 13.00" x 35.50" (330 mm x 902 mm). This feeder can
handle media weights from 16 - 36 lb (60 - 155 g/m2).
To load the multipurpose feeder
Caution: Make sure all media used meets the guidelines in “Media
Specifications” in chapter 7.
__________________________________________ Installation 2-17

1. Open the multipurpose feeder by grasping the cover’s top
center handle and pulling down (fig. 2.22).
Caution: The multipurpose feeder does not open to a 90°
angle. To prevent damage, do not exert strong
pressure or place heavy objects on the feeder.
Fig. 2.22 Open the Multipurpose Feeder
2. Pull out the tray extension for media larger than letter/A4 size
(fig. 2.23).
Fig. 2.23 Pull Out the Tray Extension
2-18 Installationbb_________________________________________
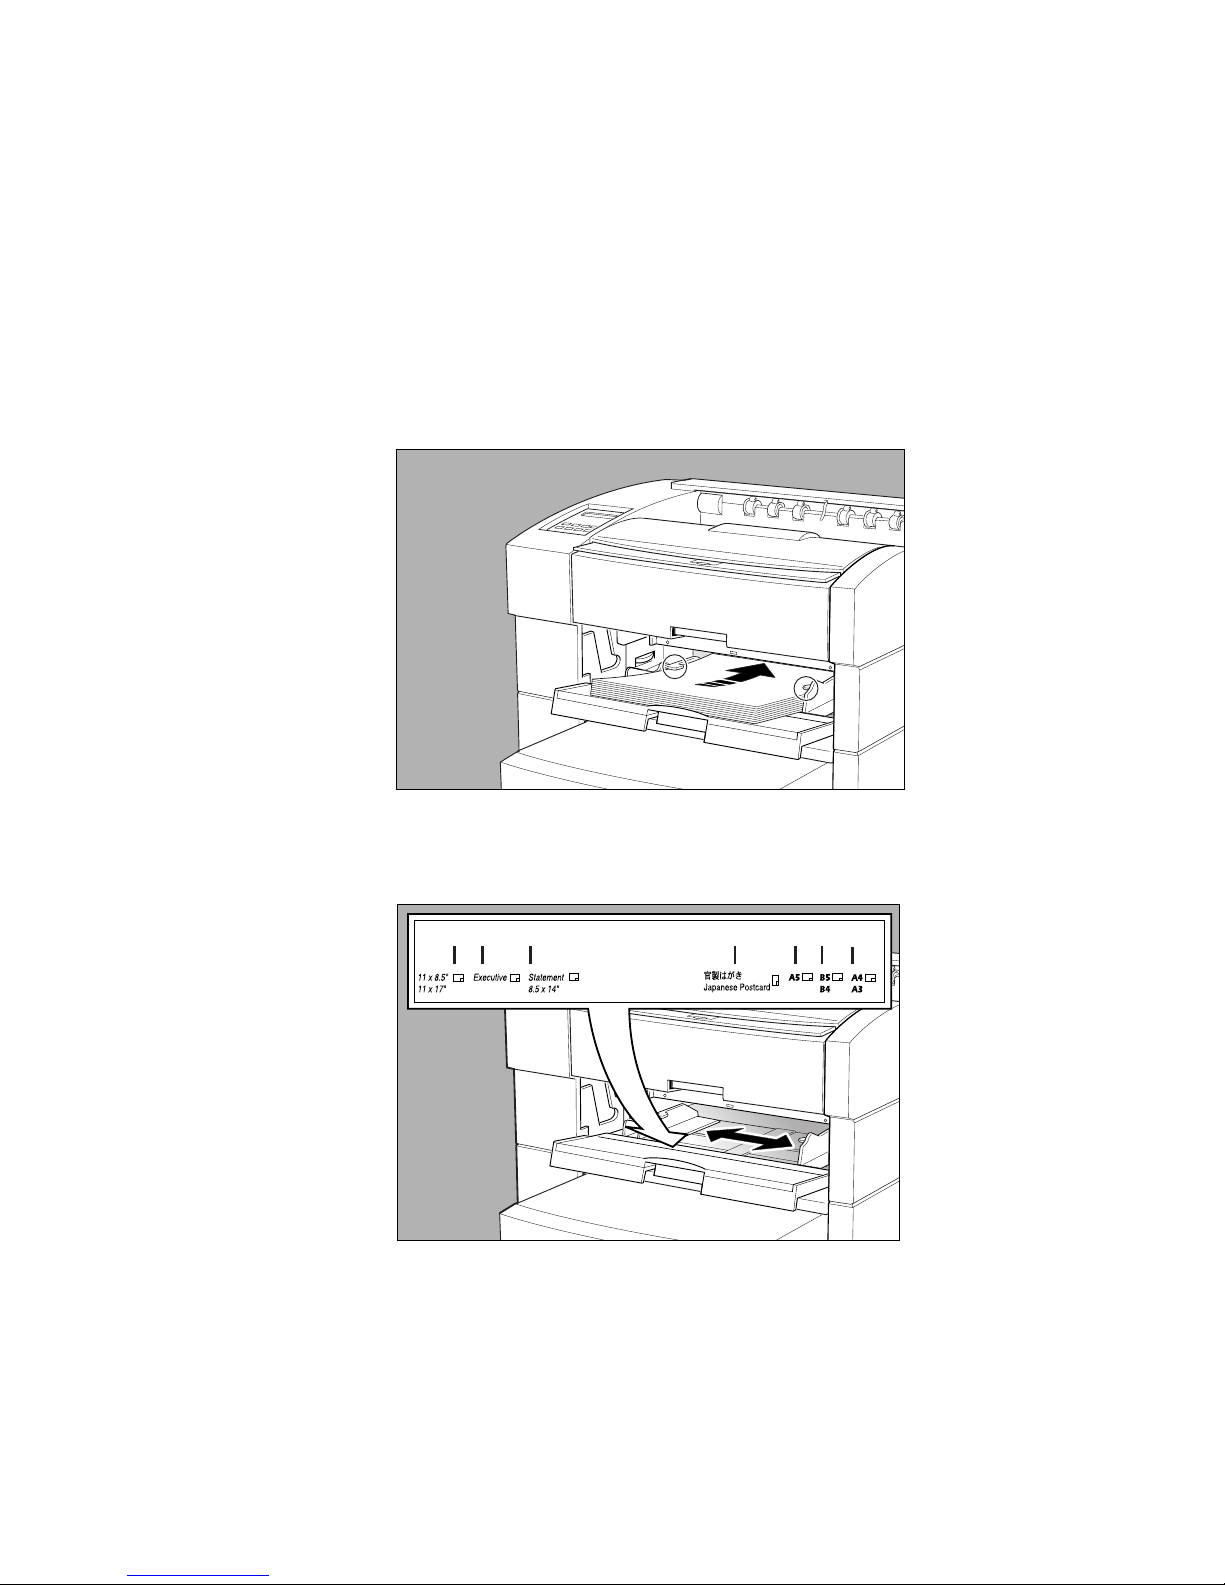
3. Align the edges of the paper stack and load it into the cassette
print side up, leading edge toward the back of the printer (fig.
2.24). See “Media Sources” in chapter 7 to determine whether
to load media short or long edge first.
Caution: To prevent jams, make sure the media stack fits
under the media guide’s retaining clips (fig. 2.24).
Fig. 2.24 Load the Paper
4. Adjust the media guide to the size of the media stack (fig. 2.25).
Fig. 2.25 Adjust the Media Guide
__________________________________________ Installation 2-19

5. Close the multipurpose feeder if the media fits completely
inside the printer (fig. 2.14).
Multipurpose Feeder Tip
Occasionally, in a Macintosh environment if media is in the
multipurpose feeder, the system’s Print Monitor sends a prompt
message to put paper into the manual feed tray and click OK. To
disable this prompt
Note: This prompt can only be turned off in Print Monitor. You
cannot turn the manual feed message off on the Desktop
Print Monitor.
1. Go to System Folder: Extensions: PrintMonitor.
2. Double click Print Monitor to open it. Then, select File:
Preferences.
3. Select Give no Notification under When a manual feed job
starts; then, click OK (fig. 2. 26).
Note: This prompt only can be turned off in Print Monitor. You
cannot turn the manual feed message off on the Desktop
Print Monitor.
2-20 Installationbb_________________________________________
Fig. 2.26 Print Monitor Preferences

Printer Ports
All the Accel-a-Writer 3 series printers have standard LocalTalk,
serial, parallel, and Ethernet ports. These simultaneously active
interfaces can receive jobs from different operating environments
without hardware switching.
(UTP)
(Coaxial)
Fig. 2.27 Printer Ports
Selecting the Printer Interface
Connect to the printer interface that is appropriate for your host
computer or network environment:
Macintosh without Ethernet LocalTalk Port
PC without Ethernet
PC/Printer distance < 10 ft. (3 m) Parallel Port
PC/Printer distance > 10 ft. (3 m),
< 25 ft. (7.6 m) Serial Port
Ethernet connection UTP or Coaxial
Connecting to the LocalTalk Port
Use the following equipment to connect your printer to a Macintosh
computer via the LocalTalk port (fig. 2.27).
• Two LocalTalk connector boxes with DIN-8 connectors
• A standard phone cable (RJ-11)
__________________________________________ Installation 2-21

• Two terminating resistors
DIN-8 Connector
RJ-11 Cable
Connector
Box
Fig. 2.28 LocalTalk Connector Boxes, Resistors, and Cable
Terminating
Resistor
Connector
Box
1. Turn off your printer and your computer.
2. Plug the DIN-8 connector on one LocalTalk connector box
into the printer’s 8-pin LocalTalk port.
3. Plug the DIN-8 connector on the second LocalTalk connector
box into the Macintosh’s printer port (refer to your Apple
Macintosh manual).
4. Connect the two LocalTalk connector boxes with the RJ-11
phone cable.
5. Plug the terminating resistor(s) into the open socket(s) in the
connector box(es) (fig. 2.28).
Note: Terminate open sockets on the ends of your LocalTalk
network with terminators supplied with your
LocalTalk connectors (fig. 2.28). Closing open sockets
helps speed data transmission and ensure the printer is
available in the Chooser.
6. Turn on your printer and Macintosh.
7. Verify that Macintosh is set up to communicate using LocalTalk.
• For operating systems prior to 7.5, go to Control Panels:
Network. Select LocalTalk.
• For operating systems 7.5 and later, go to Control Panels:
AppleTalk. From the Connect via menu, select Printer Port.
2-22 Installationbb_________________________________________

8. Verify that the printer’s LocalTalk interface is enabled and
configured properly. See “Interface Control” in chapter 6 and
“XANTÉ Command Center” in chapter 3.
Before using your printer, install and configure the Adobe PostScript
printer driver and your printer’s PPD. See “Xinstaller” and “Adobe
PostScript Printer Drivers” in chapter 3.
Connecting to the Parallel Port
Use a standard parallel cable to connect your PC and printer (fig.
2.29) via the parallel port. The cable’s printer end has a 36-pin male
connector and the computer end had a 25-pin male connector.
36-pin Connector
To Printer
Fig. 2.29 Parallel Cable
1. Turn off your printer and PC.
25-pin Connector
To Host Computer
2. Plug the cable’s 36-pin connector into the printer’s parallel
port (fig. 2.29) and the 25-pin connector into the computer’s
parallel port.
3. Turn on your printer and PC.
4. Verify that the printer’s parallel interface is enabled and
configured properly. See “Interface Control” in chapter 6.
Before using your printer, install and configure the Adobe PostScript
printer driver and your printer’s PPD. See “XANTÉ Utilities
Installer” and “Adobe PostScript Printer Drivers” in chapter 4.
__________________________________________ Installation 2-23

Connecting to the Serial Port
Use a standard serial cable (fig. 2.30) with either a 9-pin or 25-pin
female connector to attach to the computer and a 9-pin male
connector to attach to the printer.
Connector to Printer: 9-pin
Fig. 2.30 Serial Cables
Connector to PC:
25-pin
or
9-pin
1. Turn off your printer and PC.
2. Plug the serial cable’s 9-pin male connector into the printer’s
serial port.
3. Plug the other connector (either a 25-pin or a 9-pin female
connector) into the computer’s serial port.
4. Turn on your printer and PC.
5. Verify that PC and printer communication settings match.
• Check your PC documentation to determine how to check
and set the PC settings.
• Check and set your printer settings using the front panel
configuration menus. See “Interface Control” in chapter 6.
6. Verify that the printer’s serial interface is enabled and
configured properly. See “Interface Control” in chapter 6.
2-24 Installationbb_________________________________________

Before using your printer, install and configure the Adobe PostScript
printer driver and your printer’s PPD. See “XANTÉ Utilities
Installer” and “Adobe PostScript Printer Drivers” in chapter 4.
Connecting to the Ethernet Port
With the Ethernet feature, you can connect to a network using
unshielded twisted pair or coaxial cable.
Unshielded Twisted Pair (10BaseT, Optional 10/100BaseT)
Each device in a network installation using UTP cable must be
connected to a hub. The maximum length for a UTP cable connection
from device to hub is 328 feet (100 m). Larger networks are formed by
linking hubs to repeaters, routers, gateways, or to other hubs.
UTP cable is the wire used in many telephone installations. The
connectors used for an Ethernet network using UTP cable are RJ-45
plugs, which are similar to, but larger than ordinary telephone jacks.
Note: You can connect two Ethernet devices together, bypassing a
hub, using a 10BaseT crossover/patch cable where pin 1 is
crossed to pin 3 and pin 2 is crossed to pin 6.
Thin Coaxial Cable (10Base2)
Thinnet networks, which use coaxial cable, connect in a daisy-chain
configuration. A “T” connection with a male BNC connector is used
to connect each device to the main cable. The maximum cable length
for a network segment is 607 ft. (185 m). Repeaters, routers, and
gateways may be used to increase the overall length of the network
or for connections to other networks.
To connect your printer to the Ethernet Interface
1. Turn off the printer.
__________________________________________ Installation 2-25

2. Connect the printer to the appropriate port for the cable used
on your network.
Fig. 2.31 Connect to the UTP Port
Fig. 2.32 Connect to the Coaxial Port
Before using your printer, set it up for your network environment and
configure the Ethernet interface. See chapter 5 for details.
Connecting the Power Cord
1. Make sure the printer’s power switch is off (the O is pressed in).
2. Connect the power cable’s female connector to the back of the
printer and the male connector to a standard electrical outlet
(fig. 2.33).
Warning: Plug the printer into a dedicated, properly grounded AC
outlet. Do not use an extension cord. Use a surge
protected outlet to help prevent power source fluctuations
from damaging your printer.
2-26 Installationbb_________________________________________

Fig. 2.33 Connect the Power Cord to the Printer
Warning: Never use a power cord that is damaged. Check the
cord and plug monthly and replace immediately if you
find any damage.
Turning the Printer On
Press the | on the power switch to turn on the printer (fig. 2.34).
__________________________________________ Installation 2-27
Fig. 2.34 Turn the Printer On

Printer initialization takes approximately 60 seconds. When READY/
IDLE displays, the printer is ready to accept print jobs.
Note: Due to movement during shipping, XANTÉ recommends
that you calibrate your printer after setup. For procedures,
see “Accurate Calibration Technology (X-ACT)” in chapter
3 (Macintosh) or 4 (PC).
Following initialization, a start-up page prints if that feature is
enabled. This page lists the selected resolution, installed RAM, hard
disk identities, page count, enabled interfaces, and network information.
Review this page to be sure that the printer is properly configured. See
“Start-up Page” in chapter 6 for details.
Turning the Printer Off
1. Verify that the READY/IDLE message displays.
2. Press the O
2.34).
Note: When the printer is turned off, job information in memory is
lost.
on the power switch to turn off the printer (fig.
◊ ◊ ◊
2-28 Installationbb_________________________________________

Chapter 3 - Macintosh Setup
Chapter Overview
Introduction.....................................................................................3-3
XANTÉ Utilities CD-ROM ............................................................3-3
Adobe Acrobat Reader 3.0..............................................................3-5
XInstaller.........................................................................................3-5
Adobe PostScript Printer Drivers....................................................3-8
Selecting the Adobe PostScript Printer Driver.........................3-8
AdobePS 8.6 ...........................................................................3-10
AdobePS 8.5.1 ........................................................................ 3-11
PSPrinter 8.3.1........................................................................3-12
Configuring the PPD ..............................................................3-14
Configuring the Printer...........................................................3-17
App Drivers Folder .......................................................................3-18
PageMaker 5 PPD Folder .......................................................3-18
QuarkXPress PDF Folder .......................................................3-19
ScenicSoft Preps.....................................................................3-20
Downloads Folder .........................................................................3-20
XANTÉ Command Center............................................................3-21
General Menu .........................................................................3-22
Networking Menu...................................................................3-24
Graphics Menu .......................................................................3-25
Adobe Downloader .......................................................................3-26
File Menu ...............................................................................3-26
Special Menu ..........................................................................3-27
Procedures.....................................................................................3-27
Spooler....................................................................................3-28
Calibration with a Densitometer (Gamma) ............................3-32
Accurate Calibration Technology (X-ACT) ...........................3-40
Printer Margin Adjustment .....................................................3-46
Downloaded Fonts..................................................................3-48
_____________________________________ Macintosh Setup 3-1

Notes
3-2 Macintosh Setupbb ____________________________________

Introduction
This chapter describes the Macintosh setup procedures for your
printer, including installation and configuration of the Adobe
PostScript printer driver, your printer’s PPD (PostScript Printer
Description) file, XANTÉ Command Center, and the Adobe
Downloader. The last section describes procedures using XANTÉ
Command Center and Adobe Downloader.
Note: Before beginning this setup, you should be familiar with
standard Macintosh procedures.
XANTÉ Utilities CD-ROM
This section describes Macintosh files and folders on the XANTÉ CDROM.
The Acrobat folder contains an Adobe Acrobat Reader 3.0 Installer and
ReadMe-Reader file describing system requirements and use of Acrobat
Reader 3.0. See “Adobe Acrobat Reader 3.0” later in this chapter.
The App Drivers folder contains printer drivers required by some
Aldus products, QuarkXPress, and ScenicSoft Preps. See “App Drivers
Folder” later in this chapter for details.
The ATM 4.0.2 folder contains an installation program, a user guide,
and an associated file for the Adobe Type Manager. To install, open the
ATM 4.0.2 folder and double-click the installation icon. Use Adobe
Reader 3.0 to view and to print the guide.
The Downloads folder contains PostScript files that can be downloaded
to your printer. See the Overview.PDF file in the CD-ROM’s
Downloads folder and “Downloads Folder” later in this chapter.
_____________________________________ Macintosh Setup 3-3

The NetPeeks folder contains self-extracting files for two network
utility programs and associated documentation. Use EtherHelp 3.1 and
LocalHelp 2.0 to capture packets on an Ethernet network or on a
LocalTalk network respectively. Double-click on each icon to install
that utility on your Macintosh. Read all documentation installed with the
software before using these programs.
The PostScript 3 Fonts folder contains an installation program and
screen fonts used on XANTÉ’s PostScript 3 printers for display on
Macintosh systems.
Note: Do not overload the Macintosh OS Fonts folder. On
Macintosh operating systems prior to 8.0, you have to
remove some of these fonts; these system Font folders can
contain no more than 128 fonts.
The Printer Descriptions folder contains PPD (PostScript Printer
Description) files for XANTÉ printers which provide software
applications access to printer specific features.
The Printer Drivers folder contains Adobe PostScript drivers, and
their installation programs for Roman font printers. See “XInstaller”
and “Adobe PostScript Printer Drivers” later in this chapter and
Readme.pdf on the CD-ROM to load these drivers.
The Product Manuals folder contains PDF files of some XANTÉ
printer manuals. Use Adobe Acrobat Reader 3.0 to view on screen or
print these manuals.
Read1st.txt describes Adobe Acrobat Reader 3.0 installation.
Readme.PDF summarizes the XANTÉ Utilities (Macintosh). Open this
file using Acrobat Reader 3.0.
The Screen Fonts folder contains fonts used on XANTÉ’s PostScript
Level 2 printers for display on Macintosh screens. If you do not have
these fonts, copy them into the System: Fonts folder on your Macintosh.
3-4 Macintosh Setupbb ____________________________________

The XANTÉ Utilities folder contains XANTÉ Command Center,
Adobe Downloader, a Downloader readme file, and the XD-1
(densitometer) software. See “XInstaller,” “XANTÉ Command Center,”
“Adobe Downloader,” and “Calibration with a Densitometer (Gamma)”
later in this chapter to load and ;use these files.
XInstaller is an installation program for XANTÉ Command Center,
Adobe Downloader, your printer’s PostScript PPDs, and the appropriate
PDF (Printer Description File) for QuarkXPress (if it is installed on your
system), and the XD-1 software. See “XInstaller” later in this chapter.
Always check the CD-ROM Readme files before printing.
Adobe Acrobat Reader 3.0
XANTÉ Utilities CD-ROM documentation is in Adobe Acrobat
Portable Document Format (PDF). To install Adobe Acrobat Reader
3.0
1. Insert the XANTÉ Utilities CD-ROM into your Macintosh.
2. Double-click the XANTÉ Utilities 4.0 icon; then, double-click
the Acrobat icon.
3. Check the ReadMe-Reader file; then, double-click the Reader
3.0 Installer icon to install Acrobat Reader 3.0.
XInstaller
Use XInstaller to load XANTÉ Utilities, your printer’s PPD, and
your printer’s QuarkXPress PDF (if QuarkXPress is installed on your
system), and to launch the AdobePS 8.6 driver installer.
1. Insert the XANTÉ Utilities CD-ROM. Double-click the XANTÉ
Utilities CD icon; then, double-click the XInstaller icon.
2. Click Continue.
_____________________________________ Macintosh Setup 3-5

3. Read the welcome note; then, click Continue. The XInstaller
window appears (fig. 3.1).
Fig. 3.1 The XInstaller Window
4. Select either XANTÉ Utilities to install only the utilities or
select the appropriate PPD(s) for your printer(s) and the
utilities will be included during installation; then, click Install
(or stop installation by clicking Quit).
• XANTÉ Utilities installs Adobe Downloader, XANTÉ
Command Center, and the XD-1 software for
Accel-a-Writer, PlateMaker, and ScreenWriter printers.
• Individual printer options install Adobe Downloader,
XANTÉ Command Center, PPD(s), and QuarkXPress
PDF(s) (if necessary) for selected printers and launch the
AdobePS printer driver installation.
• If necessary, change the installation destination disk or
folder for the files in the Install Location box.
5. Select Quit and go to the appropriate section listed below after
the utility programs, PPD(s), and PDF(s) are installed.
• If you chose only to install the XANTÉ utilities, go to
“Adobe PostScript Printer Drivers” later in this chapter to
load the printer driver and your printer’s PPD manually.
3-6 Macintosh Setupbb ____________________________________

• If you chose one or more individual printers, go to step 6
to proceed with the AdobePS installation.
6. Click Continue in the AdobePS introduction screen.
Note: On most systems, the AdobePS 8.6 program
automatically launches unless this version is installed
already. If not, you can open it manually by doubleclicking Adobe 8.6 Installer in the Printer
Drivers:AdobePS 8.6 folder.
7. Read the license agreement and select Continue (or Accept) to
bring up the AdobePS Installer window (fig. 3.2).
8. Change the destination disk (if necessary) for the driver in the
9. Click Restart. After the restart, finish setup following
_____________________________________ Macintosh Setup 3-7
Fig. 3.2 AdobePS Installer Window
Install Location box; then, click Install and follow instructions.
A message window appears when installation is complete.
procedures in “Configuring the PPD” and “Configuring the
Printer” later in this chapter.

Adobe PostScript Printer Drivers
The XANTÉ CD-ROM contains the Adobe PSPrinter drivers and
printer PPDs. Before using your printer, install and configure your
printer’s Adobe PostScript printer driver and PPD.
Selecting the Adobe PostScript Printer Driver
Select the driver that best fits your needs and system configuration.
If the chosen driver is not compatible with your system, try one of
the other two drivers.
AdobePS 8.6
The AdobePS 8.6 driver requires the following system setup:
• Macintosh running System 7.6.1 or later (AdobePS 8.6 does not
run on Macintosh 128K, 512K, or 512Ke computers)
• At least 4 MB of memory
• At least 2.1 MB of hard disk space plus the space required for
the PPDs (each PPD is approximately 75 K)
• Apple ColorSync 2.0.1, if using the AdobePS ColorSync
features (AdobePS does not support ColorSync 1.X)
Note: AdobePS is not compatible with Apple QuickDraw GX.
AdobePS 8.6 provides
• Adobe PostScript 3 and Adobe PostScript Level 2 support
• Full ColorSync 2.1 support
• Simplified printer setup and printing interface
• Ability to change printers from the Print dialog box
• Collation to print multiple document copies as opposed to
multiple groups of the same page
• Reverse order printing to control the order in which the
document pages are printed
3-8 Macintosh Setupbb ____________________________________

• Poster printing of enlarged pages on multiple sheets that can be
combined to create a poster
• Manual duplexing to split a print job into two segments: one for
printing one side of the document; the second to print the other
side
• Booklet printing to create brochure-like printouts
AdobePS 8.5.1
The AdobePS 8.5.1 printer driver requires the following system
setup:
• Macintosh running System 7.1 or later (AdobePS does not run
on the Macintosh 128K, 512K, or 512Ke computers)
• At least 4 MB of memory
• At least 2 MB of hard disk space plus the space required for the
PPDs
• Chooser version 7.3 or later (supplied with the PSPrinter
installation)
AdobePS 8.5.1 provides
• Adobe PostScript 3 and Adobe PostScript Level 2 support
• Full ColorSync 2.1 support
• Simplified printer setup and printing interface
• Ability to change printers from the Print dialog box
• Single-pass foreground printing for faster printing of large or
complex documents
Adobe PSPrinter 8.3.1
The Adobe PSPrinter driver requires the following system setup:
• Macintosh running System 7 or later (PSPrinter does not run on
the Macintosh 128K, 512K, or 512Ke computers)
• At least 4 MB of memory
_____________________________________ Macintosh Setup 3-9

• At least 700 K of hard disk space and space required for the
PPDs
• Chooser version 7.3 or later (supplied with the PSPrinter
installation)
PSPrinter 8.3.1 provides
• Adobe PostScript Level 2 support
• Full ColorSync 2.0 support
• Improved speed when printing JPEG compressed images
• Ability to save print options for subsequent jobs
AdobePS 8.6
Following installation of the XANTÉ Utilities and your printer’s
PPD, AdobePS launches automatically. AdobePS also can be
launched manually from the Printer Drivers: AdobePS 8.6 folder.
The AdobePS installation program loads AdobePS, and AdobePS
Readme file, an AdobePS driver Custom Page extension into the
Printer Descriptions folder, and other files required for the Adobe
PostScript printer diver. It does not load PPD files automatically.
Installation overwrites any earlier AdobePS version but will not
overwrite other printer drivers. Check the Readme First file in the
AdobePS 8.6 folder before beginning driver installation.
Installing AdobePS 8.6
1. Insert the XANTÉ Utilities CD-ROM into your Macintosh.
2. Double-click the XANTÉ Utilities 4.X icon.
3. Double-click the AdobePS Installer in the Printer Drivers:
AdobePS 8.6 folder.
4. Follow steps 6 through 9 in “XInstaller” earlier in this chapter;
after your Macintosh restarts, install your printer’s PPD (see
the next section).
3-10 Macintosh Setupbb ____________________________________

Installing the PPD for AdobePS 8.6
1. Insert the XANTÉ Utilities CD-ROM into your Macintosh.
2. Double-click the XANTÉ Utilities 4.X icon.
3. Select your printer’s PPD in the Printer Descriptions folder.
4. Drag the PPD to the System Folder: Extensions: Printer
Descriptions folder on you Macintosh.
The AdobePS printer driver and your printer’s PPD are installed. See
“Configuring the PPD” later in this chapter to complete the driver
setup.
AdobePS 8.5.1
Following the installation of XANTÉ Utilities and your printer’s
PPD, AdobePS 8.5.1 needs to be launched manually from the Printer
Drivers folder.
The AdobePS installation program loads AdobePS, an AdobePS
Readme file, an AdobePS driver Custom Page extension into the
Printer Descriptions folder, and other files required for the Adobe
PostScript printer driver. It does not load PPD files automatically.
Installation overwrites any earlier AdobePS version but will not
overwrite other printer drivers. Check the appropriate language
folder’s Readme First file in the AdobePS 8.5.1 folder before
beginning driver installation.
Installing AdobePS 8.5.1
1. Insert the XANTÉ Utilities CD-ROM into you Macintosh.
2. Double-click the XANTÉ Utilities 4.X icon.
3. Double-click the AdobePS Installer icon in the Printer Drivers:
_____________________________________ Macintosh Setup 3-11
AdobePS 8.5.1: US English (or appropriate language) folder.

4. Follow steps 6 through 9 in “XInstaller” earlier in this chapter;
then, after your Macintosh restarts, install the PPD (see the
next section).
Installing the PPD for AdobePS 8.5.1
1. Insert the XANTÉ Utilities CD-ROM into your Macintosh.
2. Double-click the XANTÉ Utilities 4.X icon.
3. Select your printer’s PPD in the Printer Descriptions folder.
4. Drag the PPD to the System Folder: Extensions: Printer
Descriptions folder on your Macintosh.
The AdobePS printer driver and your printer’s PPD are installed. See
“Configuring the PPD” later in this chapter to complete the driver setup.
PSPrinter 8.3.1
The PSPrinter installation program loads PSPrinter 8.3.1, Chooser
version 7.3 (if necessary), the PSPrinter Read Me, and the latest
PPDs. It overwrites any earlier PSPrinter version but will not
overwrite other printer drivers.
Installing PSPrinter 8.3.1 and the PPD
1. Insert the XANTÉ Utilities CD-ROM into your Macintosh.
2. Double-click the XANTÉ Utilities 4.X icon.
3. Go to the Printer Drivers: PSPrinter 8.3.1: US English (or
appropriate language) folder and double-click the PSPrinter
Install icon.
4. Click OK in the Adobe Printer Driver entry window. The
PSPrinter Installation window appears.
3-12 Macintosh Setupbb ____________________________________

Fig. 3.3 PSPrinter Installation Window
5. Click Install to load the files listed in the Easy Install box. To
load only specific components, click Customize. Select the
files to load; then, click Install.
6. Read the license agreement; then, select Accept to bring up the
installation screen (or select Decline to terminate installation).
7. Follow instructions on screen to complete installation.
8. Read the Congratulations box; then click OK.
9. Click Quit to close the installation program.
The Adobe PSPrinter driver and your printer’s PPD are installed.
Use the procedure in “Configuring the PPD” later in this chapter to
complete driver setup.
PSPrinter 8.3 User Guide
Each language directory in the PSPrinter 8.3 folder has a user guide
(covering installation and use). Print the guide (less than 50 pages)
using the Adobe Downloader’s File: Download PostScript File or
XANTÉ Command Center’s General: Download PostScript File
option.
_____________________________________ Macintosh Setup 3-13

Mac Watermark Plug-in Folder
Each language directory in the PSPrinter 8.3 folder has a Mac
Watermark Plug-in folder. This folder contains the Adobe PSPrinter 8.3
Watermark plug-in for the Macintosh and a user guide. These files
allow you to customize your output with underlying watermarks.
The plug-in requires the following system setup:
• PSPrinter 8.3.1 (does not work with AdobePS 8.5.1)
• Macintosh running System 7.1 or later
• 100 K of available disk space for the plug-in, preferences, and
Watermarks folder
The user guide (less than 10 page SimpleText file) describes system
requirements and plug-in installation. To print this guide, double-click
WM UserGuide; then, select File: Print.
Configuring the PPD
1. Select Chooser from the Apple menu. The Chooser window
appears (fig. 3.4).
2. Select AdobePS or PSPrinter from the box on the left (top left
in a network environment); a list of available printers appears
to the right.
Note: If the printer does not appear in the list, verify that
—the printer is on and cable connections are secure
—LocalTalk or EtherTalk (depending on your setup)
is enabled on the printer front panel
—the correct protocol (AppleTalk or EtherTalk) is
selected on the front panel
—your Macintosh is setup for LocalTalk or EtherTalk
in the AppleTalk Control panel.
3-14 Macintosh Setupbb ____________________________________

Fig. 3.4 AdobePS Chooser Window
3. Highlight your printer and double-click. If the setup reminder
dialog box appears, click OK. The Adobe PostScript printer
driver automatically selects and configures the correct PPD for
your printer.
Note: If multiple PPDs are installed for your printer, select
the correct PPD when prompted.
4. If you are using PSPrinter, select Off for Background printing
(to maximize processing performance) when the Chooser
window reappears. This option does not appear if the AdobePS
driver is selected.
5. Close the Chooser window to complete the PPD setup unless
the following window appears (fig. 3.5). If this window
appears, continue with step 6.
Fig. 3.5 Autosetup Failed Message
_____________________________________ Macintosh Setup 3-15

6. Click OK in the Autosetup failed dialog box; the Installable
Options window appears (fig. 3.6).
Fig. 3.6 Installable Options Window
7. Configure the printer’s options.
a. Select Installed for the upgrades installed on your
printer.
Note: If your printer has two cassette trays, select
Upper Optional Tray: Installed. If it has three
cassettes, select Upper Optional Tray: Installed
and Lower Optional Tray: Installed.
b. Select True for Spooler Enabled to activate the Save
Spooled Job menu in your application Print dialog box if
your system has an optional internal hard disk.
Note: This does not enable the Spooler on your printer.
The Spooler must be enabled on your printer using
either the front panel Interface menus or XANTÉ
Command Center. See “Spooler” in chapter 6 and
“Spooler” later in this chapter for details.
c. Select the amount of RAM installed on your printer.
8. Click OK twice. The Chooser window reappears. Then, close
this window.
3-16 Macintosh Setupbb ____________________________________

Note: When you add a printer from the network, go through either
the Auto Setup or manual setup procedure to ensure that the
printer is recognized by the network.
Configuring the Printer
If necessary, configure the printer’s communication interface using
the front panel. See Chapter 6, “Configuration,” for details.
1. Select the SETUP:I/F menu.
2. Select the menu for the printer interface connected to your
computer (LTALK or ETALK).
3. Select the ENABLE menu. Then, select YES.
4. Press the Reset key until READY/IDLE appears.
5. Verify the setup.
a. Make sure your Macintosh is connected to the printer
with a LocalTalk or Ethernet cable.
b. Double-click the XANTÉ Command Center icon in the
XANTÉ Utilities folder.
c. Choose General: Printer Status. A dialog box displays
the current printer status.
Note: If the status dialog box does not appear, check
all cable connections and be sure the printer
interface you are using is enabled on the printer.
d. Click OK in the dialog box. Choose File: Quit to close
Command Center.
_____________________________________ Macintosh Setup 3-17

App Drivers Folder
Some Aldus PageMaker and FreeHand versions, QuarkXPress, and
ScenicSoft Preps applications require special files in addition to the
standard PPD supplied for your printer. These files are in the CDROM’s App Drivers folder. See “Application Notes and Page
Design” in appendix B for additional information.
Note: Some advanced XANTÉ printer features may not be
available when using older application versions. Also, APD
(Aldus Printer Description) files for PageMaker version 4.01
and earlier and FreeHand versions 2.02 and earlier are
available from XANTÉ Technical Support.
PageMaker 5 PPD Folder
The PageMaker 5 PPD folder contains PPDs for Aldus PageMaker
versions 4.2 to 5.0 and Aldus FreeHand versions 3.0 and 3.1. To
install these PPDs
1. Load and configure the Adobe PostScript printer driver and
your printer’s PPD following instructions in “Adobe PostScript
Printer Drivers” earlier in this chapter.
2. Copy your printer’s PPD from the CD-ROM’s App Drivers:
PageMaker 5 PPD folder to the System: Aldus PPD folder on
your Macintosh.
Note: The PPD’s name indicates the XANTÉ printer it
supports. A “W” after the name indicates the PPD is
for use on printers with the wide format option.
3. Check your application documentation for instructions on
selecting and using the PPD.
3-18 Macintosh Setupbb ____________________________________

QuarkXPress PDF Folder
The APP Drivers: QuarkXPress PDF folder contain PDFs (Printer
Description Files) for each XANTÉ printer. QuarkXPress versions
3.3.X and earlier require these files in addition to the PPD to ensure the
highest quality output from your printer and QuarkXPress.
XInstaller loads the QuarkXPress PDF if you choose an individual
printer installation. To load these PDFs manually
1. Load and configure the Adobe PostScript printer driver and
your printer’s PPD following instructions in “Adobe PostScript
Printer Drivers” earlier in this chapter.
2. Copy your printer’s PDF from the CD-ROM’s App Drivers:
QuarkXPress PDF folder to the appropriate folder on your
Macintosh.
• For versions 3.3.X and earlier, copy the XANTÉ 3-
Series Printer PDF to the QuarkXPress application/PDF
folder.
Note: The PDF’s name indicates the XANTÉ printer it
supports. A “W” after the PDF name indicates it is for
a printer with the wide format option.
QuarkXPress 4.X uses your printer’s PPD file (it does not need a
PDF). To load a PPD file manually, copy your printer’s PPDs from
the CD-ROM’s Printer Descriptions folder to the System Folder:
Extensions: Printer Descriptions folder on your Macintosh.
Note: Remove “Balloon Help” from the Quark folder for
QuarkXPress 3.3.2.
See the QuarkXPress section in appendix B for additional information.
_____________________________________ Macintosh Setup 3-19

ScenicSoft Preps
The App Drivers: ScenicSoft Preps folder contains PPD and PDX
files for XANTÉ Accel-a-Writer 3 series, PlateMaker 3, and
ScreenWriter 3 printers. XInstaller installs these files automatically if
you have the ScenicSoft Preps application on your system.
Downloads Folder
The Downloads folder contains Adobe PostScript files and
Overview.pdf, which describes these files. Download the PostScript
files to your printer using the Adobe Downloader or XANTÉ Command
Center.
CLEAN.PS prints cleaning instructions for the Accel-a-Writer 8100,
8200, and PlateMaker II.
FONTS.PS3 prints a list of Adobe PostScript 3 fonts resident on
XANTÉ PostScript 3 printers.
Fontsamp.ps3 prints samples of Adobe PostScript 3 fonts resident
on XANTÉ PostScript 3 printers.
FTP.PS prints instructions for uploading and downloading files to
XANTÉ’s FTP (File Transfer Protocol) site.
INITDSKX.PS files are used to initialize hard disks attached to or
installed in your printer.
• Numbered files initialize the SCSI disk with the same device
number (INITDSK1.PS initializes SCSI disk #1, INITDSK2.PS
initializes SCSI disk #2, etc.) on the printer.
• INITDSKA.PS and INITDSKB.PS initialize the internal IDE
drive of the same designation (the A or B disk) on the printer.
• INITDSKS.PS initializes all SCSI and IDE drives attached to the
printer.
3-20 Macintosh Setupbb ____________________________________

You must initialize a hard disk before it can be used to store
downloaded fonts or to set up a spooling queue. Initializing a disk
erases all information stored on that disk.
NOVELL34.PS prints instructions for setting up a XANTÉ printer
on a Novell network.
PARMDUMP.PS prints a list of the settings for communication
devices currently configured for your printer.
SETZONE.PS allows you to set your printer’s EtherTalk zone
name. Open the file in a text editor, such as SimpleText, and change
“name of zone” in the parentheses to the name of your EtherTalk
zone. Save the file, and download it to your printer. Restart your
printer to make the change effective.
SET_IP.PS allows you to set your printer’s IP address. Open the file
in a text editor, such as SimpleText, and change the IP address in the
parentheses to your printer’s IP address. Save and download the file
to your printer. Restart the printer to make the change effective.
STARTPG.OFF disables the printer’s start-up page feature,
preventing the page from printing automatically each time the printer
is restarted (see “Start-up Page” in chapter 6).
STARTPG.ON enables the printer’s start-up page feature, causing
the page to print automatically each time the printer is restarted (see
“Start-up Page” in chapter 6).
SYSPARM.PS prints a list of current system parameters.
XANTÉ Command Center
XANTÉ Command Center allows you to check and control many
printer functions from your Macintosh. Use XInstaller to install
Command Center or copy the program from the CD-ROM’s
XANTÉ Utilities: Laser Printers folder to a folder on your
Macintosh.
_____________________________________ Macintosh Setup 3-21

Features and options are for all printer models unless otherwise
indicated. Also, File and Edit menus are similar to other Macintosh
applications and are not described in detail in this section.
General Menu
The General menu allows you to communicate with the printer to
perform margin and line length calibrations, get printer settings and
status, control printer spooling, download PostScript files to the
printer, and change some printer default settings (fig. 3.7).
Fig. 3.7 General Menu
Printer Status
This option provides current printer status information on screen. For
example, the status may indicate that the printer is idle (ready to
receive a job). If the printer is receiving data, the status message lists
the interface source; if the printer is processing a job, the status
message lists the user name, document name, and interface source.
Printer Information
This option allows you to send current printer settings to the screen
or the printer. These include printer configuration, storage devices on
the printer, and network configuration details.
3-22 Macintosh Setupbb ____________________________________

Spooling
This option allows you to enable and control printer hard drive
spooling. Spooling frees up the communication channel between
your Macintosh and printer which permits your computer to return to
other processing quickly. Spooling can be enabled for each interface
independently using this menu or the printer’s front panel Interface
menus. See “Spooler” later in this chapter.
Margin Adjustment
This option (3G) allows you to adjust the printer margin. Printer
margin refers to the imageable area, not to margin settings for a
document in an application. The imageable area is the portion of a
page on which the printer can lay down toner. Margin Adjustment
allows you to adjust the position of this imageable area. See “Printer
Margin Adjustment” later in this chapter for details.
X-ACT
This option (3G) allows you to calibrate printer line lengths to a
standard and to correct inaccuracies in printing width, height, skew,
and angle. See “Accurate Calibration Technology (X-ACT)” later in
this chapter for details.
Download PostScript File
This option allows you to download PostScript files to your printer.
Test Directory
This option is not valid for laser printers.
Reboot Printer
This option allows you to reboot the printer from your computer. This
reboot causes the printer to reinitialize.
Startup Page
This option allows you to enable or disable automatic start-up page
printing after your printer goes through initialization. The Print One
option allows you to print a start-up page regardless of whether the
feature is enabled. The factory default is to print the start-up page after
initialization.
_____________________________________ Macintosh Setup 3-23

See “Downloads Folder” earlier in this chapter and “Start-up Page”
in chapter 6 for other methods to control the start-up page feature.
Networking Menu
The Networking menu allows you to configure your printer’s Ethernet
interface for Novell Print Server emulation, AppleTalk, and the TCP/IP
communication (fig. 3.8). Only the System Administrator should use
these options. See chapter 5, “Ethernet Setup” for details.
Fig. 3.8 Networking Menu
Novell Print Server
Novell Print Server options allow you to configure the Novell Print
Server emulation on your printer’s Ethernet interface.
• Login & Printing—allows you to enable your printer to login to
and accept print jobs from a designated Novell file server.
• File Servers—allows you to specify up to four Novell file servers
for your printer to poll for print jobs.
• Print Server Name—allows you to specify the name your printer
will use to login to the Novell file server(s).
• Set Print Server Password—allows you to specify the password
required for your printer to login to the Novell file server(s).
• Network Protocol—allows you to configure the Novell Print Server
emulation for your network protocol. The printer’s front panel
Novell Print Server menu is another way to set network protocol.
See “Interface Control” in chapter 6.
3-24 Macintosh Setupbb ____________________________________

AppleTalk
The AppleTalk menu allows you to configure the AppleTalk
protocol on your printer’s Ethernet interface.
• Printer Name—allows you to set the name your printer
advertises on the network.
• EtherTalk Zone Name—allows you to change your printer’s
default zone assigned by the network router.
TCP/IP
The TCP/IP menu allows you to enable the TCP/IP protocol and set
the TCP/IP address on your printer’s Ethernet interface.
• Address—allows you to change your printer’s default TCP/IP
address to agree with your network TCP/IP addressing system.
• LPR Enable—allows you to enable or disable the Line Printer
protocol on your printer’s Ethernet interface. The printer’s front
panel Line Printer menu is another way to enable or disable LPR.
See “Interface Control” in chapter 6.
Graphics Menu
The Graphics menu allows you to create custom gamma curves to
calibrate your printer’s grayscale output for specific ink, media, and
environmental conditions (fig. 3.9).
Fig. 3.9 Graphics Menu
CRD Directories
This menu is not for use with laser printers.
_____________________________________ Macintosh Setup 3-25

Linearization
This menu (3G) allows you to create and download custom curves to
your printer. These curves can be selected for a specific job from the
Print dialog box or set as the default from the printer’s front panel.
See “Calibration with a Densitometer (Gamma)” later in this chapter.
Adobe Downloader
Use Adobe Downloader to load and manage font files on your
printer’s hard drive and to send PostScript files to your printer.
Fig. 3.10 Adobe Downloader Menu
File Menu
The File menu allows you to download fonts and PostScript files to
the printer and to quit Adobe Downloader.
Download Fonts
This menu allows you to download fonts to an optional hard disk on
your printer or to printer memory. Fonts downloaded to your printer
are considered resident, which means applications do not have to
bundle these fonts with print jobs. Fonts downloaded to printer
memory only remain during the current power cycle. Fonts
downloaded to an optional hard disk survive a power cycle. See
“Downloaded Fonts” later in this chapter for details.
3-26 Macintosh Setupbb ____________________________________

Download PostScript File
This option allows you to select a PostScript file on your Macintosh
and send it to the printer. XANTÉ Command Center’s General menu
also has this option.
Special Menu
The Special menu allows you to check printer status and manage fonts
downloaded to your printer.
Printer Status
This option allows you to check current printer status. XANTÉ
Command Center’s General menu also has this option.
Printer Font Directory
The Printer Font Directory provides access to fonts downloaded to
the printer. Using this menu, you can print a list or view (on screen)
all fonts downloaded to printer ROM, memory, or an optional hard
disk. Delete allows you to remove fonts that have been downloaded
to memory or the optional hard disk. You cannot remove fonts from
ROM. See “Downloaded Fonts” later in this chapter for details.
Other Special Menu Options
We recommend that you use XANTÉ Command Center’s General:
Reboot Printer option instead of the Special menu’s Clear Font
Cache or Restart Printer options. See the PostScript Reference
Language Manual about using the Use Different Password option.
Procedures
This section covers special procedures using XANTÉ Command
Center and Adobe Downloader.
_____________________________________ Macintosh Setup 3-27

Spooler
If your printer has an optional hard drive, you can use the spooler to
place print jobs into a queue on that drive. This reduces return to
application time by freeing the communications channel between the
computer and printer. The Save Spooled Job feature allows you to
save up to 250 print jobs on the hard drive for reprinting later. See
“Spooler” in chapter 6 for details.
Spooling can be enabled for each interface independently through
XANTÉ Command Center or the printer’s front panel Interface
menus. Command Center also allows you to manage jobs in the
spooler print queue.
Using the Front Panel
To enable the Spooler using the front panel Spool menu
1. Select the Interface (SETUP:I/F) menu.
2. Select the printer interface (SERIAL, PARALLEL, ETALK,
LPR, NETBEUI, or NVL PSRV) that you use to send files.
3. Select the Spool menu; then, select YES.
4. Press the On Line key to return the printer to the
READY/IDLE state.
Using XANTÉ Command Center
To enable and control spooling on the printer’s hard drive using
XANTÉ Command Center
3-28 Macintosh Setupbb ____________________________________

1. Open XANTÉ Command Center; then, choose General:
Spooling. The Spooling window appears (fig. 3.11).
Fig. 3.11 Spooling Window
2. Select Devices from the Configure box. The Select Spool
Device window appears (fig. 3.12).
3. Select the disk to use to store the spooled jobs or select NONE
_____________________________________ Macintosh Setup 3-29
Fig. 3.12 Select Spool Device Window
to disable spooling; then, click Ok. The Spooling Window
reappears (fig. 3.11).

4. Select Interfaces from the Configure box. The Select I/O
Interfaces to Spool window appears (fig. 3.13).
Fig. 3.13 Select I/O Interfaces to Spool Window
5. Select the interface that you use to send files to the printer;
then, click Ok. The Spooling window reappears (fig. 3.11).
6. Click Ok. The Spooling Window closes. Choose File: Quit to
close Command Center.
To manage jobs in the spooler’s job queue
The spooler’s job queue can store up to 250 jobs. Jobs sent with the
Save Spooled Job option set to True in the Print dialog box are
retained indefinitely in the queue. A saved job can be reprinted
quickly from the Spooling menu without reprocessing the file
through an application. See “The PPD” in chapter 6, for details.
3-30 Macintosh Setupbb ____________________________________

1. Open XANTÉ Command Center; then choose General:
Spooling. The Spooling window appears (fig. 3.14).
Fig. 3.14 Job Queue in the Spooling Window
The Job queue lists the ID, status, title, spool device, and file
size of all jobs in the spooling queue. Job status can be W
(waiting to be processed), P (currently processing), or H
(already processed and held using the Save Spooled Job
feature).
2. Use the Control buttons to manage the jobs in the queue.
Print Prints the highlighted job
Delete Deletes the highlighted job
Delete All Deletes all jobs in the queue
Move to Front Moves the highlighted job to the front of the
queue
Refresh Updates the screen with the current job queue
3. Click Ok. The Spooling window closes. Choose File: Quit to
close Command Center.
_____________________________________ Macintosh Setup 3-31

Calibration with a Densitometer (Gamma)
Densitometer support (3G) allows you to use gamma curves to adjust
your printer’s performance to eliminate inconsistencies due to
equipment age, different toners, press inks, and media, and
environmental conditions.
The XD-1 (XANTÉ Densitometer), combined with XANTÉ Command
Center software, measures grayscale output for calibration and proofing.
This affordable, easy-to-use densitometer will be used in this manual for
example purposes.
Seven standard curves are supplied with XANTÉ’s Halftone
Calibration Technology and you can create up to seven custom
gamma curves. You can select any custom or standard gamma curves
on a job by job basis using the front panel Gamma menu or the Print
dialog box Gamma PPD option. See “Halftone Calibration
Technology (Gamma)” in chapter 6 for details.
Gamma curves are created with XANTÉ Command Center and a
densitometer using the following steps:
• Printing a Calibration Page
• Using the Densitometer
• Linearizing the Densitometer Data
Printing a Calibration Page
To begin calibrating your printer, print a calibration page to measure the
printer’s current performance as a basis for the calibration.
1. Open XANTÉ Command Center and choose Graphics:
Linearization. The Linearization window appears (fig. 3.15).
3-32 Macintosh Setupbb ____________________________________

Fig. 3.15 Linearization Window
2. Change the Linearization window LPI setting in the Print box
(fig. 3.15) to achieve 256 levels of gray for the resolution at
which you are printing.
Note: For 600 dpi, select 85 lpi; for 1200 dpi, select 106 lpi;
for 2400 dpi, select 133 to 150 lpi. Any lpi may be
used; measure the lpi that is to be used for final output.
3. Print a Calibration Page to measure the printer’s current
performance as a basis for the calibration. To do this use the
following procedure:
_____________________________________ Macintosh Setup 3-33

Note: Always print the calibration page using the same media
and toner or press ink as used for the final copy. When
calibrating film media, you must select Man Feed
using the Tray Select key and select the media size
through the front panel MISC: MAN FEED menu.
Universal is the largest size available in the front
panel. If you have larger media, you need to cut it
down to 13" x 18.5" (330 mm x 470 mm).
Also, when possible, calibrate from the final output.
For example when calibrating for plates, take the plate
to press and print. Then, measure the output from the
press.
a. Select Negative Film to calibrate the printer if you are
calibrating for negative output from your printer.
b. Select Emulsion Side Down if you want to print a mirror
image.
Note: The printed calibration page will still look like a
positive, but the patch (box) values will be
reversed.
c. Select the custom Gamma Curve you want to update
from the Update Gamma Curve list. This curve selection
automatically updates the LPI option to match the lpi
listed for the selected curve. To select a different lpi
setting, use the LPI option and scroll to the desired
setting.
Note: If you select a custom lpi for a listed curve, the
lpi listed in front of the curve’s name in the
Update Gamma Curve box does not change to
match the new lpi. In this case, you need to keep
a record of the new lpi setting for that gamma
curve.
d. Select the resolution which you will use to print the final
output in the printer front panel MISC: DPI menu.
3-34 Macintosh Setupbb ____________________________________

e. Click Print Calibration Page (fig. 3.15). The calibration
page shows the printer’s performance using no gamma
curve correction (fig. 3.16).
Note: Print only one calibration page (using the Print
Calibration Page button) at the beginning of the
calibration process. Printing this page again later
in the process resets the calibration, cancelling
any linearization you have already done.
Using the Densitometer
A densitometer uses a standard light source to measure the amount of
light reflected from printer output. This measurement is compared to
a standard and expressed as a percentage of gray.
The densitometer, like any other precision instrument, must be
calibrated before each use. Refer to your densitometer’s
documentation for instructions on calibrating and using the
densitometer.
_____________________________________ Macintosh Setup 3-35
Fig. 3.16 Sample Calibration Page

After calibrating the densitometer, use it to get density measurements
for the calibration page you printed.
Linearizing the Densitometer Data
Enter the densitometer measurements to calculate the adjustments
necessary to correct printer performance to a linear standard.
1. Click Enter Curve/Linearize in the Linearization window (fig.
3.15). The Densitometer Data Entry window appears (fig.
3.17).
Fig. 3.17 Densitometer Data Entry Window
2. Measure individual patches on the calibration page by placing
the page on a white background; then, center the
densitometer's lens over the patch and either click the black
button on top of the XD-1 or click the measure button on the
Densitometer Data Entry window (fig. 3.17). The
measurement appears in the box to the right of the Measure
button.
3-36 Macintosh Setupbb ____________________________________

3. Make sure to enter the solid black (1) and solid white (2)
measurements first. Enter the number of the patch whose
densitometer measurement most closely matches (within ±
2%) the corresponding percentage in the Enter Coverage
Values section.
For example, when you are reading for 2%, if the box labeled 7
measures 2%, enter the number 7 in the corresponding box.
Note: The calibration page blocks are numbered from 0 to
255. You may have to check several blocks to find the
one that most closely matches the percentage in the
Densitometer Data Entry window.
Also, it is not necessary to measure for each coverage
value, but that is recommended to achieve more
accurate results.
4. Click Graph to display a curve of your printer’s linear curve.
5. Click Linearize to continue. The Linearization window
reappears (3.15)
Note: If you need to stop linearization (for example, to
change the media type), you can click Cancel to stop.
6. Click Save to Disk (fig. 3.15) if you want to save the data file
for future use. Then, specify a new file name and select a
folder for saving the file. Click Save. Otherwise, skip to step 7.
7. Click OK. The Linearization window closes.
Note: To verify linearization, click the Print Verification Page
button (3.16) before you close the Linearization window.
When this page prints compare it to the original calibration
page to verify the gamma correction; you should see an
improvement in gray scale progression.
_____________________________________ Macintosh Setup 3-37

Advance Gamma Curve Control
If you are an expert user, you may want to adjust image lowlights,
midtones, highlights and details in a gamma curve using the Advanced
option in the Linearization window.
Note: You cannot see advanced window adjustments on screen.
Unless you are an expert user, you always should make these
adjustments thorough an application.
1. Select the gamma curve to update from Update Gamma Curve
in the Linearization window.
2. Click Advanced. Then, use the appropriate scroll bars to make the
adjustment and click Ok. The Linearization window reappears.
3. Click Enter Curve/Linearize to create a new curve and download
it to your printer. The Densitometer Data Entry window appears
(fig. 3.17).
4. Click Linearize. The new curve replaces the existing curve on
your printer.
5. Click Ok. The Linearization window closes. Choose File: Quit
to close Command Center.
Managing Custom Gamma Curves
You can retrieve custom gamma curves (that you created or
downloaded using the densitometer and Command Center) from
your printer and save them on your system. These files can be
downloaded to the printer again as needed.
To manage custom gamma curves, open XANTÉ Command Center
and select Graphics:Linearization. The Linearization window
appears (fig. 3.15). Then use one of the following procedures to
manage your custom gamma curve.
• To retrieve a custom gamma curve from the printer, click Load
from printer.
• To retrieve a custom gamma curve saved to your system, click
Load From Disk and select the file.
3-38 Macintosh Setupbb ____________________________________

• To save a custom gamma curve to your Macintosh, retrieve it
from the printer, and click Save to Disk.
• To save a custom gamma curve to your printer, retrieve it from
your system; select the curve to be updated from the Update
Transfer Curve list; and click Save to printer.
Resetting Custom Curve Defaults
To reset a custom gamma curve to the factory default (a copy of the
standard Gamma 0 curve) or to reset all gamma curves to the factory
defaults
1. Highlight the curve to change in Update Gamma Curve list in
the Linearization window and click Reset (fig. 3.15). The
Reset Curves window appears (fig. 3.18).
Fig. 3.18 Reset Curves Window
2. Choose Reset Custom Gamma X to factory setting (the X will be
replaced by the number of the curve you highlighted in step 1) or
choose Reset all to factory settings. Then, select Negative Film if
the final printed output will be a negative print.
3. Click Ok. After the curve or curves are reset, the Linearization
window reappears.
4. Click Ok. The Linearization window closes. Select File: Quit
to close Command Center.
_____________________________________ Macintosh Setup 3-39

Accurate Calibration Technology (X-ACT)
Use XANTÉ’s patented X-ACT (3G) feature to calibrate your printer
in two ways, through the front panel MISC: XACT menu or through
XANTÉ Command Center’s More X-ACT menu.
Front Panel X-ACT
Your printer’s front panel MISC: XACT menu allows you to make
1/2 mm line length adjustments using the following procedure.
Note: To use the front panel XACT, you need a metric ruler with
1/2 millimeter rule markings. Also, you must use the paper
cassette, not the multipurpose feeder, when making X-ACT
adjustments. The adjustments for one size media apply to
every media size, so you do not have to make individual
adjustments for each size.
1. Make sure the printer is on and idle. Then, make sure that
media the size of your final output is loaded in the printer’s
paper cassette and the cassette is selected as the media source.
2. Press the Menu key until SETUP: MISC appears. Then, press
the Enter key.
3. Press the Menu key until MISC: XACT appears. Then, press
the Enter key.
4. Press the Menu key until XACT TEST PAGE appears. Then,
press the Enter key. A page prints with 2 lines, Line A and
Line B. The measurement listed by each line is the desired
length for that line on that media size. In this example, Tabloid
size 11" x 17" (257 mm x 431 mm) media is used. Line A
should be 251.46 mm and Line B should 388.61 mm.
5. Measure Line A. Use the following procedures to adjust the
printer for the correct line length.
a. Note the amount Line A is over or under 251.46 mm.
b. Press the Menu key until LINE A appears. Then, press
the Enter key.
3-40 Macintosh Setupbb ____________________________________

c. Press the Menu key until the amount which would most
closely adjust the line to the desired length appears.
Then, press the Enter key. For example, if Line A is
250.46 mm instead of 251.46 mm, select 1.00 mm to add
one mm to make the line the correct length.
6. Measure Line B. Use the following procedures to adjust the
printer for the correct line length.
a. Note the amount Line B is over or under 388.61 mms.
b. Press the Menu key until LINE B appears. Then, press
the Enter key.
c. Press the Menu key until the amount which would most
closely adjust the line to the desired length appears.
Then, press the Enter key. For example, if Line B is 389
mm instead of 388.61 mm as it should be, select -0.50
mm to shorten the line to 388.50.
7. Press the Reset key to return to the previous menu level. Then,
press the Menu key until XACT: TEST PAGE reappears and
press the Enter key to print a new test page.
8. Repeat steps 5 and 6 until the line measurements agree with
the lengths listed on the test page.
9. Press the On Line key when the line lengths are correct.
READY/IDLE appears in the window.
Now the printer’s line lengths are calibrated correctly.
Command Center X-ACT
Use XANTÉ Command Center’s X-ACT feature to calibrate printer
line lengths and correct inaccuracies in printing width, height, skew,
and angle.
Note: You must have XANTÉ Command Center and your printer’s
current PPD installed before you can use Command Center’s
X-ACT. You also need a 1/2 millimeter ruler and the printer
needs to be connected locally with Ethernet.
_____________________________________ Macintosh Setup 3-41

1. Open XANTÉ Command Center if necessary; then, select
General: X-ACT. The More X-ACT Calibration window
appears (fig. 3.19).
Fig. 3.19 More X-ACT Calibration Window
2. Make sure that the same type of media you will use for final
printing is loaded in the printer.
3. Select a setting for the media type you are using from the
Media Type drop-down menu (fig. 3.20).
3-42 Macintosh Setupbb ____________________________________
Fig. 3.20 Media Types Menu

Note: Each media type can have only one set of options. For
example, if you calibrate for 8 1/2 x 11 (letter) paper,
you can choose Paper as the media type. If you need to
calibrate for 11 x 17 (tabloid) paper, you need to select
another media type such as User-defined 1 so that the
first calibration for letter size paper is not overwritten.
4. Check Options to make sure the paper (media) source and print
settings are correct. If any of the settings are incorrect, click
Change Options; when the More X-ACT Advanced Setup
window appears (fig. 3.21), make the necessary changes.
_____________________________________ Macintosh Setup 3-43
Fig. 3.21 More X-ACT Advanced Setup Window
a. Under Paper Source, if you select Manual Feed, go to
step 4.b; if not, skip to 4.c.

b. Under Manual Feed Options, if you are using standard
size media, click Standard Paper Size and select the size
from the drop-down menu. If you are using a custom
size, click Custom Paper Size and enter the size and
select the unit of measure (inch, millimeter, or
centimeter).
c. Under Print Settings, select the resolution from the
drop-down menu. Click the Negative Film box if you are
printing negative output.
d. Click OK. The More X-ACT window reappears.
5. Click Print Calibration Page.
A
A
Measure dashed line from left edge of
paper to top arrow tip; enter results in
millimeters in box A.
B
C
B
Measure dashed line from top edge of
paper to left arrow tip; enter results in
millimeters in box B.
C
Measure solid horizontal line from left arrow
tip to right arrow tip; enter results in
millimeters in box C. This should be
close to the value shown in box H.
D
Measure dashed line from top edge of
paper to right arrow tip; enter results in
millimeters in box D.
D
E
E
Measure solid vertical line from top arrow
tip to bottom arrow tip; enter results in
millimeters in box E. This should be
close to the value shown in box G.
I
F
F
Measure dashed line from left edge of
paper to bottom arrow tip; enter results in
millimeters in box F.
I
Measure dashed line from bottom edge of
paper to left arrow tip; enter results in
millimeters in box
I
.
G
254.0
H
190.5
J
Measure dashed line frombottom
edge of paper to bottom arrow tip;
enter results in millimeters in box J.
J
Fig. 22 X-ACT Calibration Page
3-44 Macintosh Setupbb ____________________________________

6. Make the measurements indicated on the calibration page next
to boxes A through F, I, and J, recording each measurement in
its corresponding box on the calibration page. The values in
boxes G and H are fixed values and do not require you to make
any measurements.
7. Compare the following pairs:
A to F For example: A = 25 F = 25.5
B to D B = 61 D = 61
C to H C = 190 H = 190.5
E to G E = 253 G = 254
I to J I = 39 J = 39.5
The numbers in each pair should be the same or within a 0.5
mm difference. If so, skip to step 11. If not (as in E and G in
the example), continue to step 8.
8. Copy the recorded measurements in boxes A through F, I, and
J and the fixed values in boxes G and H from the calibration
page to the corresponding boxes in the Enter Calibration
Values section of the More X-ACT window.
9. Click Update Printer. (Clicking this button sends the new
calibration measurements to the printer so it can update.)
10. Repeat steps 5 through 9 until the measurements in the
corresponding boxes are within .5 mm of each other.
Note: Your application printer properties must match your
calibration settings. For example, if you chose Userdefined 1 as your media type in the More X-ACT
calibration window for 11" x 17" (tabloid) paper, you
must choose User-defined 1 as your Media Weight in
your application printer properties when printing on
11" x 17" paper.
11. Click Ok to close the More X-ACT window.
_____________________________________ Macintosh Setup 3-45

Printer Margin Adjustment
Use Margin Adjustment (3G) to adjust the position of the imageable
area on the media.
Note: Use the standard paper size (letter or A4) for your paper
cassette with the Margin Adjustment function.
1. Open XANTÉ Command Center. Select General: Margin
Adjustment. The Printer Margin Control window appears.
Fig. 3.23 Printer Margin Control Window
2. Select Standard to use 1/32 inch units or Metric for 1 mm
units for adjustments.
3. Select Set & Print. Click Send to Printer. Click Ok in the
warning dialog box (fig. 3.24). An alignment test page prints.
Fig. 3.24 Margin Alignment Warning
3-46 Macintosh Setupbb ____________________________________

4. Turn the test page so that -x is to the left and -y is at the top of
the crossed lines.
5. Check the current settings printed near the crossed lines. The
factory default is x = 0, y = 0, which should cause each line to
print 1" (25.4 mm) from the edge of the page.
Coordinates listed on the alignment test page indicate change
from the factory default in dots per inch. Because these
measurements are rounded for display, adjustments should be
based on careful measurements, not the printed coordinates.
Note: If current settings are not the factory defaults and you
must adjust the coordinates, you may reset factory
default coordinates by selecting Factory Default and
clicking Send to Printer. Click Ok in the warning
dialog box. Print another alignment test page using the
factory defaults.
6. Measure the distance from the edge of the page to the -x line.
This distance is dependent on the y coordinate.
• To move the -x line away from the edge of the page, move
the slide on the vertical slide bar up (toward the -y).
• To move the -x line closer to the edge of the page, move
the slide on the vertical slide bar down (toward the +y).
• The distance moved (in the units you selected in step 2) is
displayed to the right of ∆y.
7. Measure the distance from the edge of the page to the -y line.
This distance is dependent on the x coordinate.
• To move the -y line away from the page’s edge, move the
slide on the horizontal slide bar to the left (toward the -x).
• To move the -y line closer to the page’s edge, move the slide
on the horizontal slide bar to the right (toward the +x).
• The distance moved (in the units you selected in step 2) is
displayed to the right of ∆x.
8. Print another alignment page (see step 3).
_____________________________________ Macintosh Setup 3-47

9. Measure the -x and -y lines on the new test page. If the lines
are not each 1" (25.4 mm) from the edge of the paper, go back
to step 5 and repeat the process.
10. When the -x and -y lines are set correctly, click Close. Choose
File: Quit to close Command Center.
Downloaded Fonts
Fonts downloaded to your printer are considered resident, which
means applications do not have to bundle these fonts with print jobs.
You can download fonts to your printer’s optional hard disk or to
printer memory. Fonts downloaded to printer memory only remain
during the current power cycle. Fonts downloaded to an optional
hard disk survive a power cycle.
Caution: Fonts downloaded to memory may cause PostScript
errors due to insufficient memory. To resolve this,
download fonts to the printer’s optional hard disk or
increase printer memory.
Downloading Fonts
1. Open the Adobe Downloader and select File: Download Fonts to
bring up the following window.
Outline Fonts Available:
Fonts
Ameri
AmeriBol
AmeriExtBol
AmeriIta
AvantGarBoo
AvantGarBooObl
AvantGarDem
AvantGarDemObl
BenguBol
BenguBoo
Bodon
BodonBol
BodonBolIta
BodonPos
BookmDem
Fig. 3.25 Download Font Window
Macinto...
Eject
Desktop
Add
Add All
Remove
Cancel
Download
Outline Fonts Selected:
MemoryDevice
Ameri
AmeriBol
3-48 Macintosh Setupbb ____________________________________

2. Select the folder on your Macintosh that contains the font files
from the drop down menu on the top left of the window (fig.
3.25). The large box on the left displays the fonts in the
selected folder.
3. Select Memory or Disk from the Device menu as the
destination for the downloaded fonts.
Note: If more than one optional hard disk is attached to your
printer, select the target disk from the drop-down menu.
4. Highlight a single font in the list on the left and click Add or click
Add All to select all the fonts in the open folder. Selected font(s)
appear in the list on the right of the screen (fig. 3.25).
Note: To remove fonts from the selected list, highlight the fonts
and click Remove.
5. Click Download to send the selected fonts to the printer.
6. Wait until download is complete; then, select File: Quit to
close the Adobe Downloader.
Reviewing and Removing Downloaded Fonts
1. Open the Adobe Downloader and select Special: Printer Font
Directory. The following window appears.
Where would you like the directory sent?
Screen
Printer
OK
Fig. 3.26 Listing Downloaded Fonts
Cancel
_____________________________________ Macintosh Setup 3-49

2. Choose Printer or Screen and then click OK. If you select
Printer, a list prints of fonts in the printer cartridge ROM and
on the hard disks; if you select Screen, the Font Directory
window appears (fig. 3.27).
Fig. 3.27 Font Directory Window
3. Select the font storage area from the Device menu to view the
fonts present in that area.
4. Remove a font from printer memory or a hard disk by
highlighting the font and clicking Delete.
5. Click OK to close the Font Directory window and return to the
Adobe Downloader main menu.
Note: To remove fonts downloaded to printer memory, turn the
printer off. Fonts are stored in printer memory only during
the current power cycle.
◊ ◊ ◊
3-50 Macintosh Setupbb ____________________________________

Chapter 4 - PC Setup
Chapter Overview
Introduction.....................................................................................4-3
XANTÉ Utilities CD-ROM (PC)....................................................4-3
Adobe Acrobat Reader 3.0..............................................................4-5
XANTÉ Utilities Installer ...............................................................4-5
XANTÉ Utilities and Application Drivers ...............................4-6
Adobe PostScript Printer Drivers..................................................4-10
Deleting Previous Driver Versions ......................................... 4-11
Windows 95, 98, and NT 4.0 Drivers .....................................4-14
Configuring the Printer...........................................................4-24
PDFs Folder ..................................................................................4-25
PS_Files Folder .............................................................................4-25
XANTÉ Command Center............................................................4-27
Options Menu .........................................................................4-27
Controller Menu .....................................................................4-28
Ports Menu .............................................................................4-32
Procedures.....................................................................................4-32
Spooler....................................................................................4-33
Calibration with a Densitometer (Gamma) ............................4-36
Accurate Calibration Technology (X-ACT) ...........................4-44
Printer Margin Adjustment .....................................................4-50
Managing Fonts on an Optional Hard Disk............................4-52
___________________________________________ PC Setup 4-1

Notes
4-2 PC Setupbb __________________________________________

Introduction
This chapter describes the contents of the PC XANTÉ Utilities as
well as installing and configuring the Adobe PostScript printer driver
and your printer’s PPD (PostScript Printer Description) file. The
procedures section covers your printer’s features and options.
Note: Before beginning this setup, you should be familiar with all
standard PC and Windows procedures.
XANTÉ Utilities CD-ROM (PC)
This section describes PC files and folders on the utilities CD-ROM.
The Acrobat folder contains Adobe Acrobat Reader 3.0 installation
programs for Windows 95, and 98. See “Adobe Acrobat Reader 3.0”
later in this chapter and the CD-ROM’s Read1st.txt file for details.
The Atm folder contains an installation program for Adobe Type
Manager and the expanded font set for use with Adobe PostScript 3.
Run the Install.exe in the ATM302 folder (Windows 95 or 98) or in
the ATM40 folder (Windows 95 or 98) or run Setup.exe in the
ATM40_NT folder (Windows NT 4.0).
Autorun.inf allows XANTÉ Utilities Installer to launch automatically
when the CD-ROM is inserted into a PC running Windows 95, 98, or
NT 4.0.
The Drivers folder contains Adobe PostScript drivers and installation
programs for Roman font printers for Windows 95, 98, NT 3.5, and NT
4.0.
Instread.txt describes the XANTÉ Utilities Installer, Adobe
Acrobat 3.0, and Adobe Type Manager. This file is displayed by the
XANTÉ Utilities Installer.
The Manuals folder contains some XANTÉ printer manuals in PDF
files to be viewed on screen or printed using Adobe Acrobat Reader 3.0.
___________________________________________ PC Setup 4-3

The Pdfs folder contains printer drivers required by QuarkXPress. See
“XANTÉ Utilities Installer” and “PDFs Folder” later in this chapter.
The Ppds folder contains XANTÉ PPDs for Roman font printers. See
the CD-ROM’s Readme.PDF file and “Adobe PostScript Printer
Drivers” later in this chapter.
The Ps_files folder contains PostScript files that can be downloaded to
your printer using XANTÉ Command Center. See the Overview.pdf file
in the CD-ROM’s Ps_files folder and “Ps_files Folder” later in this
chapter.
Read1st.txt describes XANTÉ Utilities Installer and Adobe Acrobat
3.0 Installer.
Readme.pdf summarizes the PC XANTÉ Utilities and describes
installing Adobe PostScript Printer Drivers if you do not use the
XANTÉ Utilities Installer. Use Acrobat Reader 3.0 to open this file.
Xantent is used by the Adobe PostScript printer driver installation for
Windows NT 3.5x.
The Xinstall folder contains an installation program for XANTÉ
Command Center, the PDF (Printer Description File) for QuarkXPress
(if selected), and the PPD for PageMaker (if selected). See “XANTÉ
Utilities Installer” later in this chapter.
Xinstall.exe launches the XANTÉ Utilities Installer for the PC.
Xmsprint.inf is the file Windows 95 and 98 use to install XANTÉ
printers using the Microsoft Windows PostScript driver via the Add
Printer Wizard.
Xtprint.inf allows you to install XANTÉ printers via the Add Printer
Wizard instead of running the Adobe driver setup program.
The Xutils folder contains XANTÉ Command Center and a Readme
file describing manual installation and setup of the utilities. It also
contains the XD-1 software. See “XANTÉ Utilities Installer” and
“XANTÉ Command Center” later in this chapter for details.
4-4 PC Setupbb __________________________________________

Always check the CD-ROM’s Readme files for information not
available at the time this manual was printed.
Adobe Acrobat Reader 3.0
XANTÉ Utilities CD-ROM documentation is in Adobe Acrobat
Portable Document Format (PDF). You can install Adobe Acrobat
Reader 3.0 from the CD-ROM. Windows NT 3.5.X users should
install the Windows 3.1 version; Windows NT 4.0 users should
install the Windows 95 version.
1. Insert the XANTÉ Utilities CD-ROM into your PC. With
Windows 95, 98, or NT 4.0, the XANTÉ Utilities Installer
launches automatically. Click Cancel; then, click Exit Setup to
quit the automatic installation program.
2. Select Start: Run (Windows 95 or 98), and use Browse to
select the Ar.exe file (Acrobat: Win95_98: Ar.exe) on the CDROM; then click OK.
3. Follow the instructions on each screen to complete installation.
4. See the CD-ROM’s Read1st.txt file and the Adobe Acrobat 3.0
Readme file installed with the program on your system.
XANTÉ Utilities Installer
XANTÉ Utilities Installer installs XANTÉ Command Center, your
printer’s PPD, and selected application PDFs or PPDs; then, it launches
the Adobe PostScript Printer Driver installer. With Windows NT, the
installer for the most recent printer driver launches. With Windows 95
or 98, you can select which printer driver to install.
___________________________________________ PC Setup 4-5

XANTÉ Utilities Installer runs properly only on an Intel based
computer running Windows 95, 98, or NT. To load the Adobe
PostScript printer drivers manually, see the CD-ROM’s Readme.pdf
and “Adobe PostScript Printer Drivers” later in this chapter. To load
QuarkXPress PDFs manually see “PDFs Folder” later in this chapter.
To install XANTÉ Command Center manually, run the CD-ROM’s
Setup.exe file in the Xutils folder.
XANTÉ Utilities and Application Drivers
Note: To do the NT 4.X setup, you must be logged on as the
System Administrator.
1. Insert the XANTÉ Utilities CD-ROM into your PC. XANTÉ
Utilities Installer launches automatically on systems running
Windows 95, 98, and NT 4.0. To start the Installer manually,
use the following steps.
a. Select Start: Run (Windows 95 or 98).
b. Use Browse to select the CD-ROM’s Xinstall.exe file
(Windows 95, 98, NT 3.5.X, and 4.0); then click OK.
2. Click Finish in the XANTÉ Utilities - Welcome window to
begin installation.
3. Follow instructions on each window before clicking Next.
When prompted, select the following items to customize your
installation.
a. Select your printer model(s) (fig 4.1). There are two
screens with product models listings. Choose only the
printer(s) that you are installing. Then, click Next.
4-6 PC Setupbb __________________________________________

Fig. 4.1 Select Your Printer Model(s)
b. Select the application version that you use.
Note: If you are not using a listed application for
Windows 95 and 98, select Next and go to step
3.d. For NT 4.X, select None and Next and go to
step 3.e.
Fig. 4.2 Select Your Printer Application(s)
c. Select the destination directory for the application, if you
specified an application and click Next.
Note: If you use QuarkXPress or PageMaker, setup
will install the PPD(s) and /or PDFs for your
printer in the default printer directory for those
applications or in another directory you choose.
___________________________________________ PC Setup 4-7
d. Select the destination directory for XANTÉ Utilities and
click Next.
e. Select the program folder for the XANTÉ Utilities and
click Next.

f. Select the AdobePS printer driver (fig. 4.3) for Windows
95 or 98, and click Next. This window does not appear for
Windows NT 4.X because only the AdobePS 5.X driver
(which supports both PostScript Level 2 and 3) is available.
For NT 4.X skip to step 3 in “Installing the AdobePS
Printer Driver and Printer PPD” in the “Windows 95, 98,
and NT 4.0 Drivers” section later in this chapter.
Fig. 4.3 Select the AdobePS Printer Driver
Windows 95 or Windows 98:
• AdobePS 4.1 (Adobe PostScript Level 2 only)
• AdobePS 4.2 (Adobe PostScript Level 2 and
Adobe PostScript 3)
• AdobePS 4.3 (Adobe PostScript Level 2 and
Adobe PostScript 3—Some systems have
problems using this new Adobe 4.3. If so,
revert to AdobePS 4.2)
4. Review the configuration information in the Start Copying Files
window (fig. 4.4). If you need to make any changes, click Back
and make the appropriate changes.
4-8 PC Setupbb __________________________________________

Fig. 4.4 Start Copying Files Window
5. Click Next to install XANTÉ Utilities and any applicationspecific PPD that you selected. Then use the following
appropriate procedure depending on which AdobePS driver
version you selected:
For AdobePS 4.1: Skip to “Installing AdobePS 4.1, 4.2, or 5.X
and the Printer PPD.”
For AdobePS 4.2: Skip to step 3 in “Installing the AdobePS
Printer Driver and Printer PPD.”
For AdobePS 4.3: When, the following screen appears,
continue to step 6.
___________________________________________ PC Setup 4-9
Fig. 4.5 Setup Complete Window (in the Back)

6. Click Finish on the Setup Complete window (this is the
window behind the AdobePS screen in figure 4.5). Then, wait
approximately 10 seconds and click Yes in the AdobePS
window (fig. 4.6). The Adobe PostScript Installer
automatically launches.
Fig. 4.6 AdobePS Window
7. Go to the appropriate section for your operating system in
“Adobe PostScript Printer Drivers” to continue the installation.
Adobe PostScript Printer Drivers
Before using your printer, you must install the Adobe PostScript
driver and your printer’s PPD.
XANTÉ Utilities Installer launches the installation program for the most
recent Adobe PostScript printer driver on systems running Windows NT
4.0. It allows you to select the Adobe PostScript printer driver to load on
systems running Windows 95 or 98.
This section describes loading the printer driver manually for each
operating system and starting the installer. See “XANTÉ Utilities
Installer” earlier in this chapter to load XANTÉ Utilities manually.
See “PDFs Folder” later in this chapter to load QuarkXPress PDF
files manually.
4-10 PC Setupbb __________________________________________

Deleting Previous Driver Versions
Normally, you do not have to delete previous Adobe PostScript
printer drivers or any previously installed Adobe PostScript printers.
However, if you suspect installation problems, first remove your
installed printers from the Printers dialog box in the Windows
Control Panel and reinstall them via the Adobe PostScript Printers
dialog box which is also in the Windows Control panel.
If after removing and reinstalling your printers, you still experience
problems, delete all previous driver versions and reinstall your
printers using the Adobe PostScript Printers dialog box.
This section covers deleting AdobePS 4.1.X and later and deleting
AdobePS 4.0 and earlier versions.
Deleting AdobePS 4.1.X and Later
To delete Adobe PS 4.1.X or later versions of the driver
1. Open Windows. Select Start: Programs: Windows Explorer.
The Windows Explorer main window opens.
2. Select Tools: Find: Files or Folders. The following screen
appears.
___________________________________________ PC Setup 4-11
Fig. 4.7 Find: All Files Window

3. Delete each of the following four files on your C drive using
the following procedure.
Adobeps4.drv Defprtr2.ppd
Adobeps4.hlp Adfonts.mfm
a. Enter the name of the file to be deleted in the Name field
(Fig. 4.7).
b. Select Include subfolders.
c. Make sure C:\ is selected under “Look in.”
d. Click Find Now. The file name should appear in the
bottom of the window.
e. Highlight the file name and press the Delete key.
Note: If Windows returns the message, "Error: Cannot
delete this file, it is being used by Windows,”
then restart your computer and return to step 1.
f. Repeat steps 3.a. through 3.d to delete the remaining
three files.
g. Close the Find: File All window. You return to Windows
Explorer.
4. Go to the C:\ root drive in the Windows Explorer window.
5. Locate and highlight AdobePS4 directory if it is listed; then,
press the Delete key and go to step 8. If the directory is not
listed, go to step 6.
6. Locate and open the Windows\Start Menu folder in the
Windows Explorer window. Highlight the AdobePS4 directory
if it is listed; then, press the Delete key and go to step 8. If the
directory is not listed, go to step 7.
7. Go to the Windows desktop. Select Start: Settings: Printers.
Then, locate your XANTÉ printer, highlight the printer name
and press the Delete key to delete the printer from the list.
4-12 PC Setupbb __________________________________________
 Loading...