

Page 1

Xanboo iG3 Installation Guide
Product Description
The Xanboo iG3 Gateway connects to your high speed Internet service so you can view and
control your home remotely through the Internet.
Package Contents
• (1) Gateway
• (1) 15v Power Supply
• (1) 6’ Ethernet Cable
• (1) Mounting hardware kit
• (1) Installation guide
1) Plug Ethernet network cable into the LAN jack on the back of the gateway.
Connect the other end into your router or directly into your cable/DSL
modem.
Note: if you are plugging it directly into your cable/DSL modem,
you may need to reset it after powering up the gateway.
2) Plug the two wired cameras into
3) Plug the power adapter into the ‘Power’ port on the back of the gateway.
Plug the other end into an available power outlet.
4) The ‘Service’ light on the front of the gateway will blink red for a period of
1-3 minutes. It should then go to a solid yellow.
Note: If it continues to blink Red, please consult the troubleshooting
section in the iG3 manual.
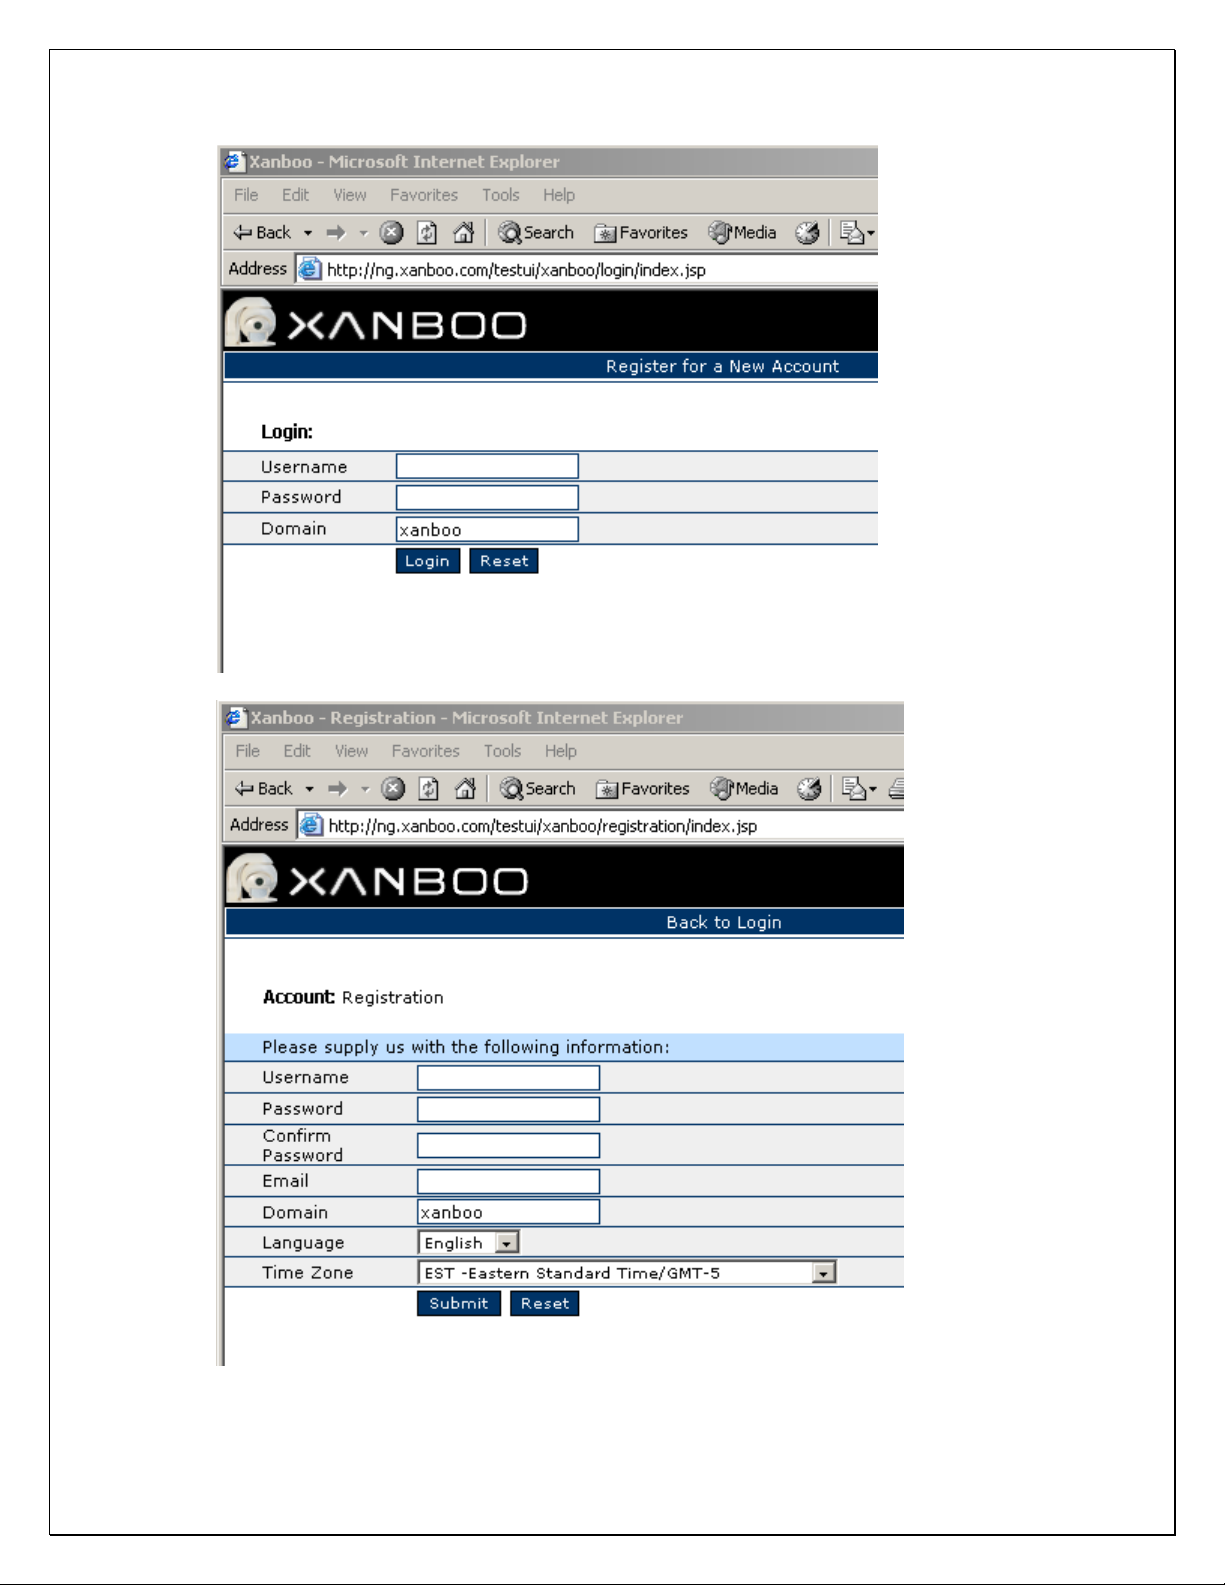
5) Before configuring your gateway, you must create an account on the
Xanboo network. Point your browser to http://ng.xanboo.com. Click on the
‘Register New Account’ link to get to the account creation page. Fill in all of
the fields and click submit to create your account.
‘CAM 1’
and
’CAM 2’
ports.
Page 2
Page 3
6) You will first need to access it from a PC located on the same network.
Place the CD provided into your PC and launch the XanAssist setup program.
7) Follow the installation wizard to install Xanassist. After it is finished
installing it is recommended that you reboot your computer.
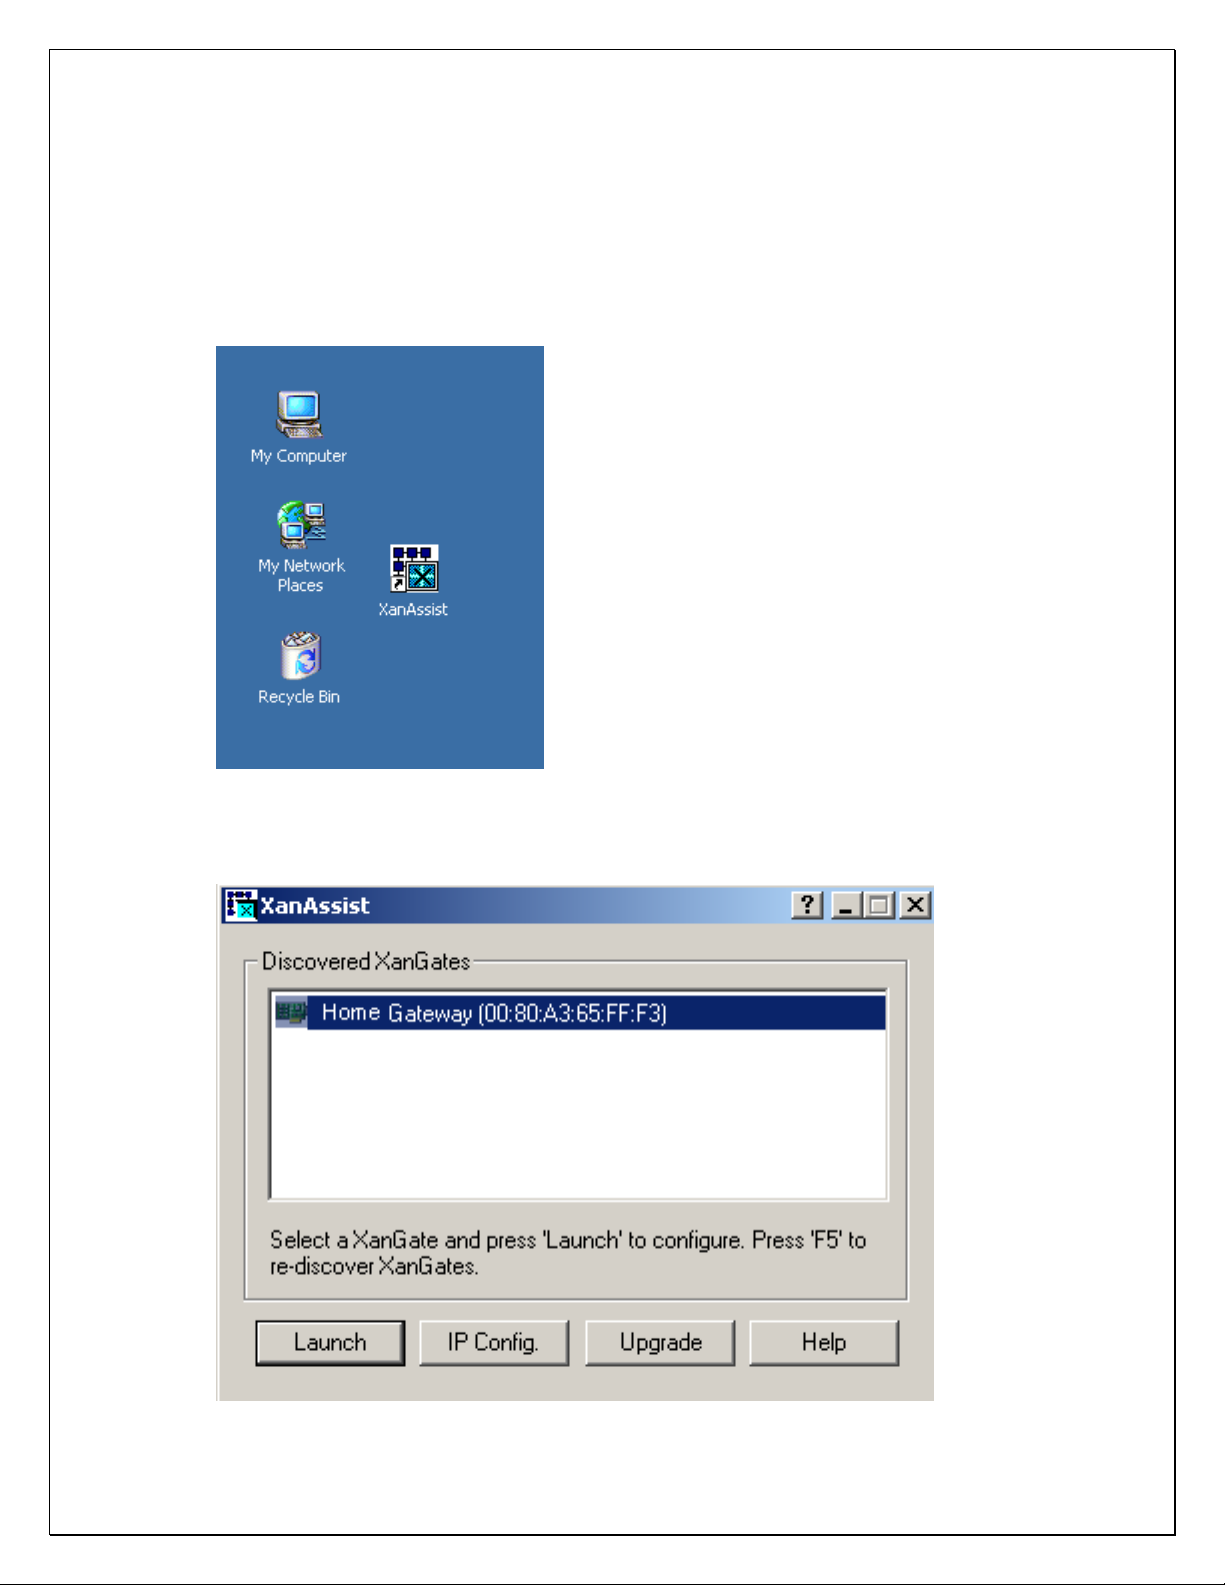
8) Launch XanAssist by clicking the icon that was placed on your desktop.
9) You should now see your gateway appear in the list. Select it and click the
‘Launch’ button.
Note: If you do not see your gateway appear in the list,
please consult the troubleshooting section at the end of this document.
Page 4
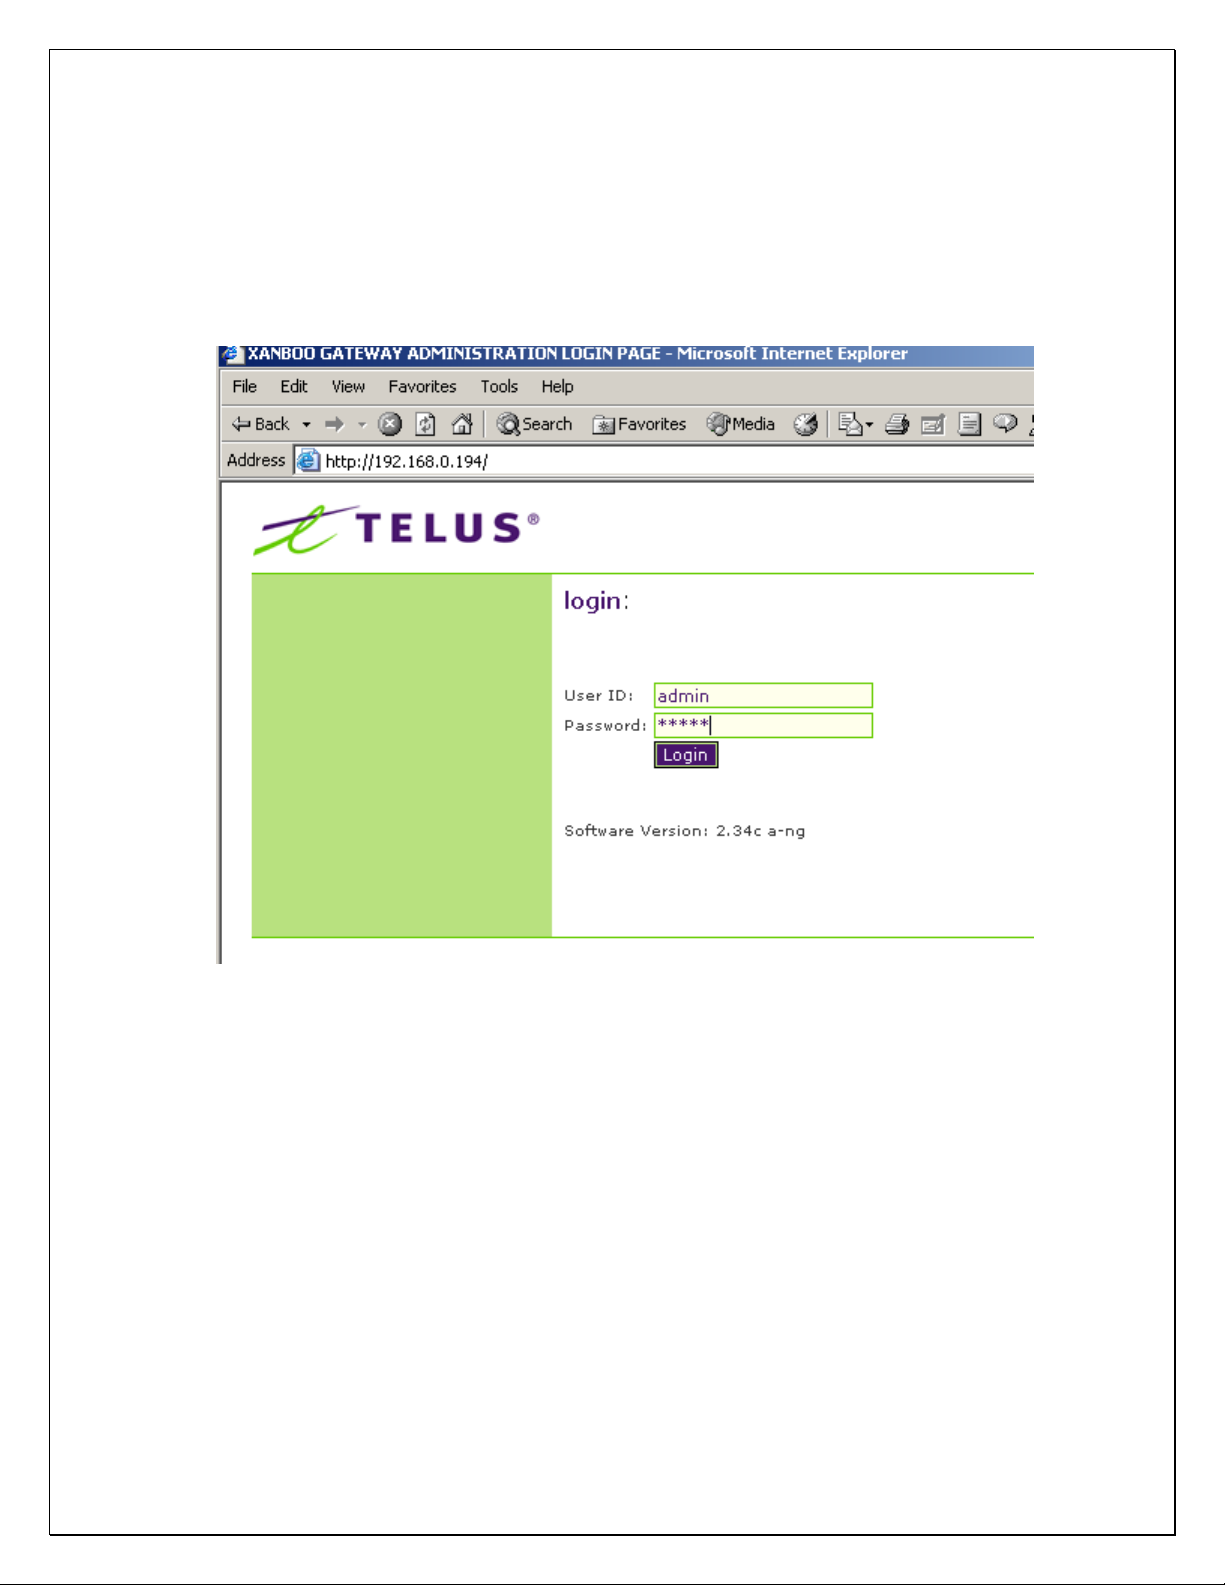
10) In order to configure the gateway you must first log into it. Type ‘admin’
for the login name and ‘admin’ for the password. This is the default setting
and can be changed later.
Note: This is the login for the local admin which is different then
your xanboo account created above.
11) Follow the setup wizard to configure your gateway and register devices
Page 5
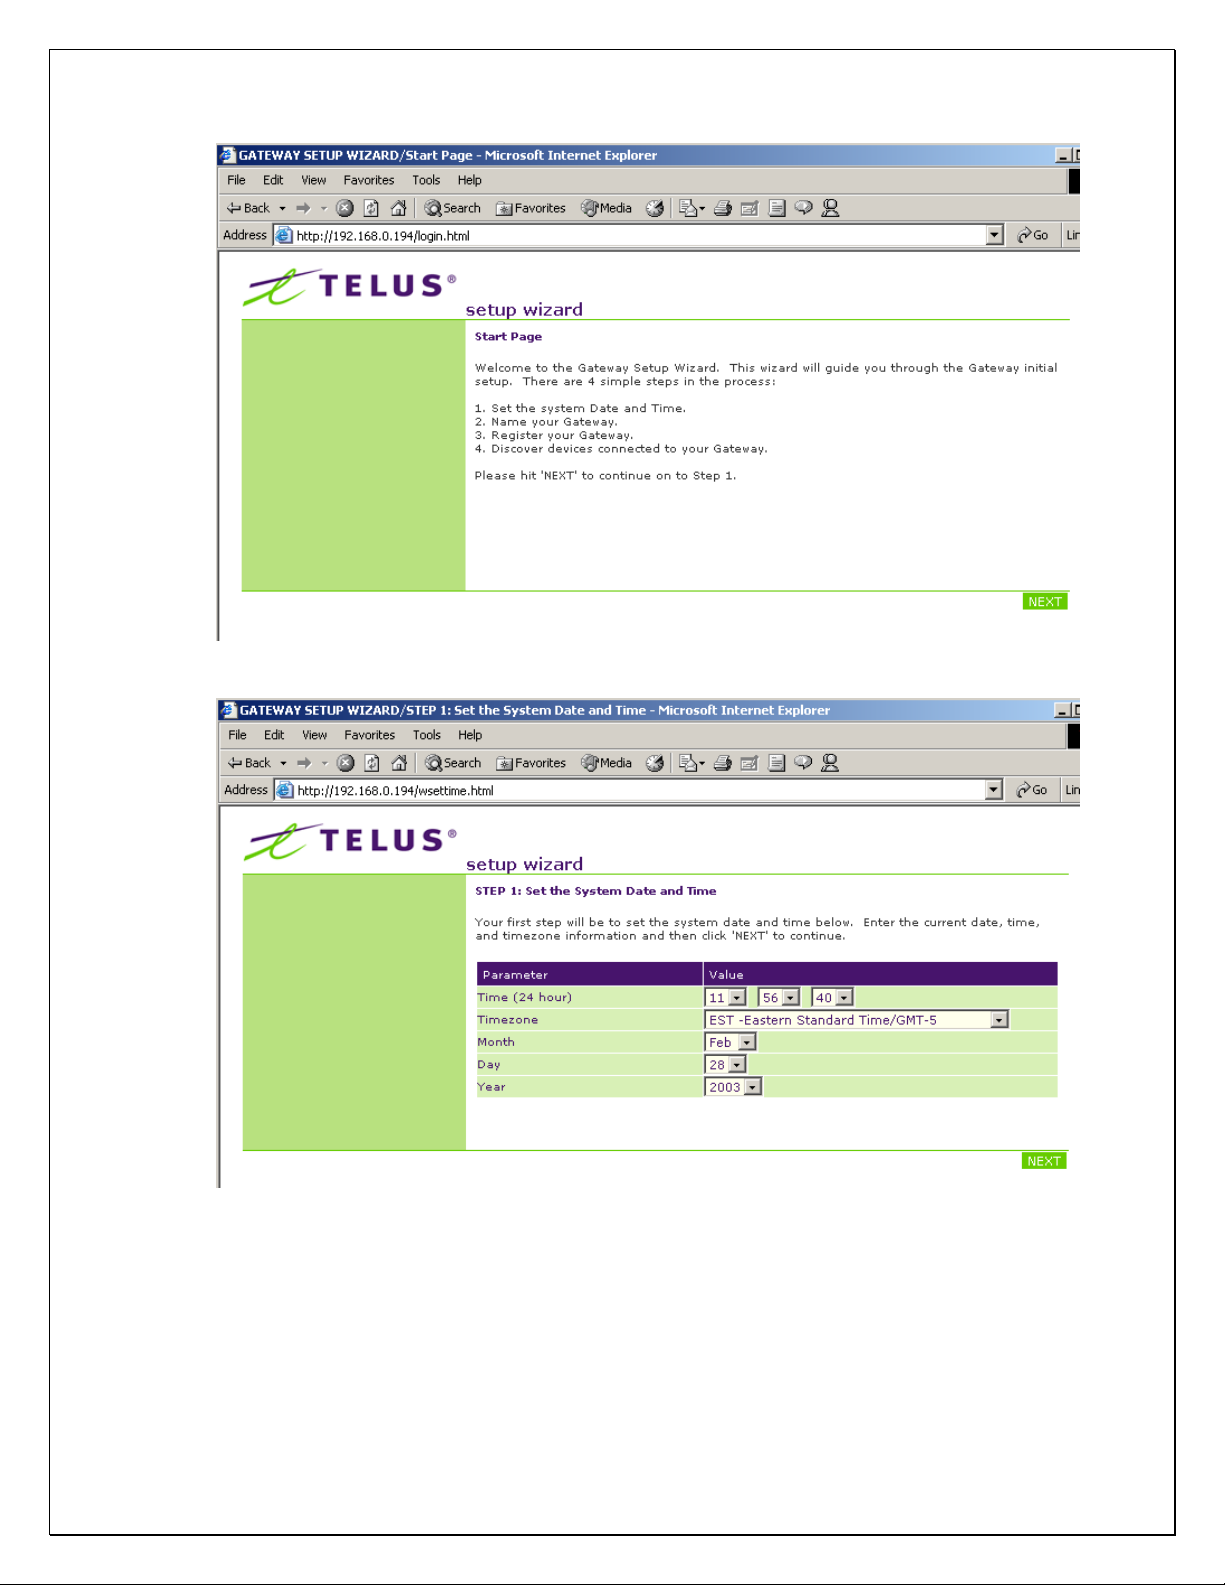
12) Set the date and time and then click next
13) Choose a name for the gateway and then click next.
Page 6
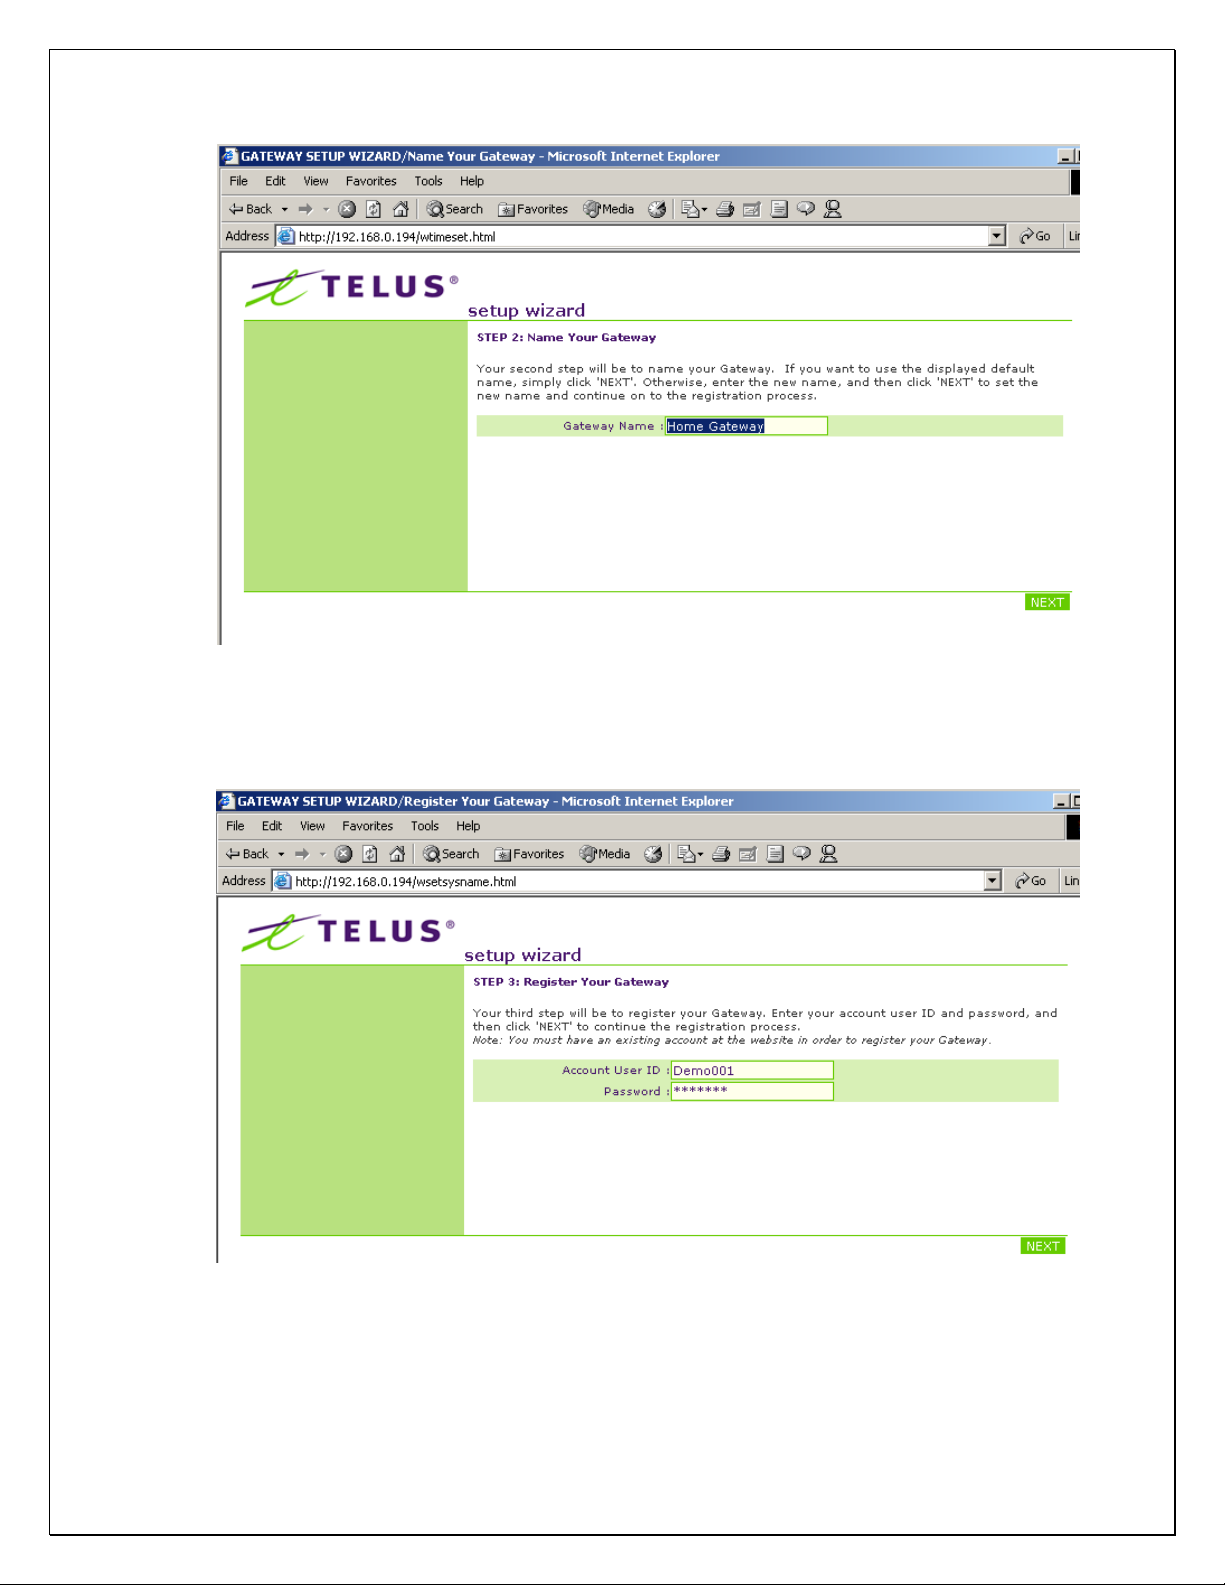
14) Enter the
Xanboo
account created in Step #5 and then click next.
Note: The login and password fields are case sensitive.
15) You will now need to ‘discover’ the devices you wish to use with the
gateway (cameras, sensors, etc). Be sure that your wired cameras are
plugged into the gateway before you start the discovery process. Also make
sure your wireless devices are located in the desired location and are
powered properly. A 9v power adapter powers the wireless cameras. When
Page 7
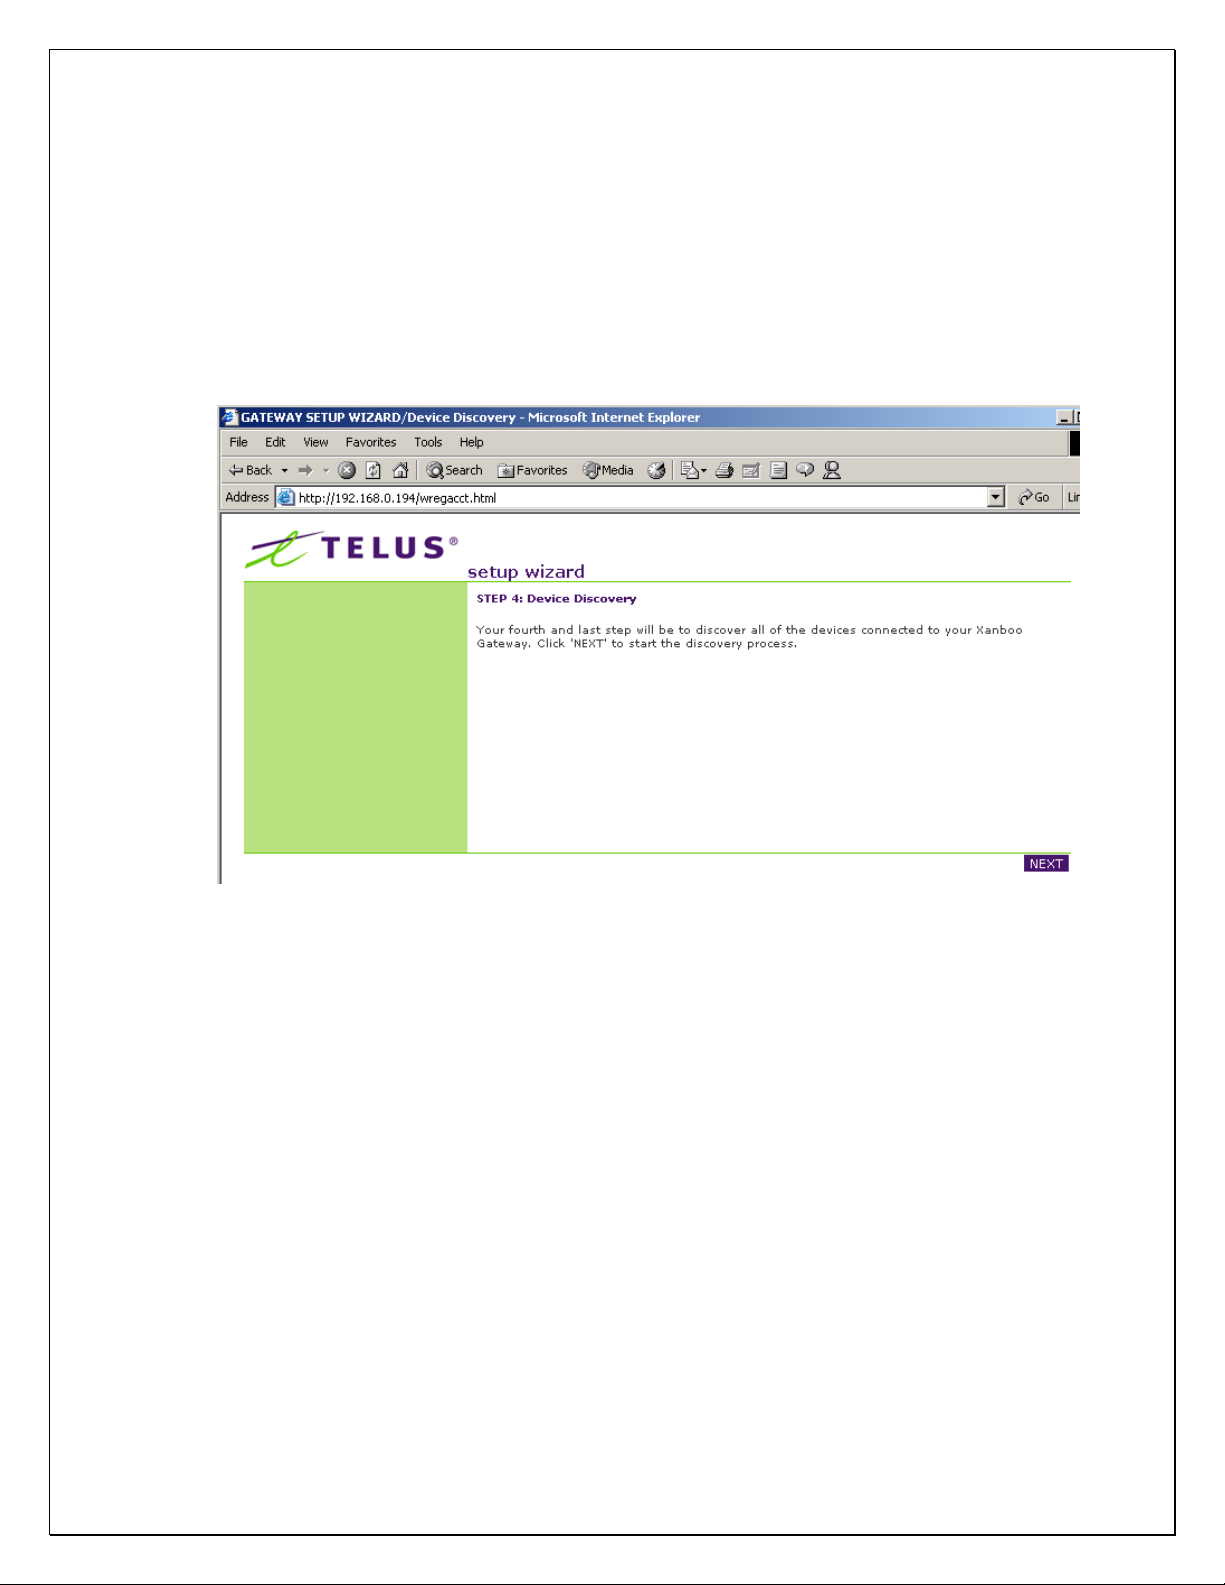
plugged in, the light on the camera will turn red. The wireless sensors are
powered by two ‘AAA’ batteries (included). Slide the battery cover off and
make sure the batteries are inserted properly. The light on the sensor will
turn on briefly each time the sensor is opened or closed. Otherwise, check
the batteries again. Click the ‘Next’ button to start discovering your devices.
Note: The discovery process will automatically timeout after 10
minutes.
16) This page will automatically refresh every 15 seconds. As devices are
discovered, they will appear in this list on each page refresh.
17) At this time, using a paper clip, press the discovery button on the back of
the wireless cameras. The light on the camera will turn green when the
gateway has discovered it properly.
Note: If the light does not turn green, please consult the
troubleshooting section of the camera guide.
18) If you have purchased any wireless sensors, repeat this step.
19) Go back to your PC and check that the page displayed in your browser
now displays all of the devices you have discovered.
Note: You can always add devices later if you have not discovered
all of them at this time.
Page 8
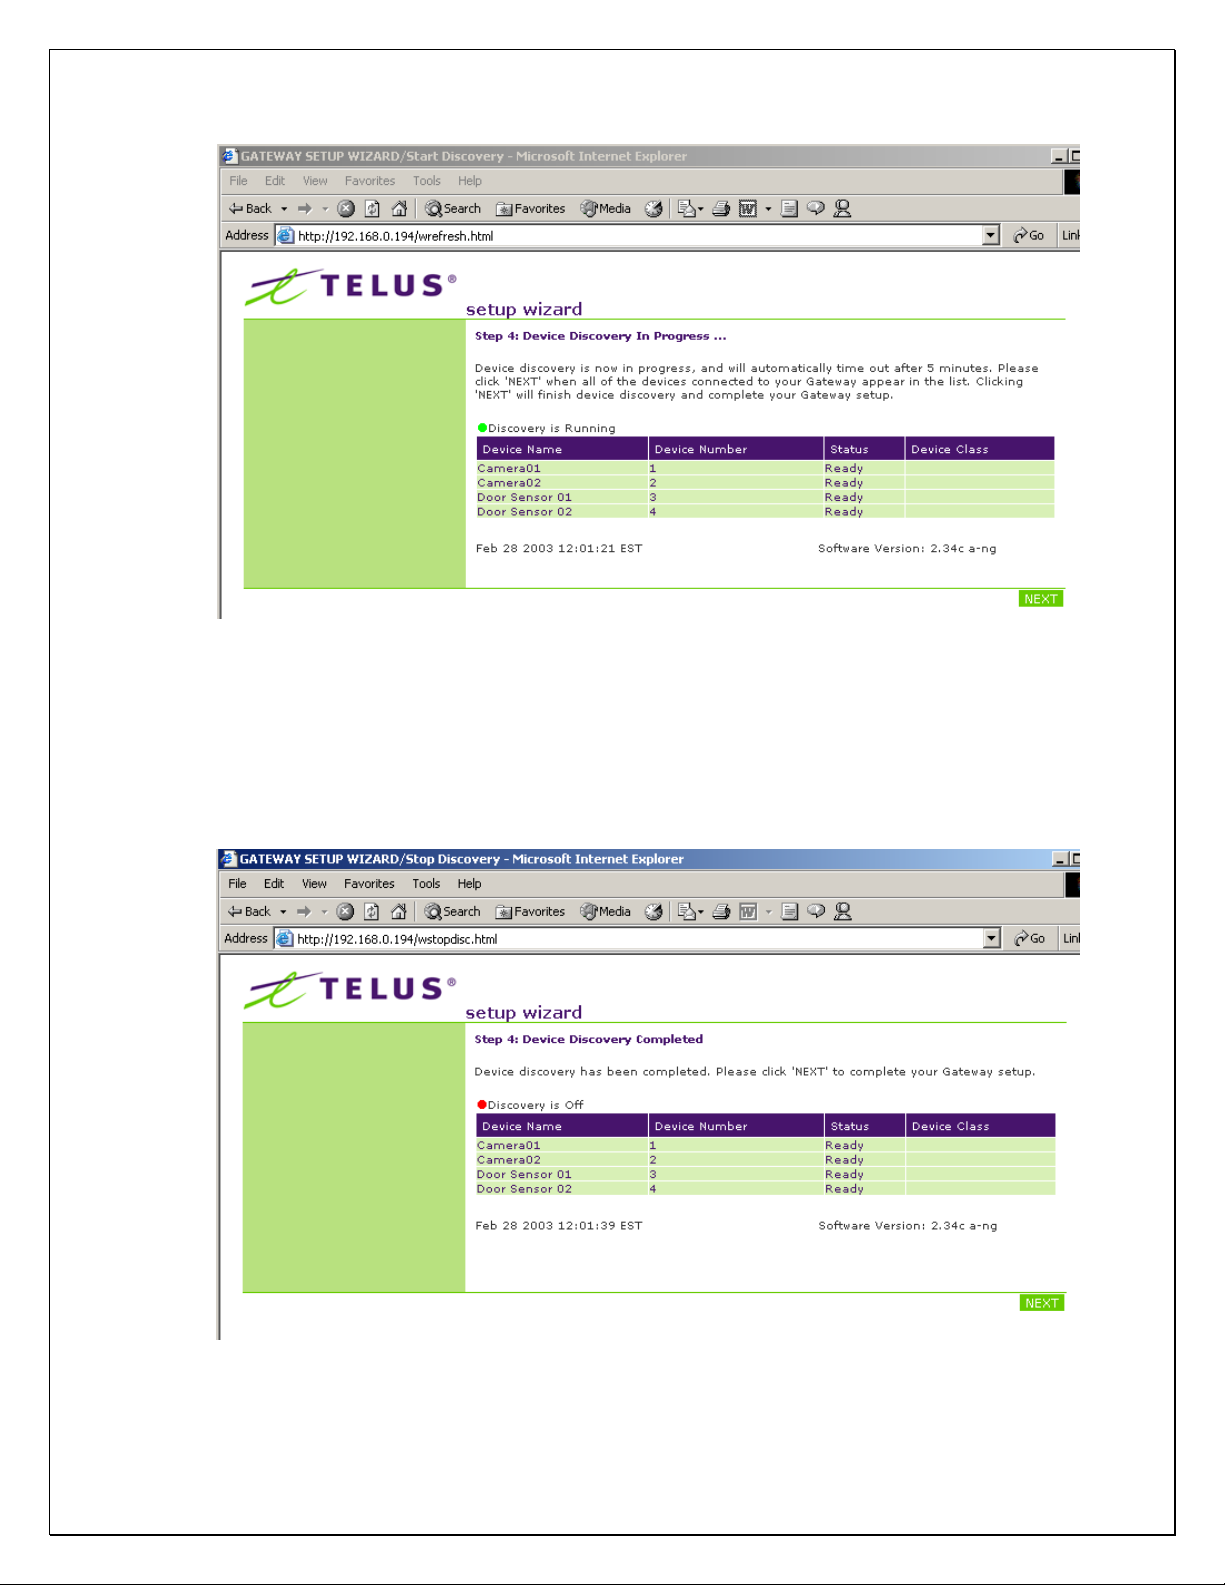
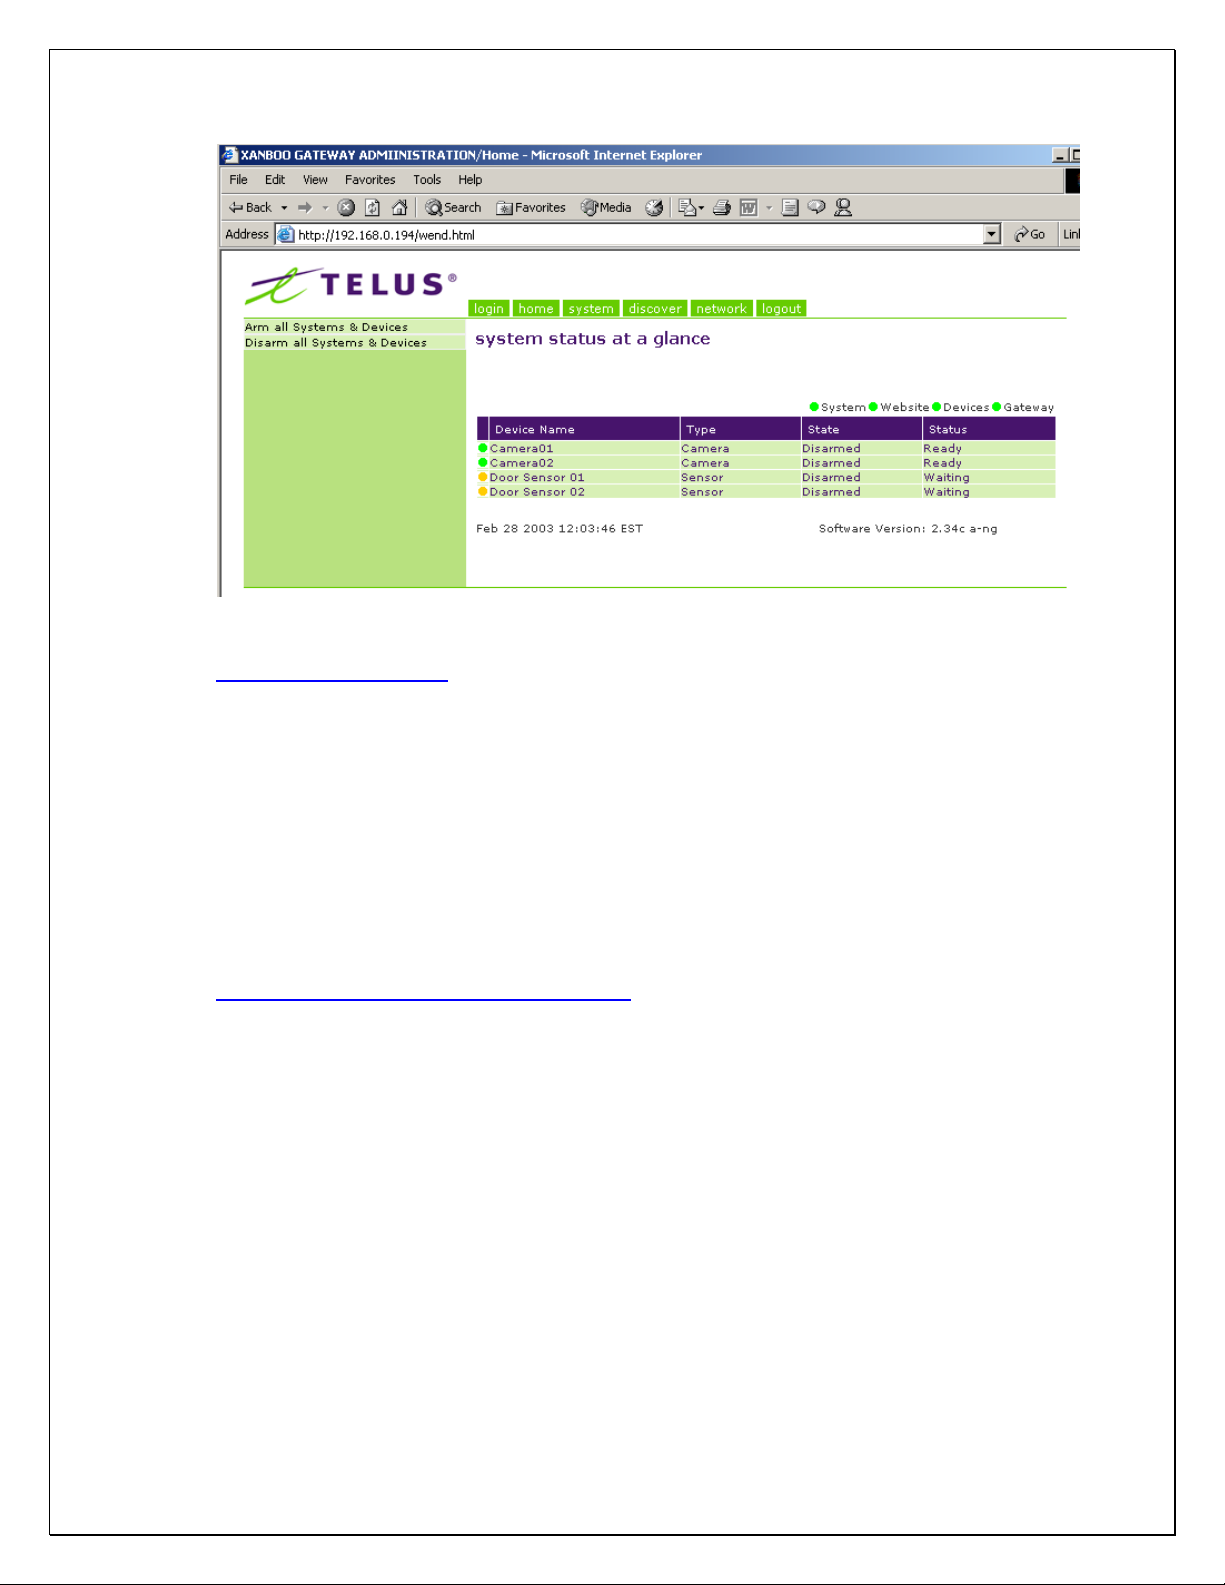
20) Click Next. You are now finished with the first time setup. Click next again
to get to the home page of the configuration screens.
Note: The next time you log in, you will see this page. The setup
wizard only appears the first time the gateway is powered or after it
has been reset.
Page 9
21) You are now ready to interact with your devices. Point your browser to
http://ng.xanboo.com and proceed to login with the user name and password
you setup in step #5.
22) The ‘Inbox’ is the default view you will see upon logging on. This will
contain a list of items that represent:
• Events: Door sensor open/close
• Images: Captured manually or through motion sensor events
• Video Clips: Captured manually.
Note: playing back the video clips requires installation of the
Quicktime player. Point your browser to
http://www.apple.com/quicktime
Page 10
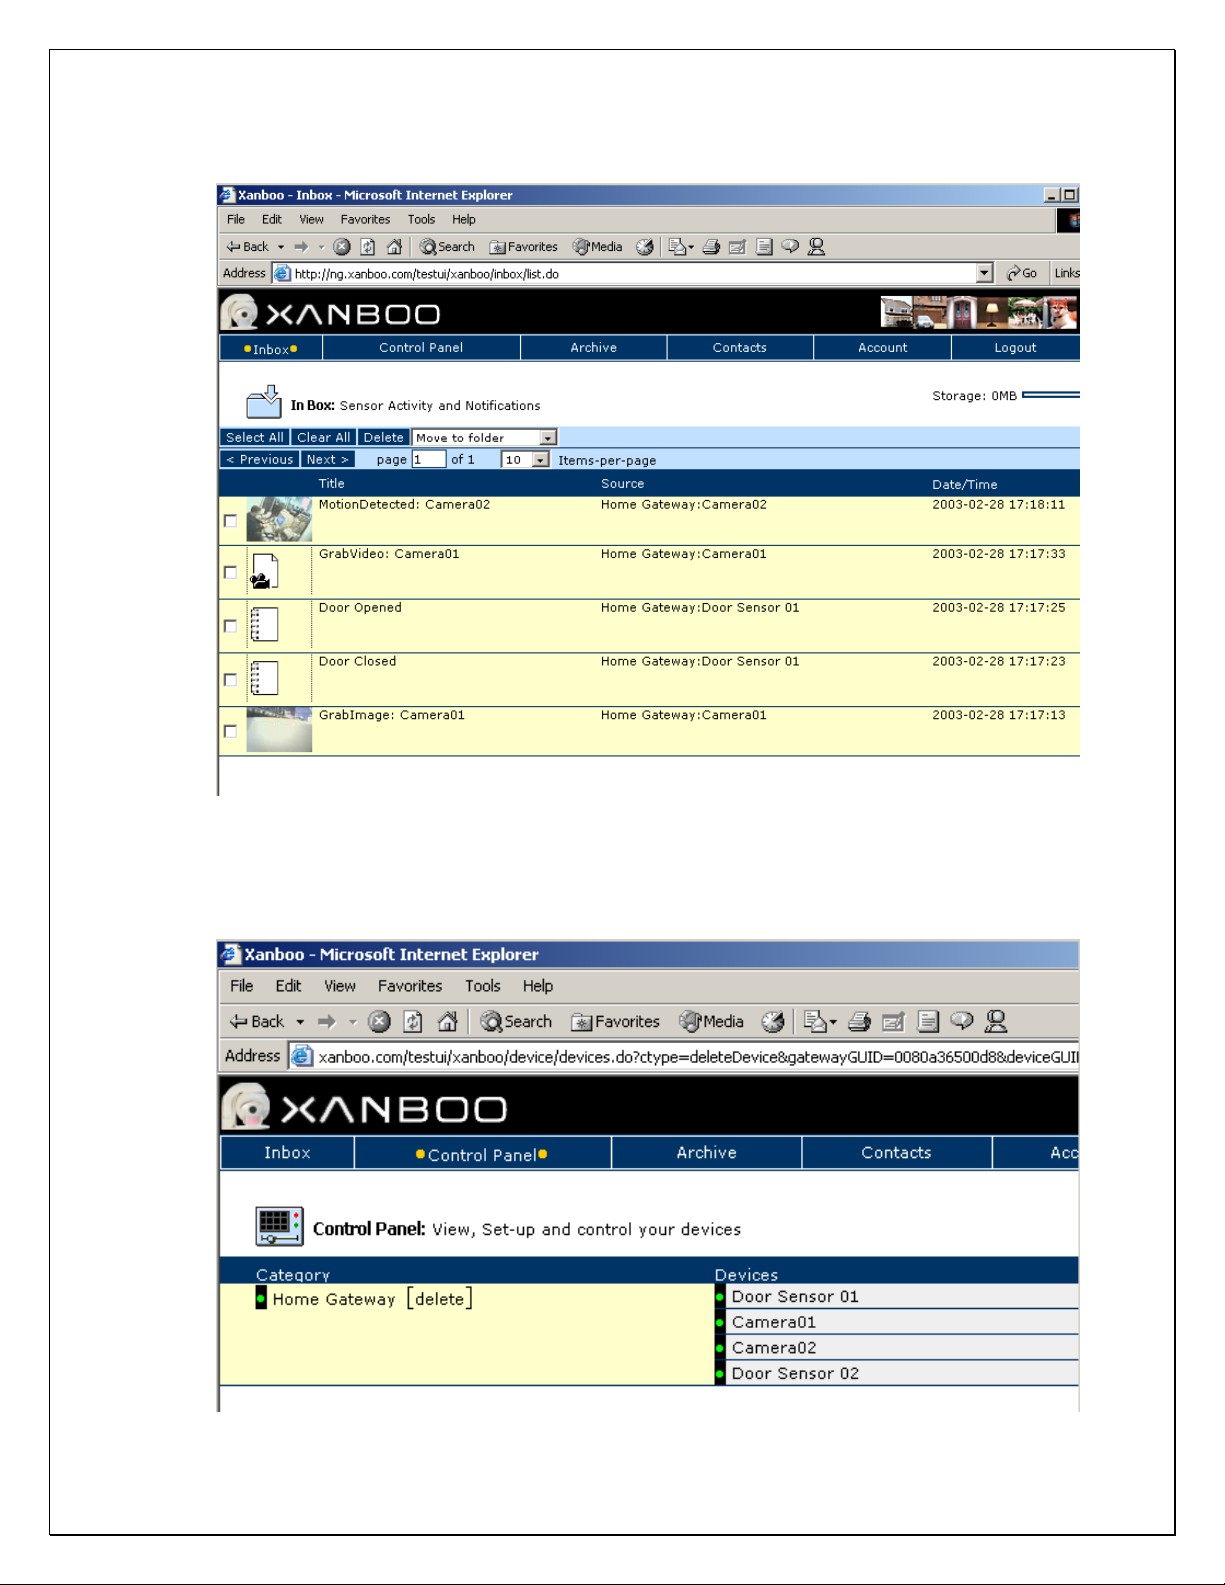
USING XANBOO.COM
1) The ‘Control Panel’ allows you to control your gateway and devices. After
clicking on it you will see your gateway name you selected during setup as
well as the devices you discovered.
Page 11
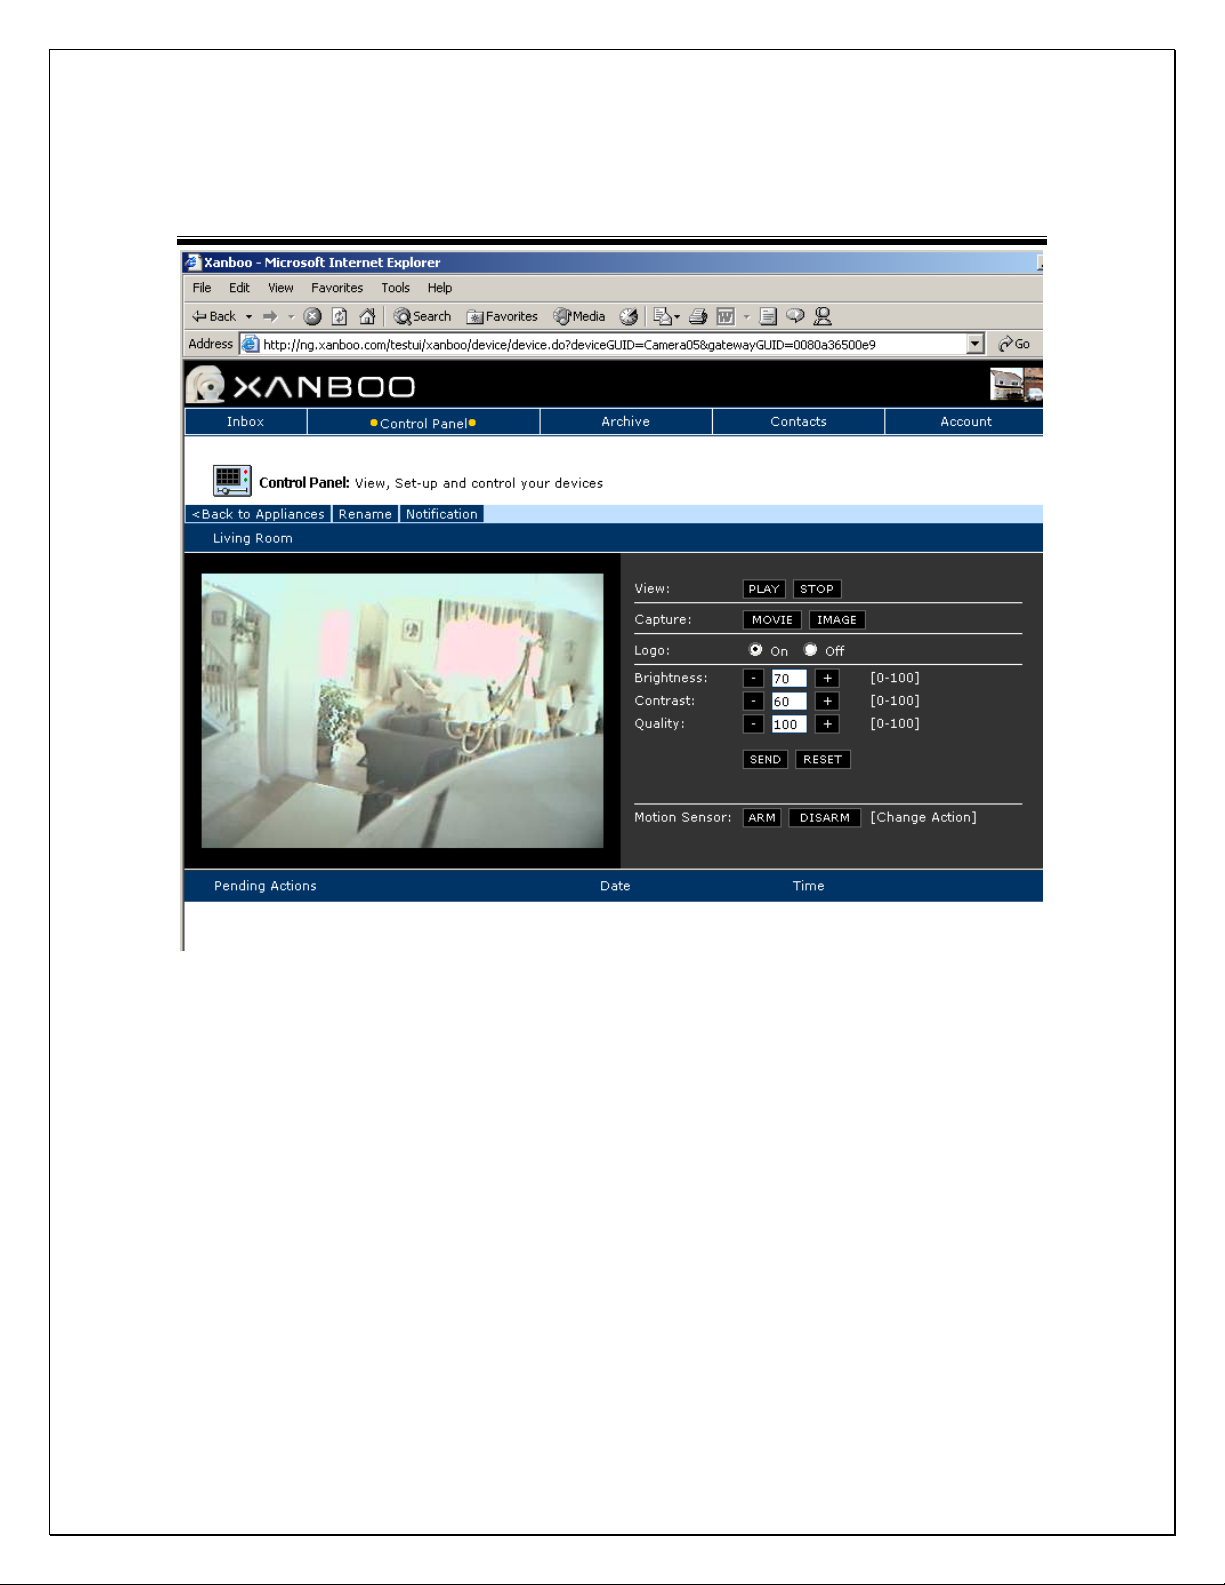
Controlling Cameras
1. Click on a camera link from the ‘Control Panel’ to control the camera.
2. Click Play to turn on the web camera.
Note: it may take up to 60 seconds
before you may see the image on the initial loading. While it is loading
you will see a ‘static’ image. This image is not coming from the cameras.
3. Click on the ‘Arm’ button to arm the cameras motion sensor
4. Click on the ‘Image’ or ‘Video’ button to capture an image or video clip.
Note: It may take up to 60 seconds for the image or video to appear in
your inbox.
5. You can also adjust the brightness, contrast and quality settings. A higher
quality setting will result is clearer images but a larger byte size of the file.
6. To have your captured images stamped with the camera name, turn the
‘Logo’ option to enabled.
7. If you wish to rename the camera, simply click on the ‘Rename’ link.
Page 12
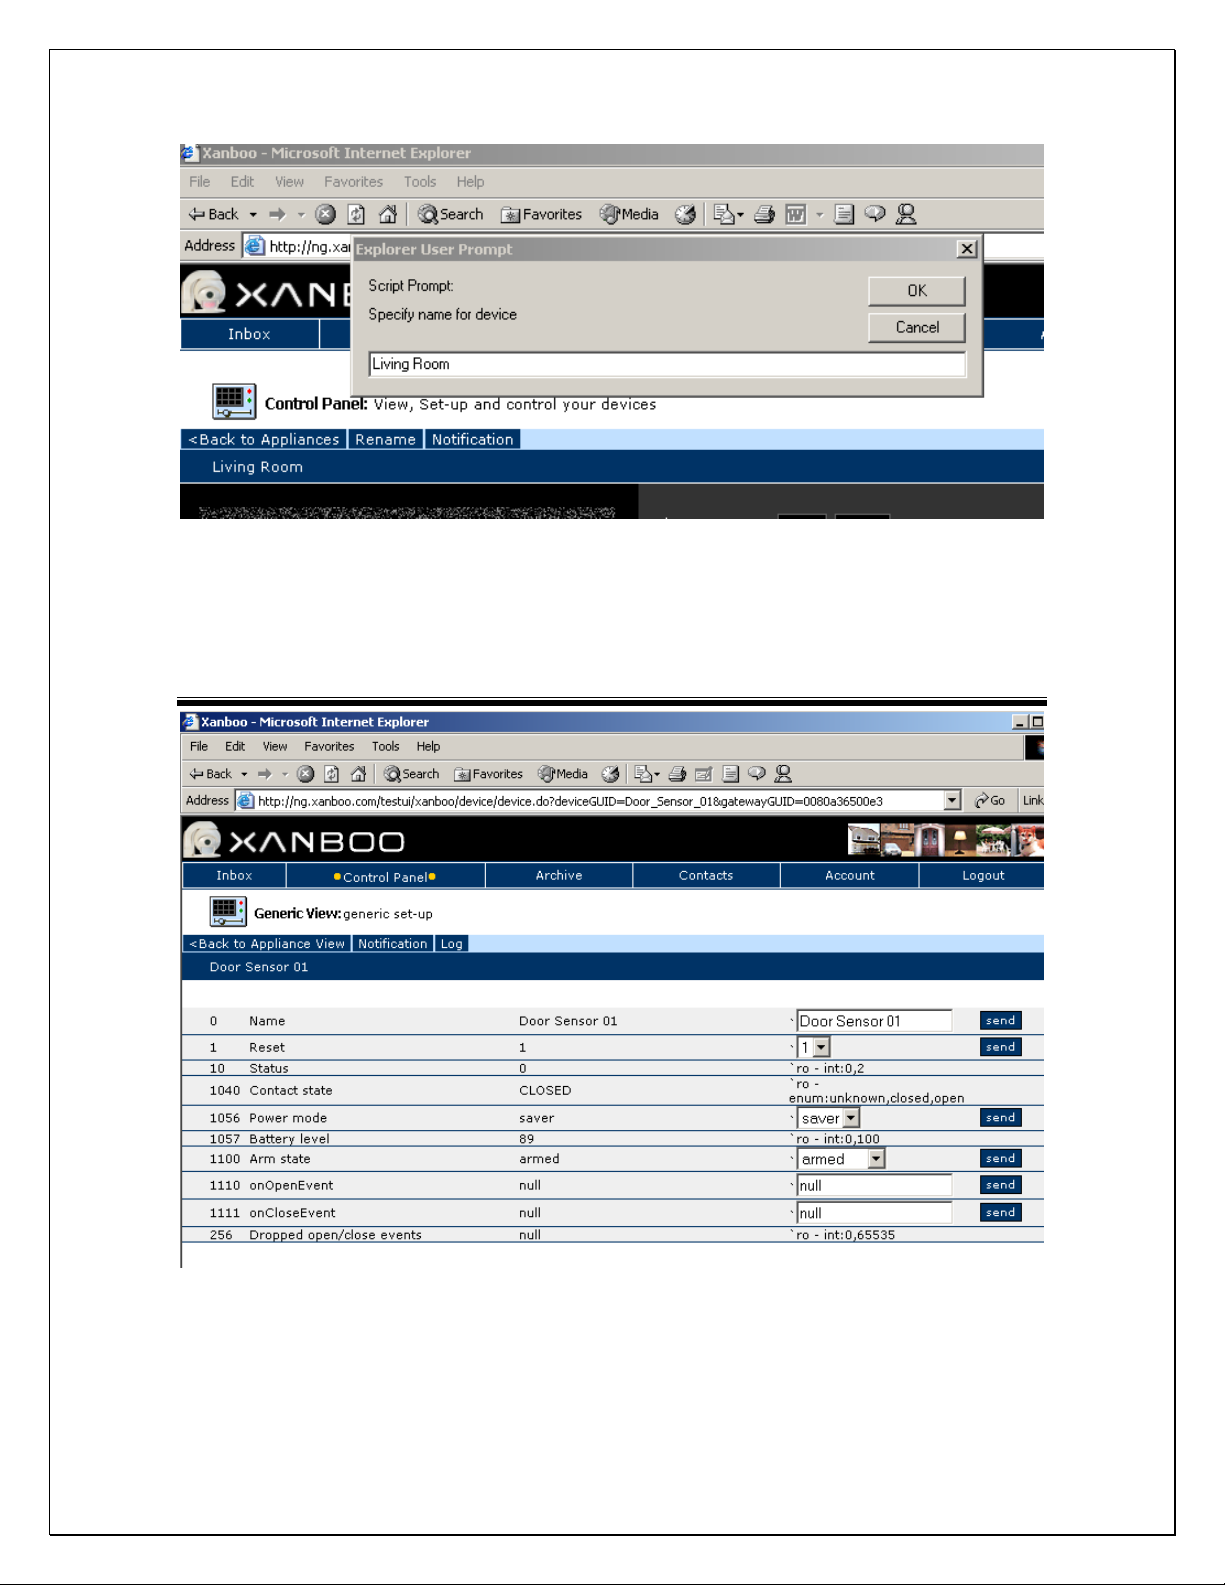
8. Click on the ‘Control Panel’ to control other cameras or sensors. Each
camera will retain its own settings.
Controlling Sensors
1. Click on the sensor link from the ‘Control Panel’ to control a sensor.
2. Select Arm and click the ‘Send’ Button to arm the sensor. Once armed the
sensor will send events to the inbox each time the sensor is opened or
closed.
Page 13
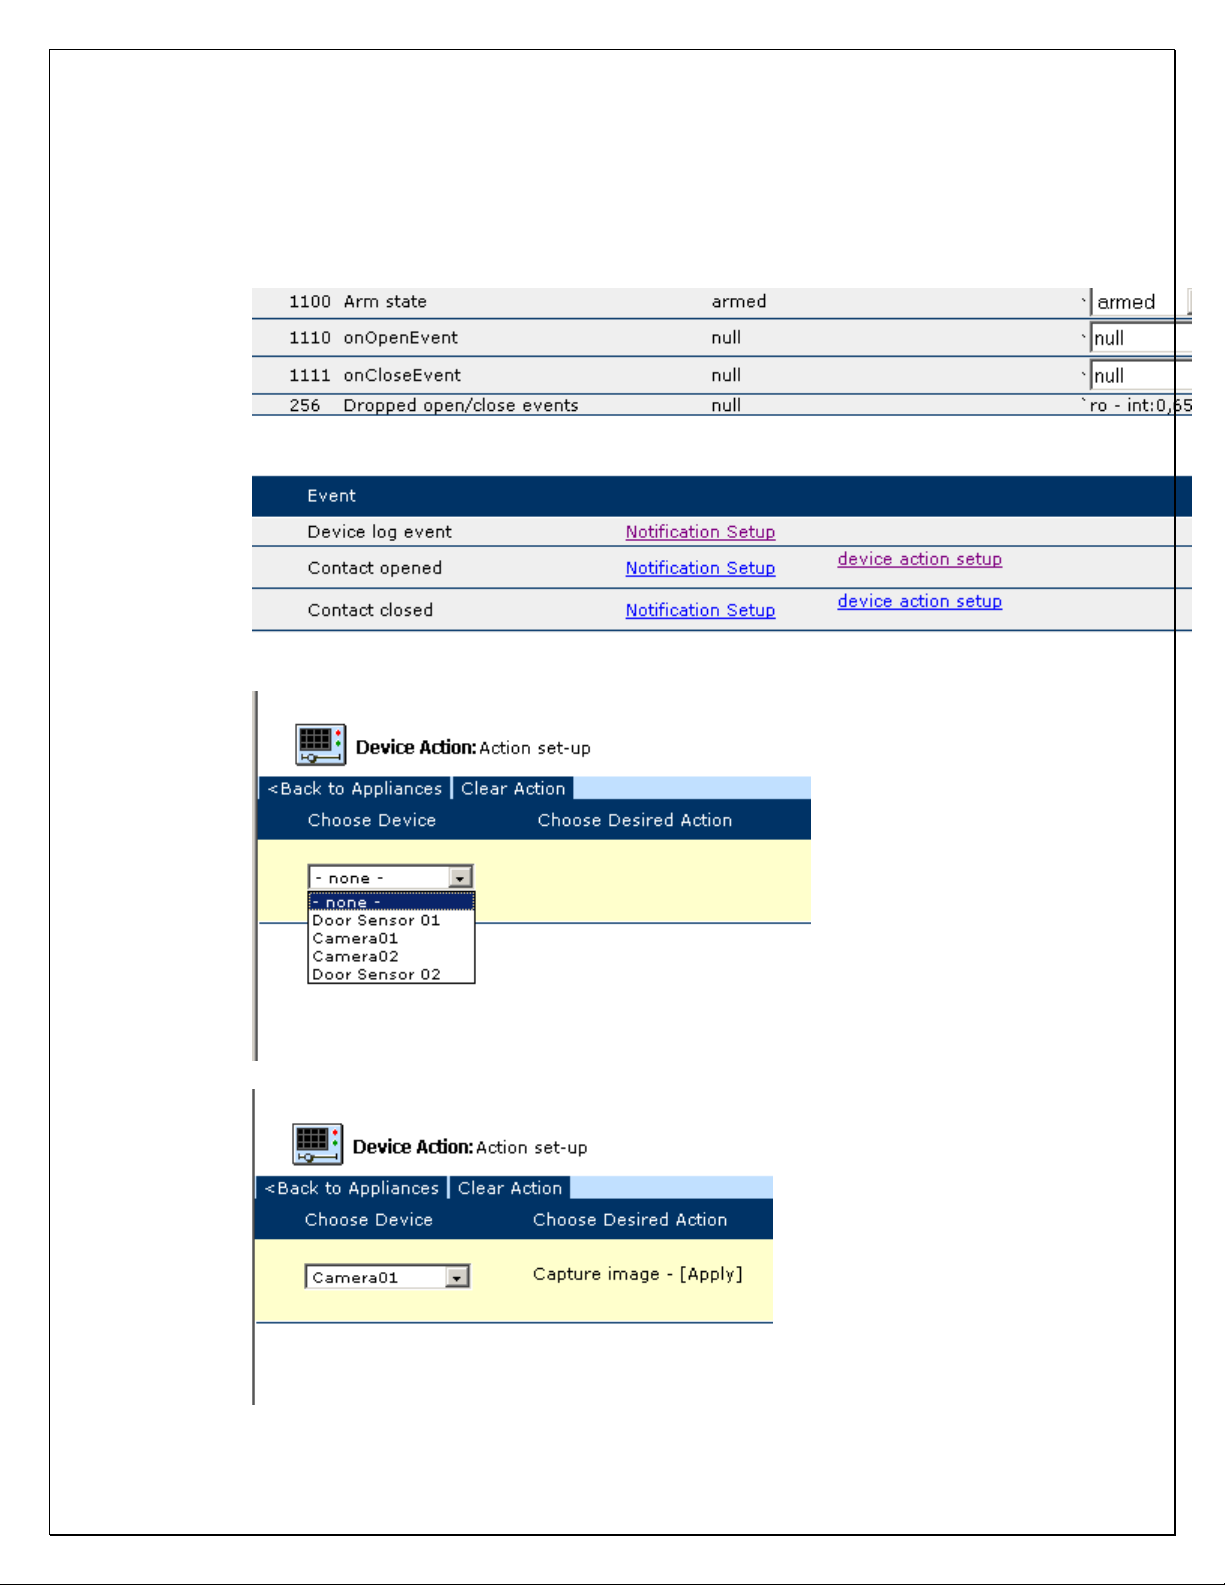
3. The sensor can also be configured to capture an image upon an open or
close event from any camera.
for each action.
4. Select the ‘device action setup’ link in the event section of the page. You
can choose either Contact Opened or Contact Closed.
5. Choose a camera from the list.
Note: You can configure different cameras
6. Then click on the ‘[Apply]’ link.
Page 14

Using the ‘Hi-Mom’ Camera
1. After the camera has been discovered with the gateway, it can be used to
send short video clips with the touch of a button.
2. When the camera is ready for a recording, the light will be a solid green.
At this time you can push the button on the camera to start recording.
3. The light will flash green while the video is being captured.
4. After it has completed, it will flash yellow while it is being reset and then
back to solid green indicating it is ready for another recording.
flashing red light at anytime indicates that the video clip was not
recorded. This usually means that was too much interference and the clip
could not be captured. Please consult the troubleshooting guide in the
camera manual.
5. The video clips will appear in your inbox within 30-60 seconds after it has
been captured.
Note: A
Page 15

ADDITIONAL iG3 GATEWAY INFORMATION
Discovering Devices (SLIDE 10)
NOTE: New devices can only be discovered when the gateway has an active Internet
connection (ie, your gateway is connected to the internet).
In order for the gateway to control Xanboo devices such as cameras and
sensors, each device must be registered with the Gateway. The iG3 Gateway
establishes a “secure wireless network” between itself and all discovered Xanboo
devices. The gateway can only control devices that it has discovered. New
devices can be discovered at any time. To discover your devices to the iG3
Gateway, access the Local Gateway Administrative pages by:
A) To Discover new devices, log into the iG3 using XanAssist
B) Click on the DISCOVERY menu option
C) If you have new wired cameras, plug them into the camera ports on the
back of the gateway. These will automatically be discovered.
D) Click the Start Discovery menu item to begin discovery for new wireless
sensors and cameras, simply push the discovery button on the device
while the gateway is in discover mode.
for more detailed instructions for specific devices
E)
As each new device is detected by the gateway, it will be listed in the
browser window. NOTE:
This page will refresh every 10 seconds to show
newly discovered devices. You may have to wait for a refresh to see the
device listed
Click on the Stop Discovery menu option when you are finished
F)
discovering all of your devices.
NOTE: The gateway will automatically stop
discovery after 5 minutes or if you browse off the page
G) Your new gateway and devices are now ready to be used.
Please consult the devices manual
.
SET DATE and TIME (SLIDE 5)
To set a new Date or Time for the iG3 Gateway:
A) Log into the iG3 using XanAssist
B) Click on the SYSTEM tab
C) Click on the SET DATE and TIME menu option on the left
D) Choose the correct information
E) Click on SAVE
Your date and time has now been updated
Page 16

RESET CONFIGURATION (SLIDE 10)
To reset the iG3 Gateway back to the factory default settings:
a) Log into the iG3 using XanAssist
b) Click on the SYSTEM tab
c) Click on the RESET CONFIGURATION menu option on the left
F) CLICK on the RESET CONFIGURATION button
G) You must then re-power the gateway, by first turning it off, then on.
H) Upon re-powering, you will need to follow the 1
mentioned above in Step 4.
st
time setup instructions
DISPLAY LOG (SLIDE 6)
To view the activity log of the iG3 Gateway:
I) Log into the iG3 using XanAssist
J) Click on the SYSTEM tab
K) Click on DISPLAY LOG menu option on the left
L) You can now review the log information
CHANGE PASSWORD (SLIDE 8)
All gateways initially have the same login and password (“admin”) and it is
recommended that you change your password after logging in for the first time.
M) Log into the XanAssist
N) Click on the SYSTEM tab
O) Click on the CHANGE PASSWORD menu option on the left
P) Verify your current password
Q) Enter your new password and click submit
R) Your password has now changed
CHANGE GATEWAY NAME (SLIDE 8)
If you wish to change the name of the Gateway (as it will appear on your web
account):
A) Log into the iG3 using XanAssist
B) Click on the SYSTEM tab
C) Click on CHANGE GATEWAY NAME menu item on the left
D) Type the new name into the Gateway Name field
E) Click on the CHANGE GATEWAY NAME button
SHOW VERSION (SLIDE 9)
To view the version of software you are using
A) Log into the iG3 using XanAssist
B) Click on the SYSTEM tab
C) Click on the SHOW VERSION menu item on the left
Page 17

D) You can now view your software version
Configuring Network Settings (Advanced users only)
(SLIDE 12)
The gateway is configured to use a DHCP server by default to obtain it’s IP
address. Most users will not have to change from this configuration. In the event
that you need to modify network configuration, you can do so through the
gateway admin pages.
E) Log into the iG3 using XanAssist
F) Click on the NETWORK tab
G) Click on the EDIT link for the settings you need to change and apply
changes
H) It is recommended that you re-power the gateway after changing the
network settings.
Page 18
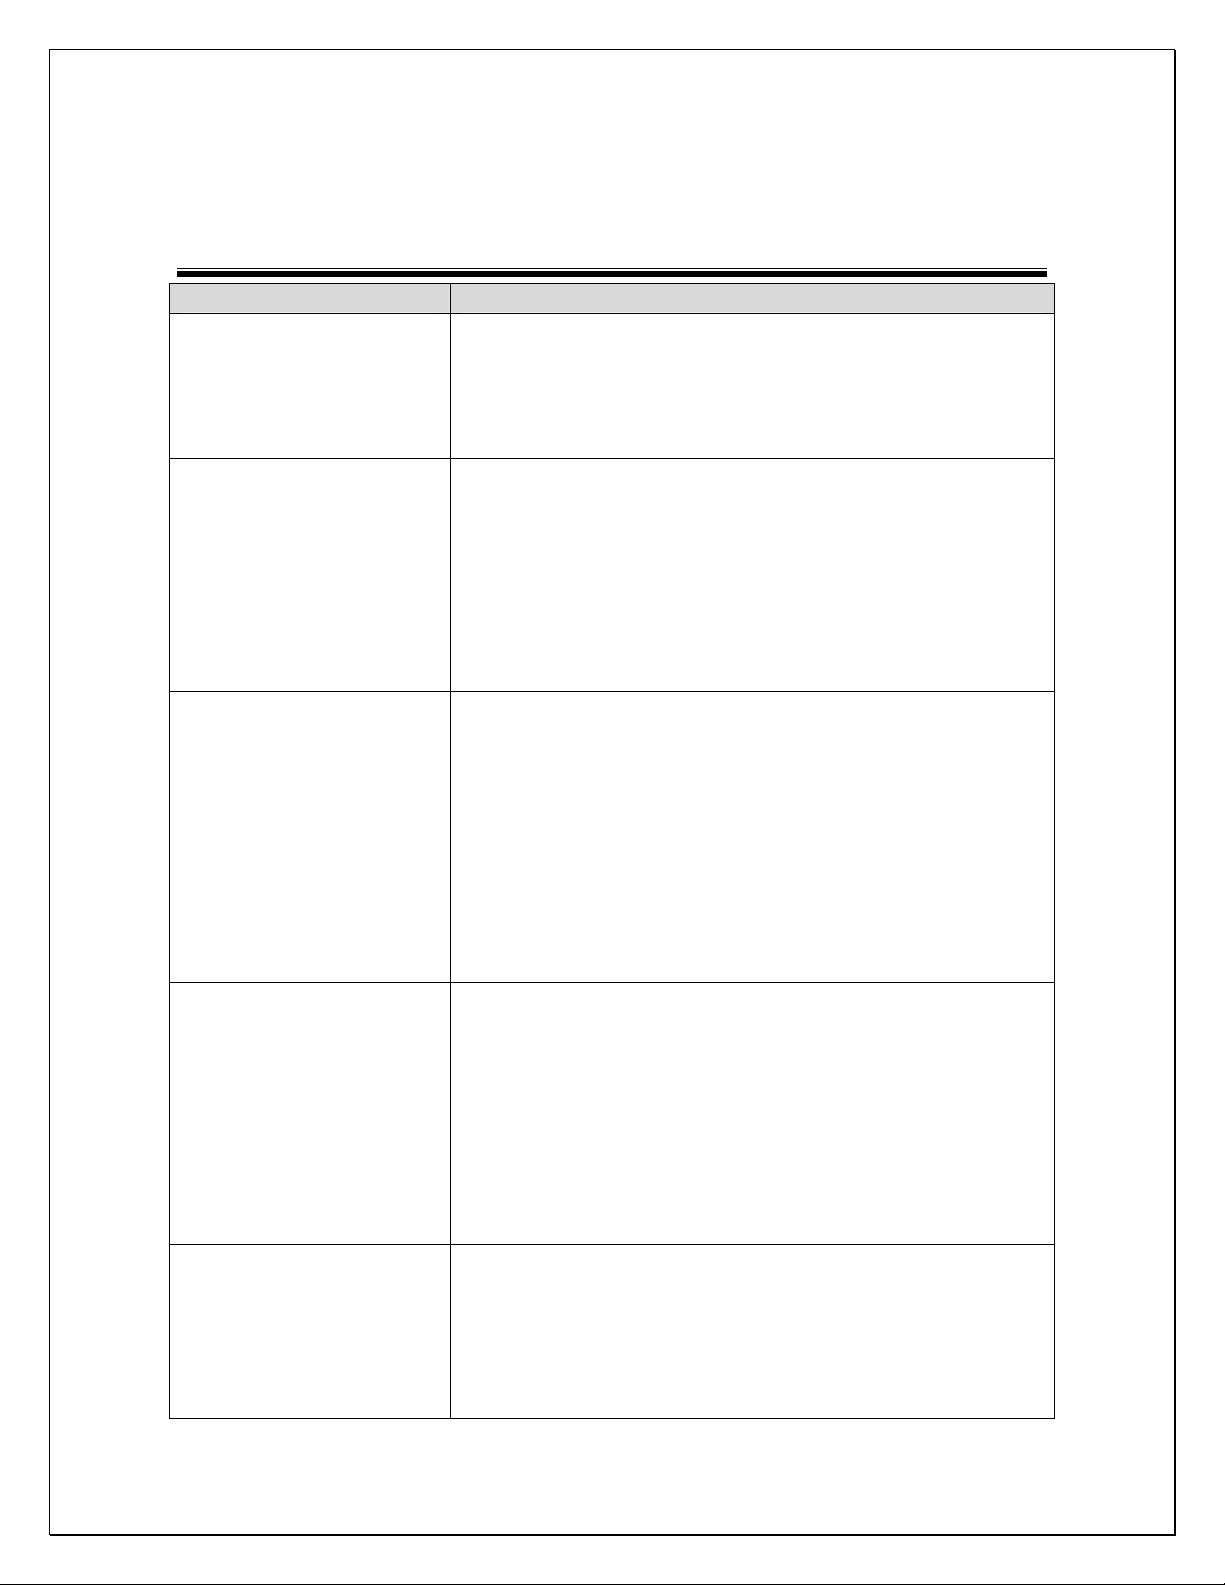
Troubleshooting
SYMPTOM
LAN status indicator is
not lit or red
SERVICE status
indicator stays flashing
red
Wireless Video problems 1. Check the VIDEO status indicator to observe
Wireless devices are not
being discovered
The gateway does not
seem to be responding
to commands I issue on
the website
1. Ensure all network cables are firmly connected
2. Check to make sure that the network cable is
plugged into an active port
1. Ensure all network cables are firmly connected
2. Check to make sure that the network cable is
plugged into an active port
3. Check to make sure your internet connection
from your cable/dsl modem is active
4. Check to make sure you can browse to <insert
link>
5. Re-power the gateway
the quality of the signal.
2. Try moving the camera or gateway to different
positions (typical range will be from 60-100
feet)
3. Move the camera or gateway away from
potential interfering devices including cordless
phones, microwaves and wireless networks.
4. Consult the wireless camera user guide for
more troubleshooting tips
1. Ensure the gateway has an active internet
connection
2. Check to see that the WIRELESS status
indicator is not solid red or unlit.
3. Try moving the devices closer in proximity to
the gateway. Typical discovery range will be 60100 feet.
4. Re-power or reset the camera or sensor and try
again.
1. Ensure that the gateway has an active internet
connection. The LAN and SERVICE indicator
should be green.
2. Ensure that the gateway is registered with the
same account that you are logged in as
3. Verify that you can log into the Gateway Admin
REMEDY
Page 19
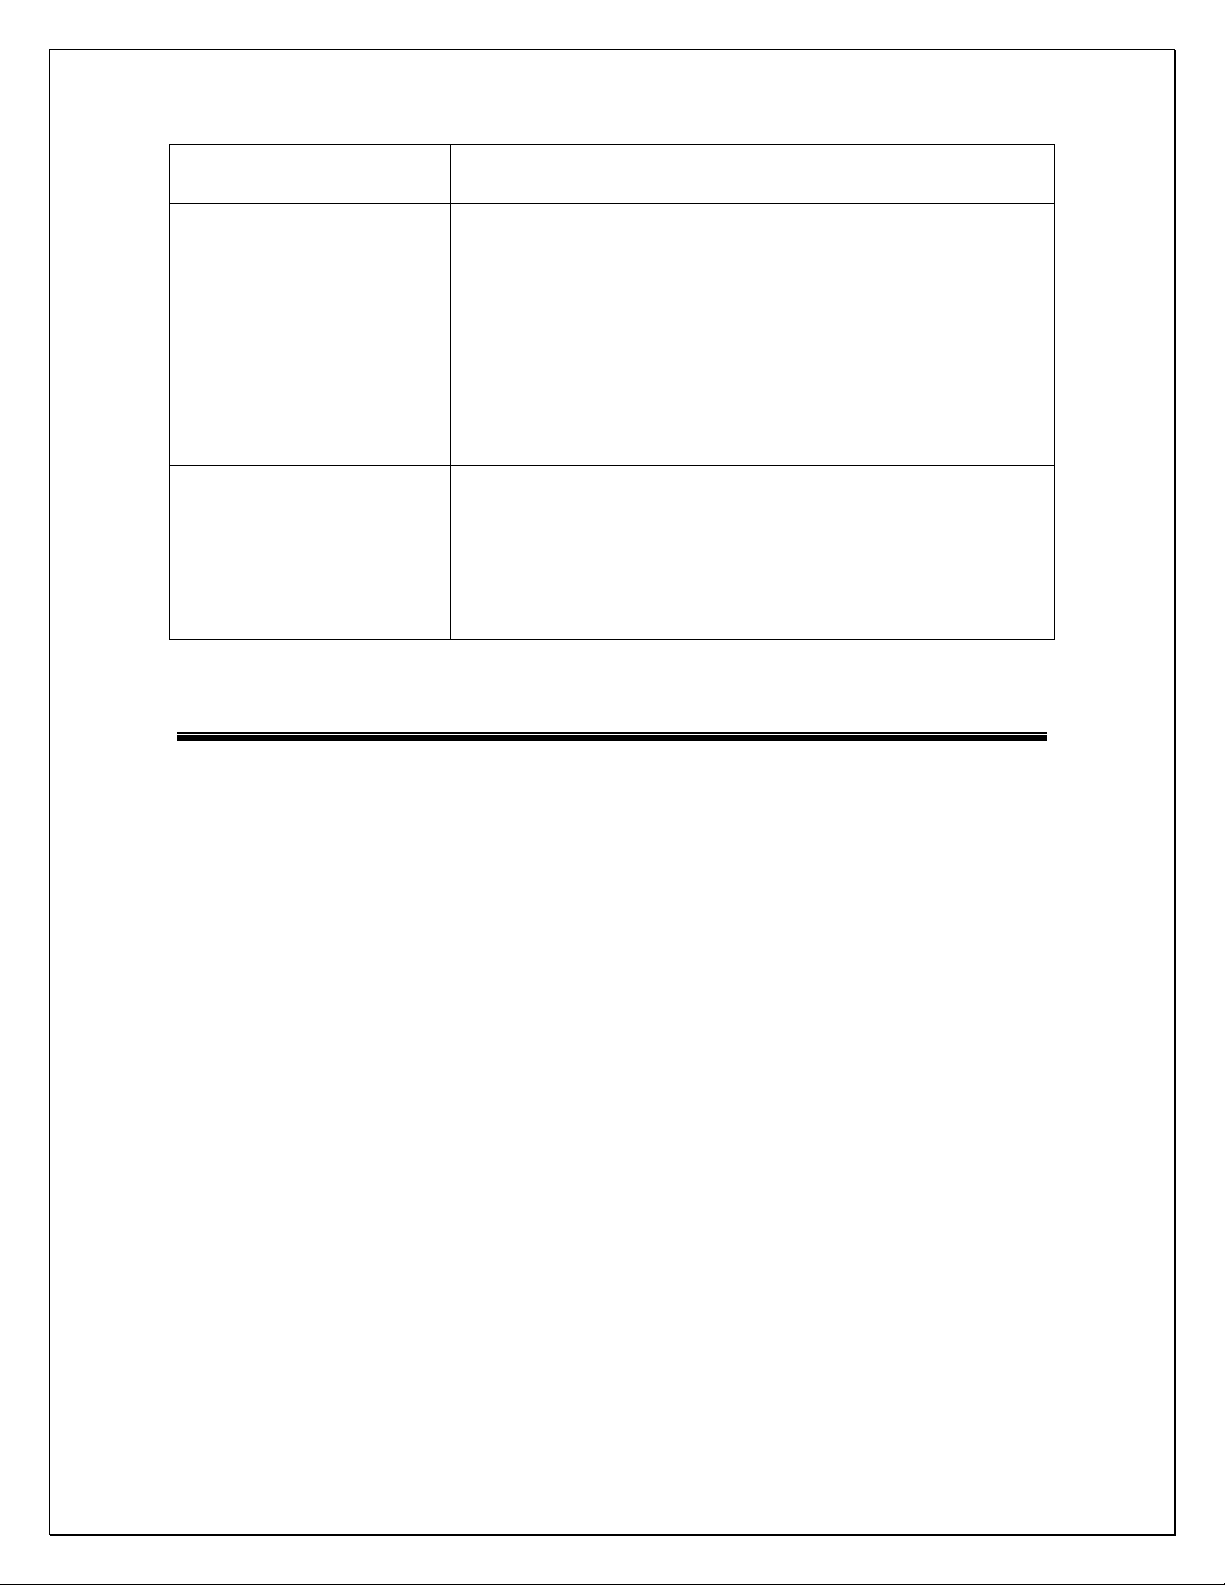
The gateway does not
show up in the
XanAssist list
Events from the
gateway do not show
the proper date and
time
FAQ’s
pages locally
4. Re-power the gateway
1. Ensure that the gateway has an active internet
connection. The LAN and SERVICE indicator
should be green.
2. Verify the computer that you are running
XanAssist from has an active network
connection and is on the same network as the
gateway
3. Press F5 in the XanAssist application to refresh
the list
1. Be sure you have the proper time and date
configured on the gateway. Log into the
gateway admin and select the system tab.
2. The gateway does not automatically adjust to
daylight savings time. You will need to manual
adjust the time .
Do I need a Xanboo subscription in order to use the gateway?
Yes, you need to register with Xanboo before you can use the gateway
What types of devices can I use with the gateway?
You can use any Xanboo enabled device. Currently we have cameras, video messengers,
contact sensors, power sensors, acoustic sensors, and water sensors. New product
offerings are being added regularly.
How many devices can I register with my gateway?
You can have 3 wired cameras, 6 wireless cameras and up to eight wireless sensors or
controls.
How far can the gateway be from the wireless devices?
Operation conditions may vary according to environmental conditions. Typical range
will be from 60-100.
Can other Xanboo users control my gateway or devices?
No, each gateway can control only the devices it “registered” during the discovery
process. Additionally, all internet communications between the gateway and the
application servers are performed over a secure encrypted channel.
Can the gateway control the wireless devices through walls?
Page 20

Yes, the gateway uses a radio frequency to control the wireless devices. These radio
waves can go through solid objects including walls, floors and ceilings.
Can the gateway work behind firewalls?
Yes, the gateway automatically adjusts to work behind firewalls. In this scenario, all
communication is performed indirectly through the backend server. You may see delays
on up to 30 seconds for transactions to transpire.
Can the gateway be configured to use a static IP address?
Yes, using the network configuration pages in the gateway admin, you can configure to
use a static ip address. Be sure to put in the proper subnet mask and default gateway
parameters. A static IP address is recommended when used in conjunction with the IP
forwarding feature of your router. This will ensure optimal performance.
How can I record video and audio from the cameras with a VCR?
You may buy a special TV-Enabling cable to connect to the AV port on the gateway. This
port will show whatever camera is currently being viewed through a live web cam or
through motion sensor events.
How can I connect more then 3 wired cameras to the gateway?
At this time, you may purchase a camera switcher and connect the camera switcher to the
camera port on the gateway. For example, if you connected three 4-camera switchers to
the gateway you could have up to 12 wired cameras.
Technical Specs
• 10/100 Ethernet
• Video quality indicator
• Speed and connectivity indicators
• Convenient wall mounting
• Internet connectivity
• Battery backup in the event of power failure via UPS
• Web based setup and configuration
• Supports both wired and wireless cameras
• Supports Xanboo sensors (door, window, power, acoustic)
• Overall size: 160cm x 120cm x 60cm
• A/V out capable to allow local recording via VCR
• https secure connections to backend webserver
• TCP/IP port configurable
• Configuration password protected
• Available in metal or plastic casing
FCC ID Number: OU4-IG3
This device complies with Part 15 of the FCC rules. Operation is subject to the following conditions: 1)This device may not
cause harmful interference and 2)This device must accept any interference received, including interference that may
cause undesired operation.Standards:93/68/EEC, 89/336/EEC, BS EN 50082-1:1992, 73/23/EEC, EN60950:1992 CE
Page 21

This equipment has been tested and found to comply with the limits for a class B
digital device, pursuant to part 15 of the FCC Rules. These limits are designed to
provide reasonable protection against harmful interference in a residential
installation. This equipment generates, uses and can radiate radio frequency
energy and if not installed and used in accordance with the instructions, may
cause harmful interference to radio communications. However, there is no
guarantee that interferences will not occur in a particular installation. If this
equipment does cause harmful interference to radio or television reception,
which can be determined by turning the equipment off and on, the user is
encouraged to try to correct the interference by one or more of the following
measures:
• Reorient or relocate the receiving antenna.
• Increase the separation between the equipment and receiver.
• Connect the equipment into an outlet on a circuit different from that to
which the receiver is connected.
• Consult the dealer or an experienced radio/TV technician for help.
This equipment has been certified to comply with the limits fro a class B
computing, pursuant to FCC Rules. In order to maintain compliance with FCC
regulations, shielded cables must be used with this equipment. Operation with
non-approved equipment or unshielded cables is likely to result in interference to
radio and TV reception. The user is cautioned that changes and modifications
made to the equipment without the approval of manufacturer could void the
user’s authority to operate this equipment.
The term “IC:” before the certification/registration number only signifies that the
Industry Canada technical specifications were met.
Operation is subject to the following two conditions: (1) this device may not
cause interference, and (2) this device must accept any interference, including
interference that may cause undesired operation of the device.”
 Loading...