

Page 1

Model XC1255
Visit Us on the Web: www.getxact.com
©
INTEGRATED SPEAKERPHONE WITH
CALLER ID ON CALL WAITING*
2003, 2004 XACT Communication, LLC
OWNER'S MANUAL
INSTALLATION AND
OPERATING
INSTRUCTIONS
PLEASE READ THIS
MANUAL CAREFULLY
BEFORE USE.
KEEP FOR YOUR
REFERENCE.
For installation information,
please see
instructions on page 8 or your
separate Quick Start guide.
“Getting Started”
*This feature requires Caller ID
with Call Waiting service available
from your local phone company.
Page 2

Special Features
Congratulations on your selection of a quality XACT Communication Product.
With proper care and adherence to the set-up and user instructions in this
Owner's Manual, this unit will provide you with years of trouble-free service.
XACT is committed to providing quality products that fit your needs. We
would like to have any comments or suggestions you might have on this product.
You may mail your comments to:
XACTCommunication, LLC
105 Madison Avenue
New York, NY 10016
Visit Us on the Web: www.getxact.com
TELEPHONE FEATURES
Speakerphone
13 Number Speed Dial Memory
Flash Key for Call Waiting
Last Number Redial/Pause
Tone/Pulse Switchable
RINGER VOLUME CONTROL (HI/LO/OFF)
RECEIVER VOLUME CONTROL
Hearing Aid Compatible
Desk/Wall Mountable
Uses 4
CALLER ID FEATURES
Name/Number LCD Screen
3 Line Display
70 Name and Number Caller ID Memory
Displays Time/Date of Each Call ----- Displays the time and date of each call after it
Caller ID Call Back ----- Instantly dials any number displayed on the LCD Screen with
Up/Down Review ----- Scrolls through all of the numbers stored in the Caller ID
Voice Mail Message Waiting Indicator
Unknown Number/Name
Private Name/Number ----- Indicates that the caller has blocked his name/number
New Call Indicator ----- LED indicator flashes if you have received new calls since last
Selective Delete ----- Allows you to choose which numbers you wish to delete from the
Battery Low Indicator
Real Time Clock
"AA" Batteries (not included)
----- Stores information about the last 70
calls you received.
is received.
one touch of any , ,or button.
memory.
----- Indicates out of area call.
from being displayed.
reviewing your calls.
memory.
DIAL 11DIAL 10DIAL 7
1
Page 3

Contents
Preparation
Important Safety Instructions................................................................... 3
Telephone Controls.................................................................................. 6
Getting Started ........................................................................................ 8
Wall Mounting.......................................................................................... 9
Installation of Batteries............................................................................ 11
Using AC Outlet Power............................................................................ 12
Telephone Operation
TONE/PULSE Select Switch.................................................................... 13
RINGER VOLUME CONTROL Switch..................................................... 13
RECEIVER VOLUME CONTROL Switch................................................. 13
Making Calls............................................................................................. 13
Receiving Calls......................................................................................... 13
Last Number Redial and Pause............................................................... 13
Flash........................................................................................................ 13
Answering Calls with the Speakerphone................................................. 13
Making Calls with the Speakerphone....................................................... 14
Storing Numbers...................................................................................... 14
Speed dialing 3 One-Touch Memory........................................................ 14
Speed dialing 10 Two-Touch Memory...................................................... 14
Resetting the Phone................................................................................. 14
Caller ID Operation
Setting up the LCD Contrast, Language, Area Code, Time and Date.
Receiving Calls......................................................................................... 16
Reviewing Caller ID Records.................................................................... 16
Call Waiting............................................................................................... 16
Dialing a Number From The Caller ID Records List................................. 17
Storing
Deleting Caller ID Records....................................................................... 18
New Calls.................................................................................................. 18
Message Waiting/Mailbox......................................................................... 18
REPEAT Display....................................................................................... 18
LONG DISTANCE Display........................................................................ 18
a Number From The Caller ID Records List................................. 17
.......... 15
Other Information
Problem Solving........................................................................................ 19
Care and Maintenance.............................................................................. 21
FCC Requirements................................................................................... 22
Warranty Information................................................................................. 24
Wall Mount Template................................................................................. 26
2
Page 4

Important Safety Instructions
To reduce the risk of fire, electric shock and/or injury, always follow these
basic safety precautions when using your telephone equipment.
1. Read and understand all instructions.
2. Follow all warnings and instructions
marked on the telephone.
3. Unplug this telephone from the wall
outlet before cleaning or replacing
the batteries. Do not use liquid or
aerosol cleaners on this telephone. If
necessary, use a soft cloth lightly
moistened with a mild detergent
solution.
4. Do not use this telephone near a
bath tub, kitchen sink, wash bowl,
laundry tub, swimming pool, in a wet
basement or anywhere else where
there is water.
5. Place this telephone on a stable
surface. Serious damage and/or
injury may result if the telephone
falls.
6. Do not cover the slots and openings
on this telephone. This telephone
should never be placed near or over
a radiator or heat register. This
telephone should be placed in a
built-in installation unless proper
ventilation is provided.
8. Do not place anything on the power
cord. Install the telephone where no
one will step or trip on the cord.
9. Do not overload wall outlets or
extension cords as this can increase
the risk of fire or electric shock.
10.Never push any objects through the
slots in the telephone. They could
touch dangerous voltage points or
short out parts that could result in a
risk of fire or electric shock. Never
spill liquid of any kind on the
telephone.
11.To reduce the risk of electric shock,
do not take this telephone apart.
Take it to a qualified service
representative when service or repair
work is required. Opening or
removing covers may expose you to
dangerous voltages or other risks.
Incorrect reassembly can cause
electric shock when the telephone is
subsequently used.
12.Unplug this telephone from the wall
outlet and consult a qualified service
representative in any of the
following situations.
7. Operate this telephone using
the electrical voltage as stated
on the
telephone or in the Owner's
Manual. If your not sure of the
voltage in your home, consult your
dealer or local power company.
BASE UNIT of the
a. When the power supply cord or
plug is damaged or frayed.
If liquid has been spilled into product.
b.
c. If the telephone has been exposed
to rain or water.
3
Page 5

Important Safety Instructions
d. If the telephone does not operate
normally by following the operating
instructions. Adjust only those
controls that are covered by the
operating instructions. Improper
adjustment of other controls may
result in damage and will often
require extensive work by a
qualified technician to restore the
telephone to normal operation.
e. If the telephone has been
dropped or the case has been
damaged.
f. The telephone exhibits a distinct
change in performance or if the
case has been damaged.
13.Avoid using a telephone (other than
a cord-less type) during an electrical
storm. There may be a remote risk
of electric shock from lighting.
14.Do not use the telephone to report a
gas leak in the vicinity of the leak.
15.Never install telephone wiring during
a lightning storm.
16.Never install jacks in wet locations
unless the jack is specifically
designed for wet locations.
17. Never touch uninsulated telephone
wires or terminals unless the
telephone line has been
disconnected at the network
interface.
18.Use caution when installing or
modifying telephone lines.
19.Use only the power cord indicated in
the Owner’s Manual.
SAVE THESE INSTRUCTIONS
4
Page 6

Important Safety Instructions
HELP LINE 1-866-466-XACT (9228)
Battery Safety: To reduce the risk of fire or personal injury read and follow
these instructions.
1. Use only the following type and size
battery: "AA" 1.5V (alkaline or
carbon zinc).
2. Do not dispose of the batteries in a
fire. They may explode. Check with
local codes for possible special
disposal instructions.
3. Do not open or mutilate the
batteries. Released electrolyte from
a battery is corrosive and may
cause damage to the eyes or skin.
Electrolyte may also be harmful if
swallowed.
4. Exercise care in handling the
batteries to prevent shorting the
battery with such conductive
materials as rings, bracelets and
keys. The battery or conductor may
overheat and cause burns.
5. Do not attempt to recharge
batteries identified for use with this
telephone. The batteries may leak
corrosive electrolyte or explode.
6. Do not attempt to recharge
batteries identified for use with this
telephone by heating them. Sudden
release of the battery electrolyte
may occur causing burns or
irritation to eyes or skin.
7. All batteries should be replaced at
the same time. Mixing fresh and
discharged batteries could increase
internal cell pressure and rupture the
discharged batteries. (Applies to
telephones with more than one
separately replaceable battery).
8. When inserting batteries into
this telephone, observe the proper
polarity or direction. Reverse
insertion of the batteries can cause
charging which may result in
leakage or explosion. (Applies to
telephones with more than one
separately replaceable battery.)
9. Remove the batteries from this
telephone if the telephone will not
be used for a long time (several
months or more) since during this
time the batteries could leak in the
telephone.
10.Discard "dead" batteries as soon as
possible since a "dead" battery is
more likely to leak in the telephone.
11.Do not store this telephone, or the
batteries identified for use with this
telephone, in high-temperature areas.
Batteries stored in a refrigerator or
freezer for the purpose of extending
shelf life should be protected from
condensation during storage and
defrosting. Batteries from cold
storage should be stabilized at room
temperature before they are used.
SAVE THESE INSTRUCTIONS
5
Page 7

Telephone Controls
pg. 8
pg. 9
pgs. 14, 17
pg. 18
pg. 13pgs. 13, 17
pg. 18
pg. 17
pgs.15 - 18
pgs. 14,17
pgs. 15,18
pgs. 14,17
pgs. 13,14, 17
pg. 13
pg. 8
pgs.
13, 14
pg. 14
pg. 11
6
pgs. 13, 19
pgs. 13, 19 pgs. 8, 9, 19
pg. 12
Page 8

Telephone Controls
1. HANDSET CORD JACK: Connection jack for the COILED HANDSET CORD.
2. SPEAKER
3. HANDSET CLIP: Holds the HANDSET in the BASE UNIT CRADLE when the
telephone is mounted on a wall.
4. HOOK switch: Press to end the call and then release to get a new dial tone.
5. MESSAGE WAITING (VOICE MAIL) LED indicator
6. NEW CALL LED indicator: Flashes red when new calls have not been reviewed.
7. , , buttons: Option buttons for CALL BACK of any
number displayed on the LCD Screen.
DOWN
8. button: Scroll through the Caller ID records from the last call received
to the first Caller ID record.
UP
9. button: Scroll through Caller ID records from the first call received to the
last Caller ID record.
10. - buttons: One-touch Speed Dial memory locations.
11. button: Press to store or dial numbers using 10 Two-Touch Speed Dial
M3M1
MEM
memory locations.
DELETE
12. button: Delete Caller ID message(s).
13. TELEPHONE KEYPAD buttons: Use to dial, store, and/or retrieve telephone
numbers.
14. SPEAKERPHONE SPEAKER button and SPEAKRPHONE LED lndicator:
Allows you to make or receive a call without lifting the
REDIAL
15. button: Press to redial the last number you dialed, or to place a pause
between numbers when dialing with a Long Distance Access Code.
FLASH
16. button: Press to connect to a call if you have Call Waiting.
STORE
17. buttons: Press to store telephone numbers in memory.
18. RECEIVER VOLUME CONTROL switch: Set the volume of the
from normal (NORM) to high (LOUD).
19. SPEAKERPHONE VOLUME CONTROL switch: Adjust the speaker volume.
20.
HANDSET CORD JACK: Connection jack for the COILED HANDSET CORD.
21. RINGER BUZZER
22. BATTERY COMPARTMENT: Place 4 "AA" alkaline batteries inside the
BATTERY COMPARTMENT matching the polarities as shown inside the
BATTERY COMPARTMENT of the BASE UNIT.
23. MEMORY INDEX
24. SPEAKERPHONE MICROPHONE: For speakerphone use.
25. RESET switch: Reset your phone by inserting a pin into the small hole on the
bottom of the
26. TONE/PULSE SELECT Switch: Selects the desired DIALING mode.
27. RINGER VOLUME CONTROL Switch: Set ringer volume OFF/LOW/HIGH.
28. TELEPHONE LINE CONNECTION JACK: Connection jack for the house
telephone line.
29. AC ADAPTER JACK: Connection jack for an AC power supply. (9V AC
adapter not included).
DIAL11DIAL 10DIAL 7
SPK
HANDSET.
HANDSET
BASE UNIT.
7
Page 9
Getting Started
Connecting Your Telephone
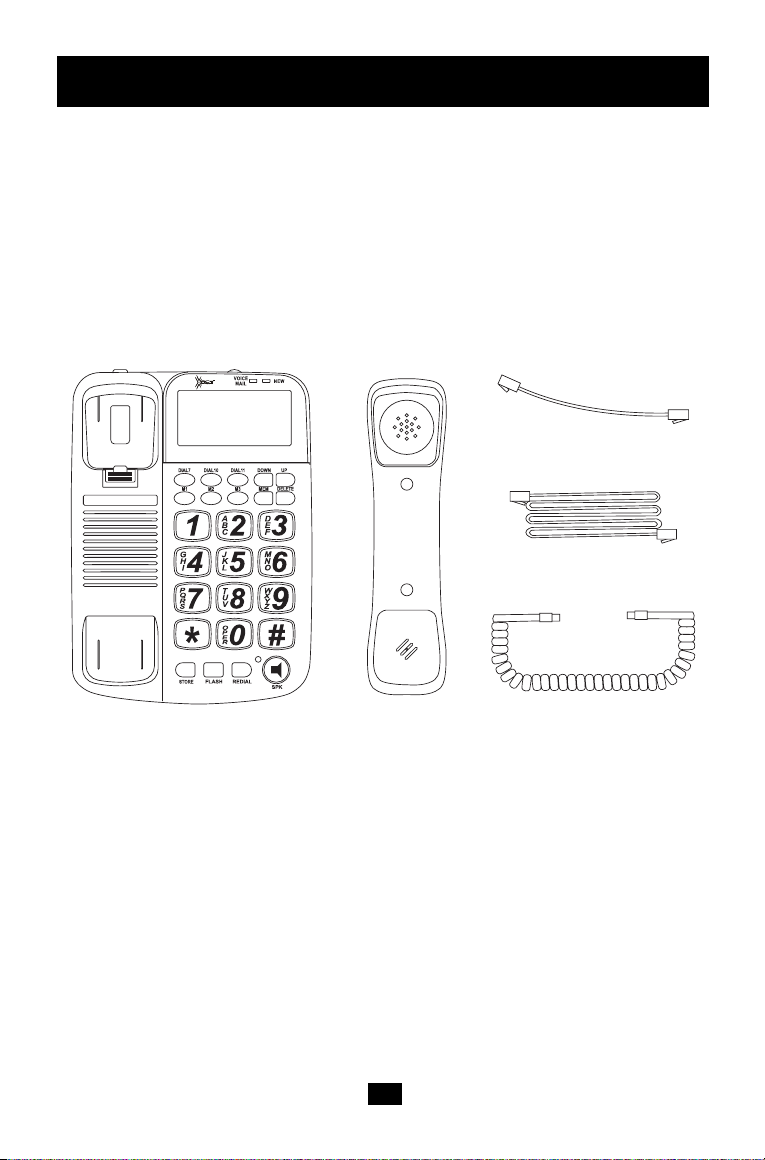
1.Carefully remove your telephone from its shipping carton. If there is any visible
damage, do not attempt to operate this telephone. Return it to the place of
purchase.
2.Check to be sure you have all the items that come with this telephone. You
should have a
TELEPHONE LINE CORD, COILED HANDSET CORD, and an Owner’s
Manual.
HANDSET, BASE UNIT, TELEPHONE LINE CORD, SHORT
SHORT TELEPHONE LINE CORD
TELEPHONE LINE CORD
BASE UNIT
3.Insert one plug of the COILED
JACK and the other end into the
BASE UNIT.
4.Insert one end of the TELEPHONE LINE CORD into the house telephone jack
and the other end into the TELEPHONE LINE CONNECTION JACK on the back
of the BASE UNIT.
NOTE:
Once the TELEPHONE LINE CORD is connected properly, the phone
can be used to dial out.
HANDSET
HANDSET CORD into the HANDSET CORD
HANDSET CORD JACK on the side of the
COILED HANDSET CORD
8
Page 10

Wall Mounting
Your XC1255 can be mounted on a wall phone plate. lf you do not have a
modular wall phone plate installed, consult with your phone company or installer to
get one, or see the next page for installation without a wall plate.
HANDSET CLIP - When the phone is mounted on the wall, the HANDSET CLIP
1.
must be adjusted so it will hold the
A. SLIDE OUT B.REVERSE C. SLIDE INTO PHONE
HANDSET.
MOUNTING BRACKET with HOOKS:
2.Insert the HOOKS of the MOUNTING
BRACKET into the matching slots on the back
of the BASE UNIT (as shown).
3.Connect one end of the SHORT TELEPHONE
LINE CORD into the TELEPHONE LINE
CONNECTION JACK on the back of the
BASE UNIT.
4.Feed the SHORT TELEPHONE LINE CORD
into the channel in the bottom of the
UNIT and plug the other end of the SHORT
TELEPHONE LINE CORD into the WALL
JACK.
5.Position the WALL MOUNT SLOTS on the
bottom of the
plate studs. Then slide the BASE UNIT down
to lock the phone onto the WALL PLATE.
BASE UNIT over the two wall
BASE
FOR WALL USE, PUT BRACKET HERE
9
Page 11

Wall Mounting
MOUNTING AREA
ANCHOR
MOUNTING SCREW
LEAVE / " (5 MM) SCREW EXPOSED
3
16
DRILL HOLE WITH / " MASONRY BIT
1
4
3 / "
(100 MM)
15
16
3
16
/ " (5 MM)
Wall Mounting without a Modular Wall Phone Plate
To mount the phone on the wall without a wall plate:
1.Locate a wall stud. lf the selected area does not have a wall stud directly behind
it, dry wall expanders or a similar type fastener is recommended.
2.Drill 2 holes 3
3.Put a screw into each hole and leave 3/16” (5mm) of the head exposed to
mount the phone (screws are not included).
4.Connect the TELEPHONE LINE CORD to the
5.Position the WALL MOUNT SLOTS on the bottom of the
mounting screws and gently push down to lock into place.
IMPORTANT:
Before mounting the BASE UNIT on the wall, consider the following:
1.The location should be away from electrical cables, pipes, or other items behind
the mounting location. Inserting screws into areas such as these can be
hazardous.
2.The location of the phone should be within 10 ~15 feet of a working house
telephone jack and an electrical outlet in order to avoid excessive cord
lengths.
Installation on Masonry
1. Use a 1/4” masonry drill bit and drill the 2 holes (spaced Per Template, Page 26).
2.lnsert plastic anchors and install the 2 screws.
3.Leave 3/16” (5 mm) of the screws exposed to mount the phone.
4.Position the WALL MOUNT SLOTS on the bottom of the
mounting screws and gently push down to lock into place (anchors and screws
are not included).
15
/16” (100 mm) apart. (Per Template, Page 26)
BASE UNIT and the wall jack.
BASE UNIT on the 2
BASE UNIT on the 2
10
Page 12

Installation of Batteries
The system requires 4 "AA" alkaline batteries for Caller ID operation. Before
connecting the phone cord, follow these steps to install the batteries:
1. Remove the BATTERY COMPARTMENT COVER by gently prying upward with
a screwdriver (FIG 1).
2. Install 4 x 1.5V "AA" alkaline batteries (not included) as shown (FIG 2).
3. Replace the BATTERY COMPARTMENT COVER (FIG 3).
FIG 1 FIG 2 FIG 3
WARNING:
* Replace the batteries when the BATTERY LOW icon appears on the LCD
Screen.
* When the batteries are dead, the LCD Screen will be blank. You can still make
or receive calls, but you cannot use the Caller ID feature or memory dialing.
* When the batteries are dead, your data and settings could be erased.
Disconnect the phone line before inserting or changing the batteries.
*
11
Page 13

Using AC Outlet Power
This telephone may be powered from any household 120V AC outlet using a 9V
AC adapter (not included). Insert the adapter’s small connector plug into the AC
ADAPTER JACK marked
outlet.
+ C -- of the phone, and plug the adapter into an AC
OPTIONAL
AC ADAPTER
RINGER
P
OFF
T
LOW
DC 9V
HI
LINE
NOTE: If the AC adapter is connected, and regular batteries are installed, the
phone automatically switches to the AC adapter power and the batteries
are not used.
12
Page 14

Telephone Operation
TONE/PULSE Select Switch
The TONE/PULSE (T/P) Select switch located on the back of BASE UNIT should be
set to the proper position. The switch should be set to "T" if you have touch-tone
service. Otherwise, set to "P".
RINGER VOLUME CONTROL Switch
The RINGER VOLUME CONTROL switch located on the back of the BASE UNIT
allows you to adjust the volume of the ringer.
HI - High Volume
LOW - Low Volume
OFF - Ringer Off
RECEIVER VOLUME CONTROL Switch
The RECEIVER VOLUME CONTROL switch is located on the side of the HANDSET.
This control allows you to adjust your
"LOUD" for a more comfortable listening level.
Making Calls
Lift the HANDSET, listen to the dial tone and dial the phone number, and the CALL TIMER
will start after a few seconds. To end a call, return the
Receiving Calls
When the phone rings, pick up the HANDSET to answer the call. The CALL TIMER will start.
Last Number Redial and Pause
(REDIAL) Lift the HANDSET to get the dial tone. Press the button to redial the
last number dialed manually.
(PAUSE) On some switchboard systems, when you wish to make an outside call you
have to dial an access code (usually 9) to get a new dial tone. By pressing the
button after the access number, you can immediately dial the desired number. Pressing
REDIAL
the button implements a 3.6 seconds delay in the dialing sequence. Pressing
REDIAL
the button will also insert a pause when dialing or storing Long Distance Access
Codes.
Flash
Use the button to activate services such as Call Waiting or 3 - Way conversa-
FLASH
tion. You may be required to press other buttons before or after you use the
FLASH
button to use these features. Refer to the custom calling instructions provided
by your local telephone company for details.
Answering Calls with the SPEAKERPHONE
1. After the phone rings twice, press the button, the SPEAKERPHONE LED
indicator will light, and the OFF-HOOK icon X will display on the LCD Screen.
2. The LCD Screen will display the Call Timer after a few seconds.
3. Adjust the SPEAKERPHONE volume by sliding the SPEAKERPHONE VOLUME
CONTROL switch on the right side of the phone.
4. To end the call, press the button again.
The SPEAKERPHONE LED indicator will turn OFF and the LCD Screen will return to
5.
SPEAKER
STANDBY mode.
HANDSET volume from normal "NORM" to high
HANDSET to the BASE UNIT.
REDIAL
REDIAL
SPEAKER
13
Page 15

Telephone Operation
Making Calls with the SPEAKERPHONE
MEM
SPEAKER
h.
SPEAKER
STORE
REDIAL
For 10 two-touch dialing:
Press the button, then press one of the
TELEPHONE KEYPAD buttons ( - ) to store
M3M1
a phone number in.
STORE
M3M1
- ), and the stored number appears on the LCD Screen for 3
MEM
M3M1
- ).
90
- ).
90
1. Press the button to get a dial tone.
2. The SPEAKERPHONE LED indicator will light, the OFF-HOOK icon X will display on
the LCD Screen, and the Call Timer will start after a few seconds.
3.
Adjust the SPEAKERPHONE volume by sliding the SPEAKERPHONE VOLUME
CONTROL switc
4. Dial the desired number.
5. To end the call, press the button again.
The SPEAKERPHONE LED indicator will turn OFF and the LCD Screen will return to
6.
STANDBY mode.
Storing Numbers
1. Press the button. "Pro" (short for programming) appears on the LCD Screen.
2. Dial the number you want to store. You can store up to 22 digits, including a TONE
(*) and a PAUSE ( ), each of which is counted as one digit.
3. For 3 one-touch dialing:
Press one of the 3 one-touch
SPEED DIAL buttons ( - ).
4. The stored number and the location will be shown on the LCD Screen.
5. Press the button twice or wait 3 seconds and the LCD Screen will return to
STANDBY mode.
6. Repeat steps 1 - 5 to store numbers into other Speed Dial memory locations.
NOTES:
1. When the batteries are dead or removed for more than 3 minutes, the stored
numbers will be erased.
2. When the HANDSET is on the BASE UNIT, press the desired one-touch SPEED
DIAL button (
seconds. If you want to change the stored number, just store a new number, as
described above and the old number will be erased automatically.
Speed Dialing the 3 One-Touch Memory Numbers
1. Pick up the HANDSET or press the SPEAKER button.
2. Press one of the one-touch SPEED DIAL buttons (
3. The number will be displayed and dialed automatically.
Speed Dialing the 10 Two-Touch Memory Numbers
1. Pick up the HANDSET or press the SPEAKER button.
2. Press button first.
3. Press the desired TWO-TOUCH MEMORY button (
Resetting the Phone
In the rare case of abnormal telephone line interference, the phone may not work
properly and may need to be reset. Make sure the phone is hung up, use a pointed
object like a straighted paper clip and stick it into the small hole in the bottom of the
phone (marked RESET) for 2 seconds. The LCD Screen will return to the SETUP mode
and the memory numbers will need to be reprogrammed.
14
Page 16

Caller ID Operation
Setting up the LCD Screen Contrast, Language, Area Code, Time and Date
You may need to set up the LCD Screen contrast level, language, area code, time,
and date for the telephone when you power the phone for the first time or when
you move to an area that has a different area code. This is necessary because the
phone must distinguish local or long distance calls to properly dial calls from the
Caller ID records list.
Press and hold down on the button, then press the button, the
following will display on the LCD Screen (FIG. 1). Release the button,
press the or button to choose the LCD Screen contrast level (1-5).
Press the button to confirm and accept. Then the LCD Screen will
DOWNUP
DELETE
change to the “SET LANGUAGE” setup screen.
The default language "E" ("E" =English; "F" =French; "S" =Spanish) will flash (FIG 2).
3
LCD CONTRAST
E F S
SET LANGUAGE
FIG. 1 FIG. 2 FIG. 3
Press the or button to choose the desired language (flashing). Press
DOWNUP
the button to confirm and accept. lf you do not press the button
within 6 seconds, English will be selected automatically.
Then the LCD Screen will display the
“HOME AREA
CODE” set up screen:
While the first digit is flashing:
1.Press the button until the first digit of your area
UP
code is displayed (flashing).
2.Press the button to accept and go to the next
DELETE
digit.
3.Repeat steps 1 and 2 above to set the 2nd and 3rd
digits of your “Home Area Code.”
NOTE: At any time during setup, you may just pick up
the HANDSET or press the button to
SPEAKER
dial or receive a call.
NOTE: lf you make a mistake, you can just do it over
again or call customer service for help.
Your phone will now go into STANDBY mode. You do not need to set the Time and
Date because the telephone company will automatically update this with your
incoming Caller ID calls.
To set the Time and Date manually, press the the and buttons to get
to the correct number and the button to accept.
DELETE
To return to the STANDBY mode (for dialing), press the button until the
LCD Screen returns to STANDBY mode (see below for example):
AM
10:50 5/18
TOTAL 00 NEW 00
(Example: 10:50 A.M. on May 18th)
15
DOWNDELETE
DELETE
000
HOME AREA CODE?
DELETEDELETE
AREA CODE EXAMPLE: 818
800
HOME AREA CODE?
Press UP & DELETE to set
UP
DELETE
800
HOME AREA CODE?
Press UP & DELETE to set
DELETE
UP
818
HOME AREA CODE?
Press UP & DELETE to set
DOWNUP
DELETE
DELETE
UP
Page 17

Caller ID Operation
Receiving Calls
The Caller ID feature allows the caller’s phone number to be displayed on the LCD
Screen after the first ring of the call, and in most cases, the caller’s name, calling time
and date will be displayed. This information will be stored automatically.
Important: In order to use this feature, you must first subscribe to Caller ID service
from your local telephone company.
When you receive a call:
The phone number and name appear on the LCD Screen with the
date and time as shown:
AM
1:54 3/19 28
212-555-1234
JOHN SMITH
The caller’s phone number and/or name will not appear in the following cases:
-"
UNAVAILABLE ": when the call is made through a telephone company which does
not offer Caller ID service (including international calls ).
-"
PRIVATE CALL ": when the call is "blocked". For privacy reasons, many states
allow callers the “private call” option to prevent telephone data from being displayed
on Caller ID units.
If the call is from an office which uses multiple lines, the displayed phone number may
not match the number you use to call that extension.
Reviewing Caller ID Records
The phone stores the data of the last 70 calls received. It keeps track of all calls
received, even if they were not answered. You can scroll through the data in the Caller
ID records list to check the numbers and names of the calls received.
1. Press the button and the data of the most recent call appears for 15 seconds.
DOWN
2. Press the button to view data from the most recent to oldest, and the
button to view from the oldest to the most recent.
* When you reach the last (most recent) call by pressing the button, “END OF
LIST” appears on the LCD Screen. If you press the button again, the LCD
UP
UP
Screen will display the first (oldest) call.
* When you reach the first (oldest) call by pressing the button, “END OF
LIST” appears on the LCD Screen. If you press the button again, the LCD
DOWN
DOWN
Screen will display the first (most recent) call. You can view the Caller ID records
during a conversation by following the steps above.
Note: 1. If the batteries are weak, the LOW BATTERY icon will be displayed.
Replace the batteries as soon as possible; otherwise the Caller ID records
and memories will be erased.
2. The system can save up to 70 Name and Number Caller ID records.
3. When the memory becomes full, the oldest call will be deleted to make
room for the new incoming calls.
Call Waiting
When you subscribe to a Call Waiting service from your local telephone company, the
telephone will display the name and number of the second caller while you are having
a phone conversation with your first caller. If you are using the telephone when a new
call comes in, "CW" will flash on the LCD Screen, and the phone number of the new
16
CALL#
NEW
UPDOWN
Page 18

Caller ID Operation
caller will appear on the LCD Screen. By pressing the button on your telephone,
FLASH
you will put the party you are having the conversation with on hold and you will be able
to talk to the new caller, and the "CW" icon will stop flashing on the LCD Screen. After
you finish the conversation with the 2nd caller, press the button to return to the
FLASH
1st call (you may also press the HOOK switch for 2 seconds).
NOTE: This function requires a CALL WAITING CALLER ID subscription from your
local telephone company.
Dialing A Number From The Caller ID Records List
1. Pick up the HANDSET or press the button.
2. Press the or button to browse through the Caller ID records list until the
number
you wish to dial appears on the LCD Screen.
DOWNUP
3. Press the (7 digits - phone number by itself), or (10 digits - area
code + phone number) or (11 digits - 1 + area code + phone number) button,
DIAL 11
SPEAKER
DIAL 10DIAL 7
the phone will dial the number displayed. Different parts of the country have different
dialing systems even for local calls, use whichever CALL BACK button ( ,
DIAL 11DIAL 10
, ) is appropriate for your area.
DIAL 7
The phone also allows you to call back in the ON-HOOK state:
1. In the ON-HOOK state select the desired number and choose the call back button
as described above.
2. The LCD Screen displays "PICK UP PHONE" for 6 seconds and waits.
3. If you pick up the
HANDSET during that 6 seconds the phone will go into OFF-HOOK
mode, pause about 1 second and then dial out the number. If you do not pick up
HANDSET within 6 seconds, the phone will go into STANDBY mode.
Storing a Number From the Caller ID Records List
This telephone records the Caller ID information of up to 70 incoming calls. If the
memory becomes full, the phone deletes the oldest Caller ID record data automatically.
To prevent important Caller ID data from being deleted, you can store it in one of the
13 SPEED DIAL memory locations (3 one-touch or 10 two-touch).
STORE
DOWN
DOWNUP
For two-touch memory:
Press the button, and then press one of the
TELEPHONE KEYPAD buttons (
M3M1
MEM
- ) .
90
1.
Press the or button until the desired number appears on the LCD Screen.
2. Press the button and the LCD Screen will display the number.
3. Press the button to change the memory dial digits (7-digit, 10-digit, or 11-digit).
4. For one-touch memory:
Press one of the 3 one-touch
SPEED DIAL buttons ( - ).
NOTE:
1. Only the number will be stored, not the name.
2. Do not allow more than 6 seconds to elapse between each step of the procedure.
3. If the phone is connected to a PBX, you may need to add an outside line access digit
(usually 9) or a pause.
17
Page 19

Caller ID Operation
Deleting Caller ID Records
Deleting individual Caller ID Records:
1. Display the Caller ID record you want to delete (by pressing the or button).
2. Press the button twice quickly, the LCD Screen will display the next or previous
call, and the data is deleted.
Deleting ALL Caller ID Records:
1. Make sure that all of the NEW calls have been reviewed (NEW CALL indicator should not
flash).
2. Press the or button to display any call, make sure the LCD Screen does not
show “
3. Press and hold the button down for 6 seconds. The LCD Screen will display "NO
CALLS,"and all of the Caller ID records will have been deleted.
NOTE: You cannot delete all of the Caller ID memory when there are any new call
DELETE
DOWNUP
END OF LIST.”
DELETE
remaining (not viewed yet), or when “END OF LIST” is displayed on the LCD
Screen.
New Calls
If a new call has been received since the last time call information was reviewed, the “NEW”
LED will flash.
Message Waiting/Mailbox
To use the Message Waiting feature, you must subscribe to this service, if available, from
your local telephone company.
This phone will only respond to the FSK type of message delivery.
1. If the message sent by the telephone company is preceded by a ring, the Message
2. After you retrieve your message(s), the telephone company will send a clear signal (by a
3. Sometimes the telephone company will not send a message clear signal, and you have to
icon will appear on the LCD Screen and the VOICE MAIL LED indicator will
Waiting
flash.
ring) to your phone. When a clear signal is received, the LCD Screen will display "MSG
WAITING OFF" for 8 seconds.The
and the VOICE MAIL LED indicator will stop flashing.
clear the message waiting record manually. Press and hold the button and then
press the button, the
MAIL LED indicator will stop flashing.
UP
icon will turn off until a new message is received. The VOICE
icon will turn off until a new message is received
DOWNUP
DELETE
"REPEAT" Display
"RPT" (repeat) appears if more than one call is received from the same caller, and the older
call has not been reviewed. Once all the calls have been reviewed, the "RPT" icon will disappear. The older record will be replaced by the new record, so the calls are counted as one
call.
"LONG DISTANCE" Display
If a long distance call has been received, "LONG DISTANCE" will be displayed at the bottom
line of the LCD Screen, switching with the NAME every second, and the TOLL icon will turn
on. When a long distance Caller ID record is being reviewed, "LONG DISTANCE" will display
for 1 second then switch to the NAME.
18
Page 20

Problem Solving
This product is manufactured from the finest grade materials and most reliable
electronic components. XACT COMMUNICATION Products is confident that you
will receive many years of uninterrupted service from this product. Before calling
for service, please check this list of most common problems.
If you experience difficulty with the telephone, disconnect it from the telephone line
and connect a known working unit to the line. If the known working unit does not
operate properly and it displays the same symptoms, contact your local telephone
company for assistance. Otherwise, refer to the warranty instruction.
No dial tone
• Check cords to be sure they are connected correctly.
Telephone does not dial
• Ensure TONE/PULSE Select switch is in the correct position.
• Check that the TELEPHONE LINE CORD is plugged into the house telephone
jack and the TELEPHONE LINE CONNECTION JACK.
You cannot be heard by the other party
• Check to be sure that the COILED HANDSET CORD is connected at both
ends.
Incoming and outgoing voices are too low
• Check to see if extension phones are OFF-HOOK. It is normal for volume to
drop when two phones are used at the same time.
Telephone does not ring
• Is the RINGER VOLUME CONTROL switch set to OFF?
• Are you using too many phones on the same line? The total REN of all the
phones should not be more than the maximum REN value, usually 5.0. (See
"FCC Requirements" on Page 22)
Feedback flutter can be heard while dialing in PULSE mode.
• This is normal as power fluctuates with pulse dialing.
Memory dialing problems
• Did you follow the proper dialing sequence?
• Did you program the number correctly?
Phone rings but there is no Caller ID Information
• Check with your telephone company to ensure Caller ID service is activated.
• Do the batteries need to be replaced?
19
Page 21

Problem Solving
• If you have an answering machine connected to the same line, make sure it is
set to answer after two or more rings so it does not interfere with receiving
Caller ID information.
• Do you pick the phone up before the second ring?
“LINE ERROR” appears on the LCD Screen
• If you pick up the phone before the second ring, the caller information may not
be completely received resulting in a "LINE ERROR" message.
• If you have an answering machine connected to the same line, make sure it is
set to answer after two or more rings so it does not interfere with receiving
Caller ID information.
• Bad data was received by the phone. The message will remain until the number
is erased.
The LCD Screen is dim or blank
• The batteries need to be replaced. See "INSTALLATION OF BATTERIES"
(Page 11).
1. You must order Caller ID service from your local telephone company so that
the Caller ID feature will operate. Caller ID service is not yet available in all
areas and user’s subscription to such service is subject to payment. This
charge will appear on your monthly bill from your local telephone company.
2. You must install batteries to power the LCD Screen and prevent the loss of
information stored in the memory.
• Reset the contrast level of the LCD Screen.
Feedback or squealing when using the SPEAKERPHONE
• Volume is too high. Reduce the SPEAKERPHONE volume by changing the
SPEAKERPHONE VOLUME CONTROL SWITCH setting.
20
Page 22

Care and Maintenance
The following suggestions will help you
care for the system so you can enjoy it
for years.
Keep the system dry. If
it gets wet, wipe it dry
immediately. Liquids
might contain minerals
that can corrode the
electronic circuits.
Use and store the system only in normal temperature environments.
Temperature extremes
can shorten the life of
electronic devices,
damage batteries, and
distort or melt plastic
parts.
Handle the system
gently and carefully.
Dropping it can damage circuit boards and
cases and can cause
the system to work
improperly.
Keep the system away
from excessive dust
and dirt, which can
cause premature wear
of parts.
Wipe the system with
a damp cloth occasionally to keep it looking new. Do not use
harsh chemicals,
cleaning solvents, or
strong detergents to
clean the telephone.
Modifying or tampering with the
telephone's internal components can
cause a malfunction and might invalidate the telephone's warranty and void
your FCC authorization to operate it. If
your telephone is not performing as it
should, take it to your local store for
assistance.
Use only fresh batteries of the required size
and type. Always
remove old or weak
batteries. They can
leak chemicals which
can destroy electronic
circuits.
21
Page 23

FCC Requirements
Federal Communications Commission Requirements
This equipment complies with Part 68
of FCC Rules. A label on the BASE
UNIT of this equipment contains,
among other information, the FCC
Registration Number and the Ringer
Equivalence Number (REN) for this
equipment. You must, upon request,
provide this information to your
telephone company.
The REN is also useful in determining
the number of devices that you may
connect to your telephone line and still
allow all of these devices to ring when
your telephone number is called. In
most areas, but not all, the sum of the
RENs for all devices connected to one
line should not exceed five (5.0). To be
certain of the number of devices that
you may connect to your line, you
should contact your local telephone
company.
If your equipment should cause harm to
the telephone network, the telephone
company may temporarily disconnect
your service. If possible, they will notify
you in advance that temporary discontinuance of service may be required.
However, when advance written notice
is not possible, the telephone company
may temporarily discontinue service
without notice if such action is necessary under the circumstances.
The telephone company may make
changes in its communication facilities,
equipment, operations, or procedures
where such action is reasonably
required in the operation of its business
and is not inconsistent with the rules
and regulations of the Federal
Communications Commission.
Do not attempt to repair or modify
this equipment. Changes or modifica-
tions not expressly approved by the
party responsible for its compliance
could void the user's authority to
operate the equipment.
This equipment should not be used on
coin telephone lines. Connections to
party line services are subject to state
tariffs. If trouble is experienced,
disconnect this equipment from the
telephone line to determine if it is
causing the malfunction. If the
equipment is determined to be
malfunctioning, its use should be
discontinued until the problem has
been corrected.
Current FCC regulations specify that
any direct connections to a telephone
company line be done using only
standard phone jacks and plugs that
meet FCC Regulations.
22
Page 24

FCC Requirements
This equipment has been tested and
found to comply with the limits for a
Class B digital device, pursuant to Part
15 of the FCC Rules. These limits are
designed to provide reasonable protection against harmful interference in a
residential installation. This equipment
generates, uses, and can radiate radio
frequency energy and, if not installed
and used in accordance with the
instructions, may cause harmful interference to radio communications.
However, there is no guarantee that
interference will not occur in a particular installation. If this equipment does
cause harmful interference to radio or
television reception, which can be
determined by turning the equipment
off and on, the user is encouraged to try
to correct the interference by one or
more of the following measures:
- Increase the distance between the
equipment and receiver.
- Connect the equipment into an outlet
on a circuit different from that to
which the receiver is connected.
- Consult the dealer or an experienced
radio/TV technician for help.
NOTICE TO HEARING AID WEARERS: This
telephone has been registered with the FCC as
hearing aid compatible.
Customer Service Telephone Number:
1-866-466-XACT (9228)
OUTSIDE THE U.S.A. ANDCANADA CALL:
1-212-481-7950
23
Page 25

Warranty Information
XACT CommunicationProducts
One - Year Limited Warranty
This limited warranty sets forth all XACT CommunicationProducts’
responsibilities regarding your telephone. There are no other expressed or implied
warranties from XACT CommunicationProducts.
Warranty Service Provided
If you purchased this telephone new from a retail vendor, XACT Communication
Products warrants it against defects in material and workmanship for a period of
one (1) year from the original date of purchase. This warranty is in lieu of all other
express warranties. This warranty begins when you purchase the telephone and
continues for one (1) year unless you sell or rent the telephone, in which case the
warranty stops.
XACT CommunicationProducts disclaims any implied warranty, including the
warranty of merchantability and the warranty of fitness for a particular purpose, as
of the date of one (1) year from your original purchase of the telephone. XACT
Communication Products assumes no responsibility for any special, incidental,
or consequential damages.
This warranty gives you specific legal rights and you may have other rights which
vary from state to state. Some states do not allow the exclusion or limitations of
special, incidental or consequential damages or limitations on how long a warranty
lasts, so the above exclusion and limitation may not apply to you.
Warranty Service Not Provided
This warranty does not cover damage resulting from accident, misuse, abuse,
improper installation or operation, lack of reasonable care, unauthorized
modification, the affixing of any attachment not provided by XACT
CommunicationProducts with the telephone and/or loss of parts. This warranty
is voided in the event any unauthorized person opens, alters or repairs the
telephone.
All XACT Communication merchandise being returned for repair must be
suitably packaged.
Telephone companies use different types of equipment and offer various types of
services to customers. XACT CommunicationProducts does not warrant that
this telephone is compatible with the type of equipment of any particular telephone
company or the services provided by it.
24
Page 26

Warranty Information
What To Do for Warranty Service
During the first thirty (30) days, a defective product is eligible for over - the - counter exchange at the retailer from whom it was purchased. After thirty (30) days, the
defective product should be returned to the authorized service center. Please
allow 2-3 weeks for the return of your telephone product. The shipping address of
the authorized service center is:
XACT Communication Consumer Center
C/O Southern Bonded Warehouse
7137 Southlake Parkway
Morrow, GA 30260
visit Us on the Web: www.getxact.com
Your telephone will be repaired or replaced if examination by the service center
determines the telephone is defective. Telephones received damaged as a result
of shipping will require you to file a claim with the carrier prior to repair. A
telephone received with missing parts or with damage due to abuse, inadequate
packing or some other noncompliance with this limited warranty will be returned to
you C.O.D., freight collect.
Note: A telephone received which was not made for XACTCommunication or
which is not defective as determined by our test procedures will not be
repaired and will be returned to you C.O.D., freight collect.
To Obtain Warranty Service
h Provide proof of the date of purchase within the package.
h Prepay all shipping costs to the authorized service center.
h Include a return shipping address within the package.
Please retain your sales receipt, the carton, the packing materials, and the printed
material. The original carton is the best shipping container for the telephone
should you have to return it.
For your reference:
Serial Number
Date of Purchase
Name of Dealer
Customer Service Telephone Number:
1-866-466-XACT (9228)
OUTSIDE THE U.S.A. ANDCANADA CALL: 1-212-481-7950
25
Page 27

Wall Mount Template
100 mm
Drill one hole
Make sure space
between holes is
Drill other hole
This page serves as a
template for attachment of
screws to the wall when mounting
this telephone on the wall
1. Cut out this page.
2.Use this template to determine the distance between
screws when mounting this
phone on the wall. The two
cross hairs identify where to
attach the screws.
Make sure space
between holes is
26
Page 28

STOP
Make certain you receive the best
performance from your telephone.
Read this manual first
!
Visit Us on the Web: www.getxact.com
Made in China
TP
 Loading...