

Page 1

FEATURES
FCC NOTICE
Congratulations on your selection of a quality XACT product. With proper care and adherence to the set-up and user
instructions in this Owner’s Manual, this unit will provide you with years of trouble-free service.
XACT is committed to providing quality products that fit your needs. We would like to have any comments or suggestions
you might have on this product. You may mail your comments to:
U.S. Electronics
105 Madison Avenue
New Yo rk, NY 10016
The M4X is the newest generation in personal two-way communications. The M4X is a lightweight, compact two-way
communication device that can be used to communicate with family or friends at parks, shopping malls, sporting events,
concerts – any indoor or outdoor activity.
Here are some of the features of this new two -way COMMUNICATOR:
• Stop Watch Style with Detachable Neck Cord
• 22 FRS/GMRS Channels
• Up to 2.0 Mile Range
• Auto Squelch
• Auto Battery Saving
• Internal VOX
• Channel Scan
• 12 Hour AM/PM Time Clock
• Backlit LCD Display on COMMUNICATOR Mode
• Uses 3 AAA size Alkaline battery with Ni-MH battery capability (not included)
Please read this Owner’s Manual carefully to get the most out of your TWO-WAY COMMUNICATOR.
NOTE: The maximum range will vary depending on terrain and environment. Range will be greater in open fields. While
range is shorter within and around buildings or large structures. This unit may not ensure privacy of communication.
Safety Information :
Your wireless hand -held portable transceiver contains a low power transmitter. When the Push -to-Talk (PTT) key is
pushed it sends out COMMUNICATOR frequency (RF) signals. This devise is authorized to operate at a duty factor not to
exceed 50%.
In August 1996, The Federal Communications Commission (FCC) adopted RF exposure guidelines with safety levels for
hand-held wireless devices.
Important Note: To maintain compliance with the FCC’s RF exposure guidelines, hold the transmitter and ANTENNA at
least 1 inch (2.5 centimeters) from your face and speak in a normal voice, with the antenna pointed away from the face.
If you wear the handset on your body while using the headset accessory, use only the manufacturer’s supplied BELT
CLIP for this product and ensure that the ANTENNA is at least 1 inch (2.5 centimeters) from your body when transmitting.
Use only supplied ANTENNA. Unauthorized antennas, modifications, or attachments could damage the transmitter and
may violate FCC regulations.
This device complies with Part 15 of the FCC Rules. Operation is subject to the following two conditions: (1) this device
may not cause harmful interference, and (2) this device must accept any interference received, including interference that
may cause undesired operation.
Page 2
DISPLAYS
KEYS and CONTROLS
15
1
4
3
2
5
6
7 8
16
9
14
13
12
11
10
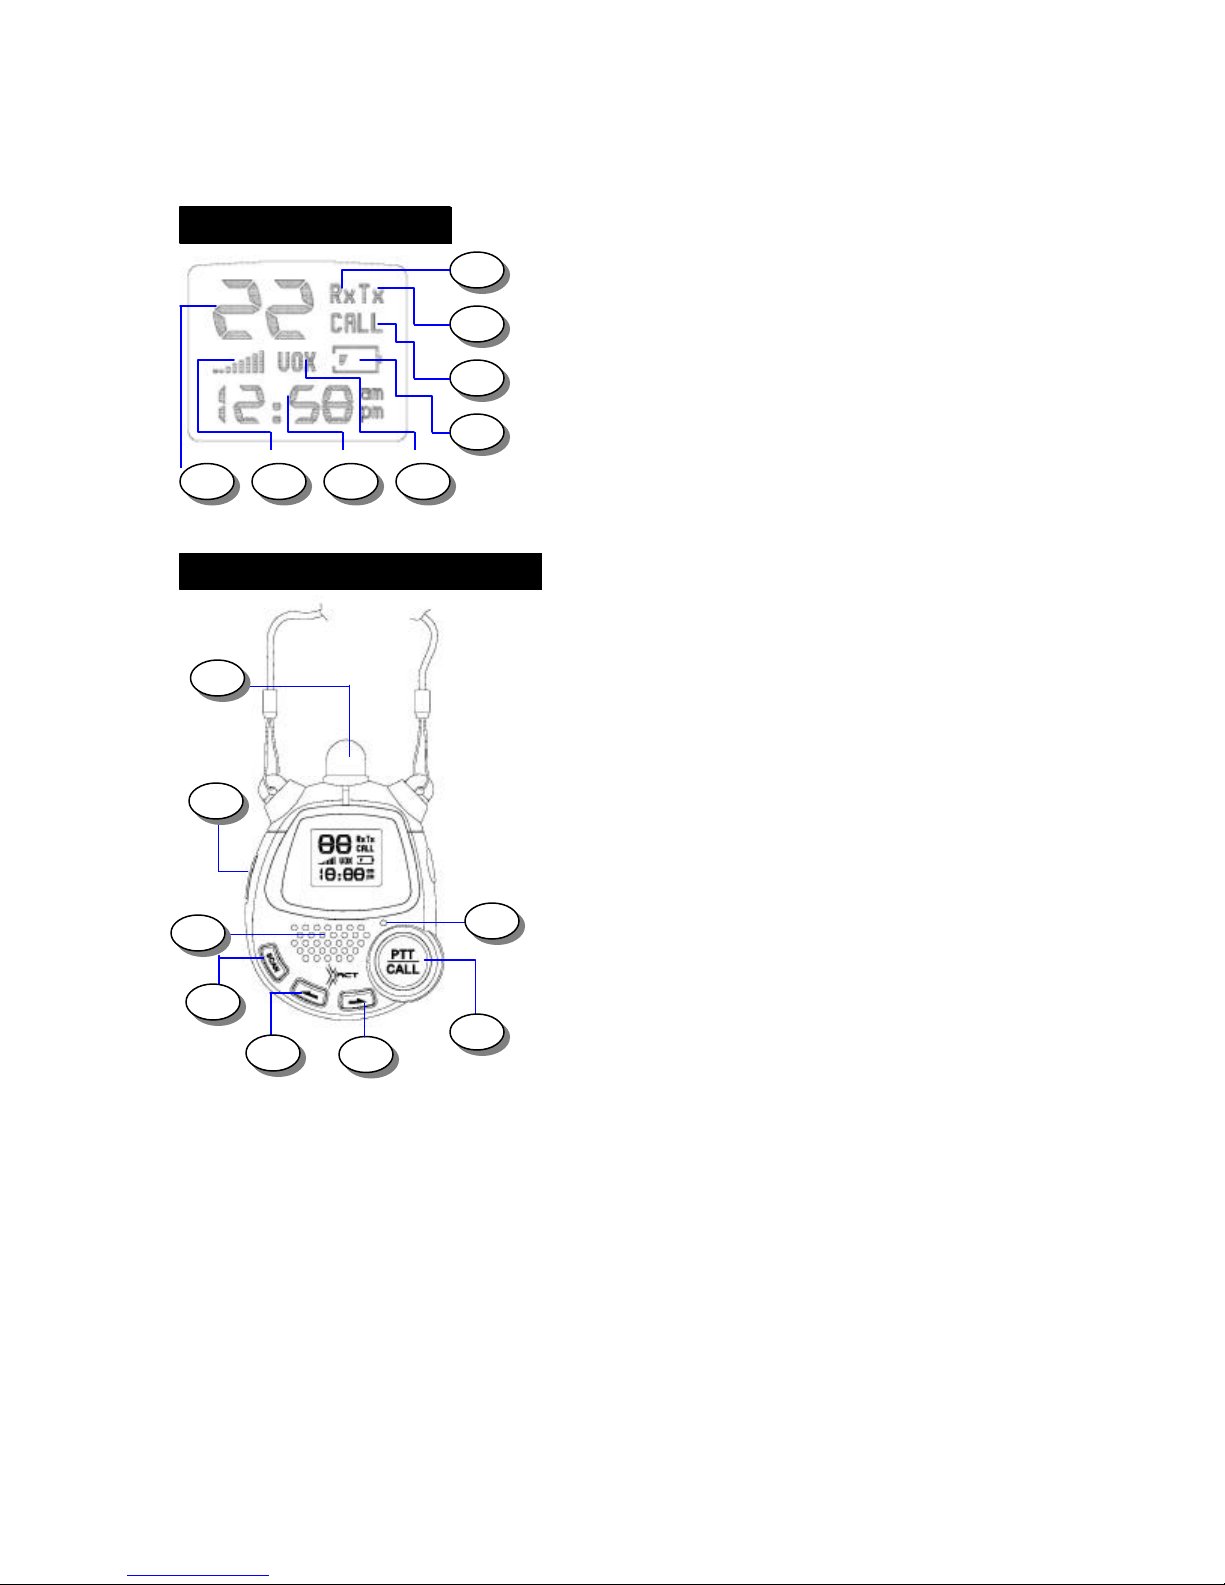
1. Channel Number (1~22) – Shows the current channel
2. Transmit Indicator (TX) – Indicates when the unit is transmitting
3. Receive Indicator (RX) – Indicates when the unit is receiving a transmission
4. Volume Selection (8 Bars) – Shows the current volume setting
5. Call Tone Transmission (CALL) – Indicates when the unit is paging
6. Low Battery Level indicator - Indicates when battery level is low or during
charging the battery
7. VOX – Indicates when unit is in VOX mode
8. 12 Hour Time Clock (12:00)
9. Power / Menu (Multi Function) – Press and hold to turn the
COMMUNICATOR ON/OFF. Momentary press will enter the Menu and Clock setting.
10. PTT / Call (Multi Function) – Press and hold to transmit voice communication.
Press twice in rapid action to transmit call tone.
11. Up – Used to adjust volume level (default), change channel and clock setting (in
Menu)
12. Down – Used to adjust volume level (default), change channel and clock setting (in
Menu)
13. Scan – Press to enter Channel Scan.
14. MIC – Built-in microphone
15. Speaker – Built-in speaker
16. Antenna
Page 3
BATTERY INSTALLATION
CAUTION: To reduce the risk of fire or personal injury, use only the battery listed in the instruction book.
Battery Compartment
Battery
CHARGING THE BATTERY
Headset/Charger
BATTERY LEVEL AND LOW BATTERY OPERATION
Battery
NOTE: Charge the Ni -MH batteries for approximately 12
ong
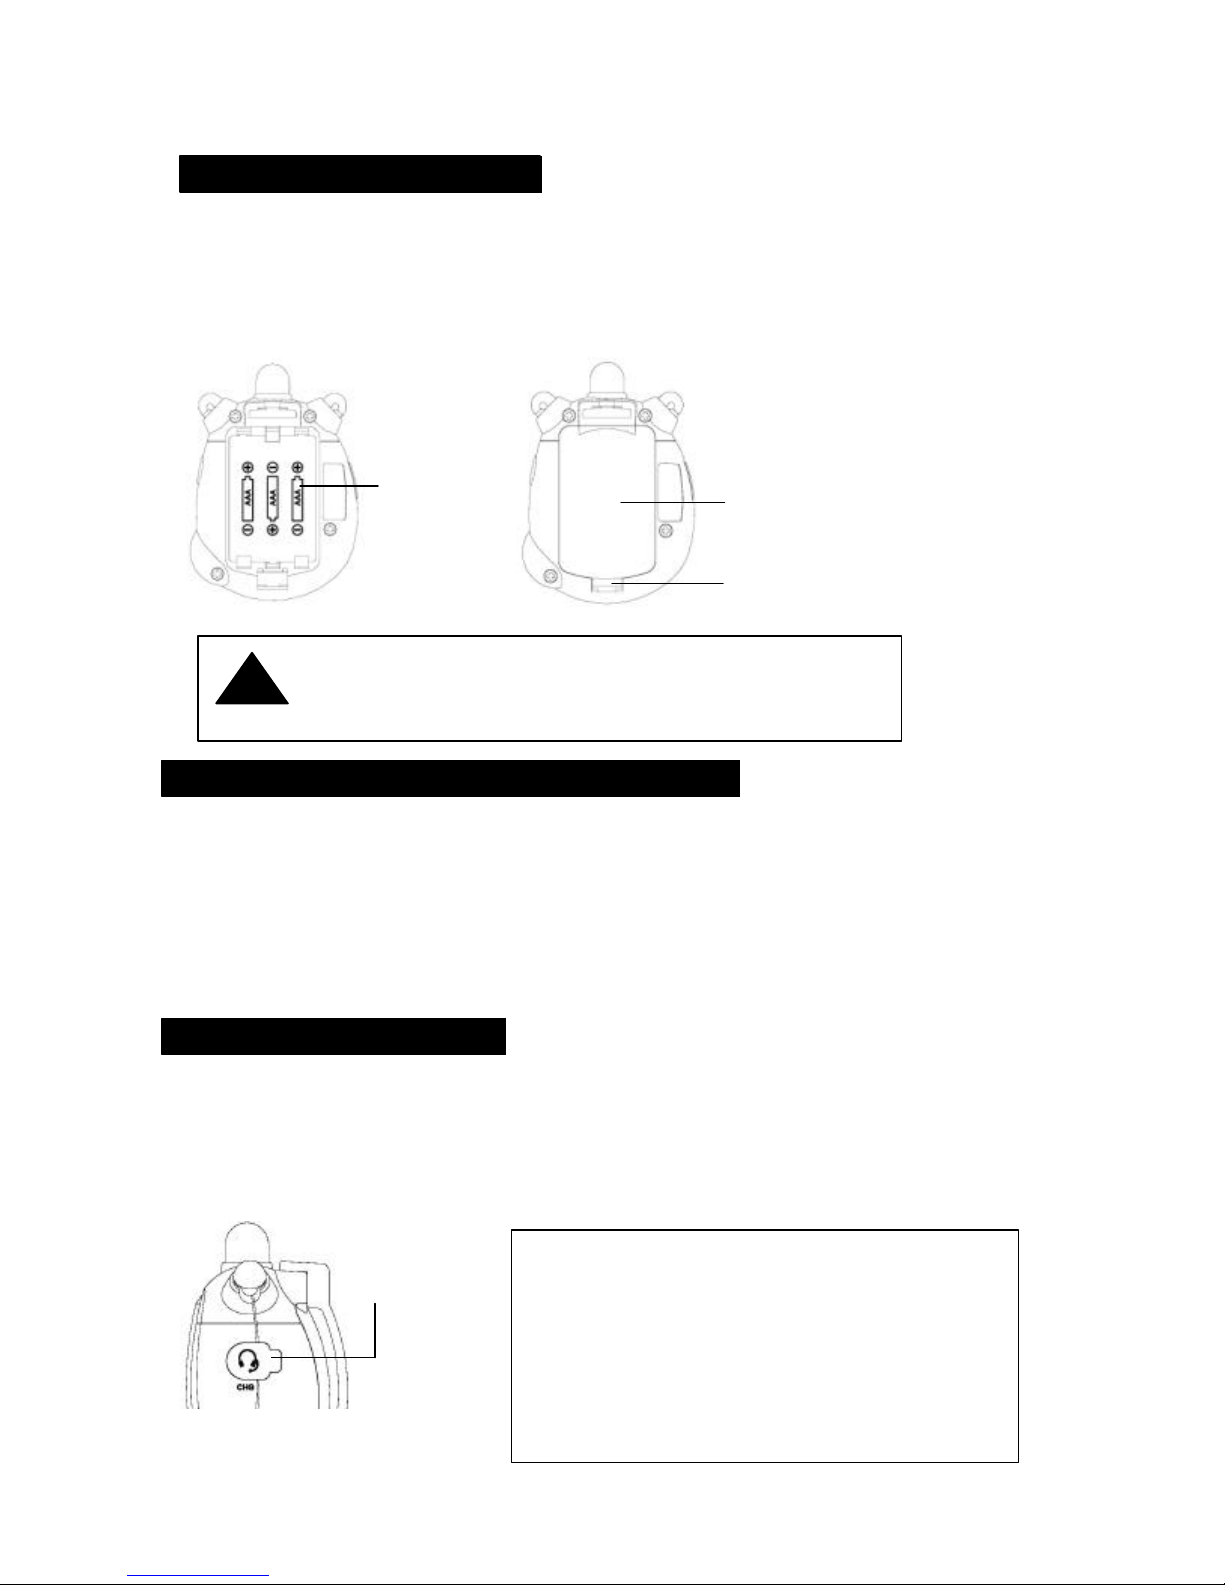
Your M4X COMMUNICATOR uses 3 AAA size Alkaline battery. To install the battery:
1. Release the Battery Compartment Cover Latch located on the rear side of the unit, and remove the Battery
Compartment Cover from the Battery Compartment.
2. Install the batteries into the Battery Compartment. Be certain to follow the correct battery orientation in the
compartment. Installing the batteries incorrectly will prevent the unit from operating.
3. Replace the Battery Compartment Cover and lock the Battery Compartment Cover Latch into position.
The M4X has a built in Power Saver feature for maximum battery life. But when the M4X
is not being used, conserve battery power by pressing the Power Key to OFF.
Remove the battery if the unit will not be used for a long period of time.
In Watch and COMMUNICATOR Mode the Low Battery Level icon will not appear on the display unless the unit detects
that the battery is low.
The unit has a Low Battery Level icon which will blink when it detects a low battery level in COMMUNICATOR and in
Watch Mode. When the unit is in COMMUNICATOR Mode or Watch Mode and the battery level is low the icon will blink.
You should replace the batteries by this time to continue operation.
Your COMMUNICATOR has the capability to use Ni-MH batteries, if you are using Ni-MH batteries you should recharge
the batteries when the level becomes low. You can recharge the batteries thru the Headset / Charger jack found at the
side of the unit.
Your M4X COMMUNICATOR comes with an A/C Adapter Charger to charge your NiMH batteries. To charge the
batteries:
1. Lift the Headset / Charger Jack Cover located in the side of your unit.
2. Connect the A/C Adapter Charger into an A/C Wall outlet
2. Insert the A/C Adapter Charger into the Headset / Charger Jack. During charging, the Low Batt ery Level icon will
disappear on the display once the battery level is above the Low Level limit.
Compartment
Jack Cover
Compartment
Cover
Cover Latch
hours before initial use. Do not attempt to charge
Alkaline batteries as it may cause leakage and cause
damage to the unit.
The M4X have internal battery protection, however
during long term storage it is strongly recommended
that you recharge the battery every 6 months or
remove the battery if the unit will not be used for a l
period of time.
Page 4
INSTALLING THE NECK CORD and BELT CLIP
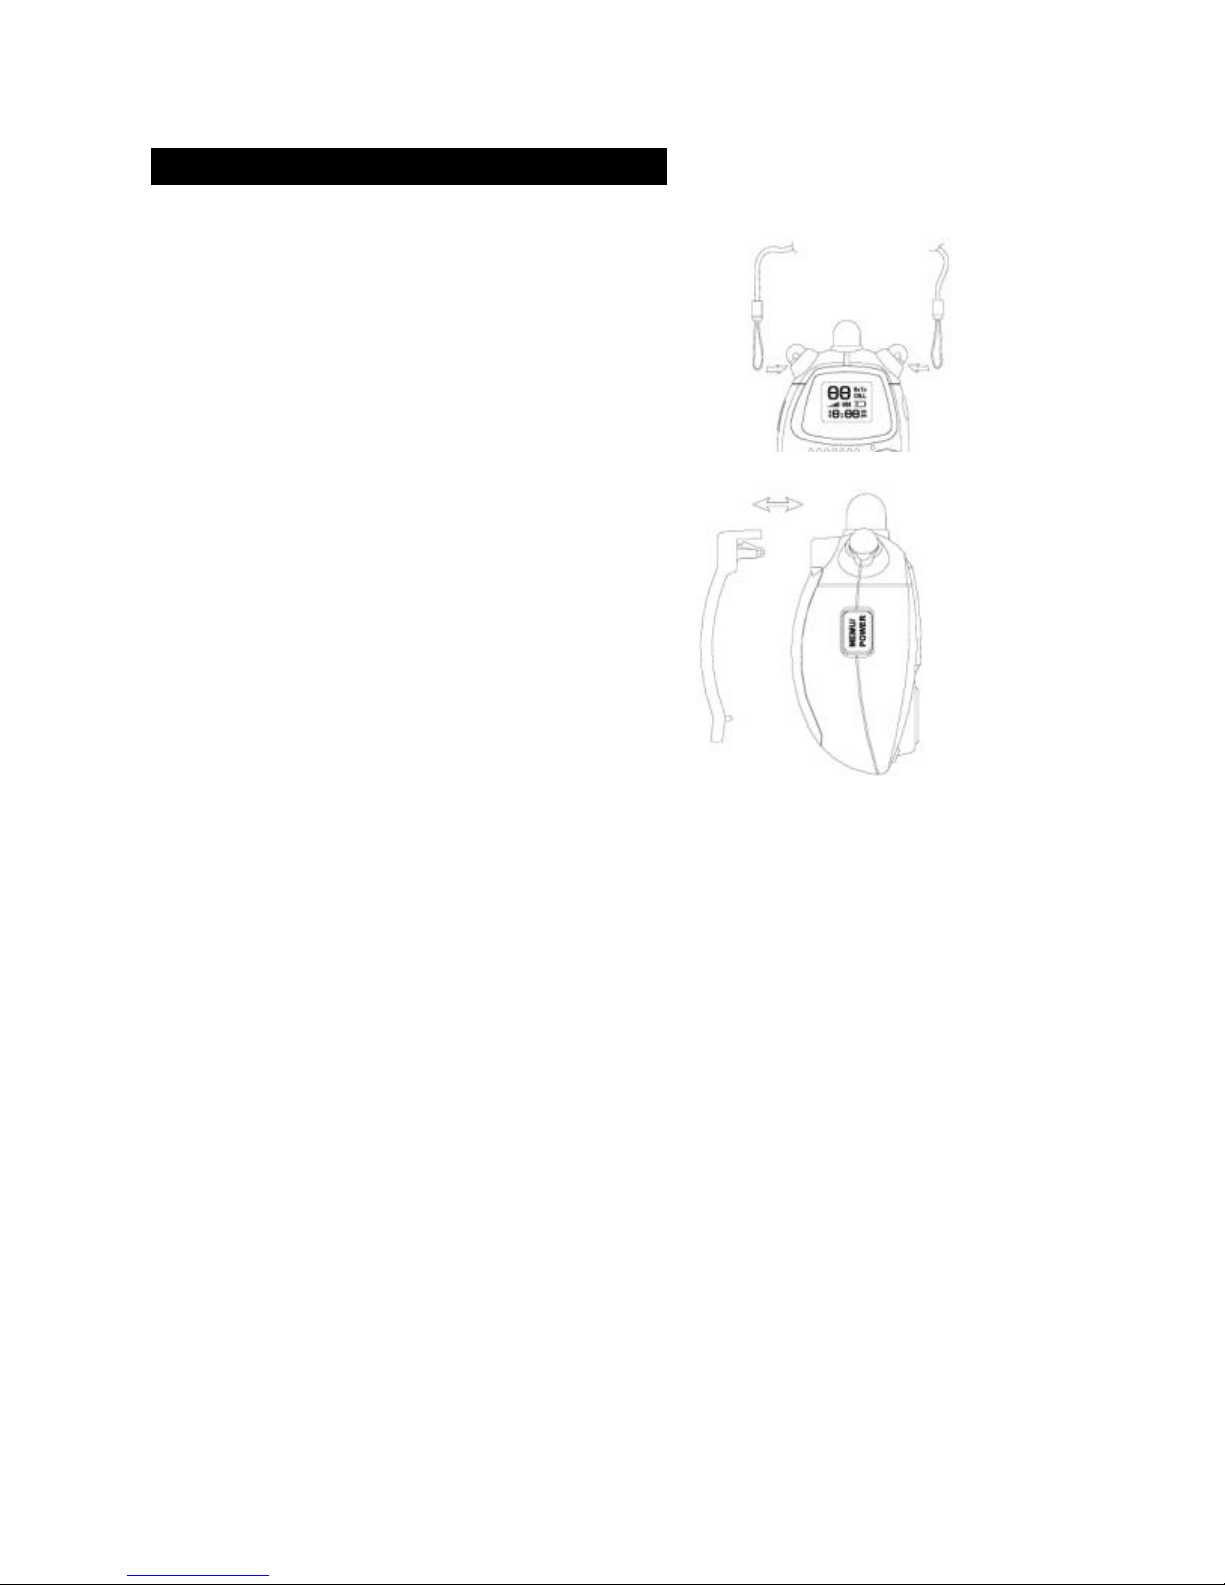
Your M4X COMMUNICATOR comes with a Neckband and Belt Clip to allow you to wear your COMMUNICATOR around
your neck or clip it in your belt.
To install the Neck Cord, simply insert the Neck Cord loop
into the holder found at the sides of the unit.
To remove the Neck Cord, simply pull the Neck Cord loop
out of the holder.
To install the Belt Clip, simply push the Belt Clip into
the Belt Clip latch until it locks into place.
To remove Belt Clip, press the Belt Clip lock and
pull the Belt Clip away from the latch.
Page 5

USING THE COMMUNICATOR
Channel
Menu
1~22
12hr am/ 12hr pm
1. Installing the battery will automatically turn-on the unit and proceeds to Watch Mode.
2. Enter to COMMUNICATOR Mode by pressing and holding the Power key for around 3 seconds. To exit
COMMUNICATOR Mode, press the Power key for around 3 seconds while on COMMUNICATOR mode.
2. Check the battery condition on the display.
3. Adjust the volume to a comfortable level by pressing the UP or DOWN key (default).
Navigating through the Menu
To access the advance feature of the M4X, your COMMUNICATOR has a Menu two (2) function:
Watch Mode (Default)
Menu
COMMUNICATOR Mode
WATCH Mode
1. Your COMMUNICATOR will automatically go to Watch Mode once the battery is installed, only the watch segments and
icons will be displayed on the LCD during this mode. Press the Menu key briefly to enter the Time Setting Mode; a
short keybeep tone will be locally generated when the Time Setting mode is engaged.
2. Additional presses of the Menu key for no longer than 1 second will advance you through the menu until exiting to
Watch mode. A short keybeep tone is generated at each key press
3. Menu mode exits to standby mode when the Menu key is pressed while the final menu selection is active.
4. The unit automatically times out of Menu mode and enters Watch mode in 10 seconds.
COMMUNICATOR MODE
1. To enter or exit to COMMUNICATOR Mode, press the Power key for around 3 seconds. A long keybeep tone is locally
generated (after a short keybeep tone) when the unit goes into COMMUNICATOR Mode and the LCD will display the
segments and icons for the COMMUNICATOR.
2. To enter the Menu Mode, press the Menu key briefly. A keybeep will be locally generated when the Menu Mode is
engaged.
3. Additional presses of the Menu key for no longer than 1 second will advance you through the menu until exiting to
COMMUNICATOR mode. A short keybeep tone is generated at each key press.
4. Menu mode exits to standby mode when the Menu key is pressed while the final menu selection is active.
5. Menu mode will automatically time out to standby mode 10 seconds after the last user programming is pressed.
6. Menu mode can be autoamtically cancelled by pressing PTT/Call key.
Hours (Watch) Minutes (Watch)
0~59
VOX
On/Off
To set the Time
Your M4X COMMUNICATOR has a 12-hour (AM/PM) Time Clock, which can be set as follows:
1. In Watch mode, enter to Menu mode by pressing the Menu key briefly until a short keybeep tone is heard. When the
Setting mode is engaged, the Hour segment in the LCD Display will flash.
2. Press the Up or Down key to increase or decrease the Hour number displayed, a short keybeep tone is generated at
each key press. The Time Setting will cycle within 12hour am and 12hour pm. To engage auto-repeat, press and hold
the Up or Down key.
3. Advance thru the Menu by pressing the Menu key briefly until the Minutes segment is flashing. A short keybeep tone
will be generated.
4. Press the Up or Down key to increase or decrease the Minutes number displayed. A short keybeep tone is generated
at each key press. To engage auto-repeat, press and hold the Up or Down key.
5. Exit the Menu mode to return to “normal” mode by pressing the Menu key briefly or by automatic time out for about 10
seconds after last key is pressed.
Page 6

Choosing a Channel
Your M4X COMMUNICATOR has 22 channels you can use to talk to others. To choose a channel:
1. To enter or exit to COMMUNICATOR mode, press the Power key for about 3 seconds. A long keybeep tone is locally
generated (after a short keybeep tone) when the unit goes into COMMUNICATOR Mode and the LCD will display the
segments and icons for the COMMUNICATOR.
2. Press the Menu for at least one second. The Channel number on the LCD display will flash.
2. Press the Up or Down key to reach higher or lower channel. Auto-repeat is engaged by pressing and holding either the
Up or Down key. You’ll hear a standard key beep with each channel cha nge.
3. To exit the Menu, press PTT/Call key.
Channel Scan
To scan the whole 22 channels of the COMMUNICATOR for any activity
1. Press the Scan key found on the side of the unit. Once engaged, the unit will start to rapidly scan the whole 22
channels of the COMMUNICATOR for any activity. The unit will pause on an active channel for 4~5 seconds before
resuming Scan function.
2. To exit the Scan mode, depress the Scan key
Transmitting and Receiving
To use your M4X COMMUNICATOR to communicate with others:
1. The unit is continuously in RECEIVE mode when the unit is ON. Turn on COMMUNICATOR mode by pressing the
Power key for 3 seconds.
2. Press and hold the PTT key and speak as you normally would, holding the microphone about 2~3 inches away from
your mouth. While transmitting, the TX icon appears on the display. To avoid cutting off the first part of your
transmission, do not speak immediately after pressing the PTT/Call key; first pause briefly, then speak.
2. When you are finished speaking, release the PTT/Call key. You are now ready to receive incoming transmission. While
receiving transmission, the RX icon appears on the display.
For optimum performance, make sure the ANTENNA is pointing upright.
Sending a Call Alert Tone
To send a Call Alert Tone, press the PTT key twice in rapid action. The Call Alert Tone will be automatically transmitted
for a fixed length of time. During transmission, the Call icon will appear on the display and a Call Alert Tone is also locally
generated for confirmation of operation. The COMMUNICATOR will return to standby mode following completion of the
Call Tone sequence. For optimum performance, make sure the ANTENNA is pointing upright.
Voice Operated Transmission (VOX)
Your M4X COMMUNICATOR is equipped with a user selectable Voice Operated Transmitter (VOX) that can be used for
automatic voice transmission. In this convenient mode, transmission is automatically initiated by speaking into the
microphone. There is no need to push the PTT/Call key.
To adjust VOX level:
1. Enter to Menu mode. Advance through the Menu until the VOX icon appears on the display.
2. Press the Up or Down key to toggle between On and Off function of the VOX. When VOX feature is on, the VOX icon
will appear on the LCD display.
3. To exit the Menu, press PTT/Call key.
To get the full advantage of the convenience of a hands free transmission and the privacy of conversation, you
can purchase an Ear Bud with Microphone (see Accessory Order Form) to be used in conjunction with the VOX
feature of your COMMUNICATOR.
To use the Ear Bud:
1. Set your COMMUNICATOR to VOX Mode.
2. Lift the Headset / Charger Jack Cover located at the side of your unit.
3. Insert the Ear Bud Jack into the Headset Jack. Wear the Ear Bud and adjust the Microphone location.
The Auto Squelch Feature
Your M4X COMMUNICATOR is equipped with an automatic squelch system that automatically cuts off weak
transmissions and unwanted noise due to terrain conditions and range limitations.
Page 7

The Automatic Power Save Feature
SPECIFICATIONS
IMPORTANT BATTERY INFORMATION
DAMAGED ANTENNA
Your M4X COMMUNICATOR has a unique circuit designed to dramatically extend battery life. If it senses no transmission
within 5 seconds, it automatically switches to the power save mode. The COMMUNICATOR can still receive
transmissions in this mode.
The Display Backlit Display Feature
Your unit’s LCD Backlight display automatically lights up for 5 seconds with the press of any key.
Channels 22 FRS/GMRS Channels
Operating Frequency UHF 462.5500 ~ 467.7125 MHz
Power Source 3 AAA size Alkaline Batteries with Ni-MH capability (not included)
Output Power 0.083W ERP maximum
Battery Life Varies per user
Channel and Frequency (MHz) Chart
Channel 1 thru 14 transmit on FRS frequencies
Channels 15 thru 22 transmit on GMRS frequencies
Ch. Frequency Ch. Frequency
1 462.5625 12 467.6625
2 462.5875 13 467.6875
3 462.6125 14 467.7125
4 462.6375 15 462.5500
5 462.6625 16 462.5750
6 462.6875 17 462.6000
7 462.7125 18 462.6250
8 467.5625 19 462.6500
9 467.5875 20 462.6750
10 467.6125 21 462.7000
11 467.6375 22 462.7250
Do not use any COMMUNICATOR that has damaged Antenna. If a damaged antenna comes in contact with the skin, a
minor burn may occur.
• Only use battery which is indicated in the manual. Using another type of battery can substantially reduce play time
• If you plan on using your COMMUNICATOR for a month or more, be sure to remove battery because they
can leak and damage the unit.
• Dispose of battery in the proper manner, according to federal, state, and local regulations that apply in your area.
• Battery may leak electrolyte if mixed with a different battery type, if inserted incorrectly, if disposed in fire, or if an
attempt is made to charge a battery not intended to be charged.
• Discard leaky batteries immediately. Leaking batteries ca n cause skin burns or other personal injury.
Page 8

FCC INFORMATION
This device complies with Part 15 of the FCC Rules. Operation is subject to the following conditions:
(1) This device may not cause harmful interference
(2) This device must accept any interference received, including interference that may cause undesired operation
Important: Changes or modifications to this unit not expressly approved by XACT could void your authority to operate this
unit. Your COMMUNICATOR is set up to transmit a regulated signal on an assigned frequency. It is against the law to
alter or adjust the settings inside the COMMUNICATOR to exceed those limitations. Any adjustment to your
COMMUNICATOR must be made by qualified technicians.
To be safe and sure:
• Never open your COMMUNICATOR’s case.
• Never change or replace anything in your COMMUNICATOR except the battery.
Your COMMUNICATOR might cause TV or COMMUNICATOR interference even when it is operating properly. To
determine whether your COMMUNICATOR is causing the interference, turn it off. If the interference goes away, your
COMMUNICATOR is causing it. Try to eliminate the interference by moving your COMMUNICATOR away from the
receiver. If you cannot eliminate the interference, the FCC requires that you stop using the COMMUNICATOR.
Hazardous Environments: Do not operate the COMMUNICATOR in hazardous environments. Explosion or fire may
result. Do not operate the COMMUNICATOR near unshielded electrical blasting caps. Under certain conditions,
COMMUNICATORs can interfere with blasting operations and may cause an explosion. Turn your COMMUNICATOR
OFF to prevent accidental transmission when in a blasting area or in areas posted: “Turn off two-way COMMUNICATOR.”
Construction crews often use remote control RF devices to set off explosives.
Care and Safety: To clean the COMMUNICATOR, use a soft cloth dampened with water. Do not use cleaners or
solvents because they can harm the body of the unit and leak inside, causing permanent damage. Use a dry, lint-free
cloth to clean the
battery contacts. Do not submerge the unit in water or attempt to use the unit on a wet environment. If the unit gets
wet, turn it off, and remove the battery immediately. Dry the battery and the battery compartment with a soft cloth to
minimize potential water damage. Leave the battery compartment cover off overnight to ensure complete drying. Do not
use the COMMUNICATOR until the unit is completely dry.
Page 9

TROUBLESHOOTING
SYMPTOMS SOLUTION
No power
Reception is weak
Cannot change
channels
Range is limited
Sound distortion
problems
• Check the batteries. Ensure that the batteries are
installed properly.
• The batteries may be weak.
• Recharge your batteries by using the A/C
Adapter Charger.
• Your batteries may be damaged. Replace old
batteries with new one
• Press the UP key to increase VOLUME.
• The receiving signal may be weak and/or out of
range.
• Check the antenna position. For optimum
performance make sure the antenna is pointing
upright
• To change channels, press the MENU key until
the channel number flashes on the LCD
Screen.
• Press the UP or DOWN key to change
channels.
• Batteries may be weak.
• Batteries may be weak
• Replace batteries if the BATTERY LEVEL
indicator is low.
• The maximum range will vary depending on
terrain and environment.
• Open fields provide the maximum range, while
steel/concrete structures, heavy foliage, and
use in buildings and in vehicles may limit the
range significantly.
• Check the antenna position. For optimum
performance make sure the antenna is pointing
upright.
• If you are transmitting, speak in a normal tone
of voice, 2 to 3 inches away from the
MICROPHONE.
• If you are receiving, lower the volume to a
comfortable level.
• COMMUNICATOR is too close.
COMMUNICATOR must be at least 10 feet
apart; increase your distance.
• COMMUNICATOR is too far apart. Obstacles
interfere with transmission. Talk range is up to
2 miles in clear unobstructed conditions.
Page 10

WARRANTY
XACT Products
One-year Limited Warranty
This limited warranty sets forth all XACT Products responsibilities regarding to your M4X. There are no other expressed
or implied warranties from XACT Products.
Warranty Service Provided
If you purchased the M4X unit new from a retail vendor, XACT Products warrants the equipment against defects in
material and workmanship for a period of one (1) year from the original date of purchase. This warranty is in lieu of all
other express warranties. This warranty begins when you purchase the M4X unit and continues for one (1) year unless
you sell or rent the unit, in which case the warranty stops.
XACT Products disclaims any implied warranty, including the warranty of merchantability and the warranty of fitness for a
particular purpose, as of the date of one year from your original purc hase of the M4X unit. XACT Products assumes no
responsibility for any special, incidental, or consequential damages.
This warranty gives you specific legal rights and you may have other rights, which vary from state to state. Some states
do not allow the exclusion or limitation of special, incidental or consequential damages or limitation on how long a
warranty lasts, so the above exclusion or limitation may not apply to you.
Warranty Service Not Provided
This warranty does not cover damages resulting fr om accident, misuse, abuse, improper installation or operation, lack of
reasonable care, unauthorized modification, or the affixing of any attachment not provided by XACT Products with the
M4X unit, and/or loss of parts. This warranty is voided in the event any unauthorized person opens, alters, or repairs the
unit.
All XACT equipment being returned for repair must be suitably packaged.
XACT Products does not warrant that this equipment is compatible with the type of accessory of any particular
COMMUNICAT OR company or the service provided by it.
What To Do For Warranty Service
During the first thirty (30) days, a defective product is eligible for over-the-counter exchange at the retailer from whom it
was purchased. After thirty (30) days, the defective product should be returned to the authorized service center. the
shipping address of the authorized service center is:
U.S. Electronics CONSUMER CENTER
C/O Southern Bonded Warehouse
7137 Southlake Parkway
Morrow, GA 30260
Website – www.uselectronics.info
Your unit will be repaired or replaced if examination by the service center determines the unit is defective.
A M4X unit received damaged as a result of shipping will require you to file a claim with the carrier to cover repair costs.
A M4X unit received with missing parts or with damage due to abuse, inadequate packing, or some other noncompliance
with this limited warranty will be returned to you C.O.D., freight collect.
NOTE: A M4X received which was not made for XACT Products or which is not defective as determined by our test
procedures will not be repaired and will be returned to you C.O.D., freight collect.
To Obtain Warranty Service
• Provide proof of the date of purchase within the package.
• Prepay all shipping costs to the authorized service center.
• Include a return shipping address within the package.
Please retain your sales receipt, the carton, the packaging materials, and the printed materials. the original carton is the
best shipping container for the M4X unit should you have to return it.
Page 11

For your reference:
Model Number _________________________
Date of Purchase _______________________
Name of Dealer ________________________
Customer Service Telephone Number
1-800-864 -2199
FCC Licensing Information
Channels 1 thru 14 transmit on FRS frequencies
Channels 15 thru 22 transmit on GMRS frequencies
Operation on GMRS frequencies requires a license from the federal Communications Commission (FCC)
Information regarding an application for your license can be obtained as follows if you intend to use the GMRS channels:
Website – http://wireless.fcc.gov/prs/genmbl.html
Tel.: 1-800-418-3676
GMRS Licensing Information
Before any station transmits on any channel authorized in the GMRS from any point within or over the territorial limits of
any area where COMMUNICATOR services are regulated by the FCC, the responsible party must obtain a license for a
GMRS system. An individual 18 years of age or older, who is not a representative of a foreign government is eligible to
apply for a GMRS license. Application for a GMRS system license is made on FCC Form 605 and you can obtain a copy
from the FCC’s Web site: http://www.fcc.gov/formpage.html or by calling the FCC’s Forms Distribution Center 1-800-418FORM (3676), or from the fax-on-demand by dialing (202) 418-0177. There is a filing fee. For information on fees, see the
FCC’s Web site:
http://www.fcc.gov/csinfo/feeinfo.html
Visit us on the Web
www.uselectronics.info
 Loading...