


BiPAC 7800GZ
3G (HSPA) 802.11g ADSL2+
VPN Firewall Router
User Manual
Version released: 1.02e

Table of Contents
Chapter 1: Introduction......................................................................... 1
Introduction to your Router .................................................................1
3G Mobility and Always-On Connection........................................................ 1
Secure VPN Connections ............................................................................. 1
Smooth, Responsive Net Connection ........................................................... 1
Wireless Mobility and Double-layer Protection.............................................. 2
Features..............................................................................................3
ADSL Compliance......................................................................................... 3
3G/HSPA ...................................................................................................... 3
Network Protocols and Features................................................................... 4
Virtual Private Network (VPN)....................................................................... 4
Firewall.......................................................................................................... 4
Quality of Service Control ............................................................................. 4
IPTV Applications.......................................................................................... 4
ATM and PPP Protocols ............................................................................... 5
Wireless LAN ................................................................................................ 5
Management ................................................................................................. 5
Hardware Specifications ..................................................................... 6
Physical Interface.......................................................................................... 6
Physical Specifications.................................................................................. 6
Operating Environment ....................................................................... 6
Models & Supported Standards .......................................................... 6
Chapter 2: Installing the Router........................................................... 7
Package Contents
...............................................................................
7
Important note for using this router ..................................................... 8
Device Description .............................................................................. 9
The Front LEDs............................................................................................. 9
The Rear Ports............................................................................................ 10
Cabling.............................................................................................. 11

Chapter 3: Basic Installation .............................................................. 12
Connecting Your Router ................................................................... 13
Network Configuration ......................................................................15
Configuring PC in Windows Vista
...............................................................
15
Configuring PC in Windows XP
...................................................................
17
Configuring PC in Windows 2000
...............................................................
18
Configuring PC in Windows 95/98/Me
........................................................
19
Configuring PC in Windows NT4.0
..............................................................
20
Factory Default Settings.................................................................... 21
Information from your ISP ................................................................. 22
Chapter 4: Configuration .................................................................... 23
Easy Sign-On (EZSO)....................................................................... 23
Configuration via Web Interface........................................................ 26
Quick Start ........................................................................................ 27
Basic Configuration Mode................................................................. 42
Status.......................................................................................................... 42
WAN – Main Port (ADSL)............................................................................ 43
PPPoE Connection (ADSL) ................................................................................................. 43
PPPoA Connection (ADSL) ................................................................................................. 44
MPoA Connection (ADSL) ................................................................................................... 45
IPoA Connections (ADSL) ................................................................................................... 46
Pure Bridge Connections (ADSL)....................................................................................... 47
WAN – Main Port (EWAN) .......................................................................... 48
PPPoE (EWAN)..................................................................................................................... 48
Obtain IP Address Automatically (EWAN) ........................................................................ 49
Fixed IP Address (EWAN) ................................................................................................... 49
WAN – Main Port (3G) ................................................................................ 50
WLAN.......................................................................................................... 51
Advanced Configuration Mode.......................................................... 53
Status.......................................................................................................... 53
ADSL Status........................................................................................................................... 55
3G Status................................................................................................................................ 56
ARP Table .............................................................................................................................. 57

DHCP Table ........................................................................................................................... 58
System Log ............................................................................................................................ 59
Firewall Log............................................................................................................................ 60
UPnP Portmap....................................................................................................................... 60
IPSec Status ..........................................................................................................................61
VRRP Status.......................................................................................................................... 61
Configuration............................................................................................... 62
LAN - Local Area Network ................................................................................................... 63
WAN - Wide Area Network .................................................................................................. 82
System .................................................................................................................................. 100
Firewall.................................................................................................................................. 106
VPN ....................................................................................................................................... 114
QoS - Quality of Service..................................................................................................... 117
Virtual Server ....................................................................................................................... 120
Wake on LAN....................................................................................................................... 125
Time Schedule..................................................................................................................... 126
Advanced.............................................................................................................................. 127
Save Configuration to Flash........................................................ 143
Restart............................................................................................ 144
Chapter 5: Troubleshooting.............................................................. 145
Appendix: Product Support & Contact............................................ 147

1
Chapter 1: Introduction
Introduction to your Router
The BiPAC 7800GZ, a Dual-WAN 3G / ADSL2+ firewall router integrated with the 802.11g
Wireless Access Point and 4-port switch is a cutting-edge networking product for SOHO and office
users. Uniquely, the router offers users more flexibility to directly insert a 3G/HSPA SIM card into
its built-in SIM slot instead of requiring external USB modems. This design will avoid compatibility
issues of many different 3G USB modems. With the increasing popularity of the 3G standard,
communication via the BiPAC 7800GZ is becoming more convenient and widely available enabling users to use a 3G/UMTS HSDPA/HSUPA or GSM GPRS/EDGE Internet connection,
making downstream rates of up to 7.2Mbps possible. Users can watch movies; download music on
the road or access e-mail wherever a 3G connection is available. Additionally, the integrated IPSec
VPN function allows you to encrypt connections of up to 4 VPN tunnels to securely transmit data
over the Internet. The support for auto fail-over means that users will be assured of a constant
Internet connection - in the event that the ADSL line fails, the BiPAC 7800GZ will connect via the
embedded 3G card to deliver uninterrupted connectivity.
3G Mobility and Always-On Connection
The BiPAC 7800GZ router allows you to insert a 3G/HSPA USIM card to its built-in SIM slot,
enabling you to use a 3G/HSPA, UMTS, EDGE, GPRS, or GSM Internet connection, which makes
downstream rates of up to 7.2Mbps*4 possible. With the increasing popularity of the 3G standard,
communication via the BiPAC 7800GZ is becoming more convenient and widely available allowing
you to watch movies, download music on the road, or access e-mail no matter where you are. You
can even share your Internet connection with others, no matter if you're in a meeting, or speeding
across the country on a train. The auto fail-over feature ensures maximum connectivity and
minimum interruption by quickly and smoothly connecting to a 3G network in the event that your
ADSL line fails. The 7800GZ will then automatically reconnect to the ADSL connection when it's
restored, reducing connection costs. These features are perfect for office situations where
constant connection is paramount.
Secure VPN Connections
The BiPAC 7800GZ supports embedded IPSec VPN (Virtual Private Network) protocols, allowing
users to establish encrypted private connections of up to 4 simultaneous tunnels over the Internet.
You can access your corporate intranet and transmit sensitive data between branch offices and
remote sites anytime; even when you are on the road, thus enhancing productivity.
Smooth, Responsive Net Connection
Quality of Service (QoS) gives users full control over outgoing data traffic. Priority can be assigned
by the router to ensure that important transmissions like gaming packets, VoIP calls or IPTV /
streaming content passes through the router at lightning speed, even when there is heavy Internet
traffic. The speed of different types of outgoing data passing through the router is also controlled to
ensure that users do not saturate bandwidth with their browsing activities.

2
Wireless Mobility and Double-layer Protection
An integrated 802.11g Wireless Access Point offers quick yet easy access with data encryption
for added security. Wireless Protected Access (WPA-PSK/WPA2-PSK) and Wireless Encryption
Protocol (WEP) support ensures high-level data protection and WLAN access control. In addition,
rich firewall security features such as SPI, DoS attack prevention and URL content filtering are
integrated to provide unparalleled protection for Internet access. The router also supports the WiFi Protected Setup (WPS) standard, allowing users to establish a secure wireless network by
simply pushing a button. If your network requires wider coverage, the built-in Wireless Distribution
System (WDS) repeater function allows you to expand your wireless network without the need for
any external wires or cables.

3
Features
• Dual WAN approach - ADSL2+ 3G or Ethernet WAN for broadband connectivity
• 3G/HSPA embedded with a built-in SIM card slot
• Integrated 4-port Ethernet switch, one port can be configured as a WAN interface
• 4 IPSec VPN tunnels supported
• Secure VPN with powerful DES/3DES/AES
• High-speed Internet access via ADSL2 / 2+; backward compatible with ADSL
• Supports 802.11g wireless access point with WPA-PSK / WPA2-PSK
• WPS (Wi-Fi Protected Setup) for easy setup
• Quality of Service control for traffic prioritization and bandwidth management
• SOHO firewall security with DoS prevention and Packet Filtering
• Supports IPTV application*2
ADSL Compliance
• Compliant with ADSL Standard
- Full-rate ANSI T1.413 Issue 2
- G.dmt (ITU G.992.1)
- G.lite (ITU G.992.2)
- G.hs (ITU G.994.1)
- ADSL over ISDN / U-R2
• Compliant with ADSL2 Standard
*1
- G.dmt.bis (ITU G.992.3)
- ADSL2 Annex M (ITU G.992.3 Annex M) (BiPAC 7800GZA only)
• Compliant with ADSL2+ Standard
*1
- G.dmt.bis plus (ITU G.992.5)
- ADSL2+ Annex M (ITU G.992.5 Annex M) (BiPAC 7800GZA only)
3G/HSPA
*4
• Supports third generation (3G/ 3.5G/ 3.75G) digital cellular standards
• Peak downlink speeds up to 7.2Mbps and peak uplink speeds up to 2.0Mbps
• Supports tri-band UMTS (HSPA): 900, 1900, and 2100 MHz

4
• Receive equalizer with antenna diversity on the 900, 1900, and 2100 MHz bands
• Supports quadband EDGE/GPRS/GSM: 850/900/1800/1900 MHz
Network Protocols and Features
• NAT, static routing and RIP-1 / 2
• Universal Plug and Play (UPnP) Compliant
• Dynamic Domain Name System (DDNS)
• Virtual Server and DMZ
• SNTP, DNS relay and IGMP Proxy
• IGMP snooping for video service
• Management based-on IP protocol, port number and address
Virtual Private Network (VPN)
• 4 IPSec VPN Tunnels
• IKE key management
• DES, 3DES and AES encryption for IPSec.
• IPSec pass-through
Firewall
• Built-in NAT Firewall
• Stateful Packet Inspection (SPI)
• Prevents DoS attacks including Land Attack, Ping of Death, etc.
• Remote access control for web base access
• Packet Filtering - port, source IP address, destination IP address, MAC address
• URL Content Filtering - string or domain name detection in URL string
• Password protection for system management
• VPN pass-through
Quality of Service Control
• Supports the DiffServ approach
• Traffic prioritization and bandwidth
IPTV Applications
*2
• IGMP Snooping
• Virtual LAN (VLAN)
• Quality of Service (QoS)

5
ATM and PPP Protocols
• ATM Adaptation Layer Type 5 (AAL5)
• Multiple Protocol over AAL5 (RFC 2684, formerly RFC 1483)
• Bridged or routed Ethernet encapsulation
• VC and LLC based multiplexing
• PPP over Ethernet (PPPoE)
• PPP over ATM (RFC 2364)
• Classical IP over ATM (RFC 1577)
• MAC Encapsulated Routing (RFC 1483 MER)
• OAM F4 / F5
Wireless LAN
• Compliant with IEEE 802.11g and 802.11b standards
• 2.4 GHz - 2.484 GHz frequency range
• Up to 54Mbps wireless operation rate
• Wi-Fi Protected Setup (WPS) for easy setup
• 64 / 128 bits WEP supported for encryption
• Wireless Security with WPA-PSK / WPA2-PSK support
• WDS repeater function support
• 802.1x radius supported
Management
• Easy Sign-On (EZSO) and Auto-scan ADSL settings
• Web-based GUI for remote and local management
• Upload and download of firmware upgrades and configuration data via web-based
GUI
• Embedded Telnet server for remote and local management
• Available Syslog
• Supports DHCP server / client / relay
• TR-069*3 supports remote management

6
Hardware Specifications
Physical Interface
• SIM slot: (for the SIM card from Telco/ISP)
• WLAN: 1 detachable antenna
• 3G antenna×2pcs
• DSL: ADSL port
• EWAN: Ethernet port #4 can be configured to ADSL / Cable / FTTH / VDSL device
• Ethernet: 4-port 10/100Mbps auto-crossover (MDI / MDI-X) Switch
• Factory default reset button
• WPS push button
• Power jack
• Power switch
Physical Specifications
• Dimensions: 9.04” x 6.10” x 1.69” (229.5mm x 155mm x 43mm)
• Power Requirements: Input: 12V DC, 1.2A
Operating Environment
• Operating temperature: 0 – 40°C
• Storage temperature: -20 – 70°C
• Humidity: 20 – 95% non-condensing
Models & Supported Standards
• BiPAC 7800GZA: Annex A and Annex M (Annex A and Annex M: ADSL over POTS)
• BiPAC 7800GZU: U-R2 and Annex B (Annex B and U-R2: ADSL over ISDN)

7
Chapter 2: Installing the Router
Package Contents
• BiPAC 7800GZ 3G (HSPA) 802.11g ADSL2+ VPN Firewall Router
• CD containing the online manual
• RJ-11 ADSL/Telephone cable
• Ethernet (RJ-45) cable
• One 2dBi Wireless detachable antenna
• Two 3G antennas
• Power adapter
• Quick Start Guide
• Splitter / Micro-filter (Optional)
8
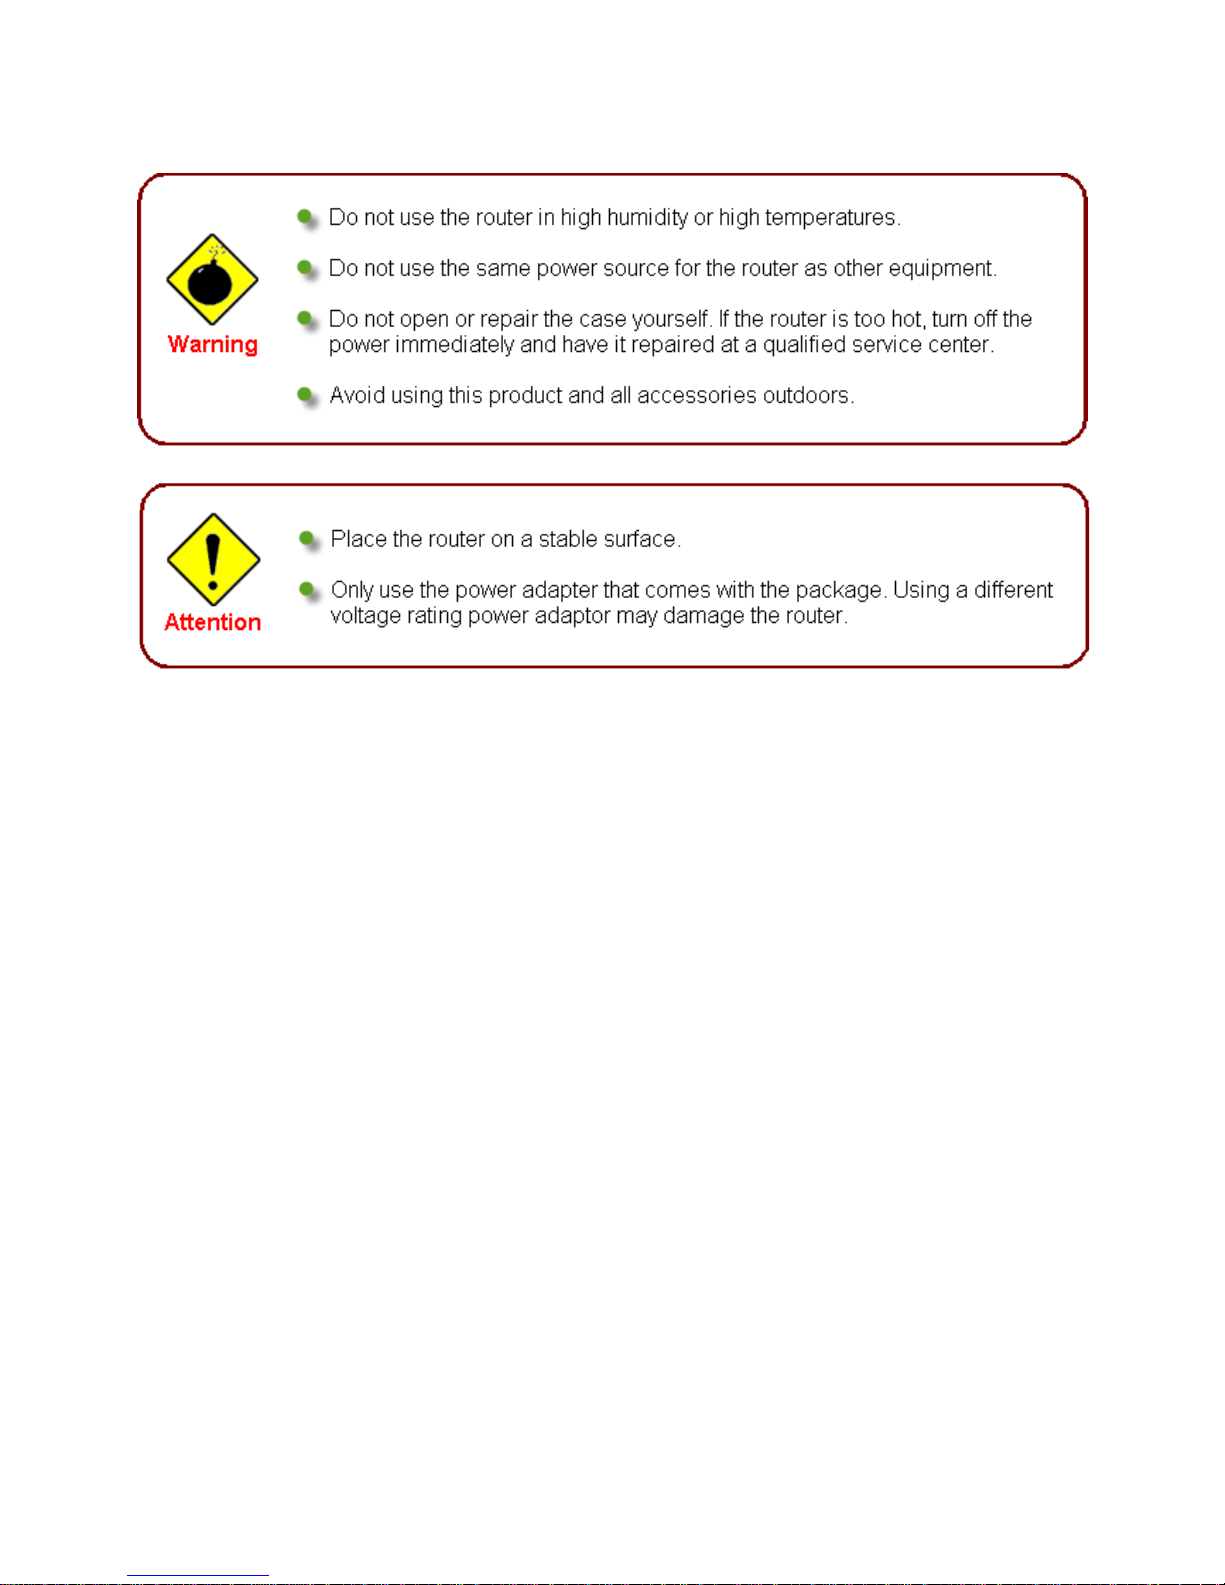
Important note for using this router

9
Device Description
The Front LEDs
LED
Meaning
1
Internet
Lit red when WAN port fails to get IP address.
Lit green when WAN port gets IP address successfully.
Lit off when the device is in bridge mode or when ADSL connection
is absent.
2 DSL
Lit green when the device is successfully connected to an ADSL
DSLAM. (“line sync”)
3
3G
Lit green when 3G service is ready.
Blinking orange slowly when 3G signal is weak; blinking orange fast
when 3G signal is middle; lit up orange steady when 3G signal is
strong.
Lit off when there is no 3G signal.
4
Wireless / WPS
Lit green when a wireless connection is established.
Flash orange when WPS configuration is in progress. However, if
WPS fails the LED will only lit for 1 min before goes off.
Blinking when data is transmitted/received.
5
Ethernet port
1X — 4X
(RJ-45 connector)
Lit up steady when connected to an Ethernet device.
Lit green when the speed of transmission hits 100Mbps; Lit orange
when the speed of transmission hits 10Mbps.
Blinking when data is transmitted/received.
6
Power
When the device is booting, the green light will lit while the red light
will flash.
When the system is ready, it will lit green.
Lit red when the device fails to boot or when the device is in
emergency mode.
10
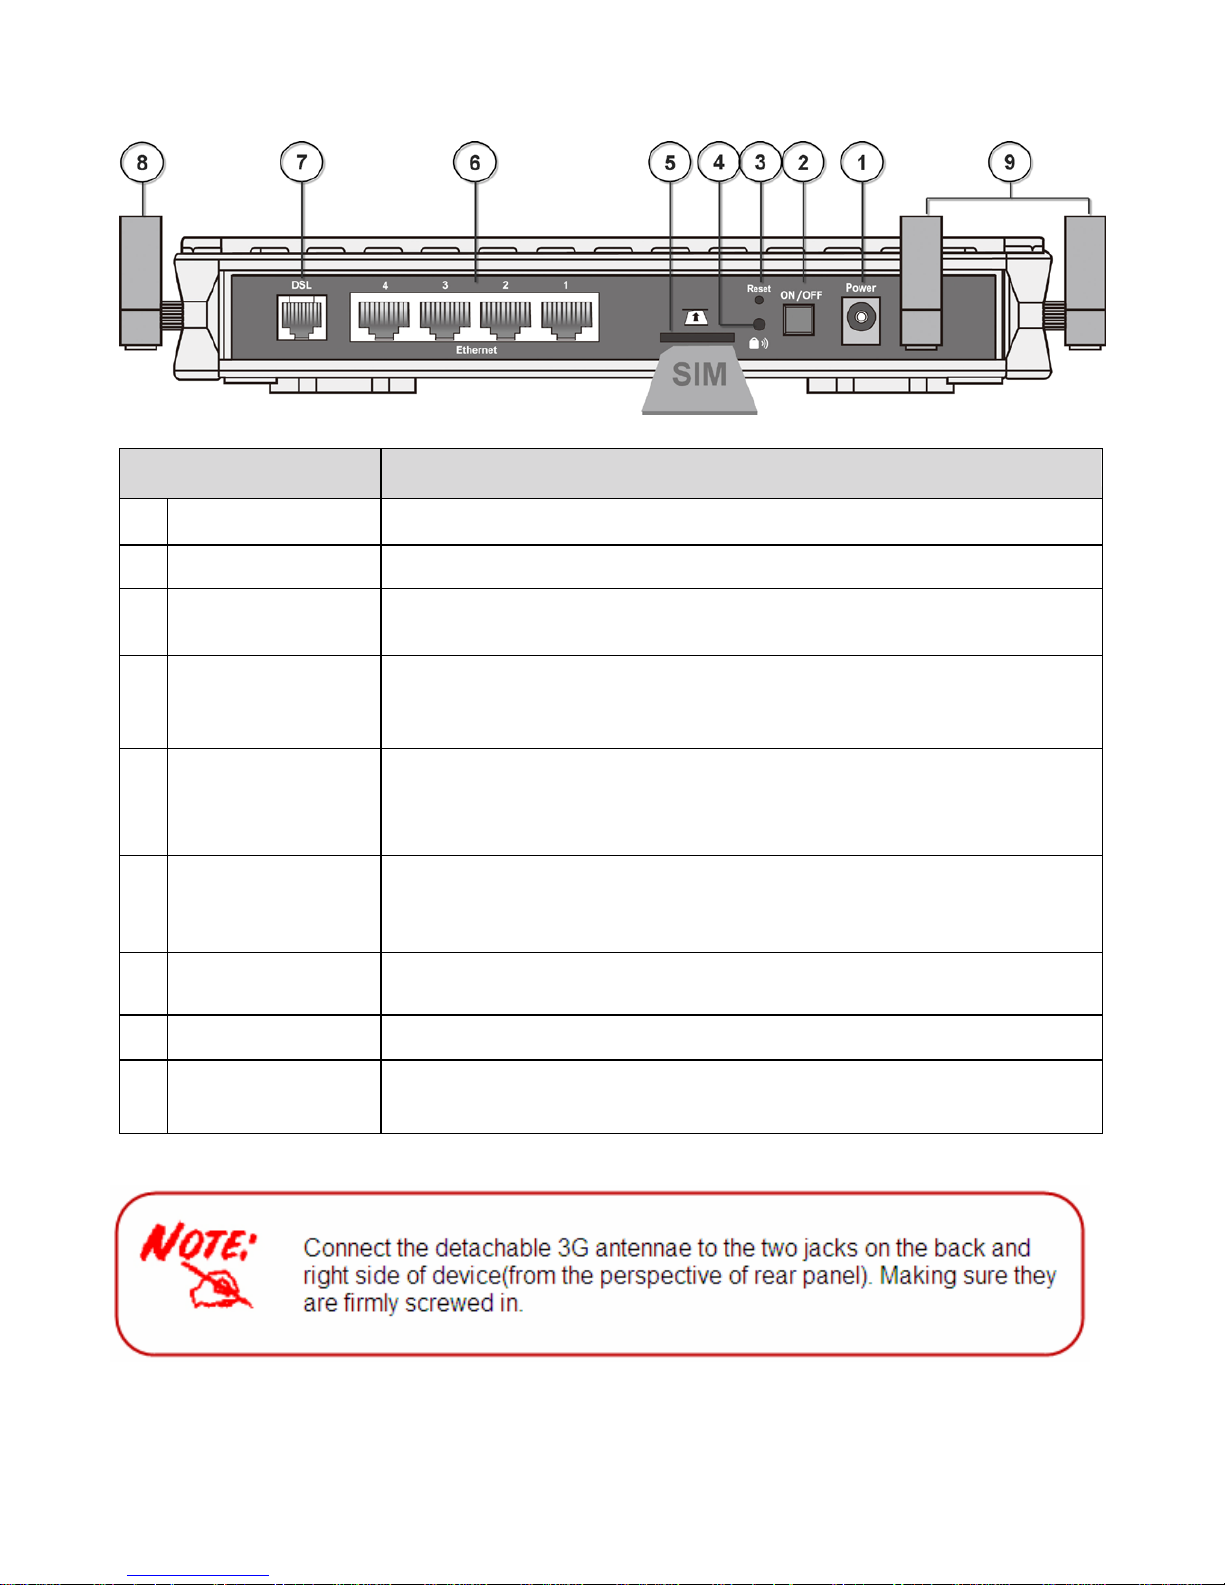
The Rear Ports
Port
Meaning
1 Power
Connect it with the supplied power adapter.
2 Power Switch
Power ON/OFF switch.
3 Reset
Press for more than 1 second to restore the device to its default
mode.
4 WPS
Push WPS button to trigger Wi-Fi Protected Setup function.
For WPS configuration, please refer to the WPS section of User
Manual.
5 USIM
Insert a SIM card into this slot.
Warning: Before inserting or removing the SIM card, you must
disconnect the router from the power adapter.
6
Ethernet
Connect your computer to a LAN port using the included Ethernet
cable (with RJ-45 cable)
Ethernet port 4 can be used for EWAN
7 DSL
Connect the supplied RJ-11 cable to this port when connecting to the
ADSL/telephone network
8 Wireless Antenna
Connect the detachable antenna for wireless connection.
9 3G Antenna
Connect the detachable antennas to these two ports for 3G
connection.

11
Cabling
One of the most common causes of problem is bad cabling or ADSL line(s). Make sure that all
connected devices are turned on. On the front panel of your router is a bank of LEDs. Verify that the
LAN Link and ADSL line LEDs are lit. If they are not, verify if you are using the proper cables. If the
error persists, you may have a hardware problem. In this case you should contact technical
support.
Ensure that all other devices connected to the same telephone line as your router (e.g. telephones,
fax machines, analogue modems) have a line filter connected between them and the wall socket
(unless you are using a Central Splitter or Central Filter installed by a qualified and licensed
electrician), and ensure that all line filters are correctly installed and the right way around. Missing
line filters or line filters installed the wrong way around can cause problems with your ADSL
connection, including causing frequent disconnections. If you have a back-to-base alarm system
you should contact your security provider for a technician to make any necessary changes.

12
Chapter 3: Basic Installation
The router can be configured through your web browser. A web browser is included as a standard
application in the following operating systems: Linux, Mac OS, Windows 98/NT/2000/XP/Me/Vista,
etc. The product provides an easy and user-friendly interface for configuration.
Please check your PC network components. The TCP/IP protocol stack and Ethernet network
adapter must be installed. If not, please refer to your Windows-related or other operating system
manuals.
There are ways to connect the router, either through an external repeater hub or connect directly
to your PCs. However, make sure that your PCs have an Ethernet interface installed properly prior
to connecting the router device. You ought to configure your PCs to obtain an IP address through
a DHCP server or a fixed IP address that must be in the same subnet as the router. The default IP
address of the router is 192.168.1.254 and the subnet mask is 255.255.255.0 (i.e. any attached PC
must be in the same subnet, and have an IP address in the range of 192.168.1.1 to 192.168.1.253).
The best and easiest way is to configure the PC to get an IP address automatically from the router
using DHCP. If you encounter any problem accessing the router web interface it is advisable to
uninstall your firewall program on your PCs, as they can cause problems accessing the IP address
of the router. Users should make their own decisions on what is best to protect their network.
Please follow the following steps to configure your PC network environment.
13
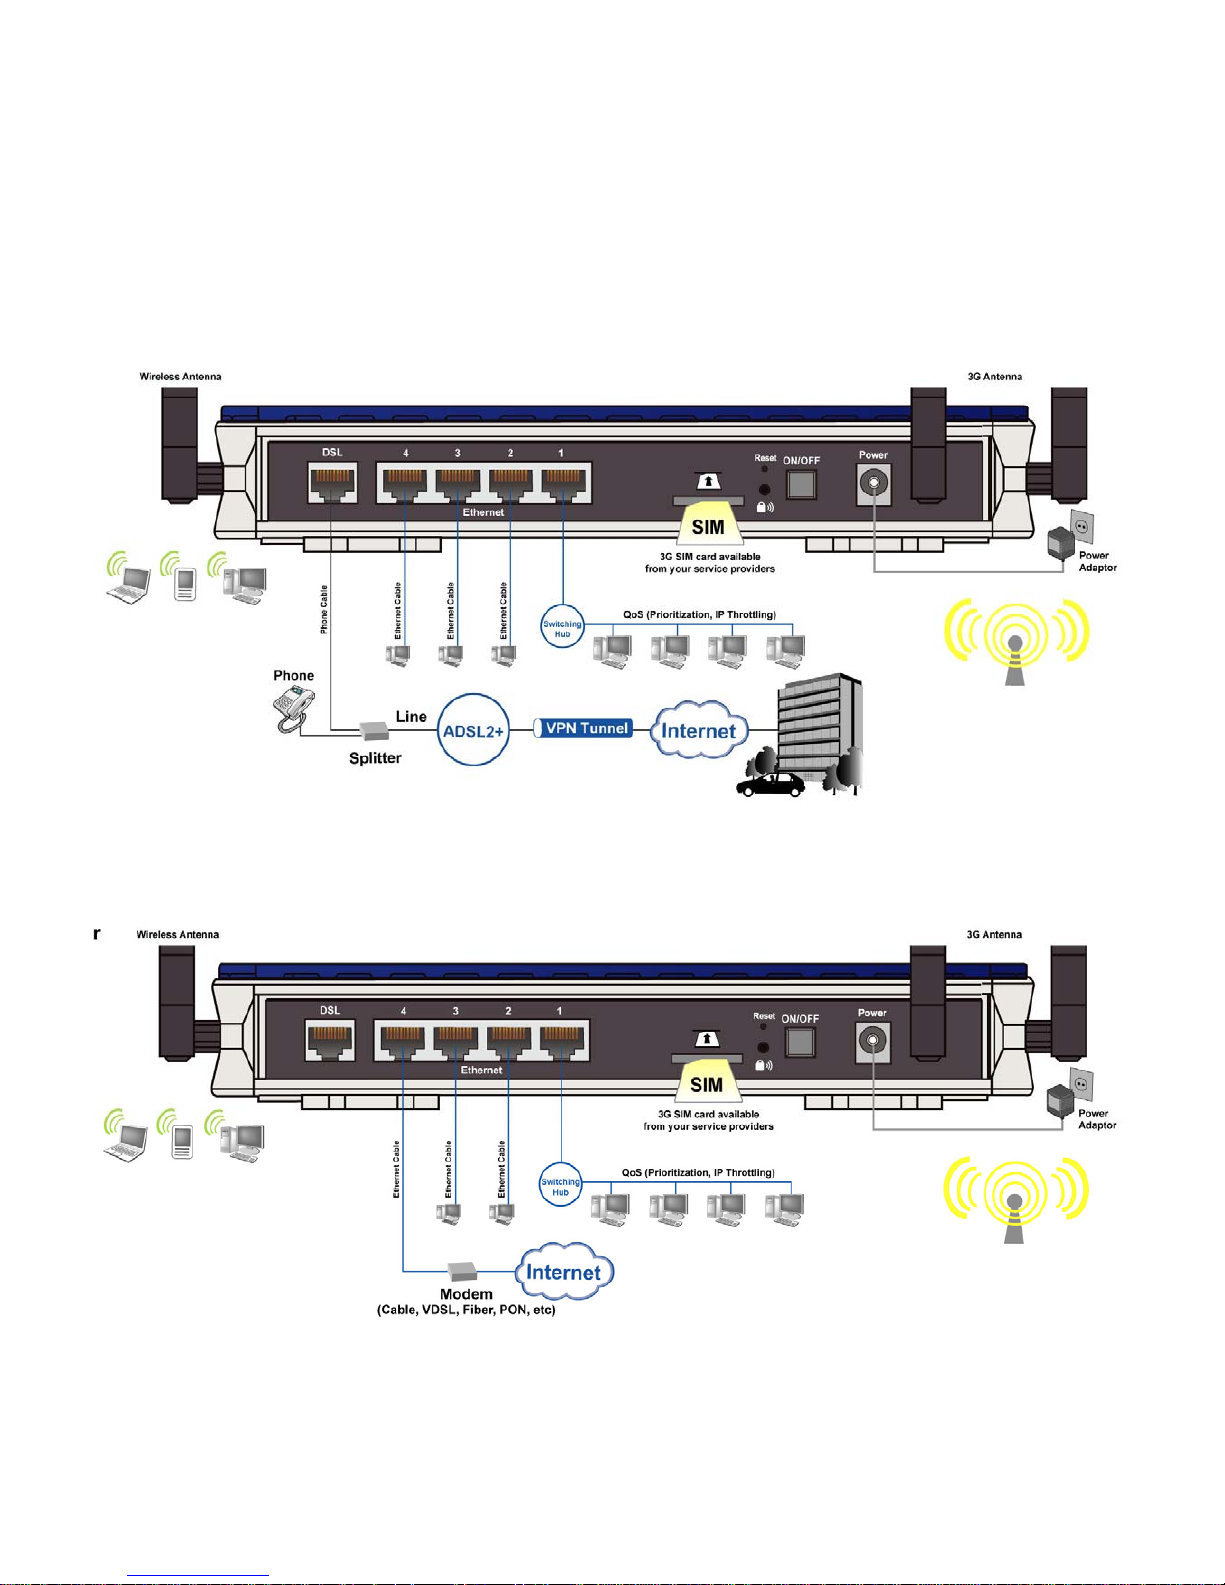
Connecting Your Router
BiPAC 7800GZ offers three modes to connect to the internet. Besides using ADSL, users can set
EWAN (Ethernet port # 4) or 3G for internet connection. BiPAC 7800GZ also allows Dual WAN
connection: ADSL fail-over to 3G, EWAN fail-over to 3G, ADSL fail-over to EWAN, and counter
likewise.
ADSL fail-over to 3G
Broadband (EWAN) fail-over to 3G
14
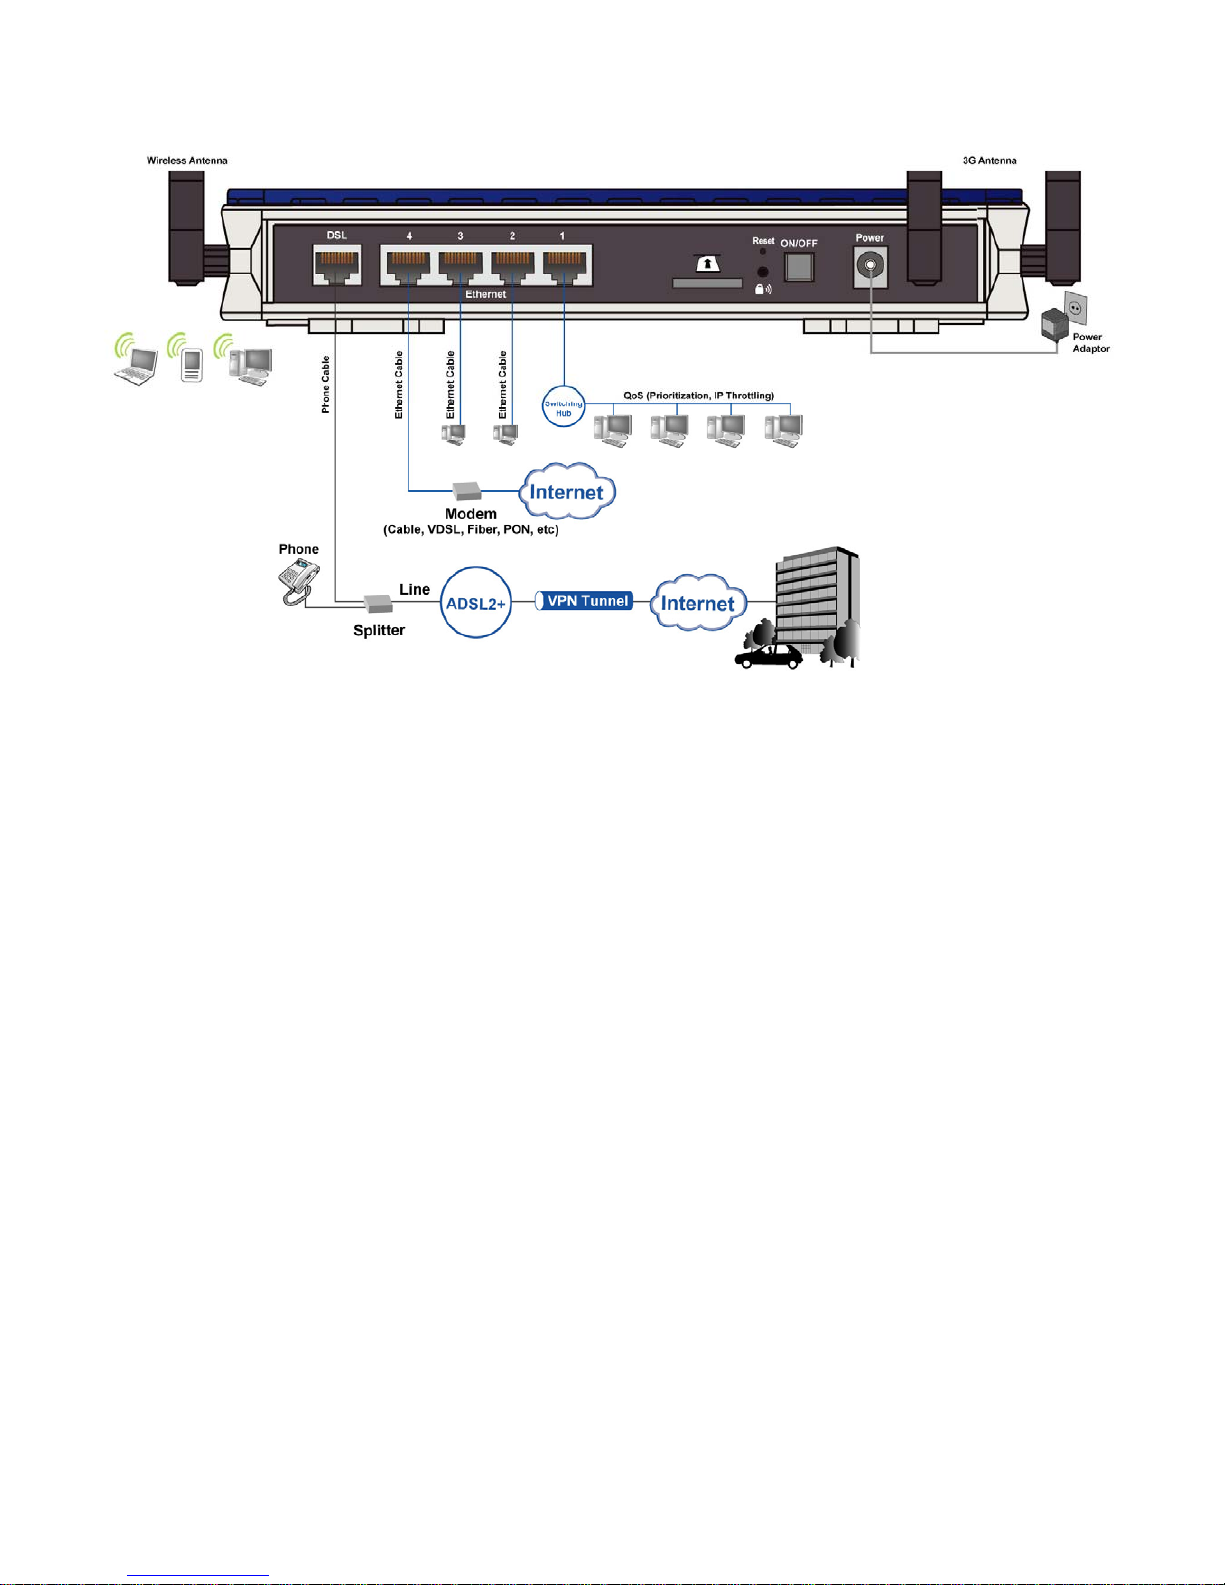
ADSL fail-over to EWAN
15
Network Configuration
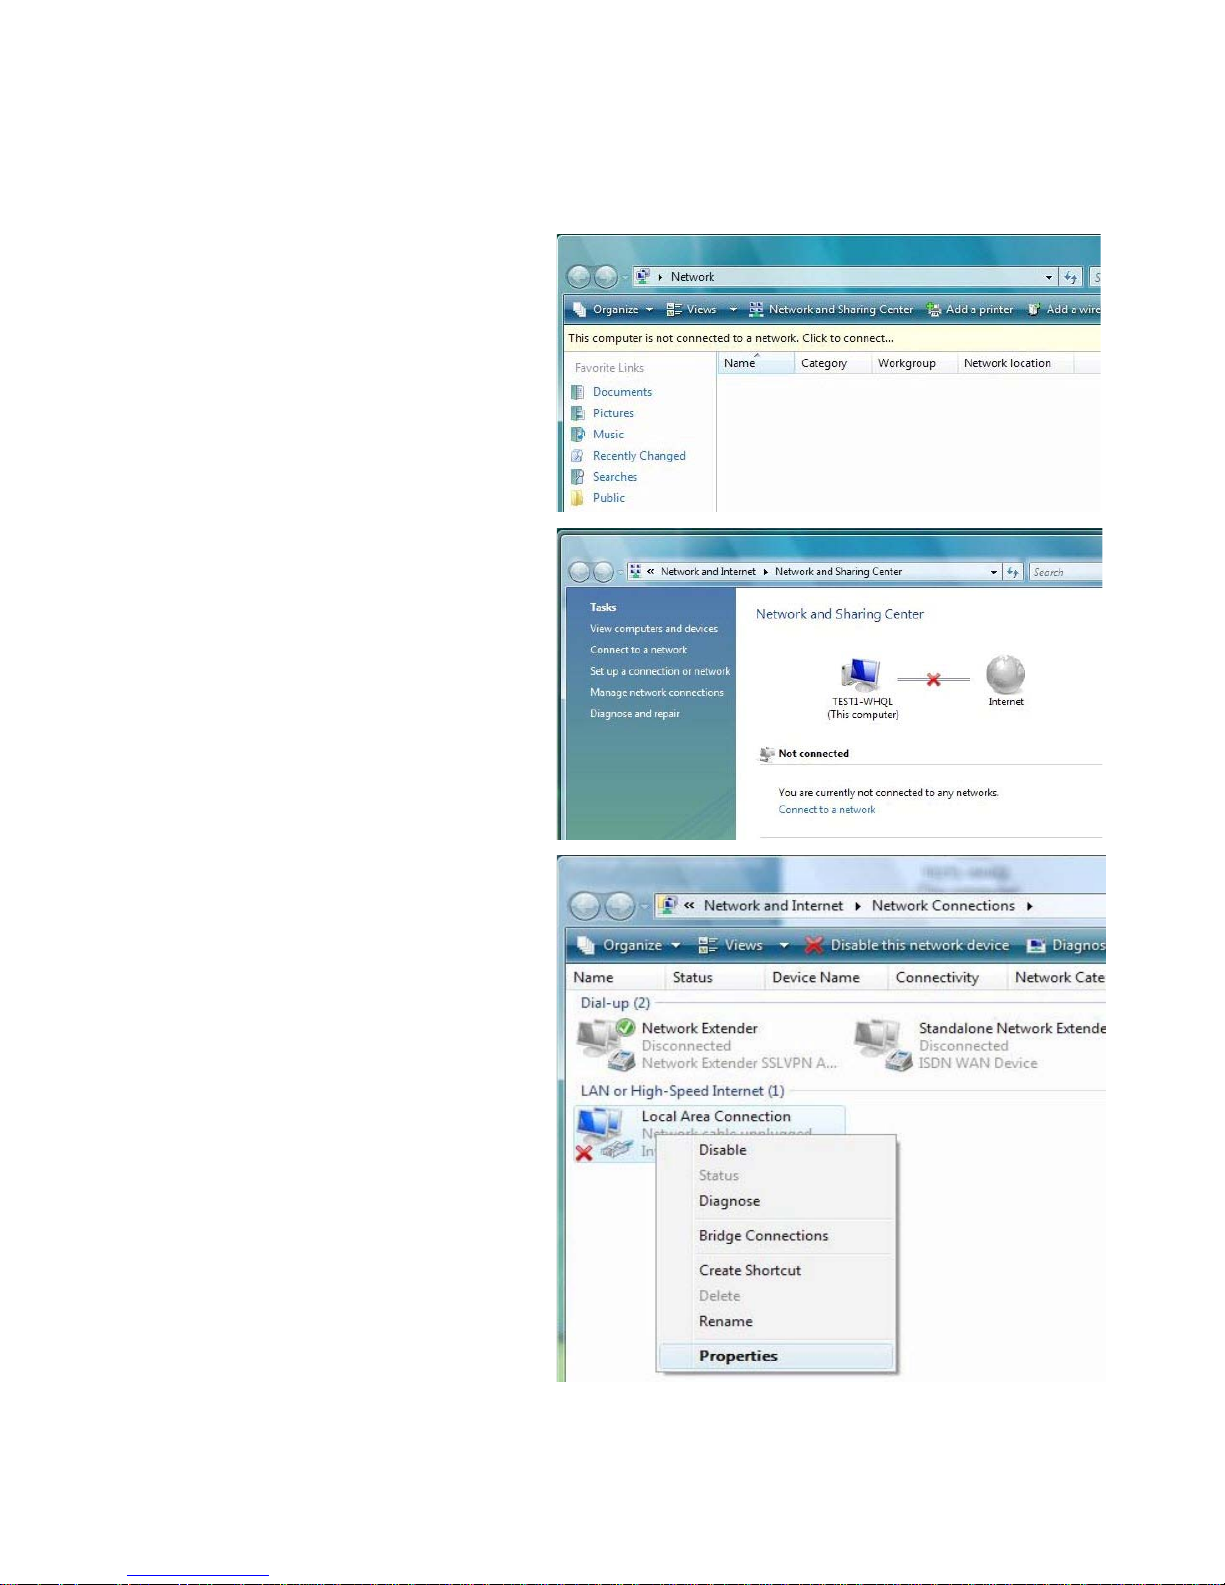
Configuring PC in Windows Vista
1. Go to Start. Click on Network.
2. Then click on Network and Sharing
Center at the top bar.
3. When the Network and Sharing
Center window pops up, select and
click on Manage network connections on the left window column.
4. Select the Local Area Connection,
and right click the icon to select
Properties.
16
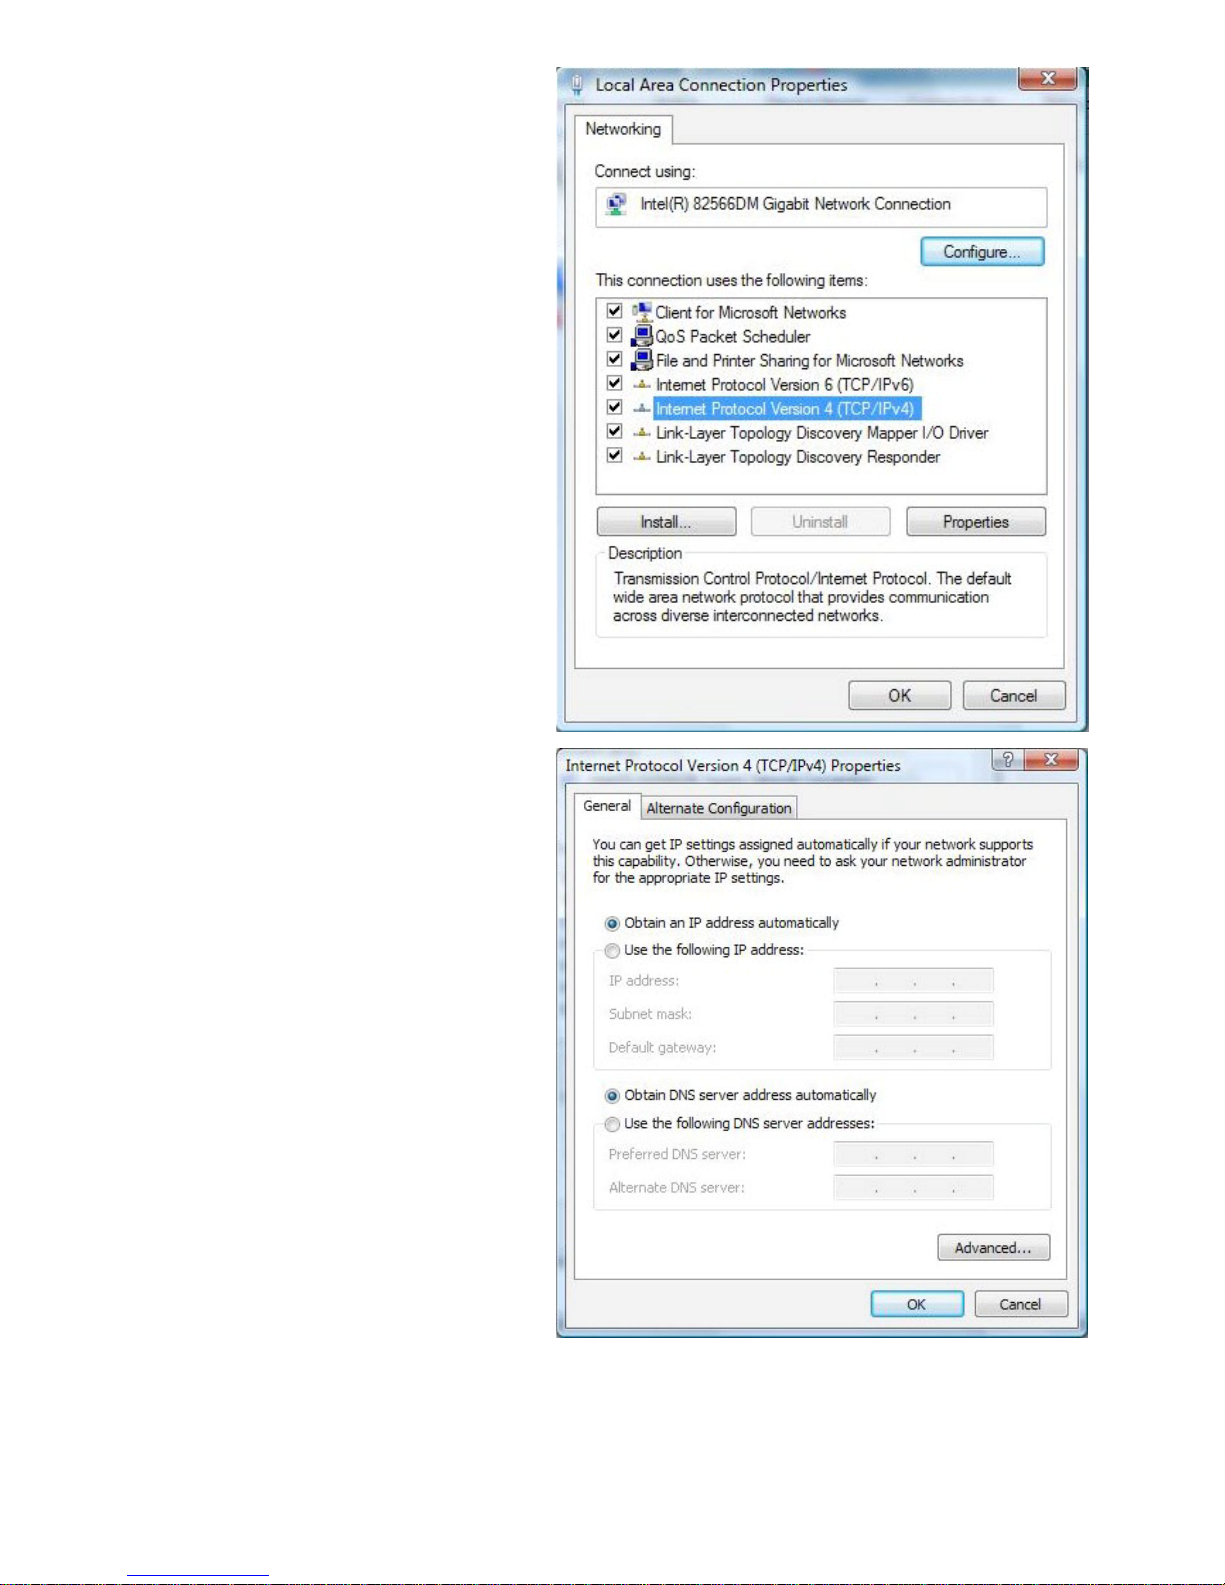
5. Select Internet Protocol Version 4
(TCP/IPv4) then click Properties.
6. In the TCP/IPv4 properties window,
select the Obtain an IP address automatically and Obtain DNS Server
address automatically radio buttons. Then click OK to exit the setting.
7. Click OK again in the Local Area
Connection Properties window to
apply the new configuration.
17
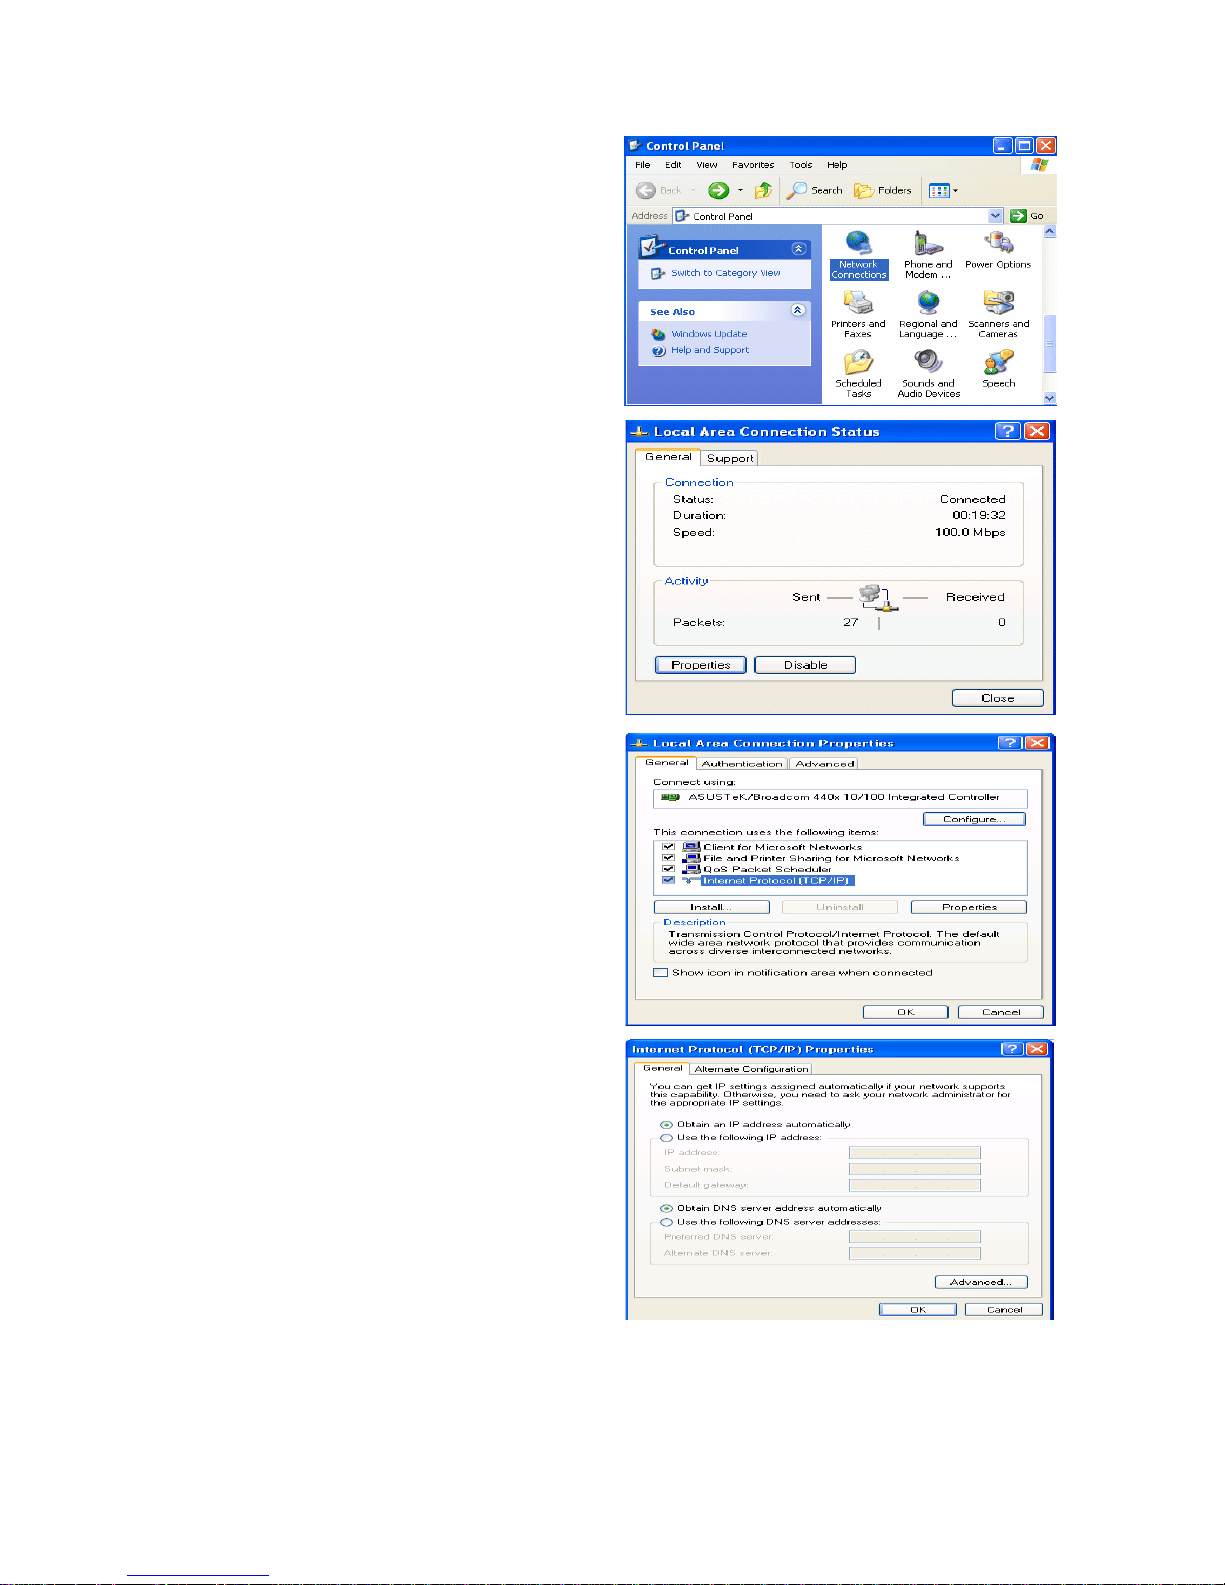
Configuring PC in Windows XP
1. Go to Start > Control Panel (in Classic
View). In the Control Panel, double-click
on Network Connections
2. Double-click Local Area Connection.
3. In the Local Area Connection Status
window, click Properties.
4. Select Internet Protocol (TCP/IP) and
click Properties.
5. Select the Obtain an IP address automatically and the Obtain DNS server
address automatically radio buttons.
6. Click OK to finish the configuration.
18
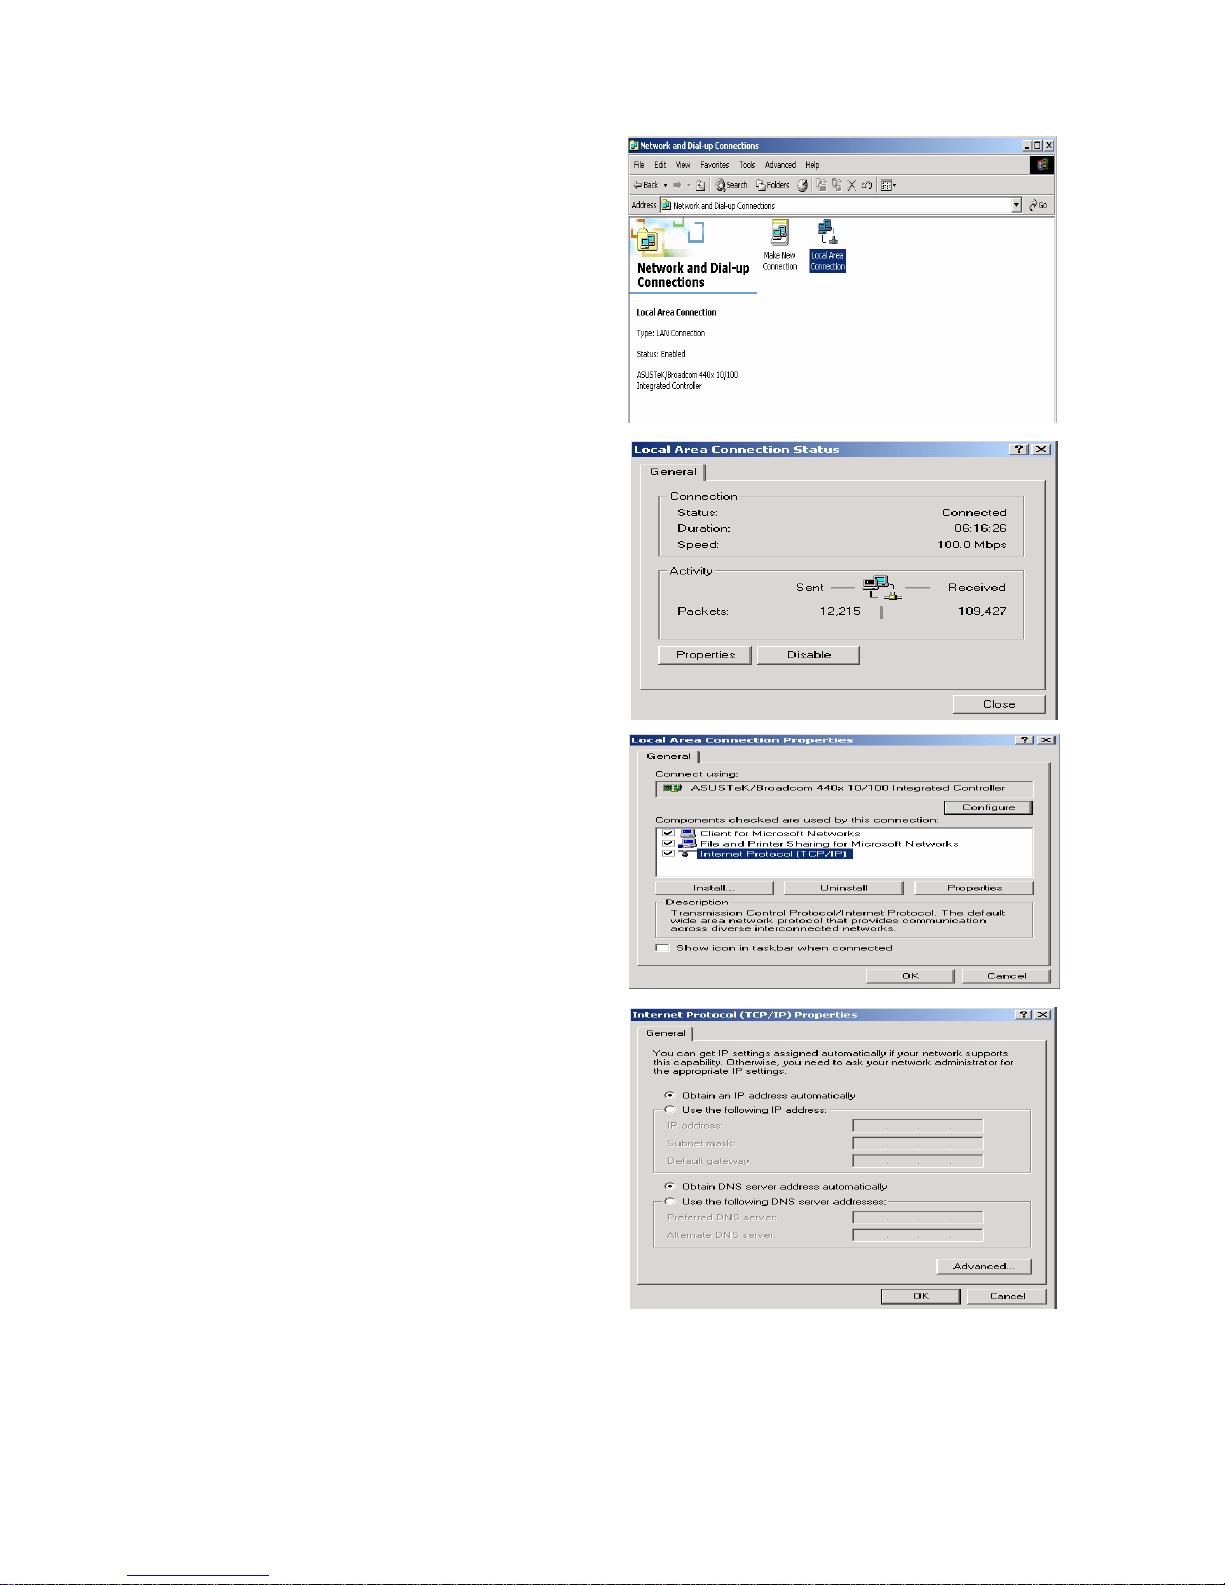
Configuring PC in Windows 2000
1. Go to Start > Settings > Control Panel.
In the Control Panel, double-click on
Network and Dial-up Connections.
2. Double-click Local Area Connection.
3. In the Local Area Connection Status
window click Properties.
4. Select Internet Protocol (TCP/IP) and
click Properties.
5. Select the Obtain an IP address automatically and the Obtain DNS server
address automatically radio buttons.
6. Click OK to finish the configuration.
19
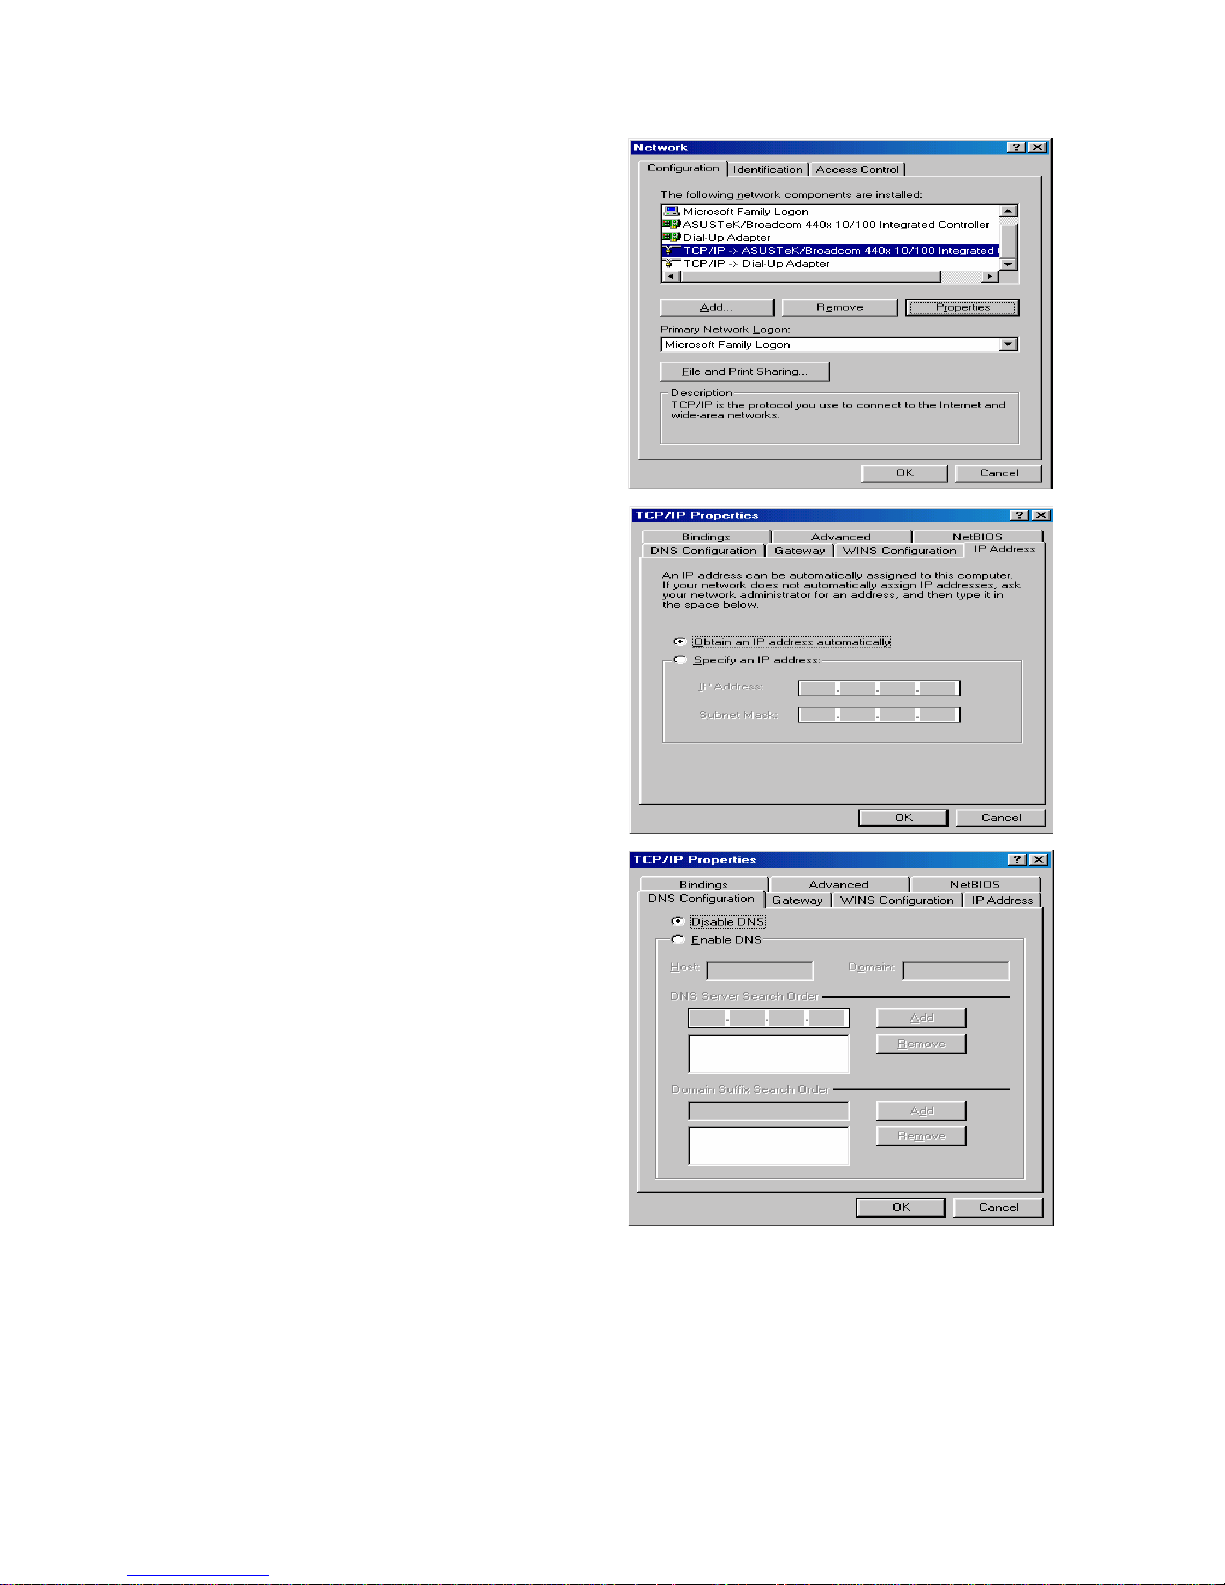
Configuring PC in Windows 95/98/Me
1. Go to Start > Settings > Control Panel.
In the Control Panel, double-click on
Network and choose the Configuration
tab.
2. Select TCP/IP > NE2000 Compatible,
or the name of your Network Interface
Card (NIC) in your PC.
3. Select the Obtain an IP address automatically radio button.
4. Then select the DNS Configuration tab.
5. Select the Disable DNS radio button
and click OK to finish the configuration.
20
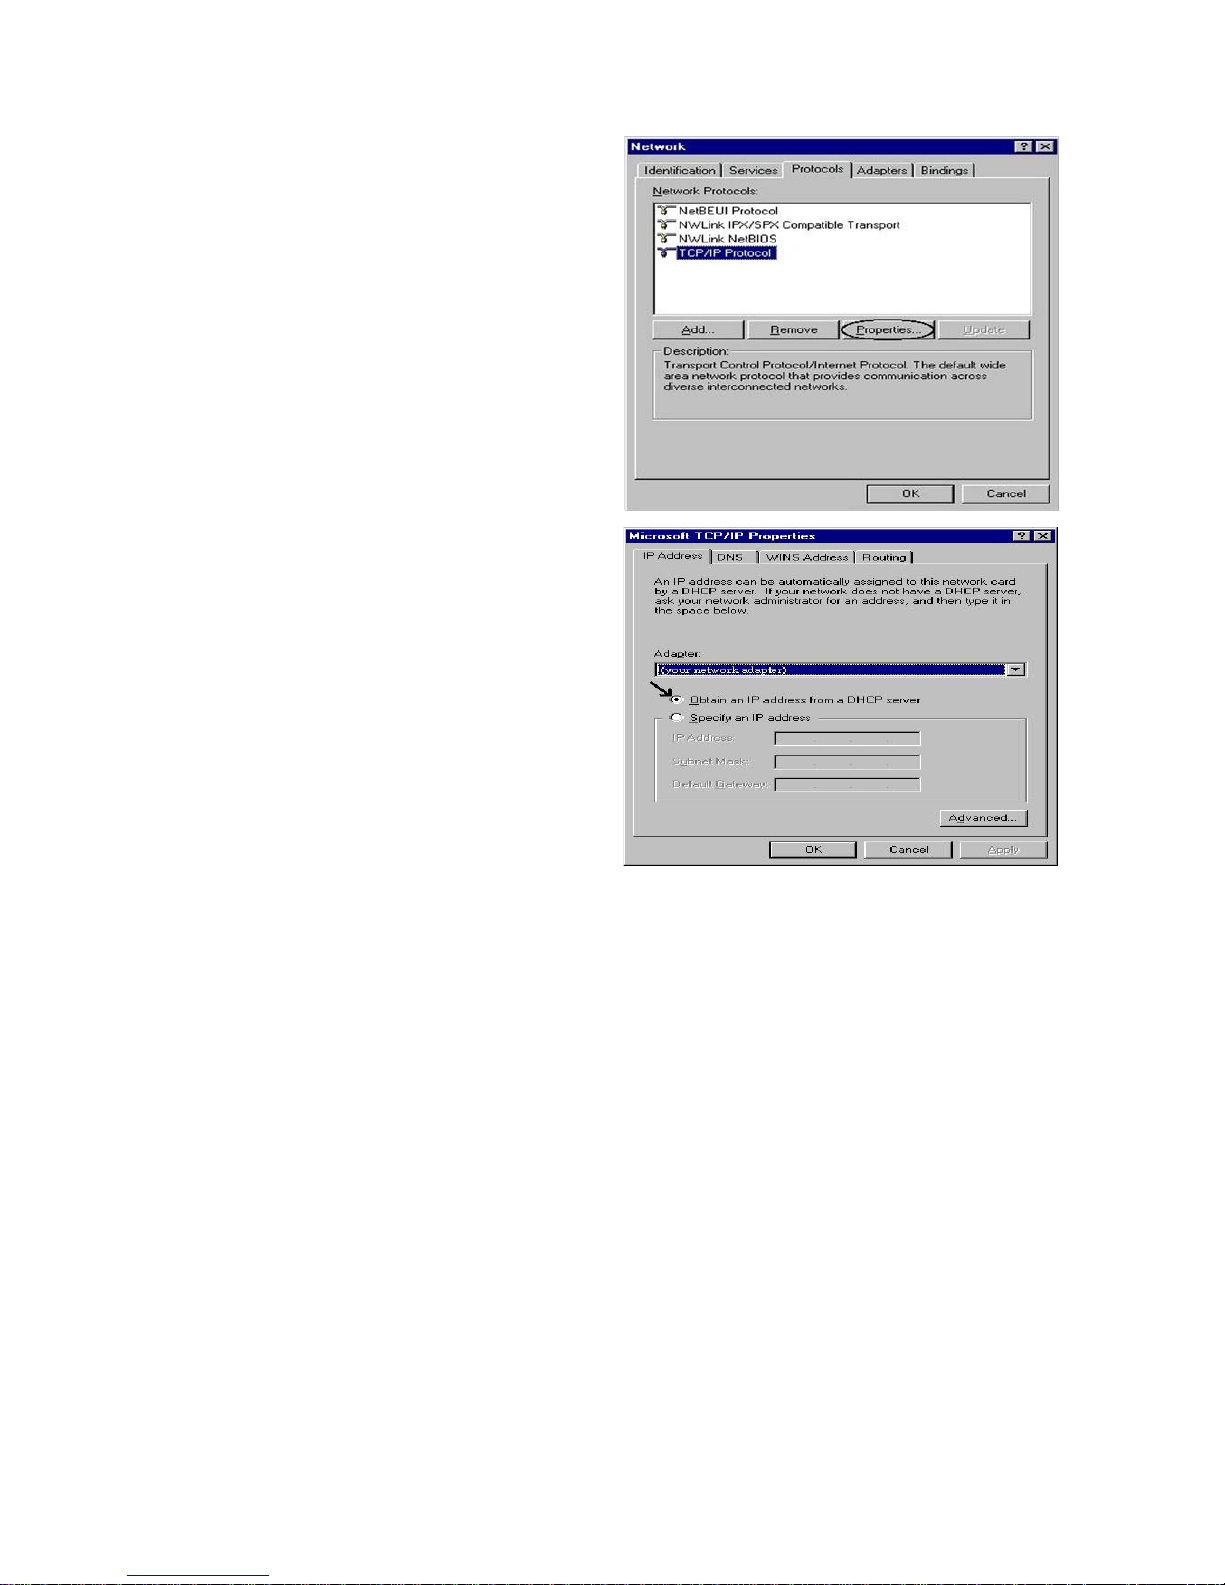
Configuring PC in Windows NT4.0
1. Go to Start > Settings > Control Panel.
In the Control Panel, double-click on
Network and choose the Protocols tab.
2. Select TCP/IP Protocol and click Properties.
3. Select the Obtain an IP address from
a DHCP server radio button and click
OK.
21
Factory Default Settings
Before configuring your router, you need to know the following default settings.
Web Interface (Username and Password)
Username: admin
Password: admin
The default username and password are “admin” and “admin” respectively.
Device LAN IP settings
IP Address: 192.168.1.254
Subnet Mask: 255.255.255.0
ISP setting in WAN site
PPPoE
DHCP server
DHCP server is enabled.
Start IP Address: 192.168.1.100
IP pool counts: 100
LAN and WAN Port Addresses
The parameters of LAN and WAN ports are pre-set in the factory. The default values are shown in
the tale.
LAN Port
WAN Port
IP address 192.168.1.254
Subnet Mask 255.255.255.0
DHCP server function Enabled
IP addresses for
distribution to PCs
100 IP addresses continuing
from 192.168.1.100 through
192.168.1.199
The PPPoE function is
enabled to automatically get
the WAN port configuration
from the ISP.

22
Information from your ISP
Before configuring this device, you have to check with your ISP (Internet Service Provider) to find
out what kind of service is provided such as DHCP (Obtain an IP Address Automatically, Static IP
(Fixed IP Address) or PPPoE.
Gather the information as illustrated in the following table and keep it for reference.
PPPoE(RFC2516)
VPI/VCI, VC / LLC-based multiplexing, Username, Password, Service
Name, and Domain Name System (DNS) IP address (it can be
automatically assigned by your ISP when you connect or be set manually).
PPPoA(RFC2364)
VPI/VCI, VC / LLC-based multiplexing, Username, Password and Domain
Name System (DNS) IP address (it can be automatically assigned by your
ISP when you connect or be set manually).
MPoA(RFC1483/
RFC2684)
VPI/VCI, VC / LLC-based multiplexing, IP address, Subnet mask, Gateway
address, and Domain Name System (DNS) IP address (it is a fixed IP
address).
IPoA(RFC1577)
VPI/VCI, VC / LLC-based multiplexing, IP address, Subnet mask, Gateway
address, and Domain Name System (DNS) IP address (it is a fixed IP
address).
Pure Bridge
VPI/VCI, VC / LLC-based multiplexing to use Bridged Mode.
23
Chapter 4: Configuration
To easily configure this device for internet access, you must have IE 5.0 / Netscape 4.5 or above
installed on your computer. There are basically 2 ways to configure your router before you are able
to connect to the internet: Easy Sign-On & Web Interface. Configuration of each method will be
discussed in detail in the following sections.
Easy Sign-On (EZSO)
This special feature makes it easier for you to configure your router so that you can connect to the
internet in a matter of seconds without having to logon to the router GUI for any detail
configuration. This configuration method is usually auto initiated if user is to connect to the internet
via Billion's router for the first time.
After setting up the router with all the appropriate cables plugged-in, open up your IE browser, the
EZSO WEB GUI will automatically pop up and request that you enter some basic information that
you have obtained from your ISP. By following the instructions given carefully and through the
information you provide, the router will be configured in no time and you will find yourself surfing
the internet sooner than you realize.
Follow the Easy Sign-On configuration wizard to complete the basic network configuration.
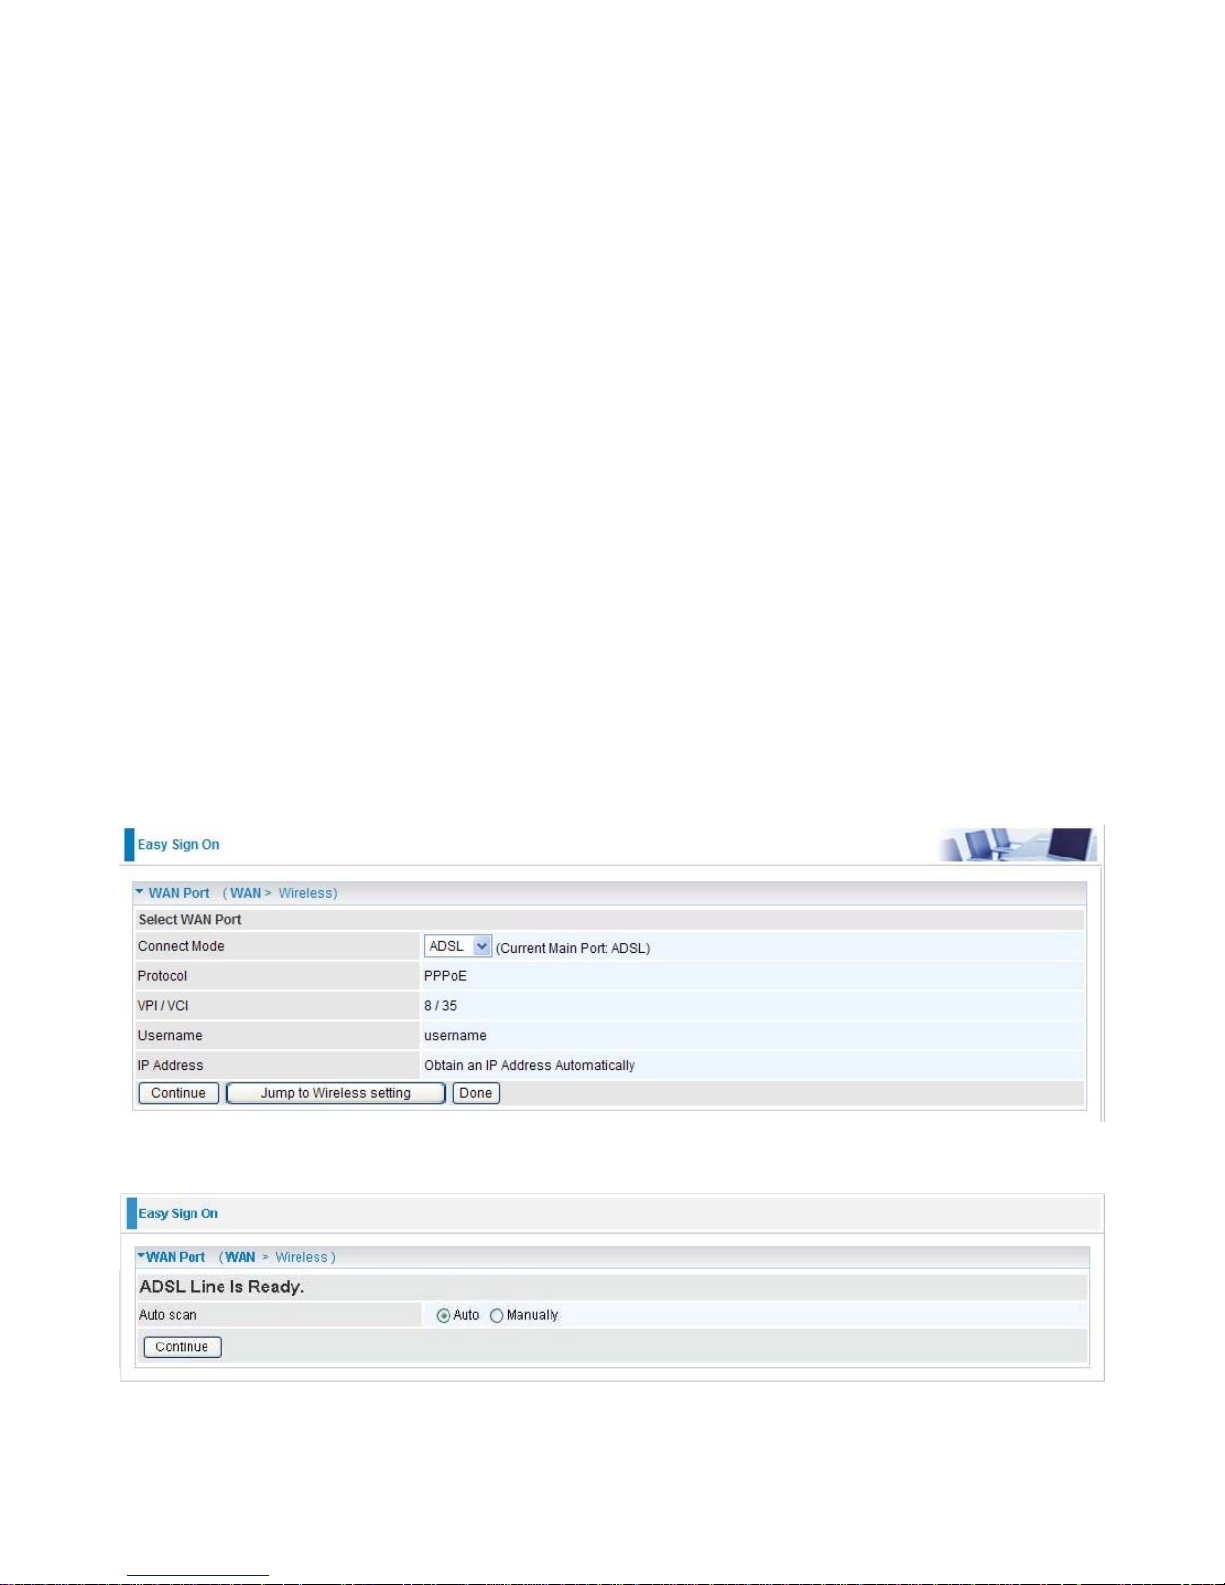
1. Connect your router with all the appropriate cables. Then, load your IE / Netscape browser.
2. When the EZSO configuration wizard pops up, select the connect mode which you want to
set up and then click continue. (There are three modes that you may select: “EWAN” “ADSL”
and another is “3G”.)
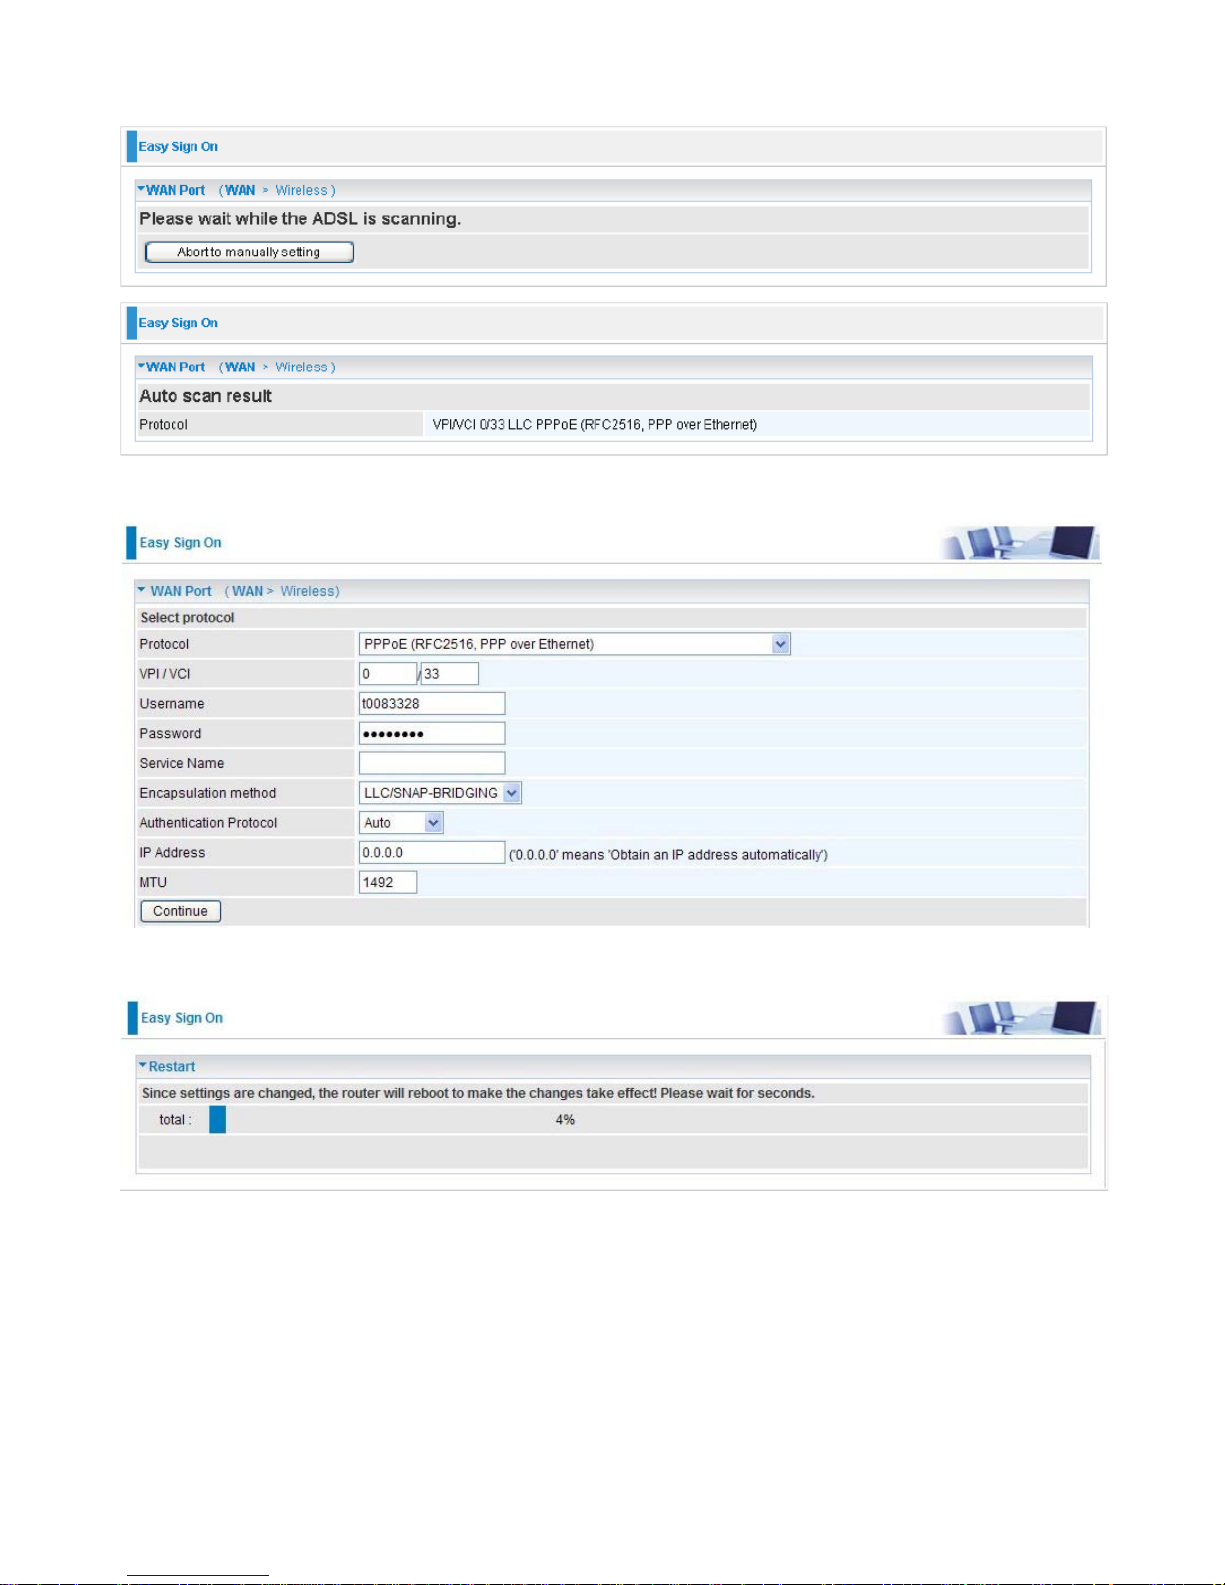
3. Choose “Auto” or “Manually” to scan ADSL information.
24
4. The window will then display the Protocol information obtained from the scan result before
redirect you to the next configuration page.
5. Please enter all the information in the blanks provided and then click continue.
6. The device will reboot and then load the new configuration.
25
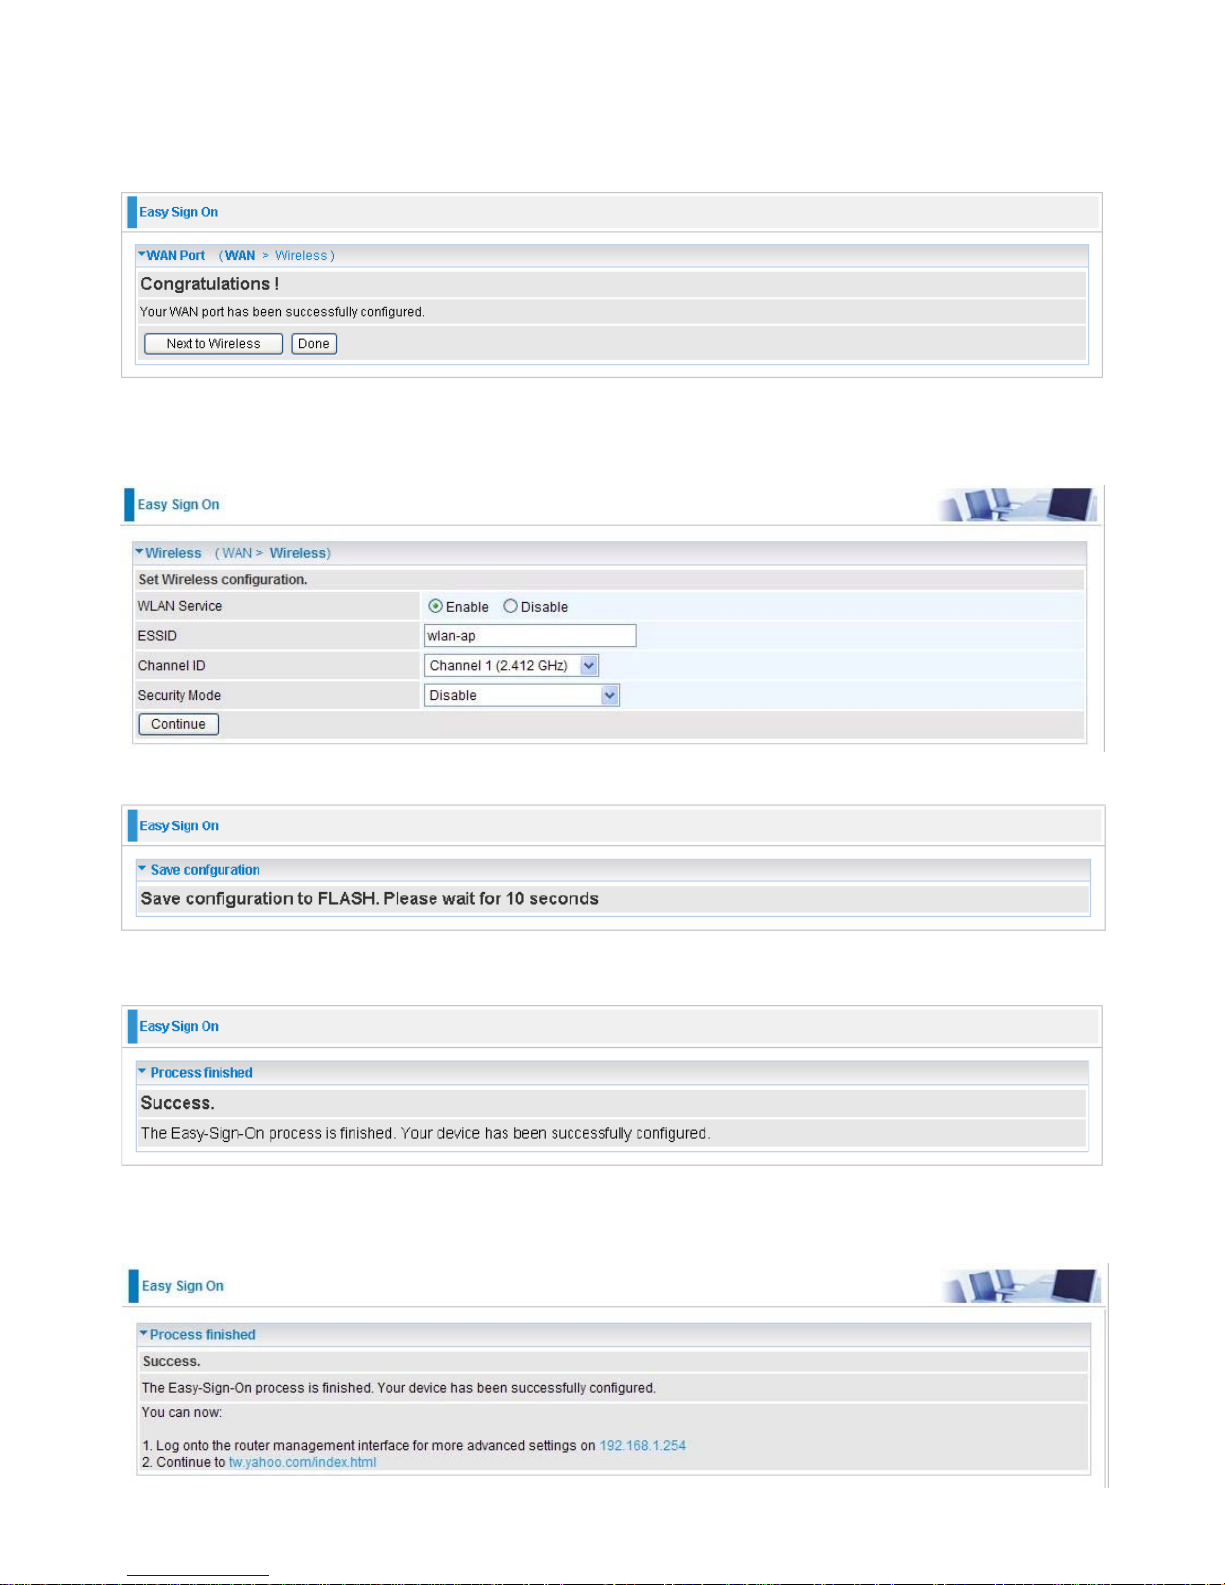
7. If all information provided is valid and the device successfully connects to WAN, a dialog box will
appear to signify the completion of the WAN port setup. At this point you can either click Done
to finish the EZSO configuration or you can click Next to wireless to proceed to the wireless
configuration if you have.
8. Select Enable and enter the necessary information in the blanks provided for the Wireless LAN
setting if you would like to use this feature and then click Continue.
9. The system will save your new configuration and complete the setup.
10. Congratulations! You’ve completed the setup and are now ready to surf the Internet.
11. You can test the connection by clicking on the URL link provided. If the setup is successful you
will be redirected to website.
26
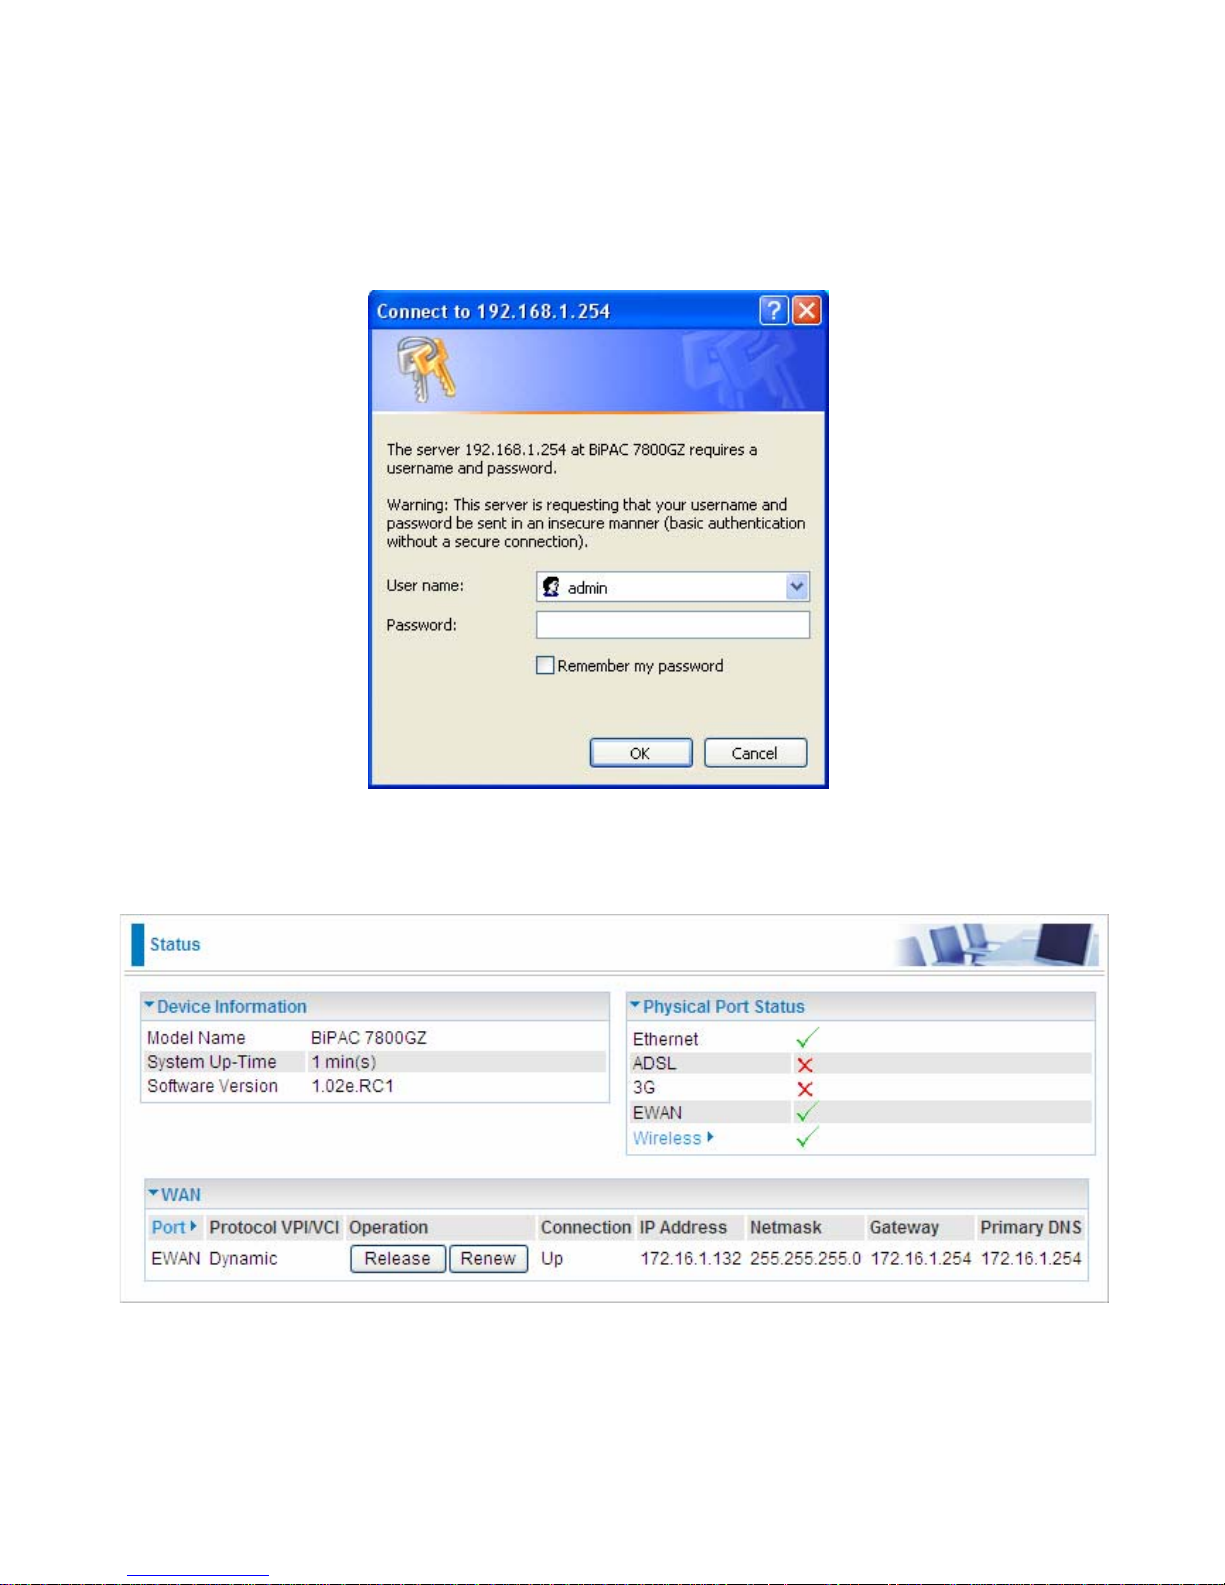
Configuration via Web Interface
Open your web browser; enter the IP address of your router, which by default is 192.168.1.254, and
click “Go”, a login window prompt will appear. The default username and password are “admin” and
“admin” respectively.
Congratulations! You are now successfully logon to the Firewall Router!
If the authentication succeeds, the homepage Status will appear on the screen.

27
Quick Start
Whether on the Basic or Advanced Configuration Mode, click Quick Start link to WAN Port setup
pages.
Step 1: Select WAN port connect mode from the connect mode drop down menu. There are
three types of connect mode to choose from: EWAN, 3G or ADSL.
Step 2: After selecting the connect mode, press Continue to move on to the next configuring page.
There are 5 types of phone service standards available for 3G connect mode while there are 5
types of connection protocols available under ADSL connect mode, 3 types of connection
protocols available for EWAN connect mode. Each type of connection mode is described in
the following sections of 3G Connect mode, ADSL Connect mode and EWAN Connect
mode.
Step 3: After finishing configuring the WAN port connection, click Continue to proceed. The system
will upload and apply the new WAN port configuration to the device.

28
Note: If the WAN line is not ready, a page will display as below and your new configuration
can not be saved.
Step 4: After the configuration is successful, click Next to Wireless button and you may proceed
to configure the Wireless setting. There are 4 types of security mode: WPA, WPA2, WPA/WPA2
Pre-Shared Key and WEP. Please refer to the Wireless Setting Mode section for detail
description of each security mode.
Step 5: After finishing configuring the WLAN setting, press Continue to finish the Quick Start.

29
3G Connect Mode
Connect Mode: You can choose either “ADSL” “EWAN” or “3G” mode.
TEL No.: The dial string to make a GPRS / 3G user internetworking call.
Username: The username provided by your service provider.
APN: An APN is similar to a URL on the WWW, it is what the unit makes a GPRS / UMTS call.

30
Mode: There are 5 options of phone service standards: GSM only, UTMS only, GPRS/EDGE first,
UMTS first, and Automatic. If you are uncertain what services are available to you, and then
please select Automatic.
APN: An APN is similar to a URL on the WWW, it is what the unit makes a GPRS / UMTS call. The
service provider is able to attach anything to an APN to create a data connection, requirements for
APNs varies between different service providers. Most service providers have an internet portal
which they use to connect to a DHCP Server, thus giving you access to the internet i.e. Some 3G
operators use the APN ‘internet’ for their portal. The default value is “internet”.
Username/Password: Enter the username and password provided by your ISP.
Authentication Protocol: Default is Auto. Please consult your ISP on whether to use PAP, CHAP
or MSCHAP.
PIN: PIN stands for Personal Identification Number. A PIN code is a numeric value used in certain
systems as a password to gain access, and authenticate. In mobile phones a PIN code locks the
SIM card until you enter the correct code. If you enter the PIN code incorrectly into the phone 3
times in a row, then the SIM card will be blocked and you will require a PUK code from your network/
service provider.
MTU: Maximum Transmission Unit. The size of the largest datagram (excluding media-specific
headers) that IP will attempt to send through the interface.

31
ADSL Connect Mode
Connect Mode: You can choose either “ADSL” “EWAN” or “3G” mode.
Protocol: The current ATM protocol in the device.
VPI/VCI: The current value of VPI/VCI in the device.
Username: To show current authentication username.
IP Address: To show current value of IP address in the device.
For ADSL connect mode there are 5 types of connection protocols: PPPoE, PPPoA, IPoA, MPoA
and Pure Bridge.

32
PPPoE Connection
VPI/VCI: Enter the information provided by your ISP.
Username: Enter the username provided by your ISP. You can input up to 256 alphanumeric
characters (case sensitive).
Password: Enter the password provided by your ISP. You can input up to 32 alphanumeric
characters (case sensitive).
Service Name: This item is for identification purposes. If it is required, your ISP will provide you the
necessary information. Maximum input is 32 alphanumeric characters.
Encapsulation method: Select the encapsulation format. Select the one provided by your ISP.
Authentication method: Default is Auto. Please consult your ISP on whether to use Chap, Pap or
MSCHAP.
IP Address: Your WAN IP address. Leave the IP address as 0.0.0.0 to enable the device to
automatically obtain an IP address from your ISP.
MTU: Maximum Transmission Unit. The size of the largest datagram (excluding media-specific
headers) that IP will attempt to send through the interface.

33
PPPoA Connection
VPI/VCI: Enter the information provided by your ISP.
Username: Enter the username provided by your ISP. You can input up to 256 alphanumeric
characters (case sensitive).
Password: Enter the password provided by your ISP. You can input up to 32 alphanumeric
characters (case sensitive).
Encapsulation method: Select the encapsulation format. Select the one provided by your ISP.
Authentication method: Default is Auto. Please consult your ISP on whether to use Chap, Pap or
MSCHAP.
IP Address: Your WAN IP address. Leave the IP address as 0.0.0.0 to enable the device to
automatically obtain an IP address from your ISP.
MTU: Maximum Transmission Unit. The size of the largest datagram (excluding media-specific
headers) that IP will attempt to send through the interface.

34
IPoA Connection
VPI/VCI: Enter the VPI and VCI information provided by your ISP.
Encapsulation method: Select the encapsulation format. Select the one provided by your ISP.
IP Address: IPOA WAN IP address can only set fixed IP address.
Netmask: User can change it to others such as 255.255.255.128. Type the Netmask assigned to
you by your ISP (if given).
Gateway: Enter the IP address of the default gateway.

35
MPoA Connection
VPI/VCI: Enter the VPI and VCI information provided by your ISP.
Encapsulation method: Select the encapsulation format. Select the one provided by your ISP.
IP Address: Your WAN IP address. If the IP is set to 0.0.0.0 (auto IP detect), both Netmask and
gateway may be left blank.
Netmask: User can change it to others such as 255.255.255.128. Type the Netmask assigned to
you by your ISP (if given).
Gateway: Enter the IP address of the default gateway.

36
Pure Bridge Connection
VPI/VCI: Enter the VPI and VCI information provided by your ISP.
Encapsulation method: Select the encapsulation format. Select the one provided by your ISP.

37
EWAN Connect Mode
PPPoE Connection
Username: Enter the username provided by your ISP. You can input up to 256 alphanumeric
characters (case sensitive). This is in the format of “username@ispname” instead of simply
“username”.
Password: Enter the password provided by your ISP. You can input up to 32 alphanumeric
characters (case sensitive).
Service Name: This item is for identification purposes. If it is required, your ISP will provide you
the necessary information. Maximum input is 32 alphanumeric characters.
Encapsulation method: Select the encapsulation format. Select the one provided by your ISP.
Authentication method: Default is Auto. Please consult your ISP on whether to use Chap, Pap or
MSCHAP.
IP Address: Your WAN IP address. Leave the IP address as 0.0.0.0 to enable the device to
automatically obtain an IP address from your ISP.
MTU: Maximum Transmission Unit. The size of the largest datagram (excluding media-specific
headers) that IP will attempt to send through the interface.

38
Obtain an IP Address Automatically
Select this protocol enables the device to automatically retrieve IP address.
Fixed IP Address Connection
IP Address: Your WAN IP address. Leave the IP address as 0.0.0.0 to enable the device to
automatically obtain an IP address from your ISP.
Netmask: The default is 0.0.0.0. User can change it to other such as 255.255.255.0. Type
the subnet mask assigned to you by your ISP (if given).
Gateway: You must specify a gateway IP address (supplied by your ISP).

39
Wireless Setting Mode
There are 4 types of wireless security modes: WP A Pre-Shared Key, WPA2 Pre-Shared Key,
WPA/WPA2 Pre-Shared Key and WEP.

40
WPA / WPA2 / WPA/WPA2 Pre-Shared Key
WPA and WPA2 pre-shared keys are an authentication mechanism in which users provides
some form of credentials to verify that they should be allowed access to a network. This requires
a single password entered into each WLAN node (Access Points, Wireless Routers, client
adapters, bridges). As long as the passwords match, a client will be granted access to a WLAN.
WLAN Service: Default setting is Enable. If you want to use wireless, you can select Enable.
ESSID: The ESSID is the unique name of a wireless access point (AP) used to distinguish one
from another. For security propose, change to a unique ID name which is already built into the
router wireless interface. It is case sensitive and must not exceed 32 characters. Make sure your
wireless clients have exactly the ESSID as the device in order to connect to your network.
Channel ID: Select the channel ID that you would like to use.
Security Mode: You can disable or enable with WPA or WEP to protect wireless network. The
default mode of wireless security is Disable.
WP A Shared Key: The key for network authentication. The input format is in character style and
key size should be in the range between 8 and 63 characters.

41
WEP
WLAN Service: Default setting is set to Enable. If you want to use wireless, you can select Enable.
ESSID: The ESSID is the unique name of a wireless access point (AP) used to distinguish one
from another. For security propose, change to a unique ID name which is already built into the
router wireless interface. It is case sensitive and must not exceed 32 characters. Make sure your
wireless clients have exactly the ESSID as the device in order to connect to your network.
Channel ID: Select the channel ID that you would like to use.
Security Mode: You can disable or enable with WPA or WEP to protect wireless network. The
default mode of wireless security is Disable.
RADIUS/802.1x: Choose this box enable RADIUS/802.1x authentication protocol for
boosting up WLAN Security.
Default Used WEP Key: Select the encryption key ID; please refer to Key (1~4) below.
Key (1-4): Enter the key to encrypt wireless data. To allow encrypted data transmission, the WEP
Encryption Key values on all wireless stations must be the same as the router. There are four keys
for your selection. The input format can either be HEX style or ASCII format, 10 and 26 HEX codes
or 5 and 13 ASCII codes are required for WEP64 and WEP128 respectively.

42
Basic Configuration Mode
Status
Device Information
Model Name: Provide a name for the router for identification purposes.
System Up-Time: Record system up-time.
Hardware Version: Device version.
Software Version: Firmware version.
Port Status
Port Status: User can look up to see if they are connected to Ethernet, ADSL, 3G and Wireless.
WAN
Port: Name of the WAN connection.
Protocol VPI/VCI: Virtual Path Identifier and Virtual Channel Identifier.
Operation: Current status in WAN interface.
Connection: Current connection status.
IP Address: WAN port IP address.
Netmask: WAN port IP subnet mask.
Gateway: IP address of the default gateway.
Primary DNS: IP address of the primary DNS server.

43
WAN – Main Port (ADSL)
A WAN (Wide Area Network) is an outside connection to another network or the Internet.
PPPoE Connection (ADSL)
PPPoE (PPP over Ethernet) provides access control in a manner similar to dial-up services using
PPP.
VPI/VCI: Enter the information provided by your ISP.
Username: Enter the username provided by your ISP. You can input up to 256 alphanumeric
characters (case sensitive).
Password: Enter the password provided by your ISP. You can input up to 32 alphanumeric
characters (case sensitive).
Service Name: This item is for identification purposes. If it is required, your ISP will provide you
the necessary information. Maximum input is 32 alphanumeric characters.
Encap. method: Select the encapsulation format. Select the one provided by your ISP.
Auth. Protocol: Default is Auto. Please consult your ISP on whether to use Chap, Pap or MSCHAP.
IP Address: Enter your WAN IP address. Leave the IP address empty or enter 0.0.0.0 to enable
the device to automatically obtain an IP address from your ISP.
MTU: Maximum Transmission Unit. The size of the largest datagram (excluding media-specific
headers) that IP will attempt to send through the interface.
Click Apply to confirm the settings.

44
PPPoA Connection (ADSL)
PPPoA stands for Point to Point Protocol over ATM Adaptation Layer 5 (AAL5). It provides access
control and billing functionality in a manner similar to dial-up services using PPP.
VPI/VCI: Enter the information provided by your ISP.
Username: Enter the username provided by your ISP. You can input up to 256 alphanumeric
characters (case sensitive).
Password: Enter the password provided by your ISP. You can input up to 32 alphanumeric
characters (case sensitive).
Encap. method: Select the encapsulation format. Select the one provided by your ISP.
Auth. Protocol: Default is Auto. Please consult your ISP on whether to use Chap, Pap or
MSCHAP.
IP Address: Enter your WAN IP address. Leave the IP address empty or enter 0.0.0.0 to enable
the device to automatically obtain an IP address from your ISP.
MTU: Maximum Transmission Unit. The size of the largest datagram (excluding media-specific
headers) that IP will attempt to send through the interface.
Click Apply to confirm the settings.

45
MPoA Connection (ADSL)
VPI/VCI: Enter the VPI and VCI information provided by your ISP.
Encap. method: Select the encapsulation format. Select the one provided by your ISP.
IP Address: Enter your WAN IP address. If the IP is set to 0.0.0.0 (auto IP detect), both Netmask
and gateway may be left blank.
Netmask: User can change it to others such as 255.255.255.128. Type the Netmask assigned to
you by your ISP (if given).
Gateway: Enter the IP address of the default gateway.
Click Apply to confirm the settings.

46
IPoA Connections (ADSL)
VPI/VCI: Enter the VPI and VCI information provided by your ISP.
Encap. method: Select the encapsulation format. Select the one provided by your ISP.
IP Address: Enter your fixed IP address.
Netmask: User can change it to others such as 255.255.255.128. Type the Netmask assigned to
you by your ISP (if given).
Gateway: Enter the IP address of the default gateway.
Click Apply to confirm the settings.

47
Pure Bridge Connections (ADSL)
VPI/VCI: Enter the VPI and VCI information provided by your ISP.
Encap. method: Select the encapsulation format. Select the one provided by your ISP.
Click Apply to confirm the settings.

48
WAN – Main Port (EWAN)
Besides using ADSL to get connected to the Internet, Ethernet port 4 of BiPAC 7800GZ can be
used as an alternative to connect to Cable Modems, VDSL and fiber optic lines. This alternative
not only provides faster connection to the Internet, it also provides users with more flexibility to get
online.
PPPoE (EWAN)
Username: Enter the username provided by your ISP. You can input up to 256 alphanumeric
characters (case sensitive).
Password: Enter the password provided by your ISP. You can input up to 32 alphanumeric
characters (case sensitive).
Service Name: This item is for identification purposes. If it is required, your ISP will provide you
the necessary information. Maximum input is 32 alphanumeric characters.
Auth. Protocol: Default is Auto. Please consult your ISP on whether to use Chap, Pap or MSCHAP.
IP Address: Enter your fixed IP address.
MTU: Maximum Transmission Unit. The size of the largest datagram (excluding media-specific
headers) that IP will attempt to send through the interface.
Click Apply to confirm the settings.

49
Obtain IP Address Automatically (EWAN)
Select this protocol enables the device to automatically retrieve IP address.
Click Apply to confirm the change.
Fixed IP Address (EWAN)
IP Address: Enter your fixed IP address.
Netmask: User can change it to others such as 255.255.255.128. Type the Netmask assigned to
you by your ISP (if given).
Gateway: Enter the IP address of the default gateway.
Click Apply to confirm the settings.

50
WAN – Main Port (3G)
The setup of 3G is simplified by the web browser-based configuration. It is easy for you to access
to the Internet wherever a 3G connection is available.
Mode: There are 5 options of phone service standards: GSM only, UTMS only, GPRS/EDGE first,
UMTS first, and Automatic. If you are uncertain what services are available to you, and then
please select Automatic.
APN: An APN is similar to a URL on the WWW, it is what the unit makes a GPRS / UMTS call. The
service provider is able to attach anything to an APN to create a data connection, requirements for
APNs varies between different service providers. Most service providers have an internet portal
which they use to connect to a DHCP Server, thus giving you access to the internet i.e. Some 3G
operators use the APN ‘internet’ for their portal. The default value is “internet”.
Username/Password: Enter the username and password provided by your ISP.
Authentication Protocol: Default is Auto. Please consult your ISP on whether to use PAP, CHAP
or MSCHAP.
PIN: PIN stands for Personal Identification Number. A PIN code is a numeric value used in certain
systems as a password to gain access, and authenticate. In mobile phones a PIN code locks the
SIM card until you enter the correct code. If you enter the PIN code incorrectly into the phone 3
times in a row, then the SIM card will be blocked and you will require a PUK code from your network/
service provider.
MTU: Maximum Transmission Unit. The size of the largest datagram (excluding media-specific
headers) that IP will attempt to send through the interface.
Click Apply to confirm the settings.

51
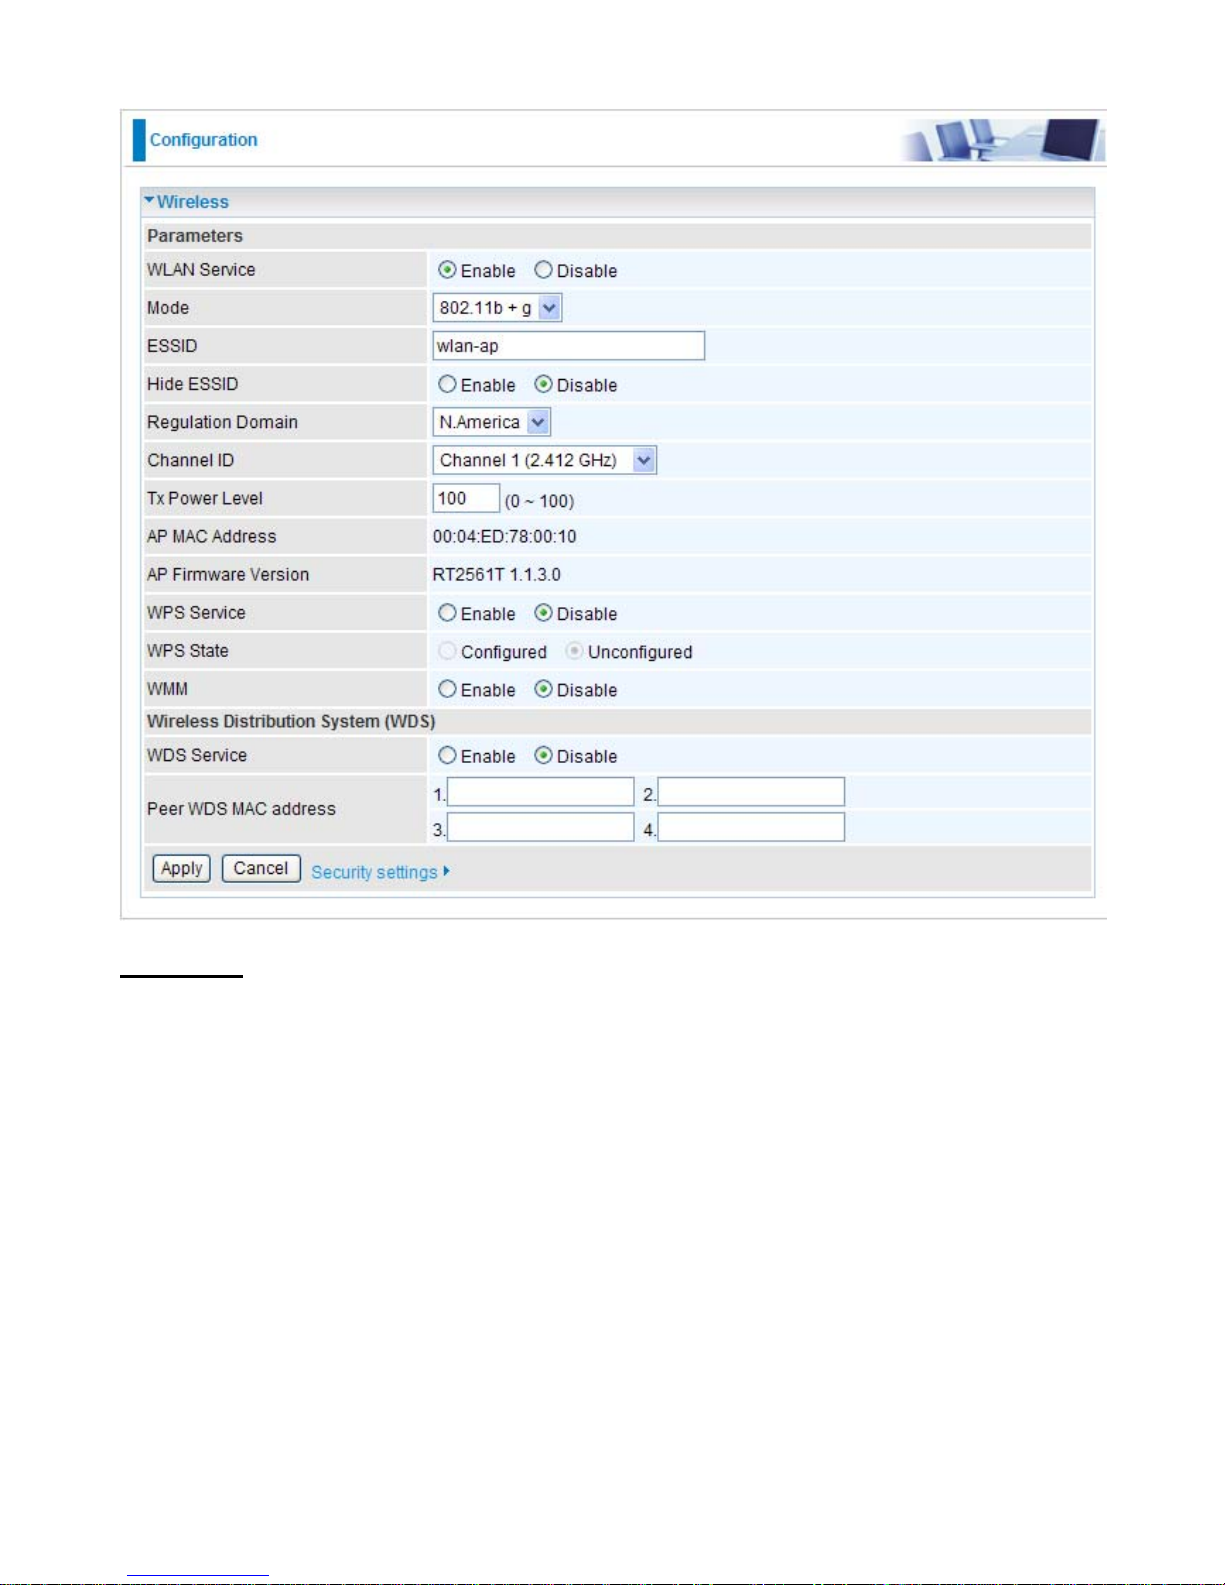
WLAN
Wireless Parameters
WLAN Service: Default setting is set to Enable. If you do not have any wireless, select Disable.
ESSID: The ESSID is a unique name of a wireless access point (AP) used to distinguish one from
another. For security purpose, change the default wlan-ap to a unique ID name that is already
built into the router wireless interface. Make sure your wireless clients have exactly the ESSID as
the device in order to connect to your network.
Note: It is case sensitive and must not exceed 32 characters.
Hide ESSID: It is used to broadcast its ESSID on the network so that when a wireless client
searches for a network, the router can be discovered and recognized. Default setting is Disable.
Enable: When enabled, you do not broadcast your ESSID. Therefore, no one will be able to
locate the Access Point (AP) of your router.
Disable: When disabled, you allow anybody with a wireless client to be able to locate the
Access Point (AP) of your router.
Regulation Domain: There are seven Regulation Domains for you to choose from, including
North America (N.America), Europe, France, etc. The Channel ID will be different based on this
setting.
Channel ID: Select the wireless connection channel ID that you would like to use.
Note: Wireless performance may degrade if the selected channel ID is already being occupied
by other AP(s).
Security Parameters
Security Mode: You can disable or enable the function with WPA or WEP to protect the wireless
network. The default mode of wireless security is Disable.
Click Apply to confirm the settings.
52
Security Mode
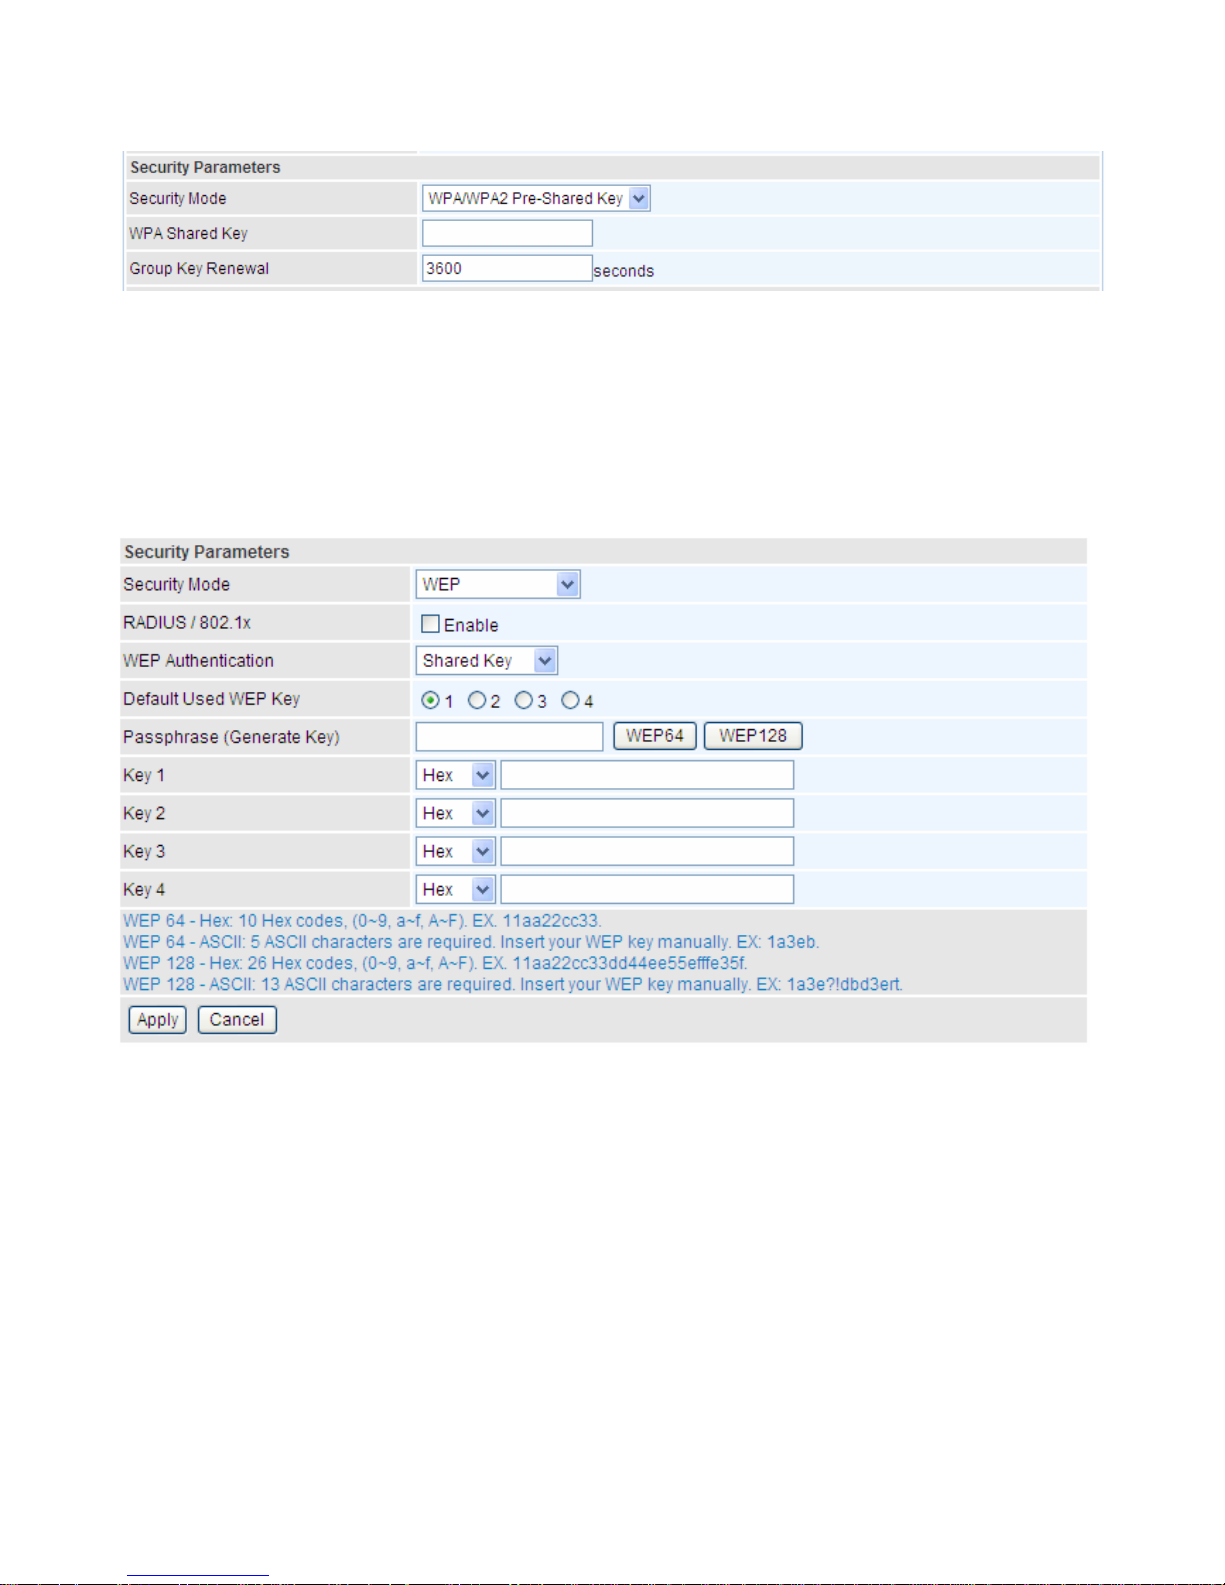
WPA / WPA2 / WPA/WPA2 Pre-Shared Key
Security Mode: You can disable or enable with WPA or WEP for protecting wireless network.
WP A Shared Key: The key for network authentication. The input format is in character style and
key size should be in the range between 8 and 63 characters.
Group Key Renewal: The period of renewal time for changing the security key automatically
between wireless client and Access Point (AP). Default value is 3600 seconds.
WEP
Security Mode: You can disable or enable with WPA or WEP for protecting wireless network.
RADIUS/802.1x: Choose this box enable RADIUS/802.1x authentication protocol for
boosting up WLAN Security.
WEP Authentication: To prevent unauthorized wireless stations from accessing data transmitted
over the network, the router offers secure data encryption, known as WEP. If you require high
security for transmissions, there are 3 options to select from: Open System, Share Key and Both.
Default Used WEP Key: Select the encryption key ID; please refer to Key (1~4) below.
Passphrase: This is used to generate WEP keys automatically based upon the input string and a
pre-defined algorithm in WEP64 or WEP128.
Key (1-4): Enter the key to encrypt wireless data. To allow encrypted data transmission, the WEP
Encryption Key values on all wireless stations must be the same as the router. There are four keys
for your selection. The input format is in HEX or ASCII style, 5 and 13 ASCII codes are required for
WEP64 and WEP128 or 10 and 26 HEX codes are required for WEP64 and WEP128 respectively.

53
Advanced Configuration Mode
Status
Device Information
Model Name: Displays the model name.
Host Name: Provide a name for the router for identification purposes. Host Name lets you change
the router name.
System Up-Time: Records system up-time.
Current time: Set the current time. See the Time Zone section for more information.
Hardware Version: Device version.
Software Version: Firmware version.
MAC Address: The LAN MAC address.
Port Status
Port Status: User can look up to see if they are connected to Ethernet, WAN and Wireless.
WAN
Port: Name of the WAN connection.
Protocol VPI/VCI: Virtual Path Identifier and Virtual Channel Identifier
Operation: The current status in WAN interface.
Connection: The current connection status.
IP Address: WAN port IP address.

54
Netmask: WAN port IP subnet mask.
Gateway: The IP address of the default gateway.
Primary DNS: The IP address of the primary DNS server.

55
ADSL Status
DSP Firmware Version: DSP code version.
DMT Status: Current DMT Status.
Operational Mode: Displays the ADSL state when the connect mode is set to AUTO. Click
Operational Mode link to go to the ADSL Mode configuration page.
Upstream: Upstream rate.
Downstream: Downstream rate.
SNR Margin (Upstream): This shows the SNR margin for upstream rate.
SNR Margin (Downstream): This shows the SNR margin for downstream rate.
Line Attenuation (Upstream): This is attenuation of signal in upstream.
Line Attenuation (Downstream): This is attenuation of signal in downstream.
Refresh: Click Refresh button to reset the statistics value of Upstream/Downstream rate.

56
3G Status
Status: The current status of the 3G card.
Signal Strength: The signal strength bar indicates current 3G signal strength.
Network Name: The network name that the device is connected to.
Network Mode: The current operation mode in 3G card, it depends on service provider and card’s
limitation. It may be UMTS(3G), GPRS, EDGE, or GSM .
Card Name: The name of the 3G card.
Card Firmware: The current firmware for the 3G card.
Current TX Bytes / Packets: The statistics of transmission, count for this call.
Current RX Bytes / Packets: The statistics of receive, count for this call.
Total TX Bytes / Packets: The statistics of transmission, count from system ready
Total RX Bytes / Packets: The statistics of receive, count from system ready
Clear: Click Clear button to reset the statistics value of Total TX/RX.

57
ARP Table
This table stores mapping information that the device uses to find the Layer 2 Media Access
Control (MAC) address that corresponds to the Layer 3 IP address of the device via the Address
Resolution Protocol (ARP) feature.
IP Address: Shows the IP Address of the device that the MAC address maps to.
MAC Address: Shows the MAC address that is corresponded to the IP address of the device it is
mapped to.
Interface: Shows the interface name (on the router) that this IP address connects to.
Static ARP: Shows the status of static ARP.

58
DHCP Table
The DHCP Table lists the DHCP lease information for all IP addresses assigned by the DHCP
server in the device.
IP Address: The IP address which is assigned to the host with this MAC address.
MAC Address: The MAC Address of internal dhcp client host.
Client Host Name: The Host Name of internal dhcp client.
Register Information: Shows the information provided during registration.

59
System Log
Display system logs accumulated up to the present time. You can trace its historical information
with this function.
Refresh: Click to update the system log.
Clear: Click to clear the current log from the screen.

60
Firewall Log
Firewall Log display log information of any unexpected action with your firewall settings. This
page displays the router’s Firewall Log entries. The log shows log entries when you have
enabled Intrusion Detection or Block WAN PING in the Configuration – Firewall section of the
interface. Please see the Firewall section of this manual for more details on how to enable
Firewall logging.
Refresh: Click to update the firewall log.
Clear: Click to clear the current log from the screen.
UPnP Portmap
The UPnP Portmap table displays the IP address of each UPnP device that is accessing the
router. It also shows the ports (Internal and External) that device has opened.

61
IPSec Status
The IPSec Table provides administrators with detailed information regarding the configured
IPSec Connections.
Name: The name you assigned to the particular VPN entry.
Active: Whether the VPN Connection is currently Active.
Local Subnet: The local IP Address or Subnet used.
Remote Subnet: The Subnet of the remote site.
Remote Gateway: The Remote Gateway IP address.
SA: The Security Association for this VPN entry.
VRRP Status
The VRRP Status displays information of current status and current master of VRRP.
Current Status: Show VRRP current status, Master or Backup.
Current Master: Show the IP address of current master.

62
Configuration
When you click this item, the column will expand to display the sub-items that will allow you to further
configure your GPON router.
LAN, WAN, System, Firewall, QoS, Virtual Server, Wake in LAN, Time Schedule and Advanced.
The function of each configuration sub-item is described in the following sections.

63
LAN - Local Area Network
A Local Area Network (LAN) is a shared communication system network where many computers
are connected. This type of network is area defined and is usually limited to a confined region
within a building or just within the same storey of a building.
There are 6 items within the LAN section: Ethernet, IP Alias, Wireless, Wireless Security, WPS
DHCP Server and VRRP.
Ethernet
The router supports more than one Ethernet IP addresses in the LAN that supports multiple internet
access at the same time. Users usually only have one subnet in their LAN. The default IP address
for the router is 192.168.1.254.
IP Address: The default IP on this router.
Netmask: The default subnet mask on this router.
RIP: RIP v1, RIP v2 and RIP v1+v2. Check to enable RIP function.
Click Apply to confirm the settings.
IP Alias
This function allows the addition an IP alias to the network interface. It further allows user the
flexibility to assign a specific function to use this IP.
IP Address: Enter the IP address to be added to the network.
Netmask: Specify a subnet mask for the IP to be added.
Click Apply to confirm the settings.
64
Wireless
Parameters
WLAN Service: Default setting is set to Enable. If you do not have any wireless, select Disable.
Mode: The default setting is 802.11b+g. From the drop-down manual, you can select 802.11b if
you have only 11b card. If you have only 11g card, select 802.11g.
ESSID: The ESSID is the unique name of a wireless access point (AP) used to distinguish one
from another. For security propose, change to a unique ID name which is already built into the
router wireless interface. It is case sensitive and must not exceed 32 characters. Make sure your
wireless clients have exactly the ESSID as the device in order to connect to your network.
Hide ESSID: This function enables the router to become invisible on the network. Thus, any
clients using the wireless setting to search for available or specific router on the network will not
be able to discover the router whose Hide ESSID function is set to enabled. The default setting is
disabled.
Enable: When enabled, you do not broadcast your ESSID. Therefore, no one will be able to
locate the Access Point (AP) of your router.
Disable: When disabled, you allow anybody with a wireless client to be able to locate the
Access Point (AP) of your router.

65
Regulation Domain: There are seven Regulation Domains for you to choose from, including
North America (N.America), Europe, France, etc. The Channel ID will be different based on this
setting.
Channel ID: Select the wireless connection channel ID that you would like to use.
Note: Wireless performance may degrade if the selected channel ID is already being occupied
by other AP(s).
TX PowerLevel: It is a function that enhances the wireless transmitting signal strength. User
may adjust this power level from minimum 0 up to maximum 100.
Note: The Power Level maybe different in each access network user premise environment,
choose the most suitable level for your network.
AP MAC Address: It is a unique hardware address of the Access Point.
AP Firmware Version: The Access Point firmware version.
WPS Service: Select Enable if you would like to activate WPS service.
WPS State: This column allows you to set the status of the device wireless setting whether it
has been configured or unconfigured. For WPS configuration please refer to the section on Wi-Fi
Network Setup for detail.
WMM: This feature is used to control the prioritization of traffic according to 4 Access categories:
Voice, Video, Best Effort and Background. Default is set to disable.
Wireless Distribution System (WDS)
It is a wireless access point mode that enables wireless link and communication with other access
points. It is easy to install simply by defining the peer’s MAC address of the connected AP. WDS
takes advantages of the cost saving and flexibility which no extra wireless client device is required to
bridge between two access points and extending an existing wired or wireless infrastructure network
to create a larger network. It can connect up to 4 wireless APs for extending cover range at the same
time.
In addition, WDS also enhances its link connection security mode. Key encryption and channel must
be the same for both access points.
WDS Service: The default setting is disabled. Check Enable radio button to activate this function.
1. Peer WDS MAC Address: It is the associated AP’s MAC Address. It is important that your
peer’s AP must include your MAC address in order to acknowledge and communicate with
each other.
2. Peer WDS MAC Address: It is the second associated AP’s MAC Address.
3. Peer WDS MAC Address: It is the third associated AP’s MAC Address.
4. Peer WDS MAC Address: It is the fourth associated AP’s MAC Address.
Note: For MAC Address, the format can be: xx:xx:xx:xx:xx:xx or xx-xx-xx-xx-xx-xx.
Click Apply to confirm the settings.
You can click Security settings link next to Cancel button to go to Wireless Security screen (see
Wireless Security section).

66
Wireless Security
You can disable or enable wireless security function using WPA or WEP for protecting wireless
network. The default mode of wireless security is disabled.
WPA / WPA2 / WPA/WPA2 Pre-Shared Key
Security Mode: You can choose the type of security mode you want to apply from the drop-down
menu.
WP A Algorithms: There are 3 types of the WPA-PSK, WPA2-PSK and WPA/WPA2-PSK.
The WPA-PSK adapts the TKIP (Temporal Key Integrity Protocol) encrypted algorithms, which
incorporates Message Integrity Code (MIC) to provide protection against hackers. The WPA2PSK adapts CCMP (Cipher Block Chaining Message Authentication Code Protocol) of the AES
(Advanced Encryption Security) algorithms.
WP A Shared Key: The key for network authentication. The input format is in character style and
key size should be in the range between 8 and 63 characters.
Group Key Renewal: The period of renewal time for changing the security key automatically
between wireless client and Access Point (AP). Default value is 3600 seconds.
Click Apply to confirm the settings.

67
WEP
Security Mode: Choose the type of security mode WEP from the drop-down menu.
RADIUS/802.1x: Choose this box enable RADIUS/802.1x authentication protocol for
boosting up WLAN Security.
WEP Authentication: To prevent unauthorized wireless stations from accessing data transmitted
over the network, the router offers secure data encryption, known as WEP. There are 3 options to
select from: Open System, Shared Key or Both.
Default Used WEP Key: Select the encryption key ID; please refer to Key (1~4) below.
Passphrase: This is used to generate WEP keys automatically based upon the input string and a
pre-defined algorithm in WEP64 or WEP128.
Key (1-4): Enter the key to encrypt wireless data. To allow encrypted data transmission, the WEP
Encryption Key values on all wireless stations must be the same as the router. There are four keys
for your selection. The input format is in HEX or ASCII style, 5 and 13 ASCII codes are required for
WEP64 and WEP128 or 10 and 26 HEX codes are required for WEP64 and WEP128 respectively.
Click Apply to confirm the settings.

68
WPS
WPS (WiFi Protected Setup) feature is a standard protocol created by Wi-Fi Alliance. This feature
greatly simplifies the steps needed to create a Wi-Fi network for a residential or an office setting.
WPS supports 2 types of configuration methods which are commonly known among consumers:
PIN Method & PBC Method.

69
Wi-Fi Network Setup
PIN Method: Configure AP as Registrar
1. Jot down the client’s Pin (eg. 16837546).
2. Enter the Enrollee’s PIN number and then press Start.
3. Launch the wireless client’s WPS utility (eg. Ralink Utility). Set the Config Mode as Enrollee,
press the WPS button on the top bar, select the AP (eg. wlan-ap) from the WPS AP List column.
Then press the PIN button located on the middle left of the page to run the scan.

70
4. The client’s SSID and security setting will now be configured to match the SSID and security
setting of the registrar.

71
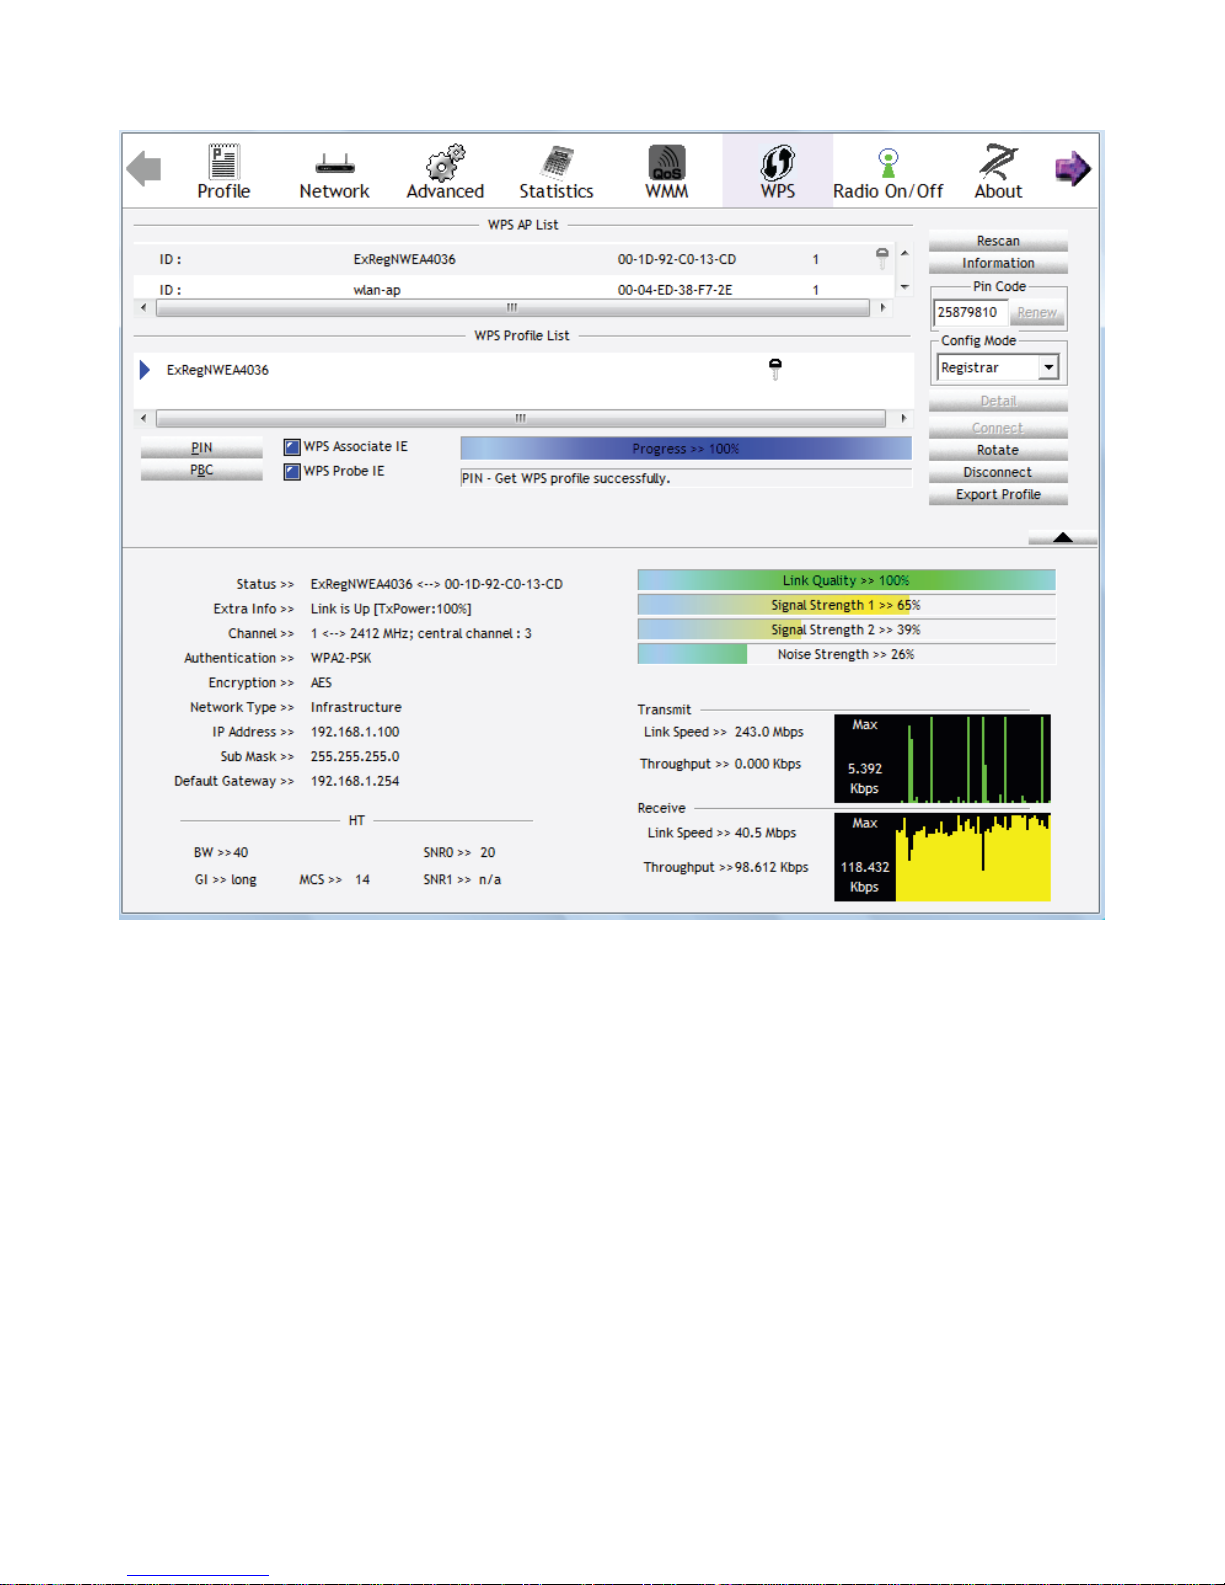
PIN Method: Configure AP as Enrollee
1. In the WPS configuration page, change the Role to Enrollee. Then press Start.
2. Jot down the WPS PIN (eg. 25879810).
3. Launch the wireless client’s WPS utility (eg. Ralink Utility). Set the Config Mode as Registrar.
Enter the PIN number in the PIN Code column then choose the correct AP (eg. wlan-ap) from
the WPS AP List section before pressing the PIN button to run the scan.
72
4. The router’s (AP’s) SSID and security setting will now be configured to match the SSID and
security setting of the registrar.
5. Now to make sure that the setup is correctly done, cross check to see if the SSID and the security
setting of the registrar setting match with the parameters found on both Wireless Configuration
and Wireless Security Configuration page.

73

74

75
PBC Method:
1. Press the PBC button of the AP.
2. Launch the wireless client’s WPS Utility (eg. Ralink Utility). Set the Config Mode as Enrollee.
Then press the WPS button and choose the correct AP (eg. wlan-ap) from the WPS AP List
section before pressing the PBC button to run the scan.

76
3. When the PBC button is pushed, a wireless communication will be established between your
router and the PC. The client’s SSID and security setting will now be configured to match the SSID
and security setting of the router.

77
Wi-Fi Network Setup with Windows Vista WCN:
1. Jot down the AP PIN from the Web (eg. 25879810).
2. Access the Wireless configuration of the web GUI. Set the WPS State to Unconfigured then
click Apply.
3. In your Vista operating system, access the Control Panel page, then select Network and Internet
> View Network Computers and Devices. Double click on the BiPAC 7800GZ icon and enter the
AP PIN in the column provided then press Next.

78
4. Enter the AP SSID then click Next.
5. Enter the Passphrase then click Next.

79
6. When you have come to this step, you will have completed the Wi-Fi network setup using
the built-in WCN feature in Windows Vista.

80
DHCP Server
DHCP allows networked devices to obtain information on the parameter of IP, Netmask, Gateway
as well as DNS through the Ethernet Address of the device.
To configure the router’s DHCP Server, select DHCP Server from the DHCP Server Mode drop-
down menu. You can then configure parameters of the DHCP Server including the domain, IP pool
(starting IP address and ending IP address to be allocated to PCs on your network), lease time
for each assigned IP address (the period of time the IP address assigned will be valid), DNS IP
address and the gateway IP address. These details are sent to the DHCP client (i.e. your PC) when
it requests an IP address from the DHCP server. If you check “Use Router as a DNS Server”, the
ADSL Router will perform the domain name lookup, find the IP address from the outside network
automatically and forward it back to the requesting PC in the LAN (your Local Area Network). Click
Apply to enable this function.
If you select DHCP Relay from the DHCP Server Mode drop-down menu, you must enter the IP
address of the DHCP server that assigns an IP address to the DHCP client in the LAN. Use this
function only if advised to do so by your network administrator or ISP. Click Apply to enable this
function.

81
VRRP
VRRP is designed to eliminate the single point of failure inherent in the static default routed
environment. VRRP specifies an election protocol that dynamically assigns responsibility for a
virtual router to one of the VRRP routers on a LAN. The VRRP router controlling the IP address
associated with a virtual router is called the Master, and forwards packets sent to these IP
addresses. The election process provides dynamic fail-over in the forwarding responsibility
should the Master become unavailable. Any of the virtual router's IP addresses on a LAN can
then be used as the default first hop router by end-hosts. The advantage gained from using
VRRP is a higher availability default path without requiring configuration of dynamic routing or
router discovery protocols on every end-host.
VRRP: The default setting is Disable. Check Enable radio button to activate this function.
VRID: A master or backup router running the VRRP protocol may participate in one VRID
instance.
Priority: Specifies the sending VRRP router's priority for the virtual router. Higher values equal
higher priority. The priority value for the VRRP router that owns the IP address associated with
the virtual router MUST be 255. VRRP routers backing up a virtual router MUST use priority
values between 1 and 254. The default priority value for VRRP routers backing up a virtual
router is 100. The priority value zero (0) has special meaning indicating that the current Master
has stopped participating in VRRP. This is used to trigger Backup routers to quickly transition to
Master without having to wait for the current Master to timeout.
Preempt Mode: When preempt mode is enabled, a backup router always takes over the
responsibility of the master router. When disabled, the lower priority backup is left in the master
state.
VRIP: One IP address that is associated with the virtual router.
Advertisement period: Indicates the time interval in seconds between advertisements. The default
value is 1 second.

82
WAN - Wide Area Network
A WAN (Wide Area Network) is a computer network that covers a broad geographical area (e.g.
Internet) that is used to connect LAN and other types of network systems. There are 4 items within
the WAN section: WAN Interface, WAN Profile, Mobile Networks and ADSL Mode.
WAN Interface (ADSL)
Main Port: Select the main port from the drop-down menu.
Click Apply to confirm the change.
WAN Interface (3G)
Main Port: Select the main port from the drop-down menu.
Click Apply to confirm the change.

83
WAN Interface (EWAN)
Main Port: Select the main port from the drop-down menu.
Click Apply to confirm the change.
WAN Interface (Dual WAN)
Main Port: Select the main port from the drop-down menu.
WAN1: Choose ADSL EWAN or 3G for WAN1. Click the link to go to WAN Profile page to configure
its parameters.
WAN2: Choose ADSL EWAN or 3G for WAN2. Click the link to go to WAN Profile page to configure
its parameters.
Connectivity Decision: Enter the value for the times when probing failed to switch backup port.
Failover Probe Cycle: Set the time duration for the Failover Probe Cycle to determine when the
router will switch to the backup connection (backup port) once the main connection (main port)
fails.

84
Failback Probe Cycle: Set the time duration for the Failback Probe Cycle to determine when the
router will switch back to the main connection (main port) from the backup connection (backup
port) once the main connection communicates again.
Note: The time values entered in Failover Probe Cycle and Failback Probe Cycle fields are
set for each probe cycle and decided by Probe Cycle duration multiplied by Connection
Decision value (e.g. 60 seconds are multiplied by 12 seconds and 5 consecutive fails).
Detect Rule (either one):
1. Physical Port Error
2. Ping Fail
• No Ping: It will not send any ping packet to determine the connection. It means to disable
the ping fail detection.
• Ping Gateway: It will send ping packet to gateway and wait response from gateway in every
“Probe Cycle”.
• Ping Host: It will send ping packet to specific host and wait response in every “Probe Cycle”.
The host must be an IP address.
Click Apply to confirm the change.

85
WAN Profile (ADSL)
PPPoE (ADSL)
PPPoE (PPP over Ethernet) provides access control in a manner similar to dial-up services using
PPP.
Description: A given name for the connection.
VPI/VCI: Enter the information provided by your ISP.
Encap. method: Select the encapsulation format. Select the one provided by your ISP.
Username: Enter the username provided by your ISP. You can input up to 256 alphanumeric
characters (case sensitive).
Password: Enter the password provided by your ISP. You can input up to 32 alphanumeric
characters (case sensitive).
Service Name: This item is for identification purposes. If it is required, your ISP will provide you
the necessary information. Maximum input is 32 alphanumeric characters.
NAT: The NAT (Network Address Translation) feature allows multiple users to access the Internet
through a single IP account by sharing a single IP address. If users on your LAN have their own
public IP addresses to access the Internet, NAT function can be disabled.
IP (0.0.0.0:Auto): Your WAN IP address. Leave the IP address as 0.0.0.0 to enable the device to
automatically obtain an IP address from your ISP.
Auth. Protocol: Default is Auto. Please consult your ISP on whether to use Chap, Pap or MSCHAP.
Obtain DNS: A Domain Name System (DNS) contains a mapping table for domain name and IP
addresses. DNS helps to find the IP address of a specific domain name. Check the checkbox to
obtain DNS automatically.

86
Primary DNS / Secondary DNS: Enter the IP addresses of the DNS servers. The DNS servers
are passed to the DHCP clients along with the IP address and the Netmask.
Connection: Click on Always on to establish a PPPoE session during start up and to
automatically re-establish the PPPoE session when disconnected by the ISP. You may uncheck
the item to disable this function.
Idle Timeout: Auto-disconnect the broadband firewall gateway when there is no activity on the line
for a predetermined period of time.
MTU: Control the maximum Ethernet packet size your PC will send.
MAC Spoofing: This option is required by some service Providers. You must fill the MAC address
specified by your service provider when this information is required. The default setting is set to
disable.

87
PPPoA (ADSL)
PPPoA stands for Point to Point Protocol over ATM Adaptation Layer 5 (AAL5). It provides access
control and billing functions in a manner similar to dial-up services using PPP.
Description: A given name for the connection.
VPI/VCI: Enter the information provided by your ISP.
Encap. method: Select the encapsulation format. Select the one provided by your ISP.
Username: Enter the username provided by your ISP. You can input up to 256 alphanumeric
characters (case sensitive).
Password: Enter the password provided by your ISP. You can input up to 32 alphanumeric
characters (case sensitive).
NAT: The NAT (Network Address Translation) feature allows multiple users to access the Internet
through a single IP account by sharing a single IP address. If users on your LAN have their own
public IP addresses to access the Internet, NAT function can be disabled.
IP (0.0.0.0:Auto): Your WAN IP address. Leave the IP address as 0.0.0.0 to enable the device to
automatically obtain an IP address from your ISP.
Auth. Protocol: Default is Auto. Please consult your ISP on whether to use Chap, Pap or MSCHAP.
Obtain DNS: A Domain Name System (DNS) contains a mapping table for domain name and IP
addresses. DNS helps to find the IP address of a specific domain name. Check the checkbox to
obtain DNS automatically.
Primary DNS / Secondary DNS: Enter the IP addresses of the DNS servers. The DNS servers
are passed to the DHCP clients along with the IP address and the Netmask.
Connection: Click on Always on to establish a PPPoE session during start up and to
automatically re-establish the PPPoE session when disconnected by the ISP. You may uncheck
the item to disable this function.

88
Idle Timeout: Auto-disconnect the broadband firewall gateway when there is no activity on the line
for a predetermined period of time.
MTU: Control the maximum Ethernet packet size your PC will send.

89
MPoA (ADSL)
Description: A given name for the connection.
VPI/VCI: Enter the VPI and VCI information provided by your ISP.
Encap. method: Select the encapsulation format. Select the one provided by your ISP.
NAT: The NAT (Network Address Translation) feature allows multiple users to access the Internet
through a single ISP account by sharing a single IP address. If users on your LAN have their own
public IP addresses to access the Internet, NAT function can be disabled.
MAC Spoofing: This option is required by some service Providers. You must fill the MAC address
specified by your service provider when this information is required. The default setting is set to
disable.
IP (0.0.0.0:Auto): Your WAN IP address. If the IP is set to 0.0.0.0 (auto IP detect), both Netmask
and gateway can be left blank.
Netmask: User can change it to other such as 255.255.255.128. Type the Netmask assigned to
you by your ISP (if given)
Gateway: Enter the IP address of the default gateway.
Obtain DNS: A Domain Name System (DNS) contains a mapping table for domain name and IP
addresses. DNS helps to find the IP address of a specific domain name. Check the checkbox to
obtain DNS automatically.
Primary DNS / Secondary DNS: Enter the IP addresses of the DNS servers. The DNS servers
are passed to the DHCP clients along with the IP address and the Netmask.

90
IPoA (ADSL)
Description: A given name for the connection.
VPI/VCI: Enter the VPI and VCI information provided by your ISP.
Encap. method: Select the encapsulation format. Select the one provided by your ISP.
NAT: The NAT (Network Address Translation) feature allows multiple users to access the Internet
through a single ISP account by sharing a single IP address. If users on your LAN have their own
public IP addresses to access the Internet, NAT function can be disabled.
IP Address: Enter your fixed IP address.
Netmask: User can change it to other such as 255.255.255.128. Type the Netmask assigned to
you by your ISP (if given).
Gateway: Enter the IP address of the default gateway.
Obtain DNS Automatically: Select this check box to activate DNS.
Primary DNS / Secondary DNS: Enter the IP addresses of the DNS servers. The DNS servers
are passed to the DHCP clients along with the IP address and the Netmask.

91
Pure Bridge (ADSL)
Description: A given name for the connection.
VPI/VCI: Enter the VPI and VCI information provided by your ISP.
Encap. method: Select the encapsulation format. Select the one provided by your ISP.
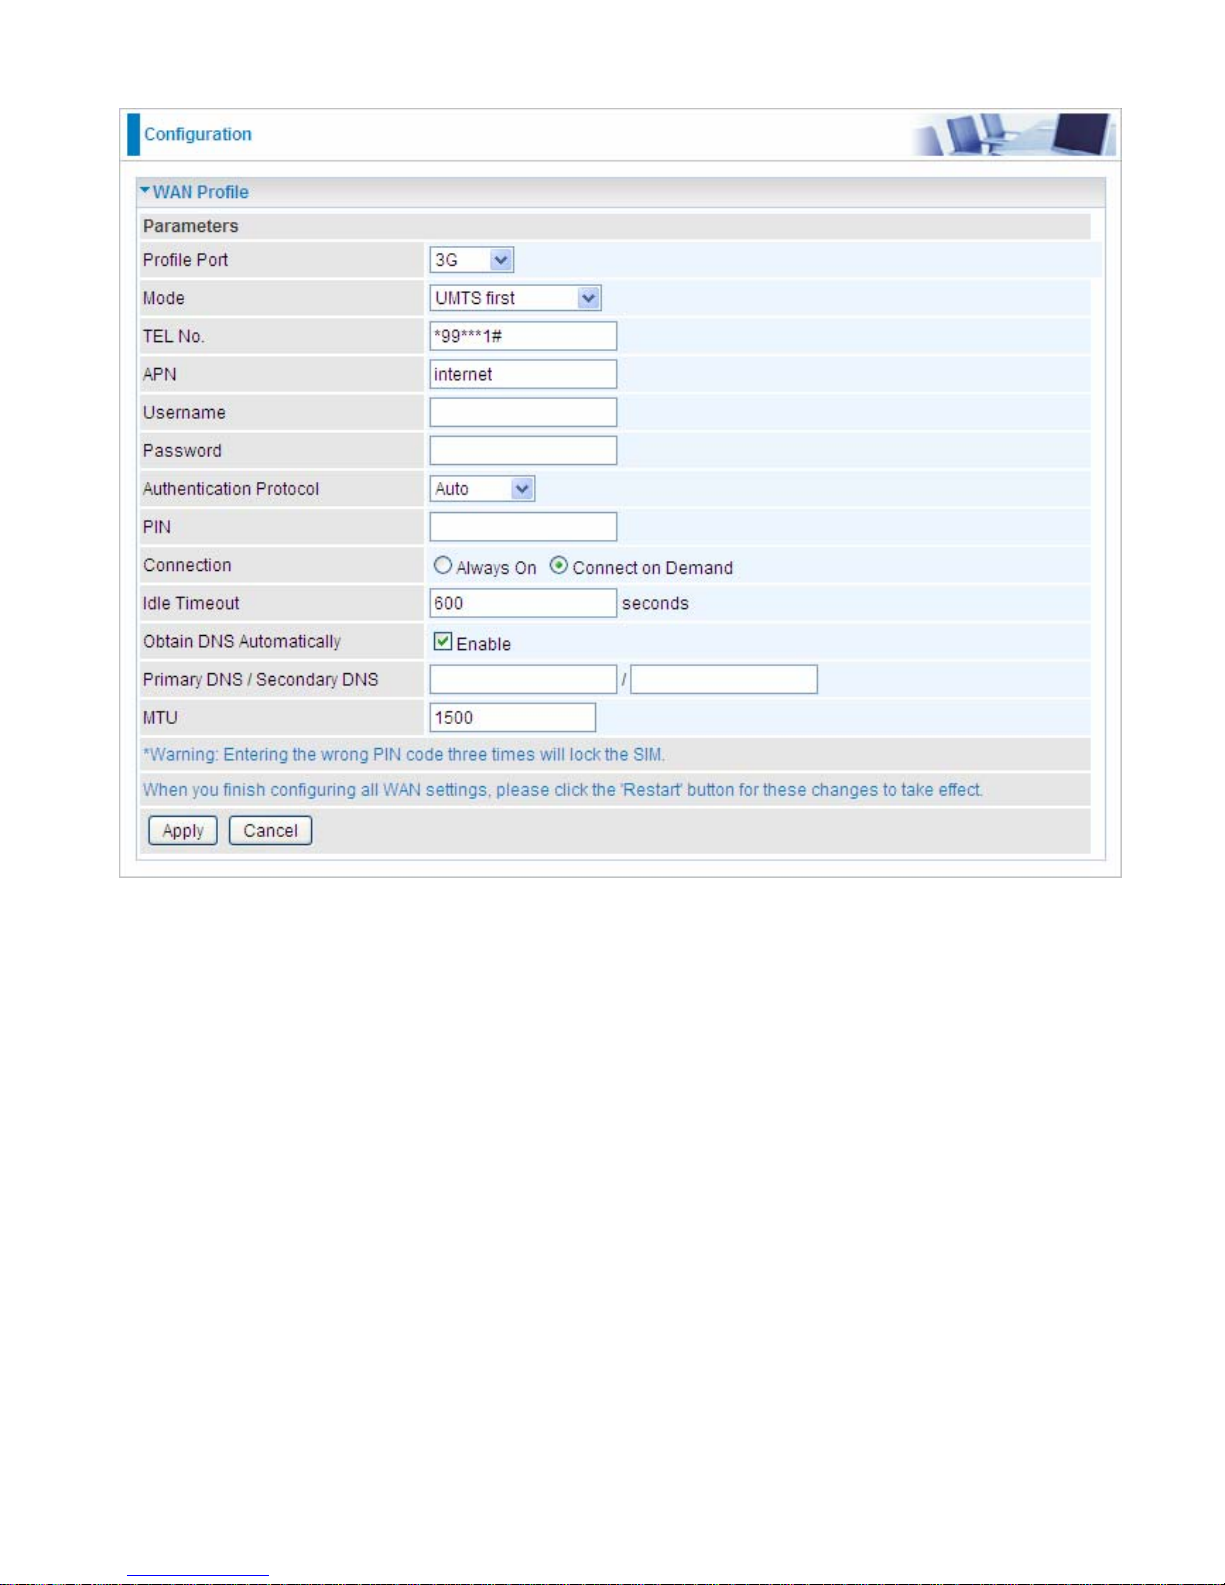
92
WAN Profile – Main Port (3G)
Mode: There are 5 options of phone service standards: GSM only, UTMS only, GPRS/EDGE first,
UMTS first, and Automatic. If you are uncertain what services are available to you, then please
select Automatic.
TEL No.: The dial string to make a GPRS / 3G user internetworking call. It may provide by your
mobile service provider.
APN: An APN is similar to a URL on the WWW, it is what the unit makes a GPRS / UMTS call. The
service provider is able to attach anything to an APN to create a data connection, requirements for
APNs varies between different service providers. Most service providers have an internet portal
which they use to connect to a DHCP Server, thus giving you access to the internet i.e. some 3G
operators use the APN ‘internet’ for their portal. The default value is “internet”.
Username/Password: Enter the username and password provided by your service provider. The
username and password are case sensitive.
Authentication Protocol: Default is Auto. Please consult your service provider on whether to use
PAP, CHAP or MSCHAP.
PIN: PIN stands for Personal Identification Number. A PIN code is a numeric value used in certain
systems as a password to gain access, and authenticate. In mobile phones a PIN code locks the
SIM card until you enter the correct code. If you enter the PIN code incorrectly into the phone 3
times in a row, then the SIM card will be blocked and you will require a PUK code from your network/
service provider.

93
Connection:
Always On: The router will make UMTS/GPRS call when starting up. Click on Always On, the
Keep Alive field will display.
Keep Alive: Check Enable to allow the router automatically reconnects the connection when
ISP disconnects it.
Always On: If you want to make UMTS/GPRS call only when there is a packet requesting
access to the Internet (i.e. when a program on your computer attempts to access the Internet).
In this mode, you must set Idle Timeout value at same time. Click on Connect on Demand, the
Idle Timeout field will display.
Idle Timeout: Auto-disconnect the broadband firewall gateway when there is no activity on
the line for a predetermined period of time. The idle timeout value is not allowed to be set
under 10 seconds. Default is 600 seconds.
Obtain DNS Automatically: Select this check box to activate DNS automatically.
Primary DNS/ Secondary DNS: Enter the IP addresses of the DNS servers. The DNS servers are
passed to the DHCP clients along with the IP address and the Netmask.
MTU: Maximum Transmission Unit. The size of the largest datagram (excluding media-specific
headers) that IP will attempt to send through the interface.
Click Apply to confirm the settings.
Note: If you don’t know how to set these parameters, please keep them untouched.

94
WAN Profile (EWAN)
PPPoE (EWAN)
Username: Enter the username provided by your ISP. You can input up to 256 alphanumeric
characters (case sensitive).
Password: Enter the password provided by your ISP. You can input up to 32 alphanumeric
characters (case sensitive).
Service Name: This item is for identification purposes. If it is required, your ISP will provide you
the necessary information. Maximum input is 32 alphanumeric characters.
NAT: The NAT (Network Address Translation) feature allows multiple users to access the Internet
through a single IP account by sharing a single IP address. If users on your LAN have their own
public IP addresses to access the Internet, NAT function can be disabled.
IP (0.0.0.0:Auto): Your WAN IP address. Leave the IP address as 0.0.0.0 to enable the device to
automatically obtain an IP address from your ISP.
Auth. Protocol: Default is Auto. Please consult your ISP on whether to use Chap, Pap or MSCHAP.
Obtain DNS: A Domain Name System (DNS) contains a mapping table for domain name and IP
addresses. DNS helps to find the IP address of a specific domain name. Check the checkbox to
obtain DNS automatically.
Primary DNS / Secondary DNS: Enter the IP addresses of the DNS servers. The DNS servers
are passed to the DHCP clients along with the IP address and the netmask.
Connection: Click on Always on to establish a PPPoE session during start up and to
automatically re-establish the PPPoE session when disconnected by the ISP. You may uncheck
the item to disable this function.
Idle Timeout: Auto-disconnect the broadband firewall gateway when there is no activity on the line
for a predetermined period of time.

95
MTU: Control the maximum Ethernet packet size your PC will send.
MAC Spoofing: This option is required by some service Providers. You must fill the MAC address
specified by your service provider when this information is required. The default setting is set to
disable.
Click Apply to confirm the settings.

96
Obtain an IP Address Automatically (EWAN)
NAT: The NAT (Network Address Translation) feature allows multiple users to access the Internet
through a single IP account by sharing the single IP address. If users on your LAN have their own
public IP addresses to access the Internet, NAT function can be disabled.
MAC Spoofing: This option is required by some service Providers. You must fill the MAC address
specified by your service provider when this information is required. The default setting is set to
disable.
Obtain DNS: Select this check box to activate DNS.
Primary DNS/ Secondary DNS: Enter the IP addresses of the DNS servers. The DNS servers are
passed to the DHCP clients along with the IP address and the Netmask.
Click Apply to confirm the settings.
 Loading...