

Page 1

mobile LCD TV
Instruction manual
Page 2

2
3
Content
6 Chapter 1 Safety instructions
Chapter 2 The television
9
9 Main features
10 LCD television
12 Remote control
14 Antenna
14 Power supply
14 Lithium polymer rechargeable battery (optional)
16
Chapter 3 Analog mode (ATV)
16 Main features
16 Indicator lamp
16 Volume regulation
17 Mute button
17 Screen settings
18 Changing channels in an analog mode
18 Analog menu settings
19 Analog mode (ATV) automatic channel search
19 Manual channel search
20 Channel ne tuning
20 Color system
21 Sound system
21 Channel skip
22
Band
Chapter 4 Digital television DVB-T (DTV)
23
23
First time installation
25 Main menu
25 Main menu installation
Page 3

4
5
30 Channel search
31 Channel edit
37 Chapter 5 AV mode
38 Chapter 6 Further features
38 Sleep timer settings
38 Listening with earphones
39 Connecting to other devices
40 Chapter 7 Troubleshooting
42 Chapter 8 Specications
42 Technical data
43 Connections
43 Delivery contents
44 Chapter 9 Accessories (optional)
Dear customer,
congratulations on purchasing the ZELO T9 LCD television. To enjoy the features that
this television has to oer and to ensure safety and years of trouble-free operation,
please read and follow all operating and maintenance instructions found in the in
struction manual thoroughly and retain this manual for future reference.
A declaration of CE conformity has been established for this product. Certication has
been documented and entrusted to the manufacturer.
-
Page 4

6
7
Safety instructions
1
1. We assume no liability for damage resulting from the failure to comply with the safety instructions, improper operation and handling. Under such circumstances, all claims
under warranty will become void.
2. We assume no liability for personal or property damage resulting from the failure to
comply with the safety instructions. Under such circumstances, all claims under war
ranty will become void.
3. Complying with the essential requirements of the European health, safety and envi
ronmental protection legislation (CE), any unauthorized modications and/or change
on the device is prohibited and will void the warranty and all warranty claims.
4. Any use other than described in this manual could cause damage to the device pre
senting a risk of hazard such as short-circuiting, re, electric shock, etc. Completely
observe and adhere to all safety instructions.
5. This device is maintenance-free. Never open the casing and attempt any mainte
nance or try to repair this device yourself. If something appears strange or the tele
vision is not functioning properly, please turn it o and consult your dealer or refer
servicing to qualied service personnel. This television is composed of many delicate
electronic components that can be damaged or broken if you open the TV or attempt
to modify it.
6. To reduce the risk of re or electric shock, do not expose this device to rain or
moisture.
7. The device should be situated away from heat sources such as radiators, heaters,
stoves and other products that produce heat.
8. Do not exposing the TV to high humidity, extreme cold, dust, steam, oil, smoke, di
rect sunlight etc. Permissible storage temperatures are within the range of –25 ~ +60 .
Permissible operation temperatures are within the range of 0 ~ +40.
9. Only use a soft and lightly dampened cloth to wipe clean. Never use any cleaning
agents or chemical solutions to clean that would otherwise cause damage to the tele
vision. Use a glass cleaning cloth to clean the display.
10. Keep liquids away from this device, due to the risk of re and life threatening elec
tric shock. Should liquids enter the devices interior, immediately pull the power supply
plug from the outlet and contact a specialist.
11. Only use the included or specied adapters and power sources. Do not use attach
ments not recommended by the manufacturer, due to the risk of hazard.
-
12. Always turn the power o and unplug the adapter when not in use.
-
-
-
-
-
-
-
13. Avoid dropping and strong impact.
14. Never use earphones with a high volume setting over a longer period of time to
avoid hearing damage.
15. Never touch the power supply plug with wet hands. This could present a risk of
electric shock.
16. Do not bend or place any heavy objects on the power cable. Power supply cords
should be routed so that they are not likely to be walked on or pinched by items placed
upon or against them, paying attention to cords at plugs, outlets and the point where
they exit from the product.
17. Damage requiring service under the following conditions:
a) When the power supply cord or plug is damaged.
b) If liquid has been spilled or objects have fallen onto the device.
c) If the device has been exposed to rain or water.
d) If the device does not operate normally after following the operating instructions.
e) If the device has been dropped or damaged in any way.
f) When the device exhibits a distinct change in performance, indicating a need for
service.
Caution
For safety reasons, the driver should not watch or operate controls while driving.
Please note that it is prohibited in some countries to watch and operate the television
while driving.
Should individual pixel errors appear during operation, then this does not necessarily
mean that the device is defect (to light or to dark pixels). These errors are a common
TFT-LCD technology phenomena. Up to 5 pixel errors are acceptable.
-
Chapter 1 Safety Instructions Chapter 1 Safety Instructions
Page 5
89Chapter 1 Safety Instructions Chapter 2 The television
The television
2
Technical information
The television and ZELO T9 DVB-T receiver need approx. 5 seconds after being turned
on, before a picture is displayed on screen.
Main features
› Mobile 16:9 LCD television
› DVB-T and analog television reception
› Brilliant widescreen display
› EPG (Electronic Program Guide), PIG (Picture in Graphic) and teletext functions
› Automatic channel search
› PAL/NTSC/SECAM color system
› Philips tuner
› NEC chipset for DVB-T
› Antenna
› Power for active antenna
› Supported bandwidth of 7 or 8 MHz
› Connections: A/V IN and OUT, earphone OUT
› DVB-T stores up to 1000 channels and analog up to approx. 99 channels
› 2 high quality speakers
› DVB radio function support
› OSD languages: German, English, French, Italian, Russian, Polish, Portuguese and
Spanish
› Viewing format can be changed automatically during DVB-T operation (16:9/4:3)
› Internal mounting compartment for a lithium polymer rechargeable battery (optio-
nal/not included in delivery) for continuous display operation up to approx. 3 hours
› Can be used as a DVB-T receiver or connect various external sources, such as a DVD
player, VCR, PSX, XBox
Page 6

10
11
LCD television
1
2
3
4
5
6
7
8
9
10
11
15
12
16
13
17
14
18
1. Stereo speakers
2. LCD screen
3. Control light ON/OFF
4. Power button: turns the device ON and OFF (For power on the device, press this
button at least 3 seconds.)
5. SR button – switches between dierent operating modes (ATV, DTV, AV,)
6. Channel CH– and CH+
7. Infrared sensor for the remote control
8. t Volume – and menu button – for volume regulation and menu adjustments
u Volume + and menu button – for volume regulation and menu adjustments
p to return to the previous channel/menu navigation
q to go to the next channel/menu navigation
OK : conrm and channel list at DVB-T
9. TV menu button
10. PIC button (for brightness, contrast, color and tone adjustments)
11. Volume regulation VOL – and VOL +
Chapter 2 The television Chapter 2 The television
12. A/V IN
13. A/V OUT
14. Earphone jack
15. Antenna
16. Screw hole circle (for stand attachment)
17. Adapter terminal
18. Stand
Page 7
12
13
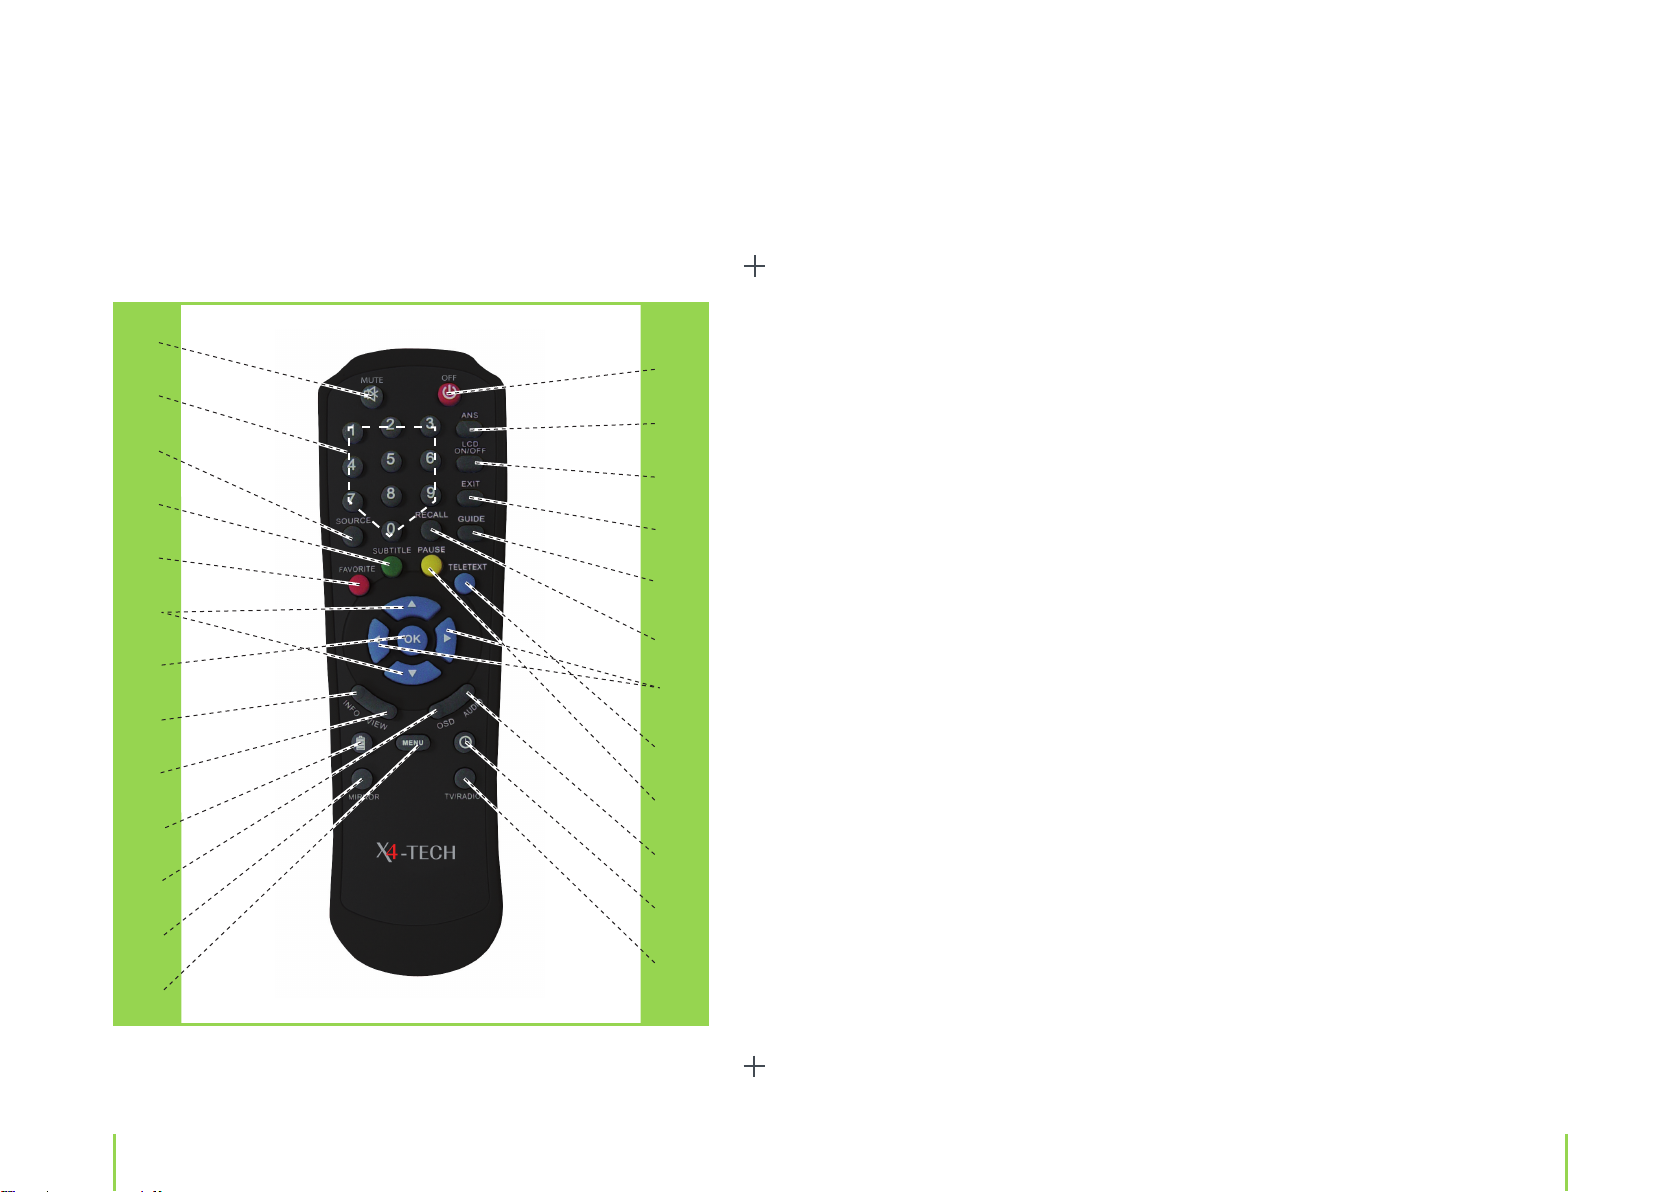
Remote control
1
2
3
4
5
6
7
8
9
10
11
12
13
14
15
16
17
18
19
20
21
22
23
24
25
1. Mute button: enable/disable sound
2. Numeric buttons: for channel selection/programming
3. Source button: for switching between DVB-T/ATV/AV modes
4. Green button: subtitle
5. Red button: favorite list
6.
p and q: previous/next channel and for menu navigation
7. OK button: for menu conrmation and channel list at DVB-T
8. INFO: displays current channel or program information
9. View: for selecting a viewing angle
10. Battery indicator: displays battery staten
11. OSD: On Screen Display (menu navigation will be displayed on screen)
12. Mirror: changes the picture viewing format
13. Menu button: during ATV and DTV operation
14. OFF button: button to put the unit o
15. PIC button: for brightness, contrast and color adjustments
16. LCD ON/OFF
17. Exit: to exit a menu
18. Guide: for DVB-T Program Guide/Radio Program Guide
19. Recall button: to return to previous selected channel (DTV mode), return to the
previous menu
20. t and u: for volume–/volume+ regulation and menu navigation
21. Blue button: teletext
22. Yellow button: to pause
23. Audio: Audio mode selection (DTV audio mode: Left, Right and Stereo/ATV: ATV
sound system)
24. SLEEP: sleep timer function
25. TV/Radio: switches between TV/radio mode
Note: The colored buttons 4+5+21+22 are only activated during DTV operation.
Chapter 2 The television Chapter 2 The television
Page 8
14
15
Antenna
Remove the antenna from the package and attach it to the antenna terminal.
Power supply
For use at home:
Connect the included adapter to a wall outlet and then to your television to supply
your television with power. Press the POWER switch for approx. 3 seconds to turn the
television on. Please make sure that the power adapter coincides with the voltage spe
cication of your wall outlet.
For use in the car (DC 12 V):
Connect the included car adapter to your cars cigarette lighter and then to your televi
sion. Press the POWER switch approx. 3 seconds to turn the television on.
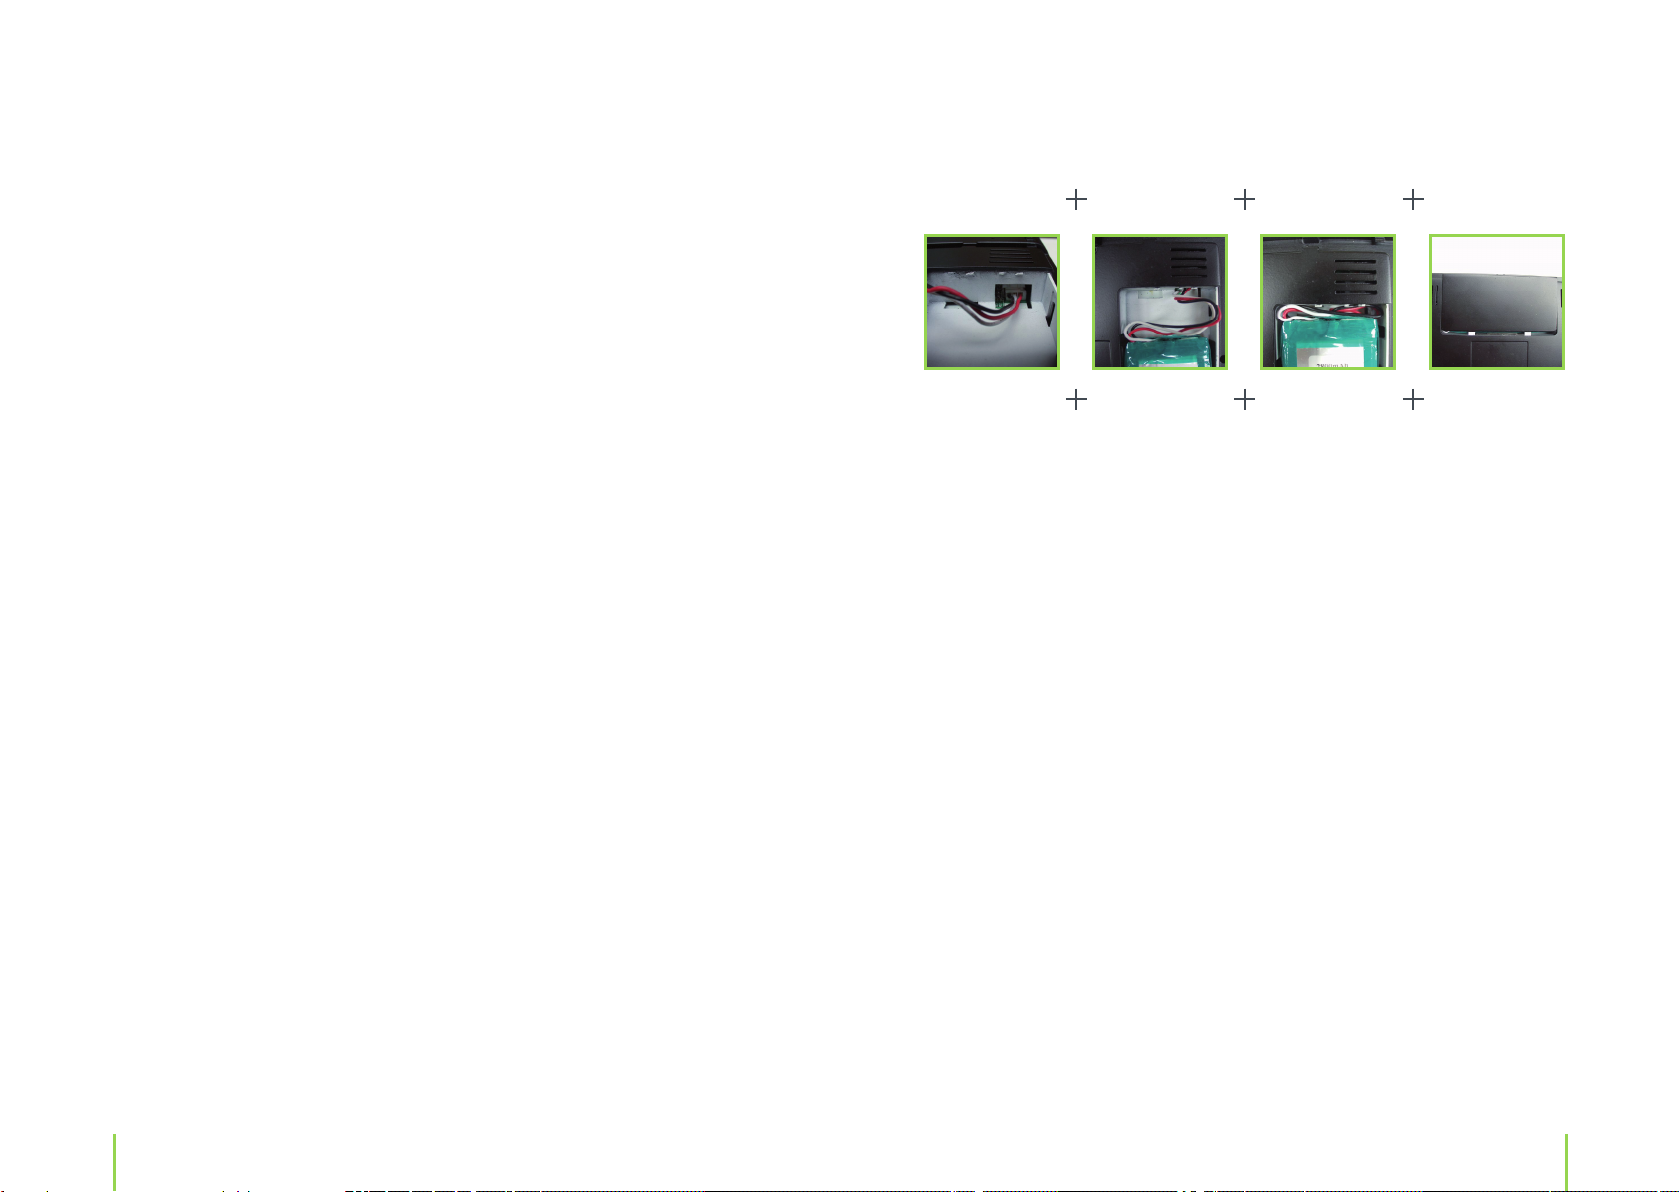
Lithium polymer rechargeable battery (optional)
Installation
1. Open the battery compartment by removing the lid on the back of the device.
2. Connect the optionally available battery pack to the terminal found inside the battery
compartment (as pictured below).
3. Insert the battery completely into the compartment.
4. Close the battery compartment by replacing the lid.
1. 2. 3. 4.
Operation
-
-
1. The rechargeable battery (optional/not included in delivery) is only to be charged
with the included power adapter.
2. After insertion the battery will automatically begin charging at standby and operati
on mode.
doing so until the battery is completely charged. After completion the battery indica
tor will stop blinking.
have a look to the charging state of the battery.
Note: If you notice a very fast blinking, the battery is broken.
3. Only use the X4-TECH ZELO television for charging.
4. Charging during driving via the 12 V car adapter is also possible.
5. An empty battery will need around 3 hours charging time at standby mode and
about 6 hours at operation mode.
6. Disruption during charging or even partial charging will classify the battery as being
fully charged and will shorten the batteries lifespan.
Standby mode: The logo will start blinking immediately and will proceed in
Operation mode: With button 10 at the remote control you can
-
-
7. Safety function: If the rechargeable battery is empty, overloaded or short-circuiting
presents a problem, then the output voltage will turn o. It can be started and charged
once again via power adapter or car adapter.
8. Lithium polymer rechargeable batteries can be charged up to 800 times without
reducing the capacity, afterwards the capacity will go down.
Chapter 2 The television Chapter 2 The television
Page 9

16
17
Analog mode (ATV)
3
Main features
1. Press the POWER button on your television 3 seconds long to turn on.
2. Press the SOURCE (SR) button respectively to choose an operating mode.
Operating mode Explanation
ATV Analog television program reception via antenna
DTV Digital television reception (DVB-T)
AV For external sources (DVD player, SAT receiver)
„NO TV SIGNAL” will be displayed on screen if antenna reception is not possible.
Indicator lamp
The logo is shining white, when the TV is switched on. Only if the battery is installed,
the logo will be shining red at standby as described at page 15, point 2.
Volume regulation
Use the VOL + and VOL– buttons on the device or the right and left menu button on the
remote control to regulate and adjust the volume accordingly.
The volume bar informs you of the actual adjusted sound level.
Mute button
For operation without sound press the MUTE button on the remote control once.
The volume bar will be displayed on screen as follows:
Press the MUTE button or the VOL– and VOL+ to deactivate this mode.
Screen settings
Press the PIC button to select one of the following submenus:
a) brightness
b) contrast
c) color
After a submenu has been selected use the
device for setting adjustment.
The following progress bar is an example of a brightness setting adjustment:
t and u button on the remote control or
Chapter 3 Analog mode (ATV) Chapter 3 Analog mode (ATV)
Page 10

1819Chapter 3 Analog mode (ATV) Chapter 3 Analog mode (ATV)
Color adjustments can only be made in the NTSC system. The PAL standard system
should be used in Germany.
Changing channels in an analog mode
There are diverse ways to change channels during analog mode operation.
Format 4:3
16:9
Battery Yes For determining if your rechargeable bat-
No
Adjustments can be made by pressing either the
the remote control.
Adjusts the screen format
tery (optional) has to be charged or not.
p and q button on the device or on
1. Press one of the numerical numbers from 1 – 9 on the remote control (e.g. pressing
the number „1” and then the number „2” consecutively will choose program 12).
2. Change programs by pressing either the CH– and CH+ buttons on your device.
In an analog mode you have the alternative to permanently store up to 100 channels.
Analog menu settings
Press the MENU button until the word FUNCTION appears on screen.
You now have the opportunity to make the following adjustments:
Note: At DTV mode you can reach this menu with the PIC button .
Menu subitem Selection Explanation
Language English
German
French
Polish
Russian
Spanish
Italian
Portuguese
Normal Below Menu surface is displayed horizontally
To adjust the menu language
Press the MENU button once again to enter into the submenu PRESET.
Analog mode (ATV) automatic channel search
After entering the PRESET menu you can start an automatic channel search by navigating with the
to conrm and carry out this action.
The automatic channel search will search and automatically store all programs found
and will assign each program with a number between 0 and 99.
Once an automatic search has been completed, program number 1 will be started.
p und q button to „SEARCH AUTO” and by then pressing the u button
Manual channel search
1. Press the MENU button to enter into the PRESET menu.
2. Navigate with the
3. Use the
nel 5).
p and q button to choose the channel to be manually adjusted (e.g. chan-
p and q button to CHANNEL.
Page 11

20
21
4. Navigate with the p and q button to SEARCH MANUAL and press the t and u
button to start a manual search. The device will search long enough for a channel until
one is found and will then store it on the corresponding number.
5. Repeat steps 1 thru 4 to manually search for further channels.
Channel ne tuning
If your television picture is not clear and precise after a search has been made, then use
the ne tuning adjustment to help regulate the picture.
Sound system
1. Press the MENU button to enter into the PRESET menu.
2. Navigate with the
3. With the
ments.
t and u button you can now make the necessary ne tuning adjust-
p and q button to FINE TUNING.
Color system
The standard color system in Germany is PAL. During holidays on other continents you
can change over to SECAM or NTSC.
1. Navigate with the
2. Use the
t and u button to choose the preferred color system.
p and q button to COLOR SYSTEM.
1. Navigate with the p and q button to SOUND SYSTEM.
2. Use the
t and u button to choose the preferred tone system.
Channel skip
If you choose „YES” under this subitem then the channel will be skipped over during
switching.
Chapter 3 Analog mode (ATV) Chapter 3 Analog mode (ATV)
Page 12

22
23
Digital television DVB-T (DTV)
4
First time installation
When starting your television for the rst time in a DTV mode (digital television reception DVB-T) an automatic rst time installation program will be displayed on screen.
No channels have been previously stored and necessary adjustments will have to be
carried out to enable DVB-T reception.
1. Region
1. Navigate with the
p and q button to select REGION.
Band
1. Navigate with the p and q button to BAND.
2. Use the
t and u button to choose the preferred band.
2. Use the
Europe (for choosing the region Germany)
2. OSD language
1. Navigate with the
2. Use the
Note: The menu language chosen will apply to the whole menu. Do not choose a
language that is not comprehendible. This would only complicate any adjustments/
readjustments that you might have to make.
3. Time zone
1. Navigate with the
2. Use the
For Germany choose GMT +1. This is equivalent to the Central European Time + 1 hour
(UTC+1).
4. Remote power supply for active antenna
A remote power supply remotely supplies an active antenna with 5 V. This means that
you can also battery operate an active antenna without a power supply system.
t and u button to choose the preferred region.
g UK g Australia
p and q button to select OSD LANGUAGE.
t and u button to choose the preferred language.
p and q button to select TIME ZONE.
t and u button to choose the GMT time zone in your region + – 0 – 12.
Chapter 3 Analog mode (ATV) Chapter 4 Digital television DVB-T (DTV)
Page 13

24
25
1. Navigate with the pand q button to select INSTALLATION and ANTENNA ACTIVE .
Main menu
2. Use the
5. Automatic scan mode
1. Navigate with the
2. Press OK to start the automatic scan mode.
Note: To skip a rst time installation, press the EXIT button.
t and u button to choose „5 V on” or „5 V o”.
p and q button to select AUTO SCAN.
After the DTV mode has been selected, press the MENU button on the remote control
or on the device directly to enter the main menu.
Navigate with the
items (for example: Installation, Channel Search or Channel Edit).
Press the OK button to select a submenu item.
p ,q, t or u buttons to choose between one of the submenu
Main menu installation
Chapter 4 Digital television DVB-T (DTV)
1. Navigate with the p and q button to select between SYSTEM SETUP and ACTIVE
ANTENNA.
2. If you want to use an active antenna, choose No. 2 (active antenna) and use the
u button to choose ANTENNA ACTIVE „ON”. The position „OFF” is normally activated by
passive antennas, as for the included antenna or for a house antenna system. This function
is only available in DVB-T reception.
3. Navigate with the
p and q button to SYSTEM SETUP.
Chapter 4 Digital television DVB-T (DTV)
t and
Page 14

26
27
4. Press the MENU or EXIT button to conrm and exit.
You know have the opportunity to make the following adjustments:
1. Local time
2. User interface
3. Video
4. System information
5. Factory reset
2. User interface
This submenu item is for OSD language and transparency settings.
1. Local time
This submenu item is for time zone and summer time (ON/OFF) adjustments.
Navigate with the
time. Press the
p and q button to select the menu item local time or summer
t or u button to adjust the local time (GMT – 12 to GMT +12 is possi-
ble) and set the summer time (you can adjust the summer time to ON or OFF).
Note: The device will automatically set the datum, month, year and the time.
Navigate with the p and q button to select the submenu OSD language or OSD
transparency. Use the
t or u button to select a language (8 languages to choose
from) and to set the OSD transparency.
Note: If the transparency is set to high then a weak menu and precise television picture will be displayed. With a lower transparency level the menu will be more precise.
Chapter 4 Digital television DVB-T (DTV)
Chapter 4 Digital television DVB-T (DTV)
Page 15
28
29
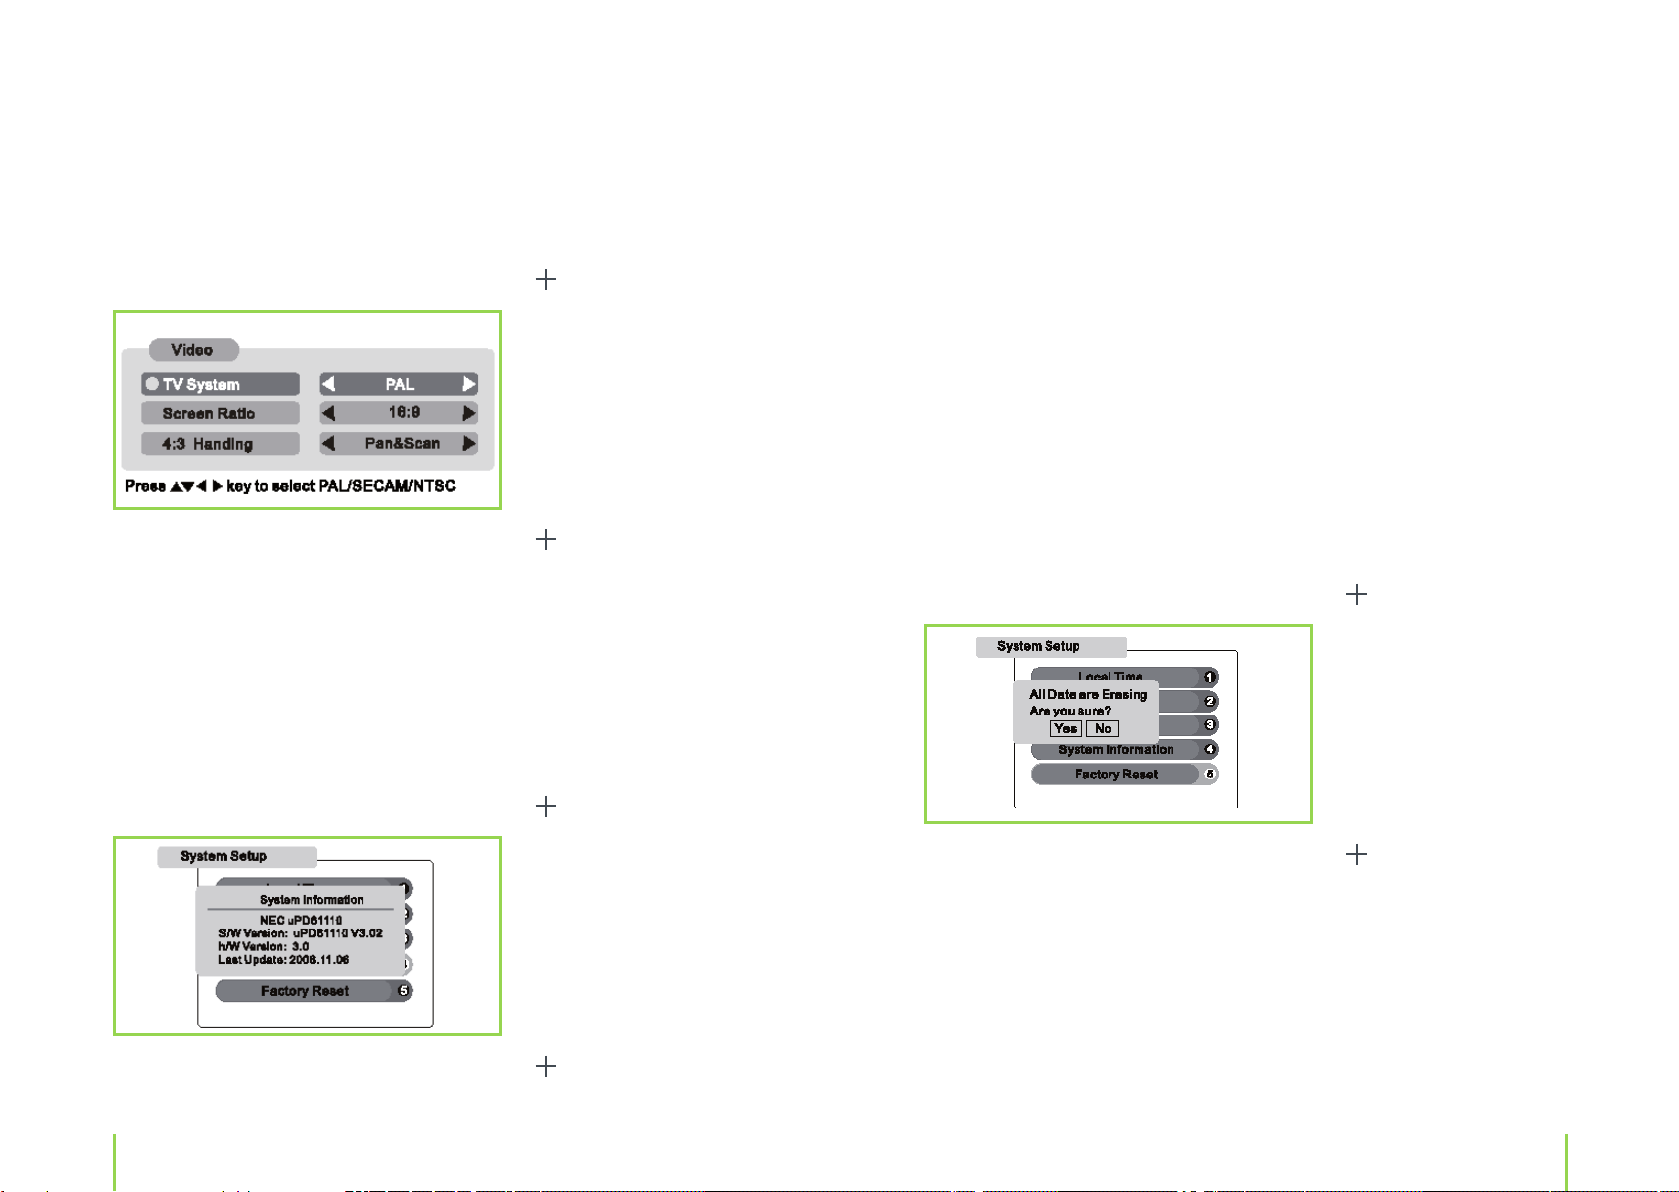
3. Video
This submenu item is for TV system, screen ratio and handling settings.
Use the
p and q button to select a submenu item and the t or u button for settings.
Navigate with the p and q button to select the submenu system information. Press
t or u button to conrm and enter this menu. System information on hardware,
the
software and updates will be displayed on screen.
This is an important information that your dealer or service hotline requires, should
repairs/maintenance claims need to be reported.
5. Factory reset
This submenu item should only be used when problems arise. Use the submenu facto
ry reset to reset your device, which means all settings previously made will be cancel
led and reset to manufacturer original settings. Navigate with the
select the submenu factory reset. Press the
u button to conrm. A window will open
p and q button to
up on screen asking you if you are sure that you want to cancel all previous settings.
Select YES or NO and then press the OK button to conrm.
-
-
Note: If you set „screen ratio” at analog and DVB-T menu to 16:9 and at
„4:3 Hand-
ling” to „letter box” the TV will change automatically to the right screen ratio.
4. System information
This submenu item reveals details of your systems hardware and software.
For example:
Note: All settings stored will be cancelled. Please make sure that you want to perform this function, before proceeding.
Chapter 4 Digital television DVB-T (DTV)
Chapter 4 Digital television DVB-T (DTV)
Page 16

30
31
Channel search
After the DTV mode has been selected, press the MENU button on the remote control
or on the device directly to enter the main menu. Navigate with the
to CHANNEL SEARCH and press the OK button to conrm.
p und q button
3. Bandwidth
The bandwidth can not be changed, as it adjusts automatically according to the fre
quency.
4. Manual scan
Navigate with the
rm. This submenu item will start a manual scan.
5. Auto scan
Navigate with the
An automatic scan will be performed completely, as described under „First time instal
lation”.
Note: Please wait until the device has carried out the automatic search completely.
p and q button to manual scan and press the OK button to con-
p and q button to auto scan and press the OK button to conrm.
Channel edit
-
-
Choose one of the following settings:
1. Region
2. Frequency
3. Bandwidth
4. Manual scan
5. Auto scan
1. Area/Region
Enter this submenu item and use the
operation (e.g. Europe).
2. Frequency
Enter this submenu item and use the
which you want to search.
Chapter 4 Digital television DVB-T (DTV)
t or u button to select the appropriate area for
t or u button to select the frequency range in
After the DTV mode has been selected, press the MENU button on the remote control
or on the device directly to enter the main menu. Navigate with the
to CHANNEL EDIT and press the OK button to conrm. The following window will be
displayed on screen:
Chapter 4 Digital television DVB-T (DTV)
p and q button
Page 17

32
33
1. TV channel
Navigate with the
p and q buttons to TV CHANNEL and press the OK button to con-
rm. You will automatically enter into the menu for TV Channel adjustments.
In the submenu TV CHANNEL you now have the opportunity to select and perform an
action by pressing one of the numeric buttons 0, 1, 2, 3, 4 and 5.
g Skip Edit Skips a channel
0
1
g Delete Edit Deletes a selected channel
2
g Move Edit Moves a channel to another spot
3
g Name Edit Renames a channel
4
g Sort Edit Sorts channels
5
g Fav Edit Adds a channel to the favorite list
Upon exiting this menu you will be asked if the adjustments made are to be stored. Use
t or u button to select either OK or Exit and conrm by pressing the OK button.
the
If you press the button No. 5 consecutively you will be able to choose one of the favo
rite Lists between 1 and 6 to which you can add channels.
Note: During operation you can view your favorite lists by pressing the RED button
on the remote control.
Note: All channel TV menu functions can also be used in the radio channel menu in
an analog mode.
2. Displaying information (Info)
Pressing the INFO button on the remote control will display important information
(e.g. signal level and quality and program) of the current channel on your screen.
-
After one of the above numbers have been selected:
(1) Use the
p and q button to select a channel on which this action is to be perfor-
med.
(2) Press the OK button to conrm and carry out this action.
Chapter 4 Digital television DVB-T (DTV)
Level: Signal strength
Quality: Reception quality
P: Displays the channel
I: Displays the current program (only when supported by the broadcasting station)
Chapter 4 Digital television DVB-T (DTV)
Page 18

34
35
3. Complete program list
Press the OK button to display the complete channel list directly.
p and q g to choose a channel
t and u g to view the channel list page by page
OK button
g to view on the selected channel
4. Audio selection
Press the AUDIO button on the remote control to display the current audio language of
the channel you are watching on screen.
5. Guide (EPG)
Press the GUIDE button on the remote control while viewing a program and the PRO
GRAM GUIDE will be displayed on screen. The current and following program of the
channel that you are viewing will be displayed. This function can be used as an electro
nic substitute for a TV guide that will help you navigate through a program and let you
catch up on detailed information about the current program.
p and q g to select a particular program
t and u g browses through programs on a day to day basis
OK
g provides detailed information about the selected program (This pro-
gram information service may not be oered by all channels)
Reserve a program
Press the YELLOW button on the remote control to reserve a program. This means that
your television will automatically switch over to the selected program when it begins.
In the EPG mode use the arrows to select a program and press the YELLOW button to
reserve it.
-
-
Navigate with the
p and q g to choose between language and audio sound (stereo/left/right)
t and u g to change the setting
EXIT button
g to exit this submenu
Note: If 1/1 appears when selecting a language, then there is only one audio language available and no selection can be made.
Chapter 4 Digital television DVB-T (DTV)
6. Teletext
Press the BLUE button on the remote control to start the teletext function. Press the OK
button to conrm. The teletext function will automatically start and display the teletext
page number 100. Use the numeric buttons (0 – 9) on the remote control to key in a
page number to be searched (e.g. 1+2+6 for the page number 126).
Chapter 4 Digital television DVB-T (DTV)
Page 19

36
37
AV mode
5
Note: Depending on the signal quality during page searching, it can take up to half
a minute until the start page 100 is retrieved for display on screen.
7. Subtitle
Pressing the GREEN button on the remote control will turn on the subtitle function,
should this function be supported by the channel selected. Otherwise „No subtitle” will
be displayed.
Press the SOURCE button on the remote control or the SR button on the device respectively until AV is displayed on screen.
You have the opportunity to connect an external source, such as a DVD player, satellite
receiver or video recorder to your mobile television as follows:
Picture and sound:
Input terminals
red/white
yellow g video channel
g audio channels stereo, right/left
Chapter 4 Digital television DVB-T (DTV)
Please refer to your external devices instruction manual before connecting. The AV
mode lets you adjust diverse settings for example, volume, picture and sleep mode
settings. Special functions such as the channel search function are naturally deactiva
ted in this mode.
Chapter 5 AV mode
-
Page 20

38
39
Further features
6
Sleep timer settings
This function allows you to set a certain amount of time after which the device will
automatically turn o, enabling you to fall asleep while watching television.
Press the SLEEP button on the remote control to display the sleep timer function on
screen. The following is displayed on screen: Sleep timer ……0
Press the
50, 60 … 200, 220, 230 or 240 minutes after which the device will automatically turn
o.
Listening with earphones
Plug the earphones into the 3.5 mm jack located on the rear side of the set.
(can be identied by the symbol „earphones”).
t and u button respectively to set a preferred sleep time from 10, 20, 30, 40,
Connecting to other devices
This device has an OUT terminal for connection to other devices. This way you also
have the opportunity to enjoy DVB-T television on a larger home television.
Cinch (Picture and sound):
White: Audio left channel
Red: Audio right channel
Yellow: Video
Use both audio OUT terminals to connect a hi- system to your television to enjoy the
sound via your systems loud speakers.
Note: No sound can be heard from the main speakers, when the earphones are connected to the device.
Chapter 6 Further features
Note: If you only want to use your mobile television as a DVB-T receiver, then press
the LCD ON/OFF button on the remote control to turn the display o.
Chapter 6 Further features
Page 21

40
41
Troubleshooting
7
Problem Solution
There is no picture or
sound.
No picture Make sure the correct color system has been cho
No sound Make sure that the right sound system has been
There is no picture; just
noise.
Make sure the AC adapter is connected properly to
the power outlet/adapter terminal.
Check that the battery (optionally available) is
charged.
Make sure your device is in a DTV or ATV mode, if
you want to watch TV.
sen.
chosen.
Check that the MUTE button has not been activa
ted or that the volume has not been adjusted to a
minimum.
Check that no earphones have been connected.
Check that the antenna has been connected pro
perly and that the right antenna is being used for
your areas reception quality.
Remote control is not
functioning properly.
Picture is undened/pic
ture disturbance
-
Doubled picture Check that there are no electromagnetic waves
Spotted picture There may be interference from automobiles,
-
-
Check if the batteries have sucient power/replace batteries.
Make sure the remote sensor is not exposed to
strong light.
-
Bad reception.
Position the antenna in the right direction.
Replace the antenna with an active antenna from a
specialty shop (e.g. X4-TECH Active-T).
that could inuence the device.
trains, high voltage lines, etc.
There may be interference between the antenna
cable and power cable. Try positioning them fur
ther apart.
-
Poor picture quality Check the color settings and make sure that the
right color system has been chosen (PAL/NTSC).
Picture is too dark. Check the contrast and brightness settings.
Chapter 7 Troubleshooting
Chapter 7 Troubleshooting
Page 22

42
43
Specications
8
Technical data
› 9” LCD screen (22.8 cm)
› 16:9 wide screen format
› Pixel: 640 x 3 x 234
› Video color system: PAL/NTSC/SECAM
› Analog TV mode: Video color system: PAL/NTSC/SECAM
Audio system: I/DK/BG/M/L
CATV: Hyperband
› DVB-T mode: Standard: DVB-T
Transport stream: ISO/IEC 13818
Standard prole and level: MPEG 2
Frequency band: VHF, UHF
COFDM: 2 k and 8 k mode
Security range: 1/32, 1/16, 1/8, and 1/4
Demodulation type: QPSK, 16QAM, 64 QAM
Audio type: one channel and stereo
Audio sampling rate: 32,44.1 and 48 kHz
› Brightness: 110 cd/m
› Display lights lifespan: 10.000 hours
› Viewing angle: horizontal 140°, vertical: 130°
› Amplier for sound: 2 x 0.25 W
› Speakers: 2 x 4 cm (diameter)
› Power supply: 10 – 15 V DC (car adapter)
100 – 240 V adapter
2
Connections
› A/V IN and OUT
› Earphone jack
› A/V OUT via jack plug 3,5 mm, 4-pol
Delivery contents
Please check contents thoroughly after purchasing.
› Mobile 16:9 LCD television
› Adapter (100 – 240 V)
› Car adapter
› Car bag for headrest attachment
› Earphones
› A/V cable
› TV stand
› Remote control
› Instruction manual
Chapter 8 Specications
Chapter 8 Specications
Page 23

44
45
Accessories (optional)
9
› X4-TECH Lithium polymer rechargeable battery Z-ION 1
› X4-TECH Active-T
Service
Hotline: +49 (0) 53 02/8 06-450
Address: x-services.eu gmbh
Service department X4-TECH
Brackestraße 3
D-38159 Vechelde
Germany
Manufacturer information
x-peer.de GmbH
Brackestraße 3
38159 Vechelde
Germany
Telephone +49 (0) 53 02/8 06-400
Fax +49 (0) 53 02/8 06-499
Internet: www.x-peer.de
E-Mail: info@x-peer.de
Chapter 9 Accessories
Page 24

Version 2.1 – 5/2008
46
www.x4-tech.de
 Loading...