

X2sat Premium nano User Manual

USER MANUAL

Welcome to the world of X2
PREMIUM NANO User’s Manual
812X2VV160101

1
English
General Safety Information
SAFETY INSTRUCTIONS
This OTT has been manufactured to meet international safety standards.
Please read the following safety instructions carefully before you handle the STB.
■ MAIN SUPPLY
AC95-250V~,50/60Hz
■ OVERLOADING
Do not overload a wall outlet, extension cord or adapter as this may result in electric shock or fire.
■ LIQUIDS
Keep liquids away from the OTT.
Apparatus shall not be exposed to dripping or splashing and no objects filled with liquids,
such as vases, shall be placed on the apparatus.
■ CABLE
Use standard certified cables to prevent any malfunction of the OTT.
■ CLEANING
Always disconnect the OTT power cord from the wall socket before cleaning it. Use a light damp
cloth (no solvents) to clean the case.
■ VENTILATION
1. Do not block ventilation slots of OTT.
2. Do not place the OTT on soft furnishings or carpets.
3. Ensure that a free air ow is maintained around the OTT.
4. Do not allow the OTT to be exposed to direct sunlight or a heater.
5. Do not stack other electronic equipment on top of the OTT.
■ ATTACHMENTS
Do not use any attachments that are not recommended. These may cause hazards or
damage the equipment.
■ CONNECTION TO THE RJ45 CABLE
Disconnect the product from the mains before connecting or disconnecting the RJ45 cable from
the wall connection. Failure to do so can damage the OTT.
■ CONNECTION TO THE TV
Disconnect the product from the mains before connecting or disconnecting the cable from the
OTT. Failure to do so can damage the TV.

2
English
General Safety Information
■ LOCATION
Keep the OTT indoors and away from potential hazards, such as houseplants,
rain and direct sunlight.
Do not install near any heat sources such as radiators, heat registers, stoves,
or other apparatus (including amplifier) that product heat.
■ LIGHTNING, OR NOT IN USE
Unplug the OTT from the wall outlet and disconnect the cable during a lightning storm or
when unused for a long time.
■ SMALL OBJECTS
Coins or other small objects must be kept away from the OTT. They can fall through
ventilation slots of the OTT and cause serious damage.
The socket-outlet shall be installed near the equipment and shall be easily accessible.
NOTE: Dispose the used batteries at designated place for environment protection.
In case of problems, contact your local operator.
Remember that the OTT is your access to digital entertainment. Treat it with care!
Please do not attempt to open the OTT or the remote. Careless handling of the OTT or
remote may damage it and cause the warranty to be null and void.
CORRECT DISPOSAL OF THIS PRODUCT
(WASTE ELECTRICAL & ELECTRONIC EQUIPMENT)
(Applicable in the European Union and other European countries with separate collection systems)
This marking shown on the product or its literature, indicates that it should not be disposed with
other household wastes at the end of its working life. To prevent possible harm to the
environment or human health from uncontrolled waste disposal, please separate this from other
types of wastes and recycle it responsibly to promote the sustainable reuse of material resources.
Household users should contact either the retailer where they purchased this product, or their local
government office, for details of where and how they can take this item for environmentally safe
recycling. Business users should contact their supplier and check the terms and conditions of the
purchase contract. This product should not be mixed with other commercial wastes for disposal.

3
English
Contents
Before Your Begin
1.1 General Features
1.2 Accessories
2.1 General Description of Your OTT
2.1.1 Front Panel
2.1.2 Rear Panel
2.1.3 Remote Control Unit
2.1.3 Remote Control Unit
2.1.3 Remote Control Unit
Connections
3.1 Connecting to HD -TV
3.2 Connecting to A/V Normal TV
3.3 Other Connect
3.4 USB Connect
3.5 All Connection
Getting Started
4.1 Fast Operation
4.2 How to Connect into Internet
4.2 Ethernet Connection (RJ45)
4.2 Wireless Connection (Wi-Fi)
4.3 Online Software Update
4.3 Online Software Update
----------------------------------------4
--------------------------------4
---------------------------------------4
------------4
----------------------------------------5
-----------------------------------------6
-----------------------------7
-----------------------------8
-----------------------------9
----------------------------------------------10
-------------------------10
---------------11
----------------------------------12
------------------------------------13
-----------------------------------14
-------------------------------------------15
----------------------------------15
----------------15
-----------------15
-----------------16
----------------------17
----------------------18
Main Menu
5.1 Menu Contents
5.2 System Setup
5.2.1 Account Setting
5.2.2 Network (Wi-Fi Setting)
5.2.2 Network (PPoE Setting)
5.2.2 Network (Network Setting)
5.2.3 AV Setting
5.2.4 Menu Setting
5.2.5 Time Setting
5.2.6 Software Upgrade
5.2.7 Factory Reset
5.2.8 System Setting
5.3 Internet Apps
5.3.1 USB File
5.3.2 Weather
5.3.3 YouTube
5.3.4 Google Maps
5.3.5 Local IPTV
5.4 Online Movies
5.5 Internet TV
5.6 TV Episodes
5.7 Listen Music
5.8 Live Radio
Troubleshooting
Specifications
Specifications
Easy & Quick Installation
------------------------------------------------19
----------------------------------19
-----------------------------------20
---------------------------------20
-----------------------21
----------------------21
-------------------22
----------------------------------------23
------------------------------------24
-------------------------------------25
------------------------------26
-----------------------------------27
----------------------------------27
------------------------------------27
------------------------------------------28
------------------------------------------28
------------------------------------------29
------------------------------------29
---------------------------------------30
----------------------------------30
---------------------------------------31
-------------------------------------31
-------------------------------------32
---------------------------------------33
-----------------------------------------34
--------------------------------------------35
--------------------------------------------36
------------------------------37

4
English
Before Your Begin
1.1 GENERAL FEATURES
● Reception of High definition and standard definition digital TV Channel through Internet TV Service.
● Multiple output resolution modes: 1080p, 1080i, 720p, 576p, 576i HDMI output
● Supported H.264.
● Internet TV Channel Memory up to: 3,000.
● SPDIF audio outputs for HiFi amplifier and Digital Audio and Optical output.
● CD Quality Audio.
● External Digital LED sensor.
● Favorite channel function (5 lists).
● Variable aspect ratio (4:3,16:9).
● Multi-language Menu.
● Subtitle function.
● Internal Wi-Fi Module.
● Internet Live Applications.
● Ethernet Port for RJ45 Cable.
● USB 2.0 Host
1.2 ACCESSORIES
● 2 X Remote Control Unit.
● Wi-Fi Antenna.
● Quick Guide.
● AV 1X3 Cable.
● HD Cable.
● Ethernet RJ45 Cable.
● Power Adapter 12V.
● External Digital LED Sensor.

5
English
Before Your Begin
2.1 GENERAL DESCRIPTION OF YOUR PREMIUM NANO
2.1.1 FRONT PANEL
■ IR Sensor: Receives the IR commands from remote control unit.
■ DISPLAY: Display for Channel Name and other information’s.
■ CH (▲/▼) Buttons: Changes channels or move cursor up/down.
■ STANDBY Button: Turns the receiver On/Off (Standby).

6
English
Before Your Begin
2.1 GENERAL DESCRIPTION OF YOUR PREMIUM NANO
2.1.2 REAR PANEL
■ POWER: Connect to the AC mains power adapter. The input AC voltage range is 95V to
250V, 50/60Hz power supply.
■ ETHERNET: Connect to RJ45 Cable.
■ S/PDIF (Optical): Connect to digital audio component with optical cable.
■ AUDIO OUT (Left/ Right): Connect to audio input jacks on the TV or any external audio system.
■ VIDEO OUT: Connect to composite video input jack on the TV or any external video system.
■ HD OUT: Connect to HD input jack on the TV or any external device support HD input.
■ IR: Connect to external digital LED sensor for remote control.
■ Wi-Fi: Connect to Wi-Fi antenna to receive wireless networks.
■ USB: Connect to External H.D.D Disk or USB flash disk for
multimedia player of Music, Videos, Photos.
7
English
Before Your Begin
2.1 GENERAL DESCRIPTION OF YOUR PREMIUM NANO
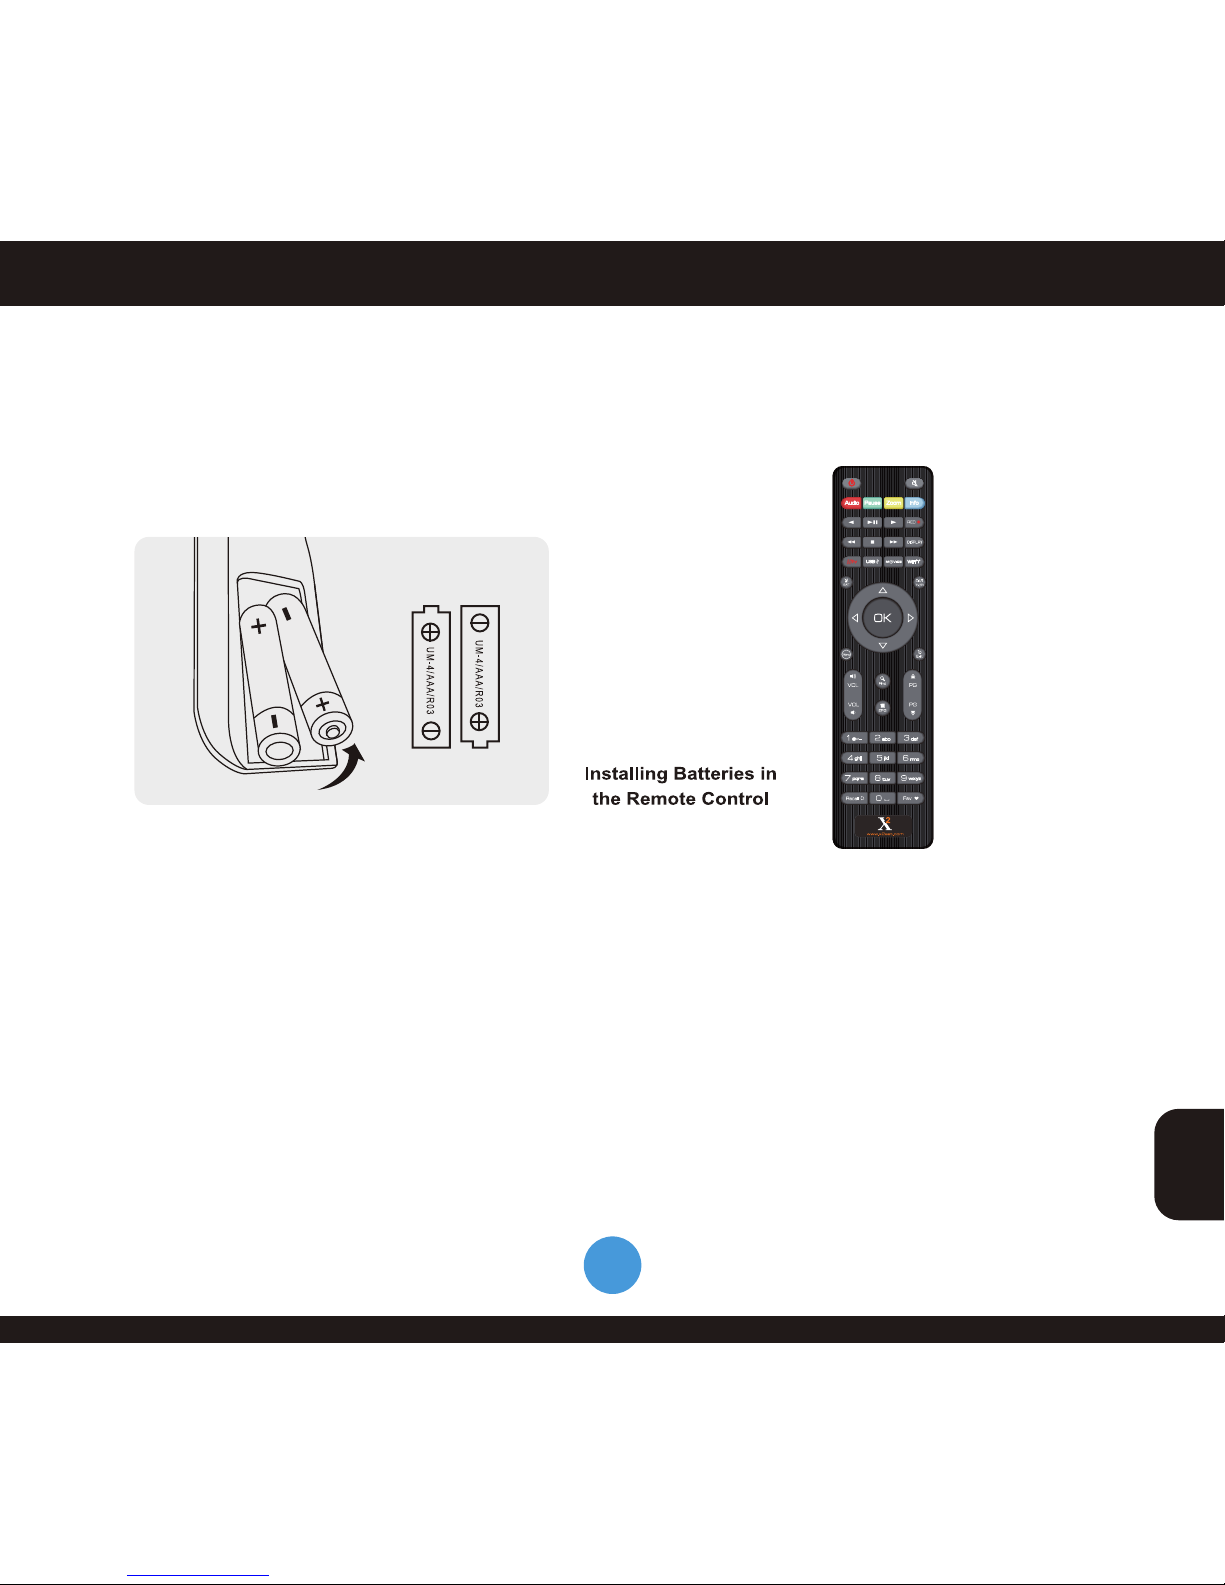
2.1.3 REMOTE CONTROL UNIT
INSERT BATTERIES
Before using the remote control unit, first time please insert the batteries according to
the instructions below:
1. Open the battery compartment on the back of the Remote Control Unit.
2. Install two AAA size batteries. Make sure that the (+) and (-) terminals are aligned correctly.
3. Close the cover.
REPLACEMENT
■ Always replace all batteries at the same time.
■ Mixing old and new batteries or mixing different types will reduce overall performance and could
cause leakage or rupture.
■ Batteries should be disposed of separately. Check with your local authority regarding waste disposal.
English
8
Before Your Begin
2.1 GENERAL DESCRIPTION OF YOUR PREMIUM NANO
2.1.3 REMOTE CONTROL UNIT
Live Internet TV
= SettingsSAT
EPG
= Option
= Stop
= Play
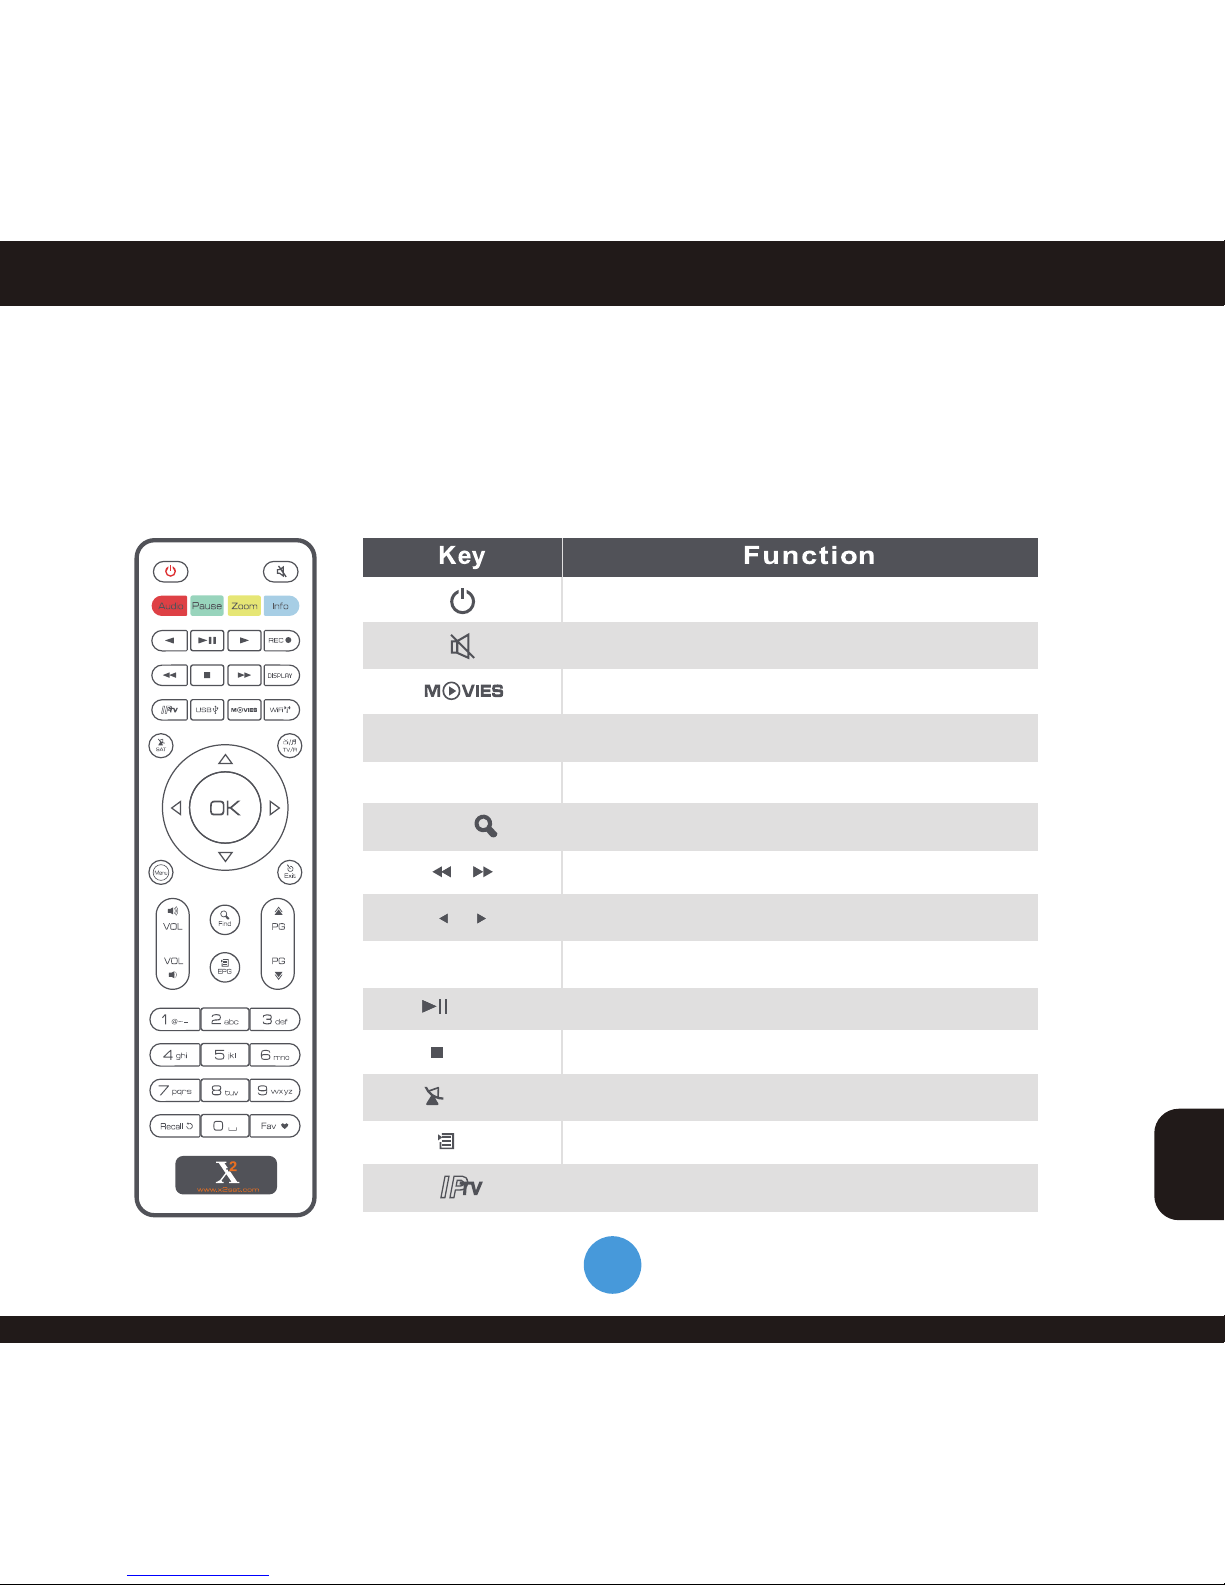
To Enter Standby Mode: Standby/On, Standby/Off
Mute Audio to Zero with one button press
Play and Pause
Stop recording
Previous or next
Press to fast forward or fast backword
To Find movie or music on Net App
To Change Setting inside list
To change the TV Screen mode between 1080i,1080p,720,
NTSC & PAL
Play the video files from USB
To Enter Setting of Premium NANO
To Change the options of language in IPTV
Press once to pause the screen picture, pressonce
again to go to the normal mode
DISPLAY
ZOOM
PAUSE
FIND

English
9
2.1 GENERAL DESCRIPTION OF YOUR PREMIUM NANO
2.1.3 REMOTE CONTROL UNIT
Before Your Begin
= Radio
Connect to Wireless Network
Show the information
INFO
Wi-Fi
CH
VOL
OK
MENU
EXIT
FAV
AUDIO
VOL
VOL VOL
PAGE
0~9
RECALL
USB
TV/R
PAGE
CH
When watching a channel, change channels or
move to the next higher or lower item in the menu
When watching a channel, adjust the volume or
move to the left or right item in the menu
Executes the selected item in the menu screen
or enters the desired value in any input mode
When watching a channel, adjust the volume or
move to the left or right item in the menu
Enter number of the required menu or
select a channel number to watch
Return to the previous menu on the menu
screen or escape from the menu
Press the key one time or turn menu on screen
Displays the Favories Grounp list
To Change Settings inside list
Page up and Page down
Switches to previous channel, Add / Delete Fav. lists
To Enter into Radio Page
Display external device window
10
English
Connections
AV
PC
HDMI
Cable
3.1 CONNECTING YOUR PREMIUM NANO (HD TV)
LOCATION OF THE PREMIUM NANO (OTT)
1. Install the OTT in horizontal position.
2. Do not place anything heavy stuff such as a TV on the OTT.
3. Do not install the OTT in the places as follows: Vibrating place, direct sunrays, humid place,
too high or low temperature, and no ventilated place.
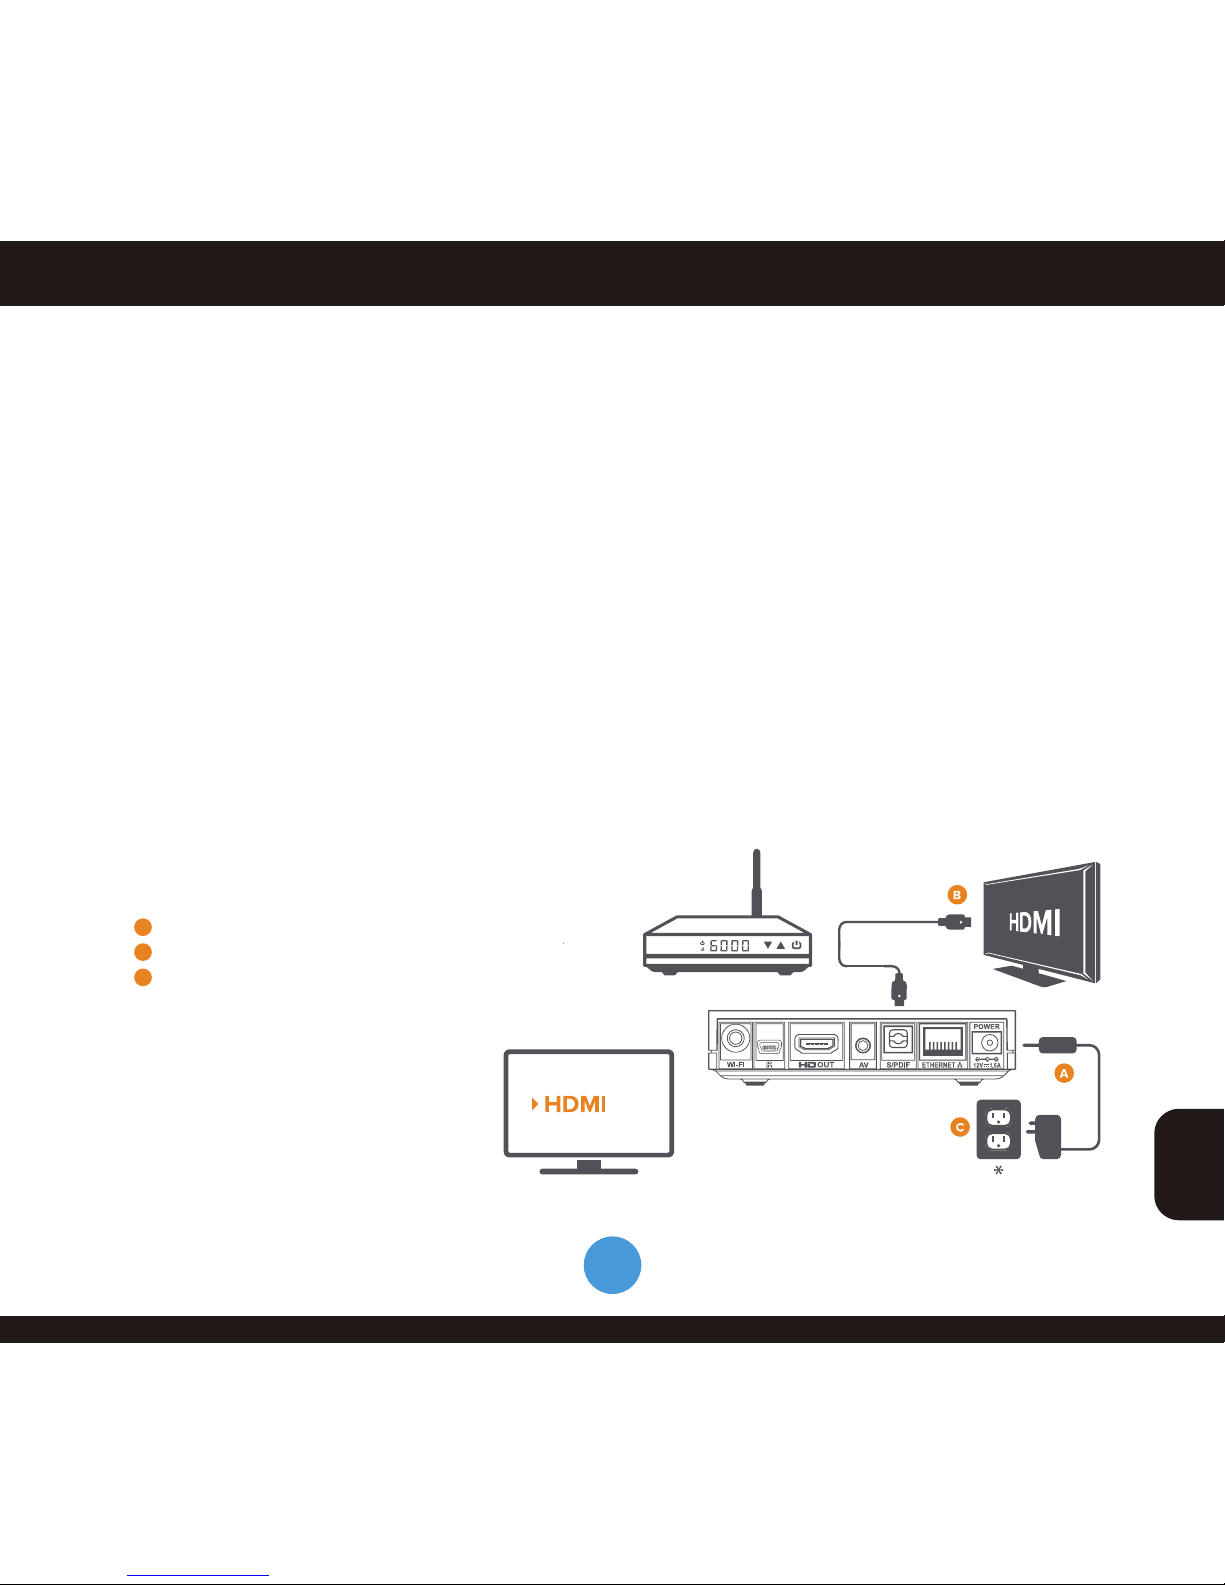
CONNECTING THE PREMIUM NANO (OTT) TO HIGH DEFINITION TV
1. To connect OTT with your TV, you can use following connection via HD cable.
2. HD-Video: Connect the HD Cable from HD-OUT on rear panel of OTT to HD-IN jack on TV,
as following drawing.
Connecting to TV-SET with HDTV Connector
Best Quality
Plug into power & TV
A
B
C
Plug power cable into PREMIUM NANO
Plug PREMIUM NANO into HDMI port of TV
Plug power adapter into wall socket*
Switch TV input
Select the HDMI input / source that
your PREMIUM NANO is plugged into.
 Loading...